

Page 1
Instructions for
installation and use
! This symbol reminds you to read this instruction manual.
EN
English,1
AR
AQUALTIS
AQM9D 49 X
, 13
F
Français,33
Contents
Installation, 2-3
Unpacking and levelling
Connecting the electricity and water supplies
Technical data
Description of the machine, 4-5
Touch control panel
How to run a wash cycle or a drying
cycle, 6
Wash cycles and options, 7
Table of wash cycles
Wash options
Detergents and laundry, 8
Detergent
Preparing the laundry
Washing recommendations
Load balancing system
WASHER-DRYER
EN
Precautions and advice, 9
General safety
Disposal
Opening the porthole door manually
Care and maintenance, 10
Cutting off the water and electricity supplies
Cleaning the machine
Cleaning the detergent dispenser drawer
Caring for your appliance drum
Cleaning the pump
Checking the water inlet hose
Trouble shooting, 11
Assistance, 12
1
Page 2
Installation
EN
! This instruction manual should be kept in a safe place
for future reference. If the washing machine is sold, given
away or moved, please ensure the manual is kept with
the machine, so that the new owner may benefit from the
advice contained within it.
! Read these instructions carefully: they contain vital
information relating to the safe installation and operation of
the appliance.
! Inside the pack containing this manual, you will also find
the guarantee and all the details necessary for installation.
Unpacking and levelling
Unpacking
1. Once you have removed all the packaging from the
washing machine, make sure it has not been damaged
during transportation.
If it has been damaged, contact the retailer and do not
proceed any further with the installation process.
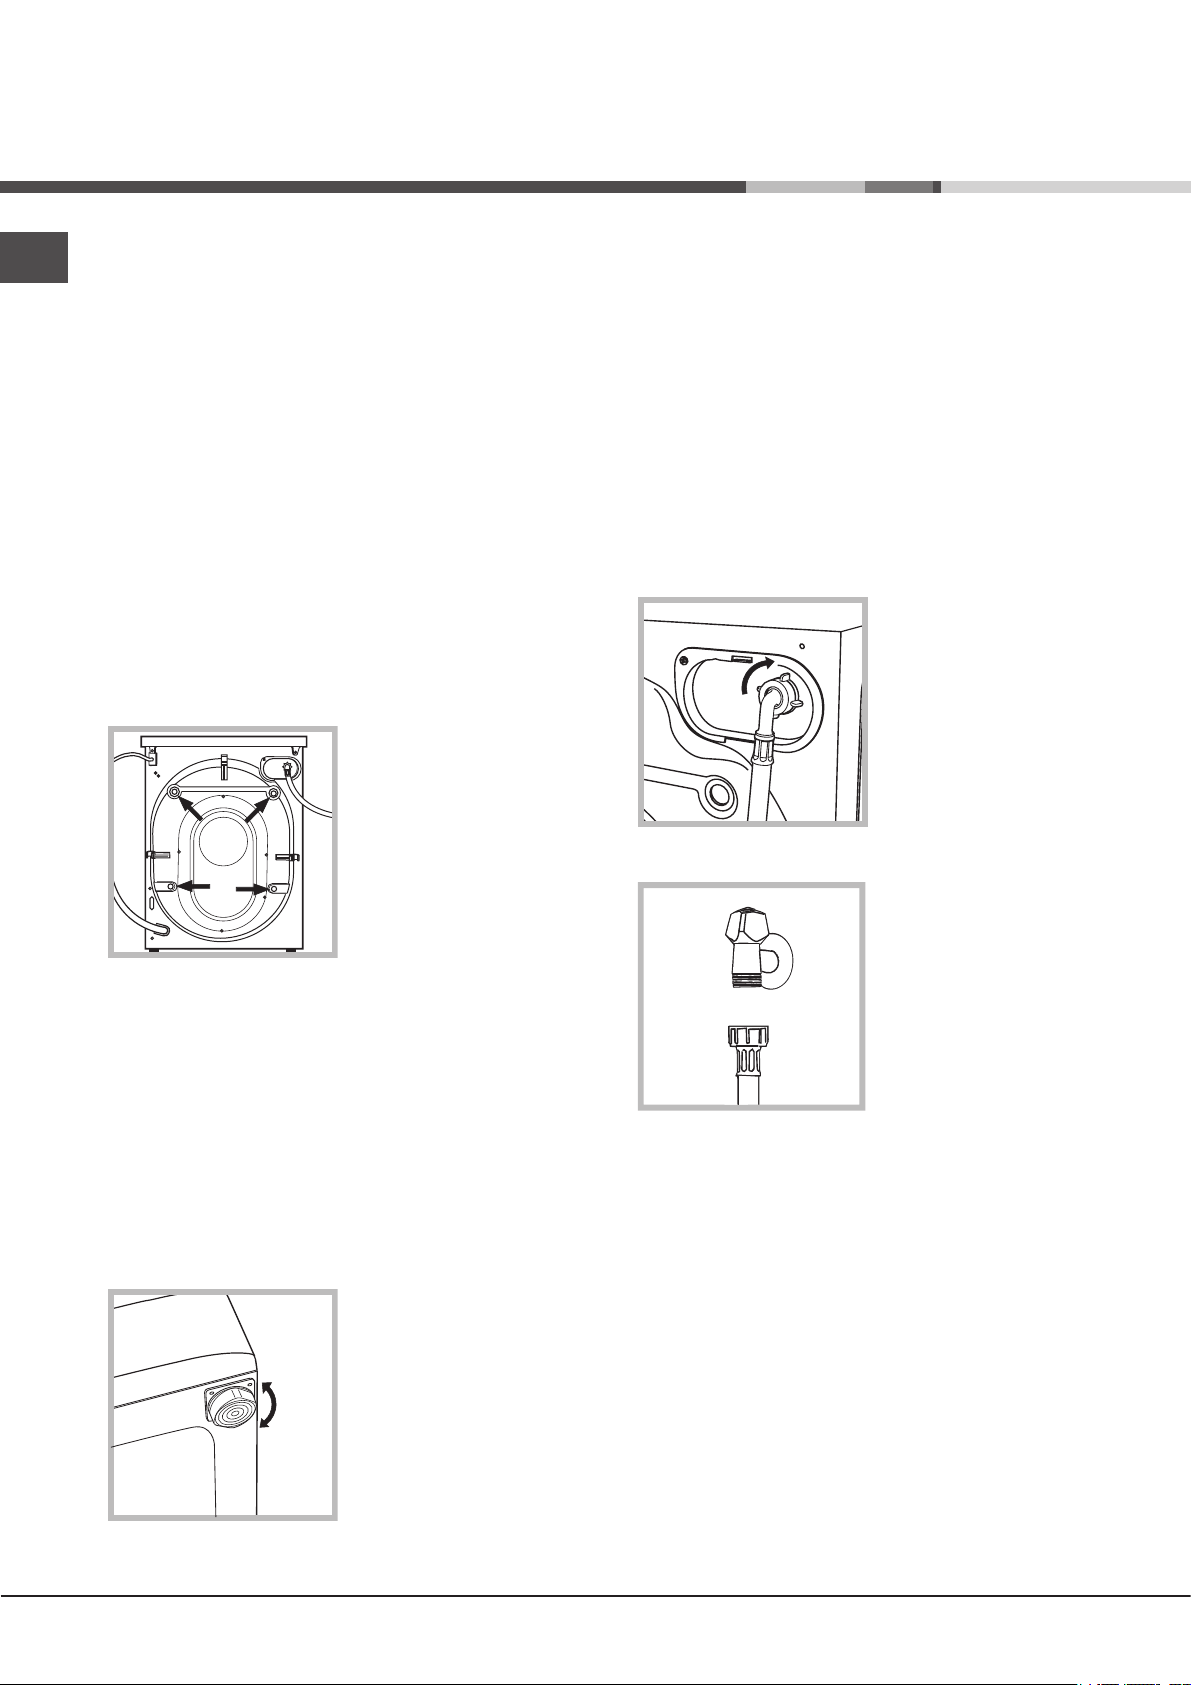
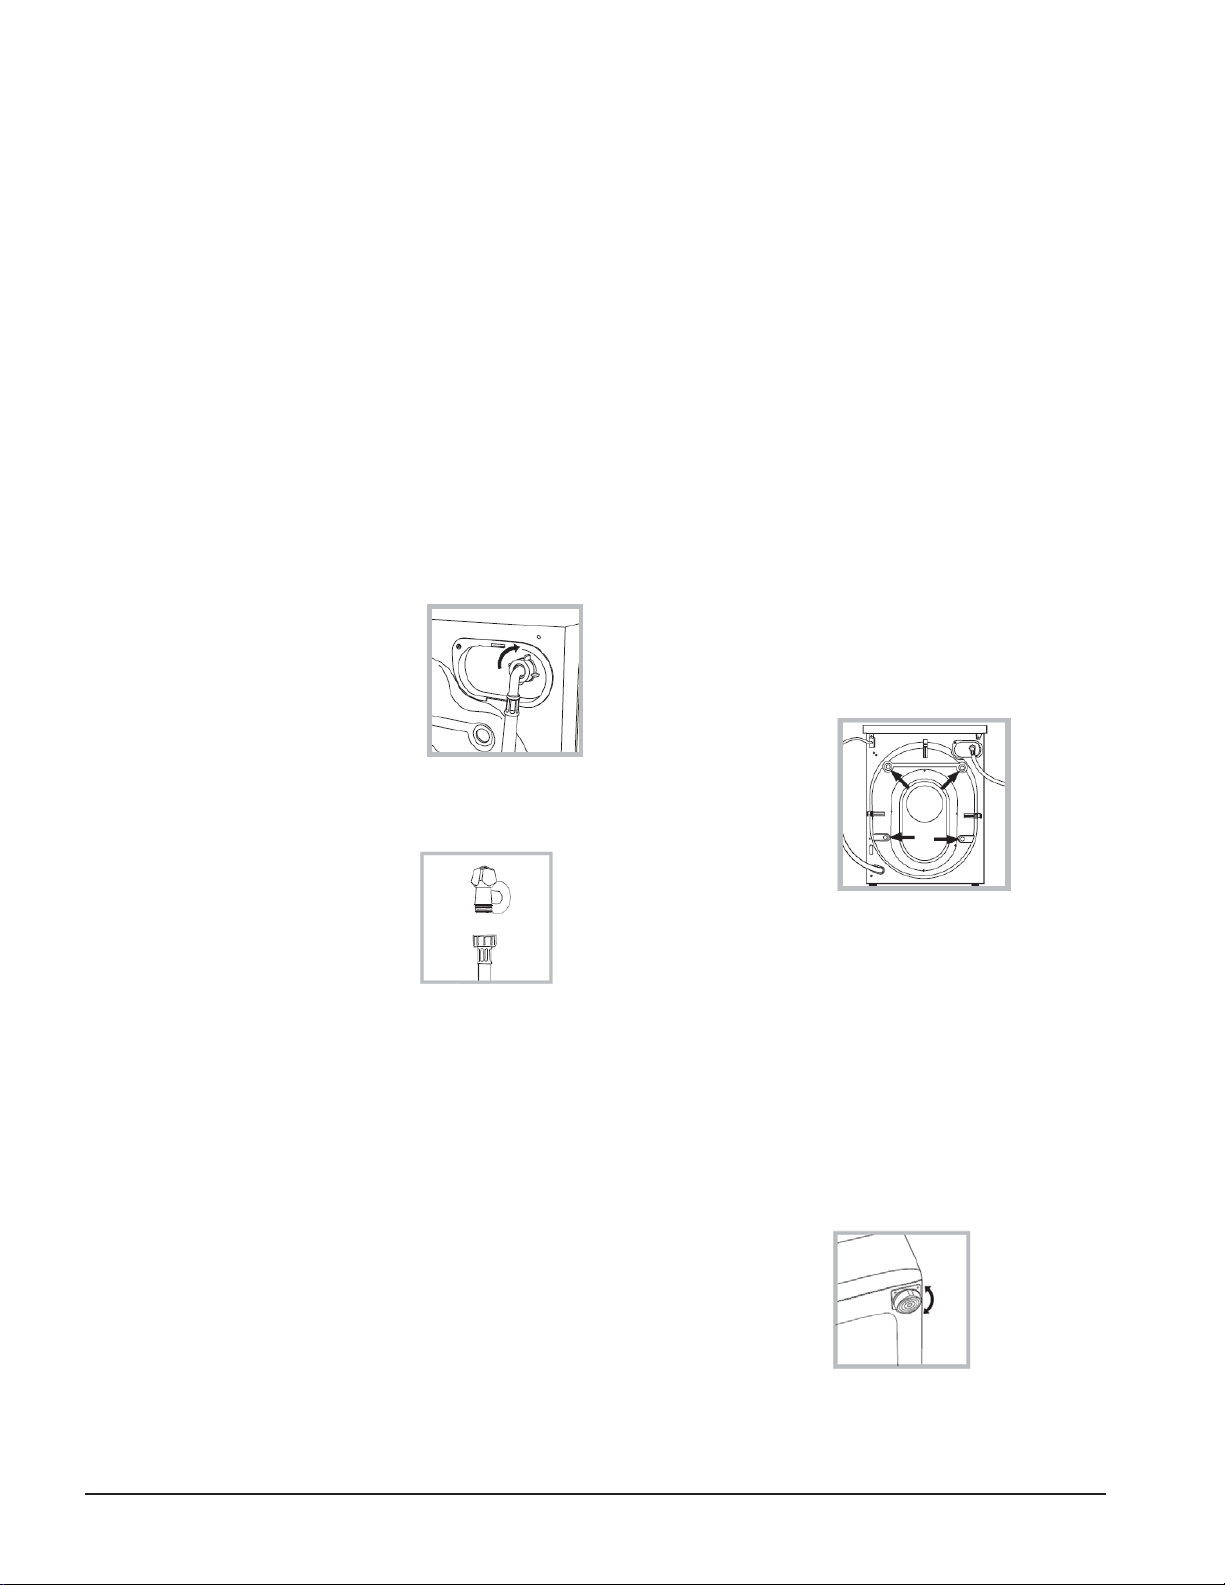
2. Remove the 4 protective
screws (used during
transportation) and the
corresponding spacer,
located on the rear part of
the appliance (see figure).
! If the appliance is levelled correctly, it will be more stable
and much less likely to cause vibrations and noise while it
is operating, particularly during the spin cycle.
! If it is placed on carpet or a rug, adjust the feet in such a
way as to allow a sufficient ventilation space underneath
the washing machine.
Connecting the electricity and water
supplies
Connecting the water inlet hose
! Before connecting the inlet hose to the water supply, run
the water until it is perfectly clear.
1. Connect the inlet hose
to the machine by screwing
it onto the cold water inlet
of the appliance, which is
situated on the top righthand side of the rear part of
the appliance (see figure).
3. Close off the holes using the plastic plugs supplied in the
pack.
4. Keep all the parts in a safe place; they will be needed
again if the washing machine is moved to another location,
to prevent the inside of the appliance being damaged.
! Packaging materials should not be used as toys for
children.
Levelling
1. Place the washing machine on a flat sturdy floor, without
resting it up against walls or cabinets.
2. If the floor is uneven, the
front feet of the machine
may be adjusted until
it reaches a horizontal
position (the angle of
inclination must not exceed
2 degrees).
2. Connect the inlet hose
by screwing it to a cold
water tab using a 3/4 gas
threaded connection (see
figure).
3. Make sure that the hose is not folded over or bent.
! The water pressure at the tap must fall within the values
indicated in the Technical data table (see next page).
! If the inlet hose is not long enough, contact a specialised
shop or an authorised technician.
! Never use second-hand or old inlet hoses; use the
products supplied with the machine.
2
Page 3
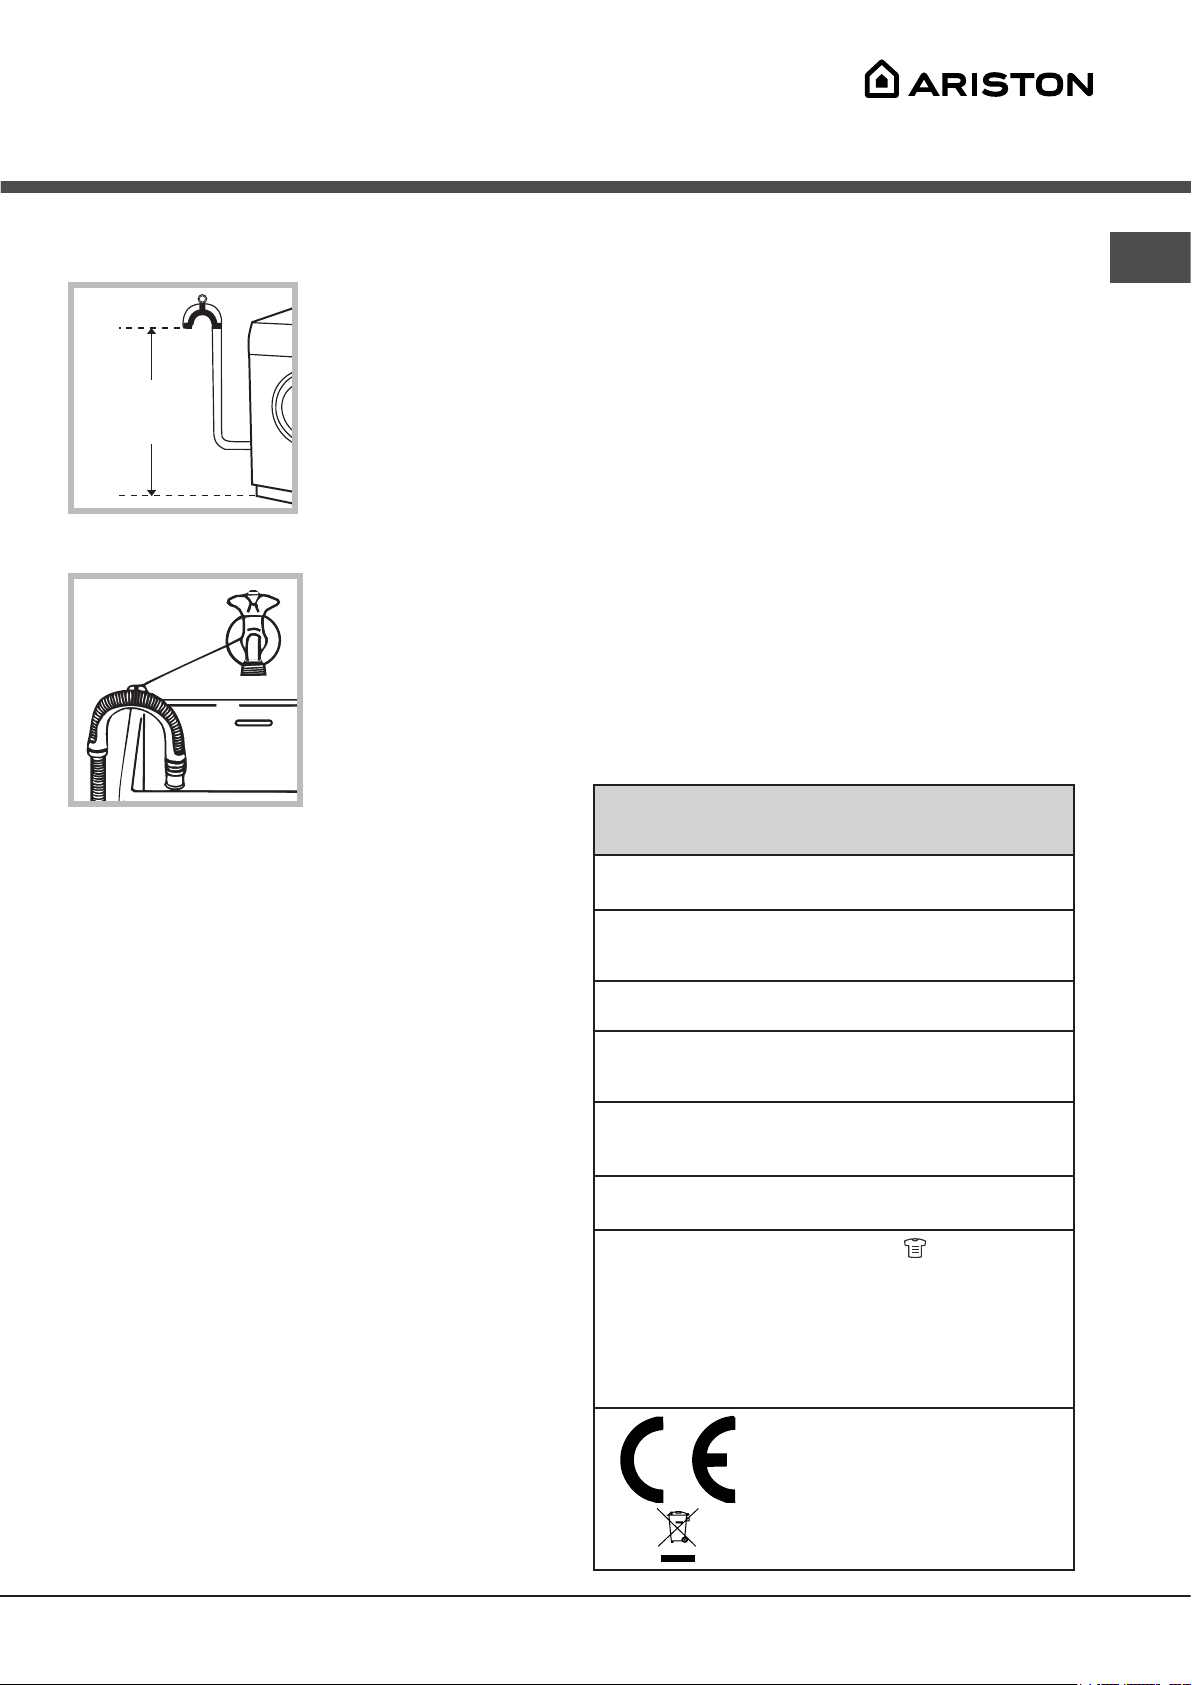
65 - 100 cm
Connecting the drain hose
- 2004/108/EC (Electromagnetic Compatibility)
Connect the drain hose to
drain duct piping or a wall
drain located between 65
and 100 cm above the floor,
making sure it is not bent
at all.
Alternatively, rest the
drain hose on the side of
a washbasin or bathtub,
fastening the duct supplied
to the tap (see figure).
The free end of the hose
should not be underwater.
! The cable should not be bent or compressed.
EN
! The power supply cable and plug must only be replaced
by authorised technicians.
Warning! The company shall not be held responsible in the
event that these regulations are not respected.
! We advise against the use of hose extensions; if it is
absolutely necessary, the extension must have the same
diameter as the original hose and must not exceed 150 cm
in length.
Electrical connections
Before plugging the appliance into the electricity socket,
make sure that:
• the socket is earthed and complies with all applicable
laws;
• the socket is able to withstand the maximum power load
of the appliance as indicated in the Technical data table
(see opposite);
• the power supply voltage falls within the values indicated
in the Technical data table (see opposite);
• the socket is compatible with the plug of the appliance.
If this is not the case, have the socket or the plug
replaced.
! The machine must not be installed outdoors, even in
covered areas. It is extremely dangerous to leave the
appliance exposed to rain, storms and other weather
conditions.
! The mains socket must remain within easy reach after the
washing machine has been installed.
! Do not use extension cords or multiple sockets.
Technical data
Model
Dimensions
Capacity
Electrical
connections
Water connections
Spin speed
Energy rated
programmes
according to
regulation
EN 50229
AQM9D 49 X
width 59.5 cm
height 85 cm
depth 64.5 cm
from 1 to 9 kg for the wash programme
from 1 to 6 kg for the drying programme
please refer to the technical data plate
fixed to the machine
maximum pressure 1 MPa (10 bar)
minimum pressure 0.05 MPa (0.5 bar)
drum capacity 62 litres
up to 1400 rotations per minute
Wash: programme
using a load of 9 kg.
Drying: first drying cycle performed with
3 kg load, by selecting the “IRON” dryness
level;
the second drying cycle performed with
6 kg load, by selecting the “EXTRA”
dryness level.
This appliance conforms to the following
EC Directives:
- 2006/95/EC (Low Voltage)
- 2002/96/EC
; temperature 60°C;
3
Page 4
3
1
2
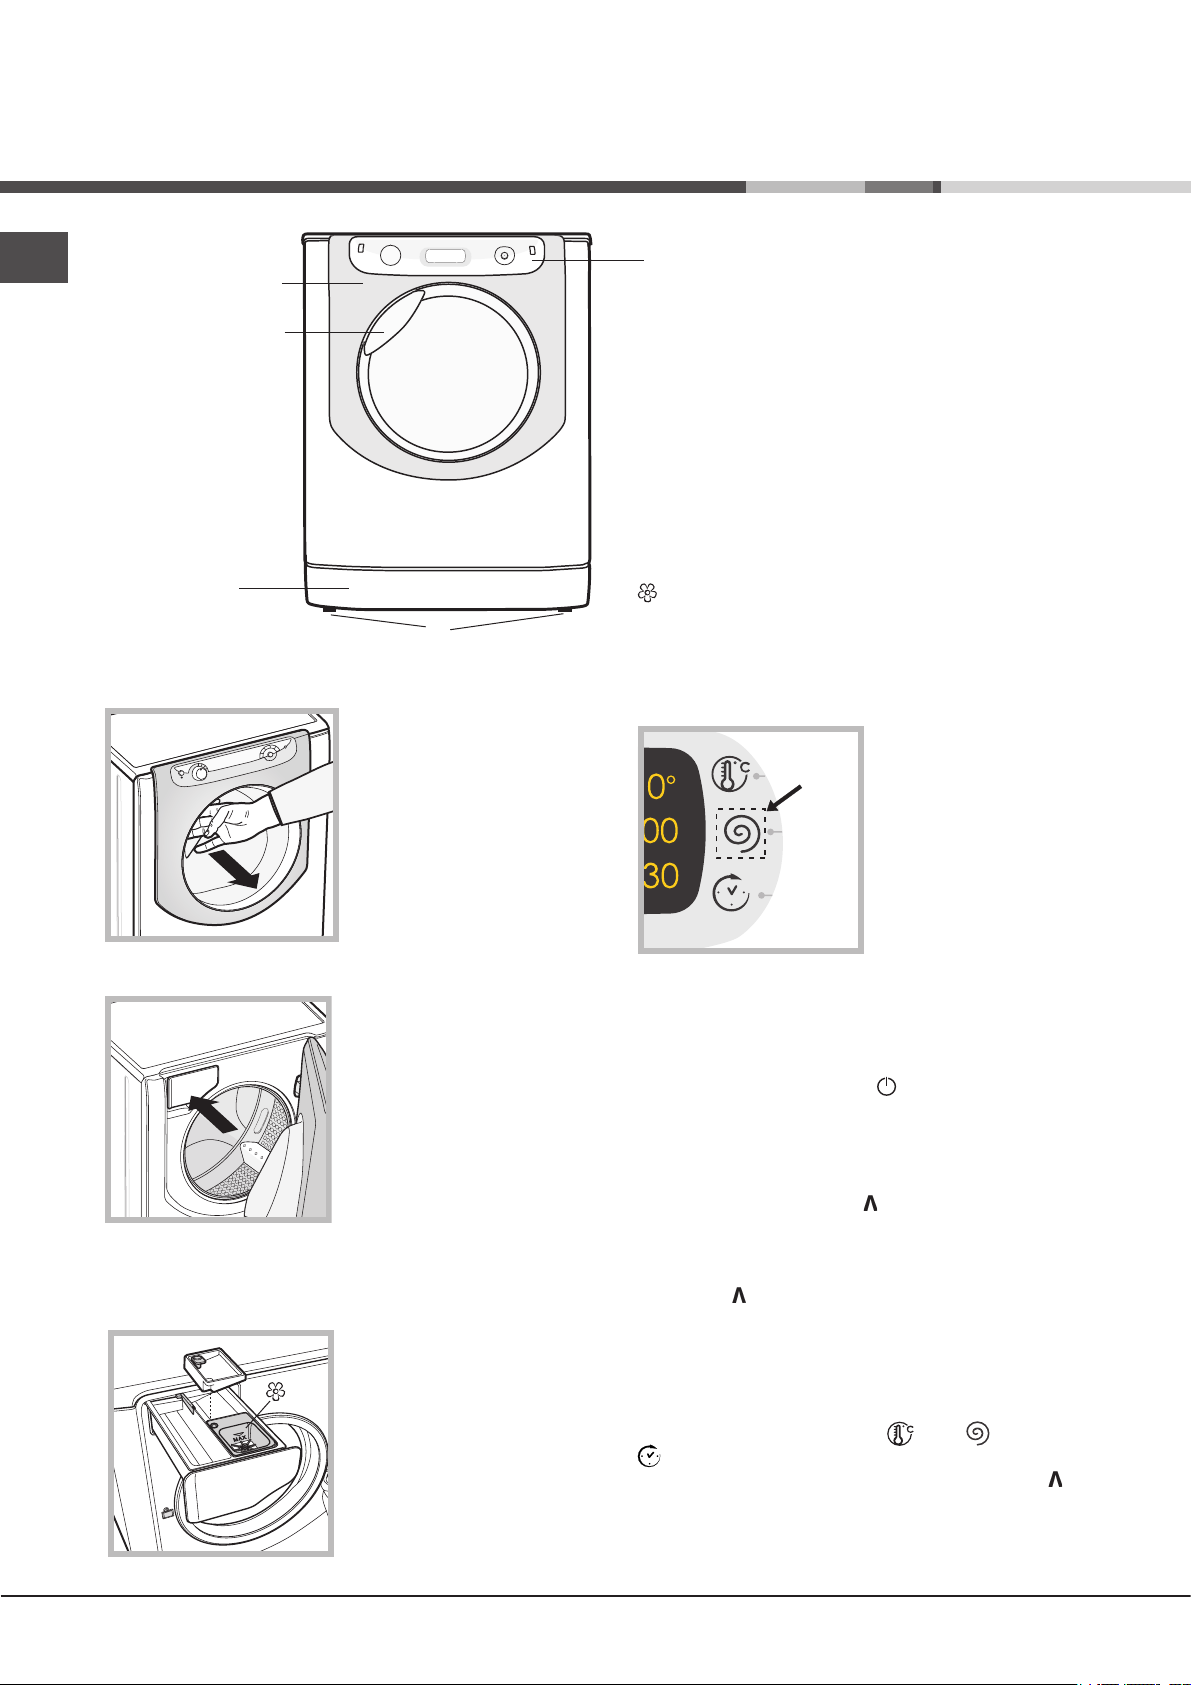
Description of the machine
EN
PORTHOLE DOOR
PORTHOLE DOOR
HANDLE
KICK STRIP
PORTHOLE DOOR
ADJUSTABLE FEET
Always use the handle to
open the porthole door (see
figure).
CONTROL
PANEL
recommend it is poured into the drawer immediately before
you start the washer-dryer.
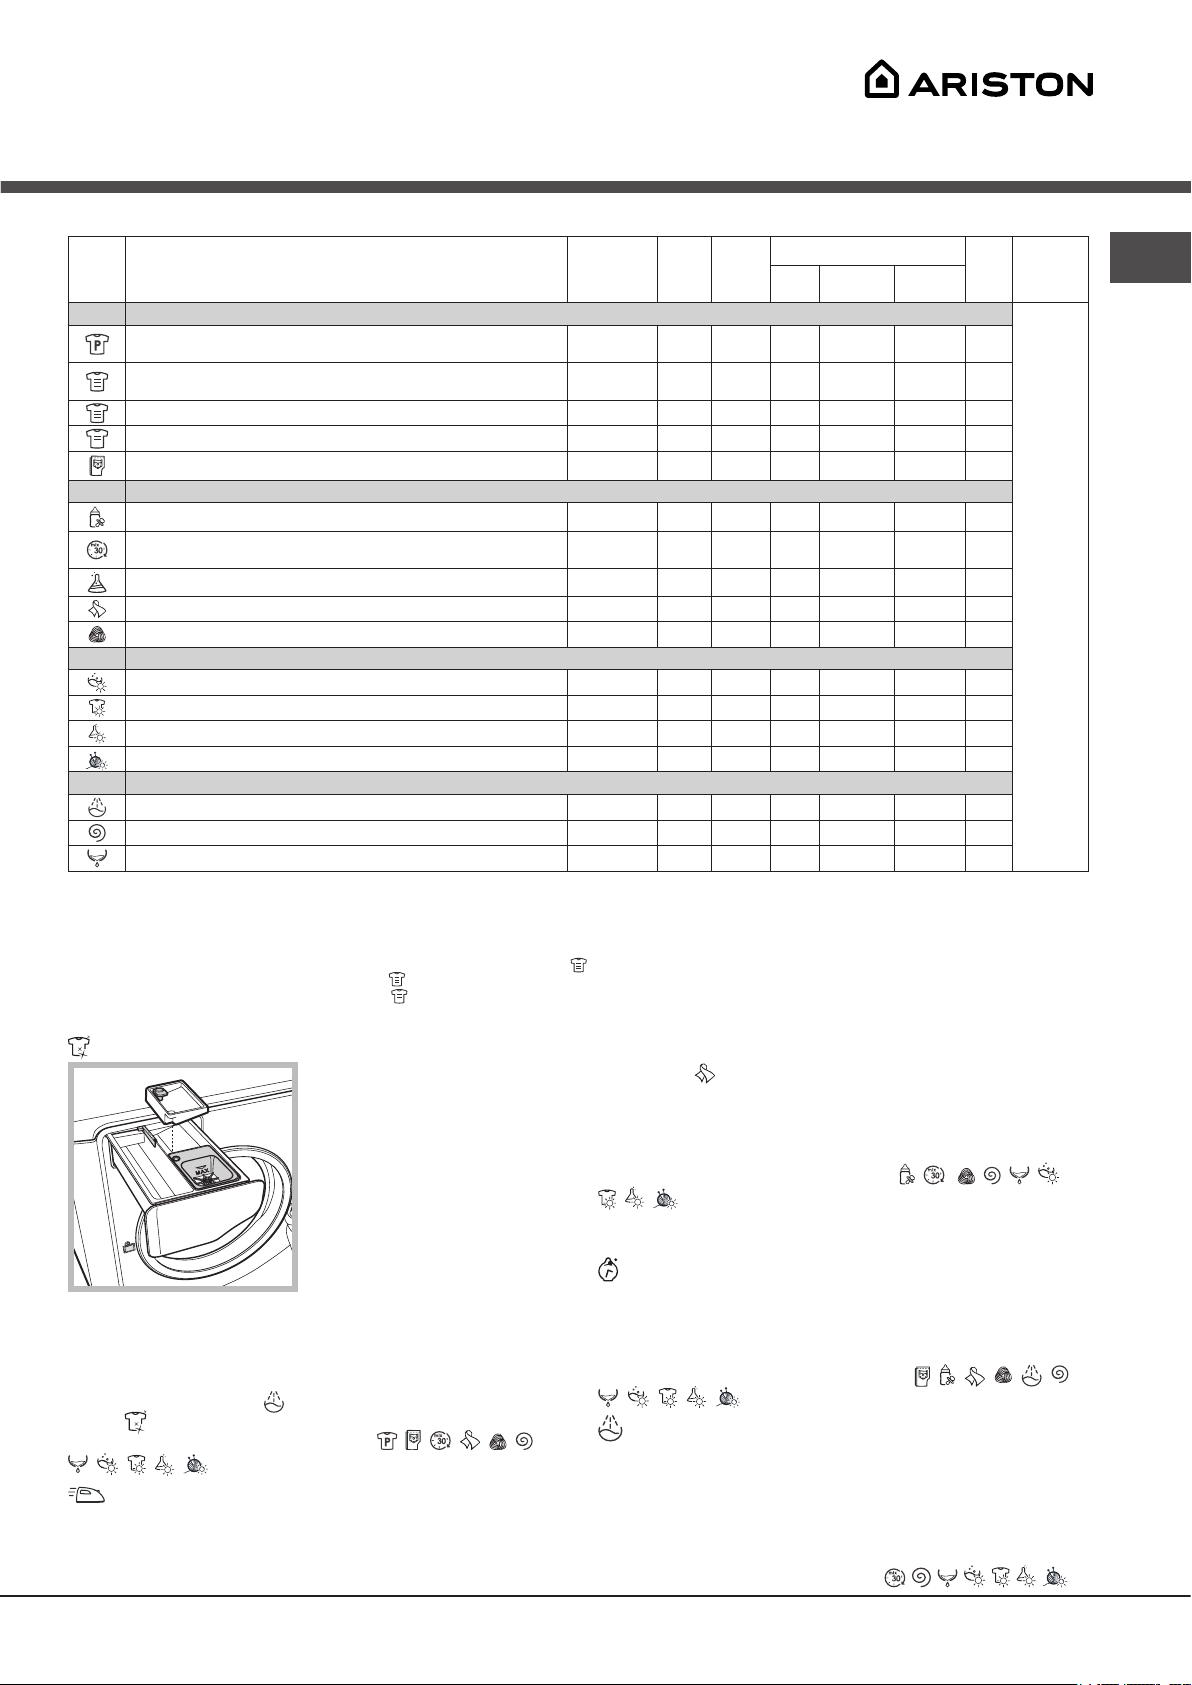
3. extra compartment: Bleach
! The use of extra compartment 3 excludes the prewash function.
washing additives compartment: for fabric softener
or liquid additives. We recommend that the maximum
level indicated by the grille is not exceeded, and that
concentrated fabric softeners are diluted.
TOUCH CONTROL PANEL
To adjust the settings, gently
press the icon inside the
sensitive (touch control) area
as illustrated in the figure.
DETERGENT DISPENSER DRAWER
The detergent dispenser
drawer is located inside
the machine and can be
accessed by opening the
door.
For more information on
detergent measures, please
refer to the chapter entitled
“Detergents and laundry”.
Note: stick the label showing
the wash cycle descriptions
and options on the front of the detergent dispenser drawer.
You will find the sticker in the pack containing this manual.
1. pre-wash compartment:
use powder detergent.
! Before pouring in the
detergent, make sure that
extra compartment 3 has
been removed.
2. main wash compartment:
use powder or liquid
detergent. If using the
latter type of detergent, we
Standby mode
This washer-dryer, in compliance with new energy saving
regulations, is fitted with an automatic standby system
which is enabled after about 30 minutes if no activity is
detected. Press the ON-OFF button briefly and wait for
the machine to start up again.
CHANGE LANGUAGE
The first time the machine is switched on, the first language
will flash on the display. The “ “, “OK” and “V” symbols will
appear on the display, in line with the 3 buttons on the righthand side. The languages change automatically every 3”;
alternatively, they can be changed by pressing the buttons
next to the “ “ and “V” symbols. Use the “OK” button to
confirm the language, which will be set after 2”. If no buttons
are pressed, the automatic language change will begin again
after 30”.
The language may only be changed while the machine is
switched off.
Press and hold the temperature +spin +delayed start
buttons for 5’’; a short beep sounds and the set language
flashes on the display. Press the buttons next to the “ “ and
“V” symbols to change the language. Use the button next to
the “OK” symbol to confirm the language, which will be set
after 2”. If no buttons are pressed, the language set previously
will be displayed after 30”. Switch on the machine.
4
Page 5
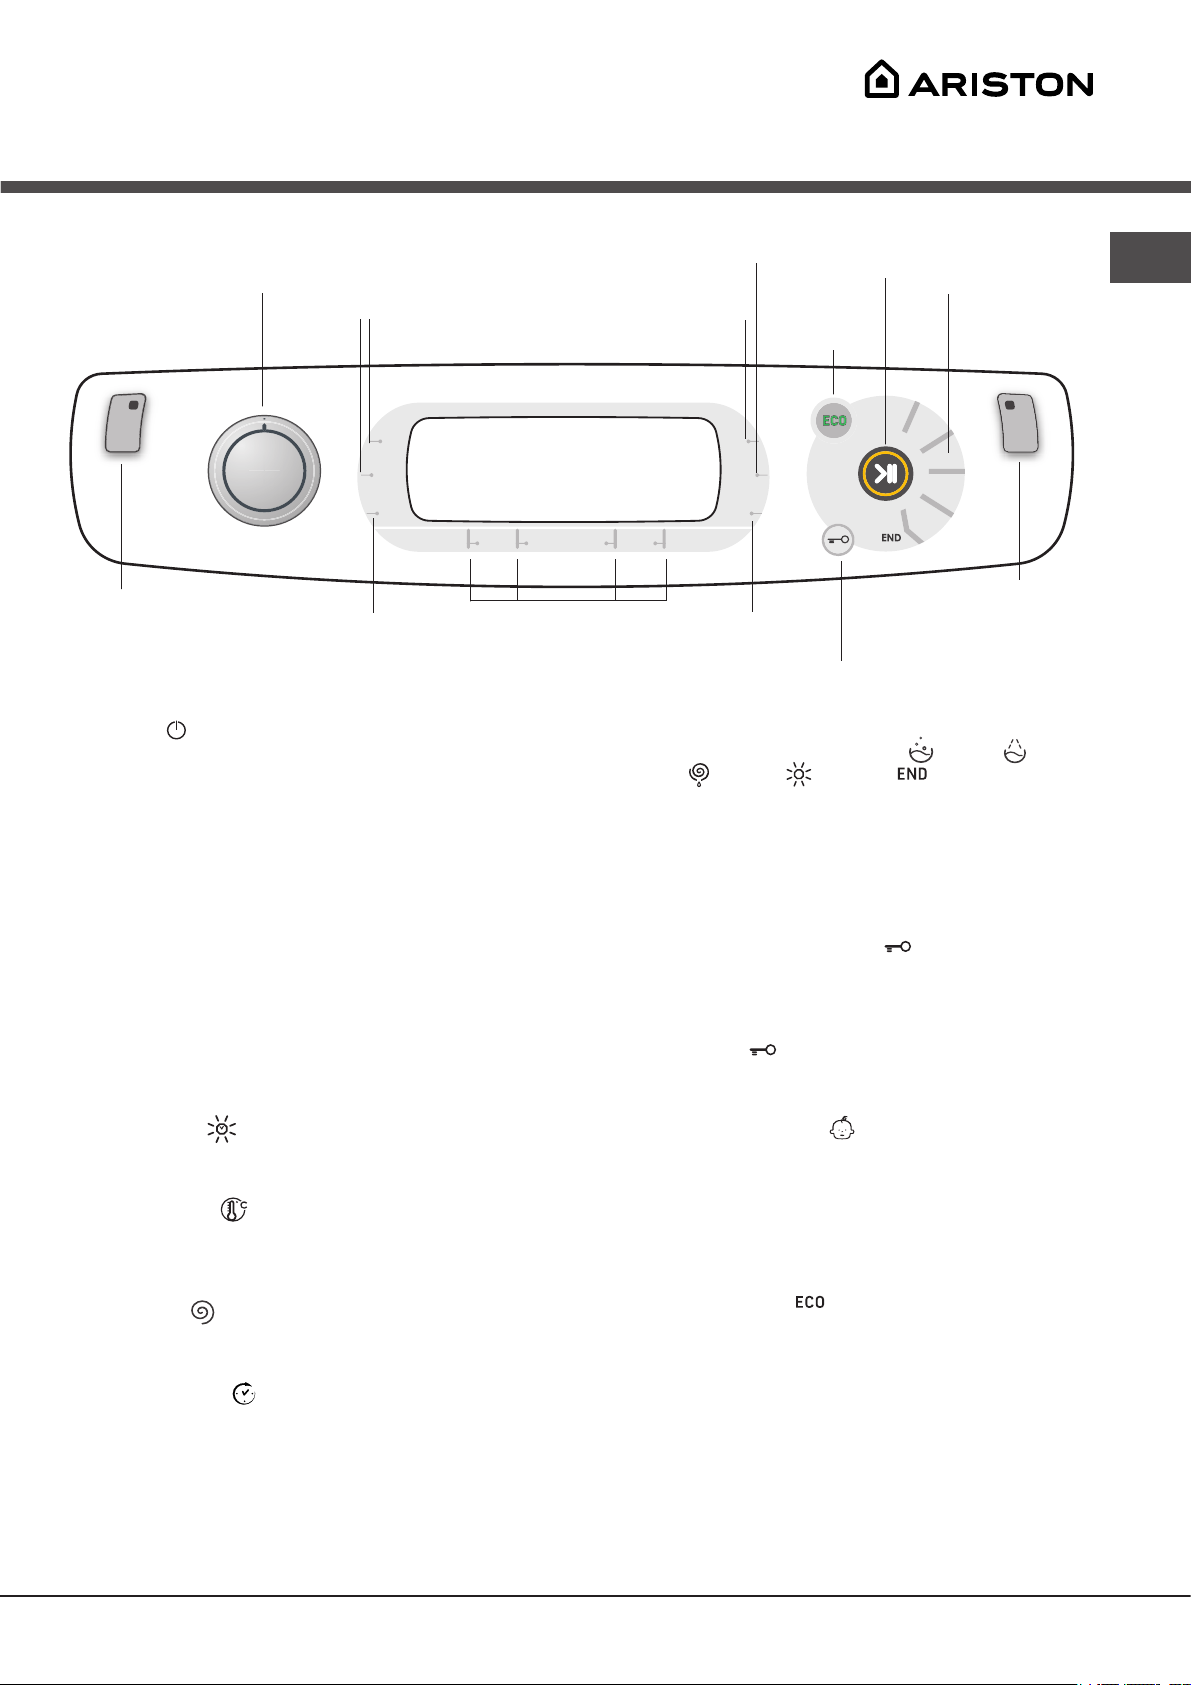
Touch control panel
WASH CYCLE
SELECTOR knob
M2
M1
TEMPERATURE
DISPLAY
SPIN
button
button
START/PAUSE button
with indicator light
ECO
indicator light
EN
WASH
CYCLE
PHASE
icons
Button with ON/OFF
indicator light
DRYING
Button with ON/OFF indicator light: press this briefly
to switch the machine on or off. The green indicator light
indicates that the machine is switched on. To switch off
the washer-dryer during the wash cycle, press and hold
the button for approximately 3 seconds; if the button is
pressed briefly or accidentally the machine will not switch
off. If the machine is switched off during a wash cycle, this
wash cycle will be cancelled.
WASH CYCLE SELECTOR knob: may be turned in
either direction. To select the most suitable wash cycle,
please refer to the “Table of wash cycles”.
The knob will not move during the wash cycle.
M1-M2 buttons: press and hold one of the buttons to
store a cycle with your own set preferences in the memory
of the machine. To recall a previously-stored cycle, press
the corresponding button.
DRYING button : press to decrease or exclude drying;
the selected drying level or time will appear on the display
(see “How to run a wash cycle or a drying cycle”).
TEMPERATURE button: press to modify or exclude
the temperature setting; the value selected will appear
on the display above (see “How to run a wash cycle or a
drying cycle”).
SPIN CYCLE button: press to modify or exclude the
spin cycle; the value selected will appear on the display
above (see “How to run a wash cycle or a drying cycle”).
DELAYED START button: press to set a delayed start
for the selected wash cycle; the set delay time will appear
on the display above (see “How to run a wash cycle or a
drying cycle”).
OPTION
buttons
CONTROL PANEL
DELAYED START
button
LOCK button with
indicator light
DOOR LOCKED indicator light
WASH CYCLE PHASE icons: these illuminate to indicate
the progress of the wash cycle (Wash – Rinse –
Spin/Drain – Drying ). The text lights up when the
cycle is complete.
START/PAUSE button with indicator light: when the green
indicator light flashes slowly, press the button to start a
wash cycle. Once the cycle has begun the indicator light
will remain lit in a fixed manner. To pause the wash cycle,
press the button again; the indicator light will flash in an
orange colour. If the “Door locked” indicator light is
switched off, the door may be opened. To start the wash
cycle from the point at which it was interrupted, press the
button again.
DOOR LOCKED indicator light: indicates that the
porthole door is locked. To open the door, pause the wash
cycle (see “How to run a wash cycle or a drying cycle”).
CONTROL PANEL LOCK button with indicator light:
to activate or deactivate the control panel lock, press and
hold the button for approximately 2 seconds. when the
indicator light is illuminated, the control panel is locked.
This means it is possible to prevent wash cycles from being
modified accidentally, especially where there are children in
the home.
ECO indicator light: the icon lights up when, after
altering the washing parameters, an energy saving of
at least 10% is made. Furthermore, before the machine
enters “Standby” mode, the icon will light up for a few
seconds; when the machine is switched off the estimated
energy saving will be around the 80% mark.
OPTION buttons: press to select the available options.
The indicator light corresponding to the selected option will
remain lit (see “How to run a wash cycle or a drying cycle”).
5
Page 6
How to run a wash cycle or a
drying cycle
EN
WARNING: before you use the washer-dryer for the first time,
run a wash cycle with detergent and no laundry, using the 90°
cottons cycle without pre-wash.
1. SWITCH THE MACHINE ON. Press the button. All
the indicator lights will illuminate for 1 second and the text
AQUALTIS will appear on the display; the indicator light
corresponding to the button will then remain lit in a constant
manner and the START/PAUSE indicator light will flash.
2. SELECT THE PROGRAMME. Turn the PROGRAMME
KNOB left or right, until the required programme has been
selected; the name of the programme will appear on the
display. A temperature and spin speed is set for each
programme; these may be adjusted. The cycle duration will
also appear on the display.
3. LOAD THE LAUNDRY. Open the porthole door. Load the
laundry, making sure you do not exceed the maximum load value
indicated in the table of wash cycles on the following page.
4. MEASURE OUT THE DETERGENT. Pull out the detergent
dispenser drawer and pour the detergent into the relevant
compartments as described in “Description of the machine”.
5. CLOSE THE PORTHOLE DOOR.
6. CUSTOMISE THE WASH CYCLE. Use the relevant
buttons on the control panel:
Modify the temperature and/or spin speed.
The machine automatically displays the maximum
temperature and spin speed values set for the selected
cycle, or the most recently-used settings if they are
compatible with the selected cycle. The temperature can
be decreased by pressing the button, until the cold
wash “OFF” setting is reached. The spin speed may be
progressively reduced by pressing the button, until it is
completely excluded “OFF”. If these buttons are pressed
again, the maximum values are restored.
! Exception: if the “Cottons” programme is selected, the
temperature can be increased up to a value of 90°C.
Setting the drying cycle
The first time the button is pressed, the machine will
automatically select the maximum drying cycle which is
compatible with the selected wash cycle. Subsequent presses
will decrease the drying level and then the drying time, until
the cycle is excluded completely (“OFF”). If these buttons are
pressed again, the maximum values are restored.
Drying may be set as follows:
A - Based on a set time period: between 20 and 180 minutes.
B- Based on the desired laundry dryness level:
Iron: suitable for clothes which will need ironing afterwards.
the remaining dampness softens creases, making them
easier to remove.
Hanger: ideal for clothes which do not need to be dried fully.
Cupboard: suitable for laundry which can be put back in a
cupboard without being ironed.
Extra: suitable for garments which need to be dried
completely, such as sponges and bathrobes.
If your laundry load to be washed and dried is much greater
than the maximum stated load (see adjacent table), perform
the wash cycle, and when the cycle is complete, divide
the garments into groups and put some of them back in
the drum. At this point, follow the instructions provided
for a “Drying only” cycle. Repeat this procedure for the
remainder of the load.
A cooling-down period is always added to the end of each
drying cycle.
Drying only
Use the cycle selector knob to select a drying cycle ( - - )
in accordance with the type of fabric. The desired drying level or
time may also be set using the DRYING button .
Setting a delayed start.
To set a delayed start for the selected cycle, press the
corresponding button repeatedly until the required delay period
has been reached. During the setting procedure, the delay period
and the text “Starts in”: will be displayed, along with the
flashing symbol. After the delayed start has been set,
the symbol will remain fixed on the display, which will
also indicate the duration of the selected cycle with the text
“Ends in”: and the cycle duration. Press the DELAYED START
button just once to display the delay time set previously. After the
countdown has begun, the display will show the text “Starts in”:
and the delay period. Once the set delay time has elapsed,
the machine will begin its cycle and the display will show
“Ends in”: and the time remaining until the end of the cycle. To
remove the delayed start option, press the button until the display
shows the text OFF; the symbol will disappear.
Modify the cycle settings.
• Press the button to activate the option; the name
of the option will then appear on the display and the
corresponding indicator light will illuminate.
• Press the button again to deactivate the option; the
name of the option will then appear on the display
followed by the text OFF, and the corresponding
indicator light will switch off.
! If the selected option is not compatible with the selected
wash cycle, this incompatibility will be signalled by the
flashing of the indicator light and a sound alert (3 beeps);
the option will not be activated.
! If the selected option is not compatible with another
option that has been selected previously, the indicator light
corresponding to the first option selected will flash and
only the second option will be activated; the indicator light
corresponding to the button will remain lit in a constant manner.
! The options may affect the recommended load value and/
or the duration of the cycle.
7. START THE PROGRAMME. Press the START/PAUSE
button. The corresponding indicator light remains lit in a fixed
manner and the porthole door locks (the DOOR LOCKED
indicator light illuminates). The icons corresponding to the wash
cycle phases will light up during the cycle to indicate which
phase is currently in progress. To change a wash cycle once
it has already started, pause the washer-dryer by pressing the
START/PAUSE button; then select the desired cycle and press
the START/PAUSE button again. To open the door during a
wash cycle, press the START/PAUSE button; if the DOOR
LOCKED indicator light is switched off you may open the
door. Press the START/PAUSE button again to restart the wash
cycle from the point at which it was interrupted.
8. THE END OF THE WASH CYCLE. This is indicated by
the illuminated text END. The porthole door may be opened
immediately. If the START/PAUSE indicator light is flashing,
press the button to end the cycle. Open the door, unload
the laundry and switch off the machine.
! If you wish to cancel a cycle which has already begun, press and
hold the button until the cycle stops and the machine switches off.
6
Page 7
3
1
2
Wash cycles and options
Table of wash cycles
Icon Description of the wash cycle
Cottons wash cycles
Cottons with pre-wash
(Add detergent to the relevant compartment).
Cotton (1): heavily soiled whites and resistant colours.
Cotton (2): heavily soiled whites and delicate colours. 40° 1400
Coloured Cotton (3) 40° 1400
Jeans
Special wash cycles
Baby: heavily soiled delicate colours 40° 800
Mix 30': to refresh lightly soiled garments quickly (not suita-
ble for wool, silk and clothes which require washing by hand)
Durable Synthetics 60° 800
Silk: for garments in silk and viscose, lingerie. 30° 0 -
Wool: for wool, cashmere, etc. 40° 800
Drying cycles
Wash&dry
Drying Cottons
Drying Synthetics
Drying Wool
Partials cycles
Rinse - 1400
Spin - 1400
The length of cycle shown on the display or in this booklet is an estimation only and is calculated assuming standard working conditions. The actual duration can vary according to factors such as
water temperature and pressure, the amount of detergent used, the amount and type of load inserted, load balancing and any wash options selected.
(*) Note: 10 minutes after the START, the machine will recalculate the time remaining until the end of the wash cycle on the basis of the load inside it; this
value will then be shown on the display.
For all Test Institutes:
1) Test wash cycle in compliance with regulation EN 50229: set wash cycle with a temperature of 60°C.
2) Long wash cycle for cottons: set wash cycle with a temperature of 40°C.
3) Short wash cycle for cottons: set wash cycle with a temperature of 40°C.
Drain - 0 - - - - 9
Wash options
Super Wash
This option offers a highperformance wash due to
the greater quantity of water
used in the initial phase
of the cycle, and due to
the increased wash cycle
duration, is particularly useful
for the removal of stubborn
stains. It can be used with or
without bleach. If you desire
Max. temp.
(°C)
90° 1400
60°
(Max. 90°C)
40° 800
30° 800
30° 1400
will flash. To end the cycle press the START/PAUSE button
or the “Easy Iron” button.
For the Silk wash cycle, the machine will end the cycle
while the laundry is soaking and the “Easy Iron” indicator
light will flash. To drain the water so that the laundry may
be removed, press the START/PAUSE button or the “Easy
Iron” button.
! It cannot be used in conjunction with , , , , , ,
Note: If you also want to run the drying cycle, this option is
enabled only if combined with level “Iron”.
bleaching, insert the extra
tray compartment (3) into
compartment 1. When pouring in the bleach, be careful
not to exceed the “max” level marked on the central pivot
(see figure). To bleach laundry without carrying out a full
wash cycle, pour the bleach into the extra compartment 3,
If you select this option, the wash cycle duration will be
reduced by 30%-50%, depending on the selected cycle,
thereby guaranteeing simultaneous water and energy
saving. Use this cycle for lightly soiled garments.
! It cannot be used in conjunction with , , , , , ,
select the “Rinse” cycle and activate the “Super Wash”
option .
! It cannot be used in conjunction with , , , , , ,
, , , , .
Easy Iron
By selecting this option, the wash and spin cycles will be
modified in order to reduce the formation of creases.
At the end of the cycle the washer-dryer drum will rotate
slowly; the “Easy Iron” and START/PAUSE indicator lights
By selecting this option, the efficiency of the rinse is
increased and optimal residual detergent removal is
guaranteed. It is particularly useful for skin which is
sensitive to detergents. We recommend this option is used
with a full load of washing, or when a large amount of
detergent is required.
! It cannot be used in conjunction with , , , , , , .
Max.
speed
(rpm)
1400
- -
- -
- -
, , .
Time Saver
, , , , .
Extra rinse
Drying
Detergent and additives
Fabric
Wash
softener
- - - 6
- - - 4
- - - 1,5
-
- - - 9
Bleach
Max.
load
(kg)
- 9
9
9
9
- 4
4
- 3,5
4
- 2
- 2
- 1
9
Cycle
duration
(*) The duration of the wash cycles can be checked on the display.
EN
7
Page 8

Detergents and laundry
EN
Detergent
The type and quantity of detergent required depend on
the type of fabric you are washing (cotton, wool, silk, etc.),
as well as its colour, the washing temperature, the level of
soiling and the hardness of the water in the area.
Measuring out the detergent carefully will avoid wastage
and help to protect the environment: although they are
biodegradable, detergents still contain ingredients which
alter the balance of nature.
We recommend the following:
• use powder detergents for white cotton garments and
pre-washing.
• use liquid detergents for delicate cotton garments and
for all low-temperature wash cycles.
• use gentle liquid detergents for wool and silk garments.
The detergent should be poured into the relevant
compartment - or the dispenser placed directly inside the
drum - before the wash cycle begins. In the latter case, it
will not be possible to select the Cottons with pre-wash
cycle.
! Do not use hand washing detergents because these
create too much foam.
Preparing the laundry
• Shake out the garments before loading them into the
machine.
• Divide the laundry according fabric type (symbol on the
washing instruction label) and colour, making sure you
separate the coloured garments from the white ones;
• Empty all pockets and check the buttons;
• Do not exceed the values listed in the “Table of wash
cycles”, which refer to the weight of the laundry when
dry.
How much does your laundry weigh?
1 sheet 400-500 g
1 pillowcase 150-200 g
1 tablecloth 400-500 g
1 bathrobe 900-1200 g
1 towel 150-250 g
1 pair of jeans 400-500 g
1 shirt 150-200 g
Curtains: use the “Silk” wash cycle. Fold curtains and
place them in a pillow case or mesh bag.
Wool: Ariston is the only washer-dryer brand to have
been awarded the prestigious Woolmark Platinum Care
endorsement (M.0508) by the Woolmark Company, which
means that all woollen garments may be washed in the
washer-dryer, even those which state “hand wash only”
on the label. The “Wool” wash cycle can be used
to wash all woollen garments in the washer-dryer while
guaranteeing optimum performance.
Bedlinen and towels: use the “Bed & Bath” cycle to
wash laundry from all over the house; this optimises fabric
softener performance and helps you save time and energy.
We recommend the use of powder detergent.
Stubborn stains: it is wise to treat stubborn stains with
solid soap before washing, and to use the Cottons with
pre-wash cycle.
Wash&Dry was designed to wash and dry lightly soiled
garments quickly. This cycle may be used to wash and dry
a laundry load of up to 1 kg in just 60 minutes.
To achieve optimum results, use liquid detergent and pretreat cuffs, collars and stains.
Load balancing system
Before every spin cycle, to avoid excessive vibrations
before every spin and to distribute the load in a uniform
manner, the drum rotates continuously at a speed which
is slightly greater than the washing rotation speed. If,
after several attempts, the load is not balanced correctly,
the machine spins at a reduced spin speed. If the load is
excessively unbalanced, the washer-dryer performs the
distribution process instead of spinning. To encourage
improved load distribution and balance, we recommend
small and large garments are mixed in the load.
Washing recommendations
Jeans: use the special “Jeans” wash cycle for all denim
garments; turn inside out before washing and use a liquid
detergent.
Baby: use the special “Baby” wash cycle to remove
the remove the soiling typically caused by babies, while
removing all traces of detergent from nappies in order to
prevent the delicate skin of babies from suffering allergic
reactions. The cycle has been designed to reduce the
amount of bacteria by using a greater quantity of water
and optimising the effect of special disinfecting additives
added to the detergent. At the end of the wash cycle, the
machine will slowly rotate the drum; to end the cycle press
the START/PAUSE button.
Silk: use the special “Silk” wash cycle to wash all silk
garments. We recommend the use of special detergent
which has been designed to wash delicate clothes.
8
Page 9
Precautions and tips
! The machine was designed and constructed in
accordance with international safety regulations. The
following information is provided for safety reasons and
must therefore be read carefully.
General safety
• This appliance is not intended for use by persons
(including children) with reduced physical, sensory
or mental capabilities, or lack of experience and
knowledge, unless they have been given supervision or
instruction concerning use of the appliance by a person
responsible for their safety.
Children should be supervised to ensure that they do
not play with the appliance.
– Do not dry unwashed items in the tumble dryer.
– Items that have been soiled with substances such
as cooking oil, acetone, alcohol, petrol, kerosene,
spot removers, turpentine, waxes and wax removers
should be washed in hot water with an extra amount of
detergent before being dried in the tumble dryer.
– Items such as foam rubber (latex foam), shower caps,
waterproof textiles, rubber backed articles and clothes
or pillows fitted with foam rubber pads should not be
dried in the tumble dryer.
– Fabric softeners, or similar products, should be used
as specified by the fabric softener instructions.
– The final part of a tumble dryer cycle occurs without
heat (cool down cycle) to ensure that the items are left
at a temperature that ensures that the items will not be
damaged.
WARNING: Never stop a tumble dryer before the end of
the drying cycle unless all items are quickly removed and
spread out so that the heat is dissipated.
• This appliance was designed for domestic use only.
• Do not touch the machine when barefoot or with wet or
damp hands or feet.
• Do not pull on the power supply cable when unplugging
the appliance from the electricity socket. Hold the plug
and pull.
• Do not touch the drained water as it may reach
extremely high temperatures.
• Never force the porthole door. This could damage the
safety lock mechanism designed to prevent accidental
opening.
• If the appliance breaks down, do not under any
circumstances access the internal mechanisms in an
attempt to repair it yourself.
• Always keep children well away from the appliance while
it is operating.
• If it must be moved, proceed with the help of two or
three people and handle it with the utmost care. Never
try to do this alone, because the appliance is very heavy.
• Before loading laundry into the washer dryer, make sure
the drum is empty.
• During the drying phase, the door tends to get
quite hot.
• Do not use the appliance to dry clothes that have
been washed with flammable solvents (e.g.
trichlorethylene).
• Do not use the appliance to dry foam rubber or
similar elastomers.
• Make sure that the water tap is turned on during
the drying cycles.
Disposal
• Disposing of the packaging materials: observe local
regulations so that the packaging may be re-used.
• The European Directive 2002/96/EC relating to Waste
Electrical and Electronic Equipment (WEEE) states
that household appliances should not be disposed of
using the normal solid urban waste cycle. Exhausted
appliances should be collected separately in order to
optimise the cost of re-using and recycling the materials
inside the machine, while preventing potential damage
to the atmosphere and to public health. The crossed-out
dustbin is marked on all products to remind the owner
of their obligations regarding separated waste collection.
For more information relating to the correct disposal of
household appliances, owners should contact their local
authorities or appliance dealer.
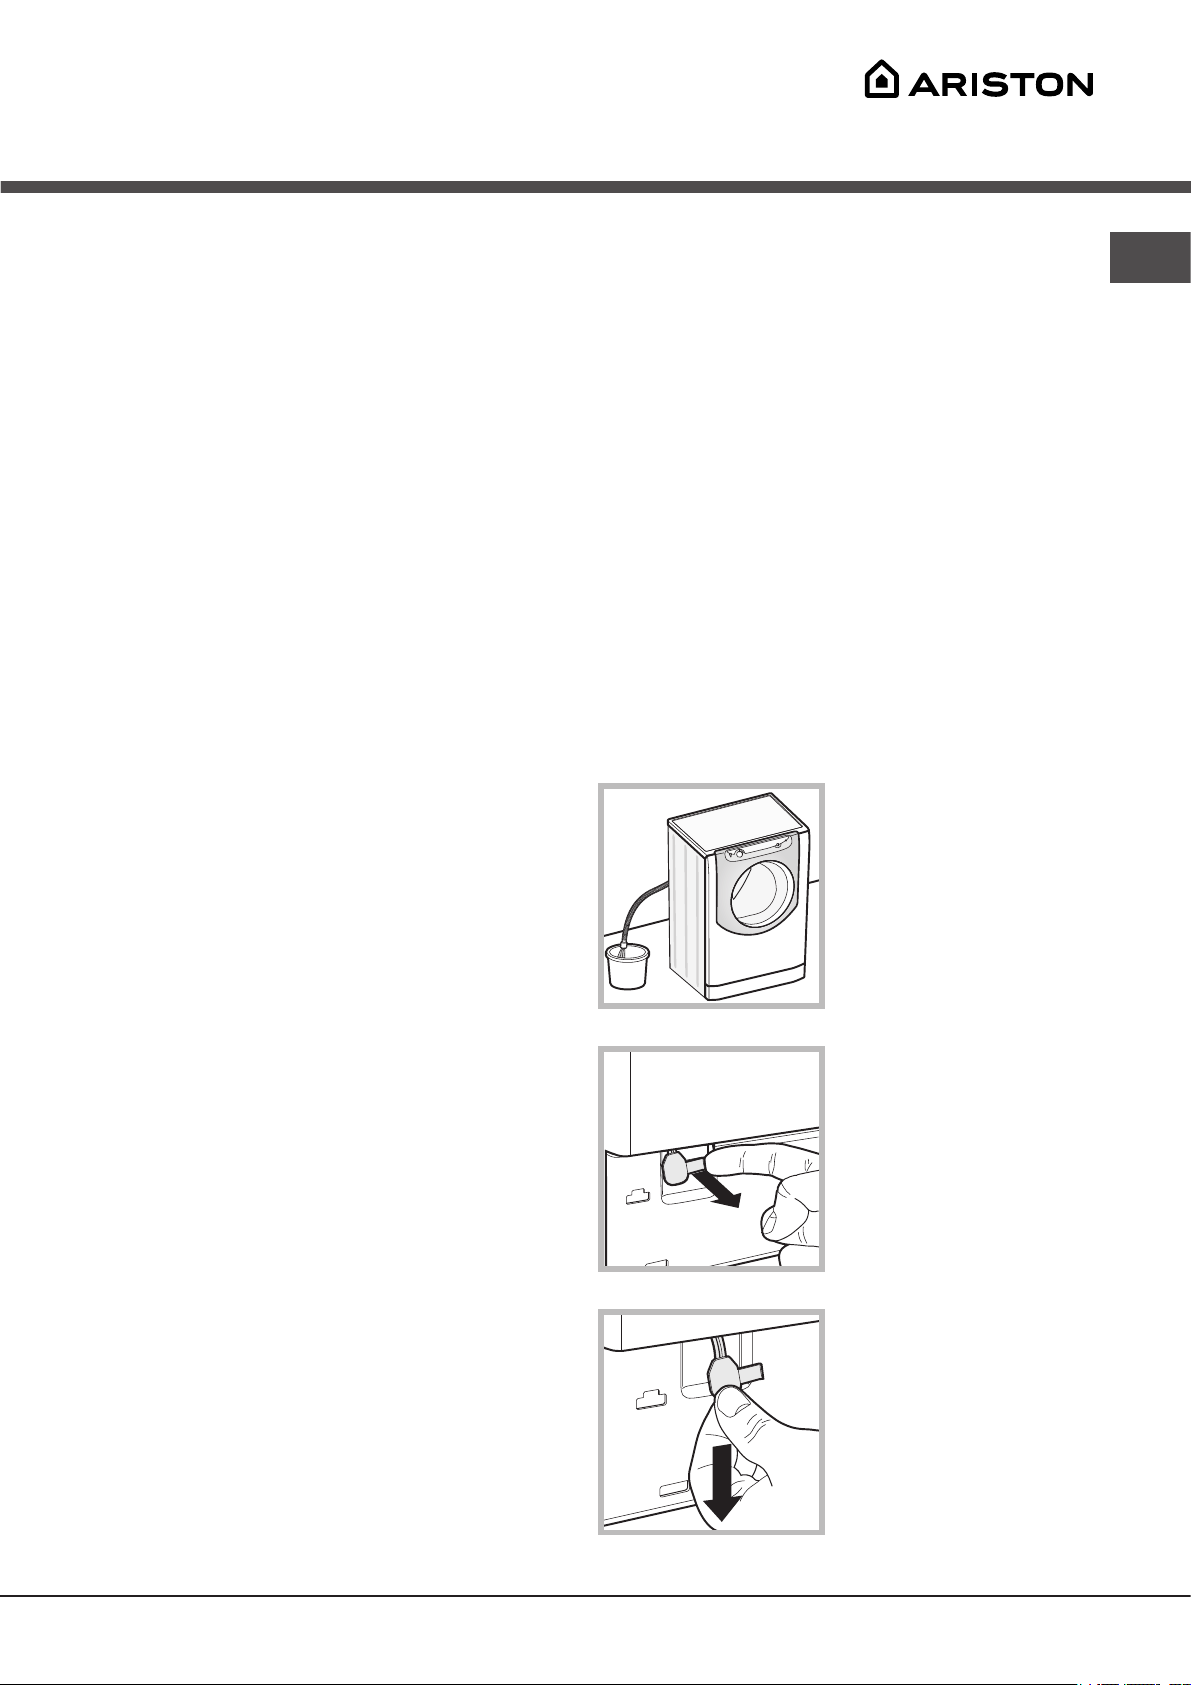
Opening the porthole door manually
In the event that it is not possible to open the porthole door
due to a powercut, and if you wish to remove the laundry,
proceed as follows:
1. remove the plug from the
electrical socket.
2. make sure the water level
inside the machine is lower
than the door opening; if
it is not, remove excess
water using the drain hose,
collecting it in a bucket as
indicated in the figure.
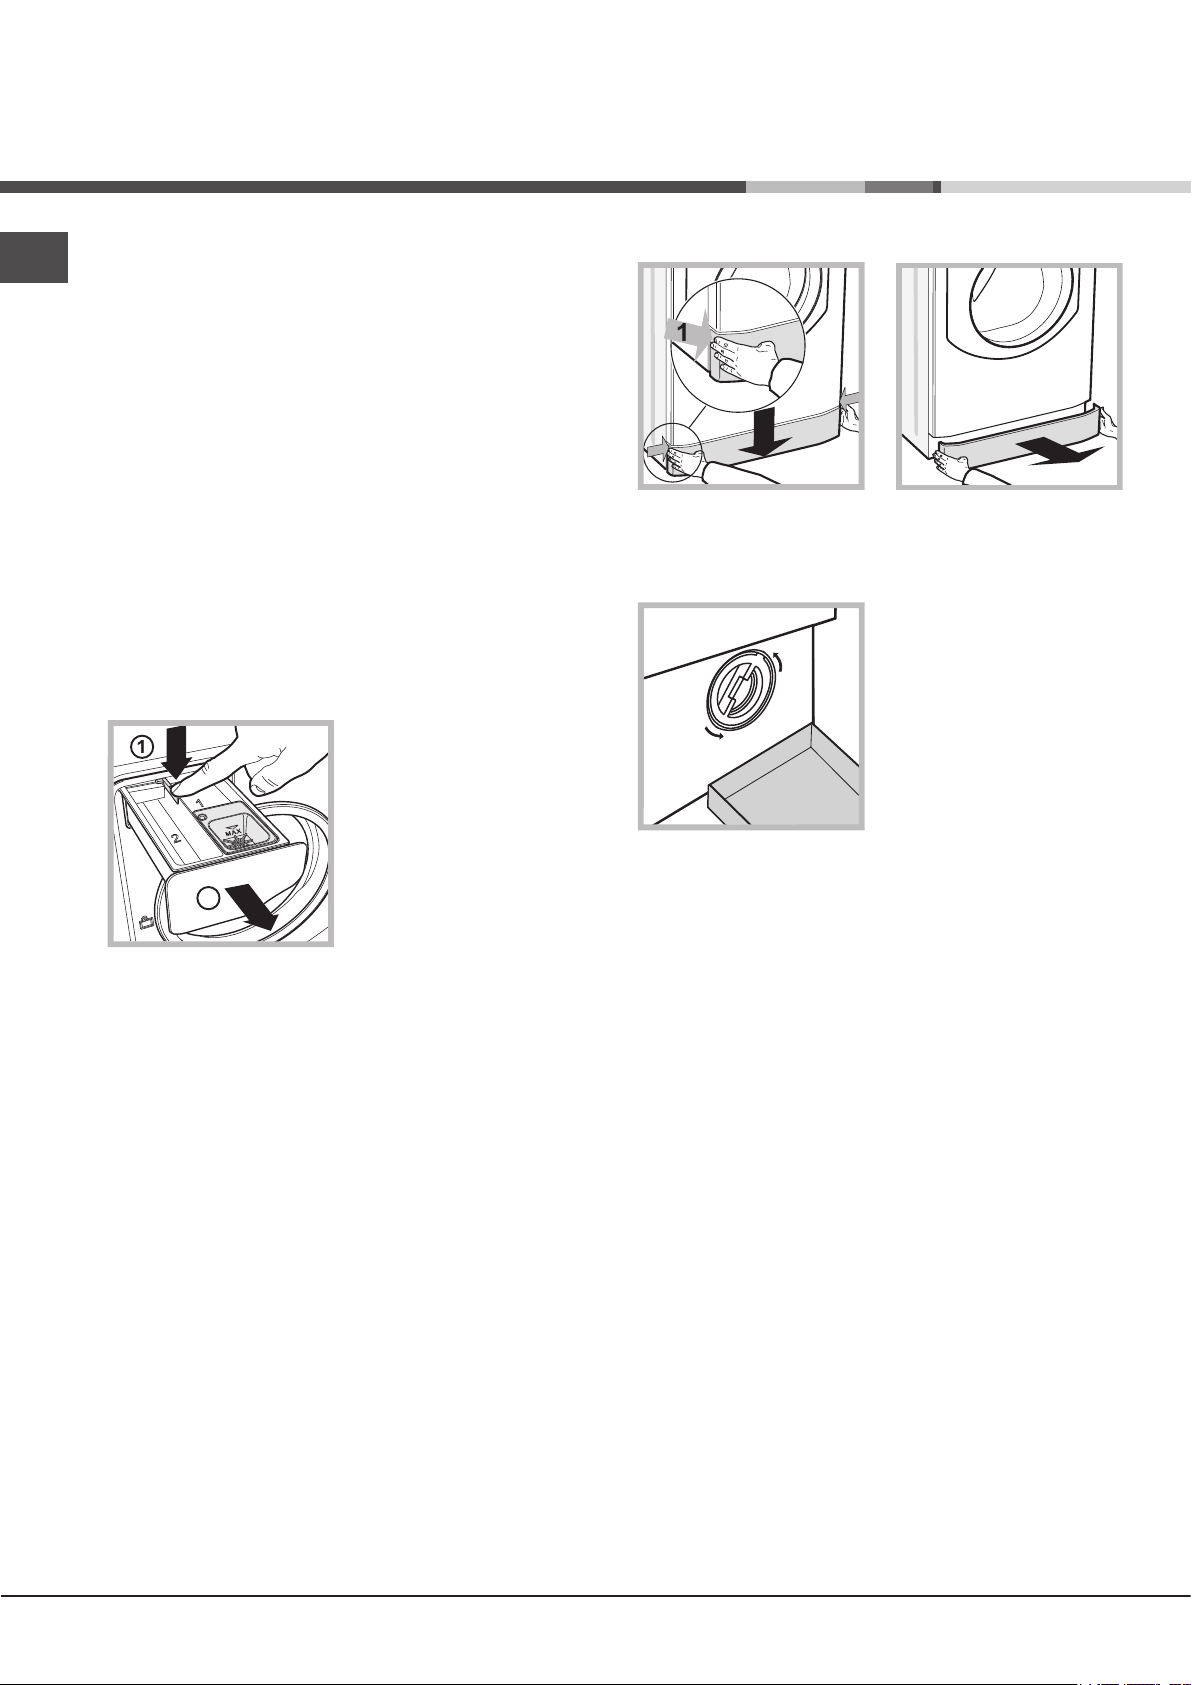
3. remove the cover panel
on the lower front part of the
washer dryer (see overleaf).
4. pull outwards using the
tab as indicated in the figure,
until the plastic tie-rod is freed
from its stop position; pull
downwards until you hear a
“click”, which indicates that
the door is now unlocked.
5. open the door; if this is
still not possible repeat the
procedure.
6. reposition the panel,
making sure the hooks are
securely in place before you
push it onto the appliance.
EN
9
Page 10
Care and maintenance
2
EN
Cutting off the water and electricity
supplies
• Turn off the water tap after every wash cycle. This will
limit wear on the hydraulic system in the machine and
help to prevent leaks.
• Unplug the appliance when cleaning it and during all
maintenance work.
Cleaning the machine
The outer parts and rubber components of the appliance
can be cleaned using a soft cloth soaked in lukewarm
soapy water. Do not use solvents or abrasives.
Cleaning the detergent dispenser
drawer
To remove the drawer, press
lever (1) and pull the drawer
outwards (2) (see figure).
Wash it under running water;
this procedure should be
repeated frequently.
To access the pre-chamber:
1. take off the cover panel on the front of the machine by
first pressing it in the centre and then pushing downwards
on both sides until you can remove it (see figures);
2. position a container so that
it will collect the water which
flows out (approximately 1.5 l)
(see figure);
3. unscrew the lid by rotating
it in an anti-clockwise
direction (see figure);
4. clean the inside thoroughly;
5. screw the lid back on;
6. reposition the panel, making sure the hooks are securely
in place before you push it onto the appliance.
Caring for your appliance drum
• Always leave the door ajar to prevent unpleasant odours
from forming.
Cleaning the pump
The washer dryer is fitted with a self-cleaning pump which
does not require any maintenance. Sometimes, small items
(such as coins or buttons) may fall into the protective prechamber at the base of the pump.
! Make sure the wash cycle has finished and unplug the
appliance.
Checking the water inlet hose
Check the inlet hose at least once a year. If there are any
cracks, it should be replaced immediately: during the wash
cycles, water pressure is very strong and a cracked hose
could easily split open.
10
Page 11

Trouble shooting
Your washer-dryer could occasionally fail to work. Before contacting the Technical Assistance Centre (see “Assistance”),
make sure that the problem cannot be not solved easily using the following list.
Problem:
The washer-dryer does not switch on.
The wash cycle does not start.
The washer-dryer does not fill
with water.
The washer-dryer door remains
locked.
The machine continuously fills
with water and drains.
The washer-dryer does not drain
or spin.
The machine vibrates a lot during
the spin cycle.
The washer-dryer leaks.
The icons corresponding to the
“Phase in progress” flash rapidly
at the same time as the ON/OFF
Possible causes / Solutions:
• The appliance is not plugged into the socket fully, or not enough to make contact.
• There is no power in the house.
• The door is not closed properly.
• The START/PAUSE button has not been pressed.
• The water tap has not been opened.
• A delayed start has been set.
• The water inlet hose is not connected to the tap.
• The hose is bent.
• The water tap has not been opened.
• There is no water supply in the house.
• The pressure is too low.
• The START/PAUSE button has not been pressed.
• If you have selected the “Baby ” cycle or the “Easy iron ” option, when
the wash cycle has finished the machine will slowly rotate the drum; to end
the cycle press the START/PAUSE button or the “Easy iron ” button. If you
have selected the “Silk ” wash cycle, the machine will end the cycle while
the laundry is soaking; to drain the water so that the laundry may be removed,
press the START/PAUSE button or the “Easy iron ” button.
• The drain hose is not fitted at a height between 65 and 100 cm from the floor
(see “Installation”).
• The free end of the hose is under water (see “Installation”).
• If the dwelling is on one of the upper floors of a building, there may be
problems relating to water drainage, causing the washer-dryer to fill with water
and drain continuously. Special anti-draining valves are available in shops and
help to prevent this inconvenience.
• The wall drainage system is not fitted with a breather pipe.
• The wash cycle does not include draining: Some wash cycles require the drain
phase to be started manually (see “Wash cycles and options”).
• The “Easy iron” option is enabled: to complete the wash cycle, press the
START/PAUSE button (“Wash cycles and options”).
• The drain hose is bent (see Installation).
• The drainage duct is clogged.
• The drum was not unlocked correctly during installation (see “Installation”).
• The machine is not level (see “Installation” ).
• The machine is trapped between cabinets and walls (see “Installation”).
• The load is unbalanced (see “Detergents and laundry”).
• The water inlet hose is not screwed on properly (see “Installation”).
• The detergent dispenser is blocked (to clean it, see “Care and maintenance”).
• The drain hose is not fixed in place properly (see “Installation”).
• Switch off the machine and unplug it, wait for approximately 1 minute and
then switch it back on again. If the problem persists, contact the Technical
Assistance Service.
indicator light.
There is too much foam.
The washer-dryer door remains locked.
• The detergent is not suitable for machine washing (it should display the text
“for washer-dryers” or “hand and machine wash”, or the like).
• Too much detergent was used.
• Perform the manual unlocking procedure (see “Precautions and tips”).
EN
The washer-dryer does not dry.
• The appliance is not plugged into the socket, or not enough to make contact.
• There has been a power failure.
• The appliance door is not shut properly.
• A DELAY TIMER has been set.
• DRYING is in the OFF position.
11
Page 12

Assistance
EN
Before calling for Assistance:
• Check whether you can solve the problem by yourself (see “Trouble shooting”);
• Restart the wash cycle to check whether the problem has been solved;
• If it has not, contact the Authorised Technical Assistance Service.
! If the washer-dryer has been installed or used incorrectly, you will have to pay for the call-out service.
! Always request the assistance of authorised technicians.
Please have the following information to hand:
• the type of problem;
• the appliance model (Mod.);
• the serial number (S/N).
The above information can be found on the data plate located on the appliance itself.
! Note: To exit “Demo mode”, press and hold the two “ON/OFF” and “START/PAUSE” buttons simultaneously for 3 seconds.
12
Page 13

لﺎﻤﻌﺘﺳﻻاو ﺐﻴآﺮﺘﻟا تﺎﻤﻴﻠﻌﺗ ﺐّﻴﺘآ
ﺔﻟﺎﺴﻏ– ﺔﻓﺎﺸﻧ
! تﺎﻴﻤﻠﻌﺘﻟا ﺐﻴﺘآ ةءاﺮﻘﺑ كﺮﻴآﺬﺘﻟ ﻮه ﺰﻡﺮﻟا اﺬه
تﺎیﻮﺘﺤﻤﻟا
ﺐﻴآﺮﺘﻟا،
و ﻚﻔﻟاﺔﻳﻮﺴﺘﻟا
و ﺔﻴﺋﺎﺑﺮﻬﻜﻟا تاداﺪﻣﻹﺎﺑ ﻞﺻﻮﻟاﻩﺎﻴﻤﻟا
ﻟا تﺎﻣﻮﻠﻌﻤﻟاﺔّﻴﻨﻘﺘ
،ﺔﻟﻵا ﻒﺻو
ﻢﻜﺤﺘﻟا رارزأ ﺔﺣﻮﻟ ﺲﻤﻠﻟا ﺔﻄﺱاﻮﺑ
AQUALTIS
AQM9D 49 X
و ﻞﻴﺴﻐﻟا تارودﻒﺋﺎﻇﻮﻟا
ﻞﻴﺴﻐﻟا تارود لوﺪﺟ
ﻞﻴﺴﻐﻟاو ﻒﻴﻈﻨﺘﻟا داﻮﻡ
ﻞﻴﺴﻐﻟا ﺮﻴﻀﺤﺕ
ﺔﻟﻮﻤﺤﻟا نزاﻮﺕ مﺎﻈﻥ
ﺔﻣﺎﻌﻟا ﺔﻣﻼﺴﻟا
ﺔﻟﺎﺴﻐﻟا ﻒﻴﻈﻨﺕ
ﻒﻴﻈﻨﺘﻟا داﻮﻣ ءﺎﻋو ﻒﻴﻈﻨﺕ
ﺔﺨﻀﻤﻟا ﻒﻴﻈﻨﺕ
ﻪﺡﻼﺻإو ﻞﻠﺨﻟا
ﺔﻴﻔﻴآ ﻞﻴﺴﻏ ةرود ﻞﻴﻐﺸﺗ وأﻒﻴﻔﺠﺗ
ﻒﺋﺎﻇو ﻞﻴﺴﻐﻟا
ﻒﻴﻈﻨﺘﻟا داﻮﻣ
لﻮﺣ ﺢﺋﺎﺼﻥ ﻞﻴﺴﻐﻟا
تاﺮیﺬﺤﺘﻟا ﺢﺋﺎﺼﻨﻟاو
ﻒﻳﺮﺼﺘﻟا
ﺢﺘﻓﻟاﺎﻳوﺪﻳ بﺎﺒ
و ﺔیﺎﻨﻌﻟاﺔﻧﺎﻴﺼﻟا
ﻓﻞﺼ ﺔﻟﻵا ﻦﻋ ﻩﺎﻴﻤﻟاو ءﺎﺑﺮﻬﻜﻟا
ﺑ ﺔﻳﺎﻨﻌﻟاضﻮﺤ ﺔﻟﻵا
ﺪﻘﻔﺕبﻮﺒﻥأ لﺎﺥدإ ﻩﺎﻴﻤﻟا
ةﺪﻋﺎﺴﻤﻟا
13
Page 14
ﻦﻴﺘﺟرّﺪﻟا راﺪﺤﻥﻻا ﺔﻳواز.(
ﺔﺠﺽ وأ تﺎﺟﺎﺠﺕرا يأ ﻚﻟﺬﺑ ىدﺎﻔﺘﺕو تﺎﺒﺜﻟا
.
ﺪﻨﻋﻞﻴﻐﺸﺘﻟا ناروﺪﻟا لﻼﺥ ًﺎﺻﻮﺼﺥو
لﺎﺣ ﻲﻓﻰﻠﻋ ﺔﻟﻵا ﻊﺽو ﻢﺕ وأ ﺔﺘﺑﺎﺙ ةدﺎﺠﺱ
!
ﺔﺋﻮﻬﺘﺑ ﺢﻤﺴﺕ ﺔﻘﻳﺮﻄﺑ ﻢﺋاﻮﻘﻟا لﺪﻋ ،ﺔﺘﺑﺎﺙ ﺮﻴﻏ
ﺔﻟﺎﺴﻐﻟا ﺖﺤﺕ ﺔﺒﺱﺎﻨﻣ.
ﻩﺎﻴﻤﻟاو ﺔﻴﺋﺎﺑﺮﻬﻜﻟا تاداﺪﻡﻹﺎﺑ ﻞﺻﻮﻟا
ﻞﺻوبﻮﺒﻧأ إﺥدﺎﻩﺎﻴﻤﻟا ل
ﻞﺻو ﻞﺒﻗ ﻩﺎﻴﻤﻟا لﺎﺥدإ بﻮﺒﻥأ رﺪﺼﻤﺑ
!
ﻩﺎﻴﻤﻟا كﺮﺕا ،ﻩﺎﻴﻤﻟايﺮﺠﺕ ﺘﺣ ﺔﻴﻘﻥ ﺢﺒﺼﺕ ﻰ
ًﺎﻣﺎﻤﺕ.
1- ﻢﻗ ﻞﺻﻮﺑ بﻮﺒﻥأ
لﺎﺥدإ ﻩﺎﻴﻤﻟا
ﺎﺑﺔﻟﺎّﺴﻐﻟ لﻼﺥ ﻦﻣ
بﻮﺒﻥﺄﺑ ﻪﻠﺻو
ةدرﺎﺒﻟا ﻩﺎﻴﻤﻟا لﺎﺥدإ
دﻮﺟﻮﻤﻟا ﻰﻠﻋأ ﻲﻓ
ﻲﻓ ﻦﻤﻳﻷا ﺐﻥﺎﺠﻟا ﺔﻬﺠﻟا ﻟا ﺔﻴﻔﻠﺨﻟ ﺔﻟﻶ
ةرﻮﺼﻟا ﻊﺟار
.(
)
2- ﻞﺻﻮﺑ ﻢﻗﻷا بﻮﺒﻥ
ﺑ ﻩﺎﻴﻤﻟا ﺔﻴﻔﻨﺤ
ةدرﺎﺒﻟا ﺔﻄﺱاﻮﺑ
ﺔﻠﺻو زﺎﻏ
ةرﻮﺼﻟا ﻊﺟار
.(
سﺎﻴﻗ ﺔﺒﻟﻮﻠﻣ3/4 )
3- ﺕ ﻦﻣ ﺪآﺄًﺎ ﻳ ﻮ ﺘ ﻠ ﻣ وأ ًﺎﻴﻨﺜﻣ ﺲﻴﻟ بﻮﺒﻥﻷا نأ .
ﻲﻓ ﺎﻬﻴﻟإ رﺎﺸﻤﻟا ﻢﻴﻘﻟا تﺎﻣﻮﻠﻌﻤﻟا ﺔﺣﻮﻟ ﺔﻴﻨﻘﺘﻟا
ﺔﻴﻟﺎﺘﻟا ﺔﺤﻔﺼﻟا ﻲﻓ
.(
! ،ﺔﻳﺎﻔآ ًﻼ ﻳ ﻮ ﻃ ﻩﺎﻴﻤﻟا بﻮﺒﻥأ ﻦﻜﻳ ﻢﻟ لﺎﺣ ﻲﻓ
ﺔﻣﺪﺥ ﻞﻣﺎﻋ وأ ﺺﺼﺨﺘﻣ ﺮﺠﺘﻤﺑ ﻞﺼﺕا
ﻪﻟ حﺮﺼﻣ.
! ﻞﻤﻌﺘﺴﺕ ﻻأﻴﺑﺎﻥأ ًا ﺪ ﺑﺔﻠﻤﻌﺘﺴﻣ ﺐ ﺔﻤﻳﺪﻗ وأ
ﺐﻴآﺮﺘﻟا
! ﻪﻴﻟإ ةدﻮﻌﻠﻟ ﻦﻣﺁ نﺎﻜﻣ ﻲﻓ ﺐﻴﺘﻜﻟا اﺬﻬﺑ ﻆﻔﺘﺣا
!ﺎﻬﻟ ﻦﻣﺆﻴﺱ ﺐﺱﺎﻨﻤﻟا ىﻮﺘﺴﻤﻟا ﻲﻓ ﺔﻟﻵا ﻊﺽو
ﻼﻟا ﻞﻴﺻﺎﻔﺘﻟا ﺔﻓﺎآو ﺔﻟﺎﻔآ ،ﺐﻴﺘﻜﻟا ﺔﻣز
ﺔﺋﺰﺠﺘﻟﺎﺑ ﻊﺋﺎﺒﻟﺎﺑ ﻞﺼﺕاو.
ﺮﻴﻣﺎﺴﻤﻟا عﺰﻥا
2-
ﺔﻴﺋﺎﻤﺤﻟا ﻊﺑرﻷا
) لﻼﺥ ﺔﻠﻤﻌﺘﺴﻤﻟا
ﻞﻘﻨﻟا (و ﻞﺻﺎﻔﻟا
دﻮﺟﻮﻤﻟا ﻲﻓ
ةﺮﺥﺆﻣﻵاﻟﺔ
.(
ﺟارةرﻮﺼﻟا ﻊ
)
ةدوﺰﻤﻟا ﺔﻴﻜﻴﺘﺱﻼﺒﻟاﺔﺒﻠﻌﻟا ﻲﻓ.
لﺎﺣ ﻲﻓ ًا د ﺪ ﺠ ﻣ ﺎﻬﻴﻟإ ﻞﻘﻥ ﻢﺕﺔﻟﺎّﺴﻐﻟا ﻰﻟإ
ﺔﻟﻵا ﻞﺥاد رﺮﻀﺕ يدﺎﻔﺘﻟ ﺮﺥﺁ ﻊﻗﻮﻣ.
! ﺐﺠﻳنأ ﻦﻤﺽ ﺔﻴﻔﻨﺤﻟا ﻲﻓ ﻩﺎﻴﻤﻟا ﻂﻐﺽ نﻮﻜﻳ
)
ضرﻷا ﺖﻥﺎآ اذإ
2-
ﺮﻴﻏﺔﺤﻄﺴﻣ ،
ﻞﻳﺪﻌﺕ ﻦﻜﻤُﻳا ﺔﻟﻵ
نأ ﻰﻟإ ﻲﻓ ﺢﺒﺼﺕ
واﺔﻟﻵا ﻊﻣ ةدوﺰﻤﻟا تﺎﺠﺘﻨﻤﻟا ﻞﻤﻌﺘﺱ.
ﻲﻘﻓأ ىﻮﺘﺴﻣ) ﻻ
ىّﺪﻌﺘﺕ نأ ﺐﺠﻳ
و ﻞﺻبﻮﺒﻧأ ﻒیﺮﺼﺘﻟا
ﻖﺣﻻ ﺖﻗو ﻲﻓ . وأ ﺎﻬﺤﻨﻣ وأ ﺔﻟﻵا ﻊﻴﺑ ﺪﻨﻋ
ﺮﻟا ،ﺎﻬﻠﻘﻥ ﺎﻬﻌﻣ ﺐّﻴﺘﻜﻟا دﻮﺟو ﻦﻣ ﺪّآﺄﺘﻟا ءﺎﺟ
ﻰﺘﺣ ﺢﺋﺎﺼﻨﻟا ﻦﻣ ﺪﻳﺪﺠﻟا ﻚﻟﺎﻤﻟا ﺪﻴﻔﺘﺴﻳ
ﻪﻴﻓ ةدﻮﺟﻮﻤﻟا.
! تﺎﻤﻴﻠﻌﺘﻟا ﻩﺬه ةءاﺮﻗ ءﺎﺟﺮﻟاﺔﻗﺪﺑ :ﻬﻓﻲ
ﺕ ﺔﻘﻳﺮﻃ ﻦﻋ ﺔّﻤﻬﻣ تﺎﻣﻮﻠﻌﻣ ﻰﻠﻋ يﻮﺘﺤ
ﺐﻴآﺮّﺘﻟا ﻦﻣﻵاﻞﻴﻐﺸﺘﻟاو.
! ﺪﺠﺕأًﺎ ﻀ ﻳ اﺬه ﻰﻠﻋ يﻮﺘﺤﺕ ﻲﺘﻟا ﺔﺒﻠﻌﻟا ﻞﺥاد
ﺐﻴآﺮﺘﻠﻟ.
ﺔیﻮﺴﺘﻟا و ﻚﻔﻟا
ﻚﻔﻟا
ﻣ عﺰﻥ ﻢﺕ ﻰﺘﻦﻋ ﻒﻴﻠﻐﺘﻟا قاروأ ﺔﻓﺎآ
1-
ﺪآﺄﺕ ،ﺔﻟﺎﺴﻐﻟا رﺮﻀﺘﺕ ﻢﻟ ﺎﻬﻥأ ﻦﻣ لﻼﺥ
ﻞﻘﻨﻟا . اذإترﺮﻀﺕ ﺎﻬﺒﻴآﺮﺘﺑ ﻢﻘﺕ ﻻ ،
ﻞﻔﻗا تاداﺪﺴﻟا ًﻼ ﻤ ﻌ ﺘ ﺴ ﻣ تاﻮﺠﻔﻟا
3-
ﻦﻣﺁ نﺎﻜﻣ ﻲﻓ ﻊﻄﻘﻟا ﺔﻓﺎﻜﺑ ﻆﻔﺘﺣا : ﺪﻗ جﺎﺘﺤﺕ
4-
! داﻮﻣ ﻒﻴﻠﻐﺘﻟالﺎﻔﻃﻸﻟ ﺎﺑﺎﻌﻟأ ﺖﺴﻴﻟ.
ﺔیﻮﺴﺘﻟا
ﺔﻟﺎﺴﻐﻟا ﺐﻴآﺮﺘﺑ ﻢﻗ رأ ﻰﻠﻋ ٍض ﺔﺤﻄﺴﻣ
1-
ﺔﻨﻴﺘﻣ ﻦﻣ ﻰﻠﻋ ﺎهدﺎﻨﺱإ نود نارﺪﺠﻟا وأ
ﻦﺋاﺰﺨﻟا .
14
Page 15

• ﺔﻟﻵا ةﻮﻗ ﻞﻤﺤﺘﻳ نأ ﺲﺒﻘﻤﻟا ﻰﻠﻋ ىﻮﺼﻘﻟا
ﻰﻠﻋ ةرﻮآﺬﻤﻟا تﺎﻣﻮﻠﻌﻤﻟا ﺔﺣﻮﻟ ﺔﻴﻨﻘﺘﻟا
ﻊﺟارﻩﺎﻥدأ
(.
)
• ﻢﻴﻘﻟا ﻦﻤﺽ نﻮﻜﺕ نأ ﺔﻴﻄﻠﻔﻟا ةﻮﻗ ﻰﻠﻋ
ﻰﻠﻋ ةرﻮآﺬﻤﻟاﺔﻴﻨﻘﺘﻟا تﺎﻣﻮﻠﻌﻤﻟا ﺔﺣﻮﻟ
ﻩﺎﻥدأ
(.
)ﻊﺟار
• نأ ﺲﺒﻘﻤﻟا ﻰﻠﻋ ﻣ ًﺎﺒﺱﺎﻨﺘﻣ نﻮﻜﻳ ﺲﺑﺎﻗ ﻊ
ﺔﻟﻵا . وأ ﺲﺑﺎﻘﻟا لﺪﺒﺘﺱا ،ﺲﻜﻌﻟا ﺪﻨﻋ
ﺲﺒﻘﻤﻟا.
! ﻮﻟو ﻰﺘﺣ جرﺎﺨﻟا ﻲﻓ ﺔﻟﻵا ﺐﻴآﺮﺕ ﺐﺠﻳ ﻻ
ًﺎﻓﻮﻘﺴﻣ نﺎﻜﻤﻟا نﺎآ .ﺮﻌﺕ ًا ﺪ ﺟ ﺮﻴﻄﺨﻟا ﻦﻣ ﺎﻬﻀﻳ
ﻒﺻاﻮﻌﻟا وأ ﺮﻄﻤﻠﻟ تﻻﺎﺤﻟا ﻦﻣ ﺎهﺮﻴﻏو
ﺔﻳﻮﺠﻟا.
! ﻰﻟإ لﻮﺻﻮﻟا ﺐﺠﻳ ،ﺔﻟﻵا ﺐﻴآﺮﺕ ﻢﺕ ﻰﺘﻣ
ﺔﻟﻮﻬﺴﺑ ﺔﻴﺱﺎﺱﻷا ﺔﻴﺋﺎﺑﺮﻬﻜﻟا ﺲﺑﺎﻘﻤﻟا.
!ﺕ ﻻةدﺪﻌﺘﻣ ﺲﺑﺎﻘﻣ وأ تﻼﺻو كﻼﺱأ ﻞﻤﻌﺘﺴ
سوؤﺮﻟا.
! ﻲﻨﺙ ﺐﺠﻳ ﻻ كﻼﺱﻷا وأﺎﻬﻴﻠﻋ ﻂﻐﻀﻟا.
! ﺐﺠﻳنأ ﻦﻣ تﻼﺻﻮﻟا كﻼﺱأ لاﺪﺒﺘﺱا ﻢﺘﻳ
ﻞﺒﻗ ﻦﻴﻴﻨﻘﺕ ﺮﻣﺥﺺ ﻟﻢﻬ.
ﺮﻳﺬﺤﺕ ! ﻲﻓ ﺔﻴﻟوﺆﺴﻣ يأ ﻞﻤﺤﺘﺕ ﻻ ﺔآﺮﺸﻟا نإ
ﺪﻋاﻮﻘﻟا ﻩﺬه ىﺪﺣﺈﺑ ﺪّﻴﻘﺘﻟا ﻢﺘﻳ ﻢﻟ لﺎﺣ.
ﻞﺻﻮﺑ ﻢﻗبﻮﺒﻥأ
ﻒﻳﺮﺼﺘﻟا نود ﻦﻣ
ﻪﻴﻨﺙ ىﺮﺠﻤﺑ
ﻂﺋﺎﺣ وأ ﻒﻳﺮﺼﺕ
ﻦﻴﺑ ﻊﻘﻳ ﻒﻳﺮﺼﺕ65
،ﻞﻳﺪﺑ ﻞﺤآ ﻊﺽ
ﻒﻳﺮﺼﺘﻟا بﻮﺒﻥأ
ﻰﻠﻋ ﺔﻓﺎﺣﻟا ضﻮﺤ
وأﻟا ،ﺔﻠﺴﻐﻤ ﻞﺻو
دوﺰﻤﻟا بﻮﺒﻥﻷا
ﻊﺟار
ﺔﻴﻔﻨﺤﻟﺎﺑ)
.( ﺐﺠﻳ ﻻ
ةرﻮﺼﻟا
و100 ﺱﺘﻨﻤﺮﺘ ﻦﻣ
ضرﻷا.
نأ ءﺎﻤﻟا ﺖﺤﺕ فﺮﻃ نﻮﻜﻳ.
! ﻻ ﺢﺼﻨﻥﺑﺐﻴﺑﺎﻥﻸﻟ تاداﺪﻣإ لﺎﻤﻌﺘﺱﺎ؛ ﺪﻨﻋ
ىﻮﺼﻘﻟا ةروﺮﻀﻟا ﺐﺠﻳ ،نأ تاداﺪﻣﻹا نﻮﻜﺕ
ﻪﻨﻴﻋ ﺮﻄﻘﻟﺎﺑو ﻲﻠﺻﻷا بﻮﺒﻥﻸﻟ ﺐﺠﻳأ ىﺪﻌﺘﺕ ﻻ
150 ًﻻ ﻮ ﻃ ﻢﺱ.
ﻞﺻﻮﻟا ﻲﺋﺎﺑﺮﻬﻜﻟا
ﺔﻴﻟﺎﺘﻟا رﻮﻣﻷا ﻦﻣ ﺪآﺄﺕ ﻲﻓ ﺔﻟﻵا ﻊﺽو ﻞﺒﻗ
ءﺎﺑﺮﻬﻜﻟا ﺲﺒﻘﻣ:
• ﻘﻤﻟا ﻰﻠﻋ ضرﻷﺎﺑ ًﻻ ﻮ ﺻ ﻮ ﻣ نﻮﻜﻳ نأ ﺲﺒ
وﺎﺑ ﺪﻴﻘﺘﻳﻮﻘﻟﻴﻥاﻘﺒﻄﻤﻟا ﻦﺔ؛
15
Page 16

آ
ﻟاتﺎﻡﻮﻠﻌﻤ ﺔﻴﻨﻘﺘﻟا
AQM9D 49 X
ضﺮﻌﻟا59.5 ﺱﺘﻨﻤﺮﺘ
جذﻮﻤﻨﻟا
مﺎﺠﺡﻷا
عﺎﻔﺕرﻻا85 ﺮﺘﻤﺘﻨﺱ
ﻖﻤﻌﻟا64،5ﺮﺘﻤﺘﻨﺱ
ﻦﻣ1 ﻰﻟإ ﻎﻠآ9 ﻎﻠآﻞﻴﺴﻐﻟا ﺞﻣﺎﻥﺮﺒﻟ
6ﻎﻠآﻒﻴﻔﺠﺘﻟا ﺞﻣﺎﻥﺮﺒﻟ
ﻦﻣ1ﻰﻟإ ﻎﻠ
ﺔﺣﻮﻟ ﺔﻌﺟاﺮﻣ ءﺎﺟﺮﻟا تﺎﻣﻮﻠﻌﻤﻟا ﻰﻠﻋ ﺔﺘﺒﺜﻤﻟا ﺔﻴﻨﻘﺘﻟا
ﺔﻌﺴﻟا
تاداﺪﻡﻹا ﺎﺑﺮﻬﻜﻟاﺔﻴﺋ
ﺔﻟﻵا
1 MPa (10 bar)
0.05 MPa (0.5 bar)
ﻰﻥدﻷا ﻂﻐﻀﻟا
ا ﻰﺼﻗﻷا ﻂﻐﻀﻟ
ﻩﺎﻴﻤﻟا تاداﺪﻡإ
ضﻮﺤﻟا ﺔﻌﺱ62ﺮﺘﻴﻟ
ﺔﻳﺎﻐﻟ1400ةرود/ﺔﻘﻴﻗﺪﻟﺎﺑ
ةراﺮﺤﻟا ؛60 ؛ﺔﻳﻮﺌﻣ ﺔﺟرد
ﻞﻴﺴﻐﻟا : ﺞﻣﺎﻥﺮﺑ
ﺑ ﺔﻟﻮﻤﺤ ﻦﻣ9 ﻎﻠآ
ﻊیﺮﺴﻟا ناروﺪﻟا ﺔﻋﺮﺳ
ﺞﻡاﺮﺑﺔﻗﺎﻄﻟا ﺐﺴﺤﺑ ﻪﻴﺝﻮﺘﻟا
EN 50229
ﻒﻴﻔﺠﺘﻟا : ﻰﻟوﻷا ﻒﻴﻔﺠﺘﻟا ةرودﺑﻦﻣ ﺔﻟﻮﻤﺤ 3 ﻦﻣ ﻎﻠآ
IRON"؛
ﻒﻴﻔﺠﺘﻟا ىﻮﺘﺴﻣ رﺎﻴﺘﺥا لﻼﺥ"
ﻦﻣ ﺔﻟﻮﻤﺣ ﻦﻣ ﺔﻴﻥﺎﺜﻟا ﻒﻴﻔﺠﺘﻟا ةرود6 لﻼﺥ ﻦﻣ ﻎﻠآ
EXTRA"؛
ﻒﻴﻔﺠﺘﻟا ىﻮﺘﺴﻣ رﺎﻴﺘﺥا"
ﻊﻣ ﺔﻟﻵا ﻩﺬه ﻰﺵﺎﻤﺘﺕ ﻲﺑوروﻷا ﻊﻤﺘﺠﻤﻟا تﺎﻬﻴﺟﻮﺕ
ﺔﻴﻟﺎﺘﻟا:
EC
108/2004/
EC )ﺔﻴﻥﺪﺘﻤﻟا ﺔﻴﻄﻠﻔﻟا(
EC
- 2006/95/
- 2002/96/
16
Page 17

ﺔﻜﺴﻣ تاذ بﺎﺒﻟاﺔﺤﺘﻔﻟا
ﻦﻣ قاو ﻂﻳﺮﺵ
ﻷا تﺎﻣﺪآﺪﻗام
ﺔﻟﻵا ﻒﺻو
ﻢﻜﺤﺘﻟا ﺔﺣﻮﻟ
ﻟا بﺎﺒﺔﺤﺘﻔﻟا تاذ
1-
ﺠﺣﻴ ﻞﺒﻗ ﺎﻣ ةﺮ
:
ﺴﻐﻟاﻴﻞ
ﻢﺋاﻮﻘﻟا ﻞﻳﺪﻌﺘﻠﻟ ﺔﻠﺑﺎﻘﻟا
ﺱا ﻞﻤﻌﺘ ﻖﻴﺣﺎﺴﻣ
ﻒﻴﻈﻨﺘﻟا.
! داﻮﻣ ﺐﻜﺱ ﻞﺒﻗ
ﻒﻴﻈﻨﺘﻟا، ﻦﻣ ﺪآﺄﺕنأ
ﺠﺤﻟاﻴ ﺔﻴﻓﺎﺽﻹا ةﺮ3 ﺪﻗ
ﺎﻬﺘﻟازإ ﻢﺕ.
:
:ﻟا ﺾﻴﻴﺒﺘ
:
ﻤﻌﻨﻤﻟتﺎ
.ﺑ ﺢﺼﻨﻥﺄ ﻢﺘﻳ ﻻ
ﻪﻴﻟإ رﺎﺸﻤﻟا ﻰﺼﻗﻷا ىﻮﺘﺴﻤﻟا زوﺎﺠﺕلوﺪﺠﻟا ﻲﻓ
ﺠﺣﻴﺴﻐﻟا ةﺮﻴﻲﺱﺎﺱﻷا ﻞ
2-
ﻞﻤﻌﺘﺱا ﻖﻴﺣﺎﺴﻣ وأ ﻒﻴﻈﻨﺘﻟاﻟاﺴﻮﻞﺋا .ﺪﻨﻋ
لﺎﻤﻌﺘﺱا داﻮﻣﻟاﻒﻴﻈﻨﺘ ﺔﻠﺋﺎﺴﻟاﻬﺒﻜﺴﺑ ﺢﺼﻨﻥ ،ﺎ
ًا ر ﻮ ﻓﺴﻐﻟا ﻞﻴﻐﺸﺕ ﻞﺒﻗﺎﻟﺔﻓﺎﺸﻨﻟا ﺔ.
اﺠﺤﻟﻴﺔﻴﻓﺎﺽﻹا ةﺮ
3-
!ﺠﺤﻟا لﺎﻤﻌﺘﺳاﻴ ﺔﻴﻓﺎﺿﻹا ةﺮ3 ﺔﻔﻴﻇو ﻲﻨﺜﺘﺴی
ﺴﻐﻟا ﻞﺒﻗ ﺎﻡﻴﻞ.
ﺠﺣﻴﺔﻓﺎﻀﻤﻟا داﻮﻤﻟا ةﺮ ﺴﻐﻠﻟﻴﻞ
ﺔﺸﻤﻗﻷاﺔﻠﺋﺎﺴﻟا ﺔﻓﺎﻀﻤﻟا داﻮﻤﻟا وأ
ﺢﺘﻔﻟ ﺔﻜﺴﻤﻟا ًﺎ ﻤ ﺋ ا د ﻞﻤﻌﺘﺱا
(
ﻊﺟارةرﻮﺼﻟا
ﻒﻴﻈﻨﺘﻟا داﻮﻡ ءﺎﻋو
ﻒﻴﻈﻨﺘﻟا داﻮﻣ ءﺎﻋو ﻊﻘﻳ
و ﺔﻟﻵا ﻞﺥاد ﻦﻜﻤﻳ
ﻪﻴﻟإ لﻮﺻﻮﻟا لﻼﺥ ﻦﻣ
بﺎﺒﻟا ﺢﺘﻓ.
ﻟﻠ تﺎﻣﻮﻠﻌﻤﻟا ﻦﻣ ﺪﻳﺰﻤ
داﻮﻣ ﺮﻴﻳﺎﻌﻣ لﻮﺣ
ﻟا بﺎﺒ)
ءﺎﺟﺮﻟا ،ﻒﻴﻈﻨﺘﻟا ﺔﻌﺟاﺮﻣ ﻞﺼﻔﻟا نﻮﻨﻌﻤﻟا"داﻮﻣ
."
وأ ن ﺔﺑاذإ ﻢﺘﻳ تﺎﻤﻌﻨﻣ ﺔﺸﻤﻗﻷاةﺰآﺮﻤﻟا.
ﺔﻄﺳاﻮﺑ ﻢﻜﺤﺘﻟا رارزأ ﺔﺡﻮﻟﺲﻤﻠﻟ
ﻒﻴﻈﻨﺘﻟا داﻮﻣ . ﻲﺘﻟا ﺔﺒﻠﻌﻟا ﻲﻓ ﻖﺼﻠﻤﻟا نوﺪﺠﺕ
ﻟا بﺎﺒ تاذ ﺔﺤﺘﻔﻟا
ﻈﻨﺘﻟاﻞﻴﺴﻐﻟاو ﻒﻴ
ﺔﻈﺡﻼﻡ: أ ﺔﻌﻗﺮﻟا ﻖﺼﻟﺑ ﺔﻘﻠﻌﺘﻤﻟا ﻒﺻﻮ ةرود
ﻞﻴﺴﻐﻟا وﻒﺋﺎﻇﻮﻟا ءﺎﻋو ﻦﻣ ﺔﻴﻣﺎﻣﻷا ﺔﻬﺠﻟا ﻰﻠﻋ
ﺐﻴﺘﻜﻟا اﺬه يﻮﺤﺕ .
17
Page 18

ًﺎﻴﺋﺎﻘﻠﺕ ﻞآ3 ناﻮﺙ ﻦﻣ ﺎهﺮﻴﻴﻐﺕ ﻦﻜﻤﻳ ،ﻞﻳﺪﺑ ﻞﻜﺸﺑ ؛
لﻼﺥﻐﻀﻟاﻂ ﻦﻳﺰﻣﺮﻟا ﺐﻥﺎﺠﺑ رارزﻷا ﻰﻠﻋ" "
OK" ﻲﺘﻟا ﺔﻐﻠﻟا ﺪﻴآﺄﺘﻟ
ﻦﻴﺘﻴﻥﺎﺙ ﻞآ ﺎﻬﻄﺒﺽ ﻢﺘﻴﺱ . ﻂﻐﻀﻟا ﻢﺘﻳ ﻢﻟ لﺎﺣ ﻲﻓ
ﺪﻌﺑ ًادﺪﺠﻣ ﺮﻴﻴﻐﺘﻟﺎﺑ ﺔﻐﻠﻟا أﺪﺒﺘﺱ ،رز يأ ﻰﻠﻋ30
ﺔﻴﻥﺎﺙ . ﺔﻟﻵا نﻮﻜﺗ ﺎﻡﺪﻨﻋ ﻂﻘﻓ ﺔﻐﻠﻟا ﺮﻴﻴﻐﺗ ﻦﻜﻤی
ةﺄﻔﻄﻡ.
ناروﺪﻟاو
ةراﺮﺤﻟا رازأ ﻰﻠﻋ ﻂﻐﺽا
ةﺪﻤﻟ5 ناﻮﺙ . رﺪﺼﻴﺱ
ﺮﺥﺄﺘﻤﻟا ﻞﻴﻐﺸﺘﻟاو
نﺎﻨﻃ ﻰﻠﻋ ﺎﻬﻄﺒﺽ ﻢﺕ ﻲﺘﻟا ﺔﻐﻠﻟا ﺾﻣﻮﺘﺱو ﺮﻴﺼﻗ
ﺔﺵﺎﺸﻟا . ﺐﻥﺎﺠﺑ ﻦﻳرﺰﻟا ﻰﻠﻋ ﻂﻐﺽا ﻦﻳﺰﻣﺮﻟا
OK" ﻢﺘﻴﺱ ﻲﺘﻟا ﺔﻐﻠﻟا ﺪﻴآﺄﺘﻟ
ﺐﻥﺎﺠﺑ ﺰﻣﺮﻟا"
ﺪﻌﺑ ﺎﻬﻄﺒﺽﻴﺘﻴﻥﺎﺙﻦ . ﻰﻠﻋ ﻂﻐﻀﻟا ﻢﺘﻳ ﻢﻟ لﺎﺣ ﻲﻓ
ﻰﻠﻋ ًﺎ ﻘ ﺒ ﺴ ﻣ ﺎﻬﻄﺒﺽ ﻢﺕ ﻲﺘﻟا ﺔﻐﻠﻟا ﺮﻬﻈﺘﺱ ،رز يأ
ﺪﻌﺑ ﺔﺵﺎﺸﻟا30 ﺎﺙﺔﻴﻥ .ﺄﻔﻃأ ﺔﻟﻵا.
ﺔﻘﻄﻨﻤﻟا ﻞﺥاد ﺰﻣﺮﻟا ﻰﻠﻋ ﻂﻐﺽا ،ﻂﺒﻀﻟا ﻞﻳﺪﻌﺘﻟ
ﺔﺱﺎﺴﺤﻟا)ﺲﻤﻠﻟا ﺔﻄﺱاﻮﺑ رﺰﻟا (ﻬﻈﻳ ﺎﻤآ ﻲﻓ ﺮ
و"" . رز ﻰﻠﻋ ﻂﻐﺽا"
ةرﻮﺼﻟا.
دﺎﻤﺘﻋﻻا ﺔﻐﻴﺻ
نإ ﺔﻟﺎﺴﻐﻟا ﺔﻓﺎﺸﻨﻟا دﺎﻤﺘﻋا مﺎﻈﻨﺑ ةﺰﻬﺠﻣ
ﻜﻴﺕﺎﻣﻮﺕوأﻲ ﺔﻗﺎﻄﻟا ﺮﻴﻓﻮﺕ ﺔﻤﻈﻥأ ﻊﻣ ﻖﺑﺎﻄﺘﻳ
ﻢﺘﻳ ﻢﻟ لﺎﺣ ﻲﻓ ةﺪﻳﺪﻋ ﻖﺋﺎﻗد ﺪﻌﺑ ﻞﻤﻌﻳ ةﺪﻳﺪﺠﻟا
طﺎﺸﻥ يأ ﻂﺒﺽ . ﻞﻴﻐﺸﺘﻟا رز ﻰﻠﻋ ﻂﻐﺽا
و ةﺰﻴﺟو ةﺮﺘﻔﻟ ﺮﻈﺘﻥا نأ ﺔﻟﻵا ﻞﻤﻌﺕ
/ءﺎﻔﻃﻹا
ًادﺪﺠﻣ.
" "و" "ﺔﻐﻠﻟا ﺮﻴﻴﻐﺘﻟ . رﺰﻟا ﻰﻠﻋ ﻂﻐﺽا
ﺔﻐﻠﻟا ﺮﻴﻴﻐﺗ
ةﺮﻤﻟا ﻲﻓﺔﻟﻵا ﻞﻴﻐﺸﺗ ﺎﻬﻴﻓ ﻢﺘی ﻲﺘﻟا ﻰﻟوﻷا،
ﺔﺵﺎﺸﻟا ﻰﻠﻋ ﻰﻟوﻷا ﺔﻐﻠﻟا ﺮﻬﻈﺕ . زﻮﻣﺮﻟا ﺮﻬﻈﺕ
OK" و" " ﻊﻣ ﻖﻓاﻮﺘﻳ ﺎﻤﺑ ﺔﺵﺎﺸﻟا ﻰﻠﻋ
" "و"
ﻰﻨﻤﻴﻟا ﺔﻬﺠﻟا ﻰﻠﻋ ﺔﺙﻼﺜﻟا رارزﻷا . تﺎﻐﻠﻟا ﺮﻴﻐﺘﺕ
18
Page 19

ﻢﻜﺤﺘﻟا رارزأ ﺔﺡﻮﻟﺲﻤﻠﻟا ﺔﻄﺳاﻮﺑ
رز ﻞﻴﻐﺸﺘﻟا/فﺎﻘیﻹا
رز رﺎﻴﺘﺥاﻞﻴﺴﻐﻟا ةرود
م2 م1
ﻟاﺔﺵﺎﺸ
رزناروﺪﻟا
ﺮﺵﺆﻣ ءﻮﺽ
رزةراﺮﺤﻟا
ﺮﻴﻓﻮﺘﻟا
ﻊﻣﻟا ءﻮﺽﺮﺵﺆﻤ
زﻮﻣر ﺔﻠﺡﺮﻡﻞﻴﺴﻐﻟا ةرود
ﺮﺵﺆﻣ ءﻮﺽ ﻊﻣ رز
و ﻞﻴﻐﺸﺘﻟاﻃﻹاءﺎﻔ
.(
.(
-
رزإﻔﻗﺎﻢﻜﺤﺘﻟا ﺔﺡﻮﻟ ل ﻊﻣ
ﻒﻴﻔﺠﺘﻟا
رارزأﻒﺋﺎﻇﻮﻟا
ةراﺮﺤﻟا رز : ﻂﻐﺽاﻠﻋرﺰﻟا اﺬه ﻰ وأ ﻞﻳﺪﻌﺘﻟ
ءﺎﻐﻟاةراﺮﺤﻟا ﻂﺒﺽ ةرﺎﺘﺨﻤﻟا ﺔﻤﻴﻘﻟا ﺮﻬﻈﺘﺱ ؛ ﻰﻠﻋ
ﻊﺟار ﺔﻴﻔﻴآﺴﻏ ةرود ﻞﻴﻐﺸﺕﻴﻞ
ﺔﺵﺎﺸﻟا)
:رﺰﻟا اﺬه ﻰﻠﻋ ﻂﻐﺽا ﻞﻳﺪﻌﺘﻟ
رزناروﺪﻟا
أ و ةرﺎﺘﺨﻤﻟا ﺔﻤﻴﻘﻟا ﺮﻬﻈﺘﺱ ؛ناروﺪﻟا ةرود ءﺎﻐﻟا
ﻊﺟار ﺔﻴﻔﻴآﺴﻏ ةرود ﻞﻴﻐﺸﺕﻴﻞ
ﺔﺵﺎﺸﻟا ﻰﻠﻋ)
رزﻤﻟا ﻞﻴﻐﺸﺘﻟاﺮﺥﺄﺘ : ﻂﻐﺽا رﺰﻟا اﺬه ﻰﻠﻋ
ﺴﻐﻟا ةروﺪﻟ ﺮﺥﺄﺘﻣ ﻞﻴﻐﺸﺕ ﻂﺒﻀﻟﻴةرﺎﺘﺨﻤﻟا ﻞ.
ﻬﻈﻴﺱﺮ ﻪﻄﺒﺽ ﻢﺕ يﺬﻟا ﺮﻴﺥﺄﺘﻟا ﺖﻗو ﺔﺵﺎﺸﻟا ﻰﻠﻋ
ﻊﺟار ﺔﻴﻔﻴآﺴﻏ ةرود ﻞﻴﻐﺸﺕﻴﻞ ةرود وأ
)
.(
ﻒﻴﻔﺠﺕ
زأ رارﻒﺋﺎﻇﻮﻟا : ﻂﻐﺽا رﺰﻟا اﺬه ﻰﻠﻋ رﺎﻴﺘﺥﻻ
ﻲﻓ ةروﺪﻟا ﻲﻓ ﺔﻠﻀﻔﻤﻟا ﻚﺕارﺎﻴﺘﺥا ﻦﻣ ﺔﻋﻮﻤﺠﻣ
ﻒﺋﺎﻇﻮﻟاةﺮﻓﻮﺘﻤﻟا . ﻰﻘﺒﻴﺱﻟا ﺮﺵﺆﻤﻟا ءﻮﺽﺐﺱﺎﻨﻤ
ﻊﺟار ﺔﻴﻔﻴآ ﻞﻴﻐﺸﺕ
(.
ةرﺎﺘﺨﻤﻟا ﺔﻔﻴﻇﻮﻠﻟ ءﺎﻀﻣ)
ﺴﻏ ةرودﻴﻞ ﻒﻴﻔﺠﺕ ةرود وأ
زﻮﻡر ﺔﻠﺡﺮﻡﻞﻴﺴﻐﻟا ةرود : ﻩﺬه ءﺎﻀﺕ زﻮﻣﺮﻟا
ﺴﻐﻟا ةرود مﺪﻘﺕ ﻰﻟإ ةرﺎﺵﻺﻟﻴ ﻞ)ﺴﻐﻟاﻴ ﻞ
- ناروﺪﻟا /ﺼﺘﻟا ﻒﻳﺮ -
ﻒﻴﻄﺸﺘﻟا
رز ﻞﻴﻐﺸﺘﻟا
ﺮﺥﺄﺘﻤﻟا
ﺮﺵﺆﻣ ءﻮﺽ
بﺎﺒﻟا لﺎﻔﻗإ
ﻟا ءﻮﺽﺮﺵﺆﻤ
ﻞﻴﻐﺸﺘﻟا ﺮﺵﺆﻡ ءﻮﺿ ﻊﻡ رز/ءﺎﻔﻃﻹا :
ﻂﻐﺽا ًﻼ ﻴ ﻠ ﻗ رﺰﻟا اﺬه ﻰﻠﻋ وأ ﺔﻟﻵا ﻞﻴﻐﺸﺘﻟ
ﺎﻬﺋﺎﻔﻃإ . ﻰﻟإ ﺮﻀﺥﻷا ﺮﺵﺆﻤﻟا ءﻮﺽ ﺮﻴﺸﻳنأ
ﺔﻠﻐﺸﻣ ﺔﻟﻵا . ﺔﻟﺎﺴﻐﻟا ءﺎﻔﻃﻹ ﺔﻓﺎﺸﻨﻟا ةرود لﻼﺥ
ﺴﻐﻟاﻴا ،ﻞﻠﻋ ﻂﻐﺽﻟ رﺰﻟا ﻰةﺪﻤ 3 لﺎﺣ ﻲﻓ ؛ناﻮﺙ
ًﻼ ﻴ ﻠ ﻗ رﺰﻟا ﻰﻠﻋ ﻂﻐﻀﻟا ﻢﺕأو ﺕ ﻦﻟ ،ًﺎﻴﺽﺮﻋﻨ ﺊﻔﻄ
ﺔﻟﻵا. ةرود لﻼﺥ ﺔﻟﻵا ءﺎﻔﻃإ ﻢﺕ لﺎﺣ ﻲﻓﻟاﺴﻐﻴ ،ﻞ
ﺴﻐﻟا ةرود ءﺎﻐﻟإ ﻢﺘﻴﺱﻴﻩﺬه ﻞ.
رﺎﻴﺘﺥا رزﻞﻴﺴﻐﻟا ةرود: ﻲﻠآ ﻲﻓ ﻪﺕرادإ ﻦﻜﻤﻳ
ﻦﻴهﺎﺠﺕﻻا .ﺴﻐﻟا ةرود رﺎﻴﺘﺥﻻﻴ ،ﺔﻤﺋﻼﻣ ﺮﺜآﻷا ﻞ
." رﺰﻟا نإ
لوﺪﺟدﺴﻐﻟا تاروﻴﻞ
ءﺎﺟﺮﻟا ﺔﻌﺟاﺮﻣ"
ﻞﻴﺴﻐﻟا ةرود ءﺎﻨﺙأ كﺮﺤﺘﻳ ﻦﻟ.
يرزم1 وم2 : ﻞﻴﺠﺴﺘﻟ ﻦﻳرﺰﻟا ﺪﺣأ ﻰﻠﻋ ﻂﻐﺽا
ﺔﻟﻵا ةﺮآاذ .ءﺎﻐﻟﻹ ﻂﻐﺽا ،ًﺎﻘﺒﺴﻣ ﺔﻠﺠﺴﻣ ةرود
ﻢﺋﻼﻤﻟا رﺰﻟا ﻰﻠﻋ .
ﻒﻴﻔﺠﺘﻟا رز: ﻂﻐﺽا ﺾﻴﻔﺨﺘﻟ رﺰﻟا اﺬه ﻰﻠﻋ
؛ﻒﻴﻔﺠﺘﻟا دﺎﻌﺒﺘﺱا وأ ﻴﺱ ىﻮﺘﺴﻣ ﺔﺵﺎﺸﻟا ﻰﻠﻋ ﺮﻬﻈ
ﻊﺟار ﺔﻴﻔﻴآ ﻞﻴﻐﺸﺕ
ﺖﻗﻮﻟا وأ رﺎﺘﺨﻤﻟا ﻒﻴﻔﺠﺘﻟا)
.(
ﺴﻏ ةرودﻴﻞ ﻒﻴﻔﺠﺕ ةرود وأ
19
Page 20

رز ﻢﻜﺤﺘﻟا ﺔﺡﻮﻟ لﺎﻔﻗإ ﺮﺵﺆﻤﻟا ءﻮﺽ ﻊﻣ :
ءﺎﻔﻃإ وأ ﻞﻴﻐﺸﺘﻟ لﺎﻔﻗإ ﻰﻠﻋ ﻂﻐﺽا ،ﻢﻜﺤﺘﻟا ﺔﺣﻮﻟ
ﺘﻴﻥﺎﺙ ﻲﻟاﻮﺤﻟ رﺰﻟاﻦﻴ . نﻮﻜﻳ ،ءﻮﻀﻟا ءﺎﻀﻳ ﺎﻣﺪﻨﻋ
ﻢﻜﺤﺘﻟا ﺔﺣﻮﻟ لﺎﻔﻗإ ﻢﺕ ﺪﻗ .ﻥا ﻲﻨﻌﻳ ﻚﻟذﻪ ﻦﻜﻤﻤﻟا ﻦﻣ
ﺐﻨﺠﺕ ﻢﺘﻳ نأﺴﻐﻟا تارود ﻞﻳﺪﻌﺕﻴ ،ًﺎﻴﺽﺮﻋ ﻞ
ﻂﻐﺽا ،ءﻂﺒﺑ ﺮﻀﺥﻷا ﺮﺵﺆﻤﻟا ءﻮﺽ ﺾﻣﻮﻳ
ًﺎﺻﻮﺼﺥلﺰﻨﻤﻟا ﻲﻓ دﻻوأ كﺎﻨه نﻮﻜﻳ ﺎﻣﺪﻨﻋ.
ﺮﺵﺆﻣ ءﻮﺽ ﺮﻴﻓﻮﺘﻟا ECO :ﻳ ءﺎﻀ ﺰﻣرECO
ﻣﺪﻨﻋﺎ ﺔﺒﺴﻨﺑ ﺔﻗﺎﻄﻟا ﺮﻴﻓﻮﺕ ﻢﺘﻳ10 % ،ﻞﻗﻷا ﻰﻠﻋ
ﺕ ﺪﻌﺑﺮﻴﻴﻐ ﺴﻐﻟا ﻢﻴﻗﻴﻞ. ﻞﺒﻗ ،ﻚﻟذ ﻰﻟإ ﺔﻓﺎﺽﻹﺎﺑنأ
ﺔﻟﻵا ﻞﺥﺪﺕ"دﺎﻤﺘﻋﻻا ﺔﻐﻴﺻ"ﺱ ،ﻴ ءﺎﻀ ﺰﻣﺮﻟا
ﻔﻄﻣﺄ ،
ﺮﺵﺆﻣ ءﻮﺽ نﺎآ"بﺎﺒﻟا لﺎﻔﻗإ "
بﺎﺒﻟا ﺢﺘﻓ ﻦﻜﻤﻳ . ةدوﺎﻌﻤﻟ ةرودﻟاﺴﻐﻴ ﻦﻣ ﻞ ﺚﻴﺣ
ناﻮﺙ ﻊﻀﺒﻟ. ﻴﻓﻮﺕ نﻮﻜﻳ ،ﺔﻟﻵا ﺊﻔﻄﺕ ﺎﻣﺪﻨﻋ ﺮ
رﺪﻘﻤﻟا ﺔﻗﺎﻄﻟا ﺪﻗ برﺎﻗ ﺔﺒﺴﻥ80%.
ﻒﻴﻔﺠﺘﻟا .( ءﺎﻀﺕ ﺔﻤﻠآEND لﺎﻤﺘآا ﺪﻨﻋ
ةروﺪﻟا.
ﻞﻴﻐﺸﺘﻟا رز/ فﺎﻘیﻹاﺮﺵﺆﻤﻟا ءﻮﺽ ﻊﻣ: ﺎﻣﺪﻨﻋ
رﺰﻟا ﻰﻠﻋﺴﻏ ةرود ﻞﻴﻐﺸﺘﻟﻴﻞ . ﻰﺘﻣأﺪﺑت ،ةروﺪﻟا
ﺱﺮﻄﺑ ءﺎﻀﻣ ﺮﺵﺆﻤﻟا ءﻮﺽ ﻰﻘﺒﻴﺔﺘﺑﺎﺙ ﺔﻘﻳ . فﺎﻘﻳﻹ
ﻞﻴﺴﻐﻟا ةرود ًادﺪﺠﻣ رﺰﻟا ﻰﻠﻋ ﻂﻐﺽا ،ًﺎﺘﻗﺆﻣ؛
ﺱﻲﻟﺎﻘﺕﺮﺒﻟا نﻮﻠﻟﺎﺑ ﺮﺵﺆﻤﻟا ءﻮﺽ ﺾﻣﻮﻴ . لﺎﺣ ﻲﻓ
ﺖﻔﻗﻮﺕًادﺪﺠﻣ رﺰﻟا ﻰﻠﻋ ﻂﻐﺽا ،.
20
Page 21

و ةراﺮﺤﻟا ةدﺎﻳز ﻦﻜﻤﻳ ﻰﻟإ ًﻻ ﻮ ﺻ90 ﺔﻳﻮﺌﻣ ﺔﺟرد.
ﻒﻴﻔﺠﺘﻟا ةرود ﻂﺒﺿ
ةﺮﻤﻟا ﻲﻓ
رز ﻰﻠﻋ ﻂﻐﻀﻟا ﺪﻨﻋ
ﻒﻴﻔﺠﺘﻟا ةرود ﻲﺋﺎﻘﻠﺕ ﻞﻜﺸﺑ ﺔﻟﻵا رﺎﺘﺨﺘﺱ،ﻰﻟوﻷا
ةرﺎﺘﺨﻤﻟا ﻞﻴﺴﻐﻟا ةرود ﻊﻣ مءﻼﺘﺕ ﻲﺘﻟا ىﻮﺼﻘﻟا .
ﻦﻣ ﺾﻔﺨﻴﺱ رﺰﻟا اﺬه ﻰﻠﻋ ﻖﺣﻼﻟا ﻂﻐﻀﻟا نإ
ﻒﻴﻔﺠﺘﻟا ةﺪﻣ ﻦﻣ ﻲﻟﺎﺘﻟﺎﺑو ﻒﻴﻔﺠﺘﻟا ىﻮﺘﺴﻣ ﻰﻟإ ،
OFF." ﻢﺕ لﺎﺣ ﻲﻓ
ءﺎﻐﻟإ ﻢﺘﻳ نأﻞﻣﺎﻜﻟﺎﺑ ةروﺪﻟا"
إ ﻢﺘﻳ ،ًادﺪﺠﻣ رارزﻷا ﻩﺬه ﻰﻠﻋ ﻂﻐﻀﻟادﺎﻋة ﻂﺒﺽ
ىﻮﺼﻘﻟا ﻢﻴﻘﻟا.
ﻦﻜﻤﻳﻂﺒﺽ ﻲﻟﺎﺘﻟﺎآ ﻒﻴﻔﺠﺘﻟا:
و180 ﺔﻘﻴﻗد.
ب . ﺠﺕ ىﻮﺘﺴﻣ ﺐﺴﺤﺑﻴﻔبﻮﻠﻄﻤﻟا ﻞﻴﺴﻐﻟا ﻒ :
ﻲﻜﻟا : ﺪﻌﺑ ﻲﻜﻟا ﻰﻟإ جﺎﺘﺤﺕ ﻲﺘﻟا ﺲﺑﻼﻤﻠﻟ ﺐﺱﺎﻨﻣ
ﻞﻴﺴﻐﻟا . ﺔﺑﻮﻃﺮﻟاّﻌ ﻨ ﺕ ﺔﻴﻘﺒﺘﻤﻟا ﻞﻌﺠﺕو تاﺪﻌﺠﺘﻟا ﻢ
ﻴﻠﻌﺘﻟاﻖ :ﺱﺎﻨﻣﺐ ﻰﻟإ جﺎﺘﺤﺕ ﻻ ﻲﺘﻟا ﺲﺑﻼﻤﻠﻟ
ﻔﺠﺕﻴﻞﻣﺎآ ﻒ.
ﻟاﻮﺘﺿﻴﺐ: ﻰﻟإ ﻪﺕدﺎﻋإ ﻦﻜﻤﻳ يﺬﻟا ﻞﻴﺴﻐﻠﻟ ﺐﺱﺎﻨﻣ
ﻪﻳﻮآ نود ﻦﻣ ﺔﻥاﺰﺨﻟا.
ﻲﻓﺎﺿإ: ﻰﻟإ جﺎﺘﺤﺕ ﻲﺘﻟا ضاﺮﻏﻸﻟ ﺐﺱﺎﻨﻣ
مﺎﻤﺤﻟا تاءادرو تﺎﺠﻨﻔﺱﻹﺎآ ﻞﻣﺎآ ﻒﻴﻔﺠﺕ.
ﻮﻤﺤﻟا نﺎآ لﺎﺣ ﻲﻓجﺎﺘﺤﺕ ﻲﺘﻟا ﺔﻟ ﻰﻟإﻟا ﻞﻴﺴﻐ
وﻟا ةرﻮآﺬﻤﻟا ﺔﻟﻮﻤﺤﻟا ﻦﻣ ﺮﺒآأ ﻒﻴﻔﺠﺘ) ﻊﺟار
لوﺪﺠﻟا( ﺎﻬﺋﺎﻬﺘﻥا ﺪﻨﻋو ﻞﻴﺴﻐﻟا ةرود ﻞﻴﻐﺸﺘﺑ ﻢﻗ ،
ﻰﻟإ ﺎﻬﻨﻣ ًﺎ ﻀ ﻌ ﺑ ﺪﻋأو تﺎﻋﻮﻤﺠﻣ ﻰﻟإ ﻞﻴﺴﻐﻟا ﻢّﺴﻗ
ضﻮﺤﻟا . تﺎﻤﻴﻠﻌﺘﻟا ﻊﺒﺕا ،ﺔﻠﺣﺮﻤﻟا ﻩﺬه ﻲﻓ
ةروﺪﺑ ﺔﺻﺎﺨﻟا"ﻂﻘﻓ ﻒﻴﻔﺠﺘﻟا ." ﻩﺬه رﺮآ
ﺔﻴﻘﺒﺘﻤﻟا ﺔﻟﻮﻤﺤﻠﻟ ةﻮﻄﺨﻟا .
ﺘﻳ ةرود ﻞآ ﺔﻳﺎﻬﻥ ﻲﻓ ًﺎ ﻤ ﺋ ا د ﺪﻳﺮﺒﺕ ةﺮﺘﻓ ﺔﻓﺎﺽإ ﻢ
ﻒﻴﻔﺠﺕ.
ﻂﻘﻓ ﻒﻴﻔﺠﺘﻟا
ﺔﻴﻔﻴآﻞﻴﺴﻏ ةرود ﻞﻴﻐﺸﺗ ﻒﻴﻔﺠﺗ وأ
!ءﺎﻨﺜﺘﺱا : ﺞﻣﺎﻥﺮﺑ رﺎﻴﺘﺥا ﻢﺕ لﺎﺣ ﻲﻓ"تﺎﻴﻨﻄﻘﻟا" ،
ﻢﻗ ،ﻰﻟوﻷا ﻞﻴﻐﺸﺘﺑﻞﻴﺴﻏ ةرود ﻨﺕ داﻮﻣ ﻊﻣ ﻒﻴﻈ
.
ةﺪﺣاو ﺔﻴﻥﺎﺜﻟ ﺮﺵﺆﻤﻟا ءاﻮﺽأ ﺔﻓﺎآ ءﺎﻀﺘﺱ
AQUALTIS ؛
ﺔﻤﻠآ ﺔﺵﺎﺸﻟا ﻰﻠﻋ ﺮﻬﻈﻴﺱو
ﺱو ﺔﺘﺑﺎﺙ ةرﻮﺼﺑ ءﺎﻀﻣﺆﻣ ءﻮﺽ ﺾﻣﻮﻴ ﺮﺵ
ﻞﻴﻐﺸﺘﻟا/فﺎﻘﻳﻹا.
رﺎﻴﺘﺥا ﻢﺘﻳ نأ ﻰﻟإ رﺎﺴﻴﻟا ﺞﻣﺎﻥﺮﺒﻟابﻮﻠﻄﻤﻟا .
ﺞﻣﺎﻥﺮﺒﻟا ﻢﺱا ﺔﺵﺎﺸﻟا ﻰﻠﻋ ﺮﻬﻈﻴﺱو . ﻂﺒﺽ ﻢﺕ
ﻞﻴﺴﻏ ةرود ﻞﻜﻟ نارود ﺔﻋﺮﺱو ةراﺮﺣ
أ . ﻣ ةﺮﺘﻓ ﺐﺴﺤﺑﺔﻃﻮﺒﻀ ﺖﻗﻮﻟا ﻦﻣ : ﻦﻴﺑ20
ﺎﻤﻬﻴﻟﺪﻌﺕ ﻦﻜﻤﻳو. ﻰﻠﻋ ًﺎ ﻀ ﻳ أ ةروﺪﻟا ةﺪﻣ ﺮﻬﻈﺕ
ﺔﺵﺎﺸﻟا.
ﺴﻐﻟا تارود لوﺪﺟ ﻲﻓﻴﺔﻴﻟﺎﺘﻟا ﺔﺤﻔﺼﻟا ﻲﻓ ﻞ .
ﻣﻦ ﺎﻬﺘﻟازإ ﻞﻬﺴﻟا.
و ﻒﻴﻈﻨﺘﻟادﺎﻣ ﺐﻜﺱاة تاﺮﻴﺠﺤﻟا ﻲﻓ ﻒﻴﻈﻨﺘﻟا
ﺔﻟﻵا ﻒﺻو
."
ﺔﺒﺱﺎﻨﻤﻟا ﻲﻓ ﻦﻴﺒﻣ ﻮه ﺎﻤآ"
ةراﺮﺤﻟا ﻞیﺪﻌﺗو/ناروﺪﻟا وأ
ﻰﻠﻋ ﺮﻬﻈﺕ ﺔﺵﺎﺸﻟا ًﺎﻴﺋﺎﻘﻠﺕﻟا ﻢﻴﻘ ىﻮﺼﻘﻟا ةراﺮﺤﻠﻟ
ناروﺪﻟا ﺔﻋﺮﺱوةرﺎﺘﺨﻤﻟا ةروﺪﻠﻟ ةدﺪﺤﻤﻟا وأ
ﻰﻟإنأ ﻢﺘﻳ
OFF." ﻦﻜﻤﻳ
ﺴﻐﻟا ﻂﺒﺽ ﻰﻟإ لﻮﺻﻮﻟاﻴدرﺎﺒﻟا ﻞ "
لﻼﺥ ﻦﻣرز ﻰﻠﻋ ﻂﻐﻀﻟا
ﻂﻐﻀﻟا لﻼﺥ ﻦﻣ جرﺪﺘﻣ ﻞﻜﺸﺑ ناروﺪﻟا ﺾﻔﺥ
ﻢﺘﻳ نأ ﻰﻟإإﺎﻐﻟ ﻞﻣﺎﻜﻟﺎﺑ ﻩؤ"OFF".
،ًادﺪﺠﻣ رارزﻷا ﻩﺬه ﻰﻠﻋ ﻂﻐﻀﻟا ﻢﺕ لﺎﺣ ﻲﻓ ﻢﺘﻳ
ﺤﺗﺮیﺬ :ﺔﻟﺎﺴﻐﻟا لﺎﻤﻌﺘﺱا ﻞﺒﻗ ﺔﻓﺎﺸﻨﻟا ةﺮﻤﻠﻟ
ﻦﻣ ،ﻞﻴﺴﻏ نود لﻼﺥ ﻦﻣود لﺎﻤﻌﺘﺱا ةر
ﻟ ﻰﻠﻋ تﺎﻴﻨﻄﻘﻠ90 ﻦﻣ ﺔﻳﻮﺌﻣ ﺔﺟرد ﺎﻣ ةرود نود
ﺴﻐﻟا ﻞﺒﻗﻴﻞ.
1. ﺔﻟﻵا ﻞﻴﻐﺸﺘﺑ ﻢﻗ .رز ﻰﻠﻋ ﻂﻐﺽا
ﺱ ﺮﺵﺆﻤﻟا ءﻮﺽ ﻰﻘﺒﻴ ﺐﺱﺎﻨﻤﻟارﺰﻟ
2. ﺞﻡﺎﻧﺮﺒﻟا ﺮﺘﺥا. أ رز رد ﺞﻣاﺮﺒﻟا وأ ﻦﻴﻤﻴﻟا ﻰﻟإ
3. ﻊﺿﻞﻴﺴﻐﻟا. ﻊﺽو بﺎﺒﻟا ﺢﺘﻓاﻟاﻞﻴﺴﻐ. ﺪآﺄﺕ
ﻦﻣ مﺪﻋ ﺎﻬﻴﻟإ رﺎﺸﻤﻟا ىﻮﺼﻘﻟا ﺔﻟﻮﻤﺤﻟا زوﺎﺠﺕ
4. ا ﺐﻜﺳﻒﻴﻈﻨﺘﻟا داﻮﻡ. داﻮﻣ ءﺎﻋو ﺐﺤﺱا
5. ﻖﻠﻏأ بﺎﺒﻟا.
6. ّﺪ ﻋﺴﻐﻟا ةرود لﻴﻞ . رارزﻷا ﻞﻤﻌﺘﺱاﺔﺒﺱﺎﻨﻤﻟا
ﻰﻠﻋﻢﻜﺤﺘﻟا ﺔﺣﻮﻟ:
ﻒﺋﺎﻇﻮﻟا ًﻻﺎﻤﻌﺘﺱا ﺮﺜآﻷاﺮﺥﺆﻣ ًا ﺖﻥﺎآ لﺎﺣ ﻲﻓ
ﺐﺱﺎﻨﺘﺕةرﺎﺘﺨﻤﻟا ةروﺪﻟا ﻊﻣ . ةراﺮﺤﻟا ﺾﻔﺥ ﻦﻜﻤﻳ
رز ﻰﻠﻋ
إدﺎﻋة ﻂﺒﺽ ىﻮﺼﻘﻟا ﻢﻴﻘﻟا.
21
Page 22

ﻣوﻴ ﻲﺕﻮﺼﻟا راﺬﻥﻹاو ﺮﺵﺆﻤﻟا ءﻮﺽ ﺾ) ثﻼﺙ
تﺎّﻥر( ،و ﻦﻟ ﻢﺘﻳ ﻞﻴﻌﻔﺕﺔﻔﻴﻇﻮﻟا ﻩﺬه.
! ﻢﻟ لﺎﺣ ﻲﻓﺕ ﻦﻜ ﺔﻔﻴﻇﻮﻟاةرﺎﺘﺨﻤﻟا مءﻼﺘﺕﻊﻣ يأ
ﻒﻴﻔﺠﺕ ةرود رﺎﻴﺘﺥﻻ ةروﺪﻟا رﺎﻴﺘﺥا رز ﻞﻤﻌﺘﺱا
( مءﻼﺘﺕ شﺎﻤﻘﻟا عﻮﻥ ﻊﻣ . ﻦﻜﻤﻳ ﺎﻤآ
ﺖﻗو وأ بﻮﻠﻄﻤﻟا ﻒﻴﻔﺠﺘﻟا ىﻮﺘﺴﻣ ﻂﺒﺽ
)
أ ﺔﻔﻴﻇوﺮﺥى هرﺎﻴﺘﺥا ﻢﺕﺎ ،ًﺎﻘﺑﺎﺱﺱ ءﻮﺽ ﺾﻣﻮﻴ
ﺪﺋﺎﻌﻟا ﺮﺵﺆﻤﻟا ﺔﻔﻴﻇﻮﻠﻟﻟوﻷاﻰ ﺱو ﻢﺘﻴ ﻞﻴﻌﻔﺕ ﻂﻘﻓ
.
ﺔﻔﻴﻇﻮﻟاﻴﻥﺎﺜﻟاﺔ . ﺮﺵﺆﻤﻟا ءﻮﺽ ﻰﻘﺒﻴﺱ ﻢﺋﻼﻤﻟا رﺰﻠﻟ
ءﺎﻀﻣﺔﺘﺑﺎﺙ ﺔﻘﻳﺮﻄﺑ.
ا ،ﺮﺥﺄﺘﻣ ﻞﻴﻐﺸﺕ ﻂﺒﻀﻟ ﻰﻠﻋ ﻂﻐﺽرﺰﻟا ﻢﺋﻼﻤﻟا
7. ّﻐ ﺵ ﻞﻟاﺞﻡﺎﻧﺮﺒ. رز ﻰﻠﻋ ﻂﻐﺽا
ﻞﻴﻐﺸﺘﻟا/فﺎﻘﻳﻹا. ﺱ ﺮﺵﺆﻤﻟا ءﻮﺽ ﻰﻘﺒﻴ
ﺐﺱﺎﻨﻤﻟاو ﺔﺘﺑﺎﺙ ﺔﻘﻳﺮﻄﺑ ًء ﺎ ﻀ ﻣﺱ ﻢﺘﻴلﺎﻔﻗإ
ﺮﺵﺆﻣ ءﻮﺽ لﺎﻔﻗإ
بﺎﺒﻟا ) ءﺎﻀﻳ
Starts in" ﺾﻣﻮﻳو ﺔﺵﺎﺸﻟا ﻰﻠﻋ
بﺎﺒﻟا( .و ءﺎﻀﺕﻮﻣﺮﻟا ﻰﻟإ ةﺪﺋﺎﻌﻟا ز ﻞﺣاﺮﻣ
ﻰﻟإ ةرﺎﺵﻺﻟ ةروﺪﻟا لﻼﺥ تاروﺪﻟاﻟا ﺔﻠﺣﺮﻤ
ﺔﻳرﺎﺠﻟا. ﺮﻴﻴﻐﺘﻟﻞﻴﺴﻏ ةرود ﺪﻌﺑنأ ﻳ ﺪﻗ نﻮﻜ
Ends in "أو ًﺎ ﻀ ﻳ
ةرﺎﺒﻌﻟا ﻊﻣ ةرﺎﺘﺨﻤﻟا ةروﺪﻟا"
ًﺎﺘﺑﺎﺙﺔﺵﺎﺸﻟا ﻰﻠﻋ ةﺪﻣ ﻚﻟﺬآو
تأﺪﺑ فﺎﻘﻳﺈﺑ ﻢﻗ ،ﺔﻟﺎﺴﻐﻟا ﺔﻓﺎﺸﻨﻟا لﻼﺥ ﻦﻣ
ز ﻰﻠﻋ ﻂﻐﻀﻟاﻞﻴﻐﺸﺘﻟا ر/فﺎﻘﻳﻹا . ﺮﺘﺥا ﻢﺙ
ﺮﺥﺄﺘﻤﻟا ﺖﻗﻮﻟا رﺎﻬﻇﻹ ةﺪﺣاو ﻪﻄﺒﺽ ﻢﺕ يﺬﻟا
و ﺔﺑﻮﻠﻄﻤﻟا ةروﺪﻟا رز ﻰﻠﻋ ﻂﻐﺽا
ﻞﻴﻐﺸﺘﻟا/ًادﺪﺠﻣ فﺎﻘﻳﻹا . لﻼﺥ بﺎﺒﻟا ﺢﺘﻔﻟ
ﺴﻏ ةرودﻴ رز ﻰﻠﻋ ﻂﻐﺽا ،ﻞ
اﻞﻴﻐﺸﺘﻟ/فﺎﻘﻳﻹا. لﺎﺣ ﻲﻓ نﺎآ ﺮﺵﺆﻣ ءﻮﺽ
ﻦﻜﻤﻳ ،ﺄﻔﻄﻣ بﺎﺒﻟا ﺢﺘﻓ .
بﺎﺒﻟا لﺎﻔﻗإ
ﻞﻴﻐﺸﺘﻟا رز ﻰﻠﻋ ﻂﻐﺽا/ ًادﺪﺠﻣ فﺎﻘﻳﻹا
ﻟ ةدوﺎﻌﻤﺴﻐﻟا ةرود ﻞﻴﻐﺸﺕﻴﻞ ﻦﻣ ﺚﻴﺣ
ﺔﻟﻵا أﺪﺒﺕ ،ﺔﻃﻮﺒﻀﻤﻟا ﺮﻴﺥﺄﺘﻟا ةﺪﻣ ﺖﻀﻘﻥا
Ends
ةرﺎﺒﻋ ﺔﺵﺎﺸﻟا ﻰﻠﻋ ﺮﻬﻈﺘﺱو ﺎﻬﺕروﺪﺑ "
ﺮﺥﺄﺘﻤﻟا ﻞﻴﻐﺸﺘﻟا ﺔﻔﻴﻇو ءﺎﻐﻟﻹ رﺰﻟا ﻰﻠﻋ ﻂﻐﺽا ،
OFF "
ﺔﻤﻠآ ﺔﺵﺎﺸﻟا ﻰﻠﻋ ﺮﻬﻈﻳ نأ ﻰﻟإ "
ﺖﻔﻗﻮﺕ.
Starts in "ﺮﻴﺥﺄﺘﻟا ةﺪﻣ ﻚﻟﺬآو . ﻰﺘﻣو
ﺔﺵﺎﺸﻟا ﻦﻋ.
ﻒﻴﻔﺠﺘﻟاﻒﻴﻔﺠﺘﻟا رز ﺔﻄﺱاﻮﺑ
ﺮﺥﺄﺘﻤﻟا ﻞﻴﻐﺸﺘﻟا ﻂﺒﺿ
رﺮﻜﺘﻣ ﻞﻜﺸﺑ ﻰﻟإنأ ﻟا ﻰﻟإ ﻞﺼﺕ ﺮﺥﺄﺘﻤﻟا ﺖﻗﻮ
بﻮﻠﻄﻤﻟا . ءﺎﻨﺙأ ،ﻂﺒﻀﻟاﺮﺥﺄﺘﻤﻟا ﺖﻗﻮﻟا ﺮﻬﻈﻳ
ةرﺎﺒﻌﻟاو"
. ،بﻮﻠﻄﻤﻟا ﺮﺥﺄﺘﻤﻟا ﺖﻗﻮﻟا رﺎﻴﺘﺥا ﺪﻌﺑ
ﺰﻣﺮﻟا
ﻰﻘﺒﻴﺱ ﺰﻣﺮﻟا
ةروﺪﻟا ةﺪﻣ .رز ﻰﻠﻋ ﻂﻐﺽا ﺮﺥﺄﺘﻤﻟا ﻞﻴﻐﺸﺘﻟا ةﺮﻣ
ًﺎ ﻘ ﺒ ﺴ ﻣ. ﺔﺵﺎﺸﻟا ﻰﻠﻋ ﺮﻬﻈﺕ ،ﻲﺴﻜﻌﻟا ﺪﻌﻟا ءﺪﺑ ﺪﻌﺑ
ةرﺎﺒﻋ"
in "ةروﺪﻟا ﺔﻳﺎﻬﻥ ﻰﺘﺣ ﻲﻘﺒﺘﻤﻟا ﺖﻗﻮﻟا ﻚﻟﺬآو .
و ﻲﻔﺘﺨﻴﺱﻟا ﺰﻣﺮ
8. ءﺎﻬﺘﻧاﻞﻴﺴﻐﻟا ةرود .ﻟإ رﺎﺸﻳﻚﻟذ ﻰ لﻼﺥ ﻦﻣ
ةءﺎﻀﻤﻟاEND . بﺎﺒﻟا ﺢﺘﻓ ﻦﻜﻤﻳ ﻰﻠﻋ
ةرﺎﺒﻌﻟا
ﻟارﻮﻔ . ﺮﺵﺆﻣ ءﻮﺽ نﺎآ لﺎﺣ ﻲﻓ
ﻞﻴﻐﺸﺘﻟا/ رﺰﻟا ﻰﻠﻋ ﻂﻐﺽا ،ﺾﻣﻮﻳ فﺎﻘﻳﻹا
ةروﺪﻟا ءﺎﻬﻥﻹ .بﺎﺒﻟا ﺢﺘﻓا جﺮﺥاو ﻞﻴﺴﻐﻟا
ﺔﻟﻵا ءﻰﻔﻃاو.
ﺔﻤﻠآ ﻢﺙ ﺔﻔﻴﻇﻮﻟا ﻢﺱا ﺔﺵﺎﺸﻟا ﻰﻠﻋ ﺮﻬﻈﻴﺱ
!ﺎﺣ ﻲﻓل ةرود ءﺎﻐﻟﺈﺑ ﺖﺒﻏرتأﺪﺑ ﺪﻗ نﻮﻜﺕ ،
أ ﻰﻟإ ﺊﻔﻄﻨﺕو ةروﺪﻟا ﻒﻗﻮﺘﺕ ن
ﻋ ﻂﻐﺽارز ﻰﻠ
ﺔﻟﻵا.
ةروﺪﻟا ﻂﺒﺿ ﻞیﺪﻌﺗ
• ﻞﻴﻐﺸﺘﻟ رﺰﻟا ﻰﻠﻋ ﻂﻐﺽاﺔﻔﻴﻇﻮﻟا ؛ ﺮﻬﻈﻴﺱ
ﺔﻔﻴﻇﻮﻟا ﻢﺱا ﺔﺵﺎﺸﻟا ﻰﻠﻋ ءﻲﻀﻴﺱو ءﻮﺽ
ﺮﺵﺆﻤﻟاﺐﺱﺎﻨﻤﻟا.
• ﻐﺽاﺬه ءﺎﻐﻟﻹ ًادﺪﺠﻣ رﺰﻟا ﻰﻠﻋ ﻂﻩ ﺔﻔﻴﻇﻮﻟا :
OFF وﻴﺱﻨ ﺮﺵﺆﻤﻟا ءﻮﺽ ﺊﻔﻄﺐﺱﺎﻨﻤﻟا .
! ﻢﻟ لﺎﺣ ﻲﻓﺕ ﻦﻜ ﺔﻔﻴﻇﻮﻟاةرﺎﺘﺨﻤﻟا مءﻼﺘﺕ ﻊﻣ
ﺴﻐﻟا ةرودﻴ ﻰﻟإ رﺎﺸﻳ ،ةرﺎﺘﺨﻤﻟا ﻞ ﻚﻟذ لﻼﺥ ﻦﻣ
22
Page 23

و ﻞﺴﻐﻟا تارودﻒﺋﺎﻇﻮﻟا
ﺴﻐﻟا تارود لوﺪﺝﻴﻞ
ةروﺪﻟا ةﺪﻡ
ىﻮﺼﻘﻟا)ﻎﻠآ(
ﺔﻓﺎﻀﻤﻟا داﻮﻤﻟاو ﻒﻴﻈﻨﺘﻟا داﻮﻡ ﺔﻟﻮﻤﺤﻟا
ﺾﻴﻴﺒﺘﻟا
ﺔﺸﻤﻗﻷا
ﻞﻴﺴﻐﻟا ﻤﻌﻨﻡتﺎ
ﻒﻴﻔﺠﺘﻟا
ﺔﻋﺮﺴﻟا
ىﻮﺼﻘﻟا
)درﺔیﻮﺌﻡ ﺔﺝ(
) ةرود /ﺔﻘﻴﻗد(
ﺮﻟاﺰﻡ ﻒﺻوﻞﻴﺴﻐﻟا ةرود ىﻮﺼﻘﻟا ةراﺮﺤﻟا
ﺴﻏ تارودﻴ ﻞاتﺎﻴﻨﻄﻘﻟ
90 1400 • • • - 9
تﺎﻴﻨﻄﻗ ﻊﻣ ﺞﻣﺎﻥﺮﺑ ﺎﻣ
ﺴﻐﻟا ﻞﺒﻗﻴ ﻞ
)ﻴﻈﻨﺘﻟا داﻮﻡ ﻒﺿأﻒ
ﻟا ﻰﻟإةﺮﻴﺠﺤ ﺔﺒﺳﺎﻨﻤﻟا(
1400• • • • 9
60
ﺔﻣوﺎﻘﻤﻟا ناﻮﻟﻷاو
) ﻰﺼﻗأ ﺪﺣ90(
40 1400• • • • 9
40 800 • • • - 4
تﺎﻴﻨﻄﻗ)1( :تﺎﺽﺎﻴﺒﻟا
ًا ﺪ ﺟ ﺔﺨﺴﺘﻤﻟا
تﺎﻴﻨﻄﻗ)2( : تﺎﺽﺎﻴﺒﻟا
ًا ﺪ ﺟ ﺔﺨﺴﺘﻤﻟا
تﺎﻴﻨﻄﻗﺔﻥﻮﻠﻣ )3( 40 1400• • • • 9
و ناﻮﻟﻷا ﺔﻘﻴﻗﺮﻟا
ﺰﻨﻴﺝ
ﻟا ﺞﻣاﺮﺒﻟاﺔﺻﺎﺨ
(*)ﺔﺵﺎﺸﻟا ﻰﻠﻋ ﻞﻴﺴﻐﻟا تارود ةﺪﻣ ﻦﻣ ﻖﻘﺤﺘﻟا ﻦﻜﻤﻳ
40 800 • • • • 4
30 800 • • • - 3.5
ًﻼ ﻴ ﻠ ﻗ ﺔﺨﺴﺘﻤﻟا ﺲﺑﻼﻤﻟا
ﺮﻳﺮﺤﻟاو فﻮﺼﻠﻟ
ﺐﻠﻄﺘﺕ ﻲﺘﻟا ﺲﺑﻼﻤﻟاو
ﺔﻴﻋﺎﻨﻄﺻا ﺔﺸﻤﻗأ ﺔﻨﻴﺘﻣ 60 800 • • • • 4
30 0 - • • - 2
40 800 • • • - 2
لﺎﻔﻃأ : ناﻮﻟأر ﺔﻘﻴﻗ
ًا ﺪ ﺟ ﺔﺨﺴﺘﻣ
ﺔﻄﻠﺘﺨﻡ30 :ﻹشﺎﻌﻥ
ﺔﻋﺮﺴﺑ)ﺮﻴﻏ ﺔﻤﺋﻼﻣ
ﺮﻳﺮﺤﻟا زﻮﻜﺴﻴﻔﻟاو
فﻮﺻ : فﻮﺼﻟا
ﺦﻟا ،ﺮﻴﻤﺸﻜﻟا
ﺴﻏﻴًﻼ ﻳوﺪﻳًﺎ(
ﺮیﺮﺡ: ﺲﺑﻼﻣ ﻦﻣ
و ﺔﻴﺘﺤﺕ ﺲﺑﻼﻣ
تارودﻒﻴﻔﺠﺘﻟا
ﻒﻴﻔﺠﺕو ﻞﻴﺴﻏ 30 1400 • • • - 1
- • - - - 6
-
تﺎﻴﻨﻄﻘﻟا ﻒﻴﻔﺠﺕ
- • - - - 4
- • - - - 1.5
-
-
ﺔﺸﻤﻗﻷا ﻒﻴﻔﺠﺕ
ﺔﻴﻋﺎﻨﻄﺻﻻا
فﻮﺼﻟا ﻒﻴﻔﺠﺕ
رود تاﻟاﺴﻐﻴ ﻞﻟاﺔﻴﺋﺰﺠ
23
Page 24

• - • • 9
1400
1400 • - - - 9
-
-
ﻒﻴﻄﺸﺘﻟا
ﻊﻳﺮﺴﻟا ناروﺪﻟا
0 - - - - 9
-
ﻒﻳﺮﺼﺘﻟا
(*)ﺔﻈﺡﻼﻡ : ﺪﻌﺑ10 ﻲﻘﺒﺘﻤﻟا ﺖﻗﻮﻟا بﺎﺴﺘﺡا ﺔﻟﻵا ﺪﻴﻌﺘﺳ ،ﻞﻴﻐﺸﺘﻟا ﻦﻡ ﻖﺋﺎﻗد ءﺎﻬﺘﻧا ﻰﺘﺡ ﻞﻴﺴﻐﻟا ةرود ﺐﺴﺤﺑ
ﺎﻬﺘﻟﻮﻤﺡ .ﺔﺵﺎﺸﻟا ﻰﻠﻋ ةﺪﻤﻟا ﻩﺬه ﺮﻬﻈﺘﺳ .
تﺎﺴﺳﺆﻡ ﺔﻓﺎﻜﻟرﺎﺒﺘﺥﻻا:
1( رﺎﺒﺘﺥاﺴﻐﻟا ةرودﻴﻞ ًﺎ ﻘ ﻓ و ﻠﻟﻪﻴﺝﻮﺘ EN 50229 :ﺴﻐﻟا ةرود ﻂﺒﻀﺑ ﻢﻗﻴﻞ ﻰﻠﻋ60 ﺔیﻮﺌﻡ ﺔﺝرد.
2( ﺴﻐﻟا ةرودﻴﻨﻄﻘﻠﻟ ﺔﻠیﻮﻄﻟا ﻞتﺎﻴ :ﺴﻐﻟا ةرود ﻂﺒﻀﺑ ﻢﻗﻴ ﻞ ﻰﻠﻋ40 ﺔیﻮﺌﻡ ﺔﺝرد .
3( ﺴﻐﻟا ةرودﻴﻨﻄﻘﻠﻟ ةﺮﻴﺼﻘﻟا ﻞتﺎﻴ : ةرود ﻂﺒﻀﺑ ﻢﻗﻞﻴﺴﻐﻟا ﻰﻠﻋ40 ﺔیﻮﺌﻡ ﺔﺝرد.
24
Page 25

، ةروﺪﻟا ﺔﻟﺎﺴﻐﻟا ﻲﻬﻨﺘﺱ
ﻟﻞﻴﺴﻏ ةروﺪ ﺮﻳﺮﺤﻟا
ﺎﻤﻨﻴﺑﻞﻴﺴﻐﻟا ﻊﻘﻥ ﻢﺘﻳ وﺱﻮﺽ ﺾﻣﻮﻴ ﺮﺵﺆﻣ ء
"ﻟاﻞﻬﺴﻟا ﻲﻜ" . ﻩﺎﻴﻤﻟا ﻒﻳﺮﺼﺘﻟﻟﻢﺘﻳ ﻲﻜ جاﺮﺥإ
ﺽا ،ﻞﻴﺴﻐﻟاﻞﻴﻐﺸﺘﻟا رز ﻰﻠﻋ ﻂﻐ/فﺎﻘﻳﻹا وأ
ﺎﻴﺘﺥﻻا اﺬه مﺪﻘﻳﺴﻏ رﻴ ﻞتاذ لﺎﻋ ءادأ
رز"ﻞﻬﺴﻟا ﻲﻜﻟا".
!ﺑ ﺔﻔﻴﻇﻮﻟا ﻩﺬه لﺎﻤﻌﺘﺱا ﻦﻜﻤﻳ ﻻ ﻊﻣ ﻦﻣاﺰﺘﻟﺎ
ﺔﻈﺡﻼﻡ : ةرود ﻞﻴﻐﺸﺕ ًﺎ ﻀ ﻳ أ تدرأ لﺎﺣ ﻲﻓ
ﺘﻟﺎﺑ ﻂﻘﻓ ﺔﻔﻴﻇﻮﻟا ﻩﺬه ﻞﻐﺸﺕ ﻢﺘﻳ ،ﻒﻴﻔﺠﺕ ﻊﻣ ﻦﻣاﺰ
ﺔﻟازﻹ صﻮﺼﺨﻟا
ىﻮﺘﺴﻣ"ﻲﻜﻟا".
ﺑو ةروﺪﻟا ﻦﻣ ﺔﻴﻟوﻷا ﺔﻠﺣﺮﻤﻟا ﻲﻓﻞﻀﻔ ةﺪﻣ
ﻦﻣ ةﺪﻳاﺰﺘﻣ ةرود
ﻞﻴﺴﻐﻟا . ﺪﻴﻔﻣ ﻮه
ﻰﻠﻋ ﻪﺟو
ةﺪﻴﻨﻌﻟا ﻊﻘﺒﻟا . ﻦﻜﻤﻳ
نأ ﻳ ﻞﻤﻌﺘﺴﻊﻡ وأ
ﻒﺋﺎﻇو ﺴﻐﻟاﻴﻞ
ﺴﻐﻟاﻴ ﻖﺋﺎﻔﻟا ﻞ
ىﻮﺘﺴﻤﻟا ﺑﻞﻀﻔ ﺔﻴﻤآ ﺮﺒآأ ﺔﻠﻤﻌﺘﺴﻤﻟا ﻩﺎﻴﻤﻟا ﻦﻣ
ﻦﻡنود ﺒﻣّﻴﺾ. ﻲﻓ
ﻗﻮﻟا ﺮﻓﻮﻡﺖ
،ﺔﻔﻴﻇﻮﻟا ﻩﺬه تﺮﺘﺥا لﺎﺣ ﻲﻓ ﺾﻴﻔﺨﺕ ﻢﺘﻴﺱ ةﺪﻣ
ﻞﻴﺴﻐﻟا ةرود ﻦﻣ 30 ﻰﻟإ50 % ةروﺪﻟا ﺐﺴﺤﺑ
ةرﺎﺘﺨﻤﻟا. ﻲﻟﺎﺘﻟﺎﺑو ﻦﻤﻀﺕﺮﻴﻓﻮﺕًا ﻨﻣاﺰﺘﻣًﺎ ﻟ ﺖﻗﻮﻠ
ﻟاوﺔﻗﺎﻄ . مﺪﺨﺘﺱا ﺔﺨﺴﺘﻤﻟا ﺲﺑﻼﻤﻠﻟ ةروﺪﻟا ﻩﺬه
ًﻼ ﻴ ﻠ ﻗ.
!ﺔﻔﻴﻇﻮﻟا ﻩﺬه لﺎﻤﻌﺘﺱا ﻦﻜﻤﻳ ﻻ ﻊﻣ ﻦﻣاﺰﺘﻟﺎﺑ
, ,
, ,
ﻲﻓﺎﺿﻹا ﻒﻴﻄﺸﺘﻟا
ﺪﻨﻋ ،ﺔﻔﻴﻇﻮﻟا ﻩﺬه رﺎﻴﺘﺥا ةدﺎﻳز ﻢﺘﻳ ﺔﻴﻟﺎﻌﻓ
ﻟاﺘﻄﺸو ﻒﻴ ﻒﻴﻈﻨﺘﻟا داﻮﻣ ﺔﻟازإ ﻦﻤﻀﺕ ﻞﻜﺸﺑ
ﻞﻀﻓأ .و ﻲه يوﺬﻟ صﻮﺼﺨﻟا ﻪﺟو ﻰﻠﻋ ةﺪﻴﻔﻣ
ﺔﺱﺎﺴﺤﻟا ةﺮﺸﺒﻟاﺪﺽ ﻒﻴﻈﻨﺘﻟا داﻮﻣ. ﺢﺼﻨﻥ
ﻩﺬه لﺎﻤﻌﺘﺱﺎﺑا ﻦﻣ ﺔﻠﻣﺎآ ﺔﻟﻮﻤﺣ ﻊﻣ ﺔﻔﻴﻇﻮﻟ
ﺪﻨﻋ وأ ﻞﻴﺴﻐﻟا لﺎﻤﻌﺘﺱا ةروﺮﺽ ةﺮﻴﺒآ ﺔﻴﻤآ
ﻒﻴﻈﻨﺘﻟا داﻮﻣ ﻦﻣ.
!ﻊﻣ ﻦﻣاﺰﺘﻟﺎﺑ ﺔﻔﻴﻇﻮﻟا ﻩﺬه لﺎﻤﻌﺘﺱا ﻦﻜﻤﻳ ﻻ.
ﺖﺒﻏر لﺎﺣ ﺔﻓﺎﺽﺈﺑ
ﺾّﻴﺒﻣ ﻊﺽ ،ﻟا ﺔﻴﻓﺎﺽﻹا ةﺮﻴﺠﺤ)3 ( ﻲﻓ
ةﺮﻴﺠﺤﻟا)1( . ،ﺾﻴﺒﻤﻟا ﺐﻜﺴﺕ ﺎﻣﺪﻨﻋﻻ ىﺪﻌﺘﺕ
ّﺪ ﺤ ﻟ ا يﺰآﺮﻤﻟا رﻮﺤﻤﻟا ﻰﻠﻋ ﻦﻴﺒﻤﻟا ﻰﺼﻗﻷا
ةرﻮﺼﻟا ﻊﺟار
.(
)
ﻞﻴﺴﻐﻟا ﺾﻴﻴﺒﺘﻟ ﻦﻡﺴﻏ ةروﺪﺑ مﺎﻴﻘﻟا نودﻴ ﻞ
،ﺔﻠﻡﺎآ ﺮﻴﺠﺤﻟا ﻲﻓ ﺾﻴﺒﻤﻟا ﺐﻜﺱا ﺔﻴﻓﺎﺽﻹا ة
ﻞﻴﻐﺸﺘﺑ ﻢﻗو
.
ﻖﺋﺎﻔﻟا ﻞﺴﻐﻟا رﺎﻴﺘﺥا
3 ةرود ﺮﺘﺥا ، ﻒﻳﺮﺼﺘﻟا
! ﻩﺬه لﺎﻤﻌﺘﺱا ﻦﻜﻤﻳ ﻻﺔﻔﻴﻇﻮﻟا ﻊﻣ ﻦﻣاﺰﺘﻟﺎﺑ
, ,
, ,
ﻞﻬﺴﻟا ﻲﻜﻟا
ﺪﻨﻋ ،ﺔﻔﻴﻇﻮﻟا ﻩﺬه رﺎﻴﺘﺥاﻞﻳﺪﻌﺕ ﻢﺘﻴﺱ تارود
ﻞﻴﺴﻐﻟاوﻟا ناروﺪﻟا ﻦﻣ ﻊﻳﺮﺴأ ﺾﻴﻔﺨﺕ ﻞﺟ
نّﻮﻜﺕﺪﻴﻋﺎﺠﺘﻟا . ،ةروﺪﻟا ﺔﻳﺎﻬﻥ ﺪﻨﻋ روﺪﻴﺱ
ضﻮﺣ ﺔﻓﺎﺸﻨﻟا ﺔﻟﺎﺴﻐﻟا ءﻂﺒﺑ ءاﻮﺽأ ﺾﻣﻮﺘﺱو
تاﺮﺵﺆﻣ"اﻞﻬﺴﻟا ﻲﻜﻟ" ﻞﻴﻐﺸﺘﻟاو/فﺎﻘﻳﻹا .
, ,
, ,
،ةروﺪﻟا ءﺎﻬﻥﻹ رز ﻰﻠﻋ ﻂﻐﺽا
ﻞﻴﻐﺸﺘﻟا/ رز وأ فﺎﻘﻳﻹا"ﻞﻬﺴﻟا ﻲﻜﻟا" .
ﻞﻴﺴﻐﻟاو ﻒﻴﻈﻨﺘﻟا داﻮﻡ
ﻒﻴﻈﻨﺘﻟا داﻮﻡ
ﻲﻬﻓ يﻮﺘﺤﺕﻜﻣ ﻰﻠﻋ ناﺰﻴﻣ ﻲﻓ لﺪﻌﺕ تﺎﻥﻮ
ﺔﻌﻴﺒﻄﻟا.
ﻲﻟﺎﺘﻟﺎﺑ ﺢﺼﻨﻥ:
• لﺎﻤﻌﺘﺱا ﻖﻴﺣﺎﺴﻣ ﻒﻴﻈﻨﺘﻟاضاﺮﻏﻸﻟ
ﻟو ءﺎﻀﻴﺒﻟا ﺔﻴﻨﻄﻘﻟا ةروﺪﺴﻐﻟا ﻞﺒﻗ ﺎﻣﻴﻞ.
و عﻮﻥ ﺪﻤﺘﻌﻳ ﻰﻠﻋ ﺔﺑﻮﻠﻄﻤﻟا ﻒﻴﻈﻨﺘﻟا داﻮﻣ ﺔﻴﻤآ
عﻮﻥ ﻪﻠﺴﻐﺑ مﻮﻘﺕ يﺬﻟا شﺎﻤﻘﻟا) ،ﺮﻳﺮﺤﻟا ،ﻦﻄﻘﻟا
فﻮﺼﻟا، ﺦﻟا( ﻰﻟإ ﺔﻓﺎﺽﻹﺎﺑ ةراﺮﺣو نﻮﻟ
ﺴﻐﻟاﻴا ىﻮﺘﺴﻣو ﻞةوﺎﺴﻗو خﺎﺴﺕﻻ ﻲﻓ ﻩﺎﻴﻤﻟا
ﺔﻘﻄﻨﻤﻟا .ﻤﻟ ﺔﺒﺱﺎﻨﻤﻟا ﺔﻴﻤﻜﻟا ﻊﺽو ﻒﻴﻈﻨﺘﻟا داﻮ
ﺐﻨﺠﻴﺱو رﺪﻬﻟاﻳﺔﺌﻴﺒﻟا ﺔﻳﺎﻤﺣ ﻲﻓ ﺪﻋﺎﺴ : ﻰﻠﻋ
ﻦﻣ ﻢﻏﺮﻟانأ ﻒﻴﻈﻨﺘﻟا داﻮﻣ ،ًﺎﻴﺟﻮﻟﻮﻴﺑ ﺔﻠﻠﺤﺘﻣ
25
Page 26

ﻒﻴﻈﻨﺘﻟا داﻮﻣ ﻰﻟإ ﺔﻓﺎﻀﻤﻟا ﺔﺻﺎﺨﻟا . ﺔﻳﺎﻬﻥ ﺪﻨﻋ
ﺴﻐﻟا ةرودﻴ ،ﻞ ضﻮﺤﻟا روﺪﻳ ءﺎﻬﻥﻹ ؛ءﻂﺒﺑ
ﻞﻴﻐﺸﺘﻟا رز ﻰﻠﻋ ﻂﻐﺽا ةروﺪﻟا/فﺎﻘﻳﻹا.
ﺮیﺮﺤﻟا: ﻏ ةرود ﻞﻤﻌﺘﺱاﺴﻴﻞ "اﺮﻳﺮﺤﻟ "
ﺔﻳﺮﻳﺮﺤﻟا ﺲﺑﻼﻤﻟا ﺔﻓﺎآ ﻞﺴﻐﻟ .
ﺔﺻﺎﺨﻟا
ﺢﺼﻨﻥداﻮﻣ لﺎﻤﻌﺘﺱﺎﺑ ﺪﻗ نﻮﻜﺕ ﺔﺻﺎﺥ ﻒﻴﻈﻨﺕ
ﺴﻐﻟ ﺖﻤﻤﺻﻴﺔﻘﻴﻗﺪﻟا ﺲﺑﻼﻤﻟا ﻞ.
.
ﺮﺋﺎﺘﺴﻟا: ﻞﻤﻌﺘﺱاﻞﻴﺴﻏ ةرود "اﺮﻳﺮﺤﻟ"
و ﺮﺋﺎﺘﺴﻟا ﻲﻄﺑ ﻢﻗﻲﻓ ﺎﻬﻌﺽ ةﺪﺨﻣ ءﺎﻄﻏ وأ
ﺔﺒﻴﻘﺣﺔﻜﺒﺸﻣ .
فﻮﺼﻟا :ﺁﻟﺎﺴﻐﻟا ﻲه نﻮﺘﺴﻳرﺔ ﺔﻓﺎﺸﻨﻟا ةﺪﻴﺣﻮﻟا
ﻲﺘﻟاﻣ ﻢﺕ ﺎﻬﺤﻨ ﺔﻳﺎﻨﻋ ﺔﻗدﺎﺼﻣ كرﺎﻤﻟوو مﻮﻨﻴﺕﻼﺑ
M.0508 (كرﺎﻤﻟوو ﺔآﺮﺵ ﻞﺒﻗ ﻦﻣ .اﺬه ﻲﻨﻌﻳ
ﺔﻟﺎﺴﻐﻟا ﺔﻓﺎﺸﻨﻟا ﻲﺘﻟا ﻚﻠﺕ ﻰﺘﺣ ﻞﻤﺤﺕ ةرﺎﺒﻋ
ﺔﻌﻗﺮﻟا ﻰﻠﻋ . ﻦﻤﻳ
ضاﺮﻏﻷا ﺔﻓﺎآ ﻞﺴﻐﻟ ةروﺪﻟا ﻩﺬه لﺎﻤﻌﺘﺱا
ﺔﻴﻓﻮﺼﻟا ﻊﻣﻞﻀﻓأ ﻰﻠﻋ لﻮﺼﺤﻟا نﺎﻤﺽ ءادأ.
ﻒﺵﺎﻨﻤﻟاو ﺮیﺮﺴﻟا تﺎﺿﺎﻴﺑ : ةرود ﻞﻤﻌﺘﺱا
ﺔﻓﺎآ ﻞﺴﻐﻟ
ﻞﻴﺴﻏ"مﺎﻤﺤﻟاو ﺮﻳﺮﺴﻟا"
لﺰﻨﻤﻟا ﻞﻴﺴﻏ . ﻰﻠﻋ لﻮﺼﺤﻟا ﻦﻤﻀﻳ اﺬﻬﻓ
ﺮﻴﻓﻮﺕ ﻰﻠﻋ ﺪﻋﺎﺴﻳو شﺎﻤﻘﻟا تﺎﻤﻌﻨﻤﻟ ءادأ ﻞﻀﻓأ
ﺔﻗﺎﻄﻟاو ﺖﻗﻮﻟا . لﺎﻤﻌﺘﺱﺎﺑ ﺢﺼﻨﻥ ﻖﻴﺣﺎﺴﻣ
ﻒﻴﻈﻨﺕ.
ةﺪﻴﻨﻌﻟا ﻊﻘﺒﻟا : ةﺪﻴﻨﻌﻟا ﻊﻘﺒﻟا ﺔﺠﻟﺎﻌﻣ ﻞﻀﻓﻷا ﻦﻣ
نﻮﺑﺎﺼﻟا ﺔﻄﺱاﻮﺑ لﺎﻤﻌﺘﺱاو ﺎﻬﻠﺴﻏ ﻞﺒﻗ ﺐﻠﺼﻟا
ﻞﻴﺴﻐﻟا ﻞﺒﻗ ﺎﻣو تﺎﻴﻨﻄﻘﻟا ةرود .
: ةروﺪﻟا ﻩﺬه ﻢﻴﻤﺼﺕ ﻢﺕ
ﻒﻴﻔﺠﺘﻟاو ﻞﻴﺴﻐﻟا
ًﻼ ﻴ ﻠ ﻗ ﺔﺨﺴﺘﻤﻟا ضاﺮﻏﻷا ﻒﻴﻔﺠﺕو ﻞﻴﺴﻐﻟ
ﺔﻋﺮﺴﺑ . ﻦﻜﻤﻳ ﻞﻴﺴﻐﻟ ةروﺪﻟا ﻩﺬه لﺎﻤﻌﺘﺱا
ﻰﻟإ ﻞﺼﺕ ﺔﻟﻮﻤﺣ ﻒﻴﻔﺠﺕو1 ﻎﻠآلﻼﺥ 60
ﻂﻘﻓ ﺔﻘﻴﻗد . ،ﺞﺋﺎﺘﻨﻟا ﻞﻀﻓأ ﻰﻠﻋ لﻮﺼﺤﻠﻟ
ﻨﺘﻟا داﻮﻣ ﻞﻤﻌﺘﺱا مﺎﻤآﻷا ﺞﻟﺎﻋو ﺔﻠﺋﺎﺴﻟا ﻒﻴﻈ
ﻟاوﻴﺎﺎﻗﻊﻘﺒﻟاو ت.
ﺔﻟﻮﻤﺤﻟا نزاﻮﺗ مﺎﻈﻧ
ﺮﺱ نارود ةرود ﻞآ ﻞﺒﻗ ،ﻊﻳو يدﺎﻔﺘﻟ
و ﺔﻃﺮﻔﻤﻟا تازاﺰﺘهﻻازﻮﺘﻟﻳﻊ ﺔﻘﻳﺮﻄﺑ ﺔﻟﻮﻤﺤﻟا
ﺔﻋﺮﺴﺑ ﻞﺻاﻮﺘﻣ ﻞﻜﺸﺑ ضﻮﺤﻟا روﺪﻳ ،ةﺪﺣﻮﻣ
ﺴﻐﻟا نارود ﺔﻋﺮﺱ ﻦﻣ ﻞﻴﻠﻘﺑ عﺮﺱأﻞﻴ .لﺎﺣ ﻲﻓ
ﺢﻴﺤﺻ ﻞﻜﺸﺑ ﺔﻟﻮﻤﺤﻟا نزاﻮﺕ ﻢﺘﻳ ﻢﻟ ﺪﻌﺑ
تﻻوﺎﺤﻣةﺪﻋ ﻊﻳﺮﺱ نارود ﺔﻟﻵا روﺪﺕ ،
ًﻻ ﺪ ﺑ ﻊﻳزﻮﺘﻟا ﺔﻴﻠﻤﻌﺑ ﺔﻟﺎﺴﻐﻟا مﻮﻘﺕ ،ﺮﻴﺒآ ﻞﻜﺸﺑ
ﻊﻳﺮﺴﻟا ناروﺪﻟا ﻦﻣ. ﻟ ﺔﻟﻮﻤﺤﻟا ﻊﻳزﻮﺕ ﻦﻴﺴﺤﺘ
• ﻟا ﻒﻴﻈﻨﺘﻟا داﻮﻣ لﺎﻤﻌﺘﺱا ﺔﻠﺋﺎﺴ ضاﺮﻏﻸﻟ
و ﺔﻘﻴﻗﺪﻟا ﺔﻴﻨﻄﻘﻟا ﻰﻠﻋ ﻞﺴﻐﻟا تارود ﺔﻓﺎﻜﻟ
ﺔﻀﻔﺨﻨﻣ ةراﺮﺣ.
• ﺔﻠﺋﺎﺴﻟا ﻒﻴﻈﻨﺘﻟا داﻮﻣ لﺎﻤﻌﺘﺱا ﺔﻤﻋﺎﻨﻟا
ﺮﻳﺮﺤﻟاو فﻮﺼﻠﻟ.
ﺠﻳﻟا ﻞﺥاد ﻒﻴﻈﻨﺘﻟا داﻮﻣ ﺐﻜﺱ ﺐةﺮﻴﺠﺤ
ﺔﺒﺱﺎﻨﻤﻟا ﻞﺥاد ةﺮﺵﺎﺒﻣ عﻮﺽﻮﻤﻟا ءﺎﻋﻮﻟا وأ
ضﻮﺤﻟا– ﺴﻐﻟا ةرود ءﺪﺑ ﻞﺒﻗﻴﻞ . ﺔﻟﺎﺤﻟا ﻲﻓ
نﻮﻜﻳ ﻦﻟ ،ةﺮﻴﺥﻷا نﺎﻜﻣﻹﺎﺑﺎﻴﺘﺥار ﺞﻣﺎﻥﺮﺑ
ﺴﻐﻟا ﻞﺒﻗ ﺎﻣ ةرود ﻊﻣ تﺎﻴﻨﻄﻘﻟاﻴ ﻞ.
! ﻒﻴﻈﻨﺕ داﻮﻣ ﻞﻤﻌﺘﺴﺕ ﻻﻟﻳﺪﻴﻟا ﻞﺴﻐﻦ ﺎﻬﻥﻷ
ﺐﺒﺴﺕﻟا ﻦﻣ ﺮﻴﺜﻜﻟاةﻮﻏﺮ.
)
ﻟا ﺮﻴﻀﺤﺗﻞﻴﺴﻐ
ﻥاﻞﺴﻏ ﻦﻜﻤﻳ ﻪ ﺔﻴﻓﻮﺼﻟا ﺲﺑﻼﻤﻟا ﺔﻓﺎآ ﻲﻓ
• ﺔﻟﻵا ﻞﺥاد ﻪﻌﺽو ﻞﺒﻗ ﻞﻴﺴﻐﻟا ﺾﻔﻥا.
• ﺐﺴﺤﺑ ﻞﻴﺴﻐﻟا ﻢّﺴﻗ شﺎﻤﻘﻟا عﻮﻥ) ﺰﻣﺮﻟا
"ﻂﻘﻓ يوﺪﻴﻟا ﻞﺴﻐﻠﻟ "
ﺴﻐﻟا تﺎﻤﻴﻠﻌﺕ ﺔﻌﻗر ﻰﻠﻋﻞﻴ (ﻮﻠﻟاو ن ﺪآﺄﺕو
ﻞﺼﻓ ﻦﻣ ﺲﺑﻼﻤﻟا ﻦﻋ ﺔﻥﻮﻠﻤﻟا ﺲﺑﻼﻤﻟا
ءﺎﻀﻴﺒﻟا.
• أ ﺔﻓﺎآ غﺮﻓﻟارارزﻷا ﻦﻣ ﻖﻘﺤﺕو بﻮﻴﺠ.
لوﺪﺟ
" نزو ﻰﻟإ ﺮﻴﺸﺕ ﻲﺘﻟا
ﻐﻟا تارودﻴﺴﻞ
• ﻲﻓ ةرﻮآﺬﻤﻟا ﻢﻴﻘﻟا زوﺎﺠﺘﺕ ﻻ"
ا ﻞﻴﺴﻐﻟفﺎﺠﻟا.
ﻚﻠﻴﺴﻏ نﺰی ﻢآ؟
ﺪﺣاو ءﺎﻄﻏ 400-500 غ
ﺪﺣاو ةدﺎﺱو ءﺎﻄﻏ 150-200 غ
ةﺪﺋﺎﻤﻠﻟ ﺪﺣاو ءﺎﻄﻏ 400-500 غ
ﺪﺣاو ﺲﻥﺮﺑ 900-1200غ
ةﺪﺣاو ﺔﻔﺸﻨﻣ 150-250غ
ﺪﺣاو ﺰﻨﻴﺟ 400-500 غ
ﺪﺣاو ﺺﻴﻤﻗ 150-200 غ
ﺢﺋﺎﺼﻧ لﻮﺡ ﺴﻐﻟاﻴﻞ
ﺰﻨﻴﺠﻟا :ﺴﻏ ةرود ﻞﻤﻌﺘﺱاﻴﻞ "اﺰﻨﻴﺠﻟ "ﺔﺻﺎﺨﻟا
ﻢﻴﻥﺪﻟا ﻦﻣ ﺔﻋﻮﻨﺼﻤﻟا ﺲﺑﻼﻤﻟا ﺔﻓﺎﻜﻟ؛ ﺎﻬﺒﻠﻗا
ﻠﺴﻏ ﻞﺒﻗ جرﺎﺨﻟا ﻰﻟإ ﻞﺥاﺪﻟا ﻦﻣﺎﻬ ﻞﻤﻌﺘﺱاو
ﺔﻠﺋﺎﺱ ﻒﻴﻈﻨﺕ داﻮﻣ.
لﺎﻔﻃﻷا: ﺴﻏ ةرود ﻞﻤﻌﺘﺱاﻴ ﻞ"لﺎﻔﻃﻷا"
ﺎﻬﺒﺒﺴﻳ ﻲﺘﻟا خﺎﺱوﻷا ﺔﻟازﻹ
ﺔﺻﺎﺨﻟا
ةدﺎﻋ لﺎﻔﻃﻷا ﺔﻟازإ ﻊﻣ ﺔﻓﺎآ ﻒﻴﻈﻨﺘﻟا داﻮﻣ رﺎﺙﺁ
نود لوﺆﺤﻠﻟ تﺎﺽﺎﻔﺤﻟا ﻦﻣ ضﺮﻌﺕ ةﺮﺸﺑ
ﻣﻨﺾﻔﺨ . ﺔﻥزاﻮﺘﻣ ﺮﻴﻏ ﺔﻟﻮﻤﺤﻟا ﺖﻥﺎآ لﺎﺣ ﻲﻓ
لﺎﻔﻃﻷا ﺔﺱﺎﺴﺤﻟاﻟﺔﻴﺱﺎﺴﺤﻠ . ﻢﻴﻤﺼﺕ ﻢﺕ ةروﺪﻟا
ﺎﻳﺮﺘﻜﺒﻟا ﺔﻴﻤآ ﺾﻴﻔﺨﺘﻟ لﻼﺥ ﻦﻣ ﺔﻴﻤآ لﺎﻤﻌﺘﺱا
أ ةﺮﻬﻄﻤﻟا داﻮﻤﻟا لﻮﻌﻔﻣ ةدﺎﻳزو ﻩﺎﻴﻤﻟا ﻦﻣ ﺮﺒآ
26
Page 27

ﻂﻘﻓ .
وأ ﻦﻳﺪﻴﺑ وأ ﻦﻴﻣﺪﻗﻦﻴﻠﻠﺒﻣ.
ﻞﺒﺤﻟا ﺲﻴﻟو ﺲﺑﺎﻘﻟا.
ﺔﺟرد ًا ﺪ ﺟ ﺔﻴﻟﺎﻋ ةراﺮﺣ.
ﻵ ًا ر ﺮ ﺽ ﺔﻴﻟﻟا ﻞﻔﻘ ﺔﻨﻣﻵاﻤﻤﺼﻤﻟاﺔ يدﺎﻔﺘﻟ
ﺔﻴﺽﺮﻋ تﺎﺤﺘﻓ يأ.
ﺎﻣﺪﻨﻋﻞﻤﻌﺕ.
و ﺔﺙﻼﺙ وأىﻮﺼﻗ ﺔﻳﺎﻨﻌﺑ ﺎﻬﻜﺴﻣا . لوﺎﺤﺕ ﻻ
ًا ﺪ ﺟ ًﺎ ﻨ ﺥ ﺎ ﺱ.
لﺎﻌﺘﺵﻼﻟ ﺔﻠﺑﺎﻗ ﻒﻴﻈﻨﺕ داﻮﻤﺑ ﺎﻬﻠﺴﻏ) ًﻼ ﺜ ﻣ
ﻦﻴﻠﺘﻳرﻮﻠﻜﻳﺮﺕ.(
ضاﺮﻏﻷا وأﺔﻬﺑﺎﺸﻤﻟا ﻦﻣ ﺔﻋﻮﻨﺼﻤﻟا
طﺎﻄﻤﻟا.
ﻒﻴﻔﺠﺘﻟا.
ﻒیﺮﺼﺘﻟا
دﺎﻋإ ﻢﺘﻴﻟ ﺔﻴﻠﺤﻤﻟا ة لﺎﻤﻌﺘﺱافﻼﻐﻟا.
ﺔﻴﺋﺎﺑﺮﻬﻜﻟا تاﺪﻌﻤﻟا ﻦﻣ ﺺﻠﺨﺘﻟا لﻮﺣ
مﺪﻋ بﻮﺟو ﻰﻠﻋ ﺺﻨﺕ ﺔﻴﻥوﺮﺘﻜﻟﻹاو
و جﺰﻤﺑ ﺢﺼﻨﻥ ،ﺎﻬﻥزاﻮﺕ ضاﺮﻏﻷاﺮﻴﻐﺼﻟا ةوﺮﻴﺒﻜﻟاة ﻲﻓﺔﻟﻮﻤﺤﻟا.
اﺮیﺬﺤﺘﻟات وﺢﺋﺎﺼﻨﻟا
• ﻢﻴﻤﺼﺕ ﻢﺕ ﻲﻟﺰﻨﻤﻟا لﺎﻤﻌﺘﺱﻼﻟ ﺔﻟﻵا ﻩﺬه
• ﻦﻴﻣﺪﻘﻟا ﻲﻓﺎﺣ نﻮﻜﺕ ﺎﻣﺪﻨﻋ ﺔﻟﺎﺴﻐﻟا ﺲﻤﻠﺕ ﻻ
• ﺐﺤﺱ لﻼﺥ ﻦﻣ ءﺎﺑﺮﻬﻜﻟا ﻦﻣ ﺔﻟﻵا ﻞﺼﻓا
ﺔﻡﺎﻌﻟا ﺔﻡﻼﺴﻟا
• ﻒﻳﺮﺼﺘﻟا ﻩﺎﻴﻣ ﺲﻤﻠﺕ ﻻ ﺪﻗ ذإﻟإ ﻞﺼﺕ ﻰ
صﺎﺨﺵأ)ﻚﻟذ ﻲﻓ ﺎﻤﺑ لﺎﻔﻃﻷا (ذيو
• ﺐﺒﺴﻳ ﺪﻗ اﺬﻬﻓ ةﻮﻘﺑ بﺎﺒﻟا ﻰﻠﻋ ﻂﻐﻀﺕ ﻻ
ﺔﻴﺴﻔﻨﻟاو ﺔﻴﺴﺤﻟاو ﺔﻳﺪﺴﺠﻟا تارﺪﻘﻟا
ﻟا ﻰﻟإ نوﺮﻘﺘﻔﻳ ﻦﻳﺬﻟا وأ ﺔﻀﻔﺨﻨﻤﻟا ةﺮﺒﺨ
ﻢﻬﺋﺎﻄﻋإ وأ ﻢﻬﺘﺒﻗاﺮﻣ ﻢﺘﻳ ﻢﻟ ﺎﻣ ﺔﻓﺮﻌﻤﻟاو
• ﻠﻄﻌﺕ لﺎﺣ ﻲﻓﺖ يأ ﻲﻓ ﺲﻤﻠﺕ ﻻ ،ﺔﻟﻵا
ﻇ ﻦﻣ ﺔﻴﻠﺥاﺪﻟا ﻊﻄﻘﻟا فوﺮﻈﻟا ﻦﻣ فﺮ
أﻚﺴﻔﻨﺑ ﺎﻬﺣﻼﺻإ ﺔﻟوﺎﺤﻣ ﻞﺟ.
• ءﺎﻘﺑإ ﺐﺠﻳ لﺎﻔﻃﻷا ًﺎ ﻤ ﺋ ا دﻋ ﻦﻳﺪﻴﻌﺑ ﺔﻟﻵا ﻦ
ﺺﺨﺵ ﻞﺒﻗ ﻦﻣ ﺎﻬﻟﺎﻤﻌﺘﺱا لﻮﺣ تﺎﻤﻴﻠﻌﺕ
ﻢﻬﺘﻣﻼﺱ ﻦﻋ لوﺆﺴﻣ. ﺔﺒﻗاﺮﻣ ﺐﺠﻳ
ﺔﻟﻵﺎﺑ نﻮﺒﻌﻠﻳ ﻻ ﻢﻬﻥأ ﻦﻣ ﺪآﺄﺘﻠﻟ لﺎﻔﻃﻷا.
ضﻮﺤﻟا.
• ﺪﻨﻋ ﻢﻗ ،ﺔﻟﻵا ﻞﻘﻥ ﻦﻴﺼﺨﺵ ةﺪﻋﺎﺴﻤﺑ ﻚﻟﺬﺑ
،ﻂﻔﻥ ،لﻮﺤآ ،نﻮﺘﻴﺱأﻦﻴﺱوﺮﻴآ تﺎﺠﺘﻨﻣ ،
أًا ﺪ ﺟ ﺔﻠﻴﻘﺙ ﺔﻟﻵا نﻻ كﺪﺣو ﻚﻟﺬﺑ مﺎﻴﻘﻟا ًا ﺪ ﺑ.
• ﻞﺒﻗ ﺪآﺄﺕ ،ﻞﻴﺴﻐﻟا ﺔﻟﺁ ﻲﻓ ﻚﻠﻴﺴﻏ ﻊﺽو ﻦﻣ
أغرﺎﻓ ضﻮﺤﻟا ن.
• ﺢﺒﺼﻴﻟ بﺎﺒﻟا ﻞﻴﻤﻳ ،ﻒﻴﻔﺠﺘﻟا ﺔﻠﺣﺮﻣ لﻼﺥ
• ﻼﻤﻟا ﻒﻴﻔﺠﺘﻟ ﺔﻟﻵا ﻞﻤﻌﺘﺴﺕ ﻻ ﻢﺕ ﻲﺘﻟا ﺲﺑ
ﺔﻨﺥﺎﺱ ﻩﺎﻴﻤﺑ ﺎﻬﻠﺴﻏﻣ ﻦﻣ ﺔﻴﻓﺎﺽإ ﺔﻴﻤآ ﻊ
ﺎﻬﻔﻴﻔﺠﺕ ﻞﺒﻗ ﻒﻴﻈﻨﺘﻟا داﻮﻣ.
،ءﺎﻤﻠﻟ ﺔﻣوﺎﻘﻤﻟا ﺔﺸﻤﻗﻷا ضاﺮﻏﻷا
وأ ﺲﺑﻼﻤﻟاو طﺎﻄﻤﻟا ﻦﻣ ﺔﻋﻮﻨﺼﻤﻟا
ﺑ ةدوﺰﻤﻟا تادﺎﺱﻮﻟاﻴﺵﺎﺤ ﺔﻴﻃﺎﻄﻣ ﺔ
• يﻮﻏﺮﻟا طﺎﻄﻤﻟا ﻒﻴﻔﺠﺘﻟ ﺔﻟﻵا ﻞﻤﻌﺘﺴﺕ ﻻ
ﺎﻬﺕﺎﻤﻴﻠﻌﺕ ﺐﺴﺤﺑ ﺔﻠﺙﺎﻤﻤﻟا تﺎﺠﺘﻨﻤﻟا
• تارود لﻼﺥ ﺔﺣﻮﺘﻔﻣ ﺔﻴﻔﻨﺤﻟا نأ ﻦﻣ ﺪآﺄﺕ
ةراﺮﺣ نود ﻦﻣ) ةرودﺕﺪﻳﺮﺒ ( نأ ﻦﻣ ﺪآﺄﺘﻠﻟ
ﺔﺻﺎﺨﻟا.
ﺑ ضاﺮﻏﻷاﺎ ﺔﻴﻗﺣ ﺔﺟرد ﻰﻠﻋ ﻦﻤﻀﺕ ةراﺮ
• ﻒﻴﻠﻐﺘﻟا داﻮﻣ ﻦﻣ ﺺﻠﺨﺘﻟا : تﺎﻬﻴﺟﻮﺘﻟا ﻊﺒﺕا
• ﺘﻟا نإتﺎﻬﻴﺟﻮ ﺔﻴﺑوروﻷا2002/96/EC
ﺎهرﺮﻀﺕ مﺪﻋ.
ﻒﻴﻔﺠﺘﻟا ةرود ضاﺮﻏﻷا ﺔﻓﺎآ ﺔﻟازإ ﺖﻤﺕ اذإ ﻻإ
ةراﺮﺤﻟا دﺪﺒﺘﺕ ﻰﺘﺣ ﺎهﺮﺸﻥ ﻢﺕو.
!ﻢﻴﻤﺼﺕ ﻢﺕ ﺬه ﻊﻴﻨﺼﺕو ﻩ ﺔﻤﻈﻥﻷ ًﺎ ﻘ ﻓ و ﺔﻟﺎﺴﻐﻟا
ﺔﻣﻼﺴﻟاﺔﻴﻤﻟﺎﻌﻟا . ﺪﻳوﺰﺕ ﻢﺕ ﻦﻣ ﺔﻴﻟﺎﺘﻟا تﺎﻣﻮﻠﻌﻤﻟا
أ ﻞﺟو ﺔﻣﻼﺴﻟاﺔﻳﺎﻨﻌﺑ ﺎﻬﺕءاﺮﻗ ﻲﻟﺎﺘﻟﺎﺑ ﺐﺠﻳ.
• ﺬه لﺎﻤﻌﺘﺱا ﺐﺠﻳ ﻻ ﻩ ﺔﻟﻵا ﻞﺒﻗ ﻦﻣ
- ﻲﻓ ﺎﻬﻠﺴﻏ ﻢﺘﻳ ﻢﻟ ًﺎ ﺽ ا ﺮ ﻏ أ ﻒﻔﺠﺕ ﻻ
- ﻷاضاﺮﻏ ﻤﻟاﺘآ داﻮﻤﺑ ﺔﺨﺴ ،ﺦﺒﻄﻟا ﺖﻳﺰ
إ ،ﻊﻘﺒﻟا ﺔﻟاز ﺐﺠﻳ ﻊﻤﺸﻟا ،ﻦﻴﺘﻨﺑﺮﺘﻟا ﺖﻳز
- ﻒﻴﻔﺠﺕ ﺐﺠﻳ ﻻ ضاﺮﻏﻷاآ طﺎﻄﻤﻟﺎ
)ﺲﻜﺘﻳﻻ ةﻮﻏر( ،مﺎﻤﺤﺘﺱﻻا تﺎﻌﺒﻗ ،
ﻏرﺔﻳﻮ.
- وأ ﺔﺸﻤﻗﻷا تﺎﻤﻌﻨﻣ لﺎﻤﻌﺘﺱا ﺐﺠﻳ
- أﺪﺒﺕ ﻒﻴﻔﺠﺘﻟا ةرود ﻦﻣ ةﺮﻴﺥﻷا ﺔﻠﺣﺮﻤﻟا
ﺮیﺬﺤﺗ : ﺔﻳﺎﻬﻥ ﻞﺒﻗ ًا ﺪ ﺑ أ ﻒﻴﻔﺠﺘﻟا نارود ﻒﻗﻮﺕ ﻻ
27
Page 28

ﻲﻓ ﻪﻴﻟإ رﺎﺸﻣ ﻮه ﺎﻤآ ﻮﻟد ﻲﻓ ﺎﻬﻌﻤﺟا
ةرﻮﺼﻟا
.
.(
ﻊﺟارﺔﻗرﻮﻟا
ﺔﻟﺎﺴﻐﻠﻟ ﻰﻠﻔﺴﻟا)
4. جرﺎﺨﻟا ﻰﻟإ ﺐﺤﺱا
ﺾﺒﻘﻤﻟا ًﻼﻤﻌﺘﺴﻣ
ﻪﻴﻟإ رﺎﺸﻤﻟا ﺮﻴﻐﺼﻟا
،ةرﻮﺼﻟا ﻲﻓ نأ ﻰﻟإ
ﺪﺸﻟا ﺐﻴﻀﻗ رﺮﺤﺘﻳ
ﻦﻣ ﻲﻜﻴﺘﺱﻼﺒﻟا
فﺎﻘﻳﻹا ﻊﺽﻮﻣ :ﺔﻳﺎﻐﻟ ﻞﻔﺱﻷا ﻰﻟإ ﺐﺤﺱا نأ
بﺎﺒﻟا نأ ﻰﻟإ ﺮﻴﺸﻳ ﺎﻣ ﺔﻘﻃ تﻮﺻ ﻊﻤﺴﺕ
نﻵا ﻞﻔﻘﻣ ﺮﻴﻏ ﺢﺒﺻأ.
ةﻮﻄﺨﻟا رﺮآ .
ﺎﻬﻌﻓﺪﺕ نأ ﻞﺒﻗ ﺎﻬﻥﺎﻜﻣ ﻲﻓ نﺎﻣﺄﺑ ﺔﻋﻮﺽﻮﻣ
ﺔﻟﻵا ﻞﺥاد ﻰﻟإ.
ﺔﻴﻟﺰﻨﻤﻟا ﺔﻴﺋﺎﺑﺮﻬﻜﻟا تاﺪﻌﻤﻟا ﻦﻣ ﺺﻠﺨﺘﻟا
تﺎﻳﺎﻔﻥ ﻦﻣ ﺺﻠﺨﺘﻠﻟ ﺔﻳدﺎﻌﻟا ﺔﻘﻳﺮﻄﻟﺎﺑ
3. ﺔﻴﻣﺎﻣﻷا ﺔﻬﺠﻟا ﻦﻣ ءﺎﻄﻐﻟا حﻮﻟ ﺔﻟازﺈﺑ ﻢﻗ
ﺔﻳﺪﻠﺒﻟا . ﻞﻜﺸﺑ ﺔﻤﻳﺪﻘﻟا تﻻﻵا ﻊﻤﺟ ﺐﺠﻳ
ﻞﻀﻓﻷ ﻞﺼﻔﻨﻣ لﺎﻤﻌﺘﺱا ةدﺎﻋإوﺮﻳوﺪﺕ
ﻰﻠﻋ ﺎهﺮﺙأ ﻒﻴﻔﺨﺕو ﺎﻬﻳﻮﺘﺤﺕ ﻲﺘﻟا داﻮﻤﻟا
ﺔﺌﻴﺒﻟا و نﺎﺴﻥﻹا ﺔﺤﺻ. ﺔﻳوﺎﺣ ﺰﻣر نإ
ﺔﻓﺎآ ﻰﻠﻋ ﺮﻬﻈﺕ ﺔﺑﻮﻄﺸﻤﻟا تﺎﻳﺎﻔﻨﻟا
ﻊﻴﻤﺠﺕ لﻮﺣ ﻚﺕﺎﺒﺟاﻮﺑ كﺮﻴآﺬﺘﻟ تﺎﺠﺘﻨﻤﻟا
ﻚﻠﻬﺘﺴﻤﻟا ﻰﻠﻋنأ ﻞﺼﺘﻳ
ﻞﺼﻔﻨﻤﻟا تﺎﻳﺎﻔﻨﻟا.
ﻄﻠﺴﻟﺎﺑتﺎ وأ ﺔﻴﻠﺤﻤﻟا ﺔﺋﺰﺠﺘﻟا ﻊﺋﺎﺑ تﺎﻣﻮﻠﻌﻤﻟ
تاﺪﻌﻤﻟا ﻦﻣ ﺺﻠﺨﺘﻟا ﺔﻴﻔﻴآ لﻮﺣ ﺔﻴﻓﺎﺽإ
ﺔﻤﻳﺪﻘﻟا.
ﺢﺘﻓﻟا ًﺎ ی و ﺪ ی بﺎﺒ
ﺢﺘﻓ ﻚﻴﻠﻋ رﺬﻌﺕ لﺎﺣ ﻲﻓﻟا بﺎﺒ ﻲﻓ عﺎﻄﻘﻥا ﺐﺒﺴﺑ
و ءﺎﺑﺮﻬﻜﻟازﺈﺑ ﺐﻏﺮﺕ ﺖﻨآ ﺮﺵﺎﺑ ﻞﻴﺴﻐﻟا ﺔﻟا
ﻲﻟﺎﺘﻟﺎﺑ:
1. ﺲﺑﺎﻘﻟا ﻦﻣ ﺲﺒﻘﻤﻟا لزأ
5.
6. بﺎﺒﻟا ﺢﺘﻓا : ،ًﺎﻨﻜﻤﻣ ﻚﻟذ ﻦﻜﻳ ﻢﻟ لﺎﺣ ﻲﻓ
ﻲﺋﺎﺑﺮﻬﻜﻟا.
2. ىﻮﺘﺴﻣ نأ ﻦﻣ ﺪآﺄﺕ
ﻰﻥدأ ﺔﻟﻵا ﻞﺥاد ﻩﺎﻴﻤﻟا
7. أ ﻚﺑﺎﺸﻤﻟأ نأ ﻦﻣ ﺪآﺄﺕو ﻪﻥﺎﻜﻣ ﻰﻟإ حﻮﻠﻟا ﺪﻋ
بﺎﺒﻟا ﺔﺤﺘﻓ ﻦﻣ . ﺪﻨﻋ
ﺔﻟازﺈﺑ ﻢﻗ ،ﺲﻜﻌﻟا
بﻮﺒﻥأ ًﻼﻤﻌﺘﺴﻣ ةﺪﺋاﺰﻟا ﻩﺎﻴﻤﻟا ﻒﻳﺮﺼﺘﻟا .
28
Page 29

ءﺎﺑﺮﻬﻜﻟا ﻦﻋ ﺔﻟﻵا.
1. ﻚﻓ ﺔﺣﻮﻟ
ﻲﻓ ءﺎﻄﻐﻟا
ﺔﻴﻣﺎﻣﻷا ﺔﻬﺠﻟا
ﺔﻟﺎﺴﻐﻟا ﻦﻣ
لﻼﺥ ﻦﻣ
ﻲﻓ ﻂﻐﻀﻟا
ﻢﺙ ﻂﺱﻮﻟا
رﻮﺼﻟا ﻊﺟار
.(
.(
ﻊﺟارةرﻮﺼﻟا
ةرﻮﺼﻟا ﻊﺟار
(.
ﺔﻋﺎﺴﻟا برﺎﻘﻋ)
ﻦﻣﺁ ﻞﻜﺸﺑ ﺎﻬﻥﺎﻜﻣ ﻲﻓ ﺔﻋﻮﺽﻮﻣ ﻚﺑﺎﺸﻤﻟا
ﻞﺒﻗنأ ﺔﻟﻵا ﻲﻓ ﺎﻬﻌﻀﺕ.
لﺎﺥدإ بﻮﺒﻥأ ﺪﻘﻔﺕةﺮﻣ ﻩﺎﻴﻤﻟا ﻰﻠﻋ ﺔﻨﺴﻟا ﻲﻓ
أو ًا ﺪ ﺟ ًﺎ ﻳ ﻮ ﻗأ يﻳ ﺪﻗ عﺪﺼﺘﻣ بﻮﺒﻥﺔﻟﻮﻬﺴﺑ ﺦﺴﻔﻨ.
اﺔﻧﺎﻴﺼﻟاو ﺔیﺎﻨﻌﻟ
! ﻦﻣ ﺪآﺄﺕنأ ﻞﻴﺴﻐﻟا ةرود ﺪﻗ و ﺖﻬﺘﻥاأ ﻞﺼﻓ
ﻦﻣ أﻟا ﻰﻟإ لﻮﺻﻮﻟا ﻞﺟةﺮﻴﺠﺤ ﺔﻴﻣﺎﻣﻷا:
تﺎﺑﺮﺴﺘﻟا ﻊﻨﻤﻳو ﺔﻟﺎﺴﻐﻟا.
ﺎﻬﺘﻥﺎﻴﺻو ﺎﻬﻔﻴﻈﻨﺕ.
و ﺔﻴﻃﺎﻄﻤﻟا ﻊﻄﻘﻟا ﻒﻴﻈﻨﺕ ﻦﻜﻤﻳ ﺔﻴﺟرﺎﺨﻟا
ﺎﻓ ﺔﻴﻥﻮﺑﺎﺻ ﻩﺎﻴﻤﺑةﺮﺕ . وأ تﺎﺒﻳﺬﻣ ﻞﻤﻌﺘﺴﺕ ﻻ
ﻒﻴﻈﻨﺘﻟا داﻮﻡ ءﺎﻋو ﻒﻴﻈﻨﺗ
ﻂﻐﺽا ،جرﺪﻟا ﺔﻟازﻹ
ﺔﻌﻓاﺮﻟا ﻰﻠﻋ)1 (
ا ﻮﺤﻥ ﺎﻬﺒﺤﺱ ﻦﻴﺒﻥﺎﺠﻟا ﻦﻣ ﻞﻔﺱﻷاﻹ ﺎﻬﺘﻟاز
)
بﺮﺴﺘﺕ ﻲﺘﻟا ﻩﺎﻴﻤﻟا ﻊﻤﺠﻳ ﻲﻜﻟ ءﺎﻋو ﻊﺽ
2.
)اﻮﺣ ﻲﻟ1.5 ﺮﺘﻴﻟ) (
3. ءﺎﻄﻐﻟا ﻚﻓ ﻪﺕرادإ لﻼﺥ ﻦﻣ ﺲﻜﻌﺑ ﻩﺎﺠﺕا
ﻰﻟإ جرﺪﻟا ﺐﺤﺱاو
ﻊﺟار
جرﺎﺨﻟا)2 ()
( . ﻪﻠﺴﻏا
ةرﻮﺼﻟا
ﺎﻴﻣ ﺖﺤﺕﻩ ،ﺔﻳرﺎﺟ
ﻩﺬه راﺮﻜﺕ ﺐﺠﻳ
ًاراﺮﻣ ﺔﻴﻠﻤﻌﻟا.
4. مﺎﺕ ﻞﻜﺸﺑ ﻞﺥاﺪﻟا ﻒﻈﻥ.
5. ًا د ﺪ ﺠ ﻣ ءﺎﻄﻐﻟا ﺖﺒﺙ.
ﺔﻟﻵا ضﻮﺤﺑ ﺔیﺎﻨﻌﻟا
6. أ ﻪﻥﺎﻜﻣ ﻰﻟإ ءﺎﻄﻐﻟا ﺪﻋو ﻦﻣ ﺪآﺄﺕنأ
ﺔﺨﻀﻤﻟا ﻒﻴﻈﻨﺗ
ﺪﻘﻔﺗلﺎﺥدإ بﻮﺒﻧأ ﻩﺎﻴﻤﻟا
ﺔﻥﺎﻴﺻ يأ ﻰﻟإ جﺎﺘﺤﺕ ﻻ ﻒﻴﻈﻨﺘﻟا . ﺾﻌﺑ ﻲﻓ
ةﺮﻴﻐﺻ ضاﺮﻏأ ﻊﻘﺕ ﺪﻗ ،نﺎﻴﺣﻷا) ﻊﻄﻘﻟا ﻞﺜﻣ
ﻞﻗﻷا .ﺎﺣ ﻲﻓ ﻪﻟﺪﺒﺘﺱا ،تﺎﻋﺪﺼﺕ يأ ﺖﻳأر ل
ًا ر ﻮ ﻓ : ءﺎﻨﺙأﺴﻐﻟا تارود ﻩﺎﻴﻤﻟا ﻂﻐﺽ نﻮﻜﻳ ،ﻞﻴ
ﺎﻬﻨﻣ ﻞﻔﺱﻷا ﻢﺴﻘﻟا ﻲﻓ ﺔﻌﻗاﻮﻟا ﺔﺨﻀﻤﻟا ﻲﻤﺤﺕ.
رارزﻷا وأ ﺔﻳﺪﻘﻨﻟا ( ﻲﺘﻟا ﺔﻴﻣﺎﻣﻷا ةﺮﻴﺠﺤﻟا ﻲﻓ
ﻞﺼﻓ ﺔﻟﻵا ﻦﻋ ﻩﺎﻴﻤﻟاو ءﺎﺑﺮﻬﻜﻟا
• ﻞآ ﺪﻌﺑ ﻩﺎﻴﻤﻟا ﺔﻴﻔﻨﺣ ﻖﻠﻏا ةرودﺴﻏﻞﻴ
ﺱ ﻚﻟﺬﻓّﺪ ﺤ ﻴ ﻩﺎﻴﻤﻟا مﺎﻈﻥ كﻼﻬﺘﺱا ﻦﻣ ﻲﻓ
• ﺔﻟﻵا ﻞﺼﻓاﻦﻣ ﺪﻨﻋ ﻲﺋﺎﺑﺮﻬﻜﻟا ﺲﺒﻘﻤﻟا
ﻒﻴﻈﻨﺗﺔﻟﺎﺴﻐﻟا
ﺔﻟﺎﺴﻐﻠﻟﺑ ﺔﻄﺱاﻮ ﺔﻌﻄﻗ شﺎﻤﻗ ﺔﻋﻮﻘﻨﻣ ﺔﻤﻋﺎﻥ
ﺔﻄﺵﺎآ داﻮﻣ .
• كﺮﺕاﻟا نﻮﻜﺕ يدﺎﻔﺘﻟ ًﺎ ﻴ ﺋ ﺰ ﺟ ًﺎ ﺣ ﻮ ﺘ ﻔ ﻣ بﺎﺒ
اوﺮﻟا ﺢﺋﺔﻬﻳﺮﻜﻟا.
إﺔﻟﺎﺴﻐﻟا ن ﺔﻓﺎﺸﻨﻟا ةﺰﻬﺠﻣ ﺔﻴﺕاذ ﺔﺨﻀﻤﺑ
29
Page 30

اﻪﺡﻼﺻإ و ﻞﻠﺨﻟ
•
•
•
•
•
(ﻣ ﺪآﺄﺕ ، ﻦأ ن
ﻊﺟار"ةﺪﻋﺎﺴﻤﻟا"
ﺤﺋﻼﻟا ﻰﻟإ ةدﻮﻌﻟا لﻼﺥ ﻦﻣ ﺔﻟﻮﻬﺴﺑ ﺎﻬﻠﺣ ﻦﻜﻤﻳ ﻻ ﺔﻠﻜﺸﻤﻟاﺔ ﺔﻴﻟﺎﺘﻟا:
ﻤﻟﺎﺑ ًﻻ ﻮ ﺻ ﻮ ﻣ ﺲﻴﻟ ﺲﺑﺎﻘﻟاﺔﻳﺎﻔآ ﻪﺑ ﻚﺘﺤﻳ ﻻ وأ ﻞﻣﺎﻜﻟﺎﺑ ﺲﺒﻘ
• ءﺎﺑﺮﻬﻜﻟا ﻲﻓ عﺎﻄﻘﻥا ﺔﻤﺙ
ﻞﻄﻌﺘﺕ ﺪﻗ ﺔﻟﺎﺴﻐﻟا ﺔﻓﺎﺸﻨﻟاأًﺎﻥﺎﻴﺣ . ﺔﻴﻨﻘﺘﻟا ةﺪﻋﺎﺴﻤﻟا ﺰآﺮﻤﺑ لﺎﺼﺕﻻا ﻞﺒﻗ)
ﺔﻠﻜﺸﻤﻟا ﺔﻠﻤﺘﺤﻤﻟا بﺎﺒﺳﻷا /ﻠﺤﻟالﻮ
ﺔﻟﺎﺴﻐﻟا ﺔﻓﺎﺸﻨﻟا روﺪﺗ ﻻ
ًﺎ ﻘ ﻠ ﻐ ﻣ ﺲﻴﻟ ﺔﻟﻵا بﺎﺑﺎﻜﺣﺈﺑم
• ﻰﻠﻋ ﻂﻐﻀﻟا ﻢﺘﻳ ﻢﻟ رﺰﻟاﻞﻴﻐﺸﺘﻟا/ءﺎﻔﻃﻹا
• ﺔﺣﻮﺘﻔﻣ ﺖﺴﻴﻟ ﻩﺎﻴﻤﻟا ﺔﻴﻔﻨﺣ نا
• ﺮﺥﺄﺘﻣ ﻞﻴﻐﺸﺕ ﻂﺒﺽ ﻢﺕ
بﻮﺒﻥأ إﺥدﺎ ﺔﻴﻔﻨﺤﻟﺎﺑ ًﻻ ﻮ ﺻ ﻮ ﻣ ﺲﻴﻟ ﻩﺎﻴﻤﻟا ل
• ﻷابﻮﺒﻥ يﻮﻠﻣ
• ﺔﺣﻮﺘﻔﻣ ﺖﺴﻴﻟ ﻩﺎﻴﻤﻟا ﺔﻴﻔﻨﺣ
• لﺰﻨﻤﻟا ﻲﻓ ﻩﺎﻴﻣ ﺪﺟﻮﻳ ﻻ
• ًﺎ ﻴ ﻓ ﺎ آ ﺲﻴﻟ ﻩﺎﻴﻤﻟا ﻂﻐﺽ
• ﻢﻟ ﻞﻴﻐﺸﺘﻟا رز ﻰﻠﻋ ﻂﻐﻀﻟا ﻢﺘﻳ/فﺎﻘﻳﻹا
" ةرود وأ" ﻞﻬﺴﻟا ﻲﻜﻟا
"، ﻲﻬﺘﻨﺕ ﺎﻣﺪﻨﻋﻞﻴﺴﻐﻟا ةرود ، ضﻮﺤﻟا روﺪﻳءﻂﺒﺑ.
ةروﺪﻟا ءﺎﻬﻥﻹ، ﻞﻴﻐﺸﺘﻟا رز ﻰﻠﻋ ﻂﻐﺽا/ رز وأ فﺎﻘﻳﻹا
" .ﺴﻏ ةرود تﺮﺘﺥا لﺎﺣ ﻲﻓﻴ ﻞ"ﻟا ﺮﻳﺮﺤ
"، ﻳ ﺎﻤﻨﻴﺑ ةروﺪﻟا ﺔﻟﻵا ﻲﻬﻨﺕ ﻢﺘﻞﻴﺴﻐﻟا ﻊﻘﻥ. ﻒﻳﺮﺼﺘﻟ
ﻹ ﻩﺎﻴﻤﻟاجاﺮﺥ ﻞﻴﻐﺸﺘﻟا رز ﻰﻠﻋ ﻂﻐﺽا ،ﻞﻴﺴﻐﻟا/ وأ فﺎﻘﻳﻹا
• ةرود تﺮﺘﺥا لﺎﺣ ﻲﻓ"لﺎﻔﻃﻷا
" ﻞﻬﺴﻟا ﻲﻜﻟا
ﻞﻴﺴﻐﻟا ةرود أﺪﺒﺗ ﻻ
ﺔﻟﺎﺴﻐﻟا ﺔﻓﺎﺸﻨﻟا ﺔﺌﺒﻌﺘﺑ مﻮﻘﺗ ﻻ
ﻩﺎﻴﻤﻟا
ﺔﻟﺎﺴﻐﻟا بﺎﺑ ﺔﻓﺎﺸﻨﻟا ﻰﻘﺒی
ًﻼﻔﻘﻡ
".
(
(
30
ﻊﺟار "ﺐﻴآﺮﺘﻟا"
ﻩﺎﻴﻤﻟا ﻒﻳﺮﺼﺕ ﻲﻓ ﻞآﺎﺸﻣ كﺎﻨهو ﺔﺌﺒﻌﺘﺑ ﺐﺒﺴﺕ ﻎﻳﺮﻔﺕ
راﺮﻤﺘﺱﺎﺑ ﻩﺎﻴﻤﻠﻟ ﺔﻟﺎﺴﻐﻟا . اﺬه ﻞﺜﻣ يدﺎﻔﺘﻟﺮﻣﻷا ، ﺪﺟﻮﻳ ﻲﻓ
" ﻞﻬﺴﻟا ﻲﻜﻟا
ﺔﻳﻮﺴﺕ ﻢﺘﻳ ﻢﻟبﻮﺒﻥأ ﻦﻴﺑ ﻩﺎﻴﻤﻟا65 و100 ضرﻷا ﻦﻣ ﻢﺱ
ﻊﺟار"ﺐﻴآﺮﺘﻟا"
)
• ﻟ ﺮﺤﻟا فﺮﻄﻟاﻸبﻮﺒﻥ ﻟا ﺖﺤﺕ ﻩﺎﻴﻤ)
• ﻦﻣ ﺎﻴﻠﻌﻟا ﻖﺑاﻮﻄﻟا ﻲﻓ لﺰﻨﻤﻟا نﺎآ لﺎﺣ ﻲﻓﻟا نﻮﻜﻳ ﺪﻗ ،ﻰﻨﺒﻤ
ﻟاﻒﻳﺮﺼﺘﻠﻟ ةدﺎﻀﻣ ﺔﺻﺎﺥ تﺎﻣﺎﻤﺻ تﻼﺤﻤ
• ﻲﻓ ﺪﺟﻮﻳ ﻻ مﺎﻈﻥﻟا ﻒﻳﺮﺼﺘ راﺪﺠﻟا ﻲﻓﻮﺒﻥاب ﻔﻨﺘﻣﺲ
ﺴﻐﻟا ةرودﻒﻳﺮﺼﺘﻟا ﻦﻤﻀﺘﺕ ﻻ ﻞﻴ : تارود ﺾﻌﺑ ﺐﻠﻄﺘﺕ
و ﺊﺒﻌﺗ ﺔﻟﺎﺴﻐﻟا ﻩﺎﻴﻤﻟا غﺮﻔﺗ
راﺮﻤﺘﺳﺎﺑ
ﺔﻟﺎﺴﻐﻟا ﺔﻓﺎﺸﻨﻟا فﺮﺼﺗ ﻻ
Page 31

ﻊﺟار" تارود
•
•
•
•
•
•
(
ﻊﺟار"ﺴﻐﻟا تارودﻴ ﻞ
(
ﻞﻴﻐﺸﺘﻟا رز ﻰﻠﻋ ﻂﻐﺽا/فﺎﻘﻳﻹا )
(
ﻊﺟار"ﺐﻴآﺮﺘﻟا"
ﺴﻐﻟاﻴ ًﺎ ﻳ و ﺪ ﻳ ﻒﻳﺮﺼﺘﻟا ﺔﻠﺣﺮﻣ ﻞﻴﻐﺸﺕ ﻞ)
ﻩﺎﻴﻤﻟا روﺪﺗ ﻻو
ﺴﻐﻟاﻴو ﻞﻒﺋﺎﻇﻮﻟا"
• ﺔﻔﻴﻇو ﻞﻴﻐﺸﺕ ﻢﺕ"ﻞﻬﺴﻟا ﻲﻜﻟا" :ﺴﻐﻟا ةرود لﺎﻤآﻹﻴ ،ﻞ
وﻮﻟاﻒﺋﺎﻇ"
• بﻮﺒﻥأ يﻮﻠﻣ ﻒﻳﺮﺼﺘﻟا)
• ةدوﺪﺴﻣ ﻒﻳﺮﺼﺘﻟا ةﺎﻨﻗ
ﻊﺟار
ﻊﺟار
ﻢﺘﻳ ﻢﻟ ﻚﻓ ﺐﻴآﺮﺘﻟا لﻼﺥ ﺢﻴﺤﺻ ﻞﻜﺸﺑ ضﻮﺤﻟا)
(
(
(
(
ﻊﺟار"ﺐﻴآﺮﺘﻟا"
ﻊﺟار"ﺐﻴآﺮﺘﻟا"
(
ﻊﺟار"ﻞﻴﺴﻐﻟاو ﻒﻴﻈﻨﺘﻟا داﻮﻣ"
ﻊﺟار" ﺔﻳﺎﻨﻌﻟا
(
(
ﻊﺟار"ﺐﻴآﺮﺘﻟا"
ﻞﺒﻗ ًﺎﺒﻳﺮﻘﺕ ةدﺎﻋإﺎﻬﻠﻴﻐﺸﺕ. ﻞﺼﺕا ،ﺔﻠﻜﺸﻤﻟا تﺮﻤﺘﺱا لﺎﺣ ﻲﻓ
ﺔﻴﻨﻘﺘﻟا ﺔﻳﺎﻨﻌﻟا ﺰآﺮﻤﺑ
ﻚﻟذ ﻪﺑﺎﺵ(
"ﺐﻴآﺮﺘﻟا"
• ﺔﻟﺎﺴﻐﻟا ﺔﻳﻮﺴﺕ ﻢﺘﻳ ﻢﻟ)
• ﺴﻐﻟاو تﺎﺵوﺮﻔﻤﻟا ﻦﺋاﺰﺥ ﻦﻴﺑ ﺔﻘﻟﺎﻋ ﺔﻟﺎ ﻂﺋﺎﺤﻟا)
"اﺐﻴآﺮﺘﻟ"
• ﺔﻥزاﻮﺘﻣ ﺮﻴﻏ ﺔﻟﻮﻤﺤﻟا)
لﺎﺥدإ بﻮﺒﻥأ ﺖﺒﺜﻣ ﺲﻴﻟ ﻩﺎﻴﻤﻟا مﺎﻜﺣﺈﺑ)
• دوﺪﺴﻣ ﻒﻴﻈﻨﺘﻟا داﻮﻣ ءﺎﻋو)ﻔﻴﻈﻨﺘﻟﻪ ،
وﺔﻥﺎﻴﺼﻟا"
• بﻮﺒﻥأ ﻟ ﻒﻳﺮﺼﺘﻟا مﺎﻜﺣﺈﺑ ًﺎﺘﺒﺜﻣ ﺲﻴ)
ءﺎﺑﺮﻬﻜﻟا ﻦﻋ ﺎﻬﻠﺼﻓأ و ﺔﻟﻵا ءﺎﻔﻃﺈﺑ ﻢﻗ. ةﺪﺣاو ﺔﻘﻴﻗد ﺮﻈﺘﻥا
ءﻮﺿ ﻊﻡ ﺔﻋﺮﺴﺑ ﺾﻡﻮﺗ
ﺕ ﻻ ﻒﻴﻈﻨﺘﻟا داﻮﻣﺘﻼء ما ﻊﻣﺴﻐﻟﻴ ﻞ) ﺎﻬﻴﻠﻋنأ ةرﺎﺒﻋ ﻞﻤﺤﺕ
"تﻻﺎﺴﻐﻠﻟ تﺎﻓﺎﺸﻨﻟا " وأ"ﻲﻟﻵا وأ يوﺪﻴﻟا ﻞﺴﻐﻠﻟ " ﺎﻣ وأ
• ﻢﺕﻤﻌﺘﺱاﺎ ل ﻦﻣ ﺮﻴﺜﻜﻟا داﻮﻣﻟا ﻒﻴﻈﻨﺘ
ﺰﺘﻬﺗ ﺔﻟﺎﺴﻐﻟاًا ﺮ ﻴ ﺜ آ ةرود لﻼﺥ
ﻊیﺮﺴﻟا ناروﺪﻟا
ﺔﻟﺎﺴﻐﻟا ﺔﻓﺎﺸﻨﻟاﻩﺎﻴﻤﻟا بﺮﺴﺗ
زﻮﻡر "ا ﺔﻠﺡﺮﻤﻟﺔیرﺎﺠﻟا"
ﻞﻴﻐﺸﺘﻟا ﺮﺵﺆﻡ/ءﺎﻔﻃﻹا.
كﺎﻨهﻟا ﻦﻡ ﺮﻴﺜﻜﻟا ةﻮﻏﺮ
(
OFF
ﻊﺟار"تاﺮﻳﺬﺤﺘﻟا ﺢﺋﺎﺼﻨﻟاو"
ﺢﺘﻔﺑ ﻢﻗ بﺎﺒﻟاﻳوﺪﻳًﺎ )
ﺘﺤﺕ ﻻ وأ ﺲﺑﺎﻘﻟﺎﺑ ﺔﻟﻮﺻﻮﻣ ﺮﻴﻏ ﺔﻟﻵاﻪﺑ ﻚ
• ءﺎﺑﺮﻬﻜﻟا ﻲﻓ عﺎﻄﻘﻥا ﺔﻤﺙ
• مﺎﻜﺣﺈﺑ ﻖﻠﻐﻣ ﺮﻴﻏ ﺔﻟﻵا بﺎﺑ
• ﺮﺥﺄﺘﻣ ﺖﻗو ﻂﺒﺽ ﻢﺕ
• ﺔﻴﻌﺽو ﻲﻓ ﻒﻴﻔﺠﺘﻟا ءﺎﻔﻃﻹا
ﻒﻔﺠﺗ ﻻ ﺔﻓﺎﺸﻨﻟا ﺔﻟﺎﺴﻐﻟا
ﺔﻟﺎﺴﻐﻟا بﺎﺑ ﺔﻓﺎﺸﻨﻟا ﻰﻘﺒی
ًﻼﻔﻘﻡ
31
Page 32

ةﺪﻋﺎﺴﻤﻟا
ةﺪﻋﺎﺴﻤﻠﻟ ًﺎ ﺒ ﻠ ﻃ لﺎﺼﺗﻻا ﻞﺒﻗ:
(
ﻊﺟار"ﺣﻼﺻإو ﻞﻠﺨﻟاﻪ"
• ﻚﺴﻔﻨﺑ ﺔﻠﻜﺸﻤﻟا ﻞﺣ ﻚﺘﻋﺎﻄﺘﺱﺎﺑ نﺎآ اذإ ﺎﻣ ﺪآﺄﺕ)
• أ ﺪﻋﺕﺸ ﻞﻴﻐﺴﻐﻟا ةرودﻴ اذإ ﺎﻣ ﺪآﺄﺘﻠﻟ ﻞ ﻞﺣ ﻢﺕﻟا ﺔﻠﻜﺸﻤ
• ﺲﻜﻌﻟا ﺪﻨﻋآﺮﻤﺑ ﻞﺼﺕا ،ﺰ ﻤﻟا ﺔﻴﻨﻘﺘﻟا ةﺪﻋﺎﺴﻤﻟاﺮﺺﺥ
! ﺔﻟﺎﺴﻐﻟا لﺎﻤﻌﺘﺱا وأ ﺐﻴآﺮﺕ ﻢﺕ لﺎﺣ ﻲﻓ ﺔﻓﺎﺸﻨﻟا ﻚﻴﻠﻋ ﻦﻴﻌﺘﻳ ،ﺊﻃﺎﺥ ﻞﻜﺸﺑنأ ﻲﺘﻟا ﺔﻣﺪﺨﻟا ﻊﻓﺪﺑ مﻮﻘﺕ
ﻒﺕﺎﻬﻟا ﺮﺒﻋ ﺎﻬﺘﺒﻠﻃ .
! ةﺪﻋﺎﺴﻣ ًﺎ ﻤ ﺋ ا د ﺐﻠﻃا ﻦﻴﻴﻨﻘﺕﻣﻦﻴﺼﺥﺮ.
ءﺎﺝﺮﻟا ﺪیوﺰﺗتﺎﻡﻮﻠﻌﻤﻟا ﺔﻴﻟﺎﺘﻟا:
• ﺔﻠﻜﺸﻤﻟا عﻮﻥ
Mod(
S/N(
• ﻵا جذﻮﻤﻥ ﺔﻟ)
• ﻠﺴﻠﺴﺘﻟا ﻢﻗﺮﻟاﻲ )
تﺎﻣﻮﻠﻌﻤﻟا ﻩﺬه دﺎﺠﻳإ ﻦﻜﻤﻳ تﺎﻣﻮﻠﻌﻤﻟا ﺔﺣﻮﻟ ﻰﻠﻋﺔﻟﺎﺴﻐﻟا ﻰﻠﻋ ةدﻮﺟﻮﻤﻟا.
ﺔﻈﺡﻼﻡ: ﻦﻣ جوﺮﺨﻠﻟ"ضﺮﻌﻟا ﺔﻐﻴﺻ"ﻦﻳرز ﻰﻠﻋ ﻂﻐﺽا ، "ﻞﻴﻐﺸﺘﻟا /ءﺎﻔﻃﻹا " و"ﻞﻴﻐﺸﺘﻟا /
ﻪﺴﻔﻥ ﺖﻗﻮﻟا ﻲﻓ ةﺪﻤﻟ3 ناﻮﺙ.
فﺎﻘﻳﻹا"
32
Page 33

Mode d’installation et
d’emploi
LAVANTE SÉCHANTE
FR
Français
AQUALTIS
AQM9D 49 X
! Ce symbole vous rappelle de lire ce mode d’emploi.
Sommaire
Installation, 34-35
Déballage et mise à niveau
Raccordements eau et électricité
Caractéristiques techniques
Description de l’appareil, 36-37
Tableau de bord “touch control”
Comment effectuer un cycle de lavage ou un
séchage, 38
Programmes et options, 39
Tableau des programmes
Options de lavage
Produits lessiviels et linge, 40
Lessive
Triage du linge
Conseils de lavage
Système d’équilibrage de la charge
FR
Précautions et conseils, 41
Sécurité générale
Mise au rebut
Ouverture manuelle de la porte hublot
Entretien et soin, 42
Coupure de l’arrivée d’eau et du courant
Nettoyage de l’appareil
Nettoyage du tiroir à produits lessiviels
Entretien du tambour
Nettoyage de la pompe
Contrôle du tuyau d’arrivée de l’eau
Anomalies et remèdes, 43
Assistance, 44
33
Page 34

Installation
FR
! Conserver ce mode d’emploi pour pouvoir le consulter
à tout moment. En cas de vente, de cession ou de
déménagement, veiller à ce qu’il accompagne toujours le
lavante-séchante.
! Lire attentivement les instructions : elles fournissent
des conseils importants sur l’installation, l’utilisation et la
sécurité de l’appareil.
! Cette notice, la garantie et les pièces servant à
l’installation sont réunies dans un sachet.
Déballage et mise à niveau
Déballage
1. Sitôt le lavante-séchante déballé, s’assurer qu’il n’a pas
été endommagé pendant son transport.
S’il est abîmé, ne pas le raccorder et contacter le vendeur.
2. Enlever les quatre vis de
protection pour le transport,
le caoutchouc et la cale,
placés dans la partie arrière
(voir figure).
! Une mise à niveau minutieuse garantit une bonne stabilité
de l’appareil et évite toute vibration et bruit surtout pendant
l’essorage.
! Si l’appareil est posé sur de la moquette ou un tapis,
agir sur les pieds de réglage de manière à ce qu’il y ait
suffisamment de place pour assurer une bonne ventilation.
Raccordements eau et électricité
Raccordement du tuyau d’arrivée de l’eau
! Avant de raccorder le tuyau d’arrivée de l’eau, laisser
couler l’eau jusqu’à ce quelle soit limpide.
1. Raccorder le tuyau
d’arrivée de l’eau à
l’appareil en le vissant à la
prise d’eau prévue, dans
la partie arrière en haut à
droite (voir figure).
3. Boucher les trous à l’aide des bouchons plastique
fournis dans le sachet.
4. Ces pièces sont à conserver car il faut les remonter
en cas de déplacement du lavante-séchante pour éviter
d’endommager l’intérieur de l’appareil pendant le transport.
! Les pièces d’emballage ne sont pas des jouets pour
enfants.
Mise à niveau
1. Poser le lavante-séchante sur un sol plat et rigide, sans
l’adosser à un mur ou à un meuble.
2. Pour compenser les
irrégularités du sol, visser
ou dévisser les pieds de
réglage jusqu’à ce que
l’appareil soit parfaitement
à l’horizontale (il ne doit pas
être incliné de plus de 2
degrés).
2. Reliez le tuyau
d’alimentation en le vissant
à un robinet d’eau froide à
embout fileté 3/4 gaz (voir
figure).
3. Attention à ce que le tuyau ne soit pas plié ou écrasé.
! La pression de l’eau doit être comprise entre les valeurs
indiquées dans le tableau des Caractéristiques techniques
(voir page ci-contre).
! Si la longueur du tuyau d’alimentation ne suffit pas,
s’adresser à un magasin spécialisé ou à un technicien
agréé.
! Ne jamais utiliser de tuyaux d’arrivée usés mais
uniquement ceux fournis avec l’appareil.
34
Page 35

65 - 100 cm
Raccordement du tuyau de vidange
Raccorder le tuyau de
vidange à un conduit
d’évacuation ou à une
évacuation murale placés
à une distance du sol
comprise entre 65 et 100
cm en évitant à tout prix de
le plier.
Autrement, accrocher le
tuyau de vidange à un évier
ou à une baignoire, dans
ce cas, fixer le support
plastique fourni avec
l’appareil au robinet (voir
figure).
L’extrémité libre du tuyau
d’évacuation ne doit pas
être plongée dans l’eau.
! Le câble ne doit être ni plié ni trop écrasé.
! Le câble d’alimentation et la fiche ne doivent être
remplacés que par des techniciens agréés.
Attention! Nous déclinons toute responsabilité en cas de
non-respect des normes énumérées ci-dessus.
Caractéristiques techniques
Modèle
AQM9D 49 X
FR
! L’utilisation d’un tuyau de rallonge est absolument
déconseillée mais si on ne peut faire autrement, il faut
absolument qu’il ait le même diamètre que le tuyau original
et sa longueur ne doit pas dépasser 150 cm.
Raccordement électrique
Avant de brancher la fiche dans la prise de courant,
s’assurer que :
• la prise est bien reliée à la terre et est conforme aux
réglementations en vigueur;
• la prise est bien apte à supporter la puissance
maximale de l’appareil indiquée dans le tableau des
Caractéristiques techniques (voir ci-contre);
• la tension d’alimentation est bien comprise entre les
valeurs figurant dans le tableau des Caractéristiques
techniques (voir ci-contre);
• la prise est bien compatible avec la fiche de l’appareil.
Autrement, remplacer la prise ou la fiche.
! Cet appareil ne doit pas être installé à l’extérieur, même
à l’abri, car il est très dangereux de le laisser exposé à la
pluie et aux orages.
! Après installation de l’appareil, la prise de courant doit
être facilement accessible.
! N’utiliser ni rallonges ni prises multiples.
Dimensions
Capacité
Raccordements
électriques
Raccordements
hydrauliques
Vitesse d’essorage
Programmes de
contrôle selon
la norme
EN 50229
largeur 59,5 cm
hauteur 85 m
profondeur 64,5 cm
de 1 à 9 kg pour le lavage
de 1 à 6 kg pour le séchage
Voir la plaque signalétique appliquée
sur la machine
pression maximale 1 MPa (10 bar)
pression minimale 0,05 MPa (0,5
bar) capacité du tambour 62 litres
jusqu’à 1400 tours minute
lavage: programme
re 60°C; effectué avec une charge
de 9 kg.
séchage: premier séchage effectué
pour 3 kg de linge avec sélection
du niveau de séchage “PRÊT A
REPASSER”;
deuxième séchage effectué pour
6 kg de linge avec sélection du
niveau de séchage “INTENSIF”;
Cet appareil est conforme aux Directives Communautaires suivantes:
- 2004/108/CE (Compatibilité électromagnétique)
- 2006/95/CE (Basse Tension)
- 2002/96/CE
; températu-
35
Page 36

3
1
2
Description de l’appareil
FR
PORTE
HUBLOT
POIGNEE
PORTE
HUBLOT
SOCLE
PORTE HUBLOT
PIEDS REGLABLES
Pour ouvrir la porte, se servir
de la poignée prévue (voir
illustration).
TABLEAU DE
BORD
! L’utilisation du bac supplémentaire 3 exclut le
prélavage.
bac à additifs : pour assouplissant ou additifs liquides.
Il est recommandé de ne jamais dépasser le niveau
maximal indiqué par la grille et de diluer des assouplissants
concentrés.
Tableau de bord “touch control”
Pour modifier les sélections,
appuyer légèrement sur
l’icône à l’intérieur de la
zone sensible (touch control)
comme illustré (voir figure).
TIROIR A PRODUITS LESSIVIELS
Le tiroir est situé à l’intérieur
de l’appareil et il faut ouvrir la
porte pour y accéder.
Pour le dosage des produits
lessiviels, consulter le chapitre
“Produits lessiviels et linge”.
1. bac à produit de prélavage :
utiliser de la lessive en poudre.
! Avant d’introduire la
lessive, s’assurer que le bac
supplémentaire 3 n’est pas
présent.
2. bac à produit de lavage :
utiliser de la lessive en poudre ou
3. Bac supplémentaire: Eau de Javel
liquide. Dans ce dernier cas, il est
recommandé de le verser juste
avant de démarrer le lavage.
Stand-by
Ce lavante-séchante, conformément aux nouvelles normes
en vigueur dans le domaine de l’économie d’énergie, est
équipée d’un système d’extinction automatique (veille)
activé après 30 minutes environ d’inutilisation. Appuyez
brièvement sur la touche ON-OFF et attendre que la
machine soit réactivée.
MODIFICATION DE LA LANGUE
A la première mise en service de l’appareil, la première
langue clignote à l’écran. En correspondance des 3 touches
à droite de l’écran, il y a affichage des symboles “ ”, “OK”
et “V”. Les langues changent automatiquement toutes
les 3 secondes ou par pression des touches à côté des
symboles “ “ et “V”. La touche “OK” permet de confirmer
la langue qui devient fixe au bout de 2 secondes. Si
aucune pression n’est exercée, le changement de langue
automatique reprend au bout de 30 secondes.
La langue ne peut être modifiée qu’appareil éteint.
Un pression simultanée de 5 secondes sur les touches
température + essorage + départ différé
déclenche un bref signal sonore et affiche à l’écran la
langue sélectionnée clignotante. Pour changer de langue,
appuyer sur les touches à côté des symboles “ ” et “V”.
La touche à côté du symbole “OK” permet de confirmer
la langue qui devient fixe au bout de 2 secondes. Si
aucune pression n’est exercée, le changement de langue
automatique reprend au bout de 30 secondes. Allumer
l’appareil.
36
Page 37

Tableau de bord “touch control”
Bouton
PROGRAMMES
M2
M1
Touche ESSORAGE
Touche TEMPÉRATURE
Écran
Touche avec voyant
START/PAUSE
Voyant
ECO
FR
Icônes PHASES
DE LAVAGE
Bouton avec témoin
ON/OFF
Bouton avec témoin ON/OFF: appuyer brièvement sur
la touche pour allumer ou éteindre l’appareil. Le témoin
vert indique que l’appareil est sous tension. Pour éteindre
le lavante-séchante en cours de lavage, appuyer sur
la touche pendant au moins 3 secondes de suite; une
pression brève ou accidentelle n’entraîne pas l’arrêt de
l’appareil. L’arrêt de l’appareil pendant un lavage annule le
lavage en cours.
Bouton PROGRAMMES: il peut tourner dans les deux
sens. Pour sélectionner le programme plus adapté,
consulter le “Tableau des programmes”.
Pendant le lavage, le bouton reste fixe.
Touches M1-M2: exercer une pression sur une des
touches pour mémoriser un cycle et les personnalisations
préférées. Pour retourner à un cycle précédemment
mémorisé appuyer sur la touche correspondante.
Touche SÉCHAGE: appuyer pour réduire ou supprimer
le séchage; le niveau ou le temps de séchage sélectionné
s’affiche à l’écran (voir “Comment faire un cycle de lavage
ou un séchage”).
Touche TEMPERATURE: appuyer sur la touche pour
régler ou supprimer la température; la valeur est indiquée
par les voyants situés au-dessus (voir “Comment faire un
cycle de lavage ou un séchage”).
Touche ESSORAGE: appuyer sur la touche pour régler
ou supprimer l’essorage; la valeur est indiquée par les
voyants situés au-dessus (voir “Comment faire un cycle de
lavage ou un séchage”).
Touche DEPART DIFFÉRÉ: appuyer sur la touche
pour sélectionner un départ différé du programme choisi; le
retard programmé est indiqué par l’écran situé au-dessus
(voir “Comment faire un cycle de lavage ou un séchage”).
Touche
S
ÉCAHGE
Touches
OPTIONS
Bouton avec témoin
Touche DEPART
DIFFÉRÉ
Voyant HUBLOT
VERROU ENFANT
VERROUILLEÉ
Touches et Voyants OPTIONS: appuyez pour sélectionner
les options disponibles. Le voyant correspondant à l’option
sélectionnée reste allumé (voir “Comment faire un cycle de
lavage ou un séchage”).
Icônes PHASES DE LAVAGE: elles s’allument pour
indiquer le stade d’avancement du cycle (Lavage
- Rinçage - Essorage/Vidange – Séchage ).
L’inscription s’allume quand le cycle est terminé.
Touche avec voyant START/PAUSE: quand le voyant vert
clignote lentement, appuyer sur la touche pour démarrer
un lavage. Une fois le cycle lancé, le voyant passe à
l’allumage fixe. Pour activer une pause de lavage, appuyer
à nouveau sur la touche; le voyant passe à l’orange et
se met à clignoter. Si le voyant “Porte verrouillée”
est éteint, on peut ouvrir la porte. Pour faire redémarrer
le lavage exactement à l’endroit de l’arrêt, appuyer une
nouvelle fois sur la touche.
Voyant HUBLOT VERROUILLEÉ: il indique que la
porte hublot est verrouillée. Pour pouvoir ouvrir la porte, il
faut mettre le cycle en pause (voir “Comment faire un cycle
de lavage ou un séchage”).
Bouton avec témoin VERROU ENFANT: pour activer
ou désactiver le verrouillage des commandes, garder la
touche enfoncée pendant environ 2 secondes. L’allumage
du voyant signale que le tableau est verrouillé. Ceci permet
d’éviter toute modification involontaire des programmes,
surtout s’il y a des enfants à la maison.
Voyant ECO: l’icône s’allume quand la modification
des paramètres de lavage permet d’atteindre au moins
10% d’économie d’électricité.
De plus, avant que l’appareil ne se mette en mode “Stand
by”, l’icône s’allume pendant quelques secondes. Appareil
éteint, la récupération d’énergie estimée est d’environ
80%.
3737
Page 38

Comment effectuer un cycle de
lavage ou un séchage
FR
REMARQUE: lors de la première mise en service du lavante-
séchante, lancer un cycle de lavage à vide mais avec du
produit lessiviel en sélectionnant un programme coton 90°
sans prélavage.
1. METTRE L’APPAREIL SOUS TENSION. Appuyer sur la
touche . Tous les voyants s’allument pendant 1 seconde
et AQUALTIS est affiché à l’écran; le voyant de la touche
reste allumé et le voyant START/PAUSE se met à clignoter.
2. CHOISIR LE PROGRAMME. Tourner le BOUTON
PROGRAMMES vers la droite ou vers la gauche pour
sélectionner le programme désiré. Le nom du programme
est affiché à l’écran avec attribution d’une température
et d’une vitesse d’essorage qui peuvent être modifiées.
L’écran affiche la durée du cycle de lavage.
3. CHARGER LE LINGE. Ouvrir la porte hublot. Charger le linge
en faisant attention à ne pas dépasser la quantité indiquée dans
le tableau des programmes de la page suivante.
4. DOSER LE PRODUIT LESSIVIEL. Sortir le tiroir et placer
le produit lessiviel dans les bacs correspondants comme
indiqué au paragraphe “Description de l’appareil”.
5. FERMER LA PORTE HUBLOT.
6. PERSONNALISER LE CYCLE DE LAVAGE. Agir sur les
touches correspondantes du tableau de bord:
Modifier la température et/ou la vitesse
d’essorage.
L’appareil affiche automatiquement la température et l’essorage
maximum prévus pour le programme sélectionné ou ceux qui
ont été sélectionnés en dernier s’ils sont compatibles avec le
programme choisi. En appuyant sur la touche , on peut
diminuer progressivement la température de lavage jusqu’à un
lavage à froid (OFF). En appuyant sur la touche , on peut
diminuer progressivement la vitesse d’essorage jusqu’à sa
suppression totale (OFF). Une autre pression sur les touches
ramènera les valeurs aux maximums prévus.
! Exception: lors de la sélection du programme Coton
Blanc la température peut être augmentée jusqu’à 90°.
Sélectionner le séchage
A la première pression sur la touche , l’appareil sélectionne
automatiquement le niveau de séchage maximum
compatible avec le programme sélectionné. Les pressions
successives font diminuer le niveau et ensuite le temps de
séchage jusqu’à sa suppression “OFF”. Une autre pression
sur les touches ramènera les valeurs aux maximums prévus.
Deux types de séchage sont disponibles:
A - En fonction du temps : de 20 à 180 min.
B - En fonction du degré d’humidité du linge:
Prêt a repasser: linge légèrement humide, facile à repasser.
Sur cintre: idéal pour le linge n’exigeant pas de séchage
complet.
Prêt a ranger: conseillé pour le linge à ranger dans l’armoire
sans repassage.
Intensif: conseillé pour le linge exigeant un séchage
complet, serviettes éponge et peignoirs par exemple.
Si, exceptionnellement, la charge de linge à laver et faire
sécher dépasse la charge maximum prévue (voir tableau des
programmes), procéder au lavage et une fois le programme
terminé, séparer le linge dont une partie sera replacée dans
le tambour. Suivre à présent les instructions pour procéder
au “Séchage seulement”. Procéder de même pour le linge
restant.
Un cycle de refroidissement est toujours prévu quand le
séchage est terminé.
Séchage seulement
Sélectionner à l’aide du bouton programmes un séchage
( - - ) en fonction du type de tissu. Possibilité de
sélectionner le niveau ou le temps de séchage souhaité à
l’aide de la touche SÉCHAGE .
Sélectionner un départ différé.
Pour programmer le départ différé d’un programme
sélectionné, appuyer sur la touche correspondante jusqu’à ce
que le retard désiré soit atteint. Pendant le réglage, le temps de
décalage est affiché ainsi que le message “Démarrage dans:”
et le symbole clignotant. Après avoir programmé le
départ différé, l’écran affiche le symbole en fixe et l’écran
retourne à l’affichage de la durée du cycle sélectionné, du
message “Finit dans:” et de la durée du cycle. Une seule
pression sur la touche DÉPART DIFFÉRÉ permet d’afficher le
délai d’attente sélectionné précédemment.
Après le lancement, l’écran affiche le message “Démarrage
dans:” et le temps de décalage. Une fois que le délai
d’attente sélectionné touche à sa fin, l’appareil démarre et
l’écran affiche le message “Finit dans:” et le temps restant
jusqu’à la fin du cycle.
Pour annuler le départ différé, appuyer sur la touche jusqu’à
ce que l’écran affiche OFF; le symbole s’éteindra.
Modifier les caractéristiques du cycle.
• Appuyer sur la touche pour activer l’option,
l’écran affiche le nom de l’option et le croissant
de lune correspondant à la touche s’allume.
• Appuyer une nouvelle fois sur la touche pour désactiver
l’option, l’écran affiche le nom de l’option plus OFF et le
croissant de lune s’éteint.
! Si la fonction sélectionnée est incompatible avec le
programme sélectionné, le voyant correspondant se met
à clignoter, un signal sonore (3 bips) retentit et la fonction
n’est pas activée.
! Si l’option sélectionnée est incompatible avec une autre
option précédemment sélectionnée, le voyant correspondant
à la première option se met à clignoter et seule la deuxième
option est activée le voyant de la touche reste fixe.
! Les options permettent de modifier la charge conseillée
et/ou la durée du cycle de lavage.
7. DEMARRER LE PROGRAMME. Appuyer sur la touche
START/PAUSE. Le voyant correspondant reste fixe et la porte
hublot est verrouillée (voyant HUBLOT VERROUILLEÉ
allumé). Les icônes correspondant aux phases de lavage
s’allument pendant le cycle pour indiquer la phase en cours.
Pour changer un programme tandis qu’un cycle est en cours,
activer une pause du lavante-séchante par pression sur la
touche START/PAUSE; sélectionner enfin le cycle désiré
et appuyer à nouveau sur la touche START/PAUSE. Pour
ouvrir la porte tandis qu’un cycle est en cours, appuyer sur la
touche START/PAUSE; si le voyant HUBLOT VERROUILLEÉ
est éteint, on peut ouvrir la porte. Pour faire redémarrer
le programme exactement à l’endroit de l’arrêt, appuyer une
nouvelle fois sur la touche START/PAUSE.
8. FIN DU PROGRAMME. Elle est signalée par l’inscription
END allumée. La porte hublot peut alors être ouverte
aussitôt. Si le voyant START/PAUSE clignote, appuyer sur
la touche pour terminer le cycle. Ouvrir la porte, vider le
lavante-séchante et éteindre l’appareil.
! Une pression prolongée sur la touche permet d’annuler
un cycle déjà lancé. Le cycle est interrompu et la machine
s’éteint.
38
Page 39

3
1
2
Programmes et options
Tableau des programmes
Icône Description du Programme
Cycles Coton
COTON avec PRÉLAVAGE: pour enlever les taches tenaces.
(Ajouter le produit lessiviel dans le bac prévu).
COTON BLANC (1): Blancs et couleurs résistantes très sales.
COTON BLANC (2): Blancs et couleurs délicates très sales. 40° 1400
COTON COULEUR (3) 40° 1400
JEANS
Cycles spécial
BÉBÉ: couleurs délicates très sales. 40° 800
MIX 30': pour rafraîchir rapidement du linge peu sale (ne con-
vient pas pour la laine, la soie et le linge à laver à la main).
SYNTHETIQUES RÉSISTANT 60° 800
SOIE: pour linge en soie, viscose, lingerie. 30° 0 -
LAINE: pour laine, cachemire, etc. 40° 800
Cycles de séchge
Lavage&Séchage
Séchage Coton
Séchage Synthétique
Séchage Laine
Fonction (Cycles partiaux)
Rinçage - 1400
Essorage - 1400
Vidange - 0 - - - - 9
La durée du cycle indiquée sur l’écran ou dans la notice représente une estimation calculée dans des conditions standard. Le temps effectif peut varier en fonction de nombreux facteurs tels que :
température et pression de l’eau en entrée, température ambiante, quantité de lessive, quantité et type de charge, équilibrage de la charge, options supplémentaires sélectionnées.
(*) Remarque : environ 10 minutes après le début du programme, selon la charge, la machine effectuera un nouveau calcul et affichera le temps restant jusqu’à la fin du programme.
Pour tous les instituts qui effectuent ces tests :
1) Programme de contrôle selon la norme EN 50229: sélectionner le programme et une température de 60°C.
2) Programme coton long: sélectionner le programme et une température de 40°C.
3) Programme coton court: sélectionner le programme et une température de 40°C.
Temp.
maxi
(°C)
90° 1400
60°
(Maxi 90°)
40° 800
30° 800
30° 1400
Vitesse
maxI
(tours
minute)
1400
- -
- -
- -
Séchage
Options de lavage
Super Lavage
Grâce à l’utilisation d’une plus
grande quantité d’eau au cours
de la phase initiale du cycle et
à une durée prolongée, cette
option permet d’obtenir un
lavage très performant, est très
utile pour éliminer les taches les
plus résistantes.
Possibilité d’utilisation avec ou
sans eau de Javel.
Pour effectuer un blanchiment
aussi, il faut introduire le
bac supplémentaire 3, fourni, dans le bac 1. Au moment
de verser l’eau de Javel, attention à ne pas dépasser le
niveau “max” indiqué sur le pivot central (voir figure). Pour
n’effectuer qu’un blanchissage sans effectuer un lavage
complet, verser l’eau de Javel dans le bac supplémentaire 3,
sélectionner le programme “Rinçage” et activer la fonction
“Super Lavage” .
! Cette option ne peut être activée avec les programmes , ,
, , , , , , , , .
Repassage Facile
En cas de sélection de cette option, le lavage et l’essorage
seront dûment modifiés pour réduire la formation de plis. A la fin
du cycle de lavage, le lavante-séchante fait tourner le tambour
lentement; les voyants “Repassage Facile” et START/PAUSE se
mettent à clignoter. Pour finir le cycle, appuyer sur la touche
START/PAUSE ou sur la touche “Repassage Facile”. Pour
le programme Soie l’appareil arrive au bout du cycle en
laissant le linge tremper, le voyant “Repassage facile” clignote.
Pour vidanger l’eau et pouvoir sortir le linge, il faut appuyer sur
la touche START/PAUSE ou sur la touche “Repassage Facile”.
! Cette option n’est pas disponible avec les programmes , ,
, , , , , , .
Note: si vous voulez aussi effectuer le séchage, ce bouton agit
uniquement s’il est utilisé avec le niveau “Prêt a repasser”.
Temps Réduit
En sélectionnant cette option, la durée du programme est
réduite de 30 à 50 % en fonction du cycle choisi, ce qui
permet de faire des économies d’eau et d’énergie. Utiliser ce
programme pour les vêtements modérément sales.
! Cette option n’est pas disponible avec les programmes , ,
, , , , , , , , .
Rinçage Plus
La sélection de cette option permet d’augmenter l’efficacité
du rinçage et d’éliminer totalement toute trace de lessive. Elle
est très utile pour les personnes particulièrement sensibles
aux produits lessiviels. Son utilisation est conseillée en cas de
pleine charge ou de doses élevées de produit lessiviel.
! Elle n’est pas disponible pour les programmes , , , ,
, , .
Produits lessiviels
Lavage
Adoucis-
- - - 6
- - - 4
- - - 1,5
-
- - - 9
sant
Javel
- 9
- 4
- 3,5
- 2
- 2
- 1
Charge
maxi
(Kg)
9
9
9
4
4
9
Durée
cycle
(*) La durée des programmes de lavage est indiquée sur l’afficheur.
FR
3939
Page 40

Produits lessiviels et linge
FR
Lessive
Le choix et la quantité de lessive dépendent du type de
textile (coton, laine, soie...), de la couleur, de la température
de lavage, du degré de salissure et de la dureté de l’eau.
Bien doser la quantité de produit lessiviel permet d’éviter
les gaspillages et protège l’environnement : bien que
biodégradables, les produits lessiviels contiennent des
éléments qui altèrent l’équilibre de la nature.
Il est conseillé de :
• utiliser des lessives en poudre pour le linge en coton
blanc et pour le prélavage.
• utiliser des lessives liquides pour linge délicat en coton
et pour tous les programmes basse température.
• utiliser des lessives liquides délicates pour la laine et la soie.
Le produit lessiviel doit être versé juste avant le démarrage
du lavage dans le bac prévu à cet effet ou dans la boule
doseuse directement dans le tambour. Dans ce cas, le
cycle Coton avec prélavage n’est pas disponible.
! Ne pas utiliser de lessives pour lavage à la main, elles
génèrent trop de mousse.
Triage du linge
• Bien déployer le linge avant de le charger.
• Trier le linge selon le type de textile (symbole sur
l’étiquette du vêtement) et la couleur en veillant à bien
séparer le linge couleur du linge blanc;
• Vider les poches et contrôler les boutons ;
• Ne pas dépasser les valeurs indiquées dans le “Tableau
des programmes” correspondant au poids de linge sec.
Combien pèse le linge ?
1 drap 400-500 g
1 taie d’oreiller 150-200 g
1 nappe 400-500 g
1 peignoir 900-1200 g
1 serviette de toilette 150-250 g
1 jeans 400-500 g
1 chemise 150-200 g
Laine: Ariston est le seul lavante-séchante à avoir obtenu
le prestigieux label Woolmark Platinum Care (M.0508)
délivré par The Woolmark Company qui garantit le lavage
à la machine de tous les vêtements en laine, y compris
ceux qui portent l’étiquette “lavage à la main uniquement”
. Grâce au programme “Laine”, on peut donc laver à la
machine, en toute tranquillité, tous les vêtements en laine
avec des performances de lavage garanties.
Taches tenaces: mieux vaut traiter les taches tenaces
avec du savon solide avant le lavage et sélectionner ensuite le
programme Coton avec prélavage.
Lavage&Séchage : spécialement conçu pour laver et
sécher du linge peu sale en un rien de temps. La sélection
de ce cycle permet de laver et de sécher jusqu’à 1 kg de
linge en à peine 60 minutes.
Pour obtenir de meilleurs résultats, utiliser une lessive
liquide ; pré-traiter les cols, les poignets et les taches.
Système d’équilibrage de la charge
Avant tout essorage, pour éviter toute vibration excessive
et répartir le linge de façon uniforme, le lavante-séchante
fait tourner le tambour à une vitesse légèrement supérieure
à la vitesse de lavage. Si au bout de plusieurs tentatives,
la charge n’est toujours pas correctement équilibrée,
l’appareil procède à un essorage à une vitesse inférieure
à la vitesse normalement prévue. En cas de déséquilibre
excessif, le lavante-séchante préfère procéder à la
répartition du linge plutôt qu’à son essorage. Pour une
meilleure répartition de la charge et un bon équilibrage,
nous conseillons de mélanger de grandes et petites pièces
de linge.
Conseils de lavage
Jeans: utiliser le programme “Jeans” pour tous les
vêtements à base de textile Denim; mettre les vêtements
sur l’envers avant le lavage et utiliser une lessive liquide.
Bébé: utiliser le programme “Bébé” pour enlever les
tâches des vêtements de bébé et rincer correctement
les vêtements afin d’éviter les réactions allergiques.
Spécialement conçu pour diminuer la charge bactérienne,
ce cycle utilise une plus grande quantité d’eau et optimise
l’effet des additifs désinfectants spécifiques ajoutés à la
lessive. En fin de lavage, l’appareil fait tourner le tambour
lentement. Pour compléter le cycle appuyer sur la touche
START/PAUSE.
Soie: sélectionner le programme “Soie ” pour le lavage
des vêtements en soie. Il est conseillé d’utiliser une lessive
spéciale pour linge délicat.
Rideaux: Utiliser le programme “Soie” . Pliez-les bien
et glissez-les dans une taie d’oreiller ou dans un sac genre
filet.
40
Page 41

Précautions et conseils
! Cet appareil a été conçu et fabriqué conformément
aux normes internationales de sécurité. Ces consignes
sont fournies pour des raisons de sécurité, il faut les lire
attentivement.
Sécurité générale
• Cet appareil n’est pas destiné à être utilisé par des
personnes (enfants compris) dont les capacités
physiques, sensorielles ou mentales sont réduites ou qui
ne disposent pas des connaissances ou de l’expérience
nécessaires, à moins qu’elles n’aient été formées et
encadrées pour l’utilisation de cet appareil par une
personne responsable de leur sécurité. Surveiller
les enfants pour s’assurer qu’ils ne jouent pas avec
l’appareil.
- Ne pas mettre sécher du linge non lavé.
- Le linge contaminé avec des substances telles que
de l’huile de cuisson, de l’acétone, de l’alcool, de
l’essence, du kérosène, des détachants, de l’essence
de térébenthine, de la cire et des substances pour
l’enlever, doit être lavé à l’eau chaude avec une dose
supplémentaire de lessive avant d’être introduit dans le
sèche-linge.
- Des objets en mousse expansée (mousse de latex),
des bonnets de douche, des textiles imperméables, des
articles doublés de caoutchouc et des vêtements ou
des coussins ayant des parties en mousse de latex ne
doivent pas être séchés en sèche-linge.
- En cas d’utilisation d’assouplissants ou de tout autre
produit similaire, se conformer aux instructions du
fabricant.
- La partie finale d’un cycle du sèche-linge se produit
sans chaleur (cycle de refroidissement) pour éviter tout
endommagement du linge.
ATTENTION: Ne jamais arrêter le sèche-linge avant
la fin du programme de séchage. Dans ce cas, sortir
immédiatement tout le linge et l’étendre pour le faire
refroidir rapidement.
• Cet appareil est conçu pour un usage domestique.
• Ne jamais toucher l’appareil si l’on est pieds nus et si les
mains sont mouillées ou humides.
• Ne jamais tirer sur le câble pour débrancher la fiche de
la prise de courant.
• Ne pas toucher à l’eau de vidange, elle peut atteindre
des températures très élevées.
• Ne pas forcer pour ouvrir la porte hublot : le verrouillage
de sécurité qui protège contre les ouvertures
accidentelles pourrait s’endommager.
• En cas de panne, éviter à tout prix d’accéder aux
mécanismes internes pour tenter une réparation.
• Veiller à ce que les enfants ne s’approchent pas de
l’appareil pendant son fonctionnement.
• Deux ou trois personnes sont nécessaires pour le
déplacer en faisant très attention. Ne jamais le déplacer
tout seul car il est très lourd.
• Avant d’introduire le linge, s’assurer que le tambour est
bien vide.
Mise au rebut
• Mise au rebut du matériel d’emballage : se conformer
aux réglementations locales de manière à ce que les
emballages puissent être recyclés.
• La directive européenne 2002/96/CE sur les déchets
d’équipements électriques et électroniques prévoit que
les électroménagers ne peuvent pas être traités comme
des déchets solides urbains ordinaires. Les appareils
usagés doivent faire l’objet d’une collecte séparée pour
optimiser le taux de récupération et de recyclage des
matériaux qui les composent et empêcher tout danger
pour la santé et pour l’environnement. Le symbole de la
poubelle barrée est appliqué sur tous les produits pour
rappeler qu’ils font l’objet d’une collecte sélective.
Pour tout autre renseignement sur la collecte des
électroménagers usés, prière de s’adresser au service
public préposé ou au vendeur.
Ouverture manuelle de la porte hublot
A défaut de pouvoir ouvrir la porte hublot à cause d’une panne
de courant pour étendre le linge, procéder comme suit :
1. débrancher la fiche de la
prise de courant.
2. s’assurer que le niveau de
l’eau à l’intérieur de l’appareil
se trouve bien au-dessous de
l’ouverture du hublot, si ce
n’est pas le cas vider l’eau en
excès à travers le tuyau de
vidange dans un seau comme
illustré voir figure.
3. démonter le panneau situé à l’avant du lavante-séchante
(voir page suivante).
4. se servir de la languette
indiquée, tirer vers soi jusqu’à
ce que le tirant en plastique
se dégage de son cran
d’arrêt; tirer ensuite vers le
bas jusqu’à ce qu’un “clic”
indique que la porte est
déverrouillée.
5. ouvrir la porte ; si elle est
encore verrouillée, refaire la
même opération.
6. remonter le panneau en
veillant à bien enfiler les
crochets dans les fentes
prévues avant de le pousser
contre l’appareil.
FR
41
Page 42

2
Entretien et soin
FR
Coupure de l’arrivée d’eau et du
courant
• Fermer le robinet de l’eau après chaque lavage. Cela
réduit l’usure de l’installation hydraulique de l’appareil et
évite tout danger de fuites.
• Débrancher la fiche de la prise de courant lors de toute
opération de nettoyage et de travaux d’entretien.
Nettoyage de l’appareil
Pour nettoyer l’extérieur et les parties en caoutchouc,
utiliser un chiffon imbibé d’eau tiède et de savon. N’utiliser
ni solvants ni abrasifs.
Nettoyage du tiroir à produits lessiviels
Pour sortir le tiroir, appuyer
sur le levier (1) et tirer vers soi
(2) (voir figure).
Le laver à l’eau courante ;
effectuer cette opération
assez souvent.
Pour accéder à cette préchambre:
1. retirer le panneau situé à l’avant du lavante-séchante en
appuyant vers le centre. Appuyer ensuite vers le bas de
chaque côté et l’extraire (voir figures).
2. placer un récipient pour
recueillir l’eau qui s’écoule
(1,5 l environ) (voir figure);
3. dévisser le couvercle en le
tournant dans le sens inverse
des aiguilles d’une montre
(voir figure);
Entretien du tambour
• Laisser toujours la porte hublot entrouverte pour éviter la
formation de mauvaises odeurs.
Nettoyage de la pompe
L’appareil est équipé d’une pompe autonettoyante qui
n’exige aucune opération d’entretien. Il peut toutefois
arriver que de menus objets (pièces de monnaie, boutons)
tombent dans la préchambre qui protège la pompe, placée
en bas de cette dernière.
! S’assurer que le cycle de lavage est bien terminé et
débrancher la fiche.
4. nettoyer soigneusement l’intérieur;
5. revisser le couvercle;
6. remonter le panneau en veillant à bien enfiler les
crochets dans les fentes prévues avant de le pousser
contre l’appareil.
Contrôle du tuyau d’arrivée de l’eau
Contrôler le tuyau d’alimentation au moins une fois par an.
Procéder à son remplacement en cas de craquèlements
et de fissures : car les fortes pressions subies pendant le
lavage pourraient provoquer des cassures.
42
Page 43

Anomalies et remèdes
Il peut arriver que l’appareil ne fonctionne pas bien. Avant d’appeler le Service de dépannage (voir “Assistance”), contrôler s’il
ne s’agit pas par hasard d’un problème facile à résoudre à l’aide de la liste suivante.
Anomalies:
L’appareil ne s’allume pas.
Le cycle de lavage ne démarre pas.
Il n’y a pas d’arrivée d’eau.
La porte de l’appareil reste
verrouillée.
L’appareil prend l’eau et vidange
continuellement.
L’appareil ne vidange pas ou
n’essore pas.
L’appareil vibre beaucoup pendant
l’essorage.
L’appareil fuit.
Les icônes correspondant à la
“Phase en cours” clignotent
rapidement en même temps que le
voyant ON/OFF.
Il y a un excès de mousse.
Causes / Solutions possibles:
• La fiche n’est pas branchée dans la prise de courant ou mal branchée.
• Il y a une panne de courant.
• La porte hublot n’est pas bien fermée.
• La touche START/PAUSE n’a pas été enfoncée.
• Le robinet de l’eau n’est pas ouvert.
• Un départ différé a été sélectionné.
• Le tuyau d’arrivée de l’eau n’est pas raccordé au robinet.
• Le tuyau est plié.
• Le robinet de l’eau n’est pas ouvert.
• Il y a une coupure d’eau.
• La pression n’est pas suffisante.
• La touche START/PAUSE n’a pas été enfoncée.
• Si le programme “Bébé ” ou l’option “Repassage Facile ” est sélectionné,
au terme du programme, le tambour tournera lentement. Pour achever le
programme, appuyer sur le bouton START/PAUSE ou sur le bouton “Repassage
Facile ”. Si le programme “Soie ” est sélectionné, la machine s’interrompt
et laisse le linge tremper. Pour vidanger l’eau et pouvoir sortir le linge, il faut
appuyer sur la touche START/PAUSE ou sur la touche “Repassage Facile ”.
• Le tuyau de vidange n’est pas installé à une distance du sol comprise entre 65
et 100 cm (voir “Installation”).
• L’extrémité du tuyau de vidange est plongée dans l’eau (voir “Installation”).
• Si l’appartement est situé aux derniers étages dans un immeuble, il peut y avoir
des phénomènes de siphonnement qui font que le lavante-séchante prend et
évacue l’eau continuellement. Pour supprimer cet inconvénient, on trouve dans
le commerce des soupapes spéciales anti-siphonnage.
• L’évacuation murale n’a pas d’évent.
• Le programme ne prévoit pas de vidange : pour certains programmes, il faut la
faire partir manuellement (voir “Programmes et options”).
• L’option “Repassage Facile” est activée: pour compléter le programme,
appuyer sur la touche START/PAUSE (voir “Programmes et options”).
• Le tuyau d’évacuation est plié (voir “Installation”).
• La conduite d’évacuation est bouchée.
• Le tambour n’a pas été débloqué comme il faut lors de l’installation du lavanteséchante (voir “Installation”).
• L’appareil n’est pas posé à plat (voir “Installation”).
• L’appareil est coincé entre des meubles et le mur (voir “Installation”).
• La charge est déséquilibrée (voir “Produits lessiviels et linge”).
• Le tuyau d’arrivée de l’eau n’est pas bien vissé (voir “Installation”).
• Le tiroir à produits lessiviels est bouché (pour le nettoyer voir “Entretien et soin”).
• Le tuyau de vidange n’est pas bien fixé (voir “Installation”).
• Eteindre l’appareil et débrancher la fiche de la prise de courant, attendre 1
minute environ avant de rallumer. Si l’anomalie persiste, appeler le service
d’assistance.
• Le produit de lavage utilisé n’est pas une lessive spéciale machine (il faut qu’il y
ait l’inscription “pour lavante-séchante”, “main et machine”, ou autre semblable).
• La quantité utilisée est excessive.
FR
La porte de l’appareil reste
verrouillée.
Le lavante-séchante ne sèche pas.
• Procéder au déverrouillage manuel (voir “Précautions et conseils”).
• La fiche n’est pas branchée dans la prise de courant ou mal branchée.
• Il y a une panne de courant.
• Le hublot n’est pas bien fermé.
• Un départ différé a été sélectionné.
• Le SÉCHAGE est en position OFF.
43
Page 44

Assistance
195090065.01
03/2011 - Xerox Fabriano
FR
Avant d’appeler le service après-vente:
• Vérifier si l’anomalie ne peut pas être résolue par soi-même (voir “Anomalie set Remèdes);
• Remettre le programme en marche pour contrôler si l’inconvénient a disparu;
• Si ce n’est pas le cas, contacter le service d’Assistance technique agréé.
! En cas de problème d’installation ou d’utilisation inadéquate du lavante-séchante, l’intervention sera payante.
! Ne jamais faire appel à des techniciens non agréés.
Signalez:
• le type de panne;
• le modèle de l’appareil (Mod.);
• le numéro de série (S/N).
Ces informations figurent sur la plaque signalétique apposée sur l’appareil.
! Remarque: pour quitter le “mode Démo”, appuyer simultanément et pendant 3 sec. sur les boutons “ON/OFF” et
“START/PAUSE” .
44
 Loading...