

Page 1

Instructions for
installation and use
Contents
Installation, 2-3
EN
English,1
DE
Deutsch,17
PL
Polski,49
AQUALTIS
AQLF9F 69 U
PT
Português,33
Unpacking and levelling
Connecting the electricity and water supplies
Technical data
Description of the machine, 4-5
Control panel
Auto Dose System, 6-7
Running a wash cycle, 8
Wash cycles and options, 9
Table of wash cycles
Wash options
Detergents and laundry, 10
Detergent
Preparing the laundry
Washing recommendations
Load balancing system
Precautions and advice, 11
General safety
Disposal
Opening the porthole door manually
WASHING MACHINE
EN
Care and maintenance, 12
Cutting off the water and electricity supplies
Cleaning the machine
Cleaning the detergent dispenser drawer
Caring for your appliance drum
Cleaning the pump
Checking the water inlet hose
Trouble shooting, 13-14
Assistance, 15
1
Page 2

Installation
EN
This instruction manual should be kept in a safe place
for future reference. If the washing machine is sold,
given away or moved, please ensure the manual is kept
with the machine, so that the new owner may benefit
from the advice contained within it.
Read these instructions carefully: they contain vital
information relating to the safe installation and operation
of the appliance.
Inside the pack containing this manual, you will also
find the guarantee and all the details necessary for
installation.
Unpacking and levelling
Unpacking
1. Once you have removed all the packaging from the
washing machine, make sure it has not been damaged
during transportation.
If it has been damaged, contact the retailer and do not
proceed any further with the installation process.
2. Remove the 4
protective screws (used
during transportation) and
the corresponding spacer,
located on the rear part of
the appliance (see figure).
If the appliance is levelled correctly, it will be more
stable and much less likely to cause vibrations and noise
while it is operating, particularly during the spin cycle.
If it is placed on carpet or a rug, adjust the feet in such
a way as to allow a sufficient ventilation space
underneath the washing machine.
Connecting the electricity and water
supplies
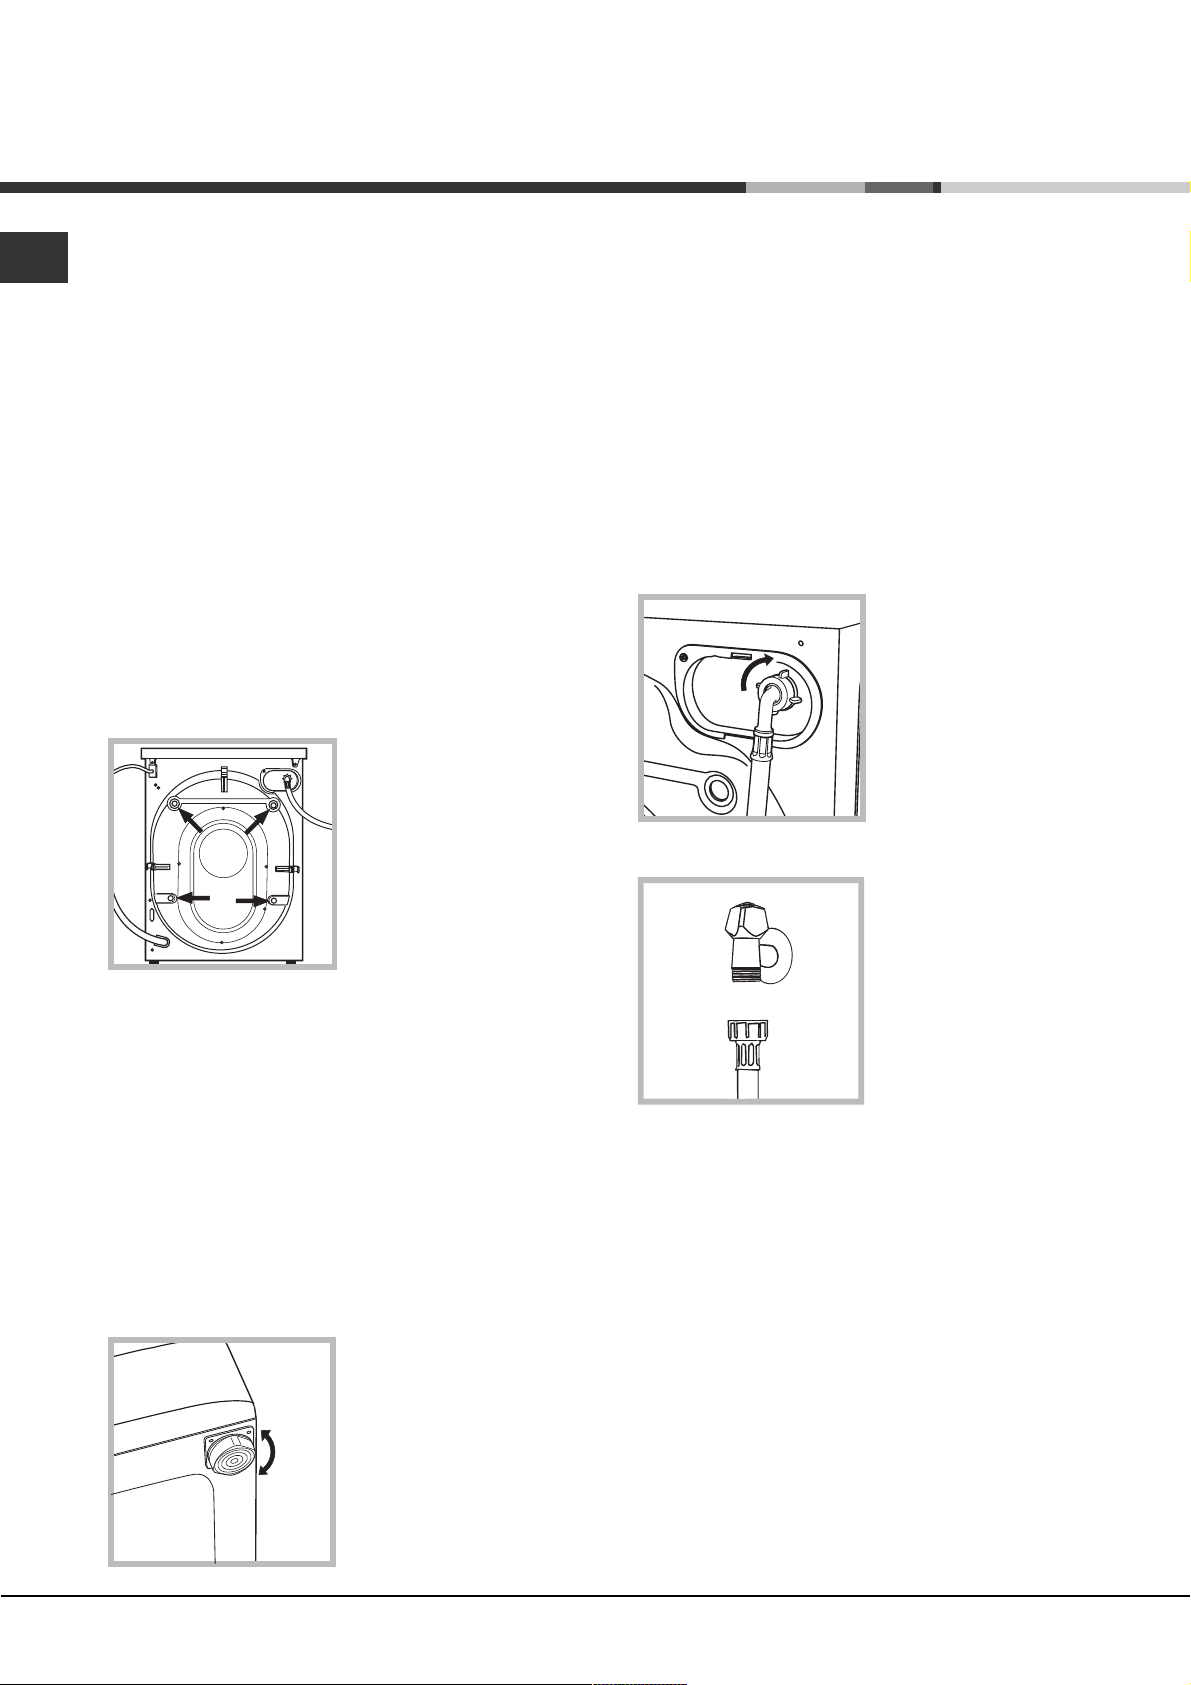
Connecting the water inlet hose
Before connecting the inlet hose to the water supply,
run the water until it is perfectly clear.
1. Connect the inlet hose
to the machine by
screwing it onto the cold
water inlet of the
appliance, which is
situated on the top righthand side of the rear part
of the appliance (see
figure).
2. Connect the inlet hose
by screwing it to a cold
water tab using a 3/4 gas
threaded connection (see
figure).
3. Close off the holes using the plastic plugs supplied in
the pack.
4. Keep all the parts in a safe place; they will be
needed again if the washing machine is moved to
another location, to prevent the inside of the
appliance being damaged.
Packaging materials should not be used as toys for
children.
Levelling
1. Place the washing machine on a flat sturdy floor,
without resting it up against walls or cabinets.
2. If the floor is uneven,
the front feet of the
machine may be adjusted
until it reaches a horizontal
position (the angle of
inclination must not
exceed 2 degrees).
3. Make sure that the hose is not folded over or bent.
The water pressure at the tap must fall within the
values indicated in the Technical data table (see next
page).
If the inlet hose is not long enough, contact a
specialised shop or an authorised technician.
Never use second-hand or old inlet hoses; use the
products supplied with the machine.
2
Page 3
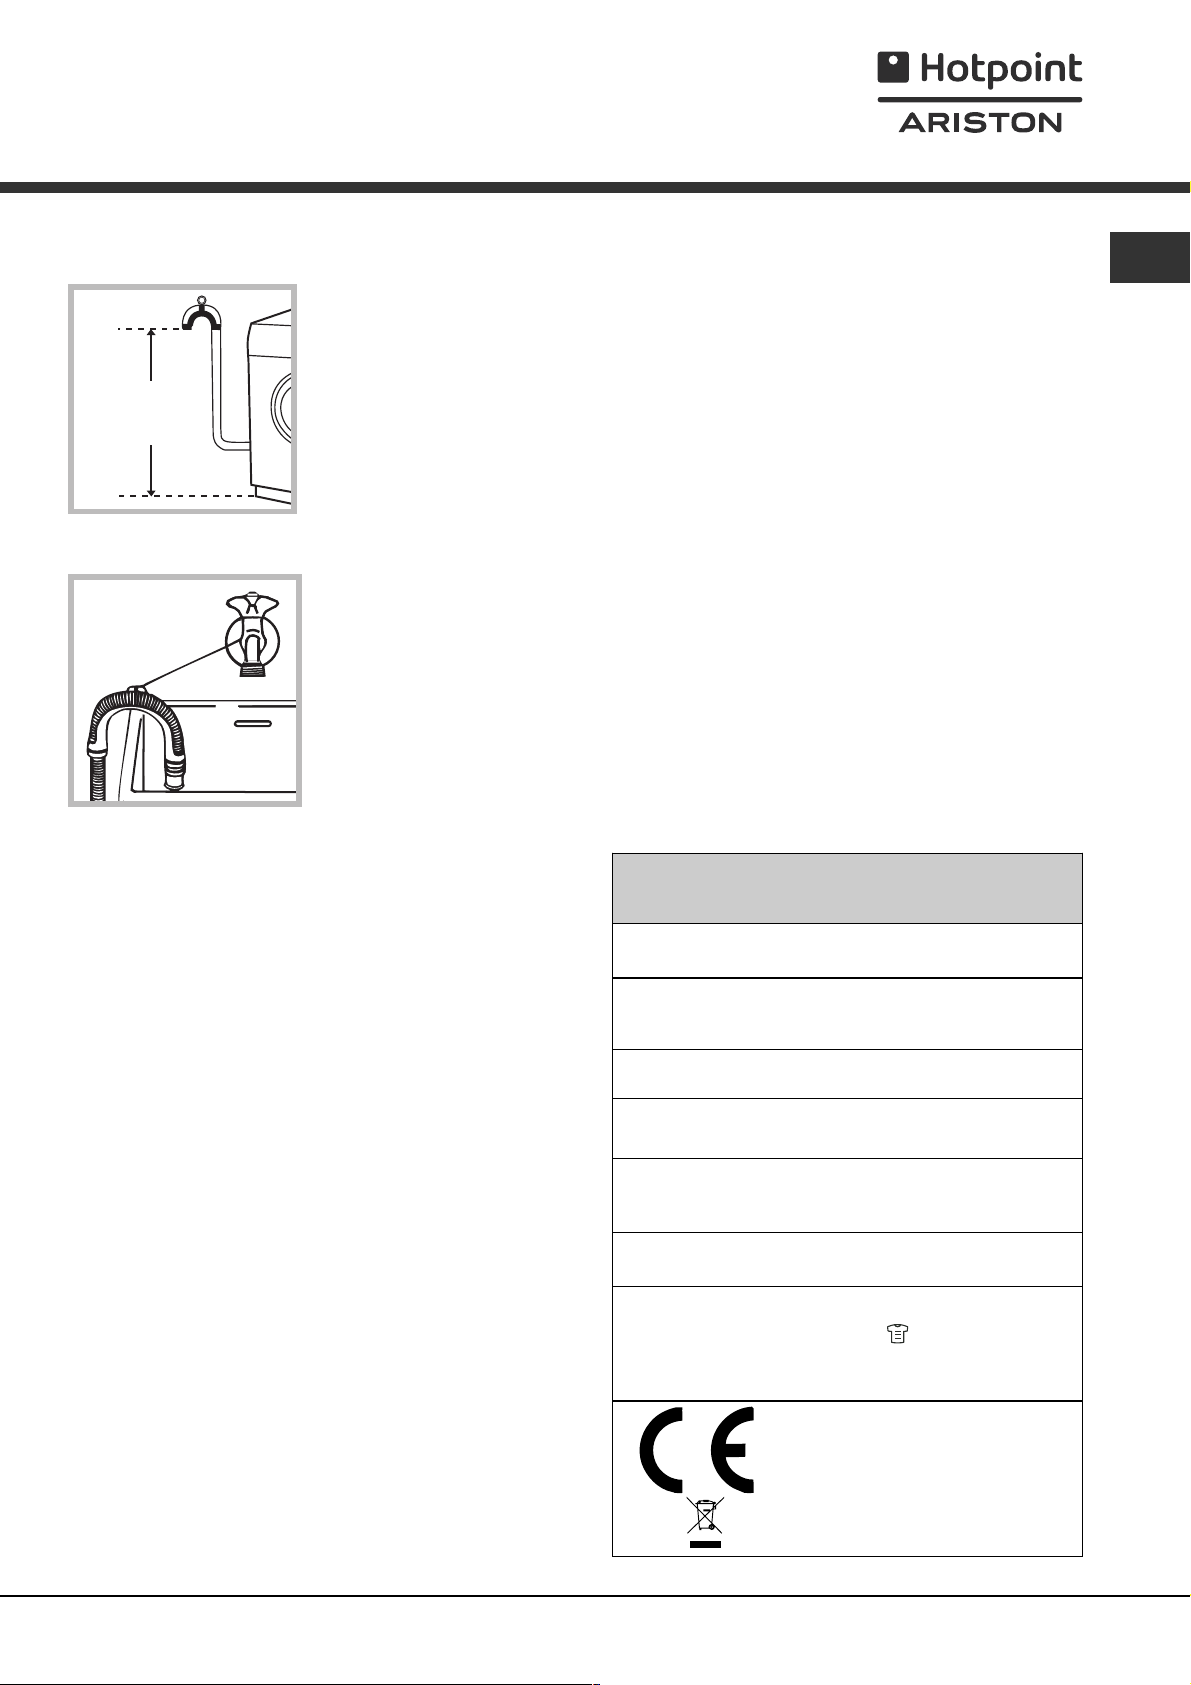
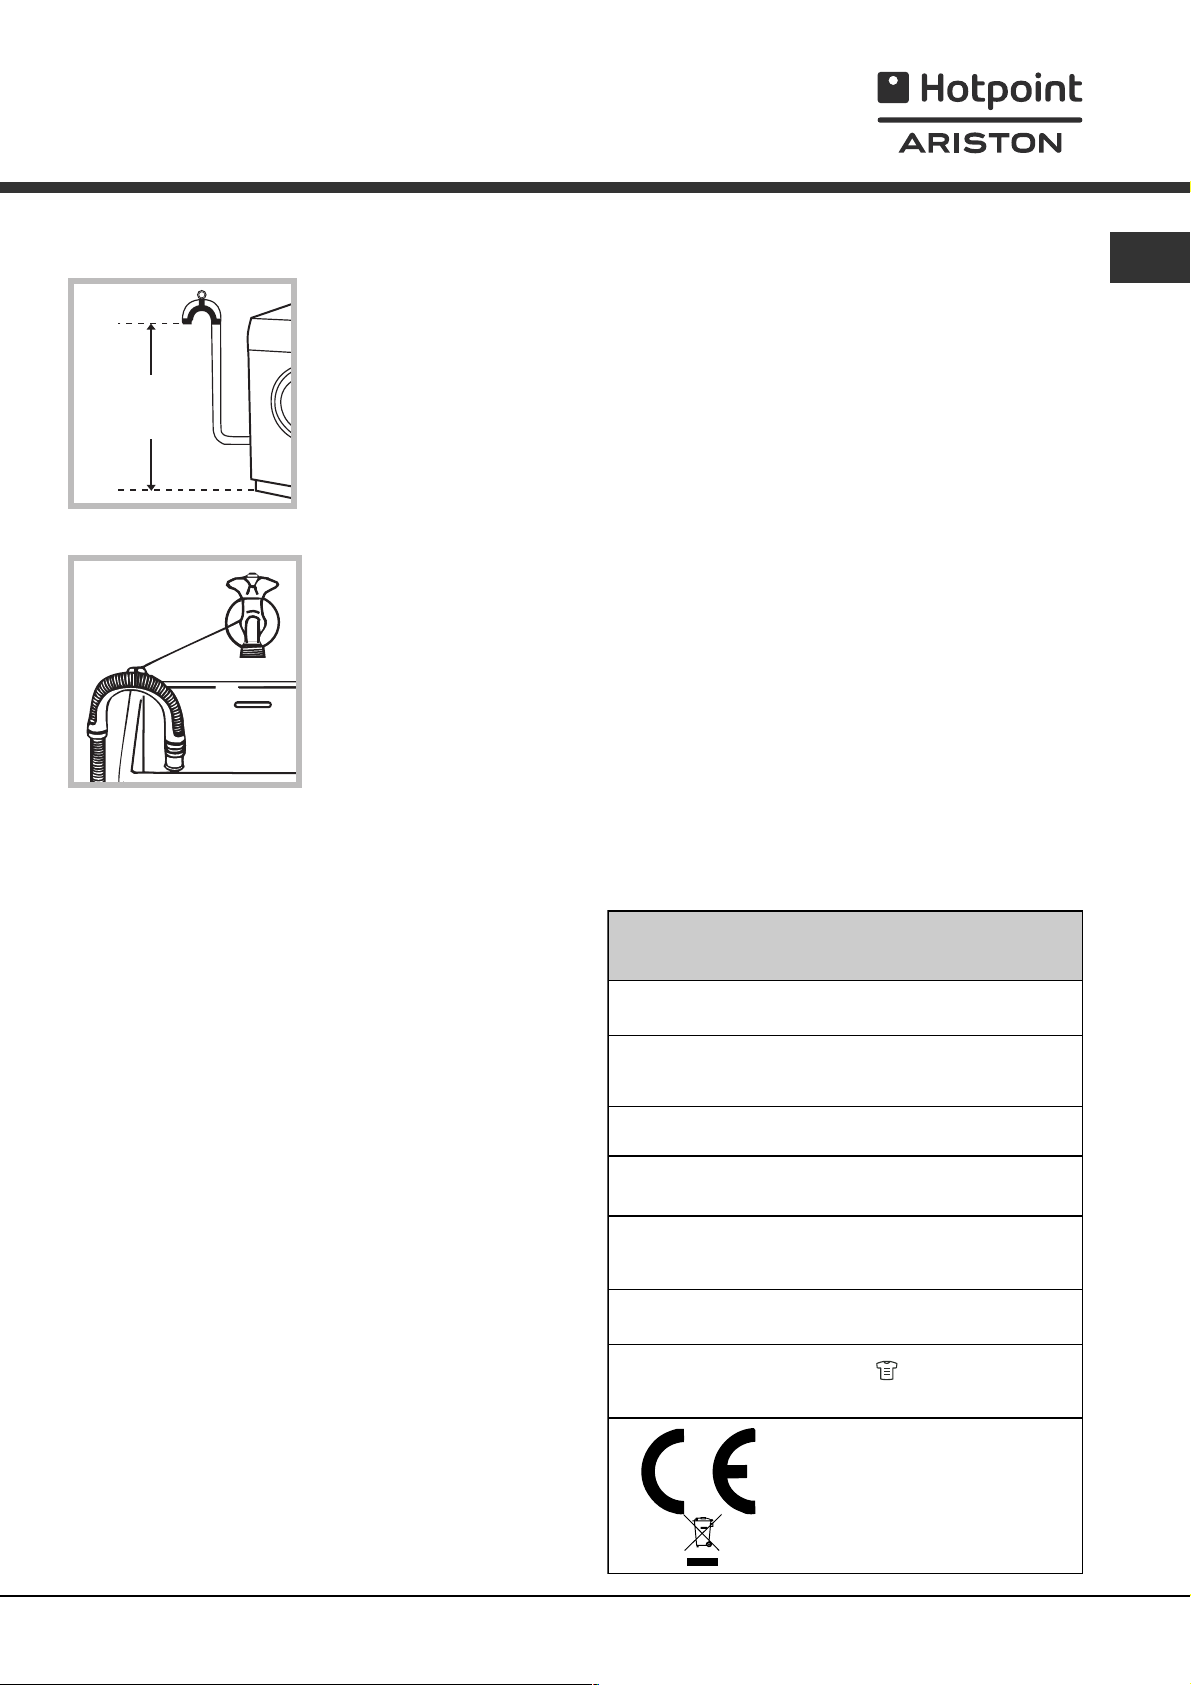
Connecting the drain hose
65 - 100 cm
Connect the drain hose to
drain duct piping or a wall
drain located between 65
and 100 cm above the
floor, making sure it is not
bent at all.
Alternatively, rest the drain
hose on the side of a
washbasin or bathtub,
fastening the duct
supplied to the tap (see
figure).
The free end of the hose
should not be underwater.
Do not use extension cords or multiple sockets.
EN
The cable should not be bent or compressed.
The power supply cable and plug must only be
replaced by authorised technicians.
Warning! The company shall not be held responsible in
the event that these regulations are not respected.
We advise against the use of hose extensions; if it is
absolutely necessary, the extension must have the same
diameter as the original hose and must not exceed 150
cm in length.
Electrical connections
Before plugging the appliance into the electricity socket,
make sure that:
the socket is earthed and complies with all applicable
laws;
the socket is able to withstand the maximum power
load of the appliance as indicated in the Technical
data table (see opposite);
the power supply voltage falls within the values
indicated in the Technical data table (see opposite);
the socket is compatible with the plug of the
appliance. If this is not the case, have the socket or
the plug replaced.
The machine must not be installed outdoors, even in
covered areas. It is extremely dangerous to leave the
appliance exposed to rain, storms and other weather
conditions.
The mains socket must remain within easy reach after
the washing machine has been installed.
Technical data
Model
Dimensions
Capacity
Electrical
connections
Water connections
Spin speed
Energy rated
programmes
according to
regulation
EN 60456
AQLF9F 69 U
width 59.5 cm
height 85 cm
depth 64,5 cm
from 1 to 9 kg
please refer to the technical data
plate fixed to the machine
maximum pressure 1 MPa (10 bar)
minimum pressure 0.05 MPa (0.5 bar)
drum capacity 62 litres
up to 1600 rotations per minute
programme ; temperature 60°C;
using a load of 9 kg.
This appliance conforms to the
following EC Directives:
- 89/336/EEC dated 03/05/89
(Electromagnetic Compatibility) and
subsequent modifications
- 2006/95/EC (Low Voltage)
- 2002/96/EC
3
Page 4

Description of the machine
EN
PORTHOLE DOOR
PORTHOLE DOOR
HANDLE
KICK STRIP
CONTROL
PANEL
ADJUSTABLE FEET
PORTHOLE DOOR
Always use the handle to
open the porthole door (see
figure).
DETERGENT DISPENSER DRAWER
The detergent dispenser
drawer is located inside the
machine and can be
accessed by opening the
door.
Refer to the chapter "Auto
Dose System" for information
on operation.
Note: stick the label showing
the wash cycle descriptions
and options on the front of
the detergent dispenser drawer. You will find the sticker
in the pack containing this manual.
Standby mode
This washing machine, in compliance with new energy
saving regulations, is fitted with an automatic standby
system which is enabled after a few minutes if no activity
is detected. Press the ON-OFF
for the machine to start up again.
button briefly and wait
4
Page 5
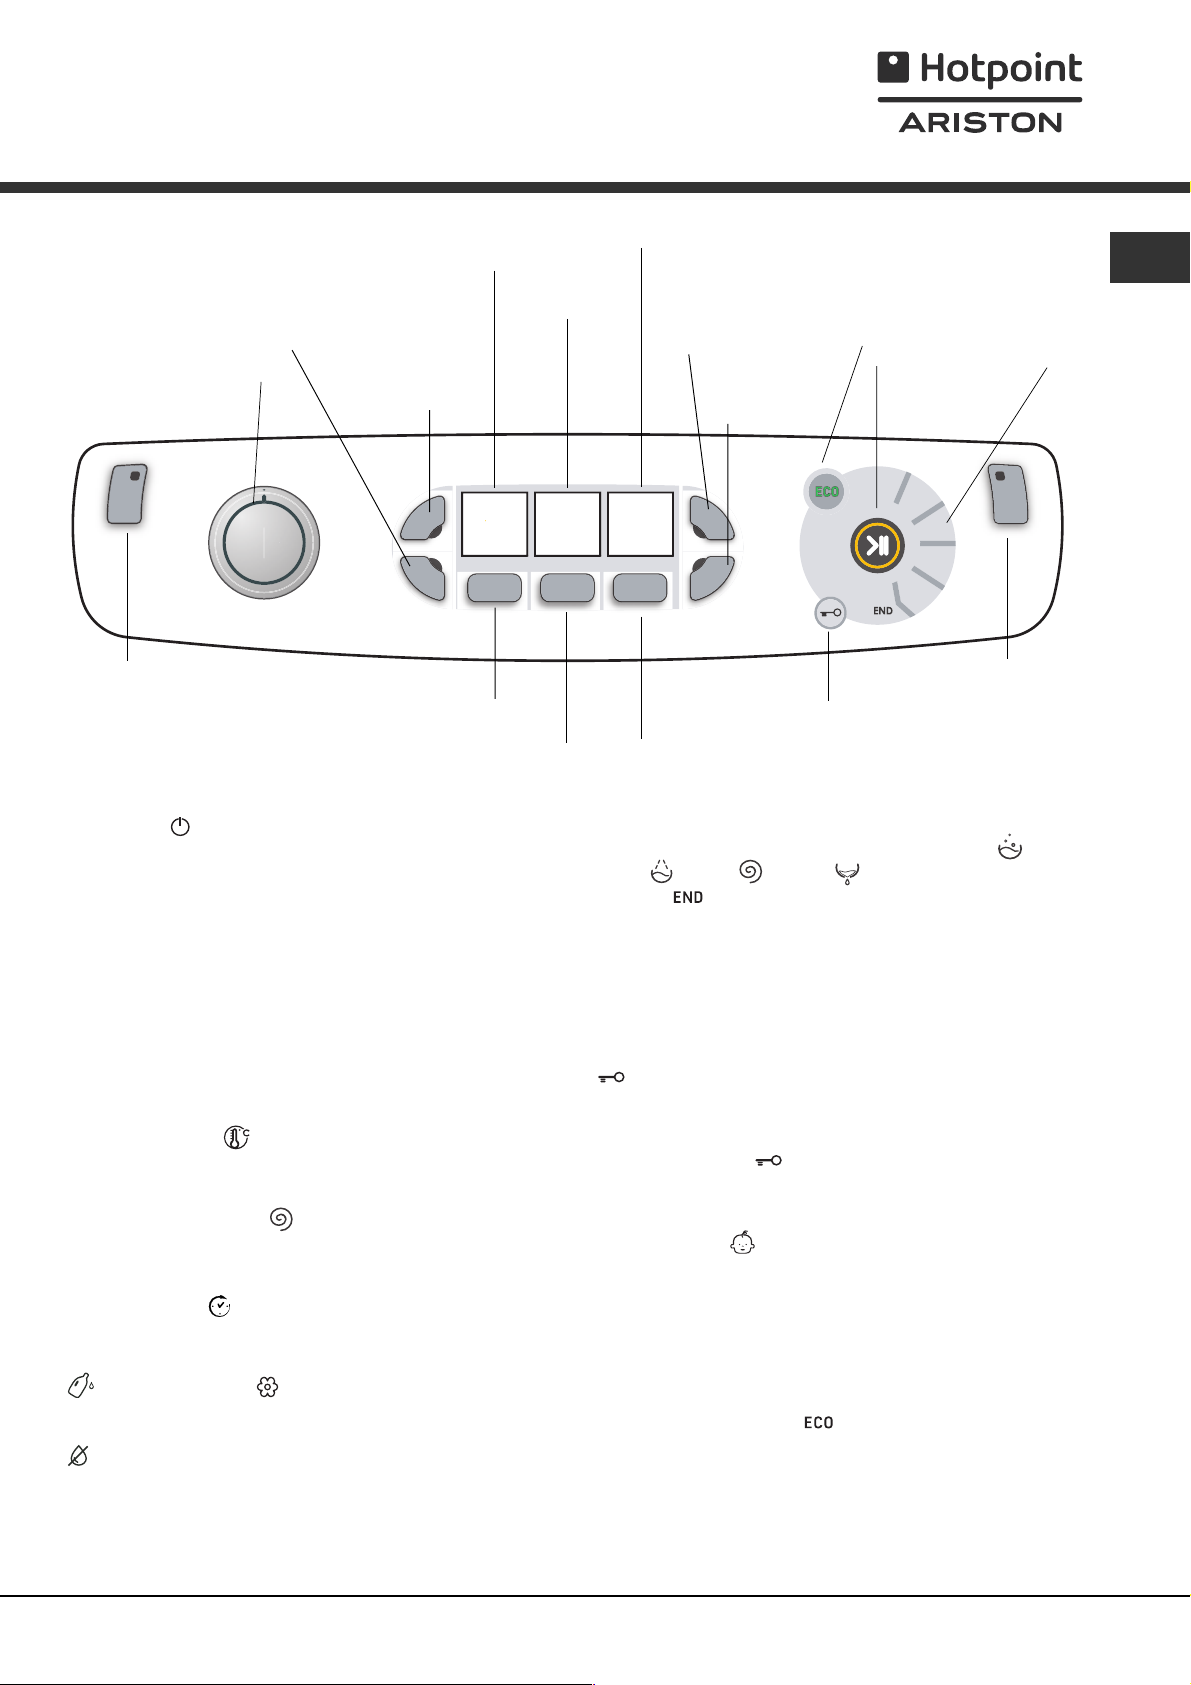
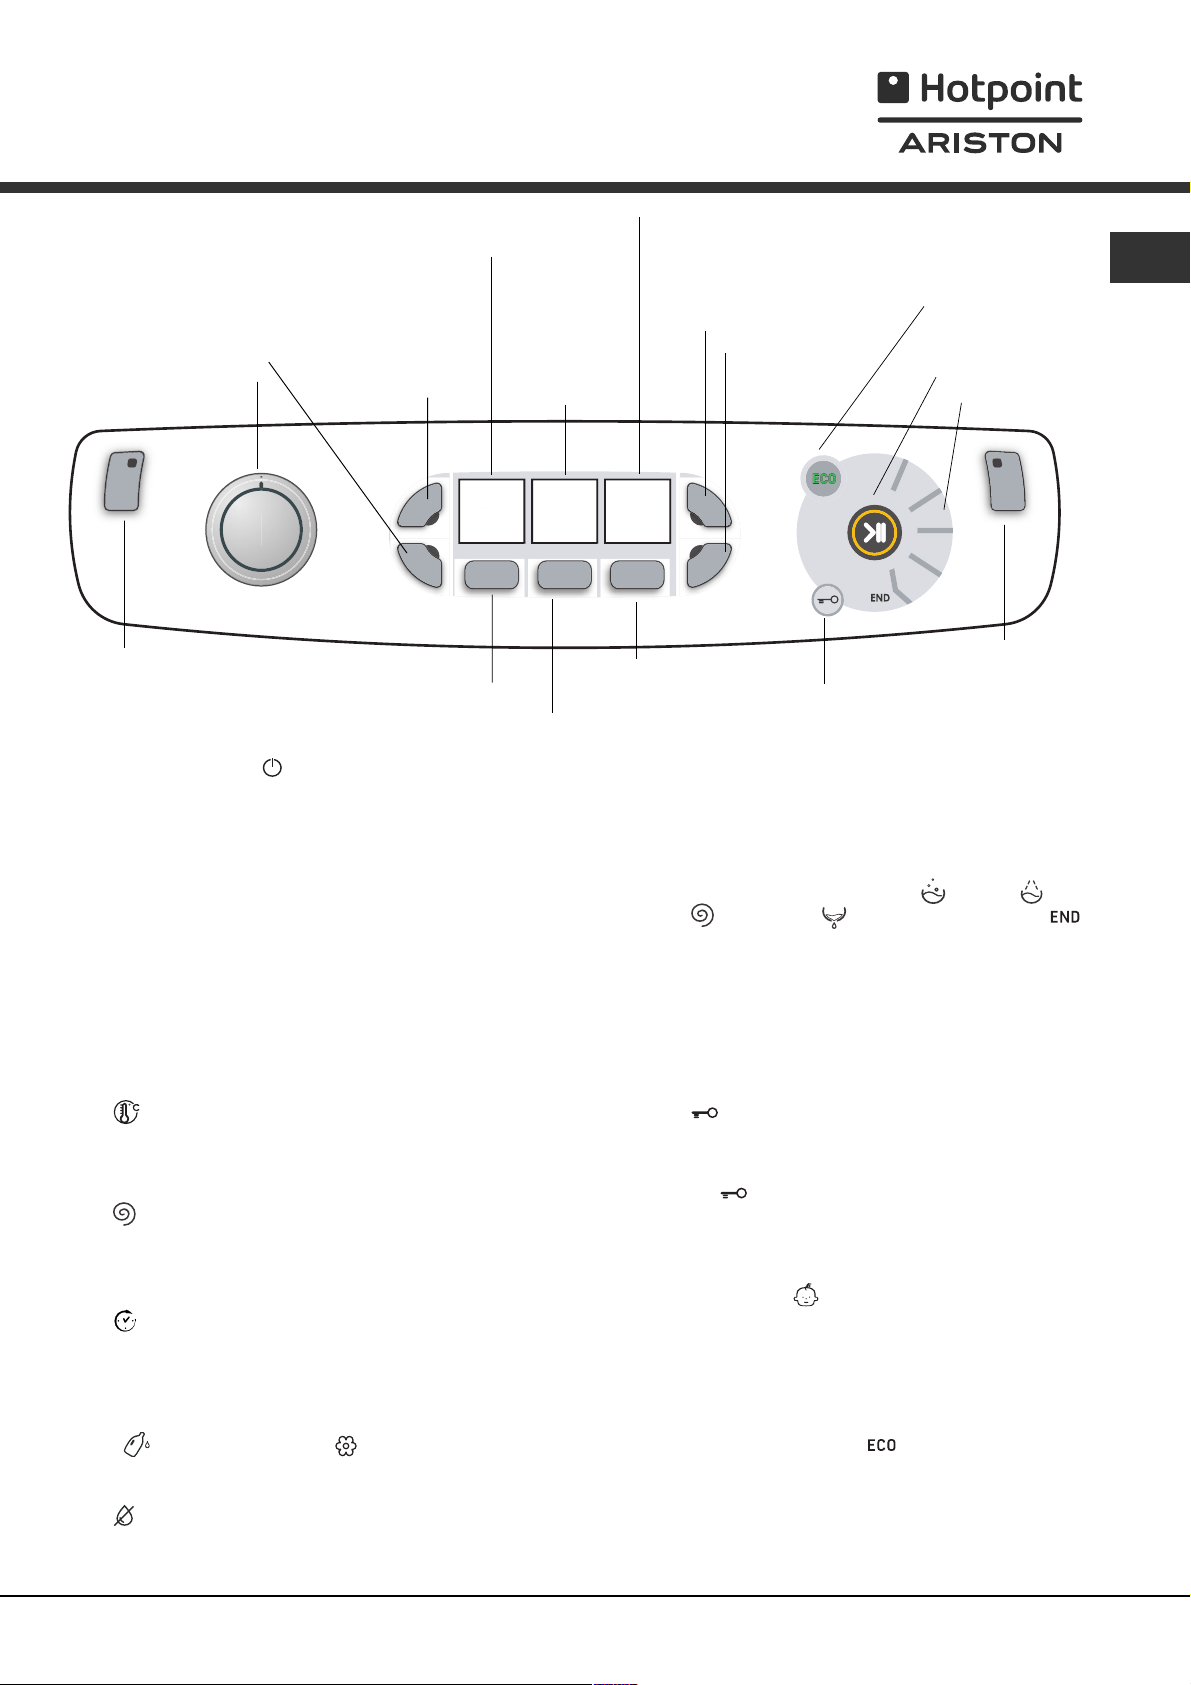
Control panel
WASH CYCLE
SELECTOR knob
DETERGENT
DILUTION
button
TEMPERATURE/
DETERGENT
DETERGENT
button
display
SPINdisplay
DELAY TIMER/SOFTENER /
CYCLE DURATIONdisplay
SOFTENER
button
OPTION button
with indicator light
ECO indicator light
START/PAUSE
button with indicator
light
EN
WASH
CYCLE
PHASE
icons
ON/OFF button with
indicator light
TEMPERATURE button
Button with ON/OFF indicator light: press this briefly
to switch the machine on or off. The green indicator light
indicates that the machine is switched on. To switch off
the washing machine during the wash cycle, press and
hold the button for approximately 3 seconds; if the
button is pressed briefly or accidentally the machine will
not switch off. If the machine is switched off during a
wash cycle, this wash cycle will be cancelled.
WASH CYCLE SELECTOR knob: may be turned in
either direction. To select the most suitable wash cycle,
please refer to the Table of wash cycles.
The knob will not move during the wash cycle.
TEMPERATURE
button: press to modify or exclude
the temperature setting; the value selected will appear
on the display above (see Running a wash cycle).
SPIN SPEED CYCLE
button: press to modify or
exclude the spin cycle; the value selected will appear on
the display above (see Running a wash cycle).
DELAY TIMER
button: press to set a DELAY TIMER
for the selected wash cycle; the set delay time will appear
on the display above (see Running a wash cycle).
DETERGENT and SOFTENER buttons: refer to
"Modifying pre-set parameters" in the chapter "Auto Dose
System".
DETERGENT DILUTION button: refer to "Filling the
tanks" in the chapter "Auto Dose System".
OPTION button with indicator light: press to select the
available options. The indicator light corresponding to the
selected option will remain lit (see Running a wash cycle).
SPIN SPEED
button
WASH CYCLE PHASE icons: these illuminate to
indicate the progress of the wash cycle (Wash
Rinse
The text
START/PAUSE button with indicator light: when the
green indicator light flashes slowly, press the button to
start a wash cycle. Once the cycle has begun the
indicator light will remain lit in a fixed manner. To pause
the wash cycle, press the button again; the indicator
light will flash in an orange colour. If the Door locked
opened. To start the wash cycle from the point at which
it was interrupted, press the button again.
DOOR LOCKED
porthole door is locked. To open the door, pause the
wash cycle (see Running a wash cycle).
CHILD LOCK
or deactivate the CHILD LOCK, press and hold the
button for approximately 2 seconds. when the indicator
light is illuminated, the control panel is locked. This
means it is possible to prevent wash cycles from being
modified accidentally, especially where there are children
in the home.
ECO indicator light: the
altering the washing parameters, an energy saving of at
least 10% is made. Furthermore, before the machine
enters Standby mode, the icon will light up for a few
seconds; when the machine is switched off the
estimated energy saving will be around the 80% mark.
DELAY
TIMER
button
DOOR LOCKED
indicator light
CHILD LOCK button
with indicator light
Spin Drain ).
lights up when the cycle is complete.
indicator light is switched off, the door may be
indicator light: indicates that the
button with indicator light: to activate
icon lights up when, after
5
Page 6
Auto Dose System
EN
Introduction
This washing machine is
equipped with two tanks: one
for liquid detergent (either
concentrated or diluted) with
a capacity of approx. 5.5 l
and another for liquid fabric
softener (either concentrated
or diluted) with a capacity of
approx. 3.5 l (see picture).
Check the detergent/fabric
softener box to verify whether
it is diluted or concentrated
detergent. The automatic
dosing system intakes the
correct amount of detergent and fabric softener from the
tanks for each type of load and at the right time,
guaranteeing optimal washing results without wastage.
The amount of detergent/fabric softener can be modified
manually by pressing the DETERGENT and FABRIC
SOFTENER buttons (refer to "Modifying pre-set
parameters"). If you prefer, the washing machine can
also be used in the "traditional" mode, i.e. by adding the
detergent in the dispenser; the machine will automatically
detect the detergent and will not use the tanks.
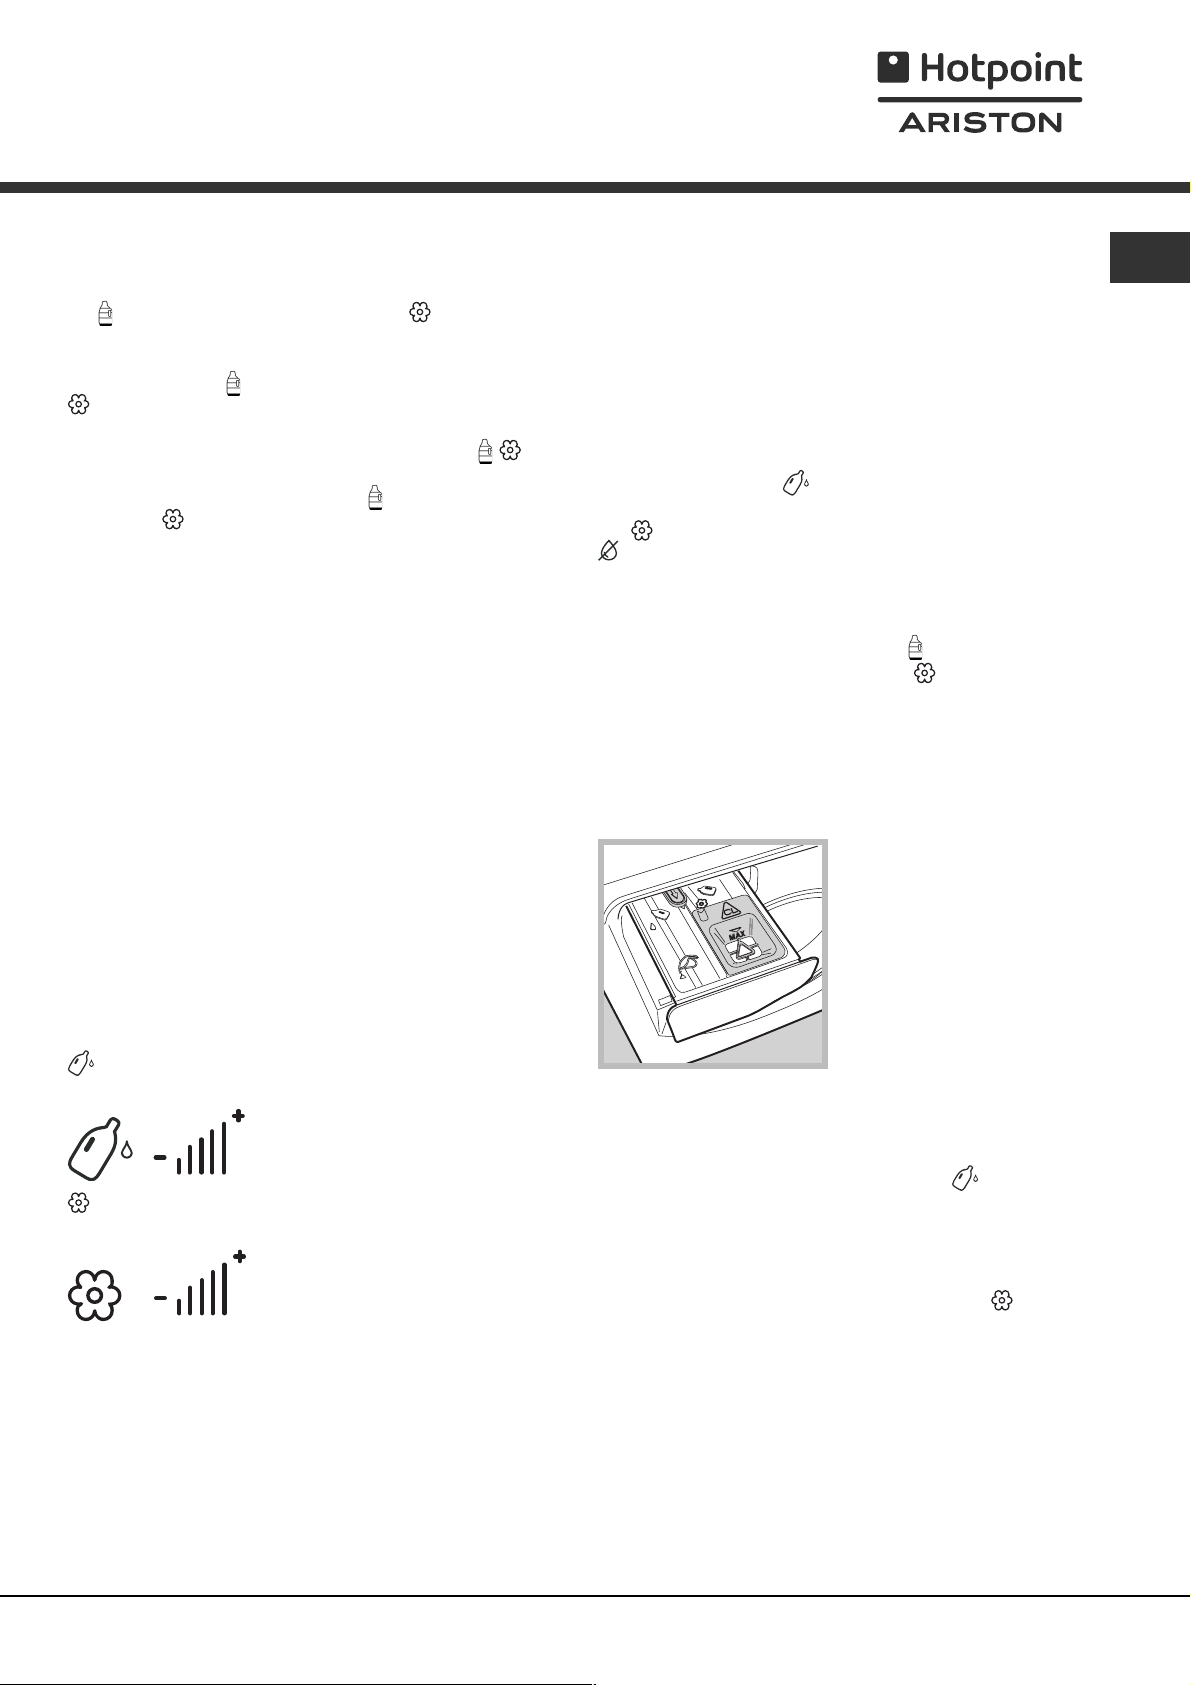
Detergent dispenser
"Traditional" mode.
Pull out the detergent dispenser drawer up to the first
stop point to add the detergent (either liquid or powder
detergent), bleach or other additives (e.g. whiteners) and
the pre-wash detergent for washing in the "traditional"
mode (refer to "Traditional mode).
"Auto Dose System mode.
A
machine can run approx. 60 cycles before the detergent
finishes.
First-time use
Turn the washing machine on by pressing the ON/OFF
button. The first wash cycle must be carried out without
laundry and by adding detergent in the detergent
dispenser (refer to "Traditional mode); set the
programme "
without filling the tanks.
Filling the tanks:
Open the detergent dispenser drawer in the "Auto Dose
System" mode (refer to "Detergent dispenser").
" (Cotton 90°) without pre-wash and
To fill the tanks with detergent
and fabric softener, open the
detergent dispenser drawer
up to the first stop point then
press lever (A) and open up
to the second stop point,
ensuring that it is fully
extracted. Once the tanks
have been filled (refer to
"Filling the tanks"), the
Slowly pour the detergent (B) and fabric softener (C)
until the tanks are completely filled (see picture).
C
B
To avoid exceeding the maximum capacity, a buzzer
(beep) will sound with growing intensity to signal the level
and 3 long beeps will sound once the tank is completely
full.
Start the wash cycle immediately after filling the tanks to
ensure that the dispenser is properly cleaned.The
respective icons
fabric softener) will light up gradually to signal the level.
The filling time depends on the density of the product.
Very dense products will take longer to fill.
Close the detergent dispenser drawer only once the
compartments are completely empty.
Select the density of the detergent added (either
concentrated or liquid) by pressing the appropriate
button
The machine will store the selection.
If no option is selected, the detergent intake option will
be pre-set to "diluted".
Use button
will be automatically extracted by the machine:
1) If concentrated detergent is used, we recommend
selecting the first level (
necessary, stepping up by a single position ( with 2
bars) to increase detergent intake.
2) If diluted detergent is used, we recommend setting
level 3 (
decrease the amount of fabric softener to be extracted.
3) To exclude the use of fabric softener, press
the bars disappear (also refer to "Modifying pre-set
parameters").
.
with 3 bars) and to then either increase/
(for the detergent) and (for the
to set the amount of fabric softener that
with one bar) and, if
until
6
Page 7
Signals for successive refilling:
When the level of detergent/fabric softener falls below the
required level, at the end of the cycle, the first segment of
the
detergent symbol or the petal of the fabric softener
symbol in the bottom left section, will flash slowly on the
display. Once the detergent/fabric softener is finished, the
first segment of the
fabric softener symbol in the lower left section will flash
fast to signal that the detergent or fabric softener tank is
empty. While the cycle runs, with empty tanks, the
symbols will disappear; at the end of the cycle or during the
pause mode, the first segment of the symbol and the
petal of the
If the tanks are not filled, the successive wash cycles in
Auto Dose System will be carried out without any intake of
detergent.
We suggest adding detergent and fabric softener ONLY
after the machine's signal.
NEVER mix two different detergents; always clean out
the tank before adding a new type of detergent (refer to
"Cleaning cycle set by the user").
Using the "Auto Dose System"
If the compartments have been filled with detergent and
fabric softener, you may start using the machine (refer to
"Running a wash cycle").
Powder detergents for pre-washing and powder additives
may only be used in the traditional mode or using the "Auto
Dose System", by placing the additives directly inside the
drum, preferably in conjunction with the "laundry ball".
Modifying pre-set parameters:
The machine automatically intakes detergent on the
basis of the selected programme, wash load and water
hardness. However, the amount of detergent/fabric
softener used may be modified.
button: press to increase, decrease and to exclude
detergent intake.
detergent symbol or the petal of the
symbol in the lower left section will flash fast.
Automatic cleaning:
The washing machine carries out an automatic cleaning
cycle during the rinse cycle if the level of detergent that
remains is insufficient for carrying out a
successive wash cycle.
Cleaning cycle set by the user:
Run the cleaning cycle (with empty drum) if you require
adding a different product to the previous one or if the
tanks have been incorrectly filled (e.g. fabric softener
has been erroneously poured into the detergent tank or
vice-versa). Keep the
seconds to activate the detergent tank cleaning cycle,
the
button for cleaning the fabric softener tank or the
button for both tanks, until the START/PAUSE button
turns green.
The cleaning cycle lasts about 40' if the tanks are initially
empty; if not, the cycle will last longer.
During the tank cleaning cycle, the
gradually from bottom to top and the
gradually petal by petal.
"Traditional" mode
Pull out the detergent dispenser drawer up to the first
stop point (see picture) then pour the amount of
detergent and other additives (e.g. bleach) required for a
single wash cycle directly into the dispenser.
1
2
3. ! Do not pour anything in this compartment.
button pressed for at least 8
symbol will fill
1. pre-wash compartment:
use powder detergent only.
2. main wash
3
compartment: use powder
or liquid detergent. If the
latter is used, we
recommend pouring it into
the dispenser immediately
before starting the washing
machine and without
running a pre-wash cycle.
symbol will fill
EN
button: press to increase, decrease and to exclude
fabric softener intake.
The level of detergent/fabric softener suggested by the
machine is indicated by 3 bars.
Less than 3 bars indicates a lower level of detergent/
fabric softener compared to that suggested by the
machine, while more than 3 bars indicates a higher level
of detergent/fabric softener.
Cleaning the tanks:
Tank cleaning cycles can either be automatic or pre-set
by the user.
Tablet detergent or the relative "laundry ball" must be
added directly inside the drum. In this event, deactivate
the "Auto Dose System" (by pressing the
the relative vertical bars disappear from the display).
Do not pour any fabric softener as the appropriate
quantity required for each wash cycle will be
automatically extracted.
To deactivate fabric softener intake, press the
until the vertical bars disappear from the display.
For wool and silk garments, we recommend using a
special detergent which must be poured directly into the
detergent dispenser (compartment 2).
Running the wash cycle:
Select the programme and the compatible options on
the basis of the required need and type of load.
button until
button
7
Page 8

Running a wash cycle
EN
WARNING: before you use the washing machine for
the first time, run a wash cycle with detergent and no
laundry, using the 90° cottons cycle without pre-wash.
1. SWITCH THE MACHINE ON. Press the
All the indicator lights will illuminate for 1 second; the
indicator light corresponding to the
remain lit in a fixed manner and the START/PAUSE
indicator light will flash slowly.
2. LOAD THE LAUNDRY. Open the porthole door.
Load the laundry, making sure you do not exceed the
maximum load value indicated in the table of wash
cycles on the following page.
3. MEASURE OUT THE DETERGENT. There is no
need to add detergent when the "Auto Dose System"
mode is used, as the machine automatically intakes
detergent on the basis of the selected programme,
type of load and water hardness. Refer to the
paragraph "Traditional mode for implementing the
traditional operation mode.
4. CLOSE THE PORTHOLE DOOR.
5. SELECT THE PROGRAMME. Turn the WASH
CYCLE SELECTOR KNOB right or left, until you have
selected the desired wash cycle. A temperature and
spin speed is set for each wash cycle; these may be
adjusted.
6. CUSTOMISE THE WASH CYCLE. Use the
relevant buttons on the control panel:
Modify the temperature and/or spin
speed.
The machine automatically displays the maximum
temperature and spin speed values set for the
selected cycle, or the most recently-used settings if
they are compatible with the selected cycle. The
temperature can be decreased by pressing the
button, until the cold wash ( ) setting is reached.
The spin speed may be progressively reduced by
pressing the
). If these buttons are pressed again, the
(
maximum values are restored.
Exception: if the Cotton programme is selected,
the temperature can be increased up to a value of
90°C.
Set a DELAY TIMER.
Press the button until you have reached the desired
delay time. During the setting process, the delay time
is shown on the display and the
After selecting a DELAY TIMER time, the fixed
symbol and the cycle duration will appear on the
display. Press the button once to display the selected
delay time. To remove the DELAY TIMER option,
button, until it is completely excluded
button will then
symbol flashes.
button.
press the button until the display shows the text OFF;
symbol will disappear.
the
Once the START/PAUSE button has been pressed,
the time delay may only be decreased.
Modify the cycle settings.
Press the OPTION button to customise the wash
cycle in accordance with your own requirements.
Press the button to activate the option; the
corresponding indicator light will switch on.
Press the button again to disable the option; the
indicator light will switch off.
If the selected option is not compatible with the
selected wash cycle, this incompatibility will be
signalled by the flashing of the indicator light and a
sound alert (3 beeps); the option will not be activated.
7. START THE PROGRAMME. Press the START/
PAUSE button. The corresponding indicator light
remains lit in a fixed manner and the porthole door
locks (the
illuminates). The icons corresponding to the wash
cycle phases will light up during the cycle to indicate
which phase is currently in progress. To change a
wash cycle once it has already started, pause the
washing machine by pressing the START/PAUSE
button; then select the desired cycle and press the
START/PAUSE button again. To open the door during
a wash cycle, press the START/PAUSE button; if the
DOOR LOCKED
may open the door. Press the START/PAUSE button
again to restart the wash cycle from the point at
which it was interrupted.
8. THE END OF THE WASH CYCLE. This is indicated
by the illuminated text END. The porthole door may
be opened immediately. If the START/PAUSE indicator
light is flashing, press the button to end the cycle.
Open the door, unload the laundry and switch off the
machine.
If you wish to cancel a cycle which has already begun,
press and hold the
the machine switches off.
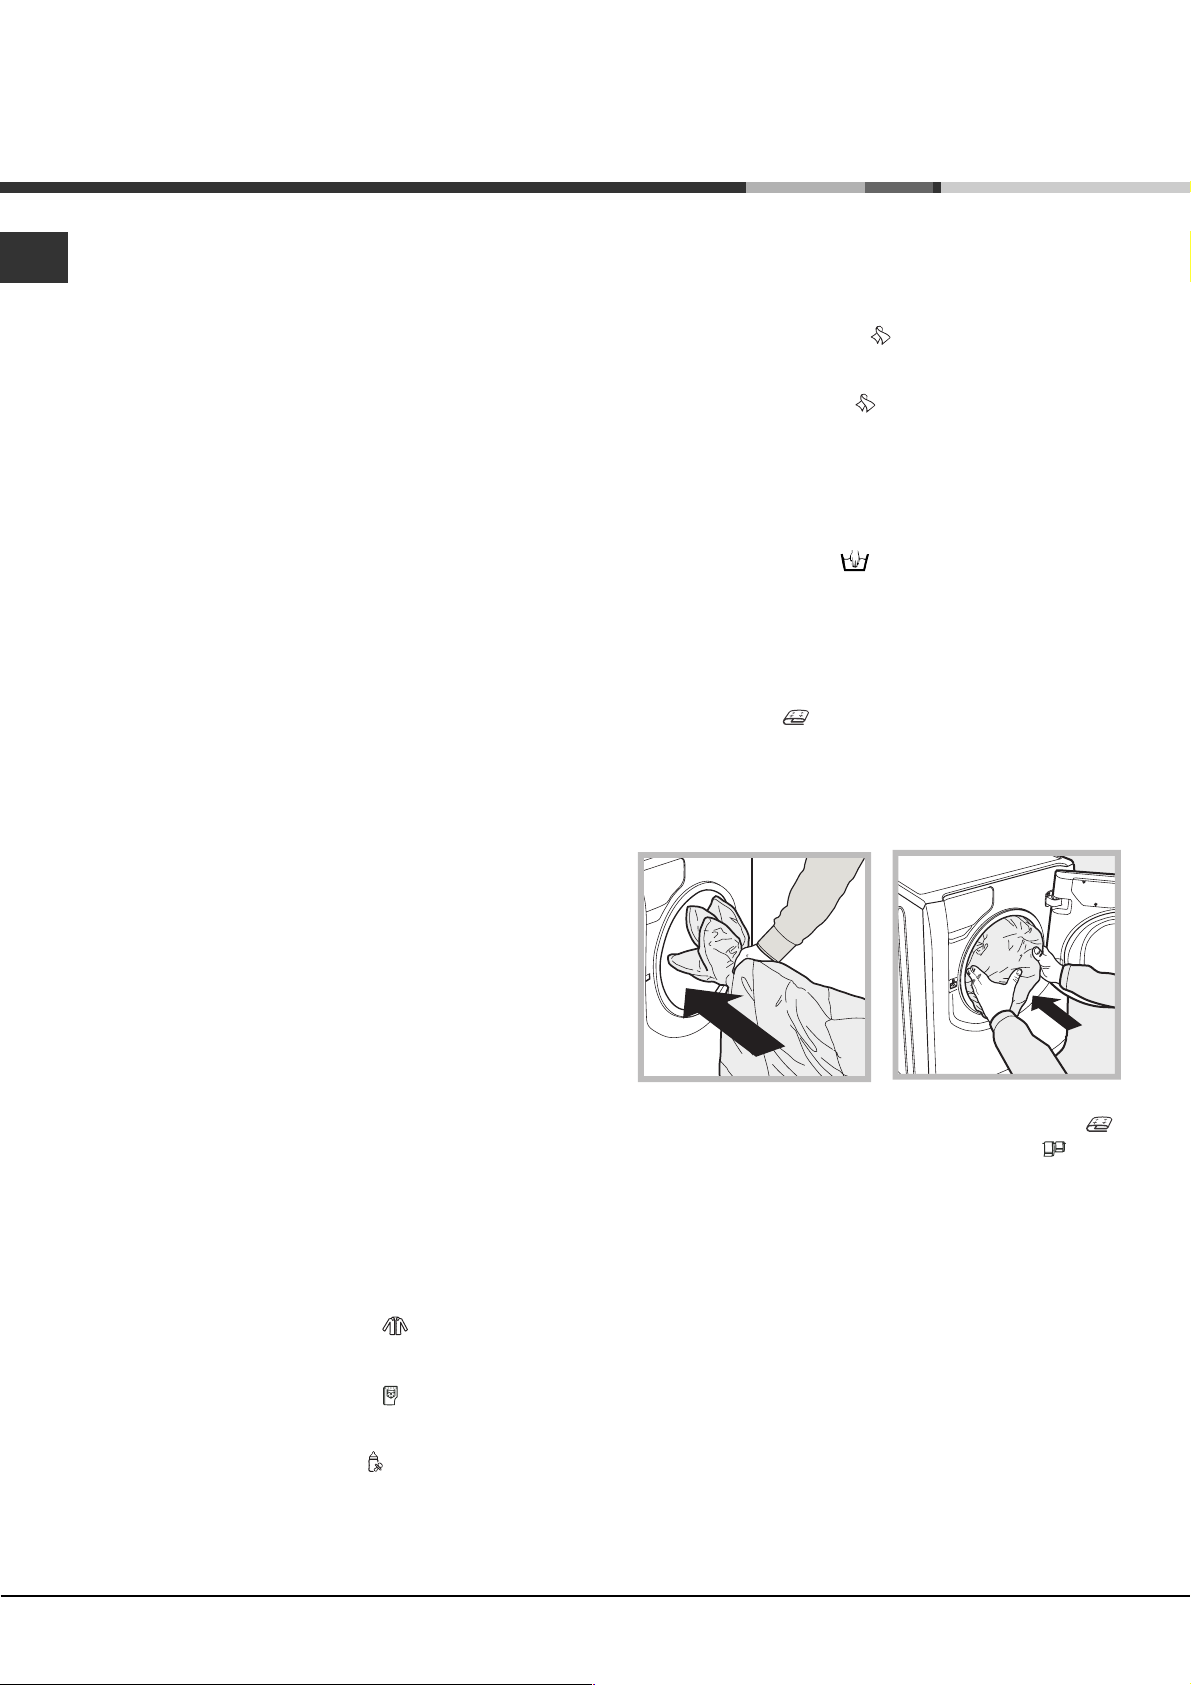
Bag for quilts, curtains and delicate garments
The Aqualtis washing machine makes it easier for you to
wash even the most valuable and delicate garments in
complete confidence thanks to the special bag which
protects the laundry (this is supplied with the machine).
We recommend that the bag is used every time you
wash quilts and padded items with an outer layer made
using synthetic material.
DOOR LOCKED indicator light
indicator light is switched off you
button until the cycle stops and
8
Page 9
Wash cycles and options
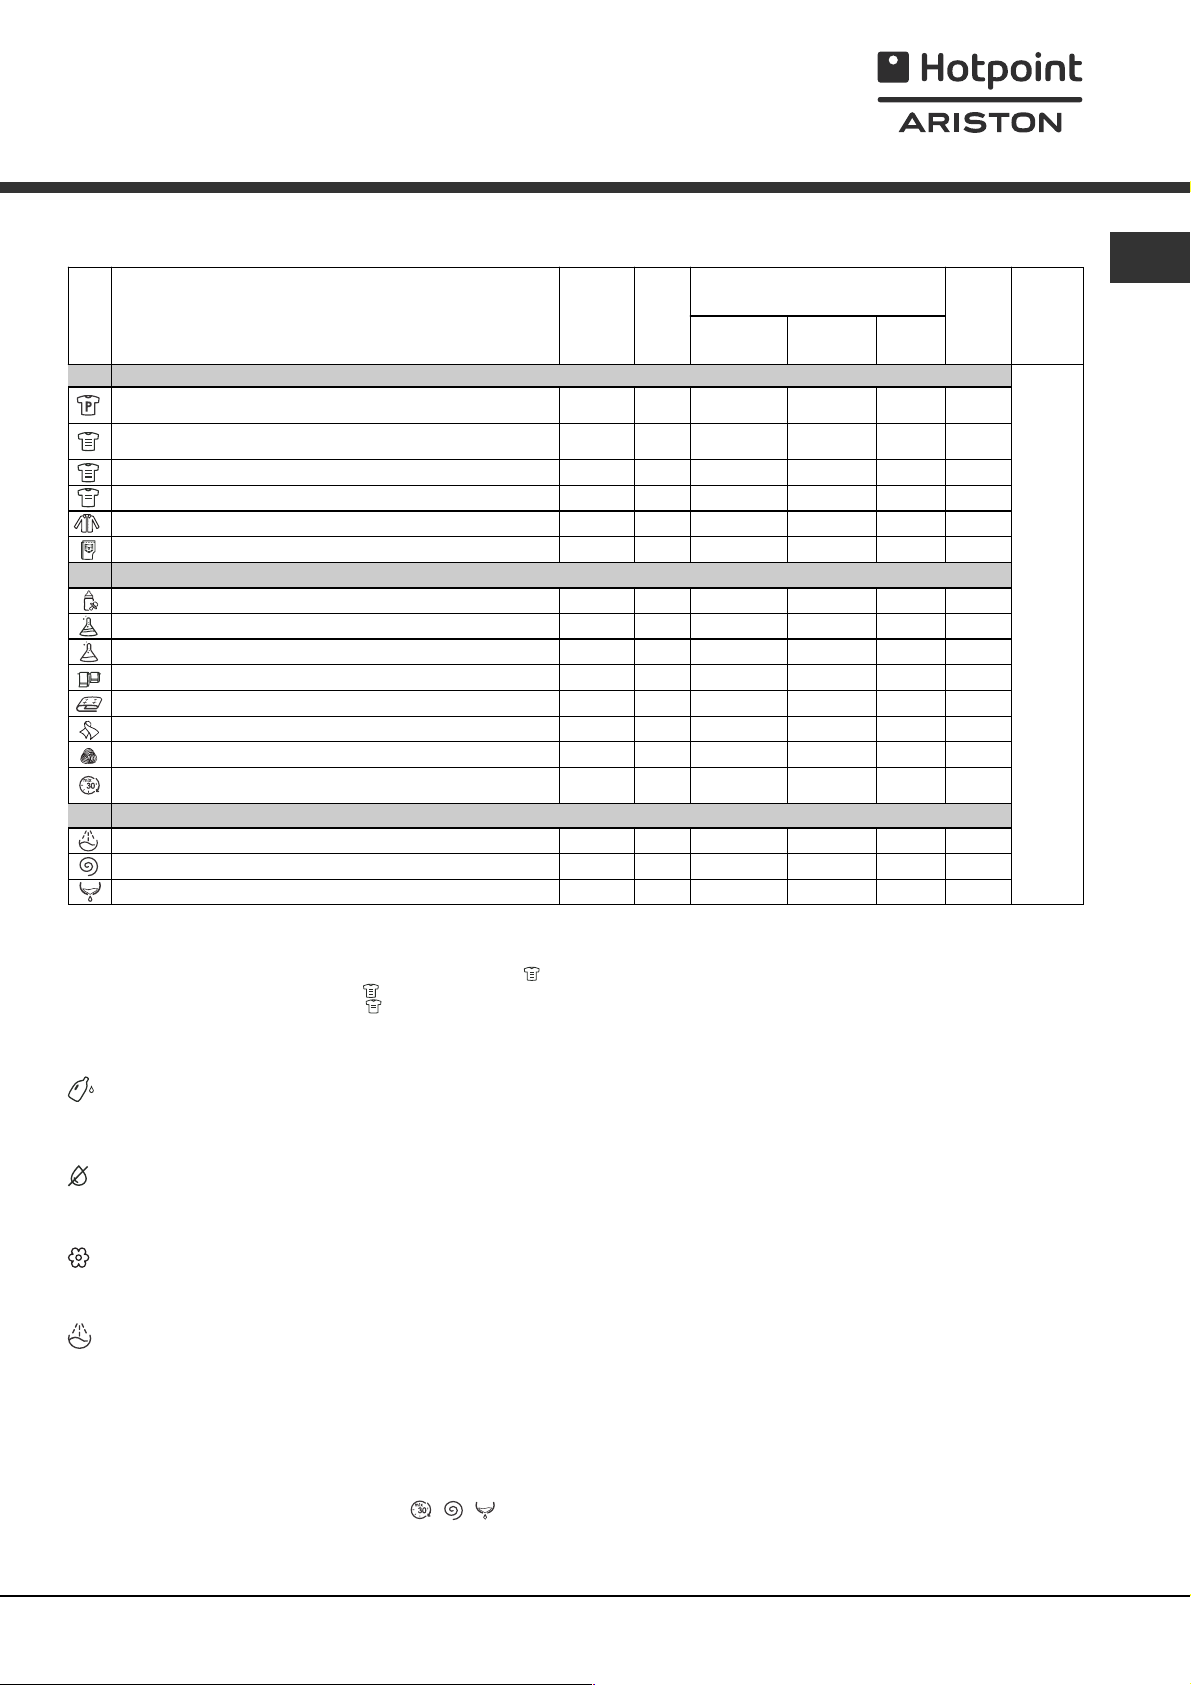
Table of wash cycles
Icon Description of the wash cycle
Cottons wash cycles
Cotton with pre-wash
(Add detergent to the relevant compartment).
Cotton (1): heavily soiled whites and resistant colours.
Cotton (2): heavily soiled whites and delicate colours.
Coloured Cotton (3) 40° 1600 -
Shir ts
Jeans
Special programmes
Baby: heavily soiled delicate colours
Durable Synthetics 60° 800 -
Synthetics
Delicate
"Bed & Bath" for bedlinen and towels.
Duvets:
Silk: for garments in silk and viscose, lingerie.
Mix 30': to refresh lightly soiled garments quickly (not suitable
Partials wash cycles
Rinse - 1600 - Spin - 1600 - - - 9
Drain - 0 - - - 9
(*) Note: 10 minutes after the START, the machine will recalculate the time remaining until the end of the wash cycle on the basis of the load inside it; this
value will then be shown on the display.
For all Test Institutes:
1) Test wash cycle in compliance with regulation EN 60456: set wash cycle
2) Long wash cycle for cottons: set wash cycle
3) Short wash cycle for cottons: set wash cycle
for down-stuffed garments.
Wool: for wool, cashmere, etc.
for wool, silk and clothes which require washing by hand)
with a temperature of 40°C.
with a temperature of 40°C.
Max.
temp.
(°C)
(Max. 90°)
40° 1600 -
40° 600 40° 800 -
40° 800 -
40° 800 -
40° 600 -
with a temperature of 60°C.
Max.
speed
(rpm)
90° 1600
60°
1600 -
60° 1600 30° 1200 30° 0 -
30° 800 -
Detergent and additives
Detergent
for prewash
lll
Detergent
for wash
ll
ll
ll
ll
ll
ll
ll
ll
ll
ll
ll
ll
ll
Fabric
softener
Max.
load
(kg)
Cycle
duration
9
9
9
9
2
4
on the display.
4
4
4
9
3,5
2
2
3,5
l
9
EN
(*) The duration of the wash cycles can be checked
Options
Detergent dosage
To dose the amount of detergent (refer to the chapter
"Auto Dose System").
Concentrated Detergent
To modify the degree of detergent density (refer to the
chapter "Auto Dose System").
Fabric softener dosage
To dose the amount of fabric softener (refer to the
chapter "Auto Dose System").
Extra rinse
By selecting this option, the efficiency of the rinse is
increased and optimal residual detergent removal is
guaranteed. It is particularly useful for skin which is
sensitive to detergents. We recommend this option is
used with a full load of washing, or when a large amount
of detergent is required.
It cannot be used in conjunction with
, , .
9
Page 10
Detergents and laundry
EN
Detergent
The type and quantity of detergent required depend on
the type of fabric you are washing (cotton, wool, silk,
etc.), as well as its colour, the washing temperature, the
level of soiling and the hardness of the water in the area.
Whenever the detergent and fabric softener Auto Dose
System is activated, this washing machine helps to
prevent wastage and to protect the environment,
besides guaranteeing optimal washing performance.
We recommend the following:
Use powder detergent for carrying out a pre-wash
and pour in the "traditional" mode.
Use liquid detergents for delicate cotton garments and
for all low-temperature wash cycles.
When activating the "Auto Dose System" mode, use
liquid detergent and fabric softeners only. Never add
ultra-concentrated detergents (e.g. "Gel" type
detergents or similar).
Use gentle liquid detergents for wool and silk
garments and pour in the "traditional" mode.
Never mix two different detergents; always clean out
the tank before adding a new type of detergent.
The detergent should be poured into the relevant
compartment - or the dispenser placed directly inside the
drum - before the wash cycle begins. In the latter case, it will
not be possible to select the Cottons with pre-wash cycle.
Do not use hand washing detergents because these
create too much foam.
and optimising the effect of special disinfecting additives
added to the detergent. At the end of the wash cycle,
the machine will slowly rotate the drum; to end the cycle
press the START/PAUSE button.
Silk: use the special Silk
garments. We recommend the use of special detergent
which has been designed to wash delicate clothes.
Curtains: use the Silk
be folded and placed inside the bag provided.
Wool: Hotpoint/Ariston is the only washing machine
brand to have been awarded the prestigious Woolmark
Platinum Care endorsement (M.0508) by the Woolmark
Company, which means that all woollen garments may
be washed in the washing machine, even those which
state hand wash only
wash cycle can be used to wash all woollen garments in
the washing machine while guaranteeing optimum
performance.
Duvets: to wash double or single duvets (the weight of
which should not exceed 3,5 kg), cushions or clothes
padded with goose down such as puffa jackets, use the
special Duvets
duvets are placed in the drum with their edges folded
inwards (see figure) and that no more than ¾ of the total
volume of the drum is used. To achieve the best results,
we recommend that a liquid detergent is used and
placed inside the detergent dispenser drawer.
wash cycle. We recommend that
wash cycle to wash all silk
wash cycle. These should
on the label. The Wool
Preparing the laundry
Shake out the garments before loading them into the
machine.
Divide the laundry according fabric type (symbol on the
washing instruction label) and colour, making sure you
separate the coloured garments from the white ones;
Empty all pockets and check the buttons;
Do not exceed the values listed in the Table of wash
cycles, which refer to the weight of the laundry when dry.
How much does your laundry weigh?
1 sheet 400-500 g
1 pillowcase 150-200 g
1 tablecloth 400-500 g
1 bathrobe 900-1200 g
1 towel 150-250 g
1 pair of jeans 400-500 g
1 shirt 150-200 g
Washing recommendations
Shirts: use the special Shirts wash cycle to wash
shirts in different fabrics and colours to guarantee they
receive the best possible care.
Jeans: use the special Jeans
denim garments; turn inside out before washing and use
a liquid detergent.
Baby: use the special Baby
the remove the soiling typically caused by babies, while
removing all traces of detergent from nappies in order to
prevent the delicate skin of babies from suffering allergic
reactions. The cycle has been designed to reduce the
amount of bacteria by using a greater quantity of water
wash cycle for all
wash cycle to remove
Quilts: to wash quilts with a synthetic outer layer, use
the bag provided and set the wash cycle to Duvets
Bedlinen and towels: use the Bed & Bath
to wash laundry from all over the house; this optimises
fabric softener performance and helps you save time and
energy. We recommend the use of powder detergent.
Stubborn stains: it is wise to treat stubborn stains with
solid soap before washing, and to use the Cottons with
pre-wash cycle.
cycle
Load balancing system
Before every spin cycle, to avoid excessive vibrations
before every spin and to distribute the load in a uniform
manner, the drum rotates continuously at a speed which
is slightly greater than the washing rotation speed. If,
after several attempts, the load is not balanced
correctly, the machine spins at a reduced spin speed. If
the load is excessively unbalanced, the washing
machine performs the distribution process instead of
spinning. To encourage improved load distribution and
balance, we recommend small and large garments are
mixed in the load.
.
10
Page 11

Precautions and tips
The machine was designed and constructed in
accordance with international safety regulations. The
following information is provided for safety reasons and
must therefore be read carefully.
General safety
This appliance was designed for domestic use only.
the machine must only be used by adults, in
accordance with the instructions given in this manual.
Do not touch the machine when barefoot or with wet
or damp hands or feet.
Do not pull on the power supply cable when
unplugging the appliance from the electricity socket.
Hold the plug and pull.
Do not touch the drained water as it may reach
extremely high temperatures.
Never force the porthole door. This could damage the
safety lock mechanism designed to prevent
accidental opening.
If the appliance breaks down, do not under any
circumstances access the internal mechanisms in an
attempt to repair it yourself.
Always keep children well away from the appliance
while it is operating.
If it must be moved, proceed with the help of two or
three people and handle it with the utmost care.
Never try to do this alone, because the appliance is
very heavy.
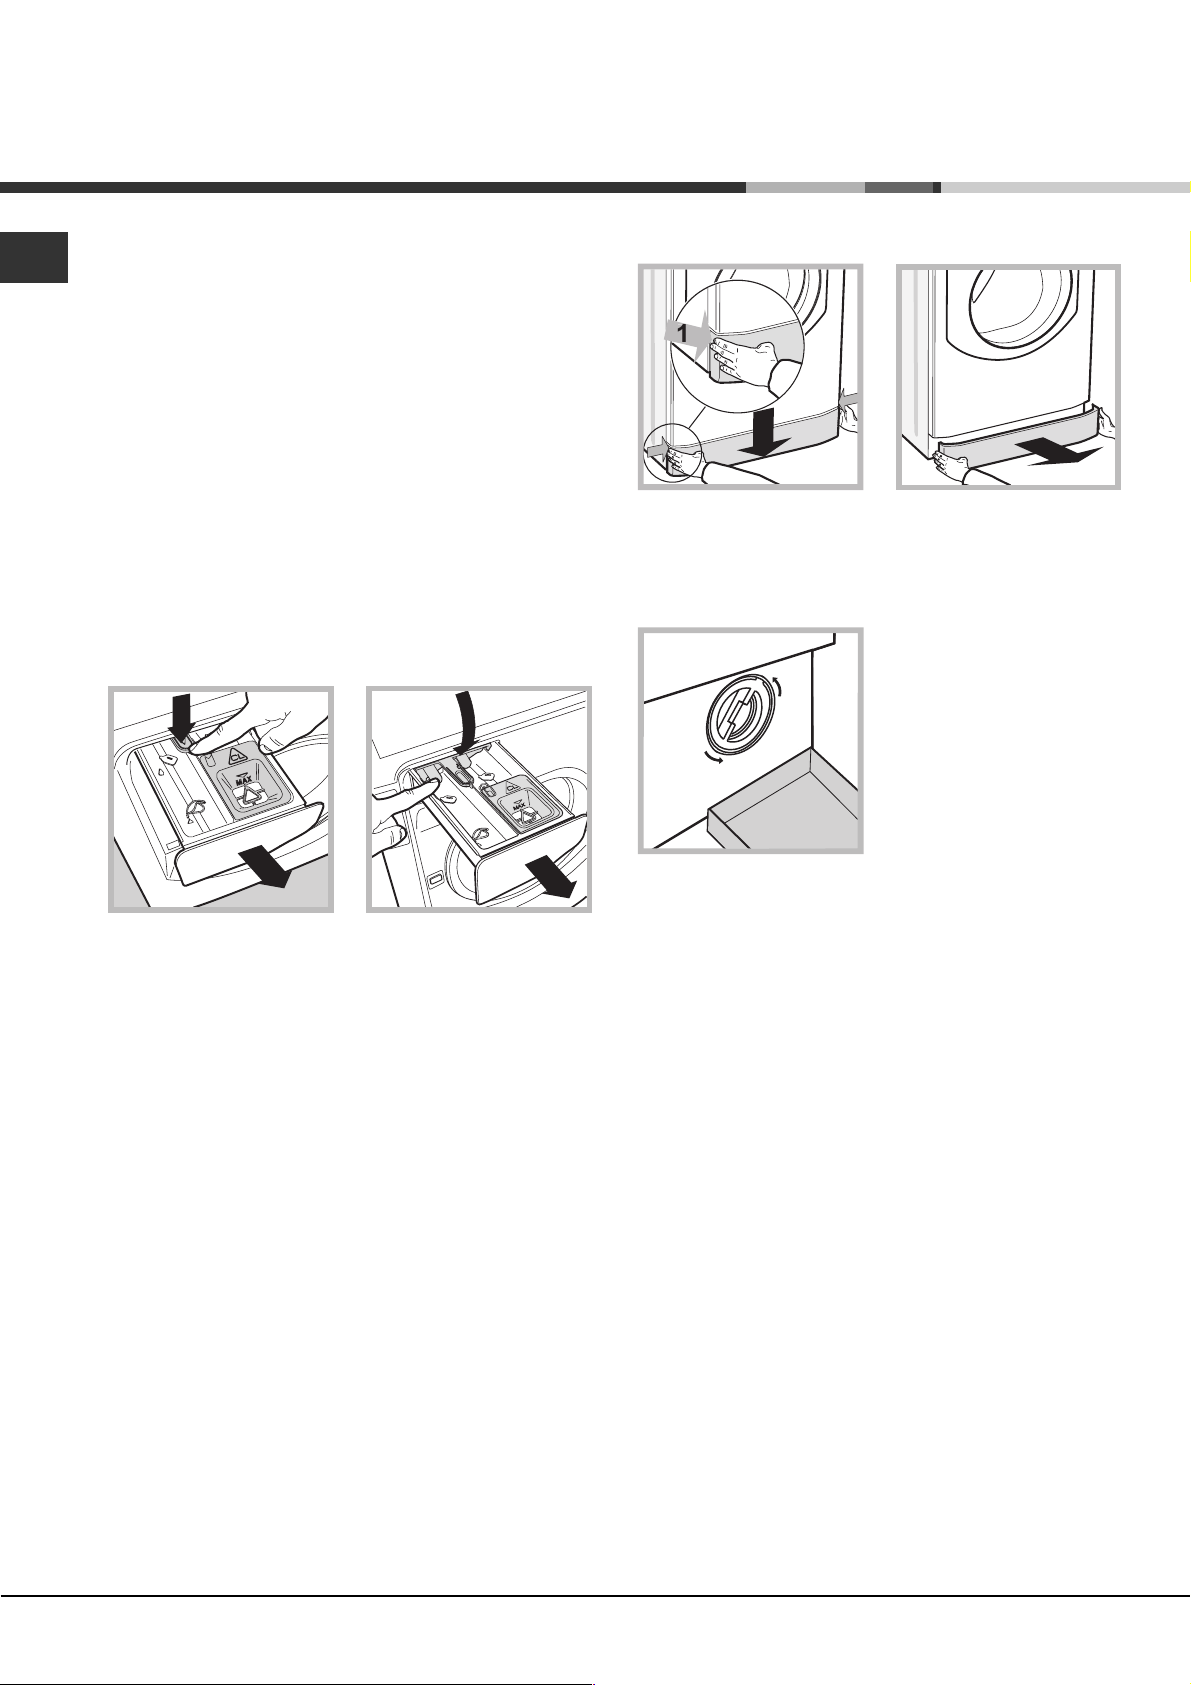
Opening the porthole door manually
EN
In the event that it is not possible to open the porthole
door due to a powercut, and if you wish to remove the
laundry, proceed as follows:
1. remove the plug from the
electrical socket.
2. make sure the water level
inside the machine is lower
than the door opening; if it is
not, remove excess water
using the drain hose,
collecting it in a bucket as
indicated in the figure.
3. remove the cover panel on the lower front part of the
washing machine (see overleaf).
4. pull outwards using the
tab as indicated in the figure,
until the plastic tie-rod is
freed from its stop position;
pull downwards until you
hear a click, which
indicates that the door is
now unlocked.
Before loading laundry into the washing machine,
make sure the drum is empty.
Disposal
Disposing of the packaging materials: observe local
regulations so that the packaging may be re-used.
The European Directive 2002/96/EC relating to Waste
Electrical and Electronic Equipment (WEEE) states
that household appliances should not be disposed of
using the normal solid urban waste cycle. Exhausted
appliances should be collected separately in order to
optimise the cost of re-using and recycling the
materials inside the machine, while preventing
potential damage to the atmosphere and to public
health. The crossed-out dustbin is marked on all
products to remind the owner of their obligations
regarding separated waste collection.
For more information relating to the correct disposal of
household appliances, owners should contact their
local authorities or appliance dealer.
5. open the door; if this is
still not possible repeat the
procedure.
6. reposition the panel, making sure the hooks are
securely in place before you push it onto the appliance.
11
Page 12
Care and maintenance
EN
Cutting off the water and electricity
supplies
Turn off the water tap after every wash cycle. This will
limit wear on the hydraulic system in the machine and
help to prevent leaks.
Unplug the appliance when cleaning it and during all
maintenance work.
Cleaning the machine
The outer parts and rubber components of the appliance
can be cleaned using a soft cloth soaked in lukewarm
soapy water. Do not use solvents or abrasives.
Cleaning the detergent dispenser drawer
A
D
To access the pre-chamber:
2
1. take off the cover panel on the front of the machine
by first pressing it in the centre and then pushing
downwards on both sides until you can remove it (see
figures);
2. position a container so
that it will collect the water
which flows out
(approximately 1.5 l) (see
figure);
3. unscrew the lid by
rotating it in an anticlockwise direction (see
figure);
To pull out the dispenser drawer, open until the first stop
point then press lever A to open completely; finally, press
one of the levers D and pull the drawer outwards (see
picture).
Wash it under running water; this procedure should be
effected regularly. Be careful to remove any detergent
residues from the dispenser drawer socket on the
machine.
Keep the drawer to the left hand side when replacing it
to ensure that it centres the guides and to prevent it
from jamming.
Caring for your appliance drum
Always leave the door ajar to prevent unpleasant
odours from forming.
Cleaning the pump
The washing machine is fitted with a self-cleaning pump
which does not require any maintenance. Sometimes,
small items (such as coins or buttons) may fall into the
protective pre-chamber at the base of the pump.
4. clean the inside thoroughly;
5. screw the lid back on;
6. reposition the panel, making sure the hooks are
securely in place before you push it onto the appliance.
Checking the water inlet hose
Check the inlet hose at least once a year. If there are
any cracks, it should be replaced immediately: during
the wash cycles, water pressure is very strong and a
cracked hose could easily split open.
Make sure the wash cycle has finished and unplug the
appliance.
12
Page 13

Trouble shooting
Your washing machine could occasionally fail to work. Before contacting the Technical Assistance Centre
(see Assistance), make sure that the problem cannot be not solved easily using the following list.
Problem:
The washing machine does not
switch on.
The wash cycle does not start.
The washing machine does not fill
with water.
The machine continuously fills
with water and drains.
The washing machine does not
drain or spin.
The machine vibrates a lot during
the spin cycle.
The washing machine leaks.
The icons corresponding to the
Phase in progress flash rapidly
at the same time as the ON/OFF
indicator light.
Possible causes / Solutions:
The appliance is not plugged into the socket fully, or not enough to make
contact.
There is no power in the house.
The door is not closed properly.
The START/PAUSE button has not been pressed.
The water tap has not been opened.
A DELAY TIMER has been set.
The water inlet hose is not connected to the tap.
The hose is bent.
The water tap has not been opened.
There is no water supply in the house.
The pressure is too low.
The START/PAUSE button has not been pressed.
The drain hose is not fitted at a height between 65 and 100 cm from the
floor (see Installation).
The free end of the hose is under water (see Installation).
If the dwelling is on one of the upper floors of a building, there may be
problems relating to water drainage, causing the washing machine to fill
with water and drain continuously. Special anti-draining valves are available
in shops and help to prevent this inconvenience.
The wall drainage system is not fitted with a breather pipe.
The wash cycle does not include draining: Some wash cycles require the
drain phase to be started manually (see Wash cycles and options).
The drain hose is bent (see Installation).
The drainage duct is clogged.
The drum was not unlocked correctly during installation (see Installation).
The machine is not level (see Installation ).
The machine is trapped between cabinets and walls (see Installation).
The load is unbalanced (see Detergents and laundry).
The water inlet hose is not screwed on properly (see Installation).
The detergent dispenser is blocked (to clean it, see Care and
maintenance).
The drain hose is not fixed in place properly (see Installation).
Switch off the machine and unplug it, wait for approximately 1 minute and
then switch it back on again. If the problem persists, contact the Technical
Assistance Service.
EN
There is too much foam.
The washing machine door
remains locked.
The detergent is not suitable for machine washing (it should display the text
for washing machines or hand and machine wash, or the like).
Too much detergent was used.
Perform the manual unlocking procedure (see Precautions and tips).
13
Page 14

EN
Troubleshooting:
Possible causes / Solutions:
The machine's washing
performance is unsatisfactory.
What happens if the tanks are
loaded even if they are already full?
What happens if the dispenser is
used in the traditional mode while
the tanks are still full?
Can the tanks also be used for
powder detergent?
Can powder detergent fall into the
tanks?
What happens if the dispenser is
not opened properly when filling the
tanks?
The tanks have not been loaded correctly (e.g. fabric softener has been
added instead of detergent or vice-versa)
Two different types of detergent/fabric softener have mixed.
NEVER mix two different detergents; always clean out the tanks before adding
a new type of detergent.
The "Auto Dose System is blocked due to prolonged lack of use: carry
out a tank cleaning cycle (refer to "Cleaning cycle pre-set by user").
Buzzers (Beep) and visual signals (icons appearing on the display) indicate
that the tank is full. If further detergent/fabric softener is added, the excess
quantity will fall into the drum and will be washed away with the next cycle.
The machine will automatically track whether powder or liquid detergent
has been loaded in the traditional mode and will not intake any amount of
detergent from the tank. Fabric softener can only be used in the "Auto
Dose System mode.
No, powder detergent can only be used in the traditional mode.
No, there is a barrier to prevent powder detergent from falling into one of
the tanks even if the dispenser is open in the "Auto Dose System" position
(i.e. completely open).
If the dispenser is not completely open, the detergent or fabric softener
that has been added will fall into the drum and will be washed away with
the next cycle.
What happens if detergent and
fabric softener are erroneously
inverted?
What happens if different
detergents are mixed before the
tanks are empty?
The washing machine will wash with unsatisfactory results, the tanks will
have to be emptied and subjected to a manual cleaning cycle.
The machine will wash normally although we recommend only refilling the
tanks after the signal emitted by the machine; do not mix different
detergents/fabric softeners.
Note: To exit Demo mode, press and hold the two ON/OFF and START/PAUSE buttons simultaneously for 3 seconds.
14
Page 15

Assistance
Before calling for Assistance:
Check whether you can solve the problem by yourself (see Trouble shooting);
Restart the wash cycle to check whether the problem has been solved;
If it has not, contact the Authorised Technical Assistance Service.
If the washing machine has been installed or used incorrectly, you will have to pay for the call-out service.
Always request the assistance of authorised technicians.
Please have the following information to hand:
the type of problem;
the appliance model (Mod.);
the serial number (S/N).
The above information can be found on the data plate located on the appliance itself.
EN
15
Page 16

EN
16
Page 17

Installations- und
Bedienungsanleitungen
INHALTSVERZEICHNIS
Aufstellung, 18-19
DE
Deutsch
AQUALTIS
AQLF9F 69 U
Auspacken und Aufstellen
Wasser- und Elektroanschlüsse
Technische Daten
Beschreibung Ihres Gerätes, 20-21
Bedienblende
Auto Dose System, 22-23
Durchführung eines Waschprogramms, 24
Programme und Zusatzfunktionen, 25
Programmtabelle
Zusatzfunktionen
Waschmittel und Wäsche, 26
Waschmittel
Vorsortieren der Wäsche
Waschhinweise
System zur Auswuchtung der Wäscheladung
Vorsichtsmaßregeln und Hinweise, 27
Allgemeine Sicherheit
Entsorgung
Manuelles Öffnen der Gerätetür
WASCHVOLLAUTOMAT
DE
Reinigung und Pflege, 28
Abstellen der Wasser- und Stromversorgung
Reinigung des Gerätes
Reinigung der Waschmittelschublade
Pflege der Wäschetrommel
Reinigung der Pumpe
Kontrolle des Wasserzulaufschlauchs
Störungen und Abhilfe, 29-30
Kundendienst, 31
17
Page 18
Aufstellung
DE
Es ist äußerst wichtig, diese Bedienungsanleitung
sorgfältig aufzubewahren, um sie jederzeit zu Rate
ziehen zu können. Sorgen Sie dafür, dass sie im Falle
eines Umzugs oder Übergabe an einen anderen
Benutzer das Gerät stets begleitet.
Lesen Sie bitte folgende Hinweise aufmerksam durch:
sie liefern wichtige Informationen hinsichtlich der
Installation, des Gebrauchs und der Sicherheit.
In der Plastikhülle dieser Bedienungsanleitung befinden
sich, außer dem Garantieschein, auch Kleinteile zur
Installation.
Auspacken und Aufstellen
Auspacken
1. Nach Entfernen der Verpackung überzeugen Sie sich
bitte davon, dass das Gerät während des Transportes
nicht beschädigt wurde.
Schließen Sie das Gerät im Falle einer Beschädigung
bitte nicht an und kontaktieren Sie Ihren Händler.
2. Schrauben Sie die 4
Transportschutzschrauben
aus und nehmen Sie das
entsprechende an der
Rückwand befindliche
Distanzstück ab (siehe
Abbildung).
3. Schließen Sie die Löcher mittels der in der Plastikhülle
befindlichen Kunststoffstöpsel.
4. Bewahren Sie bitte sämtliche Teile auf. Im Falle eines
erneuten Transportes des Gerätes sind alle Teile
wieder einzusetzen, um Schäden im Geräteinnern zu
vermeiden.
Verpackungsmaterial ist kein Spielzeug für Kinder.
Nivellierung
1. Der Waschvollautomat muss auf einem ebenen,
festen Untergrund aufgestellt werden, ohne ihn an
Wände oder Möbelteile anzulehnen.
2. Eventuelle
Unebenheiten durch Anbzw. Ausdrehen der
vorderen Stellfüße
ausgleichen, (der
Neigungsgrad darf 2° nicht
überschreiten).
Eine präzise Nivellierung verleiht dem Gerät die
erforderliche Stabilität, durch die Vibrationen und
Betriebsgeräusche, vor allem während des Schleuderns,
vermieden werden.
Bei Teppichböden müssen die Stellfüße so reguliert
werden, dass ein ausreichender Freiraum zur Belüftung
unter dem Waschvollautomaten gewährleistet ist.
Wasser- und Elektroanschlüsse
Anschluss des Zulaufschlauches
Lassen Sie das Wasser vor dem Anschluss so lange
auslaufen, bis klares Wasser austritt.
1. Schließen Sie das
andere Ende des
Schlauches an den oben
rechts am Rückteil des
Gerätes befindlichen
Wasseranschluss an (siehe
Abbildung).
2. Schrauben Sie den
Wasserschlauch an einen
Kaltwasserhahn mit ¾-
GAS-Gewindeanschluss an
(siehe Abbildung).
3. Der Schlauch darf nicht eingeklemmt oder abgeknickt
werden.
Der Wasserdruck muss innerhalb der Werte liegen, die
in der Tabelle der Technischen Daten angegeben sind
(siehe nebenstehende Seite).
Sollte der Zulaufschlauch nicht lang genug sein, dann
wenden Sie sich bitte an einen Fachhändler oder an
einen autorisierten Fachmann.
Verwenden Sie bitte niemals alte oder gebrauchte
Zulaufschläuche, sondern nur die, die Sie mit dem Gerät
erhalten haben.
18
Page 19
Anschluss des Ablaufschlauches
Schließen Sie den
Ablaufschlauch, ohne ihn
dabei zu krümmen, an
eine Ablaufleitung, oder an
einen in der Wand (in einer
65 - 100 cm
Mindesthöhe von 65 100
cm) angelegten Ablauf an,
oder hängen Sie ihn in ein
Becken oder eine Wanne
ein; befestigen Sie ihn in
diesem Falle mittels der
mitgelieferten Führung an
dem Wasserhahn (siehe
Abbildung).
Das freie
Ablaufschlauchende darf
nicht unter Wasser
bleiben.
Die Steckdose sollte nach installiertem Gerät leicht
zugänglich sein.
Verwenden Sie bitte keine Verlängerungen oder
Mehrfachstecker.
Das Netzkabel darf nicht gebogen bzw. eingeklemmt
werden.
Das Versorgungskabel darf nur durch autorisierte
Fachkräfte ausgetauscht werden.
Achtung! Der Hersteller übernimmt keinerlei Haftung,
sollten diese Vorschriften nicht genau beachtet werden.
DE
Verlängerungsschläuche sollten nicht eingesetzt
werden, sollte dies jedoch absolut unvermeidlich sein,
muss die Verlängerung denselben Durchmesser des
Originalschlauchs aufweisen und darf eine Länge von
150 cm nicht überschreiten.
Elektroanschluss
Vor Einfügen des Netzsteckers in die Steckdose ist
sicherzustellen, dass:
die Steckdose über eine normgerechte Erdung
verfügt;
die Steckdose die in den Technischen Daten
angegebenen Höchstlast des Gerätes trägt (siehe
nebenstehende Tabelle);
die Stromspannung den in den Technischen Daten
angegebenen Werten entspricht (siehe
nebenstehende Tabelle);
der Netzstecker mit der Steckdose übereinstimmt.
Lassen Sie den Netzstecker oder die Steckdose
andernfalls ersetzen.
Technische Daten
Modell
Abmessungen
Fassungsvermögen
Elektroanschlüsse
Wasseranschlüsse
Schleudertouren
Prüfprogramme
gemäß EN 60456
AQLF9F 69 U
Breite 59,5 cm
Höhe 85 cm
Tiefe 64,5 cm
1 bis 9 kg
Siehe das am Gerät befindliche
Typenschild
Höchstdruck 1 MPa (10 bar)
Mindestdruck 0,05 MPa (0,5 bar)
Trommelvolumen 62 Liter
bis zu 1600 U/min.
Programm ; Temperatur 60°C;
bei einer Lademenge von 9 kg.
Das Gerät darf nicht im Freien installiert werden, auch
nicht, wenn es sich um einen geschützten Platz handelt.
Es ist gefährlich, Ihren Vollwaschautomaten Gewittern
und Unwettern auszusetzen.
Dieses Gerät entspricht den
folgenden EG-Richtlinien:
- 89/336/EWG vom 03.05.89
(elektromagnetische Verträglichkeit)
und nachfolgenden Änderungen
- 2002/96/CE
- 2006/95/CE (Niederspannung)
19
Page 20

Beschreibung Ihres Gerätes
DE
BEDIENBLENDE
GERÄTETÜR
GRIFF
SOCKEL
REGULIERBARE
STELLFÜSSE
GERÄTETÜR
Öffnen Sie die Gerätetür
bitte stets nur am
entsprechenden Griff (siehe
Abbildung ).
WASCHMITTELBEHÄLTER
Der Waschmittelbehälter
befindet sich im Innern des
Gerätes, um ihn zu
erreichen, muss die
Gerätetür geöffnet werden.
Für die Anwendung siehe
Kapitel Auto Dose System.
Hinweis: befestigen Sie den
Aufkleber mit der
Beschreibung der
Programme und der
Optionen am Waschmittelbehälter. Der Aufkleber
befindet sich in der Plastikhülle dieser
Bedienungsanleitung.
Funktion Standby
Zur Erfüllung der neuen Richtlinien zum
Energieverbrauch ist diese Waschmaschine mit einem
automatischen Ausschaltsystem (Standby) ausgestattet,
das nach einigen Minuten des Nichtgebrauchs in
Funktion tritt. Drücken Sie kurz die Taste ON/OFF
und warten Sie, bis sich die Maschine wieder
einschaltet.
20
Page 21
Bedienblende
WASCHMITTEL-
KONZENTRAT
Wählschalter
PROGRAMME
Display TEMPERATUR/
WASCHMITTEL
Taste
WASCHMITTEL
Taste
Display
SCHLEUDER
DisplaySTARTZEITVORWAHL/
WEICHSPÜLER/
WASCHDAUER
Taste
Kontrollleuchte ECO
WEICHSPÜLER
Taste mit
Kontrollleuchte
ZUSATZFUNKTIONEN
DE
Taste mit Kontrollleuchte
START/PAUSE
Symbole PROGRAMMABLAUF
Taste mit Kontrollleuchte
ON/OFF
Taste TEMPERATUR
Taste SCHLEUDERGANG
Taste mit Kontrollleuchte ON/OFF: Drücken Sie kurz auf
die Taste, um das Gerät ein- bzw. auszuschalten. Die grüne
Kontrollleuchte zeigt an, dass das Gerät eingeschaltet ist. Um
den Waschvollautomaten während eines Waschgangs
auszuschalten, muss die Taste etwas länger gedrückt werden
(ca. 3 Sekunden); ein kurzer oder ein ungewollter Druck
bewirkt kein Ausschalten des Gerätes. Das Ausschalten des
Gerätes während eines laufenden Waschprogramms löscht
den gesamten Waschzyklus.
Wählschalter PROGRAMME: Der Schalter kann in beide
Richtungen gedreht werden. Um sicher zu sein, das am besten
geeignete Waschprogramm gewählt zu haben, raten wir die
Programmtabelle zu Rate zu ziehen. Während des
Programmablaufs bleibt der Schalter feststehend.
Taste
TEMPERATUR: Taste drücken, wenn Sie die
Temperatur ändern oder ausschalten möchten, der
ausgewählte Wert wird auf dem darüberliegenden Display
angezeigt (siehe Durchführung eines Waschprogramms).
Taste
SCHLEUDERGANG: Taste drücken, wenn Sie die
Schleuderdrehzahl ändern oder nicht schleudern möchten. Der
ausgewählte Wert wird auf dem darüberliegenden Display
angezeigt (siehe Durchführung eines Waschprogramms).
Taste
STARTZEITVORWAHL: Taste drücken, um den
verzögerten Start des gewünschten Programms zu
programmieren. Die Restzeit bis zu Programmstart wird auf
dem darüberliegenden Display angezeigt (siehe Durchführung
eines Waschprogramms).
Taste STARTZEIT-
VORWAHL
Kontrollleuchte
TÜRSPERRE
Taste mit Kontrollleuchte
TASTENSPERRE
Taste mit Kontrollleuchte ZUSATZFUNKTIONEN: Die Taste
zur Einstellung der verfügbaren Zusatzfunktionen drücken. Die
entsprechende Kontrollleuchte leuchtet (siehe Durchführung
eines Waschprogramms).
Symbole PROGRAMMABLAUF: Die Symbole zeigen die
jeweilige Programmphase (Hauptwäsche
Schleudern
Abpumpen ) anzuzeigen). Die Anzeige
Spülen
leuchtet auf, wenn der Zyklus abgelaufen ist.
Taste mit Kontrollleuchte START/PAUSE: Sobald die grüne
Kontrollleuchte auf langsames Blinklicht schaltet, drücken Sie
die Taste, um den Waschgang zu starten. Nach Start des
Programms ist die Kontrollleuchte dauerhaft an. Um den
Waschgang zu unterbrechen, drücken Sie erneut die Taste die
Kontrollleuchte blinkt orangefarben. Sobald die Kontrollleuchte
Türsperre
erlischt, kann die Gerätetür geöffnet werden.
Um das Programm an der Stelle, an der es unterbrochen
wurde, wieder in zu starten, drücken Sie die Taste erneut.
Kontrollleuchte
TÜRSPERRE: Diese zeigt an, dass die
Gerätetür nicht geöffnet werden kann. Um die Gerätetür zu
öffnen, muss der Waschzyklus auf Pause geschaltet werden
(siehe Durchführung eines Waschprogramms).
Taste mit Kontrollleuchte
TASTENSPERRE: Zur Sperre
bzw. Freigabe der Schaltelemente halten Sie die Taste ca. 2
Sekunden lang gedrückt. Die eingeschaltete Kontrollleuchte
zeigt an, dass die Bedienblende gesperrt ist. Auf diese Weise
wird verhindert, dass ein Programm aus Versehen geändert
wird, (eventuell durch Kinder).
Tasten
WASCHMITTEL und WEICHSPÜLER: siehe
"Voreingestellte Parameter ändern" im Kapitel "Auto Dose
System" .
Taste
WASCHMITTELKONZENTRAT: siehe "Behälter
auffüllen" im Kapitel "Auto Dose System".
Kontrollleuchte ECO: das Symbol
wird angezeigt, sobald
bei Änderung der Waschoptionen den Energiebverbrauch um
mindestens 10% reduziert. Außerdem leuchtet die Ikone,
bevor das Gerät in Standby-Modus übergeht, für wenige
Sekunden auf. Bei ausgeschaltetem Gerät liegt die geschätzte
Energierückgewinnung bei etwa 80%.
21
Page 22

Auto Dose System
DE
Einführung
Diese Waschmaschine ist mit
Waschmittelbehältern
ausgestattet: einer für
Flüssigwaschmittel
(konzentriert oder verdünnt)
mit einem
Fassungsvermögen von etwa
5,5 l und der zweite für
Flüssigweichspüler
(konzentriert oder verdünnt)
mit einem
Fassungsvermögen von etwa
3,5 l (siehe Abbildung).
Prüfen Sie auf dem Behälter,
ob Waschmittel/Weichspüler
verdünnt oder konzentriert sind.
Das automatische Dosiersystem entnimmt genau zum
passenden Zeitpunkt aus den Behältern die ideale Dosis
an Waschmittel und Weichspüler für den geladenen
Wäschetyp und sichert so optimale Waschergebnisse
ohne Verschwendung zu. Die zu entnehmende
Waschmittel- und Weichspülermenge kann über die
Tasten WASCHMITTEL und WEICHSPÜLER manuell
geändert werden (siehe "Voreingestellte Parameter
ändern"). Wenn gewünscht kann das Gerät im Modus
"traditionell" verwendet werden; hierzu wird das
Waschmittel in die Waschmittelschublade gefüllt; die
Maschine erkennt automatisch, dass Waschmittel
vorhanden ist und greift nicht auf die Behälter zu.
Waschmittelschublade
Modus "Traditionell"
Ziehen Sie die Waschmittelschublade bis zur ersten
Arretierung heraus, um das Waschmittel (flüssig oder in
Pulverform), das Bleichmittel oder andere Zusätze sowie
das Vorwaschmittel für den traditionellen Gebrauch
einzufüllen (siehe "traditioneller Gebrauch").
Modus "Auto Dose".
A
"Behälter auffüllen"), hat die Maschine eine
Waschmittelautonomie von etwa 60 Waschzyklen.
Erster Einsatz
Schalten Sie das Gerät über die ON/OFF-Taste ein.
Der erste Waschgang wird ohne Wäsche aber mit
Waschmittel in der Waschmittelschublade ausgeführt
(siehe Modus Traditionell) wobei das Programm gewählt
wird
Behältern.
Behälter auffüllen:
Öffnen Sie die Waschmittelschublade im Modus "Auto
Dose" (siehe "Waschmittelschublade").
(Baumwolle 90°) ohne Vorwäsche und mit leeren
Zum Befüllen der
Waschmittel- und
Weichspülerbehälter öffnen
Sie die Waschmittelschublade
bis zur ersten Arretierung,
dann drücken Sie den Hebel
(A) und ziehen die Schublade
bis zur zweiten Arretierung
heraus, wobei darauf zu
achten ist, dass sie bis zum
Anschlag gezogen wird.
Sind die Behälter befüllt (siehe
Geben Sie langsam das Waschmittel (B) und den
Weichspüler (C) hinein, bis die Behälter komplett gefüllt sind
(siehe Abbildungen).
C
B
Um eine Überfüllung zu vermeiden wird ein stetig
ansteigendes akustisches Signal (Beep) ausgegeben; der
maximale Füllstand wird mit 3 langen Tönen angezeigt.
Beginnen Sie sofort nach dem Befüllen mit dem ersten
Waschgang, damit die Schublade immer sauber ist.
Auf dem Display leuchten respektive das Symbol
Waschmittel) und das Symbol
stärker auf, um die erreichte Menge anzuzeigen.
Die zum Befüllen erforderliche Zeit hängt von der
Dickflüssigkeit des Produkts ab. Bei sehr dickflüssigen
Produkten dauert das Befüllen entsprechend länger.
Schließen Sie die Waschmittelschublade erst, wenn die
Schubladenkammern komplett geleert sind.
Wählen Sie die Dickflüssigkeit des eingefüllten
Waschmittels (konzentriert oder verdünnt) über die Taste
aus.
Das Gerät speichert die Auswahl.
Wird keine Auswahl getätigt, dann wird die
Waschmittelentnahme auf "verdünnt" eingestellt.
Wählen Sie mit der Taste
automatisch von der Maschine entnommen werden soll.
1) Wenn es sich um ein Weichspülerkonzentrat handelt,
empfehlen wir, die erste Stufe (
und diese Menge dann eventuell um nur eine Stufe (
2 Balken) zu erhöhen.
2) Bei verdünntem Weichspüler können Sie die 3. Stufe
mit 3 Balken) einstellen und dann die zu entnehmende
(
Weichspülermenge eventuell erhöhen oder senken.
3) Um die Entnahme von Weichspüler auszuschalten
drücken Sie die Taste
sind (siehe auch "Voreingestellte Parameter ändern").
bis keine Balken mehr zu sehen
(für Weichspüler) immer
die Weichspülermenge, die
mit 1 Balken) zu wählen
(für
mit
22
Page 23

Anzeige zum Nachfüllen:
Wenn der Füllstand des Waschmittels/Weichspülers unter
die Mindestmenge sinkt, blinkt bei Waschgangende auf
dem Display das erste Segment des Symbols
das Waschmittel, oder aber das Blatt unten links vom
Symbol
Weichspüler aufgebraucht sind, wird der leere Behälter für
Waschmittel oder Weichspüler mit dem schnellen Blinken
des ersten Segments im Symbol
links vom Symbol
Bei leeren Behältern während des Waschgangs
verschwinden die Symbole
Waschgangs und während der Pause blinken das erste
Segment des Symbols
Symbol
Werden die Behälter nicht nachgefüllt, dann wird für die
nachfolgenden Waschgänge im Modus Auto Dose kein
Waschmittel oder Weichspüler entnommen.
Wir empfehlen, das Waschmittel und den Weichspüler
erst NACH aufleuchten der entsprechenden Anzeige
nachzufüllen.
Vermischen Sie NIE zwei unterschiedliche Waschmittel;
wenn Sie ein neues Waschmittel verwenden möchten,
dann muss zuerst der Behälter gereinigt werden (siehe
"Vom Anw der eingestellte Reinigung").
Verwendung von "Auto Dose System"
Wenn die Behälter mit Waschmittel und Weichspüler befüllt
sind, kann die Maschine eingesetzt werden (siehe
"Durchführung eines Waschprogramms").
Das Waschmittel in Pulverform für die Vorwäsche sowie
die Zusätze in Pulverform können nur im traditionellen
Modus oder mit dem "Auto Dose System" verwendet
werden; geben Sie die Zusätze direkt in die Trommel, am
Besten in die spezielle "Waschmittelkugel".
Voreingestellte Parameter ändern:
Das Gerät entnimmt die benötigte Waschmittelmenge
automatisch entsprechend dem gewählten Programm, der
Wäschemenge und der Wasserhärte. Dennoch kann die
Waschmittel-/Weichspülermenge geändert werden.
Taste
Waschmittelmenge zu erhöhen, zu senken oder
auszuschließen.
Taste
Weichspülermenge zu erhöhen, zu senken oder
auszuschließen.
Die von dem Gerät vorgegebene Waschmittel-/
Weichspülermenge wird mit 3 Balken angezeigt.
Weniger Balken zeigen geringere Mengen im Vergleich zu
den von dem Gerät vorgeschlagenen Mengen an, mehr
Balken zeigen entsprechend höhere Mengen von
verwendetem Waschmittel/Weichspüler an.
für den Weichspüler. Wenn Waschmittel/
oder des Blatts unten
angezeigt.
; doch bei Ende des
und das Blatt unten links vom
schnell.
: drücken Sie diese Taste, um die
: drücken Sie diese Taste, um die
langsam für
Reinigung der Behälter:
Es gibt automatisch oder vom Anwender einstellbare
Reinigungszyklen für die Behälter.
Automatische Reinigung:
Die Waschmaschine führt einen automatischen
Reinigungszyklus während der Spülgänge aus, wenn die
Restmenge an Waschmittel zu gering ist, um einen
weiteren Waschgang durchzuführen.
Vom Anwender eingestellte Reinigung:
Führen Sie einen Reinigungszyklus aus (mit leerer
Trommel), wenn Sie ein anderes Produkt verwenden wollen
oder wenn die Behälter falsch befüllt wurden (Weichspüler
wurde in den Waschmittelbehälter gefüllt oder umgekehrt).
Halten Sie die Taste
um den Reinigungszyklus für den Waschmittelbehälter zu
starten; für den Weichspülerbehälter halten Sie die Taste
gedrückt und für beide die Taste , bis die Taste START/
PAUSE grün wird. Der Reinigungszyklus dauert etwa 40'
bei leeren Behältern, sonst etwas länger.
Während des Reinigungszyklus der Behälter füllt sich das
Symbol
Blatt auf.
"Traditioneller" Gebrauch
Ziehen Sie die Waschmittelschublade bis zur ersten
Arretierung heraus (siehe Abbildung) und geben Sie
Waschmittel und eventuelle Zusätze (z.B. Bleichmittel) für
einen Waschgang in die entsprechende Schubladenkammer.
wiederholt von unten nach oben, Blatt für
1
2
einzufüllen, wenn der Waschgang gestartet wird und
keinen Vorwaschgang auszuführen.
3. Verwenden Sie diesen Behälter nicht.
Waschmitteltabs oder die spezielle "Waschmittelkugel"
müssen direkt in die Trommel gelegt werden. Schalten Sie
in diesem Fall den Modus "Auto Dose System" aus
(drücken Sie die Taste
auf dem Display zu sehen sind). Füllen Sie keinen
Weichspüler ein, weil dieser automatisch in der richtigen
Menge für jeden Waschgang entnommen wird.
Um die Entnahme von Weichspüler auszuschalten drücken
Sie die Taste
sind. Für Wolle und Seide empfehlen wir die Verwendung
eines speziellen Feinwaschmittels, das in die
entsprechende Schubladenkammer gegeben wird
(Kammer 2).
Durchführung des Waschgangs:
Wählen Sie das Programm und die kompatiblen Optionen
entsprechend Ihrer Anforderungen und der geladenen
Wäsche.
bis keine vertikalen Balken mehr zu sehen
mindestens 8 Sekunden gedrückt,
1. Waschmittelkammer für den
Vorwaschgang: verwenden
Sie ausschließlich
Waschmittel in Pulverform.
3
2. Waschmittelkammer für
den Hauptwaschgang: für
Waschpulver oder
Flüssigwaschmittel. Bei
Verwendung von
Flüssigwaschmittel empfehlen
wir, dieses erst dann
bis keine vertikalen Balken mehr
DE
23
Page 24

Durchführung eines
Waschprogramms
DE
ANMERKUNG: Lassen Sie vor erstmaligem Gebrauch
des Waschvollautomaten erst einen Waschgang ohne
Wäsche, jedoch mit Waschmittel durchlaufen. Stellen
Sie hierzu das 90°C-Waschprogramm ohne Vorwäsche
ein.
1. EINSCHALTEN DES GERÄTES. Drücken Sie die
Taste
Sekunde auf; im Anschluss daran leuchtet die
Kontrollleuchte der Taste
Kontrollleuchte START/PAUSE blinkt.
2. EINFÜLLEN DER WÄSCHE. Öffnen Sie die
Gerätetür. Füllen Sie die Wäsche ein. Beachten Sie
die maximale Füllmenge laut Programmtabelle.
3. DOSIERUNG DES WASCHMITTELS. Für die
Verwendung des Modus "Auto Dose System" braucht
das Waschmittel nicht dosiert zu werden; das Gerät
entnimmt automatisch die für das eingestellte
Programm, die eingefüllte Wäsche und die
Wasserhärte passende Menge. Für die Verwendung
im traditionellen Modus siehe "Traditioneller
Gebrauch".
4. SCHLIESSEN SIE DIE GERÄTETÜR.
5. WAHL DES WASCHPROGRAMMS. Drehen Sie
den WÄHLSCHALTER PROGRAMME nach rechts
oder nach links auf das gewünschte Programm; die
dem Programm entsprechende Temperatur und
Schleudergeschwindigkeit werden automatisch
zugeschaltet, können jedoch geändert werden.
6. INDIVIDUALISIERUNG DES WASCHGANGS.
Dies erwirken Sie über die auf dem Bedienfeld
befindlichen Tasten:
Schleuderdrehzahl.
Das Gerät zeigt automatisch die für das eingestellte
Programm vorgesehene maximale Temperatur sowie
die maximale Schleudergeschwindigkeit, wenn sie
kompatibel mit dem eingestellten Programm sind.
Durch Drücken der Taste
Schritt für Schritt herabgesetzt werden, bis auf
Kaltwäsche (
die Schleudergeschwindigkeit Schritt für Schritt
herabgesetzt werden, bis auf die Abwahl des
Schleudergangs (
Tasten setzt die Einstellungen wieder auf die
maximalen Werte.
. Sämtliche Kontrolllampen leuchten für 1
dauerhaft und die
Änderung der Temperatur und/
kann die Temperatur
). Durch Drücken der Taste kann
). Ein weiterer Druck auf die
Ausnahme: Wird das Waschprogramm BAUMWOLLE
eingestellt, kann die Temperatur bis auf 90° erhöht werden.
Die Startzeitvorwahl einstellen.
Die entsprechende Taste drücken, bis die
gewünschte Startzeit erreicht ist. Bei der Einstellung
wird die Startzeit zusammen mit dem Symbol
angezeigt, das blinkt. Nach der Einstellung der
Startzeitvorwahl zeigt das Display das Symbol
ständig an sowie die Dauer des Zyklusses. Drücken
Sie die Taste einmal, um die eingestellte Startzeit
anzuzeigen. Um die Startzeitvorwahl wieder zurück zu
setzen drücken Sie die Taste bis auf dem Display die
Anzeige OFF erscheint; das Symbol
aus.
Wurde die Taste START/PAUSE einmal gedrückt,
kann die Restzeit bis zum Start nur verringert werden.
Änderung der Eigenschaften des Waschgangs.
Drücken Sie die Taste ZUSATZFUNKTIONEN, um
einen Waschgang gemäß Ihren persönlichen
Wünschen zu ändern.
Zur Aktivierung der Zusatzfunktion drücken Sie die
Taste; die entsprechende Kontrolllampe leuchtet auf.
Durch erneutes Drücken der Taste kann die
Zusatzfunktion wieder ausgeschaltet werden; die
entsprechende Kontrollleuchte erlischt.
Lässt sich eine Waschoption nicht mit dem
gewählten Programm kombinieren, blinkt die
entsprechnde Anzeige, es ertönt ein akustisches
Signal (3 Signaltöne) und die Funktion wird nicht
aktiviert.
7. STARTEN DES PROGRAMMS. Drücken Sie die
Taste START/PAUSE. Die Kontrollanzeige leuchtet und
die Gerätetür wird gesperrt (Kontrollleuchte
TÜRSPERRE
Programmablaufs leuchten die entsprechenden
Symbole auf, um die jeweils erreichte Phase
anzuzeigen. Um ein bereits laufendes Programm zu
ändern, schalten Sie das Gerät auf Pause , drücken
Sie hierzu die Taste START/PAUSE, wählen Sie
daraufhin das gewünschte Programm und drücken
Sie erneut die Taste START/PAUSE.
Zum Öffnen der Gerätetür während eines Zyklusses
drücken Sie die Taste START/PAUSE; ist die
Kontrollleuchte TÜRSPERRE
die Gerätetür geöffnet werden. Drücken Sie die Taste
START/PAUSE erneut, um das Programm an der
Stelle, an der es unterbrochen wurde, wieder in Gang
zu setzen.
8. ENDE DES PROGRAMMS. Dieses wird durch die
Leuchtanzeige END angezeigt. Die Gerätetür kann
geöffnet werden. Blinkt die Kontrollleuchte START/
PAUSE, muss die Taste gedrückt werden, um den
Waschgang abzuschließen. Öffnen Sie die Gerätetür,
nehmen Sie die Wäsche heraus und schalten Sie das
Gerät aus.
Möchten Sie ein bereits in Gang gesetztes
Waschprogramm löschen, halten Sie die Taste
gedrückt, bis der Zyklus unterbrochen wird und sich das
Gerät ausschaltet.
eingeschaltet). Während des
schaltet sich
ausgeschaltet, kann
Sack für Steppdecken, Vorhänge und Feinwäsche
Dank des speziellen mitgelieferten Sacks können Sie im
Waschvollautomaten Aqualtis auch ihre kostbarsten und
empfindlichsten Wäschestücke bei maximalem Schutz
waschen. Es empfiehlt sich, diesen Sack in jedem Fall
für die Wäsche wie z.B. (Stepp- und Daunendecken mit
Synthetikbezug zu verwenden).
24
Page 25

Programme und
Zusatzfunktionen
Programmtabelle
Sym-
Beschreibung des Programms
bole
Programme Baumwolle
Baumwolle mit Vorwäsche
(Füllen Sie das Waschpulver in die entsprechende Kammer ein).
Baumwolle (1):
Buntwäsche.
Baumwolle (2):
Buntwäsche.
Buntwäsche aus Baumwolle (3)
Hemden
Jeans
Spezialprogramme
stark verschmutzte empfindliche Buntwäsche.
Baby:
Kunstfaser
Kunstfaser
"7-Tage" Wäsche:
Daunen:
Seide:
Wolle:
Mix 30':
(nicht geeignet für Wolle, Seide und Handwäsche).
Teilprogramme
Spülen - 1600 - Schleudern - 1600 - - - 9
Abpumpen - 0 - - - 9
(*) Hinweis: nach etwa 10 Minuten nach dem START, errechnet die Maschine die Restlaufzeit unter Berücksichtigung der Ladung neu und zeigt sie an.
Für alle Testinstitute:
1) Prüfprogramm gemäß EN 60456: Programm
2) Langes Baumwollprogramm: Programm
3) Kurzes Baumwollprogramm: Programm
stark verschmutzte Weiß- und farbechte
stark verschmutzte Weiß- und empfindliche
widerstandsfähige
zarte
bettwäsche Bade- und Handtücher.
wäsche- bzw. Kleidungsstücke mit Daunenfüllung.
kleidungsstücke aus Seide, Viskose und Feinwäsche.
wolle, Kaschmir usw.
zum kurzen Auffrischen leicht verschmutzter Wäsche
und eine Temperatur von 60°C einstellen.
und eine Temperatur von 40°C einstellen.
und eine Temperatur von 40°C einstellen.
Max.
Te m p .
(°C)
90° 1600
60° 1600 -
40° 1600 40° 1600 -
40° 600 40° 800 -
40° 800 -
60° 800 -
40° 800 -
60° 1600 30° 1200 30° 0 -
40° 600 -
30° 800 -
Max.
Schleuder
Geschwindig-
keit (U/min)
Waschmittel und
Zusätze
Vorwä-
Was chmittel
sche
lll
Weich-
spüler
ll
ll
ll
ll
ll
ll
ll
ll
ll
ll
ll
ll
ll
l
Max.
Beladungsmenge
(kg)
9
9
9
9
2
4
4
4
4
9
3,5
2
2
3,5
9
Program-
DE
mdauer
(*) Die Programmdauer kann auf dem Display abgelesen
werden.
Zusatzfunktionen
Waschmitteldosierung
Zur Dosierung des Waschmittels siehe Kapitel Auto
Dose System.
Waschmittelkonzentrat
Zur Änderung der Dickflüssigkeit des Waschmittels siehe
Kapitel Auto Dose System.
Weichspülerdosierung
Zur Dosierung des Weichspülers siehe Kapitel Auto
Dose System.
Extra Spülen
Wählen Sie diese Zusatzfunktion, wird die Spülwirkung
verbessert und somit ein optimales Ausspülen von
Waschmittelresten garantiert. Dies ist besonders
empfehlenswert bei sehr empfindlicher Haut bzw.
Waschmittelallergien. Es empfiehlt sich, diese Funktion
bei voller Wäschebeladung oder bei hohen
Waschmitteldosierungen zuzuschalten.
Diese Funktion kann zu den Programmen
, , .
25
Page 26

Waschmittel und Wäsche
DE
Waschmittel
Die Wahl des Waschmittels und der Waschmittelmenge hängt von
der Gewebeart (Baumwolle, Wolle, Seide ...), der Farbe, der
Waschtemperatur, der Stärke der Verschmutzung und der
Wasserhärte ab. Diese Waschmaschine mit Autodosiersystem
für Waschmittel und Weichspüler hilft, Verschwendungen zu
vermeiden und somit die Umwelt zu schützen und sichert
dabei optimale Waschergebnisse zu.
Es empfiehlt sich:
ein Waschmittel in Pulverform zu verwenden, wenn ein
Vorwaschgang ausgeführt wird. Das Waschmittel wird auf
"traditionelle" Weise verwendet.
flüssige Waschmittel für empfindliche Baumwollwäsche und
für alle Waschprogramme bei Niedrigtemperaturen.
für den Gebrauch im Modus "Auto Dose System" nur
flüssige Waschmittel und Weichpüler zu verwenden. Keine
superkonzentierte Waschmittel, "Gels" oder ähnliches
verwenden.
flüssige Feinwaschmittel für Wolle und Seide.auf
"traditionelle" Weise zu verwenden.
NIE zwei unterschiedliche Waschmittel/Weichspüler
vermischen; immer erst eine Reinigung der Behälter ausführen,
bevor ein anderes Mittel benutzt wird.
Flüssigwaschmittel dürfen erst unmittelbar vor dem Start des
Programms in die entsprechende Kammer, oder in eine Dosierkugel,
eingefüllt werden. Bei der Benutzung von Flüssigwaschmitteln sollte
kein Programm mit Vorwäsche verwendet werden.
Verwenden Sie keine Handwaschmittel, diese verursachen
eine zu hohe Schaumbildung.
Vorsortieren der Wäsche
Falten Sie die Wäsche auseinander, bevor Sie sie in die
Trommel legen.
Trennen Sie die Wäsche je nach Gewebeart (siehe
Waschetikettensymbol) und Farbe. Weißwäsche ist immer
getrennt zu waschen.
Entleeren Sie alle Taschen und kontrollieren Sie die Knöpfe.
Das in der Programmtabelle angegebene Gewicht,
beschreibt die maximale Ladung Trockenwäsche und darf
nicht überschritten werden.
Wie schwer ist Wäsche?
1 Betttuch 400-500 g
1 Kopfkissenbezug 150-200 g.
1 Tischdecke 400-500 g
1 Bademantel 900-1200 g
1 Handtuch 150-250 g
1 Jeanshose 400-500 g
1 Oberhemd 150-200 g.
Waschhinweise
Hemden: wählen Sie das Spezialprogramm Hemden
zum schonenden Waschen von Oberhemden jeglicher
Gewebeart und Farbe.
Jeans: wählen Sie das Spezialprogramm Jeans
Wäschestücke aus Denimstoff; wenden Sie die
Wäschestücke auf links und verwenden Sie ein
Flüssigwaschmittel.
Baby: wählen Sie das Spezialprogramm Baby
durch Kinder verursachten, typischen Flecken zu beseitigen
und die Waschmittel optimal auszuspülen auch um Allergien an
der empfindlichen Kinderhaut zu vermeiden. Dieser Zyklus
reduziert das Bakterienaufkommen durch eine Erhöhunh der
Wassermenge und wurde optimiert für die Verwendung von
speziellen desinfizierenden Waschmittelzusätzen.
Am Ende des Waschgangs erfolgen einige langsame und
für alle
um die
sanfte Trommelumdrehungen. Drücken Sie abschließend die
Taste START/PAUSE.
Seide: Wählen Sie das Spezialprogramm Seide
Waschen aller Kleidungs- bzw. Wäschestücke aus Seide. Es
empfiehlt sich der Einsatz von Feinwaschmittel.
Gardinen: Verwenden Sie das Programm Seide
sollten zusammengelegt und in den mitgelieferten Beutel
gesteckt werden.
Wolle: Der Waschvollautomat von Hotpoint/Ariston ist der
einzige, der mit dem Woolmark Platinum Care-Siegel
(M.0508) von The Woolmark Company ausgezeichnet wurde.
Dieses Siegel zertifiziert diese Waschmaschine als Gerät für
eine besonders schonende Maschinenwäsche aller
Kleidungsstücke aus Wolle, auch solcher, die das Etikett nur
Handwäsche
sich sämtliche Wollwäsche bedenkenlos waschen, wobei
beste Waschergebnisse erreicht werden.
Daunen: Zum Waschen von Wäschestücken mit
Daunenfüllung wie Federbetten für Doppel- oder Einzelbetten
(die ein Gewicht von 3,5 kg nicht überschreiten), Kissen,
Anoraks wählen Sie das Spezialprogramm Daunen
empfehlen, die Federbetten mit nach innen gefalteten Ecken
(siehe Abbildung) in die Wäschetrommel zu füllen und ¾ des
Fassungsvermögens der Trommel nicht zu überschreiten.
Für optimale Waschergebnisse empfiehlt es sich,
Flüssigwaschmittel zu verwenden und dieses in die
Waschmittelkammer einzufüllen.
Steppdecken: Benutzen Sie zum Waschen von Steppdecken
mit Synthetikbezug den mitgelieferten Sack und stellen Sie das
Programm Daunen
Badezimmer- und Bettwäsche: Ihr Waschvollautomat
bietet Ihnen die Möglichkeit, Ihre gesamte Wäsche in einem
einzigen Waschgang, dem 7-Tage-Programm
waschen. Weichspüler kommt hier optimiert zum Einsatz und
Sie sparen zusätzlich Zeit und Energie. Es empfiehlt sich die
Verwendung von Waschmittel in Pulverform.
Hartnäckige Flecken: Diese sollten vor dem Waschen
vorbehandelt werden. Verwenden Sie das Programm für
Baumwolle mit Vorwäsche.
tragen. Mit dem Programm Wolle lassen
ein.
zum
. Sie
. Wie
zu
System zur Auswuchtung der
Wäscheladung
Um starke Vibrationen zu vermeiden, wird die Wäsche vor
dem Schleudern durch spezielle Trommelbewegungen
gleichmäßig verteilt. Sollte die Wäscheladung nach Ablauf
mehrerer Versuche immer noch nicht korrekt verteilt sein,
schleudert das Gerät die Wäsche bei einer niedrigeren
Schleudergeschwindigkeit. Sollte die Wäsche extrem
ungleichmäßig verteilt sein, führt das Gerät anstelle des
Schleudergangs einen Wäscheverteilungs-Zyklus durch. Um
eine optimale Verteilung der Wäscheladung und somit eine
korrekte Auswuchtung zu ermöglichen, sollten große und
kleine Wäscheteile gemischt eingefüllt werden.
26
Page 27
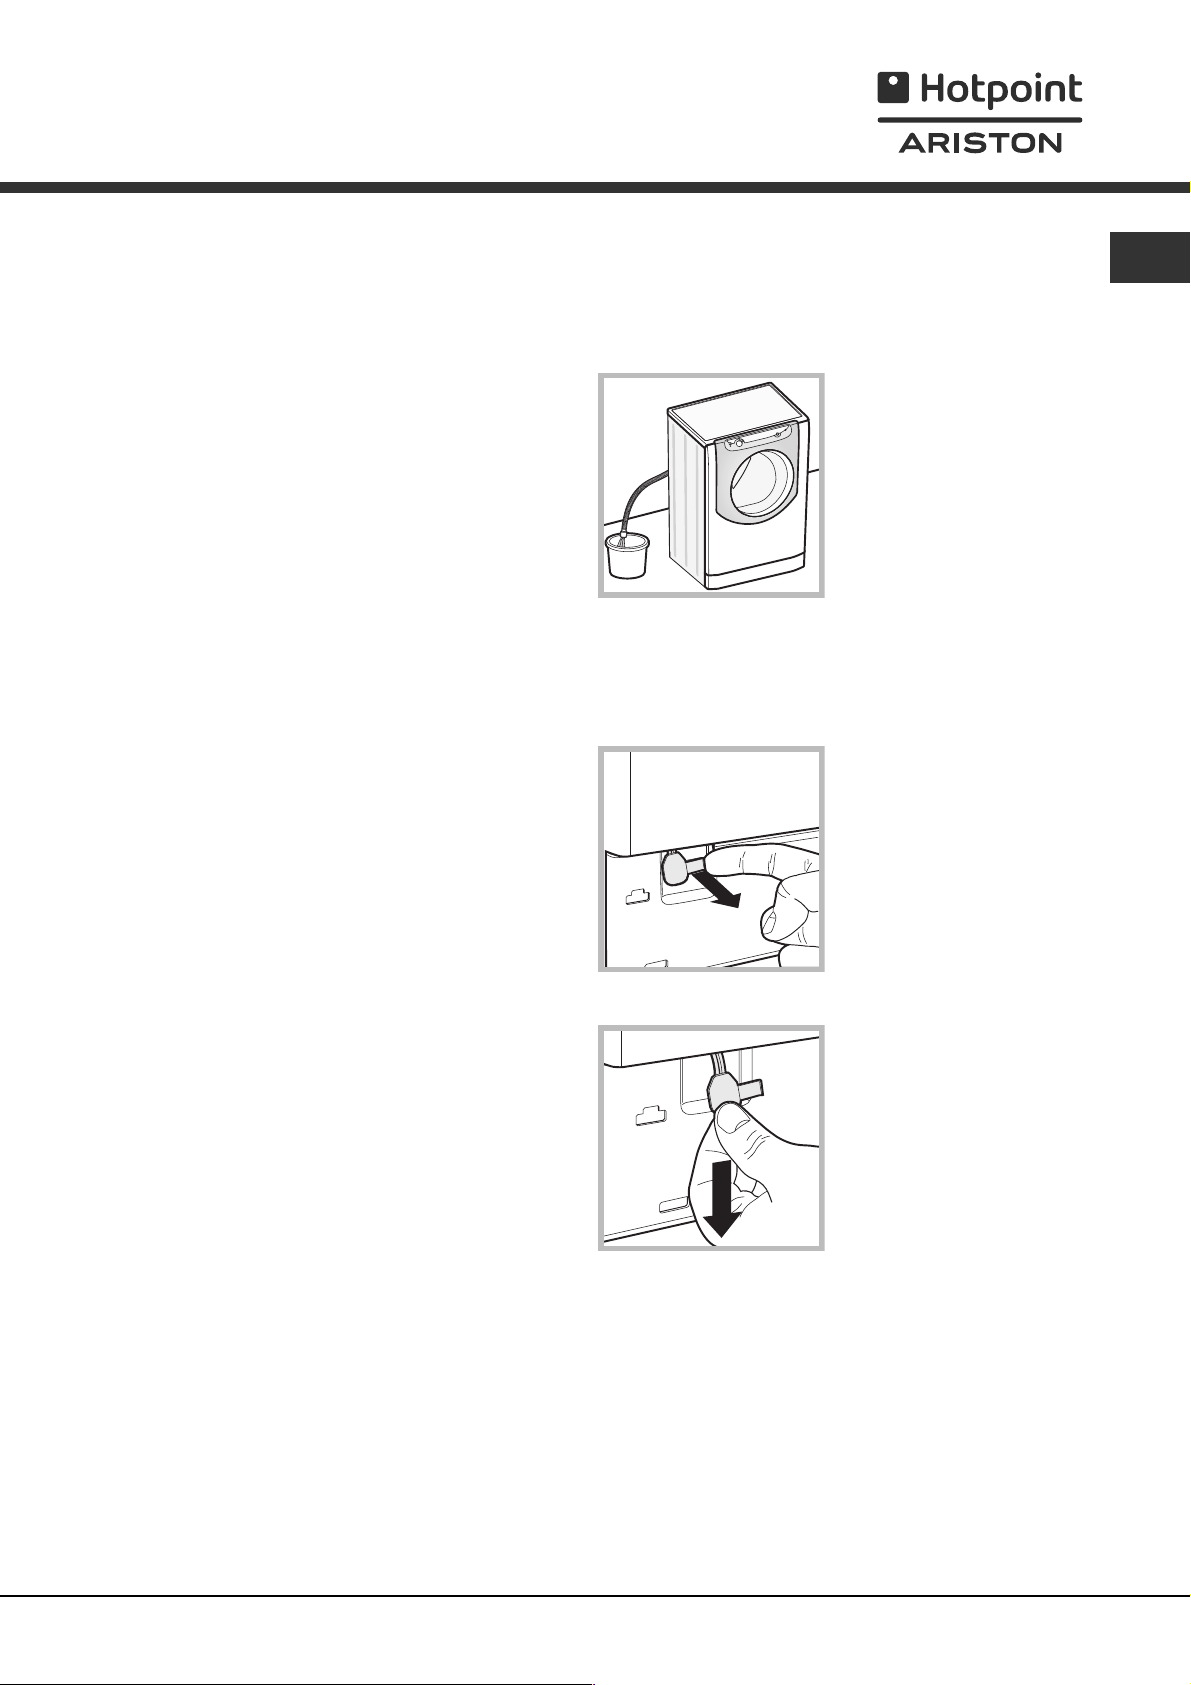
Vorsichtsmaßregeln und
Hinweise
Der Waschvollautomat wurde nach den strengsten
internationalen Sicherheitsvorschriften entworfen und
gebaut. Nachstehende Hinweise werden aus
Sicherheitsgründen genannt und sollten aufmerksam
gelesen werden
Allgemeine Sicherheit
Dieses Gerät wurde ausschließlich für den Einsatz im
privaten Haushalt konzipiert.
Das Gerät darf nur von Erwachsenen und gemäß den
Anleitungen dieses Handbuchs bedient werden.
Berühren Sie das Gerät nicht, wenn Sie barfuß sind,
und auch nicht mit nassen oder feuchten Händen
oder Füßen.
Ziehen Sie den Netzstecker nicht am Netzkabel aus
der Steckdose, sondern nur am Netzstecker selbst.
Berühren Sie nicht das Ablaufwasser, es könnte sehr
heiß sein.
Öffnen Sie die Gerätetür nicht mit Gewalt: Der
Sicherheits-Schließmechanismus könnte hierdurch
beschädigt werden.
Bei etwaigen Störungen versuchen Sie bitte nicht,
Innenteile selbst zu reparieren.
Halten Sie Kinder stets von dem in Betrieb
befindlichen Gerät fern.
Sollte es erforderlich sein, das Gerät zu versetzen,
sollten hierfür 2 oder 3 Personen verfügbar sein.
(Vorsichtig vorgehen). Versetzen Sie es niemals allein,
das Gerät ist äußerst schwer.
Bevor Sie die Wäsche einfüllen, stellen Sie bitte sicher,
dass die Wäschetrommel leer ist.
Entsorgung
Entsorgung des Verpackungsmaterials: Bitte befolgen
Sie die lokalen Richtlinien zur Entsorgung und
Wiederverwertung des Verpackungsmaterials.
Die europäische Richtlinie 2002/96/EG über Elektro-
und Elektronik-Altgeräte schreibt vor, dass
Hauhaltsgeräte nicht mit dem normalen Müll zu
entsorgen sind. Altgeräte sind zwecks Optimierung
der Rückgewinnungs- und Recyclingrate der
Gerätematerialien einer gesonderten Sammelstelle
zuzuführen, um Schäden für die Gesundheit und die
Umwelt zu vermeiden. Das durchgestrichene
Abfalleimersymbol, weist darauf hin, dass eine
getrennte Entsorgung vorgeschrieben ist.
Für weitere Informationen hinsichtlich der
ordnungsgemäßen Entsorgung von Haushaltsgeräten
wenden Sie sich bitte an Ihren Händler oder an die
zuständige kommunale Stelle.
Manuelles Öffnen der Gerätetür
DE
Sollte die Gerätetür aufgrund eines Stromausfalls nicht
geöffnet werden können, gehen Sie wie folgt vor, um die
Wäsche entnehmen und somit aufhängen zu können:
1. Ziehen Sie den
Netzstecker aus der
Steckdose .
2. Stellen Sie sicher, dass
der Wasserstand im Innern
des Gerätes die Gerätetür
nicht übersteigt, andernfalls
lassen Sie das
überschüssige Wasser, so
wie auf der Abbildung
veranschaulicht, durch den
Ablaufschlauch in einen
Eimer ablaufen.
3. Nehmen Sie die Abdeckung an der Gerätefront ab
(siehe Abbildung auf nachfolgender Seite).
4. Entfernen Sie mithilfe der
Zunge (nach vorne ziehen)
die KunststoffSpannvorrichtung aus der
Arretierung. Ziehen Sie die
Spannvorrichtung jetzt nach
unten, bis ein deutliches
Klicken anzeigt, dass die Tür
entriegelt ist.
5. Öffnen Sie die Gerätetür.
Wenn das nicht möglich ist,
wiederholen Sie die Schritte
aus Punkt 4.
6. Arretieren Die die Kunststofflasche wieder an der
beschriebenen Stelle
27
Page 28

Reinigung und Pflege
DE
Abstellen der Wasser- und
Stromversorgung
Drehen Sie den Wasserhahn nach jedem
Waschvorgang zu. Hierdurch wird der Verschleiß der
Wasseranlage verringert und Wasseraustritte
vermieden.
Ziehen Sie den Netzstecker aus der Steckdose, bevor
Sie Ihr Gerät reinigen.
Reinigung des Gerätes
Die Gehäuseteile und die Teile aus Gummi können mit
einem, mit warmer Spülmittellauge angefeuchteten Tuch
gereinigt werden. Vermeiden Sie den Einsatz von Löseund Scheuermitteln.
Reinigung der Waschmittelschublade
A
D
Zugang zur Fremdkörperfalle:
2
1. Nehmen Sie die Abdeckung an der Gerätefront ab,
indem Sie zur Mitte hin drücken, dann drücken Sie beide
Seiten nach unten und ziehen sie heraus (siehe
Abbildungen).
2. Nehmen Sie einen
Behälter zum Auffangen des
auslaufenden Wassers (ca.
1,5 Liter) zur Hand (siehe
Abbildung);
3. Drehen Sie den Deckel
gegen den Uhrzeigersinn ab
(siehe Abbildung);
Zum Herausziehen der Schublade bis zur ersten
Arretierung ziehen, dann den Hebel A drücken, um sie
ganz herauszuziehen; abschließend einen der Hebel D
drücken und nach außen ziehen (siehe Abbildungen).
Die Schublade regelmäßig unter fließendem Wasser
gründlich ausspülen. Gründlich auch eventuelle
Waschmittelreste aus dem Sitz der Schublade in der
Maschine entfernen.
Zum wieder einsetzen die Schublade ganz links halten
und genau auf die Führungen setzen, damit sie nicht
verkantet.
Pflege der Wäschetrommel
Lassen Sie die Gerätetür stets leicht offen stehen, um
die Bildung unangenehmer Gerüche zu vermeiden.
Reinigung der Pumpe
Ihr Gerät ist mit einer selbstreinigenden Pumpe
ausgerüstet, eine Wartung ist demnach nicht erforderlich.
Es könnte jedoch vorkommen, dass kleine Gegenstände
(Münzen, Knöpfe) in die Fremdkörperfalle geraten.
4. Reinigen Sie das Innere gründlich;
5. Schrauben Sie den Deckel wieder auf.
6. Bringen Sie die Abdeckung wieder an. Stellen Sie
hierbei sicher, dass die Haken in die Schlitze eingreifen,
bevor Sie die Abdeckung fest andrücken.
Kontrolle des Wasserzulaufschlauchs
Kontrollieren Sie den Zulaufschlauch mindestens einmal
im Jahr. Weist er Risse bzw. Brüche auf, muss er
ausgetauscht werden. Der starke Druck während des
Waschprogramms könnte zu plötzlichem Platzen führen.
Vergewissern Sie sich, dass der Waschgang
abgeschlossen ist und ziehen Sie den Netzstecker heraus.
28
Page 29

Störungen und Abhilfe
Bei Funktionsstörung: Bevor Sie sich an den Technischen Kundendienst wenden (siehe Kundendienst), vergewissern
Sie sich zuerst, ob es sich nicht um eine Kleinigkeit handelt, die Sie selbst beheben können. Ziehen Sie hierzu
nachstehendes Verzeichnis zu Rate.
Störungen:
Das Gerät schaltet sich nicht
ein.
Der Waschgang startet nicht.
Das Gerät zieht kein Wasser.
Das Gerät zieht laufend Wasser
und pumpt es laufend ab.
Mögliche Ursachen / Lösungen:
Der Stecker steckt nicht in der Steckdose, oder nicht so, dass der Kontakt
hergestellt wird.
Der Strom ist ausgefallen.
Die Gerätetür ist nicht ganz geschlossen.
Die Taste START/PAUSE wurde nicht gedrückt.
Der Wasserhahn ist nicht aufgedreht.
Es wurde ein verzögerter Start gewählt.
Der Zufuhrschlauch ist nicht am Wasserhahn angeschlossen.
Der Schlauch ist geknickt.
Der Wasserhahn ist nicht aufgedreht.
Es ist kein Wasser da.
Der Druck ist unzureichend.
Die Taste START/PAUSE wurde nicht gedrückt.
Der Ablaufschlauch befindet sich nicht auf der vorgeschriebenen Höhe, d.h. 65
100 cm vom Boden (siehe Installation).
Das Schlauchende liegt unter Wasser (siehe Installation).
Falls Sie in einer der obersten Etagen eines Gebäudes wohnen, kann es
vorkommen, dass sich im Syphon ein Vakuum bildet, und dadurch ständig
Wasser ansaugt und wieder abpumpt wird. Zur Lösung dieser Probleme bietet
der Handel spezielle Syphonventilean.
Der Abfluss der Hausinstallation wurde nicht mit einer Entlüftungsöffnung versehen.
DE
Das Gerät pumpt nicht ab und
schleudert nicht.
Das Gerät vibriert zu stark
während des Schleuderns.
Das Gerät ist undicht.
Die Symbole des
Programmablaufs blinken
gemeinsam mit der ON/OFF
Kontrollleuchte in kurzen
Abständen.
Es bildet sich zu viel Schaum.
Das Programm sieht kein Abpumpen vor: Bei einigen Programmen muss es
von Hand eingestellt werden (siehe Programme und Zusatzfunktionen).
Der Ablaufschlauch ist geknickt (siehe Installation).
Die Ablaufleitung ist verstopft.
Die Transportsicherungen wurden nicht entfernt (siehe Installation).
Das Gerät steht nicht eben (siehe Installation).
Das Gerät steht zu eng zwischen der Wand und einem Möbel (siehe Installation).
Das Gerät wurde nicht gleichmäßig beladen (siehe Waschmittel und Wäsche).
Der Zulaufschlauch wurde nicht ordnungsgemäß aufgeschraubt (siehe Installation).
Die Waschmittelschublade ist verstopft (zur Reinigung siehe Wartung und Pflege).
Der Ablaufschlauch ist nicht korrekt befestigt (siehe Installation).
Schalten Sie das Gerät aus und ziehen Sie den Netzstecker; warten Sie
daraufhin ca. 1 Minute und schalten Sie es wieder ein. Bleibt die Störung
bestehen, kontaktieren Sie bitte den Kundendienst.
Das Waschmittel ist für Waschmaschinen nicht geeignet (es muss mit der
Aufschrift Für Waschmaschinen, Für Handwäsche und Waschmaschinen
usw. versehen sein.
Es wurde zu hoch dosiert.
Die Gerätetür bleibt gesperrt.
Entsperren Sie die Gerätetür von Hand (siehe Vorsichtsmaßregeln und Hinweise).
29
Page 30

DE
Störungen:
Mögliche Ursachen / Lösungen:
Die Waschergebnisse des Geräts
sind nicht zufriedenstellend.
Was passiert, wenn noch volle
Behälter nachgefüllt werden?
Was passiert, wenn die
Waschmittelschublade auf
traditionelle Weise verwendet
wird, die Behälter aber noch voll
sind?
Können die Behälter auch für
Waschmittel in Pulverform
verwendet werden?
Kann das Waschmittel in
Pulverform auch in die Behälter
gelangen?
Die Behälter wurden nicht richtig befüllt (Weichspüler an Stelle des
Waschmittels oder umgekehrt).
Es wurden zwei unterschiedliche Waschmittel/Weichspüler gemischt.
Vermischen Sie NIE zwei unterschiedliche Waschmittel/Weichspüler;
führen Sie immer erst eine Reinigung der Behälter aus, bevor Sie ein
anderes Mittel benutzen.
Das System "Auto Dose System" ist verstopft, weil es über einen
längeren Zeitraum nicht verwendet wurde: Führen Sie eine Reinigung
der Behälter aus (siehe "Vom Anwender eingestellte Reinigung").
Akustische (Beep) und visuelle (Symbole auf dem Display) Signale zeigen
an, dass der Behälter voll ist. Wird nun weiter Waschmittel/Weichspüler
eingefüllt, läuft die überschüssige Menge in die Trommel und wird beim
nächsten Waschgang mit weggewaschen.
Das Gerät erkennt automatisch, ob flüssiges Waschmittel oder
Waschmittel in Pulverform in die traditionelle Waschmittelschublade
eingefüllt wurde und entnimmt in diesem Fall nichts aus dem Behälter.
Der Weichspüler kann nur im Modus "Auto dose" verwendet werden.
Nein, Waschmittel in Pulverform kann NUR im Modus "traditionell"
verwendet werden.
Nein, eine Trennwand verhindert, dass Waschmittel in Pulverform in
einen der Behälter gelangen kann, auch wenn die Schublade in der
Position "Auto Dose System" geöffnet wurde (komplett geöffnet).
Was passiert, wenn die
Waschmittelschublade nicht
richtig für das Befüllen der
Behälter geöffnet wurde?
Was passiert, wenn Waschmittel
und Weichspüler vertauscht
werden?
Was passiert, wenn die Behälter
noch nicht leer sind und ein
anderes Waschmittel eingefüllt
wird?
Wenn die Schublade nicht komplett geöffnet ist, dann fallen das
Waschmittel oder der Weichspüler in die Trommel und werden beim
nächsten Waschgang mit weggewaschen.
Das Waschergebnis wird nicht zufriedenstellend sein und die Behälter
müssen mit einem manuell eingestellten Reinigungszyklus gereinigt
werden.
Das Gerät wäscht ganz normal, aber wir empfehlen, die Behälter erst
nach dem Erscheinen der entsprechenden Symbole nachzufüllen und
keine verschiedenen Waschmittel/Weichspüler zu vermischen.
Hinweis: Um den Demo Mode zu verlassen drücken Sie gleichzeitig für 3 Sek, die beiden Tasten ON/OFF und START/PAUSE .
30
Page 31

Kundendienst
Bevor Sie den Kundendienst anfordern:
Prüfen Sie, ob einige Kontrollen vorab selbst durchgeführt werden (siehe Störungen und Abhilfe);
Starten Sie daraufhin das Programm erneut, um sicherzustellen, dass die Störung auch wirklich behoben wurde;
Ist dies nicht der Fall, wenden Sie sich bitte an den autorisierten Kundendienst.
Im Falle einer fehlerhaften Installation oder eines unkorrekten Gebrauchs wird der Einsatz eventuell in Rechnung gestellt.
Beauftragen Sie bitte niemals unbefugtes Personal.
Geben Sie bitte Folgendes an:
die Art der Störung;
das Gerätemodell (Mod.);
die Seriennummer (S/N).
Diese Angaben ersehen Sie auf dem am Gerät befindlichen Typenschild.
DE
31
Page 32

DE
32
Page 33

Instruções para a instalação e a
utilização
PT
Português
AQUALTIS
AQLF9F 69 U
MÁQUINA DE LAVAR ROUPA
Sumário
PT
Instalação, 34-35
Desembalar e nivelar
Ligações hidráulicas e eléctricas
Dados técnicos
Descrição da máquina, 36-37
Painel de comandos
Auto Dose System, 38-39
Como efectuar um ciclo de lavagem, 40
Programas e opções, 41
Tabela dos Programas
Opções de Lavagem
Detergentes e roupa, 42
Detergente
Preparar a roupa
Conselhos de lavagem
Sistema de balanceamento da carga
Precauções e conselhos, 43
Segurança geral
Eliminação
Abertura manual da porta de vidro
Manutenção e cuidados, 44
Interromper a alimentação de água e de corrente
eléctrica
Limpar a máquina
Limpar a gaveta dos detergentes
Cuidados com o tambor
Limpar a bomba
Verificar o tubo de alimentação de água
Anomalias e soluções, 45-46
Assistência, 47
33
Page 34
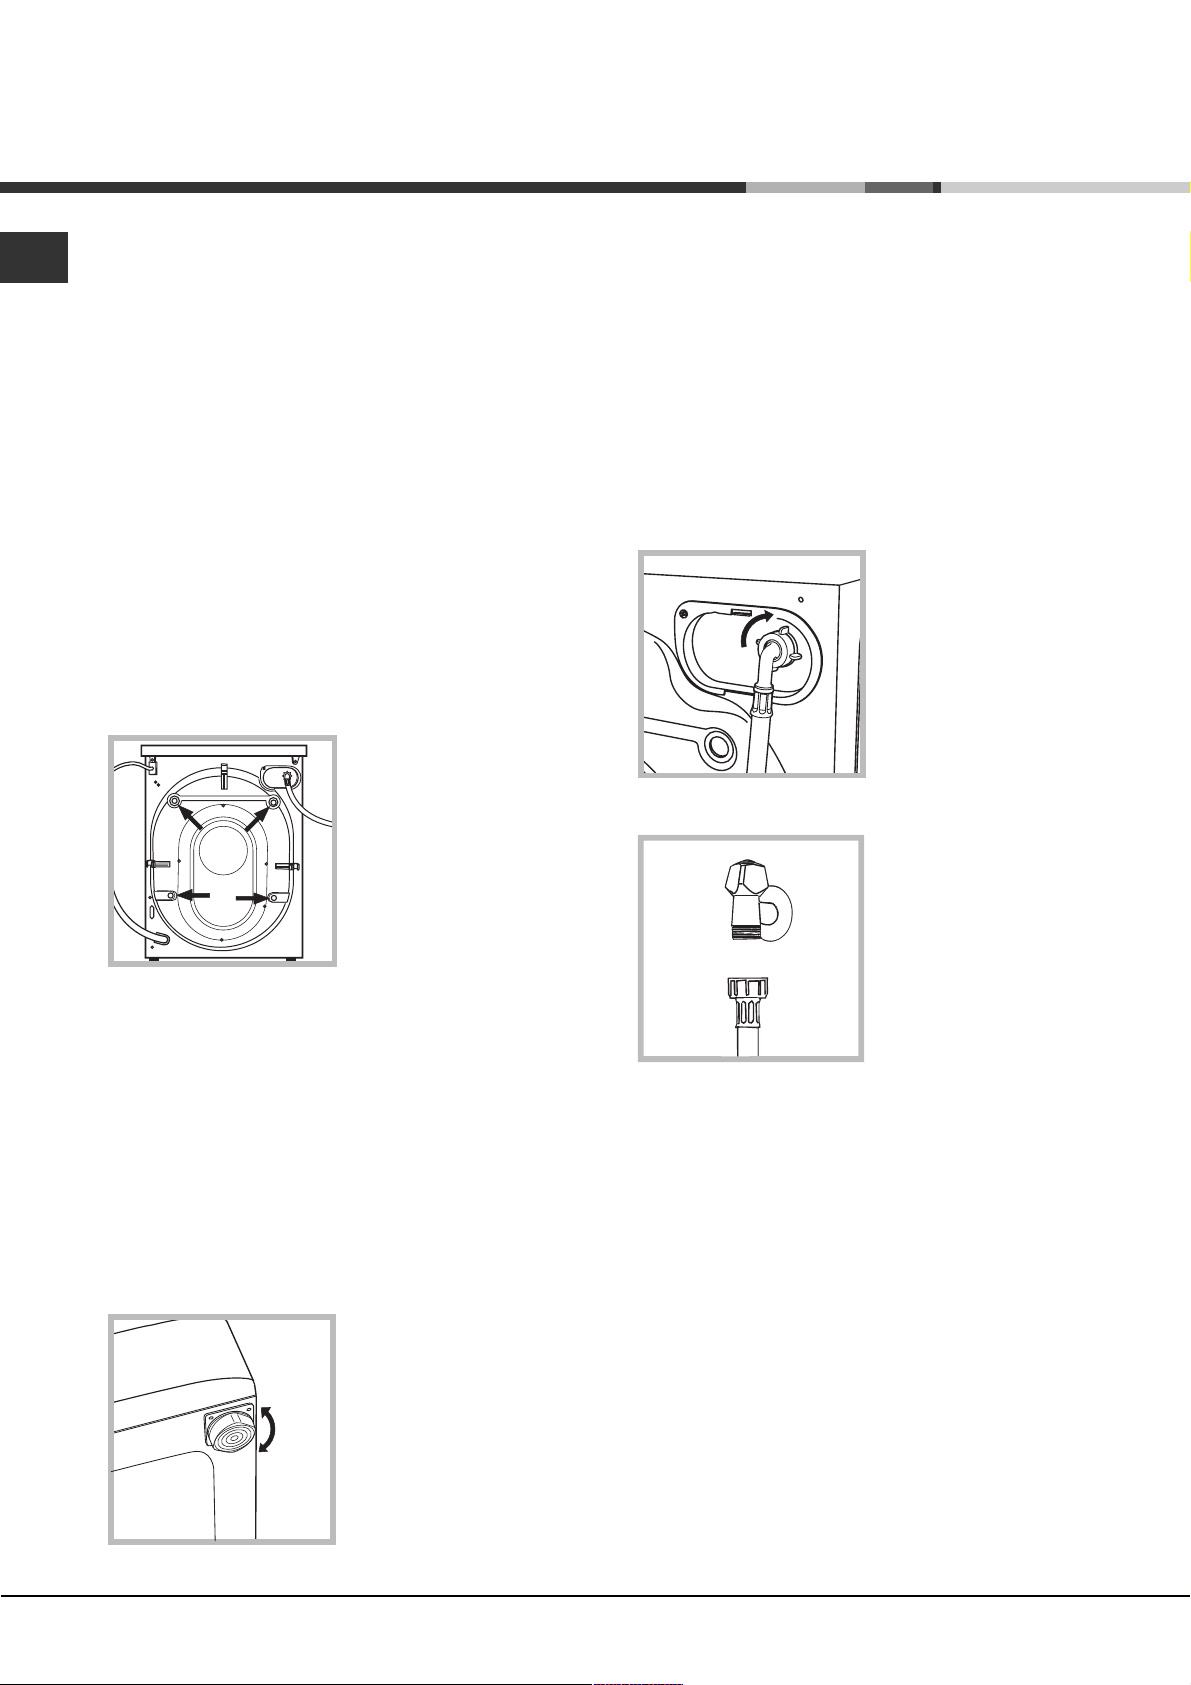
Instalação
PT
É importante guardar este livrete para poder consultálo a qualquer momento. Se a máquina for vendida,
cedida ou transferida, certifique-se que este livrete
permaneça com a máquina.
Leia com atenção estas instruções: há importantes
informações acerca da instalação, da utilização e da
segurança.
No envelope que contém este manual
encontrará, além da garantia, também algumas peças
que servirão para a instalação.
Desembalar e nivelar
Desembalar
1. Uma vez desembalada a máquina de lavar roupas,
verifique que a mesma não tenha sofrido danos durante
o transporte.
Se estiver danificada não efectue a sua ligação e
contacte o revendedor.
2. Tire os 4 parafusos de
protecção para o
transporte e o respectivo
calço, situados na parte
traseira (veja a figura).
Um cuidadoso nivelamento dá estabilidade e evita
vibrações e ruídos sobretudo na fase de centrifugação.
Se a máquina for posicionada sobre tapete ou alcatifa,
regule os pés em modo que embaixo da máquina de
lavar roupa haja espaço suficiente para a ventilação.
Ligações hidráulicas e eléctricas
Ligação do tubo de alimentação da água
Antes de ligar o tubo de alimentação à rede hídrica,
deixe a água escorrer até que seja límpida.
1. Ligue o tubo de
alimentação na máquina
de lavar roupa atarraxado
no apropriado
fornecimento da água, na
parte traseira, em cima à
direita (veja a figura).
2. Realize a ligação do
tubo de alimentação
parafusando-o a uma
torneira de água fria com
bocal de rosca de 3/4 gás
(ver figura).
3. Tampe os furos com as tampas em plástico contidas
no envelope.
4. Conserve todas as peças; se for necessário
transportar a máquina de lavar roupa, terão de ser
montadas outra vez para evitar danos internos.
Embalagens não são brinquedos para as crianças!
Nivelamento
1. Posicione a máquina de lavar roupa sobre um
pavimento plano e rígido, sem encostá-la em paredes
ou móveis.
2. Compense as
irregularidades
desatarraxando ou
atarraxando os pés até
que a máquina esteja
nivelada horizontalmente
(não deve ter uma
inclinação superior aos 2
graus).
3. Tome cuidado para o tubo não ser dobrado nem
esmagado.
A pressão hídrica da torneira deve ser entre os valores
da tabela dos Dados técnicos (veja a página ao lado).
Se o comprimento do tubo de alimentação não for
suficiente, contacte uma oficina especializada ou um
técnico autorizado.
Nunca utilize tubos de alimentação de água velhos ou
usados, mas sim aqueles fornecidos em dotação com a
máquina.
34
Page 35
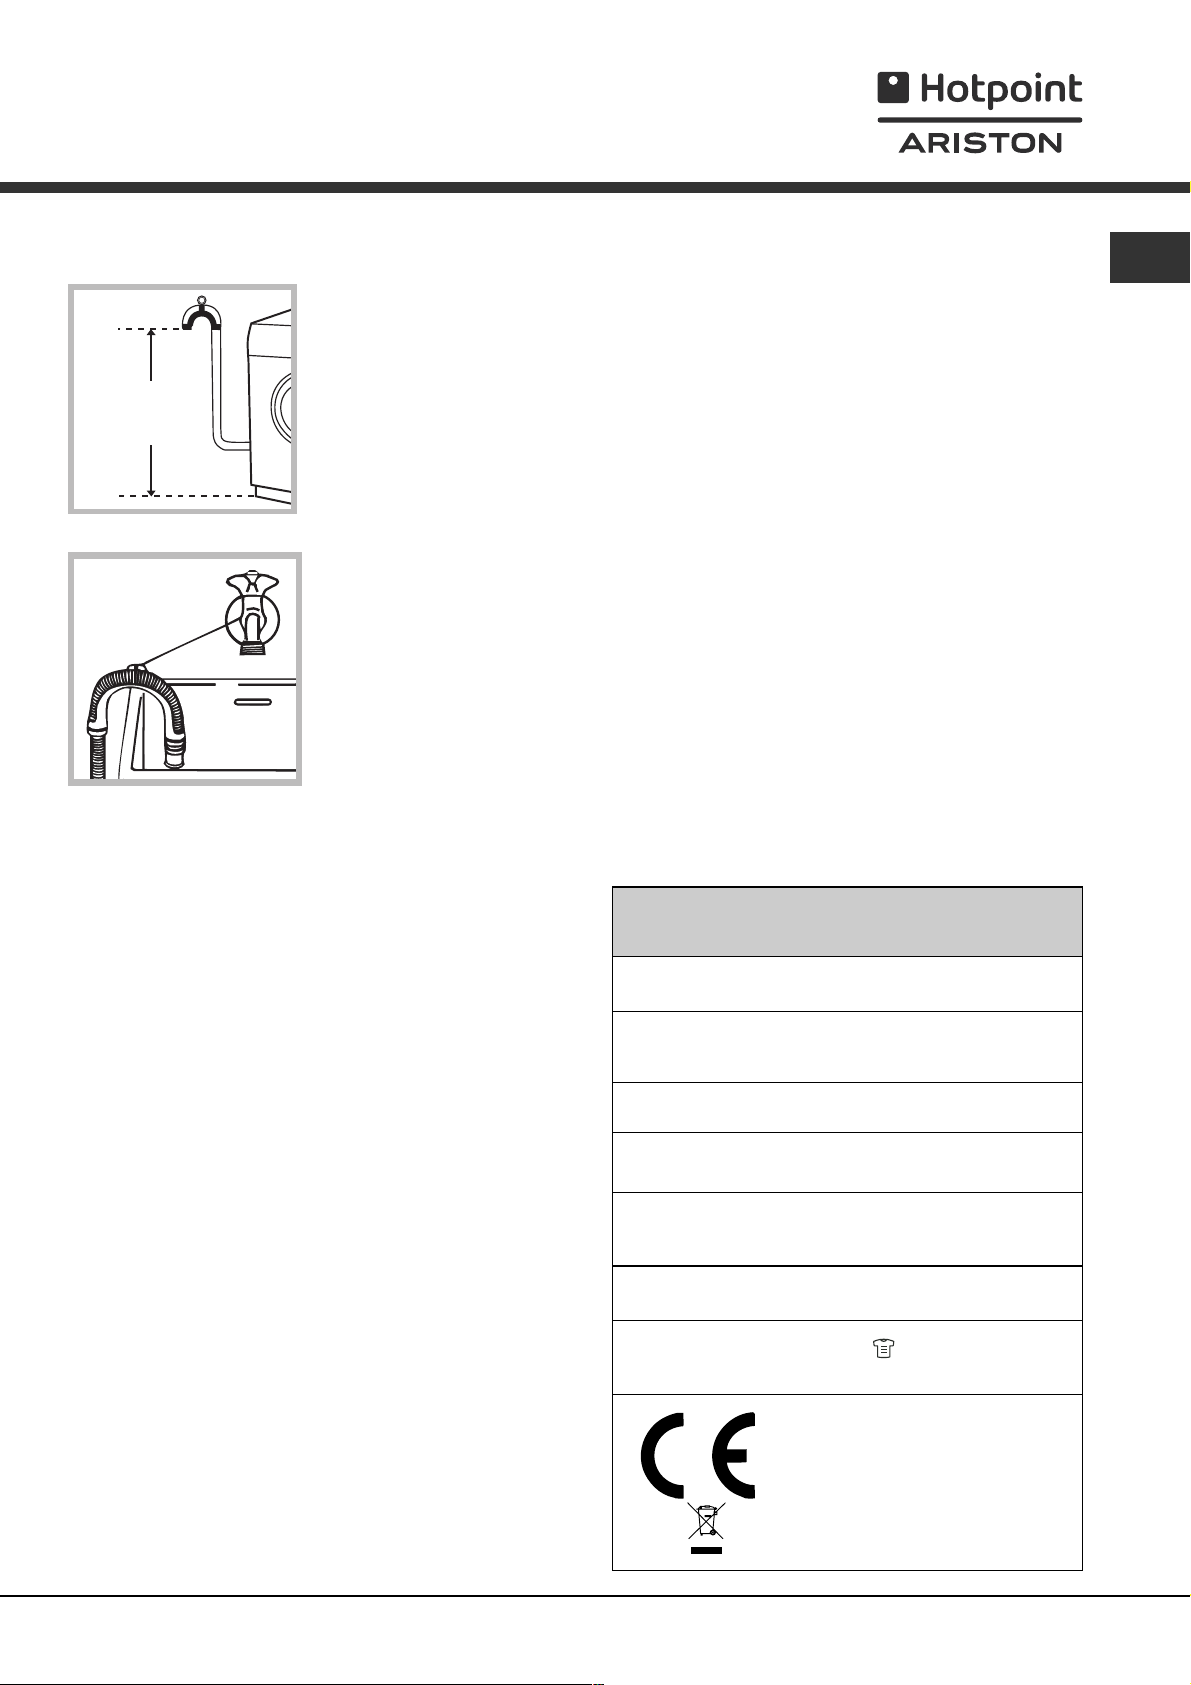
Ligação do tubo de descarga
Ligue o tubo de descarga,
sem dobrá-lo, a uma
conduta de descarga ou a
uma descarga na parede
situada entre 65 e 100
65 - 100 cm
cm. de altura do chão.
Em alternativa, coloque
na beira de um lavabo ou
de uma banheira,
prendendo na torneira a
guia fornecida com o
produto (veja a figura).
A ponta solta do tubo de
descarga não deve
permanecer emergida na
água.
O cabo não deve ser dobrado nem apertado.
PT
O cabo de alimentação e a ficha devem ser
substituídos somente por técnicos autorizados.
Atenção! O fabricante declina toda a responsabilidade se
estas regras não forem respeitadas.
É desaconselhado empregar tubos de extensão; mas
se for indispensável, a extensão deve ter o mesmo
diâmetro do tubo original e não medir mais de 150 cm
de comprimento.
Ligação eléctrica
Antes de ligar a ficha na tomada eléctrica, certifique-se
que:
a tomada tenha uma ligação à terra e seja nos
termos da legislação;
a tomada tenha a capacidade para suportar a carga
máxima de potência da máquina, indicada na tabela
dos Dados técnicos (veja ao lado);
a tensão de alimentação seja entre os valores
indicados na tabela dos Dados técnicos (veja ao lado);
a tomada seja compatível com a ficha da máquina.
Se não for, substitua a tomada ou a ficha.
Esta máquina de lavar roupa não deve ser instalada ao
aberto, nem mesmo abrigada, porque é muito perigoso
deixá-la exposta à chuva e às tempestades.
Depois de ter instalado a máquina de lavar roupa, o
acesso à tomada eléctrica deve ser fácil.
Não empregue extensões nem fichas múltiplas.
Dados técnicos
Modelo
Medidas
Capacidade
Ligações
eléctricas
Ligações hídricas
Velocidade da
centrifugação
Programas de
controlo segundo
a norma EN 60456
AQLF9F 69 U
largura 59,5 cm.
altura 85 cm.
profundidade 64,5 cm.
de 1 a 9 kg.
veja a placa das características
técnicas colocada na máquina
pressão máxima 1 MPa (10 bars)
pressão mínima 0,05 MPa (0,5 bar)
capacidade do tambor 62 litros
até 1.600 rotações por minuto
programa ; temperatura 60°C;
realizado com carga de 9 kg.
Esta aparelhagem é em
conformidade com as seguintes
Directivas Comunitárias:
- 89/336/CEE dl 03/05/89
(Compatibilidade Electromagnética) e
posteriores modificações.
- 2002/96/CE
- 2006/95/CE (Baixa Tensão)
35
Page 36

Descrição da máquina
PT
PORTA DE VIDRO
PEGA DA PORTA
DE VIDRO
BASE
PAINEL DE
COMANDOS
PÉS REGULÁVEIS
PORTA DE VIDRO
Para abrir a porta de vidro
use sempre a sua pega
(veja a figura).
GAVETA DOS DETERGENTES
A gaveta dos detergentes
encontra-se no interior da
máquina e para se ter
acesso deve-se abrir a
porta.
Para o uso, consulte o
capítulo Auto Dose
System.
Nota: cole na gaveta dos
detergentes o adesivo com
as descrições dos
programas e opções. O adesivo encontra-se no
envelope que contém este manual.
Modalidade de Stand by
Esta máquina de lavar roupa, em conformidade com as
novas normas sobre a economia energética, dispõe de
um sistema de desligação automática (stand by) que
entra em função alguns minutos depois, no caso de
inutilização. Carregue brevemente no botão
ON/OFF
e aguarde até a reactivação da máquina.
36
Page 37

Visor TEMPERATURA/
Painel de comandos
Botão
DILUIÇÃO
DETERGENTE
Selector de
PROGRAMAS
DETERGENTE
Botão
DETERGENTE
Visor CENTRI-
FUGAÇÃO
Visor INÍCIO POSTERIOR/
AMACIADOR/
DURAÇÃO DO
CICLO
Botão
AMACIADOR
Botão com
Indicadores
luminoso
OPÇÃO
Indicador
luminoso
ECO
Botão com
indicador luminoso
START/
PAUSE
PT
Ícone FASES
DE LAVAGEM
Botão com indicador luminoso
ON/OFF
Botão TEMPERATURA
Botão CENTRIFUGAÇÃO
Botão com indicador luminoso ON/OFF: carregue
brevemente no botão para ligar ou desligar a máquina.
O indicador luminoso verde indica que a máquina está
ligada. Para desligar a máquina de lavar roupa durante a
lavagem, é necessário manter pressionado o botão por
mais tempo, aproximadamente 3 segundos; uma
pressão breve ou acidental não permitirá o desligamento
da máquina. O desligamento da máquina durante uma
lavagem em curso anula a própria lavagem.
Selector de PROGRAMAS: pode ser girado em ambas
as direcções. Para estabelecer o programa mais
correcto, veja a Tabela dos Programas.
Durante a lavagem o selector permanece parado.
Botão
TEMPERATURA: pressionar para modificar
ou excluir a temperatura; o valor escolhido é indicado
pelo visor acima (ver Como efectuar um ciclo de
lavagem).
Botão
CENTRIFUGAÇÃO: pressionar para
modificar ou excluir a centrifugação; o valor escolhido é
indicado pelo visor acima (ver Como efectuar um ciclo
de lavagem).
Botão
INÍCIO POSTERIOR: pressionar para
configurar um início posterior do programa escolhido; o
valor do atraso programado é indicado pelo visor acima
(ver Como efectuar um ciclo de lavagem).
Botões
DETERGENTE e AMACIADOR: veja
"Modificar os parâmetros pré-configurados" no capítulo
"Auto Dose System".
Botão
DILUIÇÃO DETERGENTE: veja "Como
encher os reservatórios" no capítulo "Auto Dose System".
Botão com Indicadores luminoso OPÇÃO: pressionar
para seleccionar a opção disponível. O indicador
luminoso relativo à opção ficará aceso (ver Como
efectuar um ciclo de lavagem).
Botão com indicador
Botão INÍCIO
POSTERIOR
Indicador luminoso de
luminoso BLOQUEIO
DAS TECLAS
PORTA BLOQUEADA
Ícone FASES DE LAVAGEM: acendem-se para indicar
o estado de avanço do ciclo (Lavagem
Enxaguamento
A escrita
- Centrifugação Descarga ).
acende-se quanto o ciclo tiver terminado.
-
Botão com indicador luminoso START/PAUSE: quando
o indicador luminoso verde acende-se com intermitência
lenta, carregar no botão para iniciar uma lavagem.
Quando o ciclo iniciar, o indicador permanecerá aceso
fixo. Para colocar em pausa a lavagem, carregar
novamente no botão; o indicador ficará intermitente com
uma luz laranja. Se o indicador Porta bloqueada
estiver apagado, será possível abrir a porta de vidro.
Para fazer iniciar a lavagem do ponto em que foi
interrompida, carregar novamente no botão.
Indicador luminoso
PORTA BLOQUEADA: indica
que a porta de vidro está bloqueada. Para abrir a porta
é necessário colocar o ciclo em pausa (ver Como
efectuar um ciclo de lavagem).
Botão com indicador luminoso
BLOQUEIO DAS
TECLAS: para activar ou desactivar o bloqueio do
painel de comandos, manter pressionado o botão por
aproximadamente 2 segundos. O indicador luminoso
aceso indica que o painel de comandos está bloqueado.
Deste modo, impedem-se modificações acidentais dos
programas, sobretudo se houver crianças em casa.
Indicador luminoso ECO: o ícone
irá acender-se
quando, ao modificar os parâmetros de lavagem, irá
obter-se uma economia energética de ao menos 10%.
Além disto, antes que a máquina entre na modalidade
Stand by o ícone irá acender-se por alguns segundos;
com a máquina desligada estima-se uma economia
energética de aproximadamente 80%.
37
Page 38

Auto Dose System
PT
Introdução
Esta máquina de lavar roupas
possui dois reservatórios: um
para o detergente líquido
(concentrado ou diluído) com
uma capacidade de
aproximadamente 5,5 litros, e
outro para o aditivo para
amaciar líquido (concentrado
ou diluído) com uma
capacidade de
aproximadamente 3,5 litros
(veja a figura).
Verifique na etiqueta do
detergente/aditivo se o produto
é diluído ou concentrado.
sistema de dosagem automática extrai dos reservatórios
a quantidade ideal de detergente e produto para amaciar
para cada tipo de carga e no momento mais indicado da
lavagem, para garantir resultados perfeitos e sem
desperdícios. É possível modificar a quantidade de detergente e produto para amaciar manualmente, atuando nos
botões DETERGENTE e AMACIADOR (veja "Modificar os
parâmetros pré-configurados"). Se desejar, é possível
utilizar a máquina de lavar roupas no modo "tradicional",
carregando o detergente no compartimento; a máquina
detecta automaticamente a sua presença e não utilizará
os reservatórios.
Gaveta dos detergentes
Modalidade "Tradicional".
Abra a gaveta dos detergentes até o primeiro fecho para
carregar o detergente (líquido ou em pó), a água de javel
ou outros aditivos (por exemplo, produtos para branquear)
e o detergente para a pré-lavagem para o uso na
modalidade tradicional (veja "Uso tradicional").
Modalidade "Auto Dose".
A
máquina terá uma autonomia de aproximadamente 60
ciclos para o detergente.
Primeira utilização
Ligue a máquina de lavar roupa, carregando na tecla
ON/OFF. A primeira lavagem deve ser efectuada sem
roupas, mas com o detergente deitado directamente na
gaveta dos detergentes (veja Modalidade tradicional)
configurando o programa "
lavagem e sem carregar os reservatórios.
Como encher os reservatórios:
Abra a gaveta dos detergentes na modalidade "Auto
Dose" (veja "Gaveta dos detergentes").
Para encher os reservatórios
de detergente e amaciador
abra a gaveta dos
detergentes até o primneiro
fecho, aperte a alavanca (A) e
extraia-a até o segundo
fecho, verificando que
chegue até o fim.
Depois e enchidos os
reservatórios (veja "Como
encher os reservatórios"), a
" (Algodão 90º) sem pré-
Deite lentamente o detergente (B) e o aditivo para
amaciar (C) até encher completamente os reservatórios
(veja as figuras).
C
B
Para não superar a quantidade máxima, um sinal
acústico (bip) com intensidade crescente irá avisar do
nível alcançado até o completo enchimento do
reservatório, sinalizado com 3 bip prolomgados.
Comece imediatamente a lavagem após ter enchido os
reservatórios para garantir a limpeza da gaveta.
No visor, os respectivos ícones
(para o produto para amaciar) irão iluminar-se
gradualmente para indicar a quantidade alcançada.
O tempo para encher os reservatórios depende da
densidade do produto. Com produtos muito densos, o
carregamento levará mais tempo.
Feche a gaveta dos detergentes somente quando os
recipientes tiverem sido completamente esvaziados.
Seleccione a densidade do detergente introduzido
(concentrado ou diluído) pressionando o específico botão
.
A máquina irá memorizar a escolha.
Se não for feita a selecção, o detergente será retirado
na modalidade "diluído".
Use o botão
para amaciar que será retirado automaticamente pela
máquina.
1) Se o produto para amaciar for concentrado,
recomenda-se seleccionar o primeiro nível (
barra) e aumentar eventualmente de uma só posição
com duas barras) para aumentar a extração.
(
2) Se o produto para amaciar for diluído, recomenda-se
seleccionar o nível 3 (
diminuir a quantidade de produto a ser extraída.
3) Para excluir o uso do produto para amaciar, pressione
o botão
também "Modificar os parâmetros pré-configurados").
para configurar a quantidade de produto
com 3 barras) e aumentar/
até fazer desaparecer as barras (veja
(para o detergente) e
com uma
38
Page 39
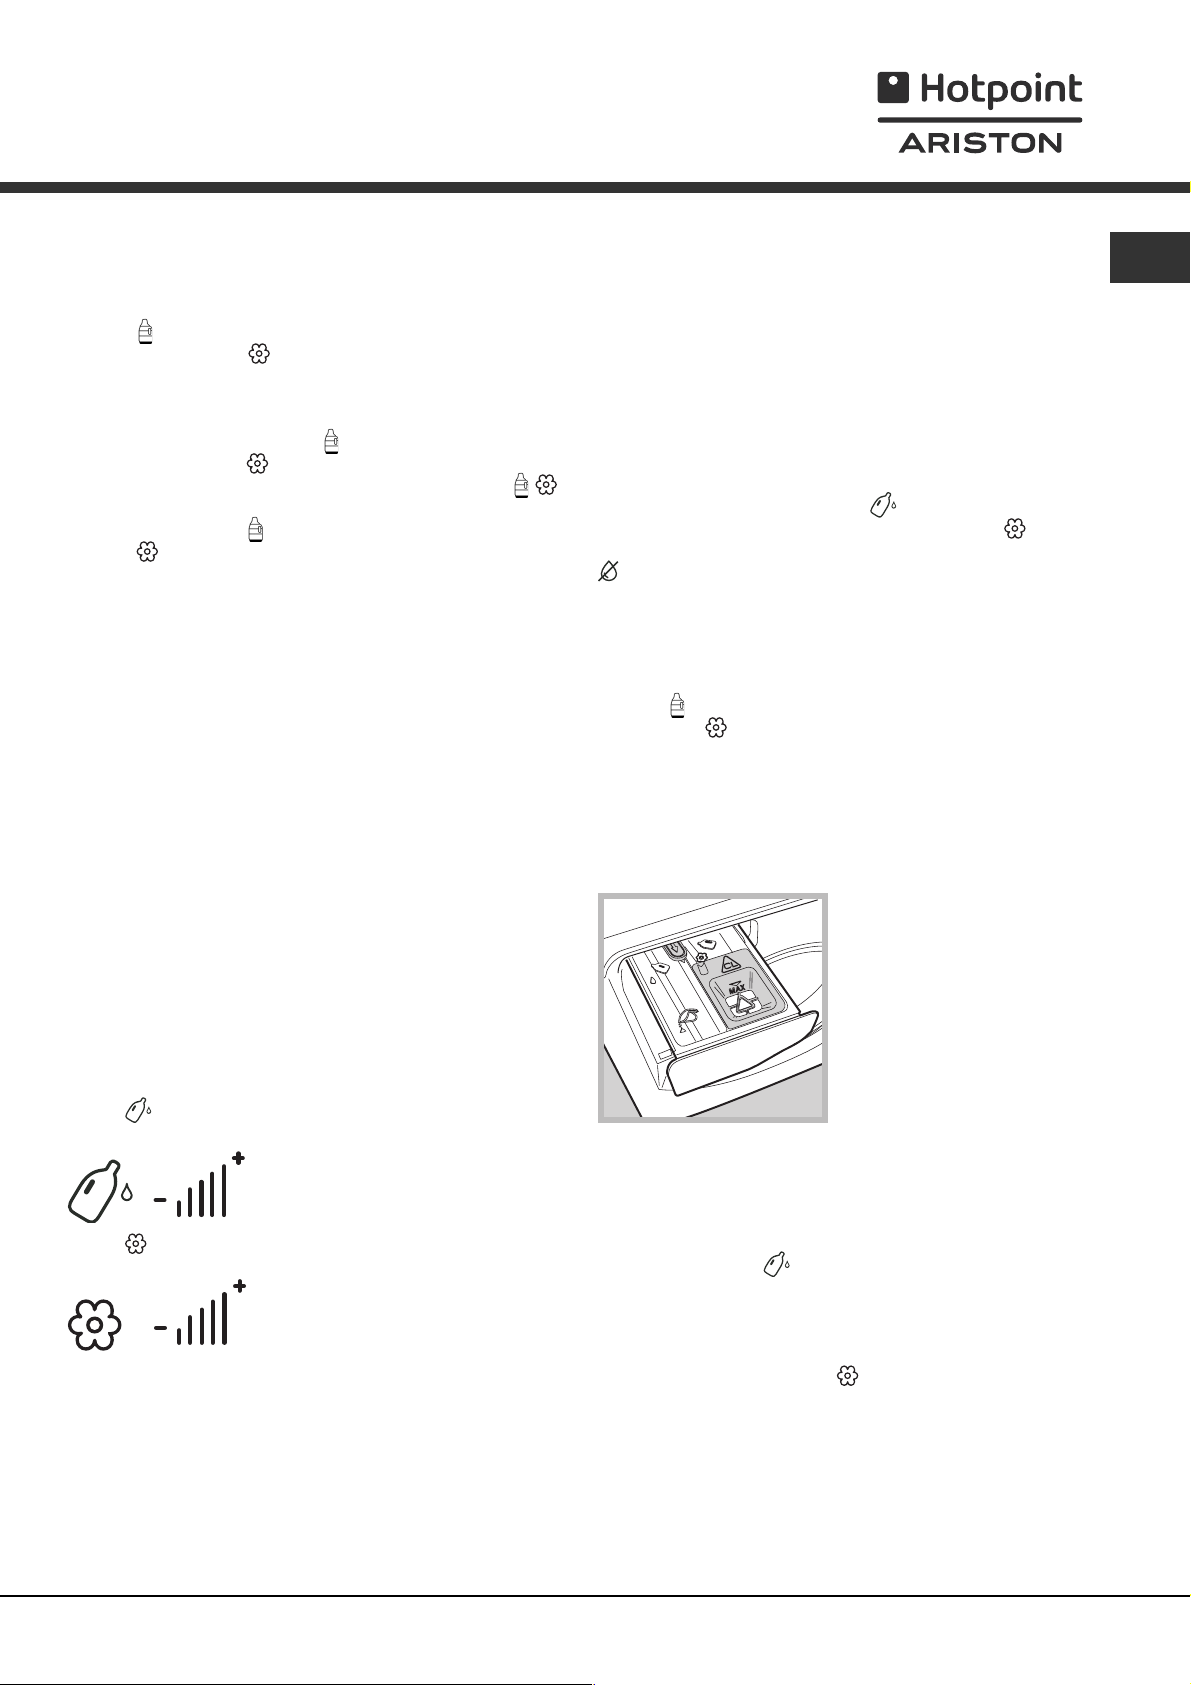
Sinalização para os sucessivos abastecimentos:
Quando o nível residual de detergente/aditivo para amaciar
descer abaixo da quantidade necessária, no fim do ciclo,
no visor irá piscar lentamente o primeiro segmento do
símbolo
esquerda do símbolo
Quando o detergente/aditivo para amaciar tiver acabado,
será sinalizado o reservatório vazio do detergente ou do
aditivo para amaciar com uma intermitência rápida do
primeiro segmento do símbolo
esquerda do símbolo
Durante o ciclo, com reservatórios vazios, os símbolos
desaparecerão; no fim do ciclo em na pausa, o primeiro
segmento do símbolo
símbolo
abastecidos os reservatórios, nas sucessivas lavagens na
modalidade Auto Dose não será extraído detergente.
Recomenda-se abastecer o detergente e o aditivo para
amaciar SOMENTE após a indicação por parte da máquina.
Não misture NUNCA dois detergentes diferentes;
efectue sempre a limpeza do reservatório antes de
introduzir um novo detergente (veja "Limpeza
programada pelo utilizador").
Como usar o "Auto Dose System"
Se os reservatório tiverem sido abastecidos com
detergente e aditivo para amaciar, proceder com o uso
da máquina (veja "Como efectuar um ciclo de lavagem").
O detergente para a pré-lavagem em pó e os aditivos
em pó podem ser utilizados somente na modalidade
tradicional ou na modalidade "Auto Dose System",
colocando os aditivos directamente no tambor,
possivelmente com a específica "bolinha".
Modificar os parâmetros pré-configurados:
A máquina pega automaticamente a quantidade de
detergente conforme o programa escolhido, a quantidade de
carga de roupa e a dureza da água. Todavia, a quantidade
de detergente/aditivo para amaciar pode ser modificada.
Botão
retirada do detergente.
Botão
retirada do aditivo para amaciar.
O nível de detergente/ aditivo para amaciar sugerido pela
máquina está indicado com 3 barras.Os níveis com
menos de 3 barras indicam menos detergente/aditivo
para amaciar respeito ao sugerido pela máquina,
enquanto os níveis com mais de 3 indicam o aumento da
quantidade de detergente/aditivo para amaciar.
Limpeza dos reservatórios:
São previstos ciclos de limpeza automáticos dos
reservatórios, ou programados pelo utilizador.
para o detergente, ou a pétala abaixo à
para o aditivo para amaciar.
ou da pétala em baixo à
.
e a pétala em baixo à esquerda do
irão piscar rapidamente. Se não forem
: pressione para aumentar, diminuir e excluir a
: pressione para aumentar, diminuir e excluir a
Limpeza automática:
A máquina de lavar roupas efectua um ciclo de
limpeza automático durante a enxaguadas, quando a
quantidade de detergente residual é insuficiente para
um sucessivo ciclo de lavagem.
Limpeza programada pelo utilizador:
Efectue um ciclo de limpeza (com o tambor vazio) se
desejar carregar um produto diferente do anterior, ou
se os reservatórios foram enchidos de modo errado (o
aditivo para amaciar foi colocado no compartimento
detergente, ou vice-cersa). Mantenha pressionado por
no mínimo 8 segundos o botão
limpeza do reservatório do detergente, o botão
para o reservatório do aditivo para amaciar ou o botão
para ambos os reservatórios, até que o botão
START/PAUSE se torne verde. O ciclo de limpeza dura
aproximadamente 40' se os reservatórios inicialmente
estiverem vazios, caso contrário a duração do ciclo
será superior.
Durante o ciclo de limpeza dos reservatórios, o
símbolo
e o símbolo
pétala.
Uso "tradicional"
Extraia a gaveta dos detergentes até o primeiro fecho
(veja figura), deite directamente na gaveta o
detergente e os outros aditivos (por ex. água de javel)
necessários para apenas uma lavagem.
enche-se repetidamente de baixo para cima
enche-se repetidamente pétala após
1
2
lavagem.
3. Não utilize este gaveta.
O detergente em pastilhas ou a específica "bolinha"
devem ser colocados directamente dentro do tambor.
Neste caso, exclua a modalidade "Auto Dose System"
(pressione o botão
respectivas barras verticais no visor).
Não deite o aditivo para amaciar porque será retirado
de forma automática na quantidade pedida para cada
lavagem. Para excluir a retirada do aditivo para
amaciar, pressione o botão
as barras verticais no visor. Para roupas de lã e seda,
aconselha-se utilizar o detergente delicado deitando-o
directamente na gaveta dos detergentes (gaveta 2).
Efectuar a lavagem:
Escolha a o programa e as opções compatíveis
conforme as necessidades e o tipo de carga.
3
até fazer desaparecer as
para activar a
1. gaveta para a pré-
lavagem: use
exclusivamente
detergente em pó.
2. gaveta para a lavagem:
use detergente em pó ou
líquido. Neste último caso,
recomenda-se deitá-lo
imediatamente antes do
início do ciclo de lavagem
e sem efectuar a pré-
até fazer desaparecer
PT
39
Page 40

Como efectuar um ciclo de
lavagem
PT
Observação: a primeira vez que utilizar a máquina de
lavar roupa, efectue um ciclo de lavagem sem roupas
mas com detergente, usando o programa algodão 90º
sem pré-lavagem.
1. LIGAR A MÁQUINA. Carregar no botão
os indicadores se acenderão por 1 segundo e logo
em seguida permanecerá aceso o indicador do botão
, o indicador luminoso START/PAUSE começará a
piscar lentamente.
2. COLOCAR A ROUPA. Abrir a porta de vidro.
Coloque a roupa dentro da máquina prestando
atenção para não superar a carga máxima indicada
na tabela dos programas na página seguinte.
3. DOSAGEM DO DETERGENTE. Para o uso na
modalidade "Auto Dose System" não é necessário
dosear o detergente, a máquina o retira
automaticamente conforme o programa
seleccionado, o tipo de carga e a dureza da água.
Para o uso na modalidade tradicional, veja "Uso
tradicional".
4. FECHAR A PORTA DE VIDRO.
5. ESCOLHA DO PROGRAMA.Girar o SELECTOR DE
PROGRAMAS para a direita ou para a esquerda até
seleccionar o programa desejado; será associada
uma temperatura e uma velocidade de centrifugação
que podem ser modificados.
6. PERSONALIZAR O CICLO DE LAVAGEM. Utilizar
os específicos botões no painel de comandos:
Modificar a temperatura e/ou a
centrifugação.
A máquina visualiza automaticamente a temperatura
e a centrifugação máximas para o programa
seleccionado ou as últimas seleccionadas se
compatíveis com o programa escolhido. Carregando
no botão
progressivamente até a lavagem a frio (
Carregando no botão
centrifugação progressivamente até a sua exclusão
(
). Uma ulterior pressão dos botões colocará os
valore novamente aos máximos previstos.
pode-se reduzir a temperatura
pode-se reduzir a
. Todos
).
Excepção: seleccionando o programa Algodão a
temperatura pode ser aumentada até a 90º.
Programar um início posterior.
Carregue no relativo botão até alcançar o tempo de
atraso desejado. Durante a programação, será
visualizado o tempo de atraso junto ao símbolo
que pisca.
Após ter programado o início posterior, o visor
mostrará o símbolo
ciclo. Ao carregar no botão uma vez, será visualizado
o tempo de atraso programado.
Para cancelar o início posterior, carregue no botão
até que no visor apareça a escrita OFF; o símbolo
irá apagar-se.
aceso fixo e a duração do
Uma vez pressionado o botão START/PAUSE o valor
do atraso poderá ser modificado somente
diminuindoo.
Modificar as características do ciclo.
Carregar no botão OPÇÃO para personalizar a
lavagem conforme as próprias exigências.
Carregar no botão para activar a opção; o
respectivo indicador luminoso irá acender-se.
Carregar novamente no botão para desactivar a
opção; o respectivo indicador luminoso irá apagar-se.
Se a opção seleccionada não for compatível com o
programa escolhido, a incompatibilidade será indicada
com a intermitência do indicador luminoso e um sinal
acústico (3 beep) e a opção não será activada.
7. INICIAR O PROGRAMA. Carregar no botão START/
PAUSE. O indicador luminoso ficará aceso fixo e a
porta irá bloquear-se (indicador luminoso PORTA
BLOQUEADA
de lavagem acendem-se durante o ciclo para indicar
a fase em curso.
Para modificar um programa durante a realização do
ciclo, colocar a máquina de lavar roupa em pausa
carregando no botão START/PAUSE; seleccionar o
ciclo desejado e carregar novamente no botão
START/PAUSE.
Para abrir a porta durante a realização de um ciclo,
carregar no botão START/PAUSE; se o indicador
luminoso PORTA BLOQUEADA
será possível abrir a porta. Carregar novamente no
botão START/PAUSE para fazer iniciar o programa do
ponto em que foi interrompido.
8. FIM DO PROGRAMA. É indicado pela escrita END
acesa. A porta de vidro poderá ser aberta
imediatamente. Se o indicador luminoso START/
PAUSE piscar, carregar no botão para terminar o
ciclo. Abrir a porta, retirar a roupa e desligar a
máquina.
Se desejar anular um ciclo já iniciado, mantenha
pressionada a tecla
e a máquina irá desligar-se.
aceso). Os ícones relativos às fases
estiver apagado,
até que o ciclo será interrompido
Saquinho para acolchoados, cortinas e peças
delicadas
Graças ao especial saquinho fornecido com o produto, a
Aqualtis consente lavar também as peças mais
preciosas e delicadas garantido a máxima protecção.
Recomenda-se o uso do saquinho para a lavagem de
acolchoados e edredões com forro externo realizado em
material sintético.
40
Page 41
Programas e opções
ç
ç
Tabela dos Programas
Icone Desc rição do Programa
Programas para algodão
Algodão
(Acrescentar o detergente no específico compartimento).
Algodão (1):
Algodão (2):
Algodão colori dos (3)
Camisas
Cal
Programas especiais
Bebé:
Sintéticos
Sintéticos
Roupas "7 dias":
Endredões:
Seda :
Lã:
Mix 30':
é indicado para lã, seda e roupas que deve ser lavadas à mão).
Programas parciais
Enxaguamento - 1600 - Centrifugação - 1600 - - - 9
Descarga - 0 - - - 9
com pré-lavagem
brancos e coloridos resistentes muito sujos.
brancos e coloridos delicados muito sujos.
as de Ganga
coloridos delicados muito sujos.
resistentes
delicados
roupa de banho e de cama.
para peças com enchimento em plumas de ganso.
para roupas de seda, viscosa, lingerie.
para lã, cashmere, etc.
para refrescar rapidamente roupas levemente sujas (não
Te m p .
max.
(Max. 90°)
Velocità
max.
(rotações
(°C)
90° 1600
60°
40° 1600 40° 1600 40° 600 40° 800 -
40° 800 -
60° 800 -
40° 800 -
60° 1600 30° 1200 30° 0 -
40° 600 -
30° 800 -
por
minuto)
1600 -
Detergentes e aditivos
Pré-
Lavagem
Lavagem
lll
ll
ll
ll
ll
ll
ll
ll
ll
ll
ll
ll
ll
ll
Amacia-
dor
l
Carga
max.
(Kg)
9
9
9
9
2
4
4
4
4
9
3,5
2
2
3,5
9
Dura
ciclo
lavagem no visor.
PT
ão
(*) É possível controlar a duração dos programas de
(*) Nota: após aproximadamente 10 minutos do START, a máquina, conforme a carga efectuada, irá calcular novamente e indicar o tempo faltante para o fim
do programa.
Para todos Test Institutes:
1) Programa de controlo segundo a norma EN 60456: configurar o programa
2) Programa longo para algodão: configurar o programa
3) Programa curto para algodão: configurar o programa
com uma temperatura de 40ºC.
com uma temperatura de 40ºC.
com uma temperatura de 60ºC.
Opções
Dosagem detergente
Para dosear a quantidade de detergente (veja o capítulo
Auto Dose System).
Densidade detergente
Para modificar o grau de densidade do detergente
(veja o capítulo "Auto Dose System").
Dosagem amaciador
Para dosear a quantidade de aditivo para amaciar
(veja o capítulo "Auto Dose System").
Extra Enxaguamento
Seleccionando esta opção aumenta-se a eficácia da
enxaguadura, e garante-se a máxima remoção dos
resíduos de detergente. É útil para quem tem a pele
particularmente sensível aos detergentes. Aconselha-se
o uso desta opção com a máquina de lavar roupa com
a carga cheira ou com grandes doses de detergente.
Esta opção não pode ser activada com os programas
, , .
41
Page 42

Detergentes e roupa
PT
Detergente
A escolha e a quantidade de detergente dependem do
tipo de tecido (algodão, lã, seda...), da cor, da
temperatura de lavagem, do grau de sujidade e da
dureza da água.
Esta máquina de lavar roupas com o sistema de autodosagem do detergente e do aditivo para amaciar, ajuda
a evitar desperdícios e a proteger o meio ambiente,
além de garantir ótimos desempenhos de lavagem.
Aconselha-se:
usar o detergente em pó se efectuar uma pré-
lavagem carregando-o no modo "Tradicional".
usar detergente líquido para peças delicadas de
algodão e para todos os programas com baixas
temperaturas.
para o uso na modalidade "Auto Dose System" use
apenas detergente e aditivo para amaciar líquidos.
Nunca use detergentes super concentrados, gel,
ou similares.
usar detergente líquido delicado para lã e seda,
colocando-os no modo Tradicional".
Não misture NUNCA dois detergentes diferentes;
efectue sempre a limpeza dos reservatórios antes de
colocar outros.
O detergente deve ser deitado antes do início da lavagem
no específico recipiente ou no doseador que deve ser
colocado directamente no tambor. Neste caso, não é
possível seleccionar o ciclo Algodão com pré-lavagem.
Não use detergentes para lavagem à mão, porque
formam espuma demais.
Preparar a roupa
Desdobre bem as roupas antes de carregá-las.
Divida a roupa em função do tipo de tecido (símbolo
na etiqueta da roupa) e a da cor, prestando atenção
para separar as peças coloridas das peças brancas;
Esvazie as algibeiras e verifique se há botões soltos;
Não ultrapasse os valores indicados na Tabela dos
Programas que se referem ao peso da roupa enxuta.
Quanto pesa a roupa?
1 lençol 400-500 gr.
1 fronha 150-200 gr.
1 toalha 400-500 gr.
1 roupão 900-1200 gr.
1 toalha de rosto 150-250 gr.
1 calça de ganga 400-500 gr.
1 camisa 150-200 gr.
Conselhos de lavagem
Camisas: utilize o específico programa Camisas
para lavar camisas de vários tipos de tecido e cores
para garantir o máximo cuidado.
Calças de Ganga: utilize o específico programa Calças de
Ganga
avesso as roupas antes de lavar e use um detergente líquido.
Bebé: utilize o específico programa Bebé
remover a sujidade típica das roupas das crianças e
remover o excesso de detergente das roupas, evitando
reacções alérgicas à pele delicada das crianças. Este ciclo
foi estudado para reduzir as bactérias utilizando uma maior
quantidade de água e optimizando o efeito de aditivos
específicos higienizantes, acrescentados ao detergente.
No fim da lavagem, a máquina efectuará lentas rotações
para todas as roupas de tecido Denim; vire do
para
do tambor; para terminar o ciclo, carregue na tecla
START/PAUSE.
Seda: utilize o específico programa Seda
todas as roupas de seda. Aconselha-se o uso de um
detergente específico para tecidos delicados.
Cortinas: use o programa Seda
coloque-as dentro do saquinho fornecido com o
produto.
Lã: A Hotpoint/Ariston é a única máquina de lavar roupa
que obteve o prestigioso reconhecimento Woolmark
Platinum Care (M.0508) por parte da The Woolmark
Company, que certifica a lavagem à máquina de todas
as roupas de lã, mesmo daquelas com etiqueta lavar
somente à mão
lavar à máquina todas as peças de lã com a garantia
das melhores performances.
Endredões: para lavar peças com enchimento de
plumas de ganso de casal ou de solteiro (com peso
inferior a 3,5 kg), travesseiros, jaquetas, utilizar o
programa específico Endredões
colocar as peças no tambor dobrando as suas pontas
para dentro (veja as figuras) e de não superar os ¾ do
volume do próprio tambor.
Para obter óptimos resultados de lavagem recomendase utilizar o detergente líquido dosado na gaveta dos
detergentes.
Acolchoados: para lavar os acolchoados com forro
sintético, use o específico saquinho fornecido com o
produto e o programa Endredões
Roupa de banho e de cama: para lavar toda a roupa
de casa com um único ciclo, utilize o programa 7 dias
que optimiza o uso do amaciador e consente uma
economia de tempo e energia. Aconselhamos a
utilização de detergente em pó.
Manchas resistentes: tratar as manchar mais
resistentes com um sabão sólido antes da lavagem e
utilizar o programa Algodão com pré-lavagem.
Com o programa Lã poderemos
. Dobre-as e
. Recomenda-se
.
para lavar
Sistema de balanceamento da carga
Antes de cada centrifugação, para evitar vibrações
excessivas e para distribuir a carga em modo uniforme, o
tambor efectua algumas rotações a uma velocidade
levemente superior àquela de lavagem. Se no fim de
repetidas tentativas a carga ainda não estiver
correctamente balanceada, a máquina efectuará a
centrifugação com uma velocidade inferior àquela
prevista. No caso de um excessivo desbalanceamento, a
máquina de lavar roupa efectuará a distribuição ao invés
da centrifugação. Para favorecer uma melhor distribuição
da carga e o seu correcto balanceamento, aconselha-se
misturar peças grandes com peças pequenas.
42
Page 43
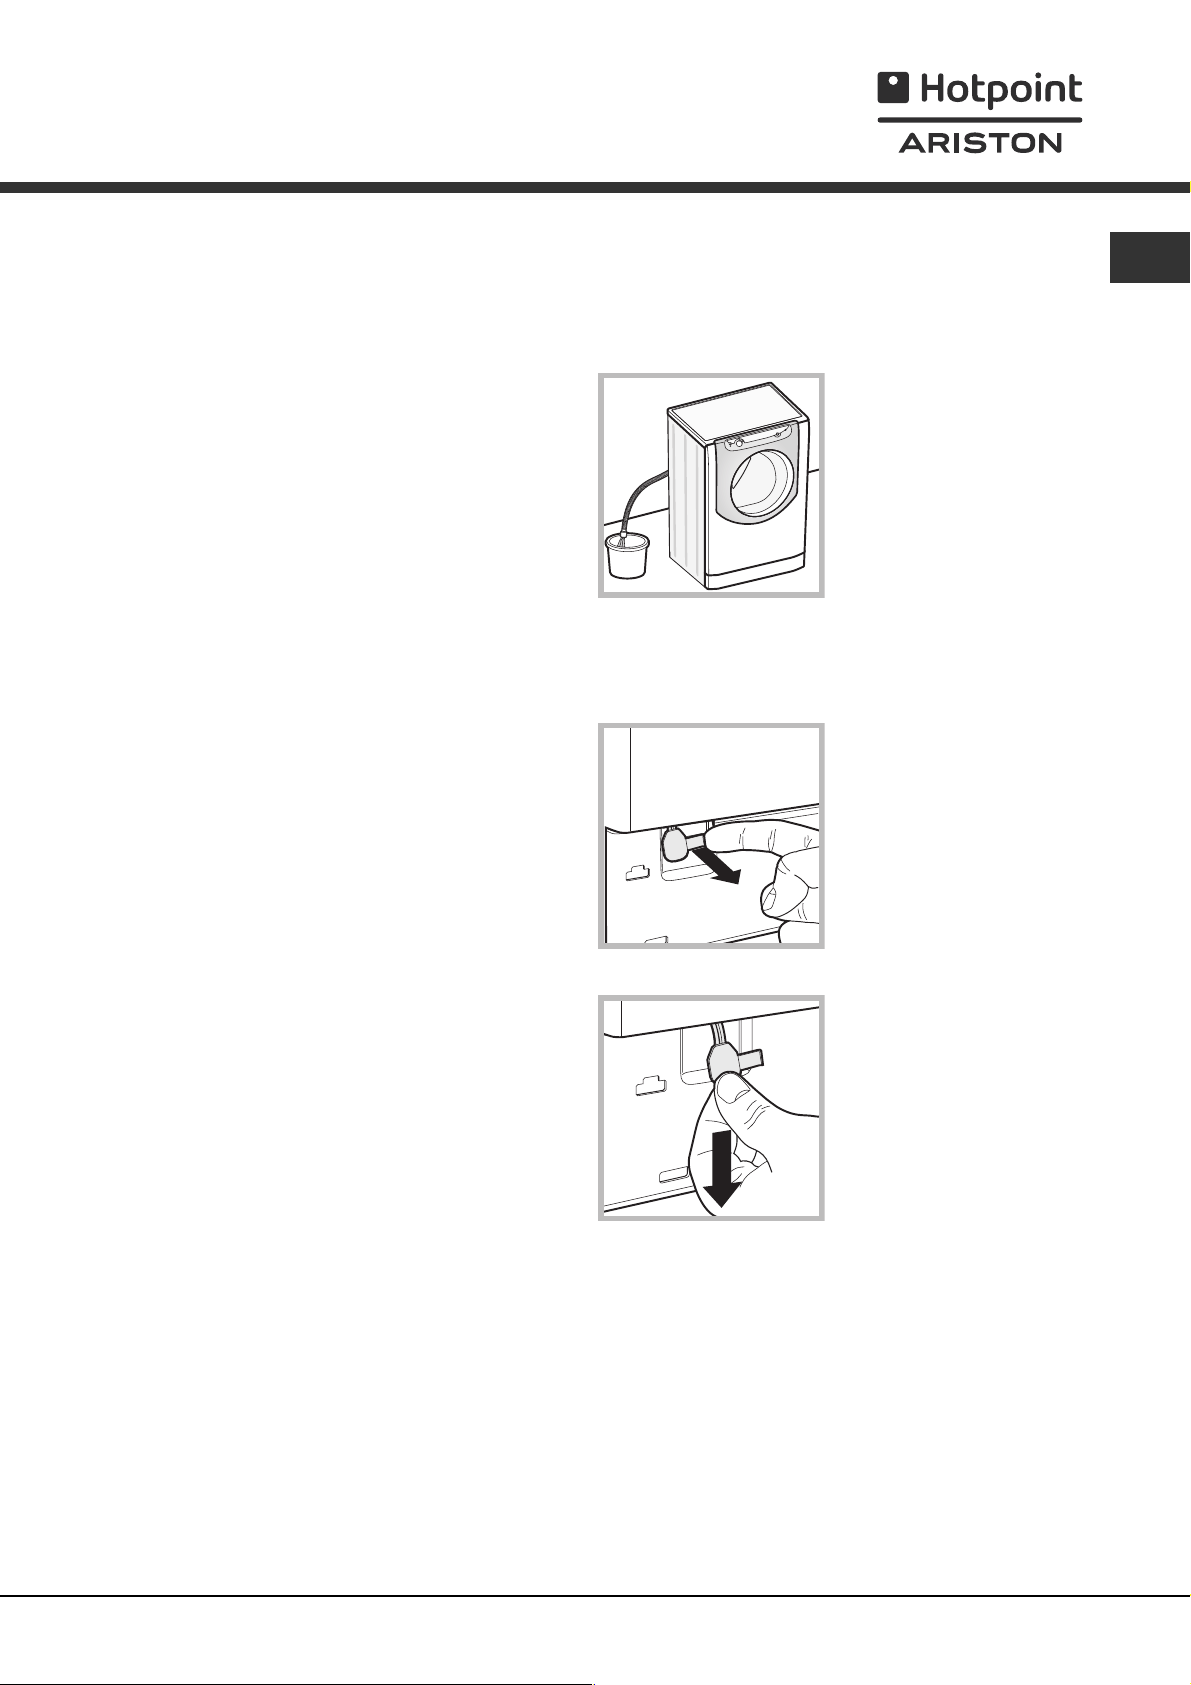
Precauções e conselhos
Esta máquina de lavar roupa foi projectada e fabricada
em conformidade com os regulamentos internacionais
de segurança. Estas advertências são fornecidas por
razões de segurança e devem ser lidas com atenção.
Segurança geral
Este aparelho foi projectado exclusivamente para um
uso doméstico.
Esta máquina de lavar roupa deve ser utilizada
somente por pessoas adultas e conforme as
instruções apresentadas neste livrete.
Não toque na máquina com os pés descalços nem
com as mãos ou os pés molhados ou húmidos.
Não puxe o cabo eléctrico para tirar a ficha da
tomada, pegue a ficha mesmo.
Não toque a água de descarga, que poderá chegar a
temperaturas altas.
Em nenhum caso force a porta para abri-la: poderá
danificar o mecanismo de segurança que a protege
contra aberturas acidentais.
Se houver avarias, em nenhum caso mexa nos
mecanismos internos para tentar reparar.
Verifique sempre que criança não se aproximem da
máquina a funcionar.
Se for preciso deslocar a máquina, são precisas pelo
menos duas ou três pessoas, com a máxima
atenção. Nunca sozinho porque a máquina é muito
pesada.
Antes de colocar a roupa controle que o tambor
esteja vazio.
Abertura manual da porta de vidro
PT
Caso não seja possível abrir a porta de vidro por falta de
energia eléctrica e quiser pendurar a roupa lavada,
proceda da seguinte maneira:
1. tire a ficha da tomada de
corrente.
2. verifique que o nível de
água no interior da máquina
seja inferior respeito à
abertura da porta de vidro;
caso contrário, tirar a água
em excesso através do tubo
de descarga recolhendo-a
num balde como indicado
na figura.
3. remova o painel de cobertura no lado anterior da
máquina de lavar roupa (veja a página seguinte).
4. utilizando a lingueta
indicada na figura, puxe para
o externo até liberar o tirante
de plástico do fecho; puxá-lo
sucessivamente para baixo
até ouvir um clique que
indica que a porta está
desbloqueada.
5. abra a porta; se ainda
não conseguir, repita a
operação.
Eliminação
Eliminação do material de embalagem: obedeça os
regulamentos locais, de maneira que as embalagens
possam ser reutilizadas.
A directiva Europeia 2002/96/CE relativa aos resíduos
de equipamentos eléctricos e electrónicos prevê que
os electrodomésticos não devem ser eliminados no
normal fluxo dos resíduos sólidos urbanos. Os
aparelhos que deixaram de ser utilizados devem ser
recolhidos separadamente para optimizar a taxa de
recuperação e reciclagem dos materiais que os
compõem e impedir potenciais danos à saúde e ao
meio ambiente. O símbolo do contentor de lixo
barrado com uma cruz está presente em todos os
produtos para lembrar o dever de recolha selectiva.
Para mais informações sobre o correcto
desmantelamento dos electrodomésticos, contacte o
serviço público especializado ou os revendedores.
6. monte outra vez o painel, certifique-se, antes de
empurrá-la na máquina, que os ganchos foram
colocados nas respectivas ranhuras.
43
Page 44

Manutenção e cuidados
PT
Interromper a alimentação de água e de
corrente eléctrica
Feche a torneira da água depois de cada lavagem.
Desta maneira diminuiu-se o desgaste do sistema
hidráulico da máquina de lavar roupa e elimina-se o
risco de vazamento.
Tire a ficha da tomada eléctrica quando for limpar a
máquina de lavar roupa e durante os trabalhos de
manutenção.
Limpar a máquina
A parte externa e as peças em borracha podem ser
limpas com um pano molhado com água morna e
sabão. Não empregue solventes nem abrasivos.
Limpar a gaveta dos detergentes
A
D
Para obter acesso à pré-câmara:
2
1. remova o painel de cobertura no lado anterior da
máquina empurrando para o centro, em seguida
empurre para baixo de ambos os lados e remova-o
(veja as figuras).
2. posicione um recipiente
para recolher a água que
sairá (aproximadamente 1,5 l)
(ver figura);
3. Para desenroscar a
tampa gire-a na direcção
contrária aos ponteiros do
relógio (veja a figura);
Para extrair a gaveta, abra-a até o primeiro fecho,
depois pressione a alavanca A abrindo-a
completamente, e enfim pressione uma das alavancas
D e puxe para fora (veja as figuras).
Lave-a com água corrente; esta limpeza deve ser
efectuada frequentemente. Limpe cuidadosamente
também eventuais resíduos de detergente da gaveta e
da máquina.
Para remontar a gaveta, apoie-a completamente à
esquerda, prestando atenção para centralizar a guia de
deslizamento e evitar que fique emperrada.
Cuidados com o tambor
Deixe a porta sempre entreaberta para evitar que se
formem odores desagradáveis.
Limpar a bomba
Esta máquina de lavar roupa é equipada com uma
bomba com limpeza automática que não precisa de
operações de manutenção. Entretanto pode acontecer
que pequenos objectos (moedinhas, botões) caiam na
pré-câmara que protege a bomba, situada na parte
inferior da mesma.
4. limpe o interior com cuidado;
5. enrosque outra vez a tampa;
6. monte outra vez o painel, certifique-se, antes de
empurrá-la na máquina, que os ganchos foram
colocados nas respectivas ranhuras.
Verificar o tubo de alimentação de água
Verifique o tubo de alimentação pelo menos uma vez por
ano. Se houver rachaduras ou fendas, será necessário
substitui-lo: durante as lavagens as fortes pressões
podem provocar repentinas quebras.
Certifique-se que o ciclo de lavagem tenha terminado e
tire a ficha da tomada.
44
Page 45

Anomalias e soluções
Pode acontecer que a máquina não funcione. Antes de telefonar para a Assistência Técnica (veja Assistência),
verifique se não se trata de um problema fácil de resolver com ajuda da seguinte lista.
Anomalias:
A máquina de lavar roupa não liga.
O ciclo de lavagem não inicia.
A máquina não carrega água.
A máquina carrega e descarrega
água continuamente.
Possíveis causas / Solução:
A ficha não está colocada na tomada eléctrica, ou não o suficiente para
haver contacto.
Em casa não há corrente.
A porta de vidro não está bem fechada.
O botão START/PAUSE não foi pressionado.
A torneira da água não está aberta.
Foi programado um atraso de uma hora no início.
O tubo de alimentação de água não está ligado na torneira.
O tubo está dobrado.
A torneira da água não está aberta.
Está a faltar água em casa.
Não há suficiente pressão.
O botão START/PAUSE não foi pressionado.
O tubo de descarga não está instalado entre 65 e 100 cm. de altura do
chão (veja Instalação).
A ponta do tubo de descarga está imersa na água (veja Instalação).
Se a morada encontrar-se nos últimos andares de um edifício, é possível que
aconteçam fenómenos de sifão por causa dos quais a máquina de lavar roupa
carrega e descarrega água continuamente. Para eliminar este inconveniente, há a
disposição no comércio apropriadas válvulas contra o efeito sifão.
PT
A máquina não descarrega ou não
realiza centrifugação.
A máquina de lavar roupa vibra
muito durante a centrifugação.
A máquina está a perder água.
Os ícones relativos à Fase em
curso piscam rapidamente
contemporaneamente ao indicador
luminoso ON/OFF.
Está a formar-se demasiada espuma.
Da descarga na parede não foi sangrado o ar.
No programa não há descarga: com alguns programas será necessário
iniciar a descarga manualmente (veja Programas e opções).
O tubo de descarga está dobrado (veja Instalação).
A conduta de descarga está entupida.
O tambor, no momento da instalação, não foi liberado correctamente (veja
Instalação).
A máquina não está nivelada (veja Instalação).
A máquina está apertada entre móveis e parede (veja Instalação).
A carga está desbalanceada (veja Detergentes e roupa).
O tubo de alimentação da água não está bem enroscado (veja Instalação).
O gaveta dos detergentes está entupida (para limpá-la veja Manutenção e
cuidados).
O tubo de descarga não está bem fixado (veja Instalação).
Desligue a máquina e tire a ficha da tomada, aguarde aproximadamente 1
minuto e volte a ligá-la. Se a anomalia persistir, contacte a Assistência
Técnica.
O detergente não é específico para máquina de lavar roupa (deve haver a
escrita para máquina de lavar, à mão e para máquina de lavar ou similares).
A dose foi excessiva.
A porta da máquina está
bloqueada.
Efectue o procedimento de desbloqueio manual (veja Precauções e
conselhos).
45
Page 46

PT
Anomalias:
Possíveis causas / Solução:
A máquina não tem um bom
desempenho de lavagem.
O que acontece se os
reservatórios estão cheios e eu os
abasteço?
O que acontece se eu usar a
gaveta no modo tradicional
enquanto os reservatórios ainda
estiverem cheios?
Os reservatórios servem também
para o detergente em pó?
O detergente em pó pode ser
colocado nos reservatórios?
Os reservatórios não foram abastecidos correctamente (aditivo para
amaciar no lugar do detergente ou vice-cersa).
Foram misturados dois detergentes/aditivos para amaciar diferentes.
Não misture NUNCA dois detergentes/aditivos para amaciar diferentes;
efectue sempre a limpeza dos reservatórios antes de colocar outros.
Sistema "Auto Dose System" obstruído porque não foi utilizado por um
longo período de tempo: efectue a limpeza dos reservatórios (veja
"Limpeza programada pelo utilizador:").
Sinais sonoros (Bip) e visuais (ícones no visor) indicam que o reservatório
está cheio. Se continuar a introdução de detergente/aditivo para
amaciar, a quantidade em excesso irá para o tambor e será eliminada
no ciclo sucessivo.
A máquina reconhecerá automaticamente quando foi carregado
detergente em pó ou detergente líquido no modo tradicional, e não irá
retirar nada dos reservatórios. O aditivo para amaciar pode ser utilizado
somente na modalidade Auto dose.
Não, o detergente em pó pode ser utilizado somente no modo
tradicional.
Não, há uma parede que evita que o detergente em pó possa cair num
dos reservatórios mesmo se a gaveta estiver aberta na posição "Auto
Dose System" (completamente aberta).
O que acontece se eu não abrir a
gaveta correctamente para o
abastecimento dos reservatórios?
O que acontece se eu inverter o
detergente com o aditivo para
amaciar?
O que acontece se eu não esperar
que os reservatórios estejam
vazios e misturar detergentes
diferentes?
Se a gaveta não estiver completamente aberta o detergente ou o aditivo
para amaciar introduzido cairá no tambor e será eliminado no próximo
ciclo.
A máquina irá lavar com poucos resultados e será necessário esvaziar
os reservatórios aplicando o ciclo de limpeza manual.
A máquina irá lavar normalmente, mas recomenda-se carregar os
reservatórios somente após o sinal comunicado pela máquina e não
misturar detergentes/aditivos para amaciar diferentes.
Nota: para sair do Demo Mode carregue contemporaneamente por 3 segundos nos botões ON/OFF e
START/PAUSE
46
.
Page 47

Assistência
Antes de contactar a Assistência Técnica:
Verifique se consegue resolver a anomalia sozinho (veja Anomalias e soluções);
Reinicie o programa para verificar se o inconveniente foi resolvido;
Em caso negativo, contacte o Serviço de Assistência Técnica autorizado.
No caso de uma incorrecta instalação ou de um uso não correcto do aparelho, o serviço de assistência será a
pagamento.
Nunca recorra a técnicos não autorizados.
Comunique:
o tipo de anomalia;
o modelo da máquina (Mod.);
o número de série (S/N).
Estas informações encontram-se na placa de identificação colocada no aparelho.
PT
47
Page 48

PT
48
Page 49

Instrukcja instalacji i obs³ugi
PRALKA
PL
Polski
AQUALTIS
AQLF9F 69 U
Spis treci
Instalacja, 50-51
Rozpakowanie i wypoziomowanie
Pod³¹czenia hydrauliczne i elektryczne
Dane techniczne
Opis urz¹dzenia, 52-53
Pulpit sterowania
Auto Dose System, 54-55
Jak wykonaæ cykl prania, 56
Programy i opcje, 57
Tabela programów
Opcje
rodki pior¹ce i bielizna, 58
rodek pior¹cy
Przygotowanie bielizny
Zalecenia dotycz¹ce prania
System równowa¿enia ³adunku
PL
Zalecenia i rodki ostro¿noci, 59
Ogólne zasady bezpieczeñstwa
Utylizacja
Rêczne otwieranie drzwiczek
Utrzymanie i konserwacja, 60
Od³¹czenie wody i pr¹du elektrycznego
Czyszczenie maszyny
Czyszczenie szufladki na rodki pior¹ce
Czyszczenie bêbna
Czyszczenie pompy
Kontrola przewodu doprowadzaj¹cego wodê
Nieprawid³owoci w dzia³aniu i sposoby
ich usuwania, 61-62
Serwis Techniczny, 63
49
Page 50

Instalacja
PL
Nale¿y zachowaæ niniejsz¹ ksi¹¿eczkê, aby móc z
niej skorzystaæ w ka¿dej chwili. W przypadku
sprzeda¿y, odst¹pienia lub przeprowadzki nale¿y
upewniæ siê, ¿e pozostanie razem z pralk¹.
Nale¿y uwa¿nie przeczytaæ instrukcjê obs³ugi:
zawiera ona wa¿ne informacje dotycz¹ce instalacji
oraz w³aciwego i bezpiecznego u¿ytkowania pralki.
W kopercie zawieraj¹cej niniejsz¹ instrukcjê, oprócz
gwarancji, znajduj¹ siê detale pomagaj¹ce przy
instalacji.
Rozpakowanie i wypoziomowanie
Rozpakowanie
1. Po wypakowaniu pralki upewniæ siê, ¿e nie dozna³a
uszkodzeñ podczas transportu.
W przypadku stwierdzenia uszkodzeñ nie pod³¹czaæ
jej i skontaktowaæ siê ze sprzedawc¹.
2. Odkrêciæ 4 ruby
ochronne umocowane na
czas transportu oraz
odpowiedni¹ rozpórkê,
znajduj¹ce siê w czêci
tylnej (patrz rysunek).
3. Zatkaæ otwory przy pomocy plastikowych korków
znajduj¹cych siê w kopercie.
4. Przechowywaæ wszystkie czêci; jeli pralka
bêdzie przenoszona, powinny zostaæ ponownie
zamontowane uszkodzeñ celu unikniêcia
uszkodzeñ wewnêtrznych.
Czêci opakowania nie s¹ zabawkami dla dzieci.
Poziomowanie
1. Ustawiæ pralkê na p³askiej i twardej pod³odze; nie
opieraæ jej o ciany lub meble.
W razie ustawienia na dywanie lub wyk³adzinie
dywanowej nale¿y tak wyregulowaæ nó¿ki, aby pod
pralk¹ pozostawa³a wolna przestrzeñ niezbêdna dla
wentylacji.
Pod³¹czenia hydrauliczne i elektryczne
Pod³¹czenie rury pobierania wody
Przed pod³¹czeniem przewodu zasilaj¹cego do sieci
wodoci¹gowej spuciæ wodê a¿ do pojawienia siê
przejrzystej wody.
1. Pod³¹czyæ do
urz¹dzenia przewód
doprowadzaj¹cy wodê,
przykrêcaj¹c go do
odpowiedniego otworu
dop³ywowego,
znajduj¹cego siê w tylnej
czêci pralki, z prawej
strony u góry (patrz
rysunek)..
2. Pod³¹czyæ przewód
zasilaj¹cy poprzez
przykrêcenie go do
zaworu wody zimnej z
otworem z gwintem
rurowym drobnozwojowym
¾ (patrz rysunek).
3. Zwróciæ uwagê, aby na przewodzie nie by³o zagiêæ
ani zwê¿eñ.
Cinienie wody w kurku powinno mieciæ siê w
przedziale podanym w tabeli Danych technicznych
(patrz strona obok).
2. Skompensowaæ
nierównoci odkrêcaj¹c
lub przykrêcaj¹c nó¿ki a¿
urz¹dzenie znajdzie siê w
po³o¿eniu poziomym (jego
nachylenie nie powinno
przekraczaæ 2 stopnii).
Dok³adne wypoziomowanie powoduje, ¿e urz¹dzenie
jest stabilne i umo¿liwia wyeliminowanie drgañ i
ha³asów, zw³aszcza podczas fazy wirowania.
50
Jeli d³ugoæ przewodu doprowadzaj¹cego wodê jest
niewystarczaj¹ca, nale¿y zwróciæ siê do
specjalistycznego sklepu lub do autoryzowanego
technika.
Nigdy nie nale¿y stosowaæ u¿ywanych lub starych
przewodów zasilaj¹cych, lecz tych, które znajduj¹ siê
na wyposa¿eniu urz¹dzenia.
Page 51

Pod³¹czenie przewodu odp³ywowego
Pod³¹czyæ rurê
odp³ywow¹ wody do
kanalizacji lub otworu
spustowego w cianie
umieszczonego na
65 - 100 cm
wysokoci od 65 cm do 1
m od ziemi, unikaj¹c
zginania jej.
Alternatywnie mo¿na
oprzeæ j¹ na brzegu
zlewu lub wanny,
przymocowuj¹c do kranu
za³¹czony do pralki
prowadnik (zobacz
rysunek).
Wolny koniec rury
odp³ywowej nie powinien
pozostawaæ zanurzony w
wodzie.
Po zainstalowaniu urz¹dzenia gniazdko elektryczne
powinno byæ ³atwo dostêpne.
Nie u¿ywaæ przed³u¿aczy ani wtyczek wielokrotnych.
Kabel nie powinien byæ zgiêty ani zgnieciony.
Kabel zasilania elektrycznego oraz wtyczka mog¹
byæ wymieniane wy³¹cznie przez upowa¿nionych
techników.
Uwaga! Producent nie ponosi ¿adnej
odpowiedzialnoci, jeli powy¿sze normy nie bêd¹
przestrzegane.
PL
Odradza siê u¿ywanie rur-przed³u¿aczy; jeli
przed³u¿acz jest jednak konieczny, powinien mieæ on
ten sam przekrój, co rura oryginalna, i nie powinien
przekraczaæ 150 cm d³ugoci.
Pod³¹czenie elektryczne
Przed w³o¿eniem wtyczki do gniazdka elektrycznego
nale¿y siê upewniæ, czy:
gniazdko posiada uziemienie i jest zgodne z
obowi¹zuj¹cymi przepisami;
gniazdko jest w stanie wytrzymaæ maksymalne
obci¹¿enie mocy urz¹dzenia, wskazane w tabeli
Danych technicznych (patrz obok);
napiêcie zasilania mieci siê w wartociach
wskazanych w tabeli Danych technicznych (patrz
obok);
gniazdko jest kompatybilne z wtyczk¹ urz¹dzenia.
W przeciwnym razie nale¿y wymieniæ gniazdko lub
wtyczkê.
Nie nale¿y instalowaæ pralki na otwartym powietrzu,
nawet jeli miejsce to jest chronione daszkiem, gdy¿
wystawienie urz¹dzenia na dzia³anie deszczu i burz
jest bardzo niebezpieczne.
Dane techniczne
Model
Wymiary
Pojemnoæ
Dane pr¹du
elektrycznego
Dane sieci
wodoci¹gowej
Szybkoæ wirowania
Programy kontrolne
zgodnie z przepisami
EN 60456
AQLF9F 69 U
szerokoæ cm 59,5
wysokoæ cm 85
g³êbokoæ cm 64,5
od 1 do 9 kg
dane techniczne umieszczone s¹ na
tabliczce na maszynie
Maksymalne cinienie 1 MPa (10 barów)
cinienie minimalne 0,05 MPa (0,5 barów)
pojemnoæ bêbna 62 litrów
do 1600 obrotów na minutê
program ; temperatura 60°C;
wykonane przy 9 kg za³adowanej bielizny.
Urz¹dzenie to zosta³o wyprodukowane
zgodnie z nastêpuj¹cymi przepisami EWG:
- 89/336/CEE z dn. 03/05/89
(o Kompatybilnoci Elektromagnetycznej)
wraz z kolejnymi zmianami
- 2006/95/CE (o Niskim Napiêciu)
- 2002/96/CE
51
Page 52

Opis urz¹dzenia
PL
DRZWICZKI
UCHWYT
DRZWICZEK
PODEST
PULPIT
STEROWANIA
REGULOWANE NÓ¯KI
DRZWICZKI
W celu otwarcia drzwiczek
pos³ugiwaæ siê zawsze
odpowiednim uchwytem
(patrz rysunek).
SZUFLADKA NA RODKI PIOR¥CE
Znajduje siê wewn¹trz
maszyny, aby uzyskaæ do
niej dostêp nale¿y otworzyæ
drzwiczki.
Sprawdziæ zastosowanie w
rozdziale Auto Dose
System.
Uwaga: na szufladkê na
proszek nale¿y nakleiæ
naklejkê z opisem
programów i opcji. Naklejka
znajduje siê w kopercie z niniejsz¹ instrukcj¹ obs³ugi.
Funkcja stand by
Pralka ta, w myl nowych norm europejskich
zwi¹zanych z oszczêdnoci¹ elektryczn¹, posiada
system auto wy³¹czenia (stand by), który w³¹cza siê
po kilku minutach nie u¿ytkowania. Ponownie lekko
wcisn¹æ przycisk ON-OFF
ponownie w³¹czy siê.
i poczekaæ, a¿ pralka
52
Page 53

Pulpit sterowania
Pokrêt³o
PROGRAMÓW
Ekran TEMPERATURY/
DETERGENT
Przycisk
DETERGENT
Przycisk
ROZCIEÑCZANIE
DETERGENTU
Ekran
WIROWANIE
Ekran OPÓNIONY START/
P£YN ZMIÊKCZAJ¥CY/
TRWANIE CYKLU
Pulsante
P£YN
ZMIÊKCZAJ¥CY
Przycisk i kontrolk¹
OPCJI
Kontrolka
EKO
Przycisk z kontrolk¹
START/
PAUSE
Ikony FAZY
PRANIA
PL
Przycisk z kontrolk¹
ON/OFF
Przycisk TEMPERATURY
Przycisk WIROWANIE
Przycisk z kontrolk¹ ON/OFF: nacisn¹æ na chwilê
przycisk w celu w³¹czenia lub wy³¹czenia maszyny.
Zielona kontrolka wskazuje, ¿e maszyna jest
w³¹czona. W celu wy³¹czenia pralki podczas prania
konieczne jest d³u¿sze przytrzymanie naciniêtego
przycisku, przez oko³o 3 sek.; krótkie lub przypadkowe
naciniêcie nie wystarczy do wy³¹czenia maszyny.
Wy³¹czenie maszyny podczas trwaj¹cego prania
anuluje program prania.
Pokrêt³o PROGRAMÓW: mo¿e byæ obracane w
obydwu kierunkach. W celu wybrania najlepszego
programu nale¿y sprawdziæ Tabela programów.
W czasie trwania programu pokrêt³o pozostaje nieruchome.
Przycisk
TEMPERATURY: nacisn¹æ w celu
dokonania zmiany lub wykluczenia temperatury,
wartoæ wskazywana jest na umieszczonym wy¿ej
ekranie (patrz Jak wykonaæ cykl prania).
Przycisk
WIROWANIE: nacisn¹æ w celu dokonania
zmiany lub wykluczenia wirówki, wartoæ wskazywana
jest na umieszczonym wy¿ej ekranie (patrz Jak
wykonaæ cykl prania).
Przycisk
OPÓNIONE URUCHOMIENIE: nacisn¹æ
w celu ustawienia opónionego uruchomienia
wybranego programu, wartoæ ustawionego opónienia
widoczna jest na umieszczonym wy¿ej ekranie (patrz
Jak wykonaæ cykl prania).
Przyciski DETERGENT i P£YN ZMIÊKCZAJ¥CY: zob.
Zmiana ustawionych parametrów w rozdziale "Auto Dose
System".
Przycisk
Nape³nianie zbiorników w rozdziale "Auto Dose System".
ROZCIEÑCZANIE DETERGENTU: zob.
Przycisk i kontrolka OPCJA: nacisn¹æ w celu
wybrania dostêpnej opcji. Bêdzie siê wieciæ kontrolka
odpowiadaj¹ca opcji (patrz Jak wykonaæ cykl prania).
Przycisk
OPÓNIONE
URUCHOMIENIE
Kontrolka
BLOKADA
DRZWICZEK
Przycisk oraz kontrolka
BLOKADA
PRZYCISKÓW
Ikony FAZY PRANIA: w³¹czaj¹ siê wskazuj¹c
zaawansowanie cyklu (Pranie
Wirowanie
Napis
Wypompowanie ).
zapala siê, kiedy cykl zostaje zakoñczony.
P³ukanie
Przycisk z kontrolk¹ START/PAUSE: kiedy zielona
kontrolka pulsuje powoli nale¿y nacisn¹æ przycisk w
celu uruchomienia prania. Po uruchomieniu cyklu
kontrolka wieci w sposób ci¹g³y. W celu wybrania
trybu pauzy podczas prania nacisn¹æ ponownie
przycisk, kontrolka zacznie pulsowaæ w kolorze
pomarañczowym. Jeli kontrolka Blokada drzwiczek
jest wy³¹czona, mo¿na otworzyæ drzwiczki pralki.
W celu ponownego uruchomienia prania od miejsca, w
którym zosta³o przerwane, nale¿y ponownie nacisn¹æ
przycisk.
Kontrolka
BLOKADA DRZWICZEK: wskazuje, ¿e
drzwiczki s¹ zablokowane. W celu otwarcia drzwiczek
konieczne jest w³¹czenie pauzy cyklu (patrz Jak
wykonaæ cykl prania).
Przycisk oraz kontrolka
BLOKADA PRZYCISKÓW:
w celu uruchomienia lub wy³¹czenia blokady panelu
sterowania przytrzymaæ naciniêty przycisk przez
oko³o 2 sekundy. W³¹czona kontrolka wskazuje, ¿e
panel sterowania zosta³ zablokowany. W ten sposób
uniemo¿liwia siê dokonywanie przypadkowych zmian
w programach, zw³aszcza, jeli w domu obecne s¹
dzieci.
Kontrolka ECO: Ikona
w³¹czy siê, gdy, podczas
zmiany parametrów prania, zostanie zaoszczêdzone
co najmniej 10% energii. Przed wejciem maszyny w
tryb Stand by, ikona zawieci siê przez kilka sekund;
gdy maszyna jest wy³¹czona, odzysk energii
elektrycznej okrelony jest na oko³o 80%.
53
Page 54

Auto Dose System
PL
Wprowadzenie
Ta pralka posiada dwa
zbiorniki: jeden na p³yn do
prania (skoncentrowany lub
rozcieñczony) o
pojemnoci oko³o 5,5 l i
drugi na P³yn zmiêkczaj¹cy
(skoncentrowany lub
rozcieñczony) o
pojemnoci oko³o 3,5 l
(zob. rysunek).
Nale¿y sprawdziæ na
opakowaniu p³ynu do
prania/p³ukania, czy jest on
rozcieñczony, czy te¿
skoncentrowany.
System automatycznego dozowania w
najw³aciwszym momencie pobiera ze zbiorników
iloæ p³ynu do prania i do p³ukania odpowiedni¹ do
rodzaju za³adowanego prania, gwarantuj¹c tym samym
optymalne rezultaty i oszczêdnoæ rodków
pior¹cych. Iloæ p³ynu do prania i do p³ukania mo¿na
zmieniæ rêcznie za pomoc¹ przycisków DETERGENT i
P£YN ZMIÊKCZAJ¥CY (zob. Zmiana ustawionych
parametrów). Pralki mo¿na te¿ u¿ywaæ w sposób
tradycyjny, wlewaj¹c lub wsypuj¹c rodek pior¹cy do
pojemnika; pralka automatycznie wykryje jego
obecnoæ i nie bêdzie u¿ywaæ zbiorników.
Pojemnik na detergenty
Tryb Tradycyjny.
Wysun¹æ pojemnik na detergenty a¿ do pierwszej
blokady, aby wlaæ lub wsypaæ rodek pior¹cy,
wybielacz lub inne dodatki (np. odplamiacz) oraz
detergent do prania wstêpnego w przypadku prania w
sposób tradycyjny (zob. Pranie tradycyjne).
Tryb Auto Dose.
A
Jedno nape³nienie zbiorników (zob. Nape³nianie zbiorników)
wystarczy na oko³o 60cyklów prania na detergent.
Pierwsze pranie
W³¹czyæ pralkê, naciskaj¹c przycisk ON/OFF.
Pierwsze pranie nale¿y wykonaæ bez wsadu,
nape³niaj¹c rodkiem pior¹cym bezporednio pojemnik
na detergenty (zob. tryb tradycyjny) i nastawiaj¹c
program
bez nape³niania zbiorników.
Nape³nianie zbiorników:
Otworzyæ pojemnik na detergenty w trybie Auto Dose
(zob. Pojemnik na detergenty).
Powoli wlaæ p³yn do prania (B) i P³yn zmiêkczaj¹cy (C),
tak aby ca³kowicie nape³niæ zbiorniki (zob. rysunki).
(Bawe³na 90°C) bez prania wstêpnego i
W celu nape³nienia
zbiorników p³ynem do
prania i p³ynem do p³ukania
wysun¹æ pojemnik na
detergenty a¿ do pierwszej
blokady, nastêpnie
nacisn¹æ dwigniê (A) i
wyci¹gn¹æ pojemnik a¿ do
drugiej blokady,
upewniaj¹c siê, czy
dosz³o do jego
zatrzaniêcia.
C
B
Aby nie dopuciæ do przekroczenia maksymalnej
iloci detergentów, sygna³ dwiêkowy (beep) o
rosn¹cym natê¿eniu bêdzie informowa³ o osi¹gniêtym
dotychczas poziomie, a¿ do ca³kowitego nape³nienia
zbiornika, wskazanego przez 3 d³ugie sygna³y.
Rozpocz¹æ pranie zaraz po nape³nieniu zbiorników, tak
aby zapewniæ czystoæ pojemnika.
Na wywietlaczu stopniowo bêd¹ zapalaæ siê ikony
(p³yn do prania) i (P³yn zmiêkczaj¹cy),
powiadamiaj¹c na bie¿¹co o iloci odpowiedniego
detergentu.
Czas nape³niania zale¿y od gêstoci produktu. W
przypadku produktów bardzo gêstych czas ten bêdzie
d³u¿szy.
Zamkn¹æ pojemnik na detergenty dopiero po ca³kowitym
opró¿nieniu jego komór.
Wybraæ gêstoæ wlanego detergentu (skoncentrowany
lub rozcieñczony) poprzez naciniêcie odpowiedniego
przycisku
Pralka zapamiêta dokonany wybór.
Przy braku wyboru pobieranie detergentu zostanie
automatycznie nastawione na rozcieñczony.
Za pomoc¹ przycisku
p³ukania, jaka bêdzie automatycznie pobierana przez
pralkê.
1) Jeli P³yn zmiêkczaj¹cy jest skoncentrowany,
zaleca siê wybranie pierwszego poziomu (
1kresk¹) i jego ewentualne podwy¿szenie o jeden
stopieñ (
pobieranego detergentu.
2) Jeli P³yn zmiêkczaj¹cy jest rozcieñczony, zaleca
siê nastawienie 3. poziomu (
póniejsze zwiêkszenie/zmniejszenie iloci
pobieranego detergentu.
3) Aby wy³¹czyæ stosowanie p³ynu do p³ukania,
nacisn¹æ przycisk
znikniêcia kresek (zob. równie¿ Zmiana ustawionych
parametrów).
.
ustawiæ iloæ p³ynu do
z
z 2kreskami) w celu zwiêkszenia iloci
z 3 kreskami) i
i przytrzymaæ a¿ do momentu
54
Page 55
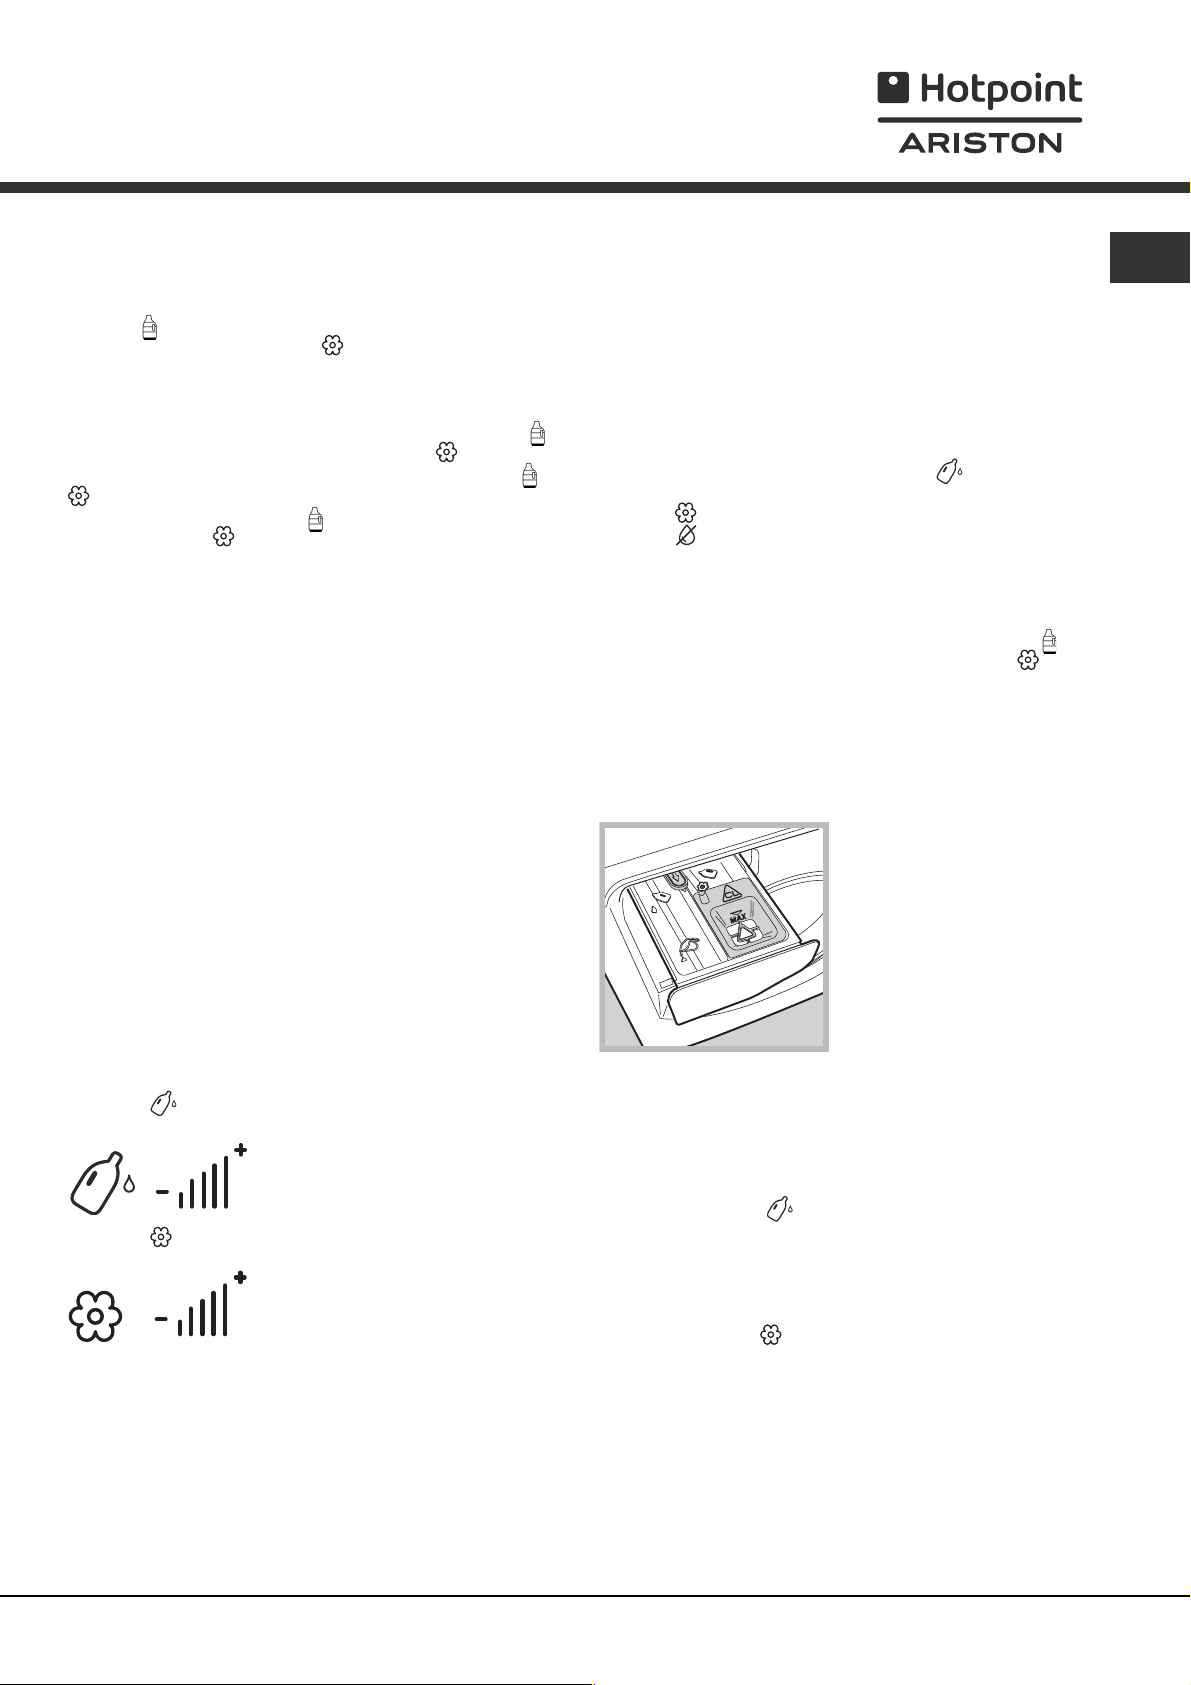
Sygnalizacja koniecznoci nape³nienia zbiorników:
Gdy pozosta³a iloæ p³ynu do prania/p³ukania zejdzie
poni¿ej wymaganego poziomu, na zakoñczenie cyklu na
wywietlaczu zacznie powoli migaæ pierwszy segment
symbolu
dole po lewej stronie symbolu
p³ukania. Gdy skoñczy siê p³yn do prania/p³ukania,
opró¿nienie zbiornika p³ynu do prania lub zbiornika p³ynu
do p³ukania zostanie zasygnalizowane szybkim
miganiem odpowiednio pierwszego segmentu symbolu
lub p³atka na dole po lewej stronie symbolu .
Podczas cyklu, przy pustych zbiornikach, symbole
znikn¹; natomiast na koniec cyklu i w czasie pauzy
pierwszy segment symbolu
stronie symbolu
Jeli zbiorniki nie zostan¹ uzupe³nione, kolejne pranie
w trybie Auto Dose zostanie wykonane bez
pobierania detergentu.
Zaleca siê uzupe³nienie p³ynu do prania i do p³ukania
DOPIERO po zasygnalizowaniu takiej koniecznoci
przez pralkê.
NIGDY nie mieszaæ dwóch ró¿nych detergentów;
przed wlaniem nowego detergentu za ka¿dym razem
wyczyciæ zbiornik (zob. Ustawianie czyszczenia
przez u¿ytkownika).
Stosowanie Auto Dose System
Po nape³nieniu zbiorników p³ynem do prania i do
p³ukania przyst¹piæ do u¿ytkowania pralki (zob. Jak
wykonaæ cykl prania).
Proszek do prania wstêpnego oraz dodatki w proszku
mo¿na zastosowaæ tylko w trybie tradycyjnym lub w
trybie Auto Dose System, umieszczaj¹c dodatki
bezporednio w bêbnie, najlepiej przy u¿yciu kulkê.
Zmiana ustawionych parametrów:
Pralka automatycznie pobiera odpowiedni¹ iloæ
detergentu w zale¿noci od wybranego programu,
iloci za³adowanego prania i twardoci wody. Iloæ
p³ynu do prania/p³ukania mo¿na jednak zmieniæ.
Przycisk
lub wy³¹czyæ pobieranie p³ynu do prania.
Przycisk
lub wy³¹czyæ pobieranie p³ynu do p³ukania.
Poziom p³ynu do prania/p³ukania sugerowany przez
pralkê jest oznaczony 3 kreskami.
Poziom poni¿ej 3 kresek oznacza mniej p³ynu do
prania/p³ukania w stosunku do iloci sugerowanej
przez pralkê, natomiast poziom powy¿ej 3 kresek
oznacza zwiêkszenie iloci p³ynu do prania/p³ukania.
Czyszczenie zbiorników:
Istnieje mo¿liwoæ skorzystania z cyklu
automatycznego czyszczenia zbiorników lub te¿
czyszczenia na ¿¹danie u¿ytkownika.
w przypadku p³ynu do prania lub p³atek na
w przypadku p³ynu do
i p³atek na dole po lewej
bêd¹ szybko migaæ.
: nacisn¹æ, aby zwiêkszyæ, zmniejszyæ
: nacisn¹æ, aby zwiêkszyæ, zmniejszyæ
Czyszczenie automatyczne:
Pralka wykonuje automatyczny cykl czyszczenia w
czasie p³ukania, gdy pozosta³a iloæ detergentu jest
niewystarczaj¹ca do kolejnego cyklu prania.
Ustawianie czyszczenia przez u¿ytkownika:
Wykonaæ cykl czyszczenia (przy pustym bêbnie)
przed wlaniem produktu innego ni¿ u¿ywany wczeniej
lub w przypadku nieprawid³owego nape³nienia
zbiorników (P³yn zmiêkczaj¹cy wlany do przegrody na
p³yn do prania lub na odwrót). Nacisn¹æ i przytrzymaæ
przez przynajmniej 8 sekund przycisk
uruchomiæ czyszczenie zbiornika p³ynu do prania,
przycisk
przycisk
START/PAUSE nie zawieci siê na zielono. Cykl
czyszczenia trwa oko³o 40 s, jeli zbiorniki by³y puste,
w przeciwnym wypadku czas trwania cyklu bêdzie
d³u¿szy.
W trakcie cyklu czyszczenia zbiorników symbol
wype³nia siê miarowo od do³u do góry, a symbol
wype³nia siê miarowo p³atek po p³atku.
U¿ytkowanie tradycyjne
Wysun¹æ pojemnik na detergenty a¿ do pierwszej
blokady (zob. rysunek), wlaæ lub wsypaæ bezporednio
do pojemnika rodek pior¹cy i ewentualne dodatki (np.
wybielacz) w iloci potrzebnej do jednego prania.
wstêpnego.
3. Nie u¿ywaæ tej komory.
rodek pior¹cy w tabletkach lub specjaln¹ kulkê
nale¿y umieciæ bezporednio w bêbnie. W takim
przypadku nale¿y wy³¹czyæ tryb Auto Dose System
(nacisn¹æ przycisk
odpowiednie pionowe kreski na wywietlaczu).
Nie wlewaæ p³ynu do p³ukania, gdy¿ bêdzie on
automatycznie pobierany w iloci potrzebnej do
ka¿dego prania.
Aby wy³¹czyæ pobieranie p³ynu do p³ukania, nale¿y
nacisn¹æ przycisk
pionowe kreski na wywietlaczu.
Do ubrañ z we³ny i z jedwabiu zaleca siê stosowanie
przeznaczonego do nich rodka pior¹cego, który
nale¿y wlaæ lub wsypaæ bezporednio do pojemnika na
detergenty (komora 2).
Pranie:
Wybraæ program i odpowiednie opcje w zale¿noci od
potrzeb i rodzaju za³adowanego prania.
dla zbiornika p³ynu do p³ukania lub
dla obydwu zbiorników, a¿ przycisk
1. komora prania
wstêpnego: stosowaæ
1
2
3
wy³¹cznie proszek do
prania.
2. komora prania
zasadniczego: stosowaæ
proszek lub p³yn do prania.
W tym ostatnim przypadku
zaleca siê wlanie go
bezporednio przed
uruchomieniem pralki i bez
wykonywania prania
i przytrzymaæ, a¿ nie znikn¹
i przytrzymaæ, a¿ nie znikn¹
, aby
PL
55
Page 56

Jak wykonaæ cykl prania
PL
UWAGA: kiedy po raz pierwszy u¿ywa siê pralki
nale¿y wykonaæ cykl prania bez wsadu, ale z u¿yciem
rodka pior¹cego nastawiaj¹c program bawe³ny 90°
bez prania wstêpnego.
1. W£¥CZENIE URZ¥DZENIA. Nacisn¹æ przycisk
Wszystkie kontrolki w³¹cz¹ siê na 1 sekundê, po
czym pozostanie w³¹czona na sta³e kontrolka
przycisku
powoli pulsowa³a.
2. ZA£ADUNEK BIELIZNY. Otworzyæ drzwiczki.
W³o¿yæ bieliznê uwa¿aj¹c, aby nie przekroczyæ
wielkoci ³adunku wskazanej w tabeli programów na
nastêpnej stronie.
3. DOZOWANIE RODKA PIOR¥CEGO.
Zastosowanie w trybie Auto Dose System nie
wymaga dozowania detergentu, gdy¿ pralka pobiera
go automatycznie w zale¿noci wybranego
programu, rodzaju za³adowanego prania i twardoci
wody. Sprawdziæ zastosowanie w trybie tradycyjnym
w U¿ytkowanie tradycyjne.
4. ZAMKNIÊCIE DRZWICZEK.
5. WYBÓR PROGRAMU. Obracaæ POKRÊT£EM
PROGRAMÓW w prawo lub w lewo, a¿ do wybrania
odpowiedniego programu, do programu dobrana
zostanie temperatura, szybkoæ wirowania oraz
intensywnoæ prania, które mog¹ byæ zmieniane.
6. PERSONALIZACJA CYKLU PRANIA Pos³ugiwaæ
siê odpowiednimi przyciskami panelu sterowania:
Zmieniæ temperaturê i/lub wirowanie.
Maszyna automatycznie wywietla temperaturê i
przewidziane maksymalne wartoci dla ustawionego
programu lub ostatnie wartoci, jeli s¹ zgodne z
wybranym programem. Poprzez naciniêcie
przycisku
a¿ do prania w zimnej wodzie (
naciniêcie przycisku
wirowanie a¿ do jego wy³¹czenia ( ). Dodatkowe
naciniêcie przycisków przywróci maksymalne
przewidywane wartoci.
, kontrolka START/PAUSE bêdzie
zmniejsza siê stopniowo temperaturê
). Poprzez
zmniejsza siê stopniowo
Wyj¹tek: wybieraj¹c program Bawe³na
temperaturê mo¿na podnieæ a¿ do 90°.
Nastawiæ opóniony start.
Nacisn¹æ odpowiedni przycisk, a¿ do uzyskania
¿¹danego czasu opónienia. Podczas ustawiania
wywietlony zostanie czas opónienia wraz z
pulsuj¹cym symbolem
Po nastawieniu opónionego startu na ekranie
zostanie wywietlony nieruchomy symbol
cyklu. Po jednorazowym naciniêciu przycisku
wywietlony zostaje czas ustawionego opónienia.
W celu usuniêcia opónionego startu nale¿y
nacisn¹æ przycisk, a¿ na ekranie uka¿e siê napis
OFF; symbol
Po naciniêciu przycisku START/PAUSE wartoæ
opónienia mo¿e byæ zmieniana jedynie malej¹co.
zganie.
.
i czas
Zmiana charakterystyki cyklu.
Naciskaæ przyciski OPCJA w celu personalizacji
prania zgodnie z w³asnymi wymaganiami.
Nacisn¹æ przycisk w celu uruchomienia opcji;
.
zawieci siê odpowiednia kontrolka.
Nacisn¹æ ponownie przycisk w celu wy³¹czenia
opcji; kontrolka zganie.
Jeli wybrana opcja nie jest zgodna z nastawionym
programem, niezgodnoæ zostanie zasygnalizowana
przez pulsowanie kontrolki i sygna³ akustyczny
(3 sygna³y) a opcja nie bêdzie aktywowana.
7. URUCHOMIENIE PROGRAMU. Nacisn¹æ przycisk
START/PAUSE. Odpowiednia kontrolka zawieci
sta³ym wiat³em a drzwiczki zostan¹ zablokowane
(kontrolka BLOKADA DRZWICZEK
Ikony odpowiadaj¹ce fazom prania zawiec¹ siê
podczas cyklu wskazuj¹c bie¿¹c¹ fazê.
W celu dokonania zmiany programu w czasie
trwania cyklu nale¿y wybraæ funkcjê pauzy
naciskaj¹c na przycisk START/PAUSE a nastêpnie
wybraæ ¿¹dany cykl i nacisn¹æ ponownie przycisk
START/PAUSE. W celu otworzenia drzwi, gdy cykl
prania jest w³¹czony nale¿y nacisn¹æ przycisk
START/PAUSE; jeli kontrolka BLOKADA
DRZWICZEK
bêdzie mo¿liwe. Nacisn¹æ ponownie przycisk
START/PAUSE, aby uruchomiæ program od
momentu, w którym zosta³ przerwany.
8. KONIEC PROGRAMU. Wskazywany jest przez
zawiecenie napisu END. Drzwiczki pralki mo¿na
otworzyæ natychmiast. Jeli kontrolka START/
PAUSE pulsuje, nacisn¹æ przycisk w celu
zakoñczenia cyklu. Otworzyæ drzwiczki, wyj¹æ
bieliznê i wy³¹czyæ urz¹dzenie.
Jeli uruchomiony ju¿ cykl ma byæ anulowany nale¿y
przytrzymaæ d³u¿ej naciniêty przycisk
zostanie przerwany i urz¹dzenie wy³¹czy siê.
jest zgaszona otwarcie drzwi
wieci siê).
, a¿ cykl
Torba na pikowane ko³dry, zas³ony i delikatne
tkaniny
Dziêki specjalnemu workowi dostarczonemu z
produktem, pralka Aqualtis pozwala na wypranie
cennych i delikatnych rzeczy chroni¹c je przed
zniszczeniem. Zaleca siê zastosowaæ go do prania
ko³der pikowanych i puchowych z syntetycznym
wsypem.
56
Page 57

Programy i opcje
Tabela programów
Ikona Opis programu
Programy Bawe³na
Bawe³na
Bawe³na (1):
Bawe³na (2):
Bawe³na kolorowe (3)
Baby:
Syntetyczne
Syntetyczne
(niewskazany dla we³ny, jedwabiu i tkanin przeznaczonych do prania rêcznego).
z pranie wstêpne
(Dodawaæ detergent do odpowiedniego pojemnika).
tkaniny bia³e i kolorowe, wytrzyma³e, mocno zabrudzone.
tkaniny bia³e i kolorowe, delikatne, mocno zabrudzone.
Koszule
Jeans
Programy Specjalne
tkaniny kolorowe, delikatne, mocno zabrudzone.
odporne
delikatne
Pociel i Rêczniki (Bed&Bath):
Puch:
do odzie¿y wype³nionej gêsim puchem.
do jedwabiu, wiskozy, bielizny.
Jedwab:
do we³ny, kaszmiru, itp.
We³na:
Mix 30:
Programy czêciowe
P³ukanie
Wirowanie
Wypompowanie
w celu szybkiego odwie¿enia lekko zabrudzonych tkanin
do bielizny pocielowej i k¹pielowej.
Temp.
maks.
(Max. 90°)
Prêdkoæ
maks.
(obroty na
(°C)
90° 1600
60°
40° 1600 -
40° 1600 -
40° 600 -
40° 800 -
40° 800 -
60° 800 -
40° 800 -
60° 1600 -
30° 1200 -
30° 0 -
40° 600 -
30° 800 -
minutê)
1600 -
- 1600 - -
- 1600 - - - 9
- 0 - - - 9
rodki pior¹ce i dodatki
rodek
Pranie
pior¹cy
wstêpne
ll l
rodek
zmiêkczaj-
¹cy
ll
ll
ll
ll
ll
ll
ll
ll
ll
ll
ll
ll
ll
l
£adunek
max (kg)
9
9
9
9
2
4
4
4
4
9
3,5
2
2
3,5
9
PL
Czas
trwania
cyklu
(*) Mo¿liwa jest kontrola czasu trwania programów na
wywietlaczu.
(*) Uwaga: po oko³o 10 minutach od START, urz¹dzenie na podstawie wsadu obliczy i poka¿e czas pozosta³y do zakoñczenia programu.
Dla wszystkich Instytucji homologacyjnych:
1) Program kontrolny zgodny z norm¹ EN 60456: ustawiæ program
2) Program bawe³na, d³ugi: ustawiæ program
3) Program bawe³na, krótki: ustawiæ program
, wybieraj¹c temperaturê 40°C.
, wybieraj¹c temperaturê 40°C.
, wybieraj¹c temperaturê 60°C.
Opcje
Dozowanie detergentu
Do dozowania iloci detergentu (zob. rozdzia³ Auto
Dose System).
Gêstoæ detergentu
Do zmiany stopnia gêstoci detergentu (zob. rozdzia³
Auto Dose System).
Dozowanie p³ynu zmiêkczaj¹cy
Do dozowania iloci p³ynu do p³ukania (zob. rozdzia³
Auto Dose System).
Super P³ukanie
Wybieraj¹c tê opcjê zwiêksza siê skutecznoæ
p³ukania i zapewnia siê maksymalne usuwanie rodka
pior¹cego. Jest przydatne dla w³ókna szczególnie
wra¿liwego na rodki pior¹ce. Radzimy u¿ywaæ tej
opcji z pralk¹ o pe³nym wsadzie i z wiêksz¹ iloci¹
rodka pior¹cego.
Nie mo¿na jej zastosowaæ przy programach
, , .
57
Page 58

rodki pior¹ce i bielizna
PL
rodek pior¹cy
Wybór oraz iloæ rodka pior¹cego zale¿ne s¹ od
rodzaju tkaniny (bawe³na, we³na, jedwab...), od koloru,
od temperatury prania, od stopnia zabrudzenia oraz od
twardoci wody.
Ta pralka z systemem automatycznego dozowania p³ynu
do prania i do p³ukania przyczynia siê do zwiêkszenia
oszczêdnoci i do ochrony rodowiska, jak równie¿
gwarantuje optymalne rezultaty prania. Zaleca siê:
stosowanie detergentu w proszku w przypadku prania
wstêpnego i wsypywanie go w sposób Tradycyjny.
stosowanie detergentu w p³ynie w przypadku
delikatnych tkanin bawe³nianych oraz we wszystkich
programach prania w niskiej temperaturze.
stosowanie w trybie Auto Dose System wy³¹cznie
detergentu w p³ynie i p³ynu do p³ukania. Nie
u¿ywaæ detergentów silnie skoncentrowanych,
w postaci ¿elu i tym podobnych.
stosowanie delikatnych detergentów w p³ynie do we³ny
i jedwabiu i wlewanie ich w sposób Tradycyjny.
NIGDY nie mieszaæ dwóch ró¿nych detergentów; przed wlaniem
nowego detergentu za ka¿dym razem wyczyciæ zbiorniki.
rodek pior¹cy powinien byæ w³o¿ony przed
rozpoczêciem prania do odpowiedniej komory lub do
dozownika wk³adanego bezporednio do bêbna. W
takim przypadku nie mo¿na wybraæ cyklu Bawe³na z
praniem wstêpnym.
Nie u¿ywaæ rodków do prania rêcznego, poniewa¿
tworz¹ za du¿o piany.
Przygotowanie bielizny
Rozprostowaæ dobrze ubrania przed w³o¿eniem ich
do pralki.
Podzieliæ bieliznê wed³ug rodzajów tkaniny (symbol
na etykiecie ubrania) oraz koloru uwa¿aj¹c na
oddzielenie odzie¿y kolorowej od bia³ej;
Opró¿niæ kieszenie i sprawdziæ guziki;
Nie przekraczaæ wartoci wskazanych w Tabela
programów odnosz¹cych siê do ciê¿aru bielizny suchej.
Ile wa¿y bielizna?
1 przecierad³o 400 500 gr
1 poszewka 150 200 gr
1 obrus 400 500 gr
1 szlafrok 900 1200 gr
1 rêcznik do r¹k 150 250 gr
1 spodnie jeansowe 400 500 gr
1 koszula 150 200 gr
Zalecenia dotycz¹ce prania
Koszule: Nale¿y u¿ywaæ odpowiedniego programu
Koszule
w celu zagwarantowania jak najlepszej ochrony ubrañ.
Jeans: u¿ywaæ odpowiedniego programu Jeans
wszystkich ubrañ z tkaniny Denim; wywróciæ ubrania
przed praniem i u¿ywaæ rodka pior¹cego w p³ynie.
Baby: u¿ywaæ odpowiedniego programu Baby
celu usuniêcia brudu typowego dla dzieci i usun¹æ
rodek pior¹cy z tkanin w celu unikniêcia reakcji
alergicznych delikatnej skóry dzieci. Cykl ten zosta³
opracowany w celu ograniczenia liczby bakterii poprzez
wykorzystanie wiêkszej iloci wody i optymalizacji
dzia³ania specjalnych dodatków higienizuj¹cych,
którymi uzupe³niany jest rodek pior¹cy.
do prania koszul z ró¿nego materia³u i koloru
dla
w
Po zakoñczeniu prania urz¹dzenie wykona seriê
wolnych obrotów bêbna, aby zapobiec powstawaniu
zagnieceñ; w celu zakoñczenia cyklu nale¿y nacisn¹æ
przycisk START/PAUSE.
Jedwab: stosowaæ odpowiedni program Jedwab
do prania wszelkiej odzie¿y jedwabnej. Zaleca siê
stosowanie specjalnego rodka pior¹cego do tkanin
delikatnych.
Firany: zastosowaæ program Jedwab
z³o¿yæ i w³o¿yæ do dostarczonego worka.
We³na: Hotpoint/Ariston to jedyna pralka, która
uzyska³a presti¿owe oznaczenie Woomark Platinium
Care (M.0508) od The Woolmark Company, która
certyfikuje pranie w pralce wszystkich wyrobów
we³nianych, tak¿e posiadaj¹cych oznaczenie Tylko
pranie rêczne
pralce mo¿na praæ wszystkie ubrania z we³ny z
gwarancj¹ najwy¿szych osi¹gów.
Puch: aby wypraæ produkty wype³nione puchem
gêsim, takie jak ko³dry dla dwóch osób lub pojedyncze
(niewa¿¹ce wiêcej ni¿ 3,5 kg), poduszki, kurtki
puchowe, nale¿y zastosowaæ w³aciwy program Puch
. Nale¿y w³o¿yæ produkty puchowe do bêbna
wyginaj¹c rogi do wnêtrza (patrz rysunki) ale tak, aby
nie przekroczyæ ¾ jego pojemnoci.
Aby uzyskaæ optymalne wyniki prania zaleca siê
wlanie do szufladki p³ynnego rodka do prania.
Ko³dry pikowane: aby wypraæ ko³dry pikowane z
syntetycznym wype³nieniem, nale¿y zastosowaæ
dostarczony w tym celu worek i ustawiæ program Puch
Bielizna k¹pielowa i pocielowa: pralka pozwala na
pranie bielizny z ca³ego domu w jednym tylko cyklu
Pociel i Rêczniki (Bed&Bath)
zu¿ycie rodka zmiêkczaj¹cego i pozwala Ci na
zaoszczêdzenie czasu i pieniêdzy. Zalecamy
stosowanie rodka pior¹cego w proszku.
Uporczywe zabrudzenia: dobrze jest wypraæ
uporczywe zaplamienia p³ynnym myd³em przed praniem
oraz zastosowaæ program Bawe³na z praniem wstêpnym.
. Dziêki programowi We³na w
. Nale¿y je
, który optymalizuje
System równowa¿enia ³adunku
Aby unikn¹æ nadmiernych drgañ i jednorodnie roz³o¿yæ
wsad, przed ka¿dym wirowaniem bêben wykonuje
nieco szybsze obroty ni¿ podczas prania. Jeli po
zakoñczeniu kolejnych prób wsad nie zostanie
roz³o¿ony w sposób wywa¿ony, urz¹dzenie dokona
wirowania z szybkoci¹ mniejsz¹ od przewidywanej.
W przypadku wyst¹pienia nadmiernego
niezrównowa¿enia pralka dokona roz³o¿enia wsadu
zamiast odwirowania. Aby zapewniæ lepsze roz³o¿enie
wsadu oraz jego w³aciwe zrównowa¿enie, zaleca siê
wymieszanie du¿ych i ma³ych sztuk bielizny.
.
58
Page 59

Zalecenia i rodki
ostro¿noci
Pralka zosta³a zaprojektowana i wyprodukowana
zgodnie z miêdzynarodowymi przepisami
bezpieczeñstwa. Niniejsze ostrze¿enia zosta³y tu
zamieszczone ze wzglêdów bezpieczeñstwa i nale¿y
je uwa¿nie przeczytaæ.
Ogólne zasady bezpieczeñstwa
Urz¹dzenie to zosta³o zaprojektowane wy³¹cznie do
u¿ytkowania w warunkach domowych.
Urz¹dzenie powinno byæ u¿ywane wy³¹cznie przez
osoby doros³e i w sposób zgodny z instrukcjami
zawartymi w niniejszej ksi¹¿eczce.
Nie dotykaæ pralki stoj¹c przy niej boso lub maj¹c
mokre lub wilgotne rêce albo stopy.
Nie wyjmowaæ wtyczki z gniazdka ci¹gn¹c za kabel,
lecz trzymaj¹c za wtyczkê.
Nie dotykaæ usuwanej wody, gdy¿ mo¿e ona
osi¹gaæ wysokie temperatury.
W ¿adnym wypadku nie otwieraæ drzwiczek pralki
na si³ê: grozi to uszkodzeniem mechanizmu
zabezpieczaj¹cego drzwiczki przed przypadkowym
otwarciem.
W razie wyst¹pienia usterki nie nale¿y w ¿adnym
wypadku próbowaæ dostaæ siê do wewnêtrznych czêci
pralki z zamiarem samodzielnego dokonania naprawy.
Zawsze uwa¿aæ, aby dzieci nie zbli¿a³y siê do
pracuj¹cej pralki.
Jeli trzeba maszynê przestawiæ musz¹ to zrobiæ
dwie lub trzy osoby przy zachowaniu jak
najwiêkszej ostro¿noci. Nigdy nie nale¿y tego robiæ
samemu, gdy¿ urz¹dzenie jest bardzo ciê¿kie.
Przed w³o¿eniem bielizny sprawdziæ, czy bêben jest
pusty.
Rêczne otwarcie drzwiczek
PL
W przypadku, gdy otwarcie drzwiczek nie jest mo¿liwe
z powodu braku energii elektrycznej a pranie ma byæ
rozwieszone, nale¿y postêpowaæ w nastêpuj¹cy
sposób:
1. wyj¹æ wtyczkê z
gniazdka elektrycznego.
2. sprawdziæ, czy poziom
wody wewn¹trz maszyny
jest ni¿szy od poziomu
otwarcia drzwiczek, w
przeciwnym przypadku
usun¹æ nadmiar wody
poprzez rurê odp³ywow¹
zbieraj¹c j¹ do wiaderka w
sposób wskazany na
rysunku.
3. usun¹æ p³ytê znajduj¹c¹ siê z ty³u pralki (zobacz
nastêpn¹ stronê).
4. przy pomocy uchwytu
pokazanego na rysunku
poci¹gn¹æ na zewn¹trz a¿
do zwolnienia plastikowego
zatrzasku z gniazda;
nastêpnie poci¹gn¹æ go ku
do³owi a¿ da siê us³yszeæ
klikniêcie, wskazuj¹ce, ¿e
drzwiczki zosta³y
odblokowane.
Utylizacja
Utylizacja opakowania: przestrzegaæ lokalnych
przepisów, dziêki temu opakowanie bêdzie mog³o
zostaæ ponownie wykorzystane.
Dyrektywa europejska 2002/96/WE dotycz¹ca
odpadów urz¹dzeñ elektrycznych i elektronicznych
przewiduje, ¿e elektryczne urz¹dzenia
gospodarstwa domowego nie powinny byæ
utylizowane w normalnym ci¹gu utylizacji sta³ych
odpadów miejskich. Stare urz¹dzenia powinny byæ
zbierane oddzielnie w celu optymalizowania stopnia
odzysku i recyrkulacji materia³ów, z których s¹
zbudowane i aby zapobiec potencjalnemu
zagro¿eniu dla zdrowia i rodowiska. Symbol
przekrelonego koszyka podany jest na wszystkich
produktach w celu przypominania o obowi¹zku ich
oddzielnego zbierania.
W³aciciele urz¹dzeñ gospodarstwa domowego
mog¹ uzyskaæ dodatkowe informacje dotycz¹ce ich
prawid³owej utylizacji zwracaj¹c siê do odpowiednich
s³u¿b publicznych lub do sprzedawców tych
urz¹dzeñ.
5. Otworzyæ drzwiczki; w
przypadku, gdy nie jest to
jeszcze mo¿liwe,
powtórzyæ czynnoæ.
6. ponownie za³o¿yæ panel upewniwszy siê, przed
dociniêciem go do maszyny, ¿e zatrzaski zosta³y
umieszczone w odpowiednich otworach.
59
Page 60

Utrzymanie i konserwacja
PL
Od³¹czenie wody i pr¹du elektrycznego
Zamkn¹æ kurek dop³ywu wody po ka¿dym praniu.
Zmniejsza siê w ten sposób zu¿ycie instalacji
hydraulicznej pralki oraz eliminuje siê
niebezpieczeñstwo przecieków.
Wyj¹æ wtyczkê z kontaktu przed przyst¹pieniem do
czyszczenia pralki oraz podczas wykonywania
czynnoci konserwacyjnych.
Czyszczenie maszyny
Obudowê zewnêtrzn¹ i gumowe czêci pralki nale¿y
myæ wilgotn¹ ciereczk¹ zmoczon¹ w letniej wodzie z
myd³em. Nie stosowaæ rozpuszczalników ani
ciernych rodków czyszcz¹cych.
Czyszczenie szufladki na rodki pior¹ce
A
D
Aby dostaæ siê do komory wstêpnej:
2
1. zdj¹æ p³ytê przykrywaj¹c¹, znajduj¹c¹ siê z ty³u
rz¹dzenie naciskaj¹c j¹ ku rodkowi, nastêpnie
popchn¹æ ku do³owi z dwóch stron i wyj¹æ j¹ (zobacz
rysunki).
2. ustawiæ pojemnik do
zbierania wyp³ywaj¹cej
wody (ok. 1,5 l) (patrz
rysunek);
3. odkrêciæ pokrywê,
obracaj¹c j¹ w kierunku
przeciwnym do ruchu
wskazówek zegara (patrz
rysunek);
Aby wyjac pojemnik, nalezy wysunac go az do
pierwszej blokady, nastepnie nacisnac dzwignie A i
calkowicie go wysunac, po czym nacisnac jedna z
dzwigni D i pociagnac pojemnik na zewnatrz (zob.
rysunki).
Umyc pojemnik pod biezaca woda; pojemnik nalezy
myc czesto. Pamietac o usunieciu ewentualnych
resztek detergentów z komory pralki, w której
umieszczony jest pojemnik.
W celu ponownego wlozenia pojemnika nalezy
przysunac go do lewej strony komory, starajac sie
trafic na prowadnice i uwazajac, aby sie nie zacial.
Czyszczenie bêbna
Nale¿y zawsze pozostawiaæ uchylone drzwiczki
pralki, aby zapobiec tworzeniu siê nieprzyjemnych
zapachów.
Czyszczenie pompy
Pralka wyposa¿ona jest w pompê samoczyszcz¹c¹,
która nie wymaga zabiegów konserwacyjnych. Mo¿e
siê jednak zdarzyæ, ¿e drobne przedmioty (monety,
guziki) wpadn¹ do komory wstêpnej zabezpieczaj¹cej
pompê, która znajduje siê w jej dolnej czêci.
4. dok³adnie wyczyciæ wnêtrze;
5. ponownie przykrêciæ pokrywê;
6. ponownie za³o¿yæ panel upewniwszy siê, przed
dociniêciem go do urz¹dzenia, czy zatrzaski zosta³y
umieszczone w odpowiednich otworach.
Kontrola przewodu doprowadzaj¹cego
wodê
Przynajmniej raz do roku nale¿y skontrolowaæ rurê
doprowadzania wody. Jeli widoczne s¹ na nim
pêkniêcia i rysy, nale¿y go wymieniæ: w trakcie prania
du¿e cinienie mo¿e bowiem spowodowaæ jego nag³e
rozerwanie.
Nale¿y siê upewniæ, ¿e cykl prania zosta³
zakoñczony i wyj¹æ wtyczkê z gniazdka.
60
Page 61

Nieprawid³owoci w dzia³aniu i
sposoby ich usuwania
Mo¿e siê zdarzyæ, ¿e pralka nie dzia³a. Przed wezwaniem Serwisu Technicznego (patrz Serwis Techniczny)
nale¿y sprawdziæ, czy problemu nie da siê ³atwo rozwi¹zaæ przy pomocy poni¿szego wykazu.
Nieprawid³owoci w dzia³aniu:
Pralka nie w³¹cza siê.
Cykl prania nie rozpoczyna siê.
Pralka nie pobiera wody.
Pralka pobiera i usuwa wodê bez
przerwy.
Pralka nie odprowadza wody i nie
odwirowuje.
Pralka mocno wibruje w fazie
odwirowywania.
Z pralki wycieka woda.
Ikony dotycz¹ce bie¿¹cej fazy
pulsuj¹ szybko jednoczenie z
kontrolk¹ ON/OFF.
Mo¿liwe przyczyny/Porady:
Wtyczka nie jest w³¹czona do gniazdka lub jest wsuniêta za s³abo, w
taki sposób, ¿e nie ma styku.
W domu nie ma pr¹du.
Drzwiczki nie s¹ dok³adnie zamkniête.
Nie zosta³ przyciniêty przycisk START/PAUSE.
Kurek dop³ywu wody jest zamkniêty.
Ustawione zosta³o opró¿nienie startu.
Rura pobierania wody nie jest pod³¹czona do zaworu.
Rura jest zgiêta.
Kurek dop³ywu wody jest zamkniêty.
W domu nast¹pi³a przerwa w dostawie wody.
Cinienie wody nie jest wystarczaj¹ce.
Nie zosta³ przyciniêty przycisk START/PAUSE
Rura usuwania wody nie zosta³a zainstalowana na wysokoci od 65 d0
100 cm od pod³ogi (patrz Instalacja).
Koñcówka rury usuwania wody jest zanurzona w wodzie (patrz Instalacja).
Jeli mieszkanie znajduje siê na najwy¿szych piêtrach budynku,
mo¿liwe, ¿e zaistnia³ efekt syfonu, w wyniku czego pralka nieustannie
pobiera i usuwa wodê. W celu wyeliminowania tej niedogodnoci nale¿y
zakupiæ specjalny zawór, zapobiegaj¹cy powstawaniu efektu syfonu.
Otwór odp³ywowy w cianie nie posiada odpowietrznika.
Program nie przewiduje odprowadzania wody: w przypadku niektórych
programów nale¿y uruchomiæ go rêcznie (patrz Programy i opcje).
Przewód odprowadzaj¹cy wodê jest zgiêty (patrz Instalacja).
Instalacja ciekowa jest zatkana.
Bêben, w chwili instalacji pralki, nie zosta³ odpowiednio odblokowany
(zobacz Instalacja).
Pralka nie jest w³aciwie wypoziomowana (patrz Instalacja).
Pralka jest zbyt ciniêta pomiêdzy meblami i cian¹ (patrz Instalacja).
Wsad jest niewywa¿ony (patrz rodki pior¹ce i bielizna).
Przewód doprowadzaj¹cy wodê nie jest dobrze przykrêcony (patrz Instalacja).
Szufladka na rodki pior¹ce jest zatkana (w celu oczyszczenia jej patrz
Konserwacja i czyszczenie).
Rura odp³ywowa nie jest dobrze zamocowana (patrz Instalacja).
Wy³¹czyæ urz¹dzenie i wyj¹æ wtyczkê z gniazdka, odczekaæ oko³o 1
minuty, nastêpnie w³¹czyæ j¹ ponownie. Jeli niedogodnoæ nie ustêpuje
wezwaæ Serwis.
PL
Tworzy siê zbyt du¿a iloæ piany.
Drzwiczki maszyny pozostaj¹
zablokowane.
rodek pior¹cy nie jest odpowiedni do pralek automatycznych (na opakowaniu
musi byæ napisane: do pralek, do prania rêcznego i pralek lub podobne).
U¿yto za du¿o rodka pior¹cego.
Wykonaæ procedurê rêcznego odblokowania (patrz rodki ostro¿noci i
zalecenia).
61
Page 62

PL
Nieprawid³owoci w
dzia³aniu:
Mo¿liwe przyczyny/Porady:
Pralka nie zapewnia
odpowiedniej skutecznoci
prania.
Co siê stanie, jeli wlejê p³yn do
pe³nych zbiorników?
Co siê stanie, jeli u¿yjê
pojemnika do tradycyjnego
prania, podczas gdy zbiorniki s¹
jeszcze pe³ne?
Czy zbiorniki s¹ przeznaczone
równie¿ do detergentów w
proszku?
Czy proszek do prania mo¿e
przedostaæ siê do zbiorników?
Zbiorniki zosta³y nieprawid³owo nape³nione (P³yn zmiêkczaj¹cy w
miejsce p³ynu do prania lub na odwrót).
Zmieszane zosta³y dwa ró¿ne p³yny do prania/p³ukania.
NIGDY nie mieszaæ dwóch ró¿nych p³ynów do prania/p³ukania; przed
wlaniem nowego p³ynu za ka¿dym razem wyczyciæ zbiorniki.
Auto Dose System jest zatkany, gdy¿ nie by³ u¿ywany przez d³ugi
czas: wyczyciæ zbiorniki (zob. Ustawianie czyszczenia przez
u¿ytkownika).
Sygna³y dwiêkowe (beep) i wzrokowe (ikony na wywietlaczu)
informuj¹ o tym, ¿e zbiornik jest pe³ny. Jeli mimo to nadal bêdzie siê
wlewaæ p³yn do prania/p³ukania, jego nadmiar dostanie siê do bêbna i
zostanie zu¿yty w kolejnym cyklu prania.
Pralka automatycznie rozpozna wsypanie proszku do prania lub wlanie
p³ynu do prania w trybie tradycyjnym i nie pobierze rodka pior¹cego ze
zbiornika. P³yn zmiêkczaj¹cy mo¿e byæ stosowany jedynie w trybie Auto
Dose.
Nie, detergentu w proszku mo¿na u¿ywaæ tylko w trybie tradycyjnym.
Nie, obecnoæ cianki zapobiega przedostaniu siê proszku do prania do
zbiorników, nawet gdy pojemnik jest otwarty i znajduje siê w pozycji Auto
Dose System (czyli ca³kowicie wysuniêty).
Co siê stanie, jeli przy
nape³nianiu zbiorników
nieprawid³owo otworzê pojemnik
na detergenty?
Co siê stanie, jeli pomylê p³yn
do prania z p³ynem do p³ukania?
Co siê stanie, jeli nie poczekam,
a¿ zbiorniki bêd¹ puste i
zmieszam ró¿ne detergenty?
Jeli pojemnik nie jest ca³kowicie wysuniêty, wlany p³yn do prania lub do
p³ukania dostanie siê do bêbna i zostanie zu¿yty w kolejnym cyklu
prania.
Pranie bêdzie ma³o skuteczne i trzeba bêdzie opró¿niæ zbiorniki,
stosuj¹c rêcznie nastawiany cykl czyszczenia.
Pralka bêdzie pra³a normalnie, lecz zaleca siê uzupe³nianie zbiorników
dopiero po zasygnalizowaniu takiej koniecznoci przez pralkê i
niemieszanie ró¿nych p³ynów do prania/p³ukania.
Uwaga: aby wyjæ z trybu demo, nale¿y nacisn¹æ równoczenie przez 3 sek. dwa przyciski ON/OFF i START / PAUSE .
62
Page 63

Serwis techniczny
Przed skontaktowaniem siê z Serwisem Technicznym:
Sprawdziæ, czy problemu nie mo¿na rozwi¹zaæ samodzielnie (patrz Anomalie i rodki zaradcze);
Ponownie uruchomiæ program i sprawdziæ, czy problem nie znikn¹³;
W przeciwnym razie wezwaæ Autoryzowany Serwis Techniczny.
W przypadku b³êdnego zainstalowania i nieprawid³owego u¿ywania pralki interwencja serwisu bêdzie p³atna.
Nigdy nie wzywaæ nieautoryzowanych techników.
Nale¿y podaæ:
rodzaj nieprawid³owoci;
model maszyny (Mod.);
numer seryjny (S/N).
Te ostatnie informacje znajduj¹ siê na tabliczce znamionowej umieszczonej na urz¹dzeniu.
PL
63
Page 64

PL
195078704.00
06/2009 - Xerox Fabriano
64
 Loading...