

Page 1

Instructions for
installation and use
Contents
Installation, 2-3
EN
English,1
ES
Español,13
AQUALTIS
AQ8D 49 U
NL
Nederlands,25
Unpacking and levelling
Connecting the electricity and water supplies
Technical data
Description of the machine, 4-5
Touch control panel
Running a wash cycle, 6
Wash cycles and options, 7
Table of wash cycles
Wash options
Detergents and laundry, 8
Detergent
Preparing the laundry
Washing recommendations
Precautions and advice, 9
General safety
Load balancing system
Disposal
Opening the porthole door manually
WASHING MACHINE
EN
Care and maintenance, 10
Cutting off the water and electricity supplies
Cleaning the machine
Cleaning the detergent dispenser drawer
Caring for your appliance drum
Cleaning the pump
Checking the water inlet hose
Trouble shooting, 11
Assistance, 12
1
Page 2
Installation
EN
This instruction manual should be kept in a safe place
for future reference. If the washing machine is sold,
given away or moved, please ensure the manual is kept
with the machine, so that the new owner may benefit
from the advice contained within it.
Read these instructions carefully: they contain vital
information relating to the safe installation and operation
of the appliance.
Inside the pack containing this manual, you will also
find the guarantee and all the details necessary for
installation.
Unpacking and levelling
Unpacking
1. Once you have removed all the packaging from the
washing machine, make sure it has not been damaged
during transportation.
If it has been damaged, contact the retailer and do not
proceed any further with the installation process.
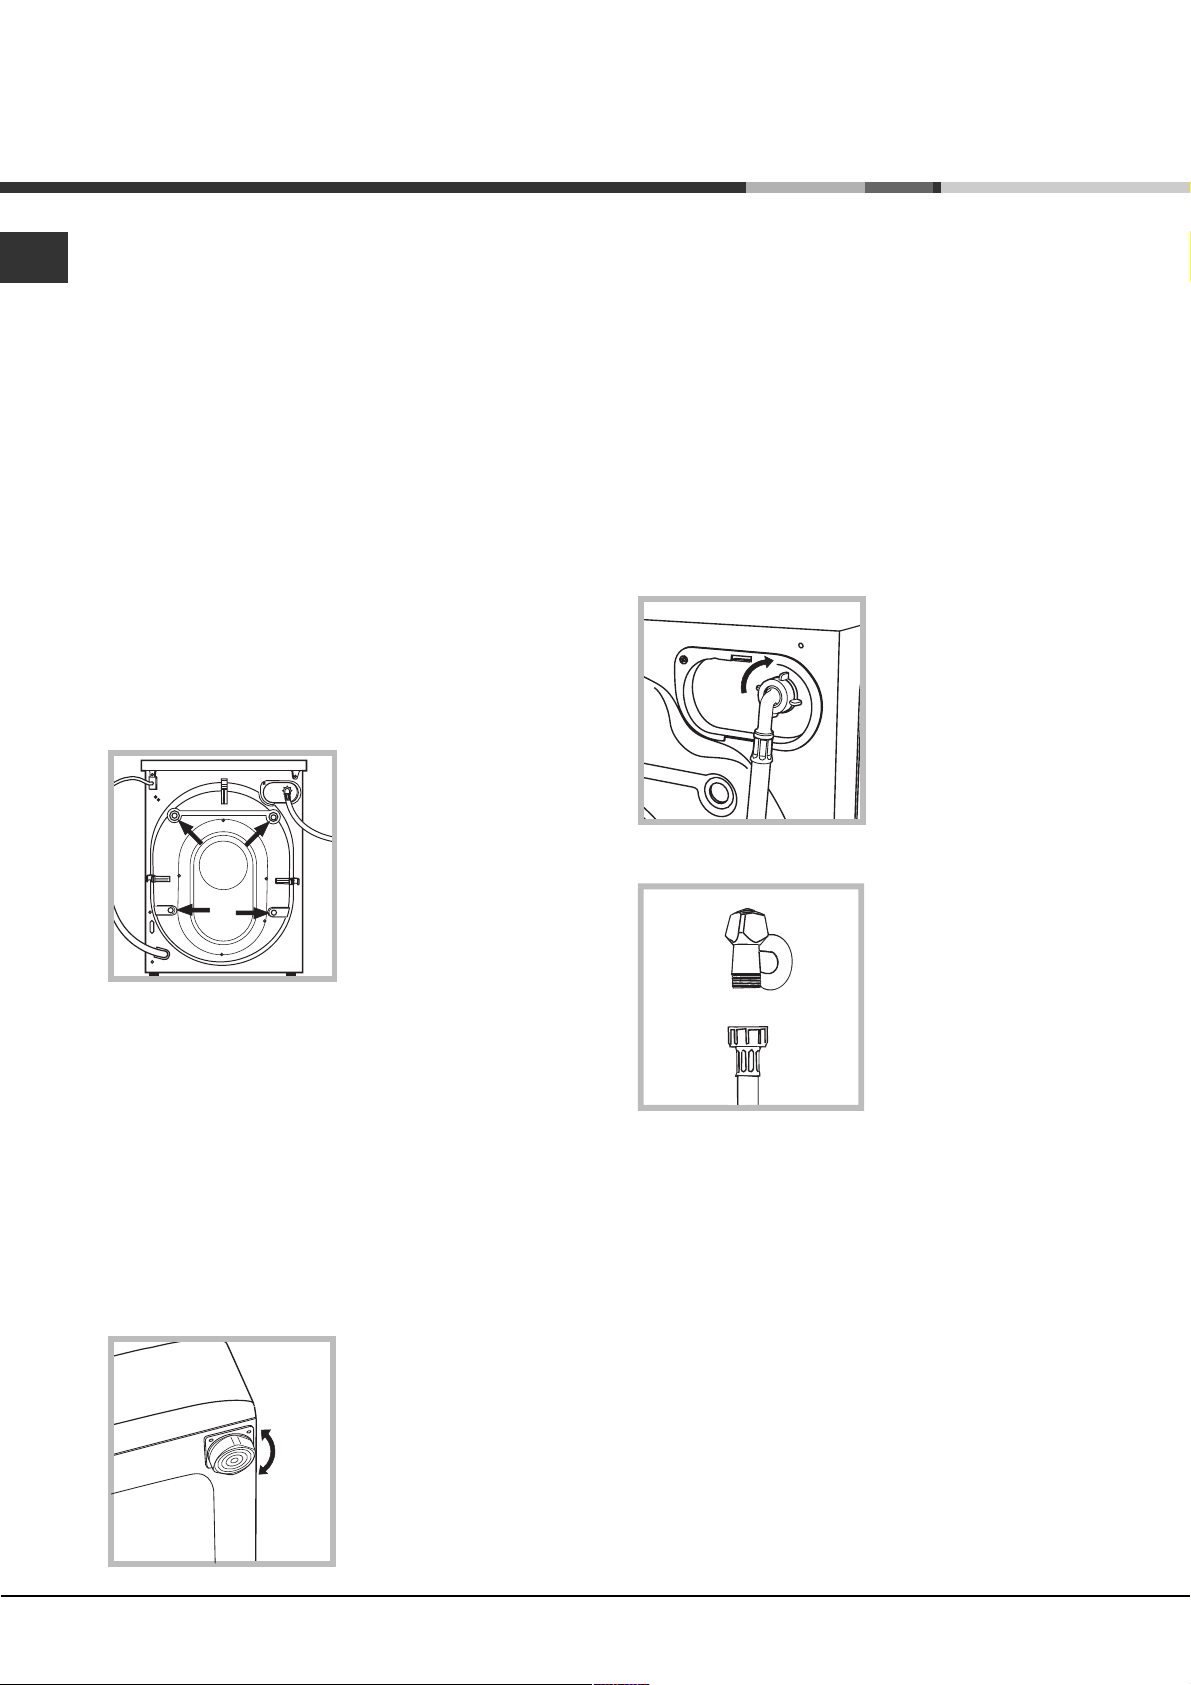
2. Remove the 4
protective screws (used
during transportation) and
the corresponding spacer,
located on the rear part of
the appliance (see figure).
If the appliance is levelled correctly, it will be more
stable and much less likely to cause vibrations and noise
while it is operating, particularly during the spin cycle.
If it is placed on carpet or a rug, adjust the feet in such
a way as to allow a sufficient ventilation space
underneath the washing machine.
Connecting the electricity and water
supplies
Connecting the water inlet hose
Before connecting the inlet hose to the water supply,
run the water until it is perfectly clear.
1. Connect the inlet hose
to the machine by
screwing it onto the cold
water inlet of the
appliance, which is
situated on the top righthand side of the rear part
of the appliance (see
figure).
2. Connect the inlet hose
by screwing it to a cold
water tab using a 3/4 gas
threaded connection (see
figure).
3. Close off the holes using the plastic plugs supplied in
the pack.
4. Keep all the parts in a safe place; they will be needed
again if the washing machine is moved to another
location, to prevent the inside of the appliance being
damaged.
Packaging materials should not be used as toys for
children.
Levelling
1. Place the washing machine on a flat sturdy floor,
without resting it up against walls or cabinets.
2. If the floor is uneven,
the front feet of the
machine may be adjusted
until it reaches a horizontal
position (the angle of
inclination must not
exceed 2 degrees).
3. Make sure that the hose is not folded over or bent.
The water pressure at the tap must fall within the
values indicated in the Technical data table (see next
page).
If the inlet hose is not long enough, contact a
specialised shop or an authorised technician.
Never use second-hand or old inlet hoses; use the
products supplied with the machine.
2
Page 3
Connecting the drain hose
65 - 100 cm
Connect the drain hose to
drain duct piping or a wall
drain located between 65
and 100 cm above the
floor, making sure it is not
bent at all.
Alternatively, rest the drain
hose on the side of a
washbasin or bathtub,
fastening the duct
supplied to the tap (see
figure).
The free end of the hose
should not be underwater.
Do not use extension cords or multiple sockets.
EN
The cable should not be bent or compressed.
The power supply cable and plug must only be
replaced by authorised technicians.
Warning! The company shall not be held responsible in
the event that these regulations are not respected.
We advise against the use of hose extensions; if it is
absolutely necessary, the extension must have the same
diameter as the original hose and must not exceed 150
cm in length.
Electrical connections
Before plugging the appliance into the electricity socket,
make sure that:
the socket is earthed and complies with all applicable
laws;
the socket is able to withstand the maximum power
load of the appliance as indicated in the Technical
data table (see opposite);
the power supply voltage falls within the values
indicated in the Technical data table (see opposite);
the socket is compatible with the plug of the
appliance. If this is not the case, have the socket or
the plug replaced.
The machine must not be installed outdoors, even in
covered areas. It is extremely dangerous to leave the
appliance exposed to rain, storms and other weather
conditions.
The mains socket must remain within easy reach after
the washing machine has been installed.
Technical data
Model
Dimensions
Capacity
Electrical
connections
Water connections
Spin speed
Energy rated
programmes
according to
regulation
EN 60456
AQ8D 49 U
width 59,5 cm
height 85 cm
depth 64,5 cm
from 1 to 8 kg
please refer to the technical data
plate fixed to the machine
maximum pressu re 1 MPa (10 bar)
minimum pressure 0.05 MPa (0.5 bar)
drum capacity 62 litres
up to 1400 rotations per minute
programme ; temperature 60°C;
using a load of 8 kg.
This appliance conforms to the
following EC Directives:
- 89/336/EEC dated 03/05/89
(Electromagnetic Compatibility) and
subsequent modification s
- 2006/95/EC (Low Voltage)
- 2002/96/EC
3
Page 4
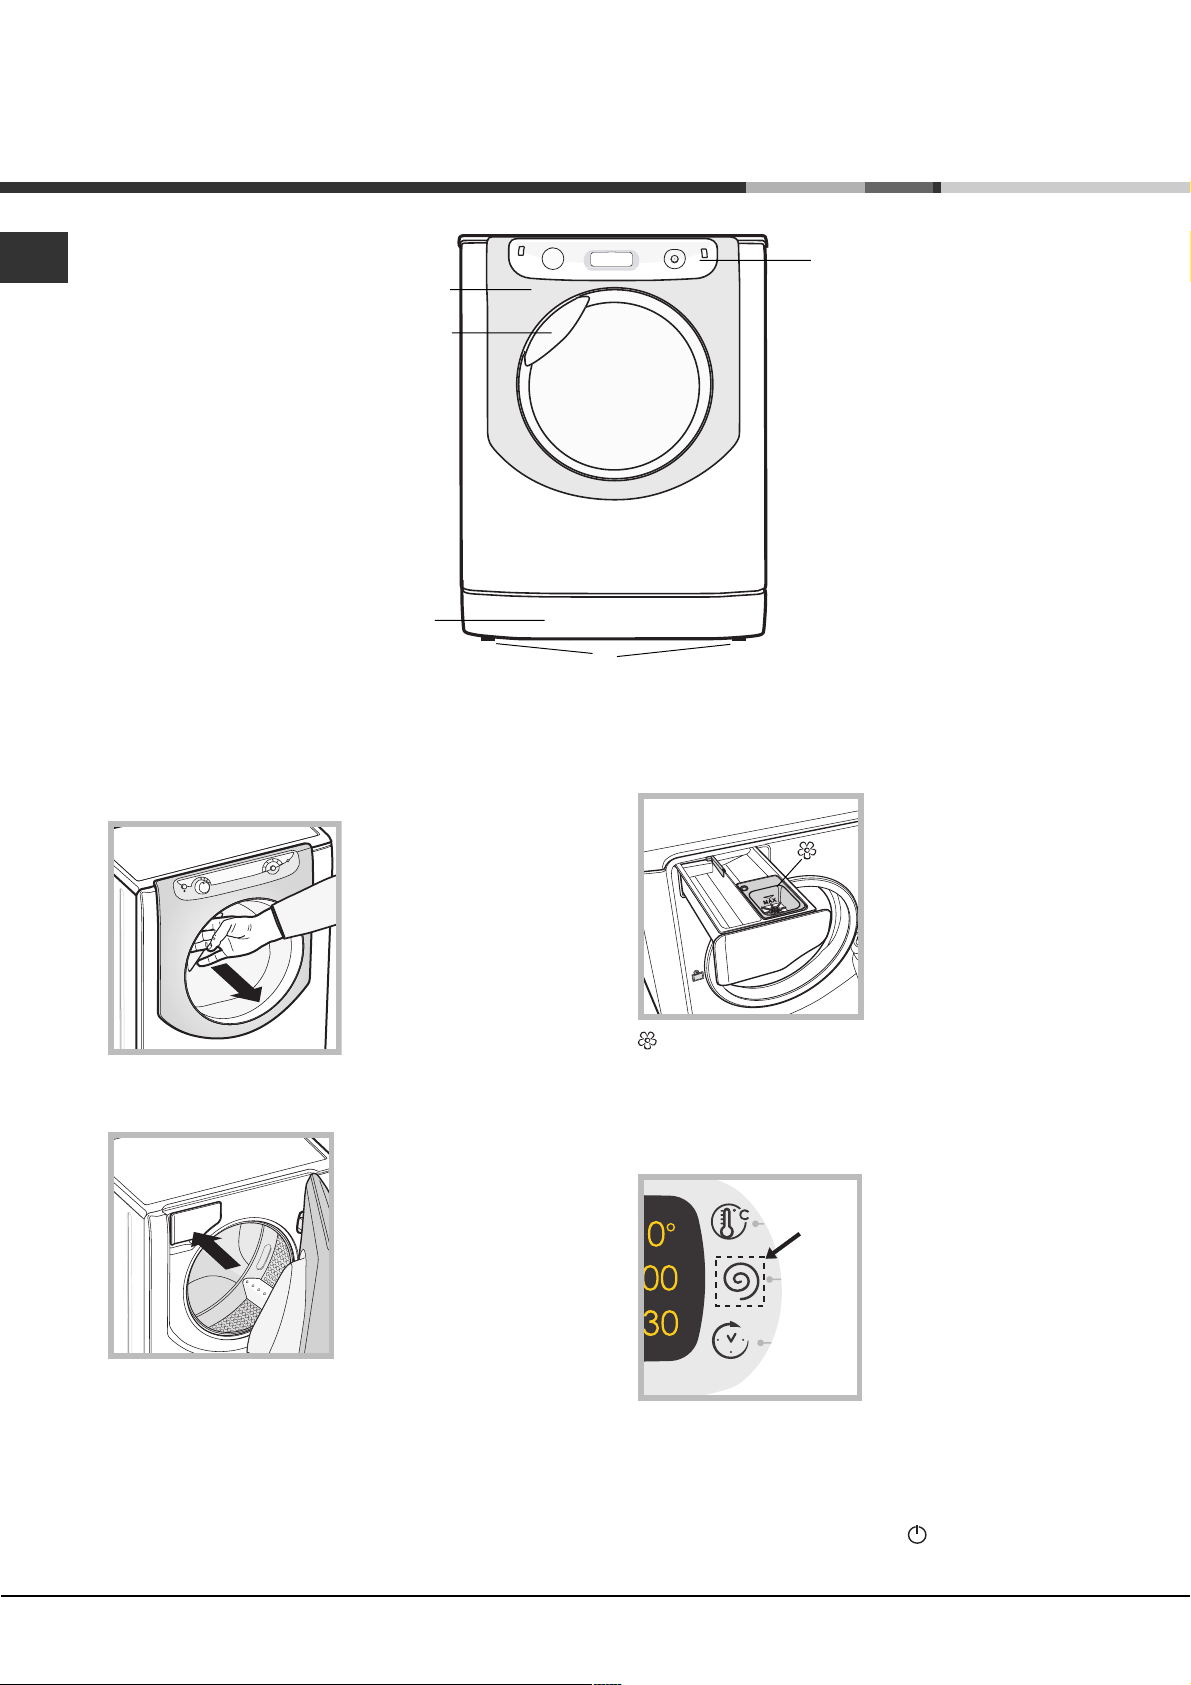
Description of the machine
EN
PORTHOLE DOOR
PORTHOLE DOOR
HANDLE
KICK STRIP
ADJUSTABLE FEET
PORTHOLE DOOR
Always use the handle to
open the porthole door (see
figure).
DETERGENT DISPENSER DRAWER
The detergent dispenser
drawer is located inside the
machine and can be
accessed by opening the
door.
For more information on
detergent measures, please
refer to the chapter entitled
Detergents and laundry.
Note: stick the label showing
the wash cycle descriptions and options on the front of
the detergent dispenser drawer. You will find the sticker
in the pack containing this manual.
CONTROL
PANEL
1. pre-wash compartment:
use powder detergent.
2. main wash compartment:
1
2
washing additives compartment: for fabric softener or
liquid additives. We recommend that the maximum level
indicated by the grille is not exceeded, and that
concentrated fabric softeners are diluted.
TOUCH CONTROL PANEL
Standby mode
This washing machine, in compliance with new energy
saving regulations, is fitted with an automatic standby
system which is enabled after a few minutes if no activity
is detected. Press the ON-OFF
for the machine to start up again.
use powder or liquid
detergent. If using the latter
type of detergent, we
recommend it is poured into
the drawer immediately
before you start the washing
machine.
To adjust the settings, gently
press the icon inside the
sensitive (touch control) area
as illustrated in the figure.
button briefly and wait
4
Page 5
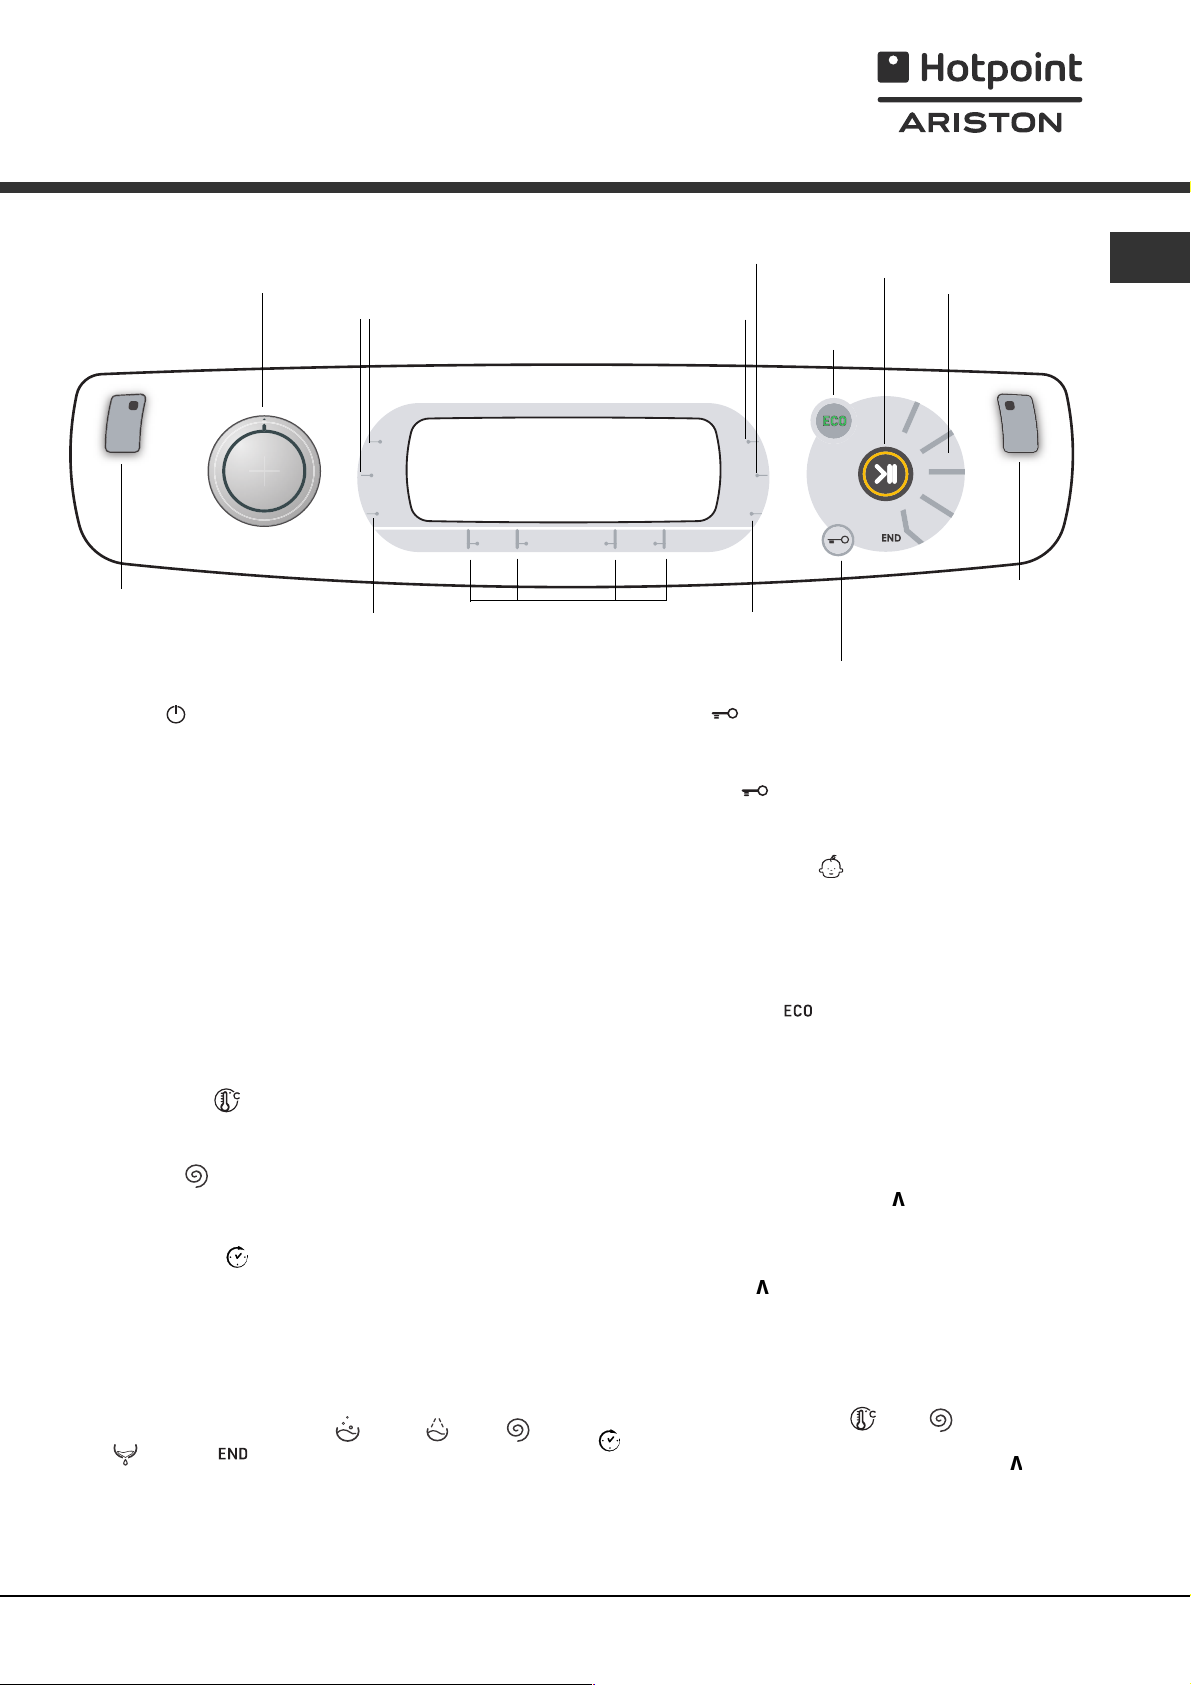
Touch control panel
WASH CYCLE
SELECTOR knob
M2
M1
TEMPERATURE
DISPLAY
SPIN
button
button
START/PAUSEbutton
with indicator light
ECO
indicator light
EN
WASH
CYCLE
PHASE
icons
Button withON/OFF
indicator light
Button with ON/OFF indicator light: press this briefly to
switch the machine on or off. The green indicator light
indicates that the machine is switched on. To switch off the
washing machine during the wash cycle, press and hold the
button for approximately 3 seconds; if the button is
pressed briefly or accidentally the machine will not switch
off. If the machine is switched off during a wash cycle, this
wash cycle will be cancelled.
WASH CYCLE SELECTOR knob: may be turned in either
direction. To select the most suitable wash cycle, please refer
to the Table of wash cycles.
The knob will not move during the wash cycle.
M1-M2-M3 buttons: press and hold one of the buttons to
store a cycle with your own set preferences in the memory of
the machine. To recall a previously-stored cycle, press the
corresponding button.
TEMPERATURE
temperature setting; the value selected will appear on the
display above (see Running a wash cycle).
SPIN CYCLE
cycle; the value selected will appear on the display above (see
Running a wash cycle).
DELAYED START
for the selected wash cycle; the set delay time will appear on
the display above (see Running a wash cycle).
OPTION buttons: press to select the available options. The
indicator light corresponding to the selected option will remain
lit (see Running a wash cycle).
WASH CYCLE PHASE icons: these illuminate to indicate the
progress of the wash cycle (Wash
Drain
START/PAUSE button with indicator light: when the green
indicator light flashes slowly, press the button to start a wash
cycle. Once the cycle has begun the indicator light will remain
lit in a fixed manner. To pause the wash cycle, press the button
again; the indicator light will flash in an orange colour. If the
). The text lights up when the cycle is complete.
button: press to modify or exclude the
button: press to modify or exclude the spin
button: press to set a delayed start
M3
Rinse Spin
OPTION
buttons
CONTROL PANEL
DELAYED START
button
LOCK button with
indicator light
DOOR LOCKED indicator light
Door locked
be opened. To start the wash cycle from the point at which it
was interrupted, press the button again.
DOOR LOCKED
porthole door is locked. To open the door, pause the wash
cycle (see Running a wash cycle).
CONTROL PANEL LOCK
activate or deactivate the control panel lock, press and hold
the button for approximately 2 seconds. when the indicator
light is illuminated, the control panel is locked. This means it is
possible to prevent wash cycles from being modified
accidentally, especially where there are children in the home.
ECO indicator light: the icon lights up when, after altering
the washing parameters, an energy saving of at least 10% is
made. Furthermore, before the machine enters Standby
mode, the icon will light up for a few seconds; when the
machine is switched off the estimated energy saving will be
around the 80% mark.
CHANGE LANGUAGE
The first time the machine is switched on, the first
language will flash on the display. The "
symbols will appear on the display, in line with the 3 buttons
on the right-hand side. The languages change automatically
every 3"; alternatively, they can be changed by pressing the
buttons next to the " " and "V" symbols. Use the "OK" button
to confirm the language, which will be set after 2". If no
buttons are pressed, the automatic language change will
begin again after 30".
The language may only be changed while the machine is
switched off.
Press and hold the temperature
buttons for 5''; a short beep sounds and the set language
flashes on the display. Press the buttons next to the "
"V" symbols to change the language. Use the button next to
the "OK" symbol to confirm the language, which will be set
after 2". If no buttons are pressed, the language set previously
will be displayed after 30".
Switch on the machine.
indicator light is switched off, the door may
indicator light: indicates that the
button with indicator light: to
", "OK" and "V"
+spin +delayed start
" and
5
Page 6

Running a wash cycle
EN
WARNING: before you use the washing machine for
the first time, run a wash cycle with detergent and no
laundry, using the 90° cottons cycle without pre-wash.
1. SWITCH THE MACHINE ON. Press the
All the indicator lights will illuminate for 1 second and
the text AQUALTIS will appear on the display; the
indicator light corresponding to the
remain lit in a constant manner and the START/PAUSE
indicator light will flash.
2. SELECT THE PROGRAMME. Turn the
PROGRAMME KNOB left or right, until the required
programme has been selected; the name of the
programme will appear on the display. A temperature
and spin speed is set for each programme; these may
be adjusted. The cycle duration will also appear on
the display.
3. LOAD THE LAUNDRY. Open the porthole door.
Load the laundry, making sure you do not exceed the
maximum load value indicated in the table of wash
cycles on the following page.
4. MEASURE OUT THE DETERGENT. Pull out the
detergent dispenser drawer and pour the detergent
into the relevant compartments as described in
Description of the machine.
5. CLOSE THE PORTHOLE DOOR.
6. CUSTOMISE THE WASH CYCLE. Use the
relevant buttons on the control panel:
Modify the temperature and/or spin speed.
The machine automatically displays the maximum
temperature and spin speed values set for the
selected cycle, or the most recently-used settings if
they are compatible with the selected cycle. The
temperature can be decreased by pressing the
button, until the cold wash OFF setting is reached.
The spin speed may be progressively reduced by
pressing the
OFF. If these buttons are pressed again, the
maximum values are restored.
Exception: if the Cottons programme is selected, the
temperature can be increased up to a value of 90°C.
Setting a delayed start.
To set a delayed start for the selected cycle, press
the corresponding button repeatedly until the required
delay period has been reached. During the setting
procedure, the delay period and the text "Starts in:"
will be displayed, along with the flashing
After the delayed start has been set, the
will remain fixed on the display, which will also indicate
the duration of the selected cycle with the text "Ends
in:" and the cycle duration. Press the DELAYED
START button just once to display the delay time set
previously.
After the countdown has begun, the display will show
the text "Starts in:" and the delay period. Once the
set delay time has elapsed, the machine will begin its
cycle and the display will show "Ends in:" and the
button, until it is completely excluded
button will then
button.
symbol.
symbol
time remaining until the end of the cycle.
To remove the delayed start option, press the button
until the display shows the text OFF; the
will disappear.
Modify the cycle settings.
Press the button to activate the option; the name
of the option will then appear on the display and
the corresponding indicator light will illuminate.
Press the button again to deactivate the option;
the name of the option will then appear on the
display followed by the text OFF, and the
corresponding indicator light will switch off.
If the selected option is not compatible with the
selected wash cycle, this incompatibility will be
signalled by the flashing of the indicator light and a
sound alert (3 beeps); the option will not be activated.
If the selected option is not compatible with another
option that has been selected previously, the indicator
light corresponding to the first option selected will flash
and only the second option will be activated; the
indicator light corresponding to the button will remain
lit in a constant manner.
The options may affect the recommended load value
and/or the duration of the cycle.
7. START THE PROGRAMME. Press the START/
PAUSE button. The corresponding indicator light
remains lit in a fixed manner and the porthole door
locks (the
illuminates). The icons corresponding to the wash
cycle phases will light up during the cycle to indicate
which phase is currently in progress.
To change a wash cycle once it has already started,
pause the washing machine by pressing the START/
PAUSE button; then select the desired cycle and
press the START/PAUSE button again.
To open the door during a wash cycle, press the
START/PAUSE button; if the DOOR LOCKED
indicator light is switched off you may open the door.
Press the START/PAUSE button again to restart the
wash cycle from the point at which it was interrupted.
8. THE END OF THE WASH CYCLE. This is indicated
by the illuminated text END. The porthole door may be
opened immediately. If the START/PAUSE indicator light
is flashing, press the button to end the cycle. Open the
door, unload the laundry and switch off the machine.
If you wish to cancel a cycle which has already begun,
press and hold the
the machine switches off.
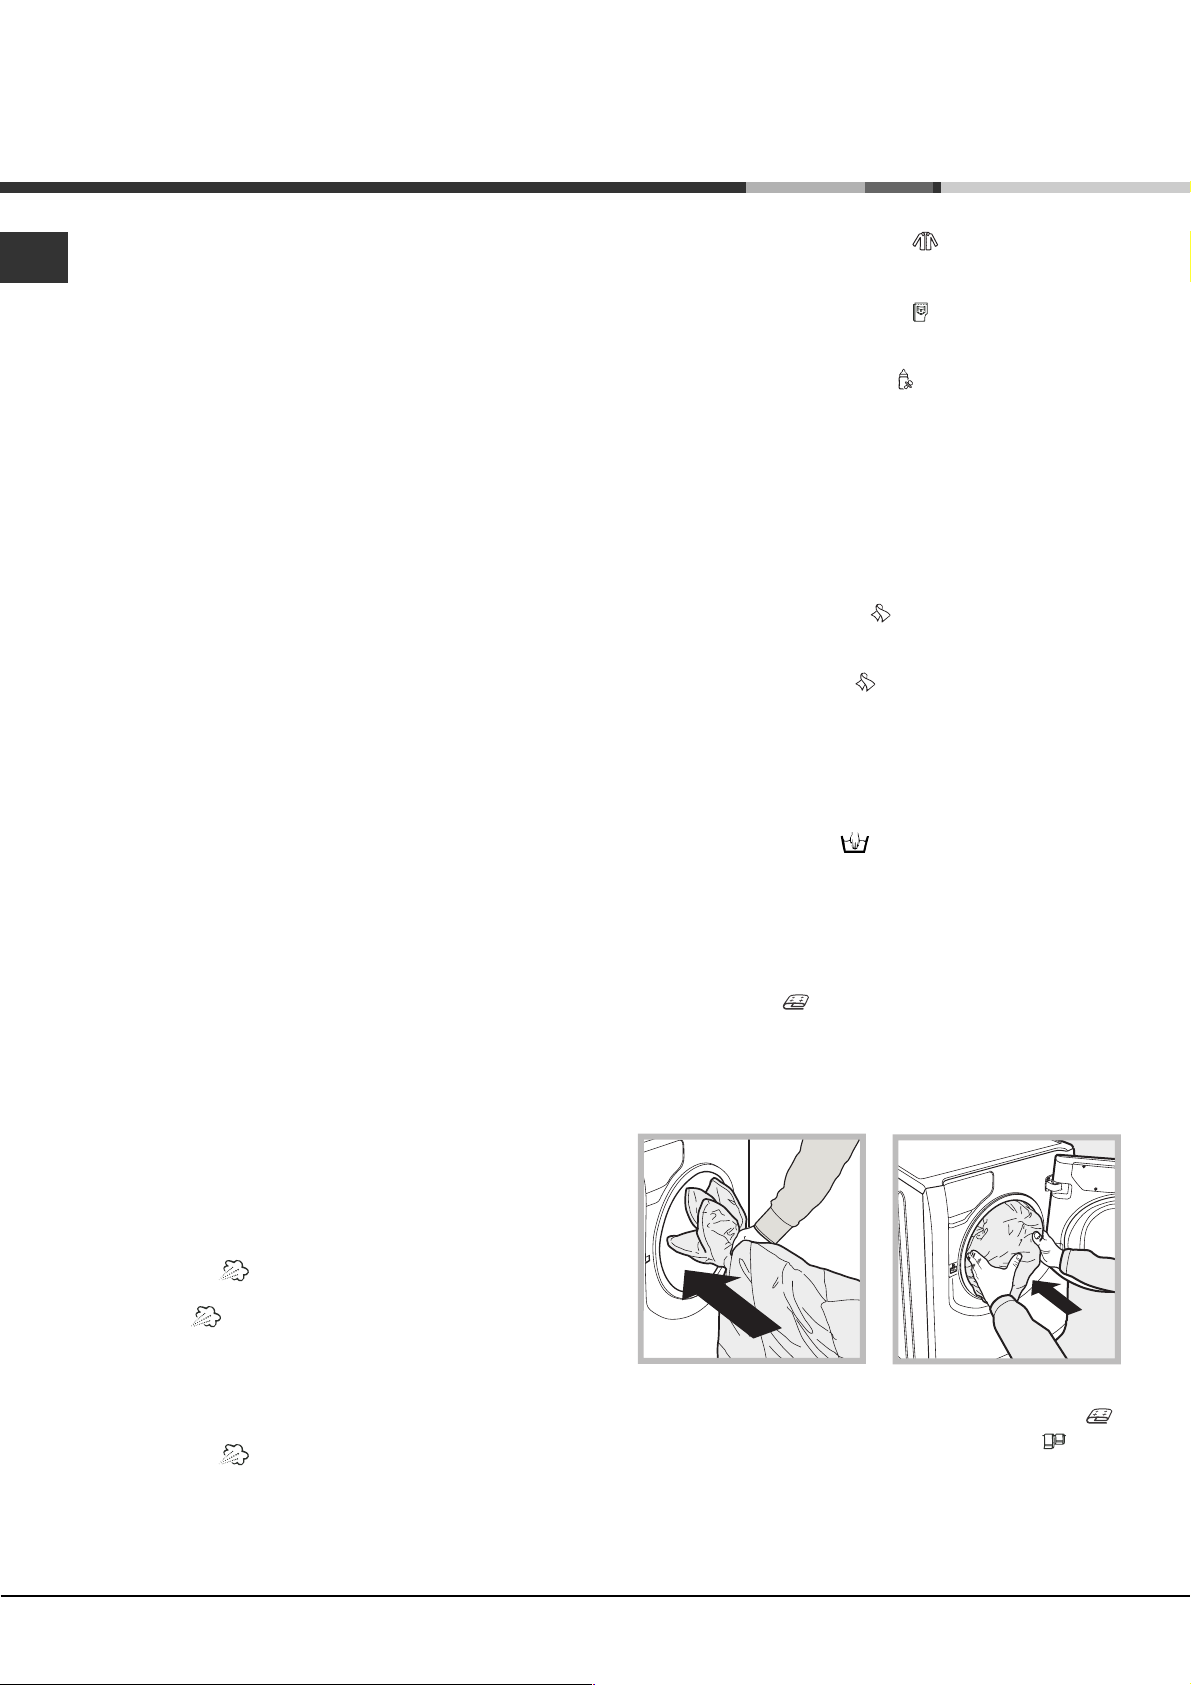
Bag for quilts, curtains and delicate garments
The Aqualtis washing machine makes it easier for you to
wash even the most valuable and delicate garments in
complete confidence thanks to the special bag which
protects the laundry (this is supplied with the machine).
We recommend that the bag is used every time you
wash quilts and padded items with an outer layer made
using synthetic material.
DOOR LOCKED indicator light
button until the cycle stops and
symbol
6
Page 7
Wash cycles and options
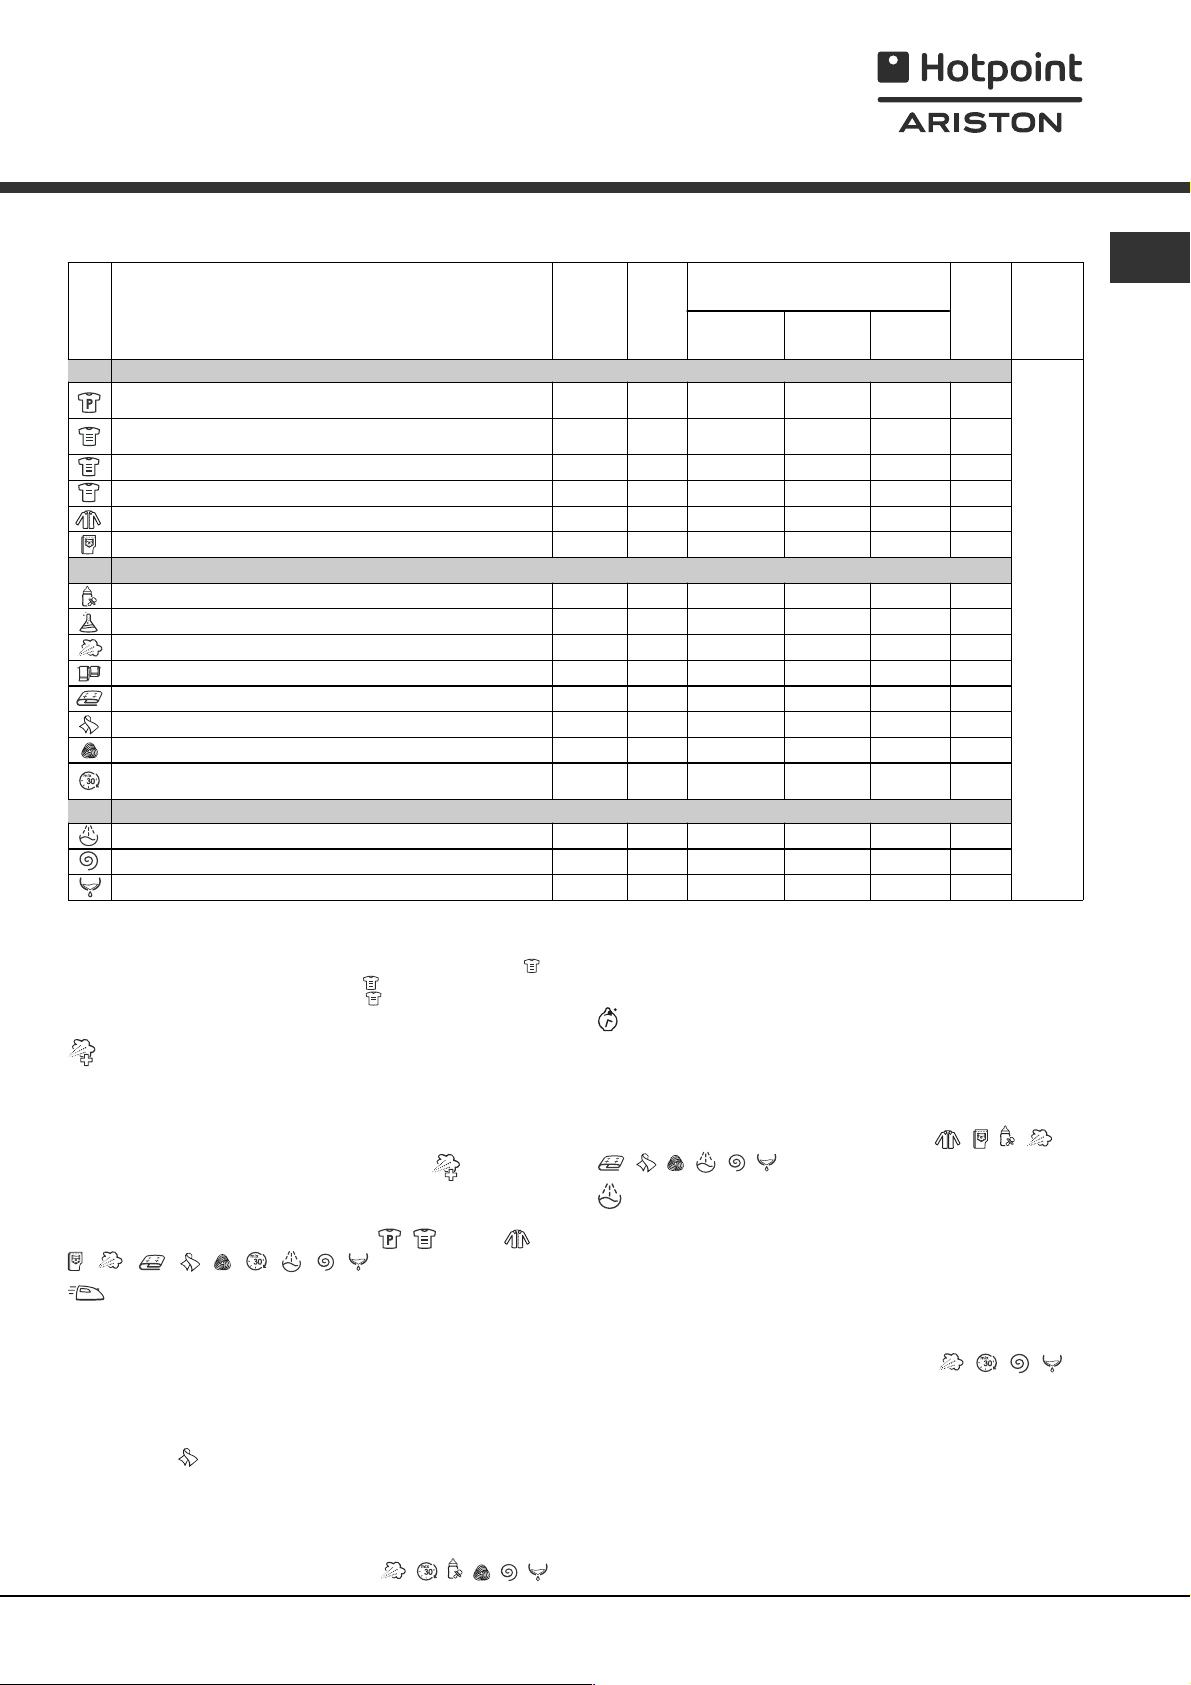
Table of wash cycles
Icon Description of the wash cycle
Cottons wash cycles
Cotton
with pre-wash
(Add detergent to the relevant compartment).
Cotton (1): heavily soi led whites and resistant colours.
Cotton (2): heavily soiled whites and delicate colours.
Coloured Cotton (3) 40° 1400 -
Shirts
Jeans
Special programmes
Baby: h eavily soiled delicate colours
Durable Synthetics 60° 800 -
* Steam Refresh (see n ext page).
"Bed & Bath" for bedlinen and towels.
Duvets: for down-stuffed garments.
Silk : for garments in silk and viscose, lingerie.
Wool: for wool, cash mere, etc.
Mix 30':
to refresh lightly soiled garments quickly (not suitable
for wool, silk and clothes which require washing by hand)
Partials wash cycles
Rinse - 1400 - -
Spin - 1400 - - - 8
Drain - 0 - - - 8
(*) Note: 10 minutes after the START, the machine will recalculate the time remaining until the end of the wash cycle on the basis of the load inside it; this
value will then be shown on the display.
For all Test Institutes:
1) Test wash cycle in compliance with regulation EN 60456: set wash cycle
2) Long wash cycle for cottons: set wash cycle
3) Short wash cycle for cottons: set wash cycle
with a temperature of 40°C.
with a temperature of 40°C.
Max.
temp.
(°C)
90° 1400
60°
(Max. 90°)
40° 1400 -
40° 600 -
40° 800 -
40° 800 -
60° 1400 -
30° 1200 -
30° 0 -
40° 600 -
30° 800 -
with a temperature of 60°C.
Wash options
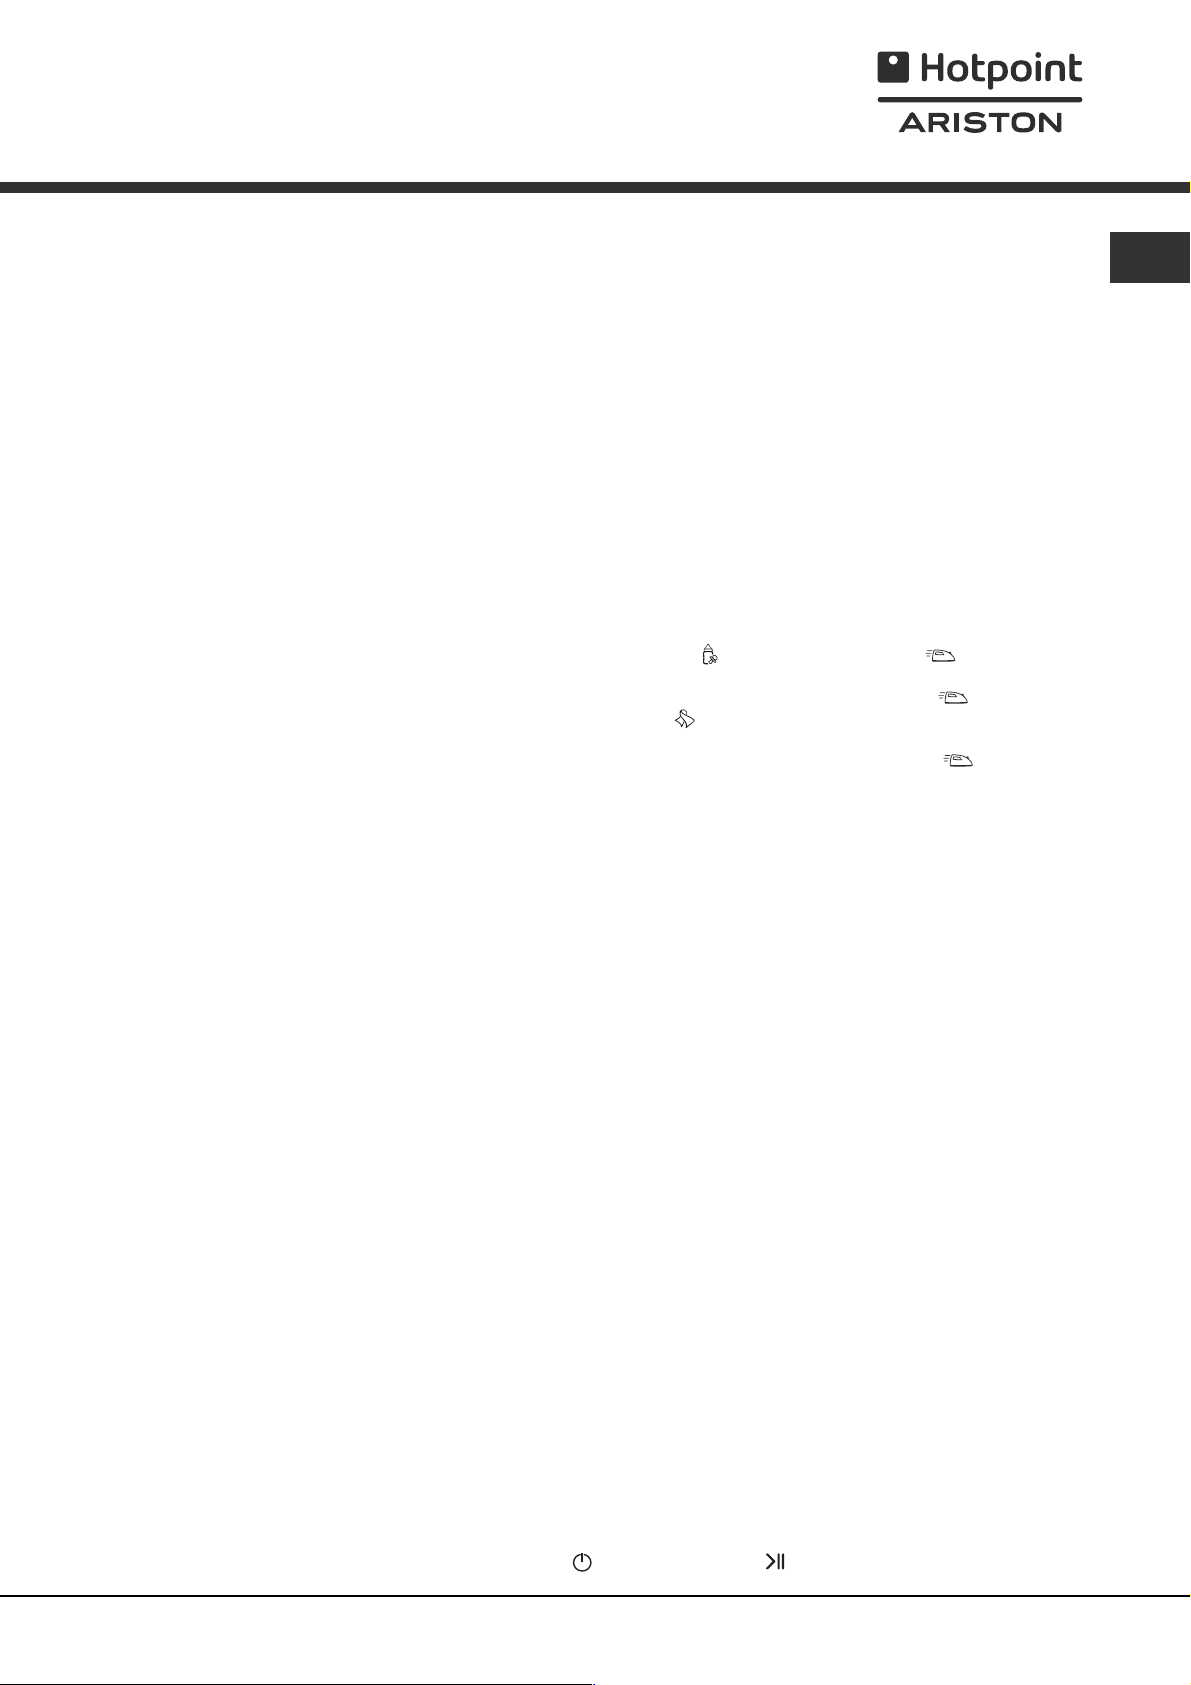
Steam Hygiene
This option enhances washing performance by
generating steam during the wash cycle that eliminates
any bacteria from fibres while treating them at the same
time. Place the laundry in the drum, choose a
compatible programme and select option "
The steam generated during washing machine
operation may cause the porthole door to become hazy.
It cannot be used in conjunction with
, , , , , , , , .
Easy Iron
By selecting this option, the wash and spin cycles will be
modified in order to reduce the formation of creases.
At the end of the cycle the washing machine
".
, (90°C), ,
Max.
speed
(rpm)
1400 -
- - - - - 1,5
Time Saver
If you select this option, the wash cycle duration will be
reduced by 30%-50%, depending on the selected cycle,
thereby guaranteeing simultaneous water and energy
saving. Use this cycle for lightly soiled garments.
It cannot be used in conjunction with
, , , , , .
Extra rinse
By selecting this option, the efficiency of the rinse is
increased and optimal residual detergent removal is
guaranteed. It is particularly useful for skin which is
sensitive to detergents. We recommend this option is
used with a full load of washing, or when a large amount
of detergent is required.
It cannot be used in conjunction with
Detergent and additives
Detergent
for prewash
lll
Detergent
for wash
ll
ll
ll
ll
ll
ll
ll
ll
ll
ll
ll
ll
Fabric
softener
drum will rotate slowly; the Easy Iron and START/
PAUSE indicator lights will flash. To end the cycle press
the START/PAUSE button or the Easy Iron button.
For the Silk
wash cycle, the machine will end the
cycle while the laundry is soaking and the Easy
Iron indicator light will flash. To drain the water so that
the laundry may be removed, press the START/PAUSE
button or the Easy Iron button.
It cannot be used in conjunction with
, , , , , .
l
Max.
load
(kg)
8
8
8
8
2
4
4
4
8
3,5
2
2
3,5
8
Cycle
duration
on the display.
, , , ,
, , , .
EN
(*) The duration of the wash cycles can be checked
7
Page 8
Detergents and laundry
EN
Detergent
The type and quantity of detergent required depend on the
type of fabric you are washing (cotton, wool, silk, etc.), as well
as its colour, the washing temperature, the level of soiling and
the hardness of the water in the area. Measuring out the
detergent carefully will avoid wastage and help to protect the
environment: although they are biodegradable, detergents still
contain ingredients which alter the balance of nature.
We recommend the following:
use powder detergents for white cotton garments and
pre-washing.
use liquid detergents for delicate cotton garments and
for all low-temperature wash cycles.
use gentle liquid detergents for wool and silk garments.
The detergent should be poured into the relevant
compartment - or the dispenser placed directly inside
the drum - before the wash cycle begins. In the latter
case, it will not be possible to select the Cottons with
pre-wash cycle.
Do not use hand washing detergents because these
create too much foam.
Preparing the laundry
Shake out the garments before loading them into the
machine.
Divide the laundry according fabric type (symbol on the
washing instruction label) and colour, making sure you
separate the coloured garments from the white ones;
Empty all pockets and check the buttons;
Do not exceed the values listed in the Table of wash
cycles, which refer to the weight of the laundry when dry.
How much does your laundry weigh?
1 sheet 400-500 g
1 pillowcase 150-200 g
1 tablecloth 400-500 g
1 bathrobe 900-1200 g
1 towel 150-250 g
1 pair of jeans 400-500 g
1 shirt 150-200 g
Washing recommendations
Shirts: use the special Shirts
shirts in different fabrics and colours to guarantee they
receive the best possible care.
Jeans: use the special Jeans
denim garments; turn inside out before washing and use
a liquid detergent.
Baby: use the special Baby
the remove the soiling typically caused by babies, while
removing all traces of detergent from nappies in order to
prevent the delicate skin of babies from suffering allergic
reactions. The cycle has been designed to reduce the
amount of bacteria by using a greater quantity of water
and optimising the effect of special disinfecting additives
added to the detergent. At the end of the wash cycle,
the machine will slowly rotate the drum; to end the cycle
press the START/PAUSE button.
Silk: use the special Silk
garments. We recommend the use of special detergent
which has been designed to wash delicate clothes.
Curtains: use the Silk
be folded and placed inside the bag provided.
Wool: Hotpoint/Ariston is the only washing machine
brand to have been awarded the prestigious Woolmark
Platinum Care endorsement (M.0508) by the Woolmark
Company, which means that all woollen garments may
be washed in the washing machine, even those which
state hand wash only
wash cycle can be used to wash all woollen garments in
the washing machine while guaranteeing optimum
performance.
Duvets: to wash double or single duvets (the weight of
which should not exceed 3,5 kg), cushions or clothes
padded with goose down such as puffa jackets, use the
special Duvets
duvets are placed in the drum with their edges folded
inwards (see figure) and that no more than ¾ of the total
volume of the drum is used. To achieve the best results,
we recommend that a liquid detergent is used and
placed inside the detergent dispenser drawer.
wash cycle. We recommend that
wash cycle. These should
on the label. The Wool
wash cycle to wash
wash cycle for all
wash cycle to remove
wash cycle to wash all silk
* Steam Refresh
This programme refreshes garments by removing bad
odours and relaxing the fibres (1.5 kg, roughly 3 items).
Insert dry items only (that are not dirty) and select
programme "
cycle is completed, so we recommend hanging them to
dry. The "
Moreover, with the "Steam Perfume" laundry balls, your
favourite perfume can be added to your laundry. Place a
few drops of perfume on the sponge contained inside
the laundry ball, close it and insert it into the drum
together with the laundry. Then launch the specific
programme "
be relaxed and fragrant.
Not recommended for wool or silk garments.
Do not add too much perfume to the sponge in order
to avoid it dripping.
Do not add softeners or detergents.
8
". The garments will be damp once the
" programme makes ironing easier.
". At the end of the cycle, garments will
Quilts: to wash quilts with a synthetic outer layer, use
the bag provided and set the wash cycle to Duvets
Bedlinen and towels: use the Bed & Bath cycle
to wash laundry from all over the house; this optimises
fabric softener performance and helps you save time and
energy. We recommend the use of powder detergent.
Stubborn stains: it is wise to treat stubborn stains with
solid soap before washing, and to use the Cottons with
pre-wash cycle.
.
Page 9
Precautions and tips
The machine was designed and constructed in
accordance with international safety regulations. The
following information is provided for safety reasons and
must therefore be read carefully.
General safety
This appliance was designed for domestic use only.
This appliance is not intended for use by persons
(including children) with reduced physical, sensory or
mental capabilities, or lack of experience and
knowledge, unless they have been given supervision
or instruction concerning use of the appliance by a
person responsible for their safety. Children should be
supervised to ensure that they do not play with the
appliance.
Do not touch the machine when barefoot or with wet
or damp hands or feet.
Do not pull on the power supply cable when
unplugging the appliance from the electricity socket.
Hold the plug and pull.
Do not touch the drained water as it may reach
extremely high temperatures.
Never force the porthole door. This could damage the
safety lock mechanism designed to prevent
accidental opening.
If the appliance breaks down, do not under any
circumstances access the internal mechanisms in an
attempt to repair it yourself.
Always keep children well away from the appliance
while it is operating.
If it must be moved, proceed with the help of two or
three people and handle it with the utmost care.
Never try to do this alone, because the appliance is
very heavy.
Before loading laundry into the washing machine,
make sure the drum is empty.
potential damage to the atmosphere and to public
health. The crossed-out dustbin is marked on all
products to remind the owner of their obligations
regarding separated waste collection.
For more information relating to the correct disposal of
household appliances, owners should contact their
local authorities or appliance dealer.
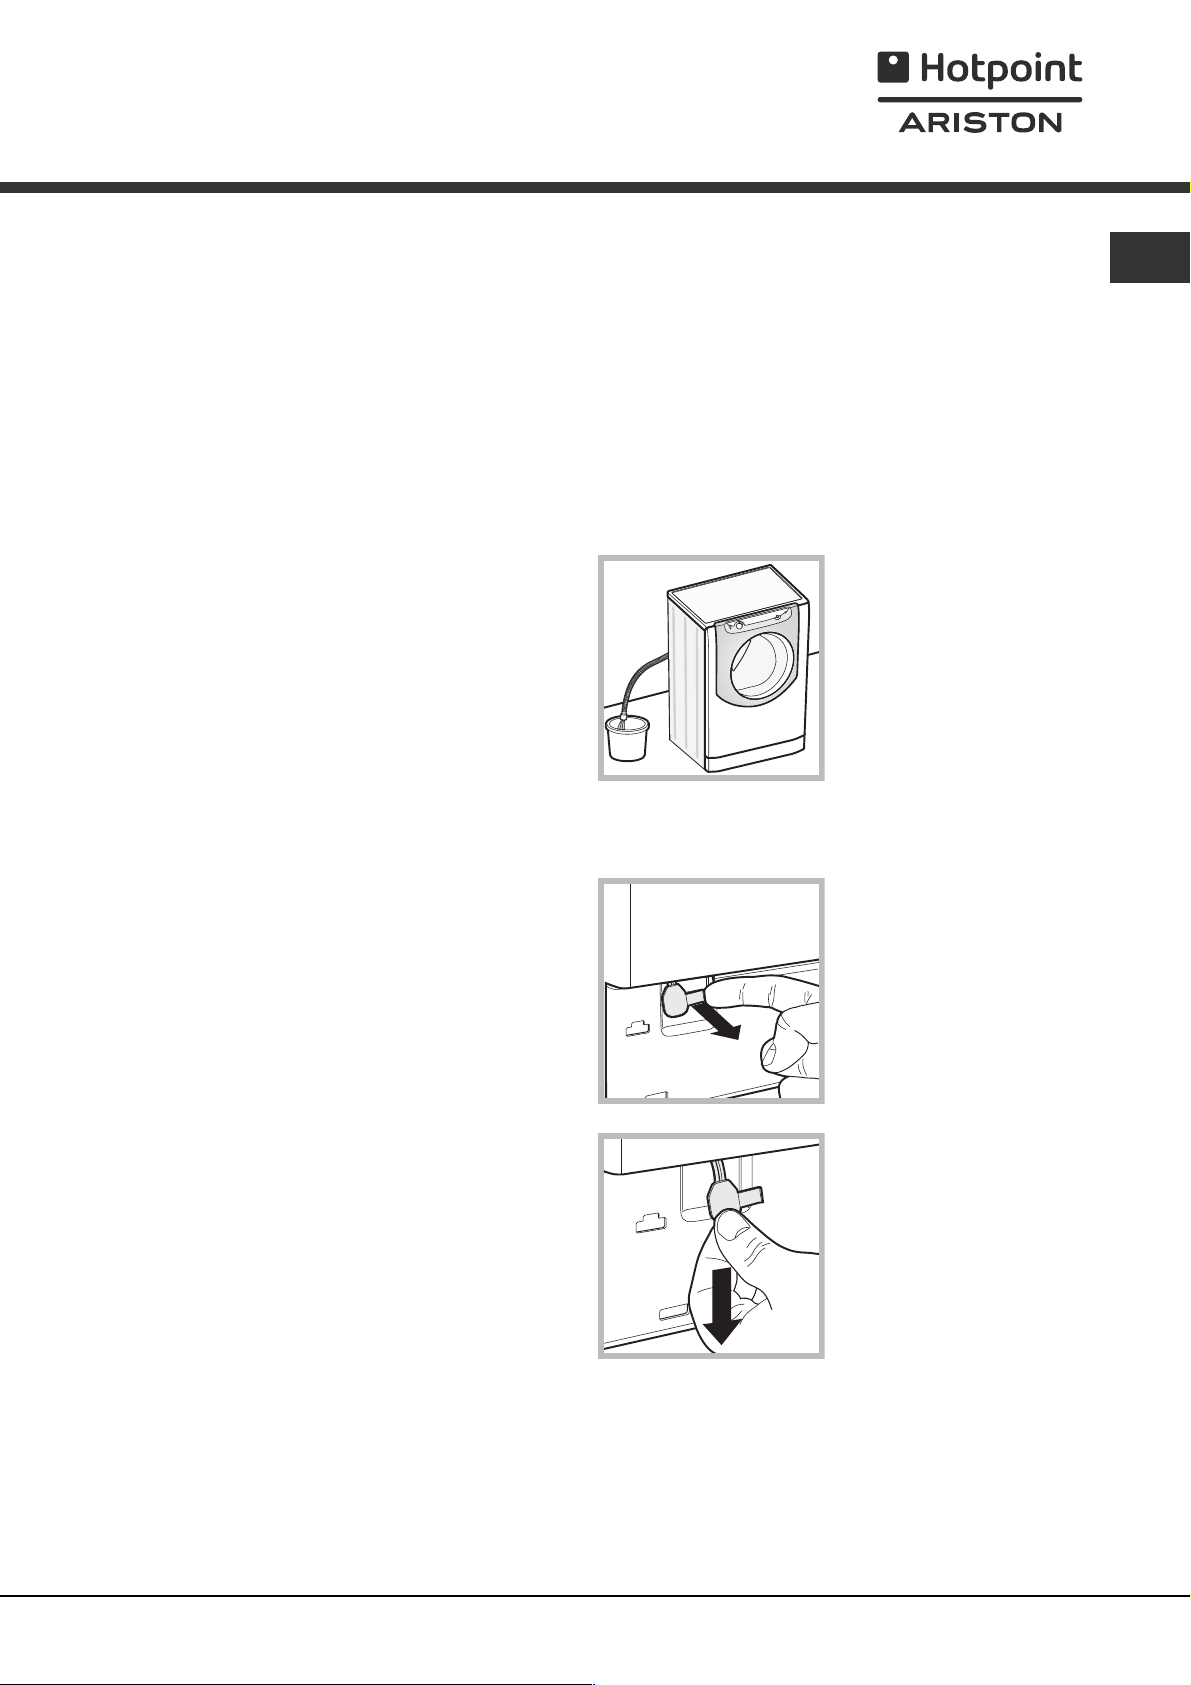
Opening the porthole door manually
In the event that it is not possible to open the porthole
door due to a powercut, and if you wish to remove the
laundry, proceed as follows:
1. remove the plug from the
electrical socket.
2. make sure the water level
inside the machine is lower
than the door opening; if it is
not, remove excess water
using the drain hose,
collecting it in a bucket as
indicated in the figure.
3. remove the cover panel on the lower front part of the
washing machine (see overleaf).
4. pull outwards using the
tab as indicated in the figure,
until the plastic tie-rod is
freed from its stop position;
pull downwards until you
hear a click, which
indicates that the door is
now unlocked.
EN
Load balancing system
Before every spin cycle, to avoid excessive vibrations
before every spin and to distribute the load in a uniform
manner, the drum rotates continuously at a speed which
is slightly greater than the washing rotation speed. If, after
several attempts, the load is not balanced correctly, the
machine spins at a reduced spin speed. If the load is
excessively unbalanced, the washing machine performs
the distribution process instead of spinning. To encourage
improved load distribution and balance, we recommend
small and large garments are mixed in the load.
Disposal
Disposing of the packaging materials: observe local
regulations so that the packaging may be re-used.
The European Directive 2002/96/EC relating to Waste
Electrical and Electronic Equipment (WEEE) states
that household appliances should not be disposed of
using the normal solid urban waste cycle. Exhausted
appliances should be collected separately in order to
optimise the cost of re-using and recycling the
materials inside the machine, while preventing
5. open the door; if this is
still not possible repeat the
procedure.
6. reposition the panel, making sure the hooks are
securely in place before you push it onto the appliance.
9
Page 10
Care and maintenance
EN
Cutting off the water and electricity
supplies
Turn off the water tap after every wash cycle. This will
limit wear on the hydraulic system in the machine and
help to prevent leaks.
Unplug the appliance when cleaning it and during all
maintenance work.
Cleaning the machine
The outer parts and rubber components of the appliance
can be cleaned using a soft cloth soaked in lukewarm
soapy water. Do not use solvents or abrasives.
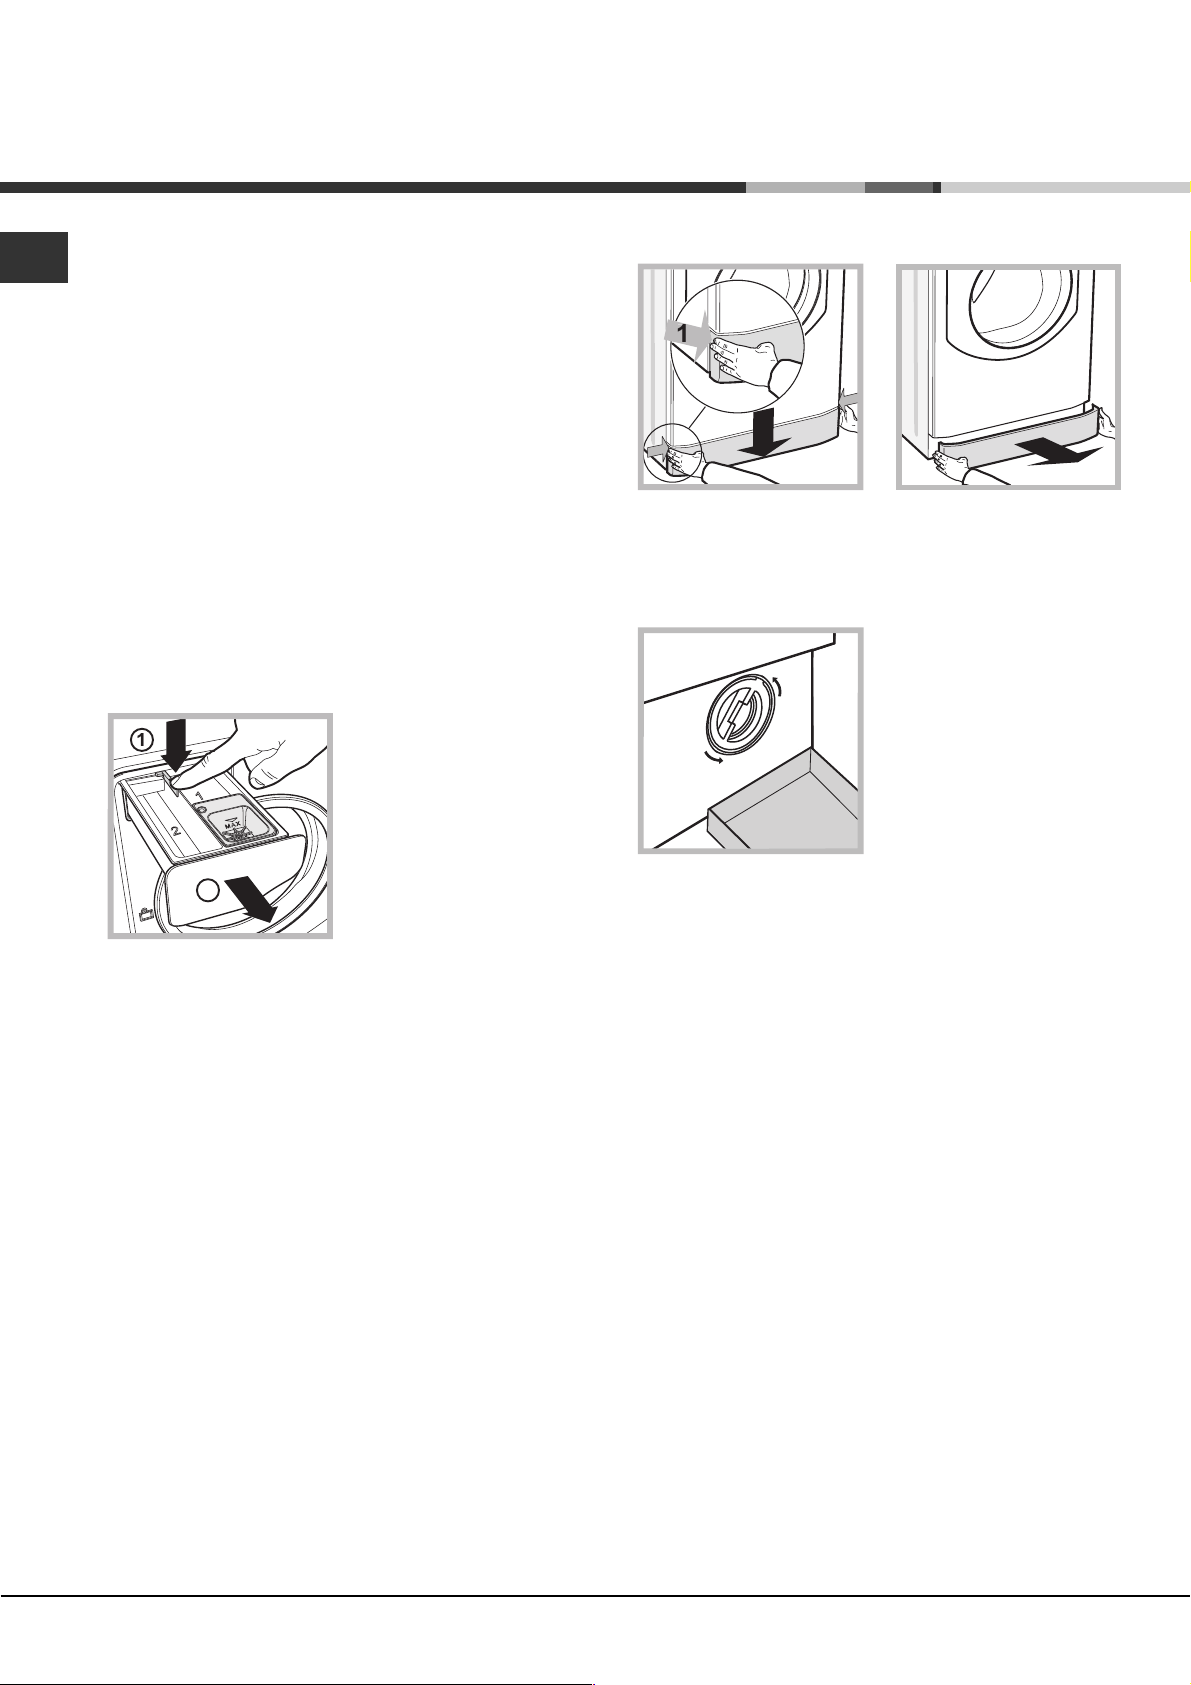
Cleaning the detergent dispenser
drawer
To remove the drawer, press
lever (1) and pull the drawer
outwards (2) (see figure).
Wash it under running
water; this procedure should
be repeated frequently.
To access the pre-chamber:
2
1. take off the cover panel on the front of the machine
by first pressing it in the centre and then pushing
downwards on both sides until you can remove it (see
figures);
2. position a container so
that it will collect the water
which flows out
(approximately 1.5 l) (see
figure);
3. unscrew the lid by
rotating it in an anticlockwise direction (see
figure);
Caring for your appliance drum
Always leave the door ajar to prevent unpleasant
odours from forming.
Cleaning the pump
The washing machine is fitted with a self-cleaning pump
which does not require any maintenance. Sometimes,
small items (such as coins or buttons) may fall into the
protective pre-chamber at the base of the pump.
Make sure the wash cycle has finished and unplug the
appliance.
4. clean the inside thoroughly;
5. screw the lid back on;
6. reposition the panel, making sure the hooks are
securely in place before you push it onto the appliance.
Checking the water inlet hose
Check the inlet hose at least once a year. If there are
any cracks, it should be replaced immediately: during
the wash cycles, water pressure is very strong and a
cracked hose could easily split open.
10
Page 11
Trouble shooting
Your washing machine could occasionally fail to work. Before contacting the Technical Assistance Centre
(see Assistance), make sure that the problem cannot be not solved easily using the following list.
Problem:
The washing machine does not
switch on.
The wash cycle does not start.
The washing machine does not fill
with water.
The washing machine door
remains locked.
The machine continuously fills
with water and drains.
The washing machine does not
drain or spin.
The machine vibrates a lot during
the spin cycle.
The washing machine leaks.
The icons corresponding to the
Phase in progress flash rapidly
at the same time as the ON/OFF
Possible causes / Solutions:
The appliance is not plugged into the socket fully, or not enough to make
contact.
There is no power in the house.
The door is not closed properly.
The START/PAUSE button has not been pressed.
The water tap has not been opened.
A delayed start has been set.
The water inlet hose is not connected to the tap.
The hose is bent.
The water tap has not been opened.
There is no water supply in the house.
The pressure is too low.
The START/PAUSE button has not been pressed.
If you have selected the Baby
the wash cycle has finished the machine will slowly rotate the drum; to end
the cycle press the START/PAUSE button or the Easy iron
you have selected the Silk
while the laundry is soaking; to drain the water so that the laundry may be
removed, press the START/PAUSE button or the Easy iron
The drain hose is not fitted at a height between 65 and 100 cm from the
floor (see Installation).
The free end of the hose is under water (see Installation).
If the dwelling is on one of the upper floors of a building, there may be
problems relating to water drainage, causing the washing machine to fill
with water and drain continuously. Special anti-draining valves are available
in shops and help to prevent this inconvenience.
The wall drainage system is not fitted with a breather pipe.
The wash cycle does not include draining: Some wash cycles require the
drain phase to be started manually (see Wash cycles and options).
The Easy iron option is enabled: to complete the wash cycle, press the
START/PAUSE button (Wash cycles and options).
The drain hose is bent (see Installation).
The drainage duct is clogged.
The drum was not unlocked correctly during installation (see Installation).
The machine is not level (see Installation ).
The machine is trapped between cabinets and walls (see Installation).
The load is unbalanced (see Detergents and laundry).
The water inlet hose is not screwed on properly (see Installation).
The detergent dispenser is blocked (to clean it, see Care and
maintenance).
The drain hose is not fixed in place properly (see Installation).
Switch off the machine and unplug it, wait for approximately 1 minute and
then switch it back on again. If the problem persists, contact the Technical
Assistance Service.
cycle or the Easy iron option, when
wash cycle, the machine will end the cycle
indicator light.
There is too much foam.
The washing machine door
The detergent is not suitable for machine washing (it should display the text
for washing machines or hand and machine wash, or the like).
Too much detergent was used.
Perform the manual unlocking procedure (see Precautions and tips).
remains locked.
EN
button. If
button.
Note: To exit Demo mode, press and hold the two ON/OFF and START/PAUSE buttons simultaneously for 3 seconds.
11
Page 12

Assistance
EN
Before calling for Assistance:
Check whether you can solve the problem by yourself (see Trouble shooting);
Restart the wash cycle to check whether the problem has been solved;
If it has not, contact the Authorised Technical Assistance Service.
If the washing machine has been installed or used incorrectly, you will have to pay for the call-out service.
Always request the assistance of authorised technicians.
Please have the following information to hand:
the type of problem;
the appliance model (Mod.);
the serial number (S/N).
The above information can be found on the data plate located on the appliance itself.
12
Page 13

Instrucciones para la
instalación y el uso
Sumario
Instalación, 14-15
ES
Español
AQUALTIS
AQ8D 49 U
Desembalaje y nivelación
Conexiones hidráulicas y eléctricas
Datos técnicos
Descripción de la máquina, 16-17
Panel de control touch control
Cómo efectuar un ciclo de lavado, 18
Programas y opciones, 19
Tabla de Programas
Opciones de lavado
Detergentes y ropa, 20
Detergente
Preparar la ropa
Consejos sobre el lavado
Precauciones y consejos, 21
Seguridad general
Sistema de equilibrado de la carga
Eliminación
Apertura manual de la puerta
LAVADORA
ES
Mantenimiento y cuidados, 22
Interrumpir el agua y la corriente eléctrica
Limpiar la máquina
Limpiar el contenedor de detergentes
Cuidar el cesto
Limpiar la bomba
Controlar el tubo de alimentación de agua
Anomalías y soluciones, 23
Asistencia, 24
13
Page 14

Instalación
ES
Es importante conservar este manual para poder
consultarlo en cualquier momento. En el caso de venta,
cesión o traslado, controle que permanezca junto con la
lavadora.
Lea atentamente las instrucciones: ellas contienen
importante información sobre la instalación, el uso y la
seguridad.
En el sobre que contiene este manual encontrará,
además de la garantía, piezas que servirán para la
instalación.
Desembalaje y nivelación
Desembalaje
1. Una vez desembalada la lavadora, controle que no
haya sufrido daños durante el traslado.
Si estuviera dañada no la conecte y llame al revendedor.
2. Quite los 4 tornillos de
protección para el
transporte y el
correspondiente
distanciador, ubicados en
la parte posterior (ver la
figura).
Cuando se instala sobre moquetas o alfombras, regule
las patas para que, debajo de la lavadora, quede un
espacio suficiente para la ventilación.
Conexiones hidráulicas y eléctricas
Conexión del tubo de alimentación de agua
Antes de conectar el tubo de alimentación a la red
hídrica, haga correr agua hasta que sea límpida.
1. Conecte el tubo de
alimentación a la máquina
enroscándolo en la toma
de agua correspondiente
ubicada en la parte
posterior derecha (arriba)
(ver la figura).
2. Conecte el tubo de
alimentación enroscándolo
a un grifo de agua fría con
la boca roscada de 3/4 gas
(ver la figura).
3. Cierre los orificios con los tapones de plástico
contenidos en el sobre.
4. Conserve todas las piezas porque si la lavadora
tuviera que ser trasladada nuevamente, se deberían
volver a colocar para evitar daños internos.
Los embalajes no son juguetes para los niños.
Nivelación
1. Instale la lavadora sobre un piso plano y rígido, sin
apoyarla en las paredes ni en los muebles.
2. Compense las
irregularidades
desenroscando o
enroscando las patas
hasta que la máquina
quede en posición
horizontal (no debe estar
inclinada más de 2
grados).
Una cuidadosa nivelación brinda estabilidad y evita
vibraciones y ruidos, sobre todo durante el centrifugado.
3. Controle que en el tubo no hayan pliegues ni
estrangulaciones.
La presión de agua del grifo debe estar comprendida
dentro de los valores contenidos en la tabla de Datos
técnicos (ver la página correspondiente).
Si la longitud del tubo de alimentación no es la
suficiente, diríjase a un negocio especializado o a un
técnico autorizado.
No utilice nunca tubos de carga usados o viejos, utilice
siempre los suministrados con la máquina.
14
Page 15

Conexión del tubo de descarga
Conecte el tubo de
descarga a una tubería de
descarga o a una
descarga de pared
ubicadas a una distancia
65 - 100 cm
del piso comprendida entre
65 y 100 cm., evitando
siempre plegarlo.
Una alternativa es apoyar
el tubo de descarga en el
borde de un lavamanos o
de una bañera, uniendo la
guía suministrada con el
aparato, al grifo (ver la
figura).
El extremo libre del tubo
de descarga no debe
permanecer sumergido en
el agua.
El cable no debe estar plegado ni sufrir compresiones.
ES
El cable de alimentación y el enchufe deben ser
sustituidos sólo por técnicos autorizados.
¡Atención! La empresa fabricante declina toda
responsabilidad en caso de que estas normas no sean
respetadas.
No se aconseja utilizar tubos de prolongación, si fuera
indispensable hacerlo, la prolongación debe tener el
mismo diámetro del tubo original y no superar los 150
cm.
Conexión eléctrica
Antes de enchufar el aparato, verifique que:
la toma tenga la conexión a tierra y haya sido hecha
según las normas legales;
la toma sea capaz de soportar la carga máxima de
potencia de la máquina indicada en la tabla de Datos
técnicos (ver al costado);
la tensión de alimentación esté comprendida dentro
de los valores indicados en la tabla de Datos técnicos
(ver al costado);
la toma sea compatible con el enchufe de la
máquina. Si no es así, sustituya la toma o el enchufe.
La máquina no debe ser instalada al aire libre, ni
siquiera si el lugar está protegido, ya que es muy
peligroso dejarla expuesta a la lluvia o a las tormentas.
Una vez instalada la máquina, la toma de corriente
debe ser fácilmente accesible.
No utilice prolongaciones ni conexiones múltiples.
Datos técnicos
Modelo
Dimensiones
Capacidad
Conexiones
eléctricas
Conexiones
hídricas
Velocidad de
centrifugado
Programas de
control según la
norma EN 60456
AQ8D 49 U
ancho 59,5 cm.
altura 85 cm.
profundidad 64,5 cm.
de 1 a 8 kg.
ver la placa de características
técnicas aplicada en la máquina
presión máxima 1 MPa (10 bar)
presión mínima 0,05 MPa (0,5 bar)
capacidad del cesto 62 litros
máxima 1400 r.p.m.
programa ; temperatura 60ºC;
efectuado con 8 kg. de carga.
Esta máquina cumple con lo
establecido por las siguientes
Directivas de la Comunidad:
- 89/336/CEE del 03/05/89
(Compatibilidad Electromagnética) y
sucesivas modificaciones
- 2002/96/CE
- 2006/95/CE (Baja Tensión)
15
Page 16

Descripción de la máquina
ES
PUERTA
MANIJA DE
LA PUERTA
ZÓCALO
PATAS REGULABLES
PUERTA
Para abrir la puerta utilice
siempre la manija
correspondiente (ver la
figura).
CONTENEDOR DE DETERGENTE
El contenedor de
detergentes se encuentra en
el interior de la máquina y se
accede a él abriendo la
puerta. Para la dosificación
de detergente, ver el capítulo
Detergentes y ropa.
Nota: adhiera al contenedor
de detergente el adhesivo
con la descripción de los
programas y las opciones.
El adhesivo se encuentra en el sobre que contiene este
manual.
PANEL DE
CONTROL
1. cubeta para el prelavado:
utilice detergente en polvo.
2. cubeta para el lavado:
1
2
superar nunca el nivel máximo indicado por la rejilla y
diluir los suavizantes concentrados.
Panel de control touch control
utilice detergente en polvo o
líquido. En este último caso
se recomienda verterlo un
instante antes de la puesta
en marcha de la lavadora.
cubeta para aditivos:
para suavizante o aditivos
líquidos. Se recomienda no
Para modificar las
programaciones presionar
levemente en el icono
dentro del área sensible
(touch control) como se
indica en la figura.
16
Modalidad de stand by
Esta lavadora está en conformidad con las nuevas
normativas vinculadas al ahorro energético. Está dotada
de un sistema de auto-apagado (stand by) que, en caso
de no funcionamiento, se activa pasados algunos
minutos. Presionar brevemente el botón ON/OFF
esperar que la máquina se active.
y
Page 17

Panel de control touch control
Mando de
PROGRAMAS
M1
M3
Botón CENTRIFUGADO
Botón TEMPERATURA
PANTALLA
Botón con piloto
START/PAUSE
Piloto
ECO
ES
Iconos FASES
DE LAVADO
Botón con piloto
ON/OFF
Botón con piloto ON/OFF: presione brevemente el botón
para encender o apagar la máquina. El piloto verde indica que
la máquina está encendida. Para apagar la lavadora durante el
lavado, es necesario mantener presionado el botón durante
más tiempo, aproximadamente 3 seg.; si se presiona en
forma más breve o accidental, la máquina no se apagará. Si la
máquina se apaga durante un lavado en curso, dicho lavado
se anulará.
Mando de PROGRAMAS: se puede girar en ambas
direcciones. Para elegir el programa más apropiado, consulte la
Tabla de programas. Durante el lavado, el mando no se mueve.
Botones M1-M2-M3: mantenga presionado uno de los
botones para memorizar un ciclo y las personalizaciones
deseadas. Para activar un ciclo previamente memorizado,
presione el correspondiente botón.
Botón
excluir la temperatura; el valor elegido está indicado en la
pantalla (ver Cómo realizar un ciclo de lavado).
Botón
excluir la centrifugación; el valor elegido está indicado en la
pantalla (ver Cómo realizar un ciclo de lavado).
Botón COMIENZO RETRASADO: presiónelo para fijar el
comienzo retrasado del programa elegido; el valor del retraso
elegido está indicado en la pantalla (ver Cómo efectuar un
ciclo de lavado).
Botones con Pilotos OPCIONES: presiónelos para
seleccionar las opciones disponibles. El piloto
correspondiente a la opción seleccionada permanecerá
encendido (ver Cómo efectuar un ciclo de lavado).
Iconos FASES DE LAVADO: se iluminan para indicar el
avance del ciclo (Lavado
Desagüe ).
El mensaje
Botón con piloto START/PAUSE: cuando el piloto verde
centellea lentamente, presione el botón para que comience el
lavado. Una vez que el ciclo ha comenzado, el piloto se
mantiene fijo. Para poner en pausa el lavado, presione
TEMPERATURA: presiónelo para modificar o
CENTRIFUGADO: presiónelo para modificar o
Aclarado Centrifugado
se ilumina cuando ha finalizado el ciclo.
M3
Botones
OPCIONES
nuevamente el botón; el piloto centelleará con un color
anaranjado. Si el piloto Bloqueo de la puerta
apagado, se podrá abrir la puerta. Para que el lavado se
reanude a partir del momento en el cual fue interrumpido,
presione nuevamente el botón.
Piloto
está bloqueada. Para abrir la puerta es necesario poner el
ciclo en pausa (ver Cómo efectuar un ciclo de lavado).
Botón con piloto BLOQUEO DE BOTONES: para activar
o desactivar el bloqueo del panel de control, mantenga
presionado el botón durante 2 segundos aproximadamente. El
piloto encendido indica que el panel de control está bloqueado.
De este modo, se evitan modificaciones accidentales de los
programas, sobre todo si en la casa hay niños.
Piloto ECO: el ícono
los parámetros de lavado, se obtenga un ahorro de energía
del 10% como mínimo. Además, antes que la máquina entre
en la modalidad "Stand by", el icono se encenderá unos
pocos segundos; con la máquina apagada la recuperación
energética estimada será de aprox. el 80%.
MODIFICACIÓN IDIOMA
Cuando se enciende por primera vez la máquina, aparece
intermitente en el display el primer idioma. En correspondencia
con los 3 botones a la derecha del display aparecen los
símbolos
automáticamente cada 3 o bien presionando los botones al
lado de los símbolos
confirma el idioma que se fija luego de 2. Si no se presiona
ningún botón, pasados 30 el cambio automático de los
idiomas recomienza. Se puede modificar el idioma sólo con
la máquina apagada. Presionando simultáneamente los
botones temperatura
en el display el idioma programado intermitente. Presionando
los botones al lado de los símbolos
idioma. Con el botón al lado del símbolo OK se confirma el
idioma que se fija luego de 2. Si no se presiona ningún botón,
pasados 30 se mostrará el idioma programado
anteriormente. Encender la máquina.
Botón con piloto
Botón COMIENZO
RETRASADO
Piloto BLOQUEO
BLOQUEO DE
BOTONES
DE LA PUERTA
está
BLOQUEO DE LA PUERTA: indica que la puerta
se encenderá cuando, modificando
,OK y V. Los idiomas cambian
y V. Con el botón OK se
+centrífuga +arranque retrasado
durante 5 además de una breve señal acústica aparece
y V se cambia el
17
Page 18

Cómo efectuar un ciclo de lavado
ES
NOTA: la primera vez que se utiliza la lavadora, realice
un ciclo de lavado sin ropa pero con detergente,
seleccionando el programa algodón 90º sin prelavado.
1. ENCENDER LA MÁQUINA. Presione el botón
Todos los pilotos se encenderán durante 1 segundo y
en la pantalla aparecerá el mensaje AQUALTIS; luego
quedará encendido de forma permanente el piloto del
botón
2. ELEGIR EL PROGRAMA. Gire el mando de
PROGRAMAS hacia la derecha o hacia la izquierda
hasta seleccionar el programa deseado; el nombre
del programa aparecerá en el display; a dicho
programa se le asociará una temperatura y una
velocidad de centrifugado que se pueden modificar.
En la pantalla aparecerá la duración del ciclo.
3. CARGAR LA ROPA. Abra la puerta. Cargue la ropa,
cuidando no superar la cantidad de carga indicada en
la tabla de programas de la página siguiente.
4. DOSIFICAR EL DETERGENTE. Extraiga el
contenedor y vierta el detergente en las cubetas
correspondientes como se explica en Descripción de
la máquina.
5. CERRAR LA PUERTA.
6. PERSONALIZAR EL CICLO DE LAVADO. Utilice
los botones correspondientes del panel de control:
centrifugado.
La máquina muestra automáticamente la temperatura
y la centrífuga máximas previstas para el programa
fijado o las últimas seleccionadas si son compatibles
con el programa elegido. Presionando el botón
disminuye progresivamente la temperatura hasta llegar
al lavado en frío (OFF). Presionando el botón
disminuye progresivamente el centrifugado hasta su
exclusión (OFF). Si se presionan una vez más los
botones, se volverá a los valores máximos previstos.
y el piloto START/PAUSA centelleará.
Modifique la temperatura y/o el
.
se
se
Excepción: cuando se selecciona el programa
ALGODÓN, la temperatura se puede aumentar hasta 90°.
Seleccionar el comienzo retrasado.
Para seleccionar el comienzo retrasado del programa
elegido, presione el botón correspondiente hasta
alcanzar el tiempo de retraso deseado. Durante la
programación aparece el tiempo de retraso junto con el
mensaje Inicio en: y el símbolo
vez programado el arranque retrasado, la pantalla
mostrará el símbolo
visualización de la duración del ciclo programado con el
mensaje Acaba en: y la duración del ciclo.
Presionando el botón COMIENZO RETRASADO, sólo
una vez se visualiza el retraso seleccionado.
Después del arranque, la pantalla mostrará el mensaje
Inicio en: y el tiempo de retraso. Una vez que
transcurre el tiempo de retraso programado, la máquina
arrancará y la pantalla mostrará Acaba en: y el
tiempo residual para el final ciclo.
fijo y la pantalla volverá a la
centelleante. Una
Para eliminar el inicio diferido, presione el botón hasta
que en el display aparezca el mensaje OFF; el símbolo
se apagará.
Modificar las características del
ciclo.
Presione el botón para activar la opción; en el
display aparecerá el nombre de la opción y se
encenderá el piloto correspondiente al botón.
Presione nuevamente el botón para desactivar la
opción; en el display aparecerá el nombre de la
opción más OFF y el piloto se apagará.
Si la opción seleccionada no es compatible con el
programa elegido, la incompatibilidad se indicará con
el centelleo del piloto y una señal sonora (3 sonidos) y
la opción no se activará.
Si la opción elegida no es compatible con otra
seleccionada precedentemente, el piloto
correspondiente a la primera opción seleccionada
centelleará y quedará activada sólo la segunda, el
piloto del botón permanecerá fijo.
Las opciones pueden variar la carga recomendada y/
o la duración del ciclo.
7. PONER EN MARCHA EL PROGRAMA. Presione el
botón START/PAUSE. El piloto correspondiente
quedará fijo y la puerta se bloqueará (piloto
BLOQUEO DE LA PUERTA
iconos correspondientes a las fases de lavado se
iluminarán durante el ciclo para indicar la fase en
curso. Para cambiar un programa mientras un ciclo
se está ejecutando, ponga la lavadora en pausa
presionando el botón START/PAUSE; luego
seleccione el ciclo deseado y presione nuevamente el
botón START/PAUSE.
Para abrir la puerta mientras un ciclo se está
ejecutando, presione el botón START/PAUSE; si el
piloto BLOQUEO DE LA PUERTA
será posible abrir la puerta. Presione nuevamente el
botón START/PAUSE para reanudar el programa a
partir del momento en el que se había interrumpido.
8. FIN DEL PROGRAMA. Se indica con la palabra
END encendida. La puerta se podrá abrir
inmediatamente. Si el piloto START/PAUSE centellea,
presione el botón para terminar el ciclo. Abra la
puerta, descargue la ropa y apague la máquina.
Si desea anular un ciclo que ya ha comenzado,
mantenga presionado el botón
interrumpa y la máquina se apague.
encendido). Los
está apagado,
hasta que el ciclo se
Bolsa para mantas acolchadas, cortinas y
prendas delicadas
Gracias a la bolsa especial suministrada, la lavadora
Aqualtis le permite lavar también sus prendas más
valiosas y delicadas garantizándole su máxima
protección. Se recomienda utilizar siempre la bolsa
cuando lave mantas acolchadas y edredones con funda
externa de material sintético.
18
Page 19

Programas y opciones
Tabla de programas
Icono Descripción del Programa
Programas Algodón
Algodón
(Agregue el detergente en el compartimento correspondiente).
Algodón (1)
Algodón (2):
Algodón de color (3)
Camisas
Vaq ueros
Programas especiales
Baby:
Sintético resis tent es
* Vapor Refresh (ver la página siguiente)
Ropa "7 días":
Anorak:
Seda:
Lana:
Mix 30':
aconseja utilizarlo para lana, seda y prendas para lavar a mano).
Programas parciales
Enjuague - 1400 Centrifugado - 1400 - - - 8
Desagüado - 0 - - - 8
(*) Nota: después de aproximadamente 10 minutos del START, en base a la carga efectuada, la máquina recalculará y visualizará el tiempo que falta para la
finalización del programa.
Para todos los Test Institutes:
1) Programa de control según la norma EN 60456: seleccione el programa
2) Programa algodón largo: seleccione el programa
3) Programa algodón corto: seleccione el programa
con prelavado
: blancos y colores resistentes muy sucios.
blancos y colores delicados muy sucios.
colores delicados muy sucios.
lencería de cama, toallas, albornoz.
para prendas rellenas con plumas de ánsar.
para prendas de seda, viscosa, lencería.
para lana, cachemira, etc.
para refrescar rápidamente prendas poco sucias (no se
con una temperatura de 40ºC.
con una temperatura de 40ºC.
Te m p .
(Max. 90°)
con una temperatura de 60ºC.
Velocidad
max.
(°C)
90° 1400
60°
40° 1400
40° 1400
40° 600
40° 800
40° 800
60° 800
---- -1,5
60° 1400
30° 1200
30° 0
40° 600
30° 800
máx.
(r.p.m.)
1400
Detergentes y aditivos
Lavado Suavi zante Blanqueador
ll
ll l
ll l
ll l
ll l
ll
ll l
ll l
ll l
ll
ll
ll
ll
ll
- 8
- 4
- 3,5
- 2
- 2
- 3,5
Carga
max.
(Kg)
8
8
8
2
4
4
8
8
Duración
del ciclo
lavado en la pantalla.
ES
(*) Se puede controlar la duración de los programas de
Opciones de lavado
Vapor Desinfec.
Seleccionando esta opción se aumenta la eficacia del
lavado generando vapor que durante el ciclo elimina la
posible presencia de bacterias en las fibras y al mismo
tiempo las protege. Introducir la ropa en el cesto,
seleccionar el programa compatible y elegir la opción "
Durante el funcionamiento de la lavadora la puerta ojo
de buey podría verse menos transparente debido a la
formación de vapor.
No se puede activar con los programas
, , , , , , , , , .
Plancha fácil
Cuando se selecciona esta opción, el lavado y el
centrifugado se modificarán oportunamente para
disminuir la formación de arrugas. Al finalizar el ciclo, la
lavadora realizará giros lentos del cesto; los pilotos
Plancha fácil y START/PAUSE centellearán. Para
terminar el ciclo, presione el botón START/PAUSE o el
botón Plancha fácil.
En el programa Seda
la máquina terminará el ciclo
dejando la ropa en remojo y el piloto Plancha fácil
centelleará. Para descargar el agua y poder sacar la
, (90°C),
ropa, es necesario presionar el botón START/PAUSE o el
botón Plancha fácil.
No se puede activar con los programas
, .
Ahorro de Tiempo
Seleccionando esta opción se disminuye la duración del
".
programa en un 30%-50% en base al ciclo elegido,
garantizando al mismo tiempo un ahorro de agua y
energía. Utilice este ciclo para prendas no
excesivamente sucias.
No se puede activar con los programas
, , , , , .
Enjuague Extra
Al elegir esta opción aumentará la eficacia del aclarado y
se asegurará la máxima eliminación de los residuos de
detergente. Es útil para pieles particularmente sensibles
a los detergentes. Se aconseja el uso de esta opción
cuando la lavadora funciona a plena carga o utilizando
elevadas dosis de detergente.
No se puede activar con los programas
, , , ,
, , , ,
, , , .
19
Page 20

Detergentes y ropa
ES
Detergente
El tipo y la cantidad de detergente dependen del tipo de
tejido (algodón, lana, seda...), del color, de la
temperatura de lavado, del grado de suciedad y de la
dureza del agua.
Dosificar bien el detergente evita derroches y protege el
medio ambiente: aún siendo biodegradables, los
detergentes contienen elementos que alteran el equilibrio
de la naturaleza.
Se aconseja:
usar detergentes en polvo para prendas de algodón
blancas y para el prelavado.
usar detergentes líquidos para prendas delicadas de
algodón y para todos los programas a baja
temperatura.
usar detergentes líquidos delicados para lana y seda.
El detergente se debe verter antes del comienzo del
lavado en la cubeta correspondiente, o en el dosificador
que se coloca directamente en el cesto. En este último
caso, no se puede seleccionar el ciclo Algodón con
prelavado.
No use detergentes para lavar a mano porque
producen demasiada espuma.
Preparar la ropa
Abra bien las prendas antes de cargarlas.
Divida la ropa según el tipo de tejido (símbolo en la
etiqueta de la prenda) y el color, separando las
prendas de color de las blancas;
Vacíe los bolsillos y controle los botones;
No supere los valores indicados en la Tabla de
Programas referidos al peso de la ropa seca.
¿Cuánto pesa la ropa?
1 sábana 400-500 gr.
1 funda 150-200 gr.
1 mantel 400-500 gr.
1 albornoz 900-1200 gr.
1 toalla 150-250 gr.
1 jeans 400-500 gr.
1 camisa 150-200 gr.
Camisas: utilice el programa correspondiente
Camisas
tejido y color, garantizando su máximo cuidado.
Vaqueros: utilice el programa correspondiente Vaqueros
para todas las prendas de tejido Denim; voltee las
prendas antes del lavado y utilice un detergente líquido.
Baby: utilice el programa correspondiente Baby
quitar la suciedad típica de los niños y eliminar el detergente
de las prendas evitando reacciones alérgicas en la piel
delicada de los mismos. Este ciclo ha sido estudiado para
disminuir la carga bacteriana utilizando una mayor cantidad
de agua y optimizando el efecto de aditivos específicos
higienizantes agregados al detergente. Al finalizar el lavado,
la máquina realizará lentas rotaciones del cesto; para
terminar el ciclo, presione el botón START/PAUSE.
Seda: utilice el programa correspondiente Seda
para lavar todas las prendas de seda. Se aconseja el
uso de un detergente específico para prendas delicadas.
Cortinas: utilice el programa Seda
plegarlas e introducirlas en la bolsa suministrada.
Lana: Hotpoint/Ariston es la única lavadora que ha
obtenido el prestigioso reconocimiento Woolmark
Platinum Care (M.0508) otorgado por The Woolmark
Company que certifica el lavado en lavadora de todas las
prendas de lana, incluidas aquellas que contienen la
etiqueta sólo lavado a mano
Lana, se pueden lavar en lavadora todas las prendas de
lana con la garantía de obtener los mejores resultados.
Anorak: para lavar prendas con relleno de pluma de
ganso como edredones para camas matrimoniales o
individuales (que no excedan los 3,5 kg. de peso),
cojines y anoraks, utilice el programa Anorak
recomienda cargar los edredones en el cesto doblando
sus bordes hacia dentro (ver las figuras) y no superar los
¾ del volumen de dicho cesto. Para lograr un lavado
óptimo, se recomienda utilizar detergente líquido
introduciéndolo en el contenedor de detergente.
para lavar camisas de distintos tipos de
para
. Se recomienda
. Con el programa
. Se
Consejos sobre el lavado
* Vapor Refresh
Este programa permite refrescar las prendas quitando
olores desagradables y aflojando las fibras (1,5 kg =
aprox. 3 prendas). Introducir sólo prendas secas (no
sucias) y elegir el programa "
prendas estarán todavía húmedas, se aconseja colgarlas.
El programa "
Además, con las bolitas "Vapor Perfume", es posible
añadir el perfume deseado para transmitirlo a la ropa.
Colocar algunas gotas de perfume en la esponja presente
dentro de la bolita, cerrarla, colocarla en el cesto junto
con la ropa y lanzar el programa dedicado "
finalizar el ciclo la ropa quedará suelta y perfumada.
¡ No se aconseja para prendas de lana o seda!
¡ Nunca mojar la esponja con una cantidad excesiva de
perfume para evitar el goteo!
¡ No añadir suavizantes o detergentes!
20
" facilita el proceso de planchado.
". Al final del ciclo las
". Al
Mantas acolchadas: para lavar mantas acolchadas
con funda sintética, utilice la bolsa suministrada y elija el
programa Anorak
Lencería de cama, toallas, albornoz: para lavar la
ropa de toda la casa en un único ciclo utilice el
programa 7 Días
y permite ahorrar tiempo y energía. Se aconseja el uso
de detergente en polvo.
Manchas difíciles: es una buena costumbre tratar las
manchas difíciles con jabón sólido antes del lavado y
utilizar el programa Algodón con prelavado.
.
que optimiza el uso de suavizante
Page 21

Precauciones y consejos
La máquina fue proyectada y fabricada en conformidad
con las normas internacionales de seguridad. Estas
advertencias se suministran por razones de seguridad y
deben ser leídas atentamente.
Seguridad general
Este aparato ha sido fabricado para un uso de tipo
doméstico exclusivamente.
El aparato no debe ser empleado por personas (niños
incluidos) con capacidades físicas, sensoriales o
mentales reducidas y con experiencias y
conocimientos insuficientes, a menos que dicho uso
no se realice bajo la supervisión o las instrucciones de
una persona responsable de su seguridad. Los niños
deben ser vigilados para asegurarse que no jueguen
con el aparato.
No toque la máquina con los pies desnudos ni con las
manos o los pies mojados o húmedos.
No desenchufe la máquina tirando el cable, sino
tomando el enchufe.
No toque el agua de descarga porque puede alcanzar
temperaturas elevadas.
Nunca fuerce la puerta: podría dañarse el mecanismo
de seguridad que la protege de aperturas
accidentales.
En caso de avería, no acceda nunca a los
mecanismos internos para intentar una reparación.
Controle siempre que los niños no se acerquen a la
máquina cuando está en funcionamiento.
Si debe ser trasladada, deberán intervenir dos o más
personas, procediendo con el máximo cuidado. La
máquina no debe ser desplazada nunca por una sola
persona ya que es muy pesada.
Antes de introducir la ropa controle que el cesto esté
vacío.
Sistema de equilibrado de la carga
Antes de cada centrifugado, para evitar vibraciones
excesivas y para distribuir la carga de modo uniforme, el
cesto realiza rotaciones a una velocidad ligeramente
superior a la del lavado. Si después de varios intentos, la
carga todavía no está correctamente equilibrada, la
máquina realiza el centrifugado a una velocidad inferior a
la prevista. Cuando existe un excesivo desequilibrio, la
lavadora realiza la distribución antes que el centrifugado.
Para obtener una mejor distribución de la carga y su
correcto equilibrado, se aconseja mezclar prendas
grandes y pequeñas.
separadamente para optimizar el porcentaje de
recuperación y reciclaje de los materiales que los
componen e impedir potenciales daños para la salud
y el medio ambiente. El símbolo de la papelera
tachada se encuentra en todos los productos para
recordar la obligación de recolección separada.
Para mayor información sobre la correcta eliminación
de los electrodomésticos, los poseedores de los
mismos podrán dirigirse al servicio público responsable
o a los revendedores.
Apertura manual de la puerta
Si desea sacar la ropa de la lavadora y no es posible
abrir la puerta debido a un corte de energía eléctrica,
proceda del siguiente modo:
1. desenchufe la máquina.
2. verifique que el nivel de
agua en el interior de la
máquina sea inferior al
hueco de la puerta; si no es
así, extraiga el agua en
exceso utilizando el tubo de
descarga y recogiéndola en
un balde como se indica en
la figura.
3. quite el panel de cobertura delantero de la lavadora
(ver la página siguiente).
4. utilizando la lengüeta
indicada en la figura, tire
hacia fuera hasta liberar la
varilla de plástico del retén;
tire posteriormente hacia
abajo hasta sentir un breve
sonido que indica que la
puerta está desbloqueada.
5. abra la puerta; si todavía
no es posible, repita la
operación.
ES
Eliminación
Eliminación del material de embalaje: respete las
normas locales, de ese modo, los embalajes podrán
volver a ser utilizados.
La norma Europea 2002/96/CE sobre la eliminación
de aparatos eléctricos y electrónicos, indica que los
electrodomésticos no deben ser eliminados de la
misma manera que los desechos sólidos urbanos. Los
aparatos en desuso se deben recoger
6. vuelva a montar el panel verificando, antes de
empujarlo hacia la máquina, que los ganchos se hayan
introducido en las correspondientes ranuras.
21
Page 22

Mantenimiento y cuidados
ES
Interrumpir el agua y la corriente
eléctrica
Cierre el grifo de agua después de cada lavado. De
este modo se limita el desgaste de la instalación
hidráulica de la máquina y se elimina el peligro de
pérdidas.
Desenchufe la máquina cuando la debe limpiar y
durante los trabajos de mantenimiento.
Limpiar la máquina
La parte externa y las partes de goma se pueden limpiar
con un paño empapado en agua tibia y jabón. No use
solventes ni productos abrasivos.
Limpiar el contenedor de detergentes
Para extraer el contenedor,
presione la palanca (1) y tire
hacia afuera (2) (ver la
figura).
Lávelo debajo del agua
corriente, esta limpieza se
debe realizar
frecuentemente.
Cuidar el cesto
Para acceder a la precámara:
2
1. quite el panel de cobertura delantero de la máquina
presionando hacia el centro, luego empuje hacia abajo
desde ambos costados y extráigalo (ver las figuras).
2. coloque un recipiente
para recoger el agua que se
verterá (aproximadamente
1,5 lt.) (ver la figura);
3. desenrosque la tapa
girándola en sentido
antihorario (ver la figura);
4. limpie con cuidado el interior;
5. vuelva a enroscar la tapa;
6. vuelva a montar el panel verificando, antes de
empujarlo hacia la máquina, que los ganchos se hayan
introducido en las correspondientes ranuras.
Deje siempre semicerrada la puerta para evitar que se
formen malos olores.
Limpiar la bomba
La máquina posee una bomba autolimpiante que no
necesita mantenimiento. Pero puede suceder que
objetos pequeños (monedas, botones) caigan en la
precámara que protege la bomba, situada en la parte
inferior de la misma.
Verifique que el ciclo de lavado haya terminado y
desenchufe la máquina.
22
Controlar el tubo de alimentación de
agua
Controle el tubo de alimentación al menos una vez al
año. Si presenta grietas o rajaduras debe ser sustituido:
durante los lavados, las fuertes presiones podrían
provocar roturas imprevistas.
Page 23

Anomalías y soluciones
Puede suceder que la máquina no funcione. Antes de llamar al Servicio de Asistencia Técnica (ver Asistencia
Técnica), controle que no se trate de un problema de fácil solución utilizando la siguiente lista.
Anomalías:
La máquina no se enciende.
El ciclo de lavado no comienza.
La máquina no carga agua.
La puerta de la máquina
permanece bloqueada.
La máquina carga y descarga
agua continuamente.
La máquina no descarga o no
centrífuga.
La máquina vibra mucho durante
la centrifugación.
La máquina pierde agua.
Los iconos correspondientes a
la Fase en curso centellean
velozmente junto con el piloto
Posibles causas / Solución:
El enchufe no está introducido en la toma de corriente, o no hace contacto.
En la casa no hay corriente.
La puerta no está bien cerrada.
El botón START/PAUSE no fue presionado.
El grifo de agua no está abierto.
Se fijó un retraso de la hora de puesta en funcionamiento.
El tubo de alimentación de agua no está conectado al grifo.
El tubo está plegado.
El grifo de agua no está abierto.
En la casa no hay agua.
No hay suficiente presión.
El botón START/PAUSE no fue presionado.
Seleccionando el ciclo Baby
ciclo, la lavadora realizará lentas rotaciones del cesto; para terminar el ciclo,
presione el botón START/PAUSE o el botón Plancha fácil
el ciclo Seda
descargar el agua y poder quitar la ropa, es necesario presionar el botón
START/PAUSE o el botón Plancha fácil
El tubo de descarga no está instalado entre los 65 y 100 cm. del suelo (ver
Instalación).
El extremo del tubo de descarga está sumergido en el agua (ver Instalación).
Si la vivienda se encuentra en uno de los últimos pisos de un edificio, es posible
que se verifiquen fenómenos de sifonaje, por ello la máquina carga y descarga
agua de modo continuo. Para eliminar este inconveniente se encuentran
disponibles en el comercio válvulas especiales que permiten evitar el sifonaje.
La descarga de pared no posee un respiradero.
El programa no prevé la descarga: con algunos programas es necesario
ponerla en marcha manualmente (ver Programas y opciones).
La opción Plancha fácil está activa: para completar el programa, presione el
botón START/PAUSE (ver Programas y opciones).
El tubo de descarga está plegado (ver Instalación).
El conducto de descarga está obstruido.
El cesto, en el momento de la instalación, no fue desbloqueado correctamente
(ver Instalación).
La máquina no está instalada en un lugar plano (ver Instalación).
Existe muy poco espacio entre la máquina, los muebles y la pared (ver Instalación).
La carga está desequilibrada (ver Detergentes y ropa).
El tubo de alimentación de agua no está bien enroscado (ver Instalación).
El contenedor de detergentes está obstruido (para ver Mantenimiento y cuidados).
El tubo de descarga no está bien fijado (ver Instalación).
Apague la máquina y desenchúfela, espere aproximadamente 1 minuto y
luego vuelva a encenderla. Si la anomalía persiste, llame al Servicio de
Asistencia Técnica.
la máquina terminará el ciclo con la ropa en remojo; para
o la opción Plancha fácil , al finalizar el
. Seleccionando
.
ON/OFF.
ES
Se forma demasiada espuma.
La puerta de la máquina
El detergente no es específico para la lavadora (debe contener algunas de las
frases para lavadora, a mano o en lavadora o similares).
La dosificación fue excesiva.
Realice el procedimiento de desbloqueo manual (ver Precauciones y consejos).
permanece bloqueada.
Nota: para salir del Demo Mode presione simultáneamente durante 3 seg. los dos botones ON/OFF y START/PAUSE .
23
Page 24

Asistencia
ES
Antes de llamar al Servicio de Asistencia Técnica:
Verifique si la anomalía la puede resolver Ud. solo (ver Anomalías y Soluciones);
Vuelva a poner en marcha el programa para controlar si el inconveniente fue resuelto;
Si no es así, llame al Servicio de Asistencia Técnica Autorizado.
En el caso de una instalación errónea o un uso incorrecto de la lavadora, la intervención de asistencia técnica
deberá ser pagada.
No recurra nunca a técnicos no autorizados.
Comunique:
el tipo de anomalía;
el modelo de la máquina (Mod.);
el número de serie (S/N ).
Esta última información se encuentra en la placa de características colocada en el aparato.
La siguiente información es válida solo para España.
Para otros países de habla hispana consulte a su vendedor.
Ampliación de garantía
Llame al 902.363.539 y le informaremos sobre el fantástico plan de ampliación de garantía hasta 5 años.
Consiga una cobertura total adicional de
Piezas y componentes
Mano de obra de los técnicos
Desplazamiento a su domicilio de los técnicos
Y NO PAGUE AVERIAS NUNCA MAS
Servicio de asistencia técnica (SAT)
Llame al 902.133.133 y nuestros técnicos intervendrán con rapidez y eficacia, devolviendo el electrodoméstico a
sus condiciones óptimas de funcionamiento.
En el SAT encontrará recambios, accesorios y productos específicos para la limpieza y mantenimiento de su
electrodoméstico a precios competitivos.
ESTAMOS A SU SERVICIO
24
Page 25

Instructies voor
installatie en gebruik
Inhoud
Installatie, 26-27
NL
Nederlands
AQUALTIS
AQ8D 49 U
Uitpakken en waterpas zetten
Water en elektrische aansluitingen
Technische gegevens
Beschrijving van de wasautomaat, 28-29
"Touch-control" bedieningspaneel
Het uitvoeren van een wascyclus, 30
Programmas en opties, 31
Programmatabel
Wasopties
Wasmiddelen en wasgoed, 32
Wasmiddel
Voorbereiden van het wasgoed
Wastips
Voorzorgsmaatregelen en advies, 33
Algemene veiligheid
Balanceersysteem van de lading
Afvalverwijdering
Handmatige opening van het deurtje
WASAUTOMAAT
NL
Onderhoud en verzorging, 34
Afsluiten van water en stroom
Reinigen van de wasautomaat
Reinigen van het wasmiddelbakje
Verzorging van de trommel
Reinigen van de pomp
Controle van de buis van de watertoevoer
Storingen en oplossingen, 35
Service, 36
25
Page 26

Installatie
NL
Het is belangrijk dit boekje te bewaren, zodat u het op
ieder gewenst moment kunt raadplegen. In het geval u
de wasautomaat verkoopt of u verhuist, moet u de
handleiding bij het apparaat bewaren.
Lees de instructies aandachtig door: u vindt er
belangrijke informatie betreffende installatie, gebruik en
veiligheid.
In de envelop vindt u samen met deze
gebruiksaanwijzing, de garantie en onderdelen die nodig
zijn voor de installatie.
Uitpakken en waterpas zetten
Uitpakken
1. Zodra u de wasautomaat uitgepakt heeft, dient u te
controleren of hij niet beschadigd is tijdens het transport.
Indien dit wel het geval is moet hij niet worden
aangesloten en moet u contact opnemen met de
handelaar.
2. Verwijder de 4
beschermschroeven voor
het transport en de
bijbehorende afstandsleider
die zich aan de achterkant
bevinden (zie afbeelding).
Een correcte nivellering geeft de machine stabiliteit en
vermijdt, vooral tijdens de centrifuge, vibraties en lawaai.
In het geval de wasautomaat op vloerbedekking of
tapijt staat regelt u de stelvoetjes zodanig dat onder de
automaat genoeg ruimte is voor ventilatie.
Water en elektrische aansluitingen
Aansluiting van de watertoevoerslang
Voordat u watertoevoerbuis aansluit op het waternet
moet u het water laten lopen totdat het helder is.
1. Verbind de
watertoevoerslang aan de
wasautomaat door hem
met de haakse aansluiting
op de betreffende
watertoevoer te
schroeven, rechtsboven
aan de achterkant (zie
afbeelding).
2. Sluit de toevoerbuis aan
op de koudwaterkraan met
een mondstuk met
schroefdraad van 3/4 gas
(zie afbeelding).
3. Sluit de gaten af met de in de envelop bijgeleverde
plastic doppen.
4. Bewaar alle onderdelen; mocht de wasautomaat ooit
nog worden vervoerd, dan moeten deze weer worden
aangebracht om interne schade te voorkomen.
Het verpakkingsmateriaal is geen speelgoed voor
kinderen.
Waterpas zetten
1. Installeer de wasautomaat op een rechte en stevige
vloer en laat hem niet tegen muren of meubels leunen.
2. Compenseer eventuele
oneffenheden door de
stelvoetjes vast of los te
draaien totdat de
automaat volledig
horizontaal staat (hij mag
niet meer dan 2 graden
hellen).
3. Let erop dat er geen knellingen of kronkels in de buis
zijn.
De waterdruk van de kraan moet zich binnen de
waarden van de tabel Technische Gegevens bevinden
(zie bladzijde hiernaast).
Als de toevoerbuis niet lang genoeg is moet u zich
wenden tot een gespecialiseerde winkel of een
bevoegde installateur.
Gebruik nooit tweedehands of oude slangen, maar
alleen die slagen die bij het apparaat worden geleverd.
26
Page 27

Aansluiting van de afvoerbuis
Verbind de afvoerbuis,
zonder hem te buigen, aan
een afvoerleiding of aan
een afvoer in de muur die
zich tussen de 65 en 100
65 - 100 cm
cm van de grond af
bevindt.
Als alternatief kunt u de
afvoerbuis aan de rand
van een wasbak of
badkuip hangen nadat u
hem met de steun aan de
kraan heeft bevestigd (zie
afbeelding).
Het uiteinde van de
afvoerslang mag niet
onder water hangen.
Als de wasautomaat is geïnstalleerd moet het
stopcontact gemakkelijk te bereiken zijn.
Gebruik geen verlengsnoeren of dubbelstekkers.
Het snoer mag niet geknikt of samengedrukt worden.
De voedingskabel en de stekker mogen alleen door
een bevoegde installateur worden vervangen.
Belangrijk! De fabrikant kan niet aansprakelijk worden
gesteld wanneer deze normen niet worden nageleefd.
NL
Gebruik nooit verlengstukken voor de slang; indien dit
niet te vermijden is moet het verlengstuk dezelfde
doorsnede hebben als de oorspronkelijke slang en mag
hij niet langer zijn dan 150 cm.
Elektrische aansluiting
Voordat u de stekker in het stopcontact steekt moet u
zich ervan verzekeren dat:
het stopcontact geaard is en voldoet aan de geldende
normen;
het stopcontact het maximum vermogen van de
wasautomaat kan verdragen, zoals aangegeven in de
tabel Technische Gegevens (zie hiernaast);
de spanning zich bevindt tussen de waarden die zijn
aangegeven in de tabel Technische Gegevens (zie
hiernaast);
de contactdoos geschikt is voor de stekker van de
automaat. Indien dit niet zo is moet of de stekker of
het stopcontact vervangen worden.
De wasautomaat mag niet buitenshuis worden
geïnstalleerd, ook niet op een beschutte plaats,
aangezien het gevaarlijk is hem aan regen en onweer
bloot te stellen. Kortom, hij mag beslist niet vochtig
staan.
Technische gegevens
Model
Afmetingen
Vermogen
Elektrische
aansluitingen
Aansluiting
waterleiding
Snelheid
centrifuge
Controle-programma's volgens de
norm EN 60456
AQ8D 49 U
breedte cm 59,5
hoogte cm 85
diepte cm 64,5
van 1 tot 8 kg
zie het typeplaatje met de technische
eigenschappen dat op het apparaat
is bevestigd
max. druk 1 MPa (10 bar)
min. druk 0,05 MPa (0,5 bar)
Inhoud trommel 62 liters
tot 1400 toeren per minuut
programma ; temperatuur 60°C;
uit gevoerd met 8 kg lading.
Deze apparatuur voldo et aan de
volgende EEC voors chriften:
-89/336/EEC van 03/05/89
(Elektromagnetische compatiabiliteit)
en successievelijke modificaties
- 2002/96/CE
- 2006/95/CE (Laagspanning)
27
Page 28

Beschrijving van de wasautomaat
NL
DEUR
WASAUTOMAAT
HANDVAT DEUR
WASAUTOMAAT
VOETSTUK
DEUR
Om de deur van de
wasautomaat te openen
dient u altijd het speciale
handvat te gebruiken (zie
afbeelding).
WASMIDDELBAKJE
Het wasmiddelbakje bevindt
zich aan de binnenkant van
de automaat en verschijnt
als u de deur opent.
Voor de dosering van
wasmiddelen zie het
hoofdstuk Wasmiddelen en
wasgoed.
N.B.: plak de sticker met de
beschrijving van
programmas en opties op
het wasmiddelbakje. De
sticker bevindt zich in het zakje waar ook deze
handleiding zat.
STELVOETJES
voor wasverzachter. We raden u aan om nooit het
maximaal aangegeven niveau te overschrijden
(aangegeven door rooster) en om geconcentreerde
wasverzachters aan te lengen.
TOUCH CONTROL bedieningspaneel
BEDIENINGS-PANEEL
1. wasmiddelbakje voorwas:
gebruik waspoeder.
2. wasmiddelbakje
1
2
hoofdwas: gebruik
waspoeder of vloeibaar
wasmiddel. In dit laatste
geval raden wij u aan het
wasmiddel direct voordat u
de wasautomaat start erin
te schenken.
bakje wasverzachters:
Om de instellingen te
wijzigen drukt u zachtjes op
het symbool aan de
binnenkant van het touch
control-deel, zoals op de
afbeelding aangegeven.
28
Stand- by modus
Deze wasautomaat beschikt, in overeenkomst met de
nieuwe normen betreffende de energiebesparing, over
een systeem wat het apparaat automatisch na enkele
minuten uitschakelt (stand-by) indien men het niet
gebruikt. Druk kort op de ON/OFF
de wasautomaat weer aangaat.
toets en wacht tot
Page 29

"Touch-control" bedieningspaneel
Knop
PROGRAMMAS
M2
M1
TEMPERATUUR
DISPLAY
Knop
CENTRIFUGEREN
Knop
Knop met
controlelampje
START/PAUSE
Controlelampje
ECO
NL
Symbolen
WASFASES
Knop met controlelampje
ON/OFF
Knop met controlelampje ON/OFF: druk even op de knop om
de wasautomaat aan of uit te zetten. Het groene controlelampje
geeft aan dat de wasautomaat aanstaat. Om de wasautomaat
tijdens de wascyclus uit te zetten moet u de knop iets langer, circa 3
seconden, ingedrukt houden. Als u de kort of per ongeluk indrukt zal
de wasautomaat niet uitgaan. Als u de wasautomaat tijdens de
wascyclus uitdoet wordt de cyclus automatisch geannuleerd.
Knop PROGRAMMAS: kan beide richtingen op draaien. Voor
de juiste programmakeuze kunt u de Programmatabel
raadplegen. Gedurende het programma blijft de knop stilstaan.
M1-M2-M3 toetsen: druk op een van de twee toetsen om
een wascyclus en uw persoonlijke aanpassingen op te slaan.
Om een voorheen opgeslagen wascyclus te starten drukt u op
de betreffende toets.
Knop
te wijzigen of uit te sluiten. De gekozen waarde leest u af op
bovenstaand display (zie Het uitvoeren van een wascyclus).
Knop
te wijzigen of uit te sluiten. De gekozen waarde leest u af op
bovenstaand display (zie Het uitvoeren van een wascyclus).
Knop
uitgestelde start van het gekozen programma in te stellen. De
ingestelde vertraging leest u af van bovenstaand display (zie Het
uitvoeren van een wascyclus).
Knoppen OPTIES: druk hierop om de beschikbare opties te
selecteren. Het controlelampje dat overeenkomt met de
geselecteerde optie blijft aan (zie Het uitvoeren van een
wascyclus).
Symbolen WASFASES: gaan aan om weer te geven in welke
fase van de cyclus de automaat zich bevindt (Wassen
Spoelen
De tekst wordt
Knop met controlelampje START/PAUSE: als het groene
controlelampje langzaam knippert, drukt u op de knop om de
wascyclus te starten. Als de cyclus is gestart blijft het
controlelampje vast aanstaan. Als u de wascyclus wilt
TEMPERATUUR: druk hierop om de temperatuur
CENTRIFUGEREN: druk hierop om de centrifuge
UITGESTELDE START: druk hierop om een
- Centrifugeren - Afpompen ).
verlicht als de wascyclus is beëindigd.
M3
-
Knoppen
OPTIES
Knop
UITGESTELDE
START
Controlelampje
Knop met controlelampje
TOETSBLOKKERING
DEUR GEBLOKKEERD
pauzeren drukt u nogmaals op de knop. Het controlelampje
wordt oranje en gaat knipperen. Als het controlelampje Deur
Geblokkeerd uit is, kunt u het deurtje openen. Om het
programma te hervatten drukt u opnieuw op de knop.
Controlelampje DEUR GEBLOKKEERD: geeft aan dat
de deur geblokkeerd is. Om de deur te openen moet u de
wascyclus pauzeren (zie Het uitvoeren van een wascyclus).
Knop met controlelampje
blokkering van het bedieningspaneel in of uit te schakelen dient
u de KNOP een aantal seconden (3-4) ingedrukt te houden. Het
ontstoken controlelampje geeft aan dat het bedieningspaneel
geblokkeerd is. Op deze manier kunt u voorkomen dat er
ongewilde wijzigingen aan de programmas worden
aangebracht, bijvoorbeeld bij aanwezigheid van kinderen.
Controlelampje ECO: het symbool
de wasparameters heeft gewijzigd, u een energiebesparing
bereikt van minstens 10%. Bovendien zal, voor het apparaat
in de Stand by modus treedt, het symbool enkele seconden
lang aangaan. Als het apparaat uitstaat zal de geschatte
energiebesparing circa 80% zijn.
TAAL WIJZIGEN
Wanneer de machine voor de eerste keer aangezet wordt,
gaat op de display de eerste taal knipperen. Overeenkomstig
de 3 toetsen aan de rechterkant van de display, verschijnen de
symbolen "
3" of door op de toetsen naast de symbolen "
drukken. Met de toets "OK" wordt de taal bevestigd die na 2"
vastgezet wordt. Als niet op een toets gedrukt wordt, begint
na 30" de automatische wisseling van de talen opnieuw.
De taal kan alleen gewijzigd worden als de machine uit is.
Als u de temperatuurtoetsen
start
kort geluidssignaal en verschijnt de ingestelde taal knipperend
op de display. Door op de toetsen naast de symbolen " " en
"V" te drukken kan de taal gewijzigd worden. Met de toets
naast het symbool "OK" wordt de taal bevestigd die na 2"
vastgezet wordt. Als niet op een toets gedrukt wordt, wordt
na 30" de eerder ingestelde taal weergegeven. Zet de machine.
" , "OK" en "V". De talen wisselen automatisch elke
tegelijkertijd 5 seconden ingedrukt houdt, klinkt een
TOETSBLOKKERING: om de
gaat aan als, nadat u
"en "V" te
+ centrifuge + uitgestelde
29
Page 30

Het uitvoeren van een wascyclus
NL
N.B.: voordat u de wasautomaat gaat gebruiken moet u
hem met wasmiddel maar zonder wasgoed een
wascyclus laten uitvoeren. Kies het programma van 90°
zonder voorwas.
1. DE WASAUTOMAAT AANZETTEN. Druk op de toets
. Alle controlelampjes gaan 1 seconde lang aan en op
het display verschijnt de tekst AQUALTIS; het
controlelampje van de toets
het controlelampje START/PAUSE zal gaan knipperen.
2. PROGRAMMAKEUZE. Draai de PROGRAMMAKNOP
naar rechts of naar links totdat u het gewenste
programma heeft geselecteerd; de naam van het
programma verschijnt op het display; hieraan worden
automatisch een temperatuur en een centrifugesnelheid
gekoppeld die naderhand kunnen worden gewijzigd. Op
de display verschijnt de duur van de cyclus.
3. LAAD HET WASGOED. Open de deur. Laad het
wasgoed in en zorg ervoor nooit de laadhoeveelheid
te overschrijden die wordt aangegeven in de
programmatabel op de volgende bladzijde.
4. WASMIDDEL DOSEREN. Trek het bakje naar
buiten en doe het wasmiddel in de speciale vakjes
zoals aangegeven in Beschrijving van de
wasautomaat.
5. SLUIT DE DEUR.
6. DE WASCYCLUS AANPASSEN. Dit kunt u doen
met behulp van de knoppen op het bedieningspaneel:
Wijzigen van de temperatuur en/of de
centrifuge.
Het apparaat toont automatisch de maximale
temperatuur en centrifuge die voor het ingestelde
programma gelden of de laatst geselecteerde
waarden, mits deze compatibel zijn met het gekozen
programma. Door op de knop
de temperatuur langzaamaan verlagen, tot aan de
koude wascyclus OFF. Door op de knop
drukken kunt u het toerental van de centrifuge
langzaamaan verlagen, tot aan een complete
uitsluiting van de centrifuge OFF. Als u nogmaals op
de knoppen drukt zult u wederom op de maximale
waarden terugkeren.
Uitzondering: als u het programma Katoen selecteert
kunt u de temperatuur tot op 90° instellen.
Een uitgestelde start instellen.
Om de uitgestelde start van het gekozen programma in
te stellen, drukt u op de uitgesteld start-toets totdat u de
gewenste vertragingstijd bereikt. Tijdens het instellen
wordt de vertragingstijd samen met de tekst "Start:" en
het knipperende symbool
uitgestelde start is ingesteld, blijft op het display het
symbool
de ingestelde cyclus weer met de tekst "Einde:" en de
duur van de cyclus. Door één keer op de toets
UITGESTELDE START te drukken, wordt de eerder
ingestelde vertraagtijd weergegeven.
Na het starten toont de display de tekst "Start:" en de
vertraagtijd. Nadat de ingestelde vertraagtijd is
staan en geeft de display weer de duur van
zal aan blijven staan en
te drukken kunt u
te
weergegeven. Nadat de
afgelopen, start de machine en toont de display "Einde:"
en de resterende tijd tot het einde van de cyclus.
Om de uitgestelde start te verwijderen drukt u op de
knop totdat op het display de tekst OFF verschijnt.
Het symbool
De eigenschappen van de cyclus
wijzigen.
Druk op de toets om de optie te activeren; op het
display verschijnt de naam van de optie en het
overeenkomende maantje zal aangaan.
Druk nogmaals op de toets om de optie te
desactiveren; op het display verschijnt de naam van de
optie plus de tekst OFF, het maantje zal uitgaan.
Als de gekozen optie niet geschikt is voor het
ingestelde programma zal het betreffende
controlelampje gaan knipperen, zal er een
geluidssignaal klinken (3 pieptonen) en zal de optie
niet worden geactiveerd.
Als de geselecteerde optie niet compatibel is met
een optie die daarvòòr is ingesteld, zal het
controlelampje van de eerst geselecteerde optie gaan
knipperen en zal alleen de tweede optie worden
geactiveerd. Het controlelampje van de betreffende
knop zal aanblijven.
De opties kunnen het aanbevolen laadgewicht en/of
de duur van de cyclus veranderen.
7. HET PROGRAMMA STARTEN. Druk op de toets
START/PAUSE. Het betreffende controlelampje zal
aanblijven en de deur zal worden geblokkeerd (het
controlelampje DEUR GEBLOKKEERD
aanstaan). De symbolen die horen bij de verschillende
wasfases worden tijdens de cyclus verlicht om aan te
geven welke fase bezig is. Om een programma te
wijzigen van een reeds gestarte wascyclus doet u de
wasautomaat op pauze met behulp van de knop
START/PAUSE. Selecteer daarna de gewenste cyclus
en druk nogmaals op de knop START/PAUSE.
Om de deur te openen tijdens de wascyclus drukt u
op de knop START/PAUSE. Als het controlelampje
DEUR GEBLOKKEERD
openen. Om het programma te hervatten drukt u
opnieuw op de knop START/PAUSE.
8. EINDE VAN HET PROGRAMMA. Wordt
aangegeven door de tekst END. De deur kan gelijk
worden geopend. Als het controlelampje START/
PAUSE knippert druk u op de toets om de wascyclus
te beëindigen. Open de deur, laad het wasgoed uit en
schakel de wasautomaat uit.
Als u een reeds gestarte cyclus wilt annuleren houdt u
de knop
onderbroken en het apparaat uitgaat.
Zak voor dekens, gordijnen en fijne was
Dankzij de speciale bijgeleverde zak kunt u met de
Aqualtis wasautomaat zelfs uw waardevolste en fijnste
kledingstukken met de machine wassen en zeker zijn
van een optimale bescherming. We raden u aan om de
zak te gebruiken voor het wassen van dekens en
donzen wasgoed met een synthetische bekleding.
ingedrukt totdat de cyclus wordt
gaat uit.
blijft
uit gaat kunt u de deur
30
Page 31

Programmas en opties
Programmatabel
Sym-
Beschrijving van het Programma
bool
Programma's Katoen
Katoen
met voorwas
(Doe het wasmiddel in het speciale vakje).
Katoen (1):
Katoen (2):
Bont
Shirts
Jeans
Speciale programma's
Baby:
Kleurvast
Opfrissen (zie de volgende pagina)
*
Bed & Bath:
Dekbedden:
Zijde:
Wol:
Gemengd 30':
(niet geschikt voor wol, zijde en handwas).
Extra programma's
Spoelen - 1400 -
Centrifugeren - 1400 - - - 8
Afpompen - 0 - - - 8
(*) N.B.: circa 10 minuten na de START zal de wasautomaat aan de hand van het ingeladen wasgoed de resterende tijd tot aan het einde van het programma
opnieuw berekenen en tonen.
Voor alle Test Institutes:
1) Controleprogramma volgens de norm EN 60456: selecteer het programma met een temperatuur van 60°C.
2) Programma katoen lang: selecteer het programma
3) Programma katoen kort: selecteer het programma met een temperatuur van 40°C.
zeer vuil wit en kleurecht bo nt wasgoed.
zeer vuile witte en bonte fijne was.
Katoen (3)
zeer vuile fijne bonte was.
Synthetisch
voor handdoeken en beddengoed.
voor kledingstukken/beddengoed gevuld met dons.
voor zijde, viscose, lin gerie.
voor wol, kasjmier, etc.
voor het snel opfrissen van niet zo vuil wasgoed
met een temperatuur van 40°C.
Max.
Te m p .
(°C)
90° 1400
60°
(Max. 90°)
40° 1400
40° 1400
40° 600
40° 800
40° 800
60° 800
- - - - - 1,5
60° 1400
30° 1200
30° 0
40° 600
30° 800
Max.
snelheid
(toeren p er
minuut)
1400
Wasmiddel en
wasversterkers
Was-
middel
Wasver za-
chter
ll
lll
lll
lll
lll
ll
lll
lll
lll
ll
ll
ll
ll
Bleek-
middel
- 8
- 4
- 3,5
- 2
- 2
- 3,5
ll
Max.
lading
(kg)
8
8
8
2
4
4
8
8
Duur-
cyclus
controleren.
NL
(*) U kunt de duur van de wasprogrammas op het display
Wasopties
Hygiënisch Schoon
Door deze optie te kiezen wordt de doelmatigheid van
de was verhoogd door middel van het genereren van
stoom, die tijdens de cyclus mogelijke bacteriën in de
vezels verwijderd en de vezels tegelijkertijd verzorgd.
Doe de was in de trommel, selecteer het compatibele
programma en kies optie "
Tijdes de werking van de wasmachine kan de vuldeur
door de vorming van stoom minder doorzichtig worden.
It cannot be used in conjunction with
, , , , , , , , .
Makkelijk Strijken
Als u deze optie selecteert zullen het wassen en de
centrifuge dusdanig worden aangepast dat er minder
kreuken worden gevormd. Aan het einde van de
wascyclus zal de wasautomaat de trommel langzaam laten
ronddraaien. De controlelampjes Makkelijk Strijken en
START/PAUSE gaan knipperen. Om de cyclus te
beëindigen drukt u op de knop START/PAUSE of op de
knop Makkelijk Strijken.
Bij het programma Zijde
cyclus door het wasgoed in de week te laten staan. Het
controlelampje Makkelijk Strijken gaat knipperen. Om het
water af te voeren en de was uit de automaat te halen
".
, (90°C), ,
beëindigt de wasautomaat de
moet u op de knop START/PAUSE drukken of op de knop
Makkelijk Strijken.
Deze optie is niet beschikbaar tijdens de programmas
, , , , , .
Tijd Besparen
Als u deze optie selecteert verkort u de duur van het
programma met 30%-50% aan de hand van de
gekozen cyclus en zorgt u als gevolg voor een
aanzienlijke water- en energiebesparing. Gebruik deze
cyclus voor niet zo vuil wasgoed.
Deze optie is niet beschikbaar tijdens de programmas
, , , , , , , , , .
Extra Spoelen
Door deze optie te selecteren verhoogt u het spoelresultaat
en zorgt u ervoor dat elk spoor van wasmiddel verdwijnt.
Deze optie is vooral nuttig bij personen wiens huid gevoelig
is voor wasmiddelen. We raden deze optie aan wanneer
een volle lading moet worden gewassen of wanneer zeer
veel wasmiddel wordt gebruikt.
Deze optie is niet beschikbaar tijdens de programmas
, , , .
31
Page 32

Wasmiddelen en wasgoed
NL
Wasmiddel
De keuze en de hoeveelheid wasmiddel hangen af van
het type stof (katoen, wol, zijde), van de kleur van het
wasgoed, de wastemperatuur, de vuilgraad en de
hardheid van het water.
Een juiste dosering van het wasmiddel voorkomt
verspillingen en beschermt het milieu: ook al zijn
wasmiddelen biologisch afbreekbaar, toch bevatten ze
elementen die het evenwicht in de natuur verstoren.
We raden u aan:
waspoeder te gebruiken voor de witte katoenen was
en voor de voorwas.
vloeibaar wasmiddel te gebruiken voor fijne katoenen
was en voor alle programmas op lage temperatuur.
speciale vloeibare wasmiddelen te gebruiken voor wol
en zijde.
Het wasmiddel kan voor het starten van het programma
in het speciale bakje worden gedaan, of in de wasbol die
direct in de trommel wordt geplaatst. Als u een wasbol
gebruikt kunt u het programma Katoen met voorwas
niet gebruiken.
Gebruik nooit wasmiddelen voor handwas aangezien
die te veel schuim vormen.
Voorbereiden van het wasgoed
Open de kledingstukken voor u ze inlaadt.
Scheid het wasgoed volgens het type stof (symbool op
het etiket van het kledingstuk) en de kleur. Let er goed
op dat u de bonte was scheidt van de witte was;
Leeg de zakken en controleer de knopen;
Overschrijd nooit het gewicht dat wordt aangegeven in
de Programmatabel wat geldt voor droog wasgoed.
Hoeveel weegt wasgoed?
1 laken 400-500 gr.
1 kussensloop 150-200 gr.
1 tafellaken 400-500 gr.
1 badjas 900-1200 gr.
1 handdoek 150-250 gr.
1 spijkerbroek 400-500 gr.
1 overhemd/blouse 150-200 gr.
Wastips
* Opfrissen
Middels dit programma kan kleding worden verfrist door
onaangename geurtjes te verwijderen en de vezels te
versoepelen (1,5 kg, circa 3 kledingstukken). Doe alleen
droog (niet vuil) wasgoed in de trommel en kies
programma "
kledingstukken vochtig: het wordt aangeraden ze op te
hangen. Het "
strijkproces. Daarnaast kan met met de "Stoomparfum"
balletjes de geur van uw voorkeur toevoegen zodat u
wasgoed hiernaar gaat ruiken. Doe een paar druppeltjes
parfum op het sponsje aan de binnenkant van het
balletje, deze al, deze sluiten en deze samen met de
kleding in de trommel doen. Het speciale programma
" starten. Aan het eind van e cyclus zijn de vezels
"
soepel en geparfurmeerd.
Wordt afgeraden voor wollen of zijden wasgoed.
Doe, om lekken te voorkomen, niet teveel parfum op
het sponsje.
Geen wasverzachter of wasmiddel toevoegen.
". Aan het einde van de cyclus zijn de
" programma vergemakkelijkt het
Shirts: gebruik het speciale programma Shirts
met maximale zorg overhemden/blouses van
verschillende soorten stof en kleur te wassen.
Jeans: gebruik het speciale programma Jeans
uw spijkergoed. Draai de kledingstukken binnenstebuiten
voor het wassen en gebruik een vloeibaar wasmiddel.
Baby: gebruik het speciale programma Baby
het wassen van typisch kindervuil en vervolgens al het
wasmiddel te verwijderen om allergie te voorkomen op de
tere kinderhuid. Deze cyclus is speciaal ontwikkeld om de
hoeveelheid bacteriën terug te dringen door een vergroot
waterverbruik en een optimale toepassing van
hygiënische wasversterkers. Aan het einde van de
wascyclus zal de trommel langzaam ronddraaien. Om de
cyclus te beëindigen druk u op de START/PAUSE toets.
Zijde: gebruik het speciale programma Zijde
alle zijden kledingstukken te wassen. We raden u aan
een speciaal wasmiddel voor fijne was te gebruiken.
Gordijnen: Gebruik het programma Zijde
de gordijnen en doe ze in de bijgeleverde zak.
Wol: Hotpoint/Ariston is het enige bedrijf dat een
wasautomaat heeft ontwikkeld die de prestigieuze
Woolmark Platinum Care (M.0508) onderscheiding heeft
gekregen van The Woolmark Company. Dit garandeert dat
u alle wollen kledingstukken in de automaat kunt wassen,
ook wasgoed met het etiket alleen handwas
het programma Wol kunt u al uw wollen wasgoed in de
automaat wassen, met gegarandeerd het beste resultaat.
Dekbedden: voor het wassen van dekens of
kledingstukken die met dons zijn gevuld zoals eenpersoons
of tweepersoons dekbedden (niet meer dan 3,5 kg),
kussens of ski-jacks gebruikt u het speciale programma
Dekbedden
de trommel te laden met de randen naar binnen toe
gevouwen (zie afbeeldingen) en ervoor te zorgen de ¾ van
het volume van de trommel niet te overschrijden. Voor het
beste resultaat raden wij aan vloeibaar wasmiddel in het
doseerbakje te gieten.
Dekens: om dekens met een synthetische bekleding te
wassen moet u de bijgeleverde zak gebruiken en het
programma Dekbedden
Handdoeken en beddengoed: u kunt al uw
linnengoed in een enkele cyclus wassen met het
programma Bed & Bath
optimaliseert het gebruik van de wasverzachter en
bespaart tijd en energie. Het beste is om tijdens dit
programma waspoeder te gebruiken.
Moeilijke vlekken: het beste kunt u moeilijke vlekken
voorbehandelen met een stuk zeep voor u ze in de
wasautomaat doet en het programma Katoen met
voorwas gebruiken.
. We raden u aan het donzen wasgoed in
instellen.
. Dit programma
om
voor al
voor
om
. Vouw
. Met
32
Page 33

Voorzorgsmaatregelen en
advies
Deze wasautomaat is ontworpen en uitgevoerd
volgens de internationale veiligheidsnormen. Deze
aanwijzingen zijn voor uw eigen veiligheid geschreven en
moeten aandachtig worden doorgenomen.
Algemene veiligheid
Dit apparaat is uitsluitend ontworpen voor
huishoudelijk niet-professioneel gebruik.
Het apparaat mag niet worden gebruikt door
personen (kinderen inbegrepen), met beperkte
lichamelijke, sensorische of mentale vermogens of
met onvoldoende ervaring en kennis, tenzij het
gebruik plaatsvindt onder het toezicht of volgens de
instructies van een persoon die verantwoordelijk is
voor hun veiligheid. Kinderen moeten in de gaten
worden gehouden om te verzekeren dat ze niet met
het apparaat spelen.
Raak de machine niet aan als u blootsvoets bent of
met natte of vochtige handen of voeten.
Trek de stekker nooit uit het stopcontact door aan
het snoer te trekken, maar altijd door de stekker zelf
beet te pakken.
Raak het afvoerwater niet aan aangezien het zeer
heet kan zijn.
Forceer nooit de deur van de wasautomaat: het
veiligheidsmechanisme dat een ongewild openen van
de deur voorkomt, kan beschadigd worden.
Probeer in geval van storingen nooit zelf de interne
mechanismen van de wasautomaat te repareren.
Zorg ervoor dat kleine kinderen niet te dicht bij de
machine komen als deze in werking is.
Als het apparaat verplaatst moet worden doe dit dan
met twee of drie personen tegelijk en heel voorzichtig.
Doe dit nooit alleen, want het apparaat is erg zwaar.
Voordat u het wasgoed in de automaat laadt, moet u
controleren of hij leeg is.
Balanceersysteem van de lading
Om overmatige trillingen te vermijden verdeelt de
automaat de lading voor het centrifugeren op een
gelijkmatige manier. Dit gebeurt door de trommel te laten
draaien op een snelheid die iets hoger ligt dan de
wassnelheid. Als na herhaaldelijke pogingen de lading
nog steeds niet goed is gebalanceerd, zal de
wasautomaat de centrifuge op een lagere snelheid
uitvoeren dan die voorzien was. Als de lading zeer uit
balans is zal de wasautomaat een verdeling uitvoeren in
plaats van een centrifuge. Teneinde een betere
distributie van de waslading en een juiste balancering te
bereiken raden wij u aan kleine en grote kledingstukken
te mengen.
normale afval mag worden meegegeven. De
afgedankte apparatuur moet apart worden opgehaald
om het wedergebruik van materialen waarvan hij is
gemaakt te optimaliseren en om potentiële schade
aan de gezondheid en het milieu te voorkomen. Het
symbool van de afvalemmer met een kruis staat op
elk product, om aan te geven dat het apart moet
worden weggegooid.
Voor verdere informatie betreffende het correcte
verwijderen van huishoudelijke apparatuur kunnen de
gebruikers zich wenden tot de gemeentelijke
reinigingsdienst of de verkoper.
Handmatige opening van het deurtje
Mocht er in het huis geen stroom aanwezig zijn en u wilt
het deurtje openen om de was op te hangen, dan dient
u het volgende te doen:
1. haal de stekker uit het
stopcontact.
2. controleer dat het
waterniveau in de automaat
lager is dan het deurtje; als
dat niet het geval is kunt het
water weg laten vloeien door
middel van de afvoerbuis en
dit opvangen in een emmer,
zoals aangegeven in de
afbeelding.
3. verwijder het paneel aan de voorkant van de
wasautomaat (zie volgende pagina).
4. trek het lipje aangegeven
in de afbeelding naar voren
totdat het plastic bandje
loskomt; trek hem daarna
naar beneden totdat u klik
hoort, wat aangeeft dat de
deur is geopend.
5. open de deur; als dat niet
lukt moet u de handeling
herhalen.
NL
Afvalverwijdering
Het verwijderen van het verpakkingsmateriaal: houdt
u aan de plaatselijke normen zodat het materiaal
hergebruikt kan worden.
De Europese richtlijn 2002/96/CE, betreffende
afgedankte elektrische en elektronische apparatuur,
voorziet dat huishoudelijke apparatuur niet met het
6. monteer het paneel weer, met de haakjes goed
bevestigd in de juiste openingen, voordat u het paneel
tegen de machine aandrukt.
33
Page 34

Onderhoud en verzorging
NL
Afsluiten van water en stroom
Sluit na iedere wasbeurt de kraan af. Hiermee
beperkt u slijtage van de waterinstallatie van de
wasautomaat alsmede lekkagegevaar.
Sluit altijd eerst de stroom af voordat u de
wasautomaat schoonmaakt en gedurende
onderhoudswerkzaamheden.
Reinigen van de wasautomaat
De buitenkant en de rubberen onderdelen kunnen met
een spons en een lauw sopje worden schoongemaakt.
Gebruik nooit schuurmiddelen of oplosmiddelen.
Reinigen van het wasmiddelbakje
Verwijder het laatje door op
het hendeltje (1) te drukken
en het naar voren te trekken
(2) (zie afbeelding).
Was het onder stromend
water. Dit moet u regelmatig
doen.
Toegang tot het voorvakje:
2
1. verwijder het afdekpaneel aan de voorzijde van de
wasautomaat door er op het midden op te drukken.
Duw beide zijkanten naar beneden toe en verwijder het
paneel (zie afbeeldingen).
2. plaats een bakje om het
water op te vangen dat eruit
zal lopen (circa 1,5 l) (zie
afbeelding).
3. draai het deksel eraf,
tegen de klok in (zie
afbeelding).
Verzorging van de trommel
Laat de deur van de wasautomaat altijd op een kier
staan om te voorkomen dat er nare luchtjes worden
gevormd.
Reinigen van de pomp
De wasautomaat is voorzien van een zelfreinigende
pomp die niet hoeft te worden onderhouden. Het kan
echter gebeuren dat kleine voorwerpen (muntjes,
knopen) in het voorvakje dat de pomp beschermt en
zich aan de onderkant ervan bevindt, terechtkomen.
Verzeker u ervan dat de wascyclus beëindigd is en haal
de stekker uit het stopcontact.
4. maak de binnenkant goed schoon;
5. schroef het deksel er weer op;
6. monteer het paneel weer, met de haakjes goed
bevestigd in de juiste openingen, voordat u het paneel
tegen de machine aandrukt.
Controle van de buis van de watertoevoer
Controleer minstens een keer per jaar de
watertoevoerbuis. Als er barstjes of scheuren in zitten
moet hij vervangen worden: gedurende het wassen kan
de hoge waterdruk onverwachts breuken veroorzaken.
34
Page 35

Storingen en oplossingen
Het kan gebeuren dat het apparaat niet werkt. Voor u contact opneemt met de Servicedienst (zie Service) moet u
controleren of het niet een storing betreft die u zelf makkelijk kunt verhelpen met behulp van de volgende lijst.
Storingen:
De wasautomaat gaat niet aan.
De wascyclus start niet.
De wasautomaat heeft geen
watertoevoer.
De deur van het apparaat is
geblokkeerd.
De wasautomaat blijft water aanen afvoeren.
Mogelijke oorzaken / Oplossing:
De stekker zit niet in het stopcontact of niet ver genoeg om contact te maken.
Het hele huis zit zonder stroom.
De deur is niet goed dicht.
De START/PAUSE toets is niet ingedrukt.
De waterkraan is niet open.
U heeft een uitgestelde start ingesteld.
De watertoevoerbuis is niet aangesloten op de kraan.
De toevoerslang is gebogen.
De waterkraan is niet open.
Het hele huis zit zonder water.
Er is onvoldoende druk.
De START/PAUSE toets is niet ingedrukt.
Als u de cyclus Baby
de wasautomaat aan het einde van de cyclus de trommel langzaam laten
ronddraaien. Om de cyclus te beëindigen drukt u op de knop START/
PAUSE of op de knop Makkelijk Strijken
selecteert zal de wasautomaat de cyclus beëindigen door de was in het
water te laten weken. Om het water af te voeren en de was uit de
automaat te halen moet u op de knop START/PAUSE drukken of op de
knop Makkelijk Strijken
De afvoerbuis is niet op 65 tot 100 cm afstand van de grond af geïnstalleerd
(zie Installatie).
Het uiteinde van de afvoerbuis ligt onder water (zie Installatie).
Als u op een van de hoogste verdiepingen van een flatgebouw woont, kan
zich een hevelingsprobleem voordoen, waarbij de wasautomaat
voortdurend water aan- en afvoert. Om deze storing te verhelpen zijn er in
de handel speciale beluchters te koop.
De afvoer in de muur heeft geen ontluchting.
selecteert of de optie Makkelijk Strijken , zal
. Als u de cyclus Zijde
.
NL
De wasautomaat voert het water
niet af of centrifugeert niet.
De machine trilt erg tijdens het
centrifugeren.
De wasautomaat lekt.
De symbolen van Fase in
voortgang knipperen snel, tegelijk
met het controlelampje ON/OFF.
Er ontstaat teveel schuim.
De deur van het apparaat is
geblokkeerd.
Het programma voorziet geen afvoer: bij enkele programmas moet dit met
de hand worden gestart (zie Programmas en opties).
De optie Makkelijk Strijken is actief: voor het beëindigen van het programma
drukt u op de toets START/PAUSE (zie Programmas en opties).
De afvoerslang is gebogen (zie Installatie).
De afvoerleiding is verstopt.
De trommel is bij het installeren niet op de juiste wijze gedeblokkeerd (zie
Installatie).
De wasautomaat staat niet goed recht (zie Installatie).
De wasautomaat staat te krap tussen meubels en muur (zie Installatie).
De waslading is niet gebalanceerd (zie Wasmiddelen en wasgoed).
De slang van de watertoevoer is niet goed aangeschroefd (zie Installatie).
Het wasmiddelbakje is verstopt (voor reiniging zie Onderhoud en
verzorging).
De afvoerslang is niet goed aangesloten (zie Installatie).
Doe de wasautomaat uit en haal de stekker uit het stopcontact. Wacht
circa 1 minuut en doe hem daarna weer aan. Als de storing voortzet, dient
u de Servicedienst in te schakelen.
Het wasmiddel is niet bedoeld voor wasautomaten (er moet voor
wasautomaat, handwas en machinewas, of dergelijke op staan).
U heeft teveel wasmiddel gebruikt.
Voer een handmatige deblokkering uit (zie Voorzorgsmaatregelen en
advies).
N.B.: om de Demo Mode te verlaten drukt u tegelijkertijd 3 sec. lang of de twee knoppen ON/OFF en START/PAUSE .
35
Page 36

Service
195079023.01
07/2009 - Xerox Fabriano
NL
Voordat u de Servicedienst inschakelt:
Controleer eerst of u het probleem zelf kunt oplossen (zie Storingen en oplossingen);
Start het programma opnieuw om te controleren of de storing is verholpen;
Als dit niet het geval is, kunt u contact opnemen met de erkende Servicedienst.
In het geval de wasautomaat verkeerd is geïnstalleerd of u hem niet correct heeft gebruikt zal u gevraagd worden
de reparatiekosten te betalen.
Wendt u nooit tot een niet erkende installateur.
Vermeld:
het type storing;
het model wasautomaat (Mod.);
het serienummer (S/N).
Deze laatste gegevens vindt u op het typeplaatje op het apparaat.
36
 Loading...