

Page 1

Instructions for
installation and use
Contents
Installation, 2-3
EN
English,1
BG
Български,13
AQUALTIS
Unpacking and levelling
Connecting the electricity and water supplies
Technical data
Description of the machine, 4-5
Control panel
Running a wash cycle, 6
Wash cycles and options, 7
Table of wash cycles
Wash options
Detergents and laundry, 8
Detergent
Preparing the laundry
Washing recommendations
Load balancing system
WASHING MACHINE
EN
AQ6F 29 U
Precautions and advice, 9
General safety
Disposal
Opening the porthole door manually
Care and maintenance, 10
Cutting off the water and electricity supplies
Cleaning the machine
Cleaning the detergent dispenser drawer
Caring for your appliance drum
Cleaning the pump
Checking the water inlet hose
Trouble shooting, 11
Assistance, 12
1
Page 2

Installation
EN
This instruction manual should be kept in a safe place
for future reference. If the washing machine is sold,
given away or moved, please ensure the manual is kept
with the machine, so that the new owner may benefit
from the advice contained within it.
Read these instructions carefully: they contain vital
information relating to the safe installation and operation
of the appliance.
Inside the pack containing this manual, you will also
find the guarantee and all the details necessary for
installation.
Unpacking and levelling
Unpacking
1. Once you have removed all the packaging from the
washing machine, make sure it has not been damaged
during transportation.
If it has been damaged, contact the retailer and do not
proceed any further with the installation process.
2. Remove the 4
protective screws (used
during transportation) and
the corresponding spacer,
located on the rear part of
the appliance (see figure).
If the appliance is levelled correctly, it will be more
stable and much less likely to cause vibrations and noise
while it is operating, particularly during the spin cycle.
If it is placed on carpet or a rug, adjust the feet in such
a way as to allow a sufficient ventilation space
underneath the washing machine.
Connecting the electricity and water
supplies
Connecting the water inlet hose
Before connecting the inlet hose to the water supply,
run the water until it is perfectly clear.
1. Connect the inlet hose
to the machine by
screwing it onto the cold
water inlet of the
appliance, which is
situated on the top righthand side of the rear part
of the appliance (see
figure).
2. Connect the inlet hose
by screwing it to a cold
water tab using a 3/4 gas
threaded connection (see
figure).
3. Close off the holes using the plastic plugs supplied in
the pack.
4. Keep all the parts in a safe place; they will be needed
again if the washing machine is moved to another
location, to prevent the inside of the appliance being
damaged.
Packaging materials should not be used as toys for
children.
Levelling
1. Place the washing machine on a flat sturdy floor,
without resting it up against walls or cabinets.
2. If the floor is uneven,
the front feet of the
machine may be adjusted
until it reaches a horizontal
position (the angle of
inclination must not
exceed 2 degrees).
3. Make sure that the hose is not folded over or bent.
The water pressure at the tap must fall within the
values indicated in the Technical data table (see next
page).
If the inlet hose is not long enough, contact a
specialised shop or an authorised technician.
Never use second-hand or old inlet hoses; use the
products supplied with the machine.
2
Page 3
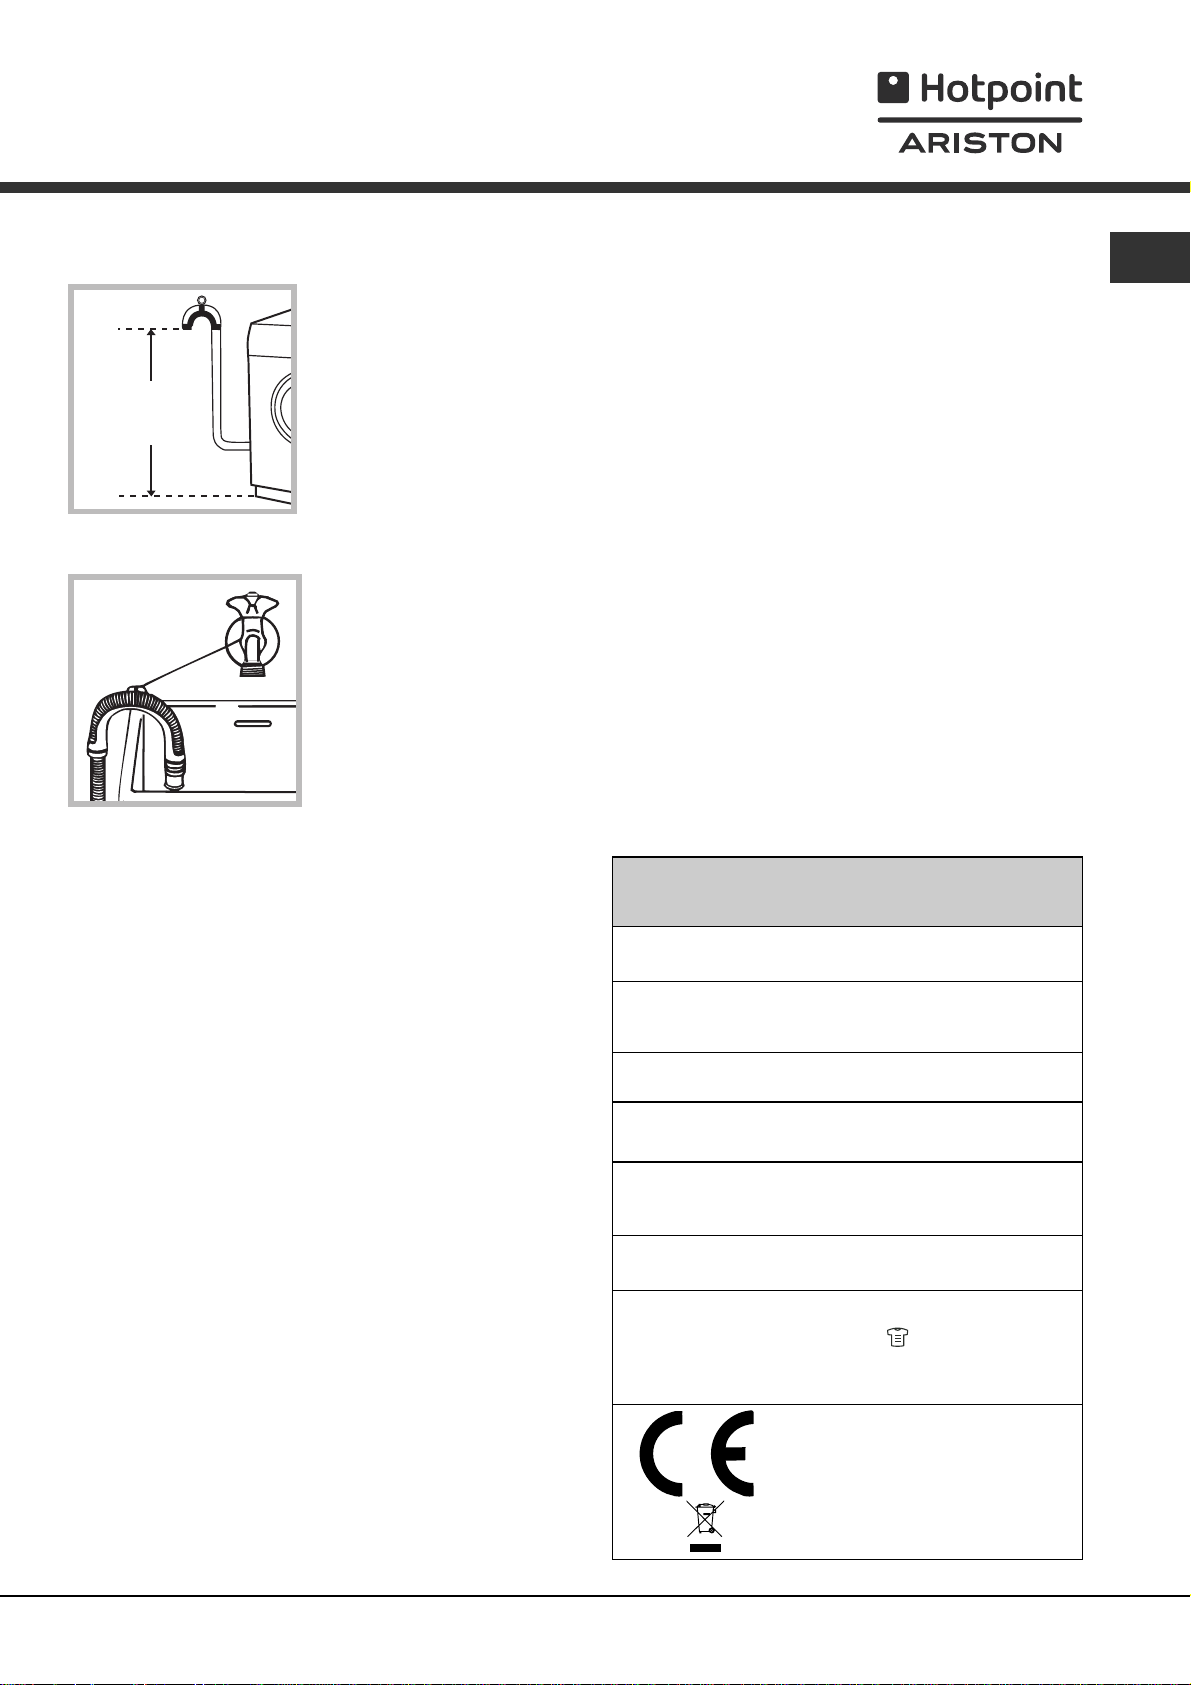
Connecting the drain hose
65 - 100 cm
Connect the drain hose to
drain duct piping or a wall
drain located between 65
and 100 cm above the
floor, making sure it is not
bent at all.
Alternatively, rest the drain
hose on the side of a
washbasin or bathtub,
fastening the duct
supplied to the tap (see
figure).
The free end of the hose
should not be underwater.
Do not use extension cords or multiple sockets.
EN
The cable should not be bent or compressed.
The power supply cable and plug must only be
replaced by authorised technicians.
Warning! The company shall not be held responsible in
the event that these regulations are not respected.
We advise against the use of hose extensions; if it is
absolutely necessary, the extension must have the same
diameter as the original hose and must not exceed 150
cm in length.
Electrical connections
Before plugging the appliance into the electricity socket,
make sure that:
the socket is earthed and complies with all applicable
laws;
the socket is able to withstand the maximum power
load of the appliance as indicated in the Technical
data table (see opposite);
the power supply voltage falls within the values
indicated in the Technical data table (see opposite);
the socket is compatible with the plug of the
appliance. If this is not the case, have the socket or
the plug replaced.
The machine must not be installed outdoors, even in
covered areas. It is extremely dangerous to leave the
appliance exposed to rain, storms and other weather
conditions.
The mains socket must remain within easy reach after
the washing machine has been installed.
Technical data
Model
Dimensions
Capacity
Electrical
connections
Water connections
Spin speed
Energy rated
programmes
according to
regulation
EN 60456
AQ6F 29 U
width 59.5 cm
height 85 cm
depth 58 cm
from 1 to 6 kg
please refer to the technical data
plate fixed to the machine
maximum pressure 1 MPa (10 bar)
minimum pressure 0.05 MPa (0.5 bar)
drum capacity 52 litres
up to 1200 rotations per minute
programme ; temperature 60°C;
using a load of 6 kg.
This appliance conforms to the
following EC Directives:
- 89/336/EEC dated 03/05/89
(Electromagnetic Compatibility) and
subsequent modifications
- 2006/95/EC (Low Voltage)
- 2002/96/EC
3
Page 4
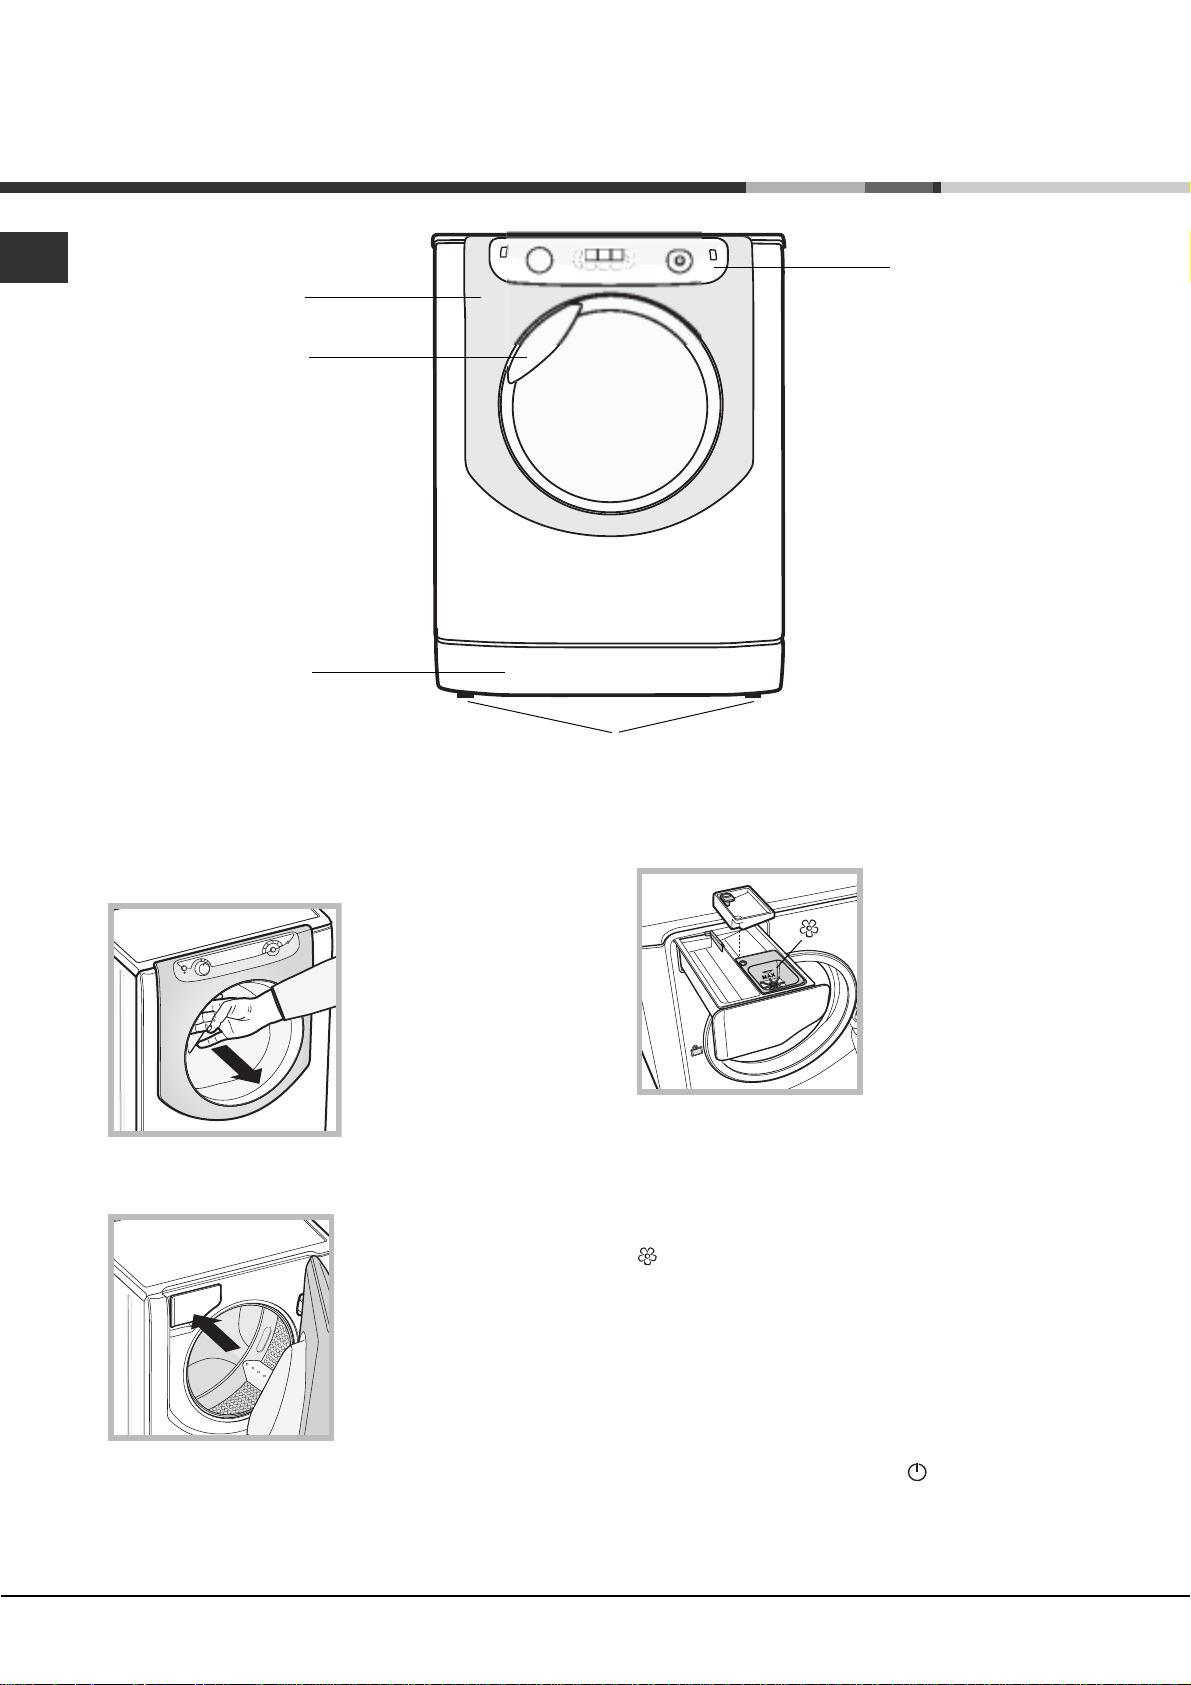
Description of the machine
EN
PORTHOLE DOOR
PORTHOLE DOOR
HANDLE
KICK STRIP
CONTROL
PANEL
ADJUSTABLE FEET
PORTHOLE DOOR
Always use the handle to
open the porthole door (see
figure).
DETERGENT DISPENSER DRAWER
The detergent dispenser
drawer is located inside the
machine and can be
accessed by opening the
door.
For more information on
detergent measures, please
refer to the chapter entitled
Detergents and laundry.
Note: stick the label showing
the wash cycle descriptions and options on the front of
the detergent dispenser drawer. You will find the sticker
in the pack containing this manual.
1. pre-wash compartment:
3
1
2
the drawer immediately before you start the washing
machine.
3. extra compartment: Bleach
The use of extra compartment 3 excludes the prewash function.
washing additives compartment: for fabric softener or
liquid additives. We recommend that the maximum level
indicated by the grille is not exceeded, and that
concentrated fabric softeners are diluted.
Standby mode
This washing machine, in compliance with new energy
saving regulations, is fitted with an automatic standby
system which is enabled after a few minutes if no activity
is detected. Press the ON-OFF
for the machine to start up again.
use powder detergent.
Before pouring in the
detergent, make sure that
extra compartment 3 has
been removed.
2. main wash compartment:
use powder or liquid
detergent. If using the latter
type of detergent, we
recommend it is poured into
button briefly and wait
4
Page 5
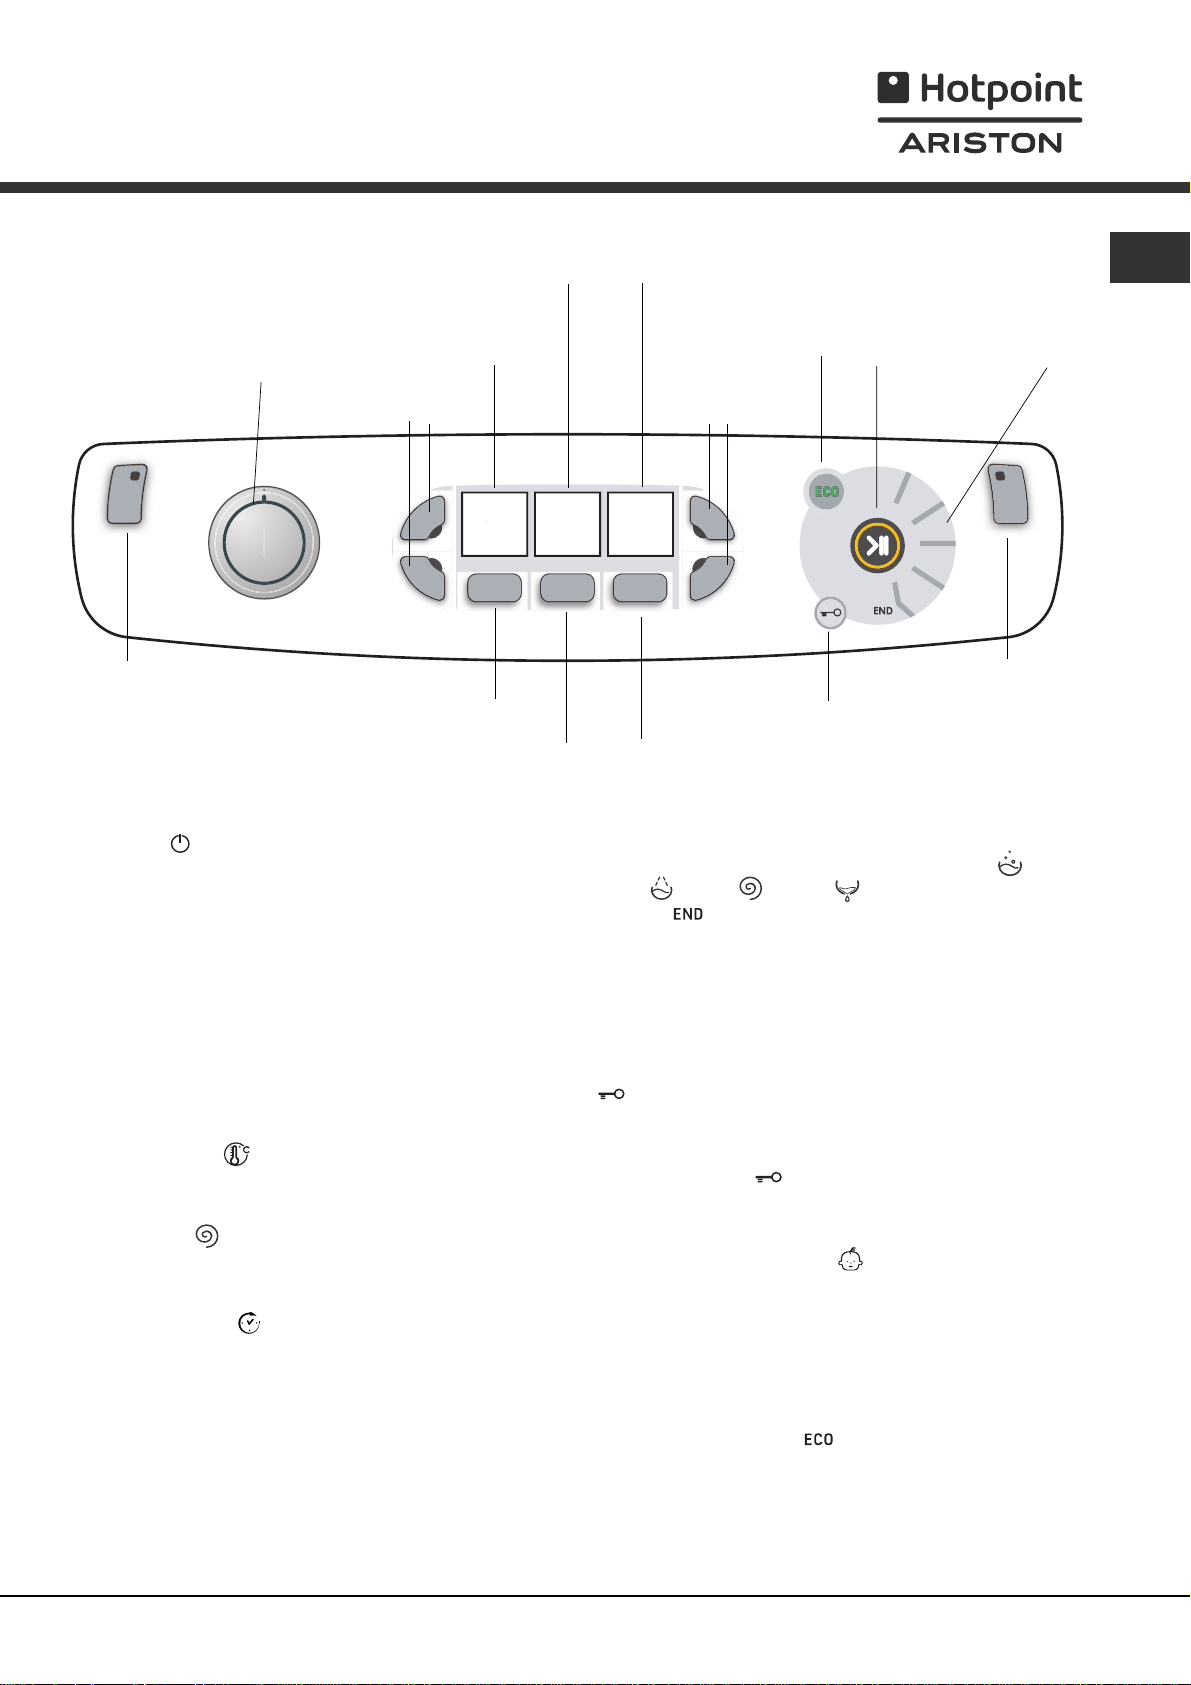
Control panel
WASH CYCLE
SELECTOR knob
TEMPERATURE
OPTION buttons with
indicator lights
display
SPINdisplay
DELAYED START/CYCLE
DURATIONdisplay
ECO indicator light
OPTION buttons with
indicator lights
EN
WASH
CYCLE
PHASE
icons
START/PAUSE
button with indicator
light
Button withON/OFF
indicator light
TEMPERATURE button
SPIN button
Button with ON/OFF indicator light: press this briefly
to switch the machine on or off. The green indicator light
indicates that the machine is switched on. To switch off
the washing machine during the wash cycle, press and
hold the button for approximately 3 seconds; if the
button is pressed briefly or accidentally the machine will
not switch off. If the machine is switched off during a
wash cycle, this wash cycle will be cancelled.
WASH CYCLE SELECTOR knob: may be turned in
either direction. To select the most suitable wash cycle,
please refer to the Table of wash cycles.
The knob will not move during the wash cycle.
TEMPERATURE
button: press to modify or exclude
the temperature setting; the value selected will appear
on the display above (see Running a wash cycle).
SPIN CYCLE
button: press to modify or exclude the
spin cycle; the value selected will appear on the display
above (see Running a wash cycle).
DELAYED START
button: press to set a delayed
start for the selected wash cycle; the set delay time will
appear on the display above (see Running a wash
cycle).
OPTION buttons with indicator lights: press to select the
available options. The indicator light corresponding to the
selected option will remain lit (see Running a wash
cycle).
DELAYED
START
button
DOOR LOCKED
indicator light
CONTROL PANEL
LOCK button with
indicator light
WASH CYCLE PHASE icons: these illuminate to
indicate the progress of the wash cycle (Wash
Rinse
The text
Spin Drain ).
lights up when the cycle is complete.
START/PAUSE button with indicator light: when the
green indicator light flashes slowly, press the button to
start a wash cycle. Once the cycle has begun the
indicator light will remain lit in a fixed manner. To pause
the wash cycle, press the button again; the indicator
light will flash in an orange colour. If the Door locked
indicator light is switched off, the door may be
opened. To start the wash cycle from the point at which
it was interrupted, press the button again.
DOOR LOCKED
indicator light: indicates that the
porthole door is locked. To open the door, pause the
wash cycle (see Running a wash cycle).
CONTROL PANEL LOCK
button with indicator
light: to activate or deactivate the control panel lock,
press and hold the button for approximately 2 seconds.
when the indicator light is illuminated, the control panel is
locked. This means it is possible to prevent wash cycles
from being modified accidentally, especially where there
are children in the home.
ECO indicator light: the
icon lights up when, after
altering the washing parameters, an energy saving of at
least 10% is made. Furthermore, before the machine
enters Standby mode, the icon will light up for a few
seconds; when the machine is switched off the
estimated energy saving will be around the 80% mark.
5
Page 6

Running a wash cycle
EN
WARNING: before you use the washing machine for
the first time, run a wash cycle with detergent and no
laundry, using the 90° cottons cycle without pre-wash.
1. SWITCH THE MACHINE ON. Press the
All the indicator lights will illuminate for 1 second; the
indicator light corresponding to the
remain lit in a fixed manner and the START/PAUSE
indicator light will flash slowly.
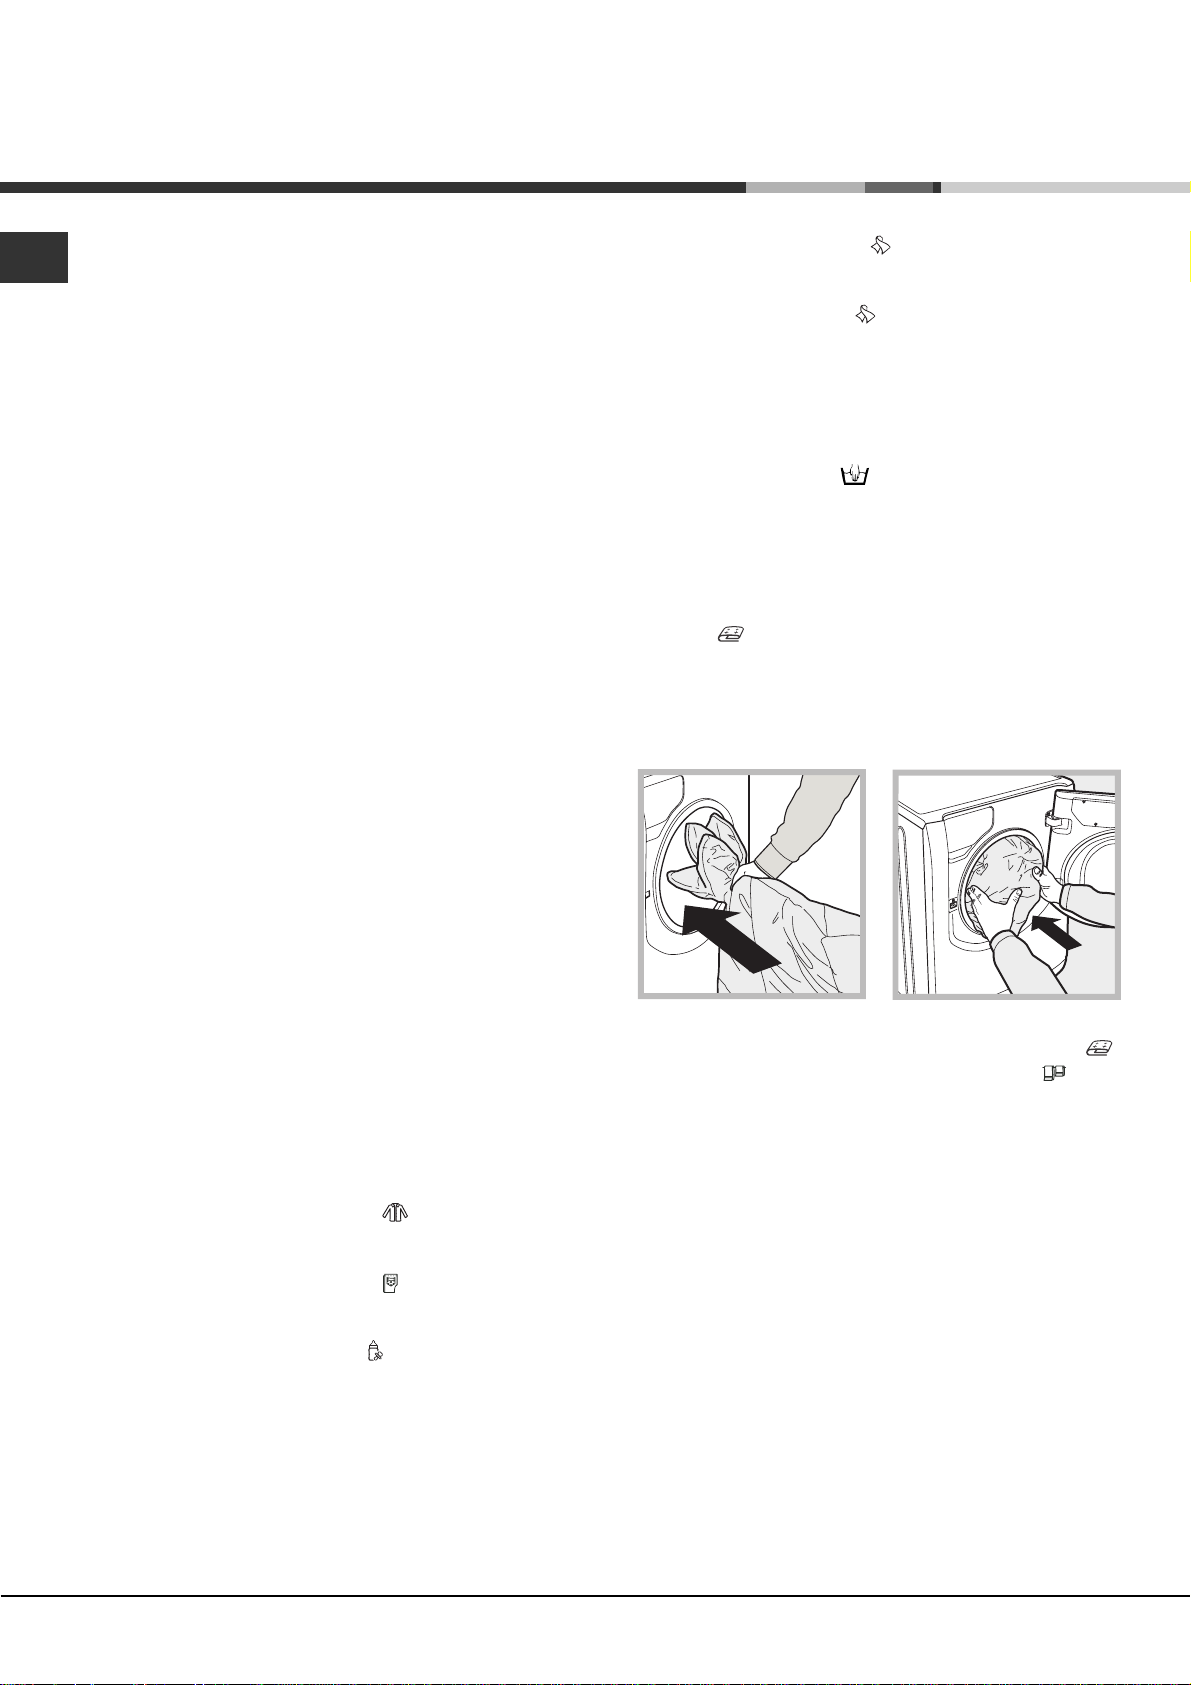
2. LOAD THE LAUNDRY. Open the porthole door.
Load the laundry, making sure you do not exceed the
maximum load value indicated in the table of wash
cycles on the following page.
3. MEASURE OUT THE DETERGENT. Pull out the
detergent dispenser drawer and pour the detergent
into the relevant compartments as described in
Description of the machine.
4. CLOSE THE PORTHOLE DOOR.
5. SELECT THE PROGRAMME. Turn the WASH
CYCLE SELECTOR KNOB right or left, until you have
selected the desired wash cycle. A temperature and
spin speed is set for each wash cycle; these may be
adjusted.
6. CUSTOMISE THE WASH CYCLE. Use the
relevant buttons on the control panel:
Modify the temperature and/or spin
speed.
The machine automatically displays the maximum
temperature and spin speed values set for the
selected cycle, or the most recently-used settings if
they are compatible with the selected cycle. The
temperature can be decreased by pressing the
button, until the cold wash ( ) setting is reached.
The spin speed may be progressively reduced by
pressing the
(
). If these buttons are pressed again, the
maximum values are restored.
button, until it is completely excluded
button will then
button.
Exception: if the Cottons programme is selected,
the temperature can be increased up to a value of
90°C.
Set a delayed start.
Press the button until you have reached the desired
delay time. During the setting process, the delay time
is shown on the display and the
After selecting a delayed start time, the fixed
symbol and the cycle duration will appear on the
display. Press the button once to display the selected
delay time.
To remove the delayed start option, press the button
until the display shows the text OFF; the
will disappear.
Once the START/PAUSE button has been pressed,
the time delay may only be decreased.
symbol flashes.
symbol
Modify the cycle settings.
Press the OPTION buttons to customise the wash
cycle in accordance with your own requirements.
Press the button to activate the option; the
corresponding indicator light will switch on.
Press the button again to disable the option; the
indicator light will switch off.
If the selected option is not compatible with the
selected wash cycle, this incompatibility will be
signalled by the flashing of the indicator light and a
sound alert (3 beeps); the option will not be activated.
If the selected option is not compatible with another
option that has been selected previously, the indicator
light corresponding to the first option selected will flash
and only the second option will be activated; the
indicator light corresponding to the button will remain
lit in a constant manner.
7. START THE PROGRAMME. Press the START/
PAUSE button. The corresponding indicator light
remains lit in a fixed manner and the porthole door
locks (the
illuminates). The icons corresponding to the wash
cycle phases will light up during the cycle to indicate
which phase is currently in progress.
To change a wash cycle once it has already started,
pause the washing machine by pressing the START/
PAUSE button; then select the desired cycle and
press the START/PAUSE button again.
To open the door during a wash cycle, press the
START/PAUSE button; if the DOOR LOCKED
indicator light is switched off you may open the door.
Press the START/PAUSE button again to restart the
wash cycle from the point at which it was interrupted.
8. THE END OF THE WASH CYCLE. This is indicated
by the illuminated text END. The porthole door may
be opened immediately. If the START/PAUSE indicator
light is flashing, press the button to end the cycle.
Open the door, unload the laundry and switch off the
machine.
If you wish to cancel a cycle which has already begun,
press and hold the
the machine switches off.
Bag for quilts, curtains and delicate garments
The Aqualtis washing machine makes it easier for you to
wash even the most valuable and delicate garments in
complete confidence thanks to the special bag which
protects the laundry (this is supplied with the machine).
We recommend that the bag is used every time you
wash quilts and padded items with an outer layer made
using synthetic material.
DOOR LOCKED indicator light
button until the cycle stops and
6
Page 7
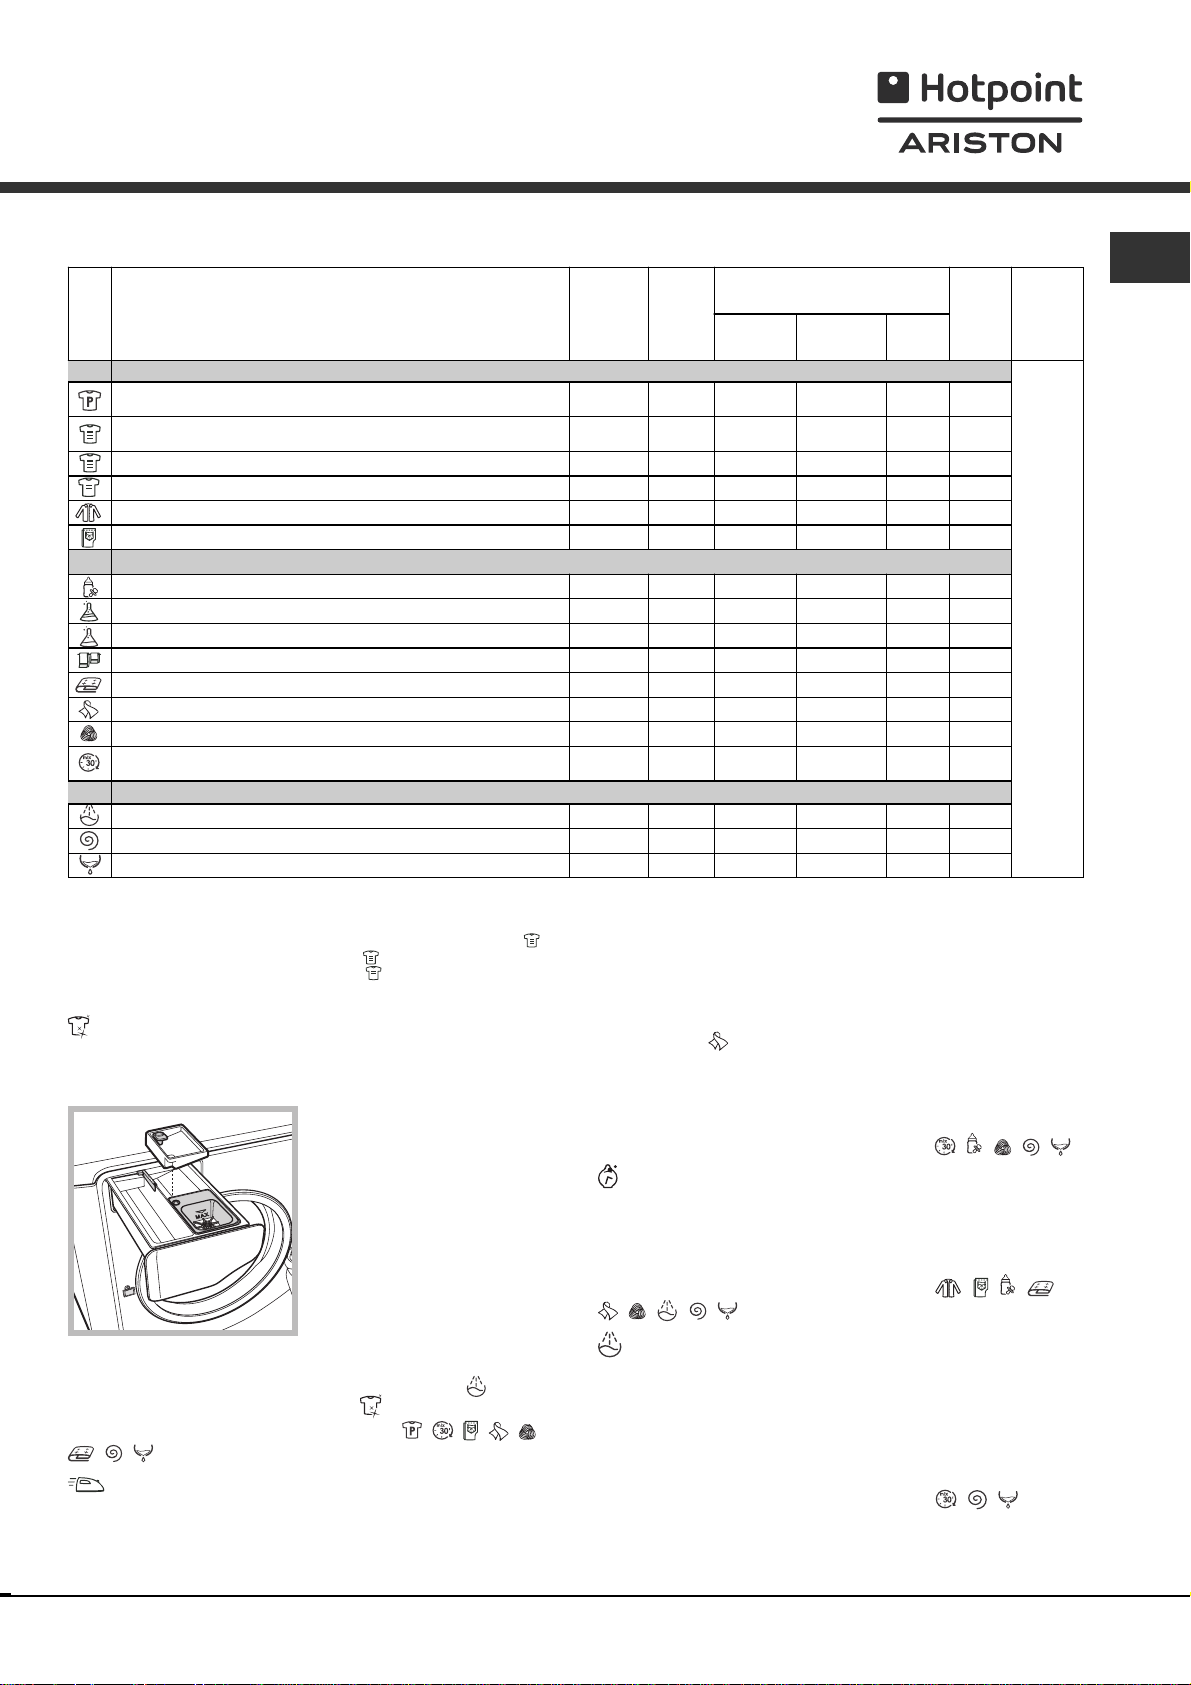
Wash cycles and options
Table of wash cycles
Icon Description of the wash cycle
Cottons wash cycles
Cottons
(Add detergent to the relevant compartment).
Cottons (1):
Cottons (2):
Coloured
Shirts
Jeans
Special programmes
Baby:
Durable
Delicate
"Bed & Bath"
Duvets:
Silk:
Wool:
Mix 30':
wool, silk and clothes which require washing by hand)
Partials wash cycles
Rinse - 1200 Spin - 1200 - - - 6
Drain - 0 - - - 6
(*) Note: 10 minutes after the START, the machine will recalculate the time remaining until the end of the wash cycle on the basis of the load inside it; this
value will then be shown on the display.
For all Test Institutes:
1) Test wash cycle in compliance with regulation EN 60456: set wash cycle
2) Long wash cycle for cottons: set wash cycle
3) Short wash cycle for cottons: set wash cycle
with pre-wash
heavily soiled whites and resistant colours.
heavily soiled whites and delicate colours.
Cottons (3)
heavily soiled delicate colours
Synthetics
Synthetics
for bedlinen and towels.
for down-stuffed garments.
for garments in silk and viscose, lingerie.
for wool, cashmere, etc.
to refresh lightly soiled garments quickly (not suitable for
with a temperature of 40°C.
with a temperature of 40°C.
Wash options
Super Wash
This option offers a high-performance wash due to the
greater quantity of water used in the initial phase of the
cycle, and due to the increased wash cycle duration, is
particularly useful for the
3
1
2
removal of stubborn stains.
It can be used with or
without bleach. If you desire
bleaching, insert the extra
tray compartment (3) into
compartment 1. When
pouring in the bleach, be
careful not to exceed the
Max.
temp.
(°C)
90° 1200
60°
(Max. 90°)
40° 1200
40° 1200
40° 600
40° 800
40° 800
60° 800
40° 800
60° 1200
30° 1000
30° 0
40° 600
30° 800
with a temperature of 60°C.
PAUSE indicator lights will flash. To end the cycle press
the START/PAUSE button or the Easy Iron button.
For the Silk
cycle while the laundry is soaking and the Easy
Iron indicator light will flash. To drain the water so that
the laundry may be removed, press the START/PAUSE
button or the Easy Iron button.
It cannot be used in conjunction with
If you select this option, the wash cycle duration will be
reduced by 30%-50%, depending on the selected cycle,
thereby guaranteeing simultaneous water and energy
saving. Use this cycle for lightly soiled garments.
It cannot be used in conjunction with
max level marked on the
central pivot (see figure).
To bleach laundry without
carrying out a full wash cycle, pour the bleach into the
extra compartment 3, select the "Rinse" cycle
activate the "Super Wash" option
It cannot be used in conjunction with
.
, , , , ,
and
, , .
Easy Iron
By selecting this option, the wash and spin cycles will be
By selecting this option, the efficiency of the rinse is
increased and optimal residual detergent removal is
guaranteed. It is particularly useful for skin which is
sensitive to detergents. We recommend this option is
used with a full load of washing, or when a large amount
of detergent is required.
It cannot be used in conjunction with
Max.
speed
(rpm)
1200
Time Saver
, , , , .
Extra rinse
modified in order to reduce the formation of creases.
At the end of the cycle the washing machine
drum will rotate slowly; the Easy Iron and START/
Detergent and additives
Detergent
for wash
ll
lll
lll
lll
lll
ll
lll
lll
lll
lll
ll
ll
ll
ll
Fabric
softener
Bleach
ll
Max.
load
(kg)
- 6
- 3
2,5
2,5
- 2
- 1
- 1,5
- 3
Cycle
duration
6
6
6
2
2
6
6
wash cycle, the machine will end the
, , , , .
, , , ,
, , .
on the display.
EN
(*) The duration of the wash cycles can be checked
7
Page 8
Detergents and laundry
EN
Detergent
The type and quantity of detergent required depend on
the type of fabric you are washing (cotton, wool, silk,
etc.), as well as its colour, the washing temperature, the
level of soiling and the hardness of the water in the area.
Measuring out the detergent carefully will avoid wastage
and help to protect the environment: although they are
biodegradable, detergents still contain ingredients which
alter the balance of nature.
We recommend the following:
use powder detergents for white cotton garments and
pre-washing.
use liquid detergents for delicate cotton garments and
for all low-temperature wash cycles.
use gentle liquid detergents for wool and silk
garments.
The detergent should be poured into the relevant
compartment - or the dispenser placed directly inside
the drum - before the wash cycle begins. In the latter
case, it will not be possible to select the Cottons with
pre-wash cycle.
Do not use hand washing detergents because these
create too much foam.
Preparing the laundry
Shake out the garments before loading them into the
machine.
Divide the laundry according fabric type (symbol on the
washing instruction label) and colour, making sure you
separate the coloured garments from the white ones;
Empty all pockets and check the buttons;
Do not exceed the values listed in the Table of wash
cycles, which refer to the weight of the laundry when dry.
How much does your laundry weigh?
1 sheet 400-500 g
1 pillowcase 150-200 g
1 tablecloth 400-500 g
1 bathrobe 900-1200 g
1 towel 150-250 g
1 pair of jeans 400-500 g
1 shirt 150-200 g
Washing recommendations
Shirts: use the special Shirts wash cycle to wash
shirts in different fabrics and colours to guarantee they
receive the best possible care.
Jeans: use the special Jeans
denim garments; turn inside out before washing and use
a liquid detergent.
Baby: use the special Baby
the remove the soiling typically caused by babies, while
removing all traces of detergent from nappies in order to
prevent the delicate skin of babies from suffering allergic
reactions. The cycle has been designed to reduce the
amount of bacteria by using a greater quantity of water
and optimising the effect of special disinfecting additives
added to the detergent. At the end of the wash cycle,
the machine will slowly rotate the drum; to end the cycle
press the START/PAUSE button.
wash cycle for all
wash cycle to remove
Silk: use the special Silk
garments. We recommend the use of special detergent
which has been designed to wash delicate clothes.
Curtains: use the Silk
be folded and placed inside the bag provided.
Wool: Hotpoint/Ariston is the only washing machine
brand to have been awarded the prestigious Woolmark
Platinum Care endorsement (M.0508) by the Woolmark
Company, which means that all woollen garments may
be washed in the washing machine, even those which
state hand wash only
wash cycle can be used to wash all woollen garments in
the washing machine while guaranteeing optimum
performance.
Duvets: to wash single duvets (the weight of which
should not exceed 2 kg), cushions or clothes padded
with goose down such as puffa jackets, use the special
Duvets
are placed in the drum with their edges folded inwards
(see figure) and that no more than ¾ of the total volume
of the drum is used. To achieve the best results, we
recommend that a liquid detergent is used and placed
inside the detergent dispenser drawer.
Quilts: to wash quilts with a synthetic outer layer, use
the bag provided and set the wash cycle to Duvets
Bedlinen and towels: use the Bed & Bath
to wash laundry from all over the house; this optimises
fabric softener performance and helps you save time and
energy. We recommend the use of powder detergent.
Stubborn stains: it is wise to treat stubborn stains with
solid soap before washing, and to use the Cottons with
pre-wash cycle.
wash cycle. We recommend that duvets
wash cycle to wash all silk
wash cycle. These should
on the label. The Wool
cycle
Load balancing system
Before every spin cycle, to avoid excessive vibrations
before every spin and to distribute the load in a uniform
manner, the drum rotates continuously at a speed which
is slightly greater than the washing rotation speed. If,
after several attempts, the load is not balanced
correctly, the machine spins at a reduced spin speed. If
the load is excessively unbalanced, the washing
machine performs the distribution process instead of
spinning. To encourage improved load distribution and
balance, we recommend small and large garments are
mixed in the load.
.
8
Page 9

Precautions and tips
The machine was designed and constructed in
accordance with international safety regulations. The
following information is provided for safety reasons and
must therefore be read carefully.
General safety
This appliance was designed for domestic use only.
the machine must only be used by adults, in
accordance with the instructions given in this manual.
Do not touch the machine when barefoot or with wet
or damp hands or feet.
Do not pull on the power supply cable when
unplugging the appliance from the electricity socket.
Hold the plug and pull.
Do not touch the drained water as it may reach
extremely high temperatures.
Never force the porthole door. This could damage the
safety lock mechanism designed to prevent
accidental opening.
If the appliance breaks down, do not under any
circumstances access the internal mechanisms in an
attempt to repair it yourself.
Always keep children well away from the appliance
while it is operating.
If it must be moved, proceed with the help of two or
three people and handle it with the utmost care.
Never try to do this alone, because the appliance is
very heavy.
Opening the porthole door manually
EN
In the event that it is not possible to open the porthole
door due to a powercut, and if you wish to remove the
laundry, proceed as follows:
1. remove the plug from the
electrical socket.
2. make sure the water level
inside the machine is lower
than the door opening; if it is
not, remove excess water
using the drain hose,
collecting it in a bucket as
indicated in the figure.
3. remove the cover panel on the lower front part of the
washing machine (see overleaf).
4. pull outwards using the
tab as indicated in the figure,
until the plastic tie-rod is
freed from its stop position;
pull downwards until you
hear a click, which
indicates that the door is
now unlocked.
Before loading laundry into the washing machine,
make sure the drum is empty.
Disposal
Disposing of the packaging materials: observe local
regulations so that the packaging may be re-used.
The European Directive 2002/96/EC relating to Waste
Electrical and Electronic Equipment (WEEE) states
that household appliances should not be disposed of
using the normal solid urban waste cycle. Exhausted
appliances should be collected separately in order to
optimise the cost of re-using and recycling the
materials inside the machine, while preventing
potential damage to the atmosphere and to public
health. The crossed-out dustbin is marked on all
products to remind the owner of their obligations
regarding separated waste collection.
For more information relating to the correct disposal of
household appliances, owners should contact their
local authorities or appliance dealer.
5. open the door; if this is
still not possible repeat the
procedure.
6. reposition the panel, making sure the hooks are
securely in place before you push it onto the appliance.
9
Page 10

Care and maintenance
EN
Cutting off the water and electricity
supplies
Turn off the water tap after every wash cycle. This will
limit wear on the hydraulic system in the machine and
help to prevent leaks.
Unplug the appliance when cleaning it and during all
maintenance work.
Cleaning the machine
The outer parts and rubber components of the appliance
can be cleaned using a soft cloth soaked in lukewarm
soapy water. Do not use solvents or abrasives.
Cleaning the detergent dispenser
drawer
To remove the drawer, press
lever (1) and pull the drawer
outwards (2) (see figure).
Wash it under running
water; this procedure should
be repeated frequently.
To access the pre-chamber:
2
1. take off the cover panel on the front of the machine
by first pressing it in the centre and then pushing
downwards on both sides until you can remove it (see
figures);
2. position a container so
that it will collect the water
which flows out
(approximately 1.5 l) (see
figure);
3. unscrew the lid by
rotating it in an anticlockwise direction (see
figure);
Caring for your appliance drum
Always leave the door ajar to prevent unpleasant
odours from forming.
Cleaning the pump
The washing machine is fitted with a self-cleaning pump
which does not require any maintenance. Sometimes,
small items (such as coins or buttons) may fall into the
protective pre-chamber at the base of the pump.
Make sure the wash cycle has finished and unplug the
appliance.
4. clean the inside thoroughly;
5. screw the lid back on;
6. reposition the panel, making sure the hooks are
securely in place before you push it onto the appliance.
Checking the water inlet hose
Check the inlet hose at least once a year. If there are
any cracks, it should be replaced immediately: during
the wash cycles, water pressure is very strong and a
cracked hose could easily split open.
10
Page 11

Trouble shooting
Your washing machine could occasionally fail to work. Before contacting the Technical Assistance Centre
(see Assistance), make sure that the problem cannot be not solved easily using the following list.
Problem:
The washing machine does not
switch on.
The wash cycle does not start.
The washing machine does not fill
with water.
The washing machine door
remains locked.
The machine continuously fills
with water and drains.
The washing machine does not
drain or spin.
The machine vibrates a lot during
the spin cycle.
The washing machine leaks.
The icons corresponding to the
Phase in progress flash rapidly
at the same time as the ON/OFF
Possible causes / Solutions:
The appliance is not plugged into the socket fully, or not enough to make
contact.
There is no power in the house.
The door is not closed properly.
The START/PAUSE button has not been pressed.
The water tap has not been opened.
A delayed start has been set.
The water inlet hose is not connected to the tap.
The hose is bent.
The water tap has not been opened.
There is no water supply in the house.
The pressure is too low.
The START/PAUSE button has not been pressed.
If you have selected the Baby
the wash cycle has finished the machine will slowly rotate the drum; to end
the cycle press the START/PAUSE button or the Easy iron
you have selected the Silk
while the laundry is soaking; to drain the water so that the laundry may be
removed, press the START/PAUSE button or the Easy iron
The drain hose is not fitted at a height between 65 and 100 cm from the
floor (see Installation).
The free end of the hose is under water (see Installation).
If the dwelling is on one of the upper floors of a building, there may be
problems relating to water drainage, causing the washing machine to fill
with water and drain continuously. Special anti-draining valves are available
in shops and help to prevent this inconvenience.
The wall drainage system is not fitted with a breather pipe.
The wash cycle does not include draining: Some wash cycles require the
drain phase to be started manually (see Wash cycles and options).
The Easy iron option is enabled: to complete the wash cycle, press the
START/PAUSE button (Wash cycles and options).
The drain hose is bent (see Installation).
The drainage duct is clogged.
The drum was not unlocked correctly during installation (see Installation).
The machine is not level (see Installation ).
The machine is trapped between cabinets and walls (see Installation).
The load is unbalanced (see Detergents and laundry).
The water inlet hose is not screwed on properly (see Installation).
The detergent dispenser is blocked (to clean it, see Care and
maintenance).
The drain hose is not fixed in place properly (see Installation).
Switch off the machine and unplug it, wait for approximately 1 minute and
then switch it back on again. If the problem persists, contact the Technical
Assistance Service.
cycle or the Easy iron option, when
wash cycle, the machine will end the cycle
indicator light.
There is too much foam.
The washing machine door
The detergent is not suitable for machine washing (it should display the text
for washing machines or hand and machine wash, or the like).
Too much detergent was used.
Perform the manual unlocking procedure (see Precautions and tips).
remains locked.
EN
button. If
button.
Note: To exit Demo mode, press and hold the two ON/OFF and START/PAUSE buttons simultaneously for 3 seconds.
11
Page 12

Assistance
EN
Before calling for Assistance:
Check whether you can solve the problem by yourself (see Trouble shooting);
Restart the wash cycle to check whether the problem has been solved;
If it has not, contact the Authorised Technical Assistance Service.
If the washing machine has been installed or used incorrectly, you will have to pay for the call-out service.
Always request the assistance of authorised technicians.
Please have the following information to hand:
the type of problem;
the appliance model (Mod.);
the serial number (S/N).
The above information can be found on the data plate located on the appliance itself.
12
Page 13

Инструкции за инсталиране
и употреба
BG
Български
AQUALTIS
ПЕРАЛНЯ
Съдържание
BG
Инсталиране, 14-15
Разопаковане и нивелиране
Хидравлични и електрически връзки
Технически данни
Описание на пералната машина, 16-17
Управляващ панел
Как се извършва един цикъл на пране, 18
Програми и опции, 19
Таблица на програмите
Опции на прането
Перилни препарати и дрехи за пране, 20
Перилен препарат
Разпределяне на прането
Съвети за изпиране
Система за измерване на товара
AQ6F 29 U
Мерки за безопасност и препоръки, 21
Общи мерки за безопасност
Рециклиране
Ръчно отваряне на вратичката
Поддръжка и почистване, 22
Спиране на водата и изключване на електрозахранването
Почистване на машината
Почистване на чекмеджето за перилните препарати
Преглед на барабана
Почистване на помпата
Проверка на маркуча за студената вода
Проблеми и мерки за отстраняването им, 23
Сервизно обслужване, 24
13
Page 14

Инсталиране
BG
Важно е да съхранявате инструкциите, за да
можете да правите допълнителни справки по всяко
време. В случай на продажба, преустановяване на
работа или преместване, се уверете, че
инструкциите ще бъдат заедно с пералнята.
Прочетете внимателно инструкциите: защото
съдържат важна информация за монтажа,
използването и безопасността.
В плика с инструкциите ще намерите освен
гаранцията, подробности, които ще бъдат
необходими за инсталирането.
Разопаковане и нивелиране
Разопаковане
1. След разопаковане на пералнята проверете дали
няма щети, причинени по време на транспорта.
Ако е повредена, не я свързвайте, а се обърнете
към дистрибутора.
2. Свалете 4-те
предпазни винта и
съответната втулка,
поставени от задната
част (виж фигура).
Прецизното нивелиране дава стабилност и се
избягват шумове и вибрации най-вече при
центрофугиране.
В случай, че пералнята е поставена върху мокет
или килим, регулирайте така крачетата, че под
пералната машина да остане достатъчно място за
вентилация.
Хидравлични и електрически връзки
Свързване на маркуча за захранване с вода
към водопроводната мрежа
Преди да свържете захранващия маркуч към
водопроводната мрежа, пуснете водата да се
изтече до избистряне.
1. Свържете маркуча за
захранване със студена
вода към пералната
машина, като го завиете
към щуцера,
разположен на гърба,
горе вдясно (âèæ
фигурата).
3. Затворете отворите с предоставените
пластмасови капачки.
4. Запазете всички части, защото, в случай че
пералнята трябва да се транспортира, те трябва да
се монтират отново, за да се избегнат вътрешни
повреди.
Опаковачния материал не трябва да се дава на
деца.
Нивелиране
1. Позиционирайте пералната машина на равен и
твърд под, без да я опирате в стени, мебели и др.
2. Компенсирайте
отклоненията, като
въртите крачетата,
докато пералнята
достигне хоризонтално
положение (не трябва да
има наклон, по-голям от
2 градуса).
2. Свържете
захранващия маркуч,
като го завиете към
крана за студената вода
с накрайник с газова
резба 3/4 (âèæ
фигурата).
3. Внимавайте маркучът да не се прегъва и
притиска.
Налягането по водопроводната мрежа трябва да
бъде в границите, указани в таблицата Технически
данни (виж следващата страница).
Ако дължината на захранващия маркуч не е
достатъчна, се обърнете към специализиран
магазин или към оторизиран техник.
Никога не използвайте стари или употребявани
захранващи маркучи, а само тези, които се
доставят с пералнята.
14
Page 15

Свързване на маркуча за мръсната вода
Свържете маркуча за
мръсната вода към
канализационната тръба
или към тръбата за
отвеждане в стената,
65 - 100 cm
разположени от пода на
височина между 65 и
100 см, като внимавате в
никакъв случай да не го
прегъвате.
Като алтернатива
подпрете маркуча за
мръсната вода в края
на мивката или ваната,
като свържете към
крана водача, доставен
в комплекта (âèæ
фигурата).
Свободният край на
маркуча за мръсната
вода не трябва да бъде
потопен във водата.
За монтираната перална машина електрическият
контакт трябва да бъде леснодостъпен.
Не използвайте удължители или разклонители.
Кабелът не трябва да бъде огънат или сплескан.
Захранващият кабел и щепселът трябва да се
заменят само от оторизирани техници.
Внимание! Фирмата отхвърля всякаква отговорност
в случаите, в които тези норми не се спазват.
BG
Не се препоръчва използването на удължаващи
маркучи. Ако е необходимо, удължителят трябва да
има същия диаметър като оригиналния маркуч и да
не надвишава 150 см.
Свързване към електрическата мрежа
Преди да свържете щепсела в контакта, проверете
дали:
контактът е заземен съгласно действащите
стандарти;
контактът може да поеме максималната мощност
на натоварване на машината, указана в таблицата
с техническите данни (виж следващата
страница);
захранващото напрежение е в границите на
указаното в таблицата с техническите данни (âèæ
следващата страница);
контактът е съвместим с щепсела на пералната
машина. В противен случай заменете щепсела
или контакта.
Пералната машина не трябва да се монтира на
открито, дори под навес, защото е много опасно да
се оставя на влиянието на атмосферните условия.
Технически данни
Ìîäå ë
Размери
Вместимост
Електр ичес ко
захранв ане
Захранване с
вода
Скор ост на
центрофугата
Прогр ами за
проверка
съгласно норма
EN 60456
AQ6F 29 U
шири на 59,5 см
височина 85 см
дълбочина 58 см
îò 1 äî 6 êã.
Виж табелката с характеристиките,
пос тав ена на машината
максималн о наля гане 1 МРа (10 bar )
минимално налягане 0,05 МРа (0,5 bar)
обем на казана 52 литра
до 1200 оборота/минута
програма ; температура 60°;
извършена с 6 кг пране.
Пералната машина съответс тва на
следните Европейски директиви:
- 89/336/СЕЕ от 03/05/89 (за
електромагнитна съвместимост) и
последващите изменения
- 2 00 2/ 96 / CE
- 2006/95/CE (за ниско напрежение)
15
Page 16

Описание на пералната машина
BG
УПРАВЛЯВАЩ
ПАНЕЛ
ВРАТА НА ЛЮКА
РЪКОХВАТКА
НА ВРАТАТА
НА ЛЮКА
ЦОКЪЛ
РЕГУЛИРУЕМИ
КРАЧЕТА
ВРАТИЧКА НА ЛЮКА
За отваряне вратичката
на люка винаги
използвайте специалната
ръкохватка (âèæ
чертежа).
ЧЕКМЕДЖЕ ЗА ПЕРИЛНИ ПРЕПАРАТИ
Намира се вътре в
пералнята и за да се
използва, трябва да се
отвори вратичката.
За дозиране на перилните
препарати вижте раздел
Перилни препарати и
дрехи за пране.
Забележка: залепете на
чекмеджето за перилни
препарати стикера с
описанието на програмите и опциите. Стикерът
се намира в плика, в който е поставена книжката
с инструкции.
1. ваничка за предпране:
3
1
2
перилен препарат. В последния случай се
препоръчва той да се постави непосредствено
преди пускане на пералнята.
3. допълнителна ваничка: Белина
използвайте перилен
препарат на прах.
Преди да изсипете
препарата, проверете
дали не е поставено
допълнителното
отделение 3.
2. ваничка за същинско
пране: използвайте
прахообразен или течен
Използването на допълнителното отделение 3
изключва предпрането.
ваничка за добавки: за омекотител или течни
добавки. Препоръчва се никога да не се превишава
указаното максимално ниво на решетката и да се
разреждат концентрираните омекотители.
Режим на stand by
В съответствие с новите нормативи за пестене на
енергия тази перална машина е снабдена със
система за автоматично изключване (stand by),
която се задейства след няколко минути в случай,
че машината не се използва. Натиснете за кратко
бутон ON/OFF
задейства отново.
и изчакайте машината да се
16
Page 17

Управляващ панел
ПРОГРАМАТОР
Дисплей
ТЕМПЕРАТУРА
Бутони със Светлинни
индикатори ОПЦИИ
Дисплей
ЦЕНТРОФУГА
Дисплей
ЗАБАВЕНО ЗАДЕЙСТВАНЕ
Бутони и следящи
светлинни
индикатори
ОПЦИИ
Светлинен
индикатор
EÊO
BG
Бутон със светлинен
индикатор START/PAUSE
Икони ÔÀÇÈ
НА ПРАНЕ
Бутон със следящ
светлинен индикатор
ON/OFF
ТЕМПЕРАТУРА
Бутон
ЦЕНТРОФУГА
Бутон със следящ светлинен индикатор ON/OFF:
натиска се, без да се задържа бутонът за
включване и изключване на пералнята. Зеленият
светлинен индикатор показва, че пералнята е
включена. За да изключите пералната машина по
време на пране, е необходимо да задържите бутона
натиснат по-дълго време - около 3 сек. Кратко или
случайно натискане няма да доведе до спиране на
машината. Изключването на пералнята по време на
започнало вече пране го анулира.
Превключвател ПРОГРАМИ: може да се върти в
двете посоки. За да изберете по-подходяща
програма, вижте Таблица на програмите. По време
на прането програматорът остава неподвижен.
Бутон
ТЕМПЕРАТУРА: натиснете за задаване на
изменение на температурата или за изключване;
избраната стойност се указва от дисплей, разположен
отгоре (виж Как да се изпълни цикъл пране).
Бутон
ЦЕНТРОФУГА: натиснете за задаване на
изменение или за изключване на центрофугата;
избраната стойност се указва от дисплей, разположен
отгоре (виж Как да се изпълни цикъл пране).
Бутон
ЗАБАВЕНО ДЕЙСТВИЕ: натиснете за
задаване на забавено задействане на избраната
програма; стойността на зададеното закъснение се
указва от разположения отгоре дисплей (âèæ Êàê äà
се изпълни цикъл пране).
Бутони със Светлинни индикатори ОПЦИИ:
натиснете за избор на възможните опции.
Съответстващият на избраната опция светлинен
индикатор остава да свети (виж Как да се изпълни
цикъл пране).
Бутон
Бутон ЗАБАВЕНО
ЗАДЕЙСТВАНЕ
Светлинен индикатор
БЛОКИРАНЕ НА ВРАТАТА
Бутон със светлинен
индикатор БЛОКИРАНЕ
НА БУТОНИТЕ
ИкониФАЗИ НА ПРАНЕ: осветяват се, указвайки
напредването на цикъла (Пране
Изплакване
Центрофугиране Последно отвеждане ).
Надписът
се осветява при завършен цикъл.
Бутон със светлинен индикатор START/PAUSE:
когато зеленият светлинен индикатор дава бавна
мигаща светлина, натиснете бутона, за да започне
прането. При започнал цикъл на пране индикаторът
свети непрекъснато. За задаване на пауза в
прането натиснете отново бутона - индикаторът ще
мига с оранжева светлина. Ако светлинният
индикатор Блокирана врата
е угаснал, ще
може да се отвори вратата на люка. За
продължаване на цикъла пране от мястото, в което
е бил прекъснат, натиснете отново бутона.
Светлинен индикатор
БЛОКИРАНЕ НА ВРАТАТА:
сигнализира, че вратата на люка е блокирана. За да
се отвори вратата, трябва да се зададе пауза на
цикъла (виж Как да се извърши цикъл пране).
Бутон и светлинен индикатор
БЛОКИРАНЕ НА
БУТОНИТЕ: за включване или изключване на
блокировката от управляващия панел задръжте
натиснат бутона за около 2 секунди. Светещият
светлинен индикатор сигнализира, че
управляващият панел е блокиран. По този начин се
възпрепятстват случайни промени в програмите,
преди всичко ако в къщата има деца.
Светлинен индикатор EÊO: Иконата
светва,
когато се постига минимум 10% пестене на енергия
чрез промяна на параметрите на пране. Освен това,
преди машината да премине в режим Stand by,
иконата ще светне за няколко секунди; когато е
изключена, машината спестява около 80 % енергия.
17
Page 18

Как се извършва един цикъл на
пране
BG
ЗАБЕЛЕЖКА: Когато пералнята се използва за първи
път, трябва да се изпълни един цикъл пране без
поставяне на дрехи, а само с перилен препарат, като
се зададе програма памук 90° без предпране.
1. ВКЛЮЧВАНЕ НА ПЕРАЛНЯТА. Натиснете бутон
Всички светлинни индикатори ще светнат за 1
секунда, след което ще остане да свети
непрекъснато само този на бутона
START/PAUSE ще свети бавно с мигаща светлина.
2. ЗАРЕЖДАНЕ НА ДРЕХИТЕ ЗА ПРАНЕ.Отваря се
вратичката на люка. Заредете дрехите за пране,
като внимавате да не превишите количеството на
зареждане, посочено в таблицата за програмите на
следващата страница.
3. ДOЗИРАНЕ НА ПЕРИЛНИЯ ПРЕПАРАТ. Извадете
чекмеджето и поставете перилния препарат в
специалните ванички, както е обяснено в Описание
на пералната машина.
4. ЗАТВОРЕТЕ ВРАТАТА НА ЛЮКА.
5. ИЗБИРАНЕ НА ПРОГРАМАТА. Завъртете СЕЛЕКТОРА
ПРОГРАМИ надясно или наляво до избор на
желаната програма, към нея се дават автоматично
температура и скорост на центрофугиране, които
могат да се променят.
6. ПЕРСОНАЛИЗИРАНЕ НА ЦИКЪЛ ПРАНЕ. Работи се
със специалните бутони от панела за управление:
Промяна на температурата и/или центрофугата.
Машината автоматично изписва максималните
температура и скорост на центрофугиране, които са
предвидени за зададената програма или последно
избраните такива параметри, ако са съвместими с
току-що избраната програма.
С натискане на бутон
температурата до студено пране (
на бутон
центрофугирането до пълното му изключване (
Последващото натискане на бутоните ще доведе
отново стойностите до максимално предвидените.
прогресивно намалява
се намалява прогресивно
, бутонът
. С натискане
.
Изключение: с избиране на програма ПАМУК
температурата може да се повиши до 90°.
Задаване на забавено задействане.
Натиснете съответния бутон до достигане на
желаното време на закъснение. При задаването се
показва времето за закъснение заедно със символа
, който свети с мигаща светлина.
След като е зададено времето на закъснение,
дисплеят ще изобразява непрекъснато символа
и времетраенето на цикъла. При еднократно
натискане на бутона се изобразява зададеното
време на закъснение.
За да се откажете от забавено задействане,
натискайте бутона, докато на дисплея се появи
надписът OFF; тогава символът
След натискане на бутона СТАРТ/ПАУЗА стойността
на забавянето може да се променя само
намалявайки.
ще изгасне.
Промяна на характеристиките на
цикъла.
С натискане на бутоните ОПЦИИ можете да
настроите процеса на прането според вашите
изисквания.
Натиснете бутона за активиране на опцията; ще
светне съответният следящ индикатор.
За деактивиране на опцията натиснете отново
бутона; следящият индикатор ще изгасне.
Ако избраната опция не е съвместима със
зададената програма, тази несъвместимост ще се
сигнализира от звуков сигнал (трикратно) и опцията
няма да се активира.
Ако избраната опция не е съвместима с друга,
предварително зададена опция, светлинният
индикатор, съответстващ на първата избрана опция
ще мига и ще се активира само втората, светлинният
индикатор на бутона ще свети непрекъснато.
7. СТАРТИРАНЕ НА ПРОГРАМАТА. Натиснете клавиш
START/PAUSE. Съответният светлинен индикатор ще
свети непрекъснато и вратата на люка ще се
блокира (индикатор БЛОКИРАНЕ НА ВРАТАТА
свети). Иконите, съответстващи на отделните фази
на пране, ще светят по време на цикъла,
сигнализирайки за текущата фаза. За промяна на
програмата, докато върви даден цикъл пране,
пералнята се поставя в пауза чрез натискане на
бутон START/PAUSE; след това се избира желаният
цикъл и се натиска отново бутонът START/PAUSE.За
да се отвори вратата по време на осъществяващ се
цикъл пране, се натиска бутона START/PAUSE; ако
следящият светлинен индикатор БЛОКИРАНЕ НА
ВРАТАТА
отвори. Натиска се отново бутон START/PAUSE, за да
продължи програмата от мястото, в което е била
прекъсната.
).
8. КРАЙ НА ПРОГРАМАТА. Сигнализира се от
светналия надпис END. Вратата на люка ще може да
се отвори незабавно. Ако светлинният индикатор
START/PAUSE мига, натиснете бутона, за да завърши
цикълът. Отворете вратичката, извадете прането и
изключете пералнята.
Ако желаете да анулирате вече стартирания цикъл,
натиснете продължително бутона
пералната машина се изключва.
Торбичка за юргани, пердета и деликатни тъкани
Благодарение на специалната торбичка, комплект с
доставката, пералната машина Aqualtis дава
възможност за пране и на най-скъпите и деликатни
тъкани, гарантирайки максималната им защита.
Препоръчва се във всеки случай да се използва
торбичката при пране на юргани и пухени завивки или
дрехи с външна подплата от синтетичен материал.
е изгаснал, вратата ще може да се
. Цикълът спира и
18
Page 19

Програми и опции
Таблица на програмите
Икона Описание на програмата
Ïð îãð àì è Ïàìó ê
Ïàì óê бели с предпране
(До баве те пер иле н пре пар ат в пре дназначено то
за това отделение).
Ïàì óê (1): бели и цветни, ус тойчиви, сил но замърсени.
Ïàì óê (2): Бели и цветни, деликатни, силн о замърсени.
Ïàì óê - öâ åòí è (3)
Ðèçè
Дънки
Специални пр ограми
Áåáå: деликатни, цветни, много замърсени.
Синтетика Устойчиви
Синтетика Деликатни
Седмиуно: За спално бельо и комплекти за баня.
Îëåê. Çàâ èâêè 30°: За дрехи и завивки, п одплатен и с гъши пух .
Kîïð èíà: За дрехи от коприна, виско за, фин о бельо.
Âúëía: за вълна, кашмир и т.н.
Ñìå ñåíî 30'íà 30°: за бързо освежаване на не много
замърсени дрехи (не се препоръчва за вълна, коприна и
дрехи, които трябва да се перат на ръка).
Частични програми
Изпл акван е
Öåí òðîô óã à
Изпо мпване
(*) Забележка: след около 10 минути от започването на работа, пералната машина ще преизчисли и покаже оставащото време до края на изпълнение на програмата.
За всички Test Institutes:
1) Програма за проверка съгласно стандарт EN 60456: задайте програма
2) Дълга програма за памук; задайте програма
3) Кратка програма за памук; задайте програма
с температура 40 °C.
с температура 40 °C.
Опции на прането
Супер изпиране
Благодарение на използването на по-голямо
количество вода в началната фаза на цикъла и на подългото време на пране, тази опция гарантира
висококачествено изпиране.
Може да се използва ñ èëè
3
1
2
áåç белина.
Ако желаете избелване,
поставете допълнителната
ваничка 3, комплект с
доставката във ваничка 1.
При дозиране на белина не
надвишавайте максималното
ниво max, указано на
централната ос (âèæ
фигурата). Ако желаете да
Ìàêñ .
òåìï.
(°C)
90° 1200
60°
(Max. 90°)
40° 1200
40° 1200
40° 600
40° 800
40° 800
60° 800
40° 800
60° 1200
30° 1000
30° 0
40° 600
30° 800
- 1200 -
- 1200 - - - 6
- 0 - - - 6
с температура 60 °C.
мигат светлинните индикатори Лесно Гладене и
СТАРТ/ ПАУЗА. За завършване на цикъла натиснете
бутон START/PAUSE или бутон Лесно Гладене. В
програмата Коприна
с накиснатите дрехи и ще започне да мига светлинният
индикатор Лесно Гладене. За да се източи водата и да
може да се извади прането, е необходимо да се
натисне бутон START/PAUSE или бутон Лесно Гладене.
Не се активира за програмите
При избор на тази опция времетраенето на
програмата се намалява с 30%-50% въз основа на
избрания цикъл, като същевременно се гарантира
пестене на вода и енергия. Използвайте тази опция за
не много замърсени дрехи.
Не може да се активира с програмите
извършите само избелване без пълен цикъл пране,
изсипете избелващия препарат в допълнителната
ваничка 3, задайте програма Изплакване
опцията Супер изпиране
.
Не може да се активира с програмите
и включете
, , , , ,
, , .
Лесно Гладене
При избор на тази опция прането и центрофугирането
ще се изменят целесъобразно така, че да се намали
образуването на гънки. При завършване на цикъла
пералнята прави бавни завъртания на барабана, ще
С избора на тази опция се увеличава ефикасността на
изплакването и се гарантира максимално
отстраняване на остатъците от перилния препарат.
Подходяща е за особено чувствителна към перилни
препарати кожа. Препоръчва се тази опция да се
използва при пълен товар на зареждане на пералната
машина или при пране с големи дози перилен
препарат.
Не може да се активира с програмите
Ìàêñ .
скорост
(обороти
в минута)
1200
Пестене на Време
, , , , .
Допълнително изплакване
Перилни пр епар ати и
добавки
Ïåð èë åí
ïð åïàð àò
Îìåê-
отител
ll
lll
lll
lll
lll
ll
lll
lll
lll
lll
ll
ll
ll
ll
Белина
ll
пералнята ще завърши цикъла
, , , , .
Зареждане
ìaêñ.
- 6
6
6
6
2
- 3
2
2,5
2,5
6
- 2
- 1
- 1,5
- 3
6
, , , ,
, , .
Пр одължителн-
îñò íà
цикъла
BG
(*) Продължителността на програмата за пране се
изписва върху дисплея.
19
Page 20

Перилни препарати и дрехи за
пране
BG
Перилен препарат
Изборът на вида и количеството перилен препарат
зависи от вида на тъканта (памук, вълна,
коприна), от цвета, от температурата на пране, от
степента на замърсеност и от твърдостта на водата.
С правилното дозиране на перилния препарат се
избягва излишното харчене и се опазва околната
среда: Въпреки че са биологично разграждащи се,
перилните препарати съдържат елементи, които
променят равновесието в природата.
Препоръчва се да:
се използват прахообразни перилни препарати за
бели памучни тъкани и за предпране.
се използват течни перилни препарати за
деликатни памучни тъкани и при всички програми
с ниска температура.
се използват течни перилни препарати за вълна и
коприна.
Перилният препарат трябва да се постави преди
началото на прането в специалната ваничка или в
дозатора, за да се внесе направо в барабана. В
този случай не може да се избере цикъл Памук с
предпране.
Не използвайте препарати за ръчно пране, защото
образуват много пяна.
Разпределяне на прането
Разгънете добре дрехите, преди да ги поставите
в машината.
Разделете дрехите според вида на тъканта
(символът е означен на етикета на дрехата) и
цвета, като внимавате да са отделени цветните от
белите дрехи;
Изпразнете джобовете и проверете копчетата.
Не надвишавайте указаните стойности в Таблица
на програмите, отнасящи се за теглото на
сухото пране:
Колко тежат дрехите за пране?
1 чаршаф 400-500 ã
1 калъфка за възглавница 150-200 ã
1 покривка за маса 400-500 ã
1 хавлия 900-1200 ã
1 хавлиена кърпа 150-250 ã
1 чифт дънки 400-500 ã
1 ðèçà 150-200 ã
Съвети за изпиране
Ðèçè: използвайте специалната програма Ризи
за пране на ризи от различни тъкани и цвят, за да
гарантирате най-грижливо изпиране.
Дънки: използвайте специалната програма Дънки
за всички дрехи от тъкан Denim; обърнете дрехите
преди пране и използвайте течен перилен препарат.
Áåáå: използвайте специалната програма Бебе
за да отстраните типичното замърсяване на
детските дрехи и премахнете перилния препарат, за
да се избегнат алергични реакции на деликатната
детска кожа. Цикълът е създаден за елиминиране
на бактериите чрез използване на по-голямо
количество вода и оптимизиране на ефекта от
специфичните хигиенизиращи добавки към
перилния препарат.
При завършване на прането пералнята прави бавни
завъртания на барабана, за да избегне
образуването на гънки; за приключване на цикъла
се натиска бутон START/PAUSE.
Коприна: използвайте специалната програма
Коприна
За деликатните тъкани се препоръчва използването
на специален вид перилен препарат.
Пердета: Използвайте програма за коприна
Коприна
поставят в доставената в комплекта торбичка.
Вълна: Hotpoint/Ariston е единствената пералня,
получила престижното признание Woolmark Platinum
Care (M.0508) от компанията Woolmark , която дава
сертификат за пране на всички вълнени дрехи, дори
носещите етикетсамо ръчно пране
програмата Вълна може абсолютно спокойно да се
перат в пералня всички вълнени дрехи с гаранция за
най-добро изпълнение.
Олек. Завивки 30°: за пране на дрехи и завивки с
подплата от гъши пух, като единични пухени
завивки (не по-тежки от 2 кг), възглавници, якета,
използвайте специалната програма Олек.
Завивки 30°
да се поставят в барабана, като краищата им се
подгънат навътре (виж фигурите) и да не се
превишават ¾ от обема на самия барабан.
За оптимално изпиране се препоръчва използване
на течен перилен препарат, който се дозира в
чекмеджето за перилния прeпарат.
Юргани: за пране на юргани със синтетичен пълнеж
трябва да се използва специалната торбичка,
комплект с доставката, и да се зададе програма
Олек. Завивки 30°
Артикули за баня и спално бельо: тази пералня
позволява да се пере бельото за цялата къща с
един-единствен цикъл Седмиуно,
оптимизира използването на омекотители и
позволява пестене на време и енергия. Препоръчва
се използването на прахообразен перилен препарат.
Трудно отстраняващи се петна: Добре е трудно
отстраняващите се петна да се третират с твърд
сапун преди пране и да се използва програма
Памук с предпране.
за пране на всички дрехи от коприна.
. Препоръчва се да се сгънат и
. Òàêà ÷å ñ
. Препоръчва се пухените завивки
.
който
Система за измерване на товара
,
Преди всяко центрофугиране, с цел избягване на
прекалени вибрации и за равномерно разпределяне
на товара, барабанът се завърта със скорост, малко
по-висока от тази при прането. Ако след
направените последователни опити товарът все още
не е правилно разпределен, машината извършва
центрофугиране при скорост, по-ниска от
предвидената. При наличие на прекален дисбаланс
пералнята извършва разпределението вместо
центрофугата. За улесняване на по-доброто
разпределение на товара и правилното му
балансиране се препоръчва да се смесват дрехи за
пране с големи и малки размери.
20
Page 21

Мерки за безопасност и
препоръки
Пералната машина е проектирана и произведена в
съответствие с международните норми за
безопасност. Предупрежденията тук са
продиктувани от съображения за безопасност и
трябва да се четат внимателно.
Общи предохранителни мерки
Този уред е предназначен изключително за
домашна употреба.
Пералната машина трябва да се използва само от
възрастни съгласно инструкциите, съдържащи се
в това ръководство.
Не докосвайте машината, когато сте боси или с
мокри или влажни ръце или крака.
Изключвайте от контакта, като хващате за
щепсела, а не като дърпате кабела.
Не докосвайте маркуча за мръсната вода,
защото може да достигне високи температури.
Никога не отваряйте люка със сила: защото може
да се повреди механизмът за безопасност, който
предпазва от случайно отваряне.
В случай на повреда по никакъв повод не достигайте
до вътрешните механизми в опити за ремонт.
Винаги контролирайте децата да не се
доближават до работещата машина.
Преместването да се извършва внимателно от
двама или трима души. Никога от сам човек,
защото пералната машина тежи много.
Преди да заредите машината, проверете дали
барабанът е празен.
Ръчно отваряне на вратичката
BG
В случай че е невъзможно да се отвори вратата на
люка поради прекъсване на електрическата
енергия, а искате да прострете прането,
процедирайте по следния начин:
1. извадете щепсела от
контакта за електрически
ток.
2. уверете се, че нивото
на водата в пералнята е
по-ниско от отвора на
люка; в противен случай
отстранете излишната
вода чрез маркуча за
мръсна вода, като я
съберете в кофа, както е
посочено нафигура.
3. свалете покривния панел на предната страна на
пералната машина (виж следващата страница).
4. като използвате
езичето, посочено на
фигурата, дръпнете навън
до освобождаване на
пластмасовия изтегляч от
неподвижно положение;
след това го издърпайте
надолу, докато чуете
щрак, което показва, че
вратата е деблокирана.
Рециклиране
Унищожаване на опаковъчния материал:
спазвайте местните норми по този начин
опаковъчният материал може да се рециклира.
Европейската директива 2002/96/EО за
отпадъците от електрическо и електронно
оборудване предвижда домакинските
електроуреди да не се изхвърлят заедно с
обичайните твърди градски отпадъци. Извадените
от употреба уреди трябва да бъдат събирани
отделно с цел да бъде увеличен делът на
подлежащите на повторна употреба и
рециклиране материали, от които са направени,
както и да бъдат избегнати евентуални вреди за
здравето и околната среда. Символът задраскан
контейнер е поставен върху всички продукти, за
да напомня за задължителното разделно
събиране.
За по-нататъшна информация относно правилното
изваждане от употреба на домакинските
електроуреди се обърнете към предпочитаната от
вас обществена служба или към дистрибуторите.
5. Отворете вратата, а в
случай, че това все още
не е възможно, повторете
операцията.
6. монтирайте отново панела, като, преди да го
избутате към пералнята, се уверите, че сте
поставили правилно закрепващите куки в
специалните водачи.
21
Page 22

Поддръжка и почистване
BG
Спиране на водата и изключване на
електрозахранването
Затваряйте крана за вода след всяко изпиране.
По този начин се ограничава амортизирането на
хидравличната инсталация на пералната машина
и се ограничава опасността от течове.
Изключвайте щепсела от контакта за
електрически ток, когато почиствате пералната
машина и по време на работи по поддръжката.
Почистване на машината
Външната част и гумените части могат да се
почистват с кърпа, напоена с хладка вода и сапун.
Не използвайте разтворители или абразивни
препарати.
Почистване на чекмеджето за
перилните препарати
За изваждане на
чекмеджето натиснете
лост (1) и го издърпайте
навън(2) (виж фигурата).
Измийте го под течаща
вода. Това почистване
трябва да се извършва
често.
За достъп до филтъра:
2
1. свалете покривния панел от предната страна на
пералната машина, като натискате в посока към
центъра, след това го избутайте от двете страни
надолу и го извадете (виж фигурите).
2. поставете съд за
събиране на водата, която
ще изтече (около 1,5 л)
(виж фигурата);
3. отвийте капачката, като
я завъртите в посока,
обратна на часовниковата
стрелка (виж фигурата);
4. почистете внимателно отвътре;
5. завийте отново капачката;
6. монтирайте отново панела, като, преди да го
избутате към пералнята, се уверите, че сте
поставили правилно закрепващите куки в
специалните водачи.
Преглед на барабана
Оставяйте винаги открехната вратата на люка, за
да се избегне образуването на лоши миризми.
Почистване на помпата
Пералната машина е окомплектована със
самопочистваща се помпа, която няма нужда от
поддръжка. Възможно е обаче малки предмети
(монети, копчета) да попаднат във филтъра, който
предпазва помпата и се намира в долната й част.
Уверете се, че цикълът на пране е завършил и
изключете щепсела от контакта.
22
Проверка на маркуча за студената вода
Проверявайте маркуча за студената вода поне
веднъж годишно. Трябва да се подмени, ако е
напукан и нацепен, защото по време на изпиране
голямото налягане може да предизвика внезапно
спукване.
Page 23

Проблеми и мерки за
отстраняването им
Възможно е пералната машина да откаже да работи. Преди да се обадите в сервиза за техническа
поддръжка и ремонт (виж Сервизно обслужване), проверете дали не става въпрос за лесноразрешим
проблем, като си помогнете със следващия списък.
BG
Проблеми:
Пералната машина не се
включва.
Цикълът на изпиране не
започва.
В машината не постъпва вода.
Вратата на пералнята остава
блокирана.
Пералната непрекъснато се
пълни и източва.
Машината не се източва или не
центрофугира.
Машината вибрира много по
време на центрофугиране.
Пералната машина има теч.
Иконите, отнасящи се до Текуща
фаза, мигат бързо едновременно
със светлинния индикатор ON/OFF
Образува се твърде много пяна.
Вратата на пералнята остава
блокирана.
Възможни причини/Мерки за отстраняването им:
Щепселът не е включен към електрически контакт или не е добре
включен, за да прави контакт.
Нямате ток вкъщи.
Вратата на люка не е затворена добре.
Бутонът START/PAUSE не е бил натиснат.
Кранът за вода не е отворен.
Въвело се е закъснение за часа на стартиране.
Маркучът за студената вода не е свързан към крана.
Маркучът е прегънат.
Кранът за вода не е отворен.
Няма вода по водопроводната мрежа.
Налягането е недостатъчно.
Бутонът START/PAUSE не е бил натиснат.
При избор на цикъл Бебе
Гладене
завъртания на барабана; за завършване на цикъла натиснете START/
PAUSE или бутона Лесно Гладене
(Коприна) пералната машина ще приключи цикъла с накиснато
пране; за да се източи водата и да може да се извади прането, трябва
да се натисне бутон START/PAUSE или бутон Лесно Гладене
Маркучът за мръсната вода не е монтиран между 65 и 100 см от
земята (виж Инсталиране).
Краят на маркуча за мръсната вода е потопен във водата (виж Инсталиране).
Ако жилището ви се намира на последните етажи на сградата, налягането
на студената вода може да е ниско, поради което пералната машина
непрекъснато се пълни и източва. За избягване на това неудобство в
търговската мрежа се предлагат подходящи възвратни клапани.
Канализационната тръба в стената няма отдушник.
Програмата не предвижда източване: с някои програми трябва да се
извършва ръчно (виж Програми и опции).
Включена е опцията Лесно Гладене: за завършване на програмата
се натиска бутон START/PAUSE (виж Програми и опции).
Маркучът за мръсната вода е притиснат (виж Монтаж).
Канализационната тръба е запушена.
При монтажа казанът не е бил отблокиран правилно.
Пералната машина не е нивелирана (виж Монтаж).
Пералната машина е притисната между мебели и стена (виж Монтаж).
Товарът не е балансиран (виж Перилни препарати и дрехи за пране).
Маркучът за студената вода не е добре свързан (виж Монтаж).
Чекмеджето за перилните препарати е запушено (за почистваното му
виж Поддръжка и почистване).
Маркучът за мръсната вода не е фиксиран добре (виж Монтаж).
Изключете машината и извадете щепсела от контакта, изчакайте
около 1 минута и я включете отново. Ако неизправността
продължава, обърнете се към Сервизно обслужване.
Перилният препарат не е за автоматична пералня (трябва да има
надпис за автоматична пералня, за пране на ръка и за автоматична
пералня или подобен надпис).
Дозирането е било твърде голямо.
Изпълнете процедурата за ръчно деблокиране (виж Мерки за
безопасност и съвети).
, в края на цикъла пералната машина ще направи бавни
(Бебешки дрехи) или опцията Лесно
. При избор на цикъл Коприна
.
Забележка: за излизане от демонстрационния режим (Demo Mode) се натискат едновременно двата бутона
ON/OFF
è START/PAUSE .
23
Page 24

Сервизно обслужване
195078832.00
05/2009 - Xerox Fabriano
BG
Преди да се свържете със сервиза за техническо обслужване и ремонт:
Проверете дали можете да разрешите сами проблема (виж Неизправности и мерки за
отстраняването им);
Включете отново програмата и проверете дали неудобството е отстранено;
В случай че не можете да се справите сами, обърнете се към оторизиран сервиз за техническо
обслужване и ремонт.
В случай на неправилен монтаж или неправилно използване на пералнята, услугата на сервиза ще се
заплаща.
Никога не ползвайте услугите на неоторизирани техници.
Съобщете:
типа на проблема;
модела на машината (Mod.);
серийния номер (S/N).
Тази информация се намира на фабричната табелка с характеристиките, поставена на уреда.
24
 Loading...