

Page 1

Instructions for
installation and use
WASHING MACHINE
EN
English,1
Deutsch,13 Nederlands,25
ES
Español,37
Português,49
AQUALTIS
AQ105D 49D
DE
PT
NL
Contents
Installation, 2-3
Unpacking and levelling
Connecting the electricity and water supplies
Technical data
Description of the machine, 4-5
Touch control panel
Running a wash cycle, 6
Wash cycles and options, 7
Table of wash cycles
Wash options
Detergents and laundry, 8
Detergent
Preparing the laundry
Washing recommendations
Precautions and advice, 9
General safety
Load balancing system
Disposal
Opening the porthole door manually
EN
Care and maintenance, 10
Cutting off the water and electricity supplies
Cleaning the machine
Cleaning the detergent dispenser drawer
Caring for your appliance drum
Cleaning the pump
Checking the water inlet hose
Trouble shooting, 11
Assistance, 12
1
Page 2
Installation
EN
! This instruction manual should be kept in a safe place
for future reference. If the washing machine is sold, given
away or moved, please ensure the manual is kept with
the machine, so that the new owner may benefit from the
advice contained within it.
! Read these instructions carefully: they contain vital
information relating to the safe installation and operation of
the appliance.
! Inside the pack containing this manual, you will also find
the guarantee and all the details necessary for installation.
Unpacking and levelling
Unpacking
1. Once you have removed all the packaging from the
washing machine, make sure it has not been damaged
during transportation.
If it has been damaged, contact the retailer and do not
proceed any further with the installation process.
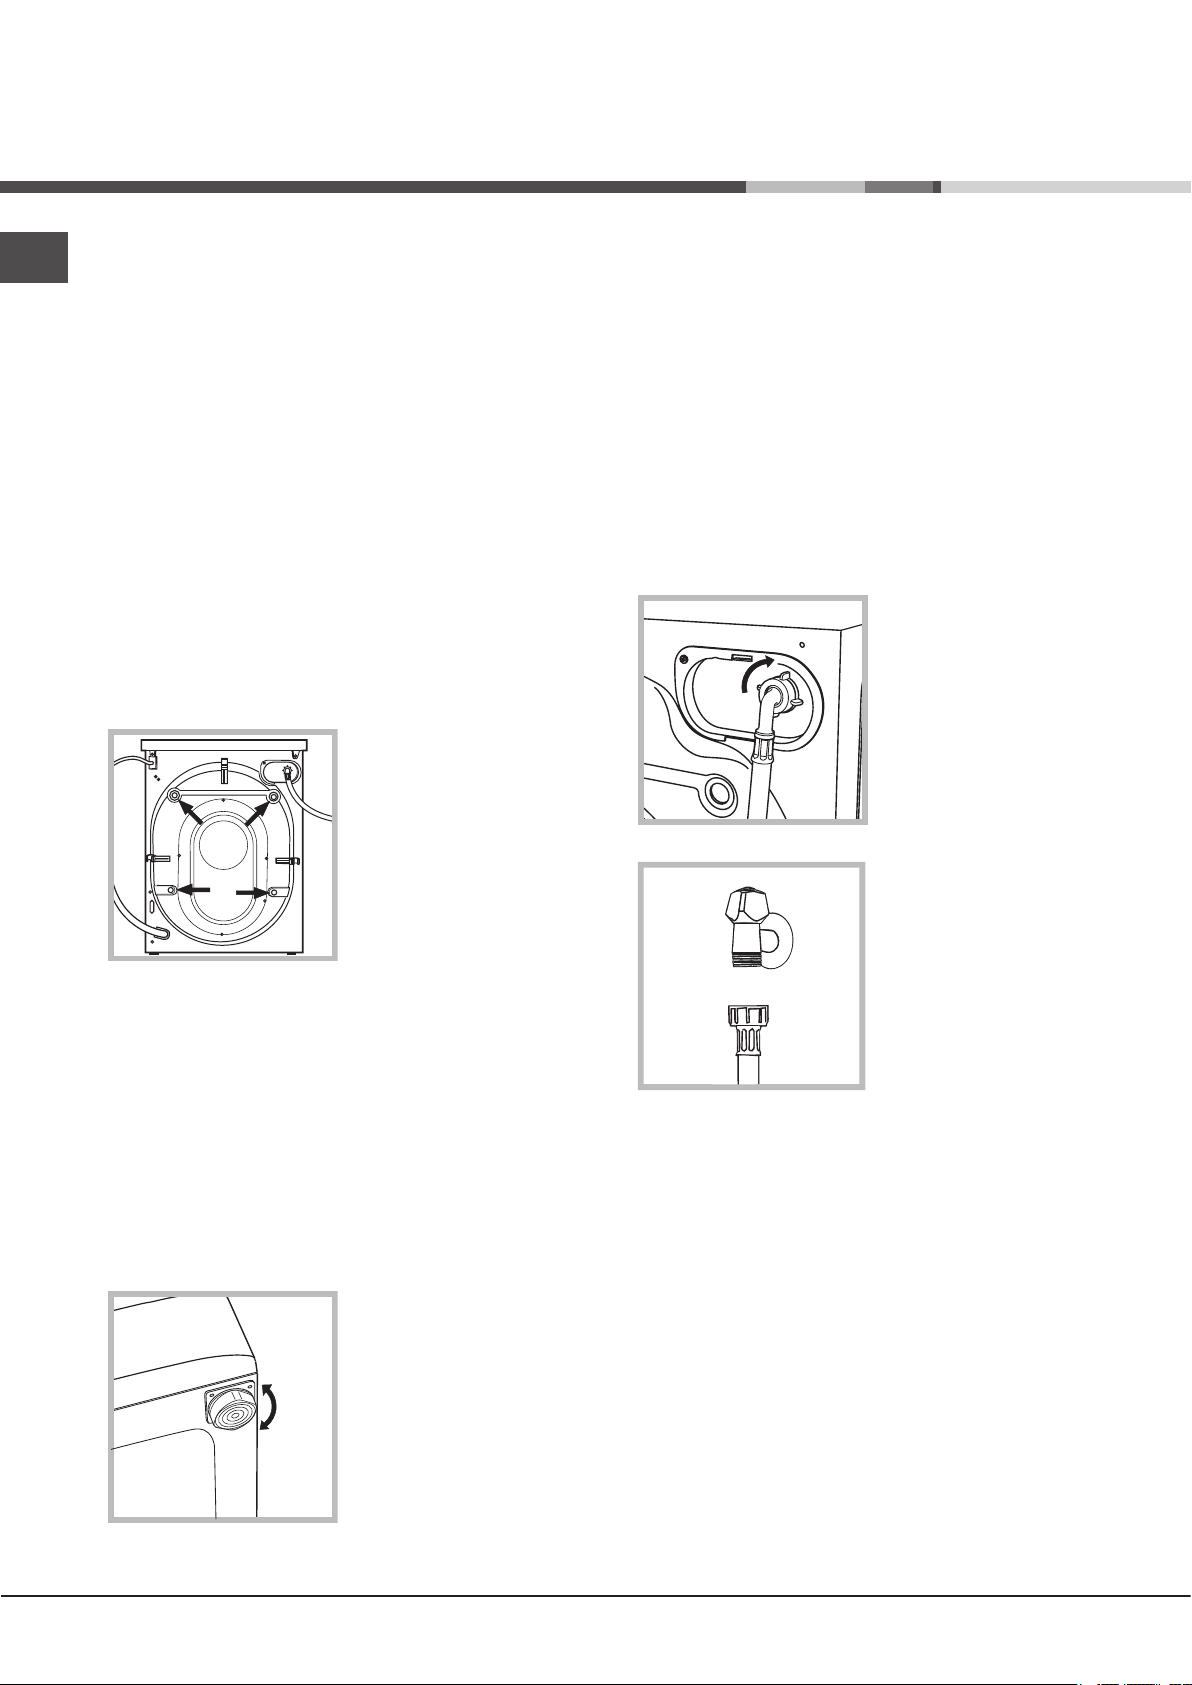
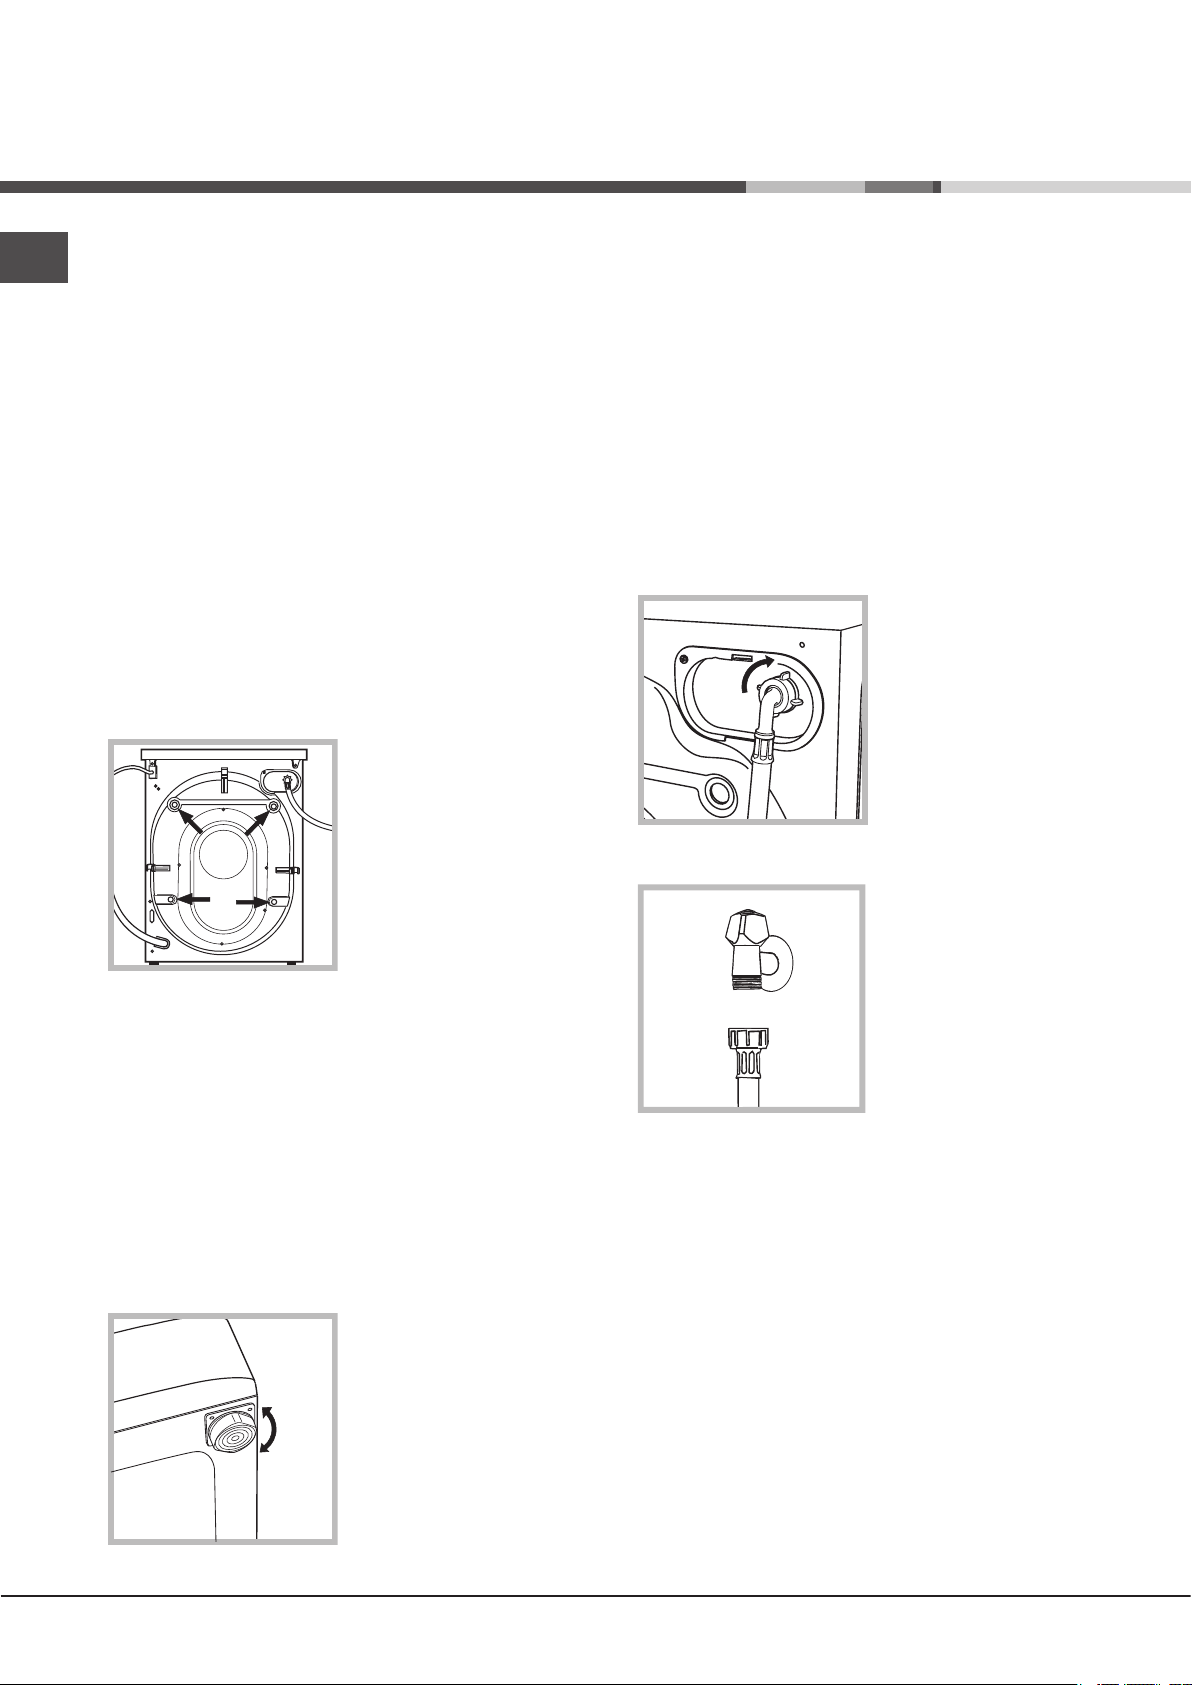
2. Remove the 4 protective
screws (used during
transportation) and the
corresponding spacer,
located on the rear part of
the appliance (see figure).
! If the appliance is levelled correctly, it will be more stable
and much less likely to cause vibrations and noise while it
is operating, particularly during the spin cycle.
! If it is placed on carpet or a rug, adjust the feet in such a
way as to allow a sufficient ventilation space underneath
the washing machine.
Connecting the electricity and water
supplies
Connecting the water inlet hose
! Before connecting the inlet hose to the water supply, run
the water until it is perfectly clear.
1. Connect the inlet hose
to the machine by screwing
it onto the cold water inlet
of the appliance, which is
situated on the top righthand side of the rear part of
the appliance (see figure).
2. Connect the inlet hose
by screwing it to a cold
water tap using a 3/4 gas
threaded connection (see
figure).
3. Close off the holes using the plastic plugs supplied in the
pack.
4. Keep all the parts in a safe place; they will be needed
again if the washing machine is moved to another location,
to prevent the inside of the appliance being damaged.
! Packaging materials should not be used as toys for
children.
Levelling
1. Place the washing machine on a flat sturdy floor, without
resting it up against walls or cabinets.
2. If the floor is uneven, the
front feet of the machine
may be adjusted until
it reaches a horizontal
position (the angle of
inclination must not exceed
2 degrees).
3. Make sure that the hose is not folded over or bent.
! The water pressure at the tap must fall within the values
indicated in the Technical data table (see next page).
! If the inlet hose is not long enough, contact a specialised
shop or an authorised technician.
! Never use second-hand or old inlet hoses; use the
products supplied with the machine.
2
Page 3
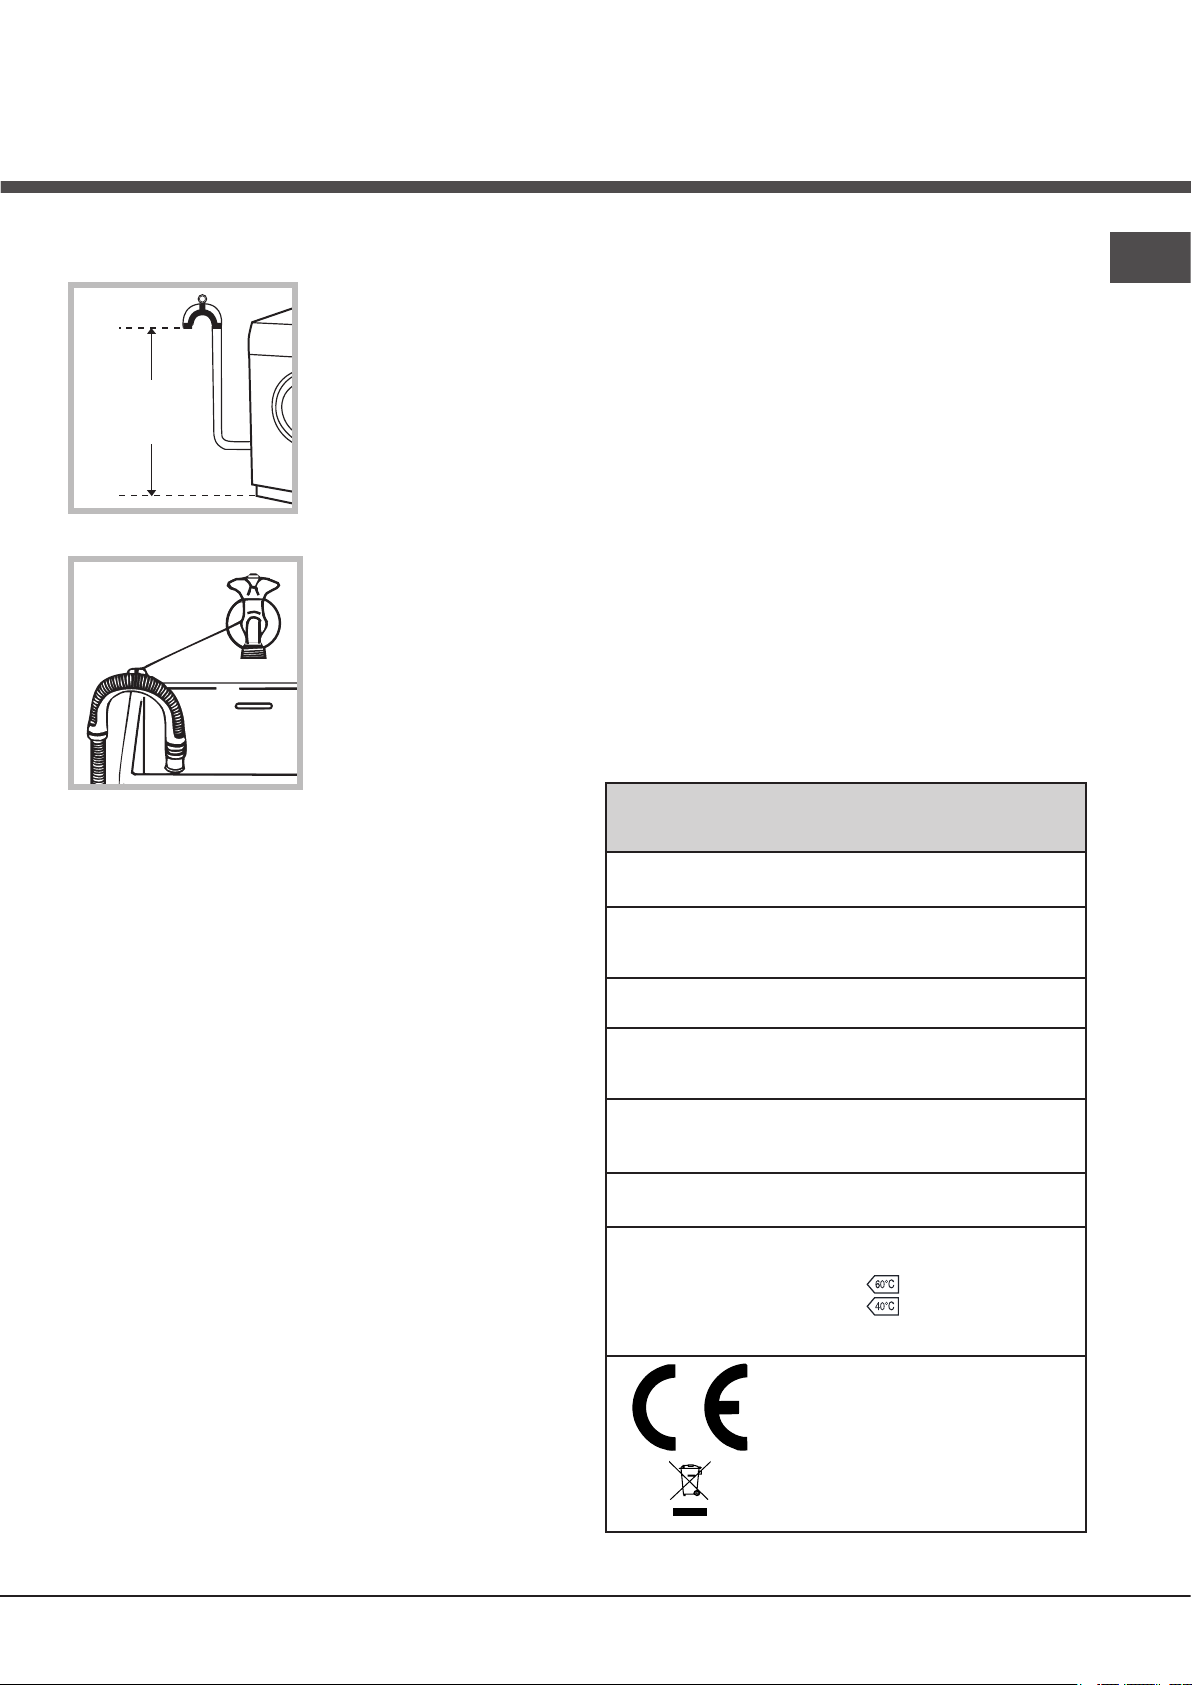
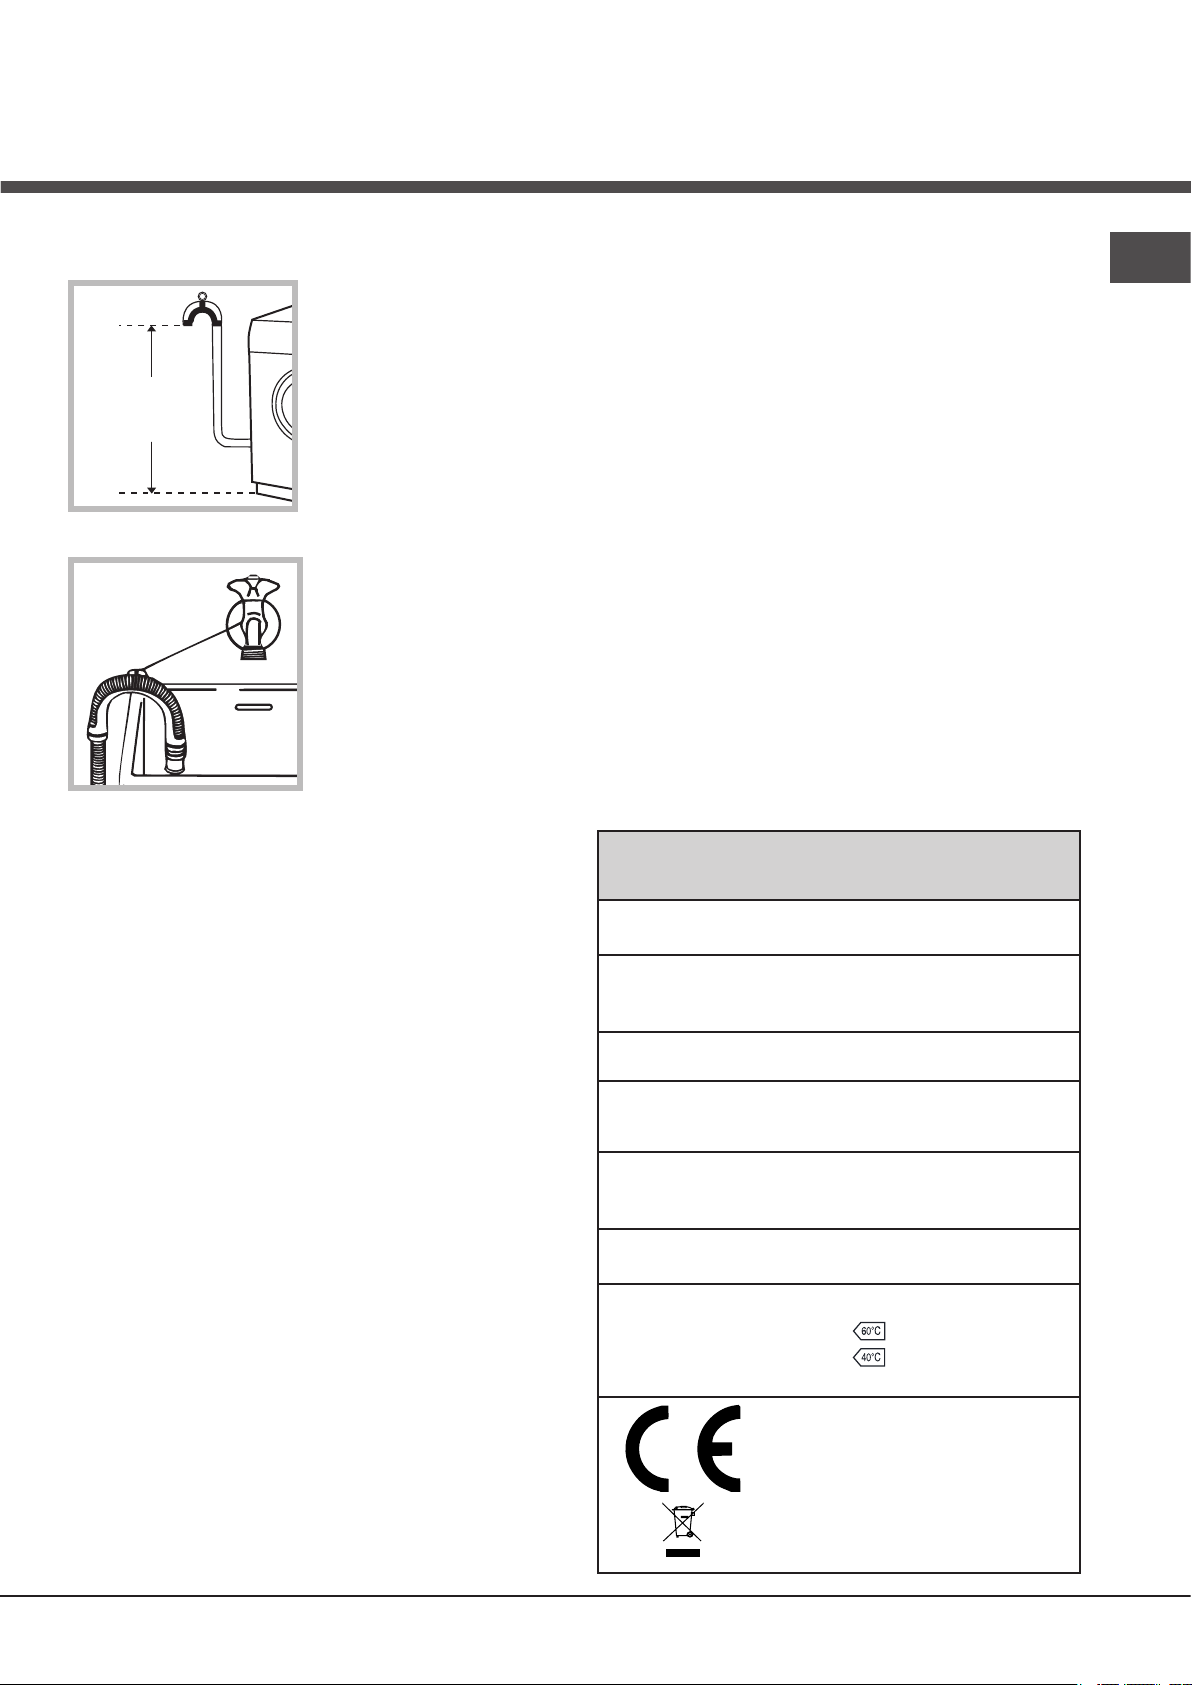
Connecting the drain hose
65 - 100 cm
Connect the drain hose to
drain duct piping or a wall
drain located between 65
and 100 cm above the floor,
making sure it is not bent
at all.
Alternatively, rest the
drain hose on the side of
a washbasin or bathtub,
fastening the duct supplied
to the tap (see figure).
The free end of the hose
should not be underwater.
! Do not use extension cords or multiple sockets.
EN
! The cable should not be bent or compressed.
! The power supply cable and plug must only be replaced
by authorised technicians.
Warning! The company shall not be held responsible in the
event that these regulations are not respected.
! We advise against the use of hose extensions; if it is
absolutely necessary, the extension must have the same
diameter as the original hose and must not exceed 150 cm
in length.
Electrical connections
Before plugging the appliance into the electricity socket,
make sure that:
• the socket is earthed and complies with all applicable
laws;
• the socket is able to withstand the maximum power load
of the appliance as indicated in the Technical data table
(see opposite);
• the power supply voltage falls within the values indicated
in the Technical data table (see opposite);
• the socket is compatible with the plug of the appliance.
If this is not the case, have the socket or the plug
replaced.
! The machine must not be installed outdoors, even in
covered areas. It is extremely dangerous to leave the
appliance exposed to rain, storms and other weather
conditions.
! The mains socket must remain within easy reach after the
washing machine has been installed.
Technical data
Model
Dimensions
Capacity
Electrical
connections
Water connections
Spin speed
Test wash cycles
in accordance
with directives
1061/2010 and
1015/2010
AQ105D 49D
width 59.5 cm
height 85 cm
depth 64,5 cm
from 1 to 10 kg
please refer to the technical data plate
fixed to the machine
maximum pressure 1 MPa (10 bar)
minimum pressure 0.05 MPa (0.5 bar)
drum capacity 71 litres
up to 1400 rotations per minute
programme
programme
This appliance conforms to the following
EC Directives:
- 2004/108/EC (Electromagnetic Compatibility)
- 2006/95/EC (Low Voltage)
- 2002/96/EC
; Cotton standard 60°C.
; Cotton standard 40°C.
3
Page 4
Description of the machine
3
1
2
1
8
0
2
1
0
1
5
0
1
2
0
9
0
6
0
B
A
EN
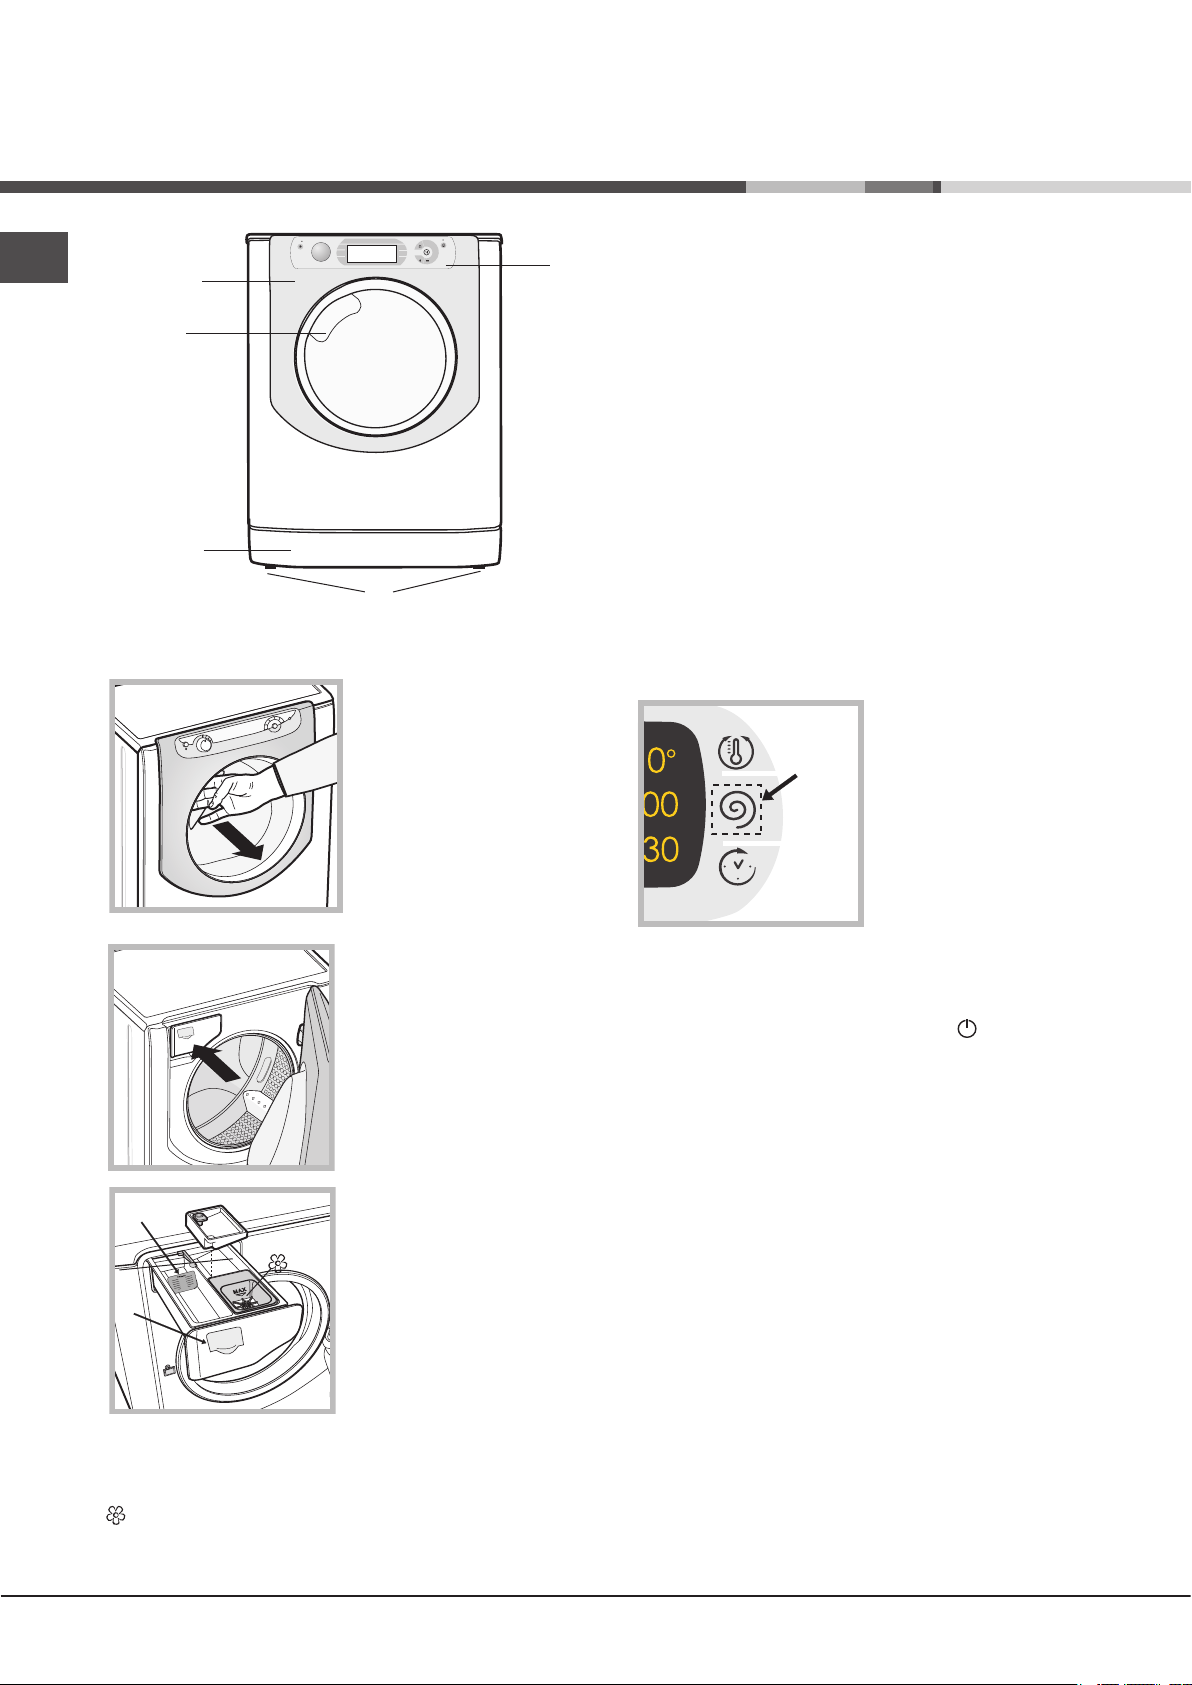
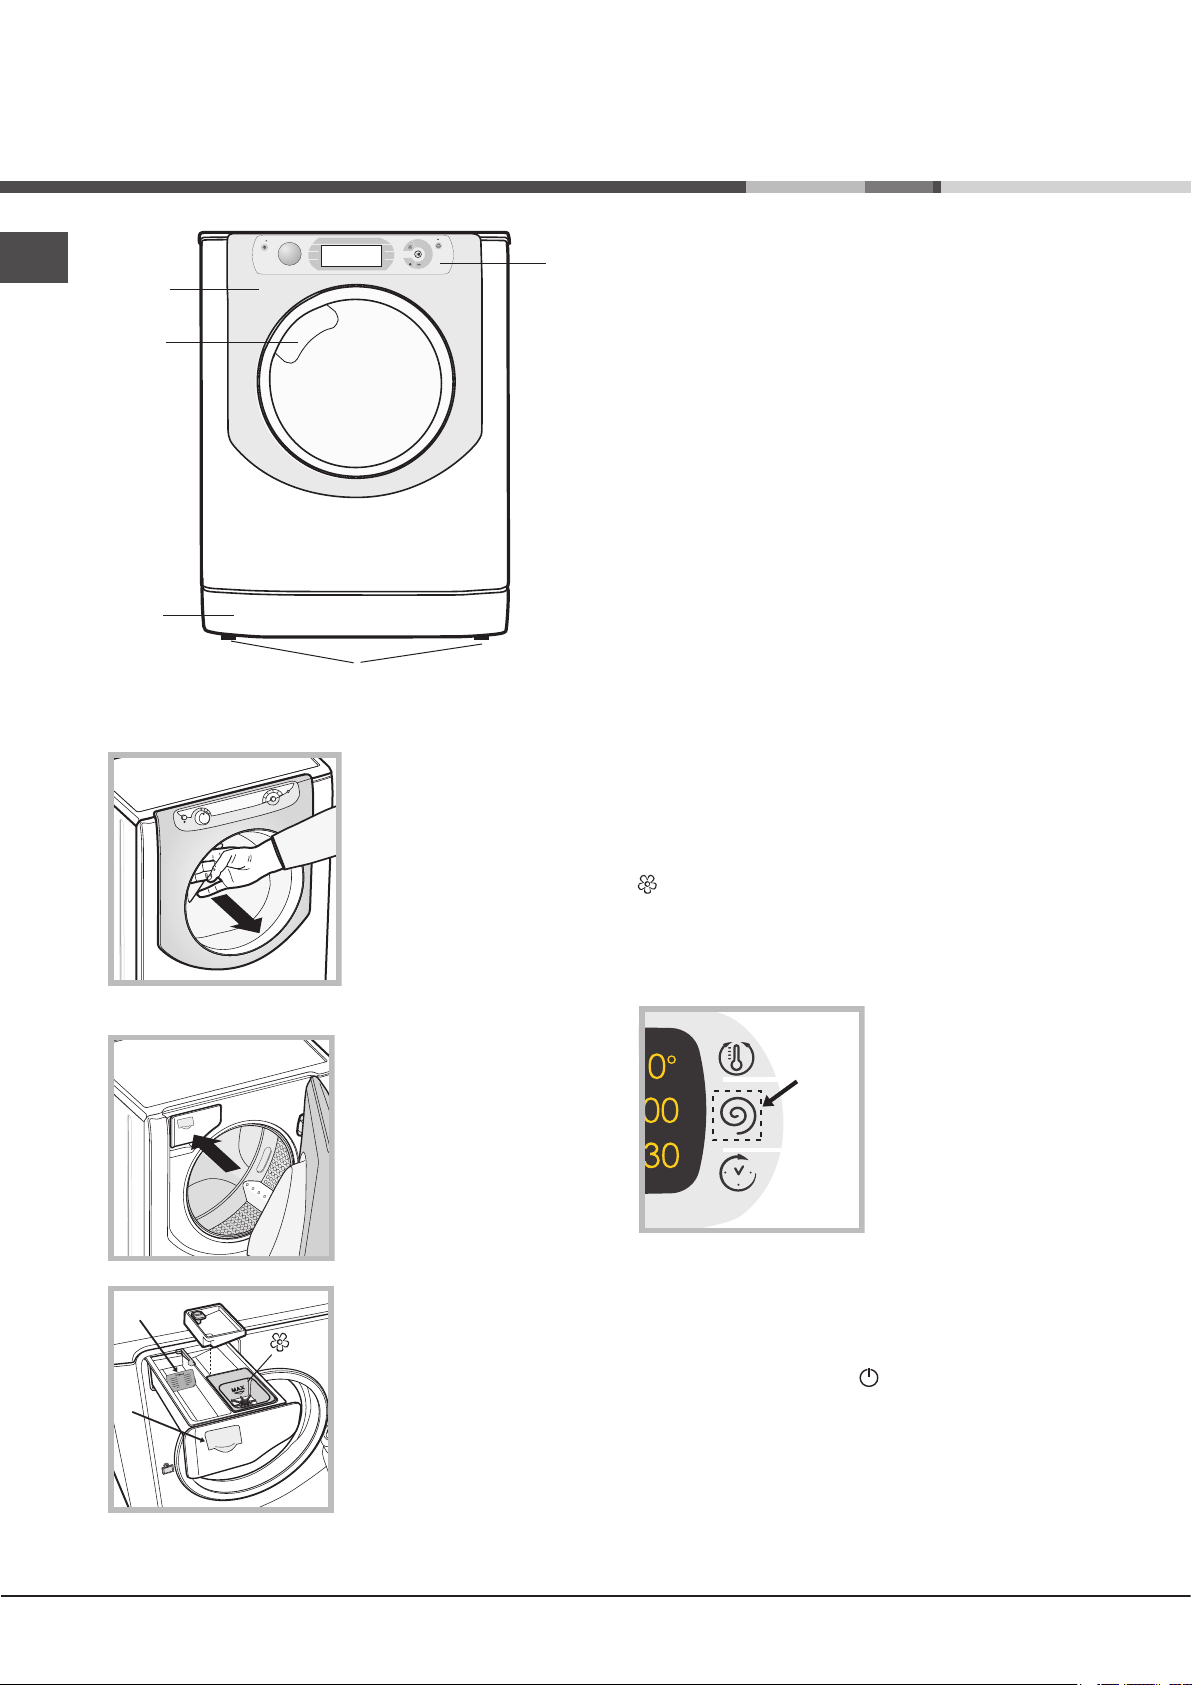
PORTHOLE DOOR
PORTHOLE DOOR
HANDLE
KICK STRIP
PORTHOLE DOOR
ADJUSTABLE FEET
Always use the handle to
open the porthole door (see
figure).
CONTROL
PANEL
DIRECT INJECTION SYSTEM
The washing machine features the innovative “Direct
Injection” technology that quickly solubilises the detergent
and efficiently activates all the various components. The
system guarantees the complete use and dissolution of
the detergent, which is mixed with water before reaching
the garments. This ensures better cleaning results already
at low temperatures, providing significant energy savings
while perfectly protecting colours and fibres. The “Direct
Injection” technology is activated automatically in all the
cycles.
TOUCH CONTROL PANEL
To adjust the settings, gently
press the icon inside the
sensitive (touch control) area
as illustrated in the figure.
DETERGENT DISPENSER DRAWER
The detergent dispenser
drawer is located inside the
machine and can be accessed
by opening the door.
For more information on
detergent measures, please
refer to the chapter entitled
“Detergents and laundry”.
Standby mode
This washing machine, in compliance with new energy
saving regulations, is fitted with an automatic standby
system which is enabled after about 30 minutes if no
activity is detected. Press the ON-OFF button briefly and
wait for the machine to start up again.
Consumption in off-mode: 0,5 W
Consumption in Left-on: 0,5 W
1. pre-wash compartment:
use powder detergent.
! Before pouring in the detergent,
make sure that extra compartment
3 has been removed.
2. main wash compartment:
If liquid detergent is used,
it is recommended that the
removable plastic partition A
(supplied) be used for proper
dosage.If powder detergent is
used, place the partition into slot
B.
3. extra compartment: Bleach
! The use of extra compartment 3 excludes the prewash function.
washing additives compartment: for fabric softener
or liquid additives. We recommend that the maximum
level indicated by the grille is not exceeded, and that
concentrated fabric softeners are diluted.
4
Page 5
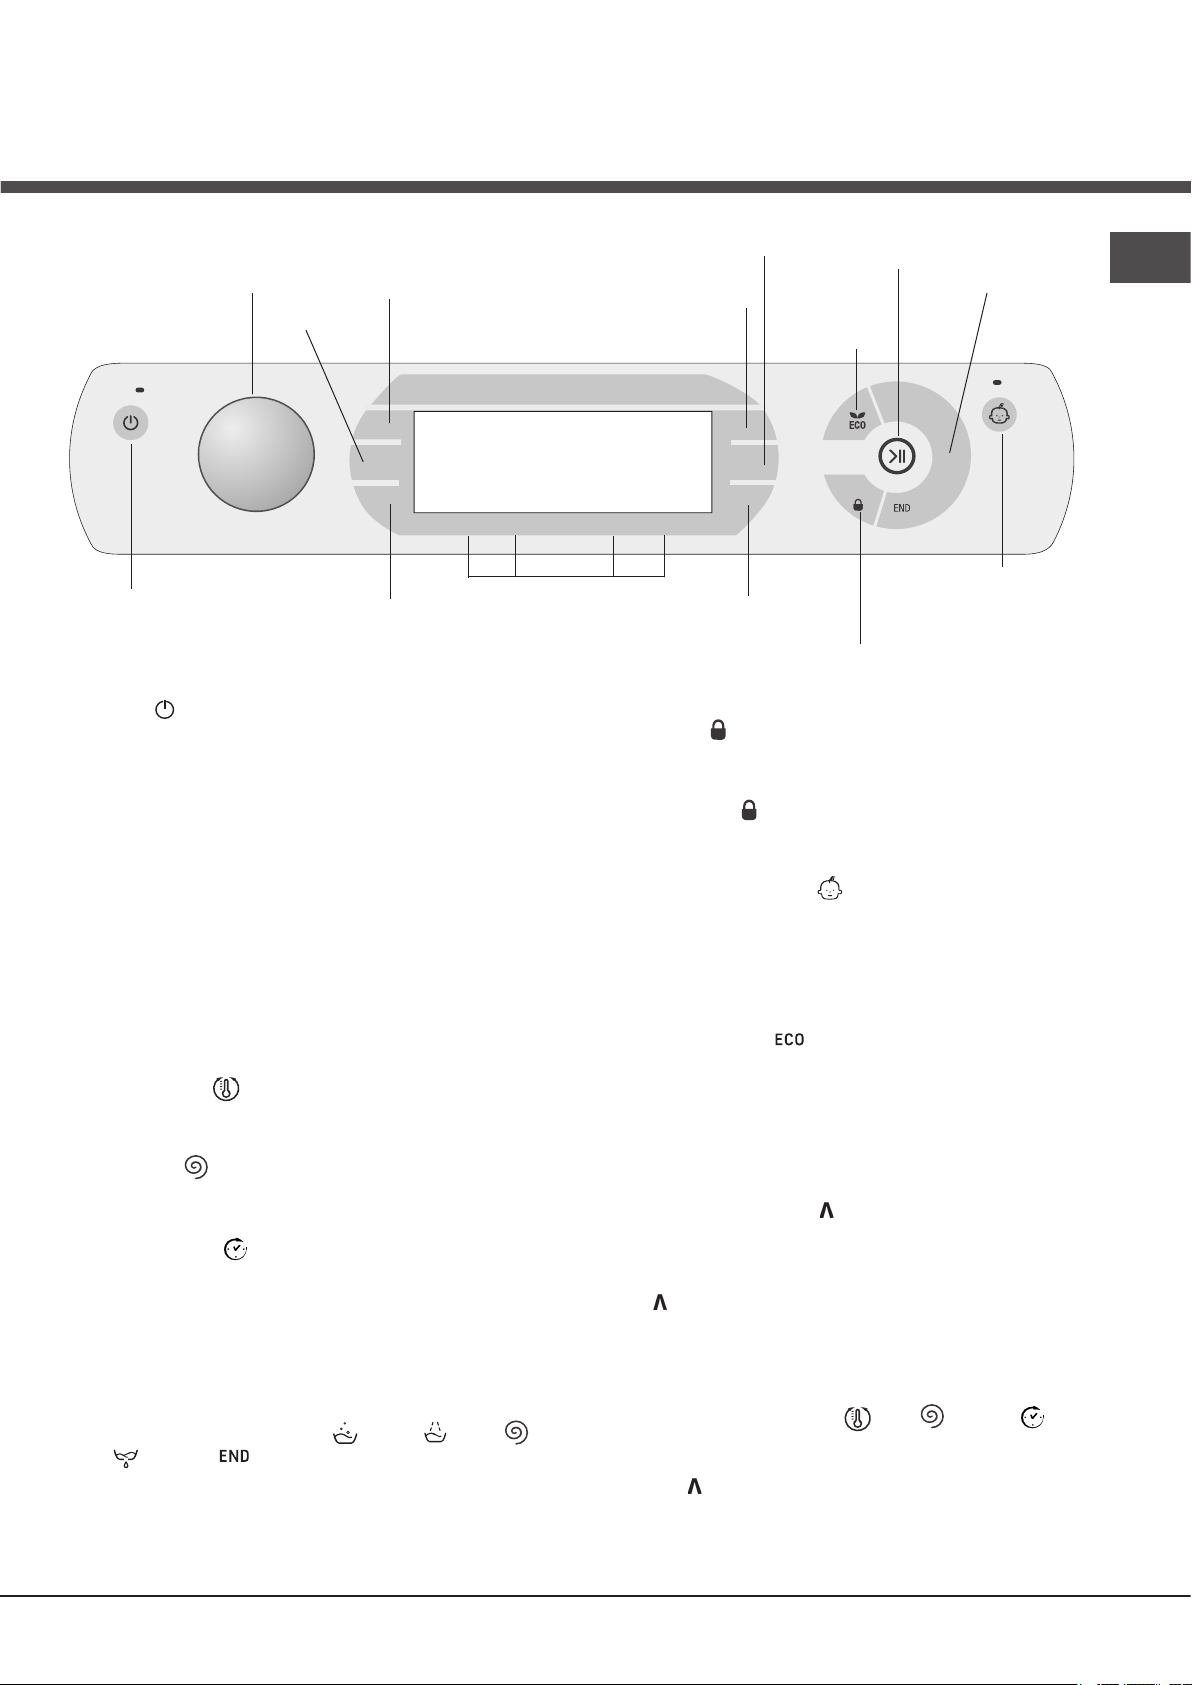
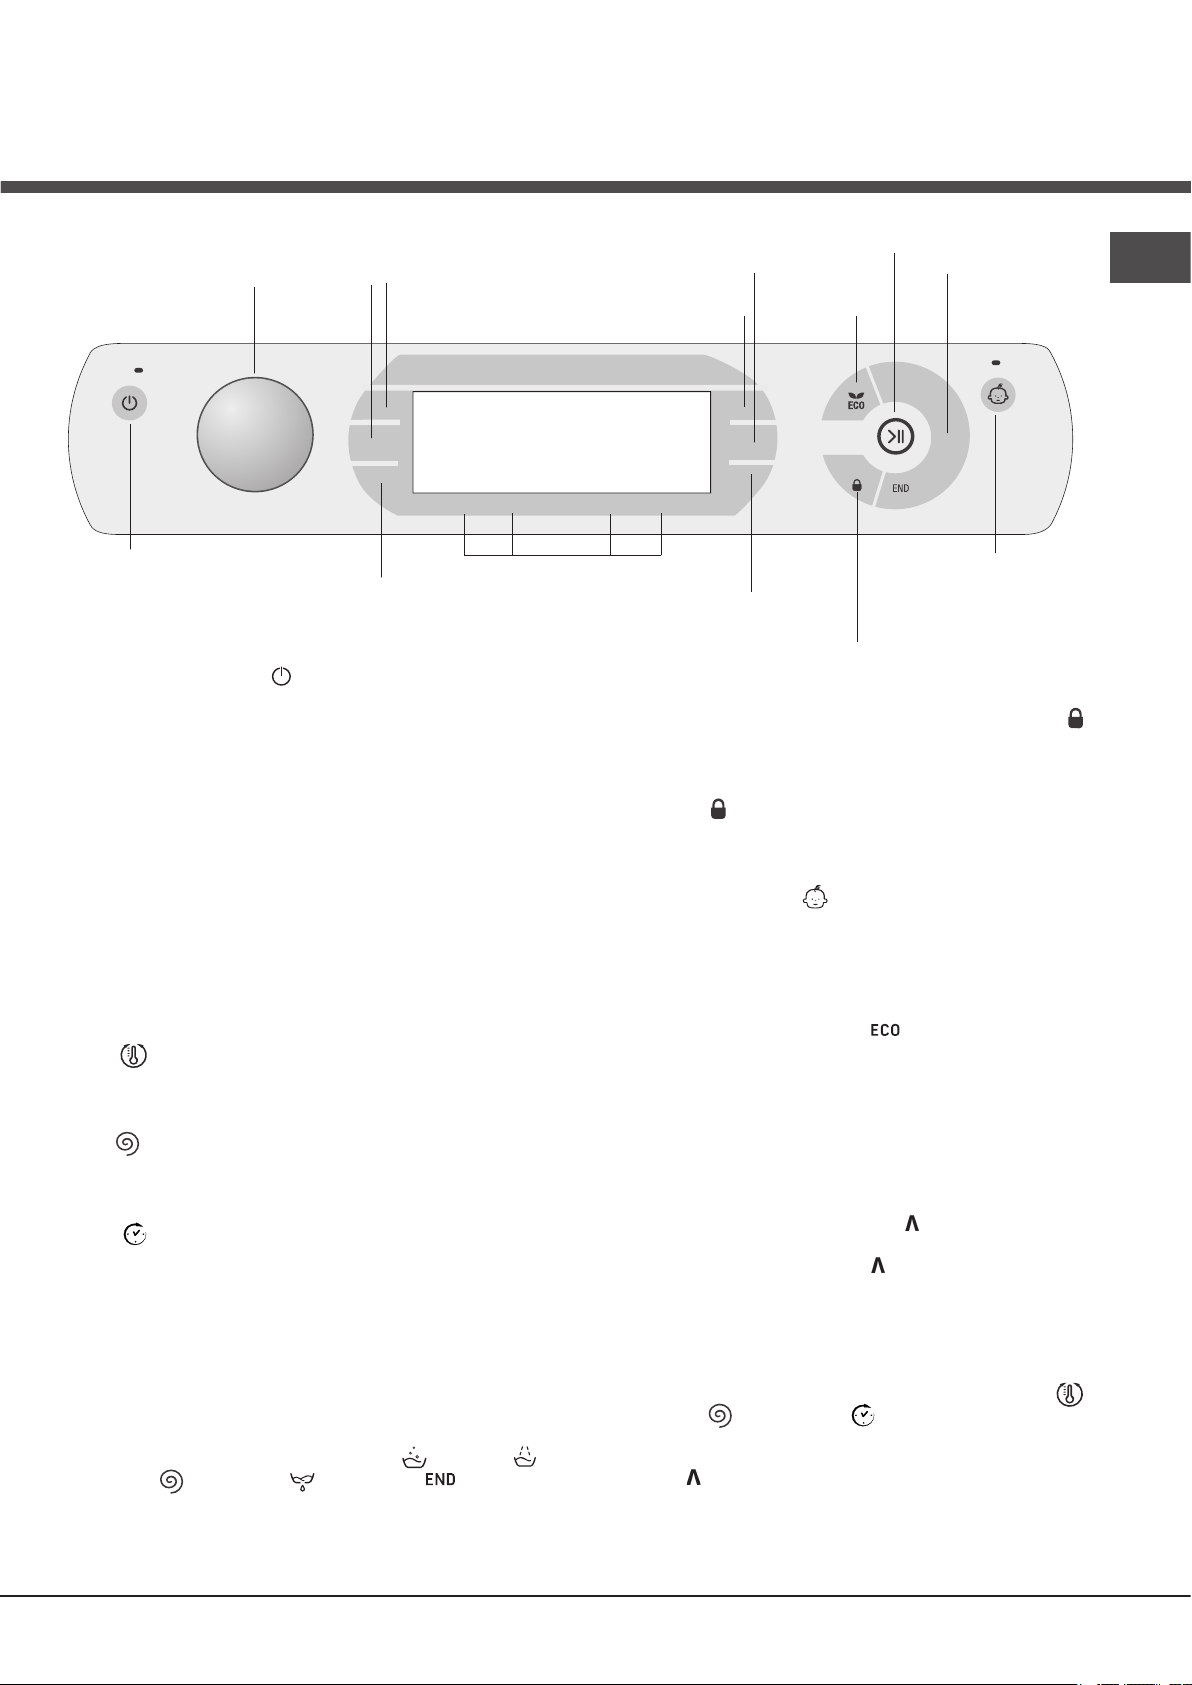
Touch control panel
WASH CYCLE
SELECTOR knob
M2
M1
TEMPERATURE
DISPLAY
SPIN
button
button
START/PAUSE button
with indicator light
ECO
indicator light
WASH
CYCLE
PHASE
icons
EN
Button with ON/OFF
indicator light
Button with ON/OFF indicator light: press this briefly to switch
the machine on or off. The green indicator light indicates that the
machine is switched on. To switch off the washing machine during
the wash cycle, press and hold the button for approximately 3
seconds; if the button is pressed briefly or accidentally the machine
will not switch off. If the machine is switched off during a wash
cycle, this wash cycle will be cancelled.
WASH CYCLE SELECTOR knob: may be turned in either
direction. To select the most suitable wash cycle, please refer
to the “Table of wash cycles”.
The knob will not move during the wash cycle.
M1-M2-M3 buttons: press and hold one of the buttons to
store a cycle with your own set preferences in the memory
of the machine. To recall a previously-stored cycle, press the
corresponding button.
TEMPERATURE button: press to modify or exclude the
temperature setting; the value selected will appear on the
display above (see “Running a wash cycle”).
SPIN CYCLE button: press to modify or exclude the spin
cycle; the value selected will appear on the display above (see
“Running a wash cycle”).
DELAYED START button: press to set a delayed start for
the selected wash cycle; the set delay time will appear on the
display above (see “Running a wash cycle”).
OPTION buttons: press to select the available options. The
indicator light corresponding to the selected option will remain
lit (see “Running a wash cycle”).
WASH CYCLE PHASE icons: these illuminate to indicate the
progress of the wash cycle (Wash – Rinse – Spin –
Drain ). The text lights up when the cycle is complete.
START/PAUSE button with indicator light: when the green
indicator light flashes slowly, press the button to start a wash
cycle. Once the cycle has begun the indicator light will remain
lit in a fixed manner. To pause the wash cycle, press the button
M3
OPTION
buttons
CONTROL PANEL LOCK
DELAYED START
button
button with indicator light
DOOR LOCKED indicator light
again; the indicator light will flash in an orange colour. If the
“Door locked” indicator light is switched off, the door may
be opened. To start the wash cycle from the point at which it
was interrupted, press the button again.
DOOR LOCKED indicator light: indicates that the porthole
door is locked. To open the door, pause the wash cycle (see
“Running a wash cycle”).
CONTROL PANEL LOCK button with indicator light: to
activate or deactivate the control panel lock, press and hold
the button for approximately 2 seconds. when the indicator
light is illuminated, the control panel is locked. This means
it is possible to prevent wash cycles from being modified
accidentally, especially where there are children in the home.
ECO indicator light: the icon lights up when, after altering the
washing parameters, an energy saving of at least 10% is made.
Furthermore, before the machine enters “Standby” mode, the
icon will light up for a few seconds; when the machine is switched
off the estimated energy saving will be around the 80% mark.
CHANGE LANGUAGE.
The first time the machine is switched on, the first language
will flash on the display. The “ “, “OK” and “V” symbols will
appear on the display, in line with the 3 buttons on the righthand side. The languages change automatically every 3”;
alternatively, they can be changed by pressing the buttons next
to the “ “ and “V” symbols. Use the “OK” button to confirm the
language, which will be set after 2”. If no buttons are pressed,
the automatic language change will begin again after 30”.
To change the language, switch the machine on and off
again; in the 30” time period after it has been switched off,
press and hold the temperature +spin +delayed start
buttons simultaneously for 5’’. A short sound alert will be emitted
and the set language will flash on the display. Press the buttons
next to the “ “ and “V” symbols to change the language. Use the
button next to the “OK” symbol to confirm the language, which
will be set after 2”. If no buttons are pressed, the language set
previously will be displayed after 30”. Switch on the machine.
55
Page 6

Running a wash cycle
EN
WARNING: before you use the washing machine for the
first time, run a wash cycle with detergent and no laundry,
using the 90° cottons cycle without pre-wash.
1. SWITCH THE MACHINE ON. Press the button. All
the indicator lights will illuminate for 1 second and the
text AQUALTIS will appear on the display; the indicator
light corresponding to the button will then remain lit in
a constant manner and the START/PAUSE indicator light
will flash.
2. SELECT THE PROGRAMME. Turn the PROGRAMME
KNOB left or right, until the required programme has
been selected; the name of the programme will appear
on the display. A temperature and spin speed is set for
each programme; these may be adjusted. The cycle
duration will also appear on the display.
3. LOAD THE LAUNDRY. Open the porthole door.
Load the laundry, making sure you do not exceed the
maximum load value indicated in the table of wash
cycles on the following page.
4. MEASURE OUT THE DETERGENT. Pull out the
detergent dispenser drawer and pour the detergent into
the relevant compartments as described in “Description
of the machine”.
5. CLOSE THE PORTHOLE DOOR.
6. CUSTOMISE THE WASH CYCLE. Use the relevant
buttons on the control panel:
Modify the temperature and/or spin
speed.
The machine automatically displays the maximum
temperature and spin speed values set for the selected
cycle, or the most recently-used settings if they are
compatible with the selected cycle. The temperature can
be decreased by pressing the button, until the cold
wash “OFF” setting is reached. The spin speed may be
progressively reduced by pressing the button, until
it is completely excluded “OFF”. If these buttons are
pressed again, the maximum values are restored.
! Exception: if the
temperature can be increased up to a value of 90°C.
Setting a delayed start.
To set a delayed start for the selected cycle, press the
corresponding button repeatedly until the required delay
period has been reached. During the setting procedure,
the delay period and the text “Starts in:” will be
displayed, along with the flashing symbol. After the
delayed start has been set, the symbol will remain
fixed on the display, which will also indicate the duration
of the selected cycle with the text “Ends in:” and the
cycle duration. Press the DELAYED START button just
once to display the delay time set previously.
After the countdown has begun, the display will show
the text “Starts in:” and the delay period. Once the
set delay time has elapsed, the machine will begin its
cycle and the display will show “Ends in:” and the time
remaining until the end of the cycle.
programme is selected, the
To remove the delayed start option, press the button
until the display shows the text OFF; the symbol will
disappear.
Modify the cycle settings.
• Press the button to activate the option; the name
of the option will then appear on the display and
the corresponding indicator light will illuminate.
• Press the button again to deactivate the option; the
name of the option will then appear on the display
followed by the text OFF, and the corresponding
indicator light will switch off.
! If the selected option is not compatible with the
selected wash cycle, this incompatibility will be signalled
by the flashing of the indicator light and a sound alert
(3 beeps); the option will not be activated.
! If the selected option is not compatible with another
option that has been selected previously, the indicator
light corresponding to the first option selected will
flash and only the second option will be activated; the
indicator light corresponding to the button will remain lit
in a constant manner.
! The options may affect the recommended load value and/
or the duration of the cycle.
7. START THE PROGRAMME. Press the START/PAUSE
button. The corresponding indicator light remains lit
in a fixed manner and the porthole door locks (the
DOOR LOCKED indicator light illuminates). The icons
corresponding to the wash cycle phases will light up
during the cycle to indicate which phase is currently in
progress.
To change a wash cycle once it has already started,
pause the washing machine by pressing the START/
PAUSE button; then select the desired cycle and press
the START/PAUSE button again.
To open the door during a wash cycle, press the START/
PAUSE button; if the DOOR LOCKED indicator light is
switched off you may open the door. Press the START/
PAUSE button again to restart the wash cycle from the
point at which it was interrupted.
8. THE END OF THE WASH CYCLE. This is indicated
by the illuminated text END. The porthole door may be
opened immediately. If the START/PAUSE indicator light
is flashing, press the button to end the cycle. Open the
door, unload the laundry and switch off the machine.
! If you wish to cancel a cycle which has already begun,
press and hold the button until the cycle stops and the
machine switches off.
Bag for quilts, curtains and delicate garments
The Aqualtis washing machine makes it easier for you
to wash even the most valuable and delicate garments
in complete confidence thanks to the special bag which
protects the laundry (this is supplied with the machine).
We recommend that the bag is used every time you wash
quilts and padded items with an outer layer made
using synthetic material.
6
Page 7
Wash cycles and options
3
1
2
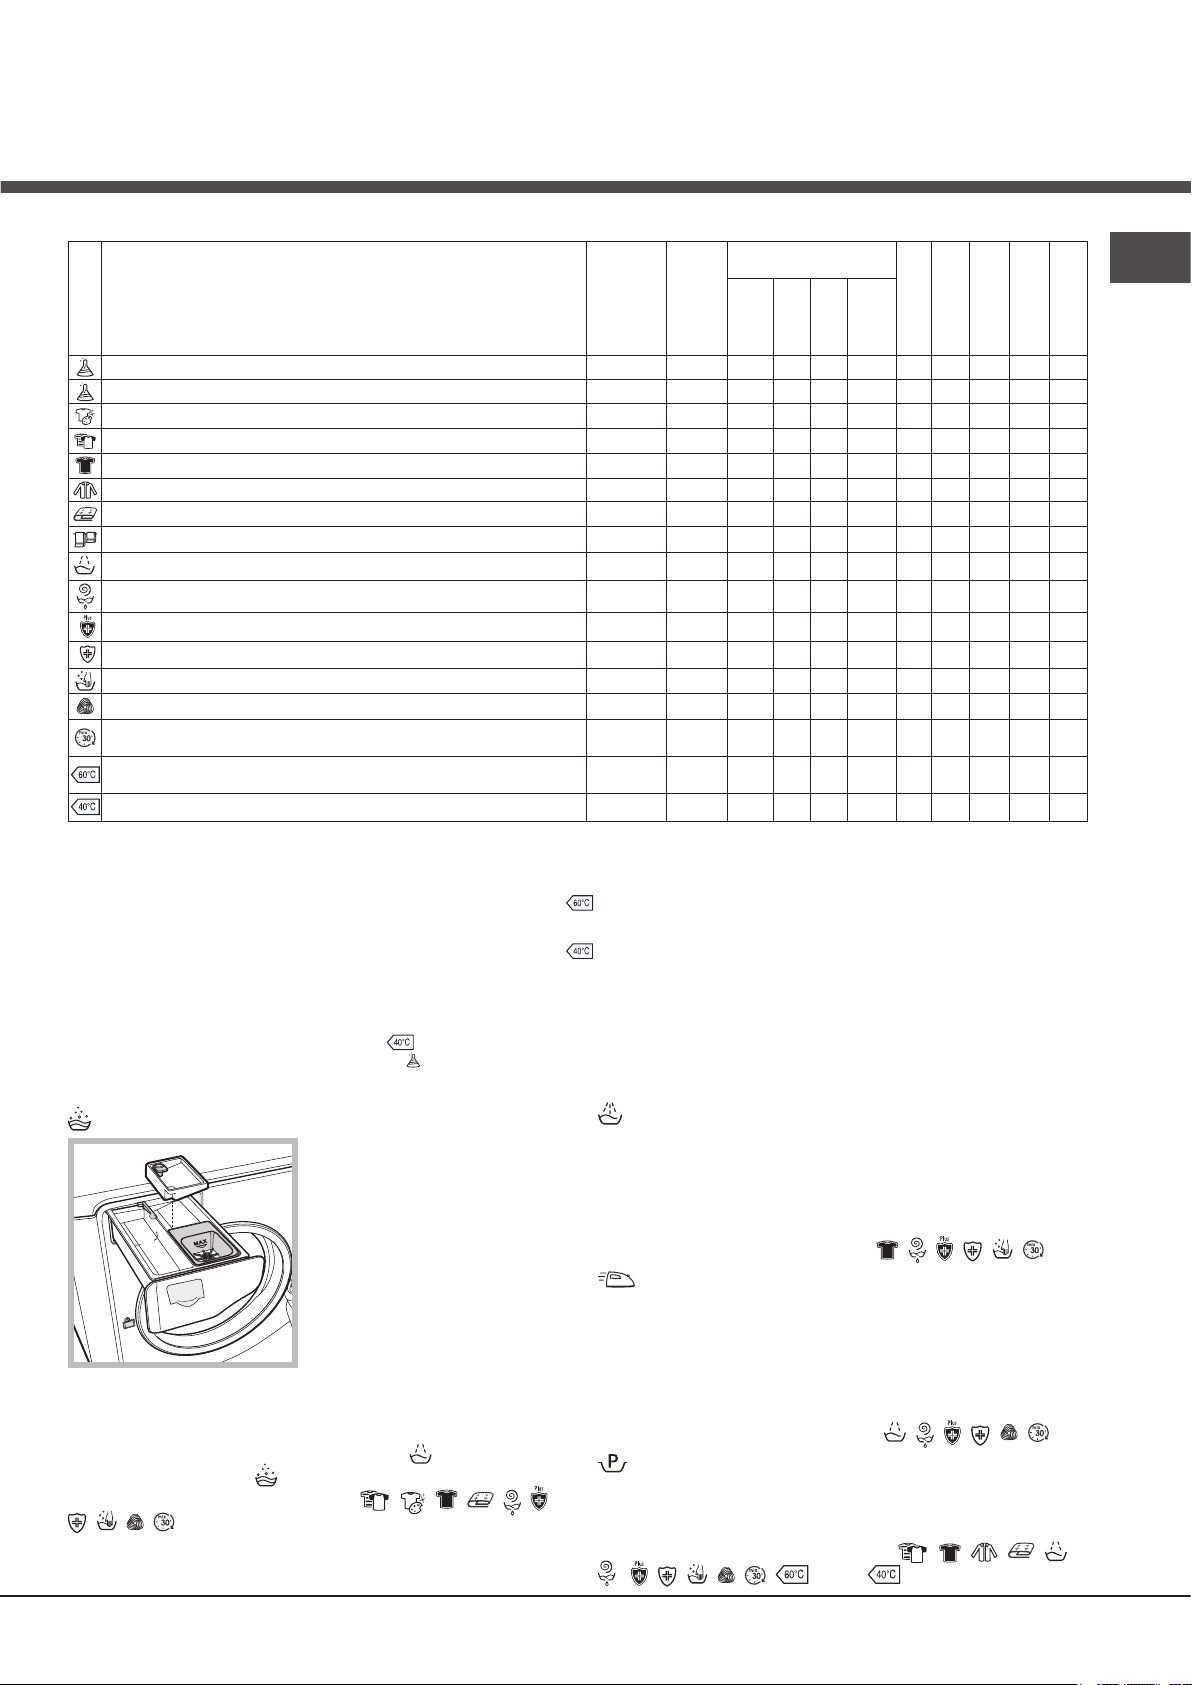
Table of wash cycles
Detergent and addi-
Description of the wash cycle
Icon
Synthetics Resistant 60° 800
Synthetics Resistant (4) 40° 800
Coloureds Intensive
Multi Colour
Darks
Shirts
Duvets: for down-stuffed garments. 30° 1200 -
Bed&Bath for bedlinen and towels. 60° 1400
Rinse
Spin and Pump out - 1400 - - - - 10 - - - 16’
Anti Allergy Plus
Anti Allergy Delicate
Ultradelicates
Wool: for wool, cashmere, etc. 40° 800 -
Mix 30': to refresh lightly soiled garments quickly (not suitable for
wool, silk and clothes which require washing by hand).
Cotton Standard 60°C (1): heavily soiled whites and resistant colours.
Cotton Standard 40°C (2): lightly soiled whites and delicate colours. 40° 1400 -
The length of cycle shown on the display or in this booklet is an estimation only and is calculated assuming standard working conditions. The actual duration can vary according to factors such as
water temperature and pressure, the amount of detergent used, the amount and type of load inserted, load balancing and any wash options selected.
Note: 10 minutes after the START, the machine will recalculate the time remaining until the end of the wash cycle on the basis of the load inside it; this value will then be shown on the display.
1) Test wash cycle in compliance with directive 1061/2010: set wash cycle with a temperature of 60°C.
This cycle is designed for cotton loads with a normal soil level and is the most efficient in terms of both electricity and water consumption; it should be used for
garments which can be washed at 60°C. The actual washing temperature may differ from the indicated value.
2) Test wash cycle in compliance with directive 1061/2010: set wash cycle with a temperature of 40°C.
This cycle is designed for cotton loads with a normal soil level and is the most efficient in terms of both electricity and water consumption; it should be used for
garments which can be washed at 40°C. The actual washing temperature may differ from the indicated value.
3) At 60 °C the “Prewash” function cannot be selected.
For all Test Institutes:
2) Long wash cycle for cottons: set wash cycle with a temperature of 40°C.
4) Long wash cycle for synthetics: set wash cycle with a temperature of 40°C.
Max.
temp.
(°C)
40° 1400
20° 1400 -
30° 800 -
40° 600 -
60° 1400 -
40° 1400 -
30° 0 -
30° 800 -
60°
(Max. 90°)
Max.
speed
(rpm)
- 1400 - -
1400
Wash options
Super Wash
This option offers a highperformance wash due to the
greater quantity of water used in
the initial phase of the cycle, and
due to the increased wash cycle
duration, is particularly useful for
the removal of stubborn stains.
It can be used with or without
bleach. If you desire bleaching,
insert the extra tray compartment
(3) into compartment 1. When
pouring in the bleach, be careful not to exceed the “max” level
marked on the central pivot (see figure). To bleach laundry
without carrying out a full wash cycle, pour the bleach into the
extra compartment 3, select the “Rinse” cycle and activate
the “Super Wash” option .
! It cannot be used in conjunction with , , , , , ,
, , , .
Extra rinse
By selecting this option, the efficiency of the rinse is increased
and optimal residual detergent removal is guaranteed. It is
particularly useful for skin which is sensitive to detergents. We
recommend this option is used with a full load of washing, or
when a large amount of detergent is required.
! It cannot be used in conjunction with , , , , , .
Easy Iron
By selecting this option, the wash and spin cycles will be
modified in order to reduce the formation of creases.
At the end of the cycle the washing machine drum will
rotate slowly; the “Easy Iron” and START/PAUSE indicator
lights will flash. To end the cycle press the START/PAUSE
button or the “Easy Iron” button.
! It cannot be used in conjunction with , , , , , .
Prewash
If this function is selected, the pre-wash cycle will run; this is
useful for removing stubborn stains.
N.B.: put the detergent in the relevant compartment.
! It cannot be used in conjunction with , , , , ,
, , , , , , (60°), .
tives
Wash
Prewash
(3)
Bleach
-
-
-
-
-
-
-
-
-
Fabric
softener
2,5 - - - 75’
3,5 - - - 110’
10 - - - 155’
10 - - - 49’
2,5 - - - 105’
10 53 0,95 60 200’
10 53 0,92 88 185’
pness %
Max. load (kg)
5 48 1,12 58 120’
5 48 0,67 54 100’
9 - - - 175’
9 - - - 185’
6 - - - 80’
6 - - - 210’
6 - - - 230’
1 - - - 80’
4 71 0,20 44 30’
Energy con-
Residual dam-
Total water lt
sumption kWh
EN
Cycle duration
77
Page 8
Detergents and laundry
EN
Detergent
The type and quantity of detergent required depend on the
type of fabric you are washing (cotton, wool, silk, etc.), as
well as its colour, the washing temperature, the level of soiling
and the hardness of the water in the area. Measuring out the
detergent carefully will avoid wastage and help to protect the
environment: although they are biodegradable, detergents still
contain ingredients which alter the balance of nature.
We recommend the following:
• use powder detergents for white cotton garments and
pre-washing.
• use liquid detergents for delicate cotton garments and
for all low-temperature wash cycles.
• use gentle liquid detergents for wool and silk garments.
The detergent should be poured into the relevant
compartment - or the dispenser placed directly inside the
drum - before the wash cycle begins. In the latter case, it will
not be possible to select the Cottons with pre-wash cycle.
! Use powder detergent for white cotton garments, for
pre-washing, and for washing at temperatures over 60°C
! Follow the instructions given on the detergent packaging.
! Do not use hand washing detergents because these
create too much foam.
Preparing the laundry
• Shake out the garments before loading them into the machine.
• Divide the laundry according fabric type (symbol on the
washing instruction label) and colour, making sure you
separate the coloured garments from the white ones;
• Empty all pockets and check the buttons;
• Do not exceed the values listed in the “Table of wash
cycles”, which refer to the weight of the laundry when dry.
How much does your laundry weigh?
1 sheet 400-500 g
1 pillowcase 150-200 g
1 tablecloth 400-500 g
1 bathrobe 900-1200 g
1 towel 150-250 g
1 pair of jeans 400-500 g
1 shirt 150-200 g
Washing recommendations
Coloureds Intensive: use the cycle on light coloured
garments to remove tough stains without damaging
the integrity and brightness of the colours. The cycle
is studied to guarantee a 60° performance at only 40°.
We recommend the use of detergents suitable to wash
coloured clothes.
Multi Colour: use the cycle to wash medium-soiled
multi-coloured garments or garments of different colours.
Cycle designed to ensure colour care while achieving a 40°
performance at just 20°. We recommend using detergents
that are suitable for coloured washes and active already at
low temperatures.
! We always recommend a separate wash for running
garments and the first time you wash a new coloured item.
Darks: use cycle to wash dark-coloured garments.
This programme is designed to maintain dark colours
over time. We recommend using a liquid detergent for the
best results when washing dark-coloured garments.
Shirts: use the special wash cycle to wash shirts in
different fabrics and colours to guarantee they receive the
best possible care.
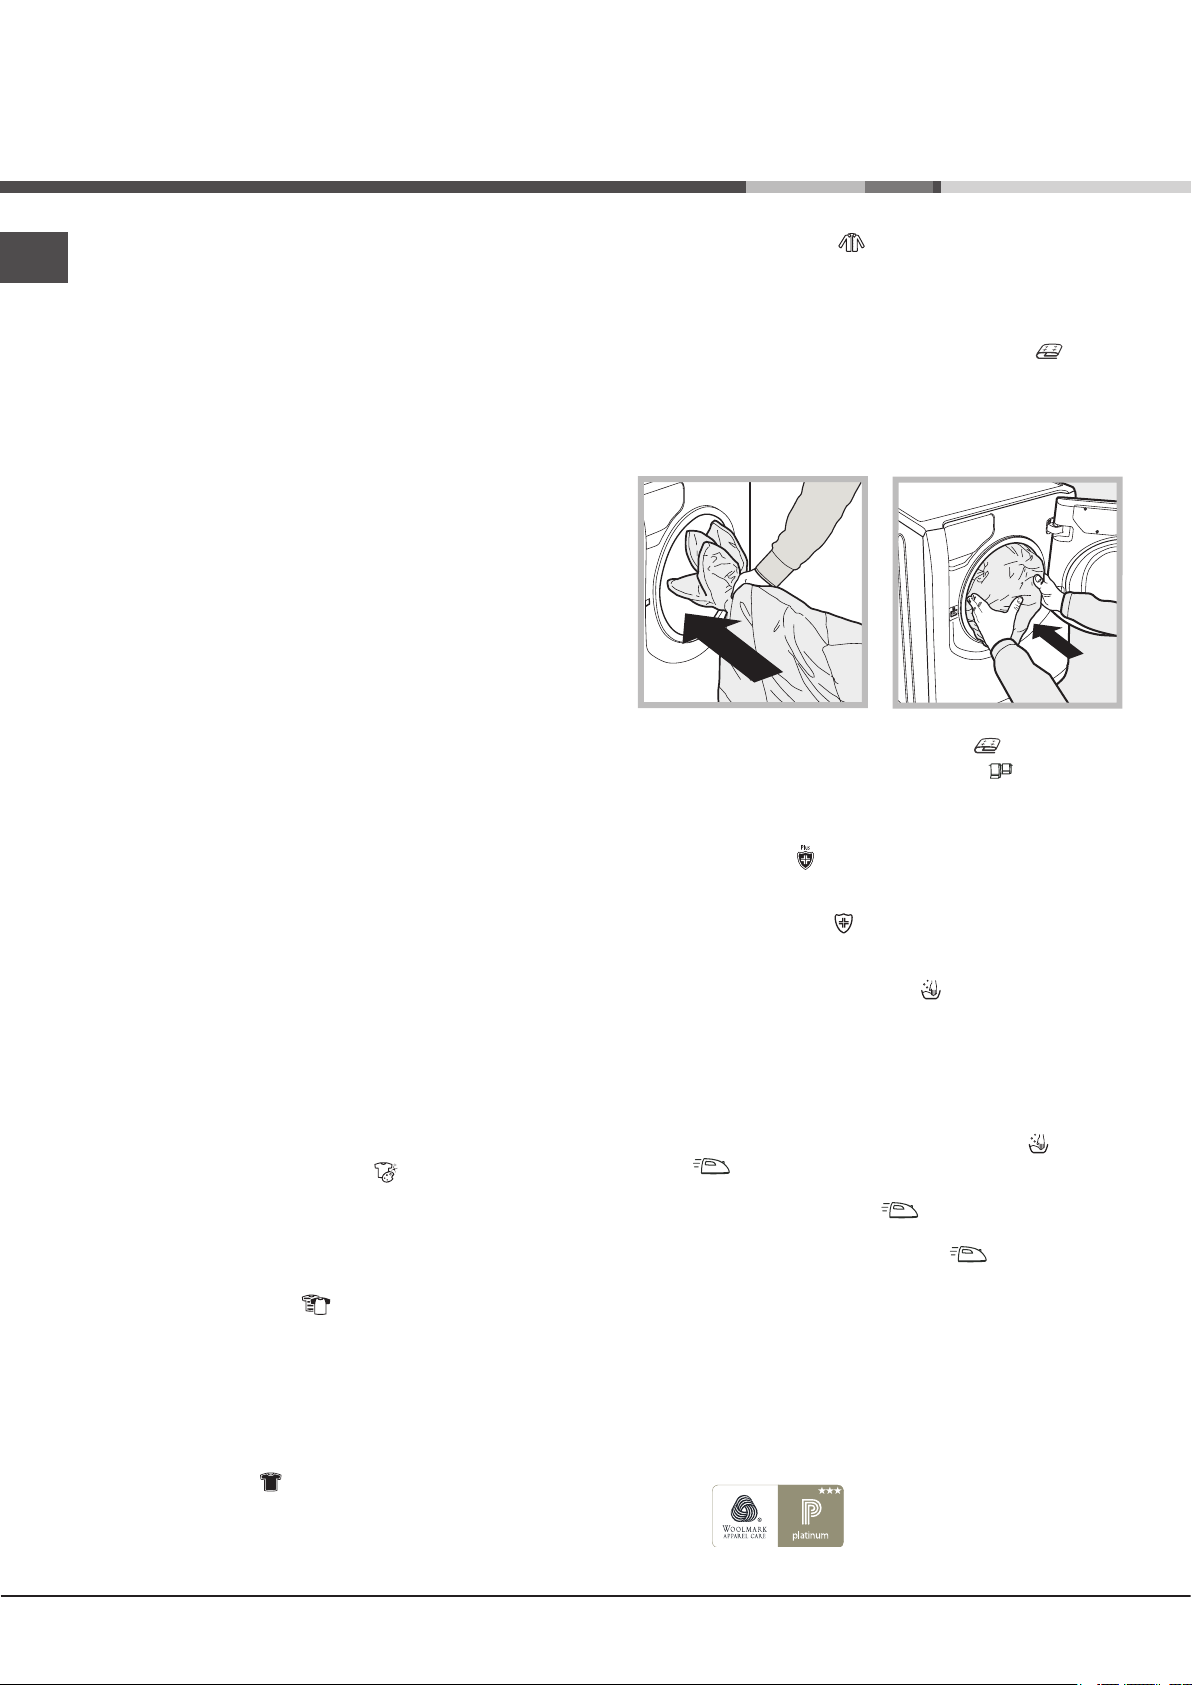
Duvets: to wash double or single duvets (the weight of which
should not exceed 3,5 kg), cushions or clothes padded with
goose down such as puffa jackets, use the special wash
cycle. We recommend that duvets are placed in the drum
with their edges folded inwards (see figure) and that no more
than ¾ of the total volume of the drum is used. To achieve the
best results, we recommend that a liquid detergent is used
and placed inside the detergent dispenser drawer.
Quilts: to wash quilts with a synthetic outer layer, use the
bag provided and set the wash cycle to .
Bedlinen and towels: Use programme to wash bed
linen and towels in one single cycle: it optimises softener
performance and helps you save time and energy. We
recommend the use of powder detergent
Anti Allergy Plus : cycle studied for cotton laundry and
other resistant fabrics to guarantee the removal of the main
allergens such as pollen, mites, cat and dog hair.
Anti Allergy Delicate : cycle studied for cotton laundry
and other resistant fabrics to guarantee the removal of
pollen and cat and dog hair already at 40°.
Ultradelicates: use programme to wash very delicate
garments having strasses or sequins.
We recommend turning the garments inside out before
washing and placing small items into the special bag
for washing delicates. Use liquid detergent on delicate
garments for best results.
To wash Silk garments and Curtains (these should be folded
and placed inside the bag provided), select cycle and then
option (in this case it will also be possible to enable the
“Extra Rinse” option); the machine will end the cycle while
the laundry is soaking and the indicator light will flash.
To drain the water so that the laundry may be removed,
press the START/PAUSE button or the button.
Wool: the wool wash cycle on this Hotpoint-Ariston
machine has been tested and approved by The
Woolmark Company for washing wool garments labelled
as hand washable provided that the garments are
washed according to the instructions on the garment
label and those issued by the manufacturer of this
washing machine. Hotpoint-Ariston is the first washing
machine brand to be approved by The Woolmark
Company for Apparel Care- Platinum for its washing
performance and consumption of energy and water.
(M1135)
8
Page 9
Precautions and tips
! The machine was designed and constructed in
accordance with international safety regulations. The
following information is provided for safety reasons and
must therefore be read carefully.
General safety
• This appliance was designed for domestic use only.
• This appliance is not intended for use by persons
(including children) with reduced physical, sensory
or mental capabilities, or lack of experience and
knowledge, unless they have been given supervision
or instruction concerning use of the appliance by a
person responsible for their safety. Children should be
supervised to ensure that they do not play with the
appliance.
• Do not touch the machine when barefoot or with wet or
damp hands or feet.
• Do not pull on the power supply cable when unplugging
the appliance from the electricity socket. Hold the plug
and pull.
• Do not touch the drained water as it may reach
extremely high temperatures.
• Never force the porthole door. This could damage the
safety lock mechanism designed to prevent accidental
opening.
• If the appliance breaks down, do not under any
circumstances access the internal mechanisms in an
attempt to repair it yourself.
• Always keep children well away from the appliance while
it is operating.
• If it must be moved, proceed with the help of two or
three people and handle it with the utmost care. Never
try to do this alone, because the appliance is very heavy.
• Before loading laundry into the washing machine, make
sure the drum is empty.
The crossed-out dustbin is marked on all products
to remind the owner of their obligations regarding
separated waste collection.
For more information relating to the correct disposal of
household appliances, owners should contact their local
authorities or appliance dealer.
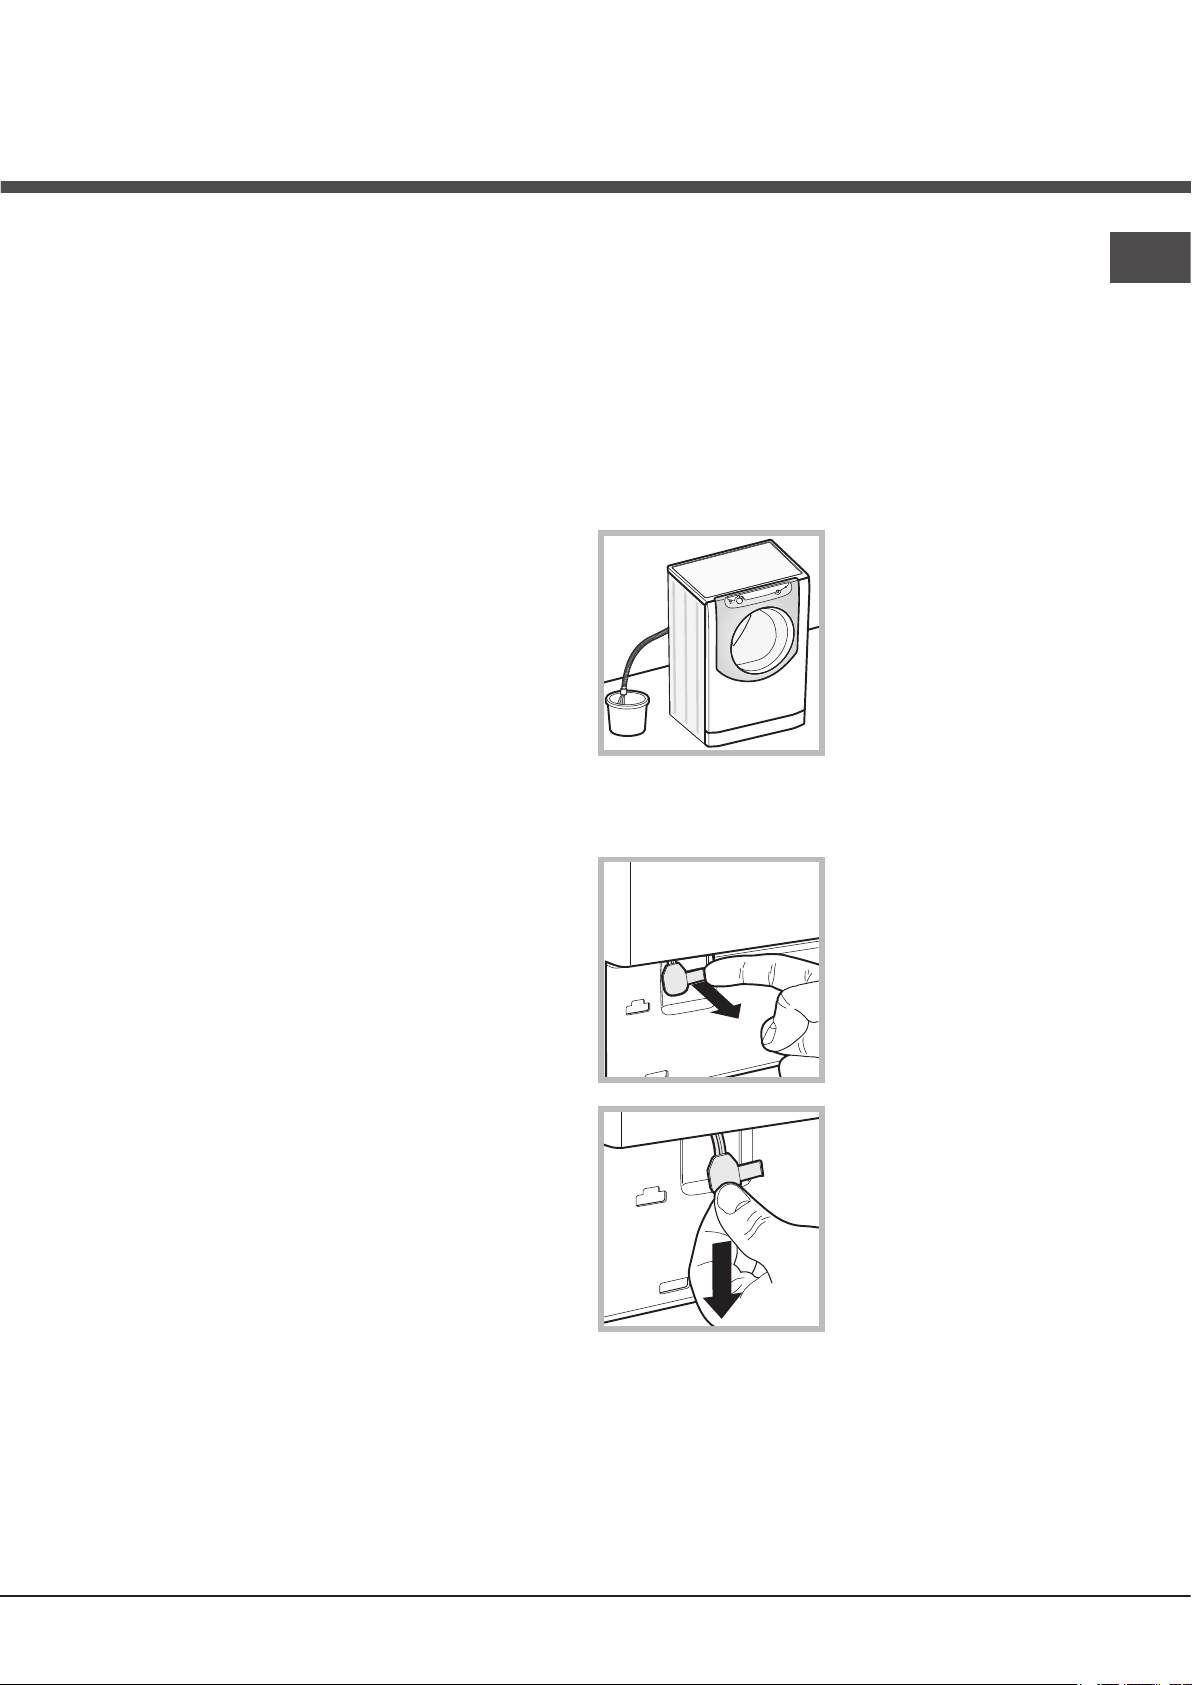
Opening the porthole door manually
In the event that it is not possible to open the porthole door
due to a powercut, and if you wish to remove the laundry,
proceed as follows:
1. remove the plug from the
electrical socket.
2. make sure the water level
inside the machine is lower
than the door opening; if
it is not, remove excess
water using the drain hose,
collecting it in a bucket as
indicated in the figure.
3. remove the cover panel on the lower front part of the
washing machine (see overleaf).
4. pull outwards using the
tab as indicated in the figure,
until the plastic tie-rod is freed
from its stop position; pull
downwards until you hear a
“click”, which indicates that
the door is now unlocked.
EN
Load balancing system
Before every spin cycle, to avoid excessive vibrations
before every spin and to distribute the load in a uniform
manner, the drum rotates continuously at a speed which
is slightly greater than the washing rotation speed. If,
after several attempts, the load is not balanced correctly,
the machine spins at a reduced spin speed. If the load is
excessively unbalanced, the washing machine performs
the distribution process instead of spinning. To encourage
improved load distribution and balance, we recommend
small and large garments are mixed in the load.
Disposal
• Disposing of the packaging materials: observe local
regulations so that the packaging may be re-used.
• The European Directive 2002/96/EC relating to Waste
Electrical and Electronic Equipment (WEEE) states
that household appliances should not be disposed of
using the normal solid urban waste cycle. Exhausted
appliances should be collected separately in order to
optimise the cost of re-using and recycling the materials
inside the machine, while preventing potential damage
to the atmosphere and to public health.
5. open the door; if this is
still not possible repeat the
procedure.
6. reposition the panel, making sure the hooks are securely
in place before you push it onto the appliance.
9
Page 10
Care and maintenance
1
2
1
2
2
EN
Cutting off the water and electricity
supplies
• Turn off the water tap after every wash cycle. This will
limit wear on the hydraulic system in the machine and
help to prevent leaks.
• Unplug the appliance when cleaning it and during all
maintenance work.
Cleaning the machine
The outer parts and rubber components of the appliance
can be cleaned using a soft cloth soaked in lukewarm
soapy water. Do not use solvents or abrasives.
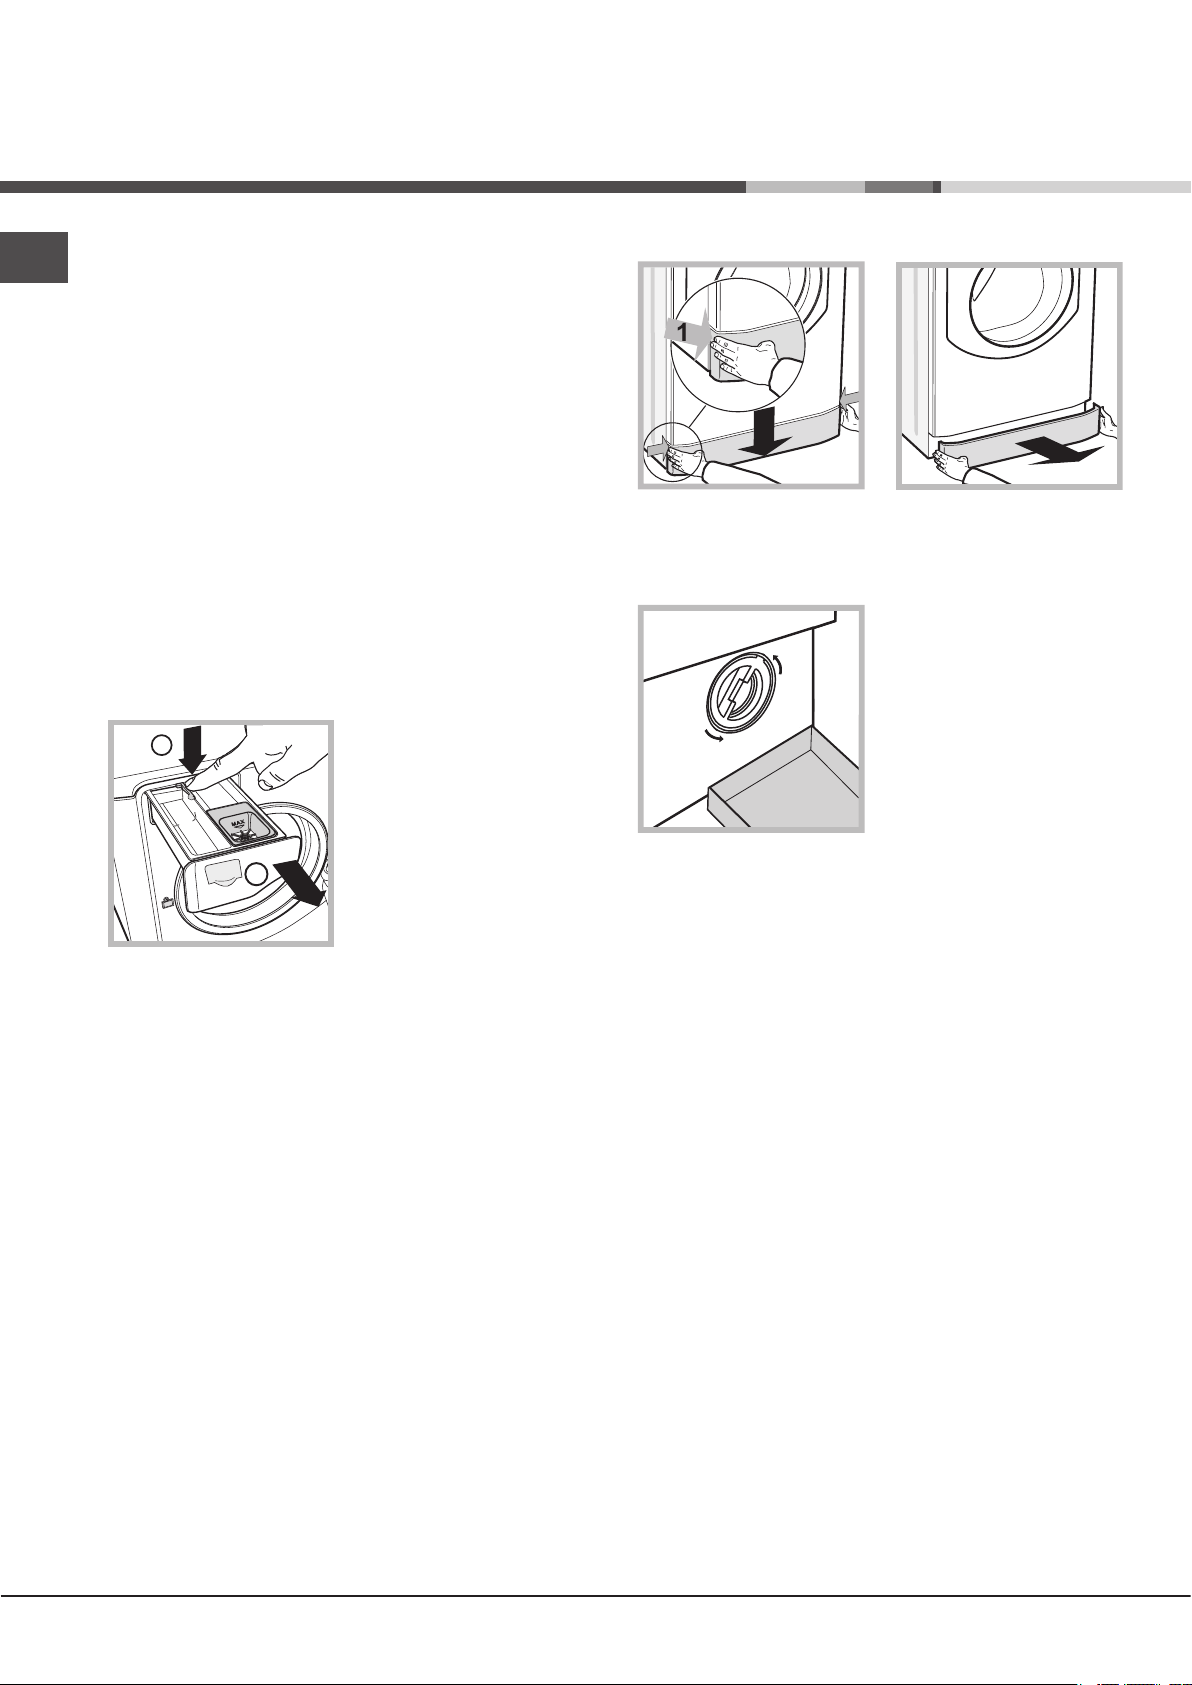
Cleaning the detergent dispenser
drawer
To remove the drawer, press
lever (1) and pull the drawer
outwards (2) (see figure).
Wash it under running water;
this procedure should be
repeated frequently.
To access the pre-chamber:
1. take off the cover panel on the front of the machine by
first pressing it in the centre and then pushing downwards
on both sides until you can remove it (see figures);
2. position a container so that
it will collect the water which
flows out (approximately 1.5 l)
(see figure);
3. unscrew the lid by rotating
it in an anti-clockwise
direction (see figure);
4. clean the inside thoroughly;
5. screw the lid back on;
6. reposition the panel, making sure the hooks are securely
in place before you push it onto the appliance.
Caring for your appliance drum
• Always leave the door ajar to prevent unpleasant odours
from forming.
Cleaning the pump
The washing machine is fitted with a self-cleaning pump
which does not require any maintenance. Sometimes,
small items (such as coins or buttons) may fall into the
protective pre-chamber at the base of the pump.
! Make sure the wash cycle has finished and unplug the
appliance.
Checking the water inlet hose
Check the inlet hose at least once a year. If there are any
cracks, it should be replaced immediately: during the wash
cycles, water pressure is very strong and a cracked hose
could easily split open.
10
Page 11
Trouble shooting
Your washing machine could occasionally fail to work. Before contacting the Technical Assistance Centre (see “Assistance”),
make sure that the problem cannot be not solved easily using the following list.
Problem:
The washing machine does not
switch on.
The wash cycle does not start.
The washing machine does not fill
with water.
The washing machine door
remains locked.
The machine continuously fills
with water and drains.
The washing machine does not
drain or spin.
The machine vibrates a lot during
the spin cycle.
The washing machine leaks.
The icons corresponding to the
“Phase in progress” flash rapidly
at the same time as the ON/OFF
Possible causes / Solutions:
• The appliance is not plugged into the socket fully, or not enough to make
contact.
• There is no power in the house.
• The door is not closed properly.
• The START/PAUSE button has not been pressed.
• The water tap has not been opened.
• A delayed start has been set.
• The water inlet hose is not connected to the tap.
• The hose is bent.
• The water tap has not been opened.
• There is no water supply in the house.
• The pressure is too low.
• The START/PAUSE button has not been pressed.
• If you have selected the function, at the end of the cycle the washing
machine drum will rotate slowly; to end the cycle press the START/PAUSE
button or the button.
• The drain hose is not fitted at a height between 65 and 100 cm from the floor
(see “Installation”).
• The free end of the hose is under water (see “Installation”).
• If the dwelling is on one of the upper floors of a building, there may be
problems relating to water drainage, causing the washing machine to fill with
water and drain continuously. Special anti-draining valves are available in shops
and help to prevent this inconvenience.
• The wall drainage system is not fitted with a breather pipe.
• The wash cycle does not include draining: Some wash cycles require the drain
phase to be started manually (see “Wash cycles and options”).
• The option is enabled: to complete the wash cycle, press the START/
PAUSE button (“Wash cycles and options”).
• The drain hose is bent (see Installation).
• The drainage duct is clogged.
• The drum was not unlocked correctly during installation (see “Installation”).
• The machine is not level (see “Installation” ).
• The machine is trapped between cabinets and walls (see “Installation”).
• The load is unbalanced (see “Detergents and laundry”).
• The water inlet hose is not screwed on properly (see “Installation”).
• The detergent dispenser is blocked (to clean it, see “Care and maintenance”).
• The drain hose is not fixed in place properly (see “Installation”).
• Switch off the machine and unplug it, wait for approximately 1 minute and
then switch it back on again. If the problem persists, contact the Technical
Assistance Service.
indicator light.
There is too much foam.
The washing machine door
• The detergent is not suitable for machine washing (it should display the text
“for washing machines” or “hand and machine wash”, or the like).
• Too much detergent was used.
• Perform the manual unlocking procedure (see “Precautions and tips”).
remains locked.
EN
! Note: to exit “Demo mode”, switch machine off, press and hold the two and buttons simultaneously for 3 seconds.
11
Page 12

Assistance
EN
Before calling for Assistance:
• Check whether you can solve the problem by yourself (see “Trouble shooting”);
• Restart the wash cycle to check whether the problem has been solved;
• If it has not, contact the Authorised Technical Assistance Service.
! If the washing machine has been installed or used incorrectly, you will have to pay for the call-out service.
! Always request the assistance of authorised technicians.
Please have the following information to hand:
• the type of problem;
• the appliance model (Mod.);
• the serial number (S/N).
The above information can be found on the data plate located on the appliance itself.
12
Page 13

Installations- und
Bedienungsanleitungen
INHALTSVERZEICHNIS
Aufstellung, 14-15
DE
Deutsch
AQUALTIS
Auspacken und Aufstellen
Wasser- und Elektroanschlüsse
Technische Daten
Beschreibung Ihres Gerätes, 16-17
Bedienblende “touch control”
Durchführung eines Waschprogramms, 18
Programme und Zusatzfunktionen, 19
Programmtabelle
Zusatzfunktionen
Waschmittel und Wäsche, 20
Waschmittel
Vorsortieren der Wäsche
Waschhinweise
WASCHVOLLAUTOMAT
DE
AQ105D 49D
Vorsichtsmaßregeln und Hinweise, 21
Allgemeine Sicherheit
System zur Auswuchtung der Wäscheladung
Entsorgung
Manuelles Öffnen der Gerätetür
Reinigung und Pflege, 22
Abstellen der Wasser- und Stromversorgung
Reinigung des Gerätes
Reinigung der Waschmittelschublade
Pflege der Wäschetrommel
Reinigung der Pumpe
Kontrolle des Wasserzulaufschlauchs
Störungen und Abhilfe, 23
Kundendienst, 24
13
Page 14
Aufstellung
DE
! Es ist äußerst wichtig, diese Bedienungsanleitung
sorgfältig aufzubewahren, um sie jederzeit zu Rate ziehen
zu können. Sorgen Sie dafür, dass sie im Falle eines
Umzugs oder Übergabe an einen anderen Benutzer das
Gerät stets begleitet.
! Lesen Sie bitte folgende Hinweise aufmerksam durch: sie
liefern wichtige Informationen hinsichtlich der Installation,
des Gebrauchs und der Sicherheit.
! In der Plastikhülle dieser Bedienungsanleitung befinden
sich, außer dem Garantieschein, auch Kleinteile zur
Installation.
Auspacken und Aufstellen
Auspacken
1. Nach Entfernen der Verpackung überzeugen Sie sich
bitte davon, dass das Gerät während des Transportes nicht
beschädigt wurde.
Schließen Sie das Gerät im Falle einer Beschädigung bitte
nicht an und kontaktieren Sie Ihren Händler.
2. Schrauben Sie die 4
Transportschutzschrauben
aus und nehmen Sie das
entsprechende an der
Rückwand befindliche
Distanzstück ab (siehe
Abbildung).
3. Schließen Sie die Löcher mittels der in der Plastikhülle
befindlichen Kunststoffstöpsel.
4. Bewahren Sie bitte sämtliche Teile auf. Im Falle eines
erneuten Transportes des Gerätes sind alle Teile wieder
einzusetzen, um Schäden im Geräteinnern zu vermeiden.
! Verpackungsmaterial ist kein Spielzeug für Kinder.
Nivellierung
! Eine präzise Nivellierung verleiht dem Gerät die
erforderliche Stabilität, durch die Vibrationen und
Betriebsgeräusche, vor allem während des Schleuderns,
vermieden werden.
! Bei Teppichböden müssen die Stellfüße so reguliert
werden, dass ein ausreichender Freiraum zur Belüftung
unter dem Waschvollautomaten gewährleistet ist.
Wasser- und Elektroanschlüsse
Anschluss des Zulaufschlauches
! Lassen Sie das Wasser vor dem Anschluss so lange
auslaufen, bis klares Wasser austritt.
1. Schließen Sie das
andere Ende des
Schlauches an den oben
rechts am Rückteil des
Gerätes befindlichen
Wasseranschluss an (siehe
Abbildung).
2. Schrauben Sie den
Wasserschlauch an einen
Kaltwasserhahn mit ¾-GASGewindeanschluss an (siehe
Abbildung).
3. Der Schlauch darf nicht eingeklemmt oder abgeknickt
werden.
1. Der Waschvollautomat muss auf einem ebenen, festen
Untergrund aufgestellt werden, ohne ihn an Wände oder
Möbelteile anzulehnen.
2. Eventuelle Unebenheiten
durch An- bzw. Ausdrehen
der vorderen Stellfüße
ausgleichen, (der
Neigungsgrad darf 2° nicht
überschreiten).
14
! Der Wasserdruck muss innerhalb der Werte liegen, die in
der Tabelle der Technischen Daten angegeben sind (siehe
nebenstehende Seite).
! Sollte der Zulaufschlauch nicht lang genug sein, dann
wenden Sie sich bitte an einen Fachhändler oder an einen
autorisierten Fachmann.
! Verwenden Sie bitte niemals alte oder gebrauchte
Zulaufschläuche, sondern nur die, die Sie mit dem Gerät
erhalten haben.
Page 15
65 - 100 cm
Anschluss des Ablaufschlauches
Schließen Sie den
Ablaufschlauch, ohne ihn
dabei zu krümmen, an
eine Ablaufleitung, oder an
einen in der Wand (in einer
Mindesthöhe von 65 – 100
cm) angelegten Ablauf an,
oder hängen Sie ihn in ein
Becken oder eine Wanne
ein; befestigen Sie ihn in
diesem Falle mittels der
mitgelieferten Führung an
dem Wasserhahn (siehe
Abbildung).
Das freie
Ablaufschlauchende darf
nicht unter Wasser bleiben.
! Verwenden Sie bitte keine Verlängerungen oder
Mehrfachstecker.
! Das Netzkabel darf nicht gebogen bzw. eingeklemmt
werden.
! Das Versorgungskabel darf nur durch autorisierte
Fachkräfte ausgetauscht werden.
Achtung! Der Hersteller übernimmt keinerlei Haftung,
sollten diese Vorschriften nicht genau beachtet werden.
DE
! Verlängerungsschläuche sollten nicht eingesetzt
werden, sollte dies jedoch absolut unvermeidlich sein,
muss die Verlängerung denselben Durchmesser des
Originalschlauchs aufweisen und darf eine Länge von 150
cm nicht überschreiten.
Elektroanschluss
Vor Einfügen des Netzsteckers in die Steckdose ist
sicherzustellen, dass:
• die Steckdose über eine normgerechte Erdung verfügt;
• die Steckdose die in den Technischen Daten
angegebenen Höchstlast des Gerätes trägt (siehe
nebenstehende Tabelle);
• die Stromspannung den in den Technischen Daten
angegebenen Werten entspricht (siehe nebenstehende
Tabelle);
• der Netzstecker mit der Steckdose übereinstimmt.
Lassen Sie den Netzstecker oder die Steckdose
andernfalls ersetzen.
! Das Gerät darf nicht im Freien installiert werden, auch
nicht, wenn es sich um einen geschützten Platz handelt.
Es ist gefährlich, Ihren Vollwaschautomaten Gewittern und
Unwettern auszusetzen.
! Die Steckdose sollte nach installiertem Gerät leicht
zugänglich sein.
Technische Daten
Modell
Abmessunge
Fassungsvermögen
Elektroanschlüsse
Wasseranschlüsse
Schleudertouren
Prüfprogramme
gemäß der Richtlinien 1061/2010
und 1015/2010
AQ105D 49D
Breite 59,5 cm
Höhe 85 cm
Tiefe 64,5 cm
1 bis 10 kg
siehe das am Gerät befindliche Typenschild
Höchstdruck 1 MPa (10 bar)
Mindestdruck 0,05 MPa (0,5 bar)
Trommelvolumen 71 Liter
bis zu 1400 U/min.
Programm
Programm ; Baumwolle 40°C.
Dieses Gerät entspricht den folgenden
EG-Richtlinien:
- 2004/108/CE (elektromagnetische Verträglichkeit)
- 2002/96/CE
- 2006/95/CE (Niederspannung)
; Baumwolle 60°C.
15
Page 16
3
1
2
1
8
0
2
1
0
1
5
0
1
2
0
9
0
6
0
B
A
Beschreibung Ihres Gerätes
DE
GERÄTETÜR
SOCKEL
GRIFF
GERÄTETÜR
REGULIERBARE STELLFÜSSE
Öffnen Sie die Gerätetür bitte
stets nur am entsprechenden
Griff (siehe Abbildung ).
BEDIENBLENDE
SYSTEM DIRECT INJECTION
Die Waschmaschine ist mit der innovativen Technologie
„Direct Injection” ausgestattet, die das Waschmittel schnell
auflöst und somit die darin enthaltenen Komponenten
bestmöglich aktiviert. Durch die Vermischung des
Waschmittels mit Wasser, bevor es auf die Wäsche gelangt,
sichert das System sichert die komplette Nutzung und
Auflösung des Waschmittels zu. Damit werden höchste
Waschleistungen bereits bei niedrigen Temperaturen erzielt
und gleichzeitig kann deutlich Energie eingespart werden
und die Farben und Fasern werden perfekt gepflegt.
Die Technologie „Direct Injection” ist automatisch für alle
Waschzyklen aktiv.
Pulverwaschmittel verwenden, geben Sie die Trennwand in
die Kammer B.
3. Zusatzkammer:Bleichmittel
! Die Verwendung der zusätzlichen Kammer 3
schließt die Vorwäsche aus.
Kammer für Zusätze: für Weichspüler oder flüssige
Zusätze. Bitte achten Sie darauf, dass der maximale auf
dem Gitter angezeigte Stand nicht überschritten wird.
Konzentrierte Weichspüler müssen verdünnt werden.
Bedienblende “touch control”
WASCHMITTELBEHÄLTER
Der Waschmittelbehälter
befindet sich im Innern des
Gerätes, um ihn zu erreichen,
muss die Gerätetür geöffnet
Zur Änderung der Einstellung
drücken Sie leicht auf die
Ikone im berührungssensiblen
Bereich (touch control) wie auf
der Abbildung gezeigt.
werden.
Hinsichtlich der Dosierung
des Waschmittels verweisen
wir auf den Absatz
„Waschmittel und Wäsche“ .
Funktion Standby
1. Waschmittelkammer für
den Vorwaschgang: für
Waschpulver.
! Vergewissern Sie sich vor
Einfüllen des Waschmittels,
dass die Zusatzkammer 3
nicht eingesetzt wurde.
Zur Erfüllung der neuen Richtlinien zum Energieverbrauch
ist diese Waschmaschine mit einem automatischen
Ausschaltsystem (Standby) ausgestattet, das nach 30
Minuten des Nichtgebrauchs in Funktion tritt. Drücken
Sie kurz die Taste ON/OFF und warten Sie, bis sich die
Maschine wieder einschaltet.
Verbrauch in Off-Betrieb: 0,5 W
Verbrauch in Left-On: 0,5 W
2. Waschmittelkammer für
die mitgelieferte Trennwand A zu benutzen, um eine
korrekte Dosierung zu gewährleisten. Wenn Sie ein
den Hauptwaschgang: Falls
Sie ein Flüssigwaschmittel
verwenden, wird empfohlen,
16
Page 17
Bedienblende “touch control”
Wählschalter
PROGRAMME
M2
M1
Taste SCHLEUDERGANG
Taste TEMPERATUR
DISPLAY
Taste mit Kontrollleuchte
START/PAUSE
Kontrollleuchte
ECO
DE
Symbole
PROGRAMMABLAUF
Taste mit Kontrollleuchte
ON/OFF
Taste mit Kontrollleuchte ON/OFF: Drücken Sie kurz auf
die Taste, um das Gerät ein- bzw. auszuschalten. Die grüne
Kontrollleuchte zeigt an, dass das Gerät eingeschaltet ist. Um den
Waschvollautomaten während eines Waschgangs auszuschalten,
muss die Taste etwas länger gedrückt werden (ca. 3 Sekunden);
ein kurzer oder ein ungewollter Druck bewirkt kein Ausschalten
des Gerätes.
Das Ausschalten des Gerätes während eines laufenden
Waschprogramms löscht den gesamten Waschzyklus.
Wählschalter PROGRAMME: Der Schalter kann in beide
Richtungen gedreht werden. Um sicher zu sein, das am
besten geeignete Waschprogramm gewählt zu haben, raten
wir die “Programmtabelle” zu Rate zu ziehen. Während des
Programmablaufs bleibt der Schalter feststehend.
Tasten M1-M2-M3: Halten Sie eine dieser Tasten gedrückt, um einen
Waschzyklus individuell zu speichern. Um einen bereits gespeicherten
Zyklus abzurufen, drücken Sie die entsprechende Taste.
Taste TEMPERATUR: Taste drücken, wenn Sie die
Temperatur ändern oder ausschalten möchten, der ausgewählte
Wert wird auf dem darüberliegenden Display angezeigt (siehe
“Durchführung eines Waschprogramms“).
Taste SCHLEUDERGANG: Taste drücken, wenn Sie die
Schleuderdrehzahl ändern oder nicht schleudern möchten.
Der ausgewählte Wert wird auf dem darüberliegenden Display
angezeigt (siehe “Durchführung eines Waschprogramms“).
Taste STARTZEI TVORWAHL: Taste drücken , um
den verzögerten Start des gewünschten Programms zu
programmieren. Die Restzeit bis zu Programmstart wird auf dem
darüberliegenden Display angezeigt (siehe „Durchführung eines
Waschprogramms“).
Tasten mit Kontrollleuchten ZUSATZFUNKTIONEN: Die Taste
zur Einstellung der verfügbaren Zusatzfunktionen drücken. Die
entsprechende Kontrollleuchte leuchtet (siehe „Durchführung
eines Waschprogramms“).
Symbole PROGRAMMABLAUF: Die Symbole zeigen die
jeweilige Programmphase (Hauptwäsche – Spülen –
Schleudern – Abpumpen ). Die Anzeige leuchtet auf,
wenn der Zyklus abgelaufen ist.
Taste mit Kontrollleuchte START/PAUSE: Sobald die grüne
Kontrollleuchte auf langsames Blinklicht schaltet, drücken Sie die
Taste, um den Waschgang zu starten. Nach Start des Programms
M3
ZUSATZFUNKTIONEN
Tasten
Taste STARTZEIT-
VORWAHL
ist die Kontrollleuchte dauerhaft an. Um den Waschgang zu
unterbrechen, drücken Sie erneut die Taste die Kontrollleuchte
blinkt orangefarben. Sobald die Kontrollleuchte “LOCK”
erlischt, kann die Gerätetür geöffnet werden. Um das Programm
an der Stelle, an der es unterbrochen wurde, wieder in zu starten,
drücken Sie die Taste erneut.
Kontrollleuchte LOCK: Diese zeigt an, dass die Gerätetür nicht
geöffnet werden kann. Um die Gerätetür zu öffnen, muss der
Waschzyklus auf Pause geschaltet werden (siehe “Durchführung
eines Waschprogramms”).
Taste mit Kontrollleuchte TASTENSPERRE: Zur Sperre
bzw. Freigabe der Schaltelemente halten Sie die Taste ca. 2
Sekunden lang gedrückt. Die eingeschaltete Kontrollleuchte
zeigt an, dass die Bedienblende gesperrt ist. Auf diese Weise
wird verhindert, dass ein Programm aus Versehen geändert wird,
(eventuell durch Kinder).
Kontrollleuchte ECO: das Symbol wird angezeigt, sobald
bei Änderung der Waschoptionen den Energiebverbrauch
um mindestens 10% reduziert. Außerdem leuchtet die Ikone,
bevor das Gerät in Standby-Modus übergeht, für wenige
Sekunden auf. Bei ausgeschaltetem Gerät liegt die geschätzte
Energierückgewinnung bei etwa 80%.
SPRACHÄNDERUNG
Beim ersten Einschalten der Maschine erscheint auf dem
Display die erste Sprache blinkend. Neben den 3 Tasten rechts
vom Display erscheinen die Symbole “ ”, “OK” und “V”. Die
Sprachen wechseln automatisch alle 3’’ oder durch Drücken
der Tasten neben den Symbolen “ “ und “V”. Mit der Taste
“OK” wird die Sprache bestätigt, die sich nach 2’’ fest einstellt.
Wird keine Taste gedrückt, dann beginnt der automatische
Sprachenwechsel nach Ablauf von 30’’ erneut.
Um die Sprache zu ändern, muss man das Gerät einund wieder ausschalten und innerhalb von 30” nach
dem Ausschalten gleichzeitig die Tasten Temperatur
+Schleudern +Startvorwahl 5” lang drücken; es ertönt
ein kurzer Signalton und auf dem Display wird die eingestellte
Sprache blinkend angezeigt Durch Drücken der Tasten neben den
Symbolen “ “ und “V” kann sie Sprache geändert werden. Mit
der Taste neben dem Symbol „OK“ wird die Sprache bestätigt,
die sich nach 2’’ fest einstellt. Wird keine Taste gedrückt, dann
wird die zuvor eingestellte Sprache nach Ablauf von 30’’ erneut
angezeigt. Schalten Sie das Gerät.
Kontrollleuchte
LOCK
Taste mit Kontrollleuchte
TASTENSPERRE
17
17
Page 18
Durchführung eines
Waschprogramms
DE
ANMERKUNG: Lassen Sie vor erstmaligem Gebrauch des
Waschvollautomaten erst einen Waschgang ohne Wäsche,
jedoch mit Waschmittel durchlaufen. Stellen Sie hierzu das
90°C-Waschprogramm ohne Vorwäsche ein.
1. EINSCHALTEN DES GERÄTES. Drücken Sie die Taste
. Alle Kontrolllampen leuchten für 1 Sekunde auf, im
Display erscheint der Schriftzug AQUALTIS; im Anschluss
schaltet die Kontrollleuchte der Taste auf Dauerlicht und
die Kontrollleuchte START/PAUSE auf Blinklicht.
2. WAHL DES WASCHPROGRAMMS. Drehen Sie
den PROGRAMMWÄHLSCHALTER nach rechts
oder nach links auf das gewünschte Programm; die
Bezeichnung des Programms wird im Display angezeigt;
dem jeweiligen Programm ist eine Temperatur und
Schleudergeschwindigkeit vorgegeben, die nur reduziert
werden können.
Auf dem Display wird die Programmdauer angezeigt.
3. EINFÜLLEN DER WÄSCHE. Öffnen Sie die Gerätetür.
Füllen Sie die Wäsche ein. Beachten Sie die maximale
Füllmenge laut Programmtabelle.
4. DOSIERUNG DES WASCHMITTELS. Ziehen Sie
die Waschmittelschublade heraus und füllen Sie das
Waschmittel in die entsprechenden Kammern (siehe „
Beschreibung Ihres Gerätes“).
5. SCHLIESSEN SIE DIE GERÄTETÜR.
6. INDIVIDUALISIERUNG DES WASCHGANGS. Dies
erwirken Sie über die auf dem Bedienfeld befindlichen
Tasten:
Änderung der Temperatur und/
Schleuderdrehzahl.
Das Gerät zeigt automatisch die für das eingestellte
Programm vorgesehene maximale Temperatur sowie
die maximale Schleudergeschwindigkeit, wenn sie
kompatibel mit dem eingestellten Programm sind.
Durch Drücken der Taste kann die Temperatur
Schritt für Schritt herabgesetzt werden, bis auf
Kaltwäsche (OFF). Durch Drücken der Taste
kann die Schleudergeschwindigkeit Schritt für
Schritt herabgesetzt werden, bis auf die Abwahl des
Schleudergangs (OFF). Ein weiterer Druck auf die Tasten
setzt die Einstellungen wieder auf die maximalen Werte.
! Ausnahme: Wird das Waschprogramm
kann die Temperatur bis auf 90° erhöht werden.
Die Startzeitvorwahl einstellen.
Zur Vorwahl der Startzeit des eingestellten Programms
drücken Sie die entsprechende Taste, bis die gewünschte
Zeitverschiebung angezeigt wird. Bei der Einstellung
wird die Startzeit zusammen mit der Anzeige “Start in:”
und das Symbol blinkend angezeigt. Nachdem die
Startzeit eingestellt wurde, zeigt das Display das Symbol
feststehend und das Display kehrt zur Anzeige der
Dauer des eingestellten Zyklus “Ende in:” und der
Zyklusdauer zurück. Wird die Taste STARTZEITVORWAHL
einmal gedrückt, dann wird die zuvor eingestellte Startzeit
angezeigt.
Nach dem Start zeigt das Display die Anzeige “Start in:”
und die Verzögerungszeit. Sobald die Verzögerungszeit
abgelaufen ist, startet die Maschine und auf dem Display
wird die Anzeige “Ende in:” und die Restzeit bis zum
Zyklusende angezeigt.
eingestellt,
Um die Startzeitvorwahl zu deaktivieren, drücken Sie die
Taste, bis auf dem Display der Schriftzug OFF eingeblendet
wird; das Symbol erlischt.
Änderung der Eigenschaften des
Waschgangs.
• Drücken Sie die Taste, um die Zusatzfunktion einzustellen;
im Display wird die Bezeichnung der Funktion angezeigt,
und die Kontrollleuchte der jeweilgen Taste leuchtet auf.
• Drücken Sie die Taste erneut, um die Zusatzfunktion
auszuschalten; im Display wird OFF angezeigt, und die
Kontrollleuchte erlischt.
! Lässt sich eine Waschoption nicht mit dem gewählten
Programm kombinieren, blinkt die entsprechnde
Anzeige, es ertönt ein akustisches Signal (3 Signaltöne)
und die Funktion wird nicht aktiviert.
! Ist die gewählte Zusatzfunktion mit einer anderen,
bereits eingestellten nicht kompatibel, blinkt die Anzeige
der ersten Option, wird deaktiviert und nur die zweite
Funktion wird aktiviert.
! Die Zusatzfunktionen können eine Änderung der
empfohlenen Ladungsmenge und/oder Waschzeit
bewirken.
7. STARTEN DES PROGRAMMS. Drücken Sie die
Taste START/PAUSE. Die Kontrollanzeige leuchtet und
die Gerätetür wird gesperrt (Kontrollleuchte LOCK
eingeschaltet). Während des Programmablaufs leuchten
die entsprechenden Symbole auf, um die jeweils
erreichte Phase anzuzeigen.
Um ein bereits laufendes Programm zu ändern, schalten
Sie das Gerät auf Pause , drücken Sie hierzu die Taste
START/PAUSE, wählen Sie daraufhin das gewünschte
Programm und drücken Sie erneut die Taste START/
PAUSE.
Zum Öffnen der Gerätetür während eines Zyklusses
drücken Sie die Taste START/PAUSE; ist die
Kontrollleuchte LOCK ausgeschaltet, kann die
Gerätetür geöffnet werden. Drücken Sie die Taste
START/PAUSE erneut, um das Programm an der Stelle,
an der es unterbrochen wurde, wieder in Gang zu setzen.
8. ENDE DES PROGRAMMS. Dieses wird durch die
Leuchtanzeige END angezeigt. Die Gerätetür kann
geöffnet werden. Blinkt die Kontrollleuchte START/
PAUSE, muss die Taste gedrückt werden, um den
Waschgang abzuschließen. Öffnen Sie die Gerätetür,
nehmen Sie die Wäsche heraus und schalten Sie das
Gerät aus.
! Möchten Sie ein bereits in Gang gesetztes
Waschprogramm löschen, halten Sie die Taste gedrückt,
bis der Zyklus unterbrochen wird und sich das Gerät
ausschaltet.
Sack für Steppdecken, Vorhänge und Feinwäsche
Dank des speziellen mitgelieferten Sacks können Sie im
Waschvollautomaten Aqualtis auch ihre kostbarsten und
empfindlichsten Wäschestücke bei maximalem Schutz
waschen. Es empfiehlt sich, diesen Sack in jedem Fall
für die Wäsche wie z.B. (Stepp- und Daunendecken
mit Synthetikbezug zu verwenden).
18
Page 19

Programme und
3
1
2
Zusatzfunktionen
Programmtabelle
Waschmittel und
Beschreibung des Programms
Symbole
Kunstfasern Widerstandsfähig
Kunstfasern Widerstandsfähig (4)
Buntwäsche Intensiv
Buntwäsche
Dunkel
Hemden
Daunen: wäsche- bzw. Kleidungsstücke mit Daunenfüllung. 30° 1200 -
7-Tage: bettwäsche Bade- und Handtücher. 60° 1400
Spülen
Schleudern und Abpumpen - 1400 - - - - 10 - - - 16’
Antiallergie Plus
Antiallergie Sanft
Ultra Fein
Wolle: wolle, Kaschmir usw. 40° 800 -
Mix 30’:
(nicht geeignet für Wolle, Seide und Handwäsche).
Baumwolle 60°C (1): stark verschmutzte Weiß- und farbechte
Buntwäsche.
Baumwolle 40°C (2): leicht verschmutzte Weiß- und empfindliche Buntwäsche.
Die auf dem Display und in der Bedienungsanleitung genannte Zyklusdauer wird ausgehend von Standardbedingungen berechnet. Die effektiv benötigte Zeit kann aufgrund zahlreicher Faktoren wie
Temperatur und Druck des Zulaufwassers, Raumtemperatur, Waschmittelmenge, Art, Menge und Verteilung der Waschladung sowie der gewählten Zusatzfunktionen variieren.
Hinweis: nach etwa 10 Minuten nach dem START, errechnet die Maschine die Restlaufzeit unter Berücksichtigung der Ladung neu und zeigt sie an.
1) Prüfprogramm gemäß 1061/2010: Programm und eine Temperatur von 60°C.
Dieser Zyklus ist für den Waschvorgang von normal schmutziger Baumwollwäsche geeignet; es ist der wirksamste in Bezug auf den kombinierten Energie-Wasser-Verbrauch; für bei 60°C zu
waschende Wäsche zu verwenden. Die effektive Waschtemperatur kann von der angegebenen abweichen.
2) Prüfprogramm gemäß 1061/2010: Programm und eine Temperatur von 40°C.
Dieser Zyklus ist für den Waschvorgang von normal schmutziger Baumwollwäsche geeignet; es ist der wirksamste in Bezug auf den kombinierten Energie-Wasser-Verbrauch; für bei 40°C zu
waschende Wäsche zu verwenden. Die effektive Waschtemperatur kann von der angegebenen abweichen.
3) Die “Vorwasche” funktion kann beim Temperaturwert 60 °C nicht aktiviert werden.
Für alle Testinstitute:
2) Langes Baumwollprogramm: Programm und eine Temperatur von 40°C.
4) Langes Kunstfaserprogramm: Programm und eine Temperatur von 40°C.
zum kurzen Auffrischen leicht verschmutzter Wäsche
Zusatzfunktionen
Super
Diese Zusatzfunktion verbessert
die Waschergebnisse durch
eine erhöhte Wassermenge
am Anfang des Programms
und eine verlängerte
Programmlaufzeit. Diese
Funktion ermöglicht das
Entfernen selbst der
hartnäckigsten Flecken. Kann
mit oder ohne Bleichmittel
verwendet werden. Möchten
Sie auch Bleichen, dann setzen
Sie die mitgelieferte, zusätzliche Kammer 3 in Kammer 1 ein.
Bei der Dosierung des Bleichmittels darf der auf dem Zentralstift
mit „max“ gekennzeichnete Höchststand (siehe Abb.) nicht
überschritten werden. Wenn Sie nur bleichen möchten,
ohne einen kompletten Waschgang durchzuführen, dann
geben Sie das Bleichmittel in die Zusatzkammer 3, stellen Sie
das Programm „Spülen“ ein und aktivieren Sie die Funktion
„Super” .
! Diese Funktion kann zu den Programmen , , ,
, , , , , , .
Max.
Temp.
(°C)
60° 800
40° 800
40° 1400
20° 1400 -
30° 800 -
40° 600 -
- 1400 - -
60° 1400 -
40° 1400 -
30° 0 -
30° 800 -
60°
(Max. 90°)
40° 1400 -
gkeit
(U/min)
Geschwindi-
Max. Schleuder
1400
Extra Spülen
Wählen Sie diese Zusatzfunktion, wird die Spülwirkung
verbessert und somit ein optimales Ausspülen von
Waschmittelresten garantiert. Dies ist besonders
empfehlenswert bei sehr empfindlicher Haut bzw.
Waschmittelallergien. Es empfiehlt sich, diese
Funktion bei voller Wäschebeladung oder bei hohen
Waschmitteldosierungen zuzuschalten.
! Diese Funktion kann zu den Programmen , , , , , .
Bügelleicht
Wird diese Zusatzfunktion eingestellt, werden Waschgang und
Schleudergang entsprechend geändert, um Knitterbildung zu
vermindern. Am Ende des Waschgangs erfolgt eine sanfte
Umdrehung der Trommel; die Kontrollleuchten „Bügelleicht“
und START/PAUSE blinken. Drücken Sie die Taste START/
PAUSE oder „Bügelleicht“, um den Waschgang abzuschließen.
! Diese Funktion kann zu den Programmen , , ,
, , .
Vorwäsche
Beim Wählen dieser Funktion wird eine Vorwäsche aktiviert,
so dass auch hartnäckige Flecken beseitigt werden.
NB: füllen Sie das Waschpulver in die entsprechende Kammer ein.
! Diese Funktion kann zu den Programmen , , ,
, , , , , , , , (60°), .
Zusätze
sche
mittel
Vorwä-
(3)
Bleich-
Wasch-
-
-
-
-
-
-
-
-
-
mittel
(kg)
Max. Bela-
spüler
Weich-
5 48 1,12 58 120’
5 48 0,67 54 100’
9 - - - 175’
9 - - - 185’
6 - - - 80’
2,5 - - - 75’
3,5 - - - 110’
10 - - - 155’
10 - - - 49’
6 - - - 210’
6 - - - 230’
1 - - - 80’
2,5 - - - 105’
4 71 0,20 44 30’
10 53 0,95 60 200’
10 53 0,92 88 185’
gkeit %
Restfeuchti-
dungsmenge
Wasser ge-
Energiever-
brauch kWh
samt lt
Program-
DE
mdauer
19
19
Page 20

Waschmittel und Wäsche
DE
Waschmittel
Die Wahl des Waschmittels und der Waschmittelmenge hängt
von der Gewebeart (Baumwolle, Wolle, Seide ...), der Farbe,
der Waschtemperatur, der Stärke der Verschmutzung und
der Wasserhärte ab. Dosieren Sie das Waschmittel gemäß
Herstellerangaben exakt, um Verschwendung zu vermeiden und die
Umwelt zu schonen: obwohl sie biologisch abbaubar sind, beinhalten
Sie dennoch Stoffe, die die Umwelt belasten. Es empfiehlt sich:
• Waschmittel in Pulverform für Weißwäsche und für die
Vorwäsche zu verwenden,
• flüssige Waschmittel für empfindliche Baumwollwäsche und
für alle Waschprogramme bei Niedrigtemperaturen,
• und flüssige Feinwaschmittel für Wolle und Seide.
Flüssigwaschmittel dürfen erst unmittelbar vor dem Start des
Programms in die entsprechende Kammer, oder in eine Dosierkugel,
eingefüllt werden. Bei der Benutzung von Flüssigwaschmitteln sollte
kein Programm mit Vorwäsche verwendet werden.
! Waschmittel in Pulverform für Baumwollweißwäsche, für die
Vorwäsche und für Waschprogramme bei Temperaturen über
60°C verwenden.
! Bitte befolgen Sie den auf der Waschmittelverpackung
angegebenen Anweisungen,
! Verwenden Sie keine Handwaschmittel, diese verursachen
eine zu hohe Schaumbildung.
Vorsortieren der Wäsche
• Falten Sie die Wäsche auseinander, bevor Sie sie in die
Trommel legen.
• Trennen Sie die Wäsche je nach Gewebeart (siehe
Waschetikettensymbol) und Farbe. Weißwäsche ist immer
getrennt zu waschen.
• Entleeren Sie alle Taschen und kontrollieren Sie die Knöpfe.
• Das in der „Programmtabelle“ angegebene Gewicht,
beschreibt die maximale Ladung Trockenwäsche und darf
nicht überschritten werden.
Wie schwer ist Wäsche?
1 Betttuch 400-500 g
1 Kopfkissenbezug 150-200 g.
1 Tischdecke 400-500 g
1 Bademantel 900-1200 g
1 Handtuch 150-250 g
1 Jeanshose 400-500 g
1 Oberhemd 150-200 g.
Waschhinweise
Buntwäsche Intensiv: verwenden Sie den Zyklus für
helle Buntwäsche zur besseren Fleckenentfernung, jedoch
ohne Beschädigung der Wäsche und Ausbleichen der
Farben. Der Zyklus wurde speziell entwickelt, um die gleichen
Waschergebnisse eines 60°-Programms bei nur 40° zu
erreichen. Es empfiehlt sich der Einsatz von Waschmitteln für
Buntwäsche.
Buntwäsche: verwenden Sie das Programm
für die Reinigung von mehrfarbigen, durchschnittlich
verschmutzten Kleidungsstücken. Dieser Zyklus wurde
speziell entwickelt, um die Farben zu schonen und dabei die
gleichen Waschergebnisse eines 40°-Programms bei nur
20° zu erreichen. Verwenden Sie spezielle Waschmittel für
Buntwäsche, die bereits bei niedrigen Temperaturen aktiv sind.
! Es ist immer zu empfehlen, färbende Wäsche und neue
Buntwäsche getrennt zu waschen.
Dunkel: Verwenden Sie das Programm für die Reinigung
von dunklen Kleidungsstücken. Das Programm wurde
konzipiert, damit dunkle Farben lange Zeit erhalten bleiben.
Um bessere Ergebnisse zu erzielen, wird bei der Reinigung
von dunklen Kleidungsstücken die Verwendung von
Flüssigwaschmittel empfohlen.
Hemden: wählen Sie das Spezialprogramm zum schonenden
Waschen von Oberhemden jeglicher Gewebeart und Farbe.
Daunen: Zum Waschen von Wäschestücken mit Daunenfüllung
wie Federbetten für Doppel- oder Einzelbetten (die ein Gewicht
von 3,5 kg nicht überschreiten), Kissen, Anoraks wählen Sie das
Spezialprogramm . Wie empfehlen, die Federbetten mit nach
innen gefalteten Ecken (siehe Abbildung) in die Wäschetrommel
zu füllen und ¾ des Fassungsvermögens der Trommel nicht
zu überschreiten. Für optimale Waschergebnisse empfiehlt
es sich, Flüssigwaschmittel zu verwenden und dieses in die
Waschmittelkammer einzufüllen.
Steppdecken: Benutzen Sie zum Waschen von
Steppdecken mit Synthetikbezug den mitgelieferten Sack und
stellen Sie das Programm ein.
Badezimmer- und Bettwäsche:Um Ihre Handtücherund Bettwäsche in einem einzigen Waschgang zu waschen,
verwenden Sie das -Programm, das die Verwendung
von Weichspülern optimiert. Dadurch sparen Sie zusätzlich
Zeit und Energie. Es empfiehlt sich die Verwendung von
Pulverwaschmittel.
Antiallergie Plus : dieser Zyklus wurde speziell für die
Entfernung der wichtigsten Allergene, wie Pollen, Milben oder
Katzen- und Hundehaare aus Wäsche aus Baumwolle und
anderen resistenten Fasern entwickelt.
Antiallergie Sanft : dieser Zyklus wurde speziell für die
Entfernung der wichtigsten Allergene, wie Pollen, Milben oder
Katzen- und Hundehaare aus Wäsche aus Baumwolle und
anderen resistenten Fasern bereits bei 40° entwickelt.
Ultra Fein: Verwenden Sie das Programm für die Reinigung von
Feinwäsche, die Applikationen wie Strass oder Pailletten aufweist.
Es wird empfohlen, die Kleidungsstücke vor der Reinigung
umzudrehen und kleinere Kleidungsstücke in den
entsprechenden Reinigungsbeutel für Feinwäsche zu geben.
Um bessere Ergebnisse zu erzielen, wird für die Reinigung von
Feinwäsche die Verwendung von Flüssigwaschmittel empfohlen.
Wählen Sie für die Reinigung von Kleidungsstücken aus
Seide oder Gardinen (sie sollten zusammengelegt und in den
mitgelieferten Beutel gesteckt werden) den Zyklus und
aktivieren Sie die Option (in diesem Fall kann auch die
Option „Extra Spülen” aktiviert werden); unterbricht Ihr Gerät das
Programm, ohne das Wasser abzupumpen. Ihre Wäsche bleibt
so im letzen Spülwasser liegen, und die Kontrollleuchte
blinkt. Zum Abpumpen des Wassers zu muss die Taste START/
PAUSE oder die Taste gedrückt werden.
Wolle: das Waschprogramm „Wolle” dieser Waschmaschine
Hotpoint-Ariston wurde von der Woolmark Company für die Wäsche
von mit „Handwäsche“ gekennzeichneten Wollkleidungsstücken
getestet und anerkannt, vorausgesetzt die Wäsche erfolgt gemäß
der Anweisungen auf Etikett des Kleidungsstück und den Angaben
des Herstellers des Haushaltsgeräts. Hotpoint-Ariston ist die
erste Waschmaschinenmarke, die von der Woolmark Company
die Zertifizierung Woolmark Apparel Care - Platinum für ihre
Waschleistungen und den Verbrauch von Wasser und Energie
erhalten hat. (M1135)
20
Page 21

Vorsichtsmaßregeln und
Hinweise
! Der Waschvollautomat wurde nach den strengsten
internationalen Sicherheitsvorschriften entworfen
und gebaut. Nachstehende Hinweise werden aus
Sicherheitsgründen genannt und sollten aufmerksam
gelesen werden
Allgemeine Sicherheit
• Dieses Gerät wurde ausschließlich für den Einsatz im
privaten Haushalt konzipiert.
• Dieses Gerät ist nicht zur Verwendung durch
Personen (einschließlich Kinder) mit eingeschränkten
körperlichen, geistigen oder sensorialen Fähigkeiten
oder ohne ausreichende Erfarhung und Kenntnis
geeignet, es sei denn, sie werden durch eine für ihre
Sicherheit verantwortliche Person beaufsichtigt und
eingewiesen. Kinder müssen beaufsichtigt werden, um
sicherzustellen, dass sie nicht mit dem Gerät spielen.
• Berühren Sie das Gerät nicht, wenn Sie barfuß sind,
und auch nicht mit nassen oder feuchten Händen oder
Füßen.
• Ziehen Sie den Netzstecker nicht am Netzkabel aus der
Steckdose, sondern nur am Netzstecker selbst.
• Berühren Sie nicht das Ablaufwasser, es könnte sehr
heiß sein.
• Öffnen Sie die Gerätetür nicht mit Gewalt: Der
Sicherheits-Schließmechanismus könnte hierdurch
beschädigt werden.
• Bei etwaigen Störungen versuchen Sie bitte nicht,
Innenteile selbst zu reparieren.
• Halten Sie Kinder stets von dem in Betrieb befindlichen
Gerät fern.
• Sollte es erforderlich sein, das Gerät zu versetzen,
sollten hierfür 2 oder 3 Personen verfügbar sein.
(Vorsichtig vorgehen). Versetzen Sie es niemals allein,
das Gerät ist äußerst schwer.
• Bevor Sie die Wäsche einfüllen, stellen Sie bitte sicher,
dass die Wäschetrommel leer ist.
System zur Auswuchtung der
Wäscheladung
Um starke Vibrationen zu vermeiden, wird die Wäsche vor
dem Schleudern durch spezielle Trommelbewegungen
gleichmäßig verteilt. Sollte die Wäscheladung nach Ablauf
mehrerer Versuche immer noch nicht korrekt verteilt sein,
schleudert das Gerät die Wäsche bei einer niedrigeren
Schleudergeschwindigkeit. Sollte die Wäsche extrem
ungleichmäßig verteilt sein, führt das Gerät anstelle des
Schleudergangs einen Wäscheverteilungs-Zyklus durch.
Um eine optimale Verteilung der Wäscheladung und somit
eine korrekte Auswuchtung zu ermöglichen, sollten große
und kleine Wäscheteile gemischt eingefüllt werden.
• Die europäische Richtlinie 2002/96/EG über
Elektro- und Elektronik-Altgeräte schreibt vor, dass
Hauhaltsgeräte nicht mit dem normalen Müll zu
entsorgen sind. Altgeräte sind zwecks Optimierung
der Rückgewinnungs- und Recyclingrate der
Gerätematerialien einer gesonderten Sammelstelle
zuzuführen, um Schäden für die Gesundheit und
die Umwelt zu vermeiden. Das durchgestrichene
Abfalleimersymbol, weist darauf hin, dass eine getrennte
Entsorgung vorgeschrieben ist.
Für weitere Informationen hinsichtlich der
ordnungsgemäßen Entsorgung von Haushaltsgeräten
wenden Sie sich bitte an Ihren Händler oder an die
zuständige kommunale Stelle.
Manuelles Öffnen der Gerätetür
Sollte die Gerätetür aufgrund eines Stromausfalls nicht
geöffnet werden können, gehen Sie wie folgt vor, um die
Wäsche entnehmen und somit aufhängen zu können:
1. Ziehen Sie den Netzstecker
aus der Steckdose .
2. Stellen Sie sicher, dass
der Wasserstand im Innern
des Gerätes die Gerätetür
nicht übersteigt, andernfalls
lassen Sie das überschüssige
Wasser, so wie auf der
Abbildung veranschaulicht,
durch den Ablaufschlauch in
einen Eimer ablaufen.
3. Nehmen Sie die Abdeckung an der Gerätefront ab (siehe
Abbildung auf nachfolgender Seite).
4. Entfernen Sie mithilfe der
Zunge (nach vorne ziehen) die
Kunststoff-Spannvorrichtung
aus der Arretierung. Ziehen
Sie die Spannvorrichtung jetzt
nach unten, bis ein deutliches
Klicken anzeigt, dass die Tür
entriegelt ist.
5. Öffnen Sie die Gerätetür.
Wenn das nicht möglich ist,
wiederholen Sie die Schritte
aus Punkt 4.
DE
Entsorgung
• Entsorgung des Verpackungsmaterials: Bitte befolgen
Sie die lokalen Richtlinien zur Entsorgung und
Wiederverwertung des Verpackungsmaterials.
6. Arretieren Die die Kunststofflasche wieder an der
beschriebenen Stelle
21
Page 22

1
2
1
2
2
Reinigung und Pflege
DE
Abstellen der Wasser- und
Stromversorgung
• Drehen Sie den Wasserhahn nach jedem Waschvorgang
zu. Hierdurch wird der Verschleiß der Wasseranlage
verringert und Wasseraustritte vermieden.
• Ziehen Sie den Netzstecker aus der Steckdose, bevor
Sie Ihr Gerät reinigen.
Reinigung des Gerätes
Die Gehäuseteile und die Teile aus Gummi können mit
einem, mit warmer Spülmittellauge angefeuchteten Tuch
gereinigt werden. Vermeiden Sie den Einsatz von Löseund Scheuermitteln.
Reinigung der Waschmittelschublade
Drücken Sie auf den
Arretierhebel (1) und ziehen
Sie die Waschmittelschublade
nach vorne heraus (2) (siehe
Abbildung).
Spülen Sie diese regelmäßig
unter fließendem Wasser
gründlich aus.
Pflege der Wäschetrommel
Zugang zur Fremdkörperfalle:
1. Nehmen Sie die Abdeckung an der Gerätefront ab,
indem Sie zur Mitte hin drücken, dann drücken Sie
beide Seiten nach unten und ziehen sie heraus (siehe
Abbildungen).
2. Nehmen Sie einen
Behälter zum Auffangen des
auslaufenden Wassers (ca.
1,5 Liter) zur Hand (siehe
Abbildung);
3. Drehen Sie den Deckel
gegen den Uhrzeigersinn ab
(siehe Abbildung);
4. Reinigen Sie das Innere gründlich;
5. Schrauben Sie den Deckel wieder auf.
6. Bringen Sie die Abdeckung wieder an. Stellen Sie hierbei
sicher, dass die Haken in die Schlitze eingreifen, bevor Sie
die Abdeckung fest andrücken.
• Lassen Sie die Gerätetür stets leicht offen stehen, um
die Bildung unangenehmer Gerüche zu vermeiden.
Reinigung der Pumpe
Ihr Gerät ist mit einer selbstreinigenden Pumpe
ausgerüstet, eine Wartung ist demnach nicht erforderlich.
Es könnte jedoch vorkommen, dass kleine Gegenstände
(Münzen, Knöpfe) in die Fremdkörperfalle geraten.
! Vergewissern Sie sich, dass der Waschgang
abgeschlossen ist und ziehen Sie den Netzstecker heraus.
22
Kontrolle des Wasserzulaufschlauchs
Kontrollieren Sie den Zulaufschlauch mindestens einmal
im Jahr. Weist er Risse bzw. Brüche auf, muss er
ausgetauscht werden. Der starke Druck während des
Waschprogramms könnte zu plötzlichem Platzen führen.
Page 23

Störungen und Abhilfe
Bei Funktionsstörung: Bevor Sie sich an den Technischen Kundendienst wenden (siehe „Kundendienst“), vergewissern Sie
sich zuerst, ob es sich nicht um eine Kleinigkeit handelt, die Sie selbst beheben können. Ziehen Sie hierzu nachstehendes
Verzeichnis zu Rate.
Störungen:
Das Gerät schaltet sich nicht
ein.
Der Waschgang startet nicht.
Das Gerät zieht kein Wasser.
Die Gerätetür bleibt gesperrt.
Das Gerät zieht laufend
Wasser und pumpt es laufend
ab.
Das Gerät pumpt nicht ab und
schleudert nicht.
Das Gerät vibriert zu stark
während des Schleuderns.
Das Gerät ist undicht.
Mögliche Ursachen / Lösungen:
• Der Stecker steckt nicht in der Steckdose, oder nicht so, dass der Kontakt
hergestellt wird.
• Der Strom ist ausgefallen.
• Die Gerätetür ist nicht ganz geschlossen.
• Die Taste START/PAUSE wurde nicht gedrückt.
• Der Wasserhahn ist nicht aufgedreht.
• Es wurde ein verzögerter Start gewählt.
• Der Zufuhrschlauch ist nicht am Wasserhahn angeschlossen.
• Der Schlauch ist geknickt.
• Der Wasserhahn ist nicht aufgedreht.
• Es ist kein Wasser da.
• Der Druck ist unzureichend.
• Die Taste START/PAUSE wurde nicht gedrückt.
• Durch Auswahl des Option führt der Waschvollautomat am Ende des Zyklus
langsame Drehungen der Trommel aus; um den Zyklus zu beenden drücken Sie
die Taste START/PAUSE oder die Taste .
• Der Ablaufschlauch befindet sich nicht auf der vorgeschriebenen Höhe, d.h. 65 –
100 cm vom Boden (siehe „Installation“).
• Das Schlauchende liegt unter Wasser (siehe „Installation”).
• Falls Sie in einer der obersten Etagen eines Gebäudes wohnen, kann es
vorkommen, dass sich im Syphon ein Vakuum bildet, und dadurch ständig
Wasser ansaugt und wieder abpumpt wird. Zur Lösung dieser Probleme bietet
der Handel spezielle Syphonventilean.
• Der Abfluss der Hausinstallation wurde nicht mit einer Entlüftungsöffnung
versehen.
• Das Programm sieht kein Abpumpen vor: Bei einigen Programmen muss es von
Hand eingestellt werden (siehe „Programme und Zusatzfunktionen“).
• Die Zusatzfunktion wurde zugeschaltet: zur Beendung des Programms Taste
START/PAUSE drücken (siehe „Programme und Zusatzfunktionen“).
• Der Ablaufschlauch ist geknickt (siehe „Installation“).
• Die Ablaufleitung ist verstopft.
• Die Transportsicherungen wurden nicht entfernt (siehe „Installation“).
• Das Gerät steht nicht eben (siehe „Installation“).
• Das Gerät steht zu eng zwischen der Wand und einem Möbel (siehe „Installation“).
• Das Gerät wurde nicht gleichmäßig beladen (siehe „Waschmittel und Wäsche“).
• Der Zulaufschlauch wurde nicht ordnungsgemäß aufgeschraubt (siehe „Installation“).
• Die Waschmittelschublade ist verstopft (zur Reinigung siehe „Wartung und Pflege“).
• Der Ablaufschlauch ist nicht korrekt befestigt (siehe „Installation“).
DE
Die Symbole des
„Programmablaufs“ blinken
gemeinsam mit der ON/OFF
• Schalten Sie das Gerät aus und ziehen Sie den Netzstecker; warten Sie daraufhin
ca. 1 Minute und schalten Sie es wieder ein. Bleibt die Störung bestehen,
kontaktieren Sie bitte den Kundendienst.
Kontrollleuchte in kurzen
Abständen.
Es bildet sich zu viel Schaum.
Die Gerätetür bleibt gesperrt.
! Hinweis: Um den “Demo Mode”zu verlassen, Schalten Sie die Waschmaschine, drücken Sie gleichzeitig für 3 Sek, die beiden
Tasten “START/PAUSE” und “ON/OFF” .
• Das Waschmittel ist für Waschmaschinen nicht geeignet (es muss mit der Aufschrift
„Für Waschmaschinen“, „Für Handwäsche und Waschmaschinen“ usw. versehen sein.
• Es wurde zu hoch dosiert.
• Entsperren Sie die Gerätetür von Hand (siehe „Vorsichtsmaßregeln und Hinweise“).
23
Page 24

Kundendienst
DE
Bevor Sie den Kundendienst anfordern:
• Prüfen Sie, ob einige Kontrollen vorab selbst durchgeführt werden (siehe “Störungen und Abhilfe);
• Starten Sie daraufhin das Programm erneut, um sicherzustellen, dass die Störung auch wirklich behoben wurde;
• Ist dies nicht der Fall, wenden Sie sich bitte an den autorisierten Kundendienst.
! Im Falle einer fehlerhaften Installation oder eines unkorrekten Gebrauchs wird der Einsatz eventuell in Rechnung gestellt.
! Beauftragen Sie bitte niemals unbefugtes Personal.
Geben Sie bitte Folgendes an:
• die Art der Störung;
• das Gerätemodell (Mod.);
• die Seriennummer (S/N).
Diese Angaben ersehen Sie auf dem am Gerät befindlichen Typenschild.
24
Page 25

Instructies voor
installatie en gebruik
WASAUTOMAAT
NL
Nederlands
AQUALTIS
AQ105D 49D
Inhoud
Installatie, 26-27
Uitpakken en waterpas zetten
Water en elektrische aansluitingen
Technische gegevens
Beschrijving van de wasautomaat, 28-29
“Touch-control” bedieningspaneel
Het uitvoeren van een wascyclus, 30
Programma’s en opties, 31
Programmatabel
Wasopties
Wasmiddelen en wasgoed, 32
Wasmiddel
Voorbereiden van het wasgoed
Wastips
Voorzorgsmaatregelen en advies, 33
Algemene veiligheid
Balanceersysteem van de lading
Afvalverwijdering
Handmatige opening van het deurtje
NL
Onderhoud en verzorging, 34
Afsluiten van water en stroom
Reinigen van de wasautomaat
Reinigen van het wasmiddelbakje
Verzorging van de trommel
Reinigen van de pomp
Controle van de buis van de watertoevoer
Storingen en oplossingen, 35
Service, 36
25
Page 26
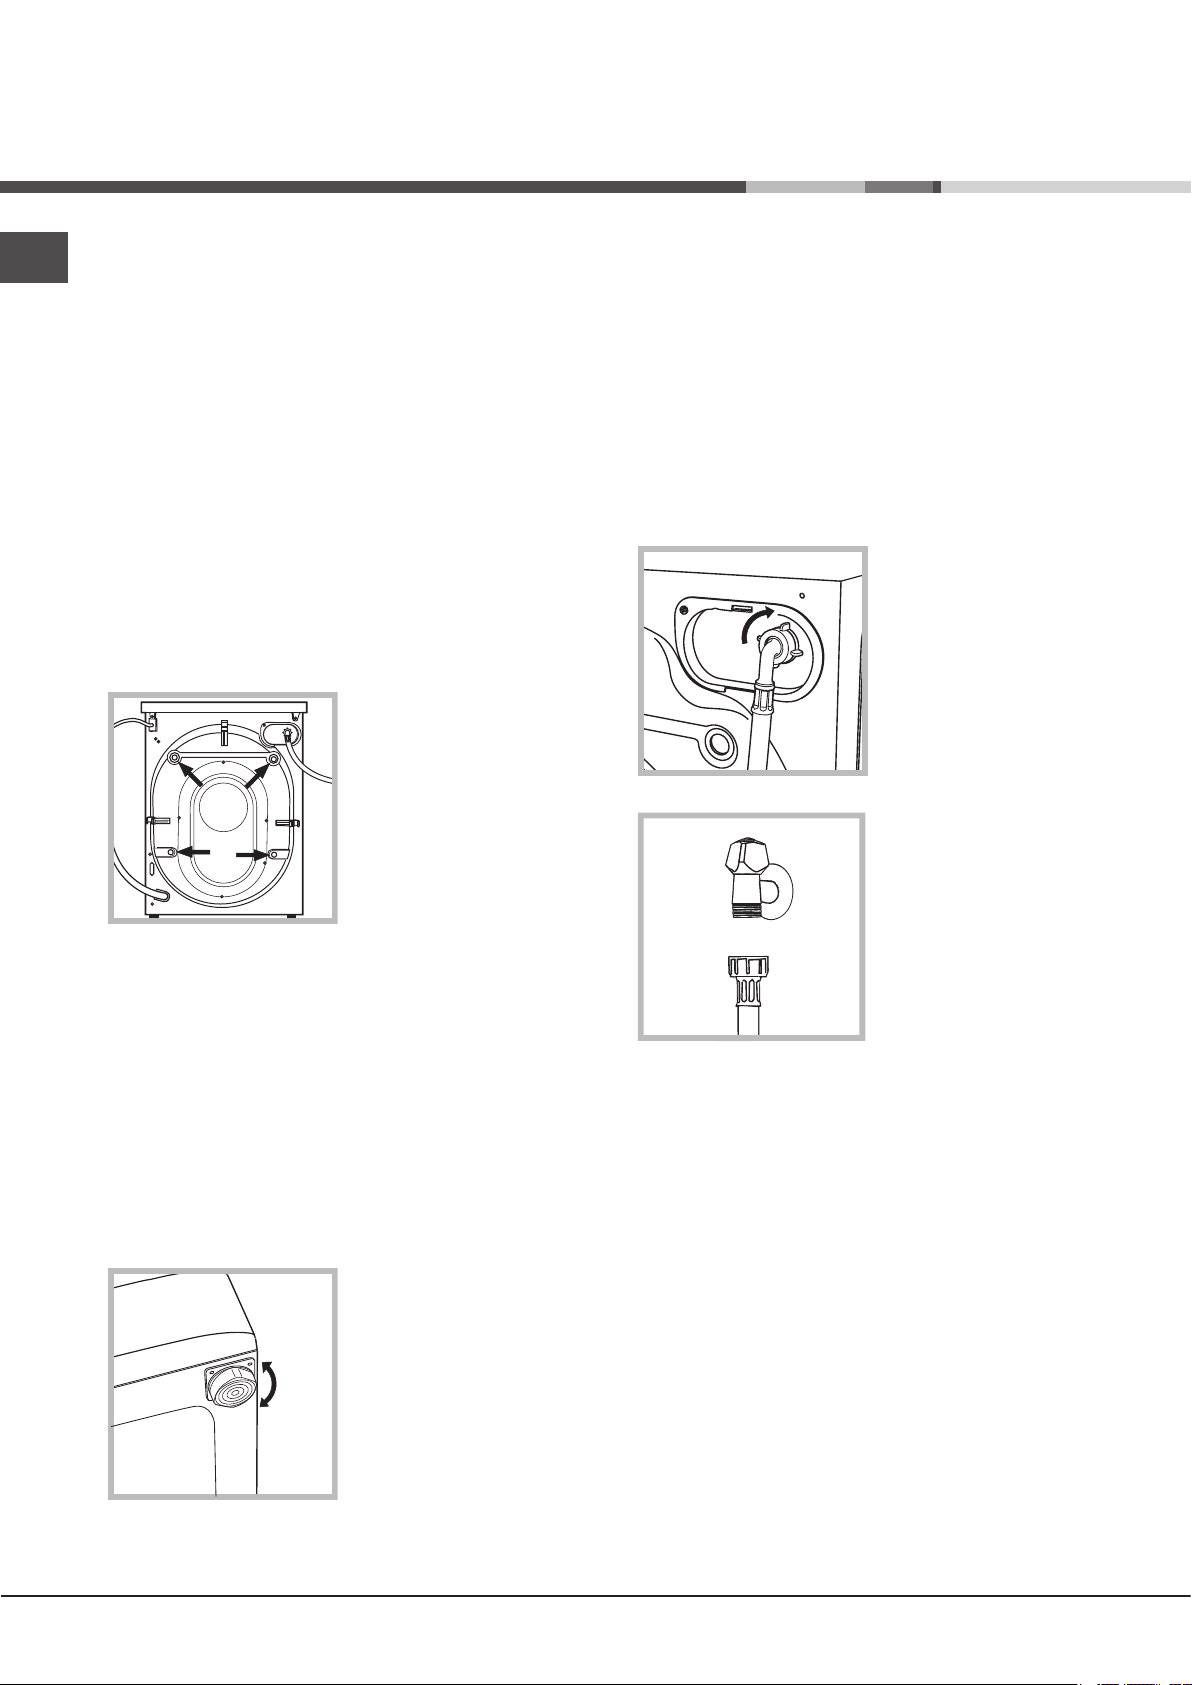
Installatie
NL
! Het is belangrijk dit boekje te bewaren, zodat u het op
ieder gewenst moment kunt raadplegen. In het geval u de
wasautomaat verkoopt of u verhuist, moet u de handleiding
bij het apparaat bewaren.
! Lees de instructies aandachtig door: u vindt er belangrijke
informatie betreffende installatie, gebruik en veiligheid.
! In de envelop vindt u samen met deze
gebruiksaanwijzing, de garantie en onderdelen die nodig
zijn voor de installatie.
Uitpakken en waterpas zetten
Uitpakken
1. Zodra u de wasautomaat uitgepakt heeft, dient u te
controleren of hij niet beschadigd is tijdens het transport.
Indien dit wel het geval is moet hij niet worden aangesloten
en moet u contact opnemen met de handelaar.
2. Verwijder de 4
beschermschroeven
voor het transport en de
bijbehorende afstandsleider
die zich aan de achterkant
bevinden (zie afbeelding).
! Een correcte nivellering geeft de machine stabiliteit en
vermijdt, vooral tijdens de centrifuge, vibraties en lawaai.
! In het geval de wasautomaat op vloerbedekking of
tapijt staat regelt u de stelvoetjes zodanig dat onder de
automaat genoeg ruimte is voor ventilatie.
Water en elektrische aansluitingen
Aansluiting van de watertoevoerslang
! Voordat u watertoevoerbuis aansluit op het waternet moet
u het water laten lopen totdat het helder is.
1. Verbind de
watertoevoerslang aan de
wasautomaat door hem met
de haakse aansluiting op de
betreffende watertoevoer
te schroeven, rechtsboven
aan de achterkant (zie
afbeelding).
2. Sluit de toevoerbuis aan
op de koudwaterkraan
met een mondstuk met
schroefdraad van 3/4 gas
(zie afbeelding).
3. Sluit de gaten af met de in de envelop bijgeleverde
plastic doppen.
4. Bewaar alle onderdelen; mocht de wasautomaat ooit
nog worden vervoerd, dan moeten deze weer worden
aangebracht om interne schade te voorkomen.
!Het verpakkingsmateriaal is geen speelgoed voor
kinderen.
Waterpas zetten
1. Installeer de wasautomaat op een rechte en stevige vloer
en laat hem niet tegen muren of meubels leunen.
2. Compenseer eventuele
oneffenheden door de
stelvoetjes vast of los te
draaien totdat de automaat
volledig horizontaal staat (hij
mag niet meer dan 2 graden
hellen).
3. Let erop dat er geen knellingen of kronkels in de buis zijn.
! De waterdruk van de kraan moet zich binnen de waarden
van de tabel Technische Gegevens bevinden (zie bladzijde
hiernaast).
! Als de toevoerbuis niet lang genoeg is moet u zich
wenden tot een gespecialiseerde winkel of een bevoegde
installateur.
! Gebruik nooit tweedehands of oude slangen, maar alleen
die slagen die bij het apparaat worden geleverd.
26
Page 27

Aansluiting van de afvoerbuis
65 - 100 cm
Verbind de afvoerbuis,
zonder hem te buigen, aan
een afvoerleiding of aan een
afvoer in de muur die zich
tussen de 65 en 100 cm
van de grond af bevindt.
Als alternatief kunt u
de afvoerbuis aan de
rand van een wasbak of
badkuip hangen nadat u
hem met de steun aan de
kraan heeft bevestigd (zie
afbeelding).
Het uiteinde van de
afvoerslang mag niet onder
water hangen.
! Gebruik geen verlengsnoeren of dubbelstekkers.
NL
! Het snoer mag niet geknikt of samengedrukt worden.
! De voedingskabel en de stekker mogen alleen door een
bevoegde installateur worden vervangen.
Belangrijk! De fabrikant kan niet aansprakelijk worden
gesteld wanneer deze normen niet worden nageleefd.
! Gebruik nooit verlengstukken voor de slang; indien dit niet
te vermijden is moet het verlengstuk dezelfde doorsnede
hebben als de oorspronkelijke slang en mag hij niet langer
zijn dan 150 cm.
Elektrische aansluiting
Voordat u de stekker in het stopcontact steekt moet u zich
ervan verzekeren dat:
• het stopcontact geaard is en voldoet aan de geldende
normen;
• het stopcontact het maximum vermogen van de
wasautomaat kan verdragen, zoals aangegeven in de
tabel Technische Gegevens (zie hiernaast);
• de spanning zich bevindt tussen de waarden die zijn
aangegeven in de tabel Technische Gegevens (zie
hiernaast);
• de contactdoos geschikt is voor de stekker van de
automaat. Indien dit niet zo is moet of de stekker of het
stopcontact vervangen worden.
! De machine mag alleen binnenshuis op een vorstvrije en
droge plek worden geïnstalleerd om elektronische schade
door bevriezing of condensatie te voorkomen.
! Als de wasautomaat is geïnstalleerd moet het stopcontact
gemakkelijk te bereiken zijn.
Technische gegevens
Model
Afmetingen
Vermogen
Elektrische
aansluitingen
Aansluiting
waterleiding
Snelheid
centrifuge
Controleprogram-
ma’s volgens
de richtlijnen
1061/2010 en
1015/2010
AQ105D 49
breedte cm 59,5
hoogte cm 85
diepte cm 64,5
van 1 tot 10 kg
zie het typeplaatje met de technische
eigenschappen dat op het apparaat is
bevestigd
max. druk 1 MPa (10 bar)
min. druk 0,05 MPa (0,5 bar)
Inhoud trommel 71 liters
tot 1400 toeren per minuu
programma
programma
Deze apparatuur voldoet aan de volgende
CE voorschriften:
- 2004/108/CE (Elektromagnetische compatiabiliteit)
- 2002/96/CE
- 2006/95/CE (Laagspanning)
; Katoen Standaard 60°C.
; Katoen Standaard 40°C.
27
Page 28

Beschrijving van de wasautomaat
3
1
2
1
8
0
2
1
0
1
5
0
1
2
0
9
0
6
0
B
A
NL
AUTOMAAT
HANDVAT DEUR
WASAUTOMAAT
VOETSTUK
DEUR
DEUR
WAS-
STELVOETJES
Om de deur van de
wasautomaat te openen
dient u altijd het speciale
handvat te gebruiken (zie
afbeelding).
BEDIENINGSPANEEL
DIRECT INJECTION SYSTEEM
De wasautomaat beschikt over de innovatieve technologie
“Direct Injection”, die het wasmiddel razendsnel oplost,
waardoor al zijn elementen op de best mogelijke wijze
worden geactiveerd. Het systeem garandeert een compleet
gebruik en een complete oplossing van het wasmiddel,
doordat het met water wordt vermengd voordat het
het wasgoed bereikt. Hiermee bereikt u reeds op lage
temperaturen betere wasresultaten en combineert u een
aanzienlijke energiebesparing met een perfecte verzorging
van kleuren en vezels. De “Direct Injection” technologie
wordt automatisch op alle cycli geactiveerd.
gebruiken voor een correcte dosering. Voor het gebruik van
poederwasmiddel doet u het schotje terug in de opening B.
3. extra bakje:Bleekmiddel
! Het gebruik van het extra bakje 3 sluit de voorwas uit.
bakje wasverzachters: voor wasverzachter. We
raden u aan om nooit het maximaal aangegeven niveau
te overschrijden (aangegeven door rooster) en om
geconcentreerde wasverzachters aan te lengen.
TOUCH CONTROL bedieningspaneel
Om de instellingen te wijzigen
drukt u zachtjes op het
WASMIDDELBAKJE
Het wasmiddelbakje bevindt
zich aan de binnenkant van
de automaat en verschijnt als
symbool aan de binnenkant
van het touch control-deel,
zoals op de afbeelding
aangegeven.
u de deur opent.
Voor de dosering van
wasmiddelen zie het
hoofdstuk “Wasmiddelen en
wasgoed”.
Stand- by modus
Deze wasautomaat beschikt, in overeenkomst met de
nieuwe normen betreffende de energiebesparing, over
1. wasmiddelbakje voorwas:
gebruik waspoeder.
! Voordat u het middel erin
strooit moet u controleren of
het aanvullende bakje 3 er niet
in zit.
2. wasmiddelbakje hoofdwas:
een systeem wat het apparaat automatisch na 30 minuten
uitschakelt (stand-by) indien men het niet gebruikt. Druk
kort op de ON/OFF toets en wacht tot de wasautomaat
weer aangaat.
Gebruik in off-mode: 0,5 W
Gebruik in Left-on: 0,5 W
Als u een vloeibaar wasmiddel
gebruikt raden we u aan het
bijgeleverde schotje A te
28
Page 29

“Touch-control” bedieningspaneel
Knop PROGRAMMA’S
M2
M1
Knop CENTRIFUGEREN
Knop
TEMPERATUUR
DISPLAY
Controlelampje
ECO
Knop met controlelampje
START/PAUSE
Symbolen
WASFASES
Knop met controlelampje
M3
ON/OFF
Knop met controlelampje ON/OFF: druk even op de knop om de
wasautomaat aan of uit te zetten. Het groene controlelampje geeft
aan dat de wasautomaat aanstaat. Om de wasautomaat tijdens
de wascyclus uit te zetten moet u de knop iets langer, circa 3
seconden, ingedrukt houden. Als u de kort of per ongeluk indrukt
zal de wasautomaat niet uitgaan. Als u de wasautomaat tijdens
de wascyclus uitdoet wordt de cyclus automatisch geannuleerd.
Knop PROGRAMMA’S: kan beide richtingen op draaien.
Voor de juiste programmakeuze kunt u de “Programmatabel”
raadplegen. Gedurende het programma blijft de knop stilstaan.
M1-M2-M3 toetsen: druk op een van de twee toetsen om een
wascyclus en uw persoonlijke aanpassingen op te slaan. Om
een voorheen opgeslagen wascyclus te starten drukt u op de
betreffende toets.
Knop TEMPERATUUR: druk hierop om de temperatuur
te wijzigen of uit te sluiten. De gekozen waarde leest u af op
bovenstaand display (zie “Het uitvoeren van een wascyclus”).
Knop CENTRIFUGEREN: druk hierop om de centrifuge
te wijzigen of uit te sluiten. De gekozen waarde leest u af op
bovenstaand display (zie “Het uitvoeren van een wascyclus”).
Knop UITG EST ELDE START: druk hierop om een
uitgestelde start van het gekozen programma in te stellen. De
ingestelde vertraging leest u af van bovenstaand display (zie “Het
uitvoeren van een wascyclus”).
Knoppen OPTIES: druk hierop om de beschikbare opties
te selecteren. Het controlelampje dat overeenkomt met de
geselecteerde optie blijft aan (zie “Het uitvoeren van een
wascyclus”).
Symbolen WASFASES: gaan aan om weer te geven in welke fase
van de cyclus de automaat zich bevindt (Wassen - Spoelen
- Centrifugeren - Afpompen ).
De tekst wordt verlicht als de wascyclus is beëindigd.
Knop met controlelampje START/PAUSE: als het groene
controlelampje langzaam knippert, drukt u op de knop om
de wascyclus te starten. Als de cyclus is gestart blijft het
controlelampje vast aanstaan. Als u de wascyclus wilt pauzeren
Knoppen
OPTIES
Knop
UITGESTELDE
START
Controlelampje
Knop met controlelampje
TOETSBLOKKERING
LOCK
drukt u nogmaals op de knop. Het controlelampje wordt oranje
en gaat knipperen. Als het controlelampje “LOCK” uit is, kunt
u het deurtje openen. Om het programma te hervatten drukt u
opnieuw op de knop.
Controlelampje LOCK: geeft aan dat de LOCK is. Om de deur
te openen moet u de wascyclus pauzeren (zie “Het uitvoeren
van een wascyclus”).
Knop met controlelampje TOETSBLOKKERING: om de
blokkering van het bedieningspaneel in of uit te schakelen dient
u de KNOP een aantal seconden (3-4) ingedrukt te houden. Het
ontstoken controlelampje geeft aan dat het bedieningspaneel
geblokkeerd is. Op deze manier kunt u voorkomen dat er
ongewilde wijzigingen aan de programma’s worden aangebracht,
bijvoorbeeld bij aanwezigheid van kinderen.
Controlelampje ECO: het symbool gaat aan als, nadat u de
wasparameters heeft gewijzigd, u een energiebesparing bereikt
van minstens 10%. Bovendien zal, voor het apparaat in de “Stand
by” modus treedt, het symbool enkele seconden lang aangaan.
Als het apparaat uitstaat zal de geschatte energiebesparing
circa 80% zijn.
TAAL WIJZIGEN
Wanneer de machine voor de eerste keer aangezet wordt,
gaat op de display de eerste taal knipperen. Overeenkomstig
de 3 toetsen aan de rechterkant van de display, verschijnen
de symbolen “ “ , “OK” en “V”. De talen wisselen automatisch
elke 3” of door op de toetsen naast de symbolen “ “en “V” te
drukken. Met de toets “OK” wordt de taal bevestigd die na 2”
vastgezet wordt. Als niet op een toets gedrukt wordt, begint na
30” de automatische wisseling van de talen opnieuw.
Om de taal te wijzigen moet u de wasautomaat in- en
uitschakelen. In de 30’’ die volgen op de uitschakeling drukt
u tegelijkertijd op de temperatuurtoets + centrifuge +
uitgestelde start voor 5 seconden of langer. Naast een kort
geluidssignaal verschijnt op het display knipperend de ingestelde
taal. Door op de toetsen naast de symbolen “ “ en “V” te drukken
kan de taal gewijzigd worden. Met de toets naast het symbool
“OK” wordt de taal bevestigd die na 2” vastgezet wordt. Als niet
op een toets gedrukt wordt, wordt na 30” de eerder ingestelde
taal weergegeven. Zet de machine.
29NL29
Page 30

Het uitvoeren van een wascyclus
NL
N.B.: voordat u de wasautomaat gaat gebruiken moet u hem
met wasmiddel maar zonder wasgoed een wascyclus laten
uitvoeren. Kies het programma van 90° zonder voorwas.
1. DE WASAUTOMAAT AANZETTEN. Druk op de toets
. Alle controlelampjes gaan 1 seconde lang aan
en op het display verschijnt de tekst AQUALTIS; het
controlelampje van de toets zal aan blijven staan en
het controlelampje START/PAUSE zal gaan knipperen.
2. PROGRAMMAKEUZE. Draai de PROGRAMMAKNOP
naar rechts of naar links totdat u het gewenste
programma heeft geselecteerd; de naam van het
programma verschijnt op het display; hieraan worden
automatisch een temperatuur en een centrifugesnelheid
gekoppeld die naderhand kunnen worden gewijzigd. Op
de display verschijnt de duur van de cyclus.
3. LAAD HET WASGOED. Open de deur. Laad het
wasgoed in en zorg ervoor nooit de laadhoeveelheid
te overschrijden die wordt aangegeven in de
programmatabel op de volgende bladzijde.
4. WASMIDDEL DOSEREN. Trek het bakje naar buiten
en doe het wasmiddel in de speciale vakjes zoals
aangegeven in “Beschrijving van de wasautomaat”.
5. SLUIT DE DEUR.
6. DE WASCYCLUS AANPASSEN. Dit kunt u doen met
behulp van de knoppen op het bedieningspaneel:
Wijzigen van de temperatuur en/of de
centrifuge.
Het apparaat toont automatisch de maximale
temperatuur en centrifuge die voor het ingestelde
programma gelden of de laatst geselecteerde waarden,
mits deze compatibel zijn met het gekozen programma.
Door op de knop te drukken kunt u de temperatuur
langzaamaan verlagen, tot aan de koude wascyclus
“OFF”. Door op de knop te drukken kunt u het
toerental van de centrifuge langzaamaan verlagen, tot
aan een complete uitsluiting van de centrifuge “OFF”.
Als u nogmaals op de knoppen drukt zult u wederom op
de maximale waarden terugkeren.
! Uitzondering: als u het programma selecteert kunt
u de temperatuur tot op 90° instellen.
Een uitgestelde start instellen.
Om de uitgestelde start van het gekozen programma in
te stellen, drukt u op de uitgesteld start-toets totdat u
de gewenste vertragingstijd bereikt. Tijdens het instellen
wordt de vertragingstijd samen met de tekst “Start:” en
het knipperende symbool weergegeven. Nadat de
uitgestelde start is ingesteld, blijft op het display het
symbool staan en geeft de display weer de duur
van de ingestelde cyclus weer met de tekst “Einde:”
en de duur van de cyclus. Door één keer op de toets
UITGESTELDE START te drukken, wordt de eerder
ingestelde vertraagtijd weergegeven.
Na het starten toont de display de tekst “Start:” en de
vertraagtijd. Nadat de ingestelde vertraagtijd is afgelopen,
start de machine en toont de display “Einde:” en de
resterende tijd tot het einde van de cyclus.
Om de uitgestelde start te verwijderen drukt u op de
knop totdat op het display de tekst OFF verschijnt. Het
symbool gaat uit.
De eigenschappen van de cyclus
wijzigen.
• Druk op de toets om de optie te activeren; op het
display verschijnt de naam van de optie en het
overeenkomende maantje zal aangaan.
• Druk nogmaals op de toets om de optie te desactiveren;
op het display verschijnt de naam van de optie plus de
tekst OFF, het maantje zal uitgaan.
! Als de gekozen optie niet geschikt is voor
het ingestelde programma zal het betreffende
controlelampje gaan knipperen, zal er een geluidssignaal
klinken (3 pieptonen) en zal de optie niet worden
geactiveerd.
! Als de geselecteerde optie niet compatibel is met een
optie die daarvòòr is ingesteld, zal het controlelampje
van de eerst geselecteerde optie gaan knipperen en
zal alleen de tweede optie worden geactiveerd. Het
controlelampje van de betreffende knop zal aanblijven.
! De opties kunnen het aanbevolen laadgewicht en/of de
duur van de cyclus veranderen.
7. HET PROGRAMMA STARTEN. Druk op de toets
START/PAUSE. Het betreffende controlelampje zal
aanblijven en de deur zal worden geblokkeerd (het
controlelampje LOCK blijft aanstaan). De symbolen
die horen bij de verschillende wasfases worden tijdens
de cyclus verlicht om aan te geven welke fase bezig is.
Om een programma te wijzigen van een reeds gestarte
wascyclus doet u de wasautomaat op pauze met
behulp van de knop START/PAUSE. Selecteer daarna
de gewenste cyclus en druk nogmaals op de knop
START/PAUSE.
Om de deur te openen tijdens de wascyclus drukt u op
de knop START/PAUSE. Als het controlelampje
LOCK uit gaat kunt u de deur openen. Om het
programma te hervatten drukt u opnieuw op de knop
START/PAUSE.
8. EINDE VAN HET PROGRAMMA. Wordt aangegeven
door de tekst END. De deur kan gelijk worden geopend.
Als het controlelampje START/PAUSE knippert druk u
op de toets om de wascyclus te beëindigen. Open de
deur, laad het wasgoed uit en schakel de wasautomaat
uit.
! Als u een reeds gestarte cyclus wilt annuleren houdt u de
knop ingedrukt totdat de cyclus wordt onderbroken en
het apparaat uitgaat.
Zak voor dekens, gordijnen en fijne was
Dankzij de speciale bijgeleverde zak kunt u met de
Aqualtis wasautomaat zelfs uw waardevolste en fijnste
kledingstukken met de machine wassen en zeker zijn van
een optimale bescherming. We raden u aan om de zak
te gebruiken voor het wassen van dekens en donzen
wasgoed met een synthetische bekleding.
30
Page 31

Programma’s en opties
3
1
2
Programmatabel
Wasmiddel en was-
Max.
Beschrijving van het Programma
Symbool
Synthet. Resistente stof
Synthet. Resistente stof (4)
Bont Intensief
Bont Gemengd
Donkere was
Shirts
Dekbedden: voor kledingstukken/beddengoed gevuld met dons. 30° 1200 -
Bed & Bath: voor handdoeken en beddengoed. 60° 1400
Spoelen
Centrifugeren en Afpompen - 1400 - - - - 10 - - - 16’
Anti Allergie Plus
Anti Allergie Delicaat
ExtradeliIcaat
Wol: voor wol, kasjmier, etc. 40° 800 -
Gemengd 30’: voor het snel opfrissen van niet zo vuil wasgoed (niet
geschikt voor wol, zijde en handwas).
Katoen Standaard 60°C (1): zeer vuil wit en kleurecht bont wasgoed.
Katoen Standaard 40°C (2): zeer vuile witte en bonte fijne was. 40° 1400 -
De duur van de cyclus die wordt aangegeven op het display of op de gebruiksaanwijzing is een geschatte waarde die wordt gecalculeerd bij standaard omstandigheden. De effectieve tijd kan variëren aan de hand van talloze factoren zoals temperatuur en druk van de watertoevoer, de kamertemperatuur, de hoeveelheid wasmiddel, de hoeveelheid en type lading, de balancering van de was en
de geselecteerde aanvullende opties.
N.B.: circa 10 minuten na de START zal de wasautomaat aan de hand van het ingeladen wasgoed de resterende tijd tot aan het einde van het programma opnieuw berekenen en tonen.
1) Controleprogramma volgens de richtlijnen 1061/2010: selecteer het programma met een temperatuur van 60°C.
Dit is de geschiktste cyclus voor het wassen van een middelmatig vuile lading katoenen wasgoed. Het is ook de efficiëntste cyclus v.w.b. het gecombineerde verbruik van energie en water, voor
wasgoed dat op 60°C kan worden gewassen. De effectieve wastemperatuur kan verschillen van de temperatuur die wordt aangegeven.
2) Controleprogramma volgens de richtlijnen 1061/2010: selecteer het programma met een temperatuur van 40°C.
Dit is de geschiktste cyclus voor het wassen van een middelmatig vuile lading katoenen wasgoed. Het is ook de efficiëntste cyclus v.w.b. het gecombineerde verbruik van energie en water, voor
wasgoed dat op 40°C kan worden gewassen. De effectieve wastemperatuur kan verschillen van de temperatuur die wordt aangegeven.
3) Bij een temperatuur van 60°C kan de functie “Voorwas” niet worden geactiveerd.
Voor alle Test Institutes:
2) Programma katoen lang: selecteer het programma met een temperatuur van 40°C.
4) Programma synthetisch lang: selecteer het programma met een temperatuur van 40°C.
Max.
Temp.
(°C)
60° 800
40° 800
40° 1400
20° 1400 -
30° 800 -
40° 600 -
60° 1400 -
40° 1400 -
30° 0 -
30° 800 -
60°
(Max. 90°)
snel-
heid
(toeren
per
minuut)
- 1400 - -
1400
versterkers
Was-
Bleek-
middel
Voorwas
(3)
-
-
-
-
-
-
-
-
-
middel
zachter
Wasver-
Overgebleven
vochtigheid %
Max. lading (kg)
5 48 1,12 58 120’
5 48 0,67 54 100’
9 - - - 175’
9 - - - 185’
6 - - - 80’
2,5 - - - 75’
3,5 - - - 110’
10 - - - 155’
10 - - - 49’
6 - - - 210’
6 - - - 230’
1 - - - 80’
2,5 - - - 105’
4 71 0,20 44 30’
10 53 0,95 60 200’
10 53 0,92 88 185’
ik kWh
Totaal water lt
Energieverbru-
Duurcyclus
Wasopties
Super Wash
Deze optie garandeert
een kwalitatief zeer hoog
wasresultaat dankzij het gebruik
van een grotere hoeveelheid
water in de beginfase van de
cyclus en een langere tijdsduur
van het programma. Kan met
of zonder bleekmiddel gebruikt
worden. Als u de was ook wilt
bleken, het extra bijgeleverde
bakje 3 in bakje 1 doen. Let bij
het gieten van het bleekwater
dat u het niveau “max”, aangegeven op de centrale pin, niet
overschrijdt (zie afb.). Als u alleen wilt bleken zonder een
volledige was uit te voeren, giet u het bleekmiddel in het extra
bakje 3, stelt u het programma “Spoelen” in, en activeert de
optie “Super Wash” .
! Deze optie is niet beschikbaar tijdens de programma’s
, , , , , , , , , .
Extra Spoelen
Door deze optie te selecteren verhoogt u het spoelresultaat en
zorgt u ervoor dat elk spoor van wasmiddel verdwijnt. Deze optie is
vooral nuttig bij personen wiens huid gevoelig is voor wasmiddelen.
We raden deze optie aan wanneer een volle lading moet worden
gewassen of wanneer zeer veel wasmiddel wordt gebruikt.
! Deze optie is niet beschikbaar tijdens de programma’s , ,
, , , .
Makkelijk Strijken
Als u deze optie selecteert zullen het wassen en de centrifuge
dusdanig worden aangepast dat er minder kreuken
worden gevormd. Aan het einde van de wascyclus zal de
wasautomaat de trommel langzaam laten ronddraaien. De
controlelampjes “Makkelijk Strijken” en START/PAUSE gaan
knipperen. Om de cyclus te beëindigen drukt u op de knop
START/PAUSE of op de knop “Makkelijk Strijken”.
! Deze optie is niet beschikbaar tijdens de programma’s
, , , , , .
Voorwas
Als u deze functie selecteert wordt de voorwas uitgevoerd,
handig voor het verwijderen van moeilijke vlekken.
N.B.: doe het wasmiddel in het speciale vakje.
! Deze optie is niet beschikbaar tijdens de programma’s
, , , , , , , , , , , (60°), .
31NL31
Page 32

Wasmiddelen en wasgoed
NL
Wasmiddel
De keuze en de hoeveelheid wasmiddel hangen af van het type
stof (katoen, wol, zijde…), van de kleur van het wasgoed, de
wastemperatuur, de vuilgraad en de hardheid van het water.
Een juiste dosering van het wasmiddel voorkomt
verspillingen en beschermt het milieu: ook al zijn
wasmiddelen biologisch afbreekbaar, toch bevatten ze
elementen die het evenwicht in de natuur verstoren.
We raden u aan:
• waspoeder te gebruiken voor de witte katoenen was en
voor de voorwas.
• vloeibaar wasmiddel te gebruiken voor fijne katoenen
was en voor alle programma’s op lage temperatuur.
• speciale vloeibare wasmiddelen te gebruiken voor wol
en zijde.
Het wasmiddel kan voor het starten van het programma in
het speciale bakje worden gedaan, of in de wasbol die direct
in de trommel wordt geplaatst. Als u een wasbol gebruikt
kunt u het programma Katoen met voorwas niet gebruiken.
! Gebruik waspoeder voor witte katoenen was, voor de
voorwas en voor het wassen op temperaturen van meer
dan 60°C.
! Volg de aanwijzingen op de wasmiddelverpakking.
! Gebruik nooit wasmiddelen voor handwas aangezien die
te veel schuim vormen.
Voorbereiden van het wasgoed
• Open de kledingstukken voor u ze inlaadt.
• Scheid het wasgoed volgens het type stof (symbool op
het etiket van het kledingstuk) en de kleur. Let er goed
op dat u de bonte was scheidt van de witte was;
• Leeg de zakken en controleer de knopen;
• Overschrijd nooit het gewicht dat wordt aangegeven in
de “Programmatabel” wat geldt voor droog wasgoed.
Hoeveel weegt wasgoed?
1 laken 400-500 gr.
1 kussensloop 150-200 gr.
1 tafellaken 400-500 gr.
1 badjas 900-1200 gr.
1 handdoek 150-250 gr.
1 spijkerbroek 400-500 gr.
1 overhemd/blouse 150-200 gr.
Wastips
Bont Intensief: gebruik het programma op licht
gekleurde was, zodat vlekken nog beter worden verwijderd
zonder dat de intensiteit en glans van de kleuren verloren
gaan. Dit programma is ontwikkeld om resultaten van het
wassen op 60° reeds bij 40° worden bereikt. We raden u
aan wasmiddelen voor bonte was te gebruiken.
Bont Gemengd: gebruik het programma voor het
wassen van bonte was of was van verschillende kleuren
dat middelmatig vuil is. Dit programma is ontwikkeld om het
behoud van de kleur te garanderen en om de resultaten van
het wassen op 40° al te bereiken op een temperatuur van
20°. We raden u aan wasmiddelen te gebruiken speciaal
voor bonte was, die reeds op lagere temperaturen actief zijn.
! Het wordt altijd aangeraden kledingstukken die niet kleurvast
zijn, en nieuwe, gekleurde kleding eerst apart te wassen.
Donkere was: gebruik de cyclus voor het wassen
van bonte was. Het programma is ontwikkeld voor het
langdurige behoud van de donkere kleuren. Voor een beter
resultaat raden we u aan voor de bonte was een vloeibaar
wasmiddel te gebruiken.
Shirts: gebruik het speciale programma om met
maximale zorg overhemden/blouses van verschillende
soorten stof en kleur te wassen.
Dekbedden: voor het wassen van dekens of
kledingstukken die met dons zijn gevuld zoals eenpersoons
of tweepersoons dekbedden (niet meer dan 3,5 kg),
kussens of ski-jacks gebruikt u het speciale programma .
We raden u aan het donzen wasgoed in de trommel te laden
met de randen naar binnen toe gevouwen (zie afbeeldingen)
en ervoor te zorgen de ¾ van het volume van de trommel
niet te overschrijden. Voor het beste resultaat raden wij aan
vloeibaar wasmiddel in het doseerbakje te gieten.
Dekens: om dekens met een synthetische bekleding
te wassen moet u de bijgeleverde zak gebruiken en het
programma instellen.
Handdoeken en beddengoed: u kunt al uw
handdoeken en beddengoed in een enkele cyclus wassen
met het programma . Dit programma optimaliseert het
gebruik van de wasverzachter en bespaart tijd en energie.
We raden u aan waspoeder te gebruiken.
Anti Allergie Plus : dit programma is ontwikkeld voor
katoenen en andere niet-fijne was, voor het verwijderen van
de voornaamste allergenen zoals stuifmeel, mijten, kattenen hondenhaar.
Anti Allergie Delicaat : dit programma is ontwikkeld
voor katoenen en andere niet-fijne was, voor het verwijderen
van stuifmeel, katten- en hondenhaar, reeds op 40°.
ExtradeliIcaat: gebruik het programma voor het
wassen van zeer fijne was met stras of pailetten.
We raden u aan de kleding binnenstebuiten te draaien voor
u hem wast en om kleine kledingstukken in het speciale
zakje voor fijne was te stoppen.
Voor een beter resultaat raden we u aan voor de fijne was
een vloeibaar wasmiddel te gebruiken.
Voor het wassen van Zijde kleding of Gordijnen (vouw
de gordijnen en doe ze in de bijgeleverde zak selecteert
u de cyclus en activeert u de optie (in dit geval is
het ook mogelijk de optie “Extra Spoelen” te activeren); de
wasautomaat de cyclus door het wasgoed in de week te
laten staan. Het controlelampje gaat knipperen. Om het
water af te voeren en de was uit de automaat te halen moet
u op de knop START/PAUSE drukken of op de knop .
Wol: het “Wol” wasprogramma van deze Hotpoint-Ariston
wasmachine is door The Woolmark Company getest en
goedgekeurd voor het wassen van wollen kleding die
als handwas geclassificeerd is, op voorwaarde dat de
aanwijzingen worden opgevolgd die op het etiket van
het kledingstuk vermeld staan en de instructies van de
fabrikant van de wasmachine. Hotpoint-Ariston is het
eerste wasmachinemerk dat voor zijn wasprestaties en het
verbruik van water en energie van The Woolmark Company
de certificering Woolmark Apparel Care – Platinum
verkregen heeft. (M1135)
32
Page 33

Voorzorgsmaatregelen en
advies
! Deze wasautomaat is ontworpen en uitgevoerd volgens
de internationale veiligheidsnormen. Deze aanwijzingen zijn
voor uw eigen veiligheid geschreven en moeten aandachtig
worden doorgenomen.
Algemene veiligheid
• Dit apparaat is uitsluitend ontworpen voor huishoudelijk
niet-professioneel gebruik.
• Het apparaat mag niet worden gebruikt door personen
(kinderen inbegrepen), met beperkte lichamelijke,
sensorische of mentale vermogens of met onvoldoende
ervaring en kennis, tenzij het gebruik plaatsvindt onder
het toezicht of volgens de instructies van een persoon
die verantwoordelijk is voor hun veiligheid. Kinderen
moeten in de gaten worden gehouden om te verzekeren
dat ze niet met het apparaat spelen.
• Raak de machine niet aan als u blootsvoets bent of met
natte of vochtige handen of voeten.
• Trek de stekker nooit uit het stopcontact door aan het
snoer te trekken, maar altijd door de stekker zelf beet te
pakken.
• Raak het afvoerwater niet aan aangezien het zeer heet
kan zijn.
• Forceer nooit de deur van de wasautomaat: het
veiligheidsmechanisme dat een ongewild openen van de
deur voorkomt, kan beschadigd worden.
• Probeer in geval van storingen nooit zelf de interne
mechanismen van de wasautomaat te repareren.
• Zorg ervoor dat kleine kinderen niet te dicht bij de
machine komen als deze in werking is.
• Als het apparaat verplaatst moet worden doe dit dan
met twee of drie personen tegelijk en heel voorzichtig.
Doe dit nooit alleen, want het apparaat is erg zwaar.
• Voordat u het wasgoed in de automaat laadt, moet u
controleren of hij leeg is.
Balanceersysteem van de lading
Om overmatige trillingen te vermijden verdeelt de automaat
de lading voor het centrifugeren op een gelijkmatige
manier. Dit gebeurt door de trommel te laten draaien op
een snelheid die iets hoger ligt dan de wassnelheid. Als na
herhaaldelijke pogingen de lading nog steeds niet goed is
gebalanceerd, zal de wasautomaat de centrifuge op een
lagere snelheid uitvoeren dan die voorzien was. Als de
lading zeer uit balans is zal de wasautomaat een verdeling
uitvoeren in plaats van een centrifuge. Teneinde een betere
distributie van de waslading en een juiste balancering te
bereiken raden wij u aan kleine en grote kledingstukken te
mengen.
De afgedankte apparatuur moet apart worden
opgehaald om het wedergebruik van materialen waarvan
hij is gemaakt te optimaliseren en om potentiële schade
aan de gezondheid en het milieu te voorkomen. Het
symbool van de afvalemmer met een kruis staat op elk
product, om aan te geven dat het apart moet worden
weggegooid. Voor verdere informatie betreffende het
correcte verwijderen van huishoudelijke apparatuur
kunnen de gebruikers zich wenden tot de gemeentelijke
reinigingsdienst of de verkoper.
Handmatige opening van het deurtje
Mocht er in het huis geen stroom aanwezig zijn en u wilt
het deurtje openen om de was op te hangen, dan dient u
het volgende te doen:
1. haal de stekker uit het
stopcontact.
2. controleer dat het
waterniveau in de automaat
lager is dan het deurtje; als
dat niet het geval is kunt het
water weg laten vloeien door
middel van de afvoerbuis en
dit opvangen in een emmer,
zoals aangegeven in de
afbeelding.
3. verwijder het paneel aan de voorkant van de
wasautomaat (zie volgende pagina).
4. trek het lipje aangegeven
in de afbeelding naar voren
totdat het plastic bandje
loskomt; trek hem daarna
naar beneden totdat u klik
hoort, wat aangeeft dat de
deur is geopend.
5. open de deur; als dat niet
lukt moet u de handeling
herhalen.
NL
Afvalverwijdering
• Het verwijderen van het verpakkingsmateriaal: houdt
u aan de plaatselijke normen zodat het materiaal
hergebruikt kan worden.
• De Europese richtlijn 2002/96/CE, betreffende
afgedankte elektrische en elektronische apparatuur,
voorziet dat huishoudelijke apparatuur niet met het
normale afval mag worden meegegeven.
6. monteer het paneel weer, met de haakjes goed
bevestigd in de juiste openingen, voordat u het paneel
tegen de machine aandrukt.
33
Page 34

Onderhoud en verzorging
1
2
1
2
2
NL
Afsluiten van water en stroom
• Sluit na iedere wasbeurt de kraan af. Hiermee beperkt
u slijtage van de waterinstallatie van de wasautomaat
alsmede lekkagegevaar.
• Sluit altijd eerst de stroom af voordat u de
wasautomaat schoonmaakt en gedurende
onderhoudswerkzaamheden.
Reinigen van de wasautomaat
De buitenkant en de rubberen onderdelen kunnen met een
spons en een lauw sopje worden schoongemaakt. Gebruik
nooit schuurmiddelen of oplosmiddelen.
Reinigen van het wasmiddelbakje
Verwijder het laatje door op
het hendeltje (1) te drukken en
het naar voren te trekken (2)
(zie afbeelding).
Was het onder stromend
water. Dit moet u regelmatig
doen.
Toegang tot het voorvakje:
1. verwijder het afdekpaneel aan de voorzijde van de
wasautomaat door er op het midden op te drukken. Duw
beide zijkanten naar beneden toe en verwijder het paneel
(zie afbeeldingen).
2. plaats een bakje om het
water op te vangen dat eruit
zal lopen (circa 1,5 l) (zie
afbeelding).
3. draai het deksel eraf, tegen
de klok in (zie afbeelding).
Verzorging van de trommel
• Laat de deur van de wasautomaat altijd op een kier
staan om te voorkomen dat er nare luchtjes worden
gevormd.
Reinigen van de pomp
De wasautomaat is voorzien van een zelfreinigende pomp
die niet hoeft te worden onderhouden. Het kan echter
gebeuren dat kleine voorwerpen (muntjes, knopen) in
het voorvakje dat de pomp beschermt en zich aan de
onderkant ervan bevindt, terechtkomen.
! Verzeker u ervan dat de wascyclus beëindigd is en haal
de stekker uit het stopcontact.
4. maak de binnenkant goed schoon;
5. schroef het deksel er weer op;
6. monteer het paneel weer, met de haakjes goed
bevestigd in de juiste openingen, voordat u het paneel
tegen de machine aandrukt.
Controle van de buis van de watertoevoer
Controleer minstens een keer per jaar de watertoevoerbuis.
Als er barstjes of scheuren in zitten moet hij vervangen
worden: gedurende het wassen kan de hoge waterdruk
onverwachts breuken veroorzaken.
34
Page 35

Storingen en oplossingen
Het kan gebeuren dat het apparaat niet werkt. Voor u contact opneemt met de Servicedienst (zie “Service”) moet u
controleren of het niet een storing betreft die u zelf makkelijk kunt verhelpen met behulp van de volgende lijst.
Storingen:
De wasautomaat gaat niet aan.
De wascyclus start niet.
De wasautomaat heeft geen
watertoevoer.
De deur van het apparaat is
geblokkeerd.
De wasautomaat blijft water aanen afvoeren.
Mogelijke oorzaken / Oplossing:
• De stekker zit niet in het stopcontact of niet ver genoeg om contact te maken.
• Het hele huis zit zonder stroom.
• De deur is niet goed dicht.
• De START/PAUSE toets is niet ingedrukt.
• De waterkraan is niet open.
• U heeft een uitgestelde start ingesteld.
• De watertoevoerbuis is niet aangesloten op de kraan.
• De toevoerslang is gebogen.
• De waterkraan is niet open.
• Het hele huis zit zonder water.
• Er is onvoldoende druk.
• De START/PAUSE toets is niet ingedrukt.
• Als u de optie , zal de wasautomaat aan het einde van de cyclus de
trommel langzaam laten ronddraaien. Om de cyclus te beëindigen drukt u op
de knop START/PAUSE of op de knop .
• De afvoerbuis is niet op 65 tot 100 cm afstand van de grond af geïnstalleerd
(zie “Installatie”).
• Het uiteinde van de afvoerbuis ligt onder water (zie “Installatie”).
• Als u op een van de hoogste verdiepingen van een flatgebouw woont, kan zich
een hevelingsprobleem voordoen, waarbij de wasautomaat voortdurend water
aan- en afvoert. Om deze storing te verhelpen zijn er in de handel speciale
beluchters te koop.
• De afvoer in de muur heeft geen ontluchting.
NL
De wasautomaat voert het water
niet af of centrifugeert niet.
De machine trilt erg tijdens het
centrifugeren.
De wasautomaat lekt.
De symbolen van “Fase in
voortgang” knipperen snel,
tegelijk met het controlelampje
ON/OFF.
Er ontstaat teveel schuim.
De deur van het apparaat is
geblokkeerd.
• Het programma voorziet geen afvoer: bij enkele programma’s moet dit met de
hand worden gestart (zie Programma’s en opties”).
• De optie “ is actief: voor het beëindigen van het programma drukt u op de
toets START/PAUSE (zie “Programma’s en opties”).
• De afvoerslang is gebogen (zie “Installatie”).
• De afvoerleiding is verstopt.
• De trommel is bij het installeren niet op de juiste wijze gedeblokkeerd (zie
“Installatie”).
• De wasautomaat staat niet goed recht (zie “Installatie”).
• De wasautomaat staat te krap tussen meubels en muur (zie “Installatie”).
• De waslading is niet gebalanceerd (zie “Wasmiddelen en wasgoed”).
• De slang van de watertoevoer is niet goed aangeschroefd (zie “Installatie”).
• Het wasmiddelbakje is verstopt (voor reiniging zie “Onderhoud en verzorging”).
• De afvoerslang is niet goed aangesloten (zie “Installatie”).
• Doe de wasautomaat uit en haal de stekker uit het stopcontact. Wacht circa
1 minuut en doe hem daarna weer aan. Als de storing voortzet, dient u de
Servicedienst in te schakelen.
• Het wasmiddel is niet bedoeld voor wasautomaten (er moet “voor
wasautomaat”, “handwas en machinewas”, of dergelijke op staan).
• U heeft teveel wasmiddel gebruikt.
• Voer een handmatige deblokkering uit (zie “Voorzorgsmaatregelen en advies”).
! N.B.: om de “Demo Mode” te verlaten, uitschakelen van de wasautomaat, drukt u tegelijkertijd 3 sec. lang of de twee knoppen
“START/PAUSE” en “ON/OFF” .
35
Page 36

Service
NL
Voordat u de Servicedienst inschakelt:
• Controleer eerst of u het probleem zelf kunt oplossen (zie “Storingen en oplossingen”);
• Start het programma opnieuw om te controleren of de storing is verholpen;
• Als dit niet het geval is, kunt u contact opnemen met de erkende Servicedienst.
! In het geval de wasautomaat verkeerd is geïnstalleerd of u hem niet correct heeft gebruikt zal u gevraagd worden de
reparatiekosten te betalen.
! Wendt u nooit tot een niet erkende installateur.
Vermeld:
• het type storing;
• het model wasautomaat (Mod.);
• het serienummer (S/N).
Deze laatste gegevens vindt u op het typeplaatje op het apparaat.
36
Page 37

Instrucciones para la
instalación y el uso
LAVADORA
ES
Español
AQUALTIS
AQ105D 49D
Sumario
Instalación, 38-39
Desembalaje y nivelación
Conexiones hidráulicas y eléctricas
Datos técnicos
Descripción de la máquina, 40-41
Panel de control “touch control”
Cómo efectuar un ciclo de lavado, 42
Programas y opciones, 43
Tabla de Programas
Opciones de lavado
Detergentes y ropa, 44
Detergente
Preparar la ropa
Consejos sobre el lavado
Precauciones y consejos, 45
Seguridad general
Sistema de equilibrado de la carga
Eliminación
Apertura manual de la puerta
ES
Mantenimiento y cuidados, 46
Interrumpir el agua y la corriente eléctrica
Limpiar la máquina
Limpiar el contenedor de detergentes
Cuidar el cesto
Limpiar la bomba
Controlar el tubo de alimentación de agua
Anomalías y soluciones, 47
Asistencia, 48
37
Page 38

Instalación
ES
! Es importante conservar este manual para poder consultarlo
en cualquier momento. En el caso de venta, cesión o traslado,
controle que permanezca junto con la lavadora.
! Lea atentamente las instrucciones: ellas contienen
importante información sobre la instalación, el uso y la
seguridad.
! En el sobre que contiene este manual encontrará, además
de la garantía, piezas que servirán para la instalación.
Desembalaje y nivelación
Desembalaje
1. Una vez desembalada la lavadora, controle que no haya
sufrido daños durante el traslado.
Si estuviera dañada no la conecte y llame al revendedor.
2. Quite los 4 tornillos
de protección para
el transporte y el
correspondiente
distanciador, ubicados en
la parte posterior (ver la
figura).
3. Cierre los orificios con los tapones de plástico
contenidos en el sobre.
4. Conserve todas las piezas porque si la lavadora tuviera
que ser trasladada nuevamente, se deberían volver a
colocar para evitar daños internos.
! Los embalajes no son juguetes para los niños.
! Cuando se instala sobre moquetas o alfombras, regule
las patas para que, debajo de la lavadora, quede un
espacio suficiente para la ventilación.
Conexiones hidráulicas y eléctricas
Conexión del tubo de alimentación de agua
! Antes de conectar el tubo de alimentación a la red
hídrica, haga correr agua hasta que sea límpida.
1. Conecte el tubo de
alimentación a la máquina
enroscándolo en la toma
de agua correspondiente
ubicada en la parte
posterior derecha (arriba)
(ver la figura).
2. Conecte el tubo de
alimentación enroscándolo
a un grifo de agua fría con
la boca roscada de 3/4 gas
(ver la figura).
Nivelación
1. Instale la lavadora sobre un piso plano y rígido, sin
apoyarla en las paredes ni en los muebles.
2. Compense las
irregularidades
desenroscando o
enroscando las patas hasta
que la máquina quede en
posición horizontal (no debe
estar inclinada más de 2
grados).
! Una cuidadosa nivelación brinda estabilidad y evita
vibraciones y ruidos, sobre todo durante el centrifugado.
38
3. Controle que en el tubo no hayan pliegues ni
estrangulaciones.
! La presión de agua del grifo debe estar comprendida
dentro de los valores contenidos en la tabla de Datos
técnicos (ver la página correspondiente).
! Si la longitud del tubo de alimentación no es la suficiente,
diríjase a un negocio especializado o a un técnico
autorizado.
! No utilice nunca tubos de carga usados o viejos, utilice
siempre los suministrados con la máquina.
Page 39

65 - 100 cm
Conexión del tubo de descarga
Conecte el tubo de
descarga a una tubería de
descarga o a una descarga
de pared ubicadas a
una distancia del piso
comprendida entre 65 y
100 cm., evitando siempre
plegarlo.
Una alternativa es apoyar
el tubo de descarga en el
borde de un lavamanos o
de una bañera, uniendo
la guía suministrada con
el aparato, al grifo (ver la
figura).
El extremo libre del tubo
de descarga no debe
permanecer sumergido en
el agua.
! El cable de alimentación y el enchufe deben ser
sustituidos sólo por técnicos autorizados.
¡Atención! La empresa fabricante declina toda
responsabilidad en caso de que estas normas no sean
respetadas.
ES
! No se aconseja utilizar tubos de prolongación, si fuera
indispensable hacerlo, la prolongación debe tener el mismo
diámetro del tubo original y no superar los 150 cm.
Conexión eléctrica
Antes de enchufar el aparato, verifique que:
• la toma tenga la conexión a tierra y haya sido hecha
según las normas legales;
• la toma sea capaz de soportar la carga máxima de
potencia de la máquina indicada en la tabla de Datos
técnicos (ver al costado);
• la tensión de alimentación esté comprendida dentro de
los valores indicados en la tabla de Datos técnicos (ver
al costado);
• la toma sea compatible con el enchufe de la máquina. Si
no es así, sustituya la toma o el enchufe.
! La máquina no debe ser instalada al aire libre, ni siquiera
si el lugar está protegido, ya que es muy peligroso dejarla
expuesta a la lluvia o a las tormentas.
! Una vez instalada la máquina, la toma de corriente debe
ser fácilmente accesible.
! No utilice prolongaciones ni conexiones múltiples.
! El cable no debe estar plegado ni sufrir compresiones.
Datos técnicos
Modelo
Dimensiones
Capacidad
Conexiones
eléctricas
Conexiones
hídricas
Velocidad de
centrifugado
Programas de
control según
las directivas
1061/2010 y
1015/2010
AQ105D 49D
ancho 59.5 cm
altura 85 cm
profundidad 64,5 cm
de 1 a 10 kg
ver la placa de características técnicas
aplicada en la máquina
presión máxima 1 MPa (10 bar)
presión mínima 0,05 MPa (0,5 bar)
capacidad del cesto 71 litros
máxima 1400 r.p.m.
programa
programa
Esta máquina cumple con lo establecido
por las siguientes Directivas de la Comunidad:
- 2004/108/CE (Compatibilidad Electromagnética)
- 2002/96/CE
- 2006/95/CE (Baja Tensión)
; Algodón normal 60°C.
; Algodón normal 40°C.
39
Page 40

Descripción de la máquina
3
1
2
1
8
0
2
1
0
1
5
0
1
2
0
9
0
6
0
B
A
ES
PUERTA
MANIJA DE
LA PUERTA
ZÓCALO
PUERTA
PATAS REGULABLES
Para abrir la puerta
utilice siempre la manija
correspondiente (ver la
figura).
PANEL DE
CONTROL
SISTEMA DIRECT INJECTION
La lavadora está dotada de una innovadora tecnología
“Direct Injection” que solubiliza rápidamente el
detergente activando, del mejor modo posible, todos
sus componentes. El sistema garantiza un completo
uso y disolución del detergente gracias a que se mezcla
con el agua antes de llegar a las prendas. Esto permite
obtener mejores rendimientos de limpieza aún a bajas
temperaturas conjugando un notable ahorro de energía
con el perfecto cuidado de los colores y de las fibras. La
tecnología “Direct Injection” se activa automáticamente
en todos los ciclos
la máquina, para una correcta dosificación. Cuando utilice
detergente en polvo, vuelva a colocar el tabique divisorio
en la cavidad B.
3. cubeta adicional: Blanqueador
! El uso de la cubeta adicional 3 excluye el
prelavado.
cubeta para aditivos: para suavizante o aditivos líquidos.
Se recomienda no superar nunca el nivel máximo indicado
por la rejilla y diluir los suavizantes concentrados.
Panel de control “touch control”
Para modificar las
CONTENEDOR DE DETERGENTE
El contenedor de detergentes
se encuentra en el interior de
la máquina y se accede a él
abriendo la puerta. Para la
programaciones presionar
levemente en el icono dentro
del área sensible (touch
control) como se indica en la
figura.
dosificación de detergente,
ver el capítulo “Detergentes y
ropa”.
Modalidad de stand by
Esta lavadora está en conformidad con las nuevas
1. cubeta para el prelavado:
utilice detergente en polvo.
! Antes de verter el
detergente, verifique que
no esté colocada la cubeta
adicional 3.
2. cubeta para el lavado: Si se
normativas vinculadas al ahorro energético. Está dotada de
un sistema de auto-apagado (stand by) que, en caso de
no funcionamiento, se activa pasados aproximadamente
30 minutos. Presionar brevemente el botón ON/OFF y
esperar que la máquina se active.
Consumo en off-mode: 0,5 W
Consumo en Left-on: 0,5 W
utiliza detergente líquido, se
aconseja colocar el tabique
divisorio A suministrado con
40
Page 41

Panel de control “touch control”
Mando de
PROGRAMAS
M2
M1
Botón CENTRIFUGADO
Botón TEMPERATURA
PANTALLA
Botón con piloto
START/PAUSE
Piloto
ECO
Iconos FASES
DE LAVADO
Botón con piloto
M3
OPCIONES
ON/OFF
Botón con piloto ON/OFF: presione brevemente el botón
para encender o apagar la máquina. El piloto verde indica que
la máquina está encendida. Para apagar la lavadora durante el
lavado, es necesario mantener presionado el botón durante más
tiempo, aproximadamente 3 seg.; si se presiona en forma más
breve o accidental, la máquina no se apagará. Si la máquina
se apaga durante un lavado en curso, dicho lavado se anulará.
Mando de PROGRAMAS: se puede girar en ambas direcciones.
Para elegir el programa más apropiado, consulte la “Tabla de
programas”. Durante el lavado, el mando no se mueve.
Botones M1-M2-M3: mantenga presionado uno de los botones
para memorizar un ciclo y las personalizaciones deseadas.
Para activar un ciclo previamente memorizado, presione el
correspondiente botón.
Botón TEMPERATURA: presiónelo para modificar o excluir
la temperatura; el valor elegido está indicado en la pantalla (ver
“Cómo realizar un ciclo de lavado”).
Botón CENTRIFUGADO: presiónelo para modificar o excluir
la centrifugación; el valor elegido está indicado en la pantalla (ver
“Cómo realizar un ciclo de lavado”).
Botón COMIENZO RETRASADO: presiónelo para fijar el
comienzo retrasado del programa elegido; el valor del retraso
elegido está indicado en la pantalla (ver “Cómo efectuar un ciclo
de lavado”).
Botones con Pilotos OPCIONES: presiónelos para seleccionar
las opciones disponibles. El piloto correspondiente a la opción
seleccionada permanecerá encendido (ver “Cómo efectuar un
ciclo de lavado”).
Iconos FASES DE LAVADO: se iluminan para indicar el avance
del ciclo (Lavado – Aclarado – Centrifugado – Desagüe
). El mensaje se ilumina cuando ha finalizado el ciclo.
Botón con piloto START/PAUSE: cuando el piloto verde
centellea lentamente, presione el botón para que comience el
lavado. Una vez que el ciclo ha comenzado, el piloto se mantiene
fijo. Para poner en pausa el lavado, presione nuevamente el
botón; el piloto centelleará con un color anaranjado.
Botones
Botón con piloto
Botón COMIENZO
RETRASADO
Si el piloto “LOCK” está apagado, se podrá abrir la puerta.
Para que el lavado se reanude a partir del momento en el cual
fue interrumpido, presione nuevamente el botón.
Piloto LOCK: indica que la puerta está bloqueada. Para abrir la
puerta es necesario poner el ciclo en pausa (ver “Cómo efectuar
un ciclo de lavado”).
Botón con piloto BLOQUEO DE BOTONES: para activar o
desactivar el bloqueo del panel de control, mantenga presionado
el botón durante 2 segundos aproximadamente. El piloto
encendido indica que el panel de control está bloqueado. De este
modo, se evitan modificaciones accidentales de los programas,
sobre todo si en la casa hay niños.
Piloto ECO: el ícono se encenderá cuando, modificando
los parámetros de lavado, se obtenga un ahorro de energía del
10% como mínimo. Además, antes que la máquina entre en
la modalidad “Stand by”, el icono se encenderá unos pocos
segundos; con la máquina apagada la recuperación energética
estimada será de aprox. el 80%.
MODIFICACIÓN IDIOMA
Cuando se enciende por primera vez la máquina, aparece
intermitente en el display el primer idioma. En correspondencia
con los 3 botones a la derecha del display aparecen los símbolos
“ ”,”OK” y “V”. Los idiomas cambian automáticamente cada
3’’ o bien presionando los botones al lado de los símbolos “
“ y “V”. Con el botón “OK” se confirma el idioma que se
fija luego de 2’’. Si no se presiona ningún botón, pasados
30’’ el cambio automático de los idiomas recomienza. Para
modificar el idioma es necesario entrar y apagar la máquina,
en los siguientes 30” posteriores al apagado presionar
simultáneamente los pulsadores temperatura + centrífuga
+comienzo retrasado por 5’’ y además de una breve señal
acústica aparece intermitente en el visor el idioma programado.
Presionando los botones al lado de los símbolos “ ” y “V” se
cambia el idioma. Con el botón al lado del símbolo “OK” se
confirma el idioma que se fija luego de 2’’. Si no se presiona
ningún botón, pasados 30’’ se mostrará el idioma programado
anteriormente. Encender la máquina.
Piloto LOCK
BLOQUEO DE
BOTONES
41ES41
Page 42

Cómo efectuar un ciclo de lavado
ES
NOTA: la primera vez que se utiliza la lavadora, realice
un ciclo de lavado sin ropa pero con detergente,
seleccionando el programa algodón 90º sin prelavado.
1. ENCENDER LA MÁQUINA. Presione el botón .
Todos los pilotos se encenderán durante 1 segundo y
en la pantalla aparecerá el mensaje AQUALTIS; luego
quedará encendido de forma permanente el piloto del
botón y el piloto START/PAUSA centelleará.
2. ELEGIR EL PROGRAMA. Gire el mando de
PROGRAMAS hacia la derecha o hacia la izquierda
hasta seleccionar el programa deseado; el nombre del
programa aparecerá en el display; a dicho programa
se le asociará una temperatura y una velocidad de
centrifugado que se pueden modificar. En la pantalla
aparecerá la duración del ciclo.
3. CARGAR LA ROPA. Abra la puerta. Cargue la ropa,
cuidando no superar la cantidad de carga indicada en la
tabla de programas de la página siguiente.
4. DOSIFICAR EL DETERGENTE. Extraiga el
contenedor y vierta el detergente en las cubetas
correspondientes como se explica en “Descripción de la
máquina”.
5. CERRAR LA PUERTA.
6. PERSONALIZAR EL CICLO DE LAVADO. Utilice los
botones correspondientes del panel de control:
Modifique la temperatura y/o el
centrifugado.
La máquina muestra automáticamente la temperatura y
la centrífuga máximas previstas para el programa fijado
o las últimas seleccionadas si son compatibles con el
programa elegido. Presionando el botón se disminuye
progresivamente la temperatura hasta llegar al lavado
en frío (OFF). Presionando el botón se disminuye
progresivamente el centrifugado hasta su exclusión (OFF).
Si se presionan una vez más los botones, se volverá a los
valores máximos previstos.
! Excepción: cuando se selecciona el programa
temperatura se puede aumentar hasta 90°.
Seleccionar el comienzo retrasado.
Para seleccionar el comienzo retrasado del programa
elegido, presione el botón correspondiente hasta alcanzar
el tiempo de retraso deseado. Durante la programación
aparece el tiempo de retraso junto con el mensaje “Inicio
en”: y el símbolo centelleante. Una vez programado
el arranque retrasado, la pantalla mostrará el símbolo
fijo y la pantalla volverá a la visualización de la
duración del ciclo programado con el mensaje “Acaba
en”: y la duración del ciclo. Presionando el botón
COMIENZO RETRASADO, sólo una vez se visualiza el
retraso seleccionado.
Después del arranque, la pantalla mostrará el mensaje
“Inicio en”: y el tiempo de retraso. Una vez que
transcurre el tiempo de retraso programado, la máquina
arrancará y la pantalla mostrará “Acaba en”: y el tiempo
residual para el final ciclo.
, la
Para eliminar el inicio diferido, presione el botón hasta
que en el display aparezca el mensaje OFF; el símbolo
se apagará.
Modificar las características del
ciclo.
• Presione el botón para activar la opción; en el
display aparecerá el nombre de la opción y se
encenderá el piloto correspondiente al botón.
• Presione nuevamente el botón para desactivar la
opción; en el display aparecerá el nombre de la
opción más OFF y el piloto se apagará.
! Si la opción seleccionada no es compatible con el
programa elegido, la incompatibilidad se indicará con el
centelleo del piloto y una señal sonora (3 sonidos) y la
opción no se activará.
! Si la opción elegida no es compatible con
otra seleccionada precedentemente, el piloto
correspondiente a la primera opción seleccionada
centelleará y quedará activada sólo la segunda, el piloto
del botón permanecerá fijo.
! Las opciones pueden variar la carga recomendada y/o
la duración del ciclo.
7. PONER EN MARCHA EL PROGRAMA. Presione el
botón START/PAUSE. El piloto correspondiente quedará
fijo y la puerta se bloqueará (piloto LOCK encendido).
Los iconos correspondientes a las fases de lavado se
iluminarán durante el ciclo para indicar la fase en curso.
Para cambiar un programa mientras un ciclo se está
ejecutando, ponga la lavadora en pausa presionando
el botón START/PAUSE; luego seleccione el ciclo
deseado y presione nuevamente el botón START/
PAUSE.
Para abrir la puerta mientras un ciclo se está
ejecutando, presione el botón START/PAUSE; si el piloto
LOCK está apagado, será posible abrir la puerta.
Presione nuevamente el botón START/PAUSE para
reanudar el programa a partir del momento en el que se
había interrumpido.
8. FIN DEL PROGRAMA. Se indica con la palabra END
encendida. La puerta se podrá abrir inmediatamente.
Si el piloto START/PAUSE centellea, presione el botón
para terminar el ciclo. Abra la puerta, descargue la ropa
y apague la máquina.
! Si desea anular un ciclo que ya ha comenzado, mantenga
presionado el botón hasta que el ciclo se interrumpa y
la máquina se apague.
Bolsa para mantas acolchadas, cortinas y
prendas delicadas
Gracias a la bolsa especial suministrada, la lavadora
Aqualtis le permite lavar también sus prendas más valiosas
y delicadas garantizándole su máxima protección. Se
recomienda utilizar siempre la bolsa cuando lave
mantas acolchadas y edredones con funda externa de
material sintético.
42
Page 43

Programas y opciones
3
1
2
Tabla de programas
Detergentes
Descripción del Programa
Icono
Sintético Resistentes
Sintético Resistentes (4)
Color Intensivos
Multi Color
Oscuro
Camisas
Plumones: para prendas rellenas con plumas de ánsar. 30° 1200 -
7 días: lencería de cama, toallas, albornoz. 60° 1400
Aclarado
Centrifugado y Desagüe - 1400 - - - - 10 - - - 16’
Anti Alergia Plus
Anti Alergia Delicado
Ultradelicado
Lana: para lana, cachemira, etc. 40° 800 Mix 30’: para refrescar rápidamente prendas poco sucias (no se
aconseja utilizarlo para lana, seda y prendas para lavar a mano).
Algodón normal 60°C (1): blancos y colores resistentes muy sucios.
Algodón normal 40°C (2): blancos y colores delicados poco sucios. 40° 1400 -
La duración del ciclo que se indica en el visor o en el manual es una estimación calculada en base a condiciones estándar. El tiempo efectivo puede variar en función de numerosos factores como la
temperatura y la presión del agua de entrada, la temperatura ambiente, la cantidad de detergente, la cantidad y el tipo de carga, el equilibrado de la carga y las opciones adicionales seleccionadas.
Nota: después de aproximadamente 10 minutos del START, en base a la carga efectuada, la máquina recalculará y visualizará el tiempo que falta para la finalización del programa.
1) Programa de control según la directiva 1061/2010: seleccione el programa
Este ciclo es adecuado para limpiar una carga de algodón normalmente sucia, es el más eficiente en lo que se refiere al consumo combinado con la energía y la cantidad de agua y se usa con
prendas lavables a 60ºC. La temperatura efectiva de lavado puede diferir de la indicada.
2) Programa de control según la directiva 1061/2010: seleccione el programa
Este ciclo es adecuado para limpiar una carga de algodón normalmente sucia, es el más eficiente en lo que se refiere al consumo combinado con la energía y la cantidad de agua y se usa con
prendas lavables a 40ºC. La temperatura efectiva de lavado puede diferir de la indicada.
3) A la temperatura de 60ºC no se puede activar la función “Prelavado”.
Para todos los Test Institutes:
2) Programa algodón largo: seleccione el programa
4) Programa sintético largo: seleccione el programa
con una temperatura de 40ºC.
con una temperatura de 40ºC.
con una temperatura 60°C.
con una temperatura 40°C.
Temp.
max.
(°C)
60° 800
40° 800
40° 1400
20° 1400 -
30° 800 -
40° 600 -
- 1400 - -
60° 1400 -
40° 1400 -
30° 0 -
30° 800 -
60°
(Max. 90°)
Velocidad
1400
max. (r.p.m.)
Prelavado
(3)
Lavado
Blanque-
-
-
-
-
-
-
-
-
-
ador
(Kg)
zante
Suavi-
Humedad
Carga max.
5 48 1,12 58 120’
5 48 0,67 54 100’
9 - - - 175’
9 - - - 185’
6 - - - 80’
2,5 - - - 75’
3,5 - - - 110’
10 - - - 155’
10 - - - 49’
6 - - - 210’
6 - - - 230’
1 - - - 80’
2,5 - - - 105’
4 71 0,20 44 30’
10 53 0,95 60 200’
10 53 0,92 88 185’
residual %
energía kWh
Consumo de
Agua total lt
Duración del
ciclo
Opciones de lavado
Súper Lavado
Gracias al uso de una mayor
cantidad de agua en la fase
inicial del ciclo y a la mayor
duración del programa, esta
opción garantiza un lavado
con óptimos resultados, es útil
para eliminar las manchas más
resistentes.
Puede emplearse con o sin
lejía. Si se desea efectuar
también el blanqueado
introducir la cubeta adicional
3 en dotación, en la cubeta 1. Al dosificar el blanqueador,
no supere el nivel “max” indicado en el perno central (ver
la figura). Para realizar sólo el blanqueo, sin realizar
un lavado completo, verter el blanqueador en la cubeta
adicional 3, seleccionar el programa “Aclarado” y activar la
opción “Super Wash” .
! No se puede activar con los programas , , , ,
, , , , , .
Extra Aclarado
Al elegir esta opción aumentará la eficacia del aclarado
y se asegurará la máxima eliminación de los residuos de
detergente. Es útil para pieles particularmente sensibles a los
detergentes. Se aconseja el uso de esta opción cuando la
lavadora funciona a plena carga o utilizando elevadas dosis de
detergente.
! No se puede activar con los programas , , , , , .
Fácil Planchado
Cuando se selecciona esta opción, el lavado y el centrifugado
se modificarán oportunamente para disminuir la formación de
arrugas. Al finalizar el ciclo, la lavadora realizará giros lentos
del cesto; los pilotos “Fácil Planchado” y START/PAUSE
centellearán. Para terminar el ciclo, presione el botón START/
PAUSE o el botón “Fácil Planchado”.
! No se puede activar con los programas , , , , , .
Prelavado
Seleccionando esta función, se realiza el prelavado, muy útil
para eliminar manchas difíciles.
Nota: agregue el detergente en el compartimento
correspondiente.
! No se puede activar con los programas , , , ,
, , , , , , , (60°), .
43ES43
Page 44

Detergentes y ropa
ES
Detergente
El tipo y la cantidad de detergente dependen del tipo de tejido
(algodón, lana, seda...), del color, de la temperatura de lavado,
del grado de suciedad y de la dureza del agua.
Dosificar bien el detergente evita derroches y protege el
medio ambiente: aún siendo biodegradables, los detergentes
contienen elementos que alteran el equilibrio de la naturaleza.
Se aconseja:
• usar detergentes en polvo para prendas de algodón
blancas y para el prelavado.
• usar detergentes líquidos para prendas delicadas de
algodón y para todos los programas a baja temperatura.
• usar detergentes líquidos delicados para lana y seda.
El detergente se debe verter antes del comienzo del lavado
en la cubeta correspondiente, o en el dosificador que se
coloca directamente en el cesto. En este último caso, no
se puede seleccionar el ciclo Algodón con prelavado.
! Utilice detergentes en polvo para prendas de algodón
blancas, para el prelavado y para lavados con una
temperatura mayor que 60ºC.
! Respete las indicaciones que se encuentran en el envase
de detergente.
! No use detergentes para lavar a mano porque producen
demasiada espuma.
Preparar la ropa
• Abra bien las prendas antes de cargarlas.
• Divida la ropa según el tipo de tejido (símbolo en la
etiqueta de la prenda) y el color, separando las prendas
de color de las blancas;
• Vacíe los bolsillos y controle los botones;
• No supere los valores indicados en la “Tabla de
Programas” referidos al peso de la ropa seca.
¿Cuánto pesa la ropa?
1 sábana 400-500 gr.
1 funda 150-200 gr.
1 mantel 400-500 gr.
1 albornoz 900-1200 gr.
1 toalla 150-250 gr.
1 jeans 400-500 gr.
1 camisa 150-200 gr.
Consejos sobre el lavado
Color Intensivos: utilice el ciclo para lavar prendas de
colores claros y eliminar de forma más intensa las manchas
sin dañar la integridad y la vivacidad de los colores. El ciclo
está estudiado para garantizar el mismo rendimiento de
los 60° sólo con 40°. Se aconseja el uso de detergentes
indicados para prendas de color.
Multi Color: utilice el ciclo para el lavado de prendas
multicolor o de distintos colores medianamente sucias.
Ciclo estudiado para garantizar el cuidado del color y
alcanzar simultáneamente los rendimientos de los 40° sólo
a 20°. Se aconseja el uso de detergentes indicados para
prendas de color y activos ya a bajas temperaturas.
! Es siempre aconsejable efectuar el lavado de prendas
que destiñen por separado, así como también las prendas
de color nuevas.
Oscuro: utilice el ciclo para el lavado de prendas
de color oscuro. El programa ha sido estudiado para
mantener los colores oscuros. Para obtener mejores
resultados, cuando lave prendas oscuras se recomienda
utilizar detergente líquido.
Camisas: utilice el ciclo correspondiente para lavar
camisas de distintos tipos de tejido y color, garantizando
su máximo cuidado.
Plumones: para lavar prendas con relleno de pluma de ganso
como edredones para camas matrimoniales o individuales
(que no excedan los 3,5 kg. de peso), cojines y anoraks,
utilice el programa . Se recomienda cargar los edredones
en el cesto doblando sus bordes hacia dentro (ver las figuras)
y no superar los ¾ del volumen de dicho cesto. Para lograr
un lavado óptimo, se recomienda utilizar detergente líquido
introduciéndolo en el contenedor de detergente.
Mantas acolchadas: para lavar mantas acolchadas
con funda sintética, utilice la bolsa suministrada y elija el
programa .
Lencería de cama, toallas, albornoz: para lavar la ropa
de cama y de baño en un único ciclo, utilice el programa
que optimiza el uso de suavizante y permite ahorrar tiempo
y energía. Se aconseja el uso de detergente en polvo.
Anti Alergia Plus : ciclo estudiado para prendas
de algodón y otros tejidos resistentes que garantiza la
eliminación de los principales alérgenos como polen,
ácaros y pelos de gatos y perros.
Anti Alergia Delicado : ciclo estudiado para prendas
de algodón y otros tejidos resistentes que garantiza la
eliminación del polen y de pelos de perros y gatos ya a 40°.
Ultradelicado: utilice el programa para el lavado de
las prendas muy delicadas que tienen aplicaciones como
strass o lentejuelas.
Se recomienda voltear las prendas antes del lavado e
introducir las más pequeñas en la bolsa para el lavado de
prendas delicadas.
Para obtener mejores resultados, se recomienda el uso de
detergente líquido para prendas delicadas.
Para el lavado de las prendas de Seda y Cortinas
(se recomienda plegarlas e introducirlas en la bolsa
suministrada), seleccione el ciclo y active la opción
(en este caso también será posible activar la opción “Extra
Aclarado”); a máquina terminará el ciclo dejando la ropa en
remojo y el piloto centelleará. Para descargar el agua
y poder sacar la ropa, es necesario presionar el botón
START/PAUSE o el botón .
Lana: el ciclo de lavado “Lana” de esta lavadora HotpointAriston ha sido probado y aprobado por la Woolmark
Company para el lavado de prendas de lana clasificadas
como “lavables a mano”, siempre que el lavado se realice
respetando las instrucciones contenidas en la etiqueta de
la prenda y las indicaciones suministradas por el fabricante
del electrodoméstico. Hotpoint-Ariston es la primera marca
de lavadoras que ha obtenido de la Woolmark Company
la certificación Woolmark Apparel Care - Platinum por
sus prestaciones de lavado y por el consumo de agua y
energía. (M1135)
44
Page 45

Precauciones y consejos
! La máquina fue proyectada y fabricada en conformidad
con las normas internacionales de seguridad. Estas
advertencias se suministran por razones de seguridad y
deben ser leídas atentamente.
Seguridad general
• Este aparato ha sido fabricado para un uso de tipo
doméstico exclusivamente.
• El aparato no debe ser empleado por personas (niños
incluidos) con capacidades físicas, sensoriales o
mentales reducidas y con experiencias y conocimientos
insuficientes, a menos que dicho uso no se realice
bajo la supervisión o las instrucciones de una persona
responsable de su seguridad. Los niños deben ser
vigilados para asegurarse que no jueguen con el
aparato.
• No toque la máquina con los pies desnudos ni con las
manos o los pies mojados o húmedos.
• No desenchufe la máquina tirando el cable, sino
tomando el enchufe.
• No toque el agua de descarga porque puede alcanzar
temperaturas elevadas.
• Nunca fuerce la puerta: podría dañarse el mecanismo
de seguridad que la protege de aperturas accidentales.
• En caso de avería, no acceda nunca a los mecanismos
internos para intentar una reparación.
• Controle siempre que los niños no se acerquen a la
máquina cuando está en funcionamiento.
• Si debe ser trasladada, deberán intervenir dos o más
personas, procediendo con el máximo cuidado. La
máquina no debe ser desplazada nunca por una sola
persona ya que es muy pesada.
• Antes de introducir la ropa controle que el cesto esté
vacío.
Sistema de equilibrado de la carga
Antes de cada centrifugado, para evitar vibraciones
excesivas y para distribuir la carga de modo uniforme,
el cesto realiza rotaciones a una velocidad ligeramente
superior a la del lavado. Si después de varios intentos,
la carga todavía no está correctamente equilibrada, la
máquina realiza el centrifugado a una velocidad inferior
a la prevista. Cuando existe un excesivo desequilibrio, la
lavadora realiza la distribución antes que el centrifugado.
Para obtener una mejor distribución de la carga y su
correcto equilibrado, se aconseja mezclar prendas grandes
y pequeñas.
potenciales daños para la salud y el medio ambiente. El
símbolo de la papelera tachada se encuentra en todos
los productos para recordar la obligación de recolección
separada.
Para mayor información sobre la correcta eliminación de
los electrodomésticos, los poseedores de los mismos
podrán dirigirse al servicio público responsable o a los
revendedores.
Apertura manual de la puerta
Si desea sacar la ropa de la lavadora y no es posible abrir la
puerta debido a un corte de energía eléctrica, proceda del
siguiente modo:
1. desenchufe la máquina.
2. verifique que el nivel de
agua en el interior de la
máquina sea inferior al hueco
de la puerta; si no es así,
extraiga el agua en exceso
utilizando el tubo de descarga
y recogiéndola en un balde
como se indica en la figura.
3. quite el panel de cobertura delantero de la lavadora (ver
la página siguiente).
4. utilizando la lengüeta
indicada en la figura, tire hacia
fuera hasta liberar la varilla
de plástico del retén; tire
posteriormente hacia abajo
hasta sentir un breve sonido
que indica que la puerta está
desbloqueada.
5. abra la puerta; si todavía
no es posible, repita la
operación.
ES
Eliminación
• Eliminación del material de embalaje: respete las normas
locales, de ese modo, los embalajes podrán volver a ser
utilizados.
• La norma Europea 2002/96/CE sobre la eliminación
de aparatos eléctricos y electrónicos, indica que los
electrodomésticos no deben ser eliminados de la
misma manera que los desechos sólidos urbanos. Los
aparatos en desuso se deben recoger separadamente
para optimizar el porcentaje de recuperación y
reciclaje de los materiales que los componen e impedir
6. vuelva a montar el panel verificando, antes de empujarlo
hacia la máquina, que los ganchos se hayan introducido en
las correspondientes ranuras.
45
Page 46

1
2
1
2
2
Mantenimiento y cuidados
ES
Interrumpir el agua y la corriente
eléctrica
• Cierre el grifo de agua después de cada lavado. De este
modo se limita el desgaste de la instalación hidráulica
de la máquina y se elimina el peligro de pérdidas.
• Desenchufe la máquina cuando la debe limpiar y
durante los trabajos de mantenimiento.
Limpiar la máquina
La parte externa y las partes de goma se pueden limpiar
con un paño empapado en agua tibia y jabón. No use
solventes ni productos abrasivos.
Limpiar el contenedor de detergentes
Para extraer el contenedor,
presione la palanca (1) y tire
hacia afuera (2) (ver la figura).
Lávelo debajo del agua
corriente, esta limpieza se
debe realizar frecuentemente.
Para acceder a la precámara:
1. quite el panel de cobertura delantero de la máquina
presionando hacia el centro, luego empuje hacia abajo
desde ambos costados y extráigalo (ver las figuras).
2. coloque un recipiente
para recoger el agua que se
verterá (aproximadamente 1,5
lt.) (ver la figura);
3. desenrosque la tapa
girándola en sentido
antihorario (ver la figura);
Cuidar el cesto
• Deje siempre semicerrada la puerta para evitar que se
formen malos olores.
Limpiar la bomba
La máquina posee una bomba autolimpiante que no
necesita mantenimiento. Pero puede suceder que objetos
pequeños (monedas, botones) caigan en la precámara que
protege la bomba, situada en la parte inferior de la misma.
! Verifique que el ciclo de lavado haya terminado y
desenchufe la máquina.
4. limpie con cuidado el interior;
5. vuelva a enroscar la tapa;
6. vuelva a montar el panel verificando, antes de empujarlo
hacia la máquina, que los ganchos se hayan introducido en
las correspondientes ranuras.
Controlar el tubo de alimentación de
agua
Controle el tubo de alimentación al menos una vez al año.
Si presenta grietas o rajaduras debe ser sustituido: durante
los lavados, las fuertes presiones podrían provocar roturas
imprevistas.
46
Page 47

Anomalías y soluciones
Puede suceder que la máquina no funcione. Antes de llamar al Servicio de Asistencia Técnica (ver “Asistencia Técnica”),
controle que no se trate de un problema de fácil solución utilizando la siguiente lista.
Anomalías:
La máquina no se enciende.
El ciclo de lavado no comienza.
La máquina no carga agua.
La puerta de la máquina
permanece bloqueada.
La máquina carga y descarga
agua continuamente.
La máquina no descarga o no
centrífuga.
La máquina vibra mucho durante
la centrifugación.
La máquina pierde agua.
Los iconos correspondientes a
la “Fase en curso” centellean
velozmente junto con el piloto
Posibles causas / Solución:
• El enchufe no está introducido en la toma de corriente, o no hace contacto.
• En la casa no hay corriente.
• La puerta no está bien cerrada.
• El botón START/PAUSE no fue presionado.
• El grifo de agua no está abierto.
• Se fijó un retraso de la hora de puesta en funcionamiento.
• El tubo de alimentación de agua no está conectado al grifo.
• El tubo está plegado.
• El grifo de agua no está abierto.
• En la casa no hay agua.
• No hay suficiente presión.
• El botón START/PAUSE no fue presionado.
• Seleccionando la opción , al finalizar el ciclo, la lavadora realizará lentas
rotaciones del cesto; para terminar el ciclo, presione el botón START/PAUSE o el
botón .
• El tubo de descarga no está instalado entre los 65 y 100 cm. del suelo (ver
“Instalación”).
• El extremo del tubo de descarga está sumergido en el agua (ver “Instalación”).
• Si la vivienda se encuentra en uno de los últimos pisos de un edificio, es posible
que se verifiquen fenómenos de sifonaje, por ello la máquina carga y descarga
agua de modo continuo. Para eliminar este inconveniente se encuentran
disponibles en el comercio válvulas especiales que permiten evitar el sifonaje.
• La descarga de pared no posee un respiradero.
• El programa no prevé la descarga: con algunos programas es necesario ponerla
en marcha manualmente (ver “Programas y opciones”).
• La opción está activa: para completar el programa, presione el botón
START/PAUSE (ver “Programas y opciones”).
• El tubo de descarga está plegado (ver “Instalación”).
• El conducto de descarga está obstruido.
• El cesto, en el momento de la instalación, no fue desbloqueado correctamente
(ver “Instalación”).
• La máquina no está instalada en un lugar plano (ver “Instalación”).
• Existe muy poco espacio entre la máquina, los muebles y la pared (ver “Instalación”).
• La carga está desequilibrada (ver “Detergentes y ropa”).
• El tubo de alimentación de agua no está bien enroscado (ver “Instalación”).
• El contenedor de detergentes está obstruido (para ‘ver “Mantenimiento y cuidados”).
• El tubo de descarga no está bien fijado (ver “Instalación”).
• Apague la máquina y desenchúfela, espere aproximadamente 1 minuto y luego
vuelva a encenderla. Si la anomalía persiste, llame al Servicio de Asistencia
Técnica.
ON/OFF.
ES
Se forma demasiada espuma.
La puerta de la máquina
• El detergente no es específico para la lavadora (debe contener algunas de las
frases “para lavadora”, “a mano o en lavadora” o similares).
• La dosificación fue excesiva.
• Realice el procedimiento de desbloqueo manual (ver “Precauciones y consejos”).
permanece bloqueada.
! Nota: para salir del “Demo Mode”, apagar la lavadora e presione simultáneamente durante 3 seg. los dos botones
“START/PAUSE” y “ON/OFF” .
47
Page 48

Asistencia
ES
Antes de llamar al Servicio de Asistencia Técnica:
• Verifique si la anomalía la puede resolver Ud. solo (ver “Anomalías y Soluciones”);
• Vuelva a poner en marcha el programa para controlar si el inconveniente fue resuelto;
• Si no es así, llame al Servicio de Asistencia Técnica Autorizado.
! En el caso de una instalación errónea o un uso incorrecto de la lavadora, la intervención de asistencia técnica deberá ser
pagada.
! No recurra nunca a técnicos no autorizados.
Comunique:
• el tipo de anomalía;
• el modelo de la máquina (Mod.);
• el número de serie (S/N ).
Esta última información se encuentra en la placa de características colocada en el aparato.
La siguiente información es válida solo para España.
Para otros países de habla hispana consulte a su vendedor.
Ampliación de garantía
Llame al 902.363.539 y le informaremos sobre el fantástico plan de ampliación de garantía hasta 5 años.
Consiga una cobertura total adicional de
• Piezas y componentes
• Mano de obra de los técnicos
• Desplazamiento a su domicilio de los técnicos
Y NO PAGUE AVERIAS NUNCA MAS
Servicio de asistencia técnica (SAT)
Llame al 902.133.133 y nuestros técnicos intervendrán con rapidez y eficacia, devolviendo el electrodoméstico a sus
condiciones óptimas de funcionamiento.
En el SAT encontrará recambios, accesorios y productos específicos para la limpieza y mantenimiento de su
electrodoméstico a precios competitivos.
ESTAMOS A SU SERVICIO
48
Page 49

Instruções para a instalação e a
MÁQUINA DE LAVAR ROUPA
utilização
PT
Português
AQUALTIS
AQ105D 49D
Sumário
Instalação, 50-51
Desembalar e nivelar
Ligações hidráulicas e eléctricas
Dados técnicos
Descrição da máquina, 52-53
Painel de comandos “touch control”
Como efectuar um ciclo de lavagem, 54
Programas e opções, 55
Tabela dos Programas
Opções de Lavagem
Detergentes e roupa, 56
Detergente
Preparar a roupa
Conselhos de lavagem
Precauções e conselhos, 57
Segurança geral
Sistema de balanceamento da carga
Eliminação
Abertura manual da porta de vidro
PT
Manutenção e cuidados, 58
Interromper a alimentação de água e de corrente eléctrica
Limpar a máquina
Limpar a gaveta dos detergentes
Cuidados com o tambor
Limpar a bomba
Verificar o tubo de alimentação de água
Anomalias e soluções, 59
Assistência, 60
49
Page 50

Instalação
PT
! É importante guardar este livrete para poder consultá-lo
a qualquer momento. Se a máquina for vendida, cedida ou
transferida, certifique-se que este livrete permaneça com a
máquina.
! Leia com atenção estas instruções: há importantes
informações acerca da instalação, da utilização e da
segurança.
! No envelope que contém este manual
encontrará, além da garantia, também algumas peças que
servirão para a instalação.
Desembalar e nivelar
Desembalar
1. Uma vez desembalada a máquina de lavar roupas,
verifique que a mesma não tenha sofrido danos durante o
transporte.
Se estiver danificada não efectue a sua ligação e contacte
o revendedor.
2. Tire os 4 parafusos de
protecção para o transporte
e o respectivo calço,
situados na parte traseira
(veja a figura).
! Um cuidadoso nivelamento dá estabilidade e evita
vibrações e ruídos sobretudo na fase de centrifugação.
! Se a máquina for posicionada sobre tapete ou alcatifa,
regule os pés em modo que embaixo da máquina de lavar
roupa haja espaço suficiente para a ventilação.
Ligações hidráulicas e eléctricas
Ligação do tubo de alimentação da água
! Antes de ligar o tubo de alimentação à rede hídrica, deixe
a água escorrer até que seja límpida.
1. Ligue o tubo de
alimentação na máquina de
lavar roupa atarraxado no
apropriado fornecimento da
água, na parte traseira, em
cima à direita (veja a figura).
2. Realize a ligação do
tubo de alimentação
parafusando-o a uma
torneira de água fria com
bocal de rosca de 3/4 gás
(ver figura).
3. Tampe os furos com as tampas em plástico contidas no
envelope.
4. Conserve todas as peças; se for necessário transportar
a máquina de lavar roupa, terão de ser montadas outra vez
para evitar danos internos.
! Embalagens não são brinquedos para as crianças!
Nivelamento
1. Posicione a máquina de lavar roupa sobre um
pavimento plano e rígido, sem encostá-la em paredes ou
móveis.
2. Compense as
irregularidades
desatarraxando ou
atarraxando os pés até que
a máquina esteja nivelada
horizontalmente (não deve
ter uma inclinação superior
aos 2 graus).
3. Tome cuidado para o tubo não ser dobrado nem
esmagado.
! A pressão hídrica da torneira deve ser entre os valores da
tabela dos Dados técnicos (veja a página ao lado).
! Se o comprimento do tubo de alimentação não for
suficiente, contacte uma oficina especializada ou um
técnico autorizado.
! Nunca utilize tubos de alimentação de água velhos ou
usados, mas sim aqueles fornecidos em dotação com a
máquina.
50
Page 51

65 - 100 cm
Ligação do tubo de descarga
Ligue o tubo de descarga,
sem dobrá-lo, a uma
conduta de descarga ou a
uma descarga na parede
situada entre 65 e 100 cm.
de altura do chão.
Em alternativa, coloque na
beira de um lavabo ou de
uma banheira, prendendo
na torneira a guia fornecida
com o produto (veja a
figura).
A ponta solta do tubo
de descarga não deve
permanecer emergida na
água.
! O cabo de alimentação e a ficha devem ser substituídos
somente por técnicos autorizados.
Atenção! O fabricante declina toda a responsabilidade se
estas regras não forem respeitadas.
PT
! É desaconselhado empregar tubos de extensão; mas
se for indispensável, a extensão deve ter o mesmo
diâmetro do tubo original e não medir mais de 150 cm de
comprimento.
Ligação eléctrica
Antes de ligar a ficha na tomada eléctrica, certifique-se
que:
• a tomada tenha uma ligação à terra e seja nos termos
da legislação;
• a tomada tenha a capacidade para suportar a carga
máxima de potência da máquina, indicada na tabela
dos Dados técnicos (veja ao lado);
• a tensão de alimentação seja entre os valores indicados
na tabela dos Dados técnicos (veja ao lado);
• a tomada seja compatível com a ficha da máquina. Se
não for, substitua a tomada ou a ficha.
! Esta máquina de lavar roupa não deve ser instalada ao
aberto, nem mesmo abrigada, porque é muito perigoso
deixá-la exposta à chuva e às tempestades.
! Depois de ter instalado a máquina de lavar roupa, o
acesso à tomada eléctrica deve ser fácil.
! Não empregue extensões nem fichas múltiplas.
! O cabo não deve ser dobrado nem apertado.
Dados técnicos
Modelo
Medidas
Capacidade
Ligações eléctricas
Ligações hídricas
Velocidade da
centrifugação
Programas de
controlo conforme as directivas
1061/2010 e
1015/2010
AQ105D 49D
largura 59.5 cm
altura 85 cm
profundidade 64,5 cm
de 1 a 10 kg
veja a placa das características técnicas
colocada na máquina
pressão máxima 1 MPa (10 bar)
pressão mínima 0.05 MPa (0.5 bar)
capacidade do tambor 71 litros
até 1.400 rotações por minuto
programa
programa
Esta aparelhagem é em conformidade
com as seguintes Directivas Comunitárias:
- 2004/108/CE (Compatibilidade Electromagnética)
- 2002/96/CE
- 2006/95/CE (Baixa Tensão)
; Algodão Normal 60°C.
; Algodão Normal 40°C.
51
Page 52

Descrição da máquina
3
1
2
1
8
0
2
1
0
1
5
0
1
2
0
9
0
6
0
B
A
PT
PORTA DE VIDRO
PEGA DA PORTA
DE VIDRO
BASE
PORTA DE VIDRO
PÉS REGULÁVEIS
Para abrir a porta de vidro
use sempre a sua pega (veja
a figura).
PAINEL DE
COMANDOS
SISTEMA DIRECT INJECTION
A máquina de lavar está equipada com uma inovadora
tecnologia “Direct Injection” que solubiliza rapidamente
o detergente, activando da melhor forma todos os
vários componentes. O sistema garante uma utilização e
dissolução completa do detergente graças à sua mistura
com a água antes de chegar à roupa. Isto permite obter
melhores performances de limpeza a baixas temperaturas,
conjugando uma excelente poupança energética com
o cuidado perfeito das cores e das fibras. A tecnologia
“Direct Injection” é activada automaticamente em todos os
ciclos.
correcta dosagem. Para o uso do detergente em pó,
coloque o recipiente na cavidade B.
3. Gaveta adicional: água de Javel
! Se utilizar a gaveta adicional 3 exclui-se a pré-
lavagem.
recipiente para os aditivos: para amaciador ou aditivos
líquidos. Recomenda-se não superar o nível máximo
indicado pela grade e diluir os amaciadores concentrados.
Painel de comandos “touch control”
Para modificar as
configurações, carregue
levemente no ícone dentro da
GAVETA DOS ETERGENTES
A gaveta dos detergentes
área sensível (touch control)
como indicado na figura.
encontra-se no interior da
máquina e para se ter acesso
deve-se abrir a porta. Para
a dosagem dos detergentes
consulte o capítulo
“Detergentes e roupa”.
Modalidade de Stand by
Esta máquina de lavar roupa, em conformidade com as
novas normas sobre a economia energética, dispõe de um
sistema de desligação automática (stand by) que entra em
função aproximadamente 30 minutos depois, no caso de
1. recipiente para a pré-
lavagem: use detergente em
pó.
! Antes de deitar detergente
inutilização. Carregue brevemente no botão
ON/OFF e aguarde até a reactivação da máquina.
Consumo em off-mode: 0,5 W
Consumo em Left-on: 0,5 W
verifique se há dentro a
gaveta adicional 3.
2. recipiente para a lavagem:
No caso do uso de detergente
líquido, aconselha-se usar a
parede divisória A fornecido
com o aparelho para uma
52
Page 53
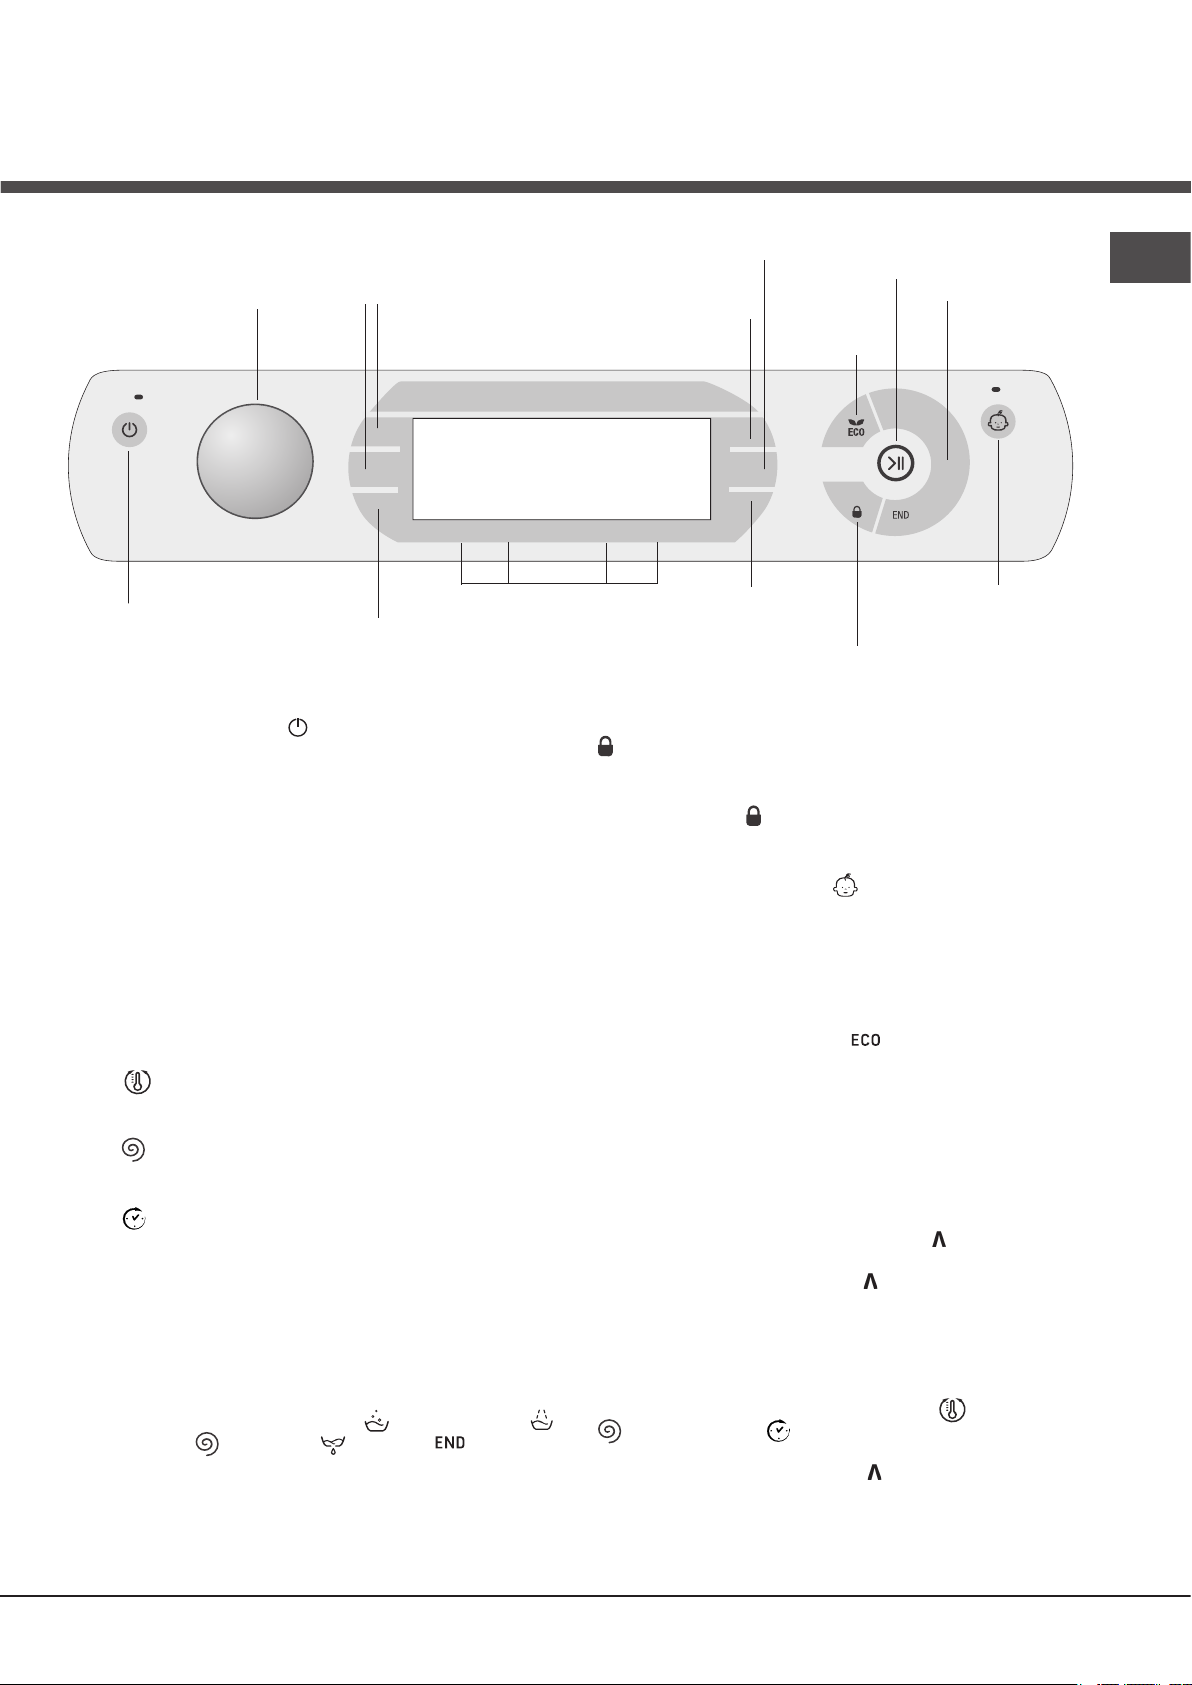
Painel de comandos “touch control”
Selector de
PROGRAMAS
M2
M1
Botão CENTRIFUGAÇÃO
Botão TEMPERATURA
VISOR
Botão com indicador luminoso
START/PAUSE
Indicador
luminoso
ECO
Ícone FASES DE
LAVAGEM
PT
Botão com indicador luminoso
M3
OPÇÕES
ON/OFF
Botão com indicador luminoso ON/OFF: carregue brevemente
no botão para ligar ou desligar a máquina. O indicador luminoso
verde indica que a máquina está ligada. Para desligar a máquina
de lavar roupa durante a lavagem, é necessário manter
pressionado o botão por mais tempo, aproximadamente 3
segundos; uma pressão breve ou acidental não permitirá o
desligamento da máquina. O desligamento da máquina durante
uma lavagem em curso anula a própria lavagem.
Selector de PROGRAMAS: pode ser girado em ambas as
direcções. Para estabelecer o programa mais correcto, veja
a “Tabela dos Programas”. Durante a lavagem o selector
permanece parado.
Botões M1-M2-M3: manter pressionado um dos botões para
memorizar um ciclo e as próprias personalizações preferidas.
Para chamar um ciclo precedentemente memorizado, pressionar
o respectivo botão.
Botão TEMPERATURA: pressionar para modificar ou
excluir a temperatura; o valor escolhido é indicado no visor (ver
“Como efectuar um ciclo de lavagem”).
Botão CENTRIFUGAÇÃO: pressionar para modificar ou
excluir a centrifugação; o valor escolhido é indicado no visor
(ver “Como efectuar um ciclo de lavagem”).
Botão INÍCIO POSTERIOR: pressionar para configurar
um início posterior do programa escolhido; o valor do atraso
programado é indicado no visor (ver “Como efectuar um ciclo
de lavagem”).
Botões com Indicadores luminosos OPÇÕES: para seleccionar
as opções disponíveis. O indicador luminoso relativo à opção
seleccionada ficará aceso (ver “Como efectuar um ciclo de
lavagem”).
Ícone FASES DE LAVAGEM: acendem-se para indicar o
estado de avanço do ciclo (Lavagem - Enxaguamento
- Centrifugação – Descarga ). A escrita acende-se
quanto o ciclo tiver terminado.
Botão com indicador luminoso START/PAUSE: quando o
indicador luminoso verde acende-se com intermitência lenta,
carregar no botão para iniciar uma lavagem. Quando o ciclo
iniciar, o indicador permanecerá aceso fixo. Para colocar em
pausa a lavagem, carregar novamente no botão; o indicador
Botões
Botão INÍCIO
POSTERIOR
Indicador luminoso
de LOCK
Botão com indicador
luminoso BLOQUEIO
DAS TECLAS
ficará intermitente com uma luz laranja. Se o indicador “LOCK”
estiver apagado, será possível abrir a porta de vidro. Para fazer
iniciar a lavagem do ponto em que foi interrompida, carregar
novamente no botão.
Indicador luminoso LOCK: indica que a porta de vidro está
bloqueada. Para abrir a porta é necessário colocar o ciclo em
pausa (ver “Como efectuar um ciclo de lavagem”).
Botão com indicador luminoso BLOQUEIO DAS TECLAS:
para activar ou desactivar o bloqueio do painel de comandos,
manter pressionado o botão por aproximadamente 2 segundos.
O indicador luminoso aceso indica que o painel de comandos
está bloqueado. Deste modo, impedem-se modificações
acidentais dos programas, sobretudo se houver crianças em
casa.
Indicador luminoso ECO: o ícone irá acender-se quando, ao
modificar os parâmetros de lavagem, irá obter-se uma economia
energética de ao menos 10%. Além disto, antes que a máquina
entre na modalidade “Stand by” o ícone irá acender-se por alguns
segundos; com a máquina desligada estima-se uma economia
energética de aproximadamente 80%.
MODIFICAR IDIOMA
A primeira vez que ligar a máquina aparecerá no visor o
primeiro idioma intermitente. Em correspondência dos 3 botões
à direita do visor aparecerão os símbolos “ “ , “OK” e “V” Os
idiomas mudam automaticamente a cada 3” ou carregando
nos botões ao lado dos símbolos “ “ e “V”. Com o botão “OK”
confirma-se o idioma que irá fixar-se depois de 2”. Se não
carregar em nenhum botão, após 30” irá recomeçar a troca
automática dos idiomas.
Para modificar o idioma é necessário ligar e desligar a
máquina, nos 30” sucessivos ao desligamento, pressione
contemporaneamente as teclas temperatura + centrifugação
+ início posterior por 5’’ e além de um sinal acústico,
aparecerá no display o idioma configurado a piscar. Ao carregar
nos botões ao lado dos símbolos “ “ e “V” muda-se o idioma.
Com o botão ao lado do símbolo “OK” confirma-se o idioma
que irá fixar-se depois de 2”. Se não carregar em nenhum botão,
após 30” será visualizado o idioma configurado anteriormente.
Ligar a máquina.
53
Page 54

Como efectuar um ciclo de
lavagem
PT
Observação: a primeira vez que utilizar a máquina de
lavar roupa, efectue um ciclo de lavagem sem roupas mas
com detergente, usando o programa algodão 90º sem
pré-lavagem.
1.LIGAR A MÁQUINA. Pressionar o botão . Todos os
indicadores luminosos se acenderão por 1 segundo e
no display aparecerá a escrita AQUALTIS; em seguida
ficará aceso o indicador luminoso do botão e o
indicador START/PAUSE ficará intermitente.
2. ESCOLHA DE PROGRAMA. Girar o selector de
PROGRAMAS para a direita ou para a esquerda até
seleccionar o programa desejado; o nome do programa
aparecerá no display; será associada uma temperatura,
uma velocidade de centrifugação que podem ser
modificados. No display aparecerá a duração do ciclo.
3. COLOCAR A ROUPA. Abrir a porta de vidro. Coloque
a roupa dentro da máquina prestando atenção para
não superar a carga máxima indicada na tabela dos
programas na página seguinte.
4. DOSAGEM DO DETERGENTE. Extrair a gaveta e
deitar o detergente nos específicos recipientes como
explicado no parágrafo “Descrição da máquina”.
5. FECHAR A PORTA DE VIDRO.
6. PERSONALIZAR O CICLO DE LAVAGEM. Utilizar
os específicos botões no painel de comandos:
Modificar a temperatura e/ou a
centrifugação.
A máquina visualiza automaticamente a temperatura e a
centrifugação máximas para o programa seleccionado
ou as últimas seleccionadas se compatíveis com o
programa escolhido. Carregando no botão pode-se
reduzir a temperatura progressivamente até a lavagem
a frio (OFF). Carregando no botão pode-se reduzir
a centrifugação progressivamente até a sua exclusão
(OFF). Uma ulterior pressão dos botões colocará os
valore novamente aos máximos previstos.
! Excepção: seleccionando o programa
temperatura pode ser aumentada até a 90º.
Programar um início posterior.
Para programar o início atrasado do programa
escolhido, carregue no botão relativo até alcançar o
tempo de atraso desejado. Durante a programação,
será visualizado o tempo de atraso junto à escrita “Inicia
em”: e o símbolo intermitente. Após ter programado
o início posterior, o visor mostrará o símbolo aceso
fixo e retornará à visualização da duração do ciclo
configurado com a escrita “Acaba em”: e a duração do
ciclo. Ao carregar no botão INÍCIO POSTERIOR uma
só vez, será visualizado o tempo de atraso programado
anteriormente.
Após o início, o visor mostrará a escrita “Inicia em”:
e o tempo de atraso. Uma vez passado o tempo de
atraso programado, a máquina iniciará o ciclo e o visor
mostrará a mensagem “Acaba em”: e o tempo que falta
para o fim do ciclo.
a
Para cancelar a opção INÍCIO POSTERIOR, carregue
no botão até que no display apareça a escrita OFF; o
símbolo irá desligar-se.
Modificar as características do
ciclo.
• Pressionar o botão para activar a opção; no display
aparecerá o nome da opção e o indicador
correspondente ao botão irá acender-se.
• Pressionar novamente o botão para desactivar a
opção; no display aparecerá o nome da opção e a
palavra OFF e o indicador irá apagar-se.
! Se a opção seleccionada não for compatível com o
programa escolhido, a incompatibilidade será indicada
com a intermitência do indicador luminoso e um sinal
acústico (3 beep) e a opção não será activada.
! Se a opção seleccionada não for compatível com uma
outra programada anteriormente, o respectivo indicador
luminoso irá piscar e será activada somente a segunda,
o indicador luminoso do botão ficará aceso fixo.
! As opções podem variar a carga recomendada e/ou a
duração do ciclo.
7. INICIAR O PROGRAMA. Carregar no botão START/
PAUSE. O indicador luminoso ficará aceso fixo e a porta
irá bloquear-se (indicador luminoso LOCK aceso).
Os ícones relativos às fases de lavagem acendemse durante o ciclo para indicar a fase em curso. Para
modificar um programa durante a realização do ciclo,
colocar a máquina de lavar roupa em pausa carregando
no botão START/PAUSE; seleccionar o ciclo desejado
e carregar novamente no botão START/PAUSE. Para
abrir a porta durante a realização de um ciclo, carregar
no botão START/PAUSE; se o indicador luminoso LOCK
estiver apagado, será possível abrir a porta. Carregar
novamente no botão START/PAUSE para fazer iniciar o
programa do ponto em que foi interrompido.
8. FIM DO PROGRAMA. É indicado pela escrita
END acesa. A porta de vidro poderá ser aberta
imediatamente. Se o indicador luminoso START/PAUSE
piscar, carregar no botão para terminar o ciclo. Abrir a
porta, retirar a roupa e desligar a máquina.
! Se desejar anular um ciclo já iniciado, mantenha
pressionada a tecla até que o ciclo será interrompido e
a máquina irá desligar-se.
Saquinho para acolchoados, cortinas e peças
delicadas
Graças ao especial saquinho fornecido com o produto, a
Aqualtis consente lavar também as peças mais preciosas
e delicadas garantido a máxima protecção. Recomenda-
se o uso do saquinho para a lavagem de acolchoados
e edredões com forro externo realizado em material
sintético.
54
Page 55

Programas e opções
3
1
2
Tabela dos Programas
Velocità
Descrição do Programa
Icone
Sintéticos Resistentes
Sintéticos Resistentes (4) 40° 800
Cores Intensivo
Multi Cores
Escuros
Camisas
Cobertor: para peças com enchimento em plumas de ganso. 30° 1200 -
Roupa 7 dias: roupa de banho e de cama. 60° 1400
Enxaguamento
Centrifugação e Descarga - 1400 - - - - 10 - - - 16’
Antialérgico Intensivo
Antialérgico Delicado
Ultradelicado
Lã: para lã, cashmere, etc. 40° 800 -
Mix 30’: para refrescar rapidamente roupas levemente sujas (não é
indicado para lã, seda e roupas que deve ser lavadas à mão).
Algodão Normal 60°C (1): brancos e coloridos resistentes muito sujos.
Algodão Normal 40°C (2): brancos e coloridos delicados muito sujos. 40° 1400 -
A duração do ciclo indicada no visor ou no manual é uma estima calculada com base nas condições padrão. O tempo efectivo poderá variar a depender de vários factores, tais como a temperatura e a pressão da água em entrada, a temperatura ambiental, a quantidade de detergente, a quantidade e o tipo de carga, o balanceamento da carga e as opções adicionais seleccionadas.
Nota: após aproximadamente 10 minutos do START, a máquina, conforme a carga efectuada, irá calcular novamente e indicar o tempo faltante para o fim do programa.
1) Programa de controlo segundo a directiva 1061/2010: configurar o programa com uma temperatura 60°C.
Este ciclo é adapto para lavar uma carga de algodão normalmente suja e é o mais eficiente em termos de consumo combinado de energia e de água, para lavar a 60ºC. A temperatura efectiva de
lavagem pode ser diferente daquela indicada.
2) Programa de controlo segundo a directiva 1061/2010: configurar o programa com uma temperatura 40°C.
Este ciclo é adapto para lavar uma carga de algodão normalmente suja e é o mais eficiente em termos de consumo combinado de energia e de água, para lavar a 40ºC. A temperatura efectiva de
lavagem pode ser diferente daquela indicada.
3) À temperatura de 60 ºC, a função de “Pré-lavagem” não pode ser activada.
Para todos Test Institutes:
2) Programa longo para algodão: configurar o programa com uma temperatura 40°C.
4) Programa longo para sintetico: configurar o programa com uma temperatura 40°C.
Temp.
max.
(°C)
minuto)
60° 800
40° 1400
20° 1400 -
30° 800 -
40° 600 -
- 1400 - -
60° 1400 -
40° 1400 -
30° 0 -
30° 800 -
60°
(Max. 90°)
Detergentes e aditivos
max.
(rota-
ções
1400
Pré-
por
(3)
Água de
lavagem
Lavagem
-
-
-
-
-
-
-
-
-
Javel
Amacia-
Humidade
residual %
Carga max.
5 48 1,12 58 120’
5 48 0,67 54 100’
9 - - - 175’
9 - - - 185’
6 - - - 80’
2,5 - - - 75’
3,5 - - - 110’
10 - - - 155’
10 - - - 49’
6 - - - 210’
6 - - - 230’
1 - - - 80’
2,5 - - - 105’
4 71 0,20 44 30’
10 53 0,95 60 200’
10 53 0,92 88 185’
energia kWh
Água total lt
Consumo de
(Kg)
dor
PT
Duração ciclo
Opções de Lavagem
Super Lavagem
Esta opção garante uma lavagem
com altas performances graças
ao uso de uma maior quantidade
de água na fase inicial do ciclo
e a uma maior duração do
programa, é útil para eliminar as
manchas mais resistentes. Pode
ser utilizada com ou sem lixívia
Se desejar efectuar também o
alvejo, coloque a gaveta adicional
3, fornecida, na gaveta 1. Quando
deitar a água de javel, não ultrapasse o nível “máx” indicado no pino
central (veja a figura). Para efectuar somente o branqueamento
sem efectuar a lavagem completa, deitar a lixívia na gaveta
adicional 3, estabelecer o programa “Enxaguamento” e activar a
opção “Super Lavagem” .
! Não pode ser activada com os programas , , ,
, , , , , , .
Extra Enxaguamento
Seleccionando esta opção aumenta-se a eficácia da
enxaguadura, e garante-se a máxima remoção dos resíduos
de detergente. É útil para quem tem a pele particularmente
sensível aos detergentes. Aconselha-se o uso desta opção
com a máquina de lavar roupa com a carga cheira ou com
grandes doses de detergente.
! Não pode ser activada com os programas , , , , , .
Engomar Fácil
Seleccionando esta opção, a lavagem e a centrifugação serão
oportunamente modificados para reduzir a formação de rugas.
No fim do ciclo a máquina de lavar roupa efectuará lentas
rotações do tambor; os indicadores luminosos “Engomar Fácil”
e START/PAUSE irão piscar. Para terminar o ciclo, carregar no
botão START/PAUSE ou no botão “Engomar Fácil”.
! Não pode ser activada com os programas , , , , , .
Pré-lavagem
Seleccionando esta função efectua-se a pré-lavagem, útil para
remover manchas resistentes.
Obs.: acrescentar o detergente no específico compartimento.
! Não pode ser activada com os programas , , , ,
, , , , , , , (60°), .
55
Page 56

Detergentes e roupa
PT
Detergente
A escolha e a quantidade de detergente dependem do tipo
de tecido (algodão, lã, seda...), da cor, da temperatura de
lavagem, do grau de sujidade e da dureza da água.
Uma correcta dosagem de detergente evita desperdícios
e protege o meio ambiente: mesmos os detergentes
biodegradáveis contêm componentes que alteram o
equilíbrio da natureza.
Aconselha-se:
• usar detergente em pó para as peças de algodão
brancas e para a pré-lavagem.
• usar detergente líquido para peças delicadas de algodão e
para todos os programas com baixas temperaturas.
• usar detergente líquido delicado para lã e seda.
O detergente deve ser deitado antes do início da lavagem
no específico recipiente ou no doseador que deve ser
colocado directamente no tambor. Neste caso, não é
possível seleccionar o ciclo Algodão com pré-lavagem.
! Usar detergentes em pó para roupas de algodão brancas
e para a pré-lavagem e para lavagens com temperatura
superior aos 60ºC.
! Seguir as indicações fornecidas pelo produtor na
embalagem do detergente.
! Não use detergentes para lavagem à mão, porque
formam espuma demais.
Preparar a roupa
• Desdobre bem as roupas antes de carregá-las.
• Divida a roupa em função do tipo de tecido (símbolo na
etiqueta da roupa) e a da cor, prestando atenção para
separar as peças coloridas das peças brancas;
• Esvazie as algibeiras e verifique se há botões soltos;
• Não ultrapasse os valores indicados na Tabela dos
Programas que se referem ao peso da roupa enxuta.
Quanto pesa a roupa?
1 lençol 400-500 gr.
1 fronha 150-200 gr.
1 toalha 400-500 gr.
1 roupão 900-1200 gr.
1 toalha de rosto 150-250 gr.
1 calça de ganga 400-500 gr.
1 camisa 150-200 gr.
Conselhos de lavagem
Cores Intensivo: utilizar o ciclo para roupas coloridas
claras, para uma remoção mais intensa das manchas, sem
danificar a integridade e a vivacidade das cores. O ciclo
foi estudado para garantir performances de 60º a 40º. É
aconselhável o uso de detergentes indicados para roupas
coloridas.
Multi Cores: utilizar o ciclo para a lavagem de roupas
de várias cores com sujidade média. Ciclo estudado
para garantir o cuidado da cor e atingir simultaneamente
performances de 40º a apenas 20º. É aconselhável a
utilização de detergentes indicados para roupas coloridas
e activos a baixas temperaturas.
! É sempre aconselhável efectuar a lavagem em separado
das roupas que podem desbotar ou a primeira lavagem de
roupas coloridas novas.
Escuros: utilizar o programa para a lavagem de peças
escuras. O programa foi estudado para preservar no
tempo a duração das cores escuras. Para obter melhores
resultados, recomenda-se o uso de detergente líquido,
preferivelmente para peças escuras.
Camisas: utilize o específico programa para lavar
camisas de vários tipos de tecido e cores para garantir o
máximo cuidado.
Cobertor: para lavar peças com enchimento de plumas
de ganso de casal ou de solteiro (com peso inferior a
3,5 kg), travesseiros, jaquetas, utilizar o programa
específico . Recomenda-se colocar as peças no tambor
dobrando as suas pontas para dentro (veja as figuras) e
de não superar os ¾ do volume do próprio tambor. Para
obter óptimos resultados de lavagem recomenda-se utilizar
o detergente líquido dosado na gaveta dos detergentes.
Acolchoados: para lavar os acolchoados com forro
sintético, use o específico saquinho fornecido com o
produto e o programa .
Roupa de banho e de cama: para lavar toda a
roupa de banho e de cama com um único ciclo, utilize
o programa que optimiza o uso do amaciador
e consente uma economia de tempo e energia.
Aconselhamos a utilização de detergente em pó.
Antialérgico Intensivo : ciclo estudado para roupas de
algodão e outros tecidos resistentes que garante a remoção dos
principais alergénios como pólenes, ácaros, pêlos de gato e cão.
Antialérgico Delicado : ciclo estudado para roupas
em algodão e outros tecidos resistentes que garante a
remoção de pólenes e pêlos de cão e gato a 40º.
Ultradelicado: utilize o programa para a lavagem de
peças muito delicadas, que possuem aplicações como
aplicações ou brilhantes.
Recomenda-se virar do avesso as roupas antes de laválas e colocar as peças pequenas no saquinho específico
para a lavagem das peças delicadas. Para obter melhores
resultados, recomenda-se o uso de detergente líquido
para peças delicadas.
Para a lavagem de peças de Seda e Cortinas (dobreas e coloque-as dentro do saquinho fornecido com o
produto), seleccionar o ciclo e activar a opção
(neste caso, será possível activar também a opção “Extra
Enxaguamento”); a máquina terminará o ciclo com a roupa
de molho e o indicador luminoso irá piscar. Para
descarregar a água e poder retirar a roupa é necessário
carregar no botão START/PAUSE ou no botão .
Lã: o ciclo de lavagem “Lã” desta máquina de lavar
roupa Hotpoint-Ariston foi testado e aprovado pela
Woolmark Company para a lavagem de vestuário em lã
classificado como “lavável à mão”, desde que a lavagem
seja executada de acordo com as instruções indicadas
na etiqueta da peça e com as indicações fornecidas
pelo produtor do electrodoméstico. Hotpoint-Ariston é
a primeira marca de máquinas de lavar roupa a obter
a certificação Woolmark Apparel Care - Platinum da
Woolmark Company pelo seu desempenho de lavagem e
consumo de água e energia. (M1135)
56
Page 57

Precauções e conselhos
! Esta máquina de lavar roupa foi projectada e fabricada
em conformidade com os regulamentos internacionais de
segurança. Estas advertências são fornecidas por razões
de segurança e devem ser lidas com atenção.
Segurança geral
• Este aparelho foi projectado exclusivamente para um
uso doméstico.
• O aparelho não deve ser utilizado por pessoas
(incluindo crianças) com capacidades físicas,
sensoriais ou mentais reduzidas ou sem experiência e
conhecimentos, salvo se supervisionadas ou se tiverem
recebido instruções sobre a utilização do dispositivo por
parte de uma pessoa responsável pela sua segurança.
As crianças devem ser mantidas sob vigilância para
evitar que brinquem com a máquina.
• Não toque na máquina com os pés descalços nem com
as mãos ou os pés molhados ou húmidos.
• Não puxe o cabo eléctrico para tirar a ficha da tomada,
pegue a ficha mesmo.
• Não toque a água de descarga, que poderá chegar a
temperaturas altas.
• Em nenhum caso force a porta para abri-la: poderá
danificar o mecanismo de segurança que a protege
contra aberturas acidentais.
• Se houver avarias, em nenhum caso mexa nos
mecanismos internos para tentar reparar.
• Verifique sempre que criança não se aproximem da
máquina a funcionar.
• Se for preciso deslocar a máquina, são precisas pelo
menos duas ou três pessoas, com a máxima atenção.
Nunca sozinho porque a máquina é muito pesada.
• Antes de colocar a roupa controle que o tambor esteja
vazio.
Sistema de balanceamento da carga
Antes de cada centrifugação, para evitar vibrações
excessivas e para distribuir a carga em modo uniforme,
o tambor efectua algumas rotações a uma velocidade
levemente superior àquela de lavagem. Se no fim
de repetidas tentativas a carga ainda não estiver
correctamente balanceada, a máquina efectuará a
centrifugação com uma velocidade inferior àquela
prevista. No caso de um excessivo desbalanceamento, a
máquina de lavar roupa efectuará a distribuição ao invés
da centrifugação. Para favorecer uma melhor distribuição
da carga e o seu correcto balanceamento, aconselha-se
misturar peças grandes com peças pequenas.
e reciclagem dos materiais que os compõem e impedir
potenciais danos à saúde e ao meio ambiente. O
símbolo do contentor de lixo barrado com uma cruz
está presente em todos os produtos para lembrar o
dever de recolha selectiva.
Para mais informações sobre o correcto
desmantelamento dos electrodomésticos, contacte o
serviço público especializado ou os revendedores.
Abertura manual da porta de vidro
Caso não seja possível abrir a porta de vidro por falta
de energia eléctrica e quiser pendurar a roupa lavada,
proceda da seguinte maneira:
1. tire a ficha da tomada de
corrente.
2. verifique que o nível de
água no interior da máquina
seja inferior respeito à
abertura da porta de vidro;
caso contrário, tirar a água
em excesso através do tubo
de descarga recolhendo-a
num balde como indicado na
figura.
3. remova o painel de cobertura no lado anterior da
máquina de lavar roupa (veja a página seguinte).
4. utilizando a lingueta
indicada na figura, puxe
para o externo até liberar o
tirante de plástico do fecho;
puxá-lo sucessivamente para
baixo até ouvir um “clique”
que indica que a porta está
desbloqueada.
5. abra a porta; se ainda não
conseguir, repita a operação.
PT
Eliminação
• Eliminação do material de embalagem: obedeça os
regulamentos locais, de maneira que as embalagens
possam ser reutilizadas.
• A directiva Europeia 2002/96/CE relativa aos resíduos
de equipamentos eléctricos e electrónicos prevê que os
electrodomésticos não devem ser eliminados no normal
fluxo dos resíduos sólidos urbanos. Os aparelhos
que deixaram de ser utilizados devem ser recolhidos
separadamente para optimizar a taxa de recuperação
6. monte outra vez o painel, certifique-se, antes de
empurrá-la na máquina, que os ganchos foram colocados
nas respectivas ranhuras.
57
Page 58

1
2
1
2
2
Manutenção e cuidados
PT
Interromper a alimentação de água e de
corrente eléctrica
• Feche a torneira da água depois de cada lavagem.
Desta maneira diminuiu-se o desgaste do sistema
hidráulico da máquina de lavar roupa e elimina-se o
risco de vazamento.
• Tire a ficha da tomada eléctrica quando for limpar a
máquina de lavar roupa e durante os trabalhos de
manutenção.
Limpar a máquina
A parte externa e as peças em borracha podem ser limpas
com um pano molhado com água morna e sabão. Não
empregue solventes nem abrasivos.
Limpar a gaveta dos detergentes
Para extrair a gaveta,
pressione a lingueta (1) e
puxe para fora (2) (veja a
figura).
Lave-a com água corrente;
esta limpeza deve ser
efectuada frequentemente.
Cuidados com o tambor
Para obter acesso à pré-câmara:
1. remova o painel de cobertura no lado anterior da
máquina empurrando para o centro, em seguida empurre
para baixo de ambos os lados e remova-o (veja as
figuras).
2. posicione um recipiente
para recolher a água que
sairá (aproximadamente 1,5 l)
(ver figura);
3. Para desenroscar a tampa
gire-a na direcção contrária
aos ponteiros do relógio (veja
a figura);
4. limpe o interior com cuidado;
5. enrosque outra vez a tampa;
6. monte outra vez o painel, certifique-se, antes de
empurrá-la na máquina, que os ganchos foram colocados
nas respectivas ranhuras.
• Deixe a porta sempre entreaberta para evitar que se
formem odores desagradáveis.
Limpar a bomba
Esta máquina de lavar roupa é equipada com uma bomba
com limpeza automática que não precisa de operações de
manutenção. Entretanto pode acontecer que pequenos
objectos (moedinhas, botões) caiam na pré-câmara que
protege a bomba, situada na parte inferior da mesma.
! Certifique-se que o ciclo de lavagem tenha terminado e
tire a ficha da tomada.
58
Verificar o tubo de alimentação de água
Verifique o tubo de alimentação pelo menos uma vez por
ano. Se houver rachaduras ou fendas, será necessário
substitui-lo: durante as lavagens as fortes pressões podem
provocar repentinas quebras.
Page 59

Anomalias e soluções
Pode acontecer que a máquina não funcione. Antes de telefonar para a Assistência Técnica (veja “Assistência”), verifique se
não se trata de um problema fácil de resolver com ajuda da seguinte lista.
Anomalias:
A máquina de lavar roupa não liga.
O ciclo de lavagem não inicia.
A máquina não carrega água.
A porta da máquina está bloqueada.
A máquina carrega e descarrega
água continuamente.
A máquina não descarrega ou não
realiza centrifugação.
A máquina de lavar roupa vibra
muito durante a centrifugação.
A máquina está a perder água.
Os ícones relativos à “Fase em
curso” piscam rapidamente
contemporaneamente ao indicador
luminoso ON/OFF.
Possíveis causas / Solução:
• A ficha não está colocada na tomada eléctrica, ou não o suficiente para haver
contacto.
• Em casa não há corrente.
• A porta de vidro não está bem fechada.
• O botão START/PAUSE não foi pressionado.
• A torneira da água não está aberta.
• Foi programado um atraso de uma hora no início.
• O tubo de alimentação de água não está ligado na torneira.
• O tubo está dobrado.
• A torneira da água não está aberta.
• Está a faltar água em casa.
• Não há suficiente pressão.
• O botão START/PAUSE não foi pressionado.
• Seleccionando a opção , no fim do ciclo a máquina de lavar roupa
efectuará lentas rotações do tambor; para terminar o ciclo carregue no botão
START/PAUSE ou no botão .
• O tubo de descarga não está instalado entre 65 e 100 cm. de altura do chão
(veja “Instalação”).
• A ponta do tubo de descarga está imersa na água (veja “Instalação”).
• Se a morada encontrar-se nos últimos andares de um edifício, é possível que
aconteçam fenómenos de sifão por causa dos quais a máquina de lavar roupa
carrega e descarrega água continuamente. Para eliminar este inconveniente, há
a disposição no comércio apropriadas válvulas contra o efeito sifão.
• Da descarga na parede não foi sangrado o ar.
• No programa não há descarga: com alguns programas será necessário iniciar
a descarga manualmente (veja “Programas e opções”).
• Está activada a opção : para completar o programa, carregue no botão
START/PAUSE (veja “Programas e opções”).
• O tubo de descarga está dobrado (veja “Instalação”).
• A conduta de descarga está entupida.
• O tambor, no momento da instalação, não foi liberado correctamente (veja
“Instalação”).
• A máquina não está nivelada (veja “Instalação”).
• A máquina está apertada entre móveis e parede (veja “Instalação”).
• A carga está desbalanceada (veja “Detergentes e roupa”).
• O tubo de alimentação da água não está bem enroscado (veja “Instalação”).
• O gaveta dos detergentes está entupida (para limpá-la veja “Manutenção e
cuidados”).
• O tubo de descarga não está bem fixado (veja “Instalação”).
• Desligue a máquina e tire a ficha da tomada, aguarde aproximadamente
1 minuto e volte a ligá-la. Se a anomalia persistir, contacte a Assistência
Técnica.
PT
Está a formar-se demasiada espuma.
A porta da máquina está bloqueada.
Nota: para sair do “Demo Mode”, desligue a máquina de lavar roupa, carregue contemporaneamente por 3 segundos nos
botões “START/PAUSE” e “ON/OFF” .
• O detergente não é específico para máquina de lavar roupa (deve haver a escrita
“para máquina de lavar”, “à mão e para máquina de lavar” ou similares).
• A dose foi excessiva.
• Efectue o procedimento de desbloqueio manual (veja “Precauções e
conselhos”).
59
Page 60

Assistência
195103521.01
05/2012 - Xerox Fabriano
PT
Antes de contactar a Assistência Técnica:
• Verifique se consegue resolver a anomalia sozinho (veja “Anomalias e soluções”);
• Reinicie o programa para verificar se o inconveniente foi resolvido;
• Em caso negativo, contacte o Serviço de Assistência Técnica autorizado.
! No caso de uma incorrecta instalação ou de um uso não correcto do aparelho, o serviço de assistência será a pagamento.
! Nunca recorra a técnicos não autorizados.
Comunique:
• o tipo de anomalia;
• o modelo da máquina (Mod.);
• o número de série (S/N).
Estas informações encontram-se na placa de identificação colocada no aparelho.
60
 Loading...