

Page 1
Istruzioni per luso
LAVASCIUGA
I
Italiano,1
AML 89
GB
English, 13
Sommario
I
Installazione, 2-3
Disimballo e livellamento, 2
Collegamenti idraulici ed elettrici, 2-3
Primo ciclo di lavaggio, 3
Dati tecnici, 3
Descrizione della Lavasciuga, 4-5
Pannello di controllo, 4
Spie, 5
Avvio e Programmi, 6
In breve: avviare un programma, 6
Tabella dei programmi, 6
Personalizzazioni, 7
Impostare la temperatura, 7
Impostare lasciugatura, 7
Funzioni, 7
Detersivi e biancheria, 8
Cassetto dei detersivi, 8
Preparare la biancheria, 8
Capi particolari, 8
Woolmark Platinum Care, 8
Precauzioni e consigli, 9
Sicurezza generale, 9
Smaltimento, 9
Risparmiare e rispettare lambiente, 9
Manutenzione e cura, 10
Escludere acqua e corrente elettrica, 10
Pulire la Lavasciuga, 10
Pulire il cassetto dei detersivi, 10
Curare oblò e cestello, 10
Pulire la pompa, 10
Controllare il tubo di alimentazione dellacqua, 10
Anomalie e rimedi, 11
Assistenza, 12
Assistenza Attiva 7 giorni su 7, 12
Estensione di garanzia Airbag, 12
1
Page 2
Installazione
È importante conservare questo libretto per poterlo
I
consultare in ogni momento. In caso di vendita, di
cessione o di trasloco, assicurarsi che resti insieme
alla Lavasciuga per informare il nuovo proprietario sul
funzionamento e sui relativi avvertimenti.
Leggere attentamente le istruzioni: ci sono
importanti informazioni sullinstallazione, sulluso
e sulla sicurezza.
Disimballo e livellamento
Disimballo
1. Disimballare la Lavasciuga.
2. Controllare che la Lavasciuga non abbia
subìto danni nel trasporto. Se fosse danneggiata
non collegarla e contattare il rivenditore.
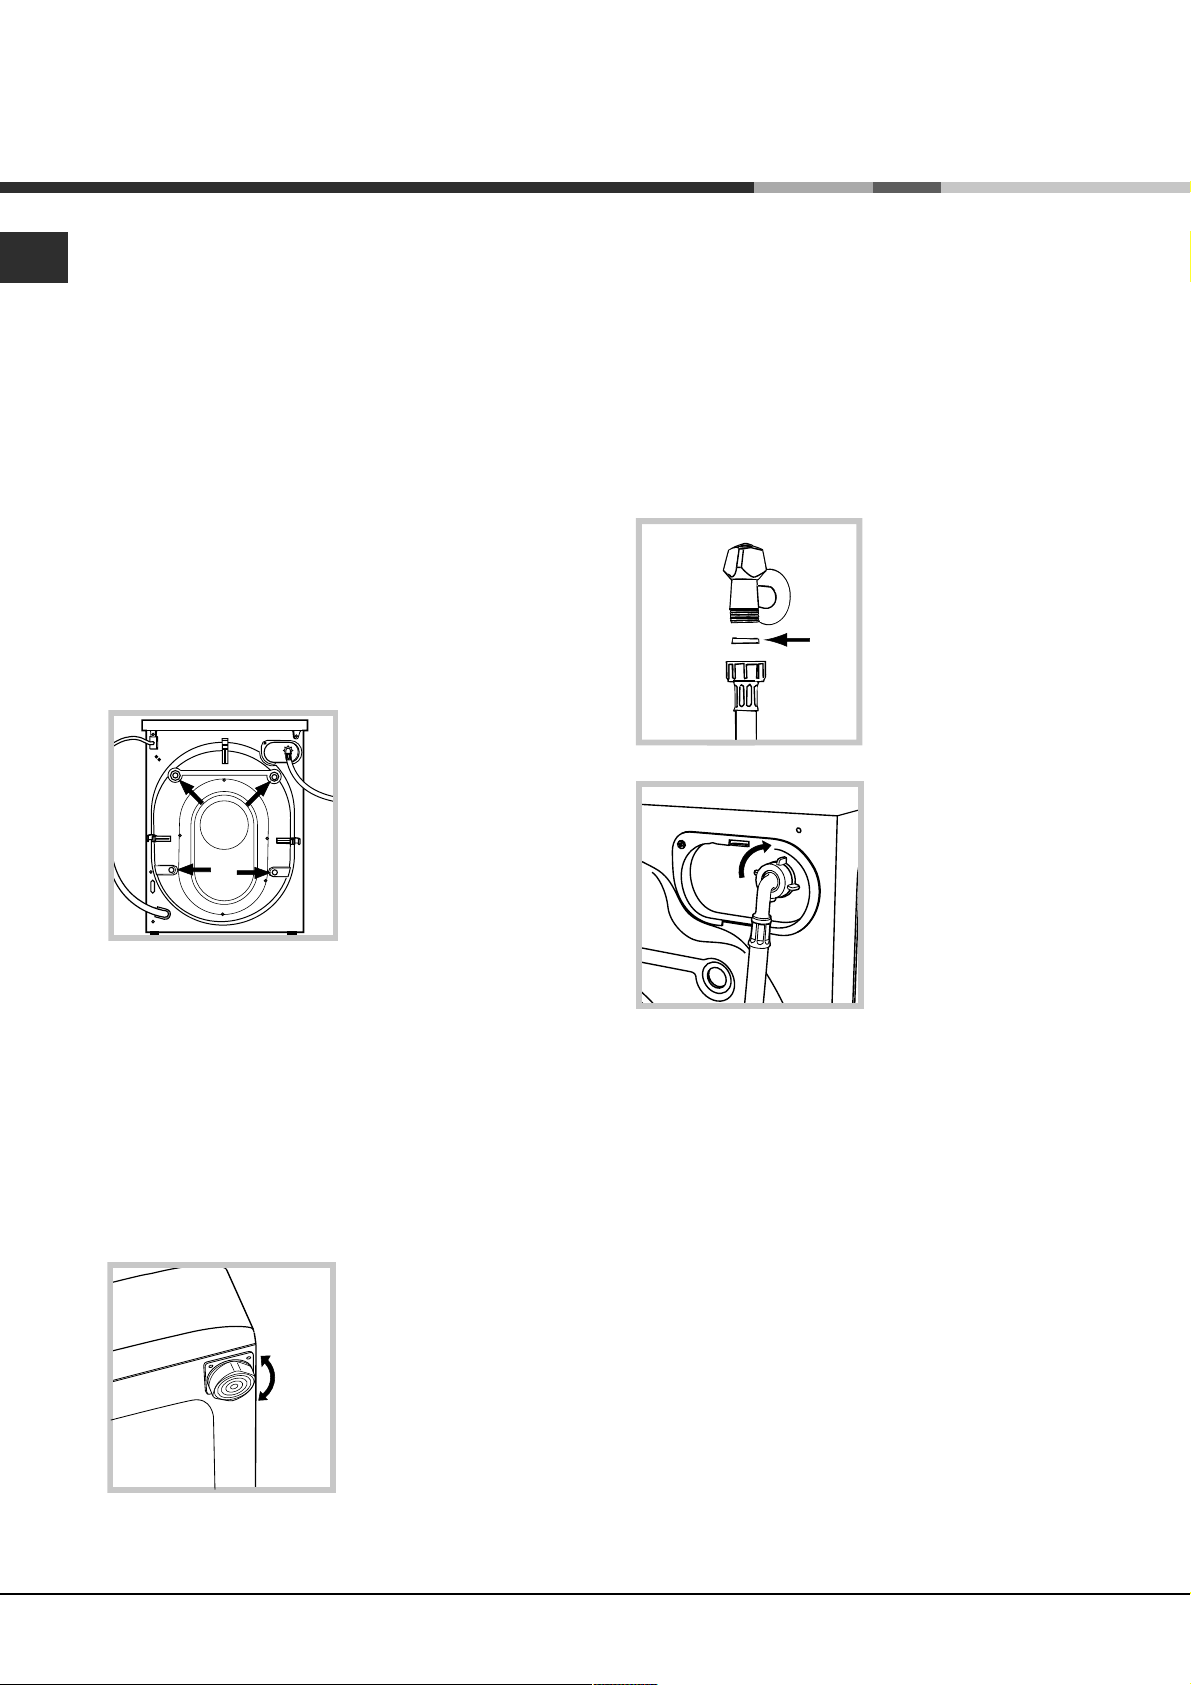
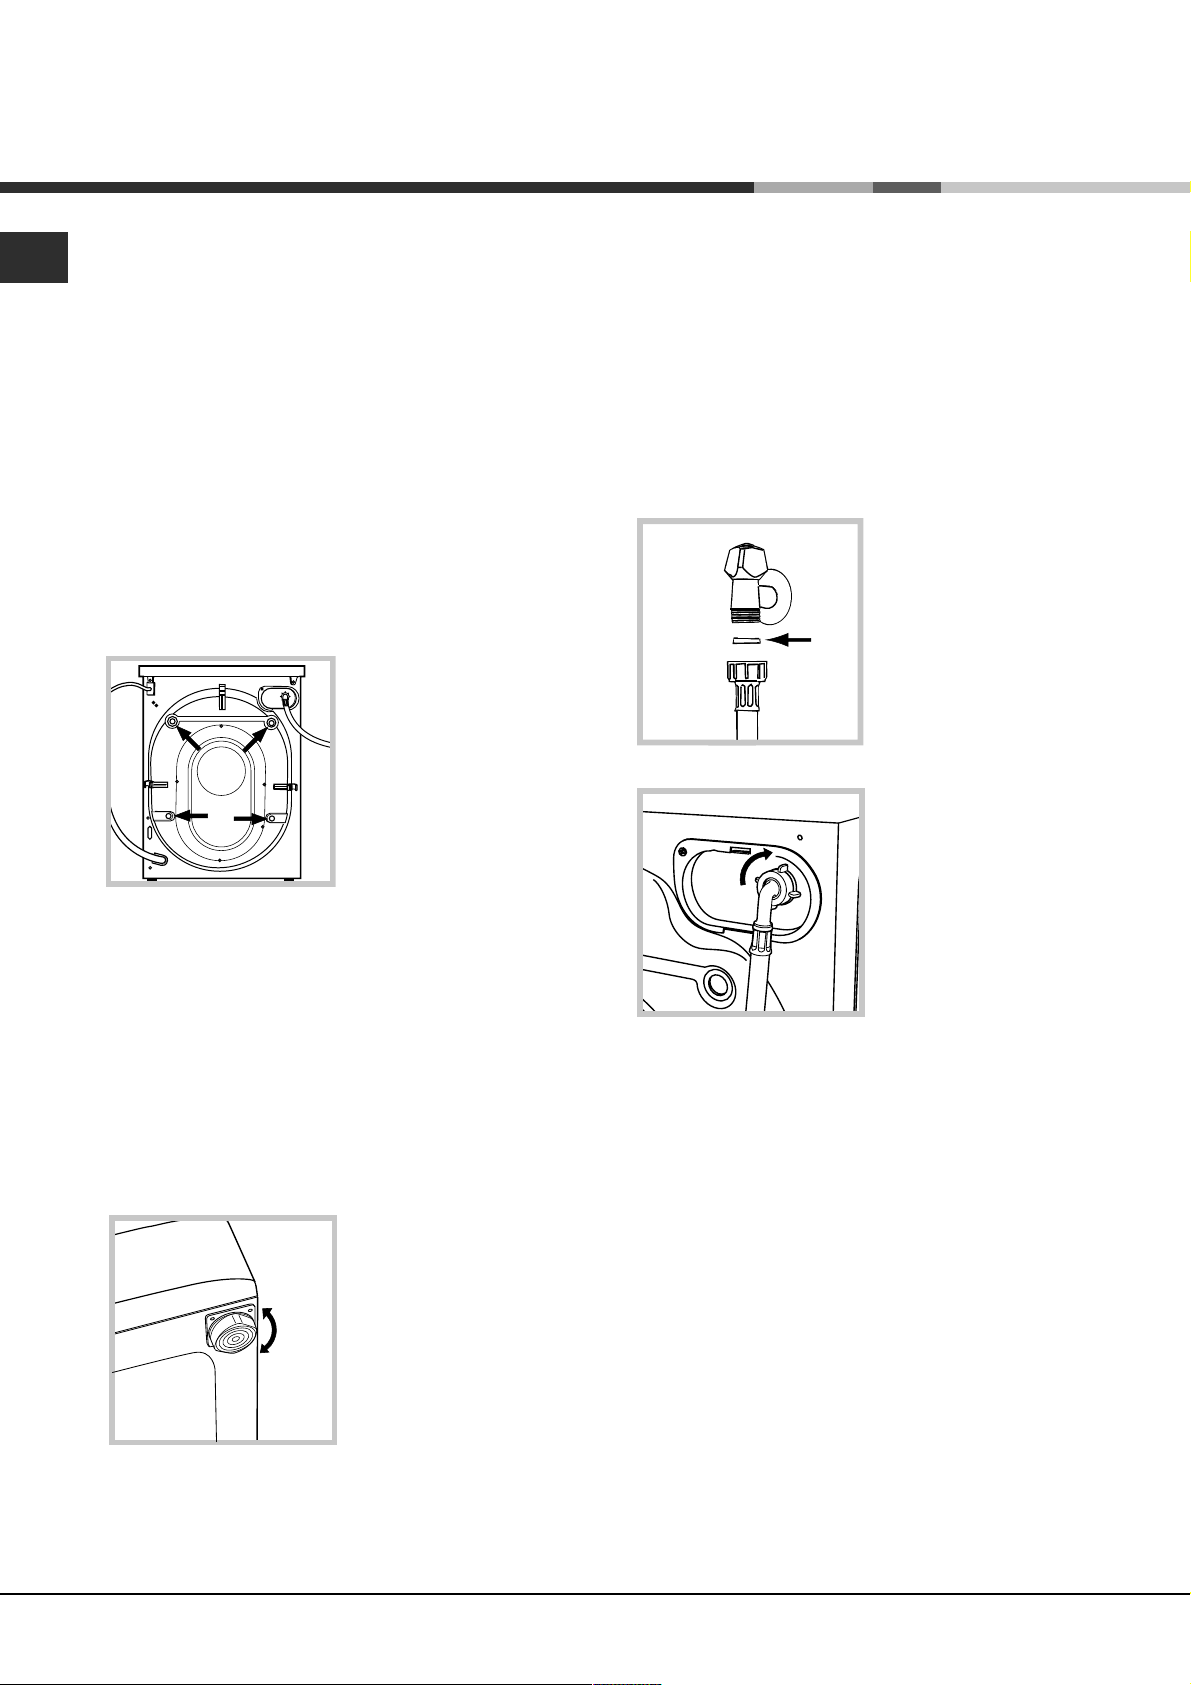
3. Rimuovere le quattro
viti di protezione per il
trasporto e il gommino
con il relativo distanziale, posti nella parte
posteriore (vedi figura).
Un accurato livellamento dà stabilità alla macchina
ed evita vibrazioni, rumori e spostamenti durante il
funzionamento. In caso di moquette o di un tappeto,
regolare i piedini in modo da conservare sotto la
Lavasciuga uno spazio sufficiente per la ventilazione.
Collegamenti idraulici ed elettrici
Collegamento del tubo di alimentazione
dellacqua
1. Inserire la guarnizione
A nellestremità del tubo
di alimentazione e
avvitarlo a un rubinetto
A
dacqua fredda con
bocca filettata da 3/4
gas (vedi figura).
Prima di allacciare, far
scorrere lacqua finché
non sia limpida.
2. Collegare il tubo di
alimentazione alla
Lavasciuga
avvitandolo allapposita
presa dacqua, nella
parte posteriore in alto a
destra (vedi figura).
4. Chiudere i fori con i tappi di plastica in dotazione.
5. Conservare tutti i pezzi: qualora la Lavasciuga
debba essere trasportata, dovranno essere
rimontati.
Gli imballaggi non sono giocattoli per bambini.
Livellamento
1. Installare la Lavasciuga su un pavimento piano e
rigido, senza appoggiarla a muri, mobili o altro.
2. Se il pavimento non
fosse perfettamente
orizzontale, compensare
le irregolarità svitando o
avvitando i piedini
anteriori (vedi figura);
langolo di inclinazione,
misurato sul piano di
lavoro, non deve superare i 2°.
3. Fare attenzione che nel tubo non ci siano né
pieghe né strozzature.
La pressione idrica del rubinetto deve essere
compresa nei valori della tabella Dati tecnici
(vedi pagina a fianco).
Se la lunghezza del tubo di alimentazione non
fosse sufficiente, rivolgersi a un negozio specializzato
o a un tecnico autorizzato.
2
Page 3
Collegamento del tubo di scarico
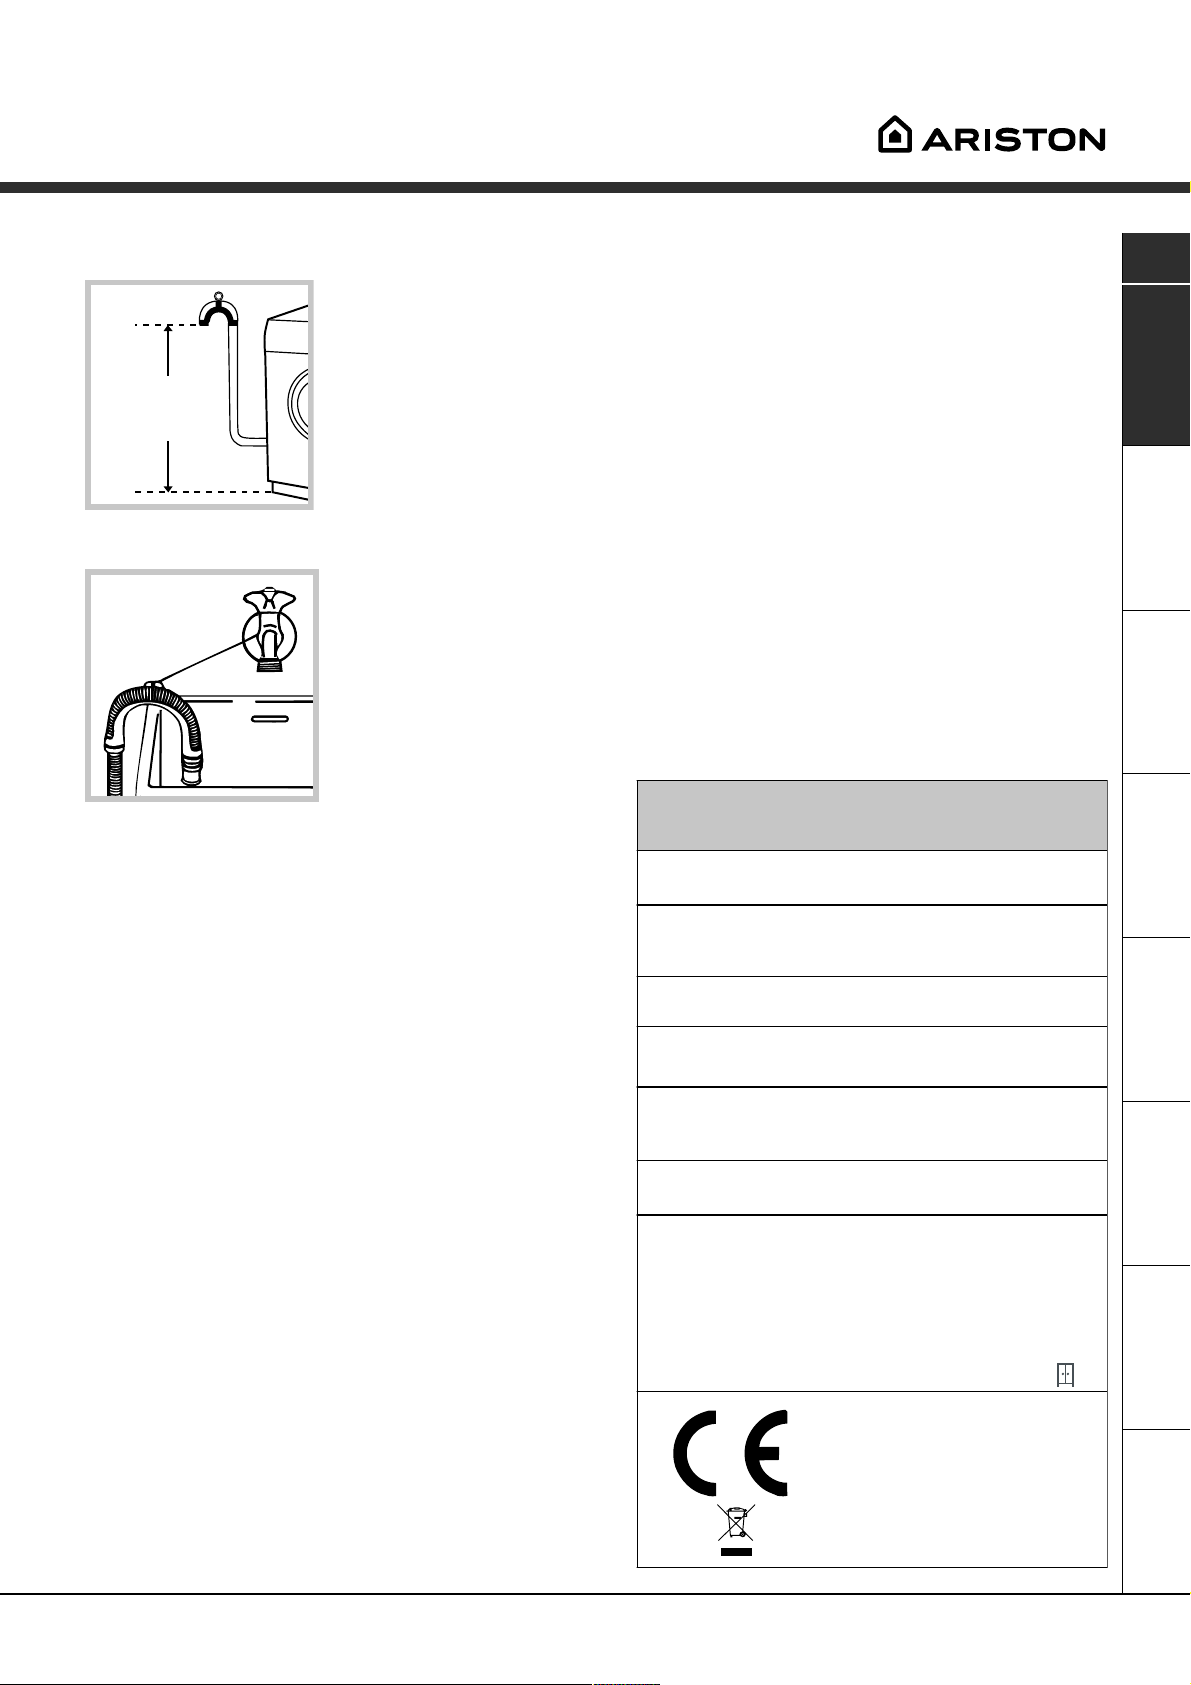
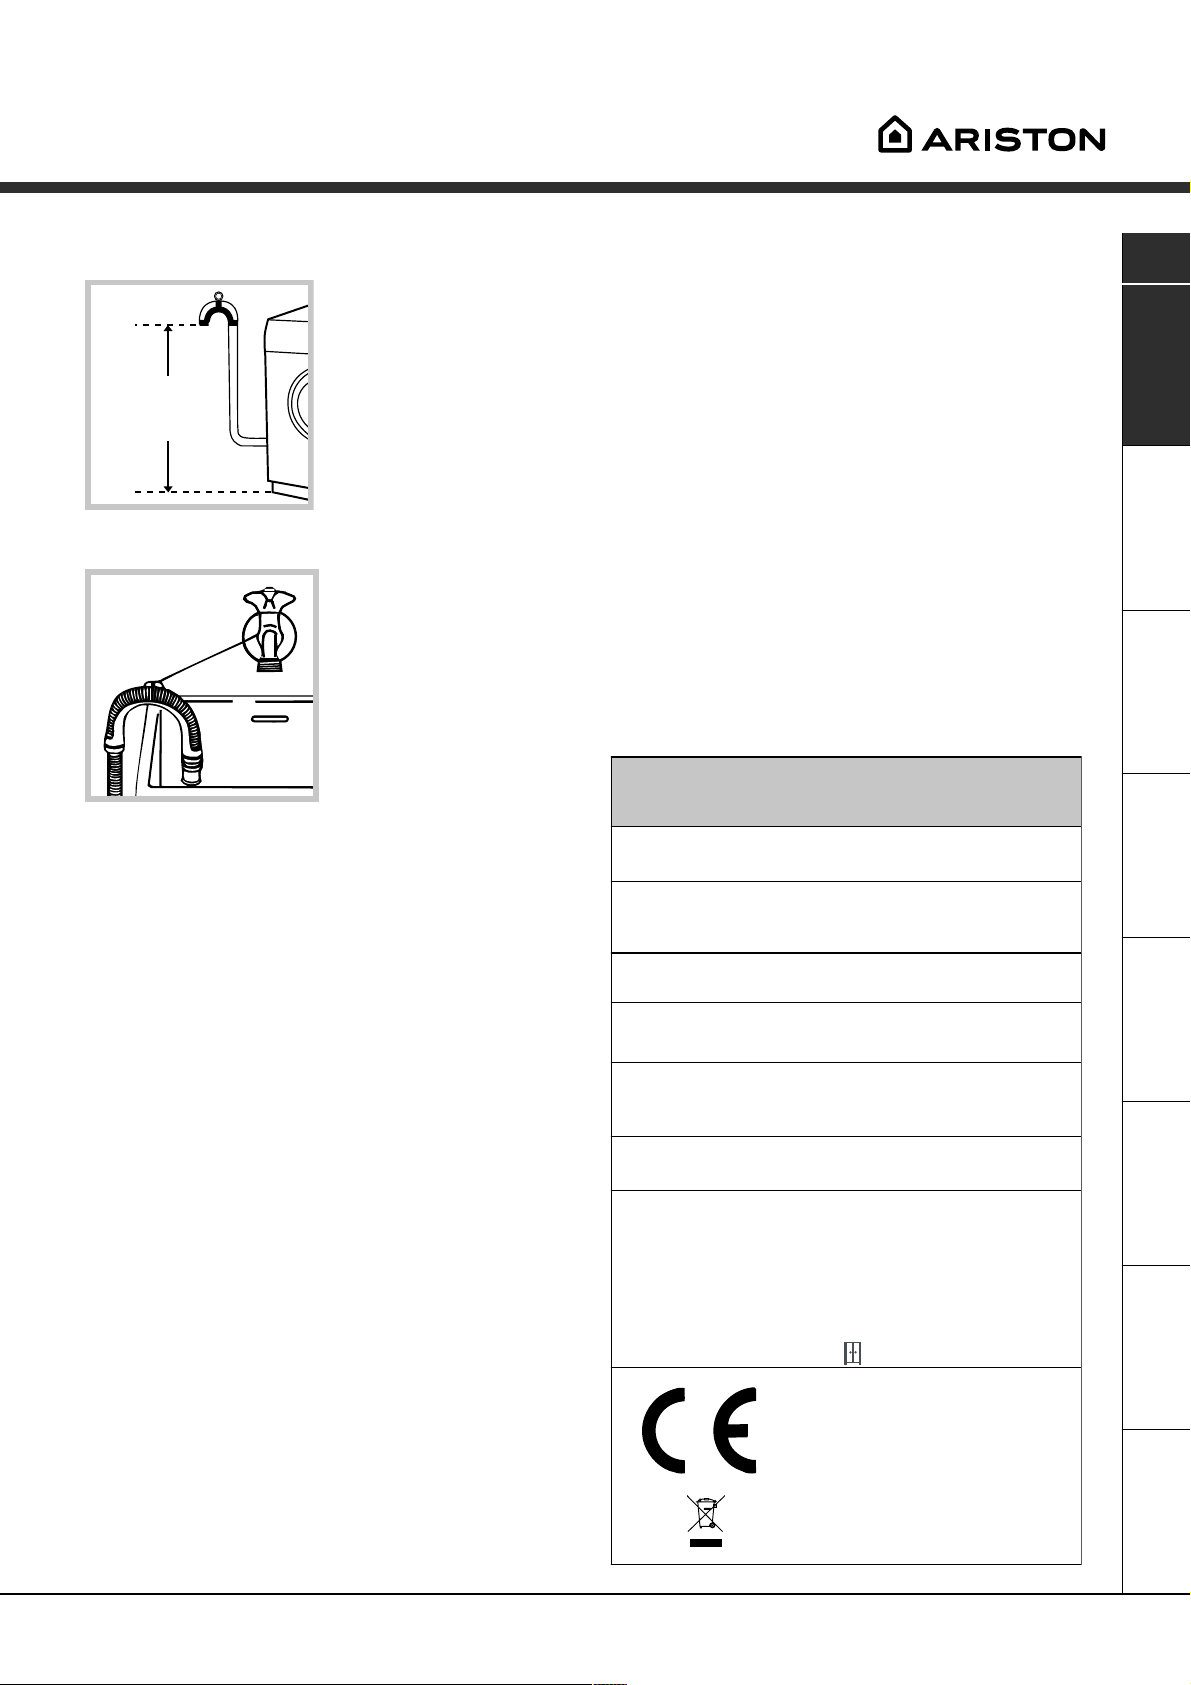
Collegare il tubo di
scarico, senza piegarlo,
a una conduttura di
scarico o a uno scarico
a muro posti tra 65 e
65 - 100 cm
100 cm da terra;
Non usare prolunghe e multiple.
I
Il cavo non deve subire piegature o compressioni.
Il cavo di alimentazione deve essere sostituito solo
da tecnici autorizzati.
Attenzione! Lazienda declina ogni responsabilità
qualora queste norme non vengano rispettate.
Primo ciclo di lavaggio
oppure appoggiarlo al
bordo di un lavandino o
di una vasca, legando
la guida in dotazione al
rubinetto (vedi figura).
Lestremità libera del
tubo di scarico non
deve rimanere immersa
nellacqua.
È sconsigliato usare tubi di prolunga; se indispen-
sabile, la prolunga deve avere lo stesso diametro del
tubo originale e non superare i 150 cm.
Collegamento elettrico
Prima di inserire la spina nella presa della corrente,
accertarsi che:
la presa abbia la messa a terra e sia a norma
di legge;
la presa sia in grado di sopportare il carico
massimo di potenza della macchina, indicato nella
tabella Dati tecnici (vedi a fianco);
la tensione di alimentazione sia compresa nei
valori indicati nella tabella Dati tecnici (vedi a
fianco);
la presa sia compatibile con la spina della
Lavasciuga. In caso contrario sostituire la
presa o la spina.
La Lavasciuga non va installata allaperto, nemme-
no se lo spazio è riparato, perché è molto pericoloso
lasciarla esposta a pioggia e temporali.
A Lavasciuga installata, la presa della corrente
deve essere facilmente raggiungibile.
Dopo linstallazione, prima delluso, effettuare un
ciclo di lavaggio con detersivo e senza biancheria
impostando il programma a 90°C senza prelavaggio.
Dati tecnici
Modello
Dimensioni
Capacità
Collegamenti
elettrici
Collegamenti
idrici
Veloci tà di
centrifuga
Programmi di
controllo secondo
la norma IEC456
AML 89
larghezza cm 59,5
altezza cm 85
profondità cm 53,5
da 1 a 5 kg per il lavaggio;
da 1 a 4 kg per l'asciugatura
tensione a 220/230 Volt 50 Hz
potenza massima assorbita 1850 W
pressione massima 1 MPa (10 bar)
pressione minima 0,05 MPa (0,5 bar)
capacità del cesto 46 litri
sino a 800 giri al minuto
lavaggio: programma 3; temperatura
60°C; effettuato con 5 kg di carico.
asciugatura: prima asciugatura
effettuata con 1 kg di carico
selezionando un tempo di 40 min;
seconda asciugatura effettuata con
4 kg di carico e la manopola
ASCIUGATURA sulla posizione .
Questa apparecchiatura è conforme
alle seguenti Direttive Comunitarie:
- 73/23/CEE del 19/02/73 (Bassa
Tensione) e successive modificazioni
- 89/336/CEE del 03/05/89
(Compatibilità Elettromagnetica) e
successive modificazioni
- 2002/96/CE
AssistenzaAnomaliePrecauzioni ManutenzioneProgrammi DetersiviInstallazione Descrizione
3
Page 4

Descrizione della Lavasciuga
Pannello di controllo
I
Cassetto dei detersivi
Cassetto dei detersivi per caricare detersivi e
additivi (vedi pag. 8).
Leggìo
Tasti
FUNZIONE
Spie
Manopola
ASCIUGATURA
Manopola TEMPERATURA per impostare la temperatura o il lavaggio a freddo (vedi pag. 7).
Tasto
ACCENSIONE/
SPEGNIMENTO
Spia
ACCENSIONE/
OBLÒ BLOCCATO
Tasto
START/RESET
Manopola
TEMPERATURA
Manopola
PROGRAMMI
Leggìo per consultare in ogni momento uno
schema sintetico dei programmi: si apre tirando
la linguetta grigia verso lesterno.
Spie per seguire lo stato di avanzamento del programma di lavaggio.
Se è stata impostata la funzione Delay Timer, indicheranno il tempo mancante allavvio del programma (vedi pag. 5).
Manopola ASCIUGATURA per impostare
lasciugatura desiderata (vedi pag. 7).
Tasti FUNZIONE per selezionare le funzioni disponi-
bili. Il tasto relativo alla funzione selezionata rimarrà
acceso.
Tasto ACCENSIONE/SPEGNIMENTO per accen-
dere e spegnere la Lavasciuga.
Tasto START/RESET per avviare i programmi o
annullare quanto erroneamente impostato.
Spia ACCENSIONE/OBLÒ BLOCCATO per capire
se la Lavasciuga è accesa e se loblò è apribile (vedi
pag. 5).
Manopola PROGRAMMI per impostare i programmi
(vedi pag. 6). La manopola è del tipo a scomparsa:
per estrarla premerla leggermente al centro.
Durante il programma la manopola resta ferma.
4
Page 5
Spie
Le spie forniscono informazioni importanti.
Ecco che cosa dicono:
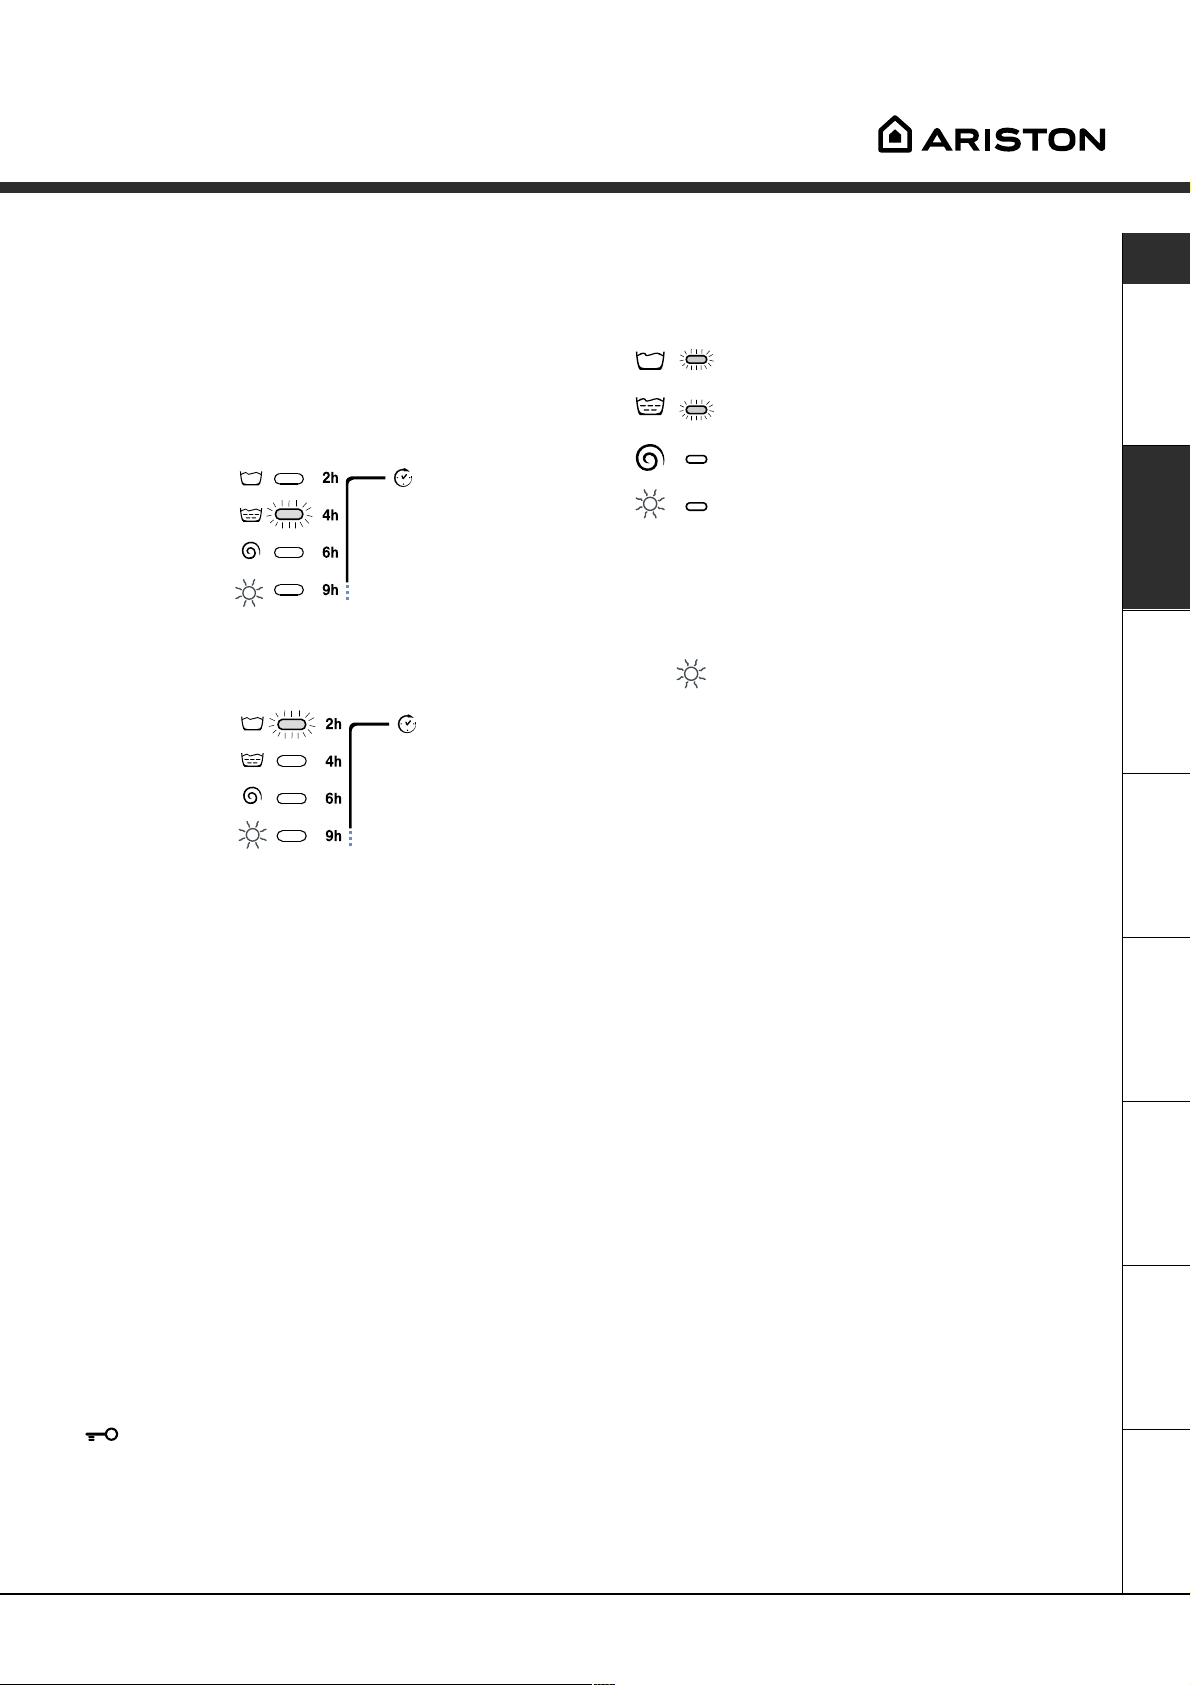
Fase in corso:
Durante il ciclo di lavaggio le spie si accenderanno
progressivamente per indicarne lo stato di avanzamento:
I
Ritardo impostato:
Se è stata attivata la funzione Delay Timer (vedi pag. 7),
dopo avere avviato il programma, inizierà a lampeggiare
la spia relativa al ritardo selezionato:
Col trascorrere del tempo verrà visualizzato il ritardo
residuo con il lampeggio della spia relativa:
Trascorso il ritardo selezionato la spia lampeggiante
si spengnerà e avrà inizio il programma impostato.
Prelavaggio / Lavaggio
Risciacquo
Centrifuga
Asciugatura
Nota:
- durante la fase di scarico si illuminerà
la spia relativa alla fase Centrifuga.
- al termine del ciclo di asciugatura, la spia relativa alla
fase
re la manopola ASCIUGATURA sulla posizione 0.
Tasti funzione
I TASTI FUNZIONE fungono anche da spie.
Selezionando una funzione il relativo tasto si illuminerà.
Se la funzione selezionata non è compatibile con il
programma impostato il tasto lampeggerà e la
funzione non verrà attivata.
Nel caso venga impostata una funzione incompatibile con unaltra precedentemente selezionata rimarrà
attiva solo lultima scelta.
lampeggerà, per indicare che bisogna riporta-
Spia ACCENSIONE/OBLÒ BLOCCATO:
La spia accesa indica che loblò è bloccato per impedire aperture accidentali; per evitare danni è necessario
attendere che la spia lampeggi prima di aprire loblò.
Il lampeggio veloce della spia ACCENSIONE/OBLÒ BLOCCATO contemporaneo a quello di almeno unaltra
spia segnala unanomalia. Chiamare lAssistenza Tecnica.
AssistenzaAnomaliePrecauzioni ManutenzioneProgrammi DetersiviInstallazione Descrizione
5
Page 6
Avvio e Programmi
In breve: avviare un programma
I
1. Accendere la Lavasciuga premendo il tasto .
Tutte le spie si accenderanno per qualche
secondo, poi si spengono e la spia ACCENSIONE/
OBLÒ BLOCCATO inizierà a lampeggiare.
2. Caricare la biancheria e chiudere loblò.
3. Impostare con la manopola PROGRAMMI il
programma desiderato.
4. Impostare la temperatura di lavaggio (vedi pag. 7).
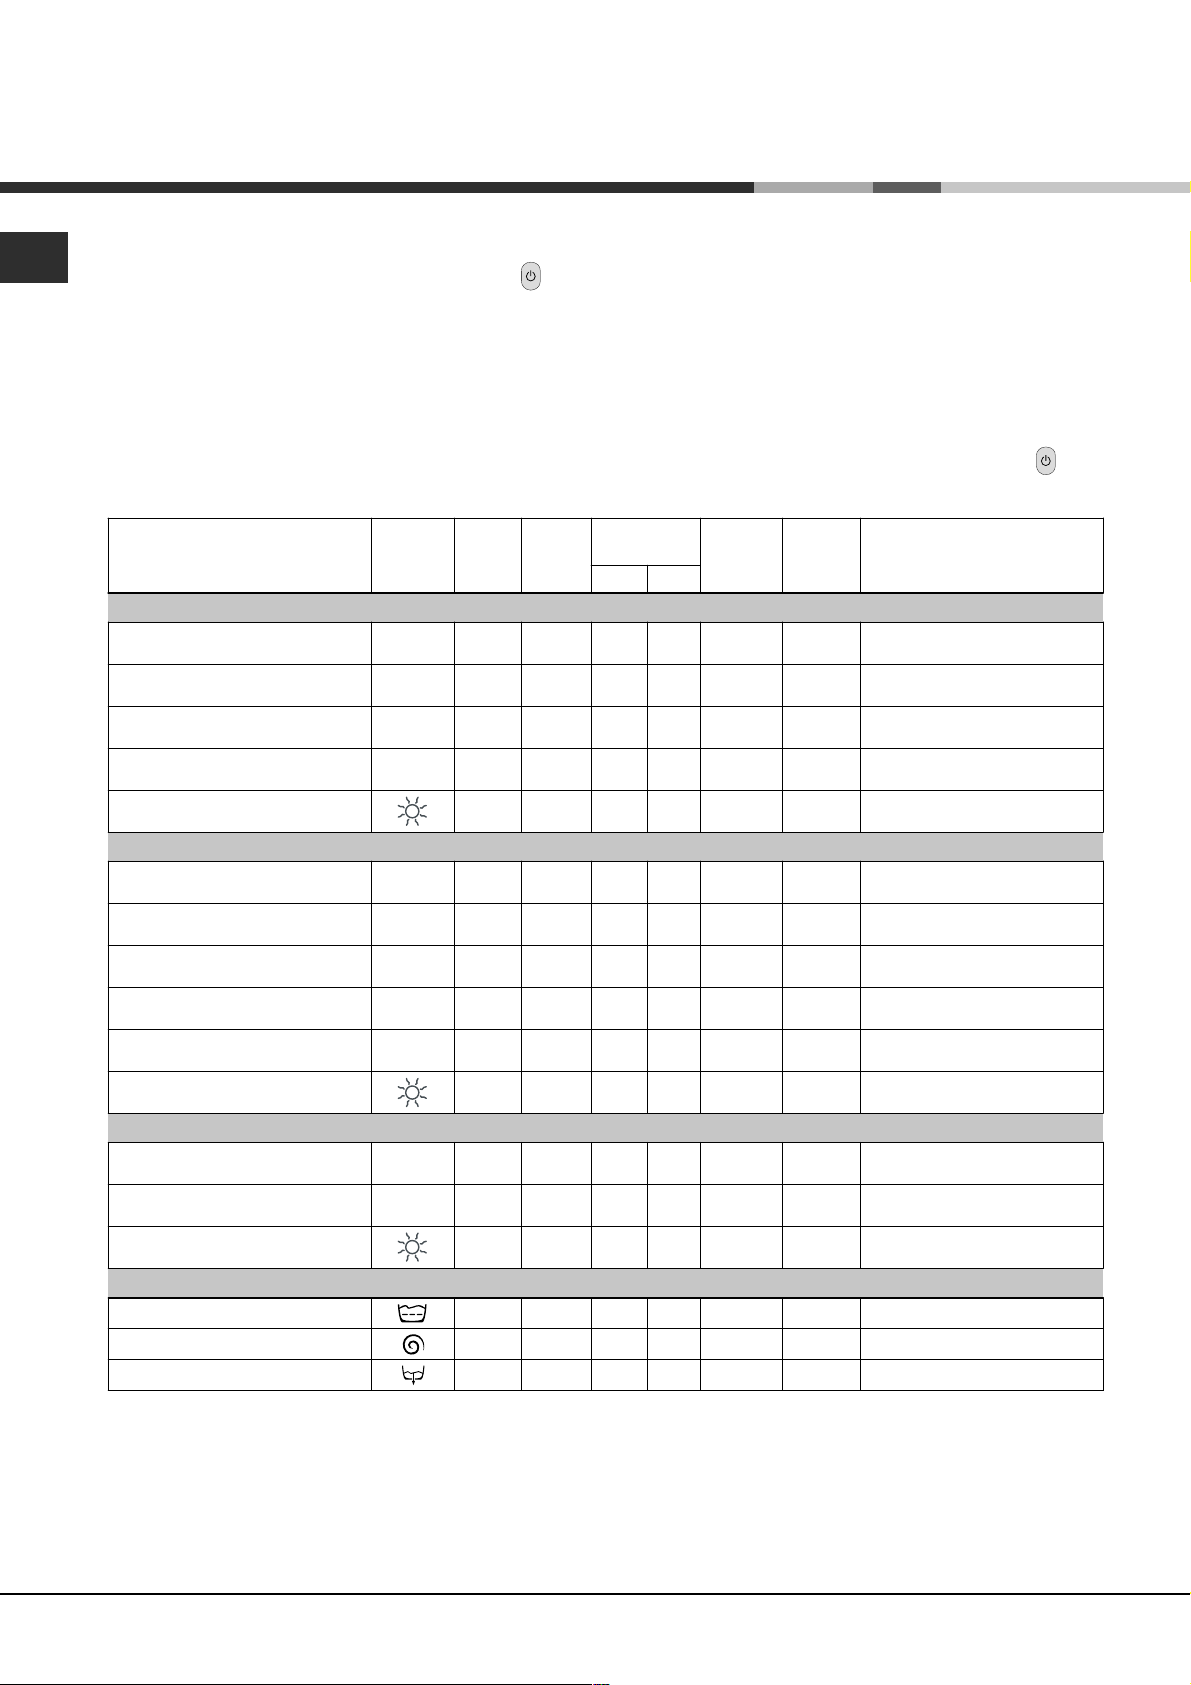
Tabella dei programmi
Natura dei tessuti
e dello sporco
Cotone
Bianchi estremamente sporchi
(lenzuola, tovaglie, ecc.)
Bianchi estremamente sporchi
(lenzuola, tovaglie, ecc.)
Bianchi e colorati resistenti
molto sporchi
Bianchi poco sporchi e colori
delicati (camice, maglie, ecc.)
Asciugatura per tessuti di cotone
Program-miTe m p e -
ratura
1
2
3
4
5. Impostare lasciugatura se necessario (vedi pag. 7).
6. Versare detersivo e additivi (vedi pag. 8).
7. Avviare il programma premendo il tasto
START/RESET.
Per annullare il ciclo impostato premere il tasto
START/RESET per 2 secondi.
8. Al termine del programma la spia ACCENSIONE/
OBLÒ BLOCCATO lampeggerà indicando che
loblò è apribile. Estrarre la biancheria e lasciare
loblò socchiuso per far asciugare il cestello.
Spegnere la Lavasciuga premendo il tasto
Asciugatura
90°C 137
90°C 120
60°C 105
40°C 72
Detersivo
prelav. lavag.
Ammorbi-
dente
Durata
del ciclo
(minuti )
.
Descrizione del ciclo di
lavaggio
Prelavaggio, lavaggio, risciacqui,
centrifughe intermedie e finale
Lavaggio, risciacqui,
centrifughe intermedie e finale
Lavaggio, risciacqui,
centrifughe intermedie e finale
Lavaggio, risciacqui,
centrifughe intermedie e finale
Sintetici
Colori resistenti molto sporchi
(biancheria per neonati, ecc.)
Colori resistenti (biancheria di tutti
i tipi leggermente sporca)
Colori resistenti molto sporchi
(biancheria per neonati, ecc.)
Colori delicati (biancheria di tutti i
tipi leggermente sporca)
Colori delicati (biancheria di tutti i
tipi leggermente sporca)
Asciugatura per tessuti sintetici
5
5
6
7
8
60°C 77
40°C 62
50°C 73
40°C 58
30°C 30
Lavaggio, risciacqui,
antipiega o centrifuga delicata
Lavaggio, risciacqui,
antipiega o centrifuga delicata
Lavaggio, risciacqui,
antipiega o centrifuga delicata
Lavaggio, risciacqui,
antipiega o centrifuga delicata
Lavaggio, risciacqui,
e centrifuga delicata
Delicati
Lavaggio, risciacqui e centrifuga
delicata
Lavaggio, risciacqui,
antipiega o scarico
10
9
40°C 50
30°C 45
Lana
Tess uti mol to delicat i
(tende, seta, viscosa, ecc.)
Asciugatura per tessuti delicati
PROGRAMMI PARZIALI
Risciacquo delicato Risciacqui, antipiega o scarico
Centrifuga delicata Scarico e centrifuga delicata
Scarico Scarico
Note
Per la descrizione della funzione Antipiega vedi pag. 8.
I dati riportati nella tabella hanno valore indicativo.
Programma speciale
Giornaliero 30' (programma 8 per Sintetici) è studiato per lavare capi leggermente sporchi in poco tempo: dura solo
30 minuti e fa così risparmiare energia e tempo. Impostando il programma (8 a 30°C) è possibile lavare insieme tessuti
di diversa natura (esclusi lana e seta) con un carico massimo di 3 kg. Si consiglia l'uso di detersivo liquido.
6
Page 7
Personalizzazioni
Impostare la temperatura
Ruotando la manopola TEMPERATURA si imposta la temperatura di lavaggio (vedi Tabella dei programmi a pag. 6).
La temperatura si può ridurre sino al lavaggio a freddo (
Impostare lasciugatura
Ruotando la manopola ASCIUGATURA si imposta il tipo di
asciugatura desiderato. Sono previste due possibilità:
A - In base al tempo: Da 40 a 150 minuti.
B - In base al livello di umidità dei capi asciugati:
Stiro
Armadio
Extra secco
accappatoi.
Alla fine dellasciugatura viene effettuato un periodo di raffred-
damento.
Se eccezionalmente il carico di biancheria da lavare ed asciugare è superiore al massimo previsto (vedi tabella a fianco), effettuare il lavaggio, e a programma ultimato, dividere
il carico e rimetterne una parte nel cestello. Seguire a questo punto le istruzioni per effettuare solo lasciugatura.
Ripeti le stesse operazioni per il carico rimanente.
Solo asciugatura
Ruotare la manopola PROGRAMMI su una delle posizioni di asciugatura
selezionare il tipo di asciugatura desiderato con la manopola ASCIUGATURA.
: capi leggermente umidi, facili da stirare.
: capi asciutti da riporre.
: capi molto asciutti, consigliato per spugne e
).
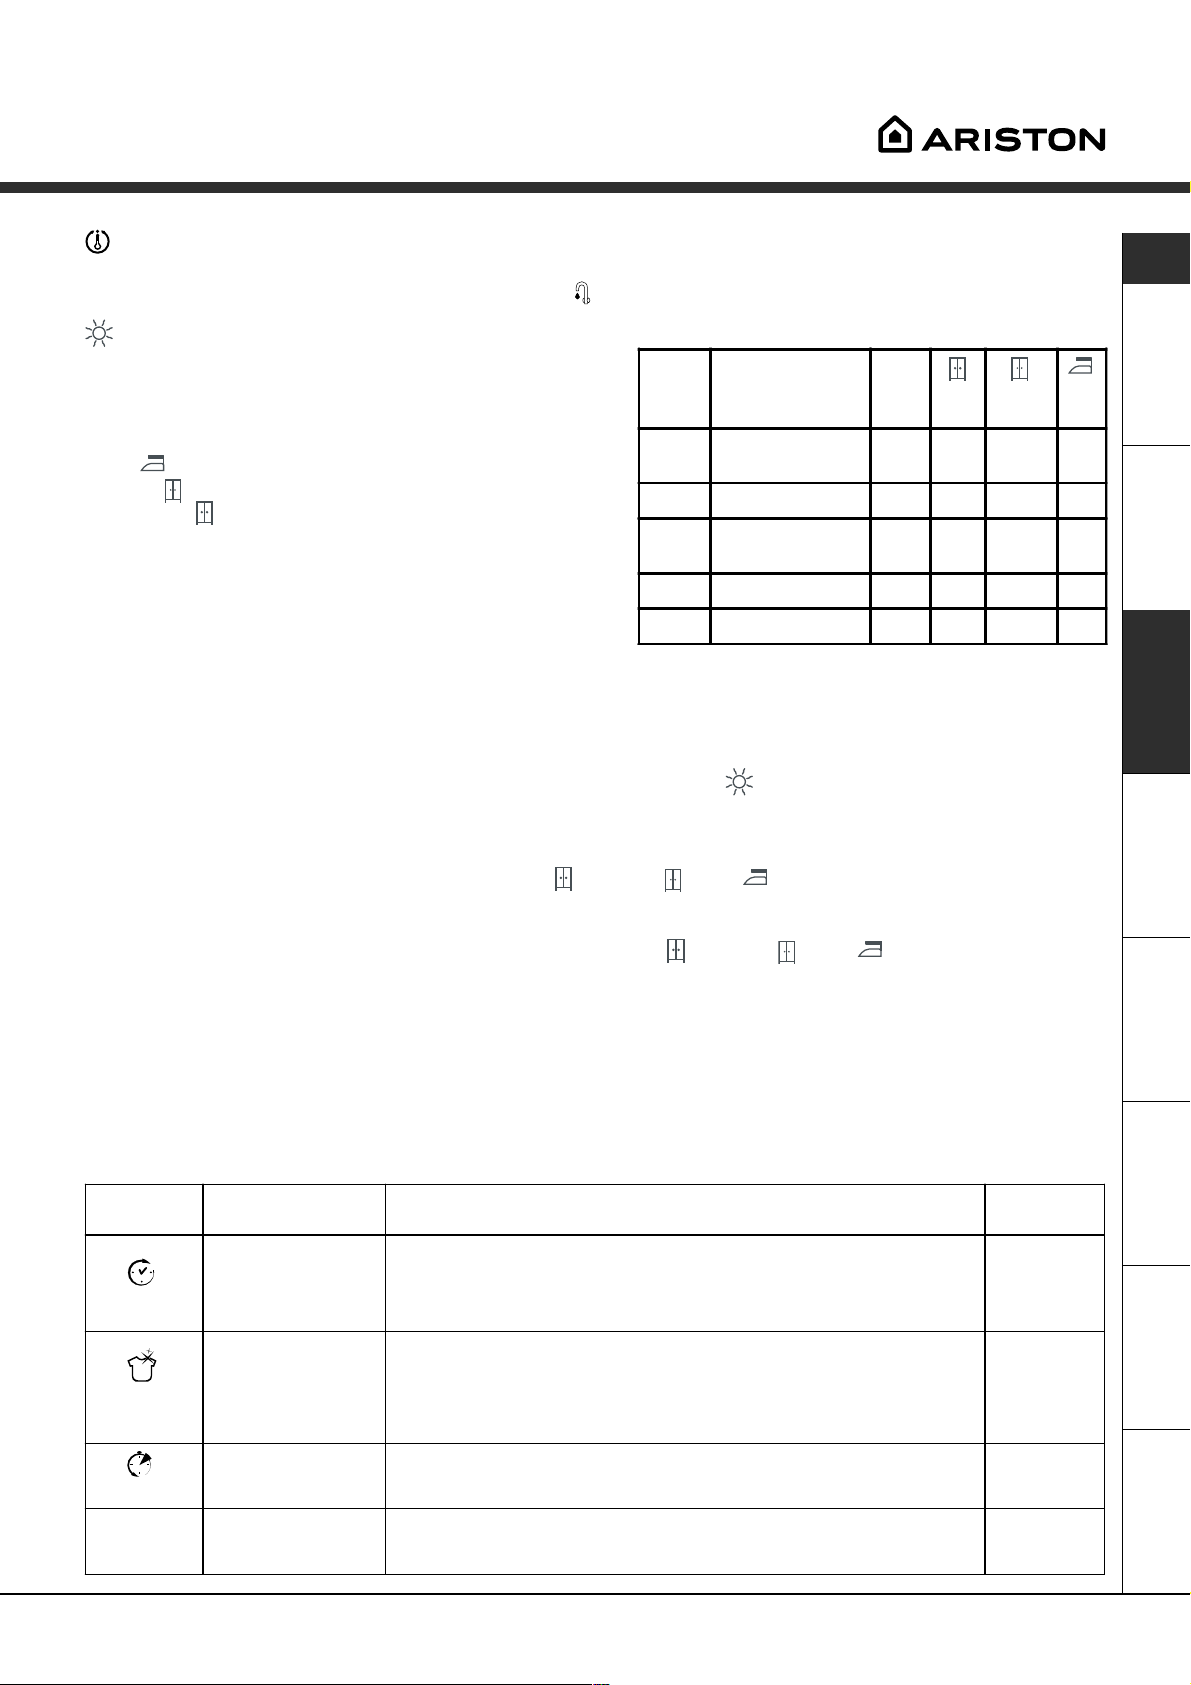
Tabella tempi di asciugatura
Tipo di
tessuto
Cotone,
Lino
Cotone Asciugamani in spugna
Terital,
Cotone
Acrilici Pigiami, calzini, ecc.
Nylon Sottoveste, calze, ecc.
Tipo di carico Carico
Biancheria di diverse
dimensioni
Lenzuola, Camice
in base al tipo di tessuto, quindi
I dati riportati nella tabella
hanno valore indicativo.
max
(Kg) Extra
4 130 120 110
4 130 120 110
2,5 90 80 70
165 6060
165 6060
secco
Armadio Stiro
I
Importante: - Durante lasciugatura viene effettuata una centrifuga se hai impostato uno dei programmi
cotone e uno dei livelli di asciugatura (Extra secco
, Armadio , Stiro ).
- Lasciugatura dei capi in lana deve essere effettuata esclusivamente selezionando i tempi (150-100-60-40
minuti). Per un carico di 1 Kg sono consigliati 60 minuti di asciugatura.
Se erroneamente viene selezionato uno dei tre livelli (Extra secco
, Armadio , Stiro ). la macchina esegui-
rà unasciugatura pari al tempo MAX previsto (150 minuti).
- Per carichi di cotone inferiori ad 1 Kg, utilizza il programma dasciugatura relativo ai tessuti sintetici.
Funzioni
Le varie funzioni di lavaggio previste dalla Lavasciuga permettono di ottenere la pulizia e il bianco desiderati.
Per attivare le funzioni:
1. premere il tasto relativo alla funzione desiderata, secondo la tabella sottostante;
2. laccensione del tasto relativo segnala che la funzione è attiva.
Nota: Il lampeggio veloce del tasto indica che la funzione relativa non è selezionabile per il programma impostato.
Funzioni Effetto Note per l'uso
Premere più volte il tasto fino a far acccendere la spia relativa al ritardo
desiderato.
Alla quinta pressione del tasto la funzione si disattiverà.
N.B.: Una volta premuto il tasto Start/Reset, si può modificare il
valore del ritardo solo diminuendolo.
Non è compatibile con l'opzione RAPIDO.
Non è compatibile con l'opzione SUPER WASH.
Delay T imer
Su p e r
Wash
R a p i d o
Ritarda l'avvio
della macchina
sino a 9 ore.
Consente un
pulito impeccabile,
visibilmente
più bianco dello
standard
in
Classe A
Riduce del 30%
circa la durata del
ciclo di lavaggio.
.
Attiva con i
programmi:
Tutt i
1, 2, 3, 4,
5, 6, 7
1, 2, 3, 4,
5, 6, 7
AssistenzaAnomaliePrecauzioni ManutenzioneProgrammi DetersiviInstallazione Descrizione
Var. cen tr.
800 - 400
Riduce la velocità
di centrifuga.
Tutti tranne
10 e
Scarico.
7
Page 8
Detersivi e biancheria
Cassetto dei detersivi
I
Il buon risultato del lavaggio dipende anche dal
corretto dosaggio del detersivo: eccedendo non si
lava in modo più efficace e si contribuisce a incrostare le parti interne della lavabiancheria e a inquinare lambiente.
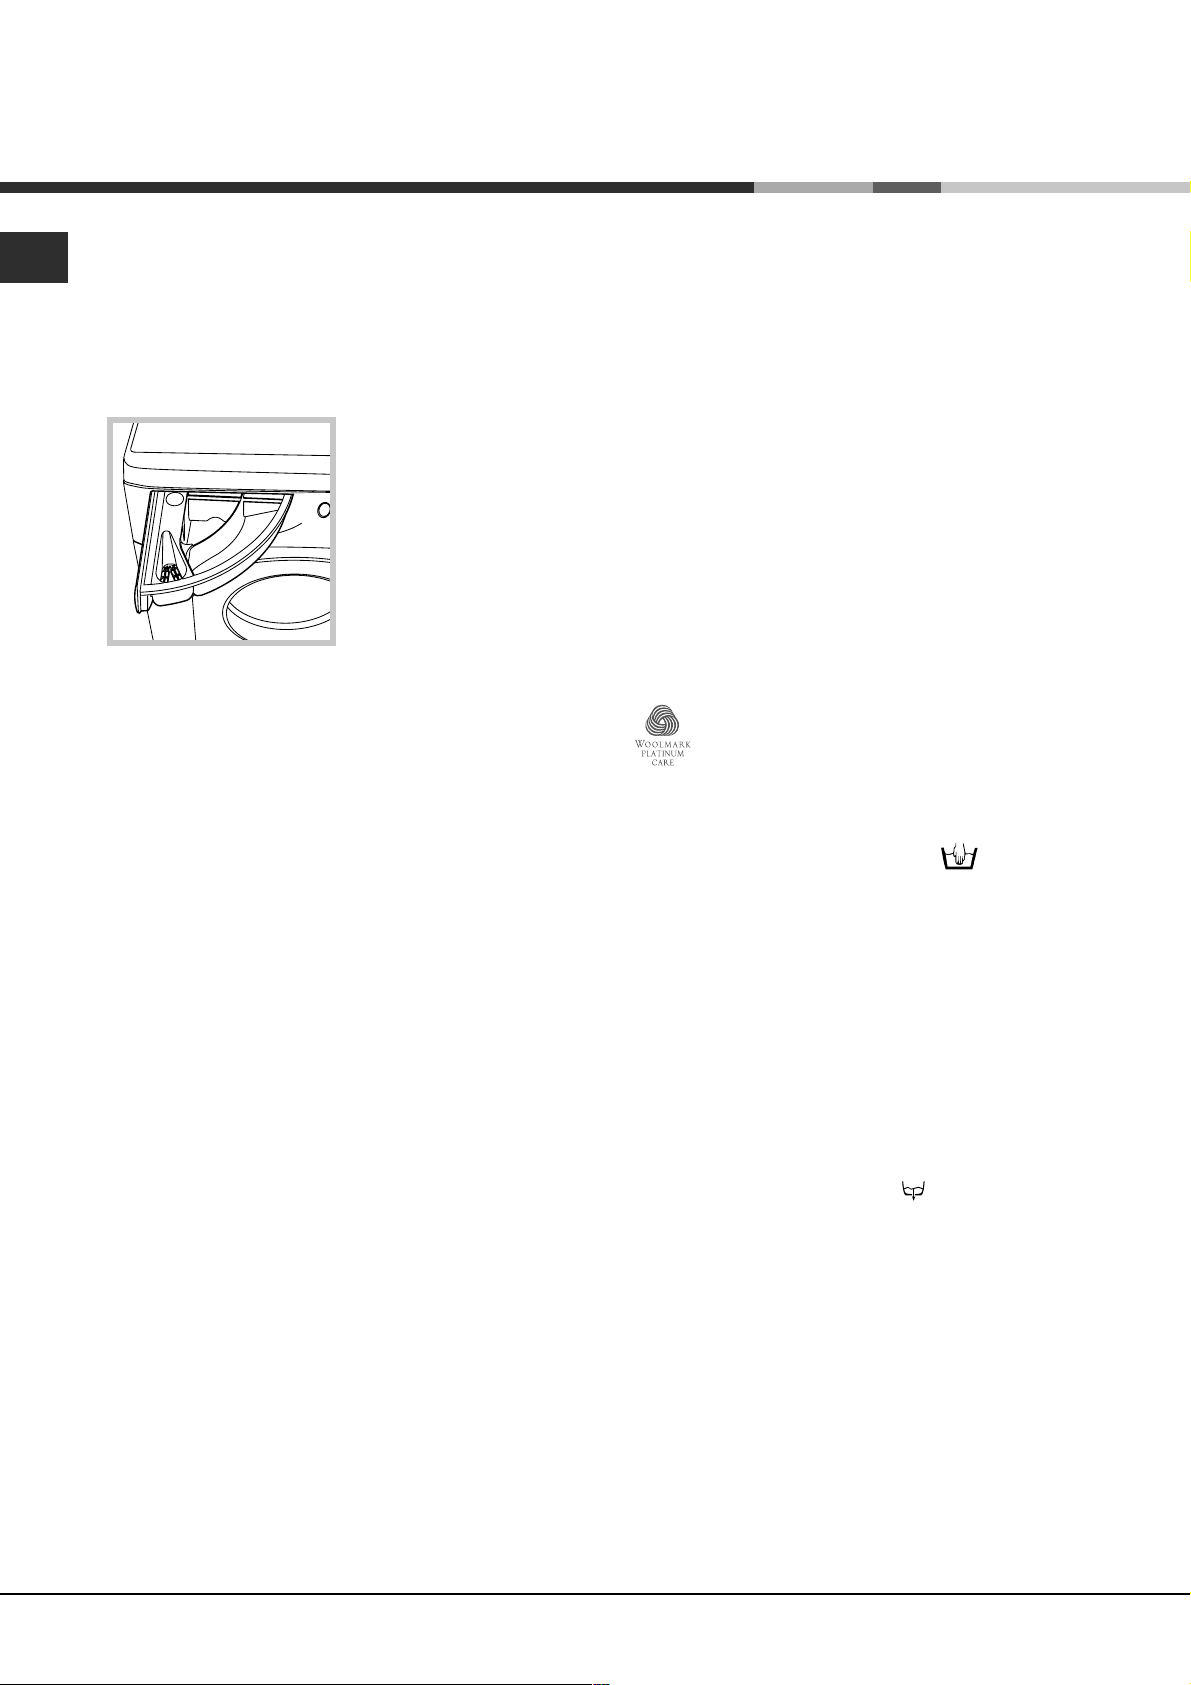
Estrarre il cassetto dei
detersivi e inserire il
detersivo o ladditivo
come segue.
1
3
vaschetta 1: Detersivo per prelavaggio
(in polvere)
vaschetta 2: Detersivo per lavaggio
(in polvere o liquido)
Il detersivo liquido va versato solo prima dellavvio.
vaschetta 3: Additivi (ammorbidente, ecc.)
Lammorbidente non deve fuoriuscire dalla griglia.
2
Non usare detersivi per il lavaggio a mano, perché
formano troppa schiuma.
Preparare la biancheria
Capi particolari
Tende: piegarle e sistemarle dentro una federa o un
sacchetto a rete. Lavarle da sole senza superare il
mezzo carico. Utilizzare il programma 10 che esclude in automatico la centrifuga.
Piumini e giacche a vento: se limbottitura è
doca o danatra si possono lavare nella
lavabiancheria. Rivoltare i capi e fare un carico
massimo di 2-3 kg, ripetendo il risciacquo una o due
volte e utilizzando la centrifuga delicata.
Scarpe da tennis: pulirle dal fango. Si possono
lavare con i jeans e i capi resistenti, ma non con i
capi bianchi.
Lana: per ottenere i migliori risultati utilizzare un
detersivo specifico e non superare 1kg di carico.
Woolmark Platinum Care
Delicato come il lavaggio a mano.
Ariston è l'unica lavabiancheria ad aver
ottenuto il prestigioso riconoscimento
Woolmark Platinum Care (M.0303) da parte di The
Woolmark Company, che certifica il lavaggio in
lavatrice di tutti i capi in lana, anche quelli recanti
l'etichetta "solo lavaggio a mano"
Con il programma "Lana" si ha quindi l'assoluta
tranquillità di lavare in lavatrice tutti i capi in lana con
la garanzia delle migliori performance.
(max.1kg).
Suddividere la biancheria secondo:
- il tipo di tessuto / il simbolo sulletichetta.
- i colori: separare i capi colorati da quelli bianchi.
Vuotare le tasche e controllare i bottoni.
Non superare i valori indicati, riferiti al peso della
biancheria asciutta:
Tessuti resistenti: max 5 kg
Tessuti sintetici: max 2,5 kg
Tessuti delicati: max 2 kg
Lana: max 1 kg
Quanto pesa la biancheria?
1 lenzuolo 400-500 gr.
1 federa 150-200 gr.
1 tovaglia 400-500 gr.
1 accappatoio 900-1.200 gr.
1 asciugamano 150-250 gr.
Antipiega
Questa funzione interrompe il programma di lavaggio
mantenendo la biancheria in ammollo nell'acqua
prima dello scarico.
È attiva nei programmi 5 - 6 - 7 - 10 e Risciacquo
delicato.
Per completare il ciclo premere il tasto START/RESET.
Per effettuare solo lo scarico posizionare la
manopola sul simbolo relativo
START/RESET.
e premere il tasto
8
Page 9
Precauzioni e consigli
La Lavasciuga è stata progettata e costruita in
conformità alle norme internazionali di sicurezza.
Queste avvertenze sono fornite per ragioni di
sicurezza e devono essere lette attentamente.
Sicurezza generale
Questo apparecchio è stato concepito esclusiva-
mente per un uso di tipo domestico.
La Lavasciuga deve essere usata solo da persone
adulte e secondo le istruzioni riportate in questo libretto.
Non toccare la macchina a piedi nudi o con le
mani o i piedi bagnati o umidi.
Non staccare la spina dalla presa della corrente
tirando il cavo, bensì afferrando la spina.
Non aprire il cassetto dei detersivi mentre la
macchina è in funzione.
Non toccare lacqua di scarico, che può
raggiungere temperature elevate.
Non forzare in nessun caso loblò: potrebbe
danneggiarsi il meccanismo di sicurezza che
protegge da aperture accidentali.
In caso di guasto, in nessun caso accedere ai
meccanismi interni per tentare una riparazione.
Controllare sempre che i bambini non si avvicinino
alla macchina in funzione.
Durante il lavaggio loblò tende a scaldarsi.
Se devessere spostata, lavorare in due o tre
persone con la massima attenzione. Mai da soli
perché la macchina è molto pesante.
Prima di introdurre la biancheria controlla che il
cestello sia vuoto.
Durante lasciugatura loblò tende a scaldarsi.
Non asciugare biancheria lavata con solventi
infiammabili (es. trielina).
Non asciugare gommapiuma o elastomeri analoghi.
Assicurati che durante le fasi di asciugatura il
rubinetto dell'acqua sia aperto.
Questa lavasciuga può essere impiegata soltanto
per asciugare biancheria prelavata in acqua.
Smaltimento
Smaltimento del materiale di imballaggio:
attenersi alle norme locali, così gli imballaggi
potranno essere riutilizzati.
La direttiva Europea 2002/96/CE sui rifiuti di
apparecchiature elettriche ed elettroniche, prevede
che gli elettrodomestici non debbano essere
smaltiti nel normale flusso dei rifiuti solidi urbani.
Gli apparecchi dismessi devono essere raccolti
separatamente per ottimizzare il tasso di recupero
e riciclaggio dei materiali che li compongono ed
impedire potenziali danni per la salute e l'ambiente.
Il simbolo del cestino barrato è riportato su tutti i
prodotti per ricordare gli obblighi di raccolta separata.
Per ulteriori informazioni, sulla corretta dismissione
degli elettrodomestici, i detentori potranno rivolgersi
al servizio pubblico preposto o ai rivenditori.
Risparmiare e rispettare lambiente
Tecnologia a servizio dellambiente
Se nelloblò si vede poca acqua è perché con la
nuova tecnologia Ariston basta meno della metà
dellacqua per raggiungere il massimo pulito: uno
scopo raggiunto per rispettare lambiente.
Risparmiare detersivo, acqua,
energia e tempo
Per non sprecare risorse bisogna utilizzare la
Lavasciuga con il massimo carico. Un carico
pieno al posto di due mezzi fa risparmiare fino al
50% di energia.
Il prelavaggio è necessario solo per biancheria
molto sporca. Evitarlo fa risparmiare detersivo,
tempo, acqua e tra il 5 e il 15% di energia.
Trattando le macchie con uno scioglimacchia o
lasciandole in ammollo prima del lavaggio, si
riduce la necessità di lavare ad alte temperature.
Un programma a 60°C invece di 90°C o uno a
40°C invece di 60°C, fa risparmiare fino al 50% di
energia.
Dosare bene il detersivo in base alla durezza
dellacqua, al grado di sporco e alla quantità di
biancheria evita sprechi e protegge lambiente:
pur biodegradabili, i detersivi contengono elementi
che alterano lequilibrio della natura. Inoltre evitare
il più possibile lammorbidente.
Effettuando i lavaggi dal tardo pomeriggio fino alle
prime ore del mattino si collabora a ridurre il
carico di assorbimento delle aziende elettriche.
La funzione Delay Timer (vedi pag. 7) aiuta molto
a organizzare i lavaggi in tal senso.
Se il bucato deve essere asciugato in un
asciugatore, selezionare unalta velocità di
centrifuga. Poca acqua nel bucato fa rispamiare
tempo ed energia nel programma di asciugatura.
I
AssistenzaAnomaliePrecauzioni ManutenzioneProgrammi DetersiviInstallazione Descrizione
9
Page 10
Manutenzione e cura
Escludere acqua e corrente elettrica
I
Chiudere il rubinetto dellacqua dopo ogni
lavaggio. Si limita così lusura dellimpianto
idraulico della Lavasciuga e si elimina il pericolo
di perdite.
Staccare la spina della corrente quando si
pulisce la Lavasciuga e durante i lavori di
manutenzione.
Pulire la Lavasciuga
La parte esterna e le parti in gomma possono
essere puliti con un panno imbevuto di acqua tiepida
e sapone. Non usare solventi o abrasivi.
Pulire il cassetto dei detersivi
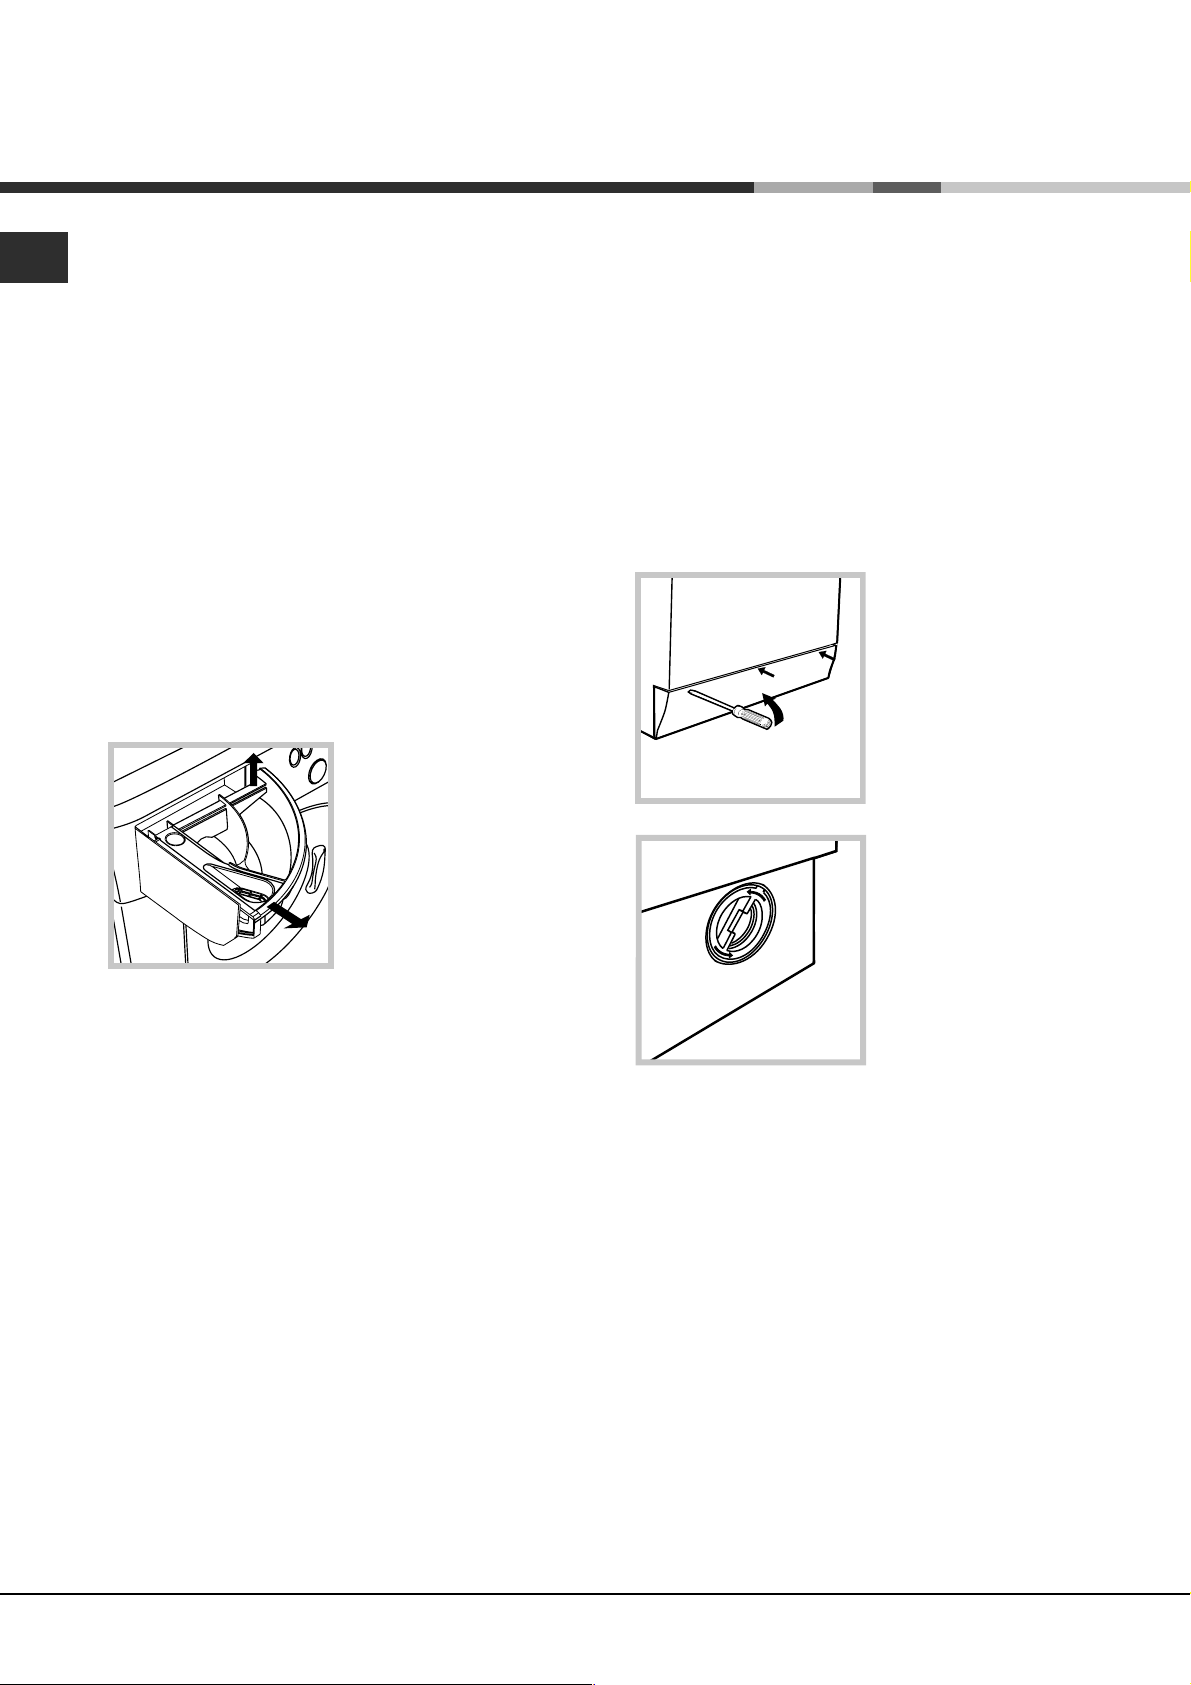
1
Sfilare il cassetto sollevandolo e tirandolo
verso lesterno (vedi
figura).
Lavarlo sotto lacqua
corrente; questa pulizia
va effettuata
frequentemente.
2
Pulire la pompa
La Lavasciuga è dotata di una pompa autopulente
che non ha bisogno di manutenzione. Può però
succedere che piccoli oggetti (monete, bottoni)
cadano nella precamera che protegge la pompa,
situata nella parte inferiore di essa.
Assicurarsi che il ciclo di lavaggio sia terminato e
staccare la spina.
Per accedere alla precamera:
1. rimuovere il pannello
di copertura sul lato
anteriore della
Lavasciuga con lausilio
di un giravite (vedi
figura);
2. svitare il coperchio
ruotandolo in senso
antiorario (vedi figura): è
normale che fuoriesca
un po dacqua;
Curare oblò e cestello
Lasciare sempre socchiuso loblò per evitare che
si formino cattivi odori.
3. pulire accuratamente linterno;
4. riavvitare il coperchio;
5. rimontare il pannello assicurandosi, prima di
spingerlo verso la macchina, di aver inserito i ganci
nelle apposite asole.
Controllare il tubo di alimentazione
dellacqua
Controllare il tubo di alimentazione almeno una volta
allanno. Se presenta screpolature e fessure va
sostituito: durante i lavaggi le forti pressioni potrebbero provocare improvvise spaccature.
Non utilizzare mai tubi già usati.
10
Page 11
Anomalie e rimedi
Può accadere che la Lavasciuga non funzioni. Prima di telefonare allAssistenza (vedi pag. 12), controllare che
non si tratti di un problema facilmente risolvibile aiutandosi con il seguente elenco.
Anomalie:
La Lavasciuga
non si accende.
Il ciclo di lavaggio
non inizia.
La Lavasciuga non carica
acqua.
La Lavasciuga carica e scarica
acqua di continuo.
La Lavasciuga non scarica
o non centrifuga.
La Lavasciuga vibra
molto durante la centrifuga.
La Lavasciuga perde acqua.
La spia ACCENSIONE/OBLÒ
BLOCCATO lampeggia in modo
veloce contemporaneamente
ad almeno unaltra spia.
Si forma troppa schiuma.
La Lavasciuga non asciuga.
Possibili cause / Soluzione:
La spina non è inserita nella presa della corrente, o non abbastanza
da fare contatto.
In casa non cè corrente.
Loblò non è ben chiuso
Il tasto
Il tasto START/RESET non è stato premuto.
Il rubinetto dellacqua non è aperto.
Si è impostato un ritardo sullora di avvio (Delay Timer, vedi pag. 7).
Il tubo di alimentazione dellacqua non è collegato al rubinetto.
Il tubo è piegato.
Il rubinetto dellacqua non è aperto.
In casa manca lacqua.
Non cè sufficiente pressione.
Il tasto START/RESET non è stato premuto.
Il tubo di scarico non è installato fra 65 e 100 cm da terra (vedi pag. 3).
Lestremità del tubo di scarico è immersa nellacqua (vedi pag. 3).
Lo scarico a muro non ha lo sfiato daria.
Se dopo queste verifiche il problema non si risolve, chiudere il rubinetto
dellacqua, spegnere la Lavasciuga e chiamare lAssistenza. Se
labitazione si trova agli ultimi piani di un edificio, è possibile che si
verifichino fenomeni di sifonaggio, per cui la Lavasciuga carica e
scarica acqua di continuo. Per eliminare linconveniente sono disponibili in commercio apposite valvole anti-sifonaggio.
Il programma non prevede lo scarico: con alcuni programmi occorre
avviarlo manualmente (vedi pag. 6).
È attiva la funzione Antipiega: per completare il programma
premere il tasto START/RESET (vedi pag. 7).
Il tubo di scarico è piegato (vedi pag. 3).
La conduttura di scarico è ostruita.
Il cestello, al momento dellinstallazione, non è stato sbloccato
correttamente (vedi pag. 2).
La Lavasciuga non è in piano (vedi pag. 2).
La Lavasciuga è stretta tra mobili e muro (vedi pag. 2).
Il tubo di alimentazione dellacqua non è ben avvitato (vedi pag. 2).
Il cassetto dei detersivi è intasato (per pulirlo vedi pag. 10).
Il tubo di scarico non è fissato bene (vedi pag. 3).
Chiamare lAssistenza perché sta segnalando unanomalia.
Il detersivo non è specifico per Lavasciuga (deve esserci la
dicitura per lavatrice, a mano e in lavatrice, o simili).
Il dosaggio è stato eccessivo.
La spina non è inserita nella presa della corrente, o non abbastanza
da fare contatto.
In casa non cè corrente.
Loblò non è ben chiuso
Si è impostato un ritardo sullora di avvio (Delay Timer, vedi pag. 7).
la manopola ASCIUGATURA è nella posizione 0.
non è stato premuto.
I
AssistenzaAnomaliePrecauzioni ManutenzioneProgrammi DetersiviInstallazione Descrizione
11
Page 12
Assistenza
I
Prima di contattare lAssistenza:
Verificare se lanomalia può essere risolta da soli (vedi pag. 11);
Riavviare il programma per controllare se linconveniente è stato ovviato;
In caso negativo, contattare il Numero Unico 199.199.199*;
Non ricorrere mai a tecnici non autorizzati.
Comunicare:
il tipo di anomalia;
il modello della macchina (Mod.);
il numero di serie (S/N);
Queste informazioni si trovano sulla targhetta applicata nella parte posteriore della Lavasciuga.
*
Assistenza Attiva 7 giorni su 7
Se nasce il bisogno di assistenza o manutenzione basta chiamare il Numero Unico 199.199.199* per
essere messi subito in contatto con il Centro Assistenza Tecnica più vicino al luogo da cui si chiama.
È attivo 7 giorni su 7, sabato e domenica compresi, e non lascia mai inascoltata una richiesta.
Estensione di garanzia AIRBAG
Ad integrazione della garanzia legale, Ariston offre lestensione di garanzia AIRBAG: una formula che con
una minima spesa iniziale, garantisce al cliente 5 anni di assistenza tecnica qualificata. In caso di guasto,
il cliente che abbia aderito al programma Airbag avrà diritto gratuitamente a:
lintervento entro 48 ore dalla chiamata;
il contributo per spese di trasferta del Tecnico;
la manodopera;
le parti di ricambio originali;
il trasporto dellelettrodomestico non riparabile in loco;
La garanzia prevede inoltre la sostituzione dellelettrodomestico non riparabile con una franchigia a carico
del cliente (in relazione allanzianità dellelettrodomestico).
Per maggiori informazioni rivolgersi al numero unico 199.199.199*.
Assistenza
12
* Al costo di 14,25 centesimi di Euro al minuto(iva inclusa) dal Lun. al Ven. dalle 08:00 alle 18:30, il Sab. dalle 08:00 alle
13:00 e di 5,58 centesimi di Euro al minuto (iva inclusa) dal Lun. al Ven. dalle 18:30 alle 08:00, il Sab. dalle 13:00 alle 08:00
e i giorni festivi, per chi chiama da telefono fisso.
Per chi chiama da radiomobile le tariffe sono legate al piano tariffario delloperatore telefonico utilizzato.
Page 13
Instructions for use
WASHER-DRYER
GB
English
AML 89
Contents
GB
Installation, 14-15
Unpacking and levelling, 14
Electric and water connections, 14-15
The first wash cycle, 15
Technical details, 15
Washer-dryer description, 16-17
Control panel, 16
Leds, 17
Starting and Programmes, 18
Briefly: how to start a programme, 18
Programme table, 18
Personalisations, 19
Setting the temperature, 19
Set the drying cycle, 19
Functions, 19
Detergents and laundry, 20
Detergent dispenser, 20
Preparing your laundry, 20
Special items, 20
Woolmark Platinum Care, 20
Precautions and advice, 21
General safety, 21
Disposal, 21
Saving energy and respecting the environment, 21
Care and maintenance, 22
Cutting off the water or electricity supply, 22
Cleaning your appliance, 22
Cleaning the detergent dispenser, 22
Caring for your appliance door and drum, 22
Cleaning the pump, 22
Checking the water inlet hose, 22
Troubleshooting, 23
Service, 24
Before calling for Assistance, 24
13
Page 14
Installation
GB
Keep this instruction manual in a safe place for
future reference. Should the appliance be sold,
transferred or moved, make sure the instruction
manual accompanies the Washer-dryer to inform the
new owner as to its operation and features.
Read these instructions carefully: they contain vital
information on installation, use and safety.
Unpacking and levelling
Unpacking
1. Unpack the Washer-dryer.
2. Check whether the Washer-dryer has been
damaged during transport. If this is the case, do not
install it and contact your retailer.
3. Remove the four
protective screws and
the rubber washer with
the respective spacer,
situated on the rear of
the appliance (see
figure).
4. Seal the gaps using the plastic plugs provided.
5. Keep all the parts: you will need them again if the
Washer-dryer needs to be moved to another
location.
Packaging materials are not children's toys.
Levelling
1. Install the Washer-dryer on a flat sturdy floor,
without resting it up against walls, furniture cabinets
or other.
2. If the floor is not
perfectly level, compensate for any unevenness
by tightening or
loosening the adjustable
front feet (see figure);
the angle of inclination,
measured according to
the worktop, must not
exceed 2°.
Levelling your appliance correctly will provide it with
stability and avoid any vibrations, noise and shifting
during operation. If it is placed on a fitted or loose
carpet, adjust the feet in such a way as to allow
enough room for ventilation beneath the Washer-dryer.
Electric and water connections
Connecting the water inlet hose
1. Insert seal A into the end of the inlet hose and
screw the latter onto a
cold water tap with a 3/
4 gas threaded mouth
(see figure).
A
of the water inlet hose to the Washer-dryer,
The water pressure at the tap must be within the
values indicated in the Technical details table
(on the next page).
If the water inlet hose is not long enough, contact
a specialist store or an authorised serviceman.
Before making the
connection, allow the
water to run freely until
it is perfectly clear.
2. Connect the other end
screwing it onto the
appliance's cold water
inlet, situated on the top
right-hand side on the
rear of the appliance
(see figure).
3. Make sure there are
no kinks or bends in the
hose.
14
Page 15
Connecting the drain hose
65 - 100 cm
Connect the drain hose,
without bending it, to a
draining duct or a wall
drain situated between
65 and 100 cm from the
floor;
Do not use extensions or multiple sockets.
GB
The power supply cable must never be bent or
dangerously compressed.
The power supply cable must only be replaced by
an authorised serviceman.
Warning! The company denies all liability if and when
these norms are not respected.
The first wash cycle
alternatively, place it
over the edge of a
basin, sink or tub,
fastening the duct
supplied to the tap (see
figure). The free end of
the hose should not be
underwater.
We advise against the use of hose extensions; in
case of absolute need, the extension must have the
same diameter as the original hose and must not
exceed 150 cm in length.
Electric connection
Before plugging the appliance into the mains socket,
make sure that:
the socket is earthed and in compliance with the
applicable law;
the socket is able to sustain the appliance's
maximum power load indicated in the Technical
details table (on the right);
the supply voltage is included within the values i
ndicated on the Technical details table
(on the right);
the socket is compatible with the washer
dryer's plug. If this is not the case, replace the
socket or the plug.
The Washer-dryer should not be installed in an
outdoor environment, not even when the area is
sheltered, because it may be very dangerous to
leave it exposed to rain and thunderstorms.
When the Washer-dryer is installed, the mains
socket must be within easy reach.
Once the appliance has been installed, and before
you use it for the first time, run a wash cycle with
detergent and no laundry, setting the 90°C
programme without a pre-wash cycle.
Technical details
Model
Dimensions
Capacity
Electric
connections
Wat er
connections
Spin speed
Control
programmes
according to
IEC456 directive
AML 89
59.5 cm wide
85 cm high
53.5 cm deep
from 1 to 5 kg for the wash programme;
from 1 to 4 kg for the drying programme
voltage 220/230 Volts 50 Hz
maximum absorbed power 1850 W
maximum pressure 1 MPa (10 bar)
minimum pressure 0.05 MPa (0.5 bar)
drum capacity 46 litres
up to 800 rpm
Wash: programme 3; temperature
60°C; run with a load of 5 kg.
Dryin g: first drying cycle performed
with a 1 kg load, by selecting a
drying time of 40 min;
Second drying cycle performed with
a 4 kg load and the DRYING knob
on the setting.
This appliance is compliant with the
following European Community
Directives:
- 73/23/CEE of 19/02/73 (Low
Voltage) and subsequent amendments
- 89/336/CEE of 03/05/89
(Electromagnetic Compatibility) and
subsequent amendments
- 2002/96/CE
ServiceTroubleshootingPrecautions CareProgrammes DetergentsInstallation Description
15
Page 16
Washer-dryer description
GB
Control panel
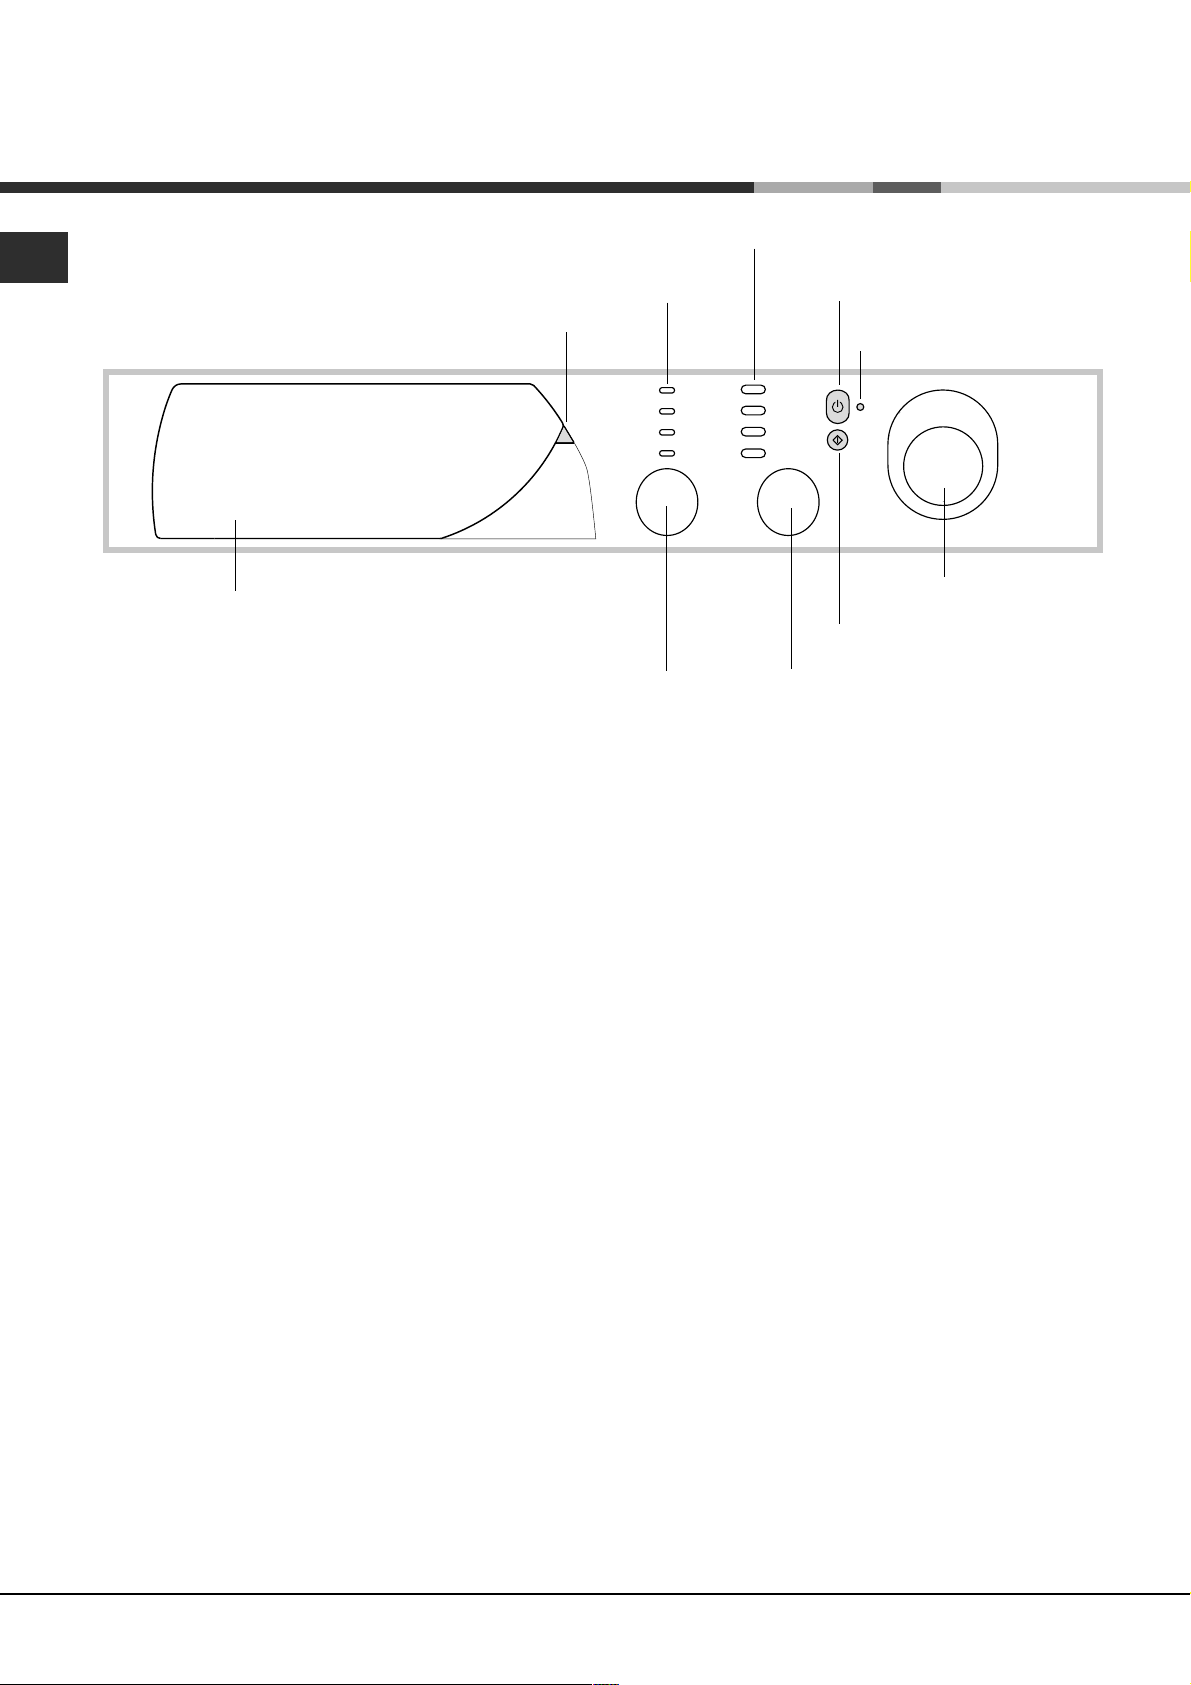
Programme key
Detergent dispenser
Detergent dispenser: to add detergent and fabric
softener (see page 20).
FUNCTION
Buttons
Leds
DRYING
Knob
TEMPERATURE knob: to set the temperature or
the cold wash cycle (see page 19).
START/STOP
Button
ON-OFF/DOOR LOCK
Led
PROGRAMME
Knob
START/RESET
Button
TEMPERATURE
Knob
l
Programme key: to consult a straightforward
chart of the different programmes available: pull the
grey tab outwards to open it.
LEDS: to find out which wash cycle phase is under
way.
If the Delay Timer function has been set, the time
left until the programme starts will be indicated (see
page 17).
DRYING knob: to set the desired drying cycle
(see page 19).
FUNCTION buttons: to select the functions
available. The button corresponding to the function
selected will remain on.
START/STOP button: to turn the Washer-dryer on
and off.
START/RESET button: to start the programmes or
cancel any incorrect settings.
ON-OFF/DOOR LOCK Led: to find out whether the
Washer-dryer is on and if the appliance door can be
opened (see page 17).
PROGRAMME knob: to select the wash
programmes. The retractable control knob: press
the centre of the knob for it to pop out. The knob
stays still during the cycle.
16
Page 17
Leds
The LEDS provide important information.
This is what they can tell you:
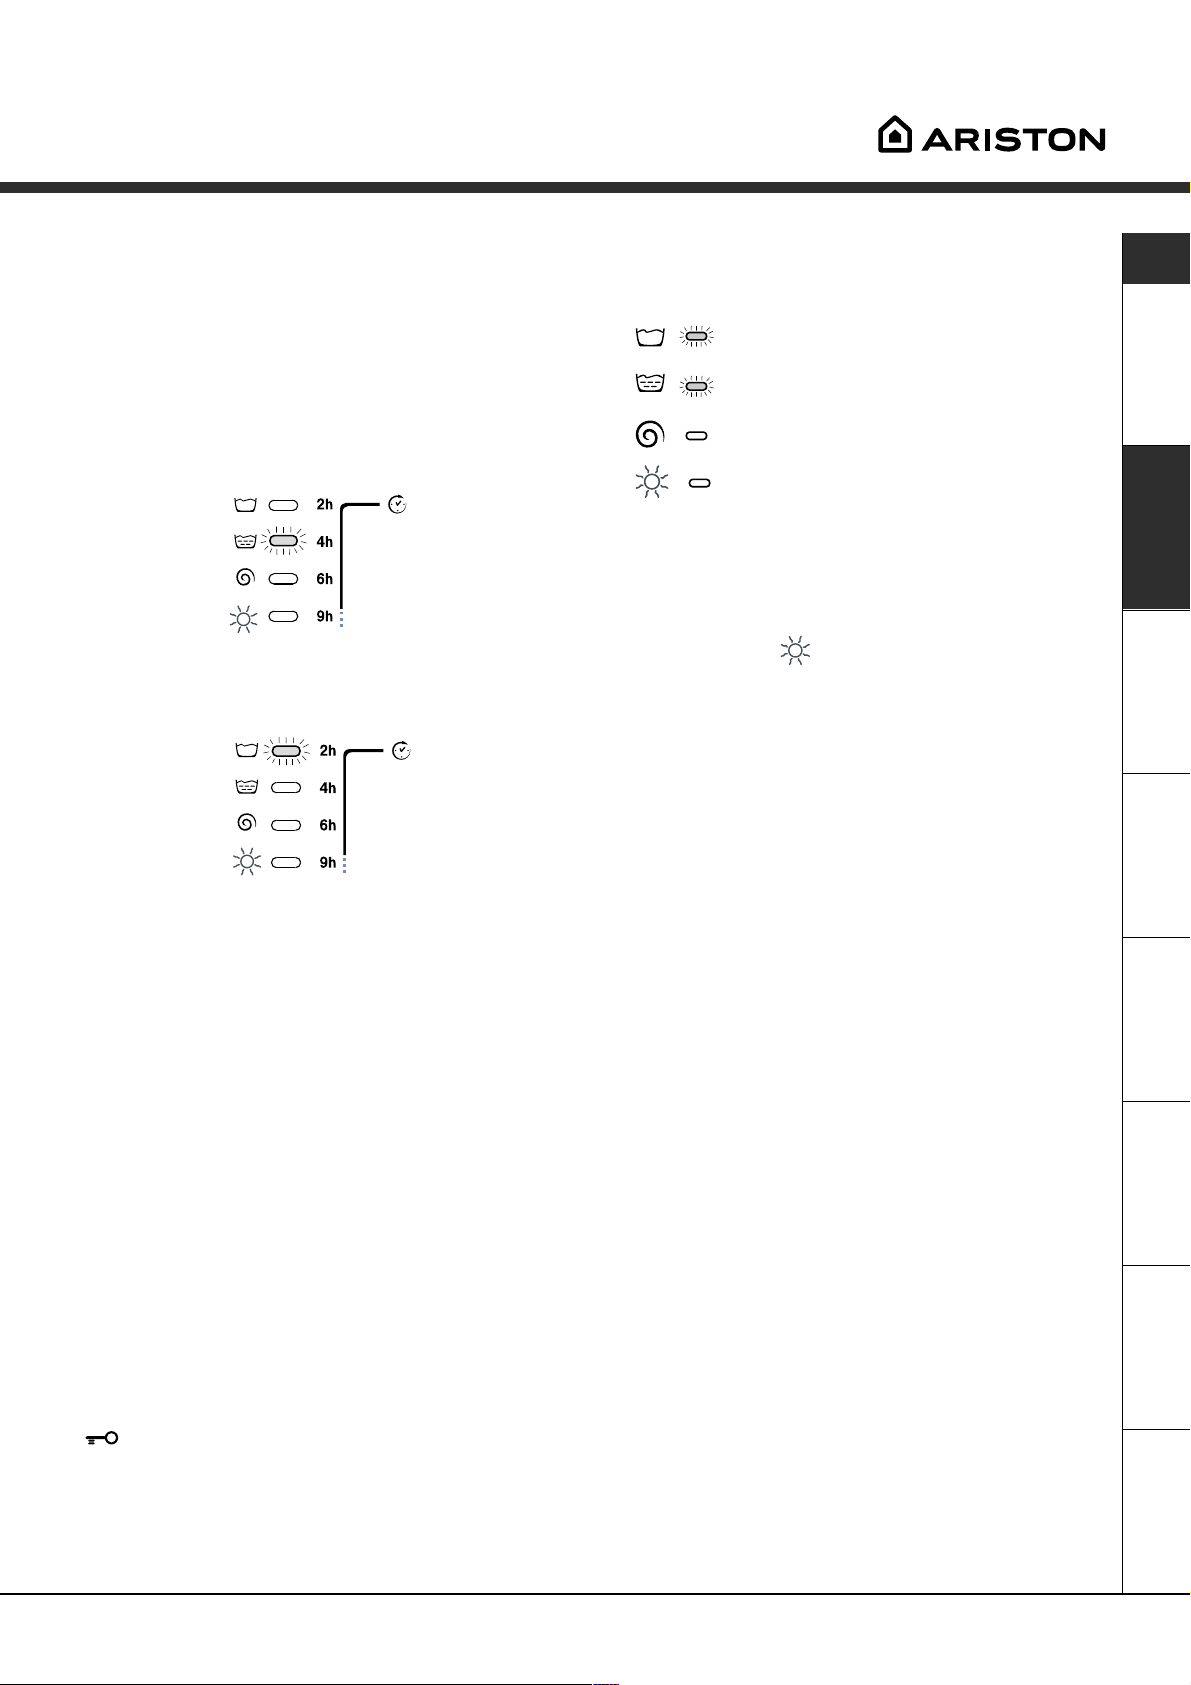
Delay set:
If the Delay Timer function has been enabled (see
page. 19), once you have started the programme,
the LED corresponding to the delay set will begin to
flash:
As time passes, the remaining delay will be
displayed, and the corresponding LED will flash:
Once the set delay is complete, the flashing LED will
turn off and the programme set will start.
Cycle phase under way:
During the wash cycle, the LEDs gradually illuminate
on to indicate the cycle phase under way:
Prewash / Wash
Rinse
Spin cycle
Drying
Note:
- during draining, the LED corresponding to the Spin
cycle phase will be turned on.
- when the drying cycle is complete, the indicator light
relative to phase
DRYING knob needs to be set back to the 0 setting.
Function buttons
The FUNCTION BUTTONS also act like LEDS.
When a function is selected, the corresponding
button is illuminated.
If the function selected is incompatible with the
programme set, the button will flash and the
function will not be enabled.
If you set a function that is incompatible with
another function you selected previously, only the
last one selected will be enabled.
will flash, to indicate that the
GB
ON-OFF/DOOR LOCK led:
If this LED is on, the appliance door is locked to prevent it from being opened accidentally; to avoid any damages,
wait for the LED to flash before you open the appliance door.
The rapid flashing of the ON-OFF/DOOR LOCK Led together with the flashing of at least one other LED indicates
there is an abnormality. Call for Technical Assistance.
17
ServiceTroubleshootingPrecautions CareProgrammes DetergentsInstallation Description
Page 18
Starting and Programmes
GB
Briefly: starting a programme
1. Switch the Washer-dryer on by pressing button .
All the LEDS will light up for a few seconds and
the ON-OFF/DOOR LOCK Led will begin to flash.
2. Load your laundry into the Washer-dryer and
shut the appliance door.
3. Set the PROGRAMME knob to the programme
required.
4. Set the wash temperature (see page 19).
5. Set the drying cycle if necessary (see page 19).
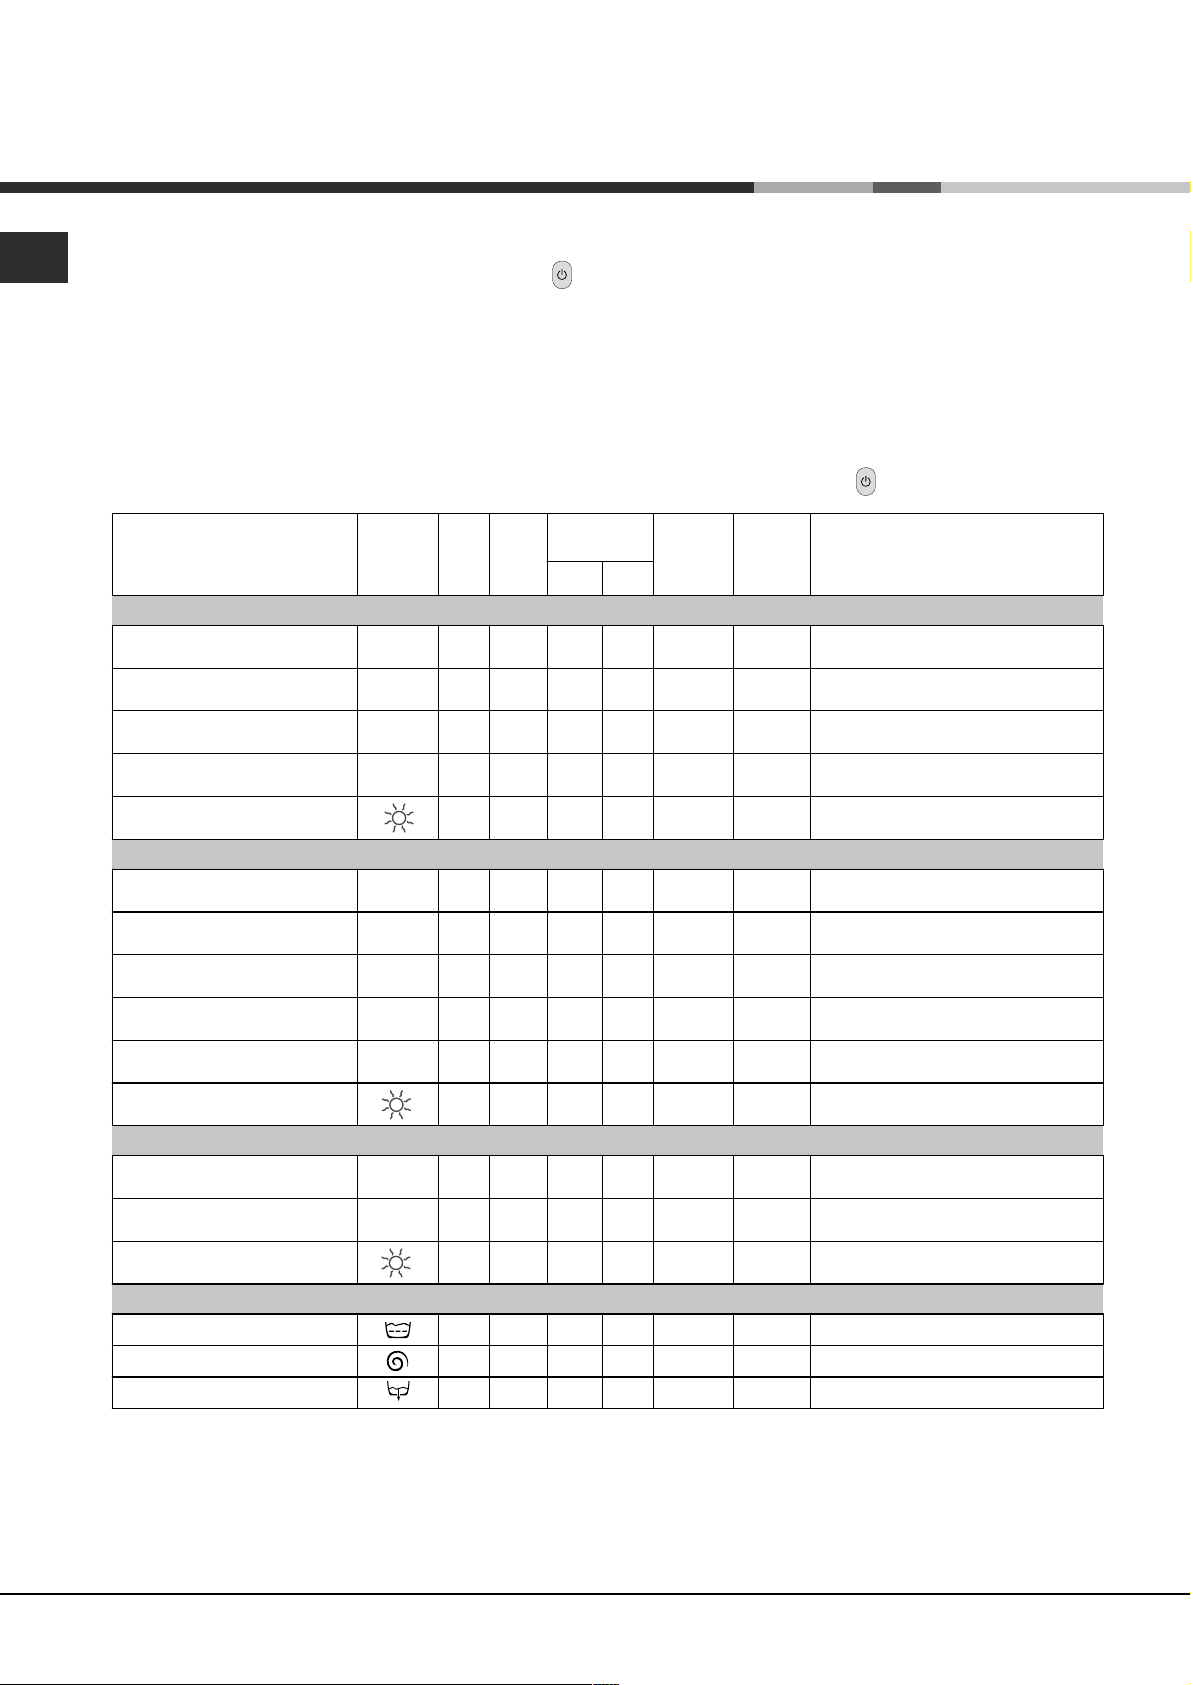
Programme table
Type of fabric and degree of soil
Programmes
Cottons
Extremely soiled whites
(sheets, tablecloths, etc.)
Extremely soiled whites
(sheets, tablecloths, etc.)
Heavily soiled whites and fast
colours
Slightly soiled whites and delicate
colours (shirts, jumpers, etc.)
Drying cycle for cotton fabrics
Wash
Drying
temp.
cycle
wash
1
90°C 137
2
90°C 120
3
60°C 105
4
40°C 72
Detergent
Pre-
Wash
6. Add the detergent and any fabric softener
(see page 20).
7. Start he programme by pressing the START/RESET
button.
To cancel it, keep the START/RESET button pressed
for at least 2 seconds.
8. When the programme is finished, the ON-OFF/
DOOR LOCK Led will flash to indicate that the
appliance door can be opened. Take out your
laundry and leave the appliance door ajar to allow
the drum to dry thoroughly. Turn the Washer-dryer
off by pressing button
Fabri c
softener
Cycle
length
(minutes)
Description of wash cycle
Pre-wash, wash cycle, rinse cycles,
intermediate and final spin cycles
Wash cycle, rinse cycles, intermediate
and final spin cycles
Wash cycle, rinse cycles, intermediate
and final spin cycles
Wash cycle, rinse cycles, intermediate
and final spin cycles
.
Synthetics
Heavily soiled fast colours
(baby linen, etc.)
Fast colours (all types of slightly
soiled garments)
Heavily soiled fast colours
(baby linen, etc.)
Delicate colours (all types of
slightly soiled garments)
Delicate colours (all types of
slightly soiled garments)
Drying cycle for synthetic fabrics
5
60°C 77
5
40°C 62
6
50°C 73
7
40°C 58
8
30°C 30
Wash cycle, rinse cycles, anti-crease or
delicate spin cycle
Wash cycle, rinse cycles, anti-crease or
delicate spin cycle
Wash cycle, rinse cycles, anti-crease or
delicate spin cycle
Wash cycle, rinse cycles, anti-crease or
delicate spin cycle
Wash cycle, rinse cycles and delicate
spin cycl
Delicates
Wool
Very delicate fabrics
(curtains, silk, viscose, etc.)
Drying cycle for delicate fabrics
PARTIAL PROGRAMMES
Delicate rinse cycle Rinse cycles, anti-crease or draining
Delicate spin cycle Draining and delicate spin cycle
Draining Draining
9
40°C 50
10
30°C 45
Wash cycle, rinse cycles and delicate
spin cycle
Wash cycle, rinse cycles, anti-crease or
draining cycle
Notes
For the anti-crease function, please see page 20. The information contained in the table is purely indicative.
Special programme
Daily 30' (programme 8 for Synthetics) is designed to wash lightly soiled garments in a short amount of time: it only
lasts 30 minutes and allows you to save on both time and energy. By setting this programme (8 at 30°C), you can
wash different fabrics together (except for woollen and silk items), with a maximum load of 3 kg.
We recommend the use of liquid detergent.
18
Page 19
Personalisations
Setting the temperature
Turn the TEMPERATURE knob to set the wash temperature (see Programme table on page 18).
The temperature can be lowered, or even set to a cold wash (
Set the drying cycle
Turn the DRYING knob to set the desired drying type.
Two options are available:
A - Based on time: From 40 minutes to 150.
B - Based on the damp level of the dry clothes:
Iron
Wardrobe
Extra dry
and bathrobes.
A cooling stage is foreseen at the end of the drying cycle.
If your laundry load to wash and dry is exceptionally in excess
of the maximum load foreseen (see table opposite), perform
the wash cycle, and when the programme is complete, divide up the garments and put part of them back in the
drum. Now follow the instructions provided for a dry only cycle. Repeat this procedure for the remainder of the load.
Dry only
Turn the PROGRAMME knob to one of the drying settings
desired drying type using the DRYING knob.
: slightly damp clothes, easy to iron.
: ry clothes to put away.
: very dry clothes, recommended for towelling
).
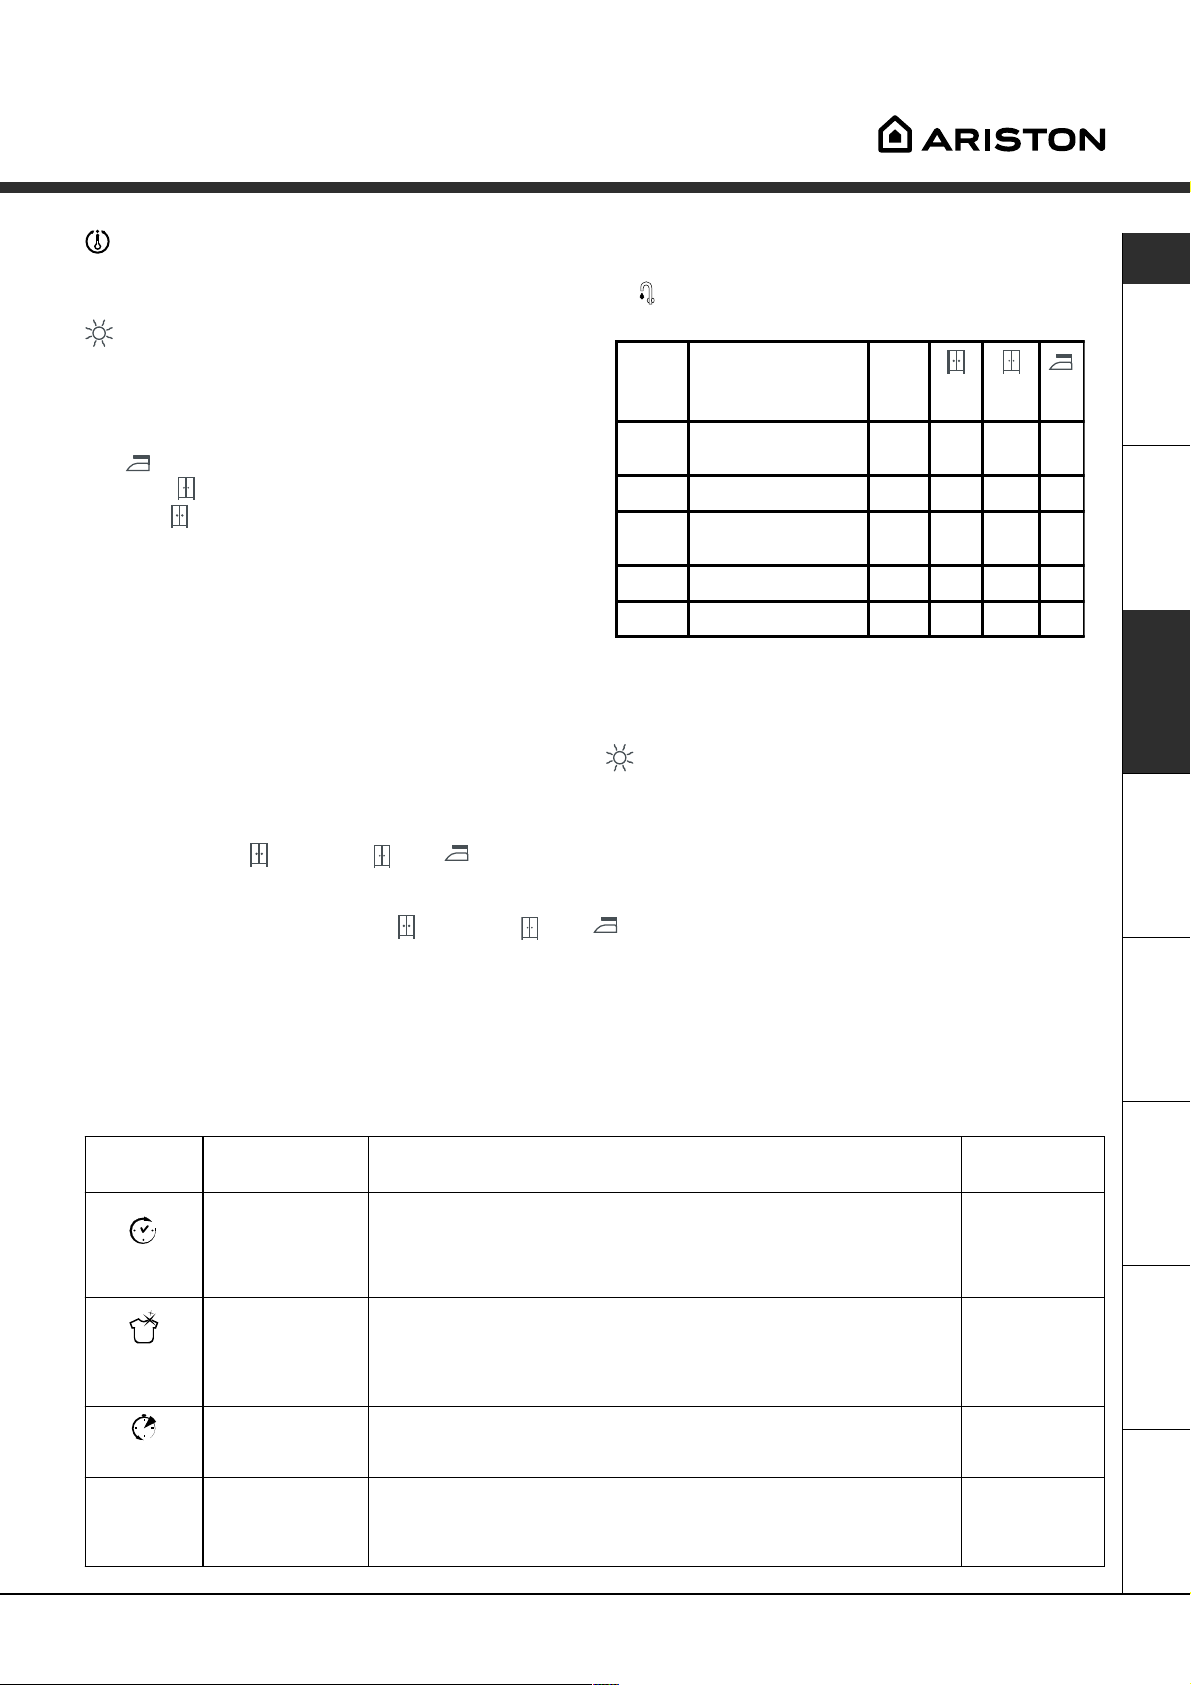
The data contained in the
Table of drying times
Fabric
type
Cotton,
Linen
Cotton Terry towels
Ter i t al ,
Cotton
Acrylics Pyjamas, socks, etc.
Nylon Slips, tights, stockings, etc.
Load type Max.
Clothing of different sizes
Sheets, Shirts
table are purely indicative.
load
(kg) Extra
4 130 120 110
4 130 120 110
2,5 90 80 70
1656060
1656060
dry
War d-
robe
depending on the type of fabric, then select the
Iron
GB
Important: - A spin cycle is carried out during the drying if you have set a cotton programme and a level of
dryness (Extra dry
, Wardrobe , Iron ).
- The woollen garments drying cycle should only and exclusively be run together with the selection of a specific
cycle time (150 - 100 - 60 - 40 minutes). We recommend a 60 minute drying cycle for a 1 kg load.
If one of the three levels (Extra dry
, Wardrobe , Iron ) is selected by mistake, the appliance will run a
drying cycle lasting the MAX time foreseen (150 minutes).
- For cotton loads of less than 1 Kg, use the drying programme designed for synthetic fabrics.
Functions
To enable a function:
1. press the button corresponding to the desired function, according to the table below;
2. the function is enabled when the corresponding button is illuminated.
Note: The rapid flashing of the button indicates that the corresponding function cannot be selected for the programme set.
Function Effect Comments
Press the button repeatedly until the LED corresponding to the
Delays the start
of the wash by
up to 9 hours.
Delay Ti mer
desired delay is turned on.
The fifth time the button is pressed, the function will be disabled.
N.B.: Once you have pressed the Start/Reset button, the delay
can only be decreased if you wish to modify it.
Allows for an
impeccable wash,
Su per
Was h
visibly whiter
than a standard
Class A
wash.
This function is incompatible with the RAPID function.
Enabled with
programmes:
All
1, 2, 3, 4,
5, 6, 7
Rapid
800-400
Cuts the duration
of the wash cycle
by 30%.
Reduces the spin
speed.
This function is incompatible with the SUPER WASH function.
1, 2, 3, 4,
5, 6, 7
ServiceTroubleshootingPrecautions CareProgrammes DetergentsInstallation Description
All
programmes
except for 10
and draining.
19
Page 20
Detergents and laundry
GB
Detergent dispenser
Good washing results also depend on the correct
dose of detergent: adding too much detergent won't
necessarily make for a more efficient wash, and may
in fact cause build up on the interior of your
appliance and even pollute the environment.
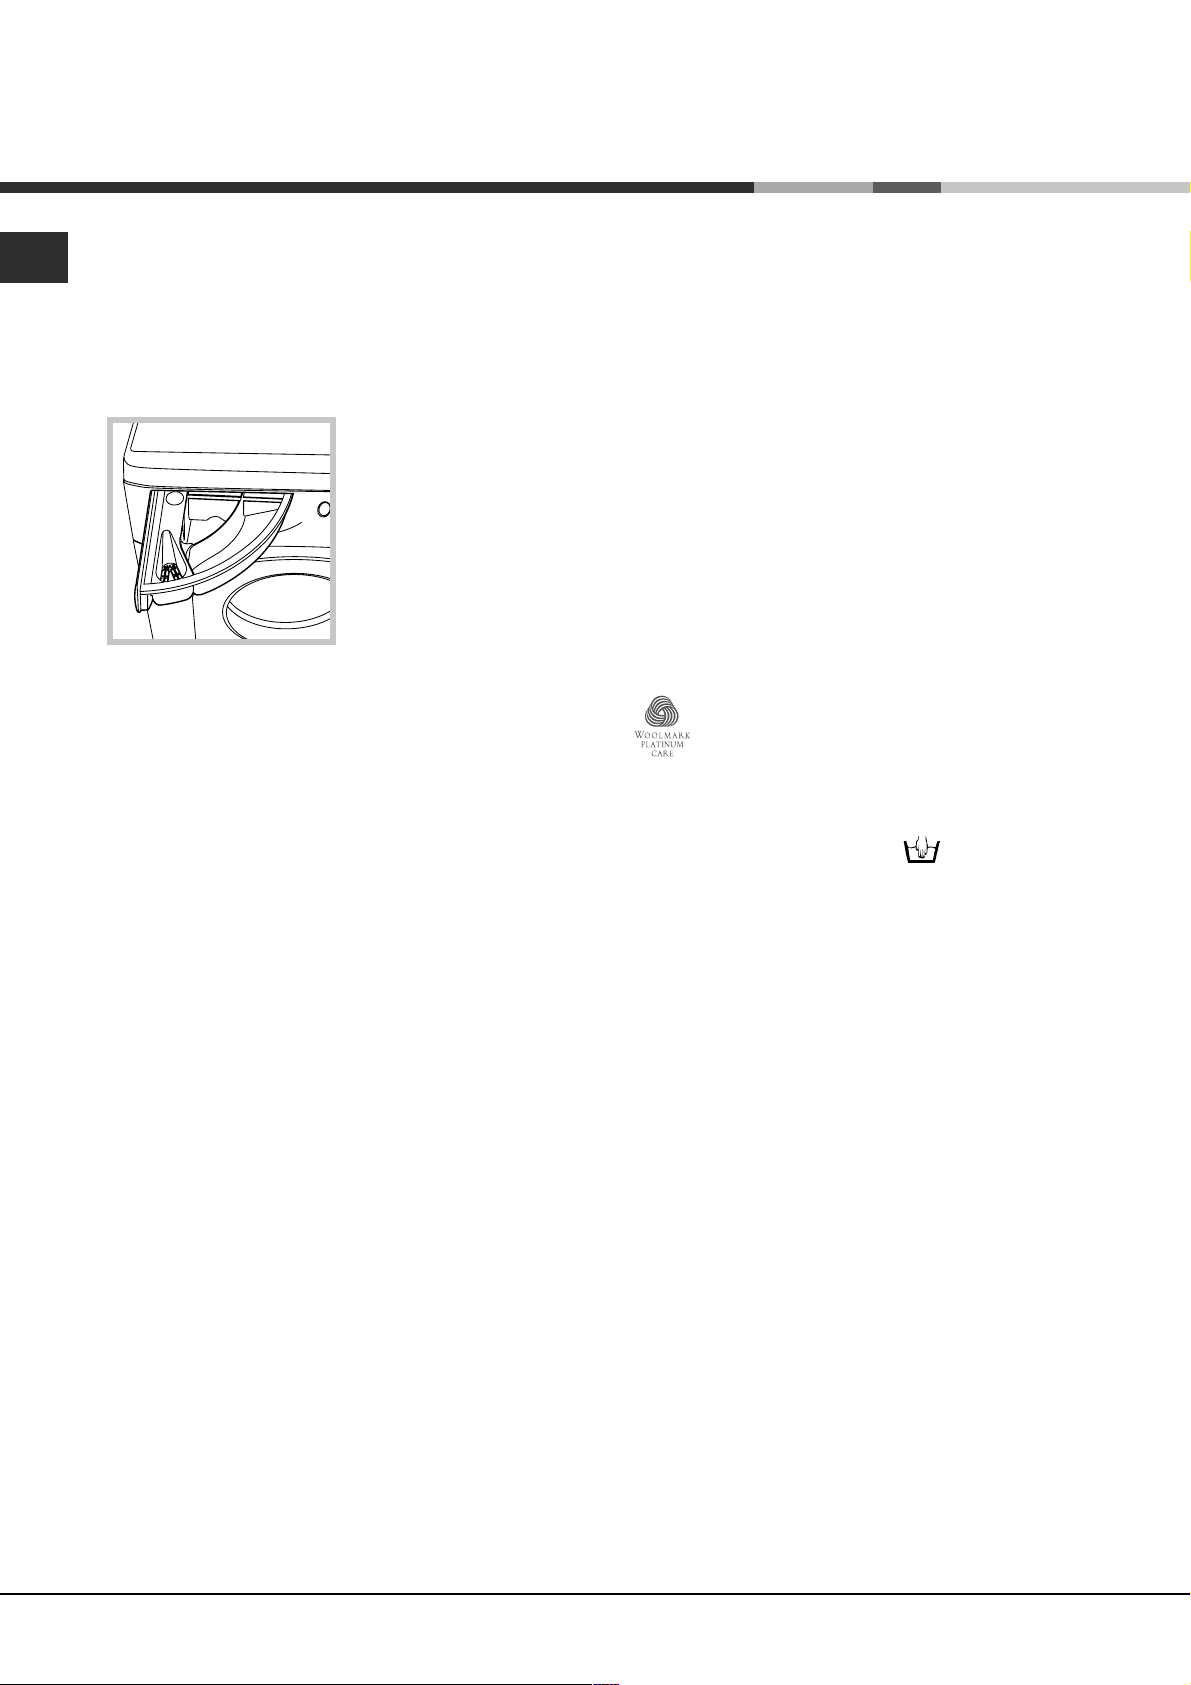
Open up the detergent
dispenser and pour in
the detergent and fabric
softener, as follows.
1
3
compartment 1: Detergent for pre-wash
(powder)
compartment 2: Detergent for the wash cycle
(powder or liquid)
Liquid detergent should only be poured in
immediately prior to the wash cycle start.
compartment 3: Additives (fabric softeners, etc.)
The fabric softener should not overflow from the grid.
Do not use hand wash detergent because it may
form too much foam.
2
Special items
Curtains: fold curtains and place them in a pillow
case or mesh bag. Wash them separately without
exceeding half the appliance load. Use programme
10 which excludes the spin cycle automatically.
Quilted coats and windbreakers: if they are
padded with goose or duck down, they can be
machine-washed. Turn the garments inside out and
load a maximum of 2-3 kg, repeating the rinse cycle
once or twice and using the delicate spin cycle.
Trainers: remove any mud. They can be washed
together with jeans and other tough garments, but
not with whites.
Wool: for best results, use a specific detergent,
taking care not to exceed a load of 1 kg.
Woolmark Platinum Care
As gentle as a hand wash.
Ariston is the only washing machine to have
obtained the prestigious Woolmark Platinum
Care mark of recognition (M.0303) from The
Woolmark Company, which certifies the machine
washing of all woollen garments, even those whose
label states "hand wash only"
"Wool" programme therefore offers you complete
peace of mind when washing all woollen garments,
with great performance guaranteed every time.
(1 kg max.). The
Preparing your laundry
Divide your laundry according to:
- the type of fabric/the symbol on the label.
- the colours: separate coloured garments from
whites.
Empty all pockets and check for loose buttons.
Do not exceed the weight limits stated below,
which refer to the weight when dry:
Sturdy fabrics: max 5 kg
Synthetic fabrics: max 2.5 kg
Delicate fabrics: max 2 kg
Wool: max 1 kg
How much does your laundry weigh?
1 sheet 400-500 g
1 pillow case 150-200 g
1 tablecloth 400-500 g
1 bathrobe 900-1,200 g
1 towel 150-250 g
Anti-crease
This function interrupts the wash programme, and
the washing is left to soak in water before the
appliance is drained. It is enabled in programmes
5 - 6 - 7 - 10 and Delicate rinse cycle.
To conclude the cycle, press the START/RESET
button.
To run the draining cycle alone, set the knob to the
relative symbol and press the START/RESET button.
20
Page 21
Precautions and advice
The Washer-dryer was designed and built in
compliance with the applicable international safety
regulations. The following information is provided for
your safety and should consequently be read carefully.
General safety
This appliance has been designed for non-
professional, household use and its functions must
not be changed.
This Washer-dryer should only be used by
adults and in accordance with the instructions
provided in this manual.
Never touch the Washer-dryer when barefoot
or with wet or damp hands or feet.
Do not pull on the power supply cable to unplug
the appliance from the electricity socket. Pull the
plug out yourself.
Do not open the detergent dispenser while the
appliance is in operation.
Do not touch the drain water as it could reach
very high temperatures.
Never force the Washer-dryer door: this could
damage the safety lock mechanism designed to
prevent any accidental openings.
In the event of a malfunction, do not under any
circumstances touch internal parts in order to
attempt repairs.
Always keep children well away from the
appliance while in operation.
The appliance door tends to get quite hot during
the wash cycle.
Should it have to be moved, proceed with the
help of two or three people and handle it with the
utmost care. Never try to do this alone, because
the appliance is very heavy.
Before loading your laundry into the washing
machine, make sure the drum is empty.
During the drying phase, the door tends to get
quite hot.
Do not use the appliance to dry clothes that have
been washed with flammable solvents (e.g.
trichlorethylene).
Do not use the appliance to dry foam rubber or
similar elastomers.
Make sure that the water tap is turned on during
the drying cycles.
This washer-dryer can only be used to dry clothes
which have been pre-washed in water.
Disposal
Disposing of the packaging material:
observe local regulations, so the packaging can
be re-used.
The European Directive 2002/96/EC on Waste
Electrical and Electronic Equipment, requires that
old household electrical appliances must not be
disposed of in the normal unsorted municipal waste
stream. Old appliances must be collected
separately in order to optimise the recovery and
recycling of the materials they contain and reduce
the impact on human health and the environment.
The crossed out "wheeled bin" symbol on the
product reminds you of your obligation, that when
you dispose of the appliance it must be separately
collected.
Consumers should contact their local authority or
retailer for information concerning the correct
disposal of their old appliance.
Saving energy and respecting the
environment
Environmentally-friendly technology
If you only see a little water through your appliance
door, this is because thanks to the latest Ariston
technology, your Washer-dryer only needs less than
half the amount of water to get the best results: an
objective reached to respect the environment.
Saving on detergent, water, energy and time
To avoid wasting resources, the Washer-dryer
should be used with a full load. A full load instead
of two half loads allows you to save up to 50% on
energy.
The pre-wash cycle is only necessary on
extremely soiled garments. Avoiding it will save on
detergent, time, water and between 5 and 15%
energy.
Treating stains with a stain remover or leaving
them to soak before washing will cut down the
need to wash them at high temperatures. A
programme at 60°C instead of 90°C or one at
40°C instead of 60°C will save up to 50% on
energy.
Use the correct quantity of detergent depending
on the water hardness, how soiled the garments
are and the amount of laundry you have, to avoid
wastage and to protect the environment: despite
being biodegradable, detergents do contain
ingredients that alter the natural balance of the
environment. In addition, avoid using fabric
softener as much as possible.
If you use your Washer-dryer from late in the
afternoon until the early hours of the morning, you
will help reduce the electricity board's peak load.
The Delay Timer option (see page 19) helps to
organise your wash cycles accordingly.
If your laundry has to be dried in a tumble dryer,
select a high spin speed. Having the least water
possible in your laundry will save you time and
energy in the drying process.
GB
ServiceTroubleshootingPrecautions CareProgrammes DetergentsInstallation Description
21
Page 22
Care and maintenance
GB
Cutting off the water or electricity
supply
Turn off the water tap after every wash. This will
limit the wear of your appliance's water system
and also prevent leaks.
Unplug your appliance when cleaning it and
during all maintenance operations.
Cleaning your appliance
The exterior and rubber parts of your appliance can
be cleaned with a soft cloth soaked in lukewarm
soapy water. Do not use solvents or abrasives.
Cleaning the detergent dispenser
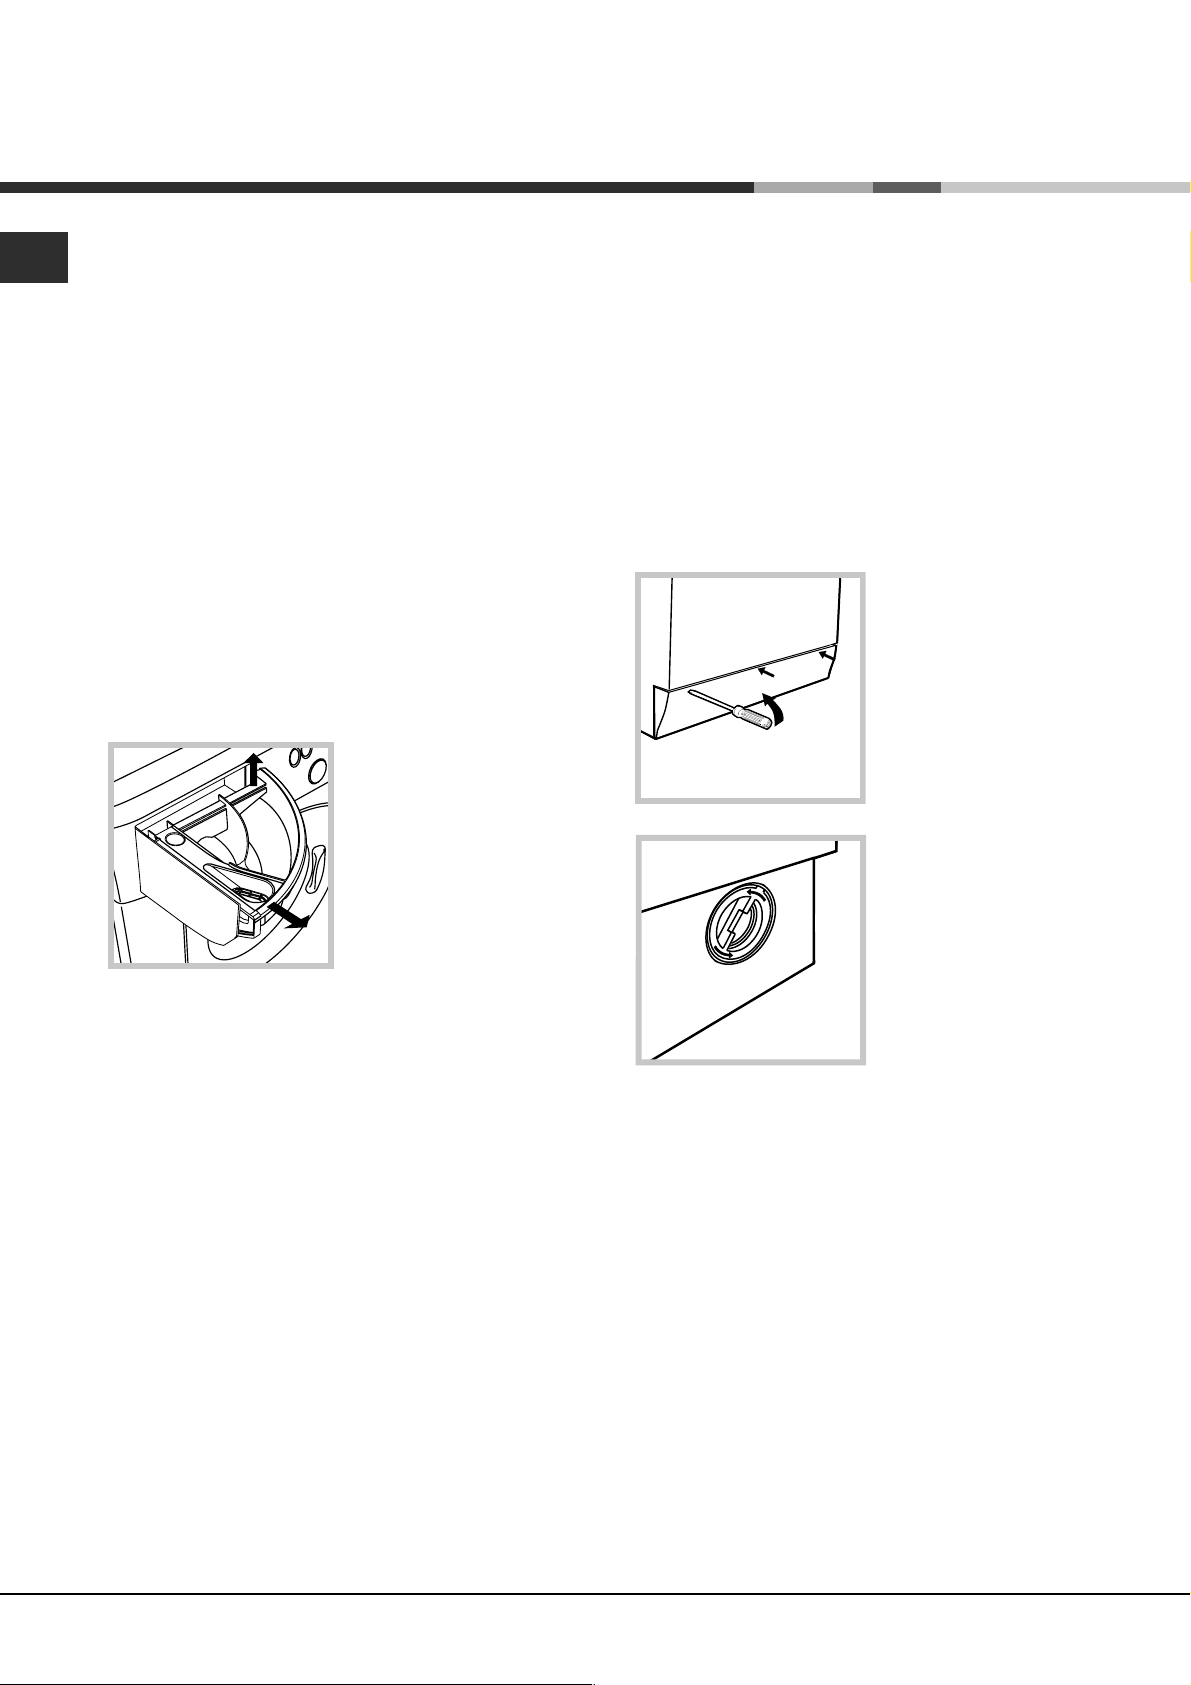
1
Remove the dispenser
by raising it and pulling it
out (see figure).
Wash it under running
water; this operation
should be repeated
frequently.
2
Cleaning the pump
The Washer-dryer is fitted with a self-cleaning pump
that does not require any maintenance. Sometimes,
small items (such as coins or buttons) may fall into
the pre-chamber that protects the pump, situated in
the lower part of the same.
Make sure the wash cycle has ended and unplug
the appliance.
To access the pre-chamber:
1. using a screwdriver,
remove the cover panel
on the lower front of the
Washer-dryer (see
figure);
2. unscrew the lid
rotating it anticlockwise (see figure): a
little water may trickle
out. This is perfectly
normal;
Caring for your appliance door and
drum
Always leave the appliance door ajar to prevent
unpleasant odours from forming.
3. clean the interior thoroughly;
4. screw the lid back on;
5. reposition the panel, making sure the hooks are
securely in place before you push it onto the
appliance.
Checking the water inlet hose
Check the water inlet hose at least once a year. If
you see any cracks, replace it immediately: during
the wash cycles, water pressure is very strong and
a cracked hose could easily split open.
Never use hoses that have already been used.
22
Page 23
Troubleshooting
Your Washer-dryer could fail to work. Before calling for Assistance (see page 24), make sure the problem can't
easily be solved by consulting the following list.
Problem
The Washer-dryer won't start.
The wash cycle won't start.
The Washer-dryer fails to load
water.
The Washer-dryer continuously
loads and unloads water.
Possible causes/Solution:
The appliance is not plugged into the socket, or not enough to make contact.
There has been a power failure.
The appliance door is not shut properly.
The
The START/RESET button has not been pressed.
The water tap is not turned on.
A delayed start has been set (using the Delay Timer, see page 19).
The water inlet hose is not connected to the tap.
The hose is bent.
The water tap is not turned on.
There is a water shortage.
The water pressure is insufficient.
The START/RESET button has not been pressed.
The drain hose is not fitted between 65 and 100 cm from the floor
The free end of the hose is underwater (see page 15).
The wall drainage system doesn't have a breather pipe.
If the problem persists even after these checks, turn off the water tap,
switch the appliance off and call for Assistance. If the dwelling is on one of
the upper floors of a building, there may be drain trap problems causing the
Washer-dryer to load and unload water continuously. In order to avoid such
an inconvenience, special anti-drain trap valves are available in shops.
button has not been pressed.
(see page 15).
GB
The Washer-dryer does not
drain or spin.
The Washer-dryer vibrates too
much during the spin cycle.
The Washer-dryer leaks.
The ON-OFF/DOOR LOCK Led
flashes rapidly at the same
time as at least one other LED.
There is too much foam.
The washer-dryer does not dry.
The programme does not foresee the draining: some programmes
require enabling the draining manually (see page 18).
The Easy iron option is enabled: to complete the programme, press
the START/RESET button (see page 19).
The drain hose is bent (see page 15).
The drain duct is clogged.
The drum was not unblocked correctly during installation (see page 14).
The Washer-dryer is not level (see page 14).
The Washer-dryer is closed in between furniture cabinets and
the wall (see page 14).
The water inlet hose is not screwed on correctly (see page 14).
The detergent dispenser is obstructed (to clean it, see page 22).
The drain hose is not secured properly (see page 15).
Call for Assistance because this means there is an abnormality.
The detergent is not suitable for machine washing (it should bear the
definition "for Washing-machinr" or "hand and machine wash", or the like).
You used too much detergent.
The appliance is not plugged into the socket, or not enough to make contact.
There has been a power failure.
The appliance door is not shut properly.
A delayed start has been set (using the Delay Timer, see page 19).
the DRYING knob is on the 0 setting.
ServiceTroubleshootingPrecautions CareProgrammes DetergentsInstallation Description
23
Page 24

Service
195041446.04
02 /20 06 - Xerox Business Services
GB
Before calling for Assistance:
Check whether you can solve the problem on your own (see page 23);
Restart the programme to check whether the problem has been solved;
If this is not the case, contact an authorised Technical Service Centre on the telephone number
provided on the guarantee certificate.
Always request the assistance of authorised servicemen.
Notify the operator of:
the type of problem;
the appliance model (Mod.);
the serial number (S/N);
This information can be found on the data plate situated on the rear of the Washer-dryer.
Service
24
 Loading...