

Page 1
ARGHERITA
ARGHERITA
M
M
Çamaþýr Makinesý
Çamaþýr Makinesý
Yerleþtirme ve kullanma kýlavuzu
Yerleþtirme ve kullanma kýlavuzu
Washing machine
Washing machine
Instructions for installation and use
Instructions for installation and use
Page 2
Çamaþýr Makinesý
TR
Yerleþtirme ve kullanma kýlavuzu
Washing machine
GB
Instructions for installation and use
1
15
Page 3
ARGHERITA
ARGHERITA
M
M
Kumaþlarýn
Kumaþlarýn
sýrlarý
sýrlarý
Nasýl daha iyi sonuçlar alýnýr
Nasýl daha iyi sonuçlar alýnýr
AB 83
TR
40°C de A
Sýnýfý Yýkama
40º Cde bile
mükemmel yýkama
performansý saðlayan ilk
çamaþýr makinesi
Ariston Margherita
Çamaþýr Makinesý
Yerleþtirme ve kullanma kýlavuzu
Page 4
M
ARGHERITA
Ariston Margherita
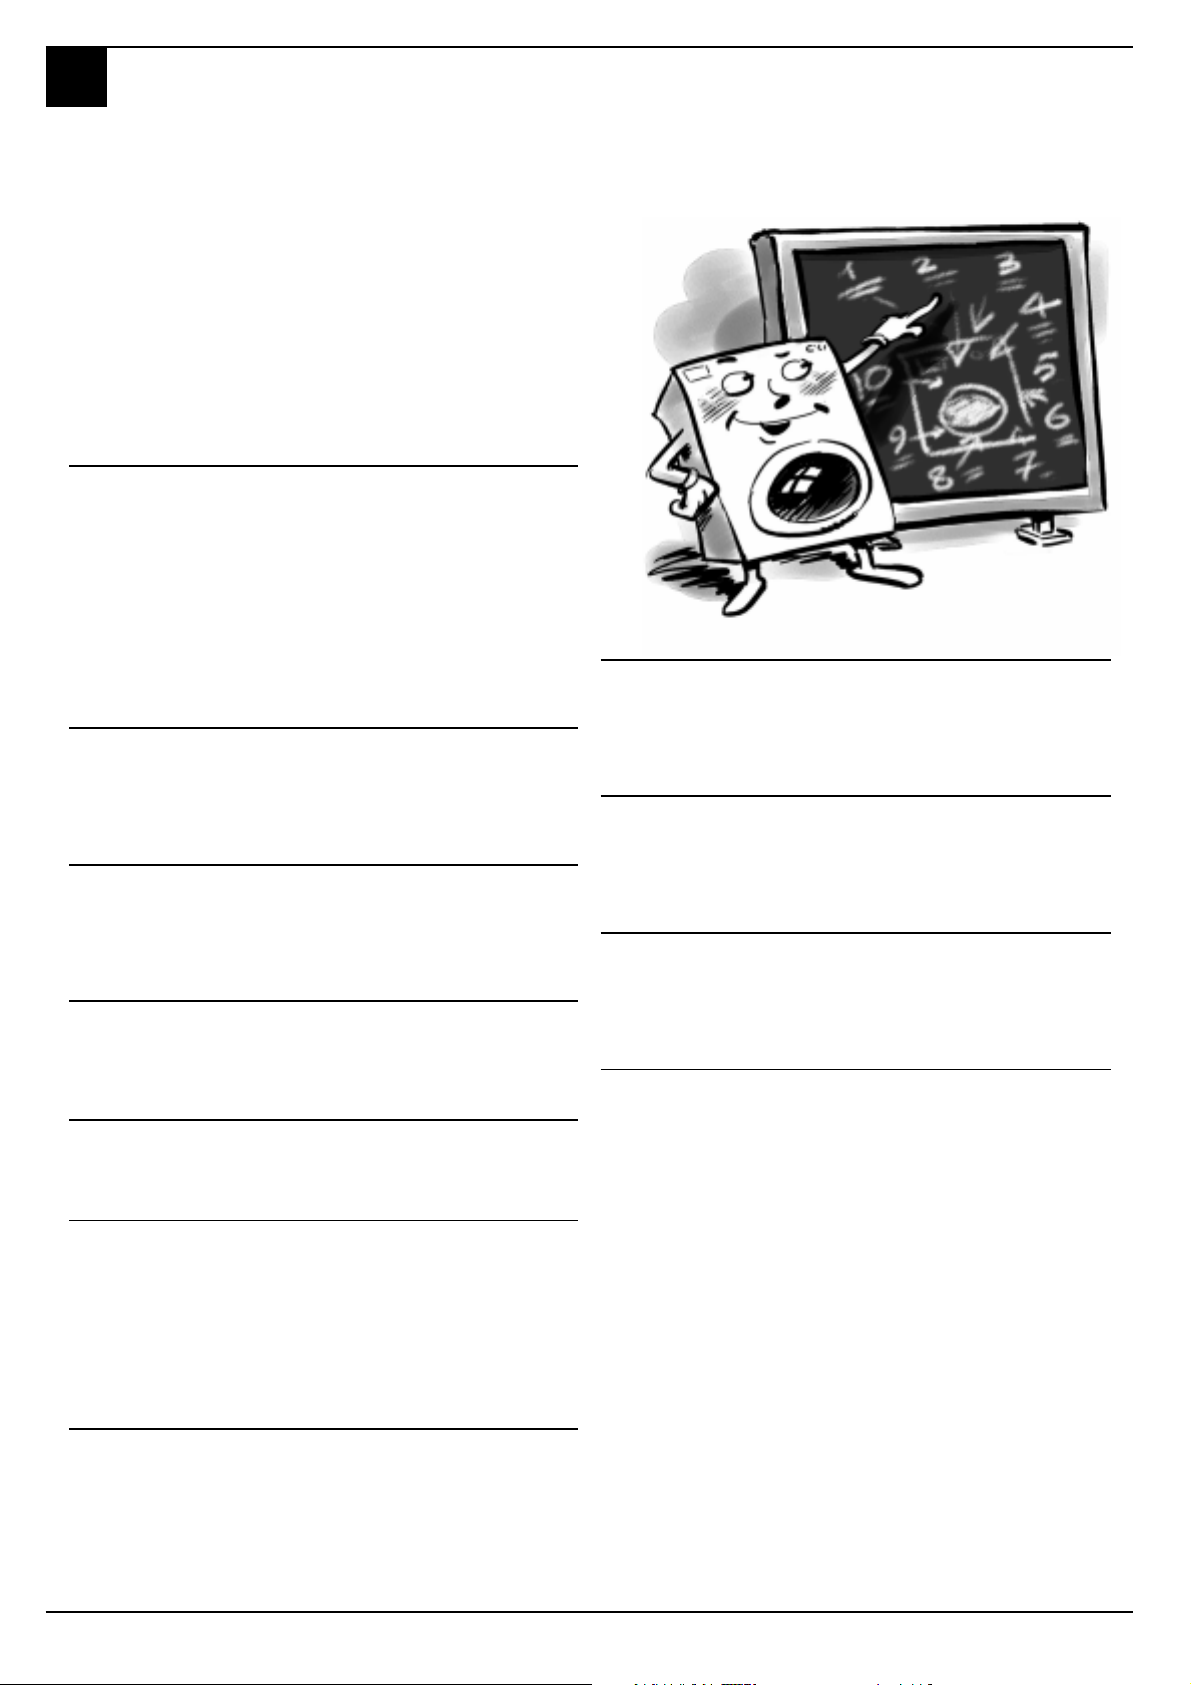
kullaným rehberi
Bu kitapçýkta çamaþýr makinenizin kullanýmý ile ilgili bazý
önemli konulara deðinilmiþtir. Bunlarý dikkatlice okuyarak
daha kolay çamaþýr yýkamanýn ve çamaþýr makinenizin daha
uzun ömürlü olmasýnýn yollarýný keþfedebilirsiniz.
1.
Kurma ve kaldýrma (sayfa. 10)
Ürünün teslimatýndan sonra, kurma iþlemi, Ariston Margherita çamaþýr
makinenizin düzgün çalýþmasý için en önemli iþlemdir. Her zaman:
1. Elektrik sisteminin yasalara uygunluðunu.
2. Giriþ ve boþaltma borularýnýn doðru baðlandýðýný kontrol edin.
Asla kullanýlmýþ boru kullanmayýnýz.
3. Çamaþýr makinenizin yere dengeli oturduðundan emin olun; çamaþýr
makinenizin ömrü ve yýkamanýn kalitesi için bu kontrol önemlidir.
4. Kazan sabitleme vidalarýnýn sökülmüþ olduðunu kontrol ediniz.
8.
Bakým (Sayfa. 11)
2.
Margherita çamaþýr makinenize hangi
çamaþýrlarý koymalýsýnýz ve nasýl çalýþtýrmalýsýnýz
(sayfa. 2)
Çamaþýrlarýnýzýn doðru ayrýmý, kaliteli bir yýkama ve çamaþýr makinenizin
ömrü açýsýndan önemlidir. Çamaþýrlarýnýzý ayýrýrken onlarýn cinslerini iyi tanýyýn,
renk, kumaþ tipi ve tüylenmeye eðilimleri önemli kriterlerdir.
3.
Etiketleri anlamak için rehber (sayfa. 5)
Giysi etiketlerinizin üzerindeki etiketlerin anlaþýlmasý kolaydýr vebu önerilere
dikkat etmek doðru yýkama yapabilmek için önemlidir. Bu Rehber, etkin
yýkama için doðru ýsýyý, yýkama devrelerini ve ütüleme önerilerini içerir.
4.
Hatalardan kaçýnmak için faydalý ipuçlarý (sayfa. 6)
Ariston Margherita, kaþmir ve yünlü yýkama konusunda size ancak bir
uzmanýn verebileceði faydalý bilgiler verir.
Ariston Margherita gerçek bir arkadaþtýr. Biraz itina, size uzun bir kullaným
ömrü olarak geri dönecektir.
Gerekli bakýmla, gelecek yýllar boyu yýkayacaktýr.
9.
Sorunlar ve Çözümleri (sayfa. 8 ve 9)
Servis çaðýrmadan önce, bu sayfalarý okuyun; bazý sorunlar çözüm
bulunabilir. Eðer sorun devam ederse, Ariston yetkili servisini arayýn, size en
kýsa zamanda yardýmcý olacaktýr.
10.
Bu bölümde çamaþýr makinenizin teknik özelliklerini bulacaksýnýz; model tipi,
elektrik ve su tüketimleri, boyutlarý, kapasitesi, sýkma devri, Avrupa kural ve
yönetmeliklerine uygunluðu.
11.
Teknik özellikler (sayfa. 9)
Sizin ve çocuklarýnýzýn emniyeti (sayfa.12)
5.
Deterjan bölmesinin kullanýmý (sayfa. 7)
Bu bölümde deterjan ve beyazlatýcý bölmelerinin kullanýmý .
6.
Kontrol panelinin kullanýlmasý (sayfa. 3)
Ariston Margherita'in kontrol panelinin kullanýmý son derece kolaydýr. Bir
tamircinin kirli pantolonunun temizlemeden en narin yünlü giysilere uzanan
bir yelpazede istediðiniz yýkama programýný seçmenizi saðlayan, fonksiyonlar
vardýr. Bu fonksiyonlarý tanýmak, bir yandan makinenizin daha uzun
ömürlüolmasýný saðlarken diðer yandan size yýkama iþleminden daha iyi
sonuçla almanýzý saðlar.
7.
Ariston Margherita programlarý rehberi
(sayfa. 4)
Bu bölümde doðru programý, uygun yýkama sýcaklýðýný ve deterjaný seçmenize
yardýmcý olacak bir tablo bulunmaktadýr. Doðru programý seçerek zaman
su ve elektrikten tasarruf etmeniz ve ayný zamanda çamaþýrlarýnýzdan
mükemmel temizlik elde etmeniz saðlanýr.
1
Margherita -
Yerleþtirme ve kullanma kýlavuzu
Burada tüm ev halkýnýn emniyeti için gerekli bilgileri bulacaksýnýz.
Page 5
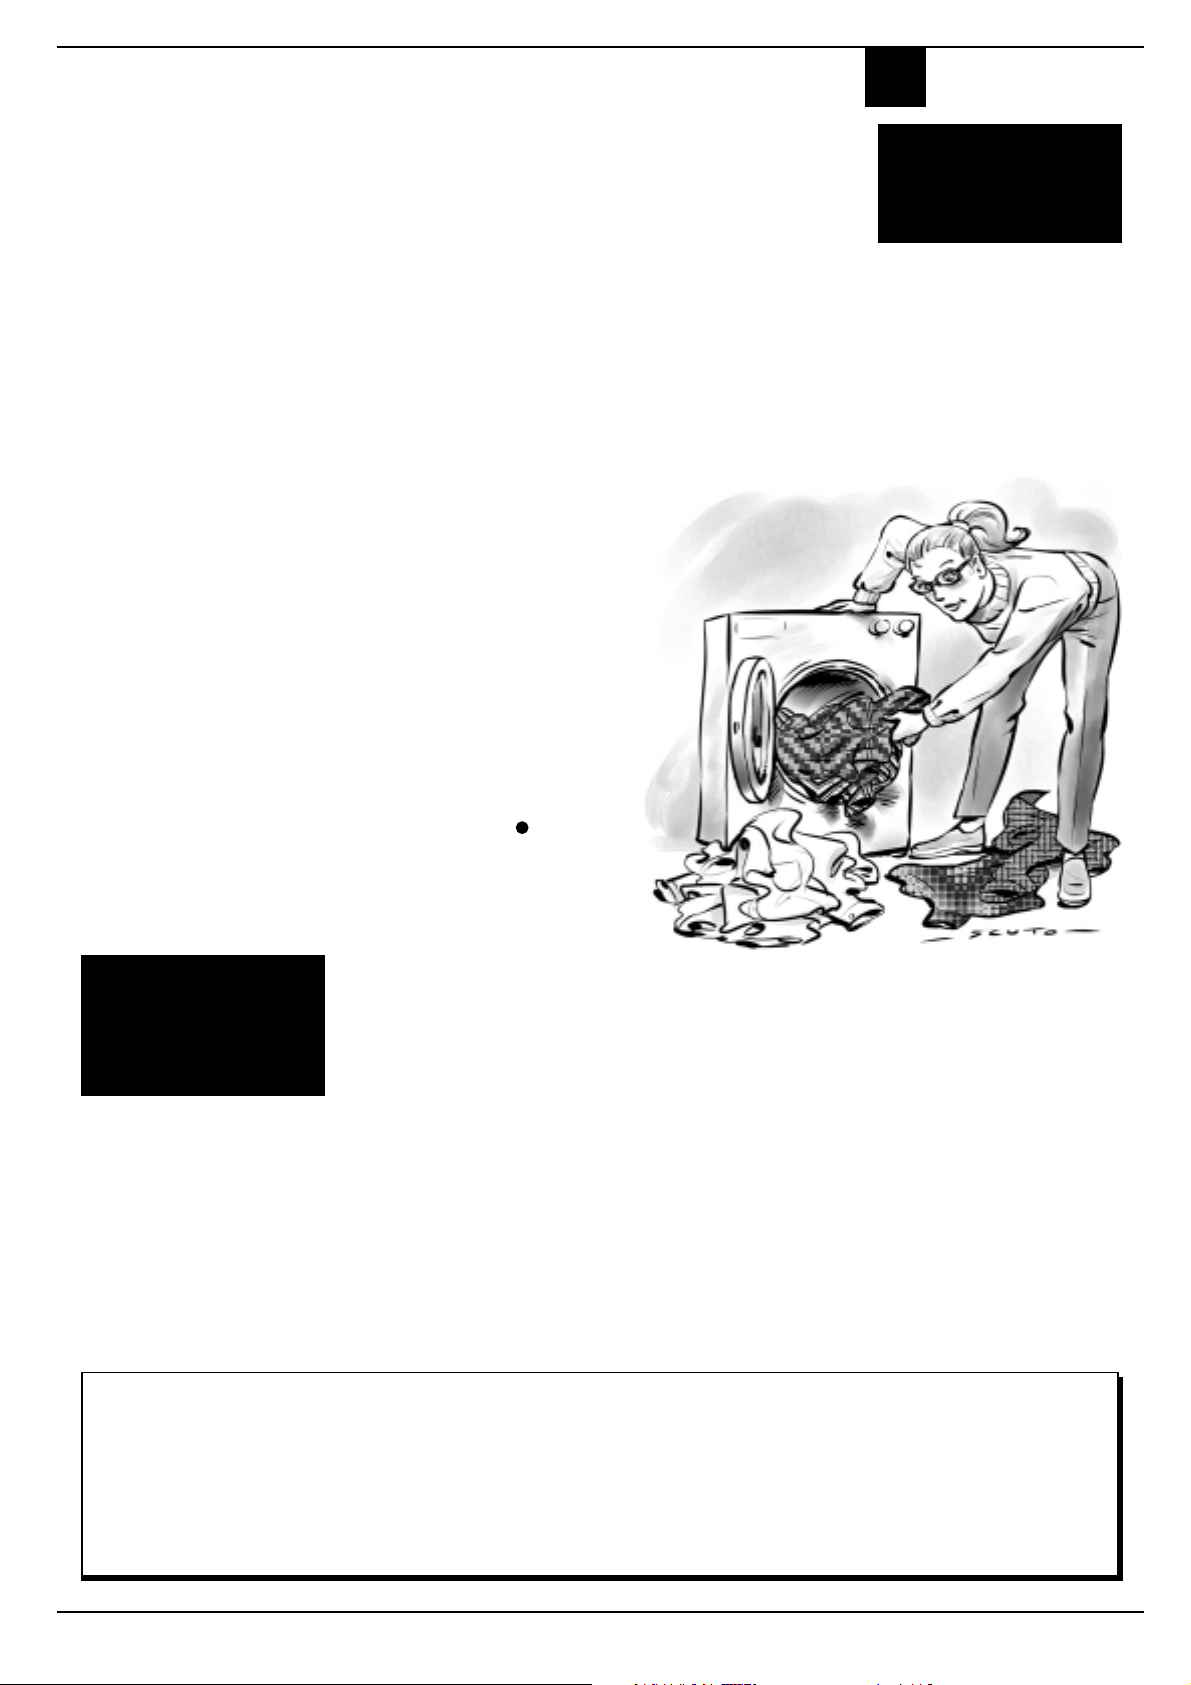
Çamaþýr makinenize çamaþýrlarýnýzý
nasýl yüklemelisiniz?
Yýkama iþleminden daha iyi sonuçlar alabilmek için dikkat edilmesi gereken noktalar
vardýr. Çamaþýrlarýnýzý kumaþ cinsine ve renklerine göre ayýrýn. Etiketleri okuyun,
talimatlarý izleyin ve küçük parçalarý büyük parçalarla dönüþümlü olarak yýkayýn.
M
ARGHERITA
M
Çamaþýrlarýnýzý kumaþ ve
renklerine göre ayýrmak iyi
sonuç almak için çok
önemlidir.
Yýkamadan önce.
Çamaþýrlarýnýzý kumaþ cinsi ve
rengine göre ayýrýn.
Dayanýklý kumaþlar narin
kumaþlardan ayrýlmalýdýr.
Açýk renkli giysiler koyu renkli
giysilerden ayrýlmalýdýr.
Tüm cepleri boþaltýn (jeton, kaðýt,
para gibi) ve düðmeleri kontrol edin.
Gevþek düðmeleri ya dikin ya da
sökün, çünkü yýkama sýrasýnda
kopabilir.
Etiketler her þeyi söyler.
Yýkadýðýnýz giysinin her zaman
etiketine bakýn; etiketler, giysiniz in
mümkün olan en iyi þekilde nasýl
yýkanacaðýný söyler.
Sayfa 5'teki tablo, etiketlerde
bulunan tüm sembollerin sýrlarýný
açýklar. Bu tablo daha iyi yýkama ve
giysilerin daha uzun süre dayanmasý
için gereken bilgileri içerir.
Ariston Margherita'nýn çalýþtýrýlmasý
Yeni çamaþýr makinenizi kurduktan sonra, 90°Cde 1
numaralý programý ayarlayýnýz.
Margherita'nýn doðru þekilde
çalýþtýrmak, yýkama kalitesini
artýrmak ve cihazýn ömrünü artýrmak
için, çok önemlidir.
Çamaþýrlarýnýzý yerleþtirdikten ve
deterjaný ekledikten sonra her zaman:
1. Kapýsýnýn doðru kapatýldýðýndan.
2. Fiþin prize takýlý olduðundan.
3. Su musluðunun açýk olduðundan.
4. A seçici düðmesinin
tekrarbaþlat) sembolü konumlarýndan
birinde olduðundan emin olun.
(durdur/
Küçükler ve büyükler bir
arada.
Ariston Margherita serisi çamaþýr
makinesinin çamaþýr yükünü dengeli
daðýtmak üzere özel bir elektronik
kontrol sistemi vardýr; sýkma iþlemine
geçilmeden önce, bu cihaz, yýkama
ve yük miktarýna göre, çamaþýrlarýn
kazan içinde mümkün olduðu kadar
eþit þekilde daðýlmasýný saðlar. Bu
nedenle istenmeyen gürültü ve
titreþimler önlenir.
Arzu edilen programý seçin
Program yýkanacak çamaþýrlarýn
cinsine göre seçilir. Doðru programý
Daha narin giysiler için: Ýç
çamaþýrý, tayt ve çoraplarý ve
narin giysileri bezden bir
kese içine koyarak
koruyabilirsiniz.
seçmek için sayfa 4'teki tabloya
baþvurun. A düðmesini, seçtiðiniz
programla kontrol paneli üzerindeki
çizgi ile ayný hizaya gelinceye kadar
çeviriniz. B düðmesini kullanarak
sýcaklýk ayarýný yapýnýz, ve eðer
gerekliyse D, E tuþlarýna bastýktan
sonra açma kapama düðmesi F ye
basýnýz.
Yýkama zamanýný geciktirmek
istiyorsanýz, bunun program
seçiminden önce ayarlanmasý
gerektiðini unutmayýn.
Yýkama iþleminin sonunda...
H lambasýnýn sönmesini bekleyin: bu
üç dakika kadar sürecektir.
Daha sonra makinenizi açma/
kapama düðmesi F'yi (OFF [kapalý]
konumuna getirerek kapatýn. Artýk
çamaþýr makinesinin kapaðýný
emniyetli bir þekilde açabilirsiniz. Yeni
yýkanmýþ çamaþýrlarýnýzý çýkardýktan
sonra,çamaþýr makinenizin kapaðýný
açýk veya aralýk býrakýn, böylelikle
içeride kalan nem buharlaþacaktýr.
Her zaman su musluðunu kapatýn.
Unutmayýnýz ki, elektrik
kesintisi halinde, ve çamaþýr
makinesinin kendini kapattýðý
durumlarda seçili program
hafýzada kalacaktýr.
Bazý inatçý lekeler nasýl yok edilir?
Mürekkep ve vücut lekeleri: 90º C'de metil alkol veya alkole batýrýlmýþ bir parça pamukla silin.
Zift: tereyaðý ile silin, terebentin ile ovun ve derhal yýkayýn.
Ciklet: Oje çýkarýcý ile ovun ve temiz bir bezle silerek temizleyin.
Küf: Pamuklu ve beyaz çamaþýr 5 ölçü su, 1 ölçü beyazlatýcý ve bir çorba kaþýðý sirkeli suya yatýrýlýp, daha sonra derhal yýkanmalýdýr. Diðer
beyaz çamaþýrlar için 10 hidrojen peroksit tableti kullanýp derhal yýkamalýdýr.
Ruj: Etere batýrýlmýþ yün veya pamukla silin. Ýpekli için trikloroetilen kullanýn.
Oje: Lekenin üzerine oje çikarýcýsýna batirilmis emici kaðit koyun, kaðýt renk deðiþtirince giysiyi kaldýrýn.
Çim: Metil alkole batýrýlmýþ bir parça pamukla silin.
Margherita -
Yerleþtirme ve kullanma kýlavuzu
2
Page 6
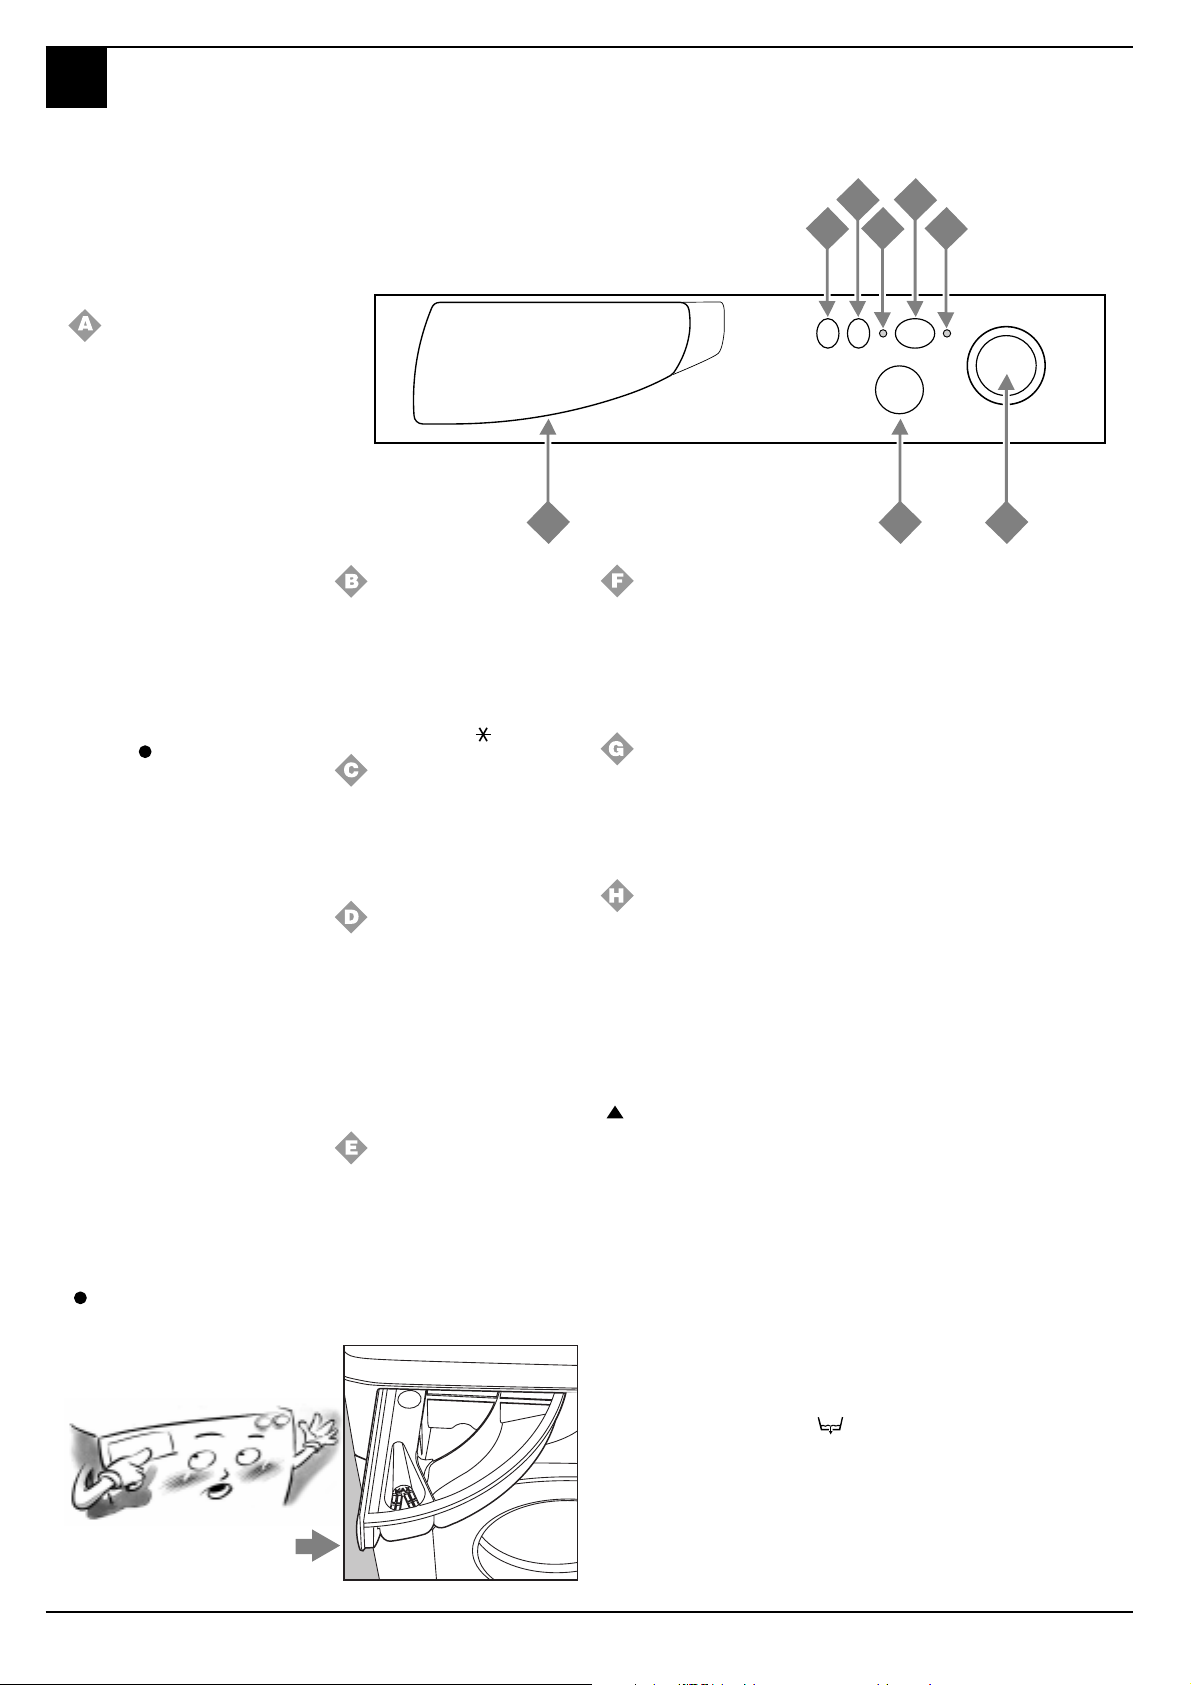
M
ARGHERITA
Kontrol Benim Elimde
Doðru seçimi yapmak çok önemlidir.
Program seçme ve yýkama
zamanýný programlama
düðmesi
Bu düðme yýkama programýný
seçmek için kullanýlýr.
Bu düðmeyi sadece saat yönünde
çeviriniz.
Programý seçmek için, program
düðmesi üzerindeki sembol yada
numara kontrol panosu üzerindeki
çizgiye gelinceye kadar çeviriniz.
Þimdi açma kapama anahtarý F ye
basýnýz, pilot lamba G göz kýrparak
yanacaktýr. 5 saniye sonra seçilen
program kabul edilecek ve pilot
lamba G sürekli yanýk kalacaktýr ve
yýkama iþlemi baþlayacaktýr.
Çalýþmakta olan programý durdurmak
veya yeni bir program seçmek için
düðmeyi
noktalarýndan birinin üzerine getirerek
5 saniye bekleyiniz. Ýptal iþlemi kabul
edildiðinde pilot lamba G göz kýrparak
yanacaktýr. Bundan sonra makinenizi
açma kapama düðmesinden
kapatabilirsiniz.
Bu düðmeyi, makinenizi gecikmeli
baþlatmak için de kullanabilirsiniz.
Gecikmeli baþlama pozisyonlarýndan
birini seçiniz, açma kapama anahtarý
F ye basýnýz ve 5 saniye bekleyiniz.
Gecikme kabul edildiðinde ( pilot
lamba G sürekli yanar ) yýkama
programýný seçiniz.
Pilot lamba G belli aralýklarla (2
saniye yanýk 4 saniye sönük) yanýp
sönmeye baþlayarak, gecikmeli
yýkama programýnýn kabul edildiðini
gösterecektir. Bu süreç içinde
makinenizin kapaðýný açabilir, içine
ilave çamaþýr ekleyebilir veya
çýkartabilirsiniz.
Yýkama devresi ayarlandýktan ve
çamaþýr makinesi tarafýndan kabul
edildikten sonra, düðmeyi çevirmek
durdur/tekrarbaþlat konumunda
(
olduðu durum hariç) bir iþe yaramaz.
durdur / tekrar baþlat
Termostat düðmesi
Bu düðme program tablosunda
belirtilen yýkama ýsýsýný ayarlamakta
kullanýlýr. Ayrýca seçili bir program
için tavsiye edilen ýsýyý düþürmenizi
ve hatta soðuk yýkama devresi
ayarlamanýzý saðlar (
Deterjan bölmesi
Deterjan bölmesi üç bölmeden oluþur:
1.Bölüm:Ön yýkama deterjaný;
2.Bölüm:Yýkama evresi deterjaný;
3.Bölüm:Yumuþatýcýlar.
Sýkma Ýptal Düðmesi
Bu düðmeye bastýðýnýzda çamaþýr
makineniz bir sýkma devresi
yürütmeyecek, ancak suyun
süzülmesine yardýmcý olmak üzere
orta hýzda bir silindir dönüþü
gerçekleþtirecektir. Bu düðmeyi
ütülemesi zor olan giysilerinizi
yýkarken kullanmanýzý öneririz.
Ekstra ekonomi tuþu
Bu tuþ sayesinde durulama iþlemi
sýrasýnda su tüketimi azalýr. Bu tuþu
sadece küçük miktarlardaki
çamaþýrlarý yýkamak için kullanýnýz ve
çamaþýr miktarý ile orantýlý olarak
deterjan miktarýný azaltýnýz.
1
3
C
Açma/kapama tuþu
F düðmesine basýldýðýnda çamaþýr
makinesi açýlýr, basýlmadýðýnda
çamaþýr makinesi kapalýdýr.
Makineyi kapamak seçili
programý iptal etmez.
).
Açýk-kapalý lambasý
Cihaz açýldýðýnda ve ayarlanmayý
beklerken G lambasý yanýp söner.
Yanýk duran lamba, cihazýn seçili
programý kabul ettiði anlamýna gelir.
Kapý bloðu lambasý
Emniyet lambasý çamaþýr
makinesinin, yanlýþlýkla açýlmasýný
önlemek üzere bloke edildiðini
gösterir. Tehlikelerden sakýnmak için,
kapýyý açmadan önce üç dakika kadar
bu lambanýn sönmesini bekleyin.
Kýrýþýklýk Önleme
( ) þekliyle gösterilen bu fonksiyon,
çamaþýrlarýn süzülmeden önce suyun
içinde kalmasýný saðlayarak yýkama
programýný durdurur. Sadece
sentetik, ipekli kumaþlar ve perdeler
için geçerli olan programlarda
kullanýlabilir. Bu þekilde narin ve
sentetik kumaþlarýn kýrýþmasý
önlenmiþ olur (örneðin, çamaþýrý
yýkadýktan sonra deðil de ancak
birkaç saat sonra çýkarabiliyorsanýz).
Bu program A düðmesini bir çýt
döndürerek tamamlanabilir.
Sentetik kumaþ yýkarken, sýkma
devresi yerine boþaltmayý tercih
edecek olursanýz, A düðmesini
2
boþaltma sembolüne getirene kadar
çevirin.
Kontrol panelini anlayalým
F
E
D
H
B
G
A
Deterjan bölmesý buradadir.
3
Margherita -
Yerleþtirme ve kullanma kýlavuzu
Page 7
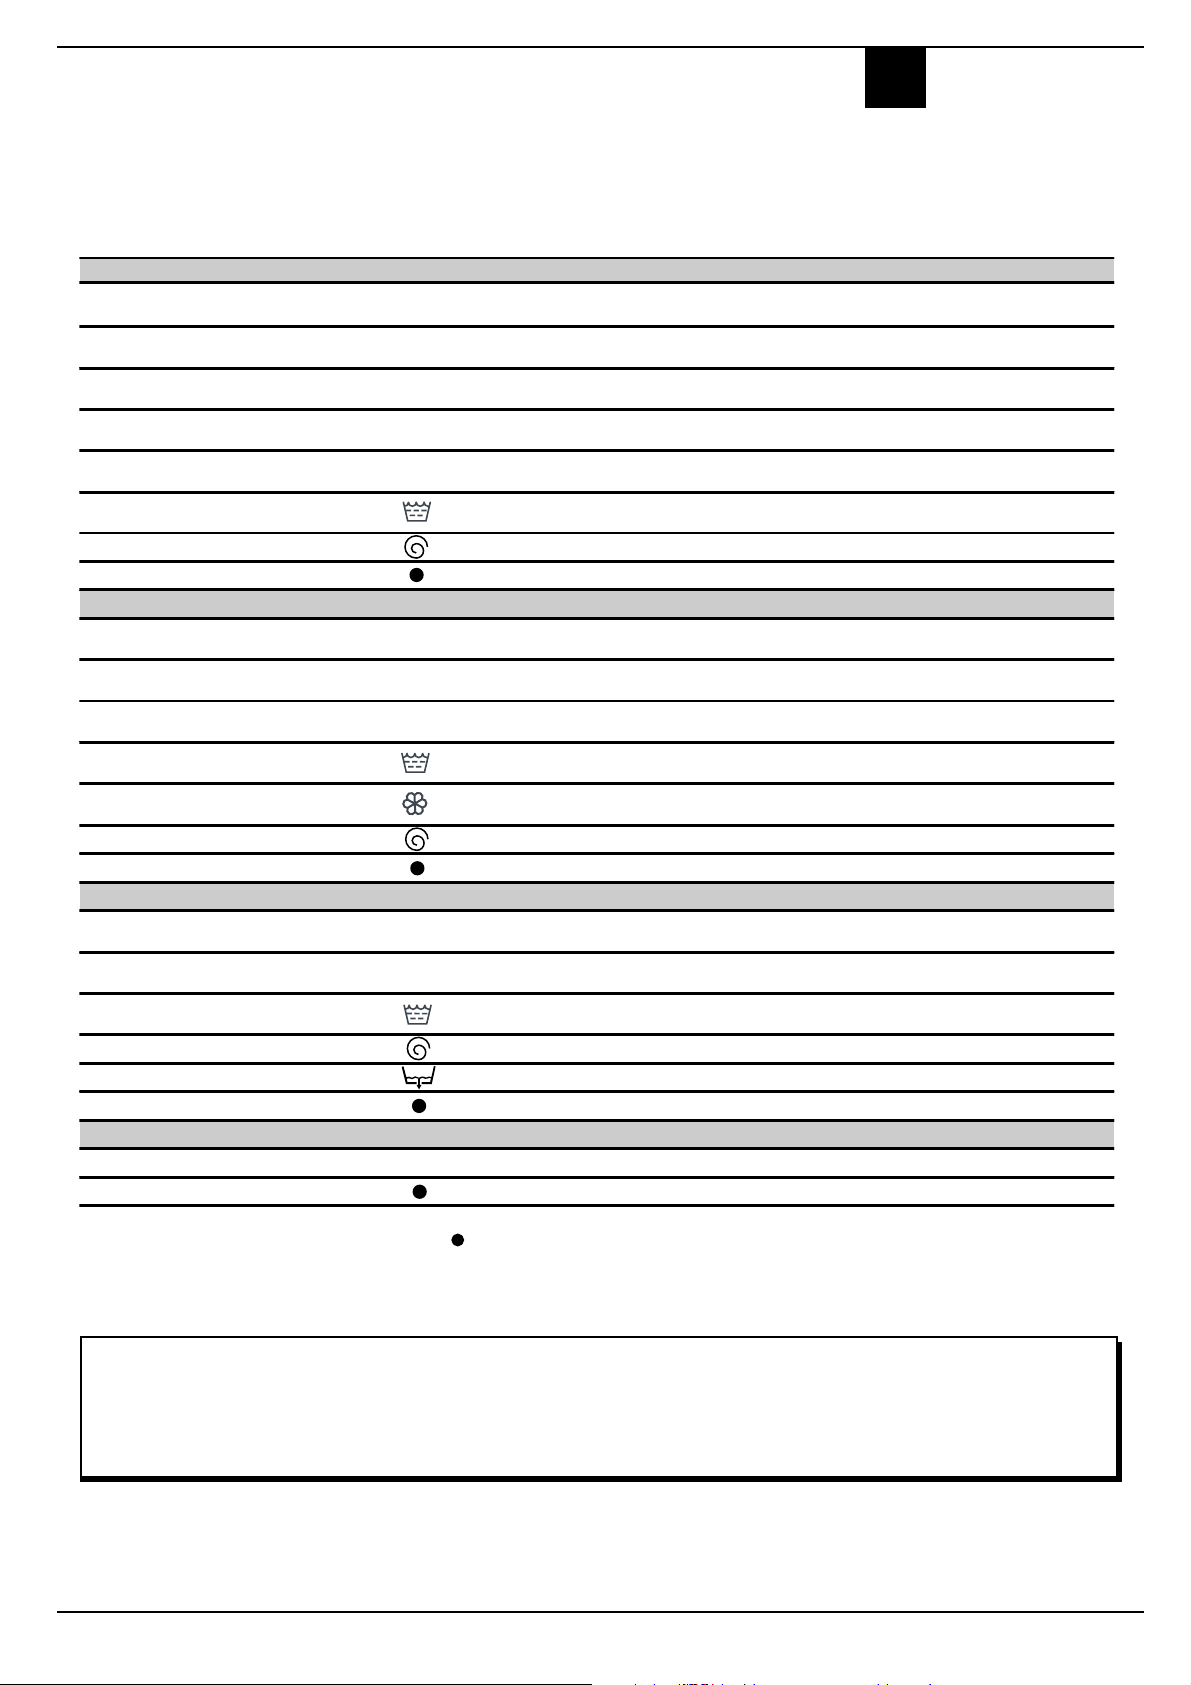
Bugün ne yýkýyorsunuz?
M
Giysileriniz için özel programlar
ARGHERITA
Kumaþ tipi ve kir derecesi Program
düðmesi
PAMUKLULAR
Aþýrý kirli beyazlar
(Çarþaf, masa örtüsü vs.)
Özellikle kirli beyazlar
(tiþört, masa örtüsü vs.)
Çok kirli beyazlar ve solmaz renkliler
Çok kirli beyazlar ve solmaz renkliler
Az kirli beyazlar ve narin renkliler
(gömlekler, kazaklar vs.)
Durulama devreleri
Sýkma devresi Boþaltma ve son sýkma devresi
Durdur/Tekrarbaþlat
SENTETÝKLER
Çok kirli solmaz sentetikler (bebek çamaþýrý vs.)
Narin renkli sentetikler
(her tip az kirli giysi)
Narin renkli sentetikler
(her tip az kirli giysi
Durulama devreleri
Yumuþatma
Sýkma devresi Boþaltma ve narin sýkma devresi
Durdur/Tekrarbaþlat
NARÝNLER
Elde Yýkama
Özellikle narin giysiler Kumaþlar (perdeler,
ipekli, viskoz vs.)
Durulama devreleri
Sýkma devresi Boþaltma ve narin sýkma devresi
Boþaltma Boþaltma
Durdur/Tekrarbaþlat
PROGRAMLI BAÞLANGIÇ
12 - 9 - 3 - 1 saat geç baþlatma Baþlatma 12 - 9 - 3 - 1 saat ertelenir
Durdur/Tekrarbaþlat
Isý düðmesi
Ön yýkama
deterjaný
1 90°C
2 90°C
360°C
440°C
540°C
660°C
740°C
8 30°C
940°C
10 30°C
Yýkama
deterjaný
◆◆◆
Kumaþ
yumuþatýcý
Yýkama
devresi
(dakika)
◆◆
◆◆
◆◆
◆◆
165
145
130
150
95
◆
◆◆
◆◆
◆◆
100
70
30
◆
◆
◆◆
◆◆
60
50
◆
Yýkama devresinin tarifi
Ilýk ön yýkama, 90º C'de yýkama, durulama
devreleri ve ilk ve son sýkma devreleri
90º C'de yýkama, durulama devreleri ve ilk ve
son sýkma devreleri
60º C'de yýkama, durulama devreleri ve ilk ve
son sýkma devreleri
40º C'de yýkama, durulama devreleri ve ilk ve
son sýkma devreleri
40º C'de yýkama, durulama devreleri ve ilk ve
son sýkma devreleri
Durulama devreleri, ilk ve son sýkma devreleri
Seçili programý durdurur/iptal eder
60º C'de yýkama, durulama, buruþuk önleme
veya narin sýkma devresi
40º C'de yýkama, durulama, buruþuk önleme
veya narin sýkma devresi
30º C'de yýkama, durulama, buruþuk önleme
veya narin sýkma devresi
Durulama devreleri, buruþuk önleme veya narin
sikma devresi
Otomatik yumuþatýcý eklemeli durulama Devreleri,
buruþukluk önleme veya narin sýkma devresi
Seçili programý durdurur/iptal eder
40º C'de yýkama, durulama ve narin sýkma
devreleri
30º C'de yýkama, durulama devreleri
buruþukluk önleme veya boþaltma
Durulama devreleri ve buruþukluk önleme veya
boþaltma
Seçili programý durdurur/iptal eder
Seçili programý durdurur/iptal eder
Önemli: Henüz ayarladýðýnýz programý iptal etmek için (durdur/tekrarbaþlat) sembollerinden birini 5 saniye süreyle seçin.
Bu tablodaki veriler sadece göstermek içindir, bunlar yýkama tipine ve miktarýna göre, su sistemi ve oda ýsýsýna göre deðiþebilir.
Özel Programlar
40º C'de A Sýnýfý: Ariston Margherita'nýn düþük ýsýlarda bile en iyi sonuçlarý elde etmek için özel bir programý vardýr. Diðer çamaþýr makinelerinde 60º C'de
alacaðýnýz yýkama performansýný program 4'ü 40º C'ye ayarladýðýnýzda alabilirsiniz; bu size örneðin 60º C'de yýkamaya cesaret edemediðiniz renkli giysilerinizi
yýkamaya olanak saðlar.
Günlük yýkama: Ariston Margherita'in hafif kirli giysilerin kýsa zamanda yýkanmasý için düþünülmüþ bir programý mevcuttur. Program 8'yi 30º C'ye
ayarladýðýnýzda, (yünlü ve ipekli hariç) farklý tipte 3 kg çamaþirý birlikte yýkayabilirsiniz. Bu yaklaþýk 30 dakika sürdüðünden zamandan ve elektrikten tasarruf
edersiniz.
SÝVÝ DETERJAN KULLANMANÝZÝ ÖNERIRIZ.
Margherita -
Yerleþtirme ve kullanma kýlavuzu
4
Page 8
M
ARGHERITA
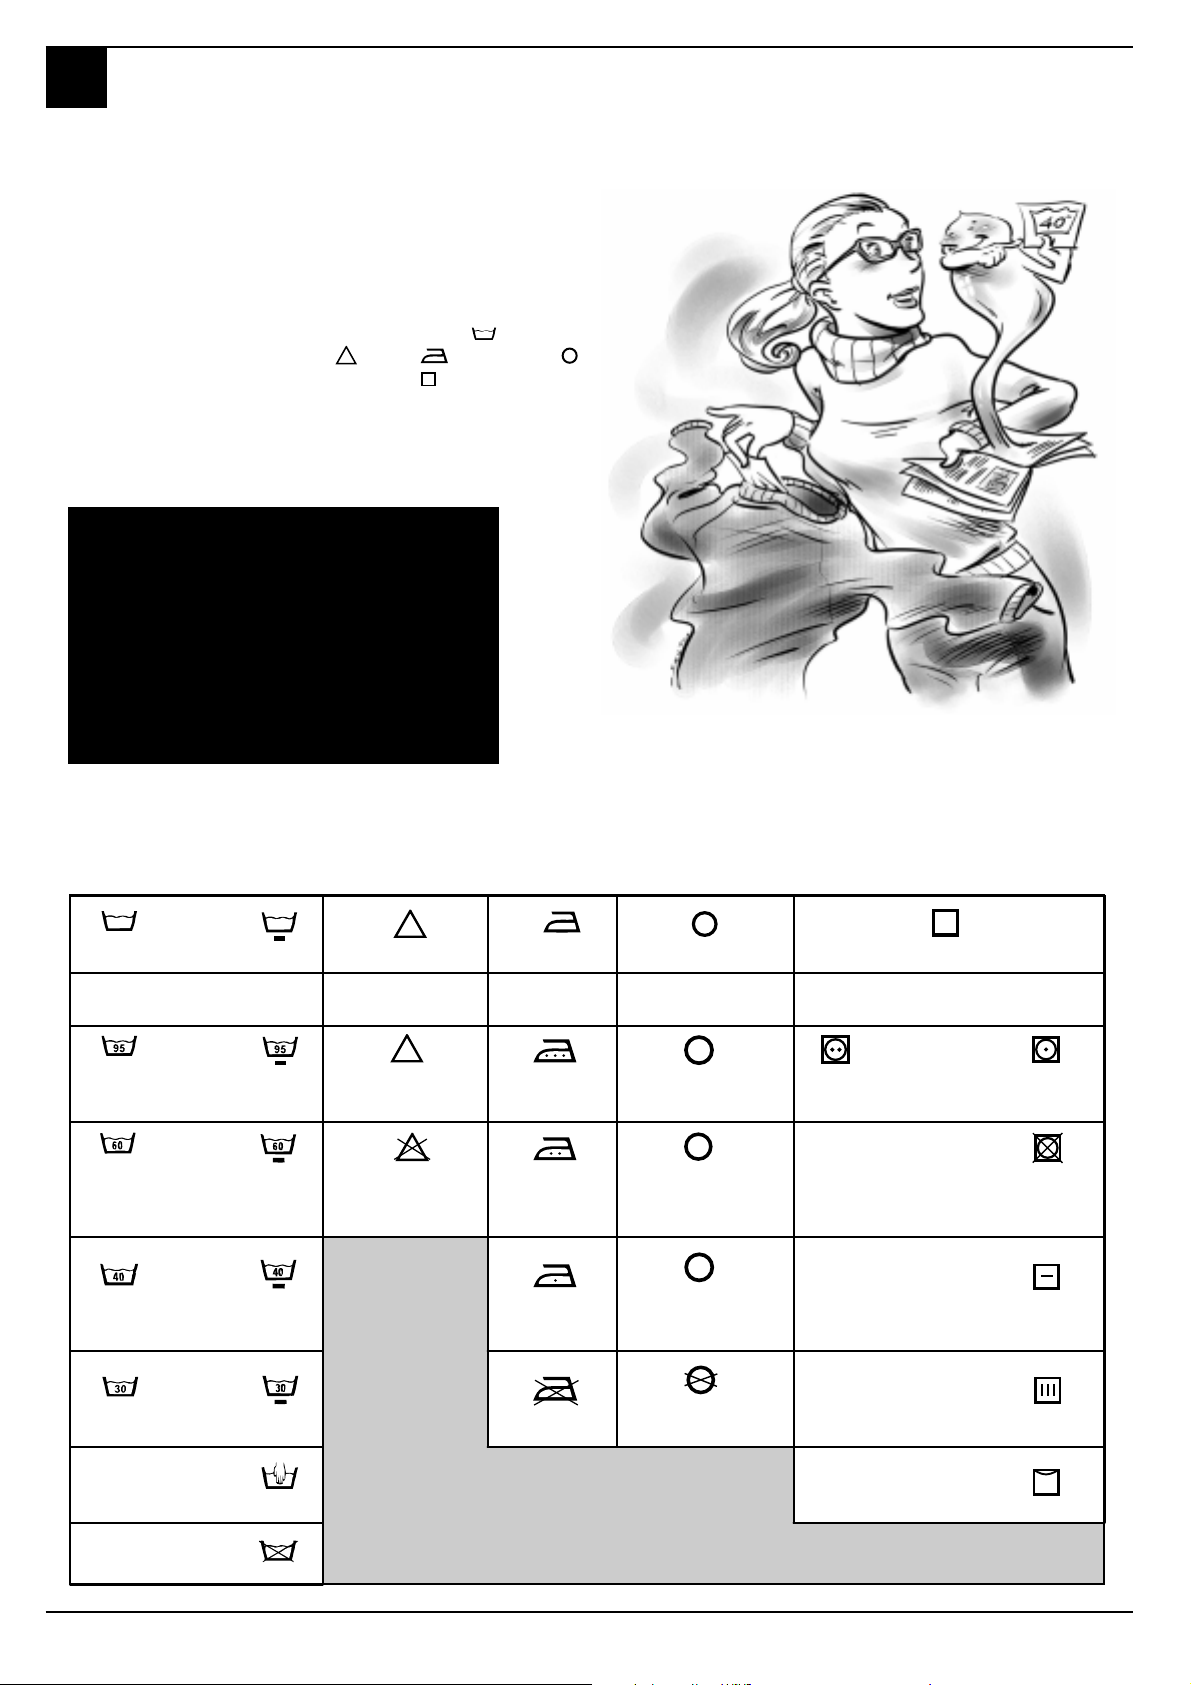
Etiketleri anlamak
Bu sembollerin anlamlarýný öðrenerek, çamaþýr yýkarken
daha iyi sonuçlar alabilirsiniz; giysileriniz daha uzun süre
dayanýr ve makineniz daha iyi yýkayarak, mükemmel
sonuçlar verir.
Giysi etiketleri, küçük ancak önemli
sembollerle ifade edilen önemli
bilgileri içerir. Eðer daha iyi yýkama
sonuçlarý almak ve giysilerinize hak
ettiði özeni göstermek istiyorsanýz
bunlarý anlamak çok faydalýdýr.
Faydalý ipuçlarý
Daha iyi sonuçlar almak ve daha fazla dayanmalarýný
saðlamak için gömleklerin içini dýsýna çevirin.
Her zaman cepleri boþaltýn.
Bu semboller beþ farklý kategoriye ve
þekle ayrýlýr: Yýkama
, beyazlatma
, ütüleme , kuru temizleme
ve kurutma .
Etikete bakýn: etiket faydalý tavsiyeyi verecektir.
Çamaþýrlarýnýzý makineye doldururken sýrayla büyük ve
küçük parça koyun.
Bu tablodaki sembolleri öðrenin; size daha iyi bir yýkama saðlamak, giysilerinize
özen göstermek ve Ariston Margherita'dan daha iyi verim almak konusunda size
yardýmcý olacaklardýr.
Yýkama Aðartma Ütüleme Kuru Temizleme Kurutma
Kuvve-
tlý etki
95°C´ de
yýkama Soðuk suda aðartma
60°C´ de
yýkama
Narý n
etki
c
l
Aðartma iþlemi
yapýlamaz
Sýcak ütüleme
max. 200°C
Orta sýcak
ütüleme max.
150°C
A
Herhangi býr çözücü
ile kuru tem izleme
P
Perklorid, benzin, saf,
alkol, R111 ve R113
ile kuru tem izleme
Kuvve-
tlý etki
Doðru ýsýyý seçtiðinizden emin
olun!
Narý n
etki
Makinada
kurutulabilir
Makinada
kurutulamaz
5
Margherita -
40°C´ de
yýkama
30°C´ de
yýkama Ütü yapýlamaz
El ile yýkam a
Yýkanamaz.
Yerleþtirme ve kullanma kýlavuzu
Max. 100°C´ de
ütüleme
F
Benzin, saf alkol ve
R113 ile kuru
temizleme Sererek kurutun.
Kuru temizleme
yapýlamaz Asarak kurutun.
Elbise askýsý ile
kurutun.
Page 9
M
Hatalardan sakýnmak için faydalý ipuçlarý
ARGHERITA
Çamaþýr makinenizi asla...
yýrtýk, yýpranmýþ, kenarlarý
dikilmemiþ çamaþýrlarý yýkamayýn.
Eðer bunlarý mutlaka yýkamak
zorundaysanýz, bunlarý korumak için
bir keseye yerleþtirin.
Aðýrlýða dikkat edin!
En iyi yýkama sonucu için, aþaðida
belirtilen aðýrlýk sýnýrlarýný aþmayýn
(çamaþýrlarýn kuru aðýrlýklarý
belirtilmiþtir):
- Dayanýklý kumaþlar:
Azami 5 kg
- Sentetik kumaþlar:
Azami 2,5 kg
- Narin kumaþlar:
Azami 2 kg
- Saf yeni yün:
Azami 1 kg
Çamaþýrýn aðýrlýðý nasýl
öðrenilir?
1 çarþaf 400-500 gr.
1 yastýk kýlýfý 150-200 gr.
1 masa örtüsü 400-500 gr.
1 bornoz 900-1.200 gr.
1 havlu 150-200 gr.
Renkli tiþörtler, baskýlý tiþörtler
ve gömlekler yýkanmadan önce ters
yüz edilirse daha uzun süre dayanýr.
Baskýlý tiþörtler ve sweatshirtler ters
yüz edilerek ütülenmelidir.
Salopet yýkarken dikkat!
"Salopet" tipi tulum pantolonlarýn
makinenizin kazaný ve yýkadýðýnýz
diðer giysiler için tehlikeli olabilecek
kancalý askýlarý vardýr. Bunlarý
pantolonun ön tulum cebi içine sokar
çengelli iðneyle iðnelerseniz, çamaþýr
makinenizi korumuþ olursunuz.
Tatillerde: cihazýn fiþini çekin.
Tatile çýktýðýnýzda, makinenizin
fiþinizi çekmenizi, su giriþ musluðunu
kapatmanýzý ve kapaðýný açýk veya
aralýk býrakmanýzý öneririz. Bu þekilde
hem kazan ve lastik conta kuru ve
temiz kalacak ve hem de çamaþýr
makinenizin içinde hoþ olmayan
kokular oluþmayacaktýr.
Yünlü yýkama
En iyi sonuca ulaþmak için,
yünlüler için üretilmiþ özel bir sývý
deterjan kullanmanýzý ve 1kg'dan
fazla çamaþýr koymamanýzý
öneririz.
Özel çamaþýrlarý nasýl yýkayabilirsiniz?
Perdeler.
Perdeler çok buruþur. Buruþmayý
önlemek için bir ipucu: perdeleri
katlayýn ve bir yastýk kýlýfý veya file
torba içine koyun. Genel aðýrlýk,
makinenin aðýrlýk yükünü
geçmeyecek þekilde olsun; baþka bir
þey koymayýn. Sýkma programýný
otomatik olarak hariç tutan program
10'u seçmeyi unutmayýn.
Kaz tüyü ceket ve rüzgarlýklar.
Ariston Margheritada Kaz veya
ördek tüyünden dolgulu ceket ve
rüzgarlýklarý da yýkayabilirsiniz, ancak
2-3 kg.dan daha fazla doldurmamaya
özen gösterin. Doldurmayý, narin
sýkmayý kullanarak 1 veya iki defa
yapýn.
Eþofmanlar.
Eþofmanlarýnýzdan çamur ve kiri
çýkardýktan sonra bunlarý kot
pantolonlar ve diðer kaba giysilerle
yýkayabilirsiniz. Eþofmanlarý
beyazlarla yýkamayýn.
Margherita -
Yerleþtirme ve kullanma kýlavuzu
6
Page 10
M
ARGHERITA
Deterjan bölmesinin kullanýmý
Ýyi yýkama için önemli
Ýlk sýr en kolay olanýdýr: Deterjan bölmesi dýþarýya doðru
döndürerek açýlýr.
Deterjan, detarjan üreticileri
tarafýndan tavsiye edilen miktarlarda
kullanýlmalýdýr. Genellikle, deterjan
kullanýmý ile ilgili ihtiyacýnýz olan tüm
açýklamalar deterjan kutusunun
üzerindedir. Kullanýlmasý gereken
deterjan miktarý çamaþýr yüküne, su
sertliðine ve çamaþýrlarýn ne kadar
kirli olduðuna baðlýdýr.
Deneyimleriniz size zaman içinde
doðru miktarý seçmenizde yardýmcý
olacaktýr.
Bölme 3'e yumuþatýcý koyarken,
ýzgaradan taþmamasýna dikkat edin.
Çamaþýr makinesi, her bir yýkama
esnasýnda çamaþýrlara otomatik
olarak yumuþatýcýyý ekleyecektir.
Sývý/toz deterjan, Bölme 2'ye, yýkama
devresi baþlamadan birkaç saniye
önce konacaktýr.
Sývý deterjan, 60 dereceye kadar olan
ve ön yýkama gerektirmeyen yýkama
devreleri için olduðundan, düðme G'i
kullanmanýza gerek olmayacaktýr.
Direkt olarak çamaþýr makinesinin
kazanýna özel kutularý içinde ve
deterjan kutusunun üzerinde yazýlý
talimatlara göre konan sývý veya toz
deterjanlar satýlýr.
Asla elle yýkama deterjaný
kullanmayýn, çünkü bunlar çok
köpük yapar ve çamaþýr makinenize
zarar verebilir.
Elde ve ayný zamanda otomatik
makinede yýkama için uygun olan
deterjanlar kullanabilirsiniz.
Soðuk suyla yýkarken, her zaman
kullandýðýnýz deterjan miktarýný
azaltýn: deterjan soðuk suda, sýcak
suda olduðundan daha zor çözülür,
bu yüzden fazlasý kullanýlmadan
dýþarý atýlmýþ olur.
Bölme 1'e:
Ön yýkama deterjaný konur (toz).
Bölme 2'ye:
Yýkama deterjaný konur (toz veya
1
2
3
sývý).
Bölme 3'e:
Eklentiler (yumuþatýcýlar, parfümler
vs.) konur.
1
Deterjan bölmesi çýkarýlýp
temizlenebilir: þekilde gösterildiði gibi
yukarý kaldýrýp dýþarý doðru çekin. Daha
2
sonra akan suyun altýnda birkaç dakika
tutun.
Tasarruf
ÇAMAÞIR YÜKÜNÜ AZAMÝYE ÇIKARIN
Tavsiye edilen azami çamaþýr yükünü kullanarak elektrikten, sudan, deterjandan ve zamandan
kazanýn.
2 yarým yük çamaþýr yýkayacaðýnýza, bir tam yük yýkayarak elektrikten %50'ye varan TASARRUF
SAÐLAYIN.
ÖN YIKAMAYA ÝHTÝYACINIZ VAR MI?
Sadece çok aþýrý kirli çamaþýrlar için ön yýkamayý kullanýn.
Az veya normal kirli çamaþýrlar için ön yýkamayý SEÇMEYEREK deterjan, zaman ve sudan ve
elektrikten %5 ila15 arasýnda TASARRUF SAÐLAYIN.
Cihazýnýzýn çevreye dost
ve ekonomik bir þekilde
kullanýmý için bir rehber
SICAK YIKAMA GEREKLÝ MÝ?
Lekeleri önden leke çikarýcýyla veya kurumuþ lekeleri suda bekleterek önceden temizleyin ve sýcak
bir yýkama programý ihtiyacýný en aza indirin.
60º C'lik bir yýkama programý seçerek %50'ye varan TASARRUF SAÐLAYIN.
7
Margherita -
Yerleþtirme ve kullanma kýlavuzu
Page 11
M
ARGHERITA
Sorun Giderme
Servis çaðýrmadan önce siz ne yapabilirsiniz?
Çamaþýr makinenizin çalýþmadýðý durumda, ortaya çýkan bazý sorunlar Ariston
Yetkili Servisini çaðýrmaya gerek kalmadan kolaylýkla çözülebilir. Yardým
çaðýrmadan önce, aþaðýdakileri kontrol edin.
Çamaþýr makinesi
çalýþmaya baþlamýyor.
Fiþ doðru bir þekilde prize
takýlmýs mý? Temizlerken
yerinden çýkmýþ olabilir.
Evde elektrik var mý? Belki ayný
anda pek çok cihaz çalýþýyordur,
ana þalter açmýþ olabilir. Belki de
bulunduðunuz bölgede genel bir
Açma/kapama düðmesine
basýlmýþ mý?
Çamaþýr makinenizin program
düðmesi doðru konuma
getirilmiþ mi?
Su musluðu açýk mý? Emniyet
amaçlý olarak, eðer çamaþýr
makinesi su almýyorsa, yýkama
iþlemi baþlamaz.
elektrik kesintisi söz konusudur.
Çamaþýr makinenizin kapaðý
düzgün olarak kapatýlmýs mý?
Eðer çamaþýr makinesinin kapaðý
açýk kalmýþ veya tam olarak
kapatýlmamýþsa, çamaþýr
makineniz çalýþmaz.
DOÐRU YANLIÞ
Her yýkama
devresinden sonra
musluðu kapatýn.
Çamaþýr makinesinin
hidrolik sisteminin
kullanýmýný kýsýtlayýn
ve evde kimse
yokken sýzýntý
risklerinden
kurtulun.
Kötü kokulardan
kurtulmak için
kapaði sürekli olarak
açýk býrakýn.
Cihazýnýzýn dýþ
yüzeyini itinayla
temizleyin. Dýþ
yüzeyleri
temizlerken ýlýk suya
batýrdýðýnýz bir bez
kullanýn.
Makinenin fiþini
temizlerken çekmemek.
Bakým esnasýnda bile
cihazýn fiþi her zaman
çekili olmalýdýr.
Çözücüler ve zararlý
aþýndýrýcýlar kullanmak.
Makinenizin dýþ ve lastik
kýsýmlarýný temizlerken
asla çözücü ve aþýndýrýcý
maddeler kullanmayýn.
Deterjan bölmesini ihmal
etmek. Deterjan bölmesi
yerinden çýkarýlabilir ve
akan suyun altýna tutarak
kolayca temizlenebilir.
Çamaþýr makinesini
düþünmeksizin tatile
çýkmak. Ayrýlmadan önce,
çamaþýr makinenizin
fiþinin çekili ve su
musluðunun kapalý
olduðundan emin olun.
Fakat, su nereye gitti ?
Yeni Ariston teknolojisi ile, iyi netice alabilmek için çok az suya
ihtiyacýnýz var!
Bu yüzdendir ki çamaþýr makinenizin kapaðýndan baktýðýnýzda suyu
göremezsiniz:
Çünki maksimum temizlikten vazgeçmeksizin çevreye dost bir þekilde
az, çok az su kullanýrýz.
Ve, bunlarýn da ötesinde elektrik tasarrufu saðlanýr.
Program seçici düðme
dönüp duruyor mu?
Boþaltma pompasýnýn kazaný
boþaltmasý için birkaç dakika
bekleyin, daha sonra
durdur/
Çamaþýr makinesi su
almýyor.
Musluk, su borusuna doðru
baðlanmýþ mý?
Su kesintisi var mý?Binanýzda
veya caddenizde bir tamirat
yapýlýyor olabilir.
Yeterli basýnç var mý? Þebekenin
su basýncý düþük olabilir.
Musluk filtresi temiz mi? Su
çok kalkerli ise veya su tesisatýnda
son zamanlarda bir tamirat
yapýlmýþ ise, musluk filtresi
parçacýklar nedeniyle týkanmýþ
olabilir.
Lastik hortum kývrýlmýþ mý?
Suyu çamaþýr makinesine taþýyan
lastik hortum mümkün olduðu
kadar düz olmalýdýr, ezilip
bükülmediðinden emin olun.
Margherita'yý kapatýn,
yeniden ayarla sembollerinden
birini seçin, daha sonra tekrar açýn.
Eðer düðme dönmeye devam
ederse, Ariston yetkili servisini
çaðýrýn çünkü makineniz bir arýzayý
haber veriyor olabilir.
Çamaþýr makinesi sürekli
olarak su alýp boþaltýyor.
Boþaltma hortumu çok mu
aþaðýda? Hortum 60 ila 100 cm
bir yüksekliðe baðlanmalýdýr.
Hortumun aðzý suyun içinde
mi?
Duvar drenaj sisteminin
havalandýrma bacasý var mý?
Eðer sorun, bu kontrollerden sonra
da devam ederse, su musluðunu
ve cihazý kapatýn ve teknik yardým
çaðýrýn. Eðer binanýzýn üst
katlarýndan birinde oturuyorsanýz,
drenajda bir sorun olabilir. Bu
sorunu çözmek için özel bir supap
tesis edilmelidir.
Margherita -
Yerleþtirme ve kullanma kýlavuzu
8
Page 12
M
ARGHERITA
Çamaþýr makinesi ne
suyu boþaltýyor ne de
sýkma yapýyor.
Seçili program su boþaltmayý
öngörüyor mu? Bazý yýkama
devreleri suyu program düðmesi
bir miktar döndürüldükten sonra
boþaltmaktadýr.
"Kýrýþýklýk önleme" özelliði
olan bir program seçilmiþ mi?
Bu özellik suyun el müdahalesiyle
boþaltýlmasýný gerektirir.
Boþaltma pompasý týkanmýþ
mý? Bunu kontrol etmek için,
musluðu kapayýn, makineyi fiþten
çekin ve sayfa 11'deki talimatlarý
izleyin veya Ariston Yetkili
Srevisini yardýma çaðýrýn.
Her zaman yetkili
teknisyenlerden yardým
alýn ve sürekli olarak
orijinal parça
kullanýlmasýnda ýsrar
edin.
Boþaltma hortumu bükülmüþ
mü? Boþaltma hortumu mümkün
olduðunca düz olmalýdýr. Ezilip
bükülmediðinden emin olun.
Çamaþýr makinesinin boþaltma
yolu týkanmýþ mý? Boþaltma
hortumunun uzatmasý varsa,
doðru takýlmýþ olduðundan emin
olun.
Çamaþýr makinesi sýkma
esnasýnda çok fazla
titriyor.
Nakliye braketleri, kurma
esnasýnda çýkarýlmýþ mý?
Kurma prosedürleri hakkýndaki bir
sonraki sayfaya bakýn.
Çamaþýr makinesi doðru
þekilde düz bir zemine konmuþ
mu? Çamaþýr makinesinin dengesi
periyodik olarak kontrol
edilmelidir. Zamanla makine, az da
olsa yerinden oynayabilir.
Ayaklarýný ayarlayýp zemine doðru
oturup oturmadýðýný kontrol edin.
Cihaz mobilya ve bir duvar
arasýna mý kurulmuþ? Çamaþýr
makinesinin sýkma devresinde bir
miktar titremesi normaldir. Bu
yüzden etrafýnda birkaç santimlik
yer býrakýlmalýdýr.
Çamaþýr makinesi
sýzdýrýyor.
Giriþ hortumunun metal
halkasý düzgün baðlanmýþ mý?
Musluðu kapatýn, cihazý fiþten
çekin ve zorlamadan baðlantýyý
sýkýlaþtýrmaya çalýþýn.
Deterjan bölmesi týkanmýþ mý?
Çýkarýn ve musluk suyunun altýnda
yýkayýn.
Boþaltma hortumu doðru
baðlanmýþ mý? Musluðu kapatýn,
cihazý fiþten çekin ve baðlantýyý
sýkýlaþtýrmaya çalýþýn.
Çok fazla köpük.
Deterjan otomatik makinede
yýkamaya uygun mu? Deterjan
etiketinde "makinede yýkama için"
veya "elde ve makinede yýkama
için" gibi ifadeler bulunup
bulunmadýðýný kontrol edin.
Doðru miktarda mý
kullandýnýz? Aþýrý miktarda
deterjan, çok köpük yapmanýn yaný
sýra, etkili bir yýkama saðlamaz ve
cihazýn iç aksamýna zarar verir.
Eðer tüm kontrollere raðmen,
çamaþýr makinesi çalýþmýyor ve
sorun devam ediyorsa, aþaðýdaki
bilgileri vererek, en yakýn Ariston
Yetkili Servisini arayýn;
- arýzanýn tipi
- model numarasý (Mod. ...)
- seri numarasý (S/N ...)
Bu bilgiler çamaþýr makinenizin
arkasýndaki bilgi levhasýnda
mevcuttur.
Teknik Özellikler
Model AB 83
Boyutlar geniþlik cm 59,5
Kapasite 1 - 5 kg
Elektrik baðlantýlarý çalýþma gerilimi 220/230 Volt 50 Hz
Su baðlantýlarý maksimum su basýncý 1 MPa (10 bar)
Sýkma hýzý 850 devir/dakika
IEC456 tarafýndan
yapýlan
düzenlemeye göre
programlama þekli
yükseklik cm 85
derinlik cm 52,5
maksimum çekilen güç 1850 W
minimum su basýncý 0,05 MPa (0,5 bar)
tambur kapasitesi 40 litre
program 3'ü 60º C'; 5,0 kg yuk ile yürütülmüþtür; ekstra ekonomi tuþuna basýnýz.
Bu onay; IEC (Uluslararasý Elektroteknik Komisyonu) kurallarý dahilince bir kalite onayý anlamýndadýr. Makinanýz, ayrýca
yine ECC kurallari 89/336 no ve 03/05/89 tarihli radyo frekanslar zarar verici parazitlerin önlenmesi ve 73/23 no 19/02/73
tarihli düþük voltajda çalýþabilme yönergelerine uygundur.
TS 2004 EN 60335-2-7
9
Margherita -
Yerleþtirme ve kullanma kýlavuzu
Page 13
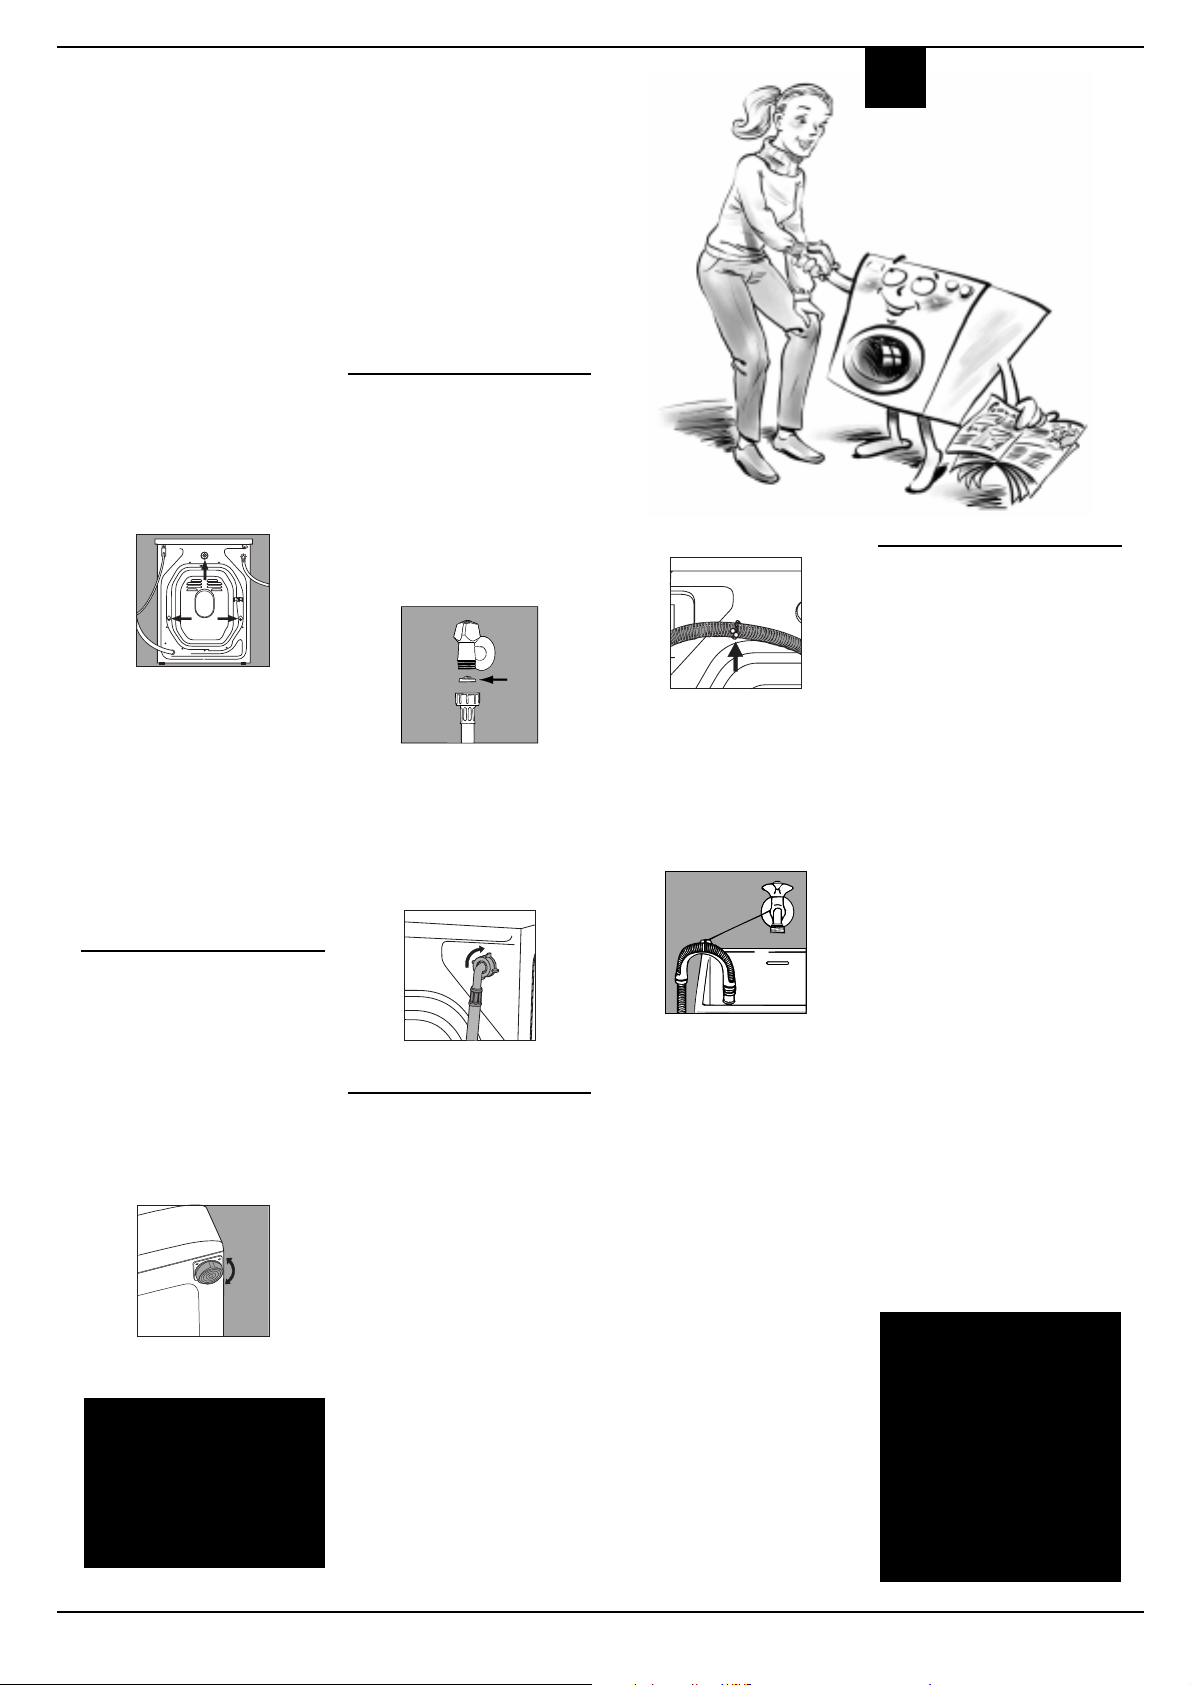
Kurma ve Kaldýrma
Ariston Margherita size
ulaþtýðýnda
(Ariston Yetkili Servisi Tarafýndan Yapýlmasý Tavsiye Edilir).
Ariston Margherita'nýzý ister yeni almýþ olun, ister yeni bir eve
naklediyor olun, çamaþýr makinenizin doðru kurulmasý doðru ve
etkin çalýþmasý için çok önemlidir.
M
ARGHERITA
Cihazý ambalajýndan çýkardýktan
sonra, noksansýz olduðundan emin
olun. Þüphe duyarsanýz, derhal bir
yetkili teknisyene baþvurun.
Makinenin içi, nakliye amaçlý
olarak, arka taraftan dört vida ile
sýkýþtýrýlmýþtýr.
Makinenizi kullanmadan önce,
vidalarý çýkarýn, özel aralýk halkasý
yardýmýyla lastiði çýkartýn (tüm
parçalarý saklayýn) ve boþluklarý
doldurmak için verilen plastik
parçalarý kullanýn.
Önemli: çamaþýr makinasýnýn
arkasýnda, alt sað tarafta bulunan ve
fiþin muhafaza edildiði 3 menfezi,
cihazýn donanýmýnda yer alan týpayla
kapatýn.
Ana su borusuna baðlantý
Su basýncý, çamaþýr makinenizin
arkasýndaki bilgi levhasýnda belirtilen
deðerler arasýnda olmalýdýr. Giriþ
hortumunu, soðuk su musluðuna,
filtre ve lastik contayý ikisinin arasýna
sabitleþtiren 3/4 gaz iplikli aðýz ile
baðlayýn.
Uyarý: Filtreyi düzenli olarak, suyun
altýna tutarak temizleyiniz.
A
Lastik hortum filtresi.
Eðer su borularý yeni veya
kullanýlmamýþ ise, içi temizlenene
kadar su geçirin. Boruyu cihaza sað
üstteki su borusu giriþine uygun
olarak baðlayýn.
Boþaltma hortumu 60 cm.den düþük
bir yükseklikte bitiyorsa kullanýlacak
kanca.
Eðer boru bir küvet veya lavaboya
boþalacaksa, plastik yönlendiriciyi
baðlayarak bunu da musluða
baðlayýn.
Elektrik baðlantýsý
Cihazý elektrik prizine takmadan
önce:
1) elektrik prizinin, cihazýn bilgi
levhasýnda belirtilen azami
elektrik yükünü taþýyabileceðinden ve kanunlara
uygunluðundan emin olun;
2) Evinizdeki voltajýn, bilgi
levhasýnda gösterilen deðerler
arasýnda olduðundan emin olun;
3) prizin cihazýn fiþine uygun
olduðundan emin olun. Deðilse,
adaptör kullanmayýn; ya prizi ya
da fiþi deðiþtirin;
4) Evinizdeki elektrik tesastý
topraklama sistemine sahip
olmalýdýr.
Dengeleme
Düzgün çalýþmasýný garanti etmek
için, çamaþýr makineniz dengeli bir
þekilde yerleþtirilmelidir. Cihazý
dengelemek için, ön ayaklar
ayarlanabilir; tezgaha göre ayarlanan
meyil açýsý, 2 dereceyi geçmemelidir.
Halý üzerine konduðunda,
havalandýrmanýn çevreden
etkilenmemesine dikkat ediniz.
Ön ayaklar ayarlanabilir.
Sýkýþtýrma vidalarýný ve
aralýk halkalarýný atmayýn,
bunlar kaldýrma ve nakliye
esnasýnda makineyi
korumak üzere, içindeki
bileþenleri sýkýþtýrmakta
tekrar kullanýlabilir.
Sað üstteki su borusu giriþi.
Boþaltma hortumunun
baðlanmasý
Makinenizin arkasýnda, boþaltma
hortumunun sabitleneceði iki kanca
(saðda ve solda) vardýr. Bir ucunu,
aþýrý dolaþma ve kývrýlmayý önlemek
için, bir gidere ya da bir lavabo veya
küvet kenarýna takýn. Bu hortum 60
ila 100 cm bir yüksekliðe
yerleþtirilmelidir. Hortumun ucunu
yerden 60 cm'den daha düþük bir
yüksekliðe sabitlemek gerekirse,
makinenin arkasýndaki kancaya
sabitlenmelidir.
Küvet ve lavaboya boþaltmak için
yönlendirici.
Hortum asla su içine batmýþ olarak
kalmamalýdýr.
Hortum için uzatma önerilmez. Çok
gerekliyse, uzatma hortumu, orijinal
hortum ile ayný çapta olmalý ve 150
cm.yi aþmamalýdýr. Duvar drenaj
borularý durumunda, bunlarýn yeterliði
yetkili bir teknisyen tarafýndan kontrol
edilmelidir. Daire binanýn üst
katlarýndan birindeyse, çamaþýr
makinesinin sürekli su almasýna ve
bosaltmasina neden olan drenaj
problemleri ortaya çýkabilir. Böyle bir
sorundan sakýnmak için dükkanlarda
özel drenaj contalarý satýlýr.
Bu normlara uyulmadýkça
Uyarý!
üretici þirket hiçbir
sorumluluk kabul etmez.
Çamaþýr makinesinin
ambalaj poþetleri ,
geniþletilmiþ suni
köpükleri, çiviler ve diðer
ambalaj malzemeleri
çocuklarýn
oynamasý için sakýncalý ve
tehlikelidir.
Margherita -
Yerleþtirme ve kullanma kýlavuzu
10
Page 14
M
ARGHERITA
Kolay Bakým ve Koruma
Ona iyi davranýn, sonsuza kadar dostunuz
Çamaþýr makineniz yaþamýnýzda güvenilir bir arkadaþýnýzdýr.
olsun!
Ariston Margherita sorunsuz bir
þekilde ömür boyu dayanacak bir
çamaþýr makinesi olarak
tasarlanmýþtýr. Birkaç küçük adým onu
saðlýklý tutar. Öncelikle, her bir
yýkamadan sonra su musluðunu
kapamalýsýnýz; sürekli su basýncý,
bileþenlerinden birkaçýnýn eðilmesine
neden olabilir.
Bölgenizdeki su çok sertse, kireci
önleyici bir ürün kullanýn (özellikle,
banyo küvetlerindeki musluk ve
giderlerin etrafýnda sýklýkla beyaz
izler býrakýyorsa, su serttir).
Sisteminizdeki suyun özellikleri
hakkýnda daha doðru bilgi için yerel
su iþlerine veya yerel bir tesisatçýya
danýþýn.
Çamaþýrlarýnýzýn cepleri her zaman
boþaltýlmalýdýr, yaka iðneleri, rozetler
ve diðer sert cisimler çýkartýlmalýdýr.
Çamaþýr makinesinin dýþ yüzeyi ýlýk
sabunlu suya batýrýlmýþ bir bezle
temizlenmelidir.
Deterjan bölmesini düzenli
olarak yýkamak önemlidir.
Kurumuþ deterjanlarýn
birikmesini önlemek için,
bölmeyi akan musluðun
altýnda birkaç dakika tutun.
Deterjaný asla olmasý
gerekenden fazla
kullanmayýn.
Asla çok miktarda deterjan veya ek
madde kullanmayýn, çünkü bu çok
miktarda köpük yaratarak, çamaþýr
makinenizin parçalarýna zarar
verebilir. Normal deterjanlar kireç
önleyici madde içerir. Eðer su
özellikle sertse, yani kireç içeriði
çoksa, her yýkamada belirli bir
ürünün kullanýlmasýný öneririz.
Periyodik olarak, kireci önleyici bir
ürün ile deterjansýz ve çamaþýrsýz bir
yýkama yapmak faydalý olabilir.
Onu uzun ömürlü kýlmak sizin elinizde.
Tüm cepleri boþaltmayý unutmayýn; küçük cisimler
arkadaþýnýz Margherita'e zarar verebilir.
Ýhtiyaç halinde, pompayý ve lastik hortumu kontrol edin.
Margherita, ayrýca temizleme ve bakým gerektirmeyen, kendi kendini temizleyen bir pompaya sahiptir. Kazara küçük cisimler:
bozuk para, saç tokalarý, gevþemiþ düðmeler vs. pompaya girebilir. Hasardan sakýnmak için, bunlar pompanýn alt kýsmýnda
eriþilebilir bir ön odada tutulur.
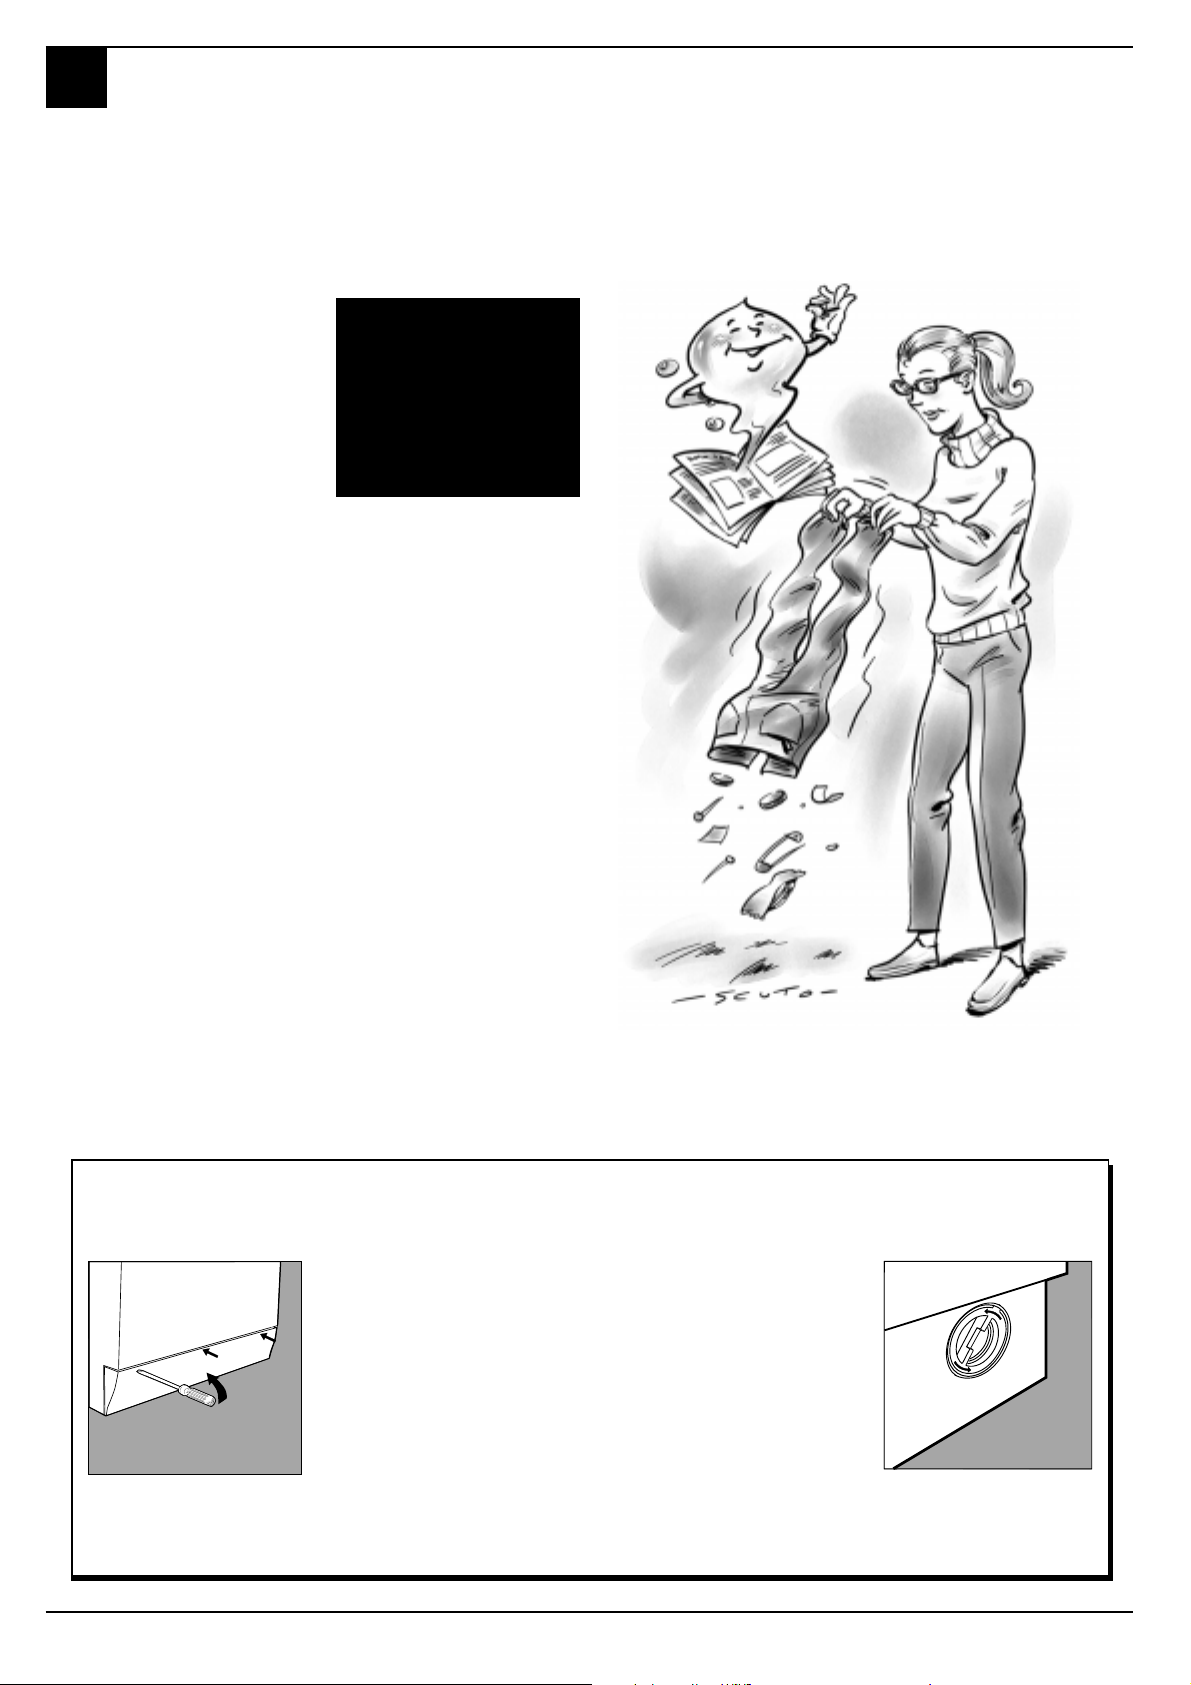
Bu odacýða eriþmek için, çamaþýr makinesinin alt kýsmýndaki levhayý tornavida
yardýmýyla çýkarýn (þekil1); daha sonra kapaði saatin aksi yönüne çevirerek kaldýrýn
(þekil 2) ve içindekileri kontrol edin.
Lastik hortum
Lastik hortumu en azýndan yýlda bir kez kontrol edin. Herhangi çatlakla
karþýlaþýrsanýz, derhal deðiþtirin. Çamaþýr makinenizi kullandýðýnýzda, su
basýncý çok güçlüdür ve çatlak bir boru patlayabilir.
Þekil 1
Dikkat: kapaði kaldýrmadan veya herhangi bakým prosedürüne giriþmeden önce yýkama devresinin bittiðinden ve cihazýn fiþini çektiðinizden emin
olun. Kapaðý kaldýrýnca bir miktar su gelmesi normaldir. Kapaði yerine yerleþtirirken, cihaza geri itmeden önce makinenin altýndaki kancalarý doðru
deliklere yerleþtirdiðinizden emin olun.
Þekil 2
11
Margherita -
Yerleþtirme ve kullanma kýlavuzu
Page 15
M
ARGHERITA
En önemlisi
Sizin ve çocuklarýnýzýn
Ariston Margherita güvenlik yönetmeliklerine
uygun olarak üretilmiþtir. Sizi ve tüm ailenizi
korumak üzere.
güvenliði
Bu uyarýlarý ve bu kitapçýktaki tüm
bilgileri okuyunuz; bunlar hem
sayýsýz faydalý ipucu, hem de
emniyet, kullaným ve bakým
konusunda önemli bilgi
kaynaðýdýr.
1. Margherita ev diþýnda bir
ortamda kurulmamalýdýr.
Asla yaðmura ve yýldýrýma
maruz býrakýlmamalýdýr.
2. Sadece yetiþkinler
tarafýndan ve bu kitapçýktaki
bilgileri izleyerek, sadece
çamaþýr yýkamak için
kullanýlmalýdýr.
3. Makine taþýnacaksa, itina ile
iki veya üç kiþinin yardýmýyla
taþýnmalýdýr. Tek baþýna
taþýmamalýdýr, çünkü cihaz
çok aðýrdýr.
4. Çamaþýr koymadan önce,
kazanýn boþ olduðundan
emin olun.
5. Makineye asla çýplak
ayakla, ýslak veya nemli el
veya ayakla dokunmayýnýz.
6. Asla uzatma kablosu veya
çoklu priz kullanmayýn,
bunlar nemli ortamlarda
özellikle tehlikelidirler.
Elektrik kablosu asla
kývrýlmamalý ve tehlikeli bir
biçimde baský görmemelidir.
7. Cihaz çalýþýrken asla
deterjan bölmesini
açmayýn; elle yýkama
deterjaný kullanmayýn
Margherita: Sadece, orijinal
Ariston yedek parçasý olan
yetkili uzman bir teknisyen
istiyorum.
çünkü köpüðün çok olmasý
cihazýn iç parçalarýna zarar
verebilir.
8. Makinenizi prizinden
çýkarmak için asla fiþe veya
çamaþýr makinesine
asýlmayýn; bu çok tehlikelidir.
9. Cihaz çalýþýrken, çok yüksek
ýsýlara eriþebileceðinden
boþaltma suyuna
dokunmayýn. Yýkama
devrelerinde cihaz kapaðý
ýsýnýr; çocuklarýn eriþmesini
engelleyin. Çamaþýr
makinesinin kapaðýný asla
zorlamayýn; bu kazara
açýlmalarý engellemeye
yarayan güvenlik bloðuna zarar
verebilir.
10. Arýza durumunda, önce su
musluðunu kapatýn ve
cihazý duvar prizinden
çýkarýn; Hiçbir durumda,
tamir etmeye çalýþmak için iç
parçalara dokunmayýn.
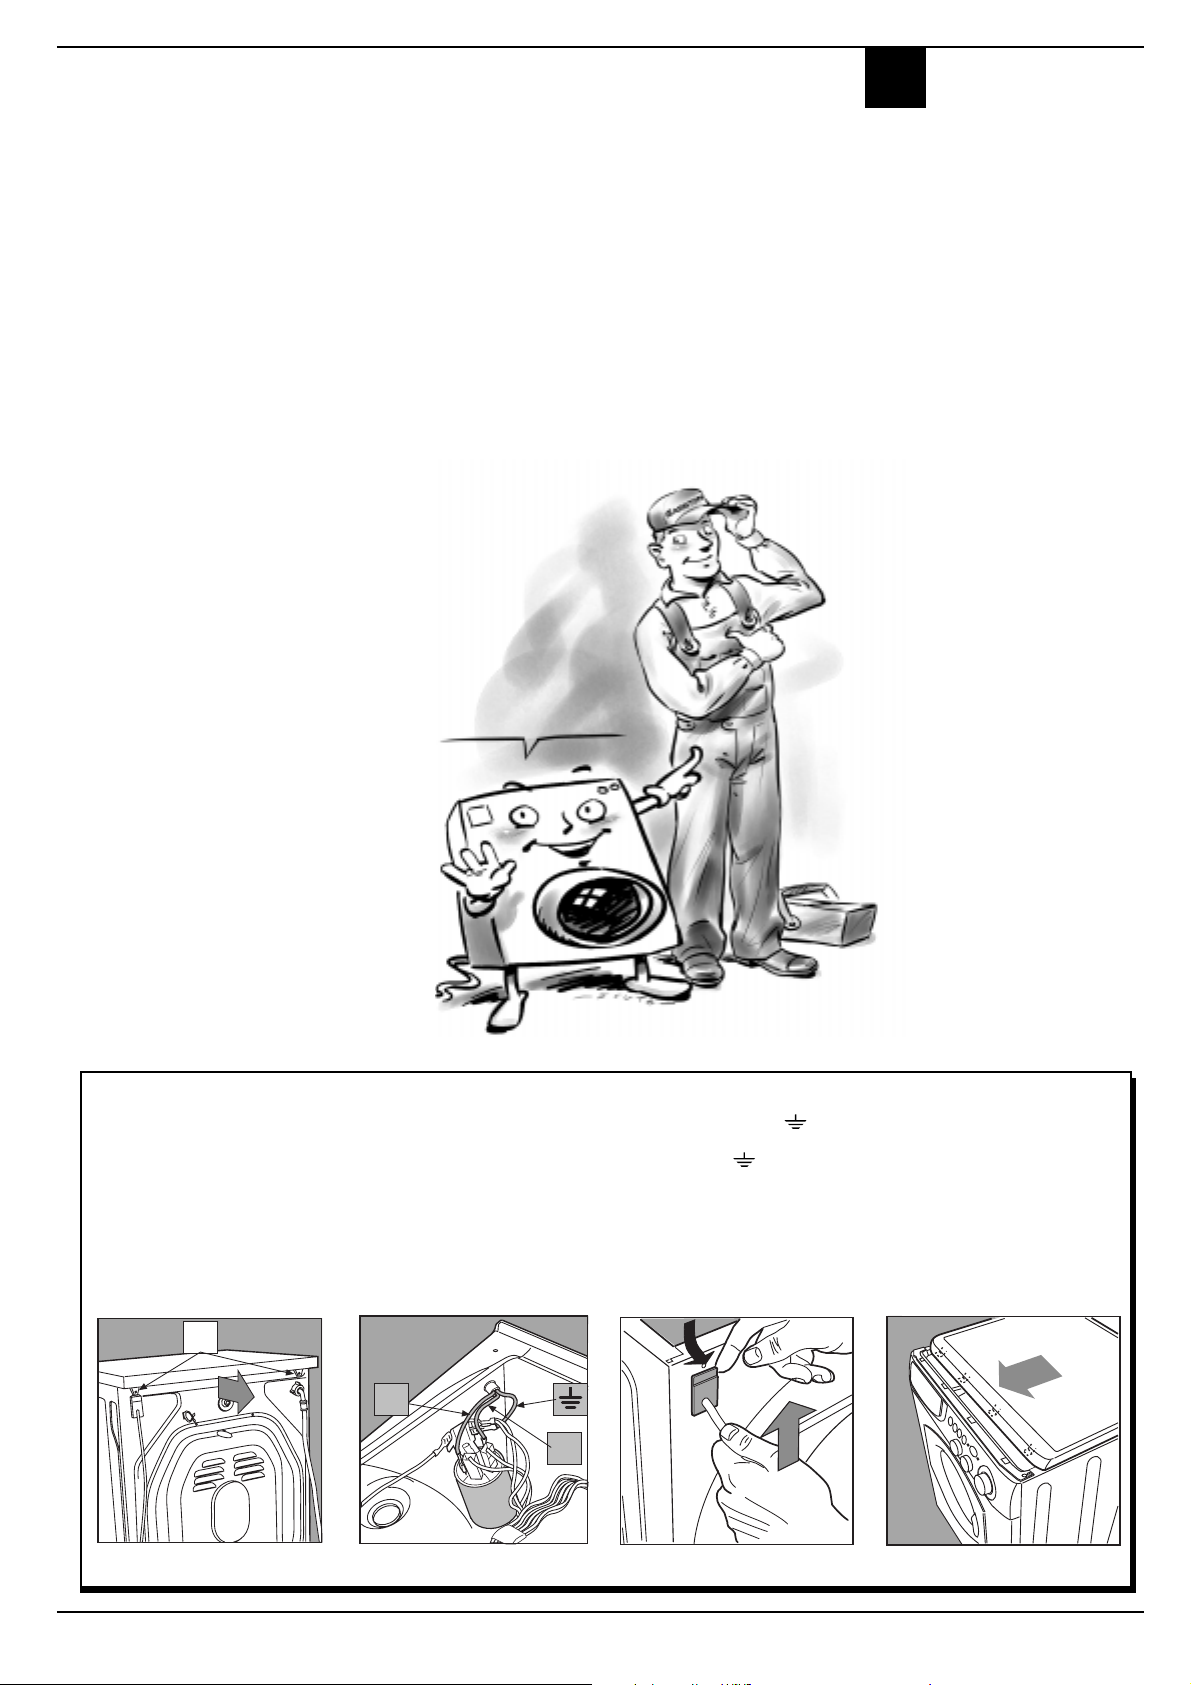
Elektrik kablosu nasýl deðiþtirilir
Margherita'nýn elektrik
kablosu özeldir ve ancak
Ariston Yetkili Servislerinden
temin edilebilir.
I
Þekil 3 Þekil 4 Þekil 5
Deðiþtirmek için aþaðýdaki
talimatlara uyunuz.
1. Margherita'nýn kapalý ve
elektrik kablosunun pizden çekili
olduðundan emin olun.
2. Üst tablayý iki vidayý sökerek
(I) ve kendinize doðru çekerek
açýn [þekil 3].
3. Kablolarý, antiparazitten (F),
konumlarýna dikkat ederek,
(Mavi=N kablosu;
N
L
F
Kahverengi=L kablosu)
topraklama kablosunu
býrakarak ayýrýn [þekil 4].
Not: L, N ve
antiparazit kondansatörü
üzerinde gösterilmiþtir.
4. Kablo tutucu plastiðinin üst
kýsmýný cihazýn arka panelinden
yavaþça ayýrýn, elektrik kablosunu
yukarý doðru çekerek çýkartýn
[þekil 5].
sona
sembolleri
Margherita -
Yeni elektrik kablosunu
baðlamak için ayný iþlemlerin
tersini yapýn.
Üst tablayý yerine takmak için
çamaþýr makinesinin üzerine koyun
[þekil 6] ve önde bulunan kancalar
kontrol panelinde oluþan özel
deliklerin üzerine gelene kadar
kaydýrýn ve vidalarý yeniden yerlerine
takýn.
Þekil 6
Yerleþtirme ve kullanma kýlavuzu
12
Page 16

M
ARGHERITA
13
Margherita -
Yerleþtirme ve kullanma kýlavuzu
Page 17
ARGHERITA
ARGHERITA
M
M
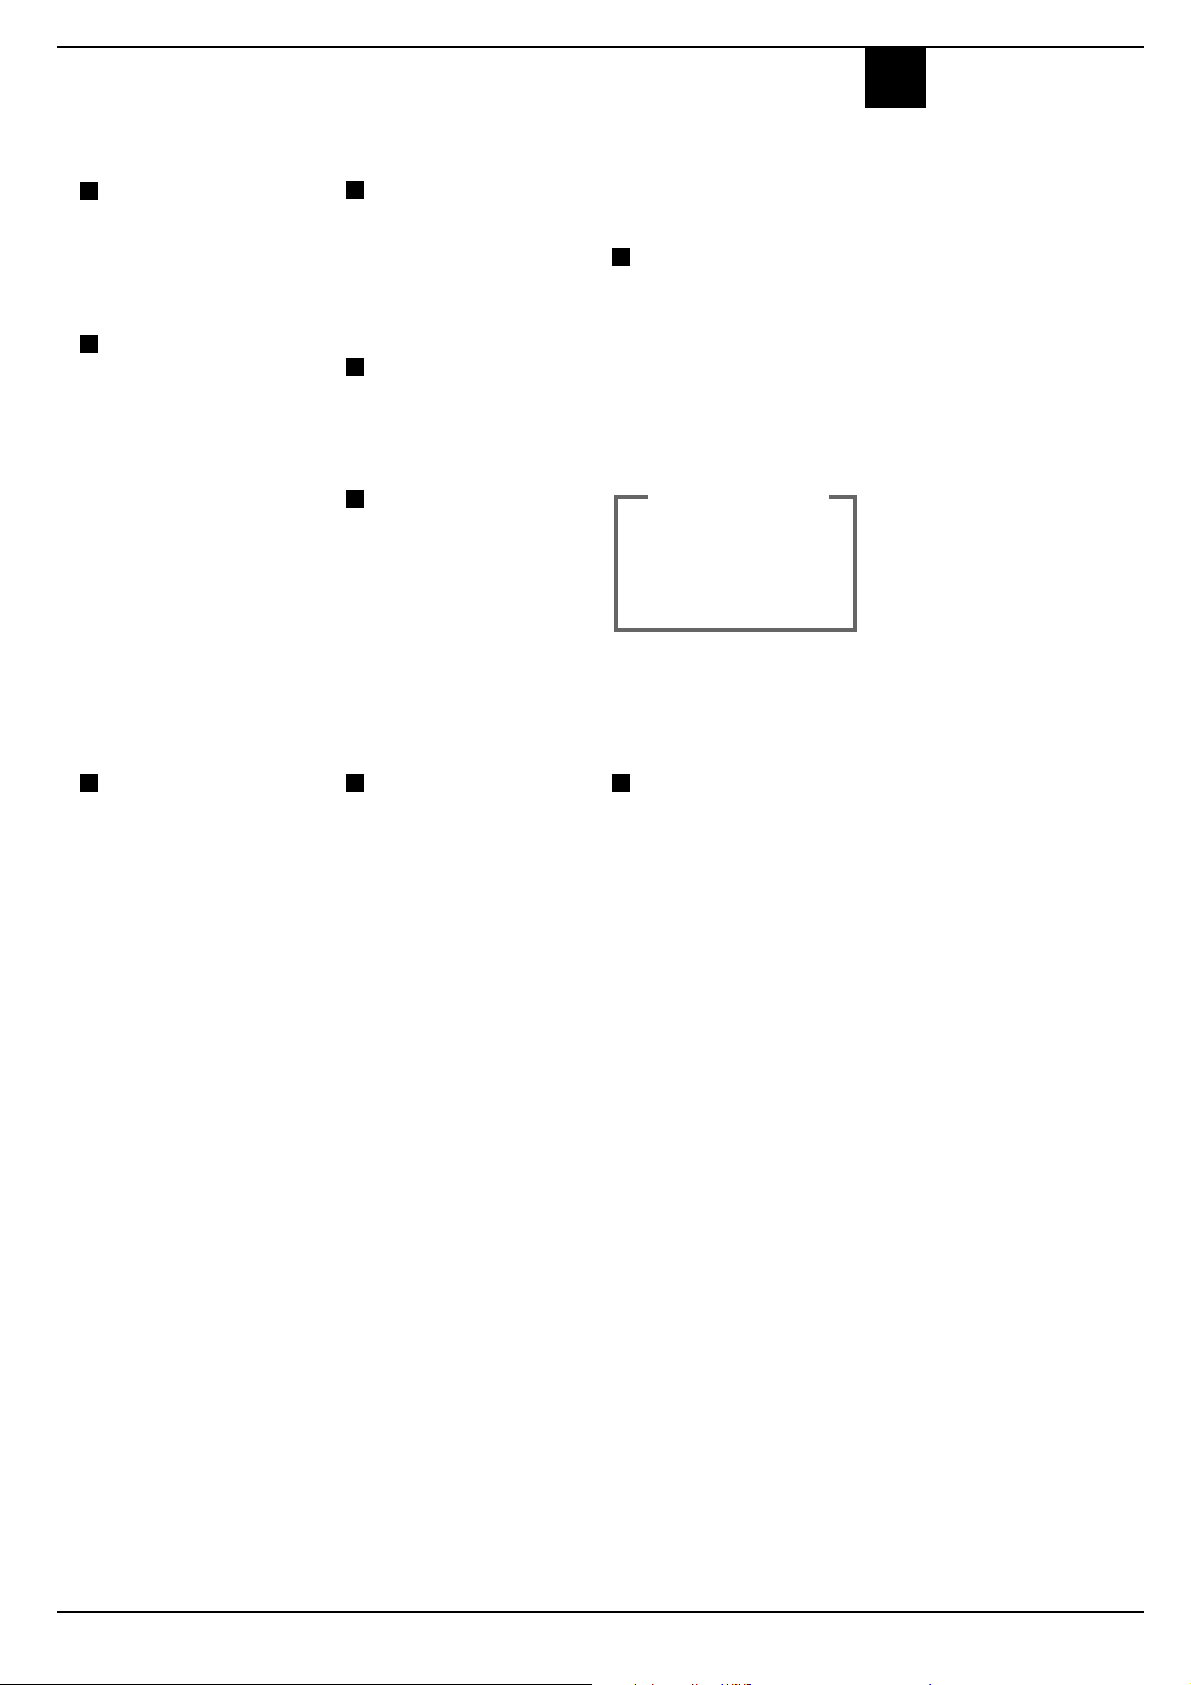
The secrets
The secrets
of fabrics
of fabrics
How to get better results
How to get better results
AB 83
Instructions for
GB
installation and use
Class A at
40°C
The first washing
machine to give a
perfect wash at only
40°C
Margherita
Washing machine
safe
and easy to use
Page 18
M
ARGHERITA
Quick guide to
Margherita
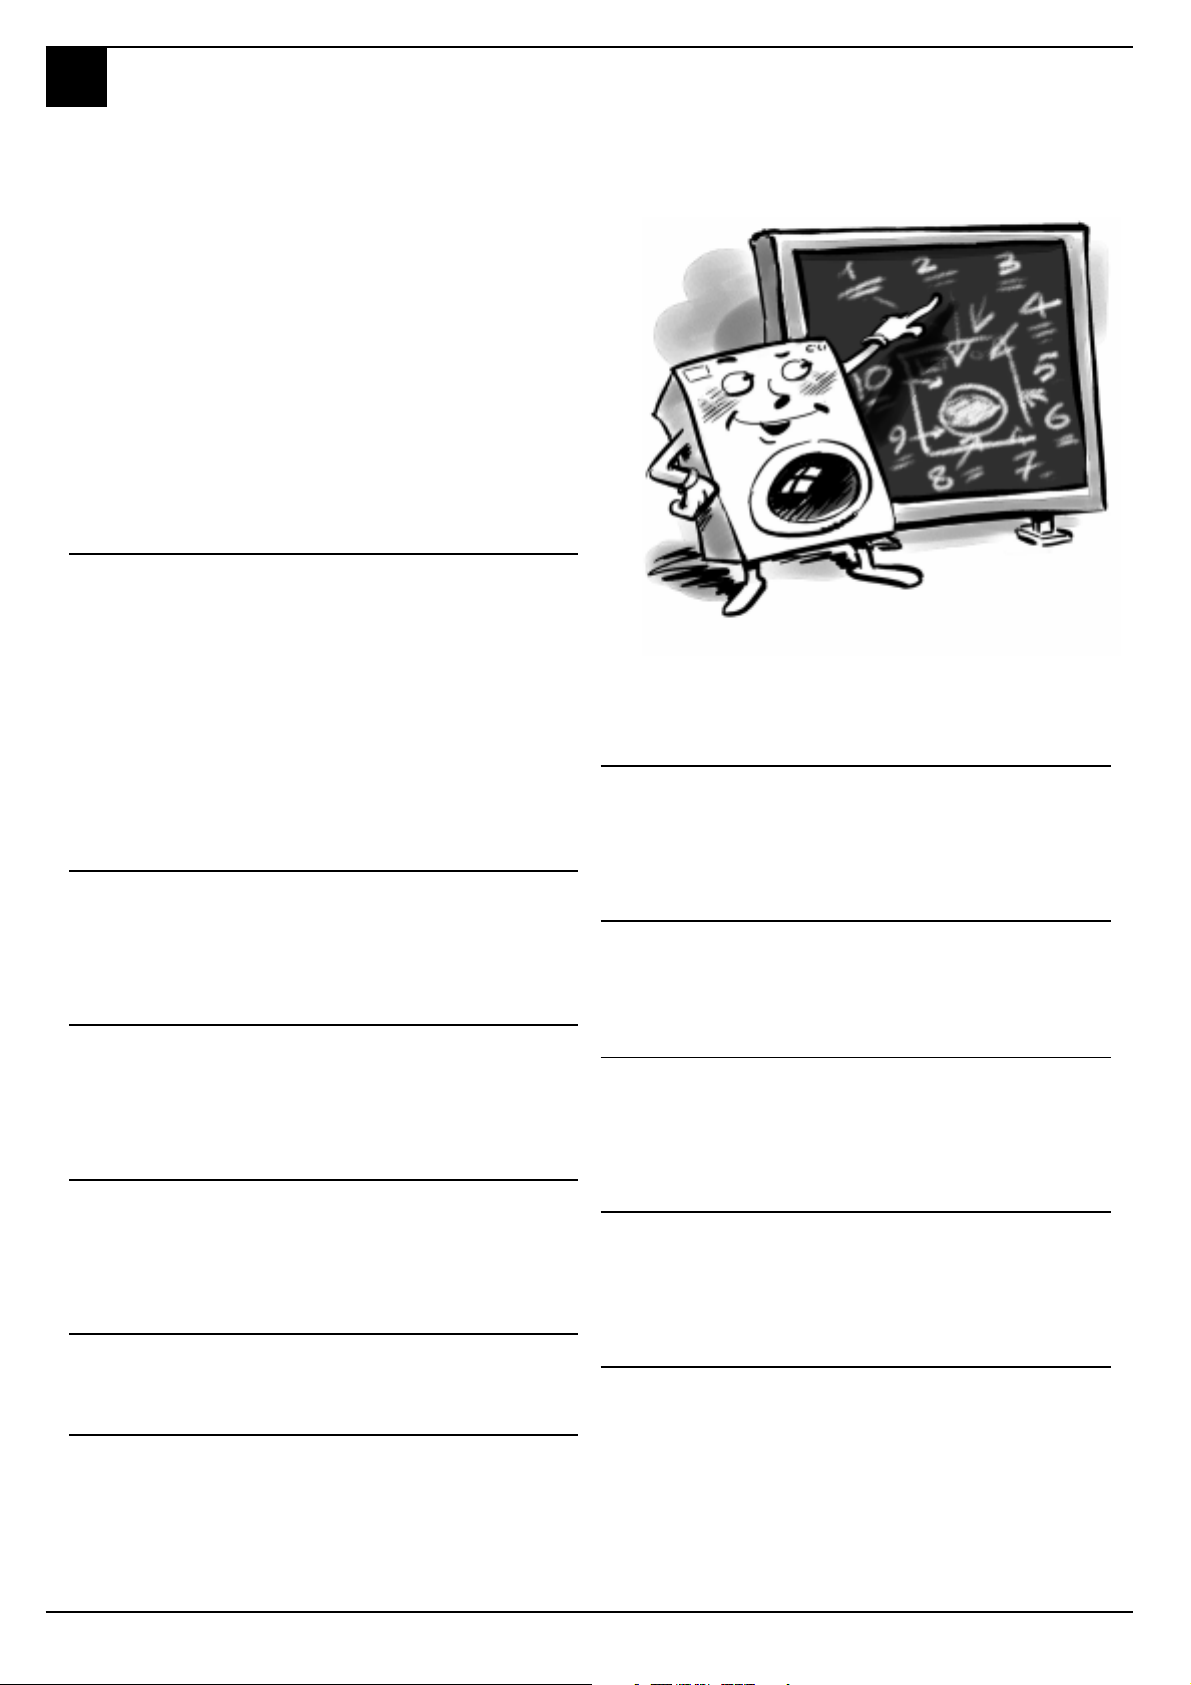
Here are the 11 topics explained in this manual. Read,
learn and have fun: you will discover many secret
ways to get a better wash, more easily and making
your washing machine last longer......and especially
keeping an eye on safety.
1.
Installation, after delivery or transport, is the most important
operation for the correct functioning of your Margherita washing
machine. Always check:
1. That the electric system complies with the law;
2. That the inlet and draining pipes are connected correctly.
3. That the washing machine is levelled properly; something worth
4. That the drum's fixing screws have been removed from the back
2.
A correct distribution of your laundry is vital to both the successful
outcome of the wash and the life of the washing machine. Learn all
the tips and secrets to dividing your linen: colour, type of fabric and
tendency of creating fuzz are the most important criteria.
3.
The symbols on the labels of your garments are easy to understand
and equally important for the success of your wash. The guide
includes simple instructions to help you choose the right temperature, wash cycles and ironing methods.
4.
Yeras back, our grandmothers were the ones who gave us good advice
- and in those days synthetic fibres did not exist: washing was easy.
Today, Margherita offers you helpful advice allowing you to wash
wool even better than an expert laundress would by hand.
5.
How to use the detergent dispenser.
6.
Installation and removal (p. 24)
Never use hoses that have already been used, always use
the new ones provided with your machine.
checking for the life of your washing machine and the quality of
your wash;
of the washing machine.
What goes in your washing machine and how
to start your Margherita (p. 16)
7.
Herein is an easy table to help you choose the right programme,
temperature, detergents and possible additives. Choose the right
programme and you will get better results with your wash while saving
time, water and energy, day after day.
8.
Margherita is a true friend. With just a bit of care, it will repay you
with loyalty and devotion.
With the necessary upkeep, it will wash for years and years to come.
Guide to understanding labels (p. 19)
9.
Before calling a technician, read these pages: immediate solutions
may be found for a number of problems. If the problem persists, call
Ariston customer services and any failure will be repaired, as soon as
possible.
Useful tips to avoid mistakes (p. 20)
10.
Herein are the technical features of your washing machine: model
type number, electric and water specifications, size, capacity, speed
of the spin cycle and compliance with Italian and European rules
and regulations.
The detergent dispenser (p. 21)
11.
Here you will find the necessary guidelines for the safety of your
Understanding the control panel (p. 17)
entire household, because safety is very important indeed.
Guide to Margheritas programmes (p. 18)
Care and maintenance (p. 25)
Problems and solutions (p. 22 and 23)
Technical characteristics (p. 23)
Safety for you and your children (p.26)
Margheritas control panel is very simple. It has only a few essential
buttons to help you choose any type of wash cycle, ranging from the
most energetic, capable of cleaning a mechanics overalls, to the
most delicate for cashmere. Familiarising with it will help you get
the best out of your wash while helping your washing machine last
longer. Its easy.
15
Margherita - Instructions for installation and use
Page 19
M
M
ARGHERITA
What goes in your washer?
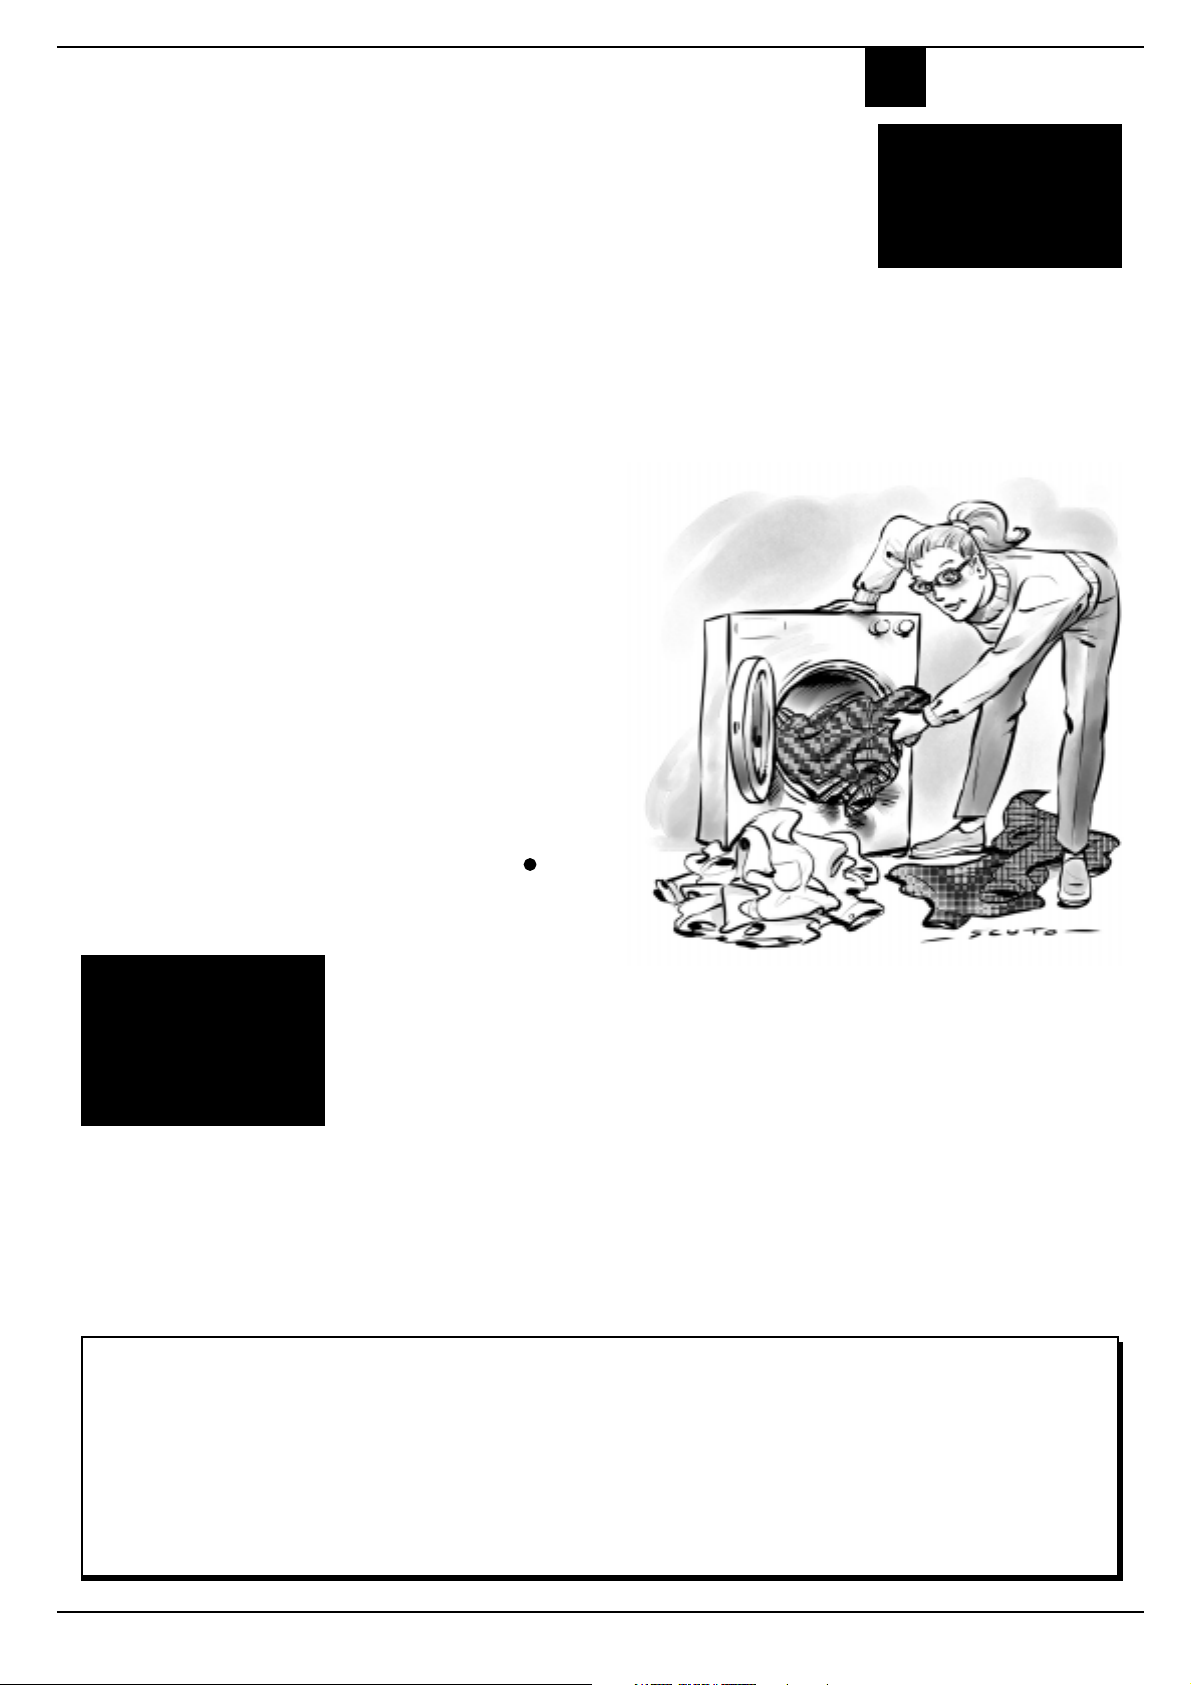
Before washing, you can do a great deal for better results. Divide your garments
according to fabric and colour. Read the labels, follow their indications and
alternate small items with large ones.
Before washing.
Divide your washing according to
the type of fabric and colour
resistance: sturdy fabrics should
be separated from delicate ones.
Light colours should be separated
from dark ones.
Empty all pockets (coins, paper,
money and small obejects) and
check the buttons. Mend
immediately or remove loose
buttons as they could fall off
during the wash cycle.
Starting Margherita
After installing your new washing machine, start a
wash cycle by setting programme "1" at 90 degrees.
Starting Margherita in the right
way is important for the quality
of your wash, for preventing
problems and for lengthening the
life of your appliance. After
loading your washing and
pouring in the detergent together
with any additives, always check
that:
For more delicate
garments:
protect underwear,
tights and stockings
and delicate items by
placing them in a
canvas pouch
The labels say it all.
Always look at the labels: they
tell you everything about your
garment and how to wash it in
the best way possible.
The table on page 19 shows you
all the secrets of the symbols
found on labels. Their
indications are a valuable guide
to a better wash and to longer
lasting clothes.
1. The door is correctly shut.
2. The plug is inserted in the
socket.
3. The water tap is open.
4. Selector knob A is positioned
on one of the symbols
Reset).
Choose the desired programme
The programme is selected
according to the type of garments
that need to be washed. To choose
a programme, refer to the table on
page 18. Turn knob A until the
selected programme coincides
with the pointer situated on the
control panel, set the temperature using knob B and, if necessary,
use buttons D, E and then press
on/off button F (position ON).
(Stop/
Big and small happily
together.
This washing machine has a
special electronic control device
for distributing the wash load
evenly: before the spin cycle
starts, this device allows the
washing to position itself as
uniformly as possible in the
drum, according to the type of
Remember that, if you want to use
it, the "programmed start" should
be set before the wash cycle.
At the end of the wash cycle...
Wait for the H lamp to turn off:
it will take about three minutes.
Then turn Margherita off by
pressing on-off button F (OFF
position). You can now open the
Dividing your
garments according to
fabric and colour, is
very important for
good results
washing and initial positioning.
For this reason, even at top spin,
the washing machine does not
vibrate or make any noise.
washing machine door safely.
After having removed the freshly
cleaned washing, leave the door
open or ajar so that the humidity
left inside can evaporate.
Always close the water tap.
Remember that, in the event
of a power failure, or should
the washing machine switch
itself off, the programme
chosen will be memorised.
How to eliminate the most common stains
Ink and biro Dab with a wad of cotton soaked in methyl alcohol or alcohol at 90°.
Tar Dab with fresh butter, rub in turpentine then wash immediately.
Wax Scrape away, then run a hot iron between two sheets of absorbent paper. Then rub in cotton with
turpentine or methyl alcohol.
Chewing gum Rub in nail polish remover and wipe with a clean rag.
Mold Cotton and white linen should be placed in a solution of 5 parts water, one bleach and a spoon of vinegar,
then washed immediately. For other white fabrics, use hydrogen peroxide at 10 volumes and wash immediately.
Lipstick Dab with ether on wool or cotton. Use tricloroetilene for silk.
Nail polish Place a sheet of absorbent paper on the side of the stain, wet it with nail polish remover, shifting the
garment as the sheet gradually changes colour.
Grass Dab with a wad of cotton soaked in methyl alcohol.
Margherita - Iinstructions for installation and use
16
Page 20
M
Understanding the control panel
Here Im in command
Making the right choice is important. And its easy.
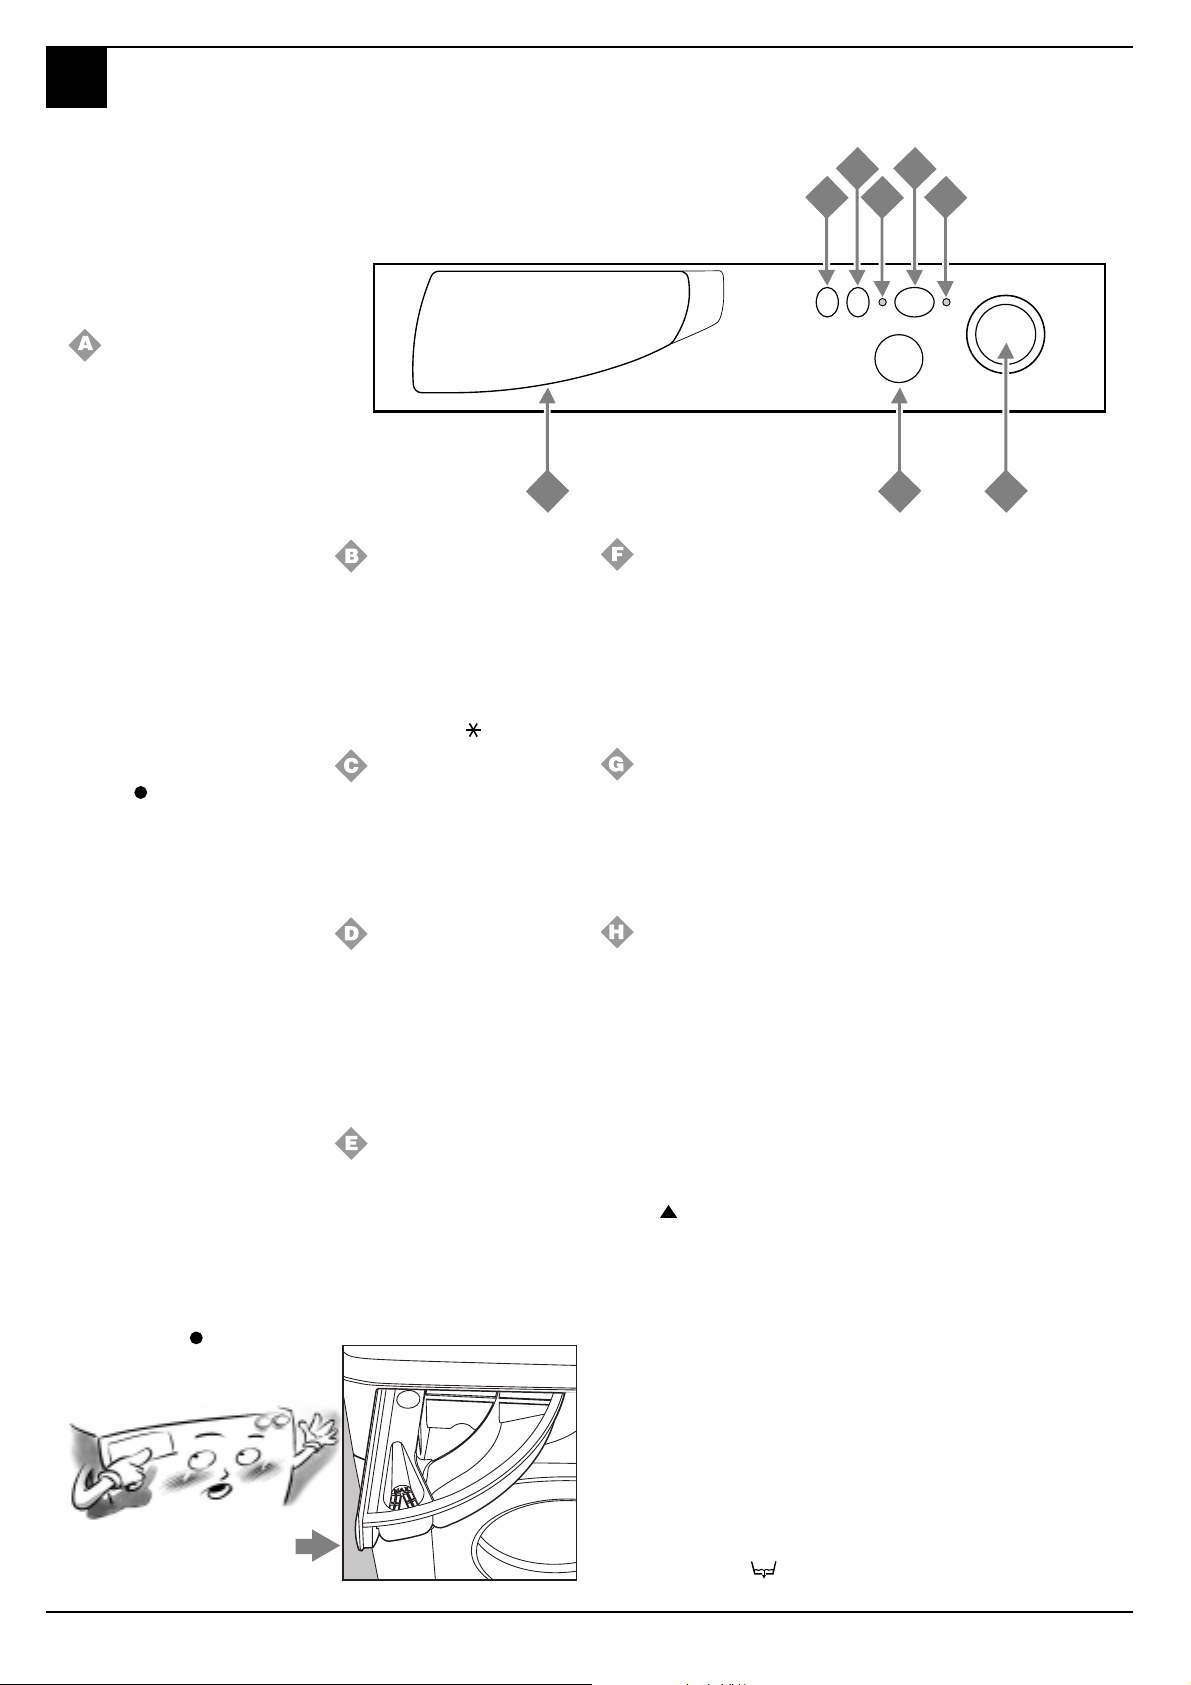
Programme selector knob
and programmed start
Use this knob to select the wash
programme.
Turn this knob clockwise only.
ARGHERITA
To select a programme, you
should turn the knob so that the
symbol/number of the desired
programme is in line with the
pointer on the control panel.
Now press on/off button F
(position ON), pilot lamp G will
start flashing.
After 5", the setting will be
accepted, pilot lamp G will stop
flashing (staying lit) and the wash
cycle will begin.
Should you wish to interrupt the
programme in progress or set a
new one, select one of the
symbols
5" : when the cancellation has
been accepted, pilot lamp G
flashes, and you can then turn the
appliance off.
You can use this knob to delay
the appliance's operation.
Select one of the four delay time
positions, press the on/off button
F (position ON) and wait 5". The
setting has now been accepted
(pilot lamp G stays lit) and you
can select the programme you
desire.
Pilot lamp G has a particular
flashing motion (2" on and 4"
off) to indicate that a delayed
start has been set.
During this phase, you can open
the appliance door and change
the washing load, should you
wish to do so.
After the wash cycle has been set
and accepted by the washing
machine, turning the knob will
have no effect (except for when
it is on position
The detergent dispenser is here.
(Stop/Reset) and wait
Stop/Reset).
Temperature control knob
It is used to set the wash temperature indicated in the
programme table. It also allows
you to reduce the temperature
recommended for the selected
programme, and even to set a
cold wash cycle (
Detergent dispenser
It is divided into three
compartments:
1. Detergent for pre-washing;
2. Detergent for the wash cycle;
3. Fabric softeners.
Spin Exclusion
Press this button and the washing
machine will not carry out a spin
cycle, but rather a drum spin at
medium speed to assist water
draining. We recommend that you
use it when washing garments
which are difficult to iron.
Extra Economy
Reduces water consumption
during the rinse cycles. We
recommend that you use this
function only with small laundry
loads, dosing the detergent
proportionally.
1
3
C
On-off
When button F is pressed, the
washing machine is switched on,
when it is not the machine is
switched off.
Turning the appliance off does
not cancel the selected
).
2
programme.
The on-off lamp
Lamp G flashes when the appliance
is switched on and awaiting a
programme to be set. A steady light
means the appliance has accepted
the selected programme.
The door block lamp
The safety lamp indicates that the
washing machine door is blocked
to prevent it from being opened
accidentally. To avoid any
damages, you must wait for the
lamp to switch itself off before
you open the door. You must
wait around three minutes.
Anti-crease
This function (represented by the
symbol
programme, keeping the washing
soaking in water before draining.
It is only enabled in programmes
for synthetic fabrics, silk and
curtains. It is very useful,
because it prevents delicate and
synthetic fabrics from creasing
(for example, when you cannot
take the washing out at the end
of the wash cycle but only a few
hours later). The programme can
be completed by turning knob A
one notch. In the case of
synthetic fabrics, should you
prefer draining rather than a spin
cycle, turn knob A until you have
selected the symbol
) interrupts the wash
D
(Drain).
E
H
B
F
G
A
17
Margherita - Instructions for installation and use
Page 21
What are you washing today?
M
A programme for all seasons
ARGHERITA
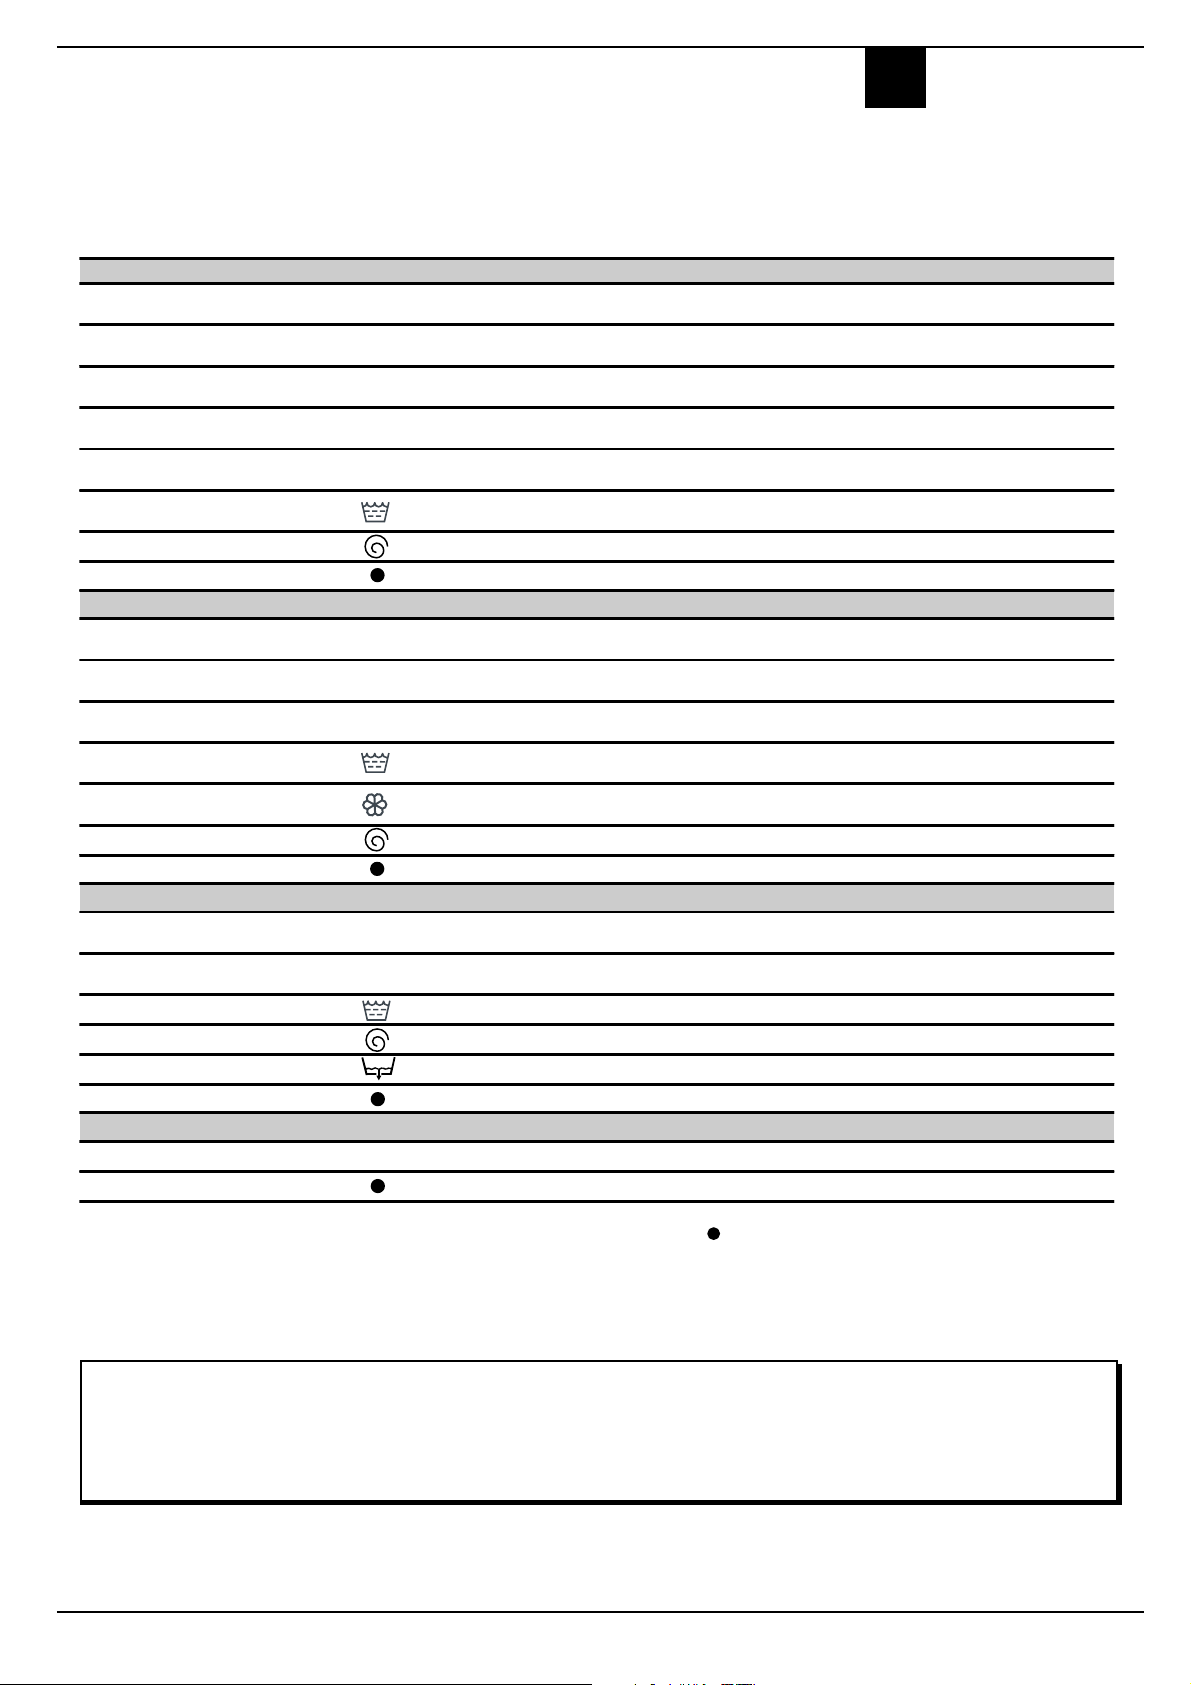
Type of fabric and degree of soil Program.
knob
STURDY FABRICS
Ecceptionally soiled whites (sheets,
tablecloths, etc.)
Ecceptionally soiled whites (sheets,
tablecloths, etc.)
Heavily soiled whites and fast
colours
Heavily soiled whites and fast
colours
Slightly soiled whites and delicate
colours (shirts, j umpe rs, etc.)
Rinse cycles
Spin cycle Draining and final spin cycle
Stop/Reset
SYNTHETIC FABRICS
Heavily soiled fast colou r synthetics
(baby linen, etc.)
Delicate colour synthetics (all
types of slightly soiled garments)
Delicate colour synthetics (all
types of slightly soiled garments)
Rinse cycles
Fabric softener
Spin cycle Draining and delicate spin cycle
Stop/Reset
WOOL
Wool
Particu larly delicate garments and
fabrics (curtains, silk, viscose, etc.)
Rinse cycles
Spin cycle Draining and delicate spin cycle
Draining Draining
Stop/Reset
PROGRAMMED START
12 - 9 - 3 - 1 hour delay Start is delayed by 12 - 9 - 3 - 1 hours
Stop/Reset
Temperat.
knob
Detergent
for
prewash
1 90°C
2 90°C
360°C
440°C
540°C
660°C
740°C
8 30°C
940°C
10 30°C
Detergent
for wash
◆◆◆
Fabric
softener
Length of
the cycle
(minutes)
◆◆
◆◆
◆◆
165
145
130
150
◆◆
◆
◆◆
100
◆◆
◆◆
◆
◆
◆◆
◆◆
◆
Description of wash cycle
Warm prewash, Wash cycle at 90°C, rinse
cycles, intermediate and final spin cycles
Wash cycle at 90°C, rinse cycles,
intermediate and final spin cycles
Wash cycle at 60°C, rinse cycles,
intermediate and final spin cycles
Wash cycle at 40°C, rinse cycles,
intermediate and final spin cycles
Wash cycle at 40°C, rinse cycles,
95
intermediate and final spin cycles
Rinse cy cles, intermediate and final spin
cycles
Inte rrupts/Cancels t he sele cted programme
Wash cycle at 60°C, rinse cycles, anticrease or delicate spin cycle
Wash cycle at 40°C, rinse cycles, anti-
70
crease or delicate spin cycle
Wash cycle at 30°C, rinse cycles and
30
delicate spin cycle
Rinse cycles, anti-crease or delicate spin
cycel
Rinse cycles with automatic introduction of
softener, anti-crease or delicate spin cycle
Inte rrupts/Cancels t he sele cted programme
Wash cycle at 40°C, rinse cycles and
60
delicate spin cycle
Wash cycle at 30°C, rinse cycles, anti-
50
crease or draining
Rinse cyclesi, anti-crease or draining
Inte rrupts/Cancels t he sele cted programme
Inte rrupts/Cancels t he sele cted programme
Important: to cancel the wash programme you have just set, select one of the symbols (Stop/Reset) and wait for at least 5.
The data found in the table is purely indicative, and can vary according to the quantity and type of washing, the water system
temperature and the room temperature.
Special programmes
Class A at 40°C Margherita has a special programme to allow you to obtain optimum results even at low temperatures.
By setting programme 4 at a temperature of 40° C, the results you will obtain will be the same as you would normally obtain at 60°C
thanks to the washing machines action and the length of the wash cycle.
Daily wash Margherita has a programme studied for the washing of lightly soiled garments in a short amount of time.
By setting programme 8 at a temperature of 30°C, you can wash different types of fabrics together (except for wool and silk), with a
maximum load of 3 kg. This programmes allows you to save on both time and energy as it only lasts around 30 minutes.
WE RECOMMEND THE USE LIQUID DETERGENT.
Margherita - Instructions for installation and use
18
Page 22
M
ARGHERITA
Understanding labels
Learn the meaning of these symbols and you will get
better results, your garments will last longer and your
machine will repay you by washing better.
All over Europe, garment labels
contain messages expressed in
small yet important symbols.
Understanding them is very
important if you want to get
better results and treat your
garments the way they deserve to
be treated.
Useful tips
Turn shirts inside out to get better results
and make them last longer.
Always empty pockets of their contents.
These symbols are divided in five
different categories and shapes:
washing
ironing
drying
, bleaching ,
, dry cleaning and
.
Look at the label: it will always give you
useful advice.
When loading your washing, alternate large
and small garments.
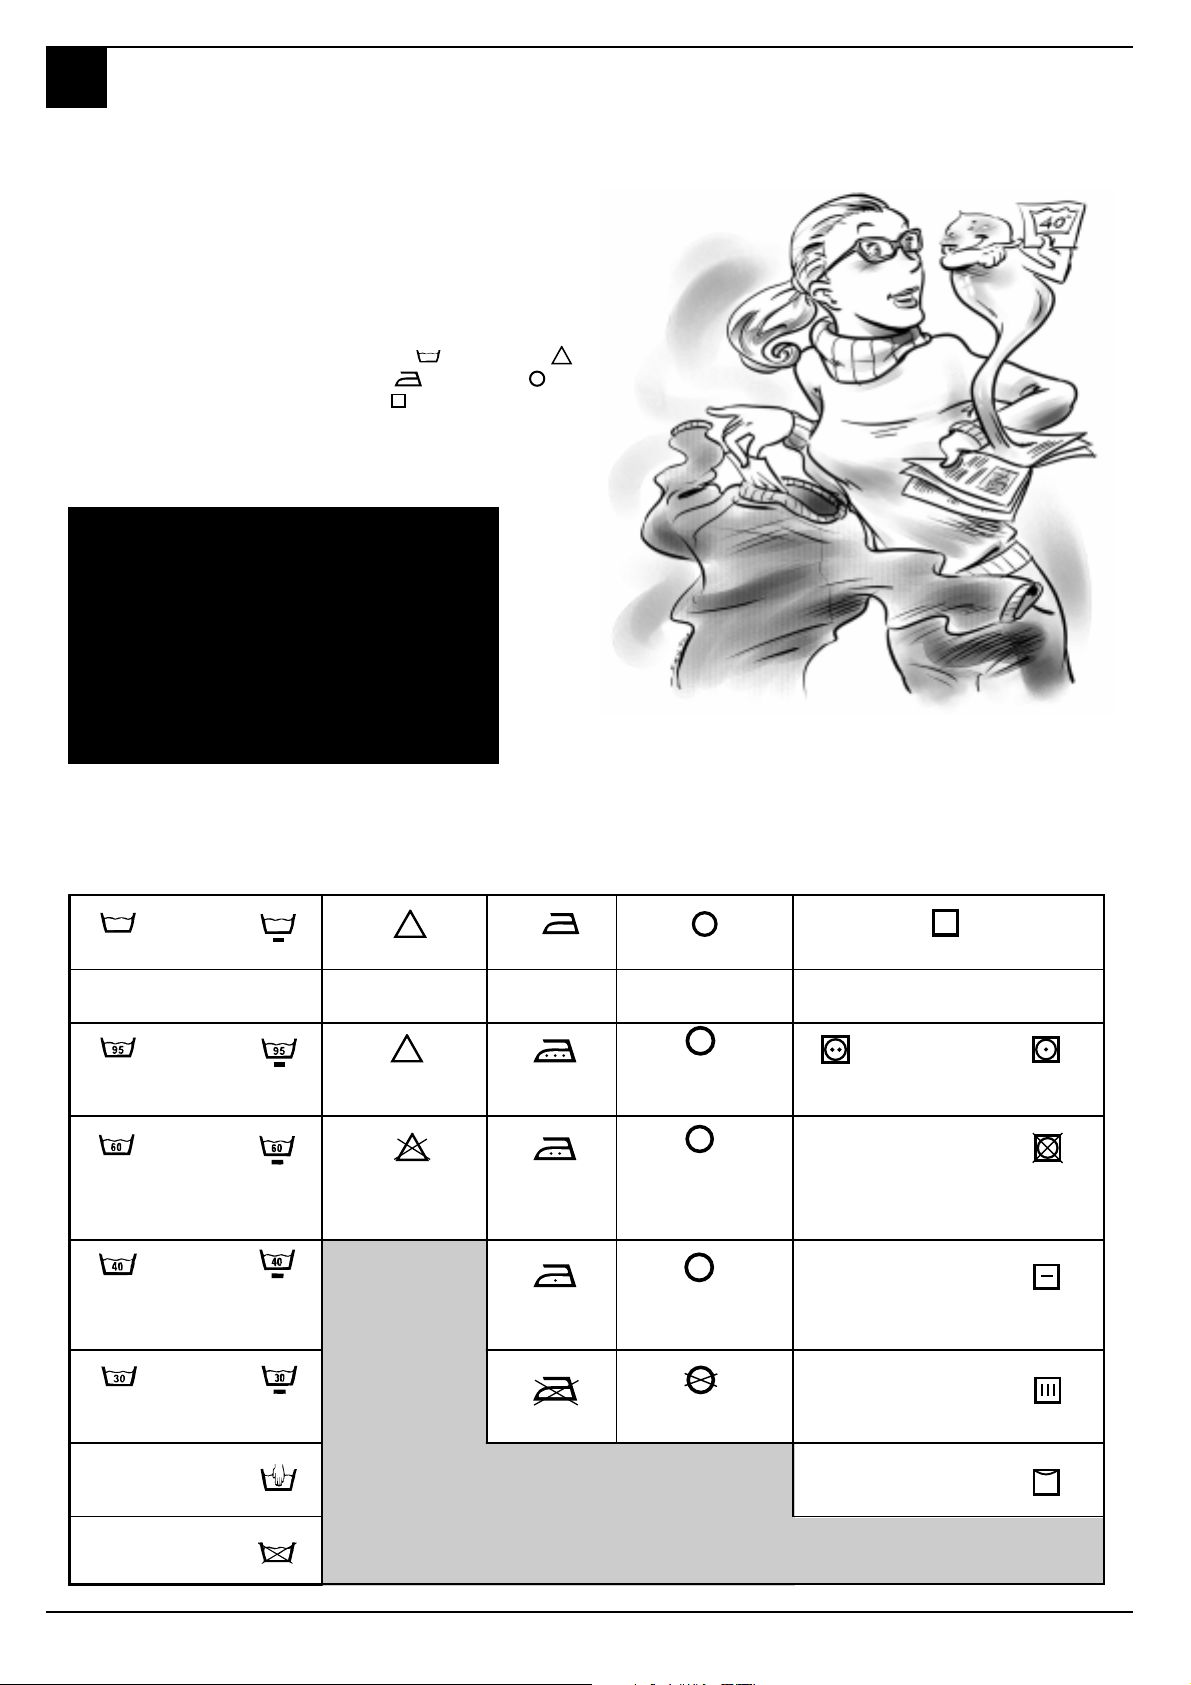
Consult and learn the symbols in this table: they will help you
obtain a better wash, treat your clothes properly, and get a
better performance out of your Ariston Margherita.
Wash Bleaching Ironing Dry cleaning Drying
Strong
action
Wash at
95°C
Wash at
60°C Do not bleach
Delicate action
c
l
Bleaching only in
cold water
Hot iron at
max 200°C
Medium hot
ironing at
max 150°C
A
Dry clean with any
solvent
P
Dry clean only with
perchloride, benzine
av., pure alcohol,
R111 and R113
High
Temp.
Make sure you select the right
temperature!
Low
Temperat.
Machine
dryable
Do not machine
dry
Wash at
40°C
Wash at
30°C Not ironable Do not dry clean
Hand wash
Not
washable in
water
19
Margherita - Instructions for installation and use
Iron at max
110°C
F
Dry clean with av.
benzine, pure
alcohol and R113 Spread to dry
Hang to dry
without spin
drying
Dry on clothes
hanger
Page 23
Useful tips to avoid mistakes
M
ARGHERITA
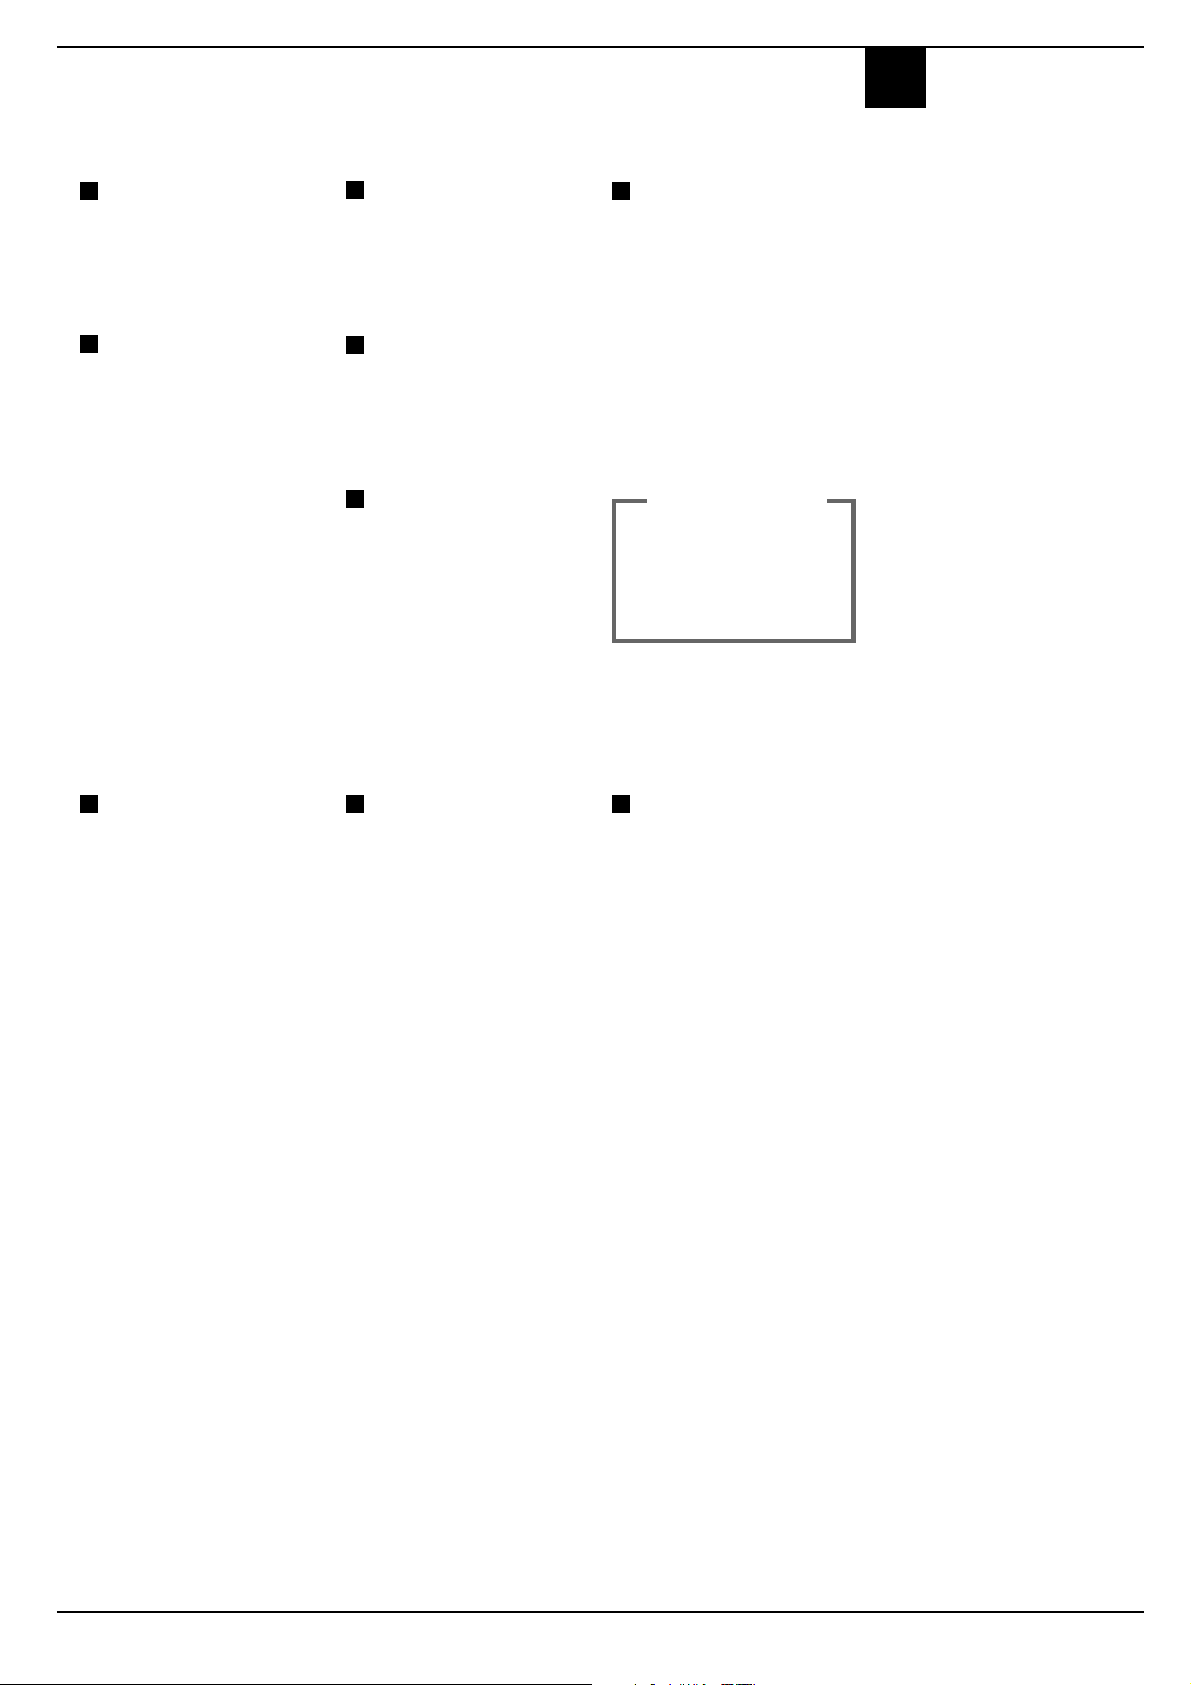
Never use your washing
machine to wash... torn, fraying
or non-hemmed linen. If it is
absolutely neccessary, place it in
a bag for protection. Brightly
coloured linen with whites.
Watch the weight!
For best results, do not exceed
the weight limits stated below
(figures show weight when dry):
- Resistant fabrics:
5 kg maximum
- Synthetic fabrics:
2.5 kg maximum
- Delicate fabrics:
2 kg maximum
- Pure new wool:
1 kg maximum
How much does it weigh?
1 sheet 400-500 gr.
1 pillow case 150-200 gr.
1 tablecloth 400-500 gr.
1 bathrobe 900-1,200 gr.
1 towel 150-250 gr.
Coloured T-shirts, printed
ones and shirts last longer if
turned inside out before washing.
Printed T-shirts and sweatshirts
should always be ironed inside
out.
Salopette alert.
Very popular salopette type
overalls have straps with hooks
that can damage the drum of your
washing machine or other
garments during the wash. By
placing the hooks in the bib
pocket and fastening them with
safety pins, all risks are avoided.
Holidays: unplug the
appliance.
When you go on holiday, we
recommend that you unplug your
washing machine, shutting off
the water inlet tap and leaving the
door opened or ajar. In this way,
both the drum and the gasket will
remain nice and dry and
unpleasant odours will not
develop inside the washing
machine.
WOOL CYCLE
For best results, we
recommend you use a
specific detergent, taking
care not to wash more
than 1 kg of laundry.
How to wash almost anything
Curtains.
Curtains tend to crease a great
deal. Here is a tip to reduce
creasing: fold the curtains and
place them in a pillow case or
mesh bag. Do not load anything
else, so that the overall weight
does not exceed the half load.
Remember to use the specific
programme 10 which automatically excludes the spin cycle.
Quilted coats and wind-
cheaters.
You can wash quilted coats and
wind-cheaters, too, if they are
padded with goose or duck
down. Do not load more than
2-3 kg and never load 5 kg. Repeat
rinse once or twice using the
gentle spin.
Trainers.
Once you have removed mud and
dirt from trainers, you can wash
them with jeans and other tough
garments. Do not wash trainers
with whites.
Margherita - Instructions for installation and use
20
Page 24
M
ARGHERITA
Its important for a good wash
The secrets of the detergent dispenser
The first secret is the easiest: the detergent
dispenser is opened by rotating it outwards.
You must add detergent and any
additives following the dosage
recommended by the manufacturers: generally, all the indications
you need are on the box. Doses
vary according to wash load, the
water hardness and how soiled
the washing is.
Experience will help you select
the right dosage almost
automatically: it will become
your secret.
When pouring in the softener in
compartment 3, avoid making it
overflow from the grate.
The washing machine automatically adds the softener to the
wash in each programme.
Liquid detergent is to be poured
into compartment 2 only a few
seconds before starting the wash
cycle.
Remember that liquid detergent
is particularly indicated for wash
cycles of up to 60 degrees and
those not requiring pre-washing.
Liquid or powder detergents are
sold together with special
containers that are to be placed
directly inside the washing
machine drum, according to the
instructions found on the
detergent box.
Never use hand wash detergent,
because it may form too much
foam, which could damage the
washing machine.
Detergents that are specifically
indicated for both hand and
machine wash are an exception.
One last secret: when washing
with cold water, always reduce
the amount of detergent you use:
it dissolves less easily in cold
water than in hot water, so part
of it would be wasted.
In compartment 1:
Detergent for pre-washing (powder)
In compartment 2:
Detergent for washing
1
2
3
(powder or liquid)
In compartment 3:
Additives (softeners, perfumes, etc.)
1
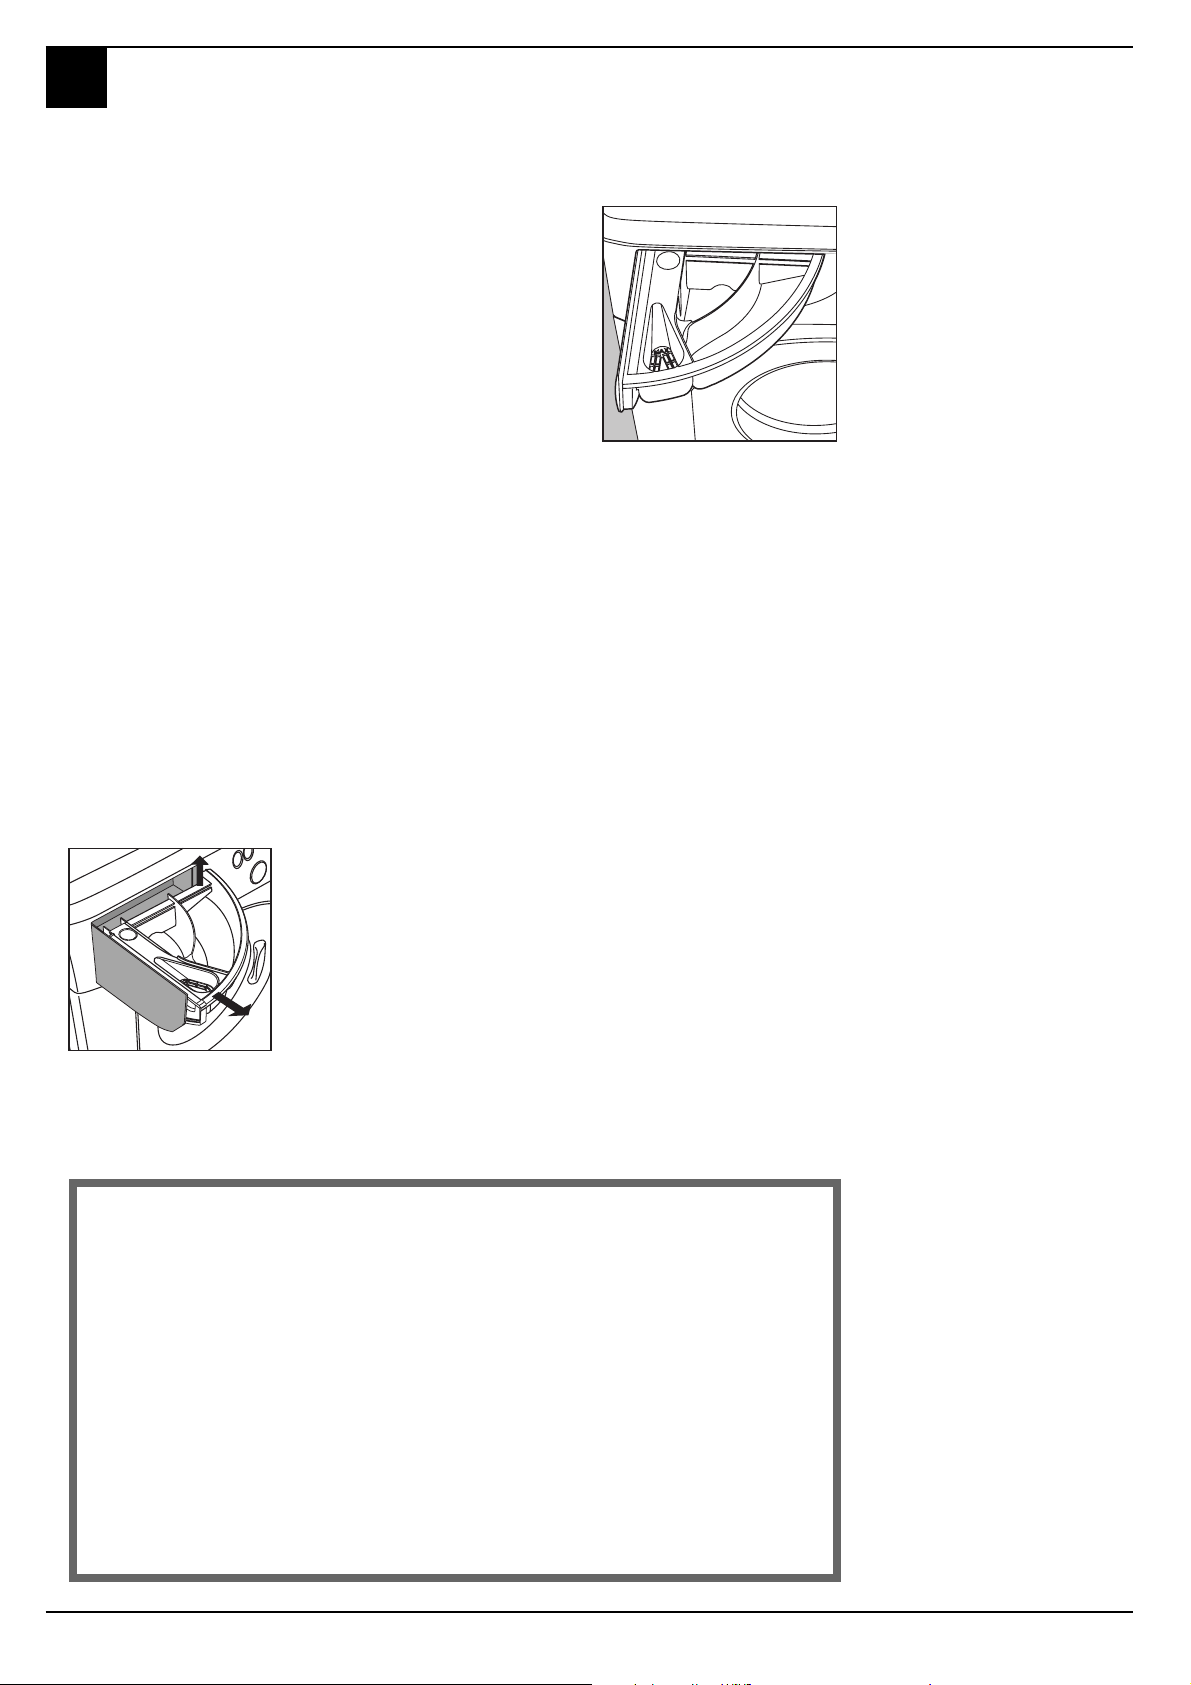
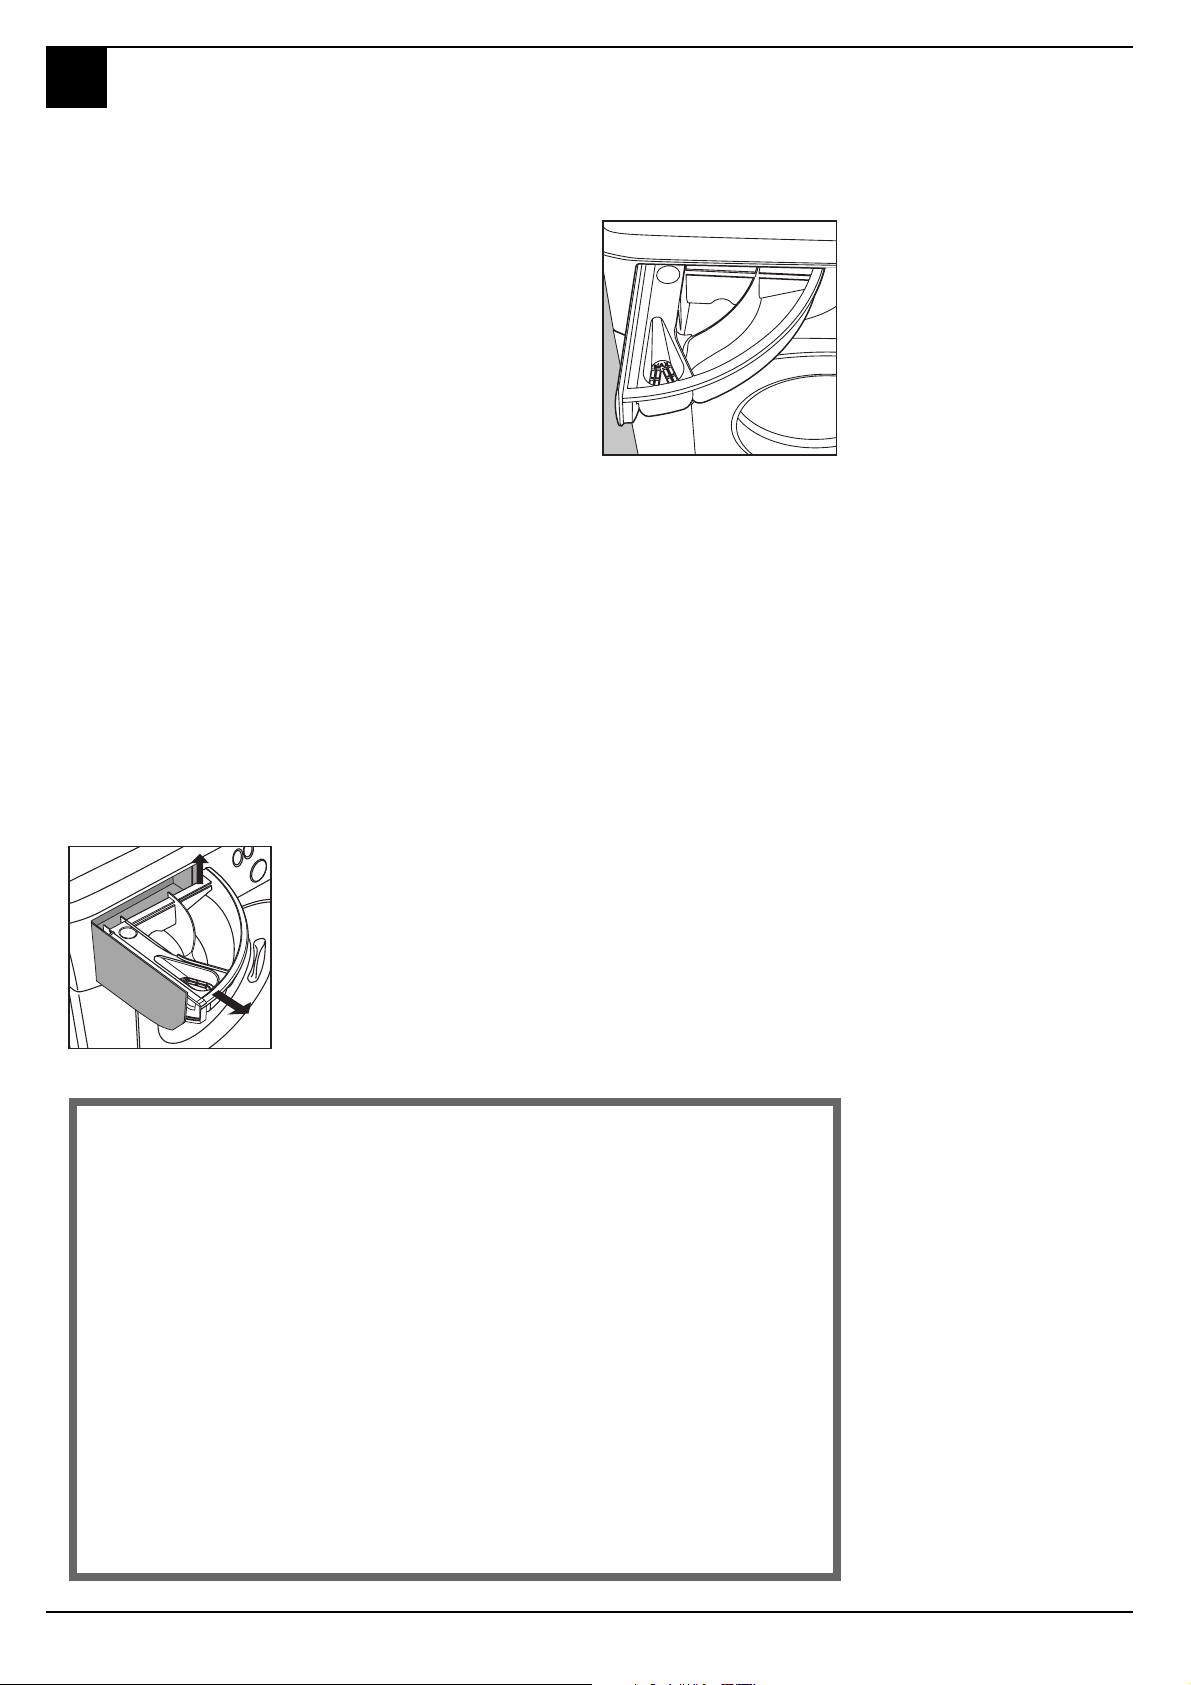
The detergent dispenser can be
removed and cleaned: just lift it up
and pull it outwards ,as indicated in
the figure. Then leave it under running
water for a few minutes.
2
Cutting costs efficiently
MAXIMISE THE LOAD SIZE
Achieve the best use of energy, water, detergent and time by using the
recommended maximum load size.
SAVE up to 50% energy by washing a full load instead of 2 half loads.
DO YOU NEED TO PRE-WASH?
For heavily soiled laundry only!
SAVE detergent, time, water and between 5 to 15% energy consumption by
NOT selecting Prewash for slight to normally soiled laundry.
IS A HOT WASH REQUIRED?
Pretreat stains with stain remover or soak dried in stains in water before
washing to reduce the necessity of a hot wash programme.
SAVE up to 50% energy by using a 60°C wash programme.
A guide to
environmentally
friendly and economic
use of your appliance.
BEFORE USING A DRYING PROGRAMME ...
SAVE energy and time by selecting a high spin speed to reduce the water
content in laundry before using a drying programme.
21
Margherita - Instructions for installation and use
Page 25
M
ARGHERITA
Troubleshooting
Before calling, read the following
Your washing machine could fail to work. In most cases, the problems
arising can be easily solved without having to call for a technician. Before
calling for assistance, always check these points.
The washing machine
fails to start.
Is the plug correctly
inserted into the socket? It
could have been moved whilst
cleaning.
Is there electricity in the
house?
A circuit breaker could have
gone off, perhaps because too
many appliances are on at the
same time. Or perhaps because
of a general power failure in
your entire area.
Is the washing machine door
closed properly?
For safety reasons, the
RIGHT
Close the tap
after every wash
cycle.
Limit the use of
the washing
machines
hydraulic system
and eliminate
leakage risks
when no-one is at
home.
Always leave the
appliance door
ajar to avoid bad
odours.
Clean the
appliances
exteriors
delicately.
To clean the
exteriors and the
rubber parts of
the appliance,
always use a rag
dipped in
lukewarm water
and soap.
WR ONG
washing machine cannot work
if the door is open or not shut
properly.
Is the On/Off button
pressed?
If it is, then a programmed
start has been set.
Is the programmed start
knob, on those models
concerned, in the correct
position?
Is the water tap open? For
safety reasons, if the washing
machine does not load water,
it cannot start a wash cycle.
Leave the washing
machine plugged in
while cleaning.
Even during maintenance, the appliance
should always be
unplugged.
Use solvents and
aggressive abrasives.
Never use solvents or
abrasives to clean the
external and rubber
parts of the washing
machine.
Neglect the detergent
dispenser.
It is removable and
can easily be cleaned
by leaving it under
running water.
Go on holiday without
thinking about her.
Before leaving, always
make sure that the
washing machine is
unplugged and that
the water tap is
closed.
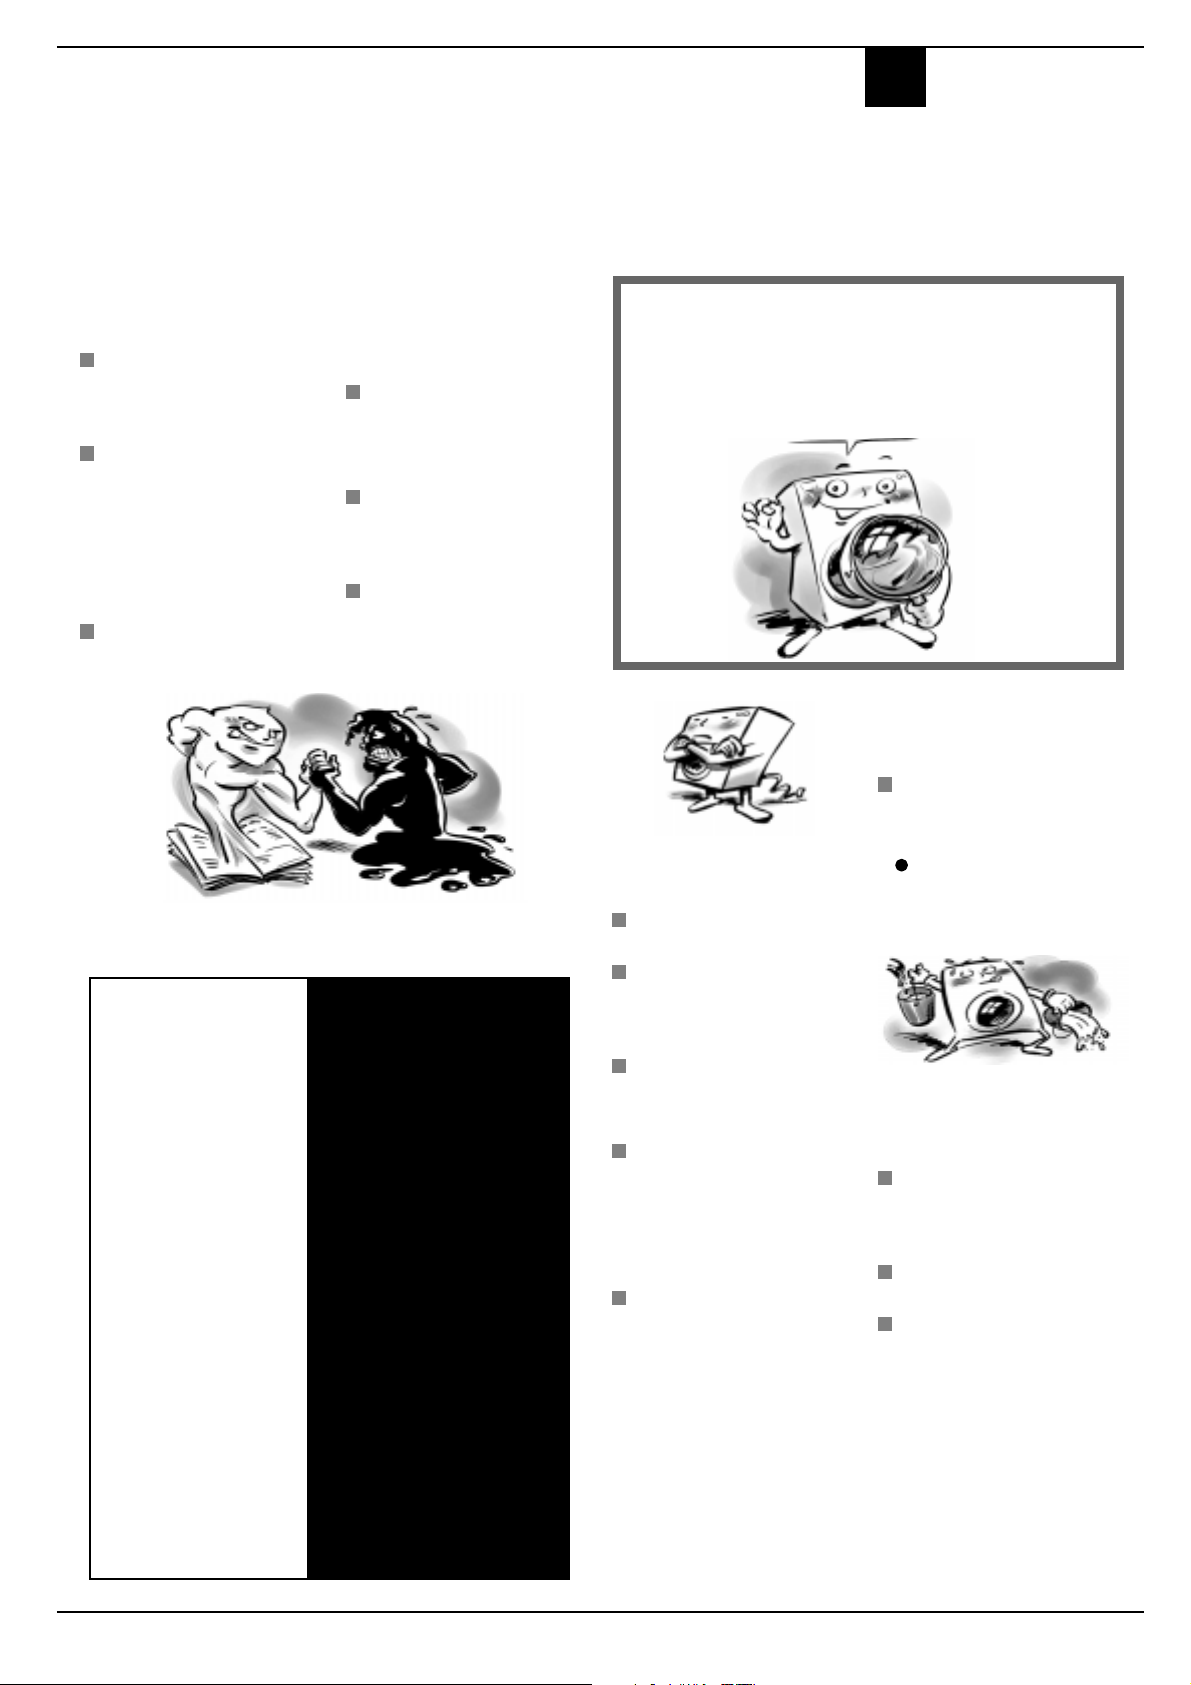
But where did all the water go?
Simple: with the new Ariston technology, you need less than
half of it, to get good results on twice as much!
This is why you cannot see the water through the door:
because there is little, very little of it, to respect the
environment yet without renouncing maximum cleanliness.
And, on top of that, you are also saving electricity.
The programme
selector knob keeps
turning?
Wait a few minutes for the
drain pump to empty the tub,
switch Margherita off, select
The washing machine
fails to load water.
Is the tap correctly
attached to the pipe ?
Is there a water shortage ?
There could be work in
progress in your building or
street.
Is there enough pressure?
The autoclave may be
malfunctioning.
Is the tap filter clean? If the
water is very calcareous, or if
work has recently been carried
out on the water piping, the tap
filter could be clogged with
particles and debris.
Is the rubber hose bent? The
tract of the rubber hose
bringing water to the washing
machine must be as straight as
possible. Make sure it is not
squashed or bent.
one of the symbols stop/reset
, then switch it back on. If
the knob continues to turn, call
for assistance because it is
reporting an anomaly.
The washing machine
continuously loads
and unloads water.
Is the drain hose
positioned too low? It must
be installed at a height ranging
from 60 to 100 cm.
Is the hoses mouth
immersed in water?
Does the wall drainage
system have a breather
pipe? If the problem persists
even after these checks, close
the water tap, switch the
appliance off and call for
assistance.
If you live on an upper floor of
your building, there may be a
problem with your drain trap.
To solve this problem, a special
valve must be installed.
Margherita - Instructions for installation and use
22
Page 26
M
ARGHERITA
The washing machine
does not drain or
spin.
Does the selected
programme foresee water
draining? Some wash cycles
require enabling the draining
manually.
Is the Anti-crease"
function -where provided enabled? This function require
enabling the draining
manually.
Is the drain pump clogged?
To check it, close the tap,
unplug the washing machine
and follow the instructions on
page 25, or call for technical
assistance.
Always get
assistance from
authorised
technicians and
always insist on
original spare
parts.
Is the drain hose bent? The
tract of the drain hose must be
as straight as possible. Make
sure it is not squashed or bent.
Is the washing machines
drain duct clogged? Is there
an extension of the drain
hose? If so, is it positioned
incorrectly, blocking the water
flow?
The washing machine
vibrates too much
during the spin cycle.
Has the internal floating
unit been correctly
unblocked during
installation? See the
following page on installation
procedures.
Has the washing machine
been levelled correctly? The
levelling of the appliance
should be checked
periodically. In time, the
machine could move
imperceptibly. Adjust the feet
and check them with a level.
Is the appliance closed in
between furniture and a
wall? If it is not a built-in
model, the washing machine
needs to oscillate a bit during
the spin cycle. A few cm of
space should therefore be left
around it.
The washing machine
leaks.
Is the metal ring of the inlet
hose properly attached?
Close the tap, unplug the
appliance and try tightening its
attachment without forcing it.
Is the detergent dispenser
obstructed? Try extracting it
and washing it under tap
water.
Is the drain hose well
attached? Close the tap,
unplug the appliance and try
tightening its attachment.
Too much foam.
Is the detergent appropriate
for machine washing? Check
whether its label reads the
definition for machine wash
or hand and machine wash,
or other similar indications.
Is the correct amount being
used? An excessive amount of
detergent, besides producing
too much foam, does not
guarantee a more effective
wash, and causes scaling in the
internal parts of the appliance.
If, despite all checks, the
washing machine fails to
function and the problem
persists, call your nearest
authorised Customer Service
Centre, providing the following
information:
- the type of malfunctioning
- the model type no. (Mod. ....)
- the serial number (S/N ....)
These indications can be found
on the data plate situated on the
back of the washing machine.
Technical characteristics
Model
Dimensions
Capacity
Electrical
connections
Water
connections
Spinning speed
Control programs
in compliance
with IEC
regulation 456
AB 83
width 59,5 cm
height 85 cm
depth 52,5 cm
from 1 to 5 kg
voltage 220/230 Volt 50 Hz
maximum absorbed power 1850 W
maximum pressure 1 MPa (10 bar)
minimum pressure 0,05 MPa (0,5 bar)
drum capacity 40 litre
up to 850 rpm
programme 3; temperature 60°C; press Extra economy button; carried out with 5 kg load.
This appliance conforms with the following E.E.C. directives:
- 73/23/EEC of 19/02/73 (Low Voltage) and subsequent modifications
- 89/336/EEC of 03/05/89 (Electromagnetic Compatibility) and subsequent modifications
TS 2004 EN 60335-2-7
23
Margherita - Instructions for installation and use
Page 27
Installation and removal
When Margherita
arrives
Whether new or just transported to a new house,
installation is extremely important for the correct
functioning of your washing machine.
M
ARGHERITA
After removing the appliance
from its packaging, check that it
is intact. If in doubt, contact a
qualified technician immediately.
The inside of the machine is
blocked, for transportation, by
3 screws on the back panel.
Before using the washing
machine, remove the screws,
remove the rubber with the aid
of the special spacer (keeping all
the parts) and use the plastic tabs
provided to fill in the holes.
Important: Use the cap (provided)
to close the 3 holes which housed
the stop pin, situated in the righthand part of the lower back of the
washing machine.
Levelling
The washing machine must be
levelled appropriatey in order to
guarantee its correct functioning.
To level the appliance, the front
feet must be adjusted; the angle
of inclination, measured according
to the worktop, must not exceed
2°. When placed on carpet, make
sure the ventilation is not
hampered within its surroundings.
The front feet are adjustable.
Do not throw the
blocking screws and
the spacers away. In
the event of a removal,
they can be used to
block the components
inside the appliance
again and so to protect
it during transport.
Connection to the water
mains
Water pressure must range within
the values indicated on the data
plate on the rear of your washing
machine. Connect the inlet hose
to a cold water tap with a 3/4 gas
threaded mouth, fitting the
rubber gasket between the two.
Warning: clean the filter
regularly by rinsing it under
running water.
A
The rubber hose filter.
If the water piping is new or has
been unused for some time, run
the water before making the
connection until it is quite clear.
Remember that impure water
may damage the washer.
Connect the other end of the
pipe to the appliance, at the top
on the right, by the water
connection.
Water pipe inlet at the top right.
Connecting the drain
hose
There are two hooks (right or
left) on the rear of your washing
machine to which the drain hose
is to be fixed. Insert the other
end in a duct or place it on the
edge of a sink or tub avoiding
excessive kinks and bending. It
should be placed at a height
ranging from 60 to 100 cm. In
case it is necessary to fix the end
of the hose at a height below 60
cm from the ground, it must be
fixed in the appropriate hook
placed on the upper part of the
back panel.
The hook to be used in case the drain
hose ends at a height below 60 cm.
If the tube drains into a tub or
sink, apply the plastic guide and
tie it to the tap.
The guide for draining into tubs and
sinks.
It must never remain immersed
in water.
Extensions are unadvisable. In
case of absolute need, the
extension must have the same
diameter as the original hose and
must not exceed 150 cm. In case
of wall draining pipes, their
efficiency must be checked by a
qualified technician. If the
dwelling is on one of the upper
floors of a building, there may be
drain trap problems causing the
washing machine to load and
unload water continuously.
In order to avoid such an
inconvenience, special anti-drain
trap valves are available in shops.
Electric connection
Before connecting the appliance
to the electric socket, be sure
that:
1) the electric socket is able to
sustain the appliances
maximum power load
indicated on the data plate
and in compliance with the
law;
2) the supply voltage is included
within the values indicated
on the data plate;
3) the socket is compatible with
the appliances plug. If not,
do not use adapters, but
replace either the socket or
the plug;
4) electric household appliances
must be equipped with an
earthing system.
Warning!
The company denies
all liability if and
when these norms are
not respected.
Plastic bags,
expanded styrofoam,
nails and other
packaging parts are
not childrens toys,
and are potentially
dangerous.
Margherita - Instructions for installation and use
24
Page 28
M
ARGHERITA
Easy Care and Maintenance
Treat her well and shell be your
Your washing machine is a reliable companion in life and on the
friend forever
job. It is just as important for you to keep it in shape.
Margherita is a washing machine
designed to last a lifetime
without any problems. A few
simple steps help keep it in shape
and last longer. Firstly, you must
close the water tap after each
wash: the constant pressure of
water could warp a few of the
component parts.
In addition, by doing so, you will
avoid the risk of leaks when noone is at home.
If the water in your area is too
hard, use a deliming product
(water is hard if it often leaves
whitish stains around taps or
drains, especially of bath tubs.
For more accurate information as
to the type of water in your
system, call the local water
works or a local plumber).
Pockets must always be emptied
removing even pins, badges and
any other hard object.
The washing machine exterior
should be cleaned with a rag
dipped in lukewarm water and
soap.
It is important to
wash the detergent
dispenser regularly.
To prevent dried
washing powder from
accumulating, place
the dispenser under
running water for a
few minutes.
Never exaggerate with
doses.
Normal detergents already
contain deliming agents. Only if
the water is particularly hard,
that is, rich in lime content, do
we recommend the use of a
specific product at every wash.
A periodical wash cycle with a
dose of a deliming product,
without detergents or washing,
may prove useful.
Never use too much detergent or
additives because this could cause an excess amount of foam,
scaling and possible damage to
the component parts of your
washing machine.
Do not forget to empty all pockets: small objects can cause
damage to your friend Margherita.
When in need, check the pump and the rubber hose.
Margherita comes equipped with a self-cleaning pump that does not require any cleaning or maintenance. Small objects
may accidentally fall into the pump: coins, hair clips, loose buttons and other small items. To avoid possible damage,
they are withheld in an accessible pre-chamber, situated at the lower end of the pump.
To access this pre-chamber, just remove the panel covering the
bottom of the washing machine using a screwdriver (figure 1);
then lift the cover rotating it anti-clockwise (figure 2) and check
its contents accurately.
The rubber hose
Check the rubber hose at least once a year. If you see any
cracks, replace it immediately. When you use your washing
machine, water pressure is very strong and a cracked tube
Fig. 1
Attention:
lid as well as before any type of maintenance procedure. It is normal to find that a little water comes out after
removing the lid. When replacing the panel, make sure you insert the hooks situated at the bottom of the washing
machine in the right slots before pushing it back against the appliance.
make sure that the wash cycle has come to a full stop and unplug the appliance before removing the
could easily split open.
Fig. 2
25
Margherita - Instructions for installation and use
Page 29
M
ARGHERITA
More and more important
Your safety and that of
Margherita has been built in compliance with
the strictest international safety regulations.
To protect you and all your family.
your children
Read these indications and all
the information in this manual
carefully: they are an
important source, not only of
numerous useful tips, but also
of vital information on safety,
use and maintenance.
1. Margherita should not be
installed in an outdoor
environment, not even
when a roof shelters the
area, because it may be
very dangerous to leave it
exposed to rain and
thunderstorms.
2. It must only be used by
adults and exclusively for
washig clothes following
the instructions provided in
this manual.
3. Should it have to be moved,
proceed with the help of
two or three people and
handle it with the utmost
care. Never try to do this
alone, because the
appliance is very heavy.
4. Before loading the washing
machine, make sure the
drum is empty.
5. Never touch the washing
machine when barefoot
or with wet or damp
hands or feet.
6. Never use extensions or
multiple plugs, which are
particularly dangerous in
humid environments. The
power supply cable must
never be bent or
dangerously compressed.
I only want an
authorised specialised
technician with original
Ariston spare parts!
7. Never open the detergent
dispenser while the
appliance is functioning;
do not use hand wash
detergent because the
abundance of foam could
damage its internal parts.
8. Never pull on the plug o r
the washing machine to
disconnect it from the wall
socket: it is extremely
dangerous.
9. While the appliance is
functioning, do not touch
the drain water as it
could reach very high
temperatures. The
appliance door, during
wash cycles, tends to
become heated; keep it
out of childrens reach.
Never force the washing
machine door because
this could damage the
safety block on the
opening, which serves to
protect from accidental
openings.
10. In case of malfunctioning, first close the
water tap and unplug the
appliance from the wall
socket; do not under any
circumstances touch
internal parts in order to
attempt repairs.
How to change the power supply cable
The Margherita power
supply cable is special and
can be purchased
exclusively from
authorised Technical
Service Centres.
To replace it, do as follows:
1. Make sure that Marghe-
rita is switched off and
unplugged.
I
Fig. 3
2. Remove the covering lid
by unscrewing the two
screws I, and then pull it
towards you [fig. 3].
3. Disconnect the wires
from the radio interference
suppressor F [fig. 4] taking
care as to their position
(Blue=N wire; Brown=L
wire) leaving the earth wire
until last
.
N
L
F
Fig. 4
N.B.: letters L, N and the
symbol
the radio interference
suppressor.
4. Remove the upper part
of the cord lead slightly
from the back panel of the
appliance, pull the power
supply cable upwards and
take it out [fig. 5].
are indicated on
Fig. 5 Fig. 6
Margherita - Instructions for installation and use
To connect the new power
supply cable, do the reverse.
To put the covering lid back
on, rest it on the washing
machine [fig. 6] and let it
slide forwards until the
hooks situated on the front
slide into the special slots
formed into the control
panel and tighten the
screws back on.
26
Page 30

M
ARGHERITA
27
Margherita - Instructions for installation and use
Page 31

M
ARGHERITA
Margherita - Instructions for installation and use
28
Page 32

Via Aristide Merloni, 47 - 60044 Fabriano - tel. (0732) 6611 - Italy
04/2002 - 195025824.05 - XEROX BUSINESS SERVICES - DOCUTECH
 Loading...