

Page 1
9YOKT 998ED X /HA
Magyar
Használati útmutató
SÜTŐ
Tartalomjegyzék
Használati útmutató,1
Figyelmeztetések,2
Szerviz,5
A készülék leírása,7
A készülék leírása,10
Beszerelés,39
A sütő felépítése,41
Bekapcsolás és használat,42
Üzemmódok,43
Óvintézkedések és tanácsok,50
Karbantartás és ápolás,50
Hibaelhárítás,52
English
Operating Instructions
OVEN
Contents
Operating Instructions,1
Warnings,2
Assistance,5
Description of the appliance,7
Description of the appliance,9
Installation,12
Oven structure,14
Start-up and use,15
Modes,16
Precautions and tips,22
Maintenance and care,22
Troubleshooting,24
Български
Инструкции за употреба
ФУРНА
Съдържание
Инструкции за употреба,1
Предупреждения,2
Техническо обслужване,5
Описание на уреда,7
Описание на уреда,9
Монтиране,25
Структура на фурната,27
Пуск и експлоатация,28
Режими,29
Предпазни мерки и препоръки,36
Поддръжка и почистване,37
Отстраняване на неизправности,38
Română
Instrucţiuni de utilizare
CUPTOR
Sumar
Instrucţiuni de utilizare,1
Avertismente,3
Asistenţă,5
Descrierea aparatului,7
Descrierea aparatului,10
Instalare,53
Structura cuptorului,55
Pornirea şi utilizarea,56
Moduri de funcţionare,57
Măsuri de precauţie şi sfaturi practice,64
Întreţinerea şi îngrijirea aparatului,64
Identicarea şi remedierea problemelor,66
Cрпски
Радна упутства
РЕРНА
Содержание
Радна упутства,1
Упозорења,3
Помоћ,6
Опис апарата,8
Опис апарата,11
Инсталација,67
Структура рерне,69
Покретање и употреба,70
Режими,71
Мере опреза и савети,78
Одржавање и нега,78
Решавање проблема,80
Page 2
Warnings
WARNING: The appliance and its
accessible parts become hot during use.
Care should be taken to avoid touching
heating elements. Children less than 8
years of age shall be kept away unless
continuously supervised. This appliance
can be used by children aged from 8 years
and above and persons with reduced
physical, sensory or mental capabilities
or lack of experience and knowledge
if they have been given supervision
or instruction concerning use of the
appliance in a safe way and understand
the hazards involved. Children shall not
play with the appliance. Cleaning and
user maintenance shall not be made by
children without supervision.
Do not use harsh abrasive cleaners or
sharp metal scrapers to clean the oven
door glass since they can scratch the
surface, which may result in shattering
of the glass.
Never use steam cleaners or pressure
cleaners on the appliance.
се избягва контакт с нагревателите.
Деца под 8 години трябва да бъдат
държани настрана, освен ако не са под
непрекъснат надзор. Уредът може да
бъде използван от деца над 8 години и от
хора с ограничени физически, сетивни
или умствени способности или без
опит и познания, ако са наблюдавани,
или са им дадени указания относно
използването на уреда по безопасен
начин, и са запознати с възможните
опасности. Децата не трябва да играят с
уреда. Почистването и поддръжката от
потребителя не трябва да се извършва
от деца без надзор.
Не използвайте груби абразивни
почистващи препарати или остри
метални шпатули за почистване на
стъклото на вратата на фурната, тъй
като могат да надраскат повърхността,
което може да доведе до счупване на
стъклото.
Никога не използвайте водочистачки
или парочистачки върху уреда.
ПРЕДУПРЕЖДЕНИЕ: Преди да
подмените лампата се уверете, че
уредът е изключен, за да избегнете
риска от токов удар.
WARNING: Ensure that the appliance is
switched off before replacing the lamp to
avoid the possibility of electric shock.
! When you place the rack inside, make
sure that the stop is directed upwards and
in the back of the cavity.
Предупреждения
ПРЕДУПРЕЖДЕНИЕ: Уредът и
достъпните му части се нагорещяват
по време на употреба. Трябва да
2
! Когато поставяте решетката вътре се
уверете, че стоперът е насочен нагоре
и в задната част на фурната.
Figyelmeztetések
FIGYELMEZTETÉS: A készülék és
a hozzáférhető részei felforrósodnak
a használat során. Ügyeljen rá, hogy
ne érjen a fűtőelemekhez. A 8 évnél
atalabb gyermekeket távol kell tartani,
ha nincsenek folyamatos felügyelet
alatt. Ezt a berendezést használhatják
Page 3
8 évnél idősebb gyermekek és csökkent
zikai, szenzoros vagy mentális
képességű, illetve tapasztalattal és
tudással nem rendelkező személyek, ha
felügyelet alatt álnak, vagy ha megfelelő
útmutatást kaptak a készülék biztonságos
működtetéséről, valamint megértették a
fennálló veszélyeket. A gyermekek nem
játszhatnak a készülékkel. A tisztítást
és a felhasználó által elvégezhető
karbantartást nem végezhetik felügyelet
nélküli gyermekek.
Ne használjon durva súroló anyagokat
vagy éles fém kaparókat a sütő
üveg ajtajának tisztításához, mert
megkarcolhatják a felületet, ami az üveg
töréséhez vezethet.
A készülék tisztításához soha ne
használjon gőztisztítót vagy nagynyomású
tisztítót.
lipsite de experienţă şi cunoştinţe numai
sub supraveghere şi după realizarea
unui instructaj cu privire la utilizarea
aparatului în condiţii de siguranţă şi după
înţelegerea riscurilor implicate. Copiii nu
trebuie să se joace cu aparatul. Copiii
nu trebuie să efectueze operaţiuni de
curăţare şi întreţinere fără supraveghere.
Nu folosiţi agenţi de curăţare abrazivi sau
raclete metalice ascuţite pentru a curăţa
uşa de sticlă a cuptorului, deoarece
acestea pot zgâria suprafaţa, ceea ce
poate duce la spargerea sticlei.
Nu folosiţi niciodată aparate de curăţare
cu abur sau sub presiune pe aparat.
AVERTISMENT: Asiguraţi-vă aparatul
este oprit înainte de înlocuirea lămpii,
pentru a evita posibilitatea unui şoc
electric.
FIGYELMEZTETÉS: Győződjön meg
róla, hogy a készülék ki van-e kapcsolva,
mielőtt kicseréli az izzót, hogy elkerülje
az áramütést.
! Amikor behelyezi a rácsot, ügyeljen arra,
hogy az ütköző felfelé nézzen, a sütő
belsejének hátuljában.
Avertismente
AVERTISMENT: Aparatul şi componentele
sale accesibile deveni erbinţi în timpul
utilizării. Trebuie luate măsuri pentru a
evita atingerea elementelor de încălzire.
Copiii cu vârste mai mici de 8 ani vor
ţinuţi la distanţă, cu excepţia cazului
în care sunt supravegheaţi continuu.
Acest aparat poate utilizat de către
copii cu vârstă mai mare de 8 şi de către
persoane cu capacităţi zice, senzoriale
sau mentale reduse sau de persoane
! Când plasaţi grilajul în interior, asiguraţivă că opritorul este îndreptat în sus şi în
partea din spate a cavităţii.
Упозорења
УПОЗОРЕЊЕ: Овај апарат и његови
доступни делови загревају се током
употребе. Водите рачуна да избегнете
додиривање грејних елемената. Деца
млађа од 8 година треба да се држе
подаље осим ако нису под сталним
надзором. Овај апарат могу да користе
деца од 8 година и више и особе са
умањеним физичким, сензорним
или менталним способностима или
са недостатком искуства и знања
ако су под надзором или су добили
упутства у вези са употребом апарата
на безбедан начин и ако разумеју
пратеће опасности. Деца се неће
играти са овим апаратом. Чишћење и
3
Page 4

корисничко одржавање неће обављати
деца без надзора.
Не користите груба абразивна
средства или оштре металне стругаче
да очистите стакло на вратима рерне
јер они могу да изгребу површину, што
може да доведе до ломљаве стакла.
Никада не користите парочистаче
или чистаче под притиском на овом
апарату.
УПОЗОРЕЊЕ: Проверите да ли је
апарат искључен пре замене лампе
како бисте избегли могућност
електричног удара.
! Када поставите полицу унутра,
проверите да ли је блокада окренута
нагоре и да ли је у усеку.
4
Page 5
Assistance
Warning:
The appliance is tted with an automatic diagnostic system
which detects any malfunctions. Malfunctions are signalled
through messages of the following type: “F—” followed by
numbers.
Call for technical assistance in the event of a malfunction.
Szerviz
Figyelmeztetés:
A készülék automatikus diagnosztikai rendszerrel
van ellátva, amely észleli a meghibásodásokat. A
meghibásodások kijelzése a következő típusú üzenetek
útján történik: “F—” melyet számok követnek.
Meghibásodás esetén forduljon a Szervizhez.
Before calling for Assistance:
• Check whether you can x the problem yourself.
• Restart the programme to check whether the malfunction
has disappeared.
• If it has not, contact the Authorised Technical Assistance
Service.
! Never use the services of an unauthorised technician.
Please have the following information to hand:
• The type of problem encountered.
• The message shown on the TEMPERATURE display.
• The appliance model (Mod.).
• The serial number (S/N).
The latter two pieces of information can be found on the
data plate located on the appliance.
Техническо обслужване
Предупреждение:
Уредът е снабден с автоматична система за
диагностициране, която установява повреди. Повредите
се оповестяват чрез съобщения от следния тип: „F—“,
последвано от цифри.
Повикайте представител на технически сервиз в случай
на повреда.
Mielőtt felhívná a szervizt:
• Győződjön meg arról, hogy Ön nem képes-e elhárítani
a hibát.
• Indítsa újra a programot és ellenőrizze, hogy a
meghibásodás megszűnt-e.
• Ha nem, vegye fel a kapcsolatot a szakszervizzel.
! Soha ne vegye igénybe nem felhatalmazott
szervizszemélyzet szolgáltatásait.
Adja meg az alábbi adatokat:
• A felmerült probléma jellege.
• A HŐMÉRSÉKLET kijelzőn látható üzenet.
• A készülék modellje (Mod.)
• A készülék sorozatszáma (S/H)
Az utolsó két információt a készüléken található adattábláról
olvashatja le.
Asistenţă
Avertisment:
Aparatul este echipat cu un sistem automat de diagnosticare
care detectează orice defecţiune. Defecţiunile sunt
semnalate prin mesaje de tipul următor: "F-" urmat de
numere.
Solicitaţi asistenţă tehnică în cazul unei defecţiuni.
Преди да позвъните в техническия сервиз:
• Проверете дали не може да отстраните проблема
сами.
• Рестартирайте програмата, за да проверите дали
повредата е отстранена.
• Ако не е, се свържете с оторизиран сервизен център
за техническо обслужване.
! Никога не използвайте услугите на неоторизиран
техник.
Подгответе следната информация:
• Вид на възникналия проблем.
• Съобщението, което излиза на ТЕМПЕРАТУРНИЯ
дисплей.
• Модел на уреда (Mod.).
• Сериен номер (S/N).
Последните два елемента се намират на табелката с
данни на уреда.
Înainte de a lua solicita asistenţă:
• Vericaţi dacă puteţi rezolva singur problema.
• Reporniţi programul pentru a verica dacă defecţiunea
a dispărut.
• Dacă defecţiunea nu a dispărut, contactaţi Serviciul
autorizat de asistenţă tehnică.
! Nu apelaţi niciodată la serviciile unui tehnician neautorizat.
Vă rugăm să aveţi următoarele informaţii la îndemână:
• Tipul problemei întâlnite.
• Mesajul aşat pe ecranul TEMPERATURE
(TEMPERATURĂ).
• Modelul aparatului (Mod.).
• Seria aparatului (S/N).
Aceste ultime două informaţii pot găsite pe plăcuţa cu
date tehnice montată pe aparat.
5
Page 6

Помоћ
Упозорење:
Апарат има аутоматски дијагностички систем који
детектује све кварове. Кварови се сигнализирају кроз
поруке следећег типа: "Ф—" у пратњи бројева.
У случају квара, позовите техничку помоћ.
Пре позивања подршке:
• Проверите да ли можете сами да исправите проблем.
• Рестартујте програм да проверите да ли је квар
нестао.
• Ако није, контактирајте овлашћени сервис за
техничку подршку.
! Никада не користите услуге неовлашћеног техничара.
Располажите следећим информацијама:
• Врста проблема до ког је дошло.
• Порука приказана на дисплеју ТЕМПЕРАТУРА.
• Модел апарата (Мод.).
• Серијски број (С/Н).
Последње две информације могу да се нађу на плочици
са подацима која се налази на апарату.
6
Page 7

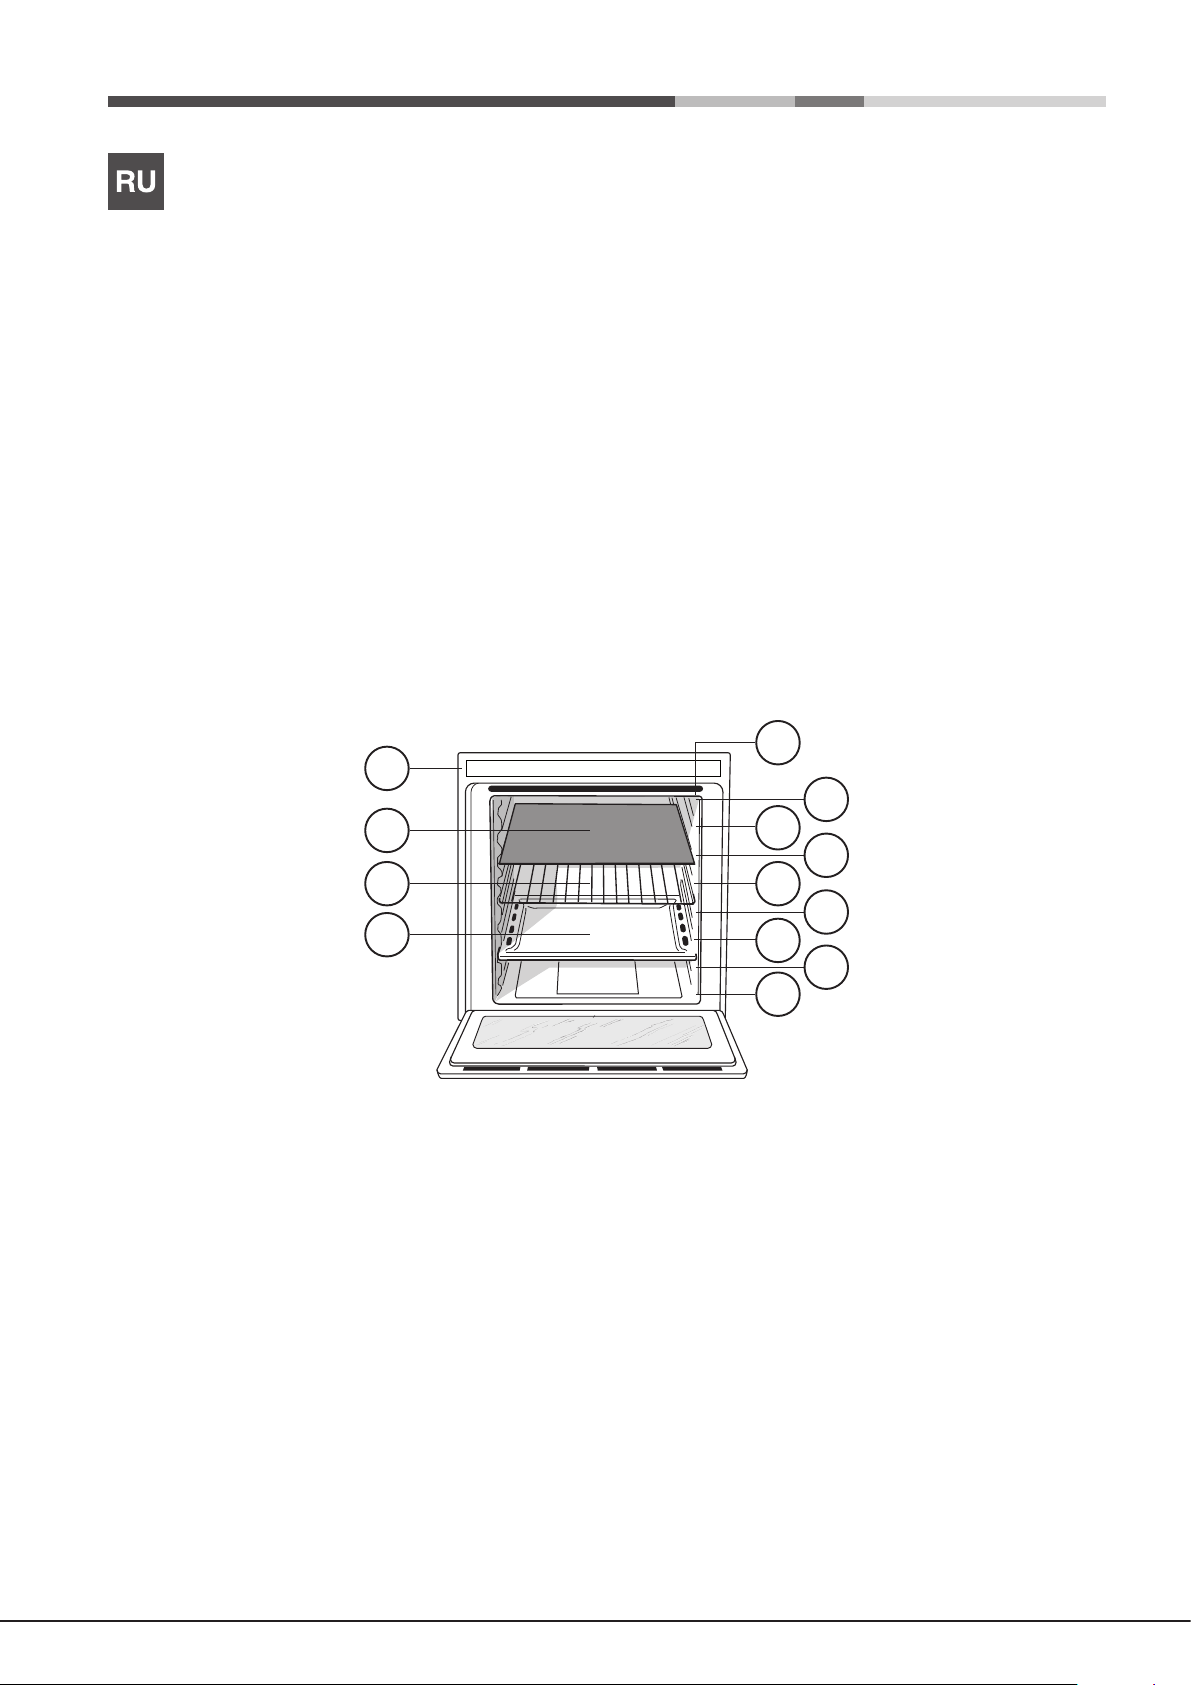
Description of the appliance
13
12
11
10
1
3
5
7
4
6
8
9
A készülék leírása
Overall view
1 POSITION 1
2 POSITION 2
3 POSITION 3
4 POSITION 4
5 POSITION 5
6 DIVIDER “D” POSITION
7 POSITION 6
8 POSITION 7
9 GUIDES for the sliding racks
10 DRIPPING PAN
11 RACK shelf
12 DIVIDER shelf
13 Control panel
Описание на уреда
Общ преглед
1 ПОЗИЦИЯ 1
2 ПОЗИЦИЯ 2
3 ПОЗИЦИЯ 3
4 ПОЗИЦИЯ 4
5 ПОЗИЦИЯ 5
6 “D” ПОЗИЦИЯ НА РАЗДЕЛИТЕЛЯ
7 ПОЗИЦИЯ 6
8 ПОЗИЦИЯ 7
9 ВОДАЧИ за плъзгане на решетките
10 ТАВИЧКА ЗА ОТТИЧАНЕ
11 позиция на СКАРАТА
12 позиция на РАЗДЕЛИТЕЛЯ
13 Контролен панел
A készülék áttekintése
1 1. POZÍCIÓ
2 2. POZÍCIÓ
3 3. POZÍCIÓ
4 4. POZÍCIÓ
5 5. POZÍCIÓ
6 OSZTÓELEM „D” POZÍCIÓ
7 6. POZÍCIÓ
8 7. POZÍCIÓ
9 SÍNEK a csúszó rácsokhoz
10 ZSÍRFOGÓ TÁLCA
11 RÁCS polc
12 OSZTÓELEM polc
13 Kezelőpanel
Descrierea aparatului
Prezentare de ansamblu
1POZIŢIA 1
2POZIŢIA 2
3POZIŢIA 3
4POZIŢIA 4
5POZIŢIA 5
6RAFT DIVIDER POZIŢIA "D"
7POZIŢIA 6
8POZIŢIA 7
9INSTRUCŢIUNI pentru grilajele culisante
10TAVĂ SCURGERE
11GRILAJ
12RAFT DESPĂRŢITOR
13Panou de control
2
7
Page 8
13
12
11
10
123
5
7
4
6
8
9
Опис апарата
Укупни преглед
1 ПОЛОЖАЈ 1
2 ПОЛОЖАЈ 2
3 ПОЛОЖАЈ 3
4 ПОЛОЖАЈ 4
5 ПОЛОЖАЈ 5
6 Положај делитеља "д"
7 ПОЛОЖАЈ 6
8 ПОЛОЖАЈ 7
9 ВОЂИЦЕ за клизне полице
10 ПЛЕХ ЗА КАПАЊЕ
11 ПОЛИЦА
12 Делитељ полица
13 Контролна табла
8
Page 9
Description of the appliance
11
Описание на уреда
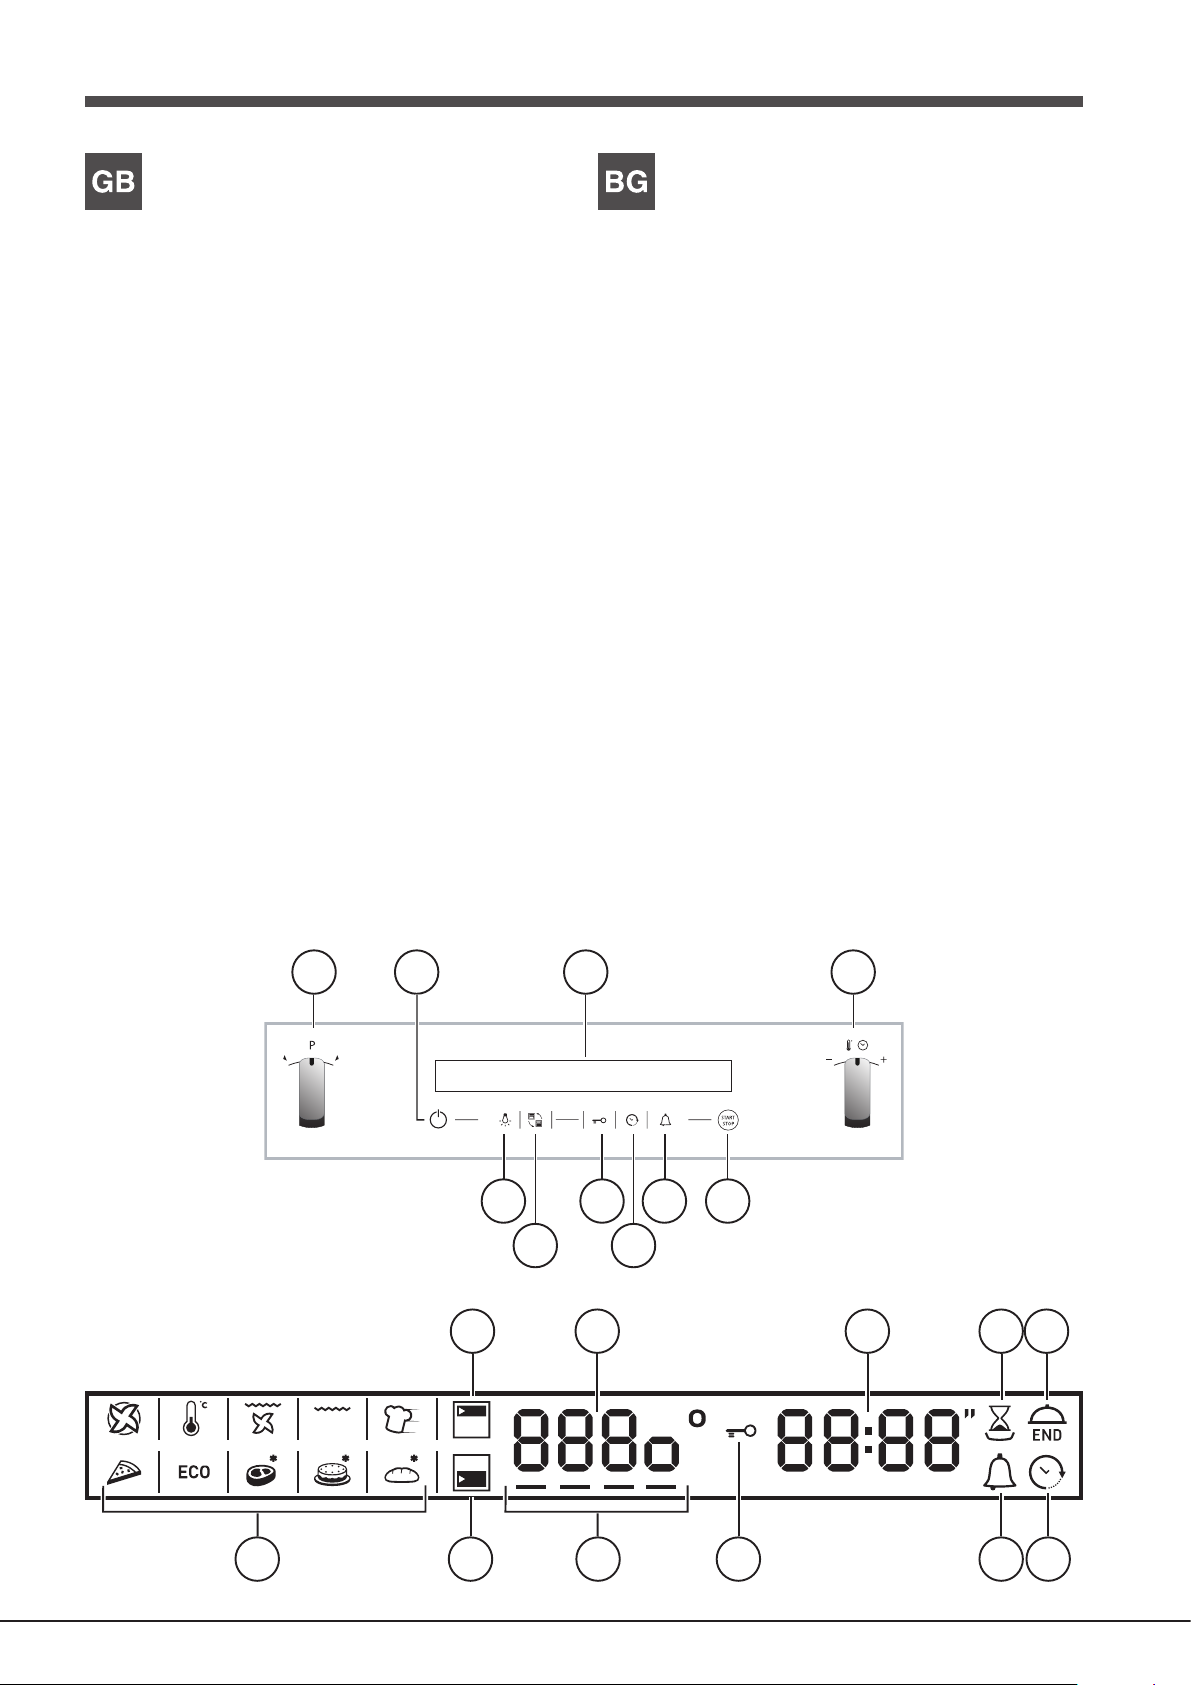
Control panel
1 SELECTOR knob
2 CONTROL PANEL POWER BUTTON
3 DISPLAY
4 THERMOSTAT / TIMER knob
5 START / STOP
6 MINUTE MINDER icon
7 TIMER icon
8 CONTROL PANEL LOCKED icon
9 SELECT CAVITY icon
10 LIGHT icon
Display
1 SMALL CAVITY icon
2 CAVITY TEMPERATURE display
3 TIME display
4 DURATION icon
5 END OF COOKING icon
6 CLOCK icon
7 MINUTE MINDER icon
8 CONTROL PANEL LOCK indicator
9 CAVITY PREHEATING / RESIDUAL HEAT indicator
10 MAIN CAVITY icon
11 MODE icons
Контролен панел
1 превключвател ИЗБОР НА РЕЖИМ
2 БУТОН ЗА ЗАХРАНВАНЕТО КОНТРОЛЕН ПАНЕЛ
3 ДИСПЛЕЙ
4 превключвател ТЕРМОСТАТ / ТАЙМЕР
5 СТАРТ / СТОП
6 икона БРОЯЧ НА МИНУТИТЕ
7 икона ТАЙМЕР
8 икона ЗАКЛЮЧЕН БУТОН НА КОНТРОЛЕН ПАНЕЛ
9 икона ИЗБОР НА ФУРНА
10 икона ЛАМПА
Дисплей
1 икона МАЛКА ФУРНА
2 дисплей ТЕМПЕРАТУРА НА ФУРНАТА
3 дисплей ВРЕМЕ
4 икона ПРОДЪЛЖИТЕЛНОСТ
5 икона КРАЙ НА ГОТВЕНЕТО
6 икона ЧАСОВНИК
7 икона БРОЯЧ НА МИНУТИТЕ
8 индикатор ЗАКЛЮЧВАНЕ НА КОНТРОЛЕН ПАНЕЛ
9 индикатор ПРЕДВАРИТЕЛНО ЗАГРЯВАНЕ НА
ФУРНАТА / ОСТАТЪЧНА ТОПЛИНА
10 икона ОСНОВНА ФУРНА
11 икони РЕЖИМ
1 2 43
10
9
1
8
6
5
7
2
43 5
6910 78
9
Page 10
A készülék leírása
11
Descrierea aparatului
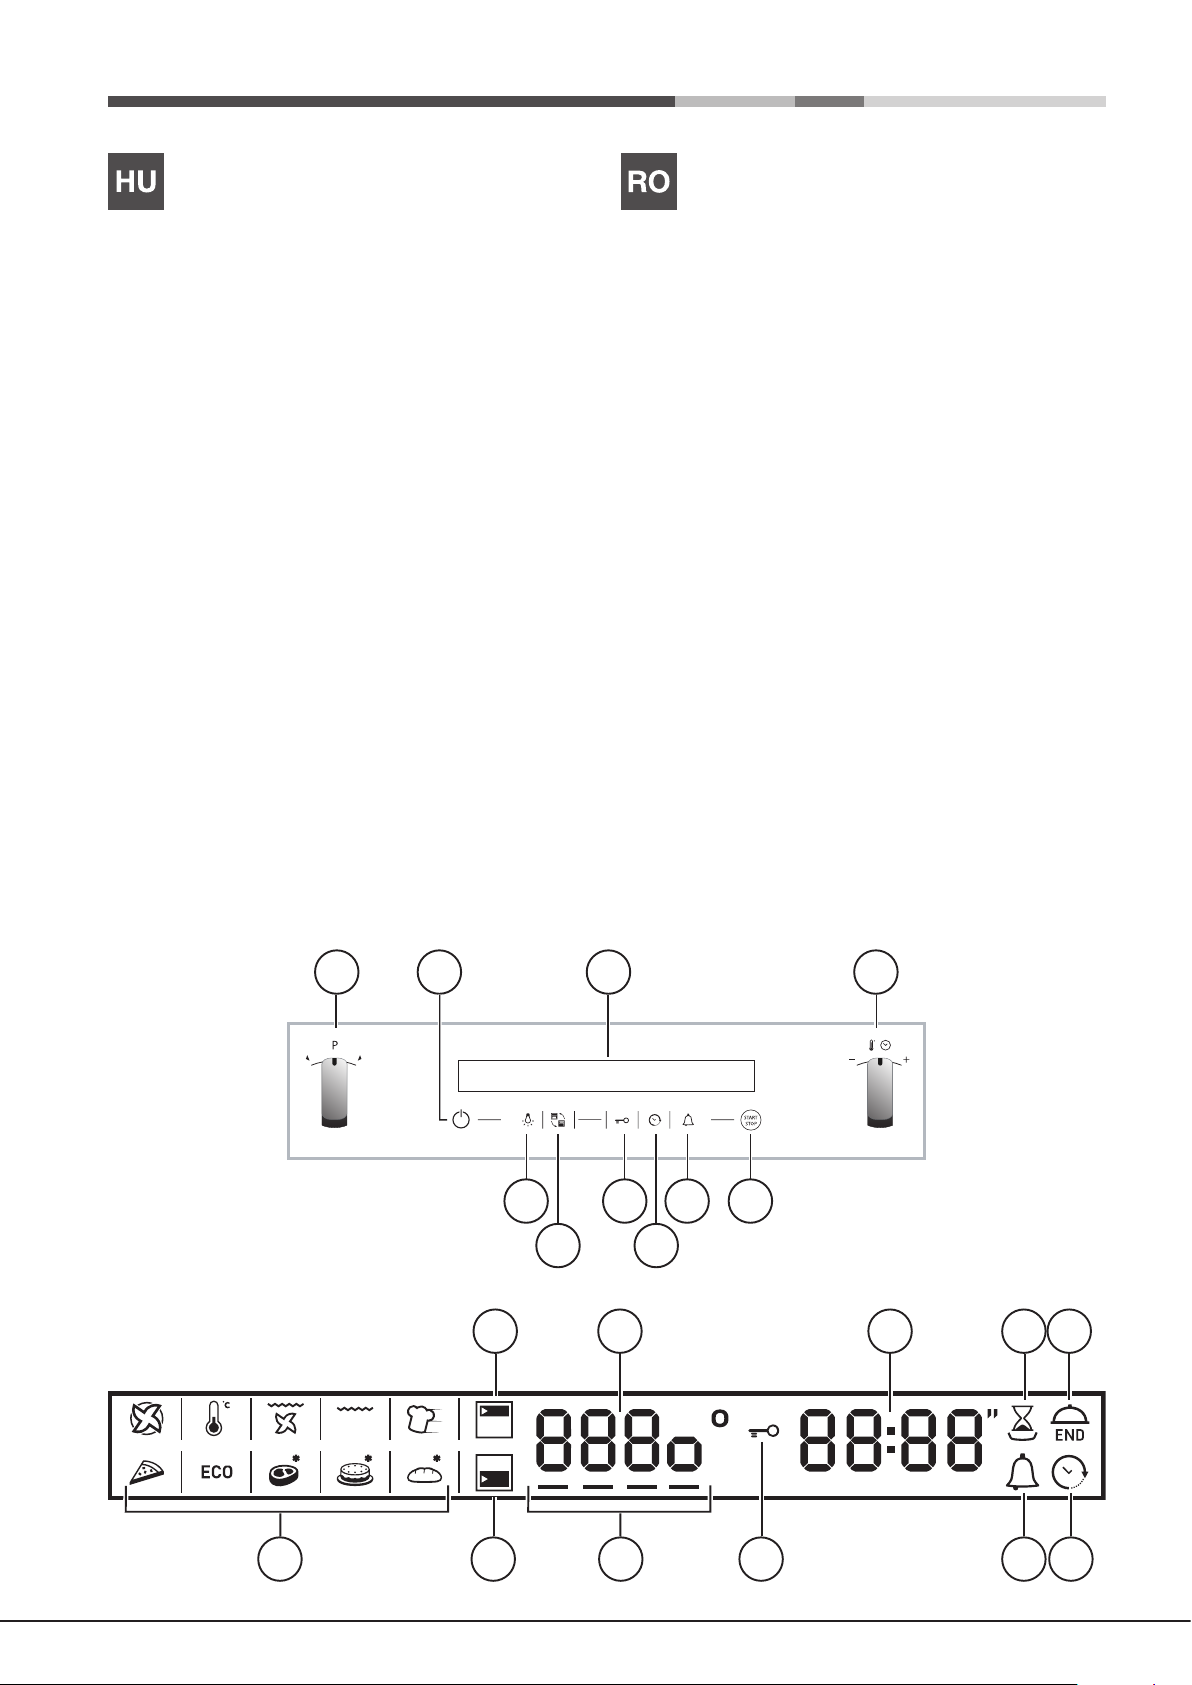
Kezelőpanel
1 VÁLASZTÓ gomb
2 KEZELŐPANEL BEKAPCSOLÓ GOMB
3 KIJELZŐ
4 HŐMÉRSÉKLET-SZABÁLYZÓ/IDŐZÍTŐ választógomb
5 INDÍTÁS / LEÁLLÍTÁS
6 VISSZASZÁMLÁLÓ szimbólum
7 IDŐZÍTŐ szimbólum
8 KEZELŐPANEL LEZÁRVA szimbólum
9 SÜTŐTÉR KIVÁLASZTÁSA szimbólum
10 FÉNY szimbólum
Kijelző
1 KIS SÜTŐTÉR szimbólum
2 SÜTŐTÉR HŐMÉRSÉKLET kijelző
3 IDŐ kijelző
4 IDŐTARTAM szimbólum
5 SÜTÉS VÉGE szimbólum
6 IDŐZÍTŐ szimbólum
7 VISSZASZÁMLÁLÓ szimbólum
8 KEZELŐPANEL LEZÁRVA visszajelző
9 SÜTŐTÉR ELŐMELEGÍTÉS / MARADÉKHŐ visszajelző
10 FŐ SÜTŐTÉR szimbólum
11 ÜZEMMÓD szimbólumok
Panoul de control
1 buton rotativ SELECTOR
2 BUTON DE PORNIRE A PANOULUI DE CONTROL
3 AFIŞAJ
4 buton rotativ TERMOSTAT/TEMPORIZATOR
5 PORNIRE/OPRIRE
6 pictogramă CRONOMETRU
7 TEMPORIZATOR
8 pictogramă PANOU DE CONTROL BLOCAT
9 pictogramă SELECTARE CAVITATE
10 pictogramă LUMINĂ
Aşaj
1 pictogramă CAVITATE MICĂ
2 ecran TEMPERATURĂ CAVITATE
3 ecran TIMP
4 pictogramă DURATĂ
5 pictogramă FINAL PROCES DE GĂTIRE
6 pictogramă CEAS
7 pictogramă CRONOMETRU
8 indicator BLOCARE PANOU DE CONTROL
9 indicator PREÎNCĂLZIRE CAVITATE/CĂLDURĂ
REZIDUALĂ
10 pictogramă CAVITATE PRINCIPALĂ
11 pictograme MOD
1 2 43
10
9
1
8
6
5
7
2
43 5
6910 78
10
Page 11
11
Опис апарата
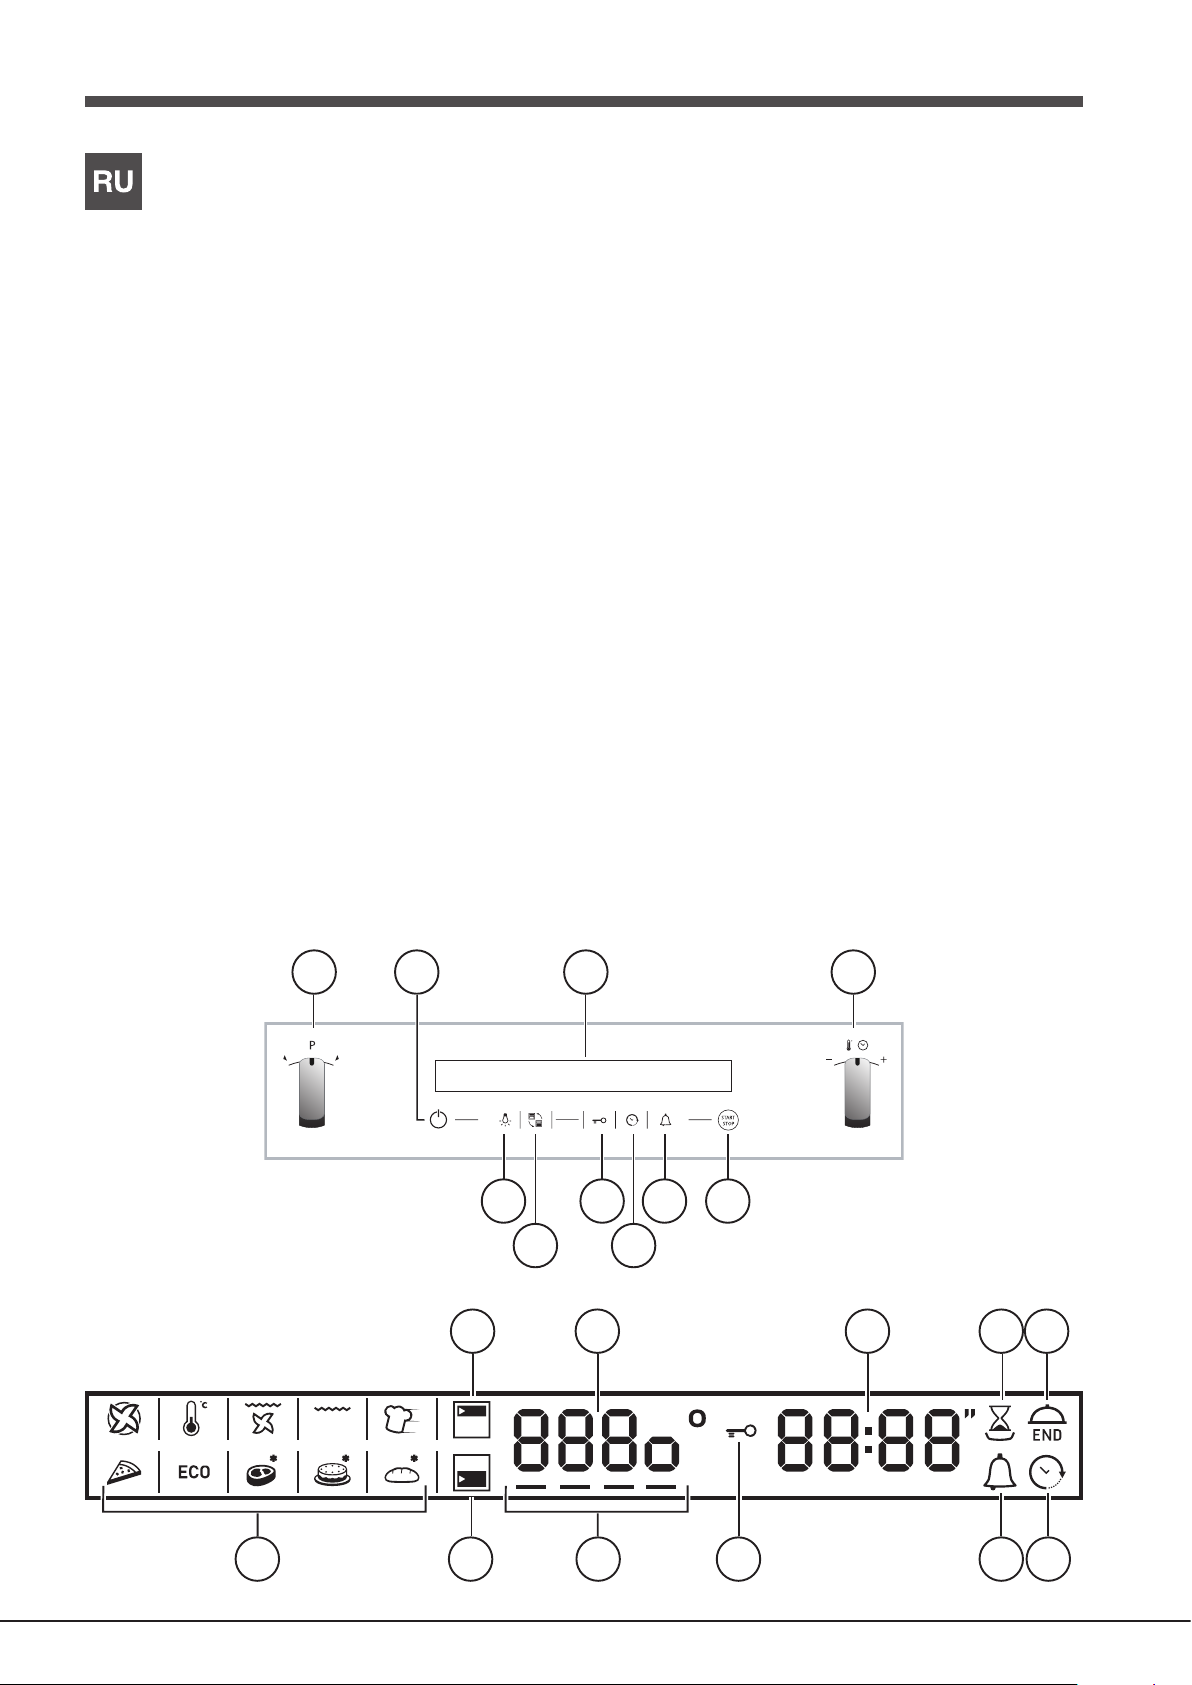
Контролна табла
1 БИРАЧ дугме
2 КОНТРОЛНА ТАБЛА ДУГМЕ ЗА ПАЉЕЊЕ
3 ДИСПЛЕЈ
4 ТЕРМОСТАТ / МЕРАЧ ВРЕМЕНА дугме
5 СТОП / СТАРТ
6 МИНУТНИ ПОДСЕТНИК икона
7 МЕРАЧ ВРЕМЕНА икона
8 КОНТРОЛНА ТАБЛА ЈЕ ЗАКЉУЧАНА икона
9 ИЗБОР ШУПЉИНЕ икона
10 СВЕТЛО икона
Дисплеј
1 МАЛА ШУПЉИНА икона
2 ТЕМПЕРАТУРА ШУПЉИНЕ дисплеј
3 ВРЕМЕ дисплеј
4 ТРАЈАЊЕ икона
5 КРАЈ КУВАЊА икона
6 САТ икона
7 МИНУТНИ ПОДСЕТНИК икона
8 КОНТРОЛНА ТАБЛА ЈЕ ЗАКЉУЧАНА индикатор
9 ПРИПРЕМНО ЗАГРЕВАЊЕ / ЗАОСТАЛА ТОПЛОТА
индикатор
10 ГЛАВНА ШУПЉИНА икона
11 РЕЖИМ иконе
1 2 43
10
9
1
8
6
5
7
2
43 5
6910 78
11
Page 12
Installation
590 mm.
GB
! Please keep this instruction booklet in a safe place for
future reference. If the appliance is sold, given away or
moved, please make sure the booklet is also passed on to
the new owners so that they may benet from the advice
contained within it.
! Please read this instruction manual carefully: it contains
important information concerning the safe operation,
installation and maintenance of the appliance.
Positioning
! Do not let children play with the packaging material; it
should be disposed of in accordance with local separated
waste collection standards (see Precautions and tips).
! The appliance must be installed by a qualied professional
in accordance with the instructions provided. Incorrect
installation may damage property or cause harm to people
or animals.
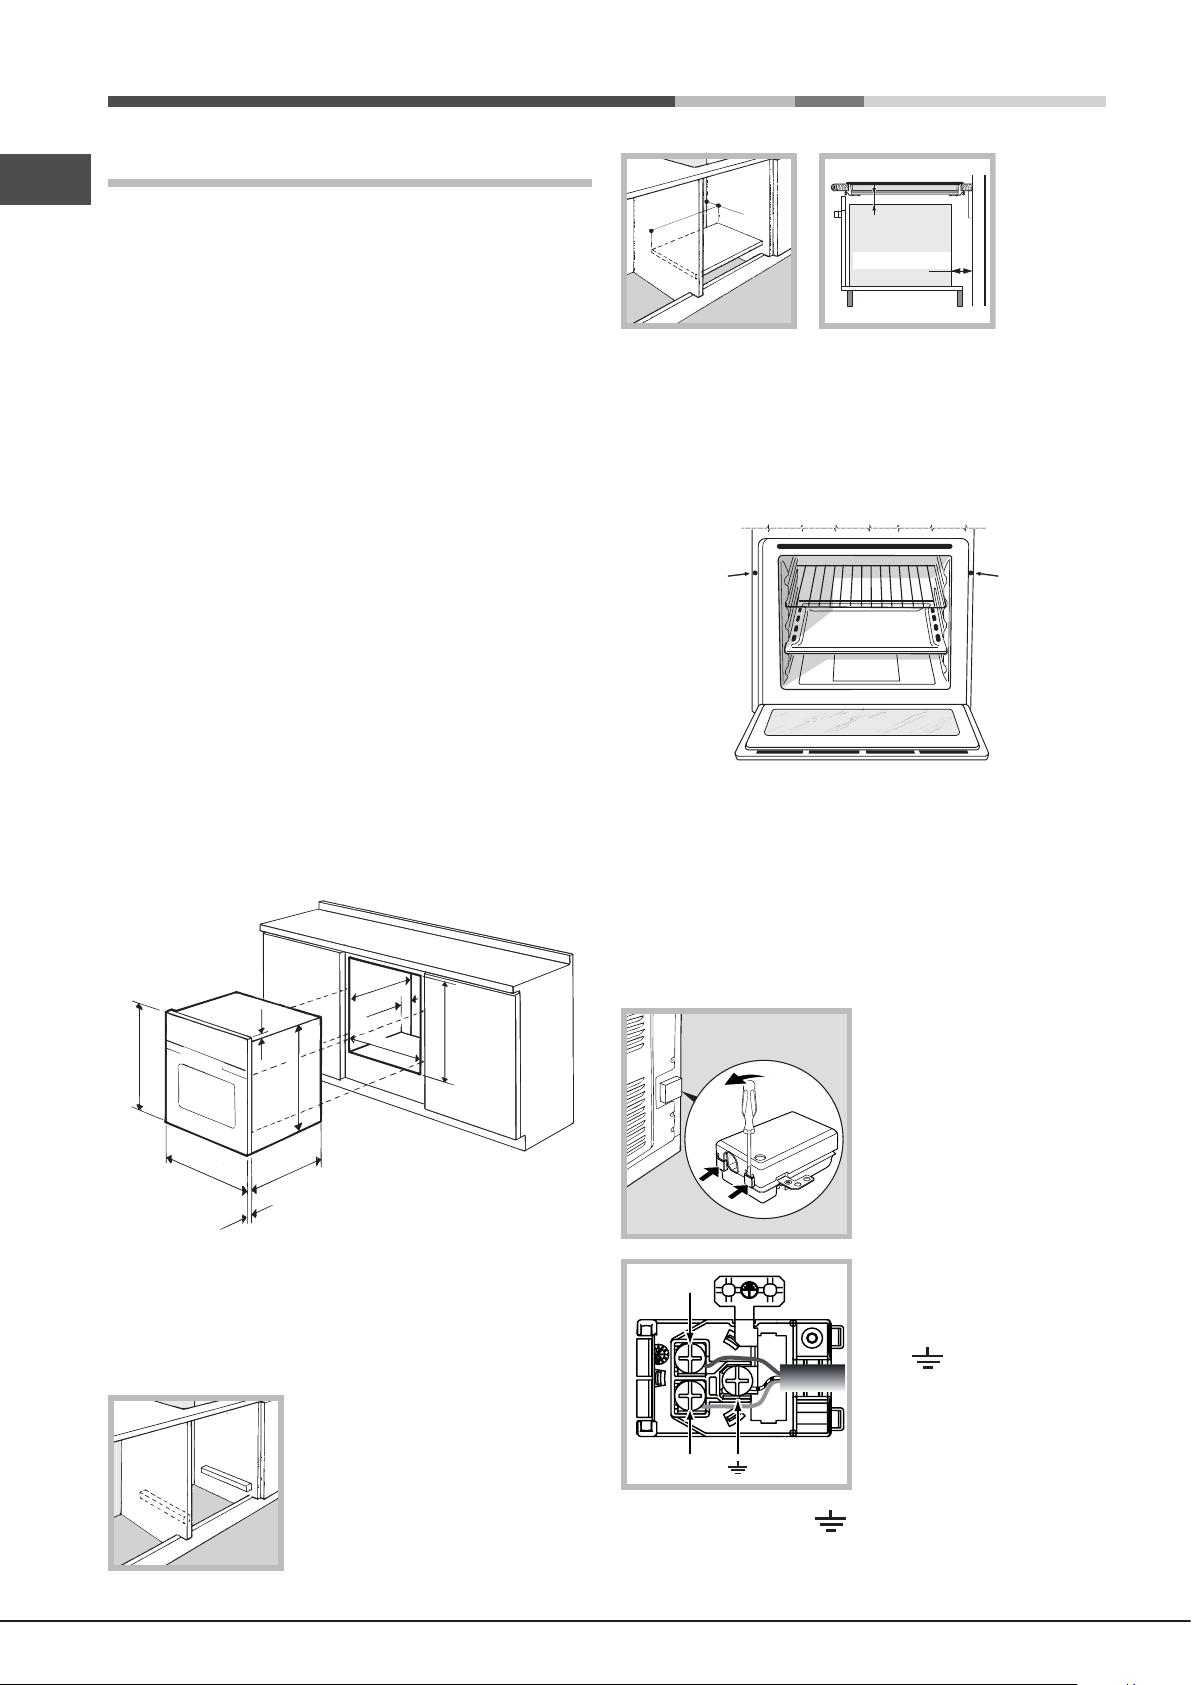
Built-in appliances
Use an appropriate cabinet to ensure that the appliance
operates properly:
• the panels adjacent to the oven must be made of heat-
resistant material.
• cabinets with a veneer exterior must be assembled with
glues which can withstand temperatures of up to 100°C.
• to install the oven under the counter (see diagram) or
in a kitchen unit, the cabinet must have the following
dimensions:
550 mm.
min.
45 mm.
560 mm.
575-585 mm.
570 mm.
595 mm.
20 mm.
550 mm.
20,5 mm.
22,5 mm.*
45 mm.
560 mm.
min. 20 mm
FAN ASSISTED
MODE
min. 45 mm
Centring and xing
Secure the appliance to the cabinet:
• Open the oven door.
• Remove the 2 rubber plugs covering the xing holes on
the perimeter frame.
• Fix the oven to the cabinet using the 2 wood screws.
• Replace the rubber plugs.
! All parts which ensure the safe operation of the appliance
must not be removable without the aid of a tool.
Electrical connection
Ovens equipped with a three-pole power supply cable are
designed to operate with alternating current at the voltage
and frequency indicated on the data plate located on the
appliance (see below).
Fitting the power supply cable
1. Open the terminal board
by inserting a screwdriver
into the side tabs of the
cover. Use the screwdriver
as a lever by pushing it down
to open the cover (see
diagram).
! The appliance must not come into contact with electrical
parts once it has been installed.
The indications for consumption given on the data plate
have been calculated for this type of installation.
Ventilation
To ensure adequate ventilation, the
back panel of the cabinet must be
removed. It is advisable to install
the oven so that it rests on two
strips of wood, or on a completely
at surface with an opening of at
least 45 x 560 mm (see diagrams).
12
N
2. Install the power supply
cable by loosening the cable
clamp screw and the three
N
wire contact screws
L-N- .
Connect the wires to the
L
L
corresponding terminals:
the Blue wire to the terminal
marked (N), the Brown wire
to the terminal marked (L)
and the Yellow/Green wire
to the terminal marked (see diagram).
3. Secure the cable by fastening the clamp screw.
4. Close the cover of the terminal board.
Page 13

Connecting the supply cable to the mains
APPLIANCE SPECIFICATIONS
Install a standardised plug corresponding to the load
indicated on the data plate (see table).
The appliance must be directly connected to the mains using
an omnipolar switch with a minimum contact opening of 3
mm installed between the appliance and the mains. The
switch must be suitable for the charge indicated and must
comply with current electrical regulations (the earthing wire
must not be interrupted by the switch). The supply cable
must be positioned so that it does not come into contact
with temperatures higher than 50°C at any point (the back
panel of the oven, for example).
! The installer must ensure that the correct electrical
connection has been performed and that it is fully compliant
with safety regulations.
Before connecting the appliance to the power supply, make
sure that
• the appliance is earthed and the plug is compliant with
the law.
• the socket can withstand the maximum power of the
appliance, which is indicated on the data plate.
• the voltage is in the range between the values indicated
on the data plate.
• the socket is compatible with the plug of the appliance.
If the socket is incompatible with the plug, ask an
authorised technician to replace it. Do not use extension
cords or multiple sockets.
! Once the appliance has been installed, the power supply
cable and the electrical socket must be easily accessible.
! The cable must not be bent or compressed.
! The cable must be checked regularly and replaced by
authorised technicians only (see Assistance).
width 43.5 cm
Dimensions*
height 41 cm
depth 41 cm
Volume* 74 l
width 45.6 cm
Dimensions**
height 41 cm
depth 41 cm
Volume** 77 l
Electrical
connections
voltage: 220 - 240 V~ 50/60Hz or
50Hz maximum power absorbed
2600 W (see data plate)
Directive 2002/40/EC on the
label of electric ovens.
Standard EN 50304
ENERGY LABEL
Declared energy consumption
for Forced convection
Class – heating mode:
ECO.
This appliance conforms to the
following European Economic
Community directives:
2006/95/EEC dated 12/12/06
(Low Voltage) and subsequent
amendments – 2004/108/EEC
dated 15/12/04
(Electromagnetic
Compatibility) and subsequent
amendments - 93/68/EEC
dated 22/07/93 and
subsequent amendments.
2012/19/EEC and subsequent
amendments.
1275/2008 Stand-by/off mode
* Only for models with drawn rails.
** Only for models with wire rails.
GB
! The manufacturer declines any liability should these
safety measures not be observed.
13
Page 14

Oven structure
Temperature in the first cavity
(Main or Small Space)
Temperature in the second cavity
(Small or Main Space)
Between 40°C and 150°C
The temperature difference in relation to the first recess
selected is no greater than 50°C
Between 155°C and 200°C
The temperature difference in relation to the first recess
selected is no greater than 70°C
GB
The OPEN SPACE oven has a capacity of 70 litres and
offers users the option of cooking on 4 shelves at the same
time or cooking large quantities which would not necessarily
be possible in a traditional oven.
The 56 universal (Creation) and automatic (Success)
cooking modes guarantee perfect results every time,
regardless of the dish you are cooking.
OPEN SPACE also offers maximum comfort for all
requirements, with 4 different operating options: the oven
is one large compartment but can be divided into separate
spaces of various sizes, each with its own independent
temperature and duration controls.
This is made possible thanks to the heat-insulating
DIVIDER, which divides the whole ExtraLarge Space into
two different-sized spaces: the Main Space and the Small
Space.
The two Main and Small Space compartments may be used
at the same time to cook different dishes more quickly,
or they may be used separately so that only the space
necessary is used.
When the two compartments are used at the same time,
the cooking temperature of each may be adjusted to a
value between 30° and 300°. There may be a difference in
temperature of 100° between the two zones, which means it
is possible to cook very different dishes without any avours
or aromas intermingling.
ExtraLarge Space: cooking on 4 shelf levels
RACK
EXTRALARGE
SPACE
Cooking using the Small Space only
SMALL
SPACE
MAIN
SPACE
RACK
RACK
DRIPPING PAN
RACK or DRIPPING PAN
Divider "D"
(fixed position)
The table below lists the possible temperature values which
may be set. The intelligent display will guide you through
Main and Small Space: simultaneous operation
SMALL
SPACE
MAIN
SPACE
Cooking using the Main Space only: cooking on 3 shelf levels
SMALL
SPACE
MAIN
SPACE
RACK or DRIPPING PAN
Divider "D" (fixed position)
RACK (cooking on 3 shelves)
RACK (cooking on 3 shelves)
DRIPPING PAN
(cooking on 3 shelves)
Divider "D" (fixed position)
RACK (cooking on 3 shelves)
RACK (cooking on 3 shelves)
DRIPPING PAN
(cooking on 3 shelves)
the correct procedure used to adjust the temperature of
the two cavities.
For example: if you set one recess to 90°C,
you may set a value of between 40°C (90°C-50°C) and 140°C (90°C+50°C) for the other.
For example: if you set one recess to 180°C,
you may set a value of between 110°C (180°C-70°C) and 250°C (180°C+70°C) for the other.
Between 205°C and 250°C The temperature difference in relation to the first recess
For example: if you set one recess to 210°C,
you may set a value of between 110°C (210°C-100°C) and 250°C (maximum temperature setting) for the other.
14
selected is no greater than 100°C
Page 15
Start-up and use
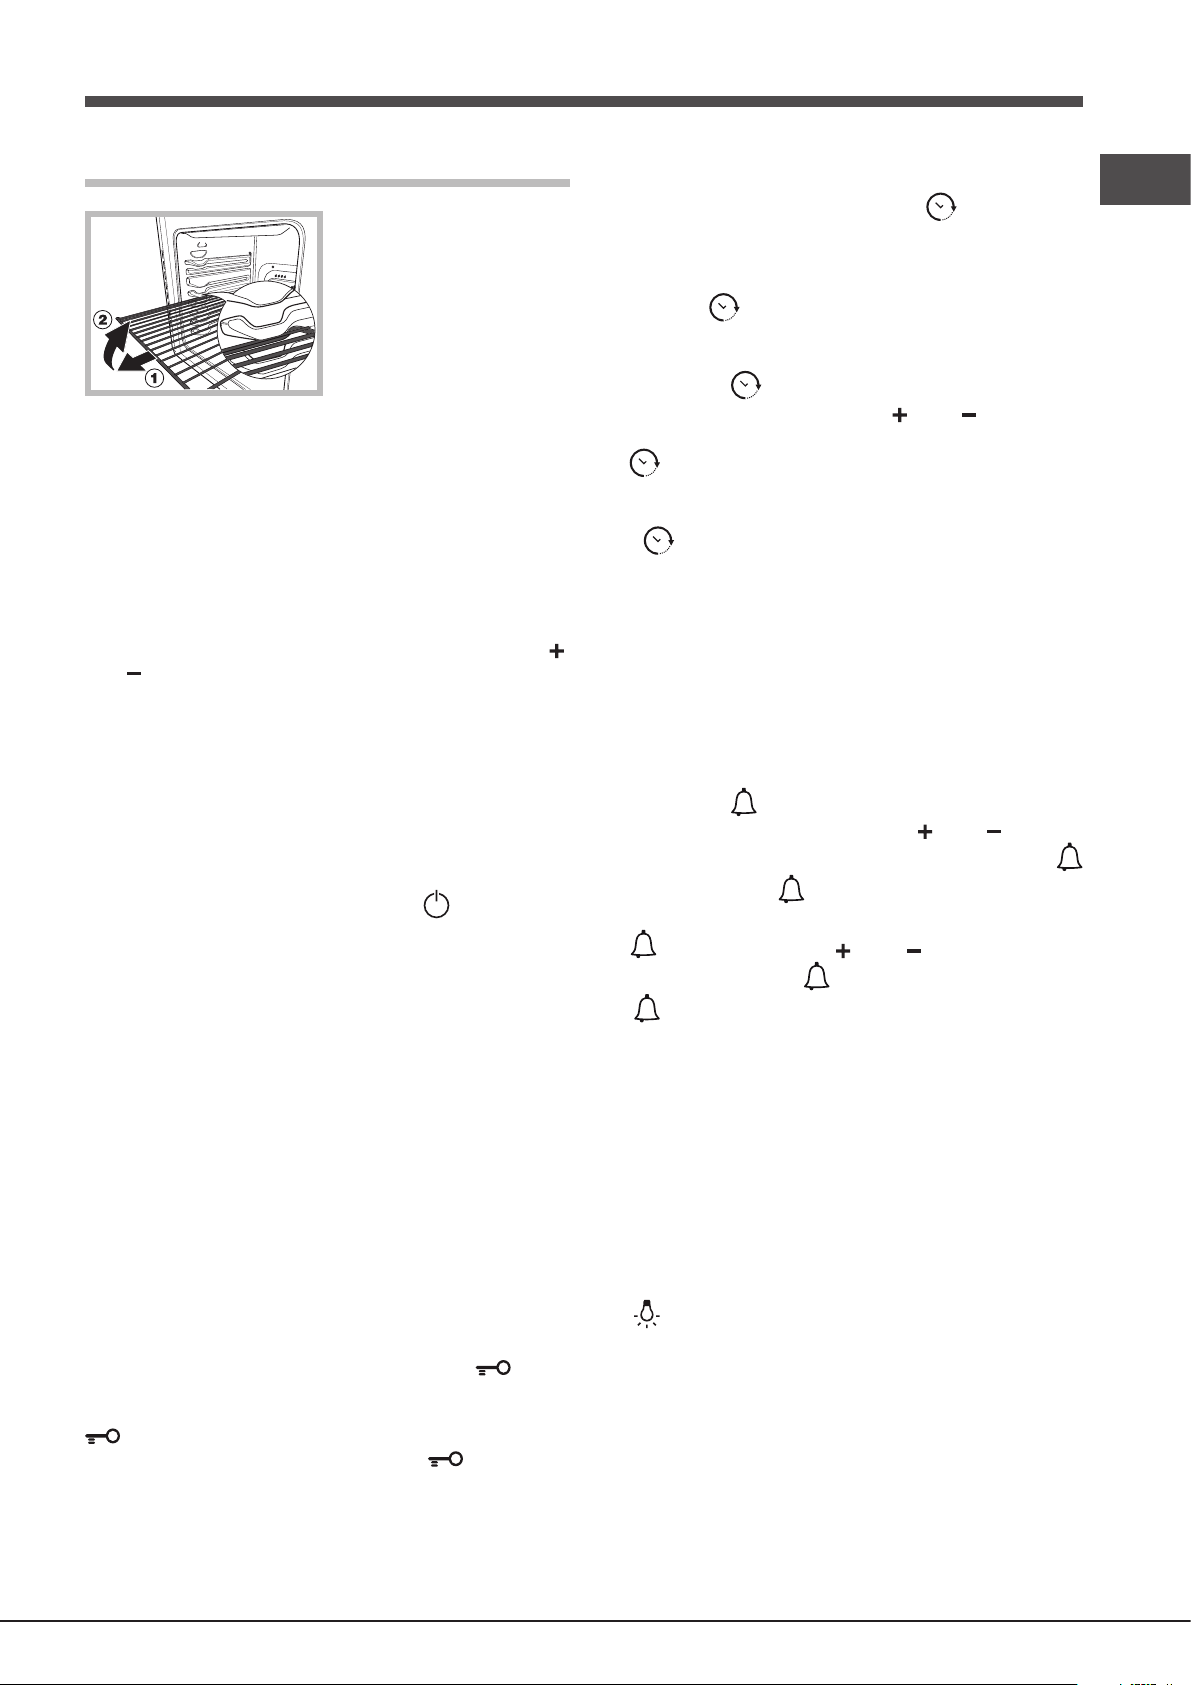
WARNING! The oven is
provided with a stop system
to extract the racks and
prevent them from coming
out of the oven (1).
As shown in the drawing,
to extract them completely,
simply lift the racks, holding
them on the front part, and
pull (2).
! The rst time you use your appliance, heat the empty oven
with its door closed at its maximum temperature for at least
half an hour. Make sure that the room is well ventilated
before switching the oven off and opening the oven door.
The appliance may emit a slightly unpleasant odour caused
by protective substances used during the manufacturing
process burning away.
! To make the setting process easier, press and hold the “ ”
and “ ” buttons to scroll through the numbers on the display
rapidly.
! Each setting will automatically be stored in the appliance
memory after 10 seconds.
! During operation, we recommend the removal of any crockery
or delicate foodstuffs from the cavities not being used.
! Once cooking has begun, before the DIVIDER is removed,
the oven must be switched off using the button.
! Every time the oven is switched on it is set to the
CREATION cooking mode.
! The touch controls cannot be activated if the user is
wearing gloves.
Setting the clock
! The clock can only be set when the oven is switched off. If
the oven is in standby mode, pressing the button once will
display the current time setting. Press it again to set the time.
After connection to the power supply network or after a
blackout, the button and the digits on the TIME display
will ash for 10 seconds.
To set the clock:
1. Press button .
2. Adjust the hour gure using the “ ” and “ ” buttons.
3. Once you have reached the correct hour value, press
the button.
4. Repeat the above process to set the minutes.
If a blackout occurs, it will be necessary to reset the clock.
If the icon ashes on the display, this indicates that the
clock has not been set correctly.
Setting the minute minder
! The minute minder may be set regardless of whether the
oven is switched on or off. It does not switch the oven on or off.
When the set time has elapsed, the minute minder emits a
buzzer that will automatically stop after 30 seconds or when
any active button on the control panel is pressed.
To adjust the minute minder, proceed as follows:
1. Press button .
2. Set the desired time using buttons “ ” and “ ”.
3. Once you have reached the desired value, press the
button again. The lit symbol will remind you that the
minute minder is on. To cancel the minute minder, press
the button and use the “ ” and “ ” buttons to set the
time to 00:00. Press the button again.
The icon will switch off to indicate that the minute minder
has been disabled.
GB
! In order to optimise the cooking performance, when
starting the selected function, product settings will be
applied that could cause a delayed start of the fan and
heating elements.
! The oven will begin its preheating phase after 2 seconds
from selecting the desired cycle.
Control panel lock
! The control panel can be locked while the oven is off, once
cooking has started or nished and during programming.
To lock the oven controls, press and hold the button
for at least 2 seconds. A buzzer will sound and the
TEMPERATURE display shows the key symbol “O—n”. The
icon will light up to indicate lock activation.
To deactivate the lock, press and hold the button again
for at least 2 seconds.
Cooling ventilation
In order to cool down the external temperature of the oven, a
cooling fan blows a stream of air between the control panel and
the oven door, as well as towards the bottom of the oven door.
! Once cooking has been completed, the cooling fan continues
to operate until the oven has cooled down sufciently.
Oven light
The light comes on when the oven door is opened or when
a cooking mode starts.
The button can be used to switch on the light at any time.
Residual heat indicators
The appliance is tted with a residual heat indicator. When the
oven is off, the “residual heat” light on the display comes on to
indicate high temperatures inside the oven cavity. The indicator
light switches off when the inside of the oven has cooled down.
Restoring the factory settings
The oven factory settings can be restored to reset all
selections made by the user (clock and customised
durations). To carry out a reset, switch off the oven, then
15
Page 16
press and hold the button corresponding to the rst manual
GB
cooking mode (top left) and the button simultaneously
for 6 seconds. Once the restore procedure is complete, a
buzzer will sound. The rst time the button is pressed, the
oven will behave as if it is being switched on for the rst time.
Standby
This product complies with the requirements of the latest
European Directive on the limitation of power consumption in
standby mode. If no buttons are pressed for 30 minutes and the
control panel/door lock has not been activated, the appliance
automatically reverts to standby mode. Standby mode is indicated
by the high luminosity “Clock button” light. As soon as interaction
with the machine resumes, system operation is restored.
Modes
! To guarantee perfectly soft or crispy food, the oven releases
water contained within the food in the form of steam. This means
it is possible to achieve optimal cooking results for all dishes.
! Every time the oven is switched on, it suggests the rst
CREATION cooking mode.
! Never put objects directly on the bottom of the oven; this
will prevent the enamel coating from being damaged.
! Always place cookware on the rack(s) provided.
ExtraLarge Space
! Do not use position “D” for racks.
Starting the oven
1. Switch the control panel on by pressing the button.
The appliance buzzer sounds three times (ascending) and
all buttons light up in sequence.
2. Press the button corresponding to the desired cooking
mode. The TEMPERATURE display shows:
- the temperature associated with the mode, if programming
manually;
- “Auto”, if programming is automatic.
The TIME display shows:
- the current time, if programming manually;
- the duration, if programming is automatic.
3. Press the button to begin cooking.
4. The oven will begin its preheating stage: the preheating
light ashes.
5. When the preheating process has nished, a buzzer sounds
and the preheating indicator light shows that this stage has
been completed: the food can then be placed in the oven.
6. During cooking it is always possible to:
- change the temperature by pressing the button,
followed by the and buttons (manual modes only);
- set the duration of a cooking mode (see Cooking Modes);
- press the button to stop cooking. In this case the
appliance stores the temperature modied previously in its
memory (manual modes only);
- switch off the oven by pressing the button for 3 seconds.
7. In case of a blackout, if the oven was already operating,
an automatic system within the appliance will reactivate
the cooking mode from where it was interrupted as long
as the temperature did not drop below a certain level.
Programmed cooking modes which have not yet started
will not be restored and must be reprogrammed.
! There is no preheating stage for the BARBECUE mode.
CREATION cooking modes
! All cooking modes have a default cooking temperature
which may be adjusted manually to a value between 30°C
and 250°C as desired (300°C for GRILL mode). CREATION
cooking modes include all manual programmes.
The oven controls all essential aspects of each of these
cooking modes and makes it easier for you to create the
perfect dish, from the simplest recipe to the most sophisticated
culinary delights: the temperature, heat source, humidity and
fan assisted operation are all controlled automatically.
This chapter was written with the help of our very own
culinary expert. We invite you to follow his advice so you can
benet from his experience and perfect your cooking skills.
The recommended cooking modes, temperatures and
oven shelf heights reect our expert’s own experience in
the kitchen and will help you achieve the very best results.
The table below species whether it is best to pre-heat your
oven or not for each CREATION cooking mode. Observing
these suggestions will guarantee perfect results.
If you wish to place food in a preheated oven, wait for the
preheating stage to be completed (this will be signalled by
a series of beeps).
The temperature is set automatically, according to the
cooking mode selected; however, you may adjust it to suit
your recipe.
You can also set a cooking duration with an immediate or
delayed start.
MULTILEVEL mode
All heating elements and the fan are activated. Since the
heat remains constant throughout the oven, the air cooks
and browns food in a uniform manner. A maximum of two
racks may be used at the same time.
LOW TEMPERATURE modes
This type of cooking can be used for proving, defrosting,
preparing yoghurt, heating dishes at the required speed and
slow cooking at low temperatures. The temperature options
are: 40, 65 and 90°C.
FAN GRILLING mode
The top heating element and the rotisserie spit (where
present) are activated and the fan begins to operate.
During part of the cycle the circular heating element is
also activated. This combination of features increases the
effectiveness of the unidirectional thermal radiation provided
by the heating elements through the forced circulation of
the air throughout the oven.
This helps prevent food from burning on the surface and
allows the heat to penetrate right into the food. Always cook
in this mode with the oven door closed.
16
Page 17
GRILL mode
The top heating element and the rotisserie spit (where
present) are activated. The high and direct temperature
of the grill is recommended for food which requires a high
surface temperature. Always cook in this mode with the oven
door closed (see “Practical cooking advice”).
FAST COOKING mode
Preheating is not necessary for this cooking mode. This
mode is particularly suitable for cooking pre-packed
food quickly (frozen or pre-cooked). The best results are
achieved using one cooking rack only.
PIZZA mode
The top and circular heating elements switch on and the fan
begins to operate. This combination heats the oven rapidly.
If you use more than one rack at a time, switch the position
of the dishes halfway through the cooking process.
ECO mode
The rear heating element and the fan are switched on,
thus guaranteeing the distribution of heat in a delicate and
uniform manner throughout the entire oven. This energy
saving mode is suitable for cooking small dishes, reheating
meat and nishing off cooking processes.
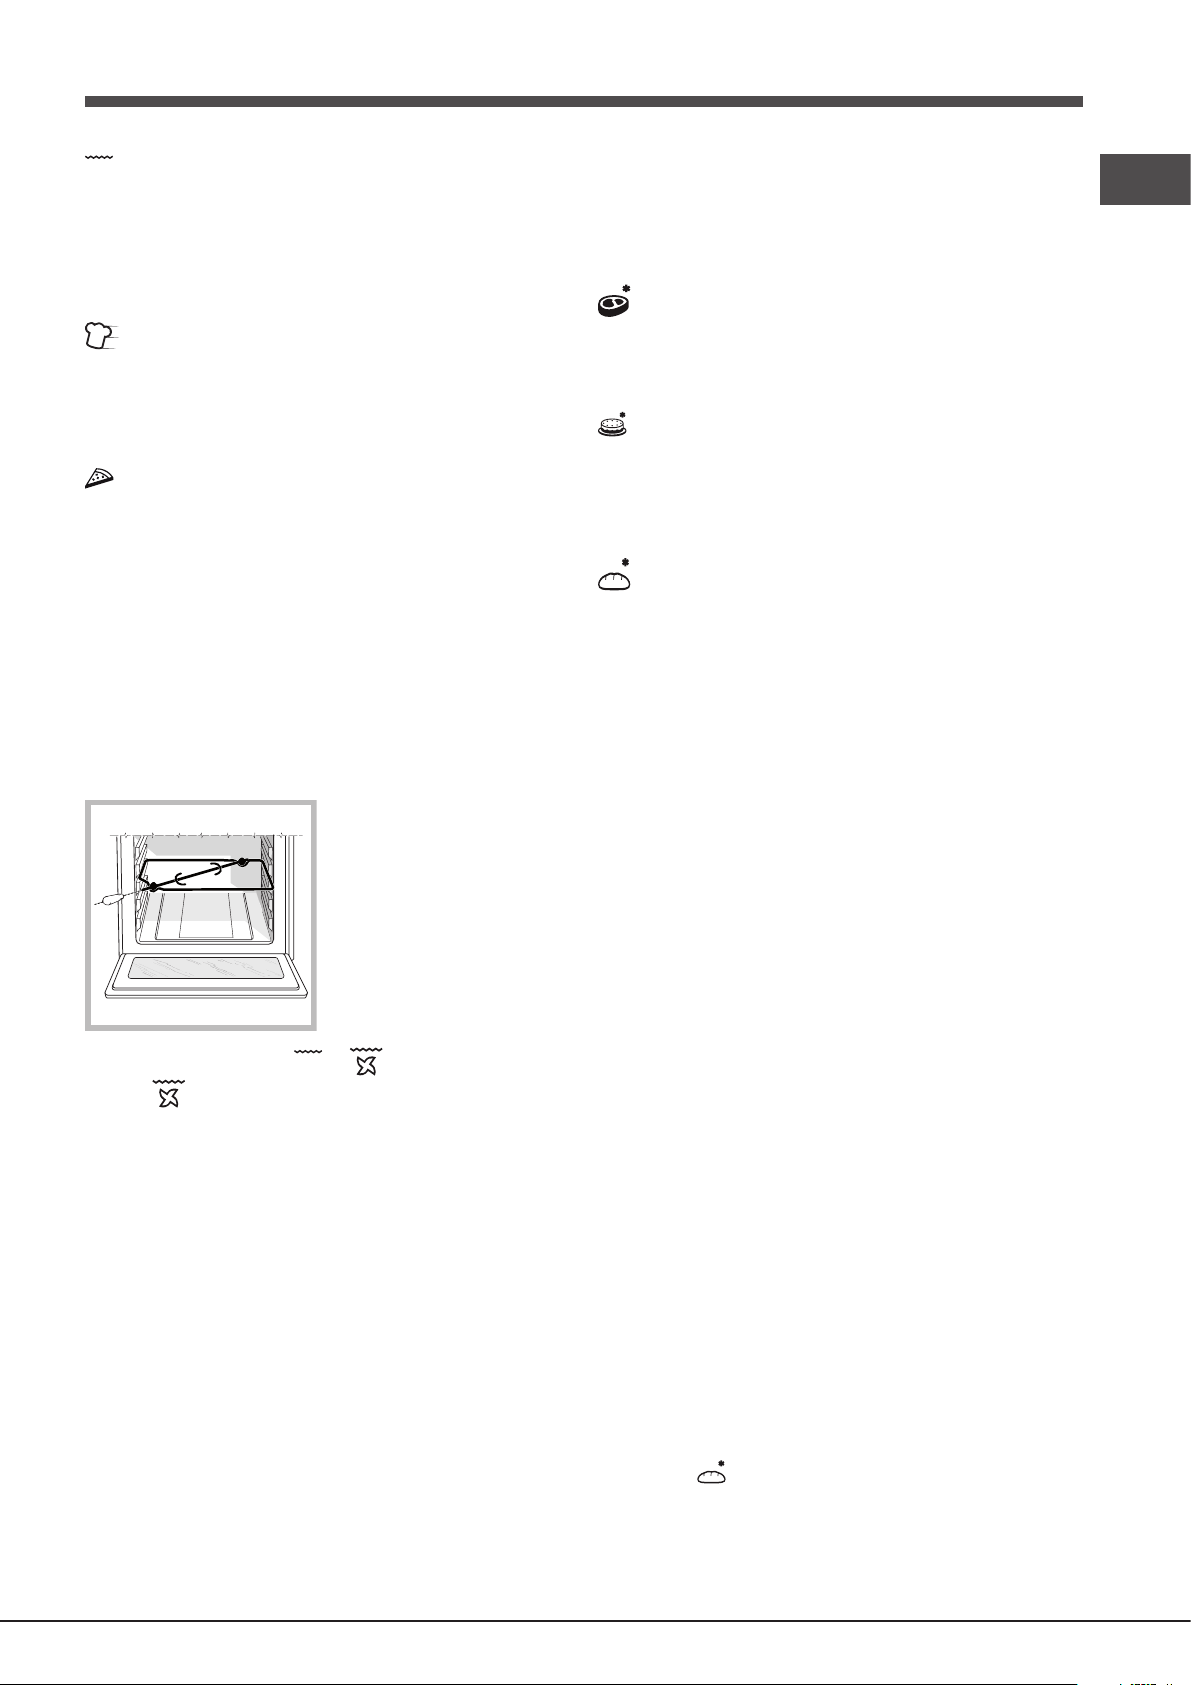
Rotisserie spit
To operate the rotisserie
function (see diagram)
proceed as follows:
1. Place the dripping pan in
position 1.
2. Place the rotisserie
support in position 3 and
insert the spit in the hole
provided on the back panel
of the oven.
3. Start the rotisserie
function by selecting the or modes.
! When mode is on, the rotisserie will stop if the door
is opened.
SUCCESS cooking modes
! The temperature and cooking duration are pre-
set values, guaranteeing a perfect result every time -
automatically. These values cannot be adjusted and use
the C.O.P.® (Programmed Optimal Cooking) system. The
cooking cycle stops automatically and the oven indicates
when the dish is cooked. You may start cooking whether
the oven has been preheated or not. The cooking duration
can be customised according to personal tastes, modifying
it - before the start time - by ±5/20 minutes depending on
the selected programme. Once cooking has begun, it is still
possible to modify its duration. If the value is modied before
cooking begins, it is stored in the appliance memory and
suggested again when that cooking mode is next used. If
the temperature inside the oven is higher than the suggested
value for the selected mode, the text “Hot” appears on the
TEMPERATURE display and it will not be possible to begin
cooking; wait for the oven to cool.
! When the cooking stage has been reached, the oven
buzzer sounds.
! Do not open the oven door as this will disrupt the cooking
time and temperature.
BEEF mode
Use this function to cook beef and pork. Place the food
inside the oven while it is still cold. The dish may also be
placed in a preheated oven.
CAKES mode
This function is ideal for cooking desserts which are made
using natural yeast, baking powder and desserts which
contain no yeast. Place the dish in the oven while it is still
cold. The dish may also be placed in a preheated oven.
BREAD mode
Use this function to bake bread. To obtain the best results, we
recommend that you carefully observe the instructions below:
• Follow the recipe.
• Do not exceed the maximum weight of the dripping pan.
• Remember to pour 100 g (1dl) of cold water into the
dripping pan, which should be placed in position 7.
• The dough must be left to rise at room temperature for
1 – 1 ½ hours (depending on the room temperature) or
until the dough has doubled in size.
Recipe for BREAD:
1 dripping pan holding 1000 g max, lower level
2 dripping pans each holding 1000 g max, middle and
lower levels
Recipe for 1000 g of dough: 600 g our, 360 g water, 11g
salt, 25 g fresh yeast (or 2 sachets of powder yeast)
Method:
• Mix the our and salt in a large bowl.
• Dilute the yeast in lukewarm water (approximately 35
degrees).
• Make a small well in the mound of our.
• Pour in the water and yeast mixture.
• Knead the dough by stretching and folding it over itself
with the palm of your hand for 10 minutes until it has a
uniform consistency and is not too sticky.
• Form the dough into a ball shape, place it in a large bowl
and cover it with transparent plastic wrap to prevent the
surface of the dough from drying out. Select the manual
LOW TEMPERATURE function on the oven and set the
temperature to 40°C. Place the bowl inside and leave
the dough to rise for approximately 1 hour (the dough
should double in volume).
• Cut the dough into equal sized loaves.
• Place them in the dripping pan, on a sheet of baking paper.
• Dust the loaves with our.
• Make incisions on the loaves.
• Place the food inside the oven while it is still cold.
• Start the BREAD cooking mode.
• Once baked, leave the loaves on one of the grill racks
until they have cooled completely.
* Only available in certain models.
GB
17
Page 18
THE DIVIDER
GB
Fit the DIVIDER to the DIVIDER shelf “D” using the pin,
with the arrows turned towards the rear part of the oven. A
buzzer will sound to conrm that the DIVIDER has been tted
correctly; it will then be possible to use the two MAIN and
SMALL Space compartments separately or at the same time.
The button will be enabled. The selected cavity
alternates every time the button is pressed. The MAIN cavity
is selected by default.
Small Space
the kitchen and will help you achieve the very best results.
The table below species whether it is best to pre-heat your
oven or not for each CREATION cooking mode.
Observing these suggestions will guarantee perfect results.
If you wish to place food in a preheated oven, wait for the
preheating stage to be completed (this will be signalled by
a series of beeps). The temperature is set automatically,
according to the cooking mode selected; however, you may
adjust it to suit your recipe.
You can also set a cooking duration with an immediate or
delayed start.
Starting the oven
1. With the DIVIDER inserted, use the button to select
the SMALL Space cavity. The icon will light up.
2. Follow the above instructions for the EXTRALARGE
cavity when carrying out the various adjustment and setting
procedures.
Cooking modes
GRILL mode
The top heating element and the rotisserie spit (where
present) are activated. The high and direct temperature
of the grill is recommended for food which requires a high
surface temperature. Always cook in this mode with the oven
door closed (see “Practical cooking advice”).
FAST COOKING mode
Preheating is not necessary for this cooking mode. This
mode is particularly suitable for cooking pre-packed
food quickly (frozen or pre-cooked). The best results are
achieved using one cooking rack only.
Main Space
MULTILEVEL mode
All heating elements and the fan are activated. Since the
heat remains constant throughout the oven, the air cooks
and browns food in a uniform manner. A maximum of two
racks may be used at the same time.
LOW TEMPERATURE modes
This type of cooking can be used for proving, defrosting,
preparing yoghurt, heating dishes at the required speed and
slow cooking at low temperatures. The temperature options
are: 40, 65 and 90°C.
PIZZA mode
The top and circular heating elements switch on and the fan
begins to operate. This combination heats the oven rapidly.
If you use more than one rack at a time, switch the position
of the dishes halfway through the cooking process.
ECO mode
The rear heating element and the fan are switched on,
thus guaranteeing the distribution of heat in a delicate and
uniform manner throughout the entire oven. This energy
saving mode is suitable for cooking small dishes, reheating
meat and nishing off cooking processes.
Starting the oven
1. With the DIVIDER inserted, use the button to select
the SMALL Space cavity. The icon will light up.
2. Follow the above instructions for the EXTRALARGE
cavity when carrying out the various adjustment and setting
procedures.
CREATION cooking modes
! All cooking modes have a default cooking temperature
which may be adjusted manually to a value between 30°C
and 250°C as desired (300°C for GRILL mode). CREATION
cooking modes include all manual programmes.
The oven controls all essential aspects of each of these
cooking modes and makes it easier for you to create
the perfect dish, from the simplest recipe to the most
sophisticated culinary delights: the temperature, heat
source, humidity and fan assisted operation are all
controlled automatically.
This chapter was written with the help of our very own
culinary expert. We invite you to follow his advice so you
can benet from his experience and perfect your cooking
skills. The recommended cooking modes, temperatures and
oven shelf heights reect our expert’s own experience in
SUCCESS cooking modes
! The temperature and cooking duration are pre-set values,
guaranteeing a perfect result every time - automatically. These
values cannot be adjusted and use the C.O.P.® (Programmed
Optimal Cooking) system. The cooking cycle stops
automatically and the oven indicates when the dish is cooked.
You may start cooking whether the oven has been preheated
or not. The cooking duration can be customised according to
personal tastes, modifying it - before the start time - by ±5/20
minutes depending on the selected programme. Once cooking
has begun, it is still possible to modify its duration. If the value
is modied before cooking begins, it is stored in the appliance
memory and suggested again when that cooking mode is next
used. If the temperature inside the oven is higher than the
suggested value for the selected mode, the text “Hot” appears
on the TEMPERATURE display and it will not be possible to
begin cooking; wait for the oven to cool.
! When the cooking stage has been reached, the oven
buzzer sounds.
! Do not open the oven door as this will disrupt the cooking
time and temperature.
18
Page 19
BEEF mode
Use this function to cook beef and pork. Place the food
inside the oven while it is still cold. The dish may also be
placed in a preheated oven.
CAKES mode
This function is ideal for cooking desserts which are made
using natural yeast, baking powder and desserts which
contain no yeast. Place the dish in the oven while it is still
cold. The dish may also be placed in a preheated oven.
Using the Small Space and Main Space at
the same time
! Simultaneous operation is only possible when using
CREATION cooking modes.
4. Once you have reached the desired end time, press the
button again. The display will show the duration, the
cooking end time and the set temperature alternately.
5. Press the button to activate the programmed mode.
Programming has been set when the and buttons
are illuminated.
The DISPLAY shows the cooking end time and the cooking
duration alternately.
6. Once cooking has nished, “END” appears on the display
and a buzzer sounds.
• For example: it is 9:00 a.m. and a time of 1 hour and 15
minutes is programmed, while the end time is set to 12:30.
The programme will start automatically at 11:15 a.m.
To cancel programming press the button.
GB
Starting the oven
For simultaneous use, simply start a cooking mode for both
cavities in succession. The TEMPERATURE display shows
the cooking parameters for both cavities.
! Thanks to the high energy efciency of the appliance, it
only takes around 15 minutes for the SMALL SPACE cavity
to preheat.
Programming cooking
! A cooking mode must be selected before programming
can take place.
Programming the cooking duration
1. Press the button until the icon and the numerical
digits on the display begin to ash.
2. Turn the TIMER knob towards “ ” and “ ” to adjust the
time as desired; keep the knob in position to scroll through
the numbers more quickly and make the setting process
easier.
3. Once you have reached the desired duration, press the
button again. The display will show the duration and
set temperature alternately.
4. Press the button to begin cooking.
5. When cooking has nished, “END” appears on the display
and a buzzer sounds.
• For example: it is 9:00 a.m. and a duration of 1 hour and
15 minutes is programmed. The programme will stop
automatically at 10:15 a.m.
Setting the end time for a cooking mode
! A cooking duration must be set before the cooking end
time can be scheduled.
Practical cooking advice
MULTILEVEL
• Use positions 1, 3, 5 and 6.
• Place the dripping pan at the bottom and the rack at the
top.
• When cooking pizzas or focaccia breads, use a
lightweight aluminium tray with a maximum diameter
of 30 cm, placing it on top of the rack supplied. If the
pizza has a lot of toppings, we recommend adding the
mozzarella cheese to the top of the pizza halfway through
the cooking process. During the cooking process, it is
advisable to change the order of the shelves.
• Use positions 2 and 4, placing the food which requires
more heat on 2.
• Place the dripping pan on the bottom and the rack on
top.
GRILL
• Preheat the oven for 5 minutes.
• Fit the DIVIDER to the DIVIDER rack “D”.
• Keep the oven door closed when cooking in this mode.
• Place the rack in position 7. Position the food in the centre
of the rack. Position the dripping pan on shelf level 6.
• This function is recommended for: browning food, cooking
gratins, colouring meringues, making toasted sandwiches
and grilling small quantities of thin, lean meat.
• We recommend that the power level is set to maximum.
The top heating element is regulated by a thermostat
and may not always operate constantly.
• Place the grill rack in position 3 or 4 and place
the food in the centre of the rack.
• We recommend that the temperature is set to its
maximum level. The top heating element is regulated by
a thermostat and may not always operate constantly.
! For the delayed programming to work properly, the clock
should be set to the correct time.
1. Follow steps 1 to 3 to set the duration as detailed above.
2. Press the button twice: the icon and the
numerical digits on the display will begin to ash.
3. Turn the TIMER knob towards “ ” and “ ” to adjust the
cooking end time value.
FAST COOKING
• Use the dripping pan on shelf level 6.
• When cooking frozen foods, always follow the instructions
on the packaging.
* Only available in certain models.
19
Page 20
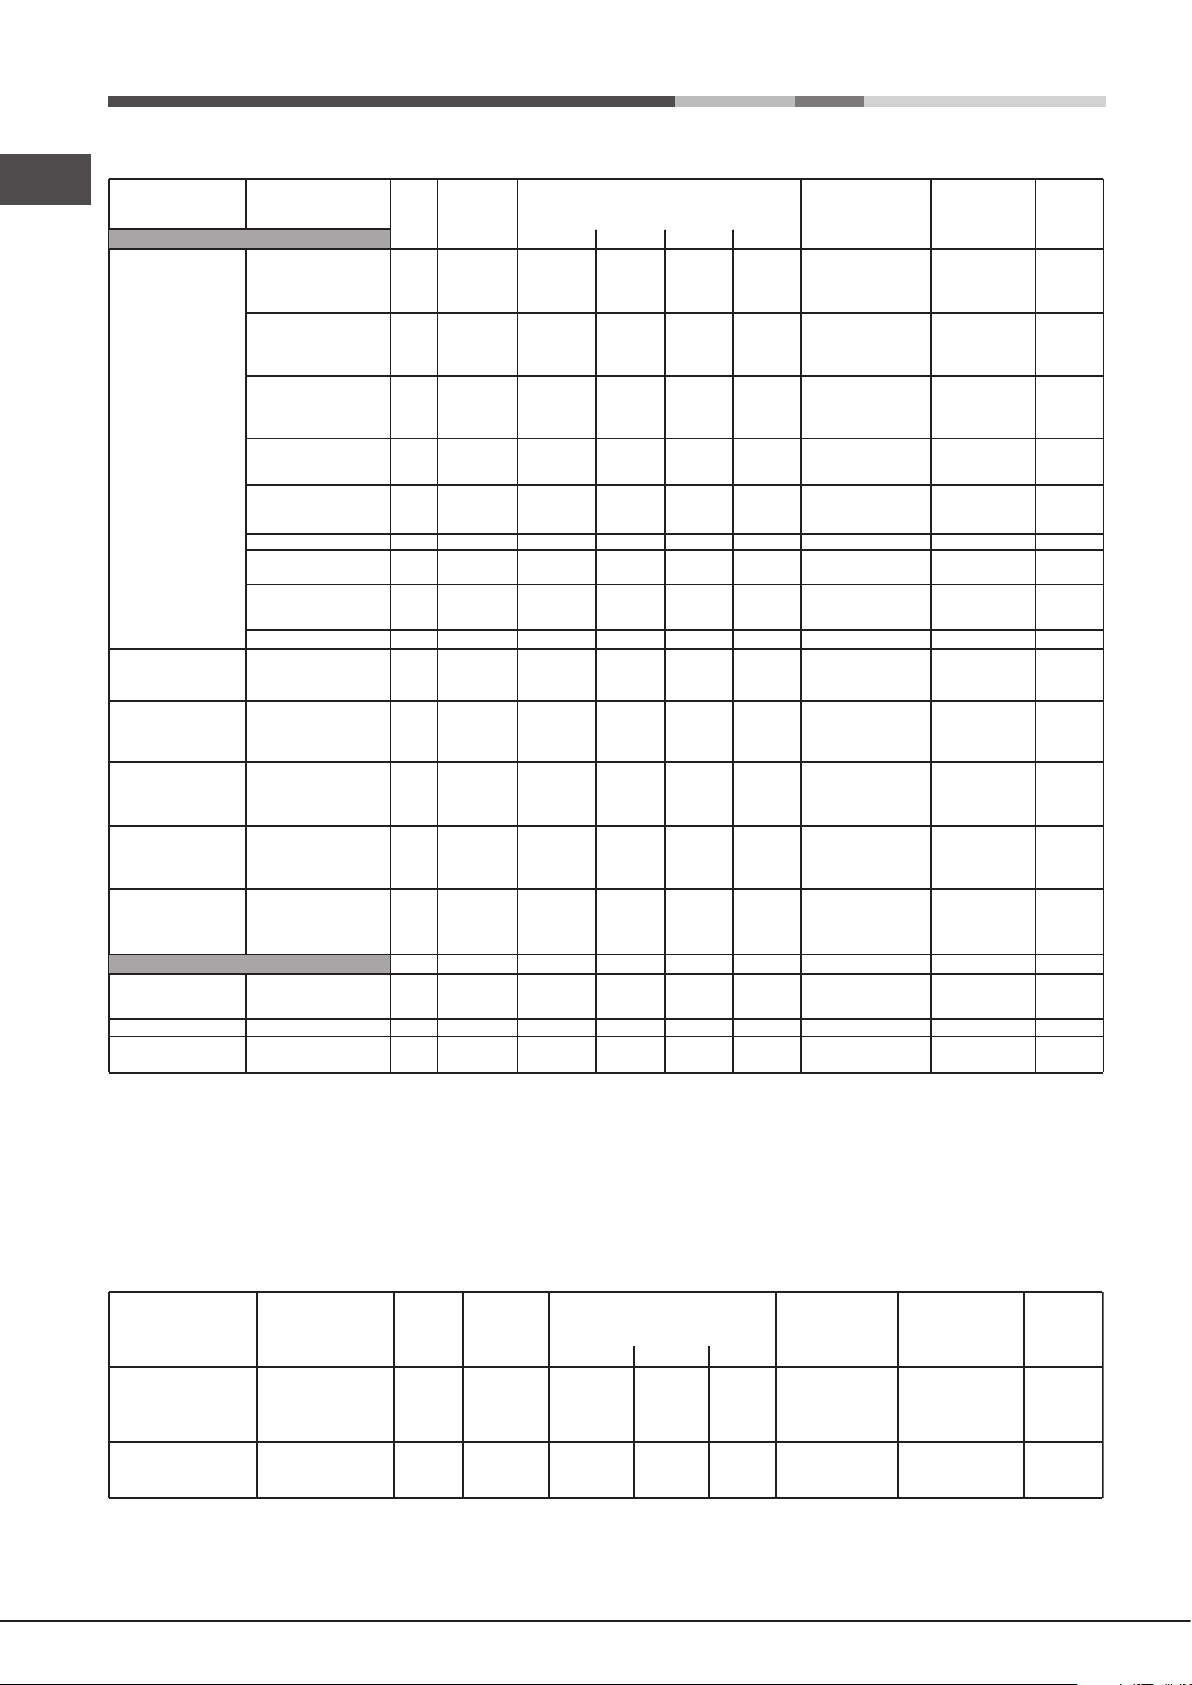
Cooking advice table for ovens with an ExtraLarge Space cavity
Cooking advice table for the Small Space feature
** Use the dripping pan to collect any oil or fat produced as a result of the cooking process.
GB
Function Food Weight
Creation
Multilevel*
Fast cooking*
Pizza*
Fan grilling*
Grill*
Low
temperature*
Tarts 1
Cream puffs 1
Biscuits 180
Small pastries 1
Crème Caramel
(bain-marie)
Panettone 11 or 2 Yes 160 45-60
Cake 1
Sponge cake
Roast
Kebabs
Fish fillets
Frozen potatoes
Pizza/Focaccia
Roast meats
Gratin
Large roasting joint
Large game roasting joint
Beef ribs
Sausages
Pork ribs
Bacon
Proving/Defrosting
White meringues
Meat/Fish
(Kg)
Cook on
Shelf position Preheating Recommended
shelf no.
Dripping
2
3
4
2
3
4
1
2
3
4
2
3
1
2
3
2
1
2
3
1,5-22
1
1
1
1
2
3
4
1
1
1
1
1
1
1
1
1
4
3
2 or 3
1 to 2
2 or 3
1 to 2
2 or 3
2 or 3
2 or 3
2 or 3
1 or 2
3 or 4
Rack 1Rack 2Rack 3
pan
1
2
1
1***
1
1
5
1
1
2***
1***
1***
1
1
1
1
2
1
2
1
3***
3***
3***
3***
2
1
1
2 or 3
1 or 2
2 or 3
3 or 5
Success
Bread
Beef
Cakes
Bread (see recipe) 2
Roast1,2-1,5 5
Cakes 1
2
2
1
2
3
11***
2
7**
7**
7**
* The cooking times listed above are intended as guidelines only and may be modified according to personal tastes.
Oven preheating times are set as standard and may not be modified manually.
** As stated in the recipe, pour 100 g water into the dripping pan in position 7.
*** Use the dripping pan to collect any oil or fat produced as a result of the cooking process.
3 or 5
1
3
3 to 5
3
3
3 to 5
3
3
5
4 6
5
46
14 or 5
5
4
5
5
3
3
3
2
2
4 or 5
5 or 7
5 or 7
5 or 7
2
1
1
2
2
3
5
5
5 6
5
5 6
Yes
6
5
56
3
3
5
5
4
3
5
5
6
Yes
Yes
Yes
6
5
temperature
(°C)
Yes
Yes
Yes
Yes
Yes
Yes
Yes
Yes
Yes
Yes
Yes
Yes
Yes
Yes
Yes
Yes
Yes
Yes
Yes
Yes160 90-240
No
No
No
Yes
Yes
Yes
Yes
No
No
No
No
Yes
Yes
Yes
Yes
No
No
No
No
No
No
No
No
No
190
180
180
180
190
190
190
190
180
180
180
200
200
200
170
170
170
160
160
190
190
190
210
200
230
220
220
220
220
200
190
200
200
270-300
270-300
270-300
270-300
40
65
90
duration
(minutes)
25-30
35-45
40-50
45-55
25-35
25-35
30-40
30-40
15-25
15-25
20-30
20-30
30-40
35-45
40-50
35-45
35-45
40-50
60-75
60-75
30-35
35-40
40-45
20-25
15-20
25-30
15-25
20-30
25-35
30-40
35-75
40-60
90-120
90-120
20-30
10-20
15-25
3-6
8-12 hours
90-180
Cooking
! ECO cooking mode: This energy saving mode is suitable for cooking dishes such as fish fillets, small pastries
and vegetables. It is also ideal for reheating meat and finishing off cooking processes.
Function Food Weight
(Kg)
Fast cooking*
Grill*
Fish fillets
Meat fillets
Frozen pizza
Frozen prepared foods
Toast
Bacon
Pork steaks
Cook on
shelf
no.
1
1
1
1
1
1
1
Dripping
pan
6
6
6
6
6**
6**
Shelf position PreheatingRecommended
Rack 1Divider
D
D
D
D
6
7
7
D
D
D
* The cooking times listed above are intended as guidelines only and may be modified according to
personal tastes. Oven preheating times are set as standard and may not be modified manually.
20
Yes
Yes
Yes
Yes
Yes
Yes
Yes
temperature
(°C)
160-180
180-200
270-300
270-300
270-300
Cooking
duration
(minutes)
20-30
30-40
3-5
3-6
15-25
Page 21
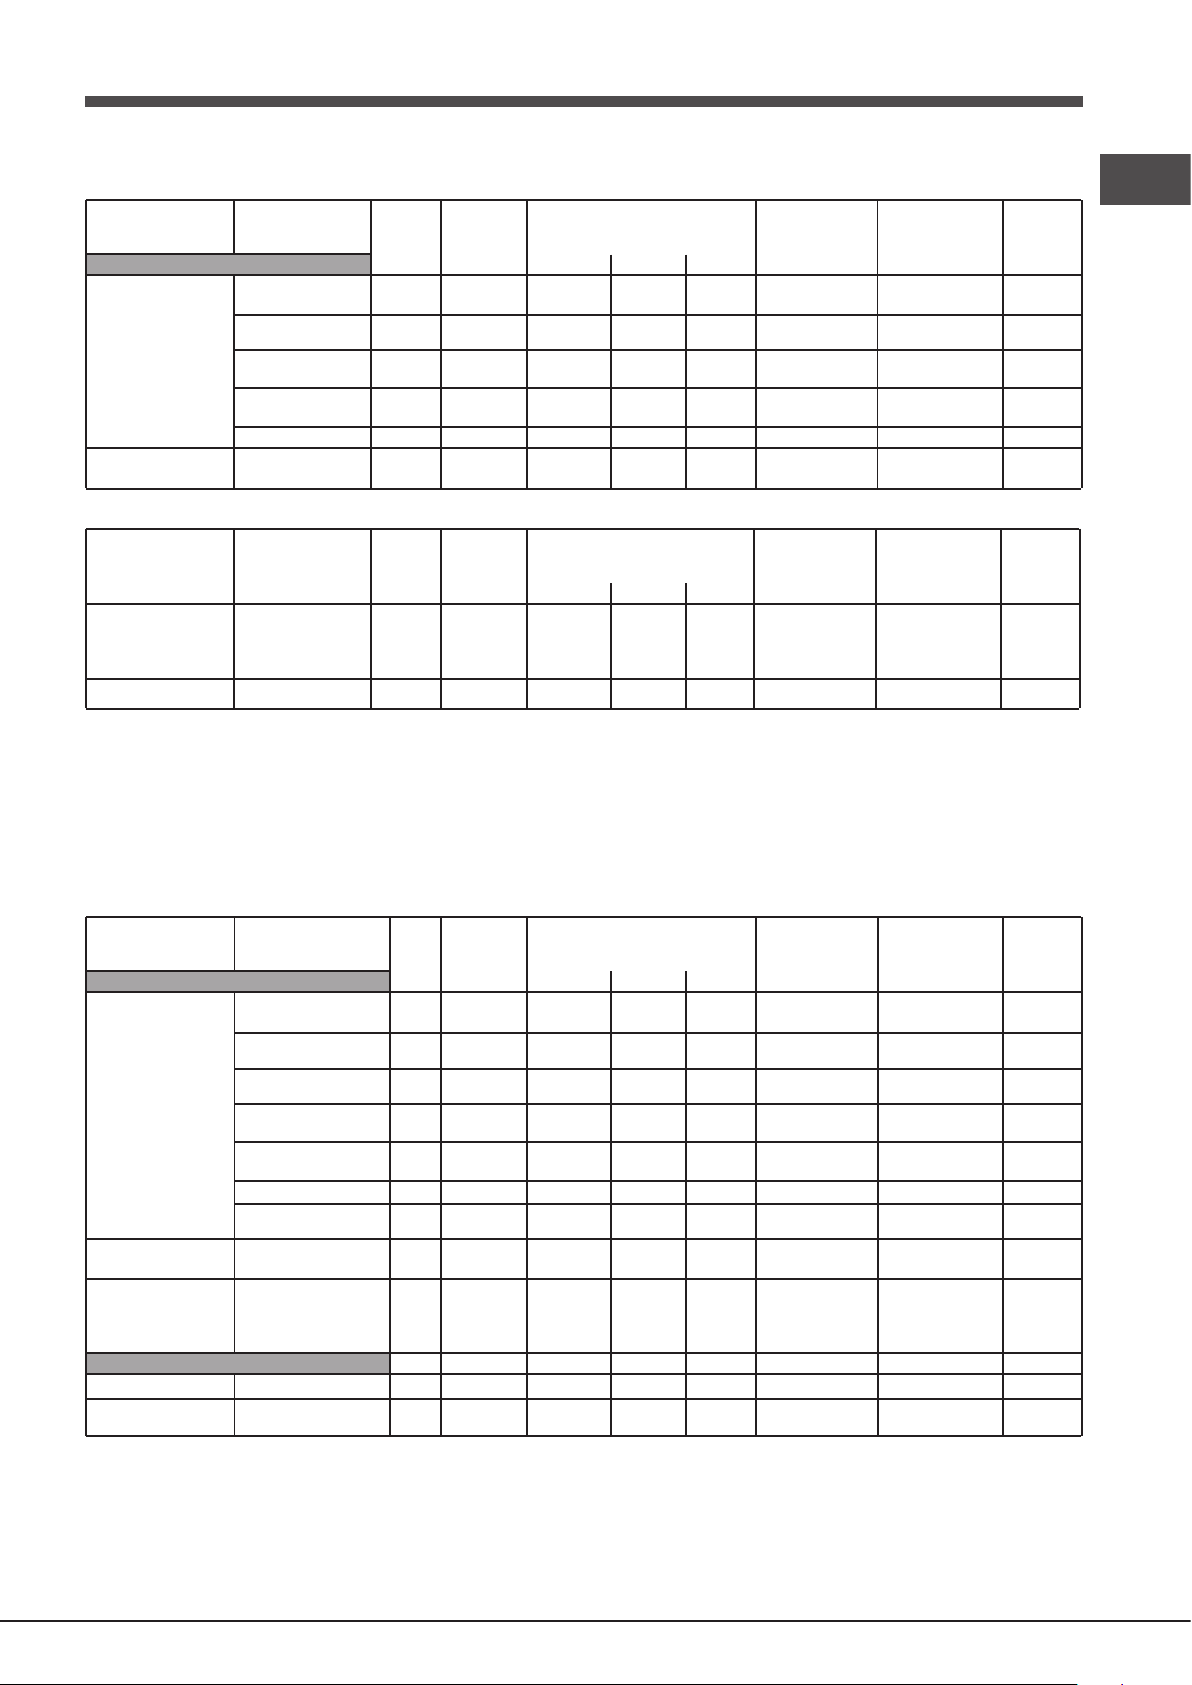
Cooking advice table for using the Small Space and Main Space at the same time
Main Space
** Use the dripping pan to collect any oil or fat produced as a result of the cooking process.
01
03
06
Cooking advice table for the Main Space feature
and vegetables. It is also ideal for reheating meat and finishing off cooking processes.
Function Food Weight
(kg)
Creation
Multilevel*
Pizza*
Tarts1
Biscuits 180
Small pastries 1
Crème Caramel
(bain-marie)
Cake 12 DYes 16
Pizza
Cook on
Rack position PreheatingRecommended
shelf
no.
1
2
Dripping
pan
2
1
2
2
12 DYes 17
2 or 3
1 or 23 or 5
Rack 1Divider
2
13DD
2
13DD
2
13
Yes
Yes
Yes
Yes
D
D
D
D
Yes
Yes
Yes
Yes
temperature
(°C)
200
200
180
200
200
220
220
Small Space
Function Food Weight
Fast cooking*
Grill*
Fish fillets
Meat fillets
Frozen pizza
Frozen prepared foods
Pork steaks 16** 7 Yes 270-30
(kg)
Cook on
shelf
no.
1
1
1
1
Shelf position PreheatingRecommended
Dripping
6
6
6
6
Rack 1Divider
D
D
D
D
D
Yes
Yes
Yes
Yes
pan
temperature
(°C)
160-180
180-200
* The cooking times listed above are intended as guidelines only and may be modified according to
personal tastes. Oven preheating times are set as standard and may not be modified manually.
Cooking
duration
(minutes)
30-40
35-45
15-25
15-25
30-40
35-45
5-45
0-75
15-25
20-30
Cooking
duration
(minutes)
20-30
30-40
5-25
GB
Function Food Weight
(Kg)
Creation
Multilevel*
Tarts1
Cream puffs 1
Biscuits 180
Small pastries 1
Crème Caramel
(bain-marie)
Cake 12 DYes 160 60-75
Sponge cake
Pizza*
Low
temperature*
Pizza/Focaccia
Proving/
Defrosting
White meringues
Meat/Fish
Cook on
Shelf position Preheating
shelf no.
Dripping
pan
2
2
1
2
2
12 DYes 170 35-45
1
2
1
2
1
2
2
2 or 3
1 or 23 or 5
Rack 1Divider
2
13DD
2
13DD
2
13DD
2
13
2
13DD
2
1
1
3
3
Yes
Yes
Yes
Yes
Yes
Yes
D
D
D
D
D
D
D
Yes
Yes
Yes
Yes
Yes
Yes
No
No
No
Success
Beef
Cakes
Roast1,2-1,5 11** 2
Cakes 1
2
2
13
D
D
D
No
No
No
* The cooking times listed above are intended as guidelines only and may be modified according to personal tastes.
Oven preheating times are set as standard and may not be modified manually.
** Use the dripping pan to collect any oil or fat produced as a result of the cooking process.
Recommended
temperature
(°C)
200
200
190
190
180
200
200
190
190
220
220
40
65
90
Cooking
duration
(minutes)
30-40
35-45
25-35
25-35
15-25
15-25
30-40
35-45
30-35
35-40
15-25
20-30
8-12 hours
90-180
! ECO cooking mode: This energy saving mode is suitable for cooking dishes such as fish fillets, small pastries
21
Page 22

Precautions and tips
GB
! This appliance has been designed and manufactured
in compliance with international safety standards. The
following warnings are provided for safety reasons and
must be read carefully.
General safety
• The appliance was designed for domestic use inside the
home and is not intended for commercial or industrial use.
• The appliance must not be installed outdoors, even in
covered areas. It is extremely dangerous to leave the
appliance exposed to rain and storms.
• When moving or positioning the appliance, always use
the handles provided on the sides of the oven.
• Do not touch the appliance while barefoot or with wet or
damp hands and feet.
• The appliance must be used by adults only for
the preparation of food, in accordance with the
instructions provided in this booklet. Any other
use of the appliance (e.g. for heating the room)
constitutes improper use and is dangerous. The
manufacturer may not be held responsible for any
damage caused as a result of improper, incorrect
and unreasonable use of the appliance.
• Do not touch the heating elements or certain parts
of the oven door when the appliance is in use; these
parts become extremely hot. Keep children well away
from the appliance.
• Make sure that the power supply cables of other electrical
appliances do not come into contact with the hot parts of
the oven.
• The ventilation and heat dispersal openings must never
be obstructed.
• Always grip the oven door handle in the centre: the ends
may be hot.
• Always use oven gloves when placing cookware in the
oven or when removing it.
• Do not use aluminium foil to line the bottom of the oven.
• Do not place ammable materials in the oven: if the
appliance is switched on accidentally, the materials could
catch re.
• When unplugging the appliance, always pull the plug
from the mains socket; do not pull on the cable.
• Do not perform any cleaning or maintenance work without
having disconnected the appliance from the electricity
mains.
• If the event of malfunctions, under no circumstances
should you attempt to perform the repairs yourself.
Contact an authorised Service Centre (see Assistance).
• Do not rest objects on the open oven door.
• Do not let children play with the appliance.
• The appliance should not be operated by people (including
children) with reduced physical, sensory or mental
capacities, by inexperienced individuals or by anyone
who is not familiar with the product. These individuals
should, at the very least, be supervised by someone who
assumes responsibility for their safety or receive preliminary
instructions relating to the operation of the appliance.
• The appliance is not intended to be operated by
means of an external timer or separate remote-
control system.
Disposal
• When disposing of packaging material: observe local
legislation so that the packaging may be reused.
• The European Directive 2012/19/EC on Waste Electrical
and Electronic Equipment (WEEE), requires that old
household electrical appliances must not be disposed
of in the normal unsorted municipal waste stream. Old
appliances must be collected separately in order to optimise
the recovery and recycling of the materials they contain and
reduce the impact on human health and the environment.
The crossed out “wheeled bin” symbol on the product
reminds you of your obligation, that when you dispose of
the appliance it must be separately collected.
Consumers should contact their local authority or retailer
for information concerning the correct disposal of their
old appliance.
Respecting and conserving the environment
• You can help to reduce the peak load of the electricity
supply network companies by using the oven in the
hours between late afternoon and the early hours of
the morning. The cooking mode programming options,
the “delayed cooking” mode (see Cooking modes) and
“delayed automatic cleaning” mode (see Care and
Maintenance) in particular, enable the user to organise
their time efciently.
• Always keep the oven door closed when using the GRILL
and FAN GRILLING modes: this will achieve improved
results while saving energy (approximately 10%).
• Check the door seals regularly and wipe them clean
to ensure they are free of debris so that they adhere
properly to the door, thus avoiding the dispersal of heat.
! This product complies with the requirements of the latest
European Directive on the limitation of power consumption
of the standby mode.
Maintenance and care
Switching the appliance off
Disconnect your appliance from the electricity supply before
carrying out any work on it.
Cleaning the appliance
• Slight differences in colour on the front of the oven are due
to the different materials used, i.e. glass, plastic or metal.
• Any shady areas resembling grooves on the oven door
glass are caused by reections from the oven light.
• The enamel is branded at very high temperatures. This
process may cause colour variations. This is normal and
will not affect appliance operation in any way. The thin
edges of the sheet metal cannot be entirely enamelled
and may therefore appear to be unnished. This will not
affect the rust protection.
• The stainless steel or enamel-coated external parts and
the rubber seals may be cleaned using a sponge that
has been soaked in lukewarm water and neutral soap.
Use specialised products for the removal of stubborn
stains. After cleaning, rinse and dry thoroughly. Do not
use abrasive powders or corrosive substances.
22
Page 23
• The inside of the oven should ideally be cleaned after
each use, while it is still lukewarm. Use hot water and
detergent, then rinse well and dry with a soft cloth. Do
not use abrasive products.
• All accessories - with the exception of the sliding racks
- can be washed like everyday crockery, and are even
dishwasher safe.
• We recommend that detergents are not sprayed directly
onto the control panel, but that a sponge is used instead.
! Never use steam cleaners or pressure cleaners on the
appliance.
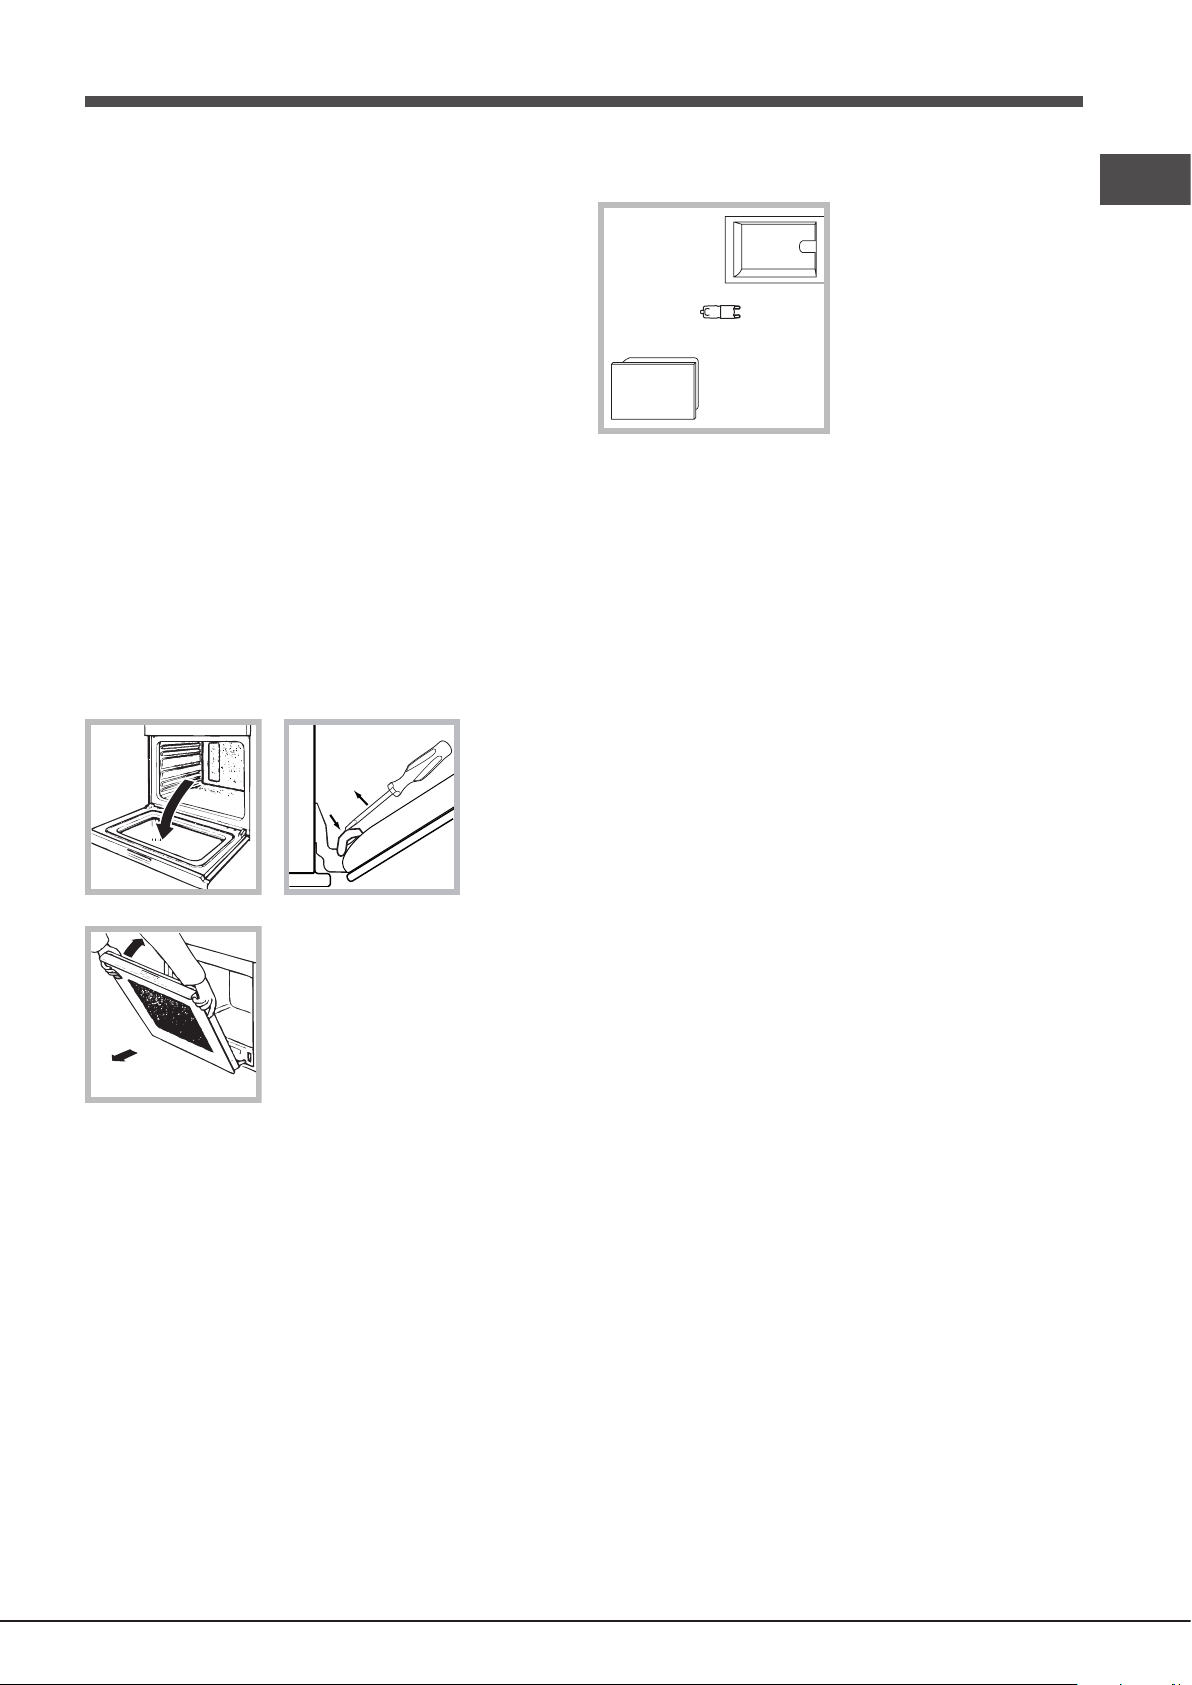
Replacing the light bulb
Lamp
Holder
compartment
Lamp
Glass cover
To replace the oven light
bulb:
1. Remove the glass cover
of the lamp-holder.
2. Remove the light bulb and
replace it with a similar one:
halogen lamp voltage 230 V,
wattage 25 W, cap G 9.
3. Replace the glass cover
(see diagram).
GB
Cleaning the oven door
Clean the glass part of the oven door using a sponge and
a non-abrasive cleaning product, then dry thoroughly with
a soft cloth. Do not use rough abrasive material or sharp
metal scrapers as these could scratch the surface and cause
the glass to crack.
For more thorough cleaning purposes, the oven door may
be removed:
1. Open the oven door fully (see diagram).
2. Use a screwdriver to lift up and turn the small levers F
located on the two hinges (see diagram).
F
3. Grip the door on the two outer
sides and close it approximately
half way. Pull the door towards you,
lifting it out of its slot (see diagram).
To replace the door, reverse this
sequence.
! Do not touch the light bulb directly with your hands.
! Do not use the oven lamp as/for ambient lighting.
Inspecting the seals
Check the door seals around the oven regularly. If the seals
are damaged, please contact your nearest Service Centre
(see Assistance). We recommend that the oven is not used
until the seals have been replaced.
23
Page 24
Troubleshooting
Problem
Possible cause
Solution
The appliance has just been
connected to the electricity mains
or there has been a blackout.
Set the clock.
GB
The “Clock button” and the
digits on the display flash.
A programmed cooking mode
does not start.
Only the high luminosity
“Clock button” is lit.
An automatic mode has been
selected. “Hot” appears on the
display and cooking does not
start.
Fan-assisted cooking has been
selected and the food looks burnt.
There has been a blackout. Reprogram the cooking mode.
The appliance is in standby mode Press any button to exit
standby mode.
The temperature inside the oven
is higher than the suggested
value for the selected mode.
Positions 1 and 5: the direct
heat could cause
temperature-sensitive
foods to burn.
Wait for the oven to cool down.
We recommend switching
dripping pan positions halfway
through cooking.
24
Page 25

Монтиране
590 mm.
! Моля, съхранявайте книжката с инструкции на сигурно
място за бъдещи справки. При продажба на уреда,
при даването му за ползване или при преместването
му се уверете, че книжката с инструкциите е заедно
с него, за да се възползват и новите собственици от
информацията в нея.
! Моля, прочетете внимателно това ръководство: то
съдържа важна информация относно безопасното
използване, монтиране и поддържане на уреда.
Позициониране
! Не позволявайте на деца да си играят с опаковъчния
материал. Той трябва да бъде депониран в съответствие
с местните стандарти за разделно събиране на отпадъци
(вижте Предпазни мерки и препоръки).
Вентилация
560 mm.
45 mm.
За да се осигури достатъчна
вентилация, задната стена на
шкафа трябва да се отстрани.
Препоръчително е да се монтира
фурната така, че да лежи върху
две дървени летви или върху
напълно гладка повърхност с
отвор от поне 45 x 560 мм (вижте
схемите).
мин. 20 мм
РЕЖИМ С
ВЕНТИЛАТОР
мин. 45 мм
BG
! Уредът трябва да бъде инсталиран от квалифициран
специалист съгласно предоставените инструкции.
Неправилното монтиране може да доведе до повреда
на имущество или да предизвика наранявате на хора
или животни.
Вградени уреди
Използвайте подходящ шкаф, за да сте сигурни, че
уредът работи правилно:
• Панелите, допрени до фурната, трябва да са
изработени от топлоустойчив материал.
• Шкафовете, облицовани с фурнир, трябва да се
сглобяват с лепило, което издържа на температури
до 100°C.
• За да монтирате фурната под плота (вижте схемата)
или в кухненски блок, шкафът трябва да има
следните размери:
550 mm.
min.
45 mm.
560 mm.
575-585 mm.
570 mm.
595 mm.
20 mm.
550 mm.
20,5 mm.
22,5 mm.*
! След инсталиране уредът не бива да влиза в контакт
с електрически части.
Показателите за консумация на енергия върху табелката
с данни са изчислени за този тип монтиране.
Центриране и фиксиране
Закрепете уреда към шкафа:
• Отворете вратата на фурната.
• Отстранете 2 гумени тапи, покриващи фиксиращите
отвори на периметърната рамка.
• Фиксирайте фурната към шкафа с помощта на 2 винта
за дърво.
• Поставете обратно гумените тапи.
! Всички части, които осигуряват безопасната
експлоатация на уреда, се отстраняват само с помощта
на инструмент.
Електрическо свързване
Фурни, оборудвани с триполюсен захранващ кабел, са
предназначени за работа с променлив ток с честота и
напрежение, каквито са посочени на табелката с данни
върху уреда (вижте по-долу).
Монтиране на захранващия кабел
1. Отворете клемната
кутия, като поставите
отвертка в страничните
отвори на капака.
Използвайте отвертката
като лостче и натиснете
надолу, за да отворите
капака (вижте схемата).
25
Page 26

BG
ТЕХНИЧЕСКИ СПЕЦИФИКАЦИИ НА УРЕДА
N
N
L
L
обозначена с (L) и жълто/зелена жица към клема,
обозначена с (вижте схемата).
3. Подсигурете кабела, като затегнете винта на
придържащата скоба.
4. Затворете капака на клемната кутия.
Свързване на захранващия кабел към електрическата
мрежа
Монтирайте стандартизиран щепсел, съответстващ на
електрическото натоварване, посочено върху табелката
с данни (вижте таблицата).
Уредът трябва да бъде директно свързан с мрежата
чрез многополюсен превключвател с минимално
междуконтактно разстояние от 3 мм, поставен между
уреда и мрежата. Превключвателят трябва да е подходящ
за посоченото натоварване и да отговаря на нормите
за електричество (заземителният кабел не трябва да
се прекъсва от превключвателя). Захранващият кабел
трябва да бъде разположен така, че в нито една точка
да не влиза в контакт с горещи повърхности над 50°C
(задния панел на фурната например).
2. Монтирайте захранващия
кабел, като разхлабите
винта на придържащата
скоба и трите винта на
контактния проводник
L-N- .
Свържете жиците към
съответните клеми:
синята жица към клема,
обозначена с (N),
кафявата жица към клема,
Ширина 43,5 см
Размери*
Височина 41 см
Дълбочина 41 см
Обем* 74 л
Ширина 45,6 см
Размери**
Височина 41 см
Дълбочина 41 см
Обем** 77 л
Електрически
свързвания
ENERGY LABEL
(ЕТИКЕТ ЗА
ЕНЕРГИЙНА
КОНСУМАЦИЯ)
напрежение: 220 - 240V
~50/60Hz или 50Hz максимално
използвана мощност
2600 W (вижте табелката с данни)
Директива 2002/40/ЕО за
етикети върху електрическите
фурни. Стандарт EN 50304
Декларирана енергийна
консумация за клас
Принудителна конвекция –
режим на загряване: ECO.
Този уред съответства на
следните директиви на ЕИО:
2006/95/ЕИО от дата 12/12/06
(ниско напрежение) и
последващите изменения 2004/108/ЕИО от дата 15/12/04
(Електромагнитна съвместимост)
и последващите изменения 93/68/ЕИО от дата 22/07/93 и
последващите изменения.
2012/19/ЕИО и последващи
изменения. 1275/2008 Режим на
Готовност/Изкл.
! Лицето, монтиращо уреда, трябва да се увери, че
е извършено правилно електрическо свързване
и че уредът напълно отговаря на регламентите за
безопасност.
Преди да свържете захранването към уреда, се уверете, че:
• Уредът е заземен, а щепселът отговаря на законовите
разпоредби.
• Контактът може да издържи максималната мощност
на уреда, посочена на табелката с данни.
• Напрежението е в допустимите граници на
стойностите, посочени на табелката с данни.
• Контактът е съвместим с щепсела на уреда. Ако
контактът е несъвместим с щепсела, се обърнете към
оторизиран техник, за да го замени. Не използвайте
удължители или разклонители.
! След инсталирането на уреда трябва да има лесен
достъп до захранващия кабел и електрическия контакт.
! Кабелът не трябва да бъде прегъван или притискан.
! Кабелът трябва периодично да бъде проверяван
и подменян само от оторизирани техници (вижте
Техническо обслужване).
* Само за модели с изтеглящи се водачи.
** Само за модели с релсови водачи.
! Производителят не носи никаква отговорност, ако
тези мерки за безопасност не са спазени.
26
Page 27

Структура на фурната
Температура в първата зона
(основно или малко пространство)
Температура във втората зона
(основно или малко пространство)
Между 40°C и 150°C
Температурната разлика в зависимост от първата
избрана вдлъбнатина не е по-голяма от 50°C
Между 155°C и 200°C
Фурната OPEN SPACE е с капацитет 70 литра и
предлага на потребителите опцията за готвене на 4 нива
едновременно или готвене на големи количества, което
не винаги е възможно в традиционна фурна.
56 универсални (Creation) и автоматични (Success)
режима на готвене гарантират перфектни резултати
всеки път, независимо от ястието, което приготвяте.
OPEN SPACE осигурява максимален комфорт за всички
изисквания, с 4 различни оперативни опции: фурната е
едно голямо отделение, но в нея могат да се обособяват
пространства с различни размери, всяко от които със
собствена независима температура и настройване на
продължителността.
Това става възможно благодарение на топлоизолиращия
РАЗДЕЛИТЕЛ, който обособява от цялото голямо
отделение две различни по размер пространства:
основно и малко.
Двете отделения, основно и малко пространство, могат
да се използват едновременно за по-бързо готвене на
различни ястия или да се използват отделно, така че
да се готви само в едното пространство.
Когато двете отделения се използват едновременно,
температурата във всяко едно може да варира между
30° и 300°. Между двете зони може да има температурна
разлика от 100°, което означава, че е възможно да се
приготвят много различни ястия без смесване на вкусове
и аромати.
BG
Изключително голямо пространство:
готвене на 4 позиции едновременно
СКАРА
Изключително
голямо
пространство
Готвене само в малкото пространство
МАЛКО
ПРОСТРА-
НСТВО
ОСНОВНО
ПРОСТРА-
НСТВО
СКАРА
СКАРА
ТАВА ЗА
ОТТИЧАНЕ
СКАРА или
ТАВА ЗА
ОТТИЧАНЕ
Разделител "D"
(фиксирана
позиция)
ОСНОВНО
Таблицата по-долу съдържа възможните температурни
стойности, които можете да задавате. Интелигентният
Основно и малко пространство: едновременна работа
МАЛКО
ПРОСТРА-
НСТВО
ПРОСТРА-
НСТВО
Готвене само в голямото пространство: готвене на 3 нива
МАЛКО
ПРОСТРА-
НСТВО
ОСНОВНО
ПРОСТРА-
НСТВО
СКАРА или ТАВА ЗА ОТТИЧАНЕ
Разделител "D"
СКАРА (готвене на 3 нива)
СКАРА (готвене на 3 нива)
ТАВА ЗА ОТТИЧАНЕ
(готвене на 3 нива)
Разделител "D"
СКАРА (готвене на 3 нива)
СКАРА (готвене на 3 нива)
ТАВА ЗА ОТТИЧАНЕ
(фиксирана позиция)
(фиксирана позиция)
дисплей ви води в процеса на задаване на температура
в двете обособени пространства.
Например: ако едната вдлъбнатина е с температура 90°C, можете да зададете
стойност между 40°C (90°C-50°C) и 140°C (90°C+50°C) за другата.
Например: ако едната вдлъбнатина е с температура 180°C, можете да зададете
стойност между 110°C (180°C-70°C) и 250°C (180°C+70°C) за другата.
Между 205°C и 250°C
Например: ако едната вдлъбнатина е с температура 210°C, можете да зададете стойност
между 110°C (210°C-100°C) и 250°C (максимална температурна настройка) за другата.
Температурната разлика в зависимост от първата избрана
вдлъбнатина не е по-голяма от 70°C
Температурната разлика в зависимост от първата
избрана вдлъбнатина не е по-голяма от 100°C
27
Page 28

Пуск и експлоатация
BG
ПРЕДУПРЕЖДЕНИЕ!
Фурната е снабдена със
система за блокиране
на решетките, която им
пречи да излязат докрай
извън фурната (1).
Както е показано на
чертежа, за да ги извадите
докрай, трябва само да ги
повдигнете, да ги задържите в предната част и да ги
изтеглите навън (2).
! Когато ползвате уреда за първи път, най-напред
загрейте фурната, докато е празна, при затворена врата
и максимална температура за поне половин час. Преди
да изключите уреда и да отворите вратата на фурната,
се уверете, че помещението може да се проветри добре.
Възможно е уредът да излъчи леко неприятна миризма
поради изгаряне на защитните вещества, използвани по
време на производствения процес.
! За да извършите по-лесно настройките, натиснете и
задръжте бутоните “ ” и “ ”, за да превъртите числата
на дисплея по-бързо.
! Всяка настройка ще се съхрани автоматично в паметта
на уреда след 10 секунди.
! По време на работа препоръчваме да се отстранят съдове
или деликатни храни от зоните, които не се използват.
! Когато готвенето е започнало, преди да се отстрани
РАЗДЕЛИТЕЛЯТ, фурната трябва да се изключи с бутона .
! Всеки път когато включите фурната, тя е в режим на
готвене CREATION.
! Бутоните чрез докосване не могат да се активират, ако
потребителят носи ръкавици.
! За да се оптимизира процесът на готвене, когато се
стартира избраната функция, ще се прилагат такива
продуктови настройки, които биха могли да предизвикат
отложен старт на вентилатора и нагревателите.
! Фурната стартира процес на предварително загряване
2 секунди след избор на желания цикъл.
Заключване на контролния панел
! Контролният панел може да бъде заключен, докато
фурната е изключена, след стартиране на готвенето
или по време на програмиране. За да заключите
превключвателите на фурната, натиснете и задръжте
бутона поне за 2 секунди. Чува се звуков сигнал и на
температурния дисплей се показва ключовият символ „O—
n“. Иконата светва, за да покаже, че заключването е
активирано. За да деактивирате заключването, натиснете
и задръжте бутона отново поне за 2 секунди.
Настройване на часовника
! Часовникът може да бъде настроен само при изключена
фурна. Ако фурната е в режим на готовност, еднократното
натискане на бутона ще покаже настройка на текущия
час. Натиснете го отново, за да настроите часовника.
След свързване към електрозахранването или след
прекъсване на тока, бутонът и цифрите на дисплея
с часа мигат в продължение на 10 секунди.
За да настроите часовника:
1. Натиснете бутона .
2. Настройте часа, като използвате бутоните “ ” и “ ”.
3. След като стигнете до желаната стойност на часа,
натиснете бутона .
4. Повторете гореописания процес, за да зададете
минутите.
Ако токът прекъсне, трябва да настроите часовника
отново. Ако иконата мига на дисплея, това показва,
че часовникът не е настроен правилно.
Настройване на брояча на минути
! Броячът на минутите може да бъде зададен независимо
дали фурната е включена или изключена. Той не
включва фурната, нито пък я изключва. След изтичане
на зададеното време броячът на минутите издава
звуков сигнал, който автоматично спира след 30
секунди или ако се натисне някой от активните бутони
на контролния панел.
За да настроите брояча на минутите, направете
следното:
1. Натиснете бутона .
2. Задайте желаното време, като използвате бутоните
“ ” и “ ”.
3. След като стигнете до желаната стойност, натиснете
отново бутона . Осветеният символ ще ви
напомни, че броячът на минутите е включен. За да
отмените броенето на минути, натиснете бутона и
използвайте бутоните “ ” и “ ”, за да върнете часа на
00:00. Натиснете отново бутона .
Иконата ще се изключи, за да покаже, че броячът
на минутите е деактивиран.
Охлаждаща вентилация
За да се охлади външната температура на фурната,
охлаждащ вентилатор издухва струя въздух между
контролния панел и вратата на фурната, както и към
долната част на вратата на фурната.
! След като приключи готвенето, охлаждащият
вентилатор продължава да работи, докато фурната се
охлади достатъчно.
Осветление на фурната
Лампичката светва, когато се отвори вратата на фурната
или когато стартира режим на готвене.
Бутонът може да се използва за включване на
лампичката по всяко време.
28
Page 29

Индикатори за остатъчна топлина
Уредът е оборудван с индикатор за остатъчна топлина.
Когато фурната е изключена, лампичката „остатъчна
топлина“ на дисплея светва, за да сигнализира
наличието на остатъчна топлина вътре във фурната.
Индикаторната лампичка изгасва, когато вътрешността
на фурната се охлади.
Възстановяване на фабричните настройки
Фабричните настройки на фурната могат да се
възстановят, за да се нулират направени от потребителя
промени (часовник и персонализирана продължителност
на готвене). За да нулирате, изключете фурната, след
това натиснете и задръжте едновременно бутона,
отговарящ за първия ръчен режим на готвене (горе
вляво), и бутона в продължение на 6 секунди.
След като приключи възстановяването, се чува звукова
сигнализация. При първото натискане на бутона
фурната се държи сякаш се включва за първи път.
Режим на готовност
Този продукт отговаря на изискванията на последната
Европейска директива за ограничаване на потреблението
на мощност в режим на готовност. Ако в продължение
на 30 минути не са натиснати никакви бутони и не се
активира нито контролният панел, нито заключването
на вратата, уредът автоматично преминава в режим на
готовност. Режимът на готовност се обозначава чрез
ярко осветената лампичката „Бутон за часовника“.
Веднага след възобновяване на взаимодействието с
машината, се възстановява работата на системата.
- температурата, свързана с този режим, ако се
програмира ръчно;
- „Auto“, ако се програмира автоматично.
Дисплеят ЧАС показва:
- текущия час, ако се програмира ръчно;
- продължителността, ако се програмира автоматично.
3. Натиснете бутона , за да стартира готвенето.
4. Фурната стартира етап на предварително затопляне:
лампичката за предварително загряване мига.
5. Когато приключи процесът на предварително
загряване, фурната издава звуков сигнал и индикаторът
за предварително загряване показва, че този етап е
приключил: храната може да бъде поставена във фурната.
6. По време на готвене винаги е възможно:
- промяна на температурата чрез натискане на бутона
, след това на бутоните “ ” и “ ” (само за ръчни режими);
- задаване на продължителност на режима на готвене
(вижте Режими на готвене);
- натиснете бутона , за да спрете готвенето. В този
случай уредът съхранява предишната настройка на
температурата в паметта си (само за ръчни режими);
- изключване на фурната чрез натискане на бутона
в продължение на 3 секунди.
7. В случай на прекъсване на тока, ако фурната вече
работи, автоматична вътрешна система активира
отново режима на гответе оттам, откъдето процесът
е прекъснат, ако температурата не е паднала под
определено ниво. Режимите за програмирано готвене,
които не са стартирани, няма да бъдат възстановени и
трябва да се програмират отново.
BG
Режими
! За да се гарантира перфектно сготвена или хрупкава
храна, фурната отделя водата, която се съдържа в
храната, под формата на пара. Това означава, че е
възможно да се постигнат оптимални резултати при
готвене на всякакви ястия.
! Всеки път когато включите фурната, тя предлага
първия режим на готвене CREATION.
! Никога не поставяйте предмети директно на дъното на
фурната; по този начин ще предотвратите увреждане
на емайловото покритие.
! Винаги поставяйте съдовете за готвене върху
наличната решетка(и).
Изключително голямо пространство
! Не използвайте позиция “D” за скари. Включване
на фурната
1. Включете контролния панел, като натиснете бутона
. Уредът издава трикратен звуков сигнал (с нарастваща
сила) и всички бутони светват последователно.
2. Натиснете бутона, съответстващ на желания режим
на готвене. Дисплеят ТЕМПЕРАТУРА показва:
! Няма етап на предварително нагряване за режима
БАРБЕКЮ.
Режими на готвене CREATION
! Всички режими на готвене имат температура на готвене
по подразбиране, която може да се регулира ръчно на
стойност между 30°C и 250°C, според желанието (300°C
при режим ГРИЛ). Режимите на готвене CREATION
включват всички ръчни режими.
Фурната контролира основните аспекти на всеки от
режимите на готвене и ви улеснява в приготвянето
на перфектното ястие, от най-простата рецепта до
най-изтънчените кулинарни шедьоври: температура,
източник на топлина, подпомагане от вентилатор всички тези операции се контролират автоматично.
Тази глава е съставена с помощта на нашия личен
кулинарен експерт. Приканваме ви да следвате
съветите му, за да се възползвате от опита му и да
усъвършенствате готварските си умения.
Препоръчителните режими на готвене, температурата
и височината на скарите във фурната отразяват личния
опит на експерта ни в кухнята и ви помагат да постигате
още по-добри резултати.
Таблицата по-долу уточнява дали е по-добре или пък
не първо да загреете фурната - за различните режими
на готвене CREATION. Спазването на тези препоръки
ви гарантира отлични резултати.
Ако желаете да поставите храна в предварително
загрята фурна, изчакайте първо да приключи цикълът
на загряване (чува се поредица от звукови сигнали).
29
Page 30

Температурата се задава автоматично според избрания
BG
режим на готвене, въпреки това може да го коригирате
съобразно рецептата си.
Можете да зададете и продължителност на готвенето с
незабавен или отложен старт.
Режим НЯКОЛКО НИВА
Всички нагреватели и вентилаторът са включени. Тъй
като топлината остава постоянна във фурната, топлият
въздух готви и запича храната равномерно. Може да се
използват най-много две решетки едновременно.
Режими НИСКА ТЕМПЕРАТУРА
Този тип готвене може да се използва за втасване,
размразяване, приготвяне на кисело мляко, притопляне на
ястия при определена скорост и бавно готвене при ниска
температура. Температурните опции са: 40, 65 и 90°C.
режим ПЕЧЕНЕ НА ГРИЛ С ВЕНТИЛАТОР
Включват се горният нагревател и шишът за печене (ако
е включен в модела) и вентилаторът започва да работи.
По време на част от цикъла се активира и кръглият
нагревател. Тази комбинация от функции повишава
ефективността на еднопосочното излъчване на топлина
от нагревателите чрез увеличаване на циркулацията на
въздуха в цялата фурна. По този начин се предотвратява
изгарянето на повърхността и се позволява на топлината
да проникне директно в продуктите. При този режим
винаги гответе със затворена врата на фурната.
Режим ГРИЛ
Активират се горният нагревател и шишът за печене
(където има такъв). Високата и директна температура
на грила се препоръчва за храна, която изисква
висока температура на повърхността. При този режим
винаги гответе със затворена врата на фурната (вижте
„Практични готварски съвети“).
Режим БЪРЗО ГОТВЕНЕ
Предварителното затопляне не е необходимо за този
режим на готвене. Този режим е изключително подходящ
за приготвяне на предварително обработена храна
(замразена или с предварителна термична обработка).
Най-добри резултати се постигат при използване само
на една решетка.
Режим ПИЦА
Горният и кръглият нагревател се включват и
вентилаторът започва да работи. В тази комбинация
те загряват фурната много бързо. Ако използвате повече
от една решетка едновременно, разменете позициите
на ястията по средата на готвенето.
ECO режим
Включват се задният нагревател и вентилаторът, като
по този начин се осигурява деликатно и равномерно
разпределение на топлината в цялата фурна. Този
икономичен режим е подходящ за приготвяне на
малки количества храна, за притопляне на храна и
довършване на процеса на готвене.
Шиш за печене
За да използвате функцията
за печене на шиш (вижте
схемата), изпълнете
следните стъпки:
1. Поставете тавичката за
оттичане в позиция 1.
2. Поставете опората
за шиша в позиция 3 и
поставете шиша в отвора
на задния панел на
фурната.
3. Стартирайте функцията за печене на шиш, като
изберете режим или .
! Когато режим е активиран, печенето на шиш спира
при отваряне на вратата на фурната.
Режими на готвене SUCCESS
! Температурата и продължителността на готвене са
предварително зададени, като гарантират перфектен
резултат всеки път - автоматично. Тези стойности не
могат да се коригират и използват системата C.O.P.®
(Програмирано оптимално готвене). Цикълът
на готвене спира автоматично и фурната издава
индикация, че ястието е готово. Можете да стартирате
готвенето независимо дали фурната е предварително
затоплена или не. Продължителността на готвене
може да се коригира в зависимост от личните
предпочитания - преди да започне готвенето - с ±5/20
минути в зависимост от избраната програма. След
стартиране на готвенето пак е възможно да се промени
продължителността. Ако стойността се промени, преди
да започне готвенето, тя се съхранява в паметта на
уреда и може да се предложи отново при следващо
използване на този режим. Ако температурата вътре
във фурната е по-висока от предложената стойност за
избрания режим, на температурния дисплей се показва
текст „Hot“ (горещо) и готвенето не може да започне;
изчакайте фурната да се охлади.
! Когато се достигне фазата на готвене, фурната издава
звуков сигнал.
! Не отваряйте вратата на фурната, защото по този
начин нарушавате зададеното време и температура.
режим ТЕЛЕШКО
Използвайте този режим за приготвяне на телешко и
свинско. Поставете храната във фурна, която е все още
студена. Ястието може да се постави и в предварително
загрята фурна.
режим СЛАДКИШИ
Тази функция е идеална за приготвяне на десерти, които
са приготвени с натурална мая, бакпулвер и десерти,
които не съдържат мая. Поставете ястието във фурната,
* Предлага се само за някои модели.
30
Page 31

докато е още студена. Ястието може да се постави и в
предварително загрята фурна.
се променя всеки път, когато натиснете бутона.
ОСНОВНОТО пространство се избира по подразбиране.
BG
режим ХЛЯБ
Използвайте тази функция за печене на хляб. За
постигане на най-добри резултати препоръчваме
внимателно да следвате указанията по-долу:
• Следвайте рецептата.
• Не надвишавайте максималното тегло на тавата за
оттичане.
• Не забравяйте да налеете 100 г (1dl) студена вода
в тавата за оттичане, която трябва да поставите на
позиция 7.
• Трябва да оставите тестото да втаса на стайна
температура в продължение на 1 – 1 ½ часa (в
зависимост от стайната температура) или докато
тестото удвои размера си.
Рецепта за ХЛЯБ:
1 тава за оттичане с капацитет максимум 1000 г, на
долното ниво
2 тави за оттичане, всяка с капацитет максимум 1000 г,
на средно и долно ниво
Рецепта за 1000 г тесто: 600 г брашно, 360 г вода, 11 г
сол, 25 г прясна мая (или 2 пакетчета мая на прах)
Начин на приготвяне:
• Смесете брашното и солта в голяма купа.
• Разтворете маята в хладка вода (приблизително 35
градуса).
• Направете малко кладенче в купа с брашно.
• Излейте сместа от вода и мая.
• Месете тестото, като го разтягате и натискате с длан
в продължение на 10 минути, докато постигнете
еднаква консистенция и не залепва по ръцете ви.
• Оформете топка от тестото, поставете го в голям съд
и го покрийте с прозрачно фолио, за да предпазите
горната повърхност от изсъхване. Изберете ръчна
функция на НИСКА ТЕМПЕРАТУРА на фурната и
задайте стойност от 40°C. Поставете купата вътре и
оставете тестото да втасва в продължение на около
1 час (тестото трябва да удвои обема си).
• Срежете тестото на равни по големина парчета.
• Поставете ги в тавата за оттичане върху хартия за
печене.
• Поръсете ги с брашно.
• Направете разрези върху тестото.
• Поставете храната във фурна, която е все още студена.
• Стартирайте режим за приготвяне на ХЛЯБ.
• След като опечете хляба, оставете го върху скарите
за печене, докато се охлади напълно.
РАЗДЕЛИТЕЛЯТ
Поставете РАЗДЕЛИТЕЛЯ на позиция “D”, като
използвате щифт, със стрелките, обърнати към
задната част на фурната. Чува се звуков сигнал,
който потвърждава, че РАЗДЕЛИТЕЛЯТ е поставен
правилно; след това става възможно да се използват
две ОСНОВНИ и едно МАЛКО пространство, отделно
или едновременно.
Бутонът се активира. Избраното пространство
Малко пространство
Включване на фурната
1. С поставен РАЗДЕЛИТЕЛ използвайте бутона , за
да изберете МАЛКО пространство за печене. Иконата
светва.
2. Следвайте указанията по-горе за ИЗКЛЮЧИТЕЛНО
ГОЛЯМО пространство, когато правите различни
корекции или настройки.
Режими на готвене
Режим ГРИЛ
Активират се горният нагревател и шишът за печене
(където има такъв). Високата и директна температура
на грила се препоръчва за храна, която изисква
висока температура на повърхността. При този режим
винаги гответе със затворена врата на фурната (вижте
„Практични готварски съвети“).
Режим БЪРЗО ГОТВЕНЕ
Предварителното затопляне не е необходимо за този
режим на готвене. Този режим е изключително подходящ
за приготвяне на предварително обработена храна
(замразена или с предварителна термична обработка).
Най-добри резултати се постигат при използване само
на една решетка.
Основно пространство
Включване на фурната
1. С поставен РАЗДЕЛИТЕЛ използвайте бутона , за
да изберете МАЛКО пространство за печене. Иконата
светва.
2. Следвайте указанията по-горе за ИЗКЛЮЧИТЕЛНО
ГОЛЯМО пространство, когато правите различни
корекции или настройки.
Режими на готвене CREATION
! Всички режими на готвене имат температура на готвене по
подразбиране, която може да се регулира ръчно на стойност
между 30°C и 250°C, според желанието (300°C при режим
ГРИЛ). Режимите на готвене CREATION включват всички
ръчни режими. Фурната контролира основните аспекти на
всеки от режимите на готвене и ви улеснява в приготвянето
на перфектното ястие, от най-простата рецепта до найизтънчените кулинарни шедьоври: температура, източник на
топлина, подпомагане от вентилатор - всички тези операции
се контролират автоматично. Тази глава е съставена с
помощта на нашия личен кулинарен експерт. Приканваме
ви да следвате съветите му, за да се възползвате от
опита му и да усъвършенствате готварските си умения.
Препоръчителните режими на готвене, температурата
и височината на скарите във фурната отразяват личния
опит на експерта ни в кухнята и ви помагат да постигате
още по-добри резултати. Таблицата по-долу уточнява
31
Page 32

дали е по-добре или пък не първо да загреете фурната -
BG
за различните режими на готвене CREATION. Спазването
на тези препоръки ви гарантира отлични резултати. Ако
желаете да поставите храна в предварително загрята
фурна, изчакайте първо да приключи цикълът на загряване
(чува се поредица от звукови сигнали). Температурата се
задава автоматично според избрания режим на готвене,
въпреки това може да го коригирате съобразно рецептата
си. Можете да зададете и продължителност на готвенето
с незабавен или отложен старт.
Режим НЯКОЛКО НИВА
Всички нагреватели и вентилаторът са включени. Тъй
като топлината остава постоянна във фурната, топлият
въздух готви и запича храната равномерно. Може да се
използват най-много две решетки едновременно.
Режими НИСКА ТЕМПЕРАТУРА
Този тип готвене може да се използва за втасване,
размразяване, приготвяне на кисело мляко, притопляне
на ястия при определена скорост и бавно готвене при
ниска температура. Температурните опции са: 40, 65
и 90°C.
Режим ПИЦА
Горният и кръглият нагревател се включват и
вентилаторът започва да работи. В тази комбинация
те загряват фурната много бързо. Ако използвате повече
от една решетка едновременно, разменете позициите
на ястията по средата на готвенето.
текст „Hot“ (горещо) и готвенето не може да започне;
изчакайте фурната да се охлади.
! Когато се достигне фазата на готвене, фурната издава
звуков сигнал.
! Не отваряйте вратата на фурната, защото по този
начин нарушавате зададеното време и температура.
режим ТЕЛЕШКО
Използвайте този режим за приготвяне на телешко и
свинско. Поставете храната във фурна, която е все още
студена. Ястието може да се постави и в предварително
загрята фурна.
режим СЛАДКИШИ
Тази функция е идеална за приготвяне на десерти, които
са приготвени с натурална мая, бакпулвер и десерти,
които не съдържат мая. Поставете ястието във фурната,
докато е още студена. Ястието може да се постави и в
предварително загрята фурна.
Използване на малко и основно
пространство едновременно
! Едновременна работа е възможна само при използване
на режими на готвене CREATION.
Включване на фурната
За едновременно използване просто стартирайте режим
на готвене за двете пространства последователно.
Дисплеят за ТЕМПЕРАТУРА показва параметрите за
готвене и в двете пространства.
ECO режим
Включват се задният нагревател и вентилаторът, като
по този начин се осигурява деликатно и равномерно
разпределение на топлината в цялата фурна. Този
икономичен режим е подходящ за приготвяне на
малки количества храна, за притопляне на храна и
довършване на процеса на готвене.
Режими на готвене SUCCESS
! Температурата и продължителността на готвене са
предварително зададени, като гарантират перфектен
резултат всеки път - автоматично. Тези стойности не
могат да се коригират и използват системата C.O.P.®
(Програмирано оптимално готвене). Цикълът
на готвене спира автоматично и фурната издава
индикация, че ястието е готово. Можете да стартирате
готвенето независимо дали фурната е предварително
затоплена или не. Продължителността на готвене
може да се коригира в зависимост от личните
предпочитания - преди да започне готвенето - с ±5/20
минути в зависимост от избраната програма. След
стартиране на готвенето пак е възможно да се промени
продължителността. Ако стойността се промени, преди
да започне готвенето, тя се съхранява в паметта на
уреда и може да се предложи отново при следващо
използване на този режим. Ако температурата вътре
във фурната е по-висока от предложената стойност за
избрания режим, на температурния дисплей се показва
! Благодарение на високата енергийна ефективност
на уреда, само около 15 минути са необходими за
предварително загряване на МАЛКОТО пространство.
Програмиране на готвенето
! Преди да заработи програмата, трябва да се избере
режим на готвене.
Програмиране на продължителността на готвене
1. Натиснете бутона няколко пъти, докато иконата
и цифрите на ДИСПЛЕЯ започнат да мигат.
2. Завъртете превключвателя на таймера към „ “ и „
“, за да коригирате времето според предпочитанията
си; задръжте в тази позиция за бързо превъртане през
числата и улесняване на процедурата за настройване.
3. След като стигнете до желаната продължителност,
натиснете отново бутона . Дисплеят показва
последователно продължителност на готвене и
температура.
4. Натиснете бутона , за да стартира готвенето.
5. Когато готвенето приключи, на дисплея се изписва
„END“ (край) и се чува звуков сигнал.
• Например: в момента е 9:00 часа и е зададен режим
на работа от 1 час и 15 минути. Програмата ще спре
автоматично в 10:15 ч.
* Предлага се само за някои модели.
32
Page 33

Задаване на краен час за режим на готвене.
! Преди да се насрочи краен час, трябва да се зададе
продължителност на готвенето.
! За да работи добре отложеното програмиране,
часовникът трябва да е настроен на точно време.
1. Следвайте стъпки 1 до 3, за да зададете
продължителност, както е подробно описано по-горе.
2. Натиснете бутона два пъти: иконата и
цифрите на ДИСПЛЕЯ започнат да мигат.
3. Завъртете ПРЕВКЛЮЧВАТЕЛЯ ТАЙМЕР към „ “ и „
“, за да регулирате стойност за продължителност на
готвенето.
4. След като стигнете до желания краен час, натиснете
отново бутона . Дисплеят показва последователно
продължителност на готвене, краен час на готвене и
температура.
5. Натиснете бутона , за активиране на програмирания
режим.
Програмирането е настроено, когато бутоните и
светят.
ДИСПЛЕЯТ редува показването на крайния час на
готвенето и продължителността на готвене.
6. Когато готвенето приключи, на дисплея се изписва
„END“ (край) и се чува звуков сигнал.
• Например: в момента е 9:00 часа и е зададен режим
на работа от 1 час и 15 минути, а краят на готвенето
е програмиран за 12:30 ч. Програмата ще стартира
автоматично в 11:15 ч.
• Тази функция се препоръчва за запичане на ястие,
за приготвяне на грaтени, за оцветяване на целувки,
запичане на сандвичи или малки парчета тънко
нарязано крехко месо.
• Препоръчваме да бъде зададено максимално
ниво на мощност. Горният нагревател се регулира
от термостат, затова е възможно да не работи
постоянно.
• Поставяйте скарата за грил на позиция 3 или 4, а
храната
в центъра на решетката.
• Препоръчваме да бъде зададено максимално ниво
на температурата. Горният нагревател се регулира
от термостат, затова е възможно да не работи
постоянно.
БЪРЗО ГОТВЕНЕ
• Поставете тавата за оттичане на позиция 6.
• Когато приготвяте замразена храна, винаги следвайте
указанията на опаковката.
BG
За отмяна на програмирането натиснете бутона .
Практически съвети за готвене
НЯКОЛКО НИВА
• Използвайте позиции 1, 3, 5 и 6.
• Поставяйте тавичката за оттичане отдолу, а скарата
– отгоре.
• Когато печете пица или фокача, използвайте лека
алуминиева тава с максимален диаметър 30 см, която
да поставите най-отгоре на скарата. Ако пицата е с
повече плънка, препоръчваме върху нея да добавите
сирене моцарела по средата на готвенето. По време
на готвене ви съветваме да сменяте местата на
отделните позиции.
• Използвайте позиции 2 и 4, като поставяте храната,
изискваща повече топлинна обработка, на позиция
2.
• Поставяйте тавичката за оттичане отдолу, а скарата
– отгоре.
ГРИЛ
• Предварително загрейте фурната за 5 минути.
• Поставете разделителя на позиция “D”.
• Винаги дръжте вратата на фурната затворена, когато
използвате този режим на готвене..
• Поставяйте скарата на позиция 7. Поставете храната
в центъра на решетката. Поставете тавата за
оттичане на позиция 6.
33
Page 34

BG
Таблица с готварски съвети за фурни с много голямо пространство във вътрешността
* Времето за готвене, посочено по-горе, е препоръчително и може да се променя в зависимост от личните предпочитания.
09
Таблица със съвети за готвене с функцията Малко пространство
личните предпочитания. Времето за предварително загряване на фурната е зададено като стандарт и
Функция Храна Тегло
“Creation”
На няколко нива*
Бързо готвене*
Пица*
Печене с
вентилатор*
Грил*
Ниска
температура*
Тарт 1
Еклери 1
Бисквити 180
Дребни сладки 1
Крем карамел
(водна баня)
Панетоне 11 или 2 Да 160 45-60
Торта 1
Пандишпан
Печено
Кебап
Рибни филета
Замразени картофи
Пица/Фокача
Печено месо
Гратен
Печене на бут
Печене на бут от дивеч
Телешки ребра
Наденички
Свински ребра
Бекон
Втасване/размразяване
Бели целувки
Месо/риба
(кг)
Да се
Позиция на скара Предварително
готви на
позиция
№
1,5-22
Тава за
оттичане
2
3
4
2
3
4
1
2
3
4
2
3
1
2
3
2
1
2
3
1
1
1
1
2
3
4
1
1
1
1
1
1
1
1
1
4
3
2 или 3
1 до 2
2 или 3
1 до 2
2 или 3
2 или 3
2 или 3
2 или 3
1 или 2
3 или 4
Скара 1Скара 2 Скара 3
2 или 3
1 или 2
1
3
3 до 5
3
3
3 до 5
3
3
5
4 6
5
46
2 или 3
14 or 5
5
4
5
5
3 или 5
3
3
3
2
2
4 или 5
5 или 7
5 или 7
5 или 7
3
3
1***
2***
1***
1***
3***
3***
3***
3***
1
1
1
1
1
2
1
2
1
2
1
1
1
5
1
1
2
1
1
3 or 5
3
5
5
5 6
5
5 6
Да
6
5
56
5
5
загряване
5
6
Да
Да
Да
6
Да
Да
Да
Да
Да
Да
Да
Да
Да
Да
Да
Да
Да
Да
Да
Да
Да
Да
Да
Да 16
Не
Не
Не
Да
Да
Да
Да
Не
Не
Не
Не
Да
Да
Да
Да
Не
Не
Не
“Success”
Хляб
Телешко
Сладкиши
Хляб (вижте рецептата) 2
Печено 1,2-1,5 5
Сладкиши 1
2
2
1
2
3
11***
2
7**
7**
7**
2
1
1
2
2
4
3
5
5
Не
Не
Не
Не
Не
Не
Времето за предварително загряване на фурната е зададено като стандарт и не може да се променя ръчно.
** Както е посочено в рецептата, налейте 100 г вода в тавата за оттичане на позиция 7.
*** Използвайте тавата за оттичане за събиране на мазнина или сокове, отделяни при готвенето.
Препоръчителна
температура
(°C)
190
180
180
180
190
190
190
190
180
180
180
200
200
200
170
170
170
160
160
190
190
190
210
200
230
220
220
220
220
200
190
200
200
270-300
270-300
270-300
270-300
40
65
90
Продължителност
на печене
(минути)
25-30
35-45
40-50
45-55
25-35
25-35
30-40
30-40
15-25
15-25
20-30
20-30
30-40
35-45
40-50
35-45
35-45
40-50
60-75
60-75
30-35
35-40
40-45
0-240
20-25
15-20
25-30
15-25
20-30
25-35
30-40
35-75
40-60
90-120
90-120
20-30
10-20
15-25
3-6
8-12 часа
90-180
! Режим на готвене ECO: Този икономичен режим е подходящ за приготвяне на ястия като рибни филета, дребни сладки
и зеленчуци. Подходящ е за затопляне на готови ястия или за довършване на готвенето.
Функция Храна Тегло
(кг)
Бързо готвене*
Грил*
Рибни филета
Месни филета
Замразена пица
Замразени
полуготови храни
Сандвичи
Бекон
Свински стекове
Готвене
на
позиция
№
1
1
1
1
1
1
1
Тава за
оттичане
6
6
6
6
6**
6**
Позиция на скараПредварително
загряване
Разде-
Скара 1
лител
D
D
D
D
6
7
7
D
D
D
Да
Да
Да
Да
Да
Да
Да
Препоръчителна
температура
(°C)
160-180
180-200
270-300
270-300
270-300
* Времето за готвене, посочено по-горе, е препоръчително и може да се променя в зависимост от
не може да се променя ръчно.
** Използвайте тавата за оттичане за събиране на мазнина или сокове, отделяни при готвенето.
34
Продължителност
на печене
(минути)
20-30
30-40
3-5
3-6
15-25
Page 35

Таблица с готварски съвети за използване на малко и основно пространство едновременно
Основно пространство
Таблица със съвети за готвене с функцията Основно пространство
Този икономичен режим е подходящ за приготвяне на ястия като рибни филета, дребни
Функция Храна Тегло
Creation
На няколко нива*
Пица*
Тарт 1
Бисквити 180
Дребни сладки1
Крем карамел
(водна баня)
Торта12 DДa 160 60-75
Пица
(кг)
Готвене
на
позиция
№
2
1
2
2
12 DДa170 35-45
1
2
Позиция на скарата Предварително
загряване
Тава за
оттичане
2 или 3
1 или 23 или 5
Скара 1
2
13DD
2
13DD
2
13
Разделител
D
D
D
D
Препоръчителна
температура
(°C)
Дa
Дa
Дa
Дa
Дa
Дa
Дa
Дa
200
200
180
200
200
220
220
Продължителност
на печене
(минути)
30-40
35-45
15-25
15-25
30-40
35-45
15-25
20-30
Малко пространство
Функция Храна Тегло
Бързо готвене*
Грил*
Рибни филета
Месни филета
Замразена пица
Замразени полуготови храни
Свински стекове 1 6** 7Да 270-300 15-25
(кг)
Готвене
на
позиция
№
1
1
1
1
Позиция на скарата Предварително
загряване
Тава за
оттичане
6
6
6
6
Скара 1
Разделител
D
D
D
D
D
Препоръчителна
температура
(°C)
Продължителност
на печене
(минути)
Да
Да
Да
Да
160-180
180-200
20-30
30-40
* Времето за готвене, посочено по-горе, е препоръчително и може да се променя в зависимост от
личните предпочитания. Времето за предварително загряване на фурната е зададено като стандарт
и не може да се променя ръчно.
** Използвайте тавата за оттичане за събиране на мазнина или сокове, отделяни при готвенето.
BG
Функция Храна Тегло
(кг)
Creation
На няколко нива*
Пица*
Ниска
температура*
Тарт 1
Еклери 1
Бисквити 180
Дребни сладки1
Крем карамел
(водна баня)
Торта12 DДа160 60-75
Пандишпан
Пица/Фокача
Втасване/
Размразяване
Бели целувки
Месо/риба
Готвене
на
позиция
№
2
2
1
2
2
12 DДа170 35-45
1
2
1
2
1
2
2
Позиция на скара
Тава за
оттичане
2 или 3
1 или 23 или 5
Скара 1
2
13DD
2
13DD
2
13DD
2
13
2
13DD
2
1
1
3
3
Разделител
D
D
D
D
D
D
D
Предварително
загряване
Да
Да
Да
Да
Да
Да
Да
Да
Да
Да
Да
Да
Не
Не
Не
Препоръчителна
температура
(°C)
200
200
190
190
180
200
200
190
190
220
220
40
65
90
Success
Телешко
Сладкиши
Печено 1,2-1,5 11** 2
Сладкиши 122
13
D
D
D
Не
Не
Не
* Времето за готвене, посочено по-горе, е препоръчително и може да се променя в зависимост от личните
предпочитания.
Времето за предварително загряване на фурната е зададено като стандарт и не може да се променя ръчно.
** Използвайте тавата за оттичане за събиране на мазнина или сокове, отделяни при готвенето.
Продължителност
на печене
(минути)
30-40
35-45
25-35
25-35
15-25
15-25
30-40
35-45
30-35
35-40
15-25
20-30
8-12 часа
90-180
! Режим на готвене ECO:
сладки и зеленчуци. Подходящ е за затопляне на готови ястия или за довършване на готвенето.
35
Page 36

Предпазни мерки и
BG
препоръки
! Този уред е проектиран и произведен в съответствие
с международните стандарти за безопасност при
употреба. Предупрежденията по-долу се предоставят
от съображения за сигурност и трябва да бъдат
внимателно прочетени.
способности, от неопитни лица или от някой, който
не е запознат с продукта. Такива лица трябва наймалкото да бъдат наблюдавани от някой, който
поема отговорност за тяхната безопасност, или да
получат предварителни инструкции, свързани с
експлоатацията на уреда.
• Уредът не е предназначен за управление с външен
таймер или отделна система за дистанционно
управление.
Общи правила за безопасност
• Уредът е разработен за домашна употреба на закрито
и не е предназначен за търговска или промишлена
употреба.
• Уредът не трябва да бъде монтиран на открито, дори
и в защитени зони. Изключително е опасно уредът да
бъде излаган на въздействието на дъжд и буря.
• Когато местите или позиционирате уреда, винаги
използвайте дръжките отстрани на фурната.
• Не докосвайте уреда с боси крака или с мокри или
влажни ръце и крака.
• Уредът трябва да се използва за приготвяне на
ястия единствено от възрастни в съответствие
с инструкциите, изложени в тази книжка.
Всяка друга употреба (напр. за отопление на
помещение) се счита за неправилна и е опасна.
Производителят не носи отговорност за възможни
щети, произтичащи в резултат на неподходяща,
неправилна и неразумна употреба на уреда.
• Не докосвайте нагревателите или определени
части от вратичката на фурната при употреба на
уреда; тези части стават изключително горещи.
Дръжте децата настрана от уреда.
• Уверете се, че захранващите кабели на други
електрически уреди не са в контакт с горещите части
на фурната.
• Отворите за вентилация и отделяне на топлина не
трябва да се възпрепятстват.
• Винаги отваряйте вратата на фурната, като хващате
дръжката по средата: краищата може да са горещи.
• Винаги използвайте готварски ръкавици, когато
поставяте или изваждате съдове.
• Не използвайте алуминиево фолио на дъното на
фурната.
• Не поставяйте запалими материали във фурната: ако
уредът бъде включен неволно, материалите може да
причинят пожар.
• Когато изключвате уреда от контакта, винаги
хващайте щепсела, а не дърпайте кабела.
• Не извършвайте дейности по почистване или
поддръжка, преди да сте изключили уреда от
електрическата мрежа.
• Ако уредът се повреди, при никакви обстоятелства не
се опитвайте сами да извършвате ремонт. Свържете
се с оторизиран сервизен център (вижте Техническо
обслужване).
• Не поставяйте предмети върху отворената врата на
фурната.
• Не позволявайте на децата да играят с уреда.
• Уредът не трябва да се експлоатира от хора (вкл.
деца) с намалени физически, сензорни или умствени
Депониране на отпадъци
• При депониране на опаковъчния материал: спазвайте
местните разпоредби за повторна употреба на
опаковките.
• Европейската директива 2012/19/ЕО относно
отпадъци от електрическо и електронно оборудване
(ОЕЕО) предвижда старите електродомакински
уреди да не се депонират чрез обикновения
цикъл за твърди отпадъци. Старите уреди се
събират разделно, за да се оптимизира
възстановяването и рециклирането на материалите,
които съдържат, за да се ограничи въздействието
върху здравето на хората и околната среда.
Символът със зачертан контейнер за отпадъци върху
продукта ви напомня за това, че сте задължени да
депонирате уреда на място за разделно събиране
на отпадъци.
Потребителите трябва да се свържат с местните
власти или търговци за информация във връзка с
правилното депониране на уреда.
Пестене и опазване на околната среда
• Можете да съдействате за намаляване на пиковото
натоварване на електроснабдителните компании,
като използвате фурната в късния следобед и рано
сутрин. Опциите за задаване на режими за готвене
и по-специално „готвене с отложен старт“ (вижте
Режими на готвене) и „отложен старт на автоматично
почистване“ (вижте Почистване и поддръжка),
позволяват на потребителя да организира времето
си ефективно.
• Винаги дръжте вратата на фурната затворена, когато
използвате режимите ГРИЛ и ПЕЧЕНЕ НА ГРИЛ С
ВЕНТИЛАТОР. Така се получават по-добри резултати,
като се пести енергия (около 10%).
• Редовно проверявайте уплътненията на вратата и
ги поддържайте чисти от остатъци от храна, за да
прилепват плътно към вратата; по този начин ще се
избегне загуба на топлина.
! Този продукт отговаря на изискванията на последната
Европейска директива за ограничаване на потреблението
на мощност в режим на готовност.
36
Page 37

Поддръжка и почистване
Изключване на уреда
Изключете уреда от електрическата мрежа, преди да
извършвате каквито и да е дейности по него.
Почистване на уреда
• Малките разлики в цвета в предната част на фурната
се дължат на използваните различни материали стъкло, пластмаса или метал.
• Всички затъмнени места, наподобяващи бразди
върху стъклената врата на фурната са отражения от
светлината вътре във фурната.
• Емайлът е брандиран при много високи температури.
Този процес може да предизвика разлика в цвета.
Това е нормално и не се отразява по никакъв начин
на работата на уреда. Тънките ръбчета на металния
лист не могат да се емайлират напълно и затова може
да изглеждат като недовършени. Това не се отразява
върху защитата срещу корозия.
• Външните части от неръждаема стомана или
емайлираните повърхности, както и гумените
уплътнения могат да бъдат почистени с гъба, напоена
с хладка вода и неутрален сапун. Използвайте
специализирани продукти за отстраняване на
упорити петна. Изплакнете и подсушете старателно
след почистване. Не използвайте абразивни прахове
или корозивни вещества.
• Вътрешността на фурната е препоръчително да се
почиства след всяка употреба, докато е все още леко
затоплена. Използвайте гореща вода и почистващ
препарат, след това изплакнете добре и подсушете
с мек парцал. Не използвайте абразивни продукти.
• Всички аксесоари, освен решетките, могат да се
мият като останалите съдове, дори и в съдомиялна
машина.
• Препоръчваме, при работа с препарати да не ги
пръскате директно върху контролния панел, а да
използвате гъба.
3. Хванете здраво вратата
за двете външни страни и я
затворете приблизително
наполовина. Издърпайте вратата
към вас, като я повдигнете от
мястото й (вижте диаграмата).
За да поставите отново вратата,
изпълнете същите указания в
обратен ред.
Проверка на уплътненията
Проверявайте редовно уплътненията около вратата на
фурната. Ако уплътненията са повредени, свържете
се с най-близкия сервизен център (вижте Техническо
обслужване). Не се препоръчва използването на
фурната преди подмяната на уплътненията.
Подмяна на осветителната лампа
Отделение
за
лампата
Лампа
Стъклен капак
3. Поставете обратно стъкления капак (вижте
диаграмата).
! Не докосвайте крушката директно с ръцете си.
! Не използвайте лампата на фурната за осветление в
помещението.
За да подмените лампата
за осветяване на фурната:
1. Свалете стъкления
капак на държача на
лампата.
2. Извадете крушката и
я заменете с подобна на
нея: халогенна лампа
за напрежение 230 V,
мощност 25 W, капачка
G 9.
BG
! Никога не използвайте водочистачки или парочистачки
върху уреда.
Почистване на вратата на фурната
Почиствайте стъклото на вратата на фурната с гъба и
неабразивен почистващ препарат, след това подсушете
добре с мек парцал. Не използвайте груби абразивни
материали или остри метални приспособления, тъй като
те могат да надраскат повърхността и това да доведе
до счупване на стъклото.
Вратата може да се вади при основно почистване:
1. Отворете докрай врата на фурната (вижте диаграмата).
2. Повдигнете и завъртете малките лостове F, намиращи
се на двете панти (вижте диаграмата).
F
37
Page 38

Отстраняване на
Проблем
Възможна причина
Решение
Уредът току-що е включен в
има прекъсване на тока.
Настройте часовника.
BG
неизправности
„Бутонът за часовник“ и
цифрите на дисплея мигат.
електрическата мрежа или
Програмиран режим на готвене
не стартира.
Само силно осветеният бутон
за часовника свети.
Избран е автоматичен режим.
На дисплея се изписва „Hot“
(горещо) и готвенето
не стартира.
Избрано е готвене с вентилатор
и храната изглежда прегоряла.
Има прекъсване на тока. Изберете друг режим на готвене.
Уредът е в режим на готовност. Натиснете някой бутон, за да
излезете от режим на готовност.
Температурата вътре във
фурната е по-висока от
предложената стойност на
избрания режим.
Позиции 1 и 5: директната
топлина може да предизвика
изгаряне на чувствителните
на температура храни.
Изчакайте фурната да изстине.
Препоръчваме промяна на
позицията на тавата за оттичане
наполовина по време
на готвенето.
38
Page 39

Beszerelés
590 mm.
HU
! Kérjük, őrizze meg ezt a tájékoztató füzetet, hogy szükség
esetén bármikor belenézhessen. Ha a készüléket eladja,
elajándékozza vagy áthelyezik, ezt a füzetet is adja át az
új tulajdonosoknak, hogy ők is elolvashassák a benne
található tanácsokat.
! Figyelmesen olvassa el azt a kezelési útmutatót:
Fontos információkat tartalmaz a készülék biztonságos
beszereléséről és használatáról és karbantartásáról.
Elhelyezés
! Ne engedje, hogy gyermekek játszanak a
csomagolóanyaggal, azt a helyi szelektív hulladékgyűjtésre
vonatkozó szabályoknak megfelelően kell selejtezni (lásd
az Óvintézkedések és Tanácsok részt).
! A készülék beszerelését az utasításoknak megfelelően,
szakembernek kell elvégeznie. A helytelen beszerelés
következtében emberek vagy állatok sérülése vagy vagyoni
kár következhet be.
Beépített készülékek
Megfelelő szekrényt használjon, amely lehetővé teszi a
készülék megfelelő működését:
• A sütővel szomszédos elemek hőálló anyagból kell, hogy
készüljenek.
• A furnér burkolatú szekrények ragasztóinak akár 100 °C-
os hőmérsékletnek is ellen kell állniuk.
• ha a sütőt pult alá (lásd az ábrát) vagy konyhaszekrénybe
építi, a szekrények a következő méretekkel kell
rendelkeznie:
550 mm.
min.
45 mm.
560 mm.
575-585 mm.
570 mm.
595 mm.
20 mm.
550 mm.
20,5 mm.
22,5 mm.*
45 mm.
560 mm.
min. 20 mm
VENTILÁTORRAL
SEGÍTETT ÜZEMMÓD
min. 45 mm
Középre állítás és rögzítés
A készülék rögzítése a szekrényhez:
• Nyissa ki a sütő ajtaját.
• A kereten található rögzítőfuratokból távolítsa el a két
gumidugót.
• A két facsavar használatával rögzítse a sütőt a
szekrényhez.
• Helyezze vissza a gumidugókat.
! Azok az alkatrészek, melyek a készülék biztonságos
működését biztosítják, nem lehetnek eltávolíthatóak
szerszám használata nélkül.
Elektromos csatlakoztatás
A sütőket , melyeket háromvillás csatlakozókábellel
szerelték fel,váltóárammal, a készüléken látható adattáblán
(lásd alább) adattáblán feltűntetett feszültség és frekvencia
értéke esetén használható.
A tápellátás vezetékének csatlakoztatása
1. Nyissa ki a csatlakozótáblát,
helyezzen egy csavarhúzót a
takaróelem oldalsó füleibe. A
csavarhúzót használja
karként, és nyomja azt le a
takaróelem nyitásához (lásd
az ábrán).
! A beszerelést követően a készülék nem érintkezhet
elektromos alkatrészekkel/szerelvényekkel.
Az adattáblán található fogyasztási adatok, ilyen típusú
beszerelésre vonatkoznak.
Szellőzés
A megfelelő szellőzés érdekében
a konyhaszekrény hátlapját el kell
távolítani. Javasoljuk, hogy a sütőt
úgy helyezze el, hogy az két
falécen támaszkodjon, teljesen
vízszintes felületen a nyílás
legalább 45 x 560 mm legyen (lásd
az ábrákon).
N
2. Lazítsa meg a kábelrögzítő
csavarját és a három
vezetékrögzítő csavart
N
L-N- .
Csatlakoztassa a
vezetékeket a megfelelő
L
csatlakozókhoz: A Kék
vezetéket az N-jelű
csatlakozóhoz, a Barna
L
vezetéket az L-jelű
csatlakozóhoz a Sárga/Zöld
vezetéket a csatlakozóhoz (lásd az ábrát).
39
Page 40

3. Rögzítse a kábelt a kábelrögzítő csavarjának
A KÉSZÜLÉK ADATAI
feszültség: 220 - 240 V~ 50/60Hz vagy
HU
meghúzásával.
4. Zárja le a csatlakozótábla fedelét.
A tápkábel csatlakoztatása az elektromos hálózathoz.
Szereljen a kábelre a készülék adattábláján feltüntetett
terhelésnek megfelelő szabványos csatlakozódugót (lásd
a táblázatban).
Egy, a készülék és a hálózat közé szerelt minimum 3 mm-es
kontaktnyílású omnipoláris megszakítóval csatlakoztassa a
készüléket közvetlenül a hálózathoz. A megszakítót a jelzett
terhelésre kell méretezni, és meg kell felelnie az érvényben
lévő szabványoknak (a földelőkábelt a megszakító nem
szakíthatja meg). A hálózati kábelt úgy kell elhelyezni,
hogy sehol se melegedhessen 50 °C-nál magasabb
hőmérsékletre (például a sütő hátsó panelje).
! A beszerelő felelőssége biztosítani azt, hogy az elektromos
csatlakozás helyesen került kivitelezésre, és az megfelel a
biztonsági előírásoknak.
Mielőtt csatlakoztatná a készüléket a tápellátáshoz
győződjön meg a következőkről:
• A készülék földelve van és a csatlakozó megfelel a
jogszabályi előírásoknak.
• Az aljzat képes elviselni a készülék adattábláján
feltüntetett maximális teljesítmény terhelését.
• A tápfeszültség megfelel az adattáblán feltüntetett
értékeknek.
• Az aljzat kompatibilis a készülék csatlakozódugójával.
Amennyiben az aljzat nem kompatibilis a
csatlakozódugóval, a cseréhez hívjon engedéllyel
rendelkező szakembert. Ne használjon hosszabbítót
vagy elosztót.
! A beszerelt készülék tápkábelének és a fali csatlakozónak
könnyen hozzáférhetőnek kell lennie.
Szélesség: 43,5 cm
Méretek*
Magasság: 41 cm
Mélység: 41 cm
Térfogat* 74 l
Méretek**
Térfogat** 77 l
Elektromos
csatlakozások
ENERGIAFOG-
YASZTÁSI
CÍMKE
50Hz, maximális teljesítményfelvétel
2600 W (lásd az adattáblán)
A villamos sütők energiafogyasztási
címkézéséről szóló 2002/40/EK
irányelv EN 50304 szabvány
Energiafogyasztás mesterséges
levegőáramoltatású sütés esetén
– fűtési üzemmód: ECO.
Ez a készülék megfelel a következő
EGK-irányelveknek:
2006.12.12-i 2006/95/EGK
kisfeszültségi irányelv és
későbbi módosításai
– 2004.12.15-i 2004/108/EGK
elektromágneses összeférhetőségi
irányelv és későbbi módosításai
– 2009.11.30-i 2009/142/EGK
gázirányelv és későbbi módosításai
– 1993.07.22-i 93/68/EGK irányelv
és későbbi módosításai.
2012/19/EGK és vonatkozó
rendelkezések.
1275/2008 készenléti/kikapcsolt
üzemmód
* Csak húzott szálakkal ellátott modellek esetében
** Csak drótszálakkal ellátott modellek esetében
! A kábel nem hajolhat meg és nem lehet összenyomva.
! A kábelt rendszeresen ellenőrizni kell, és cseréjét kizárólag
engedéllyel rendelkező szakember végezheti el.
! A fenti előírások be nem tartása esetén a gyártó
minden felelősséget elhárít.
40
Page 41

A sütő felépítése
Ηőmérséklet az első sütőtérben
(Fő vagy kisméretű sütőtér)
Ηőmérséklet a második sütőtérben
(Fő vagy kisméretű sütőtér)
40 °C és 150 °C között
155 °C és 200 °C között
A hőmérséklet különbség azt első kiválasztott sütőtérhez
képest nem lehet több mint 50 °C
(
A sütő NYITOTT TÉR 70 literes és lehetővé teszi a sütést
akár egyszerre négy polcon, illetve nagy mennyiségű ételek
sütését, ami nem lenne lehetséges hagyományos sütőben.
Az 56 universal (Creation) és automatikus (Success) sütési
módoknak köszönhetően mindig nagyszerű eredmények
érhetőek el, a sütött ételtől függetlenül.
A NYITOTT TÉR maximális kényelmet nyújt és minden
elvárásnak megfelel, 4 különböző üzemmód közül
választhat: a sütő egy nagy sütőtérből áll, azonban
különböző változó méretű helyekre bontható, mindegyik
esetében különálló hőmérsékletszabályozás és időtartam
beállítás lehetséges.
Ezt a hőszigetelő OSZTÓELEM teszi lehetővé, melynek
segítségével az extra nagy sütőteret két különböző méretű
térrel lehet osztani: A fő sütőtérre és a kisméretű sütőtérre.
A két sütőteret (fő és kisméretű) egyszerre lehet használni,
így gyorsabban lehet különböző ételeket megsütni, vagy
külön is használhatóak, ha kisebb tér is elegendő a
sütéshez.
Amikor a sütőteret egyidőben használja, mindkét sütőtér
hőmérséklete külön szabályozható 30 és 300 °C között.
A két tér közötti hőmérsékletkülönbség 100 °C lehet, így
lehetőség van teljesen más ételek főzésére, anélkül, hogy
az ízek aromák összekeverednének.
HU
Extranagy sütőtér: sütés négy polcszinten
KISMÉRETŰ
KISMÉRETŰ
EXTRANAGY
SÜTŐTÉR
KISMÉRETŰ
SÜTŐTÉR
FŐ
SÜTŐTÉR
Sütés csak a kisméretű sütőtérben
RÁCS vagy ZSÍRFOGÓ
TÁLCA
Osztóelem „D”
(rögzített pozíció)
RÁCS
RÁCS
RÁCS
ZSÍRFOGÓ
TÁLCA
Az alábbi táblázatban találja a beállítható
hőmérsékletértékeket. A két sütőtér hőmérsékletének
Fő és kisméretű sütőtér: egyidejű működés
SÜTŐTÉR
FŐ
SÜTŐTÉR
Sütés csak a Fő Sütőtérben sütés 3 polcszinten
SÜTŐTÉR
FŐ
SÜTŐTÉR
RÁCS vagy ZSÍRFOGÓ TÁLCA
Osztóelem „D” (rögzített pozíció)
RÁCS (sütés 3 szinten)
RÁCS (sütés 3 szinten)
ZSÍRFOGÓ TÁLCA
(sütés 3 szinten)
Osztóelem „D” (rögzített pozíció)
RÁCS (sütés 3 szinten)
RÁCS (sütés 3 szinten)
ZSÍRFOGÓ TÁLCA
(sütés 3 szinten)
beállítását az intelligens kijelzőn megjelenő információk
segítségével teheti meg.
Például: Ha az egyik tér hőmérsékletét 90 °C-ra állítja,
az értéket a másik térben 40 °C (90 °C-50 °C) és 140 °C (90°C+50 °C) között állíthatja.
Például: Ha az egyik tér hőmérsékletét 90 °C-ra állítja,
az értéket a másik térben 110 °C
205 °C és 250 °C között
Például: Ha az egyik tér hőmérsékletét 210 °C-ra állítja,
az értéket a másik térben 110 °C (210 °C-100 °C) és 250 °C (maximális hőmérséklet beállítás) között állíthatja.
A hőmérséklet különbség azt első kiválasztott sütőtérhez
képest nem lehet több mint 50 °C
180 °C-70 °C) és 250 °C (180 °C+70 °C) között állíthatja.
A hőmérséklet különbség azt első kiválasztott sütőtérhez
képest nem lehet több mint 100 °C
41
Page 42

Bekapcsolás és használat
HU
FIGYELMEZTETÉS!
sütő fel van szerelve
egy rögzítőrendszerrel,
melynek segítségével ki
lehet húzni a rácsokat és
megakadályozza, hogy azok
kicsússzanak a sütőből (1).
Ha teljesen ki akarja húzni
a rácsokat, akkor az ábrán
látható módon emelje meg a rácsokat az első részüknél
fogva és húzza ki azokat (2).
! A készülék első használata során csukott sütőajtó mellett
fűtse az üres sütőt legalább fél órán keresztül maximális
hőmérsékleten. A sütő kikapcsolása és a sütőajtó kinyitása
előtt gondoskodjon a helyiség megfelelő szellőzéséről.
Előfordulhat, hogy a készülék a gyártás során alkalmazott
védőanyagok elégése miatt átmenetileg kellemetlen szagot
bocsát ki.
! a beállítási folyamat megkönnyítése érdekében, nyomja meg
és tartsa nyomva a " " és " " gombokat, így gyorsabban
ugorhat a számok között a kijelzőn.
Az óra beállítása
! Az óra beállítását csak akkor lehet elvégezni, ha a sütő ki
A
van kapcsolva. Ha a sütő készenléti állapotban van, a
gomb megnyomásával megjelenítheti a jelenleg beállított
időt. Az óra beállításához nyomja meg újra.
Az áramellátáshoz történő csatlakoztatást vagy
áramszünetet követően a gomb és az IDŐ kijelzőn
látható számok 10 másodpercig villognak.
Az óra beállításához tegye a következőket:
1. Nyomja meg a gombot.
2. A " " és " " gombok segítségével állítsa be az órát.
3. Miután beállította a megfelelő óraértéket, nyomja meg
a gombot.
4. A percek beállításához ismételje meg a fenti műveletet.
Áramszünetet követően újra be kell állítani az órát. Ha a
ikon villog a kijelzőn, az azt jelenti, hogy az óra beállítása
nem megfelelő.
Az időzítő beállítása
! A visszaszámláló beállítását a sütő ki- és bekapcsolt
állapotában is el lehet végezni. A visszaszámláló nem
szabályozza a sütő be- és kikapcsolását.
! Az egyes beállítások 10 másodperc elteltével automatikusan
tárolásra kerülnek a készülék memóriájában.
! Javasoljuk, hogy a használat során, minden edényt, ételt
vegyen ki a nem használt sütőtérből.
! Ha a sütési folyamat már megkezdődött, a sütőt a gomb
segítségével ki kell kapcsolni, mielőtt az OSZTÓELEMET
eltávolítaná.
! Ha kikapcsolja a sütőt, az minden esetben a CREATION
sütési módra áll.
! Az érintőgombok nem használhatóak kesztyűben.
! A sütési teljesítmény optimalizálása érdekében, a
kiválasztott funkció elindítása esetén, beállítások kerülnek
alkalmazásra, melyek a ventilátor és fűtőelemek késleltetett
indítását okozhatják.
! A kívánt ciklus kiválasztása után 2 másodperccel a sütő
megkezdi az előmelegítési fázist.
Kezelőpanel zár
! Ha a sütő ki van kapcsolva, a sütés megkezdését
vagy befejezését követően vagy a programozás során a
kezelőpanel zárolható.
A sütő kezelőgombjainak zárolásához nyomja meg, és
tartsa nyomva a gombot legalább 2 másodpercen át.
Egy hangjelzés hallható és a HŐMÉRSÉKLET kijelzőn a
„O—n” látható. A szimbólum világítani kezd, ez jelzi
azt, hogy a zár aktiválva van.
A sütő kezelőgombjainak zárolásának feloldásához nyomja
meg újra, és tartsa nyomva a gombot legalább 2
másodpercen át.
Ha a beállított idő letelt, a visszaszámláló hangjelzést
ad, amely 30 másodperc elteltével, vagy bármelyik gomb
megnyomása esetén abbamarad.
A visszaszámláló beállításához tegye a következőket:
1. Nyomja meg a gombot.
2. A " " és " " gombok segítségével állítsa be a kívánt időt.
3. Miután beállította a megfelelő értéket, nyomja meg a
gombot. A világító szimbólum jelzi, hogy az időzítő be
van kapcsolva. Az időzítő törléséhez, nyomja meg a
és a " " és " " gombok használatával állítsa az időt 00:00
értékre. Nyomja meg újra a gombot.
A ikon már nem világít tovább, így jelzi, hogy a
visszaszámláló ki van kapcsolva.
Hűtő szellőztetés
A sütő külső hőmérsékletének csökkentése érdekében, egy
hűtőventilátor levegőt fúj a a vezérlőpanel és a sütő ajtaja közé
és a sütőajtó alja felé.
! A sütést követően a hűtőventilátor mindaddig működik, még
a sütő teljesen le nem hűlt.
Sütővilágítás
A világítás bekapcsol, ha a sütő ajtaját kinyitja, vagy egy
sütési üzemmód megkezdődik.
A segítségével bármikor bekapcsolhatja a világítást.
Maradékhő kijelzők.
A készülék maradékhő kijelzőkkel van felszerelve. Ha sütő
ki van kapcsolva a „maradékhő” jelzőfény világítani kezd, ez
azt jelzi, hogy a sütőtérben a hőmérséklet magas. Ha sütőtér
kihűlt a visszajelző elalszik.
42
Page 43

Gyári beállítások visszaállítása
A sütő gyári beállításai visszaállíthatóak, ilyenkor minden,
a felhasználó által megadott beállítás alaphelyzetbe áll
(óra és személyre szabott időtartamok). A visszaállítás
elvégzéséhez kapcsolja ki a sütőt, majd nyomja meg
egyidejűleg az első manuális sütési üzemmód gombját (bal
felső) és a gombot és tartsa nyomva hat másodpercig.
A visszaállítási folyamat végén egy hangjelzés hallható.
Amikor megnyomja a gombot, a sütő úgy viselkedik,
mintha első alkalommal kapcsolt a volna be azt.
Készenlét
A sütő megfelel a legújabb, készenléti üzemmódban
történő áramfogyasztásra vonatkozó Európai direktívában
foglaltaknak. Ha 30 másodpercig nem nyom meg egy
gombot sem és a kezelőpanel-/ajtózár nincs aktiválva a
készülék automatikusan készenléti üzemmódra vált. A
készenléti üzemmódot az „Óra” gomb erős megvilágítása
jelzi. Amint újra elkezdi kezelni a gépet a rendszer újra
működésbe lép.
Üzemmódok
! A puha vagy ropogós ételek elkészítése érdekében a
sütő, gőz formájában, felszabadítja az ételekben található
vizet. Így bármilyen étel elkészítése esetén optimális sütési
eredmények érhetőek el.
! Ha bekapcsolja a sütőt, az minden esetben a CREATION
sütési módot ajánlja fel.
! Soha ne tegyen tárgyakat közvetlenül a sütő aljára – így
elkerülhető a zománcbevonat sérülése.
! Mindig tegyen edényt a mellékelt rács(ok)ra.
Extranagy sütőtér
! Ne tegyen rácsot a „D” pozícióba.
A sütő bekapcsolása
1. A gomb lenyomásával kapcsolja be a kezelőpanelt.
A készülék három hangjelzést ad (ereszkedő) és sorban az
összes gomb világítani kezd.
2. Nyomja meg a kívánt sütési módhoz tartozó gombot. A
HŐMÉRÉSKLET kijelzőn a következő jelenik meg:
- az üzemmódhoz kapcsolódó hőmérséklet, manuális
programozás esetén;
- „Auto”, ha a programozás automatikus.
Az IDŐ kijelzőn a következő jelenik meg:
- a jelenlegi idő, ha a programozás manuális;
- az időtartam, ha a programozás automatikus.
3. A sütés megkezdéséhez nyomja meg a gombot.
4. A sütő megkezdi az előmelegítő szakaszt: Az előmelegítés
lámpa villog.
5. Ha az előmelegítési fázis befejeződött, egy hangjelzés
hallható és az előmelegítés visszajelző jelzi, hogy ez a fázis
befejeződött: behelyezheti az ételt a sütőbe.
6. A sütés során a következők bármikor végrehajthatók:
- hőmérséklet módosítása: nyomja meg a gombot, majd
a " " és " " gombokat (csak manuális üzemmód esetén);
- a főzési mód időtartamának beállítása (lásd főzési módok);
A sütés leállításához nyomja meg a gombot. Ha a
készülék egy korábban módosított hőmérsékletértéket tárol
a memóriában (csak manuális üzemmód);
- kapcsolja ki a sütőt, a gombot tartsa nyomva 3
másodpercig.
7. Áramszünet esetén, ha a sütő éppen működött,
amennyiben a hőmérséklet nem esett egy bizonyos szint
alá, a készülékben található automatikus rendszer onnan
folytatja a főzési üzemmódot, ahol az megszakadt. A még
nem megkezdett programozott sütési üzemmódok nem
indulnak el és azokat újra be kell programozni.
! BARBECUE üzemmódban nincs előmelegítési fázis.
CREATION sütési üzemmódok
! Mindegyik sütési üzemmódhoz tartozik egy alapértelmezett
hőmérséklet, melyet manuálisan is lehet állítani 30°C
és 250°C között (GRILL üzemmód esetén 300°C). A
CREATION sütési üzemmódok között az összes manuális
program megtalálható.
Ezen sütési módok minden alapvető funkcióját a sütő
vezérli, így Ön könnyebben készíthet tökéletes ételeket,
legyen szó a legegyszerűbb receptről vagy akár a
legkinomultabb konyhai műremekekről. a hőmérséklet,
a hőforrás a páratartalom és a légbefúvással segített
működés mind automatikusan vezérelt.
Ezt a fejezetet saját mesterszakácsunk írta. Javasoljuk,
hogy fontolja meg ezen tanácsok követését, hiszen Önnek
is hasznára válhat tapasztalata és tovább tökéletesítheti
főzőtudományát.
A javasolt főzési üzemmódok, hőmérsékletek,
polcmagasságok, szakértőnk konyhai tapasztalatai szerint
lettek megadva, segítségükkel a lehető legjobb eredményt
érheti el.
Az alábbi táblázatból megtudhatja, hogy érdemes-e
előmelegíteni a sütőt vagy nem az egyes CREATION
üzemmódok használata során. Ha gyelembe veszi ezeket
a javaslatokat, azzal tökéletes eredményeket érhet el.
Ha az étet előmelegített sütőben kívánja megsütni, várja
meg az előmelegítési fázis befejeződését (ezt egy ismétlődő
hangjelzés jelzi).
A hőmérséklet, a kiválasztott sütési módnak megfelelően,
automatikusan kerül beállításra, ha szükséges módosíthatja
ezt. Azt is beállíthatja, hogy a sütés azonnal vagy késleltetve
kezdődjön.
TÖBBSZINTŰ üzemmód
Minden fűtőelem és ventilátor be van kapcsolva. Mivel a hő
az egész sütőben állandó marad, a levegő egyenletesen
módon süti és pirítja az ételeket. Egyidejűleg maximum két
szintet lehet használni.
ALACSONY HŐMÉRSÉKLETŰ üzemmódok
Ezt a sütési módot, kiolvasztáshoz, joghurt készítéséhez,
ételek melegítéséhez, és alacsony hőmérsékleten történő
lassú sütéshez használható. A következő hőmérsékletek
közül választhat: 40, 65 és 90 °C.
HU
43
Page 44

HU
LÉGKEVERÉSES GRILL üzemmód
A felső fűtőelem és a forgónyárs (ha van) bekapcsol
a ventilátorral együtt. A ciklus egy bizonyos időszaka
alatt a körkörös fűtőelem is bekapcsolásra kerül.
Ez a funkciókombináció a levegő sütőben történő
erőltetett keringtetésével növeli a fűtőelemek egyirányú
hősugárzásának hatékonyságát.
Ez segít megakadályozni az étel felületének megégését,
és lehetővé teszi, hogy a hő behatoljon az étel belsejébe.
Az ezzel az üzemmóddal való sütés közben a sütőtér ajtaja
mindig legyen csukva.
GRILL üzemmód
A felső fűtőelem és a forgónyárs (ha van) bekapcsol. A
grillezés magasabb és közvetlen hőmérséklete olyan
ételekhez javasolt, melyek magasabb felületi hőmérsékletet
igényelnek. Az ezzel az üzemmóddal való sütés közben
a sütőtér ajtaja mindig legyen csukva. (lásd a „hasznos
tanácsok sütéshez” fejezetet).
SUCCESS sütési üzemmódok
! A hőmérséklet és főzési idő előre be van állítva,
így minden esetben garantált a tökéletes eredmény –
automatikusan. Ezek az értékek nem módosíthatóak, és
a C.O.P.® (Programmed Optimal Cooking) rendszeren
alapulnak. A sütési ciklus automatikusan áll le és a sütő
jelzi, ha az étel elkészül. A sütést előmelegített és nem
előmelegített sütővel is elkezdheti. A sütési idő a személyes
ízlésnek megfelelően módosítható, a kezdés előtt, ±5/20
perccel a kiválasztott programtól függően. Az időtartamot
a sütés megkezdését követően is lehet módosítani. Ha
az értéket a sütés megkezdése előtt módosítja, azt a
készülék eltárolja memóriájában és amikor legközelebb
ezt a sütési módot használja, a készülék felajánlja azt. Ha
a hőmérséklet a sütőben magasabb mint a javasolt érték,
a „Hot” felirat jelenik meg a HŐMÉRSÉKLET kijelzőn, a
sütés megkezdése nem lehetséges, meg kell várni még
a sütő lehűl.
! Ha a sütési fázis indítható a sütő hangjelzést ad.
GYORS SÜTÉS üzemmód
Ebben a sütési módban az előmelegítés nem szükséges.
Ez a mód különösen alkalmas előrecsomagolt ételek
(fagyasztott vagy előfőzött) gyors sütésére. A legjobb
eredményeket akkor érheti el, ha csak egy rácsot használ.
PIZZAüzemmód
a felső és körkörös fűtőelem bekapcsol a ventilátorral együtt.
Így rendkívül gyorsan bemelegszik a sütő. Ha egyszerre
egynél több rácsot használ, a sütési idő felénél cserélje
meg az edényeket.
ECO üzemmód
A hátsó fűtőszál és a ventilátor bekapcsol, ezáltal a sütőben
mindenhol egyenletes, kímélő hőeloszlás jön létre. Ez az
energiatakarékos üzemmód kis mennyiségű étel sütéséhez,
hús melegítéséhez vagy a sütési folyamatok befejezésére
alkalmas.
Forgónyárs
A forgónyárs funkció
használatához (lásd az
ábrán) tegye a következőket:
1. Helyezze a zsírfogó tálcát
az 1. pozícióba.
2. A nyárs tartóelemét
helyezze a 3. pozícióba és
helyezze a nyársat a sütő
hátulján található furatba.
3. Indítsa el a forgónyárs
funkciót a vagy
üzemmódok kiválasztásával;
! Ha a üzemmód aktív, az ajtó nyitásakor a forgónyárs
megáll.
! Ne nyissa ki a sütő ajtaját, mert az hatással van a sütési
időre és hőmérsékletre.
MARHA üzemmód
Ezt a funkciót marha és sertés sütéséhez használja. Az ételt
akkor helyezze be a sütőbe, amikor a sütő még hideg. Az
ételt előmelegített sütőbe is helyezheti.
SÜTEMÉNYEK üzemmód
Ez a funkció ideális élesztővel, sütőporral, vagy azok
használata nélkül készült desszertek sütésére Az ételt akkor
helyezze be a sütőbe, amikor a sütő még hideg. Az ételt
előmelegített sütőbe is helyezheti.
KENYÉR üzemmód
Ezt az üzemmódot kenyérsütéshez használja. A legjobb
eredmények eléréshez javasoljuk, hogy tartsa be az alábbi
javaslatokat:
• Kövesse a receptet.
• Ne lépje túl a zsírfogó tálca használata során megengedett
tömeget.
• Ne feledjen el 100 g (1dl) hideg vizet önteni a zsírfogó
tálcába, melyet a 7. pozícióba helyezzen.
• A cipót hagyja kelni 1 – 1 ½ órán át (a helység
hőmérsékletétől függően) szobahőmérsékleten, vagy
amíg a cipó mérete kétszeresére nem nő.
KENYÉR receptje:
1 zsírfogó tálca, maximum 1000 g terheléssel az alsó
szinten
2 zsírfogó tálca, maximum 1000 g terheléssel a középső
és alsó szinten
Recept 1000 g-os cipóhoz: 600 g liszt, 360 g víz, 11 g só,
25 g friss élesztő (vagy két csomag porélesztő)
Elkészítés:
• Egy nagy tálban keverje össze a lisztet és a sót.
• Oldja fel az élesztőt kézmeleg vízben (körülbelül 35 °C-
* Csak bizonyos modelleknél.
44
Page 45

os).
• Csináljon egy kis üreget a lisztkupacban.
• Öntse bele a víz és élesztő keverékét.
• Dagassza a cipót, nyújtsa ki kézzel majd hajtsa össze,
ezt 10 percig csinálja, amíg a tészta egyenletes nem lesz
és már nem ragad.
• Formázza gömb alakúra a cipót, helyezze egy nagy
tálba és csomagolja átlátszó műanyag fóliába, hogy
megakadályozza a kiszáradását. A sütőn válassza az
ALACSOYN HŐMÉRSÉKLET funkciót , állítsa a hőfokot
40 °C-ra. Helyezze be a tálat, és hagyja a cipót kelni
körülbelül egy órán át (a cipónak kétszeresére kell nőnie).
• Vágja a cipót egyenlő méretű veknikre.
• Helyezze azokat a tálcára egy sütőpapírra.
• Szórja meg liszttel a vekniket.
• Csináljon bevágásokat a veknikre.
• Az ételt akkor helyezze be a sütőbe, amikor a sütő még
hideg.
• Indítsa el a KENYÉR sütés üzemmódot.
• Ha megsültek, hagyja a cipókat az egyik grillrácson, amíg
teljesen ki nem hűlnek.
AZ OSZTÓELEM
A csap segítségével rögzítse az OSZTÓELEMET a
„D” OSZTÓELEM polcra a nyilak a sütő hátulja felé
mutassanak. Ha az OSZTÓELEM megfelelően a helyére
került egy hangjelzés hallható, ekkor lehetősége van a két
sütőteret (FŐ és KISMÉRETŰ) együtt vagy külön használni.
A gomb aktívvá válik. A gomb megnyomásával
váltakozik a kiválasztott sütőtér. Alapesetben a FŐ sütőtér
van kiválasztva.
Kisméretű sütőtér
A sütő bekapcsolása
1. Ha az OSZTÓELEM be van helyezve, a gombbal
válassza ki a KISMÉRETŰ sütőteret. A ikon világítani
kezd.
2. A beállítások, beállítási folyamatok tekintetében kövesse
a fenti EXTRANAGY sütőtér résznél leírtakat.
Sütési üzemmódok
GRILL üzemmód
A felső fűtőelem és a forgónyárs (ha van) bekapcsol. A
grillezés magasabb és közvetlen hőmérséklete olyan
ételekhez javasolt, melyek magasabb felületi hőmérsékletet
igényelnek. Az ezzel az üzemmóddal való sütés közben
a sütőtér ajtaja mindig legyen csukva. (lásd a „hasznos
tanácsok sütéshez” fejezetet).
Fő sütőtér
A sütő bekapcsolása
1. Ha az OSZTÓELEM be van helyezve, a gombbal
válassza ki a KISMÉRETŰ sütőteret. A ikon világítani
kezd.
2. A beállítások, beállítási folyamatok tekintetében kövesse
a fenti EXTRANAGY sütőtér résznél leírtakat.
CREATION sütési üzemmódok
! Mindegyik sütési üzemmódhoz tartozik egy alapértelmezett
hőmérséklet, melyet manuálisan is lehet állítani 30°C
és 250°C között (GRILL üzemmód esetén 300°C). A
CREATION sütési üzemmódok között az összes manuális
program megtalálható.
Ezen sütési módok minden alapvető funkcióját a sütő
vezérli, így Ön könnyebben készíthet tökéletes ételeket,
legyen szó a legegyszerűbb receptről vagy akár a
legkinomultabb konyhai műremekekről. a hőmérséklet,
a hőforrás a páratartalom és a légbefúvással segített
működés mind automatikusan vezérelt.
Ezt a fejezetet saját mesterszakácsunk írta. Javasoljuk,
hogy fontolja meg ezen tanácsok követését, hiszen Önnek
is hasznára válhat tapasztalata és tovább tökéletesítheti
főzőtudományát. A javasolt főzési üzemmódok,
hőmérsékletek, polcmagasságok, szakértőnk konyhai
tapasztalatai szerint lettek megadva, segítségükkel a lehető
legjobb eredményt érheti el.
Az alábbi táblázatból megtudhatja, hogy érdemes-e
előmelegíteni a sütőt vagy nem az egyes CREATION
üzemmódok használata során.
Ha gyelembe veszi ezeket a javaslatokat, azzal tökéletes
eredményeket érhet el. Ha az étet előmelegített sütőben
kívánja megsütni, várja meg az előmelegítési fázis
befejeződését (ezt egy ismétlődő hangjelzés jelzi). A
hőmérséklet, a kiválasztott sütési módnak megfelelően,
automatikusan kerül beállításra, ha szükséges módosíthatja
ezt.
Azt is beállíthatja, hogy a sütés azonnal vagy késleltetve
kezdődjön.
TÖBBSZINTŰ üzemmód
Minden fűtőelem és ventilátor be van kapcsolva. Mivel a hő
az egész sütőben állandó marad, a levegő egyenletesen
módon süti és pirítja az ételeket. Egyidejűleg maximum két
szintet lehet használni.
ALACSONY HŐMÉRSÉKLETŰ üzemmódok
Ezt a sütési módot, kiolvasztáshoz, joghurt készítéséhez,
ételek melegítéséhez, és alacsony hőmérsékleten történő
lassú sütéshez használható. A következő hőmérsékletek
közül választhat: 40, 65 és 90 °C.
HU
GYORS SÜTÉS üzemmód
Ebben a sütési módban az előmelegítés nem szükséges.
Ez a mód különösen alkalmas előrecsomagolt ételek
(fagyasztott vagy előfőzött) gyors sütésére. A legjobb
eredményeket akkor érheti el, ha csak egy rácsot használ.
PIZZAüzemmód
a felső és körkörös fűtőelem bekapcsol a ventilátorral együtt.
Így rendkívül gyorsan bemelegszik a sütő. Ha egyszerre
egynél több rácsot használ, a sütési idő felénél cserélje
meg az edényeket.
ECO üzemmód
A hátsó fűtőszál és a ventilátor bekapcsol, ezáltal a sütőben
mindenhol egyenletes, kímélő hőeloszlás jön létre. Ez az
energiatakarékos üzemmód kis mennyiségű étel sütéséhez,
45
Page 46

hús melegítéséhez vagy a sütési folyamatok befejezésére
HU
alkalmas.
SUCCESS sütési üzemmódok
! A hőmérséklet és főzési idő előre be van állítva,
így minden esetben garantált a tökéletes eredmény –
automatikusan. Ezek az értékek nem módosíthatóak, és
a C.O.P.® (Programmed Optimal Cooking) rendszeren
alapulnak. A sütési ciklus automatikusan áll le és a sütő
jelzi, ha az étel elkészül. A sütést előmelegített és nem
előmelegített sütővel is elkezdheti. A sütési idő a személyes
ízlésnek megfelelően módosítható, a kezdés előtt, ±5/20
perccel a kiválasztott programtól függően. Az időtartamot
a sütés megkezdését követően is lehet módosítani. Ha
az értéket a sütés megkezdése előtt módosítja, azt a
készülék eltárolja memóriájában és amikor legközelebb
ezt a sütési módot használja, a készülék felajánlja azt. Ha
a hőmérséklet a sütőben magasabb mint a javasolt érték,
a „Hot” felirat jelenik meg a HŐMÉRSÉKLET kijelzőn, a
sütés megkezdése nem lehetséges, meg kell várni még
a sütő lehűl.
2. Az IDŐZÍTŐ gombot forgassa „ ” és „ ” felé az idő
beállításához; ha elforgatva tartja a gombot, gyorsabban
ugorhat a számok között, így könnyebb lesz a beállítási
folyamat.
3. Miután beállította a megfelelő értéket, nyomja meg újra a
gombot. A kijelzőn a beállított időtartam és hőmérséklet
váltakozik.
4. A sütés megkezdéséhez nyomja meg a gombot.
5. A sütés végén a készülék hangjelzést ad és a kijelzőn
az „END” üzenet jelenik meg.
• Például: Délelőtt 9:00 óra van és a 1 óra 15 perces
időtartamot adott meg. A program 10:15-kor
automatikusan leáll.
A sütési időmód végének beállítása
! A sütés befejezési idejének megadásához először a sütés
időtartamát kell beállítani.
! A késleltetett programozás megfelelő működéséhez az
órát megfelelően be kell állítani.
! Ha a sütési fázis indítható a sütő hangjelzést ad.
! Ne nyissa ki a sütő ajtaját, mert az hatással van a sütési
időre és hőmérsékletre.
MARHA üzemmód
Ezt a funkciót marha és sertés sütéséhez használja. Az ételt
akkor helyezze be a sütőbe, amikor a sütő még hideg. Az
ételt előmelegített sütőbe is helyezheti.
SÜTEMÉNYEK üzemmód
Ez a funkció ideális élesztővel, sütőporral, vagy azok
használata nélkül készült desszertek sütésére Az ételt akkor
helyezze be a sütőbe, amikor a sütő még hideg. Az ételt
előmelegített sütőbe is helyezheti.
A kisméretű sütőtér és a fő sütőtér egyidejű
használata
! Az egyidejű használat csak a CREATION sütési
üzemmódokban lehetséges.
A sütő bekapcsolása
Az egyidejű használathoz egymás után indítsa el a sütési
üzemmódokat a két sütőtérben. A HŐMÉRSÉKLET kijelzőn
láthatóak az egyes sütőterekhez tartozó sütési paraméterek.
1. Az időtartam beállításához kövesse fent található
lépéseket 1-től 3ig.
2. Nyomja meg kétszer a gombot: a kijelzőn a ikon
és számjegyek kezdenek villogni.
3. Fordítsa az időzítő gombot „ ” és „ ” felé a sütés
befejezési időpontjának megadásához.
4. Miután beállította a megfelelő értéket, nyomja meg a
gombot. A kijelzőn a beállított időtartam, a sütés befejezési
ideje, és a hőmérséklet váltakozik.
5. Nyomja meg a gombot a programozott üzemmód
aktiválásához.
A program akkor van beállítva, ha a és gombok
világítanak.
A KIJELZŐ felváltva mutatja a sütés befejezésének idejét
és a sütés időtartamát.
6. A sütés végén a készülék hangjelzést ad és a kijelzőn
az „END” üzenet jelenik meg.
• Például: 9:00 óra van és 1 óra 15 perces sütési időt
programoz be, ugyanakkor a befejezési idő 12:30. a
Program 11:15-kor automatikusan elindul.
A programozás törléséhez nyomja meg a gombot.
Hasznos tanácsok sütéshez
! A készülék hatékony energiafelhasználásnak
köszönhetően, a KISMÉRETŰ sütőtér előmelegítése
mindössze 15 percet vesz igénybe.
A sütés programozása
! A programozást megelőzően ki kell választani egy sütési
módot.
A sütés időtartamának programozása
1. Nyomja meg többször a gombot, amíg a jel és a
három számjegy nem kezd villogni.
* Csak bizonyos modelleknél.
46
TÖBBSZINTŰ
• Az 1, 3, 5 és 6. pozíciókat használja
• A zsírfogó tálcát az alsó, a rácsot a felső szinten
használja.
• Ha pizzát vagy focaccia kenyeret süt, egy könnyű,
maximum 30 cm átmérőjű alumínium tálcát használjon,
és helyezze azt a tartozék rács tetejére Sok feltétet
tartalmazó pizzáknál javasoljuk, hogy a mozzarellát a
sütés felénél tegye a pizzára. A sütési folyamat során,
javasolt felcserélni a tálcák helyzetét
• Használja a 2. és a 4. szintet, a magasabb hőmérsékletet
igénylő ételeket tegye a 2. szintre.
Page 47

• A zsírfogó tálcát a legalsó, a rácsot a legfelső szinten
használja.
GRILL
• Melegítse elő a sütőt 5 percig.
• Az OSZTÓELEMET a „D” OSZTÓELEM helyre tegye.
• Az ezzel az üzemmóddal való sütés közben a sütőtér
ajtaja legyen csukva.
• A rácsot a 7. pozícióba helyezze, az ételt a rács közepén
helyezze el. Helyezze a zsírfogó tálcát az 6. pozícióba.
• Ezt a a funkciót a következőkhöz javasoljuk: Ételek
pirítása, csőben sültekhez, habos sütemények készítése,
meleg szendvics készítse, kis mennyiségű, vékony
sovány húsok sütése.
• Javasoljuk, hogy a hőmérsékletet állítsa a legmagasabb
fokozatra. A felső fűtőelemet hőmérséklet-szabályzó
vezérli, így előfordulhat, hogy nem működik folyamatosan.
• Tegye a grillrácsot a 3. vagy 4. szintre.
Helyezze az ételt a rács közepére.
• Javasoljuk, hogy a hőmérsékletet állítsa a legmagasabb
fokozatra. A felső fűtőelemet hőmérséklet-szabályzó
vezérli, így előfordulhat, hogy nem működik folyamatosan.
GYORS SÜTÉS
• Helyezze a zsírfogó tálcát az 6. pozícióba.
• Ha fagyasztott ételt süt, mindig olvassa el a csomagolásán
található utasításokat
HU
47
Page 48

Sütési tanácsok táblázata extranagy sütőtérrel rendelkező sütőkhöz
Sütési tanácsok táblázata a Kisméretű sütőtérhez
* A fent található sütési idők csak iránymutatásul szolgálnak és személyes ízlésnek megfelelően módosíthatóak.
*** A zsírfogó tálcával fogja fel a sütés során keletkező olajokat és zsírokat.
HU
Funkció Étel Tömeg
Creation
Többszintű*
Gyors sütés*
Pizza*
Ventilátoros grill*
Grill*
Alacsony
hőmérséklet*
Gyümölcslepény 1
Képviselőfánk 1
Aprósütemények 180
Kis sütemények 1
Krémkaramell
(bain-marie)
Panettone 11 vagy 2 Igen 160 45-60
Torta 1
Piskóta
Rostélyos
Kebab
Halfilé
Fagyasztott burgonya
Pizza/Focaccia
Sülthúsok
Gratinírozás
Nagy egybesült bélszín
Nagy egybesült vad
Marhabordák
Kolbász
Sertésborda
Bacon
Melegítés/Felolvasztás
Habcsók
Hús/Hal
(Kg)
Sütési
Polcszint Előmelegítés Ajánlott
szint.
Zsírfogó
tálca
2
3
4
2. vagy 3.
2
3
4
1
2. vagy 3.
2
3
4
2. vagy 3.
2
3
1
2. vagy 3.
2
3
2
1
2. vagy 3.
2
3
1,5-22
1
1
1
1
2. vagy 3.
2
1 vagy 2
3
4
1
1
1
1
1
1
1
1
1
4
3
2***
3. vagy 4.
1***
1***
1. rács 2. rács3. rács
2. vagy 3.
1 vagy 2
1
1–2
1–2
2
1
1***
1
1
5
1
1
1
1
1
1
2
1
2
1
3***
3***
3***
3***
2
1
1
1
3
3–5
3
3
3–5
3
3
5
4 6
5
46
2. vagy 3.
14. vagy 5.
5
4
5
5
3. vagy 5.
3
3
3
2
2
4. vagy 5.
5. vagy 7.
5. vagy 7.
5. vagy 7.
3
3
Success
Kenyér
Marha
Sütemények
Kenyér (lásd a receptet)2
Sült 1,2-1,5 5
Sütemények 1
2
2
1
2
3
11***
2
7**
7**
7**
2
1
1
2
2
* A fent található sütési idők csak iránymutatásul szolgálnak és személyes ízlésnek megfelelően módosíthatóak.
A sütő előmelegítési idők előre beállítottak és nem módosíthatóak.
** A receptnek megfelelően öntsön 100 g vizet a 7. pozícióban elhelyezett zsírfogó tálcába.
*** A zsírfogó tálcával fogja fel a sütés során keletkező olajokat és zsírokat.
3. vagy 5.
3
5
5
5 6
5
5 6
Igen
6
5
56
5
5
4
3
5
5
6
Igen
Igen
Igen
6
5
hőmérséklet
(°C)
Igen
Igen
Igen
Igen
Igen
Igen
Igen
Igen
Igen
Igen
Igen
Igen
Igen
Igen
Igen
Igen
Igen
Igen
Igen
Igen 16090-240
Nem
Nem
Nem
Igen
Igen
Igen
Igen
Nem
Nem
Nem
Nem
Yes
Yes
Yes
Yes
Nem
Nem
Nem
Nem
Nem
Nem
Nem
Nem
Nem
190
180
180
180
190
190
190
190
180
180
180
200
200
200
170
170
170
160
160
190
190
190
210
200
230
220
220
220
220
200
190
200
200
270-300
270-300
270-300
270-300
40
65
90
időtartama
(perc)
25-30
35-45
40-50
45-55
25-35
25-35
30-40
30-40
15-25
15-25
20-30
20-30
30-40
35-45
40-50
35-45
35-45
40-50
60-75
60-75
30-35
35-40
40-45
20-25
15-20
25-30
15-25
20-30
25-35
30-40
35-75
40-60
90-120
90-120
20-30
10-20
15-25
3-6
8-12 óra
90-180
Sütés
! ECO sütési üzemmód: Ez az energiatakarékos üzemmód a következő ételek sütéséhez megfelelő: halfilé,
kis sütemények és zöldségek Ugyanakkor alkalmas húsok újramelegítéséhez és a sütési folyamatok befejezéséhez.
Funkció Étel Tömeg
(Kg)
Gyors sütés*
Grill*
Halfilé
Húsfilé
Fagyasztott pizza
Fagyasztott készételek
Pirítós
Bacon
Sertés steak
Sütési
szint
no.
1
1
1
1
1
1
1
Zsírfogó
tálca
6
6
6
6
6**
6**
Polcszint Előmelegítés Ajánlott
hőmérséklet
1. rács
6
7
7
Osztóe-
lem
D
D
D
D
D
D
D
Igen
Igen
Igen
Igen
Igen
Igen
Igen
(°C)
160-180
180-200
270-300
270-300
270-300
A sütő előmelegítési idők előre beállítottak és nem módosíthatóak.
48
Sütés
időtartama
(perc)
20-30
30-40
3-5
3-6
15-25
Page 49

Sütési tanácsok fő és kisméretű sütőtér egyidejű használatához
Fő sütőtér
* A fent található sütési idők csak iránymutatásul szolgálnak és személyes ízlésnek megfelelően módosíthatóak.
*** A zsírfogó tálcával fogja fel a sütés során keletkező olajokat és zsírokat.
03
Sütési tanácsok táblázata a Fő sütőtérhez
halfilé, kis sütemények és zöldségek Ugyanakkor alkalmas húsok újramelegítéséhez és a sütési folyamatok befejezéséhez.
03
06
Funkció Étel Tömeg
(Kg)
Creation
Többszintű*
Pizza*
Gyümölcslepény 1
Aprósütemények 180
Kis sütemények 1
Krémkaramell
(bain-marie)
Torta12 DIgen 160 60-75
Pizza
Sütési
Tálcaszint Előmelegítés Ajánlott
szint
no.
1
2
Zsírfogó
tálca
2
1
2
2
12 DIgen 17
2. vagy 3.
1. vagy 2. 3. vagy 5.
1. rács
2
13DD
2
13DD
2
13
Kisméretű sütőtér
Funkció Étel Tömeg
(Kg)
Sütési
szint
Tálcaszint Előmelegítés Ajánlott
Zsírfogó
Gyors sütés*
Grill*
no.
Halfilé
Húsfilé
Fagyasztott pizza
Fagyasztott készételek
Sertés steak16** 7Igen 270-300 15-25
1
1
1
1
tálca
1. rács
6
6
6
6
A sütő előmelegítési idők előre beállítottak és nem módosíthatóak.
Osztóe-
lem
D
D
D
D
Osztóe-
lem
D
D
D
D
D
Igen
Igen
Igen
Igen
Igen
Igen
Igen
Igen
Igen
Igen
Igen
Igen
hőmérséklet
(°C)
200
200
180
200
200
220
220
hőmérséklet
(°C)
160-180
180-200
Sütés
időtartama
(perc)
30-40
35-45
15-25
15-25
30-40
35-45
5-45
15-25
20-30
Sütés
időtartama
(perc)
20-30
30-40
HU
Funkció Étel Tömeg
(Kg)
Creation
Többszintű*
Gyümölcslepény 1
Képviselőfánk1
Aprósütemények 180
Kis sütemények 1
Krémkaramell
(bain-marie)
Torta12 DIgen 16
Piskóta
Pizza*
Alacsony
hőmérséklet*
Pizza/Focaccia
Melegítés/
Felolvasztás
Habcsók
Hús/Hal
Sütési
PolcszintElőmelegítés
szint
Zsírfogó
tálca
2
2
1
2
2
12 DIgen 17
1
2
1
2
2. vagy 3.
1. vagy 2. 3. vagy 5.
1
2
2
1. rács
2
13DD
2
13DD
2
13DD
2
13
2
13DD
2
1
1
3
3
Success
Marha
Sütemények
Sült 1,2-1,5 11** 2
Sütemények 1
2
2
13
* A fent található sütési idők csak iránymutatásul szolgálnak és személyes ízlésnek megfelelően módosíthatóak.
A sütő előmelegítési idők előre beállítottak és nem módosíthatóak.
** A zsírfogó tálcával fogja fel a sütés során keletkező olajokat és zsírokat.
Osztóe-
lem
D
D
D
D
D
D
D
D
D
D
Igen
Igen
Igen
Igen
Igen
Igen
Igen
Igen
Igen
Igen
Igen
Igen
Nem
Nem
Nem
Nem
Nem
Nem
Ajánlott
hőmérséklet
(°C)
200
200
190
190
180
200
200
190
190
220
220
40
65
90
Sütés
időtartama
(perc)
30-40
35-45
25-35
25-35
15-25
15-25
30-40
35-45
5-45
0-75
30-35
35-40
15-25
20-30
8-12 hours
90-180
! ECO sütési üzemmód: Ez az energiatakarékos üzemmód a következő ételek sütéséhez megfelelő:
49
Page 50

Óvintézkedések és
HU
tanácsok
! A készülék a nemzetközi biztonsági szabványokkal
összhangban lett tervezve és gyártva. E gyelmeztetéseket
biztonsági megfontolásból közöljük, kérjük, olvassa el
gyelmesen.
Általános biztonság
• A készüléket otthoni, háztartási használtra tervezték.
Kereskedelmi vagy iparszerű használata nem
engedélyezett.
• Ez a készülék nem telepíthető szabadba, még fedett
területekre se. Nagyon veszélyes kitenni a készüléket
esőnek, illetve viharnak.
• A készülék mozgatása, pozícionálása során a készüléket
mindig a sütő oldalán található fogantyúknál fogja.
• Ne érjen a készülékhez mezítláb, illetve vizes vagy
nedves kézzel vagy lábbal.
• A készüléket kizárólag felnőttek használhatják
ételek elkészítésére, a kézikönyvben található
útmutatásoknak megfelelően. A készülék más
célú felhasználása (pl. a helyiség fűtése) nem
rendeltetésszerű használatnak minősül. A gyártó nem
vállal felelősséget a készülék nem rendeltetésszerű,
nem megfelelő és ésszerűtlen használatából
következő károkért.
• A készülék működése során ne érintse meg a
fűtőelemeket illetve a sütőajtó bizonyos részeit, mivel
ezek a részek rendkívül forróak lehetnek. Tartsa távol
a gyermekeket a sütőtől.
• Ügyeljen arra, hogy más elektromos háztartási
készülékek tápvezetéke ne érjen a sütő meleg részeihez.
• A szellőző és hőleadó nyílásokat soha ne torlaszolja/
zárja el.
• A sütőajtó fogantyúját mindig a közepén fogja meg: a
szélei forróak lehetnek.
• Az edények behelyezéséhez vagy kivételéhez mindig
használjon sütőkesztyűt.
• Ne tegyen alufóliát a sütőtér aljába.
• Ne tartson gyúlékony anyagokat a sütőben: ha a
készüléket véletlen bekapcsolják, ezek az anyagok
meggyulladhatnak.
• A csatlakozót az elektromos hálózatból ne a kábelnél,
hanem a csatlakozódugónál fogva húzza ki.
• A készülék tisztítását vagy karbantartását azután kezdje el,
hogy kihúzta a csatlakozódugót az elektromos hálózatból.
• Ha a készülék elromlana, semmilyen esetben ne próbálja
meg saját maga megjavítani. Vegye fel a kapcsolatot egy
szervizközponttal (Lásd: Szerviz).
• Ne tegyen tárgyakat a nyitott sütőajtóra.
• Ne hagyja, hogy a gyerekek játszanak a készülékkel.
• A készüléket nem használhatják testileg, érzékszervileg
vagy szellemileg korlátozott, nem hozzáértő, illetve
a terméket nem ismerő személyek a gyerekeket
is ideértve. Ezek a személyek a készüléket csak a
biztonságukért felelős személyek felügyelete mellett,
illetve a készülék használatával kapcsolatos alapvető
utasítások ismeretében használhatják.
• A készüléket nem külső időzítő vagy külön távirányító
berendezéssel együtt történő használatra tervezték.
Ártalmatlanítás
• A csomagolóanyagok ártalmatlanítása: Tartsa be a helyi
előírásokat, így a csomagolóanyag újra felhasználásra
kerülhet.
• Az Európai Parlament és Tanács elektromos és
elektronikus berendezések hulladékairól (WEEE)
szóló 2012/19/EK irányelve előírja, hogy a
cserélendő háztartási készülékek nem helyezhetőek
válogatatlan háztartási hulladék közé. A nem használt
készülékeket külön kell gyűjteni, annak érdekében,hogy
optimalizálható legyen alkatrészeik begyűjtése és
újrafelhasználása és az emberi egészségre illetve
környezetre gyakorolt hatásukat minimálisra csökkentsük.
A terméken lévő áthúzott „kerekes szemetes edény”
szimbólum arra a kötelezettségére hívja fel a gyelmet,
hogy a készüléket életciklusa végén ártalmatlanítás
céljából a többi hulladéktól külön kell kezelni és gyűjteni.
A felhasználó keresse fel az illetékes helyi hatóságot
vagy a viszonteladót, ahol tanácsot kaphat a régi eszköz
megfelelő elhelyezésével kapcsolatban.
Takarékosság és környezetvédelem
• Ha a sütőt késő esti vagy a kora reggeli órákban működteti,
hozzájárul az elektromos művek terheltségének
csökkentéséhez. A sütési módok programozhatósága,
különösen a „késleltetett sütés” üzemmód (lásd a
„sütési üzemmódok részt”) és a „késleltetett automatikus
tisztítás” (lásd az „Ápolás és karbantartás” részt),
lehetővé teszi a szervezett, hatékony időbeosztást.
• GRILL vagy VENTILÁTOROS GRILL üzemmód
használata esetén mindig zárja be a sütőajtót: így jobb
eredményeket érhet, el ugyanakkor energiát takaríthat
meg (körülbelül 10 %-ot).
• A tömítéseket tartsa tisztán és őrizze meg hatékonyságukat
oly módon, hogy jól illeszkedjenek az ajtóhoz és ne
engedjék kijutni a hőt.
! Ez a termék megfelel a legújabb, készenléti üzemmódban
történő áramfogyasztásra vonatkozó Európai direktívában
foglaltaknak.
Karbantartás és ápolás
A készülék kikapcsolása
A készüléken végzett minden művelet előtt áramtalanítsa
a készüléket.
A készülék tisztítása
• A sütő elején található színkülönbségek a különböző
anyagok, pl. üveg, műanyag, fém felhasználásából
erednek.
• A sütőajtó üvegén látható hornyokra emlékeztető árnyékos
részek a sütővilágítás tükröződése következtében jönnek
létre.
• A zománcot nagyon magas hőmérsékleten kezelik.
Ennek következtében előfordulhatnak színeltérések Ez
teljesen normális és semmilyen módon nem befolyásolja
a készülék működését. A fémlemezek vékony szélei nem
zománcozhatóak teljesen, így előfordulhat, hogy azokon
nincs zománc. Ez nem befolyásolja a korrózióvédelmet.
50
Page 51

• A külső zománc vagy inox alkatrészek és a gumitömítések
langyos, semleges szappanos vízzel átitatott szivaccsal
tisztíthatók. Ha a foltokat nehéz eltávolítani, használjon
speciális tisztítószereket. Javasoljuk, hogy tisztítás után
alaposan öblítse le és törölje szárazra. Ne használjon
súrolóport vagy maró anyagot.
• A sütő belsejét lehetőleg minden használat után, még
langyos állapotban tisztítsa meg. Használjon meleg vizet
és mosogatószert, majd jól öblítse le, és puha ruhával
törölje szárazra. Kerülje a súrolószerek használatát.
• A tartozékok – a csúszórácsok kivételével – a normál
edényekhez hasonlóan akár mosogatógépben is
elmoshatók.
• Javasoljuk, hogy a tisztítószert ne permetezze közvetlenül
a kezelőpanelre, ehelyett használjon szivacsot.
A sütővilágítás izzójának cseréje
A sütővilágítás izzójának
Izzó
foglalat
Izzó
Üvegfedél
! Ne érjen hozzá az izzóhoz puszta kézzel.
cseréje:
1. Távolítsa el a
lámpafoglalat üvegfedelét.
2. Csavarja ki az izzót, és
cserélje ki egy ugyanolyanra:
Halogén izzó, feszültség:
230 V, teljesítmény: 25 W,
foglalat: G 9.
3. Helyezze vissza az
üvegfedelet (lásd az ábrát).
HU
! A készülék tisztításához soha ne használjon gőztisztítót
vagy nagynyomású tisztítót.
A sütőajtó tisztítása.
A sütőajtó üvegét tisztítsa meg nem dörzshatású
tisztítószeres szivaccsal, majd törölje át alaposan puha
ruhával. Ne használjon durva dörzsanyagot vagy éles, fém
kaparókést, mely megkarcolhatja a felületét, vagy akár az
üvegfelület széttörését is eredményezheti.
Az alaposabb tisztítás érdekében a sütőajtó eltávolítható:
1. Teljesen nyissa ki az ajtót (lásd az ábrát).
2. Egy csavarhúzó segítségével emelje meg a két csuklón
található kis karokat (F), lásd az ábrán.
F
3. Fogja meg a két külső oldalon
az ajtót és körülbelül félig zárja be.
Húzza maga felé az ajtót, emelje
ki azt a tartóhoronyból (lásd az
ábrán). Az ajtó visszahelyezéséhez
végezze el fordítva a folyamatot.
! Ne használja a sütő lámpáját környezeti világításként.
A tömítések ellenőrzése
Rendszeresen ellenőrizze a sütőajtó körüli tömítések
állapotát. Ha sérülést vesz észre, forduljon a legközelebbi
hivatalos szakszervizhez (lásd a Szerviz részt). Javasoljuk,
hogy ne használja a sütőt, amíg a tömítéseket nem cserélték
ki.
51
Page 52

Hibaelhárítás
Probléma
Lehetséges ok
Megoldás
HU
Az „Óraszimbólum” és a kijelzőn
lévő értékek villogni kezdenek.
A sütési program nem indult el. Áramkimaradás történt. Állítsa vissza a programokat.
Csak az „Óraszimbólum” ég
erős fényerővel.
Egy automatikus programot
választottam ki. A kijelzőn megjelenik
a „Hot” felirat, és a sütés nem indul el.
Légkeveréses sütést választottam,
de az étel megégett.
A készüléket éppen most
csatlakoztatták a hálózatra vagy
áramkimaradás volt.
A készülék készenléti üzemmódban van. A készenléti üzemmódból való
A belső hőmérséklet meghaladja a
kiválasztott programhoz javasolt értéket.
Az 1. és 5. szint: ezeket a helyeket
közvetlenül éri a meleg levegő, ami a
kíméletes sütést igénylő ételek
odaégését eredményezheti.
Állítsa be az órát.
kilépéshez érintsen meg egy gombot.
Várja meg, hogy a sütő lehűljön.
A sütés felénél javasoljuk a
zsírfogó elfordítását.
52
Page 53

Instalare
590 mm.
! Vă rugăm să păstraţi acest manual de instrucţiuni într-un
loc sigur pentru consultare pe viitor. În cazul în care aparatul
este vândut, oferit sau transferat, vă rugăm să oferiţi şi
broşura noilor proprietari, astfel încât aceştia să poată
benecia de recomandările conţinute în ea.
! Vă rugăm să citiţi cu atenţie acest manual de instrucţiuni:
acesta conţine informaţii importante cu privire la funcţionarea
în condiţii de siguranţă, instalarea şi întreţinerea aparatului.
Poziţionarea
! Nu lăsaţi copiii să se joace cu materialul ambalajului;
acesta trebuie eliminat în conformitate cu standardele locale
privind colectarea separată a deşeurilor (a se vedea Măsuri
de precauţie şi sfaturi practice).
! Aparatul trebuie să e instalat de către un profesionist
calicat, în conformitate cu instrucţiunile furnizate. O
instalare incorectă poate duce la distrugerea bunurilor sau
poate cauza rănirea oamenilor sau a animalelor.
Aparate încorporate
Folosiţi un dulap corespunzător pentru a se asigura o
funcţionare corectă a aparatului:
• panourile adiacente cuptorului trebuie să e confecţionate
din material rezistent la căldură.
• dulapurile cu un exterior de furnir trebuie să e asamblate
cu cleiuri care pot suporta temperaturi de până la 100 °C.
• pentru a instala cuptorul sub un blat (a se vedea
schema) sau într-o unitate de bucătărie, dulapul trebuie
să aibă următoarele dimensiuni:
550 mm.
min.
45 mm.
560 mm.
575-585 mm.
570 mm.
595 mm.
20 mm.
550 mm.
20,5 mm.
22,5 mm.*
45 mm.
560 mm.
min. 20 mm
MOD ASISTAT
DE VENTILATOR
min. 45 mm
Centrarea şi xarea
Fixaţi aparatul de dulap:
• Deschideţi uşa cuptorului.
• Îndepărtaţi cele 2 dopuri de cauciuc care acoperă găurile
de xare de pe cadru.
• Fixaţi cuptorul de dulap cu ajutorul celor 2 şuruburi pentru
lemn.
• Puneţi la loc dopurile de cauciuc.
! Nicio piesă care asigură funcţionarea în siguranţă a
aparatului nu trebuie să e detaşabilă fără ajutorul unui
instrument.
Conexiunile electrice
Cuptoarele echipate cu cablu de alimentare cu trei poli
sunt proiectate pentru a funcţiona cu curent alternativ la
tensiunea şi frecvenţa indicate pe plăcuţa cu date tehnice
existentă pe aparat (a se vedea mai jos).
Montarea cablului de alimentare
1. Deschideţi panoul terminal
introducând o şurubelniţă în
spaţiile laterale ale
capacului. Utilizaţi
şurubelniţa ca o pârghie,
împingând-o în jos pentru a
deschide capacul (a se
vedea diagrama).
RO
! Aparatul nu trebuie să vină în contact cu părţi electrice
după ce a fost instalat.
Indicaţiile pentru consum menţionate pe plăcuţa cu date
tehnice au fost calculate pentru acest tip de instalaţie.
Ventilarea
Pentru a asigura o ventilaţie
adecvată, panoul posterior al
dulapului trebuie să e îndepărtat.
Se recomandă instalarea cuptorului
în aşa fel încât să se sprijine pe
două plăci de lemn sau pe o
suprafaţă complet plană, cu o
deschidere de cel puţin 45 x 560
mm (a se vedea diagramele).
N
2. Instalaţi cablul de
alimentare prin slăbirea
şurubului de xare a cablului
N
şi cele trei şuruburi de
contact L-N- .
Conectaţi cablurile la
L
L
bornele corespunzătoare:
rul albastru la borna
marcată cu (N), rul maro
la terminalul marcat cu (L)
şi rul galben/verde la borna
marcată cu (a se vedea diagrama).
53
Page 54

3. Fixaţi cablul prin xarea şurubului de prindere.
SPECIFICAŢII PRIVIND APARATUL
RO
4. Închideţi capacul plăcii de borne.
Conectarea cablului de alimentare la priză
Instalaţi o priză standard corespunzătoare sarcinii indicate
pe plăcuţa cu date tehnice (a se vedea tabelul).
Aparatul trebuie să e conectat direct la reţeaua de
alimentare cu ajutorul unui comutator omnipolar cu o
deschidere de contact de minim 3 mm instalat între aparat
şi sursa de alimentare. Comutatorul trebuie să e adecvat
sarcinii indicate şi trebuie să respecte reglementările privind
curentul electric (cablul de împământare nu trebuie să e
întrerupt de comutator). Cablul de alimentare trebuie să e
poziţionat astfel încât să nu vină în contact cu temperaturi
mai mari de 50°C, în orice punct (panoul posterior al
cuptorului, de exemplu).
! Instalatorul trebuie să asigure realizarea conexiunii
electrice corecte şi conformitatea deplină a acesteia cu
normele de siguranţă.
Înainte de conectarea aparatului la sursa de alimentare,
asiguraţi-vă că
• aparatul este împământat şi şa de conectare este în
conformitate cu prevederile legale.
• priza poate suporta puterea maximă a aparatului, care
este indicată pe plăcuţa cu date tehnice.
• tensiunea este în intervalul cuprins între valorile indicate
pe plăcuţa cu date tehnice.
• priza este compatibilă cu şa de conectare a aparatului.
Dacă priza este incompatibilă cu şa de conectare,
solicitaţi unui tehnician autorizat înlocuirea acesteia. Nu
utilizaţi prelungitoare sau prize multiple.
Lăţime 43,5 cm
Dimensiuni*
înălţime 41 cm
adâncime 41 cm
Volum* 74 l
Lăţime 45,6 cm
Dimensiuni**
înălţime 41 cm
adâncime 41 cm
Volum** 77 l
Conexiuni
electrice
ETICHETA
DE ENERGIE
tensiune: 220 - 240 V ~ 50/60Hz
sau 50 Hz putere maximă absorbită
2600 W (vezi plăcuţa cu date tehnice)
Directiva 2002/40/CE pe eticheta
cuptoarelor electrice.
Standardul EN 50304
Consumul de energie declarat pentru
Clasa convecţie forţată
- mod de încălzire: ECO.
Acest aparat este conform cu
următoarele directive ale
Comunităţii Economice Europene:
2006/95/CE din data de 12/12/06
(joasă tensiune) şi modificările
ulterioare
- 2004/108/CEE din 15/12/04
(compatibilitate electromagnetică)
şi modificările ulterioare
- 93/68/CEE din data de 22/07/93
şi modificările şi completările
ulterioare. 2012/19/CEE şi
modificările ulterioare.
1275/2008 Modul Standby/off
! După ce aparatul a fost instalat, cablul de alimentare şi
priza trebuie să e uşor accesibile.
! Cablul nu trebuie să e îndoit sau comprimat.
! Cablul trebuie vericat periodic şi înlocuit doar de tehnicieni
autorizaţi (a se vedea secţiunea Asistenţă).
! Producătorul îşi declină orice responsabilitate în cazul
nerespectării acestor măsuri de siguranţă.
* Numai pentru modelele cu ghidaje telescopice.
** Numai pentru modelele cu ghidaje pe sârmă.
54
Page 55

Structura cuptorului
Temperatura în prima cavitate
(Spaţiul principal sau mic)
Temperatura în a doua cavitate
(Spaţiu mic sau principal)
Între 40°C şi 150°C
Diferenţa de temperatură în raport cu prima cavitate nu
este mai mare de 50°C
Între 155°C şi 200°C
Diferenţa de temperatură în raport cu prima cavitate nu
este mai mare de 70°C
p
Î
Modelul OPEN SPACE are o capacitate de 70 de litri şi oferă
utilizatorilor posibilitatea de a găti pe 4 niveluri în acelaşi
timp sau de a găti cantităţi mari, ceea ce nu ar neapărat
posibil într-un cuptor tradiţional.
Cele 56 moduri de gătit universale (Creation) şi automate
(Success) garantează rezultate perfecte de ecare dată,
indiferent de felul de mâncare pe care îl preparaţi.
De asemenea, modelul OPEN SPACE oferă maximum
de confort pentru toate cerinţele, cu 4 opţiuni diferite de
funcţionare: cuptorul este un compartiment mare, dar poate
împărţit în spaţii separate de diferite dimensiuni, ecare
cu controalele sale independente de temperatură şi durată.
Acest lucru este posibil datorită raftului despărţilor
termoizolant DIVIDER, care separă întregul spaţiu
ExtraLarge Space (spaţiul extramare) în două spaţii de
dimensiuni diferite: Main Space (spaţiul principal) şi Small
Space (spaţiul mic).
Cele două compartimente, Main Space (spaţiul principal)
şi Small Space (spaţiul mic), pot utilizate în acelaşi timp
pentru a găti feluri de mâncare diferite mai rapid sau pot
utilizate separat, astfel încât doar spaţiul necesar să e
utilizat.
Când cele două compartimente sunt utilizate în acelaşi
timp, temperatura de preparare din ecare compartiment
poate reglată la o valoare cuprinsă între 30° şi 300°. Poate
exista o diferenţă de temperatură de 100° între cele două
zone, ceea ce înseamnă că este posibil să gătiţi feluri de
mâncare foarte diferite, fără ca aromele sau mirosurile să
se întrepătrundă.
RO
Spaţiul extramare: gătire pe 4 niveluri
GRILAJ
SPAŢIUL
EXTRAMARE
Gătire folosind numai Spaţiul mic Gătire folosind numai Spaţiul principal: gătire pe 3 niveluri
SPAŢIUL
MIC
SPAŢIUL
PRINCIPAL
GRILAJ
GRILAJ
TAVĂ DE
SCURGERE
GRILAJ sau TAVĂ
DE SCURGERE
Raft despărţitor „D”
(poziţie fixă)
Tabelul de mai jos prezintă valorile posibile de temperatură
care pot stabilite. Aşajul inteligent vă va ghida pentru a
Spaţiul principal şi Spaţiul mic: funcţionare simultană
SPAŢIUL
MIC
SPAŢIUL
PRINCIPAL
SPAŢIUL
MIC
SPAŢIUL
PRINCIPAL
GRILAJ sau TAVĂ DE SCURGERE
Raft despărţitor „D” (poziţie fixă)
GRILAJ (gătire pe 3 niveluri)
GRILAJ (gătire pe 3 niveluri)
TAVĂ DE SCURGERE
(gătire pe 3 niveluri)
Raft despărţitor „D” (poziţie fixă)
GRILAJ (gătire pe 3 niveluri)
GRILAJ (gătire pe 3 niveluri)
TAVĂ DE SCURGERE
(gătire pe 3 niveluri)
putea urma procedura corectă pentru a regla temperatura
celor două cavităţi.
De exemplu: dacă o cavitate este configurată la 90°C,
puteţi alege o valoare între 40°C (90°C-50°C) şi de 140°C (90°C+50°C) pentru cealaltă.
De exemplu: dacă o cavitate este configurată la 180°C,
uteţi alege o valoare între 110°C (180°C-70°C) şi de 250°C (180°C+70°C) pentru cealaltă.
ntre 205°C şi 250°C Diferenţa de temperatură în raport cu prima cavitate nu
De exemplu: dacă o cavitate este configurată la 210°C,
puteţi alege o valoare între 110°C (210°C-100°C) şi de 250°C (valoarea maximă a temperaturii) pentru cealaltă.
este mai mare de 100°C
,
55
Page 56

Pornirea şi utilizarea
RO
AVERTISMENT! Cuptorul
este prevăzut cu un sistem
de oprire pentru a putea
extrage grilajele şi a le
împiedica să iasă din cuptor
(1).
Aşa cum se arată în desen,
pentru a le extrage complet,
pur şi simplu ridicaţi grilajul,
ţineţi-l de partea din faţă, şi trageţi (2).
! Prima dată când folosiţi aparatul, încălziţi cuptorul gol cu
uşa închisă la temperatura maximă cel puţin o jumătate de
oră. Asiguraţi-vă că încăperea este bine aerisită înainte de a
porni cuptorul şi de a deschide uşa acestuia. Aparatul poate
emite un miros neplăcut cauzat de substanţele protectoare
folosite în timpul procesului de fabricaţie care ard.
! Pentru a simplica procesul de congurare, apăsaţi şi
menţineţi apăsate butoanele " " şi " " pentru a dela rapid
printre numerele aşate pe ecran.
! Fiecare setare va salvată automat în memoria aparatului
după 10 secunde.
! În timpul funcţionării, se recomandă îndepărtarea oricărui
vas sau a oricăror alimente delicate din cavitaţile care nu
sunt utilizate.
! Odată ce procesul de gătire a început, înainte a îndepărta
raftul despărţitor, cuptorul trebuie să e oprit cu ajutorul
butonului .
! De ecare dată când cuptorul este pornit, acesta va pe
modul de gătire CREATION.
! Clapele cu atingere nu pot activate dacă utilizatorul
poartă mănuşi.
! Pentru a optimiza performanţa procesului de gătire, la
pornirea funcţiei selectate, sunt aplicate setări ale produsului
care ar putea duce la o întârziere a pornirii ventilatorului şi
a elementelor de încălzire.
! Cuptorul va intra în faza de preîncălzire după 2 secunde
de la selectarea ciclului dorit.
Congurarea ceasului
! Ceasul poate congurat numai când cuptorul este oprit. În
cazul în care cuptorul este în modul de aşteptare, apăsarea
butonului o dată va aşa ora curentă. Apăsaţi-l din nou
pentru a congura ora.
După conectarea la reţeaua de alimentare sau după o pană
de curent, butonul şi cifrele de ecranul TIME (TIMP) vor
clipi timp de 10 secunde.
Pentru a congura ceasul:
1. Apăsaţi butonul .
2. Conguraţi cifra care indică ora cu ajutorul butoanelor
" " şi " ".
3. Odată ce aţi ajuns la valoarea corectă a orei, apăsaţi
butonul .
4. Repetaţi paşii de mai sus pentru a congura minutele.
Dacă se produce o pană de curent, va necesar să
reconguraţi ceasul. Dacă pictograma se aprinde
intermitent pe ecran, acest lucru indică faptul că ceasul nu
a fost congurat corect.
Congurarea cronometrului
! Cronometrul poate congurat indiferent dacă cuptorul
este pornit sau oprit. Acest lucru nu opreşte şi nu porneşte
cuptorul.
Atunci când timpul congurat s-a scurs, cronometrul emite
un sunet care se va opri automat după 30 de secunde sau la
apăsarea oricărui buton activ de pe panoul de control. Pentru
a congura cronometrul, procedaţi după cum urmează:
1. Apăsaţi butonul .
2. Conguraţi timpul dorit cu ajutorul butoanelor " " şi " ".
3. Odată ce aţi ajuns la valoarea dorită, apăsaţi butonul
din nou. Simbolul aprins vă va reaminti că cronometrul
este pornit. Pentru a anula cronometrul, apăsaţi butonul
şi utilizaţi butoanele " " şi " " pentru a congura timpul la
00:00. Apăsaţi butonul din nou.
Pictograma se va stinge pentru a indica dezactivarea
cronometrului.
Ventilaţia
Pentru a răci temperatura exterioară a cuptorului, un ventilator
suă un curent de aer între panoul de comandă şi uşa
cuptorului, precum şi spre partea de jos a uşii cuptorului.
Blocarea panoului de control
! Panoul de control poate blocat în timp ce cuptorul este
oprit, odată ce procesul de gătire a început sau s-a încheiat
şi în timpul programării.
Pentru a bloca controalele cuptorului, apăsaţi şi menţineţi
apăsat butonul timp de cel puţin 2 secunde. Se va auzi
un sunet, iar ecranul TEMPERATURE (temperatură) va
indica simbolul cheie “O—n”. Pictograma se va aprinde
pentru a indica activarea blocării. Pentru a dezactiva funcţia
de blocare, apăsaţi şi menţineţi apăsat butonul din nou,
timp de cel puţin 2 secunde.
56
! Odată ce procesul de gătire s-a încheiat, ventilatorul continuă
să funcţioneze până când cuptorul se răceşte sucient.
Sistemul de iluminare
Atunci când uşa cuptorului este deschisă sau când începe
un program de gătire, în cuptor se aprinde lumina.
Butonul poate utilizat pentru a aprinde lumina în orice
moment.
Indicatori de căldură reziduală
Aparatul este echipat cu un indicator de căldură reziduală.
Când cuptorul este oprit, lumina de "căldură reziduală" de pe
Page 57

ecran se aprinde pentru a indica existenţa unei temperaturi
ridicate în interiorul cuptorului. Indicatorul luminos se stinge
atunci când interiorul cuptorului s-a răcit.
Revenirea la parametrii conguraţi în fabrică
Parametrii conguraţi în fabrică ai cuptorului pot restabiliţi,
pentru a anula toate selecţiile făcute de către utilizator
(ceasul şi durata personalizată). Pentru a efectua o resetare,
opriţi cuptorul, apoi apăsaţi şi menţineţi apăsat butonul
corespunzător primului mod de gătire manual (stânga sus) şi
butonul simultan timp de 6 secunde. Odată ce procedura
de restaurare s-a încheiat, se va auzi un sunet. La prima
apăsare a butonului , cuptorul se va comporta ca şi cum
ar pornit pentru prima dată.
Modul standby (aşteptare)
Acest produs este în conformitate cu cerinţele celei mai recente
directive europene referitoare la limitarea consumului de energie
în modul standby. Dacă nu se apasă niciun buton timp de 30 de
minute şi dacă blocarea panoului de control/uşii nu a fost activată,
aparatul revine automat la modul standby. Modul standby este
indicat de luminarea cu intensitate mare a "Butonului ceas". De
îndată ce interacţiunea cu maşina se reia, funcţionarea sistemului
este restabilită.
3. Apăsaţi butonul pentru a începe procesul de gătire.
4. Cuptorul va intra în etapa de preîncălzire: indicatorul
luminos de preîncălzire se aprinde intermitent.
5. Când procesul de preîncălzire s-a încheiat, se aude un semnal
sonor, iar indicatorul luminos de preîncălzire arată că această
etapă a fost nalizată: alimentele pot introduse în cuptor.
6. În timpul procesului de gătire, întotdeauna puteţi:
- modica temperatura prin apăsarea butonului , urmat
de butoanele " " şi " " (numai pentru modurile manuale);
- stabili durata unui mod de gătire (a se vedea Modurile
de gătire);
- apăsa butonul pentru a opri procesul de gătire. În acest
caz, aparatul salvează temperatura modicată anterior în
memoria sa (numai pentru moduri manuale);
- opri cuptorul prin apăsarea butonului timp de 3 secunde.
7. În cazul unei întreruperi de curent, în cazul în care
cuptorul era în funcţiune, un sistem automat din cadrul
aparatului va reactiva modul de gătire de unde a fost
întrerupt cât timp temperatura nu a scăzut sub un anumit
nivel. Modurile de gătire programate care nu au început
încă nu vor restaurate şi, prin urmare, trebuie să e
reprogramate.
! Nu există nicio etapă de preîncălzire pentru modul
BARBECUE (FRIGERE LA GRĂTAR).
RO
Moduri de funcţionare
! Pentru a prepara feluri de mâncare perfect moi sau crocante,
cuptorul eliberează apa din alimente sub formă de abur. Aceasta
înseamnă că este posibil să se obţină rezultate optime în gătirea
tuturor felurilor de mâncare.
! De ecare dată când cuptorul este pornit, este sugerat
modul de gătire CREATION.
! Nu aşezaţi niciodată obiecte direct pe partea de jos a
cuptorului; astfel, puteţi preveni deteriorarea stratului de
email.
! Aşezaţi întotdeauna vasele pe grilajele prevăzute.
ExtraLarge Space (spaţiul extramare)
! Nu utilizaţi poziţia "D" pentru grilaje.
Pornirea cuptorului
1. Porniţi panoul de control apăsând butonul . Aparatul
emite un sunet de trei ori (cu intensitate crescătoare) şi
toate butoanele se aprind în ordine.
2. Apăsaţi butonul corespunzător modului de gătire dorit.
Ecranul TEMPERATURE (TEMPERATURĂ) indică:
- temperatura asociată cu modul respectiv, în cazul în care
se foloseşte un program manual;
- "Auto", în cazul în care se foloseşte un program automat.
Ecranul TIME (TIMP) indică:
- ora curentă, în cazul în care se foloseşte un program
manual;
- durata, în cazul în care se foloseşte un program automat.
Moduri de gătire CREATION (CREAŢIE)
! Toate modurile de gătire au o temperatură de gătire
prestabilită care poate reglată manual la o valoare
cuprinsă între 30°C şi 250°C, după dorinţă (300°C pentru
modul GRILL (GRĂTAR)). Modurile CREATION includ toate
programele manuale.
Cuptorul controlează toate aspectele esenţiale ale ecăruia
dintre aceste moduri de gătit şi vă uşurează munca, ajutânduvă să gătiţi preparate perfecte, de la cea mai simplă reţetă
până la cele mai sosticate delicii culinare: temperatura,
sursa de încălzire, umiditatea şi funcţionarea asistată de
ventilator pot controlate în mod automat.
Acest capitol a fost scris cu ajutorul propriul nostru expert
culinar. Vă invităm să urmaţi recomandările sale, pentru
a putea benecia de experienţa sa şi a vă perfecţiona
abilităţile de gătit.
Modurile de gătire, temperaturile şi înălţimile rafturilor
cuptorului recomandate reectă propria experienţă a
expertului nostru în bucătărie şi vă vor ajuta să obţineţi cele
mai bune rezultate.
Tabelul de mai jos arată dacă este mai bine să preîncălziţi
cuptorul sau nu pentru ecare mod de gătire CREATION.
Respectarea acestor recomandări vă garantează rezultate
perfecte.
Dacă doriţi să introduceţi alimente în cuptorul preîncălzit,
aşteptaţi nalizarea etapei de preîncălzire (acest lucru va
semnalat printr-o serie de bipuri).
Temperatura este congurată automat, în funcţie de modul
de gătire selectat; cu toate acestea, o puteţi modica pentru
a se potrivi reţetei dumneavoastră.
De asemenea, puteţi congura o durată a procesului de
gătire cu începere imediată sau întârziată.
57
Page 58

RO
Modul MULTILEVEL (NIVELURI MULTIPLE)
Toate elementele de încălzire şi ventilatorul sunt activate.
Întrucât căldura rămâne constantă în cuptor, aerul coace
alimentele şi le rumeneşte într-un mod uniform. Se pot folosi
maximum două grilaje în acelaşi timp.
Moduri LOW TEMPERATURE (TEMPERATURĂ
SCĂZUTĂ)
Acest tip de gătire poate utilizat pentru dospire,
decongelare, pregătirea iaurtului, încălzirea vaselor în ritmul
dorit şi pentru a găti lent la temperaturi scăzute. Opţiunile
de temperatură sunt: 40, 65 şi 90 °C.
Modul FAN GRILL (GRĂTAR ASISTAT DE VENTILATOR)
Elementul de încălzire superior şi rotisorul (dacă există)
sunt activate şi ventilatorul intră în funcţiune. În timpul
ciclului, de asemenea, elementul de încălzire circular se
activează. Această combinaţie de caracteristici creşte
ecienţa radiaţiei termice unidirecţionale furnizate de
elementele de încălzire prin circulaţia forţată a aerului în
interiorul cuptorului.
Aceasta ajută la prevenirea arderii alimentelor la suprafaţă şi
permite căldurii să pătrundă direct în alimente. Gătiţi mereu
în acest mod cu uşa cuptorului închisă.
Modul GRILL (GRĂTAR)
Elementul de încălzire superior şi rotisorul (dacă există)
sunt activate. Temperatura ridicată şi acţiunea directă a
grătarului sunt recomandate pentru alimentele care necesită
o temperatură ridicată la suprafaţă. Gătiţi mereu în acest
mod cu uşa cuptorului închisă (a se vedea “Sfaturi practice
pentru gătit”).
Modul FAST COOKING (GĂTIRE RAPIDĂ)
Preîncălzirea nu este necesară pentru acest mod de gătire.
Acest mod este potrivit în special pentru prepararea rapidă a
alimentelor preambalate (congelate sau semipreparate). Cele
mai bune rezultate se obţin folosind un singur grilaj de gătit.
Modul PIZZA (PIZZA)
Elementele de încălzire superioare şi circulare pornesc şi
ventilatorul intră în funcţiune. Această combinaţie încălzeşte
rapid cuptorul. Dacă utilizaţi mai mult de un grilaj deodată,
schimbaţi poziţia vaselor de gătit la jumătatea procesului
de gătire.
Modul ECO (ECO)
Elementul de încălzire posterior şi ventilatorul sunt pornite,
garantând astfel distribuţia căldurii într-o manieră delicată
şi uniformă în întreg cuptorul. Acest mod ce economiseşte
energia este potrivit pentru a găti preparate mici, pentru a
reîncălzi carnea şi a naliza procesul de gătire.
Rotisorul
Pentru a utiliza funcţia de
rotisor (a se vedea
diagrama), procedaţi după
cum urmează:
1. Aşezţi tava de scurgere
în poziţia 1.
2. Aşezaţi suportul pentru
rotisor în poziţia 3 şi
introduceţi-l în oriciul
prevăzut în panoul posterior
al cuptorului.
3. Porniţi funcţia rotisor prin selectarea modului sau .
! Când modul este pornit, rotisorul se va opri dacă se
deschide uşa.
Modurile de gătit SUCCESS (SUCCES)
! Temperatura şi durata procesului de gătire sunt valori
precongurate, asigurând un rezultat perfect de ecare
dată - în mod automat. Aceste valori nu pot modicate
şi utilizează sistemul C.O.P.® (Programmed Optimal
Cooking - “gătire optimă programată”). Ciclul de gătire
se opreşte automat, iar cuptorul indică momentul când
preparatul este gata. Puteţi începe să gătiţi indiferent
dacă cuptorul a fost preîncălzit sau nu. Durata de gătire
poate personalizată în funcţie de gusturile personale,
modicând-o - înainte de momentul de începere - cu ±
5/20 minute, în funcţie de programul selectat. Odată ce
procesul de gătire a început, este încă posibil să modicaţi
durata acestuia. Dacă valoarea este modicată înainte de
începerea procesului de gătire, aceasta este salvată în
memoria aparatului şi sugerată din nou data următoare
când se selectează acel mod de gătire. Dacă temperatura
din interiorul cuptorului este mai mare decât valoarea
sugerată pentru modul selectat, textul "Hot" (erbinte) apare
pe ecranul TEMPERATURE (TEMPERATURĂ) şi nu va
posibil să începeţi să gătiţi; aşteptaţi până când cuptorul
se răceşte.
! Când parametrii de gătire au fost atinşi, alarma cuptorului
va suna.
! Nu deschideţi uşa cuptorului, deoarece acest lucru va
afecta timpul de preparare şi temperatura.
Modul BEEF (CARNE DE VITĂ)
Utilizaţi această funcţie pentru a găti carne de vită şi de porc.
Aşezaţi alimentele în interiorul cuptorului în timp ce acesta
este încă rece. Preparatul poate introdus, de asemenea,
într-un cuptor preîncălzit.
Modul CAKES (PRĂJITURI)
Această funcţie este ideală pentru gătit deserturi care sunt
realizate folosind drojdie naturală, praf de copt, dar şi a
deserturilor care nu conţin drojdie. Introduceţi preparatele
în cuptor în timp ce acesta este încă rece. Preparatul poate
introdus, de asemenea, într-un cuptor preîncălzit.
* Disponibil doar cu anumite modele.
58
Page 59

Modul BREAD (PÂINE)
Utilizaţi această funcţie pentru a coace pâine. Pentru a obţine
cele mai bune rezultate, vă recomandăm să urmaţi cu atenţie
instrucţiunile de mai jos:
• Respectaţi reţeta.
• Nu depăşiţi greutatea maximă a tăvii de scurgere.
• Nu uitaţi să turnaţi 100 g (1dl) de apă rece în tava de
scurgere, care trebuie să e aşezată în poziţia 7.
• Aluatul trebuie lăsat să crească la temperatura camerei
timp de 1 - 1 ½ ore (în funcţie de temperatura camerei)
sau până când aluatul s-a dublat în volum.
Small Space (Spaţiul mic)
Pornirea cuptorului
1. Cu raftul DIVIDER inserat, utilizaţi butonul pentru a
selecta cavitatea SMALL Space (Spaţiul mic). Pictograma
se va lumina.
2. Urmaţi instrucţiunile prezentate mai sus, pentru cavitatea
EXTRALARGE (extramare), la efectuarea diferitelor
proceduri de ajustare şi congurare.
Moduri de gătire
RO
Reţetă de pâine:
1 tavă de scurgere ce susţine max. 1000 g, nivelul inferior
2 tăvi de scrugere, ecare susţinând max. 1000 g, nivelul
mediu şi nivelul inferior
Reţetă pentru 1000 g de aluat: 600 g făină, 360 g apă, 11 g
sare, 25 g drojdie proaspătă (sau 2 pliculeţe de drojdie praf)
Mod de preparare:
• Amestecaţi făina şi sarea într-un castron mare.
• Diluaţi drojdia în apă călduţă (aproximativ 35 de grade).
• Faceţi o gaură mică în movila de făină.
• Turnaţi apa şi amestecul de drojdie.
• Frâmântaţi aluatul întinzându-l şi pliâdu-l cu palmele timp
de 10 minute până când acesta capătă o consistenţă
uniformă şi nu este prea lipicios.
• Daţi aluatului o formă de sferă, puneţi-l într-un castron
mare şi acoperiţi-l cu folie de plastic transparentă pentru
a preveni uscarea aluatului la suprafaţă. Selectaţi funcţia
manuală LOW TEMPERATURE (TEMPERATURĂ
SCĂZUTĂ) a cuptorului şi conguraţi temperatura la
40°C. Aşezaţi castronul în interior şi lăsaţi aluatul să
crească timp de aproximativ 1 oră (aluatul se va dubla
în volum).
• Tăiaţi aluatul în bucăţi de dimensiuni egale.
• Puneţi-le în tava de scurgere, pe o foaie de hârtie de copt.
• Pudraţi făină peste bucăţile de aluat.
• Faceţi incizii pe bucăţile de aluat.
• Aşezaţi preparatul în interiorul cuptorului cât acesta este
încă rece.
• Porniţi modul de gătire BREAD (PÂINE).
• Odată coapte, lăsaţi pâinile pe unul dintre grilaje până
când se răcesc complet.
DIVIDER (RAFTUL DESPĂRŢITOR)
Montaţi raftul despărţitor pe raftul "D" (DIVIDER), folosind
bolţul disponibil, cu săgeţile îndreptate spre partea din spate
a cuptorului. Se va auzi un semnal sonor care va conrma că
raftul DIVIDER a fost montat corect; apoi puteţi utiliza cele
două compartimente, MAIN Space (Spaţiul principal) and
SMALL Space (Spaţiul mic), separat sau simultan.
Butonul se va activa. Cavitatea selectată alternează de
ecare dată când se apasă butonul. Cavitatea principală
este selectată în mod implicit.
Modul GRILL (GRĂTAR)
Elementul de încălzire superior şi rotisorul (dacă există)
sunt activate. Temperatura ridicată şi acţiunea directă a
grătarului sunt recomandate pentru alimentele care necesită
o temperatură ridicată la suprafaţă. Gătiţi mereu în acest
mod cu uşa cuptorului închisă (a se vedea “Sfaturi practice
pentru gătit”).
Modul FAST COOKING (GĂTIRE RAPIDĂ)
Preîncălzirea nu este necesară pentru acest mod de gătire.
Acest mod este potrivit în special pentru prepararea rapidă
a alimentelor preambalate (congelate sau semipreparate).
Cele mai bune rezultate se obţin folosind un singur grilaj
de gătit.
Main Space (Spaţiul principal)
Pornirea cuptorului
1. Cu raftul DIVIDER inserat, utilizaţi butonul pentru a
selecta cavitatea SMALL Space (Spaţiul mic). Pictograma
se va lumina.
2. Urmaţi instrucţiunile prezentate mai sus, pentru cavitatea
EXTRALARGE (extramare), la efectuarea diferitelor
proceduri de ajustare şi congurare.
Moduri de gătire CREATION (CREAŢIE)
! Toate modurile de gătire au o temperatură de gătire
prestabilită care poate reglată manual la o valoare
cuprinsă între 30°C şi 250°C, după dorinţă (300°C pentru
modul GRILL (GRĂTAR)). Modurile CREATION includ toate
programele manuale.
Cuptorul controlează toate aspectele esenţiale ale ecăruia
dintre aceste moduri de gătit şi vă uşurează munca,
ajutându-vă să gătiţi preparate perfecte, de la cea mai
simplă reţetă până la cele mai sosticate delicii culinare:
temperatura, sursa de încălzire, umiditatea şi funcţionarea
asistată de ventilator pot controlate în mod automat.
Acest capitol a fost scris cu ajutorul propriul nostru expert
culinar. Vă invităm să urmaţi recomandările sale, pentru
a putea benecia de experienţa sa şi a vă perfecţiona
abilităţile de gătit. Modurile de gătire, temperaturile şi
înălţimile rafturilor cuptorului recomandate reectă propria
experienţă a expertului nostru în bucătărie şi vă vor ajuta
să obţineţi cele mai bune rezultate.
Tabelul de mai jos arată dacă este mai bine să preîncălziţi
cuptorul sau nu pentru ecare mod de gătire CREATION.
59
Page 60

Respectarea acestor recomandări vă garantează rezultate
RO
perfecte. Dacă doriţi să introduceţi alimente în cuptorul
preîncălzit, aşteptaţi nalizarea etapei de preîncălzire (acest
lucru va semnalat printr-o serie de bipuri). Temperatura
este congurată automat, în funcţie de modul de gătire
selectat; cu toate acestea, o puteţi modica pentru a se
potrivi reţetei dumneavoastră.
De asemenea, puteţi congura o durată a procesului de
gătire cu începere imediată sau întârziată.
! Nu deschideţi uşa cuptorului, deoarece acest lucru va
afecta timpul de preparare şi temperatura.
Modul BEEF (CARNE DE VITĂ)
Utilizaţi această funcţie pentru a găti carne de vită şi de porc.
Aşezaţi alimentele în interiorul cuptorului în timp ce acesta
este încă rece. Preparatul poate introdus, de asemenea,
într-un cuptor preîncălzit.
Modul MULTILEVEL (NIVELURI MULTIPLE)
Toate elementele de încălzire şi ventilatorul sunt activate.
Întrucât căldura rămâne constantă în cuptor, aerul coace
alimentele şi le rumeneşte într-un mod uniform. Se pot folosi
maximum două grilaje în acelaşi timp.
Moduri LOW TEMPERATURE (TEMPERATURĂ SCĂZUTĂ)
Acest tip de gătire poate utilizat pentru dospire,
decongelare, pregătirea iaurtului, încălzirea vaselor în ritmul
dorit şi pentru a găti lent la temperaturi scăzute. Opţiunile
de temperatură sunt: 40, 65 şi 90 °C.
Modul PIZZA (PIZZA)
Elementele de încălzire superioare şi circulare pornesc şi
ventilatorul intră în funcţiune. Această combinaţie încălzeşte
rapid cuptorul. Dacă utilizaţi mai mult de un grilaj deodată,
schimbaţi poziţia vaselor de gătit la jumătatea procesului
de gătire.
Modul ECO (ECO)
Elementul de încălzire posterior şi ventilatorul sunt pornite,
garantând astfel distribuţia căldurii într-o manieră delicată
şi uniformă în întreg cuptorul. Acest mod ce economiseşte
energia este potrivit pentru a găti preparate mici, pentru a
reîncălzi carnea şi a naliza procesul de gătire.
Modurile de gătit SUCCESS (SUCCES)
! Temperatura şi durata procesului de gătire sunt valori
precongurate, asigurând un rezultat perfect de ecare dată -
în mod automat. Aceste valori nu pot modicate şi utilizează
sistemul C.O.P.® (Programmed Optimal Cooking - “gătire
optimă programată”). Ciclul de gătire se opreşte automat,
iar cuptorul indică momentul când preparatul este gata. Puteţi
începe să gătiţi indiferent dacă cuptorul a fost preîncălzit
sau nu. Durata de gătire poate personalizată în funcţie de
gusturile personale, modicând-o - înainte de momentul de
începere - cu ± 5/20 minute, în funcţie de programul selectat.
Odată ce procesul de gătire a început, este încă posibil să
modicaţi durata acestuia. Dacă valoarea este modicată
înainte de începerea procesului de gătire, aceasta este salvată
în memoria aparatului şi sugerată din nou data următoare
când se selectează acel mod de gătire. Dacă temperatura din
interiorul cuptorului este mai mare decât valoarea sugerată
pentru modul selectat, textul "Hot" (erbinte) apare pe ecranul
TEMPERATURE (TEMPERATURĂ) şi nu va posibil să
începeţi să gătiţi; aşteptaţi până când cuptorul se răceşte.
Modul CAKES (PRĂJITURI)
Această funcţie este ideală pentru gătit deserturi care sunt
realizate folosind drojdie naturală, praf de copt, dar şi a
deserturilor care nu conţin drojdie. Introduceţi preparatele
în cuptor în timp ce acesta este încă rece. Preparatul poate
introdus, de asemenea, într-un cuptor preîncălzit.
Folosind Small Space (spaţiul mic) şi Main
Space (spaţiul principal), în acelaşi timp,
! Utilizarea simultană este posibilă numai atunci când se
utilizează modurile de gătire CREATION.
Pornirea cuptorului
Pentru utilizare simultană, porniţi un mod de gătire pentru
ambele cavităţi în succesiune. Ecranul TEMPERATURE
(TEMPERATURĂ) arată parametrii de gătit pentru ambele
cavităţi.
! Datorită ecienţei energetice ridicate a aparatului, este
nevoie de numai aproximativ 15 minute pentru preîncălzirea
cavităţii SMALL SPACE (spaţiul mic).
Programarea modurilor de gătire
! Înainte ca programarea să poată avea loc, trebuie selectat
un mod de gătire.
Programarea duratei de gătit
1. Menţineţi apăsat butonul până când pictograma
şi cifrele de pe ecran încep să clipească.
2. Rotiţi butonul TIMER (TEMPORIZATOR) spre " " şi " "
pentru a regla timpul după cum doriţi; menţineţi butonul în
această poziţie pentru a parcurge numerele mai rapid şi a
simplica procesul de congurare a timpului.
3. Odată ce aţi ajuns la durata dorită, apăsaţi butonul
din nou. Ecranul va aşa alternativ durata şi temperatura
congurată.
4. Apăsaţi butonul pentru a începe procesul de gătire.
5. Când procesul de gătire s-a încheiat, pe ecran apare
textul "END" şi se aude un semnal sonor.
• De exemplu: este ora 9:00 şi este programată o durată de
1 oră şi 15 minute. Programul se va opri automat la 10:15
Congurarea orei de încheiere a unui mod de gătire
! Înainte de a putea programa sfârşitul procesului de gătire,
trebuie stabilită o durată de gătire.
! Când parametrii de gătire au fost atinşi, alarma cuptorului
va suna.
* Disponibil doar cu anumite modele.
60
! Pentru ca programarea întârziată să funcţioneze corect,
ceasul trebuie congurat cu ora corectă.
Page 61

1. Urmaţi paşii de la 1 la 3 pentru a congura durata aşa
cum este detaliat mai sus.
2. Apăsaţi butonul de două ori: pictograma şi cifre
de pe ecran vor începe să clipească.
3. Rotiţi butonul TIMER (TEMPORIZATOR) spre " " şi " "
pentru a congura valoarea orei de încheiere a procesului
de gătire.
4. Odată ce aţi ajuns la ora de încheiere dorită, apăsaţi
butonul din nou. Ecranul va aşa alternativ durata,
ora de încheiere a procesului de gătire şi temperatura
congurată.
5. Apăsaţi butonul pentru a activa modul programat.
Programarea este realizată atunci când butoanele şi
sunt luminate.
Ecranul va aşa ora de încheiere şi durata procesului de
gătire alternativ.
6. Când procesul de gătire s-a terminat, pe ecran apare
textul "END" şi se aude un semnal sonor.
• De exemplu: este ora 9:00 şi a fost programată o durată
de 1 oră şi 15 minute, iar ora de încheiere este congurată
la 12:30. Programul va începe automat la ora 11:15.
Pentru a anula programarea, apăsaţi butonul .
• Se recomandă congurarea temperaturii la valoarea
maximă. Elementul superior de încălzire este reglat de
un termostat şi nu poate funcţiona întotdeauna în mod
constant.
FAST COOKING (GĂTIRE RAPIDĂ)
• Aşezaţi tava de scurgere pe nivelul 6.
• Când gătiţi alimente congelate, respectaţi întotdeauna
instrucţiunile de pe ambalaj.
RO
Sfaturi practice pentru gătit
MULTILEVEL (NIVELURI MULTIPLE)
• Utilizaţi poziţiile 1, 3, 5 şi 6.
• Aşezaţi tava de scurgere în partea inferioară şi grilajul,
în partea superioară.
• Când preparaţi pizza sau pâine focaccia, folosiţi o tavă
uşoară de aluminiu, cu un diametru maxim de 30 cm,
şi aşezaţi-o pe grilajul prevăzut. În cazul în care pizza
are mai multe topping-uri, vă recomandăm să adăugaţi
brânza mozzarella la jumătatea procesului de gătire. În
timpul procesului de gătire, se recomandă schimbarea
ordinii rafturilor.
• Utilizaţi poziţiile 2 şi 4, aşezând preparatele care necesită
mai multă căldură pe 2.
• Aşezaţi tava de scurgere în partea inferioară şi grilajul,
în partea superioară.
GRILL (GRĂTAR)
• Preîncălziţi cuptorul timp de 5 minute.
• Montaţi placa despărţitoare DIVIDER pe raftul "D".
• Ţineţi uşa cuptorului închisă când utilizaţi acest mod de
gătire.
• Aşezaţi grilajul în poziţia 7. Aşezaţi preparatele în centrul
grilajului. Aşezaţi tava de scurgere pe nivelul 6.
• Această funcţie se recomandă pentru: a rumeni alimente,
a gratina preparate, a colora bezele, a face sandwich-
uri prăjite şi a prepara pe grătar cantităţi mici de carne
subţire, slabă.
• Se recomandă congurarea nivelului de putere la
valoarea maximă. Elementul superior de încălzire este
reglat de un termostat şi nu poate funcţiona întotdeauna
în mod constant.
• Plasaţi grilajul pe poziţia 3 sau 4 şi aşezaţi
preparatele în centrul acestuia.
61
Page 62

Tabel cu sfaturi pentru gătit pentru cuptoare cu cavitate ExtraLarge (extramare)
Tabelul cu sfaturi pentru gătit pentru compartimentul Spaţiu mic
** Utilizaţi tava de scurgere pentru a colecta uleiul sau grăsimea ce se poate produce ca rezultat al procesului
RO
FuncţieAliment Gătire pe
Creaţie
Niveluri multiple
Tarte 1
Choux a la creme 1
Biscuiţi 180
Produse de patiserie mici 1
Crème Caramel
(bain-marie)
Panettone 11 sau 2 Da 160 45-60
Prăjitură 1
Cozonac
Grătar
Gătire rapidă
Pizza*
Grătar asistat
de ventilator*
Grătar*
Temperatură
joasă*
Kebab
File de peşte
Cartofi congelaţi
Pizza/Focaccia
Fripturi
Gratinare
Prăjire bucată mare carne
Prăjire bucată mare
carne vânat
Coaste de vită
Cârnaţi
Coaste de porc
Bacon
Dospire/decongelare
Bezele albe
Carne/Peşte
Greu-
tate
(Kg)
nivelul nr.
Poziţie nivel Preîncălzire Temperatură
Tavă de
scurgere
2
3
4
2
3
4
1
2
3
4
2
3
1
2
3
2
1
2
3
1,5-22
1
1
1
1
2
3
4
1
1
1
1
1
1
1
1
1
4
3
2 sau 3
1 - 2
2 sau 3
1 - 2
2 sau 3
2 sau 3
2 sau 3
2 sau 3
1 sau 2
2***
3 sau 4
1***
1***
Grilaj 1Grilaj 2Grilaj 3
2 sau 3
1 sau 2
1
2
1
1***
1
1
5
1
1
1
1
1
1
2
1
2
1
3***
3***
3***
3***
2
1
1
1
3
3 - 5
3
3
3 - 5
3
3
5
4 6
5
46
2 sau 3
14 sau 5
5
4
5
5
3 sau 5
3
3
3
2
2
4 sau 5
5 sau 7
5 sau 7
5 sau 7
3
3
3 sau 5
3
5
5
5 6
5
5 6
Da
6
5
56
5
5
5
6
Da
Da
Da
6
Succes
Pâine
Friptură vită
Prăjituri
Pâine (a se vedea reţeta)2
Grătar 1,2-1,5 5
Prăjituri 1
2
2
1
2
3
11***
2
7**
7**
7**
2
1
1
2
2
4
3
5
5
* Timpii de gătire enumeraţi mai sus sunt doar orientativi şi pot fi modificaţi în funcţie de gusturile personale.
Timpul de preîncălzire a cuptorului este configurat la o valoare standard şi nu poate fi modificat manual.
** După cum se menţionează în reţetă, turnaţi 100 g de apă în tava de scurgere aşezată în poziţia 7.
*** Utilizaţi tava de scurgere pentru a colecta uleiul sau grăsimea ce se poate produce ca rezultat al procesului de gătire.
recomandată
(°C)
procesului
de gătire
(minute)
Durata
Da
Da
Da
Da
Da
Da
Da
Da
Da
Da
Da
Da
Da
Da
Da
Da
Da
Da
Da
Da 16090-240
Nu
Nu
Nu
Da
Da
Da
Da
Nu
Nu
Nu
Nu
Da
Da
Da
Da
Nu
Nu
Nu
Nu
Nu
Nu
Nu
Nu
Nu
190
180
180
180
190
190
190
190
180
180
180
200
200
200
170
170
170
160
160
190
190
190
210
200
230
220
220
220
220
200
190
200
200
270-300
270-300
270-300
270-300
40
65
90
25-30
35-45
40-50
45-55
25-35
25-35
30-40
30-40
15-25
15-25
20-30
20-30
30-40
35-45
40-50
35-45
35-45
40-50
60-75
60-75
30-35
35-40
40-45
20-25
15-20
25-30
15-25
20-30
25-35
30-40
35-75
40-60
90-120
90-120
20-30
10-20
15-25
3-6
8-12 ore
90-180
! Modul de gătire ECO: Acest mod de economisire a energiei este potrivit a găti preparate cum ar fi fileuri de peşte,
produse mici de patiserie şi legume. De asemenea, este ideal pentru a reîncălzi carnea şi a finaliza procesul de gătire.
FuncţieAliment Greutate
(Kg)
Gătire rapidă*
Grătar*
File de peşte
Fileuri de carne
Pizza congelată
Alimente preparate
congelate
Toast
Bacon
Friptură de porc
Gătire
pe nivel
nr.
1
1
1
1
1
1
1
Tavă de
scurgere
6
6
6
6
6**
6**
Poziţie nivel Preîncălzire Temperatură
recomandată
(°C)
160-180
180-200
270-300
270-300
270-300
Grilaj 1
6
7
7
Raft
despărţi
tor
D
D
D
D
D
D
D
Da
Da
Da
Da
Da
Da
Da
* Timpii de gătire enumeraţi mai sus sunt doar orientativi şi pot fi modificaţi în funcţie de gusturile personale.
Timpul de preîncălzire a cuptorului este configurat la o valoare standard şi nu poate fi modificat manual.
62
Durata
procesului
de gătire
(minute)
20-30
30-40
3-5
3-6
15-25
Page 63

Tabel cu sfaturi pentru gătit pentru utilizarea Spaţiului mic şi a Spaţiului principal în acelaşi timp,
Spaţiul principal
* Timpii de gătire enumeraţi mai sus sunt doar orientativi şi pot fi modificaţi în funcţie de gusturile personale.
Timpul de preîncălzire a cuptorului este configurat la o valoare standard şi nu poate fi modificat manual
** Utilizaţi tava de scurgere pentru a colecta uleiul sau grăsimea ce se poate produce ca rezultat al procesului de gătire.
procesului
Tabelul cu sfaturi pentru gătit pentru compartimentul Spaţiu principal
produse mici de patiserie şi legume. De asemenea, este ideal pentru a reîncălzi carnea şi a finaliza procesul de gătire.
06
FuncţieAliment Greutate
Creaţie
Niveluri multiple*
Pizza*
Tarte1
Biscuiţi 180
Produse
de patiserie mici
Crème Caramel
(bain-marie)
Prăjitură 12 DDa160 60-75
Pizza
Spaţiul mic
FuncţieAliment Greutate
Gătire rapidă*
Grătar*
File de peşte
Fileuri de carne
Pizza congelată
Alimente preparate
congelate
Friptură de porc 16** 7Da 270-300 15-25
(Kg)
(Kg)
Gătire
pe nivel
nr.
2
1
2
1
2
12 DDa170 35-45
1
2
Gătire
pe nivel
nr.
1
1
1
1
Poziţia grilajului Preîncălzire Temperatură
Raft
Tavă de
scurgere Grilaj 1
2
13DD
2
13DD
2
13
2 sau 3
1 sau 23 sau 5
despărţi
tor
D
D
D
D
Da
Da
Da
Da
Da
Da
Da
Da
Poziţia grilajului Preîncălzire Temperatură
Raft
Tavă de
scurgere Grilaj 1
6
6
6
6
despărţi
tor
D
D
D
D
D
Da
Da
Da
Da
recomandată
(°C)
200
200
180
200
200
220
220
recomandată
(°C)
160-180
180-200
Durata
de gătire
(minute)
30-40
35-45
15-25
15-25
30-40
35-45
15-25
20-30
Durata
procesului
de gătire
(minute)
20-30
30-40
.
RO
FuncţieAliment Gătire
Creaţie
Niveluri multiple*
Tarte1
Choux a la creme 1
Biscuiţi 180
Produse de patiserie mici122
Crème Caramel
(bain-marie)
Prăjitură 12 D Da 16
Cozonac
Pizza*
Temperatură
joasă*
Pizza/Focaccia
Dospire/
Decongelare
Bezele albe
Carne/Peşte
Greu-
tate
(Kg)
pe nivel
Tavă de
scurgere
2
2
1
2
12 DDa170 35-45
1
2
1
2
1
2
2
2 sau 3
1 sau 23 sau 5
Grilaj 1
2
13DD
2
13DD
2
13DD
13
2
13DD
2
1
1
Raft
despărţ
itor
Da
Da
Da
Da
Da
Da
D
D
D
D
3
3
D
D
D
Da
Da
Da
Da
Da
Da
Da
Da
Da
Poziţie nivel Preîncălzire
Temperatură
recomandată
(°C)
200
200
190
190
180
200
200
190
190
220
220
40
65
90
Durata
procesului
de gătire
(minute)
30-35
35-40
15-25
20-30
8-12 ore
90-180
Succes
Friptură vită
Prăjituri
Grătar 1,2-1,5 11** 2
Prăjituri 122
13
* Timpii de gătire enumeraţi mai sus sunt doar orientativi şi pot fi modificaţi în funcţie de gusturile personale.
D
D
D
Da
Da
Da
Timpul de preîncălzire a cuptorului este configurat la o valoare standard şi nu poate fi modificat manual.
** Utilizaţi tava de scurgere pentru a colecta uleiul sau grăsimea ce se poate produce ca rezultat al procesului de gătire.
30-40
35-45
25-35
25-35
15-25
15-25
30-40
35-45
0-75
! Modul de gătire ECO: Acest mod de economisire a energiei este potrivit a găti preparate cum ar fi fileuri de peşte,
63
Page 64

Măsuri de precauţie şi
RO
sfaturi practice
! Acest aparat a fost proiectat şi fabricat în conformitate
cu standardele internaţionale de siguranţă. Următoarele
avertismente sunt furnizate din motive de siguranţă şi
trebuie să e citite cu atenţie.
Siguranţă generală
• Aparatul a fost proiectat pentru uz casnic în interiorul
căminului şi nu este destinat uzului comercial sau industrial.
• Aparatul nu trebuie instalat în aer liber, nici măcar în zone
acoperite. Este extrem de periculos să lăsaţi aparatul
expus la ploaie şi furtuni.
• La mutarea sau poziţionarea aparatului, folosiţi
întotdeauna mânerele prevăzute pe părţile laterale ale
cuptorului.
• Nu atingeţi aparatul când sunteţi desculţi sau cu mâinile
şi picioarele ude sau umede.
• Aparatul trebuie utilizat de către adulţi doar
pentru prepararea alimentelor, în conformitate cu
instrucţiunile prevăzute în această broşură. Orice altă
utilizare a aparatului (de exemplu, pentru încălzirea
camerei) constituie o utilizare necorespunzătoare
şi este periculoasă. Producătorul nu poate
considerat responsabil pentru niciun prejudiciu
cauzat de o utilizare necorespunzătoare, incorectă
şi nerezonabilă a aparatului.
• Nu atingeţi elementele de încălzire sau anumite părţi
ale uşii cuptorului când aparatul este în funcţiune;
aceste părţi devin extrem de erbinţi. Ţineţi copiii
departe de aparat.
• Asiguraţi-vă că nu este posibil un contact între cablurile
de alimentare ale altor aparate electrice şi părţile erbinţi
ale cuptorului.
• Deschiderile de ventilaţie şi de dispersie a căldurii nu
trebuie să e obstrucţionate.
• Prindeţi întotdeauna mânerul uşii cuptorului de partea
centrală: capetele pot erbinţi.
• Folosiţi întotdeauna mănuşi de bucătărie atunci când
introduceţi vase în cuptor sau când le scoateţi.
• Nu utilizaţi folie de aluminiu pentru a acopri partea
inferioară a cuptorului.
• Nu introduceţi materiale inamabile în cuptor: dacă
aparatul este pornit accidental, acestea ar putea lua foc.
• Când deconectaţi aparatul, scoateţi întotdeauna
ştecherul din priză; nu trageţi de cablu.
• Nu efectuaţi nicio operaţie de curăţare sau lucrări de
întreţinere fără să deconectat aparatul de la sursa de
alimentare.
• În cazul în care apar defecţiuni, în niciun caz nu trebuie
să încercaţi pentru să efectuaţi reparaţii dumneavoastră.
Contactaţi un centru de service autorizat (vezi secţiunea
Asistenţă).
• Nu aşezaţi obiecte pe uşa deschisă a cuptorului.
• Nu lăsaţi copiii să se joace cu aparatul.
• Aparatul nu trebuie utilizat de către persoane (inclusiv copii)
cu capacităţi zice, senzoriale sau mentale reduse, de către
persoane fără experienţă sau de către orice persoană care
nu este familiarizată cu produsul. Aceste persoane trebuie,
cel puţin, să e supravegheate de o persoană care îşi
asumă răspunderea pentru siguranţa lor sau care a primit
instrucţiuni preliminare referitoare la utilizarea aparatului.
• Aparatul nu este destinat utilizării cu ajutorul unui
temporizator extern sau al unui sistem de comandă
de la distanţă separat.
Eliminarea
• La eliminarea ambalajului: respectaţi legislaţia locală,
pentru ca ambalajul să poată reutilizat.
• Directiva Europeană 2012/19/CE privind deşeurile de
echipamente electrice şi electronice (DEEE) prevede că
aparatele electrocasnice nu trebuie să e debarasate
în circuitul normal de deşeuri municipale nesortate.
Aparatele scoase din uz trebuie să e colectate
separat, pentru a optimiza rata de recuperare şi
reciclare a materialelor pe care le conţin şi a reduce
impactul asupra sănătăţii umane şi a mediului.
Simbolul ce prezintă un tomberon barat, aplicat pe
produse, vă reaminteşte obligaţia de colectare separată
atunci când aruncaţi aparatul.
Consumatorii trebuie să contacteze autorităţile locale sau
distribuitorul pentru informaţii privind eliminarea corectă
a aparatelor lor vechi.
Respectarea şi conservarea mediului
• Puteţi ajuta la reducerea sarcinii de vârf a companiilor ce
furnizează energie electrică prin folosirea cuptorului la
ore târzii ale după-amiezii şi la primele ore ale dimineţii.
Opţiunile de programare a modului de gătire, modul
"gătire întârziată" (a se vedea Modurile de gătire) şi
modul "curăţare automată întârziată" (a se vedea
Îngrijire şi întreţinere) în special, permit utilizatorului să-şi
organizeze ecient timpul.
• Păstraţi întotdeauna uşa cuptorului închisă atunci când
utilizaţi modurile GRILL (GRĂTAR) şi FAN GRILLING
(GRĂTAR ASISTAT DE VENTILATOR): astfel veţi obţine
rezultate mai bune şi, în acelaşi timp, veţi economisi
energie (aproximativ 10%).
• Vericaţi garniturile uşii periodic şi ştergeţi-le pentru a
vă asigura că acestea nu prezintă resturi, în vederea
obţinerii unei aderenţe corecte la uşă, evitând astfel
dispersarea căldurii.
! Acest produs este în conformitate cu cerinţele celei
mai recente directive europene referitoare la limitarea
consumului de energie în modul standby.
Întreţinerea şi îngrijirea
aparatului
Oprirea aparatului
Deconectaţi aparatul de la alimentarea cu energie electrică
înainte de a efectua orice lucrare la acesta.
Curăţarea aparatului
• Micile diferenţe de culoare pe partea frontală a cuptorului
se datorează diferitelor materiale utilizate, de exemplu,
sticlă, plastic sau metal.
64
Page 65

• Zonele umbroase asemănătoare unor caneluri pe uşa
de sticlă a cuptorului sunt cauzate de reexiile luminii
cuptorului.
• Emailul este un material ce poate folosit la temperaturi
foarte ridicate. Acest proces poate cauza variaţii de
culoare. Acest lucru este normal şi nu va afecta în niciun
fel funcţionarea aparatului. Marginile subţiri ale tablei
de metal nu pot în întregime emailate şi, prin urmare,
pot părea nenisate. Acest lucru nu va afecta protecţia
împotriva ruginirii.
• Părţile externe emailate sau de oţel inoxidabil, precum şi
garniturile din cauciuc pot curăţate cu un burete care
a fost înmuiat în apă călduţă şi săpun neutru. Folosiţi
produse adecvate pentru îndepărtarea petelor dicile.
După curăţare, clătiţi şi uscaţi bine. Nu folosiţi prafuri
abrazive sau substanţe corozive.
• Interiorul cuptorului trebuie să e curăţat, în mod ideal,
după ecare utilizare, în timp ce încă este călduţ. Folosiţi
apă caldă şi detergent, apoi clătiţi bine şi uscaţi cu o
cârpă moale. Nu folosiţi produse abrazive.
• Toate accesoriile - cu excepţia grilajelor glisante - pot
spălate ca vesela obişnuită şi chiar şi în maşina de spălat
vase.
• Vă recomandăm să nu pulverizaţi detergenţi direct pe
panoul de control, ci să folosiţi un burete în schimb.
Inspectarea garniturilor
Vericaţi periodic garniturile uşii cuptorului. Dacă garniturile
sunt deteriorate, vă rugăm să contactaţi cel mai apropiat
centru de service (vezi secţiunea Asistenţă). Se recomandă
să nu utilizaţi cuptorul până la înlocuirea garniturilor.
Înlocuirea becului
Compartime
nt suport de
lampă
Lampă
Capac de sticlă
! Nu atingeţi becul direct cu mâinile.
! Nu folosiţi lampa cuptorului drept/pentru iluminat ambiental.
Pentru a înlocui becul
cuptorului:
1. Scoateţi capacul de sticlă
al suportului lămpii.
2. Scoateţi becul şi înlocuiţi-l
cu unul similar: lampa cu
halogen de tensiune 230 V,
putere 25 W, capac G 9.
3. Puneţi la loc capacul de
sticlă (vezi diagrama).
RO
! Nu folosiţi niciodată aparate de curăţare cu abur sau sub
presiune pe aparat.
Curăţarea uşii cuptorului
Curăţaţi partea de sticlă a uşii cuptorului cu un burete şi un
produs de curăţare neabraziv, apoi uscaţi cu o cârpă moale.
Nu folosiţi materiale abrazive dure sau raclete metalice
ascuţite, deoarece acestea ar putea zgâria suprafaţa şi ar
putea provoca spargerea sticlei.
Pentru o curăţare mai temeinică, uşa cuptorului poate
îndepărtată:
1. Deschideţi uşa cuptorului complet (vezi diagrama).
2. Folosiţi o şurubelniţă pentru a ridica şi roti micile mânere
F situate pe cele două balamale (vezi diagrama).
F
3. Prindeţi uşa de cele două părţi
exterioare şi închideţi-o aproximativ
pe jumătate. Trageţi uşa spre
dumneavoastră, ridicându-o din
fantă (vezi diagrama). Pentru a
repoziţiona uşa, inversaţi această
secvenţă.
65
Page 66

Identicarea şi remedierea
Problemă
Cauza posibilă
Remediu
RO
problemelor
„Tasta Ceas“ şi cifrele de pe
display clipesc.
Programarea unei coaceri nu a pornit. A fost o pană de curent. Resetaţi programările.
Numai „Tasta Ceas“ este aprins cu
lumină puternică.
Am ales un program automat.
Pe display se aşează „Hot“ şi
coacerea nu porneşte.
Am ales coacerea ventilată, iar
alimentele prezintă arsuri.
Aparatul a fost de-abia racordat la
reţeaua electrică sau a fost o pană
de curent.
Aparatul este în modalitatea standby. Atingeţi o tastă oarecare pentru a
Temperatura internă a cuptorului
este mai mare decât cea propusă
pentru programul ales.
Poziţiile 1 şi 5: aerul cald ar putea
provoca arderi alimentelor delicate.
Reglaţi ceasul.
ieşi din modalitatea standby.
Aşteptaţi răcirea cuptorului.
Se recomandă rotirea tăvilor la
jumătatea coacerii.
66
Page 67

Инсталација
590 mm.
! Држите ову књижица са упутствима на безбедном
месту за будуће референце. Ако је апарат продат, дат
или премештен, поведите рачуна да се и ова књижица
такође пренесе новим власницима тако да могу да имају
користи од савета који се у њој налазе.
! Прочитајте пажљиво овај приручник са упутствима: он
садржи важне информације које се односе на безбедан
рад, инсталацију и одржавање апарата.
Позиционирање
! Не дозволите деци да се играју са амбалажом; њу
треба одложити у складу са локалним стандардима за
сакупљање одвојеног отпада (погледајте Мере опреза
и савети).
! Овај апарат мора да инсталира квалификовани
професионалац у складу са приложеним упутствима.
Неправилна инсталација може да оштети имовину или
да нашкоди људима или животињама.
Уградни апарати
Користите одговарајући орман да обезбедите правилан
рад апарата:
• табле уз рерну морају да буду направљене од
материјала отпорног на топлоту.
• ормани са спољним деловима од фурнира морају да
се спајају лепковима који могу да издрже температуре
до 100°С.
• за инсталацију рерне испод радне плоче (погледајте
цртеж) или у кухињску јединицу, орман мора да буде
следећих димензија:
45 mm.
560 mm.
мин. 20 мм
РЕЖИМ СА
ВЕНТИЛАТОРОМ
мин. 45 мм
Центрирање и фиксирање
Причврстите апарат за орман:
• Чишћење врата рерне.
• Уклоните 2 гумена чепа који покривају отворе за
фиксирање на ободу оквира.
• Фиксирајте рерну у орману уз помоћ 2 дрвена
завртња.
• Замените гумене чепове.
! Сви делови који обезбеђују безбедан рад апарата не
смеју да буду заменљиви без помоћи алата.
Електрични прикључак
Рерне које су опремљене трополним напонским
каблом дизајниране су да раде на наизменичну струју,
при напону и фреквенцији назначеној на плочици са
подацима која се налази на апарату (погледајте испод).
RU
550 mm.
min.
45 mm.
560 mm.
575-585 mm.
570 mm.
595 mm.
20 mm.
550 mm.
20,5 mm.
22,5 mm.*
! Апарат не сме да дође у контакт са електричним
деловима пошто се инсталира.
Показатељи потрошње дати на плочици са подацима
израчунати су за ову врсту инсталације.
Вентилација
За обезбеђивање одговарајуће
вентилације, задња табла
ормана мора да се уклони.
Препоручује се инсталација
рерне тако да се она ослања на
две дрвене летвице или на
потпуно равну површину са
отвором од најмање 45 x 560 мм
(погледајте цртеже).
Постављање напонског кабла
Отворите таблу са
терминалима уметањем
шрафцигера у бочне
језичке поклопца.
Користите шрафцигер као
ручицу гурајући га надоле
да отворите поклопац
(погледајте цртеж).
N
2. Инсталирајте напонски
кабл тако што ћете
N
олабавити кабловску
спону и три контактна
завртња жице Л-Н- .
Повежите жице
L
са одговарајућим
терминалима: плаву
L
жицу са терминалом
означеним (Н), браон жицу
са терминалом означеним (Л) и жуту/зелену жицу са
терминалом означеним (погледајте цртеж).
67
Page 68

3. Осигурајте кабл затезањем завртња споне.
СПЕЦИФИКАЦИЈЕ АПАРАТА
RU
4. Затворите поклопац табле са терминалима.
Прикључивање напонског кабла на електричну
мрежу
Инсталирајте стандардни утикач који одговара
оптерећењу назначеном на плочици са подацима
(погледајте табелу).
Апарат мора да буде директно прикључен на електричну
мрежу уз помоћ омниполарног прекидача са минималним
контактним отвором од 3 мм инсталираним између
апарата и електричне мреже. Прекидач мора да
одговара назначеном напајању и мора да буде у складу
са актуелним електричним прописима (прекидач не сме
да прекида жицу уземљења). Напонски кабл мора да се
постави тако да не долази у контакт са температурама
већим од 50°С ни у једном тренутку (задња табла рерне,
на пример).
! Инсталатер мора да провери да ли је обављено
исправно електрично прикључивање и да ли оно у
потпуности одговара безбедносним прописима.
Пре прикључивања апарата на струјно напајање,
проверите да ли је
• апарат уземљен и да ли је утикач у складу са законом.
• утичница у стању да издржи максималну снагу
апарата, која је назначена на плочици са подацима.
• напон у опсегу између вредности назначених на
плочици са подацима.
• утичница компатибилна са утикачем апарата. Ако
утичница није компатибилна са утикачем, затражите
од овлашћеног техничара да је замени. Не користите
продужне каблове или вишеструке утичнице.
Ширина 43,5 цм
Димензије*
Запремина*
Димензије**
висина 41 цм
дубина 41 цм
74 л
Ширина 45,6 цм
висина 41 цм
дубина 41 цм
Запремина** 77 л
Електрични
прикључци
ЕНЕРГЕТСКА
ЕТИКЕТА
напон: 220 - 240 V~ 50/60Hz или 50Hz
максимална апсорбована снага2600 W
(погледајте плочицу са подацима)
Директива 2002/40/EЦ на етикети
електричних рерни.
Стандард EН 50304
Oбјављена енергетска потрошња за
грејни режим
– класа принудне конвекције: ECO.
Овај апарат усклађен је са следећим
директивама Европске економске
заједнице: 2006/95/EEЦ од 12/12/06
(ниски напон) и каснији амандмани
- 2004/108/EEC од 15/02/04
(електромагнетна компатибилност)
и каснији амандмани
- 93/68/EEЦ од 22/07/93 и каснији
амандмани.
2012/19/EЕЦ и каснији амандмани.
1275/2008 режим
приправности/искључено
! Пошто се апарат инсталира, напонски кабл и
електрична утичница морају да буду лако доступни.
! Кабл не сме да буде савијен или стиснут.
! Кабл морају редовно да проверавају и замењују
искључиво овлашћени техничари (погледајте Помоћ).
! Произвођач одбија сваку одговорност ако се ове
мере опреза не узму у обзир.
* Само за моделе са вученим шинама.
** Само за моделе са жичаним шинама.
68
Page 69

Структура рерне
АП
Температура у првој шупљини
(главни или мали простор)
Између 40°C и 150°C
Температура у другој шупљини
Рерна са ОТВОРЕНИМ ПРОСТОРОМ има капацитет
од 70 литара и нуди корисницима опцију кувања на 4
полице истовремено или кување великих количина што
не би обавезно било могуће у традиционалној рерни.
56 универзалних (Креација) и аутоматских (Успех)
режима кувања гарантују савршене резултате сваки пут,
без обзира на јело које кувате.
ОТВОРЕНИ ПРОСТОР такође нуди максималну
удобност за све захтеве, са 4 различите радне опције:
рерна је један велики одељак, али може да се подели
на засебне просторе различитих величина, свака са
својим независним контролама температуре и трајања.
То је могуће захваљујући ДЕЛИТЕЉУ са топлотном
изолацијом, који дели цео додатно велики простор на
два простора различитих величина: на главни простор
и мали простор.
Два одељка главног и малог простора могу да се
користе истовремено за брже кување различитих јела
или могу да се користе засебно тако да се користи само
неопходан простор.
Када се ова два одељка користе истовремено,
температура кувања сваког може да се подеси на
вредност између 30° и 300°. Може постојати разлика
у температури од 100° између ове две зоне што значи
да је могуће кување веома различитих јела без икаквог
мешања укуса или арома.
RU
Додатно велики простор: кување на 4 нивоа полице
ПОЛИЦ
ДОДАТНО
ВЕЛИКИ
ПРОСТОР
Кување уз коришћење само малог простора
МАЛИ
ПРОСТОР
ГЛАВНИ
ПРОСТОР
ПОЛИЦА
ПОЛИЦА
ПЛЕХ ЗА
КАПАЊЕ
ПОЛИЦА или
ПЛЕХ ЗА КАПАЊЕ
Делитељ „Д“
(фиксиран положај)
Табела испод наводи могуће температурне вредности
које могу да се подесе. Интелигентни дисплеј водиће вас
Главни и мали простор: симултана радња
МАЛИ
ПРОСТОР
ГЛАВНИ
ПРОСТОР
Кување уз коришћење само малог простора: кување на 3 нивоа полице
МАЛИ
ПРОСТОР
ГЛАВНИ
ПРОСТОР
ОЛИЦА или ПЛЕХ ЗА КАПАЊЕ
Делитељ „Д“ (фиксиран положај)
ПОЛИЦА (кување на 3 нивоа)
ПОЛИЦА (кување на 3 нивоа)
ПЛЕХ ЗА КАПАЊЕ
(кување на 3 полице)
Делитељ „Д“ (фиксиран положај)
ПОЛИЦА (кување на 3 нивоа)
ПОЛИЦА (кување на 3 нивоа)
ПЛЕХ ЗА КАПАЊЕ
(кување на 3 полице)
кроз тачну процедуру која се користи за подешавање
температуре двеју шупљина.
Између 155°C и 200°C Температурна разлика у односу на прво изабрано
Између 205°C и 250°C Температурна разлика у односу на прво изабрано
можете подесити вредност између 110°C (210°C-100°C) и 250°C (максимално температурно подешавање) за друго.
(главни или мали простор)
Температурна разлика у односу на прво изабрано
удубљење није већа од 50°C
На пример: ако подесите једно удубљење на 90°C,
можете да подесите вредност између 40°C (90°C-50°C) и 140°C (90°C+50°C) за друго.
удубљење није већа од 70°C
На пример: ако подесите једно удубљење на 180°C,
можете да подесите вредност између 110°C (180°C-70°C) и 250°C (180°C+70°C) за друго.
удубљење није већа од 100°C
На пример: ако подесите једно удубљење на 210°C,
69
Page 70

Покретање и употреба
RU
УПОЗОРЕЊЕ! Рерна има
стоп систем за извлачење
полица и спречавање
њиховог испадања из
рерне (1).
Као што је приказано
на цртежу, да бисте их
у потпуности извукли,
једноставно подигните
полице, држећи их у предњем делу и повуците (2).
! Када први пут користите апарат, загрејте празну рерну
са затвореним вратима до максималне температуре
на најмање пола сата. Поведите рачуна да соба буде
добро проветрена пре искључивања рерне и отварања
врата рерне. Апарат може испустити благо непријатан
мирис изазван сагоревањем заштитних супстанци које
се користе у процесу производње.
! Да олакшате процес подешавања, притисните и држите
дугмад " " и " " да веома брзо прођете кроз бројеве на
дисплеју.
Подешавање сата
! Сат може да се подеси само када је рерна искључена.
Ако је рерна у режиму приправности, једним притиском
на дугме приказаће се само тренутно подешавање
времена. Поново га притисните за подешавање времена.
После прикључивања на електричну мрежу или после
нестанка струје, дугме и цифре на дисплеју ВРЕМЕ
трепериће 10 секунди.
За подешавање сата:
1. Притисните дугме .
2. Подесите слику сата уз помоћ дугмади " " и " ".
3. Пошто стигнете до тачне вредности сата, притисните
дугме .
4. Поновите процес изнад да подесите минуте.
Ако нестане струја, биће неопходно ресетовање сата.
Ако икона трепери на дисплеју, то показује да сат
није тачно подешен.
Подешавање минутног подсетника
! Минутни подсетник може да се подеси без обзира на то
да ли је рерна укључена или искључена. Он не искључује
и не укључује рерну.
! Свако подешавање аутоматски ће се сачувати у
меморији апарата после 10 секунди.
! Током рада, препоручујемо уклањање грнчарије и
осетљивог посуђа из шупљина које се не користе.
! Пошто кување почне, пре него што се уклони
ДЕЛИТЕЉ, рерна мора да се искључи уз помоћ дугмета
.
! Сваки пут када се рерна укључи она се подешава на
режим кувања КРЕАЦИЈА.
! Контроле на додир не могу да се активирају ако
корисник носи рукавице.
! Ради оптимизације учинка кувања, приликом покретања
изабране функције, примениће се подешавања
производа која могу да доведу до одложеног покретања
вентилатора и грејних елемената.
! Рерна ће почети своје припремно загревање после 2
секунде од одабира жељеног циклуса.
Закључавање контролне табле
! Контролна табла може да се закључа док је рерна
искључена, пошто кување почне или се заврши и током
програмирања.
За закључавање контрола рерне, притисните и држите
дугме најмање 2 секунде. Аларм ће се огласити и
дисплеј ТЕМПЕРАТУРЕ приказује симбол "O—н". Икона
ће засветлети да покаже активацију закључавања.
За деактивацију закључавања контрола рерне,
притисните и држите дугме најмање 2 секунде.
Пошто подешено време истекне, минутни подсетник
емитује аларм који ће аутоматски да се заустави после
30 секунди или када се укључи неко активно дугме на
контролној табли.
За подешавање минутног подсетника, наставите како
следи:
1. Притисните дугме .
2. Подесите жељено време уз помоћ дугмади " " и " ".
3. Пошто стигнете до жељене вредности, поново
притисните дугме . Светлећи симбол подсетиће
вас да је минутни подсетник укључен. За отказивање
минутног подсетника, притисните дугме " " и користите
дугмад " " и да подесите време на 00:00. Притисните
поново дугме .
Икона ће се искључити да покаже да је минутни
подсетник онемогућен.
Расхладна вентилација
Да би се охладила спољна температура рерне, расхладни
вентилатор дува ваздух између контролне табле и врата
рерне, као и према дну рерне.
! Пошто се заврши кување, расхладни вентилатор
наставља да ради док се рерна не охлади довољно.
Светло рерне
Светло се пали када се отворе врата рерне или када
почне режим кувања.
Дугме може да се користи за укључивање светла у
било ком тренутку.
Индикатори заостале топлоте
Апарат има индикатор заостале топлоте. Када је рерна
искључена, пали се светло "заостале топлоте" на дисплеју
70
Page 71

да покаже високе температуре у унутрашњости шупљине.
Индикаторско светло искључује се када се унутрашњост
рерне охлади.
Обнављање фабричких подешавања
Фабричка подешавања рерне могу да се обнове за
рестартовање свих одабира које је направио корисник
(сат и прилагођена трајања). За извршење ресетовања,
искључите рерну, затим притисните и држите дугме које
одговара првом ручном режиму кувања (горње лево), а
затим истовремено и дугме на 6 секунди. Пошто се
процедура обнављања заврши, огласиће се аларм. Када
се први пут притисне дугме , рерна ће се понашати
као да је укључена први пут.
Приправност
Овај производ је усаглашен са захтевима најновије Европске
директиве о ограничењу потрошње енергије у режиму
приправности. Ако није притиснуто ниједно дугме 30 минута
и ако није активирано закључавање контролне табле/врата,
апарат се аутоматски враћа у режим приправности. Режим
приправности показује се јако светлећим светлом за "дугме
за сат". Чим се интеракција са машином настави, обнавља
се рад система.
Режими
! Као гаранција савршено меке и хрскаве хране, рерна
испушта воду из хране у виду паре. То значи да се могуће
постићи оптималне резултате кувања за сва јела.
! Сваки пут када се рерна укључи она предлаже режим
кувања КРЕАЦИЈА.
! Никада не стављајте предмете директно на дно рерне;
то ће спречити оштећење емајлираног премаза.
! Увек стављајте посуђе на приложене полице.
Додатно велики простор
! Не користите положај "Д" за полице.
Покретање рерне
1. Укључите контролну таблу притиском на дугме .
Аларм апарата оглашава се три пута (све гласније) и
сва дугмад светле у секвенцама.
2. Притисните дугме које одговара жељеном режиму
кувања. Дисплеј ТЕМПЕРАТУРА приказује:
- температуру повезану са режимом, ако је програмирање
ручно;
- "Ауто", ако је програмирање аутоматско.
Дисплеј ВРЕМЕ приказује:
- тренутно време, ако је програмирање ручно;
- трајање, ако је програмирање аутоматско.
3. Притисните дугме да започнете кување.
4. Рерна ће започети своју фазу припремног загревања:
светло припремног загревања трепери.
5. Када се процес припремног загревања заврши,
оглашава се аларм и индикаторско светло припремног
загревања показује да је ова фаза завршена: тада храна
може да се стави у рерну.
6. Током кувања увек је могуће:
- променити температуру притиском на дугме " ", а
затим на дугмад " " и (само ручни режими);
- подешавање трајања режима кувања (погледајте
Режиме кувања);
- притиснути дугме да започнете кување. У том
случају апарат чува у својој меморији претходно
модификовану температуру (само ручни режими);
- искључивање рерне притиском на дугме 3 секунде.
7. У случају нестанка струје, ако је рерна већ радила,
аутоматски систем унутар апарата поново ће активирати
режим кувања тамо где је прекинут докле год температура
не падне испод одређеног нивоа. Програмирани режими
кувања који још носу почели неће бити сачувани и морају
да се репрограмирају.
! Нема фазе припремног загревања за режим РОШТИЉ.
КРЕАЦИЈА режими кувања
! Сви режими кувања имају подразумеване температуре
кувања које могу да се подесе ручно на вредност
између 30°C и 250°C према жељи (300°C за режим
ГРИЛОВАЊЕ). КРЕАЦИЈА режими кувања обухватају
све ручне програме.
Рерна контролише све есенцијалне аспекте сваког од
ових режима кувања и олакшава вам да направите
савршено јело, од најједноставнијих рецепата до
префињених кулинарских ужитака: температура, извор
топлоте, влага и рад са вентилатором контролишу се
аутоматски.
Ово поглавље је написано уз помоћ нашег кулинарског
стручњака. Позивамо вас да следите његов савет како
бисте имали користи од његовог искуства и усавршили
своје кулинарске вештине.
Препоручени режими кувања, температуре и висине
полица у рерни рефлектују лично искуство нашег
стручњака у кухињи и помоћи ће вам да постигнете
најбоље резултате.
Табела испод прецизира да ли је боље припремно
загревати рерну или није за сваки КРЕАЦИЈА режим
кувања. Узимање у обзир ових предлога гарантоваће
савршене резултате.
Ако желите да ставите храну у припремно загрејану
рерну, сачекајте да се фаза припремног загревања
заврши (ово ће сигнализирати низ пиштања).
Температура се подешава аутоматски, у складу са
изабраним режимом кувања; међутим, можете је
подесити према свом рецепту.
Можете такође подесити трајање кувања уз помоћ
тренутног и одложеног старта.
ВИШЕСТЕПЕНИ режим
Активирани су сви грејни елементи и вентилатор.
Пошто топлота остаје константна у рерни, ваздух кува
и пече храну на уједначен начин. Могу да се користе
максимално две полице истовремено.
RU
71
Page 72

RU
Режими НИСКА ТЕМПЕРАТУРА
Ова врста кувања може да се користи за пробу,
одмрзавање, припрему јогурта, грејање јела траженом
брзином, и споро кување на ниским температурама.
Температурне опције су: 40, 65 и 90°C.
Режим ВЕНТИЛАТОРСКО ГРИЛОВАЊЕ
Активирају се горњи грејни елемент и печењарски
ражањ (ако је присутна) и вентилатор почиње да ради.
Током дела циклуса, циркуларни грејни елемент се
такође активира. Ова комбинација функција повећава
ефикасност једносмерне топлотне радијације коју
пружају грејни елементи путем присилне циркулације
ваздуха кроз рерну.
То помаже у спречавању загоревања на површини и
омогућава да топлота продре право у храну. Увек кувајте
у овом режиму са затвореним вратима рерне.
Режим ГРИЛОВАЊЕ
Активирају се горњи грејни елемент и печењара (ако
је присутна). Висока и директна температура решетке
препоручује се за храну која захтева високу температуру
површине. Увек кувајте у овом режиму са затвореним
вратима рерне (погледајте "Практичне савете за
кување").
Режим БРЗО КУВАЊЕ
Припремно загревање није неопходно за овај режим
кувања. Овај режим нарочито одговара за брзо кување
припремно упаковане хране (замрзнута или припремно
кувана). Најбољи резултати постижу се коришћењем
само једне полице за кување.
Режим ПИЦА
Горњи и циркуларни грејни елементи се укључују и
вентилатор почиње да ради. Ова комбинација веома
брзо загрева рерну. Ако користите више од једне полице
истовремено, промените положај посуђа половином
процеса кувања.
Режим ЕКО
Укључују се задњи грејни елемент и вентилатор, чиме
се гарантује дистрибуција топлоте на деликатан и
уједначен начин кроз читаву рерну. Овај режим за
уштеду енергије одговарајући је за кување малих јела,
подгревање меса и завршетак процеса кувања.
Печењарски ражањ
За рад са функцијом
печењаре (погледајте
цртеж) наставите на
следећи начин:
1. Поставите плех за
капање у положај 1.
2. Поставите печењарски
ослонац у положај 3 и
уметните ражањ у отвор
који се налази на задњој
табли рерне.
* Доступно је само код неких модела.
3. Покрените функцију печењаре одабиром режима
или .
! Када је укључен режим , печењара ће се зауставити
ако се отворе врата.
УСПЕХ режими кувања
! Температура и трајање кувања су припремно
подешене вредности које гарантују савршен резултат
сваки пут - аутоматски. Ове вредности не могу да се
подесе и користе систем C.O.P.® (Programmed Optimal
Cooking). Циклус кувања аутоматски се зауставља и
рерна показује када је јело скувано. Можете почети са
кувањем без обзира на то да ли је рерна припремно
загрејана или није. Трајање кувања може да се
прилагоди личним укусима, његовом модификацијом
- пре почетног времена - за ±5/20 минута у зависности
од изабраног програма. Пошто кување почне, и даље је
могуће модификовати његово трајање. Ако се вредност
модификује пре почетка кувања, она се чува у меморији
апарата и поново предлаже следећи пут када се користи
тај режим кувања. Ако је температура унутар рерна
виша од предложене вредности за изабрани режим,
текст "Врело" појављује се на дисплеју ТЕМПЕРАТУРА
и неће моћи да се започне кување; сачекајте да се
рерна охлади.
! Када се достигне фаза кувања, оглашава се аларм
рерне.
! Не отварајте врата рерне јер ће то пореметити време
и температуру кувања.
Режим ГОВЕДИНА
Користите ову функцију да кувате говедину и свињетину.
Ставите храну у рерну док је још хладна. Ово јело може
да се стави и у припремно загрејану рерну.
Режим КОЛАЧИ
Ова функција је идеална за кување десерта који се
праве са природним квасцем, прашком за пециво и за
десерте који не садрже квасац. Ставите јело у рерну док
је још хладна. Ово јело може да се стави и у припремно
загрејану рерну.
Режим ХЛЕБ
Користите ову функцију за печење хлеба. За постизање
најбољих резултата, препоручујемо да пажљиво
погледате упутства испод:
• Следите рецепт.
• Не прекорачујте максималну тежину плеха за капање.
• Имајте на уму да сипате 100 г (1 дл) хладне воде у
плех за капање који треба да се постави у положај 7.
• Тесто мора да се остави да нарасте на собној
температури 1 - 1 1/2 сата ( у зависности од собне
температуре) или док се тесто не удвостручи.
Рецепт за ХЛЕБ:
1 плех за капање запремине 1000 г макс, доњи ниво
2 плеха за капање сваки запремине 1000 г макс, средњи
и доњи нивои
72
Page 73

Рецепт за 1000 г теста: 600 г брашна, 360 г воде, 11 г
соли, 25 г свежег квасца (или 2 кесице прашка за пециво)
Метод:
• Помешајте брашно и со у великој чинији.
• Растворите квасац у млакој води (око 35 степени).
• Направите мали бунар у гомили брашна.
• Сипајте у њега воду и мешавину квасца.
• Месите тесто развлачећи и савијајући га дланом руке
10 минута док не добије уједначену форму и не лепи
се.
• Формирајте лопту од теста, поставите је у велику
чинију и покријте је провидном, пластичном фолијом
да спречите исушивање површинског дела теста.
Изаберите ручну функцију НИСКА ТЕМПЕРАТУРА
на рерни и подесите температуру на 40°C. Ставите
чинију унутра и оставите тесто да нарасте око 1 сат
(тесто треба запремински да се удвостручи).
• Исеците тесто у једнаке векне.
• Ставите их у плех за капање, на листу папира за
печење.
• Напрашите векне брашном.
• Направите усеке у векнама.
• Ставите храну у рерну док је још хладна.
• Покрените режим кувања ХЛЕБ.
• Пошто се испеку, оставите векне на једној од
решеткастих полица док се потпуно не охладе.
ДЕЛИТЕЉ
Поставите ДЕЛИТЕЉ на полицу "Д" ДЕЛИТЕЉА уз
помоћ игле, са стрелицама окренутим ка задњем делу
рерне. Огласиће се аларм да потврди да је ДЕЛИТЕЉ
правилно постављен; тада ће бити могуће засебно или
истовремено коришћење два одељка ГЛАВНИ и МАЛИ
простор.
Дугме ће бити онемогућено. Изабрана шупљина
смењује се сваки пут када се притисне дугме.
Подразумевано се изабере ГЛАВНА шупљина.
Мали простор
Покретање рерне
1. Са уметнутим ДЕЛИТЕЉЕМ, користите дугме да
изаберете шупљину МАЛИ простор. Засветлеће икона
.
2. Следите горе наведена упутства за ДОДАТНО
ВЕЛИКУ шупљину када вршите разне процедуре
подешавања и поставки.
Режими кувања
Режим ГРИЛОВАЊЕ
Активирају се горњи грејни елемент и печењара (ако
је присутна). Висока и директна температура решетке
препоручује се за храну која захтева високу температуру
површине. Увек кувајте у овом режиму са затвореним
вратима рерне (погледајте "Практичне савете за
кување").
Режим БРЗО КУВАЊЕ
Припремно загревање није неопходно за овај режим
кувања. Овај режим нарочито одговара за брзо кување
припремно упаковане хране (замрзнута или припремно
кувана). Најбољи резултати постижу се коришћењем
само једне полице за кување.
Главни простор
Покретање рерне
1. Са уметнутим ДЕЛИТЕЉЕМ, користите дугме да
изаберете шупљину МАЛИ простор. Засветлеће икона
.
2. Следите горе наведена упутства за ДОДАТНО
ВЕЛИКУ шупљину када вршите разне процедуре
подешавања и поставки.
КРЕАЦИЈА режими кувања
! Сви режими кувања имају подразумеване температуре
кувања које могу да се подесе ручно на вредност
између 30°C и 250°C према жељи (300°C за режим
ГРИЛОВАЊЕ). КРЕАЦИЈА режими кувања обухватају
све ручне програме.
Рерна контролише све есенцијалне аспекте сваког од
ових режима кувања и олакшава вам да направите
савршено јело, од најједноставнијих рецепата до
префињених кулинарских ужитака: температура, извор
топлоте, влага и рад са вентилатором контролишу се
аутоматски.
Ово поглавље је написано уз помоћ нашег кулинарског
стручњака. Позивамо вас да следите његов савет како
бисте имали користи од његовог искуства и усавршили
своје кулинарске вештине. Препоручени режими кувања,
температуре и висине полица у рерни рефлектују лично
искуство нашег стручњака у кухињи и помоћи ће вам да
постигнете најбоље резултате.
Табела испод прецизира да ли је боље припремно
загревати рерну или није за сваки КРЕАЦИЈА режим
кувања.
Узимање у обзир ових предлога гарантоваће савршене
резултате. Ако желите да ставите храну у припремно
загрејану рерну, сачекајте да се фаза припремног
загревања заврши (ово ће сигнализирати низ пиштања).
Температура се подешава аутоматски, у складу са
изабраним режимом кувања; међутим, можете је
подесити према свом рецепту.
Можете такође подесити трајање кувања уз помоћ
тренутног и одложеног старта.
ВИШЕСТЕПЕНИ режим
Активирани су сви грејни елементи и вентилатор.
Пошто топлота остаје константна у рерни, ваздух кува
и пече храну на уједначен начин. Могу да се користе
максимално две полице истовремено.
Режими НИСКА ТЕМПЕРАТУРА
Ова врста кувања може да се користи за пробу,
одмрзавање, припрему јогурта, грејање јела траженом
брзином, и споро кување на ниским температурама.
Температурне опције су: 40, 65 и 90°C.
RU
73
Page 74

RU
Режим ПИЦА
Горњи и циркуларни грејни елементи се укључују и
вентилатор почиње да ради. Ова комбинација веома
брзо загрева рерну. Ако користите више од једне полице
истовремено, промените положај посуђа половином
процеса кувања.
Режим ЕКО
Укључују се задњи грејни елемент и вентилатор, чиме
се гарантује дистрибуција топлоте на деликатан и
уједначен начин кроз читаву рерну. Овај режим за
уштеду енергије одговарајући је за кување малих јела,
подгревање меса и завршетак процеса кувања.
УСПЕХ режими кувања
! Температура и трајање кувања су припремно
подешене вредности које гарантују савршен резултат
сваки пут - аутоматски. Ове вредности не могу да се подесе
и користе систем C.O.P.® (Programmed Optimal Cooking).
Циклус кувања аутоматски се зауставља и рерна показује
када је јело скувано. Можете почети са кувањем без обзира
на то да ли је рерна припремно загрејана или није. Трајање
кувања може да се прилагоди личним укусима, његовом
модификацијом - пре почетног времена - за ±5/20 минута у
зависности од изабраног програма. Пошто кување почне,
и даље је могуће модификовати његово трајање. Ако се
вредност модификује пре почетка кувања, она се чува у
меморији апарата и поново предлаже следећи пут када
се користи тај режим кувања. Ако је температура унутар
рерна виша од предложене вредности за изабрани режим,
текст "Врело" појављује се на дисплеју ТЕМПЕРАТУРА и
неће моћи да се започне кување; сачекајте да се рерна
охлади.
! Када се достигне фаза кувања, оглашава се аларм
рерне.
! Не отварајте врата рерне јер ће то пореметити време
и температуру кувања.
Режим ГОВЕДИНА
Користите ову функцију да кувате говедину и свињетину.
Ставите храну у рерну док је још хладна. Ово јело може
да се стави и у припремно загрејану рерну.
Режим КОЛАЧИ
Ова функција је идеална за кување десерта који се
праве са природним квасцем, прашком за пециво и за
десерте који не садрже квасац. Ставите јело у рерну док
је још хладна. Ово јело може да се стави и у припремно
загрејану рерну.
Коришћење Малог простора и Главног
простора истовремено
! Симултани рад је једино могућ када се користе
КРЕАЦИЈА режими кувања.
Покретање рерне
За симултано коришћење, једноставно покрените
режим кувања за обе шупљине заредом. Дисплеј
ТЕМПЕРАТУРА приказује параметре кувања за обе
шупљине.
! Захваљујући високој енергетској ефикасности апарата,
потребно је само 15 минута за припремно загревање
шупљине МАЛИ ПРОСТОР.
Програмирање кувања
! Режим кувања мора да се изабере пре програмирања.
Програмирање трајања кувања
1. Притисните дугме неколико пута док икона и
нумеричке цифре на дисплеју не почну да светле.
2. Окрените дугме МЕРАЧ ВРЕМЕНА према " " и " " да
подесите време како желите; држите дугме у положају
за бржи пролазак кроз бројеве и да олакшате процес
подешавања.
3. Пошто стигнете до жељеног трајања, поново
притисните дугме . Дисплеј ће приказивати
наизменично подешено трајање и температуру.
4. Притисните дугме да започнете кување.
5. Пошто се кување заврши, појављује се "КРАЈ" на
дисплеју и оглашава се аларм.
• На пример: 9:00 часова је, а програмирано је трајање
од 1 сата и 15 минута. Програм ће аутоматски да се
заустави у 10:15 часова.
Подешавање завршног времена за режим кувања
! Трајање кувања мора да се подеси пре заказивања
завршног времена кувања.
! Да би одложено програмирање правилно радило, сат
треба да се подеси на тачно време.
1. Пратите кораке 1 до 3 да подесите трајање како је
горе прецизирано.
2. Притисните дугме двапут: икона и нумеричке
цифре на дисплеју почеће да трепере.
3. Окрените дугме МЕРАЧ ВРЕМЕНА према " " и " " да
подесите вредност завршног времена кувања.
4. Пошто стигнете до жељеног завршног времена,
поново притисните дугме . Дисплеј ће наизменично
приказивати трајање, завршно време кувања и
подешену температуру.
5. Притисните дугме да активирате програмиран
режим.
Програмирање је подешено када засветле дугмад
и .
ДИСПЛЕЈ наизменично приказује завршно време
кувања и трајање кувања.
6. Пошто се кување заврши, појављује се "КРАЈ" на
дисплеју и оглашава се аларм.
* Доступно је само код неких модела.
74
Page 75

• На пример: 9:00 часова је и програмирано је време од
1 сата и 15 минута, а завршно време подешено је на
12:30 часова. Програм ће почети аутоматски у 11:15
часова.
За отказивање програмирања, притисните дугме .
Практичан савет за кување
ВИШЕСТЕПЕНО
• Користите положаје 1, 3, 5 и 6.
• Поставите плех за капање на дно, а полицу на врх.
• Када кувате пице или погаче, користите лагани
алуминијумски послужавник максималног пречника
30 цм и поставите га на приложену полицу. Ако пица
има пуно надева, препоручујемо додавање моцарела
сира преко пице половином процеса кувања. Током
процеса кувања, препоручује се промена редоследа
полица.
• Користите положаје 2 и 4 постављајући храну која
захтева више топлоте на 2.
• Поставите плех за капање на дно, а полицу на врх.
РЕШЕТКА
• Припремно загрејте рерну 5 минута.
• Поставите ДЕЛИТЕЉ на "Д" полицу ДЕЛИТЕЉА.
• Држите врата рерне затворена приликом кувања у
овом режиму.
• Поставите полицу у положај 7. Поставите храну у
центар полице. Поставите плех за капање на ниво
полице 6.
• Ова функција препоручује се за: златну корицу на
храни, гратинирање, бојење пуслица, прављење
тостираних сендвича и гриловање малих количина
танког, слабог меса.
• Препоручује се да се степен снаге подеси на
максимум. Грејни елемент на врху регулише се
термостатом и не мора увек да ради константно.
• Поставите решеткасту полицу у положај 3 или 4 и
ставите
храну у центар полице.
• Препоручује се да се температура подеси на
максимални ниво. Грејни елемент на врху регулише
се термостатом и не мора увек да ради константно.
RU
БРЗО КУВАЊЕ
• Поставите плех за капање на ниво полице 6.
• Приликом кувања замрзнуте хране, увек следите
упутства на паковању.
75
Page 76

Табела са саветима за кување за рерне са додатно великим простором шупљине
Табела са саветима за кување за мали простор
RU
Функција
Храна
Креација
Вишестепено*
Тартови 1
Принцес крофне 1
Колачићи 180
Ситни колачи 1
Карамел крем
(bain-marie)
Панетоне (Божићни колач) 1 1 или 2 Да 160 45-60
Торта 1
Сунђер торта
Печење
Брзо кување*
Пица*
Гриловање са
вентилатором*
Гриловање*
Ниска
температура*
Ћевапи
Рибљи филети
Замрзнути кромпири
Пица/погача
Печена меса
Гратинирање
Велики печењарски бут
Велики печењарски бут
дивљачи
Говеђа ребарца
Кобасице
Свињска ребарца
Сланина
Проба/одмрзавање
Беле пуслице
Месо/риба
Тежина
(кг)
Кување
на полици
бр.
1,5-22
Плех за
капање
2
3
4
2
3
4
1
2
3
4
2
3
1
2
3
2
1
2
3
1
1
1
1
2
3
4
1
1
1
1
1
1
1
1
1
4
3
2 или 3
1 до 2
2 или 3
1 до 2
2 или 3
2 или 3
2 или 3
2 или 3
1 или 2
2***
3 или 4
1***
1***
Положај полице
Полица 1 Полица 2
1
1
1
1
1
2
1
2
1
2
1
1***
1
1
5
1
1
3***
3***
3***
3***
2
1
1
2 или 3
1 или 2
3 до 5
3 до 5
2 или 3
3 или 5
4 или 5
5 или 7
5 или 7
5 или 7
3 или 5
1
3
3
3
3
3
5
4 6
5
46
1 4 или 5
5
4
5
5
3
3
3
2
2
3
3
3
5
5
5 6
5
5 6
Да
6
5
56
5
5
Полица 3
5
6
Да
Да
Да
6
Успех
Хлеб
Говедина
Торте
Хлеб (погледајте рецепт) 2
Печење 1,2-1,5 5
Торте 1
2
2
1
2
3
11***
2
7**
7**
7**
2
1
1
2
2
4
3
5
5
* Времена кувања наведена горе представљају само смернице и могу да се измене према личним укусима.
Времена припремног загревања рерне подешена су као стандардна и не могу ручно да се мењају .
** Како је наведено у рецепту, сипајте 100 г воде у плех за капање у положају 7.
*** Користите плех за капање да сакупите сво уље или масноћу насталу у процесу кувања.
Припремно
загревање
Да
Да
Да
Да
Да
Да
Да
Да
Да
Да
Да
Да
Да
Да
Да
Да
Да
Да
Да
Да 16090-240
Не
Не
Не
Да
Да
Да
Да
Не
Не
Не
Не
Да
Да
Да
Да
Не
Не
Не
Не
Не
Не
Не
Не
Не
Препоручена
температура
(°C)
190
180
180
180
190
190
190
190
180
180
180
200
200
200
170
170
170
160
160
190
190
190
210
200
230
220
220
220
220
200
190
200
200
270-300
270-300
270-300
270-300
40
65
90
Трајање
кувања
(минути)
25-30
35-45
40-50
45-55
25-35
25-35
30-40
30-40
15-25
15-25
20-30
20-30
30-40
35-45
40-50
35-45
35-45
40-50
60-75
60-75
30-35
35-40
40-45
20-25
15-20
25-30
15-25
20-30
25-35
30-40
35-75
40-60
90-120
90-120
20-30
10-20
15-25
3-6
8-12 сати
90-180
! ЕКО режим кувања: Овај режим кувања који штеди енергију одговарајући је за кување јел попут рибљих филета,
ситних колача и поврћа. Такође је идеалан за подгревање меса и процесе завршног кувања.
Функција
Брзо кување*
Гриловање*
Храна Тежина
Рибљи филети
Филети меса
Замрзнута пица
Замрзнута
припремљена храна
Печење
Сланина
Свињске шницле
(кг)
Кување на
полици
* Времена кувања наведена горе представљају само смернице и могу да се измене према личним укусима.
Времена припремног загревања рерне подешена су као стандардна и не могу ручно да се мењају .
** Користите плех за капање да сакупите сво уље или масноћу насталу у процесу кувања.
76
бр.
Положај полицеПрипремно
Плех за
капањеПолица 1 Делитељ
1
1
1
1
1
1
1
6
6
6
6
6**
6**
6
7
7
D
D
D
D
D
D
D
загревање
Да
Да
Да
Да
Да
Да
Да
Препоручена
температура
(°C)
160-180
180-200
270-300
270-300
270-300
Трајање
кувања
(минути)
20-30
30-40
3-5
3-6
15-25
Page 77

Табела са саветима за кување за коришћење малог простора и главног простора истовремено
Главни простор
03
Табела са саветима за кување за главни простор
ситних колача и поврћа. Такође је идеалан за подгревање меса и процесе завршног кувања.
Функција
Креација
Вишестепено*
Пица*
Храна Тежина
Тартови 1
Колачићи 180
Ситни колачи 1
Карамел крем
(bain-marie)
Торта 12 D Да 160 60-75
Пица
(кг)
Кување на
полици
бр.
2
1
2
2
12 D Да 17
1
2
Положај полице Припремно
Плех за
капањеПолица 1 Делитељ
2
13DD
2
13DD
2
13
2 или 3
1 или 2 3 или 5
D
D
D
D
загревање
Да
Да
Да
Да
Да
Да
Да
Да
Препоручена
температура
(°C)
200
200
180
200
200
220
220
Трајање
кувања
(минути)C
30-40
35-45
15-25
15-25
30-40
35-45
5-45
15-25
20-30
Мали простор
Функција
Брзо кување*
Гриловање*
Храна Тежина
Рибљи филети
Филети меса
Замрзнута пица
Замрзнута
припремљена храна
Свињске шницле 1 6** 7 Да 270-300 15-25
(кг)
Кување на
полици
бр.
1
1
1
1
Положај полице Припремно
Плех за
капањеПолица 1 Делитељ
6
6
6
6
D
D
D
D
D
загревање
Да
Да
Да
Да
Препоручена
температура
(°C)
160-180
180-200
Трајање
кувања
(минути)C
20-30
30-40
* Времена кувања наведена горе представљају само смернице и могу да се измене према личним укусима.
Времена припремног загревања рерне подешена су као стандардна и не могу ручно да се мењају .
** Користите плех за капање да сакупите сво уље или масноћу насталу у процесу кувања.
RU
Функција
Креација
Вишестепено*
Пица*
Ниска
температура*
Храна Кување на
Тартови 1
Принцес крофне 1
Колачићи 180
Ситни колачи 1
Карамел крем
(bain-marie)
Торта 12 D Да 160 60-75
Сунђер торта
Пица/погача
Проба/
Одмрзавање
Беле пуслице
Месо/риба
Тежина
(кг)
полици
2
2
1
2
2
12 D Да 170 35-45
1
2
1
2
1
2
2
Положај полице Припремно
Плех за
капањеПолица 1 Делитељ
2
13DD
2
13DD
2
13DD
2
13
2
13DD
2 или 3
1 или 2 3 или 5
2
1
1
3
3
D
D
D
D
D
D
D
загревање
Да
Да
Да
Да
Да
Да
Да
Да
Да
Да
Да
Да
No
No
No
Препоручена
температура
(°C)
200
200
190
190
180
200
200
190
190
220
220
40
65
90
Успех
Говедина
Торте
Печење 1,2-1,5 11** 2
Торте 1
2
2
13
D
D
D
No
No
No
* Времена кувања наведена горе представљају само смернице и могу да се измене према личним укусима.
Времена припремног загревања рерне подешена су као стандардна и не могу ручно да се мењају .
** Користите плех за капање да сакупите сво уље или масноћу насталу у процесу кувања.
Трајање
кувања
(минути)
30-40
35-45
25-35
25-35
15-25
15-25
30-40
35-45
30-35
35-40
15-25
20-30
8-12 сати
90-180
! ЕКО режим кувања: Овај режим кувања који штеди енергију одговарајући је за кување јел попут рибљих филета,
77
Page 78

Мере опреза и савети
RU
! Овај апарат дизајниран је и произведен у складу са
међународним безбедносним стандардима. Следећа
упозорења приложена су из безбедносних разлога и
морају да се пажљиво прочитају.
Општа безбедност
• Овај апарат дизајниран је за кућну употребу и није
намењен за комерцијалну или индустријску употребу.
• Овај апарат не сме да се инсталира напољу, чак и у
наткривеним областима. Веома је опасно остављати
апарат изложен киши и олујама.
• Приликом премештања или позиционирања апарата,
увек користите приложене ручке на странама рерне.
• Не додирујте апарат босоноги или мокрим или
влажним рукама или стопалима.
• Овај апарат морају да користе одрасли за припрему
хране у складу са упутствима приложеним у овој
књижици. Свака друга употреба апарата (нпр. за
грејање собе) представља неправилну употребу
и опасна је. Произвођач не може да се сматра
одговорним за штете изазване неправилном,
неодговарајућом и неразумном употребом
апарата.
• Не додирујте грејне елементе или одређене
делове врата рерне када је апарат у употреби;
ови делови постају веома врели. Држите децу
подаље од апарата.
• Проверите да ли напонски каблови или други
електрични апарати долазе у додир са врелим
деловима рерне.
• Проверите да ли напонски каблови или други
електрични апарати долазе у додир са врелим
деловима рерне.
• Увек држите ручицу врата рерне у центру: крајеви
могу да не буду врели.
• Увек користите рукавице приликом стављања посуђа
у рерну или приликом њиховог уклањања.
• Не користите алуминијумску фолију за облагање
рерне.
• Не стављајте запаљиве материјале у рерну: ако се
апарат случајно укључи, ови материјали би могли да
се запале.
• Приликом искључивања апарата, увек вуците утикач
из утичнице електричне мреже; не вуците за кабл.
• Не обављајте чишћење или одржавање без
искључивања апарата из електричне мреже.
• У случају кварова, никако не треба да покушавате да
извршите поправке сами. Контактирајте овлашћени
сервисни центар (погледајте Помоћ).
• Не остављајте предмете на отворена врата рерне.
• Не дозвољавајте деци да се играју са апаратом.
• Апаратом не треба да управљају људи (укључујући и
децу) са умањеним физичким, сензорним и менталним
способностима, неискусни појединци или неко ко
није упознат са овим апаратом. Ови појединци би, у
најбољем случају, требало да буду под надзором онога
ко је одговоран за њихову безбедност или да добију
прелиминарна упутства која се односе на рад апарата.
• Овај апарат није намењен за рад путем спољног
мерача времена или засебног система даљинског
управљања.
Oдлагањe
• Приликом одлагања амбалажног материјала:
поштујте локално законодавство тако да амбалажа
може поново да се употреби.
• Европска директива 2012/19/ЕЦ за електрични
отпад и електричну опрему (WЕЕЕ) захтева да
се стари електрични апарати из домаћинства
не смеју одлагати у нормалном, несортираном
општинском отпадном току. Стари апарати морају
да се сакупе одвојено како би се оптимизовала
санација и рециклажа материјала које они садрже
и смањио утицај на здравље и окружење људи.
Прецртан симбол "канта за отпатке са точкићима"
на производу подсећа вас на вашу обавезу да када
одлажете апарат он мора да се сакупља одвојено.
Потрошачи треба да контактирају своје локалне
власти или продавца за информације које се тичу
одлагања њихових старих апарата.
Поштовање и очување околине
• Можете помоћи у смањењу врхунца оптерећења
компанија за снабдевање струјом користећи рерну
у сатима између касног поподнева и раних јутарњих
сати. Опције програмирања режима кувања, нарочито
режим "одложено кување" (погледајте Режими
кувања) и режим "одложено аутоматско чишћење"
(погледајте Нега и одржавање), омогућавају кориснику
да ефикасно организује своје време.
• Увек држите врата рерне затворена када користите
режиме ГРИЛОВАЊЕ и ВЕНТИЛАТОРСКО
ГРИЛОВАЊЕ: то ће постићи побољшане резултате
уз уштеду енергије (око 10%).
• Проверавајте редовно заптивке врата и бришите их
како бисте били сигурни да на њима нема остатака
тако да могу правилно да пријањају уз врата, чиме
се избегава расипање топлоте.
!Овај производ је усаглашен са захтевима најновије
Европске директиве о ограничењу потрошње енергије
у режиму приправности.
Одржавање и нега
Искључивање апарата
Искључите свој апарат из струјног напајања пре вршења
било каквог рада на њему.
Чишћење апарата
• Мала разлика у боји на предњем делу рерне последица
је коришћења различитих материјала, нпр. стакло,
пластика или метал.
• Све засенчене области које подсећају на жљебове
на стаклу врата рерне изазване су обрисима светла
рерне.
• Емајл се отискује на веома високим температурама.
Овај процес може да доведе до варијација у боји.
То је нормално и неће утицати на рад апарата ни
на који начин. Танке ивице листа метала не могу у
потпуности да се емајлирају и стога могу да изгледају
недовршено. То неће утицати на заштиту од рђе.
78
Page 79

• Спољни делови од нерђајућег челика или са
емајлираним премазом и гумене заптивке могу да
се чисте сунђером натопљеним млаком водом и
неутралним сапуном. Користите специјализоване
производе за уклањање упорних флека. После
чишћења, темељно исперите и обришите. Не
користите абразивне прашкове или корозивне
супстанце.
• Унутрашњост рерне, у идеалним условима, треба да
се чисти после сваке употребе док је она још млака.
Користите врућу воду и детерџент, затим добро
исперите и обришите меком крпом. Не користите
абразивне производе.
• Сви додаци - изузев клизних полица - могу да се перу
као свакодневна грнчарија и могу се прати чак и у
машини за судове.
• Препоручујемо да се детерџенти не прскају директно
на контролну таблу, већ да се уместо тога користи
сунђер.
! Никада не користите парочистаче или чистаче под
притиском на овом апарату.
Чишћење врата рерне
Очистите стаклени део врата рерне користећи сунђер и
неабразивно средство за чишћење, затим га темељно
обришите меком крпом. Не користите абразивне
материјале или оштре металне стругаче јер могу да
огребу површину и изазову пуцање стакла.
У сврхе темељнијег чишћења, врата рерне могу да се
уклоне:
1. У потпуности отворите врата рерне (погледајте
цртеж).
2. Подигните и окрените мале ручице F које се налазе
на двема шаркама (погледајте цртеж).
Замена сијалице
Да замените сијалицу у
Одељак
држача
лампице
Лампица
Стаклени
поклопац
! Не додирујте сијалицу директно рукама.
! Не користите лампу рерне као/за амбијентално
осветљење.
рерни:
1. Уклоните стаклени
поклопац држача лампе.
2. Уклоните сијалицу и
замените је сличном:
халогена сијалица напона
230 V, снаге 25 W, са врхом
G 9.
3. Замените стаклени
поклопац (погледајте
цртеж).
RU
F
3. Ухватите врата са две спољне
стране и затворите их отприлике
до пола. Повуците врата ка себи,
издижући их из њиховог прореза
(погледајте цртеж). За замену
врата, урадите ово обрнутим
редоследом.
Провера заптивки
Редовно проверавајте заптивке врата рерне. Ако су
заптивке оштећене, контактирајте најближи сервисни
центар (погледајте Помоћ). Препоручујемо да се рерна
не користи док се заптивке не замене.
79
Page 80

Решавање проблема
Проблем
Могући узрок
Решење
до нестанка струје.
RU
195115174.01
10/2013 - XEROX FABRIANO
„Дугме за сат“ и цифре на
дисплеју трепере.
Програмиран режим кувања
се не покреће.
Сија само јако светлеће
„дугме за сат“.
Изабран је аутоматски режим.
„Врело“ се појављује на дисплеју
и кување не започиње.
Изабрано је кување са
вентилатором, а храна изгледа
загорело.
Апарат је управо прикључен на
електричну мрежу или је дошло
Дошло је до нестанка струје. Репрограмирање режима кувања.
Апарат је у режиму приправности. Притисните било које дугме да
Температура унутар рерне виша
је од предложене вредности
за изабран режим.
Положаји 1 и 5: директна топлота
може да изазове загоревање
хране осетљиве на топлоту.
Подешавање сата.
изађете из режима приправности.
Сачекајте да се рерна охлади.
Препоручујемо промену положаја
плеха за капање на половини
процеса кувања.
80
 Loading...