

Hotpoint 7OOS 997D P IX RU/HA User Manual

Operating Instructions
OVEN
GB
RS
Русский, 17English,1
7OOS 997D P RU/HA
7OOS 997D P IX RU/HA
Contents
GB
Installation, 2-3
Positioning
Electrical connection
Technical data
Description of the appliance, 4
Overall view
Control panel
Display
Oven structure, 5
Start-up and use, 6-12
Setting the clock
Setting the timer
ExtraLarge Space
Small Space
Main Space
Using the Small Space and Main Space at the same
time
Programming cooking
Practical cooking advice
Cooking advice table for ovens with the ExtraLarge
Space feature
Cooking advice table for the Small Space feature
Cooking advice table for the Main Space feature
Cooking advice table for using the Small Space and
Main Space at the same time
Precautions and tips, 13
General safety
Disposal
Respecting and conserving the environment
Care and maintenance, 14-15
Switching the appliance off
Cleaning the appliance
Cleaning the oven door
Replacing the light bulb
Automatic cleaning with the FAST CLEAN function
Assistance, 16
Installation
GB
! Before operating your new appliance please read
this instruction booklet carefully. It contains
important information concerning the safe operation,
installation and maintenance of the appliance.
! Please keep these operating instructions for future
reference. Pass them on to any new owners of the
appliance.
Positioning
! Keep all packaging material out of reach of
children. It may present a choking or suffocation
hazard (
see Precautions and tips
! The appliance must be installed by a qualified
professional in accordance with the instructions
provided. Incorrect installation may damage
property or cause harm to people or animals.
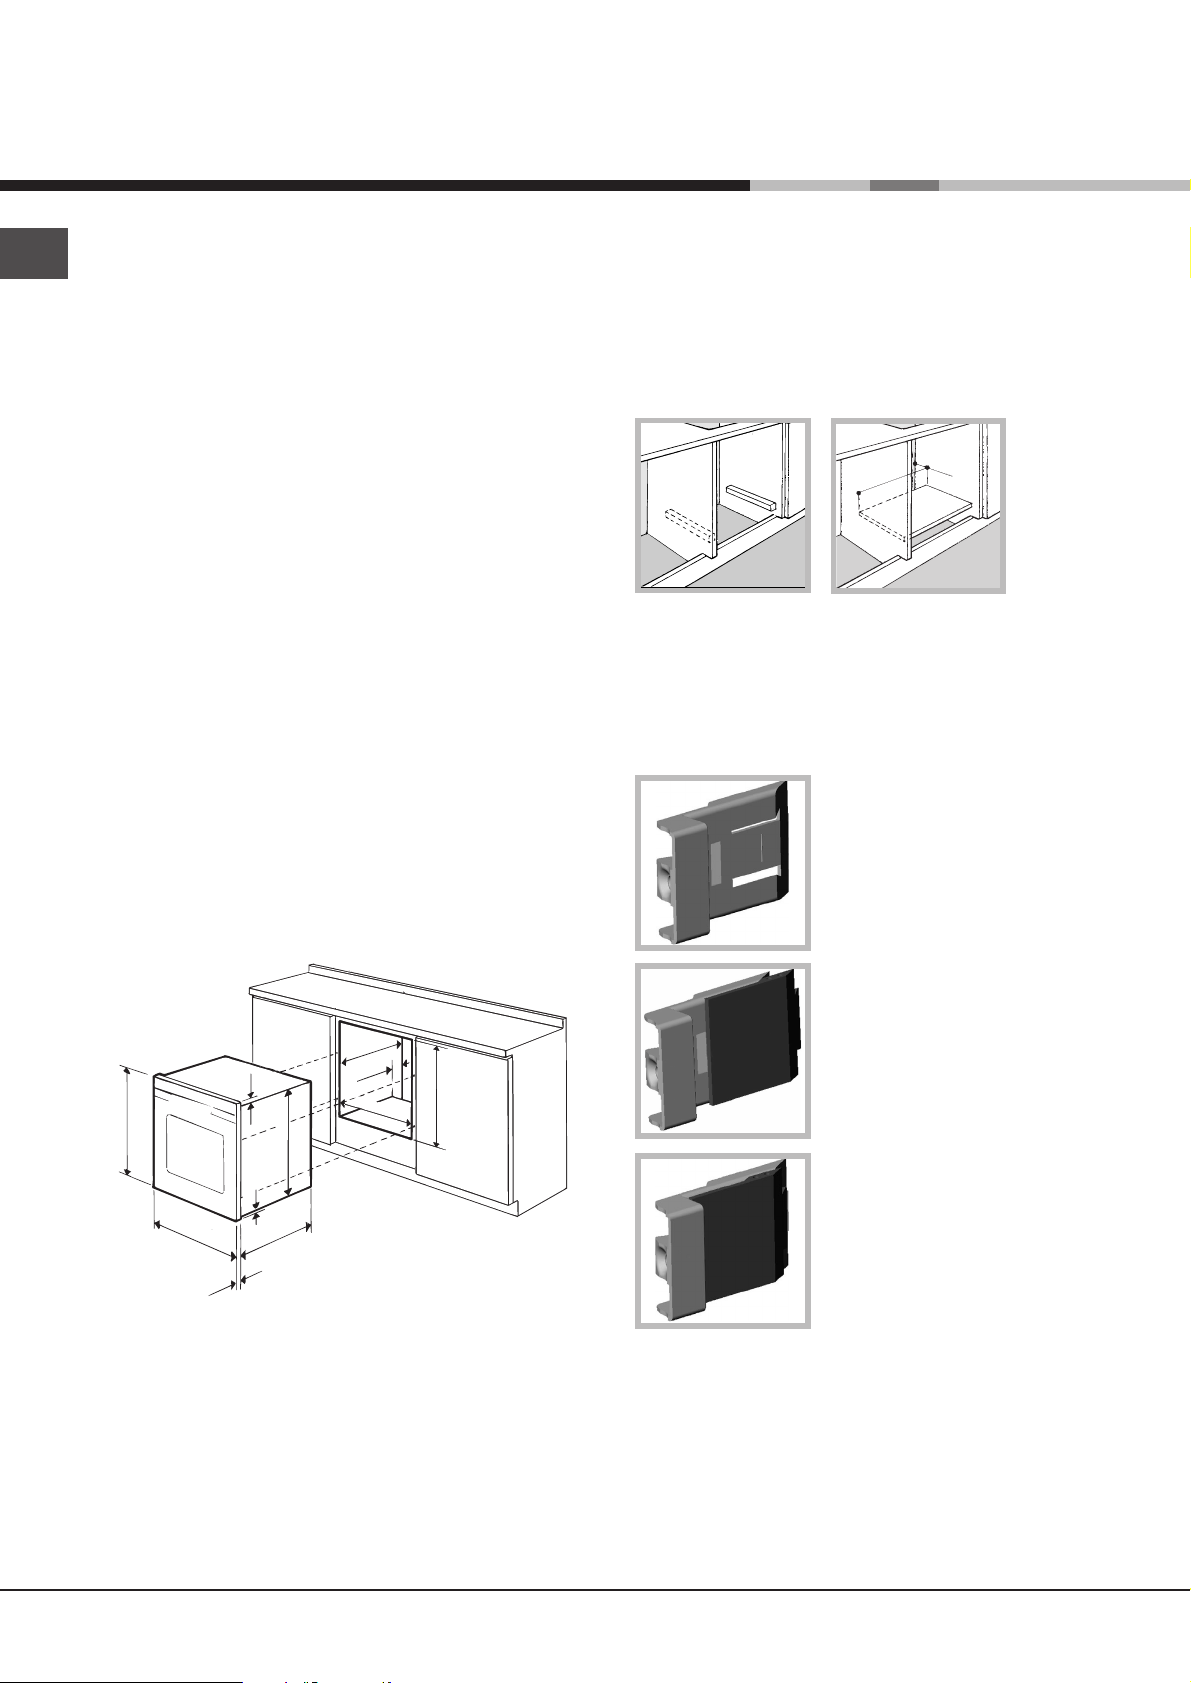
Built-in appliance
Use a suitable cabinet to ensure that the appliance
functions properly.
• The panels adjacent to the oven must be made of
heat-resistant material.
• Cabinets with a veneer exterior must be
assembled with glues which can withstand
temperatures of up to 100°C.
• To install the oven under the counter (
diagram
) or in a kitchen unit, the cabinet must
have the following dimensions:
).
see
Ventilation
To ensure adequate ventilation is provided, the back
panel of the cabinet must be removed. It is
advisable to install the oven so that it rests on two
strips of wood, or on a completely flat surface with
an opening of at least 45 x 560 mm (
45 mm.
560 mm.
see diagrams
).
Centring and fixing
Position the 4 tabs on the side of the oven so that
they are aligned with the 4 holes on the outer frame.
Adjust the tabs in accordance with the thickness of
the cabinet side panel, as shown below:
20 mm thick: take off the
removable part of the tab (
diagram
).
see
in.
547 mm. m
576 mm.
45 mm.
558 mm.
593 mm.
23 mm.
595 mm.
5 mm.
595 mm.
545 mm.
24 mm.
! The appliance must not come into contact with
electrical parts once it has been installed.
The indications for consumption given on the data
plate have been calculated for this type of
installation.
18 mm thick: use the first
groove, which has already
been set in the factory (
diagram
).
see
16 mm thick: use the second
groove (
see diagram
).
Secure the appliance to the cabinet by opening the
oven door and inserting 4 screws into the 4 holes on
the outer frame.
! All parts which ensure the safe operation of the
appliance must not be removable without the aid of
a tool.
2
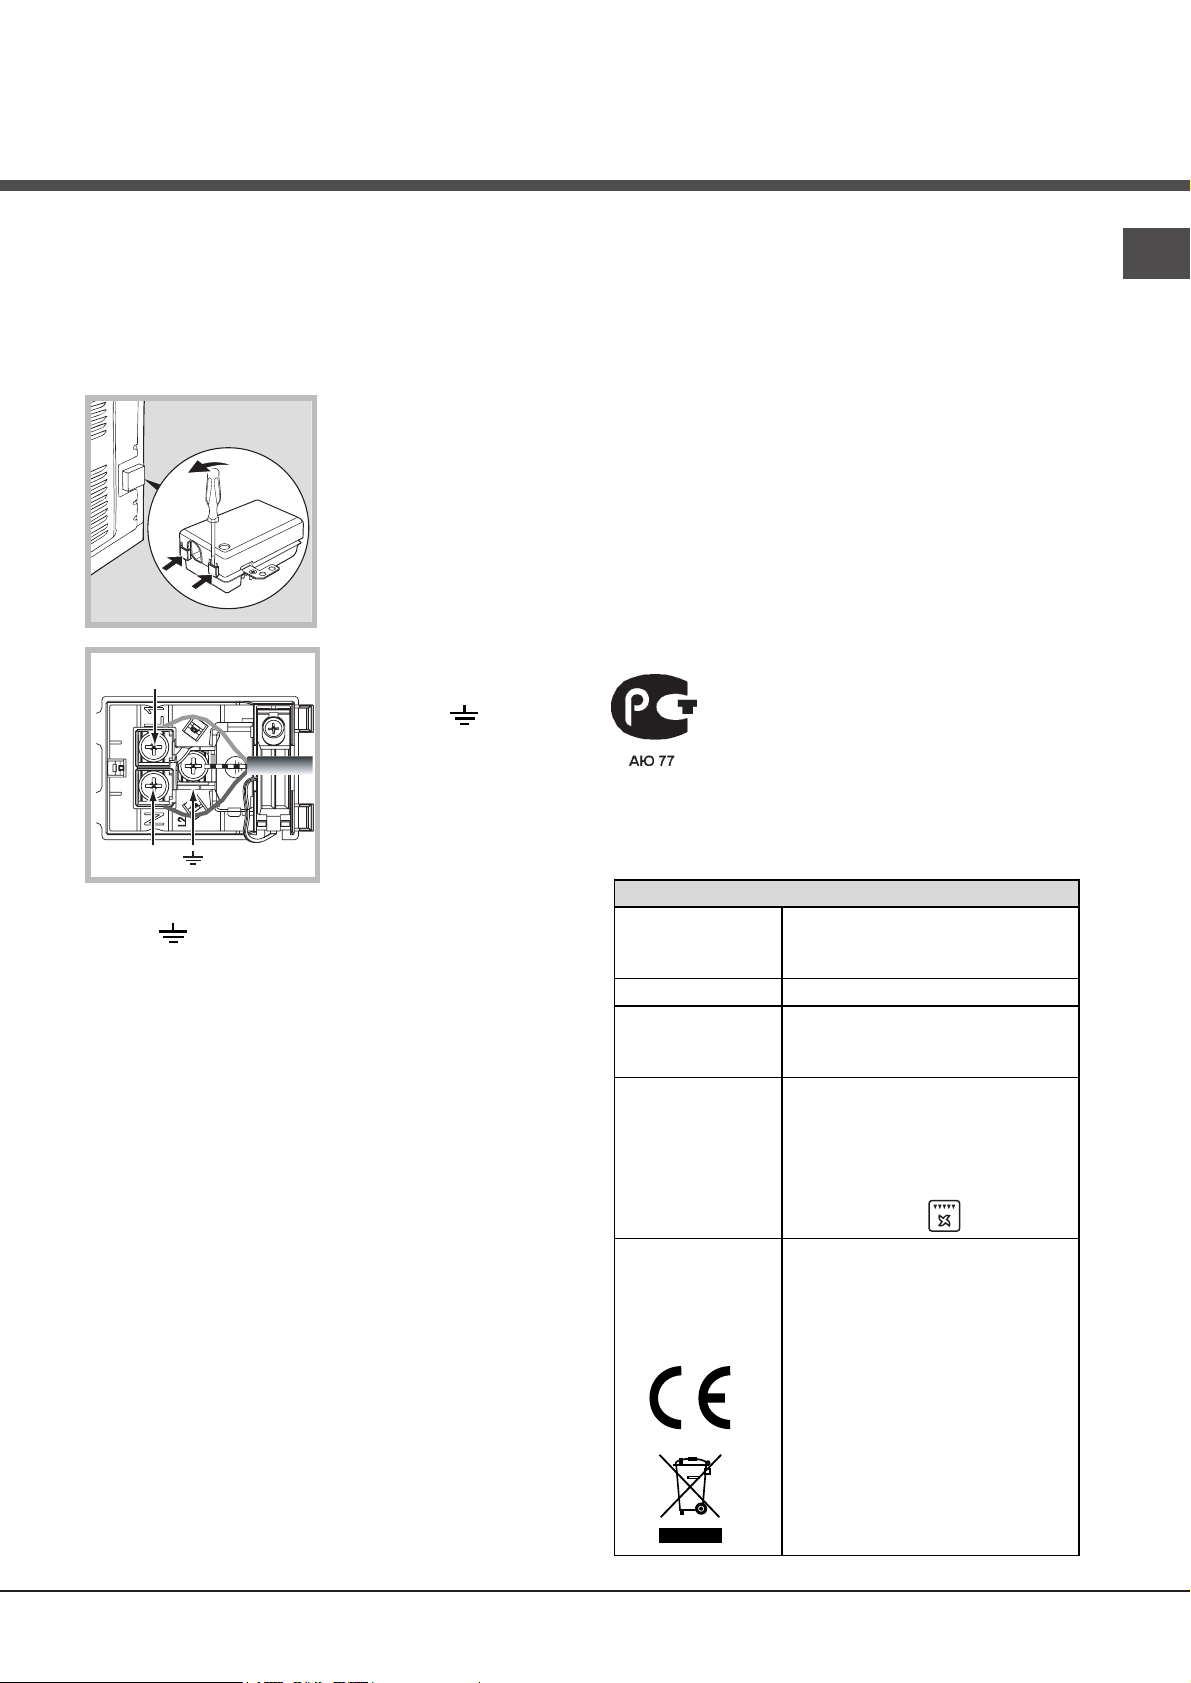
Electrical connection
! Ovens equipped with a three-pole power supply
cable are designed to operate with alternating
current at the voltage and frequency indicated on
the data plate located on the appliance (
Fitting the power supply cable
1. Open the terminal
board by inserting a
screwdriver into the
side tabs of the cover.
Use the screwdriver as
a lever by pushing it
down to open the cover
see diagram
(
2. Install the power
supply cable by
loosening the cable
L
N
(
marked
3. Secure the cable by fastening the clamp screw.
4. Close the cover of the terminal board.
Connecting the electricity supply cable to the
mains
Install a standardised plug corresponding to the
load indicated on the data plate (
The appliance must be directly connected to the mains
using an omnipolar switch with a minimum contact
opening of 3 mm installed between the appliance and
the mains. The switch must be suitable for the charge
indicated and must comply with current electrical
regulations (the earthing wire must not be interrupted
by the switch). The supply cable must be positioned
so that it does not come into contact with temperatures
higher than 50°C at any point.
! The installer must ensure that the correct electrical
connection has been made and that it is fully
compliant with safety regulations.
Before connecting the appliance to the power
supply, make sure that:
• The appliance is earthed and the plug is compliant
with the law.
see diagram
clamp screw and the
three wire contact
screws L-NConnect the wires to
the corresponding
terminals: the Blue wire
to the terminal marked
(N), the Brown wire to
the terminal marked (L)
and the Yellow/Green
wire to the terminal
).
see table
see below
).
).
).
.
• The socket can withstand the maximum power of
the appliance, which is indicated on the data
see below
plate (
• The voltage is in the range between the values
indicated on the data plate (
• The socket is compatible with the plug of the
appliance. If the socket is incompatible with the
plug, ask an authorised technician to replace it.
Do not use extension cords or multiple sockets.
! Once the appliance has been installed, the power
supply cable and the electrical socket must be
easily accessible.
! The cable must not be bent or compressed.
! The cable must be checked regularly and replaced
by authorised technicians only (
The manufacturer declines any liability shouldThe manufacturer declines any liability should
!
The manufacturer declines any liability should
The manufacturer declines any liability shouldThe manufacturer declines any liability should
these safety measures not be observed.these safety measures not be observed.
these safety measures not be observed.
these safety measures not be observed.these safety measures not be observed.
).
see below
see Assistance
).
).
APP LI AN CE SP ECI FI CATI ONS
widt h 43. 4 cm
Dimensions
height 39.5 cm
depth 40.8 cm
Vol ume 70 l
El ectric al
connec ti ons
voltage: 220 - 240 V~ 50Hz
maximum power absorbed
3400 W (see dat a pl ate)
Directive 200 2/40/EC on th e
label of electric ovens.
ENE RGY
LABEL
Stan dard EN 50304
Declared ener gy consumpt io n
for Forced convection Class –
heati ng mode:
Gratin.
Thi s appliance conforms to the
fo ll owi ng European Econ omic
Communi ty di rectives:
2006/ 95/ EEC dated 12/12/06
(Low Volt age) and subse quen t
amendments – 2004/ 108 /EEC
dated 15/12/04
(Electromagnetic Compatibility)
and subsequent amen dm ents 93/68/EEC dated 22/ 07/93 an d
subseq uent am end ments.
2002/ 96/ EEC and subsequ ent
amendments.
1275/ 200 8 stand -by/off mode.
GB
3
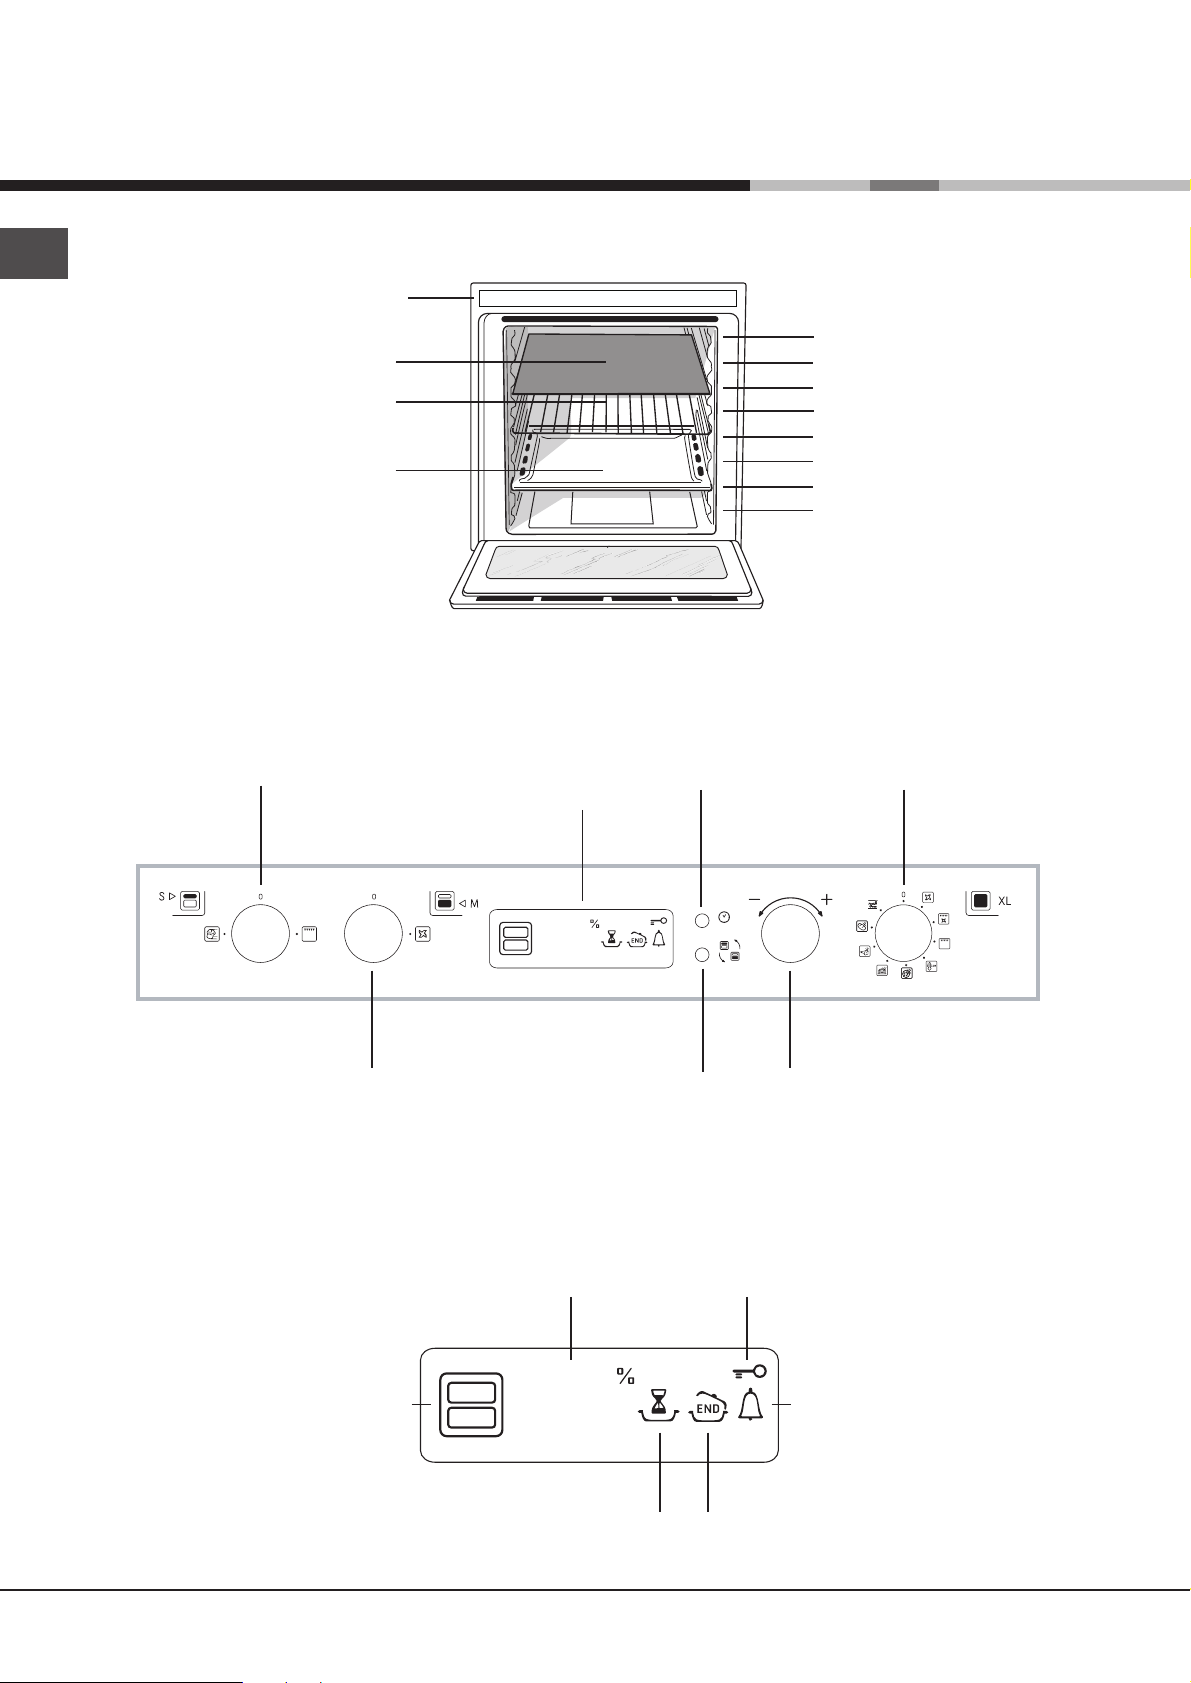
Description of
the appliance
GB
Overall view
DRIPPING PAN shelf
Control panel
Control panel
DIVIDER shelf
RACK shelf
SMALL SPACE
FUNCTION
knob
DISPLAY
SET TIMER
button
GUIDE RAILS
for the sliding racks
position 7
position 6
Divider "D" position
position 5
position 4
position 3
position 2
position 1
EXTRALARGE
SPACE FUNCTION
knob
Display
MAIN SPACE
FUNCTION
knob
RECESS
SELECTED
TEMPERATURE and
TIME numerical digits
icon
¡•OC
:
•• ••
SELECT RECESS
button
¡•OC
:
•• ••
DURATION
icon
SET
TEMPERATURE/TIMER
knob
DOOR LOCK
icon
TIMER icon
END OF COOKING
icon
4
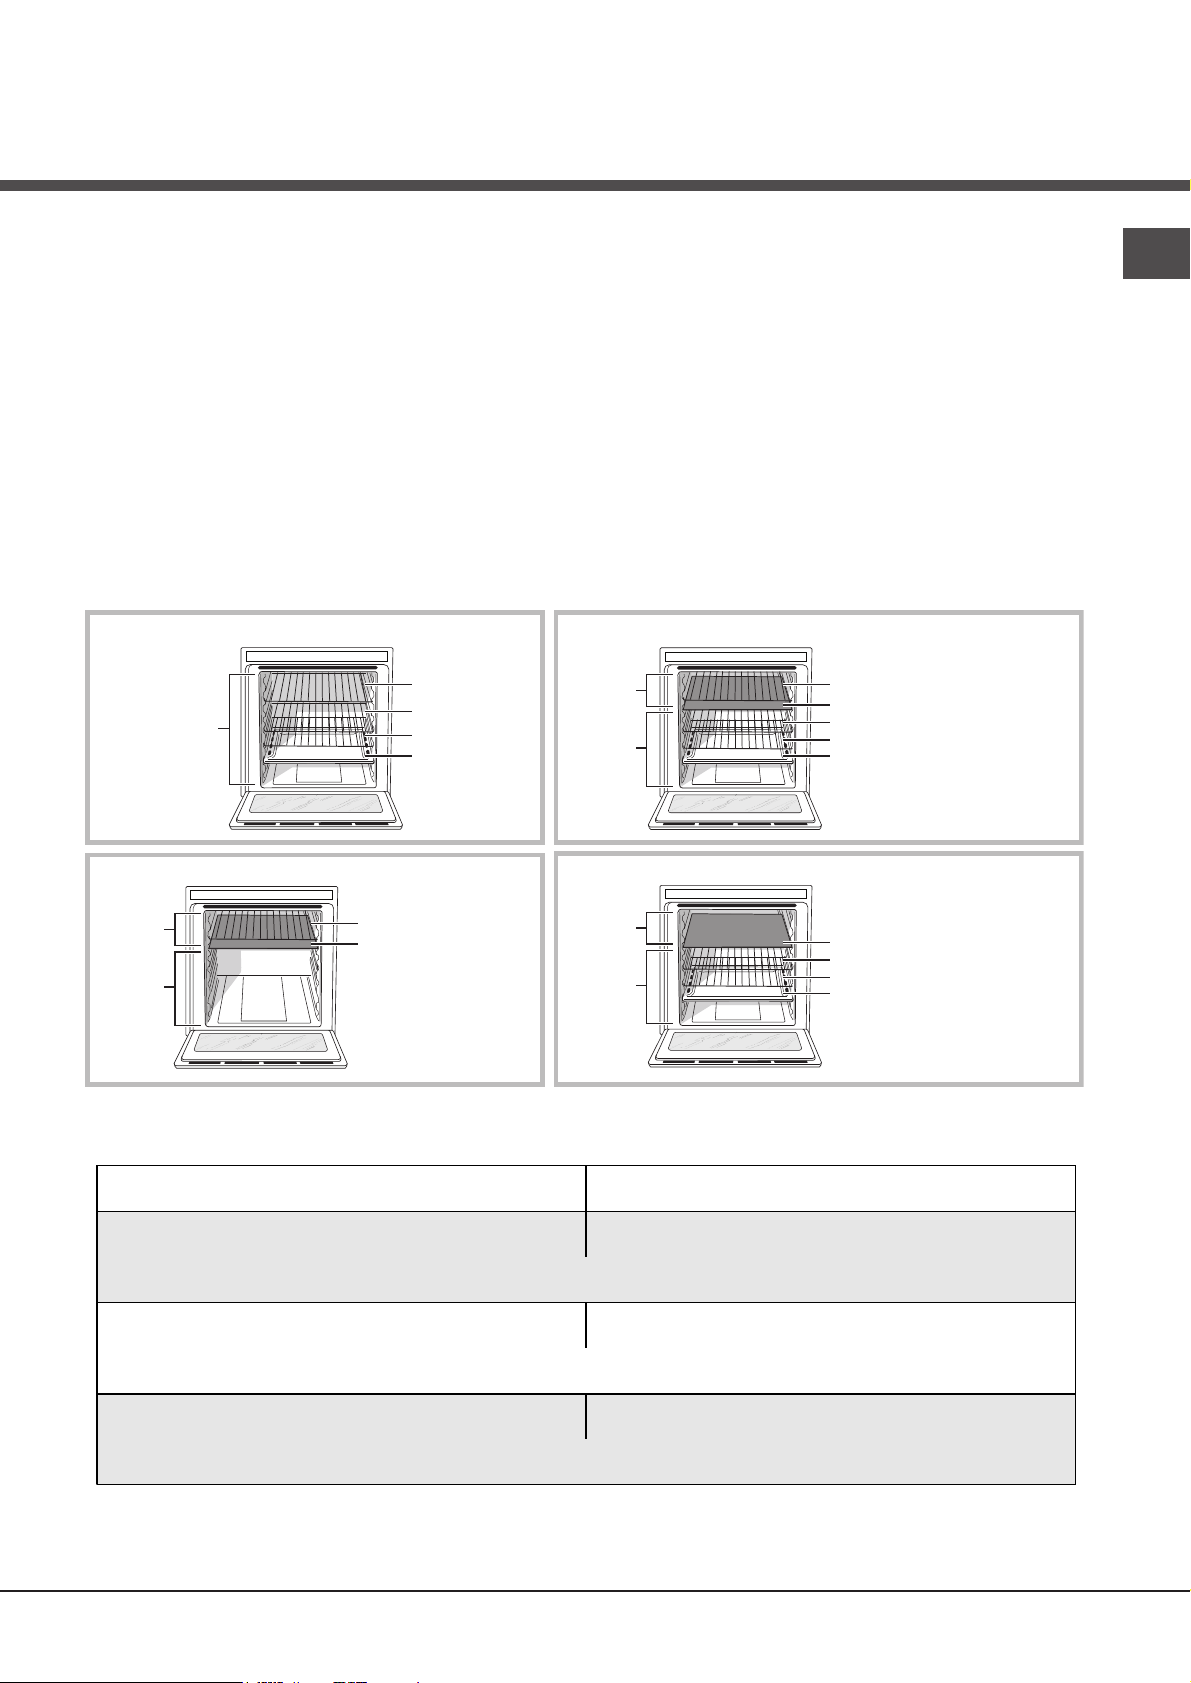
Oven structure
The Openspace oven has a capacity of 70 litres and
offers users the option of cooking on 4 shelves at
the same time or cooking large quantities, which
would not necessarily be possible in a traditional
oven.
Thanks to the ExtraLarge Space, Openspace offers
10 cooking functions, 6 of which are universal and
suitable for any type of cooking, while the remaining
4 are automatic programmes which can be used to
achieve perfect results for any recipe.
Openspace also offers maximum comfort for all
requirements, with 4 different operating options: the
oven is one large compartment but can be divided
into separate spaces of various sizes, each with its
ExtraLarge Space: cooking on 4 shelf levels
RACK
EXTRALARGE
SPACE
RACK
RACK
DRIPPING PAN
own independent temperature and duration controls.
This is made possible thanks to the heat-insulating
DIVIDER, which divides the whole ExtraLarge Space
into two different-sized spaces: the Main Space and
the Small Space.
The two Main and Small Space compartments may
be used at the same time to cook different dishes
more quickly, or they may be used separately so
that only the space necessary is used.
When the two compartments are used at the same
time, the cooking temperature of each may be
adjusted to a value between 50° and 250°. There
may be a difference in temperature of 100° between
the two zones, which means it is possible to cook
very different dishes without any flavours or aromas
intermingling.
Main and Small Space: simultaneous operation
SMALL
SPACE
MAIN
SPACE
RACK or DRIPPING PAN
Divider "D" (fixed position)
RACK (cooking on 3 shelves)
RACK (cooking on 3 shelves)
DRIPPING PAN
(cooking on 3 shelves)
GB
Cooking using the Small Space only
SMALL
SPACE
MAIN
SPACE
RACK or DRIPPING PAN
Divider "D"
(fixed position)
The table below lists the possible temperature
values which may be set. The intelligent display will
Temperature in the first cavity
(Main or Small Space)
Cooking using the Main Space only: cooking on 3 shelf levels
SMALL
SPACE
MAIN
SPACE
Divider "D" (fixed position)
RACK (cooking on 3 shelves)
RACK (cooking on 3 shelves)
DRIPPING PAN
(cooking on 3 shelves)
guide you through the correct procedure used to
adjust the temperature of the two recesses.
Temperature in the second cavity
(Small or Main Space)
Between 40°C and 150°C The temperature difference in relation to the first recess
selected is no greater than 50°C
For example: if you set one recess to 90°C,
you may set a value of between 40°C (90°C-50°C) and 140°C (90°C+50°C) for the other.
Between 155°C and 200°C The temperature difference in relation to the first recess
selected is no greater than 70°C
For example: if you set one recess to 180°C,
you may set a value of between 110°C (180°C-70°C) and 250°C (180°C+70°C) for the other.
Between 205°C and 250°C The temperature difference in relation to the first recess
selected is no greater than 100°C
For example: if you set one recess to 210°C,
you may set a value of between 110°C (210°C-100°C) and 250°C (maximum temperature setting) for the other.
To cancel any of the settings, simply turn the Small Space or Main Space function knob to the "0"
position.
5
Start-up and use
GB
! The first time you use your appliance, heat the empty
oven with its door closed at its maximum temperature for
at least half an hour. Make sure that the room is well
ventilated before switching the oven off and opening the
oven door. The appliance may emit a slightly unpleasant
odour caused by protective substances used during the
manufacturing process burning away.
! Never put objects directly on the bottom of the oven; this
will prevent the enamel coating from being damaged.
! Always place cookware on the racks provided.
! During use, we suggest removing any crockery or
delicate foodstuffs from the recesses not in function.
! We suggest not opening the door when cooking
foodstuffs which require leavening, so as to not
compromise cooking results.
! If the door is subject to repeated jerking, the divider may
come out of its housing. If this happens, the time will
appear on the display. Make sure that the divider is
correctly installed then re-start cooking.
Cooling ventilation
In order to cool down the external temperature of the oven,
a cooling fan blows a stream of air between the control
panel and the oven door.
! Once cooking is completed, the cooling fan activates
and deactivates automatically until the oven has cooled
down sufficiently.
Setting the clock
! This may only be set while the oven is switched off.
1. Press the
on the display and the
off.
2. Turn the TIMER KNOB towards “+” and “-” to adjust
the hour value.
3. Press the
numerical digits on the DISPLAY begin to flash.
4. Turn the TIMER KNOB towards “+” and “-” to adjust
the minute value.
5. Press the
button until the first numerical digit flashes
, and icons are switched
button again so that the other two
button again to confirm.
Setting the timer
! This function does not interrupt cooking and does not
affect the oven; it is simply used to activate the buzzer
when the set amount of time has elapsed.
1. Press the
digits on the DISPLAY begin to flash.
2. Turn the TIMER KNOB towards “+” and “-” to adjust
the minute value.
button until the icon and the three
3. Press the
The display will then show the time as it counts down.
When this period of time has elapsed the buzzer will be
activated.
button again to confirm.
ExtraLarge Space
Starting the oven
1. Select the desired cooking function by turning the
EXTRALARGE SPACE FUNCTION knob. If the
on the display is lit, this indicates that the ExtraLarge
Space has been selected and therefore that only the
settings corresponding to the ExtraLarge Space may be
used.
2. The oven will begin its preheating stage. The
temperature may be changed by turning the
TEMPERATURE knob. The
during the pre-heating stage.
3. Once the pre-heating stage is completed, the
stops flashing (becomes fixed) and a buzzer sounds. It is
now possible to introduce foodstuffs into the oven.
4. During cooking it is always possible to:
- Change the cooking function by turning the
EXTRALARGE SPACE FUNCTION knob.
- Adjust the temperature using the TEMPERATURE knob
(for the universal cooking functions only).
- Set a duration (for universal cooking functions only) and
the cooking end time.
- Stop cooking by turning the EXTRALARGE SPACE
FUNCTION knob to the “0” position.
5. If a blackout occurs while the oven is already in
operation, an automatic system within the appliance will
reactivate the cooking function from the point at which it
was interrupted, as long as the temperature has not
dropped below a certain level. Programmed cooking
modes which have not started will not be restored and
must be reprogrammed.
!!
! When using the oven in its ExtraLarge configuration, it
!!
will not be possible to use the Main and Small Space
features: the SMALL SPACE and MAIN SPACE
FUNCTION knobs will be disabled.
Universal cooking functions
! All functions have a default cooking temperature which
may be adjusted manually to a value between 40°C and
250°C as desired.
For the BARBECUE function, the default power level value
is indicated as a percentage (%) and may also be
adjusted manually.
indicator light flashes
icon
icon
6
MULTILEVEL function
All heating elements and the fan are activated. Since the heat
remains constant throughout the oven, the air cooks and
browns food in a uniform manner. A maximum of four racks
may be used at the same time. If you are using several
racks at the same time, we recommend you place the
dripping pan on the lower rack. If you are cooking on 4 levels
at the same time, we recommend you place the shelves on
racks 3, 5 and 6 and the dripping pan on rack 1.
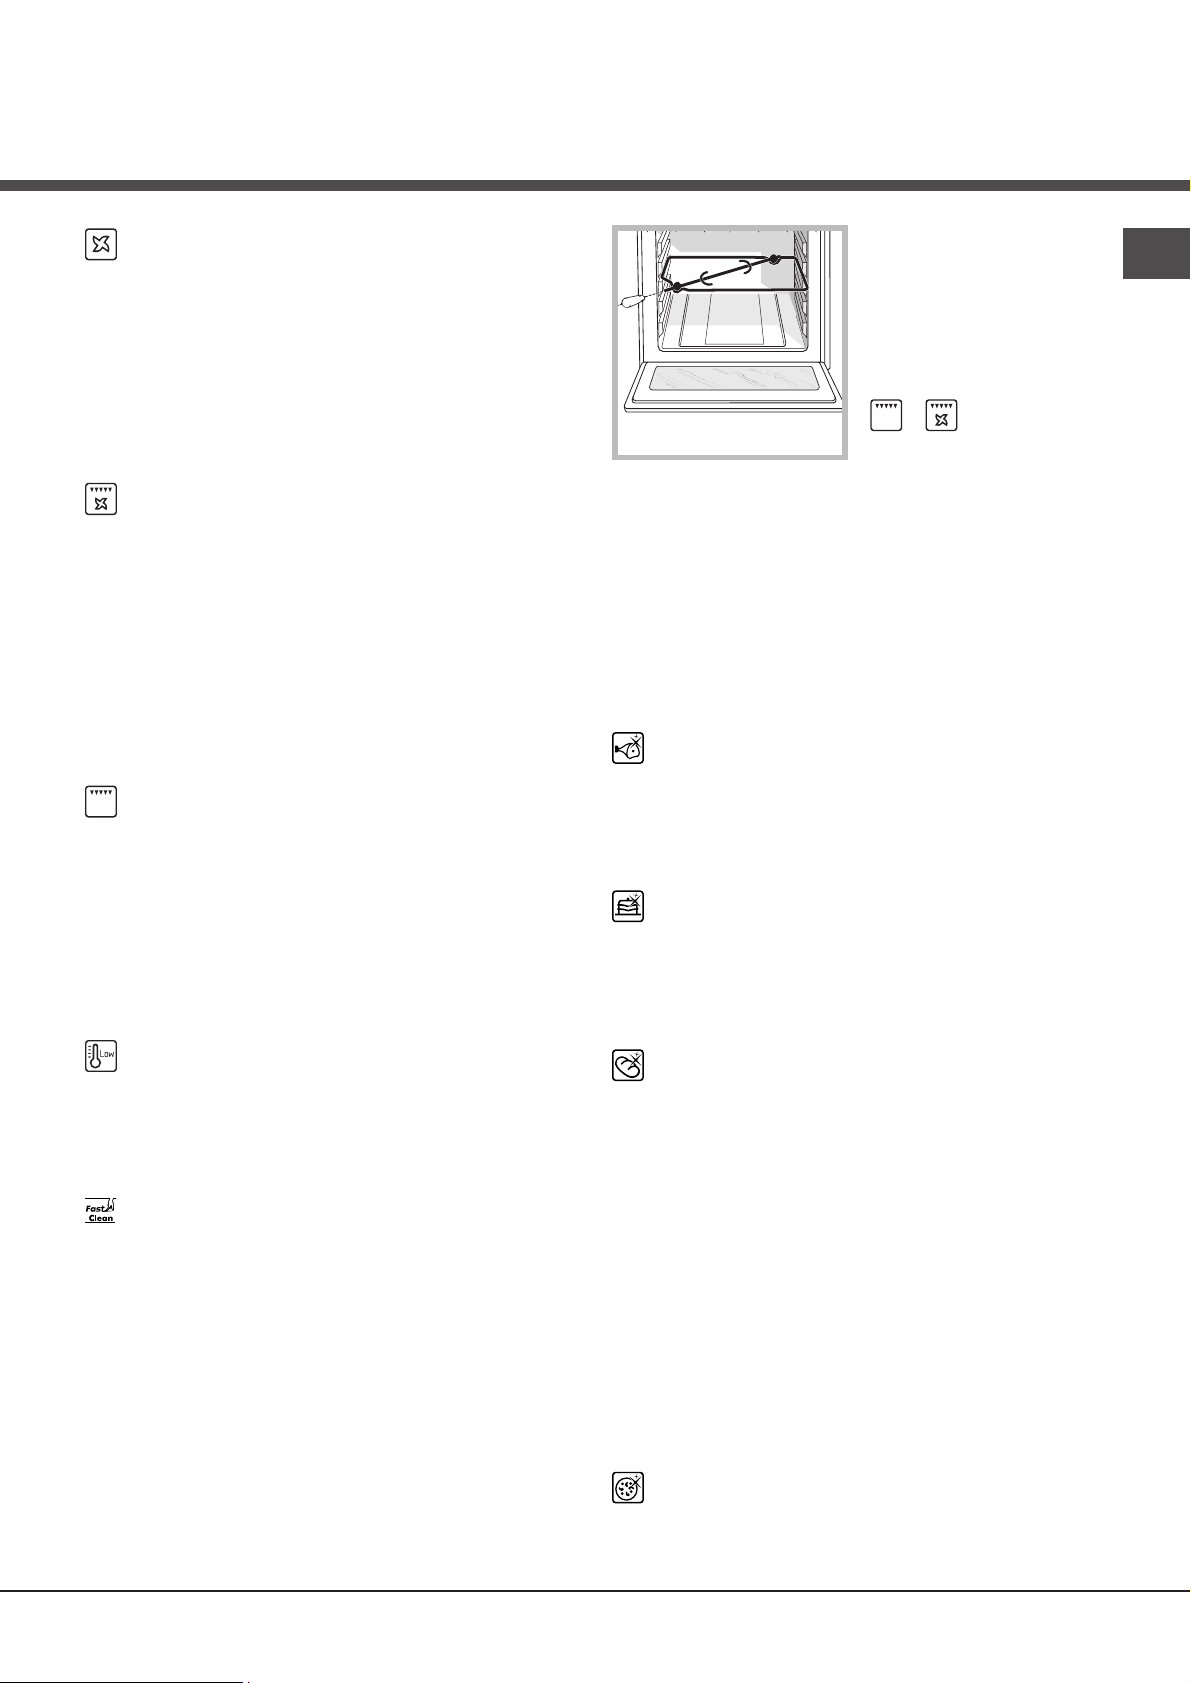
2. Place the rotisserie
support in position 3 and
insert the spit in the hole
provided on the back
panel of the oven.
3. Begin spit roast
operation by selecting the
or functions.
GB
GRATIN function
The top heating element and the rotisserie spit (where
present) are activated and the fan begins to operate.
During part of the cycle the circular heating element is
also activated. This combination of features increases the
effectiveness of the unidirectional thermal radiation
provided by the heating elements through the forced
circulation of the air throughout the oven.
This helps prevent food from burning on the surface and
allows the heat to penetrate right into the food. Always
cook in this mode with the oven door closed.
BARBECUE function
The top heating element and the rotisserie spit (where
present) are activated. By turning the TEMPERATURE
knob, the different power levels which may be set will
appear on the display; these range between 5% and
100%. The high and direct temperature of the grill is
recommended for food which requires a high surface
temperature. Always cook in this mode with the oven door
closed.
LOW TEMPERATURE function
This type of cooking can be used for proving, defrosting,
preparing yoghurt, heating dishes at the required speed
and slow cooking at low temperatures. The temperature
options are: 40, 65 and 90 °C.
FAST CLEAN mode
This mode cleans the oven automatically and thoroughly
by pyrolysis (
! The default setting is 90 minutes.
Spit roast (only available in certain models)
To operate the spit roast function (
follows:
1. Place the dripping pan in position 1.
see Maintenance and care
see diagram
).
) proceed as
Automatic cooking functions
temperaturetemperature
! The
temperature and cooking duration are
temperaturetemperature
values, guaranteeing a perfect result every time automatically. These values are set using the
Programmed Optimal CookingProgrammed Optimal Cooking
(
Programmed Optimal Cooking) system. The cooking
Programmed Optimal CookingProgrammed Optimal Cooking
cycle stops automatically and the oven indicates when
the dish is cooked. The cooking duration may be modified
by a period of several minutes, as specified in the
description of the individual functions below.
ROAST function
Use this function to cook veal, pork, lamb and beef. Place
the food inside the oven while it is still cold. The dish may
also be placed in a preheated oven. It will only be
possible to adjust the duration by -10/+10 minutes.
BAKED CAKES function
This function is ideal for baking cakes. Place the food
inside the oven while it is still cold. The dish may also be
placed in a preheated oven. It will only be possible to
adjust the duration by -10/+15 minutes.
BREAD function
Use this function to make bread. Please see the following
chapter for the recipe and further details.
To achieve the best possible results, we recommend that
you carefully observe the instructions below:
• Follow the recipe.
• Remember to pour 150 g (150 ml) of cold water into
the baking tray, which should be placed in position
7.
Place the food inside the oven while it is still cold. If you
wish to place the food in the oven after it has been
preheated, immediately following a high-temperature
cooking programme, the text “Hot” will appear on the
display until the temperature of the oven has fallen to 40°.
At this point it will be possible to place the bread in the
oven.
pre-setpre-set
pre-set
pre-setpre-set
C.O.P.®C.O.P.®
C.O.P.®
C.O.P.®C.O.P.®
PIZZA function
Use this function to make pizza. Please see the following
chapter for further details. It will only be possible to adjust
7

GB
the duration by -5/+12 minutes.
To achieve the best possible results, we recommend that
you carefully observe the instructions below:
• Follow the recipe.
• The weight of the dough should be between 350 g and
500 g.
• Lightly grease the dripping pan and the baking trays.
Place the food inside the oven while it is still cold. If you
wish to place the food in the oven after it has been
preheated, immediately following a high-temperature
cooking programme, the text “Hot” will appear on the
display until the temperature of the oven has fallen to
120°. At this point it will be possible to place the pizza in
the oven.
Recipe for PIZZA:
Makes 3 or 4 pizzas: 1000 g flour, 500 ml water, 20 g salt,
20 g sugar, 100 ml olive oil, 20 g fresh yeast (or 2 sachets
of powder yeast)
• Leavening at room temperature: 1 hour, or LOW
TEMPERATURE manual function set to 40°. Leave to
rise for approximately 30-45 minutes.
• Place the food inside the oven while it is still cold.
• Start the
Recipe for BREAD (maximum amount of dough):
Ingredients:
• 1.3 kg flour
• 700 g water
• 25 g salt
• 50 g fresh baker’s yeast or 4 sachets dried yeast
powder.
Method:
• Mix the flour and salt in a large bowl.
• Dilute the yeast in lukewarm water (approximately 35
degrees).
• Make a small well in the mound of flour.
• Pour in the water and yeast mixture.
• Knead the dough by stretching and folding it over itself
with the palm of your hand for 10 minutes, until it has a
uniform consistency and is not too sticky.
• Form the dough into a ball shape, place it in a large
bowl and cover it with transparent plastic wrap to
prevent the surface of the dough from drying out. Place
the bowl in the oven, set to 40° using the LOW
TEMPERATURE manual function, and leave to rise for
approximately 30–45 minutes. Alternatively, leave at
room temperature for approximately 1 hour (until the
dough has doubled in volume).
• Break up the dough, kneading gently, and divide it to
create several loaves.
• Place them on a sheet of baking paper (cut to the same
size as the inside of the dripping pan) on top of the
rack (or on 2 or 3 racks if you wish to cook the loaves
PIZZA cooking mode.
on different shelves) and dust them lightly with flour.
• Make a few incisions in the top using a sharp blade.
• Place the rack in the oven, on shelf level 2 if using only
one level, or place two racks on shelf levels 1 and 4 if
using two levels, or place three racks on shelf levels 1,
3 and 5 if using three levels.
• Place the dripping pan on shelf level 7 and pour in
150 g cold water.
• Place the food inside the oven while it is still cold.
• Start the automatic function
• When the cooking process has finished, leave the
loaves to rest on the rack until they have completely
cooled.
BREAD.
Small Space
Starting the oven
1. Fit the DIVIDER to the DIVIDER shelf “D” using the pin,
with the arrows turned towards the rear part of the oven.
After it has been fitted correctly, you will be able to read
the text “OPENSPACE” on the front part of the DIVIDER
frame. A buzzer will sound to confirm that the DIVIDER
has been fitted correctly; it will then be possible to use the
two Main and Small space compartments separately or at
the same time.
! The EXTRALARGE SPACE FUNCTION knob will be
disabled.
2. Select the desired cooking function by turning the
SMALL SPACE FUNCTION knob.
3. The oven will begin its preheating stage. The
temperature may be changed by turning the
TEMPERATURE knob. The
during the pre-heating stage.
4. Once the pre-heating stage is completed, the
stops flashing (becomes fixed) and a buzzer sounds. It is
now possible to introduce foodstuffs into the oven.
5. During cooking it is always possible to:
- Change the cooking function by turning the SMALL
SPACE FUNCTION knob.
- Change the temperature by turning the TEMPERATURE
knob.
- Set the cooking duration in addition to the cooking end
time.
- Stop cooking by turning the SMALL SPACE FUNCTION
knob to the “0” position.
6. If a blackout occurs while the oven is already in
operation, an automatic system within the appliance will
reactivate the cooking function from the point at which it
was interrupted, as long as the temperature has not
dropped below a certain level. Programmed cooking
indicator light flashes
icon
8
modes which have not started will not be restored and
must be reprogrammed.
Cooking functions
GRILL function
The top heating element is activated. By turning the
TEMPERATURE knob, the different power levels which
may be set will appear on the display; these range
between 5% and 100%. The high and direct temperature
of the grill is recommended for food which requires a high
surface temperature. This function is particularly suitable
for browning food, cooking gratins, colouring meringues,
making toasted sandwiches and grilling small quantities
of thin, lean meat. Always cook in this mode with the oven
door closed.
FAST COOKING function
This function requires the oven to be preheated. This
function is particularly suitable for cooking pre-packed
food quickly (frozen or pre-cooked).
Main Space
Starting the oven
1. Fit the DIVIDER to the DIVIDER shelf “D” using the pin,
with the arrows turned towards the rear part of the oven.
After it has been fitted correctly, you will be able to read
the text “OPENSPACE” on the front part of the DIVIDER
frame. A buzzer will sound to confirm that the DIVIDER
has been fitted correctly; it will then be possible to use the
two Main and Small space compartments separately or at
the same time.
! The EXTRALARGE SPACE FUNCTION knob will be
disabled.
2. Select the desired cooking function by turning the
MAIN SPACE FUNCTION knob.
3. The oven will begin its preheating stage. The
temperature may be changed by turning the
6. If a blackout occurs while the oven is already in
operation, an automatic system within the appliance will
reactivate the cooking function from the point at which it
was interrupted, as long as the temperature has not
dropped below a certain level. Programmed cooking
modes which have not started will not be restored and
must be reprogrammed.
Cooking functions
UNIVERSAL function
All heating elements and the fan are activated. Since the
heat remains constant throughout the oven, the air cooks
and browns food in a uniform manner. A maximum of
three racks may be used at the same time. If you are using
several racks at the same time, we recommend you place
the dripping pan on shelf level 1. If you are cooking on 3
levels at the same time, we recommend you place the
shelves on racks 3 and 5, and the dripping pan on rack 1.
Using the Small Space and Main Space at the
same time
Starting the oven
1. Fit the DIVIDER to the DIVIDER shelf “D” using the pin,
with the arrows turned towards the rear part of the oven.
After it has been fitted correctly, you will be able to read
the text “OPENSPACE” on the front part of the DIVIDER
frame. A buzzer will sound to confirm that the DIVIDER
has been fitted correctly; it will then be possible to use the
two Main and Small space compartments separately or at
the same time.
! The EXTRALARGE SPACE FUNCTION knob will be
disabled.
! In order to improve the oven’s energy efficiency, the preheating time of the SMALL SPACE cavity lasts about 15
minutes.
! If the MAIN SPACE is set at a temperature below 150°C,
in order to safeguard the cooking results, the grill function
will not start: the display will visualise “OFF.”
2. Select the desired cooking function for each recess by
turning the SMALL SPACE FUNCTION and/or MAIN
GB
TEMPERATURE knob. The
during the pre-heating stage.
4. Once the pre-heating stage is completed, the
stops flashing (becomes fixed) and a buzzer sounds. It is
now possible to introduce foodstuffs into the oven.
5. During cooking it is always possible to:
- Change the temperature by turning the TEMPERATURE
knob.
- Set the cooking duration in addition to the cooking end
time.
- Stop cooking by turning the MAIN SPACE FUNCTION
knob to the “0” position.
indicator light flashes
icon
SPACE FUNCTION knobs. The
Small Space has been selected and that it is therefore
possible to adjust the Small Space settings; the
lit up on the display indicates that the Main Space has
been selected and that it is therefore possible to adjust
the Main Space settings.
3. Both ovens will begin the preheating stage. The
temperature may be changed by turning the
TEMPERATURE knob. The
during the pre-heating stage.
icon indicates that the
icon
indicator light flashes
9

GB
4. Once the pre-heating stage is completed, the
stops flashing (becomes fixed) and a buzzer sounds. It is
now possible to introduce foodstuffs into the oven.
5. The digits on the display become brighter to indicate
which recess you are adjusting. To modify the settings for
the other recess, press the
and Main Space settings may actually be changed during
simultaneous cooking:
- Change the cooking function by turning the SMALL
SPACE FUNCTION and/or MAIN SPACE FUNCTION
knob.
- Change the temperature by turning the TEMPERATURE
knob.
- Set the cooking duration in addition to the cooking end
time.
- Stop cooking by turning the SMALL SPACE FUNCTION
and/or MAIN SPACE FUNCTION knob to the “0” position.
6. If a blackout occurs while the oven is already in
operation, an automatic system within the appliance will
reactivate the cooking function from the point at which it
was interrupted, as long as the temperature has not
dropped below a certain level. Programmed cooking
modes which have not started will not be restored and
must be reprogrammed.
button. The Small Space
icon
Programming cooking
! A cooking function must be selected before
programming can take place.
Programming is possible in all oven configurations:
EXTRALARGE, MAIN and SMALL SPACE, even if the
latter two are being used simultaneously.
Programming the cooking duration
1. Press the
the three digits on the DISPLAY begin to flash.
2. Turn the TIMER KNOB towards “+” and “-” to adjust the
duration.
3. Press the
4. When the set time has elapsed, the text END appears
on the DISPLAY, the oven will stop cooking and a buzzer
sounds.
• For example: it is 9:00 a.m. and a time of 1 hour and 15
minutes is programmed. The function will stop
automatically at 10:15 a.m.
Setting the end time for a cooking mode
! A cooking duration must be set before the cooking end
time can be scheduled.
1. Follow steps 1 to 3 to set the duration as detailed
above.
button several times until the icon and
button again to confirm.
2. Next, press the button until the icon and the
three numerical digits on the DISPLAY begin to flash.
3. Turn the TIMER KNOB towards “+” and “-” to adjust
the hour value.
4. Press the
numerical digits on the DISPLAY begin to flash.
5. Turn the TIMER KNOB towards “+” and “-” to adjust
the minute value.
6. Press the
7. When the set time has elapsed, the text END appears
on the DISPLAY, the oven will stop cooking and a buzzer
sounds.
Programming has been set when the
flash. The DISPLAY shows the cooking end time and the
cooking duration alternately.
To cancel programming, turn the FUNCTION knob to the
“0” position.
button again so that the other two
button again to confirm.
and icons
Practical cooking advice
MULTILEVEL
• Use positions 1, 3, 5 and 6.
• Place the dripping pan at the bottom and the rack at
the top.
BARBECUE
• Preheat the oven for 5 minutes.
• Keep the oven door closed when cooking in this mode.
• Place the dripping pan on shelf level 3. Place the rack
in a position between 4 and 7, depending on how bulky
the food is, and make sure the food is in the centre of
the rack. Examples: beef ribs should be cooked on
shelf level 4 and bacon on shelf level 6 or 7.
PIZZA or FOCACCIA
• Use a light aluminium tray with a maximum diameter of
30 cm, placing it on top of the rack supplied.
• If the pizza has a lot of toppings, we recommend
adding the mozzarella cheese on top of the pizza
halfway through the cooking process.
GRILL
• Preheat the oven for 5 minutes.
• Fit the DIVIDER to the DIVIDER rack “D”.
• Keep the oven door closed when cooking in this mode.
• Place the rack in position 7. Position the food in the
centre of the rack. Position the dripping pan on shelf
level 6.
• This function is particularly suitable for browning food,
cooking gratins, colouring meringues, making toasted
10
 Loading...