

Page 1
641 DD /HA(WH)
Eesti keeles
Kasutusjuhend
KEEDUPLAAT
Sisukord
Kasutusjuhend,1
Hoiatused,4
Klienditugi,7
Seadme kirjeldus,8
Paigaldamine,24
Käitamine ja kasutamine,28
Ettevaatusabinõud ja soovitused,28
Hooldus,29
Veaotsing,29
English
Operating Instructions
HOB
Contents
Operating Instructions,1
Warnings,3
Assistance,7
Description of the appliance,8
Installation,10
Start-up and use,14
Precautions and tips,14
Maintenance and care,15
Troubleshooting,15
Polski
Instrukcja obsługi
PŁYTA
Spis treści
Instrukcja obsługi,1
Ostrzezenia,3
Serwis Techniczny,7
Opis urządzenia,8
Instalacja,17
Uruchomienie i użytkowanie,21
Zalecenia i środki ostrożności,21
Konserwacja i utrzymanie,22
Anomalie i środki zaradcze,22
Lietuvių k.
Naudojimo instrukcijos
HOB
Turinys
Naudojimo instrukcijos,1
Įspėjimai,4
Pagalba,7
Prietaiso aprašymas,8
Montavimas,30
Įjungimas ir naudojimas,34
Atsargumo priemonės ir patarimai,34
Techninė priežiūra,35
Gedimų šalinimas,35
Latviešu valoda
Lietošanas instrukcija
PLĪTS VIRSMA
Cuprins
Lietošanas instrukcija,1
Brīdinājumi,5
Palīdzība,7
Ierīces apraksts,9
Ierīkošana,36
Ieslēgšana un lietošana,40
Piesardzības pasākumi un ieteikumi,40
Tehniskā apkope un kopšana,41
Traucējumu novēršana,41
Page 2
Русскии
Руководство по эксплуатации
ВАРОЧНАЯ ПАНЕЛЬ
Содержание
Руководство по эксплуатации,2
Предупреждения,5
Сервисное обслуживание,7
Описание изделия,9
Установка,42
Включение и эксплуатация,46
Предосторожности и рекомендации,46
Техническое обслуживание и уход,47
Неисправности и методы их устранения,47
Қазақша
Пайдалану нұсқаулығы
ПЛИТА
Мазмұны
Пайдалану нұсқаулығы,2
Ескертулер,6
Көмек,7
Құрылғы сипаттамасы,9
Орнату,49
Қосу және пайдалану,53
Сақтандырулар мен кеңестер,53
Жөндеу және күтім,54
Ақаулықтарды жою,54
Page 3
Warnings
Ostrzezenia
WARNING: The appliance and its accessible parts
become hot during use. Care should be taken to
avoid touching heating elements. Children less than 8
years of age shall be kept away unless continuously
supervised. This appliance can be used by children
aged from 8 years and above and persons with
reduced physical, sensory or mental capabilities or
lack of experience and knowledge if they have been
given supervision or instruction concerning use of the
appliance in a safe way and understand the hazards
involved. Children shall not play with the appliance.
Cleaning and user maintenance shall not be made
by children without supervision.
WARNING: Unattended cooking on a hob with fat or
oil can be dangerous and may result in re. NEVER
try to extinguish a re with water, but switch off the
appliance and then cover ame e.g. with a lid or a
re blanket.
WARNING: Danger of re: do not store items on the
cooking surfaces.
Never use steam cleaners or pressure cleaners on
the appliance.
UWAGA: To urządzenie oraz jego dostępne części
silnie się rozgrzewają podczas użytkowania. Należy
uważać, aby nie dotknąć elementów grzejnych.
Nie pozwalać, aby dzieci poniżej 8 roku życia
zbliżały się do urządzenia, jeśli nie są pod stałym
nadzorem dorosłych. Z niniejszego urządzenia
mogą korzystać dzieci powyżej 8 roku życia i
osoby o ograniczonych zdolnościach zycznych,
zmysłowych bądź umysłowych, jak również osoby
nieposiadające doświadczenia lub znajomości
urządzenia, jeśli znajdują się one pod nadzorem
innych osób lub jeśli zostały pouczone na temat
bezpiecznego sposobu użycia urządzenia oraz
zdają sobie sprawę ze związanych z nim zagrożeń.
Dzieci nie powinny bawić się urządzeniem. Prace
związane z czyszczeniem i konserwacją nie mogą
być wykonywane przez dzieci, jeśli nie są one
nadzorowane.
UWAGA: Pozostawienie bez nadzoru na kuchence
tłuszczów i olejów może być niebezpieczne i może
spowodować pożar. Nie należy NIGDY próbować
ugasić płomieni/pożaru wodą; należy wyłączyć
urządzenie i przykryć płomień np. pokrywką lub
ognioodpornym kocem.
Remove any liquid from the lid before opening it. Do
not close the glass cover (if present) when the gas
burners or electric hotplates are still hot.
The appliance is not intended to be operated by
means of an external timer or separate remote
control system.
CAUTION: the use of inappropriate hob guards can
cause accidents.
CAUTION: In case of hotplate glass breakage:
- shut immediately off all burners and any electrical
heating element and isolate the appliance from the
power supply
- do not touch the appliance surface.
UWAGA: Ryzyko pożaru: nie pozostawiać
przedmiotów na powierzchniach grzejnych.
Nie stosować nigdy oczyszczaczy parowych lub
ciśnieniowych do czyszczenia urządzenia.
Usunąć ewentualne płyny na pokrywie przed jej
otwarciem. Nie zamykać szklanej pokrywy (jeśli jest
częścią wyposażenia), jeśli palniki gazowe lub płyta
elektryczna są jeszcze rozgrzane.
Urządzenie nie jest przeznaczone do włączania przy
użyciu zewnętrznego przekaźnika czasowego lub
zdalnego systemu sterowania.
3
Page 4
UWAGA: użycie niewłaściwych zabezpieczeń płyty
może być przyczyną wypadków.
TÄHELEPANU: valede keeduplaadipiirete
kasutamine võib põhjustada õnnetusi.
UWAGA: W przypadku uszkodzenia szkła płyty:
- wyłączyć natychmiast wszystkie palniki i ewentualne
elementy grzejne i odłączyć urządzenie od sieci
elektrycznej
- nie dotykać powierzchni urządzenia.
TÄHELEPANU: kui keedualuse klaas puruneb:
- lülitage kõik põletid ja elektrilised keeduelemendid
kohe välja ning lahutage seade elektrivõrgust;
- ärge puudutage seadme pinda.
Įspėjimai
Hoiatused
ĮSPĖJIMAS! Prietaisas ir jo pasiekiamos dalys
HOIATUS: sisselülitatud seade ja selle
juurdepääsetavad osad muutuvad kasutamise
ajal kuumaks. Olge ettevaatlik ja vältige kontakti
kütteelementidega. Alla 8-aastased lapsed tuleb
hoida seadmest eemal, v.a. juhul, kui neile on
tagatud pidev järelevalve. Vanemad kui 8-aastased
lapsed ja isikud, kellel on vähenenud füüsilised
või vaimsed võimed või vähesed kogemused ja
oskused, võivad seda seadet kasutada juhul, kui on
tagatud nende järelevalve ning neile on antud juhised
seadme ohutuks kasutamiseks ja nad mõistavad
seadme kasutamisest tulenevaid ohte. Lapsed ei
tohi seadmega mängida. Lapsed võivad seadet
puhastada ja hooldada ainult järelevalve all.
HOIATUS: rasvas või õlis küpseva toidu jätmine
keeduplaadile järelevalveta on ohtlik ja võib
põhjustada tulekahju. Tulekahju kustutamiseks
ÄRGE kasutage vett, vaid lülitage seade välja ja
seejärel katke leek näiteks kaane või tuletekiga.
naudojant įkaista. Būkite atsargūs, neprisilieskite
prie įkaitusių prietaiso dalių. Jaunesni nei 8 metų
vaikai gali būti prileidžiami prie prietaiso tik jei
juos prižiūri suaugusieji. Vyresni nei 8 metų vaikai
ir asmenys, turintys zinių, jutimo ar psichinių
sutrikimų arba nepakankamai žinių ar patirties, šiuo
prietaisu gali naudotis tik tuomet, jei jie prižiūrimi
arba instruktuojami, kaip saugiai naudoti prietaisą,
ir supranta kylančias grėsmes. Vaikams turi būti
draudžiama žaisti su prietaisu. Neprižiūrimi vaikai taip
pat negali valyti prietaiso ar atlikti jo priežiūros darbų.
ĮSPĖJIMAS! Ant įjungtos viryklės palikti indai su
riebalais ar aliejumi gali sukelti gaisrą. NIEKADA
nebandykite liepsnos gesinti vandeniu – išjunkite
prietaisą ir kuo nors uždenkite liepsną, pavyzdžiui,
dangčiu arba priešgaisriniu apklotu.
ĮSPĖJIMAS! Gaisro pavojus – ant viryklės nelaikykite
jokių daiktų.
HOIATUS: Tuleoht: ärge hoidke keeduplaatidel
mingeid esemeid.
Ärge kasutage seadme puhastamiseks auru- ega
survepuhastusseadmeid.
Enne kaane avamist eemaldage sellele kogunenud
vedelik. Ärge sulgege klaaskaant (kui on olemas),
kui gaasipõletid või elektrilised keeduplaadid on veel
kuumad.
Seade ei ole mõeldud kasutamiseks koos välise
taimeri ega eraldiseisva kaugjuhtimissüsteemiga.
4
Niekuomet nevalykite prietaiso gariniais ar slėginiais
valikliais.
Prieš atidarydami gaubtą nuo jo nuvalykite skysčius.
Neuždenkite stiklinio dangčio (jei sumontuotas), kol
neatvėso dujiniai degikliai arba elektrinė kaitlentė.
Prietaisas nevaldomas išoriniu laikmačiu arba atskira
nuotoline valdymo sistema.
ATSARGIAI! Netinkamų viryklės apsaugų naudojimas
gali sukelti nelaimingą atsitikimą.
Page 5
ATSARGIAI! Įskilus arba sudužus kaitlentės paviršiui:
- Nedelsdami užsukite visus degiklius ir kaitinimo
elementus, išjunkite prietaisą iš elektros tinklo.
- Nelieskite prietaiso paviršiaus.
UZMANĪBU! Ja saplīst sildvirsmas stikls:
- nekavējoties izslēdziet visus degļus un elektriskos
sildīšanas elementus un atslēdziet iekārtu no
elektropadeves;
- nepieskarieties iekārtas virsmai.
Brīdinājumi
Предупреждения
BRĪDINĀJUMS! Ierīce un tās atklātās daļas
lietošanas laikā stipri sakarst. Nepieskarieties
sakarsušajām ierīces daļām. Bērni, kuri ir jaunāki par
astoņiem gadiem, drīkst atrasties ierīces tuvumā tikai
stingrā pieaugušo uzraudzībā. Ierīci drīkst lietot bērni,
kuri ir sasnieguši astoņu gadu vecumu, bet personas
ar ierobežotām ziskajām, maņu vai garīgajām
spējām un personas, kurām nav ierīces lietošanas
pieredzes vai nepieciešamo zināšanu, - tikai tad, ja
tās tiek uzraudzītas vai ir atbilstoši informētas par
ierīces drošu lietošanu un iespējamajiem riskiem.
Bērni nedrīkst rotaļāties ar ierīci. Bērni nedrīkst bez
uzraudzības tīrīt ierīci un veikt tās apkopi.
BRĪDINĀJUMS! Atstājot uz ieslēgtas plīts virsmas
pannu ar taukiem vai eļļu, varat radīt ugunsgrēka
risku. NEKĀDĀ GADĪJUMĀ nemēģiniet dzēst uguni
ar ūdeni, bet izslēdziet plīti un nosedziet liesmu ar
vāku vai nedegošu pārsegu.
BRĪDINĀJUMS! Aizdegšanās risks: neglabājiet
priekšmetus uz plīts virsmas.
Ierīci nedrīkst tīrīt ar tvaika vai augstspiediena
tīrītājiem.
Pirms pārsega atvēršanas notīriet no tā visu
šķidrumu. Ja gāzes degļi vai elektriskās sildvirsmas
joprojām ir karstas, stikla pārsegu (ja tāds ir) nedrīkst
aizvērt.
Iekārtu nav paredzēts lietot kopā ar ārējo taimeri vai
atsevišķu tālvadības ierīci.
UZMANĪBU! Neatbilstošu plīts virsmas aizsargu
lietošana var izraisīt nelaimes gadījumus.
ВНИМАНИЕ: Данное изделие и его доступные
комплектующие сильно нагреваются в процессе
эксплуатации.Будьте осторожны и не касайтесь
нагревательных элементов.Не разрешайте
детям младше 8 лет приближаться к изделию
без контроля.Данное изделие может быть
использовано детьми старше 8 лет и лицами с
ограниченными физическими, сенсорными или
умственными способностями или без опыта и
знания о правилах использования изделия при
условии надлежащего контроля или обучения
безопасному использованию изделия с учетом
соответствующих рисков. Не разрешайте
детям играть с изделием. Не разрешайте детям
осуществлять чистку и уход за изделием без
контроля взрослых.
Никогда не используйте паровые чистящие
агрегаты или агрегаты под высоким давлением
для чистки изделия.
Удалите жидкость из крышки перед открытием.
Не закрывать стеклянную крышку (если имеется)
с газовыми горелками или электрическая плита
еще горячая.
5
Page 6
Металл заттарды (пышақтар, қасықтар, таба
қақпақтары, т.б.) конфоркаға қоймаңыз, себебі
олар қызып кетуі мүмкін.
ВНИМАНИЕ: Использование несоответствующих
план защиты может привести к несчастным
случаям.
ВНИМАНИЕ: В случае повреждения стекла:
- Немедленно выключите все горелки и любые
электрические нагревательные элементы и
отключите устройство от сети.
- Не прикасайтесь к поверхности устройства.
Ескертулер
ЕСКЕРТУ: Құрылғы мен оның қол жететін
бөліктері жұмыс кезінде қызуы мүмкін. Қыздыру
элементтеріне тимеуге назар аударыңыз. 8-ге
толмаған балаларға үздіксіз бақылау болмаса,
құрылғыдан аулақ ұстау керек. Бұл құрылғыны
қауіпсіз түрде қолдану бойынша кеңес не нұсқау
берілген және ықтимал қауіп-қатерлерді түсінетін
жағдайда, оны 8-ге толған балалар мен дене,
сезіну немесе ой қабілеті төмен немесе тәжірибесі
мен білімі жеткіліксіз адамдар қолдана алады.
Балаларға құрылғымен ойнауға болмайды.
Балаларға бақылаусыз құрылғыны тазалауға
және оған қызмет көрсетуге болмайды.
Құрылғы сыртқы таймермен немесе бөлек
қашықтан басқару жүйесімен басқарылуға
арналмаған.
АБАЙ БОЛЫҢЫЗ: сәйкес келмейтін
конфоркалардың қорғану құралдарын пайдалану
жазатайым оқиғаларға себеп болуы мүмкін.
НАЗАР АУДАРЫҢЫЗ: Егер шыны пісіру панелі
зақымдалған жағдайда:
- тез арада барлық конфоркаларды және барлық
мүмкіндіктегі қыздыру элементтерін өшіріңіз,
сонымен қатар құрылғыны электр желісінен
ажыратыңыз.
- қондырғының беткейін қолыңызбен ұстамаңыз.
ЕСКЕРТУ: Плитада майға тамақ пісірген кезде
бақылап тұрмау қауіпті болуы және өрт шығуға
әкелуі мүмкін.
Өртті ЕШҚАШАН сумен өшіруші болмаңыз, оның
орнына құрылғыны өшіріп, жалынды жабыңыз,
мысалы қақпақпен немесе өртенбейтін матамен.
ЕСКЕРТУ: Өрт қаупі бар: пісіру беттерінде
заттарды сақтамаңыз.
Автоматты түрде тазарту кезінде құрылғының
беті ыстық болатындықтан балаларды одан алыс
жерде ұстаңыз.
6
Page 7

Assistance
Communicating:
• type of trouble
• appliance model (Mod.)
• serial number (S/N)
This information is found on the data plate located on the appliance and/or
on the packaging.
Сервисное обслуживание
Перед тем как обратиться в Центр Технического Обслуживания:
• тип неисправности;
• модель изделия (Мод.)
• номер тех. паспорта (серииныи №)
Эти данные вы наидете на паспортнои табличке, расположеннои на
изделии.
Serwis Techniczny
Należy podać:
• rodzaj anomalii
• model urządzenia (Mod.)
• numer seryjny (S/N)
Te dane znajdują się na tabliczce znamionowej w lodówce, po lewej stronie
w dolnj jej części.
Klienditugi
Hoidke käepärast järgmised andmed:
• tüüpi anomaalia
• seadme mudel (Mod.)
• seerianumber (S/N)
Need andmed leiate seadme andmeplaadilt ja/või pakendilt.
Pagalba
Informacija:
• tipas anomalija
• prietaiso modelis (Mod.)
• Serijos numeris (S/N)
Šią informaciją rasite duomenų plokštelėje, kuri yra ant prietaiso ir (arba)
pakuotės.
Көмек
Байланыс ақпараты:
• туындаған проблема түрі.
• құрылғының моделі (Мод.).
• сериялық нөмірі (С/н).
Бұл ақпарат құрылғыда орнатылған деректеме кестесінде немесе
орамадан табылуы мүмкін.
Palīdzība
Paziņojums:
• tipa anomālija
• ierīces modelis (Mod.)
• sērijas numurs (S/N)
Šī informācija ir norādīta uz tehnisko datu plāksnītes, kas piestiprināta ierīcei
un/vai tās iepakojumam.
7
Page 8
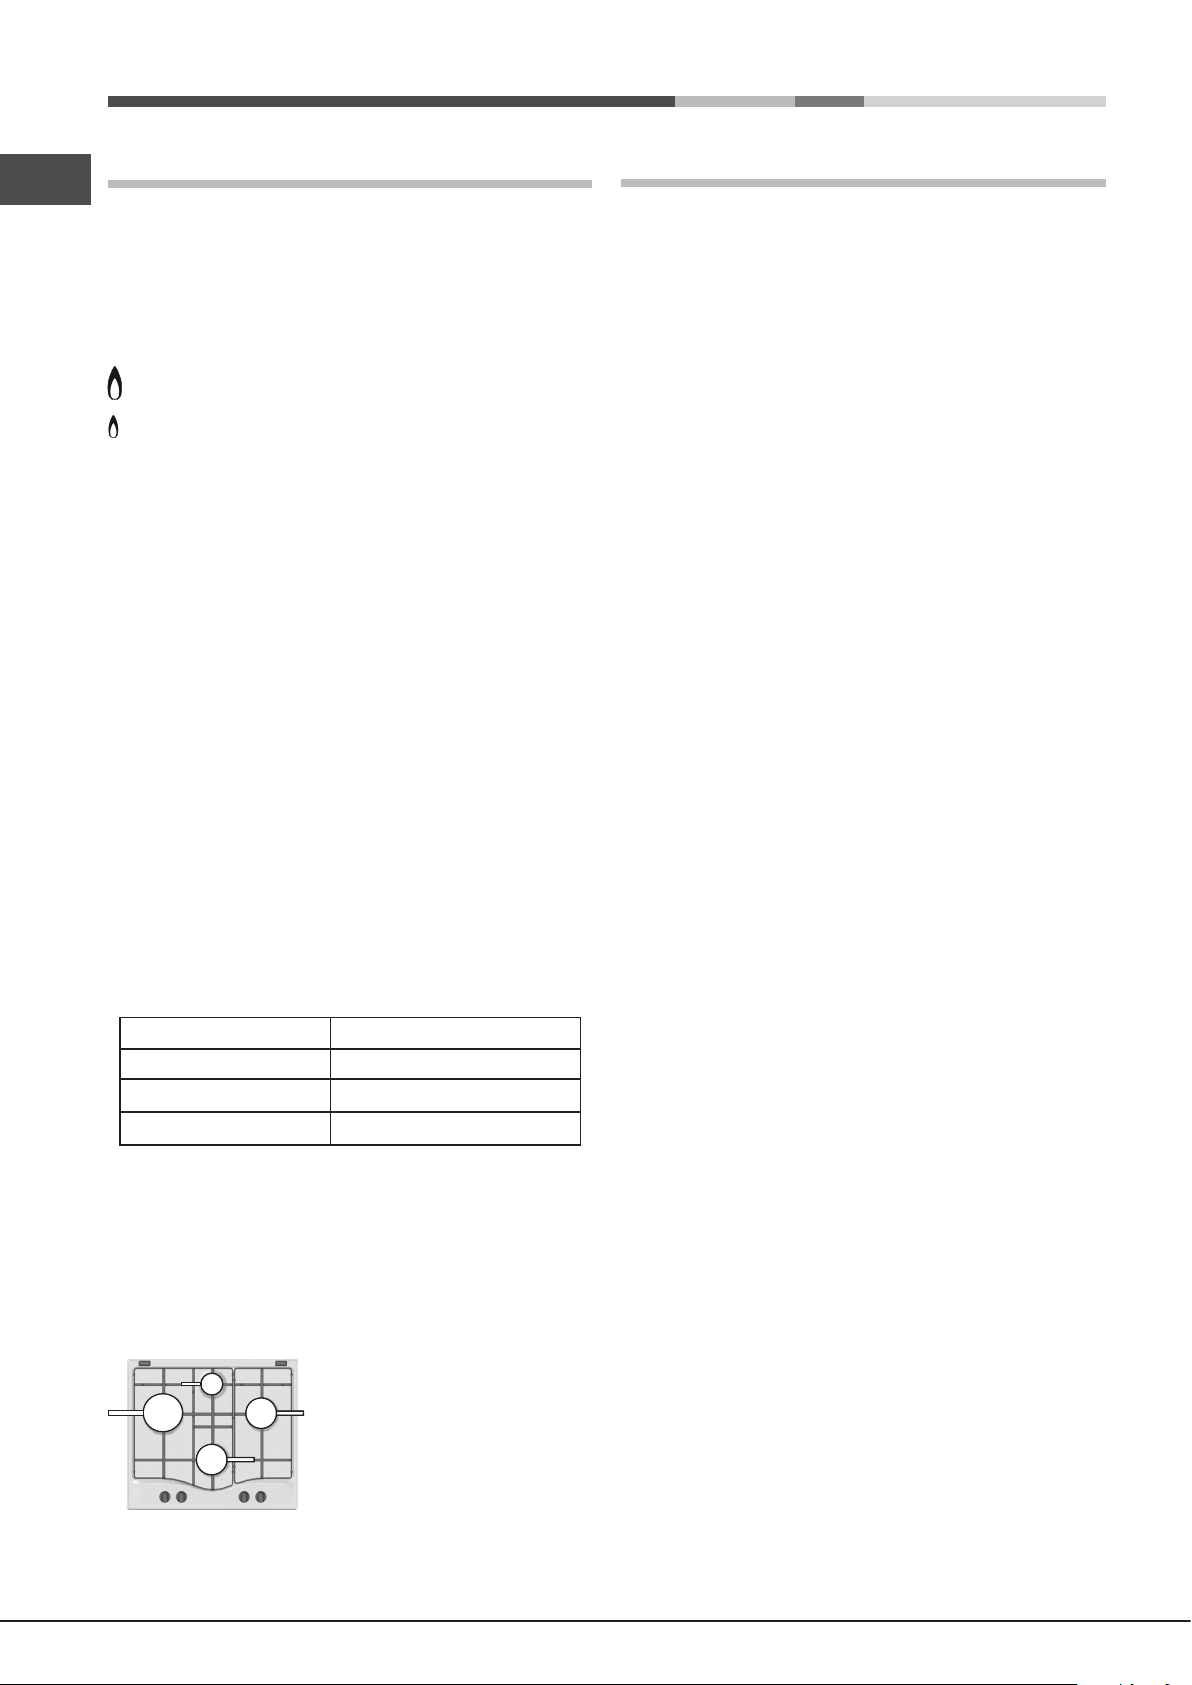
Description of the appliance
5
2
1
3
Seadme kirjeldus
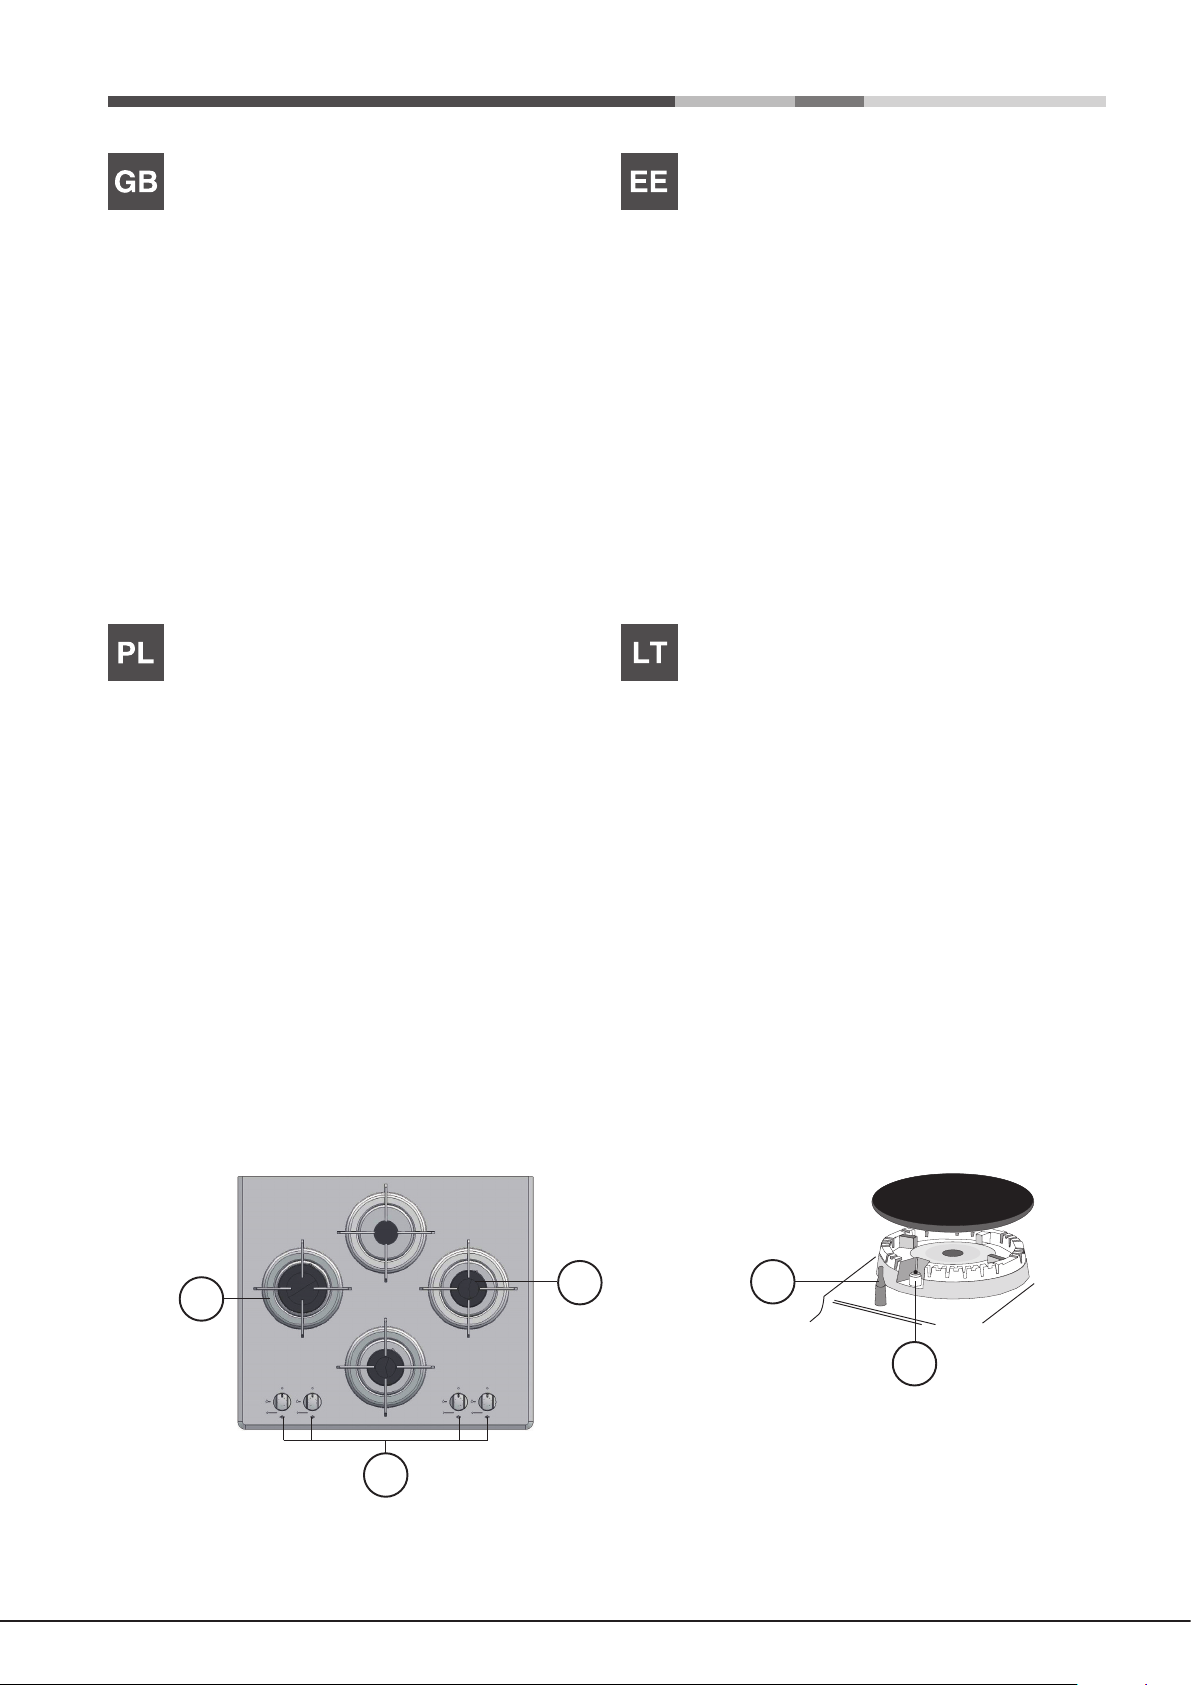
Overall view
1. Support Grid for COOKWARE
2. GAS BURNERS
3. Control Knobs for GAS BURNERS
4. Ignition for GAS BURNERS
5. SAFETY DEVICES
• GAS BURNERS differ in size and power. Use the diameter of the cookware
to choose the most appropriate burner to cook with.
• Control Knobs for GAS BURNERS adjust the size of the ame.
• GAS BURNER IGNITION enables a specic burner to be lit automatically.
• SAFETY DEVICE stops the gas flow if the flame is accidentally
extinguished.
Opis urządzenia
Widok ogólny
1. Kratki do ustawiania NACZYŃ DO GOTOWANIA
2. PALNIKI GAZOWE
3. Pokrętła sterujące PALNIKÓW GAZOWYCH
4. Świeca zapłonowa PALNIKÓW GAZOWYCH
5. URZĄDZENIA ZABEZPIECZAJĄCE
• PALNIKI GAZOWE posiadają różne wymiary i moce. Należy wybrać ten
palnik, który jest najbardziej odpowiedni dla średnicy używanego naczynia.
• Pokrętła sterowania palnikami gazowymi do regulowania płomienia.
• Świeca zapłonowa PALNIKÓW GAZOWYCH umożliwia automatyczne
zapalenie wybranego palnika.
• URZĄDZENIE ZABEZPIECZAJĄCE w razie przypadkowego zgaśnięcia
płomienia przerywa dopływ gazu.
Ülevaade
1. Rest KEEDUNÕU JAOKS
2. GAASIPÕLETID
3. GAASIPÕLETITE REGULEERIMISE NUPUD
4. GAASIPÕLETITE SÜÜTENUPP
5. OHUTUSSEADISED
• GAASIPÕLETID on erineva suuruse ja võimsusega. Kasutage põleti jaoks
kõige sobivama läbimõõduga keedunõud.
• GAASIPÕLETITE REGULEERIMISE NUPUD leegi reguleerimiseks.
• GAASIPÕLETI SÜÜTENUPP võimaldab vastava põleti automaatselt
süüdata.
• OHUTUSSEADIS seiskab gaasivoolu, kui leek peaks juhuslikult kustuma.
Prietaiso aprašymas
Bendras vaizdas
1. GAMINIMO INDO laikančiosios grotelės
2. DUJŲ DEGIKLIAI
3. DUJINIŲ DEGIKLIŲ valdymo rankenėlės
4. DUJINIŲ DEGIKLIŲ uždegimo funkcija
5. SAUGOS ĮTAISAI
• DUJINIAI DEGIKLIAI skiriasi dydžiu ir galia. Naudokite tokio skersmens
gaminimo indus, kurie geriausiai tinka tam tikram degikliui.
• DUJINIŲ DEGIKLIŲ valdymo rankenėlės liepsnai reguliuoti.
• DUJINIO DEGIKLIO UŽDEGIMO FUNKCIJA suteikia galimybę
automatiškai uždegti tam tikrą degiklį.
• APSAUGINIS ĮTAISAS sustabdo dujų srautą, jei liepsna netyčia užgęsta.
4
8
Page 9
Ierīces apraksts
5
2
1
3
Құрылғы сипаттамасы
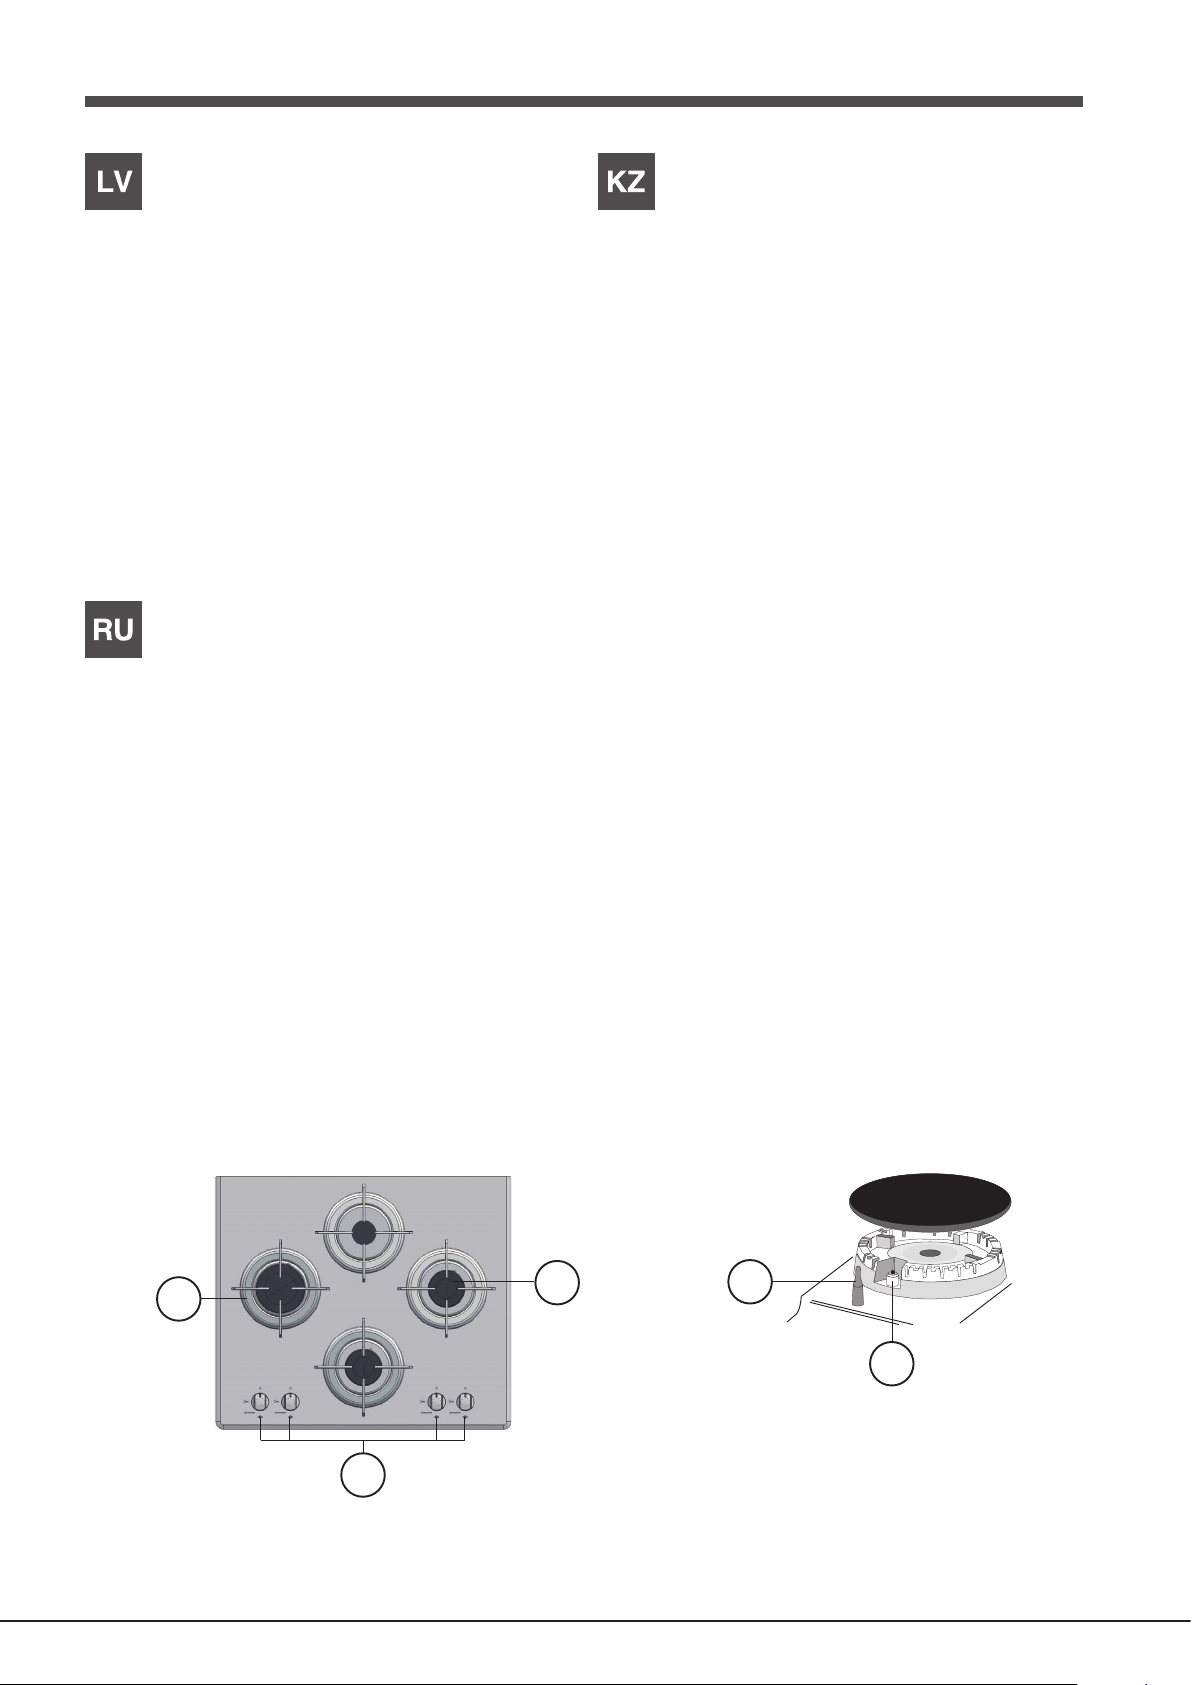
Vispārīga informācija
1. GATAVOŠANAS TRAUKU balsta režģis
2. GĀZES DEGĻI
3. GĀZES DEGĻU vadības slēdži
4. Aizdedzes GĀZES DEGĻIEM
5. DROŠĪBAS IERĪCES
• GĀZES DEGĻIEM ir dažādi izmēri un jauda. Gatavojot izvēlieties
gatavošanas trauka diametram atbilstošāko degli.
• GĀZES DEGĻU vadības slēdži liesmas regulēšanai.
• GĀZES DEGĻA AIZDEDZE ļauj automātiski aizdedzināt īpašu degli.
• DROŠĪBAS IERĪCE aptur gāzes plūsmu, ja liesma tiek nejauši nodzēsta.
Описание изделия
Общии вид
1. Опорные решетки для КАСТРЮЛЬ И СКОВОРОД
2. ГАЗОВЫЕ КОНФОРКИ
3. Регуляторы ГАЗОВЫХ КОНФОРОК
4. Свеча зажигания ГАЗОВЫХ ГОРЕЛОК
5. ЗАЩИТНОЕ УСТРОЙСТВО
Жалпы шолу
1 ЫДЫСТАРҒА арналған тіреуіш тор
2 ГАЗ КОНФОРКАЛАРЫ
3 ГАЗ КОНФОРКАЛАРЫН реттеу тұтқасы
4 ГАЗ ЖАНАРҒЫЛАРЫН тұтандыру оттығы
5 ҚОРҒАНЫС ҚҰРАЛЫ
• ГАЗ КОНФОРКАЛАРЫ өлшемі мен қуатына қарай әртүрлі болады.
Тамақ пісіру үшін тиісті оттықты ыдыстың диаметріне қарай таңдаңыз.
• ОТТЫҚТАРДЫ басқару тұтқалары жалынның өлшемін реттейді.
• ГАЗ ОТТЫҒЫНЫҢ ТҰТАТУ ҚҰРАЛЫ белгілі бір оттықты автоматты
түрде жандыруға мүмкіндік береді.
• ҚАУІПСІЗДІК ҚҰРЫЛҒЫСЫ жалын байқаусыз өшірілсе, газ ағынын
тоқтатады.
• ГАЗОВЫЕ КОНФОРКИ имеют разную мощность и размер. Выберите
конфорку, наиболее соответствующую диаметру используемой
посуды.
• Регуляторы ГАЗОВЫХ КОНФОРОК служат для регуляции пламени.
• Свеча ЗАЖИГАНИЯ ГАЗОВЫХ КОНФОРОК для автоматического
зажигания нужной конфорки.
• УСТРОЙСТВО БЕЗОПАСНОСТИ при случайном гашении пламени
перекрывает подачу газа.
4
9
Page 10
Installation
GB
! Before operating your new appliance please read this instruction booklet
carefully. It contains important information for safe use, installation and care
of the appliance.
! Please keep these operating instructions for future reference. Pass them on
to possible new owners of the appliance.
Positioning
! Keep packaging material out of the reach of children. It can become a choking
or suffocation hazard (see Precautions and tips).
! The appliance must be installed by a qualied professional according to the
instructions provided. Incorrect installation may cause harm to people and
animals or may damage property.
! This unit may be installed and used only in permanently ventilated rooms
in accordance with current national regulations. The following requirements
must be observed:
• The room must be equipped with an air extraction system that expels
any combustion fumes. This may consist of a hood or an electric fan that
automatically starts each time the appliance is switched on.
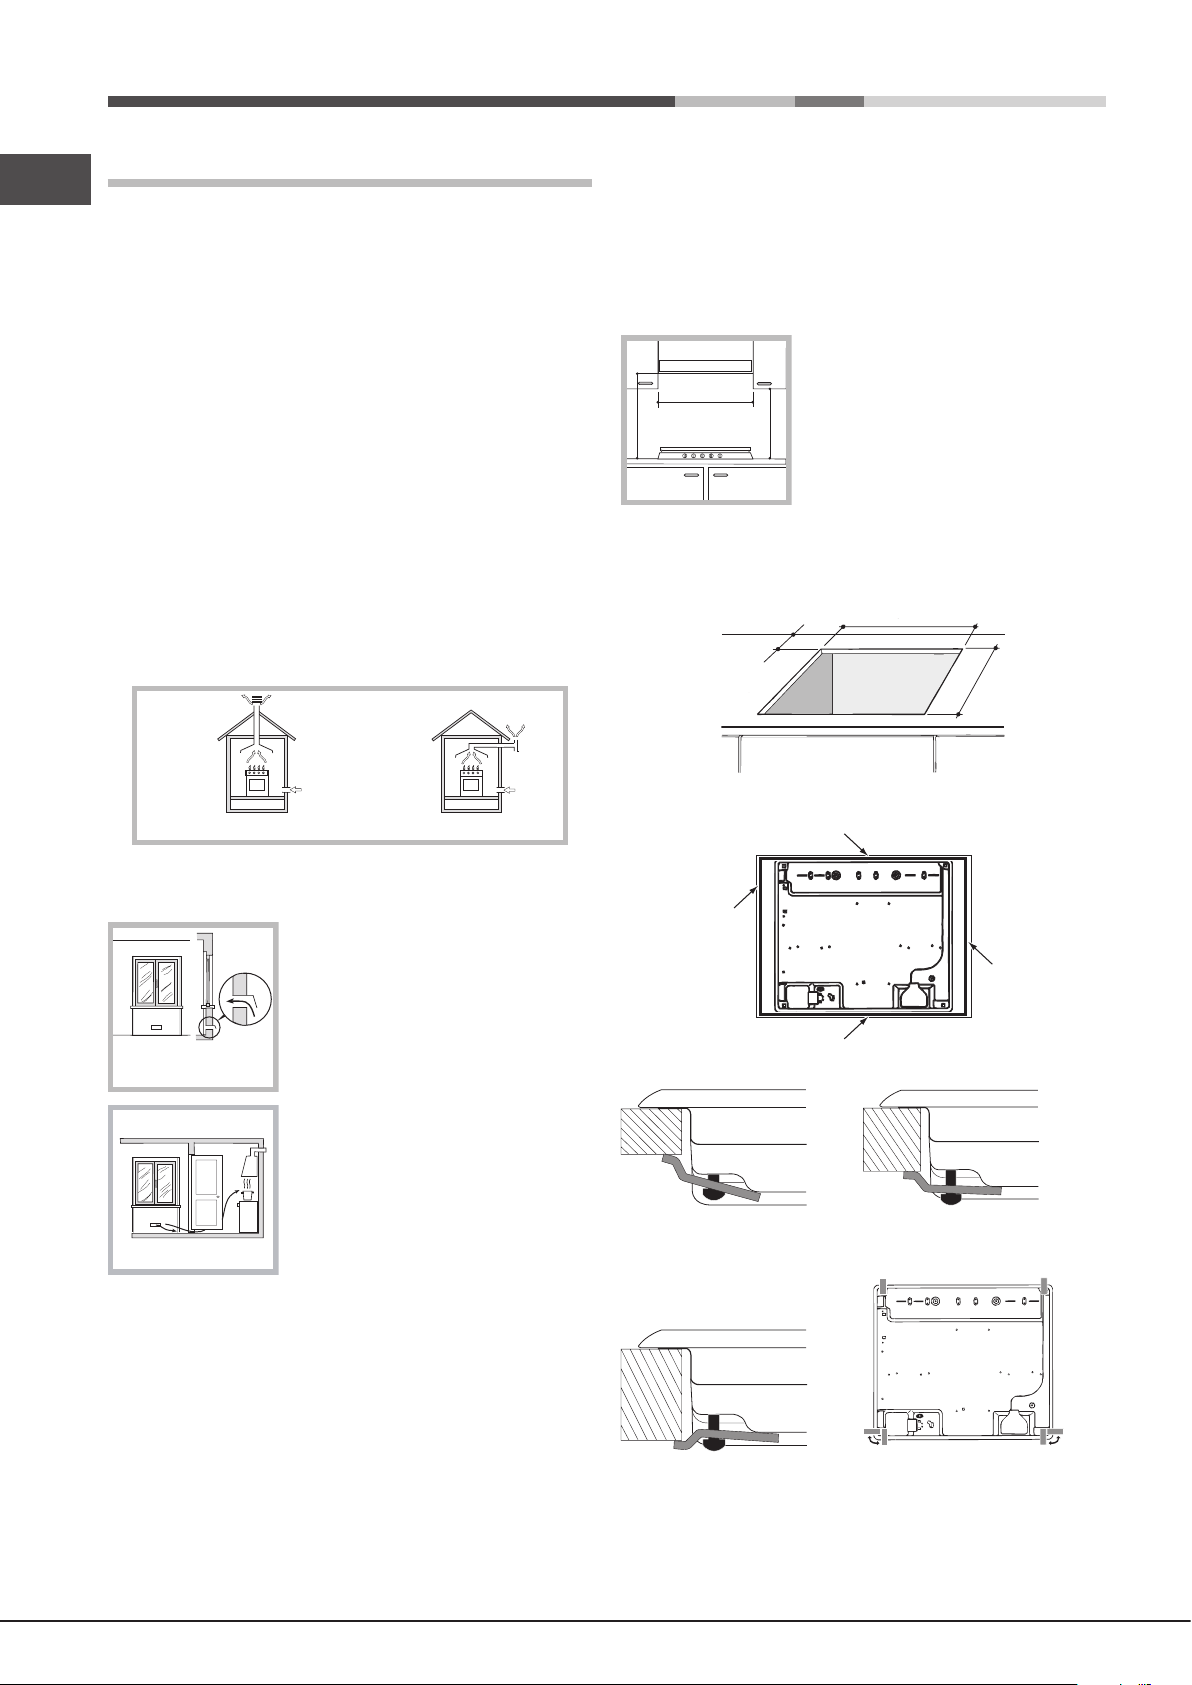
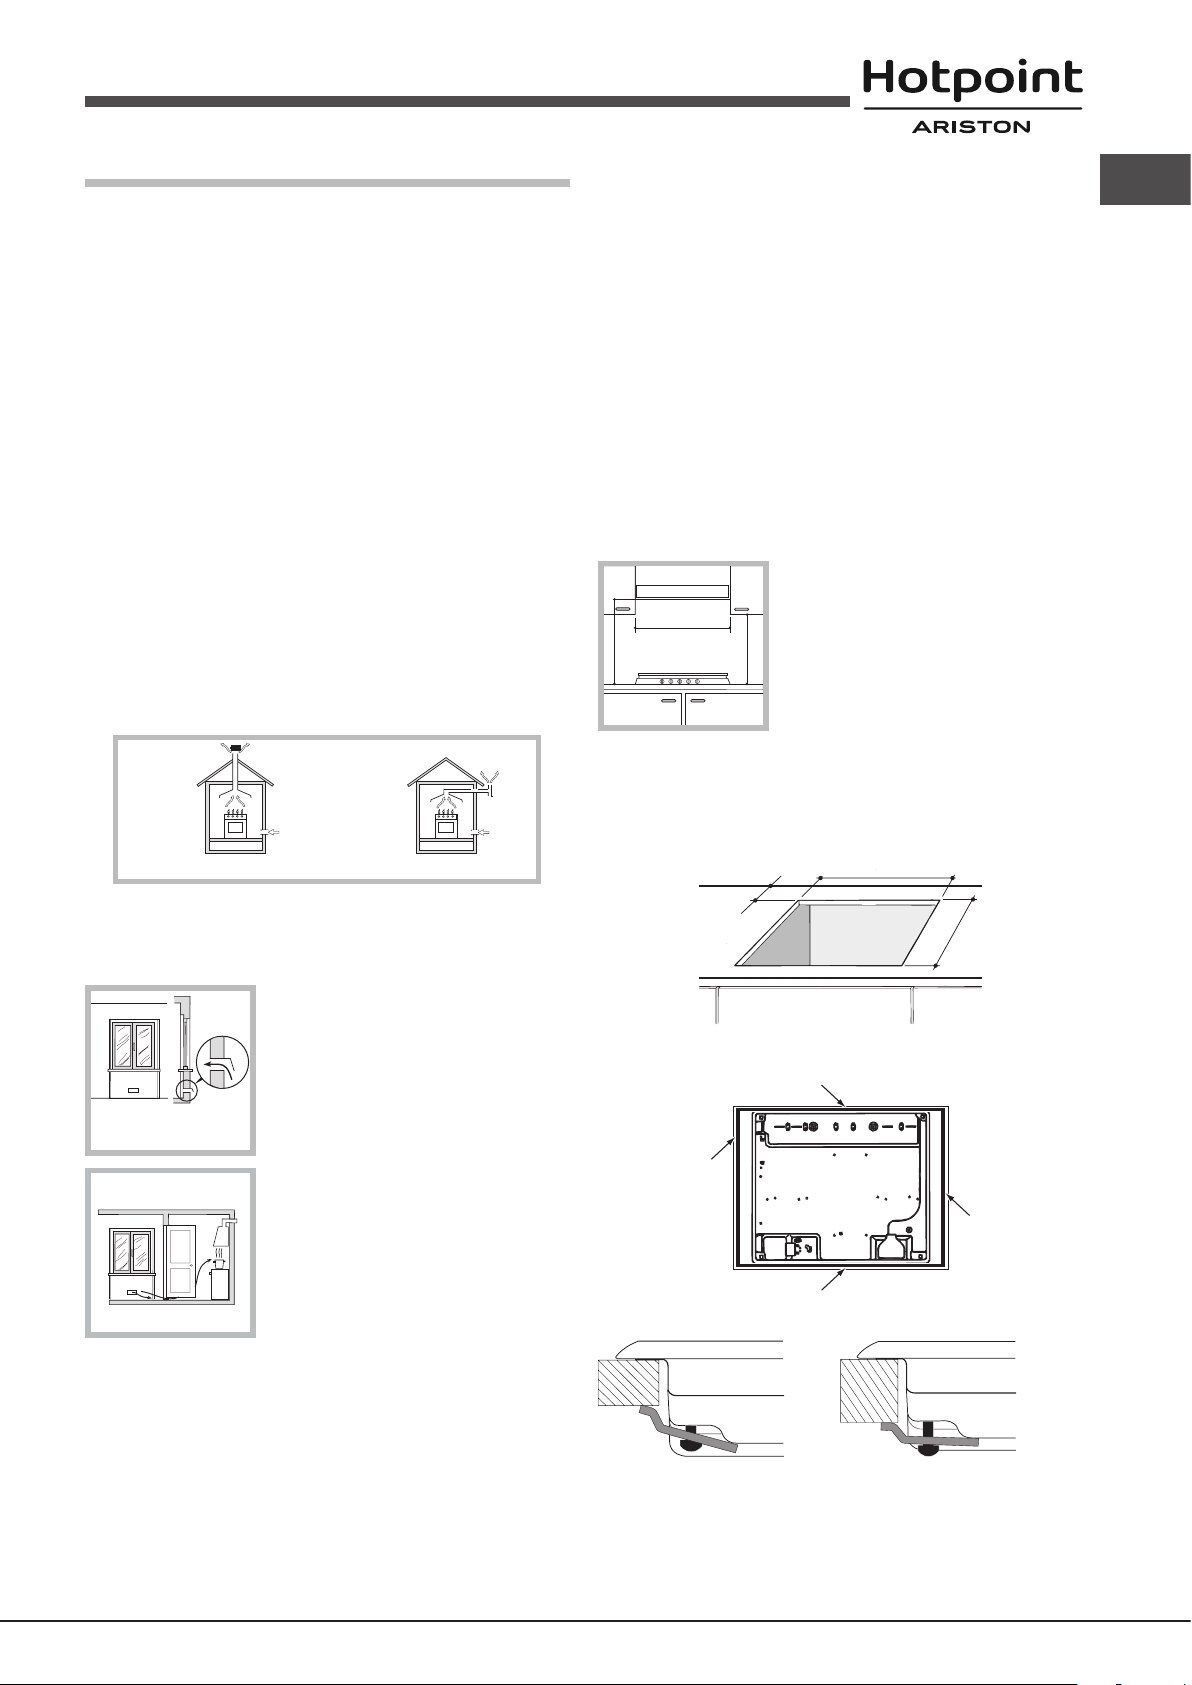
Fitting the appliance
The following precautions must be taken when installing the hob:
• Kitchen cabinets adjacent to the appliance and taller than the top of the
hob must be at least 200 mm from the edge of the hob.
• Hoods must be installed according to their relative installation instruction
manuals and at a minimum distance of 650 mm from the hob (see gure).
• Place the wall cabinets adjacent to the hood at a minimum height of 420
mm from the hob (see gure).
If the hob is installed beneath a wall cabinet,
the latter must be situated at a minimum of 700
600mm min.
650mm min.
mm above the hob.
420mm min.
• The installation cavity should have the dimensions indicated in the gure.
Fastening hooks are provided, allowing you to fasten the hob to tops that
are between 20 and 40 mm thick. To ensure the hob is securely fastened
to the top, we recommend you use all the hooks provided.
555 mm
55 mm
475 mm
In a chimney stack or branched flue.
(exclusively for cooking appliances)
Directly to
the Outside
• The room must also allow proper air circulation, as air is needed for
combustion to occur normally. The ow of air must not be less than 2 m3/h
per kW of installed power.
The air circulation system may take air directly
from the outside by means of a pipe with an
inner cross section of at least 100 cm
2
; the
opening must not be vulnerable to any type
Examples of
ventilation holes
for comburant air.
Adjacent
Room
A
Room to be
Vented
of blockages.
The system can also provide the air needed for
combustion indirectly, i.e. from adjacent rooms
tted with air circulation tubes as described
above. However, these rooms must not be
communal rooms, bedrooms or rooms that
may present a re hazard.
Enlarging the ventilation slot
between window and floor.
• Intensive and prolonged use of the appliance may necessitate
supplemental ventilation, e.g. opening a window or increasing the power
of the air intake system (if present).
• Liquid petroleum gas sinks to the oor as it is heavier than air. Therefore,
rooms containing LPG cylinders must also be equipped with vents to allow
gas to escape in the event of a leak. As a result LPG cylinders, whether
partially or completely full, must not be installed or stored in rooms or
storage areas that are below ground level (cellars, etc.). It is advisable to
keep only the cylinder being used in the room, positioned so that it is not
subject to heat produced by external sources (ovens, replaces, stoves,
etc. ) which could raise the temperature of the cylinder above 50°C.
• Before fastening the cooktop in place, position the seal (supplied) along
the perimeter of the countertop, as shown in the gure.
Hook fastening diagram
Hooking position for top H=20mm Hooking position for top H=30mm
Front
Hooking position for top H=40mm Back
! Use the hooks contained in the “accessory pack”.
10
Page 11
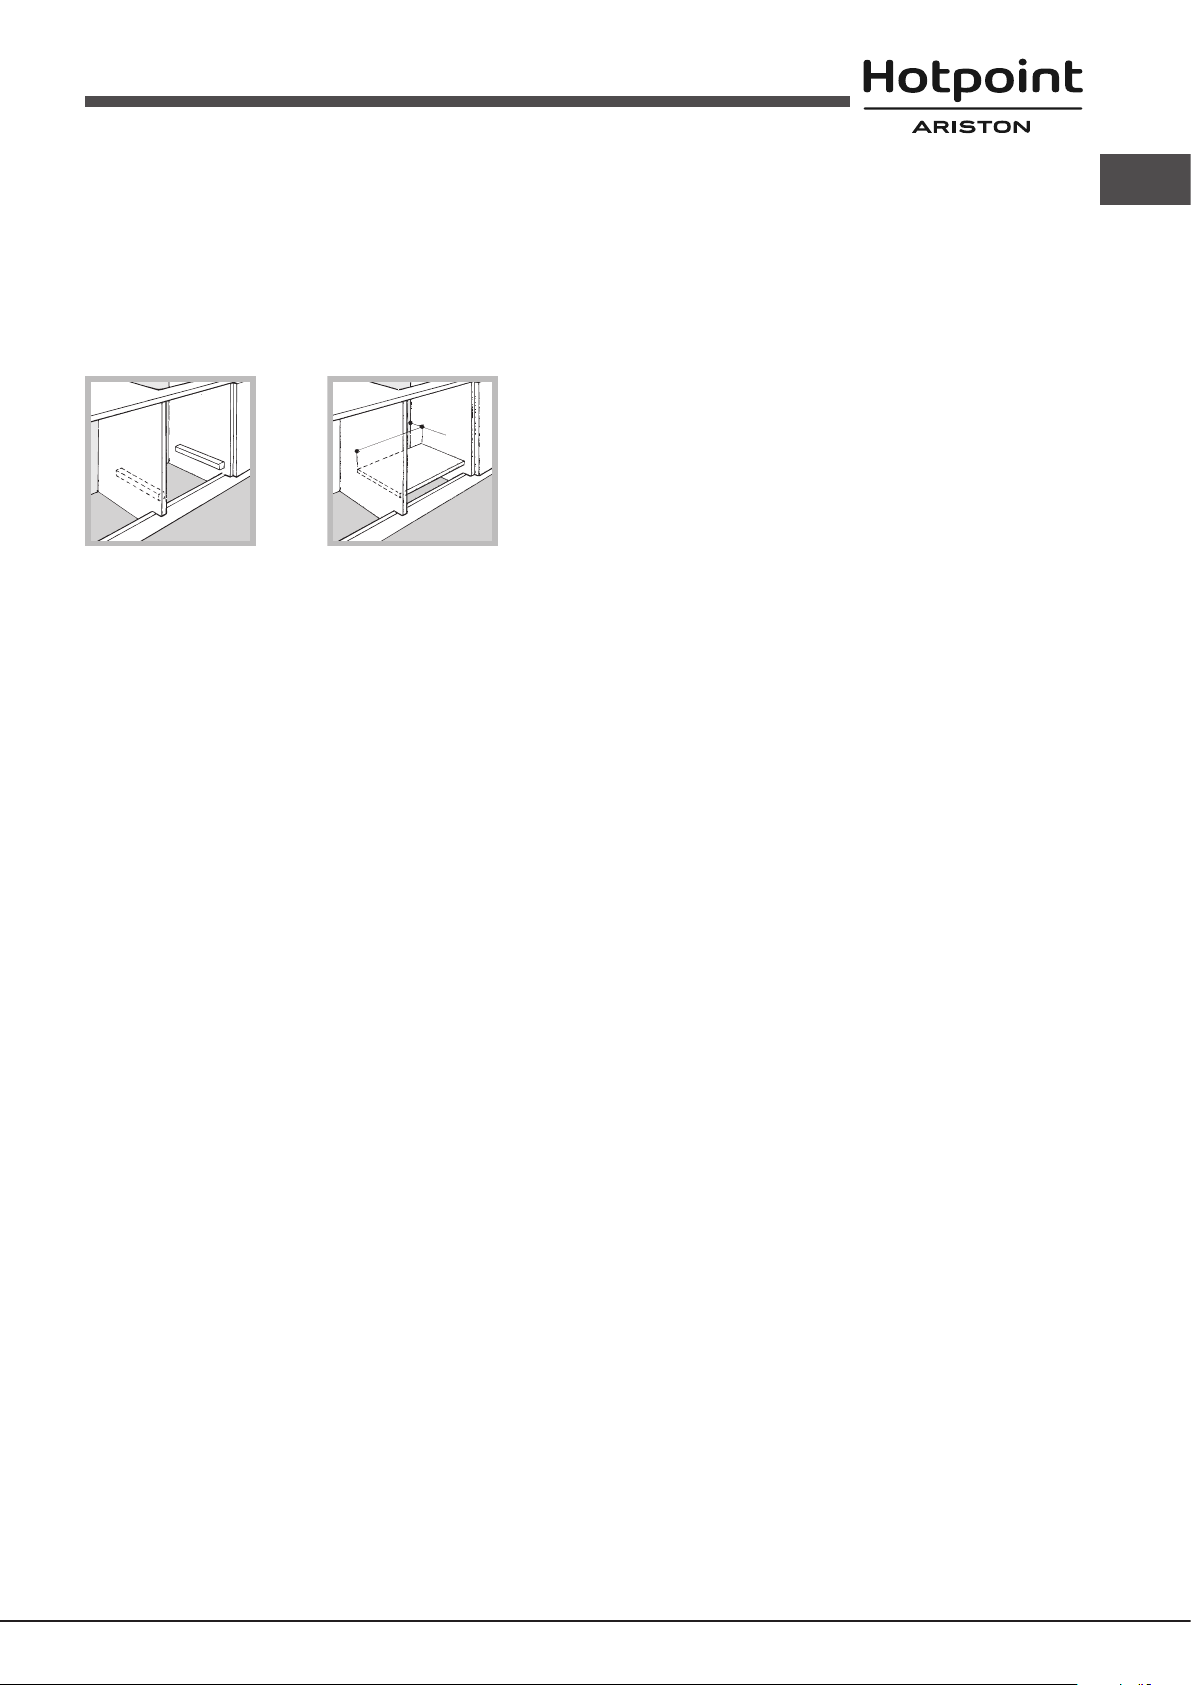
• Where the hob is not installed over a built-in oven, a wooden panel must
be installed as insulation. This must be placed at a minimum distance of
20 mm from the lower part of the hob.
Ventilation
To ensure adequate ventilation, the back panel of the cabinet must be
removed. It is advisable to install the oven so that it rests on two strips of
wood, or on a completely at surface with an opening of at least 45 x 560
mm (see diagrams).
45 mm.
560 mm.
! The manufacturer declines any liability should these safety measures not
be observed.
Gas connection
The appliance should be connected to the main gas supply or to a gas
cylinder in compliance with current national regulations. Before carrying out
the connection, make sure the cooker is compatible with the gas supply you
wish to use. If this is not the case, follow the instructions indicated in the
paragraph “Adapting to different types of gas.”
When using liquid gas from a cylinder, install a pressure regulator which
complies with current national regulations.
! Check that the pressure of the gas supply is consistent with the values
indicated in Table 1 (“Burner and nozzle specications”). This will ensure the
safe operation and longevity of your appliance while maintaining efcient
energy consumption.
GB
! The hob can only be installed above built-in ovens with a cooling ventilation
system.
Electrical connection
Hobs equipped with a three-pole power supply cable are designed to operate
with alternating current at the voltage and frequency indicated on the data
plate (this is located on the lower part of the appliance). The earth wire in the
cable has a green and yellow cover. If the appliance is to be installed above
a built-in electric oven, the electrical connection of the hob and the oven must
be carried out separately, both for electrical safety purposes and to make
extracting the oven easier.
Connecting the supply cable to the mains
Install a standardised plug corresponding to the load indicated on the data
plate.
The appliance must be directly connected to the mains using an omnipolar
circuit-breaker with a minimum contact opening of 3 mm installed between the
appliance and the mains. The circuit-breaker must be suitable for the charge
indicated and must comply with current electrical regulations (the earthing
wire must not be interrupted by the circuit-breaker). The supply cable must
not come into contact with surfaces with temperatures higher than 50°C.
! The installer must ensure that the correct electrical connection has been
made and that it is compliant with safety regulations.
Before connecting to the power supply, make sure that:
• the appliance is earthed and the plug is compliant with the law.
• the socket can withstand the maximum power of the appliance, which is
indicated on the data plate.
• the voltage is in the range between the values indicated on the data plate.
• the socket is compatible with the plug of the appliance. If the socket is
incompatible with the plug, ask an authorised technician to replace it. Do
not use extension cords or multiple sockets.
! Once the appliance has been installed, the power supply cable and the
electrical socket must be easily accessible.
! The cable must not be bent or compressed.
Attention! Before connection remove a transport plug from the connecting
hole of the cooker gas pipeline.
Connection with a rigid pipe (copper or steel)
! Connection to the gas system must be carried out in such a way as not to
place any strain of any kind on the appliance.
There is an adjustable L-shaped pipe tting on the appliance supply ramp
and this is tted with a seal in order to prevent leaks. The seal must always
be replaced after rotating the pipe tting (seal provided with appliance). The
gas supply pipe tting is a threaded 1/2 gas cylindrical male attachment.
Connecting a flexible jointless stainless steel pipe to a threaded
attachment
The gas supply pipe tting is a threaded 1/2 gas cylindrical male attachment.
These pipes must be installed so that they are never longer than 2000 mm
when fully extended. Once connection has been carried out, make sure that
the exible metal pipe does not touch any moving parts and is not compressed.
! Only use pipes and seals that comply with current national regulations.
Checking the tightness of the connection
! When the installation process is complete, check the pipe ttings for leaks
using a soapy solution. Never use a ame.
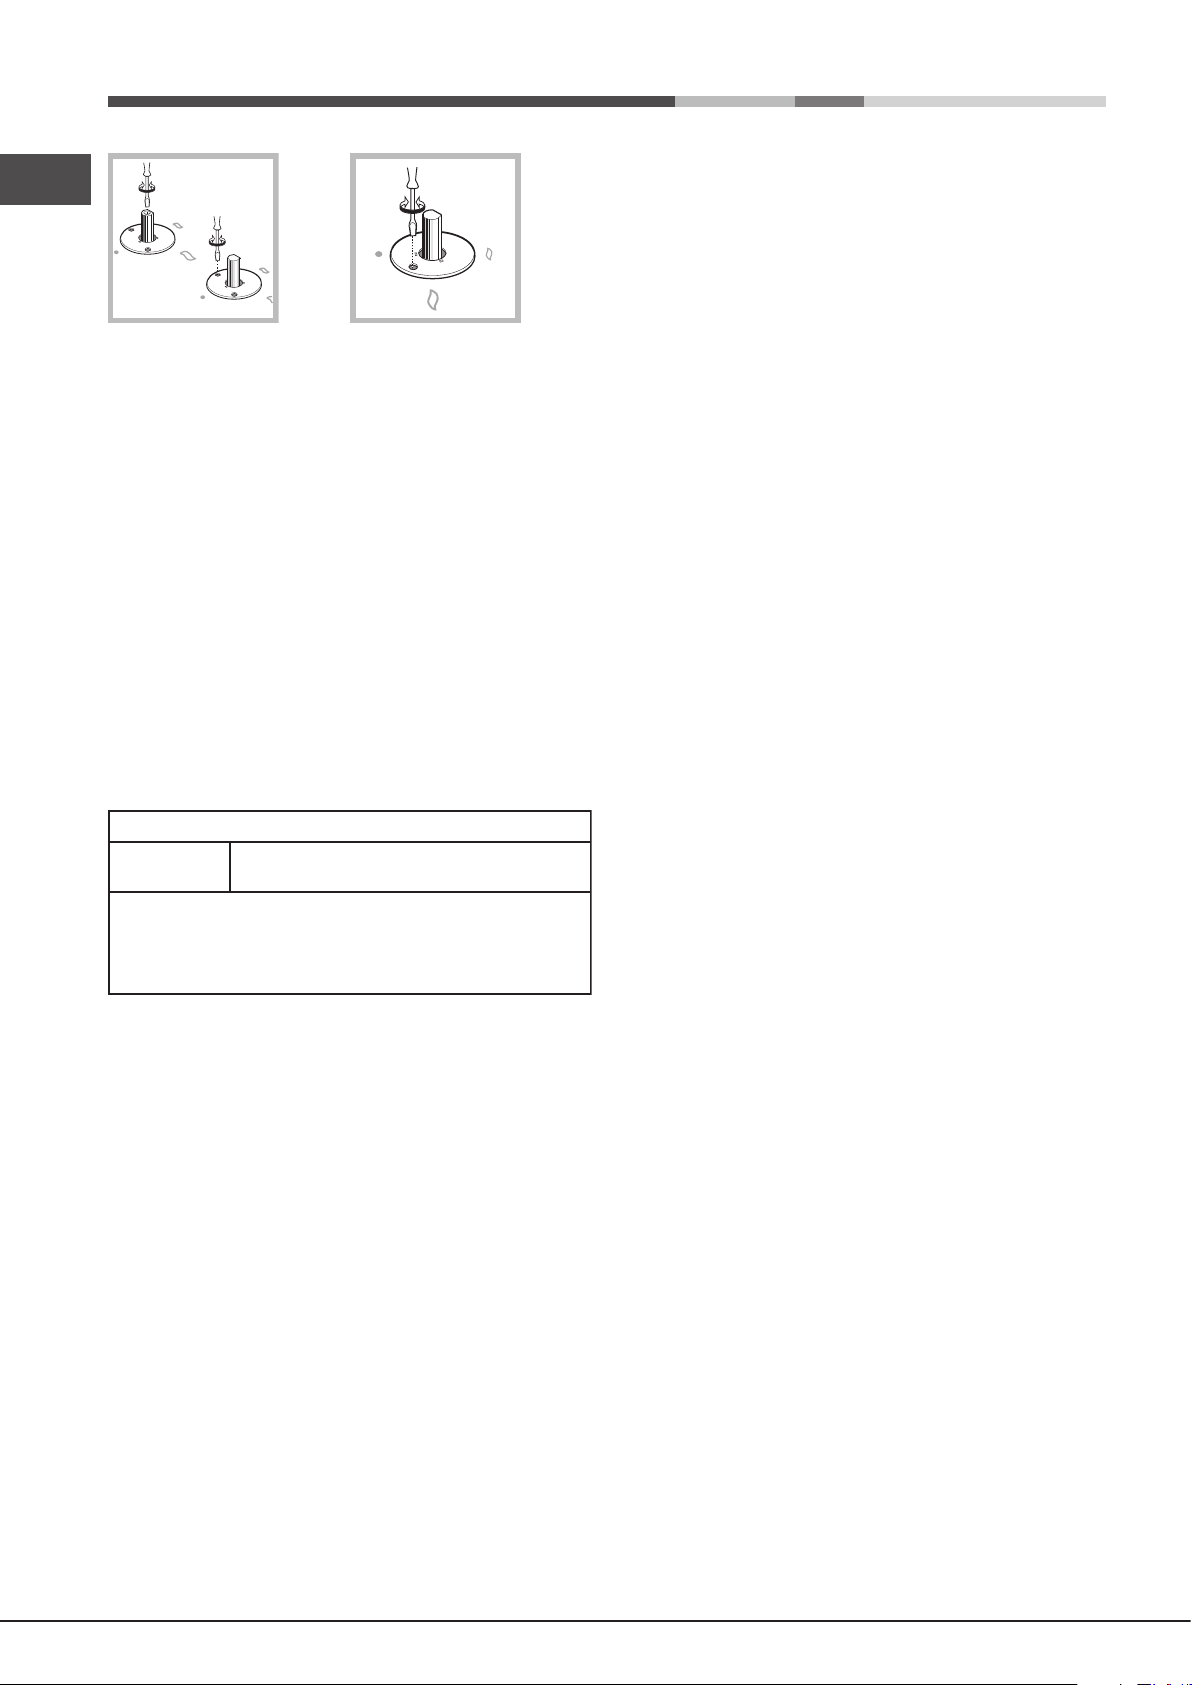
Adapting to different types of gas
To adapt the hob to a different type of gas other than default type (indicated
on the rating plate at the base of the hob or on the packaging), the burner
nozzles should be replaced as follows:
1. Remove the hob grids and slide the burners off their seats.
2. Unscrew the nozzles using a 7 mm socket spanner, and replace them
with nozzles for the new type of gas (see table 1 “Burner and nozzle
characteristics”).
3. Reassemble the parts following the above procedure in the reverse order.
4. Once this procedure is nished, replace the old rating sticker with one
indicating the new type of gas used. Sticker are available from any of our
Service Centres.
• Adjusting the burners’ primary air
Does not require adjusting.
! The cable must be checked regularly and replaced by authorised technicians
only (see Assistance).
• Setting the burners to minimum
1. Turn the tap to the low ame position;
2. Remove the knob and adjust the adjustment screw, which is positioned
in or next to the tap pin, until the ame is small but steady.
11
Page 12
GB
3. Having adjusted the ame to the required low setting, while the burner is
alight, quickly change the position of the knob from minimum to maximum
and vice versa several times, checking that the ame does not go out.
4. Some appliances have a safety device (thermocouple) tted. If the device
fails to work when the burners are set to the low ame setting, increase
this low ame setting using the adjusting screw.
5. Once the adjustment has been made, replace the seals on the by-passes
using sealing wax or a similar substance.
! If the appliance is connected to liquid gas, the regulation screw must be
fastened as tightly as possible.
! Once this procedure is nished, replace the old rating sticker with one
indicating the new type of gas used. Stickers are available from any of our
Service Centres.
! Should the gas pressure used be different (or vary slightly) from the
recommended pressure, a suitable pressure regulator must be tted to the
inlet pipe (in order to comply with current national regulations).
DATA PLATE
Electrical
connections
see data plate
ECODESIGN
This appliance conforms to the EU Regulation no. 66/2014
implementing Directive 2009/125/EC.
standard EN 30-2-1
12
Page 13

Table 1 Liquid Gas Natural Gas
Burner and nozzle specifications
*
**
***
RS
GB
Burner
Rapid (R)
Semi Rapid (S)
Auxiliary (A)
Supply pressures
At 15°C and 1013,25 mbar - dry gas
Propane (G31) P.C.S. = 50.37 MJ/Kg
Butane (G30) P.C.S. = 49.47 MJ/Kg
Natural (G20) P.C.S. = 37.78 MJ/m3
A
Diameter
(mm)
100
75
55
Thermal Power
kW (p.c.s.*)
Nomin. Reduc.
3.10
1.75
1.05
Nominal (mbar)
Minimum (mbar)
Maximum (mbar)
0.80
0.45
0.45
By-pass
1/100
(mm)
39
28
28
Nozzle
1/100
(mm) ***
86
64
50
225
127
76
Flow*
g/h
30
20
35
**
221
125
75
Nozzle
1/100
(mm)
116(Y)
96(Z)
79(6)
Flow*
l/h
295
167
100
20
17
25
S
641 DD /HA(WH)
13
Page 14
Start-up and use
Rapid (R)
Semi Rapid (S)
Auxiliary (A)
Ø Cookware Diameter (cm)
24 - 26
16 - 20
10 - 14
Burner
GB
Precautions and tips
! The position of the corresponding gas burner is shown on every knob.
Gas burners
Each burner can be adjusted to one of the following settings using the
corresponding control knob:
● Off
Maximum
Minimum
To light one of the burners, hold a lit match or lighter near the burner and, at
the same time, press down and turn the corresponding knob anti-clockwise
to the maximum setting.
Since the burner is tted with a safety device, the knob should be pressed
for approximately 2-3 seconds to allow the automatic device keeping the
ame alight to heat up.
Some models are equipped with an ignition button incorporated into the control
knob. If this is the case, the ignitor is present, but not the button.
To light a burner, simply press the corresponding knob all the way in and
then turn it in the counter-clockwise direction to the “High” setting, keeping
it pressed in until the burner lights.
! If a ame is accidentally extinguished, turn off the control knob and wait for
at least 1 minute before trying to relight it.
To switch off the burner, turn the knob in a clockwise direction until it stops
(when reaches the “●” position).
Practical advice on using the burners
To ensure the burners operate efciently:
• Use appropriate cookware for each burner (see table) so that the ames
do not extend beyond the bottom of the cookware.
• Always use cookware with a at base and a cover.
• When the contents of the pan reach boiling point, turn the knob to minimum.
To identify the type of burner, refer to the designs in the section entitled, “Burner
and Nozzle Specications”.
• For maximum stability, always make sure that the pan supports are
correctly tted and that each pan is placed centrally over the burner.
• Pan handles should be positioned in line with one of the support bars on
the pan support grid.
• Pan handle should be positioned so not to protrude beyond the front edge
of the hob.
The more variable aspect in terms of pan
stability can often be the pan itself, (or
the positioning of that pan during use).
Well balanced pans, with at bases that
are placed centrally over the burner,
with the pan handles aligned with one
of the support ngers obviously offer the
greatest stability.
14
! This appliance has been designed and manufactured in compliance with
international safety standards. The following warnings are provided for safety
reasons and must be read carefully.
General safety
• This is a class 3 built-in appliance.
• Gas appliances require regular air exchange to maintain efcient
operation. When installing the hob, follow the instructions provided
in the paragraph on “Positioning” the appliance.
• These instructions are only valid for the countries whose symbols
appear in the manual and on the serial number plate.
• The appliance was designed for domestic use inside the home and is not
intended for commercial or industrial use.
• The appliance must not be installed outdoors, even in covered areas. It is
extremely dangerous to leave the appliance exposed to rain and storms.
• Do not touch the appliance with bare feet or with wet or damp hands and
feet.
• The appliance must be used by adults only for the preparation of food,
in accordance with the instructions outlined in this booklet. Any other
use of the appliance (e.g. for heating the room) constitutes improper
use and is dangerous. The manufacturer may not be held liable for
any damage resulting from improper, incorrect and unreasonable
use of the appliance.
• Ensure that the power supply cables of other electrical appliances do not
come into contact with the hot parts of the oven.
• The openings used for ventilation and dispersion of heat must never be
covered.
• Always make sure the knobs are in the “●”/“○” position when the appliance
is not in use.
• When unplugging the appliance always pull the plug from the mains socket,
do not pull on the cable.
• Never carry out any cleaning or maintenance work without having detached
the plug from the mains.
• In case of malfunction, under no circumstances should you attempt to repair
the appliance yourself. Repairs carried out by inexperienced persons may
cause injury or further malfunctioning of the appliance. Contact a Service
Centre (see Assistance).
• Do not close the glass cover (if present) when the gas burners or electric
hotplates are still hot.
• The appliance should not be operated by people (including children)
with reduced physical, sensory or mental capacities, by inexperienced
individuals or by anyone who is not familiar with the product. These
individuals should, at the very least, be supervised by someone who
assumes responsibility for their safety or receive preliminary instructions
relating to the operation of the appliance.
• Do not let children play with the appliance.
• The appliance is not intended to be operated by means of an external
timer or separate remote-control system.
Disposal
• When disposing of packaging material: observe local legislation so that
the packaging may be reused.
• The European Directive 2012/19/EU on Waste Electrical and Electronic
Equipment (WEEE), requires that old household electrical appliances must
not be disposed of in the normal unsorted municipal waste stream. Old
appliances must be collected separately in order to optimise the recovery
and recycling of the materials they contain and reduce the impact on
human health and the environment.The crossed out “wheeled bin” symbol
on the product reminds you of your obligation, that when you dispose of
the appliance it must be separately collected.
Page 15
Consumers should contact their local authority or retailer for information
concerning the correct disposal of their old appliance.
Gas tap maintenance
Over time, the taps may become jammed or difcult to turn. If this happens,
the tap must be replaced.
Respecting and conserving the environment
• Cook your food in closed pots or pans with well-tting lids and use as little
water as possible. Cooking with the lid off will greatly increase energy
consumption.
• Use purely at pots and pans.
• If you are cooking something that takes a long time, it’s worth using a
pressure cooker, which is twice as fast and saves a third of the energy.
Maintenance and care
! This procedure must be performed by a qualied technician authorised
by the manufacturer.
Troubleshooting
It may happen that the appliance does not function properly or at all. Before
calling the service centre for assistance, check if anything can be done. First,
check to see that there are no interruptions in the gas and electrical supplies,
and, in particular, that the gas valves for the mains are open.
Switching the appliance off
Disconnect your appliance from the electricity supply before carrying out
any work on it.
Cleaning the hob surface
• All the enamelled and glass parts should be cleaned with warm water and
neutral solution.
• Stainless steel surfaces may be stained by calcareous water or aggressive
detergents if left in contact for too long. Any food spills (water, sauce, coffee,
etc.) should be wiped away before they dry.
• Clean with warm water and neutral detergent, and then dry with a soft
cloth or chamois. Remove baked-on dirt with specic cleaners for stainless
steel surfaces.
• Clean stainless steel only with soft cloth or sponge.
• Do not use abrasive or corrosive products, chlorine-based cleaners or pan
scourers.
• Do not use steam cleaning appliances.
• Do not use ammable products.
• Do not leave acid or alkaline substances, such as vinegar, mustard, salt,
sugar or lemon juice on the hob.
Cleaning the hob parts
• Clean the enamelled and glass parts only with soft cloth or sponge.
• Grids, burner caps and burners can be removed to be cleaned.
• Clean them by hand with warm water and non-abrasive detergent,
removing any food residues and checking that none of the burner openings
is clogged.
• Rinse and dry.
• Ret burners and burner caps correctly in the respective housings.
• When replacing the grids, make sure that the panstand area is aligned
with the burner.
• Models equipped with electrical ignition plugs and safety device require
thorough cleaning of the plug end in order to ensure correct operation.
Check these items frequently, and if necessary, clean them with a damp
cloth. Any baked-on food should be removed with a toothpick or needle.
The burner does not light or the ame is not even around the burner.
Check whether:
• The gas holes on the burner are clogged.
• All the movable parts that make up the burner are mounted correctly.
• There are draughts near the appliance.
The ame dies in models with a safety device.
Check to make sure that:
• You pressed the knob all the way in.
• You keep the knob pressed in long enough to activate the safety device.
• The gas holes are not blocked in the area corresponding to the safety
device.
The burner does not remain lit when set to minimum.
Check to make sure that:
• The gas holes are not blocked.
• There are no draughts near the appliance.
• The minimum setting has been adjusted properly.
The cookware is unstable.
Check to make sure that:
• The bottom of the cookware is perfectly at.
• The cookware is positioned correctly at the centre of the burner.
• The pan support grids have been positioned correctly.
GB
! To avoid damaging the electric ignition device, do not use it when the
burners are not in their housing.
15
Page 16
GB
NOTICE
16
Page 17
Instalacja
W kominie lub w odgałęzionym przewodzie dymnym
(przeznaczonym dla urządzeń kuchennych)
Bezpośrednio
na zewnątrz
! Ważnym jest, aby zachować niniejszą książeczkę instrukcji dla przyszłych
konsultacji. W razie sprzedaży, odsprzedania, czy przeniesienia, należy
upewnić się, czy znajduje się ona wraz z urządzeniem i odpowiednimi
uwagami, aby poinformować nowego właściciela o jego funkcjonowaniu.
! Należy uważnie przeczytać instrukcję: zawieraja ona ważne informacje
dotyczące instalacji, użytkowania i bezpieczeństwa.
Ustawienie
! Opakowania nie są zabawkami dla dzieci i należy je usunąć zgodnie z
normami zbierania odpadów (patrz Środki ostrożności i zalecenia).
! Instalacja powinna zostać wykonana zgodnie z niniejszymi instrukcjami i
przez personel zawodowo do tego przygotowany. Błędna instalacja może
skutkować powstaniem szkód wobec osób, zwierząt lub rzeczy.
! Niniejsze urządzenie może zostać zainstalowane wyłącznie w
pomieszczeniach ze stałą wentylacją, zgodnie z zaleceniami obowiązujących
norm krajowych. Należy dochować następujących warunków:
• Pomieszczenie powinno posiadać system odprowadzający na zewnątrz
gazów spalinowych składający się z okapu lub wyciągu elektrycznego,
uruchamianego automatycznie każdorazowo podczas uruchomienia
urządzenia.
nie powinny być instalowane ani składowane w pomieszczeniach lub
komorach o położonych poniżej poziomu podłogi (piwnice, itp.). Dobrze
jest przechowywać w pomieszczeniu jedynie butle aktualnie użytkowaną,
umocowaną w sposób nie narażający jej na bezpośrednie oddziaływanie
źródeł ciepła (piece, kominki, piecyki, itp.) mogące doprowadzić do wzrostu
temperatury powietrza powyżej 50°C.
Zabudowa
W celu poprawnego zainstalowania płyty grzewczej należy zachować
następujące środki ostrożności:
• Meble znajdujące się obok, a których wysokość przekracza wysokość
płyty roboczej, powinny zostać odsunięte przynajmniej na 200 mm od
krawędzi płyty roboczej.
• Okapy powinny być zainstalowane zgodnie z warunkami wymaganymi
podanymi przez instrukcje samych okapów, jednak w minimalnej odległości
650 mm (patrz ilustracja).
• Umieścić sąsiadujące z okapem szafki wiszące na wysokości minimalne
od szczytu 420 mm (patrz ilustracja).
By płyta grzewcza mogła być zainstalowana
pod szafką wiszącą, ta ostatnia powinna
600mm min.
znajdować się w odległości minimalnej od
szczytu wynoszącej 700 mm.
650mm min.
420mm min.
• Wnęka na obudowę powinna mieć wymiary podane na ilustracji.
Przewidziano uchwyty mocujące umożliwiające zamocowanie płyty na
podstawie posiadającej grubość od 20 do 40 mm. Aby solidnie zamocować
płytę zaleca się zastosowanie wszystkich uchwytów znajdujących się do
dyspozycji.
555 mm
PL
• Pomieszczenie powinno posiadać funkcjonalny system dopływu
powietrza umożliwiający normalne spalanie. Dopływ niezbędnego do
spalania powietrza nie powinien być mniejszy niż 2 m3/h na każdy kW
zainstalowanej mocy.
System może polegać na bezpośrednim
poborze powietrza z zewnątrz budynku przy
pomocy kanału o przekroju użytecznym
przynajmniej 100 cm2 i zabezpieczonego
A
Przykłady otwarcia
wentylacji
dla powietrza do spalania
Pomieszczenie
przyległe
Pomieszczenie
przeznaczone
do przewietrzania
przed przypadkowym zaślepieniem.
Albo też, w sposób pośredni, z przyległych
pomieszczeń wyposażonych w przewód
wentylacyjny jak opisany powyżej, a nie będący
częścią wspólną dla całej nieruchomości
ani nie mający połączeń z pomieszczeniami
sypialni lub w których występuje zagrożenie
Zwiększenie szczeliny pomiędzy
drzwiami a podłogą
pożarem.
• Intensywne i długotrwałe stosowanie urządzenia może wymagać
dodatkowej wentylacji, na przykład otwarcia okna lub bardziej skutecznej
wentylacji, zwiększającej mechaniczną siłę ssania (jeśli już istnieje).
• Skroplone gazy pochodne ropy naftowej, cięższe od powietrza, opadają
w dół. Dlatego pomieszczenia, w których przechowywane są butle GPL
powinny przewidywać otwory prowadzące na zewnątrz umożliwiające
spływanie ku dołowi ewentualnych wycieków gazu. Ponadto butle
GPL, niezaleznże od tego czy są puste, czy częściowo napełnione,
55 mm
475 mm
• Przed ostatecznym przymocowaniem ustawić uszczelkę (w zestawie) na
obrzeżu blatu tak, jak przedstawiono na rysunku.
Schemat mocowania uchwytów
Położenie uchwytu w stosunku Położenie uchwytu w stosunku
do blatu H=20mm do blatu H=30mm
17
Page 18

Przód
PL
Położenie uchwytu w stosunku Tył
do blatu H=40mm
! Stosować uchwyty zawarte w „zestawie akcesoriów”
Przed wykonaniem podłączenia należy upewnić się, czy:
• gniazdko posiada odpowiednie uziemienie i zgodne jest z obowiązującymi
przepisami;
• gniazdko jest w stanie wytrzymać obciążenie maksymalnej mocy
urządzenia wskazane na tabliczce znamionowej;
• napięcie zasilania odpowiada wartościom podanym na tabliczce
znamionowej;
• gniazdko musi być odpowiednie dla wtyczki urządzenia. W przeciwnym
razie należy wymienić gniazdko lub wtyczkę; nie stosować przedłużaczy,
ani rozgałęźników.
! Po zainstalowaniu urządzenia przewód elektryczny i gniazdko powinny być
łatwo dostępne.
• W przypadku, gdy płyta nie jest zainstalowana na zabudowanym
piekarniku, koniecznym jest zastosowanie płyty drewnianej jako izolatora.
Powinna być ona zamocowana w odległości minimum 20 mm od dolnej
części samej płyty roboczej.
Obieg powietrza
W celu zapewnienia dobrego obiegu powietrza koniecznym jest usunięcie
tylnej ścianki komory. Najlepiej zainstalować piekarnik w taki sposób, aby
wspierał się na dwóch listwach drewnianych lub na drewnianej desce z
prześwitem przynajmniej 45 x 560 mm (patrz ilustracje).
45 mm.
560 mm.
! Możliwe jest zainstalowanie płyty ponad piekarnikami zabudowanymi
wyposażonymi w wentylację chłodzącą.
Podłączenie do sieci elektrycznej
Płyty wyposażone w przewód zasilający trójżyłowy dostosowane są do
pracy na prąd zmienny przy napięciu i częstotliwości zasilania wskazanych
na tabliczce znamionowej (umieszczonej w dolnej części płyty). Przewód
uziemienia w sznurze oznaczony jest kolorem żółto-zielonym. W
przypadku zainstalowania ponad piekarnikiem zabudowanym podłączenia
elektryczne płyty i piekarnika powinny być wykonane osobno, tak z przyczyn
bezpieczeństwa elektrycznego, jak i dla ułatwienia ewentualnego wyjęcia
piekarnika.
Podłączenie przewodu zasilającego do sieci
Zamocować na przewodzie znormalizowaną wtyczkę do obciążeń
wskazanych na tabliczce znamionowej.
W przypadku bezpośredniego podłączenia do sieci koniecznym jest
zainstalowanie pomiędzy urządzeniem a siecią wyłącznika polowego z
otwarciem minimalnym pomiędzy stykami 3 mm przeznaczonego do obciążeń
i odpowiadającego obowiązującym normom (przewód uziemienia nie
powinien być przerywany przez wyłącznik). Przewód zasilania powinien być
umieszczony w taki sposób, aby w żadnym punkcie temperatura otoczenia
nie przekraczała 50°C.
! Instalator odpowiada za poprawność podłączenia elektrycznego i za
zachowanie norm bezpieczeństwa.
! Kabla nie wolno zginać ani przyciskać.
! Przewód elektryczny musi być okresowo sprawdzany i wymieniany jedynie
przez autoryzowanych techników (patrz Serwis).
! Producent odrzuca wszelką odpowiedzialność w przypadku, gdy niniejsze
zasady nie będą przestrzegane.
Podłączenie gazu
Podłączenie urządzenia do przewodów lub butli gazowej powinno zostać
wykonane zgodnie z zaleceniami obowiązujących norm krajowych dopiero po
upewnieniu się, że jest ono wyregulowane do pracy z rodzajem gazu, którym
będzie zasilane. W przeciwnym wypadku wykonać czynności wskazane w
paragrae “Dostosowanie do różnych rodzajów gazu” W przypadku zasilania
płynnym gazem z butli, stosować regulatory ciśnienia zgodne z obowiązującymi
normami krajowymi.
! W celu uzyskania pewności pracy, odpowiedniego zużycia energii i
zwiększenia trwałości urządzenia należy upewnić się czy ciśnienie zasilania
mieści się w granicach zalecanych w tabeli 1 „Charakterystyki palników i
dysz”.
Uwaga! Przed podłączeniem urządzenia do instalacji lub butli gazowej, zdjąć
zatyczkę z rury przyłączeniowej.
Podłączenie przewodem sztywnym (miedź lub stal)
! Podłączenie do urządzenia gazowego powinno być wykonane w taki sposób,
aby nie powodować żądnych naprężeń urządzenia.
Na przewodzie zasilającym urządzenie znajduje się ruchome złącze
kolankowe “L” , którego szczelność zapewniona jest uszczelką. W przypadku
gdyby okazało się, że koniecznym jest obrócenie kolanka należy obowiązkowo
wymienić uszczelkę (na wyposażeniu urządzenia). Złącze wejściowe gazu
do urządzenia jest gwintowane gwintem gazowym 1/2 walcowym męskim.
Podłączenie z przewodem elastycznym ze stali nierdzewnej o pełnych
ściankach z gwintowanymi złączami.
Złącze wejściowe gazu do urządzenia jest gwintowane gwintem gazowym
1/2 walcowym męskim.
Użycie przewodów tego rodzaju powinno być wykonane w ten sposób, aby
ich długość, w warunkach maksymalnego rozszerzenia nie przekraczała
2000 mm. Po wykonaniu podłaczenia upewnic się, czy metalowy przewód
elastyczny nie styka się z elementami ruchomymi, ani nie jest przygnieciony.
! Stosować wyłącznie przewody i uszczelki zgodne z obowiązującymi normami
krajowymi.
18
Page 19

Kontrola szczelności
! Po zakończeniu instalacji skontrolować szczelność wszystkich złącz stosując
w tym celu wodny rozwór mydła, nigdy płomień.
Dostosowanie do różnych rodzajów gazu
W celu dostosowania płyty do innego rodzaju gazu niż ten, do którego
jest przystosowana (wskazanego na etykiecie w dolnej części płyty lub
na opakowaniu), należy wymienić dysze palników wykonując następujące
czynności:
1. Zdjąć ruszt z płyty i wykręcić palniki z ich gniazd.
2. Odkręcić dysze posługując się kluczem rurowym 7mm i wymienić je na
nowy rodzaj przystosowany do nowego rodzaju gazu (patrz tabela 1
„Charakterystyki palników i dysz”).
3. Ponownie zmontować części w kolejności odwrotnej.
4. Na zakończenie czynności wymienić poprzednią etykietę regulacyjna na
nową, odpowiadająca nowemu paliwu, dostepną w naszych centrach
obsługi technicznej.
• Regulacja powietrza pierwotnego palników
Palniki nie wymagają żadnej regulacji powietrza pierwotnego.
• Regulacja minimów
1. Ustawić kurek w położeniu minimum;
2. Zdjąć pokrętło i posługując się śrubą regulacyjna znajdująca się wewnątrz
lub obok osi kurka uzyskać najmniejszy regularny płomień.
TABLICZKA ZNAMIONOWA
Podłączenia
elektryczne
patrz tabliczka znamionowa
ECODESIGN
Niniejsze urządzenie zostało wyprodukowane zgodnie z
Rozporządzeniem UE nr 66/2014, integrującym dyrektywę
2009/125/KE.
Rozporządzenie EN 30-2-1.
PL
3. Upewnić się, czy podczas szybkiego obracania pokrętłem z położenia
maksymalnego do minimalnego nie występuje gaśnięcie palników.
4. W urządzeniach wyposażonych w urządzenie zabezpieczające
(termopara) w przypadku niezadziałania urządzenia z palnikami
ustawionymi na minimum należy zwiększyć minimalne przepływy przy
pomocy śruby regulacyjnej.
5. Po zakończeniu regulacji ponownie założyć plomby lakowe, lub z
równorzędnego materiału, umieszczone na obejściu.
! W przypadku gazu płynnego śruba regulacyjna powinna być dokręcona
do końca.
! Po zakończeniu operacji należy wymienić poprzednia etykietę nastawień na
etykietę odpowiadającą nowemu gazowi użytkowemu, dostępną w naszych
centrach obsługi technicznej.
! W sytuacji, gdy ciśnienie stosowanego gazu stanie się różne (lub
zmienne) od przewidywanego, koniecznym jest zainstalowanie na
przewodach doprowadzających regulatora ciśnienia (zgodnie z zaleceniami
obowiązujących norm krajowych).
19
Page 20

PL
Charakterystyki palników oraz dysz
*
**
***
Tabela 1
Palnik
Szybki (Duży) (R)
Półszybki (Średni) (S)
Pomocniczy (Ma
Ciśnienia zasilania
(mm)
39
28
28
Moc
cieplna
kW
(p.c.s.*)
Nomin.
3.40
1.80
1.05
By-pass
Ś
rednica
(mm)
ł
y) (A)
W 15°C i 1013,25 mbar - gaz suchy
Propan (G31) P.C.S. = 50.37 MJ/Kg
Butan (G30) P. C.S. = 49.47 MJ/Kg
Naturalny (G20) P. C.S. = 37.78 MJ/m
Naturalny (G2.350) P.C.S. = 27.20 MJ/m
Moc
cieplna
kW
(p.c.s.*)
Zreduk.
100
0.80
75
0.45
55
0.45
Nominalne (mbar)
Minimalne (mbar)
Maksymalne (mbar)
1/100
Gaz
Gaz
Gaz
płynny
Dysza
1/100
(mm)
86
64
50
3
3
Przepływ
g/godz.
***
247
131
76
37
25
44
*
**
243
129
75
Moc
cieplna
kW
(p.c.s.*)
Nomin.
3.10
1.75
1.05
naturalny
(G20)
Dysza
1/100
(mm)
116(Y)
96(Z)
79(6)
20
17
25
Przepływ
l/godz.
295
167
100
Moc
*
cieplna
kW
(p.c.s.*)
Nomin.
3.10
1.75
1.05
naturalny
(G2.350)
Dysza
1/100
(mm)
183
135
106(6)
13
10
16
Przepływ
l/godz.
410
231
139
*
Model
II2ELs3B/P 8,05 (585 g/h - G30) (575 g/h - G31)
(1)
Wartości w g/h odnoszą się do p
A
RS
S
641 DD /HA(WH)
rzepływu
Część gazowa
Moc nominalna (kW)Klasa
gazu ciekłego (butan, propan).
(1)
Część elektryczna
Napięcie i częstotliwość
220-240V~ 50/60Hz
Moc (W)
0,6641 DD /HA(WH)
20
Page 21

Uruchomienie i użytkowanie
24 - 26
16 - 20
10 - 14
Palnik
Szybki (Duży) (R)
Półszybki (
Ś
redni) (S)
Pomocniczy (Mały) (A)
Ø
Ś
rednica naczyń (cm)
Zalecenia i środki ostrożności
PL
! Dla każdego z pokręteł wskazane jest położenie palnika gazowego
odpowiadających im.
Palniki gazowe
Wybrany palnik może być regulowany odpowiednim pokrętłem w następujący
sposób:
● Wyłączony
Maksimum
Minimum
W celu włączenia któregoś z palników, należy zbliżyć do niego płomień lub
zapalarkę, nacisnąć do końca odpowiadające mu pokrętło i obrócić je w
kierunku przeciwnym do wskazówek zegara aż ustawi się na maksymalną
moc.
W modelach wyposażonych w urządzenia zabezpieczające, należy
przytrzymać wduszone pokrętło przez około 2-3 sekundy aż rozgrzeje się
urządzenie automatycznie podtrzymujące zapalony płomień.
Modele są wyposażone w urządzenie zapłonowe wewnątrz pokrętła; w
takim przypadku obecna jest świeca, ale nie ma przycisku zapłonowego. Aby
włączyć wybrany palnik, wystarczy nacisnąć do końca odpowiadające mu
pokrętło i obrócić je w kierunku przeciwnym do wskazówek zegara aż ustawi
się na maksymalną moc, przytrzymując je wciśnięte dopóki nie nastąpi zapłon.
! W przypadku przypadkowego zgaśnięcia płomienia palnika, zakręcić pokrętło
sterujące i ponowić próbę zapalenia po upływie przynajmniej 1 minuty.
Aby zgasić palnik należy obrócić pokrętło zgodnie z ruchem zegara aż do
zatrzymania (odpowiadającego symbolowi “●”).
Zalecenia praktyczne użytkowania palników
W celu uzyskania maksymalnej wydajności należy pamiętać, co następuje:
• Stosować naczynia odpowiednie dla każdego z palników (patrz tabela) w
celu uniknięcia wychodzenia płomieni poza pole dna naczyń.
• Stosować zawsze naczynia o dnie płaskim i z przykrywką.
• W chwili zagotowania się obrócić pokrętło do położenia minimum.
W celu zidentyfikowania rodzaju palnika zapoznać się z ilustracjami
znajdującymi się w paragrae „Charakterystyki palników i dysz”.
• Dla uzyskania maksymalnej stabilności naczyń, należy upewnić się że
ruszty są prawidłowo ustawione i czy każde naczynie znajduje się na
środku palnika.
• Należy upewnić się że uchwyty garnków do gotowania są ustawione w
linii z jednym z drążków rusztu.
• Należy upewniać się że uchwyty garnków do gotowania, nie wystają poza
przednią krawędź płyty.
ustawionymi w linii z jednym z drążków rusztu.
Najbardziej zmienny czynnik, jeżeli chodzi
o stabilność naczyń, stanowią najczęściej
same naczynia (lub ich ustawienie
podczas użytkowania). Maksymalną
stabilność zapewniają dobrze wyważone
naczynia z płaskim dnem, umieszczone
centralnie na palniku, z uchwytami
! Urządzenie zostało zaprojektowane i wyprodukowane zgodnie z
międzynarodowymi przepisami bezpieczeństwa. Mając na względzie Wasze
bezpieczeństwo podajemy Wam poniższe zalecenia, które należy uważnie
przeczytać.
Ogólne zasady bezpieczeństwa
• Niniejsze urządzenie jest urządzeniem przeznaczonym do zabudowy
klasy 3.
• Urządzenia gazowe wymagają, dla swego poprawnego działania,
regularnej wymiany powietrza. należy upewnić się, czy podczas
ich instalowania przestrzegane były wymagania zawartye w
odpowiednim paragrae dotyczącym “Ustawienia”.
• Zalecenia mają zastosowanie wyłącznie dla krajów przeznaczenia,
których symbole znajdują się w instrukcji oraz na tabliczce z
numerem fabrycznym.
• Niniejsze urządzenie przeznaczone jest do nieprofesjonalnych zastosowań
domowych.
• Nie należy instalować urządzenia poza domem, nawet jeśli miejsce to jest
chronione daszkiem, gdyż wystawienie urządzenia na działanie deszczu
i burz jest bardzo niebezpieczne.
• W celu przenoszenia urządzenia należy zawsze korzystać z odpowiednich
uchwytów umocowanych po bokach piekarnika.
• Nie dotykać urządzenia stojąc przy nim boso lub gdy ręce czy stopy są
mokre lub wilgotne.
• Urządzenie powinno być używane przez osoby dorosłe jedynie w
celach kulinarnych, zgodnie ze wskazówkami zawartymi w instrukcji
użytkownika. Wszelkie inne próby użycia urządzenia (np. do
ogrzewania pomieszczeń) uważa się za niewłaściwe i niebezpieczne.
Producent nie ponosi odpowiedzialności za uszkodzenia wynikające
z niewłaściwej i nierozsądnej eksploatacji urządzenia.
• Należy uważać, aby przewody zasilające pozostałe urządzenia domowe
nie stykały się z rozgrzanymi elementami piekarnika.
• Nie zasłaniać otworów wentylacyjnych i odprowadzających ciepło.
• Należy zawsze sprawdzić, czy pokrętła znajdują się w pozycji “●”/“○”, kiedy
urządzenie nie jest używane;
• Nie wyciągać wtyczki z gniazdka trzymając kabel ale tylko trzymając za
wtyczkę.
• Nie czyścić ani nie wykonywać czynności konserwacyjnych bez
uprzedniego odłączenia wtyczki od sieci elektrycznej.
• W razie usterki nie należy w żadnym wypadku sięgać do wewnętrznych
części urządzenia, w celu usiłowania jego naprawy. Skontaktować się z
Serwisem (patrz Serwis).
• Nie zamykać szklanej pokrywy (jeśli jest na wyposażeniu) gdy palniki
gazowe lub płyta grzewcza są jeszcze rozgrzane.
• Nie jest przewidziane aby urządzenie było używane przez osoby (również
dzieci) niesprawne zycznie i umysłowo, przez osoby bez doświadczenia
lub bez znajomości urządzenia chyba, ze pod nadzorem osoby
odpowiedzialnej za jego bezpieczeństwo jak również bez otrzymania
instrukcji wstępnych co do jego użytku.
• Urządzenie nie jest przeznaczone do tego, aby było włączane przy
użyciu zewnętrznego przekaźnika czasowego lub osobnego systemu
sterowania zdalnego.
Usuwanie odpadów
• Usuwanie materiałów opakowaniowych: dostosować się do lokalnych
przepisów; w ten sposób opakowanie będzie mogło zostać odzyskane.
• Europejska Dyrektywa 2012/19/EC dotycząca Zużytych Elektrycznych i
Elektronicznych Urządzeń (WEEE) zakłada zakaz pozbywania się starych
urządzeń domowego użytku jako nieposortowanych śmieci komunalnych.
21
Page 22

PL
Zużyte urządzenia muszą być osobno zbierane i sortowane w celu
zoptymalizowania odzyskania oraz ponownego przetworzenia pewnych
komponentów i materiałów. Pozwala to ograniczyć zanieczyszczenie
środowiska i pozytywnie wpływa na ludzkie zdrowie. Przekreślony symbol
„kosza” umieszczony na produkcie przypomina klientowi o obowiązku
specjalnego sortowania.
Konsumenci powinni kontaktować się z władzami lokalnymi lub
sprzedawcą w celu uzyskania informacji dotyczących postępowania z
ich zużytymi urządzeniami gospodarstwa domowego.
Oszczędność i ochrona środowiska
• Gotuj jedzenie w zamkniętych garnkach lub rondlach z dobrze
dopasowanymi pokrywkami oraz używaj jak najmniej wody. Gotowanie
bez pokrywki bardzo zwiększy zużycie energii.
• Używaj garnków i rondli z płaskim dnem .
• Jeśli gotujesz potrway których przygotowanie jest czasochłonne, warto
użyć szybkowaru, który jest dwukrotnie szybszy i pozwala zmniejszyć
zużycie enegrii o jedną trzecią.
Konserwacja i utrzymanie
Odłączenie prądu elektrycznego
Przed naprawą odłączyć urządzenie od sieci zasilania elektrycznego.
! Aby nie dopuścić do uszkodzenia zapalnika elektrycznego, nie należy
używać go, gdy palniki nie znajdują się w obudowach.
Konserwacja kurków gazowych
Z upływem czasu może pojawić się kurek blokujący się lub z trudem
obracający się, dlatego może okazać się konieczną wymiana kurka.
! Czynność ta winna być wykonana przez autoryzowanego technika
producenta.
Anomalie i środki zaradcze
Może się zdarzyć, że płyta nie działa lub źle działa. Zanim wezwiecie serwis
naprawczy, zobaczmy razem, co można zrobić. Przede wszystkim należy
sprawdzić, czy nie występują przerwy w sieci zasilania gazem lub prądem
elektrycznym, a zwłaszcza czy zawory gazowe przed kuchenką są otwarte.
Palnik nie zapala się lub płomień jest nierównomierny
Sprawdzić i upewnić się:
• Są zatkane otwory wylotowe gazu w palniku.
• Zamontowane są poprawnie wszystkie części ruchome wchodzące w
skład palnika.
• Występują przeciągi w sąsiedztwie płyty kuchennej.
Czyszczenie powierzchni płyty
• Wszystkie emaliowane i szklane części należy myć ciepłą wodą z
neutralnym środkiem do czyszczenia.
• Powierzchnie ze stali nierdzewnej mogą być zabrudzone przez twardą
wodę lub zbyt długi kontakt z agresywnymi detergentami. Wszystkie resztki
żywności (woda, sosy, kawa itp.) należy zetrzeć przed wyschnięciem.
• Urządzenie należy myć ciepłą wodą i neutralnym detergentem, a następnie
wytrzeć miękką szmatką lub irchą. Ślady przypalenia należy usuwać za
pomocą specjalnych środków do powierzchni ze stali nierdzewnej.
• Stal nierdzewną należy czyścić wyłącznie miękką szmatką lub gąbką.
• Nie należy używać środków ściernych lub żrących, środków na bazie
chloru ani środków do szorowania.
• Nie należy stosować urządzeń czyszczących parą.
• Nie należy stosować środków łatwopalnych.
• Nie należy pozostawiać na płycie substancji kwaśnych ani zasadowych,
takich jak ocet, musztarda, sól, cukier lub sok z cytryny.
Czyszczenie elementów płyty
• Emaliowane i szklane części należy czyścić wyłącznie miękką szmatką
lub gąbką.
• Ruszty, nakładki na palniki oraz palniki można zdejmować do czyszczenia.
• Należy myć je ręcznie ciepłą wodą z detergentem bez właściwości
ściernych, usuwając resztki żywności i sprawdzając, czy otwory palnika
nie są zatkane.
• Przepłukać i wytrzeć.
• Zamontować ponownie palniki i nakładki na palniki w odpowiednich
obudowach.
• Podczas ponownego zakładania rusztòw należy upewnić się, że obszar
do stawiania naczyń jest wyrównany z palnikiem.
• Modele wyposażone w elektryczne zapalniki i urządzenia zabezpieczające
wymagają starannego czyszczenia końcówki zapalnika w celu
zapewnienia prawidłowego działania. Należy regularnie sprawdzać te
elementy i w razie potrzeby czyścić zwilżoną szmatką. Przypalone resztki
żywności należy usuwać wykałaczką lub igłą.
Płomień nie zostaje zapalony w wersjach z zabezpieczeniem
Sprawdzić i upewnić się:
• Nie wdusiliście do końca pokrętła
• Nie przytrzymaliście wduszonego do końca pokrętła przez czas
wystarczający do uruchomienia urządzenia zabezpieczającego.
• Są pozatykane otwory wylotowe gazu w pobliżu urządzenia
zabezpieczającego.
Palnik w położeniu minimum nie pali się
Sprawdzić i upewnić się:
• Są pozatykane otwory wylotowe gazu.
• Występują przeciągi w sąsiedztwie płyty.
• Regulacja minimum nie jest właściwa.
Naczynia są niestabilne
Sprawdzić i upewnić się:
• Dna garnków są dokładnie równe.
• Garnek jest ustawiony na środku palnika lub płyty elektrycznej.
• Ruszty zostały odwrócone.
22
Page 23

UWAGA
kuchennymi
PL
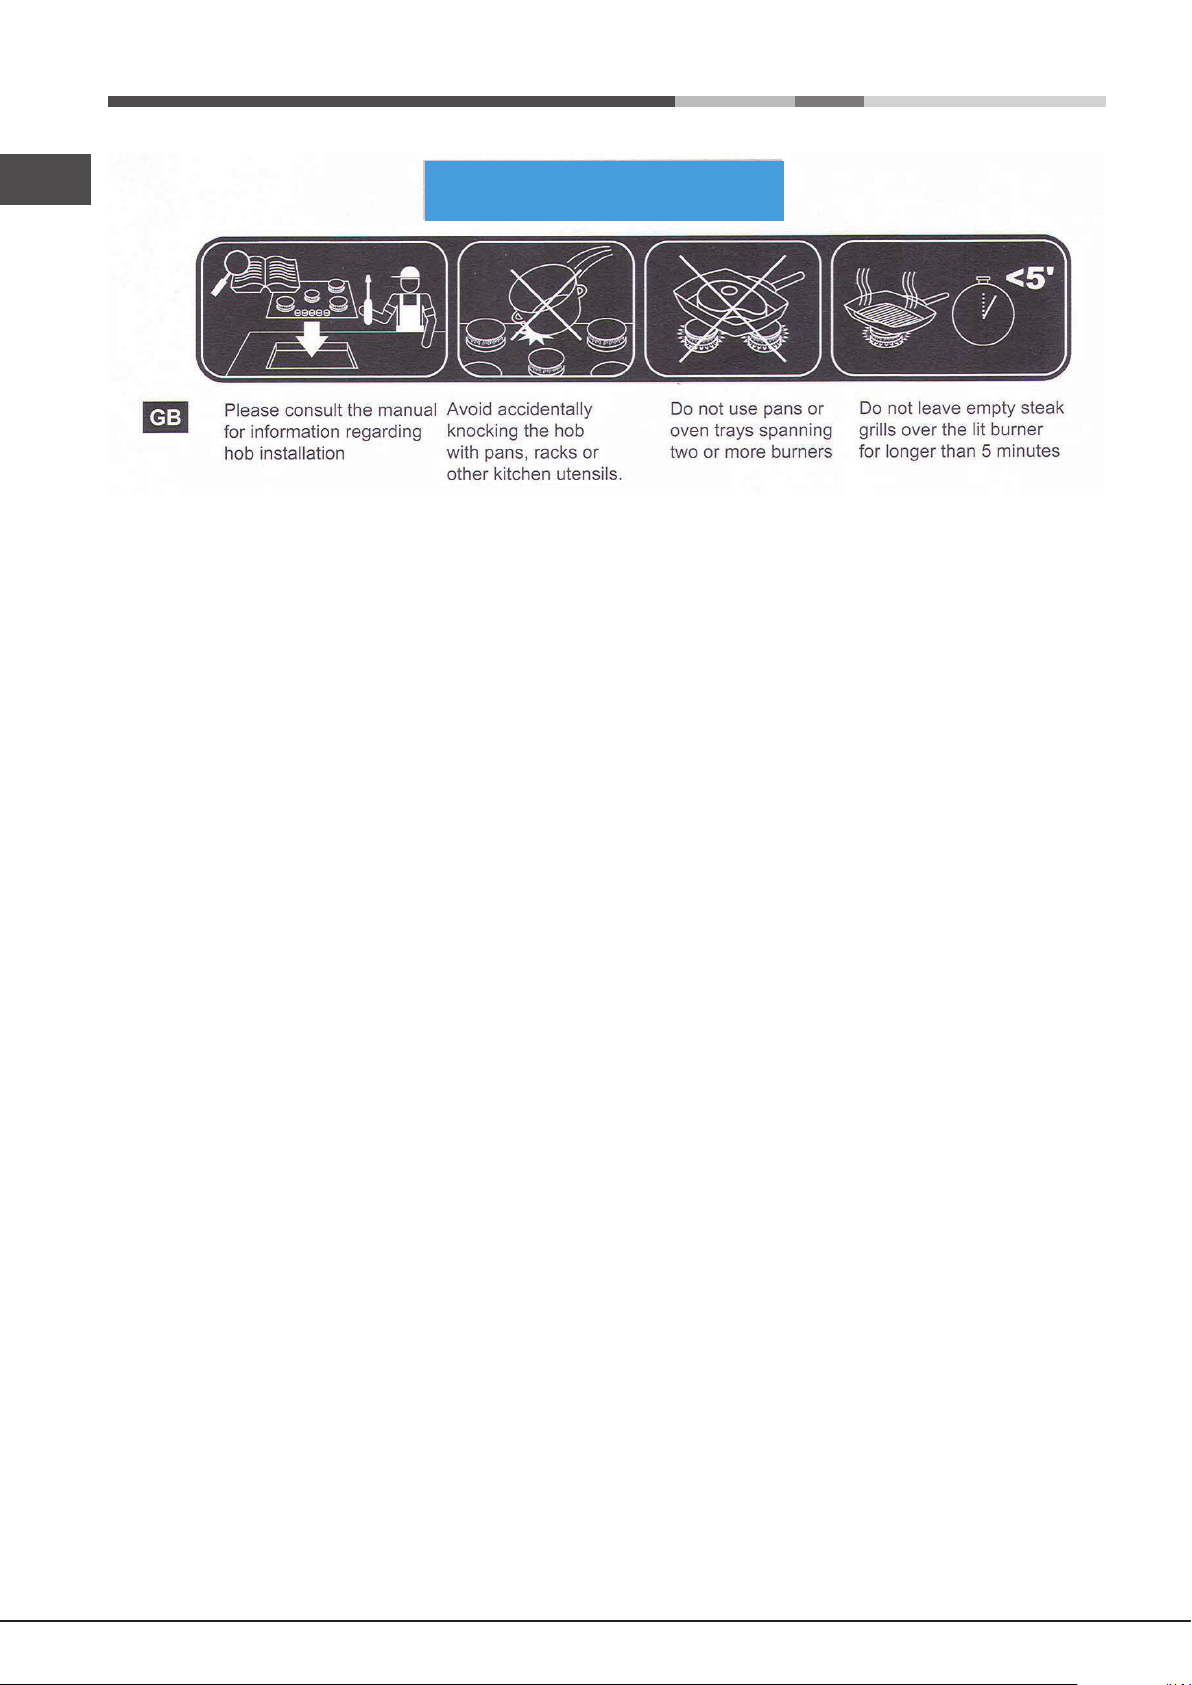
Aby zainstalować płytę
PL
należy skonsultować
instrukcję obsługi
Unikać przypadkowych
uderzeń garnkami,
rusztami lub innymi
przyrządami
Nie stawiać garnków
i patelni na dwóch lub
więcej palnikach
Nie zostawiać pustej patelni
grillowej na palniku na dłużej
niż 5 minut
23
Page 24

Paigaldamine
! Enne uue seadme kasutama hakkamist lugege kasutusjuhend põhjalikult
läbi. See sisaldab olulist teavet seadme ohutu paigaldamise, kasutamise ja
hooldamise kohta.
! Hoidke kasutusjuhend alles. Kui seade vahetab omanikku, andke selle
kasutusjuhend uuele omanikule kindlasti kaasa.
Paigalduskoht
! Hoidke pakkematerjal lastele kättesaamatus kohas. Hingamisprobleemide
ja lämbumise oht! (Vt osa "Ettevaatusabinõud ja soovitused").
! Seadet võib paigaldada ainult kvalitseeritud personal vastavalt käesolevatele
juhistele. Valesti paigaldatud seade võib põhjustada vigastusi inimestele ja
loomadele või kahjustada seadet.
! Seadme tohib paigaldada ainult püsiva ventilatsiooniga ruumi, järgides
siseriiklikke õigusakte. Tuleb järgida allpool toodud nõudeid:
• Ruumis peab olema õhuärastussüsteem, mis eemaldab põlemisaurud.
Selleks võib olla õhupuhasti või elektriline ventilaator, mis seadme sisse
lülitamisel automaatselt käivitub;
Seadme paigutamine
Keeduplaadi paigaldamisel tuleb järgida allpool toodud ohutusnõudeid:
• Köögikapid, mis on seadme kõrval ja keeduplaadist kõrgemal, ei tohi
keeduplaadi servale olla lähemal kui 200 mm (vt joonist);
• Õhupuhastid tuleb paigaldada vastavalt paigaldusjuhistele ja need ei tohi
olla seadmele lähemal kui 650 mm;
• Keeduplaadi ja seinakappide vahele peab jääma vähemalt 420 mm (vt
joonist).
Kui paigaldate keeduplaadi seinakapi alla, peab
kapi ja keeduplaadi vahele jääma vähemalt
600mm min.
650mm min.
700 mm;
420mm min.
• Paigaldusava mõõtmed peavad vastama joonisel näidatud mõõtmetele.
Komplekti kuuluvad kinnituskonksud on mõeldud keeduplaadi
kinnitamiseks 20-40 mm paksusele aluspinnale. Et keeduplaat oleks
alusele tugevalt paigaldatud, kinnitage kõik komplekti kuuluvad konksud.
555 mm
55 mm
475 mm
Korstnasse või harulõõri.
(ainult köögiseadmetele)
Otse välja
• Lisaks sellele peab ruumis olema piisav ventilatsioon, mis tagab normaalse
gaasipõlemisprotsessi jaoks vajaliku õhu. Õhu sissevool ei tohi olla alla 2
m3/h iga kilovati installeeritud võimsuse kohta.
Ventilatsioonisüsteem võib võtta õhu otse
väljast toru kaudu, mille sisemine ristlõige
peab olema vähemalt 100 cm
2
. Sissevõtuavad
tuleb paigutada nii, et on välditud nende
A
Põlemisõhu
ventilatsiooniavade näited.
Külgnev
ruum
Ventileeritav
ruum
blokeerimine.
Süsteem võib võtta gaasipõlemisprotsessi
jaoks vajaliku õhu ka kaudselt, näiteks
kõrvalruumidest, mis on varustatud
ventilatsioonitorudega, nagu eespool
kirjeldatud. Need ruumid ei tohi olla hoone
ühiskasutatavad ruumid, magamistoad ega
Akna ja põranda vahelise
ventilatsiooniava suurendamine.
kõrgendatud tuleohtlikkusega ruumid;
• Seadme intensiivse ja pikaajalise kasutamise korral võib vajalik
olla täiendav ventilatsioon, näiteks avada aken või tagada tõhusam
ventilatsioon, reguleerides juba olemasoleva sundventilatsiooni suurema
võimsuse peale.
• Vedelgaas on õhust raskem ja koguneb seetõttu põranda lähedale.
Ruumid, kuhu on paigutatud vedelgaasi balloonid, peavad olema
varustatud väljatõmbeventilatsiooniga, et juhusliku lekkimise korral
saaks gaas läbi selle välisõhku eralduda. Seetõttu on keelatud osaliselt
või täiesti täis gaasiballoonide paigaldamine või hoidmine ruumides,
mis on põrandapinnast madalamal (keldrites jne). Hoidke ruumis ainult
kasutuselolevat ballooni, mis on paigaldatud kaugemale sellistest
soojusallikatest (praeahjud, kaminad, ahjud jt.), mis võiksid kuumutada
ballooni üle 50° C.
• Enne keeduplaadi kinnitamist paigaldage ümber aluspinna tihend (kuulub
komplekti), nagu joonisel näidatud.
Konksude kinnitamise skeem
Konksude asukoht aluspinnal Konksude asukoht aluspinnal
H=20mm H=30mm
Esikülg
Konksude asukoht aluspinnal Tagakülg
H=40mm
24EE24
Page 25

! Kasutage tarvikutekotis olevaid konkse.
Gaasiühendus
Seadme ühendamisel gaasitorustiku või -ballooniga tuleb järgida kehtivaid
• Kui te ei paigalda keeduplaati sisseehitatud ahjule, tuleb paigaldada puidust
isoleeriv alusplaat. Plaadi ja keeduplaadi alumise osa vahele peab jääma
vähemalt 20 mm.
siseriiklikke eeskirju. Enne ühenduste tegemist kontrollige, kas keeduplaat
ühildub gaasi tüübiga, mida plaanite kasutada. Vastasel juhul vt osas
"Keeduplaadi reguleerimine kasutamiseks erinevat tüüpi gaasidega".
Kui ühendate pliidi vedelgaasiballooniga, siis tuleb paigaldada siseriiklike
Ventilatsioon
õigusaktide nõuetele vastav reduktor.
Piisava ventilatsiooni tagamiseks tuleb kapi tagakülg ära võtta. Ahi tuleks
paigaldada nii, et see toetub kahele puiduliistule või täiesti tasasele pinnale,
milles on ava minimaalsete mõõtudega 45 x 560 mm (vt skeeme).
! Kontrollige, kas gaasi rõhk vastab tabelis nr. 1 „Põletite ja düüside andmed”
toodud andmetele . Nii on tagatud seadme ohutu ja pikaajaline talitlus ning
samas madal energiakulu.
EE
45 mm.
560 mm.
Tähelepanu! Enne pliidiplaadi ühendamist eemaldage pliidi gaasitoru
ühendusavast kork, mis on sinna pandud transportimise ajaks.
Ühendamine jäiga toruga (vasest või terasest)
! Gaasisüsteemiga ühendamine tuleb teha nii, et üheski seadmes ei teki pinget.
Seadme toiteavas on reguleeritav L-kujuline toruliitmik ja lekete ärahoidmiseks
on see varustatud tihendiga. Pärast toruliitmiku pööramist tuleb tihend (seadme
komplekti kuuluv tihend) alati ära vahetada. Seadme gaasisisselaskeava on
! Keeduplaadi võib paigaldada ainult jahutussüsteemiga varustatud
1/2 tollise silinderkeermega haaratav liitmik.
sisseehitatud ahjudele.
Õmblusteta elastse terastoru ühendamine keermestatud liitmikuga
Elektriühendused
Kolmesoonelise kaabliga varustatud keeduplaadid on mõeldud kasutamiseks
vahelduvvooluga, mille pinge ja sagedus on märgitud seadme andmeplaadile
(asub seadme alumisel osal). Kaabli maandusjuhtmel on roheline-kollane
Seadme gaasisisselaskeava on 1/2 tollise silinderkeermega haaratav liitmik.
Torud tuleb paigaldada nii, et nende täispikkus ei ületa 2 meetrit. Pärast
ühendamist veenduge, et elastne metalltoru ei ole kokku surutud ega puutu
kokku liikuvate osadega.
ümbris. Kui paigaldate seadme sisseehitatud elektriahju peale, peavad
keeduplaadi ja ahju ühendused olema eraldi tehtud, seda nii ohutuse
tagamiseks kui ahju hõlpsamaks vahetamiseks.
Toitekaabli ühendamine vooluvõrku
Monteerige andmesildil näidatud koormust taluv pistik toitekaabli külge.
Otse elektrivõrku ühendades paigaldage seadme ja elektrivõrgu vahele
! Kasutage ainult kehtivatele siseriiklikele eeskirjadele vastavaid torusid ja
tihendeid.
Ühenduse tiheduse kontrollimine
! Pärast gaasi ühendamist kontrollige seebivahuga, et ei oleks lekkeid.
Keelatud on lahtise tule kasutamine.
mitmepooluseline lüliti, mille kontaktide vahe on vähemalt 3 mm. See lüliti
peab taluma nõutud koormust ning vastama kehtivatele elektrieeskirjadele
(lüliti ei tohi katkestada maandusjuhet). Toitekaabel ei tohi kokku puutuda
pindadega, mille temperatuur on üle 50°C.
Pliidi reguleerimine erinevat tüüpi gaasidega kasutamiseks
Keeduplaadi reguleerimiseks erinevat tüüpi gaasidega kasutamiseks (vt
seadme alumisele osale paigaldatud andmeplaadilt või pakendilt) vahetage
põletite düüsid. Selleks toimige järgmiselt:
! Seadme paigaldaja peab tagama, et elektriühendused on õigesti tehtud ja
et need vastavad ohutusnõuetele.
1. Eemaldage restid ja võtke põletid pesadest välja;
2. Keerake 7 mm toruvõtme abil düüsid välja ja asendage need uue gaasitüübi
jaoks sobilike düüsidega (vt tabel 1 „Põletite ja düüside andmed”);
Enne seadme ühendamist toitevõrku kontrollige, kas:
• seade on maandatud ja vastab kehtivatele nõuetele;
• pistik talub seadme andmeplaadile märgitud maksimumkoormust;
3. Pange kõik osad vastupidises järjekorras tagasi;
4. Kui see on tehtud, vahetage vana andmesilt uue vastu, millele on märgitud
uue gaasi tüüp. Sildid on saadaval kõigis teeninduskeskustes.
• pinge vastab seadme andmeplaadile märgitud väärtustevahemikule;
• pistikupesa vastab seadme pistikule. Kui pistikupesa ei vasta pistikule,
pöörduge kvalitseeritud elektriku poole, kes selle välja vahetab. Ärge
• Õhu juurdevoolu reguleerimine põletitesse
Ei ole vaja reguleerida.
kasutage pikendusjuhet ega harukarpe.
! Pärast pliidi paigaldamist peavad toitekaabel ja pistikupesa olema kergesti
juurdepääsetavad.
• Põletite leegi reguleerimine minimaalsele tasemele
1. Keerake lüliti asendisse, mis vastab leegi minimaalsele tasemele.
2. Võtke nupp ära ja reguleerige seadekruvi, mis asub reguleerimisvardas
! Kaabel ei tohi olla keerdus ega muljutud.
või selle kõrval nii, et leek on väike, kuid püsiv.
! Laske kvalitseeritud elektrikul kaablit regulaarselt kontrollida ja vajadusel
välja vahetada (vt osa "Klienditugi").
! Nende ohutusnõuete eiramisel ei võta tootja endale mingit vastutust.
2525
Page 26

3. Pärast leegi reguleerimist veenduge, et leek ei kustu, kui keerate nupu
kiiresti mitu korda järjest maksimaalsest asendist minimaalsesse ja
vastupidi.
4. Mõnele seadmele on paigaldatud kaitseseadis (termoelement). Kui põleti
leek on seatud minimaalsele tasemele ja seade ei tööta, suurendage leeki
seadekruvi abil.
5. Pärast reguleerimist asendage möödavoolutihendid. Kasutage selleks
tihendusvaha või sarnast ainet.
! Kui seade on ühendatud vedelgaasiga, keerake seadekruvi võimalikult
tugevalt kinni.
! Kui see on tehtud, vahetage vana andmesilt uue vastu, millele on märgitud
uue gaasi tüüp. Sildid on saadaval kõigis teeninduskeskustes.
! Kui gaasi rõhk erineb (kas või veidi) soovituslikust rõhust, paigaldage
sisselasketorule sobiv surveregulaator (et seade vastaks kehtivatele riiklikele
eeskirjadele).
ANDMEPLAAT
Elektriühend
used
vt andmeplaadilt
ECO-DISAIN
See seade on vastavuses EL määrus nr. 66/2014
täiendus direktiivile 2009/125/EC.
EN 30-2-1 määrus
26EE26
Page 27

Põletite ja düüside spetsifikatsioonid
*
**
***
M
Tabel 1 Vedelgaas Maagaas
EE
Põleti
Kiire (R)
Poolkiire (S)
Täiendav (A)
Toitesurved
Läbimõõt
(mm)
100
75
55
Soojusvõimsus
kW (p.c.s.*)
Nimiväärtus
3.10
1.75
1.05
Vähendatud
väärtus
0.80
0.45
0.45
Nimiväärtus (mbar)
Möödavool
1/100
(mm)
39
28
28
Minimaalne (mbar)
Maksimaalne (mbar)
Kui temperatuur on 15° C ja rõhk 1013,25 mbaari – kuiv gaas
Propaan (G31) P.C.S. = 50,37 MJ/Kg
Butaan (G30) P. C.S. = 49,47 MJ/Kg
aagaas (G20) P. C.S. = 37,78 MJ/m3
Osa gaasi Elektriliste
Mudel
Nimivõimsus (kW)Klass
641 DD /HA(WH)
(1)
Väärtused g/h-s näitavad vedelgaasi (butaan, propaan) voolu.
II2H3B/P 7,65 (556 g/h - G30) (546 g/h - G31)
Düüs
1/100
Voolukiirus*
(mm) ***
86
64
50
(1)
225
127
76
g/h
**
221
125
75
Düüs
1/100
(mm)
116(Y)
96(Z)
79(6)
30
20
35
Pinge ja sagedus
220-240V~ 50/60Hz
Voolukiirus*
g/h
295
167
100
20
17
25
Võimsus (W)
0,6
A
RS
S
641 DD /HA(WH)
2727
Page 28

Käitamine ja kasutamine
Ettevaatusabinõud ja soovitused
! Konkreetse gaasipõleti asukoht on näidatud selle nupul.
Gaasipõletid
Reguleerimise nupust saab põletid seada järgmistesse asenditesse:
! Selle seadme välja töötamisel ja tootmisel on järgitud rahvusvahelisi
ohutusstandardeid. Ohutuse tagamiseks lugege järgnevad ohutusnõuded
hoolikalt läbi.
Üldohutus
● Väljas
Maksimaalne
Minimaalne
Põleti süütamiseks pange põleti juurde süüdatud tikk või tulemasin, samal
ajal vajutage vastav põletinupp alla ja keerake seda vastupäeva nii, et see
on suunatud leegi maksimaalse seadistuse poole.
Kuna põleti on varustatud ohutusseadisega, siis hoidke nuppu all umbes 2-3
sekundit, et automaatne seadis hoiaks leeki piisavalt kaua.
Mõned mudelid on varustatud reguleerimise nuppu integreeritud elektrilise
süütenupuga. Sel juhul on seadmel süütur, mitte nupp.
Põleti süütamiseks vajutage lihtsalt vastav nupp lõpuni alla ja keerake
vastupäeva, maksimaalse leegitugevuse suunas. Nuppu tuleb hoida alla
seni, kuni põleti süttib.
! Kui leek peaks juhuslikult kustuma, lülitage põleti välja ja oodake enne uuesti
sisse lülitamist vähemalt 1 minut.
Põleti välja lülitamiseks keerake nuppu, kuni see jõuab lõppasendisse (asend
"●").
Praktilised nõuanded põletite kasutamiseks
Põletite tõhusa toimimise tagamiseks:
• Kasutage iga põleti jaoks sobivat keedunõud (vt tabelit) - leek ei tohi ulatuda
keedunõu põhjast kaugemale.
• Kasutage ainult ühetasase põhja ja kaanega keedunõusid.
• Kui keedunõus olev toit hakkab keema, keerake nupp minimaalse taseme
märgini.
Põleti
Kiire (R)
Poolkiire (S)
Täiendav (A)
Põleti tüübi määratlemiseks vaadake osas "Põletite ja düüside andmete tabel"
olevat skeemi.
Ø Keedunõu läbimõõt (cm)
24 - 26
16 - 20
10 - 14
• See on klassi 3 sisseehitatud seade.
• Tõhusa talitluse tagamiseks tuleb gaasiseadmed varustada
• Need juhised kohalduvad ainult riikide suhtes, mille sümbol on
• See seade on mõeldud toidu valmistamiseks kodus ning ei sobi
• Seadet ei tohi paigaldada välitingimustesse, ka mitte kaetud aladele.
• Ärge puudutage keeduplaati paljaste jalataldade ega märgade käte või
• Pliiti võivad kasutada ainult täiskasvanud toidu valmistamiseks
• Ventilatsiooni- ja hajutusavasid ei tohi kinni katta.
• Kui te seadet ei kasuta, siis peavad nupud olema asendis “●”/“○”.
• Seadme lahtiühendamisel vooluvõrgust tõmmake pistikust, mitte kaablist.
• Seadme puhastamist või hooldustöid ei tohi alustada enne, kui pistik on
• Seadme talitlushäirete korral ärge püüdke seadet ise remontida. Vastavate
• Ärge sulgege klaaskaant (kui on olemas), kui gaasipõletid või elektrilised
• See seade ei ole mõeldud kasutamiseks isikutele (sealhulgas lapsed), kellel
• Ärge lubage lastel seadmega mängida.
• See seade ei ole mõeldud kasutamiseks koos välise taimeri ega
Kasutusest kõrvaldamine
• Maksimaalse stabiilsuse tagamiseks veenduge alati, et pliidi tugirestid on
õigesti paigas ja et iga pott või pann asetatakse põleti kohale keskele
• Poti või panni sangad tuleks asetada samas joones ühega poti- või
pannialuse tugiraudadest.
• Poti- või pannisang tuleks asetada nii, et see ei ulatuks üle pliidiraua
esiserva.
Keedupottide stabiilsuse puhul kõige
enam varieeruv aspekt ongi keedupott ise
(ehk selle asetus kasutamise ajal). Hästi
tasakaalus, lameda põhjaga keedupotid
asetatuna põleti kohale keskele, sangad
resti varbadega samas joones, tagavad
kindlasti suurima stabiilsuse.
• Pakkematerjali kasutusest kõrvaldamisel: järgige kohalikke eeskirju, mis
• Vastavalt Euroopa direktiivile 2012/19/EÜ elektri- ja elektroonikaseadmete
Küsimuste korral kasutuskõlbmatuks muutunud seadme kasutusest
pideva õhuvahetusega. Keeduplaadi paigaldamisel järgige osas
"Paigalduskoht" toodud juhiseid.
kasutusjuhendis ja seadme andmeplaadil.
kasutamiseks äriliseks või tööstuslikuks otstarbeks.
Äärmiselt ohtlik on jätta seade vihma ja tormi kätte.
jalataldadega.
vastavalt käesolevale kasutusjuhendile. Seadme kasutamine muuks
otstarbeks (nt ruumide kütmiseks) on seadme mittesihipärane
kasutamine ja see on ohtlik. Tootja ei vastuta seadme valest ja
mittesihipärasest kasutamisest tulenevate kahjude eest.
seinakontaktist välja tõmmatud.
teadmisteta inimeste tehtud remont võib põhjustada kehavigastusi või
seadme talitlushäireid. Pöörduge klienditeenindusse (vt osa "Kliendiabi").
keeduplaadid on veel kuumad.
on vähenenud füüsilised või vaimsed võimed või vähesed kogemused ja
oskused või kes ei ole seadme tööpõhimõtetega tutvunud. Kui kõnealused
isikud seadet kasutavad, tuleb tagada nende ohutuse eest vastutava isiku
järelevalve või juhendamine või anda sellistele isikutele eelnevalt juhised
seadme kasutamiseks.
kaugjuhtimissüsteemiga.
võimaldavad pakendi taaskasutust.
kohta (WEEE) ei tohi kasutuskõlbmatuks muutunud majapidamisseadmeid
kasutusest kõrvaldada koos tavaliste sorteerimata olmejäätmetega.
Kasutuskõlbmatuks muutunud seadmed tuleb eraldi kokku koguda, et
optimeerida nendes sisalduvate materjalide ringlust ja taaskasutust ning
vähendada seeläbi negatiivset mõju inimeste tervisele ja keskkkonnale.
Tootel olev läbikriipsutatud prügikonteineri sümbol tuletab meelde teie
kohustust seade eraldi kasutusest kõrvaldada.
kõrvaldamise kohta pöörduge kohaliku omavalitsuse või edasimüüja poole.
28EE28
Page 29

Energia säästmine ja keskkonnasäästlikkus
• Valmistage toitu kaanega suletud pottides ja pannides ja kasutage nii vähe
vett, kui võimalik. Toidu valmistamine katmatta pottides, kulutab oluliselt
enam energiat.
• Kasutage täiesti lameda põhjaga potte ja panne.
• Kui keedate pika valmimisajaga roogasid, on mõistlik kasutada survekeetlit,
mis on kaks korda kiirem ja säästab kolmandiku energiat.
! Elektrilise süüteseadme kahjustamise vältimiseks ärge kasutage seda
ajal, kui põletid ei asu oma kohal.
Leegihajutajate hooldus
Aja jooksul võivad leegihajutid ummistuda või neid on raske pöörata. Sel juhul
vahetage need välja.
! Seda võib teha tootja poolt volitatud kvalitseeritud tehnik.
Hooldus
Veaotsing
Seadme välja lülitamine
Enne hooldus- või puhastustööde tegemist ühendage seade elektrivõrgust
lahti.
Pliidipinna puhastamine
• Kõik emaileeritud ja klaasist osad tuleb puhastada sooja vee ja neutraalse
pesulahusega.
• Kareda vee või agressiivsete pesuvahenditega pikaajalise kokkupuute
tulemusel võivad roostevabast terasest pinnad määrduda. Maha läinud
vesi, kaste, kohvi jms tuleb enne kuivamist ära pühkida.
• Puhastage sooja vee ja neutraalse pesuvahendiga ning kuivatage
seejärel pehme lapi või seemisnahaga. Eemaldage kinni kõrbenud
mustus spetsiaalsete roostevabast terasest pindadele mõeldud
puhastusvahenditega.
• Puhastage roostevaba terast ainult pehme lapi või švammiga.
• Ärge kasutage abrasiivseid või korrodeerivaid tooteid, klooripõhiseid
puhastusvahendeid ega pannide küürimisvahendeid.
• Ärge kasutage auruga puhastamise seadmeid.
• Ärge kasutage süttivaid tooteid.
• Ärge jätke pliidiplaadile happelisi või leeliselisi aineid, näiteks äädikat,
sinepit, soola, suhkrut või sidrunimahla.
Pliidi osade puhastamine
• Restid, põletikatted ja põletid saab puhastamise ajaks ära võtta.
• Puhastage neid käsitsi sooja vee ja mitteabrasiivse puhastusvahendiga
eemaldades kõik toidujäägid ja kontrollides, et ükski põletiavadest ei oleks
ummistunud.
• Loputage ja kuivatage.
• Pange põletid ja põletikatted õigesti oma vastavatesse kohtadesse tagasi.
• Restide tagasipanemisel jälgige, et toidunõu toetumisala oleks põletiga
samal joonel.
• Elektriliste süüteküünalde ja turvaseadmega varustatud mudelid nõuavad
korrektse töötamise tagamiseks küünla otsa põhjalikku puhastamist.
Kontrollige neid elemente sageli ja puhastage neid vajadusel niiske lapiga.
Kinni kõrbenud toit tuleb hambaorgi või nõelaga eemaldada.
Võib juhtuda, et seade ei tööta korralikult või ei tööta üldse. Enne
hoolduskeskusesse pöördumist toimige vastavalt allpool toodud juhistele.
Esmalt veenduge, et gaasi- või elektritoide ei ole katkenud ja kontrollige, kas
gaasiventiilid on lahti.
Põleti ei sütti või leek ei ole ühtlaselt ümber põleti.
Kontrollige, kas:
• põletite gaasiavad on ummistunud
• kõik põleti liikuvad osad on õigesti paigaldatud
• seadme lähedal on tuuletõmme
Leek kustub (ohutusseadisega varustatud mudelid)
Kontrollige, kas
• vajutasite nupu lõpuni alla
• hoidsite nuppu piisavalt kaua all, et aktiveerida ohutusseadis
• gaasiavad ei ole ummistunud ohutusseadisele vastava ala juures
Põleti kustub minimaalse taseme asendis
Kontrollige, kas
• gaasiavad ei ole ummistunud
• seadme lähedal on tuuletõmme
• minimaalse taseme seadistus on õigesti reguleeritud
Keedunõu on ebastabiilne
Kontrollige, kas
• keedunõu põhi on täiesti tasane
• keedunõu on põleti keskel
• keedunõu rest on õiges asendis
EE
EE
Pliidiplaadi paigaldamisel
järgige kasutusjuhendis
toodud juhiseid
MÄRKUS
ATTENZIONE
Vältige juhuslikke lööke
pliidiplaadile pannide,
restide või muude
köögitarvikutega
Ärge kasutage panne
ega ahjunõusid,
mis ei mahu ühele
põletile
Ärge jätke tühja lihigrilli
sisse lülitatud põletile
kauemaks kui 5 minutit
2929
Page 30

Montavimas
LT
! Prieš naudodami savo naująjį prietaisą, atidžiai perskaitykite šias instrukcijas.
Jose pateikiama svarbi informacija, susijusi su saugiu prietaiso montavimu
ir naudojimu.
! Prašome išsaugoti šias instrukcijas ateičiai. Perduokite jas galimiems
naujiems prietaiso savininkams.
Padėtis
! Pakavimo medžiagą laikykite vaikams neprieinamoje vietoje. Ji gali kelti
užspringimo arba uždusimo pavojų (žr. „Atsargumo priemonės ir patarimai“).
! Prietaisą turi montuoti specialistas pagal pateiktas instrukcijas. Netinkamai
sumontuotas prietaisas gali pakenkti žmonėms ir gyvūnams arba sugadinti
turtą.
! Šis įrenginys gali būti montuojamas ir naudojamas tik nuolat vėdinamose
patalpose pagal šalyje galiojančias taisykles. Būtina laikytis šių reikalavimų:
• Patalpoje turi būti įrengta oro ištraukimo sistema, kad ištrauktų visas degimo
medžiagas. Tai gali būti gartraukis arba elektrinis ventiliatorius, automatiškai
įsijungiantis kaskart, kai įjungiamas prietaisas.
Prietaiso įrengimas
Įrengiant kaitlentę, būtina imtis šių atsargumo priemonių:
• Virtuvės spintelės, esančios greta kaitlentės ir pakabintos virš jos, turi būti
bent 200 mm nuo kaitlentės krašto (žr. pav.).
• Gartraukiai turi būti montuojami pagal atitinkamas instrukcijas ir ne arčiau
kaip 650 mm nuo kaitlentės.
• Sienines spinteles, besiribojančias su gartraukiu, kabinkite bent 420 mm
virš kaitlentės (žr. pav.).
Jei kaitlentė sumontuota po sienine spintele,
šioji turi būti bent 700 mm virš kaitlentės.
600mm min.
650mm min.
420mm min.
• Montavimo ertmės matmenys turi atitikti nurodytuosius paveikslėlyje.
Pateikiami tvirtinimo kabliai, kad kaitlentę būtų galima pritvirtinti prie
paviršiaus plokštumų, kurios yra 20–40 mm storio. Siekiant saugiai
pritvirtinti kaitlentę, rekomenduojama naudoti visus tam skirtus kablius.
555 mm
55 mm
475 mm
Kamine arba išmetamojoje atšakoje
(tik maisto gaminimo prietaisams)
Tiesiai į išorę
• Patalpoje taip pat turi būti užtikrinta oro cirkuliacija, nes oro reikia normaliam
degimo procesui. Oro srautas turi būti ne mažesnis kaip 2 m3/val. prietaiso
galios vienetui (kW).
Oro cirkuliacijos sistema gali imti orą tiesiogiai
iš lauko, įrengus vamzdį, kurio vidinis pjūvis ne
mažesnis kaip 100 cm2; vamzdžio anga negali
būti blokuojama.
A
Oksikdacinio oro vėdinimo
angų pavyzdžiai
Gretima
patalpa
Patalpa, kurią
reikia vėdinti
Sistema taip pat gali tiekti orą, kurio reikia
degimo procesui, netiesiogiai, t. y. iš gretimų
patalpų, kuriose įrengti oro cirkuliacijos
vamzdžiai, kaip aprašyta pirmiau. Tačiau tai
neturi būti bendri kambariai, miegamieji arba
patalpos, kuriose gali kilti gaisro pavojus.
Ventiliacijos angos tarp lango
ir grindų padidinimas
• Intensyvus ir ilgalaikis naudojimas gali tekti papildomai ventiliacija,
pavyzdžiui , atveriančių langą arba ventiliacijos veiksmingesnę, labiau
padidinti mechaninį siurbimo galią , jei ji jau yra.
• Suskystintosios dujos nusėda ant grindų, nes yra sunkesnės už orą. Todėl
patalpos, kuriose yra SND balionų, taip pat turi būti su ventiliacijos angomis,
kad atsiradus nuotėkiui dujos išeitų. SND balionai (pilni ar iš dalies pripildyti)
negali būti montuojami ar laikomi patalpose arba saugyklose, kurios yra
po žeme (pvz., rūsyje). Patartina patalpoje palikti tik naudojamą balioną.
Balionas turi būti pastatytas taip, kad nebūtų veikiamas šilumą skleidžiančių
šaltinių (krosnių, židinių, viryklių ir kt.), galinčių pakelti jo temperatūrą
daugiau nei iki 50 °C.
• Prieš tvirtindami kaitlentę, nustatykite sandariklį (yra komplekte), kad atitiktų
stalviršio perimetrą, kaip parodyta paveikslėlyje.
Kablio tvirtinimo schema
Kablio tvirtinimo padėtis viršuje Kablio tvirtinimo padėtis viršuje
Aukštis – 20 mm Aukštis – 30 mm
Priekinis
Kablio tvirtinimo padėtis viršuje Užpakalinis
Aukštis – 40 mm
30
! Naudokite kablius, esančius priedų pakete.
Page 31

• Jei kaitlentė įrengiama ne virš įmontuotosios orkaitės, kaip izoliacija turi
būti montuojama medinė plokštė. Ši plokštė turi būti dedama ne mažiau
kaip 20 mm nuo kaitlentės apatinės dalies.
Vėdinimas
Siekiant užtikrinti tinkamą vėdinimą, spintelės užpakalinė plokštė turi būti
pašalinta. Patartina orkaitę įrengti taip, kad ji remtųsi į dvi medžio juosteles
arba būtų ant visiškai lygaus paviršiaus su bent 560 x 45 mm anga (žr.
schemas).
45 mm.
560 mm.
Dujų prijungimas
Prietaisas turi būti jungiamas prie pagrindinės dujų tiekimo jungties arba dujų
baliono laikantis šiuo metu šalyje galiojančių reikalavimų. Prieš jungdami
įsitikinkite, kad viryklė yra suderinama su dujų tiekimo jungtimi, kurią
norite naudoti. Jei ji nesuderinama, laikykitės instrukcijų, nurodytų punkte
„Pritaikymas prie įvairių tipų dujų“.
Naudojant suskystintąsias dujas iš baliono, reikia sumontuoti slėgio
reguliatorių, atitinkantį šalyje galiojančius reikalavimus.
! Patikrinkite, ar dujų tiekimo slėgis atitinka reikšmes, nurodytas 1 lentelėje
(„Degiklių ir antgalių specikacijos“). Taip užtikrinsite, kad prietaisas veiktų
saugiai ir ilgai, o energija būtų naudojama veiksmingai.
Dėmesio! Prieš ryšį, pašalinti iš angos dangtelį už transplantato vamzdžių
dujų viryklės transporto.
LT
! Kaitlentė gali būti įrengiama virš įmontuojamųjų orkaičių su aušinimo ir
vėdinimo sistema.
Elektros jungtys
Kaitlentės su trijų polių maitinimo kabeliu skirtos naudoti esant duomenų
plokštelėje (ji yra ant apatinės prietaiso dalies) nurodytai kintamajai srovei ir
įtampai bei dažniui. Kabelio įžeminimo laidas yra su žalia ir geltona danga.
Jei prietaisas turi būti montuojamas virš įmontuotosios elektrinės orkaitės,
kaitlentės ir orkaitės elektros jungtys turi būti atskiros ir dėl elektros saugos,
ir dėl to, kad orkaitę būtų lengviau ištraukti.
Maitinimo laido prijungimas prie maitinimo šaltinio
Įrenkite standartinį kištuką, atitinkantį apkrovą, nurodytą duomenų plokštelėje.
Prietaisas prie maitinimo šaltinio turi būti jungiamas tiesiogiai, naudojant tarp
prietaiso ir maitinimo šaltinio sumontuotą daugiapolį grandinės pertraukiklį,
kurio kontakto anga ne mažesnė kaip 3 mm. Grandinės pertraukiklis turi
būti tinkamas nurodytai įtampai ir atitikti šiuolaikinius elektros reikalavimus
(įžeminimo laidas neturi būti su grandinės pertraukikliu). Maitinimo kabelis
neturi liestis su paviršiais, kurių temperatūra didesnė nei 50 °C.
! Montuotojas turi užtikrinti, kad būtų įrengta tinkama elektros jungtis ir kad ji
atitiktų saugos reikalavimus.
Prieš jungdami prietaisą prie maitinimo šaltinio įsitikinkite, kad:
• prietaisas įžemintas, o kištukas atitinka reikalavimus.
• lizdas gali atlaikyti didžiausią prietaiso galią, nurodytą duomenų plokštelėje.
• įtampa atitinka duomenų plokštelėje nurodyto įtampos diapazono ribas.
• lizdas tinkamas prietaiso kištukui. Jei lizdas netinka kištukui, paprašykite,
kad kvalikuotas meistras jį pakeistų. Nenaudokite ilgintuvų ar šakotuvų.
! Sumontavus prietaisą reikia įsitikinti, kad maitinimo laidas ir elektros lizdas
lengvai prieinami.
! Laidas negali būti sulenktas ar suspaustas.
! Laidą reikia reguliariai tikrinti, jį gali keisti tik kvalikuotas meistras (žr.
„Pagalba“).
! Gamintojas neprisiima atsakomybės, jei nesilaikoma šių saugos nurodymų.
Jungtis su kietu vamzdžiu (vario arba plieno)
! Jungtis su dujų sistema turi būti įrengta taip, kad prietaiso padėtis jokiu atveju
nebūtų netinkama.
Prietaiso tiekimo mazge yra reguliuojamoji L formos jungtis. Siekiant išvengti
nuotėkio, ji prijungta su tarpikliu. Kiekvienąkart, kai sukama vamzdžio jungtis,
tarpiklis (sandariklis, pateiktas su prietaisu) turi būti keičiamas. Dujų tiekimo
vamzdžio jungtis yra srieginė 1/2 dujų cilindrinė kištukinė jungtis.
Lanksčių plieninių vamzdžių be jungčių prijungimas prie srieginės
jungties
Dujų tiekimo vamzdžio jungtis yra srieginė 1/2 dujų cilindrinė kištukinė jungtis.
Šie vamzdžiai turi būti sumontuoti taip, kad niekada nebūtų ilgesni nei 2000
mm, kai visiškai ištiesti. Kai sujungiate, įsitikinkite, kad lankstus metalo vamzdis
neliečia jokių judančių dalių ir nėra suspaustas.
! Naudokite tik vamzdžius ir sandariklius, kurie atitinka šalyje galiojančius
reikalavimus.
Jungties tvirtumo patikrinimas
! Kai montavimo procesas baigtas, muilo tirpalu patikrinkite, ar vamzdžiai
sujungti sandariai. Niekada nenaudokite ugnies.
Pritaikymas skirtingų tipų dujoms
Pritaikant kaitlentę ne numatyto, o kitokio tipo (nurodyto specialioje
plokštelėje prie viryklės pagrindo arba ant pakuotės) dujoms, reikia pakeisti
degiklio antgalius:
1. Nuimkite kaitlentės tinklelį ir nustumkite degiklius nuo lizdų.
2. 7 mm veržliarakčiu atsukite antgalius ir pakeiskite juos antgaliais, kurie
tinka naujo tipo dujoms (žr. 1 lentelę „Degiklių ir antgalių charakteristikos“).
3. Surinkite visas išimtas dalis atvirkštine tvarka.
4. Užbaigę šią procedūrą, senąjį lipduką pakeiskite nauju, kuriame nurodoma,
jog naudojamos naujo tipo dujos. Lipdukų galite gauti bet kuriame mūsų
priežiūros centre.
• Pirminio degiklio oro srauto reguliavimas:
reguliuoti nereikia.
• Mažiausios degiklių nuostatos nustatymas:
1. Vožtuvą pasukite į mažiausios liepsnos padėtį.
2. Išimkite rankenėlę ir vožtuvo kaištyje arba šalia jo esantį nustatymo varžtą
sureguliuokite taip, kad liepsna būtų nedidelė ir stabili.
31
Page 32

LT
3. Sureguliavę mažiausią liepsną patikrinkite, ar ji neužgęsta reguliatoriaus
rankenėlę kelis kartus greitai pasukant nuo mažiausios liepsnos padėties
iki didžiausios ir atgal.
4. Kai kuriuose prietaisuose naudojamas apsauginis įtaisas (temperatūros
jutiklis). Jei prietaisas neveikia, kai nustatytas mažiausias liepsnos lygis,
reguliavimo varžtu padidinkite liepsną.
5. Baigę reguliavimą, apylankose pakeiskite sandariklį naudodami
sandarinimo vašką arba analogišką priemonę.
! Jei prietaisas prijungtas prie suskystintųjų dujų šaltinio, nustatymo varžtas
turi būti priveržiamas kuo tvirčiau.
! Užbaigę šią procedūrą senąjį lipduką pakeiskite nauju, kuriame nurodoma,
jog naudojamos naujo tipo dujos. Lipdukų galite gauti bet kuriame mūsų
priežiūros centre.
! Jei darbinis dujų slėgis skiriasi nuo rekomenduojamo (ar šiek tiek kinta),
siekiant atitikti šalyje galiojančius reikalavimus tiekimo vamzdyje reikia
sumontuoti tinkamą slėgio reguliatorių.
LENTELĖ
Elektros
jungtys
žr. lentelę
ECODESIGN
Ši įranga atitinka ES direktyva Nr. 66/2014, integruojanti
direktyvą 2009/125/ES.
Reglamentas EN 30-2-1
32
Page 33

LT
Degiklio ir purkštukų specifikacijos
sE
641 DD /HA(WH)
1 lentelė Suskystintosios dujos
Degiklis
Greitas (R)
Pusiau greitas (S)
Papildomas (A)
Tiekimo slėgis
* Esant 15 °C ir 1013,25 mbar – sausosios dujos
** Propanas (G31) PCS = 50,37 MJ/kg
*** Butanas (G30) PCS = 49,47 MJ/kg
Gamtinės dujos (G20) PCS = 37,78 MJ/m3
Modelis
Skersmuo
(mm)
100
75
55
Klasė
Šilumos energijos
šaltinis kW (pcs*)
Nomin. Reduk.
3.10
1.75
1.05
Nominalus (mbar)
Mažiausias (mbar)
Didžiausias (mbar)
0.80
0.45
0.45
Dujų skyriu
Nominali galia (kW)
Apylanka
1/100
(mm)
39
28
28
Antgalis
1/100
(mm) ***
86
64
50
(1)
Srautas*
g/val.
**
225
127
76
221
125
75
30
20
35
Įtampa ir dažnis
Gamtinės dujos
Antgalis
1/100
(mm)
116(Y)
96(Z)
79(6)
lektros skyrius
Srautas*
20
17
25
Galia (W)
l/val.
295
167
100
641 DD /HA(WH)
(1)
Vertės g/h nurodo srauto dydį su suskystintosiomis dujomis (butanu, propanu).
II2H3B/P 7,65 (556 g/h - G30) (546 g/h - G31)
A
RS
S
220-240V~ 50/60Hz
0,6
33
Page 34

Įjungimas ir naudojimas
LT
Atsargumo priemonės ir patarimai
! Atitinkamo dujų degiklio padėtis parodyta ant kiekvienos rankenėlės.
Dujų degikliai
Kiekvienas degiklis gali būti sureguliuotas pagal vieną iš šių nuostatų,
naudojant atitinkamą rankenėlę:
● Išjungta
Didžiausia
Mažiausia
Norėdami uždegti vieną iš degiklių, laikykite degantį degtuką ar žiebtuvėlį prie
degiklio ir tuo pačiu metu paspauskite ir pasukite atitinkamą rankenėlę prieš
laikrodžio rodyklę iki didžiausios nuostatos.
Kadangi degiklyje įmontuotas saugos įtaisas, rankenėlė turėtų būti laikoma
paspausta apie 2–3 sekundes, leidžiant automatiniam įtaisui degti, kad būtų
palaikoma liepsna.
Kai kurie modeliai turi uždegimo funkciją, įdiegtą valdymo rankenėlėje. Tokiu
atveju yra uždegiklis, bet ne mygtukas.
Norėdami uždegti degiklį, tiesiog iki galo nuspauskite atitinkamą rankenėlę ir
pasukite ją prieš laikrodžio rodyklę iki didelės liepsnos nuostatos. Neatleiskite,
kol degiklis užsidegs.
! Jei liepsna netyčia užgestų, išjunkite degiklį ir prieš degdami pakartotinai
palaukite bent 1 minutę.
Norėdami išjungti degiklį, sukite rankenėlę iki galo pagal laikrodžio rodyklę
(kol pasieks ● padėtį).
Praktinis patarimas dėl degiklių naudojimo
Kad degikliai veiktų efektyviai:
• Naudokite kiekvienam degikliui tinkamą gaminimo indą (žr. lentelę), kad
liepsna nesklistų plačiau indo dugno.
• Visada naudokite gaminimo indus su plokščiu pagrindu ir dangčiu.
• Kai indo turinys pasiekia virimo temperatūrą, pasukite rankenėlę iki
mažiausios nuostatos.
Degiklis
Greitas (R)
Pusiau greitas (S)
Papildomas (A)
Norėdami išsiaiškinti degiklio tipą, žiūrėkite schemas skyriuje „Degiklių ir
antgalių specikacijos“.
• Maksimaliam stabilumui užtikrinti įsitikinkite, kad kepimo indų laikikliai
pastatyti teisingai ir kiekvienas indas yra degiklio viduryje.
• Įsitikinkite, kad kepimo indų rankenos yra lygiagrečiai su vienu iš indų
laikiklio atraminių užtvarų.
• Kepimo indų rankenos turi būti tokioje padėtyje, kad neprasikištų pro kepimo
plokštumos priekį.
Gaminimo indo skersmuo (cm)
24 - 26
16 - 20
10 - 14
Skirtingą keptuvių stabilumą dažnai
nulemia pati keptuvė (arba jos padėtis
naudojimo metu). Gerai subalansuotos
keptuvės, plokščiu dugnu, padėtos tiesiai
virš degiklio, o rankenėlės sulygintos su
vienu iš grotelių strypų, be abejo, užtikrina
didžiausią stabilumą.
! Prietaisas sukurtas ir pagamintas laikantis tarptautinių saugos standartų.
Šie įspėjimai pateikiami saugos sumetimais, juos reikia atidžiai perskaityti.
Bendroji sauga
• Tai 3 klasės įmontuojamoji įranga.
• Dujiniams prietaisams, kad normaliai dirbtų, reikia reguliarios oro
apykaitos. Montuodami kaitlentę, laikykitės instrukcijų, pateiktų
dalyje apie prietaisų padėtį.
• Nurodymai galioja tik šalyse, kurių simboliai pateikti instrukcijoje
ir serijos numerio plokštelėje.
• Prietaisas naudotinas namuose, jis neskirtas pramoninei ar komercinei
panaudai.
• Prietaiso negalima įrengti lauke, net ir dengtose vietose. Labai pavojinga
prietaisą palikti lietuje ir audroje.
• Nelieskite prietaiso, jei esate basi arba jūsų rankos ir kojos drėgnos ar
šlapios.
• Prietaisas turi būti naudojamas tik maistui gaminti pagal čia
pateikiamas instrukcijas, juo gali naudotis tik suaugusieji. Kitoks
prietaiso naudojimas (pvz., kambariui šildyti) laikomas netinkamu
ir yra pavojingas. Gamintojas negali būti laikomas atsakingu už
žalą, kilusią dėl netinkamo, netaisyklingo ar neprotingo prietaiso
naudojimo.
• Angos, naudojamos šilumai paskirstyti ir ventiliacijai, niekuomet negali būti
uždengtos.
• Visada įsitikinkite, kad nenaudojamo prietaiso rankenėlės yra ●/○ padėtyje.
• Išjungdami prietaisą iš maitinimo lizdo, visuomet traukite už kištuko, ne už
laido.
• Niekuomet nedirbkite valymo ar priežiūros darbų neatjungę prietaiso nuo
maitinimo šaltinio.
• Jei prietaisas sugestų, jokiu būdu nebandykite jo remontuoti patys.
Remonto darbus atliekant ne specialistams, kyla sužalojimų arba dar
didesnių prietaiso gedimų pavojus. Susisiekite su priežiūros centru (žr.
„Pagalba“).
• Neuždenkite stiklinio dangčio (jei sumontuotas), kol neatvėso dujiniai
degikliai arba elektrinė kaitlentė.
• Prietaiso neturėtų naudoti ribotų zinių, jutiminių ar protinių gebėjimų
asmenys (įskaitant vaikus), taip pat nepatyrę arba nesusipažinę su gaminiu
asmenys. Tokius asmenis turėtų prižiūrėti už jų saugą atsakingas asmuo
arba jie turėtų gauti nurodymus, kaip naudotis prietaisu.
• Neleiskite vaikams žaisti su prietaisu.
• Naudojamas prietaisas nevaldomas išoriniu laikmačiu arba atskira
nuotoline valdymo sistema.
Išmetimas
• Išmesdami pakavimo medžiagas laikykitės vietinių įstatymų dėl pakuočių
perdirbimo.
• Pagal Europos Sąjungos direktyvą 2012/19/EB dėl elektros ir elektroninės
įrangos atliekų reikalaujama, kad buitiniai prietaisai nebūtų išmetami su
įprastomis nerūšiuotomis komunalinėmis atliekomis. Seni prietaisai turi
būti surenkami atskirai, kad būtų galima pakartotinai naudoti arba perdirbti
juose esančias medžiagas ir sumažinti poveikį žmonių sveikatai ir aplinkai.
Perbrauktos šiukšliadėžės su ratukais piktograma ant gaminio nurodo,
jog privalote pasirūpinti, kad išmetamas prietaisas būtų paimtas atskirai.
Dėl informacijos apie tinkamą senų prietaisų išmetimą savininkai turėtų
susisiekti su vietine valdžia arba prietaisų pardavėjais.
Aplinkos tausojimas ir saugojimas
• Maistą gaminkite uždengtuose puoduose ir keptuvėse su gerai uždengtais
dangčiais, naudodami kuo mažiau vandens. Gaminant maistą inde be
dangčio išnaudojama kur kas daugiau energijos.
34
Page 35

• Naudokite puodus ir keptuves plokščia apačia.
• Jei gaminate patiekalus, kuriems pagaminti reikia labai ilgo laiko, verta
įsigyti garpuodį, jame makstas išvirs dvigubai daugiau ir sutaupys trečdalį
energijos.
Dujų čiaupo priežiūra
Laikui bėgant čiaupai užsikemša ir juos vis sunkiau atsukti. Tada čiaupus
reikia pakeisti.
! Tai turi atlikti kvalikuotas meistras, turintis gamintojo leidimą.
Techninė priežiūra
Gedimų šalinimas
Prietaiso išjungimas
Prieš atlikdami bet kokius darbus, prietaisą atjunkite nuo maitinimo šaltinio.
Viryklės paviršiaus valymas
• Visus emaliuotus ir stiklinius paviršius valykite su šiltu vandeniu ir neutraliu
plovikliu.
• Ant nerūdijančio plieno paviršių gali atsirasti dėmių dėl kalkingo vandens
arba ploviklių, jei jie greit nepašalinami. Bet kokie išsilieję maisto gaminiai
(vanduo, padažas, kava ir kt.) turėtų būti nuvalyti prieš jiems sudžiūvant.
• Valymui naudokite šiltą vandenį ir neutralų valiklį, nusausinkite minkštu
audiniu arba zomša. Pašalinkite prikepusius nešvarumus su specialiais
valikliais, skirtais nerūdijančio plieno paviršiams.
• Nerūdijantį plieną valykite tik su švelniu audiniu arba kempine.
• Nenaudokite braižančių ar ėsdinančių produktų, valiklių su chloru ir
šveistukų.
• Nenaudokite valymo garais įrangos.
• Nenaudokite degių medžiagų.
• Nepalikite ant viryklės tokių rūgštinių ar šarminių medžiagų kaip actas,
garstyčios, druska, cukrus ar citrinų sultys.
Viryklės dalių valymas
• Emaliuotus ir stiklinius paviršius valykite tik su švelniu audiniu arba kempine.
• Groteles, degiklio antgalius ir degiklius galima nuimti ir nuvalyti.
• Valykite rankomis, su šiltu vandeniu ir nebraižančiu plovikliu, nuvalykite
maisto likučius ir patikrinkite, ar neužsikimšusios degiklių angos.
• Nuskalaukite ir nudžiovinkite.
• Vėl teisingai uždėkite degiklius ir antgalius ant jų korpusų.
• Kai uždedate groteles, įsitikinkite, kad keptuvės padėklo sritis yra išlygiuota
su degikliu.
• Modelius su elektriniais degimo kištukais ir apsauginiu įtaisu reikia atidžiai
nuvalyti ties kištuko galu, kad jie veiktų tinkamai. Juos dažnai patikrinkite,
prireikus nuvalykite drėgnu skudurėliu. Prikepusį maistą reikia pašalinti su
dantų krapštuku ar adata.
Gali atsitikti, kad prietaisas ims veikti netinkamai arba visai neveiks. Prieš
skambindami į priežiūros centrą ir prašydami pagalbos patikrinkite, ar ką nors
galite padaryti patys. Pirmiausia patikrinkite, ar nėra dujų ir elektros tiekimo
pertrūkių, ar dujų vožtuvai, kuriais jos tiekiamos, yra atviri.
Neužsidega degiklis arba aplink jį nėra liepsnos.
Patikrinkite, ar:
• Neužsikimšusios degiklio dujų skylės.
• Visos judančios dalys, kurios sudaro degiklį, sumontuotos tinkamai.
• Prietaiso neveikia stiprios oro srovės.
Modeliuose, turinčiuose saugos įrangą, užgęsta liepsna.
Patikrinkite, ar:
• Iki galo nuspaudėte rankenėlę.
• Nespaudėte rankenėlės per ilgai ir neaktyvinote saugos įtaiso.
• Dujų angos nėra užblokuotos toje srityje, kur užblokuojamos veikiant
Degiklis nebedega esant mažiausiai nuostatai.
Patikrinkite, ar:
• Neužsikimšusios degiklio dujų skylės.
• Prietaiso neveikia stiprios oro srovės.
• Tinkamai sureguliuota minimalaus degimo nuostata.
Gaminimo indai yra nestabilūs.
Patikrinkite, ar:
• Gaminimo indo dugnas visiškai plokščias.
• Gaminimo indas tinkamai padėtas degiklio centre.
• Indą prilaikančios grotelės yra tinkamoje padėtyje.
LT
saugos įtaisui.
! Kad nepažeistumėte elektros degimo įtaiso, nenaudokite jo, kai degikliai
nėra įstatyti.
PASTABOS
ATTENZIONE
LT
Atidžiai perskaitykite,
kas rašoma vadove apie
kaitlentės įrengimą
Saugokitės, kad
nesutrenktumėte
kaitlentės su kaistuvais,
grotelėmis ir kt. virtuvės
reikmenimis
Nenaudokite kaistuvų
ar orkaitės padėklų,
kurie uždengia 2 ar
daugiau degiklių
Nepalikite tuščių kepsniams
skirtų grotelių ant uždegto
degiklio ilgiau nei 5 minutes
35
Page 36

Ierīkošana
LV
! Pirms sākat lietot jauno ierīci, lūdzu, rūpīgi izlasiet šo instrukciju brošūru.
Tajā ir svarīga informācija par drošu ierīces lietošanu, ierīkošanu un apkopi.
! Lūdzu, saglabājiet šo lietošanas instrukciju turpmākām atsaucēm. Nododiet
to iespējamiem ierīces jaunajiem lietotājiem.
Novietošana
! Iepakojuma materiālu glabājiet bērniem nepieejamā vietā. Tas var radīt
aizrīšanās vai nosmakšanas draudus (skat. sadaļu "Piesardzība un ieteikumi").
Ierīces uzstādīšana
Ierīkojot plīts virsmu, ir jāievēro šādi piesardzības pasākumi:
• Virtuves skapjiem, kas atrodas līdzās ierīcei augstāk par plīts virsmu, ir
jāatrodas vismaz 200 mm attālumā no virsmas malas (skat. zīmējumu);
• tvaika nosūcēji ir jāuzstāda saskaņā ar to uzstādīšanas instrukcijām un
vismaz 650 mm attālumā no plīts virsmas;
• Tvaika nosūcēju tuvumā esošie sienas skapji jāuzstāda vismaz 420 mm
augstumā no plīts virsmas (skat. attēlu).
Ja plīts virsma ir uzstādīta zem sienas skapja,
tam ir jāatrodas vismaz 700 mm augstumā
600mm min.
virs plīts virsmas.
! Ierīci drīkst ierīkot tikai kvalicēts speciālists un saskaņā ar pievienoto
instrukciju. Nepareiza ierīkošana var izraisīt kaitējumu cilvēkiem un dzīvniekiem
vai bojāt īpašumu.
! Šo ierīci drīkst ierīkot tikai pastāvīgi vēdinātās telpās, kas atbilst spēkā
esošajiem valsts normatīvajiem aktiem. Ir jāievēro šādas prasības:
• Telpai ir jābūt aprīkotai ar gaisa izvades sistēmu, kas izkliedē visus
degšanas procesā radušos dūmus. Tas var būt tvaika nosūcējs vai
elektrisks ventilators, kas automātiski ieslēdzas katru reizi, kad tiek ieslēgta
ierīce;
Skurstenī vai sazarotā dūmvadā.
(vienīgi gatavošanas ierīcēm)
Tieši uz ārpusi
• Tāpat telpā ir jānotiek atbilstīgai gaisa cirkulācijai, jo normālam degšanas
procesam ir nepieciešams gaiss. Gaisa plūsma nedrīkst būt mazāka par
2 m3/h uz vienu jaudas kW.
Gaisa cirkulācijas sistēmā gaisu var ievadīt
tieši no ārpuses, izmantojot cauruli ar vismaz
100 cm2 iekšējo diametru; atvere nedrīkst būt
bloķēta.
A
650mm min.
420mm min.
• Uzstādīšanas atverei ir jābūt attēlā norādītajiem izmēriem.
Ir pievienoti stiprināšanas āķi, kas paredzēti, lai plīts virsmu pievienotu 20
līdz 40 mm biezām galda virsmām. Lai nodrošinātu to, ka plīts virsma ir
stingri piestiprināta, iesakām izmantot visus pievienotos āķus;
555 mm
55 mm
475 mm
• Pirms plīts virsmas nostiprināšanas vietā, pa plīts virsmas perimetru
izvietojiet pievienoto blīvējumu, kā ir norādīts attēlā.
Gaisa ventilācijas
atveru piemēri.
Blakus
esošā telpa
Ventilējamā
telpa
Tāpat sistēma degšanai nepieciešamo gaisu
var nodrošināt netieši, piemēram, no blakus
esošajām telpām, kas aprīkotas ar iepriekš
aprakstītajām gaisa cirkulācijas caurulēm. Taču
šīs telpas nedrīkst būt dzīvojamās istabas,
guļamistabas vai istabas, kurās ir paaugstināta
Palielina ventilācijas spraugu
starp logu un grīdu.
uguns bīstamība.
• Plīts intensīvas un ilgstošas lietošanas gadījumā nepieciešams nodrošināt
papildu vēdināšanu, piemēram, jāatver logs vai jāizmanto efektīvāks
paņēmiens, proti, jāpalielina mehāniskās gaisa piecgades sistēmas jauda,
ja šāda sistēma jau ir uzstādīta.
• Sašķidrinātā naftas gāze izplūst uz grīdas, jo tā ir smagāka par gaisu. Tādēļ
telpām, kurās tiek glabāti LPG baloni, ir jābūt aprīkotām ar ventilācijas ejām,
lai noplūdes gadījumā, gāze varētu tikt izvadīta. Šā iemesla dēļ gan daļēji,
gan pilnīgi piepildītos LPG balonus nedrīkst ierīkot vai novietot glabāšanai
telpās vai noliktavās, kas atrodas zem pirmā stāva līmeņa (pagrabos
un tamlīdzīgās vietās). Telpā ir ieteicams glabāt vienīgi balonu, kas tiek
izmantots, novietojot to tā, lai uz to neiedarbotos ārējo avotu (plītis, kamīni,
krāsnis utt.) radīts karstums, kas temperatūru balonā varētu paaugstināt
vairāk par 50°C.
Āķa nostiprināšanas pamācība
Nostiprināšanas pozīcija galda Nostiprināšanas pozīcija galda virsmām
virsmām ar H=20mm ar H=30mm
Priekša
Nostiprināšanas pozīcija galda Aizmugure
virsmām ar H=40mm
36
Page 37

! Izmantojiet āķus, kas pievienoti “piederumu pakā”.
• Ja plīts virsma netiek uzstādīta virs iebūvētās krāsns, izolācijai ir jāuzstāda
koka panelis. Tas ir jāizvieto vismaz 20 mm attālumā no plīts virsmas
apakšējās daļas.
Ventilācija
Lai nodrošinātu pienācīgu ventilāciju, skapja aizmugures panelis ir jānoņem.
Krāsni ir ieteicams uzstādīt tā, lai tā balstītos uz divām koka detaļām, vai
arī uz pilnīgi līdzenas virsmas ar vismaz 45 x 560 mm atveri (skat. attēlu).
45 mm.
560 mm.
! Plīts virsmu drīkst uzstādīt vienīgi virs krāsnīm ar iebūvētu dzesēšanas
ventilācijas sistēmu.
Elektrības pieslēgums
Plīts virsmas, kas aprīkotas ar trīs polu enerģijas padevi, ir izstrādātas, lai
darbotos ar maiņstrāvu un tādu spriegumu un frekvenci, kāda ir norādīta
uz datu plāksnītes (tā atrodas ierīces apakšējā daļā). Zemējuma vadam
kabelī ir zaļš un dzeltens apvalks. Ja ierīci uzstāda virs iebūvētas elektriskās
krāsns, plīts virsmas uz krāsns elektrības pieslēgumiem ir jābūt atsevišķiem
gan elektriskās drošības labad, gan tādēļ, lai būtu vienkāršāk izņemt krāsni.
Elektrības vada pieslēgšana elektrotīklam
Uzstādiet standarta spraudni, kas atbilst uz datu plāksnītes norādītajai slodzei.
Ierīce ir jāpieslēdz tieši elektrotīklam, starp ierīci un elektrotīklu ierīkojot
vienpola slēdzi, kura minimālais attālums starp kontaktiem ir 3 mm. Slēdzim
jābūt piemērotam norādītajam strāvas stiprumam un jāatbilst spēkā esošajiem
strāvas noteikumiem (slēdzis nedrīkst atvienot zemējuma vadu). Piegādes
kabelis nedrīkst nonākt saskarē ar virsmām, kuru temperatūra ir augstāka
par 50°C.
Gāzes pievienošana
Ierīce galvenajai gāzes padevei vai gāzes balonam ir jāpievieno saskaņā
ar spēkā esošajiem valsts normatīvajiem aktiem. Pirms pievienošanas
pārliecinieties, ka plīts ir saderīga ar gāzes padevi, kuru vēlaties izmantot. Ja
tā nav, izpildiet instrukcijas, kuras norādītas sadaļā "Pielāgošana dažādiem
gāzes veidiem".
Ja izmantojat sašķidrināto gāzi no balona, ierīkojiet spiediena regulatoru, kas
atbilst spēkā esošajiem valsts normatīvajiem aktiem.
! Pārbaudiet, vai gāzes padeves spiediens atbilst vērtībām, kas norādītas
1. tabulā ("Degļa un sprauslas specikācija"). Tādējādi tiek garantēta droša
un ilgstoša ierīces darbība, vienlaicīgi uzturot energoefektīvu patēriņu.
Uzmanību! Pirms pievienošanas izņemt no gāzes plīts gāzes caurules
pievienošanas atveres transportēšanas aizbāzni.
Pieslēgšana ar stingro cauruli (vara vai tērauda)
! Pieslēgums gāzes sistēmai ir jāveic tā, lai ierīcei neradītu nekāda veida
deformāciju.
Ierīces piegādes rampai ir pievienota regulējama L formas caurule, kas aprīkota
ar blīvējumu, lai novērstu noplūdes. Pēc caurules stiprinājuma griešanas
blīvējums vienmēr ir jānomaina (blīvējums, kas pievienots ierīcei). Gāzes
padeves caurules stiprinājums ir cilindrisks, 1/2 gāzes aptvertais stiprinājums
ar ārējo vītni.
Elastīgā bezšuvju nerūsējošā tērauda cauruļvada savienošana ar vītņoto
stiprinājumu
Gāzes padeves caurules stiprinājums ir cilindrisks, 1/2 gāzes aptvertais
stiprinājums ar ārējo vītni.
Šīs caurules ir jāuzstāda tā, lai pilnībā izstieptas tās nebūtu garākas par 2000
mm. Kad savienojums ir veikts, pārliecinieties, ka elastīgā metāla caurule
nepieskaras nekādām kustīgām detaļām un nav saspiesta.
! Izmantojiet vienīgi valsts normatīvajiem aktiem atbilstošas caurules un
blīvējumus.
Savienojuma stingrības pārbaude
! Kad ierīkošana ir pabeigta, ar ziepju šķīdumu pārbaudiet, vai cauruļvada
stiprinājumos nav noplūžu. Nekādā gadījumā neizmantojiet atklātu liesmu.
LV
! Uzstādītājam ir jāpārliecinās, ka ir nodrošināts pareizs elektrības pieslēgums,
kas atbilst drošības noteikumiem.
Pirms elektropadeves pieslēgšanas pārbaudiet, vai:
• ierīce ir iezemēta un spraudnis atbilst normatīvo aktu prasībām;
• rozete atbilst ierīces maksimālajai jaudai, kas ir norādīta uz tehnisko datu
plāksnītes;
• elektrotīkla spriegums ir tehnisko datu plāksnītē norādītajā diapazonā;
• rozete ir savietojama ar ierīces spraudni. Ja rozete nav savietojama ar
spraudni, lūdziet pilnvarotam elektriķim to nomainīt. Nedrīkst izmantot
pagarinātāju vai vairākas rozetes.
! Pēc ierīces ierīkošanas elektrības vadam un kontaktligzdai ir jābūt brīvi
pieejamiem.
! Elektrības vadu nedrīkst saliekt vai saspiest.
! Elektrības vads regulāri jāpārbauda, un to drīkst nomainīt tikai pilnvarots
elektriķis (skat. sadaļu "Palīdzība").
! Ražotājs nav atbildīgs par zaudējumiem, kas radušies šo drošības noteikumu
neievērošanas dēļ.
Pielāgošana dažādiem gāzes veidiem
Lai pielāgotu plīts virsmu dažādiem gāzes veidiem, kas nav parastais veids,
kurš norādīts datu plāksnītē plīts virsmas apakšā vai uz iepakojuma, degļa
sprauslas ir jānomaina šādi:
1. Noņemiet plīts virsmas režģus un izbīdiet degļus no to ligzdām.
2. Atskrūvējiet sprauslas, izmantojot 7 mm uzmaucamo uzgriežņu atslēgu un
nomainiet ar jaunu sprauslu, kas ir piemērota attiecīgajam gāzes veidam
(skat. 1. tabulu "Degļa un sprauslas raksturojums").
3. Salieciet detaļas atpakaļ, veicot procedūru apgrieztā secībā.
4. Kad procedūra ir pabeigta, nomainiet veco tehnisko datu uzlīmi ar jaunu,
uz kuras norādīts jaunais gāzes veids. Uzlīme ir pieejama mūsu servisa
centros.
• Degļu gaisa padeves regulēšana
nav nepieciešama.
• Degļu minimālās spraugas iestatīšana
1. Pagrieziet krānu mazas liesmas pozīcijā.
2. Noņemiet grozāmo slēdzi un grieziet regulēšanas skrūvi, kas atrodas krāna
rēdzē vai blakus tai, līdz liesma ir maza, bet pastāvīga.
37
Page 38

LV
3. Kad ir noregulēta maza liesma, deglim degot, vairākas reizes ātri pagrieziet
grozāmo slēdzi no minimālās uz maksimālo pozīciju. Liesma nedrīkst
nodzist.
4. Dažām plītīm ir uzstādīta drošības ierīce (termoelements). Ja degļiem ir
iestatīta maza liesma un plīts nestrādā, nedaudz palieliniet liesmu, griežot
regulēšanas skrūvi.
5. Kad liesma ir noregulēta, nomainiet apvadu blīvējumu, izmantojot
hermetizējošu smēri vai līdzīgu vielu.
! Ja plīts ir pievienota sašķidrinātas gāzes padevei, regulēšanas skrūve ir
jāpievelk pēc iespējas ciešāk.
! Kad procedūra ir pabeigta, nomainiet veco tehnisko datu uzlīmi ar jaunu, uz
kuras norādīts jaunais gāzes veids. Uzlīmes ir pieejamas mūsu servisa centros.
! Ja izmantotās gāzes spiediens ir citāds (vai mazliet atšķirīgs) nekā ieteicamais
spiediens, lai nodrošinātu atbilstību spēkā esošajiem valsts normatīvajiem
aktiem, ieplūdes cauruļvadam jāuzstāda piemērots spiediena regulators.
DATU PLĀKSNĪTE
Elektrības
pieslēgumi
Skatīt datu plāksnīti
EKODIZAINS
Šī iekārta atbilst ES Regula Nr. 66/2014, kas ietver
Direktīvu 2009/125/EK.
EN 30-2-1 standarts.
38
Page 39

1. tabula Sašķidrināta gāze Dabas gāze
Degļa un sprauslas specifikācija
*
**
***
aE
641 DD /HA(WH)
LV
Deglis
Ā
trdarbīgums (R)
Daļējs ātrdarbīgums (S)
Papildu (A)
Padeves spiedieni
Pie 15°C un 1013,25 milibāriem - sausa gāze
Propāns (G31) P.C.S. = 50,37 MJ/Kg
641 DD /HA(WH)
(1)
Butāns (G30) P.C.S. = 49,47 MJ/Kg
Dabas gāze (G20) P.C.S. = 37,78 MJ/m3
Modelis
G/h vērtības attiecas uz iekārtām ar sašķidrināto gāzi (butāns, propāns).
Diametrs
(mm)
100
75
55
II2H3B/P 7,65 (556 g/h - G30) (546 g/h - G31)
Siltuma jauda,
kW (maksimālā
Nomin. Reduc.
Nomināls (mbar)
Minimāls (mbar)
Maksimāls (mbar)
Klase
siltumspēja*)
3.10
1.75
1.05
0.80
0.45
0.45
Gāze sadaļ
Nominālā jauda (kW)
Apvads
1/100
(mm)
39
28
28
Sprausla
1/100
(mm) ***
86
64
50
(1)
Plūsma*
g/h
**
225
127
76
221
125
75
30
20
35
Spriegums
un frekvence
220-240V~ 50/60Hz
Sprausla
1/100
(mm)
116(Y)
96(Z)
79(6)
lektriskā sadaļa
Plūsma*
g/h
295
167
100
20
17
25
Jauda (W)
0,6
A
RS
S
39
Page 40

Ieslēgšana un lietošana
Ātrdarbīgums (R)
Daļējs ātrdarbīgums (S)
Papildu (A)
Ø Gatavošanas trauku diametrs (cm)
24 - 26
16 - 20
10 - 14
Deglis
LV
Piesardzības pasākumi un ieteikumi
! Atbilstīgā gāzes degļa pozīcija ir norādīta uz katra slēdža.
Gāzes degļi
Izmantojot attiecīgo vadības slēdzi, katru degli var iestatīt vienā no turpmāk
norādītajām pozīcijām:
● Izslēgts
Maksimums
Minimums
Lai aizdedzinātu degli, tā tuvumā turiet aizdedzinātu sērkociņu vai šķiltavas un
tajā pašā laikā attiecīgo slēdzi piespiediet uz leju un grieziet pretēji pulksteņa
rādītāja virzienam, lai iestatītu maksimumu.
Tā kā deglis ir aprīkots ar drošības ierīci, slēdzis ir jānospiež aptuveni uz 2-3
sekundēm, lai automātiskā ierīce, kas uztur liesmu, uzsiltu.
Daži modeļi ir aprīkoti ar aizdedzināšanas pogu, kas iestrādāta vadības slēdzī.
Ja tā ir, tad aizdedzes ierīce ir, bet atsevišķas pogas nav.
Lai aizdedzinātu degli, vienkārši nospiediet attiecīgo slēdzi līdz galam un tad
pagrieziet pretēji pulksteņa rādītāja virzienam līdz pozīcijai "Maksimums",
turot to nospiestu, līdz deglis aizdegas.
! Ja liesma nejauši izdziest, nogrieziet vadības slēdzi un pagaidiet vismaz
vienu minūti, pirms mēģināt to iedegt atkal.
Lai izslēgtu degli, pagrieziet slēdzi pulksteņa rādītāja virzienā, līdz tas apstājas
(kad tas ir nonācis pozīcijā “●”).
Praktiski degļu lietošanas ieteikumi
Lai nodrošinātu to, ka degļi darbojas efektīvi:
• Katram deglim izmantojiet atbilstoša izmēra gatavošanas traukus (skat.
tabulu), lai liesmas neizplatītos pāri trauka dibena malām;
• Vienmēr izmantojiet gatavošanas traukus ar līdzenu pamatni un vāku;
• Kad trauka saturs sasniedz vārīšanās temperatūru, nogrieziet regulatoru
līdz minimumam.
Lai noteiktu degļa veidu, lūdzu, skatiet zīmējumus, kas iekļauti sadaļā "Degļu
un sprauslu specikācija".
• Lai iegūtu maksimālu stabilitāti, pannas balstiem jābūt pareizi noregulētiem
un visas pannas jānovieto tā, lai to centrs atrastos tieši virs degļa.
• Pannas jānovieto uz statīva tā, lai to rokturi atrastos paralēli vienam atbalsta
stienim.
• Pannas rokturis jānovieto tā, lai tas neizvirzītos pāri degļu bloka priekšējai
malai.
stabilitāti.
40
Vismainīgākais aspekts attiecībā uz
pannas stabilitāti bieži var būt pati panna
(vai pannas novietojums lietošanas laikā).
Labi līdzsvarota panna ar plakanu pamatni,
kuras centrs atrodas tieši virs degļa un
kuras rokturis salāgots ar vienu no atbalsta
tapām, neapšaubāmi nodrošina vislielāko
! Šī ierīce ir projektēta un ražota saskaņā ar starptautiskajiem drošības
standartiem. Drošības apsvērumu dēļ ir sniegti turpmāk minētie brīdinājumi,
kas uzmanīgi jāizlasa.
Vispārīga drošības informācija
• Šī ir trešās klases iebūvēta ierīce.
• Lai nodrošinātu efektīvu darbību, gāzes ierīcei ir nepieciešama
pastāvīga gaisa apmaiņa. Uzstādot plīts virsmu, ievērojiet
instrukcijas, kas norādītas sadaļā ierīces "Novietošana".
• Šī instrukcija attiecas tikai uz tām valstīm, kas ir minētas
rokasgrāmatā un ierīces sērijas numura plāksnītē.
• Ierīce ir paredzēta lietošanai iekštelpās mājsaimniecības, nevis
komerciālām vai ražošanas vajadzībām.
• Ierīci nedrīkst uzstādīt ārpus telpām pat tad, ja plīts uzstādīšanas vieta ir
nosegta. Pakļaut ierīci lietus un nokrišņu iedarbībai ir ļoti bīstami.
• Ierīcei nedrīkst pieskarties, ja ir basas kājas vai slapjas vai mitras rokas
vai kājas.
• Ierīci drīkst lietot tikai pieaugušie un tikai ēdiena gatavošanas
vajadzībām. Lietošanas laikā jāievēro šajā brošūrā izklāstītie
norādījumi. Ierīces lietošana citiem mērķiem (piemēram, telpas
apsildīšanai) nav atbilstoša un ir bīstama. Ražotājs neuzņemas
atbildību par bojājumiem, kas radušies nepareizas, neatļautas un
nesaprātīgas ierīces lietošanas dēļ.
• Ventilācijas un siltuma izvadīšanas atveres nedrīkst nosegt.
• Vienmēr pārliecinieties, ka pēc ierīces lietošanas grozāmie slēdži ir pārslēgti
pozīcijā “●”/“○”.
• Lai ierīci atvienotu no elektrotīkla, atvienojiet elektrības vada spraudni no
kontaktrozetes. Atvienošanas laikā nedrīkst raut aiz elektrības vada.
• Nekad neveiciet nekādus tīrīšanas vai apkopes darbus, kamēr spraudnis
nav atvienots no rozetes.
• Ja ierīce nedarbojas pareizi, nekādā gadījumā nemēģiniet to labot saviem
spēkiem. Neprofesionālu personu veiktie remontdarbi var radīt traumu un
turpmāku ierīces darbības traucējumu risku. Sazinieties ar servisa centru
(skat. sadaļu "Palīdzība").
• Ja gāzes degļi vai elektriskās sildvirsmas joprojām ir karstas, stikla pārsegu
(ja tāds ir) nedrīkst aizvērt.
• Ierīci nedrīkst lietot personas (tostarp bērni) ar ierobežotām ziskajām,
maņu vai garīgajām spējām, kā arī personas bez ierīces lietošanas
pieredzes vai nepieciešamajām zināšanām. Iepriekš minētās personas
drīkst strādāt tikai citas personas uzraudzībā, kura uzņemas atbildību
par viņu drošību, vai pirms ierīces izmantošanas tām jāsaņem norādījumi
saistībā ierīces lietošanu.
• Neļaujiet bērniem spēlēties ar ierīci.
• Ierīci nav paredzēts lietot ar ārējo taimeri vai atsevišķu tālvadības
ietaisi.
Ierīces utilizācija
• Utilizējot iepakojuma materiālu: ievērojiet vietējo tiesību aktu prasības, lai
iepakojumu varētu atkārtoti pārstrādāt.
• Eiropas Direktīvā 2012/19/EK par elektrisko un elektronisko iekārtu
atkritumiem (EEIA) ir noteikts, ka elektroniskās mājsaimniecības ierīces
nedrīkst izmest parastajos nešķirotajos atkritumos. Vecās ierīces ir
jāsavāc atsevišķi, lai optimizētu to materiālu atkārtotu izmantošanu
un pārstrādi, un samazinātu ietekmi uz cilvēku veselību un vidi.
Pārsvītrotā atkritumu konteinera simbols uz izstrādājuma atgādina par
pienākumu neizmest ierīci atkritumos, bet gan nodot atsevišķi savākšanas
punktā.
Lai uzzinātu informāciju par savu veco ierīču utilizāciju, patērētājiem ir
jāsazinās ar vietējo pašvaldību vai mazumtirgotāju.
Page 41

Apkārtējās vides aizsardzība
• Gatavojiet savu ēdienu pannās vai katlos ar vākiem un izmantojiet pēc
iespējas mazāk ūdens. Gatavošana bez vāka ievērojami palielinās
enerģijas patēriņu.
• Izmantojiet tikai pilnīgi plakanus katlus un pannas.
• Ja gatavojat ēdienu, kura pagatavošanai nepieciešams ilgs laiks, ieteicams
izmantot tvaika katlu, kurā ēdiens sagatavojas divreiz ātrāk, ietaupot
trešdaļu enerģijas.
ar mitru drānu. Piedegusī pārtika jānoņem ar zobu bakstāmā vai adatas
palīdzību.
! Lai nesabojātu elektriskās aizdedzes ierīci, neizmantojiet to, kad degļi
neatrodas savā korpusā.
Gāzes krāna tehniskā apkope
Laika gaitā krāniem var rasties aizsērējumi vai pagriešanas grūtības. Tādā
gadījumā krāns ir jāmaina.
LV
Tehniskā apkope un kopšana
Ierīces izslēgšana
Pirms sākat apkopes vai tīrīšanas darbus, ierīce ir jāatvieno no elektropadeves.
Plīts virsmas tīrīšana
• Visas emaljētās un stikla daļas ir jātīra ar siltu ūdeni un neitrālu šķīdumu.
• Nerūsējošā tērauda virsmas var būt notraipītas ar kaļķainu ūdeni, vai
agresīvi mazgāšanas līdzekļi ir bijuši saskarē ar virsmu pārāk ilgi. Jebkuras
pārtikas paliekas (ūdens, mērce, kafija, u.c.) jānoslauka, pirms tās izžūst.
• Notīriet ar siltu ūdeni un neitrālu mazgāšanas līdzekli, tad noslaukiet
ar mīkstu drānu vai zamšādu. Piedegušos netīrumus noņemiet ar
specifiskiem tīrīšanas līdzekļiem nerūsējošā tērauda virsmām.
• Nerūsējošo tēraudu tīriet tikai ar mīkstu drānu vai sūkli.
• Nelietojiet abrazīvus vai kodīgus produktus, tīrīšanas līdzekļus uz hlora
bāzes vai pannu tīrīšanas līdzekļus.
• Neizmantojiet tvaika tīrīšanas ierīces.
• Neizmantojiet ugunsnedrošus līdzekļus.
• Neatstājiet uz plīts virsmas skābas vai sārmainas vielas, piemēram, etiķi,
sinepes, sāli, cukuru vai citrona sulu.
Plīts virsmas daļu tīrīšana
• Tīriet emaljētās un stikla daļas tikai ar mīkstu drāniņu vai sūkli.
• Režģus, degļu vāciņus un degļus tīrīšanas nolūkos var noņemt.
• Notīriet tos manuāli, izmantojot siltu ūdeni un neabrazīvu tīrīšanas līdzekli,
noņemot visus pārtikas pārpalikumus un pārbaudot, vai neviena degļa
atvere nav nosprostota.
• Noskalojiet un nosusiniet.
• Degļus un to vāciņus uzstādiet atpakaļ pareizi attiecīgajos korpusos.
• Uzliekot atpakaļ režģus, pārliecinieties, vai pannu novietošanas zona ir
salāgota ar degli.
• Modeļiem ar elektriskās aizdedzes spraudņiem un drošības ierīci
nepieciešama pamatīga spraudņa gala tīrīšana, lai nodrošinātu pareizu
darbību. Bieži pārbaudiet šos elementus un pēc nepieciešamības notīriet
! Šī procedūra jāveic kvalicētam, ražotāja pilnvarotam tehniskajam
darbiniekam.
Traucējumu novēršana
Var gadīties, ka ierīce darbojas nepareizi vai nedarbojas vispār. Pirms
sazinieties ar servisa centru, pārbaudiet, vai nav iespējams to novērst.
Vispirms pārbaudiet, vai nav pārtraukta gāzes un elektrības padeve, jo īpaši
pārliecināties, vai ir atvērti gāzes vārsti.
Deglis neaizdegas vai ap degli nemaz neparādās liesmas.
Pārliecinieties vai:
• degļa gāzes padeves atveres nav aizsērējušas;
• visas degļa noņemamās daļas ir saliktas pareizi;
• ierīces tuvumā nav caurvēja.
Ja liesma izdziest modeļos, kas aprīkoti ar drošības ierīci.
Pārliecinieties vai:
• slēdzi piespiedāt līdz galam;
• slēdzi pietiekami ilgi turat nospiestu, lai aktivizētu drošības ierīci;
• vai gāzes atveres drošības ierīces tuvumā nav aizsērējušas.
Deglis izdziest, kad tiek noregulēts uz minimumu.
Pārliecinieties vai:
• gāzes atveres nav bloķētas;
• ierīces tuvumā nav caurvēja;
• minimuma iestatījums ir pareizs;
Gatavošanas trauks nav stabils.
Pārliecinieties vai:
• gatavošanas trauka dibens ir pilnīgi līdzens;
• gatavošanas trauks ir pareizi nostādīts degļa centrā;
• trauku balsta režģis ir novietots pareizi.
LV
Lūdzu, izlasiet pamācību
par plīts virsmas
uzstādīšanu
BRĪDINĀJUMS
ATTENZIONE
Uzmanieties, lai pret plīts
virsmu nejauši neatsistu
pannas, statīvus vai
citus virtuves piederumus
Neizmantojiet pannas
vai krāsns paplātes,
kas aizņem vairāk
par vienu degli
Neatstājiet tukšas steika
restes virs aizdedzināta
degļa ilgāk par piecām
minūtēm
41
Page 42

Установка
555 mm
55 mm
475 mm
RU
! Важно сохранить данное руководство для его последующих
консультации. В случае продажи, передачи изделия или при переезде
на новое место жительства необходимо проверить, чтобы руководство
оставалось вместе с изделием, для того чтобы его новый владелец
мог ознакомиться с правилами эксплуатации и с соответствующими
предупреждениями.
! Внимательно прочитайте инструкции: в них содержатся важные
сведения об установке, эксплуатации и безопасности изделия.
Расположение
! Не разрешайте детям играть с упаковочными материалами.
Упаковочные материалы должны быть уничтожены в соответствии
с правилами раздельного сбора мусора (см. Предосторожности и
рекомендации).
! Монтаж изделия производится в соответствии с данными инструкциями
квалифицированными специалистами. Неправильный монтаж изделия
может стать причиной повреждения имущества и причинить ущерб
людям и домашним животным.
! Данное изделие может быть установлено и использоваться только в
помещениях с постоянной вентиляциеи в соответствии с положениями
действующих Нормативов. Необходимо соблюдать следующие
требования:
• В помещении должна быть предусмотрена система дымоудаления
в атмосферу, выполненная в виде вытяжного зонта или
электровентилятора, автоматически включающихся каждый раз,
когда включается изделие.
• Сжиженный газ пропан-бутан тяжелее воздуха и следовательно
застаивается внизу. По этой причине помещения, в которых
установлены баллоны с СНГ (сжиженным натуральным газом)
должны иметь вентиляционные отверстия внизу, сообщающиеся с
улицеи, для удаления возможных утечек газа. Поэтому баллоны с СПГ
должны быть опорожнены или оставаться частично заполненными;
они не должны размещаться или храниться в подземных помещениях
и хранилищах (подвалах, и т.д.). Следует держать в помещении только
один рабочий баллон, расположенный таким образом, чтобы он не
подвергался прямому воздействию источников тепла (печеи, каминов
и т.д.), которые могут привести к нагреву баллона свыше 50°C.
Встроенный монтаж
Для правильного монтажа варочной панели необходимо соблюдать
следующие меры предосторожности:
• Кухонные элементы, расположенные рядом с кухонной плитой,
высота которых превышает уровень варочной панели, должны
находиться на расстояние не менее 200 мм от края варочной панели.
• Bытяжка должна быть установлена в соответствии с руководством
по эксплуатации вытяжки и в любом случае на высоте не менее 650
мм от кухонного топа (см. рисунок).
• Pасположите навесные шкафы, прилегающие к вытяжке, на высоте
не менее 420 мм от рабочей поверхности кухни (см. рисунок).
Если варочная панель устанавливается
под навесным шкафом, последнии должен
600mm min.
располагаться на высоте не менее 700 мм
от кухонного топа.
650mm min.
420mm min.
• Размеры ниши кухонного элемента должны соответствовать рисунку.
В крепежный комплект входят крепежные крюки для крепления
варочной панели на кухонной рабочей поверхности толщиной от 20
до 40 мм. Для надежного крепления варочной панели рекомендуется
использовать все прилагающиеся крюки.
B камин или в дымоход с медным покрытием
(для кухонных устpойств для приготовления пищи)
Нeпосредствeннo
в aтмосфepy
• В помещении должна быть предусмотрена система, обеспечивающая
достаточный приток воздуха для надлежащего горения. Расход
воздуха, необходимого для горения, должен быть не менее 2 м3/час
на кВт установленной мощности.
Приток воздуха может обеспечиваться
непосредственно снаружи здания через
воздуховод полезным сечением не менее
100 см2 и диаметром, исключающим
A
Пpимepы вeнтиляциoнных
отвepстий для притокa
вoздyхa для гоpeния
Cмeжное
помещение
Вентилируемое
помещение
возможность случаиного засорения.
Или же воздухозабор может
осуществляться из смежных помещении,
оснащенных вентиляционным отверстием,
сообщающимся с улицеи, как описано
выше, при условии, что это не общие зоны
здания, пожароопасные помещения и не
Увеличение зазора
между дверъю и полом
спальни.
• Интенсивное и длительное использование устройства может
потребовать дополнительной вентиляции, например, открытие окна
или более эффективная вентиляция с повышением механической
мощности вытяжки, если она уже существует.
42
• Перед креплением кухонного топа установите уплотнение
(прилагается) по периметру варочнои панели, как показано на схеме.
Схема крепления крюков
Монтаж крюка для опорных Монтаж крюка для опорных
брусков H=20mm брусков H=30mm
Page 43

Спереди
Монтаж крюка для опорных Сзади
брусков H=40mm
! Используйте крюки из комплекта “вспомогательные принадлежности”
• Если варочная панель не устанавливается сверху встроенного
духового шкафа, необходимо вставить деревянную панель в качестве
изоляции. Эта панель должна быть установлена на расстоянии не
менее 20 мм от нижнеи части варочной панели.
Вентиляция
Для обеспечения надлежащей вентиляции необходимо снять заднюю
панель ниши кухонного элемента. Рекомендуется установить духовой
шкаф на два деревянных бруска или на сплошное основание с
отверстием диаметром не менее 45х560 мм (см чертежи).
45 mm.
560 mm.
! Варочная панель может быть установлена только над встраиваемыми
духовыми шкафами с охладительной вентиляцией.
Электрическое подключение
Варочные панели, оснащенные трехполярным сетевым кабелем,
расчитаны на функционирование с переменным током с напряжением
и частотой электропитания, указанными на паспортной табличке
(расположенной снизу варочной панели). Провод заземления сетевого
кабеля имеет желто-зеленый цвет. В случае установки варочной
панели сверху духового шкафа, встроенного в кухонный элемент,
электрическое подсоединение варочной панели и духового шкафа
должно выполняться раздельно по причинам безопасности, а так же
для легкого съема духового шкафа.
Подсоединение сетевого шнура изделия к сети электропитания
Установите на сетевой кабель нормализованную штепсельную вилку,
расчитанную на нагрузку, указанную на паспортной табличке. В случае
прямого подключения к сети электропитания между изделием и сетью
необходимо установить многополюсный выключатель с минимальным
расстоянием между контактами 3 мм, расчитанный на данную нагрузку
и соответствующии действующим нормативам (выключатель не
должен размыкать провод заземления). Сетевой кабель должен быть
расположен таким образом, чтобы ни в одной точке его температура не
превышала температуру помещения более чем на 50°C.
! Электромонтер несет ответственность за правильное подключение
изделия к электрической сети и за соблюдение правил безопасности.
Перед подключением изделия к сети электропитания проверьте
следующее:
• розетка должна быть соединена с заземлением и соответствовать
нормативам;
• сетевая розетка должна быть рассчитана на максимальную
потребляемую мощность изделия, указанную в таблице технических
характеристик;
• напряжение и частота тока сети должны соответствовать
электрическим данным изделия;
• сетевая розетка должна быть совместима со штепсельной вилкой
изделия. В противном случае замените розетку или вилку; не
используите удлинители или тройники.
! Изделие должно быть установлено таким образом, чтобы электрический
провод и сетевая розетка были легко доступны.
! Электрический провод изделия не должен быть согнут или сжат.
! Регулярно проверяйте состояние кабеля электропитания и в случае
необходимости поручите его замену только уполномоченным техникам
(см. Техническое обслуживание).
! Производитель не несет ответственности за последствия несоблюдения
перечисленных выше требовании.
Подсоединение к газопроводу
Данное изделие может быть установлено и использоваться только в
помещениях с постоянной вентиляцией в соответствии с положениями
действующих Нормативов, только после проверки соответствия изделия
типу газа, к которому он подсоединяется. В случае несоответствия
выполнить операции, описанные в параграфе “Настройка на различные
типы газа”. В случае использования сжиженного газа из баллона
использовать регуляторы давления, соответствующие нормативами и
их последующим поправкам.
! Для надежного функционирования, рационального использования
энергии и более длительного срока службы электрического изделия
проверьте, чтобы давление подачи газа соответствовало значениям,
указанным в таблице 1 “Характеристики газовых горелок и форсунок”.
Внимание! Перед подсоединением снимите транспортировочную
заглушку с трубопровода газовой плиты.
Подсоединение при помощи твердой трубки (медной или стальной)
! Подсоединение к газопроводу не должно оказывать каких-либо нагрузок
на изделие.
На патрубке подачи газа в изделия имеется вращающееся колено “L”
с уплотнительной прокладкой. При необходимости повернуть колено
обязательно замените уплотнительную прокладку (прилагающейся
к изделию). Патрубок подачи газа в изделие имеет цилиндрическую
наружную резьбу 1/2 газ.
Подсоединение при помощи гибкой трубки из нержавеющей стали
со сплошными стенками с резьбовыми соединениями.
Патрубок подачи газа в изделие имеет цилиндрическую наружную
резьбу 1/2 газ.
Подсоединение таких шлангов должно производиться таким образом,
чтобы их длина при максимальном растяжении не превышала 2000 мм.
По завершении подсоединения проверьте, чтобы металлический гибкий
шланг не касался подвижных частей или не был сжат.
Использовать исключительно трубки, соответствующие Нормативу,
и уплотнительные прокладки, соответствующие действующим
государственным нормативам.
RU
43
Page 44

Проверка уплотнения
RU
! По завершении подсоединения проверьте прочность уплотнения всех
патрубков при помощи мыльного раствора, но никогда не пламенем.
Подготовка к различным типам газа
Для переоснащения варочной панели для газа, отличающемуся от газа,
на который варочная панель расчитана изначально (указан на этикетке
на верхней части варочной панели или на упаковке), необходимо
заменить форсунки конфорок следующим образом:
1. Cнимите с варочной панели опорные решетки и выньте конфорки из
своих гнезд.
2. Oтвинтите форсунки при помощи полой отвертки 7 мм и замените
их на форсунки, расчитанные на новый тип газа (смотрите таблицу
1 “Характеристики конфорок и форсунок”).
3. Восстановить детали на свой места, выполняя операции в обратном
порядке.
4. По завершении операции замените старую этикетку тарирования на
новую, соответствующую новому типу используемого газа. Этикетку
можно заказать в наших Центрах Технического Обслуживания.
• Регуляция первичного воздуха конфорок
Конфорки не нуждаются в какой-либо регуляции первичного воздуха.
• Регуляция минимального пламени
1. Поверните рукоятку-регулятор в положение минимального пламени.
2. Снимите рукоятку и поверните регуляционный винт, расположенный
внутри или рядом со стержнем крана, вплоть до получения
стабильного малого пламени.
3. Проверьте, чтобы при резком повороте рукоятки из положения
максимального пламени на минимальное, конфорки не гасли.
4. В изделиях, оснащенных защитным устройством (термопарой), в
случае неисправности этого устройства при минимальном пламени
конфорок увеличьте расход газа минимального пламени при помощи
регуляционного винта.
5. По завершении регуляции восстановите сургучные или подобные
пломбы на обводном газопроводе.
! В случае использования сжиженного газа регуляционный винт должен
быть завинчен до упора.
! По завершении операции замените старую этикетку тарирования на
новую, соответствующую новому типу используемого газа. Этикетку
можно заказать в наших Центрах Технического Обслуживания.
! Если давление используемого газа отличается от предусмотренного
давления (или варьирует), необходимо установить на питающем
газопроводе соответствующии регулятор давления (в солaсно
действующим Нормативам).
44
Page 45

RS
Характеристики горелок и форсунок
Та
блица 1
RU
Сжиженный газ Природный газ
Kонфорка Диаметр
Быстрая (Большая) (R)
Средняя (S)
Малая (А)
Давление подачи Номинальное (мбар)
* При температуре 15°C и давлении 1013,25 мбар – сухой газ
** Пропан Теплотворная способность = 50,37 МДж/кг
*** Бутан Теплотворная способность = 49,47 МДж/кг
Природный газ Теплотворная способность = 37,78 МДж/м
Для преобразования в природный газ (13мбар), попросите форсунки в сервисный центр.
(мм)
100
75
55
Теплотворная
способность
кВт (p.c.s.*)
Номин.Сокращ.
0.70
0.40
0.40
3.00
1.65
1.00
Минимальное (мбар)
Максимальное (мбар)
Байпас
1/100
мм
)
(
39
28
28
Форсунка
1/100
мм)
(
86
64
50
Расход
*** **
218
120
73
28-30
20
35
3
г/час
*
Теплотворная
214
118
71
37
25
45
A
S
способность
кВт (p.c.s.*)
3.00
1.65
1.00
Форсунка
1/100
мм)
(
116(Y)
96 (Z)
79 (6)
Расход
л/час
286
157
95
20
17
25
Форсунка
*
1/100
(
мм)
143
105
80
Расход
л/час
286
157
95
13
6.5
18
*
641 DD /HA(WH)
45
Page 46

Включение и эксплуатация
RU
! На каждом регуляторе показано положение газовой конфорки, которой
данная рукоятка управляет.
Газовые конфорки
При помощи соответствующего регулятор можно выбрать один из
следующих режимов конфорки:
● Выключено
Наиболее изменчивой характеристикой
кастрюли с точки зрения стабильности
часто может быть сама кастрюля (или ее
размещение во время использования).
Хорошо сбалансированные кастрюли,
с плоским днищем, с ручками,
расположенными линейно с одним из
ребер решетки, гарантируют максимальную стабильнос
Максимальная мощность
Минимальная мощность
Для зажигания одной из конфорок поднесите к ней зажженную спичку
или зажигалку, нажмите до упора и поверните против часовой стрелки
соответствующую рукоятку в положение максимального пламени.
В моделях, оснащенных защитным устройством, необходимо держать
рукоятку конфорки нажатой примерно 2-3 секунды до тех пор, пока
не нагреется устройство, автоматически поддерживающее горение
пламени.
В моделях, оснащенных свечой зажигания, для включения нужной
конфорки достаточно нажать до упора соответствующую рукоятку и
повернуть ее против часовой стрелки в положение максимального
пламени, удерживая ее нажатой вплоть до зажигания пламени.
! При случайном гашении пламени конфорки поверните рукоятку
управления в положение выключено и попытаитесь вновь зажечь
конфорку только по прошествии 1 минуты.
Для выключения конфорки поверните рукоятку по часовой стрелке
вплоть до гашения пламени (положение, обозначенное символом “●”).
Практические советы по эксплуатации газовых
горелок
Для максимальной отдачи изделия следует помнить:
• Для каждой конфорки используите подходящую посуду (смотри
таблицу) с тем, чтобы пламя конфорки не выходило из-под дна
посуды.
• Всегда используите посуду с плоским дном и с крышкой.
• В момент закипания поверните рукоятку в положение малого
пламени.
Конфорка
Быстрая (Большая)(R)
Средняя (S)
Малая (A)
Для определения типа конфорки смотрите рисунки в параграфе
“Характеристики конфорок и форсунок”.
• Для гарантии максимальной стабильности убедитесь, что варочные
емкости установлены правильно и что каждая емкость находится
строго в центре горелки.
• Убедитесь, что рукоятки варочных емкостей совмещены с одним из
опорных стержней держателя емкости.
• Расположите рукоятки варочных емкостей так, чтобы они не
выступали за передний край варочной панели.
Ø Диаметр кастрюли (см)
24 - 26
16 - 20
10 - 14
Предосторожности и рекомендации
! Изделие спроектировано и изготовлено в соответствии с
международными нормативами по безопасности. Необходимо
внимательно прочитать настоящие предупреждения, составленные в
целях вашей безопасности.
Общие требования к безопасности
• Данное устройство является встраиваемым бытовым
электроприбором класса 3.
• Для исправного функционирования газовых устройств
необходимо отрегулировать воздухообмен. Проверьте, чтобы
при установке этих устройств соблюдались требования,
описанные в параграфе “Расположение”.
• Инструкции относятся только к странам, обозначения которых
приведены в руководстве и на паспортнои табличке изделия.
• Данное изделие предназначается для непрофессионального
использования в домашних условиях.
• Запрещается устанавливать изделие на улице, даже под навесом,
так как воздействие на него дождя и грозы является чрезвычайно
опасным.
• Не прикасайтесь к изделию влажными руками, босиком или с мокрыми
ногами.
• Изделие предназначено для приготовления пищевых
продуктов, может быть использовано только взрослыми
лицами в соответствии с инструкциями, приведенными
в данном техническом руководстве. Любое другое его
использование (например: отопление помещения) считается
ненадлежащим и следовательно опасным. Производитель
не несет ответственности за возможный ущерб, вызванный
ненадлежащим, неправильным и неразумным использованием
изделия.
• Следите, чтобы сетевые шнуры других бытовых электроприборов не
прикасались к горячим частям духового шкафа.
• Не закрывайте вентиляционные решетки и отверстия рассеивания
тепла.
• Всегда проверяйте, чтобы регуляторы находились в положении “●”/“○”
, когда изделие не используется.
• Не тяните за сетевой кабель для отсоединения вилки изделия из
сетевой розетки, возьмитесь за вилку рукой.
• Перед началом чистки или технического обслуживания изделия
всегда вынимайте штепсельную вилку из сетевой розетки.
• В случае неисправности категорически запрещается открывать
внутренние механизмы изделия с целью их самостоятельного
ремонта. Обращаитесь в Центр Сервисного обслуживания (см.
Техобслуживание).
• Не закрываите стеклянную крышку варочной панели (если она
имеется), если газовые или электрические конфорки еще горячие.
• Не допускается эксплуатация изделия лицами с ограниченными
физическими, сенсориальными или умственными способностями
46
Page 47

(включая детей), неопытными лицами или лицами, необученными
обращению с изделием без контроля со стороны лица, ответственного
за их безопасность или после надлежащего обучения обращению с
изделием.
• Не разрешайте детям играть с бытовым электроприбором.
• Изделие не рассчитано на влючение посредством внешнего
синхронизатора или отдельной системы дистанционного
управления.
Утилизация
• Уничтожение упаковочных материалов: соблюдайте местные
нормативы с целью повторного использования упаковочных
материалов.
• Согласно Европейской Директиве 2012/19/EU касательно утилизации
электронных и электрических электроприборов электроприборы
не должны выбрасываться вместе с обычным городским мусором.
Выведенные из строя приборы должны собираться отдельно
для оптимизации их утилизации и рекуперации составляющих
их материалов, а также для безопасности окружающеи среды и
здоровья. Символ зачеркнутая мусорная корзинка, имеющиися на
всех приборах, служит напоминанием об их отдельной утилизации.
Для получения дополнительной информации о правильной
утилизации бытовой техники, владельцы должны связаться со своим
местным властям или продавцу.
Экономия электроэнергии и охрана окружающей
среды
• Храните продукты в закрытых горшках или кастрюлях с плотно
закрывающимися крышками и используйте минимальное количество
воды. В случае приготовления без крышки будет иметь место
потребление значительного количества энергии.
• Используйте горшки и кастрюли с совершенно плоским дном.
• В случае приготовления блюда в течение длительного времени
следует использовать скороварку, которая готовит в два раза быстрее
и позволяет сберечь треть энергии.
Транспортировка и хранение.
• Bарочные панели должны перевозиться в оригинальной упаковке в
горизонтальном положении.
• Во время транспортировки и хранения защищать варочные панели
от атмосферного воздействия и механических повреждений.
• Панель должна храниться в упакованном виде в не отапливаемом
помещении при температуре от минус 50°С до плюс 40°С.
Пригоревшие загрязнения удаляйте специальными средствами для
чистки поверхностей из нержавеющей стали.
• Чистите поверхности из нержавеющей стали только мягкой тряпкой
или губкой.
• Не пользуйтесь абразивными и коррозионными средствами,
чистящими средствами на основе хлора или металлическими
мочалками для чистки сковород.
• Не пользуйтесь пароочистителями.
• Не пользуйтесь горючими веществами.
• Не оставляйте на варочной панели следов кислых или щелочных
веществ, таких как уксус, горчица, соль, сахар, лимонный сок и т.п.
Чистка компонентов варочной панели
• Чистите эмалированные и стеклянные детали только мягкой тряпкой
или губкой.
• Решетки, крышки горелок и сами горелки перед чисткой можно снять.
• Вымойте их вручную теплой водой с неабразивным моющим
средством. При этом тщательно удалите все остатки пищи и
убедитесь в том, что ни одно отверстие горелок не осталось
засоренным.
• Промойте под проточной водой и тщательно высушите.
• Правильно вставьте горелки и крышки горелок в соответствующие
гнезда.
• При установке решеток на место проследите за тем, чтобы они были
правильно выставлены относительно горелок.
• Для обеспечения нормальной работы варочных панелей, снабженных
свечами электророзжига и предохранительными устройствами,
требуется особая тщательность при очистке концов свечей. Следует
часто проверять состояние этих деталей и, если нужно, чистить их
влажной тканью. Пригоревшие остатки пищи следует удалять с
помощью зубочистки или иглы.
! Во избежание повреждения устройства электророзжига не
пользуйтесь им, когда горелки вынуты из своих гнезд.
Уход за рукоятками газовой варочной панели
Со временем рукоятки варочной панели могут заблокироваться или
вращаться с трудом, поэтому потребуется произвести их внутреннюю
чистку и замену всей рукоятки.
! Данная операция должна выполняться техником, уполномоченным
производителем.
RU
Техническое обслуживание и уход
Обесточивание изделия
Перед началом какой-либо операции по обслуживанию или чистке
отсоедините изделие от сети электропитания.
Чистка поверхности варочной панели
• Все эмалированные и стеклянные детали следует промывать теплой
водой с добавлением нейтрального моющего средства.
• После продолжительного контакта с водой, в которой содержится
известь, или с едкими моющими средствами на поверхностях из
нержавеющей стали могут остаться пятна. Все попадающие на
варочную панель брызги (воды, соусов, кофе и т.д.) следует удалять
до того, как они высохнут.
• Мойте панель теплой водой с добавлением нейтрального моющего
средства, затем протирайте ее мягкой тряпкой или замшей.
Неисправности и методы их
устранения
Может случиться, что варочная панель не работает или работает плохо.
Перед обращением в сервисный центр давайте посмотрим, что вы
можете сделать сами. Во-первых, убедитесь, что нет разрывов в энергои газоснабжении, и, в частности, что газовые краны панели открыты.
Конфорка не загорается или пламя не однородно.
Убедитесь, что:
• Форсунки газовой конфорки засорились.
• Все движущиеся части конфорки установлены правильно
• Рядом с варочной панелью нет сквозняков.
47
Page 48

В моделях варочной панели, оснащенных защитным устройством,
RU
конфорка загорается и сразу гаснет.
Убедитесь, что:
• Вы до упора нажали ручку.
• Вы до упора нажали ручку в течение достаточного времени, чтобы
активировать устройство безопасности.
• Отверстия выхода газа в точке нахождения предохранительного
устройства не заблокированы.
Конфорка в положении минимума не будет гореть.
Убедитесь, что:
• Отверстия выхода газа не засорены.
• Рядом с варочной панелью нет сквозняков.
• Регулировка минимального значения неправильная.
Нестабильные кастрюли
Убедитесь, что:
• Дно кастрюли идеально ровное.
• Кастрюля должна быть установлена по центру газовои или
электрическои конфорки.
• Опорные решетки на варочной панели установлены неправильно..
48
Page 49

Орнату
555 mm
55 mm
475 mm
! Жаңа құрылғыны іске қоспас бұрын нұсқаулық кітапшасын мұқият оқып
шығыңыз. Мұнда құрылғыны қауіпсіз қолдану, орнату және оны күту
туралы маңызды ақпараттар қамтылған.
! Келешекте анықтама ретінде қарау үшін пайдалану нұсқаулығын сақтап
қойыңыз. Оны құрылғының кез келген жаңа иесіне беріңіз.
Орналастыру
! Орау материалдарын балалардың қолы жетпейтін жерде сақтаңыз.
Тыныс тарылу немесе тұншығып қалу қаупін туғызуы мүмкін
("Сақтандырулар мен кеңестер" бөлімін қараңыз).
! Құрылғыны нұсқауларға сәйкес арнайы біліктілігі бар маман орнатуға
тиіс. Құрылғы дұрыс орнатылмаған жағдайда, адамдар мен жануарлар
өміріне қауіп төндіруі немесе мүлікті зақымдауы мүмкін.
! Бұл құрылғы ағымдағы ұлттық ережелерге сәйкес тұрақты желдетілген
бөлмелерде ғана орнатылуы және пайдаланылуы тиіс. Келесі талаптар
сақталуы тиіс:
• Бөлме кез келген түтіндерді айдап шығарып жіберетін ауаны тартып
алу жүйесімен жабдықталуы тиіс. Ол құрылғы қосылған кезде
автоматты түрде қосылатын электр желдеткіштен немесе қалқадан
тұруы мүмкін.
жоғары температураға дейін ысытып жіберуі мүмкін сыртқы қайнар
көздері (пештер, каминдер және т.б.) шығаратын қызудан аулақ
орналастырып, сақтаған абзал.
Құрылғыны орнату
Плитаны орнатқан кезде төмендегі сақтық шаралар орындалуы тиіс:
• Құрылғы маңында тұрған және плитаның үстіңгі жағына қарағанда
биік ас үйі шкафтары плитаның шетінен кем дегенде 200 мм-ге алыс
орналасуы тиіс.
• Қалқалар тиісті орнату нұсқаулықтарына сәйкес және плитадан кем
дегенде 650 мм ара қашықтықта орнатылуы тиіс (суретті қараңыз).
• Қалқаның маңында тұратын қабырғаға ілінетін шкафтар плитадан
кем дегенде 420 мм биіктікте орналастырылуы тиіс (суретті қараңыз).
Плита қабырғаға ілінетін шкафтың астында
орнатылатын болса, сол шкаф плитадан
600 мм мин.
кем дегенде 700 мм ара қашықтықта
орналасуы тиіс.
650 мм мин.
420 мм мин.
• Орнату қуысы суретте көрсетілген өлшемдерге ие болуы тиіс.
Үстінің қалыңдығы 20 мен 40 мм арасындағы шкафтарға плитаны орнатуға
мүмкіндік беретін бекіту ілмектері қамтамасыз етілген. Плита шкаф үстіне
мықтап бекітілгеніне көз жеткізу үшін барлық ілмектерді пайдалану керек.
KZ
Мұрша құбырында немесе айыр түтіндікте.
(тек тағам дайындау құрылғылары үшін)
Тікелей
далаға
• Жану процесі қалыпты түрде өтуі үшін ауа керек болғандықтан
бөлмеде тиісті ауа айналымы болуы керек. Ауаның ағымы орнатылған
қуаттың әр кВт бірлігіне 2 м3/сағ мәнінен аз болмауы тиіс.
Ауа айналымы жүйесіне, ішкі диаметрі
кем дегенде 100 см2 болатын түтік арқылы
ауаны тікелей даладан алуына болады;
тесігі кез келген бөгетпен бітеліп қалуға
A
Жануға арналған
ауаның желдету
тесіктерінің мысалдары.
Жапсарлас
бөлме
Желдетілетін
бөлме
бейім болмауы тиіс.
Сондай-ақ, жүйе жануға қажетті ауаны
жанама жолмен қамтамасыз ете алады,
яғни жоғарыда сипатталған ауа айналымы
түтіктерімен жабдықталған жапсарлас
бөлмелерден. Дегенмен, бұл бөлмелер
Терезе мен еден арасындағы
желдету саңылауын кеңейту.
ортақ бөлме, жататын бөлме немесе өрт
қаупі бар бөлмелер болмауы тиіс.
• Құрылғыны қарқынды және ұзақ пайдалану үшін қосымша желдету
қажет болуы мүмкін, мысалы, терезені ашу немесе тиімділігі көбірек
әдіспен – механикалық ауа кіргізу жүйесінің (бар болса) қуатын
арттыру арқылы.
• Сығылған газ ауадан ауыр болғандықтан еденге түседі. Сондықтан,
сығылған газ баллондары тұратын бөлмелер газдың шығуы
жағдайында, ол бөлмеден шығып кетуі үшін вентиляциялық
тесіктермен жабдықталуы тиіс. Сол себепті, сығылған газ баллондары,
жартылай немесе толық болса да, жер деңгейінен төмен бөлмелерде
не сақтау аумақтарында (төле және т.б.) орнатылмауы немесе
сақталмауы тиіс. Тек пайдаланылуда болған баллонды, оны 50°C-тан
• Ас үй пешін нығайтар алдында кестеде көрсетілген пісіру панелі
бойынша нығыздағышты (қоса беріледі) орнатыңыз.
Ілмекті бекіту сызбасы
Ілмек орны шкаф үстінің Ілмек орны шкаф үстінің
қалыңдығы H=20мм үшін қалыңдығы H=30мм үшін
Алды
Ілмек орны шкаф үстінің Арты
қалыңдығы H=40 мм үшін
49
Page 50

! "Керек-жарақтар" орамасындағы ілмектерді қолданыңыз.
KZ
• Плита ендірілген пеш үстіне орнатылмаған жағдайда, оқшаулау үшін
ағаш тақтаны орнату қажет. Оны плитаның астыңғы жағынан кем
дегенде 20 мм ара қашықтықта орналастыру керек.
! Бұйымның желі шнуры майысуына немесе бүктеліп тұруына болмайды.
! Күн сайын желі шнурын тексеріп тұрыңыз және қажет болған жағдайда
оны тек уәкілетті техник мамандарға ғана ауыстыртыңыз (Техникалық
қызмет көрсетуді қара).
Желдету
Тиісті желдетудің орнатылғанын тексеру үшін шкафтың артқы қабырғасын
алып тастау қажет. Пешті екі ағаш тақтайға немесе кемінде 45 x 560 мм
ашық тұрған тегіс жерде орналастыру ұсынылады (сызбаны қараңыз).
45 мм.
560 мм.
! Пісіру панелі қоса орнатылатын салқындататын желдеткіші бар духовка
шкафының үстіне қойылады.
Электр қуатына қосу
Үш полярлі желі кабелімен жабдықталған пісіру панелдері паспорттық
кестеде көрсетілген кернеумен және электр өткізгіш жиілігіне қарай
ауыспалы тоқта жұмыс істеуге есептелген (пісіру панелінің төменгі
жағында орналасқан).
Желі кабелінің жерге тұйықталу өткізгіші сары-жасыл түсті болады.
Пісіру панелін асүй элементіне қоса жасалған духовка шкафының
жоғарғы жағына орналастырылған жағдайда, пісіру панелі мен духовка
шкафының электр көзіне жалғау қауіпсіздік ережелеріне сәйкес және
духовка шкафын тез алу үшін бөлек-бөлек орналасуы керек.
Бұйымның желі шнурын электр өткізгіші желісіне
жалғау
Электр қуаты кабеліне бұйымның паспорттық кестесінде көрсетілген
жүктемеге есептелген, нормаланған штепсельдік вилканы орнатыңыз.
Электр қуаты желісіне тікелей қосқан жағдайда, асүй пеші және желі
арасында байланыс арасы 3 мм минималдық арақашықтықтағы
мультиполярлі қосқышты орнату қажет, ол осы жүктеме есептелуі және
қолданыстағы нормативтерге сәйкес болуы керек (ажыратқыш жерге
тұйықтау сымына жанаспауы тиіс). Желі шнуры оның ешбір нүктесі жай
температурасынан 50°С аспайтындай температурада болатындай жерде
орналасуы керек.
! Электромонтер бұйымның тоқ көзіне дұрыс жалғануына және қауіпсіздік
ережелерінің сақталуына жауапкершілік алады.
Бұйымды электр тоғына қосар алдында мыналарды тексеріп алыңыз:
• pозетка жерге тұйықталып, нормативтерге сәйкес жалғануы керек
• желі розеткасы бұйымның паспортына көрсетілген максималдық қуат
қабылдау күшіне есептелуі тиіс;
• желідегі тоқтың кернеуі мен жиілігі бұйымның электр мәліметтеріне
сәйкес болуы керек;
• желілік розетка бұйымның штепсельді вилкасына сәйкес келуі
керек. Кері жағдайда, розетканы немесе вилканы ауыстырыңыз; тоқ
ұзартқыштар мен көп көзді тоқ көздерін қолданбаңыздар.
! Бұйым желі шнуры мен желі розеткасы қолжетімді жерде тұратындай
болып орналасуы керек.
! Өндіруші жоғарыда аталған ережелер сақталмаған жағдайда барлық
жауапкершіліктен босатылады.
Газ құбырына қосу
Газ баллонына немесе газ құбырына қосу иілгіш резеңке немесе
болаттан жасалған шланг арқылы қолданыстағы елдің нормативтеріне
сәйкес, бұйымның осы пайдаланылатын газ түріне күйін қалай келтіруге
болатынына байланысты жүзеге асырылады (қақпақтағы күйге келтіру
этикетін қараңыз: кері жағдайда төмендегіге қараңыз). Баллондағы
сұйытылған газды пайдаланған жағдайда қысымды реттегіштерді
қолданыстағы елдің нормативтеріне сәйкес орнату керек. Газ түтігін
жалғауды жеңілдету бағытталған болып табылады: бұқтырмадағы
нығайтатын тежегіш гайканы әр жерінен ауыстырыңыз және қосымша
тығыздағыштарды ауыстырып тұрыңыз.
! Энергия қызметі сенімді болу, оны дұрыс қолдану үшін және бұйымды
ұзақ пайдаланам десеңіз, газды беру қысымы “Газ конфоркалары мен
форсункалары сипаты” кестесінде көрсетілген мәліметтерге сәйкес
келуі керек.
Назар аударыңыз! Қоспас бұрын газ плитасының құбырынан
тасымалдағыш бітеуішін алыңыз.
Тығыз трубка көмегімен жалғау (мыс және болат)
! Газ құбырына жалғау бұйымға ешқандай жүктеме түсірмеу керек.
Бұйымның газ келетін трубасында тығыздайтын төсемі қоса берілген,
бұралып тұратын “L” буыны бар. Егер буынды ауыстыру керек болған
жағдайда, оның тығыздау төсемін ауыстыру керек (бұйымға қоса
берілетін). Бұйымдағы газ келетін трубаның цилиндрлі түрдегі ішкі ½
газ қимасы болады.
Бұрандамен жалғанып, тегіс оралған, тот баспайтын болаттан
жасалған шланг арқылы газды қосу.
Бұйымдағы газ келетін трубаның цилиндрлі түрдегі ішкі ½ газ қимасы
болады.
Бұндай шлангілерді жалғағанда олардың максималдық жазылу ұзындығы
2000 мм аспауы керек. Оларды жалғап болғаннан кейін, металлдан
жасалған иілгіш шланг қозғалмалы заттарға тимей тұруын және бүктеліп
қалмауын тексеріп алыңыз.
Нормативтерге сәйкес трубкаларды, сол елдің мемлекеттік
нормативтеріне сәйкес келетін тығыздағыш төсемдерді пайдалану керек.
Тығыздығын тексеру
! Жалғауды аяқтағаннан кейін, барлық түтіктердің тығыздық беріктігін
сабын ерітіндісінің көмегімен тексеріңіз, бірақ отпен тексермеңіз.
Әртүрлі газ түрлеріне күйге келтіру
Бұйым негізгісінен ерекшеленетін газ түріне қарай күйге келтіріледі
(қақпақтағы күйге келтіру этикетінде көрсетілген). Конфорка
форсункаларын келесі тәртіпте ауыстыру қажет:
1. Пісіру панеліндегі торды алыңыз және жанарғыны өз ұяшығынан
алыңыз;
2. Форсункаларды 7 мм кілттің көмегімен бұрап (сур.қара), оларды жаңа
газ түрлеріне есептелген форсункаларға ауыстырыңыз (Жанарғы
және форсунка сипаттамасы кестесіне қара);
50
Page 51

3. Калған жерлеріне басқа жабдықтарын жоғарыда көрсетілген тәртіпке
керісінше қарай қойып шығыңыз.
4. Операцияны аяқтағаннан кейін тестілеудің ескі этикеткасын осы
пайдаланылатын газ түріне сәйкес келетін жаңасына ауыстырыңыз.
Этикетканы біздің Техникалық Қызмет көрсету орталықтарын
тапсырыс бере аласыздар.
• Конфоркадағы бастапқы ауаны реттеу
Конфоркалар бастапқы ауаны реттеуді қажет етпейді.
• Минималды ауаны реттеу
1. Pеттегіш-тұтқаны минималды от күйіне қарай бұраңыз.
2. Tұтқаны алып, кран түтігінің ішінде немесе жанында орналасқан
реттегіш винтті тұрақты аз от күйіне келгенше бұраңыз.
3. T-ұтқаны максималдық күйден минималдық күйге оқыс бұраған
жағдайда конфорканың өшіп қалмауын байқаңыз.
4. Қорғаныс құрылғысы орнатылған бұйымдарда, қондырғы істен шыққан
жағдайда конфорка оты минималды болған жағдайда, минималды
газ күйін реттегіш винт көмегімен өзгертіңіз.
KZ
5. Реттеуді аяқтағаннан кейін газ құбырының айналасындағы сүргіштік
және сол сияқты пломбаларды қалпына келтіріңіз.
! Cұйытылған газды пайдаланған жағдайда, реттегіш винт барынша
қатты бұралуы керек.
! Oперация аяқталғаннан кейін, ескі этикетканы газдың түріне сәйкес
келетін жаңа түріне ауыстырыңыз. Этикетканы біздің Техникалық қызмет
көрсету Орталықтарына тапсырыс беру арқылы алуға болады.
! Қолданылған газ қысымы ұсынылған қысымнан өзгеше (немесе
сәл өзгеше) болса, кіріс құбырға тиісті қысым реттегіші бекітілуі керек
(ағымдағы ұлттық ережелерге сәйкес).
51
Page 52

KZ
Табиғи P.C.S. = 37,78 МДж/м
Оттық пен форсункалардың сипаттары
RS
1-кесте Сұйытылған газ
Жылу шығару
мүмкіндігі
кВт (p.c.s.)
Ном.Қысқ.
0.70
0.40
0.40
Ең төмен (мбар)
Ең жоғары (мбар)
3.00
1.65
1.00
(S)
Диаметр
(мм)
100
75
55
Оттық
Жылдам (R)
Жартылай жылдам
Қосымша
Өткізу қысымы Номиналды (мбар)
(A)
Байпас
1/100
(мм)
39
28
28
Форсунка
1/100
(мм)
86
64
50
Шығын*
***
218
120
73
28-30
20
35
г/сағ.
214
118
**
71
37
25
45
Форсунка
1/100
(мм)
116(Y)
96(Z)
79(6)
* 15°C жəне 1013,25 мбарр жағдайында – құрғақ газ
** Пропан P.C.S. = 50,37 МДж/кг
*** Бутан P.C.S. = 49,47 МДж/кг
3
A
Табиғи газ
Шығын*
л/сағ
286
157
95
20
17
25
.
S
641 DD /HA(WH)
52
Page 53

Қосу және пайдалану
Ø ыдыс табанының диаметрі (см)
Жылдам (R)
Жартылай жылдам (S)
Қосымша (A)
24 - 26
16 - 20
10 - 14
Оттық
Сақтандырулар мен кеңестер
KZ
! Тиісті газ оттығының орны әрбір тұтқада көрсетілген.
Газ оттықтары
Әрбір оттықты тиісті басқару тұтқасының көмегімен төмендегі
параметрлердің біріне реттеуге болады:
● Өшірулі
Ең жоғары
Ең төмен
Жанарғылардың бірін жандыру үшін, жанарғының жанына жанып тұрған
сіріңке не оттық апарып, дәл сол уақытта тиісті тұтқаны басып, максималды
реттеуге дейін бұраңыз.
Жанарғы қауіпсіздік құрылғысымен жабдықталғандықтан, автоматты
құрылғыға қыздыру үшін отты жанып тұрған күйде сақтауға мүмкіндік беру
үшін тұтқаны шамамен 2-3 секунд ішінде басып тұру керек.
Газ жанарғы оталуымен үлгілерді пайдаланған кезде, таңдалған
жанарғыны тұтандыру үшін тиісті тұтқаны басып, жанарғы оталмағанша
басылған күйде сағат бағытына кері максималды күйге дейін бұраңыз.
! Оты кенет өшіп қалған жағдайда, басқару тұтқасын өшірілген күйге
әкеліп, 1 минут өткеннен кейін барып конфорканы қайта тұтандырыңыз.
Конфорканы өшіру үшін тұтқаны сағат тілі бойынша жалын өшкенге дейін
бұраңыз (күй "●" белгісімен белгіленген).
Газ жанарғыларын пайдалану бойынша қарапайым
кеңестер
Бұйым максималдық түрде жұмыс істеп тұруы үшін есте сақта:
• Ә конфорка үшін тиісті ыдысты пайдаланыңыз, ыдыстың түбі
конфорка жанарғысына сәйкес келуі керек (кестені қара).
• Табаны тегіс және қақпағы бар ыдысты пайдаланыңыз.
• Қайнаған жағдайда, тұтқаны оттың аз келетін жағына қарай бұраңыз.
Конфорка түрлерін анықтау үшін “Конфоркалар мен форсункалар”
параграфындағы суреттерді қараңыз.
• Максималды тұрақтылық үшін, таба түпқоймалары әрқашан дұрыс
түрде бекітілгеніне және әрбір таба жанарғының үстінен ортаға
орналастырылғанына көз жеткізіңіз
• Таба тұтқалары таба тұғырындағы тіреу өзектерінің біріне сәйкес
орналастырылуы керек.
• Таба тұтқасы плитаның алдыңғы шетінен шығып кетпейтіндей етіп
орналастырылуы керек.
тураланған, жақсы теңгерілген түпқоймалар ең жоғары тұрақтылықты
сөзсіз қамтамасыз етеді.
Түпқойма тұрақтылығының
көзқарасынан айнымалылығы жоғары
аспектіге әдетте түпқойманың өзі
жатады (немесе қолдану барысында сол
түпқойманың орналасуы). Тегіс негіздері
жанарғы үстінен қойылған, түпқойма
тұтқалары тіреуіш штифтілерінің бірімен
! Бұйым қауіпсіздік бойынша халықаралық нормативтерге сәйкес
жоспарланған және дайындалған.
Сіздің қауіпсіздігіңіз үшін құрастырылған осы сақтандыруды аса мұқият
оқыңыз.
Қауіпсіздікке қойылатын жалпы талаптар
• Бұл құрылғы 3 класқа жататын қосалқы тұрмыстық электр
құрылғысы болып табылады.
• Газ құрылғылары дұрыс қызмет атқару үшін ауа айналымын
ретке келтіру керек. Осы қондырғыларды орнатқан кезде
“Орналастыру” параграфында сипатталған талаптар сақталуын
тексеріңіз.
• Басқару бұйымның паспорттық кестесінде және нұсқамасында
келтірілген елдерге ғана жарамды болып табылады.
• Бұл бұйым үй шарттарында кәсіби емес тұрғыда пайдалануға
арналған.
• Бұйымды көшеге, бастырма астында орнатуға тыйым салынады,
өйткені оған жаңбыр және нажағайдың әсері өте қауіпті болып
саналады.
• Бұйымға су қолмен, жалаңаяқ немесе дымқыл аяқпен жақындамаңыз.
• Бұйым тағамдық өнімдерді дайындауға арналған, оны осы
техникалық нұсқаулықта көрсетілген ережелерге сәйкес тек
ересек адамдар ғана пайдалана алады.
• Басқа тұрмыстық электрожабдықтардың электр қуаты өткізгіштерімен,
бұйымның ыстық бөліктерімен жақын байланысқа түспеңіз.
• Желдеткіш торларды және ыстықты басатын тесіктерді жаппаңыз.
• Бұйым пайдаланылмағанда, тұтқалары “” / “” жағдайында болуын
ылғи тексеріңіз.
• Бұйымның вилкасын тоқ көзінен суыру үшін желі шнурынан тартпаңыз,
вилканың өзінен ұстап суырыңыз.
• Бұйымның тазалау немесе техникалық жұмыстар жасау үшін
штепсельді вилканы тоқ көзінен суырыңыз.
• Жөнделмейтін жағдайда, бұйымның ішкі мехнанизмдерін өз бетінше
жөндеу жұмыстарын жүргізу үшін ашуға тыйым салынады. Техникалық
қызмет көрсету орталықтарына хабарласыңыздар (Техникалық
қызмет көрсетуді қара).
• Егер газ және электр конфоркалары ыстық болып тұрса, пісіру
панелінің шыны қақпағын (егер ол болса) жаппаңыз.
• Құрылғыны физикалық, сезімталдық және психикалық қабілеттері
төмен адамдар (балалар да кіреді), тәжірибесіз немесе өнімнен
хабары жоқ кез келген адамның қолданбауы тиіс. Мұндай адамдарға,
кем дегенде, қауіпсіздіктерін қамтамасыз ететін біреулер жетекші
болуы керек немесе құрылғының жұмысына қатысты кіріспе
нұсқаулары берілуі тиіс.
• Балаларға құрылғымен ойнауға рұқсат етпеңіз.
• Құрылғы сыртқы таймермен немесе бөлек қашықтан басқару
жүйесі арқылы басқарылуға арналмаған.
Жою
• Орауыш материалды жойған кезде: орауышты қайта пайдалануға
болатындай етіп жергілікті заңнаманы ұстаныңыз.
• Жарамсыз электрлік және электрондық жабдық бойынша (WEEE)
2002/19/EU Еуропалық директивасы ескі тұрмыстық құрылғыларды
қалыпты сұрыпталмаған тұрмыстық қоқыс құбырына жоюды талап
етеді. Ескі құрылғылар ішіндегі материалдардың қалпына келтірілуін
және қайта өңделуін оңтайландыру және адам денсаулығы мен
қоршаған ортағы әсерін азауту үшін ескі құрылғыларды бөлек жинау
ұсынылады. Өнімдегі үсті сызылған «қоқыс себеті» белгісі құрылғыны
жойған кезде бөлек жинау қажеттілігі туралы ескертеді.
53
Page 54

Тұтынушылар өзінің ескі құрылғыларын жою туралы мәліметтер алу
KZ
үшін жергілікті үкіметке не делдалға хабарласуы керек.
Қоршаған ортаны сақтау және қорғау
• Азық-түлікті жабық құмыраларды немесе қақпағы тығыз жабылатын
кастрөлдерде сақтаңыз және суды аз қолданыңыз. Қақпақсыз
дайындаған жағдайда, энергия көп жұмсалатын болады.
• Түбі тегіс құмыралар мен кастрөлдерді пайдаланыңыз.
• Асты ұзақ уақыт бойы дайындаған жағдайда, екі есе жылдам
дайындайтын және үштен бір энергия қуатын үнемдейтін жылдам
қайнатқышты қолданыңыз.
және қажет болса, дымқыл матамен тазалаңыз. Кез келген қатып
қалған тағамдар тіс тазартқыш немесе иненің көмегімен тазалануы
тиіс.
! Электрлік оталдыру құрылғысының зақымдалуын болдырмау
үшін оны конфоркалар орындарына орнатылмаған жағдайда
пайдаланбаңыз.
Газ шүмегіне техникалық қызмет көрсету
Уақыт өте, шүмектер тығыздануы немесе оларды бұру қиындауы мүмкін.
Бұл жағдай орын алса, шүмекті ауыстыру қажет.
Тасымалдау және сақтау.
• Пісіргіш панельдерін түпнұсқа орауыш ішінде көлденең күйде
тасымалдау керек.
• Тасымалдау және сақтау кезінде пісіргіш панельдерін атмосфералық
әсерлерден және механикалық зақымдалудан қорғаңыз.
• Панельді жылытылмаған бөлмеде минус 50°С және плюс 40°С
температура аралығында орауыш ішінде сақтау керек.
Жөндеу және күтім
Құрылғыны өшіру
Кез келген бір жұмысты бастамастан бұрын құрылғыны тоқтан
ажыратыңыз.
Конфорка бетін тазалау
• Барлық эмаль жағылған және әйнек бөліктер жылы су және
нейтралды тазалағыш затпен тазалануы тиіс.
• Тат баспайтын болат беттер тым ұзаққа жанасып қалса, әкті су
немесе қатты тазалағыш заттармен кірленуі мүмкін. Кез келген тағам
қалдықтары (су, тұздық, кофе, т.б.) құрғатылуына дейін тазалануы
тиіс.
• Жылы су және нейтрал тазалағыш затпен тазалаңыз және кейін
жұмсақ матамен немесе күдерімен құрғатыңыз. Қатып қалған кірді
тат баспайтын болат беттерге арналған тазалағыштармен тазалаңыз.
• Tат баспайтын болатты тек жұмсақ мата немесе сүлгімен тазалаңыз.
• Қатты немесе күйдіргіш өнімдерді, хлор негізіндегі тазалағыштарды
немесе металл ысқыштарды пайдаланбаңыз.
• Бу тазалағыштар құралдарды пайдаланбаңыз.
• Жанғыш өнімдерді пайдаланбаңыз.
• Сірке суы, қыша, тұз немесе лимон шырыны сияқты қышқылды
немесе сілтілі заттарды плитада қалдырмаңыз.
Конфорка бөліктерін тазалау
• Торталар, конфорка қақпақтары және конфоркалар тазалану үшін
алынуы мүмкін.
• Оларды кез келген тағам қалдықтарын алып, конфорка
саңылауларының бітелмегенін тексере отырып қолыңызбен жылы
суды және ысқыш емес тазалағышты пайдаланып тазартыңыз.
• Шаю және құрғату.
• Конфоркалар мен конфорка қақпақтарын тиісінше сәйкес орындарына
қайта орнатыңыз.
• Торларды ауыстыру кезінде табақтар орнатылатын аймақ
конфоркамен сәйкестендірілгеніне көз жеткізіңіз.
• Электрлік оталдыру қосқыштары және қауіпсіздік құрылғысымен
жабдықталған үлгілер тиісінше жұмыс істеуі үшін, тұтқаларының
шеттері толығымен тазалануы тиіс. Бұл элементтерді жиі тексеріңіз
! Бұл рәсімді өндіруші өкілет берген білікті маман орындауы тиіс
Ақаулықтарды жою
Пісіргіш панель жұмыс істемей қалып не нашар істеуі мүмкін. Қызмет
көрсету орталығына хабарласу алдында өзіңіз орындай алатын
әрекеттерді қарастырайық. Алдымен, энергия мен газбен жабдықтау
жүйесінде ажыраулардың жоқ, әсіресе панельдің газ шүмектері ашық
екендігіне көз жеткізіңіз.
Жанарғы жанбайды немесе жалын әркелкі.
Төмендегілерге көз жеткізіңіз:
• Жанарғының газ шығару саңылаулары бітелмеген.
• Жанарғының барлық жылжымалы бөлшектері дұрыс орнатылған.
• Панельдің жанында өтпе жел жоқ.
Қауіпсіздік құрылғысы бар нұсқаларда жалын өшеді.
Төмендегілерге көз жеткізіңіз:
• Тұтқаны шегіне дейін бастыңыз.
• Тұтқаны қауіпсіздік құрылғысын белсендіру үшін жеткілікті уақыт ішінде
шегіне дейін бастыңыз.
• Сақтандырғыш орналасқан жердегі газ шығару саңылаулары
бұғатталмаған.
Жанарғы минималды күйде жанбайды.
Төмендегілерге көз жеткізіңіз:
• Газ шығару саңылаулары бітелмеген.
• Панельдің жанында өтпе жел жоқ.
• Минималды мән реттеуі қате.
Ыдыстар тұрақсыз.
Төмендегілерге көз жеткізіңіз:
• Ыдыстың түбі толығымен тегіс.
• Ыдыс жанарғыда не электрлік плитада ортаға келтірілген.
• Торлар аударылмаған.
54
Page 55

KZ
55
Page 56

Indesit Company S.p.A.
V
60044 Fabriano (AN)
www.hotpoint.eu
195145530.00
05/2016 - XEROX FABRIANO
iale Aristide Merloni,47
56BG56
 Loading...