


Operating Instructions
60cm Gas Cooker
GB
English, 1
61DGWF
Contents
GB
Introduction, 2
For Your Safety, 3
Clock/Minute Minder Operation, 4
Hotplate, 5
Grill, 6
Main Oven, 7
Main Oven Cooking Charts, 8-9
The Slow Cook Setting, 10
Top Oven, 11
Top Oven Cooking Chart, 12-13
Care and Cleaning, 14
Something Wrong with your cooker?, 15
Installation Instructions, 16-20
Disposal of the appliance, 21
Guarantee Information, 22
Service Information, 23

Introduction
GB
To help you make the best use of your cooker,
PLEASE READ THIS BOOKLET CAREFULLY.
Your new cooker is guaranteed and will give lasting
service.
The guarantee is only applicable if the cooker has
been installed in accordance with the Installation
Instructions.
The cooker is designed specifically for domestic use
and responsibility will not be accepted for use in any
other installation.
When first using the cooker ensure that the room is
well ventilated (e.g. open a window or use an
extractor fan) and that persons who may be
sensitive to the odour avoid any fumes. It is
suggested that any pets be removed from the room
until the smell has ceased. This odour is due to any
temporary finish and also any moisture absorbed by
the insulation.
Our policy is one of continual improvement in design
and development, therefore strict accuracy of
illustrations and descriptions cannot be guaranteed.
This appliance conforms with the following
European Economic Community directives:
- 2006/95/
subsequent modifications;
- 2004/108/
Compatibility) and subsequent modifications;
- 90/396/
modifications (only for models which use gas);
- 93/68/
modifications.
- 2002/96/
EC EC
EC of 12/12/06 (Low Voltage) and
EC EC
ECEC
EC of 15/12/04 (Electromagnetic
ECEC
EECEEC
EEC of 29/06/90 (Gas) and subsequent
EECEEC
EECEEC
EEC of 22/07/93 and subsequent
EECEEC
ECEC
EC
ECEC
- 1275/2008 (Stand-by/ Off Mode)
2

For your Safety
Please read the precautions below before using
your cooker.
ALWAYS . . .
ALWAYS make sure you understand the controls
before using the cooker.
ALWAYS check that all controls on the cooker are
turned off after use.
ALWAYS stand back when opening an oven door to
allow heat to disperse.
ALWAYS use dry, good quality oven gloves when
removing items from the ovens.
ALWAYS take care when removing items from the
top oven/grill when the main oven is on, as
the contents may be hot.
ALWAYS keep the oven and grill doors closed when
the cooker is not in use.
ALWAYS place pans centrally over the hotplate
burners and position them so that the
handles cannot accidentally be caught or
knocked or become heated by other
burners.
ALWAYSALWAYS
ALWAYS
ALWAYSALWAYS
ALWAYS allow the cooker to cool before cleaning.
ALWAYS follow the basic principles of food handling
ALWAYS keep ventilation slots clear of obstructions.
ALWAYS turn off the electricity supply before
ALWAYS refer servicing to CORGI registered
!!
The appliance must be used by adults only forThe appliance must be used by adults only for
!
The appliance must be used by adults only for
!!
The appliance must be used by adults only forThe appliance must be used by adults only for
the preparation of food, in accordance with thethe preparation of food, in accordance with the
the preparation of food, in accordance with the
the preparation of food, in accordance with thethe preparation of food, in accordance with the
instructions outlined in this booklet. Any otherinstructions outlined in this booklet. Any other
instructions outlined in this booklet. Any other
instructions outlined in this booklet. Any otherinstructions outlined in this booklet. Any other
use of the appliance (e.g. for heating the room)use of the appliance (e.g. for heating the room)
use of the appliance (e.g. for heating the room)
use of the appliance (e.g. for heating the room)use of the appliance (e.g. for heating the room)
constitutes improper use and is dangerous.constitutes improper use and is dangerous.
constitutes improper use and is dangerous.
constitutes improper use and is dangerous.constitutes improper use and is dangerous.
The manufacturer may not be held liable forThe manufacturer may not be held liable for
The manufacturer may not be held liable for
The manufacturer may not be held liable forThe manufacturer may not be held liable for
any damage resulting from improper, incorrectany damage resulting from improper, incorrect
any damage resulting from improper, incorrect
any damage resulting from improper, incorrectany damage resulting from improper, incorrect
and unreasonable use of the appliance.and unreasonable use of the appliance.
and unreasonable use of the appliance.
and unreasonable use of the appliance.and unreasonable use of the appliance.
keep the cooker clean, as a build upkeep the cooker clean, as a build up
keep the cooker clean, as a build up
keep the cooker clean, as a build upkeep the cooker clean, as a build up
of grease or fat from cooking canof grease or fat from cooking can
of grease or fat from cooking can
of grease or fat from cooking canof grease or fat from cooking can
cause a fire.cause a fire.
cause a fire.
cause a fire.cause a fire.
and hygiene to prevent the possibility of
bacterial growth.
cleaning or replacing an oven lamp.
appliance service engineers.
NEVER . . .
NEVER leave children unsupervised where the
cooker is installed as all surfaces will get
hot during and after use.
NEVER allow anyone to sit or stand on any part of
the cooker.
NEVER store items that children may attempt to
reach above the cooker.
NEVER heat up unopened food containers as
pressure can build up causing the container
to burst.
NEVER store chemicals, food stuffs, pressurised
containers in or on the cooker, or in cabinets
immediately above or next to the cooker.
NEVER fill a deep fat frying pan more than 1/3 full
of oil, and never use a lid. DO NOT LEAVE
UNATTENDED WHILE COOKING.
NEVER place flammable or plastic items on or near
the hotplate.
NEVER use proprietary spillage collectors on the
hotplate.
NEVER use the cooker as a room heater.
NEVER dry clothes or place other times over or
near to the hotplate or oven/gril doors.
NEVER wear garments with long flowing sleeves
whilst cooking.
NOTE:NOTE:
NOTE: The use of a gas cooking appliance results
NOTE:NOTE:
in the production of heat and moisture in the room in
which it is installed. Always ensure that the kitchen
is well ventilated; keep natural ventilation holes open
or install a mechanical ventilation device
(mechanical extractor hood).
In particular when using the grill or more than one
hotplate burner, open a window if a mechanical
ventilation device is not operating.
! The appliance should not be operated by people
(including children) with reduced physical, sensory
or mental capacities, by inexperienced individuals or
by anyone who is not familiar with the product.
These individuals should, at the very least, be
supervised by someone who assumes responsibility
for their safety or receive preliminary instructions
relating to the operation of the appliance.
GB
3

GB
Features
Control panel
Lighting Device
Conventional Grill
Grill pan and
food support
'Stay Clean' liners
Top Oven door
Main Oven door
Timer
Model number &
Serial number label
Grill pan handle
fixed/detachable
Top oven
rod shelf
Inner door glass
Oven light
Oven fan
Door Switch
'Stay Clean' liners
Main oven
rod shelf
Inner door glass
4
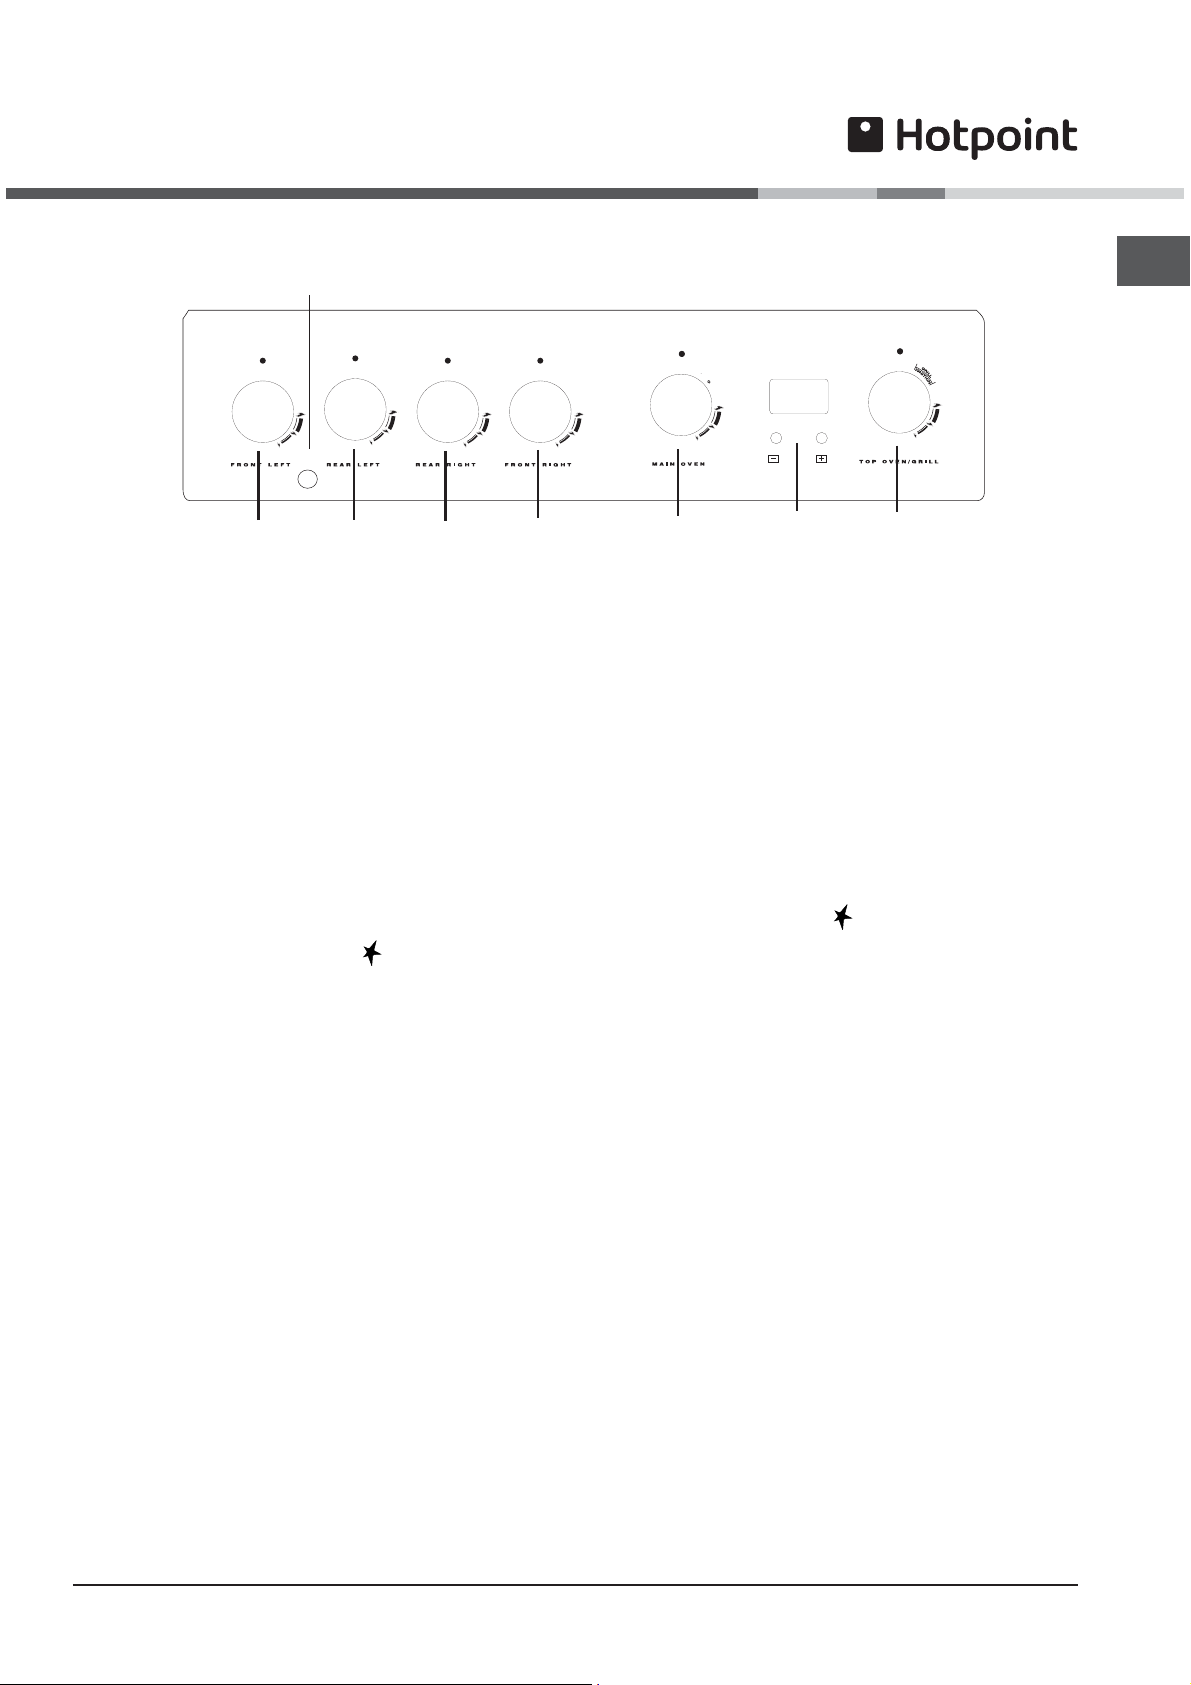
Control Panel
LIGHTING DEVICE
LEFT
FRONT
PLATE
Control Knobs for the gas burners
The position of the gas burner controlled by each one of the knobs is shown by a solid ring
the burners, hold a lighted match or lighter near the burner and, at the same time, press down and turn the
corresponding knob counter clockwise to the
maximum, minimum or intermediate power. Shown on the knob are the different symbols for off
on this setting when the symbol corresponds with the reference mark on the control panel), for
minimum minimum
and
minimum C
minimum minimum
turn off the burner, turn the knob clockwise until it stops (corresponding again with the
..
. To obtain these settings, turn the knob counter clockwise with respect to the off position. To
..
LEFT
REAR
PLATE
RIGHT
REAR
PLATE
RIGHT
FRONT
PLATE
maximum maximum
maximum
maximum maximum
MAIN
OVEN
E setting. Each burner can be operated at its
ELECTRONIC
TIMER
TOP OVEN/
GRILL
•. To light one of
• symbol).
• (the knob is
maximum maximum
maximum
maximum maximum
GB
E
Electronic Ignition for the Gas Hob*
This device operates when a slight pressure is applied to the button marked with
burner just press the button
clockwise until it lights.
! Should the burner flames accidentally go out, turn off the control knob and wait at least 1 minute before
trying to relight.
Top Oven / Grill Control
This control switches on the top and bottom heating elements in the top oven.
The temperature in the oven can be set anywhere between 100°C and 220°C.
The temperature of the top oven can be set anywhere between 80°C and 230°C by turning the knob clockwise
from 1 to 8.
To set the grill turn the corresponding knob to
The grill can be operated at
Main Oven Control
This control switches on the top and rear heating elements at various times in the main oven, dependent on
which mode has been set.
The temperature of the main oven can be set anywhere between 80°C and 230°C by turning the knob clockwise
from 1 to 9.
while pushing the corresponding knob all the way in and turning it counter-
For immediate lighting, first press the button and then turn the knobFor immediate lighting, first press the button and then turn the knob
For immediate lighting, first press the button and then turn the knob.
For immediate lighting, first press the button and then turn the knobFor immediate lighting, first press the button and then turn the knob
E
minimum minimum
minimum C
minimum minimum
..
.and
..
maximum maximum
maximum
maximum maximum
E setting.
symbol. To light a specific
5

Clock/Minute
Minder Operation
GB
CLOCKFACE
0.00
-
+
The timer incorporates a 24 hour
clock.
SYMBOLS
A 'Bell' symbol will light up when
you select a Minute Minder
0.00
Minute
Minder
Period and will remain lit for the
period set.
At the end of the Minute Minder
Period, the timer will emit an
audible tone and the 'Bell'
symbol will flash.
SETTING THE TIME OF DAY
Step 1 Make sure all oven
controls are turned off.
0.00
0.00
To change the time of day repeat Steps 4 & 5 above.
Here you can set a time period of up to 10 hours,
that will count down. When it reaches zero, the timer
will emit an audible tone.
For Example: If you set 20 minutes, the audible
tone will occur 20 minutes later.
Step 2 Check the electricity
supply to the cooker is turned
on.
Step 3 When switched on, the
display will flash 0.00
Step 4 Press and release both
buttons simultaneously.
Step 5 Press the '+' button to
set the Time of Day. The Time of
Day can be adjusted, by using
the '+' button to increase the
time setting or the '-' button to
decrease the time setting. The
Time of Day is set if no
adjustments are made within 10
seconds.
THE TIME OF DAY IS NOW SET.
SETTING THE MINUTE MINDER
Step 1 Ensure the time of day
is set correctly.
Step 2 Press and release the
0.00
Release all buttons, the timer display will show the
remaining time period.The 'Bell' symbol will remain
lit to signify that a time period has been set.
0.00
To cancel the minute minder period press the '-'
button until 0.00 is displayed in the window then
release the button.
If at any time the display shows flashing zero's, it is
likely that the electricity supply has been
interrupted.
Reset the timer to the correct time of day.
Note: The Timer display will show the minute
minder period as follows:
19.50
1.41
'+' button.
Note: Step 3 must be started
within 10 seconds, otherwise
you must repeat Step 2.
Step 3 Press the '+' button to
set the required time period. A
'Bell' symbol will light up. The
time period can be adjusted, by
using the '+' button to increase
the time period or the '-' button
to decrease the time period.
At the end of the set time an
audible tone will be heard and
the 'Bell' symbol will flash.
Step 4 To cancel the audible
tone press the '+' button.
Any period up to 99 minutes
and 50 seconds -
The display shows MINUTES and
SECONDS (10s intervals) eg. 19
minutes 50 seconds
Any period between 100
minutes (1 hour 40 minutes)
and up to 10 hours -
The display shows HOURS and
MINUTES eg. 1 hour 41 minutes
6
Hotplate
The hotplate lid is fitted with a safety device which
cuts off the gas supply to the hotplate burners
unless the lid is fully open. Do not use the safety
device as a means of controlling the hotplate
burners.
The hotplate has two high speed burners and two
simmering burners which will accommodate pans
between 100mm (4") and 240mm (91/2") diameter.
All pans should be positioned centrally over the
burners.
TO USE THE HOTPLATE
1. Remove any items or spillage from the top of the
lid and then raise it to its fully open position.
2. Press the ignition button and then push in and turn
the control knob of the chosen burner anti-clockwise
to the large flame symbol. Continue to press the
ignition button until the sparks light the gas.
3. Turn the control knob anti-clockwise to reduce the
heat input. Only turn the control knob between the
large flame symbol and the small flame symbol
when adjusting the setting.
4. To turn off, turn the control knob fully clockwise to
the symbol O.
DO NOT use the hotplate unless all pan supports
are in position.
DO NOT use mis-shapen pans which may be
unstable.
DO NOT use round base woks directly on the pan
supports.
DO NOT use the glass lid as a working surface.
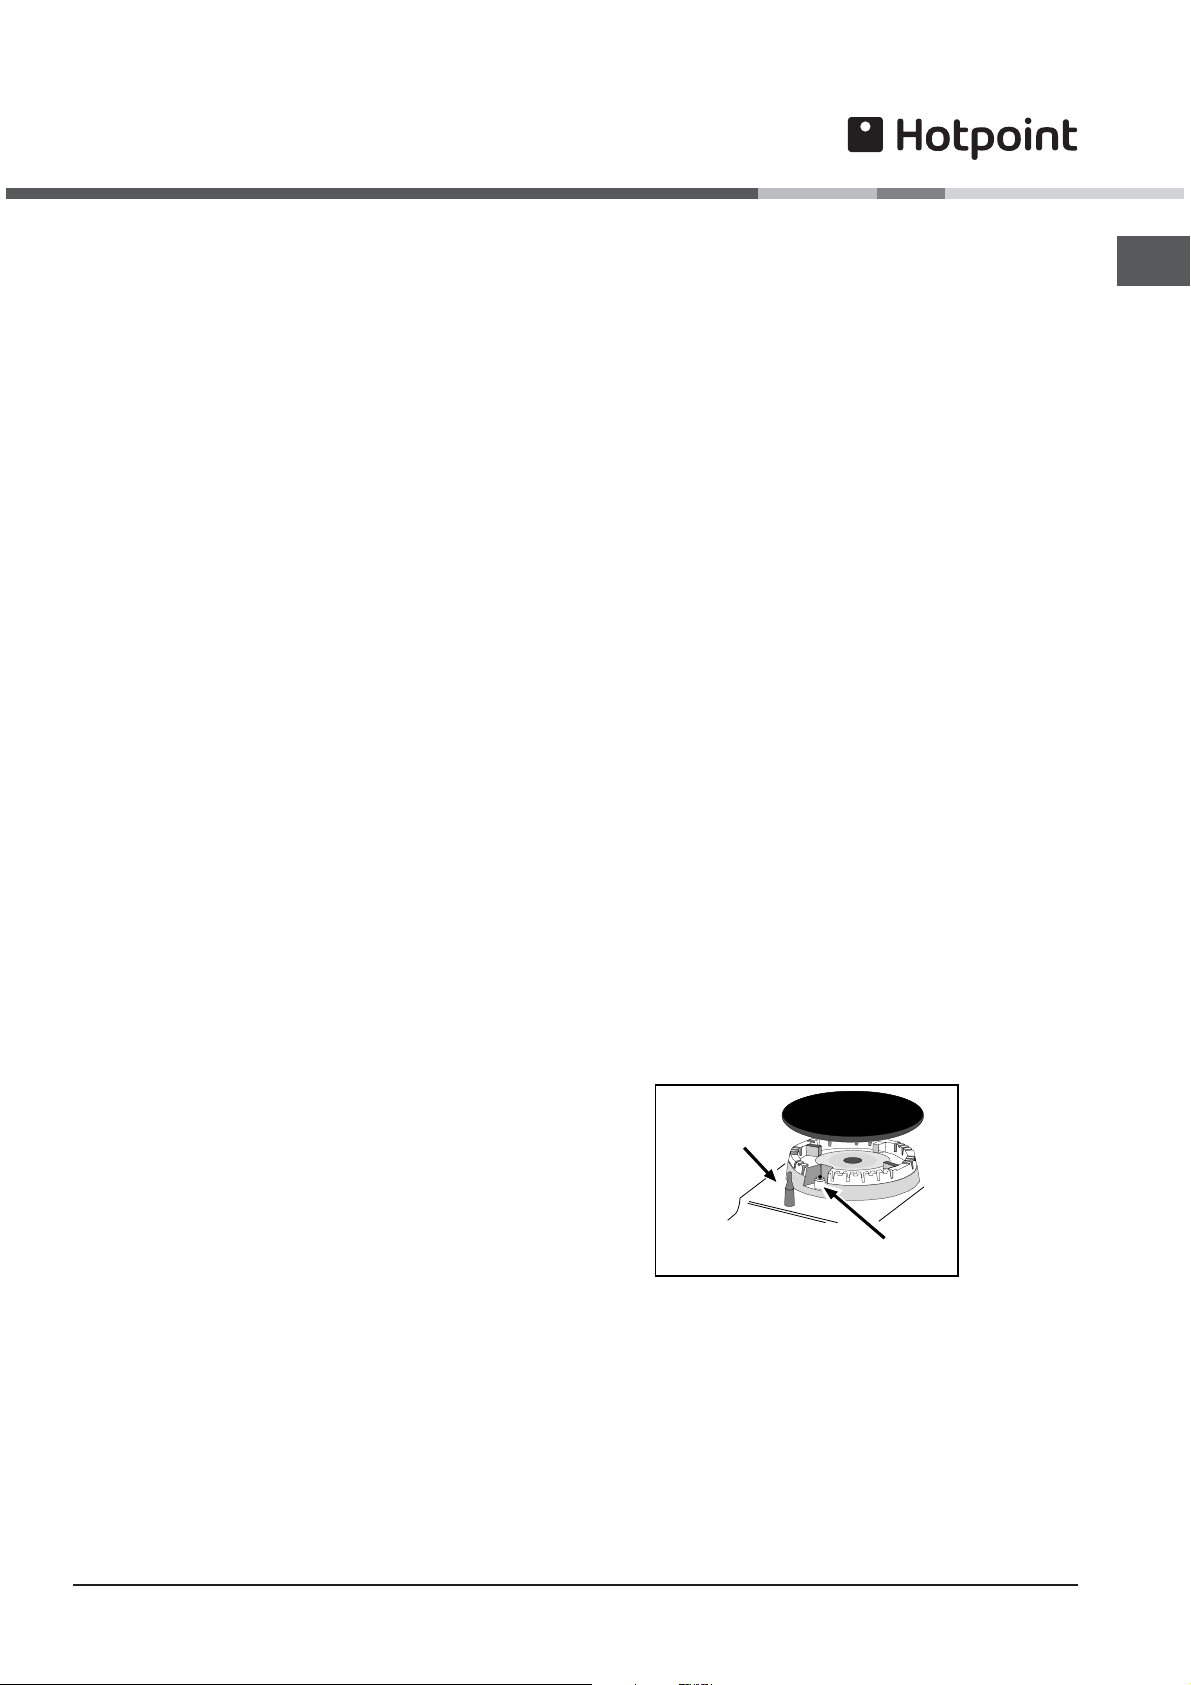
Each burner is fitted with a spark ignitor for lighting
the gas. To ensure rapid lighting of the burners
every time they are used, the ignitors must be kept
clean and dry. Remove any food spillage or
cleaning materials from the ignitor using a small
nylon brush such as a tooth brush. Access to the
ignitor can be achieved by lifting off the loose burner
parts carefully when the burners are cool.
When the hotplate burner bodies and caps are
removed for cleaning, be careful not to drop any
food particles or cleaning materials into the burner
bases, to avoid the possibility of blocking the gas
jets.
SAFETY REQUIREMENTS FOR DEEP FAT FRYING
1. Never fill chip pans more than one third full with oil
or fat.
2. Never leave oil or fat unattended during the heating
or cooling period.
3. Never heat fat or fry with a lid on the pan.
4. Always dry food thoroughly before frying, and lower
it slowly into the hot oil or fat. Frozen foods in
particular will cause frothing and spitting if added
too quickly.
5. Always keep the outside of the pan clean and free
from streaks of oil or fat.
HOW TO DEAL WITH A FAT FIRE
1. Do not move the pan.
2. Turn off the hotplate burners.
3. Smother the flames with a fire blanket or damp cloth
to extinguish the fire. Do not use water or a fire
extinguisher as the force of it may spread the
burning fat or oil over the edge of the pan.
4. Leave the pan for at least 60 minutes before moving
it.
Models with Hob Gas Burner Safety Devices to
Prevent Leaks
These models can be identified by the presence of
the device itself.
! Since the hob burners are equipped with a safety
device, you must hold the control knob in for about
3-7 seconds after the burner has been lighted to
allow the gas to pass until the safety thermocouple
has heated.
HOB GAS BURNER
SAFETY DEVICE
ELECTRONIC
LIGHTING DEVICE
GB
If aluminium based pans are used, a silvery deposit
may appear on the top edge of the pan support
fingers. See 'Care and Cleaning' section for cleaning
information.
7

Grill
GB
CAUTION - ACCESSIBLE PARTS MAY BECOME
HOT WHEN THE GRILL IS USED.
YOUNG CHILDREN SHOULD BE KEPT AWAY.
The grill is fitted with a safety device that will cut off
the gas supply to the burner if the flame is
extinguished for any reason. Each time the grill is
used, the safety device has to be activated by
pushing and holding in the control knob for 3
seconds after the gas has lit.
Grill Pan Handle
The grill pan handle is detachable from the pan to
facilitate cleaning and storage. Fix the pan handle
securely before use:
1. Fit the handle to the grill pan so that the external
‘hooks’ embrace the edge of the pan (fig. 1)
2. Make sure that the middle part of the handle fits
exactly the protruding support of the pan (fig .2)
and holds the pan from the bottom.
The food must be placed on the rack in the grill pan.
Position the grill pan on top of the oven rack. The
best results are achieved by placing the oven rack
on the uppermost shelves. Pouring a little water into
the grill pan will make the collection of grease
particles more efficient and prevent the formation of
smoke.
1
The grill pan can be stored in the top compartment
with the handle attached by placing the shelf in the
middle or lower position and tilting the grill pan over
the rear edge of the shelf.
TO USE THE GRILL
2
1. Open the top oven/grill door and remove the grill pan.
2. Remove the heat shield from the rear of the shelf for
maximum grilling area.
3. Place the shelf in the appropriate position.
4. Press the ignition button and then push in and turn
the control knob clockwise to the large flame symbol.
Continue to push in the control knob for a further 3
seconds after the gas has lit, to allow time for the
safety device to operate. If the burner extinguishes
when the control knob is released, repeat the procedure ensuring the control knob is fully depressed and
allowing more time for the safety device to operate.
5. Slide the grill pan along the shelf towards the rear of
the grill compartment until it stops.
6. Turn the control knob anti-clockwise to reduce the heat
input. Only turn the control knob between the large
flame symbol and the small flame symbol when
adjusting the setting.
7. To turn off, turn the control knob anti-clockwise to the
symbol O.
The grill cannot be used at the same time as the top
oven. If for any reason the grill burner has not lit
after 15 seconds, turn the control knob to the off
position, leave the grill door open and wait for at
least one minute before attempting to light the
burner again. An odour may be noticed when first
using the grill - this should cease after a short
period of use.
DO NOT use the grill with the door closed.
DO NOT cover the grill pan or grid with aluminium
foil as this can hold fat, intensify the heat
and create a fire hazard.
RELIGHTING THE BURNER
In the event of the burner flames being accidentally
extinguished, turn off the burner control and do not
attempt to re-ignite the burner for at least one minute.
Grilling can be started from cold but for best results
preheat for approximately two minutes. Most cooking
is done with the heat on full, but it may be desirable to
reduce it for thicker pieces of meat or for keeping food
warm.
For au gratin dishes eg. Macaroni Cheese and
meringue toppings eg. Baked Alaska, place the dish
on the floor of the grill compartment. The base of the
grill pan can be used for warming fruit garnishes on the
reduced setting.
REMOVE HEAT SHIELD
FROM SHELF WHEN
GRILLING FOR MAXIMUM
GRILLING AREA.
NOTE: Strong detergents used in dishwashers may
damage the grill pan grid finish; clean in soapy water
as described in CARE AND CLEANING section.
Always ensure that the grill pan handle is correctly
fitted to the grill pan. If necessary tighten any loose
screws with a screwdriver.
8

Main Oven
The main oven is fitted with a safety device that will
cut off the gas supply to the burner if the flame has
been extinguished for any reason. Each time the
main oven is used, the safety device has to be
activated by pushing and holding in the control knob
for 3 seconds after the gas has lit.
The oven has different heat zones - the thermostat
settings refer to the temperature on the middle shelf
position; above this shelf it is hotter and below it is
cooler. Two shelves provide five possible cooking
levels enabling full use of the different temperatures
inside the oven.
Each shelf has a safety stop to prevent if from being
pulled out too far when attending to food. Shelves
are removed from the oven by pulling them out to
the stop and then lifting them at the front to
withdraw.
The maximum size of baking tray that should be
used is 325mm x 350mm (13" x 14").
TO USE THE MAIN OVEN
1. Place the oven shelves in the appropriate positions
(refer to cooking charts).
2. Press in the ignition button and then push in and turn
the control knob fully anti-clockwise. Continue to push
in the control knob for a further 3 seconds after the
gas has lit to allow time for the safety device to operate. If the burner extinguishes when the control knob
is released, repeat the procedure ensuring the control
knob is fully depressed and allowing more time for
the safety device to operate.
3. Turn the control knob clockwise to the required setting
(refer to cooking chart).
4. To turn off, turn the control knob fully clockwise the
the symbol O.
If for any reason the oven burner has not lit after 15
seconds, turn the control knob to the OFF position.
Leave the main oven door open and wait for at least
1 minute before attempting to light the burner again.
Never place dishes over the burner.
An odour may be noticed when first using the oven this should cease after a short period of use.
COLD START COOKING
Anything requiring long slow cooking such as
casseroles and rich fruit cakes can be put into a
cold oven. Satisfactory results can also be obtained
with creamed mixture, rich pastries or yeast
mixtures, but for perfection we recommend
preheating the oven for about 15 minutes at the gas
mark you require for cooking.
ROASTING OF LARGE POULTRY
The maximum weight of poultry that can be
accommodated is 11.5kg (25 lbs) of suitable shape.
It is important to check that the bird DOES NOT
overhang the burner at the back of the oven.
STORAGE AND RE-HEATING OF FOOD
It is vitally important to strictly adhere to the basic
principles of food handling and hygiene to prevent
the possibility of bacterial growth.
1. If food is to be frozen or not served immediately,
cool it in a clean container as quickly as possible.
2. Completely thaw frozen food in the refrigerator
before re-heating.
3. Re-heat food thoroughly and quickly either on the
hotplate or in a hot oven, Mk. 6, and then serve
immediately.
4. Only re-heat food once.
'COOK CHILL' DISHES
These should always be placed in a pre-heated oven
ideally on the first or second shelf position. Follow
the packet instructions for cooking time.
ALUMINIUM FOIL
If using Aluminium Foil:
1. Remember that it is important to increase the
cooking time by one third.
2. Never allow the foil to touch the sides of the oven.
3. Never cover the oven interior with foil.
4. Never cover the oven shelves with foil.
GB
RELIGHTING THE BURNER
In the event of the burner flames being accidentally
extinguished, turn off the burner control and do not
attempt to re-ignite the burner for at least one minute.
9
 Loading...