

Hotpoint 4D W T User Manual
4DxxTVZ
4DAxxTVZ
4DAAxxTVZ
4DAAAxxTVZ
English English
English
English English
Operating Instructions
REFRIGERATOR/FREEZER COMBINATION
Español Español
Español
Español Español
Manual de instrucciones
COMBINADO FRIGORÍFICO/CONGELADOR
Sumario
Manual de instrucciones, 1
Asistencia, 2
Descripción del aparato, 5
Descripción del aparato, 7
Instalación, 16
Puesta en funcionamiento y uso, 16
Mantenimiento y cuidados, 17
Precauciones y consejos, 18
Anomalías y soluciones, 19
TürkçeTürkçe
Türkçe
TürkçeTürkçe
Kullaným talimatlarýKullaným talimatlarý
Kullaným talimatlarý
Kullaným talimatlarýKullaným talimatlarý
KOMBÝNE SOÐUTUCU/DONDURUCUKOMBÝNE SOÐUTUCU/DONDURUCU
KOMBÝNE SOÐUTUCU/DONDURUCU
KOMBÝNE SOÐUTUCU/DONDURUCUKOMBÝNE SOÐUTUCU/DONDURUCU
Contents
Operating Instructions, 1
Assistance, 2
Description of the appliance, 4
Description of the appliance, 6
Installation, 8
Start-up and use, 8
Maintenance and care, 9
Precautions and tips, 10
Troubleshooting, 10
Français Français
Français
Français Français
Mode d’emploi
COMBINE REFRIGERATEUR/CONGELATEUR
Sommaire
Mode d’emploi, 1
Assistance, 2
Description de l’appareil, 4
Description de l’appareil, 6
Installation, 12
Mise en marche et utilisation, 12
Entretien et soin, 13
Précautions et conseils, 14
Anomalies et remèdes, 15
ÝçindekilerÝçindekiler
Ýçindekiler
ÝçindekilerÝçindekiler
Kullaným talimatlarý, 2
Teknik Servis, 3
Cihazýn tanýmý, 5
Cihazýn tanýmý, 7
Kapýlarýn açýlýþ yönünün deðiþtirilmesi, 16
Montaj, 20
Çalýþtýrma ve kullaným, 20
Bakým ve özen, 21
Önlemler ve öneriler, 22
Arýzalar ve onarýmlar, 22
Assistance
Before calling for Assistance:
•
Check if the malfunction can be solved on your own (
Troubleshooting
• If after all the checks, the appliance still does not operate or
the problem persists, call the nearest Service Centre
Communicating:
• type of malfunction
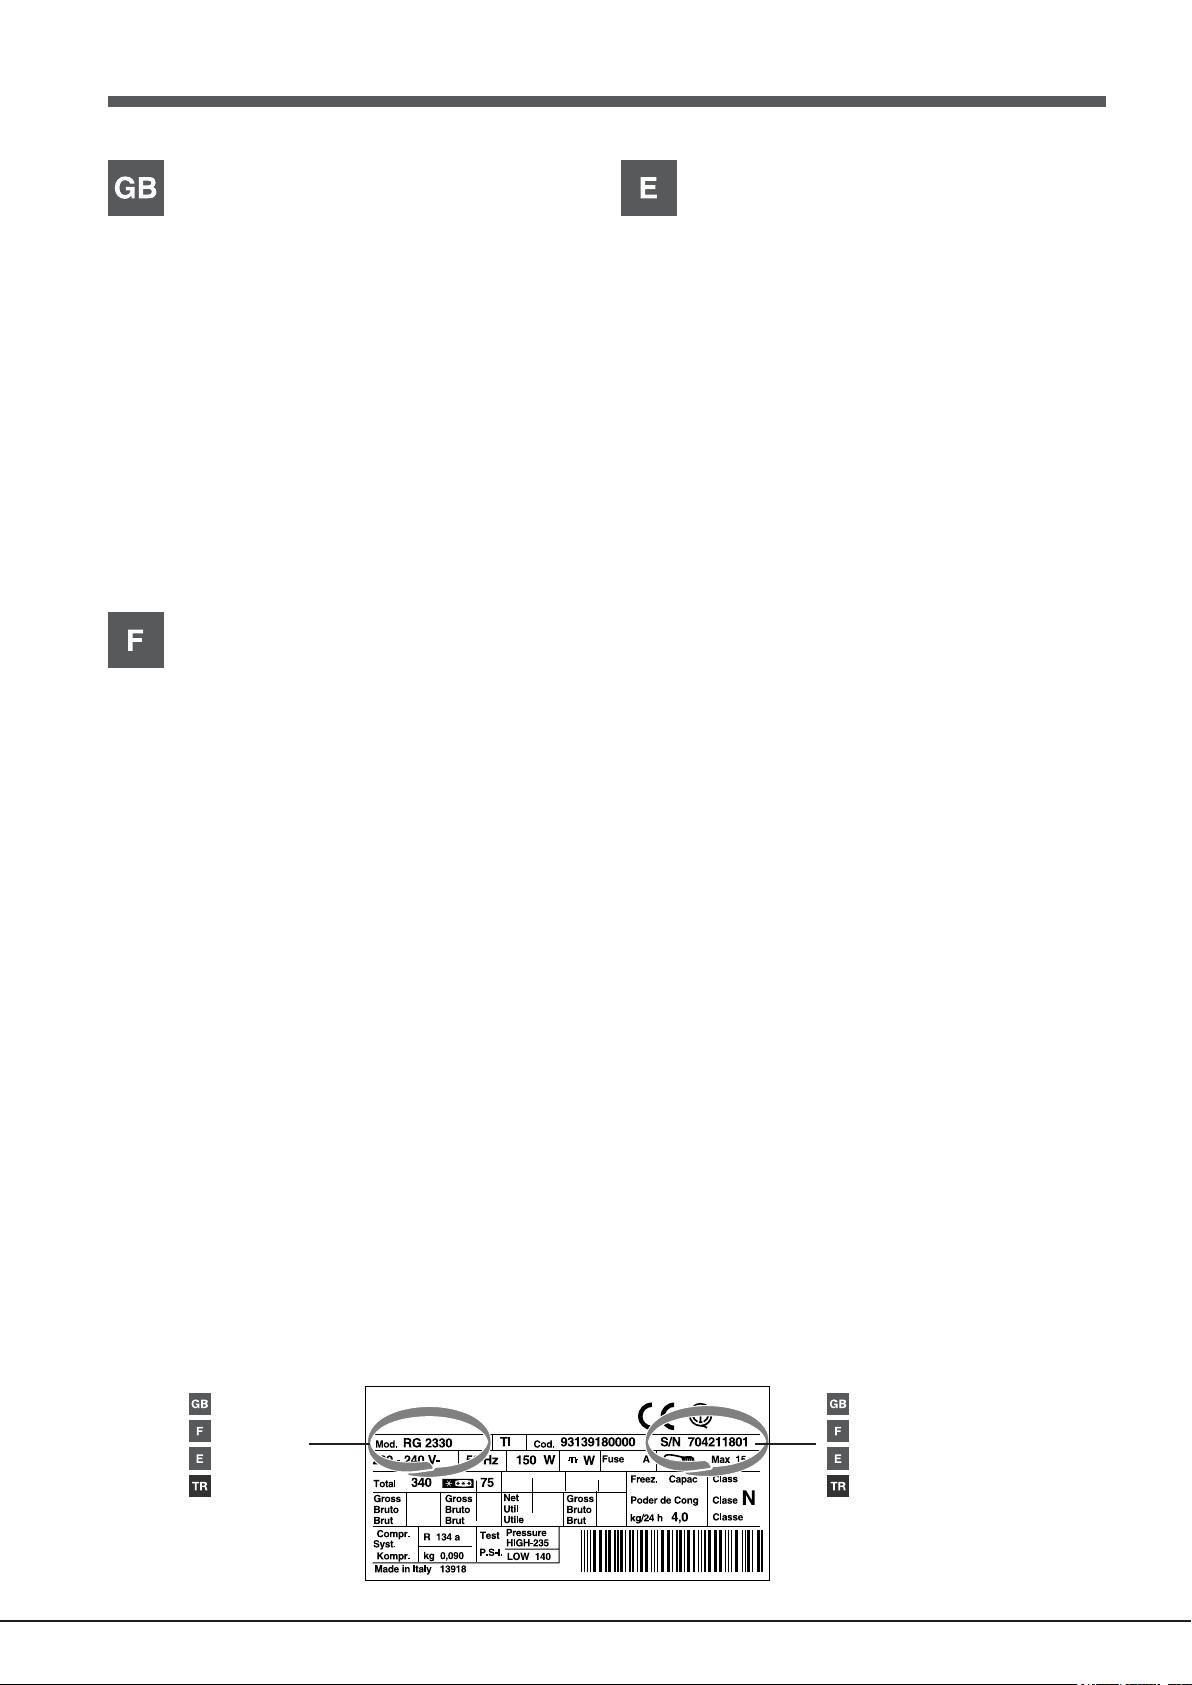
• appliance model (Mod.)
• serial number (S/N)
This information can be found on the data plate located on the
bottom left side of the refrigerator compartment.
Never call on unauthorized technicians and always refuse
spare parts which are not originals.
).
see
Asistencia
Antes de llamar al Servicio de Asistencia Técnica:
• Verifique si la anomalía puede ser resuelta por Ud. mismo
(
ver Anomalías y Soluciones
• Si, no obstante todos los controles, el aparato no funciona y
el inconveniente por Ud detectado continúa, llame al Centro
de Asistencia Técnico más cercano.
Comunique:
• el tipo de anomalía
• el modelo de la máquina (Mod.)
• el número de serie (S/N)
Esta información se encuentra en la placa de características
ubicada en el compartimento frigorífico abajo a la izquierda.
No recurra nunca a técnicos no autorizados y rechace
siempre la instalación de repuestos que no sean originales.
La siguiente información es válida solo para España.
Para otros países de habla hispana consulte a su vendedor.Para otros países de habla hispana consulte a su vendedor.
Para otros países de habla hispana consulte a su vendedor.
Para otros países de habla hispana consulte a su vendedor.Para otros países de habla hispana consulte a su vendedor.
).
Assistance
Avant de contacter le centre d’Assistance :
•
Vérifiez si vous pouvez résoudre l’anomalie vous-même (
Anomalies et Remèdes
• Si, malgré tous ces contrôles, l’appareil ne fonctionne
toujours pas et si l’inconvénient persiste, appelez le service
après-vente le plus proche.
Signalez-lui :
• le type d’anomalie
• le modèle de l’appareil (Mod.)
• le numéro de série (S/N)
Vous trouverez tous ces renseignements sur l’étiquette
signalétique placée dans le compartiment réfrigérateur en bas à
gauche.
Ne vous adressez jamais à des techniciens non agréés et
exigez toujours l’installation de pièces détachées originales.
).
voir
Ampliación de garantía
Llame al 902.363.539
de ampliación de garantía hasta 5 años.
Consiga una cobertura total adicional de
• Piezas y componentes
• Mano de obra de los técnicos
• Desplazamiento a su domicilio de los técnicos
Y NO PAGUE AVERIAS NUNCA MAS
y le informaremos sobre el fantástico plan
Servicio de asistencia técnica (SAT)
Llame al 902.133.133
rapidez y eficacia, devolviendo el electrodoméstico a sus
condiciones óptimas de funcionamiento.
En el SAT encontrará recambios, accesorios y productos
específicos para la limpieza y mantenimiento de su
electrodoméstico a precios competitivos.
ESTAMOS A SU SERVICIO
y nuestros técnicos intervendrán con
- model
- modèle
- modelo
- model - model
- model
- model - model
2
- serial number
- numéro de série
- número de serie
- seri numarasý - seri numarasý
- seri numarasý
- seri numarasý - seri numarasý
TT
(
)
eknik Serviseknik Servis
T
eknik Servis
TT
eknik Serviseknik Servis
TT
eknik Servis ile irtibata geçmeden önce:eknik Servis ile irtibata geçmeden önce:
T
eknik Servis ile irtibata geçmeden önce:
TT
eknik Servis ile irtibata geçmeden önce:eknik Servis ile irtibata geçmeden önce:
• Servise baþvurmadan çözülebilecek bir arýza olup olmadýðýný
kontrol ediniz (
• Sonucun olumsuz olmasý durumunda, en yakýn Teknik Servis
ile irtibata geçiniz.
þaðýdaki bilgileri bildiriniz:þaðýdaki bilgileri bildiriniz:
þaðýdaki bilgileri bildiriniz:
þaðýdaki bilgileri bildiriniz:þaðýdaki bilgileri bildiriniz:
• arýza tipi
• cihazýn modeli (Mod.)
• seri numarasý (S/N)
Bu bilgiler, soðutucu bölmesi içinde aþaðýda solda bulunan teknik
veriler etiketi üzerinde bulunmaktadýr.
Kesinlikle sadece yetkili teknik elemanlara baþvurunuz ve herKesinlikle sadece yetkili teknik elemanlara baþvurunuz ve her
Kesinlikle sadece yetkili teknik elemanlara baþvurunuz ve her
Kesinlikle sadece yetkili teknik elemanlara baþvurunuz ve herKesinlikle sadece yetkili teknik elemanlara baþvurunuz ve her
zaman orijinal yedek parçalarý kullanýnýz.zaman orijinal yedek parçalarý kullanýnýz.
zaman orijinal yedek parçalarý kullanýnýz.
zaman orijinal yedek parçalarý kullanýnýz.zaman orijinal yedek parçalarý kullanýnýz.
Ýklim S ýn ýfý
Enerji Tü ke tim i 467kW h/yil
Enerji Sýn ýfý A
Do ndu ruc u Bölüm 8 7 lt
Soð utucu Bö lüm 295 lt
Arýza ve Onarým bölümüne bakýnýz
T ekn ik B ilgile r
M ar ka HA
M o del
4 D X T (TVZ )/H A
4 D W T (TVZ )/H A
4 D B T
413
).
/H A
TV Z
T
- model
- modèle
- modelo
- model - model
- model
- model - model
- serial number
- numéro de série
- número de serie
- seri numarasý - seri numarasý
- seri numarasý
- seri numarasý - seri numarasý
3
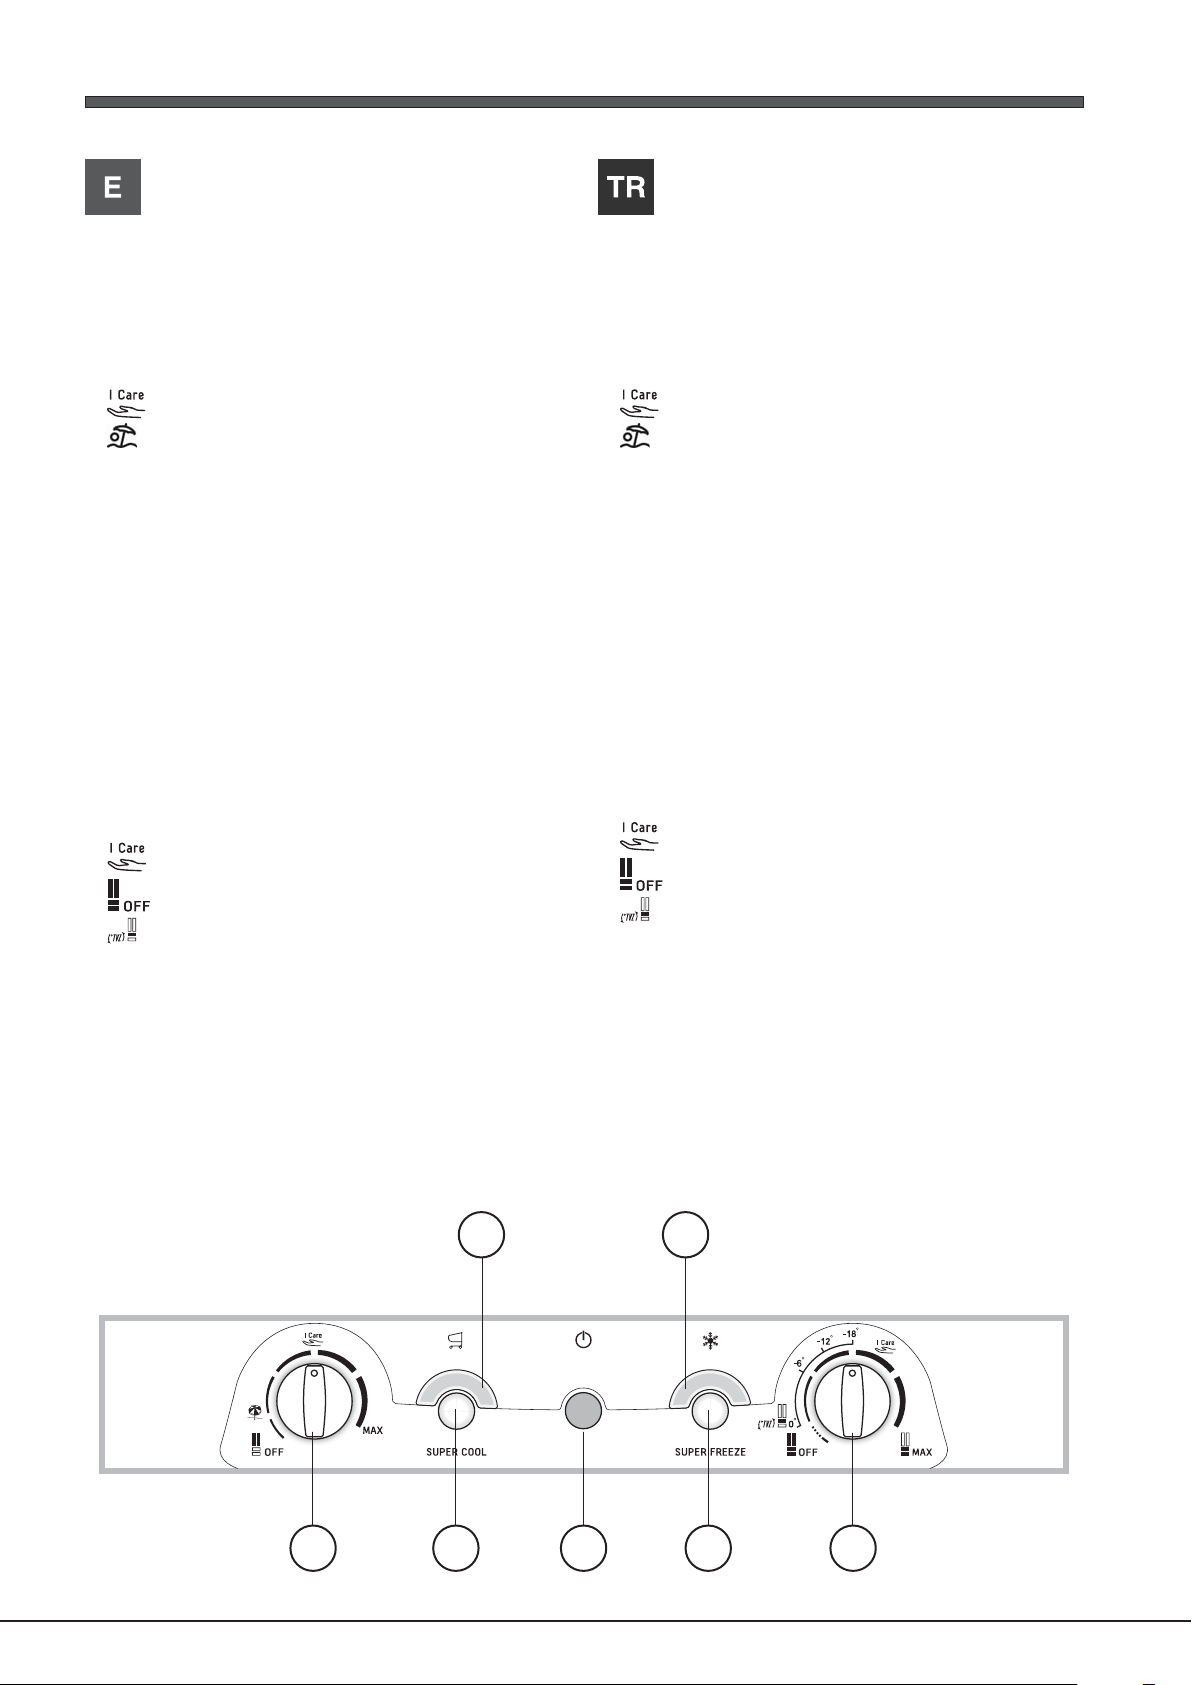
Description of the appliance
Description de l’appareil
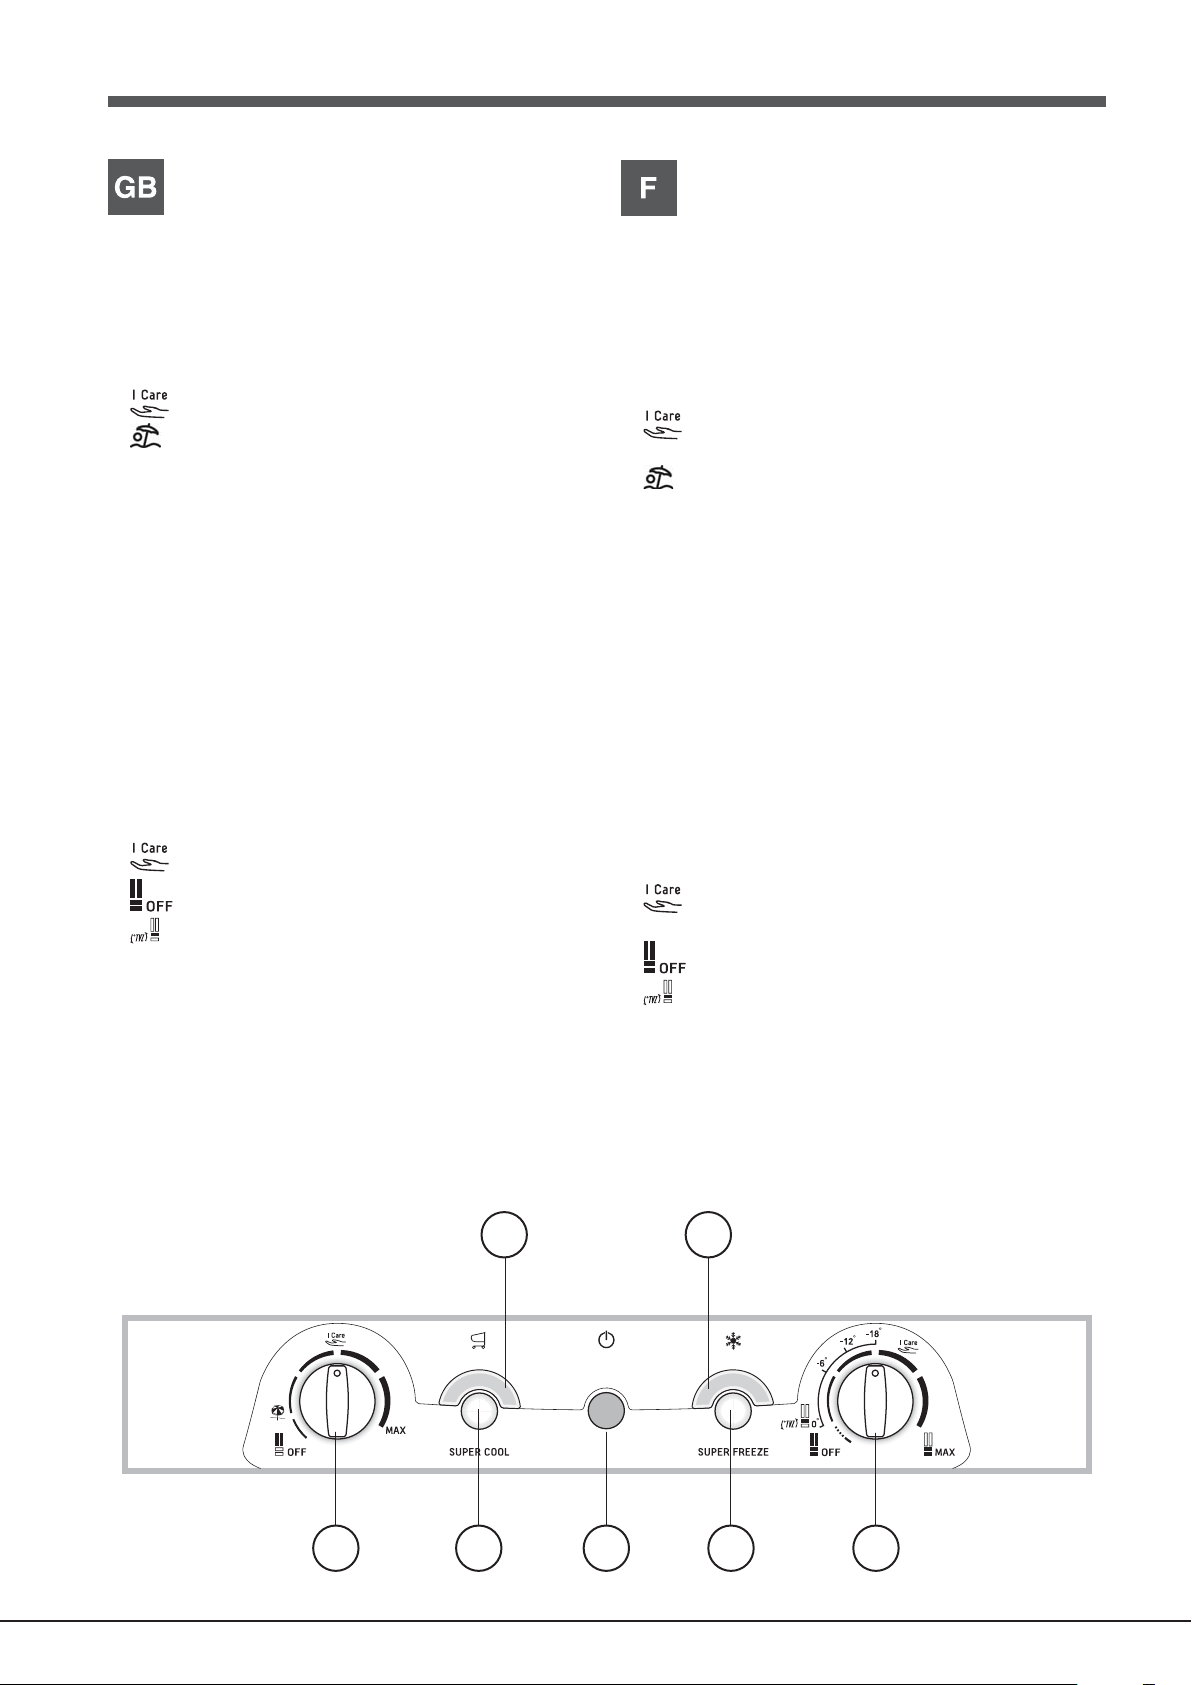
Control panel
1 REFRIGERATOR OPERATION Knob
to regulate the temperature of the refrigerator compartment.
is the optimal temperature for energy saving levels.
is the holiday function (
OFF switches the refrigerator off.
2 SUPER COOL
refrigerator compartment rapidly. When it is pressed, the
SUPER COOL indicator light illuminates (
use
).
3 SUPER COOL Yellow indicator light (rapid cooling)
illuminates when the SUPER COOL button is pressed.
4 POWER Indicator light illuminates when the appliance is
connected to the electricity network.
5 SUPER FREEZE button (rapid freezing) to freeze fresh food.
When it is pressed, the SUPER FREEZE indicator light
illuminates (
If pressed for at least 3 seconds, this activates the
“Optimization Energy Saving” function (
maintenance
6 SUPER FREEZE Yellow indicator light (rapid freezing)
illuminates when the SUPER FREEZE button is pressed.
7 FREEZER OPERATION Knob
to regulate the temperature of the freezer compartment.
is the optimal temperature for energy saving levels.
switches the appliance off, including the refrigerator.
TVZ
! The indicator lights are also used to indicate an unusual
temperature increase in the freezer compartment (
Troubleshooting
(quick cool) to lower the temperature of the
see Start-up and use
).
(see Using the freezer to its full potential)
).
see Maintenance and care
see Start-up and
).
see Care and
see
).
Tableau de bord
1 Bouton FONCTIONNEMENT REFRIGERATEUR
pour régler la température à l’intérieur du compartiment
réfrigérateur.
est la température optimale avec une faible
consommation d’électricité.
est la fonction holiday (
OFF éteint le réfrigérateur.
2 Touche SUPER COOL
rapidement la température du compartiment réfrigérateur. Si
elle est enfoncée, le voyant SUPER COOL s’allume(
en marche et utilisation
3 Voyant jaune SUPER COOL (refroidissement rapide) :
il s’allume dès que vous appuyez sur la touche SUPER COOL.
4 Voyant VERT ALIMENTATION il s’allume quand l’appareil est
branché au réseau d’alimentation.
5 Touche SUPER FREEZE (congélation rapide) pour congeler
des aliments frais. Si elle est enfoncée, le voyant SUPER
FREEZE s’allume (
Une pression d’au moins 3 secondes sur cette touche active la
fonction “Optimization Energy Saving” (
6 Voyant jaune SUPER FREEZE (congélation rapide): il s’allume
dès que vous appuyez sur la touche SUPER FREEZE.
7 Bouton FONCTIONNEMENT CONGELATEUR
pour régler la température à l’intérieur du compartiment
congélateur.
est la température optimale avec une faible
consommation d’électricité.
éteint l’appareil, réfrigérateur inclus.
TVZ
! Les voyants servent aussi à signaler toute augmentation
anormale de la température à l’intérieur du compartiment
congélateur (
voir Mise en marche et utilisation
(voir Pour profiter à plein de votre congélateur)
voir Anomalies et remèdes
voir Entretien et soins
(refroidissement rapide) pour abaisser
).
).
).
voir Mise
).
voir Entretien et soin
.
).
4
3 6
654eps
1 2 4 5 7
Descripción del aparato
Panel de control
1 Perilla FUNCIONAMIENTO DEL REFRIGERADOR
para regular la temperatura del compartimiento refrigerador.
es la temperatura óptima con bajo consumo.
es la función holiday (
OFF apaga el refrigerador.
2 Botón SUPER COOL (enfriamiento rápido) para disminuir
velozmente la temperatura del compartimiento refrigerador.
Cuando se presiona se enciende la luz testigo SUPER COOL
ver Puesta en funcionamiento y uso
(
3 Luz testigo amarilla SUPER COOL (enfriamiento rápido):
se enciende cuando se presiona el botón SUPER COOL.
4 Luz testigo verde ALIMENTACIÓN: se enciende cuando el
aparato está conectado a la red de alimentación eléctrica.
5 Botón SUPER FREEZE
alimentos frescos. Cuando se presiona se enciende la luz
testigo SUPER FREEZE
Si se presiona durante 3 segundos, como mínimo, se activa la
función “Optimization Energy Saving”
cuidados)
6 Luz testigo amarilla SUPER FREEZE (congelamiento rápido):
se enciende cuando se presiona el botón SUPER FREEZE.
7 Perilla FUNCIONAMIENTO DEL CONGELADOR
para regular la temperatura del compartimiento congelador.
! Las luces testigo sirven también para indicar un anómalo
aumento de temperatura en el compartimiento congelador
(
ver Anomalías y soluciones
.
es la temperatura óptima con bajo consumo.
apaga el aparato, incluido el refrigerador.
TVZ
(ver Utilizar el congelador en forma óptima)
ver Mantenimiento y cuidados
).
(congelamiento rápido) para congelar
(
ver Puesta en funcionamiento y uso
(ver Mantenimiento y
).
).
.
Cihazýn tanýmýCihazýn tanýmý
Cihazýn tanýmý
Cihazýn tanýmýCihazýn tanýmý
Kontrol paneliKontrol paneli
Kontrol paneli
Kontrol paneliKontrol paneli
11
SOÐUTUCU KONTROL SOÐUTUCU KONTROL
1
SOÐUTUCU KONTROL ayar düðmesi ile soðutucu bölmesindeki
11
SOÐUTUCU KONTROL SOÐUTUCU KONTROL
ýsý derecesi ayarlanýr.
düþük tüketim için optimal ýsý derecesidir.
holiday fonksiyonudur (
22
SUPER COOL SUPER COOL
2
SUPER COOL (hýzlý soðutma) tuþu ile soðutucu bölmesi
22
SUPER COOL SUPER COOL
içerisindeki ýsý derecesi hýzlý bir þekilde düþürmek için kullanýlýr.
Bu tuþa basýldýðýnda
Çalýþtýrma ve kullaným
(
33
SUPER COOLSUPER COOL
3 Sarý
SUPER COOL (hýzlý soðutma) lambasý:
33
SUPER COOLSUPER COOL
tuþuna basýldýðýnda yanar.
44
BESLEME BESLEME
4 Yeþil
BESLEME lambasý: cihaz elektrik þebekesine baðlý olduðu
44
BESLEME BESLEME
sürece yanar.
55
SUPER FREEZESUPER FREEZE
5
SUPER FREEZE (hýzlý dondurma) tuþu ile taze gýdalar
55
SUPER FREEZESUPER FREEZE
dondurulur. Bu tuþa basýldýðýnda
hemen yanar (
).
En az 3 saniye süreyle basýlmasý “
(Optimum Enerji Tasarrufu) fonksiyonunu etkinleþtirir (
bakým’a bakýnýz
66
SUPER FREEZESUPER FREEZE
6 Sarý
SUPER FREEZE (hýzlý dondurma) lambasý:
66
SUPER FREEZESUPER FREEZE
FREEZEFREEZE
FREEZE tuþuna basýldýðýnda yanar.
FREEZEFREEZE
77
DONDURUCU KONTROLDONDURUCU KONTROL
7
DONDURUCU KONTROL ayarý ile dondurucu bölmesindeki ýsý
77
DONDURUCU KONTROLDONDURUCU KONTROL
derecesi ayarlanýr.
düþük tüketim için optimal ýsý derecesidir.
TVZTVZ
TVZ
TVZTVZ
!!
! Uyarý lambalarý dondurucu bölmesinde ýsýnýn anormal bir þekilde
!!
arttýðýný belirtmek için kullanýlýr (
bakýnýz).
Çalýþtýrma ve kullaným
).
soðutucu dahil olmak üzere cihazý kapatýr.
(Ariza ve onarým bölümüne bakýnýz bölümüne bakýnýz)
Bakým ve onarým
SUPER COOLSUPER COOL
SUPER COOL uyarý lambasý hemen yanar
SUPER COOLSUPER COOL
bölümüne bakýnýz).
SUPER FREEZESUPER FREEZE
SUPER FREEZE uyarý lambasý
SUPER FREEZESUPER FREEZE
Optimization Energy SavingOptimization Energy Saving
Optimization Energy Saving”
Optimization Energy SavingOptimization Energy Saving
Ariza ve onarým
bölümüne bakýnýz).
SUPER COOLSUPER COOL
SUPER COOL
SUPER COOLSUPER COOL
bölümüne bakýnýz).
bölümüne
Onarým ve
SUPERSUPER
SUPER
SUPERSUPER
654eps
3 6
1 2 4 5 7
5
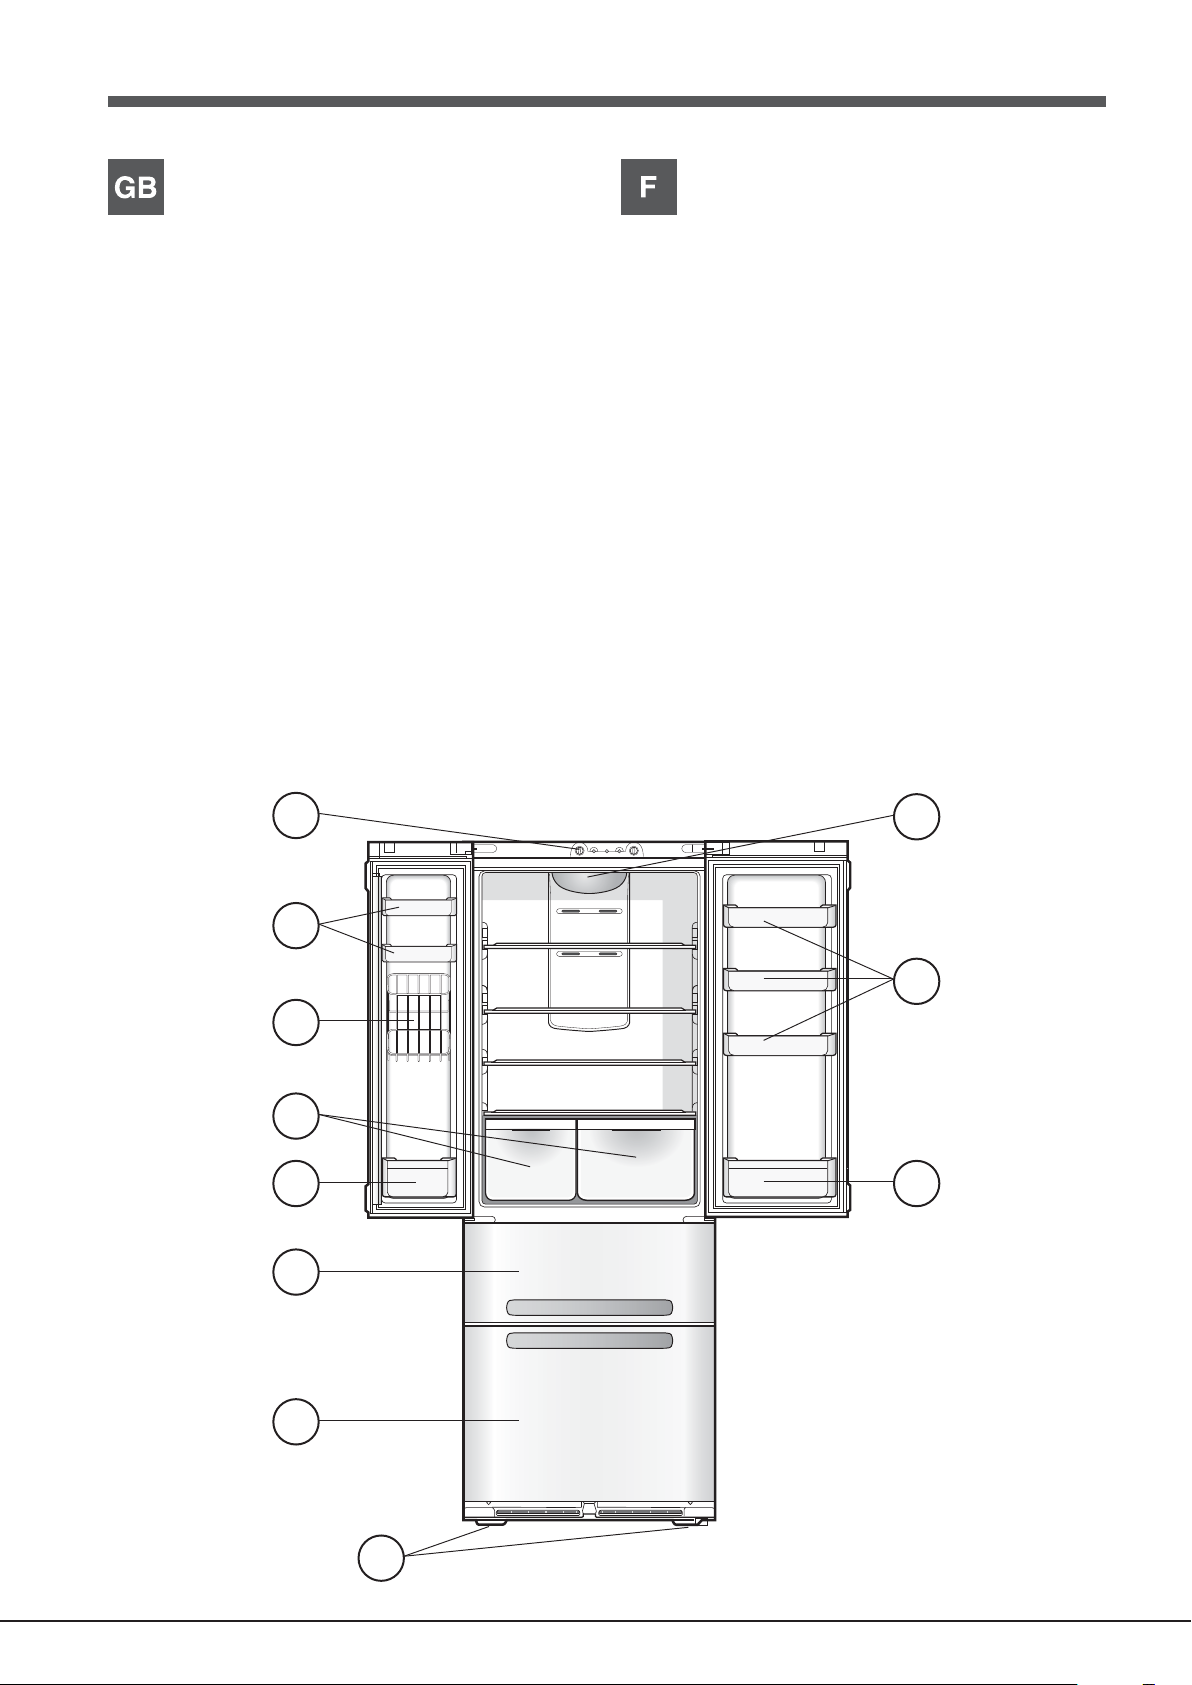
Description of the appliance
Description de l’appareil
Overall view
The instructions contained in this manual are applicable to
different model refrigerators. The diagrams may not directly
represent the appliance purchased. For more complex features,
consult the following pages.
1 Levelling FEET
2 FREEZER and STORAGE compartment
3 TVZ compartment and FREEZER and STORAGE
compartment
4 BOTTLE shelf
5 FRUIT and VEGETABLE bin
6 CAN RACK.
7 Removable multipurpose SHELVES•.
8 Control panel.
9 LAMP (see Maintenance).
• Varies by number and/or position.
8
Vue d’ensemble
Ces instructions d’utilisation s’appliquent à plusieurs modèles, il
se peut donc que les composants illustrés présentent des
différences par rapport à ceux de l’appareil que vous avez
acheté. Vous trouverez dans les pages suivantes la description
des objets plus complexes.
1 PIED de réglage
2 Compartiment CONGELATION et CONSERVATION
3 Compartiment TVZ et Compartiment CONGELATION et
CONSERVATION
4 Balconnet BOUTEILLES
5 Bac FRUITS et LEGUMES
6 Balconnet amovible PORTE-CANETTES
7 Balconnet amovible PORTE-OBJETS•
8 Tableau de bord.
9 ECLAIRAGE (voir Entretien)
• Leur nombre et/ou leur emplacement peut varier.
9
7
7
6
5
4
4
3
2
461eps
1
6
Descripción del aparato
Vista en conjunto
Cihazýn tanýmýCihazýn tanýmý
Cihazýn tanýmý
Cihazýn tanýmýCihazýn tanýmý
Genel görünümGenel görünüm
Genel görünüm
Genel görünümGenel görünüm
Las instrucciones sobre el uso son válidas para distintos
modelos y por lo tanto es posible que la figura presente detalles
diferentes a los del aparato que Ud. ha adquirido.
La descripción de las piezas más complejas se encuentra en las
páginas sucesivas.
1 PATAS de regulación
2 Compartimiento CONGELAMIENTO y CONSERVACIÓN
3 Compartimiento TVZ y Compartimiento CONGELAMIENTO y
CONSERVACIÓN
4 Balconcito BOTELLAS
5 Recipiente FRUTA y VERDURA
6 Balconcito PORTALATAS
7 Balconcito extraíble PORTAOBJETOS•
8 Panel de control.
9 BOMBILLA
• La cantidad y/o su ubicación pueden variar.
(ver Mantenimiento)
8
7
Kullaným talimatlarý birkaç model için geçerli olduðu için þekil satýn
aldýðýnýz cihazda olmayandeðiþik ayrýntýlarý gösterebilir.
Sonraki sayfalarda en karýþýk cisimler açýklanmýþtýr.
11
1 Ayarlanabilir
11
22
DONDURMADONDURMA
2
DONDURMA ve
22
DONDURMADONDURMA
33
TVZTVZ
3
TVZ bölmesi,
33
TVZTVZ
44
SISESISE
4
SISE Tutucusu
44
SISESISE
55
MEYVEMEYVE
5
MEYVE ve
55
MEYVEMEYVE
66
KUTU MEÞRUBAKUTU MEÞRUBA
6
KUTU MEÞRUBA
66
KUTU MEÞRUBAKUTU MEÞRUBA
77
KAPIKAPI
7
KAPI rafý
77
KAPIKAPI
88
Kontrol panosuKontrol panosu
8
Kontrol panosu
88
Kontrol panosuKontrol panosu
99
AMPULAMPUL
9
AMPUL (Bakým bölümüne bakýnýz)
99
AMPULAMPUL
• Sayýsý ve/veya pozisyonu deðiþebilir.
AA
YY
AKLARAKLAR
A
Y
AKLAR
AA
YY
AKLARAKLAR
SAKLAMASAKLAMA
SAKLAMA bölmesi
SAKLAMASAKLAMA
DONDURMADONDURMA
DONDURMA ve
DONDURMADONDURMA
SEBZESEBZE
SEBZE çekmecesi
SEBZESEBZE
TT
T tutucusu
••
•
••
TT
SAKLAMASAKLAMA
SAKLAMA bölmesi
SAKLAMASAKLAMA
9
7
6
5
4
4
3
2
461eps
1
7
GB
Installation
! Before placing your new appliance into operation please read these
operating instructions carefully. They contain important information for
safe use, for installation and for care of the appliance.
! Please keep these operating instructions for future reference.
Pass them on to possible new owners of the appliance.
Positioning and connection
Positioning
1. Place the appliance in a well-ventilated humidity-free room.
2. Do not obstruct the rear fan grills. The compressor and
condenser give off heat and require good ventilation to
operate correctly and save energy.
3. Leave a space of at least 10 cm between the top part of the
appliance and any furniture above it, and at least 5 cm
between the sides and any furniture/side walls.
4. Ensure the appliance is away from any sources of heat (direct
sunlight, electric stove, etc.).
5. In order to maintain the correct distance between the
appliance and the wall behind it, fit the spacers supplied in
the installation kit, following the instructions provided.
Levelling
1. Install the appliance on a level and rigid floor.
2. If the floor is not perfectly horizontal, adjust the refrigerator by
tightening or loosening the front feet.
Electrical connections
After the appliance has been transported, carefully place it
vertically and wait at least 3 hours before connecting it to the
electricity mains. Before inserting the plug into the electrical
socket ensure the following:
• The appliance is earthed and the plug is compliant with the law.
• The socket can withstand the maximum power of the
appliance, which is indicated on the data plate located on the
bottom left side of the fridge (e.g. 150 W).
• The voltage must be in the range between the values
indicated on the data plate located on the bottom left side
(e.g. 220-240V).
• The socket is compatible with the plug of the appliance. If the
socket is incompatible with the plug, ask an authorised
technician to replace it (
extension cords or multiple sockets.
! Once the appliance has been installed, the power supply cable
and the electrical socket must be easily accessible.
! The cable must not be bent or compressed.
! The cable must be checked regularly and replaced by
authorised technicians only (see Assistance).
The manufacturer declines any liability should these safety The manufacturer declines any liability should these safety
!
The manufacturer declines any liability should these safety
The manufacturer declines any liability should these safety The manufacturer declines any liability should these safety
measures not be observed.measures not be observed.
measures not be observed.
measures not be observed.measures not be observed.
see Assistance
). Do not use
Start-up and use
Starting the appliance
! Before starting the appliance, follow the installation
instructions (
! Before connecting the appliance, clean the compartments and
accessories well with lukewarm water and bicarbonate.
! The appliance comes with a motor protection control system which
makes the compressor start approximately 8 minutes after being
switched on. The compressor also starts each time the power
supply is cut off whether voluntarily or involuntarily (blackout).
see Installation
).
1. Set the FREEZER OPERATION knob on
2. Insert the plug into the socket and ensure that the green
POWER indicator light illuminates.
3. Turn the REFRIGERATOR OPERATION knob to an average
value. After a few hours you will be able to put food in the
refrigerator.
4. Turn the FREEZER OPERATION knob to an average value and
press the SUPER FREEZE button (rapid freezing): the SUPER
FREEZE indicator light will illuminate. Once the refrigerator
has reached the optimal temperature, the indicator light goes
out and you can begin food storage.
.
Chiller system
NO FROST
The No Frost system circulates cold air continuously to collect
humidity and prevent ice and frost formation. The system
maintains an optimal humidity level in the compartment,
preserving the original quality of the food, preventing the food
from sticking together and making defrosting a thing of the past.
!!
! Do not block the aeration cells by placing food or containers in
!!
direct contact with the refrigerating back panel.
!!
! Close bottles and wrap food tightly.
!!
Using the refrigerator to its full potential
• Use the REFRIGERATOR OPERATION knob to adjust the
temperature (
• Press the SUPER COOL button (rapid cooling) to lower the
temperature quickly. For example, when you place a large number
of new food items inside a fridge the internal temperature will rise
slightly. The function quickly cools the groceries by temporarily
reducing the temperature until it reaches the ideal level.
• Place only cold or lukewarm foods in the compartment, not
hot foods (
• Remember that cooked foods do not last longer than raw foods.
• Do not store liquids in open containers. They will increase
humidity in the refrigerator and cause condensation to form.
• SHELVES: with or without grill. Due to the special guides the
shelves are removable and the height is adjustable, allowing
easy storage of large containers and food. Height can be
adjusted without complete removal of the shelf.
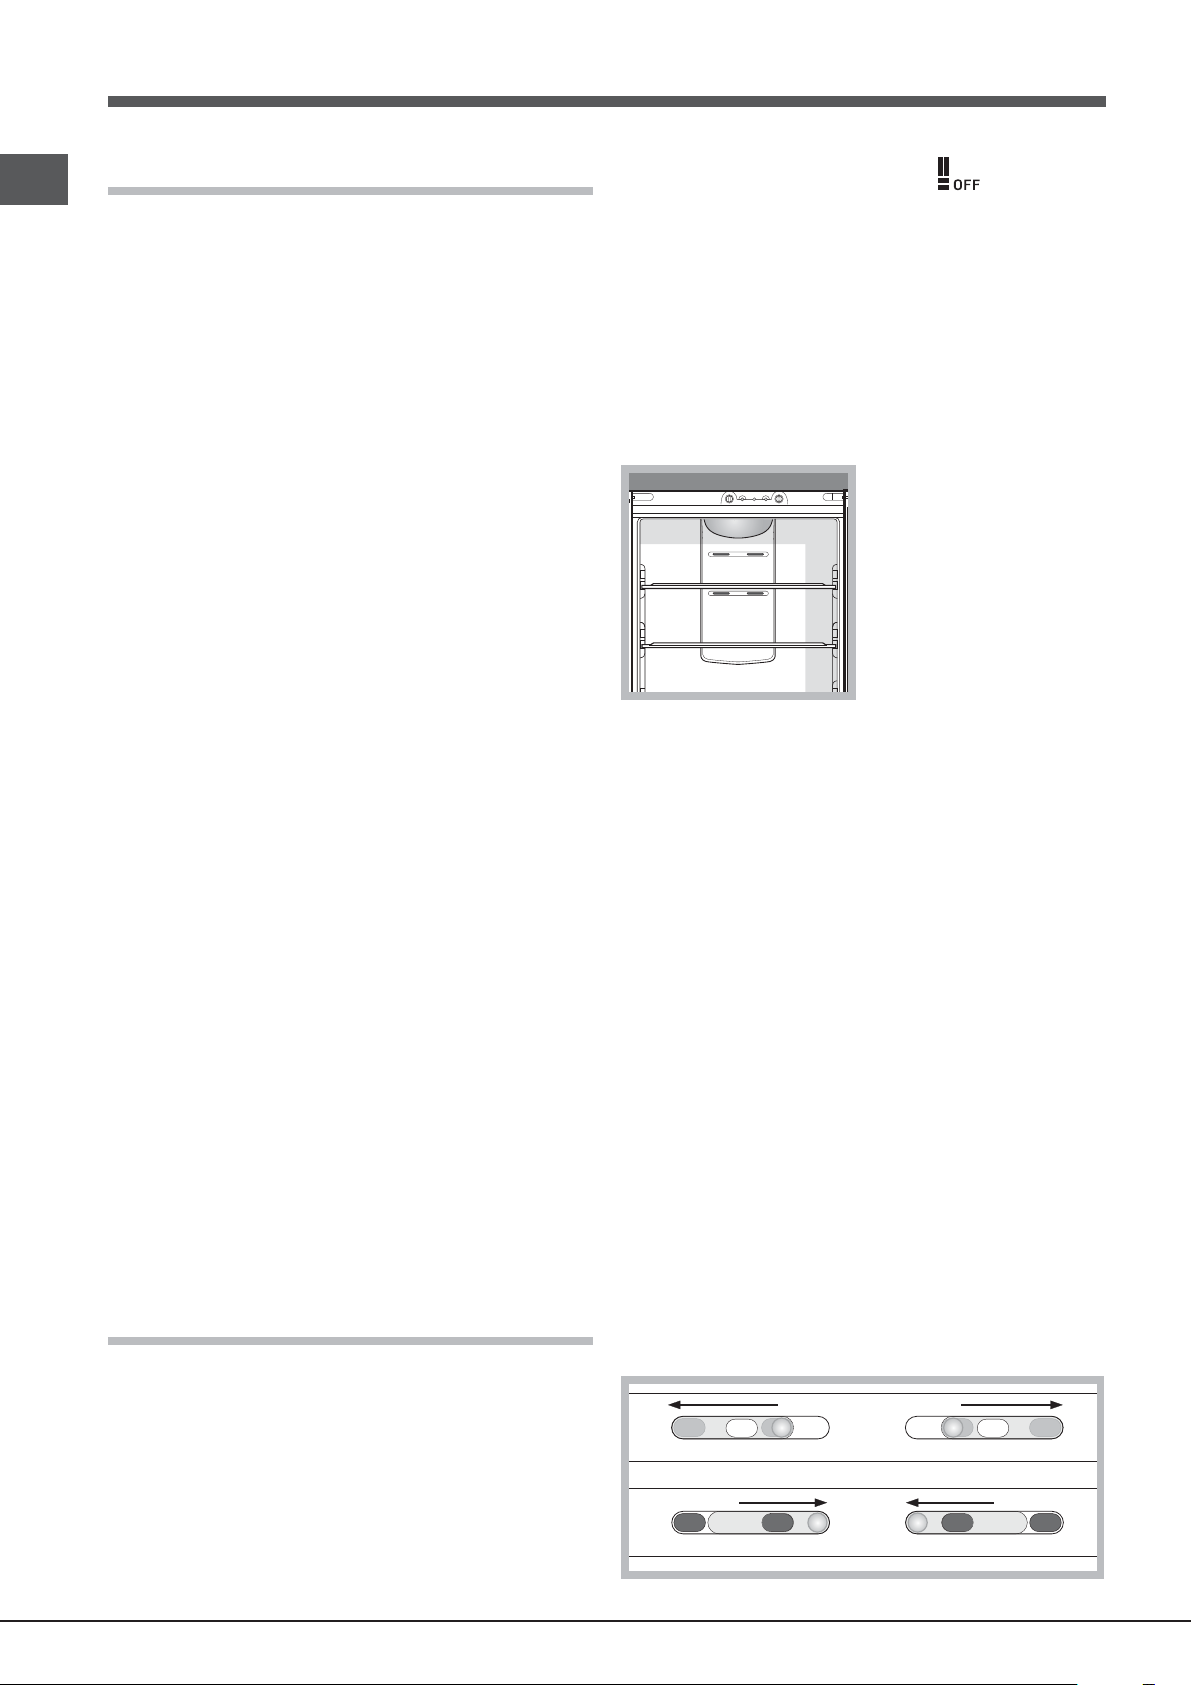
FRUIT and VEGETABLE bin
The salad crispers fitted inside the fridge have been specially
designed for the purpose of keeping fruit and vegetables fresh
and crisp. Open the humidity regulator (position B) if you want to
store food in a less humid environment, or close it (position A) to
store food in a more humid environment.
see Description
see Precautions and tips
).
A
B
).
8
 Loading...