

Page 1

Operator’s Manual
Medium Duty Torch Kit
HTK-MD
WARNING: Do not assemble, install or operate this equipment without reading ALL of
this manual and the safety precautions and warnings illustrated in this manual.
KDAR Company
1 Mulch Lane
St. Louis, MO 63044
Tel: 314-692-8555
Fax: 314-692-8578
Web Site: www.hotmaxtorches.com
Page 2

SAFETY PRECAUTIONS AND WARNINGS
PLEASE READ BEFORE USING EQUIPMENT
WARNING
ARC RAYS CAN BURN SKIN AND EYES
Arc rays when welding produce intense ultraviolet and infrared rays that can burn skin and eyes
Where face protection, either helmet or shield when operating with ANSI Z49.1 approved shade
Wear approved safety glasses with side shields under the face protection
Warn others not to stare at the arc as it can cause damage to the eyes. Provide barriers to protect
Wear flame resistant gloves, clothing, and shoes when operating
FUMES AND GASES CAN BE HAZARDOUS
Arc welding produces fumes and gases and breathing these gases is hazardous to your health
Keep your head out of the fumes and do not breath the fumes while welding
Work only in a confined area if it has sufficient ventilation, or while wearing an air supplied res-
Read the MSDS sheets and the instructions from manufacturers for metals to be welded, coat-
Do not use the welder near hydrocarbon vapors coming from degreasing, cleaning, or spraying
Do not weld coated metals, such as galvanized, lead, or cadmium plated steel. Before welding,
Do not weld containers with toxic, flammable, or reactive elements stored in them. They must be
Keep children away from this equipment
Protect your self and others from possible injury
Pacemaker wearers should consult with their doctor before operating
Read and follow all instructions in this manual before operating
All installation, operation, and maintenance procedures are to be per-
formed only by qualified individuals
#9 recommended for all cutting currents less than 300 amperes. The lens should conform to ANSI Z87.1 standards for testing.
other workers in the area from the arc while operating
pirator. Fumes from welding deplete the oxygen supply and can be harmful. Always be sure
there is ample breathing air
ings, and cleaners
operations. The heat and rays can react with solvent vapors to create the gas phosgene, a very
toxic gas and other irritating gases
all plating must be removed. The area must be well ventilated or an air supplied hood must be
used. The coatings and chemicals when burned cause highly irritating and toxic fumes.
emptied and properly prepared before welding.
WELDING SPARKS CAN CAUSE INJURY, FIRE, OR EXPLOSION
Remove all flammable materials from the welding area.
Always have a charged fire extinguisher available in the welding area.
When not welding make sure the welding gas cylinder valves are closed.
Avoid welding near hydraulic lines, fuel lines, electrical cords, air hoses, or welding gas lines.
Sparks and hot metal fly out from the work area when welding, wear approved safety glasses with
side shields under approved helmets, wear proper body and hand protection, and wear flame resistant ear plugs to keep sparks from entering the ears
KDAR Company
1
Page 3

CYLINDERS CAN EXPLODE IF DAMAGED
Gas cylinders contain gas under very high pressure. If damaged they can result in that cylinder ex-
ploding. Gas cylinders are a major part of metalworking and must be treated with care.
Protect gas cylinders from excessive heat, mechanical shocks, slag, open flames, sparks, and arcs
Always keep cylinders in an upright position securely fastened to a fixed support
Valve protection caps should always be in place and hand tight except when the cylinder is in use
Keep all cylinders away from any welding or electrical circuits
Never allow the flame or arc from a welder to contact a cylinder
Never cut any type of pressurized cylinder, an explosion could result
Always turn your face away from the valve when opening the cylinder
Read and follow all instructions on compressed gas cylinders, associated equipment, and CGA pub-
lication P-1 listed in the Safety Standards before using
HOT PARTS CAN CAUSE SERIOUS BURNS
Do not touch hat parts without wearing protection.
Allow the torch to cool sufficiently before working with parts that could potentially be hot.
NOISE CAN DAMAGE HEARING
Prolonged noise exposure from welding equipment can cause damage if levels of noise exceed the
OSHA standards
Wear approved hearing protectors
Warn other workers nearby of the high noise level and hazard
CALIFORNIA PROPOSITION 65 WARNINGS
Welding or cutting equipment produces fumes or gases which contain chemicals known to the State of California to cause
birth defects, and in some cases, cancer. (California Health and Safety Code Section 25249.5 et seq.)
PRINCIPAL SAFETY STANDARDS
AMERICAN WELDING SOCIETY
AWS C5.2, Recommended Practices for Plasma Arc Cutting
AWS F4.1, Recommended Safe Practices for the Preparation for Welding and Cutting
OSHA STANDARDS
OSHA 29 CFR 1910, Safety and Health Standards
NATIONAL FIRE PROTECTION ASSOCIATION
NFPA Standard 70, National Electric Code
NFPA Standard 51B, Cutting and Welding Processes
AMERICAN NATIONAL STANDARDS INSTITUTE
ANSI Standard Z87.1, Safe practices for Occupation and Educational Eye and Face Protection
ANSI Standard Z49.1, Safety in Welding and Cutting
KDAR Company 2
Page 4
Installation & Setup
Features & Functions
Features
Brass & Stainless Construction
Welds up to 1/2 Inch*
Cuts up to 6 Inches*
Welding Tip, #1, 2 & 3 Size
Cutting Tip, 6290AC Harris Style
Twin Welding Hose, 12.5’ x 3/16”
Oxygen Regulator
* Requires larger tips not included in this kit.
Functions
Steel Cutting up to 6”*
Welding up to 1/2”*
Acetylene Regulator
Torch Handle
Cutting Head
Goggles
Striker
10 Way Wrench
Tip Cleaner
Solders up to 3/4” Copper & Brass
Silver Solders
* Requires larger tips not included with this kit.
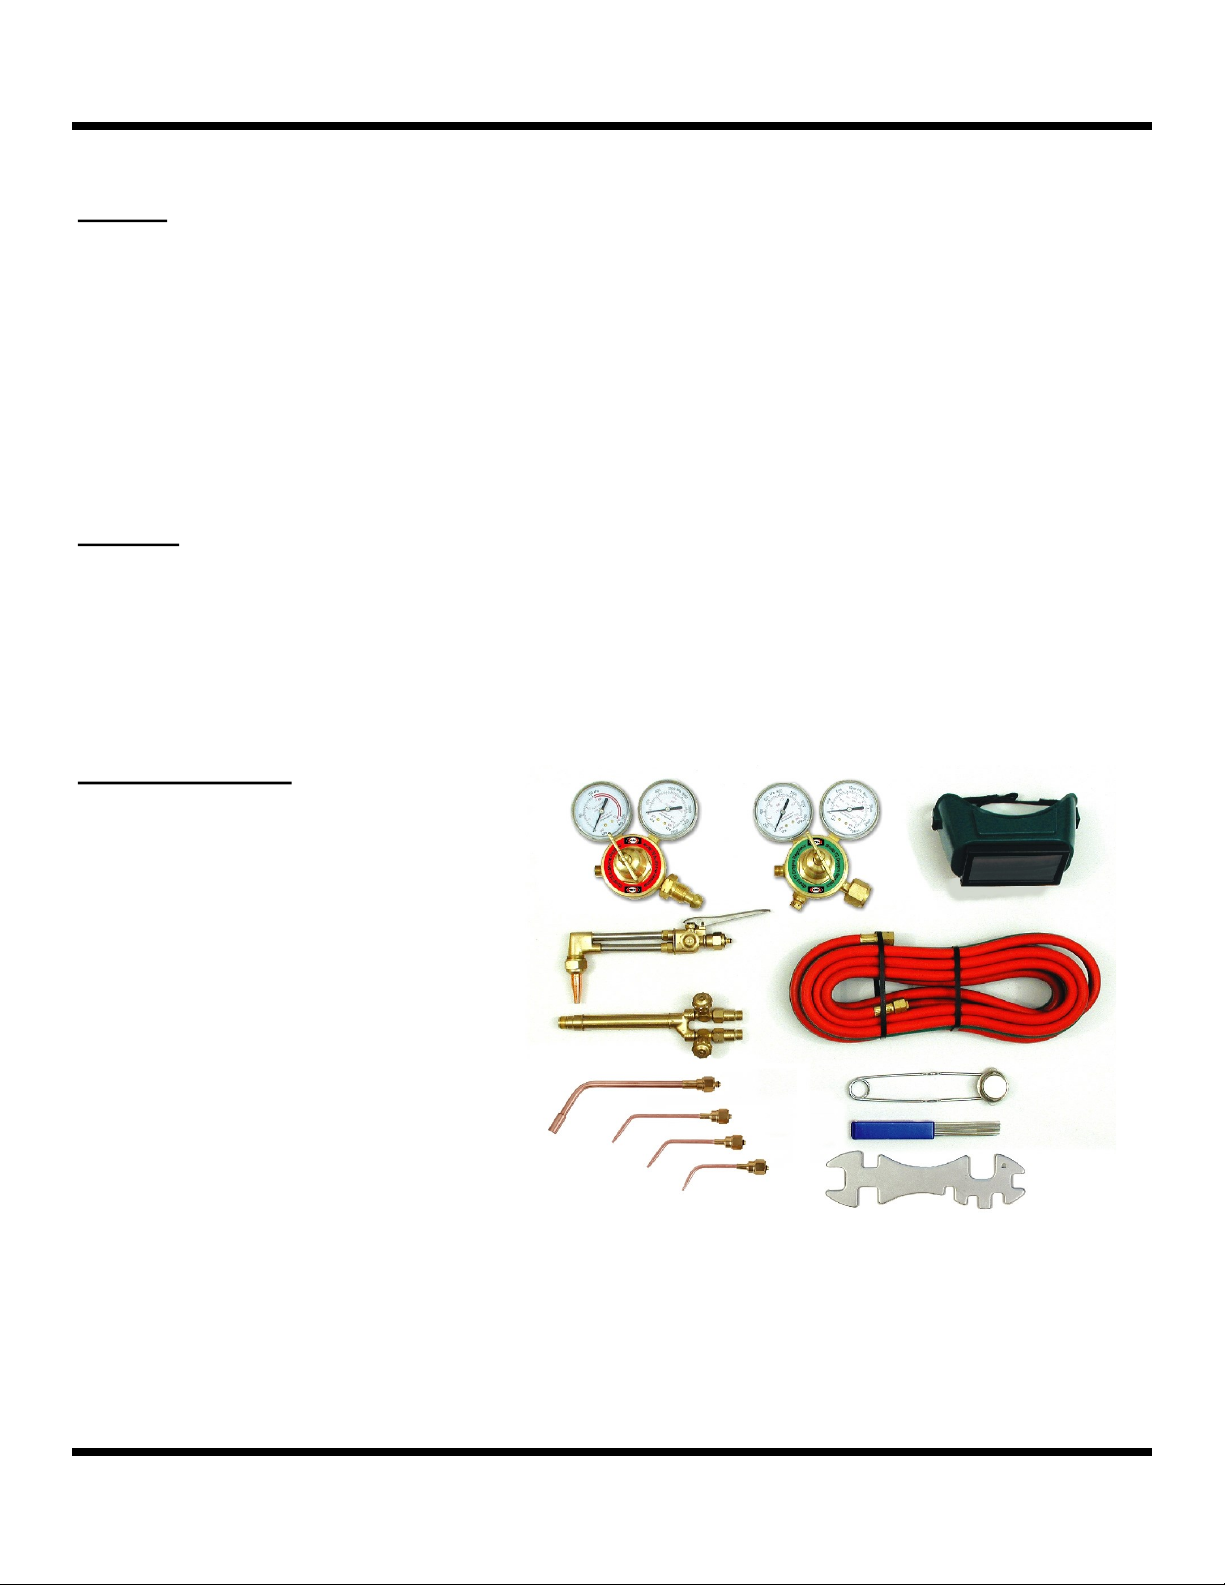
Package Contents
1. Acetylene Regulator
2. Oxygen Regulator
3. Goggles
4. Cutting Head & Tip 6290AC
5. Torch Handle
6. Hose
7. Heating Tip #6
8. Welding Tip #1
9. Welding Tip #2
10. Welding Tip #3
11. Striker
12. Tip Cleaner
13. 10 Way Wrench
KDAR Company 3
Page 5
Installation & Setup
Tanks
The VTK-MD is designed to be used with CGA540 type tanks, these tanks can purchased or leased from your
local gas distributor. Different welding gas suppliers handle tank filling differently; some will fill the tanks
while you wait while others require a tank exchange. You will need to select the type of supplier you prefer.
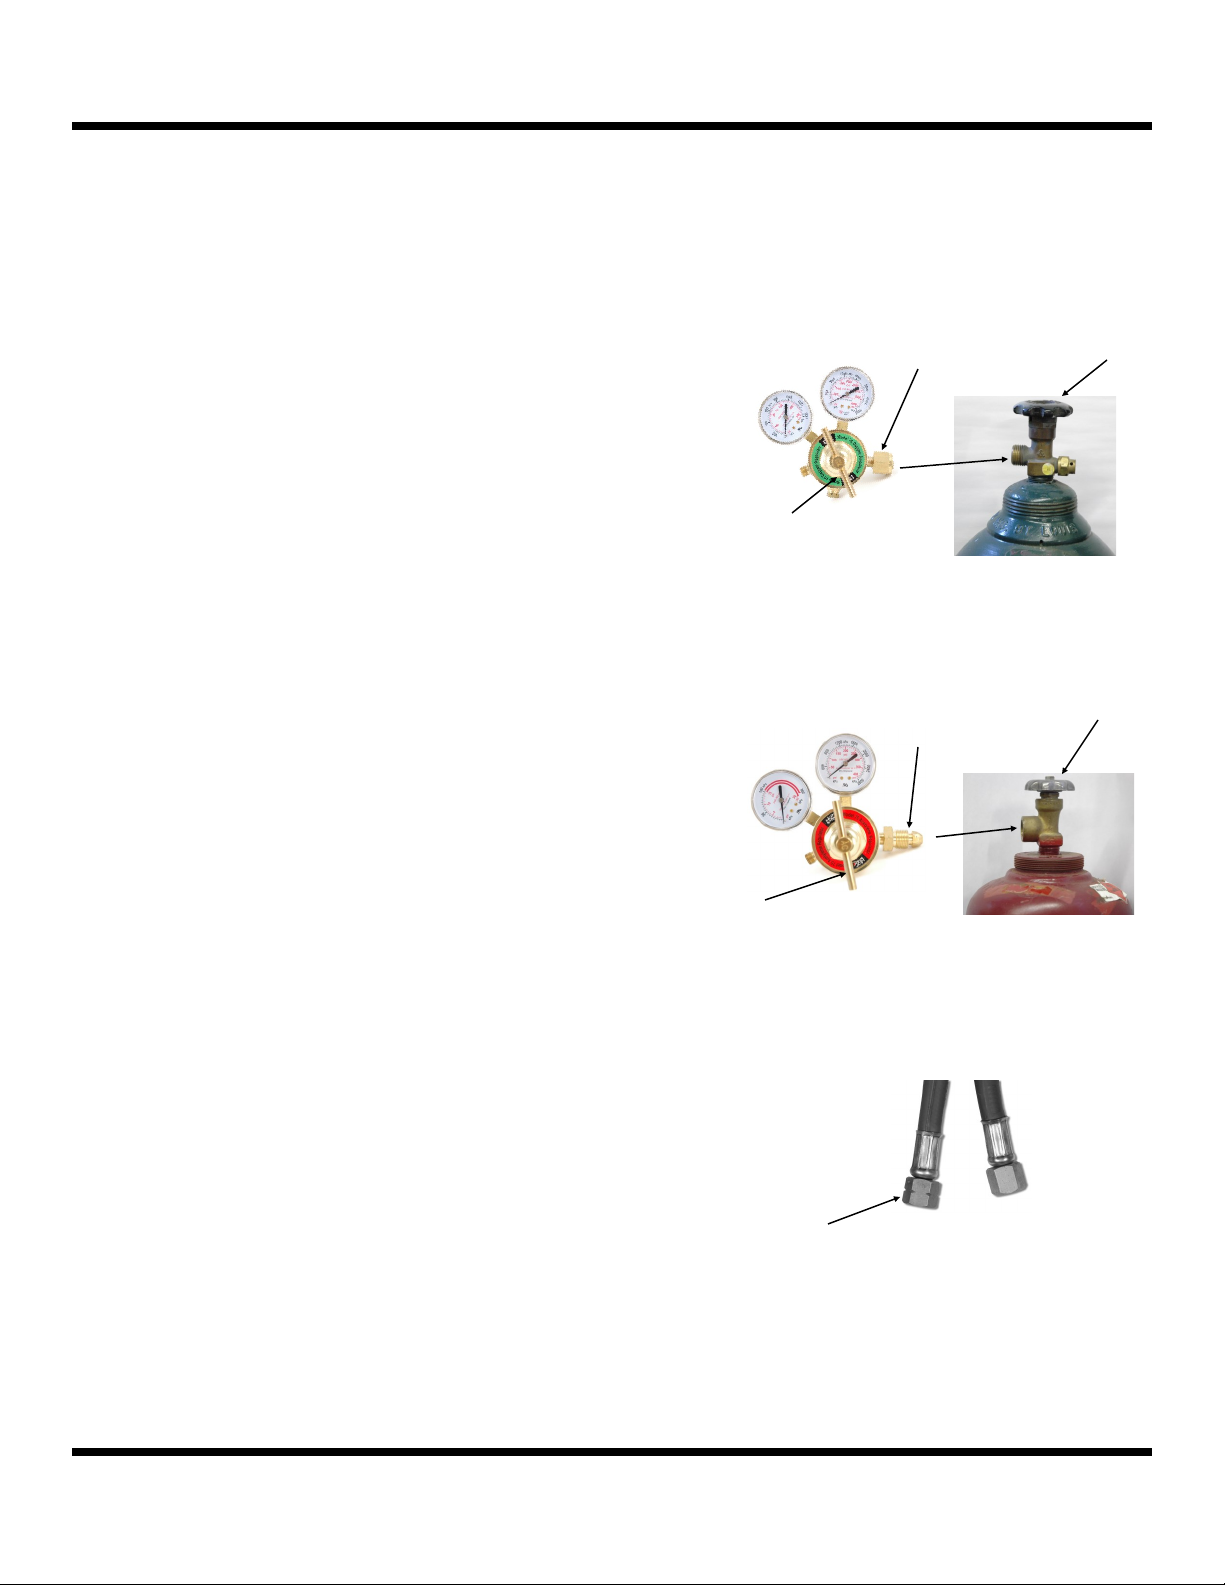
Attaching Regulators and Hoses
1. Secure the tanks to an immovable object such as a
pole or a cart specifically designed to hold the
tanks.
2. Briefly open the oxygen tank valve (1) to remove
any debris that may have accumulated.
3. Wipe the oxygen regulator fitting (2) with a clean
dry cloth and tread the fitting onto the tank valve
and tighten with a wrench. Thread in the regulator
valve lever (3).
4. Very briefly open the acetylene tank valve (4) to
remove any debris that may have accumulated.
5. Wipe the acetylene regulator fitting (5) with a
clean dry cloth and thread the fitting onto the tank
valve and tighten with a wrench. Thread in the regulator valve lever (6).
6. Using compressed air; blow out the hoses prior to
using them for the first time.
7. Attach the hoses to the regulators; green to the oxygen and red to the acetylene and tighten with a
wrench.
8. Attach the other end of the hose to the appropriate
fittings on the torch handle and tighten with a
wrench.
Note: The acetylene hose has left han d (rever se)
treads and is marked with notches in the fitting (7).
3
Oxygen
Regulator
6
Acetylene
Regulator
7
2
Oxygen Tank
Valve
5
Acetylene Tank
Valve
Hose Fittings
1
4
KDAR Com- 4
Page 6

Installation & Setup
It is important that all fittings have been tightened
with a wrench by this point.
Insure the tank valves, regulators valves and torch
handle valves are turned to the off position.
Opening Valves
1. Attach the welding tip and tighten with a wrench.
2. Slowly open the oxygen cylinder valve to allow
oxygen to flow to the regulator. Once the regulator begins to register pressure, open the valve an
additional 1 to 1 1/2 turns.
Note: This must be done slowly, as a sur ge of
pressure could damage the regulator diaphragm.
3. Slowly open the acetylene tank valve. Open slowly and not more then 1 turn.
4. Check for leaks. Leaks can not be seen, therefore,
use soapy water on all connection points to insure
there are no leaks.
Setting Working Pressures—Welding
WARNING
While setting working pressure gases
will be released from the torch. It is important that no open flame or other heat
source is present during this operation.
1. Attach the welding tip to the end of the torch handle opposite the hose attachment and tighten with
a wrench.
Note: Consult the char t on page 9 for the appr opriate tip and working pressures for the thickness of
the metal being used.
2. Open the acetylene control knob (1) on the torch
handle by turning it counter-clockwise. Turn the
control lever on the acetylene regulator until the
desired working pressure is reached. Once the
working pressure is reached turn off the control
knob on the torch handle. The regulator gauge
reading may increase slightly.
3. Open the oxygen control knob (2) on the torch
handle by turning it counter-clockwise. Turn the
control lever on the oxygen regulator until the
desired working pressure is reached. Once the
working pressure is reached turn off the control
knob on the torch handle. The regulator gauge
reading may increase slightly.
Note: The VTK-MD is equipped with single stage
regulators and as such the working pressure may
need to be adjusted as the gas pressure in the tanks
decreases.
2
1
WARNING
Prior to lighting the torch make sure the
hoses are behind the operator and that
there is no chance of them being hit by a
hot spark or slag.
KDAR Company 5
Page 7

Operation
WARNING
At this point the operator should be wearing appropriate protective clothing such as
gloves and goggles.
Lighting the Torch
1. Open the acetylene control knob on the torch handle just enough to let some gas flow.
2. Holding the striker close to the welding tip
squeeze it a few times to create the sparks required to light the acetylene.
Note: A oxy-acetylene torch should NEVER be lit
with oxygen present in the mixture.
Adjusting the Flame
1. If the acetylene is set too high the flame will be a
few inches away from the tip. Reduce the amount
of acetylene by turning the acetylene control knob
counter clockwise.
2. When the flame is about 8—10 inches long and
only has a small amount of black smoke; begin to
introduce oxygen by turning the oxygen control
knob clockwise.
3. As oxygen is added the flame will turn from a
yellow-orange to a whitish color and flame will
have three distinct cones (Figure 1). This is called
a carburizing flame and is not hot enough for
welding.
4. As oxygen is added to the mix the acetylene
feather will shrink and disappear into the cone
(Figure 2). This a neutral flame and is ideal for
welding.
5. If additional oxygen is added the cone will become shorter and fuzzy (Figure 3). This is a oxidizing flame and will cause breakdowns in the
material being welded and the weld itself.
Once a neutral flame has been achieved the torch
is ready for welding.
Heat Envelope
Acetylene
Feather
Beginning
Figure 1
Figure 2
Short Heat Envelope
Figure 3
of Cone
Heat Envelope
Sharp,
Bright Cone
Short, Fuzzy
Cone
KDAR Company 6
Page 8

Operation
Shutting Down
1. Using the acetylene control knob turn off the
flow of acetylene to the welding tip. This will
allow oxygen to continue to flow and will insure
any debris that may be in the orifice is blown
out.
2. Turn off the oxygen using the oxygen control
knob on the torch handle.
3. If shutting down for only a short period of time,
close the tank valve on both the acetylene and
oxygen and leave the hoses filled with gas.
4. If shutting down for a longer period of time,
close the tank valve on both the acetylene and
oxygen.
5. Bleed the acetylene line by opening the acetylene control knob on the torch handle. Watch the
regulator gauge, it should move to reading zero.
6. Close the acetylene control knob on the torch
handle.
7. Bleed the oxygen line by opening the oxygen
control knob on the torch handle. Watch the regulator gauge, it should move to reading zero.
8. Finally release the pressure on the regulator diaphragm by opening the regulator valve until little
or no pressure is felt. This will significantly improve the life of the regulator.
Setting Working Pressures—Cutting
WARNING
While setting working
pressure gases will be released from the
torch. It is important that no open flame
or other heat source is present during this
operation.
Note: At this poin t the tanks should be tur ned off
and both the acetylene and oxygen lines cleared of
gas.
1. Remove the welding tip from the torch handle
and attach the cutting head. Tighten with a
wrench.
2. Insure that the both the acetylene and oxygen
control knobs on the torch handle are closed
(clockwise).
3. Insure the oxygen control knob (1) on the cutting
head is closed (clockwise).
1
4. Select the appropriate cutting tip for the material
being cut and attach it to the cutting head (the
VTK-MD is shipped with a #1 tip assembled to
the cutting head). Tighten with a wrench.
Note: The char t on page 9 can be used as a
guide for selecting the correct tip for the job.
5. Close (counter clockwise) both the acetylene and
oxygen regulator valves.
6. Slowly open the oxygen cylinder valve to allow
oxygen to flow to the regulator. Once the regulator begins to register pressure, open the valve an
additional 1 to 1 1/2 turns.
Note: This must be done slowly, as a sur ge of
pressure could damage the regulator diaphragm.
7. Open the oxygen regulator until the regulator
reaches the desired working pressure.
Note: Wor king pressur e char ts ar e found on
page 9.
KDAR Company 7
Page 9

Operation
8. Check all connections for leaks. Leaks can not
be seen, therefore, use soapy water on all connection points to insure there are no leaks.
9. Open the oxygen control knob on the torch handle two full turns. No oxygen should flow at this
time because the oxygen flow is controlled by
the valve on the cutting head.
10. Insure oxygen flows by turning the control knob
on the cutting head a quarter of turn. Quickly
close the valve after confirming oxygen flow.
11. Press the oxygen cutting lever (1) briefly to confirm a stream of oxygen flows from the center
hole in the cutting tip.
1
12. Slowly open the acetylene tank valve. Open
slowly and not more then 1 turn.
13. Open the acetylene regulator until the regulator
reaches the desired working pressure.
Note: Wor king pressur e char ts ar e found on
page 9.
14. Briefly open the acetylene control knob on the
torch handle to confirm acetylene is flowing.
15. Check all connections for leaks using soapy water.
Lighting the Torch
WARNING
Prior to lighting the torch make sure the
hoses are behind the operator and that
there is no chance of them being hit by a
hot spark or slag.
At this point the operator should be wearing appropriate protective clothing such as
gloves and goggles.
1. Open the acetylene control knob on the torch
handle just enough to let some gas flow about a
quarter turn.
2. Holding the striker close to the cutting tip
squeeze it a few times to create the sparks required to light the acetylene.
Note: A oxy-acetylene torch should NEVER be lit
with oxygen present in the mixture.
Adjusting the Flame
1. Open the oxygen valve on the cutting head.
2. Develop a neutral flame at the preheat holes
(Figure 4) that results in a cone about 1/8th inch
long. This is accomplished by alternately increasing the flow of acetylene and then oxygen.
Cutting Hole
Preheat Holes
Figure 4
KDAR Company 8
Page 10

Operation
3. Press the oxygen cutting lever briefly to insure
oxygen is flowing through the cutting hole.
4. Further adjustment may now be needed to insure
a neutral flame in the preheat holes. Generally a
reduction in oxygen.
5. The torch is ready for cutting.
Shutting Down
1. Using the acetylene control knob on the torch
handle turn off the flow of acetylene to the welding tip. This will allow oxygen to continue to
flow and will insure any debris that may be in
the preheat holes is blown out.
2. Press the oxygen cutting lever to insure debris is
cleared from the cutting hole.
3. Turn off the oxygen using the oxygen control
knob on cutting head.
3. If shutting down for only a short period of time,
close the tank valve on both the acetylene and
oxygen tank and leave the hoses filled with gas.
4. If shutting down for a longer period of time,
close the tank valve on both the acetylene and
oxygen tanks.
5. Bleed the acetylene line by opening the acetylene control knob on the torch handle. Watch the
regulator gauge, it should move to reading zero.
6. Close the acetylene control knob on the torch
handle.
7. Bleed the oxygen line by opening the oxygen
control knob on the cutting head. Watch the regulator gauge, it should move to reading zero.
8. Finally release the pressure on the regulator diaphragm by opening the regulator valve until little
or no pressure is felt. This will significantly improve the life of the regulator.
Welding Nozzle Chart
Oxygen Pressure
Metal
Thickness
Up to 1/32" 000 3 5 3 5
1/16"-3/64" 00 3 5 3 5
1/32"-5/64" 0 3 5 3 5
3/64"-3/32" 1 3 5 3 5
1/16"-1/8" 2 3 5 3 5
1/8"-3/16" 3 4 7 3 6
3/16"-1/4" 4 5 10 4 7
1/4"-1/2" 5 6 12 5 8
1/2"-3/4" 6 1 14 6 9
3/4"-1 1/4" 7 8 16 8 10
Tip
Size Min. Max. Min. Max.
P.S.I.G.
Acetylene Pressure
P.S.I.G.
Cutting Tip Chart
Oxygen Pressure
Metal
Thickness
1/8" 000 20 25 3 5
1/4" 00 25 30 3 5
3/8" 0 25 30 3 5
1/2" 0 30 35 3 5
3/4" 1 30 35 3 5
1" 2 35 40 3 7
2" 3 40 45 4 8
3" 4 40 50 5 11
4" 5 45 55 6 13
5" 5 45 55 6 13
6" 6 45 55 8 14
8" 6 45 55 8 14
Tip
Size Min. Max. Min. Max.
P.S.I.G.
Acetylene Pressure
P.S.I.G.
Heating Nozzle Chart
Acetylene
Pressure
Range
Tip
P.S.I.G. P.S.I.G.
Size
4 6-10 8-12 6 20 7 22
6 8-12 10-15 14 40 15 44
8 10-15 20-30 30 80 33 88
10 12-15 30-40 40 100 44 110
Oxygen
Pressure
Range
Acetylene Cubic
Feet/Hour
Min. Max. Min. Max.
Oxygen Cubic
Feet/Hour
Note: Pr essur e settings ar e appr oximate for 25’
hose length, an increase of about 1 psi per additional
25’ is required.
KDAR Company 9
Page 11

Maintenance and Additional Products
General Maintenance
1. Prior to EVERY use, inspect hoses for damage.
Note: Never tr y to r epair damaged gas hoses.
Damaged hoses should be replaced.
2. Prior to EVERY use, check all connections for
leaks.
3. Clean splatter and slag off of the outside of
welding and cutting tips as required.
4. Regularly clean tip holes with a welding tip
cleaner (Hot Max P/N 22034 or 24175).
Note: Never use oil, grease, pipe dope or Teflon
tape on any part of the HTK-MD equipment.
Notes:
KDAR Company 10
Page 12

Warranty
KDAR Company, and its affiliates, warrants that
all torch kit components (except hoses) covered
under this warranty are free from defects in material and workmanship for two years from the date
of purchase. KDAR also warrants that all hose
assemblies are free from defects in material and
workmanship for 90 days from the date of purchase. This warranty is extended to the original
purchaser who uses the product in a consumer
application (personal, residential or household
usage). All torch kits covered under this limited
warranty which are used in commercial applica-
tions (i.e. income producing) are warranted to be
free from defects in material and workmanship
for 90 days from the date of original purchase.
The products covered under this warranty are the
VTK-HD-A, VTK-HD-B, VTK-MD, HTK-MD.
KDAR Company, and its affiliates, will repair or
replace, at KDAR’s sole discretion, parts found to
be defective in material or workmanship within
the warranty period. Warranty service will be
scheduled according to the normal work flow and
business hours of the service center doing the
work as well as the availability of replacement
parts. All decisions from KDAR Company regarding this limited warranty shall be final.
Original Purchaser’s Responsibility:
1. Retain the original cash register receipt as
proof of purchase.
2. Follow manual instructions regarding the care
and operation of your welder.
3. If warranty work is required, DO NOT RE-
TURN THIS TORCH KIT TO THE RETAILER. Contact KDAR Company for in-
structions. Visit www.hotmaxtorches.com or
call KDAR Company M-F 8AM-5PM CST to
locate the nearest Authorized Service Center.
Not Covered:
1. Transportation charges for sending or delivering the welder to the Authorized Service Center or returning the repaired or replacement
welder back to the customer. These charges are
the responsibility of the customer.
2. Damages caused by ordinary wear, abuse, rain,
freeze damage, negligence, accident or failure
to operate or maintain the torch kit in accordance with the instructions in the operator’s
manual supplied with the torch kit.
3. Damage caused by unauthorized repair or al-
terations.
Exclusions and Limitations:
KDAR Company makes no other warranty of
any kind, express or implied. Implied warranties, including warranties of merchantability
and of fitness for a particular purpose, are
hereby disclaimed. The warranty service described above is the exclusive remedy under
this warranty; liability for incidental and conse-
quential damages is excluded to the extent per-
mitted by law.
This warranty gives you specific legal rights, and
you may have other rights which vary from state to
state. Some states do not allow a disclaimer of implied warranties, or the exclusion of incidental and
consequential damages, so the above disclaimers
and exclusions may not apply to you.
For warranty service or to obtain service parts
or accessories:
Call: (314) 692-8555 M-F 8-5 PM, CST
Visit: www.hotmaxtorches.com
Write: KDAR Company
1 Mulch Lane
St. Louis, MO 63044
KDAR Company
1 Mulch Lane
St. Louis, MO 63044
Phone: 314-692-8555 Fax: 314-692-8578
 Loading...