

Page 1
3-16-2015
Installation Instructions for Model #123 -Only for Snowmobiles or ATVs
This model has three (3) wires for each grip. They can be used as a direct replacement on any Ski-Doo,
Polaris, or Arctic Cat machine that originally came fitted with a 3-wire 12 volt heated grip, although wire
colors may NOT match, we explain later. NOT for Yamaha snowmobiles because they use 18v for heated
grips but can be used on Yamaha ATVs if they offer 12 volts. Can be used on any ATV brand with 7/8" bars
and a thumb-throttle. HOT GRIPS® Manufactured under one or more of the following Patents: USA: 4,471,209 4,937,429 4,990,753 and
Canada 1,299,621 additional Patent Pending.
Read through entire instructions before starting installation. If you can NOT comfortably
install this product, hire a professional mechanic to do it. Hot Grips® model # 123 can be installed on
any snowmobile with 7/8" handlebars and a 12 volt electrical system capable of powering a headlight. It must have a
thumb-throttle, NOT a twist throttle. Some electrical systems can NOT handle the power requirements of heated grips
and the headlights at the same time.
Twist throttle: If you have modified your sled's thumb-throttle to a motorcycle twist- throttle, then
you must use one of our motorcycle HOT GRIPS® kits instead. The difference with the motorcycle
kits is that the twist throttle grip's inside diameter is 1.000" diameter instead of .875" and the shape
of the grips inboard end is different, adding more inboard rubber cushioning for your hand, a
characteristic typical of motorcycles.
Each grip is 100% (NOT lot sample tested) pre-tested at the factory for correct resistance in ohms, but you
can pretest the grips too, using a volt-ohm-meter .
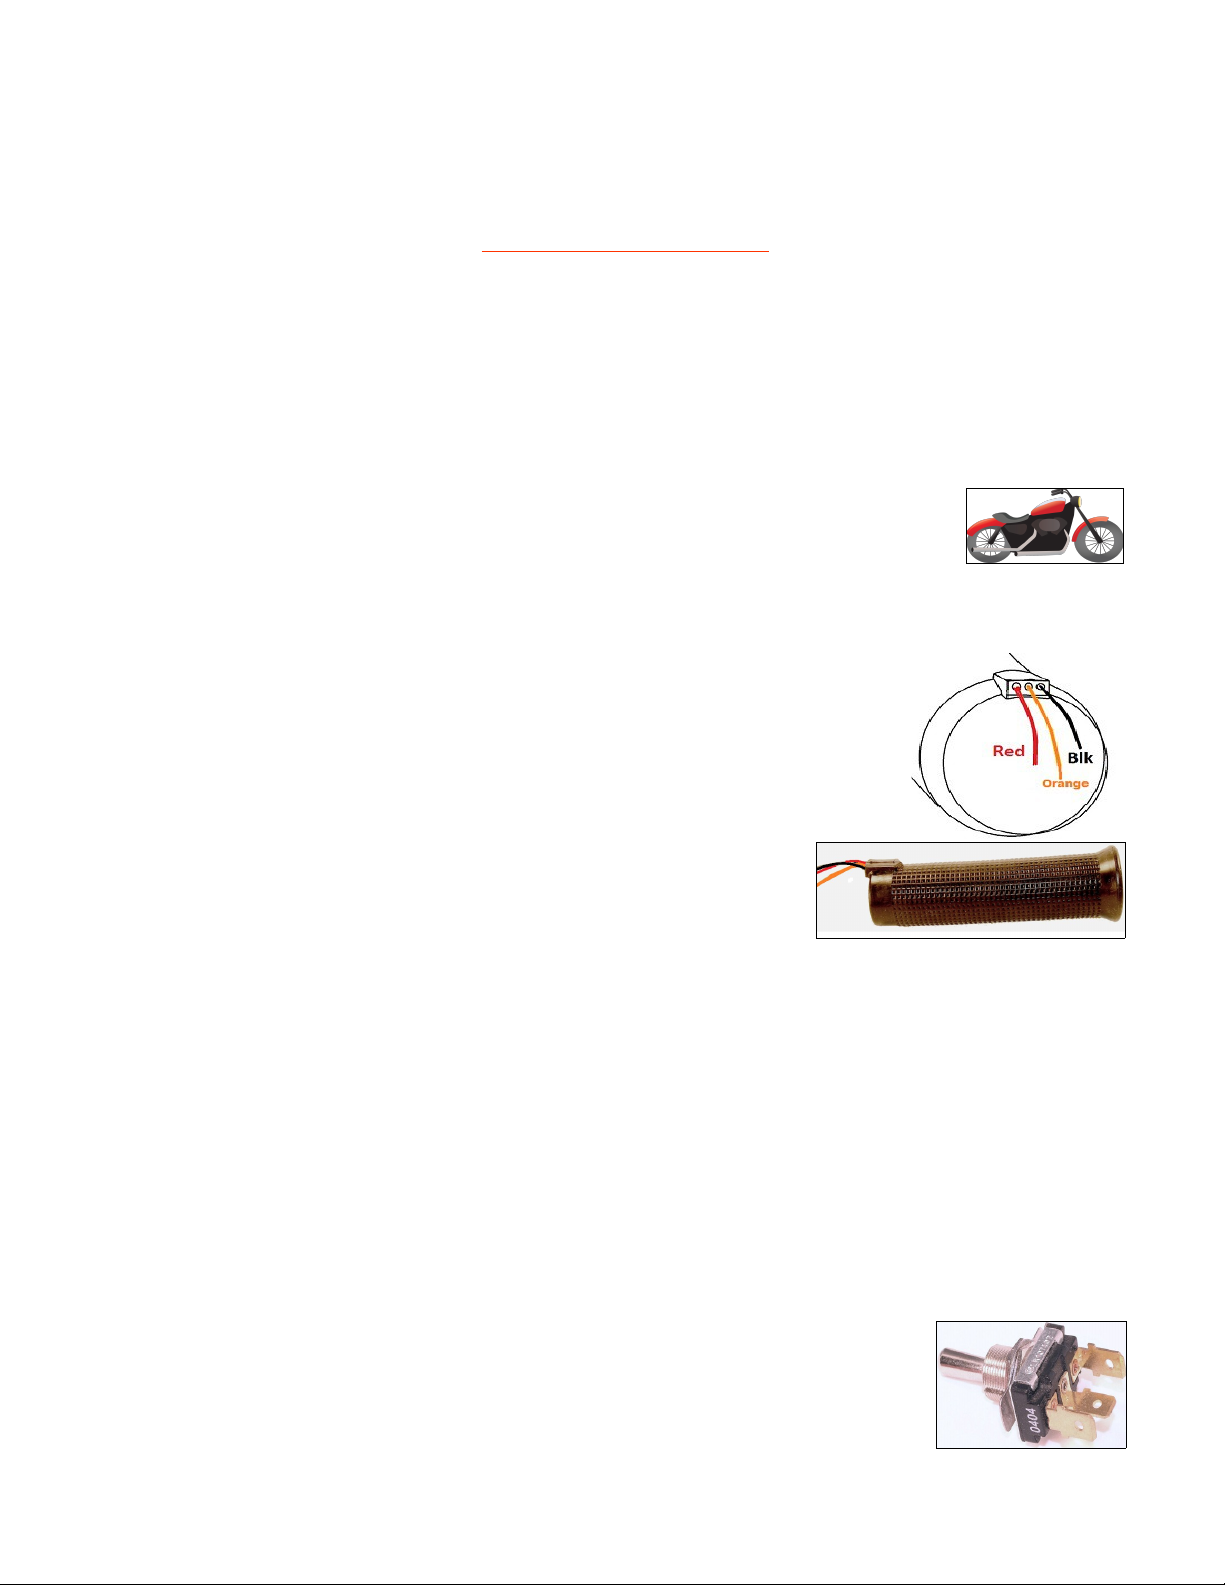
IDENTIFYING GRIP WIRES: With a grip’s wires aiming at you and at 12 o'clock, the right
wire is Black and is your common GROUND. The middle wire is Orange LOW, left wire is
Red HIGH
You can measure their resistance in ohms:
Black = ground common wire
Orange = low heat. Orange to black = approx. 14.5 to 15 ohms.
Red = high heat. Red to black = approx. 9 to 10 ohms
You may temporarily wire the grips and briefly test on a 12 volt car battery. Do
NOT leave them unattended, and do NOT heat them up for more than a few
minutes, because without the heat sink effect from the metal handlebars, they
may be damaged.
PREPARATION: Remove old grips & factory adhesive residue on bars with solvent or with edge of a coarse metal
file. Roughening the last 5 inches of your handlebars with coarse sandpaper or the edge of a steel file, will improve
epoxy bonding.
Check grip slides on with little or no force. It is designed to be a loose fit, to have the gap filled with the epoxy. If it is
NOT a loose fit, do NOT force the grip on or you may break it. If force is required then your handlebar diameter isn't
7/8" (.875") and must be filed or abrasively ground down until the grip fits on without force. Some metric handlebars
we have seen are up to .020" diameter oversize. If needed now drill the center-end of one of the grips with any size
small drill bit, to allow the air in the handlebars to escape as the 2nd grip is installed.
Test fit the grip first on the handlebar without epoxy to ensure that the positioning of it does NOT interfere with the
machine’s controls or thumb-throttle. A full length pencil is helpful as a tool to spread well-mixed epoxy inside the grip
interior, and on the handlebar. Use a very light coat, and push the grip on 75% and remove, then redistribute the
epoxy with the pencil and remove excess. Then install grip 100%, and again remove any excess epoxy on the
inboard end. Again be sure the grips do NOT interfere with any of the handlebar controls or the thumb-throttle lever.
Allow to fully cure per the epoxy's instructions, OR BETTER YET quicken the cure by
temporarily wiring thru-out it's movement. Orange = low heat. This is a better technique
because then epoxy will cure in an “expanded state” improving the tight bond. Cure them on
“LOW” heat only. The epoxy will set up firm in 20-40 minutes. Allow grips to cool off, and test
epoxy for hardness at inboard edge where it oozed out. Do NOT twist the grip to test the epoxy
as it is curing, as this will compromise and weaken the epoxy bond.
Page 2
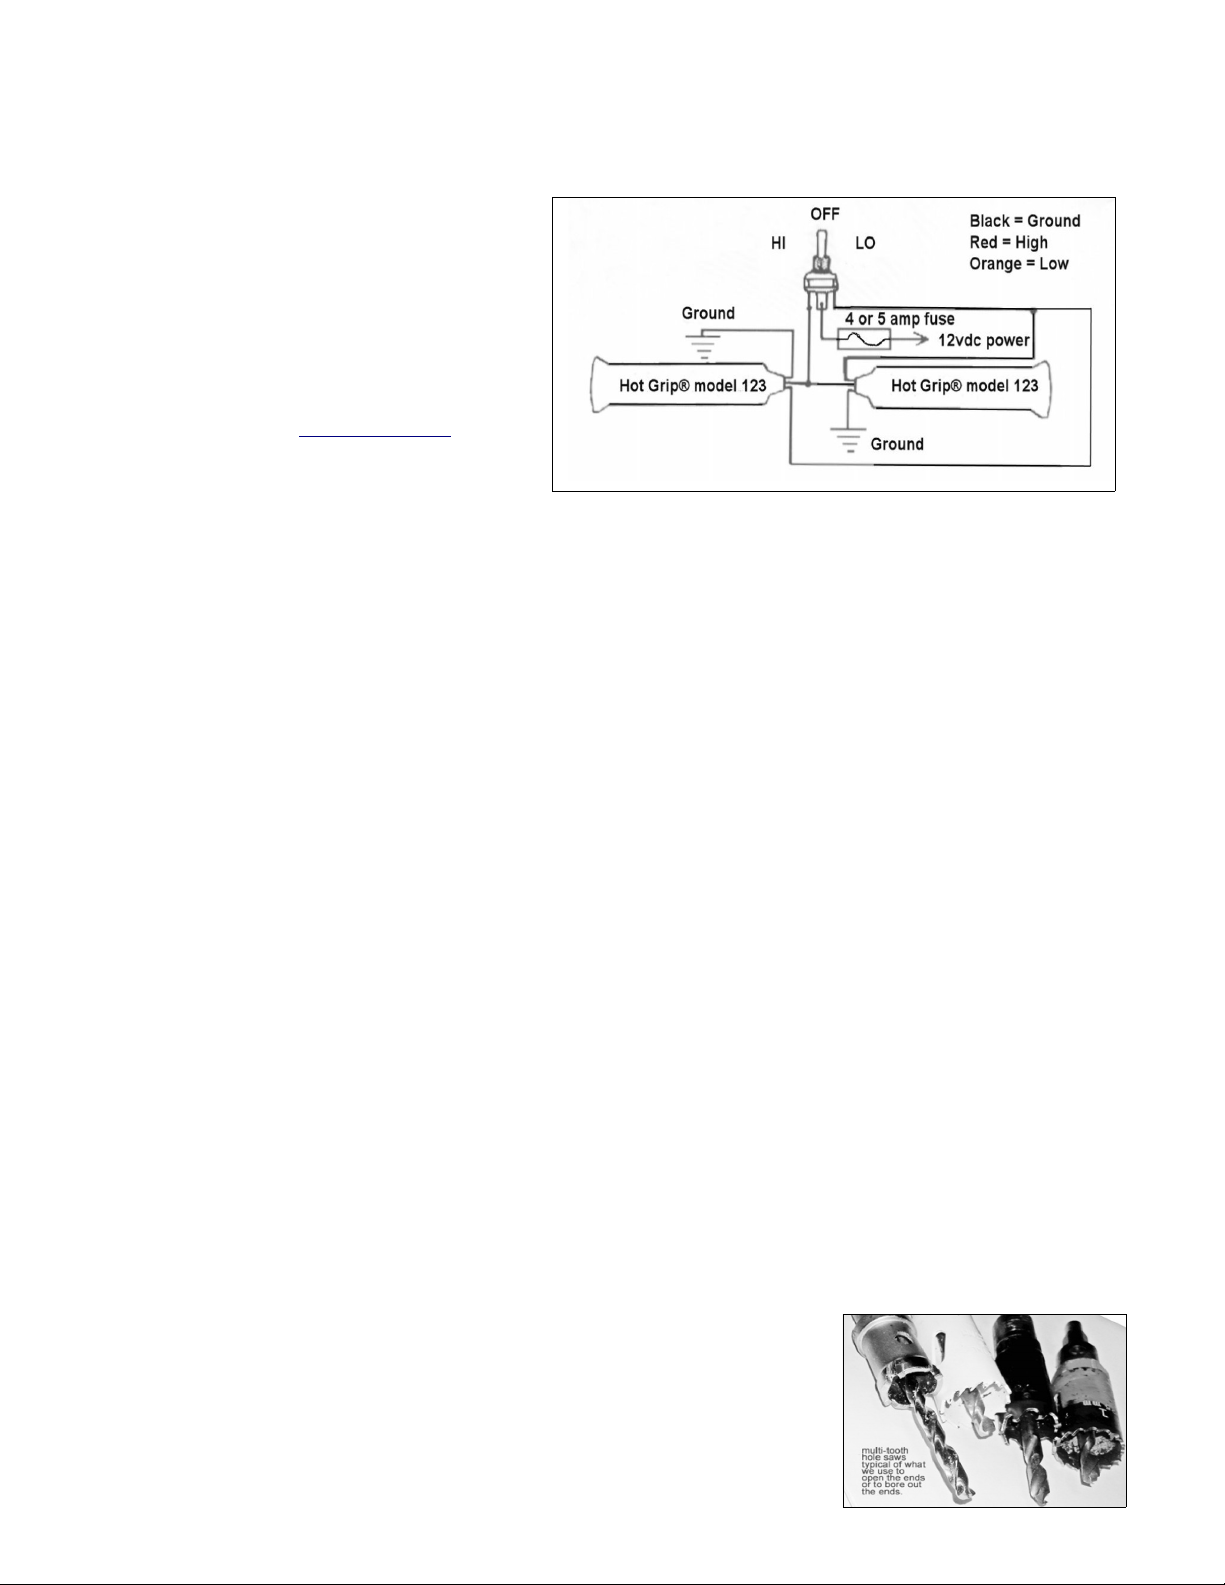
SWITCH: The switch can be located at any convenient practical location for your left hand that doesn't interfere with
safe vehicle operation. (NOTE that the orientation of the wires in our wiring illustration to the "Hi-Lo" switch metal
plate is correct because of the switch's internal pivot action.) Drill a 13mm or 1/2" hole to install switch.
WIRING: Follow the wiring illustration closely. A
good ground is important so be sure to scrape the
paint off the "ground connection" as paint will
create a problem. Ground should be to the engine
or frame, NOT the handlebars, since some of them
are rubber mounted and may NOT give a good
ground connection. Some machines use a wire or
"common-wire ground" instead of "frame-ground"
such as Ski-Doo. Check with your snowmobile or
ATV dealer if in doubt on your specific machine. Or
search on the internet (www.google.com) for your
wiring diagram. Zoom in on the original “grip
heaters”. “hand warmers”, or “grip warmers” to see
their color cods. Be aware they abbreviate such as
BK or BL=black, BR or BN = Brown, O/P = Orange with purple stripe, Y= Yellow, etc. B/Y = Black with yellow stripe.
FUSE: If your machine uses fuses, use your accessory fuse terminal or you can purchase an in-line fuse holder and
use a 3, 4, or 5 amp fuse . A fuse holder and fuse is NOT included in this kit. If your machine uses no fuses at all,
then you don’t need to use one.
POLARIS: Some Polaris snowmobiles must be wired using the machine's AC common “ground” wire to complete the
circuit, rather than a chassis "ground". Always follow our instructions when doing the wiring, and don't use the Polaris
wires that are built into the machine unless you are certain which ones to use (don't phone us on this, we don’t have
the wiring diagrams for any machine). Improper wiring will result in the Hot Grips® NOT working and/or dim lights. If
in doubt, contact your Polaris dealer's service department for assistance, or use the Internet and search online. Most
libraries have internet access.
SKI-DOO: Most Ski-Doo snowmobiles don't use a "chassis-ground" for the grips. Instead, locate a yellow wire and a yellow with
black-stripe wire at the sled's Regulator or Regulator-Rectifier. Use the yellow wire as your power positive wire, and the yellow
with black-stripe as your 'ground-substitute' wire. Do NOT ground to chassis or engine except on older Ski-Doo's that do NOT
have the yellow and yellow with black-stripe wires. Improper wiring will result in the Hot Grips® NOT working and/or dim lights. If
in doubt contact your Ski-Doo dealer's service department for assistance. Some Ski-Doo machines are using other colors for
hi and lo, often the purple stripe means it is their LOW heat.
12vdc POWER SOURCE: Use the vehicle's accessory terminal if available, one that will NOT have voltage when the
engine is off. (Otherwise your battery will be drained if the grips were left on, just as if you left your headlight on.)
Some sled's do NOT have enough electrical power to run both the headlights and heated grips. Ask your dealer's
service department if in doubt. In such a rare case, (usually machines from the mid- 1980's and older) you would
have to turn off switch to LED type headlight and taillight to run the head-light during daylight hours when the heated
grips are on. (Check with your local laws). For safety you should NOT use the heated grips in the dark if it causes
your headlights to dim. Solder all connections. Do NOT be tempted to use the blue commonly available plastic 3M®
Scotch-lok connectors for splicing into wires, as they are the wrong size for our wire, make poor electrical contact &
eventually oxidize and corrode the copper conductors. Cover all connections with heat shrink tubing or electrical
tape.
HEAT CONTROL: The heated grips do NOT have automatic temperature regulation. They rely on the rider to adjust
the heat to "high", "off", or "low" as needed. The grips should NOT be left energized unattended as they might
become too hot. Heat output on a 12 volt regulated system is 15.3 watts per grip on "high" and 9.5 watts per grip on
"low". Current draw is 2.5 amps for the set on "high" and 1.7 amps on "low". Do NOT wire the grips in such a way that
both low and high are energized at the same time, as this would cause them to get
too hot.
OPEN ENDS: Need to open the grip ends? Some sleds have extra end-loop
handles bolted onto the ends of handlebars. The Hot Grips® outboard end may be
drilled out (do NOT use a hack-saw or you will ruin the grip's internal heating wires).
Use a fine-toothed steel hole-saw with a centering pilot drill. Do NOT use a 2-blade
type hole saw or it will grab the rubber and ruin the grip, and possibly cut you. Do
Page 3

NOT drill larger than necessary (max. 7/8" and preferably 3/4") . Warning: Aluminum bolt on "hooks will draw away
the heat like a radiator, so use plastic ones instead to reduce this problem significantly. Aluminum ones will defeat
the heat output significantly so NOT recommended. Do NOT use a 2-blade type wood style hole-saw or it will grab
the rubber and ruin the grip. Do NOT drill larger than necessary (Maximum 7/8” and preferably 3/4”).
EPOXY INSTALLATION ONLY: Obtain a two-part slow-curing epoxy, such as from
www.hotgrips.com or Duro, Devcon, Borden, JB Weld, PoxyWeld, etc. Make sure it is NOT the
quick-cure type, such as a 5-minute epoxy. We need the slow cure (6-8 hours +) because generally
these epoxies are good for service up to 250 degrees F., whereas the 5-minute quick cure type
epoxies are generally good for only 200 degrees. Do NOT use any other method to install. We
have tested everything else, and they don't hold up under the stress and strain, torque loads and heat
that is present. (Do NOT use silicone seal, crazy glue, gasket cement, weatherstrip adhesive,
hairspray, paint etc. None hold under severe riding conditions!)
Resistor: should be mounted only on a metal surface, so that it
acts as a heat sink, to get rid of heat which takes place when the switch is on “Lo”
heat.
CAUTION: IMPORTANT to check for interference with vehicle controls, levers, and throttle operation
before starting or operating vehicle. Correct any interference condition before starting engine.
The wiring diagram has the correct labeling on the High and Low. When the toggle is moved left to High
side, power is fed from center terminal to the horizontal line.
Troubleshooting: www.hotgrips.com Click on Troubleshooting on right menu or go to:
http://hotgrips.com/troubleshooting.php
Email: support@hotgrips.com Tel. Six-zero-three-three-seven-two-six-three-six-three (Jim)
Printed: 3-18-2015. Hot Grips® is a Registered Trademark: USA-2929362 - Canada-TMA304887
Copyright © 2015 All Rights reserved. Hot Grips® Mfg., Inc. -166 Methodist Hill Rd.-Plainfield, NH 03781 USA
 Loading...