

Page 1

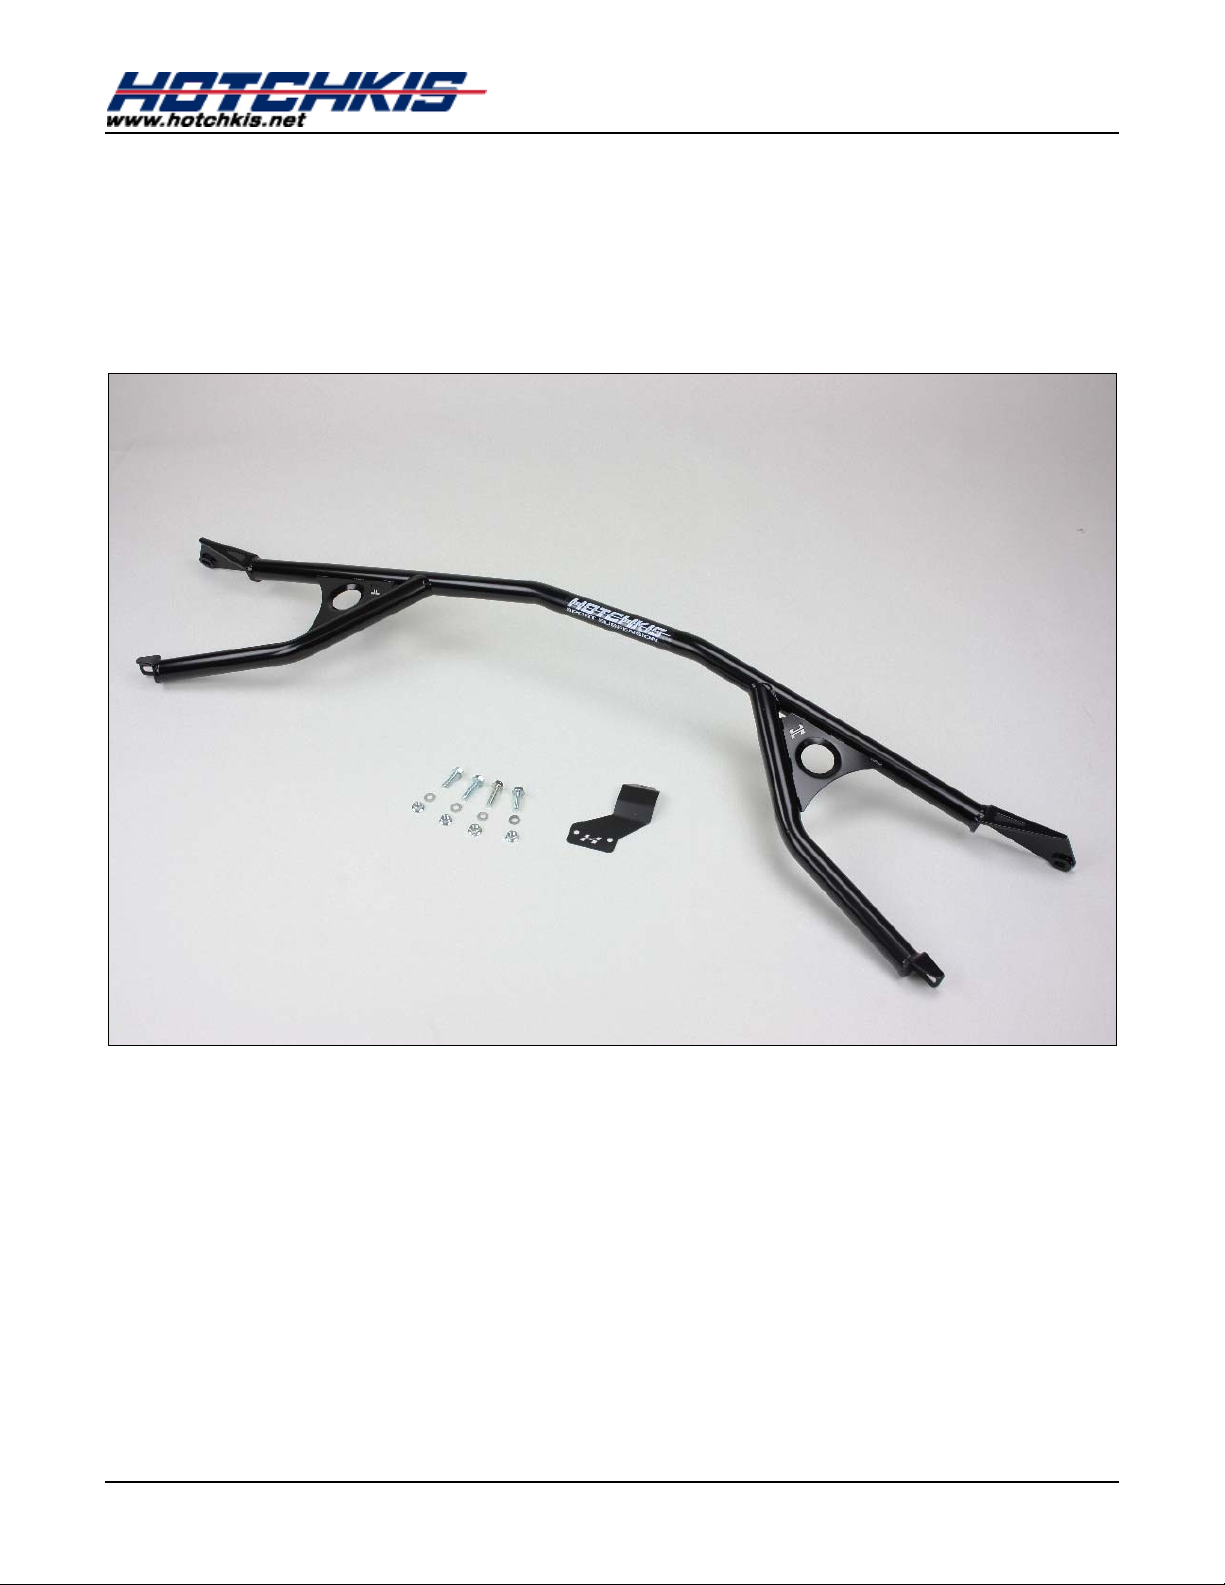
2010 Chevy Camaro
2010 Camaro SS/V6
20104 Underbody Brace
Installation Instructions
Thank you for your purchase of this Hotchkis Performance product. Your Underbody Brace set
was designed with the performance and durability you’ve come to expect from Hotchkis
Performance.
Note: Please read the entire installation instructions before starting. Having the right tools
will ensure a smooth install process.
Hotchkis Performance LLC. 1
Page 2
2010 Chevy Camaro
UNDER BODY BRACE INSTALLATION
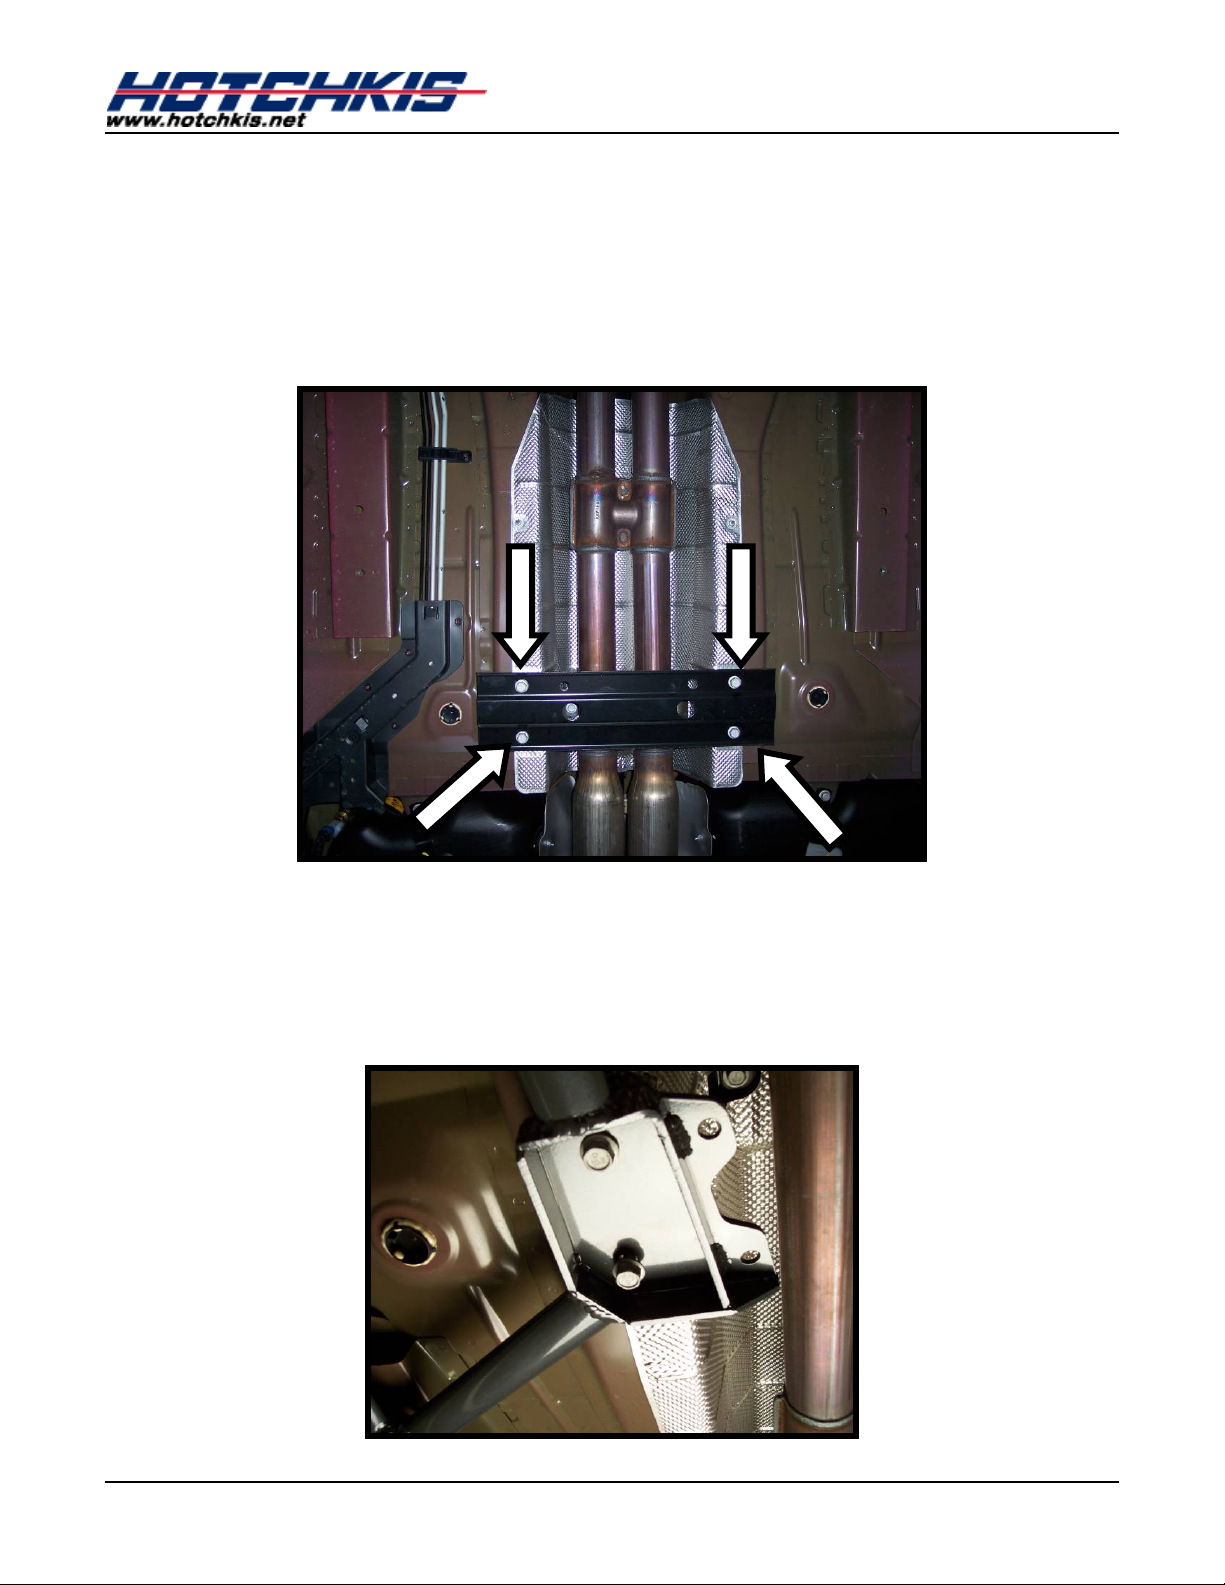
1. Safely raise the vehicle and Unbolt the stock center plate.
NOTE: This is the only stock part that needs to be removed before installation. These
bolts will be used in the installation.
2. Install either side of the under brace by first placing the center mounting
bracket holes where the stock plate was removed from. Use the stock bolts
and the included LARGE washers for this bracket.
NOTE: Do not tighten these bolts yet. Just start the bolts in the holes so that the brace
is supported. This will make it easier to bolt up the other brackets.
Hotchkis Performance LLC. 2
Page 3
2010 Chevy Camaro
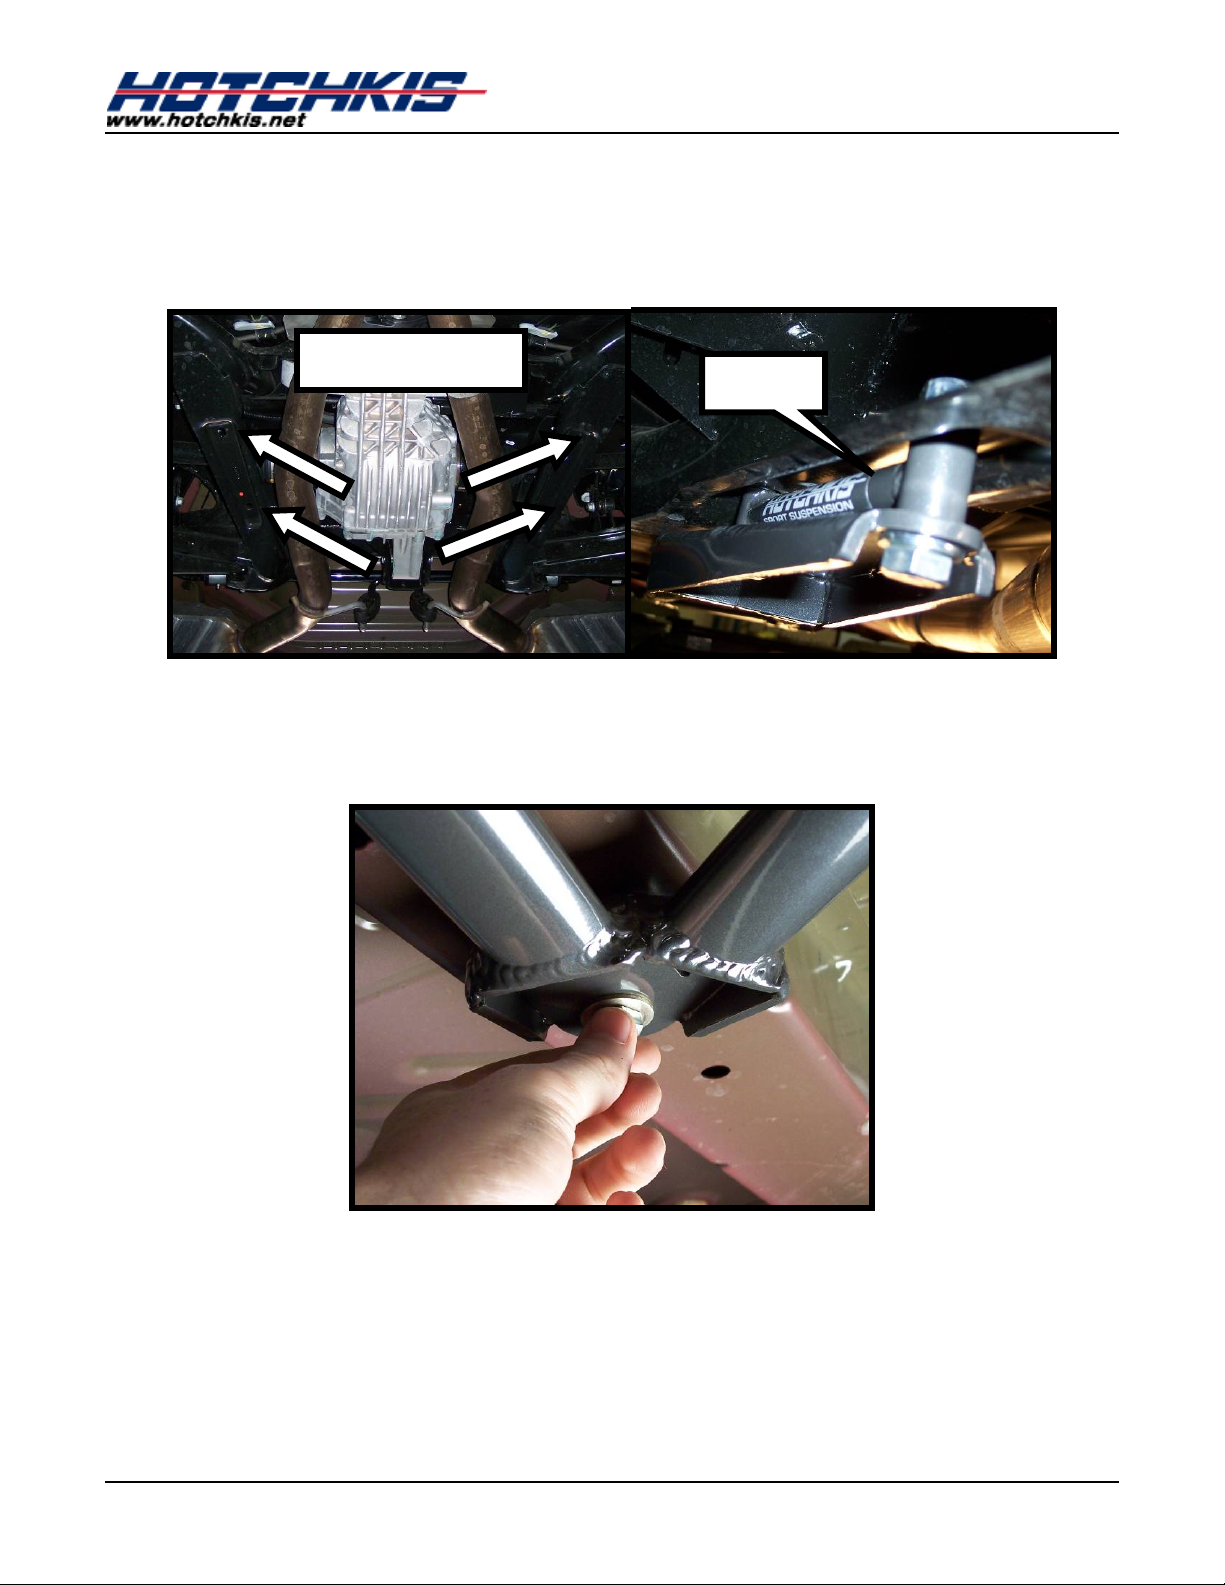
3. Now bolt the rear bracket onto the rear subframe using the holes that are
already existing. Place the provided spacers between the frame and the
brace as shown. Install the 12mm bolt from the bottom up and make sure to
use the small washers on the head and nut ends.
EXISTING HOLES
SPACER
4. The Front bracket should now line up with its hole. Use the provided hex bolt
and LARGE washer on that bracket.
NOTE: Remember, do not tighten any bolts yet. Only start each bolt.
5. Now install the other side following the previous instructions.
Hotchkis Performance LLC. 3
Page 4
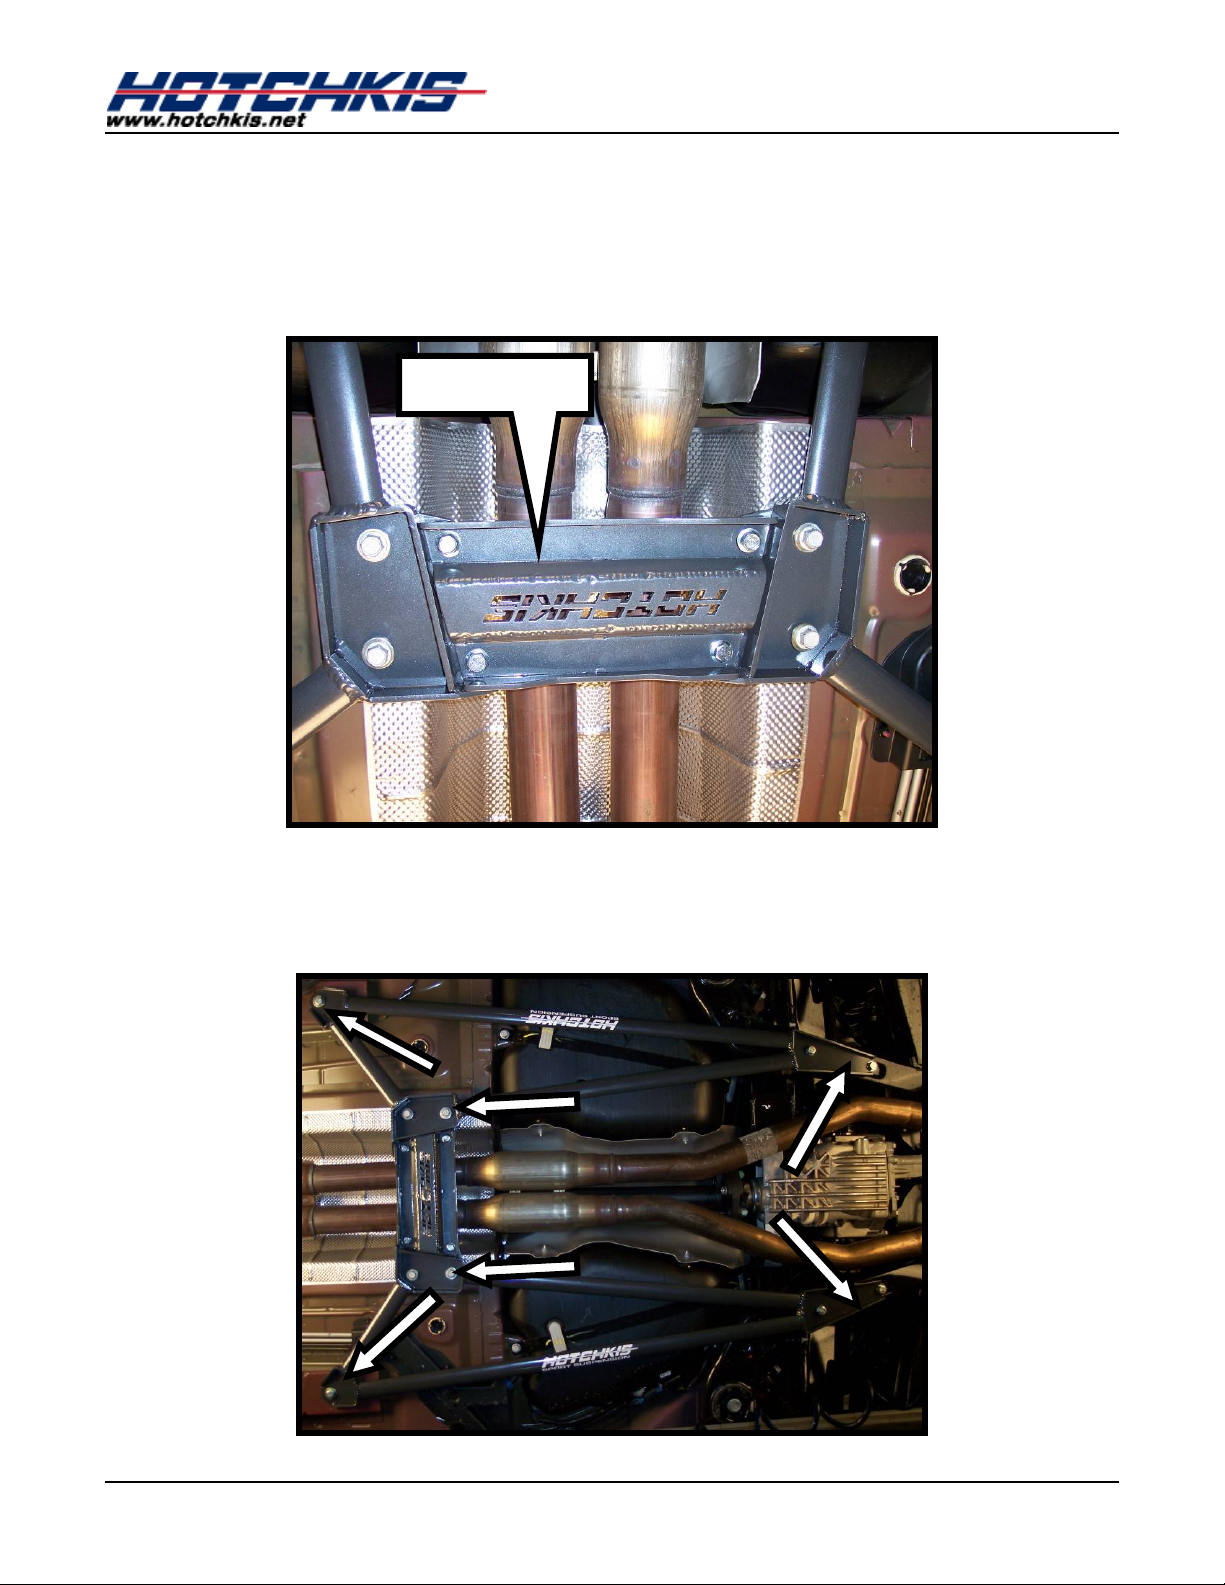
6. Once both sides are in, bolt on the center bridge plate using the provided
flange bolts. Install the 10mm flange bolt from the bottom up and make sure
to use the lock washer on the nut side.
2010 Chevy Camaro
NOTE: Do not completely tighten the bolts yet.
BRIDGE PLATE
7. Once everything has been bolted on, begin tightening the bolts on the
outside main braces. Tighten M10 bolts to 50 ft-lbs and M12 bolts to 90 ftlbs.
Hotchkis Performance LLC. 4
Page 5
2010 Chevy Camaro
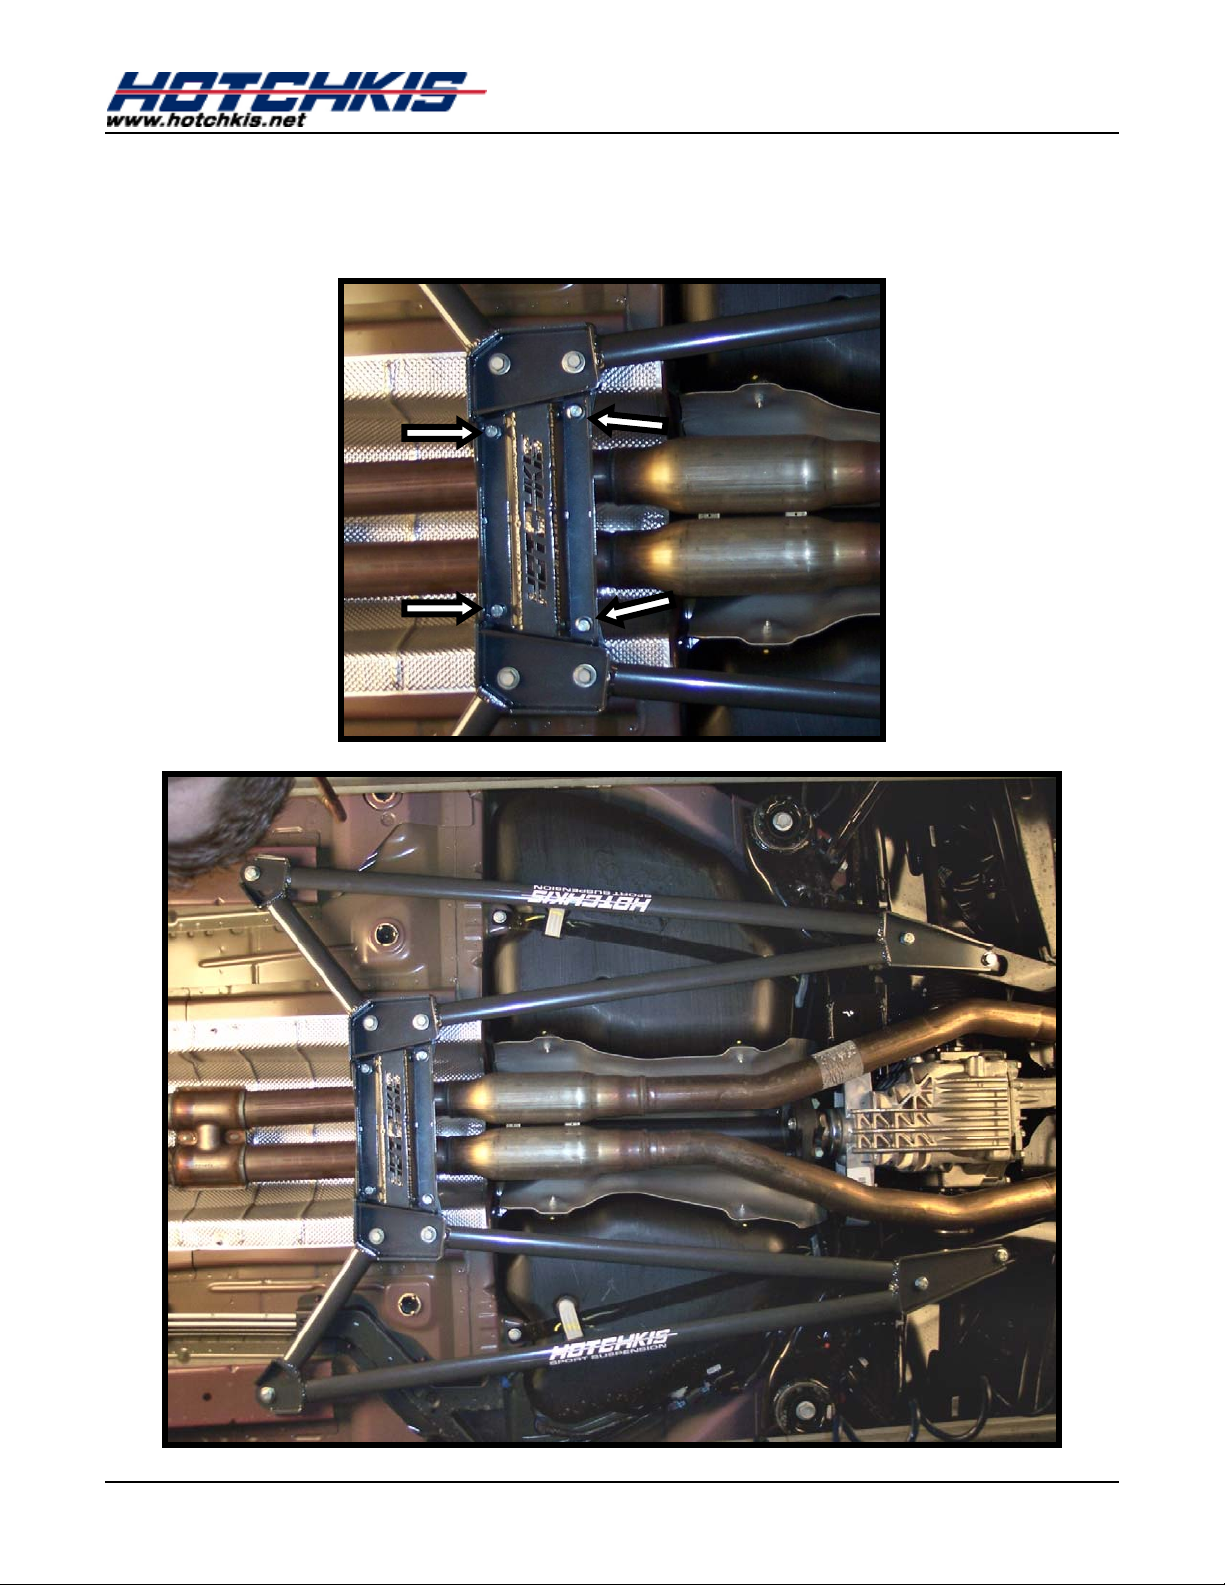
8. With the two main braces tight, now tighten the bridge plate and your under
brace is ready for the road. Tighten bridge plate bolts to 50 ft-lbs.
Hotchkis Performance LLC. 5
Page 6
2010 Chevy Camaro
2010 Camaro SS
20109 Strut Brace
Installation Instructions
Thank you for your purchase of this Hotchkis Performance product. Your Strut Brace set was designed with the
performance and durability you’ve come to expect from Hotchkis Performance.
Note: Please read the entire installation instructions before starting. Having the right tools will ensure a smooth
install process.
Hotchkis Performance LLC. 1
Page 7

2010 Chevy Camaro
Supercharger Note:
If you have the Magnuson supercharger (Magna Charger) installed on your vehicle, you will
need to relocate the intercooler reservoir tank using the included Hotchkis bracket.
The hotchkis bracket resembles the Magnuson bracket, but it positions the reservoir down
and towards the rear to gain clearance for the brace. Reuse the bracket hardware from the
Magnacharger kit. Undo the 3 bolts holding the reservoir to the bracket. Remove the single
nut that holds the bracket to the engine. Replace Magnuson bracket with Hotchkis bracket.
Reuse the nut to secure the bracket to the engine. Reuse 2 of the 3 bolts that hold the
reservoir to the bracket. Proceed to the strut brace installation.
Hotchkis Performance LLC. 2
Page 8
T
T
2010 Chevy Camaro
STRUT BRACE INSTALLATION
1. The first step for this installation is to remove the front struts to gain more room to
drill our strut brace mounting holes. There are 4 holes total that will be drilled.
Jack the front of the car up and place the car on jack stands. Remove the front
wheels.
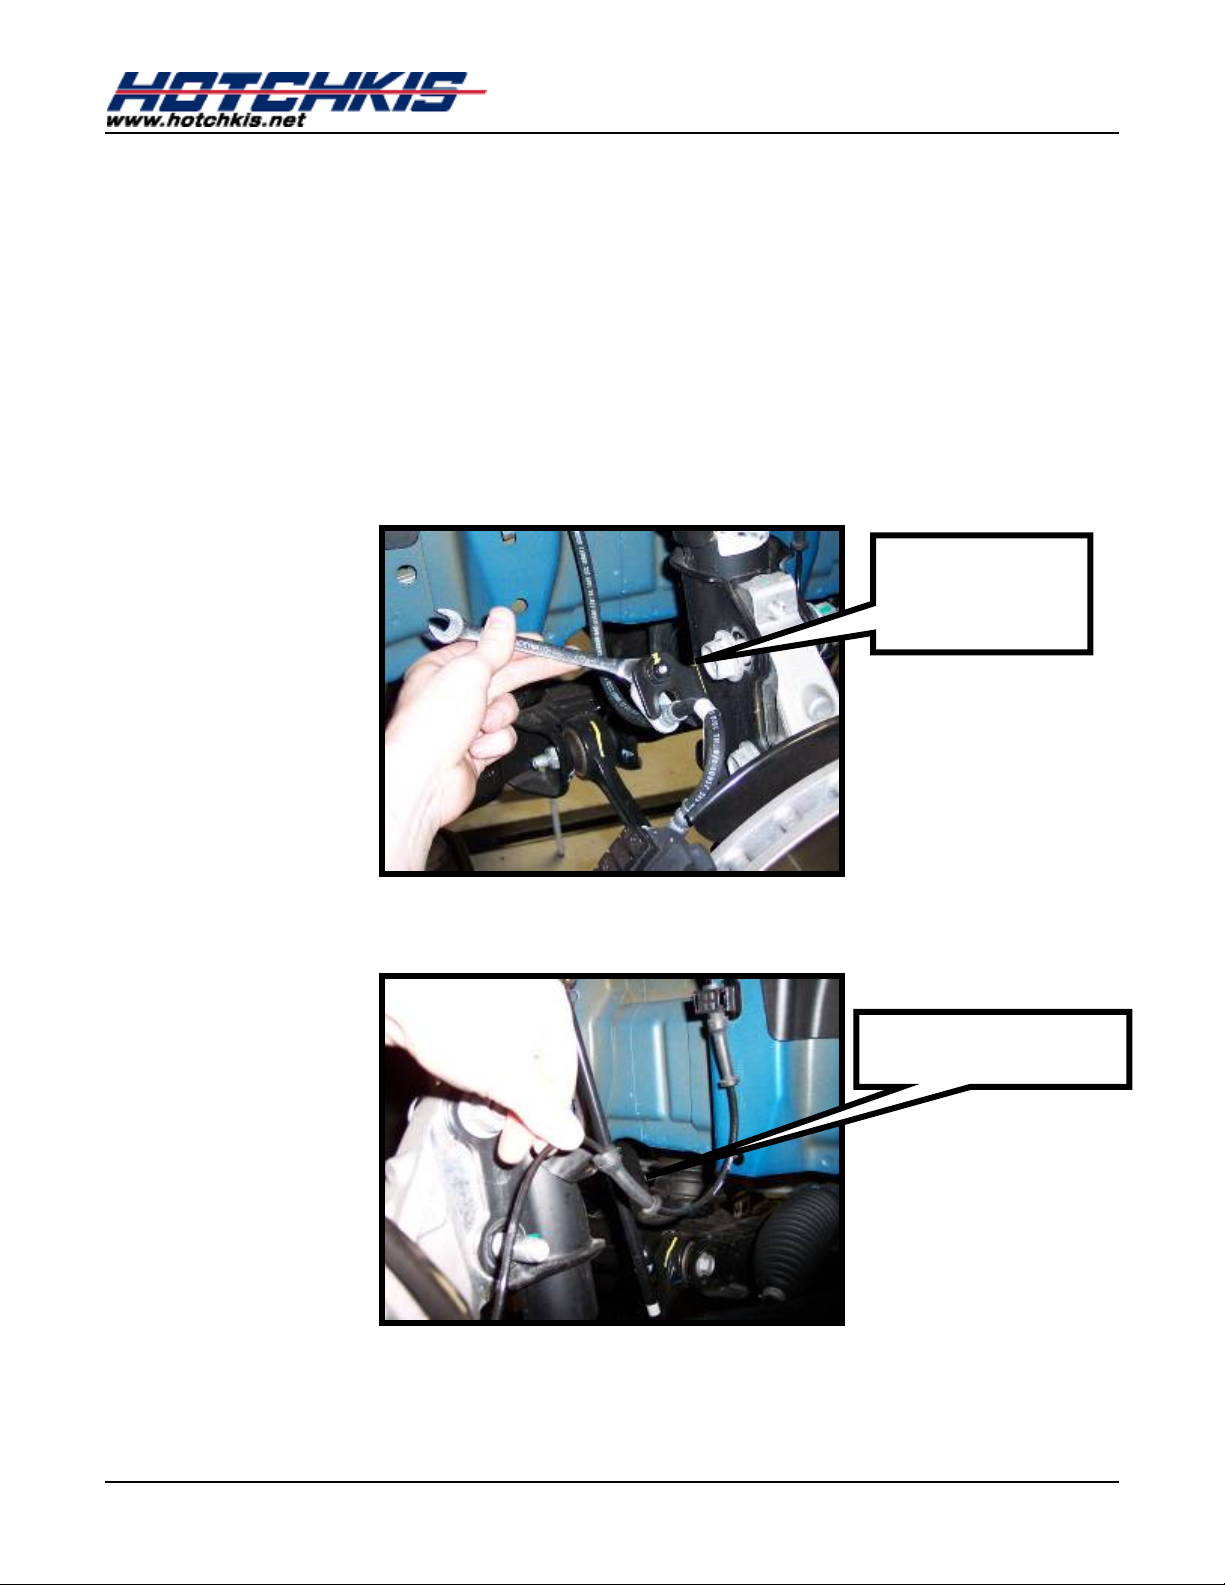
2. Unbolt the brake line tab from the strut.
BRAKE LINE
3. Remove the ABS line from the bracket.
BRACKE
ABS BRACKE
Hotchkis Performance LLC. 3
Page 9

S
4. Unbolt the sway bar link from the strut.
2010 Chevy Camaro
5. Loosen the nut on top of the strut underneath the hood.
NOTE: Do not completely remove the nut. Loosen until it can be later removed by hand.
This will make it easiest to remove the strut.
6. Mark the strut where the upright nuts are located with a marker. Remove the bolts
that hold the spindle to the strut.
SPINDLE BOLT
Hotchkis Performance LLC. 4
Page 10

2010 Chevy Camaro
7. Now while supporting the strut with one hand, remove the nut on top and lower the
strut. Use a bungee cord or wire to hold the upright close to the chassis. This will
ensure the suspension does not hang too low putting tension on the brake hose.
8. Peek underneath the strut tower apron. The first holes you will be drilling are the rear
holes located in the pictures below.
Hotchkis Performance LLC. 5
Page 11

2010 Chevy Camaro
9. Center punch the center of the semicircle shaped seam. Drill a pilot hole with a 1/16”
or 1/8” drill bit. Then drill the hole out with a 3/8” drill bit.
Hotchkis Performance LLC. 6
Page 12

2010 Chevy Camaro
10. Once the rear holes are drilled out on the both sides, Position the strut brace in the
engine bay. Install the longer rear bolts through the holes you just drilled and
through the rear bracket of the brace. Spin the nuts on, but do not tighten. The front
mounts will sit in front of the strut towers.
Hotchkis Performance LLC. 7
Page 13

2010 Chevy Camaro
11. With the strut brace in place you can now mark the front holes with a marker. Mark
the center
of the front bracket slot on each side. Remove the strut brace from the
vehicle.
12. Drill the front holes in the same manner as the rear holes. Start with a 1/16” or 1/8”
pilot hole and finish it off with a 3/8” hole. These holes can be drilled from the engine
bay side.
Hotchkis Performance LLC. 8
Page 14

2010 Chevy Camaro
13. Reinstall t he strut brace on the vehicle and insert the longer bolts from the bottom of
the strut tower through the rear holes. The shorter bolts are for the front and can be
inserted from the front. Use the lock washer on the nut side of the fasteners.
Hotchkis Performance LLC. 9
Page 15

2010 Chevy Camaro
Hotchkis Performance LLC. 10
Page 16

2010 Chevy Camaro
14. Reinstall the front struts in reverse order and you are finished with your installation.
Hotchkis Performance LLC. 11
Page 17

Sport Sway Bar Kit 22109
2010 Chevy Camaro
Thank you for your purchase from our new line of Chevy parts.
Please call us at 877 - 4NO - ROLL if you have any questions
regarding the service or installation of your Hotchkis Performance products.
IMPORTANT: PLEASE READ THE ENTIRE
STARTING THIS INSTALLATION.
INSTRUCTION MANUAL BEFORE
Front Sway Bar Installation
1F Raise the Vehicle
Raise front of the vehicle using a floor jack and place jack stands in the proper jacking points. Securely block the
rear wheels of the vehicle.
Page 18

2F Remove the Driver Side Front Wheel
The front bar will sneak it’s way out towards the driver side. Remove the driver side front wheel to gain more
clearance for installation.
3F Disconnect the Front End Links
Disconnect the front end links from the sway bar ends on each side.
Page 19

4F Detach the Sway Bar Bushing Brackets
Just above the front subframe, the sway bar is attached by 2 bushing brackets, one on each side. Undo the 2 nuts
per bracket to detach the sway bar from the subframe.
5F Raise the Engine
You will need more room to get the sway bar out from between the subframe and the engine. To do this, unbolt the
2 motor mounts attached to the subframe and jack the engine up. Make sure to use a block of wood between the
jack and the engine to avoid damage.
Page 20

6F Remove Stock Bar
Fish the stock bar towards the driver side until it’s completely out. If you need more clearance, carefully raise the
engine more until the bar can be removed.
7F Reinstall the Hotchkis Sway Bar
Reinstall the Hotchkis Sway Ba r in the same manner as stock removal. Your kit comes with new bushings and
brackets. Apply the provided silicone grease in the inside area of each bushing. Install the bushings onto the bar.
When reinstalling the stock bushing bracket nuts, please use the provided washers from your hardware kit. You
should use one washer for each nut totaling 4 for the front installation. Apply a small amount of lock threading
compound (included in your kit) on each nut. Make sure to use the brackets that have the 90° grease fitting
attached. You may choose to point the fitting towards the outside or inside depending on which direction is easiest
for you to regrease in the future.
Page 21

8F Reinstall the End Links
Lower the engine down and fully tighten the motor mount nuts completely. Insert the end links back into the sway
bar ends and fully tighten the nuts using the supplied lock threading compound.
9F Final Inspection
Before lowering the front end back onto the ground, make sure all hardware is fully tightened. You are finished with
the front Hotchkis Sway Bar installation. Let’s move on to the rear bar.
Page 22

1R Raise the Vehicle
Raise rear of the vehicle by driving the rear of the vehicle onto floor ramps. You may use floor jacks to jack up the
rear of the car, but the installation is easier with the suspension at ride height. Once the rear of the vehicle is
accessible, securely block the front wheels of the vehicle.
2R Disconnect the Rear End Links
Disconnect the rear end links from the sway bar ends on each side.
Rear Sway Bar Installation
3R Detach the Sway Bar Bushing Brackets
The sway bar is attached by 2 bushing brackets, one on each side. Undo the 2 bolts per bracket to detach the
sway bar from the subframe. The bar should be loose from the vehicle. There is enough room to fish the bar
completely out without dropping the exhaust.
Page 23

4R Reinstall the Hotchkis Sway Bar
Reinstall the Hotchkis Sway Bar in the same manner as stock removal. Your kit comes with new bushings and
brackets. Apply the provided silicone grease in the inside area of each bushing. Install the bushings onto the bar.
When reinstalling the stock bushing bracket nuts, please use the provided washers from your hardware kit. You
should use one washer for each bolt totaling 4 for the rear installation. Apply a small amount of lock threading
compound (included in your kit) on each bolt. Make sure to use the brackets that have the straight grease fitting
attached. Fully tighten the bracket hardware.
5R Reinstall the End Links
Insert the end links back into the sway bar ends and fully tighten the nuts using the supplied lock threading
compound.
6R Final Inspection
Before lowering the rear end back onto the ground, make sure all hardware is fully tightened. You are finished with
the Rear Hotchkis Sway Bar installation. Enjoy your new Sway Bar set.
Page 24

Hotchkis Performance LLC
Return Policy & Limited Warra nty
Effective December 1, 2010 all Hotchkis products must be registered to qualify for warranty at
www.hotchkis.net or via t he mail-in warranty card, included with the product, within 30 days of the
original purchase date.
IMPORTANT: This warranty supersedes all other warranties included with this product.
Return Policy
We want you to be completely satisfied with your Hotchkis Performance product. For products, presenting signs of
shipping damage please contact the freight carrier immediately. All our products are guaranteed to be free from
manufacturer’s defects. If your order arri ves wit h a manufacture def ect, pl eas e contact our Customer Service Departm ent
at (562) 907-7757. You will be ass igned a R eturned Goods Authorizat ion Num ber (RGA). The pack age you return m ust
show the RGA on the out side of the package, inclu de the original invoice and be shipped prepaid to our facility. The
product has to be unused and in its original packaging materials. Exchanges or refunds made after 30 days will be
subject to a 20% restocking charge. If you purchased your Hotchkis Performance product from an authorized
dealer, you are still covered by this return policy. All returns however, should be made to your dealer, not to
Hotchkis Performance directly.
Limited Warranty
Hotchkis Performance offers a Limited Warranty against defects in materials and workmanship for the term of 36 months
(3 years) from the date of purchase of this product. This Warranty only applies to the original retail purchaser who retains
ownership of the vehicle on which the pr od uc t was originally installed. If the product is determined to be defective,
Hotchkis Performance will repair, replace or refund the purchase price of the defective product at Hotchkis Performance's
sole discretion, which shall fully satisfy and discharge any and all warranty claims. Any repaired or replaced product will
be returned to the sender excluding the cost of freight.
www.hotchkis.net or via the mail-in warranty card, included with the product, within 30 days of the origina l
purchase date.
Products must be registered to qualify for warranty at
Exclusions from Warranty
Items offered but not manuf actured by Hotchkis Performanc e are warranted according to the manufac turer's terms and
are not covered by this limited warranty. Hotchkis Performance shall not be responsible for any labor, removal,
installation, re-installation or maintenance costs. This warranty does not cover the cosmetic finish or plating of any
product or any normal wea r and tear to any product inc luding, but not limited to bus hings, brackets , end-links, hardw are,
steering components, shocks or springs. In addition, this warranty does not apply to any products that have been:
Improperly installed or installed by someone other than a qualified, licensed auto mechanic exper ie nced in th e
installation and removal of suspension products;
Improperly serviced, misused, or modified, altered or subjected to abuse, negligence, accident or collision; Installed in any vehicle that has been modified; Installed on any vehicle that has carried loads in excess of automobile manufacturer suggested weight limits; or Installed on any vehicle that has been subject to abnormal or excessive use, including rallying, racing, or racing-type
activities or off-road use.
Limitation of Warranty
This limited warranty is the entire and only warranty for the products and may not be modified or supplem ented by any
other person or company in any form. Any description of the products, by an yone, is for the sole purpose of identif ying
them and is not part of the basis of the bargain , and does not constitute a warrant y that the pr oducts will conform to that
description. The statem ents of any salesperso n do not constitute part of this limited warrant y and cannot be relied upon
as a warranty.
THERE ARE NO WARRANTIES, EXPRESSED OR IMPLIED, INCLUDING ANY IMPLIED WARRANTIES OF
MERCHANTABILITY OR FITNESS FOR A PARTICULAR PURPOSE, WHICH EXTEND BEYOND THE
DESCRIPTION ON THE FACE HEREOF. ANY IMPLIED WARRANTIES ARE DISCLAIMED TO THE
FULLEST EXTENT PERMITTED BY LAW. THIS WARRANTY DOES NOT COVER CONSEQUENTIAL
DAMAGES, LOSS OF TIME OR REVENUES, INCONVENIENCE, LOSS OF USE OF THE VEHICLE,
 Loading...