

Page 1

1967-1969 GM F Body
2207C Anti-Roll Bar Installation Instructions
Thank you for your purchase of this Hotchkis Performance product. Your stabilizer bar set was
designed with the performance and durability you’ve come to expect from Hot chkis
Performance.
Note: Please rea d the entire installation instructions before starting. Having the rig ht tools
will ensure a smooth install process.
FRONT BAR INSTALLATION
Removing Stock Anti-Roll Bar
1F. Support the vehicle on jack stand s, and remove the front wheels.
2F. Look at the current bar installation and note the position of the anti-sway bar.
Hotchkis Performance LLC. 1
Page 2
1967-1969 GM F Body
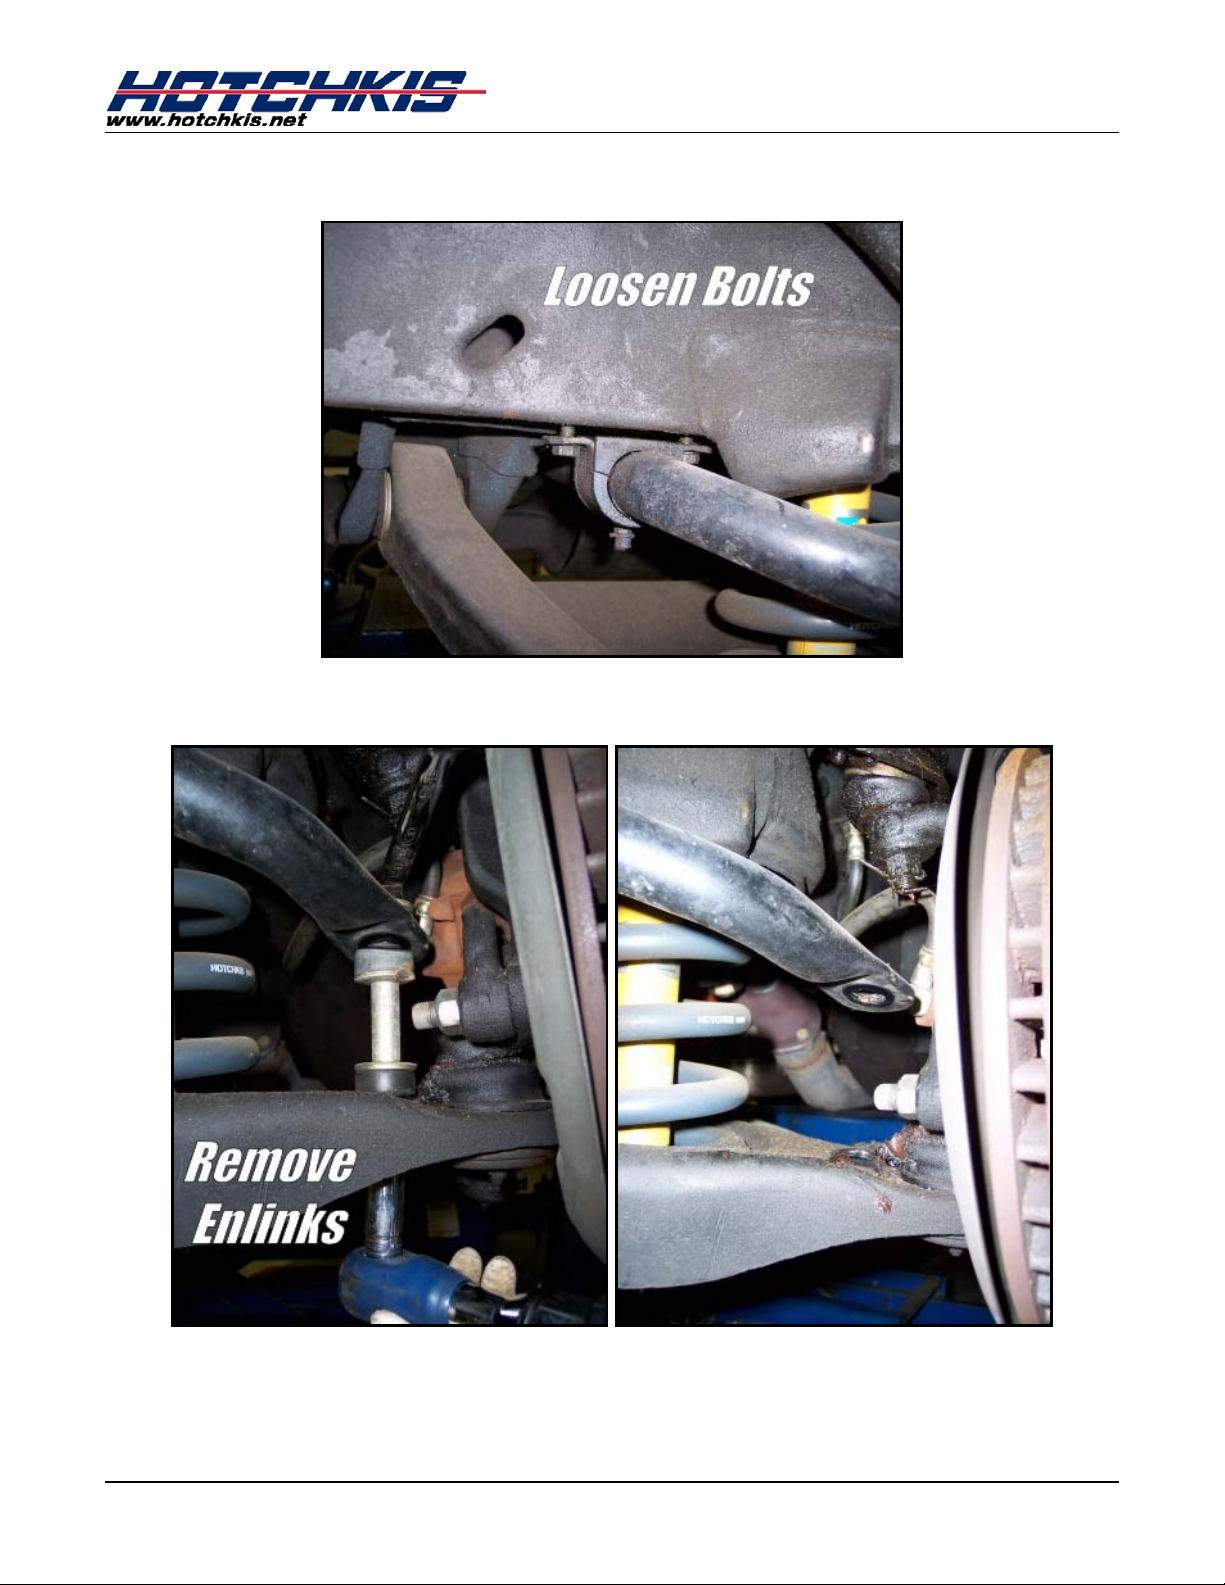
3F. Loosen, but do not remove the front b ushing bolts.
4F. Remove the endlinks from the sway bar and lower control arms.
Hotchkis Performance LLC. 2
Page 3
1967-1969 GM F Body
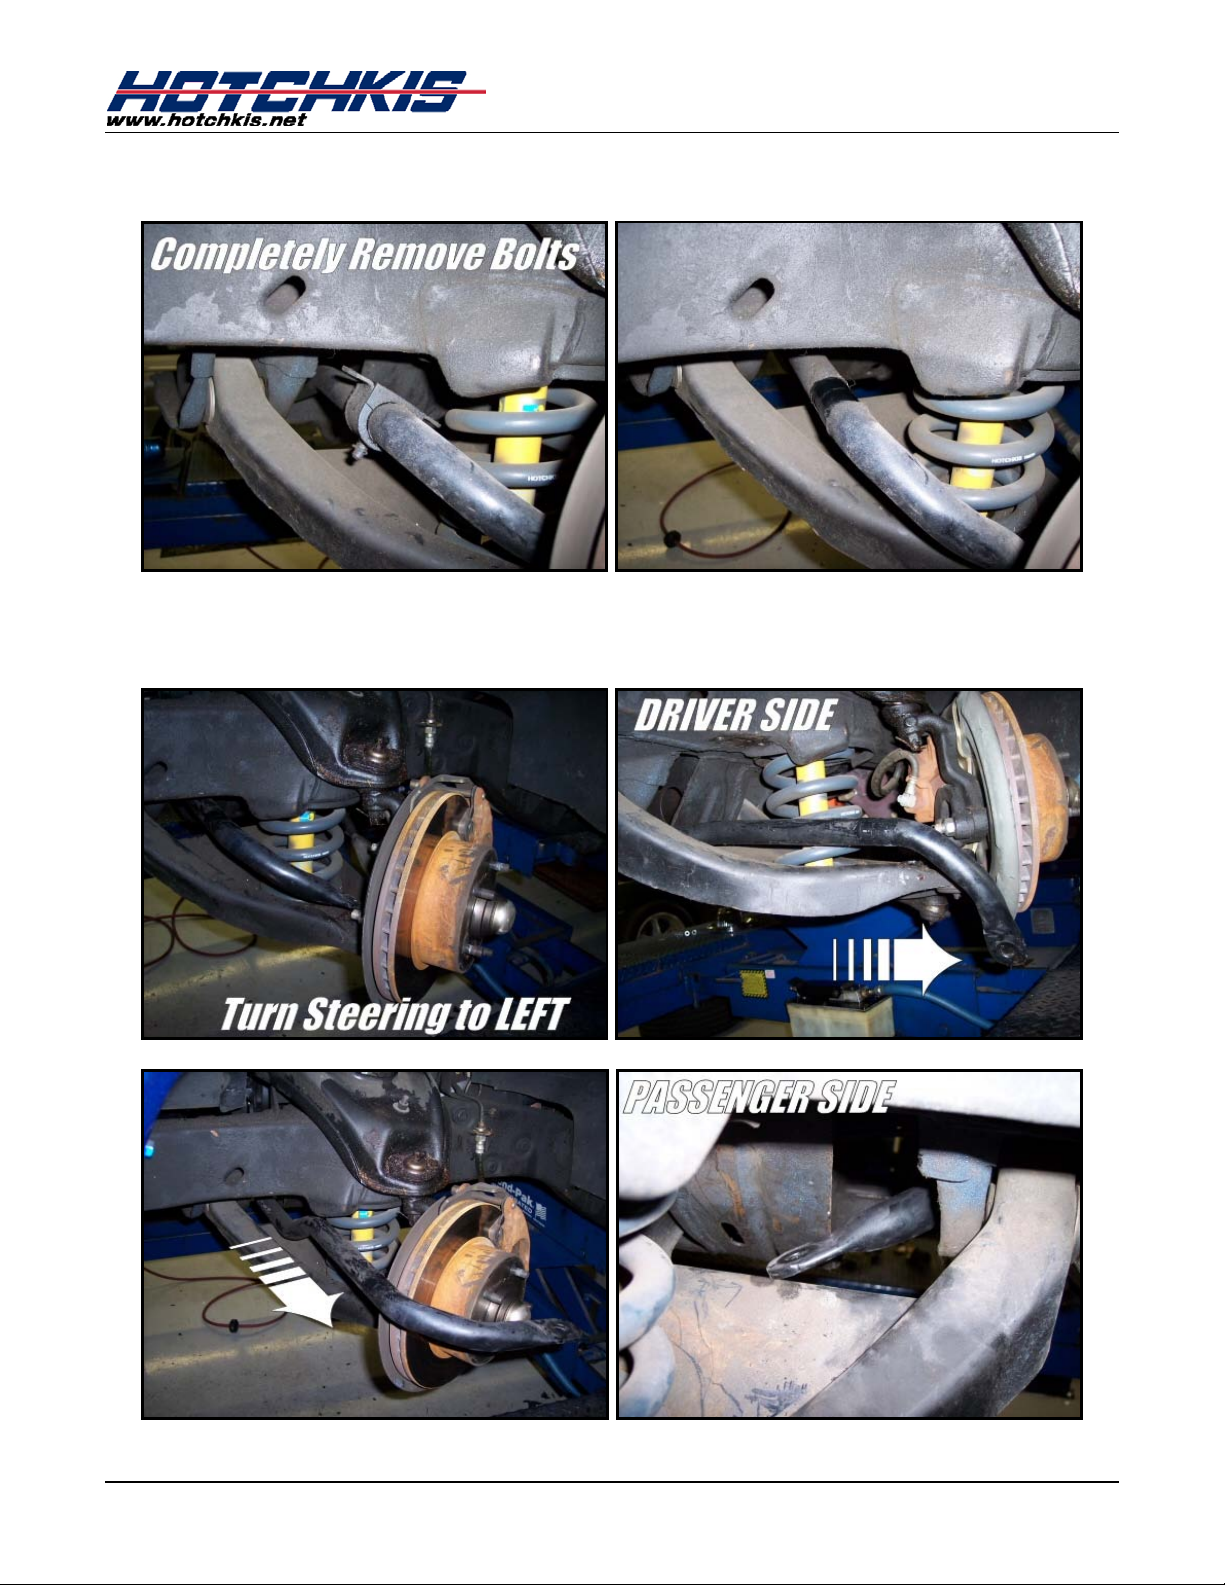
5F. Completely remove the bolts from the frame. Retain these bolts for reinstallation.
6F. Turn the steering all the way to the LEFT and remove the stock bar through the
DRIVER side wheel well. Observe the following pictures for the removal procedure.
Hotchkis Performance LLC. 3
Page 4
1967-1969 GM F Body
Hotchkis Performance LLC. 4
Page 5
1967-1969 GM F Body
Installing New Hotchkis Anti-Roll Bar
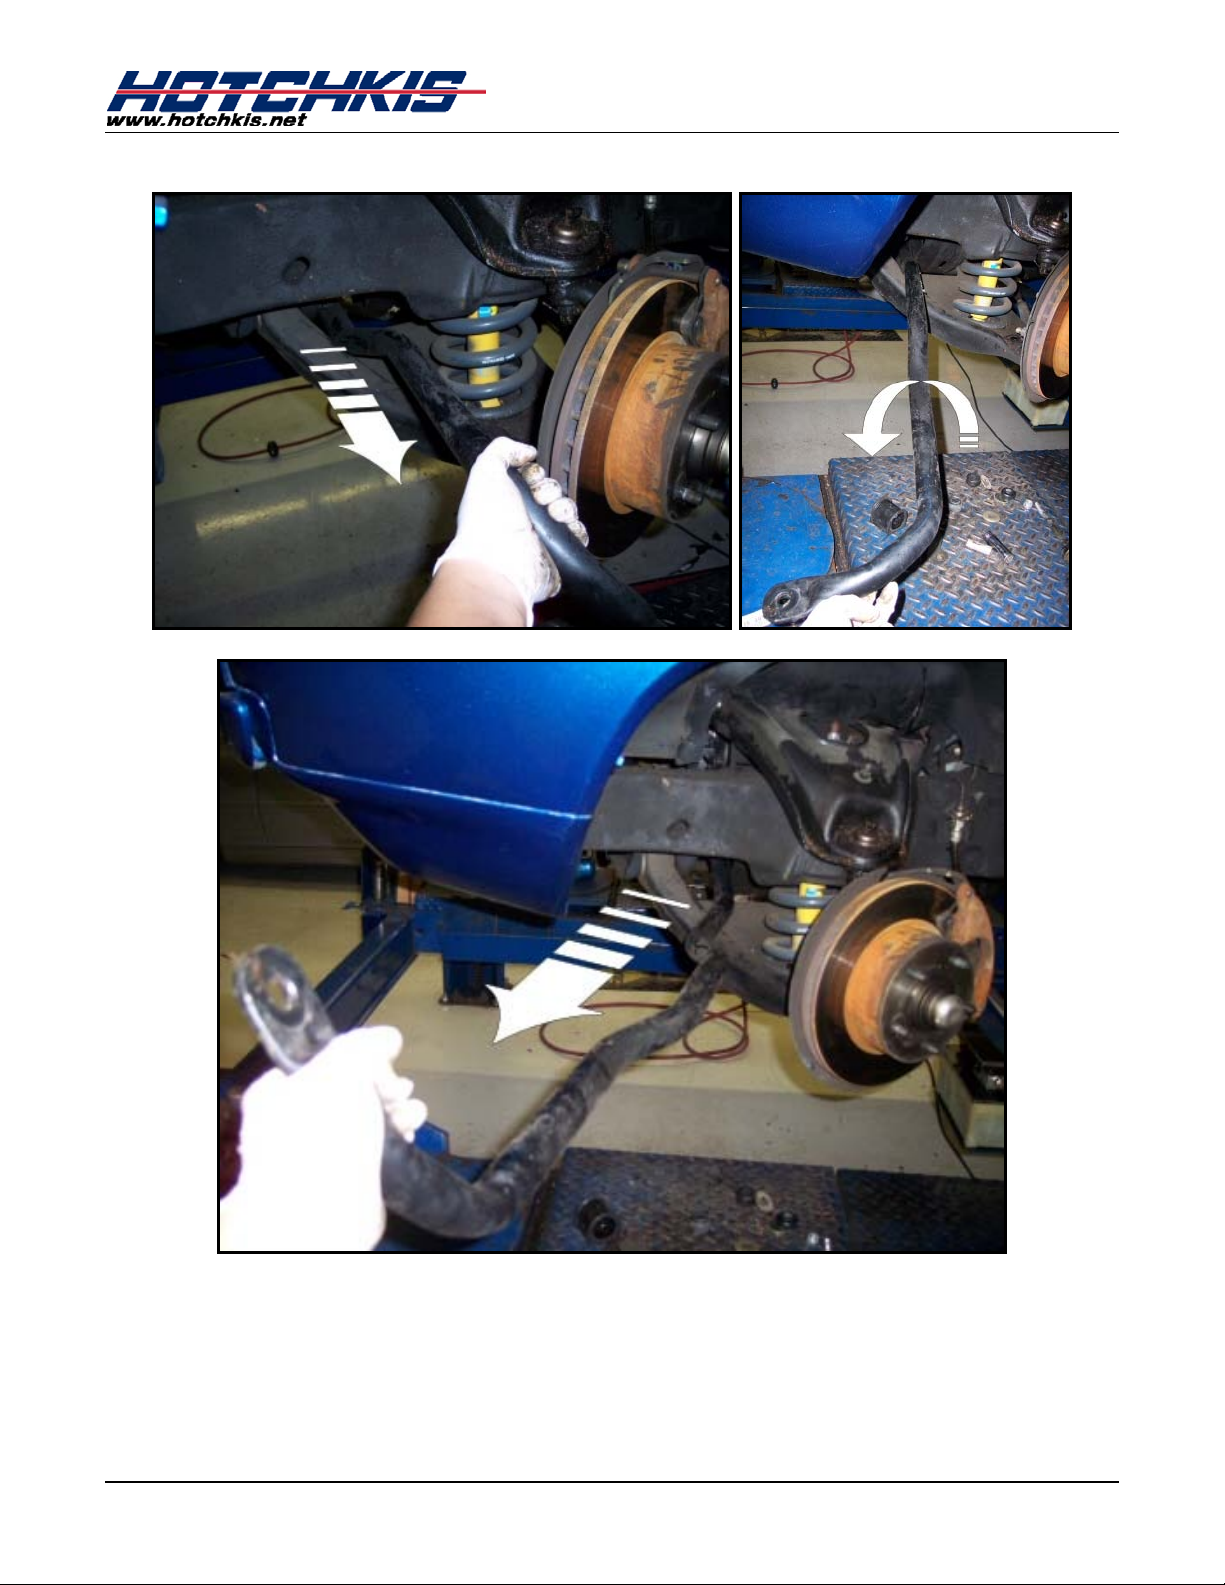
7F. Here’s the fun part. The Hotchkis bar has a larger tube diameter, so installing it may
take some patience. Please follow the pictures below. They should show you a step by-step way to install the bar.
Hotchkis Performance LLC. 5
Page 6
1967-1969 GM F Body
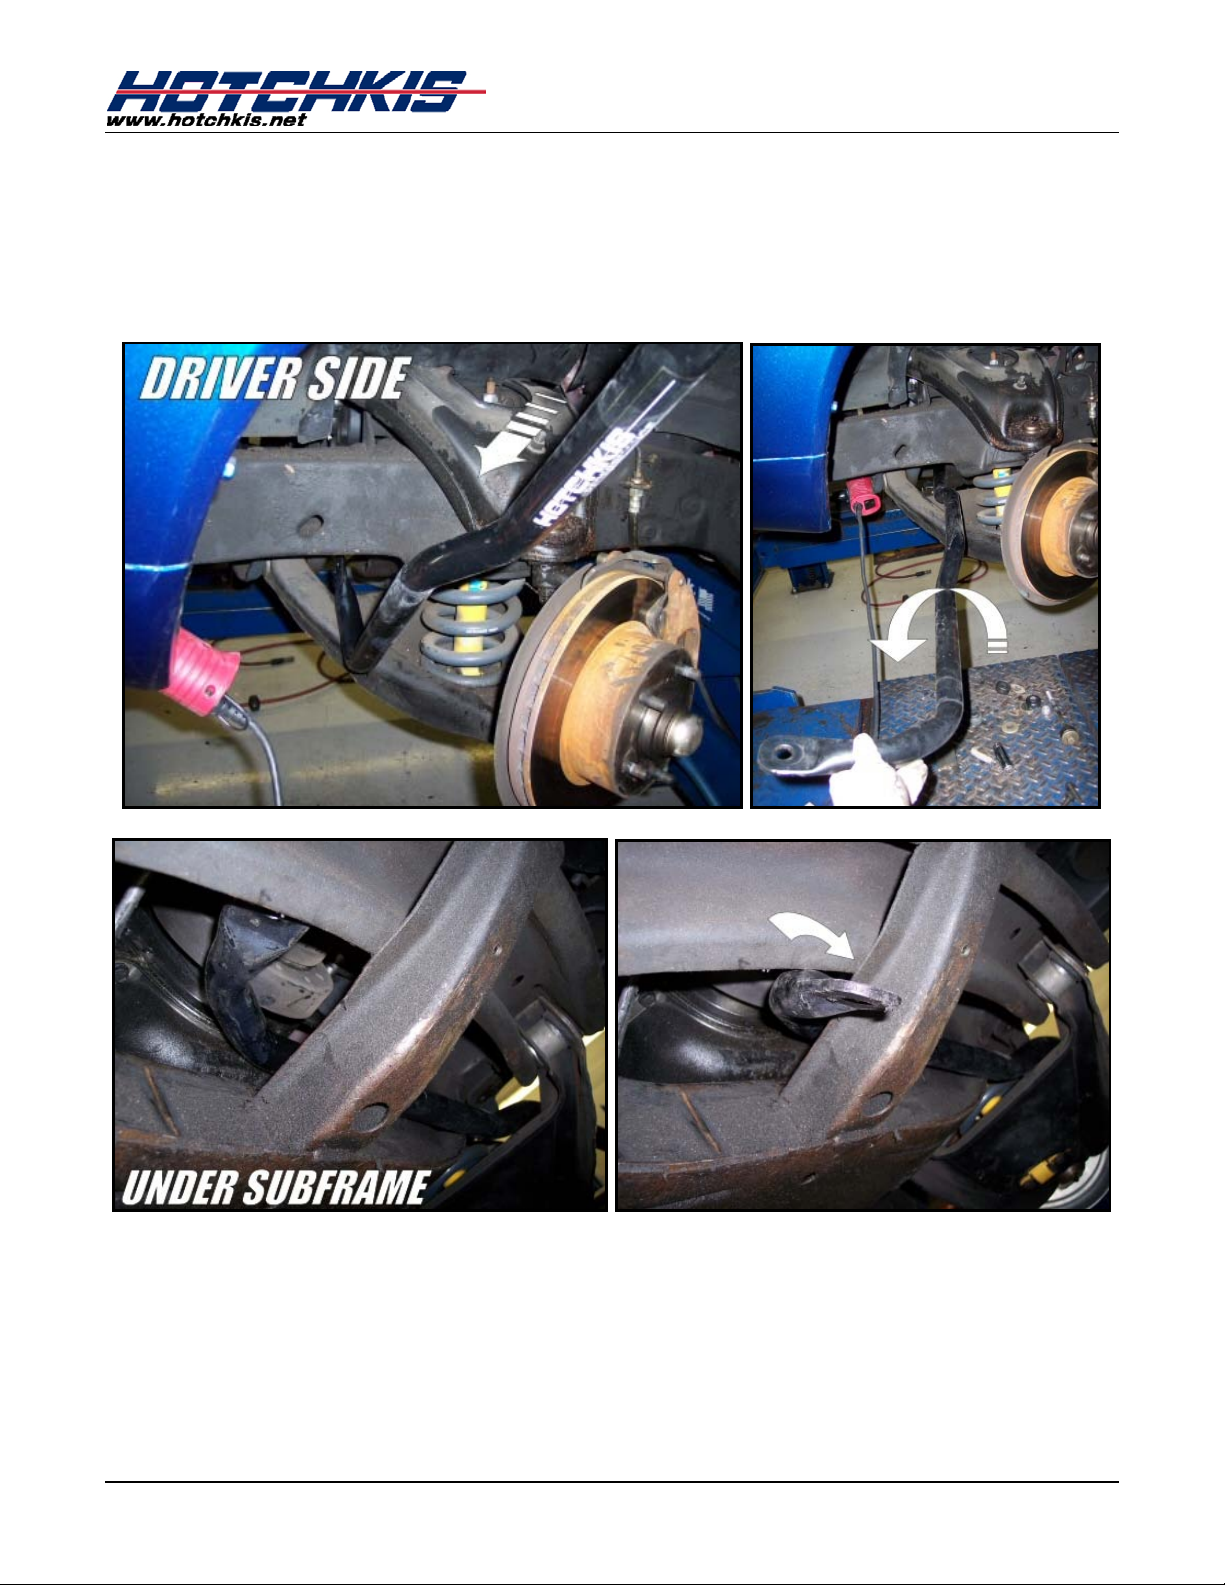
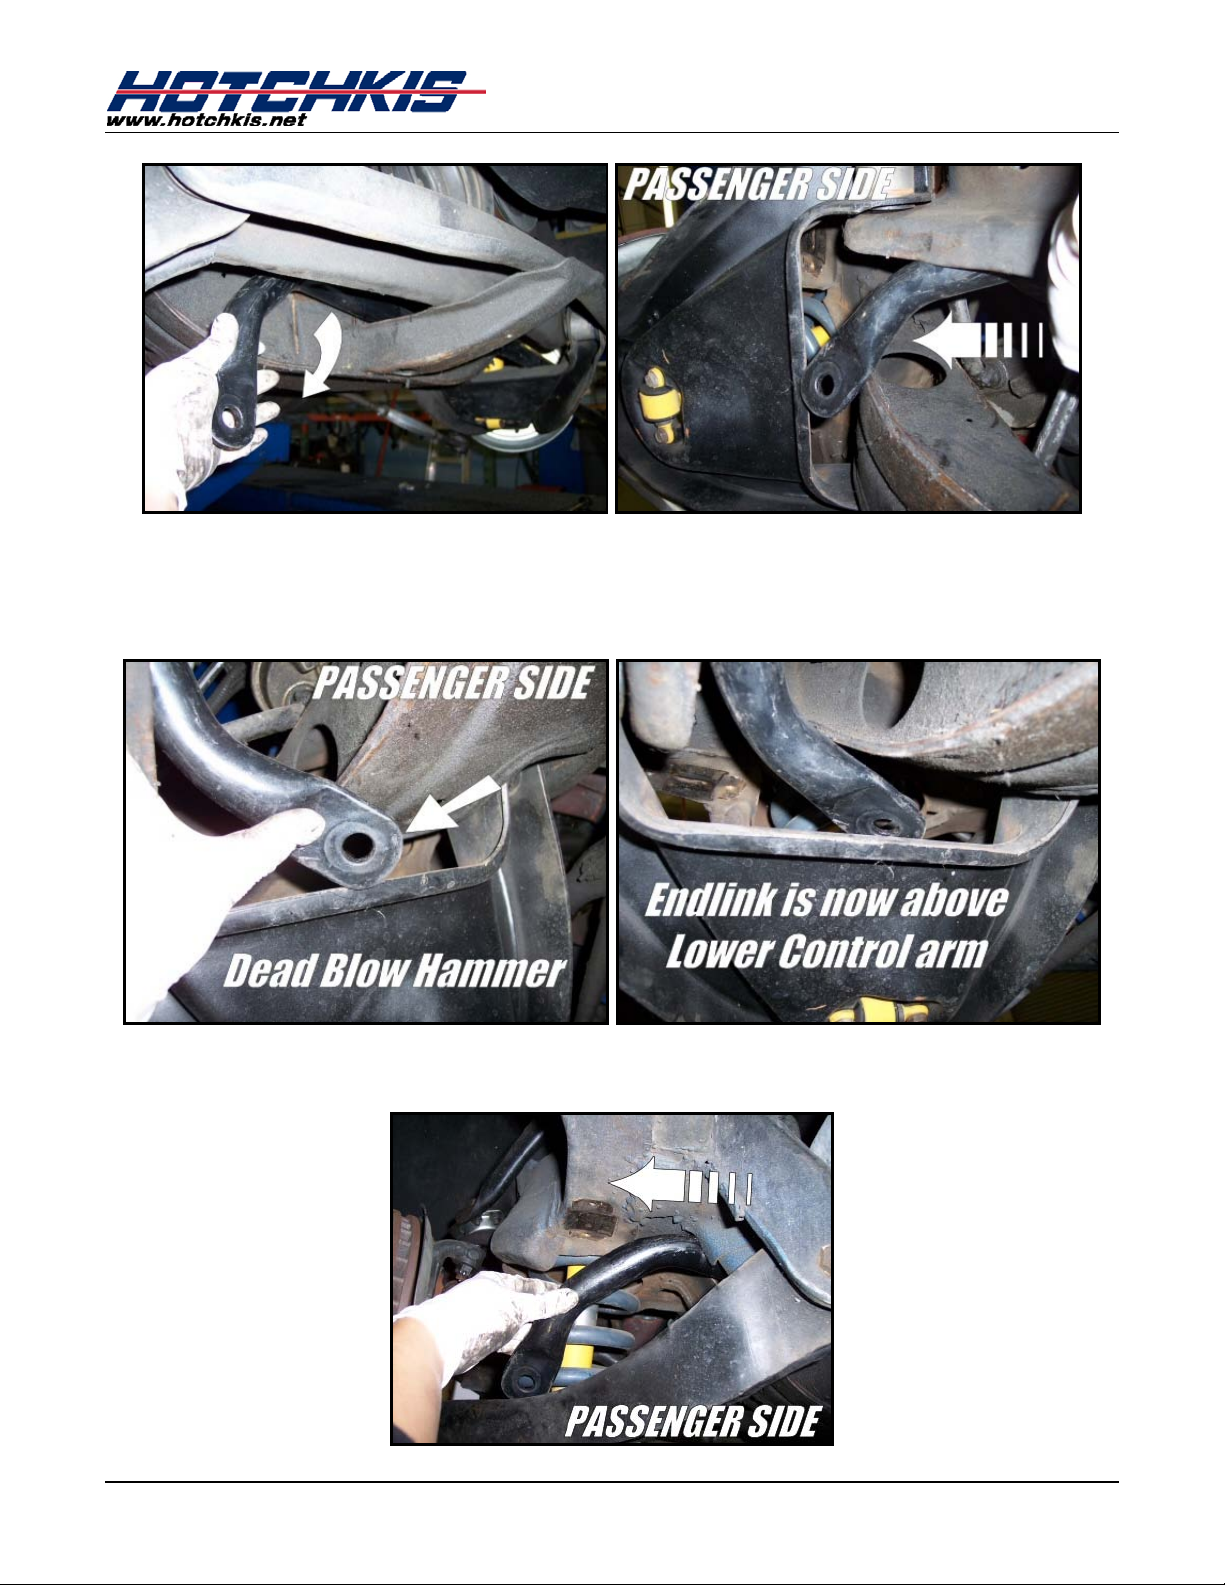
At this point the sway bar will need a little force to get into position. Take your trusty dead
blow hammer and hit the anti-roll bar end as shown in the pictu re below. It won’t take too
much to pop it into place.
Once the anti-roll bar end is above the lower control arm, you can easily slide it into position.
Hotchkis Performance LLC. 6
Page 7
1967-1969 GM F Body
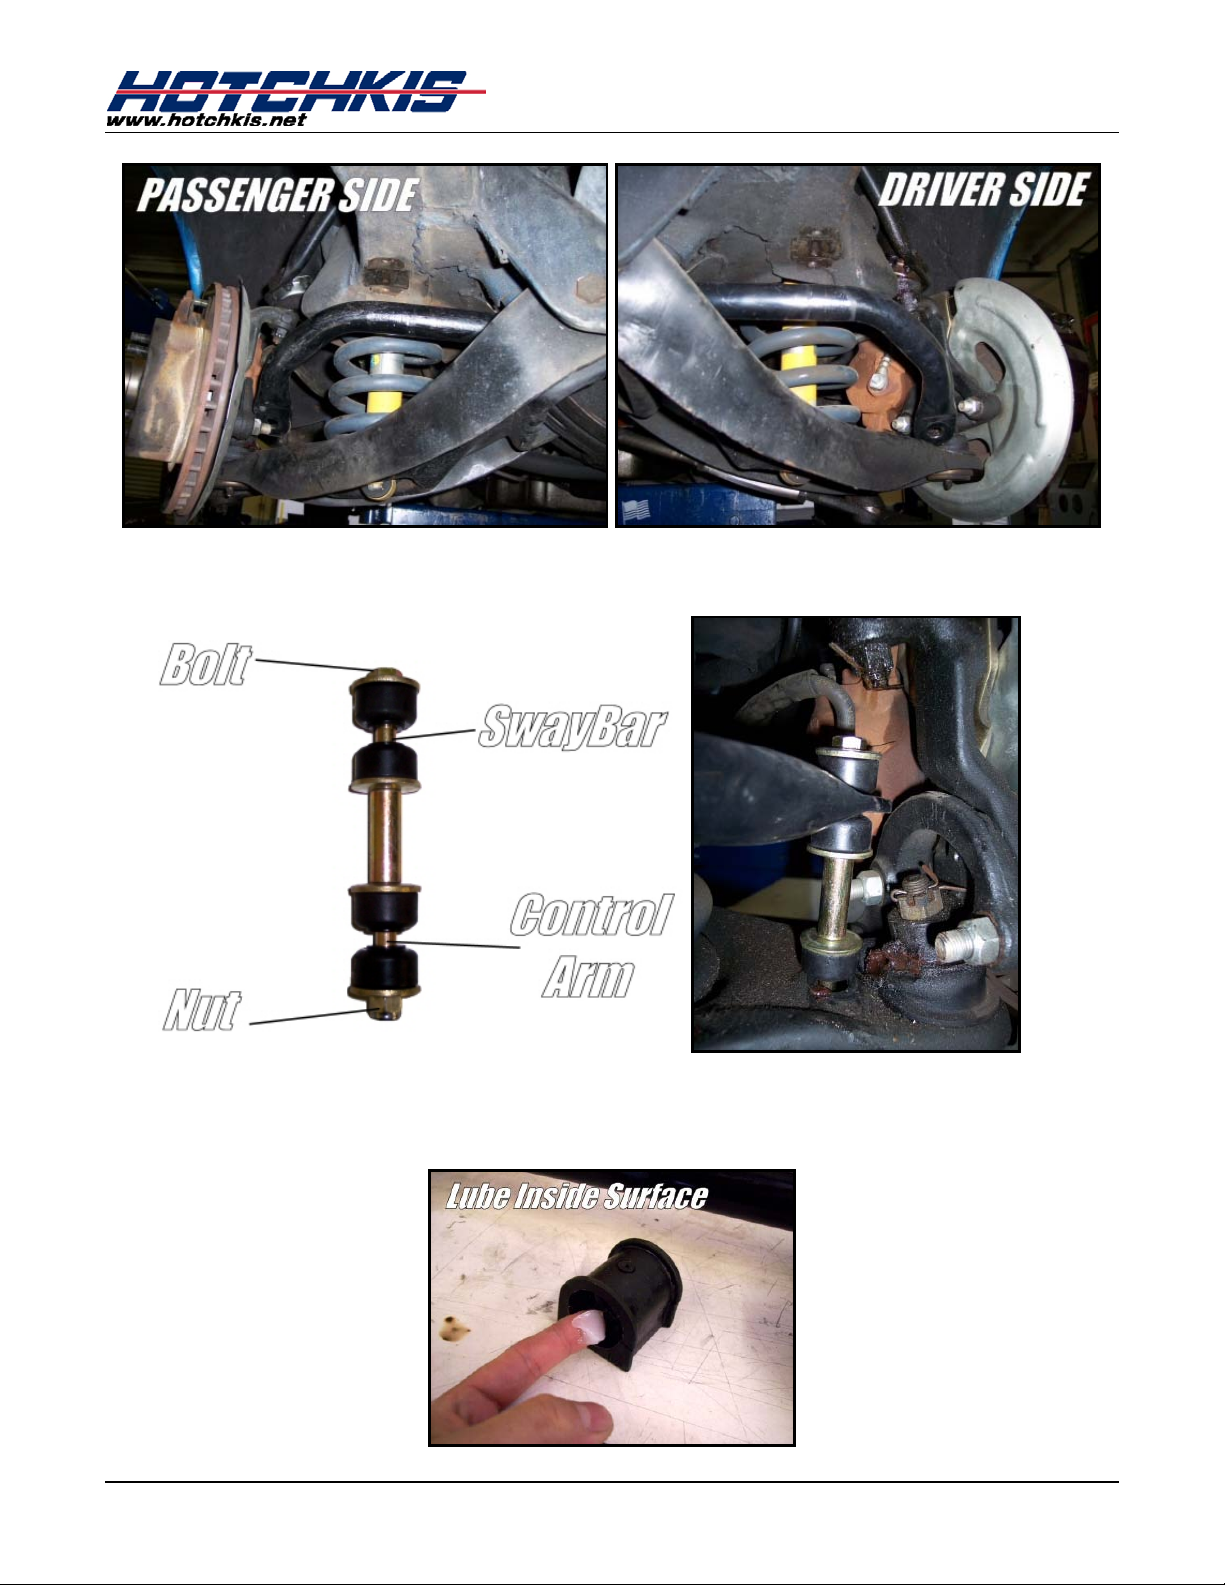
8F. Once the bar is in place, install the new endlinks but do not tighten them completely.
9F. Using the included white silicon g r ease, lube the inside of the new 1 ¼” front bushings.
NOTE: the grease can be cleaned up with WD-40
Hotchkis Performance LLC. 7
Page 8

1967-1969 GM F Body
10F. Install the bushing on the new Hotchkis bar. Make sure the split on the bushing fac es
the front when the bar is installed in the vehicle. Look at the placement of the original
stock bushings on the stock bar for guidance.
11F. Place the greasable bracket over top the bushing and secure them with the stock bolt s.
You may fully tighten these bolts at this time.
Hotchkis Performance LLC. 8
Page 9

12F. It is best to tighten the endlinks with t he suspension at ride height. To achieve this,
simply reinstall the wheels and drive the c ar onto some floor ramps. These can be
found at your local auto store. Now, with the car at ride height and on the floor ramps
you can crawl underneath the car a nd fully tighten the endlinks. Tighten the endlinks
until the bushings are squeezed just enoug h that their diameter is just larger than the
supporting washer.
You are now finished installing your new Ho tchkis Anti-Roll bar.
1967-1969 GM F Body
Hotchkis Performance LLC. 9
Page 10

1967-1969 GM F Body
Installation of Hotchkis Rear Sway Bar
1R. Remove the lower rear seat cushion. If the cushion won’t pull up ea sily, use a long
screwdriver to push and release the small b ar that is clipped in the bracket. Remo ve
the two bolts that hold the back part o f the seat to the body and lift the upper cushion
to remove it from the vehicle. This will allow yo u to access the floor pans.
2R. Jack up the vehicle and properly support with jack stands or lift jacks. Make sure the
rear end is supported with the vehicle’s load on the leaf springs. This is to ensure you
install the rear bar in the proper position.
3R. Take the 7/8” bushings and grease the inner surface with the included white silicon
grease.
Hotchkis Performance LLC. 10
Page 11

1967-1969 GM F Body
4R. Install the bushings on the ba r . (4) Place the bracket over top of the bushing. (5)
5R. After you determine there’s enough clearance for the bar, note the approximate
location of the sway bar axle bushings.
6R. Take a screwdriver and carefully pry up the brake line to allow the U-Bolt to drop down
over the axle. (7)
Hotchkis Performance LLC. 11
Page 12

1967-1969 GM F Body
7R. Install the U-Bolts on the axle and slip the axle bracket over the U-Bolt on the bottom
side of the axle. Use m asking or duct tape to secure them. Pla ce the sway bar
assembly under the axle and slip the U-bolt legs through the sway bar brackets. Place
washers and nylock nuts on the U-Bolt. Snugly fasten the nylock nuts a bit, but do not
fully tighten at this time.
Hotchkis Performance LLC. 12
Page 13

1967-1969 GM F Body
8R. Remove the screw and clip that holds the fuel line located on the frame rail of the
passenger side to all ow for the chassis brace to slide into place.
9R. Lift chassis brace up and over the back side of the rear axle and position it up against
the body pan and chassis as shown below.
Hotchkis Performance LLC. 13
Page 14

1967-1969 GM F Body
Hotchkis Performance LLC. 14
Page 15

1967-1969 GM F Body
NOTE:
We have noticed on rare occasions that the brace is too narrow on some chassis’. If
there is more than an 1/8” of gap between the brace and the frame rails, then please
use the special spacer shims (part # 23490019) included in your kit to rectify the
tolerance issue.
10R. Once you have the chassis brace in place, mark the spots where you will drill the holes
to secure the brace. Do this on both sides.
Hotchkis Performance LLC. 15
Page 16

1967-1969 GM F Body
11R. Remove the chassis brace and using a 7/16” drill bit, drill the 4 holes that you just
marked.
12R. Place chassis brace back into place a nd mark the remaining 4 holes for drilling as shown
below. After marking the holes, remove brace and using a 7/16” drill bit, dri ll the hol es.
Hotchkis Performance LLC. 16
Page 17

1967-1969 GM F Body
13R. Using the 1718 Hardware kit, pull out the U-Bolts and coat the threading with the Anti-
Seize Lubricant.
Feed one end of the U-Bolt through one of the holes on either end of the chassis brace
and maneuver it into the backside of t he other hole as shown below.
Place washers and nylock nuts on the U-Bolt. Tighten one side of the U -Bolt partially,
and then tighten the other side of the U-Bolt partially alternating back and forth until
fully tightened to guarantee the bolt is tightened properly.
Hotchkis Performance LLC. 17
Page 18

1967-1969 GM F Body
14R. From inside the car, insert the supplied 7/16” bolts into the 4 holes drilled in step 12R.
You will need one person inside the car to hold the bolts with a wrench while you
tighten up the nuts from the bottom .
15R. Grease the sides of both dog bone style end links.
Hotchkis Performance LLC. 18
Page 19

1967-1969 GM F Body
16R. Using the T1712 Hardware kit, take the longer (3”) bolts and attach the dog bone end
link to the bar on the INSIDE of the bar. There are two different washer types included
in the bolt kit, use the large diameter washer up against the dog bone, and the small
one against the sway bar. Tighten the bolt to the point where you can just rotate the
end link on the bolt.
17R. Slide the other end of the dog bone style end link up in between the brackets on the
chassis brace. Check for exhaust clearance in this area. If necessary, you may have to
have the exhaust pipes re-bent to provide clearance for the new sway bar assembly.
Any competent exhaust shop can handle this modification easily. If clear, use the
shorter (2.75”) bolt with a small washer on each side of the bracket to complete the
assembly and fully tighten.
Hotchkis Performance LLC. 19
Page 20

18R. Fully tighten the other end of the dog bone style end links which were left loose in step
16R.
1967-1969 GM F Body
19R.
Double Check all Hardware
Double check and make sure all hardware is full tightened before driving the vehicl e.
You are finished with the rear sway bar kit.
Hotchkis Performance LLC. 20
Page 21

1967-1969 GM F Body
Hotchkis Performance LLC
Return Policy & Limited Warra nty
Effective December 1, 2010 all Hotchkis products must be registered to qualify for warranty at
www.hotchkis.net or via t he mail-in warranty card, included with the product, within 30 days of
the original purchase date.
IMPORTANT: This warranty supersedes all other warranties included with this product.
Return Policy
We want you to be completel y satisfied with your Hotchk is Perform ance product. For products, presenting signs
of shipping damage pleas e contact the freight carrier immediately. All our pr oducts are guaranteed to be free
from manufacturer’s defects. If your order arrives with a manufacture defect, please contact our Customer
Service Department at ( 562) 907-7757. You will be ass igned a Returned Goods Authorizati on Number (RGA).
The package you ret urn must show the RGA on the outside of t he package, include the original invoice and be
shipped prepaid to our fac ility. T he product has to be unused and in its original pack aging m aterials. Exchanges
or refunds made after 30 days will be subject to a 20% restoc king charge. If you purchased your Hotchkis
Performance product from an authorized dealer, you are still covered by this return policy. All returns
however, should be made to your dealer, not to Hotchkis Performance directly.
Limited Warranty
Hotchkis Performance offers a Limited Warranty against defects in materials and workmanship for the term of 36
months (3 years) from the date of purchase of this product. This Warranty only applies to the original retail
purchaser who retains ownership of the vehicle on which the produc t was originally installed. If the product is
determined to be defective, Hotchkis Performance will repair, replace or refund the purchase price of the defective
product at Hotchkis Performance's sole discretion, which shall fully satisfy and discharge any and all warranty
claims. Any repaired or replaced product will be returned to the sender excluding the cost of freight.
must be registered to qualify for warr anty at www.hotchkis.net or via the mail-in warranty card, included
with the product, within 30 days of the original purchase date.
Products
Exclusions from Warranty
Items offered but not manufactured by Hotchkis Performance are warranted according to the manufacturer's
terms and are not co vered by this l imited warr anty. Hotchk is Perform ance shal l not be r esponsibl e for an y labor,
removal, installation, re-installation or m aintenance costs. This warranty does not cov er the cosmetic finish or
plating of any product or any norm al wear and t ear to any prod uct incl uding , but not l im ited to bushi ngs, bra ck ets,
end-links, hardware, steer ing components, shocks or springs. In ad dition, this warranty does not apply to an y
products that have been:
Improperly installed or installed by someone other than a qualified, licensed auto mechanic
experienced in the installation and removal of suspension products;
Improperly serviced, misused, or modified, altered or subjected to abuse, negligence, accident or
collision;
Installed in any vehicle that has been mod ified;
Installed on any vehicle that has carried loads in excess of automobile manufacturer suggested
weight limits; or
Installed on any vehicle that has been subject to abnormal or excessive use, includ ing rallying,
racing, or racing-type activities or off-road use.
Limitation of Warranty
This limited warranty is the entire a nd on ly warranty for the products and may not be modified or supplemented by
any other person or company in any form . Any description of the produc ts, by anyone, is f or the sole purpose of
identifying them and is not part of the basis of the bargain, and d oes not constitute a warranty that the products
will co nform to that des cription. The sta tements of an y salespers on do not constit ute part of this limited warr anty
and cannot be relied upon as a warranty.
Hotchkis Performance LLC. 21
 Loading...