

Page 1

4014
Please read the following key points b efore installing this kit.
1 – Before performing the subframe connector installation, the vehicle must be completely
assembled with all body and component parts installed (e.g. fenders, hood, quarterpanels,
trunk, full interior, engine, glass, etc.). Basically, the subframe connectors should be one of
the last components installed on your vehicle. Reason being is you want the vehicle settled
with all of it’s own final weight. The car’s body is always in constant tension, with forces
pushing or pulling within the chassis & body. You want to make sure these forces don’t
change after you install the subframe connectors. For example, if you installed subframe
connectors before installing the engine and body panels this may result in having misaligned
fenders, door panels and/or hood later on. The car must be in it’s final state before the
subframe connectors are installed.
2 – The subframe connectors must be installed on an alignment rack or floor ramps (all 4
wheels). The vehicle must be sitting on it’s wheels at ride height in order to install the
subframe connectors. Do not use a two-post lift, as this will load the chassis/body in the
wrong points causing the chassis to t weak.
Hotchkis Performance LLC . 1
Page 2
Subframe Connectors 67-76 Chrysler A-Body
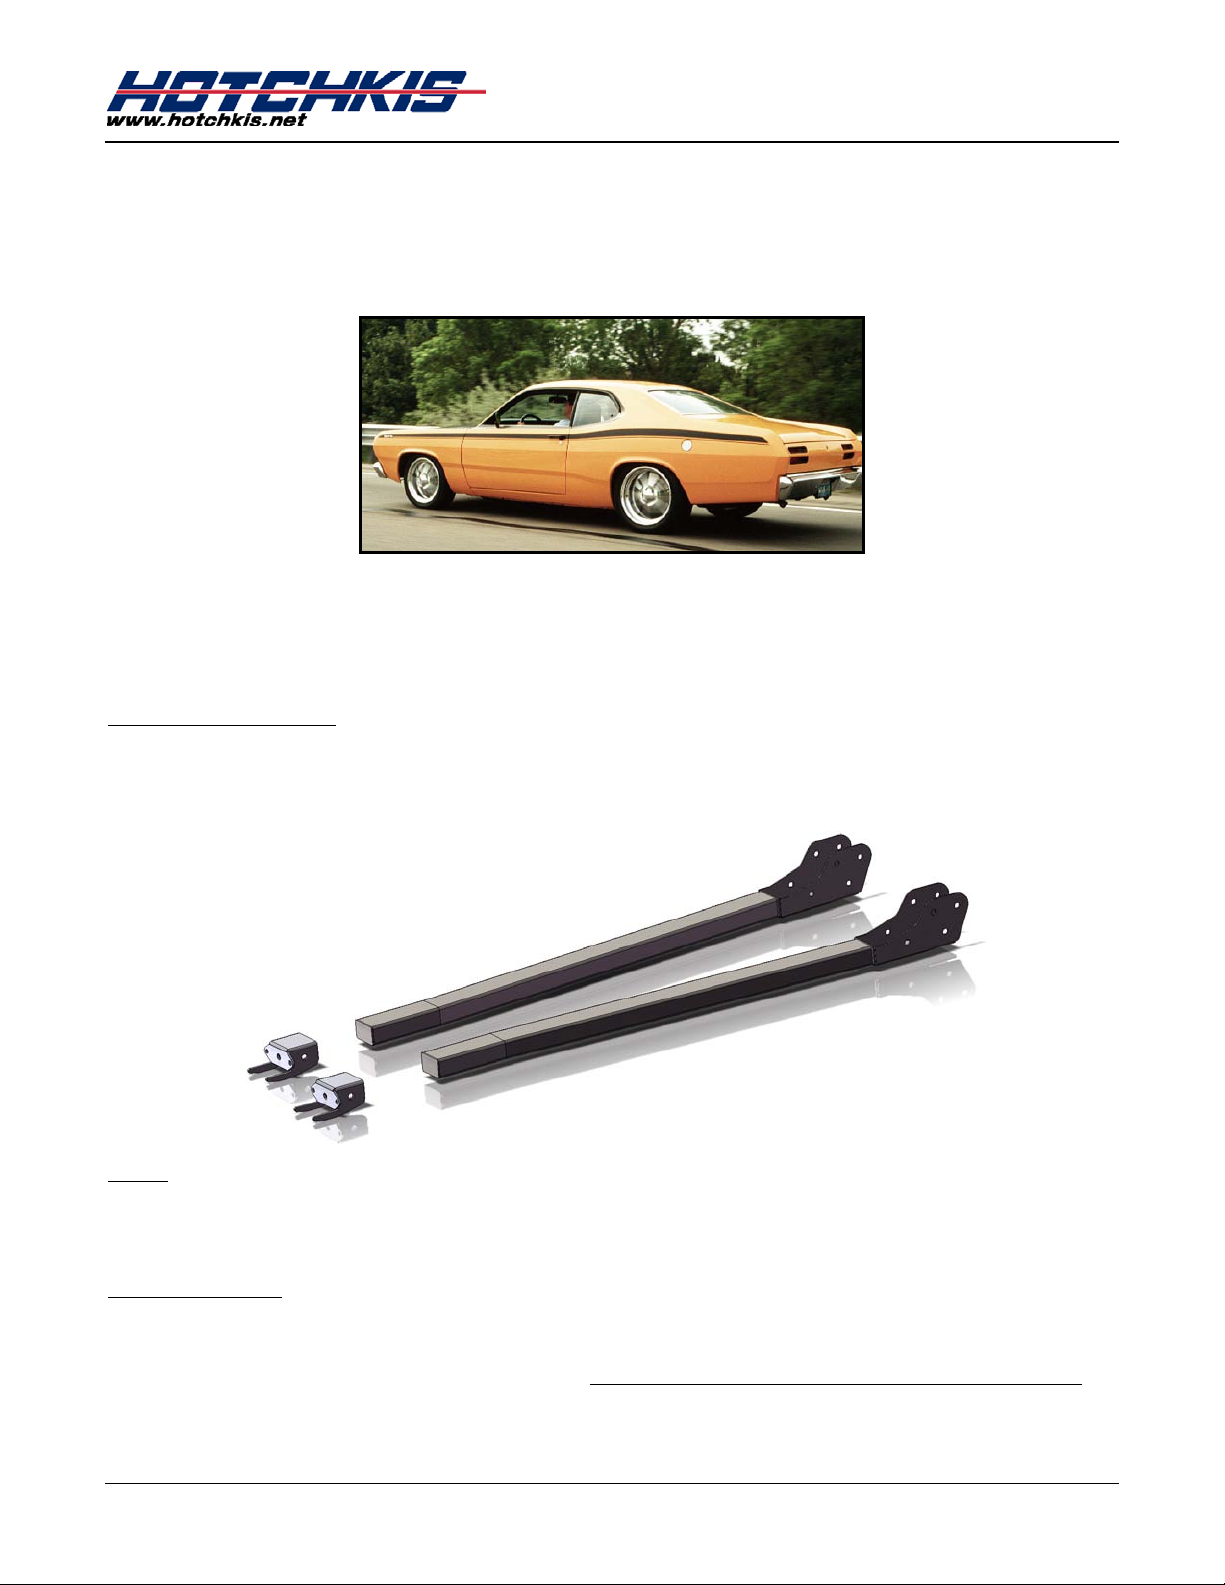
Thank you for your purchase from our new line of Chrysler parts.
Please call us at (877) 4NO - ROLL if you have any questions
regarding the service or installation of your Hotchkis products.
Subframe Connectors
Your new subframe connectors will increase the overall rigidity of your chassis and
improve handling and response. These engineered components connect the rear frame
rails with the front subframe to simul ate a complete full frame chassis.
4014
4014
:
Notes
Before You Start
Hotchkis Performance LLC . 2
:
The subframe connector is essentially a Weld-In component, effectively connecting the
front subframe and rear frame rails.
The installation of these subframe connectors will require you to grind and weld. It is
recommended that a trained professional install this product. Always wear eye
protection when grinding or welding. : Please read the entire manual before starting. All
images will depict the driver side installation.
Page 3
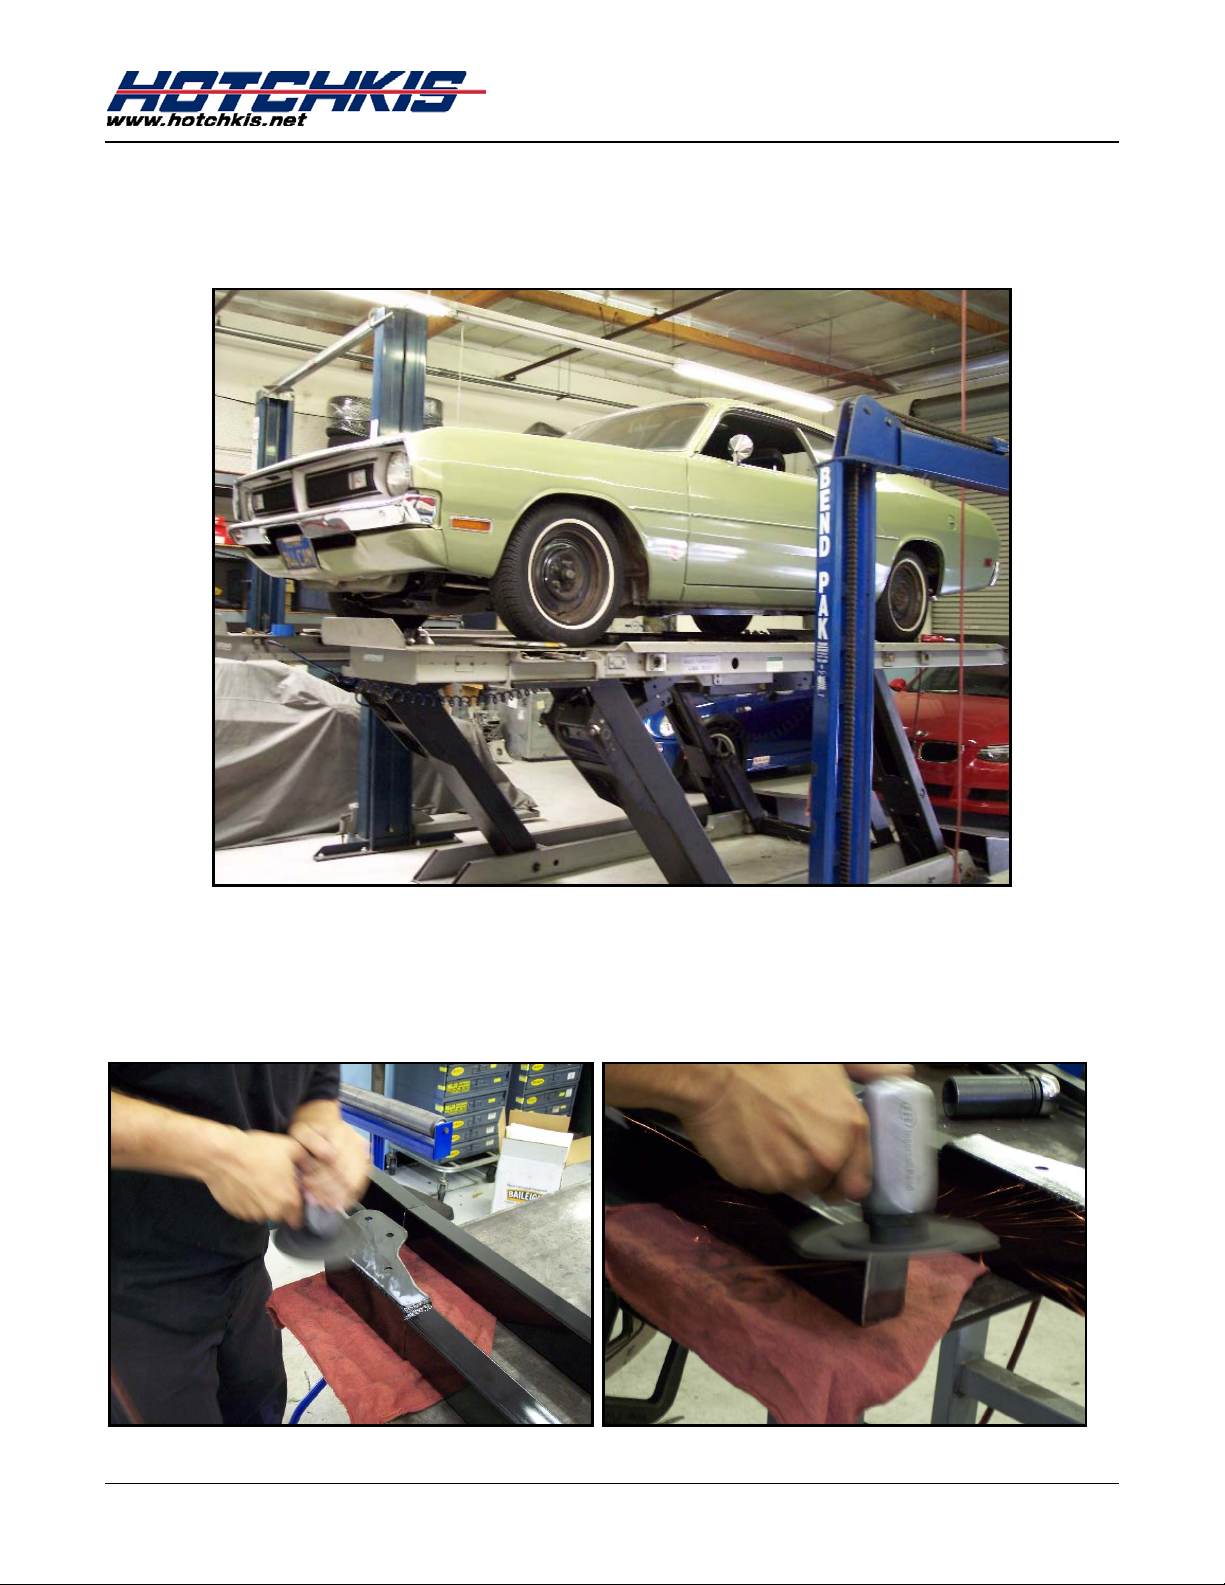
1. Raise Vehicle
It is best to install the subframe connectors at ride height. To do this properl y, please
use a 4-Post lift or alignment ra c k. Disconnect the negative battery cable.
4014
2. Prepare Subframe Pieces for Welding
Subframe pieces come fully powder coated so you will want to first prep them for the
welding process. Sand the front section and the rear mounting bracket where the parts
will be welded.
Hotchkis Performance LLC . 3
Page 4
4014
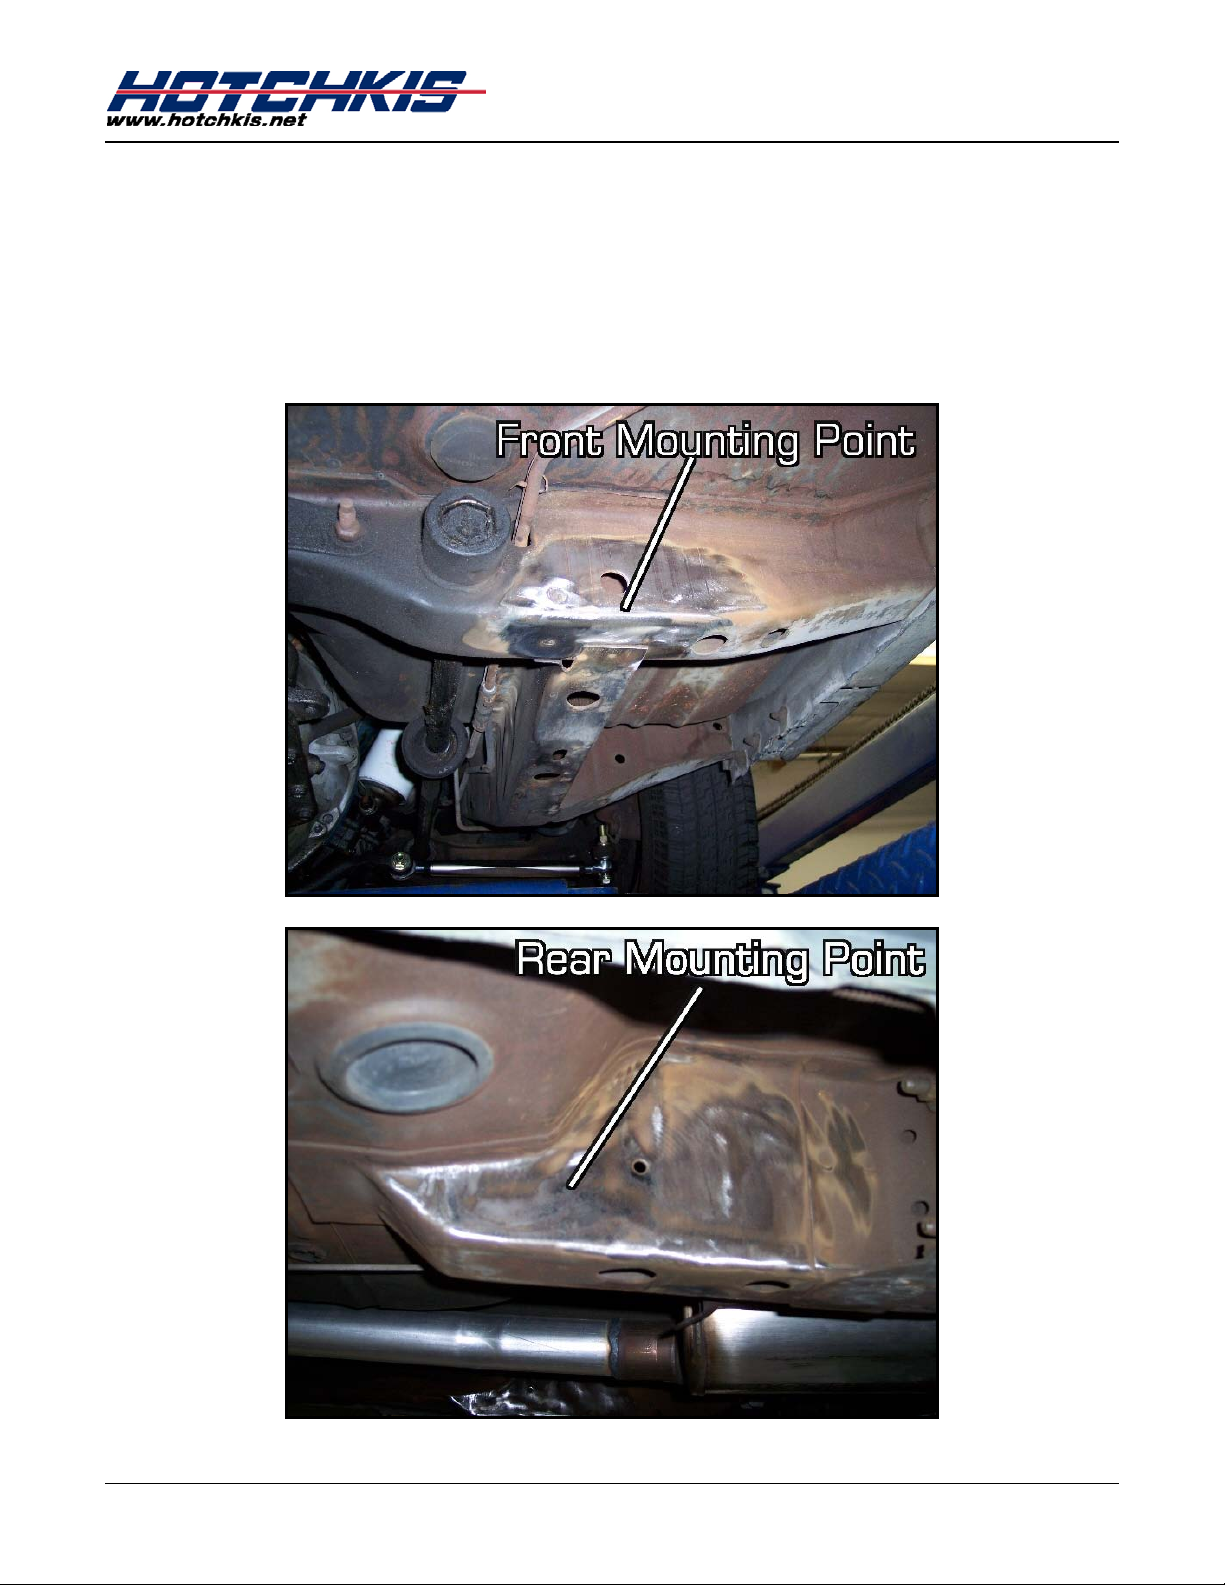
3. Trial Fit the Subframe Connectors
Before we weld anything we must first determine where we need to grind for welding
and how the front mounting bracket is going to be positioned.
The front mounting point is located in-line with the front frame rails just outboard of
the torsion bar rear mounting point. The rear mounting point is located at the fro nt
section of the rear frame rails. Grind and clean these areas as shown in the picture.
Hotchkis Performance LLC . 4
Page 5

4014
In some cases there m ay be a brake line tab on the driver side cross frame. It will be
in the way of the Hotchkis front mount br acket. The line tab is not critical and can b e
removed. Unbolt the tab and push the brake line up and out of the way.
Hotchkis Performance LLC . 5
Page 6

4014
Grab one of the subframe connectors and position it onto the vehicle. Please note that
there is a specific dri v er side and passenger side connector. Slide the rear bracket over
the rear frame rails so that the bottom of the connector is so m ew hat flush with the
bottom of the rear frame rail. See picture.
Hotchkis Performance LLC . 6
Page 7

4014
Install the front mounting bracket onto the front end of the connector. Mark the
chassis to recor d the position of the front bracket.
Hotchkis Performance LLC . 7
Page 8

4014
3. Welding the Front Mounting Bracket
Remove the connectors and repo sition the front mounts to the chassis as marked.
Tack-weld the front mount to the chassis. Do uble-check that the front mount is in the
correct position by trial fitting the connector once more.
Once the position is confirmed weld the entire bracket to the frame.
Hotchkis Performance LLC . 8
Page 9

4014
4. Weld in the Subframe Connector
Before welding, be sure that all of the surfa c es that you will be welding is clean.
Use a screw jack to hold the subframe connect or in place. Now weld the subframe
connector to the front mounting bracket.
Hotchkis Performance LLC . 9
Page 10

4014
Next, weld the rea r bracket to the rea r frame rails. There are 4 rosette holes on ea ch
side of the rear mount. Rosette weld th ese holes and weld the rest of the mount as
shown below. Repeat on other side of the bra cket.
If you find that the rear section of the bracket has too much gap between the bracket
and the frame rai l , you can use vise grips to squeeze the sides t ogether to take up the
gap. Likewise, if you have too much gap between the bottom of the bracket and the
bottom of the frame rail, then you can use a hammer to slightly bend the bottom
portion of the bracket up to close the gap. The bracket was designed with reliefs at the
bend area for this purpose.
Hotchkis Performance LLC . 10
Page 11

10. Paint
After the metal has cooled down, pai nt all exposed raw surfaces with a rust resista nt
paint.
4014
Hotchkis Performance LLC . 11
Page 12

4014
Hotchkis Performance LLC
Return Policy & Limited Warra nty
Effective December 1, 2010 all Hotchkis products must be registered to qualify for warranty at
www.hotchkis.net or via t he mail-in warranty card, included with the product, within 30 days of
the original purchase date.
IMPORTANT: This warranty supersedes all other warranties included with this product.
Return Policy
We want you to be completel y satisfied with your Hotchk is Perform ance product. For products, presenting signs
of shipping damage pleas e contact the freight carrier immediately. All our pr oducts are guarantee d to be free
from manufacturer’s defects. If your order arrives with a manufacture defect, please contact our Customer
Service Department at ( 562) 907-7757. You will be ass igned a Returned Goods Authorizati on Number (RGA).
The package you ret urn must show the RG A on the outside of t he package, include the original invoice an d be
shipped prepaid to our fac ility. The product has t o be unused and in its original pack aging m aterials. Exchanges
or refunds made after 30 days will be subject to a 20% restoc king charge. If you purchased your Hotchkis
Performance product from an authorized dealer, you are still covered by this return policy. All returns
however, should be made to your dealer, not to Hotchkis Performance directly.
Limited Warranty
Hotchkis Performance offers a Limited Warranty against defects in materials and workmanship for the term of 36
months (3 years) from the date of purchase of this product. This Warranty only applies to the original retail
purchaser who retains ownership of the vehicle on which the produc t was originally installed. If the product is
determined to be defective, Hotchkis Performance will repair, replace or refund the purchase price of the defective
product at Hotchkis Performance's sole discretion, which shall fully satisfy and discharge any and all warranty
claims. Any repaired or replaced product will be returned to the sender excluding the cost of freight.
must be registered to qualify for warr anty at www.hotchkis.net or via the mail-in warranty card, included
with the product, within 30 days of the original purchase date.
Products
Exclusions from Warranty
Items offered but not manufactured by Hotchkis Performance are warranted according to the manufacturer's
terms and are not co vered by this l imited warra nty. H otchk is Perform ance shal l not be r esponsibl e for an y labor,
removal, installation, re-installation or m aintenance costs. This warranty does not cov er the cosmetic finish or
plating of any product or any nor m al wear and t ear to any prod uct inc luding , but not lim ited to bus hings, br ack ets,
end-links, hardware, steer ing components, shocks or springs. In ad dition, this warranty does not apply to any
products that have been:
Improperly installed or installed by someone other than a qualified, licensed auto mechanic
experienced in the installation and removal of suspension products;
Improperly serviced, misused, or modified, altered or subjected to abuse, negligence, accident or
collision;
Installed in any vehicle that has been modified;
Installed on any vehicle that has carried loads in excess of automobile manufacturer suggested
weight limits; or
Installed on any vehicle that has been subject to abnormal or excessive use, including rallying,
racing, or racing-type activities or off-road use.
Limitation of Warranty
This limited warranty is the entire a nd on ly warranty for the products and may not be modified or supplemented by
any other person or company in any form . Any description of the products , by anyone, is for the sole purpose of
identifying them and is not part of the basis of the bargain, and d oes not constitute a warranty that the products
will co nform to that des cription. The sta tements of an y salespers on do not constit ute part of this lim ited warr anty
and cannot be relied upon as a warranty.
Hotchkis Performance LLC . 12
 Loading...