

Page 1
Installation of Hotchki s Fro n t Swa y Ba r
Sport Sway Bar Kit 22833
06-07 Audi A3
06-09 VW MKV & MKVI
Jetta, GTI, GLI
1F
Thank you for your purchase from our new line of Audi/VW parts.
Please call us at 877 - 4NO - ROLL if you have any questions
regarding the service or installation of your Hotchkis Performance products.
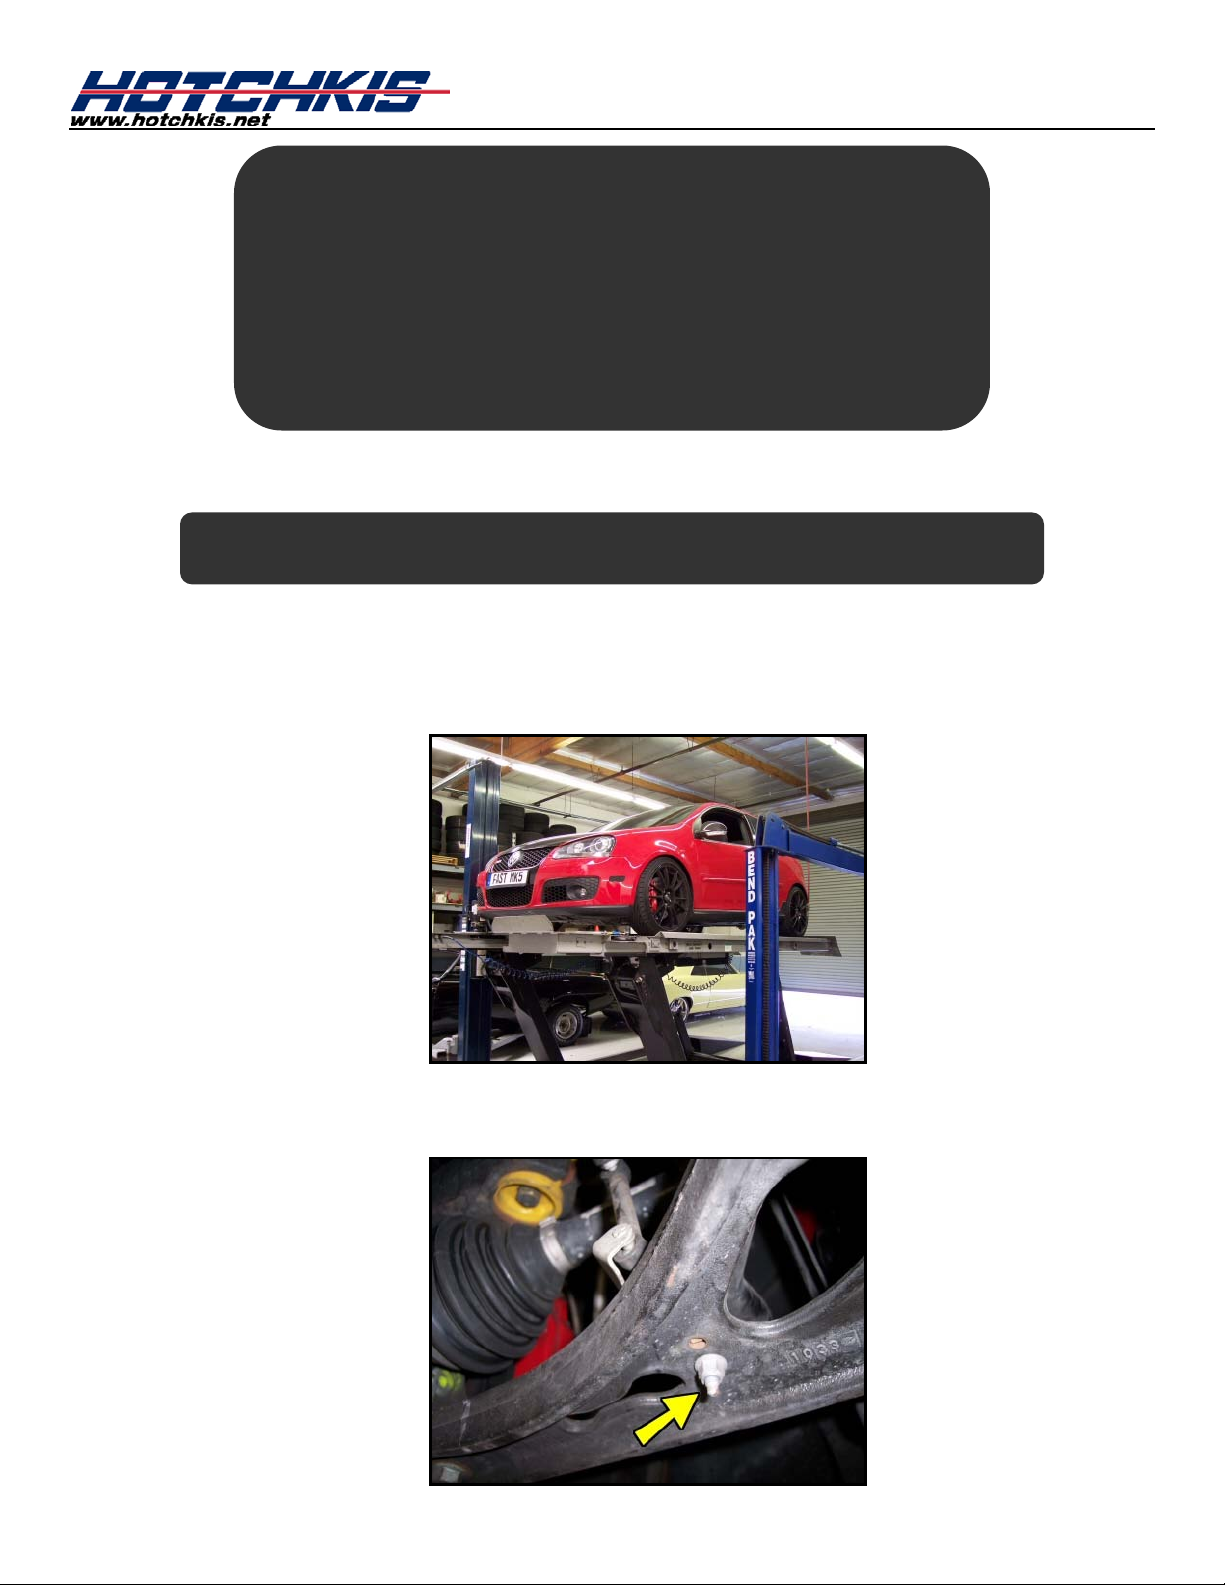
Raising Vehicle
Raise front of the vehicle by using a 4 post lift or drive-on ramps. Securely block the rear
wheels of the vehicle. Do not remove the front wheels during installation for safety.
2F
Detach Ride Height Sensor
Unbolt the ride height sensor located on the driver side lower control arm.
Page 2
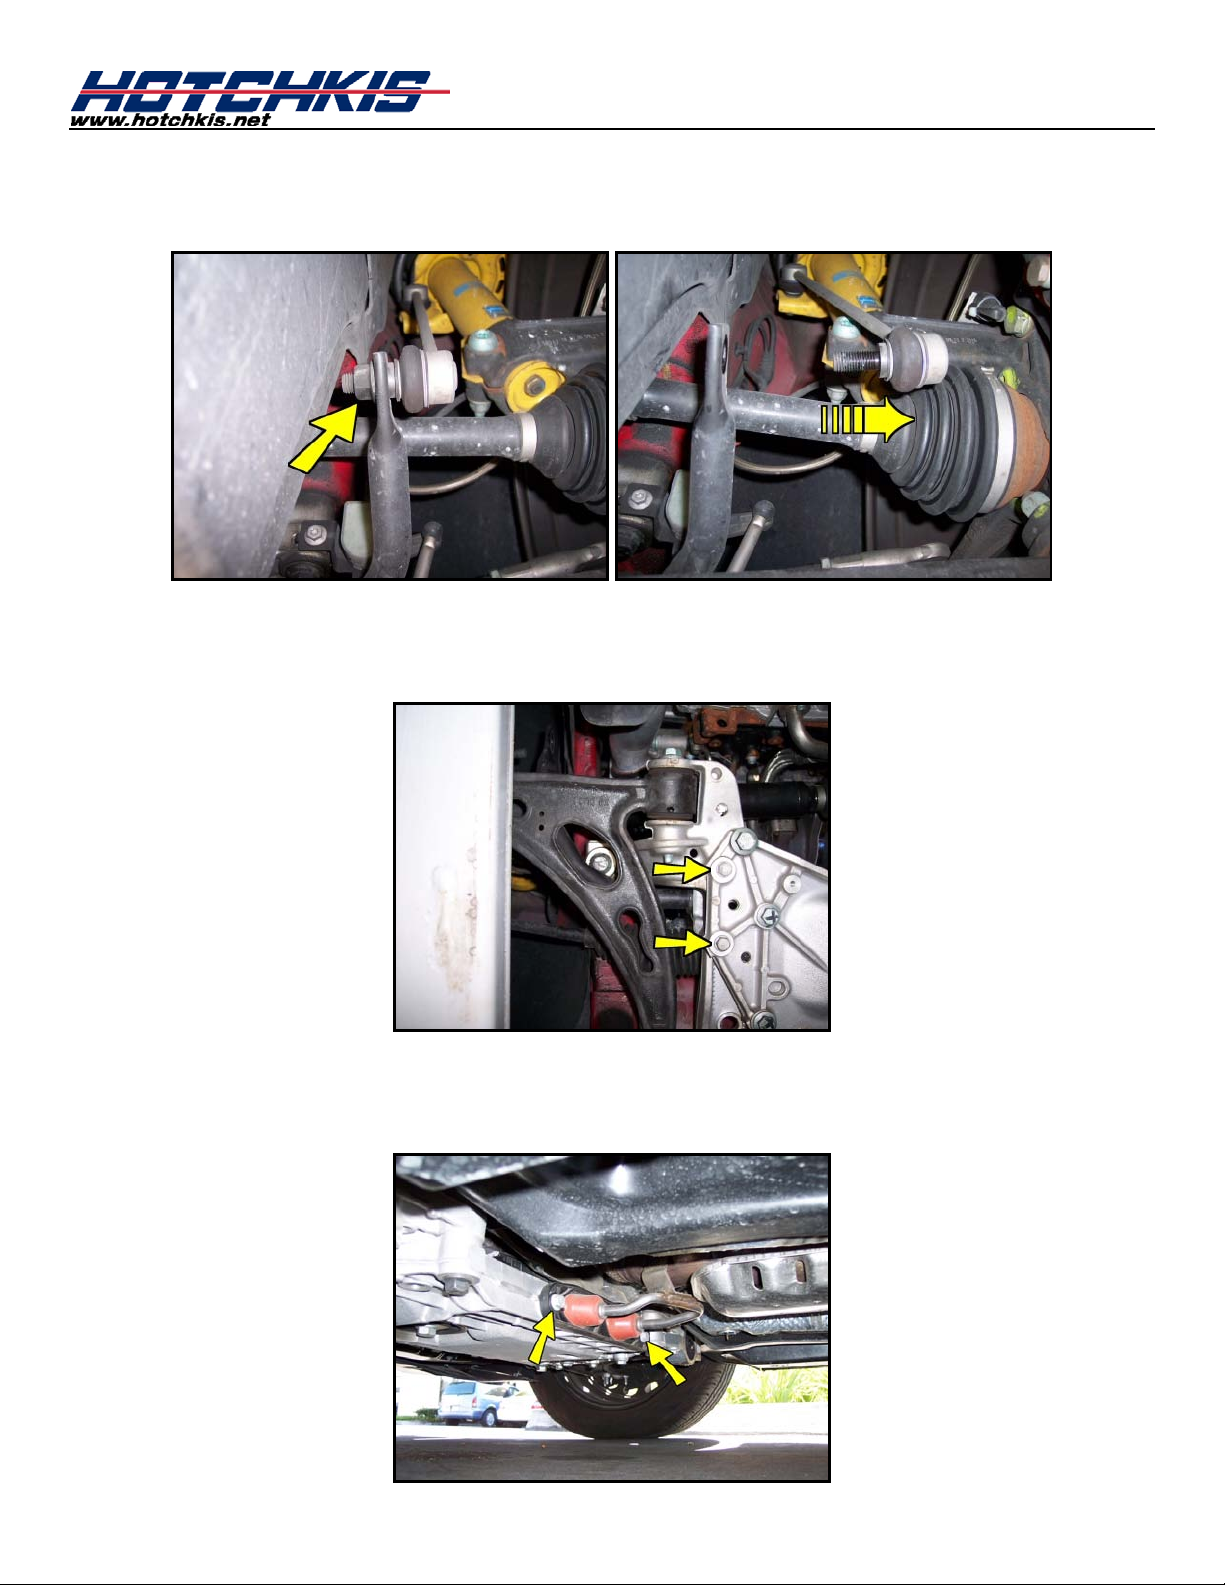
3F
4F
Unbolt the 4 bol ts (2 per side) that secure the sway bar to th e su bframe.
Detach End Links
Loosen and remove the lower end link nuts from both sides, and push links aside.
Unbolt Sway Bar Bushing Brackets
5F
Unbolt the front exhaust hanger mount
Undo Exhaust Hangers
Page 3
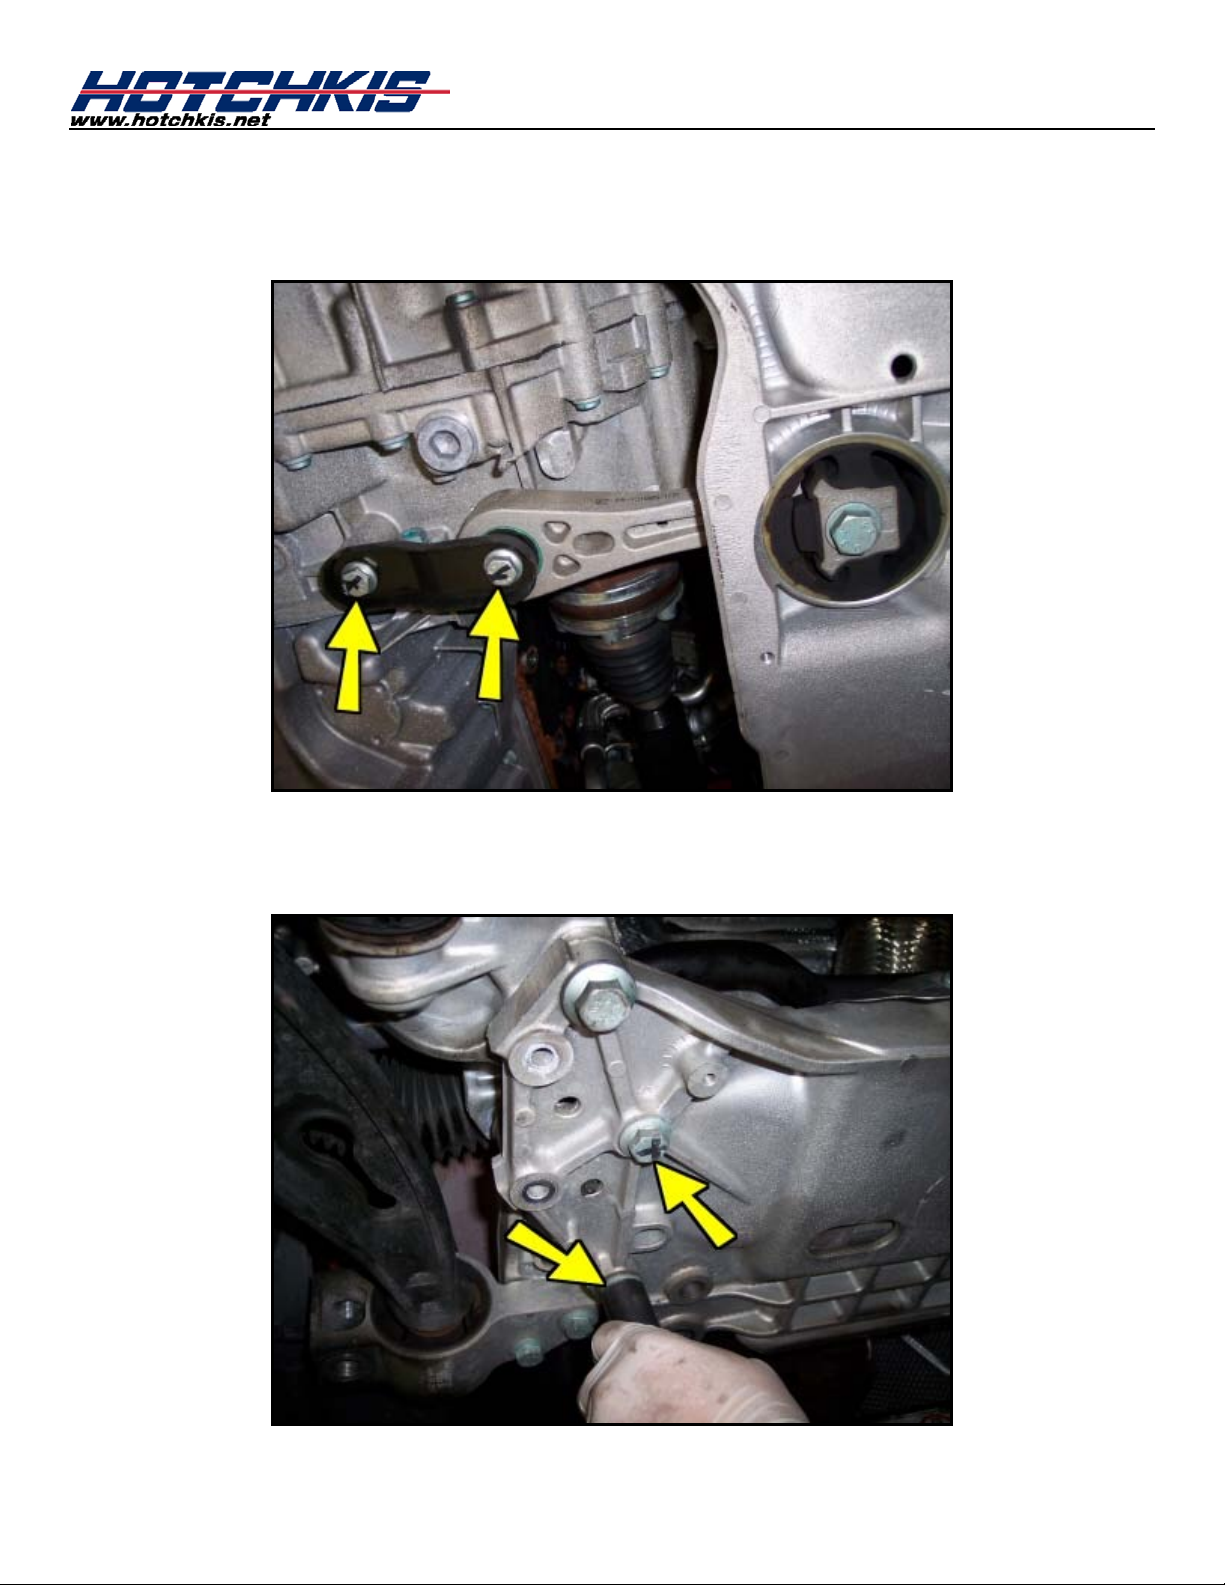
6F
Locate and remove lower engine mount that attaches to the subframe. Loosen and remove
Disconnect Lower Engine Mount
the bolt that attaches the mount to the engine.
7F
Loosen and remove the 4 steering rack bolts.
Disconnect the Steering Rack From Subframe
Page 4
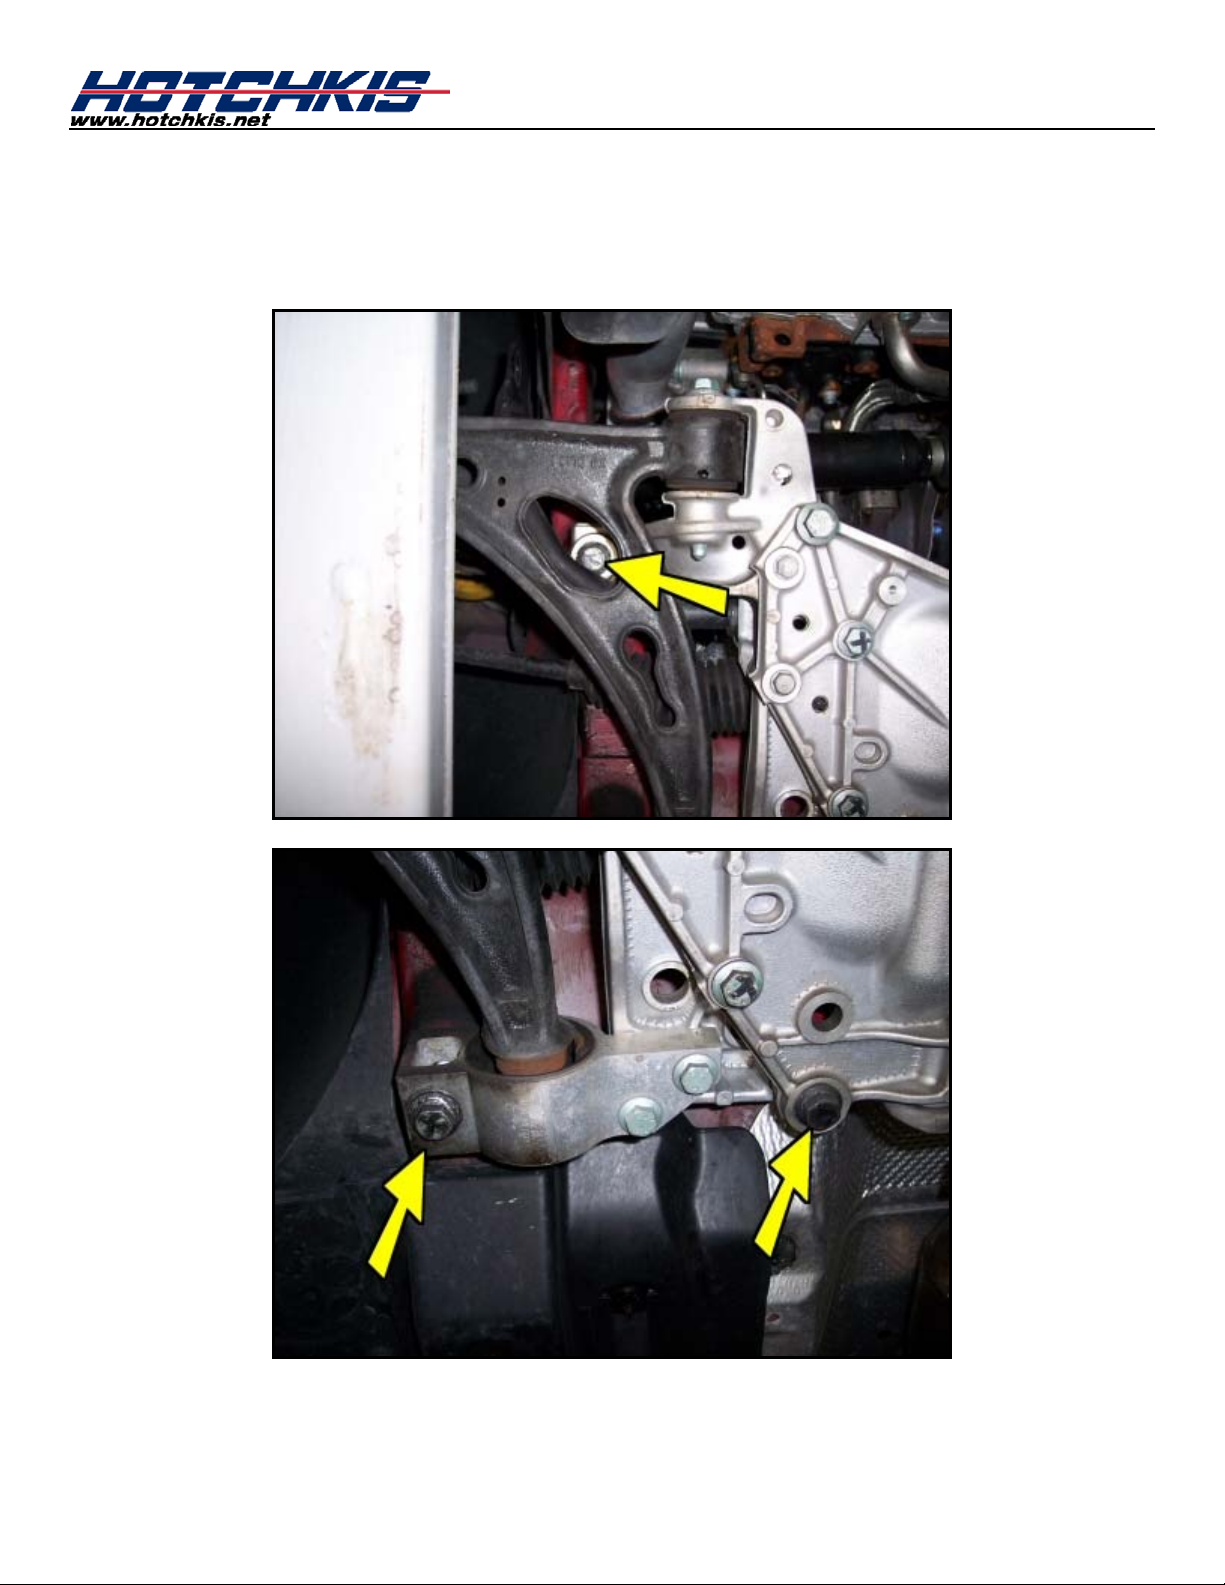
8F
Loosen and remove the 6 subframe cradle bolts. The cradle will not drop completely since it is
Drop the Subframe Cradle
still connected to the struts, so you do not have to worry about it falling out. However, be
careful when it drops down.
Page 5

9F
It’s a tight fit between the subframe and the body, so it will take some patience removing the
10F
Repeat steps 1F through 9F in reverse order. Your new Hotchkis bar uses new bushings and
Remove the Front Sway Bar
sway bar. It also helps raising the front of the vehicle slightly to gain more clearance. The
bar comes out towards the front of the car. Try to reme mber how the bar comes ou t, for this
will be the same procedure getting the new Hotchkis bar in.
Reinstall New Hotchkis Bar
brackets. The front bushing has a Ø1-1/16” hole. Use the supplied silicon grease to lube the
inside surface of the bushings. Make sure to use thread lock compound on the subframe
bushing bracket bolts and the end link nuts. The bushing brackets are slotted, so make sure
they are shifted towards the rear of the vehicle. Dish washer is used for the front bracket hole.
Please see pictures for more detail. When reinstalling the subframe you will need to use a jack
and a pry bar to align the mounting holes. Once the holes are aligned, start all 4 subframe
cradle bolts by hand to avoid cross threading. Make sure the steering column seal is popped
back into position. Install the front end links onto the sway bar with the weight of
the car on it’s wheels. Do not install the end links while the suspension is in droop.
Page 6

Fitting points outboard.
Straight fitting is shown in pictures for prototyping.
Page 7

Installation of Hotchkis Rear Sway Bar
11F
Make sure all hardware is fully tightened before driving the vehicle. Let’s move to the rear
12F
Your Hotchkis front bar has 3 adjustment holes, which allow the customer to change the sway
1R
Double Check Hardware
sway bar.
Stiffness Adjustment
bar stiffness harder or softer. The hole closets to the end is the softest setting, while the hole
furthest from the end is the stiffest. The stiffness increase compared the stock bar is as
follows:
Soft Setting: 45% Stiffer than Stock
Medium Setting: 70% Stiffer than Stock
Stiff Setting: 105% Stiffer than Stock
Raising Car
Removal of the rear sway bar should be done at ride height, so the vehicle must be raised by
a flat alignment style rack, or place the rear of the vehicle on ramps and securely block the
front wheels.
Page 8

2R
Detach End Links
Loosen and remove the lower end link nuts from both sides, and push links aside.
3R
Loosen and remove the sway bar bushing bracket bolts. There are 2 per bracket. Once the
Undo the Sway Bar Bu s h i n g Bra c ket Bolts
bolts are removed, the bar should be loose from the vehicle.
Page 9

4R
Repeat steps 2R through 3R in reverse order. Your new Hotchkis bar uses new bushings and
Reinstall New Hotchkis Bar
brackets. The rear bushing has a Ø1-1/16” hole. Use the supplied silicon grease to lube the
inside surface of the bushings. Make sure to use thread lock compound on the subframe
bushing bracket bolts and the end link nuts. There is some slop in the brackets provided, so
you can raise the sway bar upward to clear the subframe edge under each bracket .
Page 10

5R
Double Check Hardw a re
Make sure all hardware is fully tightened before driving the vehicle. You are done with the
installation. The vehicle does not r eq ui r e an alignment after this installation.
6F
Stiffness Adjustment
Your Hotchkis front bar has 3 adjustment holes, which allow the customer to change the sway
bar stiffness harder or softer. The hole closets to the end is the softest setting, while the hole
furthest from the end is the stiffest. The stiffness increase compared the stock bar is as
follows:
Soft Setting: 90% Stiffer than Stock
Medium Setting: 135% Stiffer tha n Stock
Stiff Setting: 200% Stiffer than Stock
Page 11

Hotchkis Performance LLC
Return Policy & Limited Warra nty
Effective December 1, 2010 all Hotchkis products must be registered to qualify for warranty at
www.hotchkis.net or via t he mail-in warranty card, included with the product, within 30 days of the
original purchase date.
IMPORTANT: This warranty supersedes all other warranties included with this product.
Return Policy
We want you to be completely satisfied with your Hotchkis Performance product. For products, presenting signs of
shipping damage please contact the freight carrier immediately. All our products are guaranteed to be free from
manufacturer’s def ec ts . If your or der arr ives wit h a manufacture defec t, pl eas e contact our Customer Service Departm ent
at (562) 907-7757. You will be ass igned a R eturned Goods Authorizat ion Num ber (RGA). The pack age you return m ust
show the RGA on the out side of the package, include the original invoic e and be shipped prepaid to our facility. The
product has to be unused and in its original packaging materials. Exchanges or refunds made after 30 days will be
subject to a 20% restocking charge. If you purchased your Hotchkis Performance product from an authorized
dealer, you are still covered by this return policy. All returns however, should be made to your dealer, not to
Hotchkis Performance directly.
Limited Warranty
Hotchkis Performance offers a Limited Warranty against defects in materials and workmanship for the term of 36 months
(3 years) from the date of purchase of this product. This Warranty only applies to the original retail purchaser who retains
ownership of the vehicle on which the pr od uc t was originally installed. If the product is determined to be defective,
Hotchkis Performance will repair, replace or refund the purchase price of the defective product at Hotchkis Performance's
sole discretion, which shall fully satisfy and discharge any and all warranty claims. Any repaired or replaced product will
be returned to the sender excluding the cost of freight.
www.hotchkis.net or via the mail-in warranty card, included with the product, within 30 days of the original
purchase date.
Products must be registered to qualify for warranty at
Exclusions from Warranty
Items offered but not manufactured by Hotc hkis Performance are warranted ac cording to the manufacturer's term s and
are not covered by this limited warranty. Hotchkis Performance shall not be responsible for any labor, removal,
installation, re-installation or maintenance costs. This warranty does not cover the cosmetic finish or plating of any
product or any normal wea r and tear to any product inc luding, but not limited to bus hings, brackets , end-links, hardw are,
steering components, shocks or springs. In addition, this warranty does not apply to any products that ha ve been:
Improperly installed or installed by someone other than a qualified, licensed auto mechanic experienced in the
installation and removal of suspension products;
Improperly serviced, misused, or modified, altered or subjected to abuse, negligence, accident or collision; Installed in any vehicle that has been modified; Installed on any vehicle that has carried loads in excess of automobile manufacturer suggested weight limits; or Installed on any vehicle that has been subject to abnormal or excessive use, including rallying, racing, or racing-type
activities or off-road use.
Limitation of Warranty
This limited warranty is the entire and only warranty for the products and may not be modified or supplem ented by any
other person or company in any form. Any description of the products, b y anyone, is for the sole purpose of identifying
them and is not part of the basis of the bargain , and d oes not constitute a warran ty that the pr oducts will conform to that
description. The statem ents of any salesperso n do not constitute part of this limited warrant y and cannot be relied upon
as a warranty.
THERE ARE NO WARRANTIES, EXPRESSED OR IMPLIED, INCLUDING ANY IMPLIED WARRANTIES OF
MERCHANTABILITY OR FITNESS FOR A PARTICULAR PURPOSE, WHICH EXTEND BEYOND THE
DESCRIPTION ON THE FACE HEREOF. ANY IMPLIED WARRANTIES ARE DISCLAIMED TO THE
FULLEST EXTENT PERMITTED BY LAW. THIS WARRANTY DOES NOT COVER CONSEQUENTIAL
DAMAGES, LOSS OF TIME OR REVENUES, INCONVENIENCE, LOSS OF USE OF THE VEHICLE,
 Loading...