

Page 1

HotBrick VPN Client
User Manual
Page 2

Table of Content
1 INTRODUCTION 3
2 INSTALL 3
2.1 Software installation 3
2.2 Evaluation Period 4
3 SOFTWARE MANIPULATION 4
3.1 System Tray 4
3.2 Hidden User interface 5
3.3 Main window 5
4 CONFIGURATION 7
4.1 USB Mode 7
4.2 Configuration Wizard 9
4.3 Tunnel configuration (main window) 11
4.4 Authentication or Phase 1 12
4.5 IPSec Configuration or Phase 2 14
4.6 Certificate management 15
4.7 Global Parameters 16
4.8 Configuration management 17
4.9 Tunnel management (Connections) 17
4.10 Configuration tools 18
4.11 Console 19
5 UNINSTALL 20
5.1 Software uninstall 20
6 TROUBLESHOOTINGS ERRO! INDICADOR NÃO DEFINIDO.
7 CONTACTS 20
HotBrick VPN Client User Manual Property of HotBrick — 2005
2
Page 3

1 Introduction
HotBrick VPN client is a complete IPSec VPN s olution for all Windows versions. It provides full IKE support
(preshared keying and X509 certificates) and Nat Traversal. It is compatible with most of the currently available
IPSec gateways and also operates as a peer-to-peer VPN in a “point – to – multiple" mode, wit hout a gateway
or server.
HotBrick VPN Client provides 3DES, DES and AES encryption and MD5 and SHA authentication.
• Our IPSec client is the result of many years of experience in network security and Windows network driver
development, as well as extensive research in related areas.
• Our IKE implementation is based on the OpenBSD 3.1 implementation (ISAKMPD), thus providing best compatibility with existing IPSec routers and gateways.
Our offer is specially designed to target OEM clients and System Integrators. We prov ide a fully functional VP N
Client solution to complete existing offers . Our IPSec VPN Client ca n be re-branded and source code license is
available on demand.
The VPN IPSec Client completes our range of netw ork security pro ducts and lik e all our pro ducts is ea sy to use
and to install.
HotBrick VPN IPSec Client is compatible with all curre nt Wi ndows versions: 9x, ME, NT4, 2000, XP.
2 Install
2.1 Software installation
HotBrick VPN client installation is a classical Windows installation that does not require specific information.
After completing the installation, you will be aske d to reboot your computer.
Caution
stops after the language choice with an error message.
After reboot and session login, a window appears for a license number request.
: On Windows NT, 2000 and XP, you must have administrator rights. If it is not the case, the installation
HotBrick VPN Client User Manual Property of HotBrick — 2005
3
Page 4

The license number is a string with hexadecimal characters as "0123456789ABCDEF0123". An error message
warns user if this value is false.
If the License number is correct, HotBrick VPN Cli ent is activated. You can then find a green/red icon in the
taskbar. Right and left click give access to the configuration user interface and “Quit” command.
Shortcuts
: After software installation, HotBrick VPN window can be launched:
• from user desktop, by double-clicking on HotBrick VPN shortcut
• from VPN Client icon available in the taskbar
• from menu Start > Programs > HotBrick > VPN > HotBrick VPN
2.2 Evaluation Period
It is possible to use HotBrick IPSec VPN Client during the evaluation period (i.e. limite d to 30 days) by clicking
on "Trial" button. When the IPSec VPN Client is on "Evaluatio n" mode, the register window appears at each
boot of the client.
3 Software manipulation
HotBrick VPN Client is fully autonomous and can start and stop tunn els without user i ntervention, depe nding on
traffic to certain destinations. However it requires configuration.
The VPN Client configuration is defined i n a c onfig urati on file . The software user i nterfac e all ows cre ating , modifying, saving, exporting or importing the configurations.
HotBrick VPN Client User Manual Property of HotBrick — 2005
4
Page 5

3.1 System Tray
The configuration user interface can be launch via a double click on applicatio n icon (Desktop or Wi ndows Start
menu) or by single click on application icon in system tray. Once launched, the VPN Client software shows an
icon in the system tray that indicates whether a tunnel is opened or not, using color code.
3.1.1 Color code is the following
Red icon: no VPN tunnel is established
Green icon: at least one VPN tunnel is established
Tool tips over VPN Client icon shows the connection status of the VPN tunnel:
• "Tunnel tunnelname" when one or more tunnels are established
• "Wait VPN ready..." when the IKE service is reinitializing
• "HotBrick VPN Client" when the client is up but with no established tunnel.
A left-button click on VPN icon opens configuration us er interface. A right-button click shows the following menu:
• "Quit" will close established VPN tunnels, stops the configuration user interface.
• "Save & Apply" will close established VPN tunnels and reopen all the VPN tunnels.
• "Console" shows log window.
• "Connections" opens the list of already established VPN tunnels. Yo u can configure t unnels to open up aut o-
matically when the software starts.
3.2 Hidden User interface
The configuration user interfa ce can be hidden t o the end user. W e provide configur ation tools for IT managers
that prevent the end user from changing their configurati on. Access to the configuration user interface can be
restricted with configuration tool VPNHIDE. See section 4.10.3 page 18.
In that case, the Main window can not be opened and showed by double-clicking on desktop ic on, by selecting
Start menu. Right-click over the icon in taskbar is limited to "Console" access:
HotBrick VPN Client User Manual Property of HotBrick — 2005
5
Page 6
3.3 Main window
The main window is made of several elements:
• A tree list window (left column) that contains all the IKE and IPSec configuration
• Three buttons '”Console”, “Parameters” et “Connections” (left column)
• A configuration win dow (right column) that shows the associated tree level.
3.3.1 Main menus
• “File” menu is use d for saving and loading a configuration. With this menu, y ou can import or export
VPN configuration.
• 'Configuration' menu cont ains all actions from tree control right-click menu
• 'Configuration' menu gives also access to the configuration wizard.
• 'Tools' menu contains 'Console' and 'Connections' choice.
HotBrick VPN Client User Manual Property of HotBrick — 2005
6
Page 7

• '?' menu gives access to online help and window 'About'.
3.3.2 Status bar
The status bar displays several information:
• The “USB Token box ” (left side) indicates whether the “US B mode” is set “On” or “Off” (see also sec-
tion 4.1 page 7). In case it is set “On”, “USB” will appear.
• The “central box ” gives some information about VPN Client Software status (e.g. “opening tunnel in
progress”, “saving configuration rules in progress”, “VPN client start up in progress”, …)
• The “light box” (right sid e) gives some informati on about tunnels (e.g. red li ght means at least one tun-
nels is open, green light means no tunnel open, gray light means VPN Client restart pending)
3.3.3 Window 'About'
The 'About' window provides the VPN Client software version. There is also an URL to our web site.
4 Configuration
You’ll find a set of useful VPN Client configuration docume nts available for each of the V PN Client gateway we
support. Please go to our knowledge base on our website: http://www.hotbrick.com.br/vpnclient_list.htm
4.1 USB Mode
The VPN Client 2.5 brings the capability to secure tunnel security elements by the use of a USB Stick.
Once the "USB mode" is set “On”, you just need to insert the USB stick to autom atically open tunnels. And you
just need to unplug the USB stick to automatically close al l established tunnels. In that mode, no tun nel can be
opened.
When you select “USB mode”, the tunnel security elements contained into the configuration are stored onto the
USB stick the first time you plug it in.
HotBrick VPN Client User Manual Property of HotBrick — 2005
7
Page 8
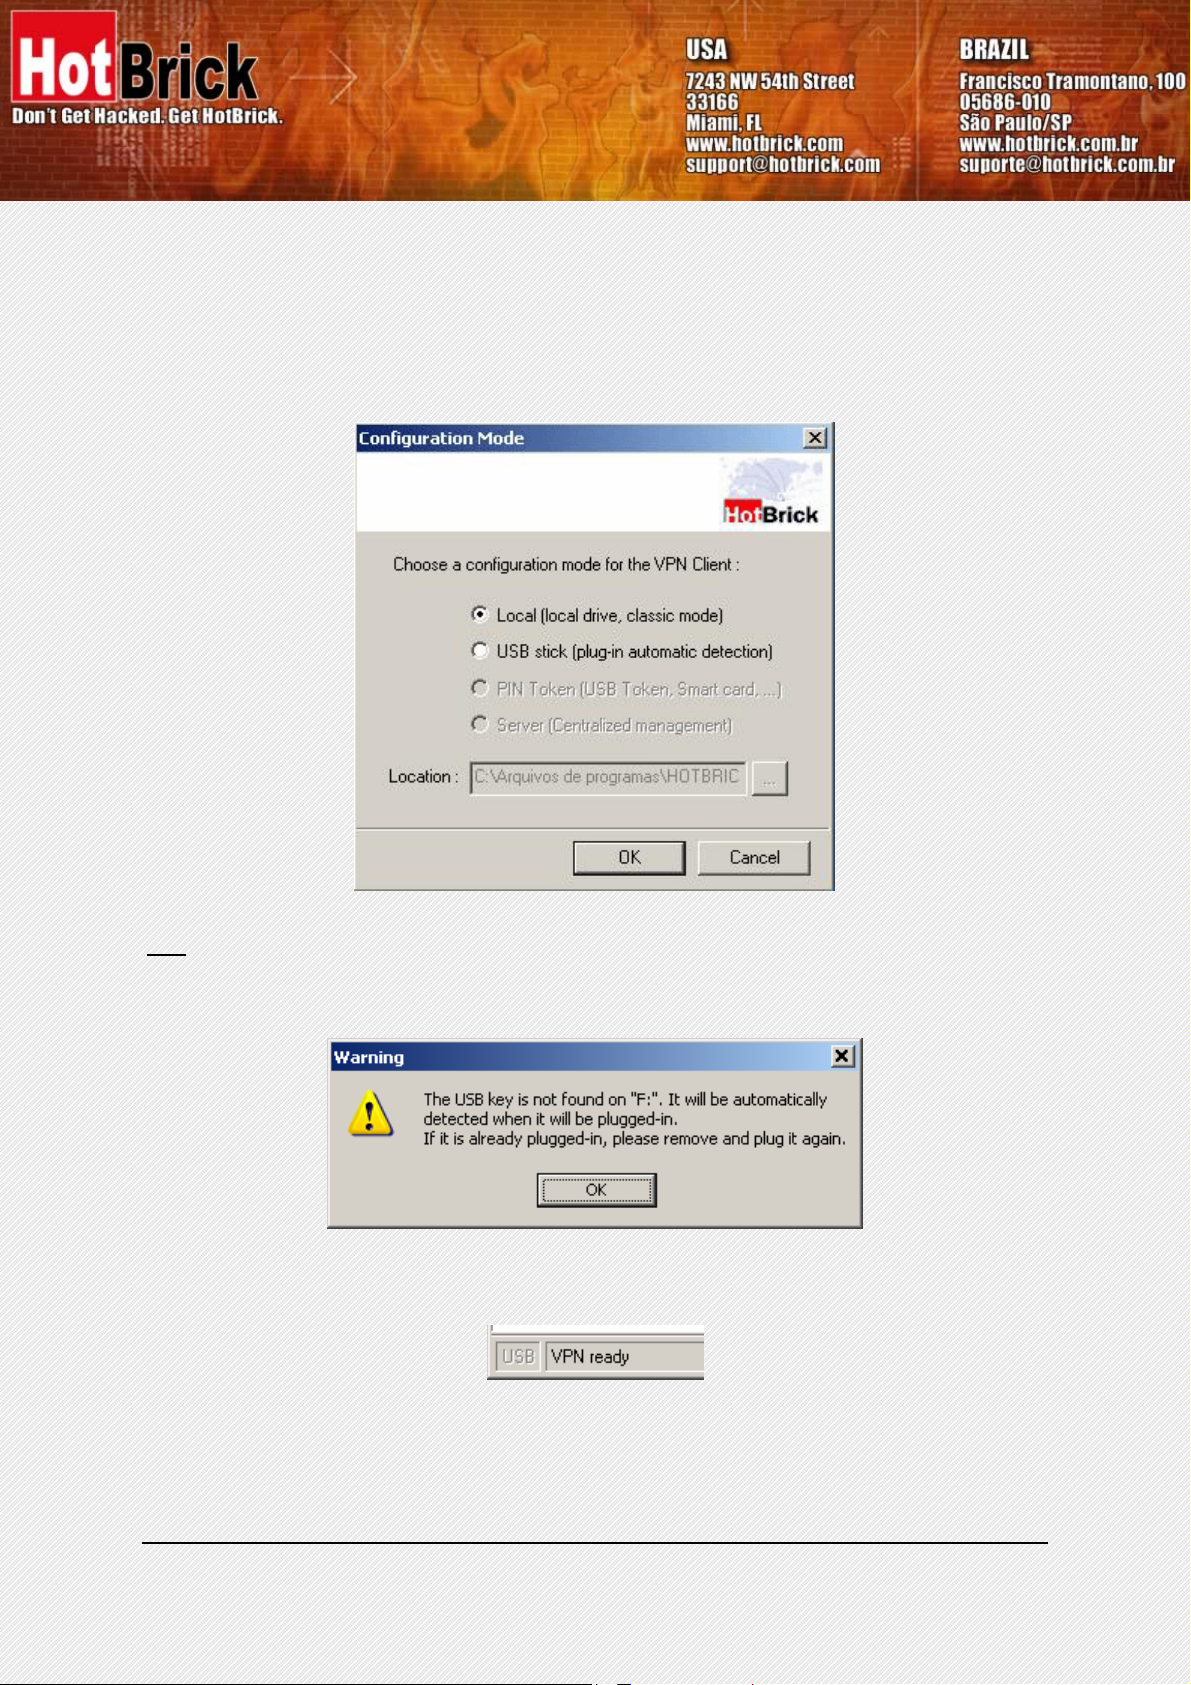
4.1.1 How to set “USB mode" on?
• Select menu File > Configuration M od e
• Select USB Stick
• Optional: indicates the drive of the USB stick if you’ve plugged it in
Note: At this stage, if an USB stick containing a VPN configuration with tunnel security elements is already
plugged in, the associated drive will be auto matically recognized. Please not e also that this is not necessary to
insert a USB Stick during this step. In case no USB Stick is pl ugged in, the foll owing pop window will i nform the
user:
Once USB mode is set on, the “USB token box ” (status bar) sh ows “USB”. The te xt is gray (i. e. see bel ow) if no
USB stick is plugged in. The text is plain when a USB St ick is plugged in.
4.1.2 How to enable the USB Stick?
When you insert a new USB stick, the IPSec VPN Client automatically pr opose to enabl e the USB stick through
the following options:
HotBrick VPN Client User Manual Property of HotBrick — 2005
8
Page 9

• Copying the configuration onto the USB stick: the VPN cli ent will copy the configuration onto the USB
Stick and leave a copy in the computer. This is used by IT managers to enable multip le USB Sticks for
multiple users.
• Moving the configuration onto the USB stick: the VPN clie nt will copy the configuration ont o the USB
Stick and remove all configuration information from the computer. This method is used to secure a
computer once VPN configuration compl ete d setup.
4.1.3 How to open tunnels automatically when an USB stick is plugged in?
Each and every tunnel must be configured individually:
• Select one tunnel by clickin g on IPSec Configuration (Phase 2) in the tree list window (see section 4.5)
• Set the mode "Auto open wh en USB stick plugged in" on
4.2 Configuration Wizard
HotBrick IPSec VPN client integrates a Configur ation Wizard that allows the creation of VPN configuratio n in
three easy steps.
This wizard is designed for remote computers that need to get connected to a corporate LAN through a VPN
gateway. Let take the following example:
• The remote computer has a dynamically provided public IP addre ss.
• It tries to connect the Corporate LAN behind a VPN gateway that has a DNS address
"gateway.mydomain.com".
• The Corporate LA N address is 192.168.1.xxx. E.g. the r emote computer wants to reach a serv er with
the IP address: 192.168.1.100.
HotBrick VPN Client User Manual Property of HotBrick — 2005
9
Page 10

For configuring this connection, open wizard' s window by selecting menu "Configuration > Wizard"
4.2.1 Step 1 of 3
You specify the type of the equipment at the end of the tunnel: VPN gateway.
4.2.2 Step 2 of 3
You must specify the following information:
• the public (network side) address of the gateway
HotBrick VPN Client User Manual Property of HotBrick — 2005
10
Page 11

• the preshared key you will use for this tunnel (this preshared key must be the same in the gateway)
• the IP address of your compa ny LAN (e.g. specify 192.168.1.0)
4.2.3 Step 3 of 3
The third step summaries your configuration. Other parameters may be further configured directl y via the main
interface (e.g. Certificates, virtual IP address, etc...)
4.3 Tunnel configuration (main window)
4.3.1 How to create a tunnel?
To create a VPN tunnel from the main window (without us ing configuration wizard), you must follo w the following steps:
1. Right-click on 'Configuration' in the tree list win do w and select "New Phase 1”
2. Configure Authentication Phas e (Phase 1)
3. Right-click on the new Phase 1 in the tree control and select “Add Phase 2”
HotBrick VPN Client User Manual Property of HotBrick — 2005
11
Page 12

4. Configure IPSec Phase (Phase 2)
5. Once the parameters are set, click on “Save & Apply” to take into account the new configurati on.
That way the IKE service will run with the new parameters
6. Click on “Open Tunnel” for establishing the IPSec VPN tunnel (only in “IP Sec Configuration” window)
4.3.2 Several Authentication or IPSec Configuration Phases
Several Authentication Phases can be co nfigured. Therefore, one computer can est ablish IPSec VPN connections with several gateways or other computers (peer to pe er).
Similarly, several IPSec Configuration (ph ase 2) can be created for a same Authentication Phase (Phase 1).
4.3.3 Active or Non Active phase
A phase can be either “active” or “n on active”. If a phase is “non active”, its settings will n ot be applied. This
feature can be used with a configuration compose d of several VPN tunnels that do not need to be enable d simultaneously.
Changing “active” to “non-activate” state for a specific Phase can be achieved by a right-click on the phase
name:
• Active (or Non active) Enable or disable the phase
• All active Enable all phases
• Active Only Disab le every phase except the phase select ed with the mouse.
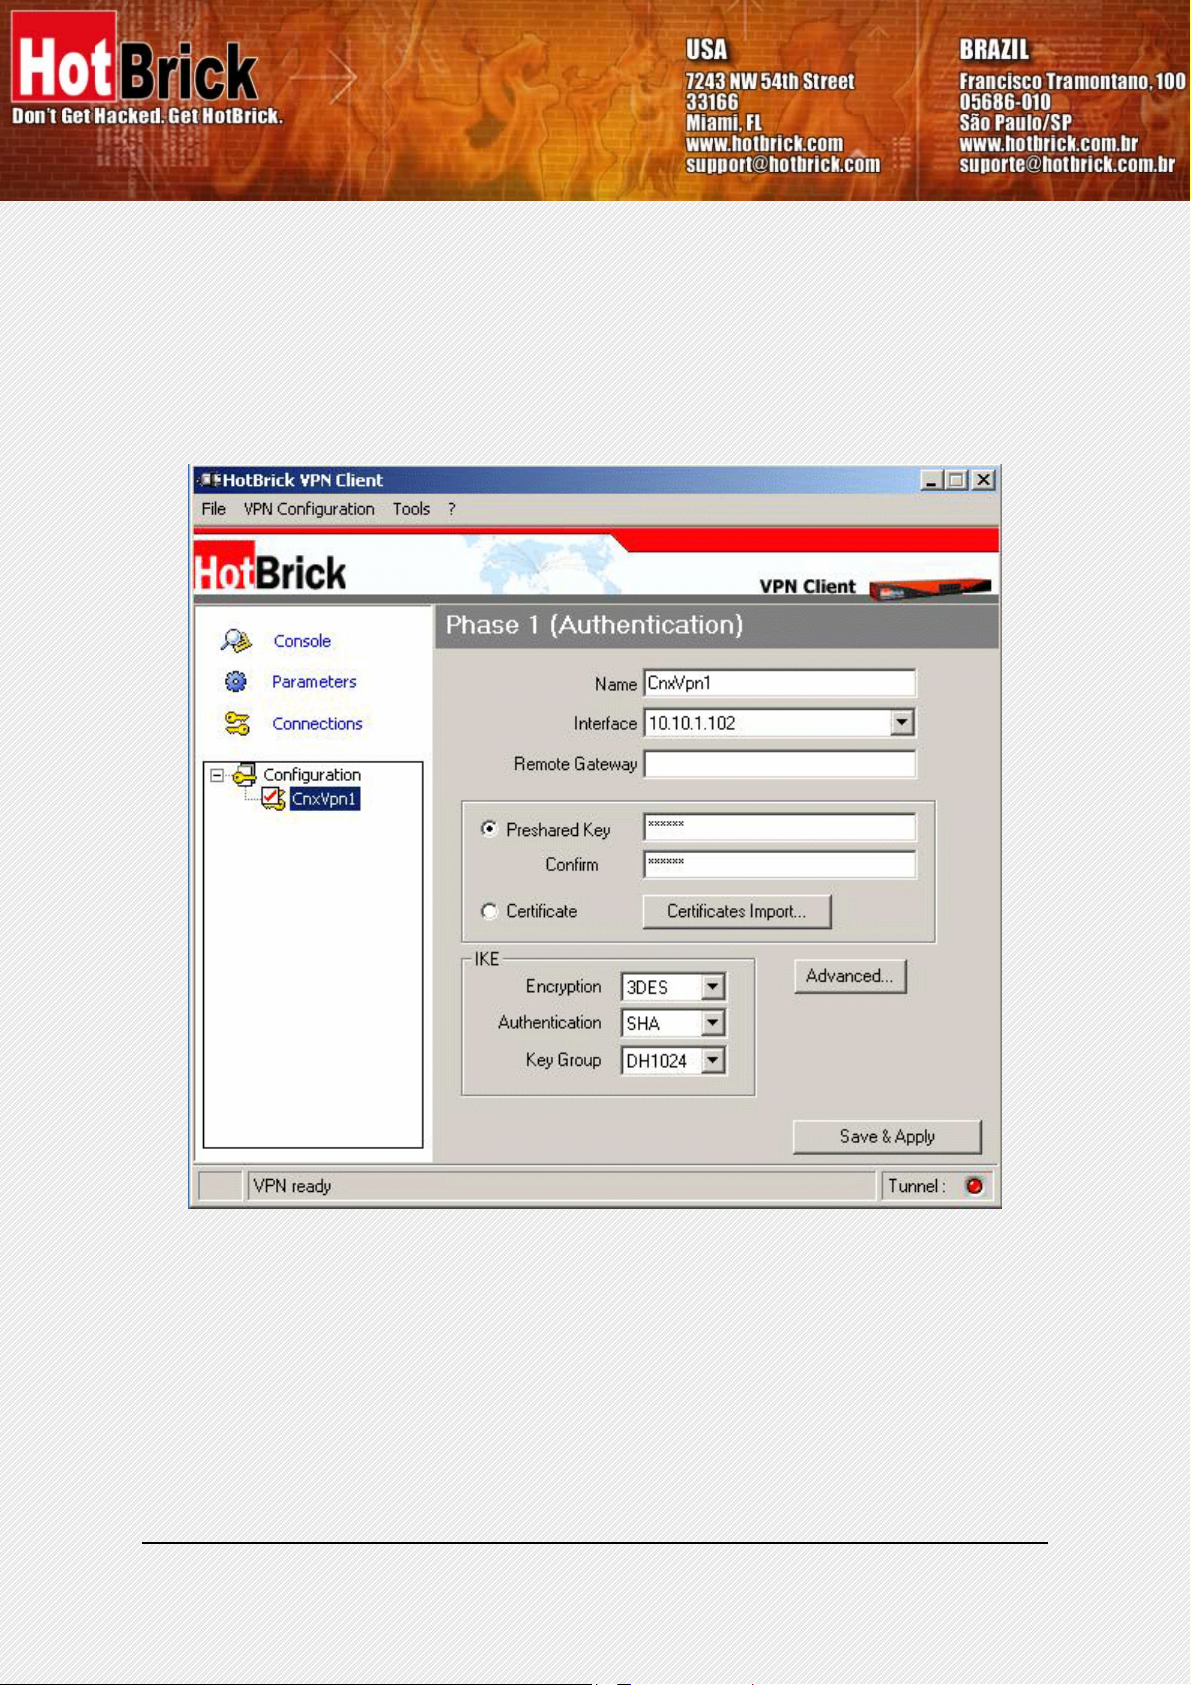
4.4 Authentication or Phase 1
'Authentication' window will concern setting s for Authentication Phase or P hase 1. It is also called IKE Negotiation Phase.
HotBrick VPN Client User Manual Property of HotBrick — 2005
12
Page 13

HotBrick VPN Client User Manual Property of HotBrick — 2005
13
Page 14

4.4.1 Settings description
Name
Label for Authentication phase us ed only the configuration user interf ace. This
value is never used during IKE negotiation. It is possible t o chan ge this n ame a t
any time and read it in the tree control. Two Phas e 1 can not have the same
name.
Interface
IP address of the network interface of the computer, through whic h VPN connection is established. If the IP address may change (wh en it is received dynamically by an ISP), select "*".
Remote Gateway
IP address or DNS address of the remote gateway (in our example: gateway.mydomain.com). This field is mandatory.
Pre-shared key
Certificate
IKE encryption
IKE authentication
IKE key group
Password or key shared with the remote gateway.
X509 certificate used by the VPN client (see certificate configuration).
Encryption algorithm used during Authentication phase (3DES, AES ...).
Authentication algorithm used during Authentication phase (MD5, SHA ...).
Diffie-Hellman key length.
Once the parameters are set, click on “Save & Apply” to save and to take into account the new configuration.
4.4.2 Advanced configuration ("Advanced" Button)
HotBrick VPN Client User Manual Property of HotBrick — 2005
14
Page 15

4.4.3 Settings description
Aggressive Mode
Nat port
Local ID
Remote ID
If checked, the VPN client will used aggressive mod e as negotiation mode wit h
the remote gateway
Negotiation port for IKE. Default value is 500.
Local ID is the identity the VPN client is sending d uring Phase 1 to VPN gate-
way.
This identity can be:
•1 an IP address (type = IP address), for example: 195.100.2 05.101
•2 an domain name (type = DNS), e.g. mydomain.com
•3 an email address (type = Email), e.g. support@HotBrick.com
•4 a string (type = KEY ID), e.g. 123456
•5 a certificate issuer (type=DER ASN1 DN) (see Certificat es configura-
tion)
If this identity is not set, VPN client's IP address is used.
Remote ID is the identity the VPN client is expecting to rec eive during Ph ase 1
from the VPN gateway. This identity can be:
•6 an IP address (type = IP address), for example: 80.2.3.4
•7 an domain name (type = DNS), e.g. gateway.mydomain.com
•8 an email address (type = Email), e.g. admin@mydomain.com
•9 a string (type = KEY ID), e.g. 123456
•10 a certificate issuer (type=DER ASN1 DN) ( see Certificates configura-
tion)
X-AUTH
If this identity is not set, VPN gateway's IP address is used.
Here are specified the login and passwor d of an X-AUTH IPSec negotiation.
HotBrick VPN Client User Manual Property of HotBrick — 2005
15
Page 16

4.5 IPSec Configuration or Phase 2
HotBrick VPN Client User Manual Property of HotBrick — 2005
16
Page 17

4.5.1 Settings description
Name
VPN Client address
Address type
Remote address
Subnet mask
Label for IPSec Configuration only used by the VPN client. This parameter is
never transmitted during IPSec Negotiation. It is possible to change th is name at
any time and read it in the tree list window. Two Phases can not have th e same
name.
Virtual IP address used by the client inside the remote LAN: The co mputer will
appear in the LAN with this IP address.
It is important this IP address not to belong to the remote LAN (e.g., in the
example, you should avoid an IP address like 192.168.1.10)
The remote endpoint may be a LAN or a single computer. In the first case choose
"Subnet address". Choose "Single address" otherwise.
When choosing "Subnet address", the two fields "Remote LAN address" and
"Subnet mask" became available.
When choosing "Single address", only the fiel d "Remote host address" is available.
This field may be "Remote host address" or "Re mote LA N address" de pending of
the address type. It is the remote IP address, or LAN network address of the
gateway, that opens the VPN tunnel.
Subnet mask of the remote LAN. Only availa ble when address type is equal to
"Subnet address".
ESP encryption
ESP authentication
ESP mode
PFS group
Auto open when Client
starts
Auto open when USB stick
plugged in
Open Tunnel
Encryption algorithm negotiated during IPSec phase (3DES, AES, ...)
Authentication algorithm negotiated during IPSec phase (MD5, SHA, ...)
IPSec encapsulation mode : tunnel or transport
Diffie-Hellman key length.
If checked, this option allows a tunnel to be automatica lly opened when the VPN
Client starts.
Note: as the VPN Client may also start during the boot (see section VPN
Tools), tunnels can be configured to be opened automatically during the
boot of the computer.
If checked, this option allows a tunnel to be automatically opened when a USB
stick is inserted (see chapter "USB mode").
This button allows opening directly the tunnel without using a ping for example.
HotBrick VPN Client User Manual Property of HotBrick — 2005
17
Page 18

4.6 Certificate management
HotBrick IPSec VPN Client uses X509 certificates with PEM format. This kind of certificates is created with
OpenSSL, not with HotBrick VPN Client.
In order to use X509 Certificates with HotBrick IPSec VPN client, you must have the following items:
• Root certificate
• User certificate
• Private key of the user c ertificate
The private key must not be encrypted. X509 certificat es are used during Phase 1.
4.6.1 How configuring IPSec VPN Client with certificates?
1. Select radio button “Certificate” in the 'Authentication' window and click on “Certificates Mgt”
2. Click on “Browse” and select the appropriate files.
3. Open “Advanced button” and fill Local ID with:
• Type = "DER_ASN1_DN".
• Value = subject user certificate ("Subject:") content like "C=FR, ST=Paris, L=Paris,
O=HotBrick, OU=Internal OpenSSL CA, CN=exemple/Email=support@hotbrick.com
".
HotBrick VPN Client User Manual Property of HotBrick — 2005
18
Page 19
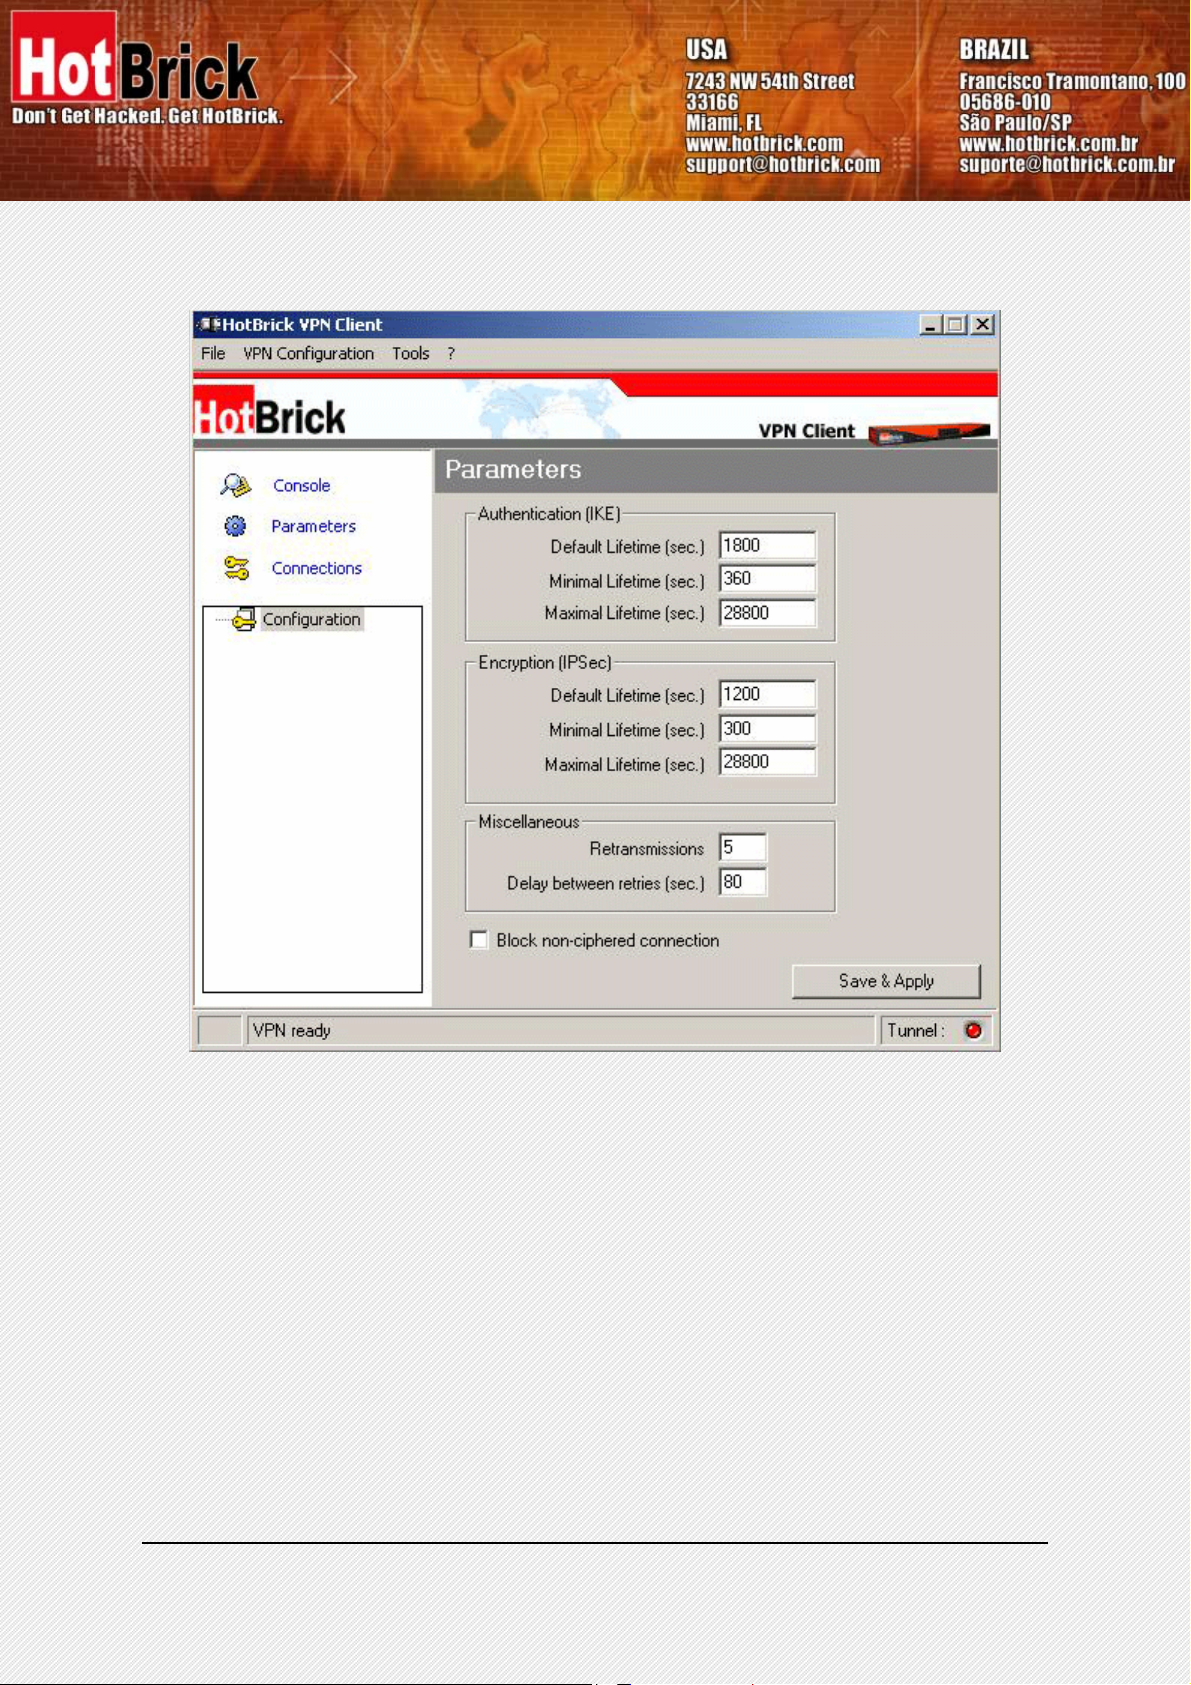
4.7 Global Parameters
HotBrick VPN Client User Manual Property of HotBrick — 2005
19
Page 20

4.7.1 Settings description
IKE default lifetime
IKE minimal lifetime
IKE maximal lifetime
IPSec minimal lifetime
IPSec maximal lifetime
IPSec minimal lifetime
Retransmissions
Delay between retries
Block non-ciphered connec-
tion
Once the parameters are set, click on “Save & Apply” to save and to take into account the new configuration.
Default lifetime for IKE rekeying.
Minimal lifetime for IKE rekeying.
Maximal lifetime for IKE rekeying.
Default lifetime for IPSec rekeying.
Maximal lifetime for IPSec rekeying.
Minimal lifetime for IPSec rekeying.
How many times a message should be retransmitt ed before giving up.
Waiting time in an exchange before giving u p a negotiation
When this option is checked, only encrypted traffic is authorized.
4.8 Configuration management
4.8.1 How to Import or Export an IPSec VPN configuration
HotBrick VPN Client can import or export a VPN Conf iguration. With this feature, IT managers can prepare a
configuration and deliver it to other users.
• Importing a configuration, se lect "File > Load configuration".
• Exporting a configuration, select "File > Save configuration".
All configuration files will have a ".tgb" ext ension.
You can open and modify an exported configuration file (extens ion .tgb) with any word processin g e.g. Notepad
and re import it again. This is other way f or IT mana gers to customiz e VPN confi gurations b efore dispat ching to
end users.
4.9 Tunnel management (Connections)
“Connections” screen shows opened VPN tunnels and this interface can be used to close them.
To close a tunnel, select one tunnel in the tunnel list and click on "Close tunnel".
HotBrick VPN Client User Manual Property of HotBrick — 2005
20
Page 21

4.10 Configuration tools
4.10.1 Stopping IPSec VPN Client: option "/stop"
HotBrick VPN Client can be stopped at any time by the command line:
• " [path]\vpnconf.exe /stop " where [path] is the client installation directory.
If there are several active tunnels, they will close properly.
This feature can be used, for example, in a script that launches the VPN Client after establishing a dialup con-
nection and exit it just before the disconnection.
4.10.2 IPSec VPN Client Startup mode: VPNSTART
VpnStart.exe is a configuration tool that sets up the client startup mode.
HotBrick VPN Client can start with 3 different modes:
• During PC boot: this mode can be used for secure r emote action
HotBrick VPN Client User Manual Property of HotBrick — 2005
21
Page 22
• At Windows login ("login" mo de)
• Launched by user or from a script ("manual" mode)
4.10.3 Hiding IPSec VPN Client configuration user interface: VPNHIDE
VpnHide.exe is a configuration tool that hides HotBri ck Client VPN interface. It can be used by IT managers for
preventing end-user from modifying configuration settings.
In "invisible" mode, the window interface is never shown.
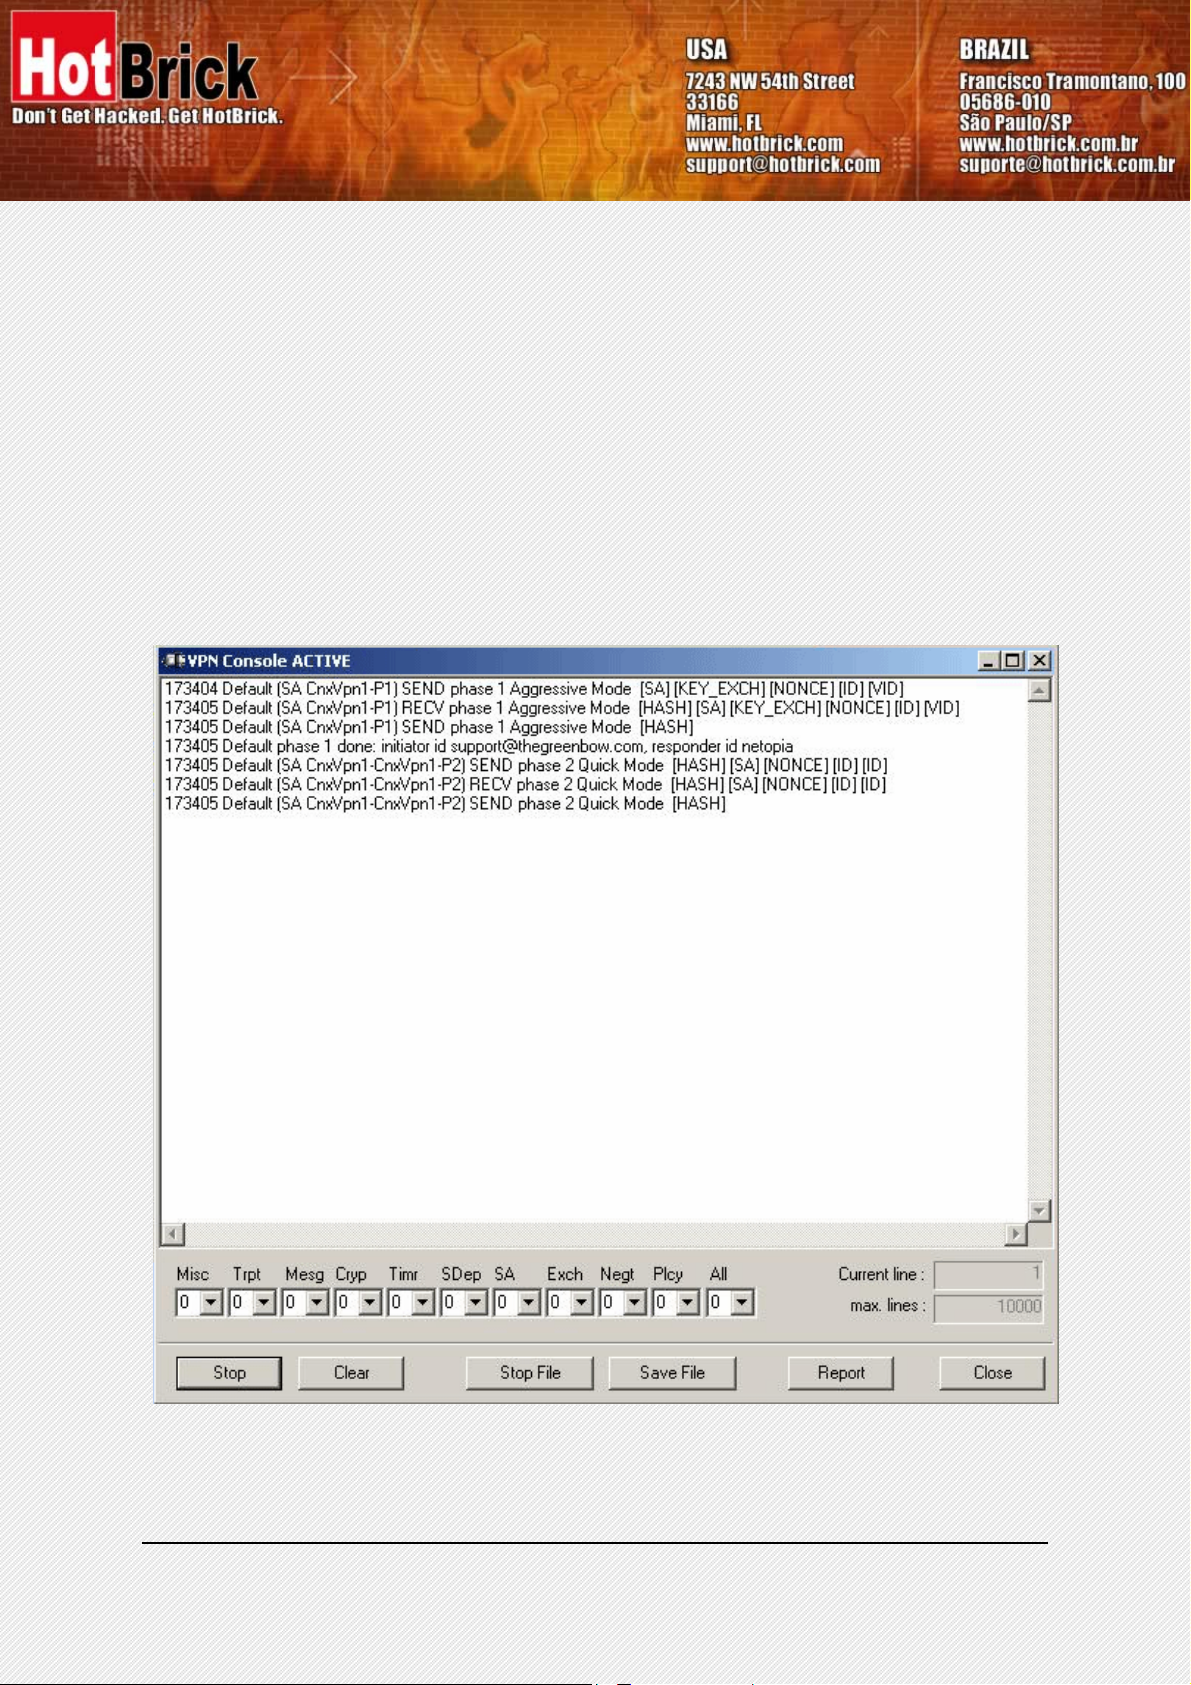
4.11 Console
The “Console” window is availab le from icon menu that c an be found in th e taskbar or from “C onsole” button in
the configuration user interface. This window can be used to analyze VPN tunn els. This tool is particularly useful
for IT managers in setting up their network.
HotBrick VPN Client User Manual Property of HotBrick — 2005
22
Page 23

Button Description
Start / Stop
Clear
Save File
Stop File
Report
Label Name Description
Misc Misc log level for configuration reading or dump of low level messages
Trpt Transport log level for UDP transport mode
Msg Message log level for IKE decode
Cryp Crypto log level and dump for crypto material exchanged
Timr Timer log level about timers
Sdep Sysdep log level about IKE interface from/to IPSec
SA SA log level for SA management
Exch Exchange log level about IKE exchanges (very useful)
Start / Stop printing log
Clear console window content
Save logs in a file
Stop saving logs in a file
Print VPN configuration and IKE internal state.
Nego Negotiation log level about phase 1 and phase 2 negotiat ion
Plcy Policy not used
All All Apply the same log level to all subsystems
Most of the time log level set to 0 is largely enough for resolving configuration issues.
5 Uninstall
5.1 Software uninstall
HotBrick IPSec VPN Client can be uninstalled:
• from Windows Control Panel by selecting "Add/Remove de programs"
6 Troubleshooting
You will be able to find all troubleshooting issue s, listed in a Troublesho oting Document on o ur website. Please
have a look at: http://www.hotbrick.com/support_detail.asp?tipo=2
.
HotBrick VPN Client User Manual Property of HotBrick — 2005
23
Page 24

7 Contacts
Information and update are available at: www.HotBrick.com.
Technical support is available by email: support@HotBrick.com
End of Document
.
HotBrick VPN Client User Manual Property of HotBrick — 2005
24
 Loading...