

Hoshizaki American, Inc. KMD-410MAH Installation Manual

MODULAR CRESCENT CUBER
INSTRUCTION MANUAL
KMD-410MAH
KMD-410MWH
L1F043101 (061010)
IMPORTANT
Only qualified service technicians should install, service and maintain the
product. No installation, service or maintenance should be undertaken until
the technician has thoroughly read this Instruction Manual. Likewise, the
owner/manager should not proceed to operate the product until the installer
has instructed them on its proper operation. Failure to install, operate, and
maintain the equipment in accordance with this manual may adversely affect
safety, performance, component life, and warranty coverage.
Hoshizaki provides this manual primarily to assist qualified service technicians in the
installation, maintenance, and service of the product.
Should the reader have any questions or concerns which have not been satisfactorily
addressed, please call, write, or send an e-mail message to the Hoshizaki Technical
Support Department for assistance.
HOSHIZAKI AMERICA, INC.
618 Highway 74 South
Peachtree City, GA 30269
Attn: Hoshizaki Technical Support Department
Phone: 1-800-233-1940 Technical Support
(770) 487-2331
Fax: 1-800-843-1056
(770) 487-3360
E-mail: techsupport@hoshizaki.com
Web Site: www.hoshizaki.com
NOTE: To expedite assistance, all correspondence/communication MUST include the
following information:
* Model Number
* Serial Number
* Complete and detailed explanation of the problem.

IMPORTANT
This manual should be read carefully before the product is installed and
operated. Only qualified service technicians should install, service, and
maintain the product. Read the warnings contained in this booklet carefully as
they give important information regarding safety. Please retain this booklet for
any further reference that may be necessary.
I. Specications ------------------------------------------------------------------------------------------- 1
A. Nameplate Rating ----------------------------------------------------------------------------------1
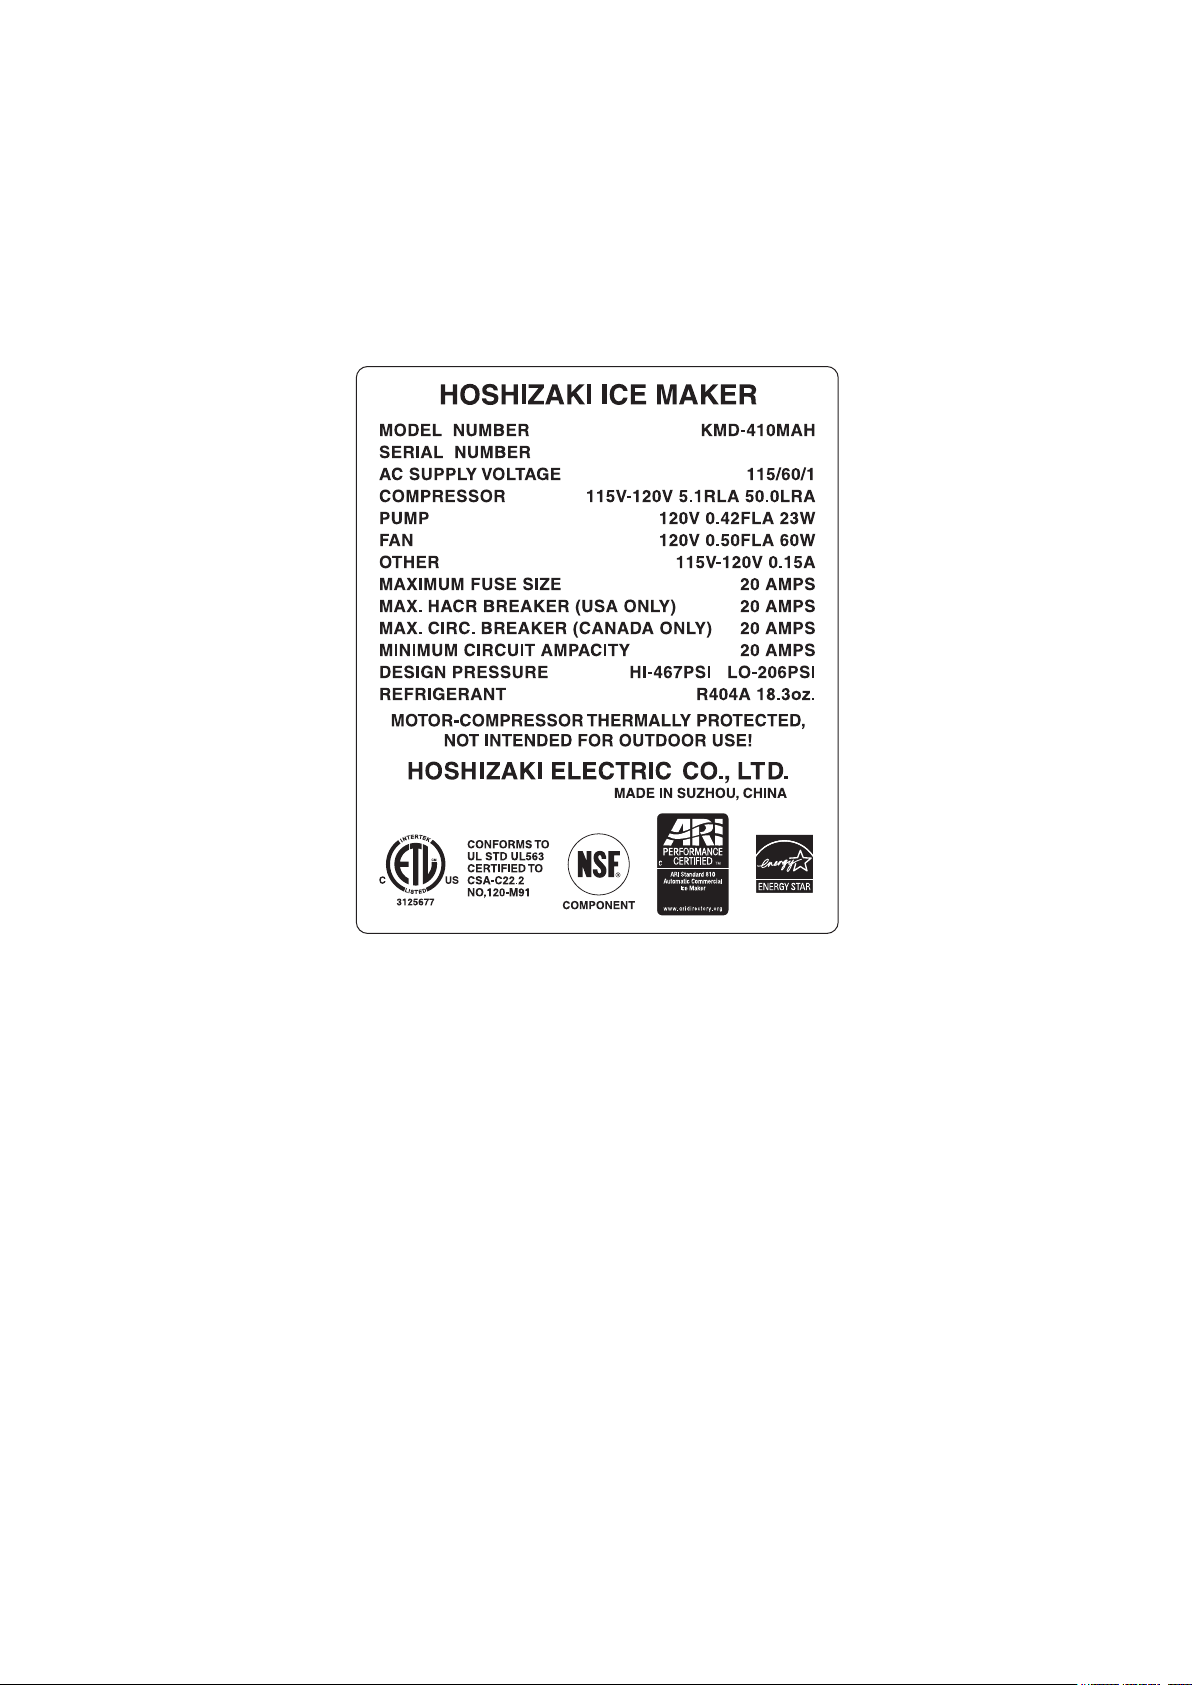
1. KMD-410MAH (air-cooled) -------------------------------------------------------------------1
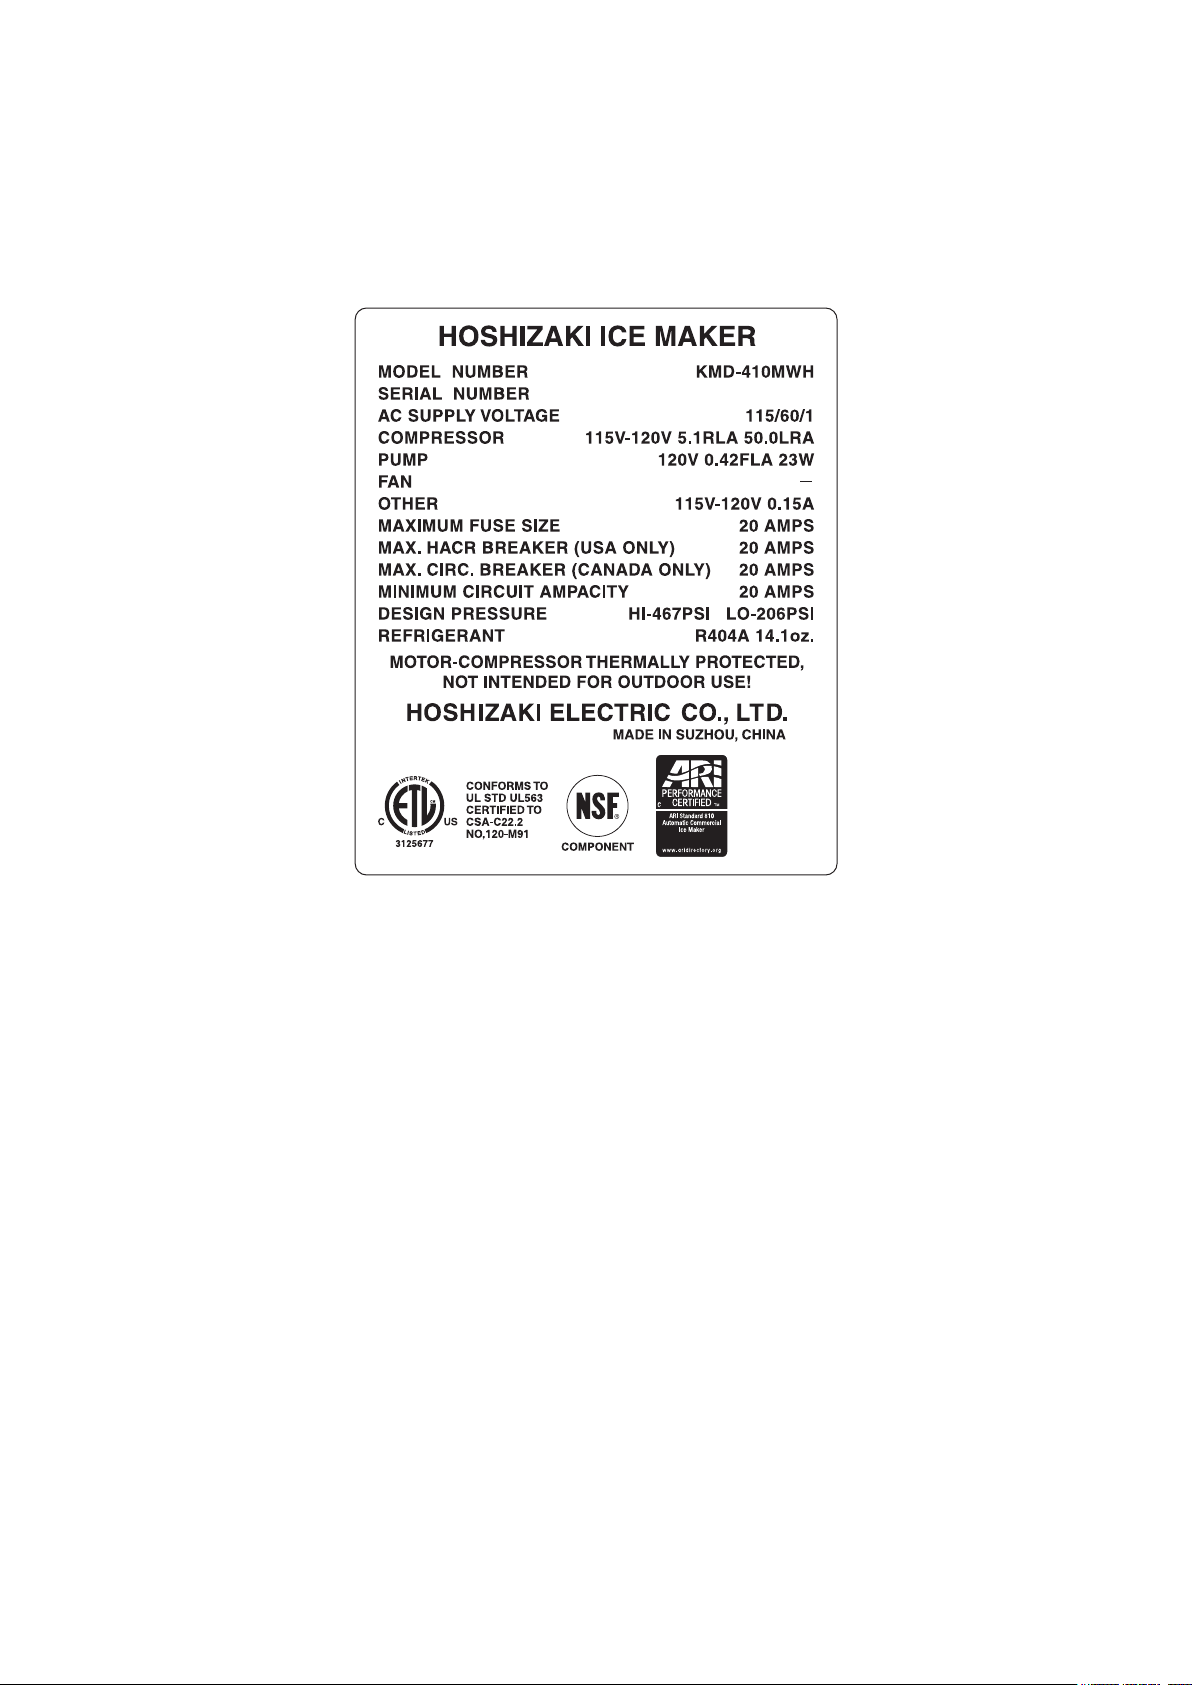
2. KMD-410MWH (water-cooled) ---------------------------------------------------------------2
B. Dimensions/Connections -------------------------------------------------------------------------3
1. KMD-410MAH -----------------------------------------------------------------------------------3
2. KMD-410MWH -----------------------------------------------------------------------------------4
II. Installation and Operating Instructions -----------------------------------------------------------5
A. Checks Before Installation -----------------------------------------------------------------------5
B. How to Remove Panels ---------------------------------------------------------------------------5
C. Location ---------------------------------------------------------------------------------------------- 6
D. Setup --------------------------------------------------------------------------------------------------7
E. Bin Control Installation ---------------------------------------------------------------------------- 8
F. Electrical Connection ---------------------------------------------------------------------------- 10
G. Water Supply and Drain Connections ------------------------------------------------------ 11
H. Final Checklist ------------------------------------------------------------------------------------ 13
I. Startup ----------------------------------------------------------------------------------------------- 14
CONTENTS
PAGE
III. Cleaning and Maintenance Instructions ------------------------------------------------------ 15
A. Cleaning -------------------------------------------------------------------------------------------- 15
1. Cleaning Procedure -------------------------------------------------------------------------- 15
2. Sanitizing Procedure ------------------------------------------------------------------------- 18
B. Maintenance --------------------------------------------------------------------------------------- 19
1. Stainless Steel Exterior ---------------------------------------------------------------------- 19
2. Storage Bin and Scoop ---------------------------------------------------------------------- 19
3. Air Filters ---------------------------------------------------------------------------------------- 20
4. Condenser -------------------------------------------------------------------------------------- 20
C. Preparing the Icemaker for Long Storage ------------------------------------------------- 20
I. Specications
A. Nameplate Rating
1. KMD-410MAH (air-cooled)
See the nameplate for electrical and refrigeration specications. This nameplate is located
on the rear panel.
Since this nameplate is located on the rear panel of the icemaker, it cannot be read when
the back of the icemaker is against a wall or against another piece of kitchen equipment.
Therefore, the necessary electrical and refrigeration information is also on the rating label,
which can be easily seen by removing only the front panel of the icemaker.
We reserve the right to make changes in specications and design without prior notice.
1
2. KMD-410MWH (water-cooled)
See the nameplate for electrical and refrigeration specications. This nameplate is located
on the rear panel.
Since this nameplate is located on the rear panel of the icemaker, it cannot be read when
the back of the icemaker is against a wall or against another piece of kitchen equipment.
Therefore, the necessary electrical and refrigeration information is also on the rating label,
which can be easily seen by removing only the front panel of the icemaker.
We reserve the right to make changes in specications and design without prior notice.
2
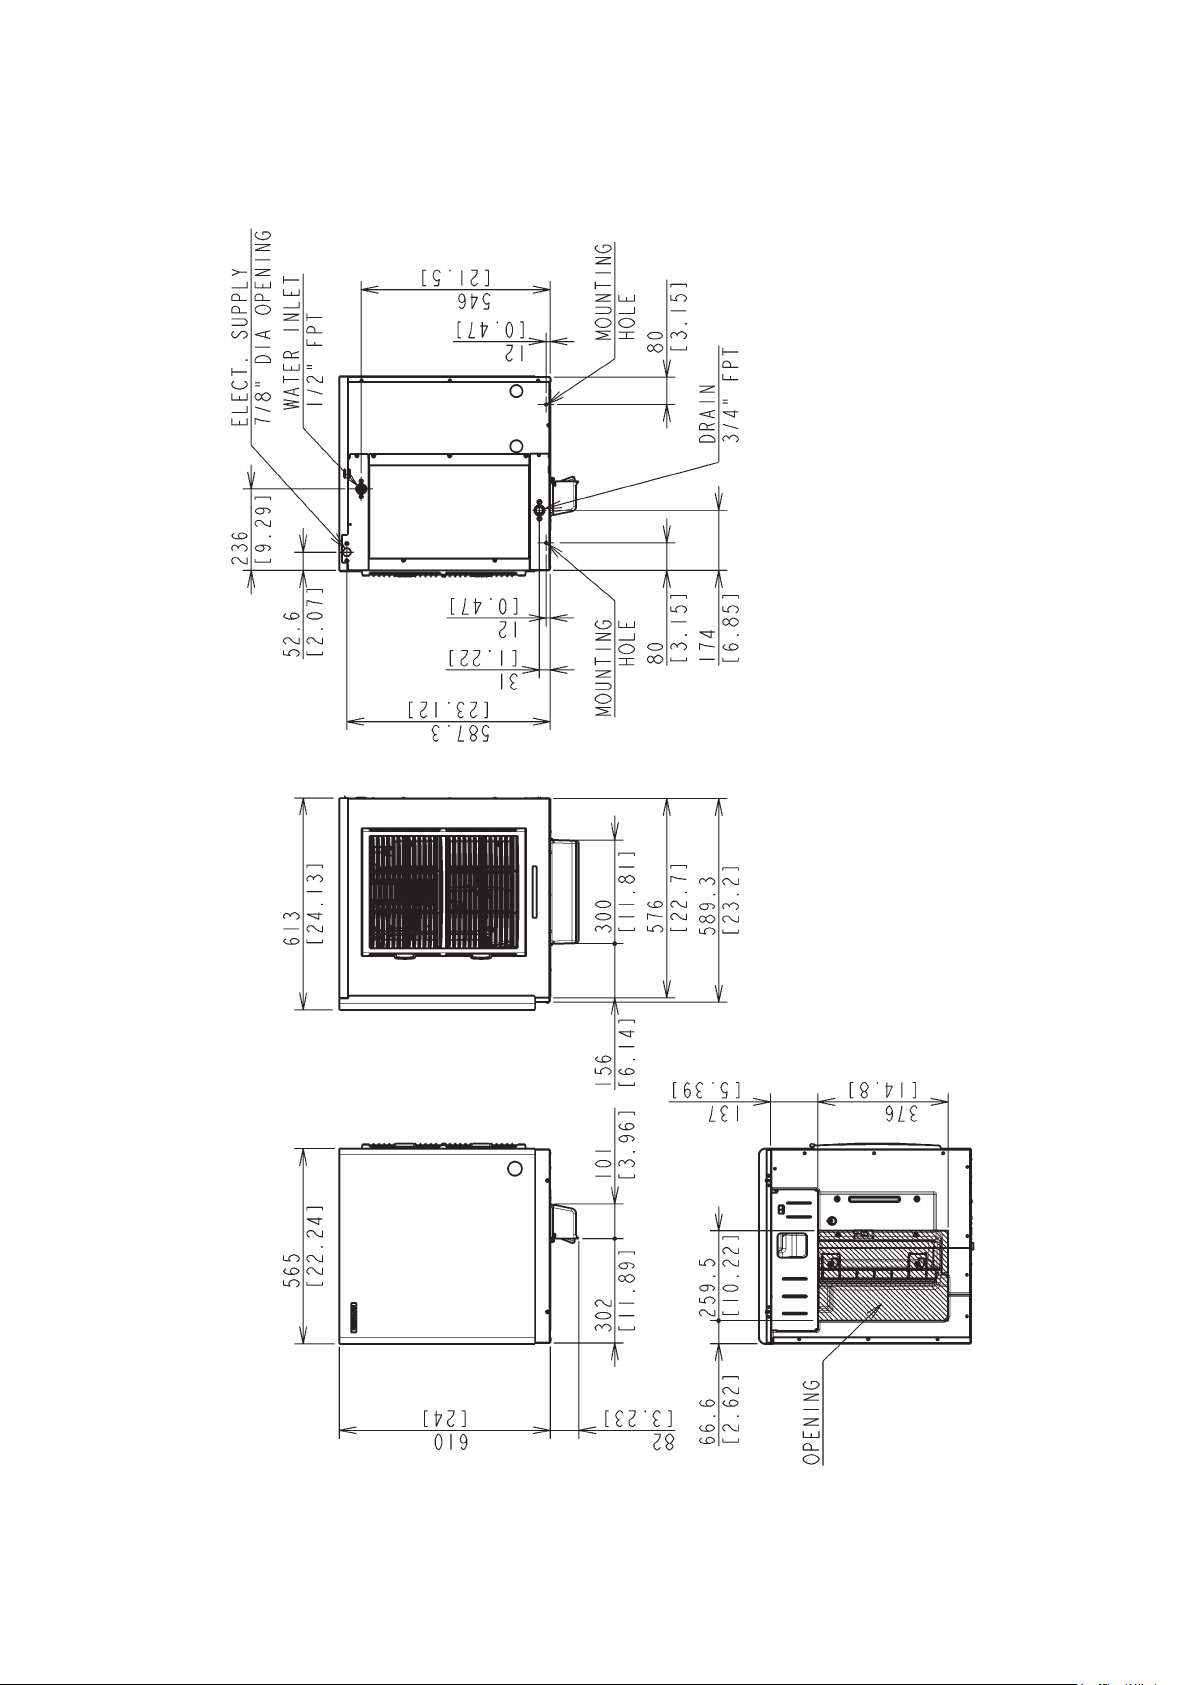
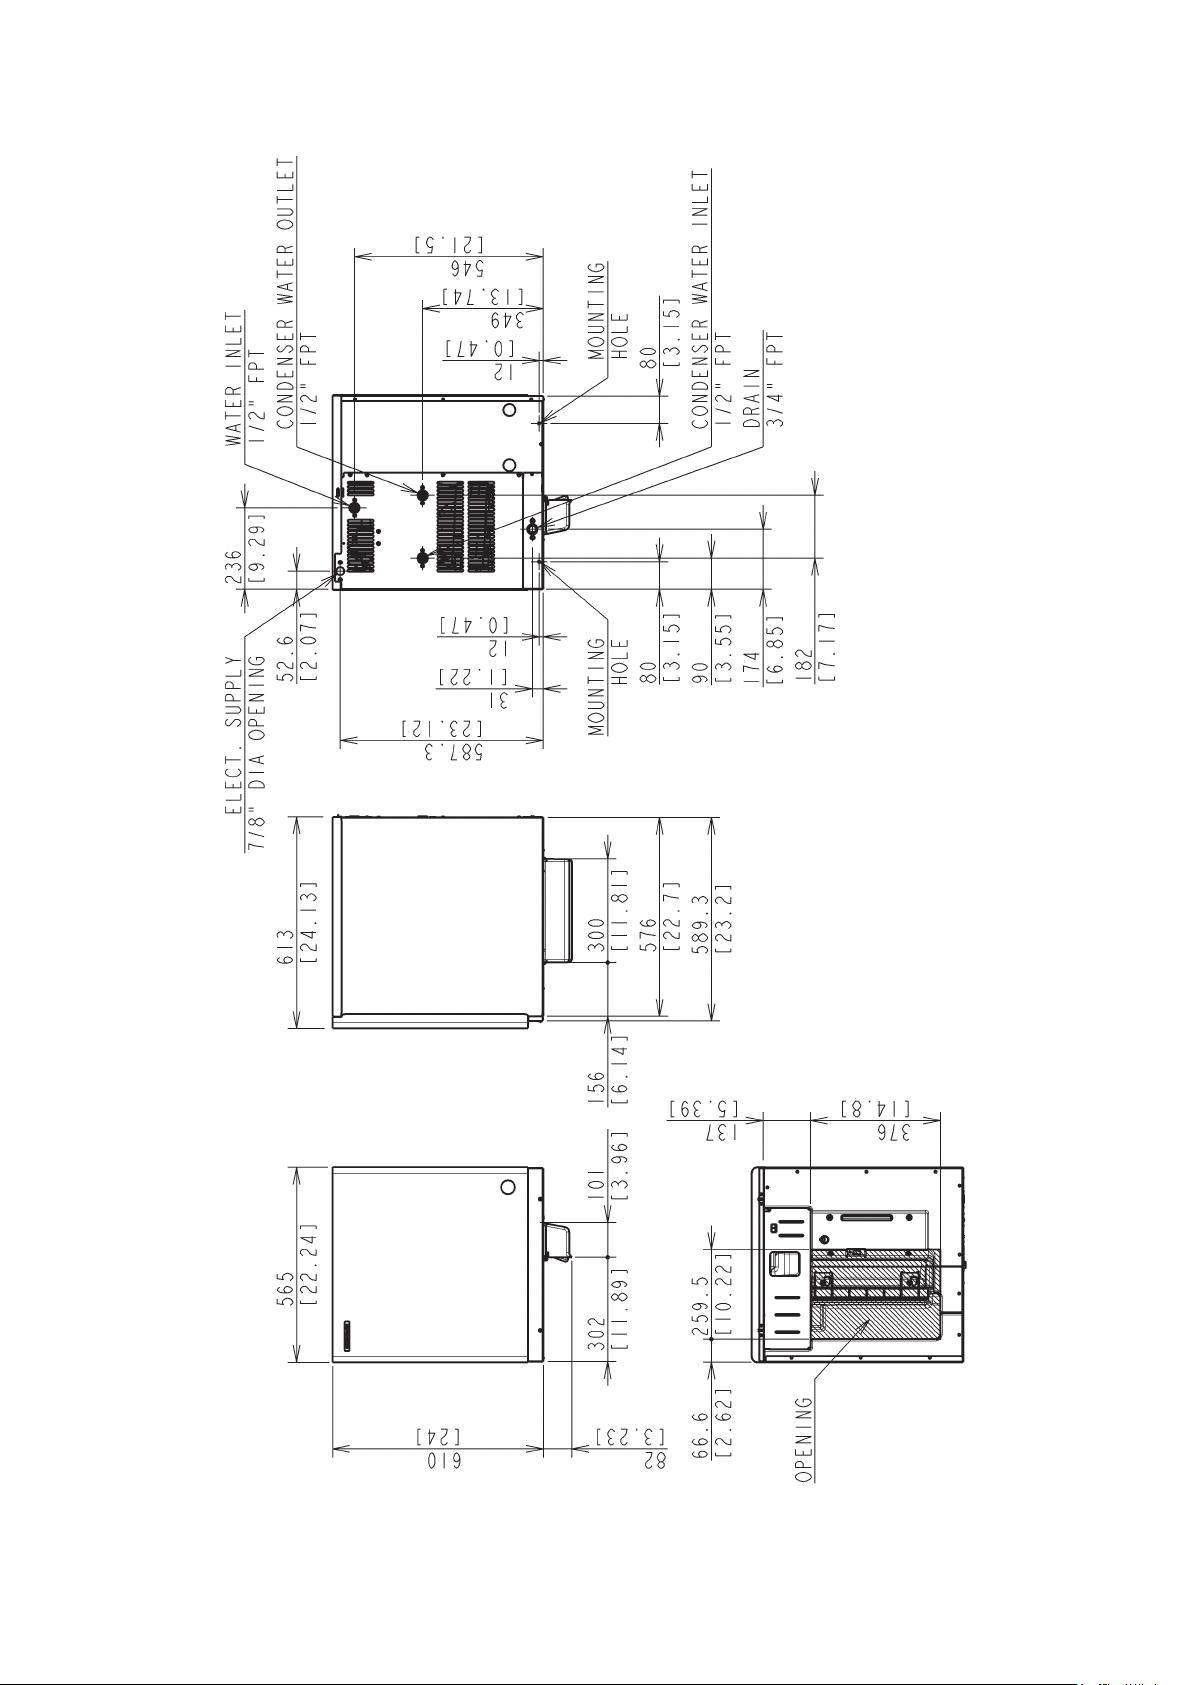
B. Dimensions/Connections
1. KMD-410MAH
Unit: mm [inches]
3
2. KMD-410MWH
Unit: mm [inches]
4
II. Installation and Operating Instructions
A. Checks Before Installation
IMPORTANT
1. Install in accordance w i t h all applicable national, state , a n d local
regulations.
2. Remove all shipping cartons, tape, and packing material. If any are left in
the icemaker, it will not work properly.
3. Ensure all components, fasteners, and thumbscrews are securely in place
after installation.
1) Remove the panels to prevent damage when installing the icemaker. (See “B. How to
Remove Panels.”)
2) Remove the package containing the accessories.
3) Remove the protective plastic lm from the panels. If the icemaker is exposed to the sun
or to heat, remove the lm after the icemaker cools.
4) Check that refrigerant lines do not rub or touch lines or other surfaces, and that the fan
blade turns freely.
5) Check that the compressor is snug on all mounting pads.
6) See the nameplate on the rear panel, and check that your voltage supplied corresponds
with the voltage specied on the nameplate.
7) This icemaker can be installed on a storage bin or dispenser unit 22” wide or wider. If
using a storage bin, HOSHIZAKI STORAGE BIN, Model B-300 series is recommended.
B. How to Remove Panels
* Front Panel: Loosen the screws. Lift up and towards you.
* Top Panel: Lift up at front slightly, push rearward and lift off.
- See Fig. 1
* Side Panel (R): Remove the screw. Slide forward slightly and lift off.
* Front Insulation: Lift up slightly, and pull towards you.
* Top Insulation: Push up at front corner, and pop off.
5
 Loading...