

Page 1
Hoshizaki
Hoshizaki America, Inc.
Professional Series
Refrigerated Kitchen Equipment
Model
SSE
“A Superior Degree
of Reliability”
www.hoshizaki.com
SERVICE MANUAL
Number: 73177
Issued: 4-14-2010
Revised: 9-17-2015
Page 2

IMPORTANT
Only qualied service technicians should install, service, and maintain the
unit. No service or maintenance should be undertaken until the technician
has thoroughly read this Service Manual. Failure to service and maintain
the equipment in accordance with this manual may adversely affect safety,
performance, component life, and warranty coverage.
Hoshizaki provides this manual primarily to assist qualied service technicians in the
service and maintenance of the unit.
Should the reader have any questions or concerns which have not been satisfactorily
addressed, please call, write, or send an e-mail message to the Hoshizaki Technical
Support Department for assistance.
HOSHIZAKI AMERICA, INC.
618 Highway 74 South
Peachtree City, GA 30269
Attn: Hoshizaki Technical Support Department
Phone: 1-800-233-1940 Technical Support
(770) 487-2331
Fax: 1-800-843-1056
(770) 487-3360
E-mail: techsupport@hoshizaki.com
Web Site: www.hoshizaki.com
NOTE: To expedite assistance, all correspondence/communication MUST include the
following information:
• Model Number __________________________
• Serial Number __________________________
• Complete and detailed explanation of the problem.
2
Page 3

IMPORTANT
This manual should be read carefully before the unit is serviced or maintenance
operations are performed. Only qualied service technicians should install,
service, and maintain the unit. Read the warnings contained in this booklet
carefully as they give important information regarding safety. Please retain this
booklet for any further reference that may be necessary.
CONTENTS
Important Safety Information ................................................................................................. 5
I. General Information ............................................................................................................ 6
A. Construction .................................................................................................................. 6
1. One Section ............................................................................................................. 6
2. Two Section ............................................................................................................. 7
3. Three Section .......................................................................................................... 8
B. Sequence of Operation ................................................................................................. 9
1. Sequence Cycles and Shutdown ............................................................................. 9
a) Startup .............................................................................................................. 9
b) Cool Down ......................................................................................................... 9
c) Cool Down Achieved ......................................................................................... 9
d) Cool Down Restart ............................................................................................ 9
e) Defrost ............................................................................................................... 9
2. Sequence Flow Chart ............................................................................................ 10
C. Display Board ...............................................................................................................11
D. Control Board .............................................................................................................. 12
1. Control Board Layout ............................................................................................. 13
2. Features ................................................................................................................. 14
a) LED Display ..................................................................................................... 14
b) Guarded Access Menu ..................................................................................... 14
c) Service Menu ................................................................................................... 14
d) Alarm Signals ................................................................................................... 14
e) Defrost ............................................................................................................. 14
f) Default Safety Program ..................................................................................... 14
g) High Voltage and Low Voltage Cut-outs ........................................................... 14
3. LED Lights and Alarm Safeties Chart .................................................................... 15
4. Controls and Adjustments ...................................................................................... 17
a) Default Dip Switch Settings .............................................................................. 17
b) Unit Operation (Freezer/Refrigerator) (S3 dip switch 1) ................................... 17
c) Cabinet Light/Heated Glass Door (S3 dip switch 2) ......................................... 18
d) Door Switch Type (S3 dip switch 3) .................................................................. 18
e) Reach-In/Pass Thru Defrost Initiation Temperature (S3 dip switch 4) .............. 18
f) Display Board Operation (S3 dip switch 5) ....................................................... 18
g) Dual Temp Unit (S3 dip switch 6) ..................................................................... 19
h) Freezer Evaporator Fan Operation (except RFH1) (S3 dip switch 7) ............... 19
i) RFH1 Condensate Pan Heater Operation (S3 dip switch 8) ............................. 19
3
Page 4

5. Guarded Access Menu .......................................................................................... 20
a) Temperature Setpoint ....................................................................................... 20
b) Defrost Frequency ............................................................................................ 20
c) Temperature Display Scale (°F or °C) .............................................................. 21
6. Service Menu ........................................................................................................ 22
E. Compressor Thermal Overload and Short Cycle Protection ........................................ 23
F. Perimeter Heater .......................................................................................................... 23
G. Thermistors ................................................................................................................. 23
III. Technical Data ................................................................................................................ 24
A. Wiring Diagrams .......................................................................................................... 24
1. RH_-SSE-XX (FG, HG, FS, or HS) Models ........................................................... 24
2. PTR_SSE-XXXX (FSFS, HSHS, FGFG, HGHG, HGHS) Models ......................... 25
IV. Service Diagnosis ........................................................................................................... 26
A. Diagnostic Procedure .................................................................................................. 26
B. Control Board Check ................................................................................................... 29
C. Thermistor Check ........................................................................................................ 30
D. Diagnostic Chart ......................................................................................................... 31
1. Unit Not Cooling ..................................................................................................... 31
2. Evaporator is Frozen Up ........................................................................................ 33
3. Defrost Fails to Terminate ...................................................................................... 33
4. Other ...................................................................................................................... 33
V. Removal and Replacement of Components .................................................................... 34
A. Service for Refrigerant Lines ....................................................................................... 34
1. Refrigerant Recovery ............................................................................................. 34
2. Brazing .................................................................................................................. 35
3. Evacuation and Recharge (R-134a) ...................................................................... 35
B. Removal and Replacement of Compressor ................................................................. 36
C. Removal and Replacement of Compressor Electronic Unit ........................................ 37
D. Removal and Replacement of Expansion Valve .......................................................... 38
E. Removal and Replacement of Evaporator ................................................................... 39
F. Removal and Replacement of Evaporator Fan Motor .................................................. 40
G. Removal and Replacement of Door Gasket ............................................................... 40
H. Removal and Replacement of Door Closure Spring ................................................... 41
I. Door Re-Hinging ........................................................................................................... 42
J. Removal and Replacement of Control Board ............................................................... 42
K. Removal and Replacement of Thermistors ................................................................. 43
VI. Cleaning Instructions ...................................................................................................... 44
4
Page 5
Important Safety Information
Throughout this manual, notices appear to bring your attention to situations which could
result in death, serious injury, or damage to the unit.
WARNING Indicates a hazardous situation which could result in death or
serious injury.
CAUTION Indicates a situation which could result in damage to the unit.
IMPORTANT Indicates important information about the use and care of the
unit.
WARNING
This unit should be destined only to the use for which it has been expressly
conceived. Any other use should be considered improper and therefore
dangerous. The manufacturer cannot be held responsible for eventual damage
caused by improper, incorrect, and unreasonable use.
To reduce the risk of death, electric shock, serious injury, or re, follow
basic precautions including the following:
• This unit requires an independent power supply. See the nameplate for proper
voltage and breaker/fuse size. Failure to use a proper breaker or fuse can
result in a tripped breaker, blown fuse, or damage to existing wiring. This
could lead to heat generation or re.
• THIS UNIT MUST BE GROUNDED: This unit is equipped with a 3-prong
grounding plug to reduce the risk of potential shock hazards. It must be
plugged into a properly grounded, independent 3-prong wall outlet. If the
outlet is a 2-prong outlet, it is your personal responsibility to have a qualied
electrician replace it with a properly grounded, independent 3-prong wall
outlet. Do not remove the ground prong from the power cord and do not use
an adapter plug.
• Do not use an extension cord.
• Make sure the control switch is in the "OFF" position before plugging in or
unplugging the unit to reduce the risk of electric shock.
• Do not use a unit with a damaged power cord. The power cord should not be
altered, jerked, bundled, weighed down, pinched, or tangled. Such actions
could result in electric shock or re. To unplug the unit, be sure to pull the
plug, not the cord, and do not jerk the cord.
• To reduce the risk of electric shock, do not touch the plug or control switch
with damp hands.
• This unit should be disassembled or repaired only by qualied service
personnel to reduce the risk of electric shock, injury, or re.
• Do not make any alterations to the unit. Alterations could result in electric
shock, injury, re, or damage to the unit.
5
Page 6
I. General Information
A. Construction
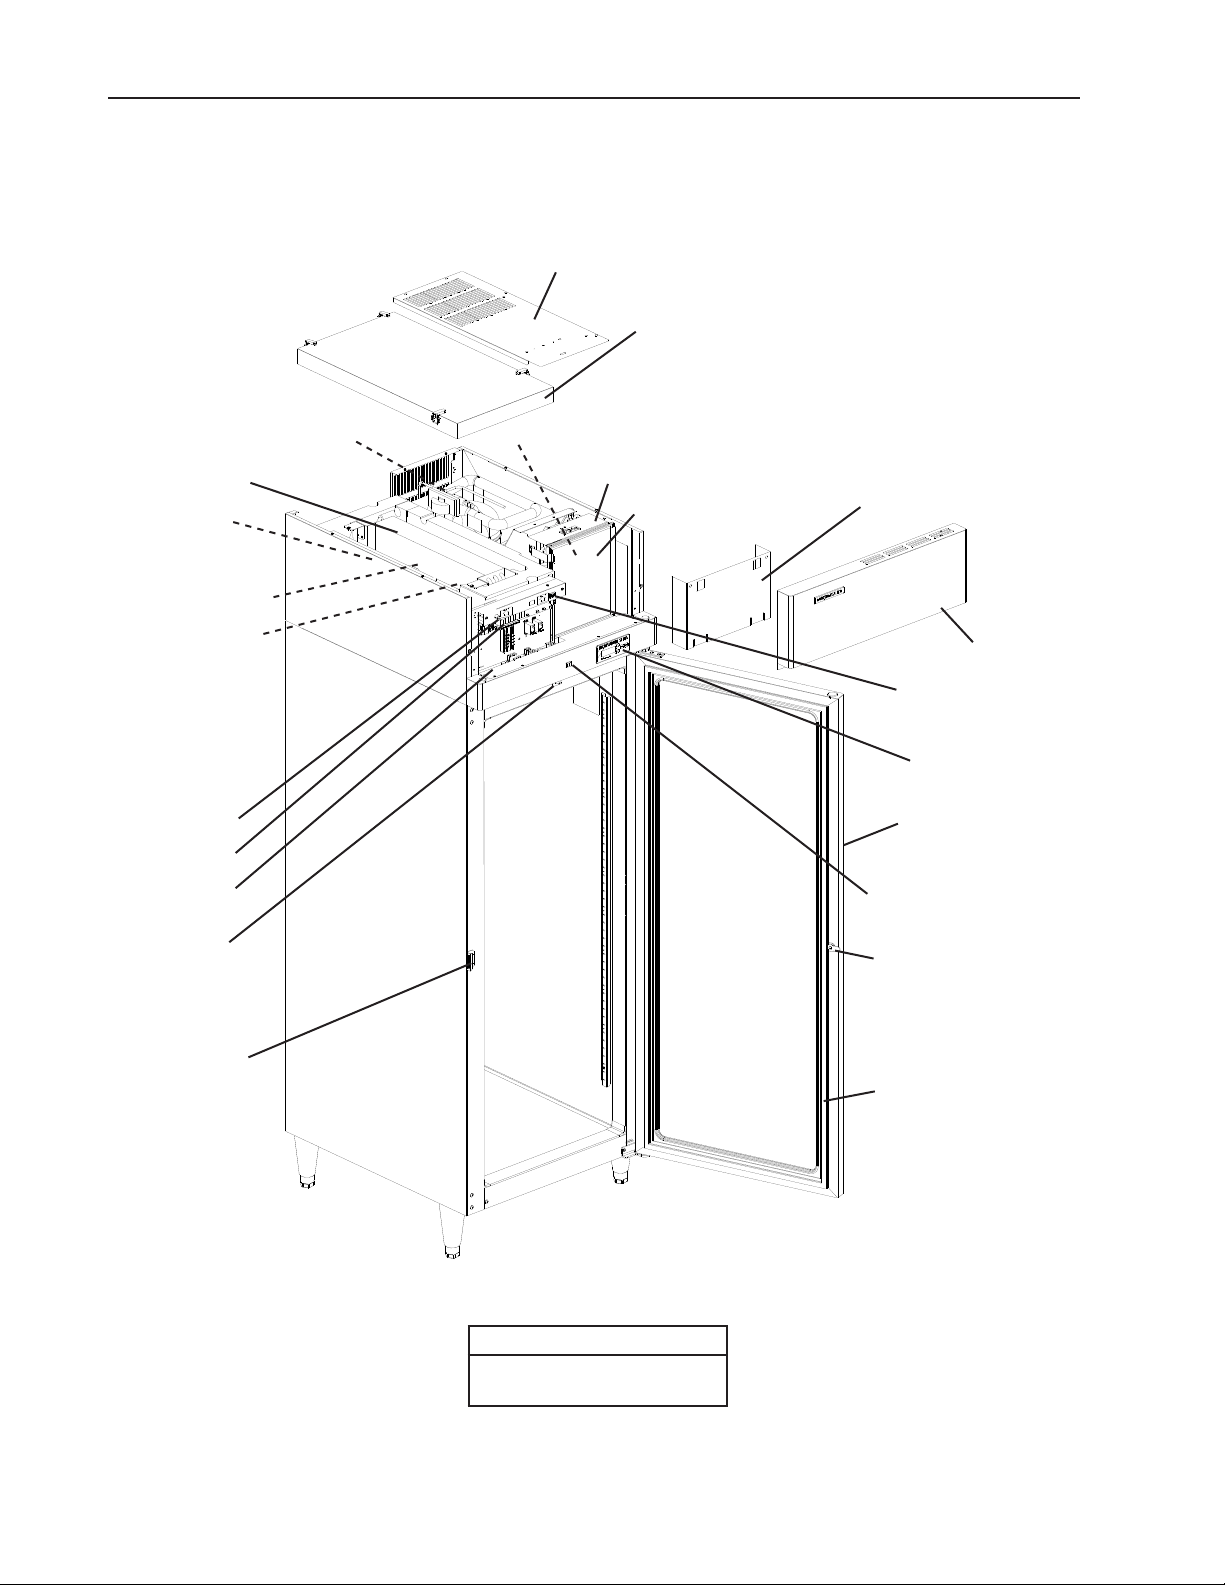
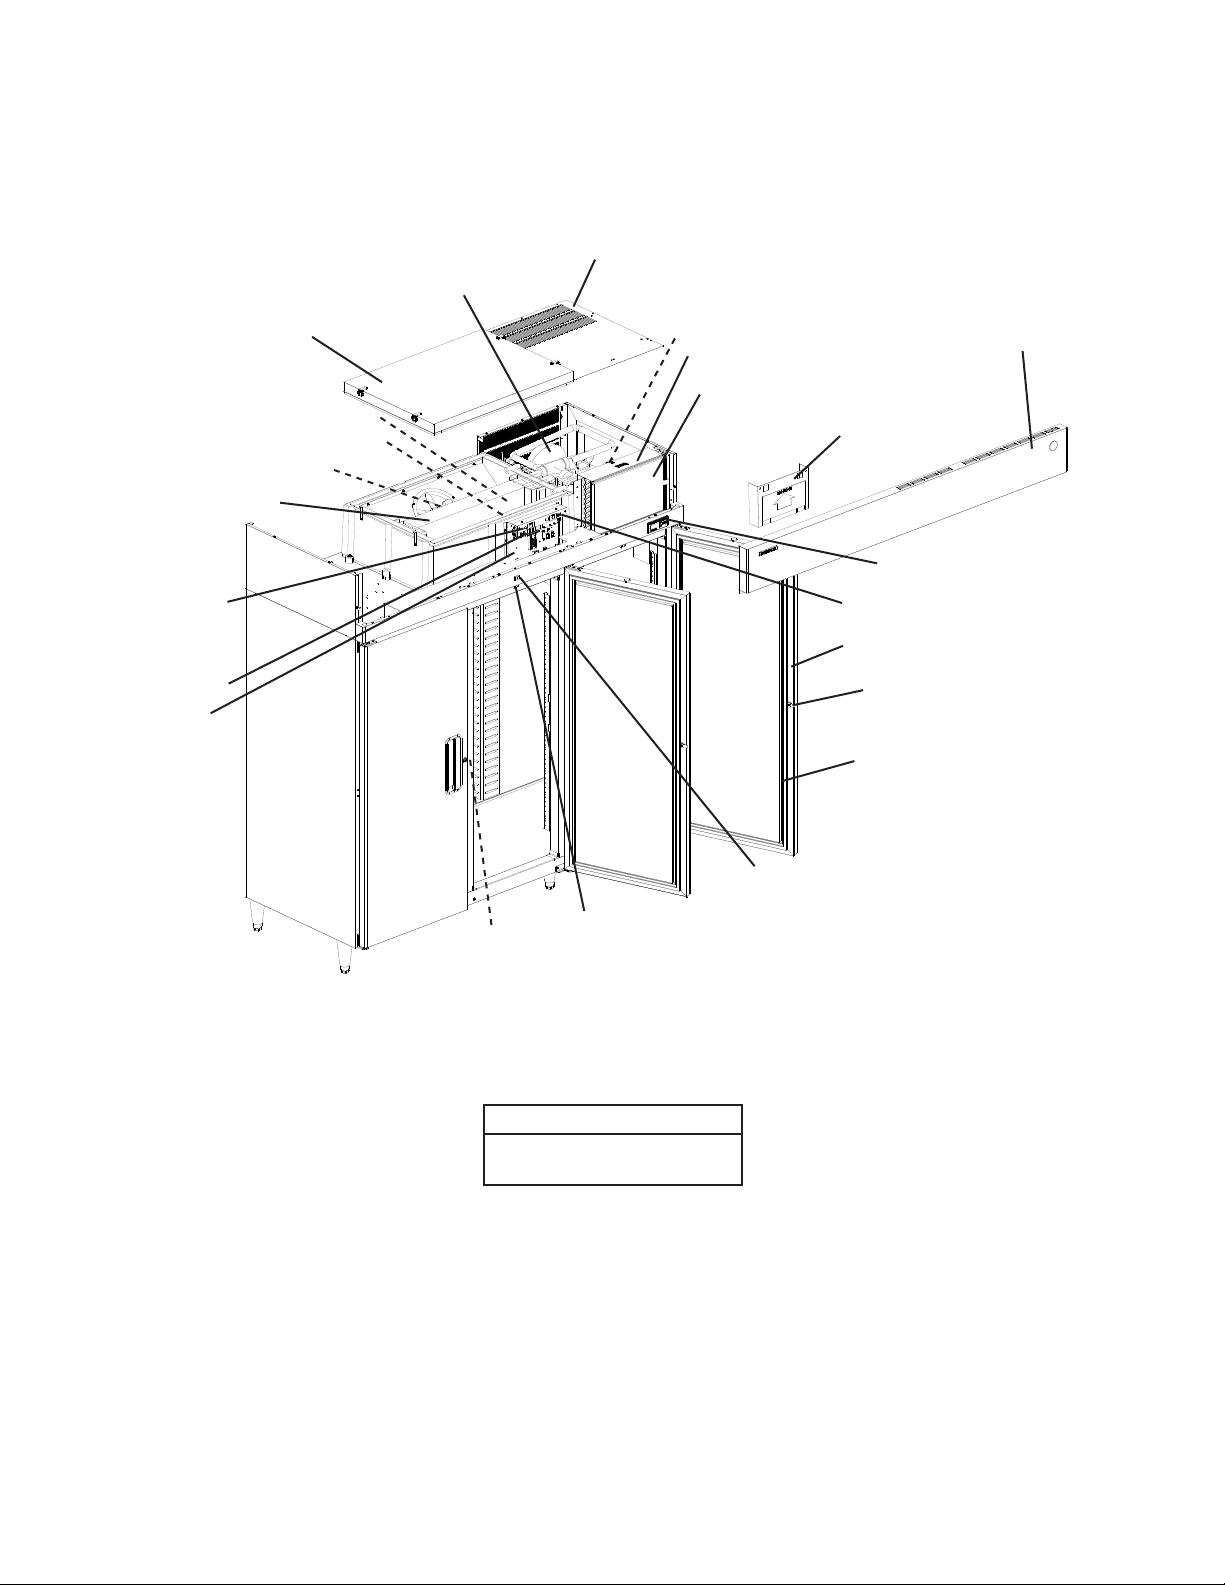
1. One Section
Compressor and
Compressor Electronic Unit
Top Cover
Evaporator Case Cover
Condenser Fan Motor
Evaporator
Evaporator
Fan Motor
Cabinet Thermistor
Defrost Thermistor
Power Switch
Control Board
Control Box
Door Switch
Condenser
Condenser Air Filter
Control Box Cover
Front Panel
Perimeter Heater
Switch
Display Board
Door
Light Switch
(glass door model)
Door Lock
Door Latch
Door Gasket
Model Shown: RH1-SSE-FG
Models
RH1-SSE-FG, RH1-SSE-HG
RH1-SSE-FS, RH1-SSE-HS
6
Page 7
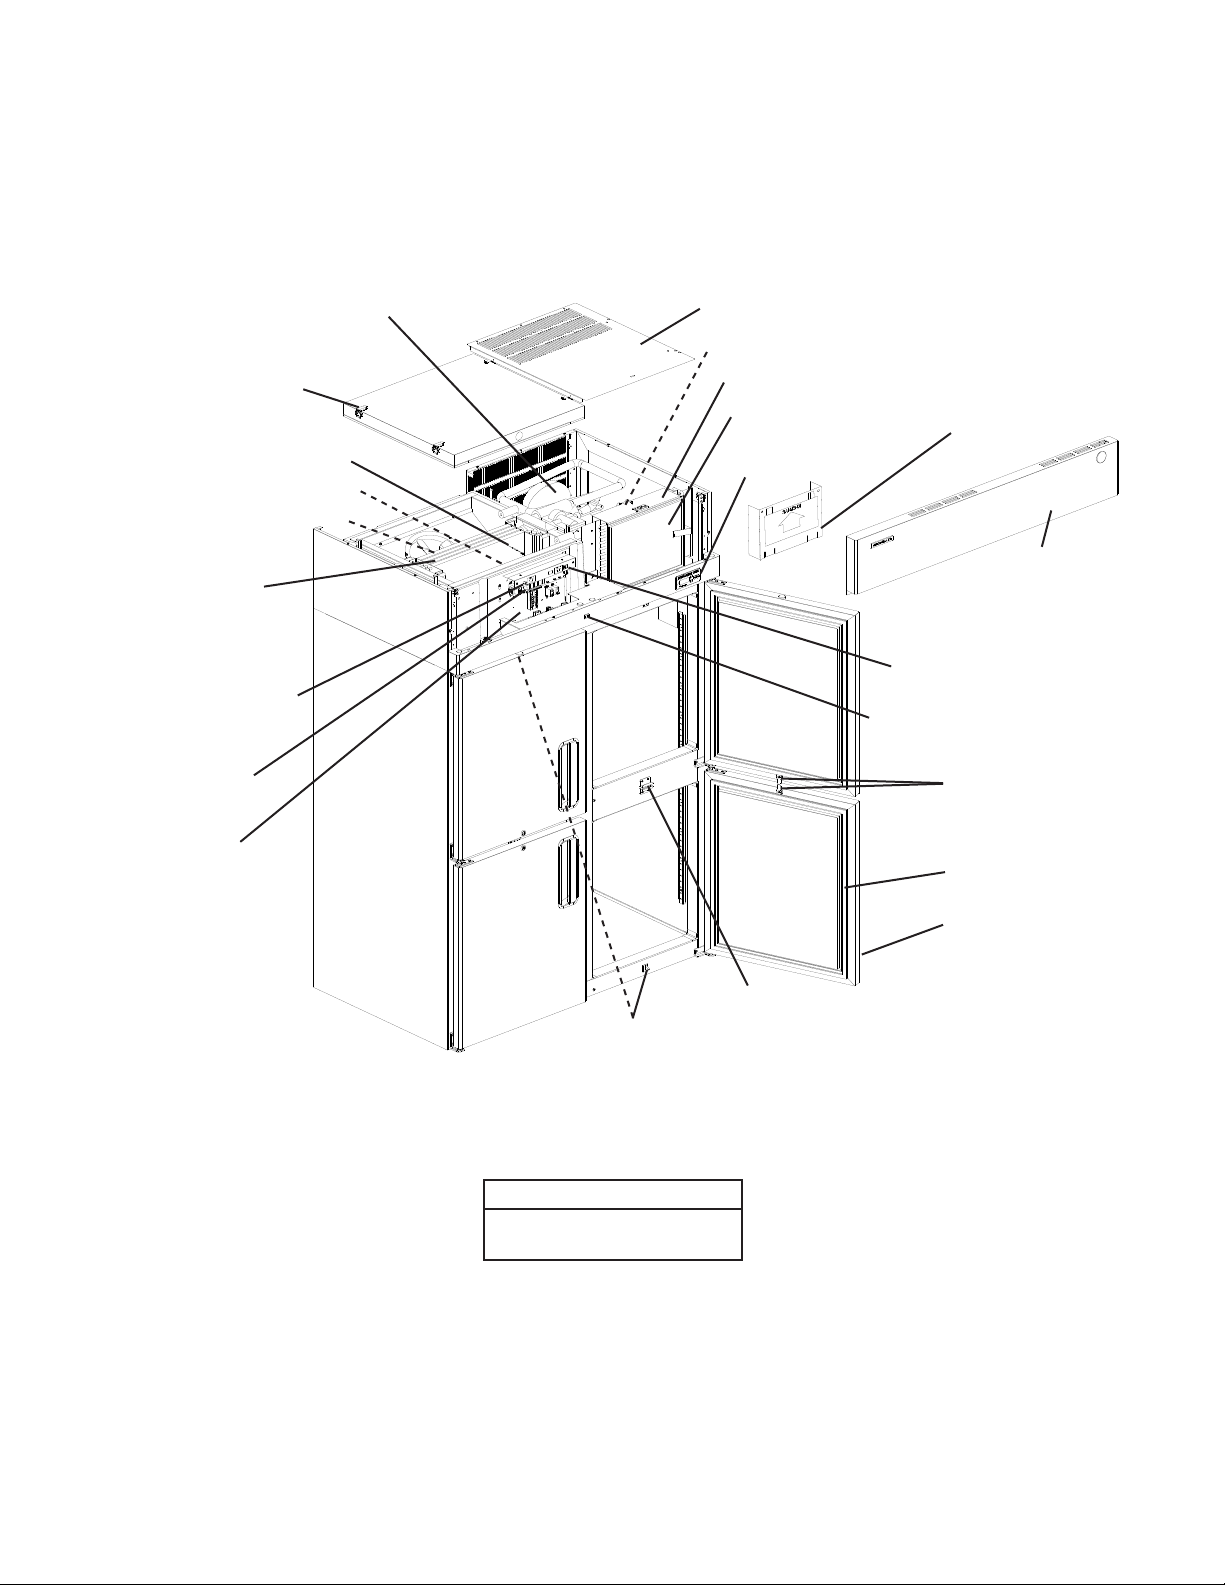
2. Two Section
Compressor and
Compressor Electronic Unit
Evaporator
Case Cover
Top Cover
Condenser Fan Motor
Condenser
Condenser Air Filter
Control Box Cover
Defrost Thermistor
Cabinet Thermistor
Evaporator Fan Motor
Evaporator
Power Switch
Control Board
Control Box
Display Board
Front Panel
Perimeter Heater
Switch
Light Switch
(glass door model)
Door Lock
Door Gasket
Door
Door Latch
Door Switch
Model Shown: RH2-SSE-HS
Models
RH2-SSE-FG, RH2-SSE-HG
RH2-SSE-FS, RH2-SSE-HS
7
Page 8
3. Three Section
Compressor and Compressor Electronic Unit
Top Cover
Evaporator Case Cover
Defrost Thermistor
Cabinet Thermistor
Evaporator Fan Motor
Evaporator
Power Switch
Control Board
Control Box
Door Latch
Condenser Fan Motor
Door Switch
Condenser
Condenser Air Filter
Control Box Cover
Light Switch
(glass door model)
Front Panel
Display Board
Perimeter Heater Switch
Door
Door Lock
Door Gasket
Model Shown: RH3-SSE-FS
Models
RH3-SSE-FG, RH3-SSE-HG
RH3-SSE-FS, RH3-SSE-HS
8
Page 9

B. Sequence of Operation
1. Sequence Cycles and Shutdown
The steps in the sequence are as outlined below.This unit utilizes a control board to
switch the components on and off as needed. When power is supplied and the power
switch is in the "ON" position, CB red "POWER OK" LED comes on and CB revision
(r###) appears on DB.
Note: 1. "POWER OK" LED remains on until the power switch is moved to the "OFF"
position, the power supply is turned off, or the unit is unplugged from the
electrical outlet.
2. There is a minimum 2.5-minute Comp on time and 2.5-minute Comp off time.
a) Startup
No Component LED on: EvapFM energizes. 2.5-minute Comp delay timer starts.
Cabinet temperature appears on DB.
b) Cool Down
LEDs 4 and 5 on: 2.5-minute Comp delay timer terminates, EvapFM continues,
Comp, ConFM, and PH energize.
c) Cool Down Achieved
No Component LED on: CB monitors cooling of the cabinet via CTh. CTh cools to
3°F (1.7°C) below setpoint. EvapFM continues, Comp, ConFM, and PH de-energize.
d) Cool Down Restart
LEDs 4 and 5 on: CTh warms to 3°F (1.7°C) above setpoint. EvapFM continues,
Comp, ConFM, and PH energize.
e) Defrost
LED 5 on:
(1a) Temperature-Initiated Defrost
DTh cools to 13°F (-10°C). Comp and PH, if energized, de-energize, EvapFM
continues. If energized, ConFM continues, otherwise, ConFM energizes. Cabinet
temperature is displayed on DB during defrost.
(1b) Optional Time-Initiated Defrost
The optional time-initiated defrost is factory set to 0 times per day. Before
changing this setting, contact Hoshizaki Technical Support at 1-800-233-1940 for
recommendations.
When set to greater than 0, defrost initiates when the defrost timer terminates. For
further details, see "II.D.5.b) Defrost Frequency."
(2) Defrost Termination
DTh warms to 40°F (4.4°C). EvapFM and ConFM continue. 2.5 minute delay
before Comp and PH energize.
Legend: CB–control board; ConFM–condenser fan motor; Comp–compressor;
CTh–cabinet thermistor; DB–display board; DTh–defrost thermistor;
EvapFM–evaporator fan motor; PH–perimeter heater
9
Page 10
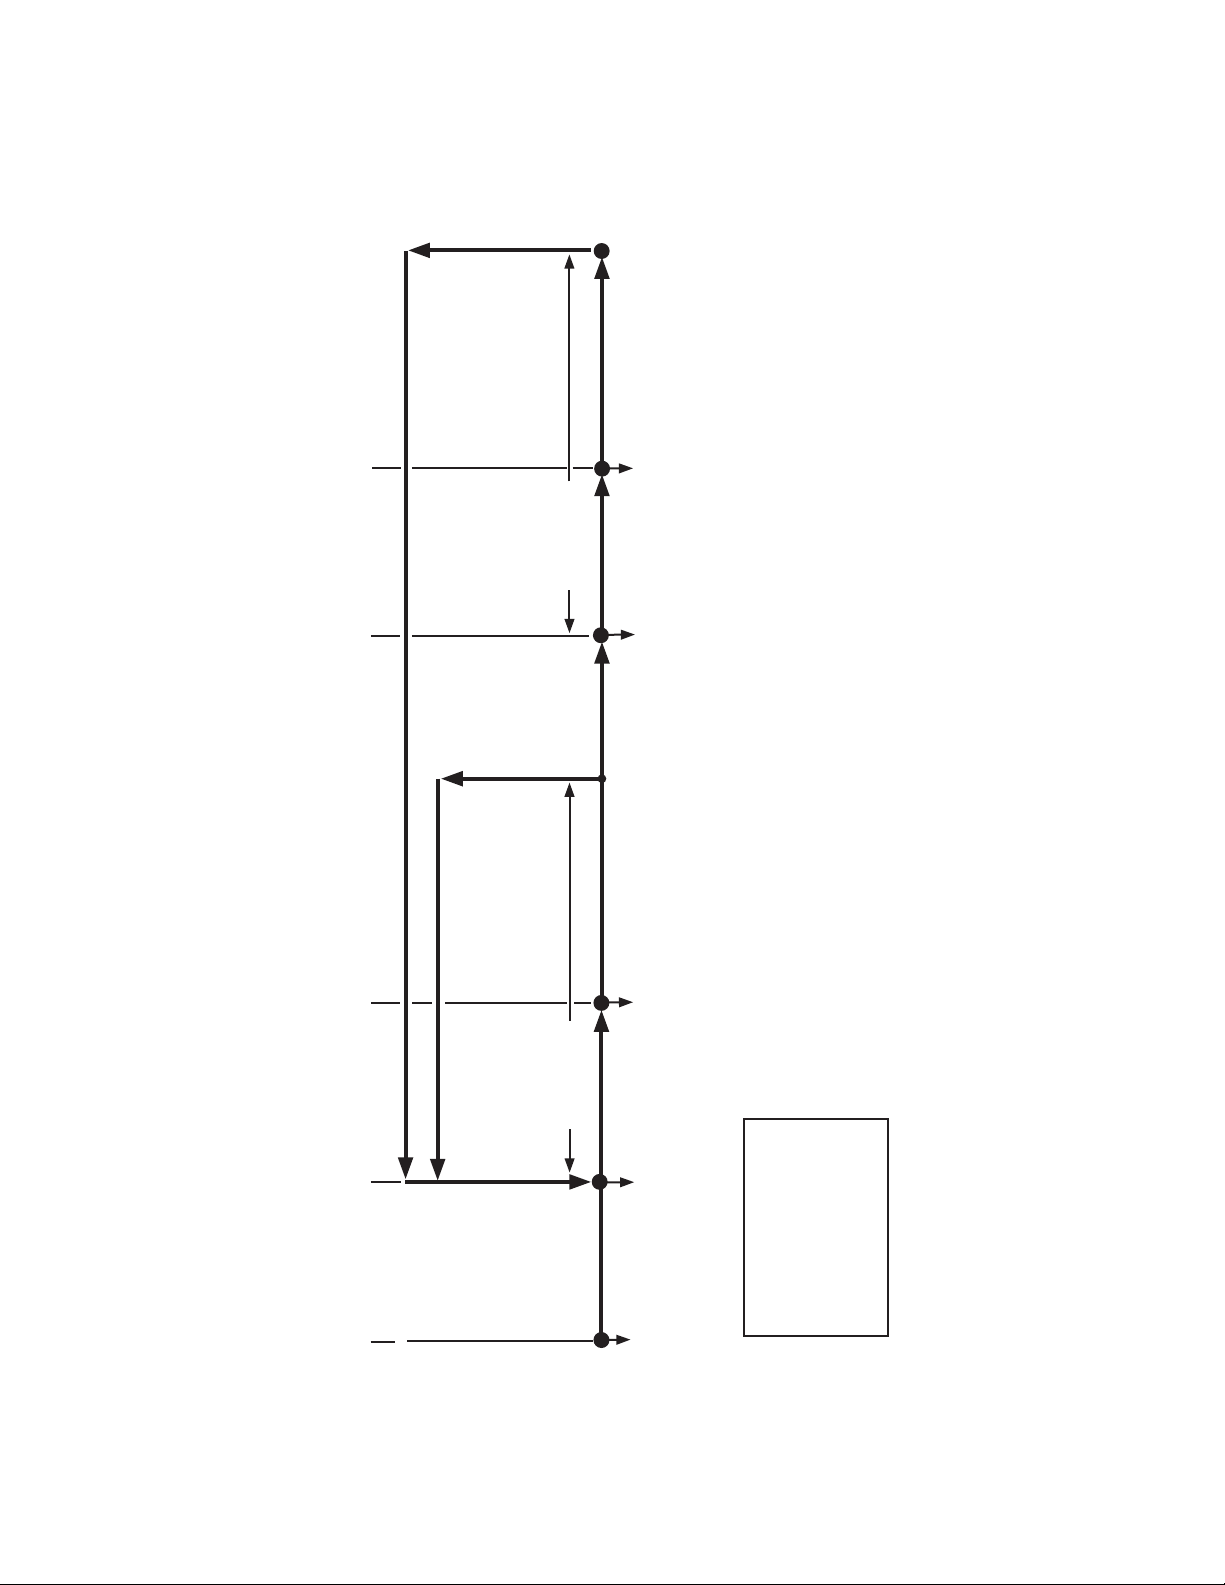
2. Sequence Flow Chart
5. Defrost Termination
4. Defrost
DTh warms to
40°F (4.4°C)
DTh cools to
13°F (-10°C) or
optional defrost
timer terminates
EvapFM continues
ConFM continues
DTh in control
EvapFM continues
ConFM continues
Comp de-energized
PH de-energized
CTh warms to
3°F (1.7°C)
above setpoint
Refrigerator Sequence Flow Chart
3. Cool Down Achieved
CTh cools to
3°F (1.7°C)
below setpoint
EvapFM continues
Comp de-energized
ConFM de-energized
PH de-energized
Note: Minimum 2.5-minute Comp on time and 2.5-minute Comp off time.
CTh in control
2. Cool Down
EvapFM continues
Comp energized
ConFM energized
PH energized
Legend:
EvapFM-cabinet fan motor
CTh-cabinet thermistor
Comp-compressor
ConFM-condenser fan motor
DTh-defrost thermistor
1. Startup
2.5-minute Comp
delay timer starts
EvapFM energized
PH-perimeter heater
10
Page 11
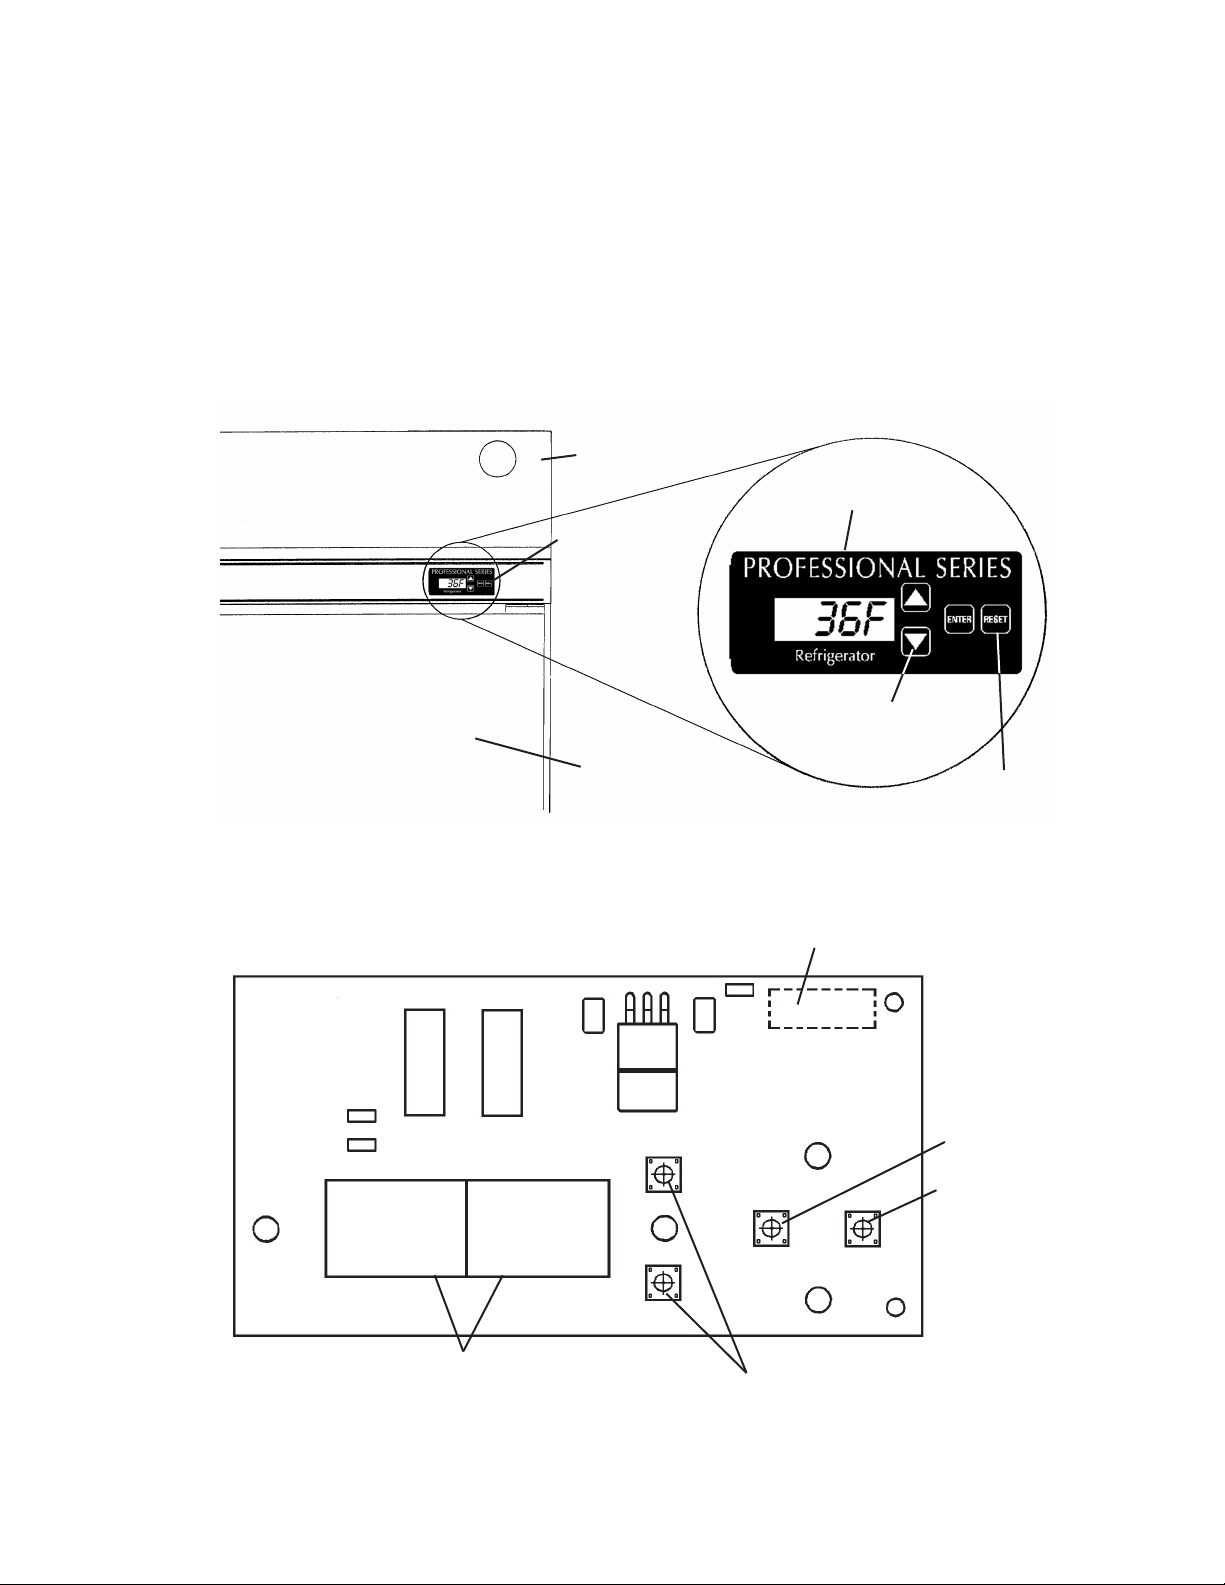
C. Display Board
When the power switch is moved to the "ON" position, the control board revision
appears on the display board. "r###" indicates the control board revision level (e.g.,
r23C). Afterward, the current cabinet temperature is displayed. The display board also
allows for access to the guarded access menu and service menu. From the guarded
access menu, the cabinet setpoint, defrost frequency, and temperature display scale can
be adjusted. For further details, see "II.D.5. Guarded Access Menu." From the service
menu, information regarding unit functions can be obtained. For further details, see
"II.D.6. Service Menu."
Display Board
Front Panel
Display Board
Door
Fig. 1
Display
Board
Up and Down
Buttons
"RESET" Button:
Temporarily
silences audible
alarms
Ribbon Cable Connector
LED Display
Fig. 2
11
P/N 2A0883-01
Up and Down Buttons
"ENTER" Button
"RESET" Button
Page 12

D. Control Board
• A Hoshizaki exclusive control board is employed in all Hoshizaki Professional Series
Reach-Ins.
• All models are pretested and factory set.
CAUTION
1. The control board is fragile, handle very carefully.
2. The control board contains integrated circuits, which are susceptible to failure
due to static discharge. It is especially important to touch the metal part of
the unit before handling or replacing the control board.
3. Do not touch the electronic devices on the control board or the back of the
control board.
4. Do not change wiring and connections. Never misconnect terminals.
5. Always replace the whole control board assembly if it goes bad.
6. Do not short out power supply to test for voltage.
7. Keep the thermistor leads, clogged lter thermostat leads, door switch leads,
pressure switch leads, and ribbon cable at least 1-1/2" away from high
voltage leads (100VAC or more) to protect against electrical noise.
12
Page 13
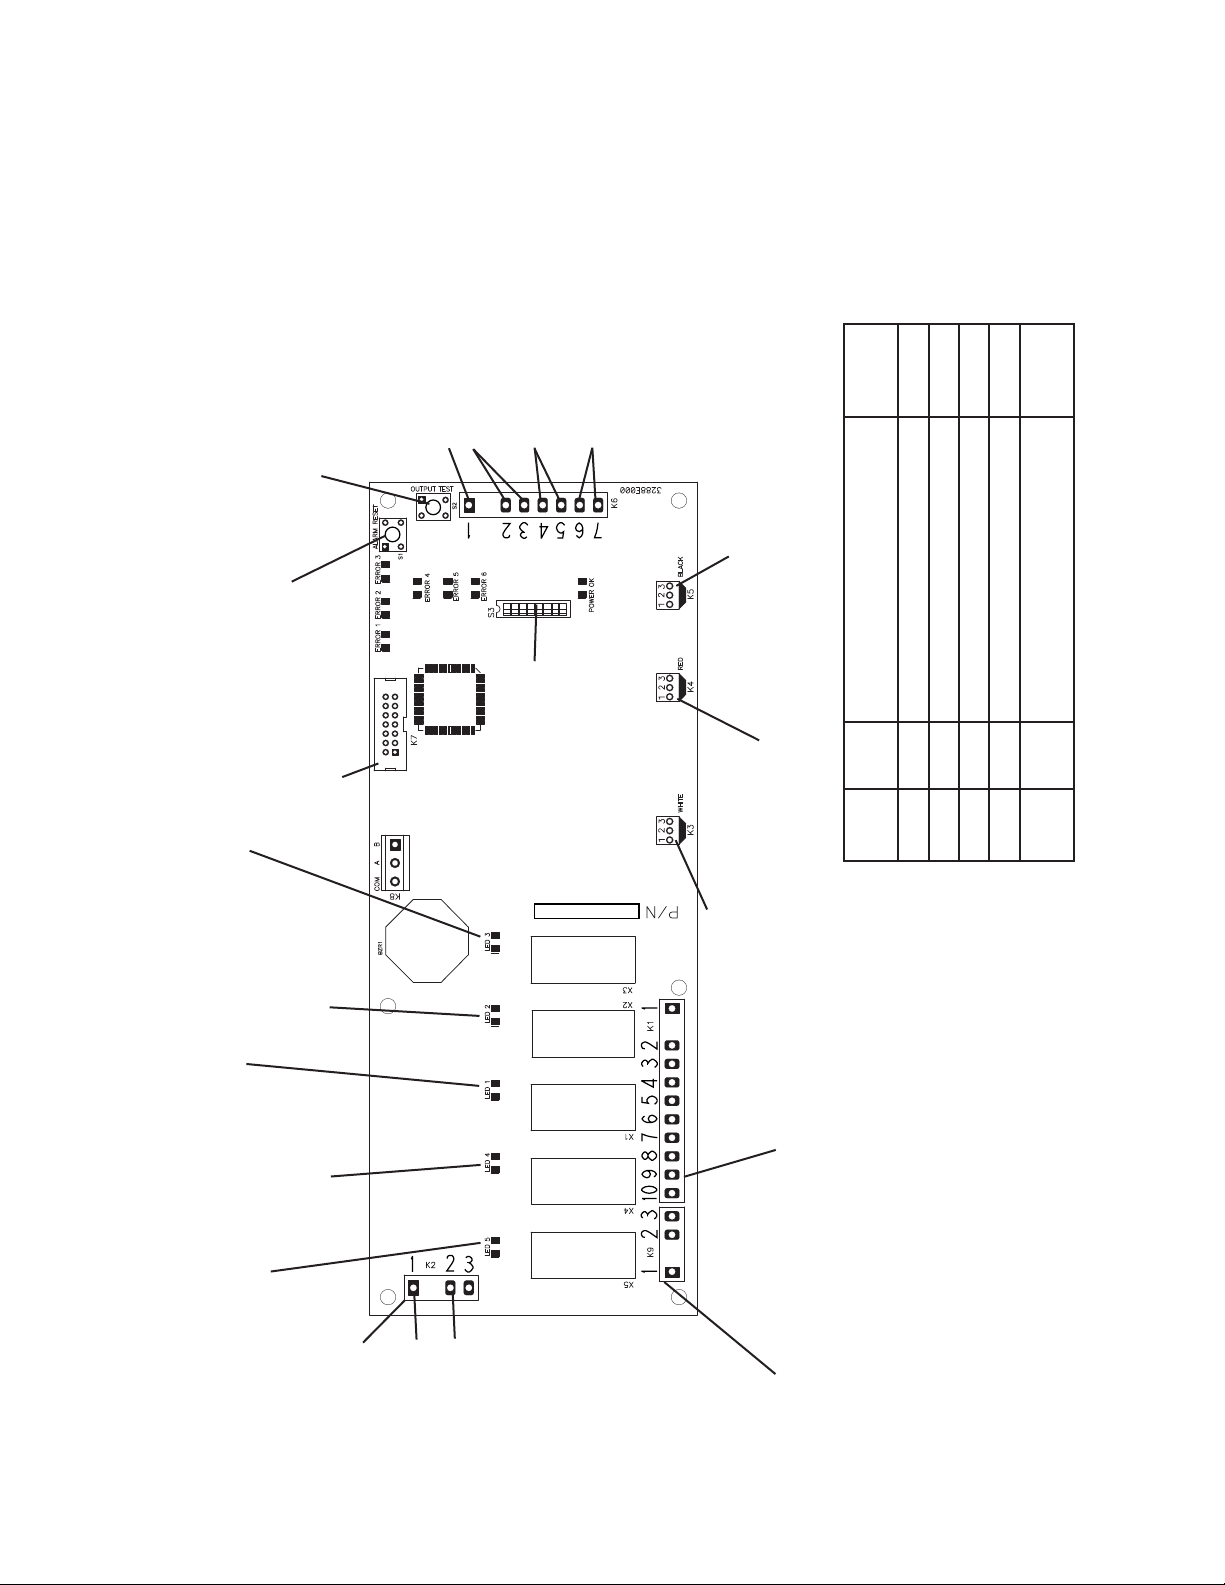
1. Control Board Layout
ETAD
SNOISIVER FO DROCER
50/02/21
A
gwD yssA weN
NOITPIRCSED
OCD/OCE
VER
"R-A" Control Board
• LED 3 (X3 Relay)
Evaporator Fan Motor
(Off when Evaporator Fan Relay Energizes)
• S1 "ALARM RESET" Button
• K7 Connector
• S2 "OUTPUT TEST" Button
LED
ON
ON/OFF
• K6 Connector (5VDC)
#1 Open
#2 and #3 Clogged Filter Thermostat
(pink) (Normally Open)
#4 and #5 Cabinet Light
(light blue) (Normally Closed)
#6 and #7 High Pressure Switch
(violet) (Normally Closed)
• K5 Connector (5VDC)
Open
Condensate Pan Heater (RFH1)
S3 Dip Switch
• K4 Connector (5VDC)
Display Cable
Cabinet Thermistor (gray (GY))
X3X2
Relay LED Component Energized
X1 1 Defrost Heater (Freezer) ON
X2 2 Cabinet Light ON
X3 3 Evaporator Fan Motor OFF
X4 4 Compressor Relay ON
X5 5 Condenser Fan Motor
• LED 1 (X1 Relay)
Defrost Heater
• LED 5 (X5 Relay)
(Freezer)
Condenser Fan Motor
Condensate Pan Heater (RFH1)
• LED 2 (X2 Relay)
Cabinet Light
• LED 4 (X4 Relay)
Compressor Relay
• K2 Connector
(10VAC)
• K3 Connector (5VDC)
Defrost Thermistor (orange (O))
X1
X4
• K1 Connector (115VAC)
#1 Power Switch Input
(black)
#2 Open
#3 Evaporator Fan Motor
(dark blue)
#4 Open
#5 Cabinet Light
(light blue)
#6 Open
#7 Open
#8 Open
#9 Power Switch Input
(black)
#10 Compressor Relay
(gray)
X5
• K9 Connector (115VAC)
#3 Condenser Fan Motor
(black)
#2 Condenser Fan Motor
#2 Transformer
(red)
(red)
#1 Transformer
(brown)
13
Page 14

2. Features
a) LED Display
The display board identies system details and diagnostic information. A ribbon cable
connects the display board to the control board for system communication. Be sure to
keep the ribbon cable at least 1-1/2" away from high voltage leads (100VAC or more)
to protect against electrical noise.
b) Guarded Access Menu
Three settings can be viewed and changed from the guarded access menu:
Temperature Setpoint, Defrost Frequency, and Temperature Display Scale (°F or °C).
For details, see "II.D.5. Guarded Access Menu."
c) Service Menu
The service menu allows for the viewing and setting of system operating details and
parameters. For details, see "II.D.6. Service Menu."
d) Alarm Signals
Alarm signals are designed to protect the unit and food product. These alarms give
information or warnings in the event the unit is operating out of acceptable parameters.
For details, see "II.D.3. LED Lights and Alarm Safeties Chart."
e) Defrost
Main defrost control: Temperature-initiated, temperature-terminated defrost. Optional
defrost control: Time-initiated, temperature-terminated defrost.
For details, see "II.D.5.b) Defrost Frequency."
f) Default Safety Program
Cabinet Thermistor: In the event the cabinet thermistor reading is out of range, the
compressor operates on a xed time basis of 5-minutes on and 5-minutes off.
Defrost Thermistor: In the event the defrost (evaporator) thermistor reading is out
of range, defrost initiation occurs every 6 hours and terminates at 40°F cabinet
thermistor temperature.
Cabinet and Defrost Thermistor: In the event both thermistor readings are out of
range, the compressor operates on a xed time basis of 5-minutes on and 5-minutes
off and a defrost cycle initiates every 6 hours and terminates after 45 minutes. For
further details, see "IV.C. Thermistor Check."
g) High Voltage and Low Voltage Cut-outs
The maximum and minimum allowable supply voltages of this unit are limited by the
high and low voltage cut-outs.
If high voltage (140VAC±5% or more) is present, the unit automatically stops and the
control board signals with "E6" display and 8-beep alarm every 3 seconds.
If low voltage (92VAC±5% or less) is present, the unit automatically stops and the
control board signals with "E7" display and 9-beep alarm every 3 seconds.
When the proper supply voltage is resumed, the unit automatically starts running
again.
14
Page 15

3. LED Lights and Alarm Safeties Chart
With proper power supply, the "POWER OK" LED energizes and remains on. LEDs
1 through 5 energize as the unit cycles through the sequence of operation. If an error
occurs, the alarm code and cabinet temperature are displayed in 2-second intervals and
an alarm sounds. To temporarily reset alarm, press the display board "RESET" button. To
reset and clear the control board memory of an alarm, press the control board "ALARM
RESET" button. See the table below for a description of alarms and reset options.
Sequence Steps LEDs Energized Components Notes
Start - EvapFM LED 3 off when EvapFM energized.
Cool Down 4 and 5 EvapFM, Comp, and ConFM At startup 2.5 minute Comp delay.
Cool Down Achieved - EvapFM 2.5 minute minimum off time.
Defrost 5 EvapFM, ConFM Door Open 2 Cabinet Light (solid door) -
Alarm Signals
Alarm
Code
E1 3
E2 4
E3 5 N/A [Freezer Only] Defrost longer than 1 hour. N/A
E4 6
E6 8
E7 9
E8 Constant
No. of Beeps
(every 10 sec.) Problem Reset Options
High Temperature Alarm
Cabinet temperature has remained above
setpoint by 10°F (5.6°C) for more than 2 hours.
Low Temperature Alarm
Cabinet temperature has remained below
setpoint by 8°F (4.4°C) for more than 1 hour.
High Pressure Alarm
Compressor discharge pressure is outside
normal operating range. Pressure switch has
been triggered 3 or more times in 1 hour.
If switch trips 5 times in 1 hour, compressor
stops and will not restart.
High Voltage (140VAC±5% or less) "POWER OK" LED turns off if voltage
Low Voltage (90VAC±5% or less)
Cabinet Thermistor
During alarm, unit operates in cabinet
thermistor fail mode.
Cabinet Thermistor Fail Mode: Unit on
5 minutes, off 5 minutes. This continues until
thermistor is replaced.
Press the display board "RESET"
button. If temperature has returned to
setpoint range, alarm stops and "E1"
clears.
If temperature is not back in range,
pressing the display board "RESET"
button temporarily silences the alarm
for 5 minutes. "E1" continues to ash.
Press the display board "RESET"
button. If temperature has returned to
setpoint range, alarm stops and "E2"
clears.
If the temperature is not back in range,
pressing the display board "RESET"
button temporarily silences the alarm
for 5 minutes. "E2" continues to ash.
After 5 high pressure switch trips, the
alarm can be silenced for 1 hour by
pressing the display board "RESET"
button.
Service Tech: Reset by pressing the
control board "ALARM RESET" button.
protection operates. The voltage
safeties automatically reset when
voltage is corrected.
Press the display board "RESET"
button to temporarily silence the alarm
for 5 minutes.
After replacing thermistor, alarm
resets.
During alarm, press the display board
"RESET" button to silence alarm for
5 minutes.
15
Page 16

Alarm Signals (continued)
Alarm
Code
E9 Constant
E10 10
CF 1
door 2 Door open: Display alternates between cabinet
No. of Beeps
(every 10 sec.) Problem Reset Options
Defrost Thermistor
During alarm, unit operates in the defrost
thermistor fail mode.
Defrost Thermistor Fail Mode: Defrost occurs
once every 6 hours and terminates after
45minutes.
N/A [Dual Temp Models Only] Communication
error between control boards.
Clogged Filter Alarm (condenser thermostat)
Condenser lter needs cleaning.
WARNING: If this alarm occurs frequently,
discharge temperature is consistently too
high. Failure to take action could result in
damage to the compressor.
temperature and "door."
Door open longer than 3 minutes: alternating
display continues and alarm sounds.
After replacing thermistor, alarm
resets.
During alarm, press the display board
"RESET" button to silence alarm for
5 minutes.
N/A
Clean lter. Allow time for thermostat
to react, then press the display board
"RESET" button.
During alarm, press the display board
"RESET" button to silence alarm for
2hours.
Close door. During alarm, press
the display board "RESET" button
to temporarily silence alarm for
3minutes.
Note: Setting service menu item #3 to "ON" resets all alarms regardless of whether
or not the problems are resolved. This is a complete clearing of all alarms. See
"II.D.6. Service Menu" for details.
16
Page 17

4. Controls and Adjustments
CAUTION
Dip switches are factory set. Failure to maintain factory settings may adversely
affect performance and warranty coverage. For more information, contact
Hoshizaki Technical Support at 1-800-233-1940.
a) Default Dip Switch Settings
The S3 dip switch settings are factory-set to the following positions:
S3 Dip Switch
Dip Switch No. 1 2 3 4 5 6 7 8
All SSE Models ON OFF OFF OFF OFF OFF OFF OFF
S3 Dip Switch
RFH1 Condensate Pan Heater Operation (8)
Freezer Evaporator Fan
Operation (except RFH1) (7)
Dual Temp Unit (6)
Display Board Operation (5)
Reach-In/Pass Thru Defrost
Initiation Temperature (4)
Door Switch Type (Rocker/Plunger) (3)
Cabinet Light/Heated Glass Door (2)
Unit Operation (Freezer/Refrigerator) (1)
b) Unit Operation (Freezer/Refrigerator) (S3 dip switch 1)
This setting determines whether the control board operates in refrigerator mode or
freezer mode. It also determines the temperature setpoint range at which the unit
operates.
Factory set, no adjustment required.
S3 Dip Switch Setting
No. 1
OFF Freezer -10°F (-23°C) to 25°F (-3.9°C) -3°F (-19.4°C)
ON Refrigerator 36°F (2.2°C) to 50°F (10°C) 36°F (2.2°C)
Unit Operation Temperature Setpoint Range Factory Default
17
Page 18

c) Cabinet Light/Heated Glass Door (S3 dip switch 2)
When the cabinet light option is selected (S3 dip switch 2 "OFF"), the control board
energizes the K1 connector pin #5 light blue (LBU) wire and turns on the cabinet light
(solid door models) each time the door and door switch open.
When the heated glass door option is selected (S3 dip switch 2 "ON"), the control board
energizes the K1 connector pin #5 when the compressor is off, and de-energizes when
the compressor turns on. Professional Series SSE glass doors are not heated.
Factory set, no adjustment required. Do not adjust to "ON" position on SSE models.
S3 Dip Switch Setting
No. 2
OFF Cabinet Light (Solid Door)
ON Heated Glass Door (No Longer Applicable)
Cabinet Light/Heated Glass Door
d) Door Switch Type (S3 dip switch 3)
Hoshizaki has utilized both normally open and normally closed door switch contact
styles. S3 dip switch 3 is used to select the type of switch used on a particular model.
Factory set, no adjustment required.
S3 Dip Switch Setting
No. 3
OFF Rocker Door Switch (square): Open Contacts when Doors are Open
ON Plunger Door Switch (round): Closed Contacts when Doors are Open
Door Switch Type (Rocker or Plunger)
e) Reach-In/Pass Thru Defrost Initiation Temperature (S3 dip switch 4)
Refrigerators only. Pass Thru refrigerator models require a defrost initiation temperature
that is different from the reach-in refrigerator models.
Factory set, no adjustment required.
S3 Dip Switch Setting
No. 4
OFF All Refrigerators Except Pass Thru 13°F (-10.5°C)
ON Pass Thru 8°F (-13.3°C)
Model
Defrost Initiation
Temperature
f) Display Board Operation (S3 dip switch 5)
The display board may be disabled by moving S3 dip switch 5 to the "ON" position. When
the display board is disabled, the control board operates in default mode.
Default Mode: Compressor on 5-minutes then off 5-minutes. See "II.D.2.f) Default Safety
Program."
Factory set, no adjustment required.
S3 Dip Switch Setting
No. 5
OFF Enabled
ON Disabled
Display Board Status
18
Page 19

g) Dual Temp Unit (S3 dip switch 6)
Dual Temp units require S3 dip switch 6 be placed in the "ON" position for proper
operation. CAUTION! Do not adjust S3 dip switch 6 out of the factory default
position on this model. This dip switch must be left in the factory default position
or this unit will not operate correctly. Factory set, no adjustment required.
S3 Dip Switch Setting
No. 6
OFF All Models Except Dual Temp
ON Dual Temp Models
Dual Temp Selector Switch
h) Freezer Evaporator Fan Operation (except RFH1) (S3 dip switch 7)
Active when S3 dip switch 1 and S3 dip switch 8 are in the "OFF" position (freezer
application). When S3 dip switch 7 is in the "ON" positon, evaporator fan operates
continuously (except during defrost) and the temperature at which the evaporator fan
resumes after defrost changes from 0°F (-17.7°C) to 70°F (21°C). When set to the
"OFF" position, the evaporator fan cycles on and off with the compressor. After defrost,
evaporator fan resumes when evaporator temperature reaches 0°F (-17.7°C).
Factory set, no adjustment required.
Note: S3 dip switch 7 is ignored when S3 dip switch 1 or S3 dip switch 8 is in the "ON"
position.
S3 Dip Switch Setting
No. 7
OFF
ON
Evap. Fan Cycles On and Off with the Compressor
After Defrost, Evap. Fan Restarts when Defrost Thermistor Reaches 0°F (-17.7°C)
After Defrost, Evap. Fan Restarts when Defrost Thermistor Reaches 70°F (21°C)
Freezer Evaporator Fan Operation
Continuous Evap. Fan (except during defrost)
i) RFH1 Condensate Pan Heater Operation (S3 dip switch 8)
Active when S3dip switch 1 is in the "OFF" position (freezer application) and S3 dip
switch6is in the "ON" position (Dual Tempapplication). When S3 dip switch 8 is in the
"OFF" position, the condensate pan heater is not active and the evaporator fan cycles
according to S3 dip switch 7 setting. When S3 dip switch 8 is in the "ON" position, the
control board energizes the condensate pan heater through the control board X5relay
(on when compressor is off) and the evaporator fan runs continuously (except in defrost).
CAUTION! Do not adjust S3 dip switch 8 out of the factory default position on this
model. This dip switch must be left in the factory default position or this unit will
not operate correctly. Factory set, no adjustment required.
Note: S3 dip switch 8 is ignored when S3 dip switch 1 is in the "ON" position or S3dip
switch 6 is in the "OFF" position.
S3 Dip Switch Setting
No. 8
OFF
ON
After Defrost, Evap. Fan Restarts when Defrost Thermistor Reaches 0°F (-17.7°C)
RFH1 Condensate Pan Heater Operation
X5 Relay Controls Condenser Fan Motor
Evap. Fan Defaults to S3 Dip Switch 7 Setting
X5 Relay Controls Condensate Pan Heater
Continuous Evap. Fan (except during defrost)
19
Page 20

5. Guarded Access Menu
Three settings can be viewed and adjusted from this menu: temperature setpoint, defrost
frequency, and temperature display scale. To enter the guarded access menu, press
and hold the up and down buttons simultaneously for 3 seconds. The current setpoint
temperature is displayed.
a) Temperature Setpoint
The temperature setpoint is the value for the average cabinet temperature. The
temperature differential for the compressor to turn on and off is ±3°F of the setpoint. For
example, setpoint = 36°F (2.2°C), compressor on at 39°F (3.9°C), compressor off at
33°F(0.6°C). If necessary, adjust the setpoint temperature as follows:
1) Press and hold the up and down buttons simultaneously for 3 seconds. The current
setpoint temperature is displayed.
2) To change the setpoint, press the up or down button until the desired value appears.
The cabinet temperature is adjustable between 36°F and 50°F (2.2°C and 10°C).
Factory default is 36°F (2.2°C).
3) Press the "ENTER" button to set the value and view the next setting. If no change in
value is desired, press the "ENTER" button repeatedly until you return to the normal
display. If you do not cycle through the menu and no button is pressed in 15 seconds,
the display returns to normal and the temperature setpoint remains unchanged.
b) Defrost Frequency
This unit uses an off-cycle defrost initiated by temperature or time. During defrost the
cabinet temperature is displayed and the condenser fan motor and evaporator fan motor
are energized.
• Defrost Initiation Temperature: 13°F (-10°C). (8°F (-13.3°C) for pass thru units).
• Defrost Termination Temperature: 40°F (4.4°C).
• Defrost Initiated Time: Adjustable between 0 and 12 defrosts per 24 hrs. The factory
default setting is 0. Before changing this setting, contact Hoshizaki Technical Support
at 1-800-233-1940 for recommendations. When changed, the defrost setting will take
effect after the next defrost based on the previous setting. If it is desired that this
change in interval timing take effect immediately, turn the unit off and back on. The next
time-initiated defrost initiates "x" hours after power is turned back on. For example, if
the setting is dF 6, x=4 the next defrost takes place 4 hours from the time that power is
turned back on.
• 1-Hour Defrost Backup Timer: When defrost is initiated (temperature or time), a 1-hour
back-up defrost timer starts. The 1-hour back-up defrost timer terminates the defrost
cycle in cases where the defrost thermistor fails to terminate the defrost cycle within
1hour.
If necessary, adjust the time-initiated defrost frequency as follows:
1) Press and hold the up and down buttons simultaneously for 3 seconds. Press the
"ENTER" button until "dF" is displayed.
2) To change the defrost frequency, press the up or down button until the desired value
appears. The defrost frequency is adjustable between 0 and 12 defrosts per 24 hrs.
20
Page 21

3) To save the value, press the "ENTER" button repeatedly until you have cycled through
the menu and the unit returns to normal display mode. If you do not cycle through the
menu and no button is pressed within 15 seconds, the display returns to normal and the
defrost frequency remains unchanged.
c) Temperature Display Scale (°F or °C)
To change the display scale, follow the steps below.
1) Press and hold the up and down buttons simultaneously for 3 seconds. Press the
"ENTER" button until "F" or "C" temperature display scale is displayed.
2) To change the temperature display, press the up or down buttons until the desired scale
is displayed. The factory default is "F".
3) Press the "ENTER" button to save the value and return to normal display mode. If
you do not press the "ENTER" button and no button is pressed within 15 seconds,
the display returns to normal display and the temperature display scale remains
unchanged.
21
Page 22

6. Service Menu
From the service menu information regarding the functioning of the unit can be obtained.
To access the service menu, press and hold the up and down buttons and the "ENTER"
button simultaneously for 3 seconds. Scroll through the service menu list using the
"ENTER" button. Change options using the up/down arrows. To exit, press the "ENTER"
button until normal display mode returns. To exit the service menu at any point, press
and hold the "ENTER" button for 3 seconds or the service menu display remains on the
display board for 10 minutes after the last keystroke, then automatically reverts to normal
operation (cabinet temperature display). All information given in degrees automatically
displays in the current selected scale (°F or °C).
Display Denition
1OFF Displays current cabinet temperature.
1 ON Displays current evaporator temperature. Display will automatically revert to cabinet sensor after ve minutes.
2OFF Manual forced defrost option not activated.
2 ON
3OFF Unconditional alarm reset option not activated.
3 ON
4 16
5 50
6 45
7 45 Length of last defrost cycle (Freezer Only).
8 67
9-10
R_ _ 0
Manual forced defrost option activated. Changing from 2OFF to 2 ON initates a forced defrost upon returning
to the normal display mode.
Unconditional alarm reset option activated. Changing from 3OFF to 3 ON resets all alarm display codes
simultaneously. This is a complete clearing of alarms.
Right two digits represent compressor run time in last 24 hours to the nearest hour. Example: 16 hours total
run time in the last 24 hours.
Right two digits represent compressor on time percentage for the last 5 run cycles. A run cycle begins when
the compressor switches from off to on and ends the next time it switches from off to on. (See diagram below).
Example: 50% run time over the last 5 run cycles.
Value is calculated as follows: Percent On Time = On Time Last 5 Cycles/Total Time Last 5 Cycles. Value is
saved every 5 cycles.
Note: "On Time Last 5 Cycles" does not include an on time that was terminated by a defrost cycle or the rst
on time after a defrost, and "Total Time Last 5 Cycles" does not include an on or off time that was terminated
by a defrost cycle, the time spent in defrost, or the rst on time after a defrost.
Right two digits represent compressor run time for the last run cycle. Example: 45 minutes of compressor run
time in last run cycle.
Right two digits represent highest cabinet temperature recorded during the last high temperature alarm.
Example: Temperature reached 67 degrees during last high temperature alarm. Display will show "8--" if there
has not been a high temperature alarm. Value is saved every 8.5 minutes when in alarm.
Right three places represent lowest cabinet temperature recorded during the last low temperature alarm.
Example: Temperature reached -10 degrees during the last low temperature alarm. Display will show "9--" if
there has not been a low temperature alarm. Value is saved every 8.5 minutes when in alarm.
The diagram below is an example of a run cycle used to calculate run time:
22
Page 23

E. Compressor Thermal Overload and Short Cycle Protection
1. Compressor Thermal Overload: When a temperature or amperage value is above the
limit specied by the compressor manufacturer, a thermal overload activates, turning off
the compressor. The compressor restarts when the thermal overload resets.
• Compressor thermal overload resets automatically.
• If the condenser fan is operating and the compressor is off, it is most likely that the
thermal overload opened.
2. Short Cycle Protection: There is a 2.5-minute compressor delay at start up and a
2.5-minute mandatory on time.
Any time the compressor turns off, it will remain off for a minimum of 2.5 minutes.
Any time the compressor starts, it will remain on for a minimum of 2.5 minutes.
Note: Time may vary with high pressure switch or thermal overload activation.
F. Perimeter Heater
This unit is equipped with a perimeter heater. The perimeter heater is controlled by
the perimeter heater switch located on the control box. To help prevent the formation
of condensation on the front frame, turn the perimeter heater on (perimeter heater
switch red marking visible). When on, the perimeter heater cycles on and off with the
compressor. If operating the unit under conditions where condensation does not form,
this heater may be turned off (perimeter heater switch red marking hidden).
G. Thermistors
The cabinet thermistor is used for cabinet temperature control and the defrost thermistor
is used for initiation and defrost termination. Thermistor resistance varies depending on
temperature. The control board monitors the resistance to control system operation. No
adjustment is required. For further details, see "IV.C. Thermistor Check."
23
Page 24

III. Technical Data
A. Wiring Diagrams
1. RH_-SSE-XX (FG, HG, FS, or HS) Models
Transformer Ouput
10V at 115VAC Input
24
Page 25

2. PTR_SSE-XXXX (FSFS, HSHS, FGFG, HGHG, HGHS) Models
25
Transformer Ouput
10V at 115VAC Input
Page 26

IV. Service Diagnosis
WARNING
1. This unit should be diagnosed and repaired only by qualied service
personnel to reduce the risk of death, electric shock, serious injury, or re.
2. Risk of electric shock. Use extreme caution and exercise safe electrical
practices.
3. Moving parts (e.g., fan blade) can crush and cut. Keep hands clear.
4. Make sure all food zones are clean after the unit is serviced. For cleaning
procedures, see "VI. Cleaning Instructions."
A. Diagnostic Procedure
The diagnostic procedure is basically a sequence check which can be used at unit
startup or for system diagnosis. This procedure allows you to diagnose electrical system
and component failures. Before conducting the diagnostic procedure, check for proper
voltage per unit nameplate. The maximum allowable voltage variation is ±10 percent
of the nameplate rating. Check the control board S3 dip switch settings to assure that
they are in the factory default position. Check CB using the steps in "IV.B. Control Board
Check." For factory default settings, see "II.D.4.a) Default Dip Switch Settings." The
service menu may used to view history information. To access the service menu, press
and hold the up and down buttons and "ENTER" button simultaneously for 3 seconds.
Scroll through the service menu list using the "ENTER" button. For further details, see
"II.D.6. Service Menu." As you go through the diagnostic procedure, check to assure the
components energize and de-energize correctly. If not, those components or controls are
suspect. Always choose a white (W) neutral wire to establish a good neutral connection
when checking high voltages.
IMPORTANT
The maximum allowable voltage variation is ±10 percent of the nameplate
rating. 115VAC is used as reference voltage when checking voltage to
components. Voltage may vary depending on power supply.
1) Raise the front panel and move the power switch to the "OFF" position.
2) Unplug the unit from the electrical outlet.
3) Remove the control box cover.
4) Plug the unit back into the electrical outlet.
5) Move the power switch to the "ON" position.
6) The red "POWER OK" LED on CB comes on and stays on while the unit is in operation.
26
Page 27

7) Startup–no component LEDs are on (LED 3 off for EvapFM operation): There is a
5-second delay while CB identies program revision. Revision (r###) is shown on DB.
After 5-second delay, DB shows current cabinet temperature and EvapFM energizes.
2.5 minute Comp delay timer starts. Diagnosis: Check that red "POWER OK" LED is
on. If not, verify incoming voltage supply. Check transformer input and output voltage
(115VAC input and 10VAC output voltage) and transformer continuity. If 115VAC input
and 10VAC output voltage is present, and the red "POWER OK" LED is off, CB is bad
and must be replaced. Check that EvapFM is running. If not, check EvapFM blade for
binding. Next, check for 115VAC at K1 connector pin #3 dark blue (DBU) to any white
(W) neutral wire. If 115VAC is not present, CB is bad and must be replaced. If 115VAC is
present, check EvapFM continuity.
8) Cool-Down–LED 4 (Comp) and LED 5 (ConFM) are on: EvapFM continues and
2.5 minute Comp delay timer terminates. Comp, ConFM, and PH energize (if PH switch
is in the on position (red marking visible)).
Comp Circuit Diagnosis: If Comp does not start, check for 115VAC at K1 connector
pin #10 gray (GY) wire to any white (W) neutral wire. If 115VAC is not present, CB is
bad and must be replaced. If 115VAC is present, check for 115VAC at Comp relay coil
gray (GY) wire to any white (W) neutral wire. If 115VAC is present, and Comp is not on,
check for 115VAC at Comp relay orange (O) wire to Comp relay red (R) wire. If 115VAC
is present, Comp relay is bad and must be replaced. If 115VAC is not present, check
for 115VAC at Comp relay red (R) wire to any white (W) neutral wire. If 115VAC is not
present, electronic unit is bad and must be replaced. If 115VAC is present, and Comp
is not on, remove the electronic unit to access Comp terminals. Next, check for 80VAC
from each Comp terminal to ground. If 80VAC is not present, electronic unit is bad and
must be replaced. If 80VAC is present, check Comp continuity.
ConFM Diagnosis: If ConFM does not start, check that the fan blade is not binding.
Next, check for 115VAC at red K9 connector pin #2 brown (BR) to any white (W) neutral
wire. If 115VAC is not present, CB is bad and must be replaced. If 115VAC is present,
check ConFM continuity.
If Comp and CondFM are on and the cabinet temperature is not dropping, check for
a restriction in the refrigeration circuit, correct TXV operation, and correct refrigerant
charge.
PH Diagnosis: Comp must be energized when troubleshooting PH. Conrm PH switch
is on (red marking visible). Next, check for voltage at PH switch. 115VAC should be
present from both black (BK) wires to any white (W) neutral wire. If 115VAC is present
on one and not the other, the PH switch is open. Conrm 115VAC at the PH relay coil.
Next, check for 115VAC from both black (BK) wires at the PH relay to any white (W)
neutral wire. If 115VAC is present on one and not the other, the PH relay contacts are
open. Check PH amp draw, if no amp draw is present, check the continuity of the PH.
27
Page 28

9) Defrost–LED 5 (ConFM) is on:
Temperature-Initiated Defrost: Dth cools to 13°F (-10°C), CB initiates defrost. EvapFM
and ConFM continue. Comp de-energizes. If ConFM is off, ConFM energizes once
defrost starts.
Time-Initiated Defrost: If the factory time-initiated setting is moved from 0 defrost per
24 hours, the unit enters the defrost cycle once the time of the new setting expires.
EvapFM and ConFM continue. Comp de-energizes. If ConFM is off, ConFM energizes
once defrost starts.
Defrost Termination: Dth warms to 40°F (4.4°C). EvapFM and ConFM continue.
2.5 minutes later Comp and PH (if PH switch is on (red marking visible)) energize.
Diagnosis: Has Dth cooled to 13°F (-10°C)? Conrm Dth status, see "IV.C. Thermistor
Check." Conrm that Comp stops. If not, check for 115VAC at K1 connector pin #10
gray (GY) wire to any white (W) neutral wire. If 115VAC is present, CB is bad and must
be replaced. If Comp is on and 115VAC is not present, check Comp relay for closed
contacts. Conrm EvapFM and ConFM continue to run. If not, check for 115VAC at
K1 connector pin #3 dark blue (DBU) wire to any white (W) neutral wire for EvapFM
and 115VAC at red K9 connector pin #2 brown (BR) to any white (W) neutral wire
for ConFM. If 115VAC is not present, CB is bad and must be replaced. If 115VAC is
present, check that EvapFM or ConFM is not binding. Then, check EvapFM and ConFM
windings for continuity.
Conrm defrost termination. Conrm evaporator has warmed to defrost termination
temperature of 40°F (4.4°C). Check Dth status, see "IV.C. Thermistor Check."
2.5 minutes later LED 4 comes on and Comp energizes. EvapFM and ConFM continue.
Legend: CB–control board; ConFM–condenser fan motor; Comp–compressor;
CTh–cabinet thermistor; DB–display board; DTh–defrost thermistor;
EvapFM–evaporator fan motor; PH–perimeter heater
28
Page 29

B. Control Board Check
Before replacing a control board that does not show a visible defect and that you
suspect is bad, always conduct the following check procedure. This procedure will help
you verify your diagnosis. Always choose a white (W) neutral wire to establish a good
neutral connection when checking high voltages.
Alarm Reset: If the control board is in alarm (beeping), press the "ALARM RESET"
button on the control board with power on. For alarm information, see
"II.D.3. LED Lights and Alarm Safeties Chart."
1) Check S3 dip switch settings to assure that they are in the factory default position. For
factory default settings, see "II.D.4.a) Default Dip Switch Settings."
2) Move the power switch to the "ON" position. If the "POWER OK" LED is on, the control
board voltage is good. If the "POWER OK" LED is off, check the control transformer
secondary circuit. Transformer output is 10VAC at 115VAC primary input. If the
secondary circuit has proper voltage (10VAC) and the "POWER OK" LED is off, the
control board is bad and must be replaced. See "V.J. Removal and Replacement of
Control Board."
If the secondary circuit does not have proper voltage, check the control transformer
primary circuit. Check the power switch to a white (W) neutral wire.
3) The "OUTPUT TEST" button provides a relay sequence test. Move the power switch to
the "ON" position. Next, press the "OUTPUT TEST" button. The control board cycles
through all relays in sequence. The correct LED lighting sequence is 3, 2, 1, 4, 5. Note
that the order of the LEDs from the outer edge of the board is 5, 4, 1, 2, 3. Components
(e.g., compressor) cycle during the test. Following the output test, the unit resumes
operation. If the LEDs do not light as described above, the control board is bad and
must be replaced. See "V.J. Removal and Replacement of Control Board."
4) Conrm K6 connector output voltage (5VDC). Check at the following K6 connector
locations: Pin #2 to pin #3 pink (P) wires (Clogged Filter Thermostat), pin #4 to pin
#5 light blue (LBU) wires (Door Switch), and pin #6 to pin #7 violet (V) wires (High
Pressure Switch).
5) Conrm proper output voltage (3.8VDC) at RED K4 connector (cabinet thermistor)
pin #1 to pin #2 gray (GY) wires and WHITE K3 connector (defrost thermistor) pin #1 to
pin #2 orange (O) wires.
6) As the unit cycles through the sequence of operation, check for 115VAC from
K1 connector pins to corresponding components and relays as needed.
29
Page 30

C. Thermistor Check
In the event the cabinet thermistor reading is out of range, the compressor operates on
a xed time basis of 5-minutes on and 5-minutes off.
In the event the defrost (evaporator) thermistor reading is out of range, defrost initiation
occurs every 6 hours and terminates based on cabinet thermistor temperature.
In the event of both thermistor readings are out of range, the compressor operates on a
xed time basis of 5-minutes on and 5-minutes off and the defrost cycle initiates every
6hours and terminates after 45 minutes.
To check thermistor resistance, follow the steps below.
1) Raise the front panel. Move the power switch to the "OFF" position, then unplug the unit.
2) Remove the control box cover.
3) Remove the cabinet and defrost thermistors. See "V.K. Removal and Replacement of
Thermistor."
4) Disconnect the cabinet thermistor (gray (GY) wires) from the RED K3 connector or the
defrost thermistor (orange (O) wires) from the WHITE K3 connector.
5) Immerse the thermistor sensor portion in a glass containing ice and water for 2 or
3 minutes.
6) Check the resistance between the wires at the thermistor connector (cabinet thermistor
gray (G) wires or defrost thermistor orange (O) wires). Normal reading is within 4.7 to
6.2 kΩ. If outside the normal reading, replace the thermistor.
7) Replace the thermistors in their correct position. See "V.K. Removal Replacement of
Thermistor."
8) Reconnect the red and white thermistor connectors to the control board RED K4 and
WHITE K3 thermistor connectors.
9) Replace the control box cover in its correct position.
10) Plug the unit back in. Move the power switch to the "ON" position.
11) Close the front panel.
30
Page 31

D. Diagnostic Chart
1. Unit Not Cooling
Problem Possible Cause Remedy
[1] Unit does not
start.
[2] Evaporator fan
does not start.
[3] Cool down
does not start.
(compressor)
a) Power Supply
b) Cord and Plug 1. Defective. 1. Replace.
c) Power Switch
(Control Box)
d) Control Transformer 1. Open coil winding. 1. Check continuity and replace.
e) Wiring 1. Loose connection or open. 1. Tighten, check for continuity and
f) Control Board 1. In alarm. 1. See "II.D.3. LED Lights and Alarm
g) High Pressure Switch
(3 pressure trips in
1 hour, 6 beep alarm)
h) Cabinet Thermistor 1. Defective. 1. Replace.
i) Clogged Filter Thermostat 1. Clogged lter or condenser. 1. Clean lter or condenser coil.
a) Evaporator Fan Motor 1. Defective. 1. Replace.
b) Control Board 1. Defective. 1. See "IV.B. Control Board Check."
a) Setpoint 1. Incorrect. 1. Correct setpoint.
b) Cabinet Thermistor 1. Defective. 1. Check thermistor reading and
c) Control Board 1. In alarm. 1. See "II.D.3. LED Lights and Alarm
d) High Pressure Switch
(5 pressure trips in
1 hour, 6 beep alarm)
e) Compressor Relay 1. Bad contacts. 1. Replace.
f) Electronic Unit 1. Defective. 1. See "IV.A. Diagnostic Procedure."
1. Unplugged, off, blown fuse,
or tripped or defective circuit
breaker.
2. Loose connection. 2. Tighten.
3. Not within specications. 3. Refer to nameplate and correct.
1. "OFF" Position. 1. Move to "ON" position.
2. Bad contacts. 2. Check for continuity and replace.
2. Faulty. 2. Check continuity and replace.
2. Defective. 2. Replace.
1. Bad contacts. 1. Check continuity and replace.
2. Dirty air lter or condenser. 2. Clean
3. Ambient temperature too
warm.
4. Refrigerant overcharge. 4. Recharge.
5. Condenser fan not operating. 5. Replace.
6. Refrigerant lines or
components restricted.
2. Defective. 2. Replace.
2. Defective. 2. See "IV.B. Control Board Check."
1. Bad contacts. 1. Check continuity and replace.
2. Dirty air lter or condenser. 2. Clean.
3. Ambient temperature too
warm.
4. Refrigerant overcharge. 4. Recharge.
5. Condenser fan not operating. 5. Replace.
6. Refrigerant lines or
components restricted.
2. Open coil windings. 2. Replace.
1. Turn on, reset, or replace.
repair.
Safeties Chart."
3. Reduce temperature.
6. Recover, repair, replace drier,
evacuate, and recharge.
Factory defaults:
Refrigerator 36°F (2°C).
position. Replace.
Safeties Chart."
3. Reduce temperature.
6. Recover, repair, replace drier,
evacuate, and recharge.
31
Page 32

[3] Cool down
does not start.
(compressor)
(continued)
[4] Cool down starts,
temperature does
not drop.
g) Overload 1. Open. 1. Let compressor cool and overload
reset. If overload does not reset,
replace compressor. If overload
resets, check compressor
amperage and operating voltage.
2. Clogged lter or condenser
coil.
3. Condenser fan not operating. 3. Replace.
4. Defective. 4. Replace.
5. Open coil windings. 5. Replace.
h) Compressor 1. Defective. 1. Replace.
a) Location of Unit 1. Restricted air ow to
condenser or ambient
temperature too high.
b) Cabinet Temperature too
High
c) Setpoint 1. Incorrect. 1. Correct setpoint.
d) Door 1. Left open, opened too often. 1. Close, check for door open
e) Cabinet Thermistor 1. Defective. 1. Check thermistor reading and
f) Clogged Filter Thermostat 1. Clogged lter or condenser
g) Evaporator 1. Clogged or frozen. 1. Clean. Defrost and check defrost
h) Evaporator Fan Motor 1. Defective. 1. Replace.
i) Defrost 1. Not enough defrosts
j) Control Board 1. Defective. 1. See "IV.B. Control Board Check."
k) Refrigerant/Refrigerant
Lines
l) Expansion Valve (TXV)
(not adjustable)
m) Electronic Unit Voltage 1. Defective. 1. Replace.
n) Compressor 1. Defective. 1. Replace.
1. Warm food recently placed in
cabinet area.
2. Air ow blocked. 2. Remove blockage or redistribute
2. Not sealing. 2. Check for proper sealing.
coil.
2. Defective. 2. Replace.
occurring per day.
2. Defrost Thermistor. 2. Check position and ohm reading.
3. Control Board. 3. Replace.
1. Gas leaks. 1. Check for leaks with a leak
2. Refrigerant lines restricted. 2. Recover, repair, replace drier,
1. Defective. 1. Replace.
2. Clean.
1. Increase ventilation or lower
ambient temperature.
1. Pre-cool food product or allow
time for unit to return to normal
setpoint temperature.
food products.
Factory defaults:
Refrigerator 36°F (2°C).
at time of warm cabinet
temperature.
position. Replace.
1. Clean lter or condenser coil.
cycle.
1. See "II.D.5.b) Defrost
Frequency."
Reposition in evaporator. See
"IV.C. Thermistor Check."
detector. Repair leaks.
Replace drier, evacuate and
recharge. See "V.A. Service for
Refrigerant Lines."
evacuate, and recharge.
32
Page 33

[5] Cabinet
Temperature
Too Low
a) Setpoint 1. Incorrect. 1. Correct setpoint.
b) Cabinet Thermistor 1. Defective. 1. Check and replace.
c) Evaporator Fan Motor 1. Defective. 1. Replace.
d) Control Board 1. Defective. 1. See "IV.B. Control Board Check."
2. Evaporator is Frozen Up
[1] Evaporator does
not defrost
completely.
[2] Compressor on
during defrost.
a) Defrost Frequency 1. Not enough defrosts
b) Defrost Thermistor 1. Out of position or defective. 1. Reposition or replace.
c) Control Board 1. Defective. 1. Replace.
a) Compressor Relay 1. Bad Contacts. 1. Replace.
b) Control Board 1. Defective. 1. See "IV.B. Control Board Check."
3. Defrost Fails to Terminate
[1] Defrost cycle
too long.
[2] Compressor
operates during
defrost.
a) Defrost Thermistor 1. Out of position or defective. 1. Reposition or replace.
b) Defrost Frequency 1. Not enough defrosts
c) Control Board 1. Defective. 1. See "IV.B. Control Board Check."
a) Compressor Relay 1. Bad Contacts. 1. Replace relay.
b) Control Board 1. Defective. 1. Replace.
Factory defaults:
Refrigerator 36°F (2°C).
1. See "II.D.5. b) Defrost Frequency."
occurring per day.
Operation in humid
conditions.
1. See "II.D.5.b) Defrost Frequency."
occurring per day. Operation
in humid conditions.
4. Other
[1] Abnormal Noise. a) Fasteners 1. Loose fasteners allow
vibration of part.
b) Compressor 1. Problem with mount or
electronic unit.
2. Floodback to compressor. 2. Check for signs of oodback
3. Defective. 3. Replace.
[2] Condensate
water overow.
c) Fan (evaporator or
condenser)
d) Relay 1. Chattering. 1. Replace.
a) Cabinet Contents 1. Loading of large volumes
b) Location of Unit 1. Unit located near high
c) Seals 1. Poor sealing around
d) Environment 1. Extreme environment and
1. Fan blade loose. 1. Adjust and tighten.
2. Defective motor. 2. Replace.
of warm, moist, uncovered
product.
humidity source such as
fryer, steamer, etc.
evaporator, door gaskets.
door-opening conditions.
1. Tighten fasteners.
1. Properly mount compressor.
Replace any missing grommets.
to compressor. Evacuate and
recharge if necessary.
1. Allow product to cool before
placing in cabinet. Cover
product with plastic wrap.
1. Relocate.
1. Adjust or replace.
1. Adjust conditions.
33
Page 34

V. Removal and Replacement of Components
WARNING
1. This unit should be diagnosed and repaired only by qualied service
personnel to reduce the risk of death, electric shock, serious injury, or re.
2. Move the power switch to the "OFF" position and unplug the unit from the
electrical outlet before servicing.
A. Service for Refrigerant Lines
WARNING
1. Repairs requiring the refrigeration circuit to be opened must be performed by
properly trained and EPA-certied service personnel.
2. Always recover the refrigerant and store it in an approved container. Do not
discharge the refrigerant into the atmosphere.
3. Use an electronic leak detector or soap bubbles to check for leaks. Add a
trace of refrigerant to the system (if using an electronic leak detector), and
then raise the pressure using nitrogen gas (140 PSIG). DO NOT use R-134a
as a mixture with pressurized air for leak testing.
CAUTION
1. Do not leave the system open for longer than 15 minutes when replacing or
servicing parts. The Polyol Ester (POE) oils used in R-134a units can absorb
moisture quickly. Therefore it is important to prevent moisture from entering
the system when replacing or servicing parts.
2. Always install a new drier every time the sealed refrigeration system is
opened.
3. Do not replace the drier until after all other repair or replacement has been
made. Install the new drier with the arrow on the drier in the direction of the
refrigerant ow.
4. When brazing, protect the drier by using a wet cloth to prevent the drier from
overheating. Do not allow the drier to exceed 250°F (121°C).
1. Refrigerant Recovery
The unit is provided with refrigerant access valves. Using proper refrigerant practices
recover the refrigerant from the access valves and store it in an approved container. Do
not discharge the refrigerant into the atmosphere.
34
Page 35

2. Brazing
WARNING
1. R-134a itself is not ammable at atmospheric pressure and temperatures up
to 176°F (80°C).
2. R-134a itself is not explosive or poisonous. However, when exposed to high
temperatures (open ames), R-134a can be decomposed to form hydrouoric
acid and carbonyl uoride both of which are hazardous.
3. Do not use silver alloy or copper alloy containing arsenic.
4. Use an electronic leak detector or soap bubbles to check for leaks. Add a
trace of refrigerant to the system (if using an electronic leak detector), and
then raise the pressure using nitrogen gas (140PSIG). DO NOT use R-134a
as a mixture with pressurized air for leak testing.
1) Braze all ttings while purging with nitrogen gas owing at a pressure of 3 to 4 PSIG.
CAUTION
1. Always install a new drier every time the sealed refrigeration system is
opened.
2. Do not replace the drier until after all other repair or replacement has been
made. Install the new drier with the arrow on the drier in the direction of the
refrigerant ow.
3. When brazing, protect the drier by using a wet cloth to prevent the drier from
overheating. Do not allow the drier to exceed 250°F (121°C).
2) Use an electronic leak detector or soap bubbles to check for leaks. Add a trace of
refrigerant to the system (if using an electronic leak detector), and then raise the
pressure using nitrogen gas (140 PSIG). DO NOT use R-134a as a mixture with
pressurized air for leak testing.
Note: Because the pipes in the evaporator case are specially coated to resist corrosion,
it is important to make connections outside the evaporator case when possible. If
it is necessary to braze inside the evaporator case, use sandpaper to remove the
coating from the brazing connections before unbrazing the components.
3. Evacuation and Recharge (R-134a)
1) Attach a vacuum pump to the system. Be sure the charging hoses are connected to both
high and low-side access valves.
IMPORTANT
The vacuum level and vacuum pump may be the same as those for current
refrigerants. However, the rubber hose and gauge manifold to be used for
evacuation and refrigerant charge should be exclusively for POE oils.
2) Turn on the vacuum pump. Never allow the oil in the vacuum pump to ow backwards.
3) Allow the vacuum pump to pull down to a 29.9" Hg vacuum. Evacuating period depends
on pump capacity.
35
Page 36

4) Close the low-side valve and high-side valve on the service manifold.
5) Disconnect the gauge manifold hose from the vacuum pump and attach it to a
refrigerant service cylinder. Remember to loosen the connection and purge the air from
the hose. See the nameplate for the required refrigerant charge. Hoshizaki recommends
only virgin refrigerant or reclaimed refrigerant which meets ARI Standard 700 (latest
edition) be used.
6) A liquid charge is recommended for charging an R-134a system. Invert the service
cylinder and place it on scales. Open the high-side valve on the gauge manifold valve.
7) Allow the system to charge with liquid until the proper charge weight is met.
8) If necessary, add any remaining charge to the system through the low-side. Use a
throttling valve or liquid dispensing device to add the remaining liquid charge through
the low-side access port with the unit running.
9) Close gauge manifold valves and disconnect the hoses and service manifold.
10) Cap the access valves to prevent a possible leak.
B. Removal and Replacement of Compressor
CAUTION
1. Always install a new drier every time the sealed refrigeration system is
opened.
2. Do not replace the drier until after all other repair or replacement has been
made. Install the new drier with the arrow on the drier in the direction of the
refrigerant ow.
3. When brazing, protect the drier by using a wet cloth to prevent the drier from
overheating. Do not allow the drier to exceed 250°F (121°C).
Note: Due to the ability of the POE oil in the compressor to absorb moisture quickly,
the compressor must not be opened more than 15 minutes for replacement or
service. Do not mix lubricants of different compressors even if both are charged
with R-134a, except when they use the same lubricant.
1) Raise the front panel. Then, move the power switch to the "OFF" position and unplug
the unit.
2) Remove the panels.
3) Recover the refrigerant and store it in an approved container. See "V.A. Service for
Refrigerant Lines."
4) Loosen the 2 screws securing the compressor electronic unit to the compressor. See
Fig. 3. Remove the electronic unit from the compressor.
5) Remove the discharge and suction pipes.
6) Remove the hold-down bolts, washers, and rubber grommets.
7) Remove the compressor.
8) Place the new compressor in position and secure it using the grommets, washers and
bolts.
36
Page 37

9) Remove the drier, then place the new drier in position.
11) Remove plugs from the suction, discharge, and process pipes.
12) Braze all ttings while purging with nitrogen gas owing at a pressure of 3 to 4 PSIG.
See "V.A.2. Brazing."
13) Use an electronic leak detector or soap bubbles to check for leaks. Add a trace of
refrigerant to the system (if using an electronic leak detector), and then raise the
pressure using nitrogen gas (140 PSIG). DO NOT use R-134a as a mixture with
pressurized air for leak testing.
14) Evacuate the system, and charge it with refrigerant. See "V.A.3. Evacuation and
Recharge (R-134a)." See the nameplate for the required refrigerant charge.
15) Connect and secure the compressor electronic unit to the new compressor.
16) Replace the panels in their correct positions.
17) Plug the unit back in. Move the power switch to the "ON" position.
18) Close the front panel.
C. Removal and Replacement of Compressor Electronic Unit
CAUTION! Do not attempt to repair the compressor electronic unit.
1) Raise the front panel, then move the power switch to the "OFF" position and unplug the
unit.
2) Remove the rear panel.
3) Loosen the 2 screws securing the compressor electronic unit to the compressor. See
Fig. 3. Remove the electronic unit from the compressor.
4) Remove the wire cover from the compressor electronic unit, then disconnect the wires
from the compressor electronic unit.
5) Remove the wire cover from the new compressor electronic unit and connect the wires.
Replace and secure the wire cover.
6) Secure the new electronic unit to the compressor.
7) Replace the rear panel in its correct position.
8) Plug the unit back in. Move the power switch to the "ON" position.
9) Close the front panel.
Variable Speed Compressor
Electronic Unit
Mounting Screws
Fig. 3
37
Compressor Electronic Unit
Page 38

D. Removal and Replacement of Expansion Valve
Moisture in the refrigeration circuit may exceed drier capacity and freeze up at the
expansion valve.
CAUTION
1. Always install a new drier every time the sealed refrigeration system is
opened.
2. Do not replace the drier until after all other repair or replacement has been
made. Install the new drier with the arrow on the drier in the direction of the
refrigerant ow.
3. When brazing, protect the valve body and drier by using wet cloths to prevent
the valve body and drier from overheating. Do not allow the valve body or
drier to exceed 250°F (121°C).
1) Raise the front panel, then move the power switch to the "OFF" position and unplug the
unit.
2) Remove the evaporator case cover and panels.
3) Recover the refrigerant and store it in an approved container.
4) Remove the insulation and the expansion valve bulb on the suction line.
5) Remove the expansion valve cover and disconnect the expansion valve. Place the new
expansion valve in position.
6) Remove the drier, then place the new drier in position.
7) Braze all ttings while purging with nitrogen gas owing at a pressure of 3 to 4 PSIG.
See "V.A.2. Brazing."
8) Use an electronic leak detector or soap bubbles to check for leaks. Add a trace of
refrigerant to the system (if using an electronic leak detector), and then raise the
pressure using nitrogen gas (140 PSIG). DO NOT use R-134a as a mixture with
pressurized air for leak testing.
9) Evacuate the system, and charge it with refrigerant. See "V.A.3. Evacuation and
Recharge (R-134a)." See the nameplate for the required refrigerant charge.
10) Attach the expansion valve bulb to the suction line in the same location as the previous
bulb. The bulb should be between the 10 and 2 o'clock position on the tube. Be sure to
secure the bulb with the clamp and holder and to insulate it.
11) Place the expansion valve cover in position.
12) Replace the evaporator case cover and panels in their correct positions.
13) Plug the unit back in. Move the power switch to the "ON" position.
14) Close the front panel.
38
Page 39

E. Removal and Replacement of Evaporator
CAUTION
1. Always install a new drier every time the sealed refrigeration system is
opened.
2. Do not replace the drier until after all other repair or replacement has been
made. Install the new drier with the arrow on the drier in the direction of the
refrigerant ow.
3. When brazing, protect the drier by using a wet cloth to prevent the drier from
overheating. Do not allow the drier to exceed 250°F (121°C).
1) Raise the front panel, then move the power switch to the "OFF" position and unplug the
unit.
2) Remove the evaporator case cover and panels.
3) Recover the refrigerant and store it in an approved container.
4) Remove the insulation tubing, then disconnect the evaporator tubing. Elevate the
evaporator to avoid overheating of the evaporator housing. Lift out the evaporator.
Note: The pipes in the evaporator case are specially coated to resist corrosion. Use
sandpaper to remove the coating from the brazing connections before unbrazing.
5) Place the new evaporator in position.
6) Remove the drier, then place the new drier in position.
7) Braze all ttings while purging with nitrogen gas owing at a pressure of 3 to 4 PSIG.
See "V.A.2. Brazing."
8) Use an electronic leak detector or soap bubbles to check for leaks. Add a trace of
refrigerant to the system (if using an electronic leak detector), and then raise the
pressure using nitrogen gas (140 PSIG). DO NOT use R-134a as a mixture with
pressurized air for leak testing.
9) Evacuate the system, and charge it with refrigerant. See "V.A.3. Evacuation and
Recharge (R-134a)." See the nameplate for the required refrigerant charge.
10) Replace the removed parts in the reverse order of which they were removed.
11) Replace the evaporator case cover and panels in their correct positions.
12) Plug the unit back in. Move the power switch to the "ON" position.
13) Close the front panel.
39
Page 40

F. Removal and Replacement of Evaporator Fan Motor
1) Raise the front panel, then move the power switch to the "OFF" position and unplug the
unit.
2) Remove the evaporator case cover and panels.
3) Remove the screws securing the evaporator fan bracket, then remove the evaporator
fan bracket and fan motor.
4) Remove the fan motor bracket from the fan motor and secure it to the new fan motor.
5) Install the new fan motor assembly.
6) Replace the evaporator case cover and panels in their correct positions.
7) Plug the unit back in. Move the power switch to the "ON" position.
8) Close the front panel.
G. Removal and Replacement of Door Gasket
Remove old gasket by pulling it directly out of the vinyl gasket retainer. Thoroughly clean
the gasket area with mild soap and water prior to installing the new gasket. The new
gasket should be installed by assembling it at the corners rst, then working toward the
center at the top, bottom, and sides. The arrow-shaped portion of the gasket should be
rmly seated in the retainer groove for proper assembly. This can be checked by lifting
the edge of the gasket and observing the engagement.
CAUTION
In order to get a proper gasket t, it is important not to stretch gasket material
during assembly.
40
Page 41

H. Removal and Replacement of Door Closure Spring
WARNING
Wear eye protection and use caution when removing the tension screw (step 3).
1) Raise the front panel. Then, move the power switch to the "OFF" position and unplug
the unit.
2) Remove the wire cover. See Fig. 4.
3) Remove the bushing cover from the top of the spring guide pin.
4) Insert a small drift pin or long leg of an allen wrench into one of the threaded tension
screw holes in the spring guide pin. Turn the spring guide pin to access the tension
screw. Securely hold the spring guide pin in this position while removing the tension
screw. Carefully rotate (walk) the spring guide pin to release spring tension.
5) Use a 1/2" socket wrench to remove the top pivot pin and hinge washer from the top
hinge bracket.
6) Firmly grasp the door and pull it forward at the top. Then raise the door, disengaging it
from the bottom pivot pin.
7) Remove the spring guide pin and spring from the spring cartridge.
8) Replace the spring with one of the same color. Be certain that the spring ends are
engaged in both the spring cartridge and the top of the spring guide pin.
9) Reverse procedure to reassemble door(s) to cabinet.
Note: Tighten spring guide pin one complete rotation to set proper spring tension.
10) Replace the wire cover in its correct position.
11) Plug the unit back in. Move the power switch to the "ON" position.
12) Close the front panel.
Side Color Part Number
Left Blue 4A3312-02
Right Black 4A3312-01
Spring Cartridge
Pivot Pin
Hinge Washer
Bushing Cover
Hinge Stop Pin
Hinge Bracket
Spring Guide Pin
Tension Screw
Spring
Front Panel
Wire Cover
Fig. 4
41
Page 42

I. Door Re-Hinging
.CNI STCUDORP LORTNOC
71355 .NM ,silopaenniM
: EMAN
: ETAD
: ELTIT
: # GwD
:VER GWD
: VER BCP
FJT
: ETAD .VER
A
50/02/21
50/02/21
DL 32-2682A2-SOH ,ACP
21008823
: ETAD VER
E
50/02/21
ETAD
SNOISIVER FO DROCER
50/02/21
A
gwD yssA weN
NOITPIRCSED
OCD/OCE
VER
The door on any unit is reversible as shown below. The instructions for re-hinging are
provided in the kits listed below.
Convert Door Type Kit Number
Right to Left Full HS-3527
Left to Right Full HS-3528
Right to Left Half HS-3529
Left to Right Half HS-3530
J. Removal and Replacement of Control Board
1) Raise the front panel. Then, move the power switch to the "OFF" position and unplug
the unit.
2) Remove the control box cover.
3) Unhook all wiring connections to the control board.
4) Remove the control board by carefully squeezing the tips of the board mounts.
5) Verify that the S3 dip switches are set correctly. See "II.D.4.a) Default Dip Switch
Settings."
6) Place the control board into its correct position, taking care not to damage it.
7) Connect all wiring connections to the control board.
8) Replace the control box cover in its correct position.
9) Plug the unit back in. Move the power switch to the "ON" position.
10) Close the front panel.
Micro-Controller-Control
Board Revision ID
Fig. 5
42
S3 Dip Switches
Page 43

K. Removal and Replacement of Thermistors
This section covers removal and replacement of the cabinet and defrot thermistors. For a
thermistor check procedure, see "IV.C. Thermistor Check."
CAUTION
1. The thermistors are fragile; handle very carefully.
2. Do not shorten or cut the thermistor leads.
1. Cabinet Thermistor
1) Raise the front panel. Move the power switch to the "OFF" position, then unplug the unit.
2) Remove the evaporator case cover.
3) Remove the control box cover.
4) Disconnect the cabinet thermistor (gray (GY) wires) from the RED K4 connector on the
control box.
5) Remove the cabinet thermistor from the thermistor bracket. Remove the thermistor.
6) Place the new cabinet thermistor in the thermistor bracket. Then, route the thermistor
connector to the control box.
7) Connect the cabinet thermistor (gray (GY) to the RED K4 connector on the control
board.
8) Replace the evaporator case cover and control box cover.
9) Plug the unit back in. Move the power switch to the "ON" position.
10) Close the front panel.
2. Defrost Thermistor
1) Raise the front panel. Move the power switch to the "OFF" position, then unplug the unit.
2) Remove the evaporator case cover.
3) Remove the control box cover.
4) Disconnect the defrost thermistor connector (orange (O) wires) from the WHITE K3
connector on the control box.
5) Remove the defrost thermistor clip from the evaporator (note the location in the
evaporator). Remove the defrost thermistor from the defrost thermistor clip.
6) Place the new defrost thermistor in the defrost thermistor clip, then insert it back into its
original position in the evaporator. Route the defrost thermistor connector to the control
box.
7) Connect the defrost thermistor connector (orange (O) wires) to the WHITE K3 connector
on the control board.
8) Replace the evaporator case cover and control box cover.
9) Plug the unit back in. Move the power switch to the "ON" position.
10) Close the front panel.
43
Page 44

VI. Cleaning Instructions
1. Stainless Steel Exterior
Wipe the exterior occasionally with a clean, soft cloth. Use a damp cloth containing a
neutral cleaner to wipe off oil or dirt build up.
2. Stainless Steel Interior
Spills should be wiped up promptly to avoid unpleasant odors. The cabinet interior
should be cleaned periodically with a mild soap or detergent.
3. Door Gaskets
Door gaskets should be cleaned regularly with mild soap and water to remove dirt and
grease.
4. Air Filter
Check the lter at least once a month. If it is dirty, use warm water and a neutral
cleaner to wash the lter.
Fig. 6
5. Condenser
Check the condenser once a year and use a brush or vacuum cleaner to clean the unit
as required.
6. Glass Door
Wipe occasionally with a clean, soft cloth. Use a damp cloth containing a neutral cleaner
to wipe off oil or dirt build up.
44
 Loading...