

Page 1
Hoshizaki America, Inc.
Hoshizaki
Commercial Refrigerators & Freezers
Undercounter & Worktop Series
Models
Refrigerators
HUR40A(-D) HWR40A(-D)
“A Superior Degree
of Reliability”
www.hoshizaki.com
HUR68A(-D) HWR68A(-D)
HUR96A(-D) HWR96A(-D)
Freezers
HUF40A(-D) HWF40A(-D)
HUF68A(-D) HWF68A(-D)
SERVICE MANUAL
Number: 73123
Issued: 2-4-2005
Revised: 9-30-2008
Page 2
IMPORTANT
Only qualied service technicians should attempt to service or maintain this
unit. No such service or maintenance should be undertaken until the technician
has thoroughly read this Service Manual.
Hoshizaki provides this manual primarily to assist qualied service technicians in the
service and maintenance of the unit.
Should the reader have any questions or concerns which have not been satisfactorily
addressed, please call, write or send an e-mail message to the Hoshizaki Technical
Support Department for assistance.
HOSHIZAKI AMERICA, INC.
618 Highway 74 South
Peachtree City, GA 3069
Attn: Hoshizaki Technical Support Department
Phone: 1-800-33-1940 Technical Support
(770) 487-331
Fax: 1-800-843-1056
(770) 487-3360
E-mail: techsupport@hoshizaki.com
Web Site: www.hoshizaki.com
NOTE: To expedite assistance, all correspondence/communication MUST include the
following information:
• Model Number __________________________
• Serial Number __________________________
• Complete and detailed explanation of the problem.
ENERGY STAR
®
Products earning the ENERGY STAR prevent greenhouse gas emissions by meeting strict
energy efciency guidelines set by the U.S. Environmental Protection Agency and the
U.S. Department of Energy. Several models of Hoshizaki undercounters have earned the
ENERGY STAR. To easily determine if your unit has earned the ENERGY STAR, see the
nameplate attached to the right wall on the inside of the cabinet.
Page 3

Please review this manual. It should be read carefully before the unit is serviced or
maintenance operations are performed. Only qualied service technicians should service
and maintain the unit. This manual should be made available to the technician prior to
service or maintenance.
CONTENTS
I. Specications ..................................................................................................................... 5
A. Nameplate Ratings ....................................................................................................... 5
B. Dimensions ................................................................................................................... 5
1. HUR40A, HUF40A .................................................................................................. 6
1a. HUR40A-D, HUF40A-D ......................................................................................... 6
. HWR40A, HWF40A ................................................................................................. 7
a. HWR40A-D, HWF40A-D ....................................................................................... 7
3. HUR68A, HUF68A .................................................................................................. 8
3a. HUR68A-D, HUF68A-D ......................................................................................... 8
4. HWR68A, HWF68A ................................................................................................. 9
4a. HWR68A-D, HWF68A-D ....................................................................................... 9
5. HUR96A ................................................................................................................ 10
5a. HUR96A-D .......................................................................................................... 10
6. HWR96A ............................................................................................................... 11
6a. HWR96A-D ......................................................................................................... 11
II. General Information ........................................................................................................ 1
A. Construction ................................................................................................................ 1
B. Sequence of Operation and Timing Charts ................................................................ 13
1. Refrigerators – Continuous Operating Mode ........................................................ 13
. Freezers – Continuous Operating Mode ............................................................. 15
3. Refrigerators – Energy Saving Operating Mode .................................................. 17
4. Freezers – Energy Saving Operating Mode ......................................................... 19
C. Control Board ............................................................................................................. 1
1. Start-Up Delay ....................................................................................................... 1
. Control Board Layout ............................................................................................
D. Settings and Diagnostics ............................................................................................ 3
1. Gaining Access to Settings and Diagnostics ......................................................... 3
. Temperature Display ............................................................................................. 4
a) Switching the Display Between Fahrenheit and Celsius (F5) .......................... 4
b) Adjusting the Setpoint Temperature ................................................................ 4
c) Cabinet Temperature Correction (calibration factor) ........................................ 5
3. Settings and Diagnostics Menu ............................................................................. 6
a) Defrost Interval (F0) ......................................................................................... 7
b) Defrost Termination Temperature (F1) ............................................................ 7
c) Setpoint Temperature Differential (F) ............................................................ 8
d) High Temperature Alarm Delay Time (F3) ....................................................... 9
e) Low Temperature Alarm Delay Time (F4) ....................................................... 9
f) Temperature Display Scale (F5) ....................................................................... 30
g) Alarm History (F6) ............................................................................................ 30
h) Compressor Run Time (F7) ............................................................................. 31
3
Page 4

4. Operating Modes ................................................................................................... 31
a) Continuous ....................................................................................................... 3
b) Energy Saving ................................................................................................. 3
c) Automatic Corrections Made During Energy Saving Operating Mode ............. 3
E. Perimeter Frame Heater ............................................................................................. 3
III. Service Diagnosis ........................................................................................................... 33
A. Alarm Codes ............................................................................................................... 33
1. Alarm Display Priority ............................................................................................ 34
. Alarm Details and Countermeasures .................................................................... 35
a. High Temperature Alarm (E1) .......................................................................... 35
b. Low Temperature Alarm (E) ........................................................................... 36
c. Defrost Alarm (E3) ........................................................................................... 37
d. High Pressure Alarm (E4) ................................................................................ 37
e. Clogged Filter Alarm (E7) ................................................................................ 38
f. Defrost Temperature Sensor Malfunction Alarm (E8) ....................................... 39
g. Clogged Filter Sensor Malfunction Alarm (E9) ................................................. 40
h. Control Board Error Alarms (EA and ED) ........................................................ 41
B. Diagnosis Chart .......................................................................................................... 4
C. Thermistor Check ....................................................................................................... 45
IV. Removal and Replacement of Components .................................................................. 46
A. Service for Refrigerant Lines ...................................................................................... 46
1. Refrigerant Recovery ............................................................................................ 46
. Brazing .................................................................................................................. 46
3. Evacuation and Recharge .................................................................................... 47
B. Removal and Replacement of Refrigeration Unit........................................................ 48
C. Removal and Replacement of Compressor ................................................................ 48
D. Removal and Replacement of Evaporator .................................................................. 49
E. Removal and Replacement of Capillary Tube / Suction Line Assembly ..................... 51
F. Removal and Replacement of Thermistors ................................................................. 5
G. Removal and Replacement of Door Gasket ............................................................... 53
H. Removal and Replacement of Defrost Heater ............................................................ 53
I. Removal and Replacement of Control Board ............................................................... 54
J. Removal and Replacement of Fan Motors .................................................................. 55
K. Door Re-Hinging and Drawer Conversion .................................................................. 55
V. Cleaning and Maintenance Instructions .......................................................................... 56
A. Cleaning ...................................................................................................................... 56
B. Maintenance ............................................................................................................... 57
VI. Wiring Diagrams ............................................................................................................ 58
A1. HUR40A, HWR40A (auxiliary code Q5 and earlier).................................................. 58
A. HUR40A(-D), HWR40A(-D) (auxiliary code Q6 and later) ....................................... 59
B. HUF40A(-D), HWF40A(-D) ......................................................................................... 60
C1. HUR68A, HWR68A (auxiliary code Q5 and earlier) ................................................. 61
C. HUR68A(-D), HWR68A(-D) (auxiliary code Q6 and later) ........................................ 6
D. HUF68A(-D), HWF68A(-D) ......................................................................................... 63
E. HUR96A(-D), HWR96A(-D) ........................................................................................ 64
4
Page 5
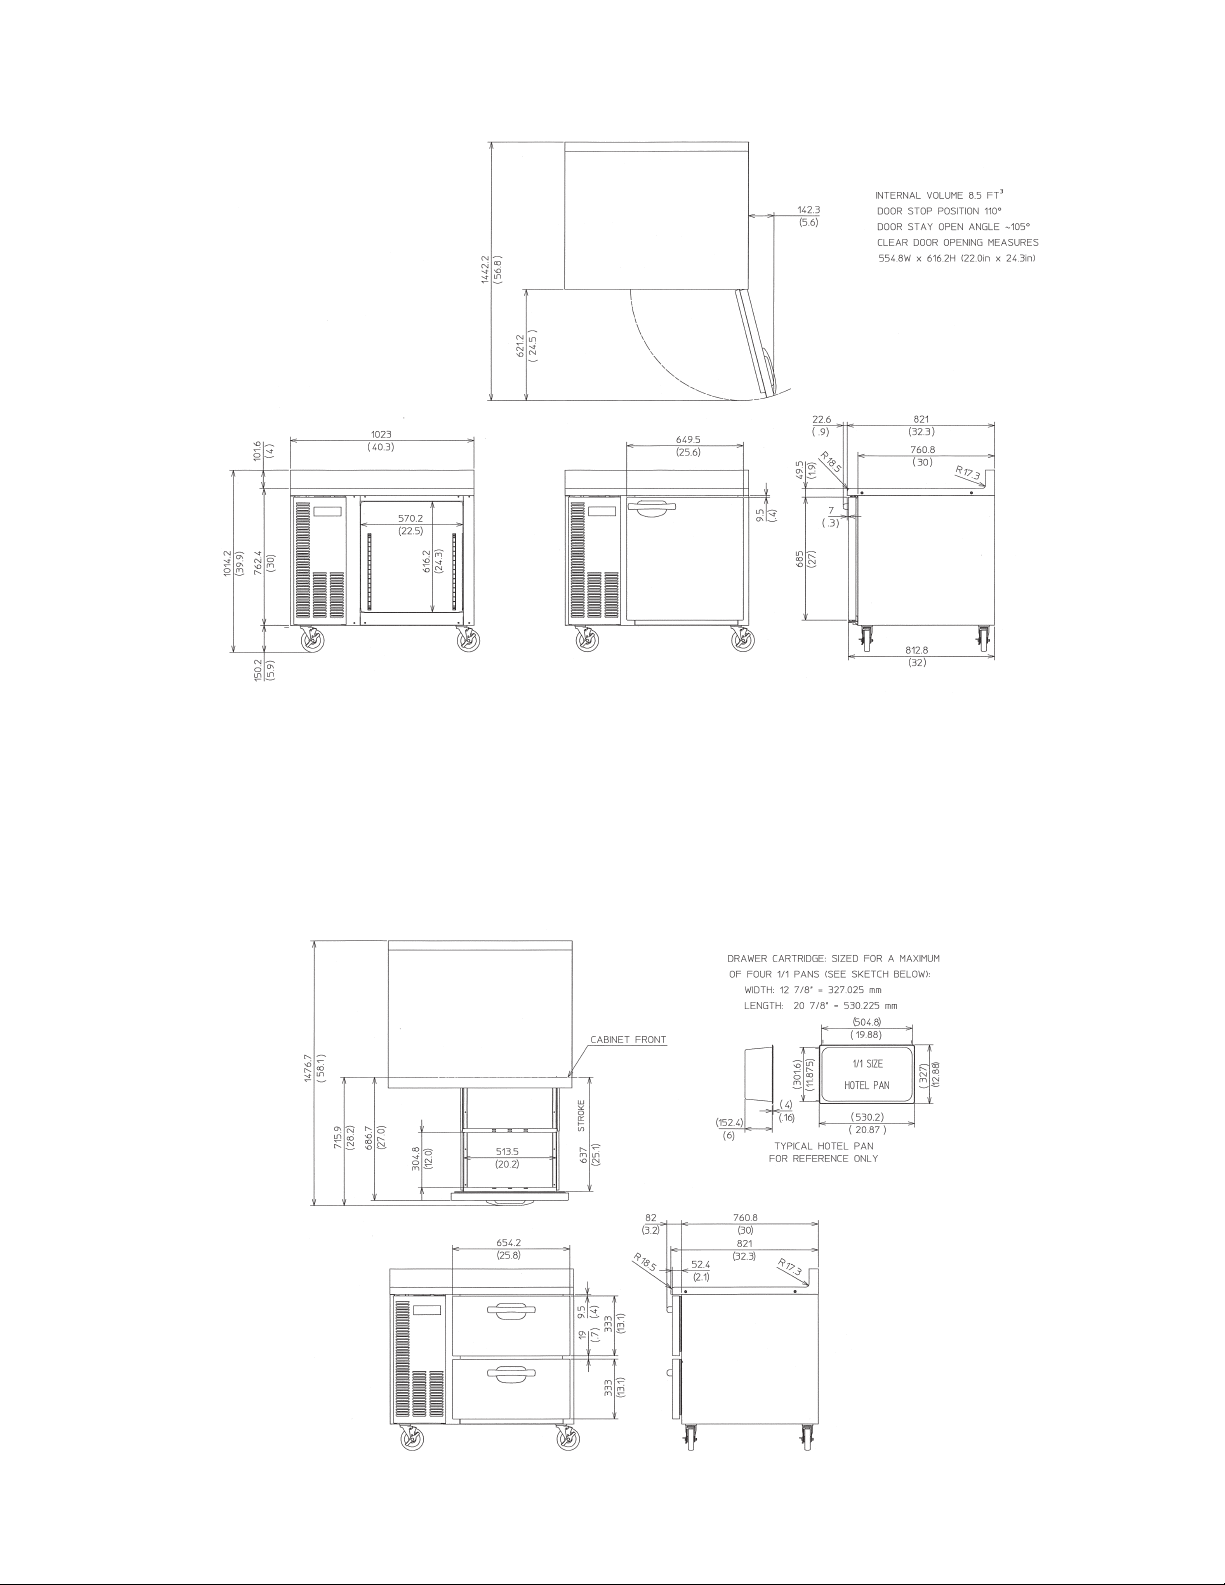
I. Specications
A. Nameplate Ratings
Design Pressure
(PSIG)
Model AC Supply Voltage Amperes HI LO 404A 134a
HUR40A(-D), HWR40A(-D) 115/60/1 5.0 40 10 15.
HUR68A(-D), HWR68A(-D) 115/60/1 5.0 40 10 15.
Refrigerant
(oz.)
HUR96A(-D), HWR96A(-D) 115/60/1 6.0 40 10 15.
HUF40A(-D), HWF40A(-D) 115/60/1 5.5 450 50 14.1
HUF68A(-D), HWF68A(-D) 115/60/1 10.0 450 50 13.0
Undercounter Model Names
The undercounter models covered in this service manual initially had different model
names. If you have a unit with an auxiliary code of N-6 and a serial number ending in "H",
refer to the table below.
Model Name on
Nameplate
UR1-SSB HUR40A
UR-SSB
Current
Name
HUR68A
UF1-SSB HUF40A
UF-SSB
HUF68A
B. Dimensions
Door Opening mm Total Refrigerated
Model
HUR40A(-D), HWR40A(-D),
HUF40A(-D), HWF40A(-D)
HUR68A(-D), HWR68A(-D),
HUF68A(-D), HWF68A(-D)
HUR96A(-D), HWR96A(-D) 9.1 6.6 1
Width Height
570. 616.
Volume ft
18.8 17.1 8
3
8.5 7.6 4
Total Shelf
Space ft
2
Hotel Pan
Capacity (-D)
5
Page 6
1. HUR40A, HUF40A
Units: mm (in.)
1a. HUR40A-D, HUF40A-D
6
Page 7
2. HWR40A, HWF40A
Units: mm (in.)
2a. HWR40A-D, HWF40A-D
7
Page 8
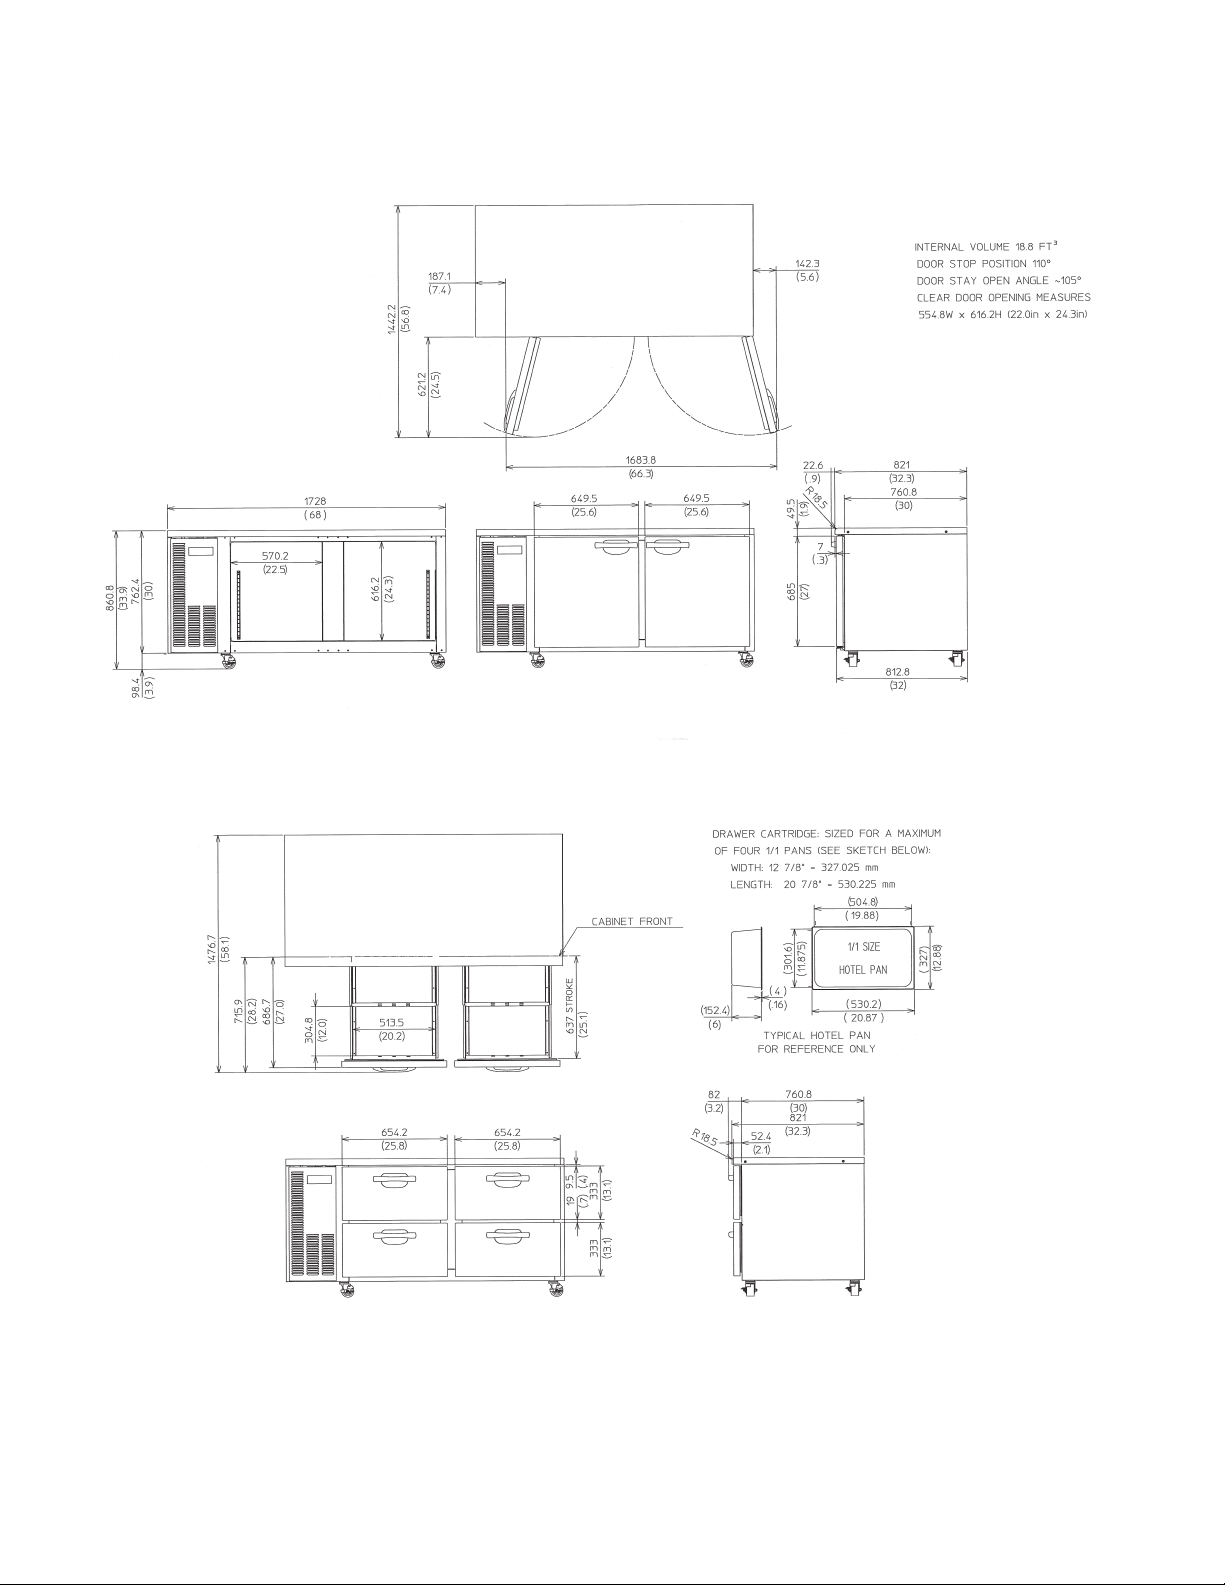
3. HUR68A, HUF68A
Units: mm (in.)
3a. HUR68A-D, HUF68A-D
8
Page 9
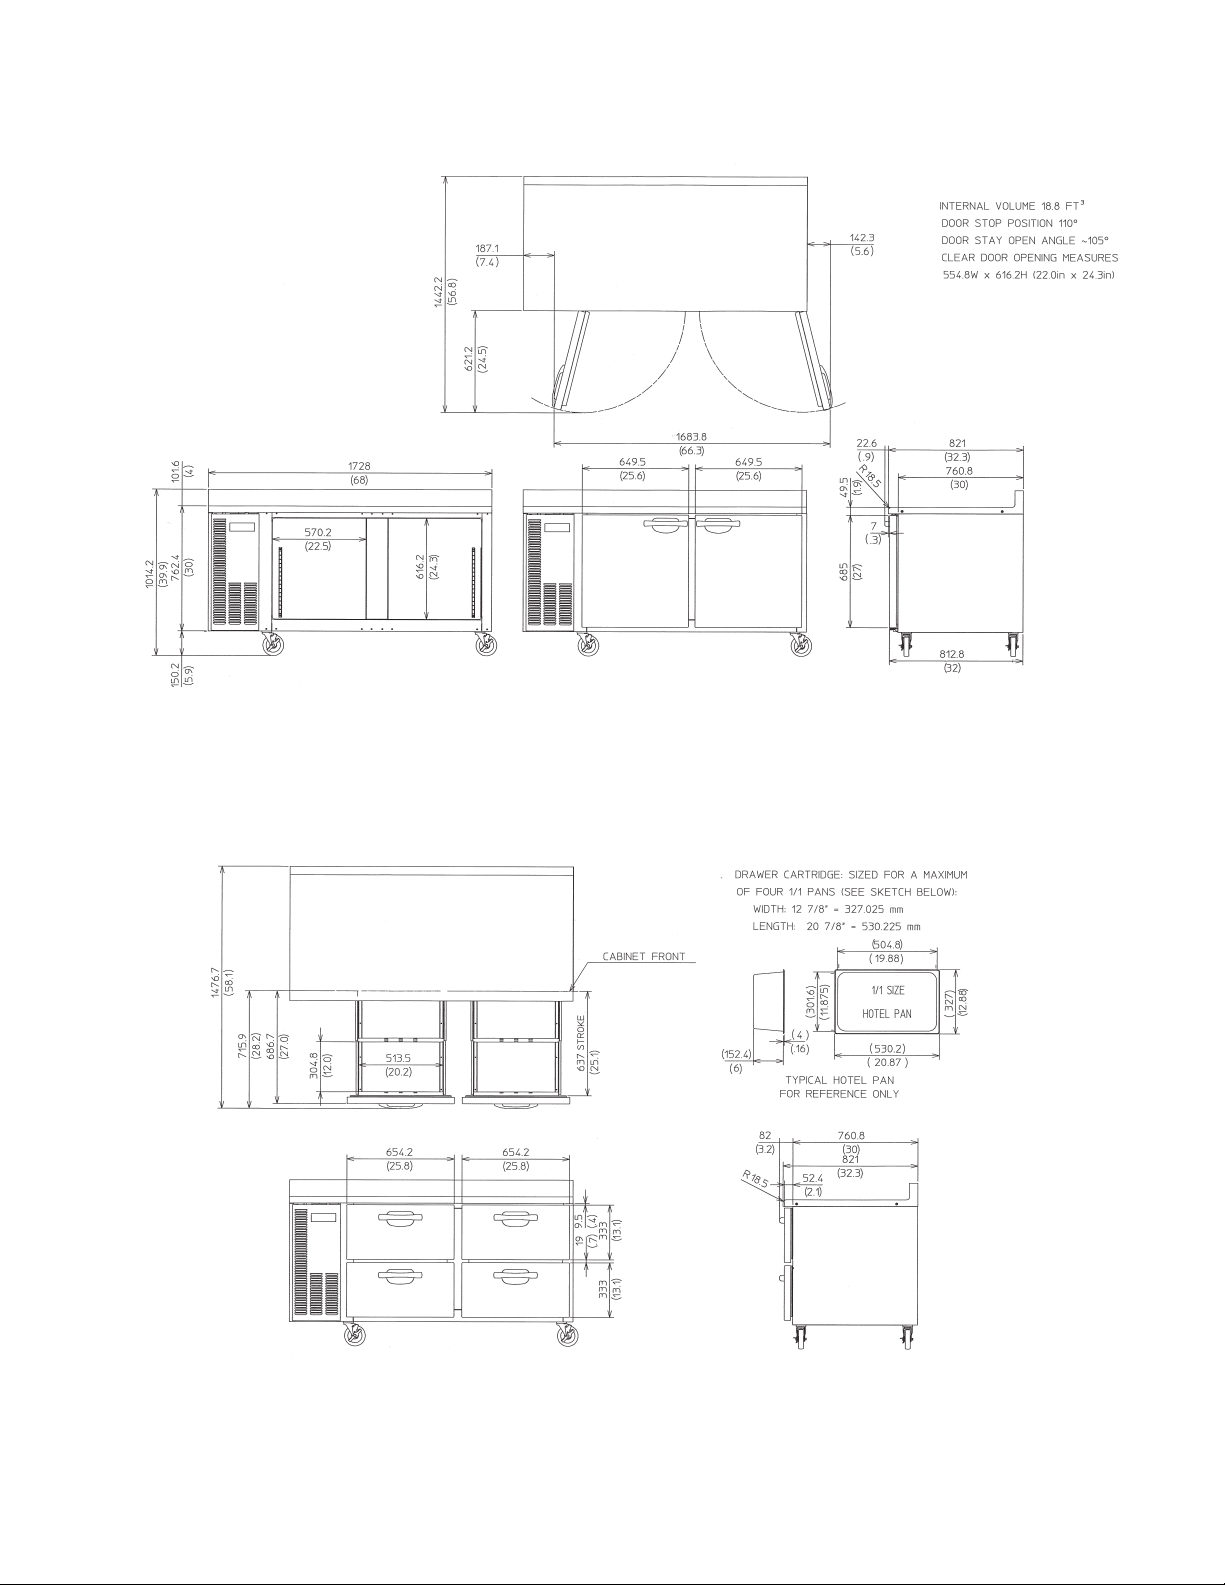
4. HWR68A, HWF68A
Units: mm (in.)
4a. HWR68A-D, HWF68A-D
9
Page 10
5. HUR96A
Units: mm (in.)
5a. HUR96A-D
10
Page 11
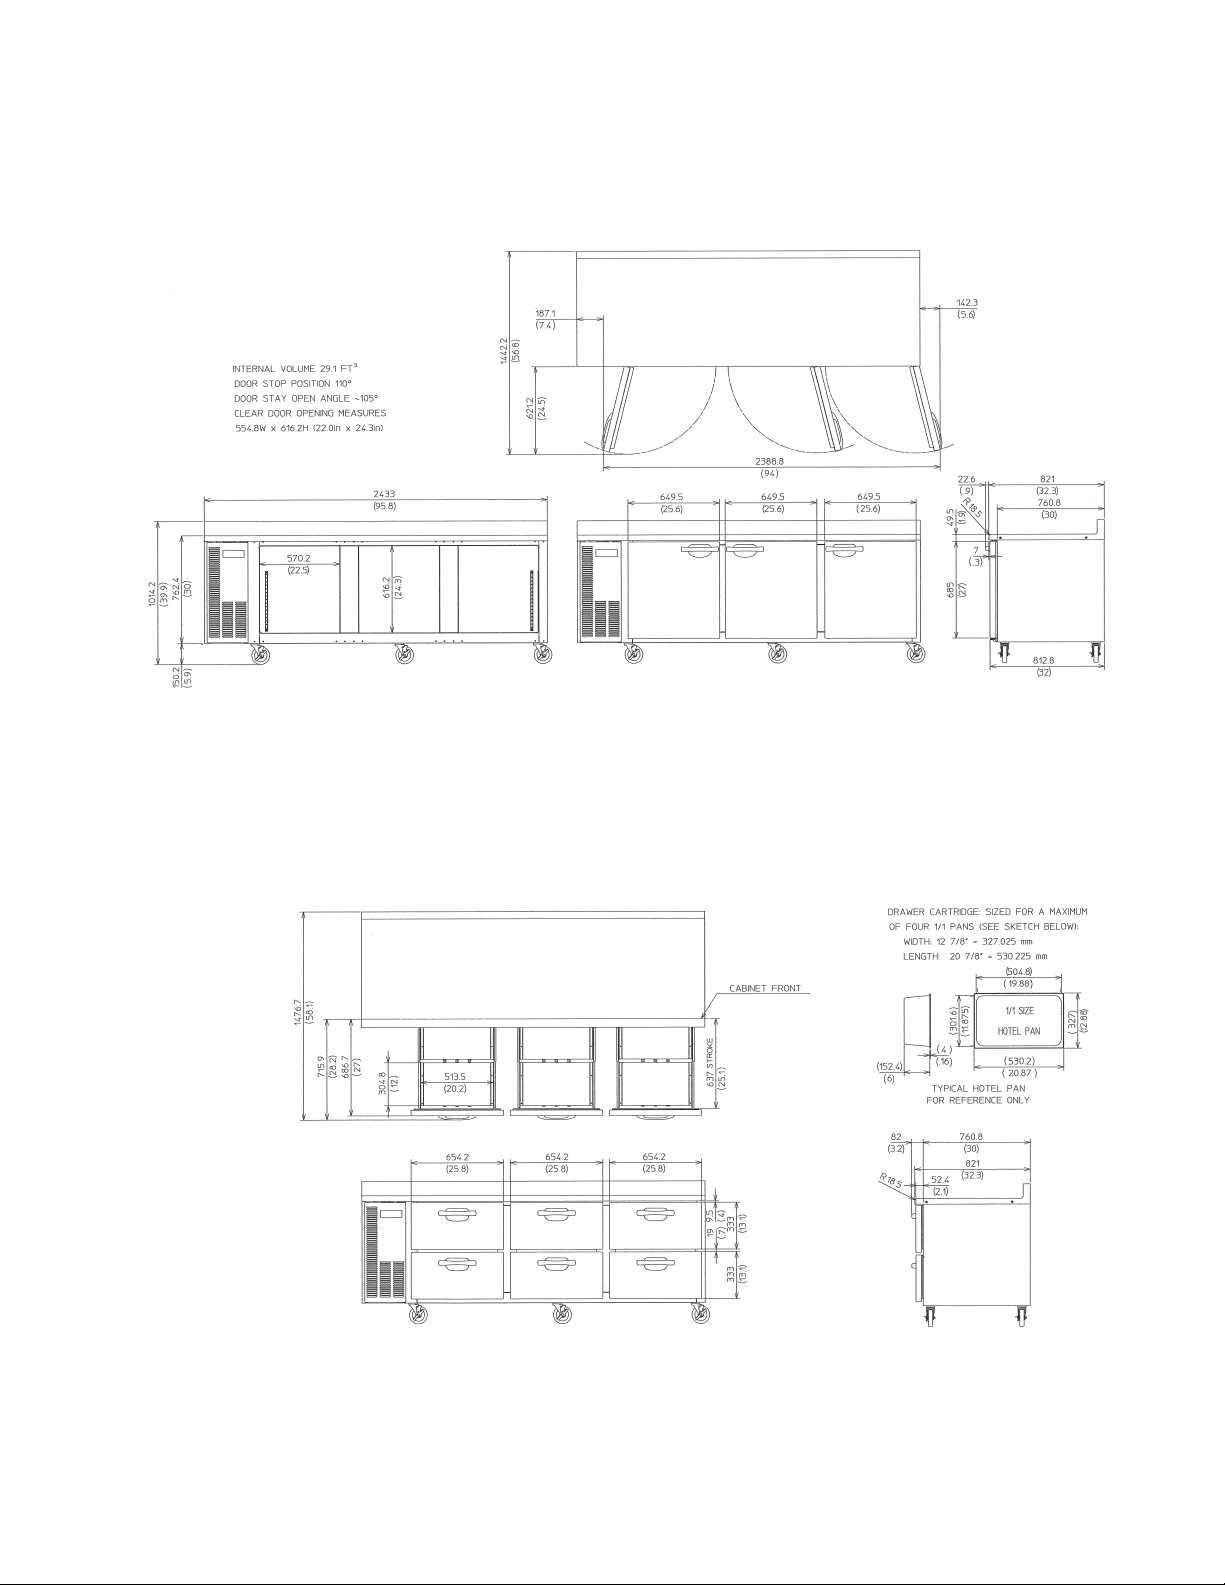
6. HWR96A
Units: mm (in.)
6a. HWR96A-D
11
Page 12
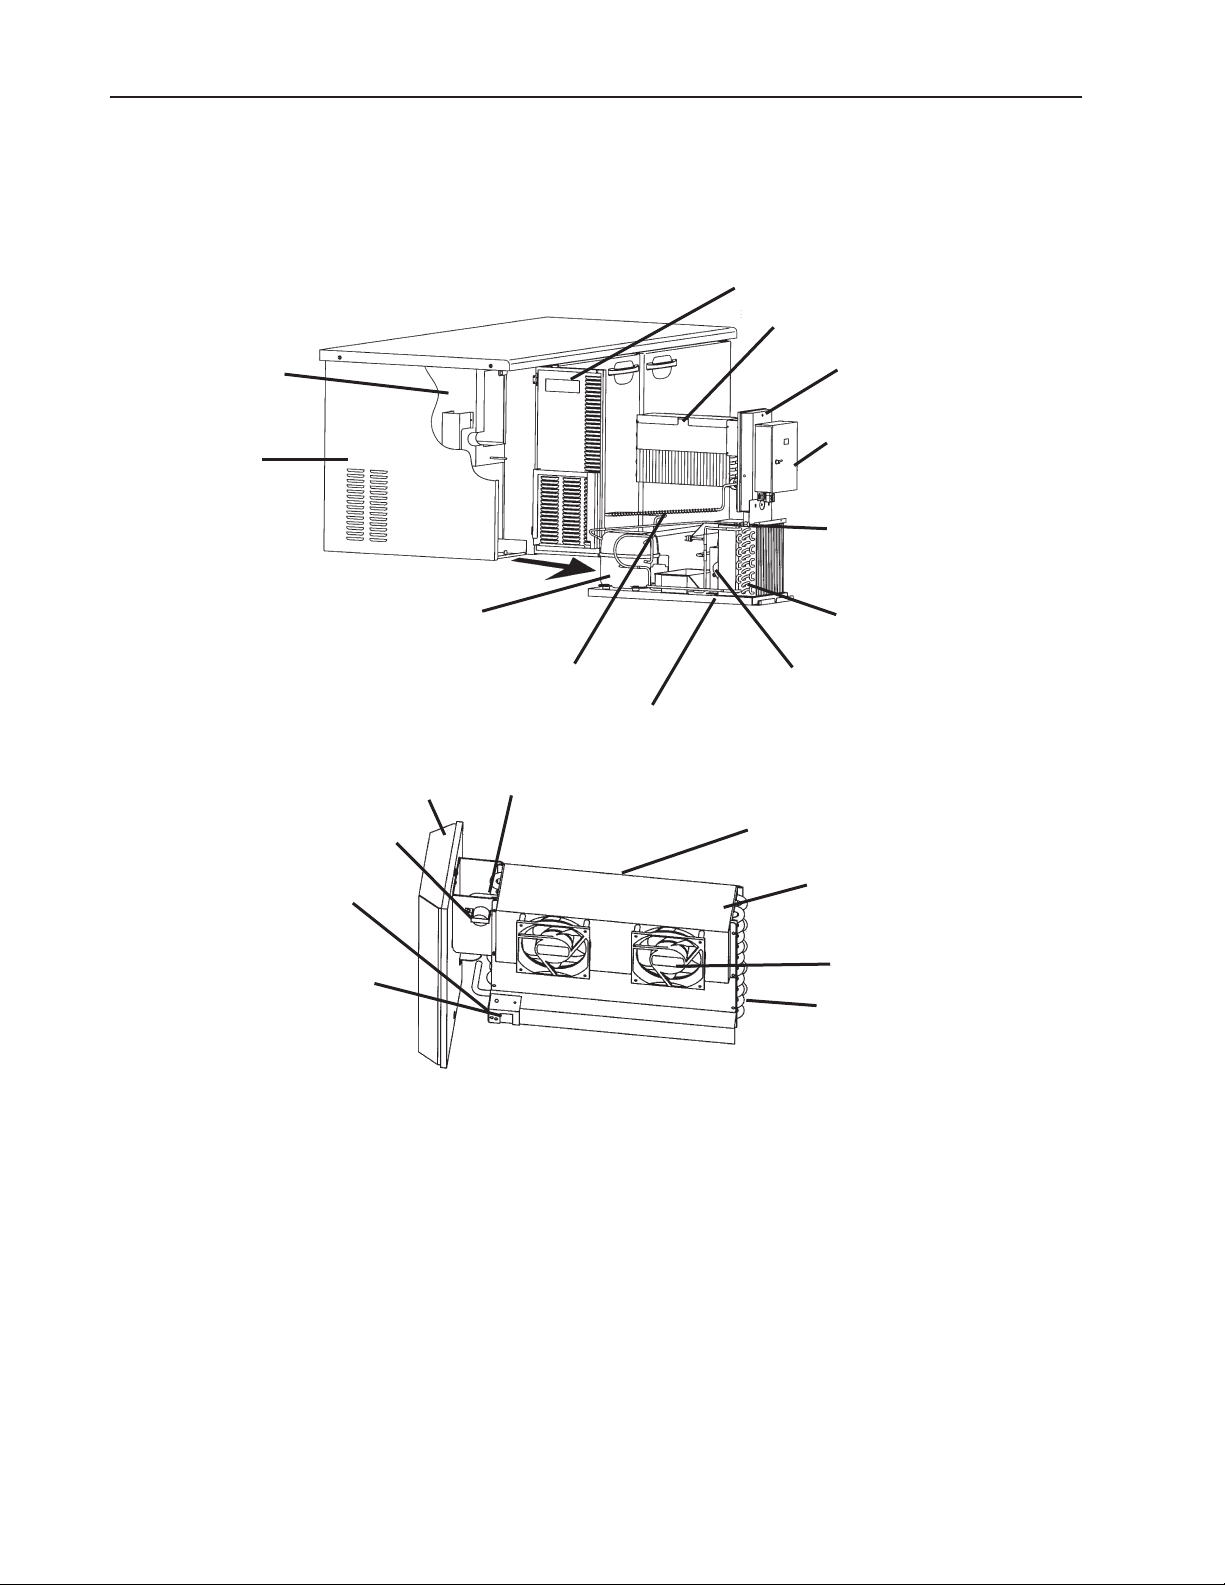
II. General Information
A. Construction
Hoshizaki undercounters feature a cartridge-type refrigeration unit that can be removed
without taking off the top and side panels.
Front Panel
Evaporator Assembly
Evaporator Case
Side Panel
Evaporator Case Cover
Defrost Thermostat
Defrost Heater
Compressor
Capillary Tube/Suction
Line Assembly
Thermal Fuse
Evaporator Case Cover
Control Box
Access Valve (Low-Side)
Condenser
Condenser Fan Motor
Compressor Base
Defrost Thermistor
Evaporator Shroud
Cabinet Thermistor
Evaporator Fan Motor
Evaporator
Evaporator Case
1
Page 13
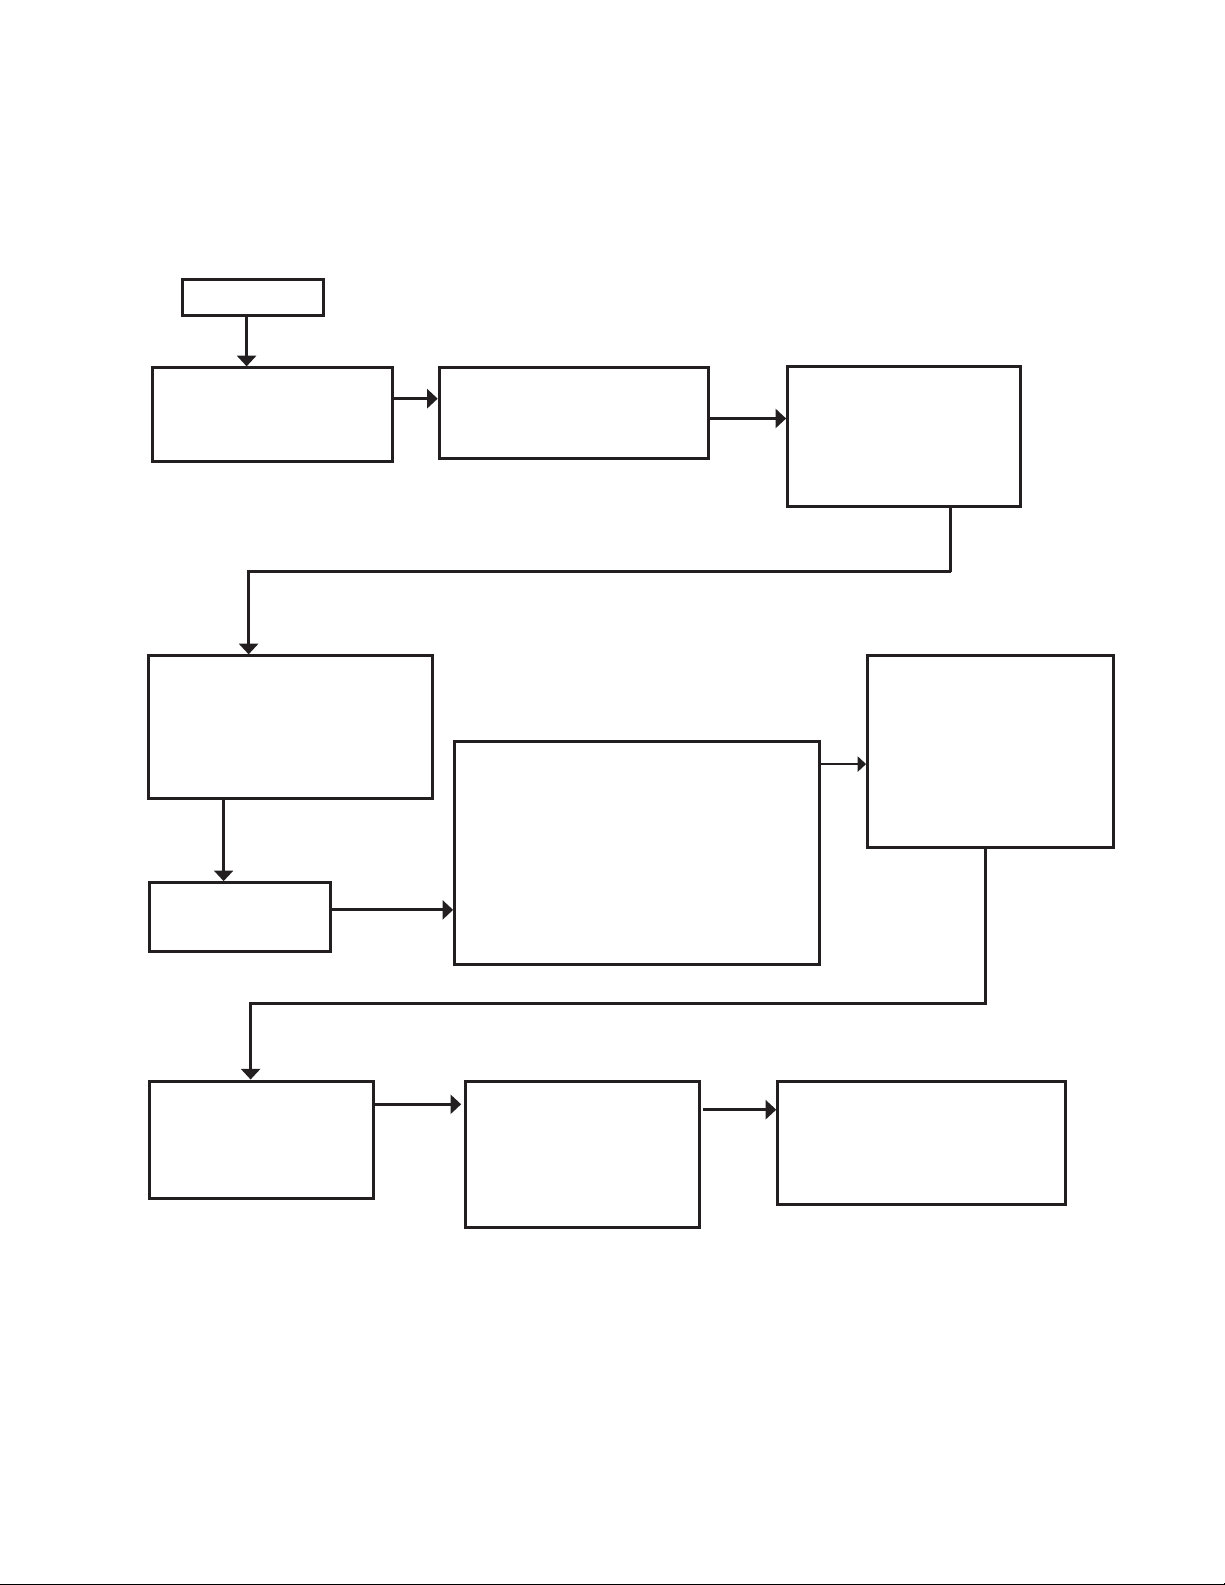
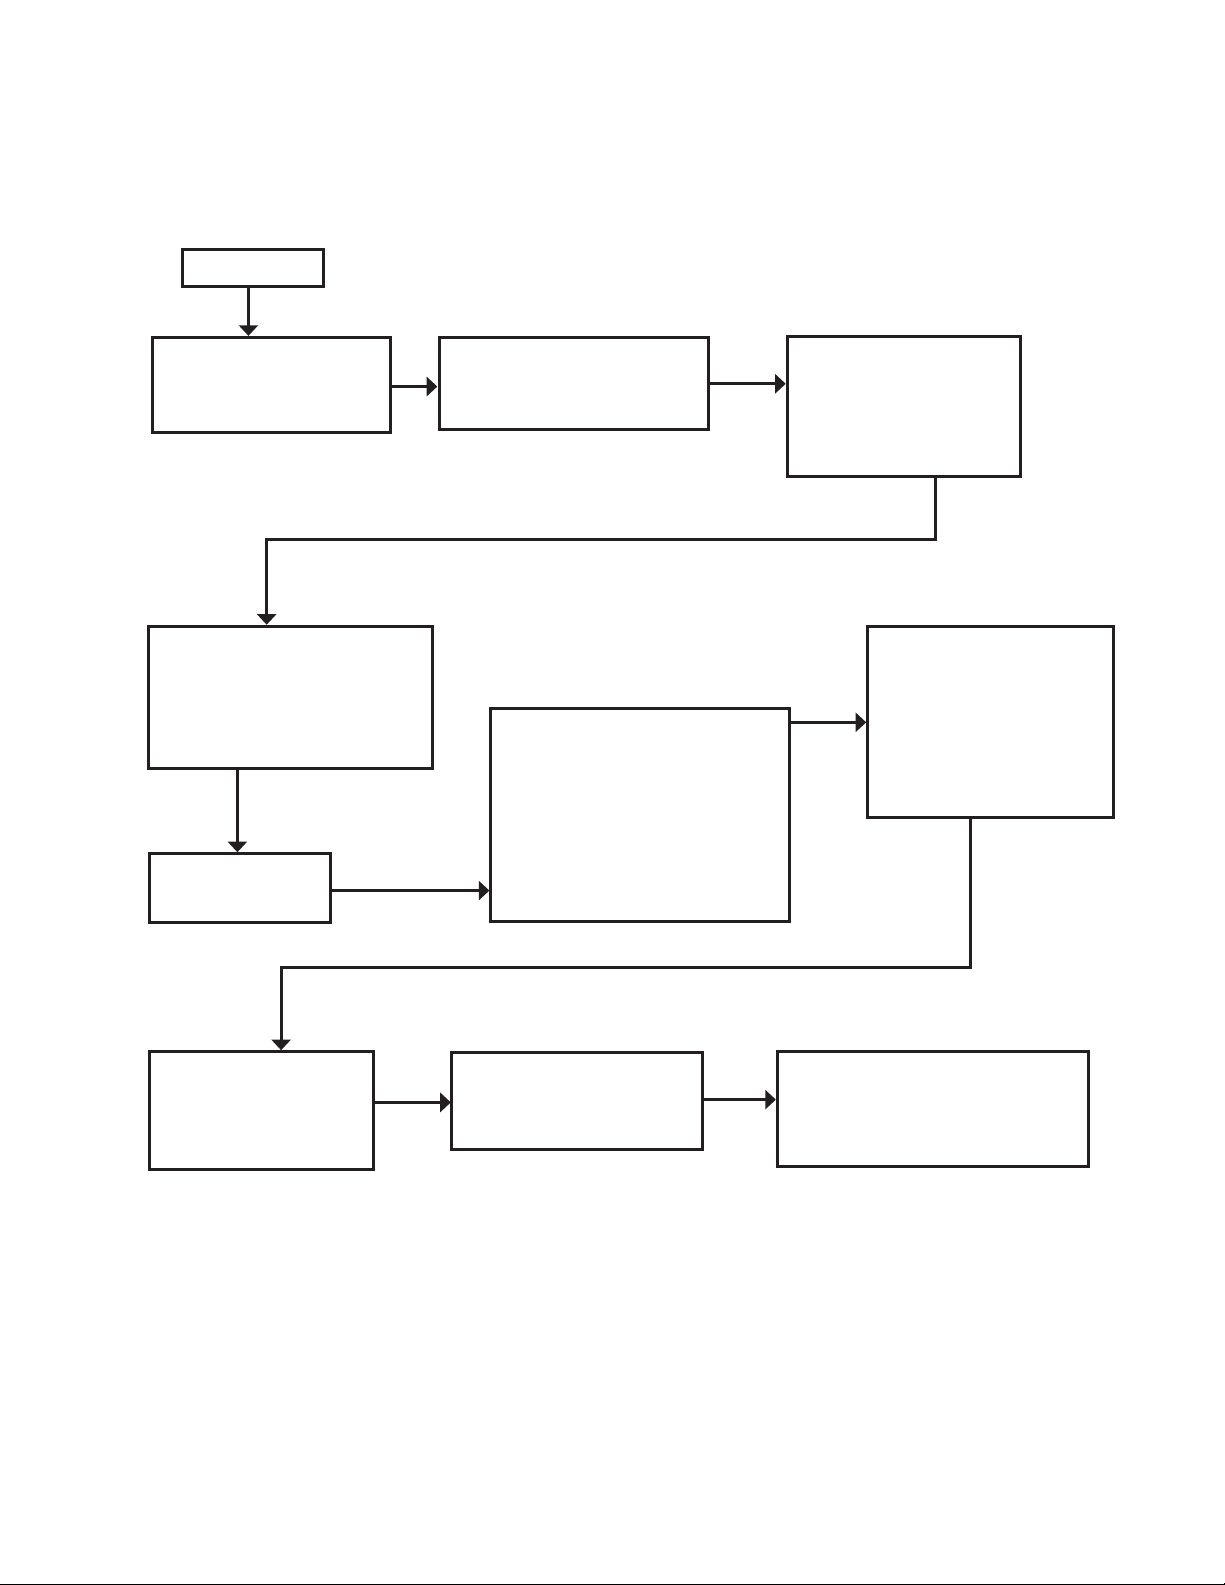
B. Sequence of Operation and Timing Charts
For details on operating modes, see "II.D.4. Operating Modes."
1. Refrigerators – Continuous Operating Mode
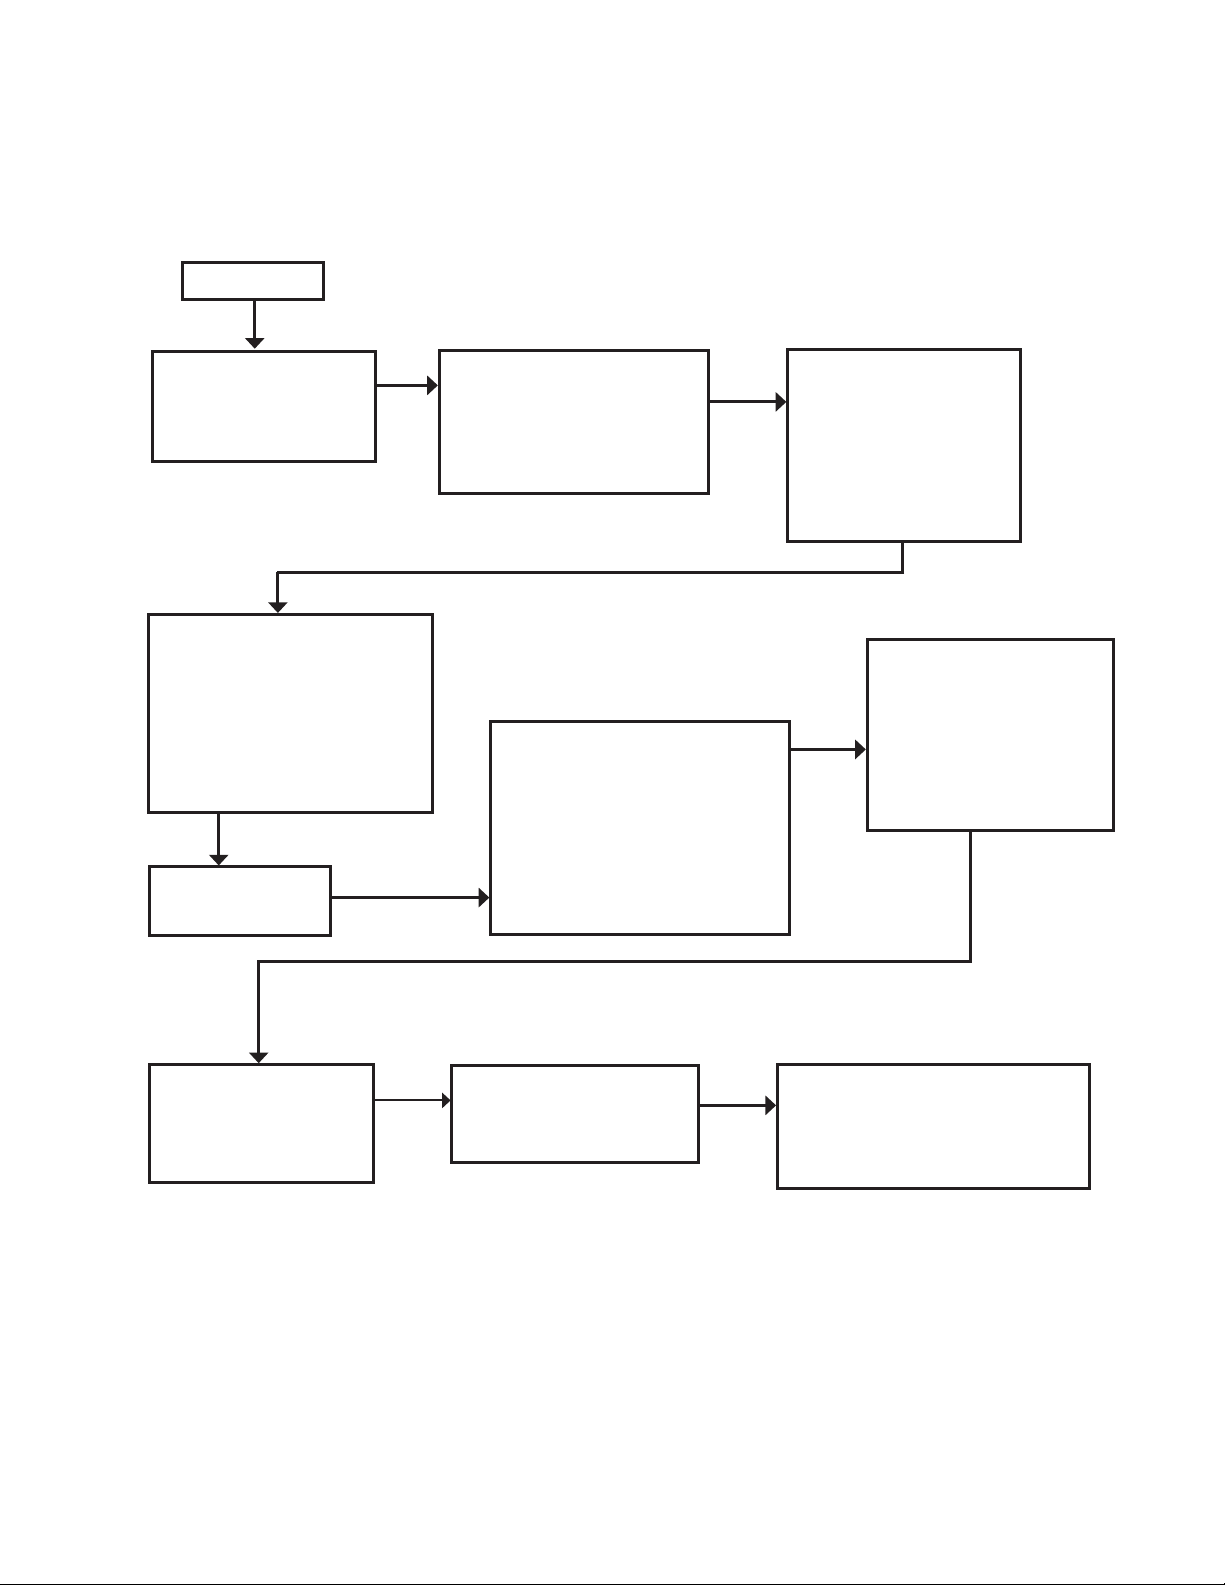
a) Sequence of Operation
POWER ON
Board Self Check
1. Frame heater(s) on
. Evaporator fan(s) on
Cycle On (Cut-on
temperature reached)
[Minimum minutes]
1. Compressor start-up
. Condenser fan start-up
Continue as
normal cycling
2-minute Delay
1. Compressor start-up
. Condenser fan start-up
Defrost Start
Preprogrammed time interval
1. Compressor off
. Evaporator fan(s) off
3. Frame heater(s) off (Q6 and later)
4. Condenser fan off
5. Defrost heater on
6. "dF" displayed
Cycle Off (Cut-out
temperature reached)
[Minimum minutes]
1. Compressor off
. Condenser fan off
Defrost End
Defrost thermistor
reaches defrost
termination temperature,
or defrost timer reaches
1 hour
Defrost heater off
Five minutes after
defrost heater off
1. Compressor on
. Condenser fan on
Five minutes after
compressor start-up
1. Evaporator fan(s) on
. Frame heater(s) on
(Q6 and later)
One minute after evaporator
fan start-up "dF" no
longer displayed, cabinet
temperature displayed
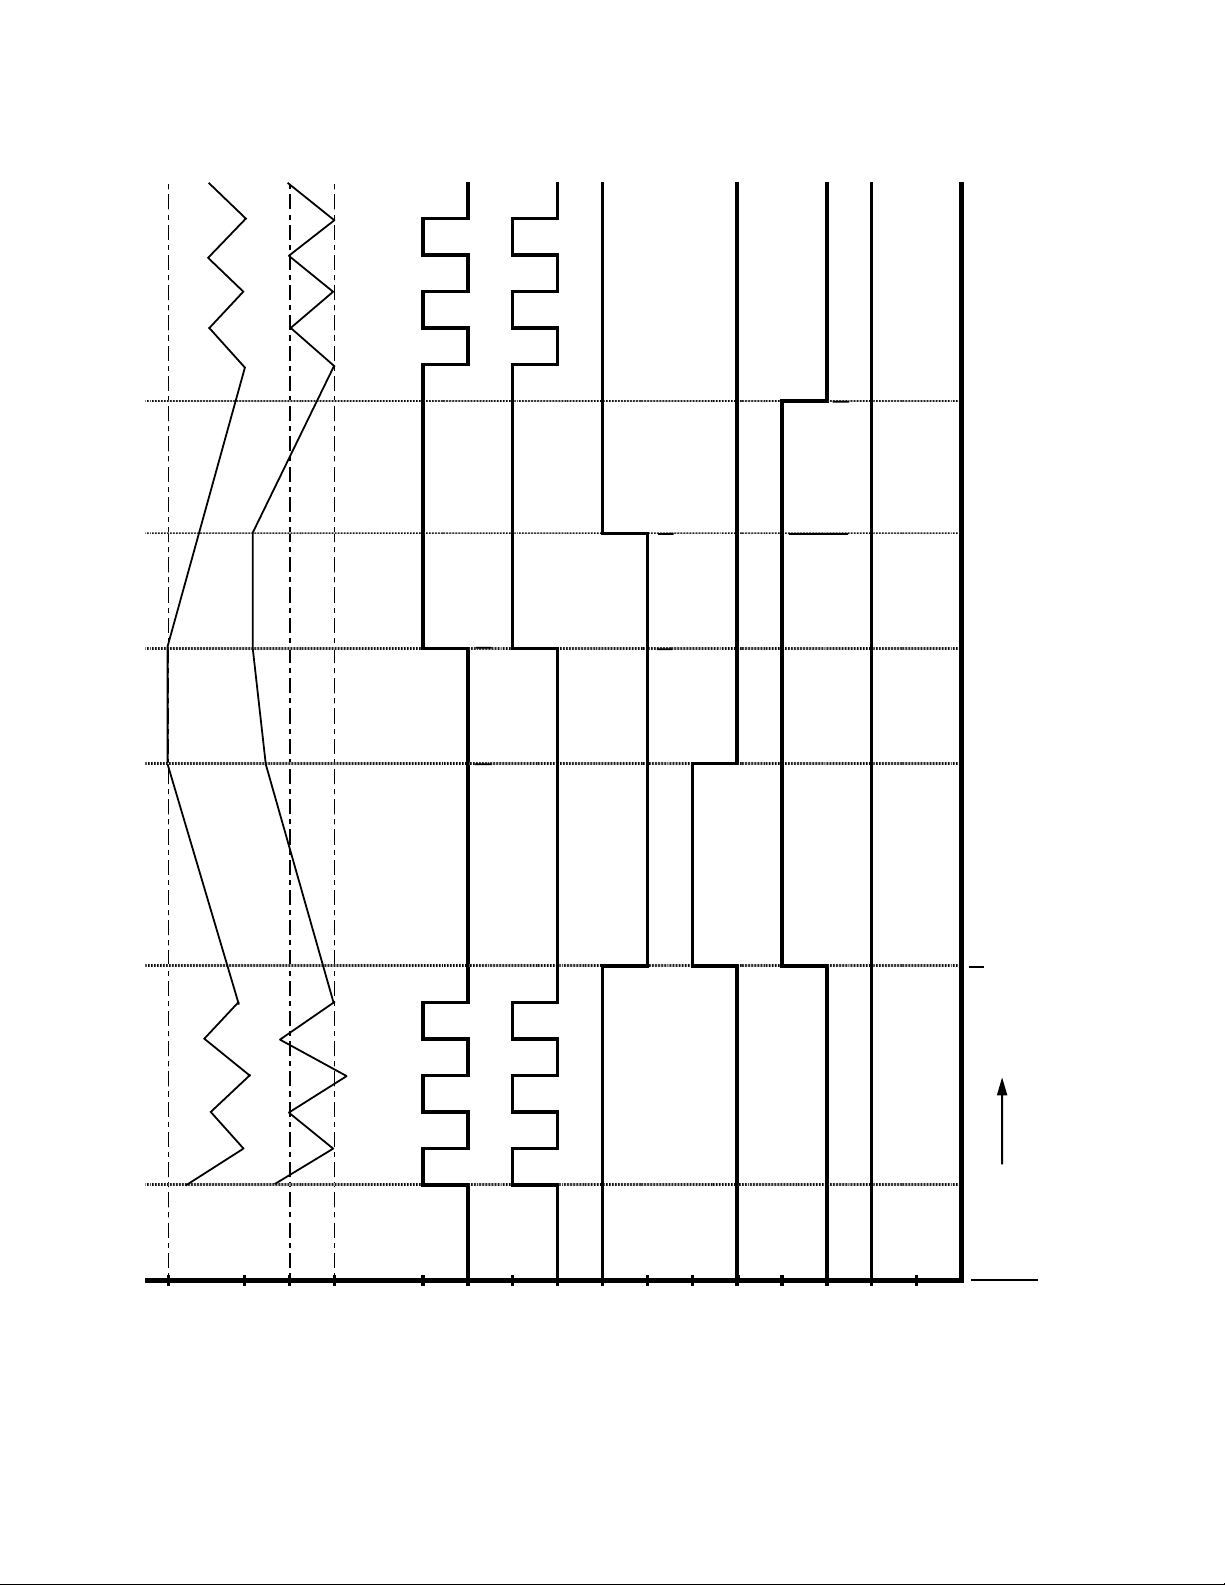
Note:
1) Cut-on, cut-off, and cabinet temperature are read by the same sensor, called the
"cabinet thermistor."
) The defrost thermistor reads the evaporator temperature.
3) There is a ve second evaporator fan startup delay when the compressor and
fan would otherwise start together.
13
Page 14
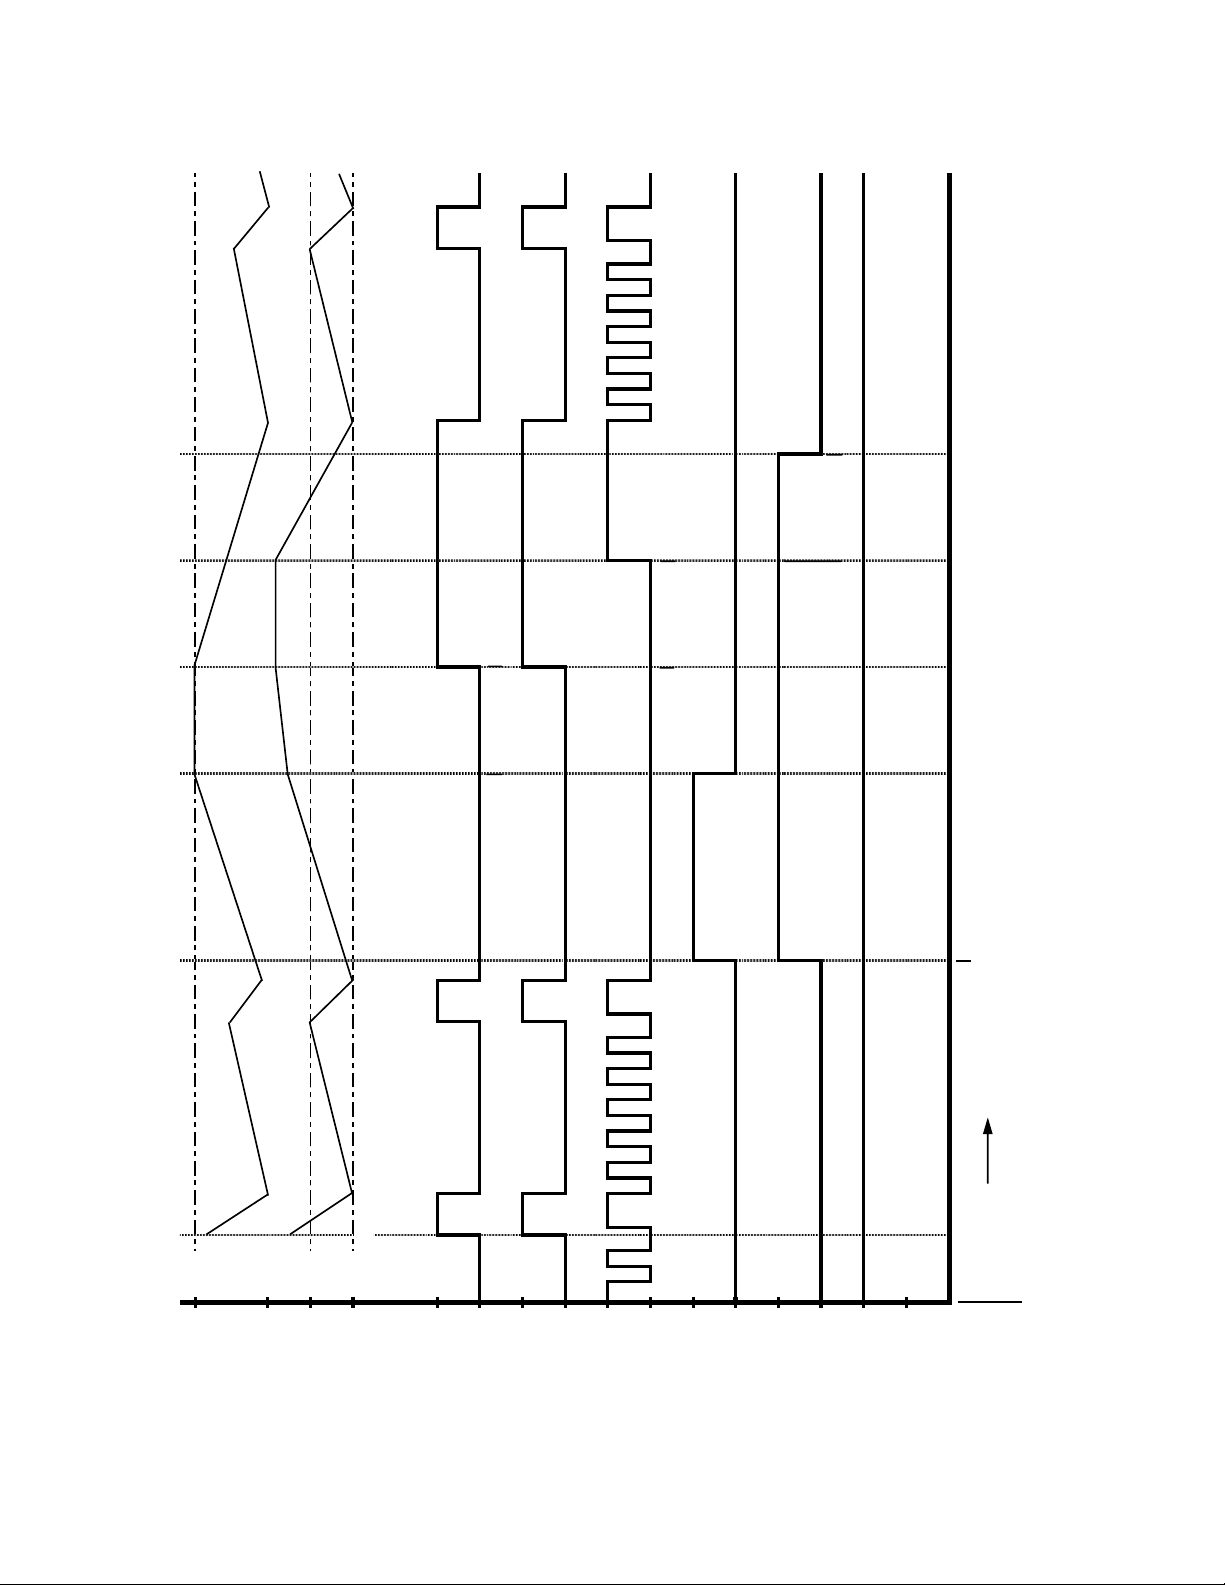
b) Timing Chart
N
O
FF
O
NO
FF
O
FFO
NO
N
O
F
FO
)+
(
la
i
tnere
f
fiD
+
t
niop
t
eS
)
--( laitne
r
effiD + t
ni
opt
e
S
gni
nae
m
oN
NO
F
F
O
N
O
F
F
O
rotsimrehT tenibaC
rotsimr
e
hT tsorfeD
osserpmoC
r
n
aF
r
e
s
n
e
dno
C
n(s)
a
F
r
o
t
a
r
o
p
a
v
E
r
e
t
a
e
H
t
s
o
r
f
e
D
.
n
i
m
2
)
y
aleD
t
rat
S
(
N
O
r
e
w
o
P
emiT
sr
uo
h
6
)
el
b
a
t
suj
d
A
t
ra
t
S
t
s
o
r
f
e
D
(
.nim
5
)yale
D
niarD(
.n
i
m
5
)ya
l
eD naF(
r
o
t
a
cid
n
I
t
sor
f
eD
.nim 1
)
ya
leD ya
l
ps
i
D
(
.n
im
2
)NO
.n
i
M
(
.
n
im
2
)
F
FO
.n
i
M
(
e
ru
tarep
meT
noi
t
ani
m
re
T
t
sor
feD
.
n
im
06
<
)
noi
t
a
ruD
t
s
o
r
feD
.
x
aM
(
TIME-TEMPERATURE CONTROL CHART ENERGY SAVING MODE
REFRIGERATORS
1AND,ATER
1AND%ARLIER
Frame Heater(s)
Refrigerators – Continuous Operating Mode
14
Page 15
2. Freezers – Continuous Operating Mode
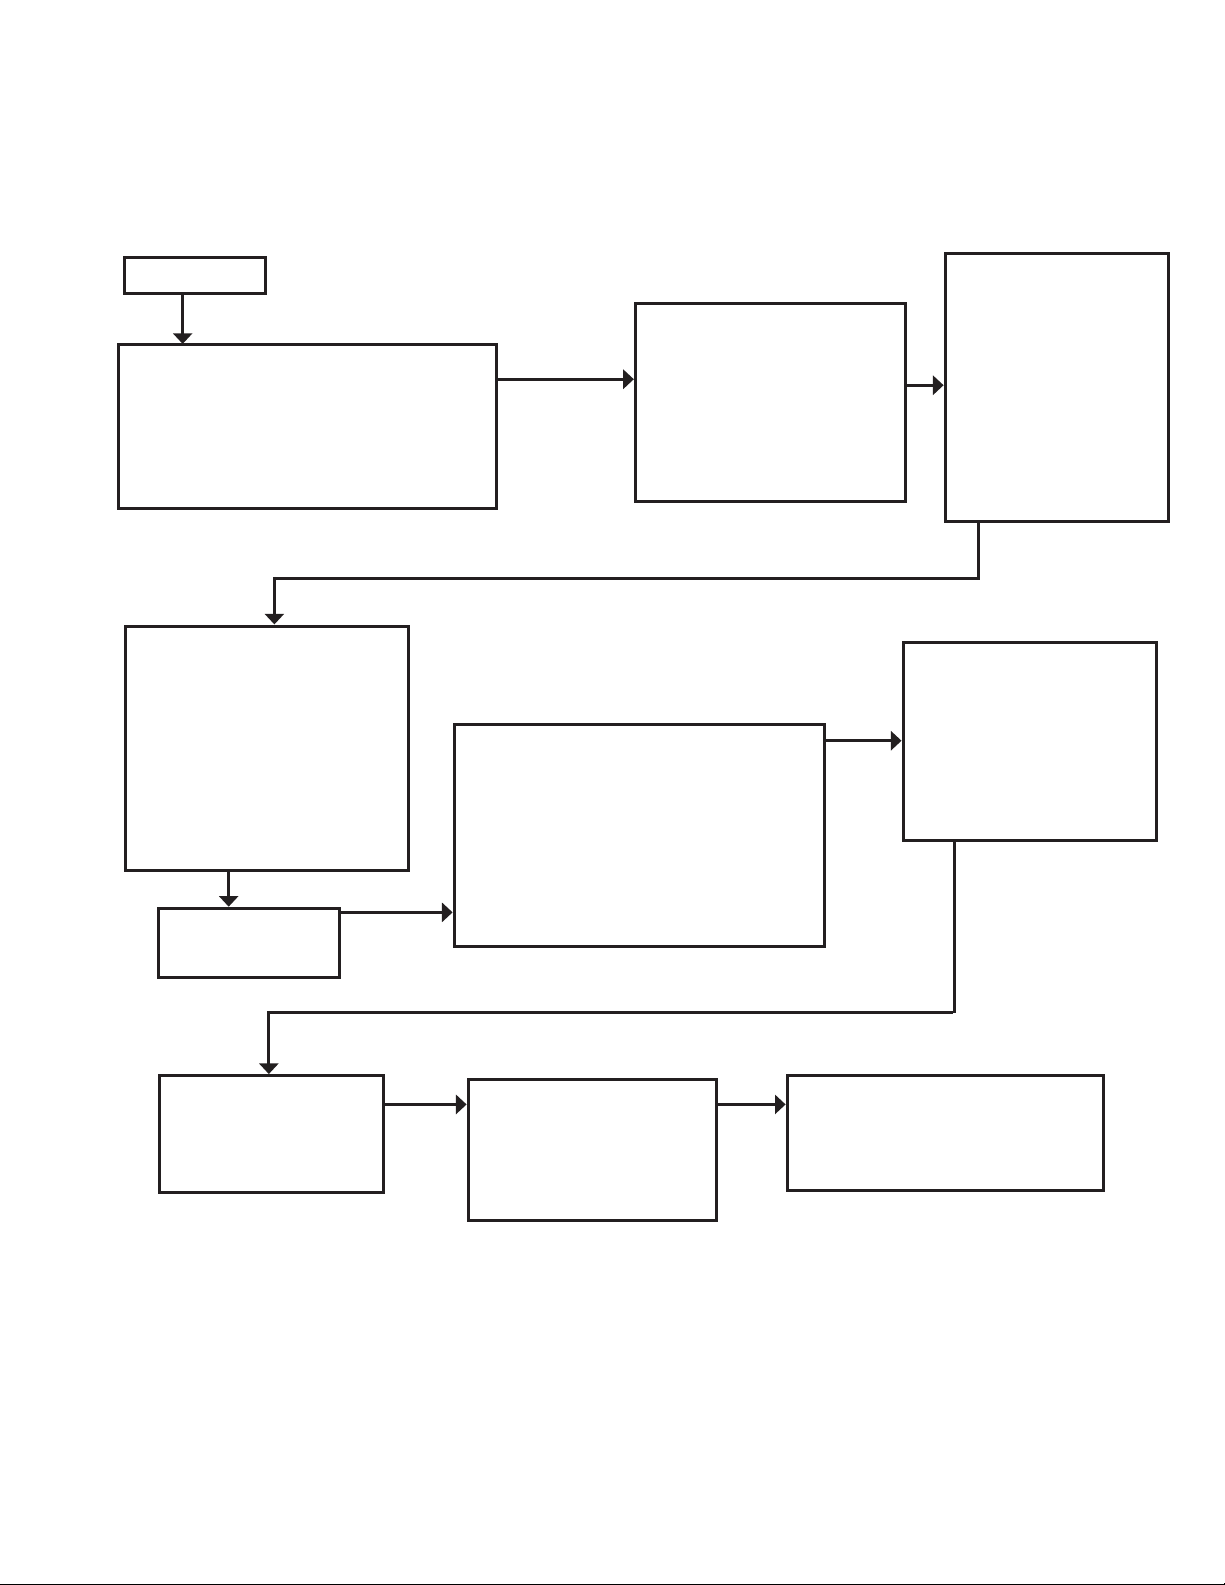
a) Sequence of Operation
POWER ON
Board Self Check
1. Frame heater(s) on
. Evaporator fan(s) on
Cycle On (Cut-on
temperature reached)
[Minimum minutes]
1. Compressor start-up
. Condenser fan start-up
Continue as
normal cycling
2 minute delay
1. Compressor start-up
. Condenser fan start-up
Defrost Start
Preprogrammed time interval
1. Compressor off
. Evaporator fan(s) off
3. Condenser fan off
4. Defrost heater on
5. "dF" displayed
Cycle Off (Cut-out
temperature reached)
[Minimum minutes]
1. Compressor off
. Condenser fan off
Defrost end
Defrost thermistor
reaches defrost
termination
temperature, or defrost
timer reaches 1 hour
Defrost heater off
Five minutes after
defrost heater off
1. Compressor on
. Condenser fan on
Five minutes after
compressor start-up
1. Evaporator fan(s) on
Eight minutes after evaporator
fan start-up "dF" no longer
displayed, cabinet temperature
displayed
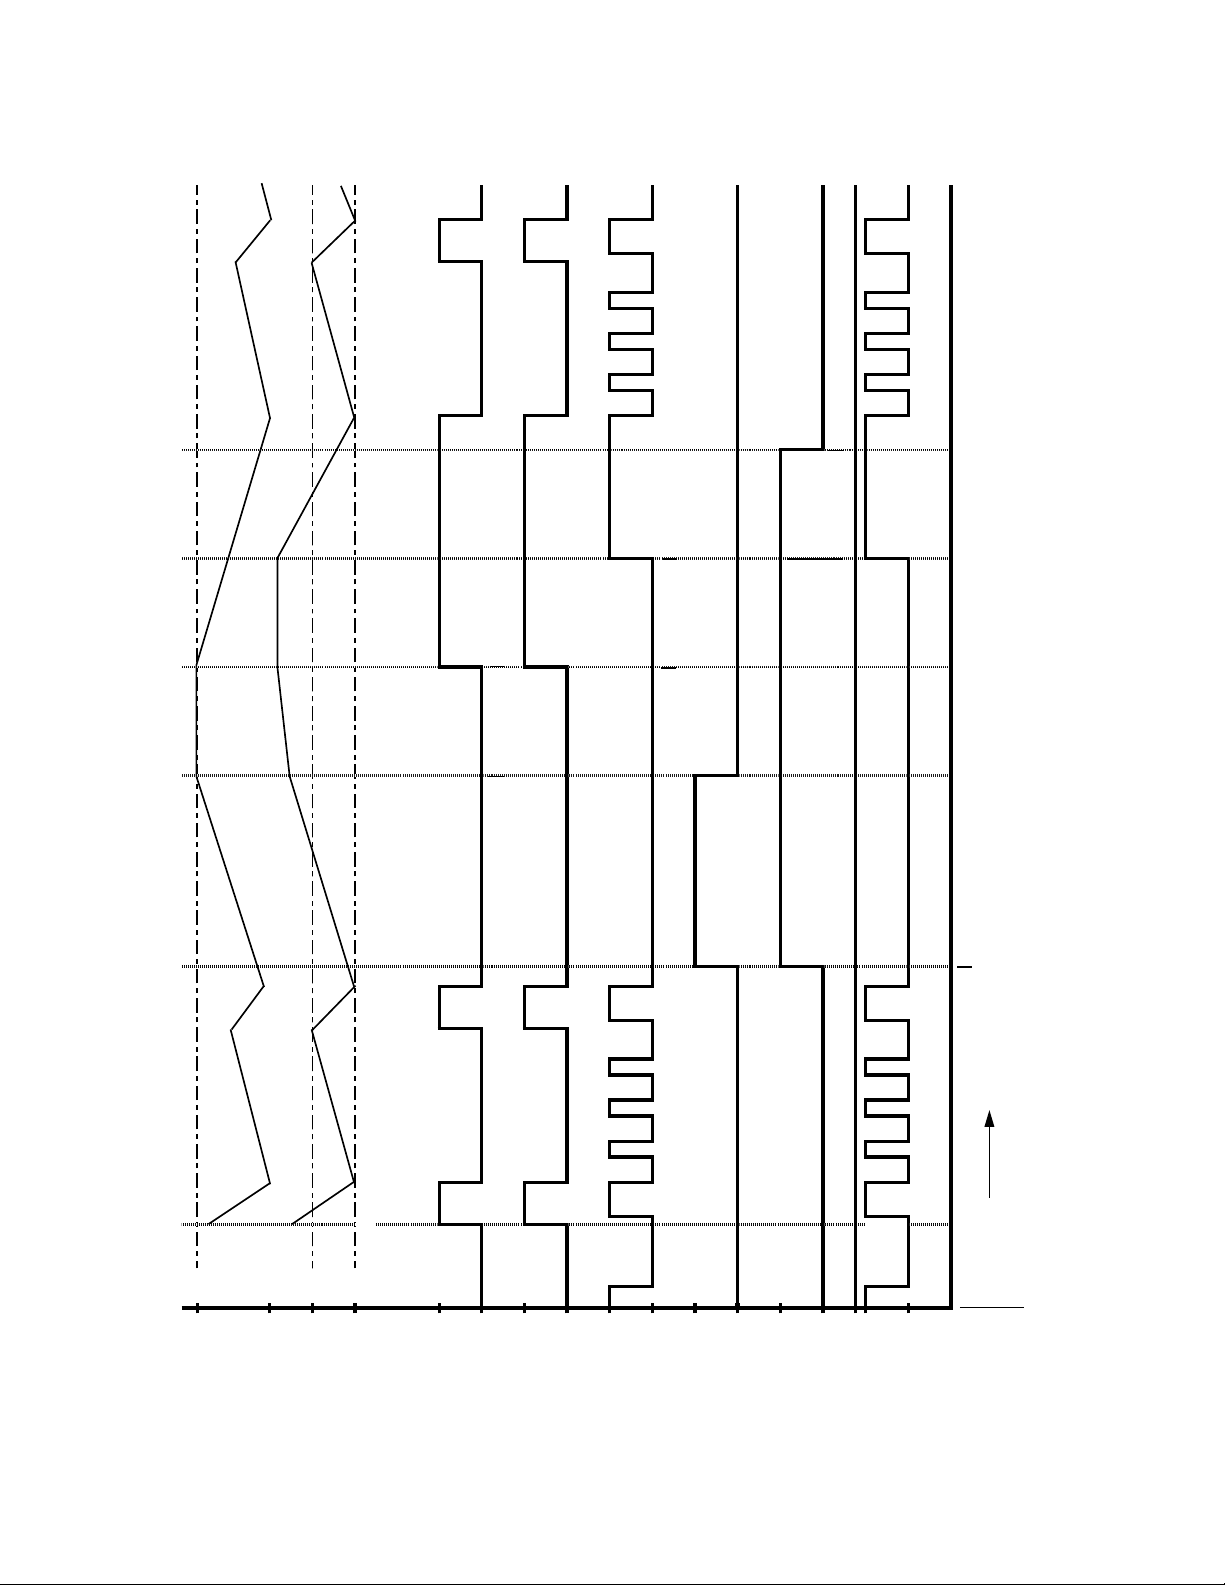
Note:
1) Cut-on, cut-off, and cabinet temperature are read by the same sensor, called the
"cabinet thermistor."
) The defrost thermistor reads the evaporator temperature.
3) There is a ve second evaporator fan startup delay when the compressor and
fan would otherwise start together.
15
Page 16
b) Timing Chart
N
O
F
F
O
N
O
FF
O
)+(
la
i
tnere
f
f
i
D
+
tniop
teS
)--( laitnere
f
fiD + tniopteS
gn
inaem
oN
F
FO
N
O
N
O
F
F
O
N
O
F
F
O
N
O
F
F
O
otsimrehT teni
b
aC
r
o
ts
imr
eh
T
t
s
o
r
f
e
D
r
osserpmoC
r
n
aF
r
e
sn
e
dn
oC
n(s)
a
F
ro
t
aro
p
a
v
E
e
t
a
e
H
t
s
o
r
f
e
D
r
.n
i
m
2
)ya
le
D
tra
t
S
(
NO
r
e
wo
P
em
iT
sru
o
h
6
)e
lba
tsu
j
dA
t
ra
tS
tso
r
fe
D
(
.
ni
m 5
)ya
leD n
ia
rD(
.
n
i
m 5
)yaleD
na
F(
o
t
a
c
i
d
n
I
t
s
o
r
f
e
D
r
.nim
8
)yaleD y
a
lpsiD(
.
n
i
m
2
)
N
O
.
n
iM(
.
n
im
2
)
F
F
O
.n
iM(
e
ru
tarepme
T
no
i
tan
imre
T
tsorf
e
D
.
n
im
06
<
)no
i
taru
D
tso
r
fe
D
.xaM
(
TIME-TEMPERATURE CONTROL CHART [NOT DURING ENERGY SAVING MODE] FOR
REFRIGERATORS & FREEZERS WITH AUXILIARY CODE _____ AND BEFORE
Frame Heater(s)
Freezers – Continuous Operating Mode
16
Page 17
3. Refrigerators – Energy Saving Operating Mode
a) Sequence of Operation
POWER ON
Board Self Check
1. Frame heater(s) on continuously
(Q5 and earlier)
Frame heater(s) cycle on and off
(Q6 and later)
. Evaporator fan(s) cycles on and off
Cycle On (Cut-on
temperature reached)
[Minimum minutes]
1. Compressor start-up
. Condenser fan start-up
3. Frame heater(s) on
(continuously)
4. Evaporator fan(s) on
(continuously)
Continue as
normal cycling
Defrost Start
Preprogrammed time interval
1. Compressor off
. Frame heater(s) off (Q6 and later)
3. Evaporator fan(s) off
4. Condenser fan off
5. Defrost heater on
6. "dF" displayed
2-minute Delay
1. Compressor start-up
. Condenser fan start-up
3. Frame heater(s) on
(continuously)
4. Evaporator fan(s) on
(continuously)
Cycle Off (Cut-out
temperature reached)
[Minimum minutes]
1. Compressor off
. Condenser fan off
3. Frame heater(s)
cycle on and off
(Q6 and later)
4. Evaporator fan(s)
cycles on and off
Defrost End
Defrost thermistor
reaches defrost
termination temperature,
or defrost timer reaches
1 hour
Defrost heater off
Five minutes after
defrost heater off
1. Compressor on
. Condenser fan on
Five minutes after
compressor start-up
1. Evaporator fan(s) on
. Frame heater(s)
on (Q6 and later)
One minute after evaporator
fan start-up "dF" no longer
displayed, cabinet temperature
displayed
Note:
1) Cut-on, cut-off, and cabinet temperature are read by the same sensor, called the "cabinet
) The defrost thermistor reads the evaporator temperature.
thermistor."
17
Page 18
b) Timing Chart
NO
FFO
NO
FFO
)+(
l
a
i
t
n
e
r
ef
f
i
D
+
t
n
i
o
p
teS
)-
-(
l
a
it
n
er
ef
f
i
D
+
tniopt
e
S
g
n
i
n
a
e
m
oN
FFO
NO
NO
FFO
NO
FFO
NO
FFO
r
ots
imre
h
T
t
enib
a
C
rotsimrehT tsorfeD
o
ss
e
r
pm
o
C
r
n
a
F
r
es
n
ed
n
o
C
n(s)
a
F
r
o
t
a
r
o
p
a
v
E
e
t
a
e
H
t
s
o
rf
e
D
r
.
n
im
2
)y
a
l
e
D
t
r
a
t
S
(
NO
rew
o
P
e
miT
s
ruoh
6
)
e
l
b
ats
u
j
d
A
t
r
atS
t
so
r
fe
D(
.
n
im 5
)yaleD nia
r
D(
.ni
m
5
)yale
D
naF
(
r
ota
c
i
d
n
I
t
s
o
rfe
D
.nim 1
)yaleD yalpsiD(
eru
t
arepmeT
n
o
i
tanimreT tsorfeD
.ni
m
0
6
<
)
n
o
it
ar
uD
t
s
o
r
f
e
D
.
x
a
M(
tn
et
t
i
m
r
e
tn
I
noit
a
r
epO
)
s
d
o
ir
eP FFO r
os
s
er
p
m
o
C
l
lA
(
t
n
ettimretnI
no
i
tarep
O
)s
d
o
i
re
P
F
FO
r
oss
e
rpmoC
ll
A(
TIME-TEMPERATURE CONTROL CHART [DURING ENERGY SAVING MODE] FOR
REFRIGERATORS
WITH AUXILIARY CODE _____ AND AFTER
*
*
neh
w
y
ale
d
pu tr
a
t
s
naf rotaropave dnoc
e
s
eviF
r
eh
t
e
g
ot
t
r
ats e
s
i
w
reh
t
o dluo
w
naf dn
a
r
osse
r
pm
o
c
1AND%ARLIER
1AND,ATER
*
*
Frame Heater(s)
.n
im
2
)NO
.n
i
M
(
.
n
im
2
)
F
FO
.n
i
M
(
Refrigerators – Energy Saving Operating Mode
18
Page 19
4. Freezers – Energy Saving Operating Mode
a) Sequence of Operation
POWER ON
Board Self Check
1. Frame heater(s) on
. Evaporator fan(s)
cycles on and off
Cycle On (Cut-on
temperature reached)
[Minimum minutes]
1. Compressor start-up
. Condenser fan start-up
3. Evaporator fan(s) on
(continuously)
Continue as
normal cycling
2-minute Delay
1. Compressor start-up
. Condenser fan start-up
3. Evaporator fan(s) on
(continuously)
Defrost Start
Preprogrammed time interval
1. Compressor off
. Evaporator fan(s) off
3. Condenser fan off
4. Defrost heater on
5. "dF" displayed
Cycle Off (Cut-out
temperature reached)
[Minimum minutes]
1. Compressor off
. Condenser fan off
3. Evaporator fan(s)
cycles on and off
Defrost End
Defrost thermistor
reaches defrost
termination temperature,
or defrost timer reaches
1 hour
Defrost heater off
Five minutes after
defrost heater off
1. Compressor on
. Condenser fan on
Five minutes after
compressor start-up
1. Evaporator fan(s) on
Eight minutes after evaporator
fan start-up "dF" no longer
displayed, cabinet temperature
displayed
Note:
1) Cut-on, cut-off, and cabinet temperature are read by the same sensor, called the "cabinet
) The defrost thermistor reads the evaporator temperature.
thermistor."
19
Page 20
b) Timing Chart
nehw
y
ale
d
pu
t
rat
s
naf
rot
a
ro
p
ave
dno
c
es
evi
F
NO
F
F
O
N
O
F
F
O
)
+
( lait
n
er
ef
fiD
+ t
nio
pt
eS
)
-
-( l
ait
ne
r
effiD + tni
o
pteS
gninaem
oN
F
F
O
NO
N
O
F
F
O
NO
F
F
O
N
O
F
F
O
rot
s
im
r
ehT
tenibaC
rotsimrehT tsorf
e
D
ro
s
s
e
rp
moC
n
aF
r
e
snednoC
n(s)
aF
rot
aropa
v
E
r
e
t
aeH t
so
r
f
eD
.n
i
m
2
t
r
atS(
al
eD
)y
N
O
r
e
w
o
P
e
m
iT
s
r
u
o
h
6
)
el
ba
t
suj
d
A
-
t
ra
t
S
ts
or
feD
(
.nim
5
)ya
l
eD
niarD(
.
n
im 5
)yal
eD
naF
(
ro
t
a
cidn
I
t
so
r
f
eD
.n
i
m
8
)yaleD yalpsiD(
erutarepmeT noi
t
animreT tsorfeD
.
n
i
m
0
6
<
)
noi
ta
ru
D t
s
o
rf
eD
.x
a
M(
tn
e
tt
i
mre
t
nI
n
oi
tare
p
O
)sd
oi
reP
F
F
O
r
oss
e
rp
m
oC ll
A
(
tn
e
tt
i
mre
tn
I
n
oi
tare
p
O
)sd
o
ireP
F
F
O ross
e
rp
m
oC
l
lA(
TIME-TEMPERATURE CONTROL CHART [DURING ENERGY SAVING MODE] FOR
FREEZERS
(ALL UNITS)
re
h
tego
t
t
r
a
t
s
esiwr
e
hto
dl
uow
n
a
f
dna
r
o
ss
e
rp
m
o
c
*
*
*
*
Frame Heater(s)
.n
im
2
)NO
.n
i
M
(
.
n
im
2
)
F
FO
.n
i
M
(
Freezers – Energy Saving Operating Mode
0
Page 21

C. Control Board
• A Hoshizaki exclusive solid-state control board is employed in all Hoshizaki
refrigerators and freezers.
• All models are pretested and factory-adjusted.
CAUTION
1. Fragile, handle very carefully.
. The control board contains integrated circuits, which are susceptible to
failure due to static discharge. It is especially important to touch the metal
part of the unit when handling or replacing the board.
3. Do not touch the electronic devices on the board or the back of the board to
prevent damage to the board.
4. Do not attempt to repair the board in the eld. Always replace the whole
board assembly if it goes bad.
5. Do not short out power supply to test for voltage.
6. Keep the thermistor leads, clogged lter sensor leads, and pressure switch
leads at least 1.5" away from high voltage leads (AC 100 volts or more) to
protect against electrical noise.
1. Start-Up Delay
The start circuit of the compressor is timed such that at power-up and during any
compressor off time, there will be at least a -minute delay before the compressor will
start. This delay is controlled through the control board. To bypass the startup delay,
move the power switch to the "OFF" position. Then press and hold the up arrow key
while moving the power switch to the "ON" position.
Note: The compressor must run a minimum of three minutes during each run cycle.
1
Page 22

2. Control Board Layout
Board Part
Number
Chip Revision
K51 (5 pin)
(not used)
K101 (3 pin)
Transformer
K151 (10 pin)
Thermistor
Wiring
Harness
Rear
K311 (6 pin)
Relay Wiring
Harness
Board Part
Number
SW 135
Display
Setpoint
LED 13
Lit for
Negative
Values
LED 14
Temperature
and Alarm
Display
Front
SW 134
Raise
Setpoint
SW 133
Lower
Setpoint
SW 13
Manual
Defrost
SW 131
Energy
Saving/
Service
Button
Relays
F101
3 Amp Fuse
(not used)
K361 (9 pin)
(not used)
(not used)
Note: Fuse at position F101 on board is not currently used. The board can function
without this fuse.
Relay Wiring Harness (K311)
(brown) Compressor Relay
(red) Evaporator Fan Relay
(orange) Defrost Heater Relay
Thermistor Wiring Harness (K151)
(gray) Clogged Filter Sensor
(orange) Defrost Thermistor
(black) Cabinet Thermistor
(white) Jumper Wire (limits access to settings and
diagnostics menu - not present on all units)
(light blue) High Pressure Switch
Page 23

D. Settings and Diagnostics
Various settings and diagnostic information can be controlled via the display panel. The
display panel is located behind the front panel. To open the front panel, grip the outer
edge of the panel near the top and bottom and pull it open. This permits access to the
display panel and control box. The unit has a minute startup delay. To bypass the
startup delay, move the power switch to the "OFF" position. Then press and hold the up
arrow key while moving the power switch to the "ON" position. Follow the instructions
and warnings below and on the display panel for safe and efcient operation of the unit.
1. Gaining Access to Settings and Diagnostics
Generally, the only two settings that can change are the temperature display scale
(°F or °C) and the temperature setpoint. The restriction to these two settings is achieved
by the presence of a jumper between connector K151 pins 7 and 8 on the control board.
To access other settings, the jumper must be removed. To see if the jumper is present
press and hold both the button and the unmarked, blank button for 5 seconds. If
"F5" appears in the display window, the jumper is present and must be removed in order
to access other settings. If "F0" is displayed, no jumper is present and all settings are
unrestricted and accessible. See the rest of this section for details about each setting.
Note: If there is no input for 60 seconds, the display will revert to normal.
3
Page 24

2. Temperature Display
• Displays the cabinet temperature. The factory setting is °F. To change the display to the
°C scale, see "a) Switching the Display Between Fahrenheit and Celsius (F5)" below.
• The cabinet temperature is updated every 30 seconds.
• During defrost, "dF" is displayed in place of the cabinet temperature.
a) Switching the Display Between Fahrenheit and Celsius (F5)
The factory setting is °F. To change the display to °C, follow the steps below.
1) Press and hold both the button and the unmarked, blank button for 5 seconds.
"F5" appears in the display window. (If "F0" is displayed, press the MANUAL
DEFROST button until "F5" appears.)
) Press the
unmarked, blank button to display the current setting (default: "F"). Press
the up or down button to switch to °C. Press the unmarked, blank button
again to save the setting.
3) Press and hold both the button and the unmarked, blank button for 5 seconds.
The cabinet temperature will be displayed using the newly saved temperature scale.
4) Afx the "°C" label supplied with the unit to the display panel, covering "°F" but not the
display window.
b) Adjusting the Setpoint Temperature
The setpoint temperature is the temperature at which the compressor turns on. To set
the setpoint temperature, follow the steps below.
1) Press the button to display the current setpoint temperature.
) To change the setpoint, press and hold the
button while pressing the up or
down button to raise or lower the setpoint.
Model Allowable Setpoint Range Default
Refrigerator (auxiliary code Q5 and earlier)
Refrigerator (auxiliary code Q6 and later)
Freezer (Door)
Freezer (Drawer)
+1 to +53°F
(-6 to +1°C)
-13 to +19°F
(-5 to -7°C)
39°F
(4°C)
37°F
(3°C)
0°F
(-18°C)
°F
(-17°C)
3) After 10 seconds, the new setpoint will be saved automatically.
Note: For refrigerators, the temperature differential for the compressor to turn off is
-4.5°F (-.5°C) for auxiliary code Q5 and earlier and -3.6°F (-.0°C) for auxiliary
code Q6 and later. For 1-section freezers, it is -6.3°F (-3.5°C) and for -section
freezers, it is -3.6°F (-.0°C).
4
Page 25

c) Cabinet Temperature Correction (calibration factor)
In cases where there is a discrepancy between the actual cabinet center temperature
and the displayed temperature for a particular model, a calibration factor is used to
correct the displayed temperature.
WARNING
This unit has been factory tested with the default settings listed. Avoid using
this function except to conrm that the setting is correct. If set incorrectly, the
display could show an acceptable temperature even though the temperature
is out of the proper range. This value should only be changed after consulting
with the factory.
To view the current value, follow the steps below.
1) Turn the power on while pressing the up button. The current correction calibration
factor will be shown. If "18" is displayed, the value is 1.8°F (1.0°C). See the table below
for the default values.
Cabinet Temperature Correction (Calibration Factor)
Model Setting Range 1-Section 2-Section 3-Section
Refrigerator
Freezer
-9.9 to 9.9°F in 0.9°F increments
(-9.5 to 9.5°C in 0.5°C increments)
00 (0.0°F)
(00 (0.0°C))
18 (1.8°F)
(10 (1.0°C))
Default
45 (4.5°F)
(5 (.5°C))
) If it is determined through discussion with the factory that the setting needs to be
changed, press the up or down button to increase or decrease the value.
3) Press the button to save the new value.
4) Turn the power off and then back on. The unit will start running with the new value.
[Example]
When the average cabinet temperature is 5.4°F
(3.0°C) higher than the thermistor detected
temperature, change the correction calibration
factor to 5.4°F (3.0°C).
36 (3.6°F)
( 0 (.0°C))
5
Page 26

3. Settings and Diagnostics Menu
To gain access to the settings, see "II.D.1. Gaining Access to Settings and Diagnostics."
Once inside this menu, press the MANUAL DEFROST button to scroll through the menu
and the unmarked, blank button at any point to view the current setting. Press the
MANUAL DEFROST button to return to the menu screen.
Default
Refrigerator Freezer
Auxiliary Code
Q5 and
Code Item Setting and Display Range
F0 Defrost Interval 1 to 1 hours in 1 hour increments 6 6 6
F1 Defrost Termination
Temperature
Setpoint
F
Temperature
Differential
(upper and lower)
F3 High Temperature
Alarm Delay Time
F4 Low Temperature
Alarm Delay Time
F5 Temperature Dis-
play
F6 Alarm History Displays alarm history - maximum 8
F7 Compressor Run
Time
F8 Not Used NA NA NA
F9 Not Used NA NA NA
Refrigerator: 59 to 68°F (15 to 0°C) in
one degree increments
Freezer: 41 to 68°F (5 to 0°C) in one
degree increments
0 to 6.3°F in increments of .9°F
(0 to 3.5°C in increments of .5°C)
0 to 180 minutes in 60 minute
increments
(0=0; 1=60; =10; 3=180 minutes)
0 or 60 minutes
(0=0; 1=60 minutes)
Fahrenheit or Celsius
alarms
Displays run time between two most
recent defrosts
earlier
59°F 59°F 41°F
0°F, -45°F
(0°C,
-.5°C )
(decimal
is not
displayed)
1 1 1
°F °F °F
NA NA NA
NA NA NA
Q6 and
later
0°F, -36°F
(.0, -
.0°C)
(decimal
is not
displayed)
1
section2section
0°F, -63°F
(0°C,
-3.5°C)
(decimal
is not
displayed)
0°F, -36°F
(.0,
-.0°C)
(decimal
is not
displayed)
6
Page 27

a) Defrost Interval (F0)
This unit is preset at the factory to defrost once every 6 hours for general conditions.
However, if it is determined that this interval does not suit actual conditions, the interval
can be changed. To change the defrost interval, follow the steps below.
1) Make sure the jumper is removed between connector K151 pins 7 and 8 on the control
board. Otherwise you will not be able to access this setting. For details, see "D.1.
Gaining Access to Settings and Diagnostics."
) Press and hold both the
If "F0" is not displayed, press the MANUAL DEFROST button until "F0" appears in the
display window.
3) Press the unmarked, blank button to display the current setting (default: "6"). Press
the up or down button to increase or decrease the number of hours between
each defrost. The interval can be from 1 to 1 hours in increments of 1 hour.
4) Press the unmarked, blank button to save the setting.
5) Press the MANUAL DEFROST button to return to the menu screen. Press and hold
both the button and the unmarked, blank button for 5 seconds to exit the setting
mode and return to the temperature display.
6) If a jumper was present between connector K151 pins 7 and 8 , reconnect it after all
setting and diagnostic work is complete.
Note:
• The defrost is a heated defrost, and therefore has a tendency to raise cabinet
temperature.
• When the unit goes into defrost during energy saving mode, evaporator fan(s)
and/or perimeter frame heaters will turn off.
• Cabinet temperature is not displayed during defrost; "dF" is displayed in its place.
• The change in the defrost setting will take effect immediately. The next defrost will
take place after the newly set time interval has elapsed.
• Initiating a manual defrost will restart the defrost timer.
• The evaporator temperature must be below the defrost completion temperature for
any defrost (manual or auto) to be initiated.
button and the unmarked, blank button for 5 seconds.
b) Defrost Termination Temperature (F1)
To change the defrost termination temperature, follow the steps below.
1) Make sure the jumper is removed between connector K151 pins 7 and 8 on the control
board. Otherwise you will not be able to access this setting. For details, see "D.1.
Gaining Access to Settings and Diagnostics."
) Press and hold both the
"F0" should appear in the display window. Press the MANUAL DEFROST button until
"F1" appears in the display window.
button and the unmarked, blank button for 5 seconds.
7
Page 28

3) Press the unmarked, blank button to display the current setting. Press the up or
down button to increase or decrease the defrost termination temperature.
Note: The defrost termination temperatures can be adjusted within the following ranges:
• Refrigerator: 59 to 68°F (15 to 0°C) in one degree increments
• Freezer: 41 to 68°F (5 to 0°C) in one degree increments
4) Press the unmarked, blank button to save the setting.
5) Press the MANUAL DEFROST button to return to the menu screen. Press and hold
both the button and the unmarked, blank button for 5 seconds to exit the setting
mode and return to the temperature display.
6) If a jumper was present between connector K151 pins 7 and 8, reconnect it after all
setting and diagnostic work is complete.
c) Setpoint Temperature Differential (F2)
To change the differential, follow the steps below.
1) Make sure the jumper is removed between connector K151 pins 7 and 8 on the control
board. Otherwise you will not be able to access this setting. For details, see "D.1.
Gaining Access to Settings and Diagnostics."
) Press and hold both the
"F0" should appear in the display window. Press the MANUAL DEFROST button until
"F" appears in the display window.
3) Press the unmarked, blank button to display the current + setting (the decimal
between the digits is not shown). Press the up or down button to increase or
decrease the + (plus) differential in .9°F increments.
Note:
• Both the + and - values can be adjusted between 0.0 and 6.3°F in .9°F increments
(0.0 to 3.5°C in .5°C increments).
• You cannot set both + and - to 0.0.
4) Press the unmarked, blank button to save the + setting and move to the - (minus)
differential setting.
5) Press the up or down button to increase or decrease the - (minus) differential in
.9F increments.
Note:
• Both the + and - values can be adjusted between 0.0 and 6.3°F in .9°F increments
(0.0 to 3.5°C in .5°C increments).
• You cannot set both + and - to 0.0.
button and the unmarked, blank button for 5 seconds.
6) Press the unmarked, blank button to save the - (minus) setting. The - (minus) sign
will turn off and the display will change to the + (plus) differential setting.
7) Press the MANUAL DEFROST button to return to the menu screen. Press and hold
both the button and the unmarked, blank button for 5 seconds to exit the setting
mode and return to the temperature display.
8) If a jumper was present between connector K151 pins 7 and 8, reconnect it after all
setting and diagnostic work is complete.
8
Page 29

d) High Temperature Alarm Delay Time (F3)
To change the high temperature alarm delay time, follow the steps below.
1) Make sure the jumper is removed between connector K151 pins 7 and 8 on the control
board. Otherwise you will not be able to access this setting. For details, see "D.1.
Gaining Access to Settings and Diagnostics."
) Press and hold both the
button and the unmarked, blank button for 5 seconds.
"F0" should appear in the display window. Press the MANUAL DEFROST button until
"F3" appears in the display window.
3) Press the unmarked, blank button to display the current setting. Press the up or
down button to increase or decrease the high temperature alarm delay time.
Note: The time can be adjusted between 0 and 180 minutes in 60 minute increments.
The display corresponds to time as follows:
Display Detection Time
(minutes)
0 0
1 60
10
3 180
4) Press the unmarked, blank button to save the setting.
5) Press the MANUAL DEFROST button to return to the menu screen. Press and hold
both the button and the unmarked, blank button for 5 seconds to exit the setting
mode and return to the temperature display.
6) If a jumper was present between connector K151 pins 7 and 8, reconnect it after all
setting and diagnostic work is complete.
e) Low Temperature Alarm Delay Time (F4)
To change the low temperature alarm delay time, follow the steps below.
1) Make sure the jumper is removed between connector K151 pins 7 and 8 on the control
board. Otherwise you will not be able to access this setting. For details, see "D.1.
Gaining Access to Settings and Diagnostics."
) Press and hold both the
button and the unmarked, blank button for 5 seconds.
"F0" should appear in the display window. Press the MANUAL DEFROST button until
"F4" appears in the display window.
3) Press the unmarked, blank button to display the current setting. Press the up or
down button to increase or decrease the low temperature alarm delay time.
Note: The time can be 0 or 60 minutes. The display corresponds to time as follows:
Display Detection Time
(minutes)
0 0
1 60
9
Page 30

4) Press the unmarked, blank button to save the setting.
5) Press the MANUAL DEFROST button to return to the menu screen. Press and hold
both the button and the unmarked, blank button for 5 seconds to exit the setting
mode and return to the temperature display.
6) If a jumper was present between connector K151 pins 7 and 8, reconnect it after all
setting and diagnostic work is complete.
f) Temperature Display Scale (F5)
For information about switching the display between °F and °C, see "D..a) Switching
the Display Between Fahrenheit and Celsius (F5)."
g) Alarm History (F6)
To view the alarm history, follow the steps below.
1) Make sure the jumper is removed between connector K151 pins 7 and 8 on the control
board. Otherwise you will not be able to access this setting. For details, see "D.1.
Gaining Access to Settings and Diagnostics."
) Press and hold both the
button and the unmarked, blank button for 5 seconds.
"F0" should appear in the display window. Press the MANUAL DEFROST button until
"F6" appears in the display window.
3) Press the unmarked, blank button to display the alarm history. The alarms will be
displayed in reverse chronological order (newest to oldest - up to 8 alarms). When "--"
is displayed, you have reached the end of the alarm history and the display will begin
again.
Note: The alarms are as follows:
Alarm Code Description
E1 High Temperature Alarm
E
E3 Defrost Alarm
E4 High Pressure Alarm
E7 Clogged Filter Alarm
E8 Defrost Temperature Sensor Malfunction Alarm
E9 Clogged Filter Sensor Malfunction Alarm
EA EEPROM Write Error Alarm
ED EEPROM Verication or Read Error Alarm
Low Temperature Alarm
4) To reset the alarm history, press and hold both the unmarked, blank button and the
MANUAL DEFROST button for 5 seconds.
5) Press the MANUAL DEFROST button to return to the menu screen. Press and hold
both the button and the unmarked, blank button for 5 seconds to exit the setting
mode and return to the temperature display.
6) If a jumper was present between connector K151 pins 7 and 8, reconnect it after all
setting and diagnostic work is complete.
30
Page 31

h) Compressor Run Time (F7)
To display the compressor run time between the two most recent defrosts, follow the
steps below.
1) Make sure the jumper is removed between the connector K151 pins 7 and 8 on the
control board. Otherwise you will not be able to access this feature.
) Press and hold both the
button and the unmarked, blank button for 5 seconds.
"F0" should appear in the display window. Press the MANUAL DEFROST button until
"F7" appears in the display window.
3) Press the unmarked, blank button to display the run time. The number displayed
indicates what percent of the time the compressor was running.
4) Press the MANUAL DEFROST button to return to the menu screen. Press and hold
both the button and the unmarked, blank button for 5 seconds to exit the setting
mode and return to the temperature display.
5) If a jumper was present between connector K151 pins 7 and 8, reconnect it after all
setting and diagnostic work is complete.
4. Operating Modes
Hoshizaki undercounters and worktops feature two operating modes, energy saving and
continuous. Always use the default setting of your unit. To determine the default setting
of your unit, see the chart below.
Model Default Setting
Refrigerator (auxiliary code Q5 and earlier) Continuous Operating Mode
Refrigerator (auxiliary code Q6 and later) Energy Saving Operating Mode
Freezer - 1 section Continuous Operating Mode
Freezer - section
Energy Saving Operating Mode
To determine the operating mode your unit is in, look at the unit's cabinet temperature
display. If a period does not appear after the temperature, the unit is in continuous
operating mode. If a period appears after the temperature, the unit is in energy saving
operating mode.
To switch between operating modes, press and hold the unmarked, blank button for
5 seconds.
Note: It takes 5 seconds for this setting to be saved. Once saved, the setting you made
will be remembered even if the power is turned off.
Continuous
(no period after temperature)
Energy Saving
(period after temperature)
31
Page 32

a) Continuous
The evaporator fan runs constantly (except in defrost). The frame heaters are on
continuously.
b) Energy Saving
The evaporator fan runs when the compressor is on, but only intermittently when
the compressor is off. The frame heaters cycle on and off with the evaporator fan
for refrigerators auxiliary code Q6 and later, but are on continuously for refrigerators
auxiliary code Q5 and earlier and all freezers. Intermittent fan operation saves energy by
reducing heat leak, especially around the gasket, and by extending compressor off time.
Fan on/off time is dependent on the setpoint temperature.
Model Setpoint Temperature
3 to 30°F
Refrigerator
Freezer
(-5 to -1°C)
3 to 5°F
(0 to 11°C)
-13 to +19°F
(-5 to -7°C)
Off Time
(seconds)
90 15
150 15
30 30
On Time
(seconds)
c) Automatic Corrections Made During Energy Saving Operating Mode
(1) Temperature Display Correction
When the unit is in energy saving mode and the evaporator fan shuts off, the
temperature at the cabinet thermistor drops due to its close proximity to the evaporator.
Therefore, the temperature at the cabinet thermistor does not accurately reect the
true cabinet temperature. To compensate for this, the cabinet temperature registered
at compressor shutoff is displayed for 10 seconds after shutoff when in energy saving
mode. After 10 seconds, the cabinet temperature plus 1.8°F (1°C) will be displayed.
Once the compressor turns back on, the display will return to the normal display.
(2) Temperature Differential Correction
During energy saving mode, the cabinet temperature tends to be higher than during
normal operation because the evaporator fan operates only intermittently when the
compressor is off. The upper setpoint differential for turning the compressor on is
automatically adjusted to compensate.
E. Perimeter Frame Heater
This unit is equipped with a perimeter frame heater. This prevents the formation of
condensate on the front frame of the unit under high humidity conditions.
Note: On refrigerators with auxiliary code Q6 and later, perimeter frame heater(s)
operate together with the evaporator fan(s).
3
Page 33

III. Service Diagnosis
A. Alarm Codes
If an error occurs, the alarm code and cabinet temperature are displayed in 1-second
intervals. See the table below for a general description of the problem, then see the rest
of this section for detailed instructions.
Alarm Signals
Alarm Code Problem Notes
E1
High Temperature Alarm
Cabinet temperature has exceeded set
temperature by 14.4°F (10°C) for more than
x hours. The default value of x is "" ( hours).
When temperature returns to setpoint range,
alarm code "E1" will clear.
The value of x can be changed under F3 on the
Settings and Diagnostics Menu.
(0=No delay; 1=1 hour; = hours; 3=3 hours)
E2
E3
E4
E7
E8
E9
EA
ED
Low Temperature Alarm
Cabinet temperature has remained below
setpoint by 9°F (5°C) for more than y hours.
The default value of y is "1" (1 hour).
Defrost Alarm
Defrost has taken longer than 1 hour. Control
board has terminated defrost.
High Pressure Alarm
Compressor discharge pressure is outside
normal operating range. Pressure switch has
been triggered 5 or more times in 1 hour.
Condenser lter may need cleaning.
Clogged Filter Alarm
Condenser temperature is outside of normal
operating range. Condenser lter needs
cleaning.
Defrost Temperature Sensor Malfunction Alarm
Defrost temperature sensor has failed.
Clogged Filter Sensor Malfunction Alarm
Clogged lter sensor has failed.
EEPROM Write Error Alarm
Control board is defective.
EEPROM Verication or Read Error Alarm
Control board is defective.
When temperature returns to setpoint range,
alarm code "E" will clear.
The value of y can be changed under F4 on the
Settings and Diagnostics Menu.
(0=No delay; 1=hour)
E3 may alternate with "dF" instead of the
temperature.
Clean lter if necessary. Allow time for
pressure switch to react, then turn power off
and back on again to reset.
If switch trips 5 times in 1 hour, and the
above steps do not clear alarm code, see the
procedure contained in this section.
Clean lter. Allow time for sensor to react, then
turn power off and back on again to reset.
After replacing sensor, alarm will reset.
After replacing sensor, alarm will reset.
After replacing the control board, alarm will
reset.
After replacing the control board, alarm will
reset.
33
Page 34

1. Alarm Display Priority
If multiple alarms occur simultaneously, only the alarm with the higher priority is
displayed.
Error Code Priority Description
ED 1 EEPROM Verication or Read Error Alarm
EA EEPROM Write Error Alarm
E8 3
E9 4 Clogged Filter Sensor Malfunction Alarm
E4 5 High Pressure Alarm
E7 6 Clogged Filter Alarm
E3 7 Defrost Alarm
E1 8 High Temperature Alarm
E
Defrost Temperature Sensor Malfunction
Alarm
9 Low Temperature Alarm
34
Page 35

2. Alarm Details and Countermeasures
a. High Temperature Alarm (E1)
If the cabinet temperature exceeds the setpoint temperature by 14.4°F (8°C) or more for
more than x hours, "E1" is displayed. The default value of x is "" ( hours). The value
of x can be changed under F3 on the Settings and Diagnostics Menu. (0=No delay; 1=1;
=; 3=3 hours)
Note:
• After the machine has been turned off and then turned back on, the high
temperature alarm feature is not active until the cabinet temperature reaches the
lower setpoint temperature differential.
• The high temperature alarm feature operates even during defrost.
Reset Options
The alarm will automatically reset once the cabinet temperature reaches the lower setpoint
temperature differential.
Possible Causes
• The door is opened frequently or is not completely closed.
• Trouble with the compressor or a gas leak.
• Trouble with the cabinet thermistor (black).
35
Page 36
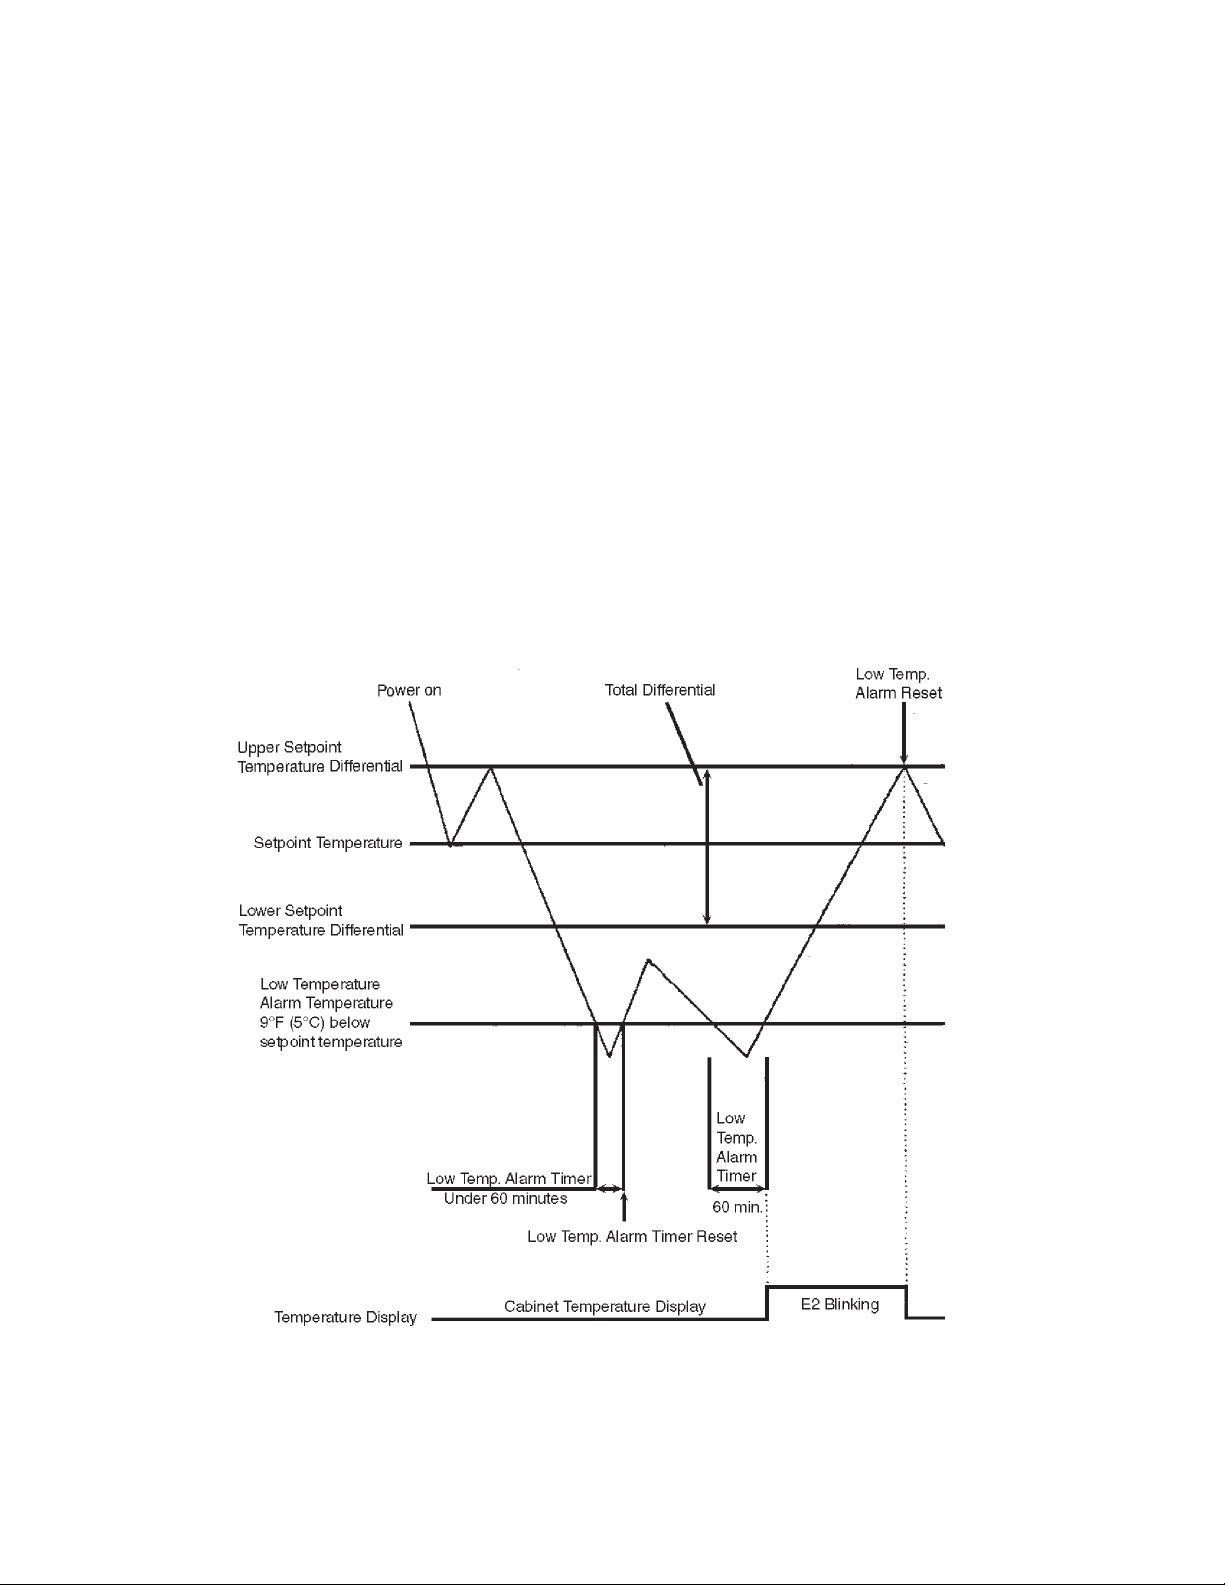
b. Low Temperature Alarm (E2)
If the cabinet temperature drops below the setpoint temperature by 9°F (5°C) or more for
more than y minutes, "E" is displayed. The default value of y is "1" (1 hour). The value
of y can be changed under F4 on the Settings and Diagnostics Menu. (0=No delay; 1=1
hour)
Note:
• The low temperature alarm timer starts once the cabinet temperature drops 9°F
(5°C) below the setpoint temperature.
• The low temperature alarm feature operates even during defrost.
Reset Options
The alarm will automatically reset once the cabinet temperature reaches the upper setpoint
temperature differential.
Possible Causes
• Ambient temperature is low.
• Trouble with the cabinet thermistor (black).
36
Page 37

c. Defrost Alarm (E3)
If the defrost thermistor does not turn off in one hour after defrost begins, "E3" is
displayed. When "E3" is displayed, the next step in the defrost termination process
(drain - fan delay - defrost display delay) begins.
Reset Options
To reset the alarm, turn the unit off and then back on.
Possible Causes
• Trouble with the defrost heater.
• The temperature fuse is blown.
• Trouble with the defrost thermistor (orange).
d. High Pressure Alarm (E4)
In order to protect the compressor if the discharge pressure reaches a preset value
(outside the normal operating range), a switch will temporarily stop the compressor.
At another preset pressure, the compressor will attempt to restart. If the switch is
triggered 5 or more times in one hour, "E4" will be displayed.
Reset Options
To reset the alarm, turn the unit off and then back on.
Possible Causes
• The condenser air lter is dirty.
• There is blockage or contamination inside the capillary tube or elsewhere in the
refrigeration circuit.
• The condenser fan motor is locked or otherwise not functioning.
37
Page 38

e. Clogged Filter Alarm (E7)
The unit is equipped with a lter for protecting the condenser from dirt, oils, grease, etc.
The lter promotes clean condenser surfaces and efcient operation and should be
checked twice monthly and cleaned when necessary. The unit is also equipped with a
sensor to determine if this lter is excessively dirty. If the unit detects that the condenser
lter is excessively dirty by sensing a temperature at the condenser outlet of at least
136.4°F (58°C) for over minutes, "E7" will be displayed.
Reset Options
After cleaning the lter, the alarm will automatically reset once the temperature at the
condenser outlet drops below 136.4°F (58°C).
Possible Causes
• The condenser air lter is dirty.
• The condenser fan motor is locked or otherwise not functioning.
IMPORTANT
If this alarm occurs frequently, the compressor discharge temperature is
consistently too high.
Note:
• If the unit is turned off and then back on while the alarm code is displayed, the
alarm may be reset even if the lter is not yet clean. However, the alarm will recur
once the compressor discharge temperature reaches 136.4°F (58°C).
38
Page 39

f. Defrost Temperature Sensor Malfunction Alarm (E8)
If input from the defrost thermistor is below the defrost open circuit detection point
(equivalent to -67°F (-55°C)), "E8" is displayed. "E8" is also displayed when input
from the defrost thermistor is above the defrost thermistor short circuit detection point
(equivalent to 1°F (50°C)) for 10 minutes or more.
Note:
• If this alarm appears, rst make sure that the sensor is properly connected.
• A short circuit will not be detected during the rst hour after power is turned on.
However, a short circuit can be detected immediately by turning on the power
while pressing the button. In this case, "E8" will be displayed immediately if a
short circuit is detected.
• A short circuit will not be detected during defrost or fan delay.
Reset Options
The alarm automatically resets when one of the following conditions is met:
• The input from the defrost thermistor exceeds the open circuit detection point (equivalent
to -67°F (-55°C)).
• The input from the defrost thermistor drops below the short circuit detection point
(equivalent to 1°F (50°C)).
• A functioning defrost thermistor (orange) is installed.
Possible Causes
• Trouble with the defrost thermistor (orange).
39
Page 40

g. Clogged Filter Sensor Malfunction Alarm (E9)
If the input from the clogged lter sensor is below the clogged lter sensor open circuit
detection point (equivalent to -7.6°F (-°C)), "E9" is displayed. "E9" is also displayed
when input from the clogged lter sensor is above the clogged lter sensor short circuit
detection point (equivalent to 186.8°F (86°C)) for 10 minutes or more.
Note:
• If this alarm appears, rst make sure that the sensor is properly connected.
• A short circuit can be detected immediately by turning on the power while pressing
the button. In this case, "E9" will be displayed immediately if a short circuit is
detected.
Reset Options
The alarm automatically resets when one of the following conditions is met:
• The input from the clogged lter sensor exceeds the open circuit detection point
(equivalent to -7.6°F (-°C)).
• The input from the clogged lter sensor drops below the short circuit detection point
(equivalent to 186.8°F (86°C)).
• A functioning clogged lter sensor (gray) is installed.
Possible Causes
• Trouble with the clogged lter sensor (gray).
40
Page 41

h. Control Board Error Alarms (EA and ED)
"EA" is displayed when an EEPROM write error is detected. "ED" is displayed when an
EEPROM verication or read error is detected.
Reset Options
Replacing the control board with a functioning replacement control board will eliminate this
error condition.
41
Page 42

B. Diagnosis Chart
Problem Possible Cause Remedy
[1] Compressor will
not start—no
current draw.
Compressor will
[]
not run—draws
current and trips
on overload.
[3] Compressor runs
intermittently and
trips on overload.
[4] Cabinet
temperature too
high; compressor
will not start.
a)Power Supply 1. "OFF" position. 1. Move to "ON" position.
Loose connection(s). . Tighten or reconnect.
.
3. Failure. 3. Call electrician.
b) Cord and Plug 1. Defective. 1. Replace.
c) Circuit Breaker
(kitchen)
d)Transformer 1. Open coil winding. 1. Check continuity and replace.
e)Wiring to Control Board 1. Loose connection(s). 1. Tighten.
f) Voltage 1. Too low. 1. Call electrician.
g)High Pressure Switch 1. Bad contacts. 1. Check continuity and replace.
h)Thermistor 1. Defective. 1. Check and replace.
i) Control Board 1. Defective. 1. Replace control board.
j) Compressor Overload 1. Defective. (Contacts
k) Compressor 1. Open windings. 1. Check continuity and replace.
l) Relay (Condensing
Unit)
a)Voltage 1. Too low. 1. Call electrician.
b)Start Relay 1. Bad contacts. 1. Replace.
c) Compressor 1. Locked rotor. 1. Replace.
d)Start Capacitor 1. Defective. 1. Check and replace.
a)Voltage 1. Too low. 1. Call electrician.
b)Condenser Filter 1. Clogged. 1. Clean lter.
c) Refrigerant Line or
Component
d)Condenser Fan Motor 1. Failed. 1. Replace.
e)Refrigerant 1. Overcharged. 1. Evacuate and recharge.
f) Location of Unit 1. Restricted air ow to
a)Thermistor 1. Defective. 1. Check and replace.
b)Compressor Relay 1. Defective. 1. Check and replace.
c) Control Board 1. Defective. 1. Replace.
1. Tripped. 1. Check and reset. Call
electrician if breaker trips
repeatedly.
Defective. . Call electrician.
.
Faulty. . Check continuity and replace.
.
Too high. . Call electrician.
.
Has operated 5 or
.
more times in one
hour. (E4 should be
displayed)
open)
1. Bad contacts. 1. Replace.
Open coil winding. . Check and replace.
.
Open coil windings. . Replace.
.
Too high. . Call electrician.
.
1. Plugged or restricted. 1. Clean and replace drier. Clean
Non-condensibles in
.
system.
condenser.
. Determine why pressure
switch is activated.
1. Replace.
and replace capillary tube heat
exchanger assembly.
. Evacuate and recharge.
1. Move unit or increase
ventilation.
4
Page 43

Problem Possible Cause Remedy
[5] Cabinet
temperature too
high.
[6] Cabinet
temperature
display
indicator does
not illuminate
properly.
[7] Cabinet
temperature too
low.
[8] Evaporator does
not defrost
completely.
a)Setpoint and/or
Differential
b)Door 1. Not sealing, opened
c) Defrost 1. Defrost time
d)Refrigerant 1. Leak. 1. Repair leak and recharge.
e)Fan Motor 1. Defective. 1. Check and replace.
f) Air Filter 1. Clogged. 1. Clean.
g)Condenser 1. Dirty. 1. Clean.
h)Thermistor 1. Defective. 1. Check and replace.
i) Control Board 1. Defective. 1. Replace.
j) Outside Heat Source 1. Too close to unit. 1. Separate unit from heat
k) Air Flow 1. Blockage inside
l) Warm Food 1. Warm food recently
a)Power Supply 1. "OFF" position. 1. Move to "ON" position.
b)Control Board 1. Defective. 1. Replace.
a)Setpoint and/or
Differential
b)Frozen Food 1. Frozen food recently
c) Thermistor 1. Defective. 1. Check and replace.
d)Compressor Relay 1. Defective; contacts
e)Control Board 1. Defective. 1. Replace.
a)Defrost Thermistor 1. Defective. 1. Check and replace.
b)Defrost 1. Not enough defrosts
c) Defrost Heaters 1. Defective. 1. Replace heaters.
d)Safety Defrost
Thermostat
e)Defrost Heater
Temperature Fuse
1. Incorrect. 1. Correct setting(s).
See sections "II.D..b)" and
"II.D.3.c)" for defaults.
1. Check for sealing, check for
frequently or open for
long intervals.
insufcient to remove
frost.
Operation in humid
conditions.
interior.
placed in refrigerator.
Loose connection(s). . Tighten or reconnect.
.
3. Failure or tripped
breaker.
1. Incorrect. 1. Correct setting(s).
placed in refrigerator.
welded.
occurring per day.
Operation in humid
conditions.
1. Defective, turning off
heaters prematurely,
or fused open.
1. Blown. 1. Determine why fuse blew.
door open at time of warm
cabinet temperature.
1. See "[8] Evaporator does
not defrost completely."
source.
1. Remove blocakge by removing
or redistributing food product.
1. Allow time for unit to return to
setpoint temperature.
3. Call electrician and/or reset
breaker.
See sections "II.D..b)" and
"II.D.3.c)" for defaults.
1. Allow time for unit to return to
setpoint temperature.
1. Replace.
1. Factory default is once every
6 hours. If coil is frosting too
much, can shorten defrost
interval.
1. Replace safety defrost
thermostat.
Replace fuse.
43
Page 44

Problem Possible Cause Remedy
[9] Defrost cycle
lasts too long.
[10]Condensate
water overow.
[11]Abnormal Noise a) Fasteners 1. Loose fasteners allow
a)Defrost Thermistor 1. Defective. 1. Replace.
b)Control Board 1. Defective. 1. Replace.
c) Defrost 1. Not enough defrosts
occurring per day.
Operation in humid
conditions.
d)Defrost Heater 1. Defective. 1. Replace heaters.
e)Safety Defrost
Thermostat
a)Cabinet Contents 1. Loading of large
b)Location of Unit 1. Unit located near high
c) Seals 1. Poor sealing around
d)Environment 1. Extreme environment
b)Compressor 1. Problem with mount. 1. Properly mount compressor.
c) Fan 1. Fan blade loose. 1. Adjust and tighten.
d) Relay 1. Chattering. 1. Replace.
1. Defective, turning off
heaters prematurely,
or fused open.
volumes of warm,
moist, uncovered
product.
humidity source such
as fryer, steamer, etc.
evaporator, door
gaskets.
and door-opening
conditions.
vibration of part.
Floodback to
.
compressor.
3. Defective. 3. Replace.
Defective motor. . Replace.
.
1. Factory default is once every
6 hours. If coil is frosting too
much, can shorten defrost
interval.
1. Replace safety defrost
thermostat.
1. Cover product with plastic
wrap.
1. Relocate.
1. Adjust or replace.
1. Adjust conditions.
1. Tighten fasteners.
Replace any missing
grommets.
. Check for signs of oodback
to compressor. Evacuate and
recharge if necessary.
44
Page 45

C. Thermistor Check
A thermistor (semiconductor) is used for the cabinet control sensor and defrost termination
sensor. The resistance varies depending on temperature. No adjustment is required. If
necessary, check for resistance between thermistor leads and visually check the thermistor
mounting.
Temperature Resistance (kΩ)
°F °C Cabinet/Defrost Thermistors Clogged Filter Thermistor
0 -17.8 14. -
10 -1. 10.7 -
0.0 6.0 160
3
50 10.0 3.9 100
70 1.1 .5 59
90 3. 1.6 36
Cabinet & Defrost Thermistor T-R Curve
Temperature °F (°C)
Clogged Filter Thermistor T-R Curve
Temperature °F (°C)
To check a thermistor's resistance, follow the steps below.
1) Disconnect the connector for the thermistor in question under the control box and
behind the wire guard.
) Remove the thermistor. See "IV.F. Removal and Replacement of Thermistors."
3) Immerse the thermistor sensor portion in a glass or cup containing ice and water for
or 3 minutes.
4) Check for a resistance between thermistor leads. Normal reading is from 5 to 6.5kΩ
for the cabinet and defrost thermistors and 145 to 175kΩ for the clogged lter sensor.
Replace the thermistor if it exceeds the normal reading.
45
Page 46

IV. Removal and Replacement of Components
IMPORTANT
1. Ensure all components, fasteners, and thumbscrews are securely in place
after the equipment is serviced.
. The Polyol Ester (POE) oils used in all units can absorb moisture quickly.
Therefore it is important to prevent moisture from entering the system when
replacing or servicing parts.
3. Always install a new drier every time the sealed refrigeration system is
opened. Do not replace the drier until after all other repair or replacement
has been made.
4. Do not leave the system open for longer than 15 minutes when replacing or
servicing parts.
A. Service for Refrigerant Lines
WARNING
Use an electronic leak detector or soap bubbles to check for leaks. Add a trace
of refrigerant to the system (if using an electronic leak detector), and then raise
the pressure using nitrogen gas (140 PSIG). DO NOT use R-404A or R-134a
as a mixture with pressurized air for leak testing.
1. Refrigerant Recovery
The undercounter unit is provided with a refrigerant access valve. Using proper
refrigerant practices, recover the refrigerant from the access valve and store it in an
approved container. Do not discharge the refrigerant into the atmosphere.
2. Brazing
WARNING
1. R-404A and R-134a are not ammable at atmospheric pressure and
temperatures up to 176°F (80°C).
. R-404A and R-134a themselves are not explosive or poisonous. However,
when exposed to high temperatures (open ames), these refrigerants can
be decomposed to form hydrouoric acid and carbonyl uoride both of which
are hazardous.
3. Always recover the refrigerant and store it in an approved container. Do not
discharge the refrigerant into the atmosphere.
4. Do not use silver alloy or copper alloy containing arsenic.
5. Use an electronic leak detector or soap bubbles to check for leaks. Add a
trace of refrigerant to the system (if using an electronic leak detector), and
then raise the pressure using nitrogen gas (140 PSIG). DO NOT use R-404A
or R-134a as a mixture with pressurized air for leak testing.
46
Page 47

1) Always install a new drier every time the sealed refrigeration system is opened. Do not
replace the drier until after all other repair or replacement has been made. Install the
new drier with the arrow on the drier in the direction of the refrigerant ow.
) Braze all ttings while purging with nitrogen gas owing at a pressure of 3 to 4 PSIG
Note: Because the pipes in the evaporator case are specially coated to resist corrosion,
it is important to make connections outside the evaporator case when possible. If
it is necessary to braze inside the evaporator case, use sandpaper to remove the
coating from the brazing connections before unbrazing the components.
3) Use an electronic leak detector or soap bubbles to check for leaks. Add a trace of
refrigerant to the system (if using an electronic leak detector), and then raise the
pressure using nitrogen gas (140 PSIG). DO NOT use R-404A or R-134a as a mixture
with pressurized air for leak testing.
3. Evacuation and Recharge
1) Attach a vacuum pump to the system using the low-side access valve.
IMPORTANT
The vacuum level and vacuum pump may be the same as those for current
refrigerants. However, the rubber hose and gauge manifold to be used for
evacuation and refrigerant charge should be exclusively for POE oils.
) Turn on the vacuum pump. Open the low-side service manifold valve. Never allow the
oil in the vacuum pump to ow backwards.
3) Allow the vacuum pump to pull down to a 9.9" Hg vacuum. Evacuating period depends
on pump capacity.
4) Close the low-side service manifold valve.
5) Turn off the vacuum pump. Disconnect the vacuum pump hose and attach it to a
refrigerant service cylinder. Remember to loosen the connection, and purge the air
from the hose. See the nameplate for the required refrigerant charge. Hoshizaki
recommends only virgin refrigerant or reclaimed refrigerant which meets ARI Standard
No. 700 (latest edition) be used.
6) A liquid charge is required for charging an R-404A system and optional for charging an
R-134a system. Invert the service cylinder and place it on scales. Open the low-side
service manifold valve.
IMPORTANT
In order to prevent compressor damage, use caution in charging large
quantities of liquid into the low side.
7) Allow the system to charge with liquid until the proper charge weight is met.
8) Close the refrigerant service cylinder access valve and disconnect the hose. Close the
service manifold valve and disconnect the low-side hose.
9) Cap the access valve to prevent a possible leak.
47
Page 48

B. Removal and Replacement of Refrigeration Unit
1) Turn off the power supply, and unplug the unit.
) Remove the front panel, then remove the wire guard located below the display panel.
3) Unhook the wiring connectors at the control box, then remove the two hex-head M6
attachment nuts and the M5 bolt.
4) Very carefully slide out the refrigeration unit. Support the evaporator as it clears the
evaporator case.
5) Replace the removed parts in the reverse order of which they were removed.
6) Replace the front panel and all other guards in their correct positions.
7) Plug in the unit, and turn on the power supply.
CAUTION
1. To avoid a gas leak, be sure to prevent the refrigeration piping from coming
into contact with the body when taking out and returning the refrigeration unit
to its original position.
. Do not let the fan motor or high pressure pipe touch wires.
Refrigeration Unit
Front Panel
C. Removal and Replacement of Compressor
IMPORTANT
Always install a new drier every time the sealed refrigeration system is opened.
Do not replace the drier until after all other repair or replacement has been
made.
Note: When replacing a compressor with a defective winding, be sure to install a new
start capacitor, overload and start relay. Due to the ability of the POE oil in the
compressor to absorb moisture quickly, the compressor must not be opened
more than 15 minutes for replacement or service. Do not mix lubricants of
different compressors even if both are charged with the same type of refrigerant,
except when they use the same lubricant.
48
Page 49

1) Turn off the power supply, and unplug the unit.
) Remove the front panel, then remove the wire guard located below the display panel.
3) Unhook the wiring connectors at the control box, then remove the two hex-head M6
attachment nuts and the M5 bolt.
4) Very carefully slide out the refrigeration system. Support the evaporator as it clears the
evaporator case.
5) Recover the refrigerant and store it in an approved container.
6) Remove the terminal cover on the compressor and disconnect the compressor wiring.
7) Remove the discharge, process, and suction pipes.
8) Remove the hold-down bolts, washers, rubber grommets, and sleeves.
9) Remove the compressor. Unpack the new compressor. Attach the rubber grommets
and sleeves of the prior compressor.
10) Place the new compressor in position, and secure it using the bolts and washers.
11) Remove the drier, then place the new drier in position.
1) Remove the plugs from the suction, discharge and process pipes.
13) Braze all ttings while purging with nitrogen gas owing at a pressure of 3 to 4 PSIG.
14) Use an electronic leak detector or soap bubbles to check for leaks. Add a trace of
refrigerant to the system (if using an electronic leak detector), and then raise the
pressure using nitrogen gas (140 PSIG). DO NOT use R-404A or R-134a as a mixture
with pressurized air for leak testing.
15) Evacuate the system, and charge it with refrigerant; see the nameplate for the required
refrigerant charge.
16) Connect the terminals, then replace the terminal cover in its correct position.
17) Return the refrigeration unit to its proper position in the reverse order of the removal
procedure.
18) Plug in the unit, and turn on the power supply.
D. Removal and Replacement of Evaporator
IMPORTANT
Always install a new drier every time the sealed refrigeration system is opened.
Do not replace the drier until after all other repair or replacement has been
made. Install the new drier with the arrow on the drier in the direction of the
refrigerant ow.
1) Turn off the power supply, and unplug the unit.
) Remove the front panel, then remove the wire guard located below the display panel.
3) Unhook the wiring connectors at the control box, then remove the two hex-head M6
attachment nuts and the M5 bolt.
49
Page 50

4) Very carefully slide out the refrigeration system. Support the evaporator as it clears the
evaporator case.
5) Recover the refrigerant and store it in an approved container.
6) Remove the four 4×8 T screws holding the evaporator to the evaporator bracket and
provide a safe means for supporting the evaporator away from the ABS liner of the
evaporator case cover.
7) Remove the thermistors and thermal fuse. Protect any wiring from damage due to the
brazing torch.
8) Remove the insulation tubing, and disconnect the evaporator inlet and outlet tubing.
CAUTION
Be careful when handling the evaporator shroud assembly. This assembly
includes a defrost heater sheathed in a glass tube. This sheathing can be
easily damaged and may also cause cuts if broken. Heater will also be hot after
a defrost. Use gloves when handling and avoid touching the glass directly. Also
prevent heaters from touching other parts.
9) Remove the six 4×8 T screws attaching the shrouds to the evaporator unit and remove
the shrouds. Remove the defrost thermistor if necessary to remove the shrouds.
10) Remove the evaporator and drier.
11) Place the new evaporator and new drier in position.
1) Braze all ttings while purging with nitrogen gas owing at a pressure of 3 to 4 PSIG.
CAUTION
1. Care must be taken to ensure that the capillary tube is not blocked or
contaminated during this process.
. Ensure that the capillary tube extends inside the mating tubing 1 to 1 3/8"
(5 to 35 mm).
13) Use an electronic leak detector or soap bubbles to check for leaks. Add a trace of
refrigerant to the system (if using an electronic leak detector), and then raise the
pressure using nitrogen gas (140 PSIG). DO NOT use R-404A or R-134a as a mixture
with pressurized air for leak testing.
14) Evacuate the system, and charge it with refrigerant. See the nameplate for the required
refrigerant charge.
15) Replace the removed parts in the reverse order of which they were removed.
16) Replace the front panel and all other guards in their correct positions.
17) Plug in the unit, and turn on the power supply.
50
Page 51

E. Removal and Replacement of Capillary Tube / Suction Line Assembly
IMPORTANT
Always install a new drier every time the sealed refrigeration system is opened.
Do not replace the drier until after all other repair or replacement has been
made. Install the new drier with the arrow on the drier in the direction of the
refrigerant ow.
1) Turn off the power supply, and unplug the unit.
) Remove the front panel, then remove the wire guard located below the display panel.
3) Unhook the wiring connectors at the control box, then remove the two hex-head M6
attachment nuts and the M5 bolt.
4) Very carefully slide out the refrigeration system. Support the evaporator as it clears the
evaporator case.
5) Recover the refrigerant and store it in an approved container.
6) Remove the insulation on the suction line.
7) Remove the four 4×8 T screws holding the evaporator to the evaporator bracket and
provide a safe means for supporting the evaporator away from the ABS liner of the
evaporator case cover. Protect any wiring from damage due to the brazing torch.
8) Remove the capillary tube / suction line assembly and drier.
9) Place the new capillary tube / suction line assembly and new drier in position.
10) Braze all ttings while purging with nitrogen gas owing at a pressure of 3 to 4 psig.
CAUTION
1. Care must be taken to ensure that the capillary tube is not blocked or
contaminated during this process.
. Ensure that the capillary tube extends inside the mating tubing 1 to 1 3/8"
(5 to 35 mm).
11) Use an electronic leak detector or soap bubbles to check for leaks. Add a trace of
refrigerant to the system (if using an electronic leak detector), and then raise the
pressure using nitrogen gas (140 PSIG). DO NOT use R-404A or R-134a as a mixture
with pressurized air for leak testing.
1) Insulate the entire suction line between the compressor and evaporator case.
13) Evacuate the system, and charge it with refrigerant; see the nameplate for the required
refrigerant charge.
14) Return the refrigeration unit to its proper position in the reverse order of the removal
procedure.
15) Plug in the unit, and turn on the power supply.
51
Page 52

F. Removal and Replacement of Thermistors
1) Turn off the power supply, and unplug the unit.
) Remove the front panel, then remove the wire guard located below the display panel.
3) Unhook the wiring connectors at the control box, then remove the two hex-head M6
attachment nuts and the M5 bolt.
4) Very carefully slide out the refrigeration system. Support the evaporator as it clears
the evaporator case. For the remainder of the procedure, see the appropriate section
below.
Cabinet Thermistor
5) Cut the cable tie holding the cabinet thermistor to the bracket attached to the fan motor
side of the evaporator shroud. Remove the thermistor.
6) Remove the thermistor wire connection (below the control box).
7) Install the new thermistor and return the refrigeration unit to its proper position in the
reverse order of the removal procedure.
8) Plug in the unit, and turn on the power supply.
Defrost Thermistor
5) The defrost thermistor element is secured to the top of the evaporator with aluminum
tape, and the wire is secured with a cable tie. Remove each with care.
6) Remove the thermistor wire connection (below the control box).
7) Install the new thermistor and return the refrigeration unit to its proper position in the
reverse order of the removal procedure.
8) Plug in the unit, and turn on the power supply.
Clogged Filter Thermistor (sensor)
5) The thermistor element is secured to the condenser outlet pipe with aluminum tape,
and the wire is secured with a cable tie. Remove each with care.
6) Remove the thermistor wire connection (below the control box).
7) Install the new thermistor and return the refrigeration unit to its proper position in the
reverse order of the removal procedure.
8) Plug in the unit, and turn on the power supply.
5
Page 53

G. Removal and Replacement of Door Gasket
Remove old gasket by pulling it directly out of the vinyl gasket retainer. Thoroughly clean
the gasket area with mild soap and water prior to installing the new gasket. The new
gasket should be installed by assembling it at the corners rst, then working toward the
center at the top, bottom and sides. The arrow-shaped portion of the gasket should be
rmly seated in the retainer groove for proper assembly. This can be checked by lifting
the edge of the gasket and observing the engagement.
CAUTION
In order to get a proper gasket t, it is important not to stretch gasket material
during assembly.
H. Removal and Replacement of Defrost Heater
1) Turn off the power supply, and unplug the unit.
) Remove the front panel, then remove the wire guard located below the display panel.
3) Unhook the wiring connectors at the control box, then remove the two hex-head M6
attachment nuts and the M5 bolt.
4) Very carefully slide out the refrigeration system. Support the evaporator as it clears the
evaporator case.
5) Remove the connection lead wire for the defrost heater.
6) Remove the two 4×8 T evaporator shroud screws above each end of the defrost
heater.
7) Carefully remove the defrost heater by twisting the ends together and removing the
ends from the slots in the shroud.
8) Return the refrigeration unit to its proper position in the reverse order of the removal
procedure.
9) Plug in the unit, and turn on the power supply.
CAUTION
Be careful when handling both the old and new defrost heaters. The heaters
are sheathed in glass tubes and can possibly cause cuts if broken. Heater will
also be hot after a defrost. Use gloves when handling. Avoid touching the glass
directly; hold the heaters by the ends.
53
Page 54

I. Removal and Replacement of Control Board
IMPORTANT
When receiving a service call, please ask the customer to turn the power off,
then turn it back on and monitor the condition for awhile. Even if the control
board malfunctions for some reason, it may resume normal operation after the
power is turned off once.
CAUTION
1. Fragile, handle very carefully.
. The control board contains integrated circuits, which are susceptible to
failure due to static discharge. It is especially important to touch the metal
part of the unit when handling or replacing the board.
3. Do not touch the electronic devices on the board or the back of the board to
prevent damage to the board.
4. Do not attempt to repair the board in the eld. Always replace the whole
board assembly if it goes bad.
5. Do not short out power supply to test for voltage.
6. Keep the thermistor leads, clogged lter sensor leads, and pressure switch
leads at least 1.5" away from high voltage leads (AC 100 volts or more) to
protect against electrical noise.
1) Turn off power and unplug the unit.
) Remove the front panel.
3) Remove the wire guard, then remove all wiring connections at the bottom of the control
box.
4) Remove the control box by loosening the 4×8 T screw securing the bottom control box
bracket to the evaporator case cover.
5) Remove the three 4×8 T screws from the control box top and bottom, then carefully
remove the control box cover.
6) Unhook all wiring connections to the control board.
7) Remove the control board by carefully removing the four 4×8 T attachment screws.
8) Identify the part number and software revision of the new board and make sure it is
interchangeable with the old board.
9) Install the new board in the control box taking care not to damage it.
10) Hook all wiring connections back to the control board.
11) Check to make sure that the switches and buttons line up appropriately on the display
panel and that they operate.
1) Replace all panels and guards.
13) Plug in the unit and turn on the power supply.
54
Page 55

J. Removal and Replacement of Fan Motors
1) Turn off the power supply, and unplug the unit.
) Remove the front panel, then remove the wire guard located below the display panel.
3) Unhook the wiring connectors at the control box, then remove the two hex-head M6
attachment nuts and the M5 bolt.
4) Very carefully slide out the refrigeration system. Support the evaporator as it clears
the evaporator case. For the remainder of the procedure, see the appropriate section
below.
Condenser Fan Motor
5) Disconnect the lead wire to the condenser fan motor.
6) Remove the two 5×10 condenser fan motor bracket attachment bolts and remove the
condenser fan motor assembly.
7) Remove the fan motor from the attachment base and remove the fan blade from the fan
motor.
8) Install the new fan motor and return the refrigeration unit to its proper position in the
reverse order of the removal procedure.
9) Plug in the unit, and turn on the power supply.
Evaporator Fan Motor
5) Disconnect the lead wire to the evaporator fan motor.
CAUTION
Be careful when handling the evaporator shroud assembly. This assembly
includes a defrost heater sheathed in a glass tube. This sheathing can be
easily damaged and may also cause cuts if broken. Heater will also be hot after
a defrost. Use gloves when handling and avoid touching the glass directly. Also
prevent heaters from touching other parts.
6) Remove the eight 4×8 T screws attaching the shroud to the evaporator unit and
remove the shroud. Remove the defrost thermistor if necessary to remove the shroud.
7) Remove the four 4×1 T evaporator fan motor attachment screws and remove the
evaporator fan motor.
8) Install the new fan motor and return the refrigeration unit to its proper position in the
reverse order of the removal procedure.
9) Plug in the unit, and turn on the power supply.
K. Door Re-Hinging and Drawer Conversion
Contact your local Hoshizaki distributor or Hoshizaki Technical Support
(1-800-33-1940) if door reversing or drawer conversion is desired.
55
Page 56

V. Cleaning and Maintenance Instructions
WARNING
1. Do not splash water directly onto the unit. This might cause short circuit,
electric shock, corrosion or failure.
. When cleaning or inspecting the unit, turn off the power switch and unplug
the unit or disconnect the main power source to prevent electric shock, by
unexpected entrance of water into the unit, or injury by any moving parts.
3. To prevent frostbite, do not touch foods or containers (especially metallic) in
the freezer compartment with damp hands.
4. Before using a sanitizer such as inert soap and sodium hypochlorite,
thoroughly read the manufacturer’s instructions on the proper usage and
amount.
IMPORTANT
1. To prevent damage to the painted or plastic surfaces, do not use the
following: thinner, benzine, alcohol, petroleum, soap powder, polishing
powder, alkaline cleaner, acid, scouring pad and especially those strong
cleaners for use on a ventilating fan or a cooking range. Also, to prevent
corrosion, do not use a chlorine bleach such as sodium hypochlorite on the
stainless steel surfaces.
. Use clean cloth and hands for cleaning.
3. Before cleaning the cabinet interior, move the stored foods into another
clean refrigerator/freezer.
A. Cleaning
1. Stainless Steel Exterior
Wipe the exterior occasionally with a clean, soft cloth. Use a damp cloth containing a
neutral cleaner to wipe off oil or dirt build up.
2. Stainless Steel Interior
Spills should be wiped up promptly to avoid unpleasant odors. The cabinet interior
should be cleaned periodically with a mild soap or detergent.
3. Gaskets
Gaskets should be cleaned regularly with mild soap and water to remove dirt and
grease.
4. Condenser
Check the condenser once a year and use a brush or vacuum cleaner to clean the unit
as required.
56
Page 57

5. Air Filter
As the air lter becomes clogged with dirt or dust, the unit’s performance will be reduced.
Do not operate the unit with the air lter removed. This will accelerate clogging of the
condenser and result in failure. Check the lter at least twice each month. If it is dirty,
use warm water and a neutral cleaner to wash the lter. To avoid damaging the air lter,
do not use water hotter than 104°F (40°C). The lter is located behind the front panel.
This lter can be removed by opening the front panel and lifting the lter away from the
condenser. Reinstall the lter after cleaning.
6. Shelves
Remove and clean regularly.
7. Drawers
On units with drawers, the drawers can be removed for cleaning either individually or as
an entire assembly.
• To remove an individual drawer, rst remove all food product from the drawer. Pull the
drawer out to its fully extended position and lift up on the handle to disengage the drawer.
Before removing the drawer, carefully support the rear and front of the drawer and then
slowly remove it from the cabinet.
• To remove the drawer frame assembly, rst remove the drawers and then remove the
fasteners in the thermal break and in the rear of the cabinet. Carefully slide the frame
out of the cabinet, making sure not to damage the thermal break. Reinstall in the reverse
order, making sure not to overtighten the screws in the thermal break.
• To remove the drawer slide (center slide containing rollers) for cleaning, rotate the top
of the slide away from the frame while the slide is completely inside the cabinet. Drawer
slides do not require lubrication, but slides should be kept clean and free of food.
Note: Drawer slides are dishwasher safe.
B. Maintenance
1. Air Filter
The air lter promotes clean condenser surfaces and efcient unit operation by removing
dirt and grease from circulating air. The lter should be checked monthly and cleaned
when necessary—as described in "A.5. Air Filter".
All other maintenance or service on this unit should be performed in accordance with the
Hoshizaki Service Manual by a qualied service technician.
57
Page 58

VI. Wiring Diagrams
A1. HUR40A, HWR40A (auxiliary code Q5 and earlier)
115/60/1
Transformer Output
10V at 115V
Note: Jumper (color: white) between pins 7 and 8 of connector K151 may not be
present on all units, but this will not adversely affect performance.
CAUTION
Before diagnosing and/or servicing the unit, conrm that you have the proper
wiring diagram by checking against the diagram located inside the front panel.
58
Page 59

A2. HUR40A(-D), HWR40A(-D) (auxiliary code Q6 and later)
115/60/1
Transformer Output
10V at 115V
Note: Jumper (color: white) between pins 7 and 8 of connector K151 may not be
present on all units, but this will not adversely affect performance.
CAUTION
Before diagnosing and/or servicing the unit, conrm that you have the proper
wiring diagram by checking against the diagram located inside the front panel.
59
Page 60

B. HUF40A(-D), HWF40A(-D)
115/60/1
Transformer Output
10V at 115V
Note: Jumper (color: white) between pins 7 and 8 of connector K151 may not be
present on all units, but this will not adversely affect performance.
CAUTION
Before diagnosing and/or servicing the unit, conrm that you have the proper
wiring diagram by checking against the diagram located inside the front panel.
60
Page 61

C1. HUR68A, HWR68A (auxiliary code Q5 and earlier)
115/60/1
Transformer Output
10V at 115V
Note: Jumper (color: white) between pins 7 and 8 of connector K151 may not be
present on all units, but this will not adversely affect performance.
CAUTION
Before diagnosing and/or servicing the unit, conrm that you have the proper
wiring diagram by checking against the diagram located inside the front panel.
61
Page 62

C2. HUR68A(-D), HWR68A(-D) (auxiliary code Q6 and later)
115/60/1
Transformer Output
10V at 115V
Note: Jumper (color: white) between pins 7 and 8 of connector K151 may not be
present on all units, but this will not adversely affect performance.
CAUTION
Before diagnosing and/or servicing the unit, conrm that you have the proper
wiring diagram by checking against the diagram located inside the front panel.
6
Page 63

D. HUF68A(-D), HWF68A(-D)
115/60/1
Transformer Output
10V at 115V
Note: Jumper (color: white) between pins 7 and 8 of connector K151 may not be
present on all units, but this will not adversely affect performance.
CAUTION
Before diagnosing and/or servicing the unit, conrm that you have the proper
wiring diagram by checking against the diagram located inside the front panel.
63
Page 64

E. HUR96A(-D), HWR96A(-D)
115/60/1
Transformer Output
10V at 115V
Note: Jumper (color: white) between pins 7 and 8 of connector K151 may not be
present on all units, but this will not adversely affect performance.
CAUTION
Before diagnosing and/or servicing the unit, conrm that you have the proper
wiring diagram by checking against the diagram located inside the front panel.
64
 Loading...