

Page 1

Guest Pager User’s Manual
Page 2

Contents
1. Components
2. Instructions
2.1 Installation
2.2 Operations
2.3 Before Use
3. Caution
4. Transmitter Instruction
4.1 Keypad Description
4.2 Paging Instruction
4.3 Preference
4.4 Other Features
5. Description of Coaster
………………………………………………… 3
………………………………………………… 3
………………………………………..……….. 3
……………………………………………..….. 3
……………………………………………….... 4
……………………………………………...…. 4
……………………………………………..….. 5
…………………………………………..…….. 5
…………………………………………….…… 5
……………………………………………….... 10
…………..…………………………………….. 17
…………………………………………………. 20
6. Description of Staff Pager
6.1 Menu
6.2 Button Configuration
6.3 Functional Description
7. Care & Maintenance ................................................................. 24
…………………………………………………. 21
……………….………………………………… 21
…………….…………………………………… 22
…………….…………………………………… 23
2
Page 3
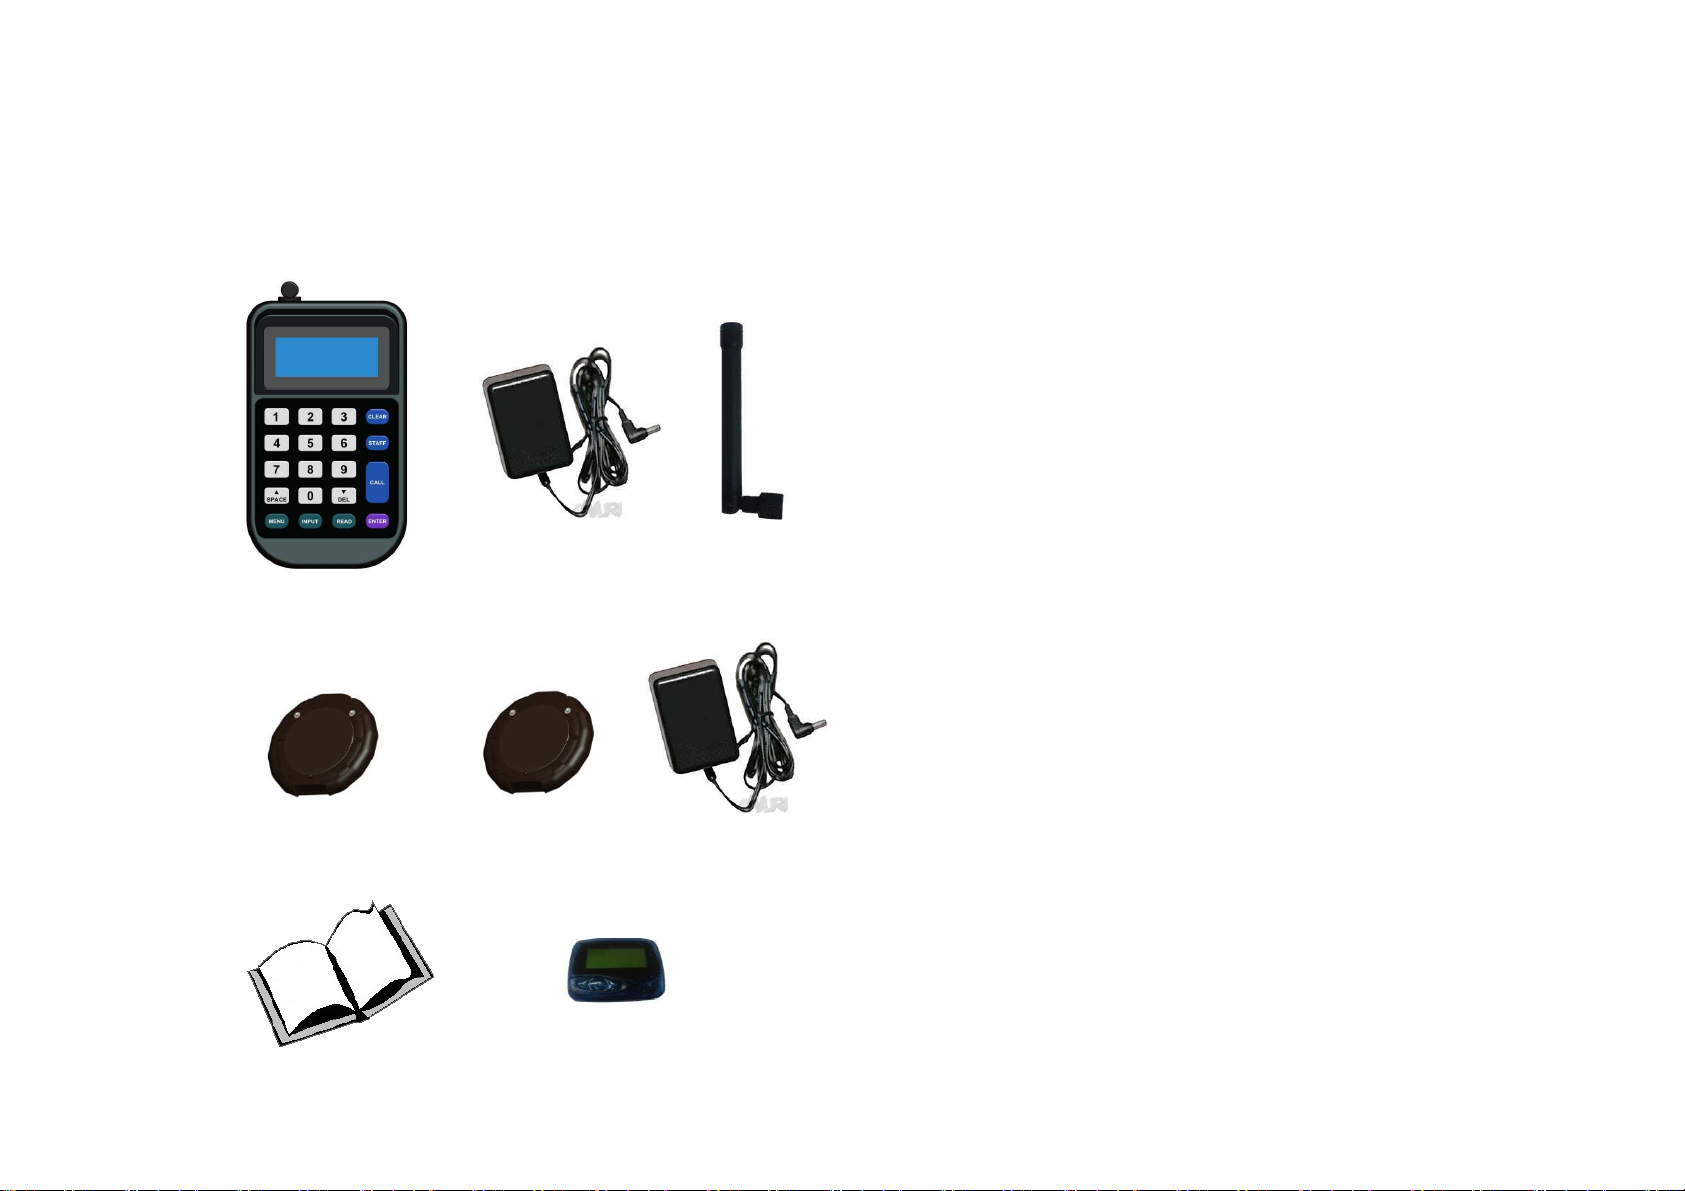
1. Components 2. Instructions
2.1 Installation
※ Actual product might be different from the picture
below.
Transmitter Transmitter Antenna
A/C Adaptor
Coaster Coaster Base Coaster
A/C Adaptor
User’s Manual Staff Pager (optional)
- Connect Antenna in to Transmitter.
- Connect Transmitter A/C Adaptor in to Transmitter
- Connect Transmitter A/C Adaptor in to power outlet.
- Connect Coaster A/C Adaptor in to Coaster Base.
- Connect Coaster A/C Adaptor in to power outlet.
- Stack Coasters on top of Coaster Base.
- Add AAA battery in to Staff Pager.
2.2 Operations
- Coaster and Staff Pager will work once registered to
the Transmitter.
- Coaster cannot be programmed or paged unless
pager is removed from the Coaster Base.
- All the key functions can be used by adding an
external USB keyboard on to the Transmitter.
- Staff name and/or message input must be via USB
keyboard.
- Transmitter A/C Adaptor must be connected in
order to use USB keyboard and must click space
button on the transmitter to start.
- SPACE & DEL key can be use as an up/down key from
the Menu List.
- Number key or Long key can be used from the Menu
List for quick move.
- Capable of handling up to 999 Coasters & Staff
Pagers.
※Note : To save data, information can not be saved
in “Low Battery” condition. We highly recommend
that the A/C Adaptor is connected while the
Transmitter is in use.
3
Page 4

2.3 Before Use
- Follow the “Instructions” on page 3 to set up the equipments.
- If coaster is not registered please refer to page 11,1-6 “Pager Registration”.
- Registration of Staff Pager is the same as Coaster but must use PIN #900 – #999 in order to add staff name.
- To register staff name on the staff pager, refer to page 12, 1-8 “Staff Name”.
- To save canned message, refer to page 12, 1-10 “Canned Message Setting”
- Once registration is done, refer to page 5, 4.2 “Paging Instruction”
3. Caution
3-1 . Safety Caution
Use products safely to prevent any unexpected accidents in advance.
• Do not disassemble, repair, or modify.
• Avoid direct heat.
• Be sure to connect antenna before connecting to power.
Warning
• Do not plug or unplug with wet hands.
• Do not use if cord or plug appears to be damaged.
* Connect to a properly grounded outlet only.
Caution
• Only use provided adaptor.
• Avoid humid and dusty area.
* Place Transmitter on a solid surface and treat it carefully.
• Avoid strong magnetic field.
• USB connector on the transmitter is for USB Keyboard only.
4
Page 5
4. Transmitter Instruction
4.1 Keypad Description
①
②
⑨ : MENU : Menu Entry
⑩ : DEL : Deletes the last entered character
( use as down arrow key on the menu list)
⑪ : SPACE : Use as hyphen in group calling
( use as up arrow key on the menu list)
⑫ : Number Keypad : Input numbers
4.2 Paging Instruction
③
⑫
⑪
⑩
⑨
① : Antenna : Wireless transmission/reception
antenna
② : LCD Display : Displays menu, status & input key
③ : CLEAR : Clears screen/back to previous menu
④ : STAFF : Check registered staff
⑤ : CALL : Paging
⑥ : ENTER : Complete menu selections and settings
⑦ : INPUT : Select or input messages to page
⑧ : READ : View call, message call, wait list &
registered list
⑧⑦⑥
④
⑤
Enter all calls from the main screen
Number of Wait Count
Estimated Wait Time
Current Time
Main Screen
※ It will automatically go back to main screen if no input
has been made from the menu or the sub-menu screen
for 5 minutes.
1. Individual Calls
1-1. General Call
- calling one Coaster and/or Staff Pager
ex) calling coaster #7
5
Page 6
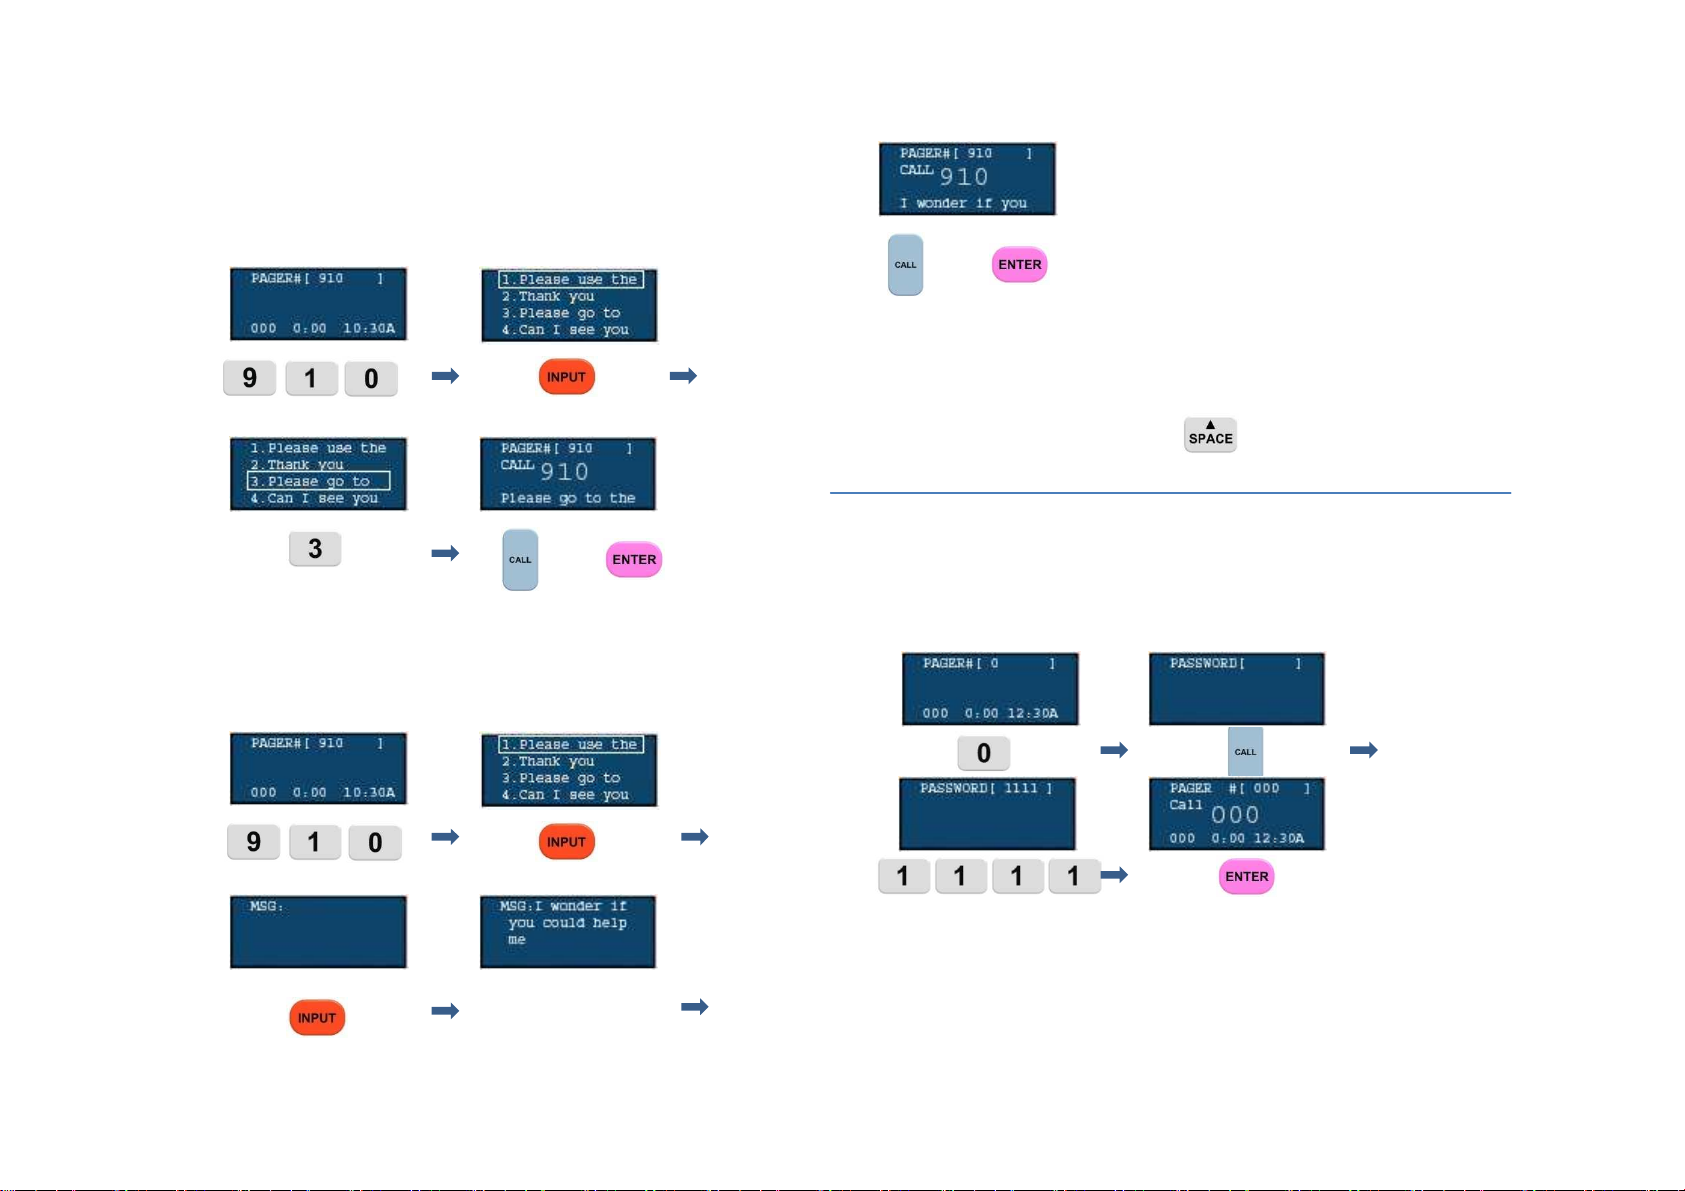
1-2. Sending Message (Staff Pager)
- using a canned message in the Transmitter
ex) calling Staff Pager #910 by using canned
message #3
or
- text message
ex) calling Staff Pager #910 by inputting new message
via USB keyboard
or
※ Staff Pager must be registered between 900 to 999 in
order to assign names.
※ USB keyboard must be connected to the Transmitter
in order to input characters.
※ To use USB keyboard press key on the
Transmitter before typing.
1-3. Call All Pagers
- calling all registered Coasters and Staff Pagers at
once.
- can be used in emergency
ex) calling all registered pagers
keyboard input
※ All registered Coasters & Staff Pagers receives calls.
※ All calls including message can be sent by pressing 0
and follow step 1-2 (Sending Message).
※ use user password (default 1111).
6
Page 7
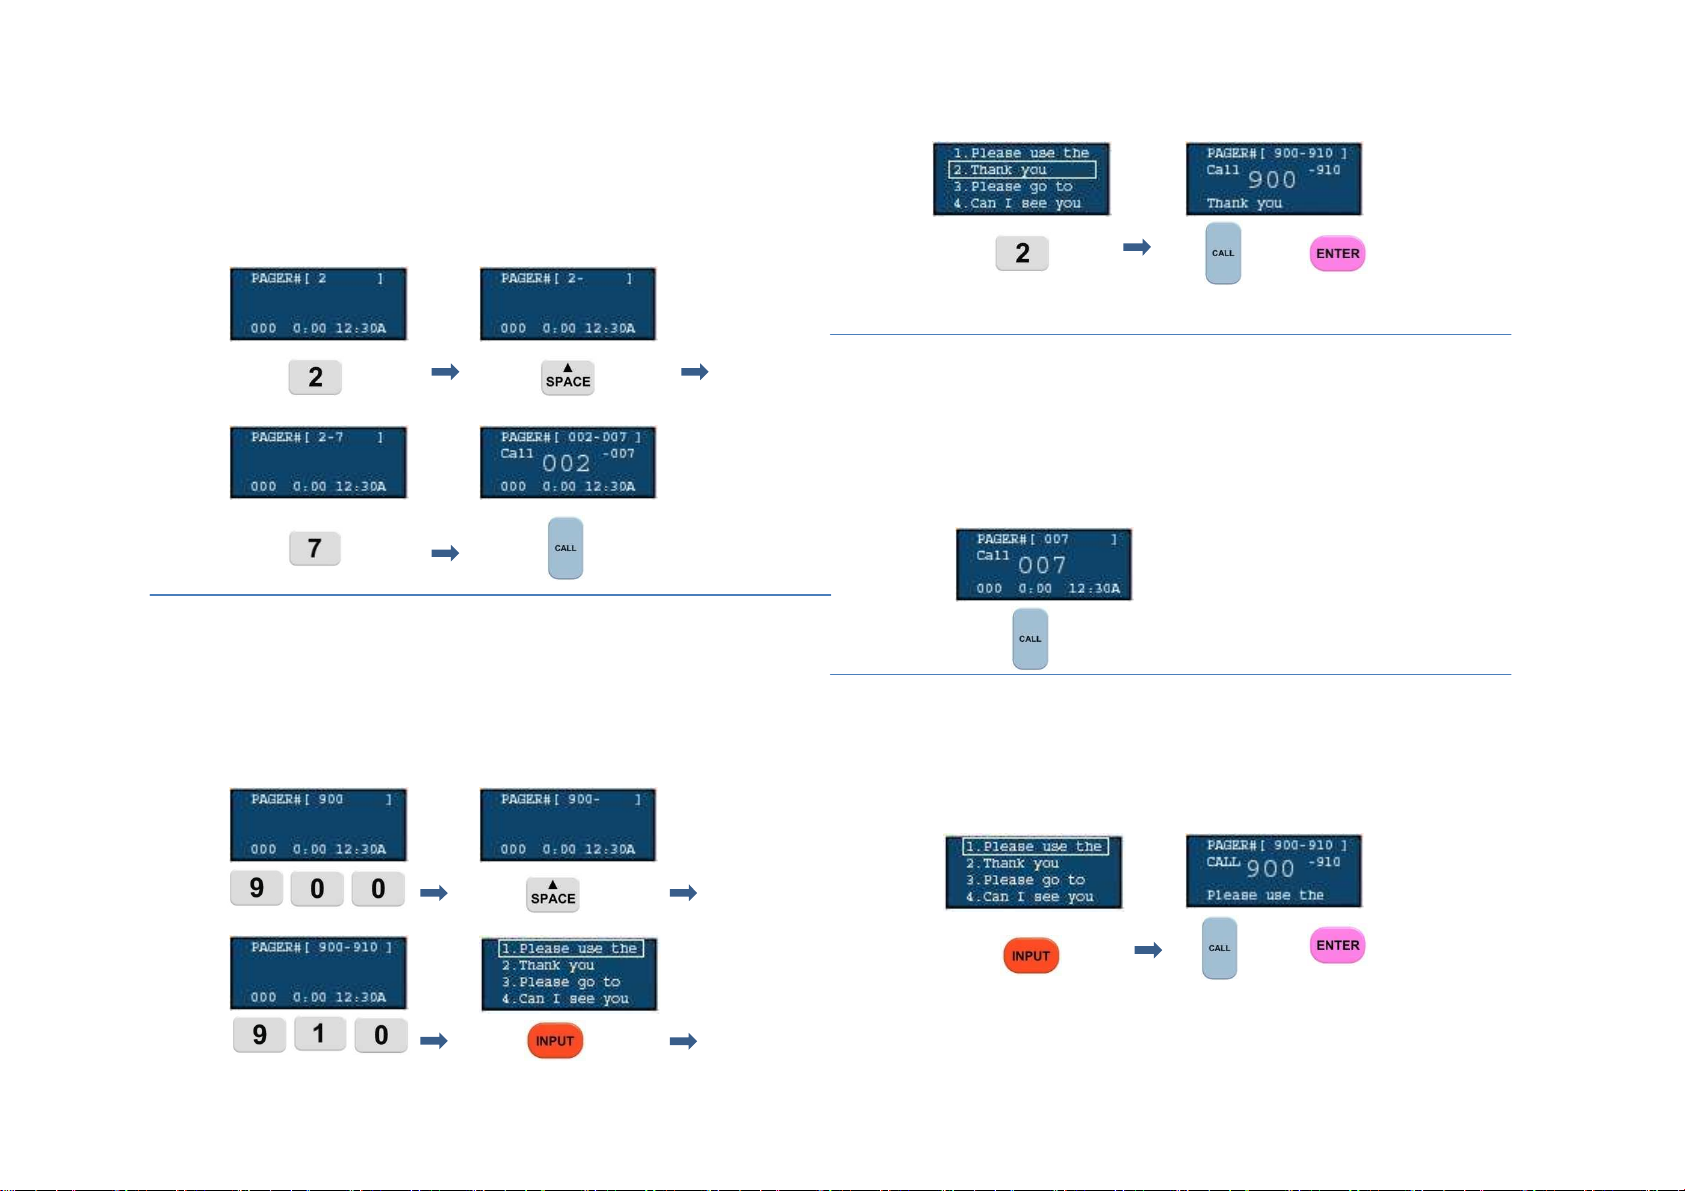
2. Group Calls
2-1. General Group Call (Coaster & Staff Pager)
- calling consecutive numbers at once
ex) calling Coaster #2 thru #7
2-2. Group Message Call (Staff Pager)
- calling consecutive number of Staff Pagers by
entering same messages.
ex) calling Staff Pager #900 thru #910 by using
canned message #2
or
- USB keyboard input method is same as page 6(1-2 ).
3. Re-Call
3-1. General Re-Call
- re-call last called number/group
- press call button to bring last called number
ex) re-calling last called #7
3-2. Send a New Message by Re-Calling (Staff Pager)
- sending a new message to last called number/group
ex) sending a new message #1 to a last called number
or
※ Canned/text messages can be only sent to the Staff
Pagers. Please check registered Staff Pager number
before calling.
7
Page 8
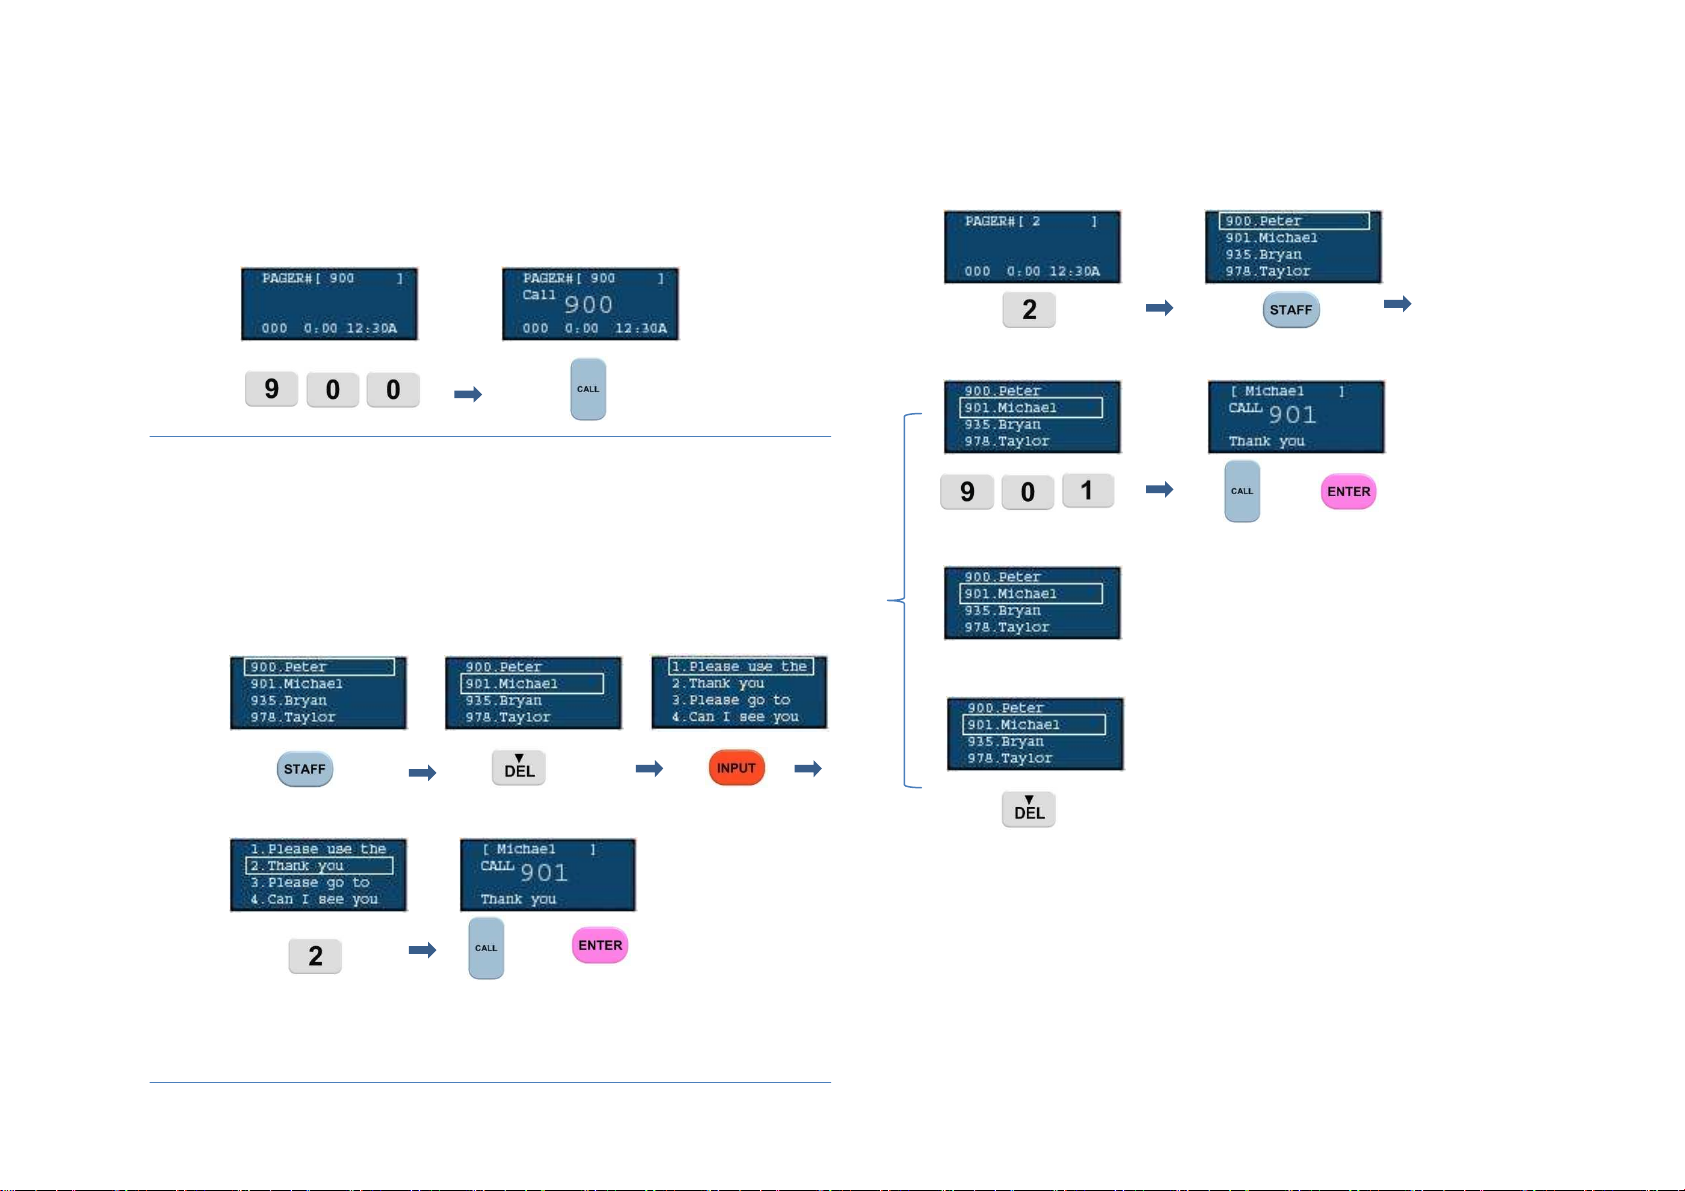
4. Staff Calls (when Staff Pager is Registered)
4-1. General Staff Calls (same as individual calls)
ex) calling registered Staff Pager #900
4-2. Call Staff Pager Using Canned Message
a. using staff menu & input key
-calling after checking staff name and a message
contents.
ex) calling Michael who is registered to #901 by
selecting #2 canned message
b. using staff menu & canned message number
ex) calling Michael who is registered to #901 by
selecting #2 canned message
(input canned message number)
or
(input staff number)
(input “Michael” via USB keyboard)
input “901” via USB keyboard
or
※ Staff name is not case sensitive.
※ Registered name can be found by typing the name.
※ In this case, a staff pager must be registered between
900 -999 with staff name. Also, canned message
must be registered.
8
Page 9

4-3. Calling Staff Pager Using Frequently Used
Canned Message
ex) calling registered Staff Pager #901
※ Frequently used canned message needs to be registered
on #10. If message is not selected, #10 will be
automatically selected.
※ #10 message will be selected for group calls too.
ex) “Hurry up” is registered on #10
(from main screen)
or
※ Number, alphabet and arrow key can be used
for search.
※ When duplicate names are used, no combination of numbers
and alphabets can be used.
ex) Michael 1 (x)
Michael H (o)
4-4. Call Staff Pager by Text Message
- calling staff pager without using canned message
ex) calling Michael who is registered to #901 by inputting
a new message “Yes” via USB keyboard
input “901”
via USB keyboard
Michael or
(spell out name)
Using up & down arrow instead of inputting numbers.
or
input via
USB keyboard or
※ up to 50 characters can be entered.
9
Page 10

4.3. Preference
1. User Menu
Use up /down ( SPACE/DEL) keys to check menu and
use Enter key for setting.
key is used to get back to the previous menu.
1-1. BackLight On/Off
- BackLight On/Off on LCD screen.
1-3. LCD Contrast Setting
- Adjust contrast of LCD on the Transmitter
ex) set contrast to 10
PASSWORD
input 10
PASSWORD
1-2. Keytone On/Off
- It will beep when key pad is pressed or when
pagers are programmed correctly.
PASSWORD
1-4. Transmitter Information
- Shows the information of the Transmitter.
PASSWORD
※ Displays software version, hardware version, serial
number & Transmitter ID
1-5. Coaster & Staff Pager Information
- Displays Coaster and Staff Pager information.
PASSWORD
10
Page 11

1-6. Coaster/Staff Pager Registration (Adding Pagers)
- Coaster must be removed from the Coaster Base to
start programming.
ex) program a Coater pager #7 with capcode 03248517
PASSWORD
input3248517
(if registered correctly)
※If you are registering the device that has been registered, it
will ask to delete the existing registration before re-
registering the same pager. In this case, staff name
associated with existing number will be discarded.
1-7. Delete Coaster/Staff Pager Registration
- To delete existing registered number. Remove
Coaster from the Coaster Base.
ex) deleting existing registration of the coaster #7
PASSWORD
※ Each Coaster and Staff Pager contains individual
capcode on the back of the pager.
※ “Empty” will display if not registered correctly.
“Empty” will display if re-programming is not done
correctly on a previously programmed pager.
※ If registered correctly, you will hear a buzzer sound.
※ Error will appear if wrong capcode is registered.
※ Only previously registered unit can be deleted.
※ Registration will remain if not deleted correctly.
※ If deleted correctly, you will hear a buzzer sound.
※ Staff name will be deleted if pager is replaced/updated.
11
Page 12

selected. (will be used as the frequently used message)
1-8 Staff Name Setting
- Assigning staff name on a registered Staff Pager
ex) assigning “Peter” to registered staff pager #900
※ Staff Pager must be registered and [ USED ] will appear
if registered correctly. [EMPTY] will appear if not
registered.
password
input name
via USB keyboard
1-9 Time Setting
- To set year, month, day and time
PASSWORD
input yy/mm/dd
toggle12/24H.
※ If time is set on the Transmitter, it will automatically set
time on the Staff Pagers.
1-10 Canned Message Setting
- To set Canned Messages.
ex) setting message #1 as “Thank you”
※ Staff name will appear on the staff pager LCD screen
when registration is complete. (up to 9 characters)
※ Staff name can be assigned between 900 ~ 999 on
registered staff pagers.
※ Staff name will be deleted if pager is replace/updated.
※ When duplicate names are used, no combination of
numbers and alphabets can be used.
ex) Michael 1 (x)
Michael H (o)
PASSWORD
input via
USB keyboard
※ Up to 10 different canned messages can be saved.
Message #10 will automatically used if no message is
12
Page 13

2. Manager Menu
2-1 Coaster LED Setting
- Ability to set LED brightness on the Coaster
ex) setting LED to ”Bright” on all registered pagers
2-3 Out of Range Setting
- To Alert when pager is out of range of the
Transmitter
ex) set “OUT OF RANGE” on
PASSWORD
or
Total : total registered Coaster quantities
Current : current set quantities
※ Each pager will register individually. A dot on the left
side of the LCD will keep flashing while setting.
2-2 Coaster Buzzer Setting
-Allows to set buzzer on/off.
ex) set buzzer off
PASSWORD
PASSWORD
※ Alert will go off if pager is taken out of range of the
Transmitter.
2-4 Coaster/Staff Pager Power Down
- setting pager power off
PASSWORD
input User password
※ “Power Downed” Coaster will go back to normal
operation once put on the Coaster Base.
13
Page 14

2-5 Channel Setting
- Set channel on Transmitter, Coaster and Staff Pager
ex) setting to Channel A
PASSWORD
※ Each pager will register individually. A dot on the left side
of the LCD will keep flashing while setting.
※ If there’s no communication between the Transmitter
and pager, the Transmitter channel can be reset from
the menu (see 2-6 TX Channel Setting)
PASSWORD
2-7 Retry Delay Setting
- Ability to adjust Retry Call time to prevent
interference of using multiple Transmitters.
ex) Retry call is set to call after 3 seconds of the call
PASSWORD
※Transmitter & Pager default channel: Channel A
2-6 TX Channel Setting
- Change channel on the Transmitter only
ex) change Transmitter channel to “Channel A”
14
Page 15

2-8 INIT EEPROM
- Initializing all stored memories of the Transmitter
PASSWORD
User Password
2-10 RF TEST
- Ability to call interval of 10 seconds in order to test
distance between the Transmitter and the pagers.
ex) testing with the registered coaster #1
PASSWORD
2-9 FACTORY SET
- Re-set to factory setting
PASSWORD
User Password
※ Only applies to the registered pagers and if there’s no
registered pagers an “Error” will display.
※ Difference from the 2-8 is that it applies to both
Transmitter and registered pagers. If at least one
doesn’t receive, it won’t reset to factory mode.
registered Coaster#
※ RF Test can be done for 2 hours if the Transmitter’s
output power is set on 10mW or for 10 minutes if set
on100mW or 2W.
※ Only button can be used while testing.
Use button to cancel.
※ Transmitting rate: 4800 bps / 6.25 kHz
2-11 Password Setting for Users
- Ability to set user’s password
ex) set to 1111
PASSWORD
15
Page 16

User password re- enter
※ Default password is set to 1111.
2-12 Password Setting for Manager
- Ability to set manager’s password.
ex) set to 2222.
PASSWORD
Manager password re-enter
※ Default password is set to 2222.
16
Page 17

4.4. Other Features
1. Waiting Count & Waiting Time
1-1 Shows List of Waiting Count
- Ability to count number of waiting customers
- Automatically shows registered Coaster number to
the Transmitter when picked up from the Coaster Base
to give to a customer.
ex) When Coaster #7 is picked up from the Coaster
Base.
remove Coaster from
Coaster Base
1-3 Initializing Wait Time & Waiting Count
- Ability to initialize wait time and number of waiting
people manually.
※ It will automatically initialize, once all the
Coasters are mounted on the Coaster Base without being
used for 2 hours
※ To prevent conflict on auto display of registered Coaster
number to the Transmitter, the Coaster is set to 2 – 5
seconds randomly. It is recommended to remove
one Coaster at a time from the Coaster Base.
1-2 Waiting Time
- Displays estimated wait time
ex) customer’s waiting time was15 minutes.
1-4 Wait List & Wait Time View
- Ability to see wait list & wait time for each customer.
※ Shows up to 150 wait list.
※ Wait list will initialize once the Transmitter’s power is off
or reset.
※ Customer can be called from the wait list by using
button.
17
Page 18

2. Call & Message Call List
2-1 Displays Call List (Coaster & Staff Pager)
- Shows call time and registered Coaster number
which was paged.
※ Shows up to 150 called list.
It will automatically delete oldest call list once the list
reaches 150 to show latest call list.
※ Call list will initialize once the Transmitter’s power is off
or reset.
2-2 Display Message Call List (Staff Pager)
- Shows call time and registered pager number which
was paged to the Staff Pager.
3. Registration List
3-1 Displays Registration List
- Ability to show currently registered Coaster and/or
Staff Pager.
4. USB Keyboard Functions
4-1 USB Keyboard Input Functions
- All the key functions can be used by adding an
external USB Keyboard in to the Transmitter.
- Staff name and/or message input must be done via
USB Keyboard.
- Must click space key in the Transmitter from the
main screen to start USB keyboard.
- Number button can be used from the Menu List
screen. Also PgUp & PgDn button can be used. Long
Key can be used from the Transmitter keypad.
※ Shows up to 150 Message Called List.
It will automatically delete oldest message once the list
reaches 150 to show latest messages.
※ Message Call list will initialize once the Transmitter’s
power is off or reset.
Key Mapping
F1 : CALL ESC : CLEAR
F5 : STAFF Enter : ENTER
F8 : READ ‘-’ : SPACE
F9 : INPUT Backspace : DEL
F12 : MENU ↑,↓ : SPACE, DEL
※ Note :Transmitter A/C adaptor must be connected to
use USB Keyboard.
18
Page 19

5. Low Battery Indicator
5-1 Low Battery display
- Displays when there’s not enough battery power.
※ Note : Call cannot be made in Low Battery mode and
setting will not be saved.
※ Internal battery is to support temporary use in case of
power loss only.
Recommended to use with the A/C adaptor
connected..
19
Page 20

5. Description of Coaster
1. Register
- Coaster must be registered to Transmitter. It will not receive if
not registered.
(see page11, 1-6 “Coaster/Staff Pager Registration” )
2. Receiving Call
- LED, vibrate or buzzer alert will go off depending on setting
- (see page 13, 2-1 “Coaster LED Setting” & 2-2 “Coaster Buzzer
Setting”)
- It will alert until coaster is back on the Coaster Base
3. Out of range
- Occurs when the Coaster is Out of range of the Transmitter
(see page 13, 2-3 “Out Of Range Setting”)
- Displays “OUT” on the screen and vibrate & buzz alert
periodically
- Automatically turns alert off when the pager is within range
-Turn alert off when pager is back on the Coaster Base
4. Power Down
-Function to turn power off when not in use
- (see page 13, 2-4 “Coaster/Staff Pager Power Down)
- Back to normal operation once put back on the Charger Base
6. RF Test
-Check receiving range
(see page 15, 2-10 “RF Test”)
- Response to periodically sent message from the Transmitter
- LED &Buzzer Alert when message received
7. Low Battery
- Vibrate when removed from the Charger Base
- Blinking LED
8. PIN Display
- Displays PIN when registered
- Displays “999” when abnormal message is received
- Displays “OUT” when our of range
9. Charging Indicator
- Right LED light comes on if fully charged on the Charger Base
- Left LED light comes on if not fully charged on the Charger
Base
- Left & right light comes on for Low Battery while in use
5. Factory Set
- Initialize Coaster from the Transmitter
(see page 15, 2-9 “Factory Set”)
20
Page 21

6. Description of Staff Pager
6.1. Menu
①
02:57P 01/01/12
②
④
③
②
①
1. [Call]
02:57P 01/01/12
③
1.1 [Inbox]
① Index : The order of message received
② Message : Received message
③ Date : Received date & time
①
②
PIN [900]
User [Steve]
1. Main Menu
① [Inbox] : Menu to check received message
② [INFO] : Check PIN & User Name
③ [Config] : Set alert type, date, power down
④ Date : Display time and date
1.2 [INFO]
① PIN : Registered number on the Transmitter
② User : Registered staff name on the Transmitter
21
Page 22

6.2. Button Configuration
① ②
③ ④
⑤
1.3 [Config]
① Beep : Buzzer Alert
② Vibration : Vibrate Alert
③ Beep+VIbration : Buzzer and Vibrate Alert
④ Set Time : Time setting
⑤ Power Down : Power off
2.1
- Use to move left and right
- Use to navigate through the menu
2.2
-Use to go back to previous menu
2.3
- Use to adjust time on “Set Time”
- Use to check message
- Use to complete setting
- Press for 5 seconds to put power on from the Power
Down mode
22
Page 23

6.3. Functional Description
1. Register
-Staff Pager must be registered to Transmitter. It will not receive
if not registered.
(see page11, 1-6 “Coaster/Staff Pager Registration” )
- Displays PIN from the [INFO] menu
2. User Name Setting
- User name can be set from the transmitter via USB keyboard
(see page 12, 1-8 “Staff Name Setting”)
-Displays User from the [INFO] menu
3. Call / Message Receiving
- Vibrate and/or Buzzer occurs depends on setting
(can be set from the [Config] menu)
-Press any button to stop vibrate/beep while during incoming call
- Received message can be checked from the [Inbox]
-New message icon display on top of the screen. It will disappear
if message is read or is pressed while receiving a call
3. Out of range
-Occurs when the Staff Pager is out of range of Transmitter
(see page 13, 2-3 “Out Of Range Setting”)
- Enable the Out of Range Icon on top of the screen ( ) when
out of range
- Automatically turns off when the pager is back in range
- Periodically alerts when out of range
4. Power Down
- Function to turn power off when not in use
- Power Down setting from the [Config] menu
- Back to normal operation when is pressed for 5 seconds
5. Factory Set
-Initializing staff pager from the transmitter
(see page 15, 2-9 “Factory Set”)
6. RF Test
- Check receiving range
(see page 15, 2-10 “RF Test”)
- Response to the periodically sent message from the Transmitter
-Saves as “Test Message” in [Inbox]
7. Low Battery
-Low Battery Alarm
-Periodically displays “Low Battery” on the screen
-Displays icon when Low Battery
23
Page 24

7. Care & Maintenance
24
Page 25

 Loading...