

Page 1
ReFLEX Two Way Messaging Device
User’s Guide
(AT 100)
ATCOM WIRELESS
1
Page 2
IMPORTANT SAFETY INSTRUCTIONS
1) Read these instructions.
2) Keep these instructions.
3) Heed all warnings.
4) Follow all instructions.
5) Do not use this apparatus near water.
6) Clean only with dry cloth.
7) Do not block any ventilation openings. Install in accordance with the manufacturer’s instructions.
8) Do not install near any heat sources such as radiators, heat registers, stoves, or other apparatus
(including amplifiers) that produce heat.
9) Do not defeat the safety purpose of the polarized or grounding-type plug. A polarized plug has two
blades with one wider than the other. A grounding type plug has two blades and a third grounding
prong. The wide blade or the third prong are provided for your safety. If the provided plug does not
fit into your outlet. Consult an electrician for replacement of the obsolete outlet.
10) Protect the power cord from being walked on or pinched particularly at plugs, convenience
receptacles, and the point where they exit from the apparatus.
11) Only use attachments/accessories specified by the manufacturer.
12) Use only with the cart, stand, tripod, bracket, or table specified
by the manufacturer, or sold with the apparatus. When a cart is used,
use caution when moving the cart/apparatus combination to avoid injury
from tip-over.
13) Unplug this apparatus during lightning storms or when unused for long periods of time.
14) Refer all servicing to qualified service personnel. Servicing is required when the apparatus has been
damaged in any way, such as power-supply cord or plug is damaged, liquid has been moisture,
does not operate normally, or has been dropped.
15) The apparatus shall not be exposed to dripping or splashing and that no objects filled with liquids,
such as vases, shall be placed on the apparatus.
WARNING: TO REDUCE THE RISK OF FIRE OR ELECTRIC SHOCK. DO NOT EXPOSE THIS
APPATATUS TO RAIN OR MOISTURE.)
THIS SYMBOL IS INTENDED TO ALERT THE USER TO THE PRESENCE OF
UNINSULATED “DANGEROUS VOLTAGE” WITHIN THE PRODUCTS ENCLOSURE THAT
2
Page 3

MAY BE OF SUFFICIENT MAGNITUDE TO CONSTITUTE A RISK OF ELECTRIC SHOCK TO
PERSONS.
THIS SYMBOL IS INTENDED TO ALERT THE USER TO THE PERSENCE OF INPORTANT
OPERATING AND MAINTENANCE (SERVICING) INSTRUCTIONS IN THE LITERATURE
ACCOMPANYING THE APPLIANCE.
CAUTION
Danger of explosion if battery is incorrectly replaced.
Replace only with the same or equivalent type.
3
Page 4

Welcome ................................................................... 4
Getting Started ........................................................... 5
What’s in the Box? ............................................................... 5
The Home Screen ................................................................. 6
The Keyboard ......................................... ............................ 7
How to Key in Capital Letter ………………………………….. 8
How to use ALT key ………………………………………….. 8
Special Key Description ………………………………………. 9
Starting ...............................................................…. 10
Turn On and Off ..........……………………………….. 10
How to Reading a Receiving Message………………… 10
Mailbox ………………………………………………… 11
Inbox (Received Message) …………………………….. 12
How to Reading a Message …………. ……….………… 12
Message Option …………………………………………. 13
How to Delete a Message …………………………….….. 14
How to Response to Received Message ……………………. 15
Outbox ( Sent Message) ………………………………………. 16
How to Reading a Message ……………………………… 16
Message Option ………………………………………………. 17
How to Delete All Message ………………………………. 17
Compose …………………………………………………. 18
How to Compose a Message …………………………….. 18
Compose Option ………………………………………….. 20
How to M\make a MCR List ……………………………. 20
Addresses Book........................................................ 21
How to Register a New Contact Address ........................ 21
How to Register New Group Address ............................... 23
Address Option -Contact.................................................... 25
Address Option – Group…………………………………….. 28
News/Info Inbox ........................................................... 30
Folder ……………………………………………….. 31
Application ……………………………………………….. 33
Alarm ……………………………………………………………. 34
Scheduler………………………………………………………… 36
Game ………………………………………………………….. 37
4
Page 5

Customized .............................................................. 37
How to Set Up Time & Date ........................................... 38
How to Set Alert” …………………………....................... 40
How to Set Display ……….............................................. 45
How to Edit Quick Text ……………………………………. 46
How to make a Custom replies …………………………….. 47
How to make a Signature …………………………………… 48
How to Edit My Info …………………… …………………… 49
Device …………………………………………………… 51
Power Off …………………………………………………….. 51
Battery Status Check ……………………………………… 51
Memory Status Check ……………………………………. 52
Appendix 1- ICON List ……………………………… 53
FCC Compliance …………………………………. 55
Warranty ……………………………………………. 55
5
Page 6
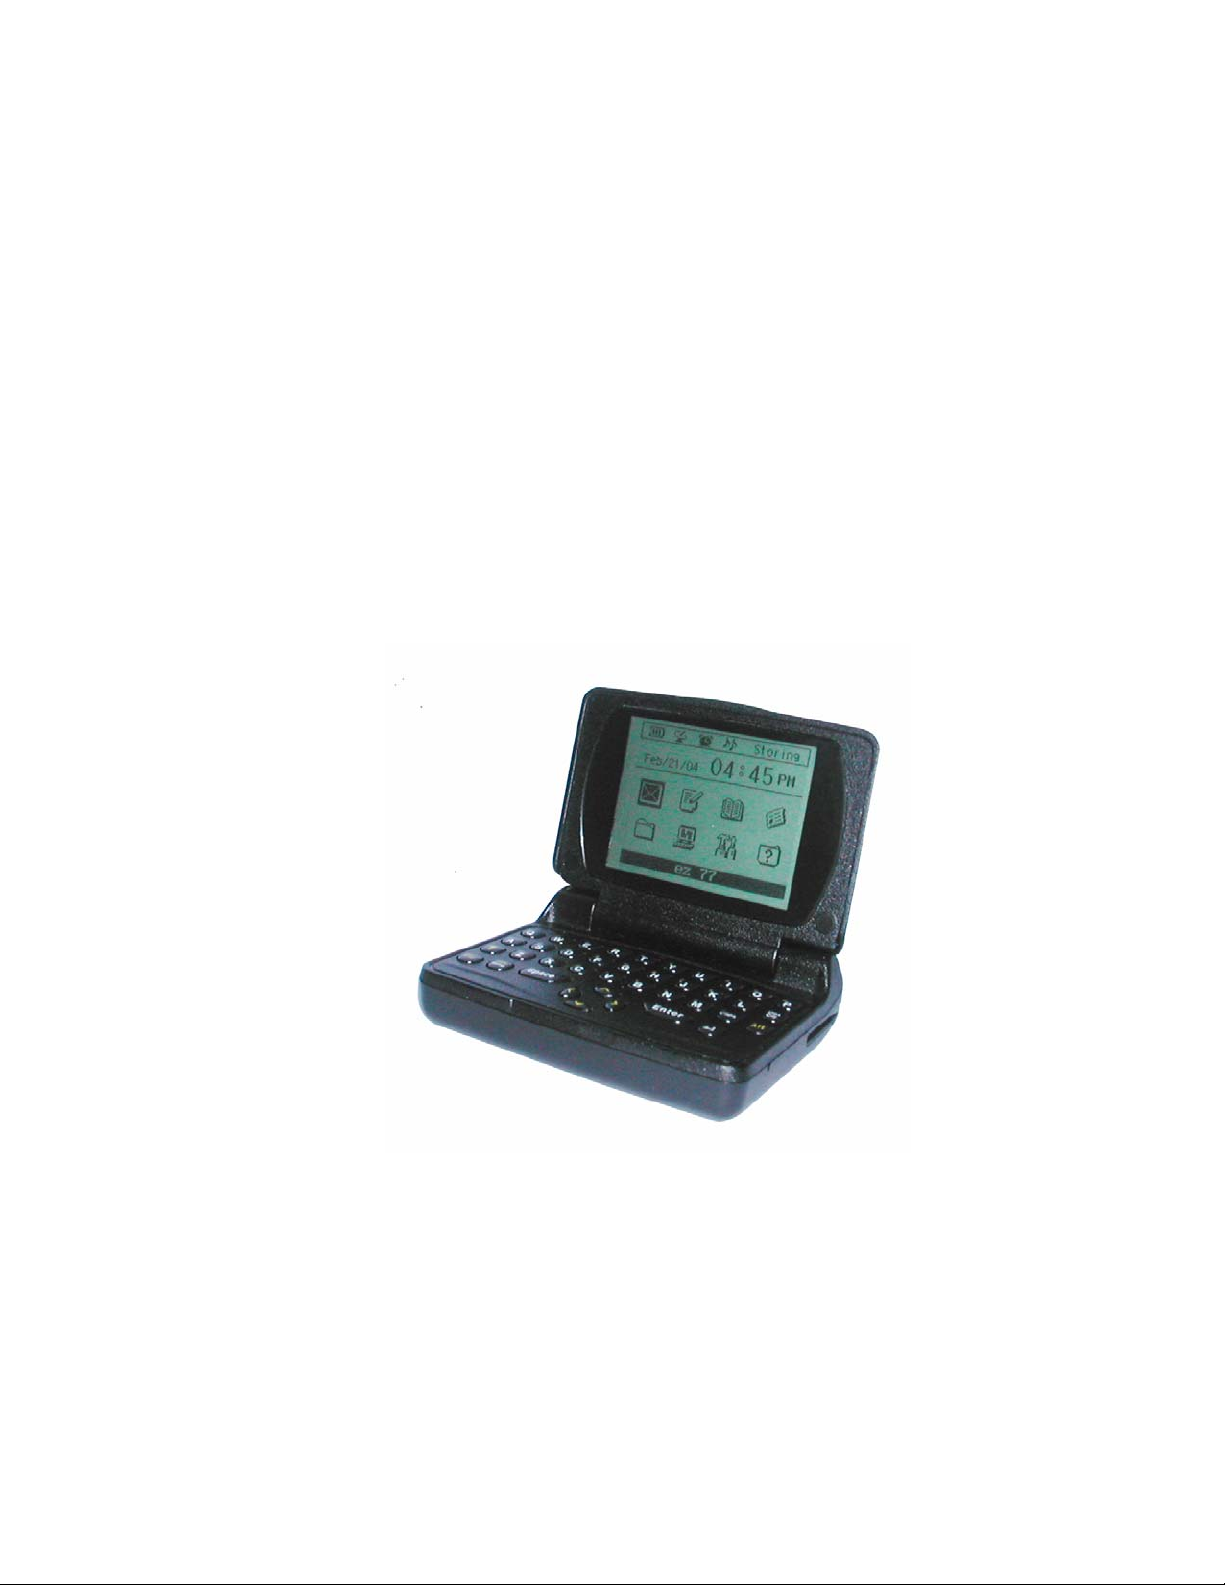
Welcome
Thanks for your selecting Hosoe’s ReFLEX Two Way Messaging Device, AT 100. The device
is designed for user’s convenient in sending or receiving a message through device or internet.
Please be advised following brief description for Main Menu;
Mail Box(
And you can repose to the received message or information, or you can forward the received
it to the others.
COMPOSE(
in any place.
ADDRESSES Book(
business associates up to 250 persons. And if you use the group message function, you can
send the message up to 20 persons at once. You can store the detailed Information of the
person using thirteen (13) fields. During the searching the Address Book, you can send the
message directly.
) Reading a received message or information from other device or Internet.
) You can easily compose the message using QWERTY Tiny Type key pad
) You can memorize the information of friends, family , and
NEWS/INFO INBOX( ) You can received the news or information on this folder.
FOLDERS(
) You can store the important message on this Folder. You can make
three folder.
APPLICATIONS(
) The device has additional function i.e. Alarm setting, Scheduler,
and Game.
CUSTOMIZED( ) You can set the device depend on your favorites i.e. Alert type, Key Tone,
Display , Font and Font size, and etc.
DEVICE( ) In this menu, you can check the device status i.e. Battery status, memory status,
Power Off and etc.
6
Page 7
Getting Started
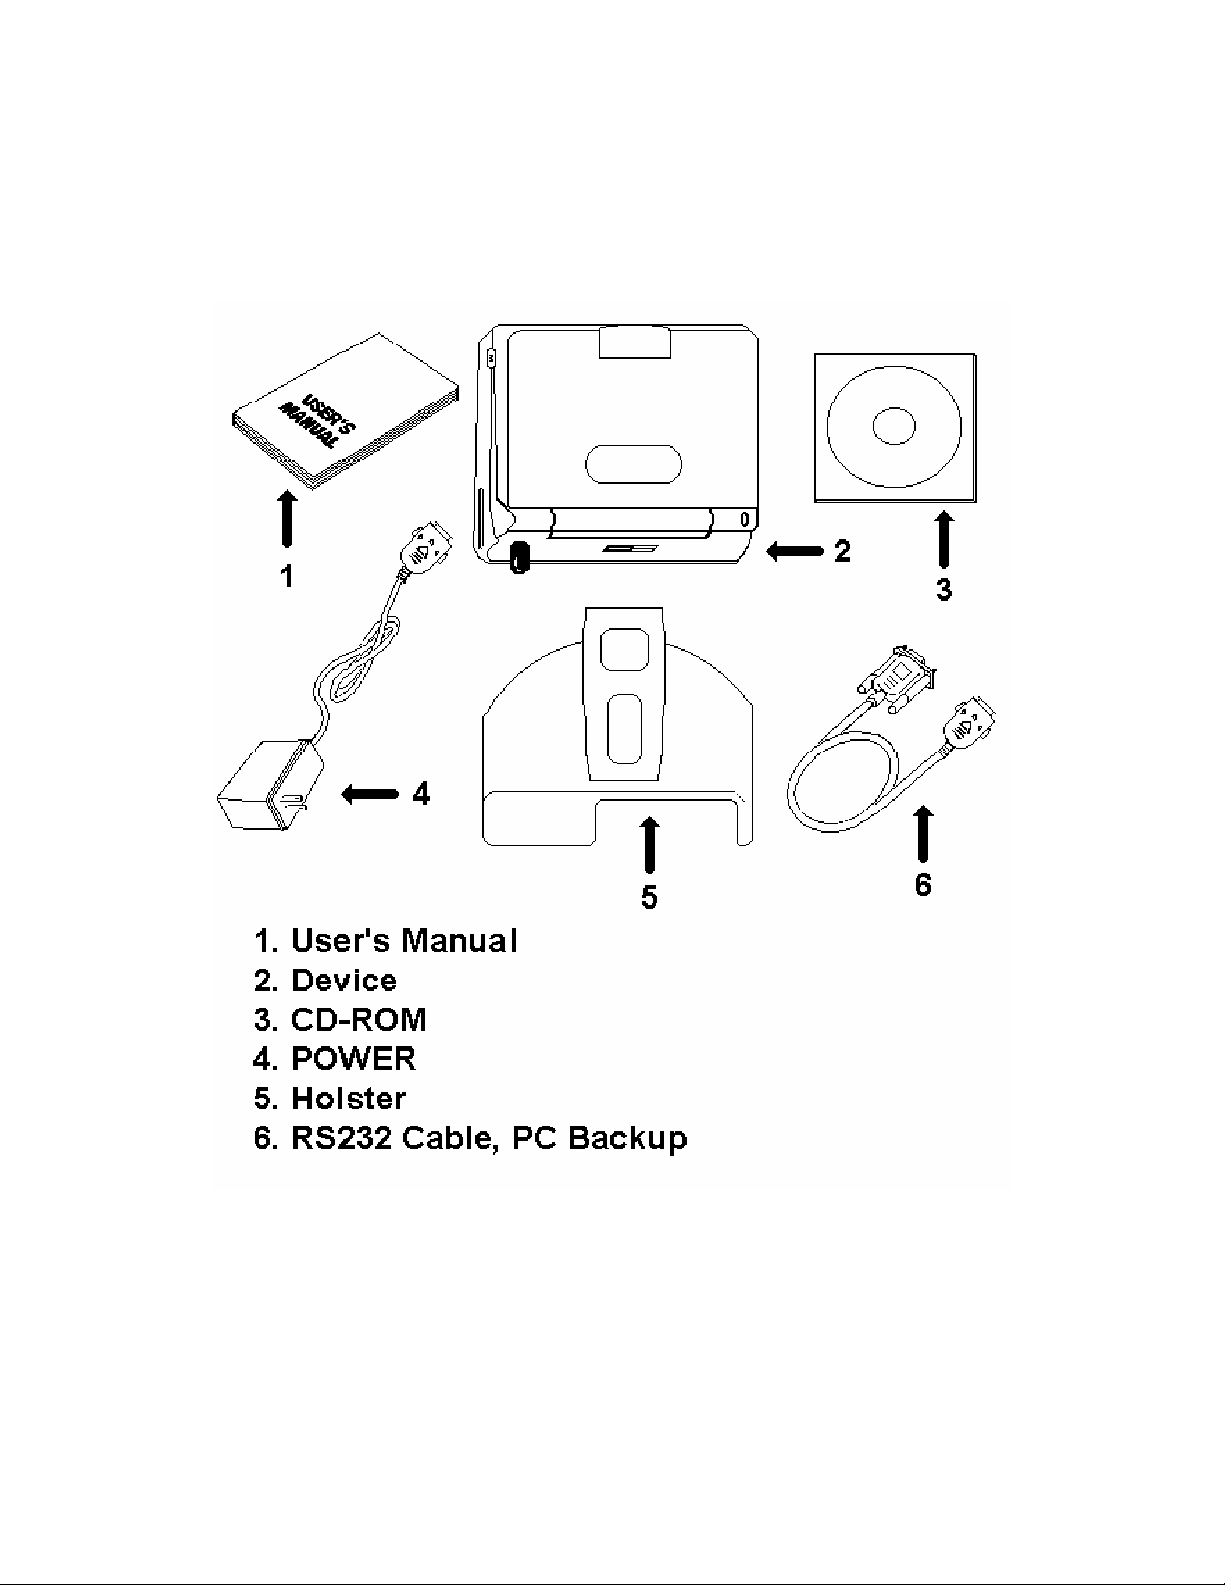
What’s in the Box?
*Note : Backup Link Cable PC & CD-ROM are option one
The Battery and Charger
The device operates with rechargeable Li-ion battery. The long lasting rechargeable Li-ion
battery will continuous about one (1) year. You are recommended to replace the battery for one
year interval. The battery charger will be operated on 110V, 60Hz. Then charging time is
7
Page 8
approximately 2 hours for full charging.
1. During the charging, the red light will be lit.
2. If the battery is in full charging, the LED of device will be turn to yellow.
The PC Interface Port & Cable –Optional item
If you want to store , back up, or import & export the data , mail ,and address to your Personal
Computer, the cable will be used for interconnected with device and Personal Computer. The
specific back up program is required to o storing or back up the data and information.
User ‘s Guider ( Manual)
The Holster
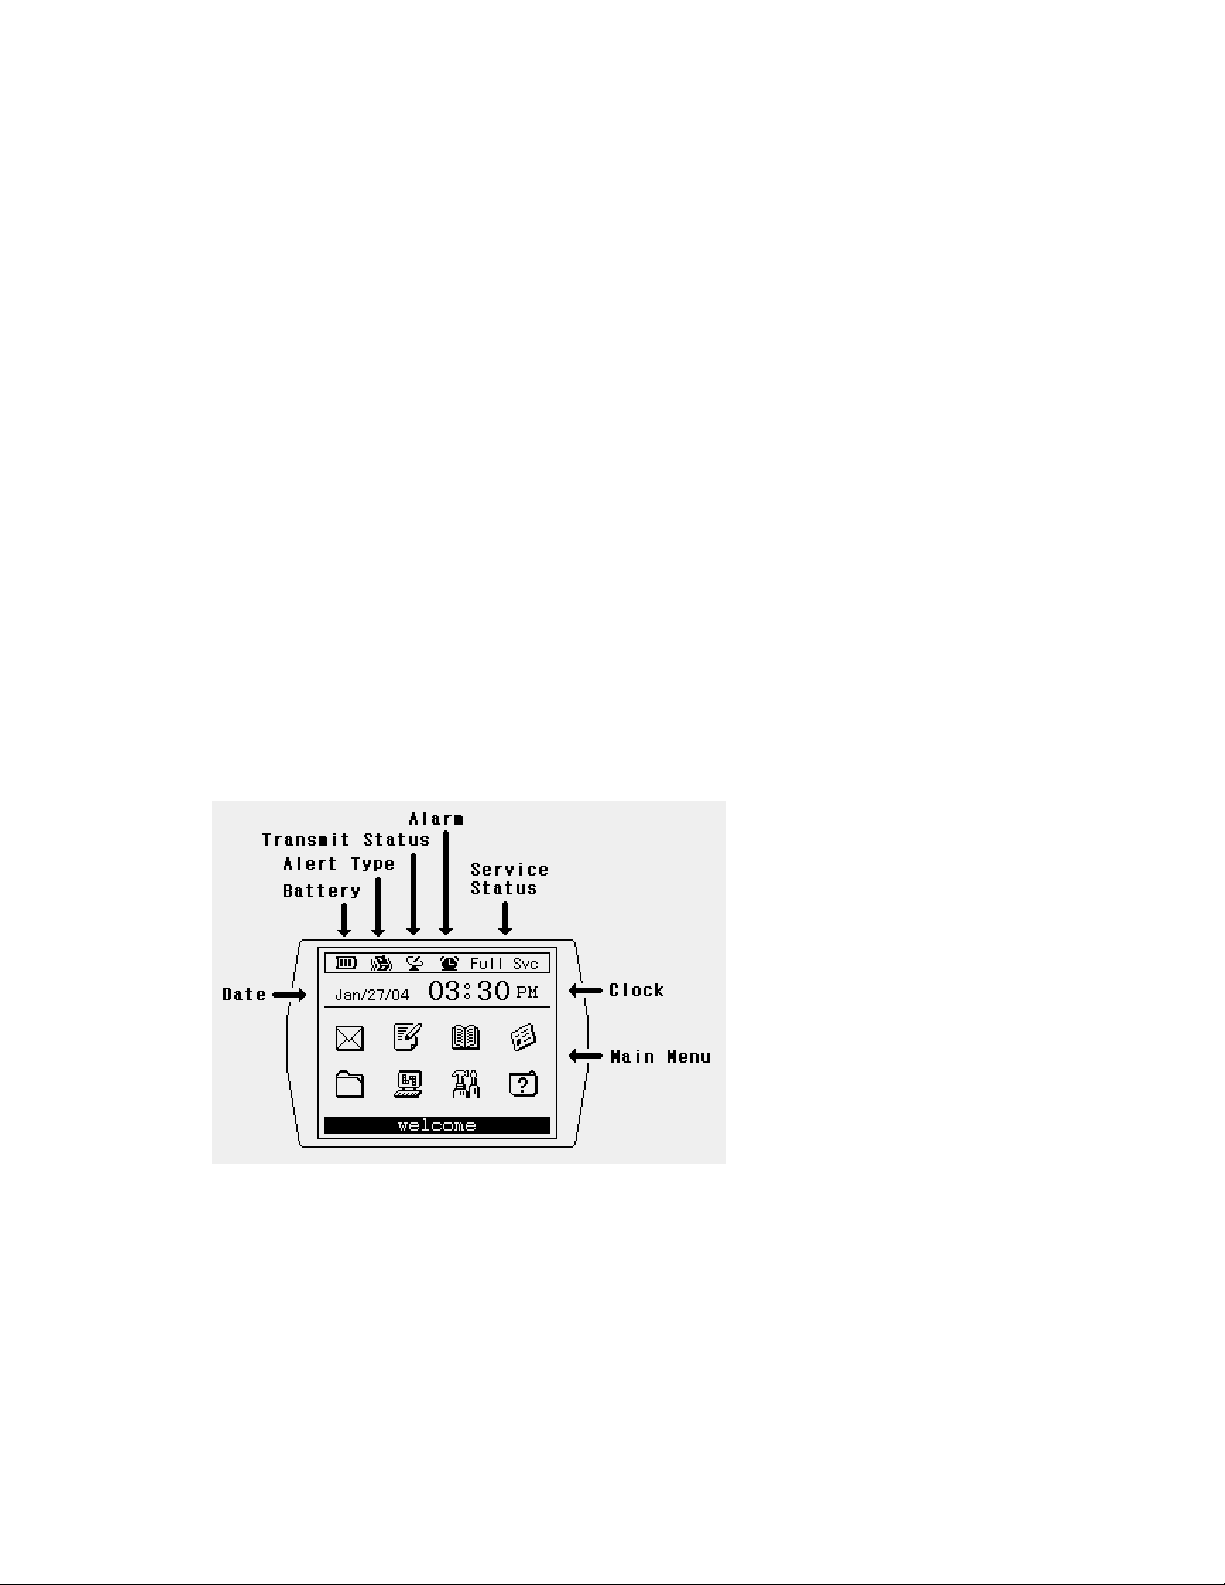
The Home Screen
The Home Screen will be as follows; You can get the brie information of device i.e. date, time,
message receiving status, and Radio mode/status.
The Time and Date, Clock
You can set the date, and time. Time can be set as 24 hours or 12 hours in
“Customize” menu.
Service Status
Indicate the system status depending on signal strength or system status i.e. Storing
Mode, Basic Mode, Full Service Mode, and Roaming service ( Storing, Basic,
Full Service)
8
Page 9
Status Icon
The Status indicator icon will be 4 kinds as follows;
- Alert Type
There are four (4) kind of alert sound i.e. bell sound, vibration, Vibration + Bell
sound, and LED and silent. The icon will be change depending on alert type
setting in “Application” mode.
- Battery Status
Showing the battery status by 3 bars. If the Battery is in full status, the number
of bar will be three.
- Alarm
If you set the Alarm as “Enable” in “Application” mode, the icon will be
displayed.
- Transmitter Status
You can turn “On” and “Off” the transmitter of Device in “Customize”
menu.
.
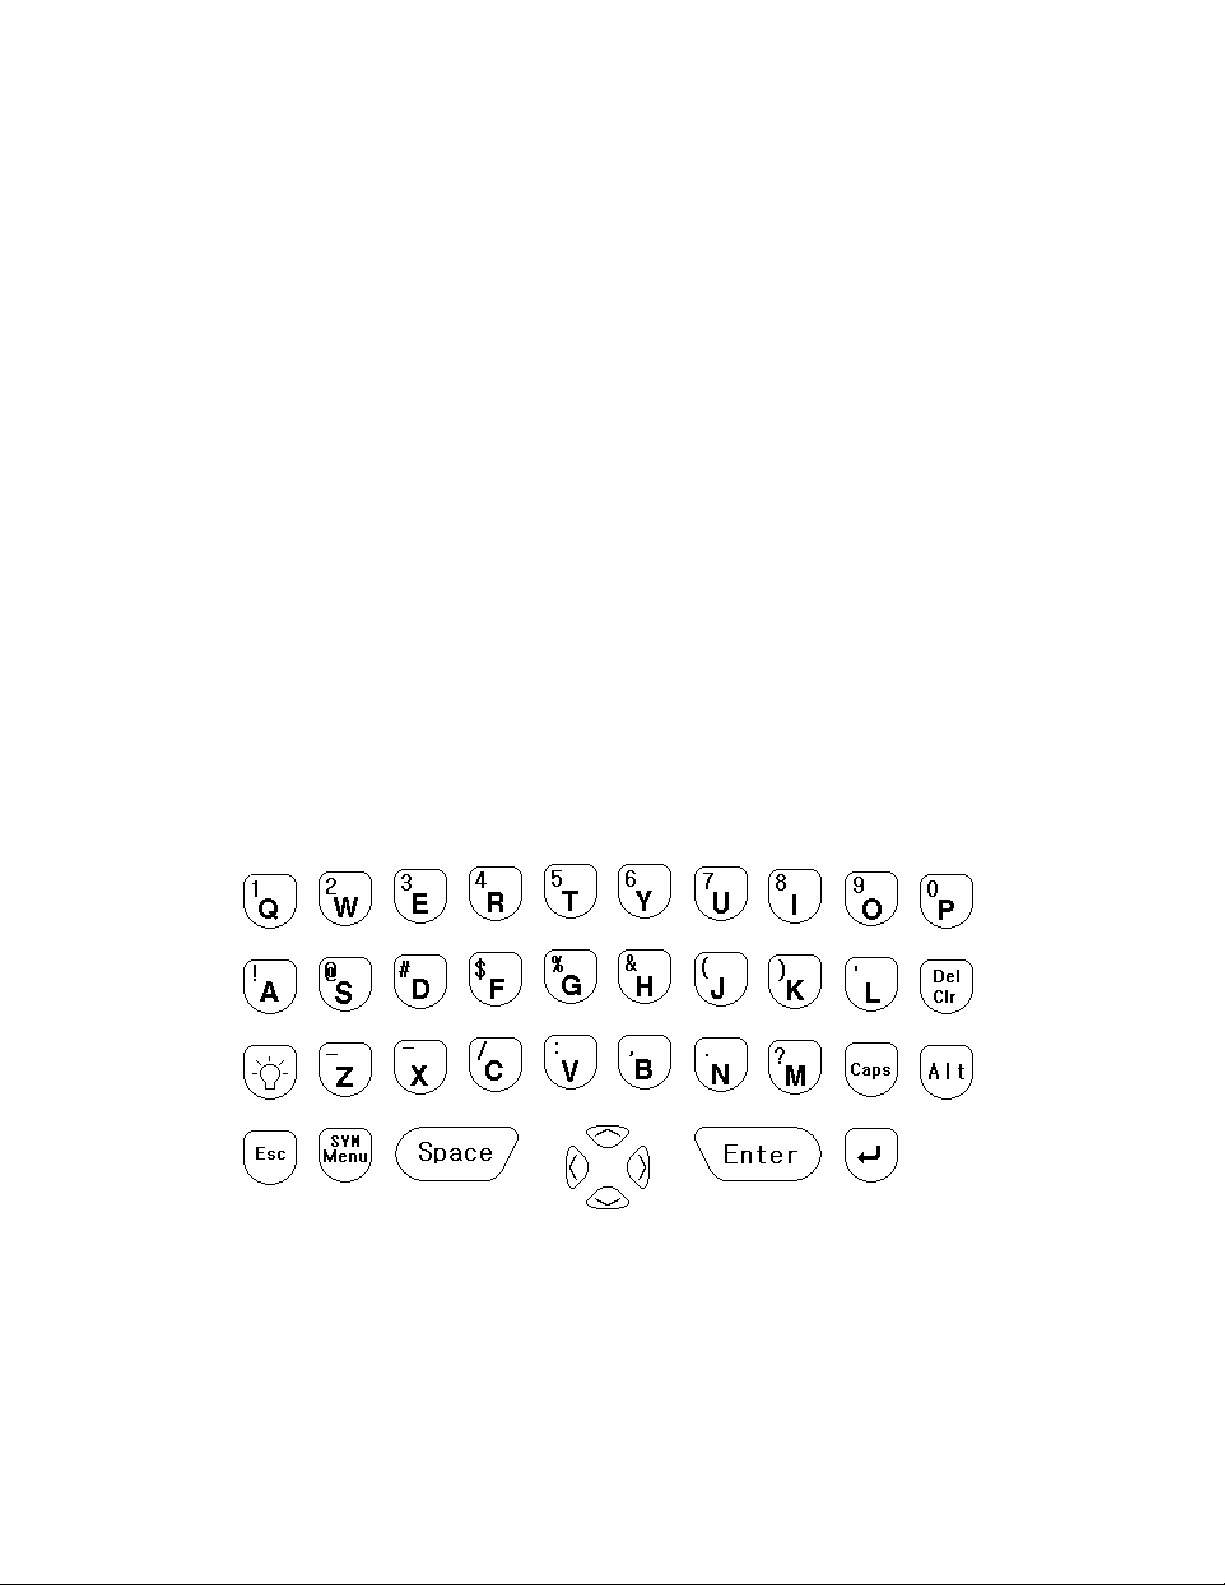
The Keyboard
The QWERTY tiny type key pad layout is similar with PC one. The back light LED will help your
operation of AT 100 in dark place or night time.
How to key in Capital letter and small letter.
9
Page 10
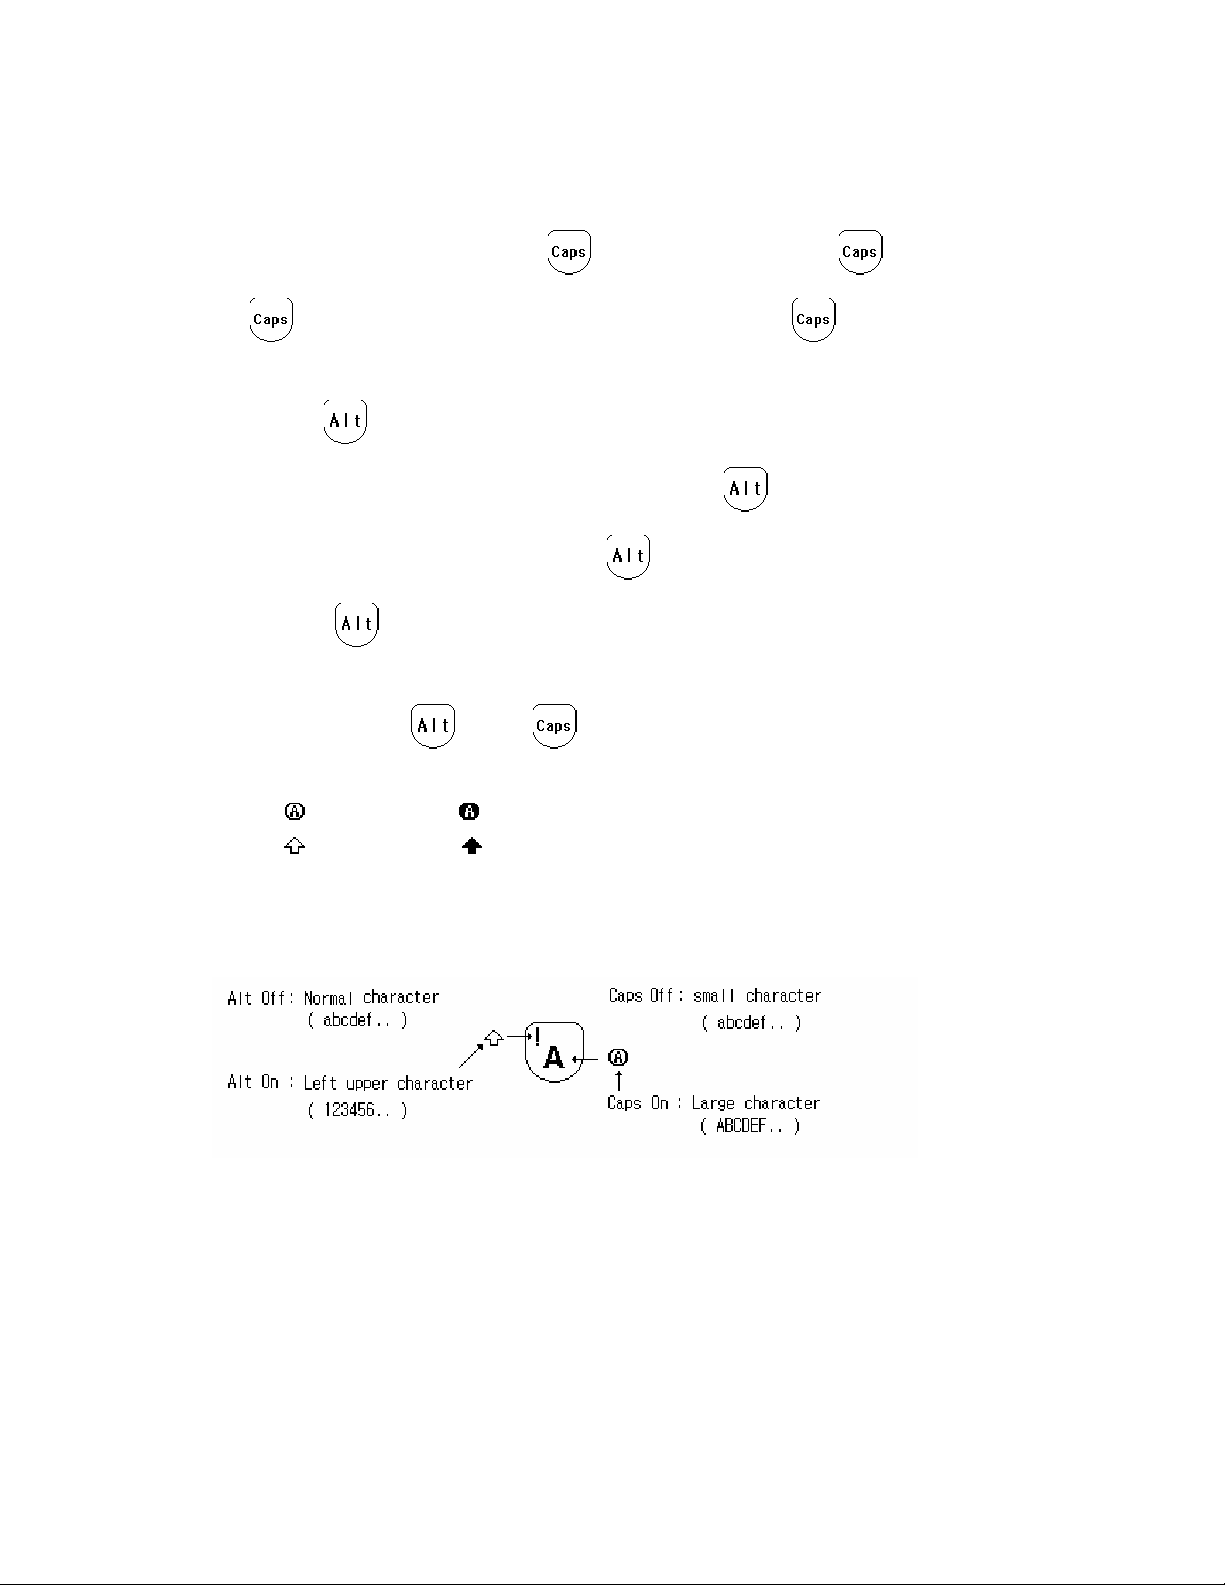
If you are to key in the small letter, just key in the letter using key pad, but if you are to
key in the capital letter, press the
key once. If you press the key twice, the
key will be locked. To release the lock status, press again key.
How to use
key.
If you are to use the yellow coded special letter, press the
you want to write. If you are to lock the
release the
key function, press the key again,
key function, press it twice. If your are to
* Note : If you press
key or key during composing, the following icon will be
displayed left upper corner of screen;
CAPS :
ALT :
( Pressed once ), ( Pressed twice )
( Pressed once ), ( Pressed twice )
Please refer to following for your quick understanding;
key and press the key what
Input key
10
Page 11
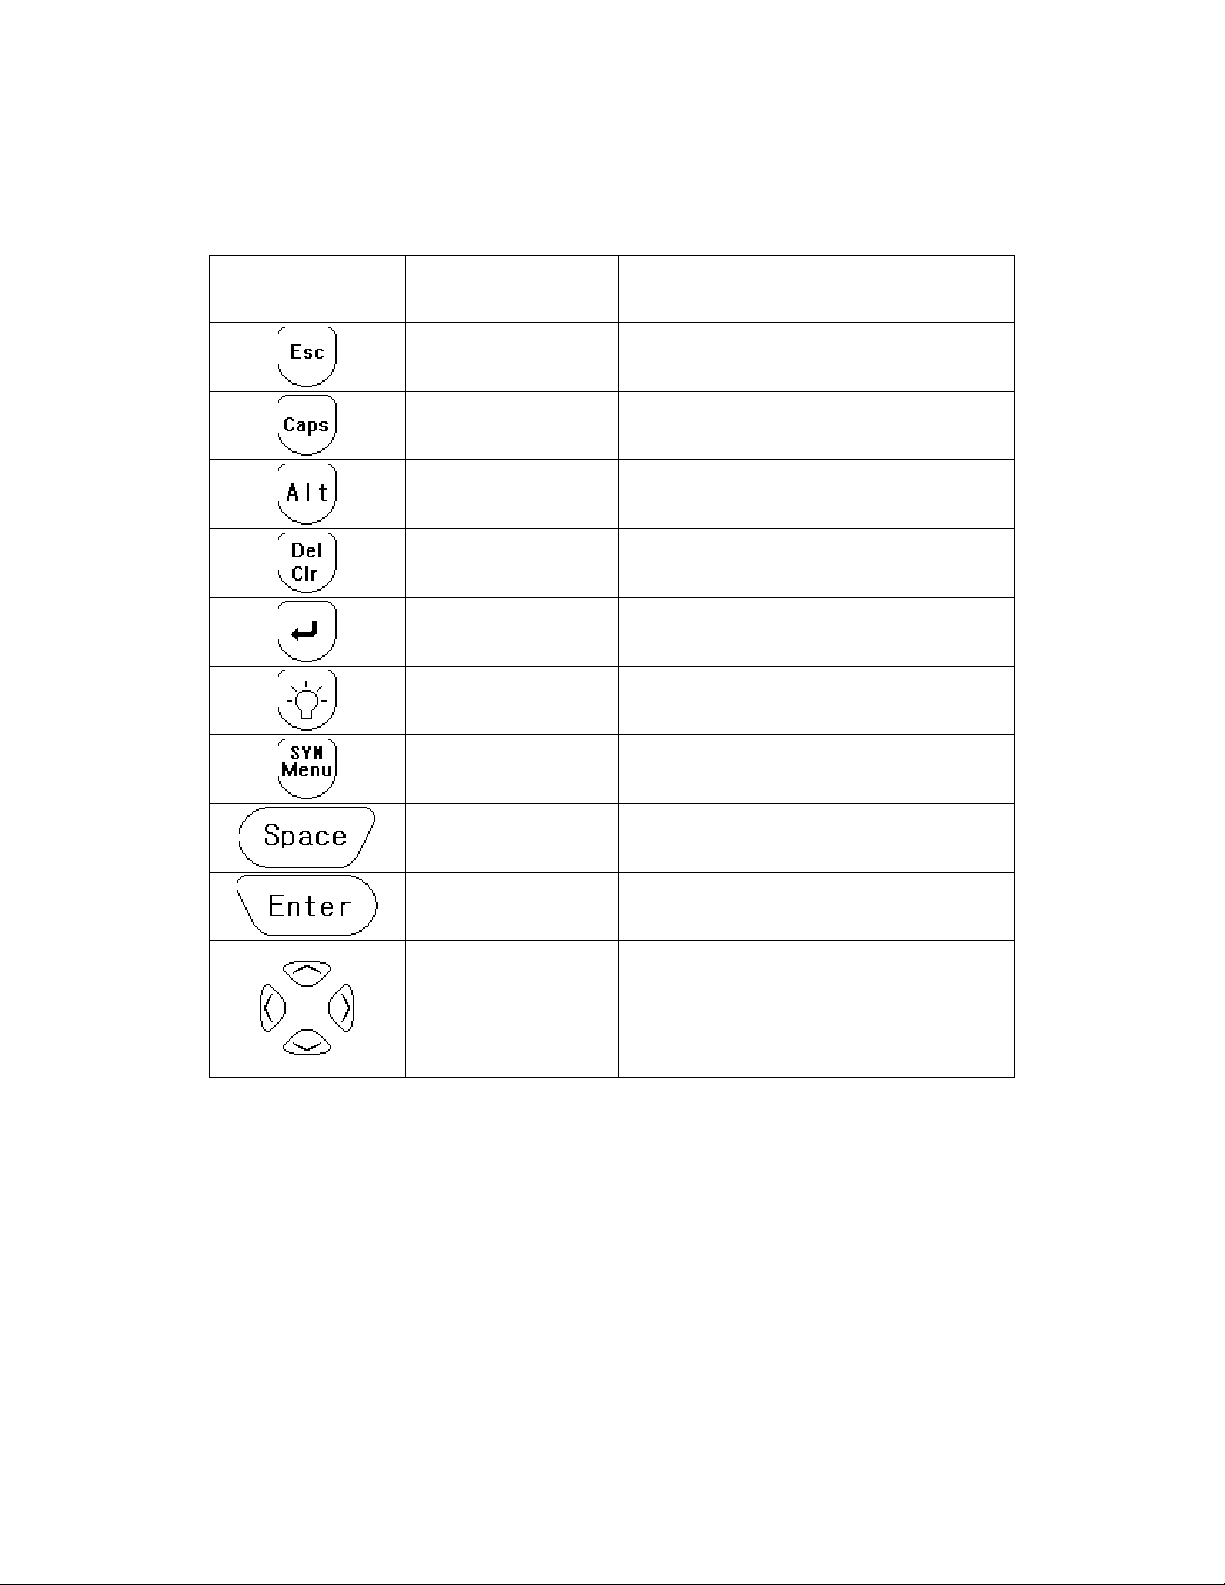
Special Key Description
Key Description Usage
Escape
Capital character Capital letter will be key in.
Alternative The yellow colored character will be key in.
Delete/clear Character delete / (Alt+Del) clear
Line Feed Line feed in Edit mode
Backlight LED backlight On/Off
Menu Sub menu display
Space
Enter Power “ON”/ Selection / Confirm
Return to proceeding screen, Cancel Action,
and save data
Space Character and preview the alert sound
in Alert mode setting.
Navigation
Move to Menu / Setting Value / Increase,
Decrease
11
Page 12
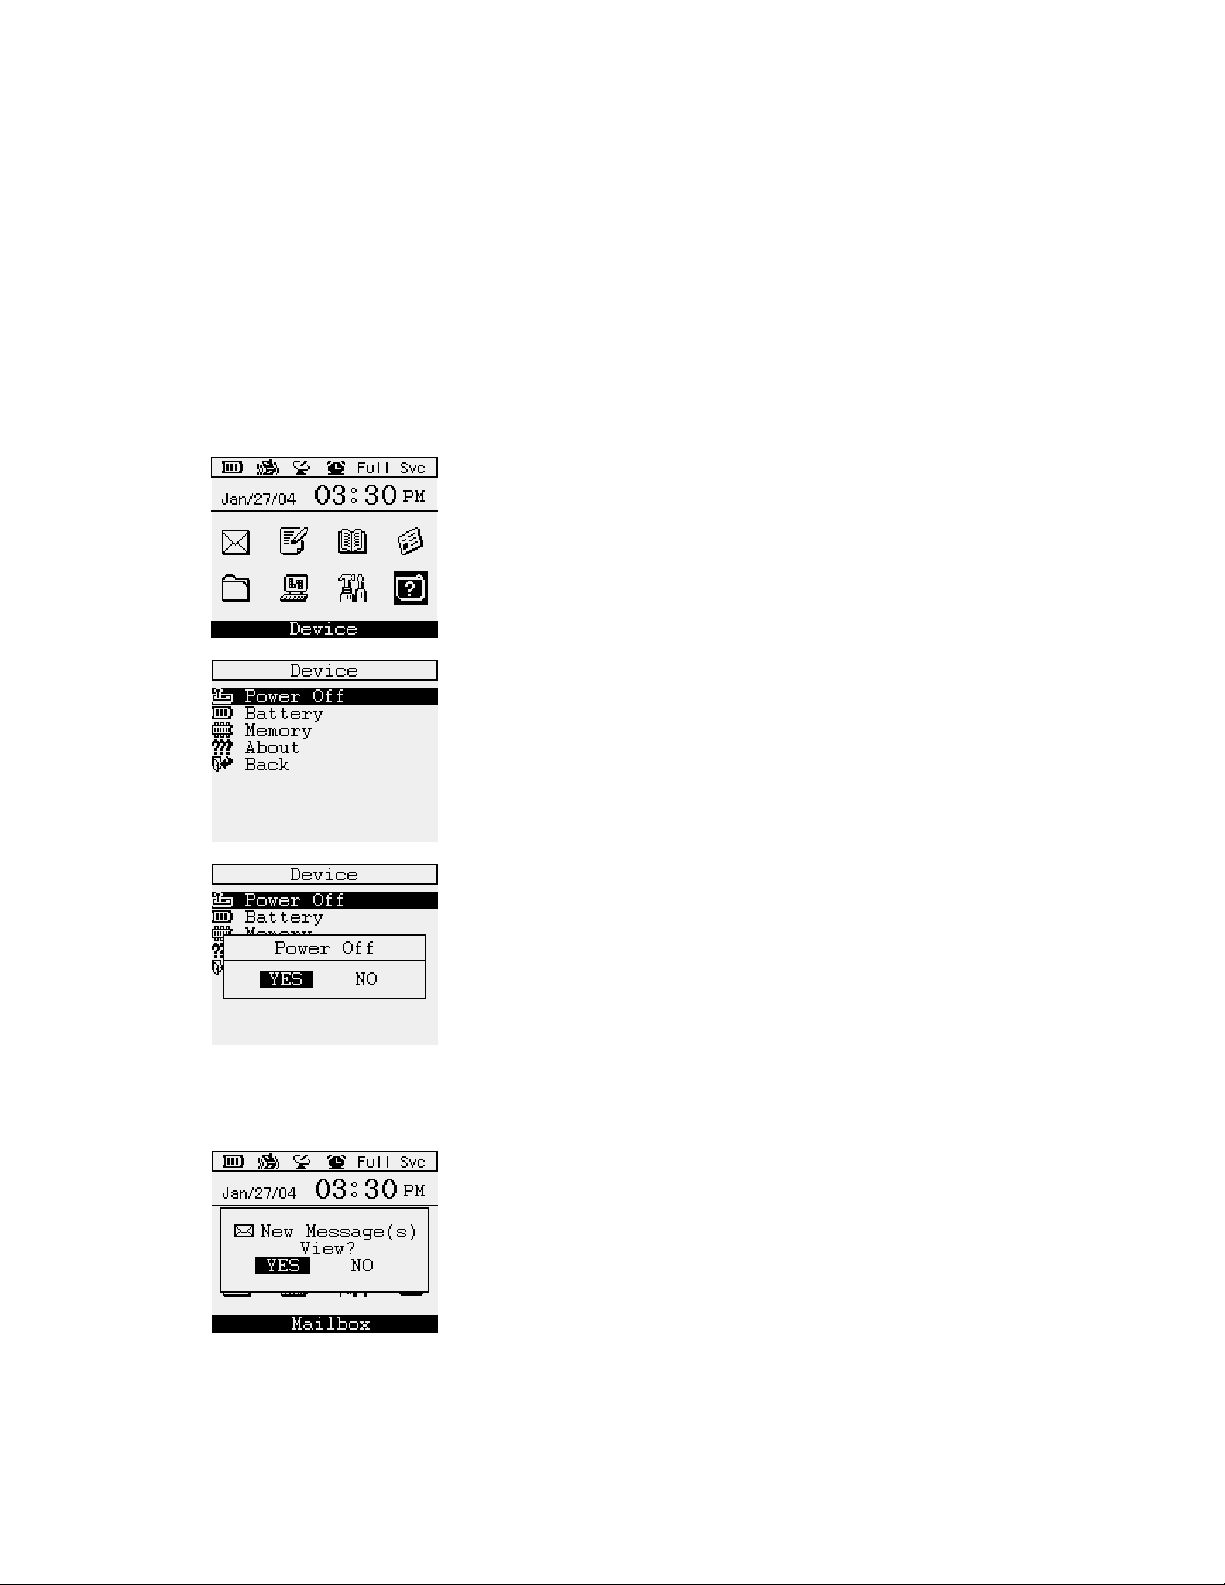
Starting
How to Turn On AT 100
To turn “ON” the AT 100, open the flip and press “ Enter” key for 2-3 seconds, then home
screen will be displayed.
How to Turn Off AT 100
Press the “D” key in main menu or move the cursor to ‘Device”,
and press “Enter” key.
Then “Device” related sub menu will be displayed as left picture.
Then move to ‘Device”, and press the “Enter” key
Select the “ Power Off” menu, and press “Enter” key
Select “YES” and press “Enter”, then power of At 100 will be
“OFF”.
How to Reading a Receiving Message.
If there is a receiving message in any mode, the message
arriving pop up window will be displayed and set Alter sound will
be activated. To stop the alert sound, please press any key.
If the reminder alert were preset, AT 100 will remind you
periodically to remind you the existing of unread message.
12
Page 13
Select “YES” or “NO” using navigation key, and press “Enter”. If
you select “YES”, you can read the message.
Mail box
In Mailbox, there are three(3) sub menus. The first one is “ Inbox”(received message). Please
be advised that the Information related message will be stored in New/Info Folder. The seconds
one is “Outbox (sent message). The third one is draft message, and it will be stored in “Draft
box..
Select the Mailbox in main screen, press “Enter”.
The Mail Box menu will be as following picture;
1] Inbox
Store the received message. The number show you the unread message and total received
message number.
2] Outbox
The sent and sending message will be stored in “Outbox”. The forwarded message also
stored on “Outbox”. The number show you the failed message number and total sent message
number.
3] Drafts
During the message composing, you can hold or cancel the message sending. Then it will be
13
Page 14
stored in “Draft”.
“Inbox” Message (Received Messages)
How to Reading a Message
Move the black bar to ‘Inbox” and press “Enter”.
The number of Inbox show you the number of total and
unread one.
Then all messages will be displayed with serial number and title
of message. The nine (9) messages will be displayed in one
screen. The read message will be marked
messages will be marked
will be marked (
move the black bar to the message and press “Enter”.
Then message will be displayed.
The end of each message, the message receiving date and time
will be displayed. To read next page, press “Enter”.
) icon. If you are to read any specific message,
icon, the unread
icon and the forwarded message
After the reading a message, press ”Enter”. Then AT 100 will be
in Message Option mode .
There are four (4) menus in this option.
*Note : The message number exceed 100 messages in Inbox, the
oldest one will be deleted and the new one will be stored.
14
Page 15

Message Options List
1) Next Message
If there are another message, press “Enter”. Then next message will be displayed.
2) Forward message
You can forward the message to others .
If you select “Forward Message”, and press “Enter”. The screen
will goes to “Select Address” menu of ‘Address book. Then Key in
the address or select the address, and press “Enter
Select “ Address Type” using navigation key, and press ‘Enter”. ”
How to select “Address” and how to key in the new address will be
referred in “Address Book” in detail.
The black bar will be placed on “Send Message”, then
press ”Enter” to forwarding it.
Then “Sending” pop up message will be displayed for seconds
and the screen will goes to “Mail Box.
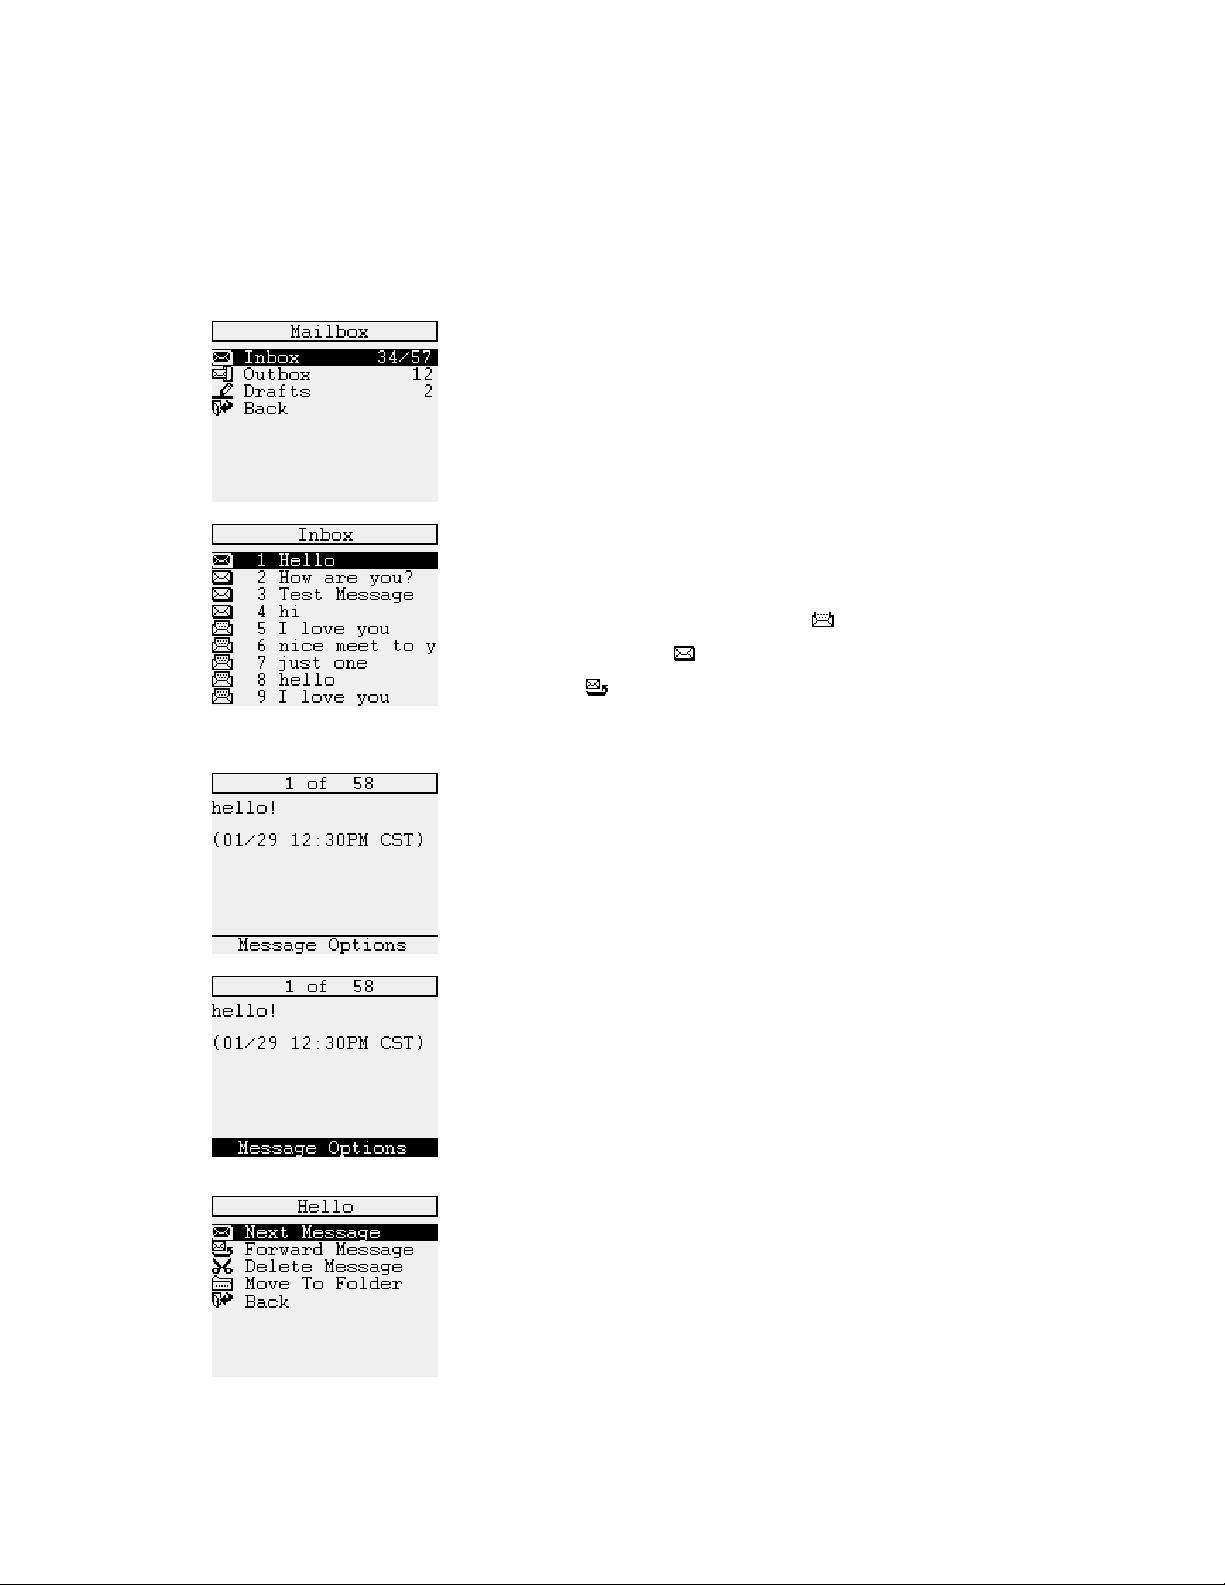
3) Delete Message
Select “”Delete Message”, and press “Enter”.
15
Page 16
Then “Message Deleted” pop up window will be displayed for a
seconds, and the screen goes to “ Inbox” list.
4) Move to Folder
It will be used for store the message in “Folders”.
*Note : The message number exceed 100 messages in Inbox, the oldest one will be deleted
and the new one will be stored in Inbox.
How to Delete Messages .
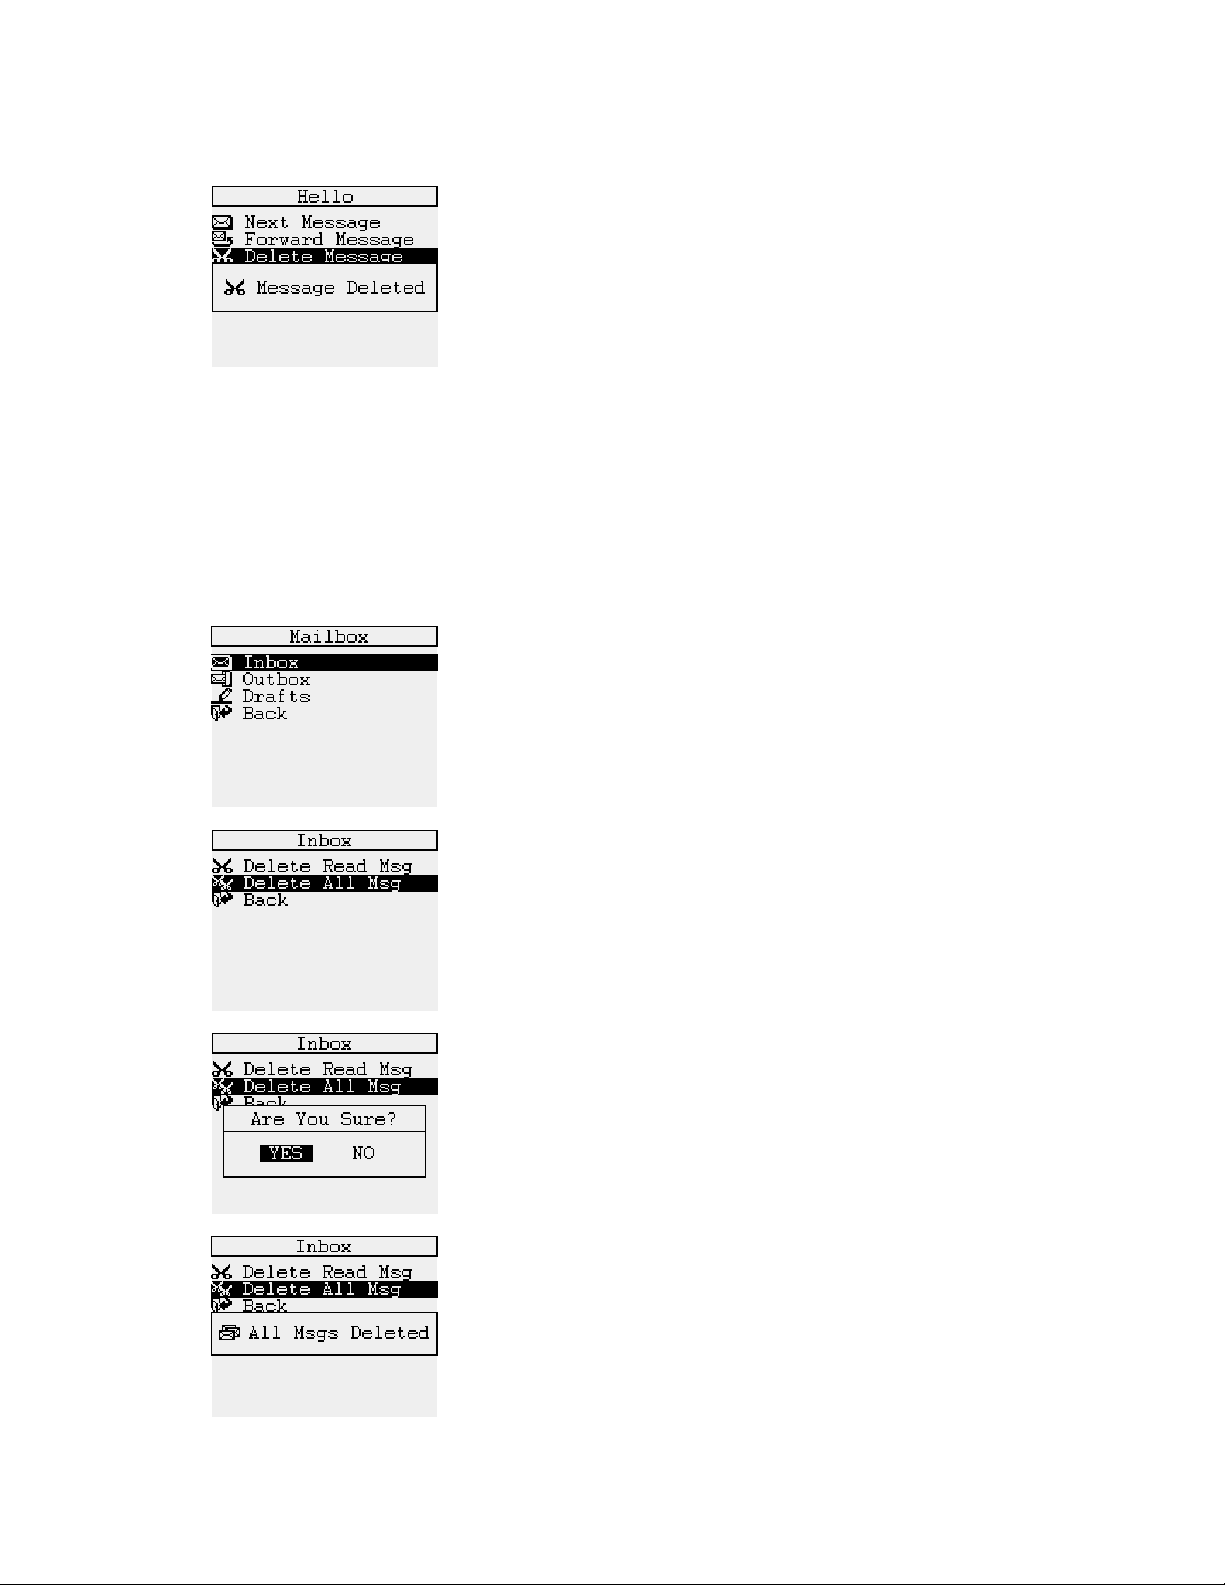
- How to Delete All Message in “Mail Box “ mode
In “ Mailbox” mode, select Inbox. Press “Menu” key,
Select “Delete All Msg”, and press ‘Enter”
Then “confirmation pop up window will be displayed , and select
“ YES” using navigation key and press “Enter”.
Then “All Msgs Deleted” pop up message will be displayed for a
seconds and screen will goes to “ Mailbox “ mode
16
Page 17
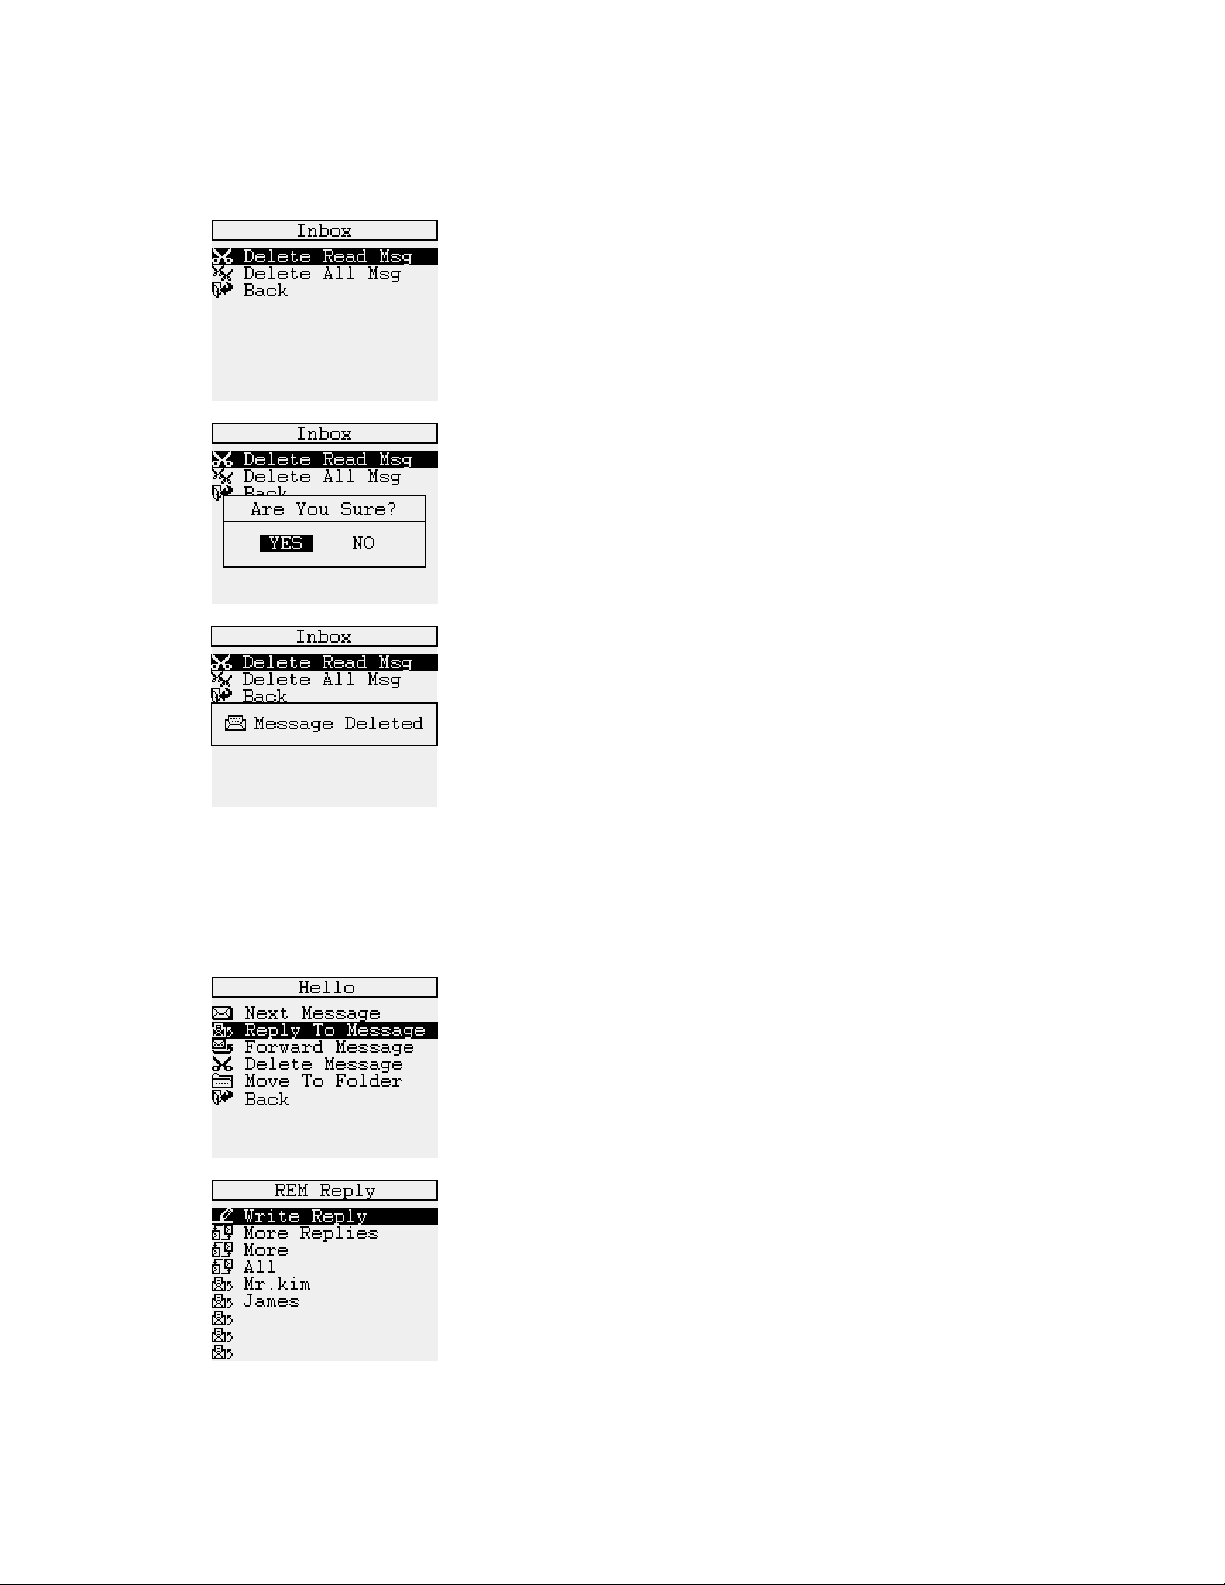
- How to Delete Individual Message in “Mail Box “ mode
Move the cursor to “Inbox” using navigation key, and
press “Menu” key. Then select “ Delete Read Msg.”, and press
“ Enter” key.
Then AT 100 ask you whether you will delete it or not, then
select “ YES” using navigation key to delete message and press
“Enter” .
Then “Message Deleted” pop up message will be displayed for a
seconds and screen will goes to “ Mailbox “ mode
How to response to a Received Message
When you press “ Menu” key on specific message in “Inbox list or when you press “Enter”
after the reading message, the AT 100 will be in “Message Option” as follows;
The Message option menu will be 5 sub menus And the sender ID
will be displayed on top of screen. If you are to reply to sender,
select the “Reply To Message” menu and press “enter “ key.
Select one of list using navigation key, and press “Enter “ key,
Then the “Replying” pop up will be displayed and the message will
be transmitted. If you select “ Write reply”, you can type in what
you want to reply. Please refer to “ Compose” menu for “ How to
Compos” the message.
17
Page 18
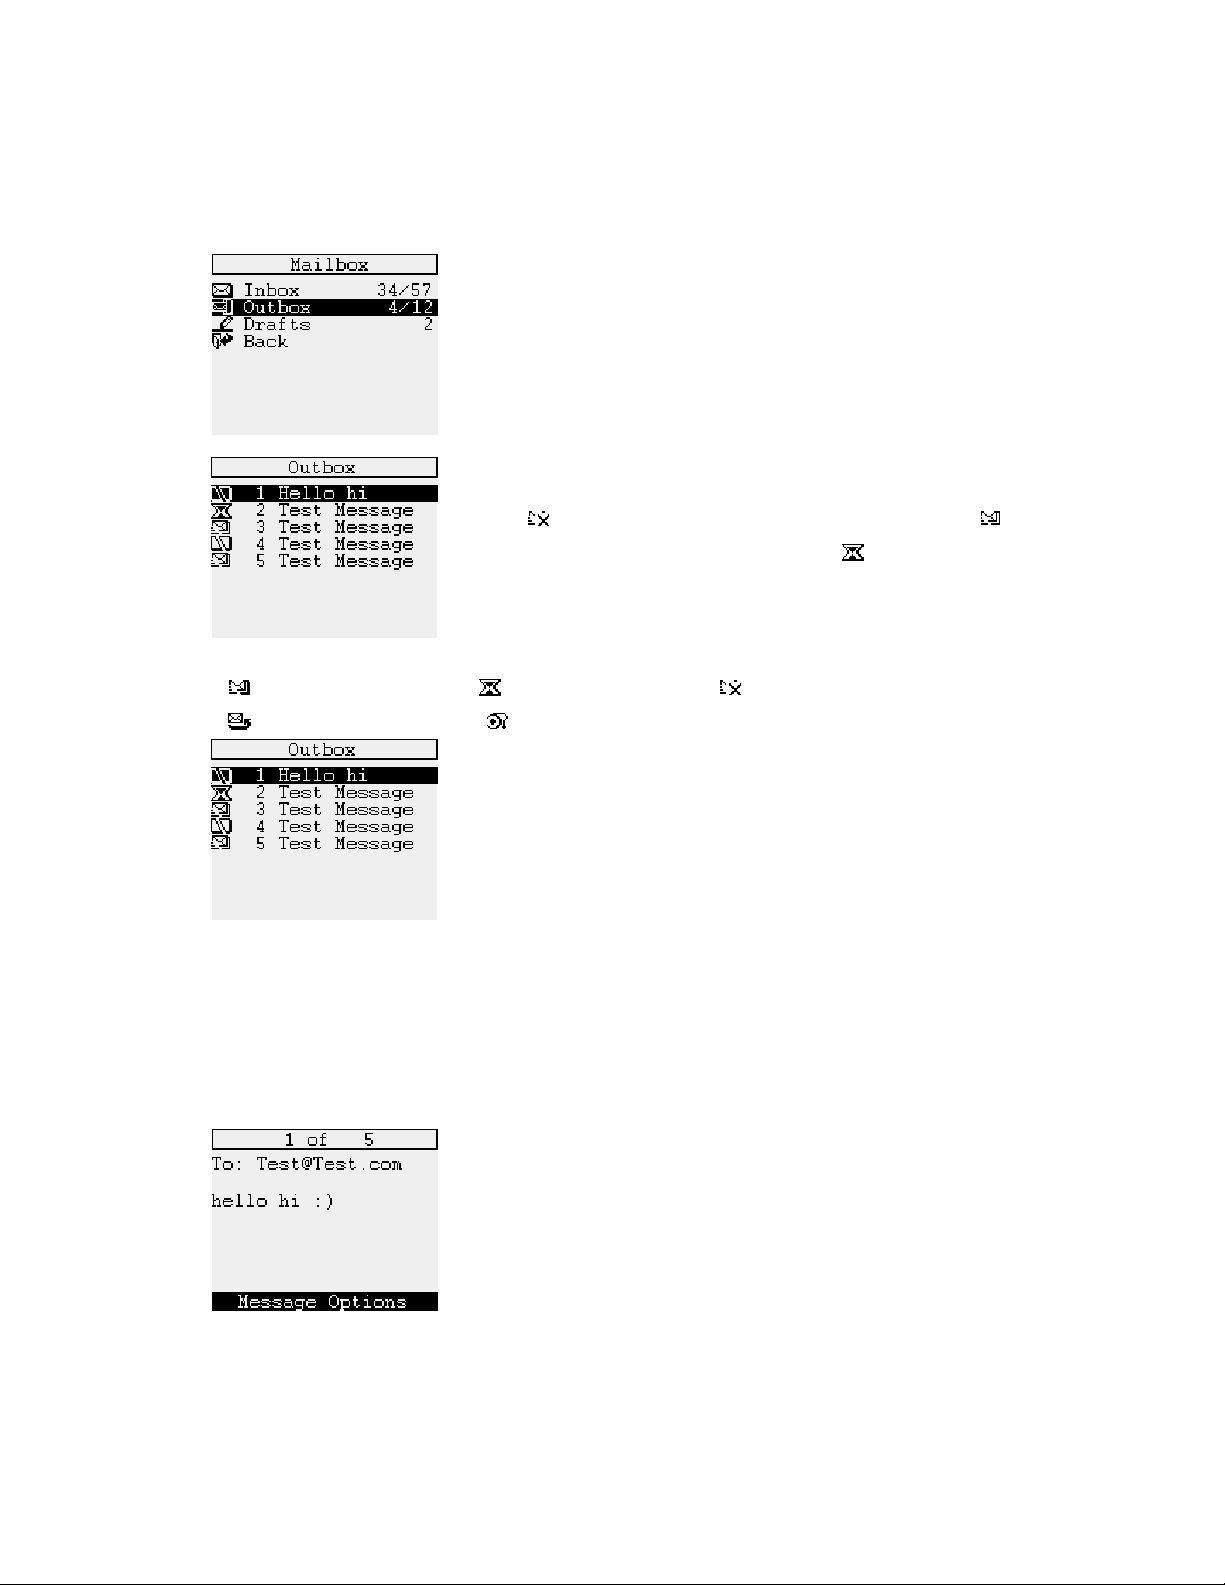
“Outbox” Message ( Sent Message)
How to Reading a Message
Press “Enter” after select the “Outbox” on ”Mailbox” list. The
number of “Outbox’ show the number of message ( failed message
number is 4 and total sent message is 12). Press “ Enter” key to
review the list of sent message.
If there are five(5) messages in “Outbox”. The two messages are
failed (
in sending , and one is on the way to sending (
*Note : Icon Description:
: Sending completion : Sending processing : Sending failure.
: Forwarding : Pending .
Press “Enter” after selected No.1 message which is failed in
sending.
) in sending, the two(2) messages are successes( )
).
*Note : The message number exceed 100 messages in mail box, when the new message
arrived the oldest one will be deleted.
Message Option
- Resending a failed message”
Select the message and press “Enter”. Press “Menu” key, and press
“enter. Otherwise, press ’Enter” until “ Message Option” menu listed on
the end of message, and press “Enter”
18
Page 19

Select the “ Resend Message”, and press “Enter”.
Then “Sending” pop up message will be displayed for a second, and the
screen will be returned to “Mailbox” mode.
- Forward Message : same as “Inbox”
- Delete Message : It will be used to delete individual message, and the How to delete a
message is same as “Inbox”
-
Move to Folder : same as “Inbox”
It will be used for store the message in “Folders”.
How to Delete “All Messages”
Move the cursor to “Outbox” using navigation key in Mailbox mode,
and press “Menu” key.
Then select “Delete All Msg”, and press “ Enter” key.
19
Page 20

Then AT 100 ask you whether you will delete the message or not ,
and select the YES using navigation key to delete the messages
and press “Enter” key.
Then “ Messages Deleted” pop up message will be displayed for a
second, and the screen goes to “Mailbox” mode.
Compose
How to Composing a Messages
Select "Compose" in main menu, and press “Enter”.
Then new screen will be appears to compose a message.
After the complete the message using key pad , press “Enter” to go to
select the ‘Address”. If you press ‘ESC’ key to stop the composing,
then device will ask you whether you will save the message or not with
pop up message.
20
Page 21

Select one of address on the list. You can select Group Address and /or
“contact” address using “Line feed” key (
Otherwise, if you want to send to new address, select “ Onetime Address”
and press “Enter” key.
If you select and press “Onetime Address”, you can choose the address
type. Select one of address type using navigation key and press “Enter”
key,
Then window will be displayed to key in the proper
Address , press ”Enter” key after the key in the address.
Then screen will be changed, then press “Enter” to send the message.
The “Transmitting” pop up message will be displayed, and the screen will
be retuned to Main screen.
), and press “Enter” key.
Compose Options
The special character , MCR List composing and Quick Text will help you to make nice message
. You can use that function in “ Compose Option.
21
Page 22

How to make MCR List .
During composing a message, press “Menu” key,”
If you move the cursor by left and right key in Navigation key, you
see all special mark and character. Select the one and press
‘Enter”.
MCR means “Multi Choice Reply “. That means message receiver can
reply to receiving message selectively by the sender’s option.
You can make up to eight(8) MCR list..
After the No.1 and press “enter”. And type what you want to compose.
Then press ‘Enter. The cursor will move to No.2
After the completion of MCR List, press “ESC” two times. Then screen
move to following screen to compose send message.
“ The MCR icon will be displayed upper corner of right.
You can send the message as procedure of How to compose and sending
a message
22
Page 23

Address Book
Address book is divided into two, Contacts list for individual and the other one is Groups List.
You can sore up to 250 address in Contact list. Each address will ten( 10) information field. i.e.
telephone number , address and etc. You can store the 20 Group and each group can store up to 20
individual address.
How to register “New Contact”
Select the “Address Book” in Main Menu, and press “Enter”.
.
Select the New Contact and press ‘Enter”.
Then pop up window will be appeared to write First name. press “Enter”.
Continue the “Last Name” as First Name field. After the key in the name,
Then “name” will be marked with (
The black bar will be placed on first information list, and then press
“Enter”,
) and information field will be listed.
If you want to skip, press “Enter”.
Note : For your convenient , in this mode you don’t need to press Alt key
to key in numeric number. The "
window .
" mark will be appeared on top of
23
Page 24

If you skip the a list, there will be no mark(
Press “Enter” after select “ Email Address.”
.
If you key in the following address;.
abc@abc.com
The following procedure are required;.
After that press “Enter” to store, then black bar will be in next list
“ Email Address #2.
If you are to stop the further works, press ‘ESC”. Then pop up
message will be displayed as left screen. If you press “YES”, the
information will be stored and back to previous menu. If you press
“NO”, all input data will not be stored and back to previous menu.
To continue, press “Enter”.
You can store the Address in E-Mail address #2 as same way as above.
After the key in the address, press “Enter”. You can store three(3) email
address per contact.
.After the completion of all information, select “ Save Entry”” and press
“Enter” key, or press ‘ESC”. Then “Entry Saved ” pop up message will be
appeared and go to “Address Book” menu.
) in front of that list.
- How to review registered address.
24
Page 25

Select the “Contacts” on list and press “Enter”.
Select one among list and press “Enter” . For example, select
“ Tomas" and press “Enter”. Or key in the name on search window and
press “Enter”.
.
Then registered address and information will be appears. If you press
“Enter”, the screen will turn to Address Option.
How to Register New Group Address
To make Group list, select the ”New Group” and press “Enter”.
Then pop up window will be appeared, then make group name using key
pad and press “Enter”.
25
Page 26

To add the address that Group, select "Add Entry" , and press “Enter”.
Then select entry in “Contact” list.
Select one of address among list by “Line Feed Key”.
Then the stored address type will be displayed in pop up window.
Then select one of address by “Line Feed Key” ” to add. You can
add another address as same way. After the selecting address, press
‘Enter” to add and return to previous menu screen.
If you are to review the new Group, select “ Review Address”, and
press “Enter”
Then registered address will be appeared.
Press “ Enter”, or “ESC” to back to previous menu for Group address
works.
26
Page 27

If you are to save the Group Address, select “save Group” and press
“Enter”. .()
Then “Group Saved” pop up message appears and go to sub menu of
Address book
Addresses Options – “Contacts”
Select “Contacts” “Address Book” main menu. And select one of “Contact” ”, and press
“Menu” Key. The three(3) Address option will be displayed.
- Send Message
This option will be used to send a message using registered
address. If you select “ Tomas” in Contact list, and press “Menu”
key. Then select “Send Message’ menu and press “Enter”.
"Then registered address information will be displayed in pop up
window, and select one of the address and press “Enter”.
You can compose a message following to “How to Compose” .
After the completion of composing, press “Enter”.
27
Page 28

“Edit Entry”.
Then black bar will goes to “ Send Message” menu.
You can also modify or review the message before sending a
message by “ Compose Message”. If you are to send the message,
select “ Send Address” and press “Enter”.
If the message is forwarding, the “ Sending" pop up message will
be appeared for seconds and try to sending.
If you are to send test message automatically at the interval of
two(2) minutes, select the “Test (will be del)” , and press “Enter”.
If you want to stop the Test sending, then Turn Off the AT 100 in
“DEVICE” menu.
Select the “Contacts” and select the name what you want to
edit , and press “Menu” key. Then select the “Edit Entry", and
press “Enter”.
Then the all information of the Contact will be appeared, and the
registered list is mark with “
“. Select the list what you want to
modify, and press “Enter”
Edit the content , and press ‘enter” Continue the same procedure
to change or modify the information.
28
Page 29

- “Delete Entry”
To save the changed information and data , select “Save Entry”
and press “Enter” or press ‘ESC”. Then “Save Entry “ pop up will
be displayed and select “YES’ or “NO” by navigation key, and
press Enter. Then the screen goes “Contacts” menu.
If you are to delete the “Contact “, select ‘ Delete Entry”. Press
‘Enter”.
Then “ Delete Entry” pop up will ask you whether your will delete
the ‘Contact” or not. Select “YES” or “NO” using navigation key,
and press ‘Enter”
If you select “YES”, “Entry Deleted” pop up message will be
displayed for a seconds, and the screen will return to “contact” list.
Addresses Options –“Groups”
Select “Groups” in Address Book, and press “Enter”.
29
Page 30

- Send Message
Select one of Groups, and press “Menu”.
Select “ Send Message”, and press “Enter” .
You can compose a message following to “How to Compose”, and
press ”Enter” after the completion.
- Edit Group
Select “ Send Message”, then the message will be sent to with
“ Sending” pop up message.
If the message is sent completely, the “ Message sent” pop up
message will be displayed for a seconds.
Select “ Edit Group”, and press “Enter”
30
Page 31

- Delete Group
You can change the Group name, add or delete contacts.
After the change what you want to do, review the changed address
of the group by “review Entry”
To save and return to previous menu, select “Save Group”. Then
“Group Saved’ pop will be displayed for seconds and return to
main menu of “Address Book”
Select “ Delete Group”, and press “Enter”
Then “Delete Group? “ pop up message will be displayed,. If you
select “YES”, “Group Deleted” pop up will be appeared for a
second and the screen return to Group list.
If you select “NO”, the screen return to Group list without any pop
up message.
News/Info Inbox
Select ‘ News/info Inbox” in main screen, and press “Enter”.
31
Page 32

When you select of Holder, and press “Enter. If there is no
receiving message, “ No Message” pop up message will be
appeared.
How to make “ Folder Name” and “Enable Folder”
You can make folder name in each folder. Select the folder and
press ‘Menu’ key . Select “Folder Name”, and press “Enter”.
You can make the title of folder. For example, type the name as
“ Info Service 1”, and press “Enter”.
And black bar place on “Enable Folder”. This option will be used to
restricts the message receiving to that Folder
You can set the YES or NO. Select one of confirmation on pop up
menu and press “Enter”. Other wise press “ESC” to return
previous screen
32
Page 33

-Delete Read Msgs
- Delete All Msgs
Folder
Select “ Delete Read Msgs” on list, and press ‘Enter”
This feature will be used to delete what you read one.
Select “ Delete All Msgs on list, press “Enter.
This feature will be used to delete all messages in that folder.
Select the “Folders" in main menu and press “Enter”.
The three. folder available. You can make the title of each Folder.
Select the folder and press “Menu” key.
How to make a “Folder Name”
The black bar place on “ Folder Name”, then press “Enter”
33
Page 34

Pop up window will be displayed to key in the name. After the key
in the name, press ‘Enter” to store the name, or press ”ESC” key
to escape to previous screen.
How to “Delete All Msgs” in Folder
Select specific Folder, and press “Menu” key.
Select “ Delete All Msgs”, and press “Enter”
Then pop up window will be displayed to ask you whether you will
delete it or not.
If you select “YES”, then “ All Msgs Deleted” pop up message will
be displayed for a seconds, and return to Folder main screen. If
you select “NO”, the screen will be returned to previous one.
34
Page 35

How to read “Folder” message
Select specific Folder in main screen, and press “Enter” Then
stored message will be listed.
Select one of them, press “Enter”. Then message contents will be
displayed.
If you press “Menu” key, you can Forward, delete and move to the
other Folder the message. For details, please refer to “Mailbox”
description.
Applications
Alarm
The function will be used for user convenience.
You can set alarm for specific time and date Select the “ Alarm ” and
press “Enter”.
35
Page 36

To activate the alarm, select “Enable Alarm”, and press “Enter”.
Then “Enable “ YES” or NO” pop up window will be displayed, and
select one it using navigation key and press ‘Enter”.
Then screen goes to next step to set periodicity of alarm. Select
“Period” and press “Enter”
Then “Period” pop up message will be displayed, Select one of the tree,
and press “Enter”
Then screen goes to next step “ Alert type”, hen press “Enter”.
Sect one of four alert type, and press “Enter”. The details for How to select
“Alert type” will be discussed in “Audio” of “Device” menu. After the select
the ‘Alert Type”, select ‘Back” and press “Enter ” or press ‘ESC” to
escape this mode.
36
Page 37

Then screen goes to “Alarm Time”, then press “Enter” to set the alarm
time. Then ‘Alarm Time” pop up window will be displayed. You can set
time and date using navigation key. To adjust the time, use the
“
“ and “ “ key , and move to next digit use the
“
“ and“ “ key. After the completion of adjustment, press “Enter”
Then screen goes to next menus “ Snooze”. Press “Enter” to set the
“Snooze”
Select one of four menu, and press “Enter”.
Then screen goes to “Alarm “ set mode, and select ‘Back: or “ESC” to
return to menu of “Applications
Scheduler
Select the “schedule”, and press “Enter”.
Then cursor will be placed on set date in “Customize” menu, select the
day and month using navigation key.. After the set the exact date what
you want to make a schedule, and press enter.
37
Page 38

Then cursor will be placed on hour digits, select the hour by up and down
key. Move the cursor to set minute digit by right key, and the digit can be
changed by up and down key.
After the set the time, press ‘Enter”. Then key in the memo, and press
the “Enter” .
Then screen goes to calendar mode, and the date will be marked as (
on the day.
If you add the new schedule, repeat the above procedure.
)
Game (Block Down)
Select Game(Block Down), and press “Enter”.
The Stat level can be up and down by navigation key.
38
Page 39

Customize
To start the game, press “Enter”
If you are to quit the game, press “ESC”, and if you are start new game,
press “Enter”.
Select the “Customize” in main menu and press “Enter”.
There are seven (7) sub menu in ‘Customize”.
How to “Set up” Time & Date
It will be used to set time and date, transmitter, and private time.
Select “Set up”, and press “Enter”
Set Time
Select the “ set Time & Date” to set time and date, and press
“Enter”
39
Page 40

Then black bar will be located on “ Time Format” menu, then press
“Enter”
There are two type of time format as AM/PM and 24hours.
Select one of them, and press “Enter” .
Then screen goes to “Set Time & Date” menu. Press “Enter”
You can set the hour using up (
move to minute set by right (
) and down( ) key,
) key , and set the digits same way
as hours. Date also can be set as time setting way. After the
completion of Time and date set, press “Enter” or “ESC” to escape.
The black bar will be placed on “ Network Sync. Press ‘enter”
Select the “ON” or ‘OFF” using up (
) and down ( ) key,
and press “Enter”
40
Page 41

Transmitter
Transmitter Set up used to transmitter ON/OFF of Device ( AT
100). Select the “ Transmitter” and press “Enter”.
Then “TX” set pop up window will be displayed. Select the
Set Private Time
“ON” or “OFF” using up (
) and down( ) key, and
press “Enter”. If you want to remain as it was, press “ESC”..
If you set Private time, the AT 100 will not alert during Private Time
even if AT 100 receive the message. But the “Alarm’ will be
activated during “Private Time”. Select “ Private Time ‘ and press
“Enter”
Then “Private sub menu will be displayed Select the “ Enable
Private” to activate , and press ‘Enter”
“On/OFF “ pop up window will be displayed, then select one of
them using up (
) and down ( ) key, and press “Enter”
Then bar goes to “Time” to set the Private Time, press ”Enter”
The time set pop up window will be displayed. set the Start time
and End time using navigation key, and press :Enter” If you
don’t want to set the time, pres “ESC” to return to next procedure.
41
Page 42

“How to set “ Alert”
How to set Mailbox Alert
Select “Audio” and press “Enter in “Customize” menu.
Select “Alert set” and press ‘Enter” to set the alert type of
message.
To set the Mailbox alert sound, select ‘ Mailbox Alert” and press
“Enter”.
Select what you want to set, and press “Enter”.
The “
“ mark means existing set mode.
If you select “Alert” , move the black bar using navigation key to
“ Alert” menu, and press “Enter
You can select one of bell sound alert sound using navigation key,
and press “Enter” Then “
screen return to “Alert Type” mode. “ Then (
displayed on home screen.
*Note: To preview the sound of each alert, press” Space” bar ..
“ will be marked on the tile of song, and
) mark will be
42
Page 43

Vibration Mode.
Vibration + Bell Mode.
Silent Mode
Set Reminder
Select “Vibrate” on “ Set Type” mode, and press “Enter” to
escape .
The “
“ mark will be displayed on home screen.
.
In Alert Type” mode, select “ Vibrate + Bell, and press “Enter” to
select ‘ Alert” sound.
.
Then bell list screen appears. Select one of them, and press
“Enter”. The “
“mark will be appears on home screen.
Select “ No Alert” in “Alert Type” mode, and press Enter”
Then “
“ mark will be displayed on home screen.
To set remind call, select “ Set Reminder”, and press “Enter”
43
Page 44

The black bar will be placed on “Enable reminder”, then press
“Enter”
“ Enable “ pop up window will be displayed, and select “ YES” to
activate reminder call. Then press “Enter”
Then black bar moves to “Re-Alert” to set the number of alert time.
Press “Enter” to go to next step.
“Re-Alert” pop up window will be displayed to set the times, and
select one of them and press “Enter”
Then black bar moves to “ Period” to set the interval. Press “Enter”
to go to next step.
“Period” pop up window will be displayed, and select one of them
and press “Enter”.
44
Page 45

How to set “News/Info Alert”
Volume Control
You can set the different alert sound with Mailbox. And the
procedure will be same with “ How to Set “ Mailbox Alert”
Select “Volume Control in “Audio” mode, and press “Enter”.
Key Click
The level is three(3)) step. The value can set by left(
right(
) key. To set the level, press “Enter” after the set the value.
) and
Select the “ Key Click” in “Audio” mode, and press ‘Enter”.
Then pop up window will be appeared , then select one of what
you want to set. After the select, press “Enter”.
If you press “ESC”, the previously set value will be stores.
45
Page 46

“Quiet Mode”
Select the” Quite Mode in “Audio” Mode, and press “Enter”
Then pop up window will be appeared, then select of the them,
and press “Enter”
If you press “ESC”, the previously set value will be stores.
If you set “ON”, the “
and the alert sound will not be activated.
How to set “Display “ Mode
Contrast
To adjust the contract of screen, select “ Contrast” in Display
and press ”Enter”.
“ mark will be displayed on Home screen,
Display Timeout
Set the value by right & left key of navigation, and press “Enter”.
If there is no any key input during designated time, the device will
be in power save mode.
Select “ Display Time out” and press “Enter”.
46
Page 47

“Font”
Font Size”
There are four (5) kinds intervals..
For example, if select “1 Minute” If there is no any key in or
sending or receiving message for one(1) minute, the AT 100 will
be in power save mode. Select one of them, and press “Enter”.
. If you press “ESC”, the previous set value will be stored.
You can choose the font thickness. Then select “ Font” in “Display”
mode, and press ‘Enter”
.
Select ‘BOLD or ”NORMAL’ using navigation key . And press
‘Enter’ to store . If you press “ESC”, the previous set value will be
stored.
The if you select “BOLD” one, the character will be ticker than
“ NORMAL” one. If you press “ESC”, the previous set value will be
stored.
To set the ‘Font Size” ,select “ Font Size “ menu in ‘ Display mode.
Press “Enter”. If you press “ESC”, the previous set value will be
stored.
Select “ SMALL or LARGE, and press “Enter” The font size will
be available during composing.
47
Page 48

How to Edit Quick Text
You can use the pre composed canned message e during composing a message. You can
make 10 sentences, and one sentence can be up to sixteen character. If you are to use the
sentence during composing, press “Menu” key.
Select the “ Edit Quick Text” in “ Customized” menu, and press
“Enter”.
Select the location using up(
navigation key, press “Enter”.
Key in the sentence up to 16 characters, and press ‘Enter”.
As same way, you can make the ten (10)text. After the completion
of composition work, press “ESC”.
) & down ( ) key of
Then pop up window will be appeared whether you will save the all
sentence or not. Press” YES” to save.
To cancel, press “NO” or <ESC> key.
48
Page 49

How to Make Custom Replies
It is available in Inbox. The pre composed sentence will be used to reply to e-mail or message.
It will be used for instance reply like Canned message and MCR list. You can make up ten
(10) sentence and each sentence will be made up to sixteen (16) characters.
Select “ Custom Reply” in “customized” menu, and press
“Enter”.
Then you can compose a sentence. Select the location, and
press “Enter”.
Then you can edit the sentence. After the complete the sentence,
press ‘Enter”.
After the completion of all sentence , press “ESC”
Then device will ask you whether you will store it or not. Select
“YES” and press ‘Enter” to store. If you press “ESC”, the screen
goes to previous screen.
49
Page 50

How to make Signature
To add the your signature at the end of sending message, you can store your signature.
Select the “"Signature", and press “Enter”.
You can select “ON” or “OFF” by left & right key of navigation, and
press “Enter”. Then you can key in your signature. After the key
in the signature, press “Enter” to store it.
How to Edit My Info
This feature will be useful when you lost the device. In this menu, you can memorized the
address , and telephone number, and you can put the password. If you have password in
device, you must put the number when you start operation. If the input password is wrong,
stored “ My Info” information will appears..
Select the "My Info" in “customized” , and press “Enter”.
There are three (3) menus.
To set ‘Password”, select “Password” among them, and press
“Enter”.
If there is no any key function for five(5) seconds , AT 100 will
ask you to key in the password when you are to work in the
other
Menu..
50
Page 51

Edit My Info
If there is existing Password, the cursor is located in “ ON” mark. If
you are to store the existing password, press “Enter” If you are
to change the password, select “ ON” and press “Enter”. Then you
can key in the new password and press ‘Enter” to store it. (
**** )
If there is no password, the screen will be appeared as left figure.
Then key in the password, and press “Enter”. In this case, the
password function will not be activated.
But if you don’t want to store the password, press ”ESC”.
Select “ Edit My Info” in My Info” mode, and press ”Enter”.
Three (3) list will appears, then key in the information pressing one
by one. Press Enter” after select the “ May “Name’ menu.
Then key in the name of device holder, and press “Enter”
You can procedure followings ( My Number and My Memo) as
above.
51
Page 52

Review My Info
After the completion of key in, select “ Save My Info” and press
“Enter” to save the information.
Then “Save My Info ?” pop up window will be displayed to ask you
whether you will save the information or not. Select one of them,
and press “Enter”
If you select “YES”, then “My Info Saved” pop up displayed for a
Seconds and return to “ Edit My Info” menu. ”
Then you can review what you stored information on “ Review My
Info”. To review, press “Enter” on “ Review My Info” menu.
Then stored information will be displayed. In one screen.
52
Page 53

Device
Power Off
You can set and check the “ Power Off, Battery status, Memory Status
and device related information. Select “Device “ in main menu, and press
“Enter”
To turn off the power of device, select “Power Off”, and press ‘Enter.
Then “Power Off” pop up window will be displayed , select “YES”
and press “Enter” Then power will be “OFF”
Battery Status Check
To check the battery status, move the black bar to ”Battery ” and press
“Enter”.
Then present status of battery will be displayed as percentage(%) with
black bar..
53
Page 54

Memory Status Check
To check the memory status, select the “ Memory”, and press ‘Enter”.
There are two memory category, one is r Message related one , the other
one is address related one. To review more details, press, “Enter”.
The detailed memory state of each Box will be shown. And press
“Enter”, then return to sub menu of Device.
About
Select “About”, and press “Enter”
The other information related to device will be displayed.
54
Page 55

Appendix 1 : ICON List
Num Icon Description Num Icon Description
001
002
003
004
005
006
007
008
009
010
011
012
013
014
015
016
017
018
019
Inbox, Next Message 055
Out Box 056
Drafts, Compose Message,
Edit Entry
Message Forwarding or
Back 058
MCR 059 Network Sync, Enable Private
Unread Message 060
Read Message 061
Standby
Send Message, Resend
Message
Move To Folder, Folder Name 069
Sending failure 064
Pending 065
Forward Message 066
Delete message 067
Delete all message 068
Select Address, Add Entry 070
Review info 071
Search 072
Onetime Address, Edit My
info, Note
057
062
063
073
Transmitter “ON”
Transmitter “OFF”
Private Time
Time Format
Military Hour
Twenty Hours
Volume Cont rol
Key Click
Contrast
Font
Font Size
Bold Text
Normal Text
Big Text
Small Text
Password
My Memo
Power off
020
021
022
023
024
025
026
027
028
029
Wireless Address 074
Email Address 075
New Contact 076
New Group 077
Contacts 078
Group 079
Name, My Name 080
Work Number, My Number 081
Mobile Number 082
Home Number 083
Battery Indicator
Memory
About
Yes
No
Warning
Alt key - pressed once
Alt key – pressed twice
CAPS key – pressed once
CAPS key – pressed twice
55
Page 56

030
031
032
033
034
035
036
037
038
039
040
041
042
043
044
045
046
047
048
049
050
051
052
Alarm Time, Set Time & Date 094
Fax Number 084
Company Name 085
Mailing Address 086
Save Entry 087
News/Info Service 088
Folder Name 089
Enable Folder 090
Alarm 091
Alarm Period 092
Alarm Type, Set Alert 093
Snooze 095
Audio 096
Vibrate 097
Vibrate+ Bell 098
Quiet Mode 099
Choice Alert 100
Schedule 101
Game 102
Setup 103
Display 104
Quick Message 105
Reply message, Custom
Reply
106
053
054
Signature 107
My info 108
FCC Compliance
This device complies with part 15 of the FCC Rules. Operation is subject to the following two
conditions: (1) This device may not cause harmful interference, and (2) this device must accept
56
Page 57

any interference received, including interference that may cause undesired operation.
This equipment has been tested and found to comply with the limits for a Class B digital device,
pursuant to part 15 of the FCC Rules. These limits are designed to provide reasonable
protection against harmful interference in a residential installation. This equipment generates,
uses and can radiate radio frequency energy and, if not installed and used in accordance with
the instruction, may cause harmful interference will not occur in a particular installation. If this
equipment does cause harmful interference to radio or television reception, which can e
determined by turning the equipment off and on, the user is encouraged to try correct the
interference by one or more of the following measure:
• Reorient or relocate the receiving antenna.
• Increase the separation between the equipment and receiver.
• Connect the equipment into an outlet on a circuit different from that which the receiver is
connected.
• Consult the dealer or an experienced radio/TV technician for help.
57
Page 58

SAFETY INFORMATION FOR FCC RF EXPOSURE
WARNING! Read this information before using your phone
CAUTION
In August 1996, the Federal Communications Commission (FCC) of the United States with its action in
Report and Order FCC 96-326 adopted an updated safety standard for human exposure to radio
frequency electromagnetic energy emitted by FCC regulated transmitters. Those guidelines are consistent
with the safety standard previously set by both U.S. and international standards bodies.
The design of this pager complies with the FCC guidelines and these international standards.
Use only the supplied or an approved antenna. Unauthorized antennas, modifications, or attachments
could impair quality, damage the pager, or result in violation of FCC regulations.
Do not use the pager with a damaged antenna. If a damaged antenna comes into contact with the skin, a
minor burn may result.
Please contact your local dealer for replacement antenna.
Body-worn Operation
This device was tested for typical body-worn operations with the back of the pager kept 1.0 cm from the
body. To maintain compliance with FCC RF exposure requirements, use only belt-clips, holsters or similar
accessories that maintain a 1.0 cm separation distance between the user's body and the back of the pager,
including the antenna. The use of belt-clips, holsters and similar accessories should not contain metallic
components in its assembly.
The use of accessories that do not satisfy these requirements may not comply with FCC RF exposure
requirements, and should be avoided.
Note: For more information about RF exposure, please visit the
FCC website at www.fcc.gov.
58
Page 59

Warranty
ONE (1) YEAR STANDARD LIMITED WARRANTY AND PROVISION (U.S.A. ONLY)
AT 100 warrants the pager against defects in material in workmanship under normal use and
service for the period of time specified below. This express warranty is extended by AT 100,
to the original end user purchaser only and is not assignable or transferable to any other party.
This warranty sets forth the full extent of AT 100’s responsibilities regarding the pager.
Repair replacement, or refund or the purchase price, at ATCOM’s option, is the exclusive
remedy. THIS WARRANTY IS GIVEN IN LIEU IF ALL OTHER WARRANTIES, EXPRESS OR
IMPLIED, INCLUDING WITHOUT LIMITATION, IMPLIED WARRANTIES OF
MERCHANTABILITY AND FITNESS FOR A PARTICULAR PURPOSE. THIS WARRANTY IS
LIMITED TO THE DURATION CHOSEN. IN NOEVENT SHALL AT 100 BE LIABLE FOR
DAMAGES IN EXCESS OF THE PURCHASE PRICE OF THE AT 100 PAGER, FOR ANY
LOSS OF USE, LOSS OF TIME, INCONVENIENCE, COMMERCIAL LOSS, LOST PROFITS
OR SAVING OR OTHER INCIDENTAL, SPECIAL OR CONSEQUENTIAL DAMAGES ARISING
OUT OF THE USE OR INABILITY TO USE SUCH PRODUCT, TO THE FULL EXTENT SUCH
MAY BE DISCLAIMED BY LAW.
AT 100 pagers are shipped from the factory with a standard limited warranty of one (1) year on
parts and labor from date of purchase by the original end user purchaser, based on proof of
purchase. In the event of a defect, malfunction, or failure to conform to specifications during the
warranty period, AT 100, at its option, will either repair, replace or refund the purchase price of
the pager. Repair, at ATCOM’s option, may include the replacement of part of boards with
functionally equivalent reconditioned or new parts or boards. Replaced parts and boards are
warranted for the balance of the original warranty period.
All parts and boards removed in the replacement process shall become the property of AT 100.
This warranty does not cover defects, malfunctions, performance failures or damages to the unit
resulting from use in other than its normal and customary manner, misuse, accident or neglect,
the use of non-conforming parts, or improper alteration or repairs. This warranty does not cover
wear and teat on covers or housings, nor coverage or range over which the pager will receive
signals.
For information on how to receive service on AT 100 pagers or covered accessories, call
Pager warranty will be VOID if any of the following conditions occur:
• Pagers that are incomplete such as those in which boards or components are missing and/ or
incompatible.
• Pager whose serial numbers do not match on the boards, or pagers in which the board serial
59
Page 60

numbers don’t match the housing.
• Pagers that have been opened by, or had work performed by, anyone other than a AT 100
authorized pager service center.
• Pagers received with non-conforming or non-AT 100 housing or parts.
Flat rate repair fees apply to pagers and accessories not covered under warranty.
STATE LAW RIGHTS
SOME STATE DO NOT ALLOW THE EXCLUSION OR LIMITATION OF INCIDENTAL OR
CONSEQUENTIAL DAMAGES, OR LIMITATION ON HOW LONG AN IMPLIED WARRANTY
LASTS, THEREFORE THE ABOVE LIMITATIONS OR EXCLUSIONS MAY NOT APPLY. This
warranty gives you specific legal rights and you may also have other rights which vary from
state to state.
60
 Loading...