

Page 1
USER_MSA19.910/EN
1
Page 2

TABLE OF CONTENTS
1. The magnetic field
2. Description
3. How to interpret the magnetic field with this device
4. Operation
5. Connections
5.1 AC adapter
5.2 Switching on the device
5.3 Switching off the device
5.4 Battery
6. Settings
6.1 Mute
6.2 Info
6.3 Reset
6.4 Auto
7. Screen information
8. Functions
9. Settings
10. Switching on the device
10.A Magnetism detection
10.B Demagnetization
10.C Compass mode
10.D Settings
11. Important information
12. Safety precautions
3
4
4
4
5
5
5
5
5
6
6
6
6
6
6
7
8
9
9
11
12
13
16
17
N.B. :
Press the function keys for about half a second to activate them.
2
Page 3
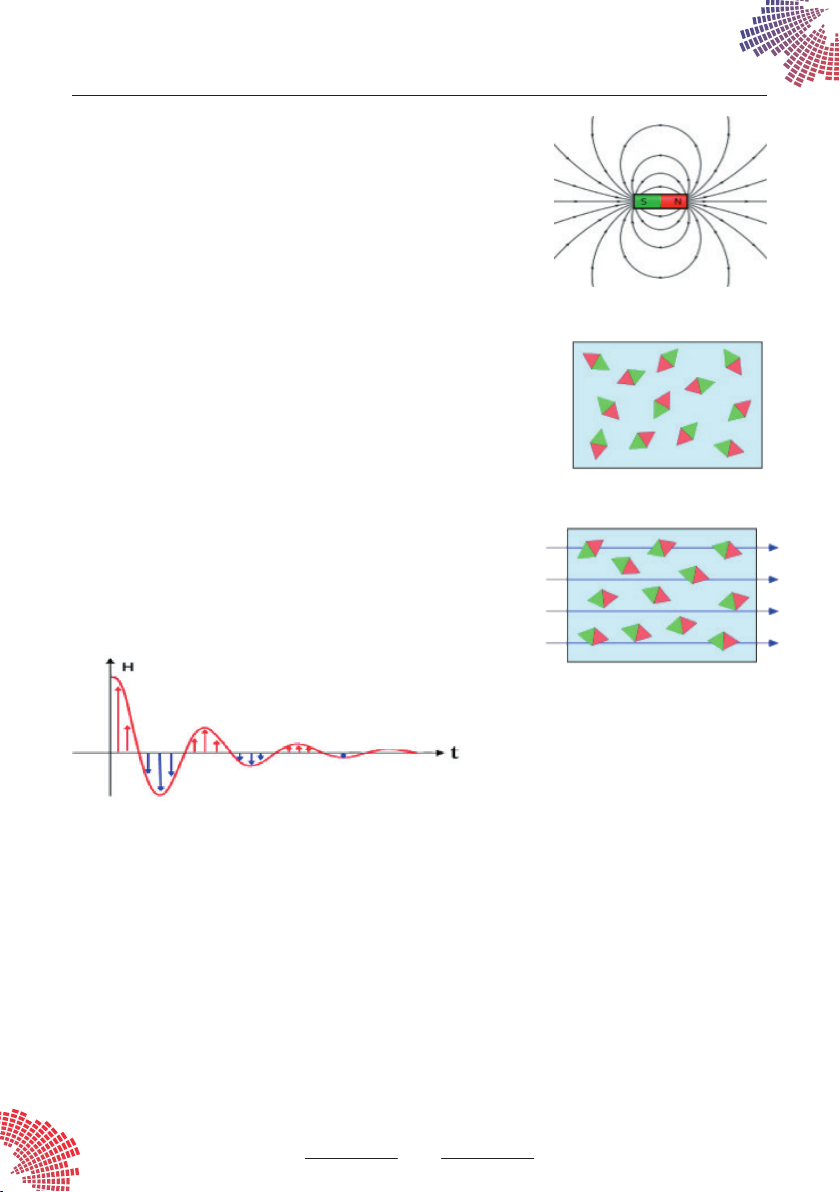
1. THE MAGNETIC FIELD
A magnetic field is manifested by a force affecting certain materials in its environment,
acting on moving electrical charges. The magnitude of this force decreases as a function
of the distance between the magnetic field emitter and its action point. Magnetization
is a vector quantity which characterizes on a macroscopic scale the magnetic behaviour
of a material sample. It is measured in amperes per metre (A/m) or in Tesla (T). (1)
Ferromagnetism designates the ability of certain material samples to become magnetised
under the effect of an external magnetic field, and to retain part of this magnetisation.
On a microscopic scale, a ferromagnetic material can be described as a set of independent
magnetic domains (Weiss domains).
When the magnetic moments of the domains are not aligned, the total magnetostatics
energy of the material is minimised: the material is not magnetised.
(2)
For demagnetization purposes, a damped magnetic excitation field is applied so
that certain domains are reversed more than others, depending on the magnetic
excitation force passing through them. This leads to a state of magnetic disorder
equivalent to the state of a non-magnetized material. (3 and 4)
(1)
(2)
(3)
(4)
There are relatively intense magnetic fields all around us in daily life. It goes without saying that mechanical watches are
influenced by them, and thereby undergo potentially significant operating variations, i.e. which affect the rate precision.
It should be noted that the Earth’s magnetic field varies between 25 and 65 μT, depending on geographic position.
The most significant items in everyday life which can affect the rate of a mechanical watch by means of a magnetism effect
are computers, mobile phones, TVs, refrigerators, etc. Magnetic flux measurements (taken at 10 cm from the source) have
revealed values of 60 μT for an electric toothbrush, 75 μT for a mobile phone and 110 μT for a computer. Consider too that
watchmaking tools often have a magnetic charge capable of disrupting the rate of a watch !
The distance at which a watch is placed from the magnetising object is an important factor. Although watch manufacturers
regularly equip their cases with protective materials or opt for non-magnetic components, nevertheless rate problems due
to magnetism remain very common.
3
Page 4

2. DESCRIPTION
The HOROTEC© MAGTEST is an electronic device for the detection of magnetism in μTesla (μT), demagnetization and control
of magnetic remanence of watches, movements, tools and watch parts.
It combines the measurement function with the demagnetization function in a single device.
After demagnetization, the residual magnetism value in μT can be checked again.
A. Detection of the degree of magnetism in μTesla with display of the magnetic remanence.
B. Demagnetization cycle.
DEMAG
DETECT
3. HOW TO INTERPRET THE MAGNETIC FIELD WITH THIS DEVICE
Large metal parts, such as a movement, modify the lines of the earth’s magnetic field. For this reason, an indicative value
of up to 50 μT can be considered without any influence or consequence on the functioning of the movement.
For small parts, such as screws, the displayed values must be considered as real remanence values.
4. OPERATION
DETECT ZONE : Surface for detecting the degree of magnetism.
A. Measures the micro Tesla value (μT) of the degree of magnetization.
DEMAG ZONE : Demagnetization surface.
B. Demagnetization.
C. Compass mode.
D. Settings.
A. Detection of the degree of magnetism B. Demagnetization
4
Page 5
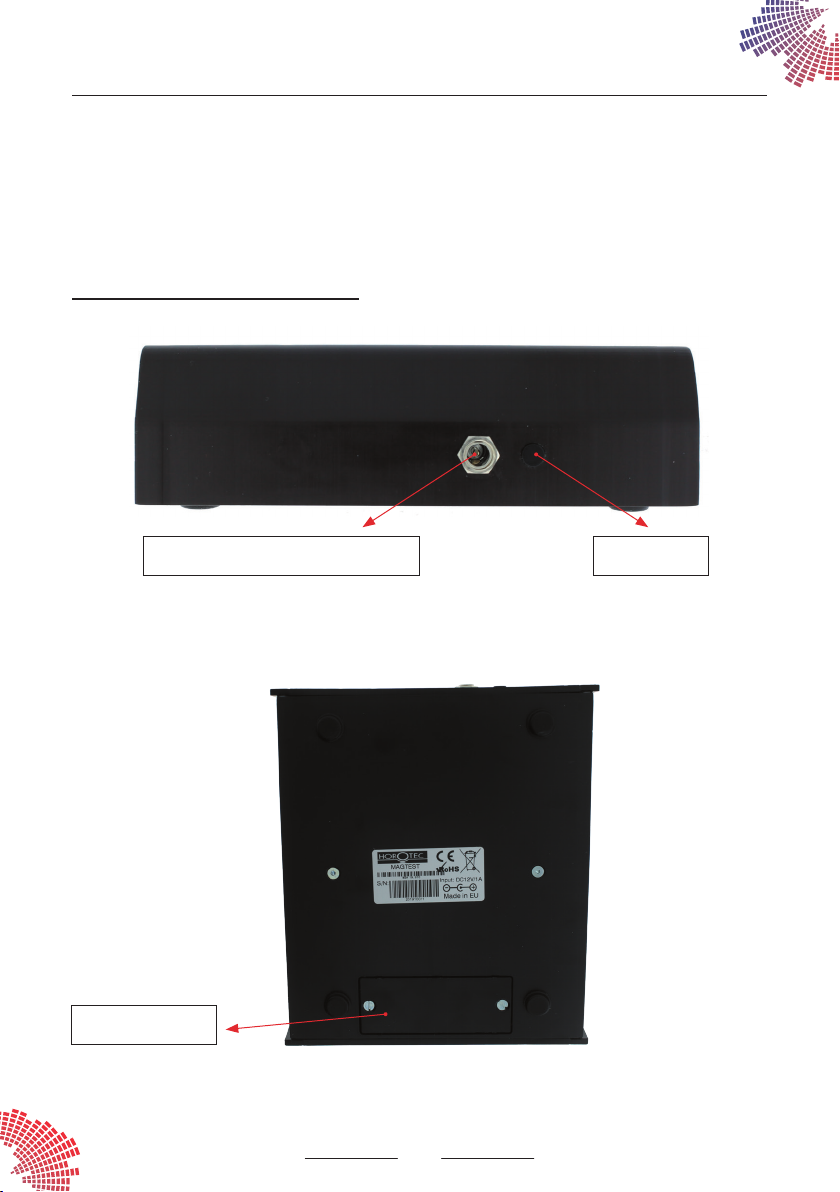
5. CONNECTIONS
1. AC adapter : connect the adapter to rear jack of the device HOROTEC© Magtest. Connect the cord of the AC adapter
to the mains supply (115 or 230 V).
2. Switching on the device on : press the ON/OFF button located at the rear panel of the device.
3. Switching off the device off : press the ON/OFF button located at the rear panel of the device.
Connections on the rear panel of the device :
Power supply sector 115 - 230 V Button ON/OFF
4. Battery : unscrew the battery cover on the back of the HOROTEC© Magtest and insert the 9 V battery delivered
with the device.
Note : change the battery if the «low battery» symbol appears on the screen when the device is turned on.
Battery cover
The HOROTEC© Magtest is delivered with an adapter (input 115 - 230 V AC / output 12 V DC), a 9 V battery and
instructions for use.
5
Page 6
6. PARAMETERS
1. Mute : silent mode or sound mode. see paragraph 10D2
INFO
2. Info : hardware and software version. see paragraph 10D3
3. Reset : sensors resetting. see paragraph 10D4
AUTO
4. Auto : activate or deactivate the automatic mode. The object can be moved from the DETECT ZONE to the
DEMAG ZONE without having to press the key
DEMAG
. see paragraph 10D5
7. SCREEN INFORMATION
When this symbol is visible, the device is in automatic mode.
AUTO
To activate/deactivate the
When this symbol is visible, the device emits sound signals.
When this symbol does not appear on the display, the
To activate/deactivate the
When this symbol is visible, the device is connected to the 115 - 230 V mains supply.
When this symbol is visible, the device runs on the battery. The number of green bars indicates the battery
charge level.
Compass mode. see paragraph 10C
1. Display of the compass mode.
2. North compass calibration.
function, see paragraph 10D5
function is activated, and the device is silent.
function, see paragraph 10D2
Return to the main menu.
Press this key at any time to return to the main menu.
Settings. see paragraph 10D
Sleep mode screen :
1. When the device is connected to the mains supply (115 - 230 V), the screen goes to sleep mode after 2 minutes without
use. To reactivate its operation, press the ON/OFF button located at the rear panel of the device.
Display in sleep mode.
Touch the screen to return to the main menu.
2. When the device is running on the battery, the screen goes to sleep mode after 2 minutes without use. To reactivate its
operation, press the ON/OFF button located at the rear panel of the device.
6
Page 7

8. FUNCTIONS
<->
<
<
>
>
<->
<->
DEMAG
MAGTEST
DETECT
DEMAG
DETECT
0 µT
-
DEMAG
DETECT
DEMAG
DETECT
DEMAG
DEMAG
DETECT
200 µT
-
DEMAG
7
Page 8

9. SETTINGS
<->
<->
<->
<->
<->
<->
<->
MAGTEST
DETECT
DEMAG
COMPASS
COMPASS
SETTINGS
AUTO
INFO
INFO
Hardware Version : V1.3
Software Version : V1.2
+20.1 °C
RESET
89 57
66
51 75
SAVE
360°
SAVE
RESET
SAVE
8
Page 9

10. SWITCHING ON THE DEVICE
<->
Press the ON/OFF button located at the rear panel of the device to turn it on.
The following screen displays :
MAGTEST
DETECT
DEMAG
Display of the main menu
MAGTEST
A. Magnetism detection
1. Press the
DETECT
key on the main menu
MAGTEST
to check the degree of magnetization of the object (watch,
movement or any other watch piece).
The following screen displays :
DETECT
DETECT
0 µT
Display of the submenu
DEMAG
The search for magnetic remanence is active.
If the displayed value is greater than «0 μT», it is recommended to reset the sensors. see paragraph 10D4
A2. Sensors
There are 5 sensors and one of them is located in the centre of the detection surface. The others are in the corners of a 1.5
cm square. They can measure the magnetism force as well as the position. A dot on the LCD screen shows a sensor with its
position and the dot size is proportional to the magnetic force.
To check the degree of magnetism of small parts (screws for example), it is recommended to
place them in the white areas of the example shown here. The sensor placed in the centre and
the two zones between the 3 outer circles (in red) will not detect the degree of magnetism
of the small parts.
9
Page 10

Place the object to be tested on the DETECT ZONE surface.
<->
- If the screen remains neutral (as in the image above), it means that the object placed on the detection surface is not
magnetized
- If red dots appear on the screen and a positive value in μT (as shown in the image below), it means that the object placed
on the detection surface is magnetized.
A3. In case of magnetic remanence
The following screen displays :
DETECT
Display of the submenu
DETECT
with a magnetized object placed on
the DETECT ZONE surface
200 µT
DEMAG
In case of magnetic remanence, the value displayed in μT, is the difference between the value of the Earth’s magnetic field
and the magnetism of the object being tested.
In addition to the value displayed in μT, red dots (up to 5) appear on the display indicating :
- By their presence, the magnetization surface
- By their size (diameter of the red dot more or less large), the importance of magnetism between the various sensors.
The value displayed in μT, will always be the highest value detected by the 5 sensors.
DEMAG
Place the object on the DEMAG ZONE surface and press the key
to demagnetize the object.
If the screen displays the presence of magnetism without any object on the detection surface DETECT ZONE, it is recommended
to reset the sensors.
+ see paragraph 10D4
Information :
In automatic mode, the device switches directly from DETECT mode to DEMAG mode.
Once the detection is complete (screen with red dots), remove the object from the DETECT ZONE surface. The device automatically switches to DEMAG mode. Place the object on the DEMAG ZONE surface and press the DEMAG button to start
demagnetizing the object.
10
Page 11

B. Demagnetization (without going through the
<->
<->
<->
B1. Press the key
DEMAG
on the main menu
MAGTEST
The following screen displays :
DEMAG
DETECT
function)
to demagnetize the object.
Display of the submenu
DETECT
DEMAG
B2. Place the object to be demagnetized on the demagnetizing surface DEMAG ZONE and press the
DEMAG
DEMAG
key.
The device starts its demagnetization cycle.
The following screen displays during the demagnetization cycle :
DEMAG
Display of the submenu
heard during the cycle. We will also see that the
DEMAG
in demagnetization mode (beeps are
S
and N poles flash
and cross each other throughout the cycle)
DETECT
DEMAG
Note :
DETECT
At the end of the cycle, move the object to the DETECT ZONE surface and press the
key.
If a remanence is detected (see the screen below with the red dots), the demagnetization process must be repeated by
DEMAG
pressing the
key again. Repeat this operation until a display of 0 μT is obtained.
DETECT
200 µT
DEMAG
Press the key to return to the main menu
MAGTEST
.
11
Page 12

C. Compass mode
<->
<->
<->
The compass mode allows the following checks :
- The north of the device corresponds to the actual magnetic north
- Check the accuracy of watches equipped with a compass.
Compass calibration is rarely necessary unless there is too much gap between the device and the actual magnetic north.
Follow the instructions below to calibrate the compass.
C1. Press the
The following screen displays :
COMPASS
key to display the compass.
+20.1 °C
L’écran suivant s’affiche :
COMPASS
SAVE
The following screen displays :
COMPASS
360°
Display of the submenu
magnetic north). It is also possible to check the accuracy of watches equipped with a compass in relation to the red dot).
This sub-menu also displays the ambient temperature in ° C.
Press the key again to calibrate the compass.
Display of the sub-submenu
Rotate the device once or twice (360°) to display as many red dots as
possible.
Wait until the red dots stabilize and press the
new calibration.
COMPASS
COMPASS
(the red dot indicates the actual
SAVE
button to save the
Press the
+20.1 °C
key to return to the main menu
Display of the submenu
MAGTEST
.
12
COMPASS
with the new calibration saved
Page 13

D. Settings
<->
<->
D1. Press the
to set the device.
The following screen displays :
SETTINGS
AUTO
INFO
D2. mode
Pressing the
Press the
INFO
D3.
Press the
key, the symbol will disappear (silent mode) or appear (sound mode).
key to return to the main menu
mode
INFO
key to check the hardware and software version of the device.
Display of the submenu
MAGTEST
.
SETTINGS
The following screen displays :
INFO
Hardware Version : V1.3
Software Version : V1.2
Press the key to return to the main menu
Display of the submenu
MAGTEST
.
13
INFO
Page 14

D4.
<->
<->
mode
Press the
key to check the hardware and software version of the device.
The following screen displays :
RESET
89 57
66
51 75
SAVE
SAVE
Press the
key to perform the reset.
The following screen displays :
RESET
SAVE
Display of the
Display of the
RESET
submenu before resetting
RESET
submenu after the reset
Press the
key to return to the main menu
MAGTEST
.
14
Page 15

AUTO
<->
D5.
Press the
mode
AUTO
key to activate or deactivate this function.
The following screen displays :
SETTINGS
AUTO
INFO
AUTO
Press the
Press again the
Press the
Display of the submenu
AUTO
key to deactivate the automatic mode. The symbol disappears.
AUTO
key to reactivate the automatic mode. The symbol appears again.
key to return to the main menu
MAGTEST
.
15
Page 16

11. IMPORTANT INFORMATION
CAUTION !
DO NOT OPEN THE DEVICE.
HIGH VOLTAGE (> 400 V) !
Do not place magnets on the device !
The maximum value that can be displayed by the device is 999 μT.
The maximum value that can be supported by the sensors before deterioration is 100.000 μT.
HOROTEC© is a registered trademark in Switzerland, the United States, the European Union and several other countries.
16
Page 17

12. SAFETY PRECAUTIONS
Copyright law protects the contents of this operating manual. Law prohibits reproduction and using its elements without the written consent of the manufacturer
and the importer.
Before you use the HOROTEC© Magtest product, read all operating instructions because it can provide optimum performances and longer service life for your
device. Save all manuals and documentation for future reference.
The manufacturer reserves the right to modify or update the information contained in this guide.
CAUTION !
RISK OF ELECTRIC SHOCK
CAUTION : TO REDUCE THE RISK OF ELECTRICAL SHOCK,
WARNING !
Danger of electrocution.
To avoid the risk of electric shock, do not remove the cover.
No user serviceable parts inside.
An exclamation mark enclosed in a triangle alerts the user to important operating and maintenance instructions in the documentation provided
with the product.
DANGER ! If the product is used without observing the information given under this symbol, serious injury or death may result.
DO NOT OPEN
DO NOT REMOVE THE COVER.
NO USER SERVICEABLE PARTS INSIDE.
ATTENTION ! If the product is used without observing the information given under this symbol, minor personal injury, damage to the equipment,
or loss of valuable data may result.
General precautions :
Instructions for use Read the entire instructions for use before using the product
Cleaning
Accessories For your safety, use only accessories recommended by HOROTEC SA
Water/Humidity Do not use the device near a water or moisture source
Power supply Power this device only with the type of power supply specified on the manufacturer's label
Thunderstorms If a thunderstorm occurs while using an AC adapter, remove it from the wall outlet immediately
Heat
Always unplug the wall outlet before starting to clean the device. Never use a liquid cleaner, aerosol or organic solvents to clean the
device. Wipe the unit with a slightly damp cloth
Never use or store this product near any heat source such as a radiator, heat register, stove, or any type of equipment or appliance
that generates heat
17
Page 18

Handling of the HOROTEC© Magtest :
WARNING !
Never use the device near flammable or explosive gases.
Stop using the product immediately if you notice any unusual odours, noise, or smoke around it.
Do not leave the device in places where it may be subject to extremely high temperatures.
In use, the internal power source (battery or rechargeable battery) become warm.
After long-term use, the device may feel warm.
Be careful with the measuring cables. They could easily catch on stray objects and cause serious damages.
Follow these important guidelines to prevent batteries from leaking overheating, burning, exploding, or causing electrical shocks or burns.
DANGER !
Do not use any other type of network adapters than those with your device.
FOR OUR EUROPEAN CUSTOMERS :
«CE» mark indicates that this product complies with the European requirements for safety, health, environment and customer protection.
This symbol (crossed-out wheeled bin - WEEE Annex IV) indicates separate collection of waste electrical and electronic equipment in the EU countries.
Please do not throw the equipment into the domestic refuse. Please use the return and collection systems available in your country for the
disposal of this product.
This symbol (crossed-out wheeled bin - Directive 2006/66/EC Annex II) indicates separate collection of waste batteries in the EU countries.
Please do not throw the batteries into the domestic refuse. Please use the return and collection systems available in your country for the disposal
of the waste batteries.
Registered trademarks :
Microsoft and Windows are registered trademarks by Microsoft Corporation.
Other registered trademarks (company name and product brands) belong to their respective holders.
USER_MSA19.910/EN
18
 Loading...