

Page 1
HoverUSERMANUAL
3.5”SATAHDDEXTERNALENCLOSURE
Page 2

External Enclosure Installation Guide
1
Contents
English………………………………………………………………………….. P.2
Deutsch…………………………………………………………………………. P.6
Français…………………………………………………………………………P.10
Español………………………………………………………………………… P.14
简体中文………………………………………………………………. ………. P.18
繁體中文………………………………………………………………………....P.24
Page 3
External Enclosure Installation Guide
2
English
Hardware Installation Guide
Note: Please follow the instructions and make sure your HDD is successfully installed to the
mobile disk.
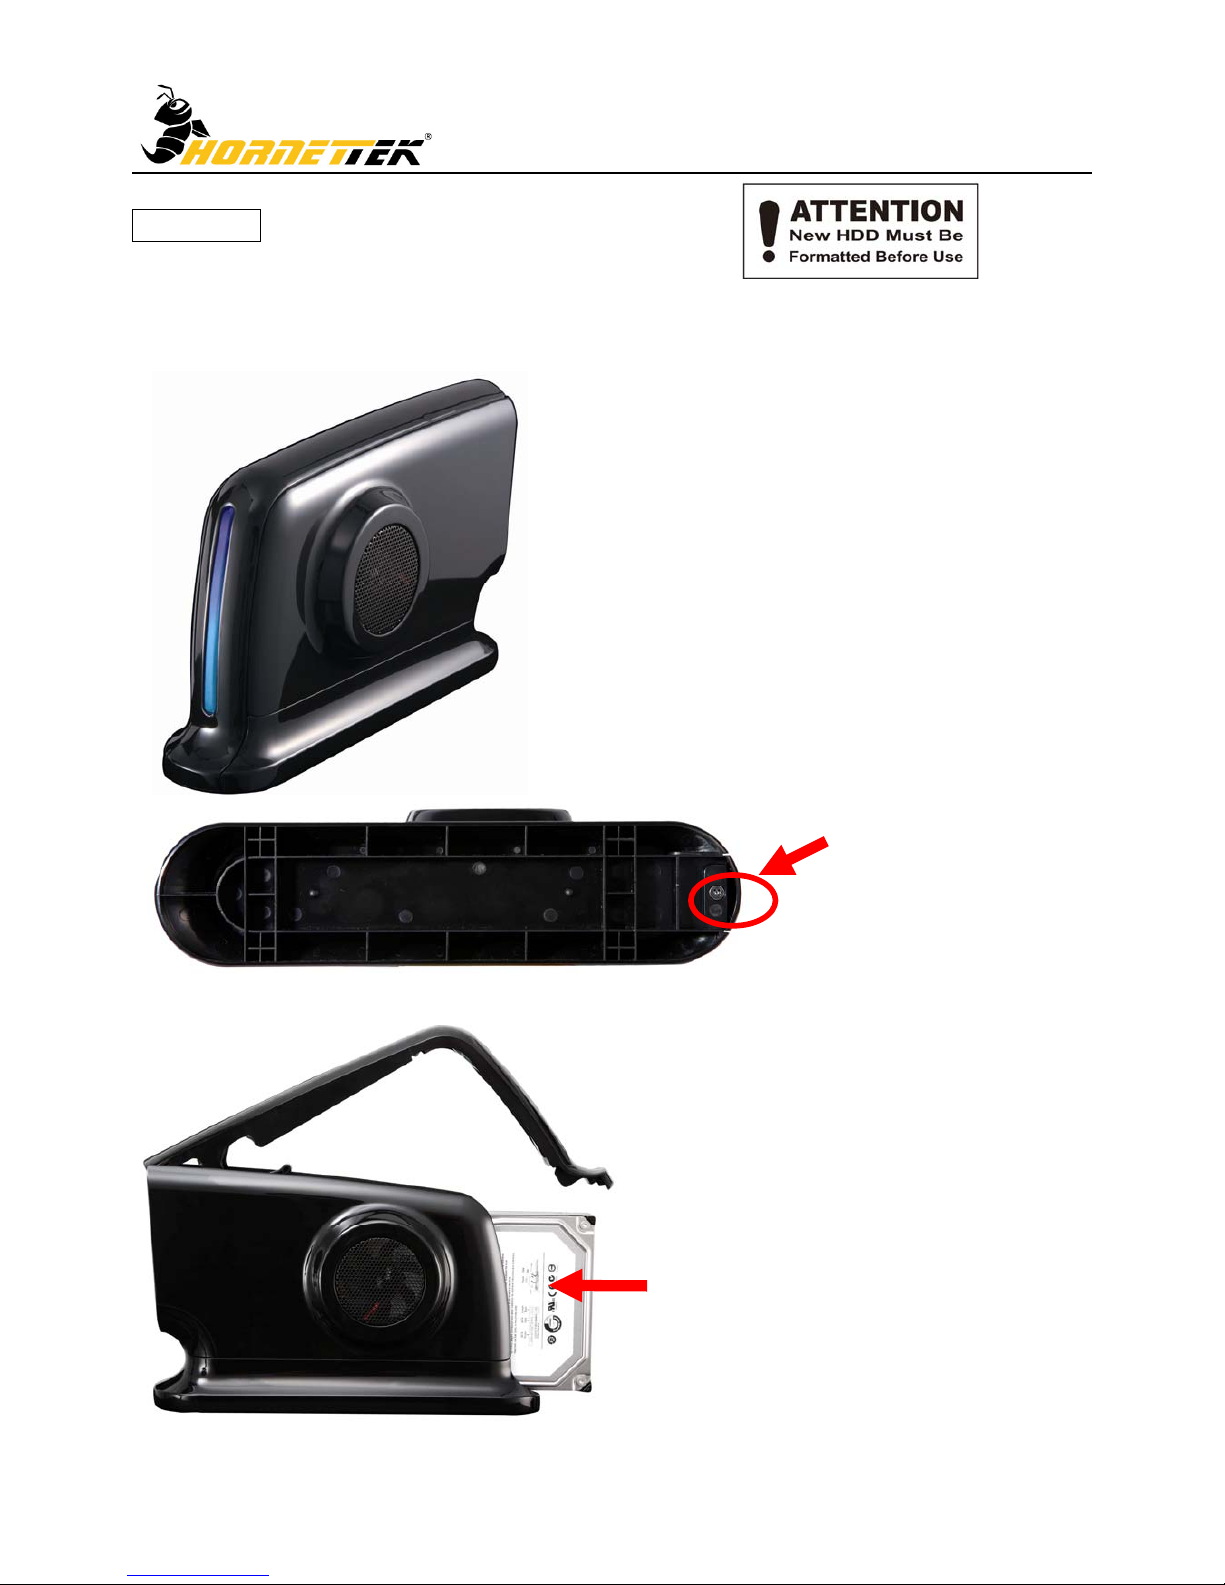
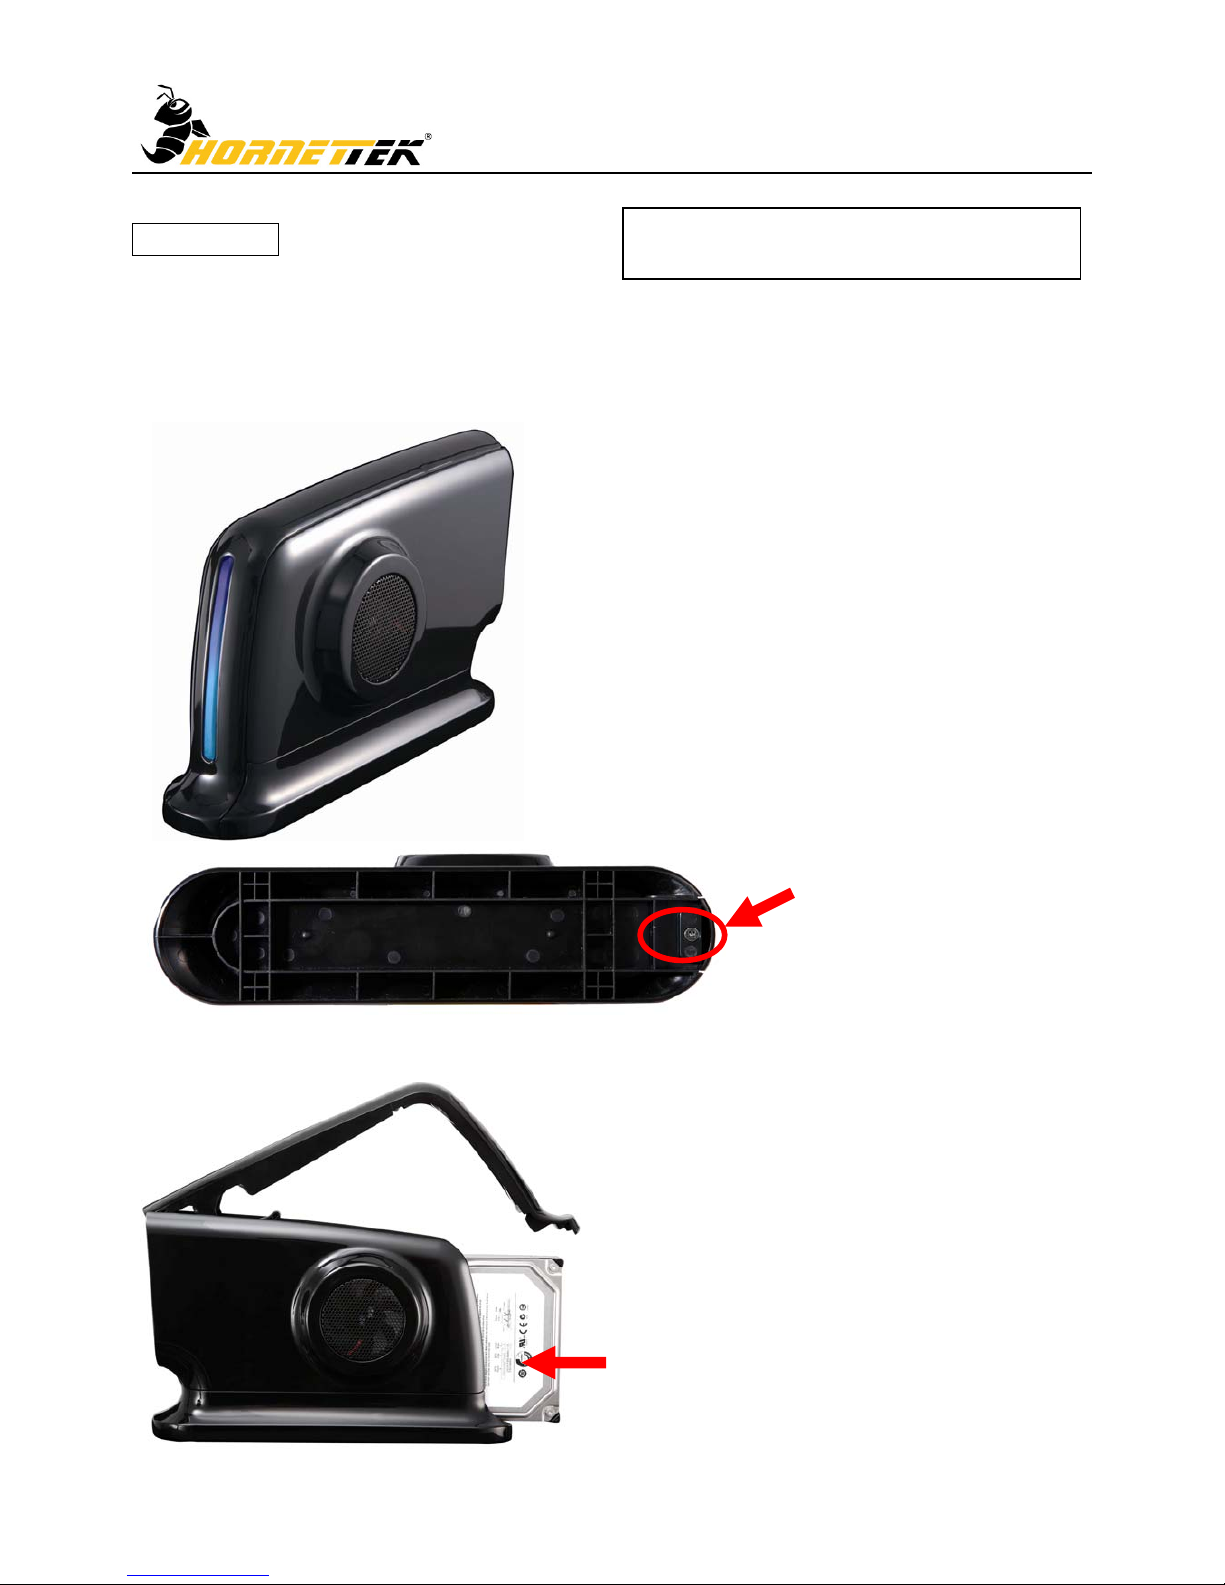
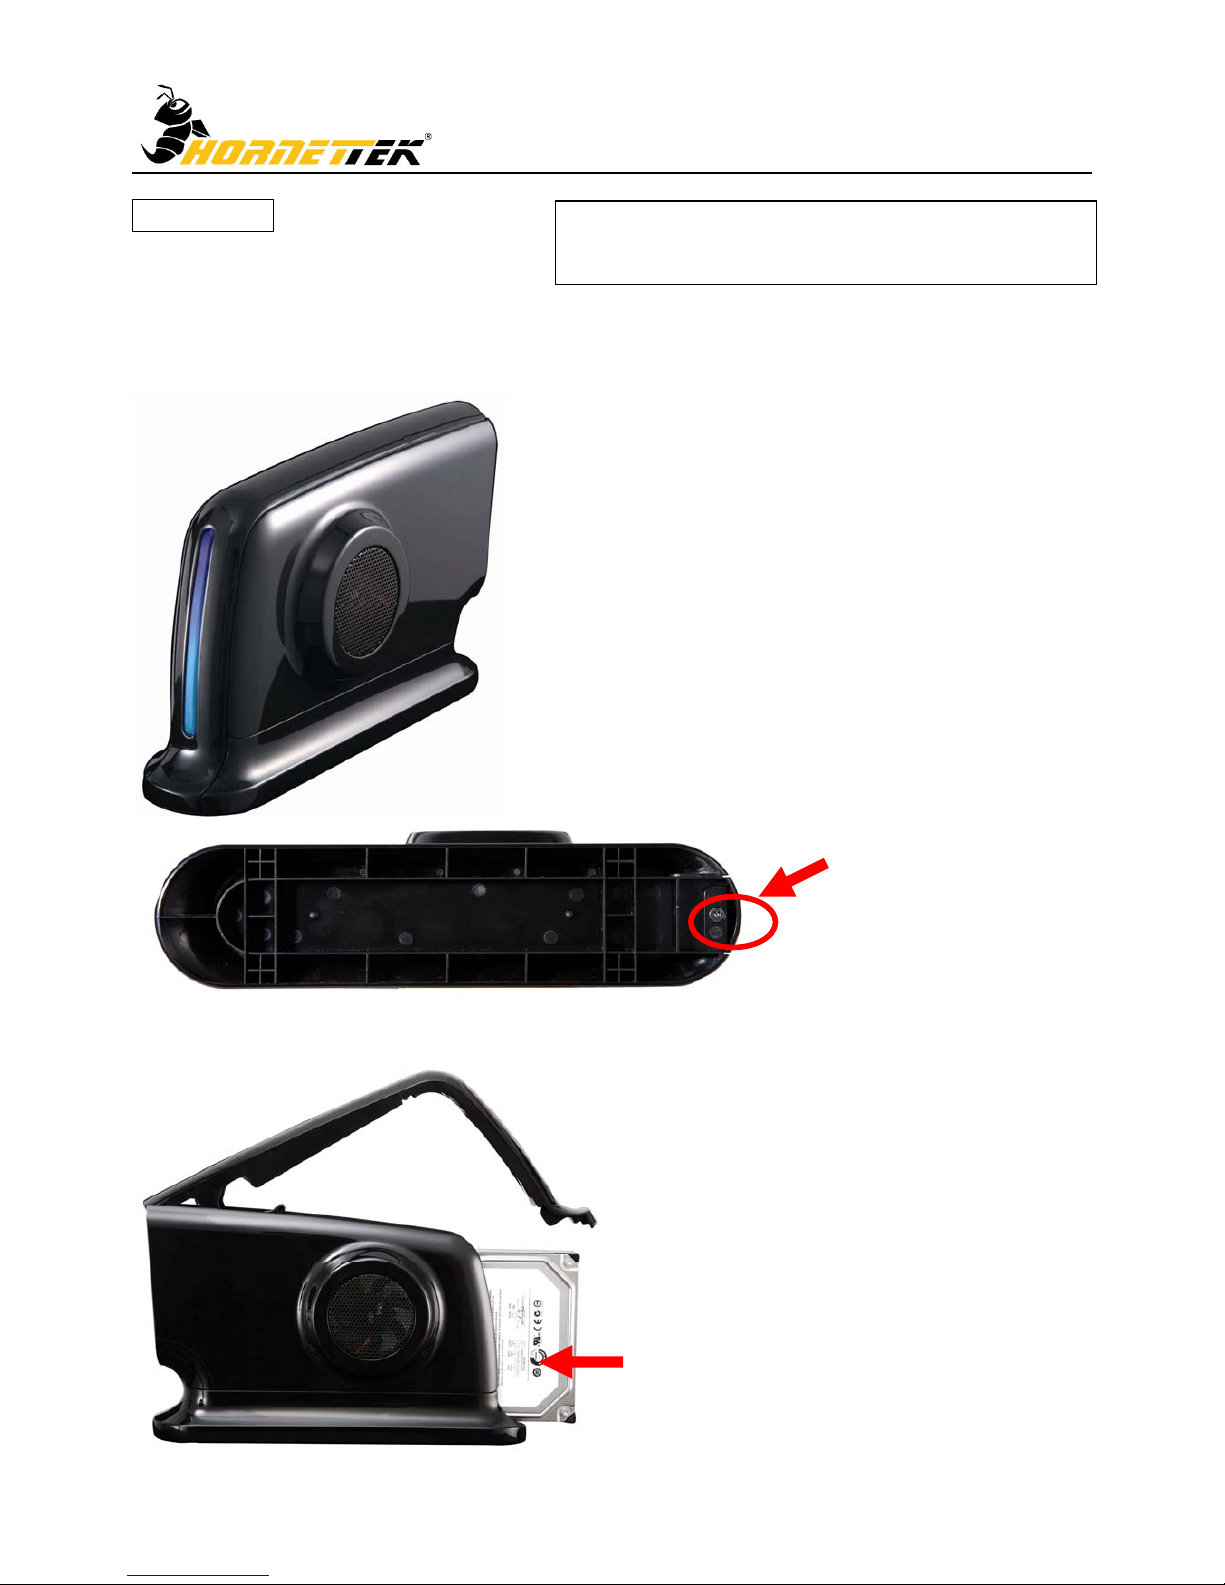
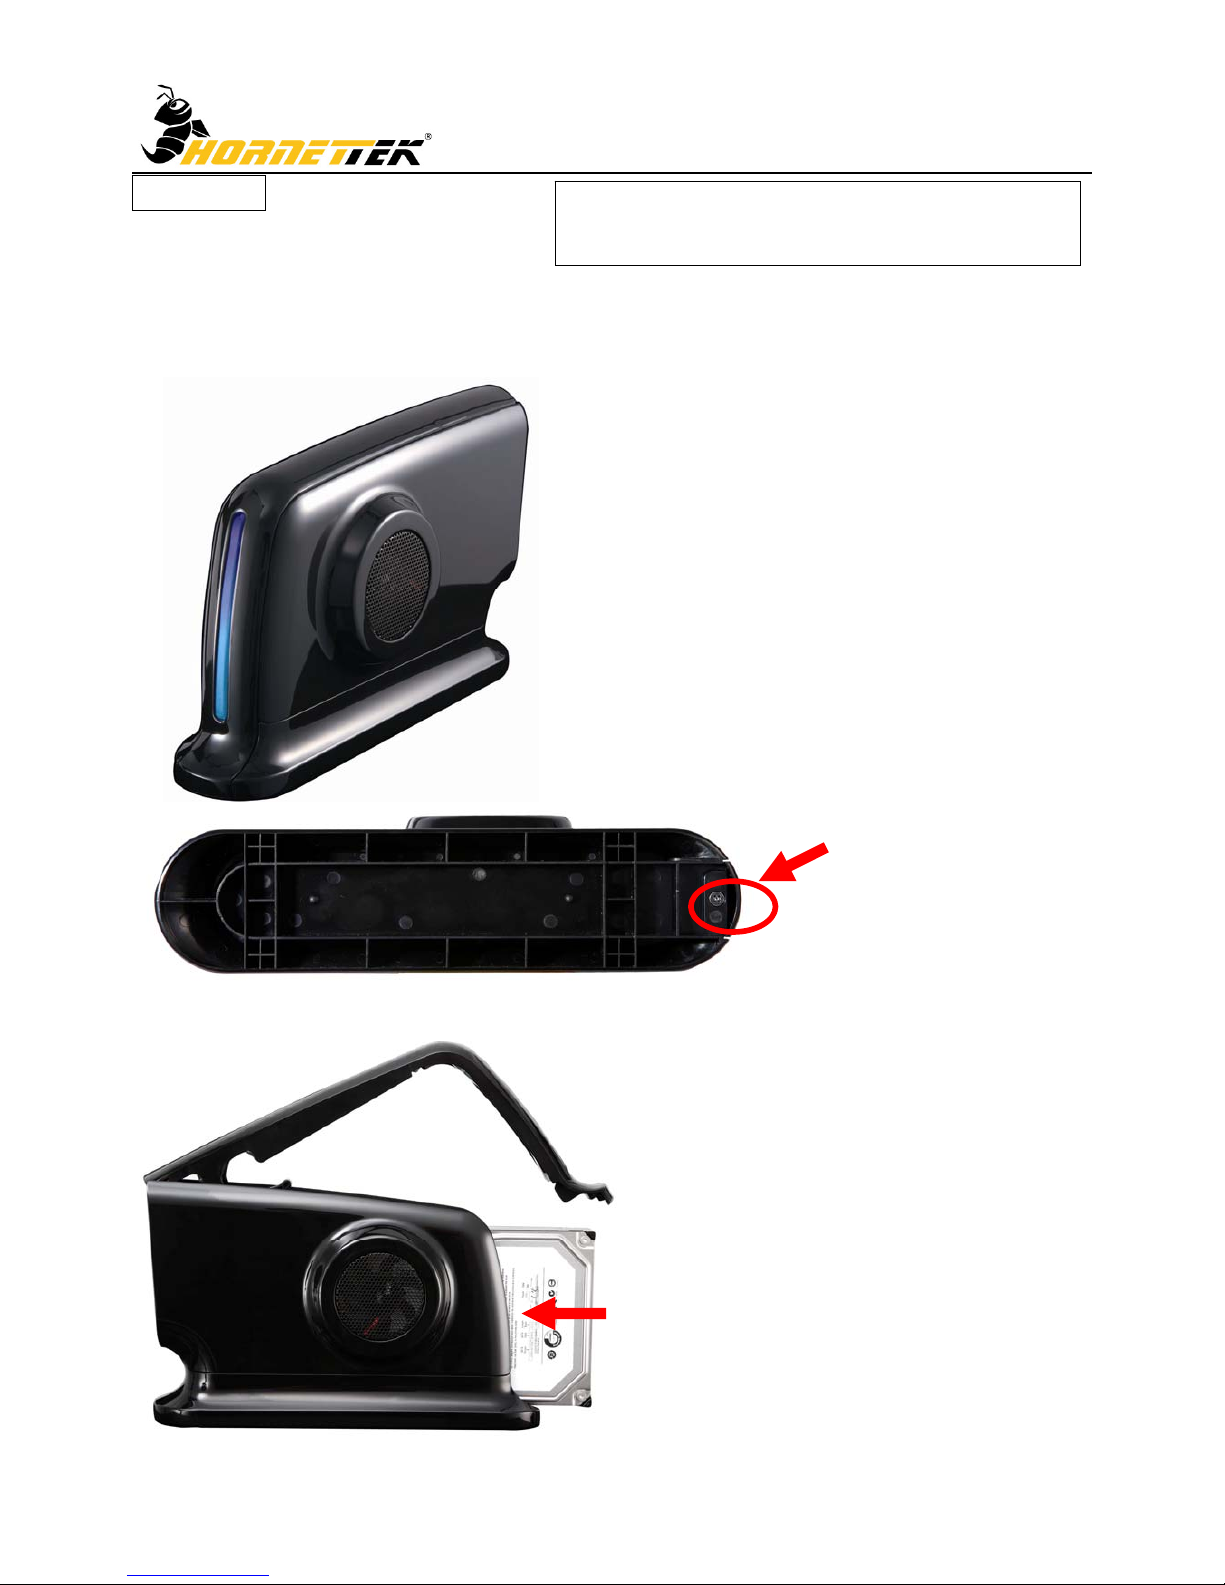
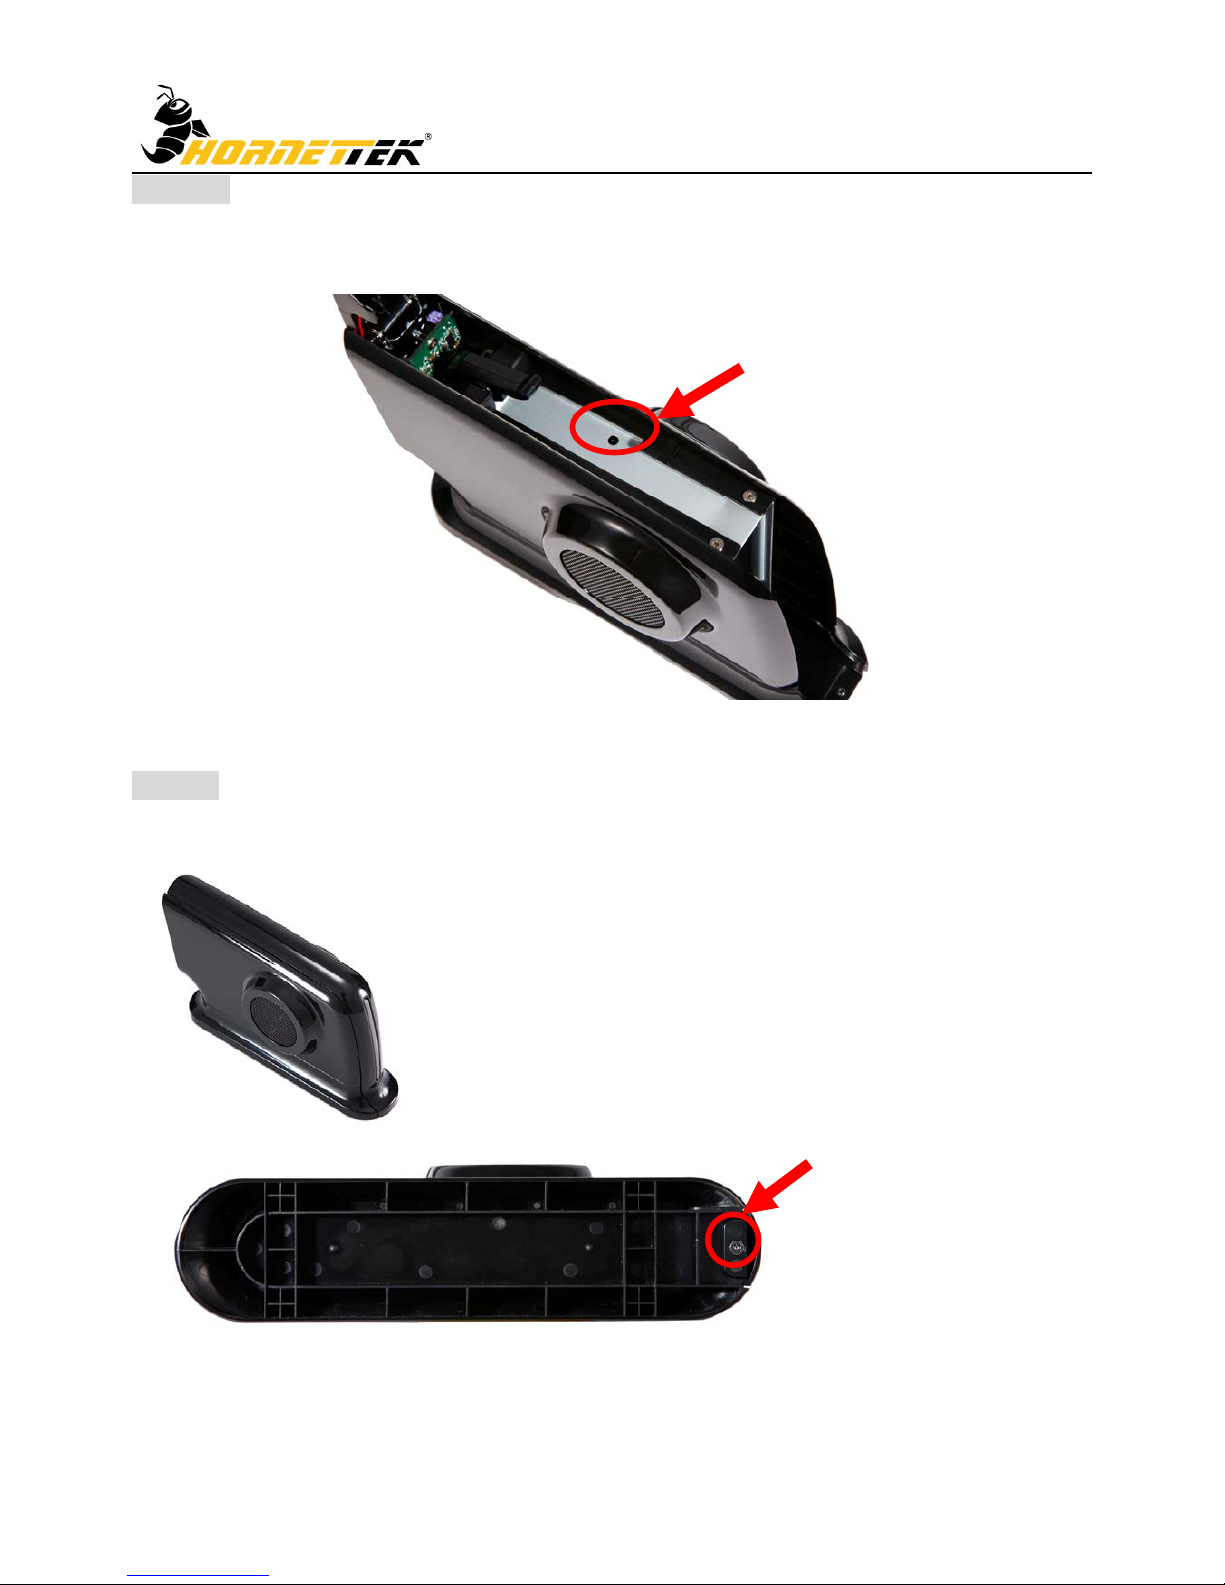
STEP1: Release the screw underneath the enclosure then open its front panel.
STEP2: Place the HDD into tray. Firmly push the HDD to connect the SATA connector inside.
Page 4
External Enclosure Installation Guide
3
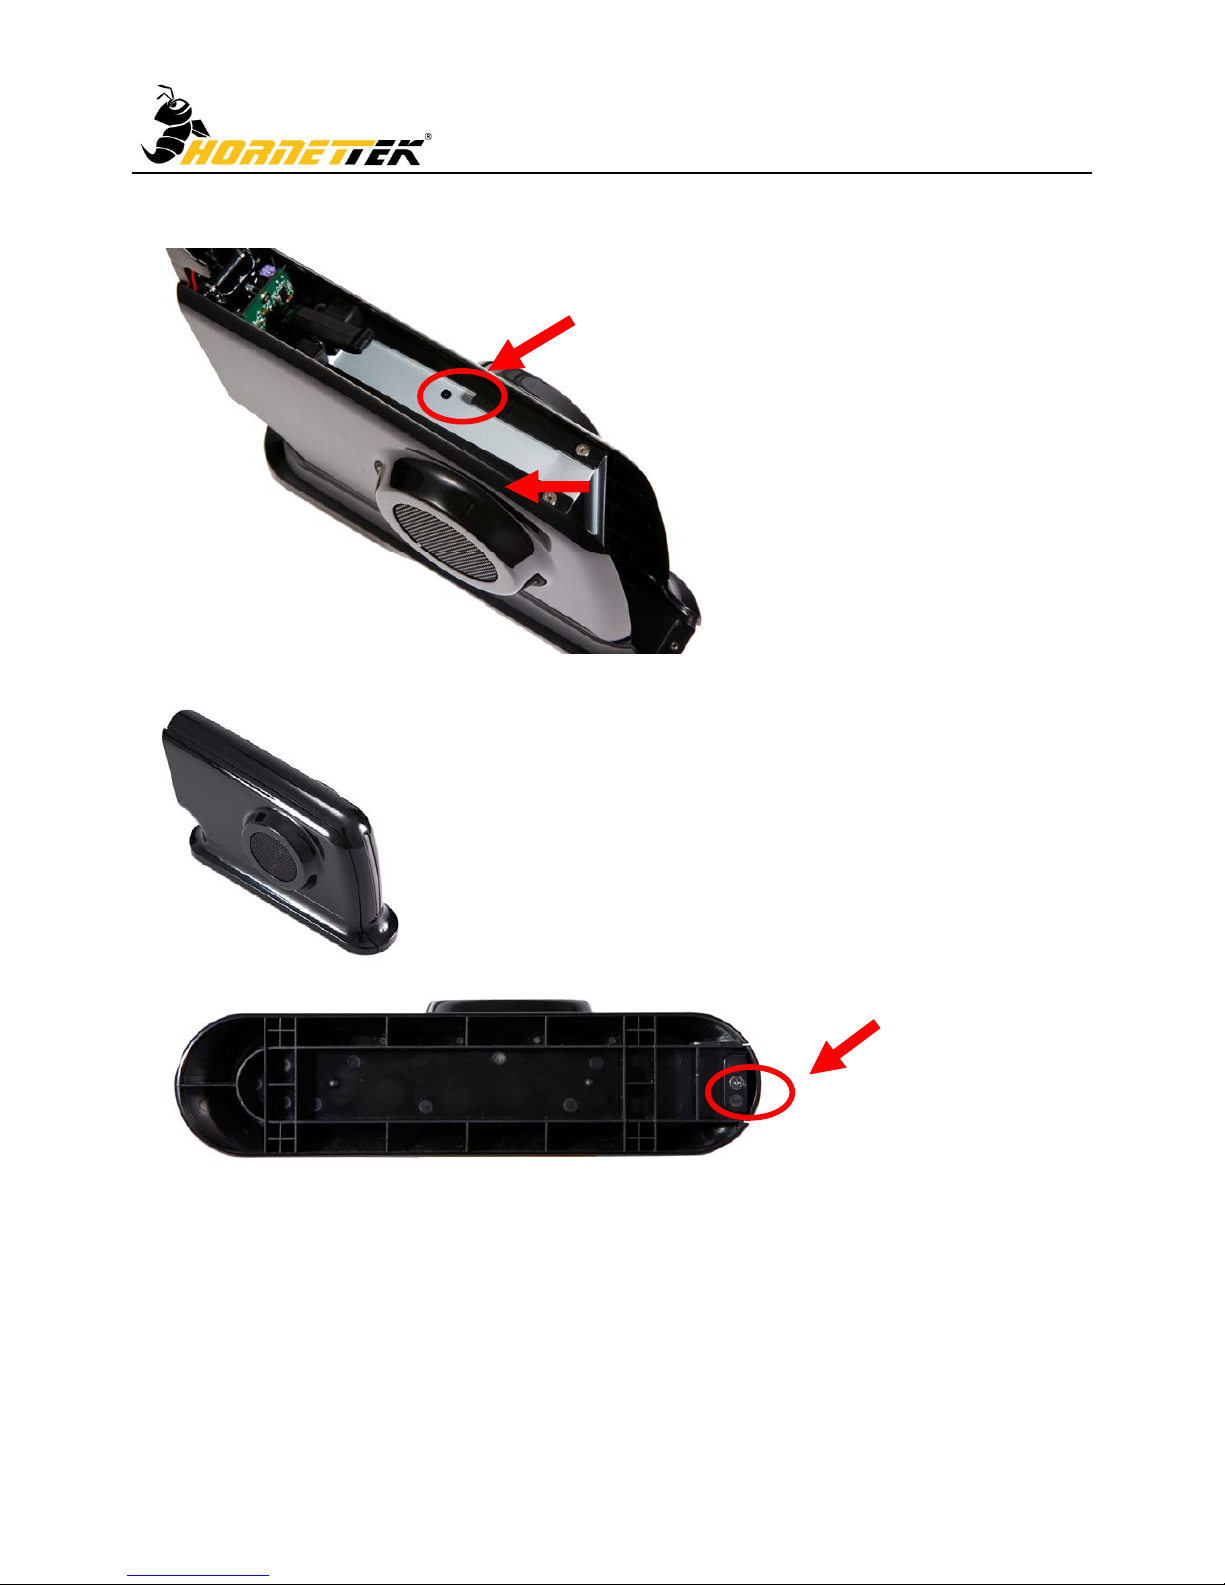
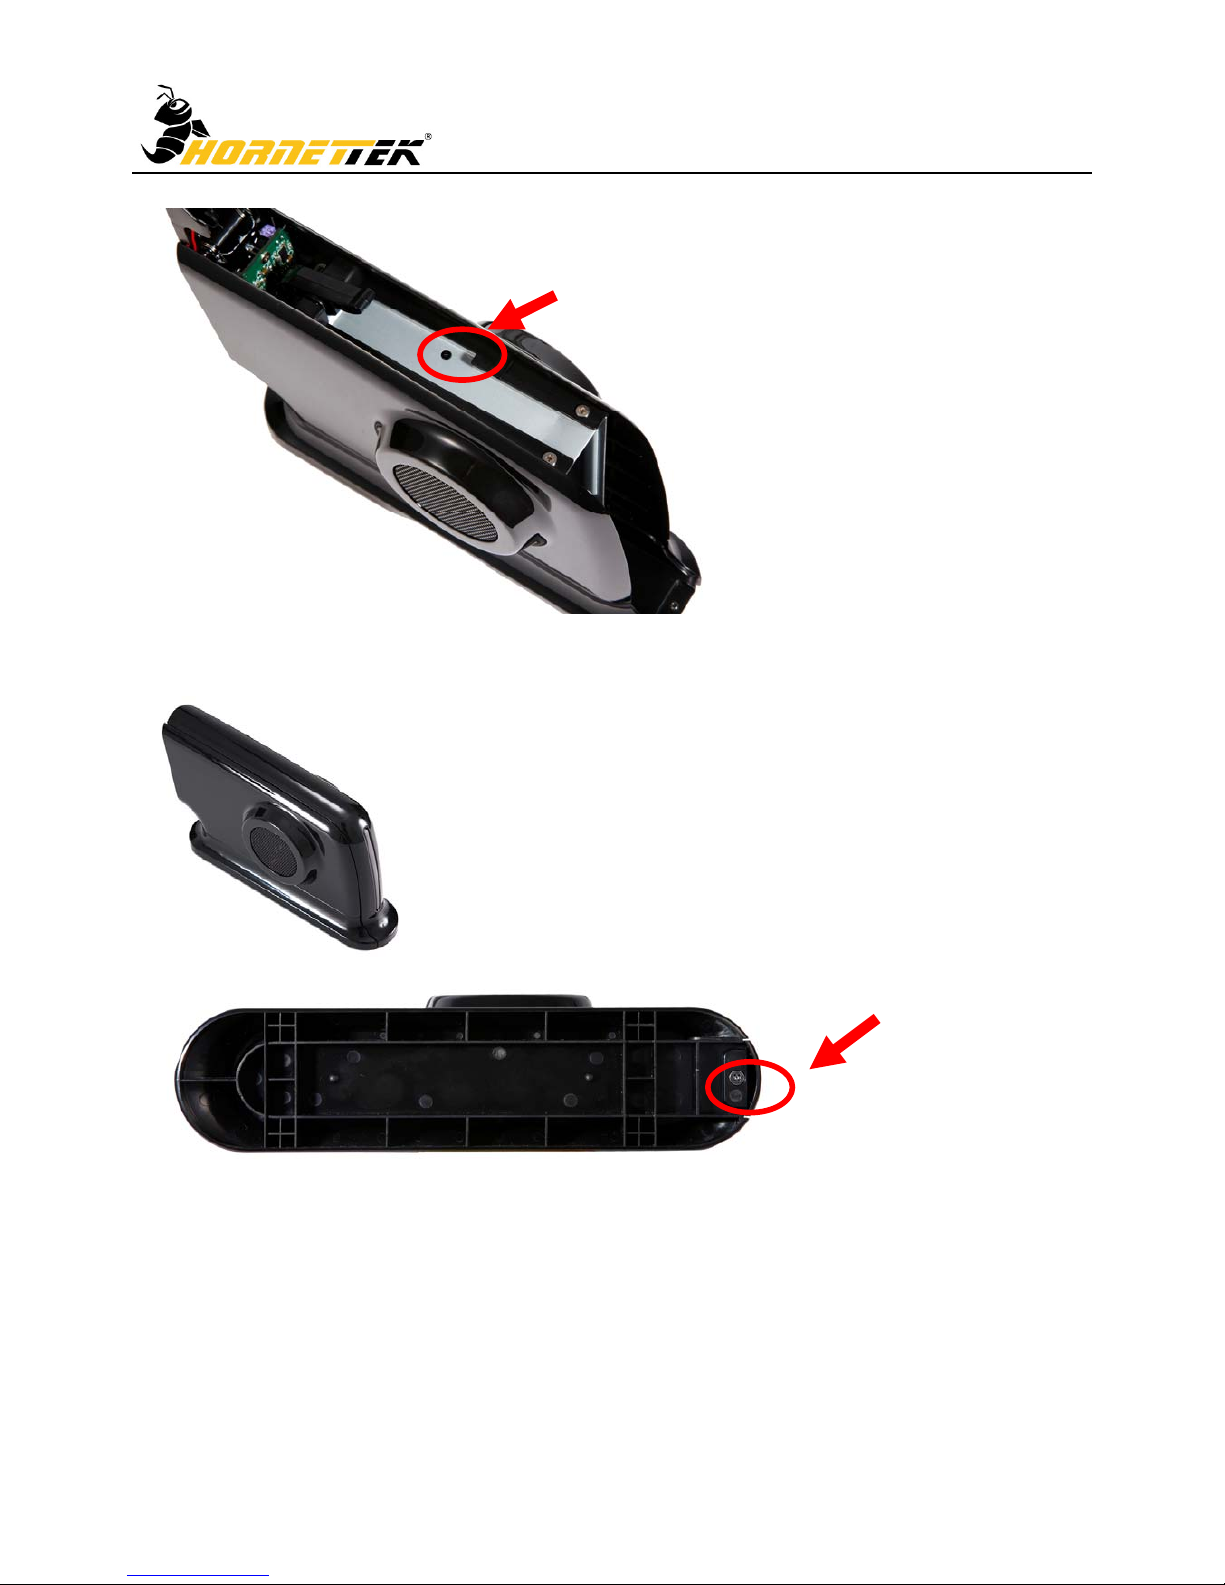
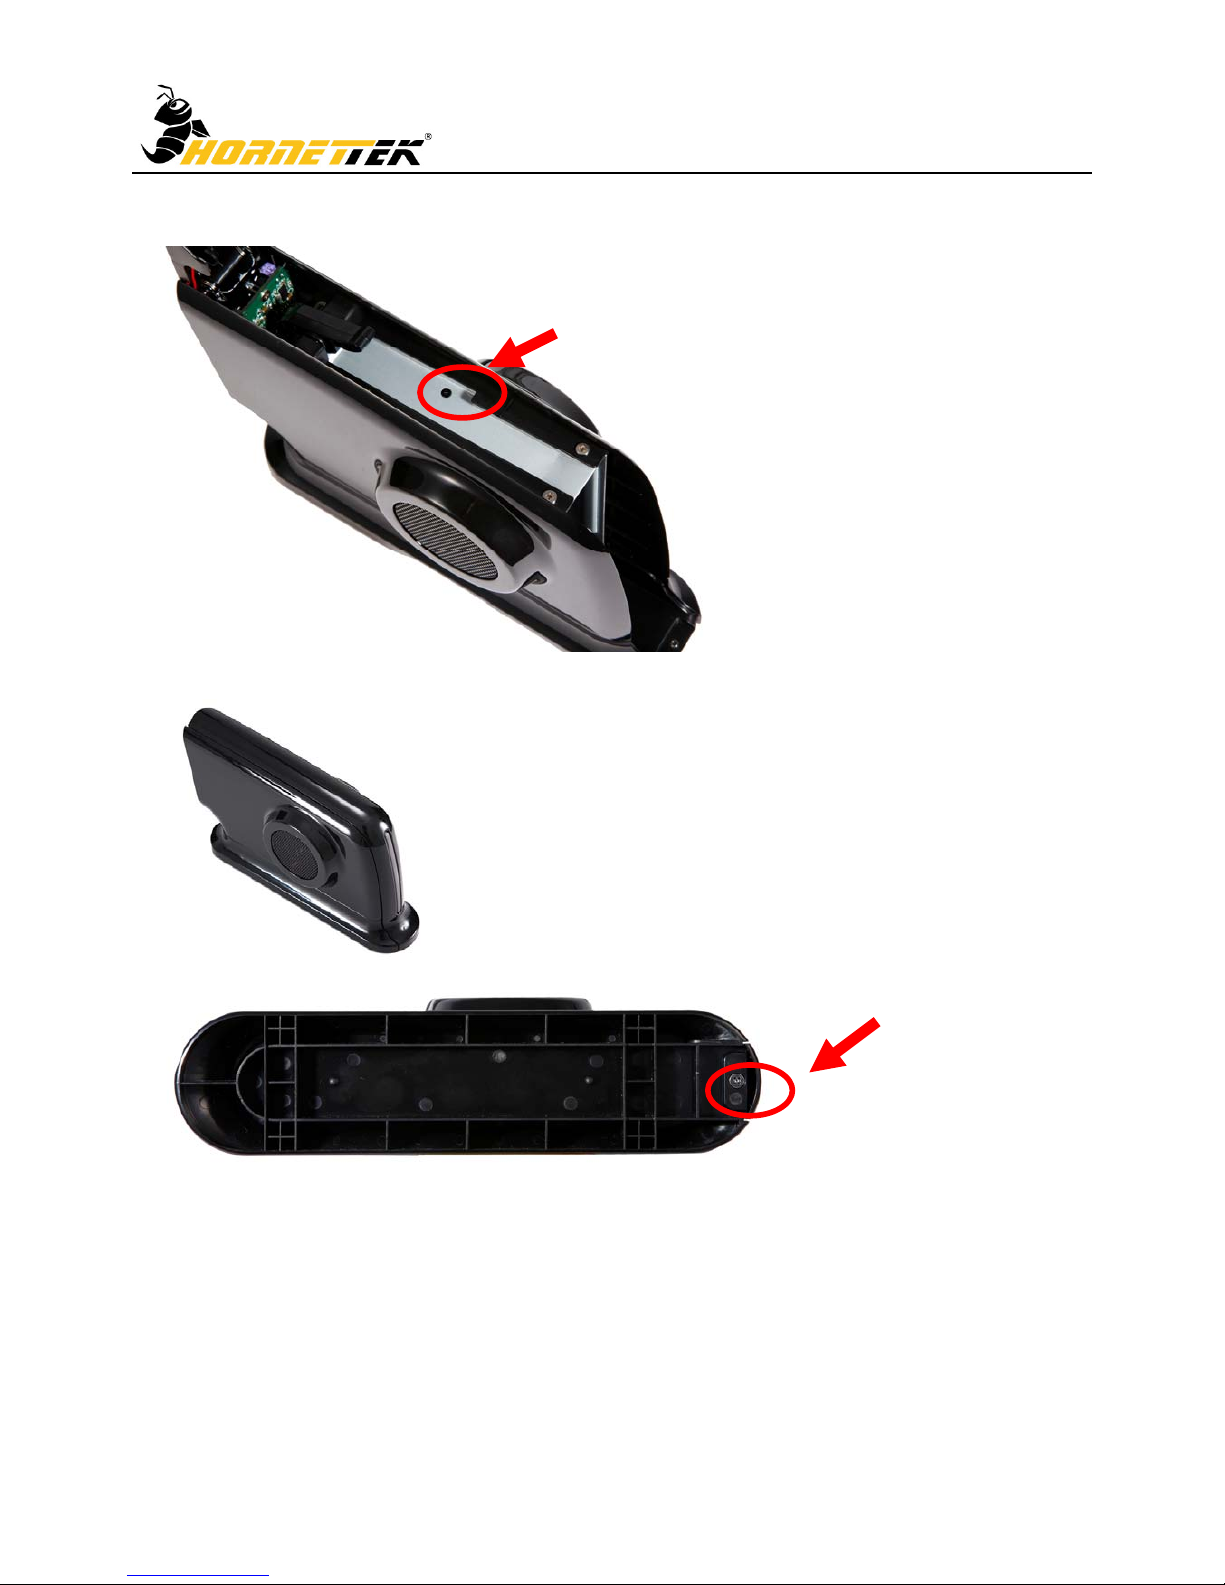
STEP3: Once confirmed the HDD is connected to the enclosure, screw the HDD with the tray.
STEP4: Screw the front panel and enclosure together.
Page 5
External Enclosure Installation Guide
4
HDD Formatting Guide
☆ You may format your external HDD through USB2.0 connection.
☆ Please make sure your external HDD is turned on and well connected to the PC before
formatting the HDD.
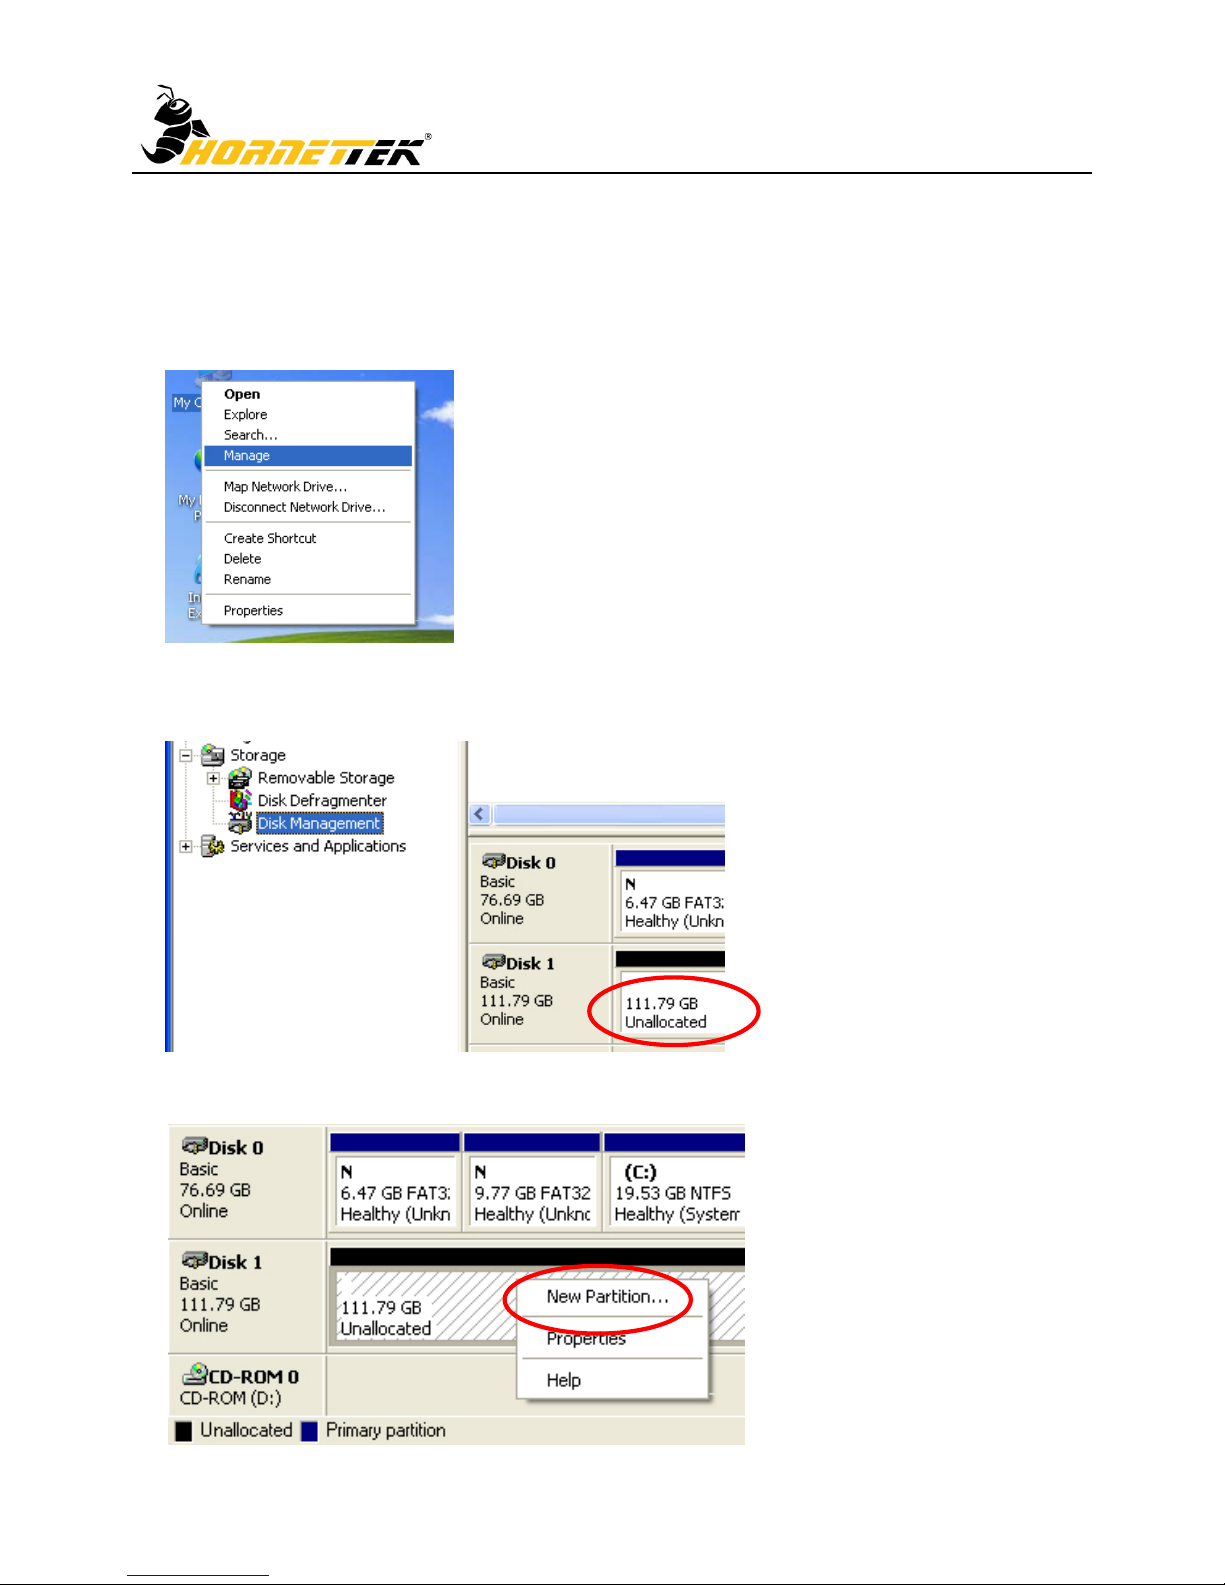
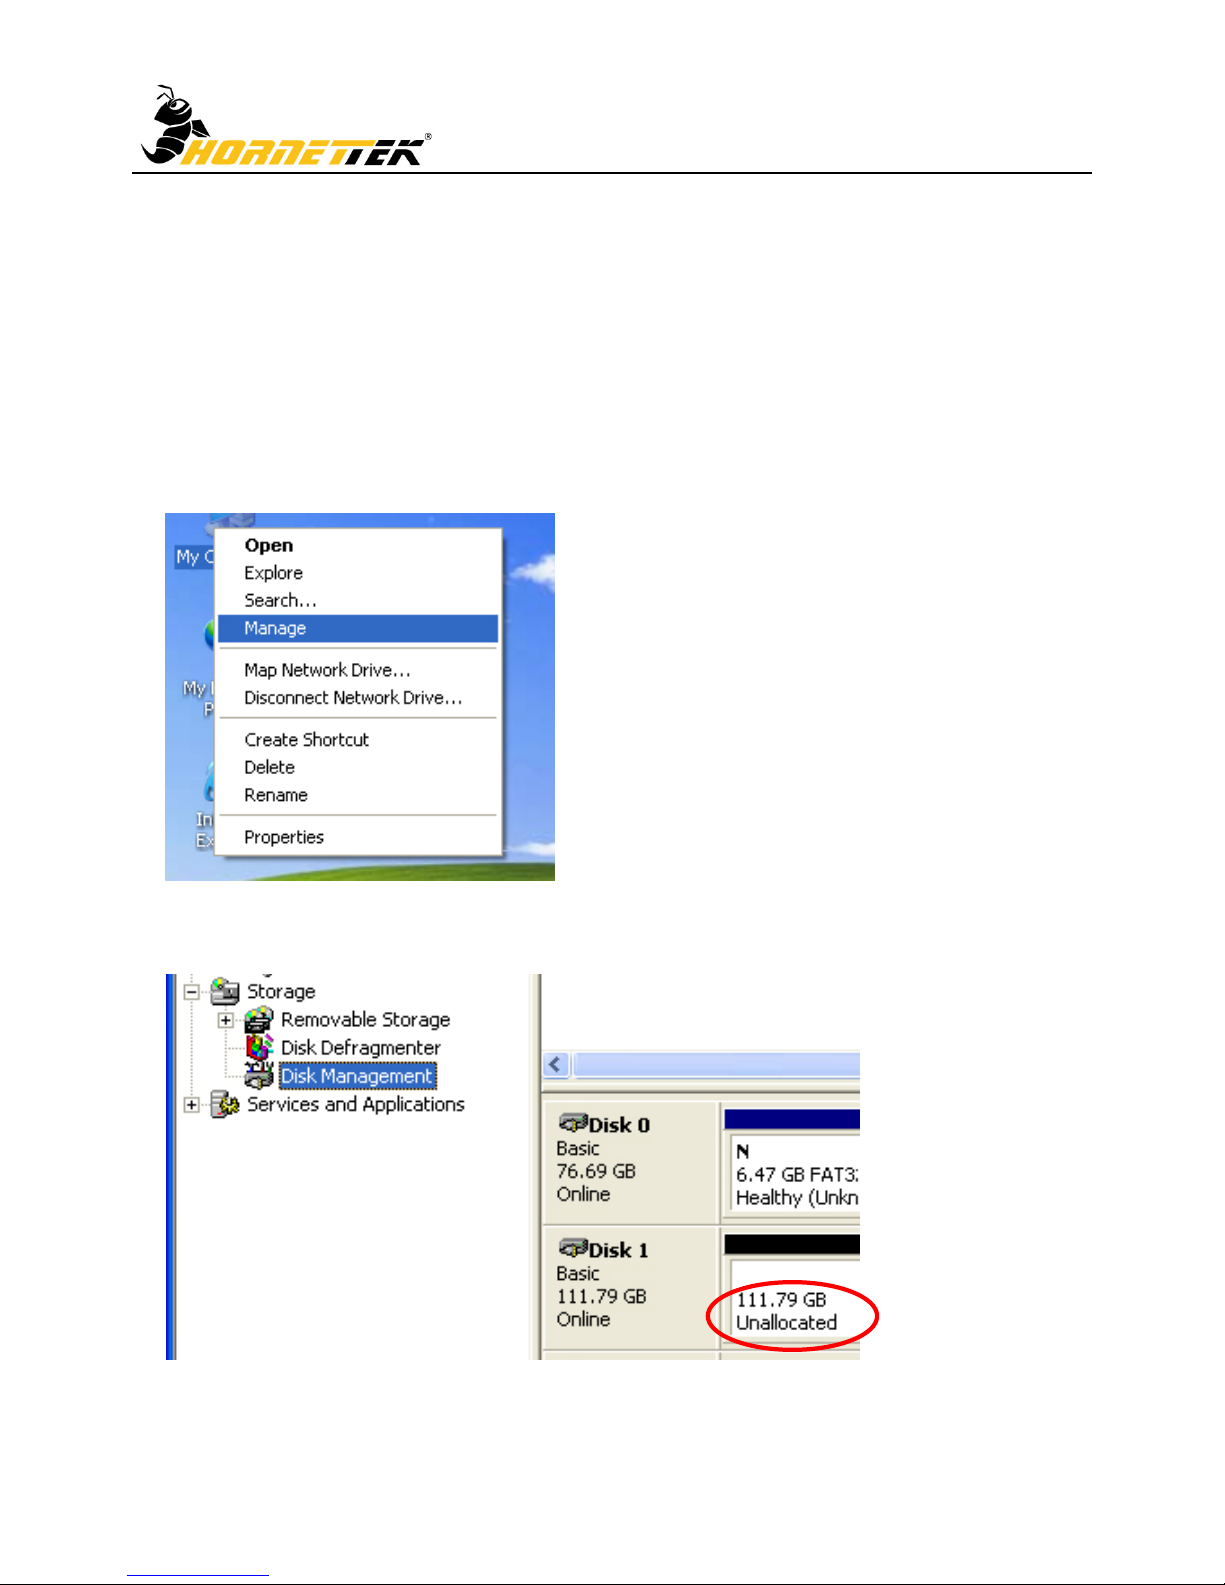
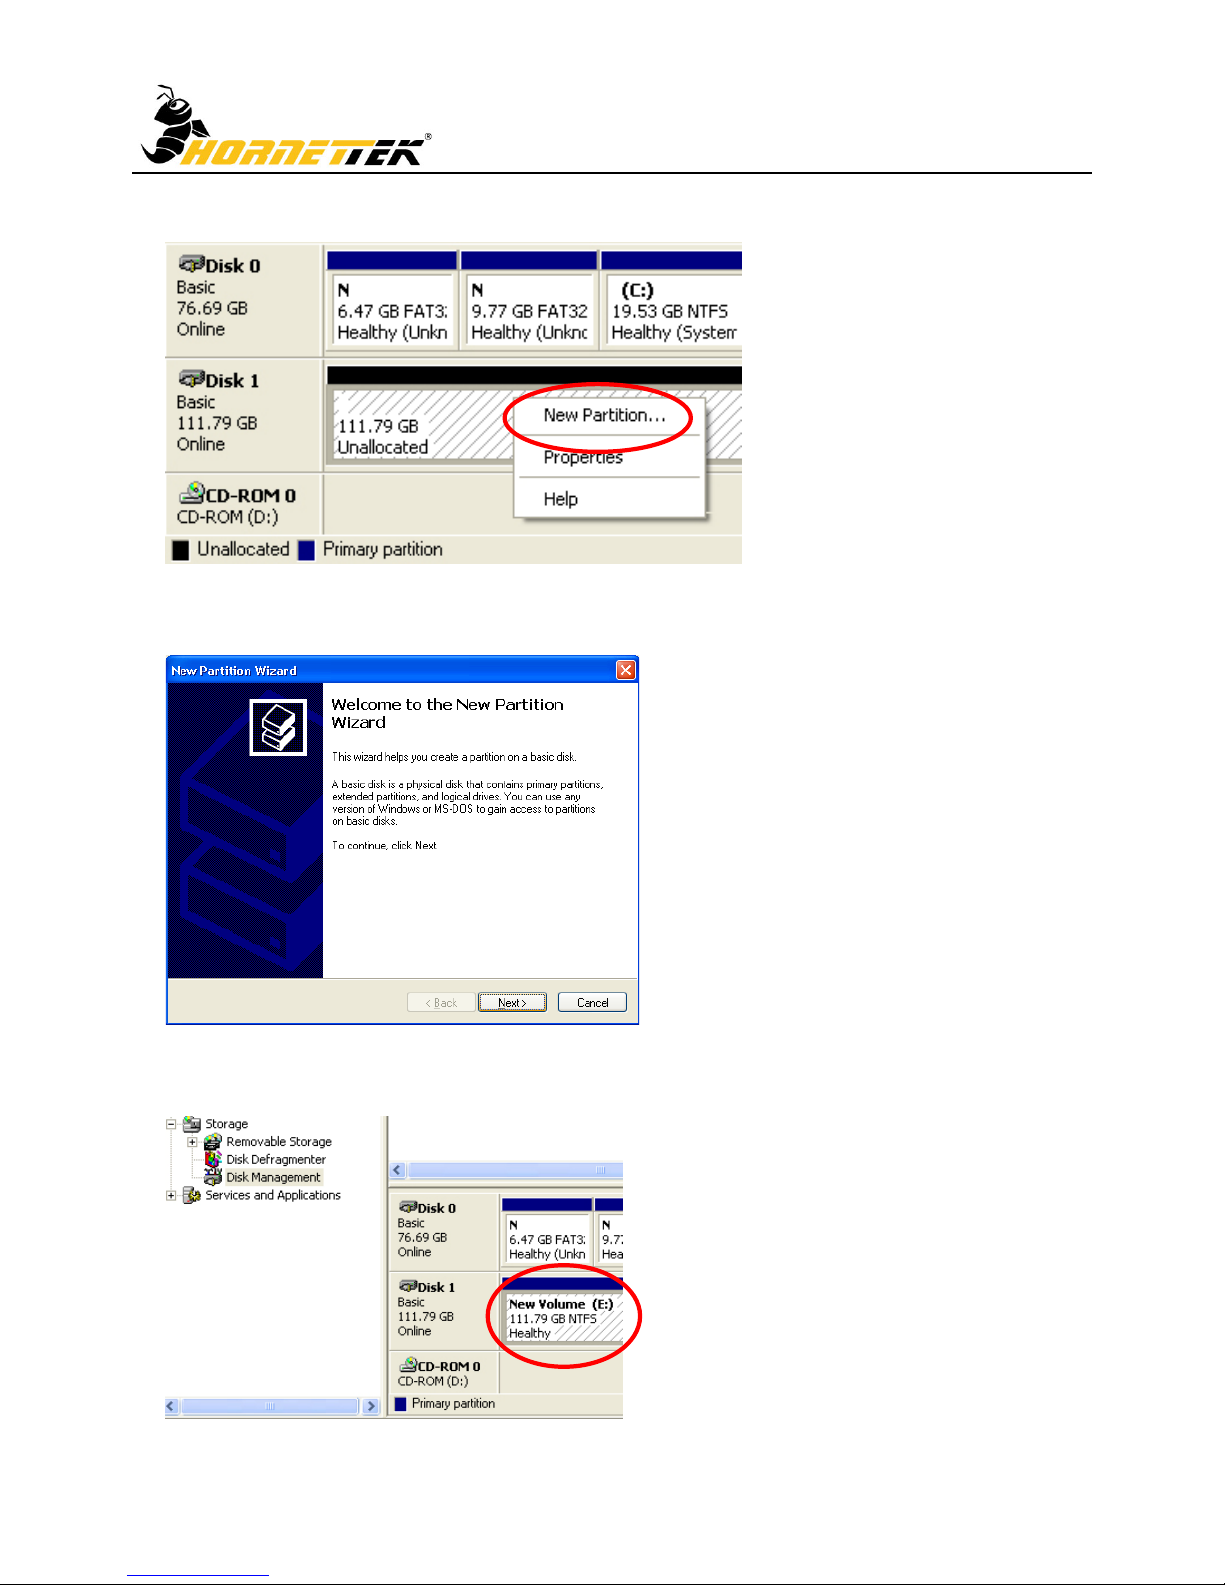
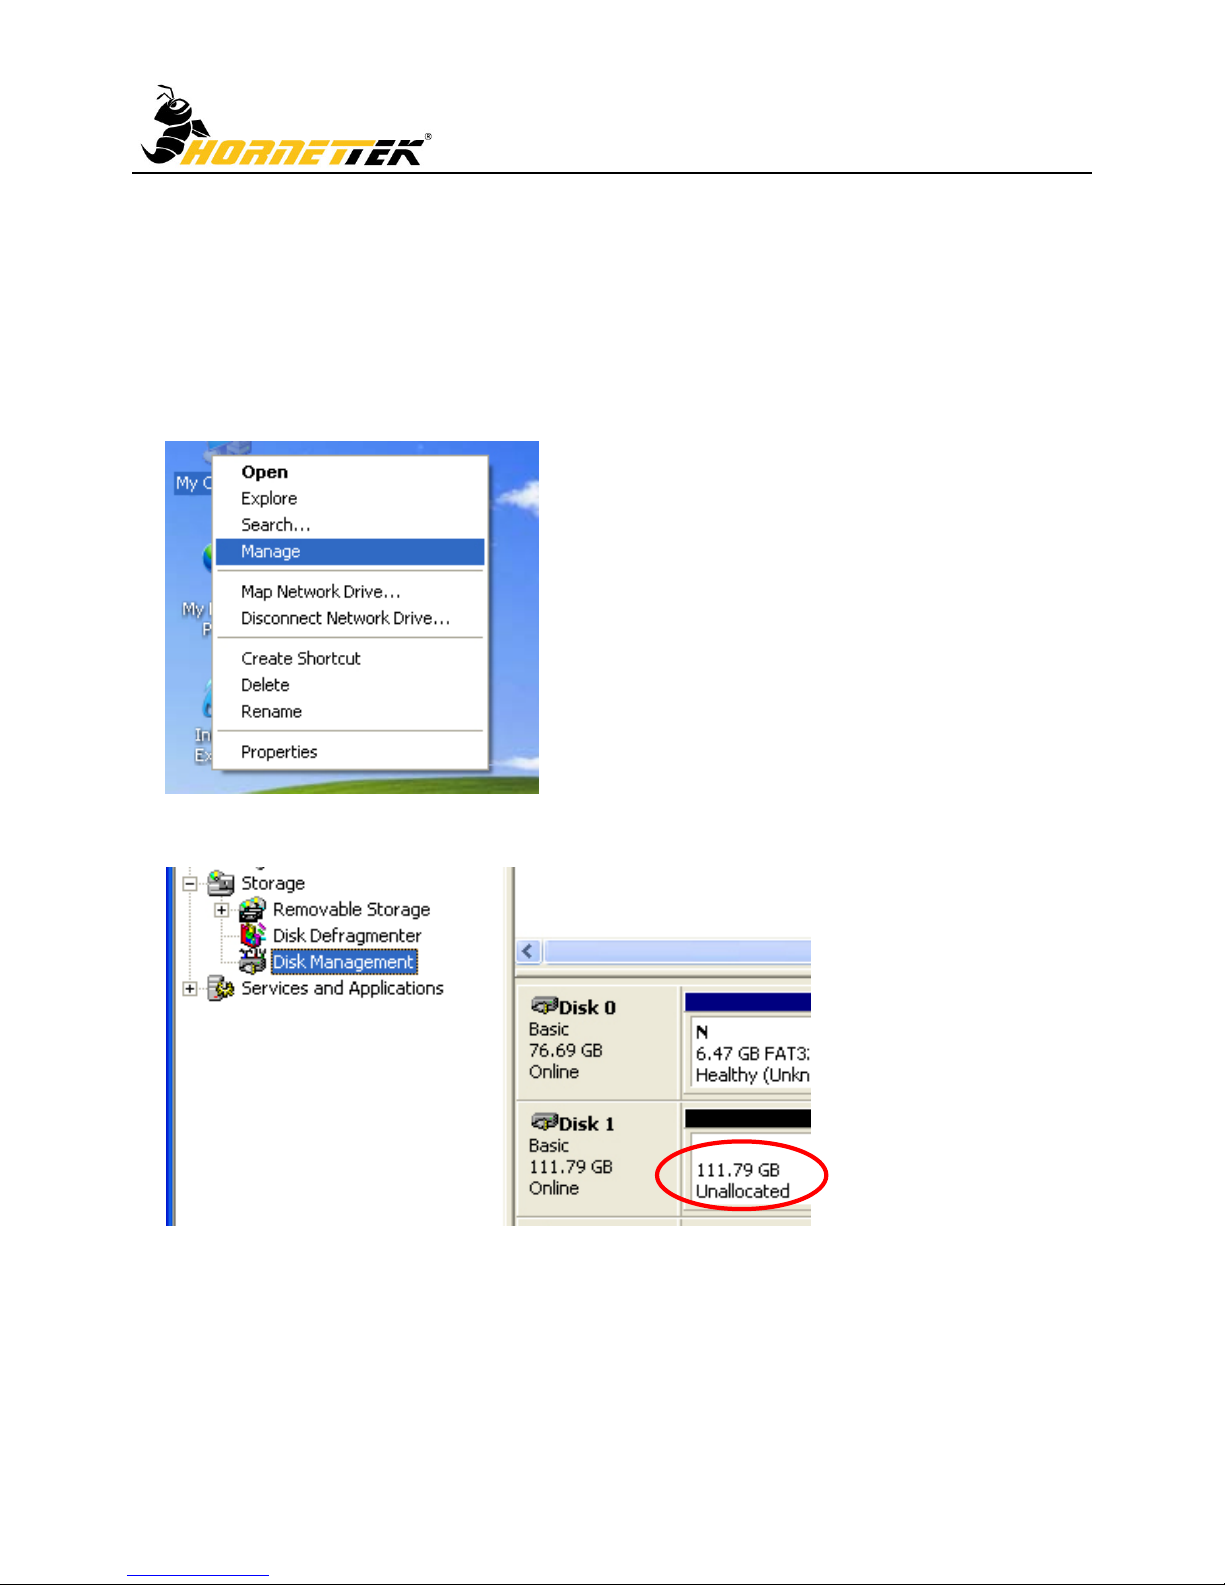
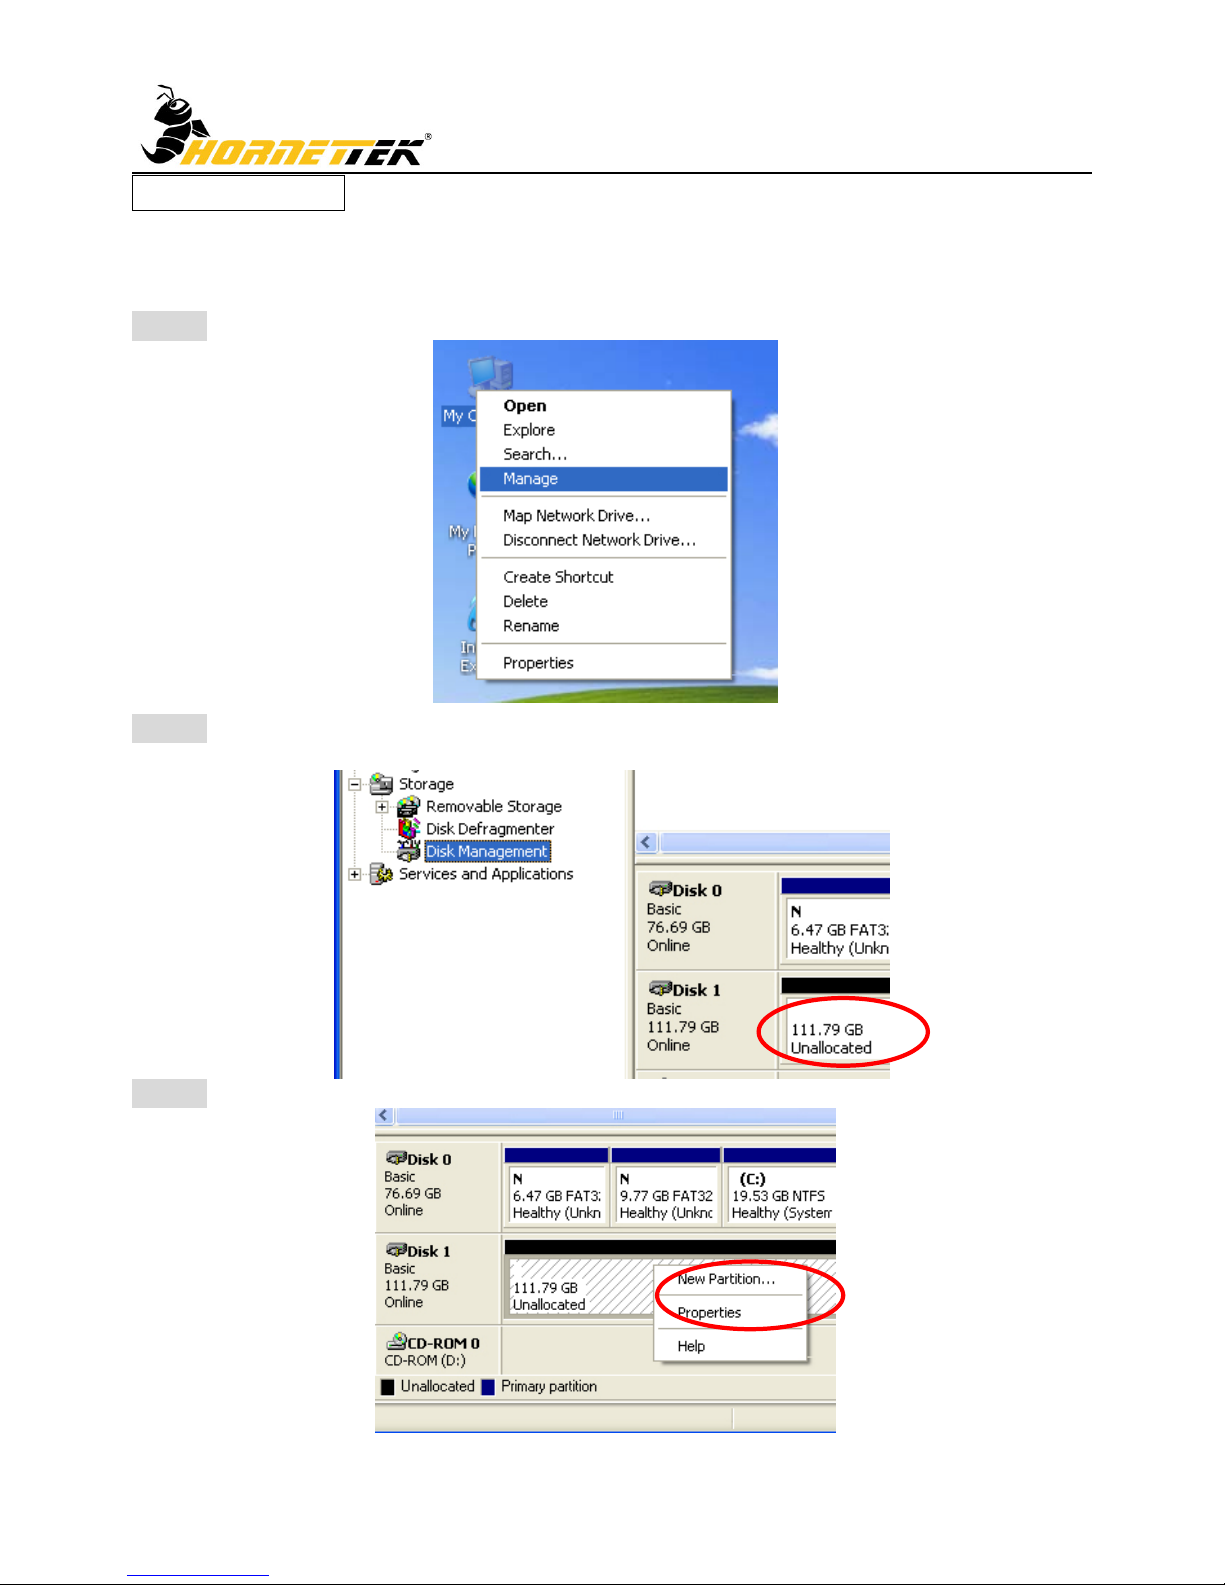
STEP1: Right-click “My Computer” icon and select” Manage”
STEP2: Under “Manage” select “Disk Management” and you will see the External HDD as
“Unallocated”.
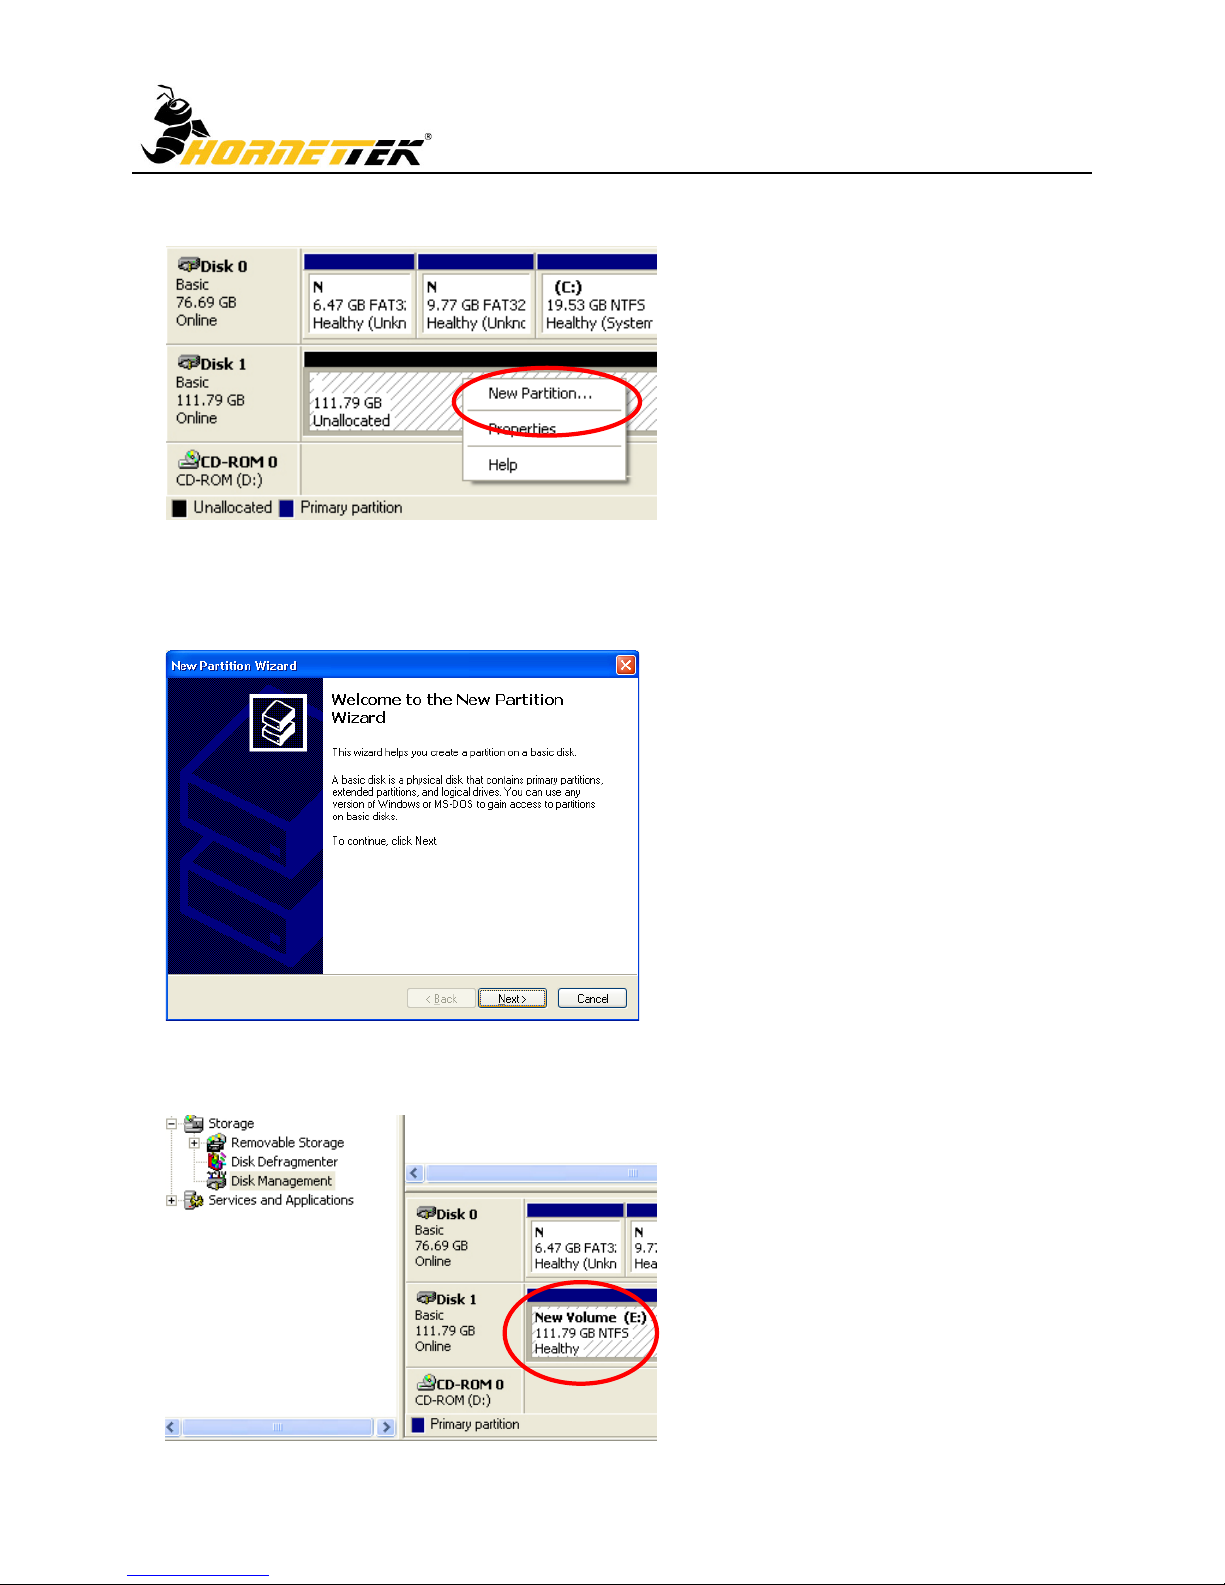
STEP3: Right-click on the “Unallocated” section and select “New Partition”.
Page 6
External Enclosure Installation Guide
5
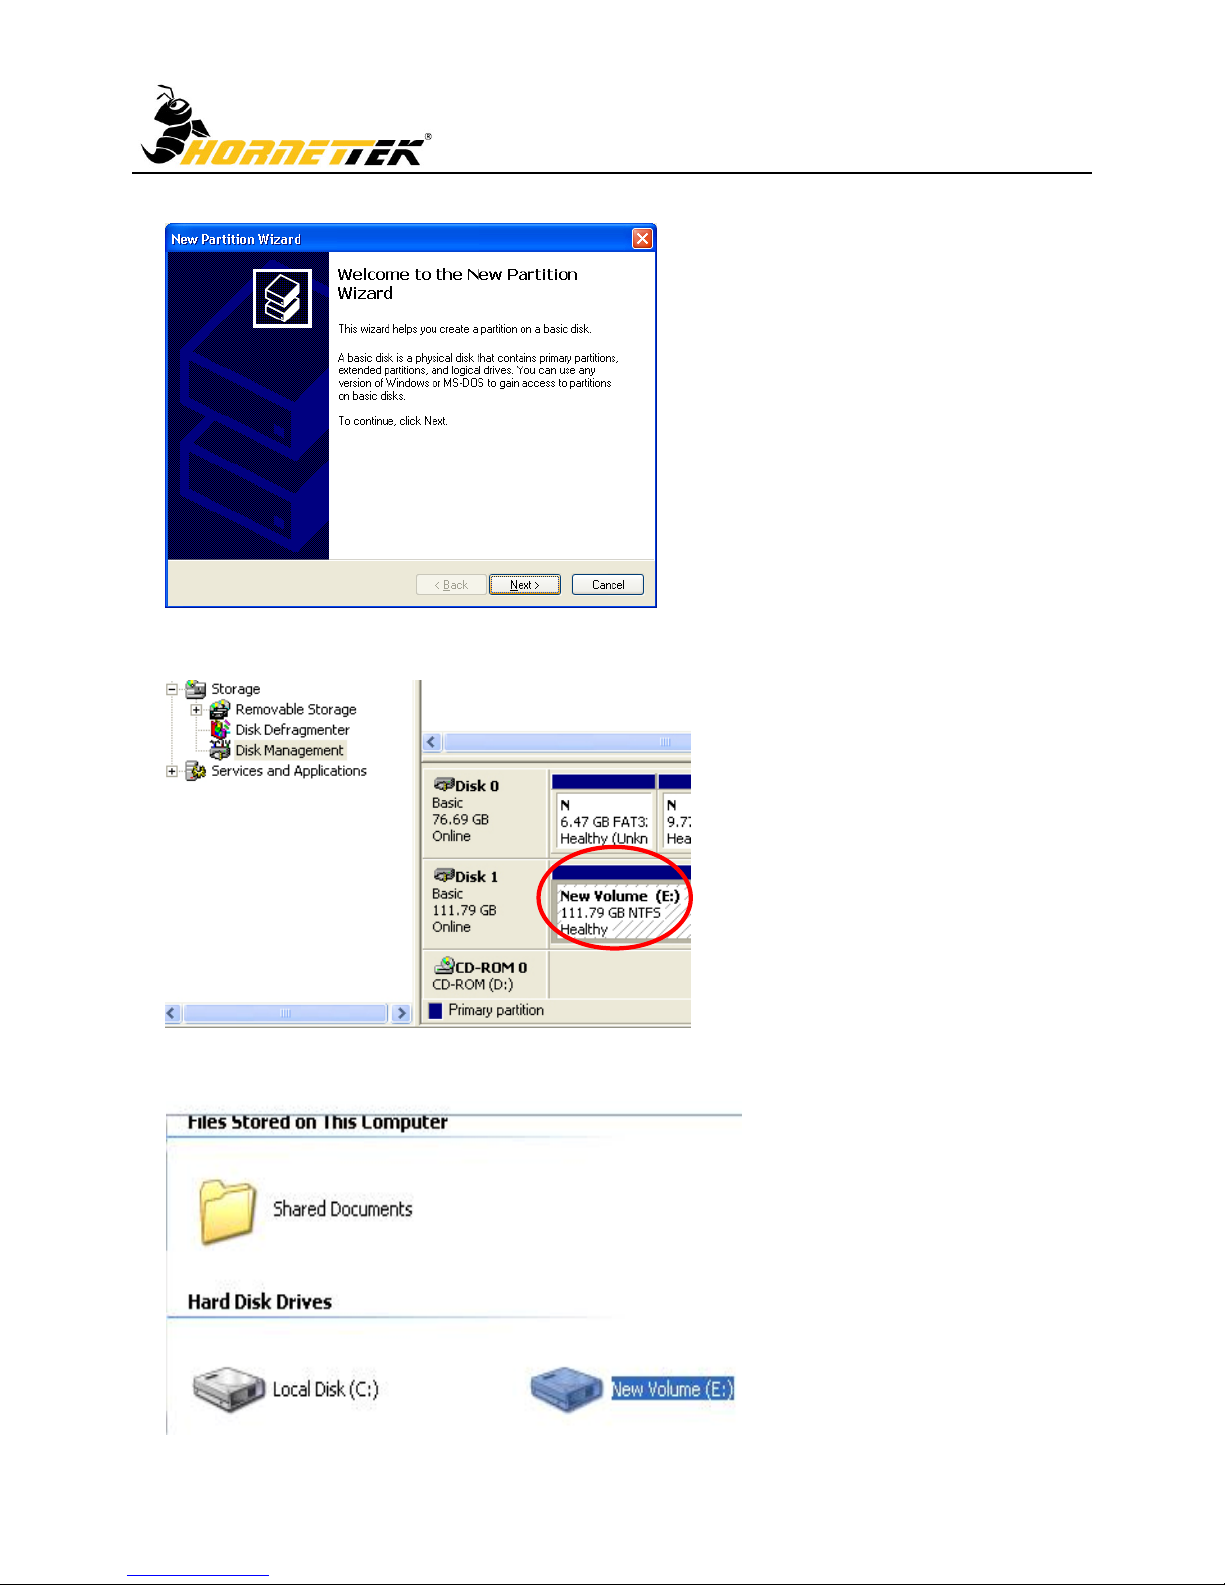
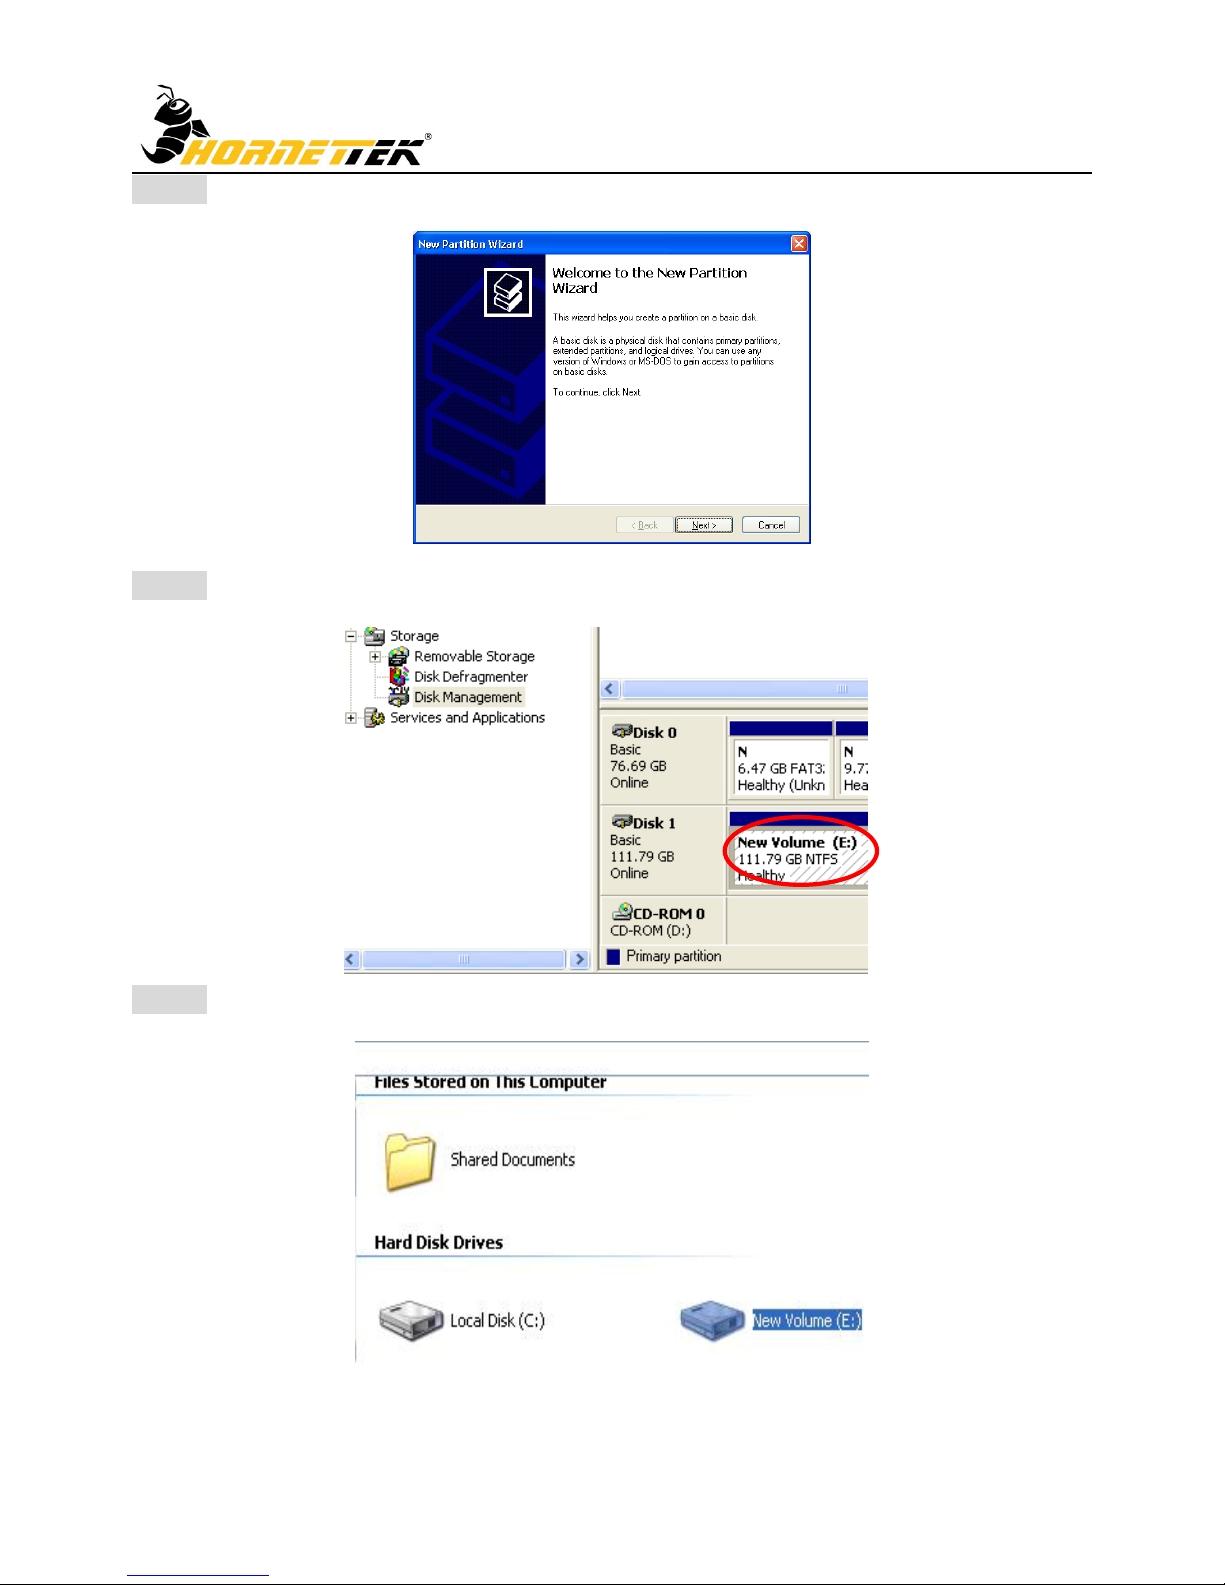
STEP4: The “New Partition Wizard” will appear. Please follow its instruction till complete.
STEP5: When partition has completed, the external HDD will be recognized as “New Volume”.
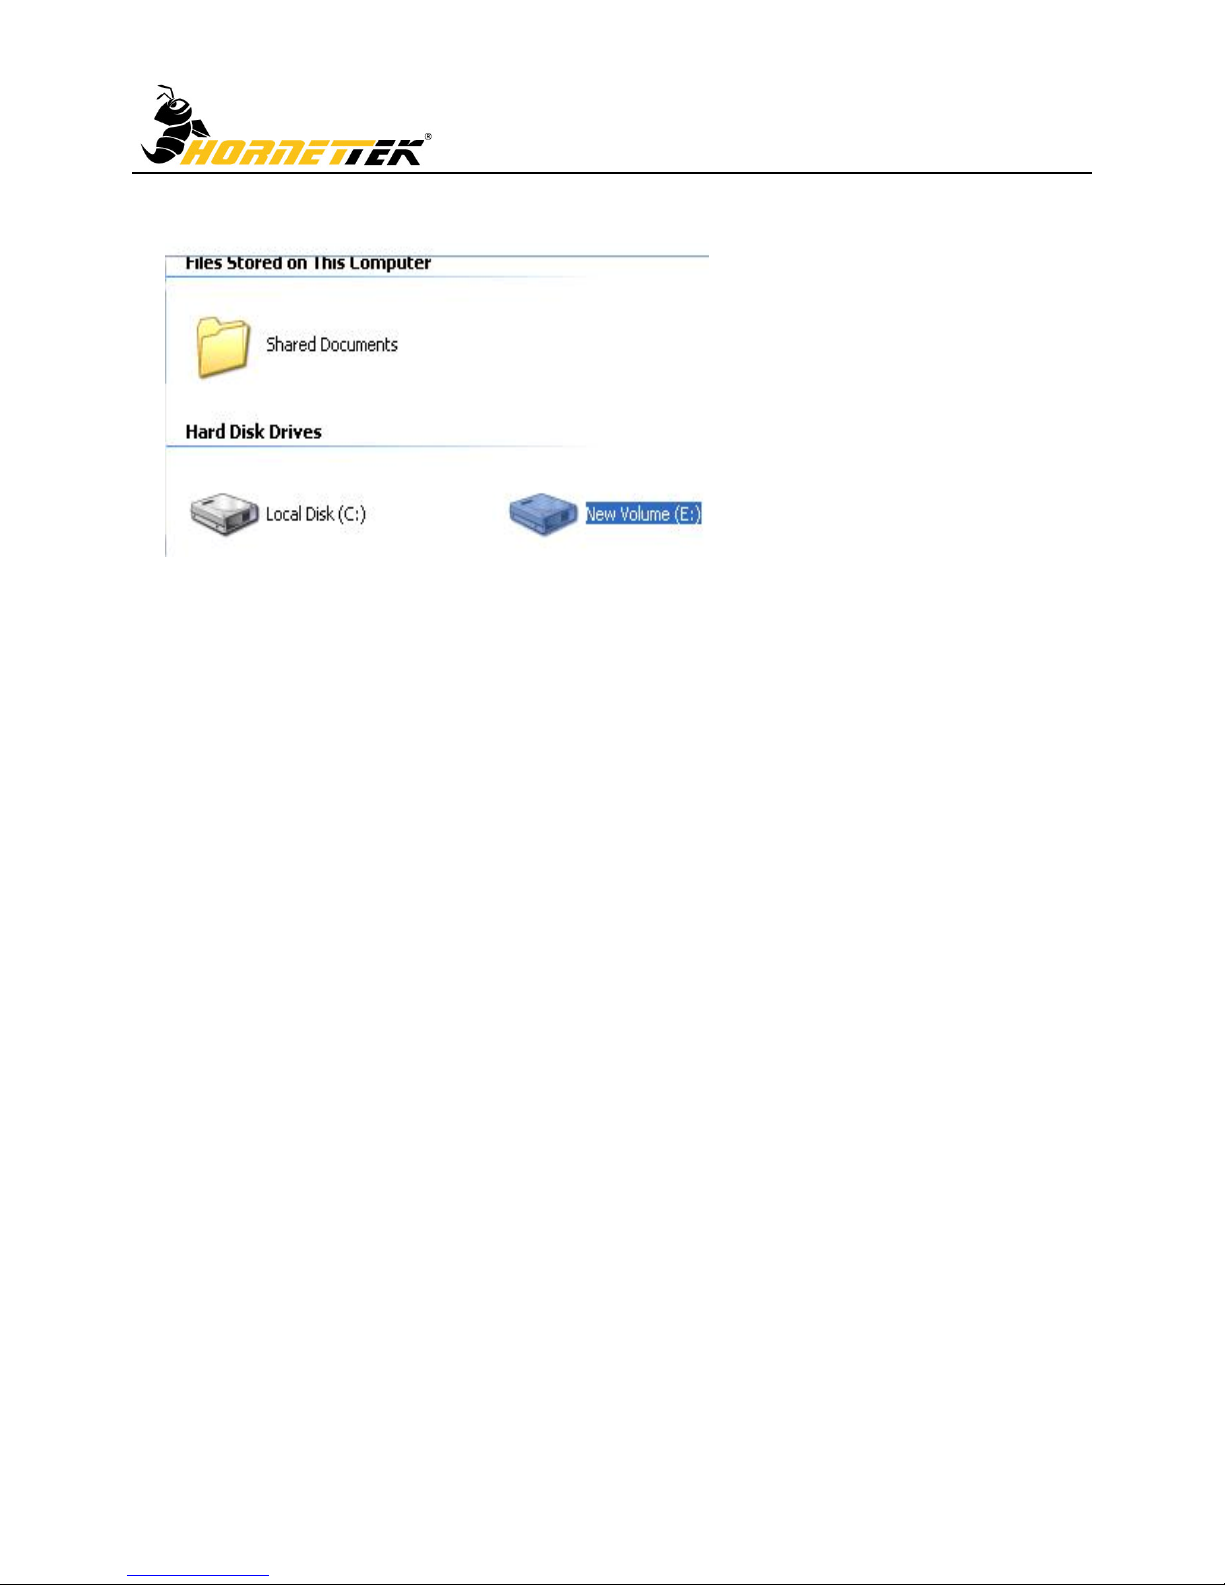
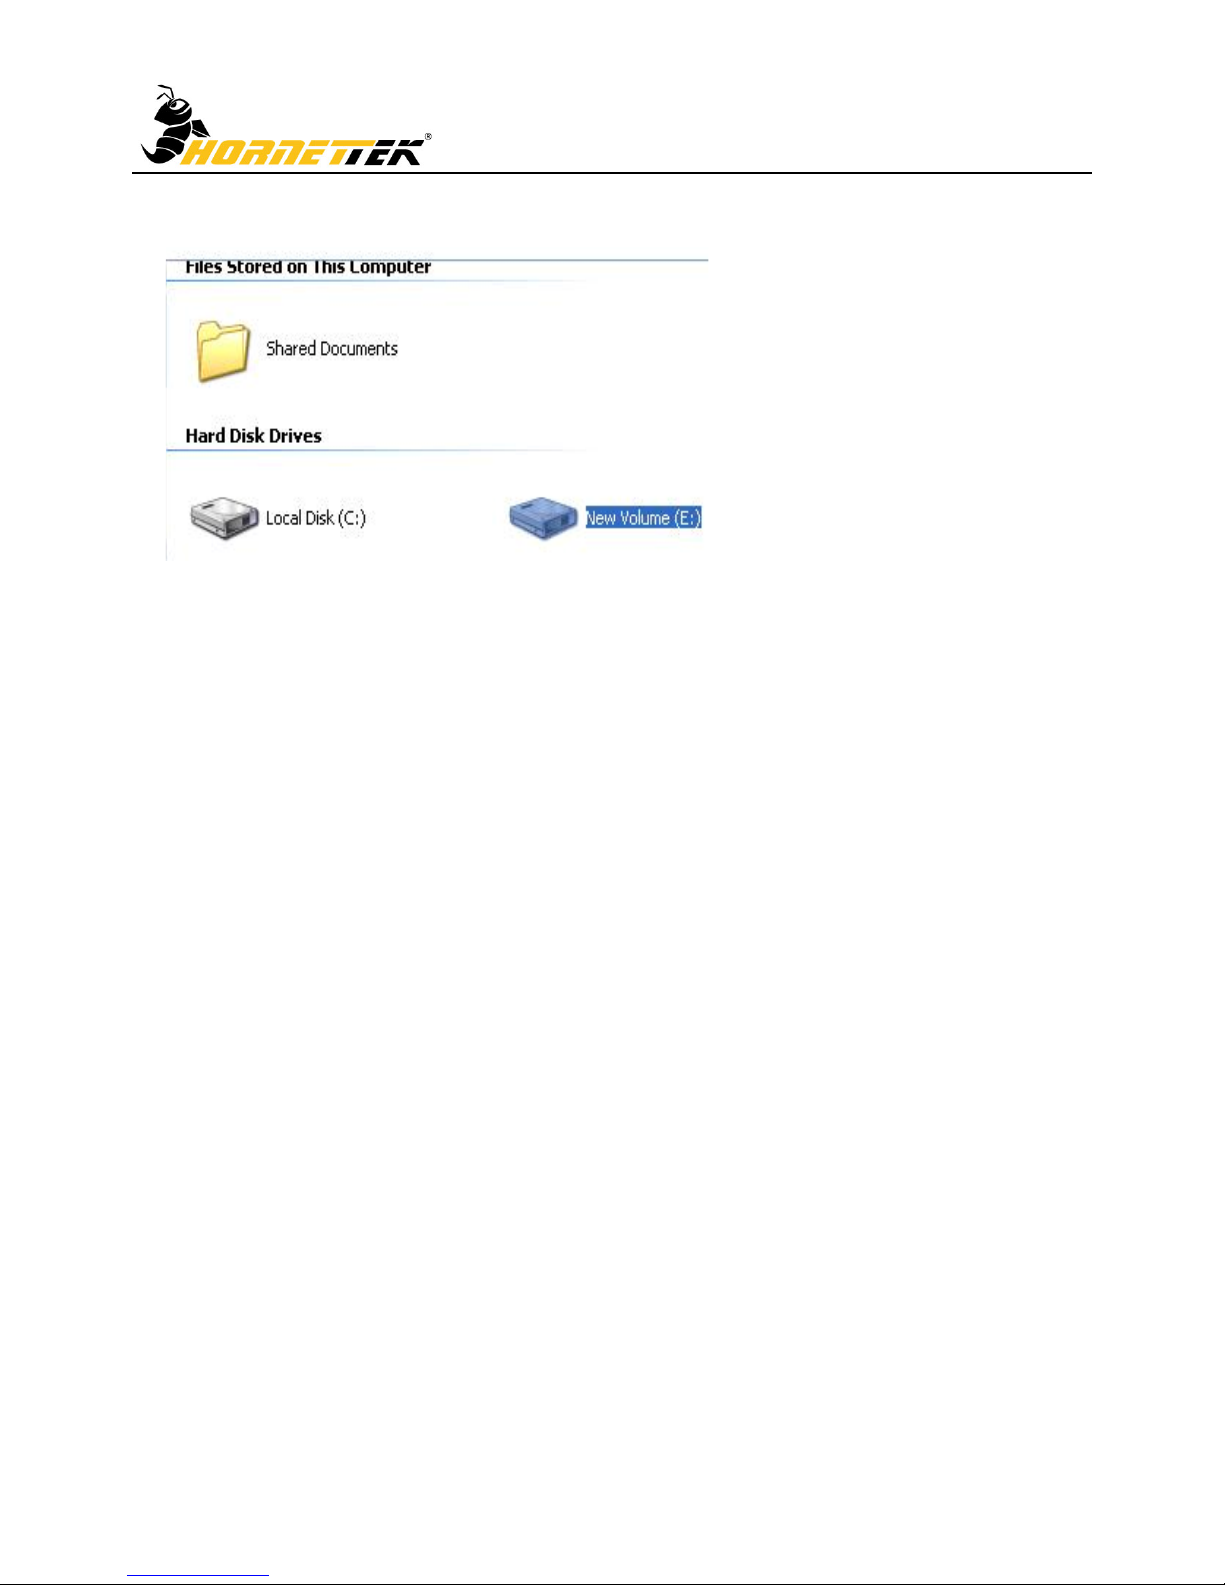
STEP6: Double-click “My Computer”. You will see the drive appear on your PC as “New Volume”.
Page 7
External Enclosure Installation Guide
6
Deutsch
Hardware-Installation Bedienungsanleitung
Anmerkung: Folgen Sie bitte den Instruktionen und stellen Sie sicher, dass Ihr HDD zur
beweglichen Diskette erfolgreich installiert wird.
SCHRITT 1:Loosen Sie die 1 Schraube und dann öffnen Sie die Frontplatte.
SCHRITT 2:Legen Sie den HDD ins Tablett. Drängen Sie den HDD, um den SATA Stecker
anzuschließen.
!AUFMERKSAMKEIT Neuer HDD muss
vor dem Gebrauch formatiert werden.
Page 8
External Enclosure Installation Guide
7
SCHRITT 3: Schrauben Sie den HDD auf dem Tablett dicht.
SCHRITT 4: Schrauben Sie die Frontplatte und HDD-Gehäuse zusammen an.
Page 9
External Enclosure Installation Guide
8
HDD-Formatierung Bedienungsanleitung
☆ Sie können Ihren externen HDD durch die USB2.0 Verbindung formatieren.
☆ Stellen Sie bitte sicher, dass Ihr externer HDD angeschaltet wird und gut an den PC vor der
Formatierung des HDD angeschlossen wird.
SCHRITT 1: Klicken Sie "Mein Computer" Ikon mit der rechten Maustaste an und wählen Sie die
"Verwalten" Kolumne aus.
SCHRITT 2: Wählen Sie "Diskettenmanagement" aus, und Sie werden sehen, dass Ihr Externer HDD "
unbesetzt" zeigte.
Page 10
External Enclosure Installation Guide
9
SCHRITT 3: Klicken Sie auf dem "Unbesetzt" Block mit der rechten Maustaste an und wählen Sie "Neue
Partition" aus.
SCHRITT 4: Das "Neue Partition Zauberer" wird erscheinen. Folgen Sie bitte der Instruktion des
Zauberers zu vollenden.
SCHRITT 5: Wenn neue Partition vollendet wird, wird der externe HDD als ein "Neues Volumen"
anerkannt.
Page 11
External Enclosure Installation Guide
10
SCHRITT 6: Klicken Sie auf "Meinen Computer" doppel. Sie werden sehen, dass das neue Volumen auf
Ihrem PC erscheint.
Page 12
External Enclosure Installation Guide
11
Français
Guide d’Installation du Materiel
Note: Veuillez suivre les instructions et assurer que votre HDD est inst allé sur le disque mobile
avec réussite.
ETAPE1:Librer les 1 vis et puis ouvrir le panneau avant .
ETAPE2:Placer HDD dans le plateau. Pousser HDD pour connecter le connecteur SATA .
!ATTENTION
Nouveau HDD Doit Etre Formatté Avant d’Utiliser
Page 13
External Enclosure Installation Guide
12
ETAPE3: Visser HDD sur le plateau étroitement.
ETAPE4: Visser le panneau avant et clôturer ensemble.
Page 14
External Enclosure Installation Guide
13
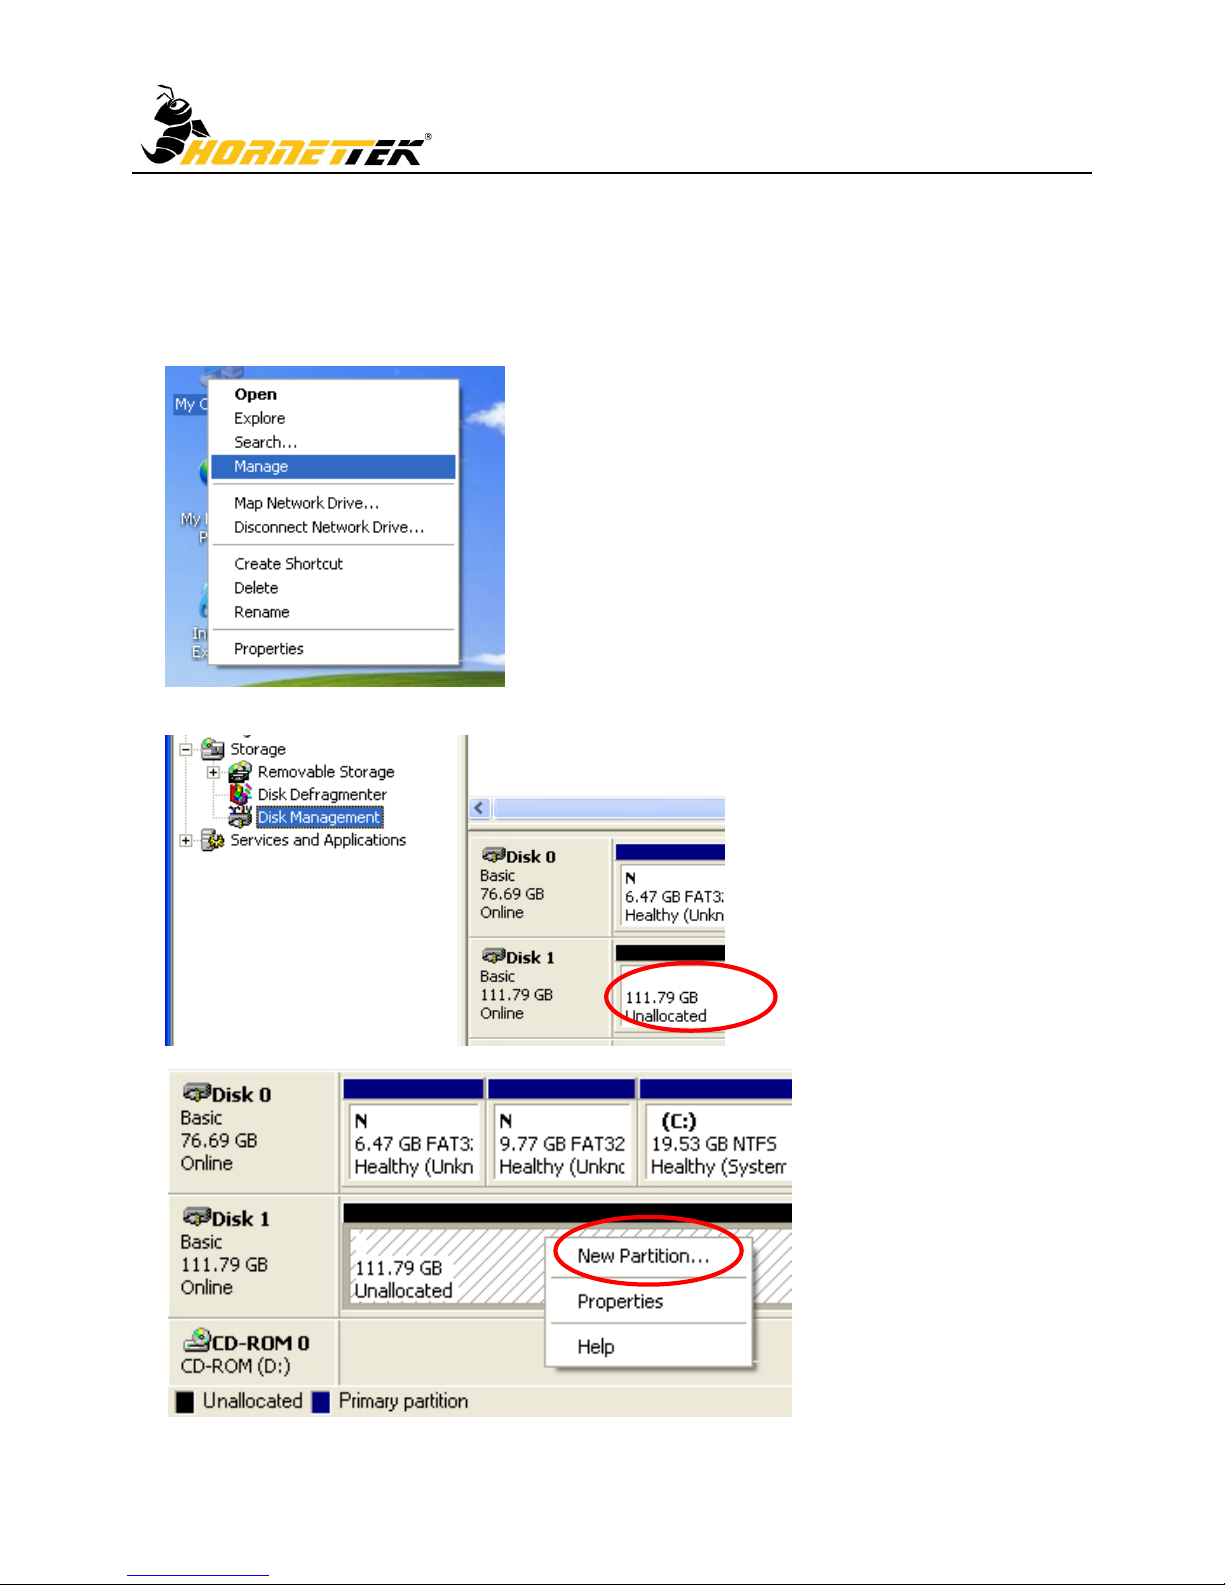
Guide de Formatage HDD
☆ Vous pouvez formatter votre HDD externe par la connection USB2.0.
☆ Veuillez assurer que votre HDD externe est allumé et bien connecté sur PC avant de formater
HDD.
ETAPE1: Cliquer à droit l’icône “My computer” et selectionner la colonne” Manage”.
ETAPE2: Selectionner “Disk Management” et vous allez voir que votre HDD Externe a
montré“Unallocated”.
ETAPE3: Cliquer à droit sur le bloc “Unallocated” et selectionner “New Partition”.
Page 15
External Enclosure Installation Guide
14
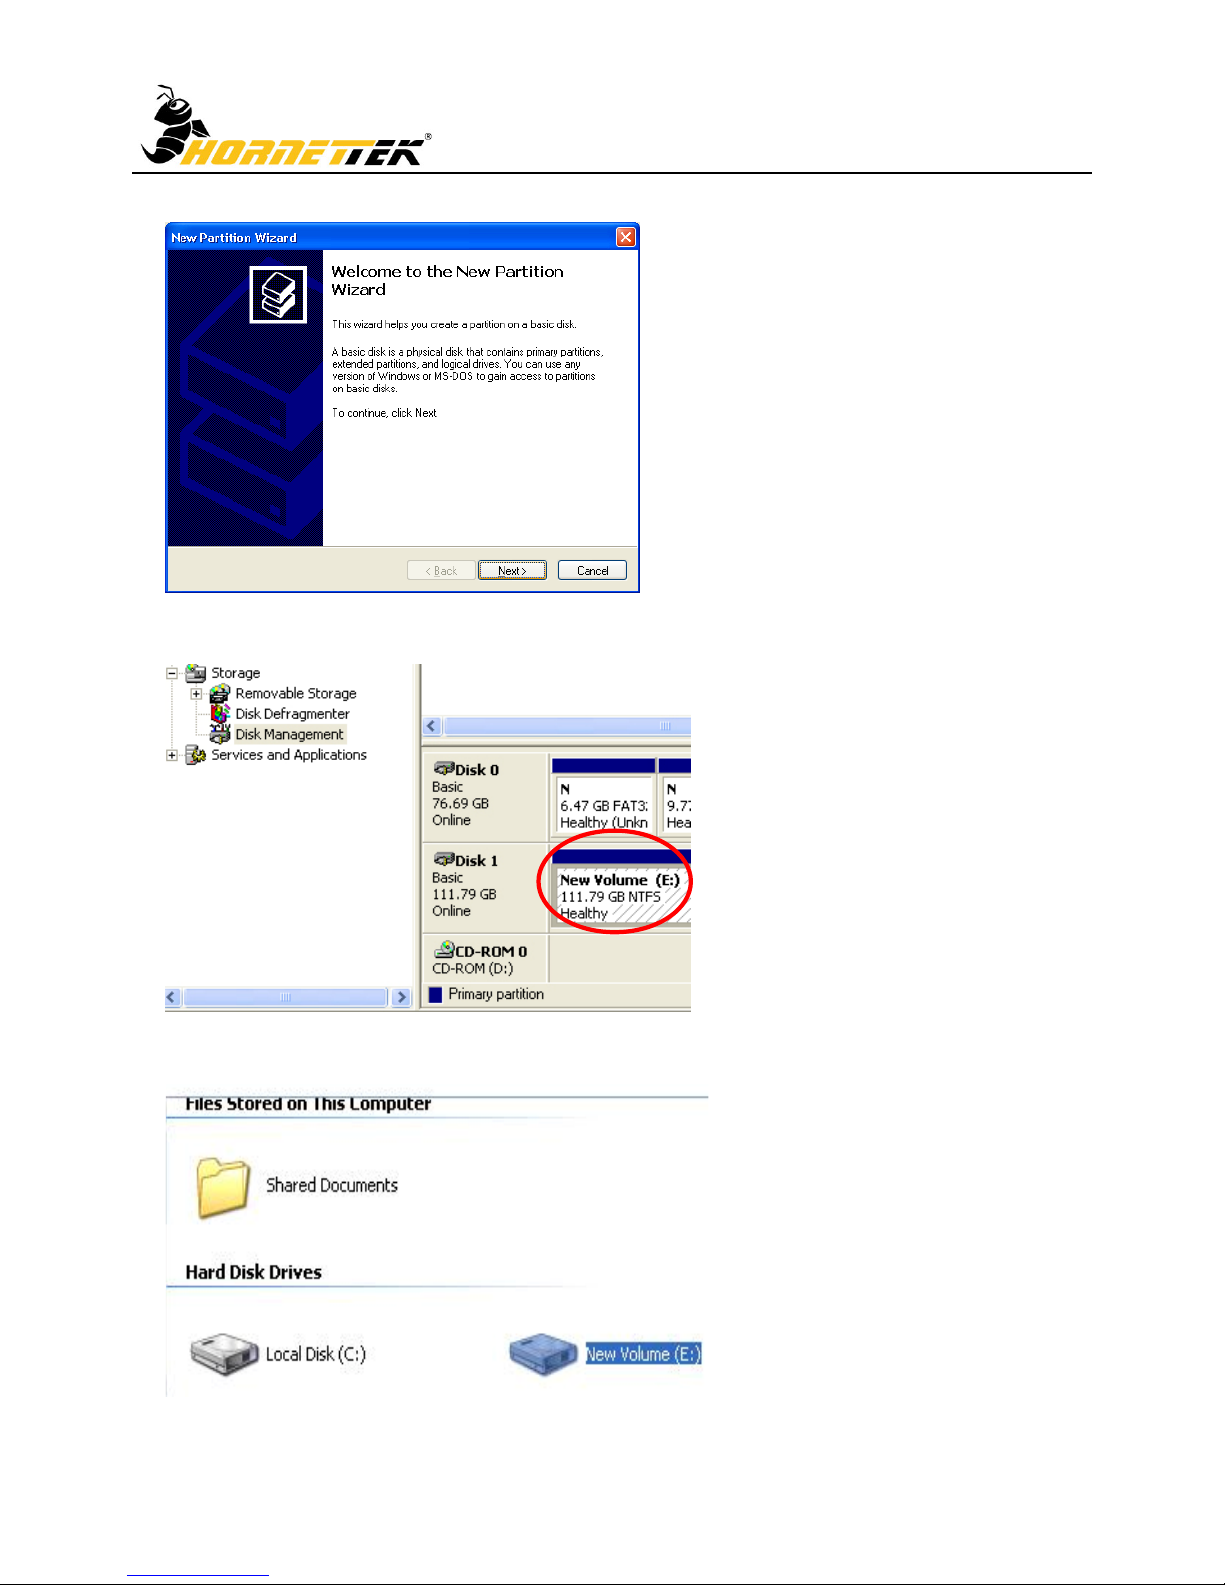
ETAPE 4: “New Partition Wizard” va apparaitre. Veuillez suivre l’instruction de wizard pour compléter.
ETAPE5: Quand la nouvelle partition est finie, HDD externe sera reconnu comme un “New Volume”.
ETAPE6: Cliquer double “My Computer”. Vous allez voir une nouvelle colonne apparaitre sur votre
PC.
Page 16
External Enclosure Installation Guide
15
Español
Guía de Instalación del Hardware
Nota: Siga las instrucciones y asegúrese de que su HDD se instala con éxito al disco móvil.
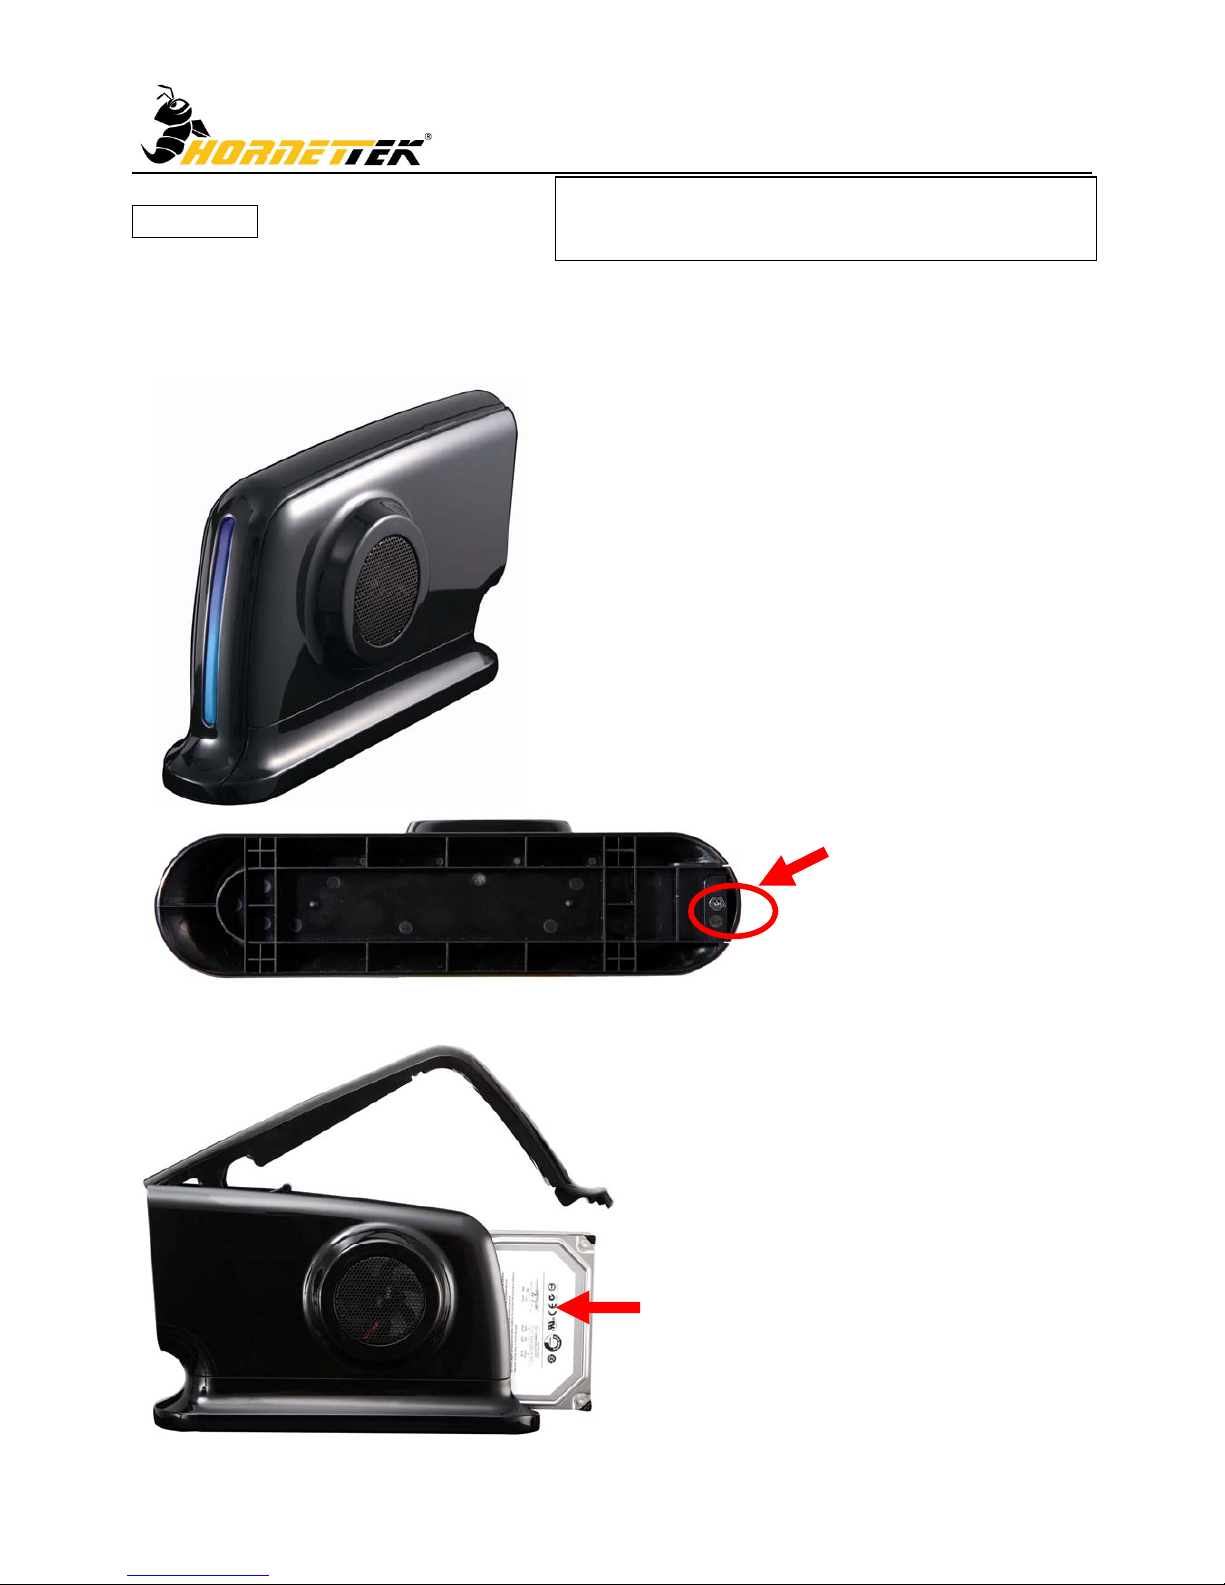
PASO 1 :
Suelte el tornillo y luego abra el panel delantero.
PASO 2 :Ponga el HDD en la bandeja. Empuje el HDD para conectar al conectador SATA.
!ATTENTION
Nouveau HDD Doit Etre Formatté Avant d’Utiliser
Page 17
External Enclosure Installation Guide
16
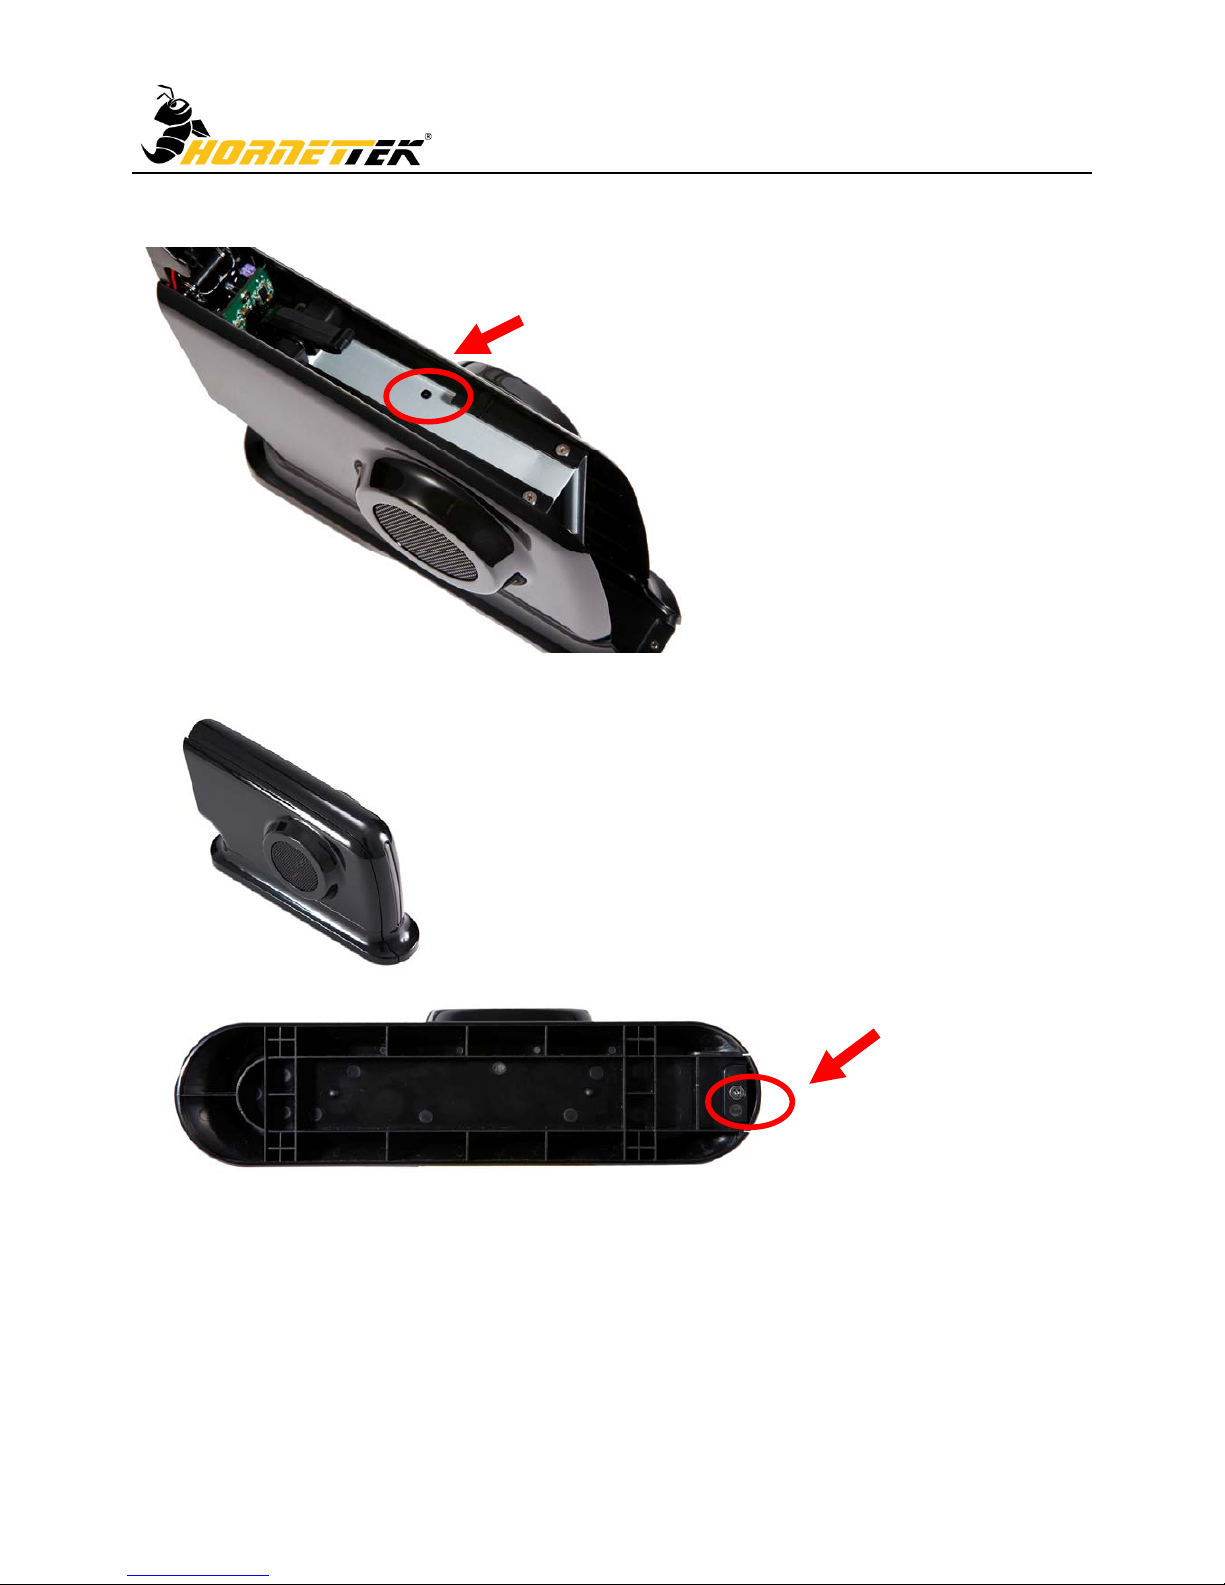
PASO 3 : Atornille el HDD en la bandeja herméticamente.
PASO 4 : Atornille el panel delantero y el cercado
Page 18
External Enclosure Installation Guide
17
Guía de Formato de HDD
☆ Usted puede formatear su HDD Externo por la conexión del USB2.0.
☆ Asegúrese de que su HDD externo esté encendido y bien conectado al PC antes de formatear
el HDD.
PASO 1: Haga clic a la derecha en el icono de “My Computer(Mi Computadora)” y seleccione la columna
de ¨Manage (Administrar)¨.
P ASO 2: Seleccione “Disk Management(Administración del Disco)” y verá que su HDD Externo muestra
“Unallocated(No Asignado)”.
Page 19
External Enclosure Installation Guide
18
PASO 3: Haga clic a la derecha en el cuadro “Unallocated(No Asignado)” y seleccione “New
Partition(Nueva Partición)”.
PASO 4: El “New Partition Wizard(Asistente de Partición Nueva)” se aparecerá. Siga las instrucciones
del asistente para completar.
PASO 5: Cuando la nueva partición se ha completado, el HDD externo será reconocido como un nuevo
volumen “(New Volume)”.
Page 20
External Enclosure Installation Guide
19
PASO 6: Haga doble clic en “My Computer(Mi Computadora)”. Verá que el nuevo libro se muestra en
su PC.
Page 21
External Enclosure Installation Guide
20
简体中文
硬件安装说明书
注意:请遵循使用说明并确认硬盘已完全成功的安装在硬盘盒里
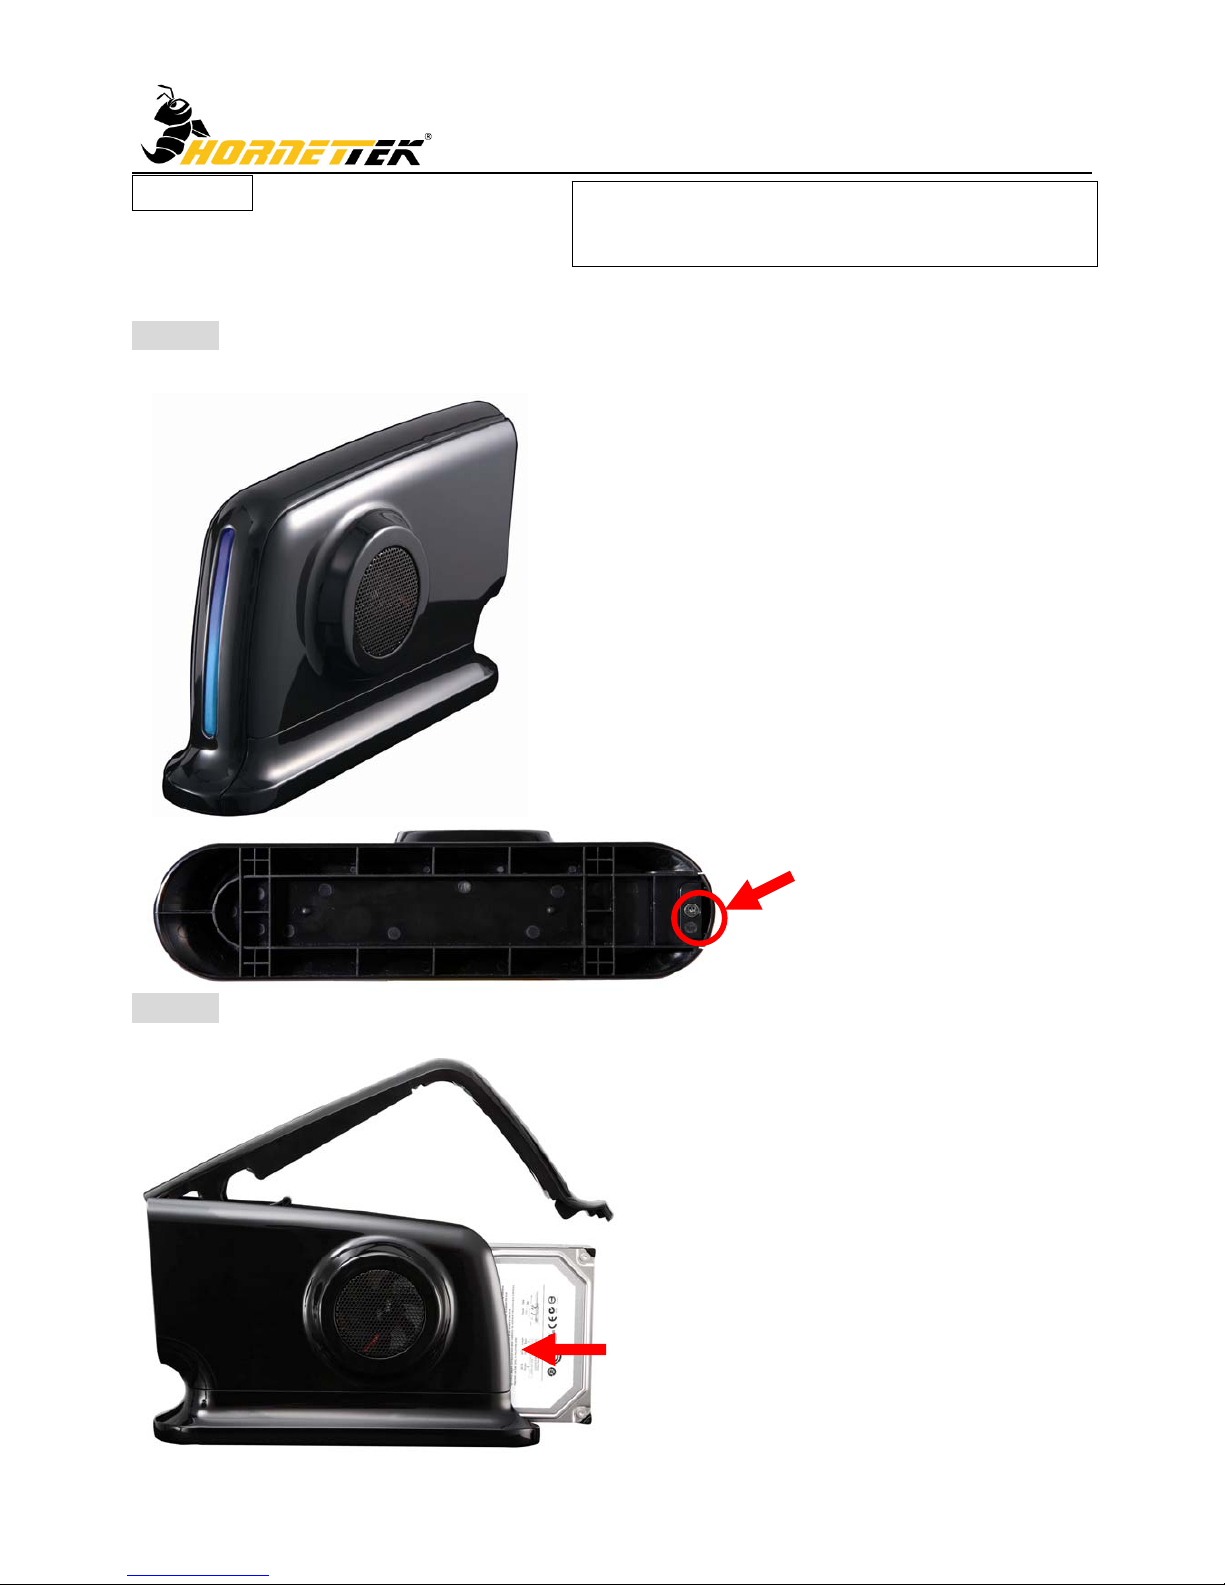
第一步 :松开底座的螺丝并打开前面板.
第二步 :将硬盘置入硬盘盒里并将硬盘和盒内的 SATA 连接器确实接合.
! 注意 !
新硬盘在使用前需要先将格式化
Page 22
External Enclosure Installation Guide
21
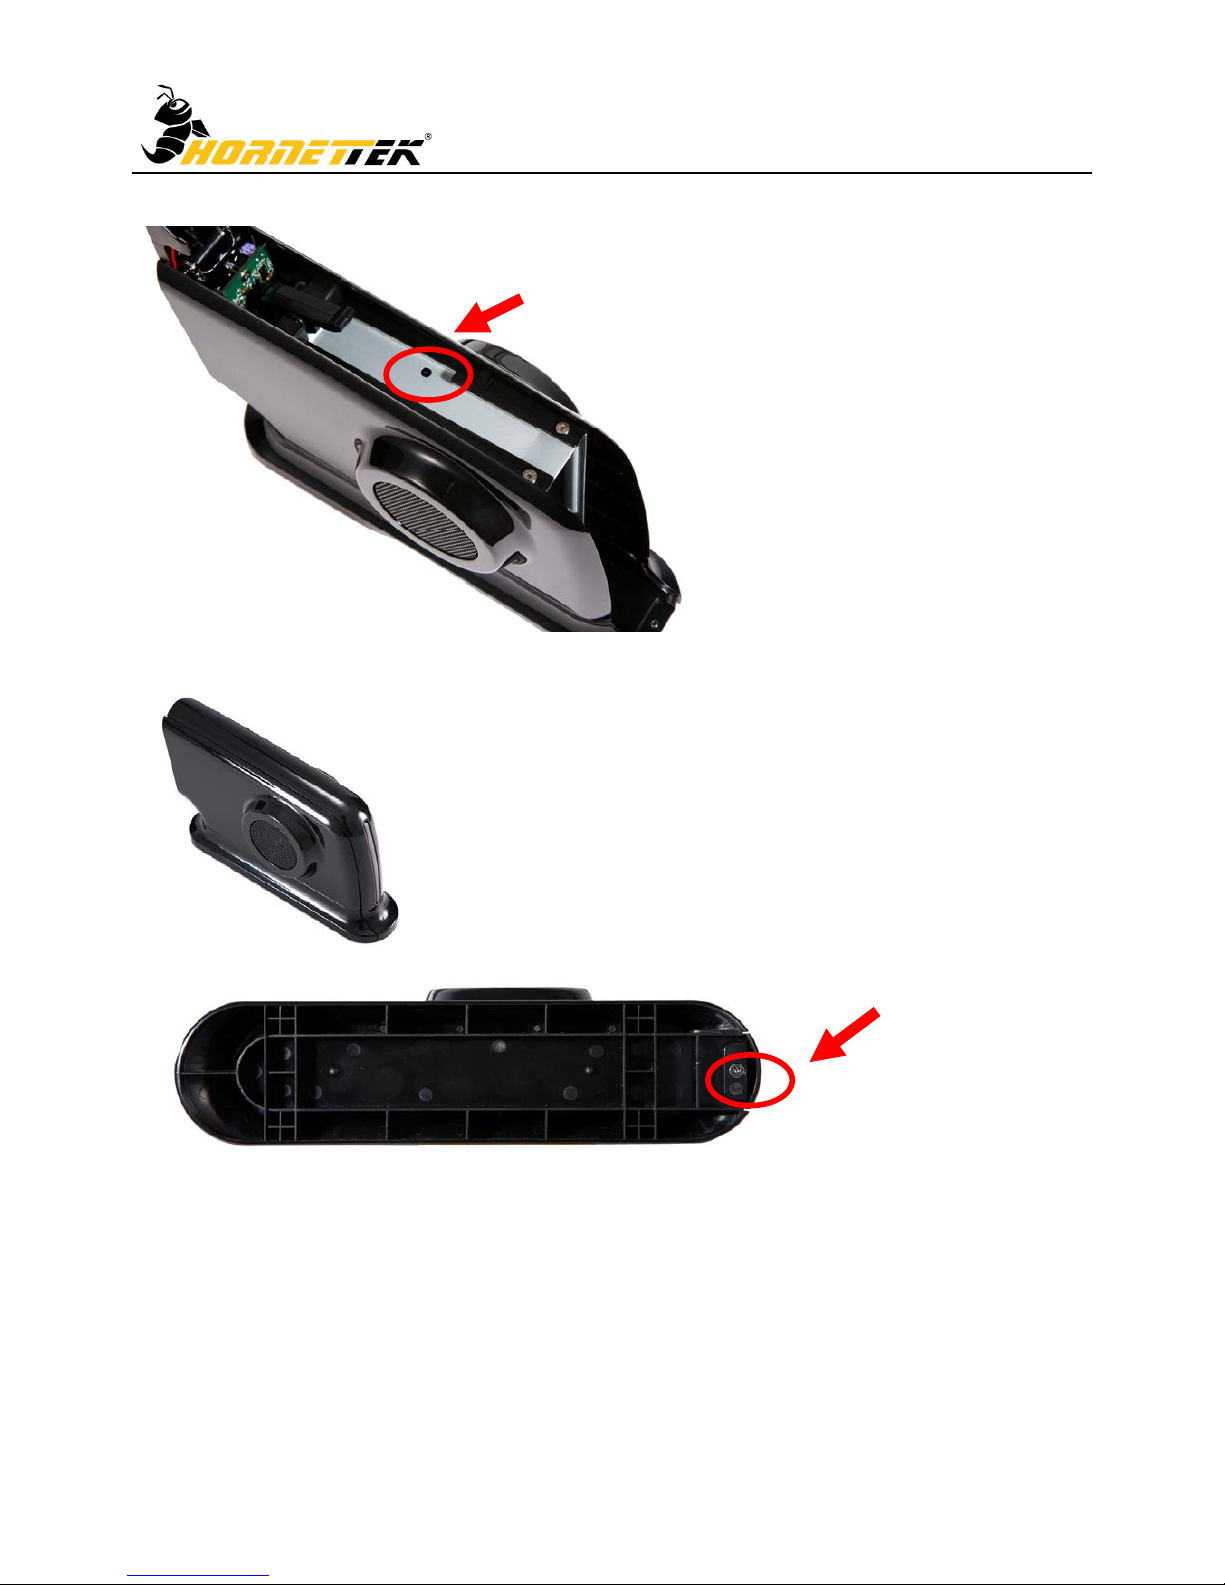
第三步 : 锁上螺丝固定硬盘.
第四步: 将前面板关上并锁上螺丝.
Page 23
External Enclosure Installation Guide
22
硬盘格式化说明书
☆ 请透过 USB 2.0 来格式化新的硬盘.
☆ 在格式化前请确认外接硬盘盒电源已经开启并成功的连接计算机
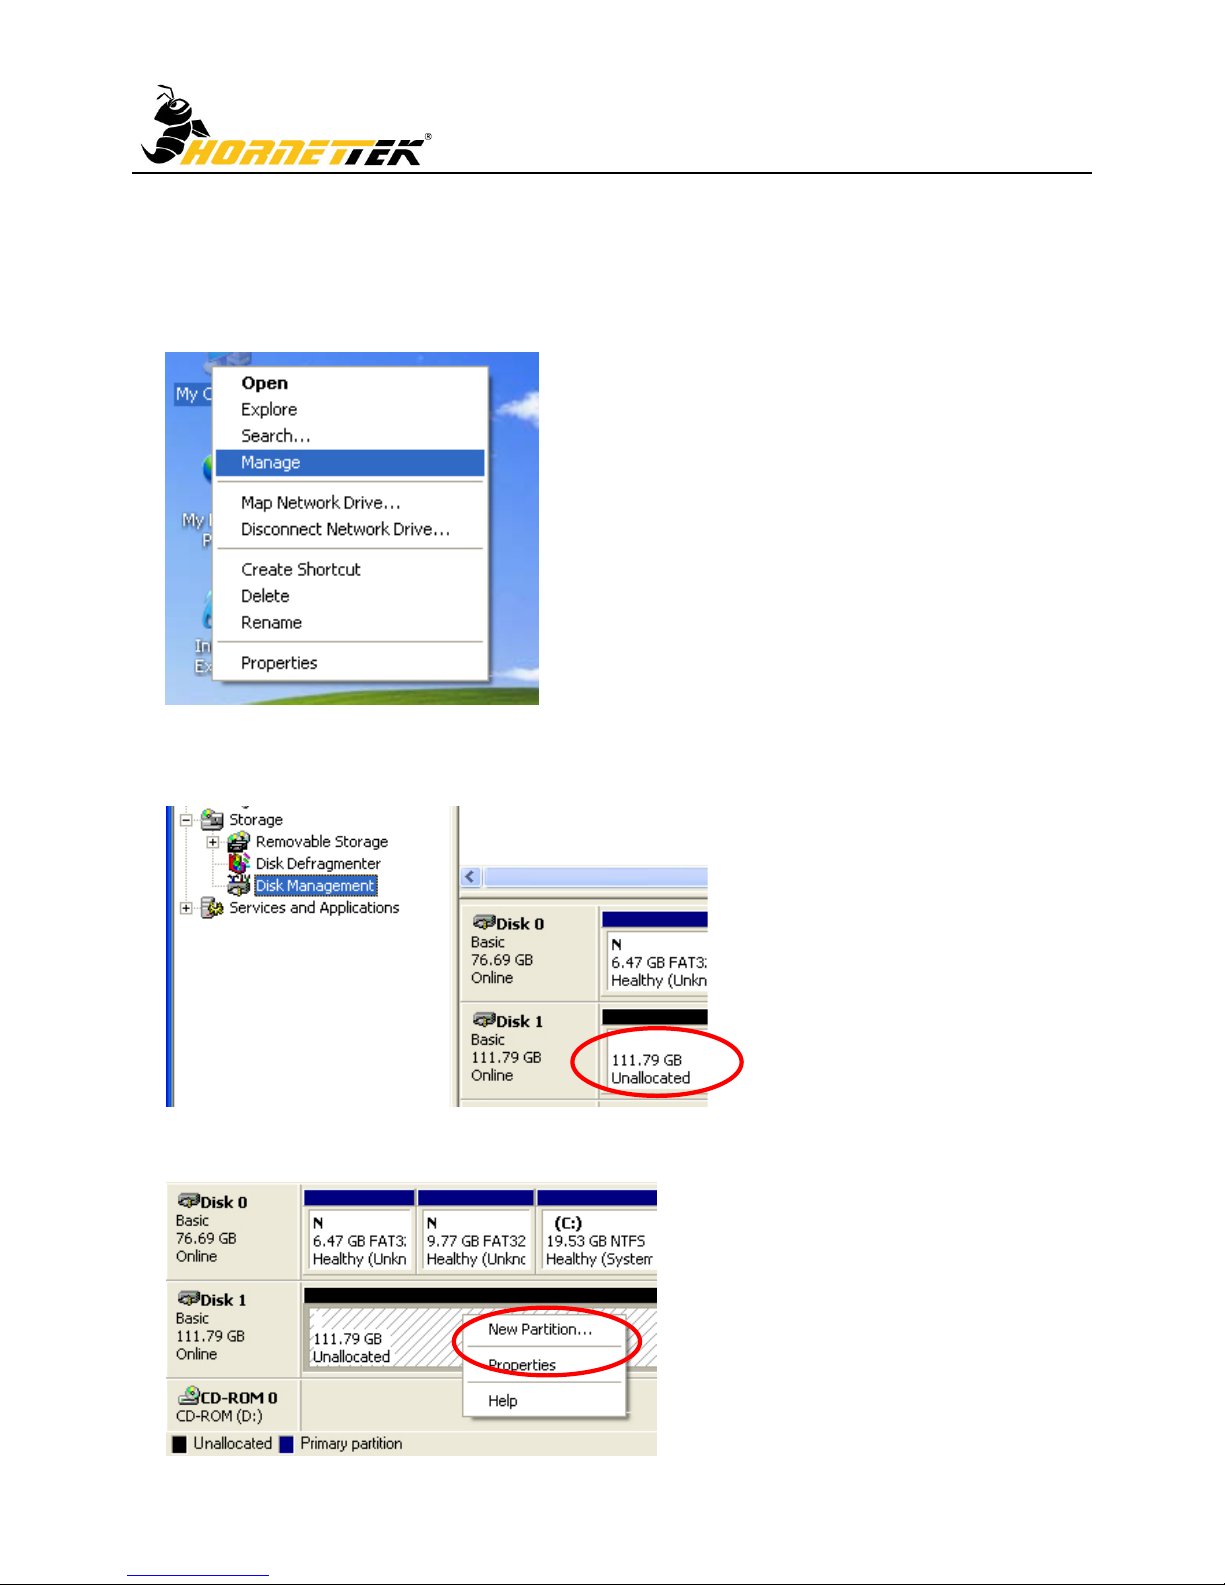
第一步: 在桌面上”我的电脑”按下鼠标右键, 并点取”管理”
第二步: 选取”磁盘管理”后, 在您的外接硬盘将会显示”未分配”扇区
第三步: 在”未分配”扇区里按下鼠标右键并选取”新扇区”
Page 24
External Enclosure Installation Guide
23
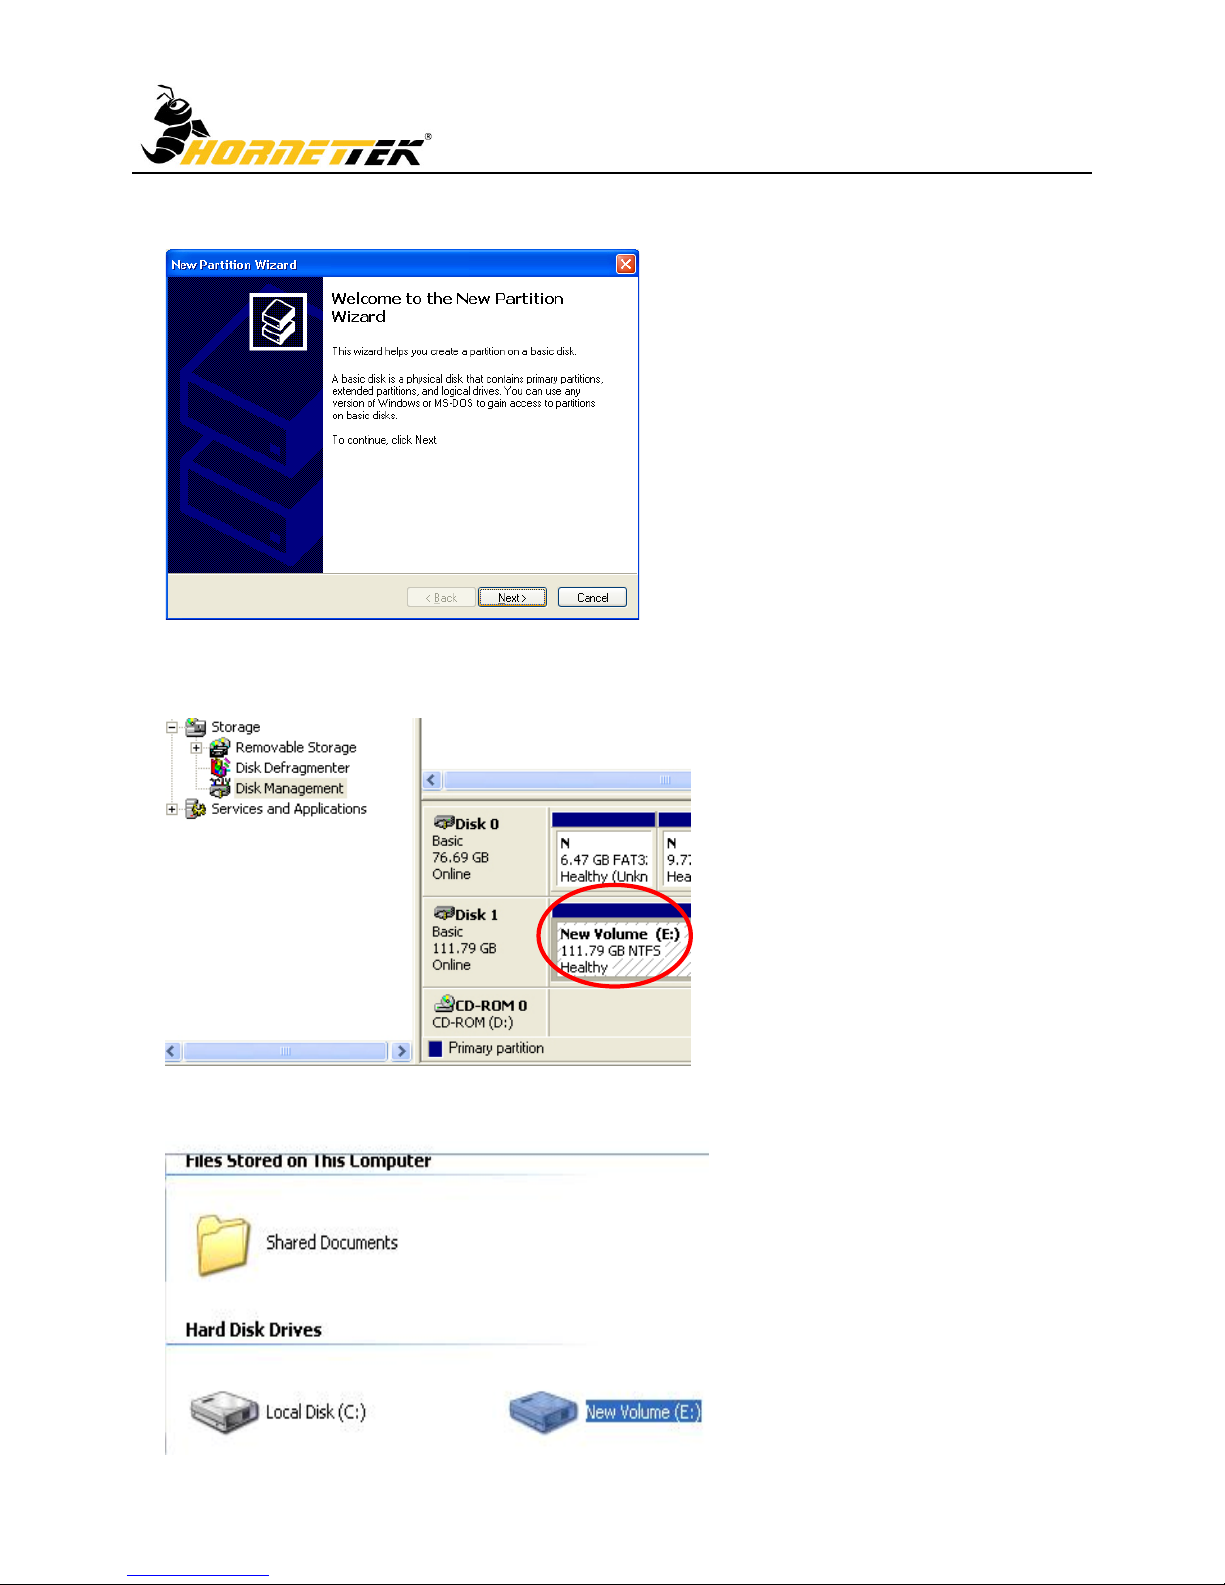
第四步: 系统将出现分割扇区的画面, 请遵循指示直到扇区分割完成.
第五步: 当分割扇区完成后, 计算机将认定此硬盘为新容量扇区
第六步: 点取”我的电脑” 将会看见新的硬盘出现.
Page 25
External Enclosure Installation Guide
24
繁體中文
注意: 請遵循使用說明並確認硬碟已完全成功的安裝在外接盒裡
第一步 :
鬆開底座的螺絲並打開前面板.
第二步 :
將硬碟置入外接盒裡並將硬碟和 SATA 接頭確實接合.
! 注意 !
新硬碟在使用之前需要先格式化
Page 26
External Enclosure Installation Guide
25
第三步 :
鎖上螺絲固定硬碟.
第四步:
將前面板關上並鎖上螺絲.
Page 27
External Enclosure Installation Guide
26
硬碟格式化說明書
☆ 請透過 USB 2.0 來格式化新的硬碟.
☆ 在格式化前請確認電源已經開啟並成功的連接電腦
第一步: 在桌面上”我的電腦”按下滑鼠右鍵, 並點取”管理”
第二步: 選取”磁碟管理”後, 在您的外接硬碟將會顯示”未分配”磁區
第三步: 在”未分配”磁區裡按下滑鼠右鍵並選取”新磁區”
Page 28
External Enclosure Installation Guide
27
第四步: 系統將出現分割磁區的畫面, 請遵循指示直到磁區分割完成.
第五步: 當分割磁區完成後, 電腦將認定此硬碟為新容量磁區
第六步: 點取”我的電腦” 將會看見新的硬碟出現.
 Loading...