

Page 1
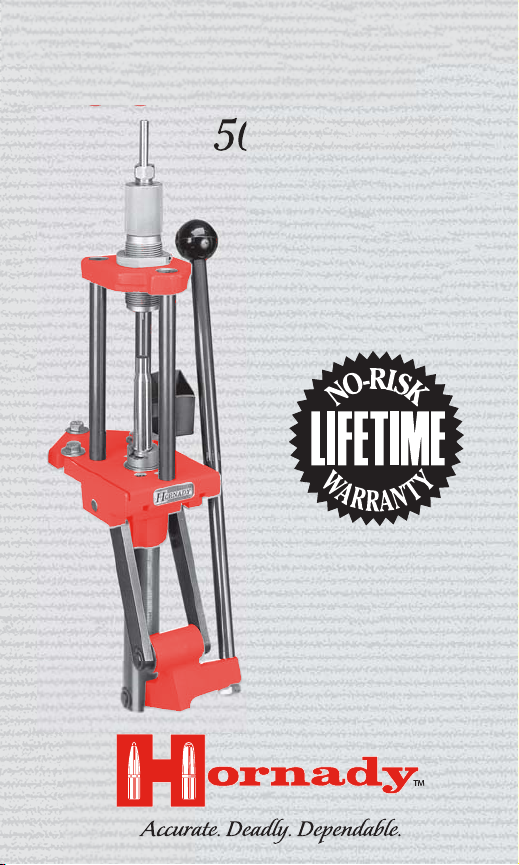
Lock-N-Load
50 Cal. BMG
TM
Page 2

INTRODUCTION
The single-stage Lock-N-Load 50 BMG is a big, strong press that
provides the experienced or beginning handloader with all the capacity, strength, and leverage to reload all rifl e and pistol calibers. With
the Hornady Lock-N-Load 50 BMG press compound leverage system
and massive 1 1/2" ram, Lock-N-Load 50 BMG will form cases or
swage bullets. With an optional ram end adapter bushing, and
standard Lock-N-Load die bushing, the press can be converted to load
ammo with any standard die using 7/8-17 threads. With seven inches
between the top plate and the main press frame, Lock-N-Load 50 BMG
will easily handle the longest standard cartridge.
BEFORE RELOADING
Before using the Lock-N-Load 50 BMG press, read the instruction
manual carefully to fully learn how to safely operate the related
reloading equipment. Failure to properly operate certain reloading
equipment can result in severe personal injury and/or equipment damage. If you have read these instructions and still do not understand
some operations, call us at 1-800-338-3220 and a technician will
assist you . This instruction manual contains specifi c safety and
operating information. It should be considered a permanent part of
your reloading equipment and remain with the equipment at all times
for easy reference.
SAFETY
Reloading is an enjoyable and rewarding hobby that can be conducted
safely. But, as with any hobby, carelessness or negligence can make
reloading hazardous. When reloading, safety rules must be followed.
By observing these rules, the chance of a hazardous occurrence causing personal injury or property damage is minimized.
Page 3

WARNING
To avoid injury, read and follow these safe priming practices.
DO NOT attempt to prime military cartridge cases with crimped primer
pockets until the crimp has been removed with a counter sink, a special reamer or by swaging. Primers seated into crimped pockets are
subject to deformation which can cause misfi res and even detonation
during seating which can cause serious personal injury.
DO NOT attempt to seat primers against excessive resistance which
may cause detonation and possible serious personal injury. Check
to be certain that the case was not previously primed, that the fi red
primer was removed, that a portion of the primer cup wall might still
be in the primer pocket and that you are using the correct size primer.
DO NOT modify the priming system in any manner or attempt to use
similar parts or priming systems from other manufacturers. To do so
could result in primer detonations resulting in serious personal injury.
NEVER seat a primer into a powder charged case.
INSTALLATION
Before proceeding, mount the Lock-N-Load 50 BMG to a sturdy work
surface. Use three bolts at least 5/16” in diameter and of suffi cient
length to extend through the press base and work surface with enough
length to allow washers and nuts. Install the threaded portion of the
handle through the toggle block. Attach the handle nut and tighten
fi rmly. The handle nut must remain tight at all times to avoid damage
to the handle and toggle. To correctly position the primer catcher, snap
it onto the rear post as shown. Spent primers drop through the partially
hollow ram and into the primer catcher.
Page 4
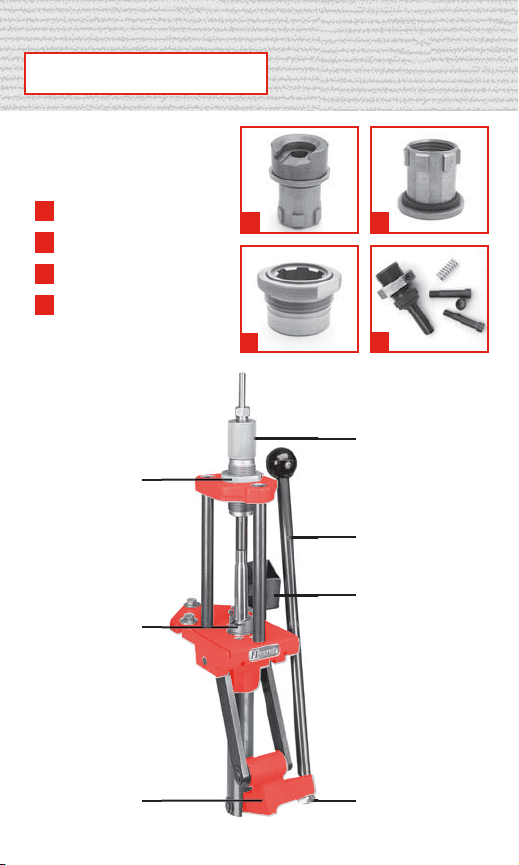
50 Cal. BMG PARTS
Your 50 Cal BMG press
comes with the
following items:
1
.50 BMG Shell Holder
2
Lock-N-Load Bushing
3
Lock-N-Load Bushing Adapter
4
Ram Prime System
1
2
Die Station
Shell Holder
Toggle Block
3
4
Reloading Die
Reloading Die
(optional)
(optional)
Handle
Primer Catcher
Handle Lock Nut
Page 5

GUIDELINES
General
* Use all equipment as the manufacturer recommends. Study the instructions carefully and
become thoroughly familiar with the operation of the product. If you do not have written
instructions, request a copy from the equipment manufacturer.
* Don’t take short cuts. Attempting to bypass established procedures is an invitation to
an accident.
* Observe “good housekeeping” in the reloading area. Keep tools and components neat,
clean and orderly. Promptly and completely clean up primer and powder spills.
* Reload only when you can give it your undivided attention. Do not reload when fatigued or
ill, or under the infl uence of medications or alcohol. Develop a reloading routine to avoid
mistakes which may prove hazardous. Don’t rush — load at a leisurely pace.
* Always wear adequate eye protection to protect your eyes from fl ying particles. You as-
sume unnecessary risk when reloading without wearing safety glasses.
Loading Data
* Use only laboratory-tested reloading data. We highly recommend the Hornady
reloading manuals.
Primers will explode!
* Keep away from children.
* Do not smoke near primers.
* Primers are designed to explode and will do so when subjected to heat or percussion.
* Always wear safety glasses when handling primers.
* DO NOT force primers. All primers in the near vicinity of an exploding primer will usually
also detonate violently. Do not store or handle primers in bulk.
* For identifi cation and safety, keep primers in their original protective packaging.
* An absolute minimum of primers should be kept at the loading operation. Open only one
package tray at a time.
* Do not decap live primers.
* Never attempt to seat or reset a primer in a loaded round.
Record Keeping
* Keep complete records of reloads. Apply a descriptive label to each box showing the date
produced, and the primer, powder and bullet used. Labels for this purpose are packed
with Hornady bullets.
Page 6

RELOADING INSTRUCTIONS
Sizing the Case
1
Place the shell holder into the end of the ram and lock it in
place with the Lock-N-Load system. Thread the .50 cal size die
into the press, until the end of the die contacts the shell head
holder, with the ram raised to its highest position. Turn it a
quarter turn more, and turn the Lock Ring down the die until it
contacts the top of the press. Back the die and the Lock Ring out
of the press a short distance, and lock the Lock Ring to the die.
Turn the die back into the press, until it stops against the Lock
Ring. Place a lubricated case into the shell head holder. (We rec-
ommend Hornady’s One Shot Case Lube; follow the instructions
on the can.) Lower the press handle and run the case all the
way into the die, and retract it. This will size your case, expel the
spent primer, and expand the case mouth. (See die instructions
for proper decap pin setting.)
2
The Lock-N-Load 50 BMG is supplied with a ram priming unit.
The installation and operation procedure to seat is as follows:
Remove the sizer die from the top plate. Install the Press Adapt-
er, and the shell head holder in the top of the press. (You may
want to use a wrench to snug the press adapter to the press.)
Page 7

3
Assemble the Ram Prime with a Sure Loc Lock Ring to a
Lock-N-Load die bushing. Select the Primer Seater Punch
of your choice. Place the Primer Seater cup, and spring onto
the primer seater punch. Place a wire (a paper clip works
well) through the cross hole in the Primer Seater cup and
Primer Seater punch. Thread the seater punch into the primer
adjusting shaft, until the thread “bottoms out.” Remove the
wire. Thread the adjustment shaft and lock ring into the body.
Thread the body into the Sure Loc Lock Ring and the Lock-N-
Load die bushing. Snug the Sure Loc Lock Ring to the bushing,
but do not secure it at this time. Place the assembled ram
prime unit in the end of the ram, and engage the Lock-N-Load
bushings. Raise the ram to the top of its stroke. (This is with
the links parallel to the ram, and just before the end of travel
of the press handle.) Adjust the primer seater punch to extend
through the shell head holder a few thousandths of an inch.
(Correct adjustment should seat the primer .005 to .013,
depending on your requirements.) Once adjusted, lock the Lock
Rings in place. The Ram Prime Unit should now be able to be
removed and replaced at will, with no adjustments necessary.
Page 8

Priming the Case
4
Insert the .50 cal shell holder in the adapter bushing and
lock into place in top plate. Lower the press handle to raise the
Primer Seater cup above the shell head holder. Place a primer
in the cup, and raise the handle to allow you to place a case in
the shell head holder. Lower the handle to seat the primer. Raise
the handle a small amount and remove the case. Insuffi cient
or excessive primer seating depth will greatly decrease primer
sensitivity and can result in misfi res. Due to the mechanical
advantages of this press, it is possible to over-seat or crush
primers during this operation. Care must be exercised while
adjusting to the proper depth to not crush or overseat the prim-
ers. After you have accurately weighed the powder charge, it can
be poured into the primed case. You are now ready for the fi nal
steps of reloading seating the bullet and crimping the case.
Page 9

Seating the Bullet and Crimping Case
5
Remove the Ram Primer and reinstall the Lock-N-Load shell
holder in the ram. Install the seater die and place a case in the
shellhead holder. Raise the ram to the top of its stroke. Turn the
seater adjusting screw up and out of the way. Screw the seater
die down until it contacts the case, then back it off one quarter
turn. Lower the ram and insert a bullet in the mouth of the
case. Raise the ram to the top of its stroke, and lower the seater
adjusting screw to seat a bullet to the proper depth. Crimp
a case, by backing the seater adjusting screw up a couple of
turns. Screw the seater die down a little at a time until the de-
sired crimp is achieved. Turn the seater adjusting screw down
until it contacts the bullet. When you have achieved the proper
adjustment, lock it in place with the Lock Ring.
Page 10

PRODUCT WARRANTY
"We guarantee our reloading tools and accessories for life."
No Risk Lifetime Warranty:
All Hornady reloading tools and accessories are warranted against material defects and workmanship for the life of the product. Parts, which
by nature of their function are subject to normal wear such as springs,
pins, bearings, etc. Parts which have been altered, abused, or neglected
are excluded from the warranty.
If the product is deemed defective by either workmanship or materials,
the reloading tool or accessory will either be repaired, reconditioned or
replaced at Hornady Manufacturing Company's option. If it breaks, we'll
repair it or replace it at no charge.
To return a product, call toll free, 800-338-3220 and ask for Customer
Service. They will provide instructions for return if the problem can't be
solved over the phone.
Prices and or specifi cations are subject to change without notice. For
the best prices on any of our products, contact your nearest Hornady
dealer. Hornady Manufacturing Company cannot assume liability for
damage which may result from use of the products or information
given herein, since Hornady has no control over the manner in which its
products or components are used during reloading.
TM
Page 11

HORNADY WARRANTY REGISTRATION
Please return in envelope within 20 days of purchase.
Name ___________________________________________
Address __________________________________________
City ____________________________________________
State ________________________ Zip _______________
email ___________________________________________
Item Purchased ____________________________________
Serial No. ________________________________________
Dealer Name ______________________________________
City ____________________________________________
State ________________________ Zip _______________
Send to:
Hornady Manufacturing
P.O. Box 1848 • Grand Island, NE 68802-1848
Page 12

TM
P.O. Box 1848 • Grand Island, NE 68802-1848
(308) 382-1390 •
4/06 780229(2)
www.hornady.com
 Loading...