


Information & Operations Manual for
Bavaria 32 2011
“Hotel Bravo 32”

Welcome!
Welcome to Horizon Yacht Charters and your Bavaria 32 “Hotel Bravo 32”. We hope you had a
pleasant journey and are looking forward to a fantastic holiday and some of the most enjoyable
sailing in the world here.
This manua l is here to guide you through the in’s and out’s of your yacht. Please take the time to
read this manual and don’t hesitate to ask any of our professional, friendly staff if you have any
questions.
All of the yachts in the Horizon fleet are maintained to the highest standards so that you may enjoy
a trouble free vacation on a beautiful yacht. Please remember that these yachts will all be privately
owned, and we ask you to care for it like it was your own.
Best Wishes for a great vacation,
Sylvia, Andrew, and Kenny
Directors
Office Hours:
Monday – Saturday 8:30 – 17:30
Telephone: (410) 990-0269
Duty Manager: (443) 603-5530 (Emergency Only)

Contents:
1. Yacht Specifications
2. 12 volt panel and 110 volt breakers
3. Inverter
4. Daily Engine Checks
5. Engine Start Procedures
6. Batteries & Batte ry Switches
7. Instruments
8. VHF Radio
9. Anchoring, the Windlass, and Picking Up a Mooring
10. Fresh Water System
11. Showers
12. Heads
13. Refrigeration
14. Propane System and Using the Stove
15. The BBQ
16. Air Conditioning
17. Fire Safety
18. The Dinghy and Outboard
1. Yacht Specifications
Length 32’9”
Beam 11’3”
Draft 4’11”
Fuel 40 gallons
Water 40 gallons
Engine 27 hp Volvo Penta - Saildrive
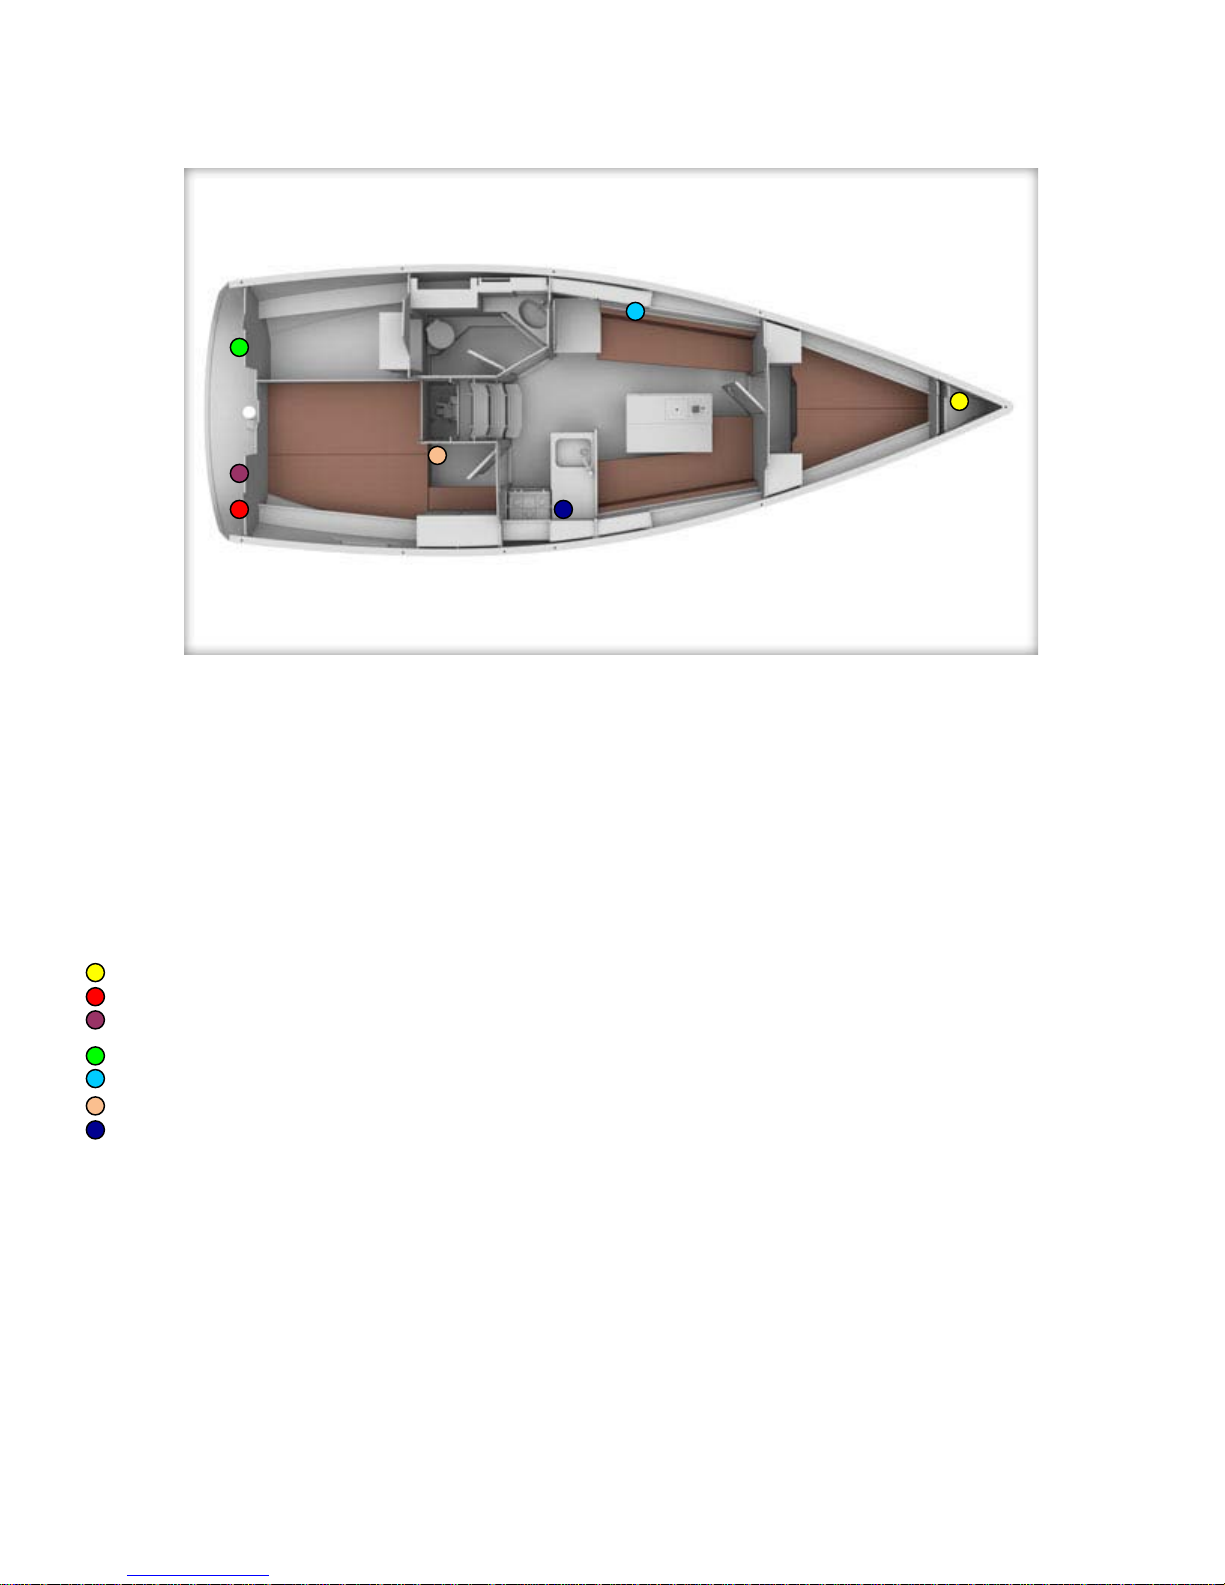
Location of:
Fresh water refill (bow)
Diesel refill (starboard aft cockpit)
Manual bilge pump (in cockpit)
Propane tank (port aft cockpit locker)
Windlass breaker (behind port salon seating)
Emergency fuel shut-off (Aft, stbd cabin under bunk)
Propane shut-off

2. The 12 volt Panel
Use the up and down switches (top left) toggle through your water tank gauge, your battery
voltages, and your holding tank alarm (alerts at ¾ full).
The following functions are controlled by the 12v panel:
Top row functions from left to ri ght:
Navigation Instruments
Autopilot
Stereo System
Windlass
Secondary Bilge Pump & Fridge Drain
Middle row functions from left to right:
Fresh Water Pump
Shower Drain
12v Panel Backlight
Not in Use
Fridge
Bottom row functions from left to right:
F1, F3, F4: Not in Use
F2: Cockpit Light
F5: Anchor and Deck Washdown pump
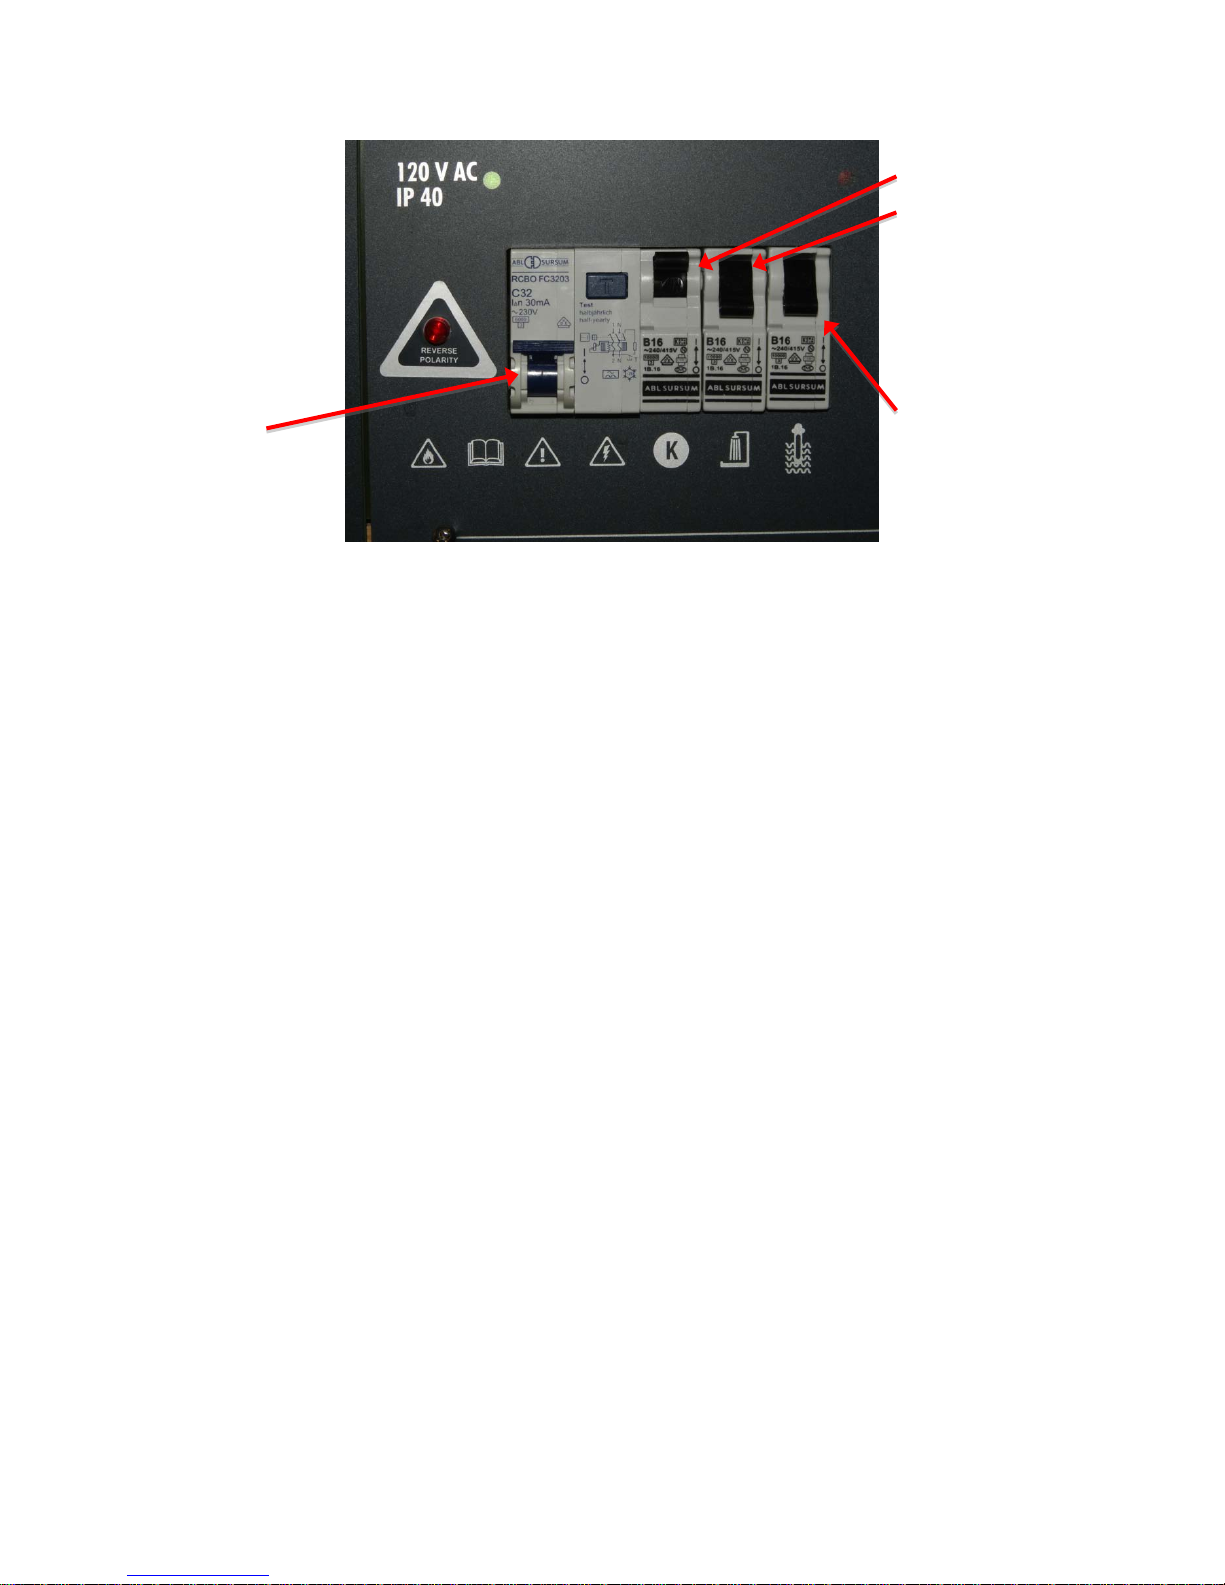
110v Breakers
110v breakers:
ensure these are on
when using 110v
outlets (when on
main breaker:
leave on at all
breaker:
leave this off
The 110v outlets will operate while you are plugged into shore power. Your yacht is equipped with
a power inverter that enables you to have 110v power while away from the dock. See section 3
(Inverter) for details.
water heater
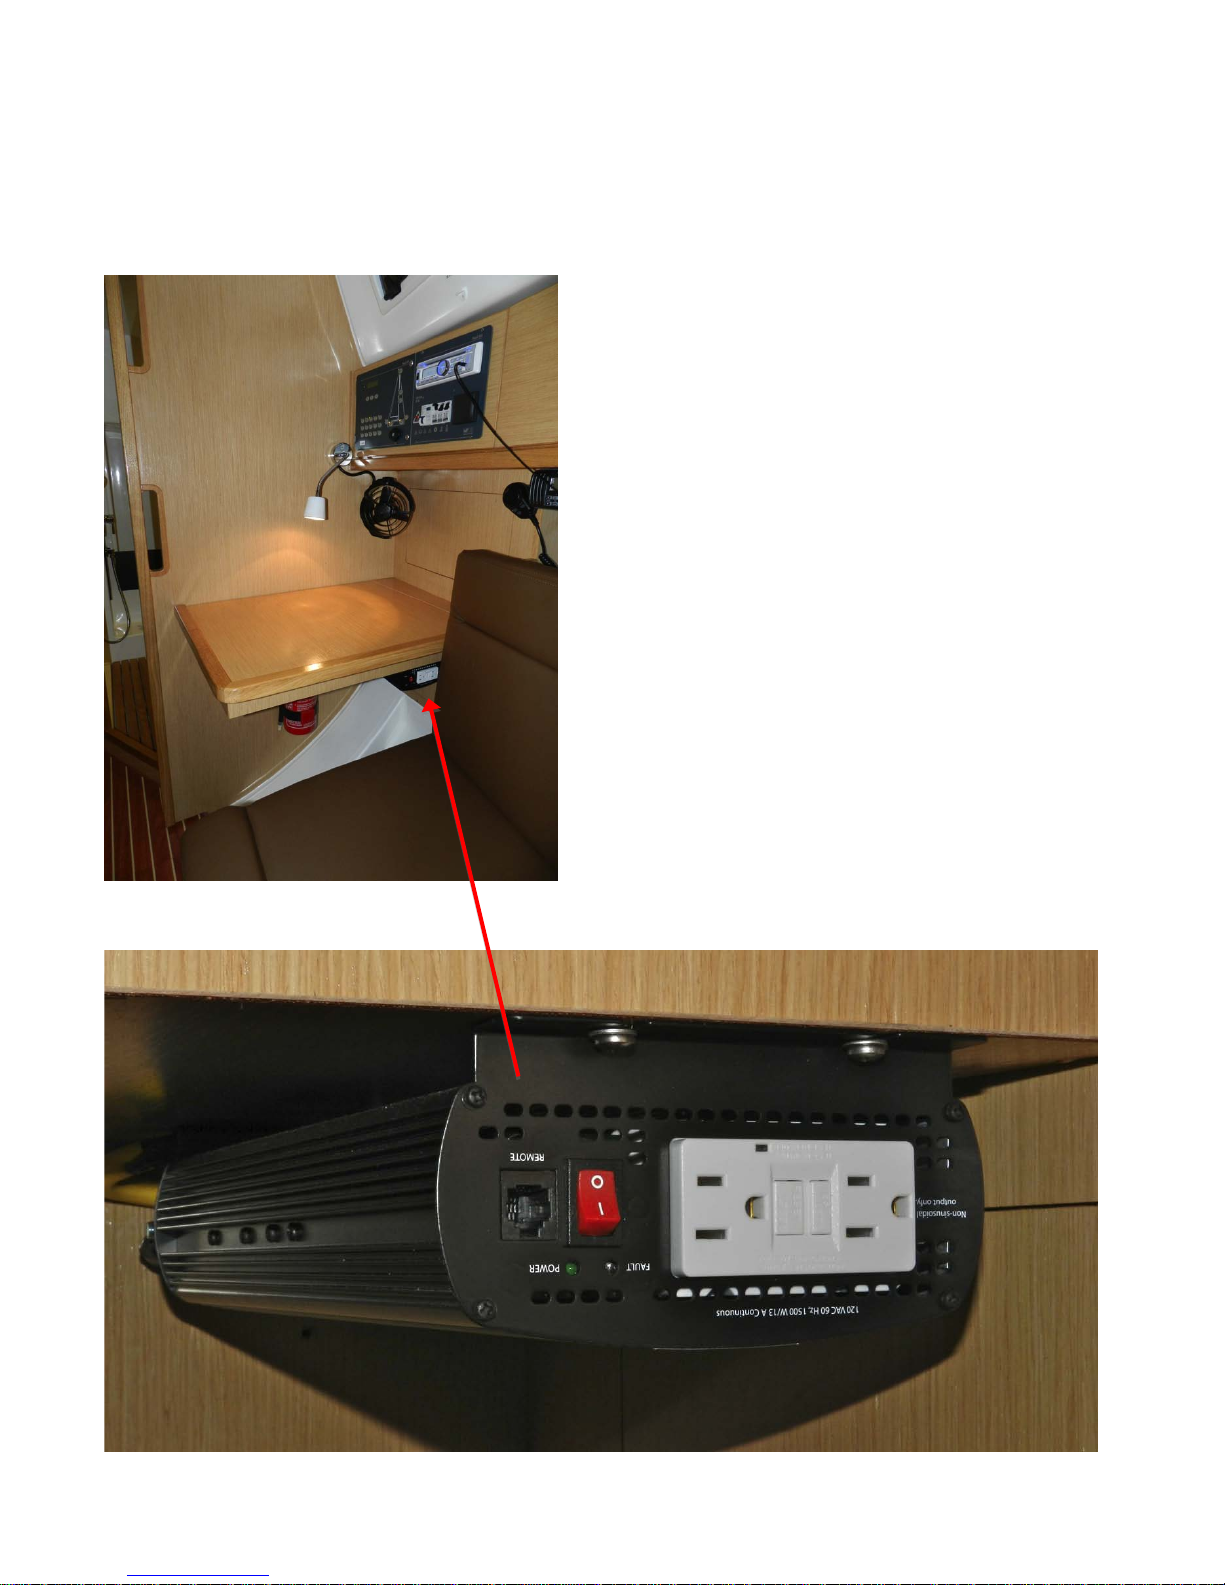
3. Inverter
Your yacht is equipped with a 1 500 watt power in verter (12v DC to 110v AC) that allows you to hav e
110v power when you are not connected to shower power. The inverter is located underneath the
charter table and is turned on by a red switch on its face.
To avoid additional drain on your batteries while
operating electrical appliances off the inverter, the
engine should be turned on and idled at 1400 rpm.

4. Daily Engine Checks
PRIOR TO STARTING ENGINE EACH DAY:
Check the oil level using the yellow dipstick located to the left rear of the engine. The level should
be at least halfway between the empty and full marks. To add oil, open the black oil filler cap on
top of the engine.
To the rear of the engine is the sea water strainer.
To the front right of the engine is the engine coolant reservoir. The coolant level should be between
the maximum and minimum lines.
Check for any engine leaks or bilge water below the engine.
Check the belt for wear and correct tension (no more than 1” of give when pushed inward).
KEEP HANDS CLEAR OF ALL MOVING PARTS
ANY PROBLEMS: CALL HORIZON
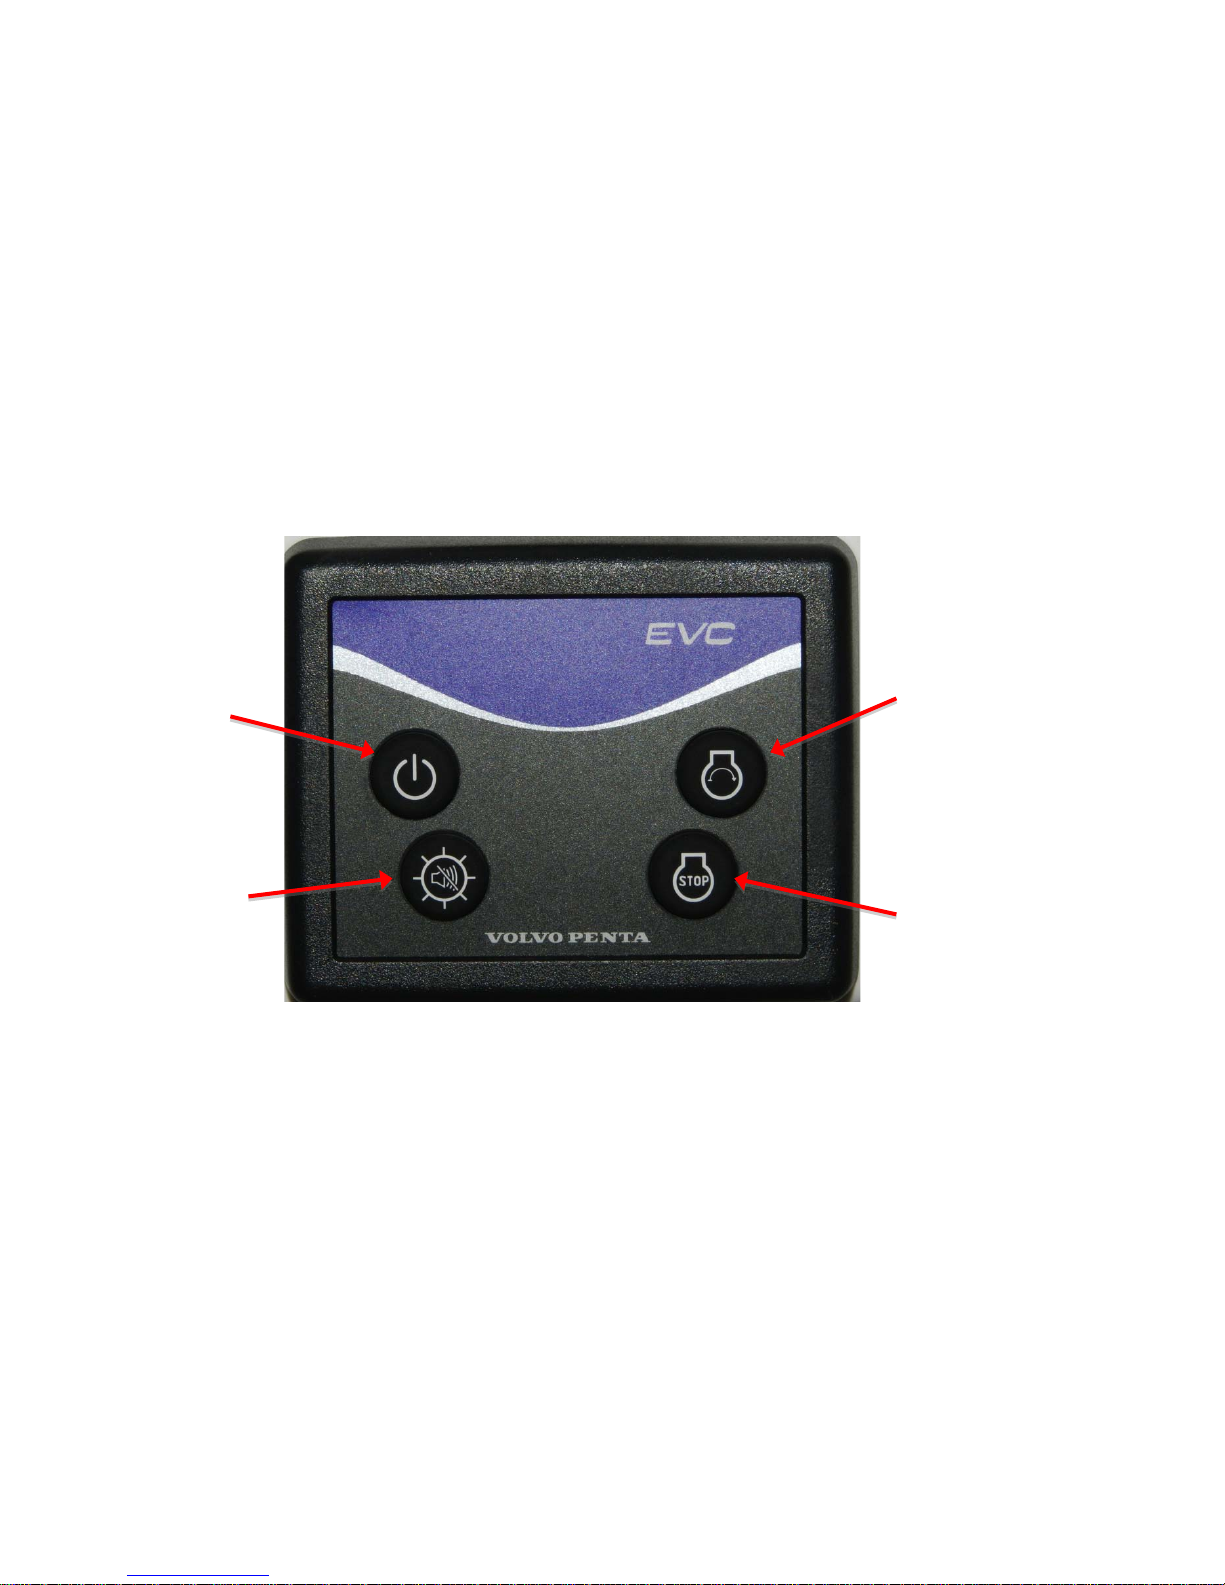
5. Engine Start Procedures
Check the engine every morning before starting as instructed in section 4.
Make sure engine is in neutral.
Press the ignition switch (allows power to the starter). Press and hold the start button until you
hear the engine turn over and begin running, then release the start button. IMMEDIATELY check
over starboard side to make sure you have water coming out of the exhaust.
To stop the engine, press and hold the stop button until the engine has stopped.
An alarm will sound after you stop the engine, alerting you that the ignition is still on (and that you
will drain y our starter battery if you do not shut it off). Press the ignition button once more to turn
off the ignition and the alar m.
Ignition button
Start button
Silence Alarm
button
Stop button
Should you hear an engine alarm during operation, check the tachometer to identify
the reason for the alarm (overheating, oil pressure, etc) then immediately shut down
the engine and CALL HORIZON
All our yacht engines run with diesel fuel. There is a diesel fill cap on the transom
that is clearly mark ed “DIESEL”….DO NOT PUT WATER OR GASOLIINE IN HERE
6. Batteries & Battery Switc h e s
The systems on your yacht are all 12 volt. The batteries will need to be recharged as often as you
deplete them. Conserving power will result in less time needed for charging, so turn off systems
that are not actively being used.
Your yacht has two battery systems that are isolated from one another: an engine battery to start
the engine and a house battery bank to run your 12 volt systems. To check the levels of each, use
the up and down buttons (below the LED display) on the 12v instrument panel.
Your batteries will charge when the engine is running at 1400 rpms or more, whether sitting at a
mooring or motoring to a destination. Check the battery levels and make note of them before
turning on the engine.
Run the engine at 1400 rpms or more for a minimum of 1 – 1 ½ hours twice a day.
To check the resting battery level, shut the motor off and wait 15 minutes before checking (they will
remain in an excited state for about 10 minutes after shutti ng the motor off).
The house system should come to rest around 12.8v and then slowly get lower. When the system
gets to 12.2v you should start planning to recharge the batteries soon.
To rev the engine at 1400 rpms without engaging
the propeller, put the engine in neutral. Push in
the black button at the base of the throttle/gear
shift arm while increasing rpms to the desired
level.

7. Instruments
Your yacht is equipped with the following instruments on board at the helm.:
Garmin GMI 10 (windspeed, depth, and more), GHC 10 (auto-helm), and GPS Map 4008. There is
also a ship’s compass located at the helm.
Use the left and right arrows on t he GMI 10
to go through pages of information such as:
wind speed and direction; depth and
heading; sunrise, sunset, temperature and
barometric pressure; and more.
Notice on the GHC 10 display that, just
under the heading numbers, is a bar that
indicates rudder position with a small
diamond (hard to starboard in this picture).

8. VHF Procedures
Your vessel is equipped with an ICOM M412 Marine VHF and is hard-wired to the battery.
Push-to-talk
Power On/Off
and volume
control
Squelch
Channel up/down
Familiarize yourself with the VHF controls, particularly switching channels, the volume and
squelch knobs, the button for channel 16, an d the distress button under the red plastic cover.
Using the VHF:
• Make sure the radio is on, volume turned well up, power to high (unless the station you are
calling is quite close), and that you are tuned to the correct channel.
• Turn the squelch knob slowly clockwise until the loud static hissing just stops.
• Press push-to-talk button on mike hand le and hold while speaking. Release immediately.
You will not receive transmissions and will clog the channel if you do not release the button.
If no response, wait two minutes and repeat the call. If still no response, wait a further two
minutes before trying again. If calling on channel 16, it is very important to switch to a working
channel after contact is established. Do not use channel 16 for your conversations – it is for hailing
and distress only.
Channels to Use:
9 Alternate Hailing Channel: contact marinas, fuel docks, the harbor master, radio checks
12 Port Operations
16 Hailing and Distress only: if used to hail, immediately switch to a non-commercial working
channel upon contact
27 Radio Checks with Sea Tow (Automated)
70 DSC only (Digital Selective Calling) – do not use
66, 68, 69, 71, 72, 78 – Non-commercial working frequencies for use by general traffic. After
contacting your party on 9 or 16, switch to one of these channels to communicate
In the event that your vessel is involved in a non-life threatening incident with an object or another
vessel, it is important that you contact the Horizon Offic e immediately at 410-990-0269 or 443603-5530. Remember to get as much information as possible about your location, the other
vessel’s description, and what damage has been done to your vessel so that we can best assist you.
Failure to report any accidents or incidents in a timely manner may result in
nullification of your hull damage insuran ce.

Types of Emergency:
In the unlikely event that you are involved in an emergency, stay calm and follow these steps. You
will also have an Emergency procedure card next to your VHF.
Distress: “MAYDAY MAYDAYMAYDAY” – This is an internatio nal dist r ess signal and an
imperative call for assistance. It is used only when a life or vessel is considered to be in grave
and imminentdanger.
Mayday Relay: used to summon help for a vessel which is either too far offshore to contact the
coastguard directly, without radio capabilities, or whose radio has been damaged or destroyed.
Urgency: “PAN-PAN, PAN-PAN, PAN-PAN” – This is the international urgency signal and is used
when a vessel or person is in some jeopardy but is not considered to be in grave and imminent
danger.
Medical Emergency: “PAN-PAN MEDICO, PAN-PAN MEDICO, PAN-PAN MEDICO” (pronounced
“med-ick-oh”) – This is an international urgency signal for summoning medical advice
Safety: “SECURITE, SECURITE, SECURITE” (pronounced “seh-cure-it-tay) – This is an
international safety signal with a notice about some aspect of navigational safety or a weather
warning.
Also listen for “SEELONCE” calls, which call for radio silence so that emergency communications
may be carried out swiftly and without interruption. “PRUDONCE” relaxes “SEELONCE” calls.
How to issue an emergency message:
Select channel 16, press and hold push-to-talk transmit button on handset
Say slowly and clearly “MAYDAY, MAYDAY, MAYDAY”
“This is HOTEL BRAVO 32, HOTEL BRAVO 32, HOTEL BRAVO 32”
Give position in latitude and longitude or nautical miles from and bearing to a navigational
landmark
Describe emergency – state the nature of the problem (fire, sinking, man-over-board, etc), the type
of assistance needed, number of people aboard, and describe vessel (32’, white hull, sloop)
Wait 1 minute for a response then repeat message if unanswered

9. Anchoring & the Windlass
Dropping the Anchor:
Preparation:
• Establish a non-verbal communication system for signaling between the helmsman at the
stern and the fore-deck grunt at the bow, necessary because the noise of wind and the engine
will likely make verbal communication difficult and frustrating. Agree upon hand signals to
indicate direction-to-go, slowing down, putting engine in neutral, stopping the boat, anchor
in the water and clear of the water (to gauge risk of anchor swinging into bow), and anchor
free of the bottom.
• Tie the dinghy painter close to the boat at the bow or amidships to avoid wrapping the line
around the propeller and losing the use of your engine!
Location:
• Consider: bottom composition, depth, swing room, shelter from wind and waves, lee shores
(being blown onto shore), tide (and its effects on d epth), current, and rights of the
anchorage (first boat there sets the standard)
• Choose a clear area to anchor, ideally in 12-15 feet, with plenty of swing room.
• Make sure not to anchor on a lee shore. Ensure the nearby land mass is protecting you from
the elements and that you are not being pushed onto the shore. A lee shore is the most
dangerous place to an c h or y ou r y ac h t .
Actions:
• Ma nually lift the anchor over the bow roller and feed out the chain so the anchor is just
above the water’s surface (but not in risk of swinging into the bow).
• Use the elements – approach from downwind or down current, whichever prevails.
• Once the yacht has bled off its forward momentum, use the electric windlass to drop the
anchor. Pay out chain as the elements push you ba ck away from the anchor, but do not drop
all your chain in a pile or it will tangle and bind.
• Use minimum scope of 5:1 (chain to water depth). In heavy weather, you may want to
increase your scope, always ensuring that your swing area is clear of any obstacles.
• Engage engine astern (reverse), slowly building up to 1500 rpm to drive your hook in. Use
200 rpm increments and take transits
*
at each setting to ensure you’re not dragging before
increasing rpms to next increment.
• Once set, put the engine in neutral and watch your transit sight – the boat should move
forward noticeably. It is always advisable to snorkel the anchor to ensure it is bedded
correctly.
Attaching the Snubbing Line:
• Once you have set your anchor you must attach the snubbing line. The snubbing line
protects the windlass and improves the anchor’s holding ability, so it is important that you
attach the snubber every time you set the anchor.
• Attach the hook around the chain link (the hook is too big to go through the link) and clea t
off the bitter end of the line to a bow cleat. Pay out enough chain so that the snubbing line is
taut, holding the full weight of the boat, an d the chain bellies slack. If the hook falls off the
chain, it means there is not enough slack: reattach the hook then let out chain once again
until the snubbing line is taut.
Setting a Secondary Anchor:
• If a secondary anchor is required, for instance when concerned about wind shifts and swing
room, deploy the primary anchor as above and ready the secondary at the bow. Drive the
*
Taking transits: sight points on shore to check vessel’s relative movement. See glossary for more
on transits
boat forward 45°angle to the primary. Once in line with the primary, deploy the secondary
and allow the elements to push you back. Set the secondary with 1500 rpm astern as with
the primary. You may also use the dinghy to drop your second anchor.
Retreiving the Anchor:
• Agree upon a non-verbal communication system between the helmsman and the person on
the fore-deck. For instance, a fully extended arm from the fore-deck indicates what
direction to steer, a closed fist indicates neutral, a “hang loose” gesture indicates anchor’s off
the bottom.
• At the direction of the fore-deck crew, drive forward slowly towards the anchor and begin
taking up the chain only when it hangs directly down from the bow roller so that
you don’t try to pull the boat forward using only the windlass. If the chain trails out ahead,
motor forward more until reactivating the w indlass. If you’ve driven past the lay of the
chain so that it leads back under the boat, signal to the helmsman to put the motor in
neutral, then simply wait for the wind to push the boat back down and it will settle pointing
directly at the remaining line of chain.
• Be very careful returning the anchor onto the bow roller after it crests the water. It can be
done with the windlass, but it is usually safer to pull it by hand from the top of the water
back onto the bow roller to reduce the risk of the anchor swinging into the bow.
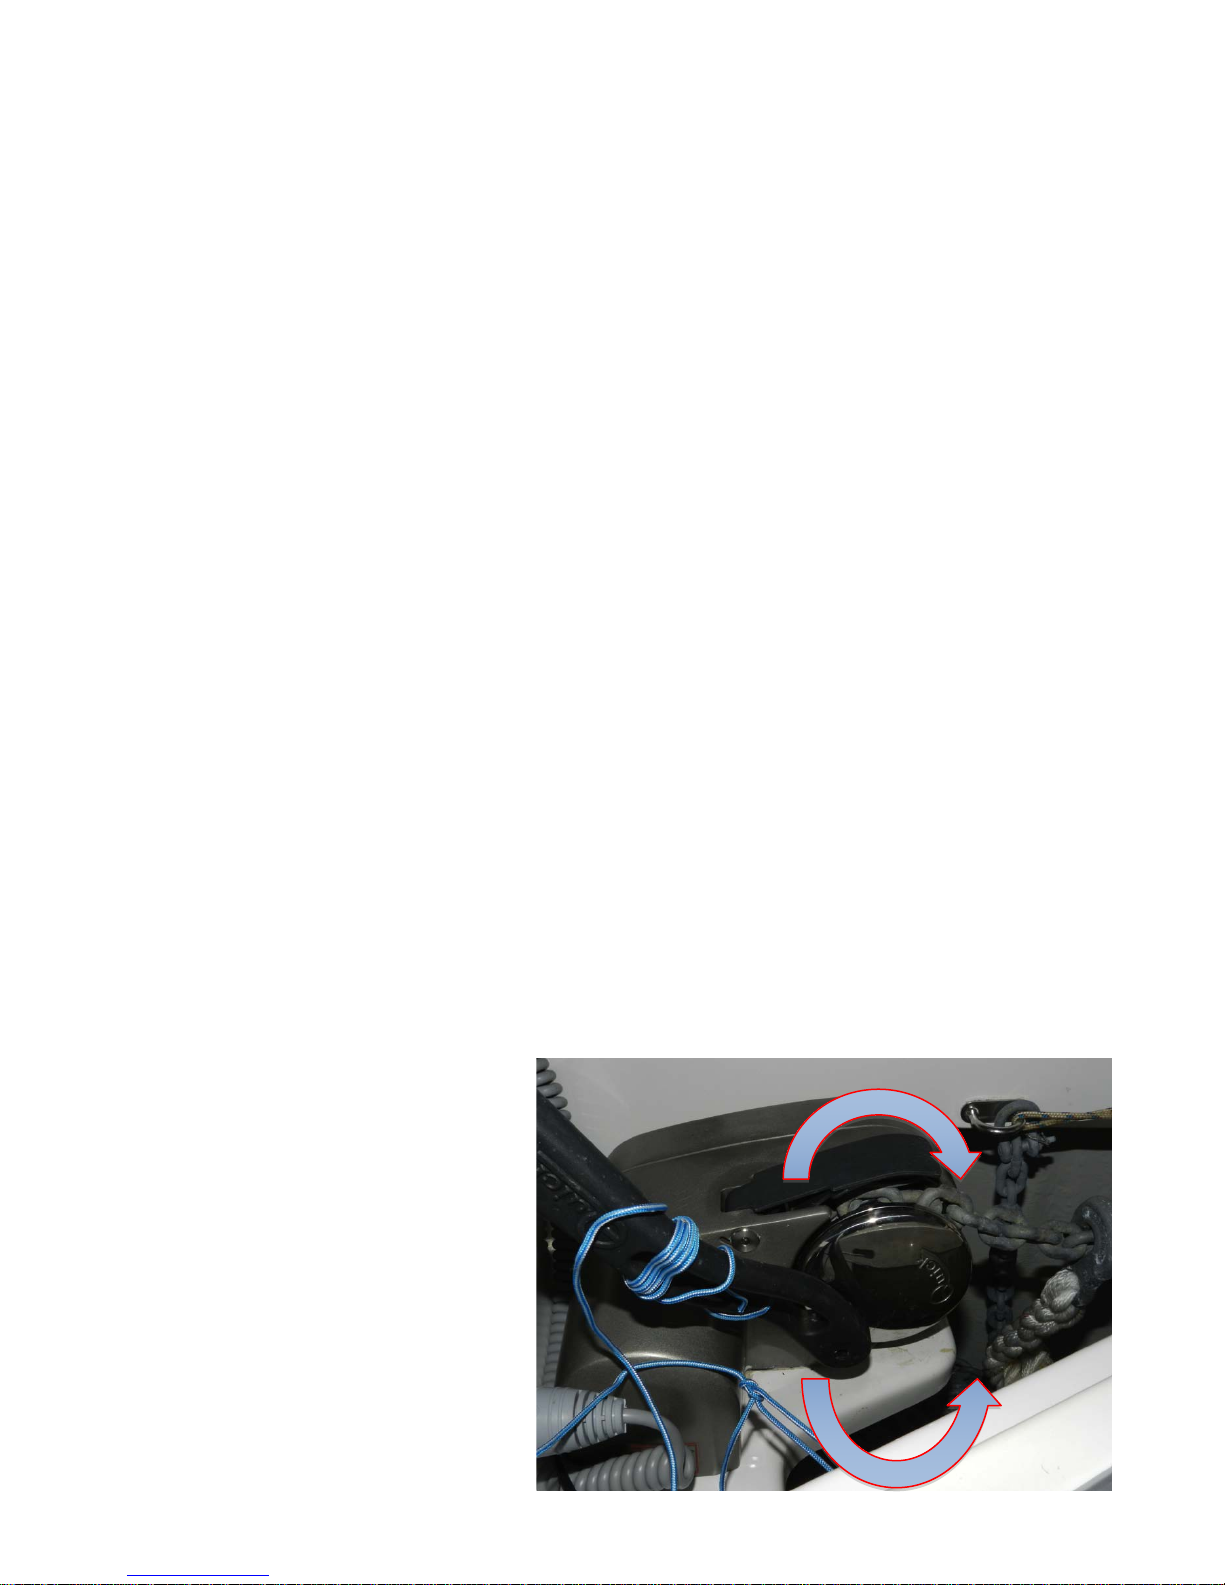
Manual Operation of th e Windlass:
If you lose power to your windlass, start the engine and give it some revs to make sure the problem
is not just low battery voltage. Then make sure the windlass breaker button o n your 12v
instrument panel (the icon of the anchor) is in the “on” position. If there is still no power, you
can operate the windlass manually.
To drop the anchor, insert the windlass handle into the octagonal fitting on the right side of the
windlass.
Continue to pull back on the windlass handle, so that the brake cap loosens (the cap is called a
‘gypsy’). Your anchor is now ready to drop.
Remove the safety line and lower the anchor over the bow, keeping hands and feet clear. Control
the rate the chain pays out by tightening or loosening the brake with the windlass handle.
When you have paid out sufficient chain (5-8 times the water depth), push the handle forward and
tighten the brake. Set the anchor at 1500 rpm astern as explained above. If you drag, pay out
more chain, and try to set the anchor again. When the anchor is set, fit the snubbing line and
cleat it off, then release the chain by loosening the gypsy as above so that the load is taken up on
the snubbing line.
clockwise tightens
counter-clockwise loosens

Picking Up a Mooring Buoy
Ensure the dinghy painter is tied off short on the bow or amidships and is clear of the prop.
Have a crew member on the bow to pick up the mooring pennant with the boat hook. The bowman
should ready a line from each bow cleat to slip through the eye of the mooring pennant.
Approach the mooring keeping the bow into the wind or current, whichever prevails. The bowman
will direct the helmsman to the mooring, using an already established non-verbal communication
system (a good one is to use the boat hook held high like a javelin to point at the buoy to indicate
direction and also distance by the angle of the hook). Catch the pennant line with the boat hook,
run one of the bow lines through the pennant eye and back to the same cleat.
Once at the mooring, inspect the buoy and pennant for any signs of wear and tear – if you are
unsure about a mooring buoy’s integrity, choose another location to moor up.
Checking clear behind you, reverse slowly up to 1500 rpm to ensure the mooring is secure.
Once set your mooring buoy will be attached either on the port or starboard cleat and the yacht will
head up into the wind. Remember to centralize the wheel and lock it in place to avoid the yacht
sailing around the buoy or the rudder clanging.
Next, attach the second bow line directly to the mooring ball. There will be a metal ring at the top
of the ball or a shackle just underneath the ball. Use the line from the opposite bow cleat and if
possible run the line through the ring or shackle and back to the same cleat. It is always easier to
do this from the dinghy. Do not try to make the lines of equal length. The first line should be
taking all the weight of the boat.
To depart, release the back up line first. Slowly motor the boat forward to create slack, then release
the line from the cleat and allow the pennant to slip from the line into the water. Fall back with the
wind or current and wait until you can see the mooring buoy and pennant well clear before
engaging the propeller.

10. Fresh Water System
Your yacht has a water capacity of 40 gallons. Use the up/down arrows underneath the LED
display on your 12v panel to check the remaining water level.
To use the fresh water system, turn on the fresh water breaker button on the 12 v panel and open a
faucet. When the tank runs out of water, the p ump will run at high speed and the faucet will sta rt
to cough air. As soon as you notice this or hear the pump running continuously, immediately
switch off the pump to prevent the pump from drawing more air into the system or the pump
overheating.
Before filling the tank, let the hose run for a few moments until the standing water in the hose has
run out, then place the hose end into the filler that is located on the transom. It is imperative to
only put water into the water deck fill, NOT the diesel fill or holding tank.

11. Showers
Your yacht has a hot and cold, fresh-water shower in each head and on the transom.
If the engine has been running, the hot water can be extremely hot – be careful!
In order to use the showers, the fresh-water pump must be activated on the 12v panel. There is
also a shower-drain pump switch directly to the r ight of the fresh-water pump on the 12v panel.
Switch this on also.
As you shower, you’ll notice that water will gather at your feet. To operate the shower-drain pump
and pump out this water, push the black button below the water control for the shower and hold
the button until the water is gone.
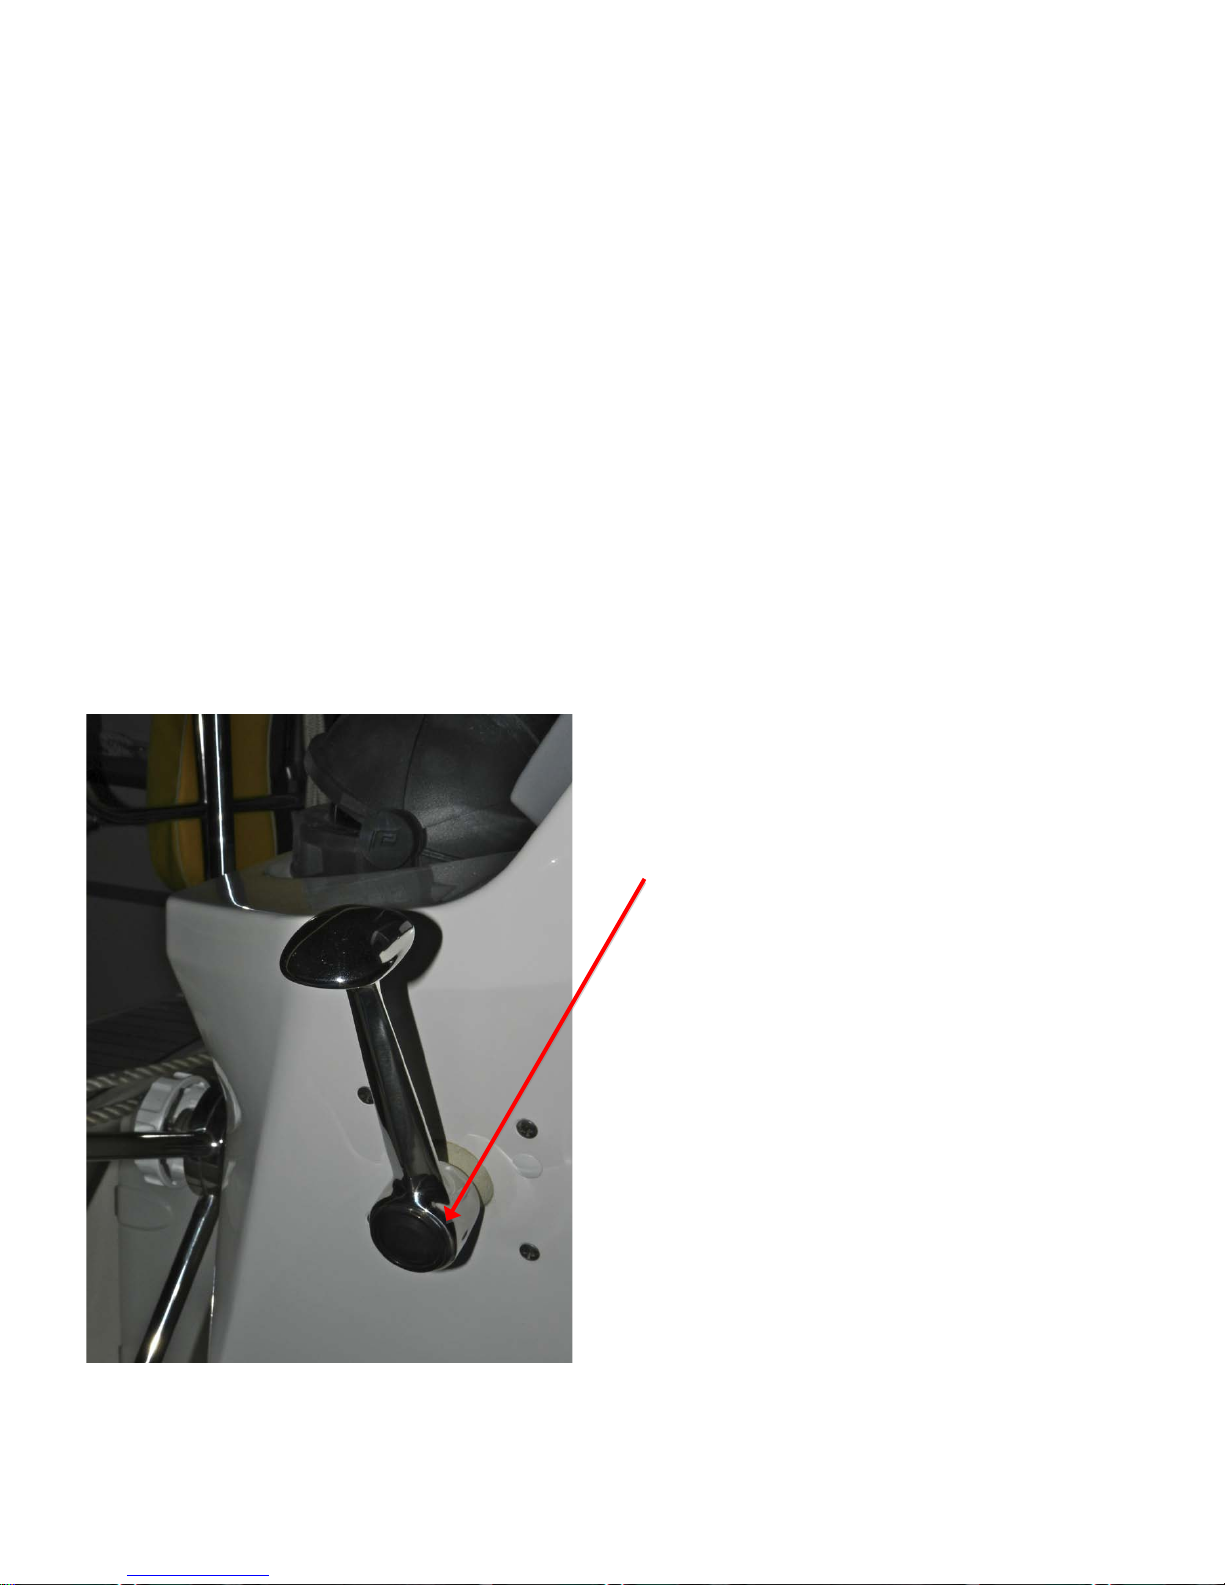
Transom Shower:
The valve below the retractable shower head has two functions:
1. By turning the knob clockwise and counter-clockwise you can ad just the tempera ture of the
water. Be careful – the water can be very hot. Test before showering.
2. By pushing the valve side-to-side, you can change the water pressure.
To use this shower head, simply pull it out and press the button on the back. If no water comes
out, make sure the 12v water switch is on, the water pressure valve is in the correct position, and
the shower hose is not kinked (accessed from the starboard aft cabin).
Shower-drain pump
press-button
Button to operate
transom shower head
Transom shower valve:
twist to chang e temperature,
move side-to-side to adjust flow
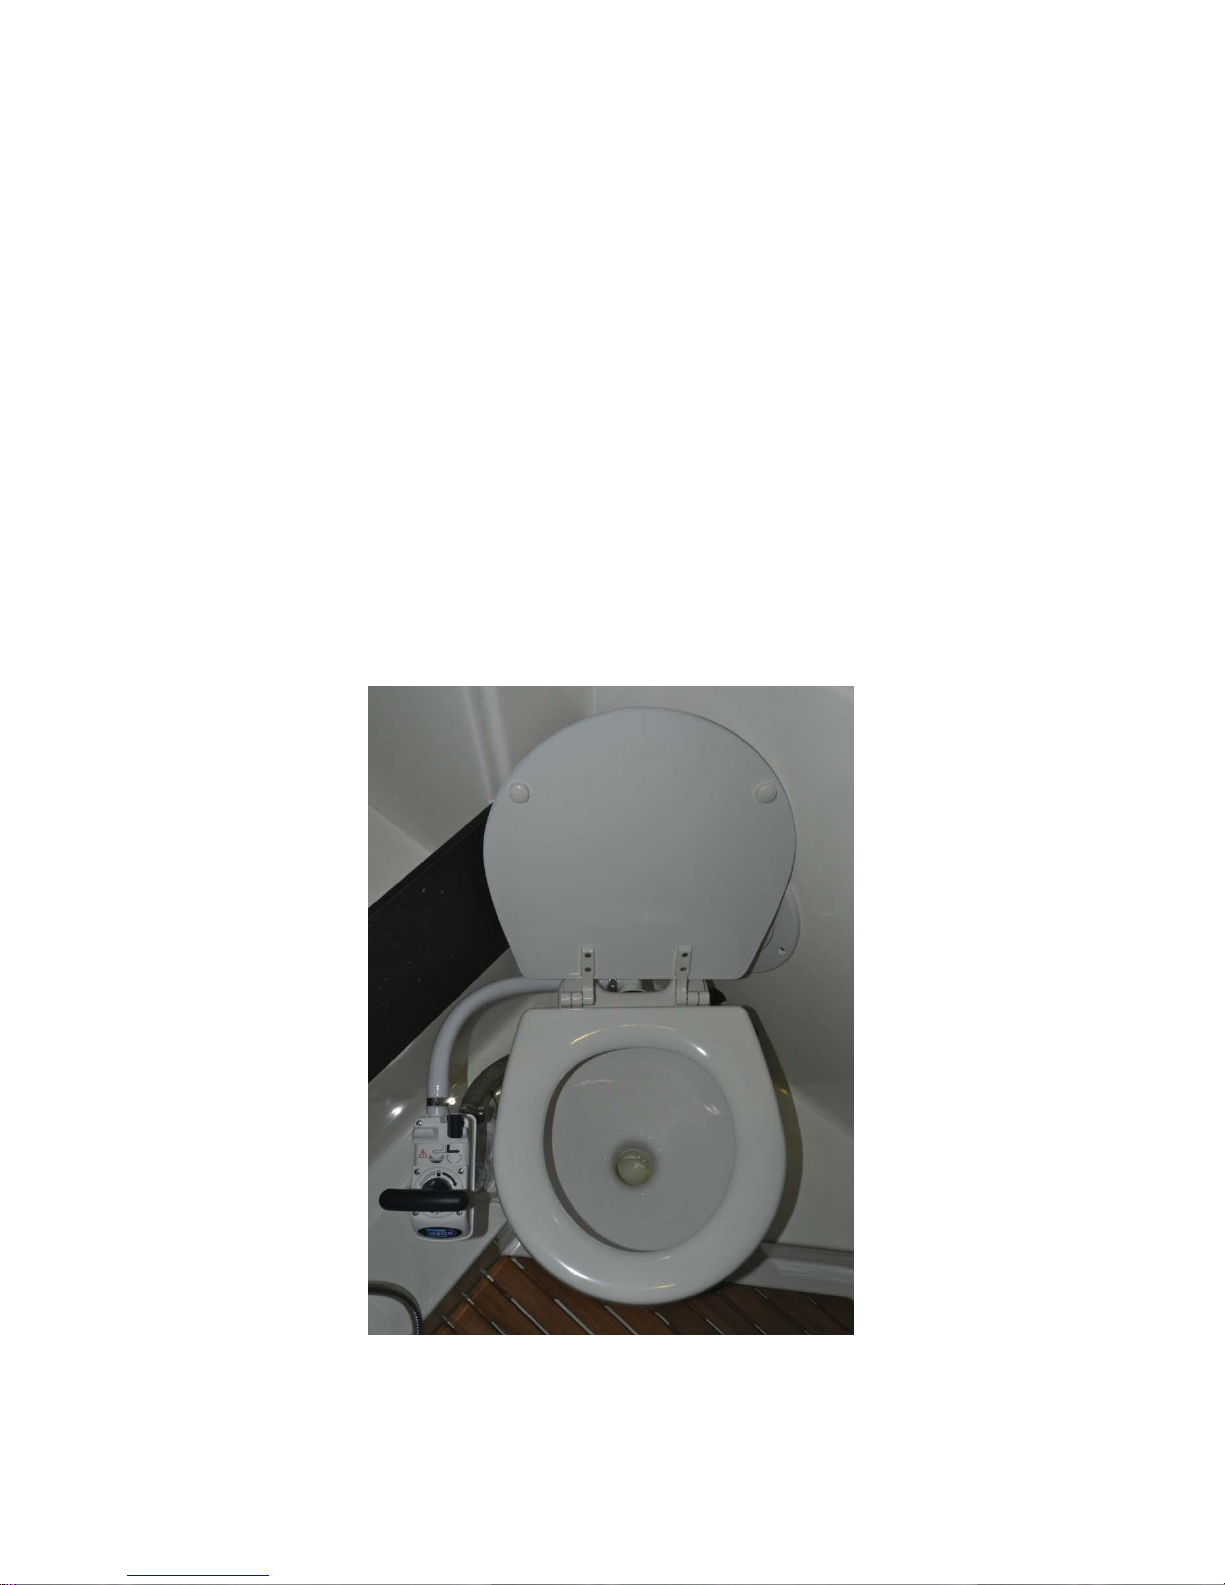
12. Heads
Nothing is to be put down the head unless it has been digested first.
Prior to use, move the lever above the pump handle to the left (wet bowl) and p ump 3-5 times to
add water.
Use the head.
Pump 15-20 times on “wet bowl” (left position) to flush waste into holding tank. Move the lever
back to the ri ght to “dry bowl” and pump the bowl and pipes dry. To conserve holding tank space,
you may use a few less pumps for liquid-only waste.
Leave the lever in the “dry bowl” position (to the right) to prevent water ingress.
The holding tank will alarm on the instrument panel when it is ¾ full, meaning it is time for a
pump out. To check exactly how much space is left, press the two push-button latches on the panel
above the head to the right and remove the panel to observe fill level.
Wherever possible, please use the heads ashore as this minimizes odor and decreases the chance
you’ll end up with a full holding tan k!

13. Refrigeration
The system on this boat is an upgraded 12v refrigerator. This system is designed to run 24 hours a
day if you wish. To ensure that it does not fail, there are two things you should do:
1. Keep your batteries charged. If the level goes below 12v, the system will malfunction.
2. DO NOT PUNCTURE THE COLD PLATE IN YOUR FRIDGE! Do not chip at the ice or
use any other sharp items in the fridge. If something is frozen to the side of the fridge,
DO NOT FORCE IT AWAY. Pour warm water on it if you need the ice to melt.
There is a thermostat in the fridge. It is a white dial with numbers on it going from 1 to 7. 7 is the
coldest setting (match the number to the apex beside the dial). 5-6 usually works the best without
the risk of freezing anything. However, if 7 is not cold enough, you may augment the system with a
bag of ice. Also, the fuller you keep the fridge box, the better it will hold its cool.
Ask one of our staff for a deck cooler if you would like one for storing your drinks. This will keep
the drinks cold and your refrigeration colder as people will not be going in it every 5 minutes for a
drink. Note: do not use the cockpit table locker as a cooler as it is not insulated.
The fridge can be drained by pressing the top r ight button on th e 12v panel, but first make sure that
the Fridge Drain/Secondary Bilge selector behind the trash bin is pointing to “Fridge Drain”. It is a
gray valve that allows the same pump to act as a back-up bilge pump or the fridge drain.
Hose to fridge drain
Black arrows denoting
route of flow
Hose to bilge Thermostat dial

14. Propane and Stove
The propane tank locker is located in the cockpit at the helm seat on the port side.
Manual shut-off
in cabinet:
-parallel is open
-perpindicular is closed
Valve ON/OFF button
Oven latch:
push down
to open
To use:
• Press the F1 func tion button on the instrument panel then press the valve on/off button on
the solenoid control panel above the stove on the left. This supplies power then opens the
solenoid on the tank.
• To light the stove or oven: push the desired knob in, turn it 90° counter-clockwise, and light
the burner. Hold in the knob for 8-10 seconds before releasing. Make sure the flame goes
all the way around the burner. Reduce any wind that may hinder this (close hatches if
necessary). To light the oven, place the flame in the funnel at the bottom center of the oven
or, if this fails, carefully reach in and light either side of the burner.
• Burner knobs fro m left to right: l eft burner, right burner, oven
• If you cannot get the burner lit, check the manual shut-offs. There are two: one on the
propane tank in the cockpit and one in the galley in the cabinet to the left of the stove. Make
sure both of those are open and try again.
The 12v solenoid system is a USCG approved device. You do not need to shut off any of the manual
valves unless you wish.
This boat is fitted with a Xintex S1-A propane detector and control system. This device will detect
propane and any other noxious gas or fume. The propane “sniffer” is located in the bilge (propane
is heavier than air and will sink into the bilge). The detectors are sensitive to several types of gas
and will trigger the alarm if any are present. The alarm can also be triggered by moisture in the
bilge. If the alarm sounds, it does not necessarily mean that the propane system is leaking, so don’t
panic!

In the event that the alarm goes off, follow these steps:
• Close the valve on the propane tank in the cockpit.
• Check the stove and surrounding area for the smell of propane and listen for any hissing
sound like escaping gas or air.
• If detected, open up the bilges and hatches and point the boat downwind. Use the manual
bilge pump to pump o ut bilges.
• Call Horizon immediately.
Under no circumstances should you use the electrical bilge pumps or any other
electrical system if you suspect a gas leak.

15. BBQ
• When using the B BQ, tie your dinghy off at the side of the yacht, not off the stern
• Never use the BBQ while sailing
• Never use the BBQ on a dock
• Never change propane tanks when using the BBQ
• Make sure someone is always tending the BBQ when hot
• Call us if you have too much food

16. Fire Safety
Prevention is always the best answer to fire safety.
Always switch off the propane solenoid when stove is not in use.
Never leave the stove, oven, or grill burning unattended.
Never change propane tanks while barbecuing.
Never smoke below decks.
Never smoke when changing propane tanks.
Safely store any flammable liquids (charcoal lighter fluid, for instance).
Keep matches away from children.
Engine Compartment Fire:
In the event of a fire in the engine compartment, immediately shut off the engine and shut off the
diesel fuel supply by turning the in-line valve perpendicular, just under the starboard aft berth.
Use the fire extinguisher positioned closest to the companionway hatch steps (under the sink on
your yacht) and insert the mouth of the extinguisher into the fire hole.
Pull the yellow key out.
Press down on the red button until all the contents of the extinguisher have been discharged.
Do not open the engine compartment! Even if you think the fire has been
extinguished, dying embers can easily be re-ignited by a fresh supply of oxygen (air).
Open Fire:
Pull the yellow safety tab on the nearest extinguisher. Point the extinguisher at the base of the fire
and press down on the red button to discharge contents. Generously cover the base of the fire,
sweeping back and forth over the base area. Continue discharging the extinguisher until the fire is
out.
Galley Fire:
Take the fire blanket out of its container.
Read the instructions for use carefully.
Ensure hands and limbs are protected from the fire by the blanket.
Carefully lay the blanket over the fire, laying the blanket away from you and keeping yourself
protected at all times from the flames.
Once in place, leave the blanket until all the heat has gone from the scene of the fire, this way you
can be sure that the fire has definitely gone out and will not re-ignite.
Smoke Alarm:
There is a battery operated smoke alarm mounted in the salon. This alarm will be triggered by
smoke caused by cooking or other fires. Opening a hatch while cooking will allow ventilation and
decrease the likelihood the alarm will sound during galley use. For safety purposes, the 9v battery
should not be removed from the smoke alarm.

Temperature Controls
Power
On/Off
Fan
Speed
17. Air Conditioning
The air conditioning only operates when connected to shore-side power. Once plugged in to shore
power, switch on the breakers below the navigation desk.
Ensure all hatches and companionway doors are closed before starting air conditioning otherwise
the compressors may freeze up.
With breakers on and power coming in (evidenced by
the green lights beside the breakers), go to the head
unit located in the salon on the starboard side behind
the fridge (pictured at right) and press the top left
button to turn it on. Then set the temperature using
the blue and red down and up arrows. The display
reads ambient room temperature except when setting
the desired temperature. The fan speed sets itself
automatically unless you change it.
Turn the unit off in reverse order (head unit, boat-side breakers, shoreside breakers) before unplugging from shore power.
Bleeding the System:
AC bleed valve: turn
90° to open, then turn
on secondary bilge to
pump out air
Sometimes while sailing air will find its way into the water intake and effectively “lock” water from
flowing to the units, meaning they cannot run as it is from this circulation of outside water that the
units produce cool air. The head units will blink “HPF” (High Pressure Fault) and shut down when
an air lock happens. First, turn the head unit off or it may damage the unit!
To bleed the air out of the water intake, go to the cabinet under the sink and look along the top
back corner (behind the trash can). Open the white-handled valve and turn the head unit on, then
switch the secondary bilge pump on at the instrument panel (top right button). Water and air will
be exhausted overboard. If you look in the primary bilge in the galley area, you’ll see a clear hose
that runs off a through-hull fitting to a strainer then forward to the AC unit. There should be no air
bubbles in that hose with water flowing continuously. Watch for a moment and ensure it is then
close the bleed valve and shut off the bilge pump – the system should be bled of air and operating
smoothly.
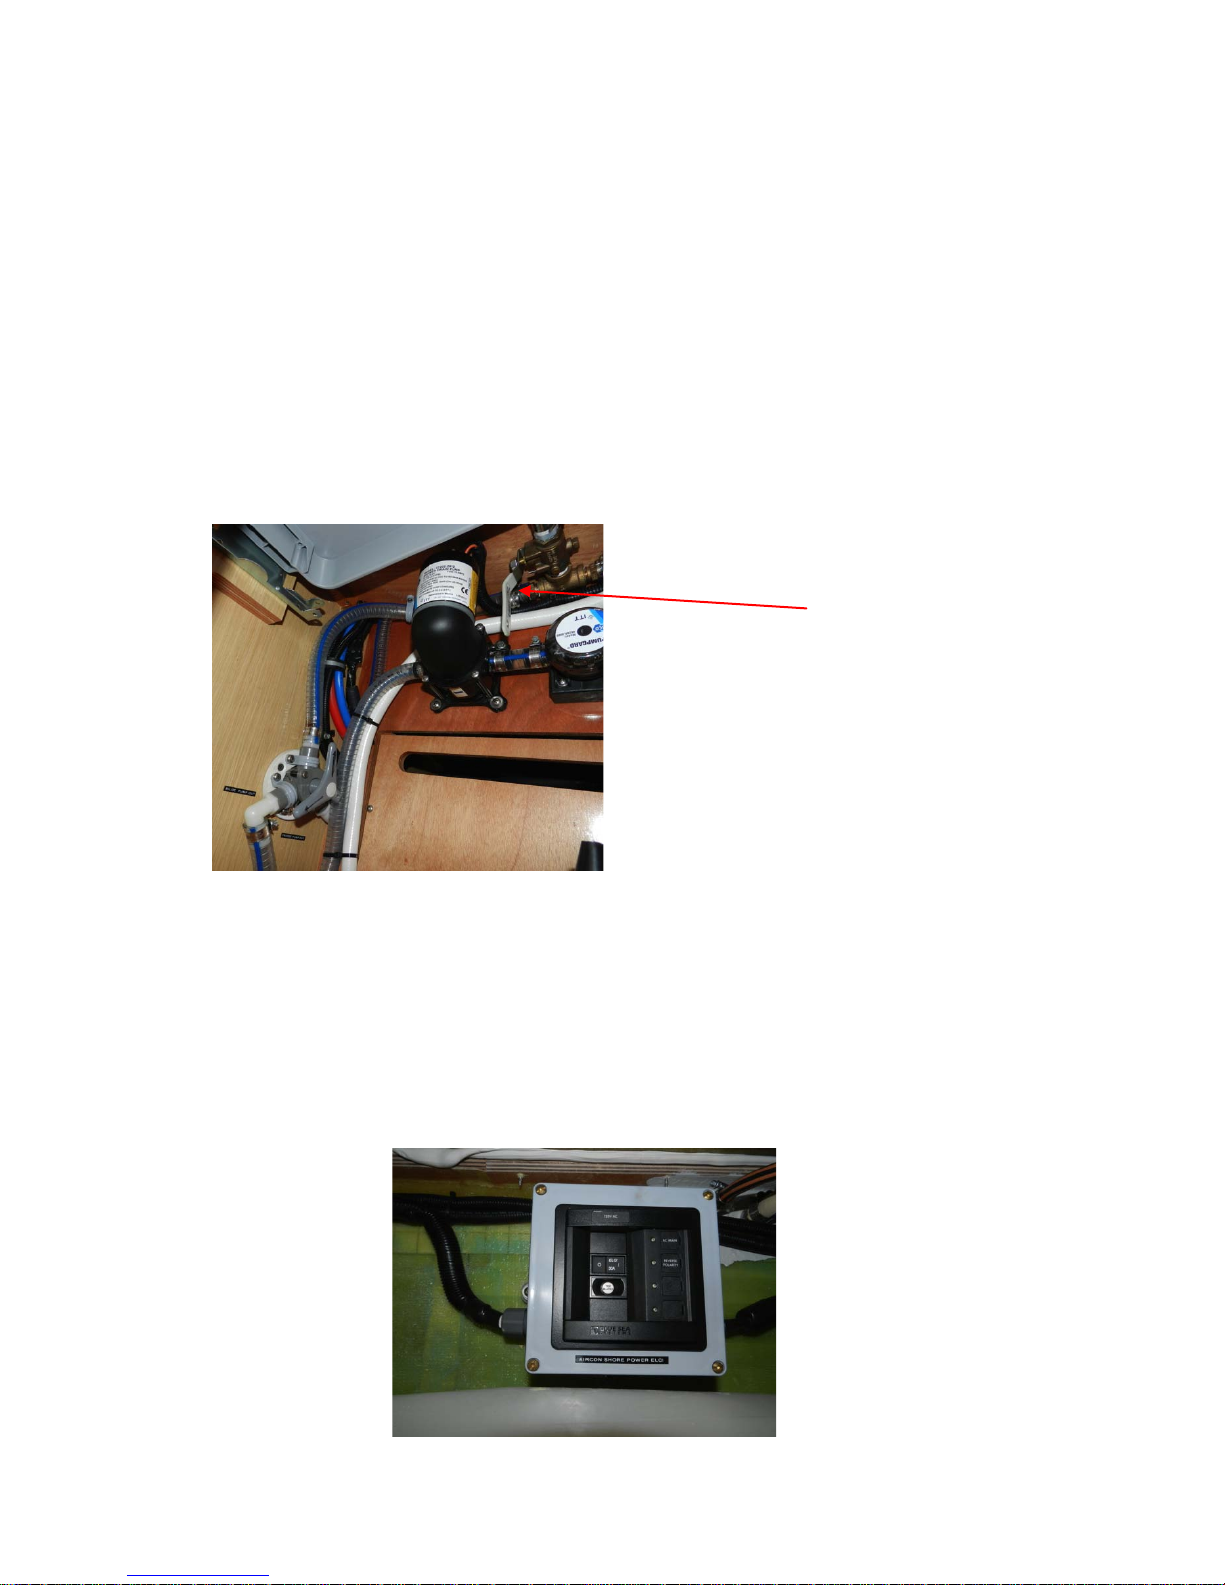
Circuit Breakers:
If there’s power coming into the boat but the breakers at the panel and the head units won’t turn
on, check that the secondary breakers haven’t tripped. They are reachable through the holding
tank inspection panel in the head (shown below).

18. The Dinghy and Outboard
The driver of the dinghy must be over 18 and must wear the kill cord at all times.
Never operate the dinghy under the influence of alcohol or drugs.
Always tow the dinghy using a short line while motoring (to prevent fouling the propeller) and a
long line while sailing. You may tow with the engine leg up to reduce drag: raise the motor when it
is not running by putting the gear-shift lever in forward and pulling forward from the grip on the
back of the outboard.
When going ashore for an evening’s entertainment, designate a dinghy captain, someone who will
bring the whole crew back to the boat safely while allowing the rest of the crew to enjoy a few local
concoctions.
Operation:
• To start the engine, lower the motor into the water using the lever on the starboard side of
the outboard (lift it towards you as lower the engine down – and mind your fingers!). Check
that you are in neutral and the safety cord is in place. For starting an engine that has
been at res t for more than a fe w hours, pull the choke out and set the throttle arm to idle.
Face the engine and pull the start cord until it attempts to turn over, then immediately push
the choke back in. Do not leave the choke in for more than a few pulls as t his wi ll flo o d
the engine.
• Only put engine in gear with the throttle at idle, and never switch directly from
forward to reverse or vice versa – this will damage the engine!
• To stop the engine, press the red button under the kill cord or pull the kill cord out.
Keep the kill cord with you to prevent anyone borrowing your dinghy. You have been provided
with a dinghy lock and cable – use them.
When tying up to a dock, go to the leeward side of the dock to tie up and use your dinghy anchor off
the stern to prevent the dinghy from going under the dock and capsized or damaged. Do not drag
the dinghy onto a beach.
Do not speed in and around other vessels, both for courtesy and lest you get a speeding fine. Mind
all speed limits, and never plane the dinghy while operating at night.
At night, an all around white light must be displayed along with red & green sidelights. It is always
a good idea to have a flashlight with you: to show the way, warn other vessels of your presence and
once ashore.
Wear the life preservers provided in the cockpit lockers when in the dinghy.
Refueling: the outboard is a 4-stroke – do not put oil into the gas tank as it will
permanently damage the engine.

Swim Ladder
Your yacht is equipped with a retractable transom that also doubles as a transom seat when the
transom is up. There is a removable swim ladder that is stowed in the port cockpit locker. While
underway (sailing or motoring), the transom should remain closed. After you are securely
anchored or moored, feel free to deploy the transom for a swim platform or easy access to your
dinghy (thoug h be careful not to let the dinghy hull ride up on the platform, which could damage
both the dinghy hull and the platform). There is a lanyard attached to the swim ladder that enables
you to secure the ladder while in use.
Always use the safety lanyard while using the swim ladder to prevent losing the ladder overboard.
A

Glossary:
Transit
Seacocks and Through-hulls
Snubbing line
Lee shore
Y-valve
Pennant line (mooring pennant)
 Loading...