

Page 1
ORIGINALBETRIEBSANLEITUNG
de
Elektrozaungerät
OPERATING INSTRUCTION
en
Electric Fencer
MODE D‘EMPLOI
fr
Électrificateur de Clôture
INSTRUCCIONES DE USO
es
Cercado Electrico Accionado
85328C 07/15
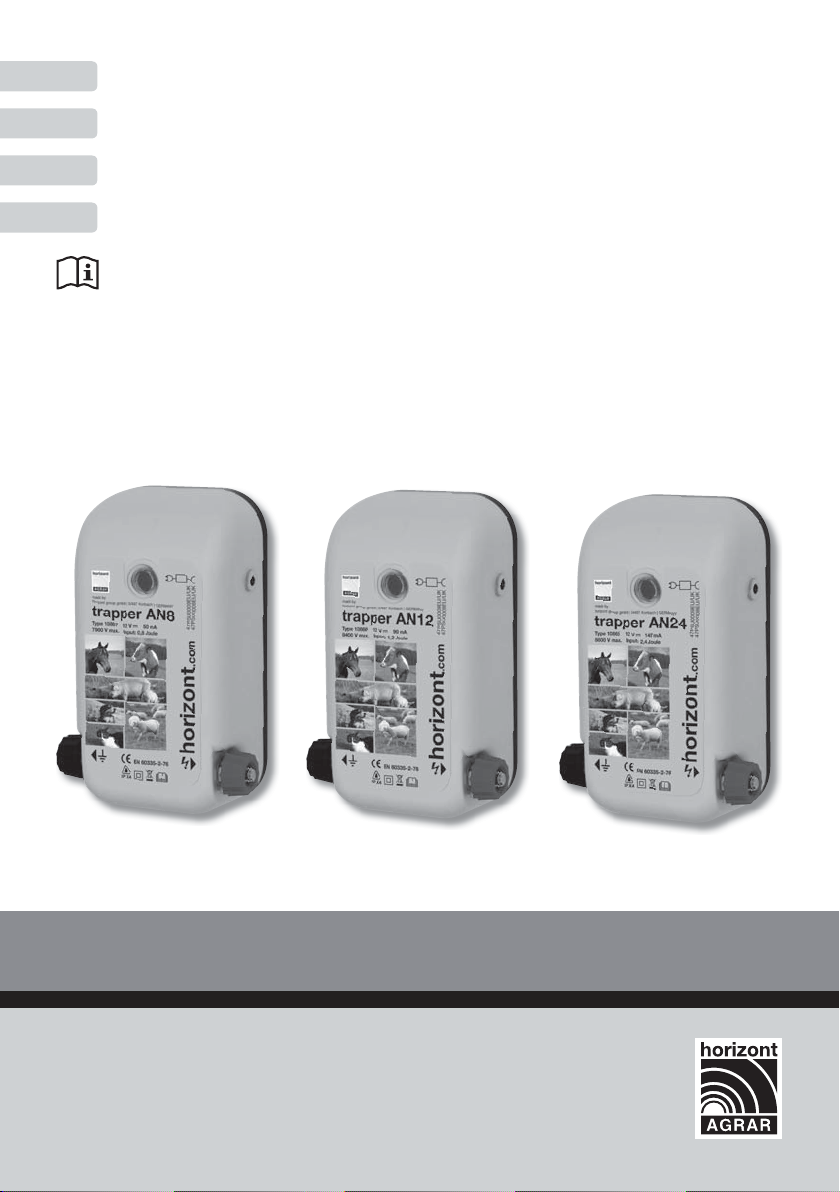
TRAPPER AN8 TRAPPER AN12 TRAPPER AN24
Type 10867
horizont
Type 10866
Type 10865
horizont group gmbh
Division agrartechnik
Postfach 13 29
34483 Korbach
Homberger Weg 4-6
34497 Korbach
GERMANY
Telefon: +49 (0) 56 31 / 5 65-1 00
Telefax: +49 (0) 56 31 / 5 65-1 20
agrar@horizont.com
www.horizont.com
Page 2
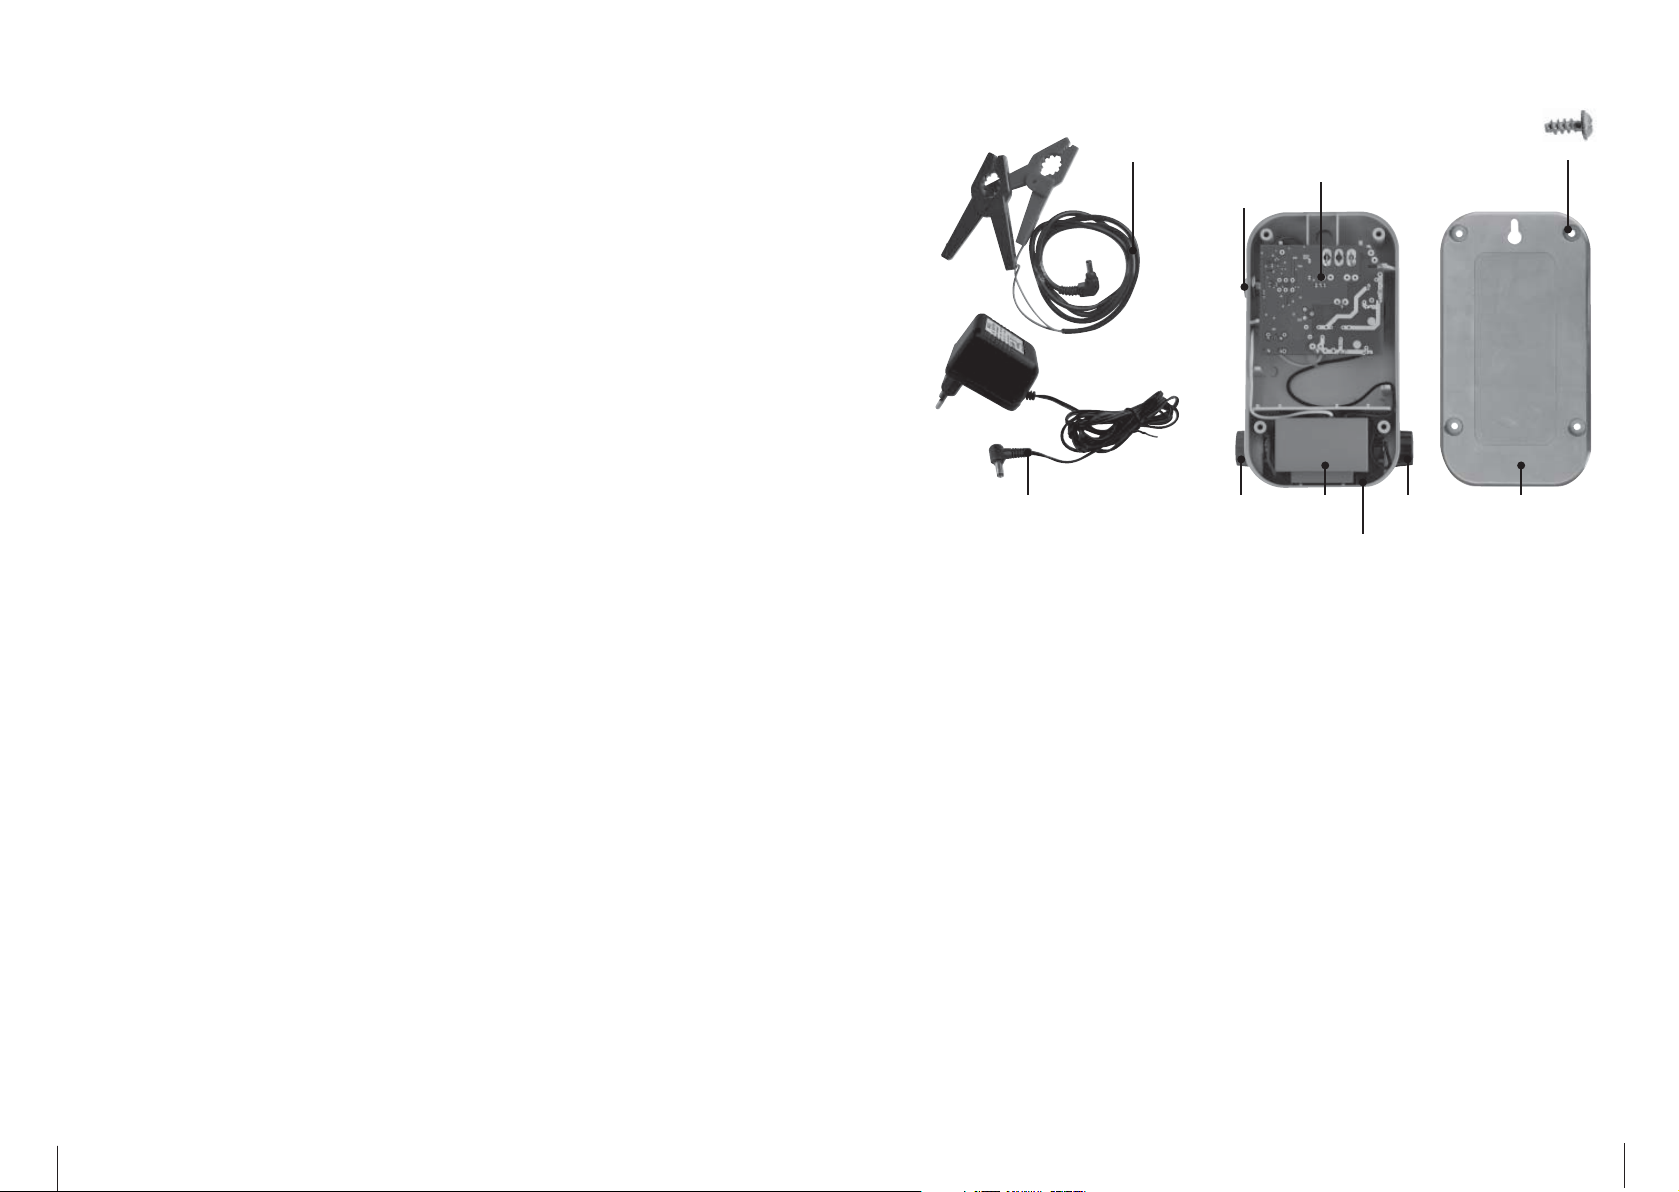
Ersatzteile | Spare parts | Pièces détachées | repuesto
AN8: 60704 (B15)
47BL1.2
AN12: 60705 (A11)
AN24: 60719 (A12)
606852
94581
47PSU0008EU
47PSU0009EU
98676 (rot) 60709 81045
AN8: 84219A-10867
AN12: 84219A-10866
AN24: 84219A-10865
(schwarz)
84041
2
horizont.com
3
Page 3
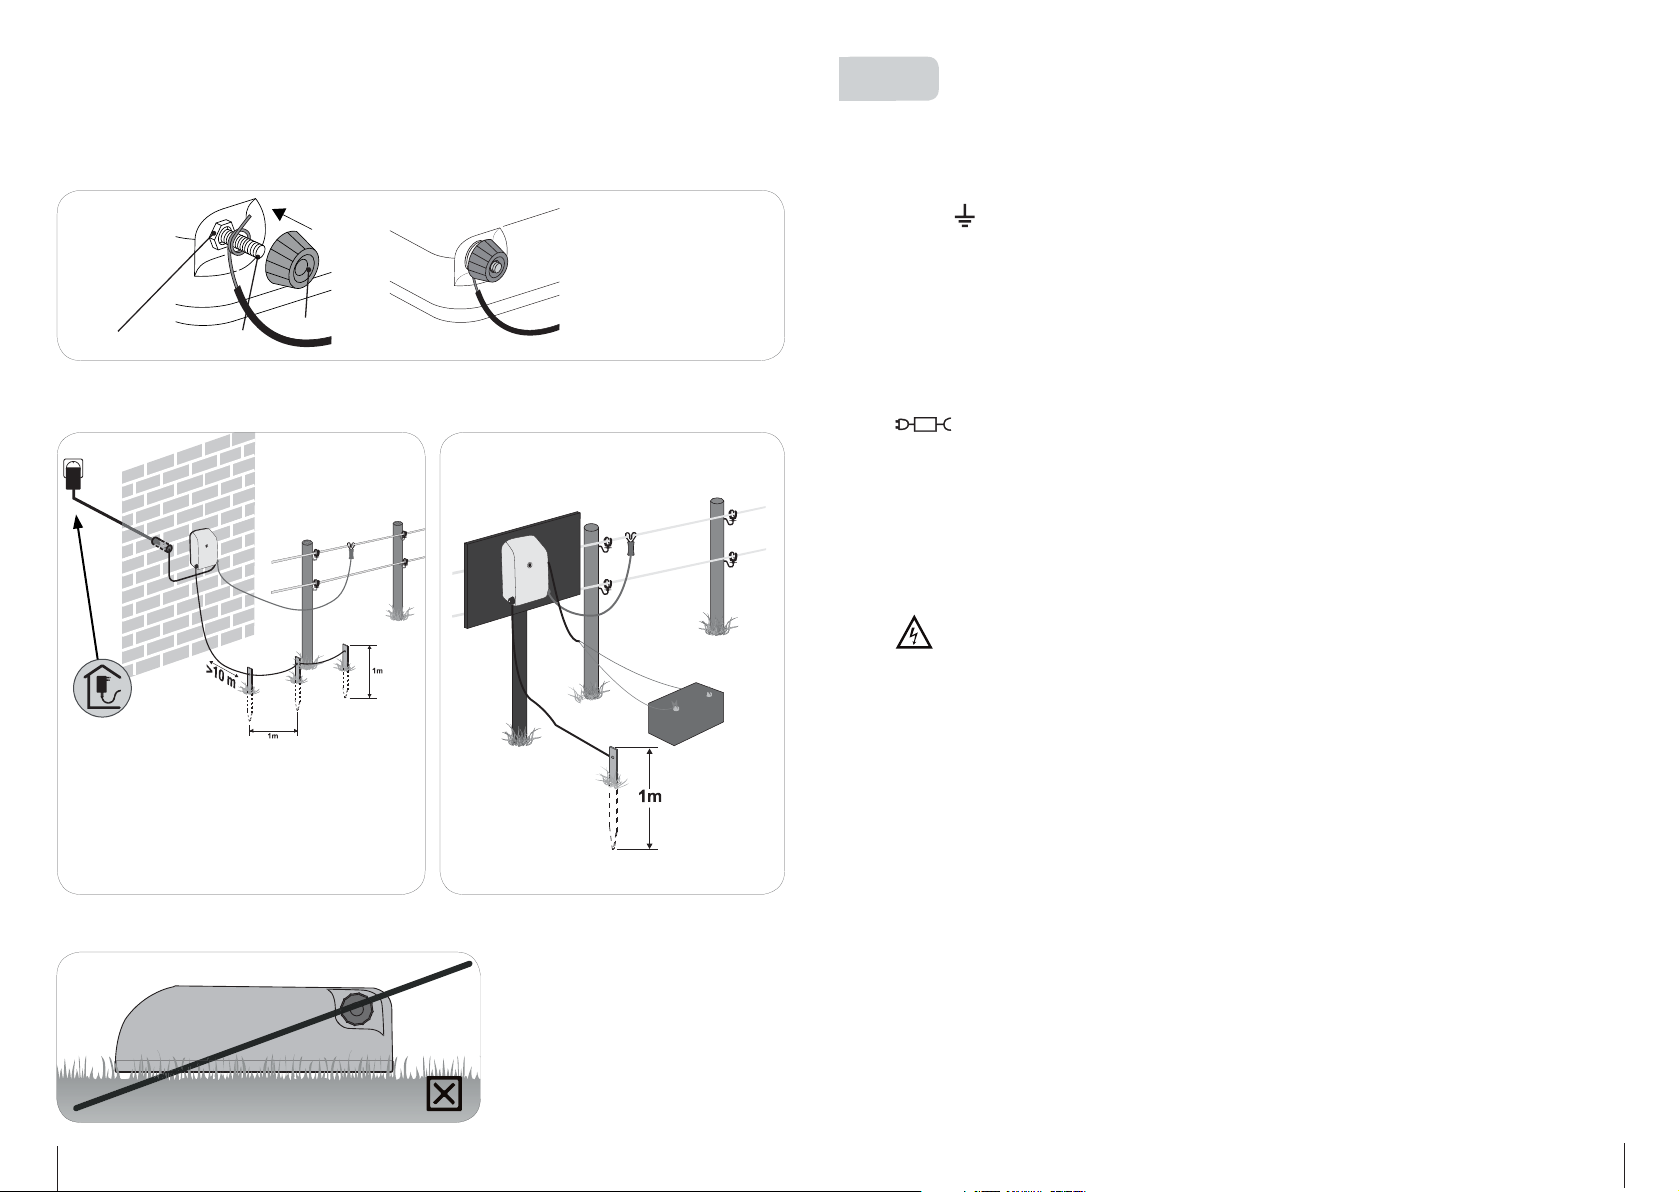
Montage und Anschluss | Installation and connection |
Montage et raccordement | Montaje y conexión:
Fig. 2
81800 81792
98676
de
MONTAGE UND ANSCHLUSS:
Das Gerät kann wahlweise an einer Wand oder einem soliden Pfahl montiert werden. Der Erdungsstab (Längsstab) muss
an einer feuchten Stelle möglichst tief in den Boden eingeschlagen und mit einem korrosionsfesten Draht mit der Erdklemme (
INBETRIEBNAHME 12 V AKKU (FIG. 4):
Gerät an 12V Akku anschließen ( rot + / schwarz - ), dabei auf saubere Polklemmen und richtige Polarität achten. Nur
aufladbare 12V-Blei-Batterien verwenden, Bleibatterien nur in gut belüfteten Räumen laden. Nach einigen Sekunden hört
man ein gleichmäßiges Ticken, das Gerät ist in Betrieb. Bei falscher Polarität läuft das Gerät nicht an. Eine Control LED
leuchtet im Takt der Impulse auf.
Der Akku sollte bei einer Spannung von 11,9 Volt (entspricht einer Entladung von etwa 60%) nachgeladen werden. Entladen Sie den Akku nicht tiefer als bis zu einer Spannung von 11,7 Volt (entspricht einer Entladung von etwa 80%).
Originalbetriebsanleitung trapper AN8 | AN12 | AN24
in Verbindung mit den Errichtungs- und Sicherheitshinweisen für Elektrozaungeräte
SECURA ANIMAL (www.horizont.com)
) des Gerätes verbunden werden. (Seite 2)
Fig. 3
de: Bei 230V Betrieb sollte das Gerät und muss der Netzadapter in
einem vor Feuchtigkeit geschützten Raum installiert werden.
en: For 230V operation the energizer should be and the adapter must
be installed in a room protected from moisture.
fr: Pour un bon fonctionnement sur le 230V, l‘électrificateur et
l‘adaptateur doivent être installés dans une pièce à l‘abri de
l‘humidité.
es: En servicio con 230 V el aparato debería y la fuente de alimentación
tiene que ser instalada en un recinto protegido de la humedad.
Fig. 5
Fig. 4
INBETRIEBNAHME 230 V NETZ (FIG. 3):
Verwenden Sie für den Betrieb im 230V Netz ausschließlich das mitgelieferte Netzteil 47PSU0009EU/UK oder
als Alternative 47PSU0008EU/UK, so wie es vorne auf dem Gerät angegeben ist! Nach einigen Sekunden hört man ein
gleichmäßiges Ticken, das Gerät ist in Betrieb. Eine Control LED leuchtet im Takt der Impulse auf.
ERDUNG:
Eine gute Erdung des Weidezaungerätes ist äußerst wichtig für den einwandfreien Betrieb und die optimale Leistung des
Gerätes, deshalb soll die Erdung an einer möglichst feuchten und bewachsenen Stelle vorgenommen werden. Mindestens
einen 1m langen Erdstab und/oder weitere 1 oder 2 längere Erdstäbe einsetzen. Die Betriebserde der Elektrozaunanlage
muss von der Schutz- und Betriebserde des Netzes im Hof getrennt sein (Abstand mind. 10m).
SERVICE:
Reparaturen dürfen nur von qualifizierten Personen durchgeführt werden.
Es sind nur die vom Hersteller vorgeschriebenen Ersatzbauteile zu verwenden.
TECHNISCHE ÄNDERUNGEN VORBEHALTEN!
4
horizont.com
5
Page 4

en
Operating instruction trapper AN8 | AN12 | AN24
in connection with SECURA ANIMAL or SECURA SECURITY safety hints (www.horizont.com)
INSTALLATION AND CONNECTION:
The controller can be mounted alternatively onto a wall or a solid post. The earth stake must be inserted into the ground
as far as possible at a moisty place and must be connected to the earth terminal ( ) of the controller by means of a
noncorrosive wire.
Connect the fence connecting lead to the fence terminal (
The controller is water protected only when being installed acc. the instructions. Prodect from bright sunshine. Do not
operate the energizer when laying on the ground.
When using 230V, the machine and the line adapter need to be installed in a waterproof area.
OPERATION 12V (SEE FIG. 4):
Connect the controller to a 12V wet battery ( red + / black - ), ensure that the terminals are absolutely clean and the polarity is correct. Use only rechargeable 12V- lead-acid batteries, during charging lead-acid batteries must be placed in a
well-ventilated area. After a few seconds a slight tic-tac can be heard. The fence voltage level flashes with the pulses. In
case of wrong polarity the controller will not operate.
The battery should be recharged at a voltage of 11.9 volts (corresponding to a discharge of approx. 60%). Do not discharge the battery deeper than a voltage of 11.7 volts (corresponding to a disharge of approx. 80 %).
OPERATION 230V (SEE FIG. 3):
For the connection with mains (230V) use only the delivered Power Supply 47PSU0009EU/UK or an alternative
47PSU0008EU/UK as indicated on the front of the electric fence energizer.
After a few seconds a slight tic-tac can be heard. The fence voltage level flashes with the pulses. In case of wrong polarity
the controller will not operate.
GROUNDING:
For a faultless operation and to obtain best possible output a good grounding is very important. Therefore the grounding
must be made at a rather moisty and overgrown place.
Minimum an 1m earth stake ( e.g. 12mm ø ) and / or additional 1 – 2 longer earth stakes shall be used. With long fences
and on dry soil a ground return wire with intermediate groundings (every 50 m) is necessary. The distance between the
system earth and the protective system earth of the supply net work shall be at least 10 m.
SERVICE:
Repair is only to be made by qualified service personnel. Only by the manufacturer commanded replacement parts
must be used.
SUBJECT TO TECHNICAL ALTERATIONS !
) - page 2
f
MONTAGE ET RACCORDEMENT:
L‘appareil peut être monté au choix sur un mur ou sur un piquet solide. Le piquet de mise à la terre doit être enfoncé le
plus profond possible dans le sol à un endroit humide et relié à la borne de terre (
corrosif. Raccorder le câble de raccordement de la clôture (
ll n’est protégé de l’humidité que lors par un montage correct. Ne pas exposé directement du soleil. Ne pas mettre en
marche l‘appareil couché sur le sol.
Lors de l‘utilisation sur secteur 230V, veillez à ce que les appareils et adaptateurs soient installés en zone imperméable.
MISE EN SERVICE ET CONTRÔLE L‘ACCUMULATEUR 12V (FIG. 4):
Raccorder l‘accumulateur 12V, veiller à ce que les bornes polaires soient propres et à la bonne polarité ( rouge + / noir - ).
Utilisez seulement 12V batteries-Gel-Plomb (rechargeables), les batteries-Gel-Plomb doivent être placées dans un
espace ventilé. Quelques secondes après on entend un tic-tac régulier, l’appareil est en marche. Les lampes temoin
clignotent au rythme des impulsions électriques.
Il faut recharger l´accumulateur avec une tension de 11,9 volt (cela correspond un déchargement de 60% env.) Ne déchargez jamais l´accumulateur plus profond que 11,7 volt. (cela correspont un déchargement de 80% env.)
MISE EN SERVICE ET CONTRÔLE AVEC LE RÉSEAU ÉLECTRIQUE 230V AC (FIG. 3):
47PSU0009EU ou 47PSU0008EU alternatif comme indiqué sur la façade la clôture électrique. Quelques secondes après on
entend un tic-tac régulier, l’appareil est en service. Les lampes témoin clignotent au rythme des impulsions électriques.
VÉRIFICATION DE LA PRISE DE TERRE:
Une bonne prise de terre est particulièrement importante pour le bon fonctionnement et la performance maximum de
l‘électrificateur; c’est pourquoi la prise de terre doit être faite à un endroit le plus humide possible et couvert de végétation. La distance entre électrificateur/piquet de terre et la prise de terre sur laquelle est branché l’électrificateur doit être
d’au moins 10 m.
SERVICE:
Mode d’emploi trapper AN8 | AN12 | AN24
en relation avec les conseils de sécurité SECURA ANIMAL ou SECURA SECURITY (www.horizont.com)
) de l‘électrificateur par un fil non
). page 2
Pour la connexion avec le réseau électrique (230V AC) utilisez uniquement le bloc d‘alimentation livré
Les réparations ne doivent être faites que par des personnes qualifiées. Utiliser uniquement les pièces détachées
et composants du fabricant.
SOUS RÉSERVE DE CHANGEMENTS TECHNIQUES!
6
horizont.com
7
Page 5

es
MONTAJE Y CONEXIÓN:
Montar el dispositivo en un punto en los posible húmedo. La varilla de puesta a tierra (varilla longitudinal) debe ser clavada
en un punto húmedo, en lo posible profundo, y ser conectado con un alambre resistente a la corrosión con el borne de
puesta a tierra (
PUESTA EN MARCHA CON ACUMULADOR DE 12 VOLT (FIG. 4):
Conectar a un acumulador de 12V (rojo+ / negro-), en este caso se debe cuidar de la polaridad correcta y la limpieza de
los bornes de los polos. Tras algunos segundos se escucha un tic-tac uniforme, el aparato está en servicio. En caso de
polaridad errónea el aparato no funciona. La lámpara de control de la valla se enciende en el mismo tiempo que el del
ritmo de los impulsos eléctricos.
El acumulador debería ser recargado encuanto el voltaje alcance los 11,9 V ( corresponde a una descarga de 60%). No
deje descargar el acumulador a un voltaje de menos de 11,7 V ( corresponde a una descarga de 80%).
INBETRIEBNAHME 230 V NETZ (FIG. 3):
47PSU0010EU/UK, así como está indicado delante sobre el dispositivo! Tras algunos segundos se escucha un tic-tac
uniforme, el aparato está en servicio. La lámpara de control de la valla se enciende en el mismo tiempo que el del ritmo de
los impulsos eléctricos.
PUESTA A TIERRA:
Una buena puesta a tierra de la valla de pastos es extremadamente importante para un servicio impecable y una prestación óptima del dispositivo, por esta razón la puesta a tierra debe ser realizada en lo posible en un punto húmedo y cubierto
de plantas. Como mínimo emplear una varilla de puesta a tierra de 1m y/o 1 o 2 varillas de puesta a tierra adicionales. La
puesta a tierra de servicio de la instalación de la valla eléctrica debe estar separada de la puesta a tierra de protección y
servicio de la red en la granja (distancia mín. 10 m).
SERVICIO TÉCNICO:
¡MODIFICACIONES TÉCNICAS RESERVADAS!
Instrucciones trapper AN8 | AN12 | AN24
en com binación con las indicaciones de preparación y de seguridad para dispositivos de valla eléctric
SECURA ANIMAL (www.horizont.com)
) del dispositivo. Conectar el conductor del vallado al borne con el símbolo de rayo ( ).
¡Utilice para el servicio en la red de 230V exclusivamente la fuente de alimentación 47PSU0009EU/UK o
Las reparaciones solo pueden ser ejecutadas por personas cualificadas. Se deben emplear únicamente los
componentes de repuesto especificados por el fabricante. Si se daña el conductor de conexión de este dispositivo
debe ser sustituido por un conductor de conexión especial que puede ser adquirido del fabricante o sus servicios
postventa.
Technische Daten | Technical data | Données techniques | Ficha técnica
TRAPPER AN8: TYPE 10867, 12V DC, 50 mA / 0,8 J
TRAPPER AN12: TYPE 10866, 12V DC, 90 mA / 1,2 J
TRAPPER AN24: TYPE 10865, 12V DC, 145 mA / 2,4 J
trapper AN8
trapper AN12
trapper AN24
CEE: MAX. ZAUNLÄNGE | MAX. FENCE LINE LENGTH | LONGUEUR ÉLECTRIFÉE | MÁXIMA LONGITUD DEL VALLADO:
max. 7900 V ~ 8000 V ~ 3300 V ~ 4200 V ~ 2100 V
max. 8400 V ~ 8600 V ~3800 V ~ 4800 V ~ 2500 V
max. 8600 V ~ 8800 V ~ 4300 V ~ 5800 V ~ 3200 V
trapper AN24 = 18 km
trapper AN12 = 12 km
trapper AN8 = 8 km
trapper AN24 = 18 /3 km
trapper AN12 = 12 /3 km
trapper AN8 = 8 /3 km
TECHNISCHE ÄNDERUNGEN VORBEHALTEN!
SUBJECT TO TECHNICAL ALTERATIONS!
SOUS RÉSERVE DE CHANGEMENTS TECHNIQUES!
¡MODIFICACIONES TÉCNICAS RESERVADAS!
8
horizont.com
9
Page 6

10
Page 7

12
 Loading...