

Page 1
ORIGINALBETRIEBSANLEITUNG
DE
Elektrozaungerät
INSTRUCTION MANUAL
EN
Electric Fencer
NOTICE D‘UTILISATION
FR
Électricateur de clôture
INSTRUCCIONES DE SERVICIO
ES
Valla eléctrica
MANUAL DE INSTRUÇÕES
PT
Cerca Eléctrica
ISTRUZIONI PER L’USO
IT
Apparecchio per recinti elettrici
BRUGSANVISNING
DK
El-hegnsapparat
BEDIENINGSHANDLEIDING
NL
Schrikdraadinstallatie
85794I- 05/17
ranger B4
TYPE 10445
ranger B6
TYPE 10840
ranger B8
TYPE 10841
9V / 12V
horizont group gmbh
Animal Care
Postfach 15 69
34483 Korbach
Homberger Weg 4
34497 Korbach
Germany
Telefon: +49 (0) 56 31 / 5 65
Telefax: +49 (0) 56 31 / 5 65 - 1 20
-
6
agrar@horizont.com
www.horizont.com
-
1 00
Page 2
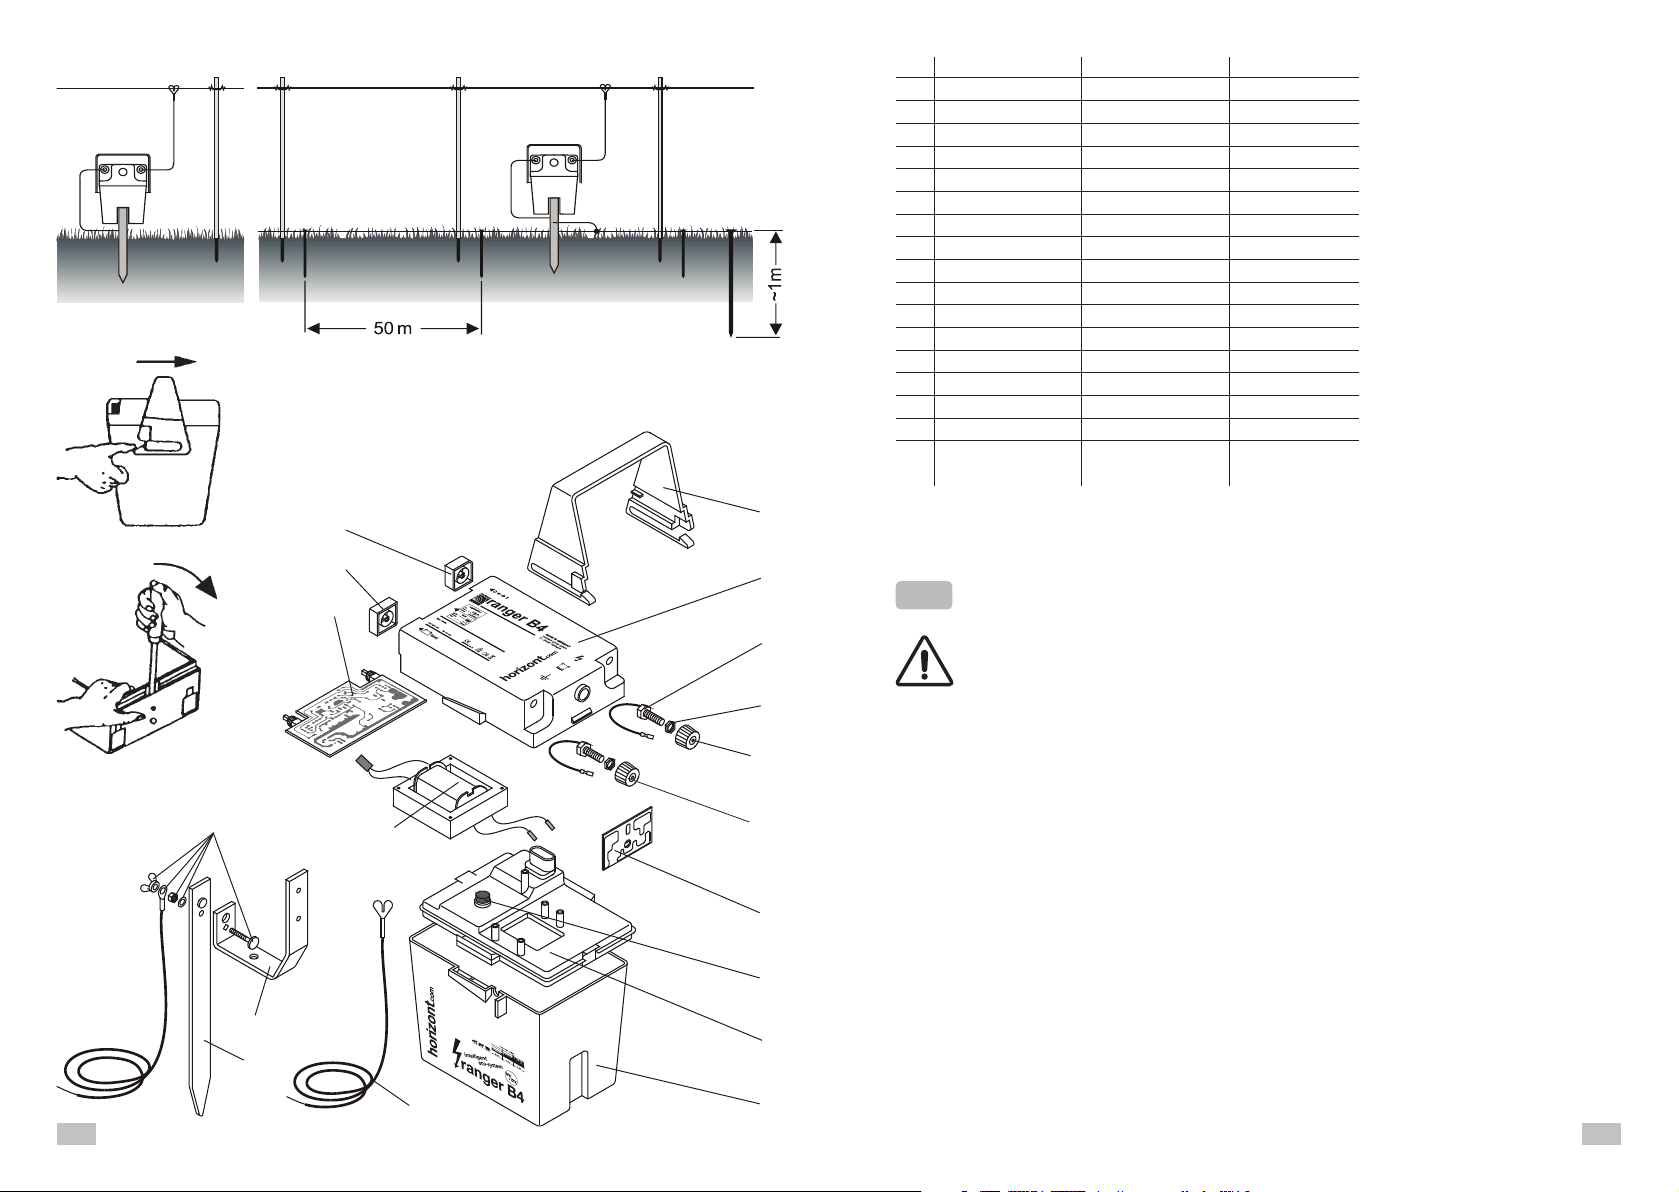
Fig. 1 Fig. 2
Fig. 3a
Fig. 4a
ranger B4 / 10445 ranger B6 / 10840 ranger B8 / 10841
01
91956 91956 91956
02
93186-ranger B4 93186-ranger B6 93186-ranger B8
03
80924 (2x) 80924 (2x) 80924 (2x)
04
84719 (2x) 84719 (2x) 84719 (2x)
05a
98676 98676 98676
05b
81045 81045 81045
06
90222 90222 90222
07
81051 81051 81051
08
91960 91960 91960
09
91921-ranger B4 91921-ranger B6 91921-ranger B8
10
88167 88167 88167
11
88168 88168 88168
12
90965 60588 60587
13
90218CE 90395 90395
14
80979 80979 80979
15
83449 83449 83449
16
80054 80054 80054
17
90676U 90676U 90676U
Fig. 3b
Fig. 4b
14
15
16
10
11
12
13
01
02
03
04
05a
rot / red / rouge
rood / rosso / rojo
vermelho / rød
05b
schwarz / black
sort / noir / zwart
nero / negro / preto
06
07
08
Originalbetriebsanleitung turbostar B4, turbostar B6 & turbostar B8
DE
in Verbindung mit den Errichtungs- und Sicherheitshinweisen für
Elektrozaungeräte SECURA ANIMAL oder SECURA SECURITY
(www.horizont.com/securaanimal oder www.horizont.com/securasecurity)
Das Weidezaungerät muss vor jedem Eingriff ausgeschaltet werden!
Aufstellung und Anschluss: Gemäß Fig.1+4a die beiden Teile
des Erd- und Standpfahles mit dem Erdkabel verbinden. Den
Erdpfahl bis zum Anschlag in eine möglichst feuchte Stelle beim
Zaun in den Boden einschlagen. Gerät aufsetzen und an Erdund Zaunkabel anschließen. Zaunkabel in den Zaun hängen.
Erdung: Eine gute Erdung ist äußerst wichtig für den einwandfreien Betrieb und die optimale Leistung des Gerätes (siehe Fig.
2), daher unbedingt SECURA ANIMAL beachten.
Inbetriebnahme und Kontrolle: Schalter 1 - 0 drücken, nach
einigen Sekunden hört man ein gleichmäßiges Ticken. Die
17
2
09
3
Page 3
Zaunkontrollampe leuchtet im Rhythmus der Impulse auf.
Wenn die VDE-Mindestspannung am Zaun (2000V) unterschritten wird, erlischt die Kontrollampe.
Mögliche Ursachen:
1) Batterie leer;
2) starker Bewuchs am Zaun, Durchschlag am Isolator oder
Zaun zu lang.
TEST - Batterie, Akku, argutektor:
Taste drücken: grünes Dauerlicht = Batterie gut;
grünes Blinklicht = Batterie wechseln, Akku nachladen
kein grünes Licht = Batterie leer.
argutektor: Eine rote Lampe leuchtet auf, wenn Bewuchs am Zaun ist, wobei die Zaunspannung noch
voll vorhanden, aber eine erhöhte Stromaufnahme aus der Batterie gegeben ist. Bei einwandfreier Isolation (niedriger Stromverbrauch) leuchtet die rote Lampe nicht auf.
Die eingebaute “master-Dialogschaltung” bewirkt bei guter Zaunisolation einen geringeren Stromverbrauch. Batterie- und Zaunzustand (Hütespannung) regelmäßig (täglich) überprüfen.
ACHTUNG ! Bei Verwendung einer Solaranlage Batterietest nur zu Tagesbeginn durchführen (ohne
Solarstromzuführung - Panel abdecken)
Batteriewechsel: Gerätegriff gemäß Fig.3a entriegeln und
abziehen. Geräteoberteil abnehmen. Batterieanschlüsse abnehmen. Neue Batterie einsetzen und Anschlüsse ( rot an +
) aufstecken. Oberteil aufsetzen, Griff auf die Schwalbenschwanzführung aufschieben, bis die unteren Haken einrasten.
Service Batteriegerät: Steckbare Module ermöglichen einen raschen, problemlosen Austausch bei
Ihrem Fachhändller, siehe Fig.4a/4b und die zugehörige Auflistung der Art.-Nr.. Die Abdeckplatte im
Oberteil des Gerätes wird zu diesem Zweck gemäß Fig. 3b angehoben.
Operating instruction for electric fence controller
EN
turbostar B4, turbostar B6 & turbostar B8
Technische Änderungen vorbehalten !
in connection with safety hints SECURA ANIMAL or
SECURA SECURITY (www.horizont.com/securaanimal or
www.horizont.com/securasecurity)
nect the earth and fence cable to the marked terminals. Attach
the fence cable to the fence.
Operation and control: Press button 1-0, after few seconds
a slight tick-tac can be heard. The fence controllamp flashes
with the pulses. There is no flashing if the fence voltage falls
below the minimum voltage of 2000 V; possible reasons:
1) empty battery,
2) heavy vegetation on the fence, insulator flashover or fence
too long.
CONTROL - battery, accu, argutektor :
press button: steady green light = battery / accu capacity available,
flashing green light = battery must be replaced, or accu must be charged
no green light = battery / accu empty.
argutektor: a red lamp flashes with the pulses when vegetation is on the fence with still full voltage
on the fence but increased current consumption. In case of good fence insulation the red lamp does
not flash; with low current drain out of the battery due to the master-dialog circuit. Check battery and
fence daily.
ATTENTION ! In case of solar supply the battery check must be carried out only at the beginning of the
day ( disconnect the solar supply cable and cover the solar panel )
Change of the battery: Depress the retention catches of the
handle and slide it off (fig.3a). Separate the upper controller unit
from the battery housing. Change the battery and connect the
battery red lead to the + positive terminal on the underside of
the controller unit and the black lead to the - negative terminal.
Refit the unit to the battery housing and slide the handle into
position ensuring the retention catches are engaged.
Earthing: An effective earthing is a precondition for a well operating fence installation, in order to achieve
this follow SECURA ANIMAL.
Service: Plug in modules can be replaced easily by your dealer, where in the event of failure the fault
is likely to be on the printed board.
Mode d’emploi pour électrificateur turbostar B4, turbostar B6 & turbostar B8
FR
Technical changes reserved !
Energizer has to be turned OFF before any intervention!
Installation and connection: Connect the 2 parts of the earth
and support rod with the ground cable. acc. to the figures (fig.1
+ 4a). Drive the ground rod to its stop into a rather moisty place
close to the fence. Place the controller on the support and con-
4
en relation avec les conseils de sécurité SECURA ANIMAL
ou SECURA SECURITY (www.horizont.com/securaanimal ou
www.horizont.com/securasecurity)
L‘appareil de clôture électrique doit être coupé avant
chaque intervention!
5
Page 4

Montage et raccordement: Assembler les deux parties du
piquet de terre et de support au câble de terre selon fig.1 + fig.
4a. Enfoncer le piquet de terre dans le sol dans un endroit aussi
humide que possible, près de la clôture. Mettre l‘appareil en
place et le raccorder au câble de terre et au câble de clôture.
Service, appareils à pile: 3 modules enfichables peuvent être échangés rapidement et sans problème
chez votre revendeur. Pour celà, on soulèvera le couvercle dans la partie supérieure de l‘appareil (fig.3b).
Gebruiksaanwijzing van het schrikdraadapparaat turbostar B4, turbostar B6 & turbostar B8
NL
Sous réserve de changements techniques !
Prise de terre: Une bonne prise de terre est particulièrement
importante pour le fonctionnement parfait et la performance
optimale de l‘appareil (fig.2). Il est donc nécessaire de se reporter aux données SECURA ANIMAL.
Mise en service et contrôle: Presser l‘interrupteur 1-0. Après
quelques secondes on entend un léger tic-tac régulier. La lampe témoin de la clôture s‘allume au rythme des impulsions. Si la
tension minimale prescrite par VDE n‘est pas atteinte, la lampe
témoin s‘éteint.
Causes possible:
1) pile vide;
2) végétation abondante à la clôture, isolateur défectueux ou
clôture trop longue.
DISPOSITIF DE CONTRÔLE - pile, accumulateur, argutektor :
Appuyer sur le bouton: La lampe verte s‘allume = la pile / accu est bonne.
La lampe verte clignote = la pile est à changer, rechager de l‘accumulateur
La lampe ne s‘allume pas = la pile / accu est vide.
ATTENTION ! Lors de l’utilisation d’un panneau solaire, le contrôle de batterie doit être effectué seulement au début du jour (débrancher le câble de connection solaire et recouvrir le panneau solaire)
„argutektor“: Une lampe rouge s‘allume sila végétation vient en contact avec la ligne, la tension de
la clôture est encore complète mais la consommation d‘electricité venant de la pile est accrue. Lors
d‘une isolation parfaite (basse consommation délectricité), la lampe rouge ne s‘allume pas. „SYSTEME
DIALIGNE“ (un branchement encastré „master-dialogue“), entraîne lors d‘une bonne isolation de la
clôture, une faible consommation d‘electricité. Contrôler régulièrement (chaque jour), les piles et l‘etat
de la clôture (tension de garde).
Changement de pile: Débloquer la poignée de l‘appareil selon
la fig.3a et l‘enlever. Retirer la partie supérieure de l‘appareil.
Retirer les raccords de pile. Placer la nouvelle pile et enficher les
raccords ( rouge sur + ). Remettre lapartie supérieure, placer la
poignée sur la glissiére en forme de queue d‘hirondelle, jusqu‘à
l‘encliquetage du crochet inférieur
in combinatie met installatie- en veiligheidsinstructies voor
schrikdraad installaties SECURA ANIMAL of SECURA SECURITY
(www.horizont.com/securaanimal of www.horizont.com/securasecurity)
Het schrikdraadapparaat moet voor elke interventie uitgeschakeld worden!
Het installeren en aansluiten: Volgens figuur 1 + 4a de aardpaal
monteren en aansluiten op de aardkabel. De aardpaal totaan de
ronding liefs op een vochtige plaats in de grond drukken. Hierna
het apparaat erop zetlen met het steunpunt onder de batterijbak
en de AARDE- en STROOMkabel aansluiten.
Aarding: Een goede aarde is uiterst belangrijk voor het goed
funktioneren von het apparaat.
Hoe beter de aarde hoe sterker de stroom.
Het ingebruikstellen en kontrole: Schalkelaar 1-0 indrukken
en na ongeveer een sekonde hhort U een regelmatig tikken.
Het kontrolelampje licht in het ritme von de impuls op. Indien
de stroomspanning echter beneden de minimum spanning von
2000 Volt komt licht het lampje niet meer op.
Kontrole - baterij, akku, argutektor :
Drukknop indrukken: groen licht = batterij / akku goed
groen knipperlicht = batterij nog+/- 2 dg / akku laden
geen groen licht = batterij / akku leeg
BELANGRIJK ! Een accu, die wordt geladen met behulp van zonenergie, uitsluitend ‘s morgens vroeg
testen. (zonder stroomtoevoer - het zonnepaneel afdekken)
argutektor: Het rode lampje licht op als er teveel aangroei aan de draad is maar nog wel genoeg
stroom. Hierdoor wordt er meer stroom van de batterij getrokken. Bij een goede isolatie gebruikt het
apparaat minder stroom. De ingebouwde “master dialogschakeling” zorgt er automatisch voor dat er bij
goede isolatie minder stroom van de batterij wordt verbruikt. Het dient aanbeveling om dit regelmatig
te kontroleren.
Het verwisselen van de batterij: Handgreep volgens figuur 3a
indrukken en lostrekken. Bovendeel apparaat afnemen en de
batterijaansluitingen losmaken. Nieuwe batterij plaatsen en de
6
7
Page 5

batterij op de + (rood) en de - (zwart) aansluiten. Bovendeel weer
aanbrengen en met de greep vastklikken.
Service: Door de 3 printen is het zeer eenvoudig voor Uw vakhandelaar om een defekte print te vervangen (zie figuur 4a en figuur 4b). Alle onderdelen worden op figuur 4b met bestelnummer aangegeven en
volgens figuur 3a en figuur 3b kan men het aparaat openen.
Istruzioni per l’uso del recinto elettrico turbostar B4, turbostar B6 & turbostar B8
IT
Technische veranderingen voorbehouden !
in combinazione con le istruzioni d’installazione e di sicurezza
per apparecchi per recinti elettrici SECURA ANIMAL o
SECURA SECURITY (www.horizont.com/securaanimal o
www.horizont.com/securasecurity)
È necessario disinserire la centralina del recinto da pascolo prima di
ogni intervento!
argutektor: Uma luz vermelha começa a piscar de acordo com os impulsos se a vegetação começar
a tocar no cercado, mantendo um elevado nível de voltagem no cercado mas com um maior consumo
de energia. No caso de haver um bom isolamento esta luz vermelha não pisca e o consumo de energia
é baixo devido ao circuito automático de regulação de carga do cercado.
Mudança da pilha: Solte a molas de retenção da asa e retire esta (fig. 3a). Separe o topo do compartimento da pilha.
Desligue os cabos, retire a pilha e coloque outra, fazendo as
respectivas ligações – vermelho ao terminal positivo (+) e preto
ao terminal negativo (-). Coloque a pilha no compartimento da
bateria e coloque o topo sobre este. Coloque a asa assegurando-se de que as molas de retenção ficam devidamente fixadas.
Terra: Uma terra efectiva é uma pré-condição para a instalação de um bom cercado eléctrico. De
modo a obter os melhores resultados possíveis consulte as nossas indicações sobre o sistema de
terra no nosso catálogo ou aceda a SECURA ANIMAL (www.horizont.com).
Serviço: Os módulos de ligação podem ser substituídos facilmente pelo seu fornecedor. Veja no início
deste manual a lista de peças e acessórios.
Reservamo-nos o direito de fazer alterações técnicas!
Instalação e ligação: Ligue as duas partes da estaca de terra
ao cabo de ligação de acordo com as figuras (fig. 1 + 4a). Coloque a estaca de terra num local húmido e junto ao cercado.
Coloque o aparelho no suporte da estaca de terra e ligue o
cabo de ligação à terra e o cabo de ligação ao cercado nos
respectivos terminais. Ligue o cabo de ligação ao cercado no
fio, fita ou corda que compõem o seu cercado.
Operação e controlo: Pressione o botão 1-0 e após alguns
ligeiros segundos poderá ouvir um tic-tac. A luz de controlo do
cercado começa a piscar de acordo com os impulsos. Esta luz
não piscará se a voltagem do cercado for inferior a 2000V.
Possíveis causas:
1) pilha sem carga -
2) forte vegetação, cercado muito longo ou mal isolado
Verifique o aparelho e o cercado (voltagem de saída) diariamente.
CONTROLO – pilha, bateria, argutektor:
pressione o botão: luz verde permanente = carga da pilha/bateria OK
luz verde intermitente = a pilha deve ser substituída, bateria deve ser recarregada
sem luz = pilha/bateria sem carga
ATENÇÃO! No caso de utilização de painel solar, este só deverá ser retirado da cerca ao inicio do
dia (Disconectar os cabos de ligação entre o painel solar e a cerca, protegendo de seguida o painel,
tapando-o)
INSTRUCCIONES DE USO turbostar B4, turbostar B6 & turbostar B8
ES
en combinación con las indicaciones de instalación y seguridad para
dispositivos de valla eléctrica SECURA ANIMAL o SECURA SECURITY
(www.horizont.com/securaanimal o www.horizont.com/securasecurity)
¡La valla para pastos debe ser desconectada antes de la
intervención!
Montaje y unión: Juntar las dos partes del piquete de tierra y
del soporte al cable de tierra según la fig.1+4a. Hundir el piquete
de tierra en el suelo en un lugar lo más húmedo posible, cerca
del cercado. Poner el aparato en su sitio y unirlo al cable de
tierra y al cable del cercado.
Toma de tierra: Una buena toma de tierra es particularmente
importante para el buen funcionamiento y el cuidado óptimo
del aparato (fig.2). Por lo tanto es necesario hacerlo según las
normas SECURA ANIMAL .
Puesta en marcha y control: Pulsar el interruptor 1-0. Después
de algunos segundos se oirá un tic-tac regular. La luz piloto
del cercado se enciende al ritmo de los impulsos. Si la tensión
8
9
Page 6

mínima descrita por VDE no es obtenida, la luz piloto se apaga.
Causas posibles:
1.) Pila gastada.
2.) Vegetación abundante en la cerca, aislador defectuoso o cerca
demasiado grande.
DISPOSITIVO DE CONTROL - pila, batería, argutektor :
Pulsar el botón:
La luz verde se enciende = La pila / batería es buena.
La luz verde parpadea = La pila deberá cambiarse dentro de dos días. Regarga de la batería.
La luz no se enciende = La pila / batería está gastada.
ATENCIÓN ! En caso de la utilización de la tecnología solar el funcionamiento de la batería tiene que
ser ejecutado solamente a la madrugada (sin alimentación de tensión solar - cubrir el panel)
„argutektor“: Una lámpara roja se enciende si la vegetación entra en contacto con el cercado, la tensión
del cercado es aún completa pero el consumo eléctrico de la pila aumenta. Cuando hay un aislamiento
perfecto (bajo consumo de electricidad), la luz roja no se enciende. „SISTEMA DIALIGNE“ (una conexión
empotrada „master dialogue“) conlleva, si hay una buen aislamiento del cercado, un consumo de electricidad bajo. Controlar regularmente (cada día), las pilas y el estado del cercado (tensión de vigilancia).
Cambio de pilas: Desbloquear el asa del aparato según la fig.3 y
quitarla. Retirar la parte superior del aparato. Retirar los enlaces
de la pila. Poner una nueva y poner los enlaces ( rojos en + ).
Poner la parte superior, poner el asa en la corredera, hasta el
click del corchete interior.
Servicio, aparatos a pilas: 3 módulos sueltos pueden cambiarse rápidamente y sin problemas en su
distribuidor (ver fig.4a/4b y la lista de recambios con sus correspondientes referencias). Para esto hay
que levantar la tapa de la parte superior del aparato (fig.3b).
Manual de instruções para a cerca eléctrica turbostar B4, turbostar B6 & turbostar B8
PT
Nos reservamos el dechero de las modificaciones técnicas !
em combinação com as indicações de implementação e de
segurança para cercas elétricas SECURA ANIMAL ou
SECURA SECURITY (www.horizont.com/securaanimal ou
www.horizont.com/securasecurity)
A vedação deve ser desligada antes da realização de qualquer intervenção!
Instalação e ligação: Ligue as duas partes da estaca de terra
ao cabo de ligação de acordo com as figuras (fig. 1 + 4a). Coloque a estaca de terra num local húmido e junto ao cercado.
Coloque o aparelho no suporte da estaca de terra e ligue o
cabo de ligação à terra e o cabo de ligação ao cercado nos
respectivos terminais. Ligue o cabo de ligação ao cercado no
fio, fita ou corda que compõem o seu cercado.
Operação e controlo: Pressione o botão 1-0 e após alguns
ligeiros segundos poderá ouvir um tic-tac. A luz de controlo do
cercado começa a piscar de acordo com os impulsos. Esta luz
não piscará se a voltagem do cercado for inferior a 2000V.
Possíveis causas:
1) pilha sem carga -
2) forte vegetação, cercado muito longo ou mal isolado
Verifique o aparelho e o cercado (voltagem de saída) diariamente.
CONTROLO – pilha, bateria, argutektor:
pressione o botão: luz verde permanente = carga da pilha/bateria OK
luz verde intermitente = a pilha deve ser substituída, bateria deve ser recarregada
sem luz = pilha/bateria sem carga
ATENÇÃO! No caso de utilização de painel solar, este só deverá ser retirado da cerca ao inicio do
dia (Disconectar os cabos de ligação entre o painel solar e a cerca, protegendo de seguida o painel,
tapando-o)
argutektor: Uma luz vermelha começa a piscar de acordo com os impulsos se a vegetação começar
a tocar no cercado, mantendo um elevado nível de voltagem no cercado mas com um maior consumo
de energia. No caso de haver um bom isolamento esta luz vermelha não pisca e o consumo de energia
é baixo devido ao circuito automático de regulação de carga do cercado.
Mudança da pilha: Solte a molas de retenção da asa e retire esta (fig. 3a). Separe o topo do compartimento da pilha.
Desligue os cabos, retire a pilha e coloque outra, fazendo as
respectivas ligações – vermelho ao terminal positivo (+) e preto
ao terminal negativo (-). Coloque a pilha no compartimento da
bateria e coloque o topo sobre este. Coloque a asa assegurando-se de que as molas de retenção ficam devidamente fixadas.
Terra: Uma terra efectiva é uma pré-condição para a instalação de um bom cercado eléctrico. De
modo a obter os melhores resultados possíveis consulte as nossas indicações sobre o sistema de
terra no nosso catálogo ou aceda a SECURA ANIMAL (www.horizont.com).
Serviço: Os módulos de ligação podem ser substituídos facilmente pelo seu fornecedor. Veja no início
deste manual a lista de peças e acessórios.
Reservamo-nos o direito de fazer alterações técnicas!
10
11
Page 7

Brugsanvisning for spændingsgiver turbostar B4, turbostar B6 & turbostar B8
DK
i forbindelse med opstillings- og sikkerhedsoplysningerne til
el-hegnsapparater SECURA ANIMAL eller SECURA SECURITY
(www.horizont.com/securaanimal eller www.horizont.com/securasecurity)
Hegnsapparatet skal altid frakobles inden det åbnes!
Montering og tilslutning:
Forbind begge dele fra jord-og standpælene med jordledningen
i henhold til fig. 1 og 4a. Slå jordpælen i jorden til stoppekanten
på et mest muligt fugtigt sted ved hegnet. Sæt spædingsgiveren
på og tilslut jord-og hegnledningerne. Sæt hegnledningen på
hegnet.
Jordforbindelse:
En god jordforbindelse er yderst vigtig for en perfekt drift og
spændingsgiverens optimale ydelse- derfor er det vigtigt at
SECURA ANIMAL.
Ibrugtagning og kontrol:
Tryk på 1-0 knappen, efter nogle sekunder høres en ensartet
tikken. Hegnskontrollampen blinker med de elektriske impulser,
Hvis spændingen i hegnet falder under VDE-mindstespændingen
(2000V), lyser kontrollampen konstant - mulige årsager:
1) tomt batteri
2) ekstrem bevoksning på hegnet, kortslutning ved isolatoren
eller hegnet er for langt.
Argutektor:
Hvis der er bevoksning på hegnet, lyser en rød lampe, hvorved hegnspændingen stadig eksisterer i fuld
styrke, men leverer en højere strømoptagelse fra batteriet. Ved perfekt isolering (mindre strømforbrug)
lyser den røde lampe ikke.
Det indbyggede „master-dialog kredsløb“ bevirker at der ved godt isoleret hegn opnås et mindre strømforbrug. Afprøv regelmæssigt (daligt)batteriets og hegnets tilstand (spænding).
Batteriskift:
Løsne spændingsgiverens håndtag og træk af. Tag spændingsgiverens overdel af. Tag batteritilslutningen af. Sæt et nyt batteri
i og tilslut det ( røt til + ). Sæt overdelen på batterikassen og før
håndtaget frem indtil de nederste kroge går i hak.
Service:
3-stiks modul muliggør en hurtig, problemfri udskiftning hos Deres leverandør. Se fig 4a/4b og den tilhørende liste med varenr. Afdækningspladen i spændingsgiverens overdel skal til dette formål løftes op.
Der tages forbehold mod teckniske aenderinger !
TEST - batteri, akkumulator, argutektor :
Tryk på knappen:
Grønt vedvarende lys = Godt batteri / akkumulator
Grønt blinkende lys = Batteriet skal skiftes inden 2 dage / Efteroplad akkumulator
Intet grønt lys = Tomt batteri / akkumulator
BEMÆRK !
Ved battericheck på et solcelleanlæg, skal det ske ved først på dagen (demonter kabler fra solpanel og tildæk solpanel)
12
13
Page 8

Technische Daten - Technical data - Données techniques - Dados técnicos Dati tecnici - Dados
técnicos - Tekniske data - Technische gegevens :
ranger B4
ranger B6
ranger B8
9 V
12 V
9 V
12 V
9 V
12 V
0 km
max. 9000 V
0,3 J / 16 mA
max. 9500 V
0,4 J / 10 mA
max. 9000 V
0,4 J / 20 mA
max. 9500 V
0,55 J / 15 mA
max. 9500 V
0,65 J / 25 mA
max. 10000 V
0,75 J / 20 mA
0,25 km
1 M Ω
~ 9000 V
16 mA
~ 9500 V
10 mA
~ 9000 V
20 mA
~ 9500 V
15 mA
~ 9500 V
25 mA
~ 10000 V
20 mA
0,25 km
500 Ω
~ 2000 V
44 mA
~ 2500 V
25 mA
~ 1300 V
70 mA
~ 1600 V
60 mA
~ 1400 V
90 mA
~ 1700 V
70 mA
5 km
5 k Ω
~ 2500 V
44 mA
~ 2200 V
25 mA
~ 3200 V
70 mA
~ 3400 V
60 mA
~ 4000 V
90 mA
~ 4200 V
70 mA
5 km
500 Ω
~ 1500 V
44 mA
~ 1600 V
25 mA
~ 1000 V
70 mA
~ 1100 V
60 mA
~ 1300 V
90 mA
~ 1500 V
70 mA
14
CEE: max. Zaunlänge - max. fence line length - longueur électrifée - lunghezza massima recinzione - max. longitud de la cerca - comprimento máximo do cercado - max. afrasteren - max.
hegnslængde
ranger
B4
ranger
B6
ranger
B8
9 V =
12 V =
9 V =
12 V =
9 V =
12 V =
max. 8 km
max. 10 km
max. 10 km
max. 12 km
max. 15 km
max. 20 km
ranger
B4
ranger
B6
ranger
B8
9 V =
12 V =
9 V =
12 V =
9 V =
12 V =
max. 8 km
3
max. 10 km
3
max. 10 km
3
max. 12 km
3
max. 15 km
3
max. 20 km
3
15
Page 9

1617181920
Page 10

Page 11

ACHTUNG:
DE
Nicht an netzbetriebene Versorgung einschließlich Batterieladegeräte anschließen!
WARNING:
EN
Do not connect to mains-operated equipment including battery chargers!
ATTENTION:
FR
Ne pas relier à un appareil alimenté par le secteur, y compris à un chargeur de batterie!
¡ATENCIÓN!
ES
¡No conectar a una alimentación operada por red incluyendo cargadores de batería!
ATENÇÃO:
PT
Não ligar à alimentação ligada diretamente à rede elétrica, incluindo carregadores de
bateria!
ATTENZIONE:
IT
Non collegare a un alimentatore alimentato dalla rete elettrica, tra cui i caricabatterie!
OBS:
DK
Må ikke sluttes til netdrev en strømforsyning eller batteriopladere!
LET OP:
NL
Niet aansluiten op netstroom inclusief accuopladers!
 Loading...