

Page 1

HBZ7390
HobbyZone
®
products are distributed exclusively by
Horizon Hobby, Inc.
4105 Fieldstone Road
Champaign, IL 61822
©2009 Horizon Hobby, Inc.
Horizon Hobby UK
Units 1-4 Ployters Rd
Staple Tye
Harlow, Essex
CM18 7NS
United Kingdom
Horizon Hobby Deutschland GmbH
Hamburger Strasse 10
25335 Elmshorn
Germany
14931 Printed 3/09
Page 2

Congratulations on your purchase of the HobbyZone®
Super Cub Floats. These floats add a new level of fun and
excitement to your Super Cub.
Note: Only use the floats if you are comfortable flying your Super Cub
and have repeatedly and successfully taken off, flown and landed.
Flying off water poses a higher risk to the airplane because the
electronics can fail if immersed in water.
Crash damage is not covered
under the warranty.
Be sure to read the warranty
on page 16 and "Warnings and
Safety" on pages 14–15 before
you proceed to Step 1.
Page 3
3
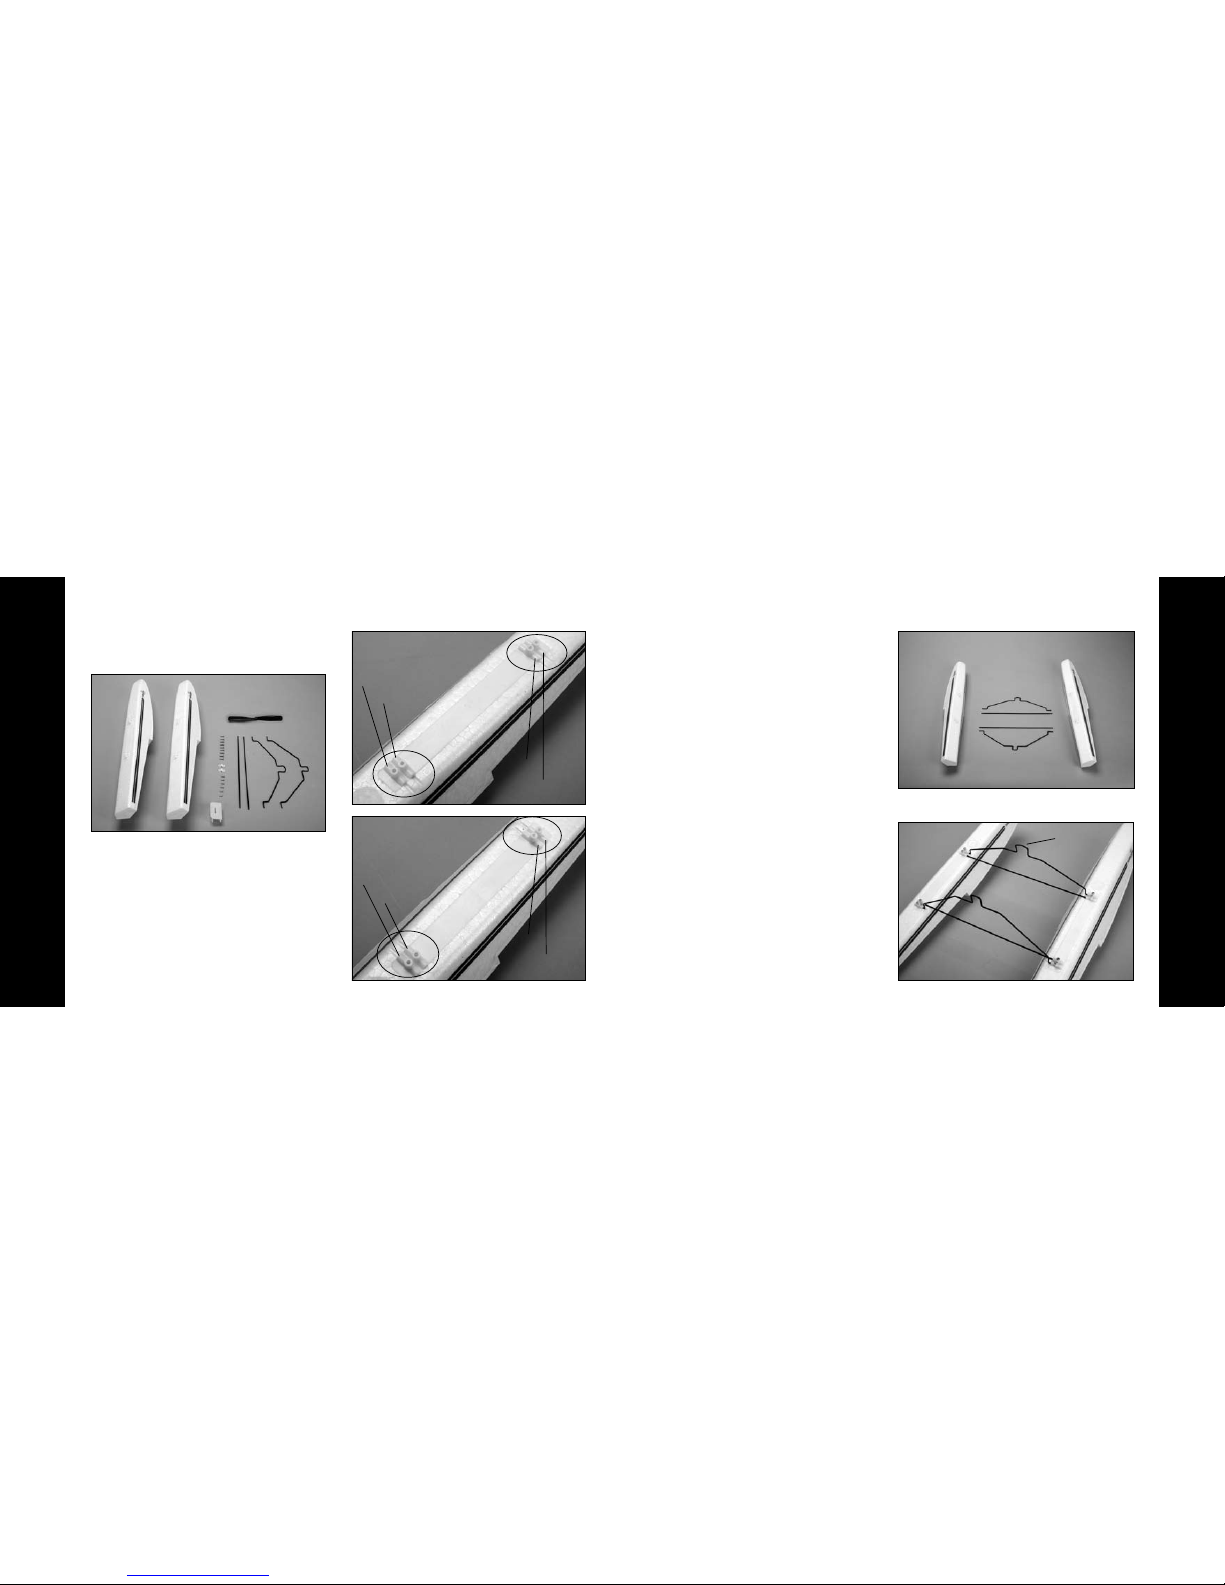
Step 1
4
Step 1
Assembly
• Remove contents from the box
and inspect for missing parts or
any damage.
• Separate the eight 3mm x 10mm
Phillips head machine screws, the
spreader wires and the two landing
gear legs.
• Note that there is a right and left
float. The indentions in the foam for
the spreader wires and landing gear
will face inward.
• Install the landing gear with the wider
top portion into the front holes on the
floats. Next install the front spreader
wire into the second holes on the
floats. Install the rear spreader wire
into the third holes on the floats.
Finally, install the rear landing gear
legs with the narrower top portion into
the rear holes on the floats.
Wider
Right Float
1 (front holes)
4 (rear holes)
4 (rear holes)
2
3
3
Left Float
1 (front holes)
2
Page 4
5
Step 1
6
Step 2
Installation
• Install the eight 3mm x 10mm Phillips
head machine screws into the
floats making sure the screws are
tightening against the flat spots on
the wires.
• Install 10 x 8 propeller included with
the float kit*. Do not use the 9 x 6
prop included with the airplane as
there will not be enough power to
successfully fly on floats.
* When using the 10 x 8 propeller, it is
essential that you allow approximately
10–15 minutes between flights in order
to allow the 480 motor to properly cool.
Failure to follow this warning will greatly
reduce motor life.
• Remove the landing gear and
landing gear covers from your
Super Cub.
• Insert the front landing (wider) gear
wire of the floats into the front
landing gear slot.
• Insert the rear landing gear wire into
the rear float mount in the fuselage.
Rear Float
Mount
• The Super Cub LP (blue Super Cub
with Li-polymer battery) comes with
the rear float mount pre-installed in
the fuselage. If you are attaching
your Super Cub floats to an original
red Super Cub (HBZ7100), a rear float
mount will have to be installed into
the fuselage. This is a separate part
that has been included with this float
set. Please see page 9 for installation
instructions.
Page 5

7
Step 2
8
Success Tips
• Install the landing gear straps on the
rear float mount with the included
self-tapping screws.
Note: If installing the floats on the original
red and white Super Cub (HBZ7100),
refer to page 9 of this manual for
installation of the rear float mount.
Prior to each flight, make sure ACT is off
and never attempt to fly with the floats with
ACT on.
When flying with floats always take off
and land into the wind. Do not fly off
water when the wind is too high as the
wind causes larger waves and makes the
plane more likely to flip over.
Attempt your first float flight only if the
water is calm with very little wind. When
taxiing in the water always hold full upelevator. When starting your takeoff or
just after touchdown, hold up-elevator
to prevent the floats from “digging”
into the water and causing the plane to
flip over.
On takeoff when the floats begin to ride
on top of the water, or get “on step”,
reduce the up elevator input and allow
the plane to build up speed before
lifting off.
When flying off water there is usually a
lot of room to fly, do not try to force the
plane into the water. Let the airplane
settle into the water when landing. If a
float starts to “dig” into the water it will
cause the airplane to veer to one side or
the other. Reduce power immediately
and abort the takeoff.
The floats add weight well below the
airplane and cause a “pendulum” effect
that will change the flying characteristics
of the Super Cub.
Page 6

9 10
When finished flying off water check all
components for water, if any water is in
the airplane or around the battery
cavity, dry with a paper towel.
Check for water inside the floats. The
joint between the plastic bottom surface
and the foam structure has been sealed,
but if for some reason that seal has
been broken, water could build up
inside the float. This could cause
serious weight gain and/or CG issues.
Installing Floats on the Red and White Super Cub
If installing floats on your red and white
Super Cub (HBZ7100), you will need to
install the included rear float mount on
the fuselage.
Note: We recommend you change the
receiver unit in your red and white
Super Cub to the receiver unit in the
Super Cub LP. You will also need to use
the 3S 11.1V Li-Po Battery (PKZ1033)
The ESC auto cut in the original Super
Cub has been set for Ni-MH cells and
can cause permanent damage to a Li-Po
battery pack if flown to the low-voltage
cutoff point.
Measure back 5 3/4 inches from the
rear of the slot for the original landing
gear. Place the front edge of the rear
float mount at this distance and press
the rear mount into the fuselage of your
Super Cub.
Note: The rounded corners will be facing
forward.
Success Tips (continued)
Page 7

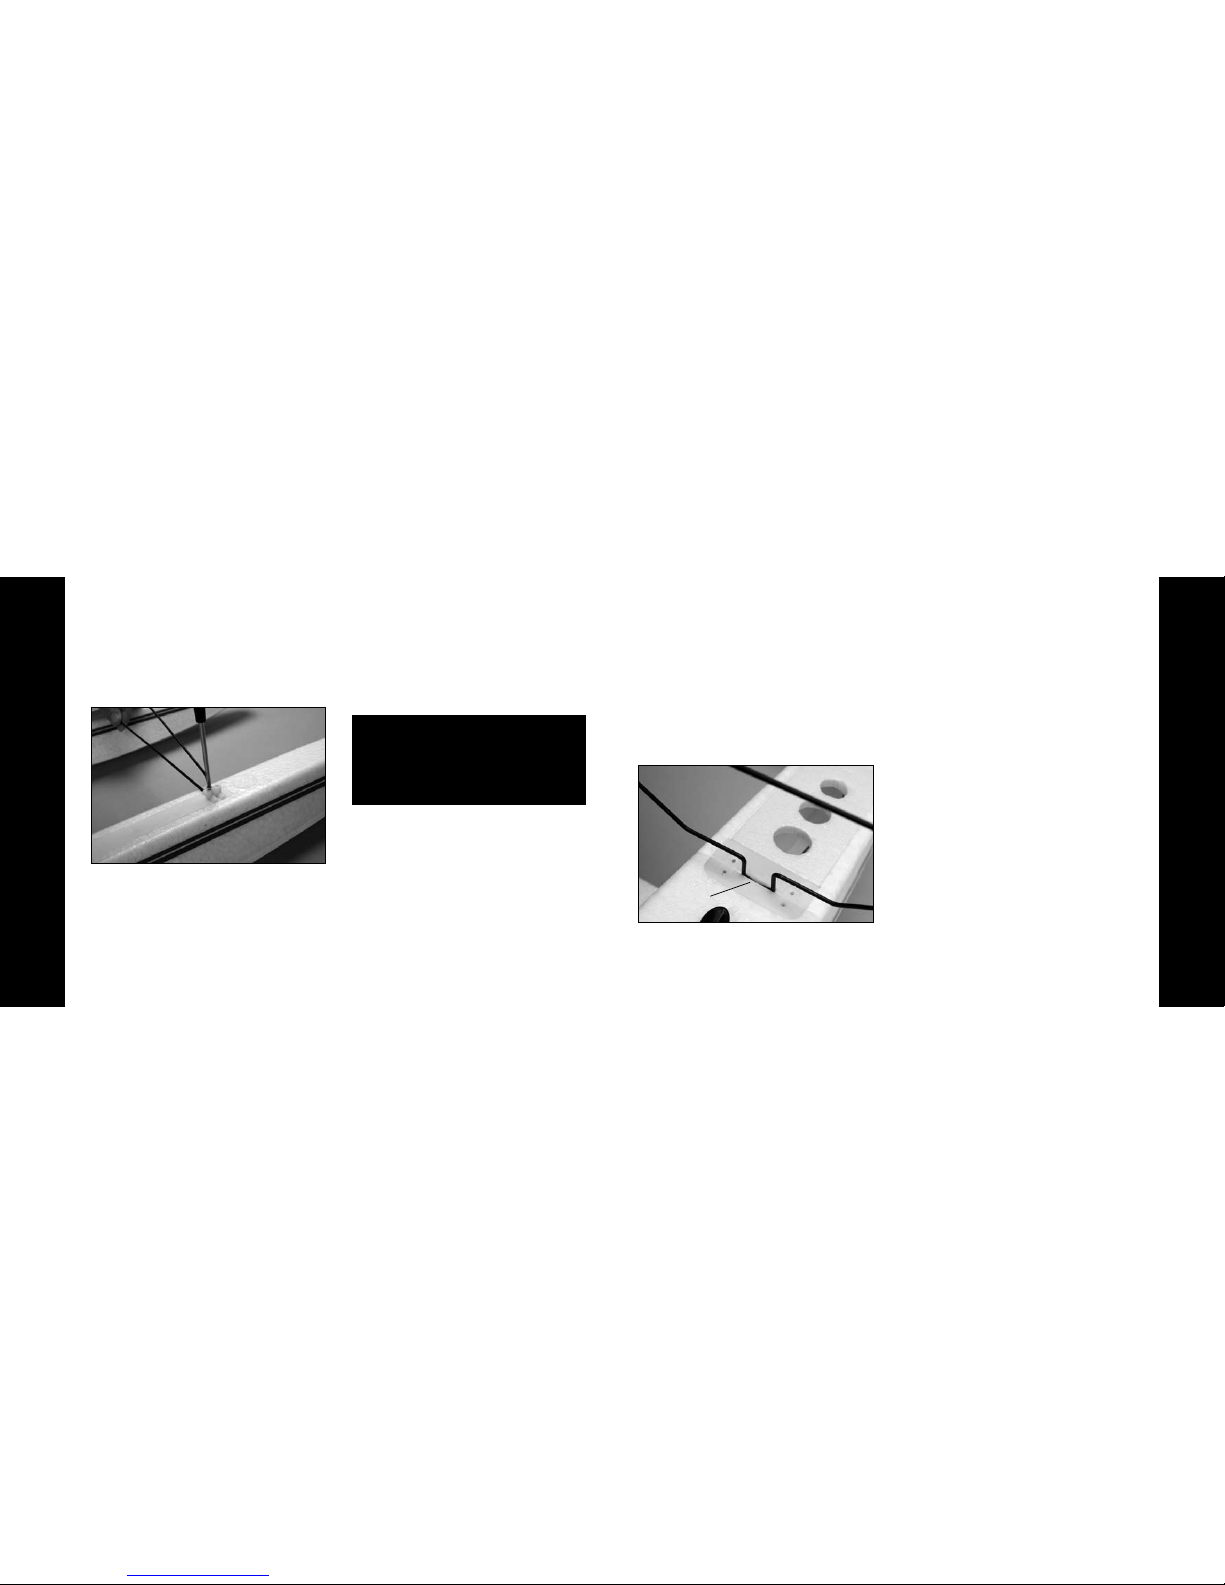
11 12
Press hard enough to leave marks in the
foam on the fuselage to indicate what
foam needs to be removed. Set the
rear mount aside, then slowly cut away
where the foam is compressed by the
rear float mount until the mount is flush
with the bottom of the fuselage.
Page 8

13 14
Glue the rear float mount into the
fuselage using epoxy, making sure not
to get epoxy in the screw holes. Go to
the assembly and installation section
when done mounting the rear float
mount into your Super Cub.
Note: The rear float mount will rest on top of
the foam and not be recessed into the
bottom of the fuselage.
• Do not y off of water if you are
uncomfortable flying the Super Cub
on land. Only use the floats if you can
fly the Super Cub without having any
incidents and can take off and land
smoothly and multiple times in a row.
• Do not y in wind over 5–7 mph
(8-11km/h) as wind will cause larger
waves and make the plane more
susceptible to flipping over.
• Always stay clear of the propeller.
• Always select wide open spaces.
• Always follow all aircraft instructions
when using the floats.
• Always y your aircraft responsibly.
• Stay away from boat wake as it may
cause the airplane to flip or splash
water into the airplane and on the
electronics.
Warnings and Saftey
• Always check the bottom of the oats
each time you pull the airplane out
of the water to check if there is any
damage from hitting submerged
sticks or rocks. If water is found in a
float, it needs to be carefully
removed before the next flight.
• Never attempt to swim out to your
airplane in the water. Use a boat,
RC boat or fishing pole to retrieve
your airplane. Also be aware that
the airplane is still powered up when
retrieving it.
• Never retrieve the airplane alone.
Always have another person with you
to assist in retrieval.
• If the motor of the airplane gets
wet, do not power up to get the
airplane back to the shore. It is
possible to burn up the motor if it is
run while wet.
Page 9

15 16
• Always allows 10-15 minutes for the
motor to cool between flights when
flying with the 10 x 8 propeller. The
Super Cub’s 480 motor may be
damaged if you don’t follow this
warning.
Prior to each flight, make sure ACT is off
and never attempt to fly with the floats with
ACT on.
Warnings and Saftey (continued)
The Super Cub Floats are guaranteed
against any manufacturing defects at
the time of production. There is no
warranty of any kind from damage to
either the aircraft or the floats itself due
to hard landings or crashes. If you have
any questions regarding your floats,
please contact the Horizon Service
Center at 1.877.504.0233
Warranty Period
Exclusive Warranty- Horizon Hobby, Inc.,
(Horizon) warranties that the Products
purchased (the “Product”) will be free
from defects in materials and
workmanship at the date of purchase by
the Purchaser.
Limited Warranty
(a) This warranty is limited to the original
Purchaser (“Purchaser”) and is not
transferable. REPAIR OR
REPLACEMENT AS PROVIDED UNDER
THIS WARRANTY IS THE EXCLUSIVE
Warranty
REMEDY OF THE PURCHASER. This
warranty covers only those Products
purchased from an authorized Horizon
dealer. Third party transactions are
not covered by this warranty. Proof of
purchase is required for warranty claims.
Further, Horizon reserves the right to
change or modify this warranty without
notice and disclaims all other
warranties, express or implied.
(b) Limitations- HORIZON MAKES NO
WARRANTY OR REPRESENTATION,
EXPRESS OR IMPLIED, ABOUT NONINFRINGEMENT, MERCHANTABILITY
OR FITNESS FOR A PARTICULAR
PURPOSE OF THE PRODUCT. THE
PURCHASER ACKNOWLEDGES THAT
THEY ALONE HAVE DETERMINED
THAT THE PRODUCT WILL SUITABLY
MEET THE REQUIREMENTS OF THE
PURCHASER’S INTENDED USE.
Page 10

17 18
(c) Purchaser Remedy- Horizon’s sole
obligation hereunder shall be that
Horizon will, at its option, (i) repair or
(ii) replace, any Product determined by
Horizon to be defective. In the event of
a defect, these are the Purchaser’s exclusive remedies. Horizon reserves the
right to inspect any and all equipment
involved in a warranty claim. Repair or
replacement decisions are at the sole
discretion of Horizon. This warranty
does not cover cosmetic damage or
damage due to acts of God, accident,
misuse, abuse, negligence,
commercial use, or modification of or to
any part of the Product. This warranty
does not cover damage due to
improper installation, operation,
maintenance, or attempted repair by
anyone other than Horizon. Return of
any goods by Purchaser must be
approved in writing by Horizon before
shipment.
Damage Limits
HORIZON SHALL NOT BE LIABLE FOR
SPECIAL, INDIRECT OR
CONSEQUENTIAL DAMAGES, LOSS
OF PROFITS OR PRODUCTION OR
COMMERCIAL LOSS IN ANY WAY
CONNECTED WITH THE PRODUCT,
WHETHER SUCH CLAIM IS BASED IN
CONTRACT, WARRANTY,
NEGLIGENCE, OR STRICT LIABILITY.
Further, in no event shall the liability of
Horizon exceed the individual price of
the Product on which liability is
asserted. As Horizon has no control over
use, setup, final assembly, modification
or misuse, no liability shall be assumed
nor accepted for any resulting damage
or injury. By the act of use, setup or
assembly, the user accepts all resulting
liability. If you as the Purchaser or user
are not prepared to accept the liability
associated with the use of this Product,
you are advised to return this Product
immediately in new and unused
condition to the place of purchase.
Law: These Terms are governed by
Illinois law (without regard to conflict of
law principals).
Safety Precautions
This is a sophisticated hobby Product
and not a toy. It must be operated
with caution and common sense and
requires some basic mechanical ability.
Failure to operate this Product in a safe
and responsible manner could result in
injury or damage to the Product or
other property. This Product is not
intended for use by children without
direct adult supervision. The Product
manual contains instructions for safety,
operation and maintenance. It is
essential to read and follow all the
instructions and warnings in the manual,
prior to assembly, setup or use, in order
to operate correctly and avoid damage
or injury.
Questions, Assistance, and Repairs
Your local hobby store and/or place of
purchase cannot provide warranty
support or repair. Once assembly, setup
or use of the Product has been started,
you must contact Horizon directly. This
will enable Horizon to better answer
your questions and service you in the
event that you may need any assistance.
For questions or assistance, please
direct your email to
productsupport@horizonhobby.com, or
call 877.504.0233 toll free to speak to a
service technician.
Inspection or Repairs
If this Product needs to be inspected or
repaired, please call for a Return
Merchandise Authorization (RMA). Pack
the Product securely using a shipping
carton. Please note that original boxes
may be included, but are not designed
to withstand the rigors of shipping
without additional protection. Ship via a
carrier that provides tracking and
insurance for lost or damaged parcels,
Page 11

19 20
as Horizon is not responsible for
merchandise until it arrives and is
accepted at our facility. A Service Repair
Request is available at
www.horizonhobby.com on the
“Support” tab. If you do not have
internet access, please include a letter
with your complete name, street
address, email address and phone
number where you can be reached
during business days, your RMA
number, a list of the included items,
method of payment for any
non-warranty expenses and a brief
summary of the problem. Your original
sales receipt must also be included for
warranty consideration. Be sure your
name, address, and RMA number are
clearly written on the outside of the
shipping carton.
Warranty Inspection and Repairs
To receive warranty service, you must
include your original sales receipt
verifying the proof-of-purchase date.
Provided warranty conditions have been
met, your Product will be repaired or
replaced free of charge. Repair or
replacement decisions are at the sole
discretion of Horizon Hobby.
Non-Warranty Repairs
Should your repair not be covered by
warranty the repair will be completed
and payment will be required without
notification or estimate of the expense
unless the expense exceeds 50% of the
retail purchase cost. By submitting the
item for repair you are agreeing to
payment of the repair without
notification. Repair estimates are
available upon request. You must
include this request with your repair.
Non-warranty repair estimates will be
billed a minimum of ½ hour of
labor. In addition you will be billed for
return freight. Please advise us of your
preferred method of payment. Horizon
accepts money orders and cashiers
checks, as well as Visa, MasterCard,
American Express, and Discover cards.
If you choose to pay by credit card,
please include your credit card number
and expiration date. Any repair left
unpaid or unclaimed after 90 days will
be considered abandoned and will be
disposed of accordingly. Please note:
non-warranty repair is only available on
electronics and model engines.
United States
Electronics and engines requiring
inspection or repair should be shipped
to the following address:
Horizon Service Center
4105 Fieldstone Road
Champaign, Illinois 61822
All other Products requiring warranty
inspection or repair should be shipped
to the following address:
Horizon Product Support
4105 Fieldstone Road
Champaign, Illinois 61822
Please call 877-504-0233 or e-mail us
at productsupport@horizonhobby.com
with any questions or concerns
regarding this product or warranty.
Page 12

21 22
United Kingdom
Electronics and engines requiring
inspection or repair should be shipped
to the following address:
Horizon Hobby UK
Units 1-4 Ployters Rd
Staple Tye
Harlow, Essex
CM18 7NS
United Kingdom
Please call +44 (0) 1279 641 097 or
e-mail us at sales@horizonhobby.co.uk
with any questions or concerns
regarding this product or warranty.
Germany
Electronics and engines requiring
inspection or repair should be shipped
to the following address:
Horizon Technischer Service
Hamburger Strasse 10
25335 Elmshorn
Germany
Please call +49 4121 46199 66 or e-mail
us at service@horizonhobby.de with any
questions or concerns regarding this
product or warranty.
 Loading...