


User’s Guide
Functional FX Series. Rev. 1.9 2004 Horizon Fitness Products | Designed & Engineered in the U.S.A. | Made in China
Contact Information
For all warranty issues, to purchase a replacement ball or resistance bands, or if you are missing any
parts please contact the appropriate customer service location based on the list below. Thank you.
FRANCE
Johnson Health Tech – France
Tel: 0033.(0).130.686280
Fax: 0033.(0).130.686281
Email: info@johnsonhealthtech.fr
NETHERLANDS
Style Fitness GMBH
Tel: 49.2234.433550
Fax: 49.2234.433551
Email: info@horizonfitness.de
UNITED KINGDON
Johnson Health Tech UK Ltd.
Tel: 44.0.1782.749100
Fax: 44.0.1782.572000
Email: info@johnsonhealthtech.co.uk
GERMANY & NETHERLANDS
Style Fitness GMBH
Tel: 49.2234.433550
Fax: 49.2234.433551
Email: info@horizonfitness.de
SPAIN
Style Fitness - Spain
Tel: 34.916.592030
Fax: 34.916.548426
Email: info@stylefitness.es
UNITED STATES
Horizon Fitness
Tel: 1.800.244.4192
Fax: 608.842.1660
Email: info@horizonfitness.com
VersaBALL_User’s_Guide_v1.9.qxd 10/7/2004 2:55 PM Page 1

VersaBALL_User’s_Guide_v1.9.qxd 10/7/2004 2:55 PM Page 2

2
Table of Contents
INTRODUCTION . . . . . . . . . . . . . . . . . . . . . . . . . . . . . . . . . . . . . . . . . . . . . . . .3
SAFETY INSTRUCTIONS . . . . . . . . . . . . . . . . . . . . . . . . . . . . . . . . . . . . . . . . . . .4
PARTS LIST . . . . . . . . . . . . . . . . . . . . . . . . . . . . . . . . . . . . . . . . . . . . . . . . . . . . .5
HARDWARE LIST . . . . . . . . . . . . . . . . . . . . . . . . . . . . . . . . . . . . . . . . . . . . . . . .6
ASSEMBLY INSTRUCTIONS (FRAME, BALL, & BAND ASSEMBLY) . . . . . . . . . . . . . .7
STORAGE . . . . . . . . . . . . . . . . . . . . . . . . . . . . . . . . . . . . . . . . . . . . . . . . . . . .12
MAINTENANCE (RESISTANCE BAND, & BALL REPLACEMENT) . . . . . . . . . . . . . .12
WARM UP/COOL DOWN . . . . . . . . . . . . . . . . . . . . . . . . . . . . . . . . . . . . . . . .13
LIMITED WARRANTY . . . . . . . . . . . . . . . . . . . . . . . . . . . . . . . . . . . . . . . . . . . .13
CONTACT INFORMATION . . . . . . . . . . . . . . . . . . . . . . . . . . . . . . . . .BACK PANEL
13
WARM-UP
Warm-Up consists of 3 activities. And it is important that they are followed in the below order.
1. Raise Heart Rate - begin to warm-up the muscles that you will be working by increasing your
heart rate. This may include a brisk walk, jogging, jumping jacks, jump rope, or running in
place.
2. Motor Skills - These activities once again incorporate the muscles groups you will be using, but
the focus is more on coordination and flexibility. This may include rolling the arms and legs in
small to big circles, squats with no weight, or slow and controlled twisting at the waist.
3. Stretching - Stretching should be done after you have raised your heart rate and have sufficiently gone through motor activities. Muscles will be easier to stretch at this time because of their
increased temperature; this will reduce the risk of injury. Hold each stretch for approximately
15-30 seconds without much movement. Make sure to stretch out all of the major muscles groups.
COOL-DOWN
Cool-down your body by following the below steps.
1. Slowly Lower Heart Rate - Return your body's heart rate to a resting state by walking in place.
Since muscles are still warm begin to stretch out muscles. Stretching should take place after each
training session.
Warm-Up & Cool-Down
WARRANTY
Horizon Fitness warrants the Ball Trainer to the original purchaser only, that is the product will be free
from defects in materials and workmanship under normal use for a period of 90 days from the date of
the purchase by the original purchaser.
This warranty does not apply to any product that has been subject to commercial use, abuse, misuse,
alteration of any type or cause or damage caused by repair, replacement, substitution or use with
parts other than Horizon Fitness parts. Commercial use includes all other use that is not for personal
or household purposes.
This limited warranty is not transferable to another party.
For all warranty issues please contact us. See back panel for contact information.
Limited Warranty
VersaBALL_User’s_Guide_v1.9.qxd 10/7/2004 2:55 PM Page 3

3
12
Introduction
THANK YOU for purchasing the Horizon Fitness Functional FX
TM
VersaBALL FXTMTrainer. Horizon
Fitness is dedicated to providing our customers with efficient and effective fitness solutions. Look for more
Functional FXTMproducts in the near future at your nearest fitness retailer or online at www.horizonfitness.com.
WARNING!
Consult a physician before beginning any exercise program. Immediately discontinue use of this product if you feel faint or dizzy. If you suffer from heart disease, high blood pressure or any other disease
or condition, consult your physician prior to use. If this equipment is not assembled and used properly,
serious bodily injury can occur. Serious bodily injury can also occur if the enclosed instructions are not
followed correctly. Keep pets and children away from machine when in use. Always make sure hardware is tightened prior to use and make sure to follow all safety instructions in this manual.
WEIGHT CAPACITY
Weight on this product should not exceed 350lbs. This includes user weight plus any other type of
resistance that has additional weight.
To store the Ball Product keep it in a clean, dry place away from direct sunlight. For smaller storage
areas, you can deflate the ball.
Resistance bands can be stored within the base ring. Lock the bands from side to side for convenient
storage.
Examine the ball for damage or wear before each use. Give special attention to ball discoloration
and scratching; if either of these exist call Horizon Fitness to replace ball.
CARE:
1. It is the responsibility of the owner to provide regular maintenance.
2. Clear workout area of sharp objects that could puncture ball. Use only smooth surface when using
ball outside of frame.
3. Slight air leakage may occur over time. Re-inflate when necessary.
4. Hand wash ball with soft, damp and soapy cloth.
5. Do not use harsh or abrasive chemicals or cleaning tools that could damage ball or paint on frame.
6. Avoid placing ball on printed materials as ink could permanently mark ball.
7. Avoid exposing the ball to heat or direct sunlight.
RESISTANCE BANDS AND BALL REPLACEMENT
If the resistance bands or ball becomes cut, nicked, or gouged in any way do not use. To purchase a
replacement please contact us. See back panel for contact information.
Storage
Maintenance
VersaBALL_User’s_Guide_v1.9.qxd 10/7/2004 2:55 PM Page 4
4
WARNING: Before using the VersaBALL FX
TM
please read the following safety instructions to
reduce the risk of injury.
1. Read all warning labels attached to VersaBALL FX.
TM
2. Read the Assembly/Owner's Manual in its entirety.
3. Make sure the VersaBALL FX
TM
is assembled properly before using, tightening all hardware.
4. Do not allow children to play on VersaBALL FX.
TM
5. Keep pets away from VersaBALL FX.
TM
6. Keep ball away from sharp objects and inspect ball before each use for any areas where ball
may be damaged; this includes deep scratches or gouges.
7. Keep resistance bands away from rough surfaces and inspect bands before each use for any
areas where resistance bands may be damaged; this includes cuts, deep scratches, or gouges.
8. There are non-slip pads on the base of the VersaBALL FX,
TM
please make sure they are in contact
with the floor. A fitness mat also helps stabilize the product.
9. Consult a physician before exercising on the VersaBALL FX.
TM
If at anytime while working out on
the product you feel discomfort, stop and consult your physician.
10. Choose exercises that fit your level of fitness experience, considering your strength and flexibility
during all exercises.
11. Wear proper fitness clothing; clothing that does not hang over machine.
12. Try to maintain balance at all times when using the VersaBALL FX.
TM
Falling from the machine may
result in serious bodily injury.
13. The VersaBALL FX
TM
should only be used by one person.
14. The VersaBALL FXTMis not intended for commercial use. It should not be used in health clubs,
hospitality corporations, medical corporations, or any other business not selling to the endconsumer.
WARNING: Before starting an exercise program consult a physician. This is very important if you
have never exercised before, you are pregnant, or you suffer from any illness making physical activities more difficult.
Safety Instructions
11
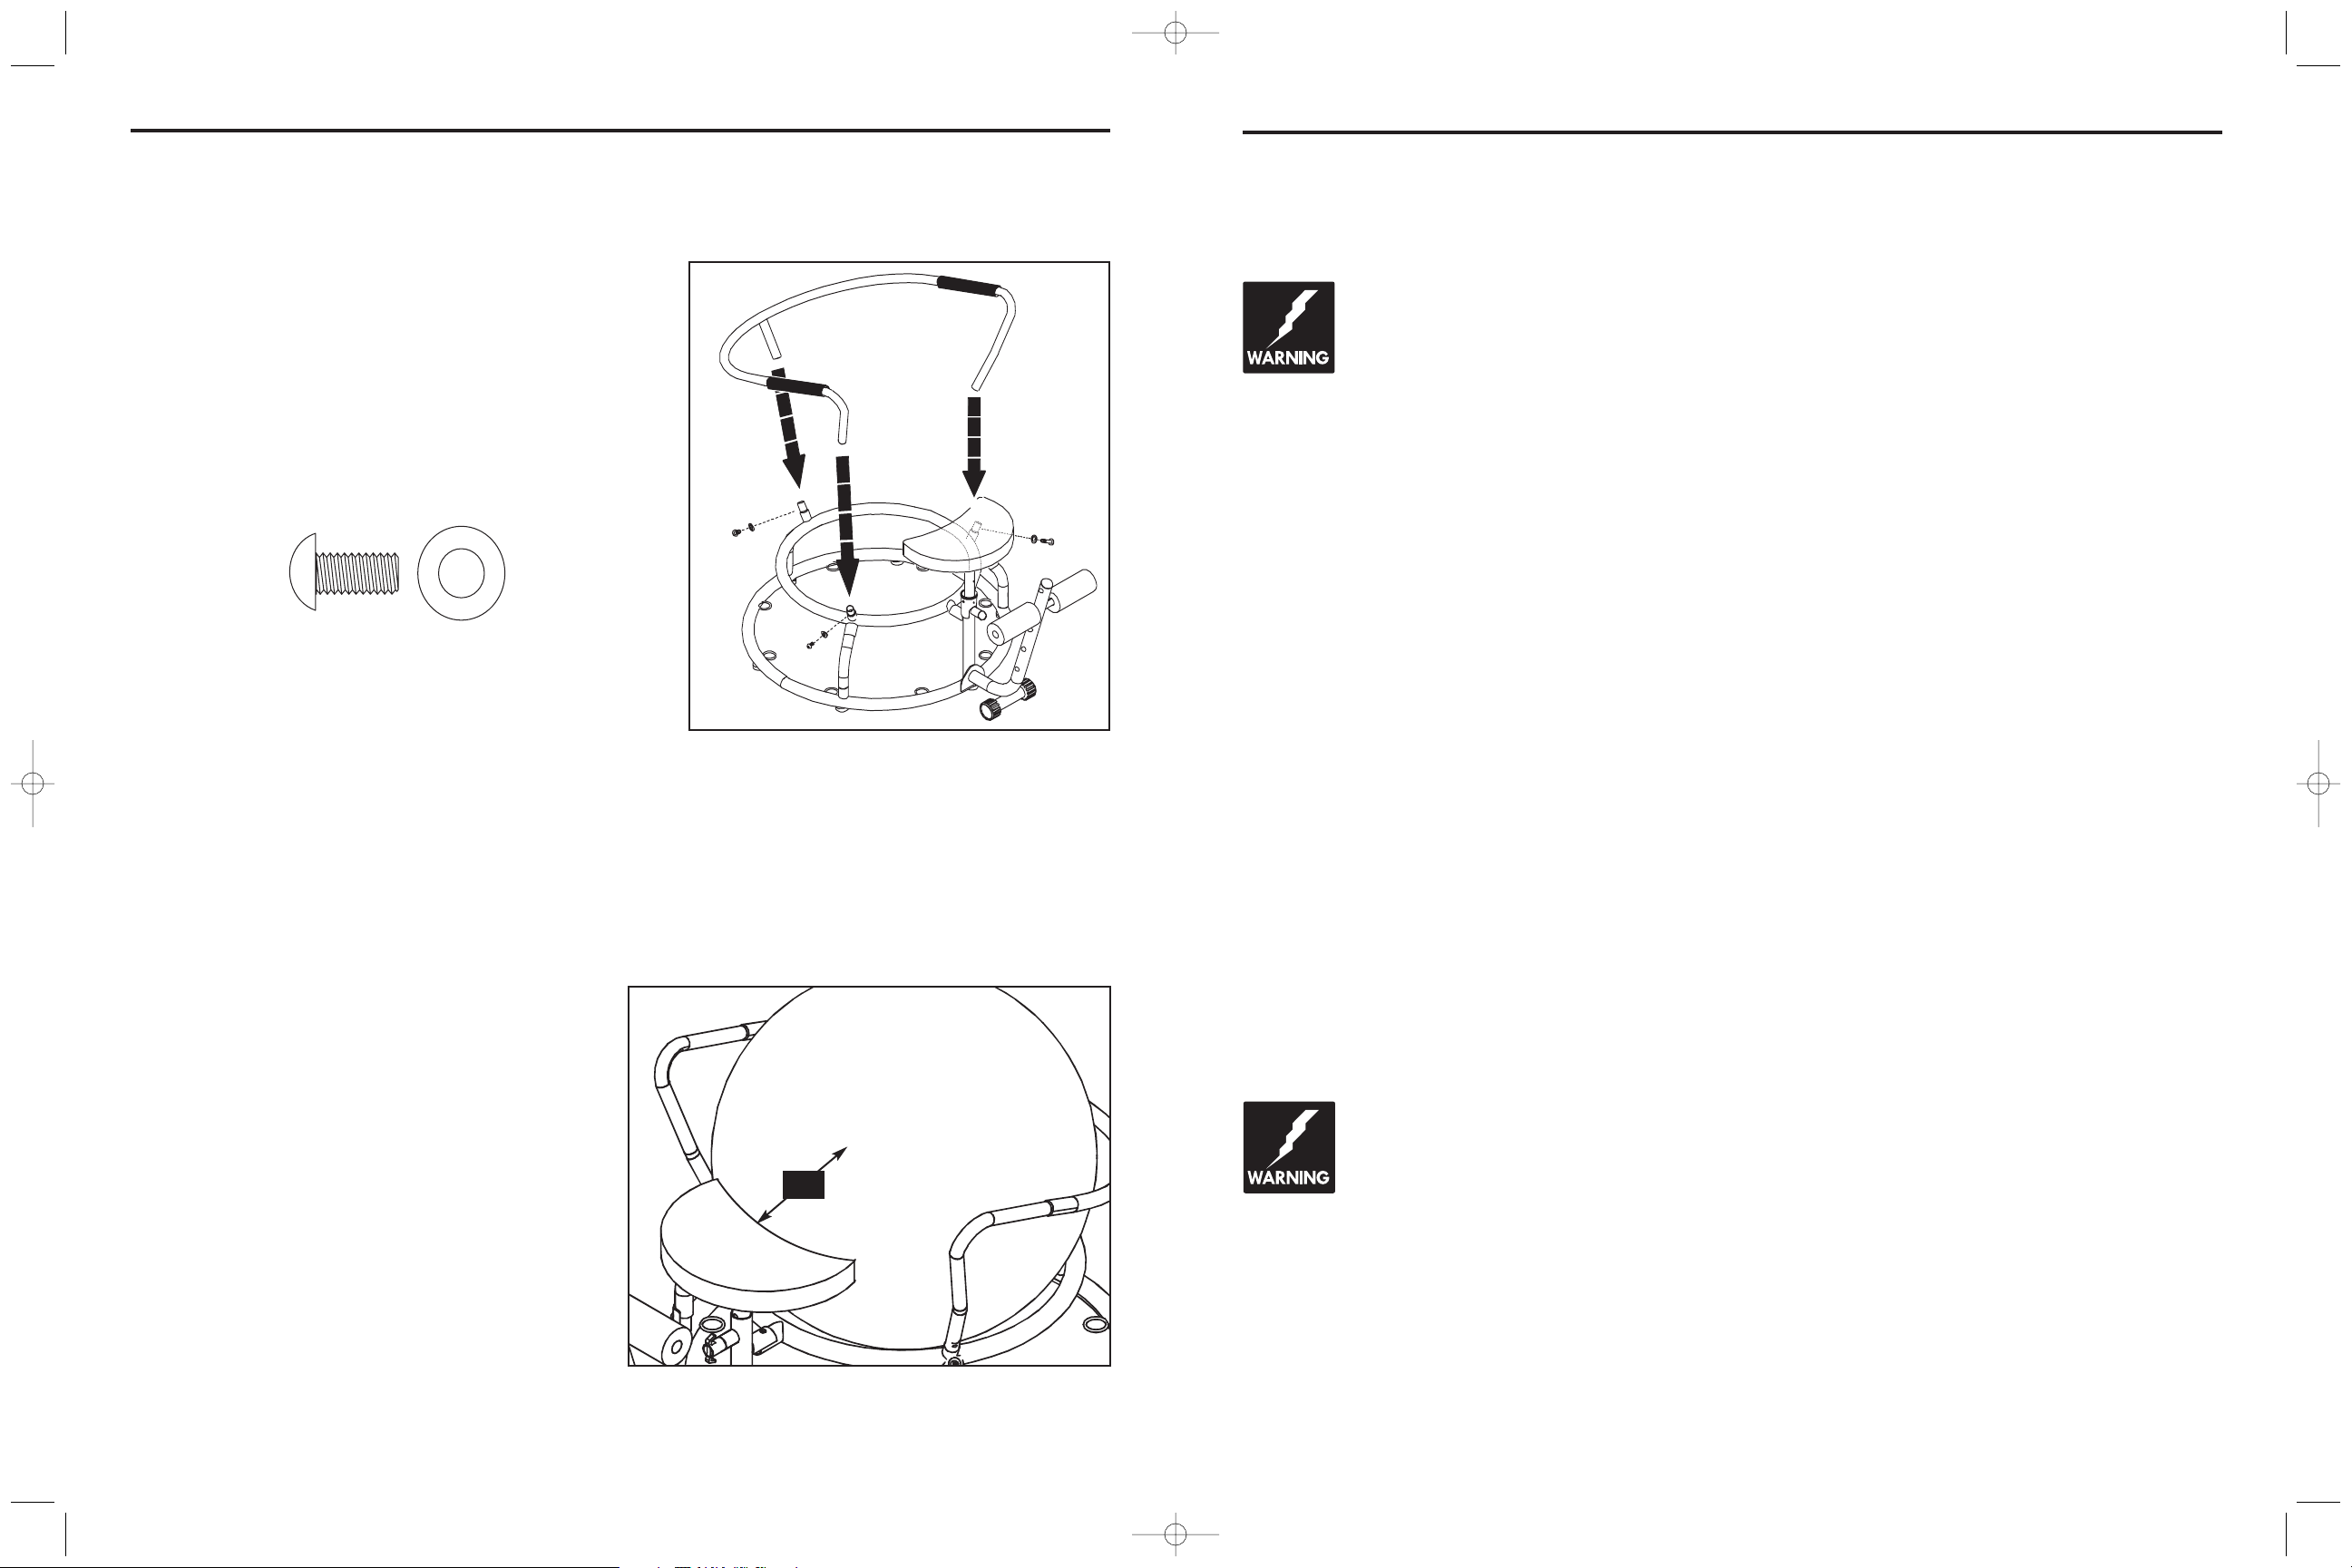
Assembly Instructions
STEP 7
Assemble handle bar to upper ball ring. The left and
right handle tubes, as well as the rear handle tube,
should slide over the upper ball ring male tube ends.
Use 3 Bolt D’s and 3 curved washers.
BOLT D
STEP 8
Inflate the ball. WARNING...DO NOT OVER-INFLATE!
To ensure your ball is inflated properly you will need to measure the distance between the ball and
the seat when the seat is at a mid-level position. There should be a 1/2 inch of space between the
seat and the ball so that the seat can move up and down properly.
.5”
VersaBALL_User’s_Guide_v1.9.qxd 10/7/2004 2:55 PM Page 5

5
Parts List
10
Assembly Instructions
STEP 5
Assemble foot support tube. 1 Bolt A and 1 flat washer goes through
the upper center hole, then assemble through the seat adjustment tube
with a nut. The remaining 2 BOLT A’s go through the 2 lower, left and
right holes on the foot support and then through the base ring.
Note: The left and right bolts use 1 curved washer and 1 flat washer.
BOLT A
STEP 6
Assemble the left and right handle tubes to the remaining portion of the
handle bar using 2 Bolt D’s and 2 curved washers.
BOLT D
LEFT
RIGHT
BASE RING TUBE A
BH100-01
BASE RING TUBE B
JBH100-02
UPPER BALL RING
JBH100-03
REAR SUPPORT TUBE
JBH100-04
HANDLE BAR
JBH100-06
FOOT SUPPORT TUBE
JBH100-08
SEAT RECEIVER TUBE
JBH100-07
SEAT ADJUSTMENT
TUBE JBH100-10
LEFT HANDLE
TUBE JBH100-12
RIGHT HANDLE
TUBE JBH100-13
LEG PAD TUBE
JBH100-09
BALL
JBH100-19
LONG RESISTANCE BAN
D
JBH100-17
SHORT RESISTANCE
BAND JBH100-18
SMALL ROUND
END PLUG
JBH100-20
MEDIUM ROUND
END PLUG
JBH100-21
LOW FOOT
JBH100-16
LARGE ROUND
END PLUG
JBH100-22
HIGH FOOT
JBH100-15
SEAT SLEEVE
JBH100-14
SEAT CUSHION
JBH100-11
LEG PAD
JBH100-23
HAND GRIP
JBH100-24
ROUND END CAP
JBH100-25
PULL PIN
JBH100-26
FRONT SUPPORT TUBE
JBH100-05
VersaBALL_User’s_Guide_v1.9.qxd 10/7/2004 2:55 PM Page 6

6
9
Assembly Instructions
STEP 3
STEP 4
Parts List
(A) M8x52 ALLEN BOLT (QTY 3)
BOLT B
Assemble seat receiver tube to upper ball ring
and base ring. The tube should fit on top of the
upper ring and over the bottom male connection
point. At this point only assemble the tube to the
upper ball ring using 1 BOLT B, 2 curved washers, and a nut.
Note: Assemble one bent washer on each side
of the bolt/nut connection point.
Also assemble pull-pin by turning the pull-pin bolt
clockwise.
Note: The pull-pin has a pulling and a locking
feature. To unlock the pull-pin twist the pullpin
counterclockswise.
BOLT D
Using 4 Bolt D’s and 4 flat washers, assemble
seat adjustment tube to seat.
Note: Make certain to assemble the seat in the
correct direction. Seat adjustment tube holes
should be facing away from the machine.
See diagram.
CURVED WASHER
QTY 19
(B) M8x45 ALLEN BOLT (QTY 3)
(C) M8x38 ALLEN BOLT (QTY 4)
(D) M8x16 ALLEN BOLT (QTY 11)
FLAT WASHER
QTY 7
LOCK NUT
QTY 10
1.5 mm ALLEN
WRENCH
13/14 mm
HEX WRENCH
VersaBALL_User’s_Guide_v1.9.qxd 10/7/2004 2:55 PM Page 7

7 8
Assembly Instructions
Check the parts list before assembling. If you are missing any parts please contact us. See back panel
for contact information. Thank you.
Before assembling the product read the following bulleted instructions:
·DO NOT INFLATE BALL FIRST.
·DO NOT INFLATE BALL OVER 65cm.
·DO NOT FULLY TIGHTEN BOLTS UNTIL PRODUCT IS FULLY ASSEMBLED.
·Tools are included for efficient assembly.
·Remove parts from bags and lay them out on a cleared area.
·Remove all packing materials and place them in box.
·Make sure all hardware is included.
Note: It is recommended that you apply grease to the threads of each bolt as you assemble the product, to prevent loosening and noise. Also, during each assembly step, ensure that ALL nuts and bolts
are in place and partially threaded in before completely tightening any ONE bolt.
BOLT C
BOLT C
BOLT B
BOLT C
BOLT B
FRONT
REAR
STEP 1
Assemble front support tubes and rear support tube to the upper ball ring. Make sure small tube ends
on the upper ring are facing up.
Note: Use BOLT C for the 2 front support tubes.
Note: Use BOLT B and 2 curved washers for the rear support tube.
STEP 2
Connect base ring tube A to base ring tube B using 2 BOLT D’s and 2 curved washers.
Assemble the upper ball ring front support tubes and rear support tube to the base ring.
The upper ring support tubes should slide over the base ring tubes.
Note: Use BOLT C for the 2 front support tubes.
Note: Use BOLT B and 2 curved washers for the rear support tube.
Assembly Instructions
BOLT C BOLT B
BOLT B
BOLT C
BOLT C
FRONT
REAR
BOLT D
BOLT D
BOLT D
VersaBALL_User’s_Guide_v1.9.qxd 10/7/2004 2:55 PM Page 8
 Loading...