

Horizon Dehumidifier Eclipse Installation And Operation Manual

1
RReeaadd aanndd SSaavvee TThheessee IInnssttrruuccttiioonns
s
HHoorriizzoon
n
®
®
EEcclliippssee -- IInnssttaallllaattiioonn aanndd OOppeerraattiioonnss MMaannuuaal
l
Air Cleaning Equipment, Inc.
303 N. Main St.
Broadway, NC 27505
www.horizondehumidifiers.com

2
Safety Notes:
• The Hori zon Series Dehumidifier must always be conne cted using the grounded
electrical connec tion as required for all electrical app liances. The warranty is
voided an d a ll respon sib ility for the operation is born by the owner if non-grounded
wiring is utilized.
• The Hori zon Dehumidifiers must only be maintained and serviced by a qualified
technician.
• The Hori zon Dehumidifiers are i ntended only for operation when oriented with the
unit sitting on its feet and level. Any other orientat ion could cause water to come in
contact with the elect rical components.
• Remove plug before moving dehumidifier.
• If any water may have spread thro ug hout unit, the unit should be opened and
allowed to dry thoroughly before reconnecting to electric and restarting.
• For proper operation, neither the inlet nor discharge should be positioned against a
wall. The inlet requires a minimum of 12” clearance and the discharge requires a
minimum of 36” clearance.
• For proper diffusion of air throughout the room, the best option would be to have
the discharge blowing away fr om a wall and the inle t pulling air in parallel to the
wall.
• Do not insert any objects or fingers into the inlet or discharge. If service is
require d , call a qualified technician. All work on unit should be done with the unit
“off” and unplugge d.
• Do not us e wat er to clean unit exterior. Only use a d amp cloth to clean exterior
and always unp lug the unit first.
• Do not us e unit as shelf or device to hang clothes. This could cause damage to
unit.
• Do not s tand on machine.
• The inlet filter generally does not need to be cleaned more than once per month
3
Identification:
For future reference, write down the model, serial number, date of purchase so you can
identify your unit when seeking assistance
Model Number Horizon Eclipse
Serial N um b er _____________________________
Date of Purchase _____________________________
NOTE: Data label has key operational charact eristics of this specific unit.
Customer Service:
For additional questions concerning the operation of your dehumidifier, please:
Contact your i nstalling contractor
Please call ACE at 919-258-3330
Email: sales@horizondehumidifiers.com
WARNING: 120 Volts AC may cause ser ious injury from electric shock.
1. Disconnect electrical power before servicing
2. Only plug unit into grounded electrical outlet
3. Do not use extension cord
4. Do not us e p lug adapter
Power Supply: 115V, 60 Hz AC Only 1 Phase
Outlet Requirement: 3-Pro ng, GFI
Circuit Protector: 15 Amp Time Delay Fuse or Circuit Breaker
Principle of Operation
The Hori zon Series Dehumidifier utilizes its integral humidistat to monitor the conditioned
space. W hen the relative hum idity goes above the selected set point, the dehumidifier
will energize. Air is drawn across an evaporator coil. The evaporator coil is cooler than
the dew point of the air so moisture will condense out of the air. Air is then reheated
through the condenser coil and distributed b ack into the room.

4
Installation:
The area to be controlled should be sealed w ith a vapor barrier. If unit is installed in a
crawlspace, all vents shoul d be sealed.
WARNING: It is recommended to remove dehumidifier from area if applying a liquid
vapor barr ier. Some coatings dry via “sol vent evaporation,” which can be harmful to
certai n components in yo ur dehumidifier. Allow coating to comple t ely dry and exhaust
vapors pr ior to positioni ng d ehumidifier. Read and follow coating manufacturer’s
instructions completely.
1) Place dehumidifier on level surface
WARNING – If after unit is positioned,
it is moved in such a manner that t he compressor d idn’t remain in a vertical orientation,
wait a minim um of 2 hours before turning the unit “on.”
2) Drain Line
o Included drain line attaches to the unit via a compression type fitting on the
discharg e end of the unit. Remo ve the compression nut and slide it over t he
end of the h ose to b e atta ched to the un it. S lide tha t end of the tu be over t he
insert on the compression fitting completely. Tighten compression nut.
o Drain line should be routed to a s uitable drain or outside. Because the unit
features an integral drain pump, drain l ine may go vertically up 10’ prior to
reaching final d rain location.
3) Pl ug unit into 15 amp gr ounded outlet.
Drain Tube – 20’ Long. 10 mm OD.
5
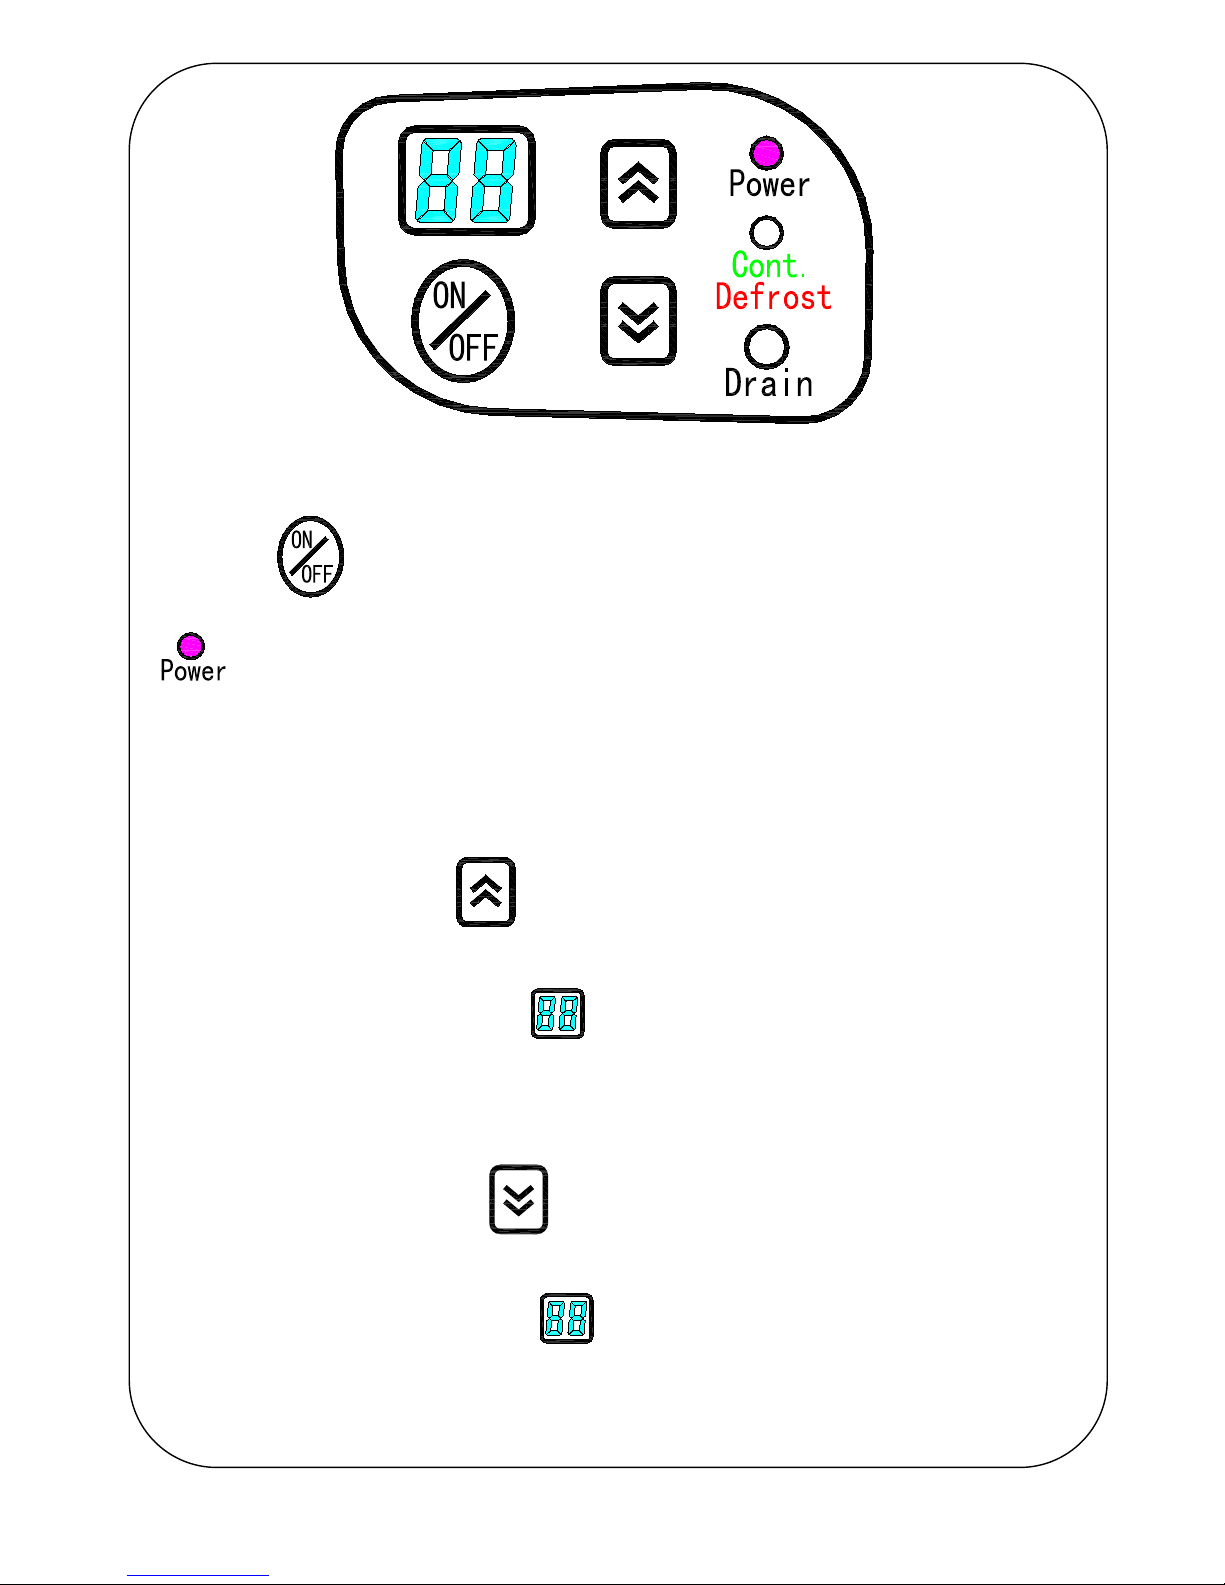
Key functions
1. Power Key
indicator light must be on ind icated unit is plugged in and has power to it. Press
the on/off button, and the machine will start running (Two Beeps). Press this key again,
the machine will stop running (Single Beep). The display will read room humidity levels
except while you’re adjusting the setpoint humidity level. NOTE: When unit is turned off,
the fan will run for 1 minute prior to shutting off.
2. Increase Humidity button
Press this button to set indoor humidity , according to this sequence: 60%, 65%, 70%,
80%. When the i nd oor humidity is lower than the set humidi ty, the machin e will stop
automatically. When i ndoor humidity is hig her than setpoint, the unit will operate.
3. Decrease Humidity button
Press this button to set indoor humidity
, according to this sequence: 60%, 55%, 50%,
45%, 40%. Whe n the indoor humidity lower than set humidity, the machine will stop
working aut omatically. When the indoor humidity is higher than setpoint, uni t will
operate.
 Loading...