

Horizon T84 Owner’s Manual

TREADMILLUSER'S GUIDE
I T84 Treadmill Rev.l.2.indd 1
5/17/07 2:27:21 PM

CONGRATULATIONSand THANKYOUforyourpurchaseof this HorizonSeriesTreadmill!
Whetheryour goal is to win races or simply enjoy a fuller, healthier fifestyle, a Horizon Series treadmill
can help you attain it- adding club-quafity performance toyour at-home workouts, with the ergonomics
and innovative features you need to get stronger and healthier, faster. Because we're committed to
designing fitness equipment from the inside out, we use only the highest quafity components. It's a
commitment we back with one of the strongest frame-to-motor warranty packages in the industry.
Youwantexerciseequipmentthat offers the most comfort,the best reliability and thehighest quality
in its class.
TheHorizonSeriesdelivers.
Important Precautions
Assembly 6
Before YouBegin i4
Treadmill Operation 17
Conditioning Guidelines 28
Troubleshooting & Maintenance 35
Limited Warranty 38
CONTACTINFORMATION Back Panel
T84 Treadmill Rev.l.2.indd 2-3 5/17/07 2:27:22 PM [
I
il_ i_ ii
I
SAVETHESEINSTRUCtiONS
Readall instructions beforeusing this treadmill. Whenusing an electrical product, basic precautions
shouldalwaysbefollowed,including the following:Readaftinstructions beforeusingthis treadmill It isthe
responsibilityof the ownertoensurethat all usersof this treadmill areadequatelyreformedof aft warnings
and precautions.Ifyouhaveanyquestionsafter readingthis manual,contactCustomerTechSupportatthe
numberlisted on the backpanelof this manual
GROUNDINGINSTRUCtiONS
Thisproductmustbegrounded.If a treadmill shouldmalfunctionor breakdown,groundingprovidesa path
of least resistanceforelectricalcurrentto reducetheriskof electricalshock.Thisproductis equippedwith
a cordhavingan equipment-groundingconductorand a groundingplug. Theplug must bepluggedinto an
appropriateoutlet that is properlyinstalled and groundedin accordancewith local codesand ordinances.
o Neveruse the treadmill beforesecuringthesafety tetherclip toyour clothing.
o Ifyouexperienceanykind ofpain, including but notlimited tochestpains,nausea,dizziness,orshortness
of breath,stopexercisingimmediatelyand consultyour physicianbeforecontinuing.
o Donot wearclothesthat might catch onanypart of the treadmill.
o Alwayswearathletic shoeswhile using this equipment.
o Donotjump on thetreadmill.
o Keeppowercord awayfrom heatedsurfaces.
o Donot insert or drop anyobject intoanyopening.
o Unplugtreadmill beforemovingor cleaningit. Toclean,wipesurfacesdownwith soapandslightly damp
cloth only:neverusesolvents.(SeeMAINTENANCE)
o At no time shouldmorethan onepersonbeon treadmill whilein operation.
o Thetreadmill's should not be used by personsweighing morethan 350 pounds.Failure to complywill
voidthe warranty.
o Thetreadmills are intended for in-home use only.Donot use this treadmill in any commercial,rental,
schoolor institutional setting. Failureto complywill voidthe warranty.
o Donot usetreadmill in anylocationthat is not temperaturecontrolled,suchasbut notlimited to garages,
porches,poolrooms,bathrooms,carportsor outdoors.Failuretocomplymayvoidthe warranty.
• Usethe treadmill onlyas describedin this manual.
At NOtime ShOuldpetsOrchiidrenunderthe ageof J2 bedoserio_iii ireadmitl than ]o ieit.
%_ _,4
' improperconnectiOnOftheeq,¢ment:gro,, ingCon ,ctorcanresuitinariskof
dectric shock.Checkwitha qualifiedelectricianor servicemanifyouarein doubt
as to whethertheproductis properlygrounded.Donot modifythep!ug provided
with theproduct.!f it wi/!not fit the outlet, havea properoutlet installed by
qua!ified e!ectrician
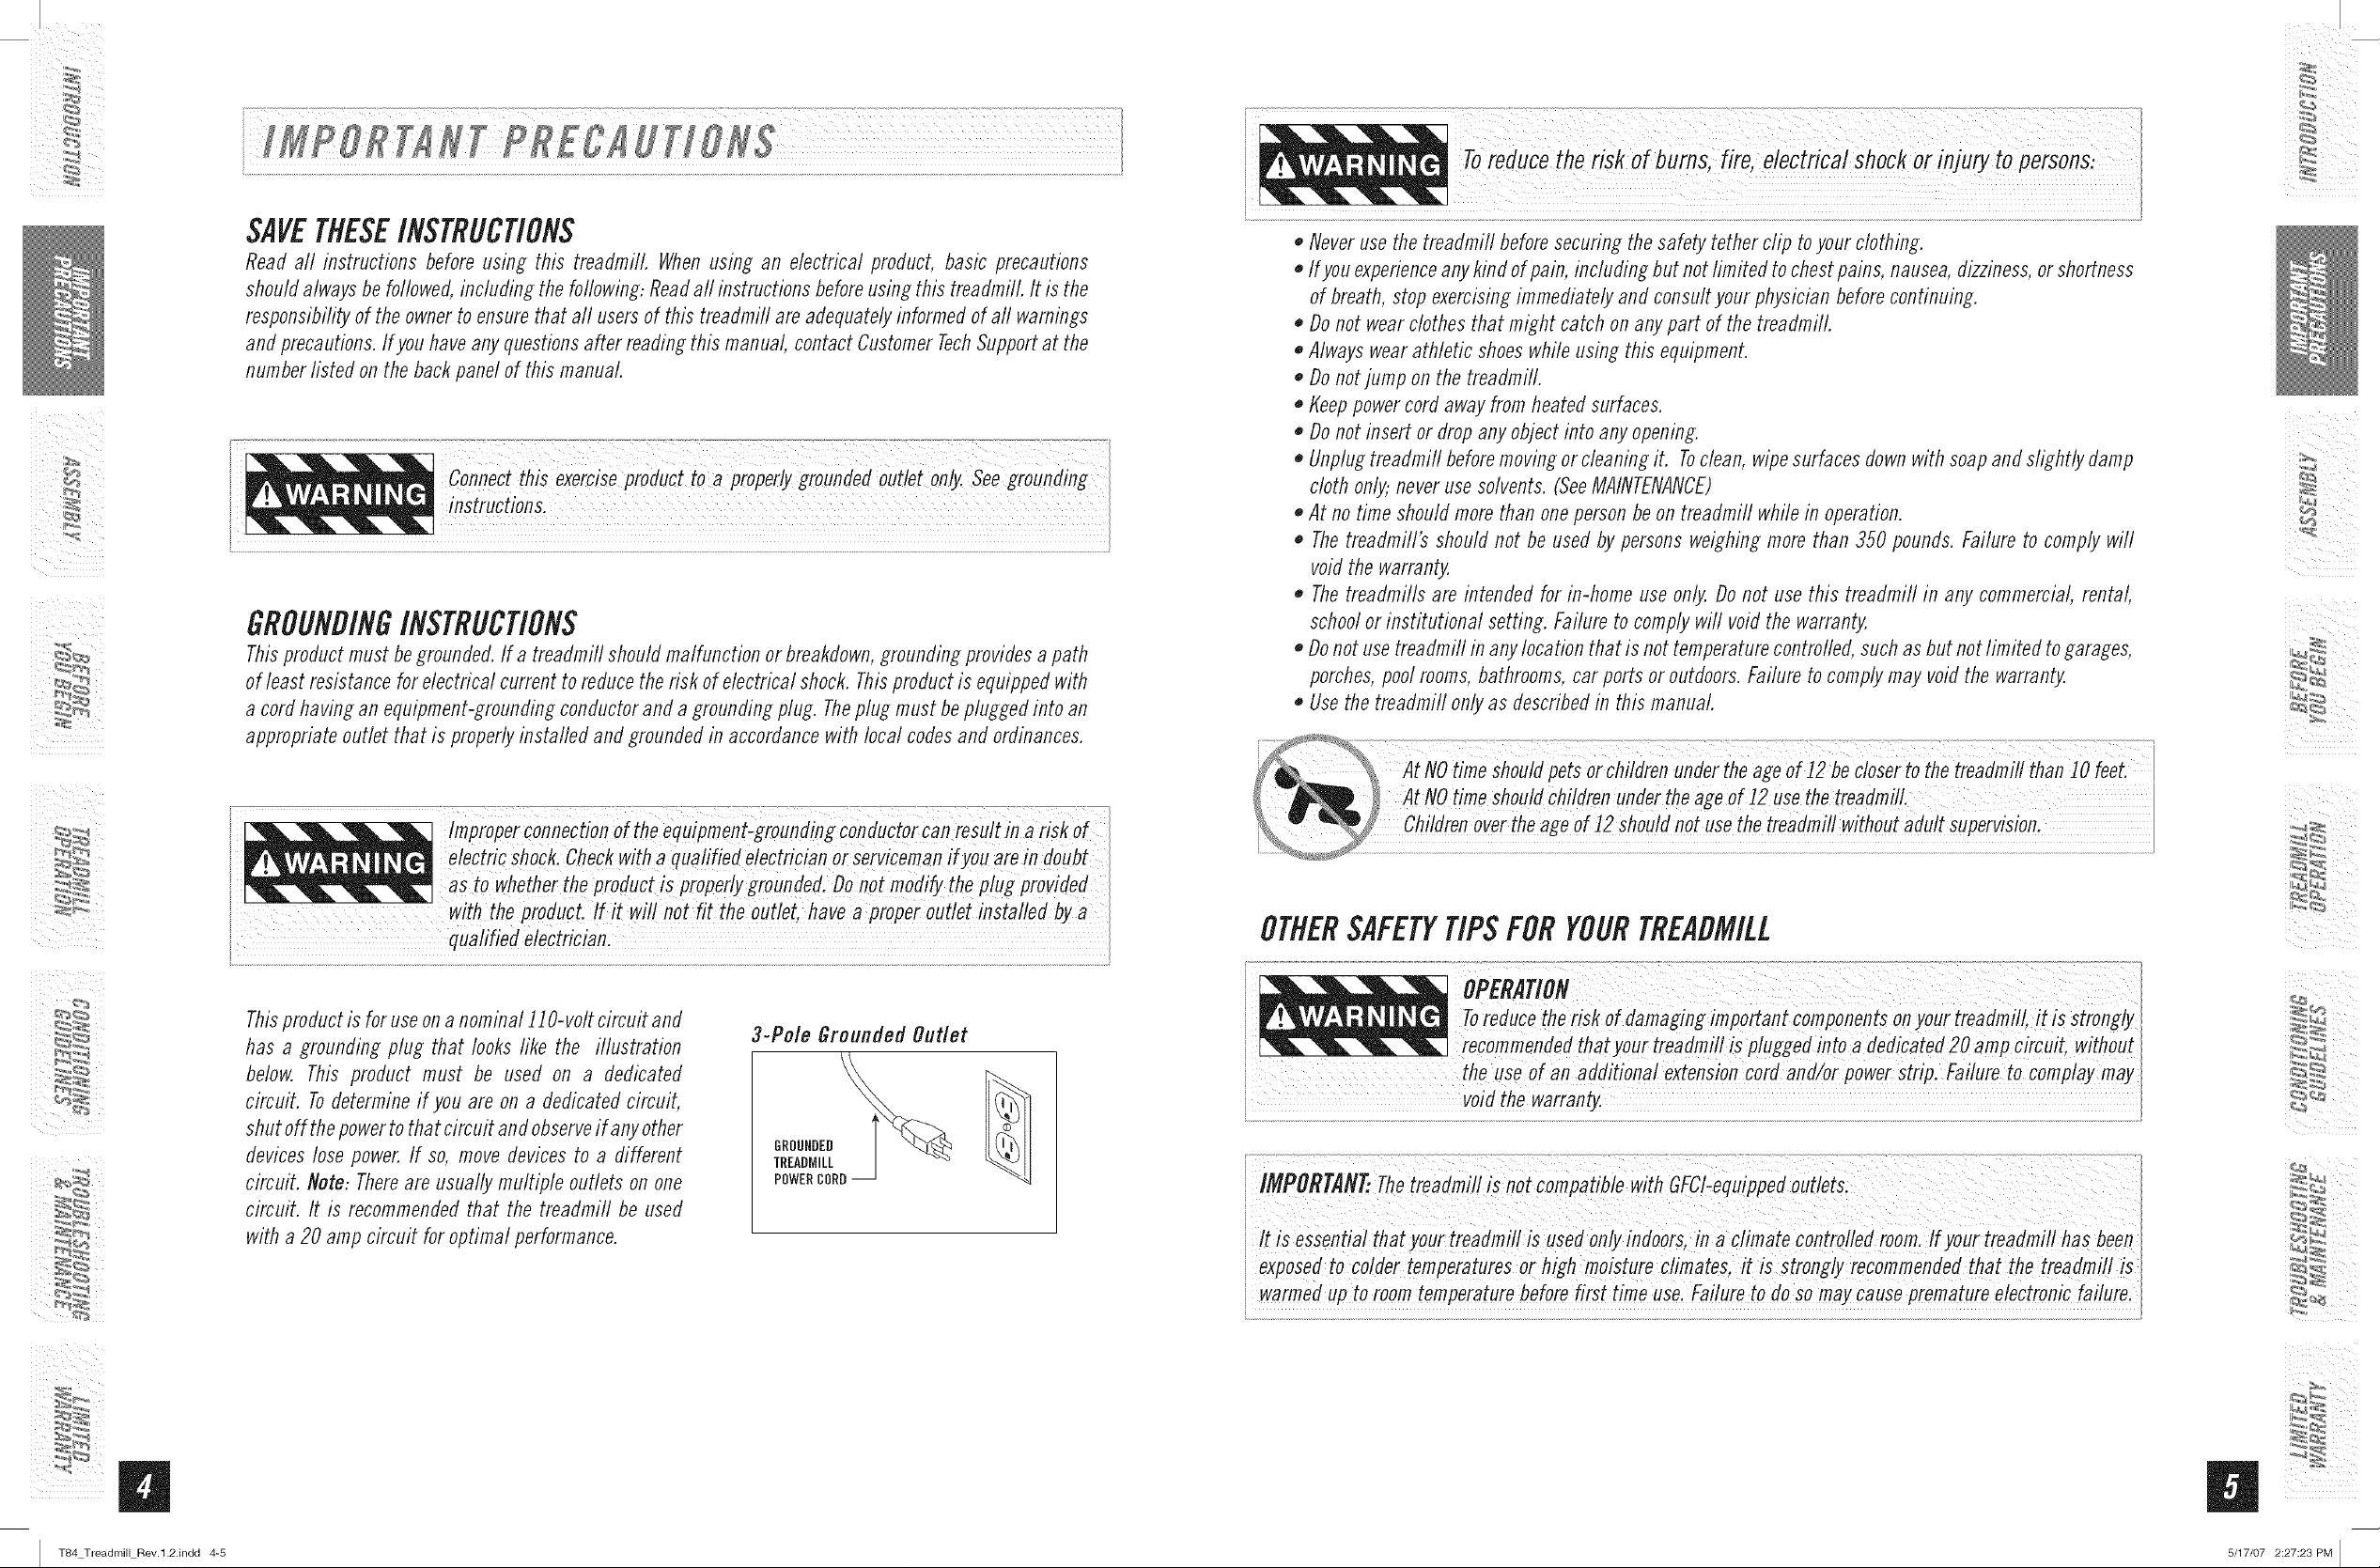
This product is for use on a nominal HO-volt circuit and
has a grounding plug that looks like the illustration
below. This product must be used on a dedicated
circuit. Todetermine if you are on a dedicated circuit,
shut off the power to that circuit and observe if any other
devices lose power. If so, move devices to a different
circuit. Note: Thereare usually multiple ouflets on one
circuit. It is recommended that the treadmifl be used
with a 20 amp circuit for optimal performance.
3-Pole Grounded Outlet
At No time should ChildrenUndertheageOf !2 usethe treadmil!.
ageo( !2 shou!_not use the treadmi//withoutadu!t supervision:
OTHERSAFETYTIPSFORYOURTREADMILL
i Toreducetheriskof damagingimportantcom_one_ts on
recommendedthatyour treadmill ispluggedintoa dedicated20ampcircuit, without
the Useof an additiona! extensioncord and/orpOwerstrip, Fai!ureto comp!aymay
i it is essentia!that your treadmiii is usedOnlyindoors,in aclimate co_troltedroOm:ifyourtreadmifl has been
i exposedto colder temperaturesor high moisture climates,it is strongly recommendedthat thetreadmifl iS
i warmedup to roomtemperaturebeforefirst time UselFailureto dosomay Causepremature electronicfai!ure;
H
I T84 Treadmill Rev.l.2.indd 4-5
5/17/07 2:27:23 PM I

I
/ i
IMPORTANZ.READTHESESAFETYINSTRUCtiONSBEFOREUSE!
Duringthe assemblyprocessof the treadmill thereareseveralareas that special attention must bepaid.
It is veryimportant to follow the assemblyinstructions correctlyand to make sure all parts are firmly
tightened. If theassemblyinstructions arenot followedcorrectly,thetreadmill couldhaveframeparts that
arenot tightenedand will seemlooseand maycauseirritating noises.Thereshouldbenoside-to=sideplay
in the consolemasts oranyforwardand backplay in the consoleassemblyor handlebars.If thereis any
playin theseareas,thetreadmillhas not beenproper!vassembled.Topreventdamagetothetreadmill,the
assemblyinstructions must bereviewedand correctiveactionsshouldbe taken.
UNPACKING
Placethetreadmillcartononalevelflat surface.It is recommendedthat youplace aprotectivecoveringon
your floor. TakeCAUTIONwhenhandling and transporting this unit. Neveropenbox whenit is on its side.
Oncethe bandingstraps have beenremoved,donot rift or transport this unit unless it is fully assembled
and in the upright foldedposition, with the locklatch secure.Unpackthe unit whereit wifl be used. The
enclosedtreadmill is equippedwith high-pressureshocksand mayspring openif mishandled.Nevergrab
holdofanyportionof theincline frameandattempt tolift or movethetreadmill FAILURETOFOLLOWTHESE
INSTRUCTIONSCOULDRESULTININJURY!
REAOINORACK
MP3-IN,lACK
WATERDOTTLEHOLDER
GRIPPULSEHANDRAILS
°EAOPHONEJACK
SUPPORTBAR
HANDLEBARS
ON/OFFSWITCH
CIRCUITBREAKER
POWERCORD
TRANSPORTWHEEL
AIRCELL
SPEAKERS
STORAGEAREA
CONSOLEMASTCOVER
CONSOLE
FAN
SAFETYKEYPLACEMENT
CONSOLEMAST
MOTORCOVER
RUNNINGBELTIRUNNINGDECK
FOOTLOOKLATCH
SiDERAIL
%_ _,4
ROLLERENDCAP
REARROLLER
ADJUSTMENTBOLTS
m
I T84 Treadmill Rev.l.2.indd 6-7
proceeding,findyo"rtre"dmilr seriai',mbe
and modelnamelocated under thedeck on the frame
crossbarand enterit in the spaceprodded below.
ENTER
SERIALNUMBER:
MODELNAME:
* Referto theSERIALNUMBERandMODELNAMEwhencalfing forservice.
* Alsoenterthisserialnumberonyour WarrantyCard.
[] 1SafetyKey [] 2 ConsoleMasts
[] i ConsoleAssembly(locatedundertreadmill deck) [] i Bottleof SiliconeLubricant
[] 2 ConsoleMast Covers [] 1 SupportBar
[] 1PowerCord [] 1AudioAdaptorCable
[] 6 HardwareBags
[] 2 Handlebars
For a complete exploded diagram, visit us at www.horizonfitness.com
5/17/07 2:27:30 PM [
I
/ i
i i
so mayresult b injury! Removeplastic wrap fromconsole masts.
BOLT(A) FLATWASHER(B)
15mm 20 mm
Qty:1 Qty:1
TEFLONWASHER(C)
18mm
Qty:1
BOLT(g)
Qty:l
L¸
FLATWASHER(E) WAVYWASHER(F)
27rnm 29 rnm
Qty:1 Qty:1
CONSOLEMAST
MAINFRAME
WAVYWASHER(F) FLATWASHER(E)
BOLT(A) _ _/
FLATWASHER(O) /
TEFLONWASHER(C) ELEVATIONFRAME
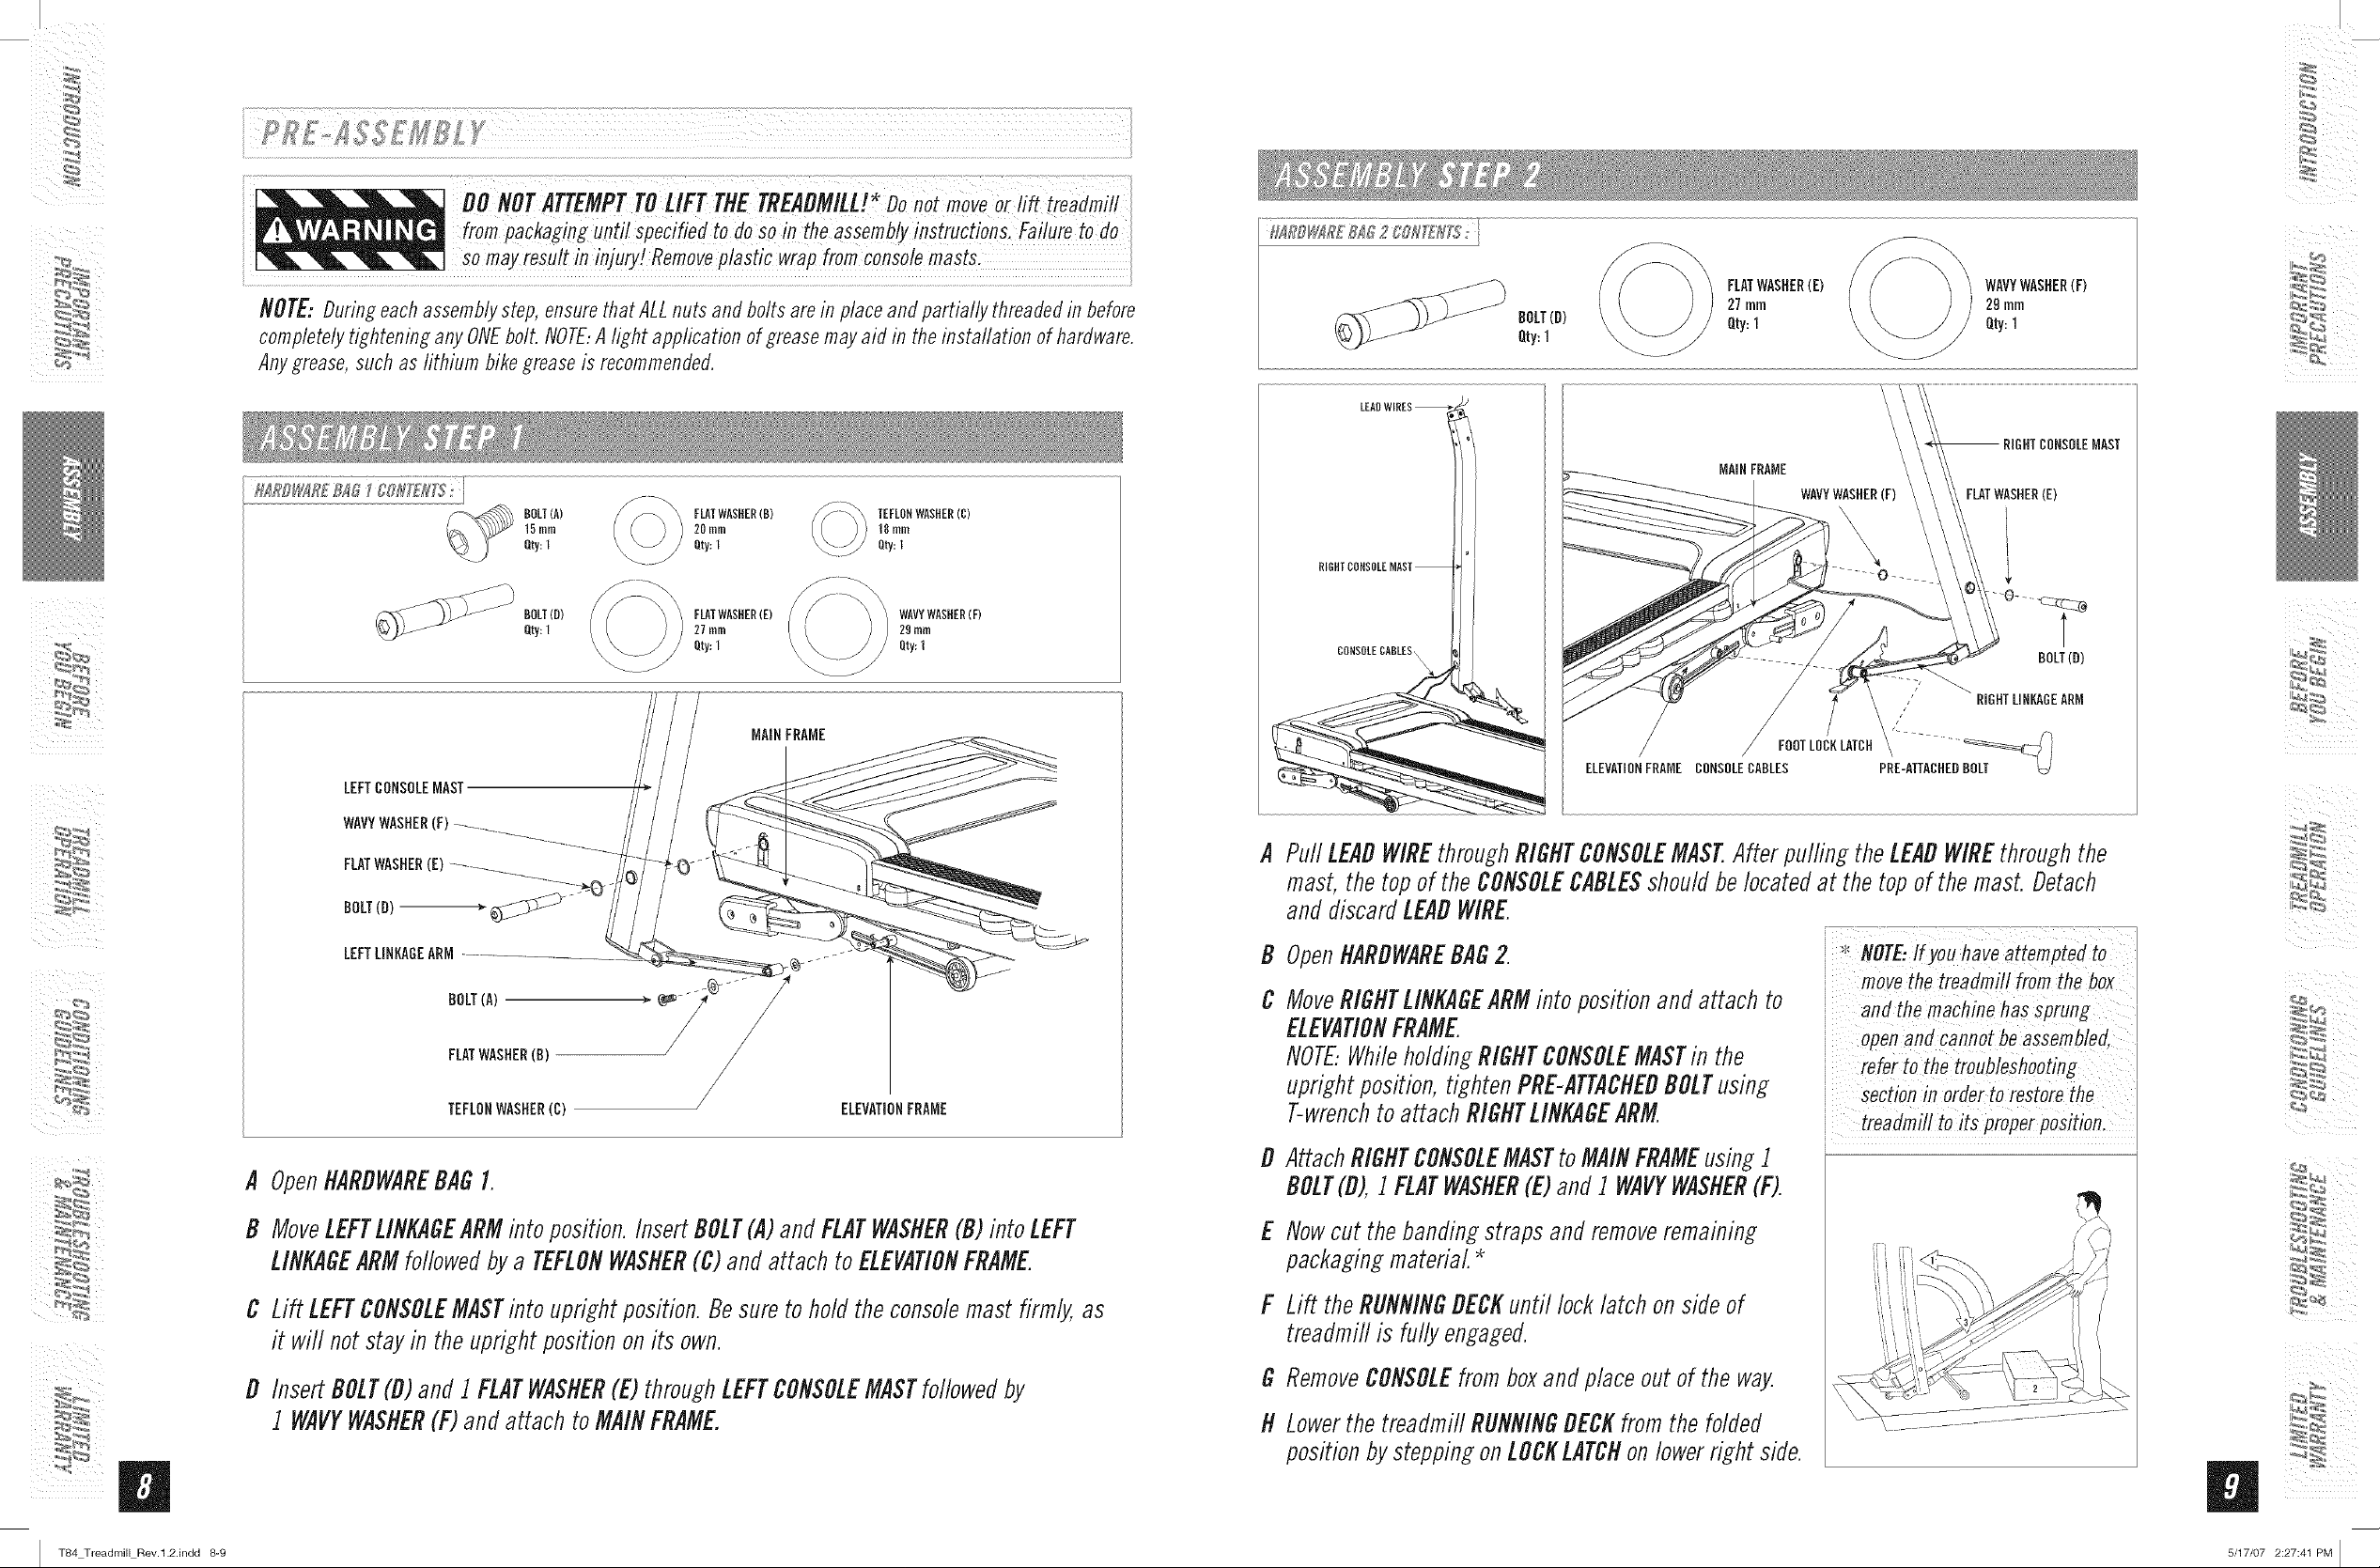
A OpenHARDWAREDAGI.
BOLTTO)
i
/
/
,/ FOOTLOCKLATCH \ ........... _&IL1 _
ELEVMIONFRAIE CONSOLECABLES PRE-ATTACHEOBOLT
A
PullLEADWIREthroughRIGHTCONSOLEMAST.Afterpulfing the LEADWIREthroughthe
RIGHTLINKAGEARM
%_ _,_
mast, the topofthe CONSOLECABLESshouldbelocatedat thetopof themast.Detach
and discardLEADWIRE.
i ; .................... .....................
D
OpenHARDWAREBAG1
i _"NOTE:Ifyouhaveattemptedto
i
move thetreadmi//fromthe box
C
MoveRIGHTLINKAGEARMintopositionandattach to
ELEVATIONFRAME.
/
NOTF:Whileho/din_RIGHTCONSOLEMASTin the
/
uprightposition,tightenPRE-ATTACHEflBOLTusin_
T-wrenchto attachRIGHTLINAGEARM.
U
AttachRIGHTCONSOLEMASTtoMAINFRAMEusin_i
i themachinehassprung
openandcannotbeassembtefl,
i refer to the troubleshooting
i sectionin orflertorestore the
DOLT(U),1 FLATWASHER(E)andi WAVYWASHER(F).
m
I T84 Treadmill Rev.l.2.indd 8-9
D MoveLEFTLINKAGEARMintoposition.InsertDOLT(A)andFLATWASHER(D)into LEFT
LINKAGEARMfollowedbya TEFLONWASHER(C)andattach toELEVATIONFRAME.
C Lift LEFTCONSOLEMASTinto upright position.Besureto hold theconsolemast firmly, as
it will notstayin the uprightpositiononits own.
U InsertDOLT(D)and ] FLATWASHER(E)throughLEFTCONSOLEMASTfollowedby
7 WAVYWASHER(F)andattach toMAINFRAME.
E
Nowcut thebandin_straps andremoveremainin_
packadn_ material.*
F
Lift theRUNNINGDECKuntil locklatch onsideof
treadmiflis fully en_a_ed.
G
RemoveCONSOLEfromboxandplace out of the way.
H
LowerthetreadmiflRUNNINGBECKfromthefolded
positionby steppin_onLOCKLATCHonlowerright side.
5/17/07 2:27:41 PM I
I
/ i
SPRINGWASHER(B)/ J-_ \ FLATWASBEB(I)
Qty:4 Qty:2
15rnrn _x_ 19rnrn
CONSOLE
i i
i ARCWASHER(J)
CONSOLEMAST
CABLES
ABCWASHER(J)
17rnrn
Qty:2
\
\
\
SUPPORTBAR
\\
\
%_ _,4
FLATWASHER(I)
SPRINGWASHER(H)
BOLT(G)
A
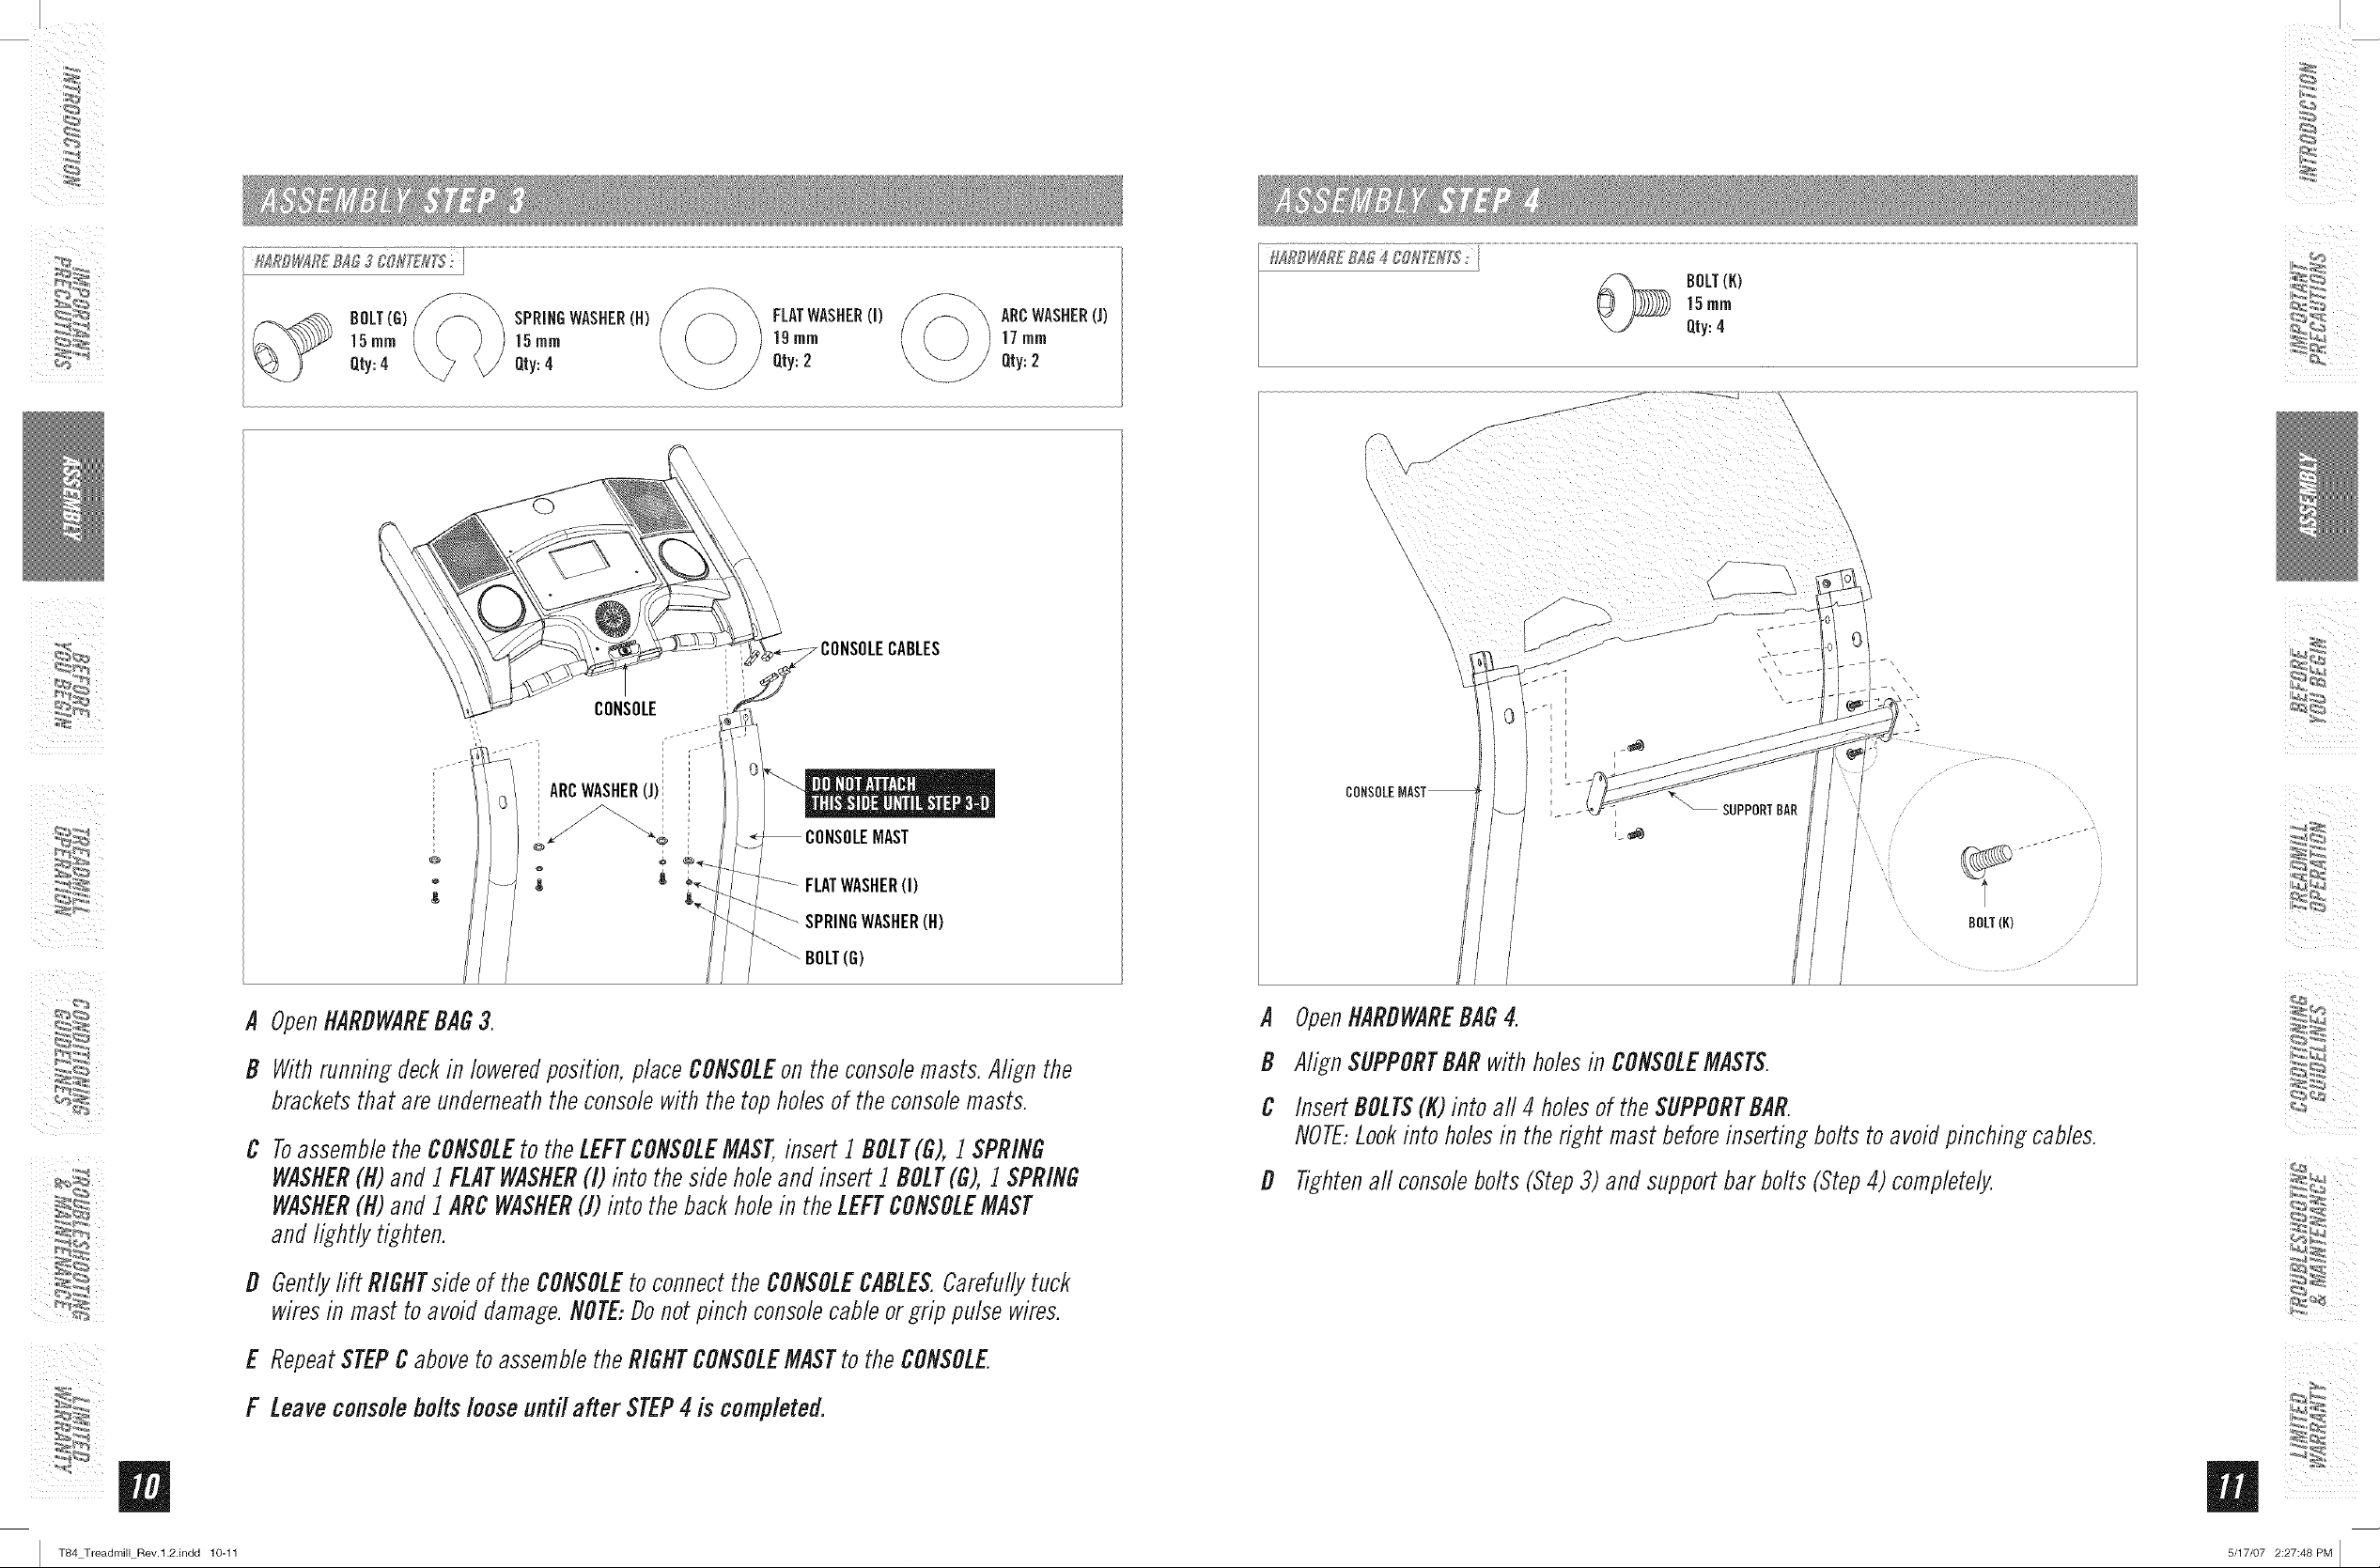
OpenHARDWAREBAG3.
D
Withrunningdeckin loweredpositbn, placeCONSOLEon theconsolemasts.Align the
bracketsthat areunderneaththeconsolewiththetop holesof the consolemasts.
ToassembletheCONSOLEto theLEFTCONSOLEMAST,insert i DOLT(G),1SPRING
WASHER(H)and i FLATWASHER(I) into the sideholeand insert] DOLT(G),] SPRING
WASHER(H)and i ARCWASHER(]) into thebackholein theLEFTCONSOLEMAST
andlightly tighten.
D
Gentlyrift RIGHTsideof theCONSOLEto connectthe CONSOLECABLES.Carefullytuck
wiresin mast to avoiddamage.NOTE:Donotpinchconsolecableorgrip pulse wires.
E
RepeatSTEPCabovetoassembletheRIGHTCONSOLEMASTto theCONSOLE
F
Leaveconsoleboltsbose untilafter STEP4 is completed.
BOLT(K)
A OpenHARDWAREBAG4.
D AlignSUPPORTBARwithholesin CONSOLEMASTS.
C InsertDOLTS(t0 into aft4 holesoftheSUPPORTDAR.
NOTE:Lookintoholesin the right mastbeforeinsertingboltstoavoidpinchingcables.
B Tightenaftconsolebolts (Step3) andsupportbar bolts (Step4) completely.
m
I T84 Treadmill Rev.l.2.indd 10-11
5/17/07 2:27:48 PM ]
I
BOLT(L) .......
ARCWASHER(J).....
CONSOLEMAST
HANDLEBARS
BOLT(L)
120rnrn
Qty:4
ARCWASHER(J)
17rnrn
Qty:2
SCREW(M)_c_ .....
CONSOLE
CONSOLEMAST
(_ SCREW(M)
10rnrn
Qty:10
%_ _,4
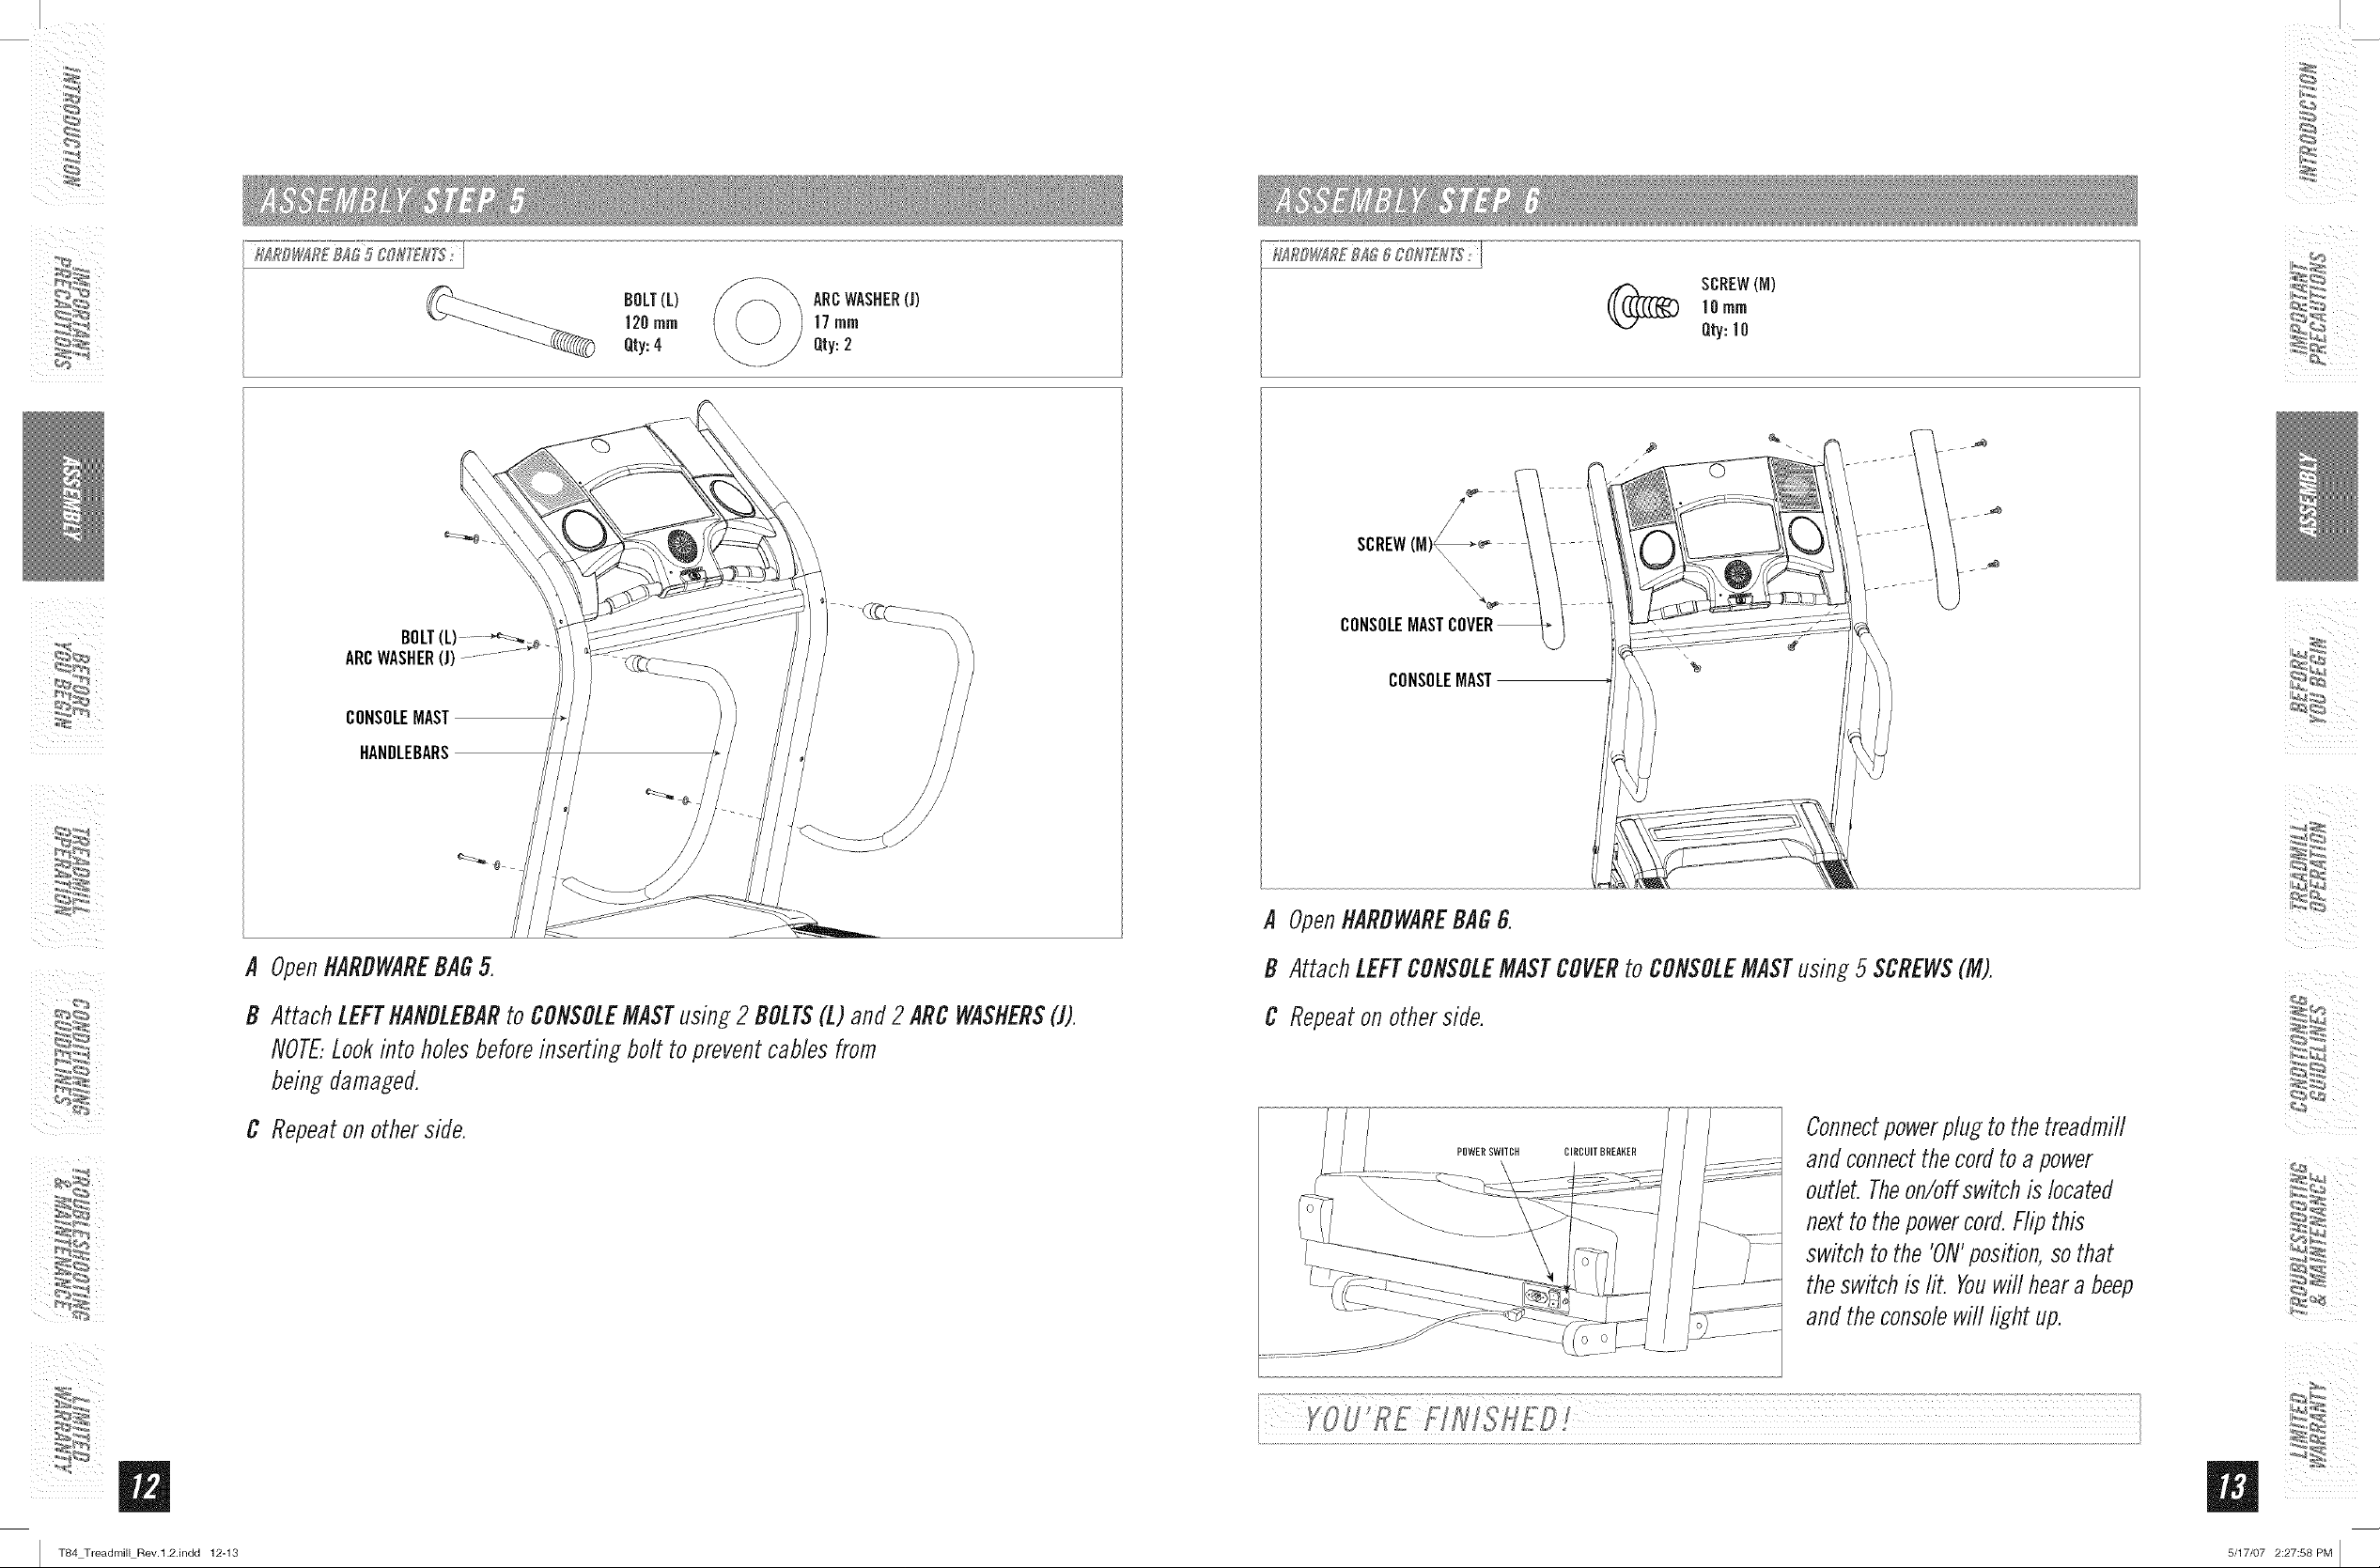
A OpenHARDWAREBAG5.
B Attach LEFTHANDLEBARto CONSOLEMASTusing2 BOLTS(L)and2ARCWASHERS(J).
NOTE..Lookinto holesbeforeinsertingbolt topreventcablesfrom
beingdamaged.
C Repeatonotherside.
A OpenHARDWAREBAG6.
B AttachLEFTCONSOLEMASTCOVERto CONSOLEMASTusing 5 SCREWS(M).
C Repeatonotherside.
Connectpowerplug to the treadmill
POWERSWITCH CIRCUITBREAKER
\
and connectthe cordtoa power
outlet. Theon/off switch is located
nextto thepowercord. Flip this
switch to the 'ON'position,so that
theswitch is lit. Youwill heara beep
and the consolewill light up.
m
I T84 Treadmill Rev.l.2.indd 12-13
5/17/07 2:27:58 PM I
 Loading...