

Horizon T82 Owner’s Manual

//
TREADMILLUSER'S GUIDE
CONGRATULATIONSand THANKYOUforyourpurchaseof this HorizonSeriestreadmill!
Whetheryour goal is to win races or simply enjoy a fuller, healthier lifestyle, a Horizon Series treadmill
can help you attain it- adding club-quality performance toyour at-home workouts, with the ergonomics
and innovative features you need to get stronger and healthier, faster. Because we're committed to
designing fitness equipment from the inside out, we use only the highest quafity components. It's a
commitment we back with one of the strongest frame-to-motor warranty packages in the industry.
Youwantexerciseequipmentthat offers the most comfort,the bestreliability and the highest quality
in its class.
TheHorizonSeriesderivers.
Important Precautions
Assembly
Before You Begin
13
Treadmill Operation 16
Conditioning Guidelines 25
Troubleshooting & Maintenance 32
Limited Warranty 35
CONTACTINFORMATION Back Panel
4
6
i_I _ iii
SAVETHESEINSTRUCTIONS
Readall instructions before using this treadmill. Whenusing an electrical product, basic precautions
shouldalwaysbefollowed,including the following:Readaftinstructionsbeforeusingthis treadmill.It isthe
responsibilityof the ownertoensurethat aft usersof this treadmill areadequatelyinformedof aft warnings
and precautions.Ifyouhaveanyquestionsafter readingthis manual,contactCustomerTechSupportatthe
numberlisted on the backpanelof this manual
GROUNDINGINSTRUCTIONS
Thisproductmustbegrounded.If a treadmill shouldmalfunctionor breakdown,groundingprovidesa path
of least resistanceforelectricalcurrentto reducetheriskof electricalshock.Thisproductis equippedwith
a cordhavingan equipment-groundingconductorand a groundingplug. Theplug must bepluggedinto an
appropriateoutlet that is properlyinstafledandgroundedin accordancewithlocal codesand ordinances.
i _-_I_T_ ¸¸¸_ ¸¸ _'_'_ ": ............................_
Improperconnectionof theequipment,groundingconductorcanresult in a risk of
electric shock.Checkwith a qualifiedelectricianorservicemanifyou arein doubt
as to whetherthe productis properlygrounded,Donotmodifytheplug provided
i with the product, if it will not fit the outlet, have properOutletinstalled by a
qualified e!ectrician
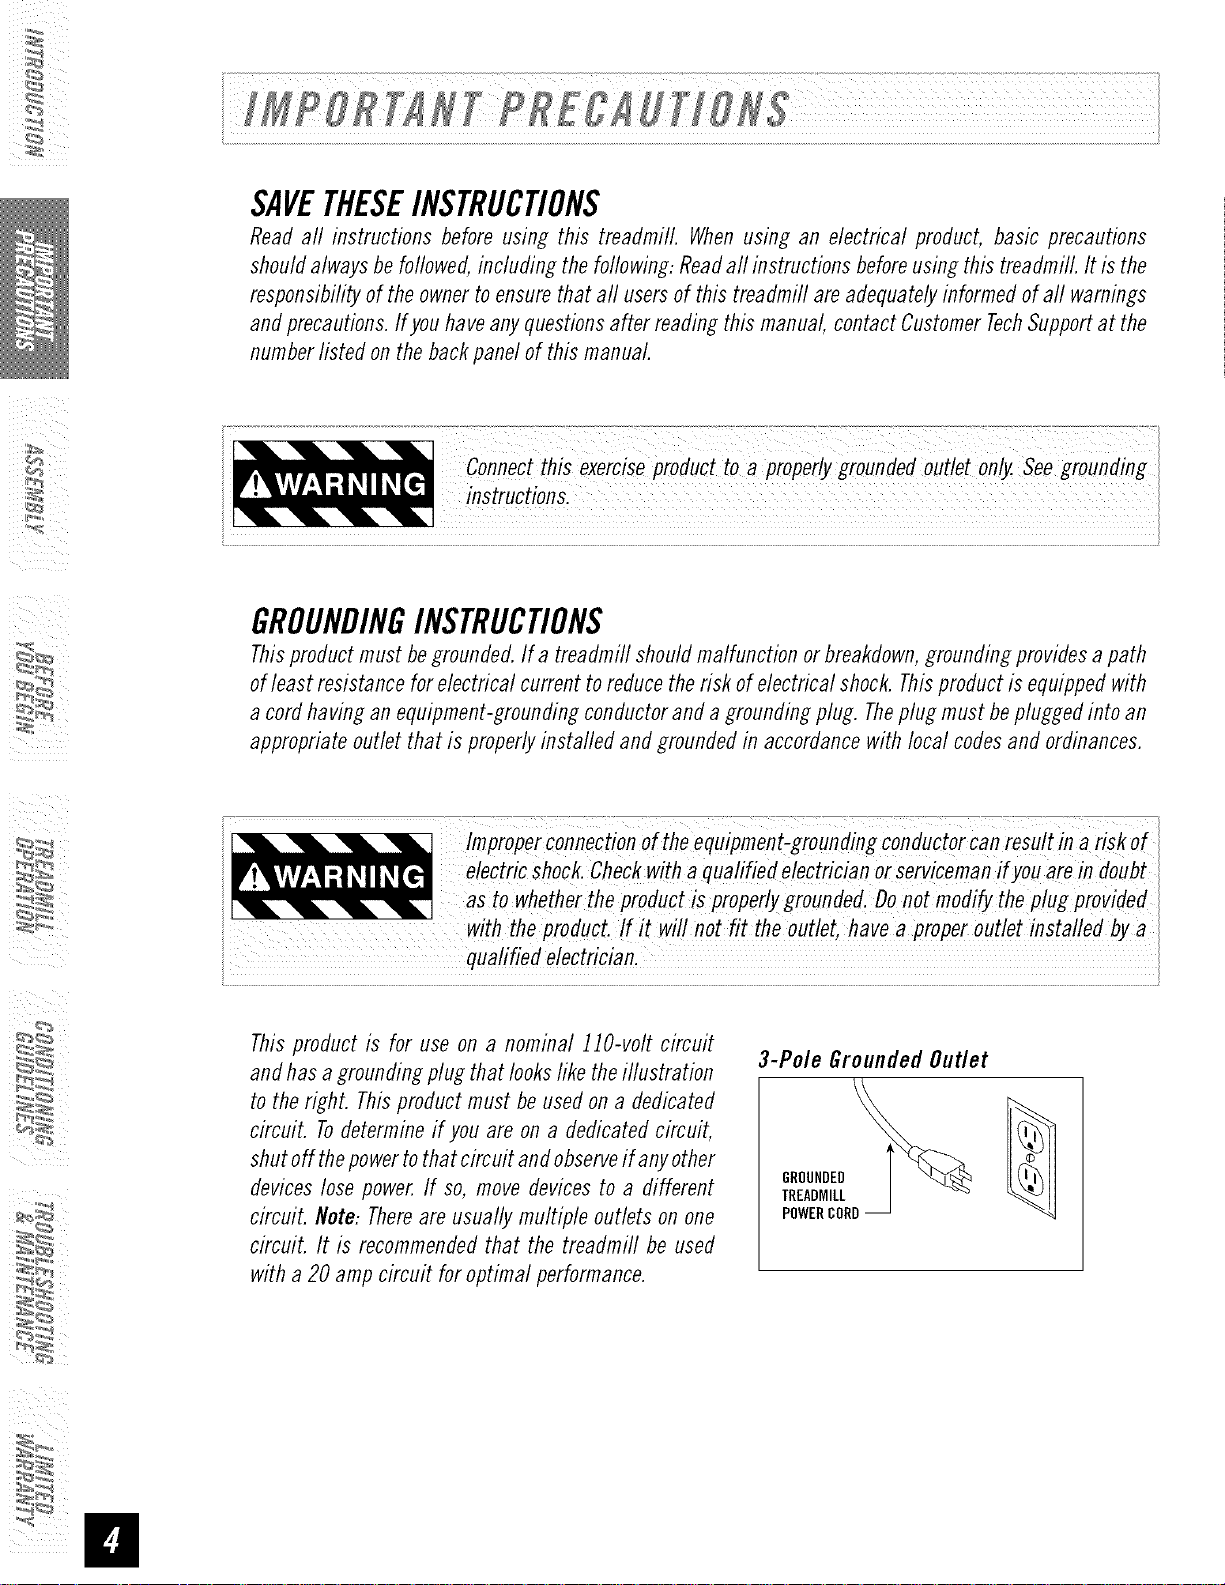
This product is for use on a nominal 110-volt circuit
and has a grounding plug that looks like the iflustration
to the right. This product must be used on a dedicated
circuit. Todetermine if you are on a dedicated circuit,
shut off thepower to that circuit and observe if any other
devices lose power. If so, move devices to a different
circuit. Note: There are usually multiple outlets on one
circuit. It is recommended that the treadmill be used
with a 20 amp circuit for optimal performance.
3-Pole Grounded Outlet
GROUNDED
TREADMILL
POWERCORD
• Never use the treadmill before securing the safety tether clip toyour clothing.
• Ifyou experience any kind of pain, including but not limited to chest pains, nausea, dizziness, or shortness
of breath, stop exercising immediately and consult your physician before continuing.
• Donot wear clothes that might catch on any part of the treadmill.
• Always wear athletic shoes while using this equipment.
• Donot jump on the treadmill.
• Keep power cord away from heated surfaces.
• Donot insert or drop any object into any opening.
• Unplug treadmill before moving or cleaning it. Toclean, wipe surfaces down with soap and slightly damp
cloth only, never use solvents. (SeeMAINTENANCE)
• At no time should more than one person be on treadmill while in operation.
• The treadmills should not be used by persons weighing more than 300 pounds. Failure to comply will
void the warranty.
• The treadmills are intended for in-home use only. Do not use this treadmill in any commercial, rental,
school or institutional setting. Failure to comply will void the warranty.
• Donot use treadmill in any location that is not temperature controlled, such as but not limited to garages,
porches, pool rooms, bathrooms, car ports or outdoors. Failure to comply may void the warranty.
• Use the treadmill only as described in this manual
OTHERSAFETYTIPSFORYOURTREADMILL
OPERATION
Toreduce the risk of damaging important components on your treadmill, it is strongly
recommended that your treadmill is plugged into a dedicated 20 amp circuit, without
the use of an additional extension cord and/or power strip. Failure to comply may void
the warranty.
IMPORTANT..Thetreadmill is not compatible with GFCl-equippedoutlets.
It is essential that_fourtreadmifl is usedonlyindoors,in a climate controlledroom.If your treadmill has been
exposedto colder temperaturesor high moistureclimates, it is strongly recommendedthat the treadmill is
warmedup toroomtemperaturebeforefirst time use,Failureto do somay causeprematureelectronicfailure.
IMPORTANT..READTHESESAFETYINSTRUCTIONSBEFOREUSE!
During the assembly process of the treadmill there are several areas that special attention must be paid.
It is very important to follow the assembly instructions correctly and to make sure aft parts are firmly
tightened. If the assembly instructions are not followed correctly, the treadmill could have frame parts that
are not tightened and will seemloose and may cause irritating noises. Thereshould be no side-to-side play
in the console masts or any forward and back play in the console assembly or handlebars. If there is any
play in these areas, the treadmill has not been properly assembled. Toprevent damage to the treadmill, the
assembly instructions must be reviewed and corrective actions should be taken.
i_I "_ i_ii
UNPACKING
Placethetreadmillcartononalevelflat surface.It is recommendedthatyou place aprotectivecoveringon
your floor. TakeCAUTIONwhenhandling and transporting this unit. Neveropenboxwhenit is onits side.
Oncethe bandingstraps have beenremoved,do notlift or transport this unit unlessit is fully assembled
and in the upright foldedposition, with the lock latch secure.Unpackthe unit whereit will beused. The
enclosedtreadmill is equippedwith high-pressureshocksand mayspring openif mishandled.Nevergrab
holdofanyportionof theincline frameandattern_ttofit ormovethe treadmill.FAILURETOFOLLOWTHESE
INSTRUCTIONSCOULDRESULTININJURY!
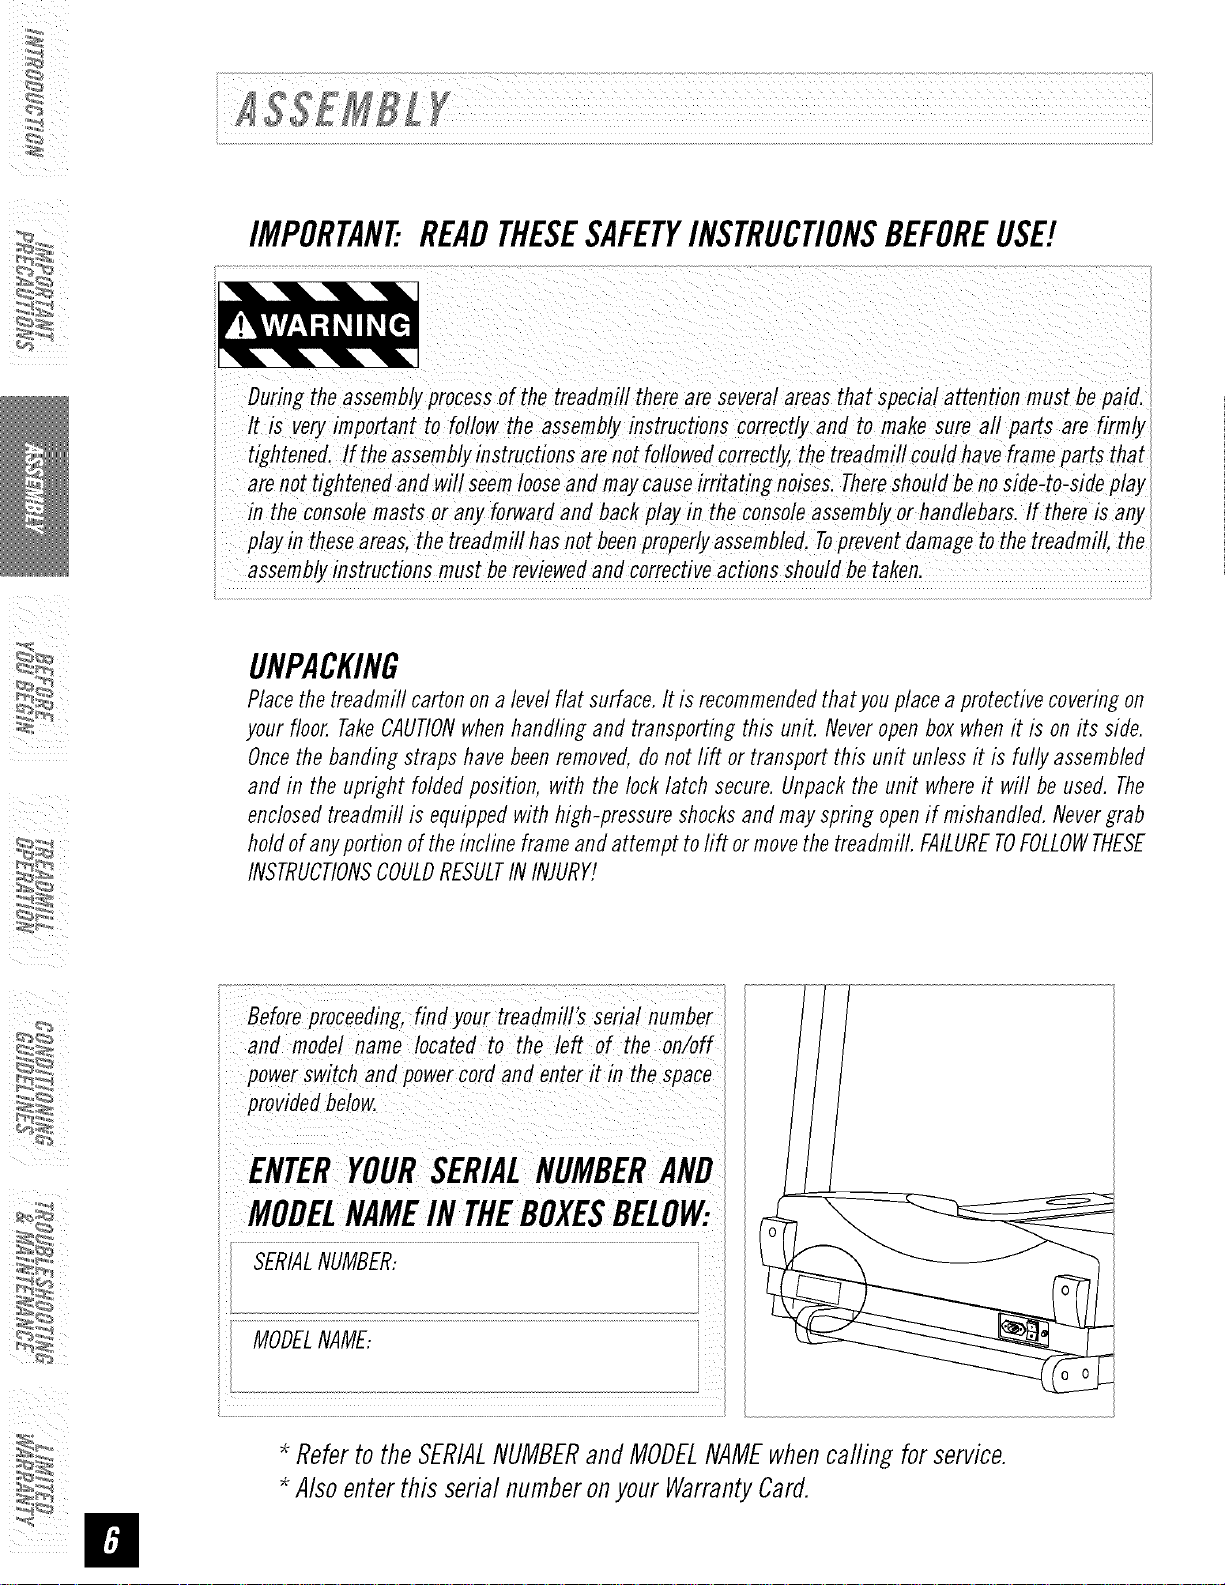
Beforepreceeding,find your treadmill's serialnumber
model name located to the left Of
powerswitchand powercordand enter it in the space
MODELNAMEINTHEBOXESBELOW:
* Referto theSERIALNUMBERandMODELNAMEwhencaring forservice.
* Alsoenterthis serialnumberonyourWarrantyCard.
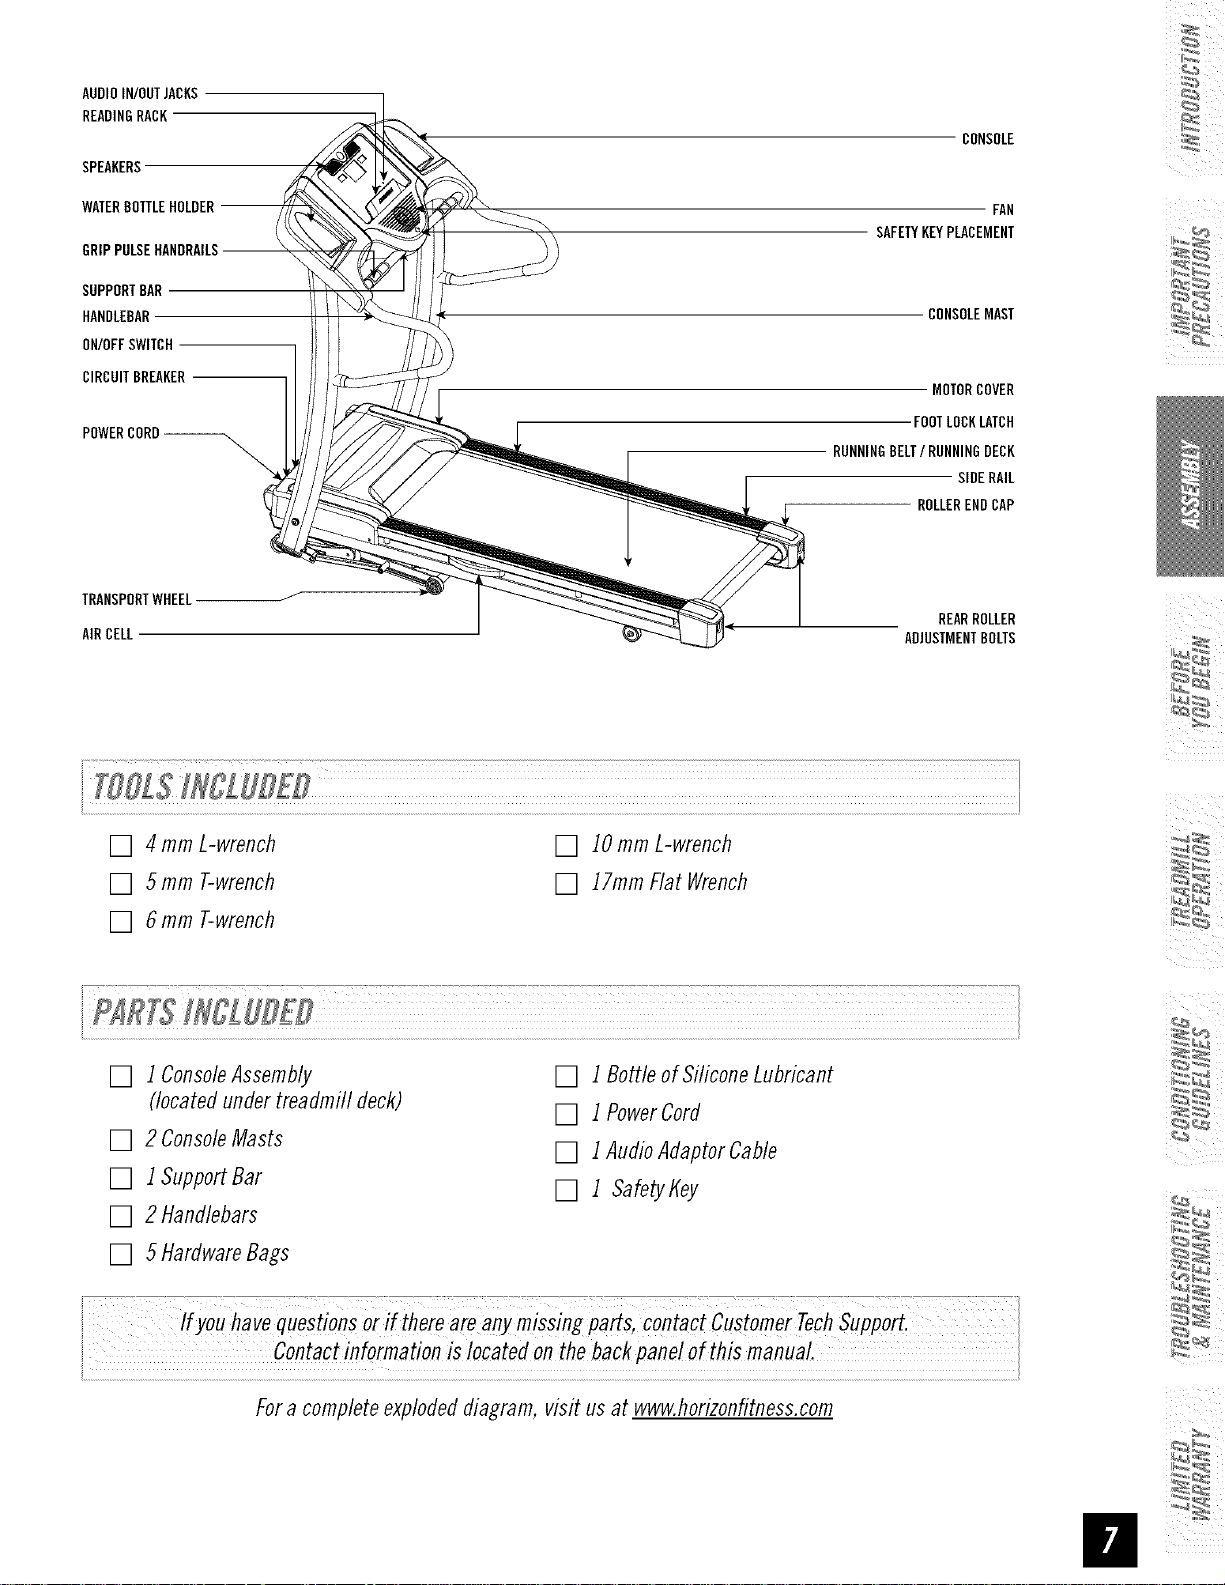
AUDIOIN/OUTJACKS
READINGRACK
CONSOLE
SPEAKERS
FAN
SAFETYKEYPLACEMENT
SUPPORTBAR
HANDLEBAR
ON/OFFSWITCH
CIRCUITBREAKER
RUNNINGBELT/RUNNINGDECK
TRANSPORTWHEEL J
AIRCELL ADJUSTMENTBOLTS
CONSOLEMAST
MOTORCOVER
FOOTLOCKLATCH
SIDERAIL
ROLLERENDCAP
REARROLLER
[] 4 mm L-wrench [] 10mmL-wrench
[] 5mm T-wrench [] 17ramFlat Wrench
[] 6mm T-wrench
[] 1ConsoleAssembly
(locatedundertreadmill deck)
[] 2 ConsoleMasts
[] 1SupportBar
[] 1 Bottleof SiliconeLubricant
[] 1PowerCord
[] 1AudioAdaptorCable
[] 1 Safetyt ey
[] 2 Handlebars
[] 5HardwareBags
i C°ntactinf°rmati°n is !ocated on the back panel o(thismanual.
x
Fora completeexplodeddiagram, visit us at www.horizonfitness.com
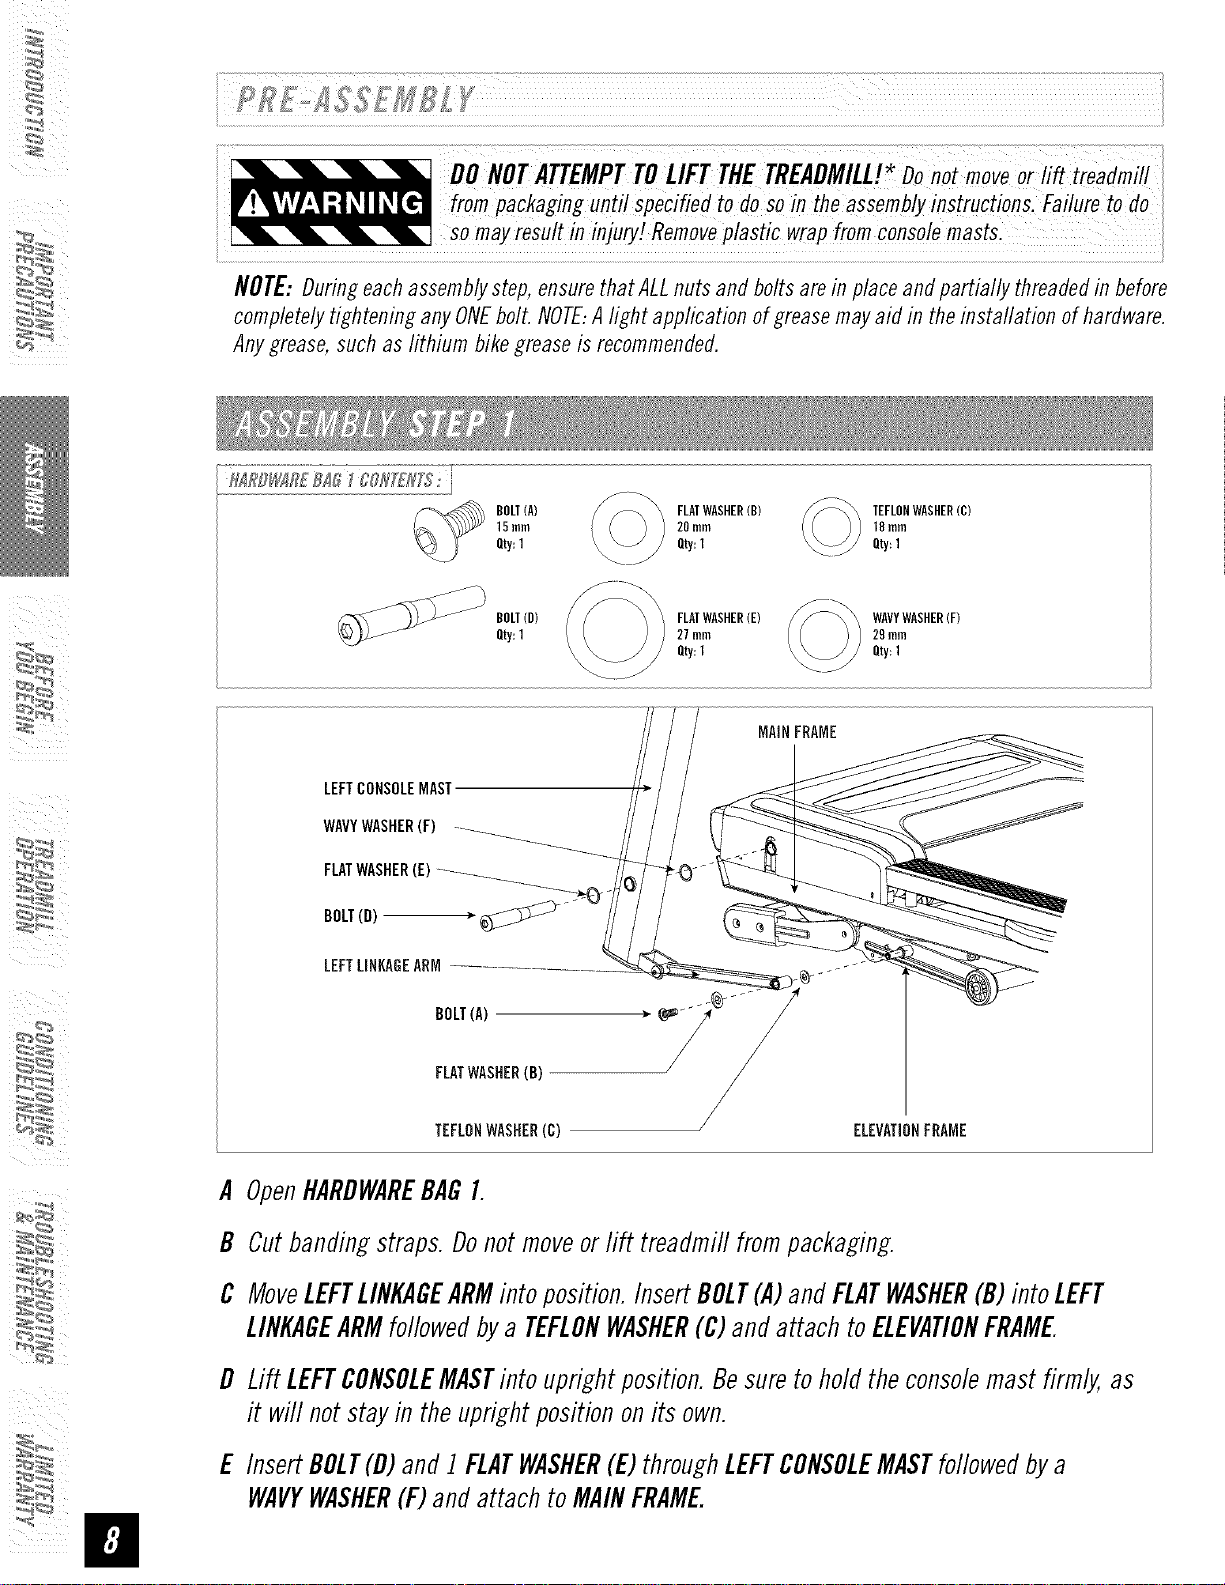
NOTE=During each assembly step, ensure that ALL nuts and bolts are in place and partially threaded in before
completely tightening any ONEbolt. NOTE:A light application of grease may aid in the installation of hardware.
Any grease, such as lithium bike grease is recommended.
I--h_RD_S_REB_O_c_Hr/_z_,j
HOLT(A) FLATWASHER(H)
15mm 20 mm
Qty:1 Qty:1
TEFLONWASHER(C)
18mm
Q_:I
i_I _ i_ii
LEFTCONSOLEMAST
WAVYWASHER(F) _
LEFTLINKAGEARM
BOLT(A) _._ _?/_
FLATWASHER(B)
TEFLONWASHER(C) /
A OpenNARBWAREBAGI.
HOLT(H)
Qty:1
FLATWASHER(E) WAVYWASHER(F)
27 mm 29mm
Qty:1 Qty:1
MAiNFRAME
/
ELEVATIONFRAME
B Cutbandingstraps. Donotmoveorlift treadmill frompackaging.
C MoveLEFTLINKAGEARMintoposition.InsertBOLT(A)andFLATWASHER(B)into LEFT
LINKAGEARMfollowedbya TEFLONWASHER(C)andattach toELEVAtiONFRAME
D Lift LEFTCONSOLEMASTinto upright position.Besureto hold theconsolemast firmly,as
it will notstayin the uprightpositiononits own.
E InsertBOLT(D)andI FLATWASHER(E)throughLEFTCONSOLEMASTfollowedbya
WAVYWASHER(F)andattach to MAINFRAME.
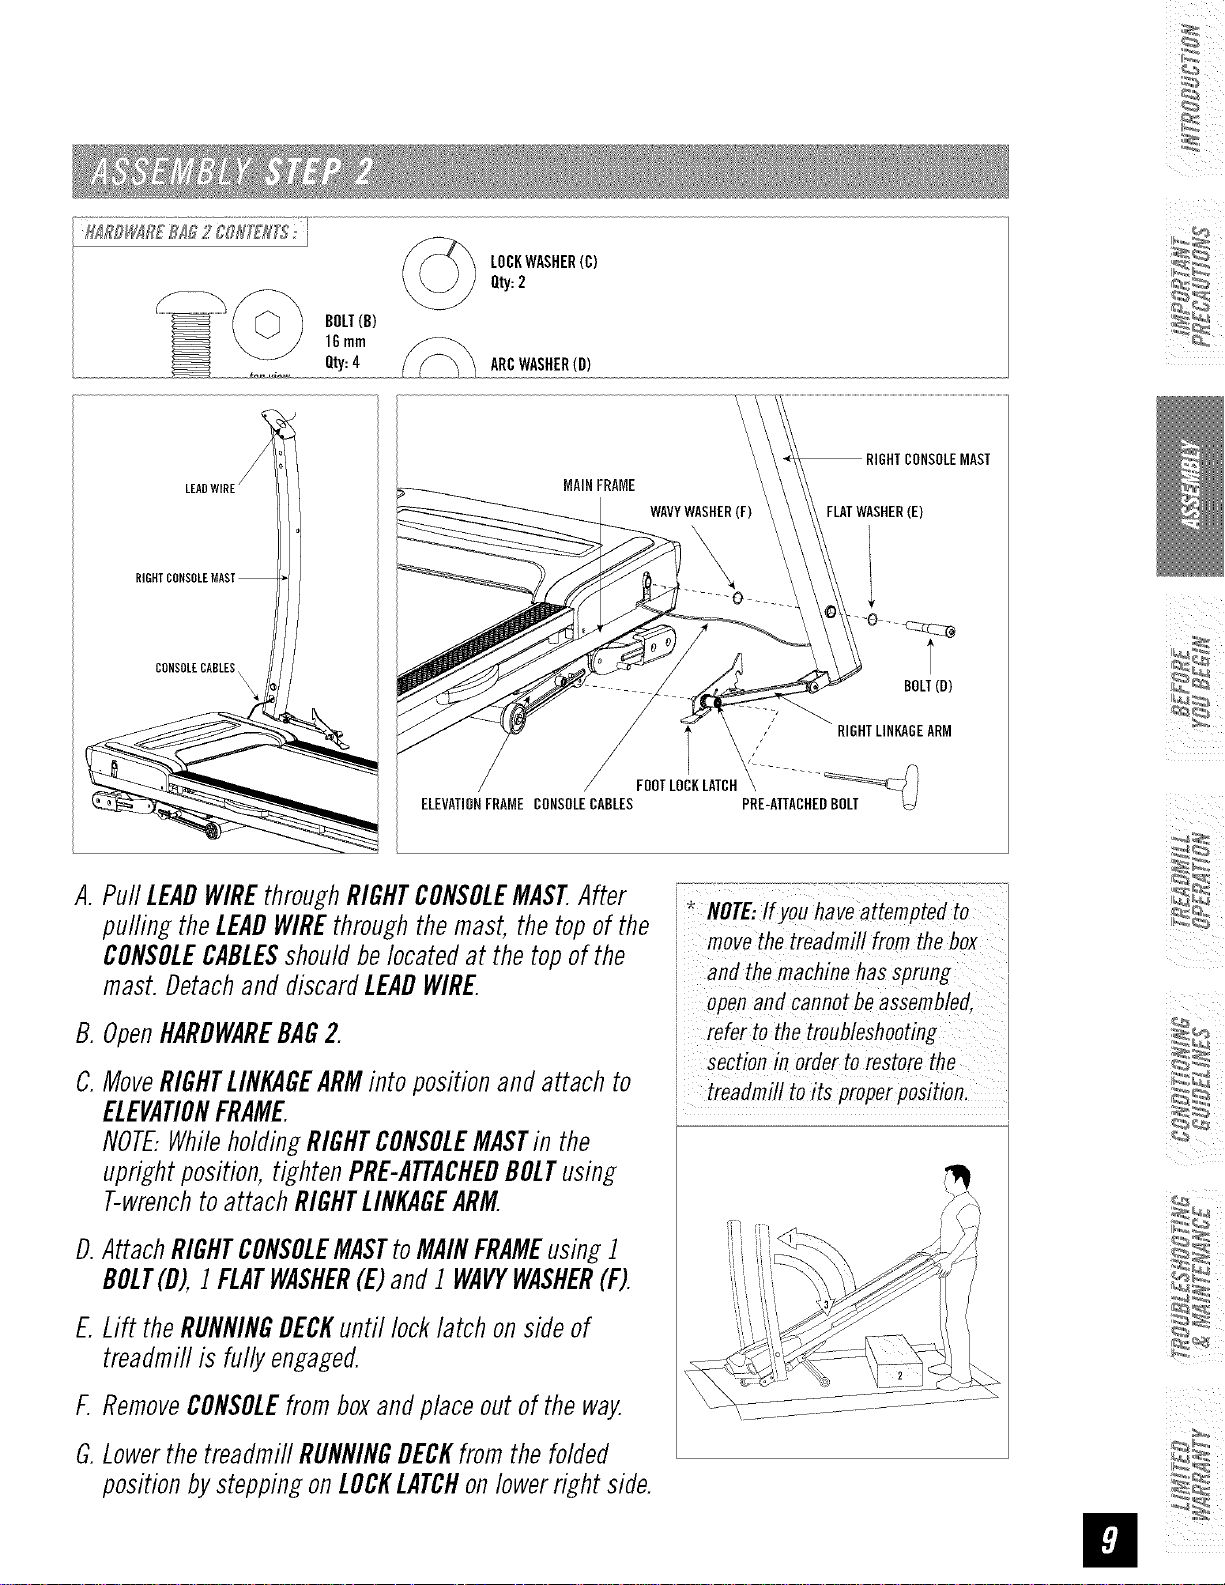
BOLT(B)
16mm
Qty:4
Qty:2
LOCKWASHER(C)
ARCWASHER(D)
MAINFRAME
WAVYWASHER(F) FLATWASHER(E)
CONSOLECABLES
ELEVATIONFRAMECONSOLECABLES PRE-ATTACHE
A. PuffLEADWIREthroughRIGHTCONSOLEMASTAfter
puffingtheLEADWIREthroughthemast, thetopof the
CONSOLECABLESshouldbelocatedat thetop ofthe
mast.Detachand discardLEADWIRE.
B.OpenHARDWAREBAG2
C.MoveRIGHTLINKAGEARMinto positionandattach to
ELEVATIONFRAME.
NOTE.,WhileholdingRIGHTCONSOLEMASTin the
uprightposition,tightenPRE-ATTACHEBBOLTusing
T-wrenchto attachRIGHTLINKAGEARM.
J
l / RIGHTLINKAGEARM
FOOTLOCKLATCH\
i,
i NOTE:Ifyou haveattempted to
i movethetreadmillfrom thebox
i
/
i and themachine hassprung
i openand cannotbe assembled,
i refer to the troubleshooting
i sectionin orderto restorethe
i treadmill toits proPerposition,
T
BOLT(D)
D.AttachRIGHTCONSOLEMASTtoMAINFRAMEusing1
BOLT(D),1 FLATWASHER(E)and1WAVYWASHER(F).
E.Lift theRUNNINGDECKuntil locklatch onsideof
treaclmiflis fully engaged.
F.RemoveCONSOLEfrom boxandplaceoutof the way.
G.LowerthetreaflmiflRUNNINGDECKfromthefolded
positionbysteppingonLOCKLATCHonlowerright side.
L_
i_I "_ )
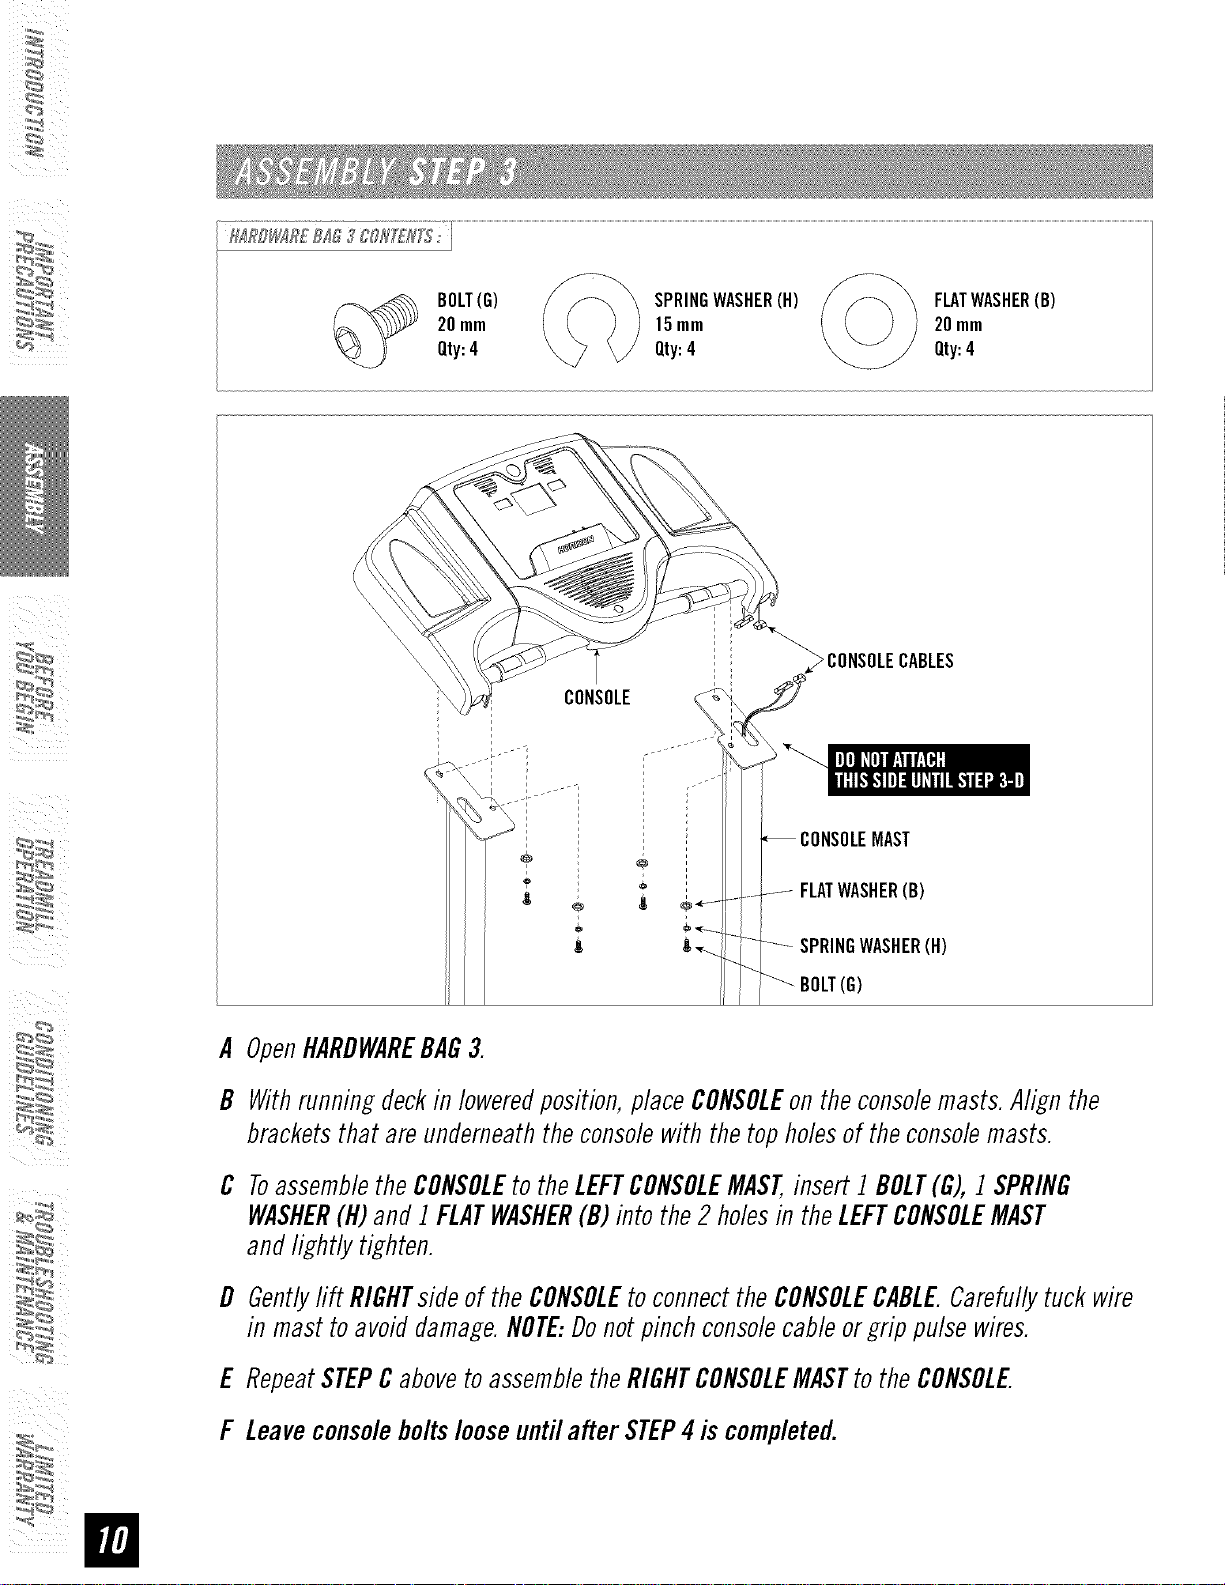
BOLT(G)
20mm
Qty:4
CONSOLE
SPRINGWASHER(H)
15mm
Qty:4
_CONSOLE CABLES
FLATWASHER(B)
20mm
Qty:4
MAST
FLATWASHER(B)
SPRINGWASHER(H)
(G)
A OpenHARDWAREBAG3.
B Withrunningdeckin loweredposition,placeCONSOLEon theconsolemasts.Align the
bracketsthat areunderneaththeconsolewiththetop holesof the consolemasts.
C ToassembletheCONSOLEtotheLEFTCONSOLEMAST,insert1BOLT(G),1SPRING
WASHER(H)and 1 FLATWASHER(B)into the2 holesin the LEFTCONSOLEMAST
andlightly tighten.
D Gentlytiff RIGHTsifleof the CONSOLEto connectthe CONSOLECABLE.Carefullytuck wire
in mast to avoiddamage.NOTE:Donotpinchconsolecableorgrip pulse wires.
E RepeatSTEPCabovetoassembletheRIGHTCONSOLEMASTto the CONSOLE
F Leaveconsoleboltslooseuntilafter STEP4 is completed.
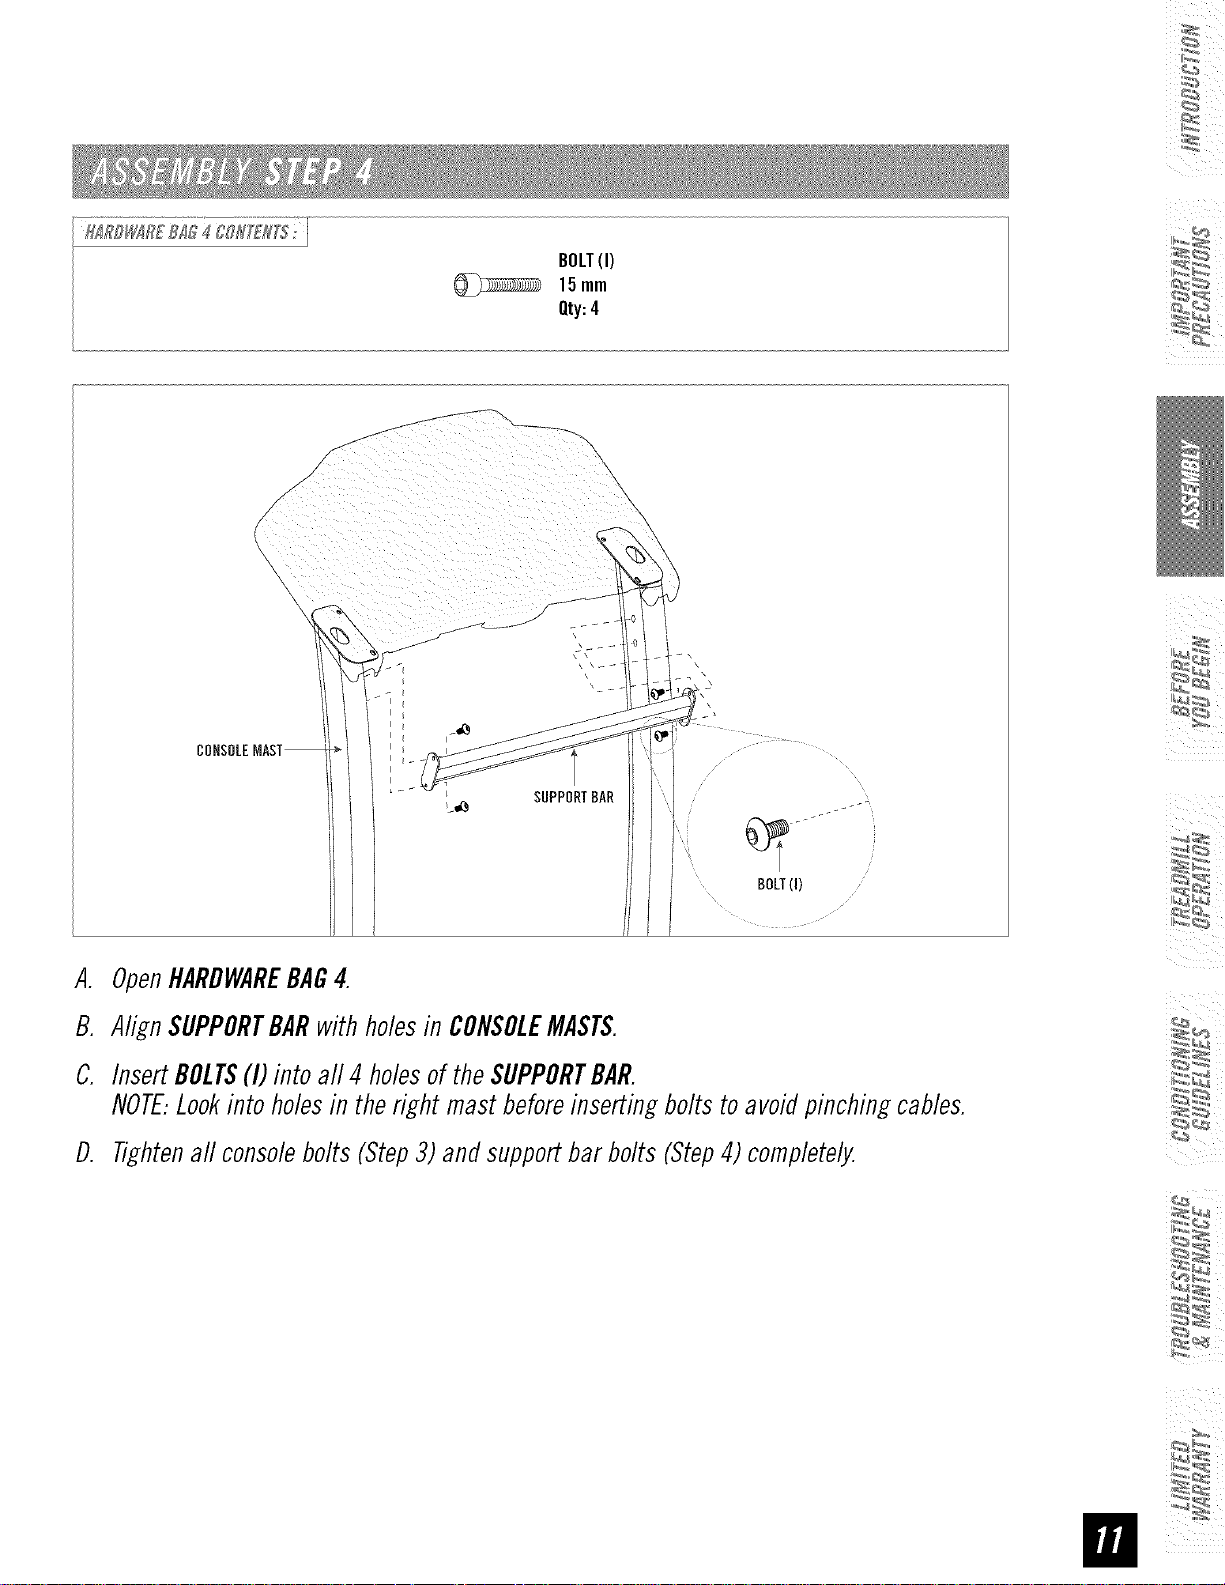
BOLT(I)
15ram
Qty:4
\
\
\
I
SUPPORTBAR
BOLT(I)
A. OpenHARDWAREBAG4.
B. AlignSUPPORTBARwithholesin CONSOLEMASTS.
C. InsertDOLTS(I) into all 4 holesof the SUPPORTBAR.
NOTE:Lookinto holesin the right mast beforeinsertingboltstoavoidpinchingcables.
D. Tightenaft consolebolts (Step3) and supportbar bolts (Step4) completely.

i_I _ )
i!l
SETSCREW(J)12mm ..............................._ 120mm
Qty:4 Qty:2
_ BOLT(K)
_ angleview 17mm
ARCWASHER,
BOLT(K)
ARCWASHER(L)
Qty:2
A OpenHARDWAREBAG5.
B StifleLEFTHANDLEBARtoCONSOLEandattach using2 SETSCREWS(J).
C AttachLEFTHANDLEBARto CONSOLEIgASTusin61BOLT(K)andI ARCWASHER(L).
D Repeatonotherside.
NOTE:Lookinto holesin theright mastbeforeinsertingboltsto avoidpinchingcables.
Connectpowerplug to the treadmill
POWERSWITCH CIRCUITBREAKER
......... .....
and connectthecord toa power
outlet. Theon/off switch is located
nextto thepowercord. Flip this
switch to the 'ON'position,so that
theswitch is lit. Youwill heara beep
and the consolewill turn on.
 Loading...