

Horizon T74, T73 Owner’s Manual

TREADMILLUSER'S GUIDE
CONGRATULATIONSand THANKYOUforyourpurchaseof this HorizonSeriesTreadmill!
Whetheryour goal is to win races or simply enjoy a fuller, healthier lifestyle, a Horizon Series treadmill
can help you attain it- adding club-quality performance toyour at-home workouts, with the ergonomics
and innovative features you need to get stronger and healthier, faster. Because we're committed to
designing fitness equipment from the inside out, we use only the highest quafity components. It's a
commitment we back with one of the strongest frame-to-motor warranty packages in the industry.
Youwantexerciseequipmentthat offers the most comfort,the best reliability and thehighest quality
in its class.
TheHorizonSeriesderivers.
Important Precautions
Assembly
Before You Begin
13
Treadmill Operation 16
Conditioning Guidelines 23
Troubleshooting & Maintenance 31
Limited Warranty 34
CONTACTINFORMATION Back Panel
4
6
i_I _ iii
SAVETHESEINSTRUCTIONS
Readall instructions before using this treadmill. Whenusing an electrical product, basic precautions
shouldalwaysbefollowed,including the following:Readaftinstructionsbeforeusingthis treadmill.It isthe
responsibilityof the ownertoensurethat aft usersof this treadmill areadequatelyinformedof aft warnings
and precautions.Ifyouhaveanyquestionsafter readingthis manual,contactCustomerTechSupportatthe
numberlisted on the backpanelof this manual
GROUNDINGINSTRUCTIONS
Thisproductmustbegrounded.If a treadmill shouldmalfunctionor breakdown,groundingprovidesa path
of least resistanceforelectricalcurrentto reducetheriskof electricalshock.Thisproductis equippedwith
a cordhavingan equipment-groundingconductorand a groundingplug. Theplug must bepluggedinto an
appropriateoutlet that is properlyinstalled and groundedin accordancewith local codesand ordinances.
!mproPerconnecfionof theequipment-groundingconductorcanresu!tin a risk of
electricShock.Checkwith a qualifiefl electricianor servicemanif youarein doubt
as to whethertheproductis properlygrounded,Donot modifytheP!Ugprovided
with the product. !f it will not fit the outlet, have a properoutlet installed by a
rualifiedelectfician.
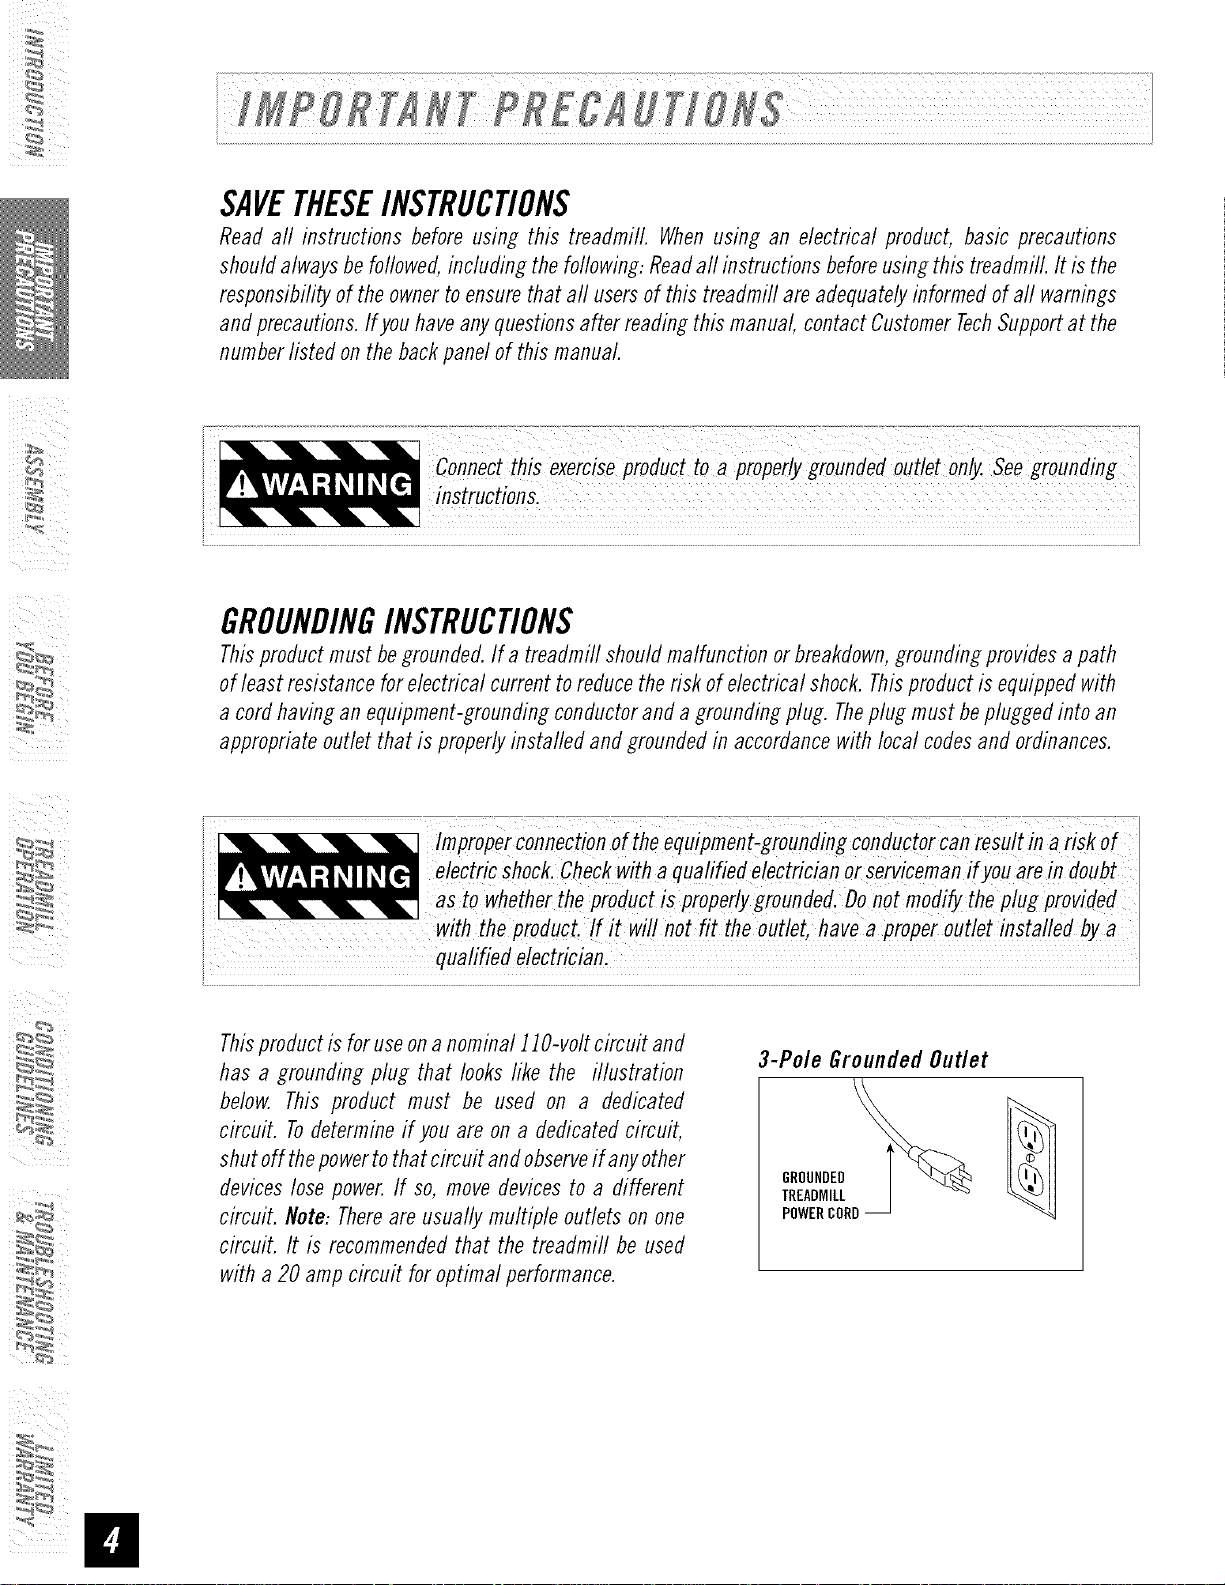
Thisproductis foruseona nominal 110-voltcircuit and
has a grounding plug that looks like the illustration
below. This product must be used on a dedicated
circuit. Todetermineif you are ona dedicatedcircuit,
shutoff thepowertothatcircuitandobserveif anyother
deviceslosepower.If so, move devicesto a different
circuit. Note:Thereare usually multiple outlets on one
circuit. It is recommendedthat the treadmill be used
with a 20 amp circuit for optimal performance.
3-Pole Grounded Outlet
GROUNDED
TREADMILL
POWERCORD
• Never use the treadmifl before securing the safety tether clip toyour clothing.
• If you experience any kind of pain, including but not limited to chest pains, nausea, dizziness, or shortness
of breath, stop exercising immediately and consult your physician before continuing.
• Do not wear clothes that might catch on any part of the treadmill.
• Always wear athletic shoes while using this equipment.
• Do not jump on the treadmill.
• Keep power cord away from heated surfaces.
• Do not insert or drop any object into any opening.
• Unplug treadmill before moving or cleaning it. Toclean, wipe surfaces down with soap and slightly damp
cloth only: never use solvents. (SeeMAINTENANCE)
• At no time should more than one person be on treadmill while in operation.
• Thetreadmill's should not be used by persons weighing more than 325 pounds (T73) or 350 pounds (T74).
Failure to comply will void the warranty.
• The treadmills are intended for in-home use only. Do not use this treadmill in any commercial, rental,
school or institutional setting. Failure to comply will void the warranty.
• Donot use treadmill in anylocation that is not temperature controlled, such as but not limited to garages,
porches, pool rooms, bathrooms, carports or outdoors. Failure to comply may void the warranty.
• Use the treadmill only as described in this manual
At NO time should children under the age of ]2 use the treadmilL
Children over the age of 12 should not use the treadmill without adult supervision
OTHERSAFETYTIPSFORYOURTREADMILL
OPERATION
Toreduce the risk of damaging important components onyour treadmill, it is strongly
recommended that your treadmill is plugged into a dedicated 20 amp circuit, without
the use of an additional extension cord and/or power strip. Failure to complay may
void the warranty.
IMPORTANT..Thetreadmifiis not compatiblewith GFCl-equippedoutlets.
It is essentialthatyour treadmill is usedonlyindoors,in a climate controlledroom.Ifyourtreadmill has been
exposedto coldertemperaturesorhigh moisture climates, it is strongly recommendedthat the treadmill is
warmedup to roomtemperaturebeforefirst time use.Failureto doso maycauseprematureelectronicfailure.
IMPORTANT..READTHESESAFETYINSTRUCTIONSBEFOREUSE!
During the assemblyprocessof the treadmill thereareseveralareas that special attention must bepaid.
It is veryimportant to follow the assembly instructions correctlyand to make sure aft parts are firmly
tightened. If theassemblyinstructions arenot followedcorrectly,thetreadmill couldhave frameparts that
arenot tightened and will Seemlooseand maycauseirritating noises.Thereshouldbeno side-to-sideplay
in theconsolemasts or any forward and back play in theconsoleassemblyor handlebars.If thereis any
playin theseareas,thetreadmillhasnot beenproperlyassembled.Topreventdamageto thetreadmill, the
assemblyinstructionsmust bereviewedand correctiveactions shouldbetaken.
i_I _ i_ii
UNPACKING
Placethetreadmillcartononalevelflat surface.It is recommendedthat youplace aprotectivecoveringon
your floor. TakeCAUTIONwhenhandling and transporting this unit. Neveropenboxwhenit is on its side.
Oncethe bandingstraps have beenremoved,do notlift or transportthis unit unless it is fully assembled
and in the upright foldedposition, with the locklatch secure.Unpackthe unit whereit will be used. The
enclosedtreadmill is equippedwith high-pressureshocksand mayspring openif mishandled.Nevergrab
holdofanyportionof theincline frameandattempt tolift ormovethetreadmill. FAILURETOFOLLOWTHESE
INSTRUCTIONSCOULDRESULTIN INJURY!
i; i ¸¸::: i ¸ i_ ;:;
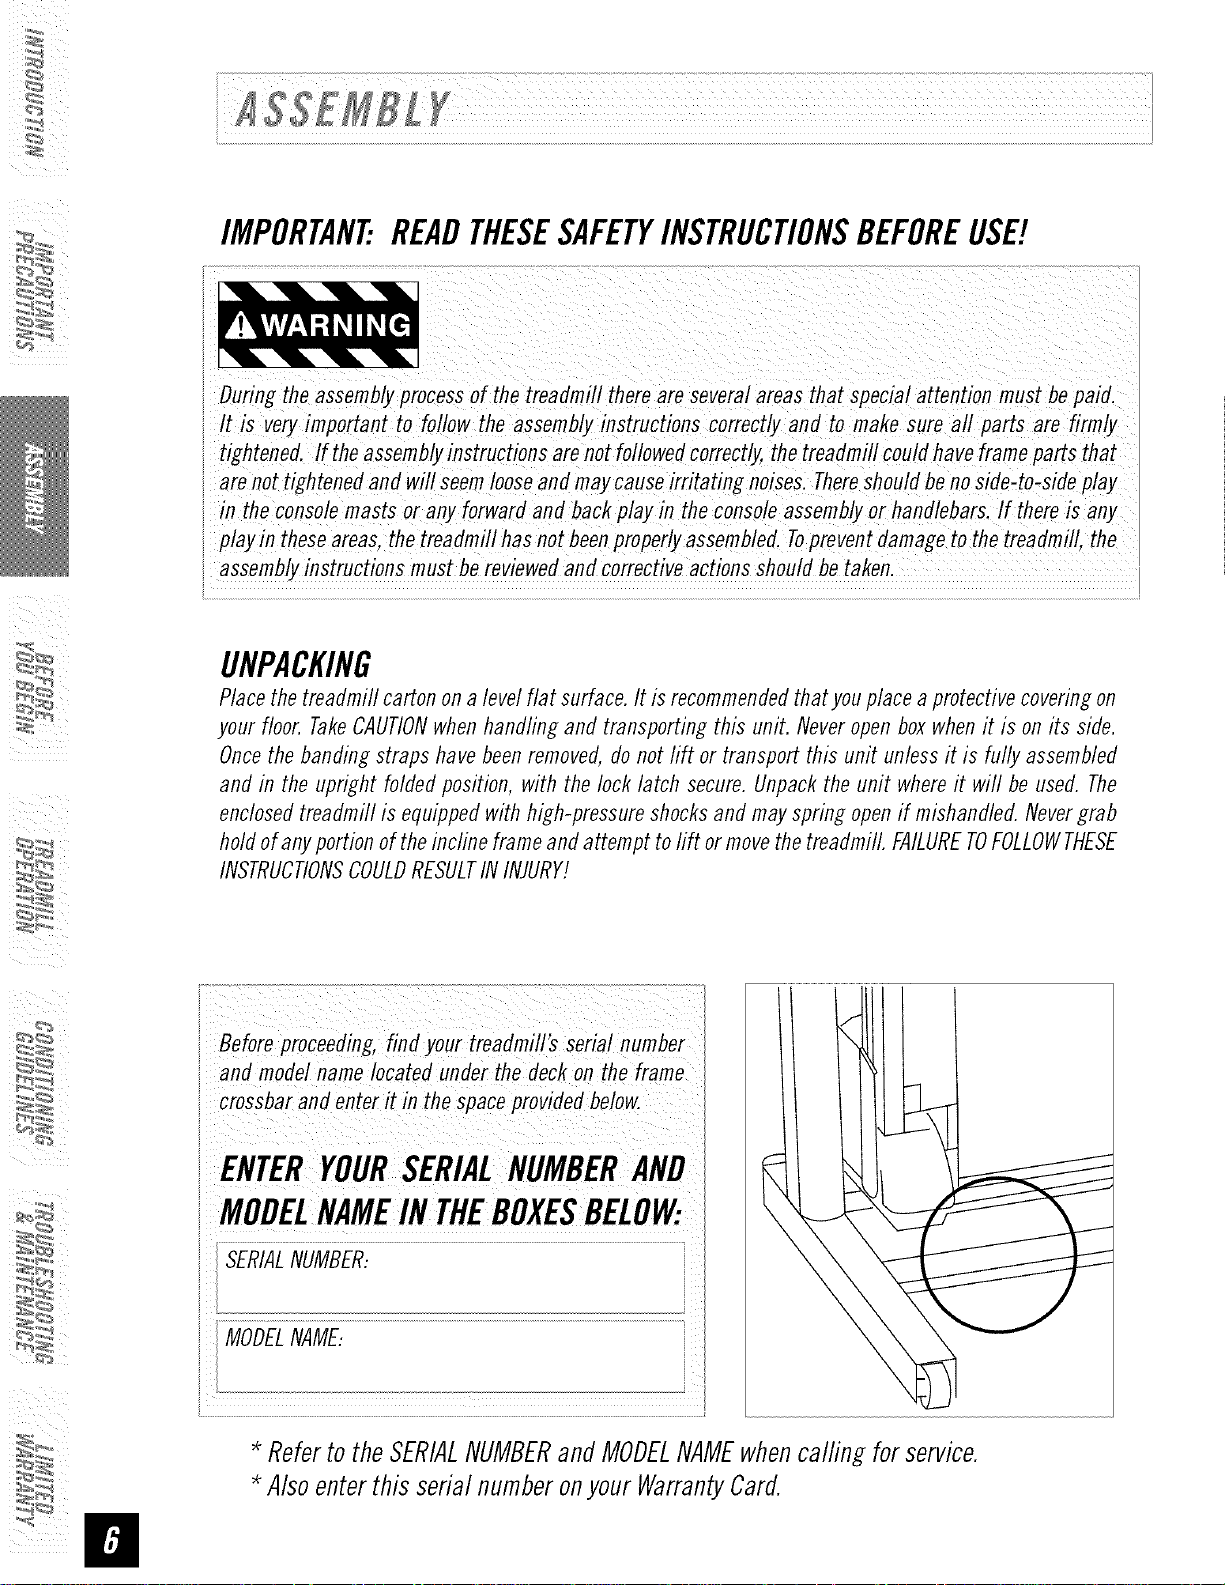
Beforeproceeding,finUyo'rtreadmill'_seriainumber
and modelnamelocated underthe deckon the frame
i crossbara'denteritinthespaceprovide_below.
ENTERYOURSERIALNUMBERAND
i MODEL THEBOXESBEL0W:
i
SERIALNUMBER:
MODELNAME:
* RefertotheSERIALNUMBERandMODELNAMEwhencalfing forservice.
* AlsoenterthisserialnumberonyourWarrantyCard.

READINGRACK
STORAGEAREA
WATERBOTTLEHOLDER
GRIPPULSEHANDRAILS
MAGAZINERACK(T74)
HANDLEBARS
ON/OFFSWITCH
CIRCUITBREAKER
POWERCORD
FOOTLOCKLATCR
TRANSPORTWHEEL
CONSOLE(T74SHOWN)
FAN
SAFETYKEYPLACEMENT
CONSOLEMAST
MOTORCOVER
C3TM CUSHIONINGSYSTEM
RUNNINGBELTi RUNNINGDECK
SIDERAIL
ROLLERENDCAP
[] l Safety Key
[] ] ConsoleAssembly(locatedundertreadmill deck)
[] ] PowerCord
[] 3 HardwareBags(T73)
[] 4 HardwareBags(T74)
REARROLLER
ADJUSTMENTBOLTS
[] 2 Handgrips
[] 2 Handlebars
[] 2 SupportBars
[] 1MagazineRack(T74)
Ifyou avequestiOn;_rif tb;re areany missingP_;i bontactcustomer TecbSupport.
Contactinf°rmation is !°catefi Onthe backpane!Of this manual
Fora completeexplodeddiagram,visit us at www.horizonfitness.com

Disassembleboxandremovethecardboardpackagingthatisnotbeneaththetreadmill.Donotattemptto
lift thetreadmillatthistime.Removeplastic wrapfrom consolemasts.
NOTE:During each assembly step, ensure that ALL nuts and bolts are in place and partially threaded in before
completely tightening any ONEbolt. NOTE:A light application of grease may aid in the installation of hardware.
Any grease, such as lithium bike grease is recommended.
i_I "_ i_ii
I--hmD_smEBm_c_mrl_y_:i
CONSOLEMAST
BOLT(A)
SPRING
MAINFRAME
[
BOLT(A) FLATWASHER(B)
65mm 16mm
Qty:4 IJty:4
A
OpenHARDWAREBAG1.
B
PuffLEADWIREthroughRIGHTCONSOLE
SPRINGWASHER(C)
16mm
Qty:4
MASTto dragupward.
PlaceLEFTCONSOLEMASTintoupright
position.Besuretoholdtheconsolemast
firmly,asit will notstayin the upright
positiononits own.
UseBOLTS(A),2SPRINGWASHERS(B),
and2FLATWASHERS(C)to attach console
mastto the MAINFRAME.
E Repeaton theright side.
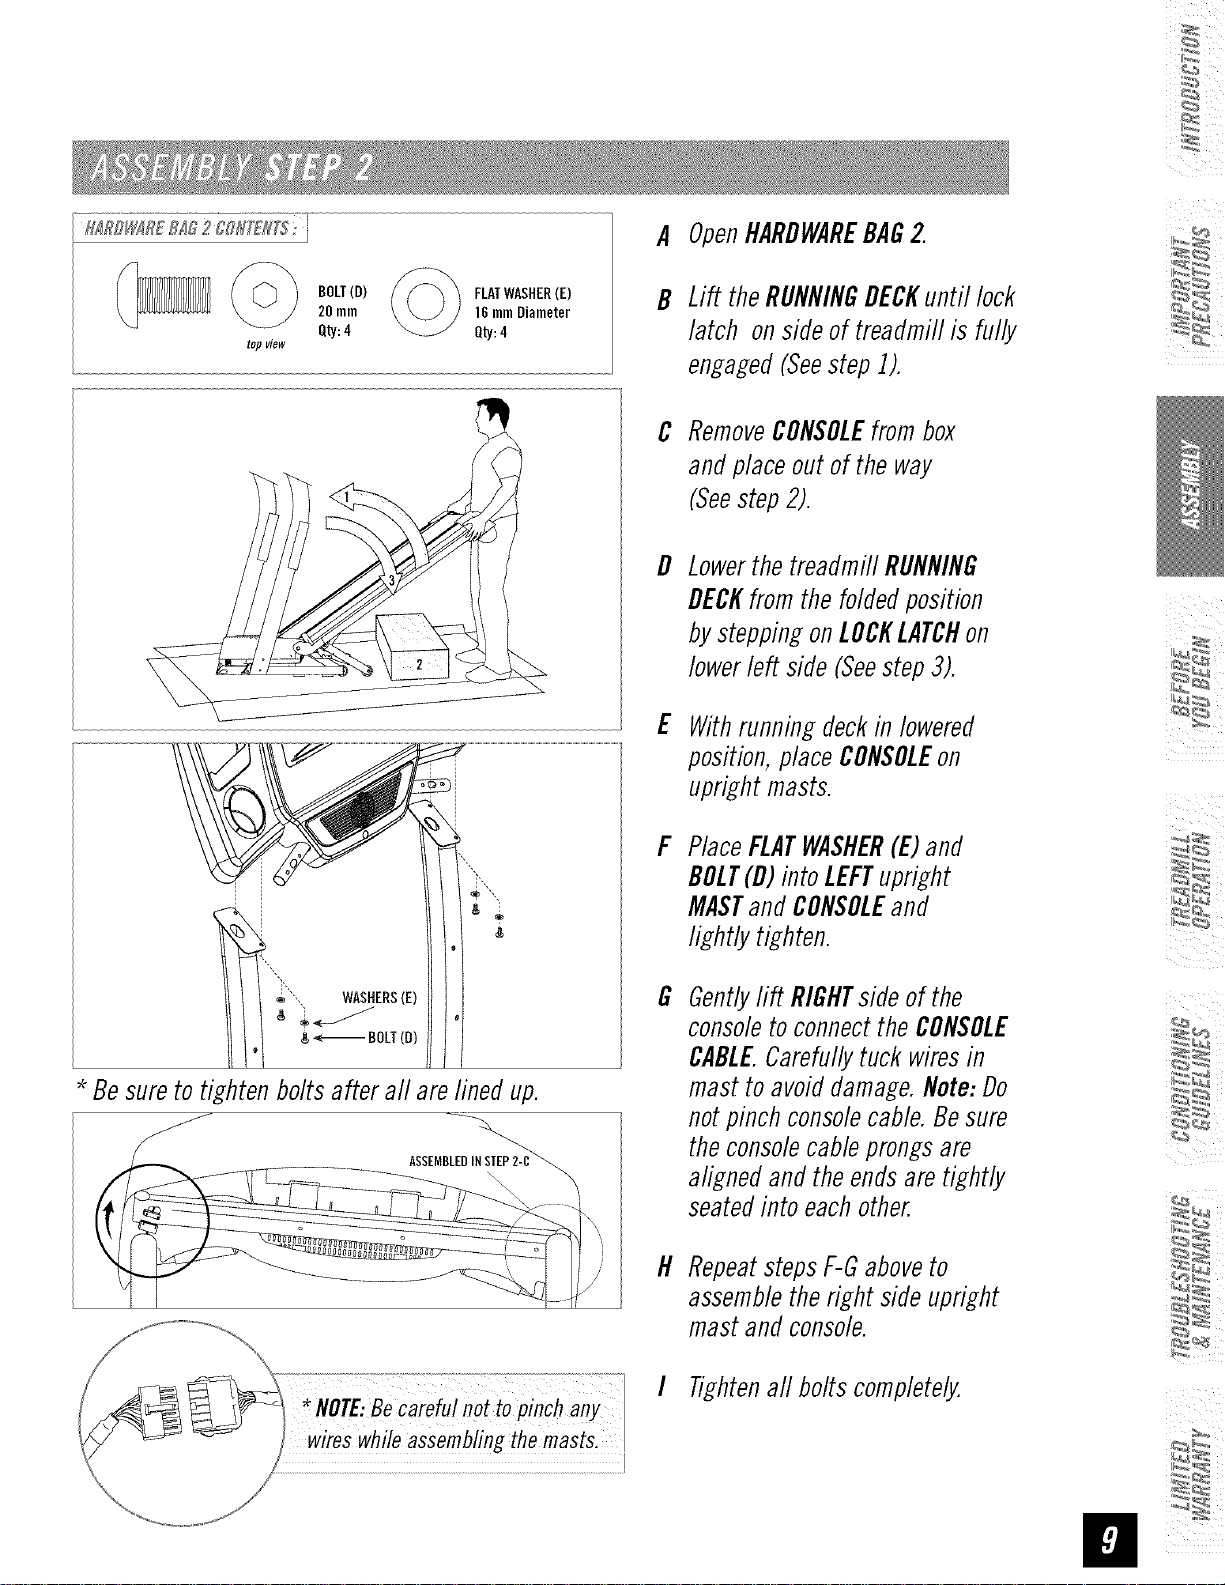
H_RDWAR£B_ 2 0gli[£1115:
A OpenHARDWAREBAG2.
topview
BOLT(D)
20mm
Qty:4
FLATWASHER(E)
16mmDiameter
Qty:4
Lift theRUNNINGDECKuntil lock
B
latch onsideof treadmillis fully
engaged(Seestep1).
RemoveCONSOLEfrombox
C
andplaceout ofthe way
(Seestep2).
D
Lowerthe treadmill RUNNING
DECKfrom the folded position
bysteppingonLOCKLATCHon
lowerleft side (Seestep3).
E
Withrunningdeckin lowered
position,placeCONSOLEon
uprightmasts.
F
PlaceFLATWASHER(E)and
BOLT(D)intoLEFTupright
MASTand CONSOLEand
lightlytighten.
Besureto tightenboltsafter all arelined up.
ASSEMBLEDINSTEP2-C
G
Gentlyrift RIGHTside of the
consoleto connect the CONSOLE
CABLE.Carefully tuck wiresin
mast to avoid damage. Note: Do
not pinch consolecable. Be sure
the consolecable prongs are
aligned and the ends are tightly
seated into each other.
H
Repeat steps F-Gaboveto
assemble the right side upright
mast and console.
I Tightenaft bolts completely.

i _ ¸
top view
BOLT
(F)
_-%_ ARCWASHER(G) SPRINGWASHER(H)
Qty:1154ram_ Qty:4 Qty:4
A OpenHARDWAREBAG3.
B Attachleft HANDLEBARto
CONSOLEMASTusing2 BOLTS
(F),2 SPRINGWASHERS(G),
and2 ARCWASHERS(H).
C Repeatonotherside.
ii
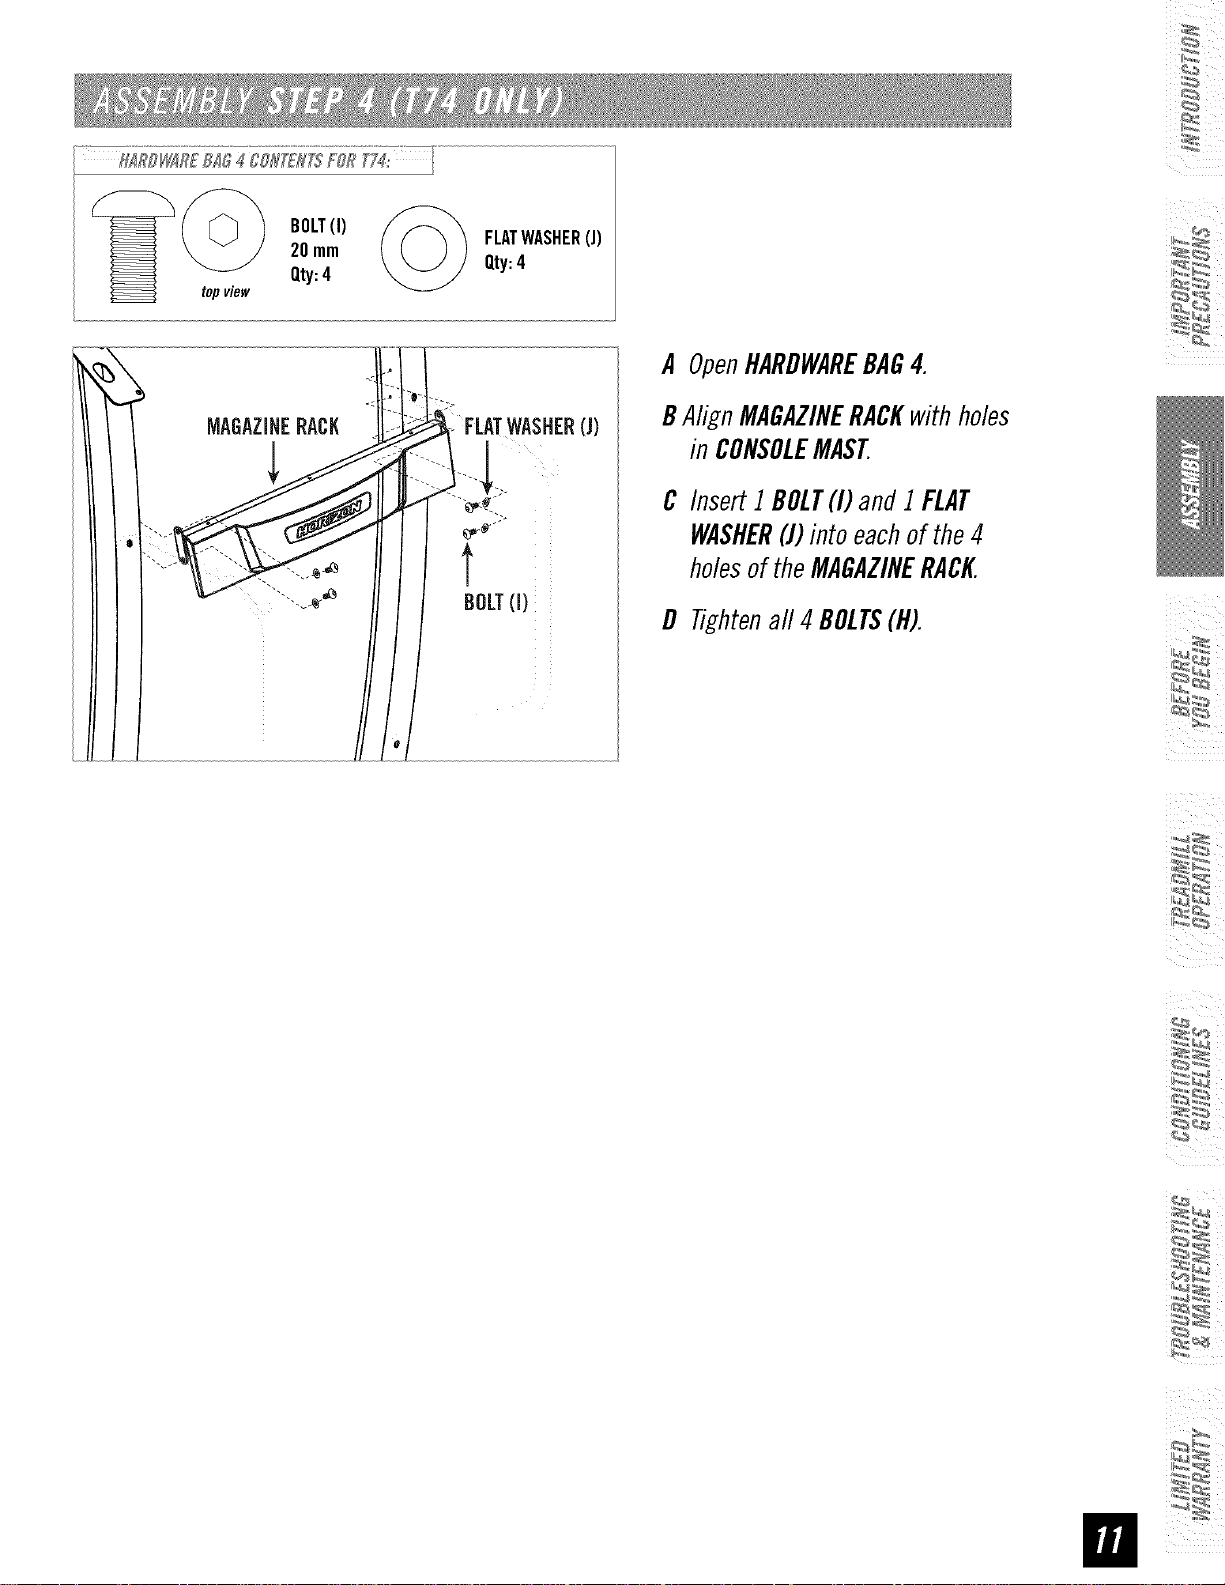
fl_lTDlti_R£BJO400H_'_/TT5+FORT7_' I
top view
20mm
BOLT(I)
Qty:4
FLATWASHER(J)
Qty:4
A OpenHARDWAREBAG4.
BAlign MAGAZINERACKwithholes
in CONSOLEMAST
C InsertI BOLT(I) and I FLAT
WASHER(J)intoeachof the4
holesof the MAGAZINERACK.
D Tightenall 4 BOLTS(H).
i_ ¸
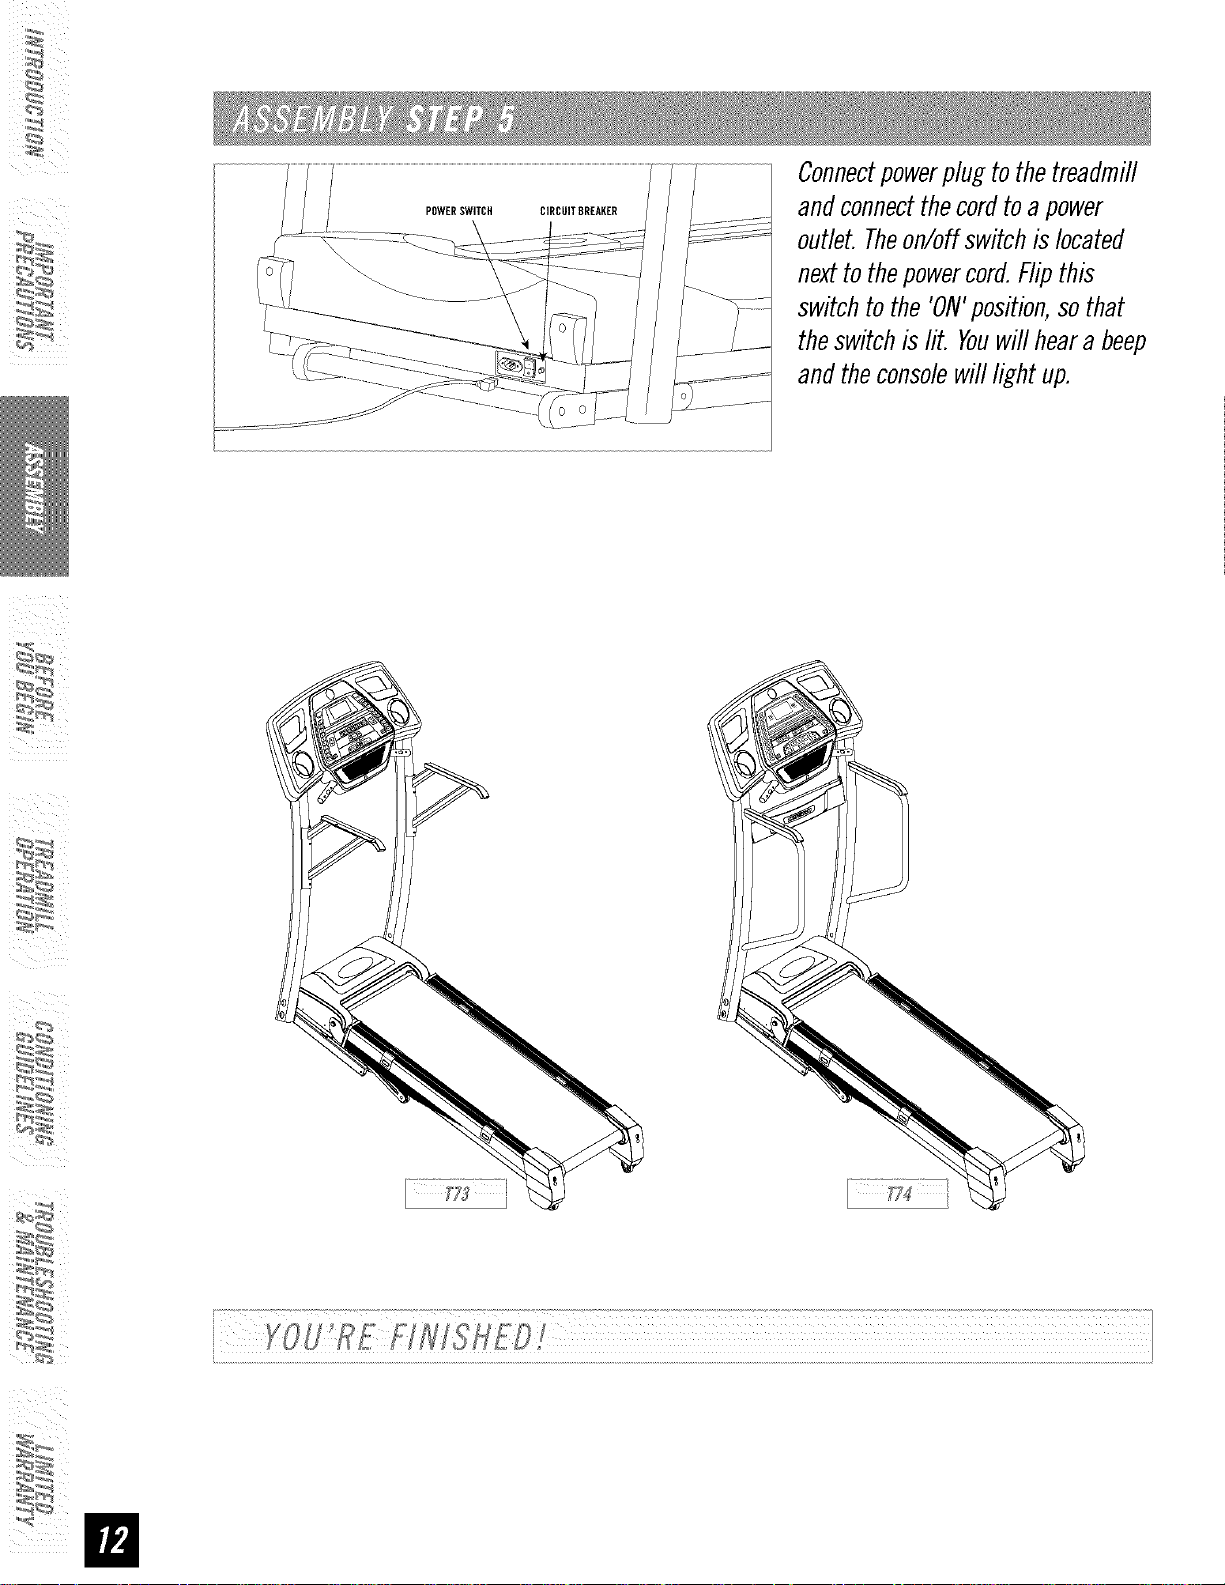
Connectpowerplug tothetreadmill
andconnectthecordto a power
outlet.Theon/offswitchislocated
nexttothepowercord.Flipthis
switchto the 'ON'position,sothat
theswitchis lit. Youwill heara beep
andtheconsolewilllight up.
ii
 Loading...