

Page 1

TREADMILLUSER'S GUIDE
Page 2
CONGRATULATIONSand THANKYOUforyourpurchaseof this HorizonSeriesTreadmill!
Whetheryour goal is to win races or simply enjoy a fuller, healthier lifestyle, a Horizon Series treadmill
can help you attain it- adding club-quality performance toyour at-home workouts, with the ergonomics
and innovative features you need to get stronger and healthier, faster. Because we're committed to
designing fitness equipment from the inside out, we use only the highest quafity components. It's a
commitment we back with one of the strongest frame-to-motor warranty packages in the industry.
Youwantexerciseequipmentthat offers the most comfort,the best reliability and thehighest quality
in its class.
TheHorizonSeriesderivers.
Important Precautions
Assembly
Before You Begin
13
Treadmill Operation 16
Conditioning Guidelines 23
Troubleshooting & Maintenance 31
Limited Warranty 34
CONTACTINFORMATION Back Panel
4
6
Page 3
i_I _ iii
SAVETHESEINSTRUCTIONS
Readall instructions before using this treadmill. Whenusing an electrical product, basic precautions
shouldalwaysbefollowed,including the following:Readaftinstructionsbeforeusingthis treadmill.It isthe
responsibilityof the ownertoensurethat aft usersof this treadmill areadequatelyinformedof aft warnings
and precautions.Ifyouhaveanyquestionsafter readingthis manual,contactCustomerTechSupportatthe
numberlisted on the backpanelof this manual
GROUNDINGINSTRUCTIONS
Thisproductmustbegrounded.If a treadmill shouldmalfunctionor breakdown,groundingprovidesa path
of least resistanceforelectricalcurrentto reducetheriskof electricalshock.Thisproductis equippedwith
a cordhavingan equipment-groundingconductorand a groundingplug. Theplug must bepluggedinto an
appropriateoutlet that is properlyinstalled and groundedin accordancewith local codesand ordinances.
!mproPerconnecfionof theequipment-groundingconductorcanresu!tin a risk of
electricShock.Checkwith a qualifiefl electricianor servicemanif youarein doubt
as to whethertheproductis properlygrounded,Donot modifytheP!Ugprovided
with the product. !f it will not fit the outlet, have a properoutlet installed by a
rualifiedelectfician.
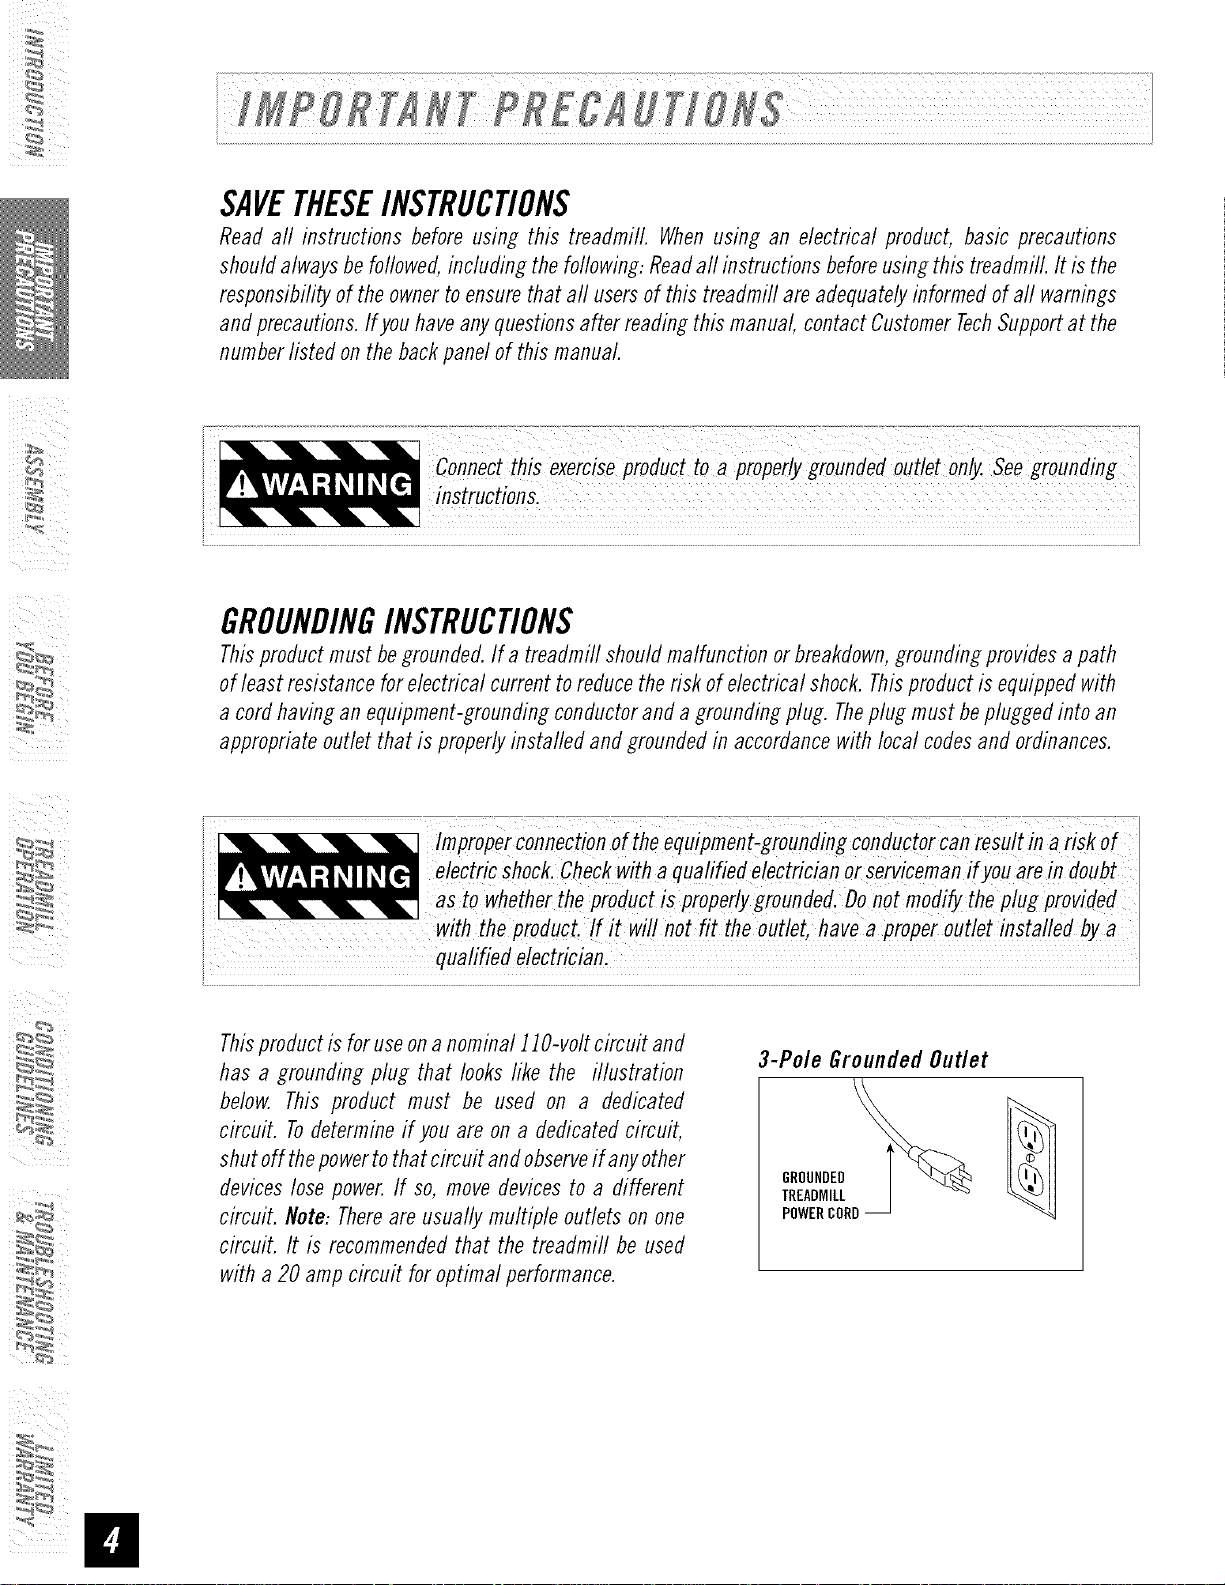
Thisproductis foruseona nominal 110-voltcircuit and
has a grounding plug that looks like the illustration
below. This product must be used on a dedicated
circuit. Todetermineif you are ona dedicatedcircuit,
shutoff thepowertothatcircuitandobserveif anyother
deviceslosepower.If so, move devicesto a different
circuit. Note:Thereare usually multiple outlets on one
circuit. It is recommendedthat the treadmill be used
with a 20 amp circuit for optimal performance.
3-Pole Grounded Outlet
GROUNDED
TREADMILL
POWERCORD
Page 4
• Never use the treadmifl before securing the safety tether clip toyour clothing.
• If you experience any kind of pain, including but not limited to chest pains, nausea, dizziness, or shortness
of breath, stop exercising immediately and consult your physician before continuing.
• Do not wear clothes that might catch on any part of the treadmill.
• Always wear athletic shoes while using this equipment.
• Do not jump on the treadmill.
• Keep power cord away from heated surfaces.
• Do not insert or drop any object into any opening.
• Unplug treadmill before moving or cleaning it. Toclean, wipe surfaces down with soap and slightly damp
cloth only: never use solvents. (SeeMAINTENANCE)
• At no time should more than one person be on treadmill while in operation.
• Thetreadmill's should not be used by persons weighing more than 325 pounds (T73) or 350 pounds (T74).
Failure to comply will void the warranty.
• The treadmills are intended for in-home use only. Do not use this treadmill in any commercial, rental,
school or institutional setting. Failure to comply will void the warranty.
• Donot use treadmill in anylocation that is not temperature controlled, such as but not limited to garages,
porches, pool rooms, bathrooms, carports or outdoors. Failure to comply may void the warranty.
• Use the treadmill only as described in this manual
At NO time should children under the age of ]2 use the treadmilL
Children over the age of 12 should not use the treadmill without adult supervision
OTHERSAFETYTIPSFORYOURTREADMILL
OPERATION
Toreduce the risk of damaging important components onyour treadmill, it is strongly
recommended that your treadmill is plugged into a dedicated 20 amp circuit, without
the use of an additional extension cord and/or power strip. Failure to complay may
void the warranty.
IMPORTANT..Thetreadmifiis not compatiblewith GFCl-equippedoutlets.
It is essentialthatyour treadmill is usedonlyindoors,in a climate controlledroom.Ifyourtreadmill has been
exposedto coldertemperaturesorhigh moisture climates, it is strongly recommendedthat the treadmill is
warmedup to roomtemperaturebeforefirst time use.Failureto doso maycauseprematureelectronicfailure.
Page 5
IMPORTANT..READTHESESAFETYINSTRUCTIONSBEFOREUSE!
During the assemblyprocessof the treadmill thereareseveralareas that special attention must bepaid.
It is veryimportant to follow the assembly instructions correctlyand to make sure aft parts are firmly
tightened. If theassemblyinstructions arenot followedcorrectly,thetreadmill couldhave frameparts that
arenot tightened and will Seemlooseand maycauseirritating noises.Thereshouldbeno side-to-sideplay
in theconsolemasts or any forward and back play in theconsoleassemblyor handlebars.If thereis any
playin theseareas,thetreadmillhasnot beenproperlyassembled.Topreventdamageto thetreadmill, the
assemblyinstructionsmust bereviewedand correctiveactions shouldbetaken.
i_I _ i_ii
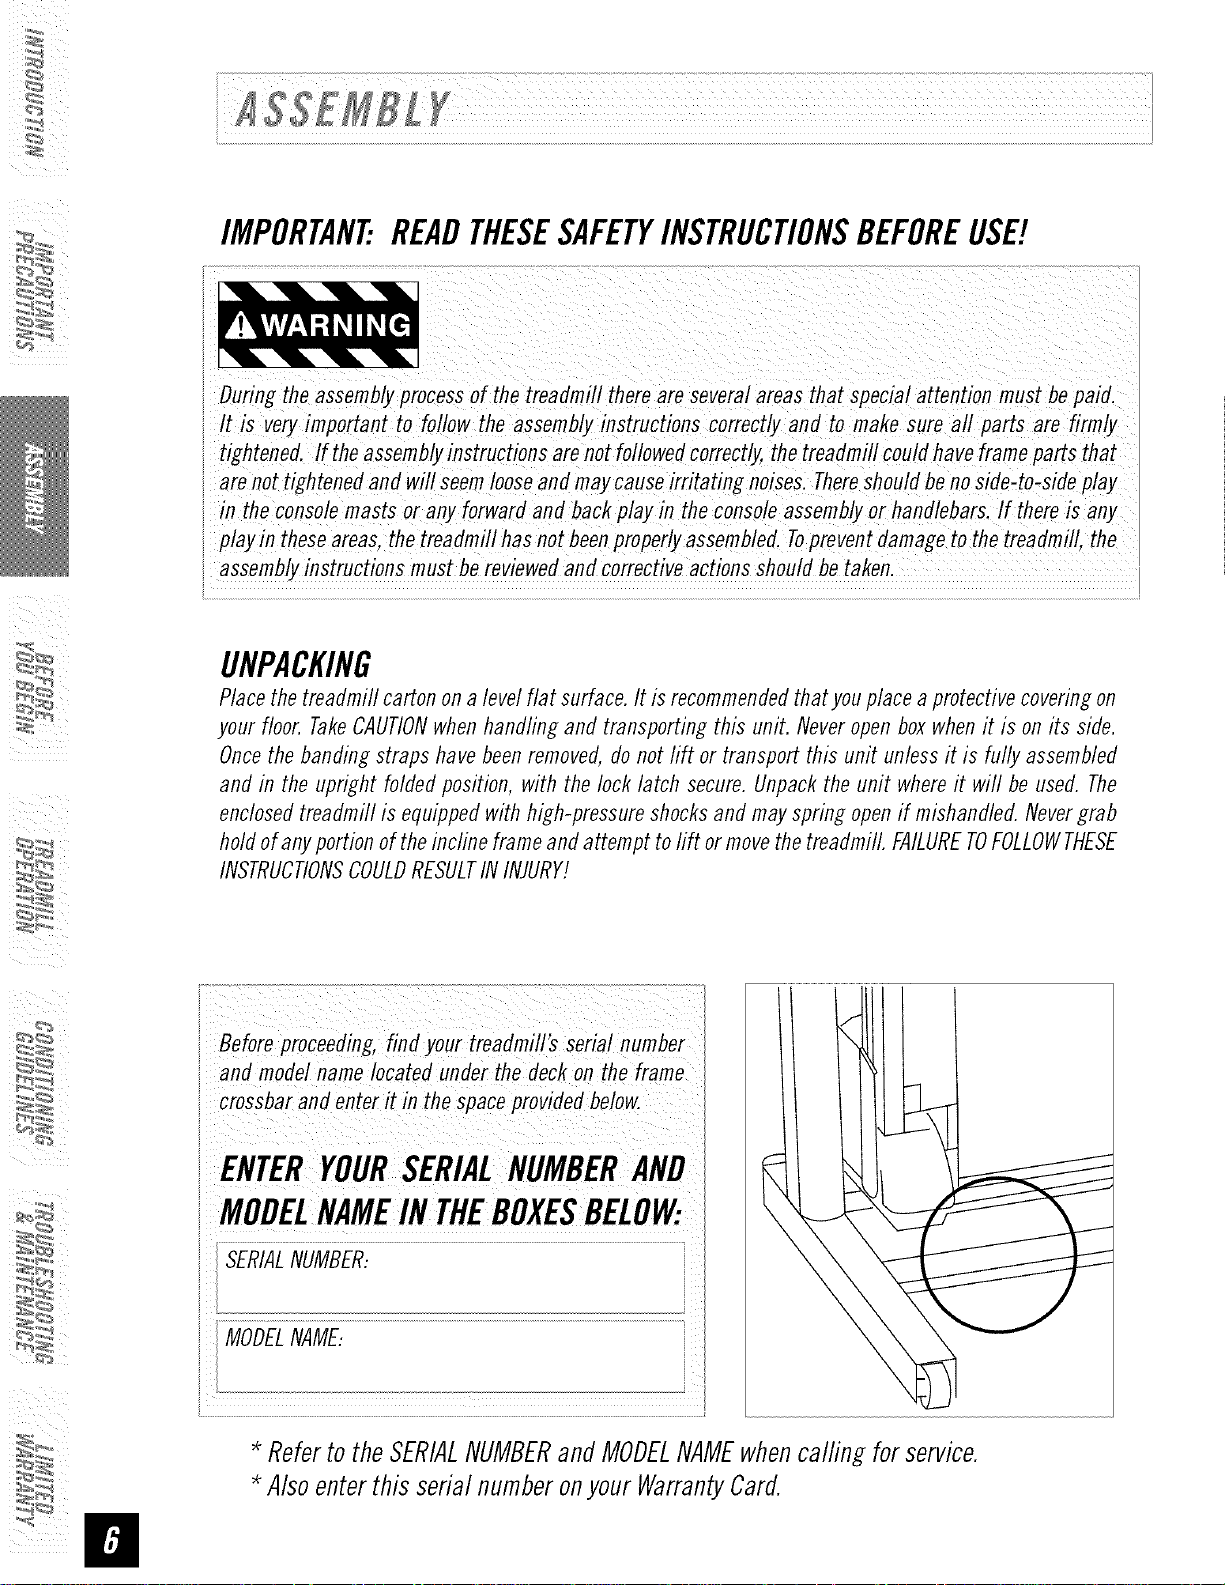
UNPACKING
Placethetreadmillcartononalevelflat surface.It is recommendedthat youplace aprotectivecoveringon
your floor. TakeCAUTIONwhenhandling and transporting this unit. Neveropenboxwhenit is on its side.
Oncethe bandingstraps have beenremoved,do notlift or transportthis unit unless it is fully assembled
and in the upright foldedposition, with the locklatch secure.Unpackthe unit whereit will be used. The
enclosedtreadmill is equippedwith high-pressureshocksand mayspring openif mishandled.Nevergrab
holdofanyportionof theincline frameandattempt tolift ormovethetreadmill. FAILURETOFOLLOWTHESE
INSTRUCTIONSCOULDRESULTIN INJURY!
i; i ¸¸::: i ¸ i_ ;:;
Beforeproceeding,finUyo'rtreadmill'_seriainumber
and modelnamelocated underthe deckon the frame
i crossbara'denteritinthespaceprovide_below.
ENTERYOURSERIALNUMBERAND
i MODEL THEBOXESBEL0W:
i
SERIALNUMBER:
MODELNAME:
* RefertotheSERIALNUMBERandMODELNAMEwhencalfing forservice.
* AlsoenterthisserialnumberonyourWarrantyCard.
Page 6

READINGRACK
STORAGEAREA
WATERBOTTLEHOLDER
GRIPPULSEHANDRAILS
MAGAZINERACK(T74)
HANDLEBARS
ON/OFFSWITCH
CIRCUITBREAKER
POWERCORD
FOOTLOCKLATCR
TRANSPORTWHEEL
CONSOLE(T74SHOWN)
FAN
SAFETYKEYPLACEMENT
CONSOLEMAST
MOTORCOVER
C3TM CUSHIONINGSYSTEM
RUNNINGBELTi RUNNINGDECK
SIDERAIL
ROLLERENDCAP
[] l Safety Key
[] ] ConsoleAssembly(locatedundertreadmill deck)
[] ] PowerCord
[] 3 HardwareBags(T73)
[] 4 HardwareBags(T74)
REARROLLER
ADJUSTMENTBOLTS
[] 2 Handgrips
[] 2 Handlebars
[] 2 SupportBars
[] 1MagazineRack(T74)
Ifyou avequestiOn;_rif tb;re areany missingP_;i bontactcustomer TecbSupport.
Contactinf°rmation is !°catefi Onthe backpane!Of this manual
Fora completeexplodeddiagram,visit us at www.horizonfitness.com
Page 7

Disassembleboxandremovethecardboardpackagingthatisnotbeneaththetreadmill.Donotattemptto
lift thetreadmillatthistime.Removeplastic wrapfrom consolemasts.
NOTE:During each assembly step, ensure that ALL nuts and bolts are in place and partially threaded in before
completely tightening any ONEbolt. NOTE:A light application of grease may aid in the installation of hardware.
Any grease, such as lithium bike grease is recommended.
i_I "_ i_ii
I--hmD_smEBm_c_mrl_y_:i
CONSOLEMAST
BOLT(A)
SPRING
MAINFRAME
[
BOLT(A) FLATWASHER(B)
65mm 16mm
Qty:4 IJty:4
A
OpenHARDWAREBAG1.
B
PuffLEADWIREthroughRIGHTCONSOLE
SPRINGWASHER(C)
16mm
Qty:4
MASTto dragupward.
PlaceLEFTCONSOLEMASTintoupright
position.Besuretoholdtheconsolemast
firmly,asit will notstayin the upright
positiononits own.
UseBOLTS(A),2SPRINGWASHERS(B),
and2FLATWASHERS(C)to attach console
mastto the MAINFRAME.
E Repeaton theright side.
Page 8
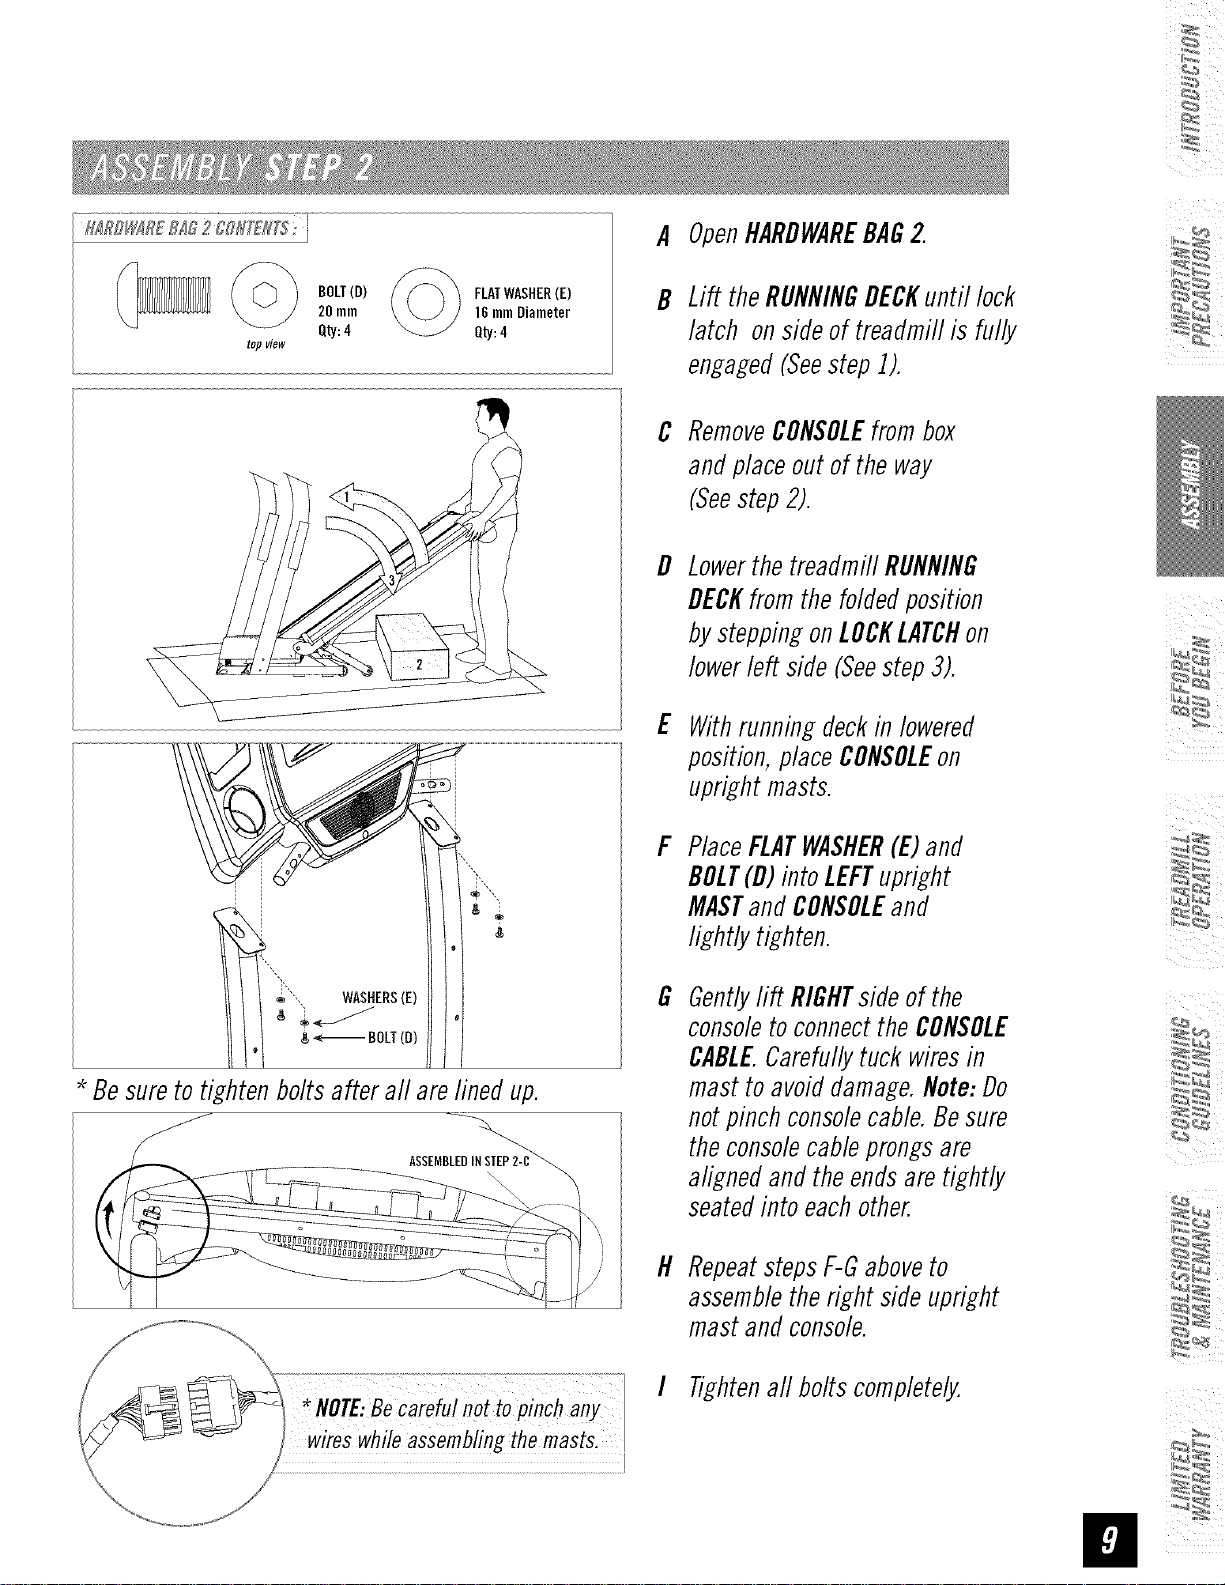
H_RDWAR£B_ 2 0gli[£1115:
A OpenHARDWAREBAG2.
topview
BOLT(D)
20mm
Qty:4
FLATWASHER(E)
16mmDiameter
Qty:4
Lift theRUNNINGDECKuntil lock
B
latch onsideof treadmillis fully
engaged(Seestep1).
RemoveCONSOLEfrombox
C
andplaceout ofthe way
(Seestep2).
D
Lowerthe treadmill RUNNING
DECKfrom the folded position
bysteppingonLOCKLATCHon
lowerleft side (Seestep3).
E
Withrunningdeckin lowered
position,placeCONSOLEon
uprightmasts.
F
PlaceFLATWASHER(E)and
BOLT(D)intoLEFTupright
MASTand CONSOLEand
lightlytighten.
Besureto tightenboltsafter all arelined up.
ASSEMBLEDINSTEP2-C
G
Gentlyrift RIGHTside of the
consoleto connect the CONSOLE
CABLE.Carefully tuck wiresin
mast to avoid damage. Note: Do
not pinch consolecable. Be sure
the consolecable prongs are
aligned and the ends are tightly
seated into each other.
H
Repeat steps F-Gaboveto
assemble the right side upright
mast and console.
I Tightenaft bolts completely.
Page 9

i _ ¸
top view
BOLT
(F)
_-%_ ARCWASHER(G) SPRINGWASHER(H)
Qty:1154ram_ Qty:4 Qty:4
A OpenHARDWAREBAG3.
B Attachleft HANDLEBARto
CONSOLEMASTusing2 BOLTS
(F),2 SPRINGWASHERS(G),
and2 ARCWASHERS(H).
C Repeatonotherside.
ii
Page 10
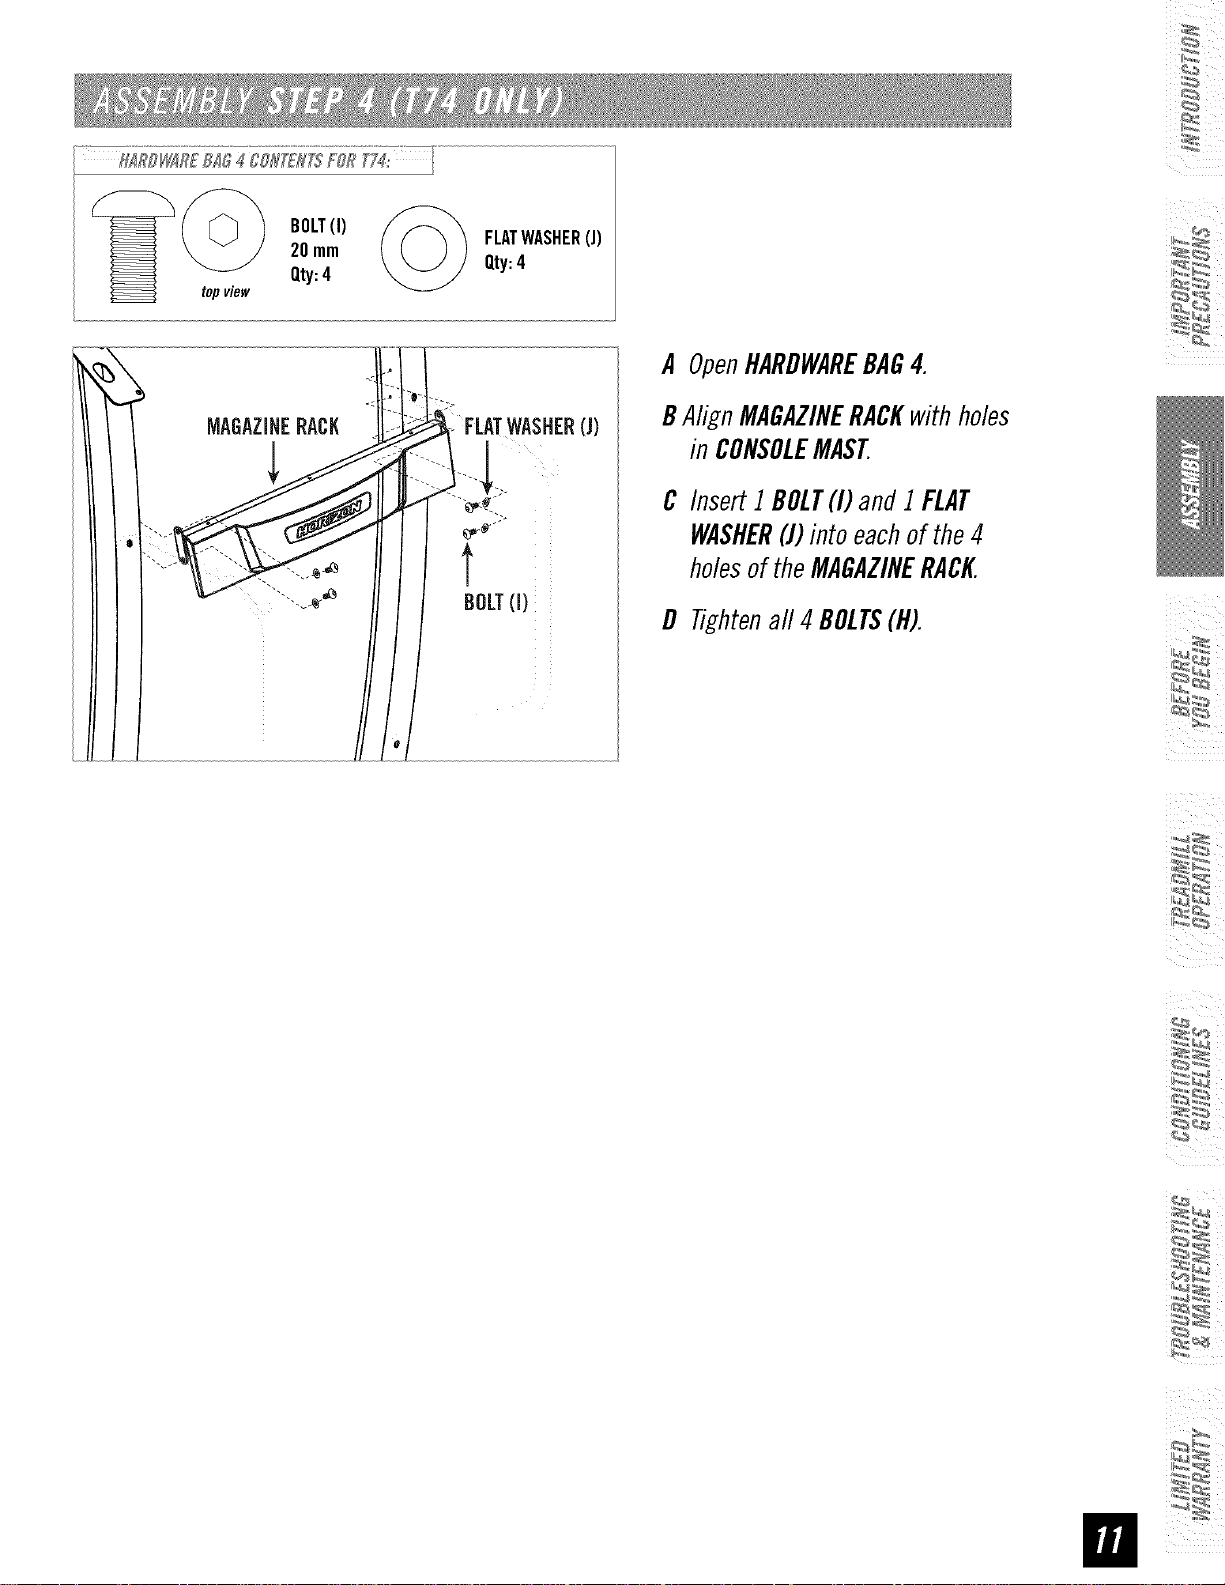
fl_lTDlti_R£BJO400H_'_/TT5+FORT7_' I
top view
20mm
BOLT(I)
Qty:4
FLATWASHER(J)
Qty:4
A OpenHARDWAREBAG4.
BAlign MAGAZINERACKwithholes
in CONSOLEMAST
C InsertI BOLT(I) and I FLAT
WASHER(J)intoeachof the4
holesof the MAGAZINERACK.
D Tightenall 4 BOLTS(H).
Page 11
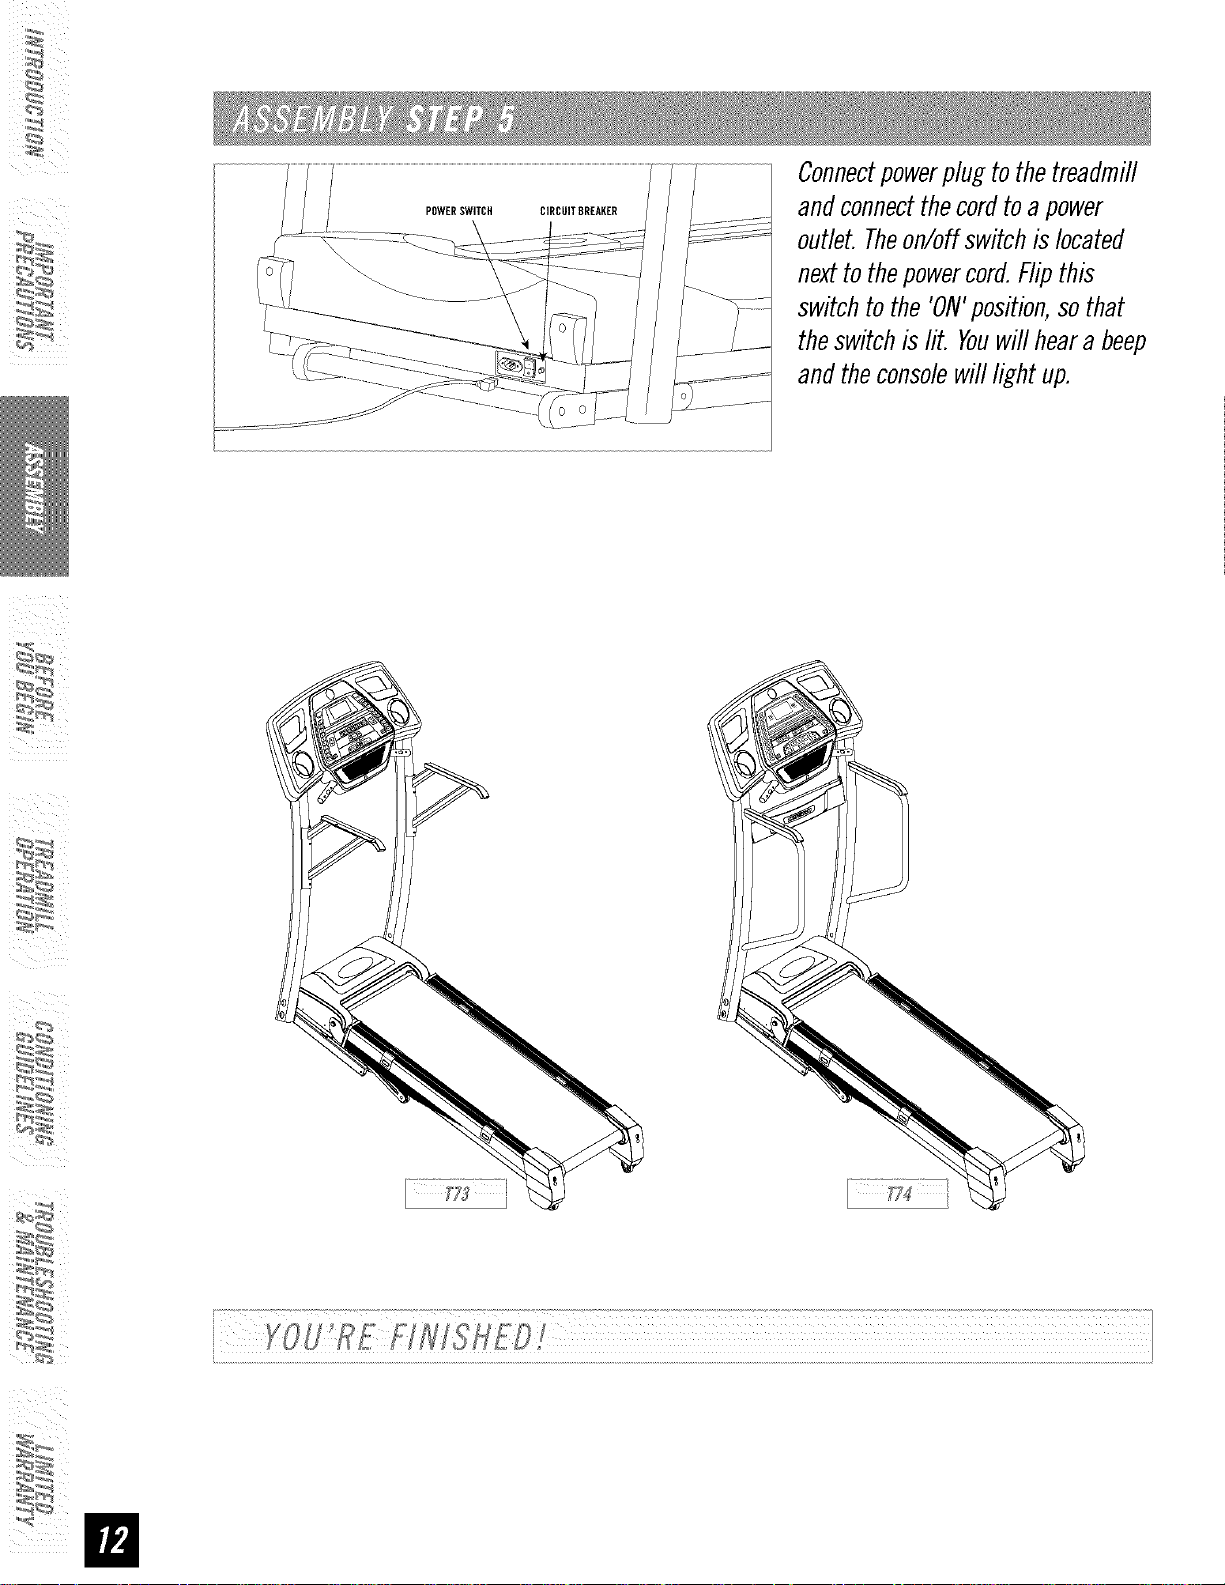
i_ ¸
Connectpowerplug tothetreadmill
andconnectthecordto a power
outlet.Theon/offswitchislocated
nexttothepowercord.Flipthis
switchto the 'ON'position,sothat
theswitchis lit. Youwill heara beep
andtheconsolewilllight up.
ii
Page 12

CONGRATULATIONS!onchoosingyour treadmill. You'vetakenan important stepin developingand
sustaining anexerciseprogram! Yourtreadmill is a tremendouslyeffectivetool for achievingyourpersonal
fitness goals.Regularuseofyour treadmill canimprovethe quality ofyour life in somanyways.
HEREAREJUSTA FEWOFTHEHEALTHBENEFITSOFEXERCISE
• Weight Loss
• A Healthier Heart
• Improved Muscle Tone
• Increased Daily Energy Levels
Thekey to reaping these benefits is to develop an exercise habit. Yournew treadmill will help you eliminate
obstacles that prevent you from exercising. Inclement weather and darkness won't interfere with your
workout when you use your treadmill in the comfort of your home. This guide provides you with basic
information for using and enjoying your new machine.
LOCATIONOFTHETREADMILL
Place the treadmill on a level surface. Thereshould be 6 feet of clearance
behind the treadmill, 3 feet on each side and one foot in front for folding
and the power cord. Donot place the treadmill in any area that will block
any vent or air openings. Thetreadmill should not be located in a garage,
covered patio, near water or outdoors.
i While you are preparing to use the treadmill, do not stand On the be!t.
i Place your feet on the side rails before startingthe treadmill. Start
i walking on thebe!t only after the be!t has begun to inOre. Never start the
i treadmill at a fast running speed and attempt tojump on!
3 feet 3 feet
_ i foot
6 feet
SAFETYKEY
Yourtreadmill will not start unless the safety key is placed in position. Attach the clip end securely to your
clothing. This safety key is designed to cut the power to the treadrnifl if you should fall Check the operation
of the safety keyevery2 weeks.
i
NEVERUSETHETREADMILL
Page 13

PROPERUSAGE
Yourtreadmillis capableofreachinghigh speeds.Alwaysstart off usinga slowerspeedandadjust thespeedin
small incrementsto reach a higherspeedlevel Neverleavethe treadmifl unattendedwhileit is running. When
not in use, removethesafetykey,turn the on/off switch to off and unplugthepowercord. Makesure to foflow
theMAINTENANCEschedulelocatedon page27 in this manual.Keepyourbodyand headfacingforward.Donot
attempt to turn aroundor lookbackwardswhile the treadmill is running.Stopyour workoutimmediatelyif you
feelpain,faint, dizzyorare shortof breath.
FOLDING
Firmlygraspthebackendof thetreadmill. Carefully
lift the end of the treadmill deck into the upright
position until the foot lock latch engages and
securelylocksthedeckinto position.Makesurethe
deckis securelylatchedbeforeletting go. Tounfold,
firmly grasp the back end of the treadmill. Gently
pressdownonthe footlocklatch withyourfootuntil
thelocklatch disengages.Carefullylower thedeck
tothe ground.NOTE:Thefootlocklatch is located
on the bottom left side of thedeck.
MOVING
Yourtreadmill has a pair of transport wheelsbuilt
into the frame. Tomove,makesurethetreadmill is
foldedand securelylatched. Thenfirmly grasp the
handlebars,tilt thetreadmifl backand roll
OurTreadmillsareheavy,usecare andadditional help if necessa_ whenmoving. !
Donot attempt to moveor transPo_ treadmill unlessit is in theupright, folded
i _ POsition with the Iock !atch secured. Failure to fo//ow these instructions Could
resu! inJu
Page 14

TENSIONINGTHERUNNINGBELT
The running belt has been properly adjusted at the
factory before it was shipped. At times the belt can
moveoff-center during shipment.
CAUTION:Runningbelt should NOTbe moving during
tensioning. Over-tightening the running belt can
cause excessivewear on the treadmill as well as its
components. Neverover-tightenthe belt.
If youcan feela slipping sensationwhenrunning onthe
treadmill, the running belt must be tightened. In most
cases, the belt has stretched from use, causing the
belt to slip. Thisis a normal and commonadjustment.
Toeliminate this slipping, TURNTHETREADMILLOFF
and tension BOTHTHEREARROLLERBOLTSusing the
supplied Allen wrench, turning them 1/4 TURNto the
right as shown. Turnthe treadmill on and check for
slipping. Repeat if necessary,but NEVERTURNthe
roller bolts morethan 1/4turn at a time. Beltis properly
tensionedwhentheslipping sensationis gone.
CENTERINGTHERUNNINGBELT
Therunning belt hasbeenproperlyadjustedat the
factorybeforeit wasshipped.At times the beltcan
moveoff-center during shipment.Beforeoperating the
treadmill, makesurethe belt is centeredand remains
centeredtomaintain smoothoperation.
Beltistoofar totherightside
Beltistoofartotheleftside
CAUTION:Donot run belt faster than 1/2 mph while
centering.Keepfingers,hair and clothingaway from
beltat all times.
If therunningbeltis toofarto theright side:
Withthe treadmill running at 1/2 mph, turn the right
adjustment bolt clockwise 1/4 TURNat a time (using
the suppliedAllen wrench).Checkthe belt alignment.
Allowbelttoruna fullcycletogaugeif moreadjustment
is needed.Repeatif necessary,until the belt remains
centeredduring use.
If the running belt is too far to the left side:
Withthe treadmill running at 1/2 mph, turn the right
adjustment bolt counter-clockwise1/4 TURNat a time
(using the supplied Allen wrench). Check the belt
alignment.Allowbeltto runa full cycletogaugeif more
adjustment is needed.Repeat if necessary,until the
beltremainscenteredduring use.
Page 15

Note:Thereis a thin protectivesheetof clearplastic on the overlayof the consoleandshouldbe removed.
A) MONITORDISPLAESpeed,Time,Pulse,Distance,Incfine,CaloriesandProgramProfiles.
B) STOP:Presstopause/enflyour workout.Holdfor 3 secondsto resetthetreadmill.
C) START/PAUSE:Simplypressto beginexercising,startsyourprogramorpausescurrent workout.
D) ARROWKEYS:Usedtoscroll throughprogrammingoptionssuchasProgram,Level, Time,Speed& Weight.
E) ENTER:Pressto confirm theselectedProgram,Time,Level Speedand Weight.
F) QUICKADJUSTINCLINEKEYS:Usedtoreach desiredincline morequickly.PressbeforeSETINCLINEkey.
G) QUICKADJUSTSPEEDKEYS:Usedtoreachdesiredspeedmorequickly.PressbeforeSETSPEEDkey.
H) INCLINEARROWKEYS:Usedto adjust incline in small increments(0.5% increments).
I) SPEEDARROWKEYS:Usedtoadjust speedin small increments(0.] mph increments).
J) PRESSTOSETINCLINEKEEPressto confirm one-touchincline selection.Pressafter QUICKADJUSTINCLINEkey.
K) PRESSTOSETSPEEDKEEPressto confirmone-touchspeedselection.Pressafter QUICKADJUSTSPEEDkey.
L) INCLINELEDDISPLAEIlluminate to indicate currentincline.
tvl) SPEEDLEDDISPLAEIlluminate to indicate current speed.
N) FAN:Personalworkoutfan.
0) FANBUTTON:Pressthe fanbutton ON/OFF.
ii
P) WATERBOTTLE/ CD/ tvlP3HOLDERS:Holdspersonalworkoutequipment.
Q) READINGRACK:Holdsreadingmaterial (Removesalessticker beforeuse)
R) SELECTPROGRAM:Usedto selecta program.
Page 16

TIME • Shownas Minutes:Seconds.Viewthe time
remainingorthetime elapsedin your workout.
PULSE • Shownas BeatsPerMinute.Usedto
monitoryour heart rate (displayedwhencontact is
madewith bothpulsegrips or wirelesscheststrap is
used(purchasedseparatelyfor T74modelonly.)
00.00 ,,o,,,Mp,E,ss,,,,,o,E,,,
DISTANCE • Shownas Miles. Indicatesdistance
traveledduringyour workout.
CALORIES• TotalCaloriesburnedduringyour workout.
PROGRAMPROFILES• Represents the profile of the program being used (speed during speed based
programs and incline during incline based programs).
54
PULSEGRIPS
Place the palm of your hands directly on the grip pulse handlebars. Both hands must grip the bars for your
heart rate to register. It takes 5 consecutive heart beats (J5-20 seconds) foryour heart rate to register. When
gripping the pulse handlebars, do not grip tightly. Holding the grips tightly may elevate your blood pressure.
Keep a loose, cupping hold. You may experience an erratic readout if consistently holding the grip pulse
handlebars. Make sure to clean the pulse sensors to ensure proper contact can be maintained.
Page 17

I) Checktomakesurenothingis onor will hinderthemovementof thetreadmill.
2) Plugin thepowercordand turn the treadmill ON.
3) Standonthe side railsof the treadmill.
4) Attachthesafetykeyclip topart ofyourclothing.
5) Insertthesafetykeyinto the safetykeyholein the console.
6) Youhavetwooptionstostartyourworkout:
QUICKSTARTUP
A)
Simplypressthe STARTkeyto begin workingout. OR...
B)
SELECTAPROGRAM
Selecta PROGRAMusingtheSELECTPROGRAMkey.
Oncea PROGRAMhasbeenchosen,pressENTER.
i_I _ iii
SELECTA TIME
Selecta Timeusing theARROWkeysorusethe default time.
Oncea TIMEhasbeenchosen,pressENTER.
SELECTALEVEL
Selecta PROGRAMLEVELusing the ARROWkeys.
Oncea PROGRAMLEVELhas beenchosen,pressENTER.
SELECTA WEIGHT
Selecta WEIGHTusingtheARROWkeys.
Oncea WEIGHThas beenchosen,pressSTART.
FINISHINGYOURWORKOUT
Whenyour workoutis complete,the MONITORDISPLAYwill flash and beep.Yourworkoutinformation will
stay displayedontheconsolefor 45 secondsandthenreset.
CLEARCURRENTSELECTION
Toclear the currentprogramselectionorscreen,hold theSTOPbutton for 3 seconds.
Page 18

Allows'OnTheFly' manualSPEEDand INCLINEchanges.Time-basedgoal.
Walkorrun a seriesof alternating SPEEDlevels,time-basedgoal with 10 difficulty levelsto choosefrom.
INTERVALSPROGRAMSEGMENTS
(peak segments last 30 seconds, valley segments last 90 seconds)
tevel l i.0 ' 1.5 2.0 4.0 _ 1.5 ' i.0
Level2 1.0 ' 1.5 2.0 4.5 _ 1.5 ' i.0
Level3 1,3' 1,9 2,5 5,0 _
Level4 1,3 ' 1,9 Z5 5,5 __ _
Level5 i,5 ' 2.3 3,0 6,0 _ _ 2.3 i,5
Level6 i.5 ' 22 3,0 6,5 _ _ 22 1.5
Level7 i.8' 2.6 3.5 ZO _ _ 2.6 ' 1.8
Level8 J.8 21_ 3.8 7.5 .__ 21_' J.8
Level9 2.0 ' 3.0 4.0 8.0 _ 3.0 2.0
LevellO 2.0 ' 3.0 4.0 8.5 _ 3.0 ' 2.0
1.9 ' 1,3
1.3
1.9
¸¸4¸¸
(WARM-UPandCOOL-DOWNlast4:00 minuteseachandareincludedin programtimes)
i ,_,,_ "_ ...............................................
Motivates with different combinationsof SPEED.Time-basedgoal with 10 difficulty levelsto choosefrom.
ROLLINGPROGRAMSEGMENTS(all segmentslast 30 seconds)
li;l_ll_ _ l 2 3 4 5 6 7 8
LevelI i,O 1,5 2,0 2,5 3,0 3,5 4,0 3,5 3.0 2,5
Level2 1,3 ' 1,9 Z5 3,0 £5 4,0 4,5 4,0 £5 3,0
Level3 1,5 2,3 3,0 3,5 4,0 4,5 5,0 4,5 4,0 3,5
Level4 1,8 2,6 3,5 4,0 4,5 5,0 5,5 5,0 4,5 4,0
Level5 2,0 3,0 4,0 4,5 5,0 5,5 6,0 5,5 5,0 4,5
Level6 2.3 3,4 4,5 5,0 5,5 6,0 6,5 6,0 5,5 5,0
Level7 2.5 ' 3,8 5,0 5,5 6,0 6,5 7,0 6,5 6,0 5,5
Level8 2,8 4,I 5,5 6,0 6,5 7,0 7,5 7,0 6,5 6,0
Level9 3,0 4,5 6,0 6,5 7,0 7,5 8,0 7,5 7,0 6,5
LevelIO £3 4,9 6.5 7,0 7,5 8,0 8,5 8,0 7,5 7,0
i
i
I
i
i
I
(WARM-UPandCOOL-DOWNlast 4:00minuteseachandareincludedin programtimes)
2.3 1,5
2,6 ' 1,8
3.0 ' 2,0
3.4' 2,3
3.8 2,5
4.i '2.8
i
4.5 8.0
' 3,3
5.3 3,5
3,8
Page 19

%
i_I _ iii
Challengeswith variouscombinationsof hills and valleys
(INCLINE&SPEEDlevels). Time-basedgoal with 10
difficulty levelsto choosefrom.
WEIGHTLOSSPROGRAMSEGMENTS(all segmentslast 30
I 2 3 4 5 6 7
LevelI
Level2 Speed i]3 i.9 2.5 3.0 3.5 4.0 4.5 4.0 3.5 3.0 _ 2.6 ' 1.8
Level3
Level4
Level5
Level6 Speed 2.3 ' 3.4 4.5 5.0 5.5 6.0 6.5 6.0 5.5 5.0 _ 4.1 2.8
LeveI7 Speed 2.5 3.8 5,0 5,5 6,0 6,5 7,0 6,5 6,0 5,5 _ 4.5 ' 3.0
LeveI8
Level9
Level10
Elevation 0.0 0,5 1,5 1,5 1,0 0,5 0,5 0,5 1,0 1,5 0,5 ' 0,0
Speed 1.0 ' 2.0 2.5 3.0 3.5 4.0 3.5 3.0 2.5 2.3 _ 1.5
Elevation 0.0 0,5 1,5 1,5 1,0 0,5 1,0 0,5 1,0 1,5 _ 0,5 ' 0,0
Elevation 0.5 ' 1,0 2,0 2,0 1,5 1,0 1,0 1,0 1,5 2,0 _ l,O _ 0,5
Speed 1.5 ' 2.3 3,0 3,5 4,0 4,5 5,0 4,5 4,0 3,5 _ 3.0 2.0
Elevation 0.5 2,0 2,0 1,5 1,0 1,0 1,0 1,5 2,0 _ l,O 0,5
Speed 1.8 ' 2.6 3,5 4,0 4,5 5,0 5,5 5,0 4,5 4,5 _ 3.4 ' 2.3
Elevation 1.0 ' 2,5 2,5 2,0 1,5 1,5 1,5 2,0 2,5 _ i.5 ' i10
speed2.0 3.0 4.0 4.5 5.0 5.5 5.5 5.0 4.5
Elevation 1.0' i.5 2.5 2.5 2.0 1.5 1.5 1.5 2.0 2.5 _ 1.5 1.0
Elevation i.5 ' 2.0 3,0 3,0 2,5 2,0 2,0 2,0 2,5 3,0 _ 2.0' i.5
Elevation 1.5 ' 2,0 3,0 3,0 2,5 2,0 2,0 2,0 2,5 3,0 _ 210' t6
Speed 2,8 ' 4,I 5,5 6,0 6,5 7,0 7,5 7,0 6,5 6,0 _ 4.9 3.3
Elevation ZO Z5 3,5 3,5 3,0 2,5 Z5 2,5 3,0 3,5 _ Z5 ZO
Speed 3.0 ' 4.5 6,0 6,5 7,0 7,5 8,0 7,5 7.0 6.5 5.3 ' 3.5
Elevation 2,0 ' 2.5 3,5 3,5 3,0 2,5 Z5 2,5 3,0 3,5 2.5 2.0
Speed 3.3 43 6,5 7,0 7,5 8,0 8,5 8,5 7,5 7,0 5.6 3.8
seconds)
8
i
LevelI
Level2
Level3
Level6
Level7
Level8
Level9
Level10
(WARM-UPandCOOL-DOWNlast 4:00minuteseachandareincludedin programtimes)
(WARM-UPandCOOL-DOWNlast 4:00minuteseachandareincludedin programtimes)
Page 20

Simulates various INCLINESandyardages for holes on a golf course, with 4 tee-off boxesand 9 or I8 holes to choose
from.Distance-basedgoal.
GOLFPROGRAMSEGMENTS
HOLE
HUMBER:
Redtee Elevation 0,0 1,0 2,0 3.0 2,5 1,0 2,0 2.5 1,5
9holes Distance 309 359 283 256 113 387 9I 351 333
Whitetee Elevation 0.0 1.0 2.0 3.0 2.5 1.0 2.0 2.5 1.5 I
9holes Distance 33i 427 330 295 129 466 97 369 43I
Bluetee Elevation 0,0 1,0 ZO 3,0 Z5 1,0 ZO Z5 1,5
9holes Distance 345 460 337 308 142 484 97 389 44I
B!acktee Elevation 0.0 1.0 2.0 3.0 2.5 1.0 2.0 2.5 1.5 I
9holes Distance 376 502 374 827 i87 500 i06 416 462
Redtee Elevation 0,0 1,0 2,0 3,0 2,5 1,0 2,0 2,5 1,5 3,5 2,5 2,0 4,0 2,5 3,0 2,0 5,0 2,0
I8 holes Distance 309 359 283 256 113 387 9I 351 333 301 30I 165 288 434 312 310 I50 455
Wflitetee Elevation' 0.0' 1.0' 2.0 3.0 2.5 1.0 2.0 2.5 1.5 8.5 2.5 2.0' 4.0' 2.5 3.0 2.0 5.0 2.0
18 holes Distance 33i 427 330 295 I29 466 97 369 43I 407 339 179 368 548 349 376 I66 509 6116
Bluetee Elevation 0,0 1,0 2,0 3.0 2,5 1,0 2,0 2.0 1,5 3,5 2.5 2,0 4.0 2,5 3.0 2,0 5.0 2.0
18heles Distance 345 460 337 308 142 484 97 389 44I 413 349 187 376 560 373 383 I72 532
2482
2875
3003
3250
5198
6348
¸¸4¸¸
Blackiee Elevation 0.0 1.0 2.0 3.0 2.5 1.0 2.0 2.5 1.5 3.5 2.5 2.0' 4.0' 2.5 3.0 2.0 5.0 2.0
18floles Distance 376 502 374 327 187 500 106 416 462 430 378 201 393 572 396 40i I78 543
Distance = Yards
Automaticallyadjusts incfine to maintain your TargetHeart Rate.Perfectforsimulating the intensity ofyour favoritesport
or everydayactivity. Time-basedgoal
1.Oncethe THRZONEprogramhas beenchosen,pressENTER.
2. Choosethe desiredTIMEusing theARROWKEYSandpress ENTER.
3. Choosea TARGETHEARTRATEusing theARROWKEYSand pressENTER.
Note:Usethe chart providedin this guide, to determineyourtarget heart rate.
4.Choosea Weightusing the ARROWKEYSandpressENTER.
5. PressSTARTtobeginyourprogram.
After the4 minute warm-upperiod,the INCLINElevel will increasegradually toget theuser to theentered TARGETHEART
RATEZONE.Oncethe user is at the TARGETHEARTRATEZONE(plus or minus 5 beats per minute) the INCLINElevel wifl
remain until you would rise aboveor drop belowyou TARGETHEARTRATEZONEat which time the incline wouldadjust
accordingly. Thelast 4 minutes of the program will begin the cool downperiod.At this time, the program will gradually
decreasethe resistanceleveltogive theuser asmoothcooldown.
Page 21

i_I _ iii
I. Oncethe CUSTOMI or 2 programhas beenchosen,pressENTER
2. Choosethe desiredTIMEusing thePROGRAMMINGARROWKEYSand press
ENTER.
3.ChoosethedesiredSPEEDfor eachsegment,using theARROWKEYSand
pressENTER.Note:Youwill needto pressENTERafter eachsegment.
• TheSTOPkeywill takeyou back to the previoussegment.
4. Choosethe desiredINCLINEforeachsegment,usingtheARROWKEYSand
pressENTER.Note:Youwill needto pressENTERafter eachsegment.
• TheSTOPkeywill takeyou back to the previoussegment.
5. Choosethe Weight, using the ARROWKEYSand press ENTER.
6. PressSTARTto beginyourprogram.At this time,yourprogramhasbeen
successfullysavedinto memory,andcanbe usedfor future workouts.
• ToRESETyourprograminformationand deleteit frommemory,pressand hold
theENTERkeyfor 5 seconds(afteryou haveselectedthe
CUSTOM] or2 program).
• While usingyour saved program, you are able to adjust the speed or incline, but
any changes will not be saved.
Page 22

ALWAYSCONSULTYOURPHYSICIANBEFOREBEGINNINGANEXERCISEPROGRAM.
HOWOFTEN?(Frequencyof Workouts)
The American Heart Association recommends that you exercise at least 3 to 4 days per week to maintain
cardiovascular fitness. If you have other goals such as weight or fat loss, you will achieve your goal faster with
more frequent exercise. Whether it's 3 days or 6 days, remember that your ultimate goal should be to make
exercise a lifetime habit. Many people are successful staying with a fitness program if they set aside a specific
time of day to exercise. It doesn't matter whether it's in the morning before breakfast, during lunch hour or while
watching the evening news. What's more important is that it's a time that allows you to keep a schedule, and a
time whenyou won't be interrupted. Tobe successful with your fitness program, you have to make it a priority in
your life. So decide on a time, puff out your day planner and pencil in your exercise times for the next month!
HOWLONG?(DurationofWorkouts)
For aerobic exercise benefits, it's recommended that you exercise from between 24 and 60 minutes per session.
But start slowly and gradually increase your exercise times. Ifyou've been sedentary during the past year, it may
be a good idea to keepyour exercise times to as little as five minutes initially. Yourbody will need time to adjust
to the new activity. If your goal is weight loss, a longer exercise session at lower intensities has been found to
be most effective. A workout time of 48 minutes or more is recommended for best weight loss results.
¸¸4¸¸
HOWHARD?(Intensityof Workouts)
How hard you workout is also determined by your goals. If you useyour treadmill to prepare for a 51{run, you will
probably work out at a higher intensity than if your goal is general fitness. Regardless of your long term goals,
always begin an exercise program at low intensity. Aerobic exercise does not have to be painful to be beneficial!
Thereare two ways to measure your exercise intensity. The first is by monitoring your heart rate (using the grip
pulse handlebars or a wireless chest transmitter - may be sold separately), and the second is by evaluating your
perceived exertion level (this is simpler than it sounds!).
PERCEIVEDEXERTIONLEVEL
A simple way to gaugeyour exercise intensity is to evaluateyour perceived exertion level. Whileexercising, if you
are too winded to maintain a conversation without gasping, you are working out too hard. A good rule of thumb
is to work to the point of exhilaration, not exhaustion. If you cannot catch your breath, it's time to slow down.
Always be aware of these warning signs of overexertion.
Page 23

y
i_i"_ i<i
Whatis TargetHeartRateZone?
Target Heart Rate Zone tells you
the number of times per minute
your heart needs to beat to
achieve a desired workout effect.
It is represented as a percenta@
of the maximum number of times
your heart can beat per minute.
Target Zone will vary for each
individual, depending on a@,
current level of conditioning,
and personal fitness goals. The
American Heart Association
recommends working-out at a
Target Heart Rate Zone of between
60% and 75% of your maximum
heart rate. A beginner will want to
workout in the 60% ran@ while
! o
a more experienced exerciser will
want to workout in the 70-75%
ran@. Seechart for reference.
EXAMPLE:
For a 42-year-old user: Find a@ along the bottom of the chart (round to 40), follow a@ column up to
the target zone bar. Results: 60% of maximum Hear Rate = 108 Beats Per Minute, 75% of maximum
Heart Rate = 135 Beat Per Minute.
ALWAYSCONSULTYOURPHYSICIANBEFOREBEGINNINGANEXERCISEPROGRAM.
Page 24

STRETCHFIRST
Before using your product, it is best to take a few minutes doing a few gentle stretching exercises.
Stretching prior to exercise will improve flexibility and reduce chances of exercise related injury. Ease into
each of these stretches with a slow gentle motion. Do not stretch to the point of pain. Make sure not to
bounce while doing these stretches.
I. STANDINGCALFMUSCLESTRETCH
Stand near a wall with the toes of tour left foot about iS" from the wall, and
the right foot about J2" behind the other foot. Lean forward, pushing against
the waft with your palms, t_eepyour heels flat and hold this position for a
count of J5 seconds. Make sure that you do not bounce while stretching.
Repeat on the other side.
54
2. STANDINGOUADRICEPSSTRETCH
Using a wall to provide balance, grasp your left ankle
with your left hand and hold your foot against the back
of your thigh for J5 seconds. Repeat with your right
ankle and hand.
3.SITTINGHAMSTRING&LOWERBACKMUSCLESTRETCH
Sit on the floor with your legs together and straight out in front of you. Do
not lock your knees. Extend your fingers towards your toes and hold for a
count of J5 seconds. Make sure that you do not bounce while stretching. Sit
upright again. Repeat one time.
Page 25

WARMUP
The first 2 to 5 minutes of a workout should be devoted to warming up. The warm-up will limber your
muscles and prepare them for more strenuous exercise. Make sure that you warm-up on your product at a
slow pace. The warm up should gradually bring your heart rate into your Target Heart Rate Zone.
COOLDOWN
Never stop exercising suddenly! A cool-down period of 3-5 minutes allows your heart to readjust to the
decreased demand. Make sure that your cool down period consists of a veryslow pace to allow your heart
rate to lower. After the cool-down, repeat the stretching exercises listed above to loosen and relax your
muscles.
i_I "_ i_ii
An important step in developing a long term fitness program is to determine your goals. Is your primary
goal for exercising to lose weight? Improve muscle? Reduce stress? Prepare for the spring racing schedule?
Knowing what your goals are will help you develop a more successful exercise program. Below are some
common exercise goals:
• WeightLoss- lowerintensity,longerduration workouts
• ImproveBodyShapeand Tone- interval workouts,alternatebetweenhi and lowintensities
• IncreasedEnergyLevel- morefrequentdailyworkouts
• ImprovedSportsPerformance- high intensity workouts
• ImprovedCardiovascularEndurance- moderateintensity,longerduration workouts
If possible try to define your personal goals in precise, measurable terms, and then putyour goals in writing.
Themore specific you can be, the easier it will be to track your progress. If your goals are long term, divide
them up into monthly and weekly segments. Longer term goals can lose some of the immediate motivation
benefits. Short term goals are easier to achieve. Your console provides you with several readouts that can
be used to record your progress. Youcan track Distance, Calories or Time.
KEEP/NGANEXERCISEDIARY
Tomake your personal exercise log book, photocopy the weekly and monthly log sheets, which are located
on the following pages, or you can print them off of your computer bygoing to-
www.horizonfitness,com/ uifles/weeMvlo .pflf
www.horizonfitness,com/ uides/monthlvIo ,pflf
Asyour fitness improves,youcanlook backand seehowfar you'vecome!
Page 26

WEEK# WEEKLY GOAL
DAY DATE DISTANCE CALORIES TIME COMMENTS
SUNDAY
MONDAY
TUESDAY
WEDNESDAY
THURSDAY
FRIDAY
SATURDAY
WEEKLY TOTALS :
¸¸4¸¸
DAY DATE DISTANCE CALORIES TIME COMMENTS
SUNDAY
MONDAY
TUESDAY
WEDNESDAY
THURSDAY
FRIDAY
SATURDAY
WEEKLY TOTALS :
DAY
SUNDAY
MONDAY
TUESDAY
WEDNESDAY
THURSDAY
FRIDAY
SATURDAY
DATE DISTANCE CALORIES TIME COMMENTS
WEEKLY TOTALS :
Page 27

i_I "_ i_ii
DAY DATE DISTANCE CALORIES TIME COMMENTS
SUNDAY
MONDAY
TUESDAY
WEDNESDAY
THURSDAY
FRIDAY
SATURDAY
WEEKLY TOTALS :
DAY DATE DISTANCE CALORIES TIME COMMENTS
SUNDAY
MONDAY
TUESDAY
WEDNESDAY
THURSDAY
FRIDAY
SATURDAY
WEEKLY TOTALS :
DAY
SUNDAY
MONDAY
TUESDAY
WEDNESDAY
THURSDAY
FRIDAY
SATURDAY
DATE DISTANCE CALORIES TIME COMMENTS
WEEKLY TOTALS :
Page 28

WEEK# DISTANCE CALORIES TIME
MONTHLYTOTALS:
¸¸4¸¸
WEEK# DISTANCE CALORIES TIME
MONTHLYTOTALS:
WEEK#
DISTANCE CALORIES TIME
MONTHLYTOTALS:
Page 29

MONTH MONTHLYGOAL
WEEK# DISTANCE CALORIES TIME
MONTHLYTOTALS:
i_I "_ i_ii
MONTH MONTHLYGOAL
WEEK# DISTANCE CALORIES TIME
MONTHLYTOTALS:
MONTH MONTHLYGOAL
WEEK# DISTANCE CALORIES TIME
MONTHLYTOTALS:
Page 30

i............................................................................................................................................................................................................................................................................................................................................................................................................................................................................................................................................................
COMMONPRODUCTQUESTIONS
ARETHESOUNDSMYTREADMILLMAKESNORMAL?
All treadmills makea certain typeof thumping noisedue to the belt riding overtherollers, especiallynew
treadmills. Thisnoisewill diminish overtime, although may not totallygo away.Overtime, thebelt will
stretch, causing thebelt to ride smootherover the rollers.
WHYIS THETREADMILLI PURCHASEDLOUDERTHANTHEONEATTHESTORE?
All fitness productsseemquieter in a largestoreshowroombecausethereis generallymorebackgroundnoise
than in yourhome.Also, therewill beless reverberationon acarpetedconcretefloor than on a woodoverlay
floor.Sometimesa heavyrubbermat will help reducereverberationthrough the floor.If a fitness product is
placed closeto a wall, there will be morereflected noise.
WHENSHOULDI BEWORRIEDABOUTANOISE?
Aslong as thesoundsyour treadmill makesare no louder than a normal conversationaltoneof voice,it is
considerednormalnoise.
TROUBLESHOOTING-TREADMILL
Yourtreadmill is designedto bereliableand easy to use.However,if you experiencea problem,please referencethe
troubleshootingguide listed below.
PROBLEM: Theconsoledoesnet light up and/or the belt doesnotmove.
$OL UTJO_: Verifythe following:
DOESTHEREDLIGHTONTHEON/OFFSWITCHLIGHTUP?
IF YES..
• Doublecheck that all connectionsaresecure,especiallythe consolecable. Unplugandreconnectthe console
cable to verify.
• Makesure theconsolecable is notpinched ordamagedin anyway.
• Turnthepoweroff, unplug thepower cable and wait 60 seconds.Removemotor cover.Wait until aft red LED
lights havegoneoff on themotorcontrolboard beforeproceeding.Next,verify thatnoneof thewiresconnected
to thelowerboard arelooseor disconnected.
IF NO:
Verifythat the outlet the machineis plugged into is functional Doublecheckthat the breakerhas not tripped,
it is on a dedicated 20-amp circuit, it is net on a GFCIequippedoutlet, and it is not plugged into a power
strip/surge protectoror extensioncord.
Thepowercordis not pinched or damagedandis properlyplugged into theoutlet ANDthe machine.
Thepowerswitch is turned to the ONposition.
Page 31

i_I _ i_ii
PROBLEM:Thetreadmill circuit breakertrips during a workout.
SOLUTION: Verifythefollowing:
• Makesure the treadmill is plugged into a dedicated 20-amp circuit.
• Verifythat you do not havethe machine on an extensioncordor surge protector
• Confirm that the machine is not plugged into a GFCI-equippefl outlet or on a circuit that has a GFCI-equippefloutlet on it.
PROBLEM:Therunning belt does not stay centered during a workout.
$OLUTJOHi Verifythefollowing:
• Makesure the treadmill is on a levelsurface.
• Verifythat the belt is properly tightened and centered(Referto the Adjustmentsection for detailed directions).
PROBLEM:Operating speed appears inaccurate.
$OL UT_OH: Auto-cafibrate the treadmill:
• Poweron the treadmill and havethe safety keyin position on the
console.Press andhold the elevation "+" and speed %" buttons for
approximately 5seconds to enter the EngineeringMode. Theconsole
will beep and "ENGO"appears in the display.
• Press theSpeed "+" or "-" button until "ENG2"appears in the display.
• Press, "ENTER"to select.Press, "START"to begin. Thetreadmill
running belt will begin to move automatically and the auto-calibration
sequencewill properlyset and store the speed values.
• Uponsuccessful calibration, the treadmill will beepseveral times. The
console will automatically exit EngineeringModeand return to the
start-up screen.
DoNorstandonrunningbe!twhile
i calibrating- standontheguide
i rails. Treadmiflwifl fluctuate between
JOWand s eedsseverai
i minutesunf!!calibrafion is complete,
i i i
i i
TROUBLESHOOTING- HEARTRATE
Checkyour exerciseenvironment for sourcesof interference suchas fluorescent lights, computers, undergroundfencing, home
security systems orappliances containing large motors. Theseitems maycause erratic heart rate readouts.
Youmayexperiencean erratic readout underthe following conditions:
° Grippingthe heart rate handlebars too tighL Tryto maintain moderatepressure whileholding ontothe heart rate handlebars.
• Constantmovementand vibration due to constantly holding the heart rate handlebarswhile exercising.If youare receiving
erratic heart rate readouts, try to only hold the grips long enoughto monitor your heart rate.
• Whenyou arebreathing heavily during a workout.
• Whenyour hands areconstricted by wearing a ring.
• Whenyour hands aredry or cold. Trytomoisten yourpalms byrubbing them together to warm.
• Anyonewith heavyarrhythmia.
° Anyonewith arteriosclerosisorperipheral circulation disorder
• Anyonewhoseskin on the measuring palm is especially thick.
!f e n Pr° mi ii i Ui"i an ¸¸¸5¸¸¸¸:¸¸¸¸¸¸
PLEASECALLCUSTOMERTECHSUPPORTATTHENUMBERONTHEBACKPANEL
Thefollowing information may be asked ofyou whenyou call. Pleasehave theseitems readily available:
• ModelName
• SerialNumber
• Dateof Purchase(receipt or credit card statement)
In orderfor CustomerTechSupportto serviceyour treadmill they may needto ask detailed questions about thesymptoms that are
occurring. Sometroubleshooting questions that may be askedare:
• Howlong has this problem beenoccurring?
• Doesthis problem occur with everyuse?With everyuser?
• Ifyou are hearing a noise, doesit come from the front or the back? Whatkind of noiseis it (thumping. grinding, squeaking,
chirping etc.)?
• Has the machine beenlubricated and maintained per the maintenance schedule?
Answeringthese and other questions will give the technicians the ability to send proper replacementparts and the servicenecessary
toget you andyour HorizonFitness treadmill running again]
Page 32

Cleanlinessof your treadmill and its operation environment will keep maintenance problems and service calls to a
minimum. Forthis reason,werecommendthat the following preventivemaintenanceschedulebefollowed.
AFTEREACHUSE(DAILY)
Cleanand inspect, following thesesteps:
• Turnoff the treadmill with the on/off switch, then unplug the powercord at the waft outlet.
• Wipedownthe running belt, deck,motor cover,and consolecasing with a dampcloth. Neverusesolvents, as they
can causedamageto the treadmill.
• Inspect the powercord.If the powercord is damaged,contact HorizonFitness.
• Makesure thepower cordis not underneaththe treadmill or in any other area whereit can becomepinched or cut.
• Checkthe tension and alignment of the running belt. Make surethat the treadmill belt will not damageany other
componentson thetreadmill by beingmisaligned.
EVERYWEEK
Cleanunderneath the treadmill, following thesesteps:
• Turnoff the treadmill with the on/off switch, then unplug the powercord at the waft outlet.
• Fold the treadmill into the upright position, making sure that the locklatch is secure.
• Movethe treadmill to a remotelocation.
• Wipeorvacuumanydustparticlesorotherobjectsthat mayhaveaccumulatedunderneaththetreadmill.
• Return the treadmill to its previousposition.
54
EVERYMONTH-IMPORTANfl
• Turnoff the treadmill with the on/offswitch, thenunplug the powercordat the waftoutlet.
• Inspect aft assemblybolts of the machine forpropertightness.
• Turnoff the treadmill and wa# 60 seconds.
• Removethe motorcover. WaituntilALL LEDlights turn off.
• Cleanthe motor and lowerboard area to eliminate any lint or dustparticles that may haveaccumulated. Failureto
do somay result in premature failure ofkeyelectrical components.
• Vacuumand wipedown the belt with a damp cloth. VacuumanyblacUwhite particles that mayaccumulate around
theunit. Theseparticles mayaccumulatefrom normal treadmill use.
EVERY6 MONTHSOR150 MILES
It is necessaryto lubricate your treadmifl running deck everysix months
or J50 miles to maintain optimal performanceof your treadmill. Oncethe
treadmill reaches J50 miles, the console wiflpromptyou to lubricate the
treadmill Onlyuselubricant provided byHorizonFitness!
• TURNOFFTHETREADMILLwith the on/off switch, then unplug the
powercord at the waft outlet.
• Loosenboththerearrollerbolts. (Forbestresults, placetworemovable
marks on both sides of the frame and note roller position). Once
the belt is loosened,take the bottle of lubricant and apply it to the
entire top surface of the running deck. Tightenboth rear roller bolts
(matching tip the marks forproperposition) to original position.After
you have applied lubricant, plug in the power cord, insert the safety
key,start the treadmill and walk on thebe# for two minutes tospread
thelubricant.
• Lubricate theair shockswith Teflonbasedspray.
• Oncelubrication is complete,reset theconsolebypressing andholding
'STOP'and Speed'+' buttons for 5 seconds.
LU HIC HUH
RUNNINGBELT
RUNNINGDECK
L_
Pleasecontact HorizonFitnesswith questions aboutapplying lubricanttoyour treadmill.
Page 33

I iii
i i i
T73WeightCapacity= 325LBS
T74WeightCapacity= 350LBS
FRAME• LIFETIME
HorizonFitness warrants the frame against defects in
workmanshipand materials for the fifefime of the original
owner (Theframeis definedas the weldedmetal baseof the
unit anddoesnot includeanyparts that canberemoved.)
DRIVEMOTOR/ELEVATION
T73= 12YEARS
T74= 15YEARS
HorizonFitnesswarrantsthedrive/elevationmotorsagainst
defectsin workmanshipandmaterialsfora periodof
twelveyears(T73)orfifteenyears(T74)fromthedate of
purchase,solongasthedeviceremainsinthepossession
of theoriginalowner
ELECTRONICS&PARTS• I YEAR
HorizonFitness warrants the electroniccomponents, finish
and all original parts for a period of oneyear from the date
of original purchase, so long as the deviceremains in the
possessionof the original owner
LABOR• I YEAR
HorizonFitness shall coverthe labor cost for the repair
of the device for aperiod of oneyear from the date of the
original purchase, so long as the deviceremains in the
possessionof the original owner
EXCLUSIONSANDLIMITAtiONS
WhoIScovered:
• Theoriginalownerandis nottransferable.
WhatIS covered:
• Repairor replacementofa defectivemotor,electroniccomponent,
or defectivepart and is the soleremedyof the warrant_
WhatIS NOTcovered:
• Normalwearand tear,improperassemblyor maintenance,or
installation ofparts or accessoriesnot originallyintendedor
compatible with theequipmentassold.
• Damageor failure dueto accident,abuse,corrosion,discoloration
of paint orplastic, neglect,theft, vandalism, fire,flood, wind,
lightning, freezing,or othernatural disastersof anykind, power
reduction,fluctuation or failure from whatevercause,unusual
atmosphericconditions,collision,introduction of foreignobjects
into thecoveredunit, ormodifications that are unauthorizedornot
recommendedbyHorizonFitness.
• Incidental orconsequentialdamages.HorizonFitnessis not
responsibleor liable forindirect,special orconsequentialdamages,
economicloss,lossof property,orprofits, loss ofenjoymentor use,
or otherconsequentialdamagesof whatsoevernaturein connection
with thepurchase,use,repair ormaintenanceof the equipmenL
• Equipmentusedforcommercialpurposes oranyuseother thana
single family orHousehold,unlessendorsedbyHorizonFitnessfor
coverage.
• Equipmentownedoroperatedoutsidethe USandCanada.
• Defivery,assembly,installation, setupfor originalor replacement
units orlabor orother costsassociated withremovalorreplacement
of the coveredunit.
• Anyattempt to repair this equipmentcreatesa risk ofinjury,
HorizonFitnessis notresponsibleor liable for anydamage,lossor
liability arising from anypersonalinjury incurredduring thecourse
of, or asaresult of anyrepair orattempted repairofyour fitness
equipmentby other thanan authorizedservicetechnician. All
repairsattempted byyouonyour fitnessequipmentareundertaken
ATYOUROWNRISKandHorizonFitnessshall have noliability for
anyinjury tothe personorpropertyarising fromsuchrepairs.
SERVICE/RETURNS
• In-homeserviceis available within150 miles of thenearest
authorizedrepair center(Mileagebeyond150miles froman
authorizedservicecenteris theresponsibilityof the consumer).
• AIIreturns must bepre-authorizeflbyHorizonFitness.
• HorizonFitness'obligation under this warrantyis limited to
replacingorrepairing, at HorizonFitness'option,the sameor
comparablemodelat oneof its authorizedservicecenters.
• A HorizonFitnessauthorizedservicecentermust receiveall
equipmentfor whicha warrantyclaim is made. Thisequipment
must bereceivedwith all freight and othertransportationcharges
prepaid,accompaniedbysufficient proof ofpurchase.
• Replacementunits,parts andelectroniccomponentsreconditioned
toAs-newConditionbyHorizonFitness orits vendorsmay
sometimesbesuppliedas warrantyreplacementand constitute
fulfillment of warrantyterms.
• Thiswarrantygivesyou specificlegalrights, andyourrights may
varyfromstate tostate.
Page 34

Forfast and friendlyservice,pleasecontact oneofour
trainedcustomertechnicians via phone,email or ourwebsite.
Customer TechSupport Hotline.. 1-800- 244- 4192
Email.. comments@horizonfitness.com
Website..www.horizonfitness.com
Everyemployeeat HorizonFitnesstakespride in providingyouwith a high quality product.
E
T73T74:Re_].8 I © 2006Hort2onFitnessProductsI Destined& Engineeredin theU.S.A.I Madein China
 Loading...