

Horiba Scientific LAQUA WQ-310, LAQUA WQ-320, LAQUA WQ-300, LAQUA WQ-330 Instruction Manual


■Preface
This manual describes the operation of the following instrument.
Brand: LAQUA
Series name: LAQUA WQ-300series Handheld Water Quality Meter
Model: WQ-310, WQ-320, WQ-330
Be sure to read this manual before using the product to ensure proper and safe operation
of the product. Also, safely store the manual so it is readily available whenever necessary.
Product specifications and appearance, as well as the contents of this manual are subject
to change without notice.
●Warranty and Responsibility
HORIBA Advanced Techno Co., Ltd. warrants that the product shall be free from defects in
material and workmanship and agrees to repair or replace free of charge, at option of
HORIBA Advanced Techno Co., Ltd., any malfunctioned or damaged product attributable
to responsibility of HORIBA Advanced Techno Co., Ltd. for a period of Three (3) years from
the delivery unless otherwise agreed in a written statement. In any one of the following
cases, none of the warranties set forth herein shall be extended:
• Any malfunction or damage attributable to improper operation
• Any malfunction attributable to repair or modification by any person not authorized by
HORIBA Advanced Techno Co., Ltd.
• Any malfunction or damage attributable to the use in an environment not specified in
this manual
• Any malfunction or damage attributable to violation of the instructions in this manual or
operations in the manner not specified in this manual
• Any malfunction or damage attributable to any cause or causes beyond the
reasonable control of HORIBA Advanced Techno Co., Ltd. such as natural disasters
• Any deterioration in appearance attributable to corrosion, rust, and so on
• Replacement of consumables
HORIBA Advanced Techno Co., Ltd. SHALL NOT BE LIABLE FOR ANY DAMAGES
RESULTING FROM ANY MALFUNCTIONS OF THE PRODUCT, ANY ERASURE OF
DATA, OR ANY OTHER USES OF THE PRODUCT.
●Trademarks
Microsoft, Windows are registered trademarks or trademarks of Microsoft Corporation in
the United States and other countries.
Other company names and brand names are either registered trademarks or trademarks of
the respective companies. (R), (TM) symbols may be omitted in this manual.
CODE:GZ0000574030
August, 2019 2019 HORIBA Advanced Techno, Co.,
Ltd.
I

■Regulations
●EU regulations
●Conformable Directive
This equipment conforms to the following directives and standards:
EMC: EN61326-1
RoHS: EN50581
Warning: This product is not intended for use in industrial environments. In an indus-
trial environment, electromagnetic environment effects may cause the
incorrect performance of the product in which case the user may be
required to take adequate measures.
Regulations
Class B, Basic electromagnetic environment
9. Monitoring and control instruments
●Information on Disposal of Electrical and Electronic Equipment and
Disposal of Batteries and Accumulators
The crossed out wheeled bin symbol with underbar shown on the product or accompanying
documents indicates the product requires appropriate treatment, collection and recycle for
waste electrical and electronic equipment (WEEE) under the Directive 2002/96/EC, and/or
waste batteries and accumulators under the Directive 2006/66/EC in the European Union.
The symbol might be put with one of the chemical symbols below. In this case, it
satisfies the requirements of the Directive 2006/66/EC for the object chemical.
This product should not be disposed of as unsorted household waste.
Your correct disposal of WEEE, waste batteries and accumulators will contribute to
reducing wasteful consumption of natural resources, and protecting human health and the
environment from potential negative effects caused by hazardous substance in products.
Contact your supplier for information on applicable disposal methods.
●Authorised representative in EU
HORIBA Europe GmbH
Hans-Mess-Str.6, D-61440 Oberursel, Germany
II

●FCC rules
●FCC Compliance Statement
This device complies with part 15 of the FCC Rules. Operation is subject to the following
two conditions: (1) This device may not cause harmful interference, and (2) this device
must accept any interference received, including interference that may cause undesired
operation. 47 CFR 15 subpart B. This product is considered an exempt device per
clause §15.103/§2.1202.
Note
This equipment has been tested and found to comply with the limits for a Class A digital
device, pursuant to part 15 of the FCC Rules. These limits are designed to provide
reasonable protection against harmful interference when the equipment is operated in a
commercial environment. This equipment generates, uses, and can radiate radio
frequency energy and, if not installed and used in accordance with the instruction
manual, may cause harmful interference to radio communications. Operation of this
equipment in a residential area is likely to cause harmful interference in which case the
user will be required to correct the interference at his own expense.
Regulations
Any changes or modifications not expressly approved by the party responsible for
compliance could void the user's authority to operate the equipment.
Responsible Party for FCC matter
HORIBA Instruments Incorporated
Head Office
9755 Research Drive
Irvine, California 92618, U.S.A
+1 949 250 4811
III

Regulations
ᵢḽ䇦䘸⭞൞ѣӰ≇ާૂള䬶⭫ಞ⭫ᆆӝθḽ䇦ѣཤⲺᮦ
ᆍ㺞⽰⧥ູؓᣚֵ⭞ᵕ䲆ⲺᒪᮦȾ(уᱥ㺞⽰ӝ䍞䠅ؓ䇷ᵕ䰪Ⱦ)
㾷䚫ᆾ䘏ѠӝᴿީⲺᆿޞૂֵ⭞⌞ᝅӁ亯θԄ䙖ᰛᔶခ㇍
䎭൞䘏Ѡᒪ䲆θуՐ㔏⧥ູ⊗ḉȽӰ։ૂ䍘ӝᑜᶛћ䠃ⲺᖧଃȾ
䈭у㾷䳅ᝅᓕᔹᵢ⭫ಞ⭫ᆆӝȾ
This marking is applie
d to electric and electronic products sold
in the People's Republic of China. The figure at the center of
the marking indicates the environmental protection use period
in years. (It does not indicate a product guarantee period.) It
guarantees that the product will not cause environment
pollution nor serious influence on human body and property
within the period of the indicated years which is counted from
the date of m
anufacture as far as the safety and
usage
precautions for the product are observed. Do not throw away
ḽ䇦Ⲻᝅѿ
Meaning of Marking
●Korea certification
●
●Taiwan battery recycling mark
●China regulation
IV
this product without any good reason.

Regulations
ӝѣᴿᇩ⢟䍞Ⲻ〦䠅
N
ame and amount of hazardous substance used in a product
䜞Ԭ〦
Unit name
ᴿᇩ⢟䍞
䫻
Lead
(Pb)
⊔
Mer
cury
(Hg)
䭿
Cad-
mium㻌
(Cd)
ޣԭ䬢
Hexavalent
chrom-
ium㻌
ཐ⓪㚊㤥
Poly
bromo-
biphenyl
(PBB)
ཐ⓪ӂ㤥䟐
Poly
bromo-
diphenyl
ether
ᵢ։
ۑ ۑ ۑ ۑ ۑ
⭫⊖
ۑ ۑ ۑ ۑ ۑ
AC䘸䞃ಞ
*1, *2
ۑ ۑ ۑ ۑ ۑ
⭫㔼
ۑ ۑ ۑ ۑ ۑ
᭥
ۑ ۑ ۑ ۑ ۑ ۑ
ᢉদᵰ
ۑ ۑ ۑ ۑ ۑ
⭫ᶷ
ۑ ۑ ۑ ۑ
ᵢ㺞ṲדᦤSJ/T 11364Ⲻ㿺ᇐ㕌Ⱦ
This form is prepared in accordance with SJ/T 11364.
ۑ: 㺞⽰䈛ᴿᇩ⢟䍞൞䈛䜞Ԭᡶᴿൽ䍞ᶆᯏѣⲺ䠅ൽ൞ GB/T 26572 㿺ᇐⲺ䲆䠅㾷
≸ԛсȾ
Denotes that the amount of the hazardous substance contained in all of the
homogeneous materials used in the component is below the limit on the
acceptable amount stipulated in the GB/T 26572.
h: 㺞⽰䈛ᴿᇩ⢟䍞㠩ቇ൞䈛䜞ԬⲺḆжൽ䍞ᶆᯏѣⲺ䠅䎻࠰GB/T 26572 㿺ᇐⲺ
䲆䠅㾷≸Ⱦ
Denotes that the amount of the hazardous substance contained in any of the
homogeneous materials used in the component is above the limit on the
*
1: ᵢ䜞ԬⲺ⧥ֵؓ⭞ᵕ䲆Ѱ10ᒪȾ㻌 The environmental protection use period
of this product is 10 years.
*2:
䘿䞃Ԭ
Optional products
Hazardous substance
Main unit
Battery
AC adapter
Cable*2
Stand*2
Printer*2
Electrode*2
(Cr (VI))
(PBDE)
acceptable amount stipulated in the GB/T 26572.
V
For Your Safety
■For Your Safety
●Hazard classification and warning symbols
Warning messages are described in the following manner. Read the messages and follow
the instructions carefully.
●Hazard classification
This indicates an imminently hazardous situation which, if
not avoided, will result in death or serious injury. This is to
be limited to the most extreme situations.
This indicates a potentially hazardous situation which, if
not avoided, could result in death or serious injury.
This indicates a potentially hazardous situation which, if
not avoided, may result in minor or moderate injury. It may
also be used to alert against unsafe practices.
Without safety alert indication of hazardous situation
which, if not avoided, could result in property damage.
●Warning symbols
Description of what should be done, or what should be followed
Description of what should never be done, or what is prohibited
VI
For Your Safety
WARNING
CAUTION
WARNING
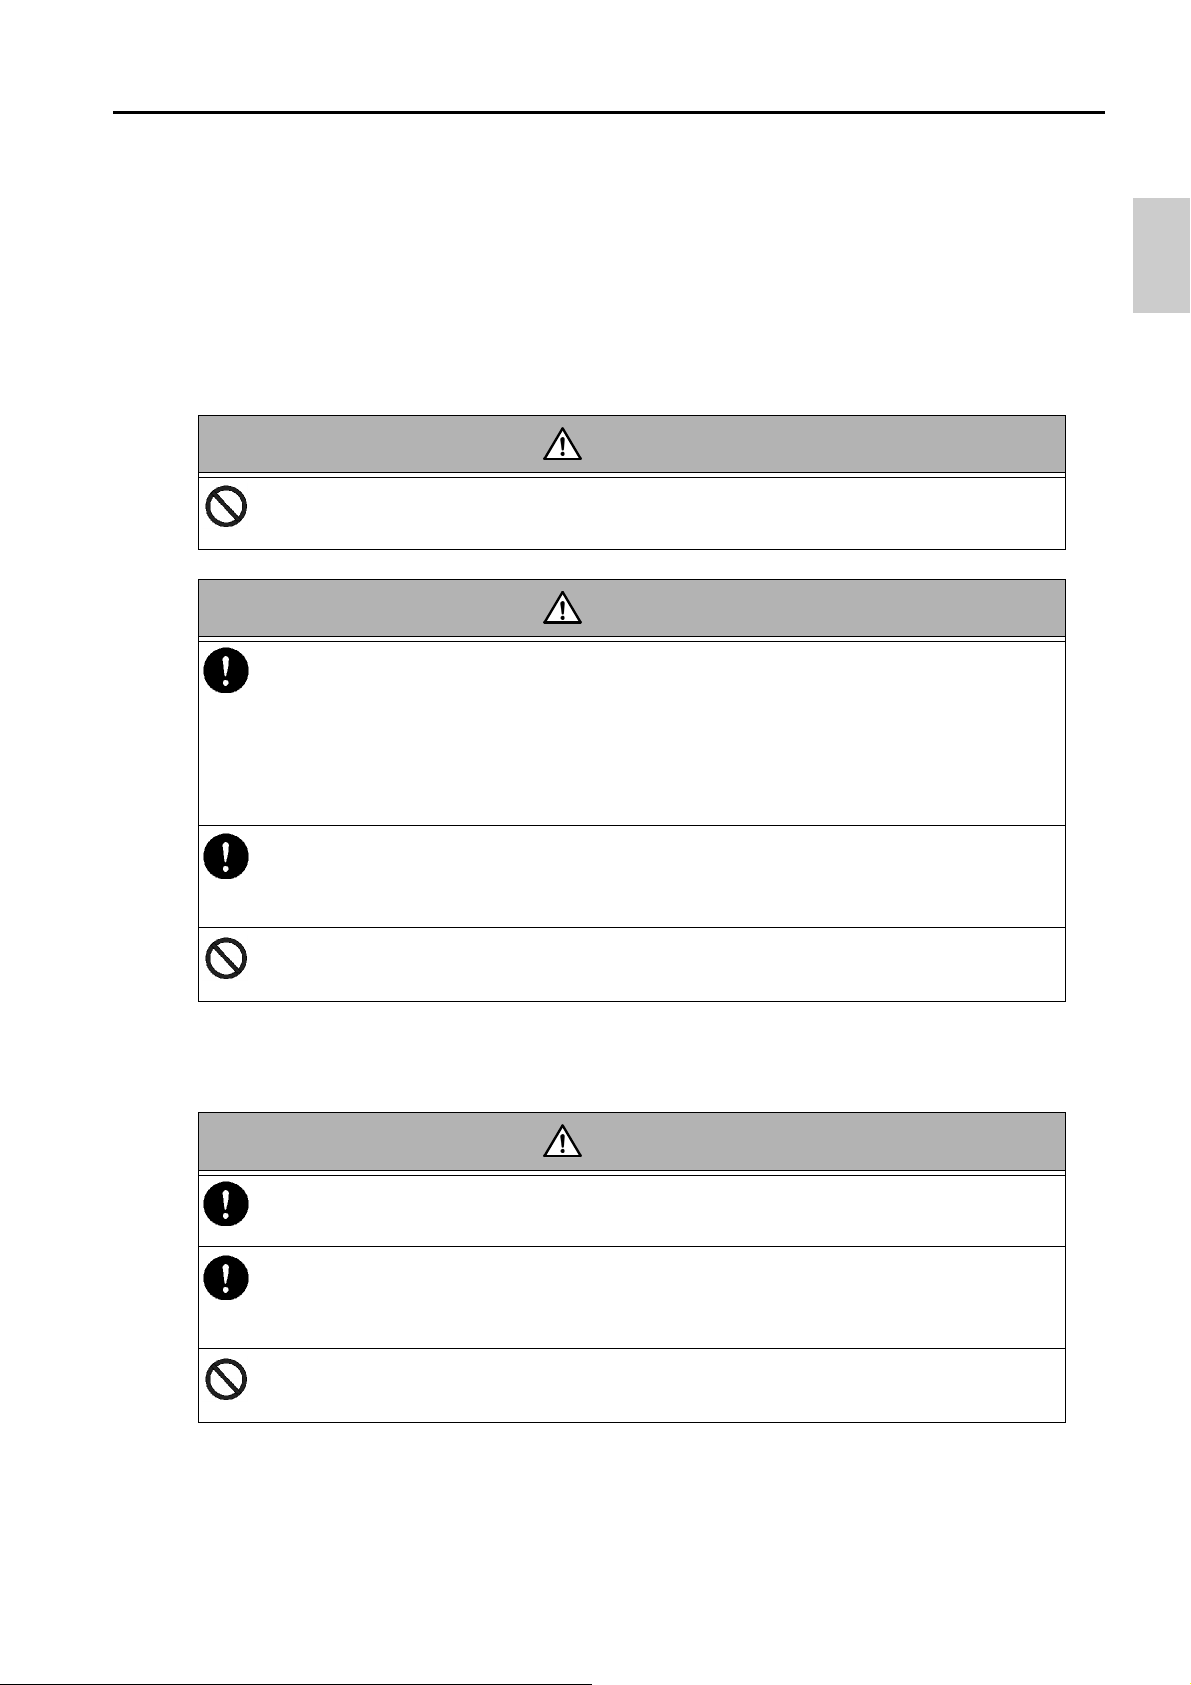
●Safety precautions
This section provides precautions for using the product safely and correctly and to prevent
injury and damage. The terms of DANGER, WARNING, and CAUTION indicate the degree
of imminency and hazardous situation. Read the precautions carefully as it contains
important safety messages.
●Instrument and Sensor
Do not disassemble or modify the instrument. Otherwise, it may heat up or
be ignited resulting in a fire or an accident.
Harmful chemicals
Some electrodes are used with hazardous standard solutions. Handle them
with care. The internal solution of pH electrode is highly concentrated
potassium chloride (3.33 mol/L KCl). If the internal solution comes in contact
with the skin, wash it off immediately. If it gets into the eyes, flush with plenty
of water and then consult a doctor.
●Battery
Broken glass
Broken glass may cause injury. The outer tube and tip of an electrode are
made of glass. Handle them with care.
Do not use the photo jack under wet or humid conditions. Otherwise, it may
cause a fire, electric shock, or breakage.
Keep batteries out of reach of children. If someone accidentally swallows a
battery, consult a doctor immediately.
If alkaline fluid from a battery gets into the eyes, do not rub the eyes, rinse
with clean water immediately and then consult a doctor.
Contact with alkaline fluid could cause blindness.
Do not put batteries in a fire, expose to heat, disassemble or remodel.
Doing so could case fluid leakage, overheating or explosion.
VII

Product Handling Information
■Product Handling Information
●Operational precautions (instrument)
• Only use the product including accessories for their intended purpose.
• Do not drop or physically impact on the instrument.
• The instrument is made of solvent-resistant materials but that does not mean it is
resistant to all chemicals. Do not expose the instrument in strong acid or alkali
solution, or wipe with such solution.
• If the instrument is dropped into water or gets wet, wipe it using soft cloth. Do not heat
to dry it.
• The instrument has a dust-proof and waterproof structure i.e., the instrument does not
malfunction even when immersed in water of 1 m depth for 30 minutes. This does
guarantee non-destructive, trouble-free, dust-proof, and waterproof performance in all
situations.
• When replacing the batteries or when a serial cable connected, the instrument does
not have the dust-proof and waterproof performance. The dust-proof and waterproof
performance is maintained only when the covers are attached correctly.
• After replacing the batteries or removing the serial cable connected, make sure that
the waterproof gasket attached to the cover is not deformed or discolored, or has
foreign matter adhering to it. If the waterproof gasket is deformed, discolored or has
foreign matter adhering to it, dust could get inside, water leaks could occur that could
lead to instrument malfunction.
• To disconnect an electrode or serial cable, hold the connector and pull it off. If you pull
at the cable, it may cause breakage.
• The phono jack communication between the instrument and a personal computer
(referred to as PC in the rest of this document) may fail because of environmental
conditions, such as electromagnetic noise.
• Do not replace the batteries in a dusty place or with wet hands. Dust or moisture could
get inside the instrument, possibly causing instrument malfunction.
• Do not use an object with a sharp end to press the keys.
• If the power supply is interrupted while measurement data is being saved in the
instrument, the data could be corrupted.
• A Ni-MH rechargeable battery can be used in this instrument.
VIII

Product Handling Information
●Operational precautions (battery)
• Do not short circuit a battery.
• Position the + and – side of the battery correctly.
• When the battery has depleted or the instrument will not be used for a long time,
remove the batteries.
• Of the specified battery types, make sure to use two batteries of the same type.
• Do not use a new battery together with a used battery.
• Do not use a fully charged nickel-metal hydride battery together with a partially
charged battery.
• Do not attempt to charge a non-rechargeable battery.
●Environmental conditions for use and storage
• Temperature: 0°C to 45°C
• Humidity: under 80% relative humidity and free from condensation
Avoid the following conditions.
• Strong vibration
• Direct sunlight
• Corrosive gas environment
• Locations close to an air-conditioner
• Direct wind
●Transportation
When transporting the instrument, repackage it in the original package box. Otherwise, it
may cause instrument breakage.
●Disposal
When disposing of the product, battery and standard solutions used for the calibration
follow the related laws and regulations of your country for disposal of the product.
IX

Contents
Product Overview................................................................. 1
■ Package Content .................................................................1
■ Key Features ........................................................................3
■ Product components...........................................................4
■ Display..................................................................................5
■ Keypad operation ................................................................7
Basic operations .................................................................. 8
■ Turnig on the instrument ....................................................8
■ Using the External Power Supply ......................................9
■ Connecting sensors ............................................................9
■ Operation mode .................................................................10
■ Changing the measurement parameter........................... 11
■ Changing the magnifing measurement display.............. 11
■ Viewing Calibration data...................................................12
Calibration ..........................................................................14
■ pH Calibration ....................................................................14
■ EC Calibration....................................................................16
■ Salinity Calibration ............................................................18
■ DO Calibration ...................................................................20
■ ION Calibration ..................................................................22
■ ORP calibration..................................................................24
■ Temperature calibration....................................................26
■ Multi auto calibration ........................................................28
Measurement ...................................................................... 30
■ measurement .....................................................................30
X

Contents
Data .....................................................................................31
■ Data storage.......................................................................31
■ Data display .......................................................................31
■ Data management..............................................................32
■ Data transfer to PC ............................................................33
■ Print data ............................................................................34
Setup ................................................................................... 36
■ ID Setup ..............................................................................36
■ General Setup ....................................................................37
■ pH Setup.............................................................................39
■ COND, TDS, Sal Setup ......................................................40
■ DO Setup ............................................................................42
■ ION Setup ...........................................................................43
■ ORP Setup..........................................................................44
Maintenance and storage .................................................. 45
■ Maintenance and storage of the instrument ...................45
■ Maintenance and storage of pH and ORP sensors ........46
■ Maintenance and storage of the EC sensor....................47
■ Maintenance and storage of the DO sensor ...................48
■ Maintenance and storage of the ION sensor ..................49
Error messages and trouble shooting ............................. 50
Appendix............................................................................. 52
■ Specification ......................................................................52
XI

Contents
XII

Package Content
Instruction manual
4 AA batteries
Standard solutions
Meter
Sensors
Protective cap
for DO sensor
*only kit included
DO sensor
Product Overview
This section describes the package content, Key features and product components of LAQUA
WQ-300 series Handheld Water Quality meters.
■Package Content
After opening the carry case, remove the meter and check for damage on the
instrument and the standard accessories all exist. If damage or defects are found on the
product, contact your dealer.
LAQUA WQ-300 Series Hand-held meter and meter kit include the following items:
a
1
Package Content
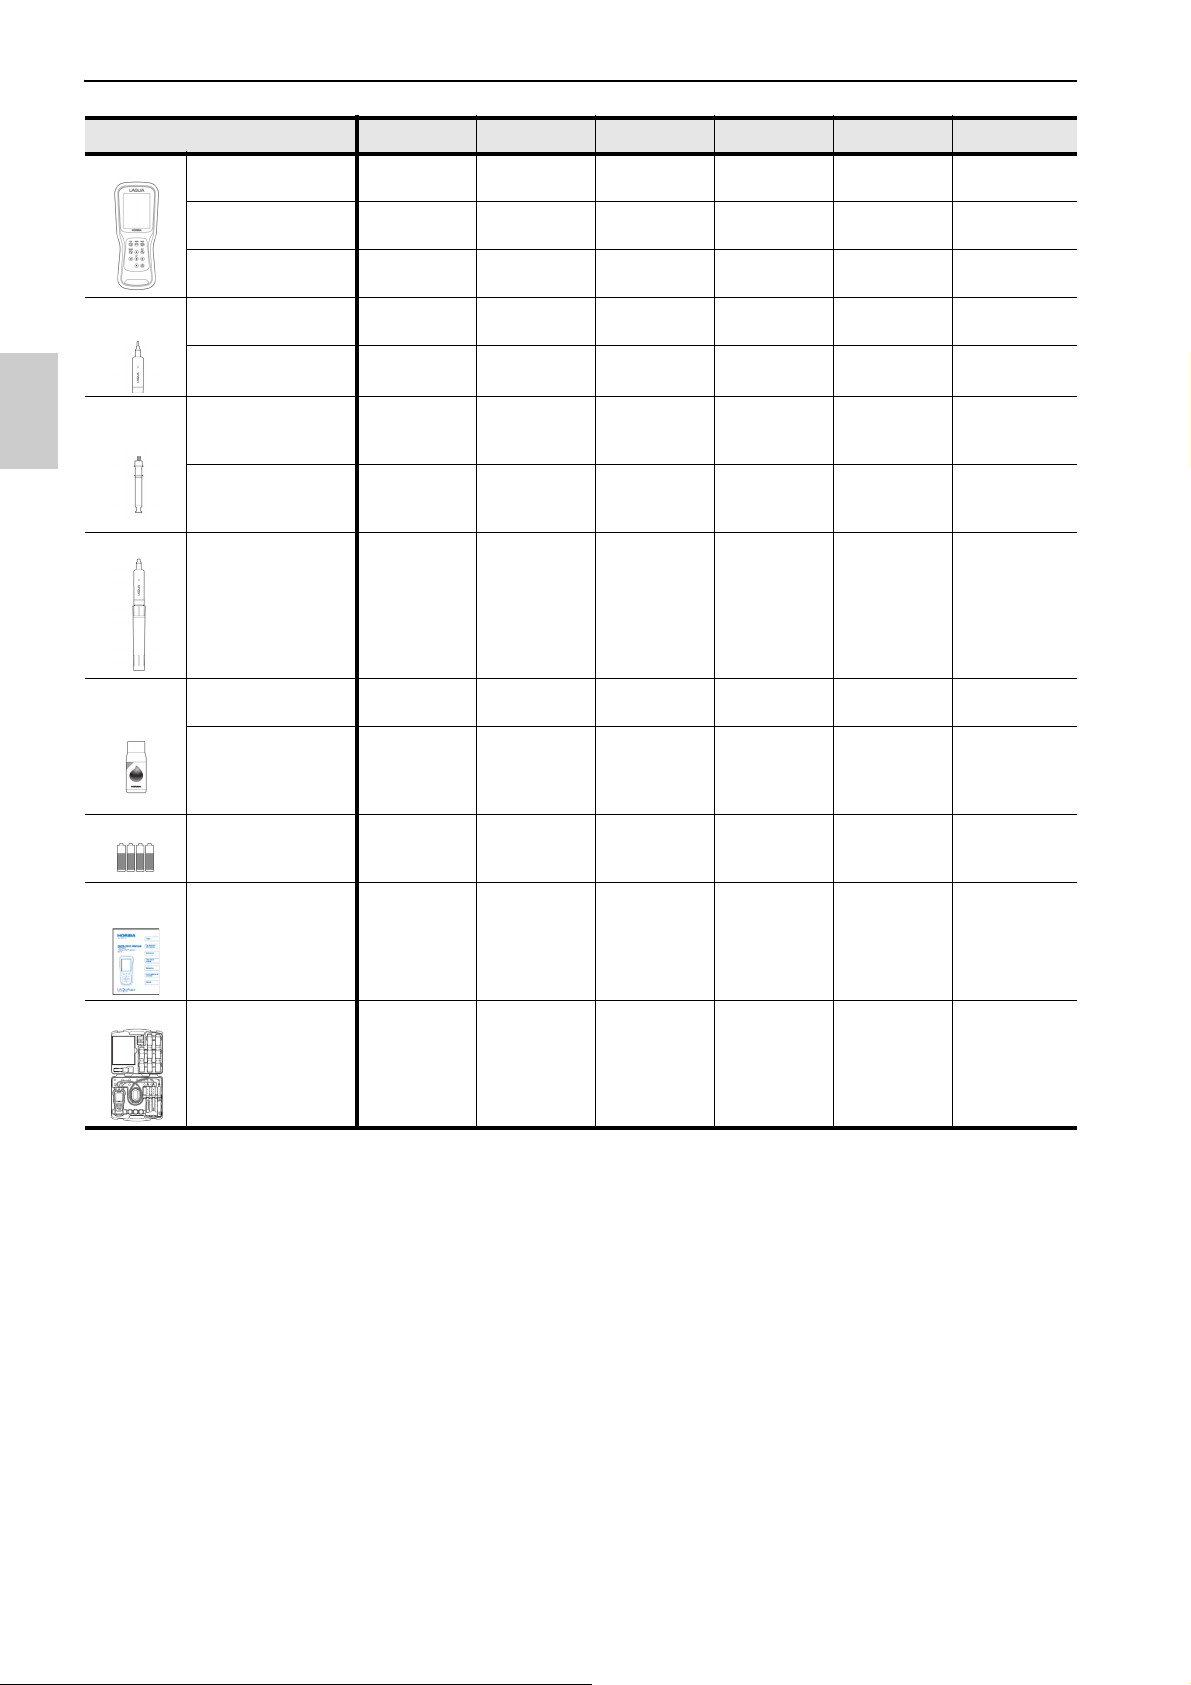
Kit WQ-310PH-K WQ-310EC-K WQ-310DO-K WQ-320PC-K WQ-320PD-K WQ-330PCD-K
Meter
Sensor
Head
Sensor
Cartridge
DO Sensor
WQ-310 :
1 Channel type
WQ-320 :
2 Channels type
WQ-330 :
3 Channels type
300PH-2 :
pH Sensor Head
300-C-2 :
EC Sensor Head
300-P-C :
Gel-filled pH Sensor
Cartridge
300-4C-C :
4-Cell EC Sensor
Cartridge
300-D-2 :
Optical DO sensor
(mounted DO cap)
●●●
●●
●
●●●●
●● ●
●●●
●● ●
●●●
Standard
Solutions
Battery
Instruction
Manual
Carry Case
4.01, 7.00, 10.01 pH
(Each 60ml)
84µS,1413µS,
12.88mS &
111.8mS/cm
(Each 60ml)
4 × AA Batteries
For WQ-300 series
For WQ-300 series
●●●●
●● ●
●●●●● ●
●●●●● ●
●●●●● ●
2

■Key Features
IP67 water ingress, dust-proof, shock-resistant, anti-slip meter housing.
Large Color Graphic Display (70 x 55 mm)
Built-in sensor holder (up to 3 sensors)
Simple user interface and multi parameter display.
10,000 data memory.
Automatic Temperature Compensation (ATC) with temperature sensor
Auto-hold / Auto stable with stability indicator and Real-time measurement modes.
Data transfer without a special software from the meter to a computer via USB
connection
Key Features
3
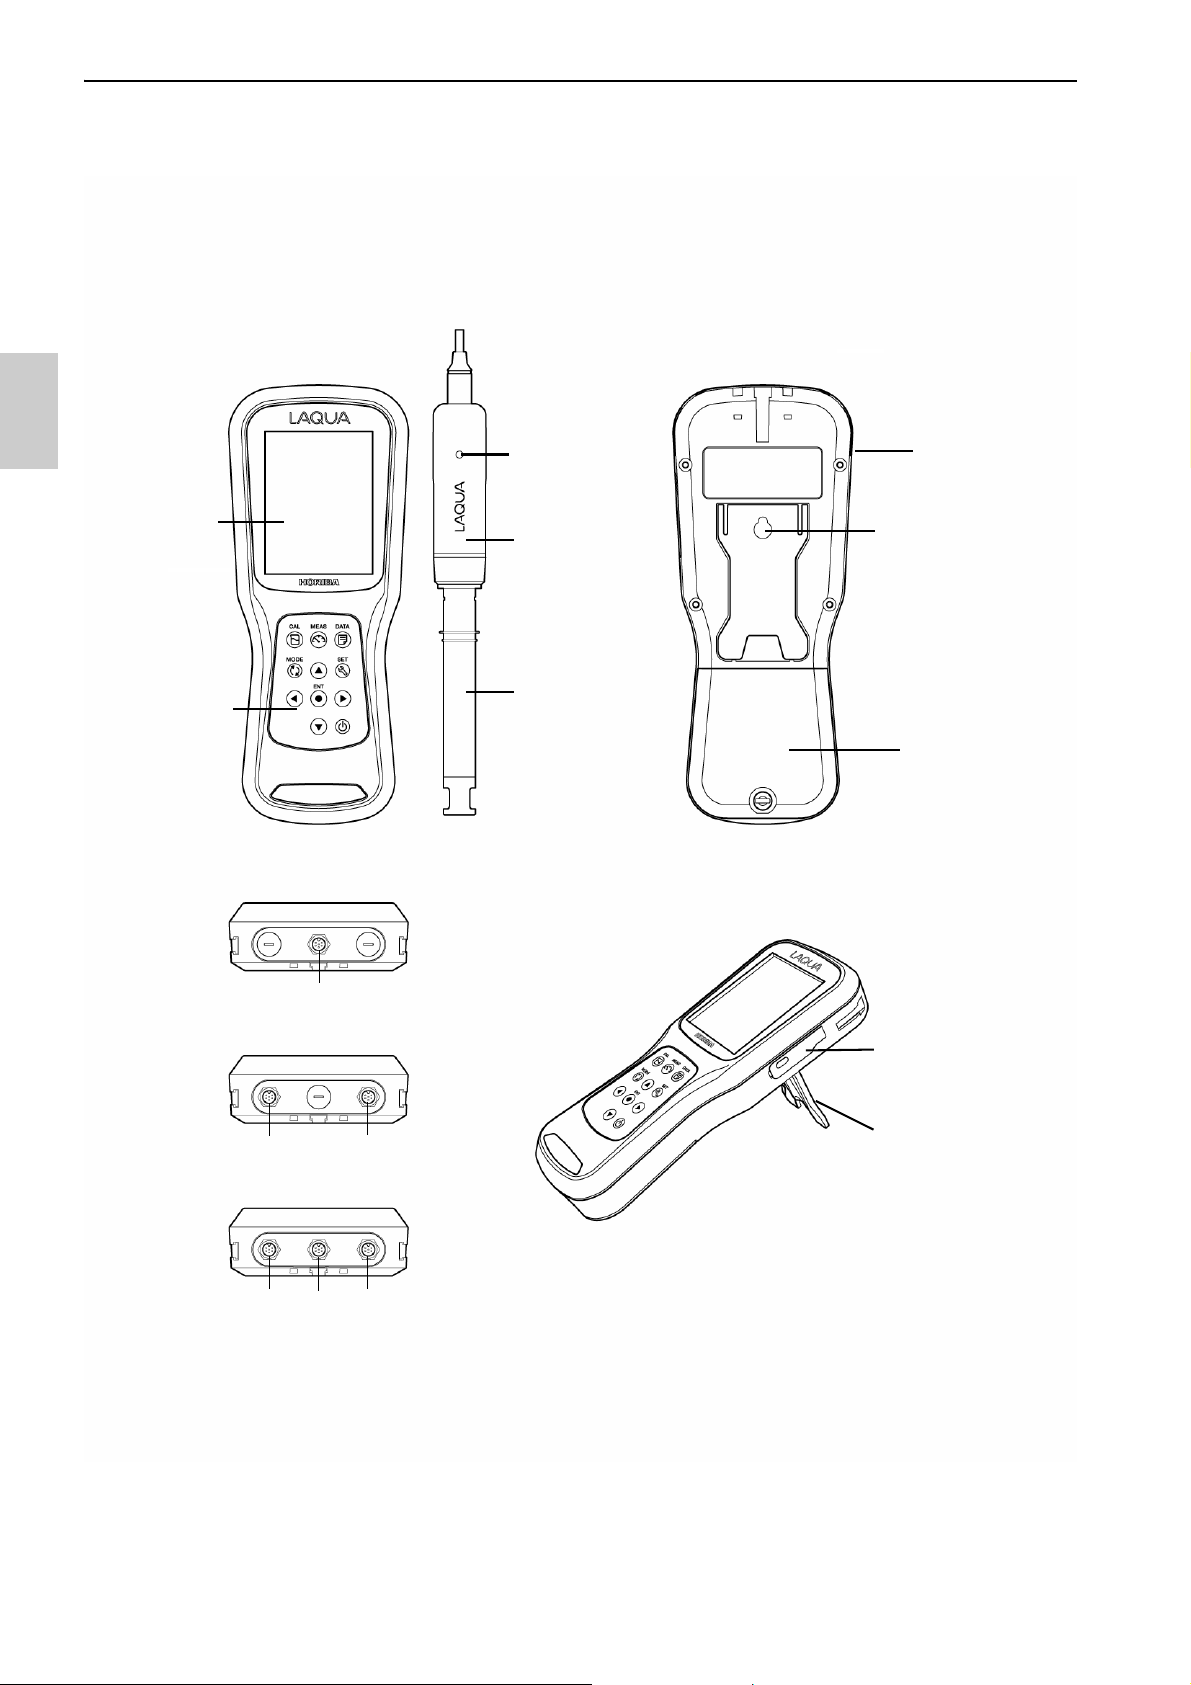
Product components
Meter
Display
Operation
key
LED Stability
indicator
Sensor Head
Sensor
Cartridge
Printer port
Micro USB port
Stand
Sensor
holder
Wall Hanging
hole
Battery Cover
1 channel
type
2 channel
type
3 channel
type
Ch1
Ch1
Ch2
Ch 1
Ch 2
Ch3
■Product components
4
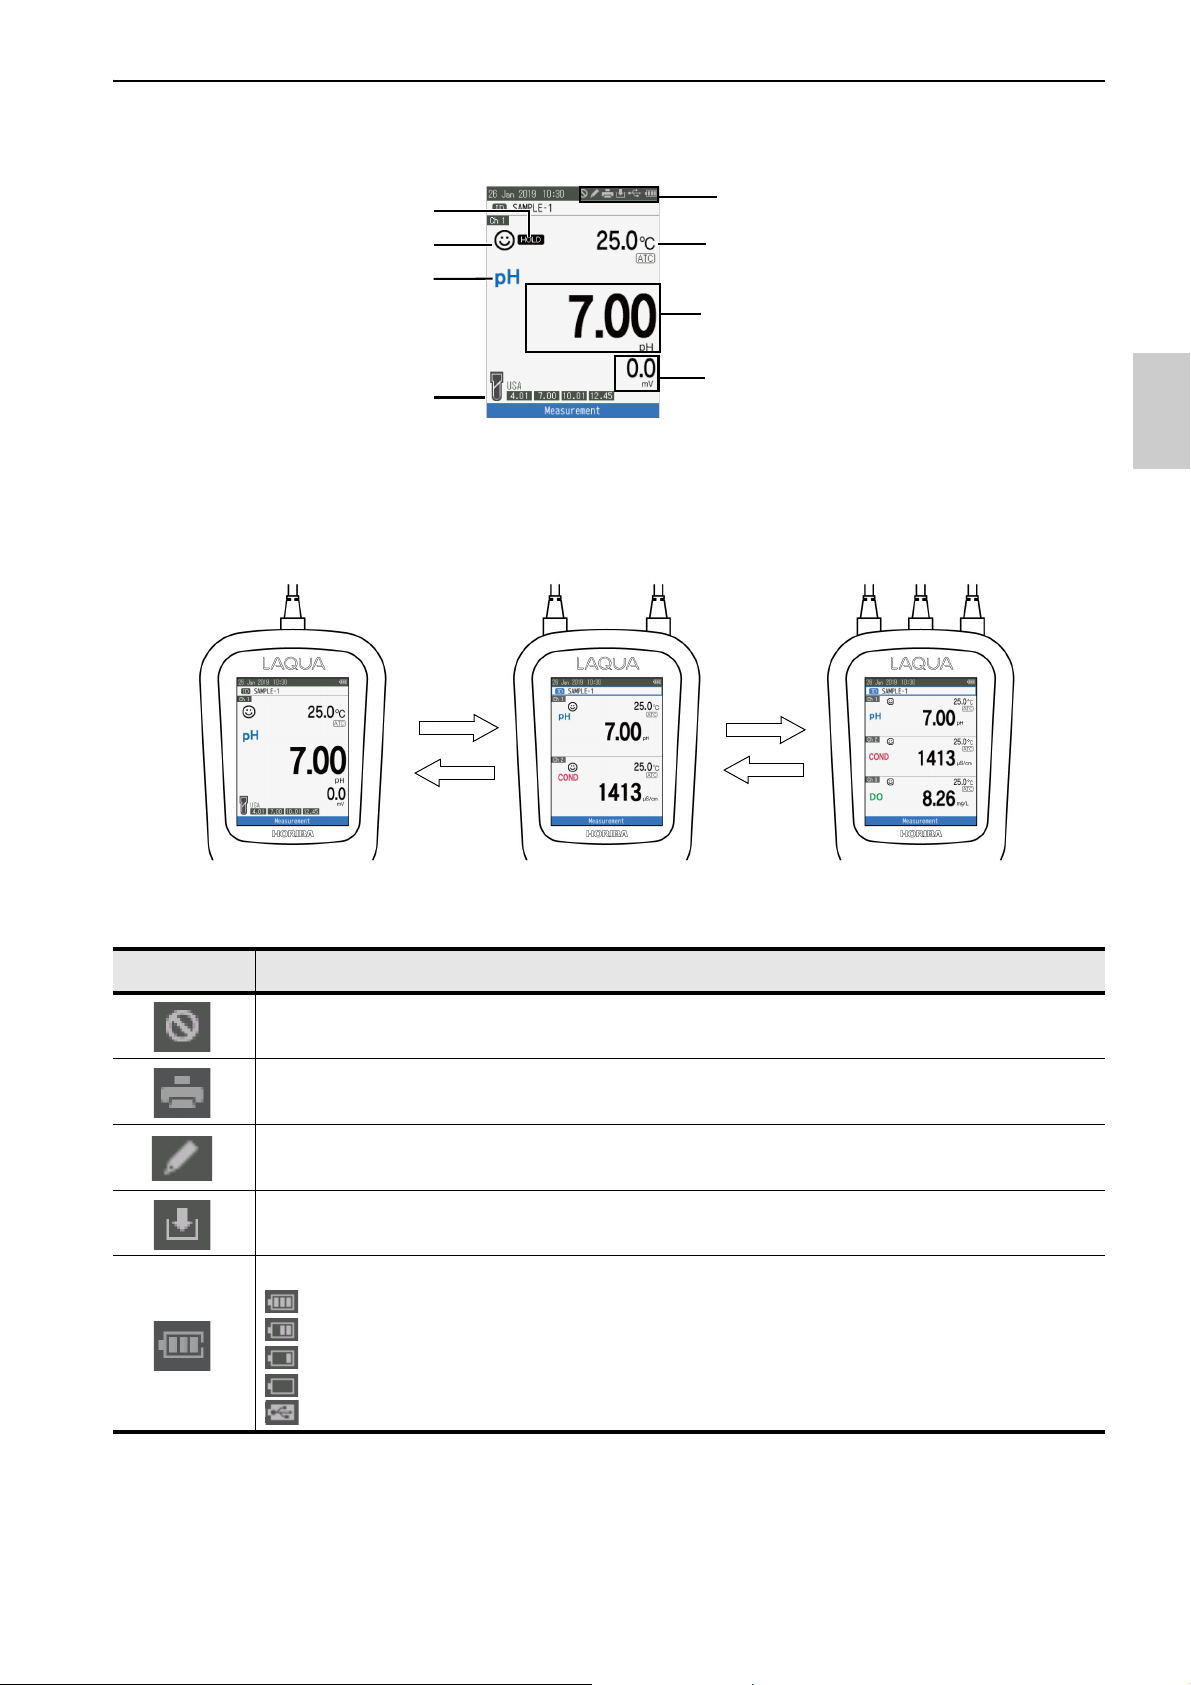
■Display
Status icons
*1
Sample temperature
Main measurement value
Sub measurement value
*2
(Only 1 channel display)
Sensor Status
Calibration information
*2
(Only 1 channel display)
Main measurement item
Stability icon
HOLD icon
Connect
Connect
Remove
Remove
Display
*1
Overview of Status icon area
Icon Function
Appears when a key operation is invalid.
Appears when Printer comunication is set ON.
Appears when Data logging is set ON.
Appears when data is storaged to the meter.
Displays the battery level.
: Battery level 50 - 100%
: Battery level 20 - 50%
: Battery level less than 20% Prepare the batteries or use Power supply.
: Battery has run out. Replace the batteries or use Powe supply.
: Displays USB power supply in use. Batteries power is not used.
5
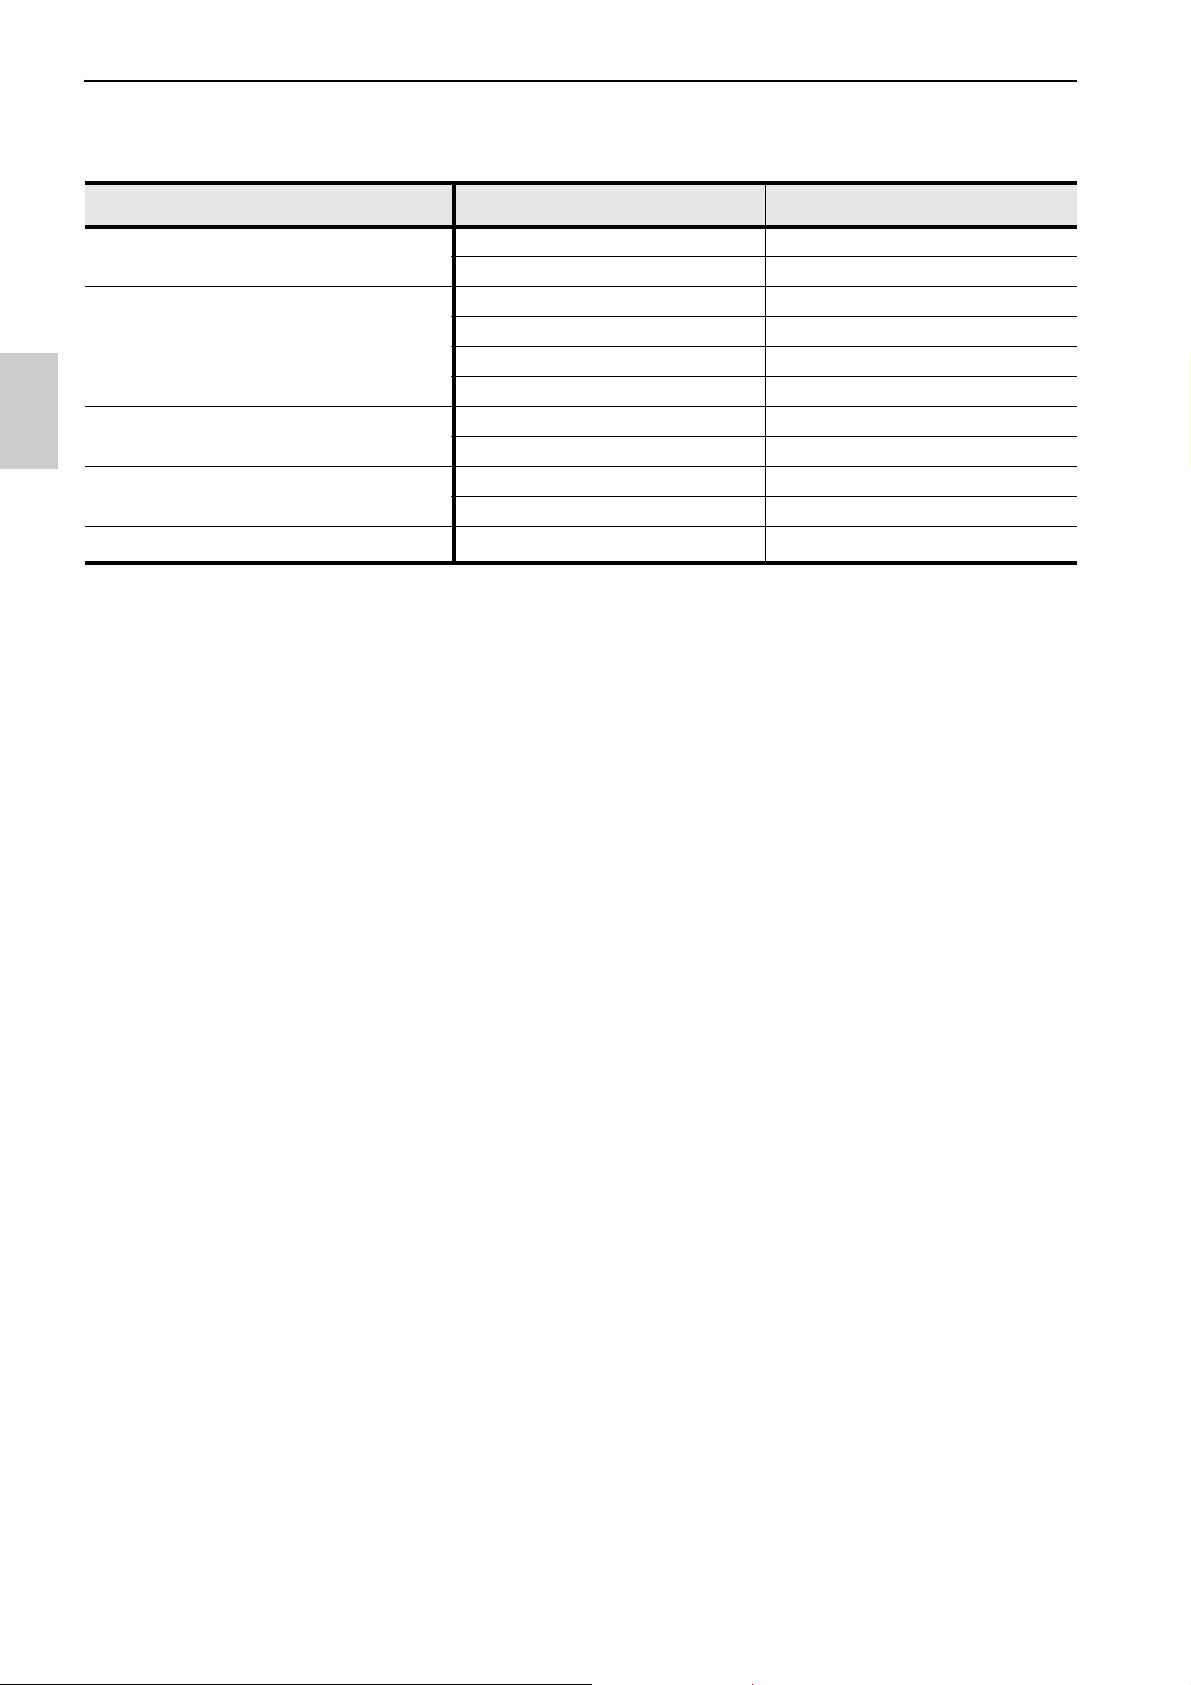
Display
*2
Sub Item : In the measurement display, the Sub measurement value is displayed
according to the displayed main measurement item.
Sensor type Main measurement item Sub measurement item
pH Sensor Head
EC Sensor Head
DO Sensor
ION Sensor Head
ORP Sensor Head
pH mV (pH)
mV (pH) pH
COND -
Res -
Sal COND
TDS COND
DO DO (%)
DO (%) DO
ION mV (ION)
mV (ION) ION
mV (ORP) -
6
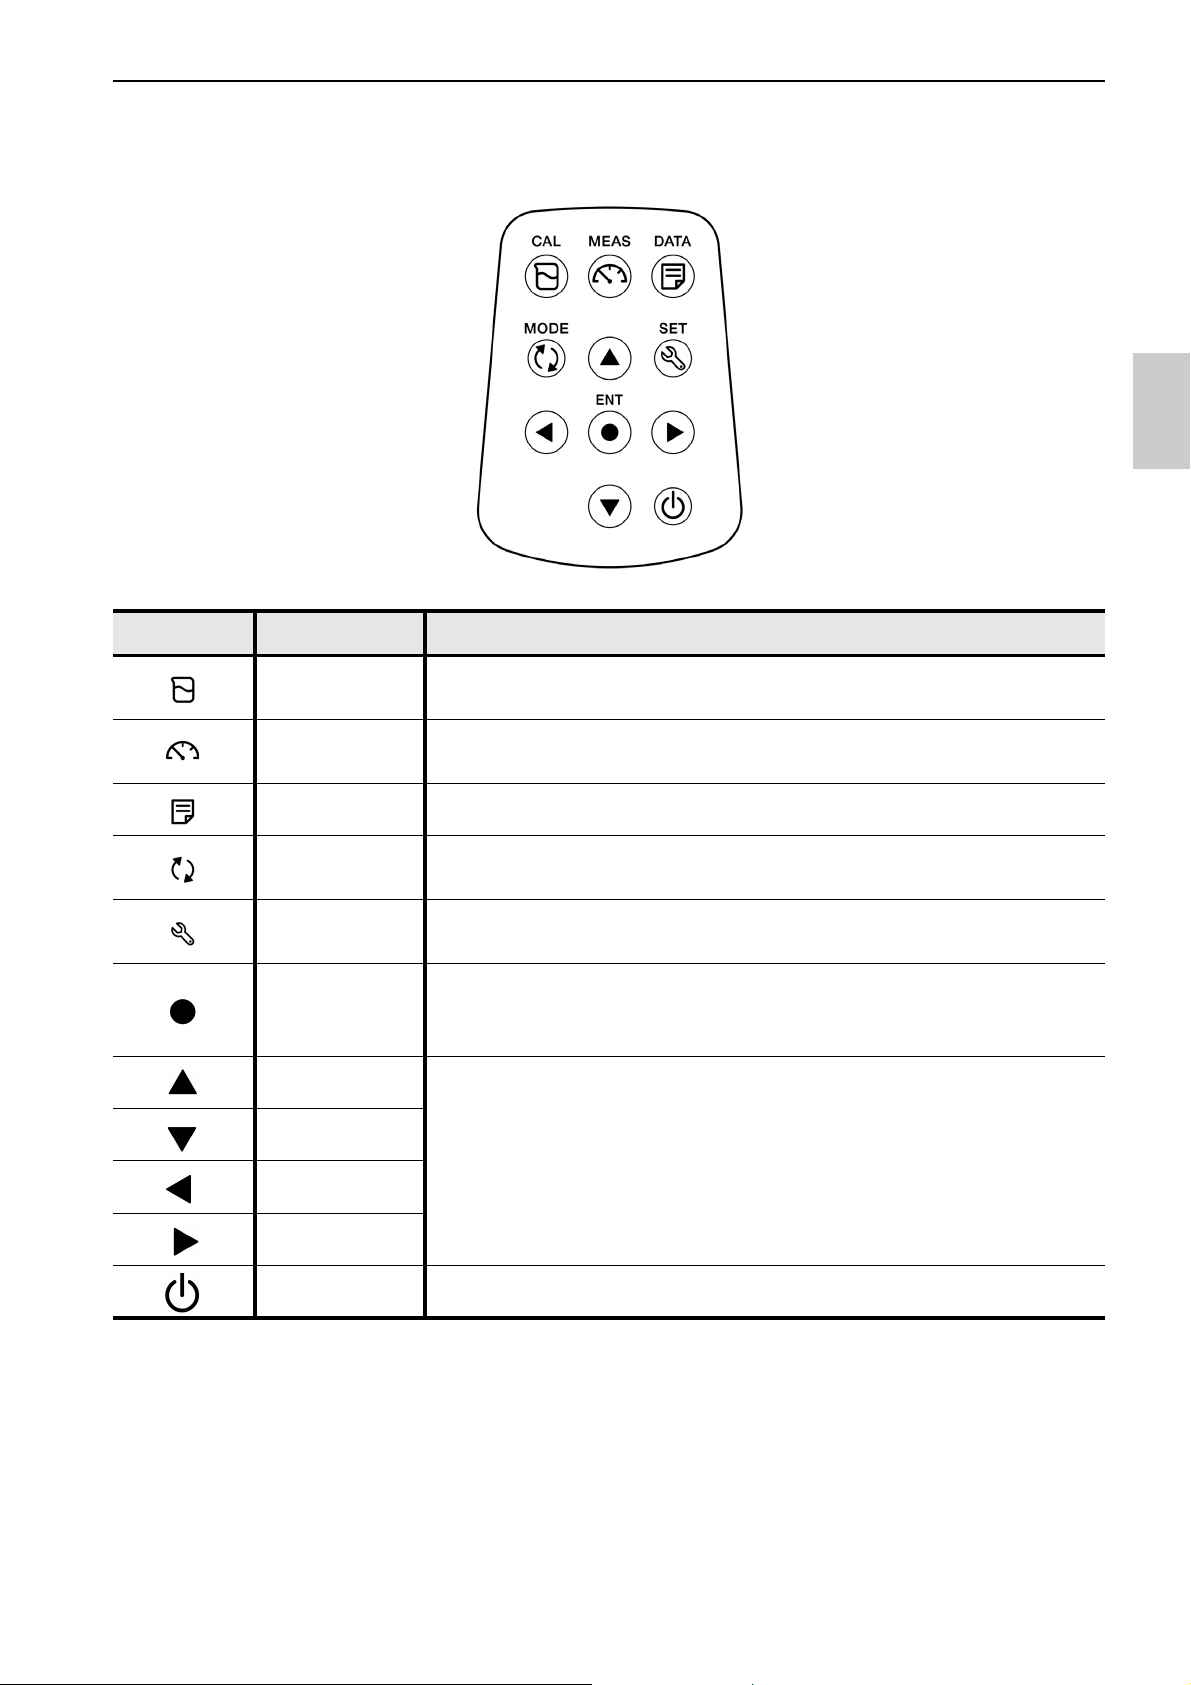
■Keypad operation
Keypad Name Function
Keypad operation
CAL key
MEAS key
DATA key Switches from the measurement mode to the data mode.
MODE key
SET key
ENT key
UP key
DOWN key
LEFT key
RIGHT key
Switches from the measurement mode to the calibration
mode.
Switches the operation mode to the measurement mode.
In the measurement mode, changes measurement
parameters.
Switches to the setup mode of the meter and the connected
sensor.
Determines the selection or set up. Saves data in
measurement mode and confirm calibration value in
calibration mode.
Moves the focus area and switches the screen.
POWER key Powers ON/OFF the instrument.
7
Turnig on the instrument
Note
Basic operations
This section describes function and basic operation method of each part of LAQUA WQ-300
series handheld Water Quality meter.
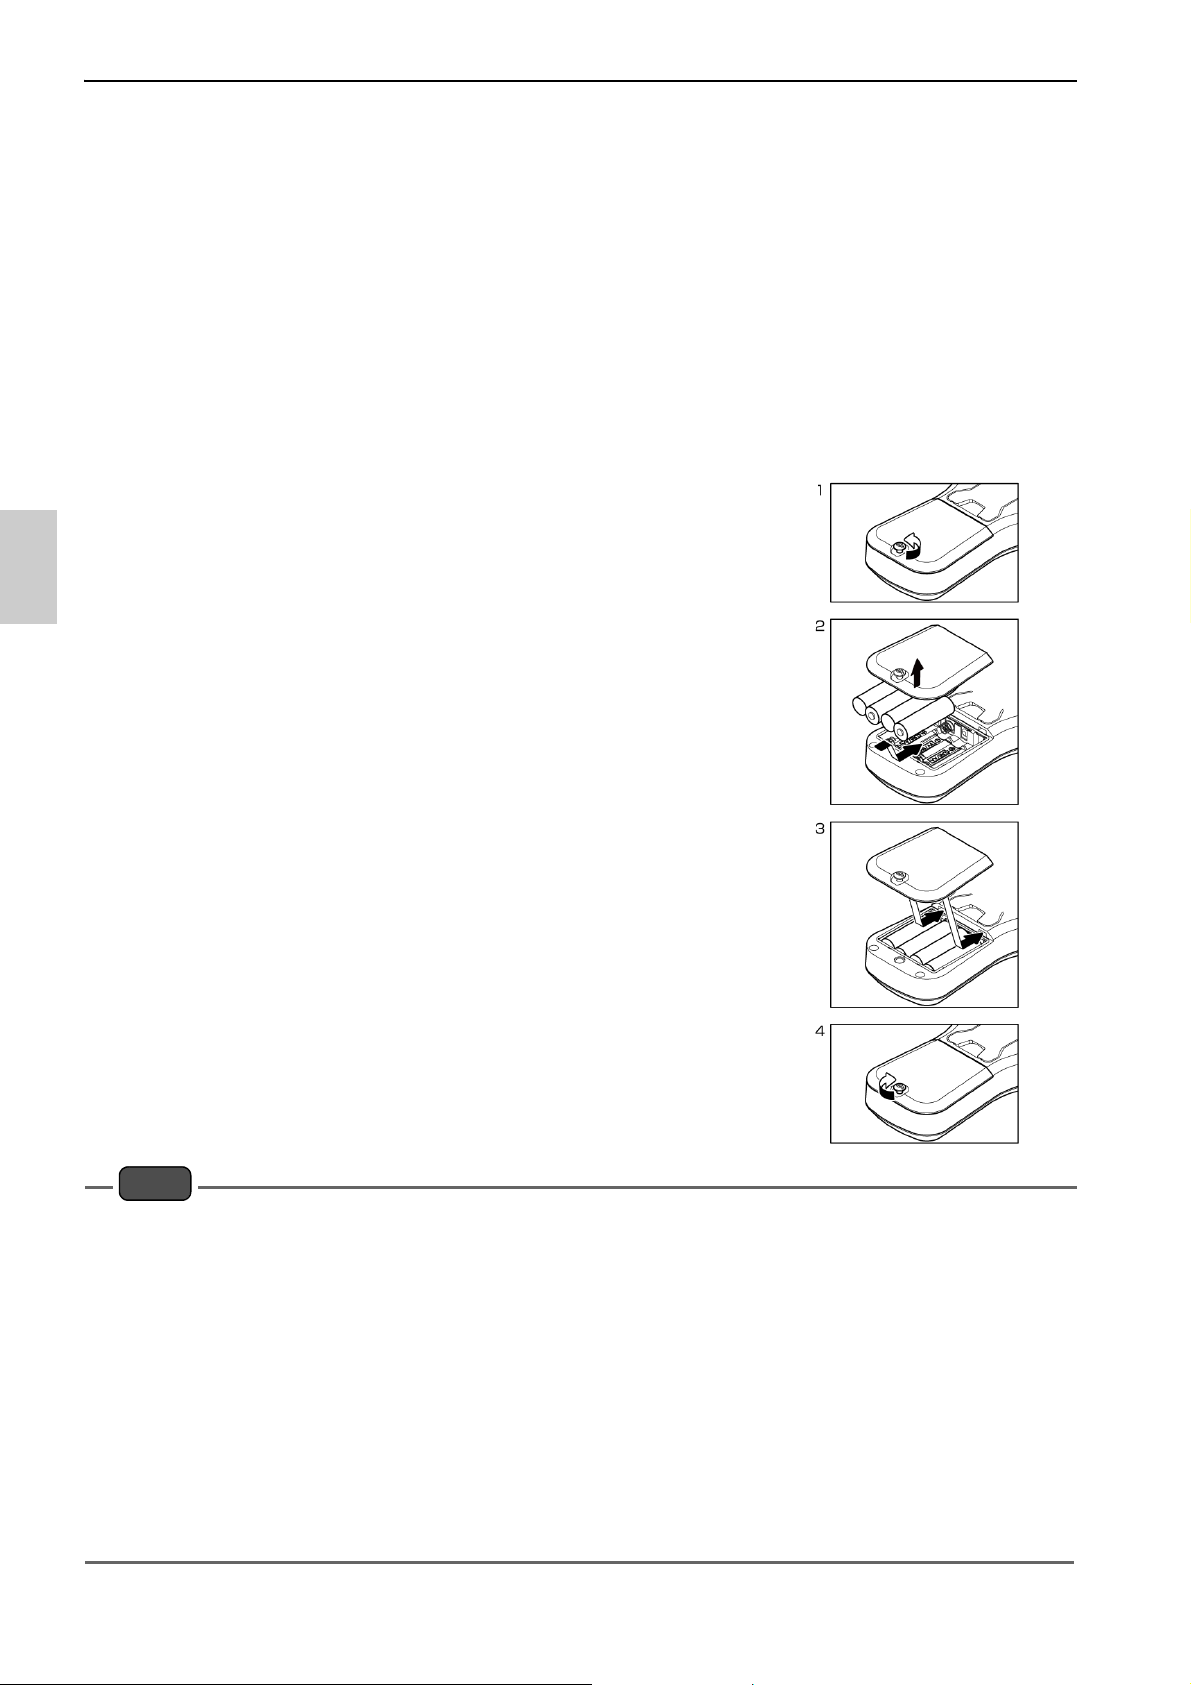
■Turnig on the instrument
• Inserting the batteries
This instrument is operated by batteries. You can use AA alkaline batteries or AA Ni-MH
chargeable batteries. Perform the following procedure to insert batteries in the
instrument.
1. Unscrew the battery cover on the back of the instrument counter-clock wise to unlock the battery cover.
2. Remove the battery cover and set the batteries
inside.
3. Replace battery cover.
4. Screw the battery cover on the back of the instrument clockwise to lock the battery cover.
Do not replace the batteries in a dusty place or with wet hands. Dust or moisture could get
inside the instrument and possibly cause an instrument malfunction.
Do not short-circuit a battery.
Note polarity as shown in the battery compartment.
When the battery has depleted or the instrument is not used for a long time, remove the
batteries.
Of the specified battery types, make sure to use two batteries of the same type.
Do not use a new battery together with an used battery.
When using the Ni-MH batteries, do not use a fully charged battery together with an insuf-
ficiently-charged battery.
The SD memory is mounted below the battery box. When replacing it, remove the battery
and replace it.
8

■Using the External Power Supply
Sensor connector
Meter plug
The Micro-USB interface can be used for external power supply. It is not possible to
charge the batteries. The instrument is not supplied with an external 5V USB battery.
Alternatively, the instrument can be supplied by an external power supply unit (not
included in the scope of delivery) via the Micro-USB socket. Use an external battery that
is suitable for 5V USB battery. For connection, a suitable USB cable with a Micro-USB
plug is required. The power saving mode is canceled only when using external power.
*Power saving mode: When the power supply is only the battery, the screen brightness
will automatically shift to 1 if there is no button operation for more
than 1 minute. Return to the set screen brightness by key operation.
While the instrument is powered by the external power supply, the batteries are not
being used. The icon is shown the screen.
Attention
Take care that the AC adapter does not come into contact with liquids.
Using the External Power Supply
■Connecting sensors
To perform calibration/ measurement, it is necessary to use the appropriate sensors for
measurement parameter. Recommended sensors for various sample are listed below.
Use the following procedure to correctly connect the sensor to the instrument
Measurement
item
pH pH Sensor head (300PH-2, -5) pH Sensor Cartridge (300-P-C)
Conductivity EC Sensor head (300-C-2, -5)
ION
ORP
DO DO Sensor (300-D-2, -5)
Align the arrow on the sensor connector with the groove of the meter plug and insert it.
It does not matter if you plug the connector of any measurement item into the meter
plug.
Sensor head or Sensor Sensor Cartridge or Electrode
4-Cell EC Sensor Cartridge
(300-4C-C)
ION Sensor head (300-I-2)
and BNC conversion connector
(300-BNC)
ORP Sensor head (300-O-2)
and BNC conversion connector
(300-BNC)
Ion Selective Electrode
(65XXS-10C series, 5002S-10C)
ORP Electrode (9300-10D)
9
 Loading...