

Horiba Scientific 6582S-10C Instruction Manual
Instruction Manual
Combination type Potassium Ion
Selective Electrode
6582S-10C
ELECTRODE

Preface
This manual describes operation of the combination type potassium ion
selective electrode.
Be sure to read this manual before using the product to ensure proper and safe
operation of the product.
Also safely store the manual so it is readily available whenever necessary.
Please contact HORIBA Advanced Techno if any points regarding safety come
to your attention during use.
Product specifications and appearance, as well as the contents of this manual
are subject to change without notice.
Warranty and responsibility
This product is not covered by warranty because it is a consumable item.
HORIBA Advanced Techno Co., Ltd. SHALL NOT BE LIABLE FOR ANY
DAMAGES RESULTING FROM ANY MALFUNCTIONS OF THE
PRODUCT, AN Y ERASURE OF DATA, OR ANY OTHER USES OF THE
PRODUCT.
Trademarks
QR Code is a trademark of DENSO WAVE INCORPORATED.
Company names and brand names are either registered trademarks or
trademarks of the respective companies. (R), (TM) symbols may be
omitted in this manual.
Regulations
Conformable standards
This equipment conforms to the following standards:
RoHS: EN50581
9. Monitoring and control instruments
April, 2017 © 2017 HORIBA Advanced Techno Co., Ltd.
Authorised representative in EU
HORIBA UK Limited
2 Dalston Gardens, Stanmore,
Middx HA7 1BQ, UK
CODE:GZ0000452165
For your safety
Hazard classification and warning symbols
Warning messages are described in the following manner. Read the
messages and follow the instructions carefully.
Hazard classification
This indicates an imminently hazardous
situation which, if not avoided, will result in
death or serious injury. This is to be limited to
the most extreme situations.
This indicates a potentially hazardous
situation which, if not avoided, could result in
death or serious injury.
This indicates a potentially hazardous
situation which, if not avoided, may result in
minor or moderate injury. It may also be used
to alert against unsafe practices.
Warning symbols
Description of what should be done, or what should be
followed
Description of what should never be done, or what is
prohibited

Safety precautions
This section provides precautions for using the product safely and correctly
and to prevent injury and damage. The terms of DANGER, WARNING, and
CAUTION indicate the degree of imminency and hazardous situation. Read
the precautions carefully as it contains important safety messages.
Precautions for chemicals
Solutions used for calibration and measurement must not
come in contact with the skin, or consumed.
These solutions stimulate the eyes and skin. If these
solutions come in contact with your skin or eyes, flush
immediately with running water.
If you drink these solutions by accident, immediately seek
medical advice.
When you handle these solutions, make sure to wear latex
gloves, protective glasses, etc.

Product handling information
Operational precautions
Use of the product in a manner not specified by the manufacturer may
impair the protection provided by the product. And it may also reduce
product performance.
Exercise the following precautions:
Use the supplied internal solution for the reference electrode. Using any
other internal solutions may cause measurement errors.
If the ion selective membrane is dry, soak the electrode in pure water for
at least one hour. Using it in a dry state will cause measurement errors.
Do not get the electrode connector wet or touch it with dirty hands. It may
cause a failure.
Do not touch a hard surface with the electrode. It may cause a failure.
Only use the product including accessories for their intended purpose.
HORIBA Advanced Techno assumes no liability when they are used for
any other products.
Disposal of the product
When disposing of the product, follow the related laws and/or regulations of
your country.
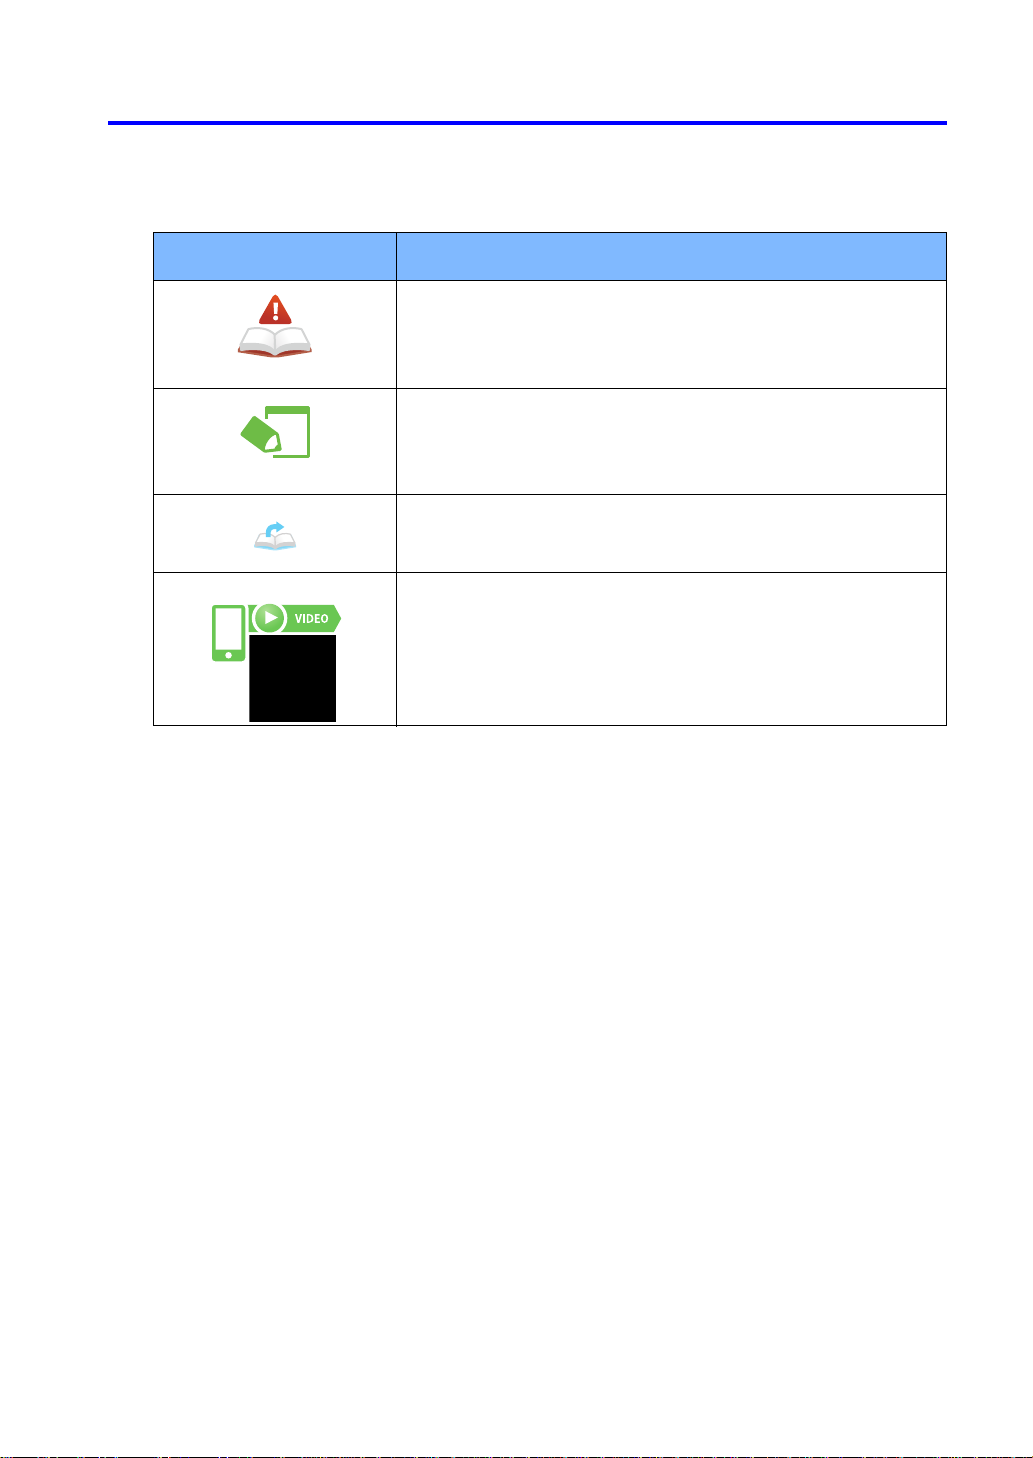
Manual information
Note
TipTip
View videoView video
Description in this manual
The following explains the icons used in this manual.
Icon Meaning
This interprets the necessary points for correct
operation and notifies the important points for
Note
handling the product.
This indicates reference information.
This indicates the part where to refer for
information.
This indicates that you can access the instruction
video on the web page.
Access the webpage by using the QR Code.
Original language
This is the English translation of an original Japanese document.
Documents related to this product
The following documents are related to this product.
Combination type Potassium Ion Selective Electrode
Instruction Manual (this manual)
This manual mainly discusses how to operate the combination type
potassium ion selective electrode.
Meter Instruction Manual
This manual mainly discusses how to operate the meter to which the
combination type potassium ion selective electrode is connected.
Electrode Stand Instruction Manual
This manual mainly discusses how to operate the electrode stand which
holds the combination type potassium ion selective electrode.

Contents
Before Use 1
Confirmation of the items included in the package . . . . . . . 2
About this product . . . . . . . . . . . . . . . . . . . . . . . . . . . . . . . . 3
Measurement procedure . . . . . . . . . . . . . . . . . . . . . . . . . . . 5
Electrode Preparation 9
Assembling the electrode (only when use for first time) . . 10
Filling with internal solution . . . . . . . . . . . . . . . . . . . . . . . . 12
Rinsing the electrode . . . . . . . . . . . . . . . . . . . . . . . . . . . . 15
Connecting the electrode to the meter . . . . . . . . . . . . . . . 16
Calibration 17
Standard solutions . . . . . . . . . . . . . . . . . . . . . . . . . . . . . . 18
Calibration operation . . . . . . . . . . . . . . . . . . . . . . . . . . . . . 19
Measurement 29
Requirements for sample and standard solutions . . . . . . . 30
Measurement hints . . . . . . . . . . . . . . . . . . . . . . . . . . . . . . 31
Measurement units . . . . . . . . . . . . . . . . . . . . . . . . . . . . . . 31
Measurement operation . . . . . . . . . . . . . . . . . . . . . . . . . . 32
After Measurement 37
How to clean the electrode . . . . . . . . . . . . . . . . . . . . . . . . 38

Maintenance 43
Storage . . . . . . . . . . . . . . . . . . . . . . . . . . . . . . . . . . . . . . . 44
Consumables . . . . . . . . . . . . . . . . . . . . . . . . . . . . . . . . . . 45
Troubleshooting 47
When accurate measurement is not possible . . . . . . . . . . 48
Reference 53
Ion selective electrodes . . . . . . . . . . . . . . . . . . . . . . . . . . 54
Measurement principle of ion selective electrode . . . . . . . 56
Characteristics of potassium ion selective electrode . . . . 60
Material 67
Specifications . . . . . . . . . . . . . . . . . . . . . . . . . . . . . . . . . . 68
External dimensions . . . . . . . . . . . . . . . . . . . . . . . . . . . . . 69
Consumables . . . . . . . . . . . . . . . . . . . . . . . . . . . . . . . . . . 70

Figures
Fig. 1 Included items. . . . . . . . . . . . . . . . . . . . . . . . . . . 2
Fig. 2 System configuration. . . . . . . . . . . . . . . . . . . . . . 3
Fig. 3 Names of parts . . . . . . . . . . . . . . . . . . . . . . . . . . 4
Fig. 4 Structure of combination type
ion selective electrode. . . . . . . . . . . . . . . . . . . . 54
Fig. 5 State of liquid junction of reference electrode. . 55
Fig. 6 Relationship between monovalent cation
concentration (activity) and electrode potential. 57
Fig. 7 Difference in state of solution depending on ion
concentration. . . . . . . . . . . . . . . . . . . . . . . . . . . 58
Fig. 8 Calibration curve of potassium ion selective
electrode . . . . . . . . . . . . . . . . . . . . . . . . . . . . . . 60

Tables
Table 1 K+ concentration measurement unit conversion
table . . . . . . . . . . . . . . . . . . . . . . . . . . . . . . . . . 31
Table 2 Check list . . . . . . . . . . . . . . . . . . . . . . . . . . . . . 48
Table 3 Electrode types . . . . . . . . . . . . . . . . . . . . . . . . 54
Table 4 (Example) Activity coefficient for
monovalent ion concentration . . . . . . . . . . . . . 59
Table 5 Relationship between temperature of
ion selective electrode and theoretical slope . 62
Table 6 Relationship between temperature of
potassium ion selective electrode and theoretical
slope . . . . . . . . . . . . . . . . . . . . . . . . . . . . . . . . 62
Table 7 Substances that cause a 10% error in the reading,
and their concentrations. . . . . . . . . . . . . . . . . .64
Table 8 Specifications of combination type potassium ion
selective electrode . . . . . . . . . . . . . . . . . . . . . . 68
Table 9 Consumables. . . . . . . . . . . . . . . . . . . . . . . . . . 70

Before Use
B
This chapter describes what you should know before using the product.
efore Use
Confirmation of the items included in
the package ...................................... 2
About this product ........................... 3
Product features...........................................................3
System configuration ...................................................3
Names of parts.............................................................4
Measurement procedure ................. 5
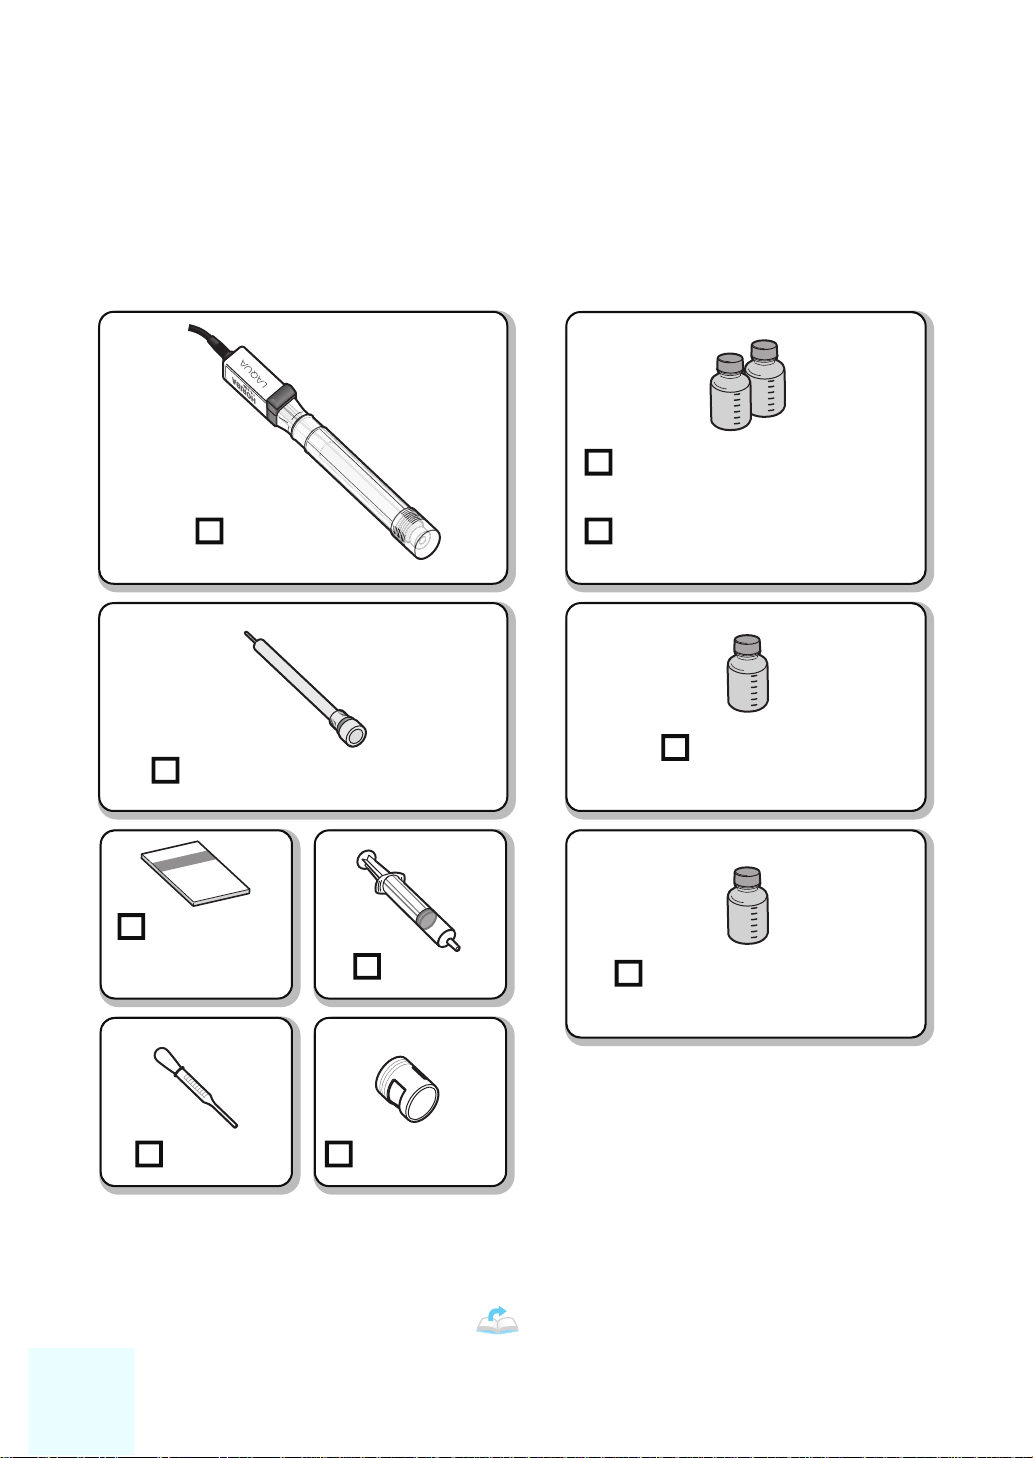
Confirmation of the items included
1000 mg/L standard solution
(50 mL)
100 mg/L standard solution
(50 mL)
Internal solution
(50 mL)
Syringe
Protective pipe
Instruction
manual
(this document)
Ion electrode tip (2 units)
Ionic strength adjuster
(50 mL)
Dropper
Main unit
of electrode
: Referred to as ISA in the rest of
this document
in the package
Open the package and make sure that the following items are included.
This product is a consumable item. For details on purchasing an electrode and
reagent, refer to "Consumables" ( page 70).
Fig. 1 Included items
2

Before Use
About this product
MeterMeter
ElectrodeElectrode
* This stand is optional for the portable meter.
Electrode stand *
Desktop type
Portable type
Product features
System configuration
The combination type potassium ion selective electrode is an electrode that
combines a tip type ion electrode with a reference electrode.
This product has the following features.
Ion concentration can be measured with this one electrode. There is no
need to use a pair of an ion selective electrode and reference electrode.
The reference electrode part has a double junction structure. This
minimizes the contamination of the sample solution by the internal
solution outflow, the interference on the electrode potential, and so on.
Since the structure of the liquid junction, movable sleeve type, is capable
of eliminating clogging by contaminants, it is possible to measure the
concentration accurately.
This product is used with the meter of HORIBA Advanced Techno
connected, which is sold separately.
Electrode stand(*) is also available.
Refer to the meter instruction manual for more details.
Fig. 2 System configuration
3

Names of parts
This product consists of the parts shown in the figure below.
Cable
Electrode cap
Internal solution
fill port
Internal
solution
chamber
Electrode connector
(BNC connector)
Ion electrode tip
Support pipe
Protective cap
Ion selective
membrane
Liquid junction
When the ion electrode tip is
attached
Fig. 3 Names of parts
Rubber cap
(to be removed
before use)
Protective pipe *
* Use the protective pipe for protecting the ion electrode tip.
Attaching it for measurements outdoors will protect the ion electrode tip
against damage from gravel or other foreign matters.
If there is no risk of damage, it is not required to attach it.
4
Before Use
Measurement procedure
1
2
4
3
Meter
Fill with internal solution.
( page 12)
Connect the electrode to the meter.
( page 16)
Attach the ion
electrode tip.
( page 10)
Rinse with pure water.
( page 15)
The following figure shows the procedure for measuring the K+ concentration.
1 Measurement preparation
5
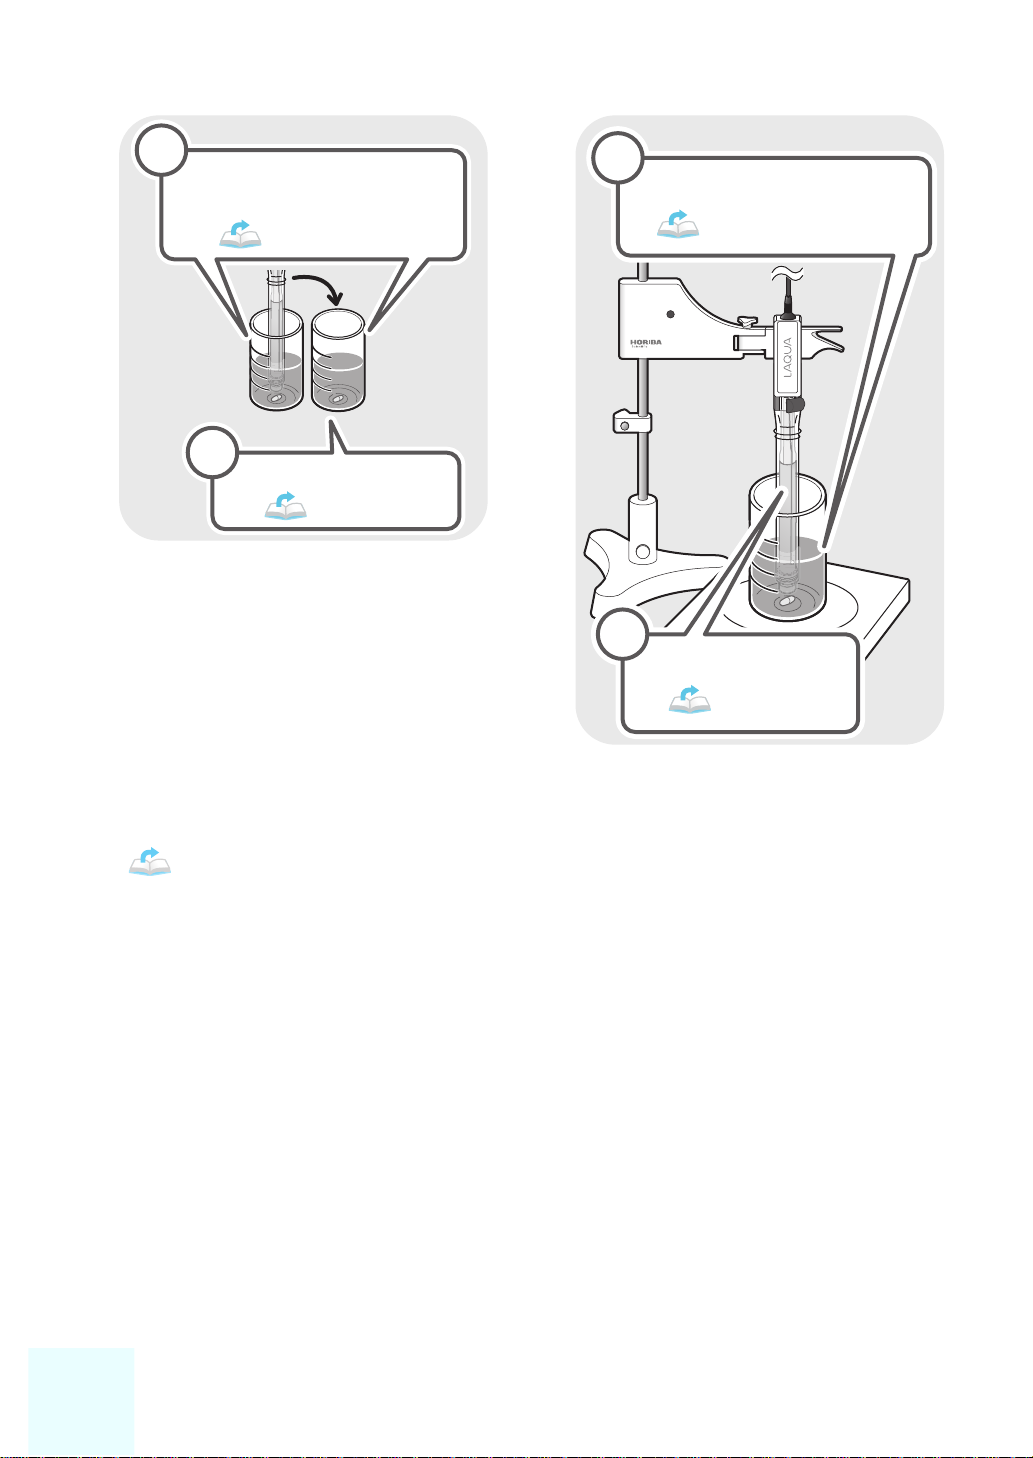
2 Calibration
1
2
Perform calibration.
( page 22)
Prepare two types of
solutions for calibration.
( page 19)
1
2
Prepare the sample solution.
( page 34)
Perform measurement.
( page 35)
In the following cases, perform
conditioning of the electrode before
calibration.
Before the first use
Before use after storage for two
weeks or longer
If the electrode is less responsive
For details on conditioning, refer to
“Conditioning of the electrode”
( page 23).
3 Measurement
6
Before Use
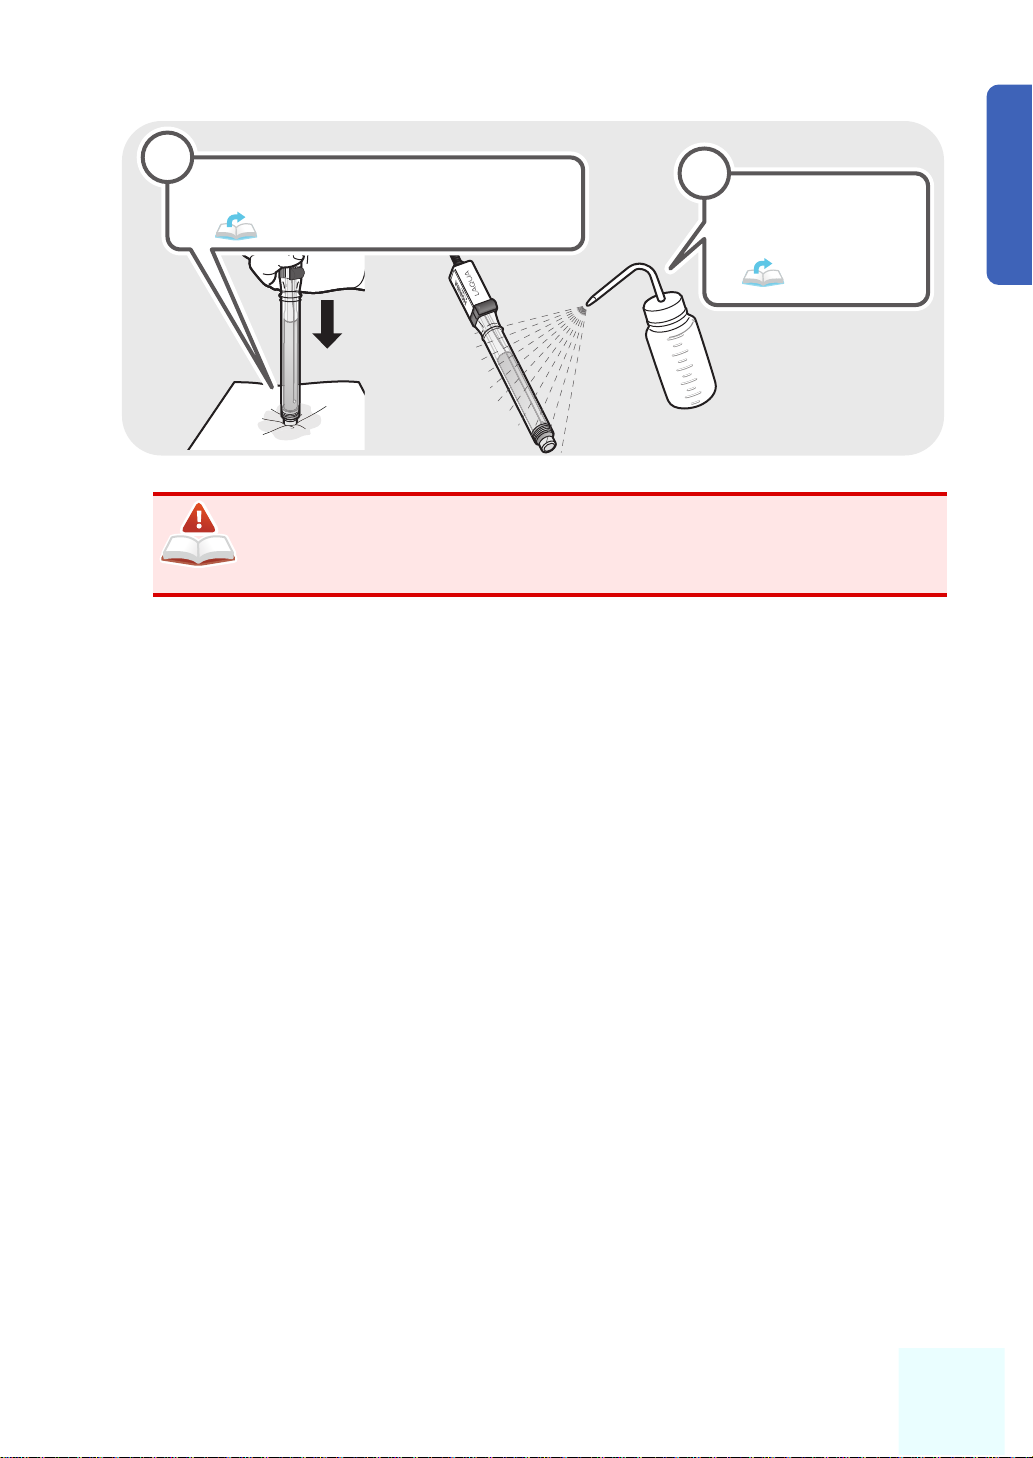
4 After measurement
2
1
Rinse the electrode
with pure water.
( page 42)
Discharge the internal solution
from the electrode.
( page 41)
NoteNote
When the electrode will not be used for two weeks or
longer, store it as described on page 44.
7

8

Electrode Preparation
Calibration Measurement
After Measurement
E
lectrode Preparation
This chapter describes the preparation that must be performed before
using the product.
Assembling the electrode (only when
use for first time)............................ 10
Filling with internal solution ......... 12
Rinsing the electrode..................... 15
Connecting the electrode to the
meter ............................................... 16
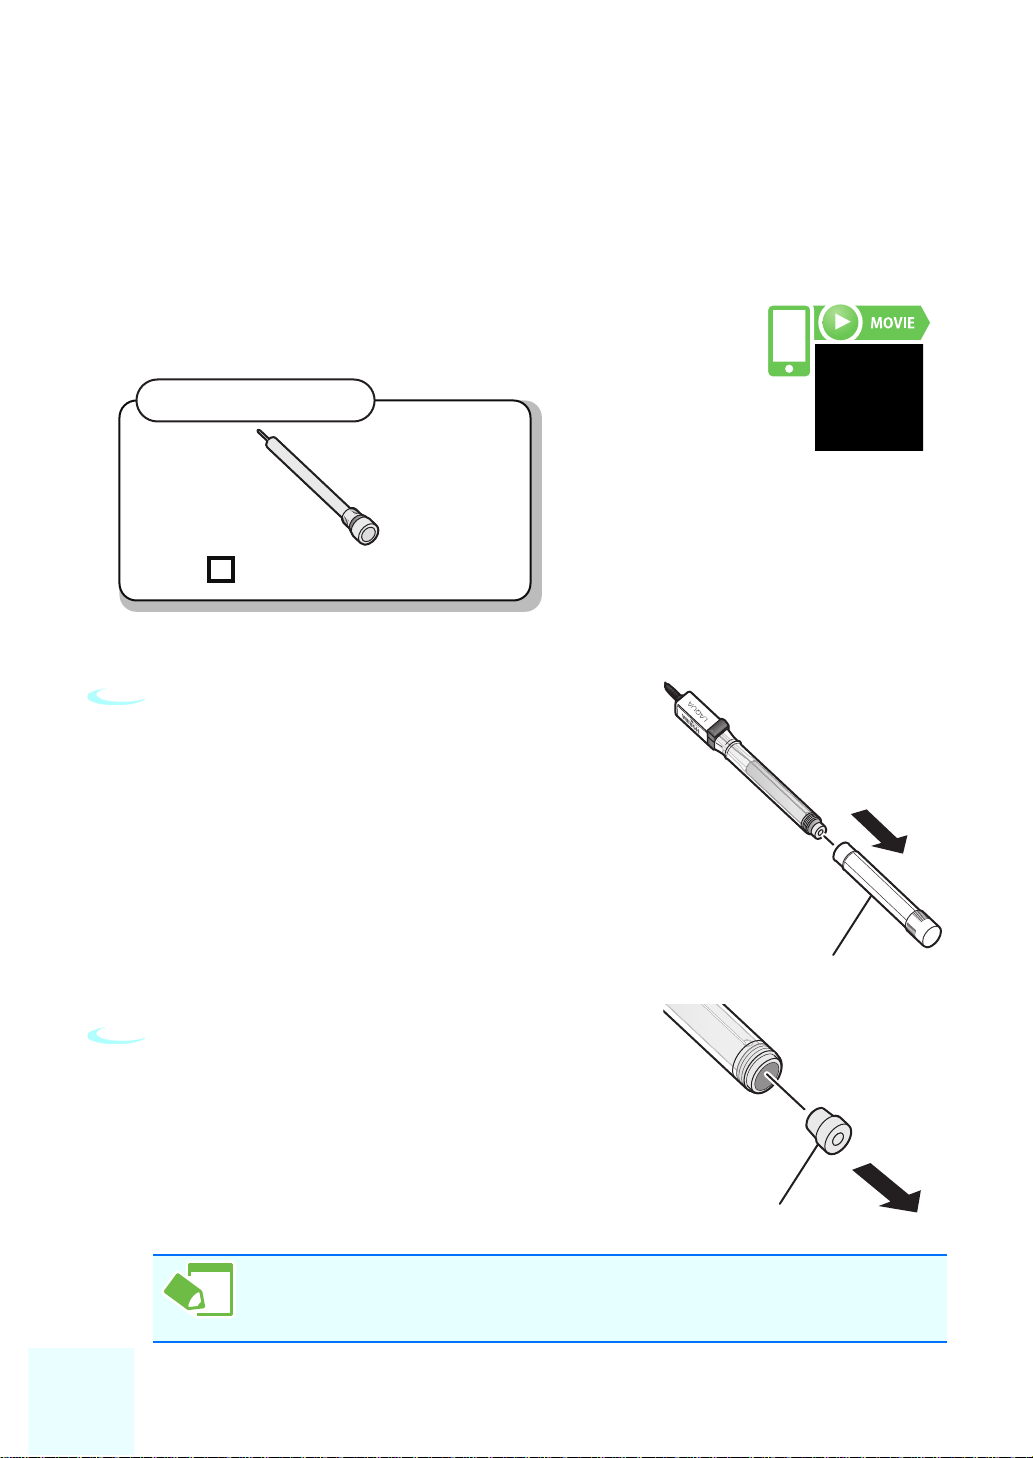
Assembling the electrode (only
View videoView video
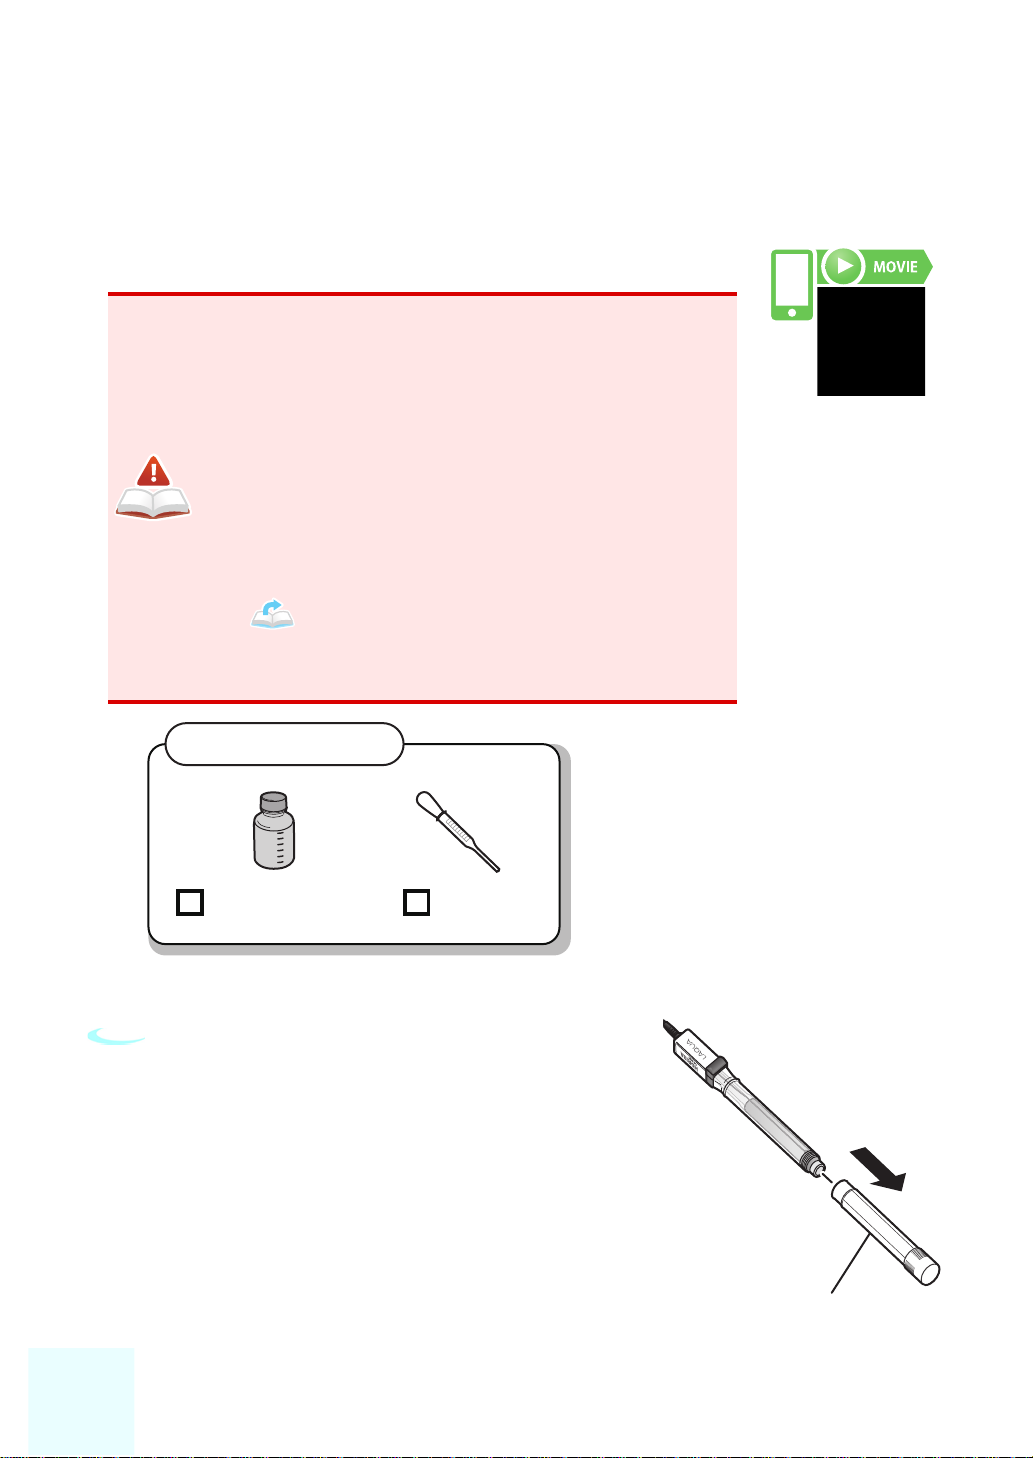
Item to be prepared
Ion electrode tip
Protective cap
Rubber cap
TipTip
when use for first time)
When using the product for the first time, assemble the
electrode as described in the following procedure.
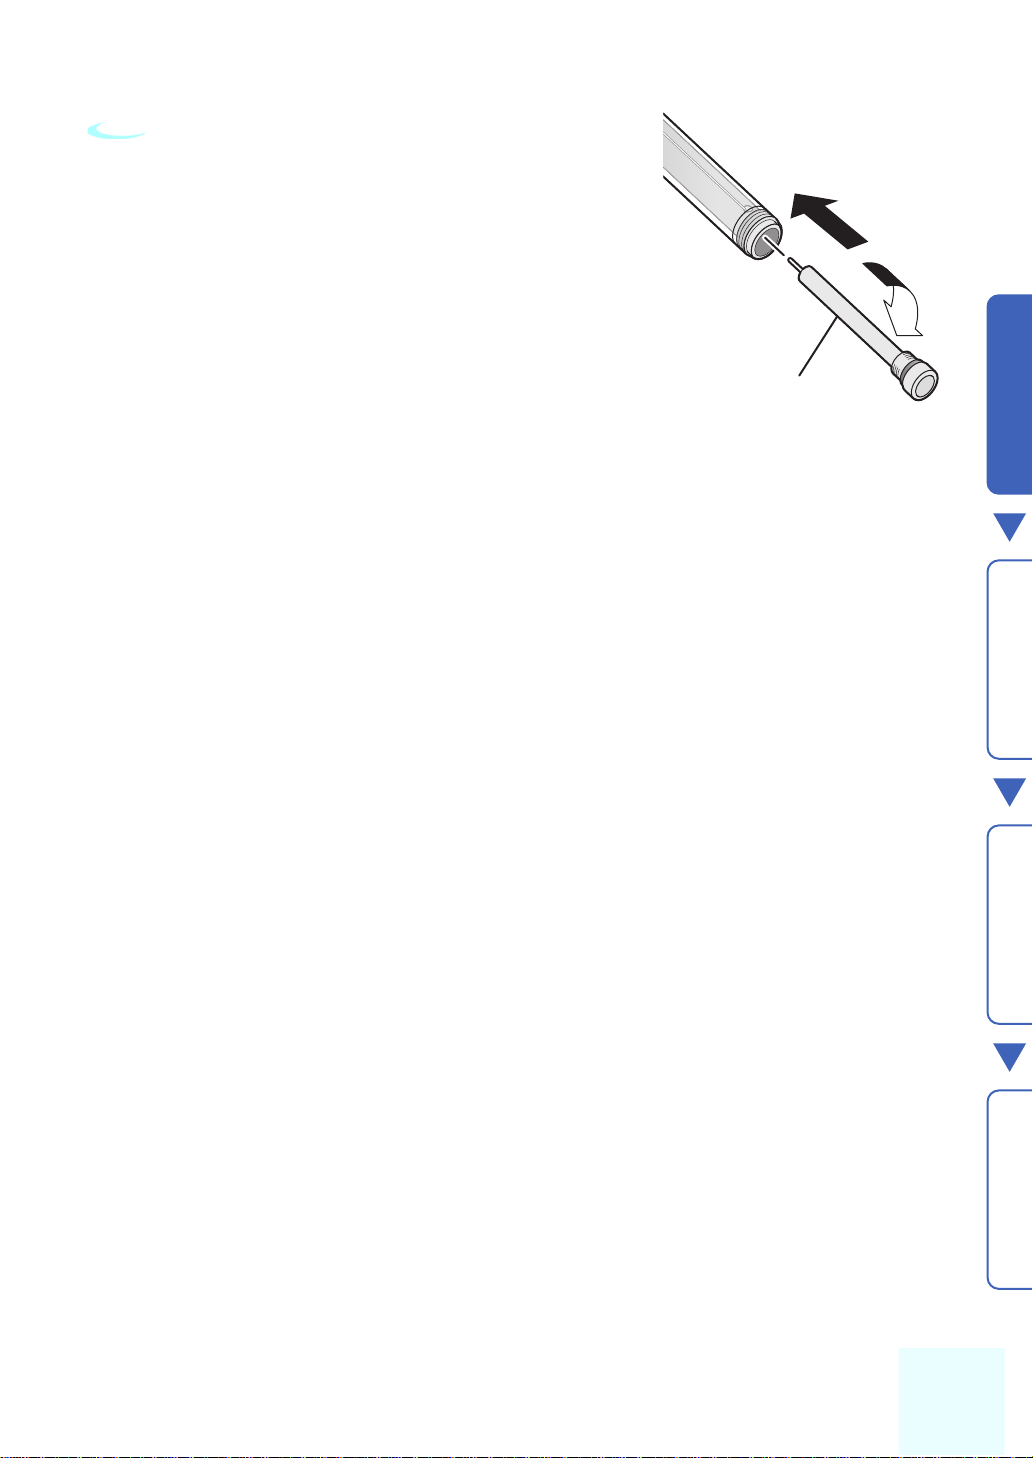
1 Remove the protective cap.
2 Remove the rubber cap.
10
The rubber cap will not be used again. Dispose of it according to
the local rules and regulations.
Electrode Preparation
Calibration Measurement
After Measurement
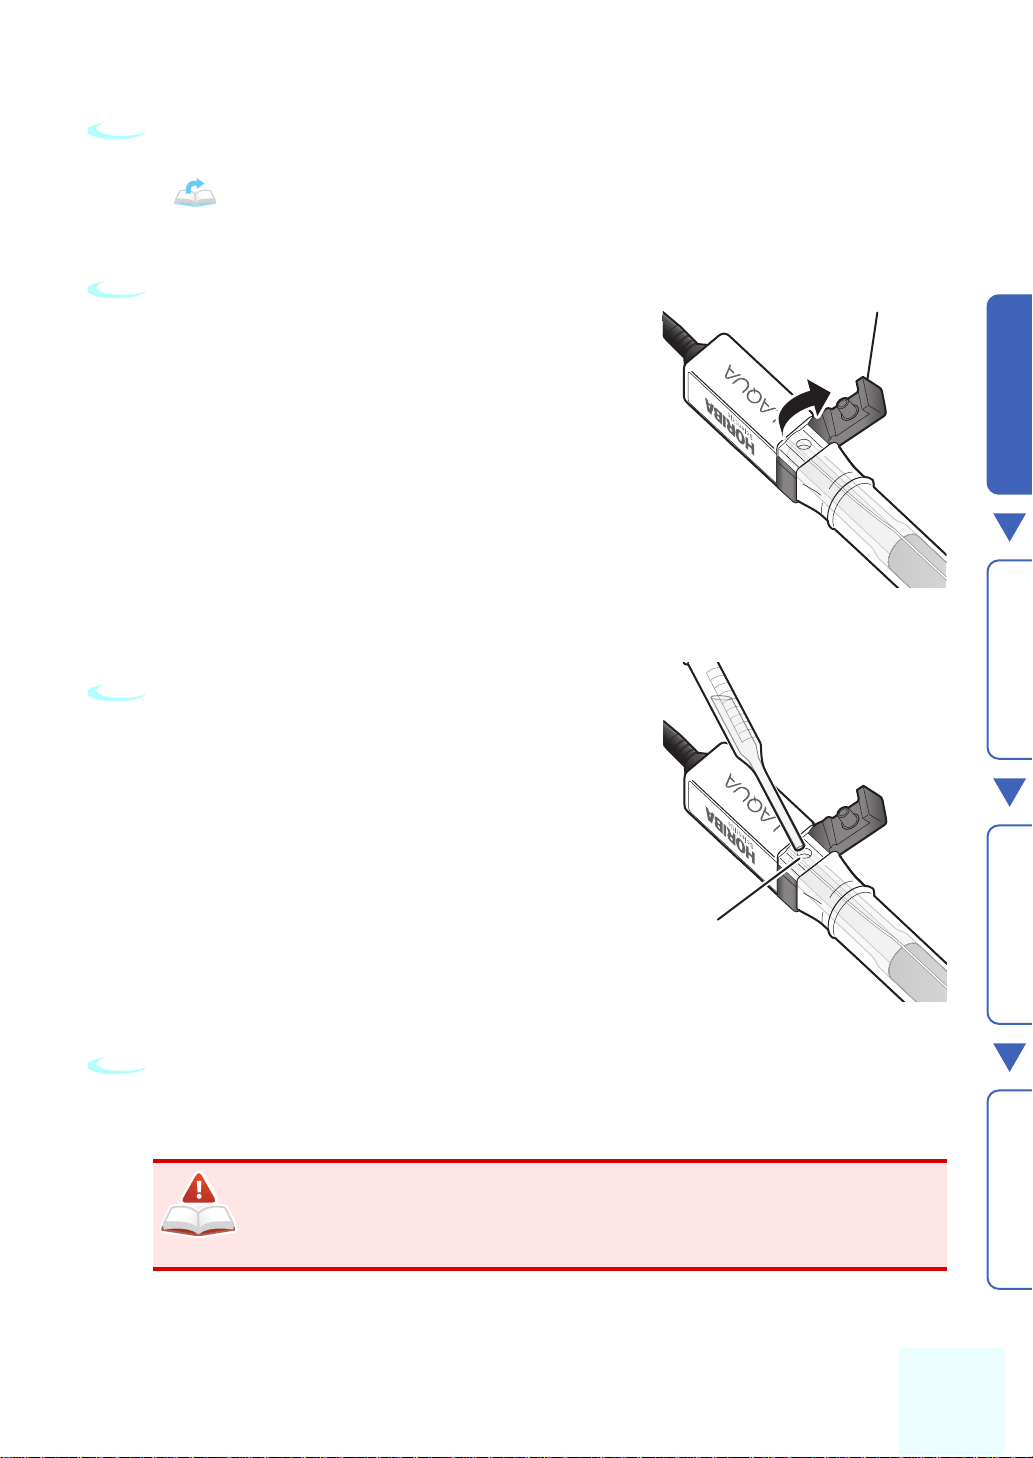
3 Attach the ion electrode tip by
turning it clockwise.
Ion electrode tip
11
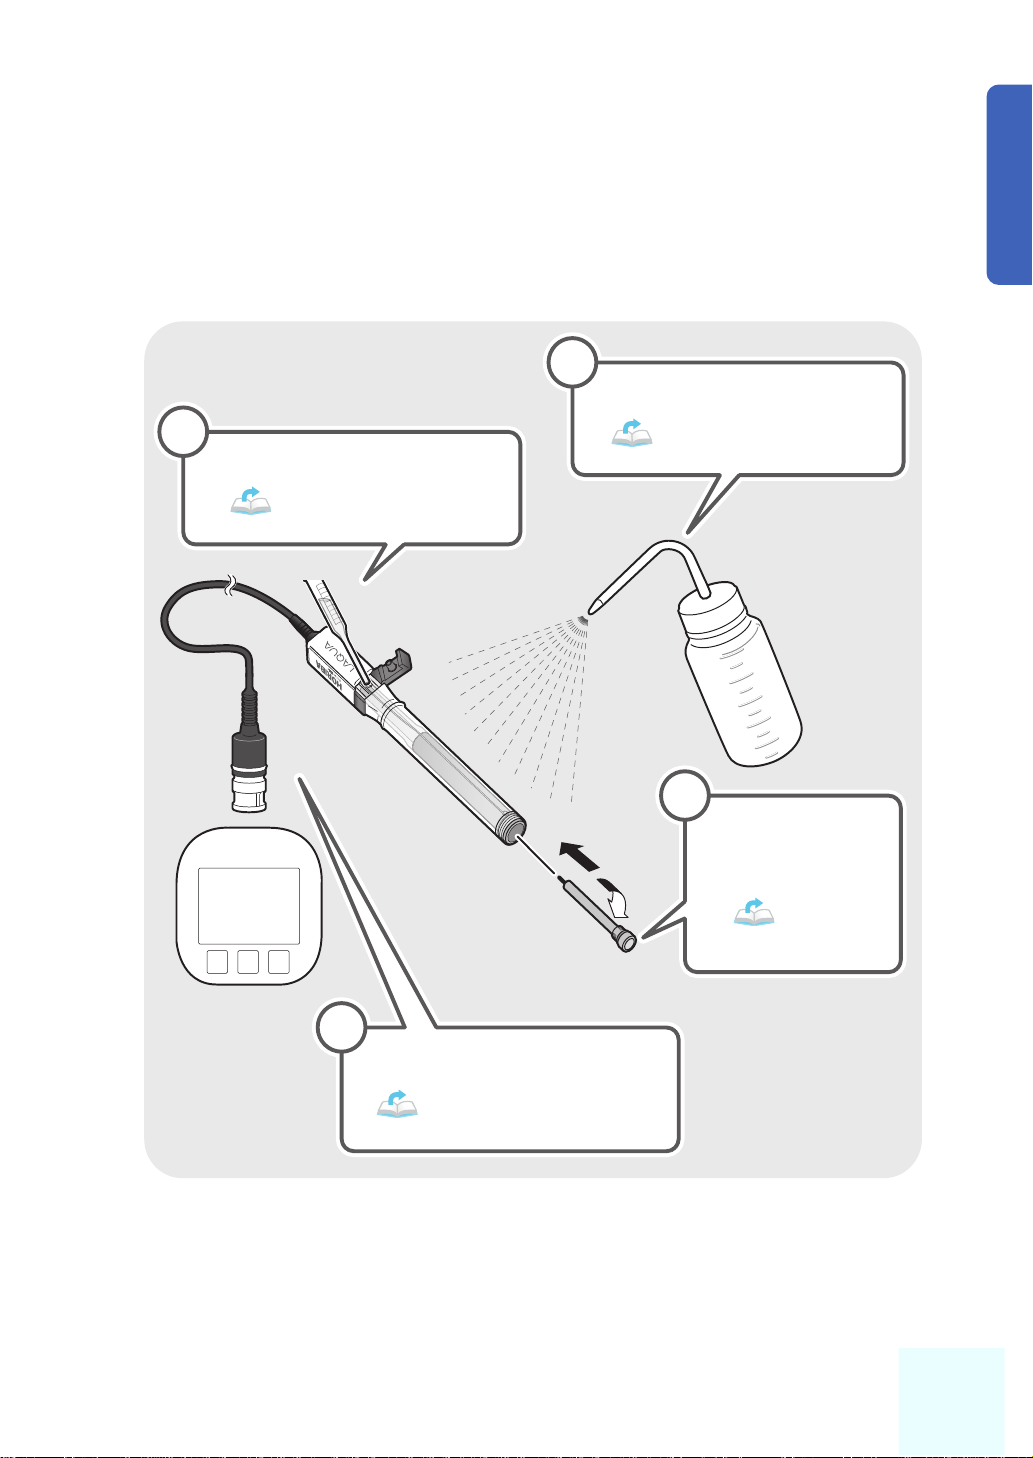
Filling with internal solution
View videoView video
NoteNote
Internal solution Dropper
Items to be prepared
Be sure to fill the electrode with internal solution as
described in the following procedure before use.
Be sure to fill with internal solution before
use.
If measurement is performed in the state in
which there is not much internal solution,
an inflow of sample solution into the
electrode will result in accurate
measurements no longer being possible.
Use the internal solution included in the
package or available as a consumable sold
separately by HORIBA Advanced Techno.
( “Consumables” (page 70))
Discharge the internal solution each time
measurement finishes.
1 Remove the protective cap.
(Except when it is already removed,
such as first time of use.)
12
Protective cap
Electrode Preparation
Calibration Measurement
After Measurement
2 Make sure that there is no internal solution remaining.
Rubber stopper
NoteNote
If there is any internal solution remaining, remove it all.
( Steps 1 to 2 of “How to clean the electrode” (pages 38 to 39.))
3 Open the rubber stopper of the
internal solution fill port.
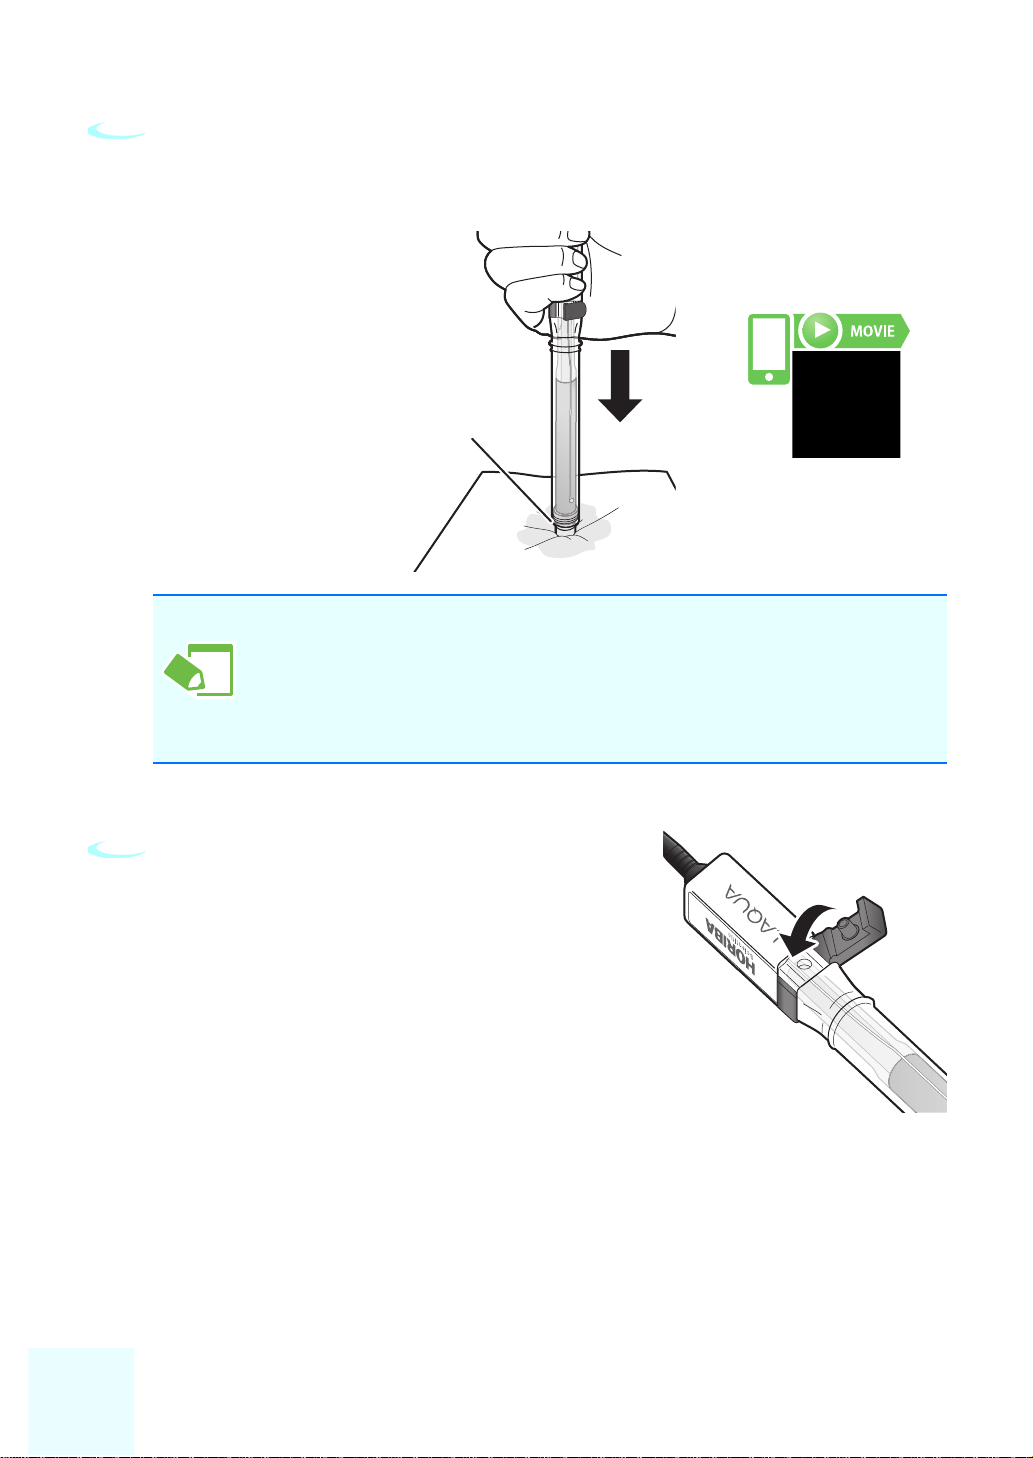
4 Fill the internal solution with a
dropper.
Fill until the solution surface comes up to just
below the internal solution fill port.
5 Spread soft and clean lint-free paper or cloth beneath the
electrode and then press the electrode against it from
above.
Internal solution
fill port
When pressing the electrode from above, do not press too
hard and do not subject it to an impact.
It may damage the electrode.
13
6 Make sure that the inside of the electrode moves up and
View videoView video
TipTip
down and that internal solution oozes out from the liquid
junction.
The internal solution
oozes out from the
liquid junction.
It is best that the internal solution oozes out slightly. If the
outflow is extremely little, the potential of the reference electrode
will become unstable and susceptible to stir.
In such a case, repeat step 5 and 6 until the internal solution
oozes out from the liquid junction.
7 Close the rubber stopper of the
14
internal solution fill port.
Electrode Preparation
Calibration Measurement
After Measurement
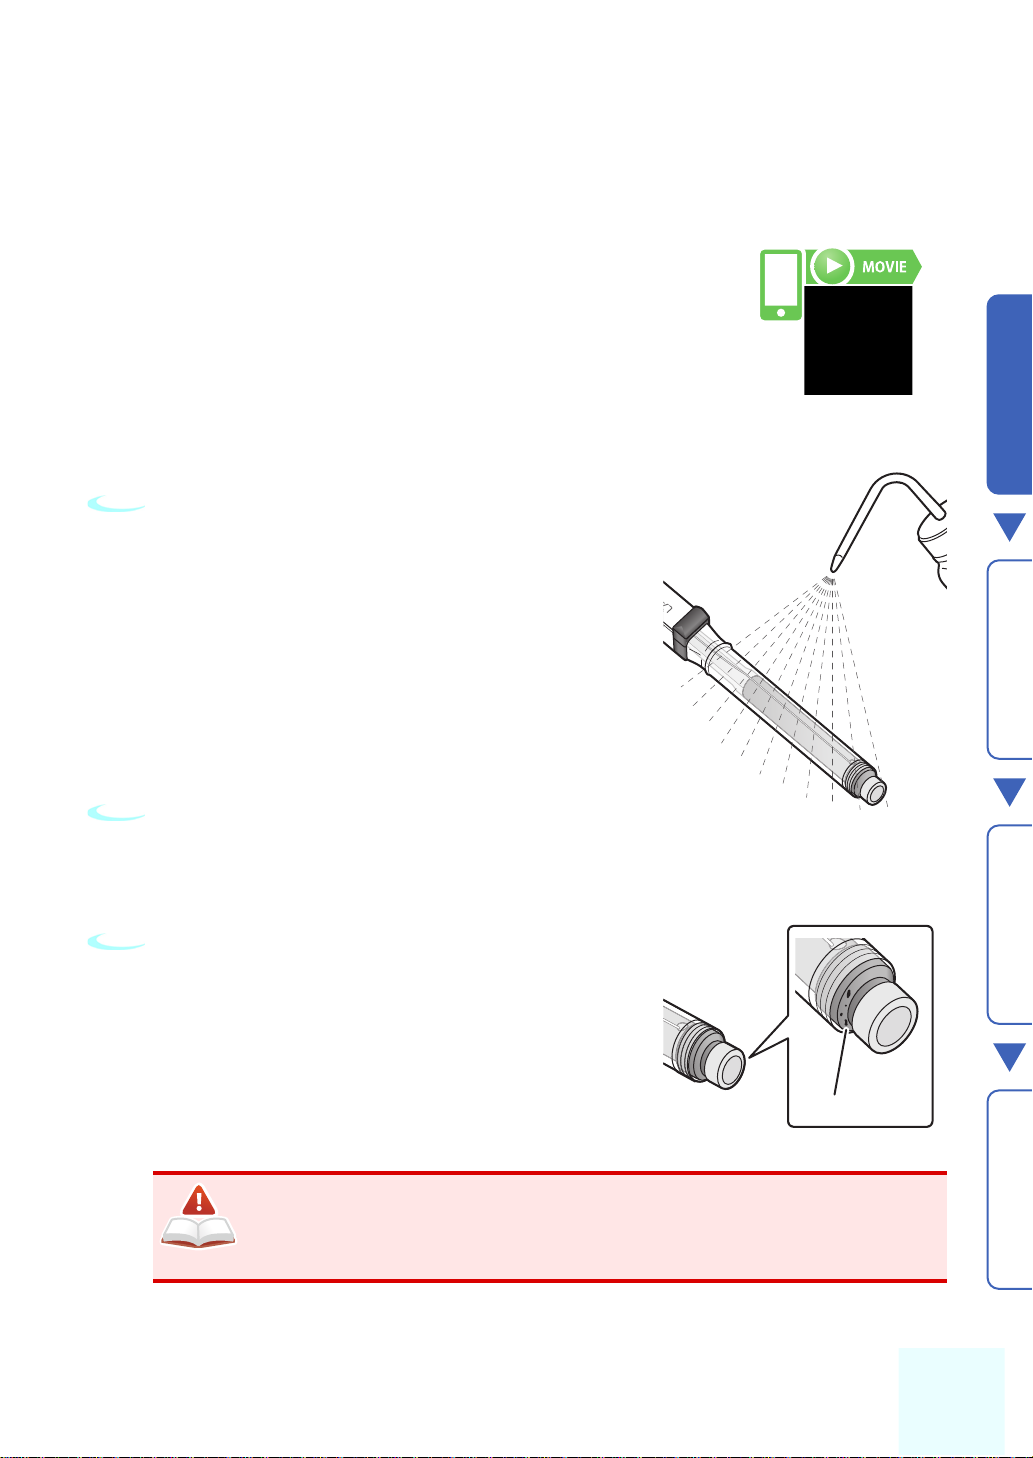
Rinsing the electrode
View videoView video
Contamination
NoteNote
Make sure that no dirt and other foreign matters have
adhered to the electrode before measurement.
If dirt and other foreign matters have adhered to the
electrode, rinse the electrode as described in the following
procedure.
1 Rinse the electrode with pure water.
2 Wipe off the moisture.
Wipe off the moisture using soft and clean lint-free paper or cloth.
3 Make sure that there are no dirt and
crystals of internal solution adhered
to the area around the liquid
junction.
If dirt and crystals of internal solution are adhered, they
may affect the outflow of internal solution. Rinse the
electrode with pure water again.
15
 Loading...