

Page 1

MANUAL
31312
Assembly instructions, how to use, useful tips for keeping
your tool for togetherness in shape.
EN – NL – DE – FR – IT – ES
Hopper
Picnic
Combi
Table
Page 2

EXTREMIS
Tools for togetherness
Page 3

IMPORTANT! RETAIN FOR FUTURE
REFERENCE: READ CAREFULLY.
BELANGRIJK! LEES DIT DOCUMENT
AANDACHTIG EN BEWAAR HET VOOR
TOEKOMSTIGE RAADPLEGING!
WICHTIG! AUFHEBEN, UM SPÄTER
ETWAS NACHSEHEN ZU KÖNNEN:
SORGFÄLTIG DURCHLESEN!
IMPORTANT! LISEZ ATTENTIVEMENT
CE MANUEL ET CONSERVEZ-LE POUR
RÉFÉRENCE ULTÉRIEURE!
IMPORTANTE! CONSERVARE COME
RIFERIMENTO PER IL FUTURO:
LEGGERE ATTENTAMENTE!
¡IMPORTANTE! CONSÉRVELO PARA
FUTURA REFERENCIA: LÉALO
ATENTAMENTE!
Page 4

4
Hopper picnic
Hopper combi
3 x 2 4 x 2
35x 1
x 1
4 x 1
7a
7a
x 24
x 18
7b
7b
x 24
x 18
7c7cx 24
x 18
11x 1
x 1
2
2
x 2
x 1
6 x 1
A
B
Page 5

5
Hopper table
Backrest
7a x 12
7b
x 12 7c x 12
1 x 1
D
C
8 x 1
9
x 1
10
x 1 11a x 4
11b
x 4
11c
x 6
With Galvanised legs
Met gegalvaniseerde poten
Mit Feuerverzinktem Füße
Avec pieds galvanisés
Con gambe galvanizzate
Con pies galvanizados
With powder-coated aluminum legs
Met gepoederlakte aluminium poten
Mit Pulverbeschichtete, Aluminium Füße
Avec pieds aluminium thermolaqués
Con gambe aluminio verniciato a polvere
Con pies aluminio, pintado en polvo
5 x 2 6 x 2
Page 6

6
English
CONTENT
Hopper picnic
1. Tabletop
2. Bench
3. Right picnic leg
4. Left picnic leg
7. Mounting kit
(1 set)
a. M10x30 bolt
b. M10 nut
c. M10 spring washer
Hopper combi
1. Tabletop
2. Bench
3. Right picnic leg
4. Left picnic leg
5. Right table leg
6. Left table leg
7. Mounting kit
(1 set)
a. M10x30 bolt
b. M10 nut
c. M10 spring washer
Optional: backrest
8. Backrest shelf
9. Right back support
10. Left back support
11. Mounting kit
(1 set)
a. M10x40 bolt
b. M10 nut
c. 5x25 screw
Hopper table
1. Tabletop
5. Right table leg
6. Left table leg
7. Mounting kit
(1 set)
a. M10x30 bolt
b. M10 nut
c. M10 spring washer
Nederlands
INHOUD
Hopper picnic
1. Tafelblad
2. Bank
3. Rechter picnic poot
4. Linker picnic poot
7. Montageset
(1 set)
a. M10x30 bout
b. M10 moer
c. M10 veerring
Hopper combi
1. Tafelblad
2. Bank
3. Rechter picnic poot
4. Linker picnic poot
5. Rechter tafel poot
6. Linker tafel poot
7. Montageset
(1 set)
a. M10x30 bout
b. M10 moer
c. M10 veerring
Optioneel: rugleuning
8. Rugplank
9. Rechter rugsteun
10. Linker rugsteun
11. Montageset
(1 set)
a. M10x40 bout
b. M10 nut
c. 5x25 vijs
Hopper tafel
1. Tafelblad
5. Rechter tafel poot
6. Linker tafel poot
7. Montageset
(1 set)
a. M10x30 bout
b. M10 moer
c. M10 veerring
Deutsch
INHALT
Hopper picnic
1. Tischplatte
2. Bank
3. Rechte picnic bein
4. Linke picnic bein
7. Montagesatz
(1 set)
a. M10x30 Schraube
b. M10 Mutter
c. M10 Sprengring
Hopper combi
1. Tischplatte
2. Bank
3. Rechte picnic bein
4. Linke picnic bein
5. Rechte Tisch bein
6. Linke Tisch bein
7. Montagesatz
(1 set)
a. M10x30 Schraube
b. M10 Mutter
c. M10 Sprengring
Option: Rückenlehne
8. Rückenlehne
9. Rechte Lehnenstütz
10. Linke Lehnenstütz
11. Montagesatz
(1 set)
a. M10x40 Schraube
b. M10 Mutter
c. Vis 5x25
Hopper tisch
1. Tischplatte
5. Rechte Tisch bein
6. Linke Tisch bein
7. Montagesatz
(1 set)
a. M10x30 Schraube
b. M10 Mutter
c. M10 Sprengring
Page 7

7
Français
CONTENU
Hopper picnic
1. Plateau de table
2. Banc
3. Picnic pied droit
4. Picnic pied gauche
7. Kit de montage
(1 set)
a. M10x30 boulon
b. M10 écrou
c. M10 rondelle
Hopper combi
1. Plateau de table
2. Banc
3. Picnic pied droit
4. Picnic pied gauche
5. Table pied droit
6. Table pied gauche
7. Kit de montage
(1 set)
a. M10x30 boulon
b. M10 écrou
c. M10 rondelle
Option: dossier
8. Dossier
9. Support de dossier droit
10. Support de dossier gauche
11. Kit de montage (1 set)
a. M10x40 boulon
b. M10 écrou
c. Vis 5x25
Hopper table
1. Plateau de table
5. Table pied droit
6. Table pied gauche
7. Kit de montage
(1 set)
a. M10x30 boulon
b. M10 écrou
c. M10 rondelle
Italiano
CONTENUTO
Hopper picnic
1. Piano del tavolo
2. Panchina
3. Picnic gambe destro
4. Picnic gambe sinistro
7. Kit di montaggio
(1 set)
a. M10x30 bulloni
b. M10 dado
c. M10 rondella
Hopper combi
1. Piano del tavolo
2. Panchina
3. Picnic gambe destro
4. Picnic gambe sinistro
5. Table gambe destro
6. Table gambe sinistro
7. Kit di montaggio
(1 set)
a. M10x30 bulloni
b. M10 dado
c. M10 rondella
Opzionale: schienale
8. Schienale
9. Sostegno destro
10. Sostegno sinistro
11. Kit di montaggio
(1 set)
a. M10x40 bulloni
b. M10 dado
c. Viti 5x25
Hopper tavolo
1. Piano del tavolo
5. Table gambe destro
6. Table gambe sinistro
7. Kit di montaggio
(1 set)
a. M10x30 bulloni
b. M10 dado
c. M10 rondella
Español
CONTENIDO
Hopper picnic
1. Tablero
2. Banco
3. Picnic pata derecho
4. Picnic pata izquierdo
7. Kit de montage
(1 set)
a. M10x30 tornillo
b. M10 tuerca
c. M10 arandela
Hopper combi
1. Tablero
2. Banco
3. Picnic pata derecho
4. Picnic pata izquierdo
5. Table pata derecho
6. Table pata izquierdo
7. Kit de montage
(1 set)
a. M10x30 tornillo
b. M10 tuerca
c. M10 arandela
Opcional: respaldo
8. Respaldo
9. Soporte izquierdo
10. Soporte derecho
11. Kit de montaje
(1 set)
a. M10x40 tornillo
b. M10 tuerca
c. Tornillo 5x25
Hopper mesa
1. Tablero
5. Table pata derecho
6. Table pata izquierdo
7. Kit de montage
(1 set)
a. M10x30 tornillo
b. M10 tuerca
c. M10 arandela
Page 8

8
1.
2.
3
3
4
4
Hopper picnic
N° 17
45’
A
Page 9

9
3.
4.
Page 10

10
5.
6.
1
3
3
4
4
Page 11

11
7.
7a
7a 7b7c
7b7b
7c7c
7b7c
7.
7a x 12
7b
x 127c x 12 7b x 127c x 12
Page 12

12
8.
9.
20P
2
Page 13

13
10.
7a
7a 7b7c
7b7b
7c7c
7b7c
10.
7a x 12
7b
x 127c x 12 7b x 127c x 12
Page 14

14
1.
2.
15’
Page 15
15
3.
4.
Page 16
16
1.
2.
15’
Page 17
17
3.
4.
Page 18
18
1.
2.
3
4
Hopper combi
B
N° 17
30’
Page 19
19
3.
4.
Page 20
20
5.
6.
1
3
4
5
6
Page 21
21
7.
7a
7a 7b7c
7b7b
7c7c
7b7c
7.
7a x 12
7b
x 127c x 12 7b x 127c x 12
Page 22
22
8.
9.
20P
2
Page 23
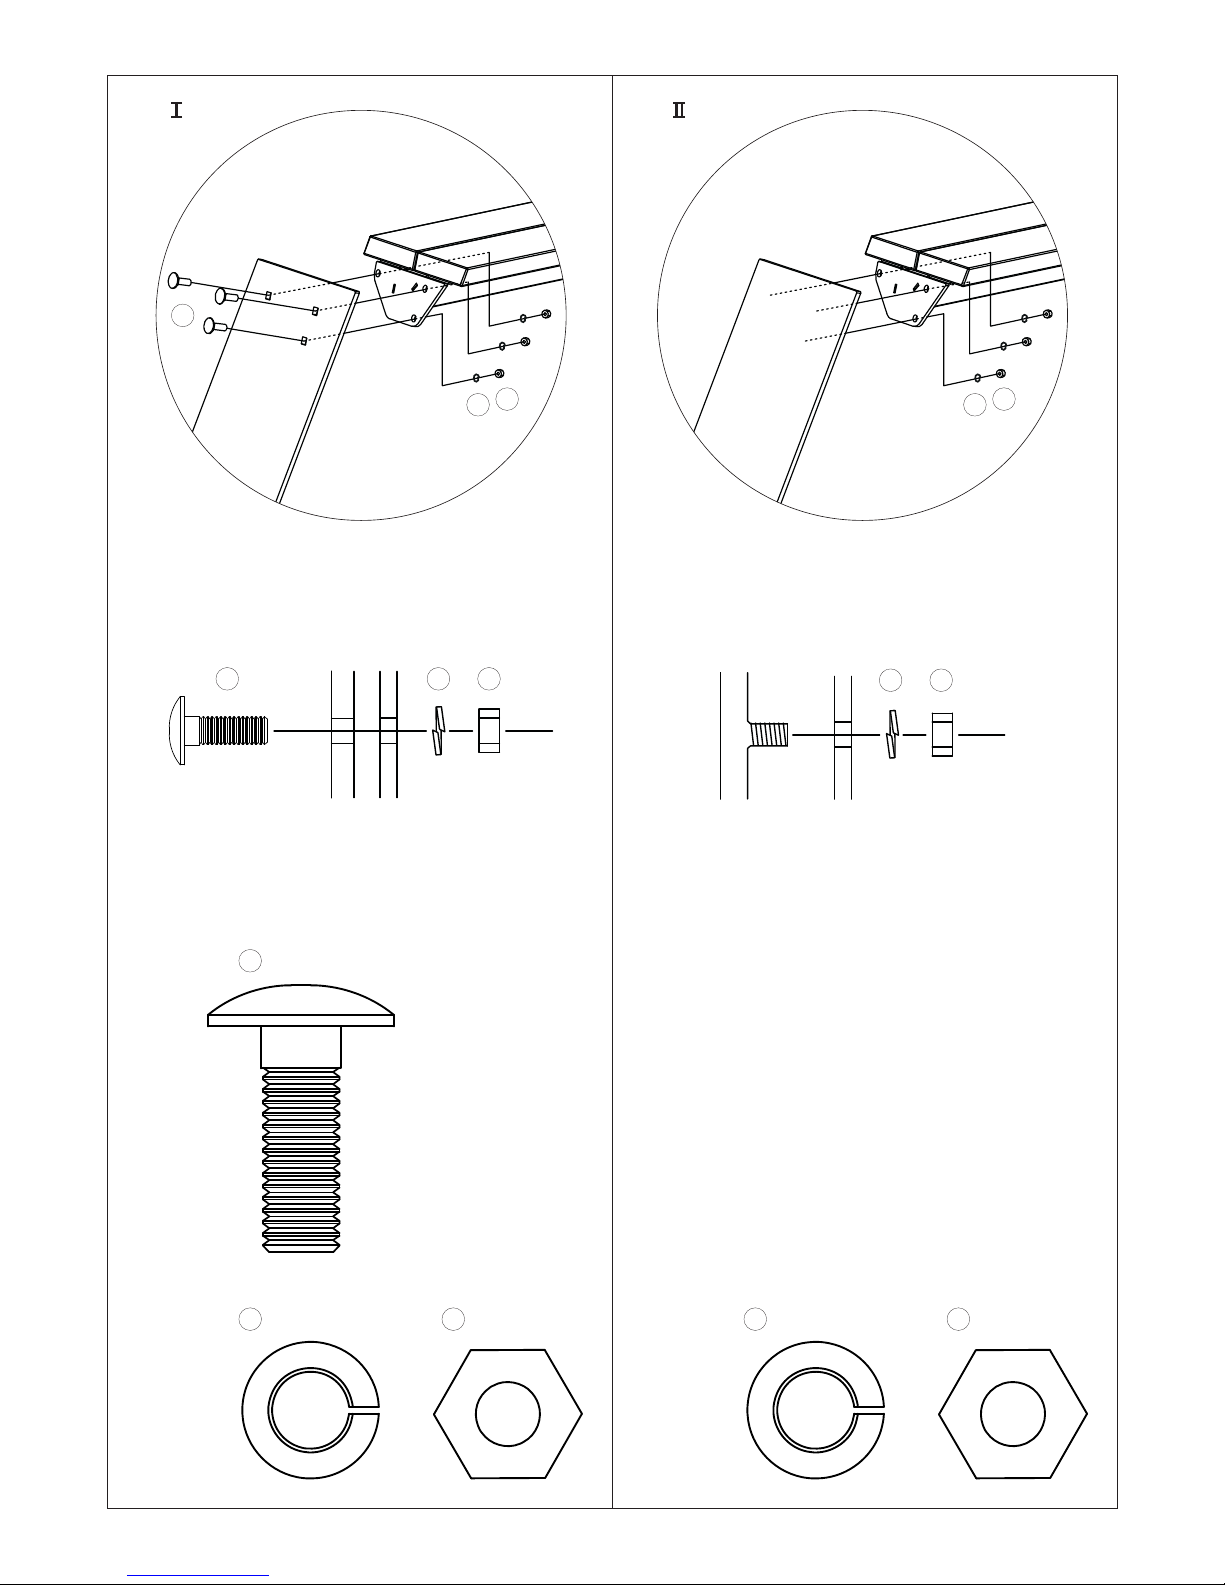
23
7a
7a 7b7c
7b7b
7c7c
7b7c
7a x 6
7b
x 67c x 6 7b x 67c x 6
10. 10.
Page 24
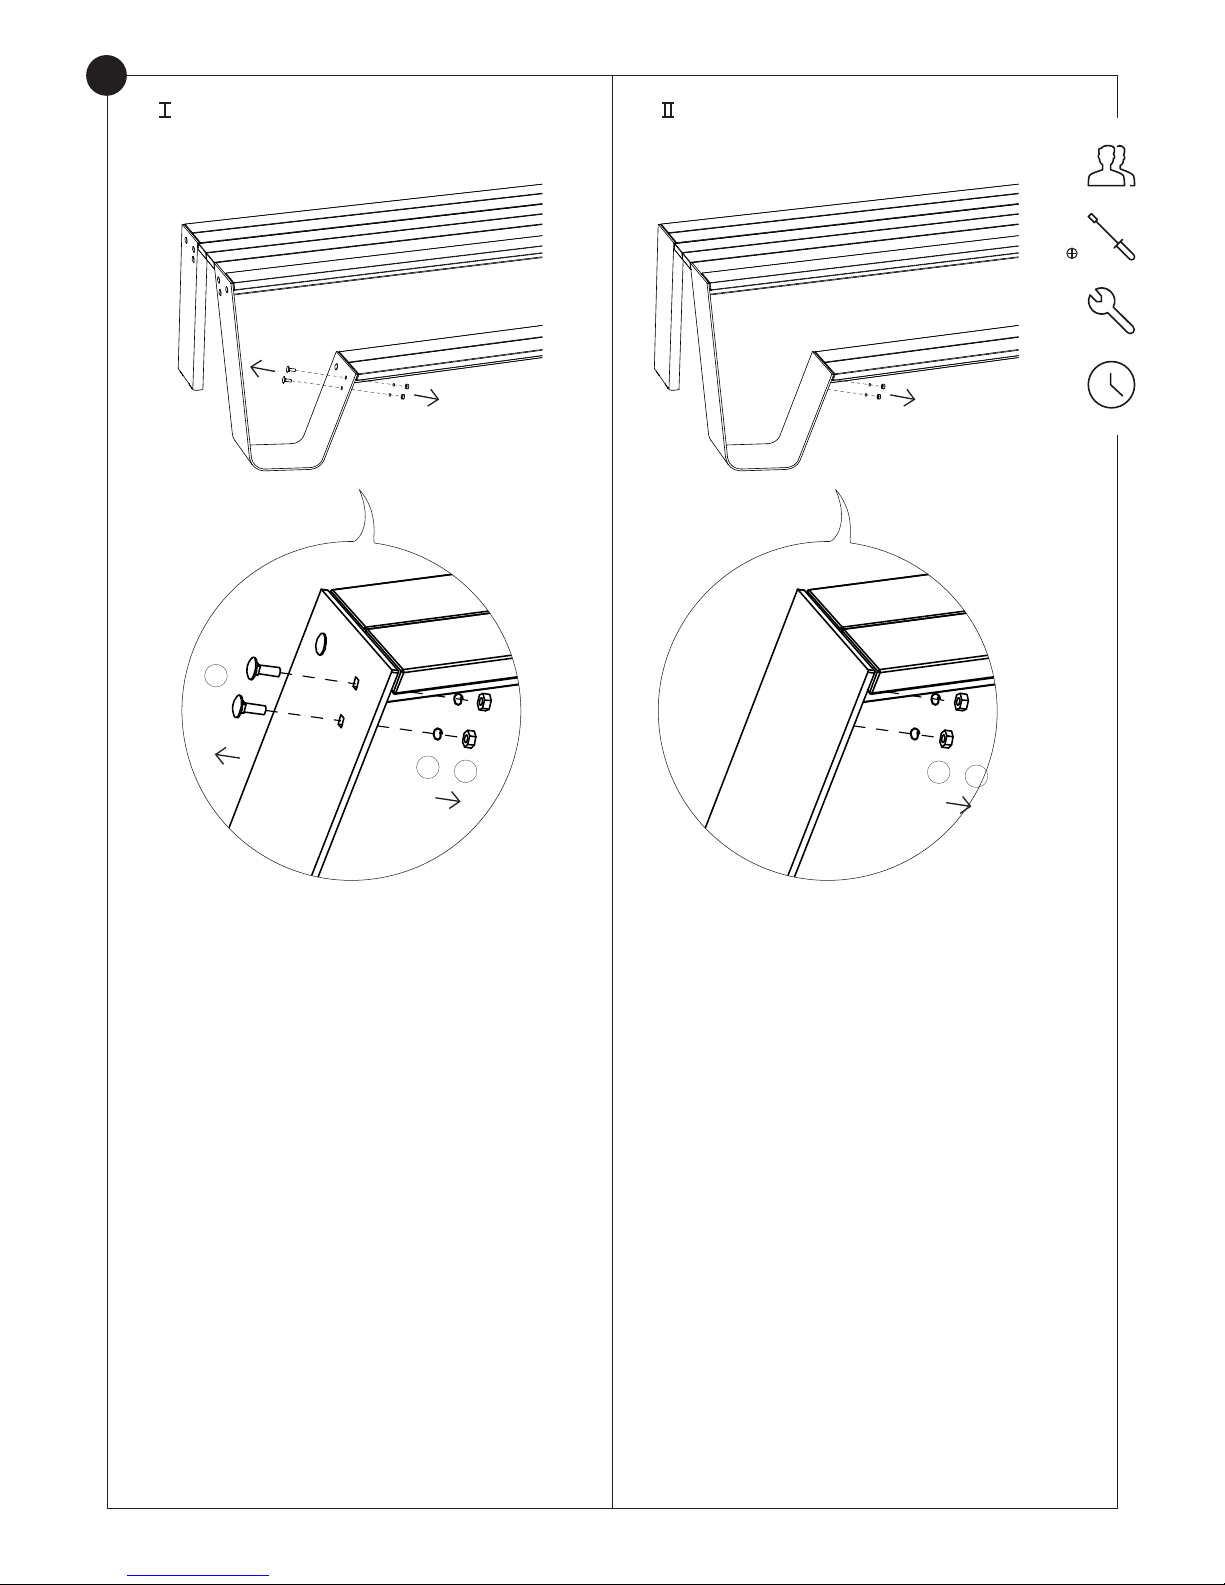
24
C
7a
7b
7c
7b
7c
1. 1.
N° 17
15’
Page 25
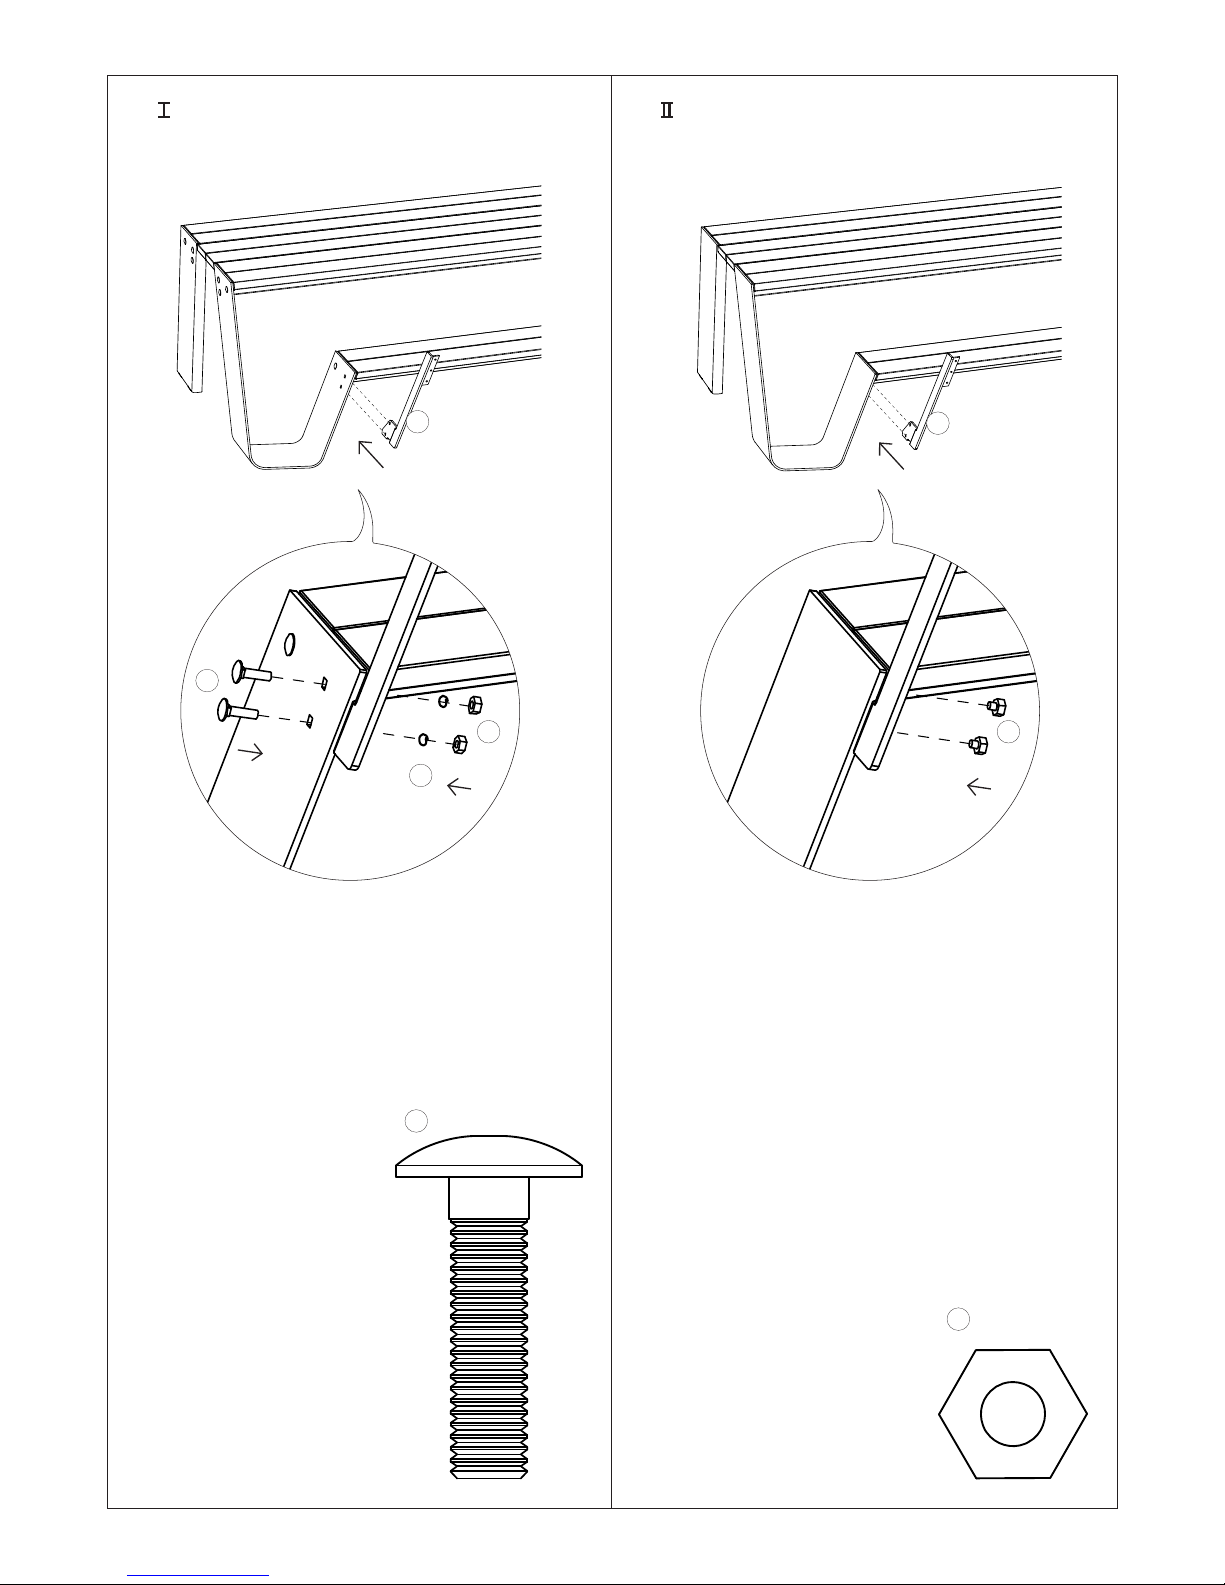
25
2. 2.
10
11a
7b
7c
11b x 4
11a x 4
10
11b
Page 26
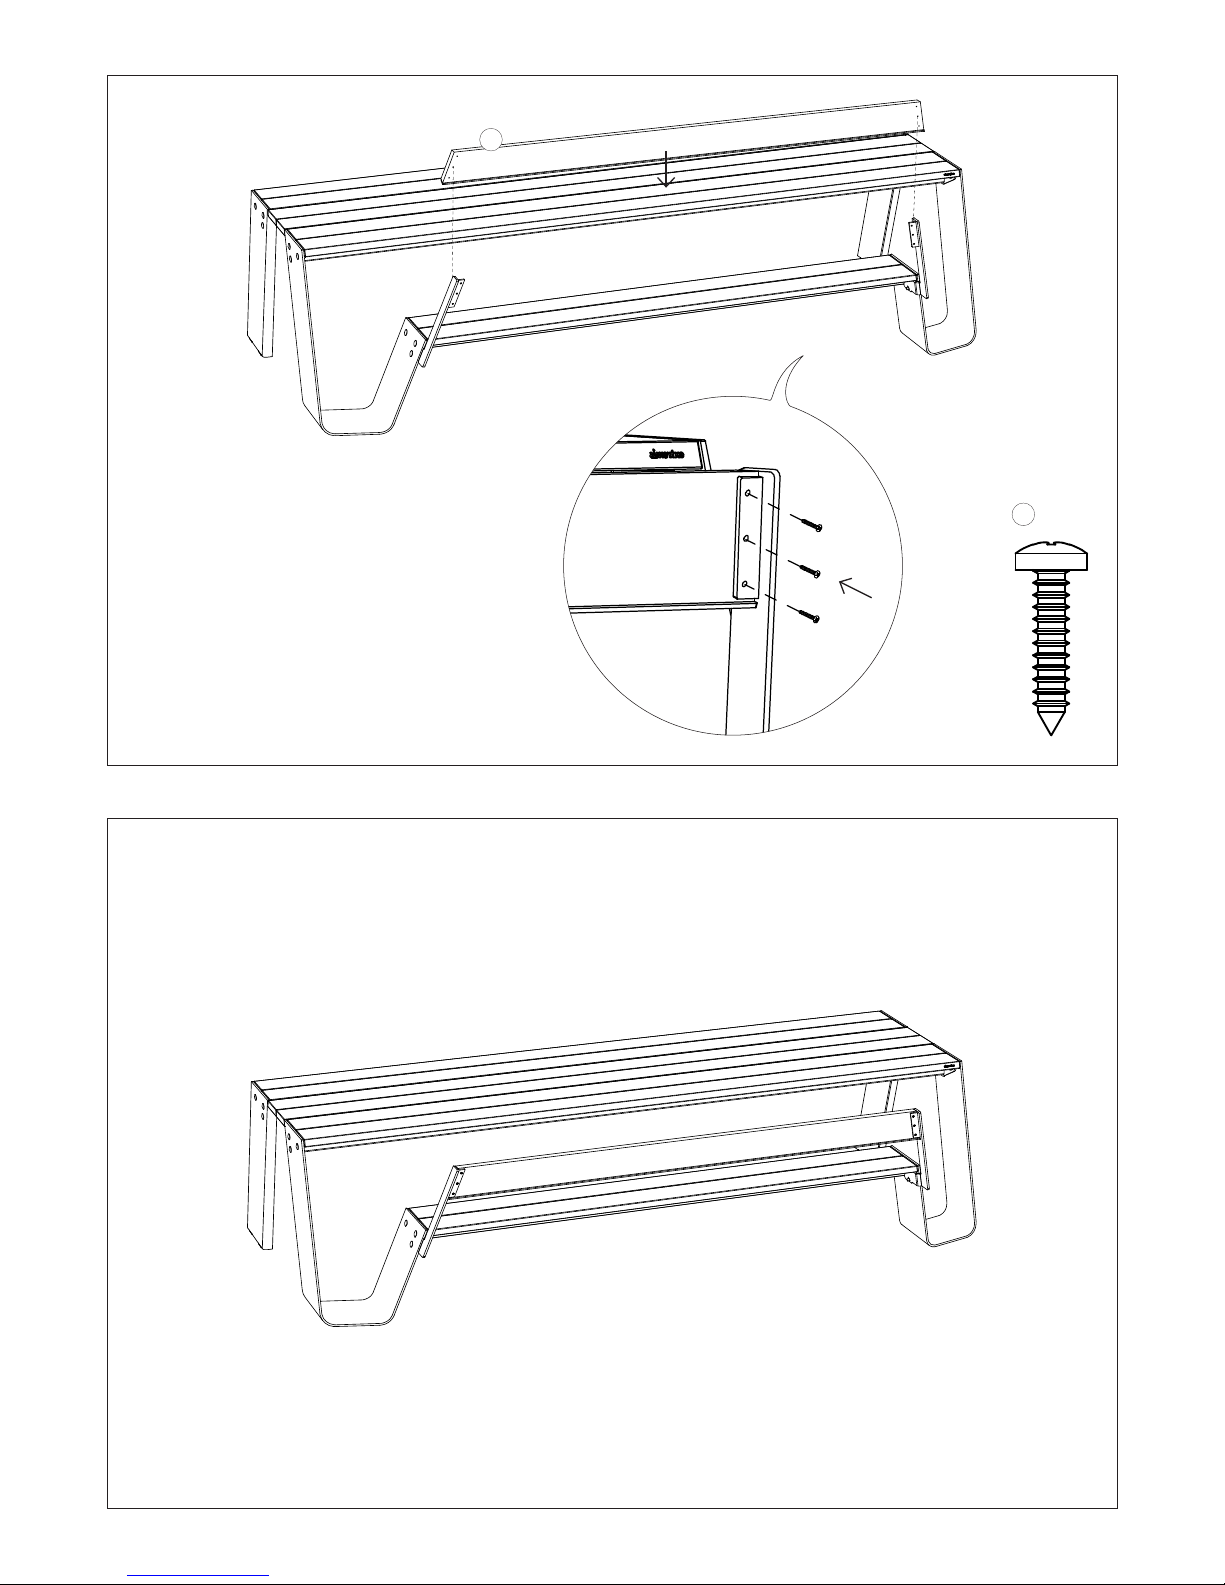
26
3.
4.
6 x 5x25
8
11c
Page 27

27
Page 28
28
6
6
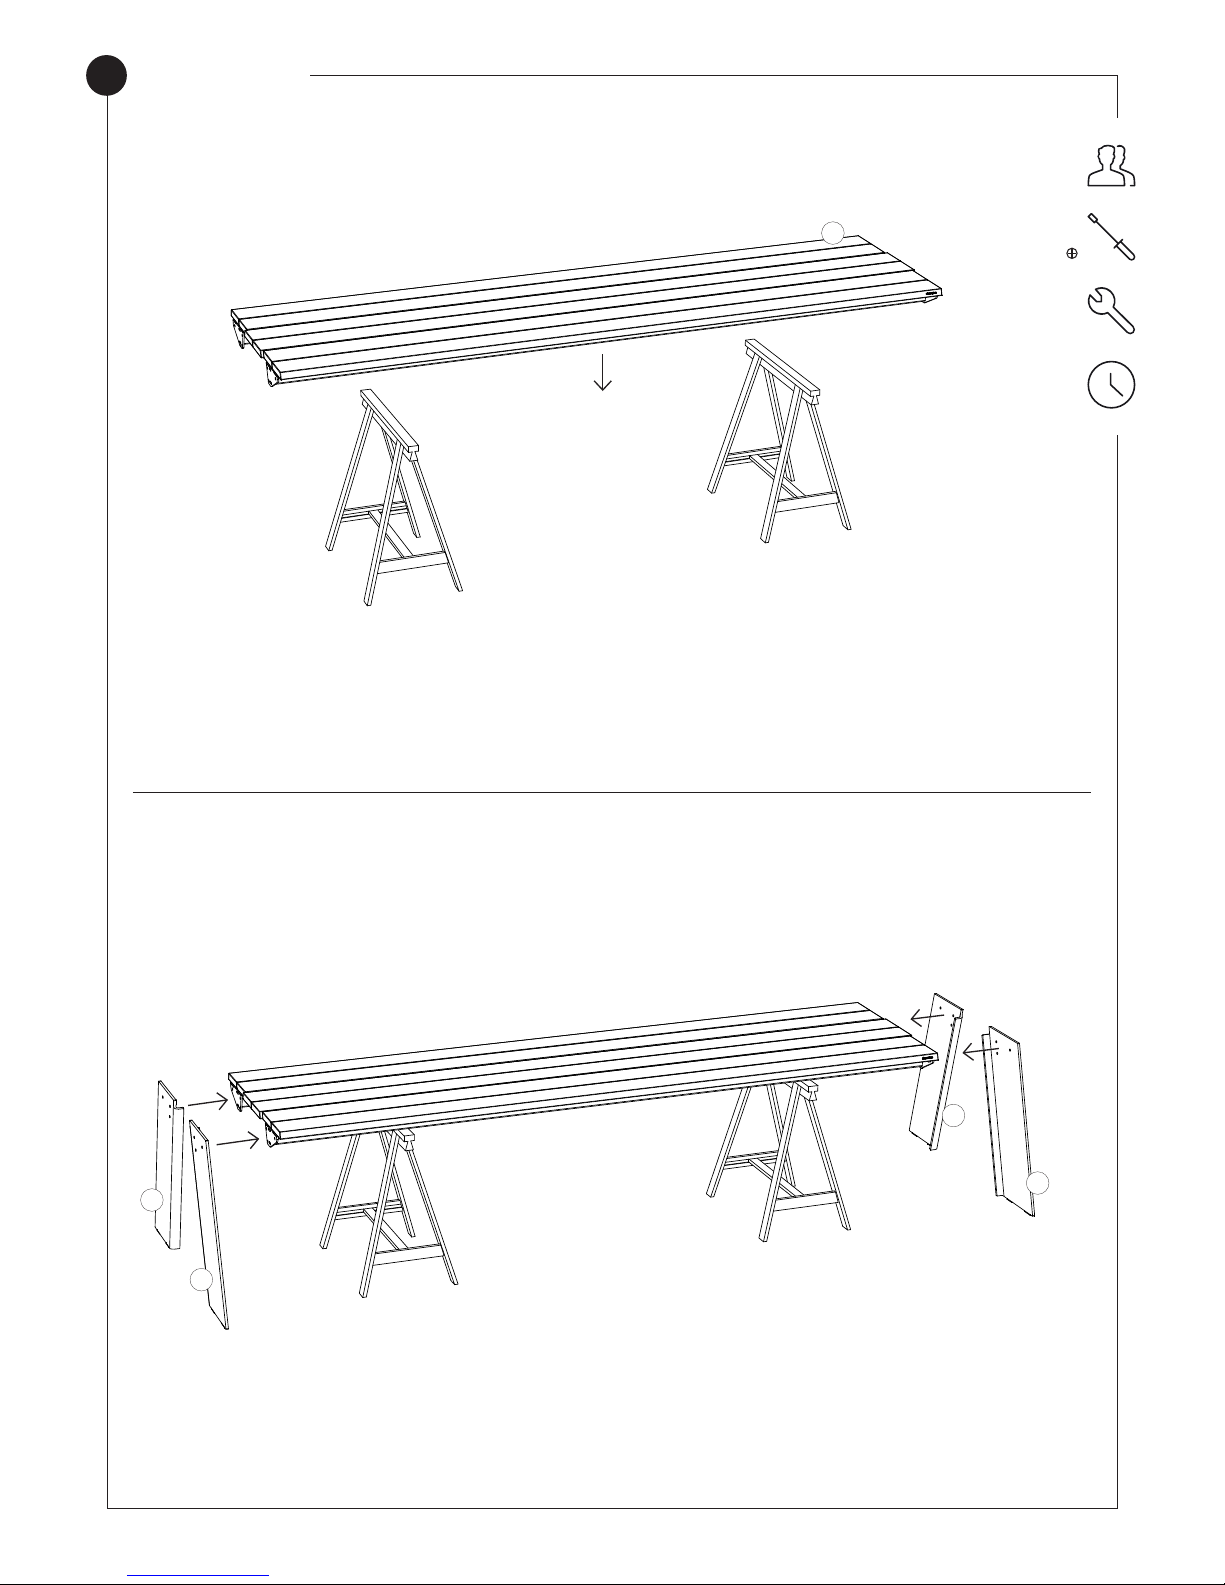
1.
2.
1
5
5
Hopper table
D
N° 17
15’
Page 29
29
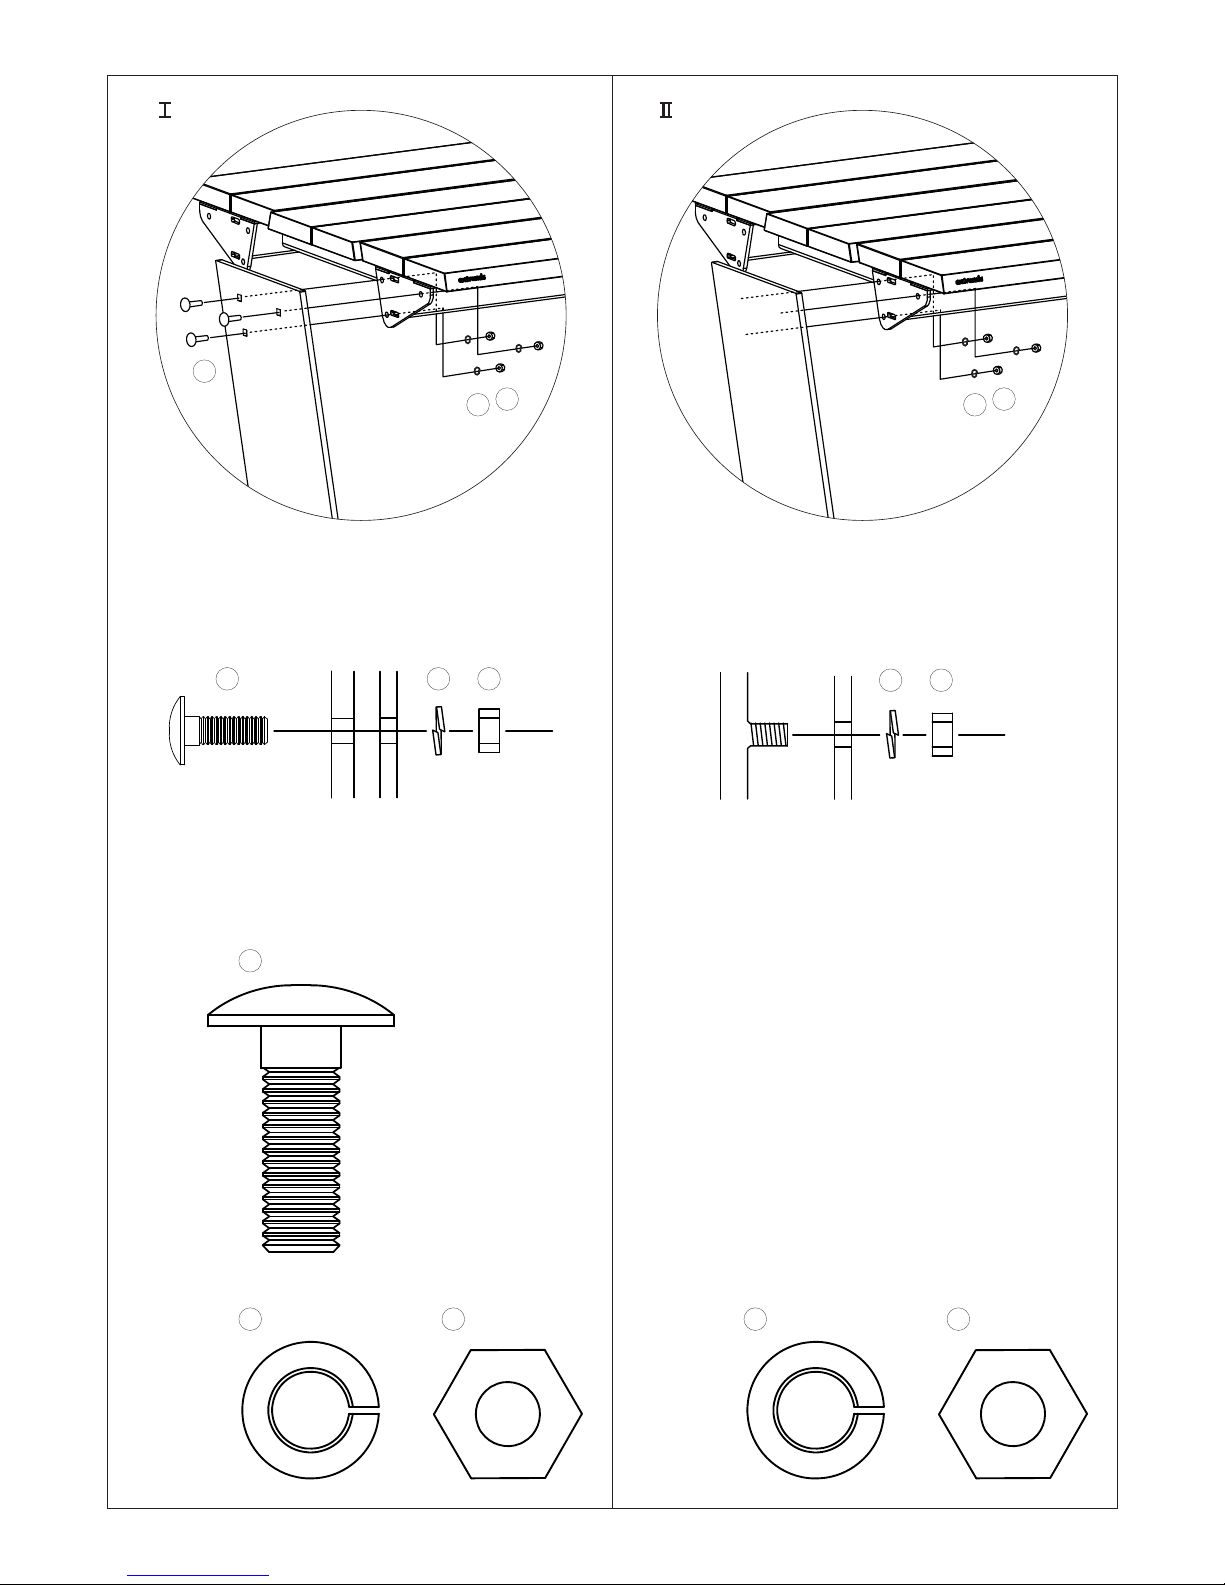
3.
7a
7a 7b7c
7b7b
7c7c
7b7c
3.
7a x 12
7b
x 127c x 12 7b x 127c x 12
Page 30

30
English
ASSEMBLY
Hopper picnic
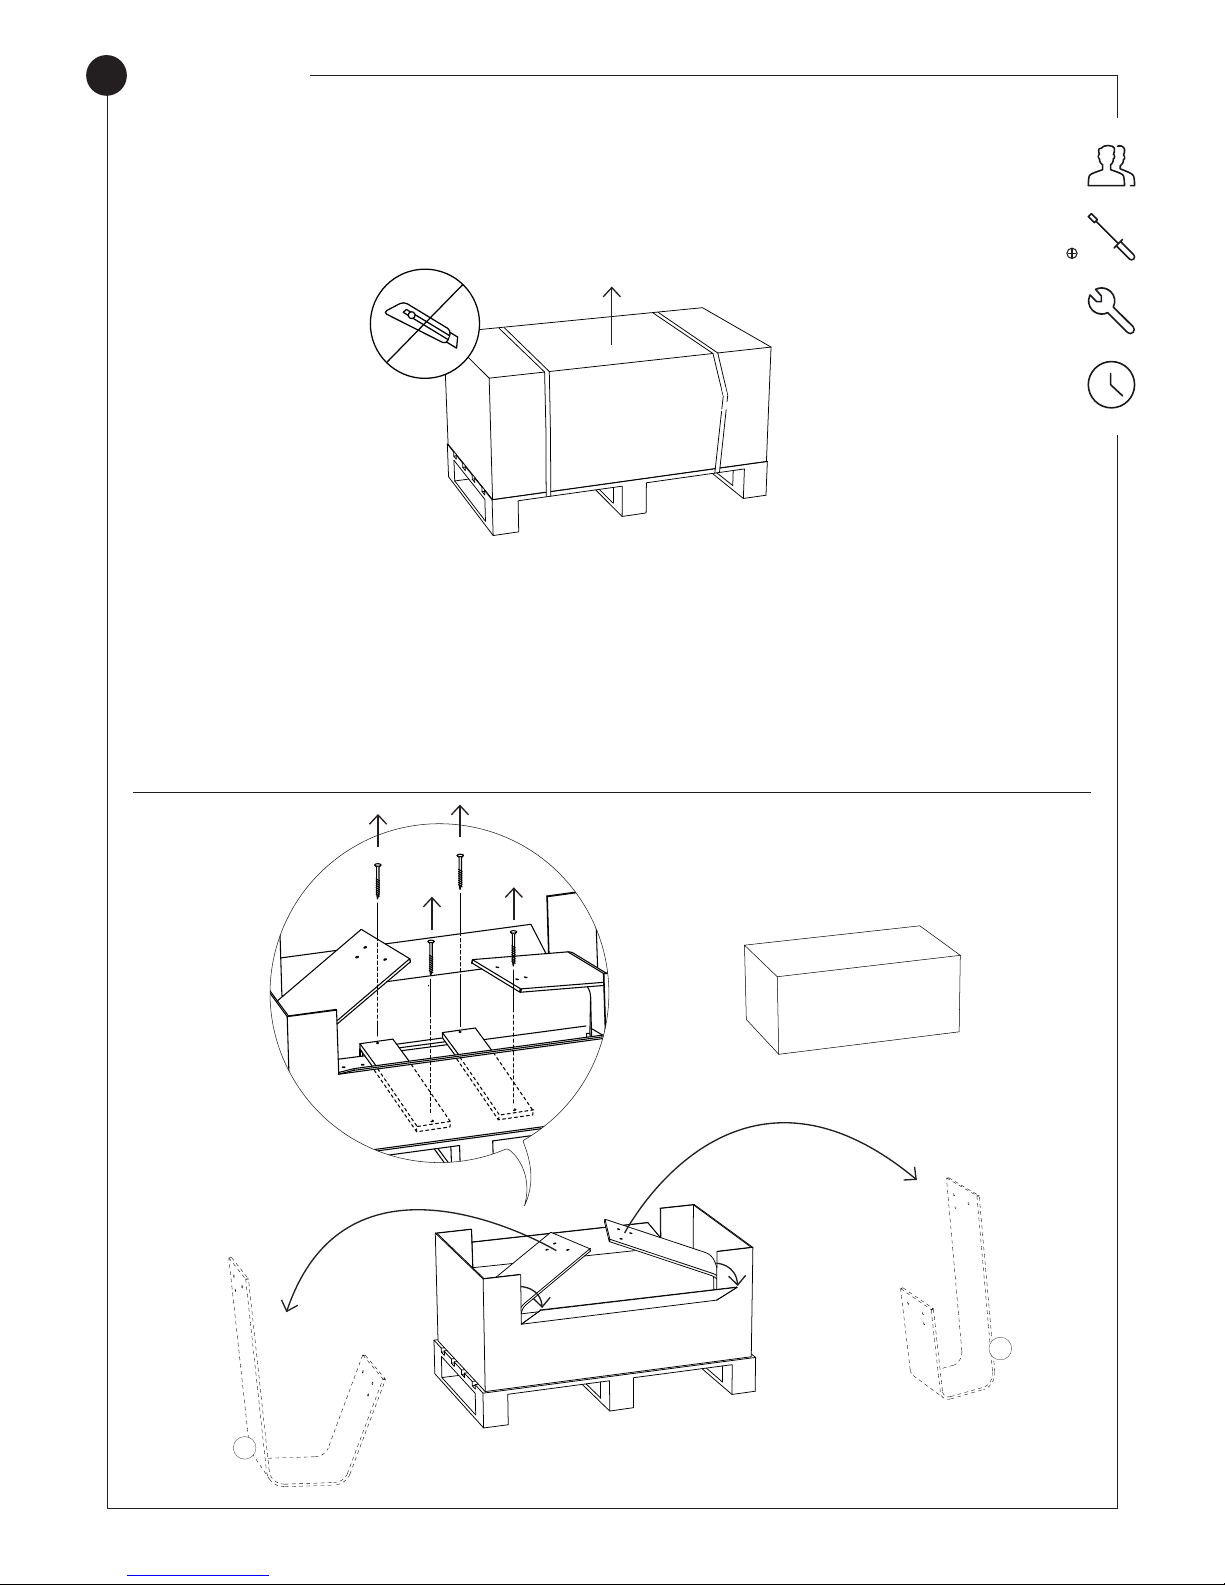
1. Remove the lid of the box. The packaging materi-
al must stay intact for the rest of the assembly!
2. Remove the four screws from the two boards that
prevent the table legs from moving during
transport. Fold down the cardboard flaps to have
better access to the legs. Take them out the box
and position them as shown in the drawing (de
pending on the size of the table).
3. Put the lid back on the box.
4. Put the 2 boards mentioned in step 2 on top of
the lid.
5. Put the tabletop with its frame facing downwards
on top of the two boards. The top of the legs are
now at the same height as the tabletop.
6. Position the legs to the tabletop.
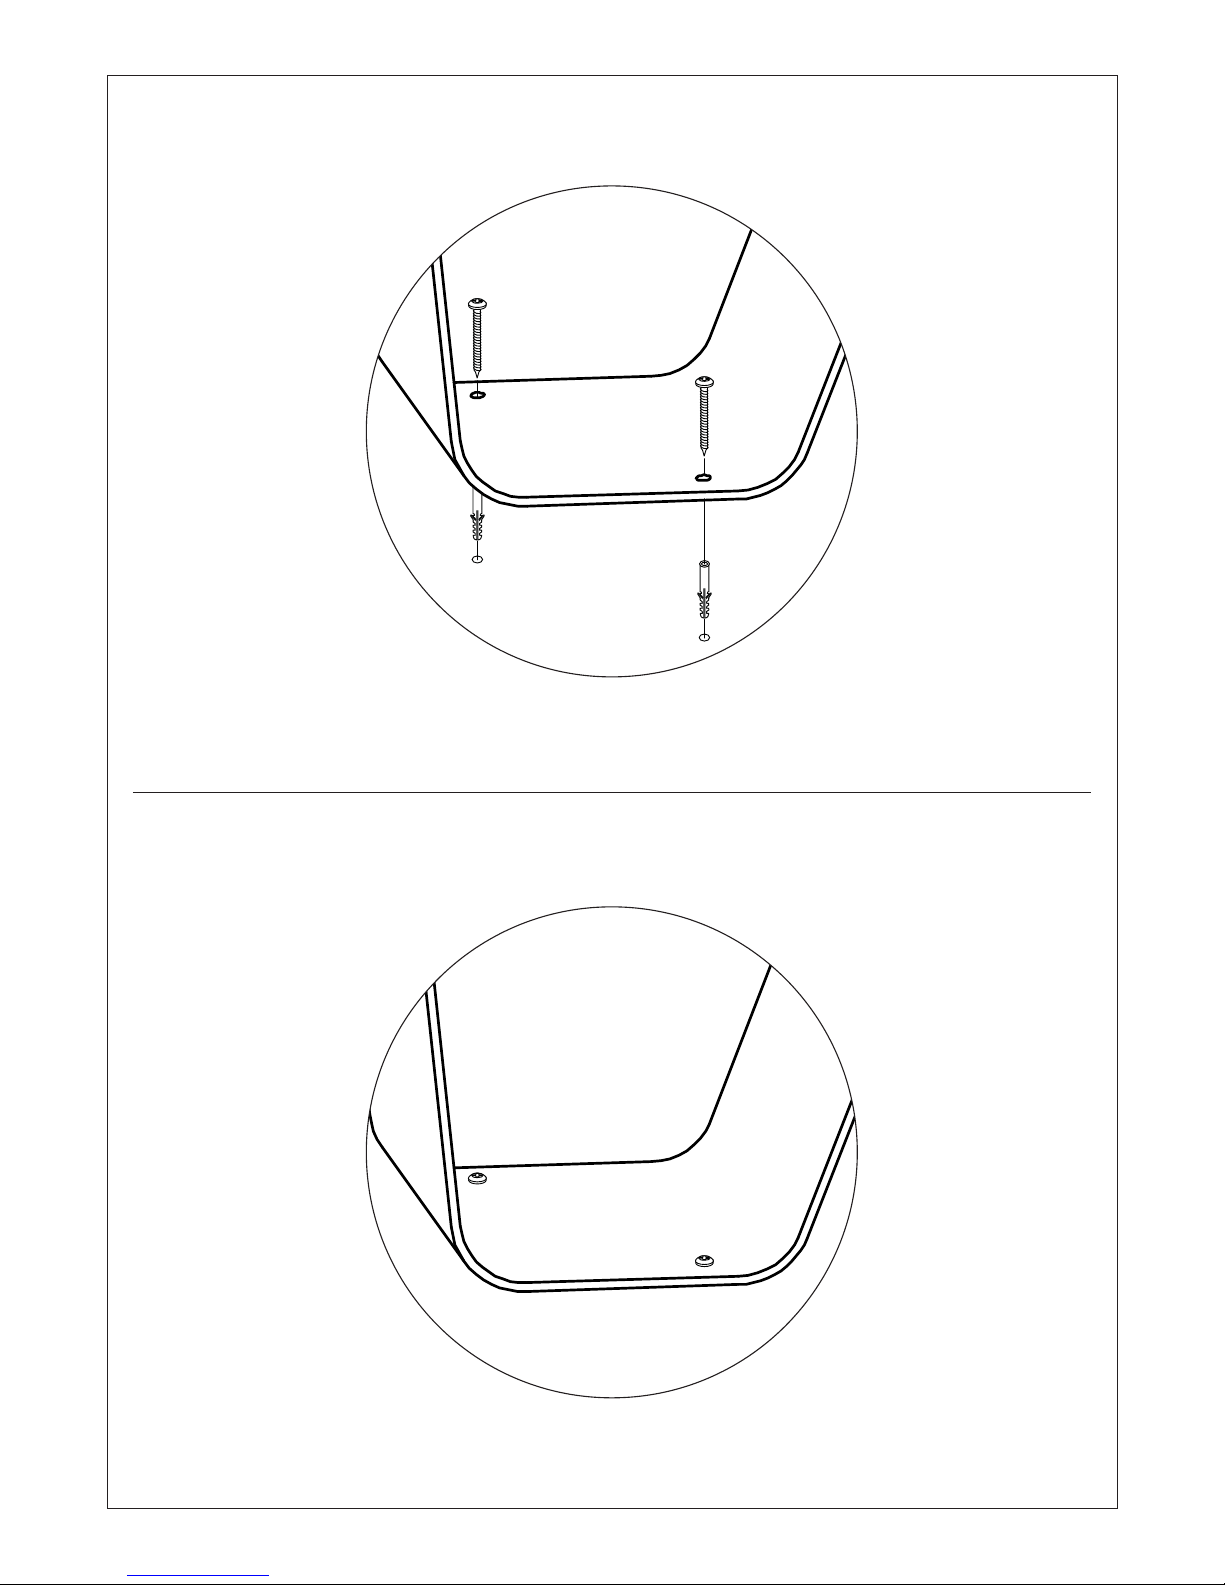
7
Put 3 bolts M10x30 in the square holes of each
table leg. Screw the supplied nuts and spring
washers onto the threaded rods, but do not tigh ten them yet.
7
. Screw the supplied nuts and spring washers onto
the threaded rods, but do not tighten them yet.
8. Before assembling the benches, remove the
packaging material from under the frame!
9. Fasten the bench to the legs in the same way
described above. Now tighten all the nuts.
Hopper combi
1. Remove the lid of the box. The packaging materi al must stay intact for the rest of the assembly!
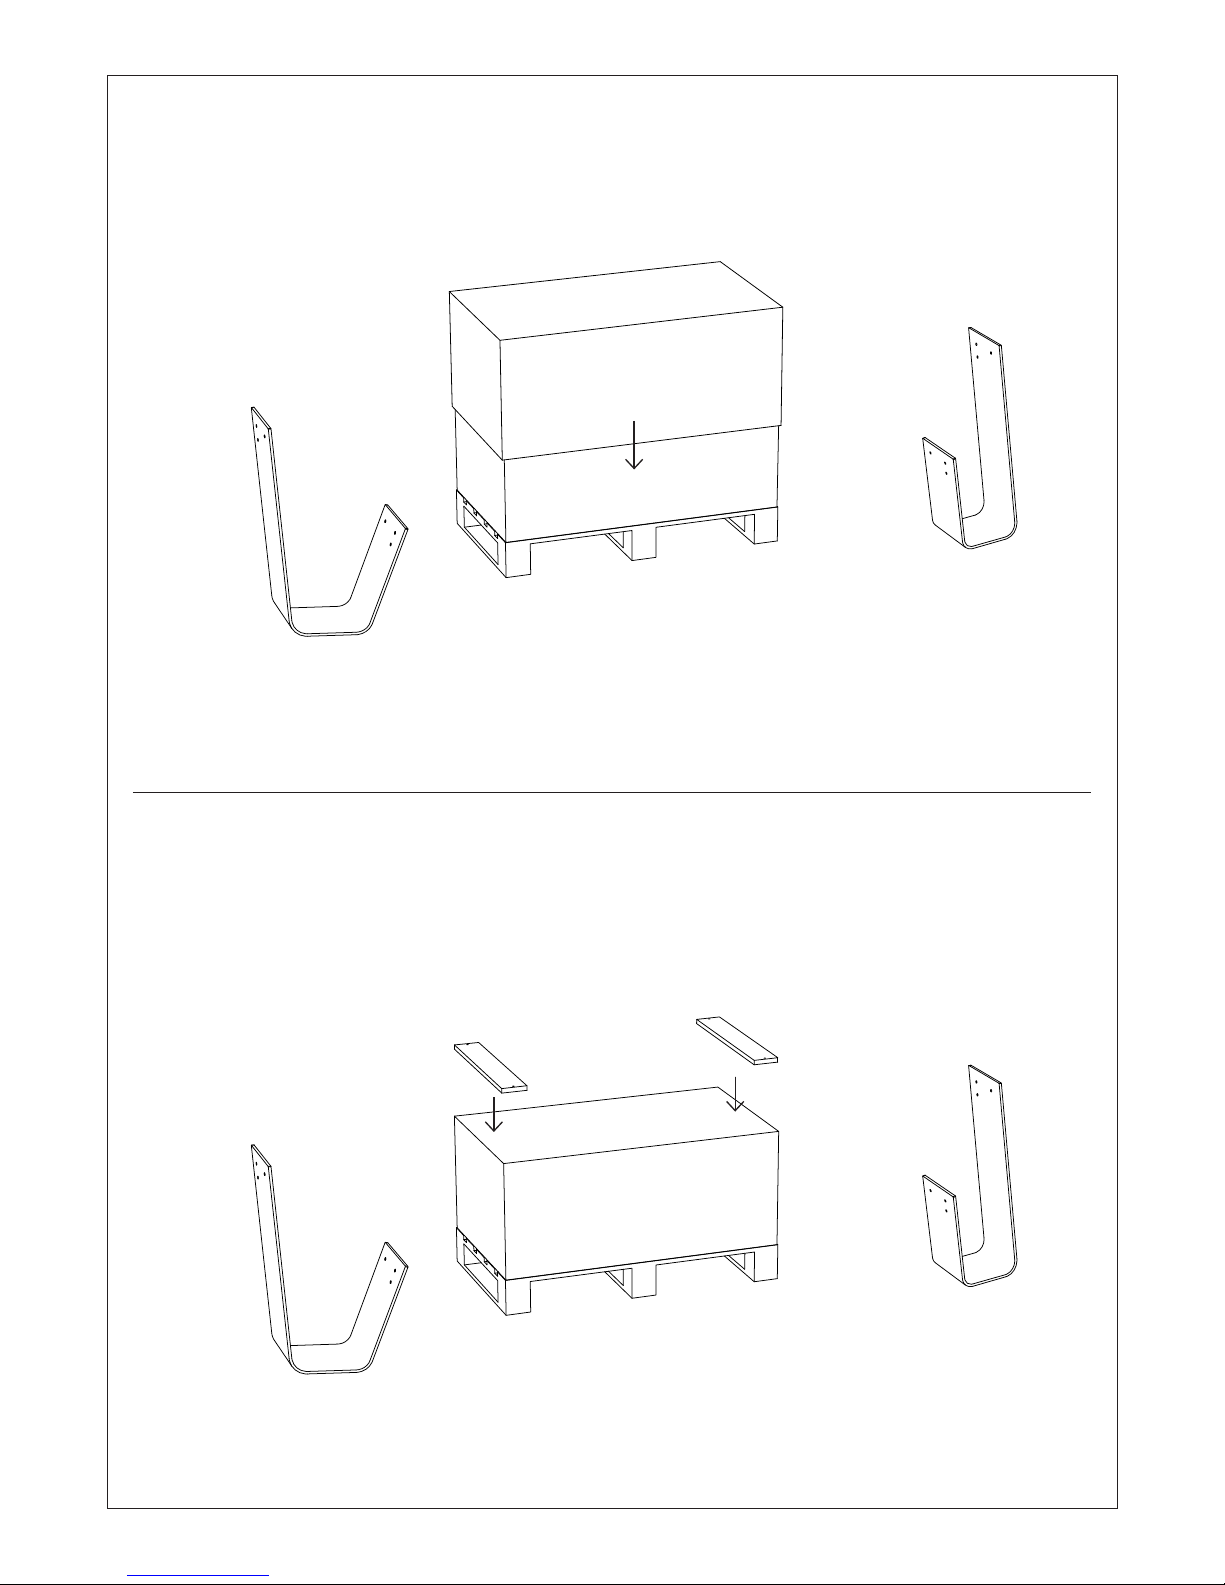
2. Remove the four screws from the two boards that
prevent the table legs from moving during
transport. Fold down the cardboard flaps to have
better access to the legs. Take them out the box
and position them as shown in the drawing (de
pending on the size of the table).
3. Put the lid back on the box.
4. Put the 2 boards mentioned in step 2 on top of
the lid.
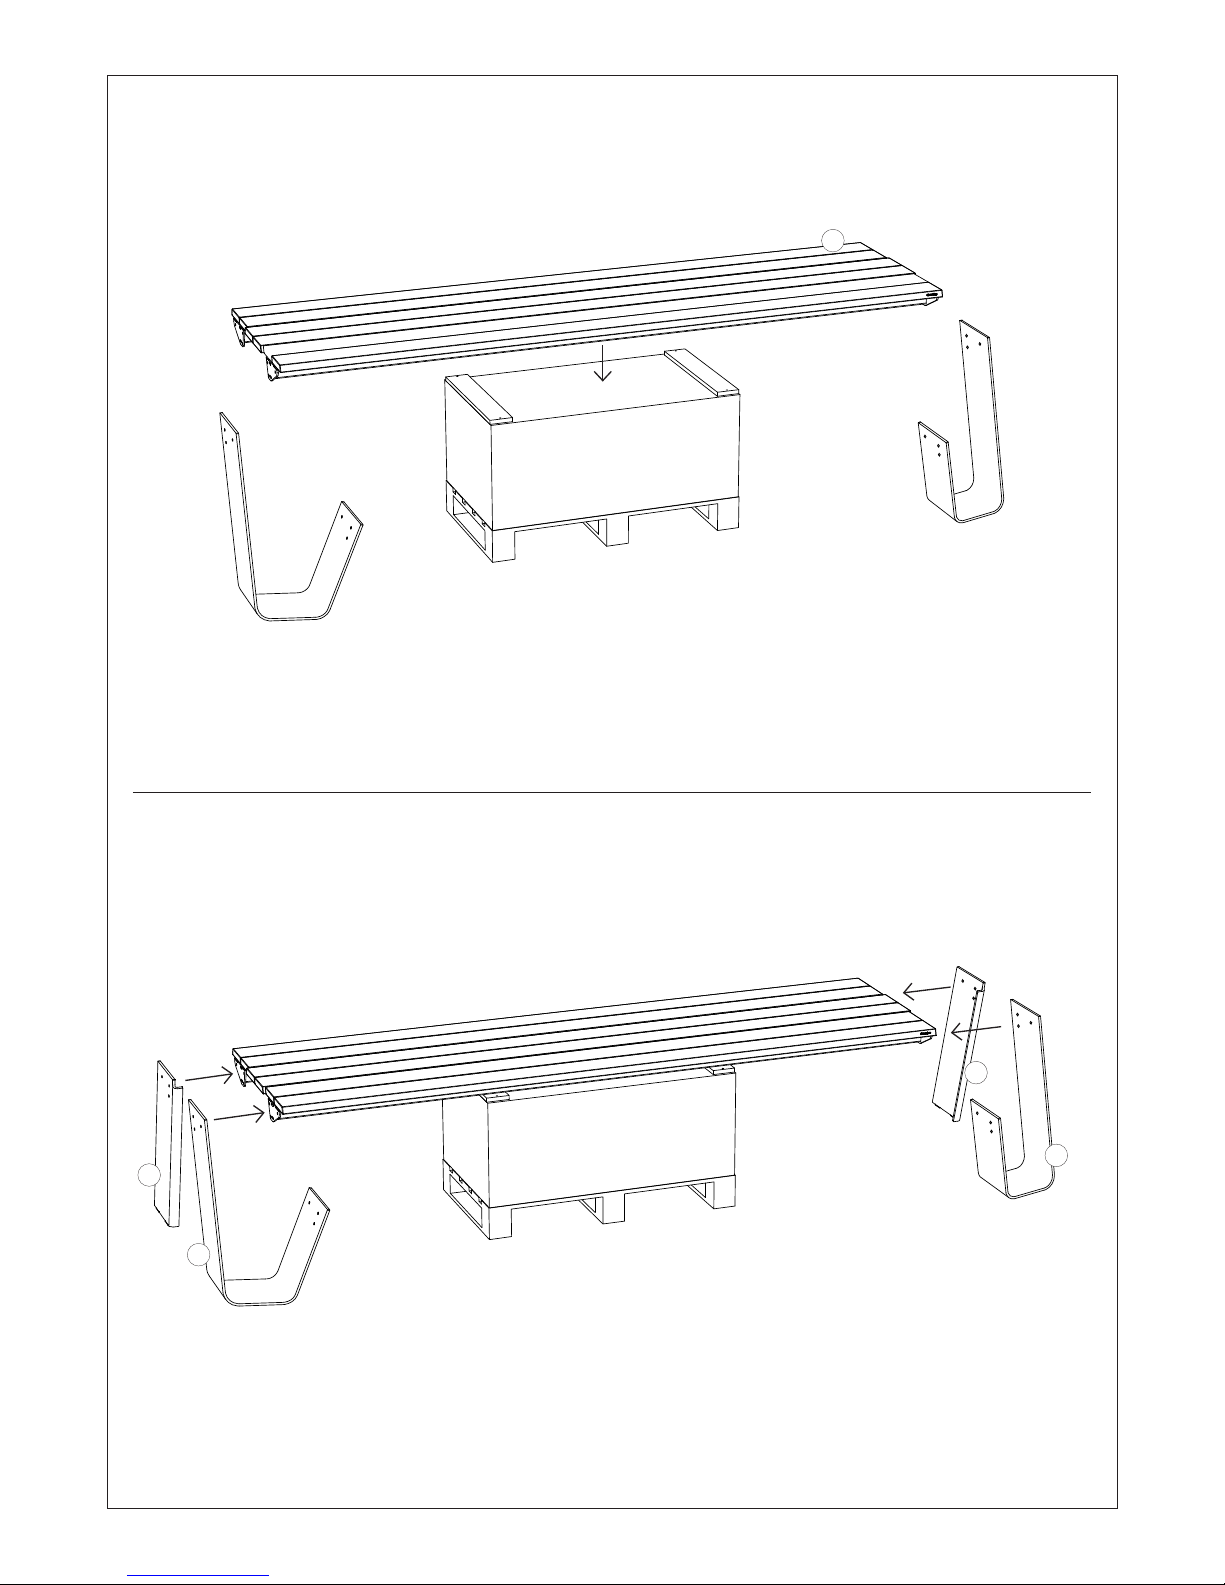
5. Put the tabletop with its frame facing downwards
on top of the two boards. The top of the legs are
now at the same height as the tabletop.
6. Position the legs to the tabletop.
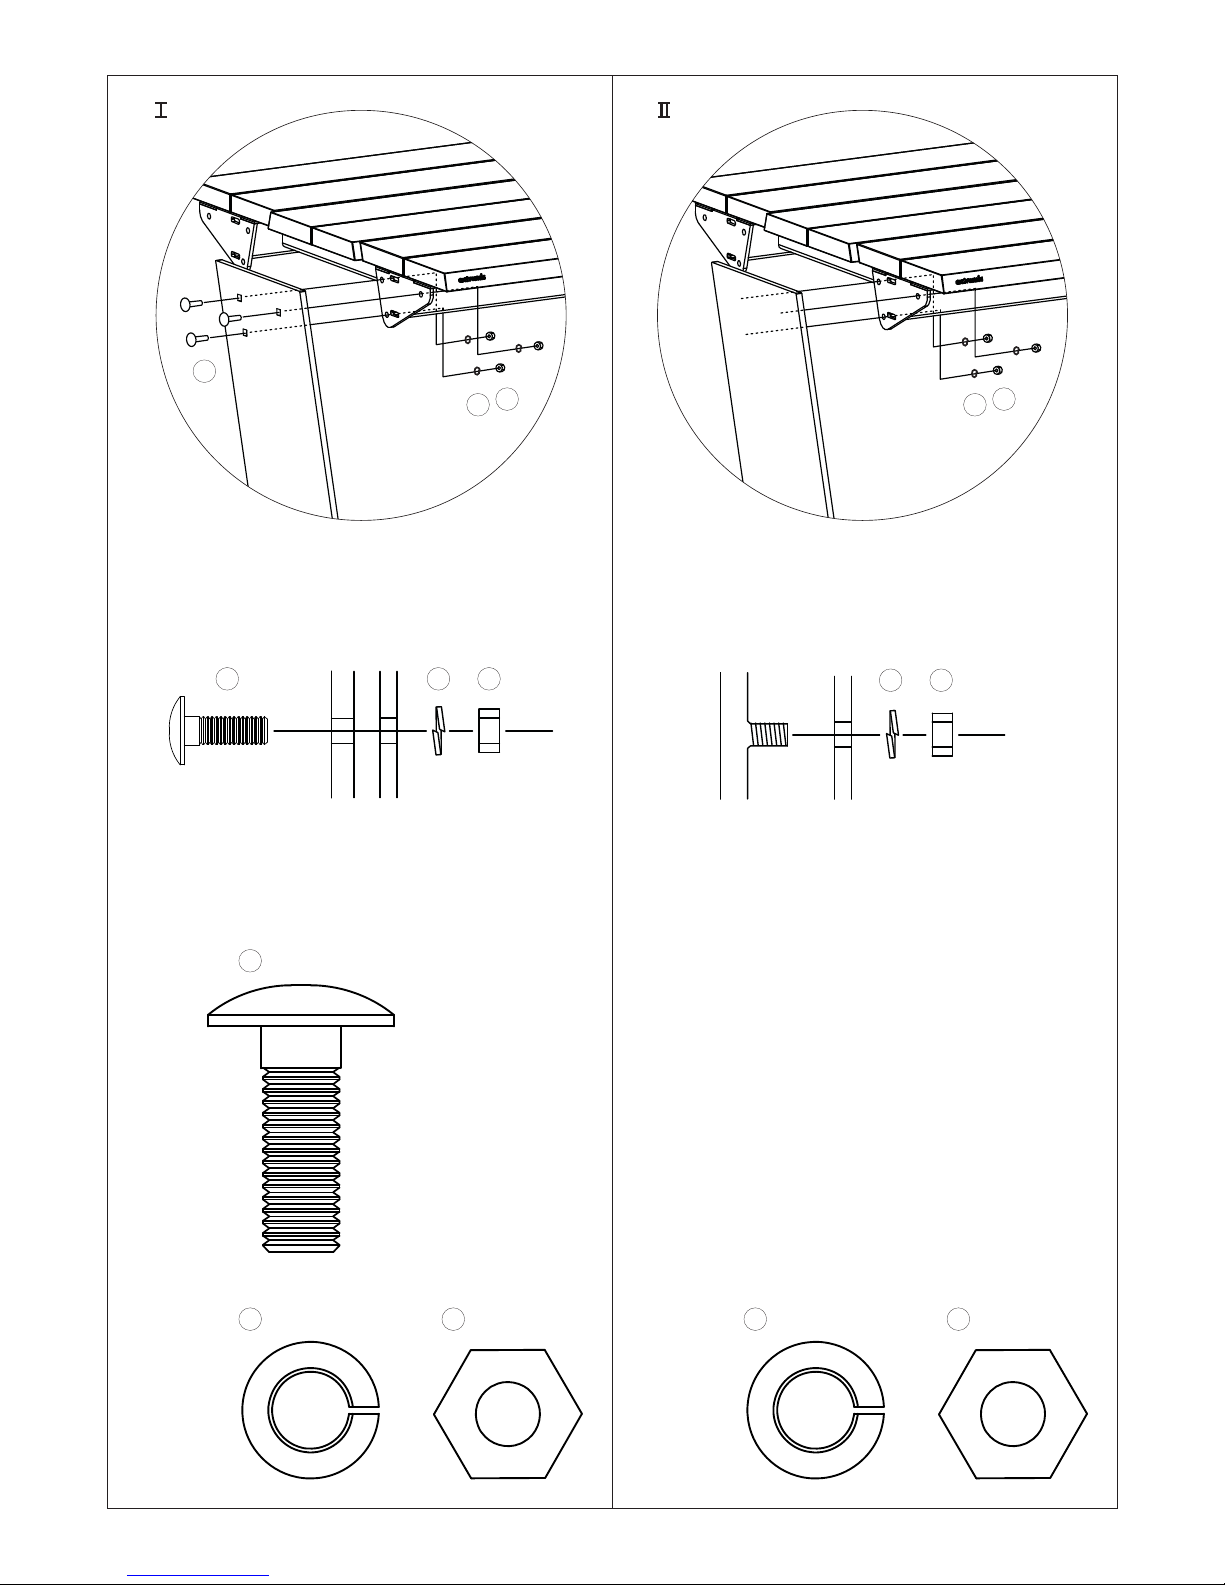
7
. Put 3 bolts M10x30 in the square holes of each
table leg. Screw the supplied nuts and spring
washers onto the threaded rods, but do not tigh ten them yet.
7
. Screw the supplied nuts and spring washers onto
the threaded rods, but do not tighten them yet.
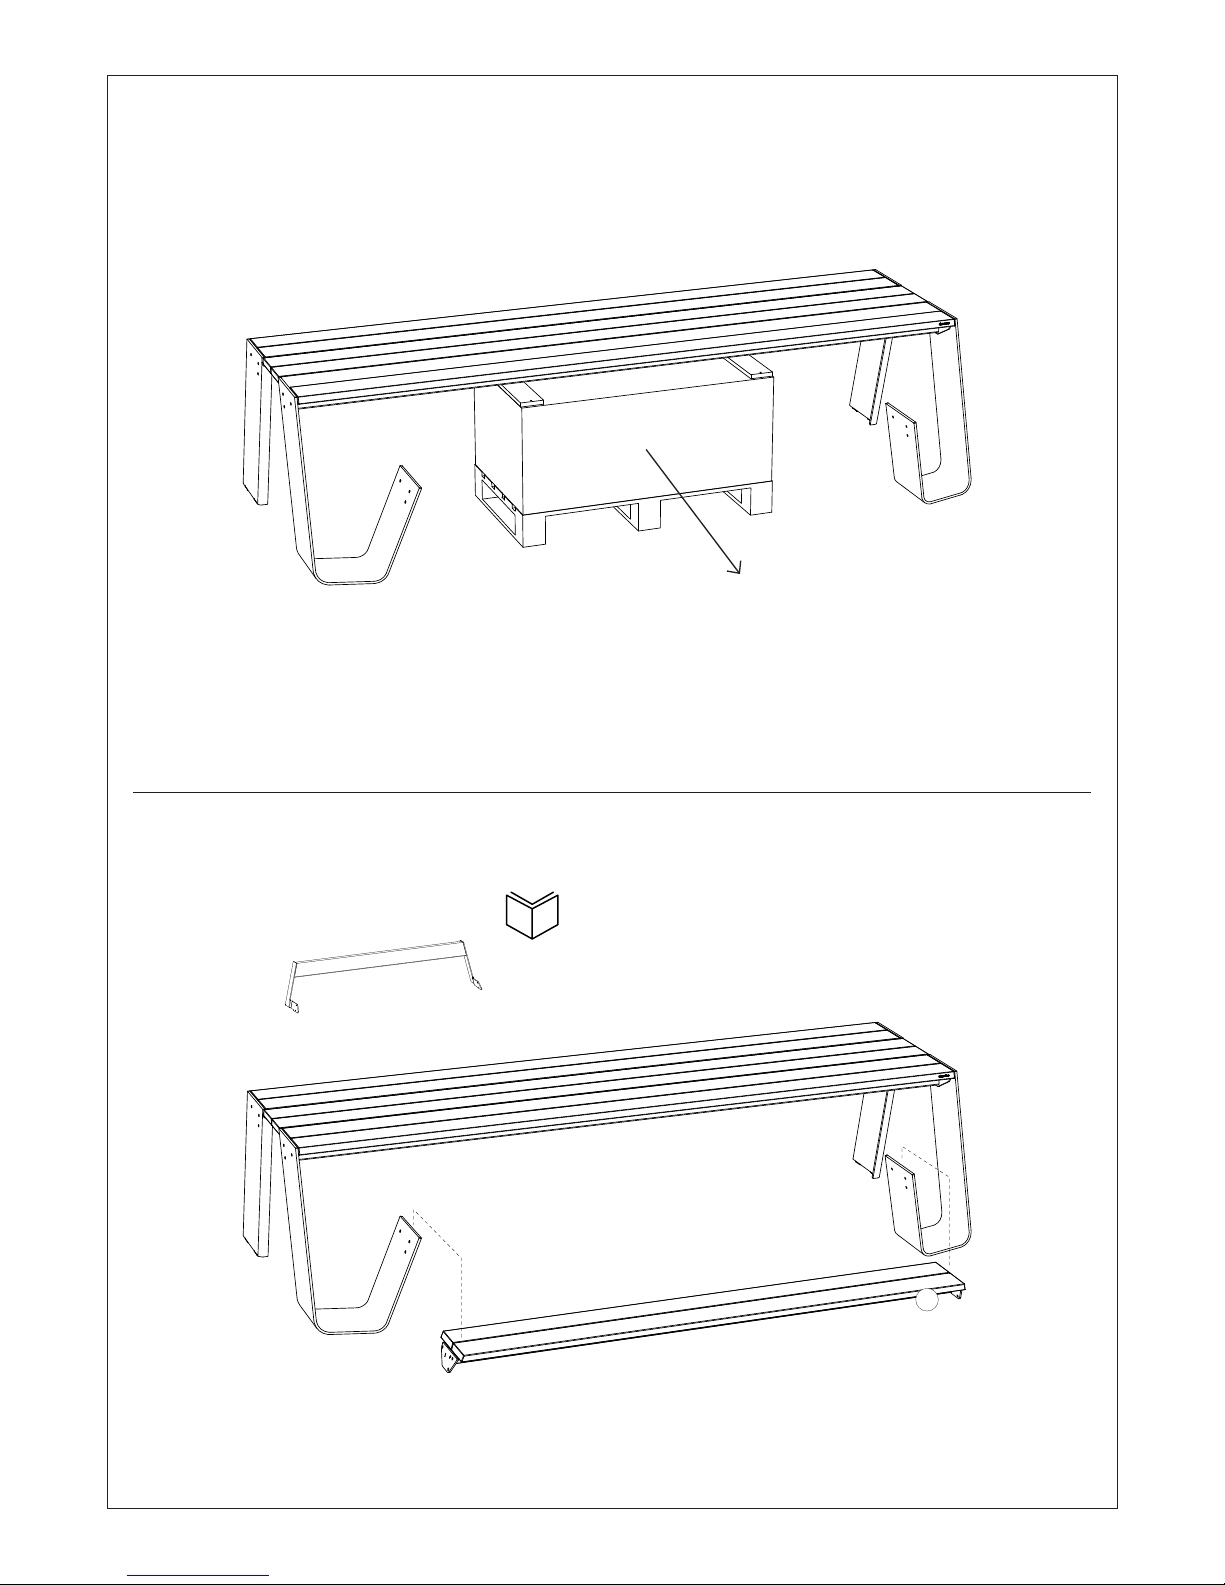
8. Before assembling the benches, remove the
packaging material from under the frame!
9. Fasten the bench to the legs in the same way
described above. Now tighten all the nuts.
Backrest
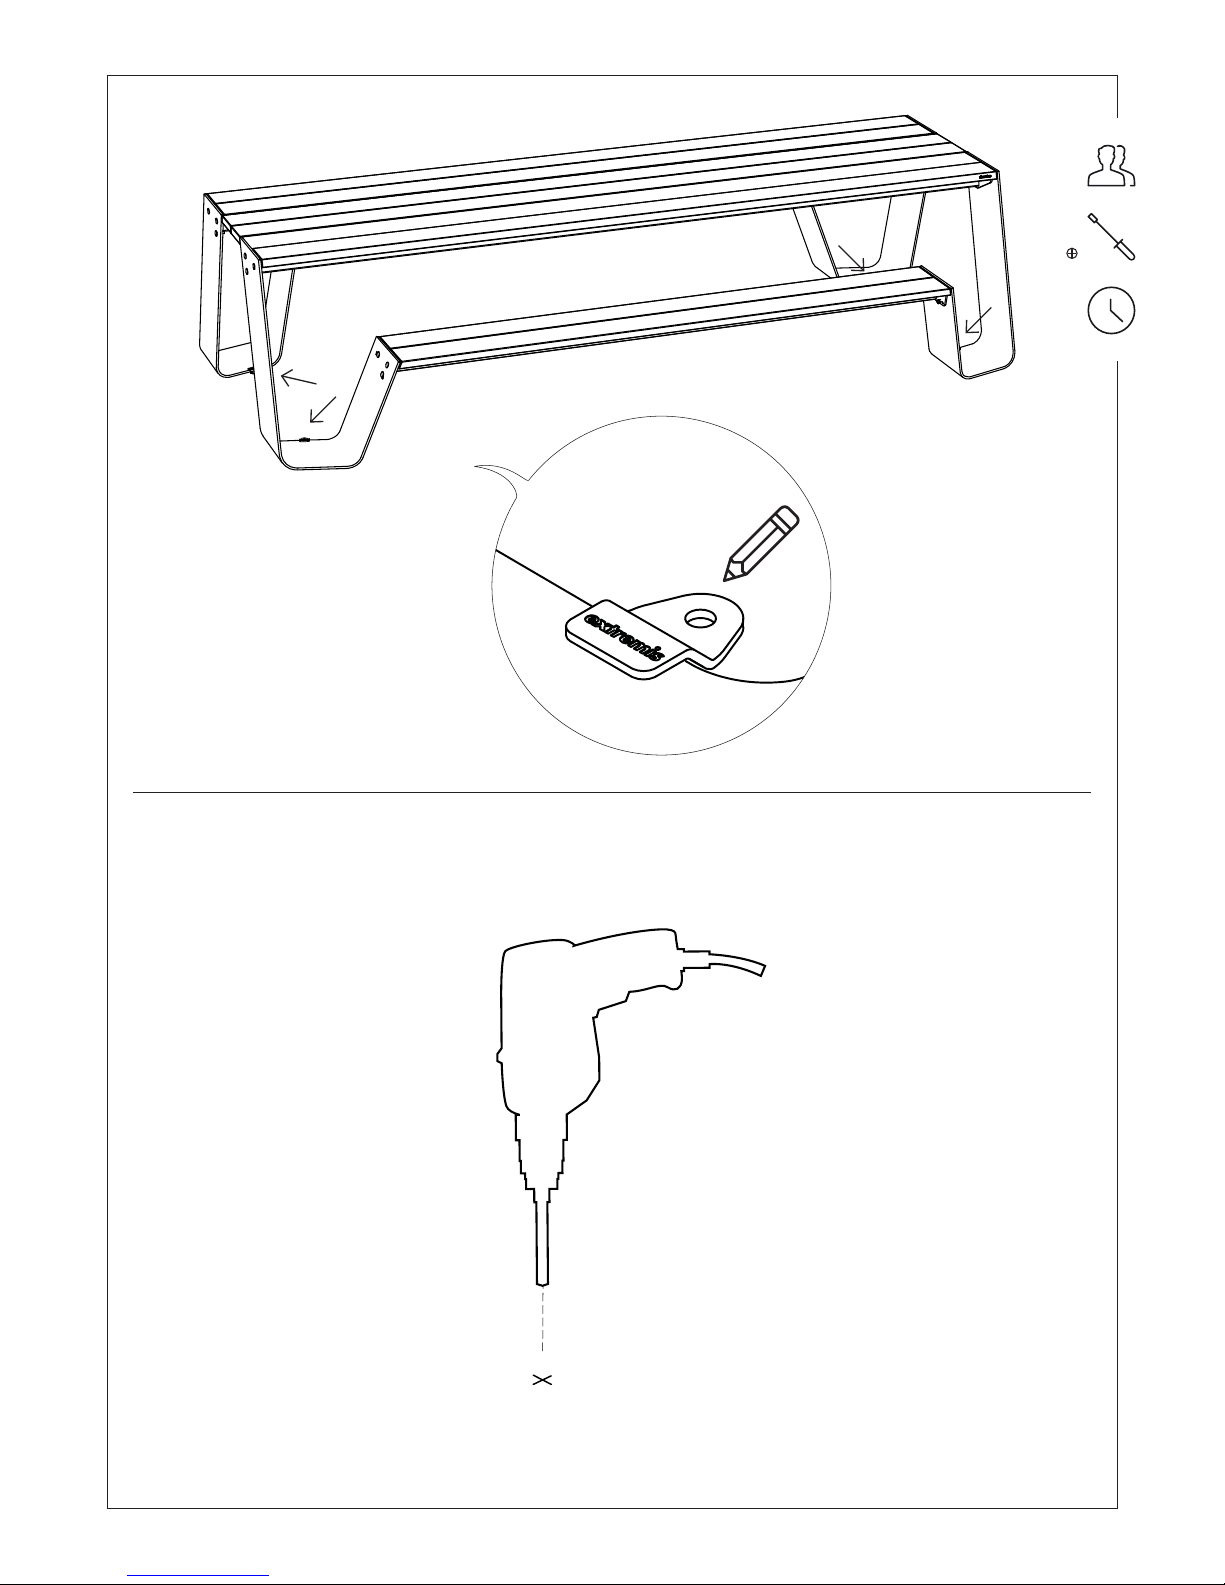
1 . Unscrew the 2 nuts and spring washers at the
outside of the bench frame. Now also remove the
2 bolts M10x30. The bolt and nut on the insed
will prevent the bench from falling.
1
. Unscrew the 2 nuts and spring washers at the
outside of the bench frame. The nut on the insed
will prevent the bench from falling.
2
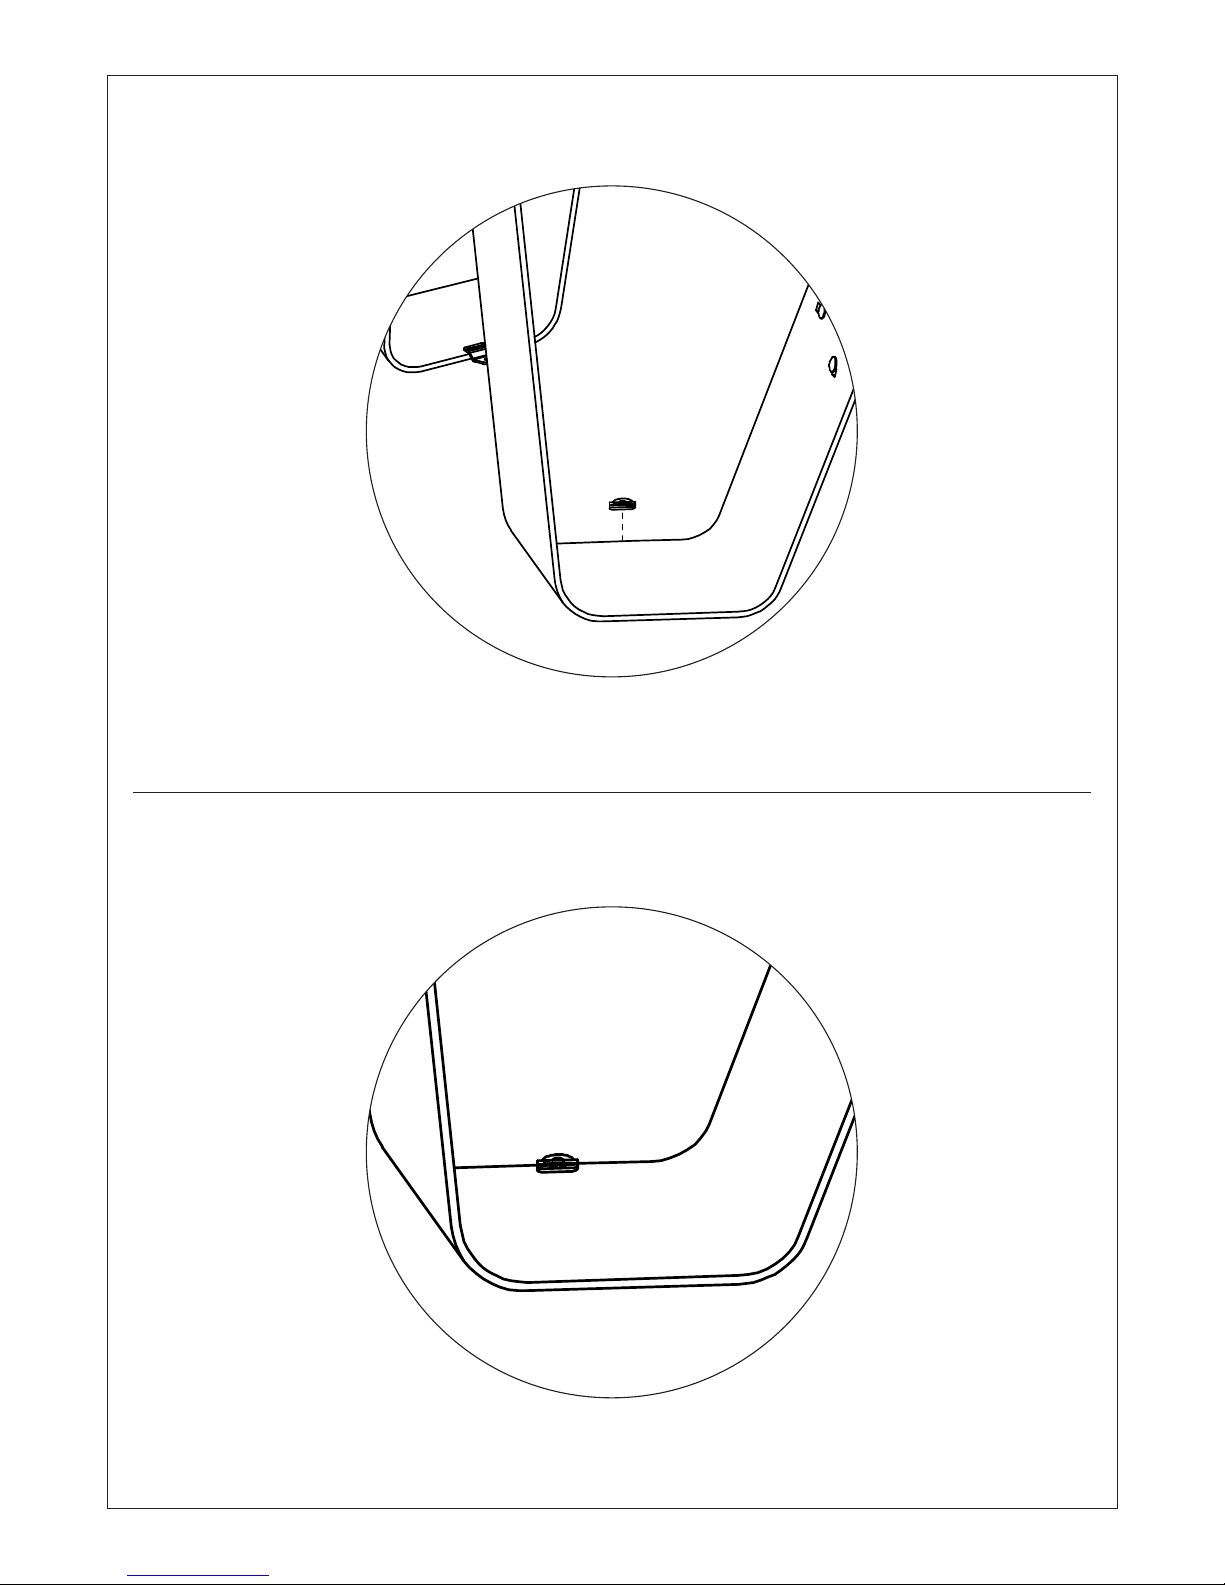
. Position the back supports on the bottom of the
bench and fasten it by inserting put 2 bolts
M10x40 in the square holes on either side and
screw 2 nuts & spring washer onto the threaded
rods.
2
. Position the back supports on the bottom of the
bench and fasten it by 2 nuts onto the threaded
rods.
3. Screw the wooden shelf to the supports, each
time using 3 screws 5x25. Use the pre-drilled
holes to correctly position the backrest.
Hopper table
1. Lay the tabletop on trestles.
2. Position the legs to the tabletop.
3
. Put 3 bolts M10x30 through the square holes
of each table leg. Screw the supplied nuts and
spring washers onto the threaded rods.
3
. Screw the wooden shelf to the supports, each
time using 3 screws 5x25. Use the pre-drilled
holes to correctly position the backrest.
MAINTENAN CE
Wood
Iroko wood and Hellwood requires little or no maintenance. However, we strongly advise you to remove
persistent dirt. To clean the wood you can use special products (www.rmc-extremis.be) or simply a sti
bristle brush and some water. Be careful not to irreparably damage the wood fibres. For this reason,
never use a high pressure cleaner as this will
roughen the wood’s smooth surface and irreparably
damage the wood’s fibres.
At first, the wood will give o this red dye every time
it comes into contact with water. The dye that drips
onto the frame and the surface will remain water-soluble and will dissapear entirely after a while.
We strongly recommend that you treat your wood for
indoor use with wood oil to protect it from stains.
When delivered, the wooden parts of our products
are untreated. Exposure to sun and rain will gradual-
Page 31

English – 31
ly change their colour to silvery grey, and also
roughen the surface. If you want to somewhat retain
their original colour, you should oil them once a
year. We recommend using RMC Hybrid Wood Protector (www.rmcextremis.com). RMC products for
wood treatment are available all over the world. Visit
the website www.rmc-extremis.com to find a reseller
near you.
Important!
Wood is a living matter and, in spite of the superior
quality provided by Iroko and Hellwood, outdoors
it constantly has to adapt to extreme changes in
temperature and humidity. Due to internal stress
resulting from these constant adaptations the wood
“warps”. This warping can among other things
lead to cracking. Changes in colour or wood structure may also appear. These characteristics are typical
of the material and by choosing this material you
accept them.
Should any cracks appear, you can simply sand them
down either by hand using sandpaper or by means of
a hand sander. To protect any galvanised or painted
parts, cover the edges with highly robust masking
tape. Use 80-grit sandpaper and start at the vertical
side of the tabletop. Keep the hand sander parallel to
the edge of the tabletop. Lightly sand the edge until
it is smooth again. Now sand the rest of the tabletop.
Make sure that you always hold the hand sander
parallel to the tabletop. Do not only sand the crack,
but the entire tabletop to obtain a uniform result.
To avoid burrs, sand the top edge of the tabletop by
hand. When you have removed all the burrs, you can
treat the wood with hardwood furniture oil or leave it
untreated, depending on the desired eect.
Galvanised parts
Hot dip galvanisation is the most durable way of
protecting metal against rusting. If the zinc coating
is damaged, the exposed metal can rust. This can
easily be touched up with zinc paint that automatically has the same colour and is readily available in
shops. Galvanisation is a thermal process that can
slightly deform the material. Other metal protection
methods do not have this disadvantage, but the
quality they oer is insucient.
Powder-coated parts
Clean with lukewarm water and a mild detergent. DO
NOT USE abrasive scouring powders or scourers as
they will scratch the surface.
Magic sponge
Only use the Miraclean sponge when normal cleaning with lukewarm water, soft soap and a normal
sponge isn’t sucient!
If stubborn stains remain visible after treatment
according to the instructions (see product manual),
you can use the MiraClean sponge provided. Dip the
sponge in water and rub it over the stain. Do not rub
too hard with this sponge as this might cause dull
patches on a surface.
There is no need to use cleaning products. Water
alone is sucient.
This sponge is made of melamine resin and wears
away with use. The sponge is very easy to use and
gives results up to 26 times more quickly than a
traditional microfibre cloth.
The magic sponge gets rid of most stubborn stains
without extra eort.
Never use this sponge on highgloss surfaces as it
may cause dull patches.
The magic sponge is the solution for getting rid of
stubborn stains such as felt-tip pens, grease, scu
marks, limescale marks or coee and tea stains.
The magic sponge can be used on tarpaulin fabric,
plastic profiles, glass, steel, chrome, aluminium,
porcelain, artificial leather and many types of floor.
For more information, contact Extremis: info@
extremis.be
Page 32

32
Nederlands
MONTAGE
Hopper picnic
1. Schuif het deksel van de verpakking. De ver pakking moet intact blijven voor het vervolg van
de montage!
2. Verwijder de vier vijzen uit de twee plankjes
die de picnic poten fixeren voor transport. Plooi
de flappen naar buiten zodat de tafelpoten
makkelijk bereikbaar worden. Haal ze nu uit de
doos en plaats ze zoals op de tekening (afhanke lijk van de grootte van de tafel).
3. Plaats nu het dekstel opnieuw op de doos.
4. Leg de fixeerplankjes van stap 2 er bovenop.
5. Leg het tafelblad met het dragende frame op de
twee plankjes. De bovenzijde van de picnic
poten komt nu op gelijke hoogte met het tafel blad.
6. Positioneer nu de poten aan het tafelblad.
7
. Steek per poot 3 bouten M10x30 door de
vierkante gaten. Draai vervolgens de bijgeleverde
moeren met veerring op het draadeinde, maar
span nog niet volledig aan.
7
. Draai vervolgens de bijgeleverde moeren met
veerring op het draadeinde, maar span nog niet
volledig aan.
8. Vooraleer de bank te monteren moet de verpak king van onder het frame gehaald worden!
9. Monteer nu op dezelfde manier het bankframe
aan de poten. Pas hierna kunnen alle moeren
aangespannen worden.
Hopper combi
1. Schuif het deksel van de verpakking. De ver pakking moet intact blijven voor het vervolg van
de montage!
2. Verwijder de vier vijzen uit de twee plankjes
die de picnic poten fixeren voor transport. Plooi
de flappen naar buiten zodat de tafelpoten
makkelijk bereikbaar worden. Haal ze nu uit de
doos en plaats ze zoals op de tekening (afhanke
lijk van de grootte van de tafel).
3. Plaats nu het dekstel opnieuw op de doos.
4. Leg de fixeerplankjes van stap 2 er bovenop.
5. Leg het tafelblad met het dragende frame op de
twee plankjes. De bovenzijde van de picnic poten
komt nu op gelijke hoogte met het tafelblad.
6. Positioneer nu de poten aan het tafelblad.
7
. Steek per poot 3 bouten M10x30 door de
vierkante gaten. Draai vervolgens de bijgeleverde
moeren met veerring op het draadein de, maar span nog niet volledig aan.
7
. Draai vervolgens de bijgeleverde moeren met
veerring op het draadeinde, maar span nog niet
volledig aan.
8. Vooraleer de bank te monteren moet de verpak king van onder het frame gehaald worden!
9. Monteer nu op dezelfde manier het bankframe
aan de poten. Pas hierna kunnen alle moeren
aangespannen worden.
Rugleuning
1 . Draai de 2 moeren met veerring aan de
buitenzijde van de banken los. Verwijder nu ook
de 2 bouten M10x30. De bout en moer aan de
binnenzijde zorgen ervoor dat de bank op zijn
plaats blijft.
1
. Draai de 2 moeren met veerring aan de
buitenzijde van de banken los. De moer aan de
binnenzijde zorgt ervoor dat de bank op zijn
plaats blijft.
2
. Positioneer de rugsteun onderaan de bank, en
monteer deze door telkens 2 bouten M10x40
door de vierkante gaten te steken. Draai
vervolgens de 2 moeren vast met veerring.
2
. Positioneer de rugsteun onderaan de bank, en
draai vervolgens de 2 moeren vast.
3. Schroef nu de houten rugplank aan de
rugsteunen met telkens drie 3 vijzen 5x25.
Positioneer aan de hand van de voorgeboorde
gaatjes.
Hopper tafel
1. Leg het tafelbald op schragen.
2. Positioneer nu de poten aan het tafelblad.
3
. Steek per poot 3 bouten M10x30 door de
vierkante gaten. Draai vervolgens de bijgeleverde
moeren met veerring op het draadeinde.
3
. Draai vervolgens de bijgeleverde moeren met
veerring op het draadeinde.
ONDERHOUD
Hout
Iroko en Hellwood vragen weinig tot geen onderhoud. Wij raden u echter wel aan om hardnekkige
vuilresten te verwijderen. Om het hout te reinigen,
kunt u de speciale producten (www.rmc-extremis.be)
gebruiken of gewoon een harde borstel en wat water.
Zorg er echter voor dat u de houtvezels niet beschadigt. Gebruik daarom nooit een hogedrukreiniger.
Hierdoor wordt het gladde oppervlak van het hout
immers ruwer en raken de houtvezels onherstelbaar
beschadigd.
Zoals vele andere houtsoorten bevat Iroko een wateroplosbare gomstof. In het begin zal het hout deze
fel rode kleurstof afscheiden telkens het met water in
Page 33

contact komt. De op het onderstel en de ondergrond
afgedropen kleurstof blijft wateroplosbaar en zal na
zekere tijd volledig verdwijnen.
We raden ten sterkste aan het hout voor binnen
gebruik in te oliën tegen vlekken.
Bij levering zijn de houten onderdelen van onze producten onbehandeld. Door blootstelling aan zonlicht
en regen zullen ze geleidelijk een grijs patina krijgen
en zal hun oppervlak ook ruwer worden. Als u de
oorspronkelijke kleur min of meer wilt behouden,
moet u ze jaarlijks oliën. Hiervoor raden wij RMC Hybrid Wood Protector (www.rmc-extremis.com) aan.
De houtbeschermingsproducten van RMC zijn overal
ter wereld verkrijgbaar. Kijk op www.rmc-extremis.
com voor een verkooppunt in uw buurt.
Belangrijk!
Hout is een levende materie, en ondanks de superieure kwaliteiten van Iroko en Hellwood, moet het
zich buiten steeds aanpassen aan extreme schommelingen van temperatuur en vochtigheid. Hierdoor
opgebouwde interne spanningen doet het materiaal
“werken” of vervormen en kan er mogelijk o.a.
scheurvorming veroorzaken. Ook kunnen er kleuren structuurverschillen voorkomen. Deze kenmerken
zijn typisch voor het materiaal, die u door uw keuze
hiervoor accepteert.
U kan mogelijke scheuren eenvoudig glad schuren
met de hand en een vel schuurpapier of met een
handschuurmachine. Om de gegalvaniseerde of gelakte onderdelen te beschermen, moet u hun randen
vooraf afplakken met stevige afplakband. Gebruik
schuurpapier met korrel 80 en begin bij de verticale
zijde van het tafelblad. Houd de machine evenwijdig
aan de tafelrand. Schuur lichtjes tot de rand weer
egaal glad is. Schuur nu het bovenblad. Let er op dat
u de machine evenwijdig aan het tafelblad houdt. Behandel niet enkel de gescheurde plaats, maar gans
uw blad om een egaal resultaat te bekomen. Om
bramen te vermijden schuurt u de bovenste rand van
het tafelblad glad. Doe dit deel met de hand. Als alle
bramen verwijderd zijn kan u, afhankelijk van het
gewenste eect, de tafel inoliën met hardhout olie.
Gegalvaniseerde onderdelen
Galvanisatie, of thermische verzinking, is de meest
duurzame manier om metaal te beschermen tegen
roestvorming. Als de zinklaag wordt beschadigd, kan
het blootgekomen metaal toch roesten. Dit is eenvoudig bij te werken met zinkverf, die automatisch
dezelfde kleur heeft en in de handel verkrijgbaar is.
Galvanisatie is een thermisch proces en kan het ma-
teriaal licht vervormen. Andere metaalbeschermingsmethodes hebben dit nadeel niet, maar leveren
onvoldoende kwaliteit.
Gepoederlakte onderdelen
Reinigen met warm water en een niet-schurend reinigingsmiddel, droog daarna met een zachte doek.
Schuurmiddelen en schuursponsjes mogen NIET
gebruikt worden teneinde krassen te voorkomen.
Wondersponsje
Gebruik de Miraclean spons enkel wanneer normaal
reinigen met lauw water, zachte zeep en een zachte
spons niet voldoende is.
Wanneer er na het reinigen (zie handleiding van het
product) nog steeds hardnekkige vlekken zichtbaar
zijn, kun je deze eventueel verwijderen met de bijgeleverde sponsjes. Maak het sponsje wat vochtig met
gewoon water en wrijf over de te reinigen vlekken.
Wrijf niet te hard aangezien dit matte vlekken zou
kunnen veroorzaken.
Het gebruik van reinigingsmiddelen is overbodig.
Water volstaat.
De MiraClean is gemaakt van melamine hars en slijt
naarmate gebruik. De spons is zeer eenvoudig in
gebruik en geeft tot 26x sneller resultaat in vergelijking met een traditionele microvezeldoek. De spons
verwijdert de meest hardnekkige vlekken zonder
extra moeite.
Niet gebruiken op glanzende oppervlakken.
De MiraClean schuurspons is de oplossing voor het
verwijderen van hardnekkig vlekken zoals stiftvlekken, vet, schoenstrepen, kalkvlekken, koeen
theeaanslag. De MiraClean kan gebruikt worden op
zeil, pvc, glas, staal, chroom, aluminium, porselein,
kunststofleer en diverse vloeren.
Voor meer informatie, contacteer Extremis via info@
extremis.be
Nederlands – 33
Page 34

34
Deutsch
MONTAGE
Hopper picnic
1. Nehmen Sie den Deckel von der Verpackung. Für
die nächsten Montageschritte muss die Verpack ung intakt bleiben!
2. Entfernen Sie die vier Schrauben aus den zwei
Brettchen, die die Tischbeine bem Transport
fixieren. Biegen Sie die Klappen nach außen,
sodass die Tischbeine leicht erreichbar werden.
Nehmen Sie sie jetzt aus dem Karton und stellen
Sie sie auf, wie auf der Zeichnung angegeben (Je
nach Größe des Tisches).
3. Setzen Sie den Deckel wieder auf den Karton.
4. Legen Sie die Fixierungsbrettchen von Schritt 2
darauf.
5. Legen Sie die Tischplatte mit dem tragenden
Rahmen auf die zwei Brettchen. Die Oberkante
der Tischbeine befindet sich jetzt auf gleicher
Höhe wie die Tischplatte.
6. Schieben Sie daraufhin die Tischbeine bis an den
Tischplatte.
7
. Stecken Sie jedes Tischbein 3 Schrauben
M10x30 durch die viereckigen Löcher. Drehen
Sie dann die mitgelieferten Muttern mit Spreng ring auf das Gewindeende, aber ziehen Sie sie
noch nicht an.
7
. Drehen Sie dann die mitgelieferten Muttern mit
Sprengring auf das Gewindeende, aber ziehen
Sie sie noch nicht an.
8. Vor dem Montieren der Bänke muss die Verpack ung unter dem Rahmen herausgezogen werden!
9. Montieren Sie jetzt die Bankrahmen auf dieselbe
Weise auf die Tischbeine. Erst danach können
alle Muttern angezogen werden.
Hopper combi
1. Nehmen Sie den Deckel von der Verpackung. Für
die nächsten Montageschritte muss die Verpack ung intakt bleiben!
2. Entfernen Sie die vier Schrauben aus den zwei
Brettchen, die die Tischbeine bem Transport
fixieren. Biegen Sie die Klappen nach außen,
sodass die Tischbeine leicht erreichbar werden.
Nehmen Sie sie jetzt aus dem Karton und stellen
Sie sie auf, wie auf der Zeichnung angegeben (Je
nach Größe des Tisches).
3. Setzen Sie den Deckel wieder auf den Karton.
4. Legen Sie die Fixierungsbrettchen von Schritt 2
darauf.
5. Legen Sie die Tischplatte mit dem tragenden
Rahmen auf die zwei Brettchen. Die Oberkante
der Tischbeine befindet sich jetzt auf gleicher
Höhe wie die Tischplatte.
6. Schieben Sie daraufhin die Tischbeine bis an den
Tischplatte.
7
. Stecken Sie jedes Tischbein 3 Schrauben
M10x30 durch die viereckigen Löcher. Drehen
Sie dann die mitgelieferten Muttern mit Spreng ring auf das Gewindeende, aber ziehen Sie sie
noch nicht an.
7
. Drehen Sie dann die mitgelieferten Muttern mit
Sprengring auf das Gewindeende, aber ziehen
Sie sie noch nicht an.
8. Vor dem Montieren der Bänke muss die Verpack ung unter dem Rahmen herausgezogen werden!
9. Montieren Sie jetzt die Bankrahmen auf dieselbe
Weise auf die Tischbeine. Erst danach können
alle Muttern angezogen werden.
Rückenlehne
1 . Lösen Sie die 2 Muttern und 2 Sprenring an
der Außenseite der Bänke. Lösen Sie auch die 2
Schrauben M10x30. Die Mutter an der Innenseite
sorgt dafür, dass die Bank an Ort und Stelle
bleibt.
1
. Lösen Sie die 2 Muttern und 2 Sprenring an der
Außenseite der Bänke. Die Mutter an der
Innenseite sorgt dafür, dass die Bank an Ort und
Stelle bleibt.
2
. Positionieren Sie die Lehnenstütze unten an
der Bank und stecken Sie zur Montage jeweils 2
Schrauben M10x40 durch die quadratischen
Löcher. Ziehen Sie die Muttern und Sprengring
wieder an.
2
. Positionieren Sie die Lehnenstütze unten an der
Bank und ziehen Sie die Muttern wieder an.
3. Schrauben Sie die Holzlehne mit jeweils 3
Schrauben 5x25 an die Lehnenstütz.
Positionieren Sie sie an hand der vorgeborten
Löcher.
Hopper tisch
1. Legen Sie den Tischplatte auf Böcke.
2. Schieben Sie daraufhin die Tischbeine bis an den
Tischplatte.
3
. Stecken Sie jedes Tischbein 3 Schrauben
M10x30 durch die viereckigen Löcher. Drehen
Sie dann die mitgelieferten Muttern mit Spreng ring auf das Gewindeende.
3
. Drehen Sie dann die mitgelieferten Muttern mit
Sprengring auf das Gewindeende.
PFLEGE
Holz
Iroko und Thermoholz benötigen wenig oder
gar keine Pflege. Wir empfehlen Ihnen jedoch
Page 35

Deutsch – 35
nachdrücklich, anhaftenden Schmutz zu entfernen.
Zur Reinigung des Holzes können Sie Spezialprodukte (www.rmc-extemis.be) oder einfach nur eine
harte Bürste und etwas Wasser verwenden. Achten
Sie darauf, die Holzfasern nicht irreparabel zu
beschädigen. Aus diesem Grund sollten Sie niemals
einen Hochdruckreiniger verwenden, da dadurch
die glatte Oberfläche des Holzes aufgeraut wird
und die Holzfasern irreparabel beschädigt werden.
Am Anfang kann das Holz, wenn es mit Wasser in
Kontakt kommt, diesen hellroten Farbsto ausscheiden. Der auf das Gestell und die Unterfläche
getropfte Farbsto ist nach wie vor wasserlöslich
und ist nach einiger Zeit völlig verschwunden. Wir
raten unbedingt dazu, das Holz für die Verwendung
in Innenräumen zum Schutz vor Flecken einzuölen.
Bei der Lieferung sind die Holzteile unserer Produkte
unbehandelt. Wenn sie Sonne und Regen ausgesetzt
sind, werden sie mit der Zeit eine silbergraue Farbe
annehmen und ihre Oberfläche wird rauer. Wenn Sie
ihre ursprüngliche Farbe zu einem gewissen Grad
bewahren wollen, sollten Sie sie einmal jährlich ölen.
Wir empfehlen die Verwendung von RMC Hybrid
Wood Protector (www.rmc-extremis.be). RMCProdukte zur Holzbehandlung sind weltweit erhältlich.
Auf der Webseite www.rmc-extremis.com finden Sie
einen Händler in Ihrer Nähe.
Wichtig!
Irokoholz und Hellwood ist ein lebendes Material,
das sich trotz seiner vorzüglichen Eigenschaften
ständig an extreme Temperatur- und chtigkeitsschwankungen anzupassen hat, was für Spannungen
im Holz sorgt. Aufgrund dieser Spannungen fängt
das Holz zu „arbeiten“ an, was zu Rissen sowie
Farb- und Strukturunterschieden führt. Diese
Eigenschaften sind charakteristisch für das Material. Wenn Sie sich für diese Holzart entscheiden,
müssen Sie diese Eigenschaften einfach in Kauf
nehmen. Eventuelle Risse können Sie einfach mit der
Hand und einem Blatt Schleifpapier oder mit einer
Handschleifmaschine abschleifen. Um verzinkte
und gestrichende Teile zu schützen, decken Sie die
Kanten mit sehr robustem Abdeckband. Verwenden
Sie Schleifpapier mit 80er Körnung und beginnen
Sie an der senkrechten Seite der Tischplatte. Halten
Sie die Maschine plan an den Tischrand. Leicht
anschleifen, bis der Rand wieder gleichmäßig glatt
ist. Danach die Oberseite der Tischplatte schleifen.
Achten Sie darauf, dass Sie die Maschine plan auf
die Tischplatte aufsetzen. Schleifen Sie nicht nur die
gerissene Stelle, sondern die gesamte Platte, um ein
gleichmäßiges Ergebnis zu erzielen. Um Grate zu
vermeiden, schleifen Sie den oberen Rand der Tischplatte glatt. Schleifen Sie diesen Teil mit der Hand.
Wenn alle Grate entfernt sind, können Sie den Tisch
je nach gewünschtem Eekt mit Hartholzöl einölen.
Feuerverzinkte Teile
Feuerverzinkung ist die dauerhafteste Art und Weise,
um Metall vor Rost zu schützen. Wenn die Zinkschicht aber beschädigt ist, kann das freigelegte
Metall dennoch anrosten. Mit Zinkfarbe lässt sich
diese Beschädigung leicht beheben. Der Unterschied
ist nicht merkbar, da die Zinkfarbe und das verzinkte
Bein dieselbe Farbe haben. Zudem ist diese Farbe
im Handel frei erhältlich. Galvanisation ist ein thermischer Prozess, der das Material leicht verformen
kann. Andere Metallschutzmethoden weisen diesen
Nachteil nicht auf, sie sind aber von geringerer
Qualität.
Pulverbeschichtete Teile
Mit lauwarmem Wasser und einem milden Reinigungsmittel reinigen, danach mit einem weichen
Tuch abtrocknen. Scheuermittel und Scheuerschwämme dürfen NICHT verwendet werden, um Kratzer
zu vermeiden.
Wunderschamm
Den Miraclean Wunderschamm nur benutzen, wenn
säubern mit lauwarmem wasser, milder seife und
einem normalen schwamm nicht reicht. Wenn hartnäckige Flecken sichtbar bleiben nach Behandlung
(siehe Gebrauchsanweisung des produktes), können
Sie den mitgelieferten Wunderschwamm benutzen.
Tauchen Sie den Schwamm in Wasser und reiben
Sie über den Fleck. Reiben Sie nicht zu hart mit
diesem Schwamm um matte Flecken zu vermeiden.
Sie brauchen kein andere Reinigungsmittel. Wasser
allein reicht.
Dieser Schwamm ist aus Melaminharz gefertigt und
nutzt ab nach Verwendung. Der Schwamm ist sehr
einfach zu verwenden und gibt bis 26 Mal schneller
Erfolg als mit einem traditionellen Mikrofasertuch.
Der Wunderschwamm säubert die meisten hartnäckigen Flecken ohne extra Mühe. Den Schwamm nie
auf Oberflächen in Hochglanz verwenden um matte
Flecken zu vermeiden.
Der Wunderschwamm ist die Lösung gegen hartnäckige Flecken wie Filzstifte, Fett, Abriebspuren,
Kalkflecken oder Kaee und Tee Flecken. Den
Schwamm kann benutzt werden auf Plane, Kunststoffprofile, Glass, Stahl, Chrom, Aluminium, Porzellan,
Kunstleder und viele Arten von Boden.
Für weitere Informationen, wenden Sie sich Extremis: [email protected]
Page 36

36
Français
MONTAGE
Hopper picnic
1. Soulevez le couvercle de l’emballage. L’emballa ge doit rester intact pour la suite du montage!
2. Ôtez les quatre vis des deux planchettes que
fixent les pieds de la table pour le transport. Pliez
les rabats de la boîte vers l’extérieur de manière à
avoir facilement accès auspieds. Sortez-les à
présent de la boîte et placez-les comme indiqué
sur le dessin (Selon la taille de la table).
3. Replacez le couvercle sur la boîte.
4. Déposez les planchettes de fixation mentionnées
à l’étape 2.
5. Déposez le plateau de table avec le cadre portant
sur les deux planchettes. Le haut des pieds de la
table est à présent à la même hauteur que le
plateau de la table.
6. Faites ensuite les pieds de la table jusque contre
le cadre de la table.
7
. Insérez par pied de table 3 boulons M10x30.
Posez ensuite les écrous fournis avec rondelles
sur les tiges filetées, mais ne les serrez pas
encore.
7
. Posez ensuite les écrous M10 fournis avec ron delles sur les tiges filetées, mais ne les serrez
pas encore.
8. Avant de monter les bancs, il faut retirer l’embal lage de sous le cadre!
9. Montez à présent de la même manière les cadres
des bancs sur les pieds de la table. C’est seule ment après cette opération que vous pourrez
serrer tous les écrous.
Hopper combi
1. Soulevez le couvercle de l’emballage. L’emballa ge doit rester intact pour la suite du montage!
2. Ôtez les quatre vis des deux planchettes que
fixent les pieds de la table pour le transport. Pliez
les rabats de la boîte vers l’extérieur de manière à
avoir facilement accès auspieds. Sortez-les à
présent de la boîte et placez-les comme indiqué
sur le dessin (Selon la taille de la table).
3. Replacez le couvercle sur la boîte.
4. Déposez par-dessus les planchettes de fixation
mentionnées à l’étape 2.
5. Déposez le plateau de table avec le cadre portant
sur les deux planchettes. Le haut des pieds de la
table est à présent à la même hauteur que le
plateau de la table.
6. Faites ensuite les pieds de la table jusque contre
le cadre de la table.
7
. Insérez par pied de table 3 boulons M10x30.
Posez ensuite les écrous fournis avec rondelles
sur les tiges filetées, mais ne les serrez pas
encore.
7
. Posez ensuite les écrous fournis avec rondelles
sur les tiges filetées, mais ne les serrez pas
encore.
8. Avant de monter les bancs, il faut retirer l’embal lage de sous le cadre!
9. Montez à présent de la même manière les cadres
des bancs sur les pieds de la table. C’est seule
ment après cette opération que vous pourrez
serrer tous les écrous.
Dossier
1 . Desserrez les 2 écrous et rondelles sur le côté
extérieur des bancs. Desserrez aussi les 2
boulons M10x30. Le banc reste en place grâce à
l’écrou sur le côté intérieur.
1
. Desserrez les 2 écrous et rondelles sur le côté
extérieur des bancs. Le banc reste en place grâce
à l’écrou sur le côté intérieur.
2
. Positionnez le support de dossier sur le dessous
du banc, et fixez-le en vissant chaque fois 2
boulons M10x40 dans les orifices carrés.
Resserrez les écrous et rondelles.
2
. Positionnez le support de dossier sur le dessous
du banc, et resserrez les écrous.
3. Fixez le dossier en bois aux supports de dossier,
chaque fois au moyen de trois vis 5x25.
Positionnez correctement la pièce au moyen des
trous pré-percés.
Hopper table
1. Posez le plateau de table sur des tréteaux.
2. Faites ensuite les pieds de la table jusque contre
le cadre de la table.
3
. Insérez par pied de table 3 boulons M10x30.
Posez ensuite les écrous fournis avec rondelles
sur les tiges filetées.
3
. Posez ensuite les écrous fournis avec rondelles
sur les tiges filetées.
ENTRETIE N
Bois
Les bois Iroko et Hellwood. ne demandent que peu
ou pas d’entretien, mais nous recommandons néanmoins fortement d’enlever la saleté persistante. Pour
nettoyer le bois, vous pouvez utiliser des produits
spéciaux (www.rmc-extremis.be) ou tout simplement
une brosse à poils durs et un peu d’eau. Soyez attentif à ne pas endommager les fibres du bois. N’utilisez
dès lors jamais de nettoyeur à haute pression car
cela rendrait la surface lisse du bois rugueuse et
endommagerait irrémédiablement les fibres du bois.
Page 37

Français – 37
Comme beaucoup d’autres essences, le Iroko contient une gomme soluble à l’eau. Au début, le bois
sécrétera ce colorant rouge chaque fois qu’il entre
en contact avec l’eau. Le colorant ainsi tombé sur le
piètement et sur le sol reste soluble à l’eau et disparaîtra complètement après quelque temps.
Il est fortement recommandé de huiler le bois à usage intérieur pour le protéger contre les taches.
À la livraison, les parties en bois de nos produits
sont non traitées. L’exposition au soleil et à la pluie
modifiera progressivement leur aspect et les rendra
grisâtres. Leur surface deviendra aussi plus rugueuse. Si vous souhaitez leur conserver leur couleur
d’origine, il faut les huiler une fois par an. Nous
recommandons l’utilisation de RMC Hybrid Wood
Protector (www.rmcextremis.com). Les produits
d’entretien du bois RMC sont disponibles dans le
monde entier. Rendez-vous sur le site Web www.
rmc-extremis.com pour trouver un revendeur dans
vos environs.
Important!
Le bois est un matériau vivant; bien que l’Iroko et
Hellwood soit un bois de qualité supérieure, il doit
s’adapter à des variations extrêmes de températures
et à l’humidité. Cela crée des tensions internes qui
font “travailler” le matériau et peuvent causer entre
autres des fissures. Des diérences de couleur et de
structure peuvent aussi apparaître. Ces caractéristiques sont typiques du matériau, et vous les acceptez
par votre choix.
Vous pouvez poncer d’éventuelles gries simplement à la main avec une feuille de papier émeri ou
avec une ponceuse manuelle. Protégez les parties
galvanisées ou peintes avec du ruban de masquage.
Utilisez du papier émeri de grain 80, et commencez
sur la face verticale du plateau de table. Tenez la
machine parallèlement au bord de la table. Poncez
légèrement jusqu’à ce que le bord soit à nouveau
parfaitement lisse. Poncez à présent le dessus du
plateau. Veillez à tenir la machine bien parallèle au
plateau de table. Ne vous limitez pas à la partie griffée mais poncez l’ensemble du plateau afin d’obtenir
un résultat égal. Pour éviter les arbes, lissez l’arête
supérieure du plateau. Eectuez cette partie-là à la
main. Une fois que toutes les barbes ont été enlevées, vous pouvez, en fonction de l’eet souhaité,
huiler la table avec de l’huile pour bois dur.
Pièces galvanisées
La galvanisation, ou zingage thermique, est la manière la plus durable de protéger le métal contre la
formation de rouille. Si la couche de zinc est endommagée, le métal risque de rouiller. C’est facile à
traiter; il sut de passer une peinture au zinc de la
même couleur, disponible dans le commerce.
La galvanisation est un procédé thermique qui peut
légèrement déformer le matériau. Les autres techniques de protection du métal n’ont pas cet inconvénient, mais leur qualité est insusante.
Pièces thermolaqué
Nettoyage avec de l’eau tiède et un détergent doux,
Nettoyage avec de l’eau tiède et un détergent doux,
séchage avec un chion doux. NE PAS utiliser de
poudre abrasive ou d’éponge à récurer, afin d’éviter
les gries.
Éponge miracle
Vous pouvez seulement utiliser l’éponge miraclean si
nettoyer avec de l’eau tiède, savon doux et une éponge normale n’est pas susant.
S’il y a encore des taches tenaces visibles après
nettoyer (voyez le mode d’emploi du produit), vous
pouvez utiliser une éponge MiraClean ciincluse.
Mouillez l’éponge avec de l’eau et frottez les taches.
Ne frottez pas trop dur parce que ça peut causer des
taches mattes.
L’usage des détergents n’est pas nécessaire, l’eau
sut.
Le MiraClean consiste de résine mélanine et s’use
après usage. L’éponge est très facile à utiliser et
donne résultat jusqu’à 26x plus vite par rapport au
chion microfibres.
L’éponge miracle enlève les taches plus tenaces sans
eort supplémentaire.
N’utilisez pas sur les surfaces brillantes.
L’éponge MiraClean est la solution pour enlever les
taches tenaces comme des taches de marqueur, de
graisse, des marques de soulier, des taches de
chaux, de café et de thé. Le MiraClean peut être utilisé sur bâche, PVC, verre, acier, chrome, aluminium, porcelaine, cuir synthétique et des sols divers.
Pour plus d’informations, contactez Extremis: info@
extremis.be
Page 38

38
Italiano
MONTAGE
Hopper picnic
1. Sollevare il coperchio della cassa. Per il montag gio l’imballaggio deve rimanere intatto!
2. Svitare le quattro viti dalle due assicelle che
bloccano le gambe del tavolo durante il traspor to. Piegare le alette dell’imballaggio verso
l’esterno così che le gambe del tavolo diventino
più accessibili. Estrarle dalla cassa e posizionar le come nel disegno (a seconda della grandezza
del tavolo).
3. Rimettere il coperchio sulla cassa.
4. Posizionarvi sopra le assicelle di fissaggio di cui
al punta 2.
5. Appoggiare il piano del tavolo con la struttura
portante sulle due assicelle. L’estremità superiore
delle gambe è ora alla stessa altezza del ripiano.
6. Spingere quindi le gambe del tavolo contro la
struttura dello stesso.
7
. Per ogni gamba inserire 3 bulloni attraverso i
buchi quadrati. A questo punto avvitare i dadi
forniti con rondella sull’estremità filettata, ma
non ancora completamente.
7
. A questo punto avvitare i dadi forniti con rondella
sull’estremità filettata, ma non ancora completa mente.
8. Prima di montare le panche, la casa deve essere
tolta da sotta la struttura!
9. Seguendo la stessa procedura, montare ora le
strutture delle panche alle gambe del tavolo.
Solo dopo averlo fatto, tutti i dadi potranno esse re fissate.
Hopper combi
1. Sollevare il coperchio della cassa. Per il montag gio l’imballaggio deve rimanere intatto!
2. Svitare le quattro viti dalle due assicelle che
bloccano le gambe del tavolo durante il traspor
to. Piegare le alette dell’imballaggio verso
l’esterno così che le gambe del tavolo diventino
più accessibili. Estrarle dalla cassa e posizionar
le come nel disegno (a seconda della grandezza
del tavolo).
3. Rimettere il coperchio sulla cassa.
4. Posizionarvi sopra le assicelle di fissaggio di cui
al punta 2.
5. Appoggiare il piano del tavolo con la struttura
portante sulle due assicelle. L’estremità superiore
delle gambe è ora alla stessa altezza del ripiano.
6. Spingere quindi le gambe del tavolo contro la
struttura dello stesso.
7
. Per ogni gamba inserire 3 bulloni attraverso i
buchi quadrati. A questo punto avvitare i dadi
forniti con rondella sull’estremità filettata, ma
non ancora completamente.
7
. A questo punto avvitare i dadi forniti con rondella
sull’estremità filettata, ma non ancora completa mente.
8. Prima di montare le panche, la casa deve essere
tolta da sotta la struttura!
9. Seguendo la stessa procedura, montare ora le
strutture delle panche alle gambe del tavolo.
Solo dopo averlo fatto, tutti i dadi potranno esse re fissate.
Schienale
1 . Svitare i 2 dadi y rondella sul lato esterno delle
panche. Rimuovere ora i 2 bulloni M10x30. Il
bulloni i dado all’interno fa sì che la panca
rimanga al suo posto.
1
. Svitare i 2 dadi y rondella sul lato esterno delle
panche. Il dado all’interno fa sì che la panca
rimanga al suo posto.
2
. Posizionare il sostegno dello schienale sotto
alle panca e montarlo inserendo di volta in volta
2 bulloni M10x40 nei fori quadrati. Riavvitare i
dadi M10 y rondella M10.
2
. Posizionare il sostegno dello schienale sotto alle
panca e riavvitare i dadi M10.
3. Avvitare lo schienale in legno ai rispettivi
supporti utilizzando 3 viti 5x25. Posizionare lo
schienale in base ai fori preesistenti.
Hopper tavolo
1. Posizionare il piano del tavolo su cavalletti.
2. Spingere quindi le gambe del tavolo contro la
struttura dello stesso.
3
. Per ogni gamba inserire 3 bulloni attraverso i
buchi quadrati. A questo punto avvitare i dadi
forniti con rondella sull’estremità filettata.
3
. A questo punto avvitare i dadi forniti con rondella
sull’estremità filettata.
MANUTENZIONE
Legno
Il legno di Iroko e il legno Hellwood non richiedono
particolare manutenzione. Tuttavia, consigliamo
vivamente di rimuovere lo sporco persistente.
Per pulire il legno è possibile utilizzare prodotti
specifici (www.rmc-extremis.be) o semplicemente
una spazzola a setole dure con un po’ d’acqua. Fare
attenzione a non danneggiare irreparabilmente le
fibre del legno. Per evitarlo, non utilizzare mai un
idropulitrice ad alta pressione, che graerebbe la
superficie liscia del legno danneggiandone irrimediabilmente le fibre.
Page 39

Italiano – 39
Come molte altre essenze, la Iroko contiene una
gomma idrosolubile. Nel primo tempo dopo líacquisto questo colorante rosso si liberer ogni volta che la
Jatoba entra a contatto con líacqua. Il colorante sulle
gambe e sul suolo resta idrosolubile e sparir dunque
completamente dopo qualche tempo.
Consigliamo vivamente di oliare il legno da utilizzare
all’interno per evitare le macchie.
Al momento della consegna, le parti in legno dei
nostri prodotti sono non trattate. L’esposizione al
sole e alla pioggia ne modificherà gradualmente il
colore a un grigio argentato, rendendone inoltre
ruvida la superficie. Per preservarne il più possibile
il colore originale, le parti andrebbero trattate con
olio una volta all’anno. Consigliamo di utilizzare
il prodotto RMC Hybrid Wood Protector (www.
rmc-extremis.com). I prodotti RMC per la cura del
legno sono disponibili in tutto il mondo. Per trovare
il rivenditore più vicino, visitare il sito web www.
rmcextremis.com.
Importante!
Il legno è un materiale vivo e,nonostante sia un legno di qualità superiore, all’aperto Iroko e Hellwood
deve costantemente adattarsi alle oscillazioni estreme di temperatura e umidità. A causa delle tensioni
interne derivanti da questi adattamenti il legno “si
deforma” ed è anche possibile che si creino delle
crepe. Possono anche determinarsi variazioni nel
colore e nella struttura.
Queste caratteristiche sono tipiche del materiale:
scegliendolo, accettate anche queste possibili
variazioni.
Eventuali gra possono essere eliminati semplicemente a mano utilizzando della carta vetrata oppure
servendosi di una levigatrice manuale. Per proteggere le parti galvanizzate o verniciate, coprirne
i bordi con scotch di carta molto resistente. Utilizzare carta vetrata a grana 80 iniziando dal lato
verticale del piano del tavolo. Tenere la levigatrice
in posizione parallela rispetto al bordo del tavolo.
Levigare leggermente finché il bordo è di nuovo
liscio e omogeneo. Levigare quindi il ripiano. Fare
attenzione a mantenere la levigatrice in posizione
parallela rispetto alla superficie del tavolo. Per ottenere un risultato uniforme, non trattare soltanto le
parti danneggiate, ma l’intera superficie. Per evitare
imperfezioni, levigare il bordo superiore del piano
del tavolo a mano. Quando tutte le imperfezioni
saranno state rimosse, sarà possibile, a seconda
dell’eetto desiderato, trattare il tavolo con olio
per legno duro.
Parti galvanizzate
La galvanizzazione, o zincatura a caldo, è il modo
più duraturo per proteggere il metallo dalla ruggine.
Se lo strato di zinco viene danneggiato, il metallo
esposto può arrugginire. È possibile ovviare al
problema con una vernice allo zinco, che automaticamente assume lo stesso colore ed è facilmente
reperibile in commercio. La galvanizzazione è un
processo termico che può leggermente deformare il
materiale. Altri metodi di protezione del metallo non
presentano questo svantaggio, ma non orono la
stessa qualità.
Parti verniciato a polvere
Pulire con acqua tiepida e un detergente non aggressivo, quindi asciugare con un panno morbido. NON
utilizzare prodotti e spugnette abrasivi per evitare di
graare la superficie.
Spugna magica
Utilizzare la spugna Miraclean solo quando non
basta la normale pulizia con acqua tiepida, sapone
delicato e una spugna morbida.
Quando, anche dopo la pulizia (vedereil manuale
del prodotto), rimangono visibili macchie ostinate,
eventualmente si possono rimuovere con le spugne
in dotazione. Inumidire la spugna solo con acqua
e strofinare le macchie da pulire. Non strofinare
troppo forte, altrimenti potrebbero formarsi macchie
opache.
Non è necessario utilizzare detergenti ma è suciente l’acqua.
La spugna MiraClean è realizzata in resina melamminica e si consuma con l’uso. La spugna è molto
semplice da utilizzare e raggiunge i risultati desiderati 26 volte più velocemente rispetto a un panno in
microfibra tradizionale.
La spugna rimuove senza fatica anche le macchie
più ostinate. Non utilizzare mai la spugna su superfici lucide.
La spugna MiraClean è la soluzione ideale per la
rimozione di macchie ostinate, come quelle di pennarello, grasso, segni di scarpe, macchie di calcare,
caè e tè. La spugna MiraClean può essere utilizzata
sulla tela cerata, sui profilati in PVC, vetro, acciaio,
cromo, alluminio, porcellana, pelle sintetica ediversi
tipi di pavimenti.
Per ulteriori informazioni, contattare Extremis:
[email protected]
Page 40

40
los armazones de los bancos con las patas.
Después, apriete todas las tuercas empleando.
Respaldo
1 . Destornille las tuercas y arandelas al lado
exterior de los bancos. Ahora también quitar 2
tornillos M10x30. La tornillo y tuerca al lado
interior asegura que el banco no mueve.
1
. Destornille las tuercas y arandelas al lado
exterior de los bancos. La tuerca al lado interior
asegura que el banco no mueve.
2
. Coloque el soporte de respaldo en la parte
inferior del banco y fíjelo cada vez insertando 2
pernos M10x40 en los agujeros cuadrados.
Vuelva a apretar las tuercas.
2
. Coloque el soporte de respaldo en la parte
inferior del banco y vuelva a apretar las tuercas.
3. Fije el respaldo de madera a las soportes, cada
vez empleando 3 tornillos 5x25. Coloque el
respaldo por medio de los agujeros retaladrados.
Hopper mesa
1. Ponga el tablero sobre caballetes.
2. Ponga las patas contra el armazón de la mesa.
3
. Insiera 3 tornillos M10x30 por los agujeros
cuadrados, por pata. Ahora ponga los tuercas
y arandelas suministrados en el extremo roscado.
3
. Ahora ponga los tuercas y arandelas suministra dos en el extremo roscado.
MANTENIMIENTO
Madera
La madera de Iroko y Hellwood necesitan poco o
ningún mantenimiento. Sin embargo, está fuertemente recomendado eliminar la suciedad persistente. Para limpiar la madera, puede emplear productos
especiales (www.rmc-extremis.be) o simplemente un
cepillo de cerdas duras y agua. Evite dañar irreparablemente las fibras de la madera. Por eso, nunca
emplee una manguera a presión; la superficie lisa
de la madera se puede volver áspera y puede dañar
irreparablemente las fibras de la madera.
Al principio, la madera liberará un tinte rojo cada
vez que entre en contacto con agua. El tinte que se
pueda filtrar a la estructura o la superficie inferior
sigue siendo soluble, por lo que desaparecerá por
completo al cabo de cierto tiempo.
Es fuertemente recomendado aceitar la madera para
uso interior; así se evitan manchas.
Las partes de madera de nuestros productos se
suministran sin tratamiento. Expuestas al sol y a la
Español
MONTAGE
Hopper picnic
1. Quite la tapa del embalaje. ¡El embalaje debe
quedar intacto para la continuación del montaje!
2. Quite los cuatro tornillos de las dos tablitas que
fijaron las patas durante el transporte. Doble las
solapas hacia afuera, para facilitar el acceso a
las patas. Ahora saque las patas de la caja y
colóquelas como se ve en el dibujo (Según el
tamaño de la mesa).
3. Ahora vuelva a poner la tapa en la caja.
4. Ponga las dos tablitas del paso 2 sobra la tapa.
5. Ponga el tablero con el armazón portante sobre
las dos tablitas. El lado superior de las patas está
al mismo nivel que el tablero.
6. Ponga las patas contra el armazón de la mesa.
7
. Insiera 3 tornillos M10x30 por los agujeros
cuadrados, por pata. Ahora ponga los tuercas
y arandelas suministrados en el extremo rosca do, per no apriételos.
7
. Ahora ponga los tuercas y arandelas suministra dos en el extremo roscado, per no apriételos.
8. Antés de montar los bancos, ¡hace falta quitar el
embalaje debajo del armazón!
9. Ahora proceda de la misma manera, para unir
los armazones de los bancos con las patas.
Después, apriete todas las tuercas empleando.
Hopper combi
1. Quite la tapa del embalaje. ¡El embalaje debe
quedar intacto para la continuación del montaje!
2. Quite los cuatro tornillos de las dos tablitas que
fijaron las patas durante el transporte. Doble las
solapas hacia afuera, para facilitar el acceso a
las patas. Ahora saque las patas de la caja y
colóquelas como se ve en el dibujo (Según el
tamaño de la mesa).
3. Ahora vuelva a poner la tapa en la caja.
4. Ponga las dos tablitas del paso 2 sobra la tapa.
5. Ponga el tablero con el armazón portante sobre
las dos tablitas. El lado superior de las patas está
al mismo nivel que el tablero.
6. Ponga las patas contra el armazón de la mesa.
7
. Insiera 3 tornillos M10x30 por los agujeros
cuadrados, por pata. Ahora ponga los tuercas
y arandelas suministrados en el extremo rosca do, per no apriételos.
7
. Ahora ponga los tuercas y arandelas suministra dos en el extremo roscado, per no apriételos.
8. Antés de montar los bancos, ¡hace falta quitar el
embalaje debajo del armazón!
9. Ahora proceda de la misma manera, para unir
Page 41

Español – 41
lluvia, adquirirán una pátina gris plateada. Si quiere
mantener más o menos el color original, trátelas con
aceite una vez al año. Recomendamos emplear RMC
Hybrid Wood Protector (www.rmc-extremis.com).
Los productos para el tratamiento de madera RMC
se venden en el mundo entero. Visite el sitio web
www.rmc-extremis.be para buscar un revendedor
cerca de usted.
¡Importante!
La madera es un material vivo, por lo que, a pesar de
la calidad superior de la Iroko y Hellwood, se ve
afectada por los cambios bruscos de temperatura y
por la humedad. Como consecuencia de las tensiones internas provocadas por estas constantes adaptaciones, la madera se alabea. Entre otras cosas,
este alabeo puede provocar la aparición de grietas.
Asimismo, puede producirse cambios en el color y
en la estructura. Dado que estas características son
inherentes al material, quien lo elige debe aceptarlas.
Es posible lijar grietas a mano y con papel de lija, o
con una lijadora. Para proteger las partes galvanizadas o pintadas, cubra los bordes con cinta de
enmascarar muy robusta. Emplee papel de lija de
grano 80 y empiece por el lado vertical del tablero.
Mantenga la lijadora paralela al borde de la mesa.
Lije ligeramente hasta que el borde sea plano. Ahora
lije la parte superior. Cuide de mantener la lijadora
paralela al tablero. No sólo trate la parte agrietada,
pero todo el tablero. Esto asegura que el resultado
es llano. Para evitar barbas, lije a mano el borde
superior del tablero. Una vez eliminadas las barbas,
puede tratar la mesa con aceite para madera dura,
en función del efecto deseado.
Piezas galvanizadas
La galvanización o el zincado en caliente es la manera más eficaz de evitar la formación de óxido en
el metal. Sin embargo, cuando la capa de zinc está
dañada, el metal expuesto se oxidará. Este daño es
fácilmente remediable mediante la pintura de zinc,
de color idéntico y de venta en tiendas.
Es muy excepcional la formación de óxido, pero
necesita una reparación a tiempo. La galvanización
es un proceso en caliente y puede deformar ligeramente el material. Otros métodos de protección
anticorrosiva no presentan esta desventaja, pero
proporcionan una calidad insuficiente.
Piezas pintado en polvo
Limpiar con agua tibia y detergente suave, secar
luego con un trapo suave. NO se puede utilizar abra-
sivos ni estropajos para evitar arañazos.
Esponja mágica
Sólo emplee la esponja Miraclean cuando una
limpieza normal con agua tibia, jabón suave y una
esponja suave no es suficiente.
Si aún quedan manchas persistentes después de la
limpieza (véase el manual del producto), es posible
quitarlas mediante las esponjas suministradas. Humedezca la esponja con agua regular y frote las
manchas. Frote ligeramente para evitar manchas
opacas.
No hace falta usar detergentes. Basta emplear agua.
La esponja MiraClean está elaborada con resina de
melamina y se desgasta conforme se usa. La esponja
es muy fácil en el empleo et da 26 veces más rápido
resultado que un paño de microfibras tradicional.
La esponja elimina las manchas las más rebeldes sin
esfuerzo especial.
No use nunca esta esponja para superficies de alto
brillo.
La esponja MiraClean es la solución para eliminar
manchas rebeldes, como las producidas por rotuladores, grasa, zapatos, cal, café, té. Se puede
utilizar la esponja MiraClean en toldos, PVC, vidrio,
acero, cromo, aluminio, porcelana, cuero sintético
y diversos suelos.
Para obtener más información, póngase n contacto
con Extremis: [email protected]
Page 42
Pantagruel
Son of gargantua featuring
a ‘lazy susan’
Anker
A triangular picnic table that
comfortably seats six of you
Hopper
Easy boarding thanks to four
pass-through zones
Gargantua
Superior functionality thanks
to its adjustable benches
Abachus
When standing up, you can
lean against one of its six arms
Extempore
A full range of modular
outdoor furniture
Marina
Endless possibilities with this picnic
table in lengths from 1.65m to 12.10m
Picnik
Iconic picnic table made of
half a plate of solid aluminium
Pontsūn
An oriental feel
with origami-like legs
Captain’s chair
Wide shell for ultimate seating
pleasure for all people
Virus
Compact 2 - 3 - 4 - 5 seater for
the urban garden or balcony
Arthur
Xxl table with rotating ‘lazy suzan’
in the middle
Sol+Luna
A day bed and night sofa
available 2017 – discover it online!
Qrater
An attractive campfire dish
made of weathering steel
Collection
Icecube
Simply the perfect cooler
at all your parties, self-service
Kosmos
Picnic & lounge by moving
the table up & down
Walrus
The very first outdoor sofa with
blanket & pillow in the backrest
Sticks
A space divider, create privacy
wherever needed
Inumbrina
All the technical parts are
above the uv resistant fabric
Inumbra
Its flat shape & high tension
for beauty and resistance
Romeo & Juliet
This bench adds a touch of
green to your terrace or project
Woodstock
Indoor & outdoor wood rack
including a cart
Kosmos Parasol
The kosmos parasol opens
and closes horizontally
Hopper Shade
Open and close intuitively with
spring mechanism
Page 43

Page 44
www.extremis.be
Our headquarters:
[email protected]
+ 32 57 34 60 20
Connect with us:
Download our app and configure our tools in your garden!
All rights reserved. Unless otherwise specied, all designs and photographs contained in this publication are copyright protected and are the property
of Extremis. No part of this publication may be copied or distributed without Extremis’ prior written consent. e names of the authors of photographs
to which we do not hold rights are mentioned here. We have done our utmost to provide a comprehensive list of names. In the event of an alleged
breach, please contact the editorial sta. © Extremis
 Loading...