

Page 1
Version 1.0
Zoom Pet
User Guide
HU88-ZP-ZA
hoover.za.com
Page 2
NOTE: Some parts may vary according to model. Please check inside flap of box for more details.
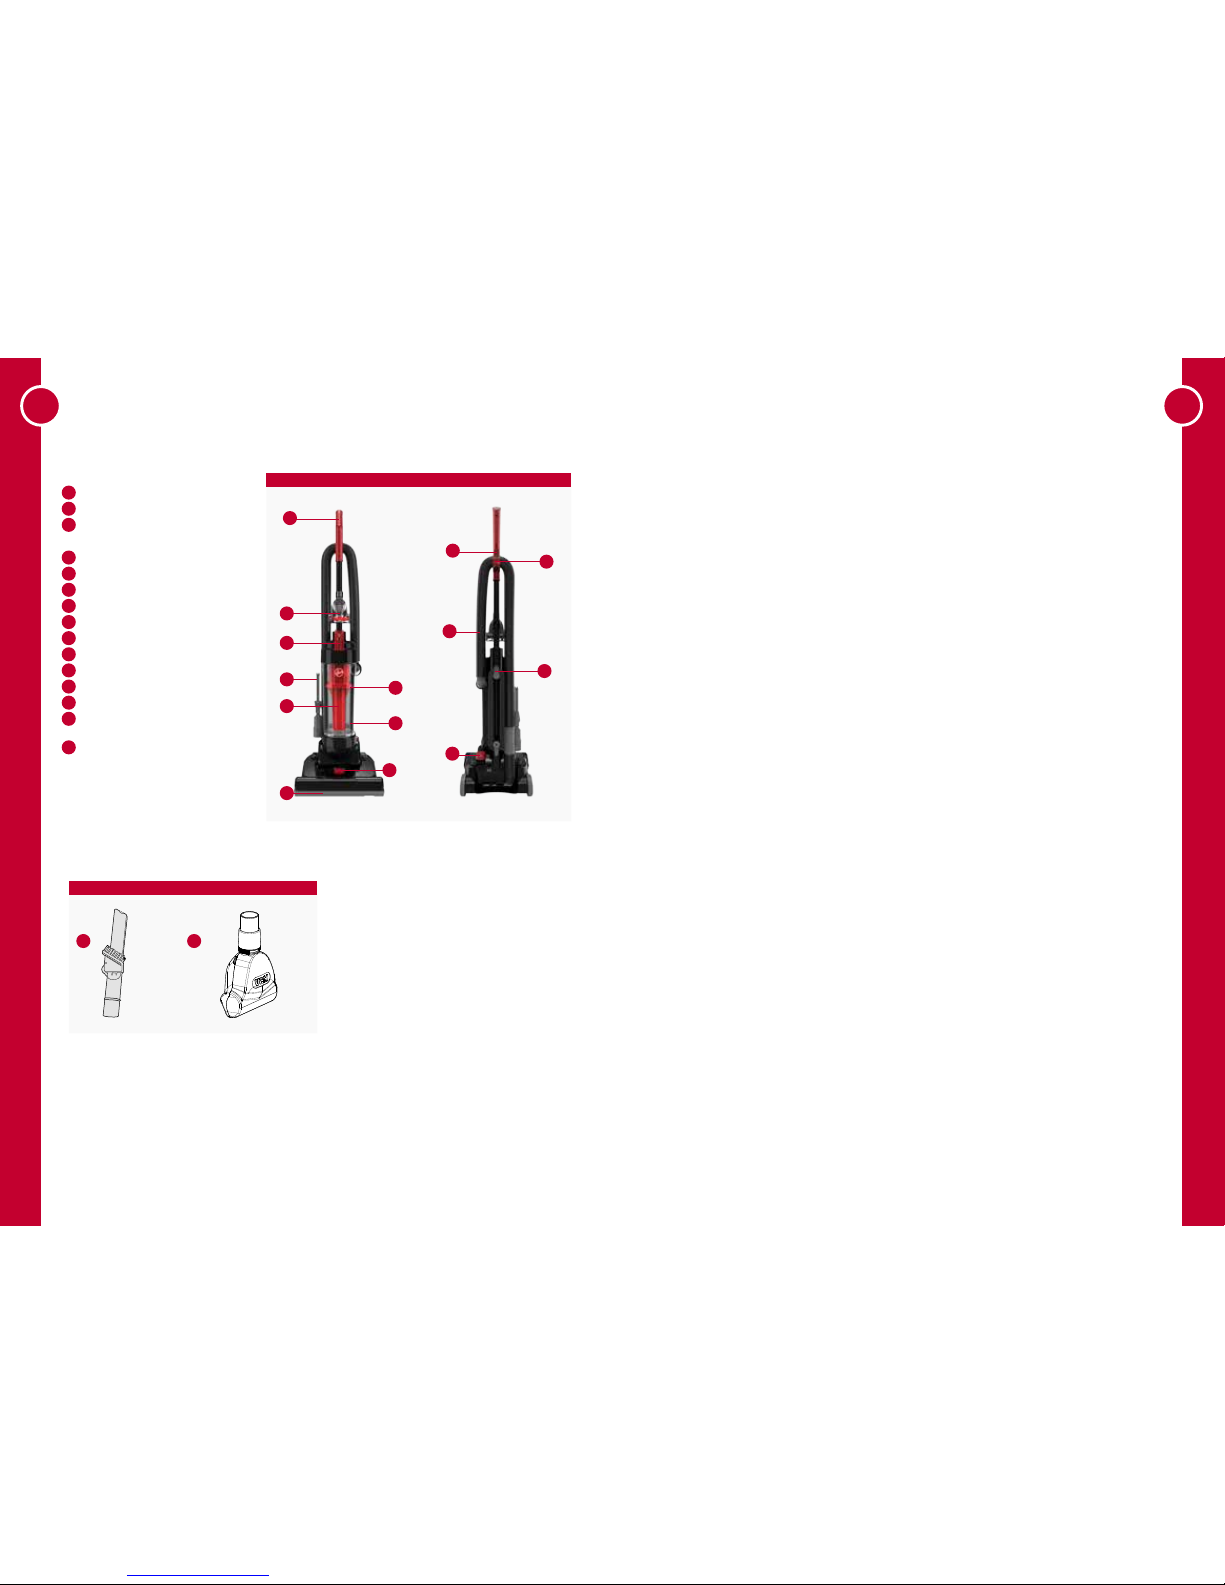
Handle
Carry Handle
2-in-1 Crevice Tool &
Dusting Brush
HEPA Filter (hidden)
Separator
Dirt Container
Brushbar Height Adjuster
Hard Floor Adaptor
Cord Guide
Hose Guide
Hose
Cord Wraps
On/Off Button
2-in-1 Crevice Tool
and Dusting Brush
Turbo Tool
Unit
Filters & Accessories
MACHINE OVERVIEW
GENERAL SAFETY INFORMATION
14 15
2 3
FOR HOUSEHOLD USE ONLY.
This vacuum cleaner is intended for household use only and NOT for commercial or industrial use.
When using the vacuum cleaner basic safety precautions should always be observed, including the
following:
• Only use the vacuum cleaner indoors on dry surfaces.
• Turn off the on/off switch on the vacuum cleaner controls before disconnecting or connecting
from the mains supply.
• Always unplug the vacuum cleaner before connecting or disconnecting the vacuum hose
and accessories.
• Children should be supervised to ensure that they do not play with the appliance.
• This appliance is not intended for use by children under eight years of age and persons with reduced
physical, sensory or mental capabilities or lack of experience and knowledge, unless they have
been given supervision or instruction concerning use of the appliance in a safe way and understands
the hazards involved.
• Cleaning and maintenance shall not be made by children without supervision.
• The appliance should only be used as described in this user guide.
• Only Hoover recommended attachments should be used with this appliance.
• Do not use this vacuum cleaner if it has been dropped, damaged, left outdoors or dropped into water.
Do not use this vacuum cleaner with a damaged cord or plug.
• Do not pull or carry this appliance by the cord. Do not use the cord as a handle, close a door on
the cord or pull the cord around sharp edges or corners. Do not run the vacuum cleaner over the
cord. Keep the cord away from heated surfaces.
• Do not handle the plug or the vacuum cleaner with wet hands.
• Keep hair, loose clothing, fingers and all parts of the body away from openings and moving parts.
• Do not pick up any hot coals, cigarette butts, matches or any hot, smoking or burning objects.
• Do not pick up any flammable or combustible materials (lighter fluid, petrol, kerosene etc.) or use in
the presence of explosive liquids or vapours.
• Do not vacuum up harmful or toxic material (chlorine, bleach, ammonia, drain cleaner etc.).
• Do not vacuum up hard or sharp objects such as glass, nails, screws, coins etc.
• Store the vacuum cleaner in a cool, dry area.
• Use only CB approved 13 amp extension cords. Non-approved cords may overheat. Care should be
taken to arrange the cord so that the cord cannot be tripped over.
• Do not put any objects into openings. Do not use with any openings blocked and do not restrict
airflow. Keep all openings free of dust, lint, hair or anything that might reduce airflow.
• Do not use without all of the filters in place.
• Take extra care when positioning the vacuum cleaner on the stairs.
PLEASE KEEP INSTRUCTIONS FOR FURTHER USE.
1
7
4
10
2
8
5
11
3
9
13
15
6
12
14
1
2
15
3
5
4
6
7
8
9
10
11
12
13
Page 3
CAUTION: Always switch off the vacuum cleaner before connecting or disconnecting the hose/
attachments, or removing and emptying the dirt container.
IMPORTANT: The vacuum cleaner is equipped with a thermal cut-out. If for any reason the
vacuum cleaner does overheat the thermostat will automatically turn the vacuum cleaner
off. If this happens, switch the vacuum cleaner off and unplug. Remove and empty the dirt
container also check the vacuum cleaner for blockages. Allow the vacuum cleaner to cool for
approximately 1 hour (if you have cleaned the filters please wait 24 hours for the filters to fully
dry before putting back into the machine). If the vacuum cleaner is blocked, switch off and
unplug before removing the blockage.
Familiarise yourself with these home maintenance tasks as proper use and care of your cleaner
will ensure continued cleaning effectiveness.
IMPORTANT: Always switch off the vacuum cleaner before disconnecting or connecting the hose and
accessories. The accessories can be attached directly to the hose. This vacuum cleaner is fitted with a
constantly rotating brushbar. To avoid damage to your flooring, ensure the brushbar is raised to the
highest setting when using the accessories.
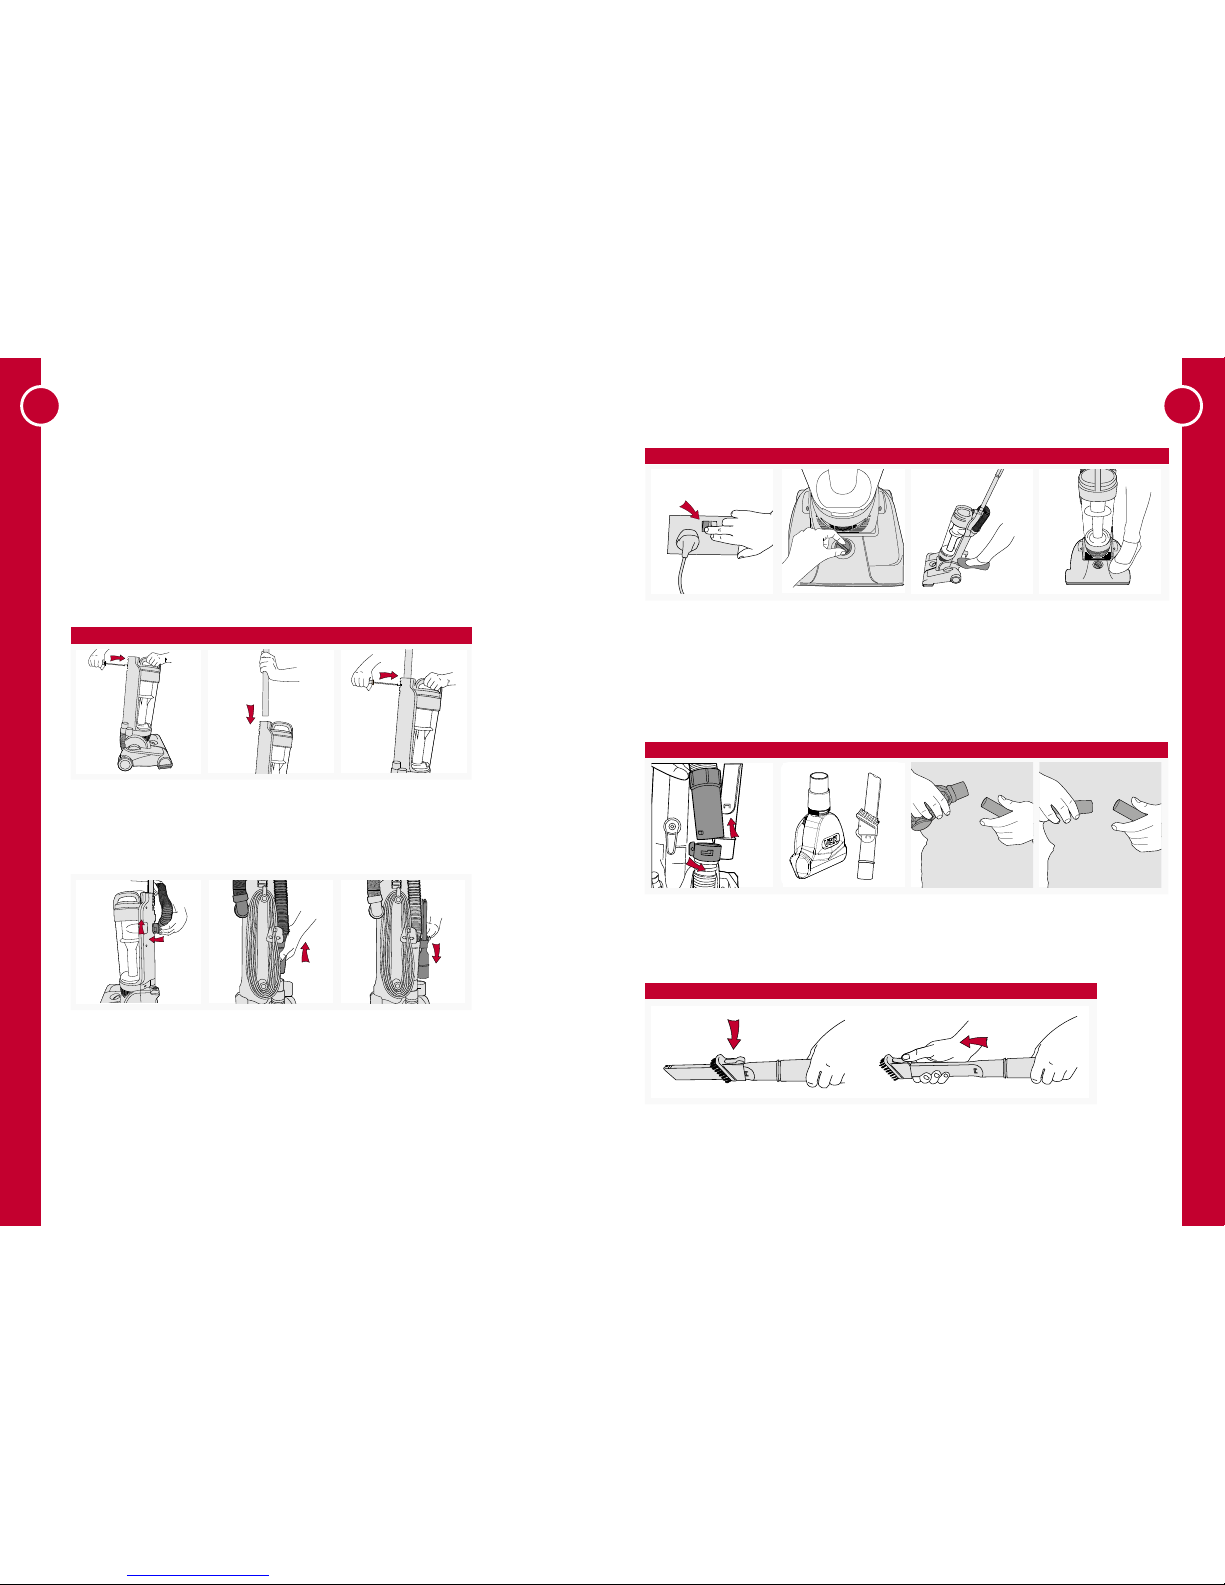
Using a crosshead
screwdriver, remove the
screw from the back of
the vacuum cleaner.
Line up tabs on the
upper hose connector
with the tabs in the
upper hose entry
point. Twist connector
clockwise until clicks
and locks into place.
Slide the handle down
into the main body of
the vacuum cleaner.
Wrap the hose over
the hose guide. Line up
tabs on the lower hose
connector with the tabs
in the lower hose entry
point. Twist connector
clockwise and lock
into place.
Return the screw and
tighten, securing the
handle into the main
body of the vacuum
cleaner.
Place the 2-in-1 crevice
tool and dusting brush
into the tool holder.
OPERATION
OPERATION
4 5
Assembling your upright
Plug vacuum
cleaner into the
mains, switch on.
To use the dusting brush, press the tab and slide the dusting brush forwards until it
clicks into place.
Turn brushbar height
adjuster dial to
desired setting.
Press the On/Off
button to switch on.
Place foot on floorhead
and pull handle
backwards to recline.
Twist lower hose
connector anti-clockwise
to unlock. Pull and
remove lower hose.
Choose an accessory. Attach TurboTool
connector to hose before
attaching TurboTool
(some models only).
Attach accessory
to hose.
Using your machine
Using the accessories
2-in-1 crevice tool and dusting brush
Page 4

OPERATION
MAINTENANCE
6
7
Hold vacuum cleaner with brushbar over tread of stairs.
Use the hard floor setting for best results on hard floors.
TIP: Don’t over fill the dirt
container to avoid blocking
the air flow through the
vacuum cleaner and replace
filters every 6-9 months.
Using on the stairs
Press the dirt container
release button, pull and
remove dirt container.
Hold the dirt container
over a bin. Pull the dirt
release clip, allowing
dirt/debris to fall out.
Turn the dirt container
lid anti-clockwise to
unlock and lift to remove.
Tap excess dirt from
the filter and rinse
under a tap.
Turn the separator
clockwise to remove from
the dirt container lid.
Leave the filter to dry for
at least 24 hours.
Lift the pre-motor
filter out of the
central separator.
Emptying the dirt container
Cleaning the pre-motor filter
40 C max
24hr
CAUTION: This vacuum cleaner has a constantly rotating brushbar. When cleaning on stairs raise
the height adjuster dial to the highest setting. The brushbar must over hang the stair tread. Always
take extra care when cleaning stairs.
Page 5

Tap separator over
a bin to remove
any dirt/debris.
Line up the dirt
container lid with the
dirt container Turn
the dirt container lid
clockwise to lock.
Lift to remove brushbar.
Remove and dispose
of old belt. Clean any
debris from spindle
and place new belt
onto spindle.
Using a soft brush
clean any dirt/debris
out of the separator.
The separator should
sit on seal in bottom
of dirt container when
correctly fitted.
Place belt on rounded
area of brushbar without
bristles. Line up right side
of brushbar with base,
push into place. Lift and
push left side of brushbar
until clicks into place.
MAINTENANCE
MAINTENANCE
8
9
Cleaning the separator
Re-fitting the pre-motor filter and separator
Replacing the belt
Using a pair of scissors
remove any threads or hair
caught around the brushbar.
Twist upper hose
connector anti-clockwise
and remove upper hose.
Twist lower hose
connector anti-clockwise
to unlock. Pull and
remove lower hose.
Remove any blockage
by inserting wire coat
hanger into hose.
Removing debris from the brushbar
Removing a blockage from the hose
Lift to remove
post-motor filter.
Remove any dirt/debris.
Rinse under water
(max 40°C).
Leave to dry for 24
hours or until fully dry
before placing back in
the vacuum cleaner.
Cleaning the post-motor filter
24hr
IMPORTANT: Unplug and switch off vacuum cleaner before performing maintenance or
troubleshooting checks.
IMPORTANT: Don’t use your vacuum cleaner without all of the filters in place.
IMPORTANT: If the brushbar does not rotate easily then the belt may not have been fitted correctly.
Make sure the belt is not twisted.
TIP: To test for a
blockage in hose,
drop a small ball of
paper through the
hose. The paper will
drop through if the
hose is clear.
Turn the dirt container
lid anti-clockwise to
unlock and lift to remove.
Slide the pre-motor filter
into the central separator.
Lie vacuum cleaner on its
back exposing brushbar.
Use a crosshead
screwdriver to remove
6 screws.
Turn the separator
clockwise to remove from
the dirt container lid.
Line up tabs on
separator with tabs
in dirt container lid.
Turn clockwise until
separator clicks
into place.
Lift to remove brushbar
cover from base of
vacuum cleaner.
Page 6

FAQs
10
11
WARRANTY
Please affix proof of purchase/receipt here
In the event of a claim under warranty this receipt must be produced.
WARRANTY
1. Home of Living Brands (Pty) Limited warrants to the original purchaser of this product (“the
customer”) that this product will be free of defects in quality and workmanship which under normal
personal, family or household use and purpose may manifest within a period of 1 (one) year from
the date of purchase )”warranty period”).
2. Where the customer has purchased a product and it breaks, is defective or does not work
properly for the intended purpose, the customer must notify the supplier from whom the customer
bought the product (“the supplier”) thereof within the warranty period. Any claim in terms of this
warranty must be supported by a proof of purchase. If proof of purchase is not available, then
repair, and/or service charges may be payable by the customer to the supplier.
3. The faulty product must be taken to the supplier’s service centre to exercise the warranty.
4. The supplier will refund, repair, or exchange the product in terms of this warranty subject to
legislative requirements. This warranty shall be valid only where the customer has not broken
the product himself, or used the product for something that it is not supposed to be used for. The
warranty does not include and will not be construed to cover products damaged as a result of
disaster, misuse, tamper, abuse or any unauthorised modification or repair of the product.
5. This warrant will extend only to the product provided at the date of the purchase and not to any
expendables attached or installed by the customer.
6. If the customer requests that the supplier repairs the product and the product breaks or fails
to work properly within 3 (three) months of the repair and not as a result of misuse, tampering or
modification by or on behalf of the customer, then the supplier may replace the product or pay a
refund to the customer.
7. The customer may be responsible for certain costs where the products returned are not in the
original packaging, or if the packaging is damaged. This will be deducted from any refund paid
to the customer.
HOME OF LIVING BRANDS (PTY) LTD (JOHANNESBURG)
JOHANNESBURG
CAPE TOWN
DURBAN
TEL NO. (001) 490-9600
TEL NO. (021) 552-5161
TEL NO. (031) 792-6000
www.hoover.za.com
WARNING: To reduce the risk of personal injury, unplug the vacuum cleaner before
performing maintenance/troubleshooting checks.
Is there an accessory missing?
• Check the ‘Machine Overview’ page in this guide or the box that the machine came in to
make sure that the part is definitely included in your unit.
Why does the vacuum cleaner have no power?
• The plug may not be fully pushed into the electrical socket.
• Check the fuse in the plug if this needs replacing, always replace with a 13amp fuse.
• The motor thermostat may have tripped. If this has happened, unplug the vacuum cleaner.
Remove and empty the dirt container and check the hose for blockages. Clean the filters
and allow the vacuum cleaner to cool for approximately 1 hour (if you have washed the
filters you will need to wait 24 hours for the filters to fully dry before putting them back
into the vacuum cleaner).
Why won’t the vacuum cleaner pick up?
• There may be a blockage in the hose. Please remove the hose from the vacuum cleaner,
check and clear any blockages. Go to ‘Maintenance’.
• Empty the dirt container and clean filters. Go to the ‘Operation’.
• The brushbar may not be turning. Go to ‘My brushbar isn’t turning?’ below.
• The brush bar height adjuster dial may not be set to the correct setting. Go to ‘Operation’.
• If the accessory/tool will not pick up, check and clear any blockages.
Go to ‘Maintenance’.
My brushbar isn’t turning?
• The brushbar may be clogged, check the brush bar and clear any hair or debris.
Go to ‘Maintenance’.
• The belt might be broken, go to ‘Maintenance’.
Page 7

To find your nearest Hoover retailer, simply visit hoover.za.com
Technical Specification
Consumables
Service and Help
Voltage: 220-240V ~ 50/60Hz
Wattage: 1600W
Capacity: 2.4L
Cord length: 7m
Weight: 4.7kg
Subject to technical change without notice.
For information on spares and accessories, please visit hoover.za.com
The use of genuine Hoover spare parts helps to maintain optimised performance and
validates your guarantee.
Manufacturer/EEC importer: Hoover, hereby on our own responsibility, declare that the
HU88-ZP-ZA Hoover is manufactured in compliance with the following CE Directives:
Safety: 2006/95/EC Low Voltage Directive
EMC: 2004/108/EC Electromagnetic Compatibility Directive
Waste electrical products should not be disposed of with household waste. Please recycle where
facilities exist. Check with your Local Authority or retailer for recycling advice.
EEC Statement of Compliance
OTHER INFORMATION
NOTES
12
13
Page 8

NOTES
NOTES
14
15
Page 9

HU88-ZP-ZA
hoover.za.com
 Loading...