

Page 1

IMPORTANT: READ CAREFULLY BEFORE ASSEMBLY AND USE.
This product is intended for household use only.
If used commercially the warranty is void.
Designed in the USA. Made in China.© 2019 Techtronic Floor Care Technology Limited.
Dist ributed b y, Royal Ap pliance M fg. Co. Char lotte , NC 28262. Al l Rights Re served . 961152123 -R0
PET MAX
COMPLETE
UPRIGHT VACUUM
USER MANUAL
Page 2

Welcome to
Hoover
Make it ofcial.
Register your vacuum by:
®
ownership.
Calling 1-800-944-9200Visiting Hoover.com or Hoover.ca
Get cleaning condence for up to 3 years with the Hoover®
limited warranty. See warranty for complete details.
2
IT’S GUARANTEED.
Page 3

Table of Contents
Important Safety Instructions ............................................................................4
What’s in the Box? ...............................................................................................5
Assembly .............................................................................................................6
User Controls ......................................................................................................7
Getting to Know Your Hoover® Pet Max Complete ..............................................8
Using Your Hoover® Pet Max Complete ................................................................9
Maintenance ........................................................................................................10
Troubleshooting ...................................................................................................16
Service and Warranty .........................................................................................17
French..................................................................................................................19
Spanish ................................................................................................................37
3
Page 4

IMPORTANT SAFETY INSTRUCTIONS SAVE THESE INSTRUCTIONS
When using an electrical appliance, basic precautions should always be followed, including the following:
READ ALL INSTRUCTIONS BEFORE USING THIS APPLIANCE.
WARNING: TO REDUCE THE RISK OF FIRE, ELECTRIC SHOCK, DAMAGE OR INJURY:
• Fully assemble before operating.
• Operate vacuum only at voltage specied on data label on back of vacuum canister.
• Do not leave appliance when plugged in. Unplug from outlet when not in use and before cleaning or
servicing.
• Do not use outdoors or on wet surfaces.
• Do not allow to be used as a toy. Not intended for use by children age 12 and under. Close supervision is
necessary when used by or near children. To avoid injury or damage, keep children away from product, and
do not allow children to place ngers or other objects into any openings.
• Use only as described in this manual. Use only Hoover® recommended attachments and products.
• Do not use with damaged cord or plug. If appliance is not working as it should, has been dropped,
damaged, left outdoors, or dropped into water, call customer service at 1-800-844-9200 prior to
continuing use.
• Do not pull or carry by cord, use cord as a handle, close a door on cord, or pull cord around sharp edges or
corners. Do not place product on cord. Do not run appliance over cord. Keep cord away from heated surfaces.
• Do not unplug by pulling on cord. To unplug, grasp the plug, not the cord.
• Do not handle plug or appliance with wet hands.
• Do not put any object into openings. Do not use with any opening blocked; keep free of dust, lint, hair, and
anything that may reduce air ow.
• Keep hair, loose clothing, ngers, and all parts of body away from openings and moving parts.
• Turn off all controls before unplugging.
4
• Use extra care when cleaning on stairs. To avoid personal injury or damage, and to prevent the vacuum
from falling, always place vacuum at bottom of stairs on oor. Do not place vacuum on stairs or furniture,
as it may result in injury or damage.
• Do not use to pick up ammable or combustible liquids, such as gasoline, or ne wood shavings, or use in
areas where they may be present.
• Unplug before connecting Air-Powered Hand Tool or Motorized Hand Tool.
• Do not pick up anything that is burning or smoking, such as cigarettes, matches, or hot ashes.
• Do not use without Dirt Cup and Filters in place.
CAUTION: TO REDUCE THE RISK OF DAMAGE OR INJURY:
• Avoid picking up hard, sharp objects with this product, as they may
cause damage.
• Store appropriately indoors in a dry space. Always store the vacuum with the power cord secured around
the two cord hooks. Do not expose machine to freezing temperatures. Do not use sharp objects to clean
out hose as they can cause damage.
• With brush roll on, do not allow vacuum to sit in one location for an extended period of time, as damage to
oor can result.
• To reduce risk of injury from moving parts, unplug before servicing.
WARNING: TO REDUCE THE RISK OF ELECTRIC SHOCK, THIS APPLIANCE HAS A POLARIZED PLUG (ONE BLADE
IS WIDER THAN THE OTHER). THIS PLUG WILL FIT IN A POLARIZED OUTLET ONLY ONE WAY. IF THE PLUG DOES NOT FULLY
FIT IN THE OUTLET, REVERSE THE PLUG. IF IT STILL DOES NOT FIT, CONTACT A QUALIFIED ELECTRICIAN TO INSTALL THE
PROPER OUTLET. DO NOT CHANGE THE PLUG IN ANY WAY.
Page 5
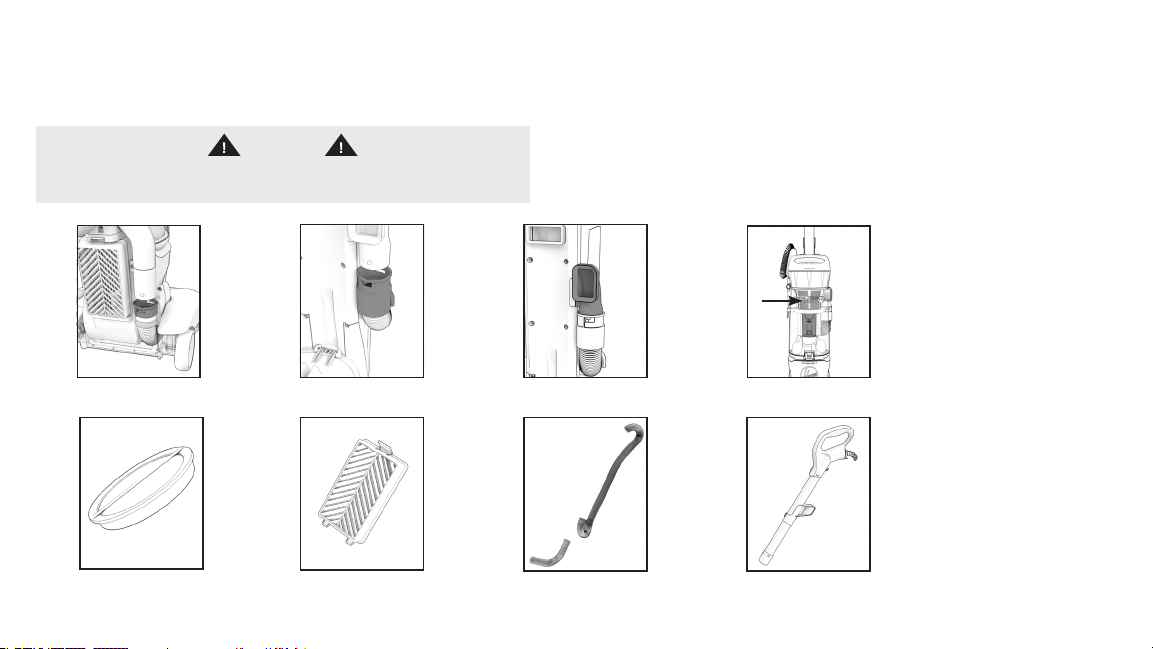
What’s in the Box?
Available Tools and Accessories***
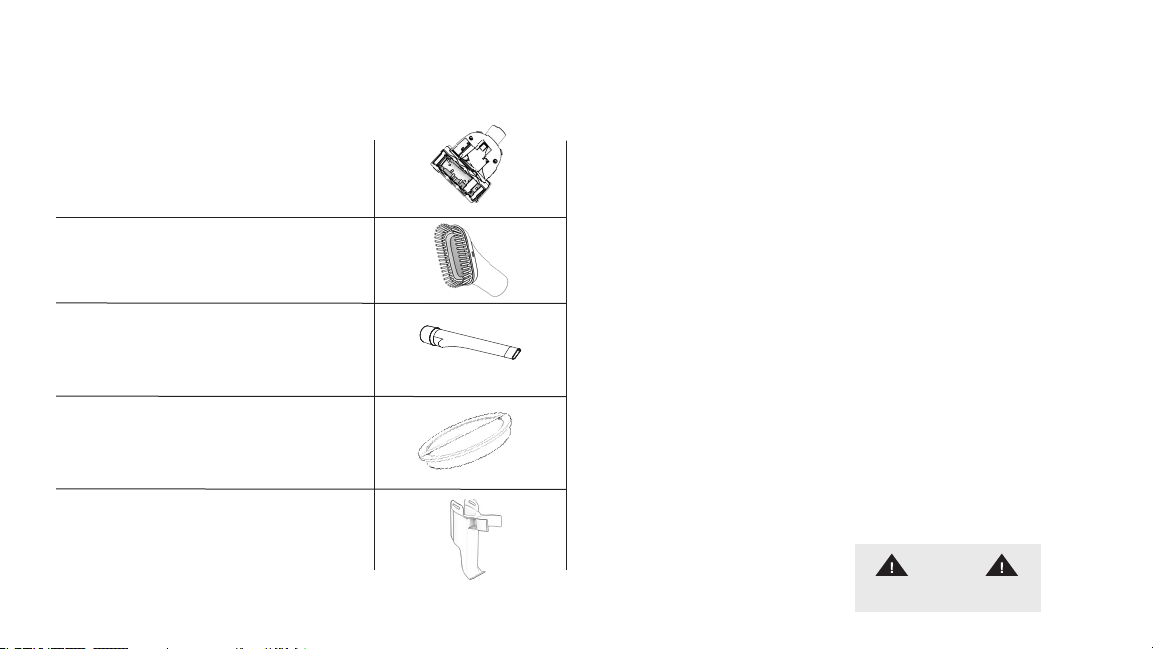
Pet Turbo Tool:
Designed to remove stubborn pet hair from furniture,
stairs, upholstery and more
Dusting Brush:
Delicate bristles that gently clean
ne dust
Crevice Tool:
Great for cleaning in tight spaces and hard-to-reach
corners
Extra Primary Filter:
Additional lter makes regular maintenance
more convenient
Pet Turbo Tool Accessory Clip:
Attaches to the wand for easy and convenient onboard
storage
***Tools vary by model number. Refer to Hoover.com or Hoover.ca for tools included in each model.
CAUTION
Not to be used for grooming a pet.
5
Page 6
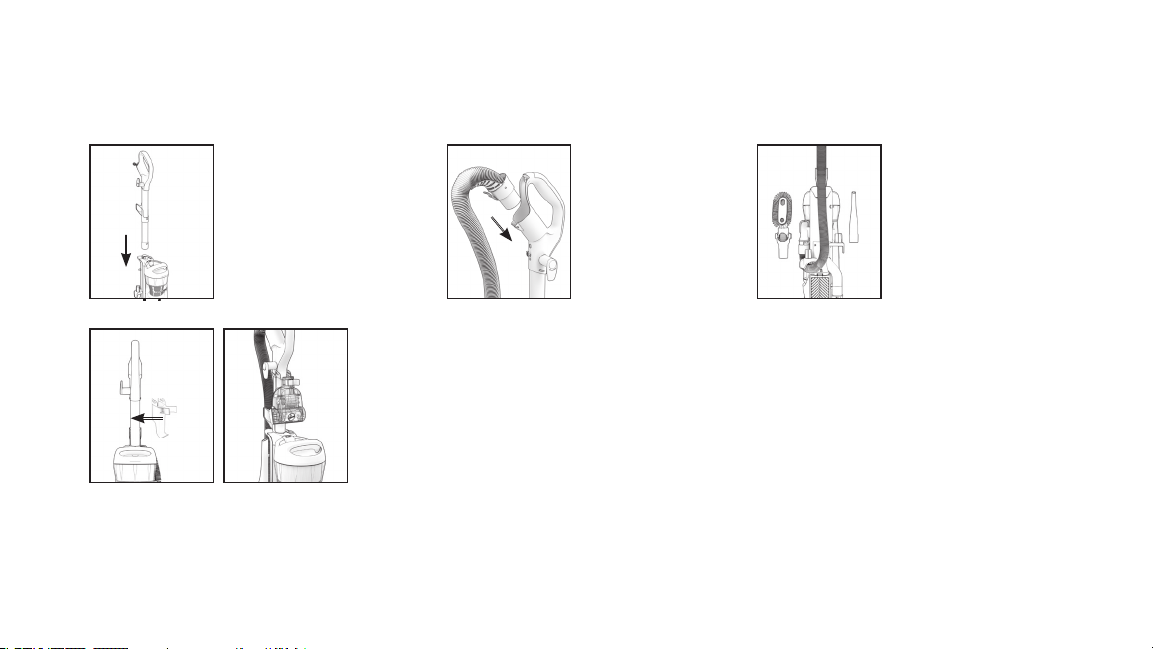
Assembly
Insert the wand into the spine
until it clicks in place.
Insert the hose into the
handle until it clicks
in place.
1 2 3
Optional: Attach Pet Turbo Tool
clip to wand until you hear a
4
Tip: Make sure all pieces click into place.
Tip: Wrap cord around cord hooks for convenient storage. Attach the plug to the end of the cord. Always store the vacuum with the power cord secured around the two cord hooks.
6
Tip: To unwrap the cord quickly, rotate the cord hook 180 degrees.
click. Insert Pet Turbo Tool.
Place tools onboard.
Press rmly into place.
Page 7
User Controls
Power the unit ON/OFF.*
1 2
Quick Release Cleaning Wand.*
Press the ‘Wand Release’ and pull
out of the vacuum for above oor
cleaning.
3
*See page 8 for location of features.
4
Brush Roll ON/OFF Pedal.*
ON: Carpets
OFF: Hard Floors
To turn the Brush Roll
ON/OFF, step on the
pedal.
4 Level Height Adjustment Lever*
To adjust the height setting, turn the lever to the desired height
setting.
For maximum cleaning performance, the following carpet height
settings are recommended:
-Hard oor setting: use for hard oors only
-Low and Medium setting: adjust depending on carpet type
-High carpet setting: for use on high pile carpets to ease pushing
effort
Pedal is inactive when the cleaner is in the upright position.
IMPORTANT
Brush roll should be in OFF position for
cleaning of high pile carpet deeper than 1”.
• IMPORTANT•
If the vacuum is difcult to push, rotate the lever to the next higher setting.
CAUTION
7
Page 8

Getting to Know Your Hoover® Pet Max Complete
1.
Quick Release Cleaning Wand
2.
Dual-Cyclonic Filtration System
3.
Rinsable Filter
4.
WindTunnel® Technology
5.
Power ON/OFF
6.
Extra Large Capacity Dirt Cup
7.
Odor Absorbing Filter
8.
AllergenBlock™ Technology
9.
Multi-Floor ON/OFF Pedal
10.
4 Level Height Adjust
11.
Advanced Action™ Brush Roll
8
1
2
3
4
5
6
7
8
9
10
11
Page 9

Using Your Hoover® Pet Max Complete
Upright Mode Above Floor Mode
Make sure the vacuum
is in the upright
1 Step on the ‘Handle Release’
pedal on the foot of the
vacuum and pull the handle
back.
2 Turn the vacuum ON.
TIP: For optimal cleaning, turn
the brush roll ON for carpets
and OFF to prevent the scatter
of debris on hard oors.
CAUTION
Use extra care when cleaning on stairs. To avoid personal injury or damage, and to
prevent the cleaner from falling, always place cleaner at the bottom of the stairs or on
the oor. Do not place cleaner on stairs or furniture, as it may result in injury or damage.
When using tools, always ensure handle is in the upright position.
1
3
position.
Attach the cleaning
accessory to the end
of the wand or hose.
Tip: Twist and push to
lock tools in place.
Press the wand
release button and
pull the wand out of
the vacuum.
OR
Press the hose tab
to remove the hose
2
from the handle.
Turn the vacuum ON.
4
9
Page 10

Maintenance
Any other servicing should be done by an authorized service representative.
If appliance is not working as it should, has been dropped, damaged, left outdoors, or dropped into water, call customer service at 1-800-844-9200 prior to continuing use.
Hoover® Pet Max Complete vacuums should have regular maintenance checks to maintain optimal performance and suction.
NOTICE: A Thermal Protector has been designed into your cleaner to protect it from overheating.
When the Thermal Protector activates, the cleaner will stop running. If this happens proceed as follows:
1. Turn the cleaner OFF and unplug it from the electrical outlet.
2. Empty the dirt cup.
3. Inspect the nozzle inlet, hose connector, hose, dirt cup inlet, cyclonic lter, rinsable lter and HEPA lter for any obstructions. Clear
obstructions if present.
4. When the cleaner is unplugged and the motor cools off for 30 minutes, the Thermal Protector will deactivate and cleaning may
Dirt Cup Release
continue. If the Thermal Protector continues to activate after following the above steps, your cleaner needs servicing. Refer to the
Warranty section in the user manual for servicing information.
WARNING
To reduce the risk of personal injury, unplug before cleaning or servicing.
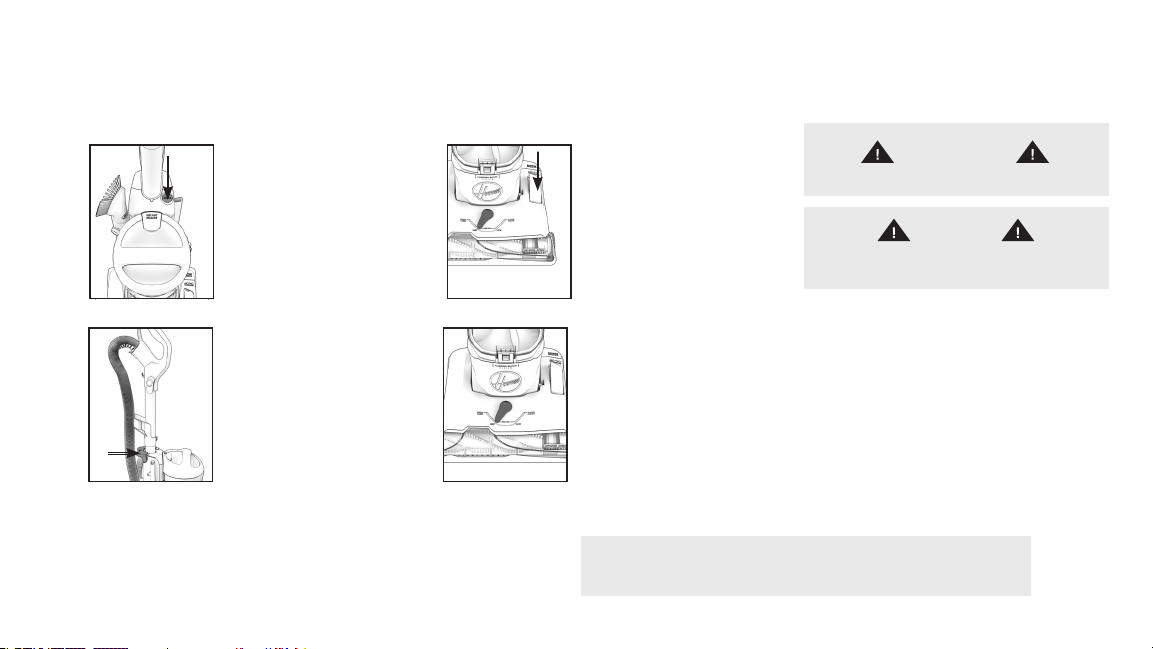
Emptying the Dirt Cup
1. Remove the dirt cup by pressing the dirt cup release button.
2. Hold the dirt cup over your trash can and press the dirt cup trap door release to empty the dirt cup.
Empty Dirt Cup
10
TIP: Empty the dirt cup after every use to maintain optimal performance.
Do not use vacuum without dirt cup and dry lters.
WARNING
Page 11

Maintenance
Cleaning the Filter
Rinsable Filter
To reduce the risk of personal injury, unplug before cleaning or servicing.
WARNING
TIP: Replace lters when heavily discolored.
Make sure the lter is ush with the bottom of the lter
housing.
Remove the dirt cup by pressing
the dirt cup release button.
1
Rinse under running water until
all dirt is out of the lter.
2
Access the rinsable
lter under the lter
access door.
Let your lter dry for 24
hours before replacing
into vacuum.
To remove, pull up on the
tab provided.
3
TIP: DO NOT bend filter.
YES NO
24H
4
5
11
Page 12

Maintenance
Cleaning the Filter
HEPA Filter
WARNING
To reduce the risk of personal injury, unplug before cleaning or servicing.
Locate the HEPA Filter on the
back of the vacuum.
1
TIP: DO NOT RINSE THE HEPA FILTER. Replace lters when heavily discolored.
Do not use your vacuum without all of the lters in place.
12
2
Push down on the top tab and
pull out.
Tap the HEPA Filter on the side
of the trash can to remove
excess dirt.
3
Page 13

Maintenance
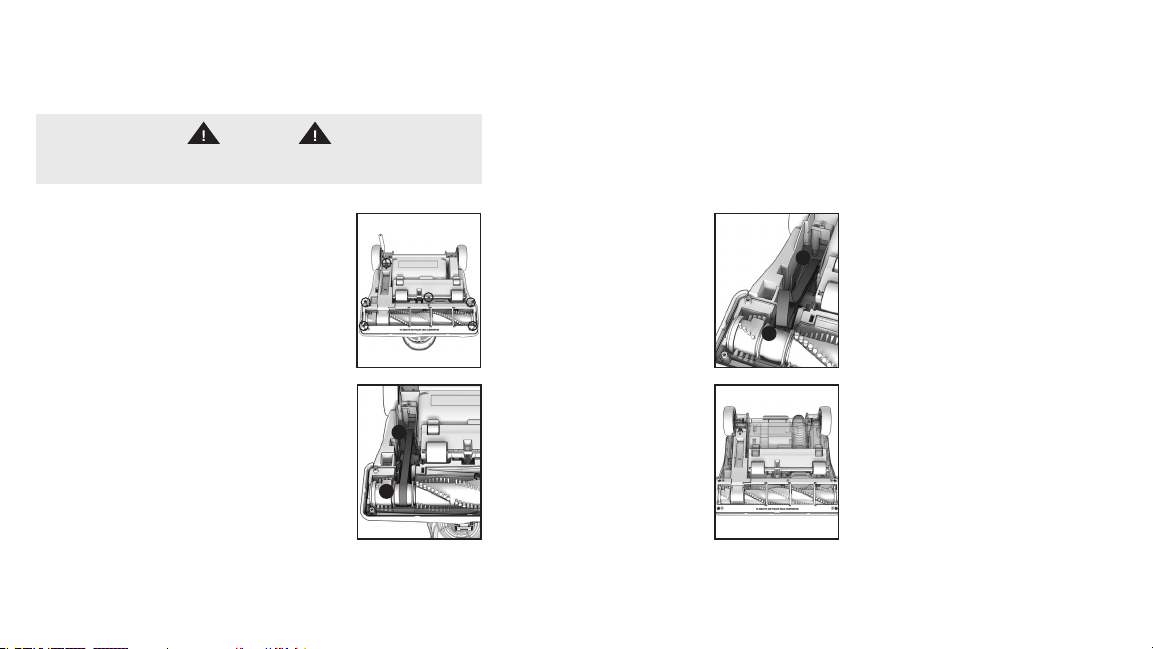
Cleaning & Maintaining the Brush Roll
CAUTION
To reduce the risk of injury from moving parts, unplug before servicing.
LUBRICATION: The motor and brush roll
are equipped with bearings which contain
sufcient lubrication for their lifetime.
The addition of lubrication could cause
damage. Do not add lubricant to motor or
brush roll.
Lower the handle to the reclined
position, and ip the unit over.
To access the brush roll, unscrew
the nozzle guard from the nozzle.
1
Remove any hair or
blockages.
3
TIP: Rotate the brush roll manually to ensure the belt is properly installed.
2
4
Remove the brush roll by
pulling it up and out from the
vacuum belt.
Replace the brush roll and nozzle
guard. Secure with screws.
13
Page 14
Maintenance
Belt Replacement
CAUTION
To reduce the risk of injury from moving parts, unplug before servicing.
WHEN TO REPLACE
Replace the belt if it is damaged, cut or
broken. Refer to the directions below.
HOW TO REPLACE
Place the handle in the low position and
turn the cleaner over so the bottom side
is up.
14
Remove the 6 screws as shown
with a Phillips screwdriver.
Remove the bottom plate.
A
1
Ensure that the letters printed on the belt are facing
C
D
you, slide the new belt over
the motor shaft (metal rod)
(C). Then slip it around the
area of the brush roll where
no bristles are present (D).
3
2
4
Remove the used belt from the
brush roll (A) then from the
motor shaft (metal rod) (B) and
B
discard.
With the belt in place, pull the belt and
slide the brush roll into the nozzle making
sure that the brush roll end caps are in
the correct orientation. Place the bottom
plate aligning the screw holes and reinstall the 6 screws.
Page 15
Maintenance
Removing System Clogs
WARNING
To reduce the risk of personal injury, unplug before cleaning or servicing.
1 2 3 4
Dirt Cup InletHose ConnectorNozzle Inlet Cyclonic Separator
5 6 7 8
Rinsable Filter
WandHoseHEPA Filter Hose
15
Page 16

Troubleshooting
• Any other servicing should be done by an authorized service representative.
• If appliance is not working as it should, has been dropped, damaged, left outdoors, or dropped into water, call customer service at 1-800-844-9200 prior to continuing use.
Problem Possible Solution
My vacuum will not turn ON 1. Always be sure to plug it in rmly.
My vacuum is hard to push 1. If the vacuum is difcult to push, turn the height adjustment lever to the next higher setting.
2. The Thermal Protector may have been activated - unplug your vacuum and let cool for 30 minutes. If this does not work, there may be no
voltage in the wall plug.
3. Check the fuse or breaker in your home. If there is a blown fuse or tripped breaker, replace the fuse in your home or reset the breaker.
My vacuum is losing suction
My brush roll is not spinning
16
CAUTION TO REDUCE THE RISK OF PERSONAL INJURY, UNPLUG BEFORE CLEANING OR SERVICING.
1. Be sure to empty the dirt cup if it is full.
2. You may have a clogged lter. Refer to the Maintenance in the user manual for directions on removing clogs.
3. Your lter may be dirty. Your lter should be rinsed every 4-6 uses. Refer to the Maintenance section for directions on how to
clean your lters.
4. If the problem persists, you may have a clog in the system. Refer to the Maintenance section on how to remove a clog in your system.
CAUTION TO REDUCE THE RISK OF INJURY FROM MOVING PARTS, UNPLUG BEFORE CLEANING OR SERVICING.
1. Unplug and remove any hair or other blockages around the brush roll.
2. Clean lters. Refer to the Maintenance section for directions on how to clean lters.
3. Check for clogs in the system. Refer to the Maintenance section for directions on how to remove clogs.
4. Replace the belt if it is damaged, cut or broken. Refer to the Belt Replacement section for directions.
5. Resume normal operation.
For more troubleshooting or FAQ’s please visit Hoover.com or Hoover.ca
Page 17

Service & Warranty
SERVICE & WARRANTY FOR HOOVER® PET MAX COMPLETE PRODUCT
REPRESENTATIVE Call 1-800-944-9200 USA & Canada
In the event that further assistance is required, visit and authorized service center. Find one nearest you by visiting our
website at www.Hoover.com or Hoover.ca. Costs of any transportation to and from any place of repair are to be paid
by the owner. Always identify your product by the model number and manufacturing code when requesting information
or ordering replacement parts. (the model number and manufacturing code for the vacuum appears on the back of the
spine.)
LIMITED THREE YEAR WARRANTY (DOMESTIC USE)
If this product is not as warranted, contact Hoover Customer Service at 888 679-2121. Please have available the proof
of purchase and model number for the warranted product.
WHAT THIS WARRANTY COVERS
This limited warranty provided by Royal Appliance Mfg. Co., doing business as TTI Floor Care North America (referred
to hereafter as “Hoover”) applies only to products purchased in the U.S. (including its territories and possessions), a
U.S. Military Exchange, or Canada. When used and maintained in normal household use and in accordance with the
Owner’s Guide, your Hoover® product is warranted against original defects in material and workmanship for three years
from the date of original purchase (the “Warranty Period”). If Hoover determines that the issue you are experiencing is
covered under the terms of this warranty (a “covered warranty claim”), we will, at our sole discretion and free of charge
(subject to the cost of shipping), either repair your product or ship you a replacement product, subject to availability.
Parts and replacements may be new, refurbished, lightly used, or remanufactured, in Hoover’s sole discretion. If parts
and replacements are unavailable, we may, at our discretion, provide a similar product of equal or greater value, a
store credit (if applicable), or a refund of the actual purchase price at the time of the original purchase, as reected on
the original sales receipt.
WHO THIS LIMITED WARRANTY COVERS
This limited warranty extends only to the original retail purchaser, with original proof of purchase from Hoover or an
authorized dealer of Hoover products, in the U.S., U.S. Military Exchanges, and Canada.
WHAT THIS WARRANTY DOES NOT COVER
This warranty does not cover use of the product in a commercial operation (such as maid, janitorial, and equipment
SERVICE INFORMATION
rental services, or any other income-generating activity); improper maintenance of the product; the product if it has
been subject to misuse, negligence, neglect, vandalism, or the use of voltages other than that on the data plate of
this product. This warranty does not cover damage resulting from an act of God, accident, owner’s acts or omissions,
service of this product by other than Hoover or a Hoover authorized service provider (if applicable), or other acts beyond
the control of Hoover. This warranty also does not cover use outside the country in which the product was initially
purchased, or resale of the product by the original owner. Pick-up, delivery, transportation, and house calls are not
covered by this warranty. In addition, this warranty does not cover any product that has been altered or modied;
repairs made necessary by normal wear; or the use of parts or accessories which are either incompatible with the
Hoover product or adversely affect its operation, performance, or durability. Normal wear items that are not covered
under this warranty include, but are not limited to, belts, lters, brush rolls, blower fans, blower and vacuum tubes,
and vacuum bags and straps.
OTHER IMPORTANT TERMS
This warranty is not transferable and may not be assigned; any assignment made in contravention of this prohibition is
void. This warranty shall be governed and construed under the laws of the state of North Carolina. The Warranty Period
will not be extended by any replacement of batteries or parts or repair performed under this warranty.
THIS WARRANTY IS THE EXCLUSIVE WARRANTY AND REMEDY, and all express and implied warranties other than the limited warranty
set forth above, including implied warranties of merchantability and tness for a particular purpose, are expressly disclaimed. In
no event will hoover be liable for any special, indirect, incidental or consequential damages of any kind or nature to owner or any
party claiming through owner, whether based in contract, negligence, tort, or strict products liability or arising from any cause
whatsoever. To the extent permitted by applicable law, no warranties that arise by operation of law, if applicable, shall exceed the
duration of the limited warranty provided herein. Hoover’s liability for damages to you for any costs whatsoever arising out of this
statement of limited warranty shall be limited to the amount paid for this product at the time of original purchase and Hoover shall
not be liable for any direct, indirect, consequential, or incidental damages arising out of the use or inability to use this product.
Some states do not allow the exclusion or limitation of incidental or consequential damages; disclaimers of implied
warranties; or limitations on how long an implied warranty lasts, so the above exclusions, disclaimers and/or limitations
may not apply to you.
17
Page 18

NOTES:
18
Page 19

IMPOR TANT : LISE Z ATTEN TIVEMENT LE PR ÉSENT GUIDE D’UT ILISATION
AVANT D’ASSEMBLER ET D’UTILISER L’APPAREIL.
Ce produit est des tiné à un usage domestique seulement.
La garantie est nulle si l’appareil est utilisé à des ns commerciales.
Conçu a ux États -Unis. Fa briqué en C hine. ©Techt ronic Fl oor Care Tech nology Li mited, 20 19.
Distribué par Royal Appliance Mfg. Co. Charlotte, NC 28262. Tous droits réservés. 961152 123-R0
PET MAX
COMPLETE
ASPIRATEUR VERTICAL
GUIDE D’UTILISATION
Page 20

Bienvenue chez
HooverMD.
Devenez ofciellement propriétaire.
Pour enregistrer votre aspirateur :
Appelez au 1 800 944-9200Visitez le site Hoover.com ou Hoover.ca
Nettoyez en toute conance pendant 3 ans grâce à la garantie limitée de
HooverMD. Consultez la garantie pour obtenir tous les détails.
20
C’EST GARANTI.
Page 21

Table des matières
Consignes de sécurité importantes ............................................................................... 22
Contenu de la boîte ........................................................................................................23
Assemblage ....................................................................................................................24
Commandes de l’utilisateur ........................................................................................... 25
Au sujet de votre aspirateur Pet Max Complete de HooverMD ........................................ 26
Utilisation de votre aspirateur Pet Max Complete de HooverMD ....................................27
Entretien .........................................................................................................................28
Dépannage ...................................................................................................................... 34
Entretien et garantie ......................................................................................................35
21
Page 22

CONSIGNES DE SÉCURITÉ IMPORTANTES CONSERVEZ CES INSTRUCTIONS!
Lorsque vous utilisez des appareils électriques, veuillez toujours respecter entre autres les consignes de sécurité
élémentaires suivantes:
VEUILLEZ LIRE TOUTES LES INSTRUCTIONS AVANT D’UTILISER CET APPAREIL.
AVERTISSEMENT :
• Assemblez entièrement l’appareil avant de l’utiliser.
• Faites seulement fonctionner l’appareil à la tension indiquée sur la plaque signalétique située à l’arrière de l’aspirateur-
chariot.
• Ne laissez pas l’appareil en marche sans surveillance. Débranchez la che de la prise de courant dès la n de l’utilisation
et avant le nettoyage ou l’entretien.
• N’utilisez pas l’appareil à l’extérieur ni sur des surfaces humides.
• Ne permettez pas aux enfants de jouer avec l’appareil. Cet appareil ne doit pas être utilisé par des enfants de moins de
12ans. Exercez une surveillance étroite lorsque l’appareil est utilisé par un enfant ou près de lui. Gardez l’appareil hors
de la portée des enfants et ne laissez pas ces derniers introduire leurs doigts ou d’autres objets dans aucune ouverture
an d’éviter les blessures ou les bris.
• Utilisez l’appareil uniquement aux ns décrites dans le présent guide. N’utilisez que des accessoires et des produits
recommandés par HooverMD.
• N’utilisez pas l’appareil lorsque le cordon ou la che est endommagé. Si l’appareil ne fonctionne pas comme il le devrait,
est tombé, est endommagé, a été laissé à l’extérieur ou a pris l’eau, communiquez avec le service à la clientèle au
1800844-9200 avant de continuer à l’utiliser.
• Ne tirez pas et ne transportez l’appareil par son cordon, n’utilisez pas le cordon comme une poignée, ne coincez pas le cordon
dans l’embrasure d’une porte et ne le tirez pas contre des arêtes ou des cornières tranchantes. Ne placez pas l’appareil sur le
cordon. Ne faites pas rouler l’appareil sur le cordon. Tenez le cordon éloigné des surfaces chaudes.
• Ne débranchez pas l’appareil en tirant le cordon. Débranchez l’appareil en tenant la che et non le cordon.
• Ne manipulez pas la che ou l’appareil avec des mains mouillées.
• N’insérez aucun objet dans les ouvertures. N’utilisez pas l’appareil si les ouvertures sont obstruées. Assurez-vous qu’elles
sont exemptes de poussière, de mousse, de cheveux ou de tout ce qui pourrait réduire le débit d’air.
• Gardez les cheveux, les vêtements amples, les doigts et toute autre partie du corps à l’écart des ouvertures et des
pièces en mouvement.
22
POUR RÉDUIRE LE RISQUE D’INCENDIE, DE DÉCHARGE ÉLECTRIQUE, DE DOMMAGE OU DE BLESSURE :
• Éteignez toutes les commandes avant de débrancher l’appareil.
• Redoublez de prudence lorsque vous utilisez l’appareil dans un escalier. Pour éviter tout dommage ou blessure et
empêcher l’appareil de tomber, placez toujours ce dernier au bas des escaliers, sur le plancher. Ne placez pas l’aspirateur
sur les marches d’un escalier ou sur un meuble, car cela peut entraîner des dommages ou des blessures.
• N’utilisez pas l’appareil pour aspirer des liquides inammables ou combustibles comme de l’essence, ni de la sciure de
bois, ni dans des endroits où de telles substances peuvent être présentes.
• Débranchez l’appareil avant d’installer l’outil à air comprimé ou motorisé.
• N’utilisez pas l’appareil pour aspirer quoi que ce soit qui brûle ou dégage de la fumée comme des cigarettes, des
allumettes ou des cendres chaudes.
• N’utilisez pas l’appareil si le vide-poussière ou les ltres ne sont pas installés.
MISE EN GARDE : MISE EN GARDE : POUR RÉDUIRE LES RISQUES DE DOMMAGES OU DE BLESSURES :
• Évitez d’utiliser l’appareil pour ramasser des objets durs ou aux arêtes tranchantes, car ils pourraient endommager
l’appareil.
• Rangez l’appareil adéquatement à l’intérieur et dans un endroit sec. Entreposez toujours l’aspirateur en xant le cordon
d’alimentation autour des deux crochets destinés au cordon. N’exposez pas l’appareil à des conditions de gel.N’utilisez
pas d’objet aux arêtes tranchantes pour nettoyer le tuyau, car cela risquerait de l’endommager.
• Lorsque le rouleau-brosse est en marche, ne laissez pas l’appareil trop longtemps au même endroit, car vous risqueriez
d’endommager le plancher.
• Pour réduire le risque de blessures présenté par les pièces en mouvement, débranchez l’appareil avant d’en effectuer
l’entretien.
AVERTISSEMENT : CET APPAREIL EST ÉQUIPÉ D’UNE FICHE POLARISÉE (UNE LAME PLUS LONGUE QUE L’AUTRE)
AFIN DE RÉDUIRE LE RISQUE DE DÉCHARGE ÉLECTRIQUE. CETTE FICHE NE PEUT ÊTRE BRANCHÉE QUE DANS UN SEUL SENS À UNE
PRISE POLARISÉE. SI LA FICHE NE S’INSÈRE PAS ENTIÈREMENT DANS LA PRISE, RETOURNEZ-LA. SI VOUS NE POUVEZ TOUJOURS PAS
L’INSÉRER, COMMUNIQUEZ AVEC UN ÉLECTRICIEN QUALIFIÉ POUR FAIRE INSTALLER UNE PRISE APPROPRIÉE. NE MODIFIEZ LA FICHE
EN AUCUN CAS.
Page 23

Contenu de la boîte
Outils et accessoires offerts***
Outil Turbo pour animaux :
Un produit conçu pour éliminer les poils d’animaux incrustés des
meubles, des escaliers, des tissus de revêtement, etc.
Brosse à épousseter :
Des poils délicats qui nettoient doucement
la poussière ne.
Suceur plat :
Idéal pour atteindre les espaces restreints et les recoins difciles
d’accès.
Filtre principal supplémentaire :
Un ltre supplémentaire rend l’entretien régulier plus pratique
Pince pour accessoire turbo :
Se xe au tube pour faciliter son rangement et pour la
commodité.
***Les outils varient selon le numéro de modèle. Consultez Hoover.com ou Hoover.ca pour connaître les outils fournis avec les différents modèles.
MISE EN GARDE
N’utilisez pas l’aspirateur pour toiletter un animal.
23
Page 24

Assemblage
Insérez le tube dans le manchon
jusqu’à ce qu’il s’enclenche.
Insérez le tuyau dans la
poignée jusqu’à ce qu’il
s’enclenche.
1 2 3
Facultatif : Fixez la pince pour
accessoire turbo au tuyau jusqu’à ce
4
Astuce : Veillez à ce que toutes les pièces s’enclenchent bien.
Astuce : Enroulez le cordon autour des crochets pour un rangement pratique. Fixez la che à la n du cordon. Rangez toujours l’aspirateur avec le cordon d’alimentation xé autour des deux crochets.
24
Astuce : Pour dérouler rapidement le cordon, tournez le crochet du cordon sur 180degrés.
que vous entendiez un clic. Insérez
l’accessoire turbo
Insérez les outils sur l’appareil.
Appuyez-les fermement en place.
Page 25

Commandes de l’utilisateur
Allumage/extinction de l’appareil.*
1 2
Tube de nettoyage à dégagement rapide.*
Appuyez sur le bouton de dégagement
du tube et retirez-le de l’aspirateur pour
nettoyer les surfaces au-dessus du sol.
3
*Consultez la page26 pour voir l’emplacement des caractéristiques.
4
Pédale d’activation/
désactivation de la pédale.*
MISE EN MARCHE : Tapis
DÉSACTIVATION: au-dessus
des planchers à surface
dure
Appuyez sur la pédale pour
activer ou désactiver le
rouleau-brosse.
4 Levier de réglage de hauteur*
Tournez le levier pour ajuster la hauteur au niveau désiré.
Les réglages de hauteur de poils de tapis recommandés an d’obtenir une
performance de nettoyage optimale sont:
- Réglage pour planchers durs: À utiliser seulement sur les planchers
durs
- Réglage bas ou moyen: À régler selon la sorte de tapis
- Réglage pour tapis à poils longs: À utiliser sur les tapis à poils longs
pour faciliter les efforts de poussée
La pédale est inactive lorsque l’aspirateur est en position verticale.
Désactivez le rouleau-brosse lorsque vous passez l’aspirateur
sur un tapis à poil d’une épaisseur de plus de 2,5cm (1po).
IMPORTANT
MISE EN GARDE
• IMPORTANT •
Si l’aspirateur est difcile à pousser, appuyez et tournez le levier vers le réglage pour tapis à poils longs.
25
Page 26

Au sujet de votre aspirateur Pet Max Complete de Hoover
1.
Tube de nettoyage à dégagement rapide
2.
Technologie à doub le cyclone
3.
Filtre lavable
4.
Technologie WindTunnel
5.
Mise SOUS TENSION/HORS TENSION
6.
Vide-poussière de très grande capacité
7.
Filtre absorbant l’odeur
8.
Technologie AllergenBlock
9.
Rouleau-brosse multisurface Marche/Arrêt
10.
Réglage de hauteur de niveau
11.
Rouleau-brosse Advanced Action
26
MD
1
MC
MC
2
3
4
MD
5
6
7
8
9
10
11
Page 27

Utilisation de votre aspirateur Pet Max Complete de Hoover
MD
Mode vertical Mode surface de plancher
Assurez-vous que
l’appareil est en position
1 Apposez le pied sur la pédale
de dégagement au bas de
l’aspirateur et tirez la poignée
vers vous.
2 Mettez l’appareil en MARCHE.
ASTUCE : Pour un nettoyage optimal,
ALLUMEZ le rouleau-brosse pour
les moquettes et ÉTEIGNEZ-le pour
éviter l’étalement des saletés sur
les planchers durs.
Redoublez de prudence lorsque vous utilisez l’appareil dans un escalier. Pour éviter tout dommage
ou blessure et empêcher l’appareil de tomber, placez toujours ce dernier au bas des escaliers ou sur
le plancher. Ne placez pas l’appareil sur les marches d’un escalier ou sur un meuble, car cela peut
entraîner des dommages ou des blessures. Lorsque vous utilisez des accessoires, assurez-vous que la
MISE EN GARDE
poignée est toujours en position verticale.
1
3
verticale.
Installez l’accessoire de
nettoyage à l’extrémité du
tube ou du tuyau.
Astuce : Tournez et
poussez pour verrouiller
les accessoires en place.
Appuyez sur le bouton
de dégagement du tube
et retirez le tube de
l’aspirateur.
OU
Appuyez sur la languette
du tuyau pour retirer le
tuyau de la poignée.
2
Mettez l’appareil en
MARCHE.
4
27
Page 28

Entretien
Toute autre tâche d’entretien doit être conée à un représentant de service autorisé.
Si l’appareil ne fonctionne pas comme il le devrait, est tombé, est endommagé, a été laissé à l’extérieur ou a pris l’eau, communiquez avec le service à la clientèle au 1800844-9200 avant de continuer à l’utiliser.
Les aspirateurs Pet Max Complete de HooverMD doivent être vériés périodiquement an de maintenir un niveau de performance et d’aspiration optimal.
REMARQUE : Votre appareil est équipé d’un rupteur thermique interne an de le protéger contre la surchauffe.
L’appareil cessera de fonctionner si ce rupteur thermique s’active. Voici ce qu’il faut faire lorsque ceci survient :
1. ÉTEIGNEZ l’appareil et débranchez-le de la prise de courant.
2. Videz le vide-poussière.
3. Inspectez l’orice de la buse, le connecteur, le tuyau, l’orice du vide-poussière, le ltre cyclonique, les ltres lavables et les ltres HEPA an de
détecter toute obstruction. Dégagez toutes les obstructions visibles.
4. Le rupteur thermique se réinitialisera après le débranchement de l’appareil et que le moteur ait refroidi pendant 30minutes et vous pourrez à ce
moment reprendre le travail. Votre appareil devra être réparé si le rupteur thermique se réinitialise constamment après avoir respecté les étapes ci-
Dégagement du vide-poussière
dessus. Reportez-vous à la section Garantie du manuel de l’utilisateur pour connaître les dispositions d’entretien et de réparation.
AVERTISSEMENT
Débranchez l’appareil avant de le nettoyer ou d’en effectuer l’entretien an de réduire le risque de blessures.
Vider le vide-poussière
1. Retirez le vide-poussière en appuyant sur son bouton de dégagement.
2. Tenez le vide-poussière au-dessus de votre poubelle et appuyez sur le loquet du panneau du vide-poussière pour le vider.
28
Videz le vide-poussière
ASTUCE : Videz le vide-poussière après chaque utilisation pour conserver un rendement
optimal.
AVERTISSEMENT
N’utilisez pas l’aspirateur sans vide-poussière ou sans ltres.
Page 29

Entretien
Nettoyage du filtre
Filtre lavable
Débranchez l’appareil avant de le nettoyer ou d’en effectuer l’entretien an de réduire le risque de blessures.
AVERTISSEMENT
ASTUCE : Remplacez votre ltre lorsqu’il est fortement décoloré.
Prenez soin de bien aligner le ltre avec le bas de son logement.
Retirez le vide-poussière en appuyant
sur son bouton de dégagement.
1
Rincez à l’eau courante jusqu’à ce
que toute la poussière soit éliminée
du ltre.
2
Accédez au ltre lavable
situé sous la porte d’accès
au ltre.
Laissez votre ltre sécher
pendant 24 heures avant
de le remettre dans
l’aspirateur.
Pour le retirer, tirez sur la
languette fournie.
3
ASTUCE : NE pliez PAS le filtre.
OUI NON
24 H
4
5
29
Page 30

Entretien
Nettoyage du filtre
Filtre HEPA
Débranchez l’appareil avant de le nettoyer ou d’en effectuer l’entretien an de réduire le risque de blessures.
AVERTISSEMENT
Repérez le ltre HEPA situé derrière
l’aspirateur.
1
ASTUCE : NE RINCEZ PAS LE FILTRE HEPA. Remplacez votre ltre lorsqu’il est fortement décoloré.
N’utilisez pas votre aspirateur sans avoir installé les ltres.
30
2
Poussez la languette supérieure et
tirez vers l’extérieur.
3
Tapotez le ltreHEPA sur la paroi
d’une poubelle pour éliminer le
surplus de saletés.
Page 31

Entretien
Nettoyage et entretien du rouleau-brosse
Débranchez l’appareil avant d’en effectuer l’entretien an de réduire le
MISE EN GARDE
risque de blessures présenté par les pièces en mouvement.
LUBRIFICATION : Le moteur et le rouleau-brosse
sont dotés de roulements contenant une
quantité sufsante de lubriant pour leur durée
de vie. L’ajout de lubriant pourrait causer
des dommages. N’ajoutez pas de lubriant au
moteur ni au rouleau de brosses.
Abaissez la poignée en position
basculée et retournez l’appareil. Pour
accéder au rouleau-brosse, dévissez le
protecteur de la buse.
1
Retirez tout amas de poils ou
obstruction.
3
ASTUCE : Faites tourner le rouleau-brosse manuellement afin de vous assurer que la courroie est bien installée.
2
4
Retirez le rouleau-brosse en
tirant dessus vers le haut et en
le dégageant de la courroie de
l’aspirateur.
Replacez le rouleau-brosse et le
protège-buse. Réinstallez les vis.
31
Page 32

Entretien
Remplacement de la courroie
MISE EN GARDE
Débranchez l’appareil avant d’en effectuer l’entretien an de réduire le
risque de blessures présenté par les pièces en mouvement.
QUAND DOIT-ON REMPLACER LA COURROIE?
Remplacez la courroie si elle est endommagée,
coupée ou cassée. Consultez les instructions
ci-dessous.
COMMENT LES REPLACER
Placez la poignée à la position la plus basse et
retournez l’aspirateur de manière à ce que le
dessous se retrouve sur le dessus.
32
Retirez les six(6) vis (montrées) à
l’aide d’un tournevis cruciforme.
Enlevez la base.
A
1
Assurez-vous que les lettres
imprimées sur la courroie sont
C
D
face à vous puis glissez la
courroie neuve sur l’arbre du
moteur (tige métallique) (C).
Insérez-la ensuite autour de
la partie du rouleau-brosse où
aucune soie ne se trouve.
3
2
4
Retirez la courroie usée du
rouleau-brosse (A) et de l’arbre
du moteur (tigemétallique) (B)
B
et jetez-la.
Une fois la courroie en place, poussez la
courroie et glissez le rouleau-brosse sur la buse
en vous assurant que les capuchons d’extrémité
du rouleau-brosse sont orientés correctement.
Installez la base en alignant les trous de vis et
réinstallez les 6 vis.
Page 33

Entretien
Éliminer les obstructions du système
AVERTISSEMENT
Débranchez l’appareil avant de le nettoyer ou d’en effectuer l’entretien an de réduire le risque de blessures.
1 2 3 4
Admission du vide-poussièreRaccord du tuyauAdmission de la buse Séparateur cyclonique
5 6 7 8
Filtre lavable
TubeTuyauFiltre HEPA Tuyau
33
Page 34

Dépannage
• Toute autre tâche d’entretien doit être conée à un représentant de service autorisé.
• Si l’appareil ne fonctionne pas comme il le devrait, est tombé, est endommagé, a été laissé à l’extérieur ou a pris l’eau, communiquez avec le service à la clientèle au 1800844-9200 avant de continuer à l’utiliser.
Problème Solu tion possi ble
L’aspirateur ne s’ALLUME pas
Mon aspirateur est difcile à pousser
1. Veillez à toujours le brancher fermement et correctement.
2. Le rupteur thermique est peut-être activé. Débranchez votre aspirateur et laissez-le refroidir pendant 30minutes. Si cela ne fonctionne pas, il se peut que la
prise de courant murale ne soit pas sous tension.
3. Vériez les fusibles ou les disjoncteurs de votre domicile. Si un fusible est brûlé ou un disjoncteur s’est déclenché, remplacez le fusible ou réarmez le
disjoncteur.
1. Si l’aspirateur est difcile à pousser, appuyez et tournez le levier de réglage de hauteur vers le réglage supérieur.
Mon aspirateur perd de sa
puissance d’aspiration
Mon rouleau-brosse ne tourne pas
34
MISE EN GARDE DÉBRANCHEZ L’APPAREIL AVANT DE LE NETTOYER OU D’EN EFFECTUER L’ENTRETIEN AFIN DE RÉDUIRE LE RISQUE DE BLESSURES.
1. Veillez à vider le vide-poussière s’il est plein.
2. Le ltre de votre aspirateur est peut-être obstrué. Consultez le chapitre «Entretien» du manuel de l’utilisateur pour savoir comment retirer les obstructions.
3. Votre ltre est peut-être sale. Votre ltre doit être net toyé après 4 à 6utilisations. Reportez-vous à la section Entretien pour savoir comment nettoyer vos
ltres.
4. Si le problème persiste, il se peut qu’il y ait une obstruction dans le système. Repor tez-vous à la section Entretien pour savoir comment retirer les obstructions dans votre système.
MISE EN GARDE DÉBRANCHEZ L’APPAREIL AVANT D’EN EFFECTUER LE NETTOYAGE OU L’ENTRETIEN AFIN DE RÉDUIRE LE RISQUE DE BLESSURES CAUSÉES PAR LES PIÈCES MOBILES.
1. Débranchez l’aspirateur et retirez tout amas de poils ou obstruction autour du rouleau-brosse.
2. Nettoyez les ltres. Consultez le chapitre «Entretien» pour connaître les instructions de nettoyage des ltres.
3. Vériez s’il y a des obstructions dans le système. Reportez-vous à la section Entretien pour des instructions pour retirer les obstructions.
4. Remplacez la courroie si elle est endommagée, coupée ou cassée. Consultez le chapitre «Remplacement de la courroie» pour connaître les instructions.
5. Reprenez le travail normalement.
Pour obtenir plus de solutions de dépannage ou consulter la foire aux questions, n’hésitez pas à visiter le site Hoover.com ou Hoover.ca.
Page 35

Entretien et garantie
RENSEIGNEMENTS CONCERNANT L’ENTRETIEN ET À LA GARANTIE DU PRODUIT PET MAX COMPLETE DE HOOVER
Appelez au 1-800-944-9200 (É.-U. et Canada)
Si le présent produit ne fonctionne pas comme il a été annoncé, communiquer avec le service à la clientèle de Hoover au 1888 679-2121.
Assurez-vous d’avoir en main la preuve d’achat et le numéro de modèle du produit couvert par la garantie.
ÉLÉMENTS COUVERTS PAR LA PRÉSENTE GARANTIE:
Cette garantie limitée fournie par Royal Appliance Mfg. Co., exerçant ses activités sous TTI Floor Care North America (appelée «Hoover»
ci-après) s’applique uniquement aux produits achetés aux États-Unis (y compris ses territoires et possessions), au Canada et par l’intermédiaire
du programme d’échanges militaires américain. Votre produit HooverMD est garanti pour des conditions normales d’utilisation et d’entretien
domestiques, comme le stipule le Guide d’utilisation, contre les défauts de matériaux et de fabrication pour une période complète de trois ans
à compter de la date d’achat (ci-après la «période de garantie»). Si Hoover détermine que le problème que vous rencontrez est couvert en
vertu des modalités de cette garantie (une «réclamation couverte par la garantie»), nous réparerons alors votre produit ou vous expédierons
un produit de rechange, selon la disponibilité des produits, à notre entière discrétion et sans frais (sous réserve du coût d’expédition). Les
pièces de rechange peuvent être nouvelles, remises à neuf, légèrement utilisées ou réusinées, à l’entière discrétion de Hoover. Si une pièce
ou une pièce de rechange n’est pas disponible, nous pourrions, à notre entière discrétion, fournir un produit de valeur égale ou supérieure, un
crédit en magasin (le cas échéant) ou un remboursement équivalant au prix d’achat réel en date de l’achat initial, comme indiqué sur le reçu
de vente original.
PERSONNES COUVERTES PAR LA PRÉSENTE GARANTIE:
La présente garantie limitée s’applique uniquement à l’acheteur original, avec une preuve d’achat provenant de Hoover ou d’un détaillant
autorisé des produits Hoover aux États-Unis, au Canada et par l’intermédiaire du programme d’échanges militaires américain.
ÉLÉMENTS NON COUVERTS PAR LA PRÉSENTE GARANTIE:
La présente garantie ne couvre pas toute utilisation commerciale du produit (p.ex., utilisation dans le cadre de services ménagers,
de conciergerie ou de location de matériel ou de toute autre activité générant un revenu), l’entretien inadéquat du produit, l’utilisation
MD
inadéquate du produit, la négligence, les actes de vandalisme ou l’utilisation d’une tension électrique autre que celle indiquée sur la plaque
signalétique de ce produit. La présente garantie ne couvre pas les dommages résultant d’un cas de force majeure, d’un accident, d’actes
ou d’omission de la part du propriétaire, de l’entretien de ce produit autre que par Hoover ou un fournisseur de service autorisé par Hoover
(le cas échéant) ou en raison d’autres actes qui sont hors du contrôle de Hoover. La présente garantie ne couvre pas non plus l’utilisation à
l’extérieur du pays d’achat initial du produit ni sa revente par le propriétaire original. La présente garantie ne couvre pas le ramassage, la
livraison, le transport et la réparation à domicile. De plus, elle ne couvre pas les produits qui ont été modiés, les réparations nécessaires
en raison de l’usure normale ou l’utilisation de pièces ou d’accessoires qui sont incompatibles avec le produit de Hoover ou qui nuisent à
son fonctionnement, à son rendement ou à sa durabilité. Les articles ayant une usure normale qui ne sont pas couverts par cette garantie
comprennent, sans s’y limiter, les courroies, les ltres, les rouleaux-brosses, les ventilateurs soufants, le soufeur et les tuyaux d’aspirateur,
les sacs d’aspirateurs et les attaches.
AUTRES CONDITIONS IMPORTANTES:
La présente garantie n’est pas transférable et ne peut être cédée; toute cession effectuée en violation de cette interdiction est annulée. La
présente garantie sera régie et interprétée selon les lois de l’État de la Caroline du Nord. La période de garantie ne peut pas être prolongée par
une réparation ou un remplacement des piles ou des pièces exécutés en vertu de la présente garantie, quels qu’ils soient.
LA PRÉSENTE GARANTIE EST L’UNIQUE GARANTIE ET RECOURS ET TOUTE GARANTIE EXPLICITE OU IMPLICITE AUTRE QUE LA GARANTIE LIMITÉE PRÉSENTÉE
CI-DESSUS, y compris les garanties implicites de qualité marchande et de convenance à une n particulière, est expressément déclinée. Hoover ne pourra
en aucun cas être tenue responsable de tous dommages intérêts spéciaux ou dommages indirects, accessoires ou consécutifs de quelque nature que ce
soit subis par le propriétaire du produit ou par toute partie réclamant par l’intermédiaire du propriétaire, qu’ils relèvent de la responsabilité contractuelle,
de la négligence, de la responsabilité civile délictuelle ou de la responsabilité stricte du fait des produits, ou qu’ils découlent de quelque cause que ce soit.
Dans les limites permises par la loi applicable, aucune garantie résultant d’une théorie juridique, le cas échéant, ne peut dépasser la durée de la garantie
limitée aux présentes. La responsabilité de Hoover à votre endroit pour tous les coûts, quels qu’ils soient, découlant de cette déclaration de garantie limitée
se limite au montant payé pour ce produit au moment de l’achat initial. Hoover ne peut être tenue responsable de tout dommage direct, indirect, consécutif ou
accidentel résultant de l’utilisation ou de l’impossibilité d’utiliser ce produit.
Certains États n’autorisent pas l’exclusion ni la restriction des dommages indirects ou accessoires, l’exclusion de garanties implicites ou les
limites de durée d’une garantie implicite; par conséquent, les restrictions ou exclusions précédentes peuvent ne pas s’appliquer. La présente
garantie vous donne des droits précis. Vous pouvez également avoir d’autres droits, lesquels varient d’une province à l’autre.
35
Page 36

NOTES :
36
Page 37

PET MAX
COMPLETE
ASPIRADORA VERTICAL
MANUAL DEL USUARIO
IMPOR TANTE: L EA ESTE M ANUAL CON ATENCIÓN ANTES DE ENSAMBLAR Y U SAR ESTE APAR ATO.
El único uso previsto para este producto es el uso doméstico.
Si se utiliza para uso comercial, se invalida la garantía.
Diseñ ado en EE. UU . Hecho en Chi na.© 2019 Techt ronic Fl oor Care Tech nology L imited.
Distribuido por Royal Appliance Mfg. Co. Charlotte, NC 28262. Todos los derechos reservados. 9611521 23-R0
37
Page 38

Bienvenido a la
propiedad de Hoover®.
Hágalo ocial.
Registre su aspiradora de la siguiente manera:
Llamando al 1-800-944-9200Visitando Hoover.com o Hoover.ca
Obtenga conanza al limpiar con la garantía limitada de hasta 3 años
Hoover®. Consulte la garantía para conocer los detalles completos.
38
TIENE GARANTÍA.
Page 39

Índice
Instrucciones de seguridad importantes ......................................................................40
¿Qué hay en la caja? ...................................................................................................... 41
Ensamblaje ..................................................................................................................... 42
Controles del usuario ....................................................................................................43
Conozca su Pet Max Complete de Hoover® .................................................................... 44
Uso de su Pet Max Complete de Hoover® .......................................................................45
Mantenimiento ...............................................................................................................46
Resolución de problemas ..............................................................................................52
Servicio y garantía .........................................................................................................53
39
Page 40

INSTRUCCIONES DE SEGURIDAD IMPORTANTES CONSERVE ESTAS INSTRUCCIONES
Cuando se utilizan aparatos eléctricos, se deben seguir siempre precauciones básicas, incluidas las siguientes:
LEA TODAS LAS INSTRUCCIONES ANTES DE UTILIZAR ESTE APARATO.
ADVERTENCIA: PARA DISMINUIR EL RIESGO DE INCENDIO, DESCARGA ELÉCTRICA, DAÑOS O LESIONES, RESPETE LAS
SIGUIENTES MEDIDAS:
• Arme la unidad por completo antes de ponerla en funcionamiento.
• Hágala funcionar únicamente con el voltaje especicado en la etiqueta de datos que se encuentra en la parte trasera del
contenedor de la aspiradora.
• No descuide el aparato cuando esté enchufado. Desenchúfelo del tomacorriente cuando no esté en uso y antes de
realizarle limpieza o servicio de mantenimiento.
• No utilice la aspiradora en exteriores o en supercies mojadas.
• Evite que se lo utilice como un juguete. Los niños de 12 años o menos no deben utilizar la unidad. Cuando la utilicen niños
o se utilice cerca de ellos, será necesario hacerlo bajo una estricta supervisión. Para evitar lesiones o daños, mantenga
a los niños alejados del producto y no permita que introduzcan los dedos ni objetos en ninguna de las aberturas del
producto.
• Utilice la unidad únicamente según el uso descrito en este manual. Utilice solamente los accesorios y productos
recomendados por Hoover®.
• No lo utilice si el cable o el enchufe se encuentran dañados. Si el aparato no funciona como debe; si se ha caído, ha sido dañado,
dejado a la intemperie o sumergido en agua, llame al servicio de atención al cliente al 1-800-844-9200 antes de seguir usándolo.
• No tire del aparato ni lo transporte tomándolo por el cable, no use el cable como una mana, no cierre una puerta sobre el cable
ni lo enrosque alrededor de bordes o esquinas losas. No apoye el producto sobre el cable. No pase el aparato por encima del
cable. Mantenga el cable lejos de las supercies calientes.
• No lo desenchufe tirando del cable. Para desenchufarlo, agarre el enchufe, no el cable.
• No manipule el enchufe ni el aparato con las manos mojadas.
• No coloque ningún objeto en las aberturas. No utilice la unidad si alguna de sus aberturas se encuentra bloqueada.
Manténgala libre de polvo, pelusas, cabello y cualquier otro elemento que pueda disminuir el ujo de aire.
40
• Evite que el cabello, la ropa suelta, los dedos y cualquier otra parte del cuerpo entren en contacto con las aberturas y las
piezas móviles de la unidad.
• Apague todos los controles antes de desenchufarlo.
• Extreme las precauciones cuando limpie en escaleras. Para evitar lesiones o daños físicos, y a n de evitar que la
aspiradora se caiga, siempre colóquela al pie de las escaleras, sobre el suelo. No coloque la aspiradora sobre las
escaleras o sobre un mueble, ya que esto puede producir lesiones o daños.
• No utilice la unidad para aspirar líquidos combustibles o inamables, tales como gasolina o restos de madera lada, ni la
utilice en áreas en las que dichas sustancias puedan estar presentes.
• Desenchufe la unidad antes de conectar la herramienta manual neumática o la herramienta manual motorizada.
• No aspire nada que se encuentre en combustión o emita humo, como cigarrillos, fósforos o cenizas calientes.
• No utilice la unidad si esta no tiene colocados la copa de recolección de residuos y los ltros.
PRECAUCIÓN: PRECAUCIÓN: PARA REDUCIR EL RIESGO DE DAÑO O LESIÓN:
• Evite aspirar objetos duros y losos con este producto, ya que pueden dañarlo.
• Almacénelo apropiadamente en interiores, en un espacio seco. Siempre guarde la aspiradora con el cable de alimentación
enroscado en forma segura alrededor de los dosganchos. No exponga la máquina a temperaturas bajo cero.
• No utilice objetos losos para limpiar la manguera, ya que pueden dañar la unidad.
• Con el cepillo giratorio encendido, evite dejar la aspiradora apoyada en un lugar por mucho tiempo. Esto puede dañar el piso.
• Para reducir el riesgo de lesión derivado de las piezas móviles, desconecte el aparato antes de realizarle el servicio de
mantenimiento.
ADVERTENCIA: PARA REDUCIR EL RIESGO DE DESCARGA ELÉCTRICA, ESTE APARATO TIENE UN ENCHUFE POLARIZADO
(UNA CLAVIJA ES MÁS ANCHA QUE LA OTRA). ESTE ENCHUFE CABE EN UN TOMACORRIENTE POLARIZADO DE UNA SOLA MANERA. SI NO
ENCAJA POR COMPLETO EN EL TOMACORRIENTE, INVIERTA EL ENCHUFE. SI AÚN NO ENCAJA, CONTACTE A UN ELECTRICISTA CALIFICADO
PARA QUE INSTALE EL TOMACORRIENTE CORRESPONDIENTE. NO REALICE NINGÚN TIPO DE MODIFICACIÓN EN EL ENCHUFE.
Page 41

¿Qué hay en la caja?
Herramientas y accesorios disponibles***
Herramienta turbo para pelos de animales:
Diseñada para eliminar pelos de animales aferrados a
muebles, escaleras, tapizados y más.
Cepillo quitapolvo:
Delicadas cerdas que limpian el polvo no lentamente.
Herramienta para limpieza en rincones:
Ideal para limpiar en espacios pequeños y esquinas de difícil
acceso.
Filtro principal adicional:
El ltro adicional facilita el servicio de mantenimiento
frecuente
Sujetador de accesorios de herramienta Turbo:
Se conecta a la varilla para un almacenamiento integrado
sencillo y cómodo.
***Las herramientas varían según el número de modelo. Consulte Hoover.com o Hoover.ca para ver las herramientas incluidas en cada modelo.
PRECAUCIÓN
La aspiradora no debe utilizarse para limpiar mascotas.
41
Page 42

Ensamblaje
Inserte la varilla en el lomo hasta que
encastre en su lugar.
1
4
Sugerencia: Asegúrese de que todas las piezas encastren en su lugar.
Sugerencia:
Envuelva el cable alrededor de los ganchos para un almacenamiento conveniente. Conecte el enchufe al extremo del cable. Siempre almacene la aspiradora con el cable de alimentación asegurado alrededor de los dos ganchos para cables.
42
Sugerencia: Para desenrollar el cable rápidamente, gire el gancho para el cable 180 grados.
2 3
Opcional: Conecte el sujetador de la
herramienta Turbo en la varilla hasta
sentir un clic. Inserte la herramienta
Turbo
Inserte la manguera en el
mango hasta que encastre
en su lugar.
Incorpore las herramientas.
Presione con rmeza en su lugar.
Page 43

Controles del usuario
ENCIENDA/APAGUE la unidad.*
1 2
Aplique la liberación rápida de la varilla
de limpieza.*
Presione la ‘Liberación de la varilla’
y extráigala de la aspiradora para la
limpieza sobre el nivel del suelo.
3
*Consulte la página 44 para ver la ubicación de las funciones.
4
Pedal de ENCENDIDO/APAGADO
del cepillo giratorio*
ENCENDIDO: Alfombras
APAGADO: Pisos duros
Para encender/apagar
el cepillo giratorio, pise
el pedal.
4 Palanca de ajuste de nivel alto*
Para ajustar la altura, gire la palanca hasta el ajuste de altura deseado.
Para obtener un máximo rendimiento de limpieza, se recomiendan los ajustes de altura de
alfombra siguientes:
-Ajuste para pisos duros: úselo solo para pisos duros
-Ajustes bajo y medio: ajuste según el tipo de alfombra
-Ajuste de alfombra alta: para usar en alfombras de pelo alto y disminuir el esfuerzo de
empuje
El pedal está inactivo cuando la aspiradora está en posición vertical.
El cepillo giratorio debe estar en la posición de apagado para limpiar
alfombras de pelo muy alto con una profundidad mayor a (25,4 mm) 1 pulg.
IMPORTANTE
PRECAUCIÓN
• IMPORTANTE •
Si se le diculta empujar la aspiradora, gire la palanca al ajuste superior siguiente.
43
Page 44

Conozca su Pet Max Complete de Hoover
1.
Aplique la liberación rápida de la varilla de limpieza
2.
Tecnología doble multiciclónica
3.
Filtro enjuagable
4.
Tecnología WindTunnel
5.
ENCENDIDO/APAGADO
6.
Copa de recolección de residuos con capacidad extra grande
7.
Filtro Absorbente de Olor
8.
Tecnología AllergenBlock
9.
Encendido/Apagado del cepillo giratorio para varios pisos
10.
Ajuste de altura del nivel
11.
Cepillo giratorio Advanced Action
44
®
™
™
®
1
5
2
6
3
7
8
9
4
10
11
Page 45

Uso de su Pet Max Complete de Hoover
®
Modo vertical Modo para limpiar sobre el nivel del piso
Asegúrese de que la
aspiradora esté en
1 Pise el pedal de ‘Liberación del
mango’ en el pie de la aspiradora
y tire del mango.
posición vertical.
2 Encienda la aspiradora.
SUGERENCIA: Para una limpieza
óptima, encienda el cepillo giratorio
en alfombras y apáguelo para
evitar la dispersión de suciedad en
pisos duros.
PRECAUCIÓN
Extreme las precauciones cuando limpie en escaleras. Para evitar lesiones o daños físicos, y a n
de evitar que la aspiradora se caiga, colóquela siempre al pie de las escaleras o sobre el suelo. No
coloque la aspiradora sobre las escaleras ni sobre un mueble, ya que pueden generarse lesiones o
daños. Cuando utilice las herramientas accesorias, siempre asegúrese de que el mango se encuentre
en posición vertical.
1
Conecte el accesorio de
limpieza al extremo de la
varilla o de la manguera.
Sugerencia: Gire y
presione para jar las
herramientas en su lugar.
3
2
4
Presione el botón de
liberación de la varilla
o el mango y tire de la
varilla hacia afuera de
la aspiradora.
O BIEN,
Presione la lengüeta
de la manguera para
extraer la manguera del
mango.
Encienda la aspiradora.
45
Page 46

Mantenimiento
Cualquier otro mantenimiento lo debe realizar un representante de servicio autorizado.
Si el aparato no funciona como debe; si se ha caído, ha sido dañado, dejado a la intemperie o sumergido en agua, llame al servicio de atención al cliente al 1-800-844-9200 antes de seguir usándolo.
Las aspiradoras Total Home Pet de Hoover® deben someterse a vericaciones de mantenimiento frecuentes para mantener un rendimiento y una succión óptimos.
AVISO: Se ha colocado un protector térmico en la aspiradora para protegerla contra el sobrecalentamiento.
Cuando dicho protector se active, la aspiradora dejará de funcionar. De ser así, proceda como se indica a continuación:
1. APAGUE la aspiradora y desenchúfela del tomacorriente.
2. Vacíe la copa de recolección de residuos.
3. Revise la entrada de la boquilla, el conector de la manguera, la manguera, la entrada de la copa de recolección de residuos, el ltro ciclónico, el ltro
enjuagable y el ltro HEPA en busca de obstrucciones. Limpie cualquier obstrucción presente.
4. Una vez que la aspiradora esté desenchufada y el motor se haya enfriado durante 30 minutos, el protector térmico se desactivará y usted podrá retomar
la limpieza. Si el protector térmico continúa activándose luego de haber seguido los pasos anteriores, signica que su aspiradora requiere de un
Liberación de la copa de
recolección de residuos
servicio de mantenimiento. Consulte la sección Garantía del manual del usuario para ver la información de mantenimiento.
ADVERTENCIA
Para disminuir el riesgo de lesiones físicas, desenchufe la unidad antes de limpiarla o realizarle un servicio de mantenimiento.
Vaciado de la copa de recolección de residuos
1. Retire la copa de recolección de residuos presionando el botón de liberación de la copa de recolección de residuos.
2. Sostenga la copa de recolección de residuos sobre el contenedor de basura y presione la liberación de la puerta de trampa de la
copa de recolección de residuos para vaciarla.
Vacíe la copa de recolección
46
de residuos
SUGERENCIA: Vacíe la copa de recolección de residuos después de cada uso para
lograr un rendimiento óptimo.
ADVERTENCIA
No use la aspiradora sin la copa de recolección de residuos y los ltros secos.
Page 47

Mantenimiento
Limpieza del filtro
Filtro enjuagable
Para disminuir el riesgo de lesiones físicas, desenchufe la unidad antes de limpiarla o realizarle un servicio de
ADVERTENCIA
mantenimiento.
Retire la copa de recolección de
residuos presionando el botón de
liberación de la copa de recolección
de residuos.
Acceda al ltro enjuagable
debajo de la puerta de
acceso del ltro.
SUGERENCIA: Reemplace los ltros cuando estén altamente decolorados.
Asegúrese de que el ltro quede al ras en el fondo del alojamiento del
ltro.
Para extraerlo, tire hacia
arriba de la lengüeta
provista.
1
Enjuague con agua corriente hasta
retirar toda la suciedad del ltro.
2
Deje secar el ltro durante
24 horas antes de volverlo a
colocar en la aspiradora.
3
SUGERENCIA: NO doble el filtro.
SÍ NO
24H
4
5
47
Page 48

Mantenimiento
Limpieza del filtro
Filtro HEPA
Para disminuir el riesgo de lesiones físicas, desenchufe la unidad antes de
ADVERTENCIA
limpiarla o realizarle un servicio de mantenimiento.
Busque el ltro HEPA en la parte
trasera de la aspiradora.
1
SUGERENCIA: NO ENJUAGUE EL FILTRO HEPA. Reemplace los ltros cuando estén altamente decolorados.
No utilice la aspiradora sin la totalidad de los ltros en su lugar.
48
2
Presione la lengüeta superior y tire
hacia afuera.
3
Golpee el ltro HEPA en la parte
lateral del contenedor de basura
para extraer el exceso de suciedad.
Page 49

Mantenimiento
Limpieza y mantenimiento del cepillo giratorio
Para reducir el riesgo de lesión derivado de las piezas móviles,
PRECAUCIÓN
desconecte el aparato antes de realizarle el servicio de mantenimiento.
LUBRICACIÓN: El motor y el cepillo giratorio
vienen equipados con cojinetes de suciente
lubricación para toda su vida útil. Si le agrega
lubricantes, esto podría dañar el motor. No
agregue lubricante al motor o al cepillo.
Baje el mango hasta la posición
reclinada e invierta la unidad.
Para acceder al cepillo giratorio,
desatornille la protección de la
boquilla de la boquilla.
1
Retire los cabellos u
obstrucciones.
3
SUGERENCIA: Gire el cepillo giratorio en forma manual para asegurarse de que la correa esté bien instalada.
2
4
Retire el cepillo giratorio tirando
de él hacia arriba y afuera de la
correa de la aspiradora.
Vuelva a colocar el cepillo giratorio y
la protección de la boquilla. Asegure
con tornillos.
49
Page 50

Mantenimiento
Reemplazo de la correa
PRECAUCIÓN
Para reducir el riesgo de lesión derivado de las piezas móviles,
desconecte el aparato antes de realizarle el servicio de mantenimiento.
CUÁNDO REEMPLAZARLA
Reemplace la correa si está dañada, cortada o
rota. Consulte las instrucciones a continuación.
CÓMO VOLVER A COLOCARLOS
Coloque el mango en la posición baja e invierta
la aspiradora de manera que el lado inferior
quede hacia arriba.
50
Retire los 6 tornillos con un
destornillador Phillips como se
muestra en la gura. Extraiga la
placa base.
A
1
Asegúrese de que las letras
impresas en la correa apunten
C
D
hacia usted y deslice la nueva
correa sobre el eje del motor
(varilla metálica) (C). Luego,
colóquela alrededor del área del
cepillo giratorio donde no haya
cerdas (D).
3
2
4
Retire la correa usada del
cepillo giratorio (A), luego del
eje del motor (varilla metálica) y
B
deséchela.
Con la correa en su lugar, tire de ella y deslice
el cepillo giratorio dentro de la boquilla
asegurándose de que las tapas de los extremos
del cepillo giratorio estén en la orientación
correcta. Coloque la placa base alineando los
oricios de los tornillos y vuelva a colocar los
6 tornillos.
Page 51

Mantenimiento
Extracción de obstrucciones del sistema
ADVERTENCIA
Para disminuir el riesgo de lesiones físicas, desenchufe la unidad antes de
limpiarla o realizarle un servicio de mantenimiento.
1 2 3 4
Conector de la mangueraEntrada de la boquilla Separador ciclónico
Entrada de la copa de recolección
de residuos
5 6 7 8
Filtro enjuagable
VarillaMangueraFiltro HEPA Manguera
51
Page 52

Resolución de problemas
• Cualquier otro mantenimiento lo debe realizar un representante de servicio autorizado.
• Si el aparato no funciona como debe; si se ha caído, ha sido dañado, dejado a la intemperie o sumergido en agua, llame al servicio de atención al cliente al 1-800-844-9200 antes de seguir usándolo.
Problema Soluc ión posible
La aspiradora no enciende
Es difícil empujar la aspiradora
1. Asegúrese siempre de enchufarla en forma rme.
2. Es posible que el protector térmico se haya activado: desenchufe la aspiradora y déjela enfriar durante 30 minutos. Si esto no funciona, puede ser que no haya
tensión en el enchufe de la pared.
3. Revise el fusible o el disyuntor del hogar. Si encuentra un fusible quemado o un disyuntor activado, reemplace el fusible en su hogar o restablezca el
disyuntor.
1. Si se le diculta empujar la aspiradora, gire la palanca de ajuste de altura al ajuste superior siguiente.
La aspiradora pierde succión
El cepillo giratorio no gira
52
ADVERTENCIA PARA DISMINUIR EL RIESGO DE LESIONES FÍSICAS, DESENCHUFE LA UNIDAD ANTES DE LIMPIARLA O DE REALIZARLE UN SERVICIO DE MANTENIMIENTO.
1. Asegúrese de vaciar la copa de recolección de residuos si está llena.
2. Es probable que el ltro esté obstruido. Consulte Mantenimiento en el manual del usuario para obtener instrucciones sobre cómo eliminar obs trucciones.
3. Es posible que el ltro esté sucio. Se debe enjuagar el ltro cada 4 a 6usos. Consulte la sección Mantenimiento para obtener instrucciones sobre cómo limpiar
los ltros.
4. Si el problema continúa, es posible que el sistema esté obstruido. Consulte la sección Mantenimiento para ver cómo eliminar una obstrucción en el sistema.
PRECAUCIÓN PARA REDUCIR EL RIESGO DE LESIÓN DERIVADO DE LAS PIEZAS MÓVILES, DESCONECTE EL APARATO ANTES DE REALIZARLE EL SERVICIO DE MANTENIMIENTO.
1. Desenchufe la unidad y extraiga los cabellos u otras obstrucciones alrededor del cepillo giratorio.
2. Limpie los ltros. Consulte la sección Mantenimiento para obtener instrucciones sobre cómo limpiar los ltros.
3. Revise en busca de obstrucciones en el sistema. Consulte la sección Mantenimiento para obtener instrucciones sobre cómo eliminar obstrucciones.
4. Reemplace la correa si está dañada, cortada o rota. Consulte la sección Reemplazo de la correa para ver las instrucciones.
5. Reanude el funcionamiento normal.
Para obtener más resolución de problemas o ver las preguntas frecuentes, visite Hoover.com o Hoover.ca
Page 53

Servicio y garantía
SERVICIO Y GARANTÍA PARA HOOVER® PET MAX COMPLETE PRODUCTO
UN REPRESENTANTE Llame al 1-800-944-9200 en EE. UU. y Canadá
Si este producto no cumple con la garantía, comuníquese con el Servicio de atención al cliente de Hoover llamando al 888 679-2121.
Tenga a mano el comprobante de compra y el número de modelo para el producto cubierto por la garantía.
COBERTURA DE LA GARANTÍA LIMITADA:
Esta garantía limitada provista por Royal Appliance Mfg. Co., que realiza negocios como TTI Floor Care North America (a la que se hará
referencia como “Hoover” en el presente documento) se aplica solo a productos adquiridos en EE. UU. (incluidos sus territorios y pos-
esiones), una Tiendas de intercambios militares de los EE.UU. o Canadá. En casos de uso y mantenimiento domésticos en condiciones
normales y conforme a la Guía del propietario, el producto Hoover® tiene garantía contra fallas de fábrica en los materiales y fallas
por mano de obra por un periodo de tres años desde la fecha de compra original (en adelante, el “Plazo de la garantía”). Si Hoover
determina que el problema que presenta cuenta con la cobertura de los términos de esta garantía (un “reclamo de la garantía cubierto”), a nuestro criterio y sin costo (sujeto al costo de envío), repararemos su producto o enviaremos un producto de remplazo, que
será nuevo o refabricado y estará sujeto a disponibilidad. Las piezas y reemplazos pueden ser nuevos, reacondicionados, con poco uso
o refabricados, según el criterio de Hoover. Si no hay piezas y remplazos disponibles, a nuestro criterio, podemos otorgar un producto
similar de igual o superior valor, un crédito para la compra (si corresponde) o reembolsar el precio de la compra real al momento de la
compra original, tal como se indique en el recibo de venta original.
PERSONAS AFECTADAS POR LA COBERTURA DE LA GARANTÍA LIMITADA:
Esta garantía limitada se extiende únicamente al comprador minorista original, con comprobante de compra original de Hoover o un
distribuidor autorizado de productos Hoover, en EE. UU., Tiendas de intercambios militares de los EE.UU., y en Canadá.
¿QUÉ ES LO QUE NO CUBRE ESTA GARANTÍA LIMITADA?:
Esta garantía no cubre el uso del producto en operaciones comerciales (tales como servicios de limpieza, portería y servicios de alquiler de equipos, u otra actividad generadora de ingresos); el mantenimiento inadecuado del producto; el producto si ha sido expuesto a
abuso, negligencia, mal uso, vandalismo o el uso de voltajes diferentes a los especicados en la placa de identicación del producto.
INFORMACIÓN DE SERVICIO
Esta garantía no cubre los daños resultantes de actos fortuitos, accidentes, actos de omisión del propietario, servicio de este producto
por parte de otra entidad distinta de Hoover o un proveedor de servicios autorizado por Hoover (si corresponde), u otros actos que estén
más allá del control de Hoover. Esta garantía tampoco cubre el uso fuera del país en el que se compró el producto originalmente, o la
reventa del producto por parte del propietario original. Esta garantía no cubre la recolección, la entrega, el transporte ni las llamadas
domésticas. Además, esta garantía no cubre ningún producto que haya sido alterado o modicado, reparado en forma necesario por el
desgaste normal, o en el cual se hayan utilizado piezas o accesorios incompatibles con el producto Hoover o que afecten de manera
negativa su funcionamiento, rendimiento o durabilidad. Los elementos con desgaste normal que no estén cubiertos por esta garantía
incluyen, entre otros, correas, ltros, cepillos giratorios, ventiladores sopladores, sopladores y tubos aspiradores, y bolsas y cintas
para la aspiradora.
OTROS TÉRMINOS IMPORTANTES:
Esta garantía no es transferible y no puede asignarse, cualquier asignación realizada en contravención con esta prohibición quedará
nula. Esta garantía se regirá e interpretará bajo las leyes del estado de Carolina del Norte. El Plazo de la garantía no se prolongará por
el reemplazo de las baterías o piezas, ni por cualquier reparación realizada conforme a esta garantía.
ESTA GARANTÍA TIENE PREVALENCIA EXCLUSIVA COMO TAL Y COMO RECURSO LEGAL, y quedan expresamente rechazadas todas las garantías expresas e implícitas diferentes de la garantía limitada establecida anteriormente respecto de este producto, con inclusión de las garantías implícitas de
aptitud para la venta o adecuación a nes especícos. En ningún caso, hoover será responsable por los daños especiales, indirectos, incidentales
o consecuentes de ningún tipo que sufra el propietario o cualquier parte que reclame por intermedio de este, ya sea con base en un contrato,
por negligencia, hecho ilícito civil o responsabilidad objetiva, ni por ninguna otra causa. En la máxima medida permitida por las leyes aplicables,
ninguna garantía que surja de la aplicación de la ley, si es aplicable, superará la duración de la garantía limitada aquí provista. La responsabilidad
de Hoover por daños y por todo gasto que surja de esta declaración de garantía limitada quedará restringida al monto abonado por este producto
al momento de su compra original, y Hoover no será responsable de ningún daño directo, indirecto, emergente o incidental que surja del uso o la
imposibilidad de uso de este producto.
Algunos estados no permiten la exclusión o la limitación de daños incidentes o consecuentes, descargos de garantías implícitas o
limitaciones con respecto a la duración de garantías implícitas; por lo tanto, es posible que las exclusiones, los descargos o las limitaciones no se apliquen en su caso. Esta garantía le otorga derechos legales especícos. También puede tener otros derechos,
que varían según el estado.
53
Page 54

NOTAS:
54
Page 55

55
Page 56

Hoover.com
youtube.com/hoover facebook.com/hoover twitter.com/hooverusa instagram.com/hoover
56
 Loading...