

Hoover UH40080 Owner's Manual
www.hoover.com
Owner’s Manual
Operating and Servicing Instructions
©2010 Techtronic Floor Care Technology Limited. All Rights Reserved. #961069009 ID102086-R0
THIS PRODUCT IS INTENDED FOR HOUSEHOLD USE ONLY.
IF USED COMMERCIALLY WARRANTY IS VOID.
IMPORTANT: READ CAREFULLY BEFORE ASSEMBLY AND USE.
Questions or concerns? For assistance, please call Customer Service at 1-800-944-9200
Mon-Fri 8am-7pm EST. PLEASE DO NOT RETURN THIS PRODUCT TO THE STORE.

2
Important Safeguards .....................................................3
Assembling Cleaner .......................................................4
Carton Contents ......................................................4
How To Use ...........................................................5-8
Cleaner Descriptions ...................................................5
Carpet Height Adjustment ..............................................6
Custom Control™ Switch ................................................6
Cleaning Tools ........................................................7
Maintenance .............................................................9
Emptying Dirt Cup ....................................................9
Cleaning filter .......................................................10
Replacing Headlight ..................................................11
Replacing Agitator Brushroll ............................................12
Replacing Brushroll Belt ...............................................13
Replacing Powered Hand Tool ..........................................13
Replacing Power Hand Tool Belt .........................................14
Lubrication .........................................................14
Thermal Protector ....................................................15
If You Have a Problem ....................................................15
Clearing Blockages .......................................................16
Authorized Service .......................................................17
If you need assistance:
Visit our website at hoover.com. Follow the authorized dealer locator link to find the
Hoover® authorized dealer nearest you or call 1-800-944-9200 for an automated referral
of Hoover® authorized dealer locations (U.S. only) or to speak with a customer service
representative; Mon- Fri 8am- 7pm EST.
PLEASE DO NOT RETURN THIS PRODUCT TO THE STORE.
CONTENTS

3
Important Safety Instructions
When using an electrical appliance, always follow basic precautions, including the following:
READ ALL INSTRUCTIONS BEFORE USING THIS APPLIANCE
WARNING: To reduce the risk of fire, electric shock, or injury:
• Do not use outdoors or on wet surfaces.
• Close supervision is necessary when any appliance is used by or near children. Do not
allow vacuum cleaner to be used as a toy.
• Do not run unattended at any time.
• Keep hair, loose clothing, fingers, feet and all parts of body away from openings, rotating
agitator and other moving parts.
• Do not pick up anything that is burning or smoking, such as cigarettes, matches, or hot ashes.
• Do not use to pick up flammable or combustible materials such as gasoline or fine wood
sandings or use in areas where they may be present.
• Always turn off this appliance before connecting or disconnecting hose.
• Unplug cleaner before connecting the powered hand tool.
• Do not use without dirt cup or filters in place. Empty cup and clean filter frequently
when picking up very fine materials such as powder.
• Use extra care when cleaning on stairs.
• Do not put any object into openings. Do not use with any opening blocked; keep free of
dust, lint, hair, or anything that may reduce air flow.
• Always disconnect cord from electrical outlet before servicing the cleaner.
• Always unplug cleaner when not in use. Turn off all controls before unplugging.
• Do not unplug by pulling on cord. To unplug, grasp the plug, not the cord. Never handle
plug or appliance with wet hands.
• The use of an extension cord is not recommended.
• Do not use with damaged cord or plug. If appliance is not working as it should, has been
dropped, damaged, left outdoors, or dropped into water, take it to a Hoover Sales and
Service Center or Authorized Hoover Warranty Service Dealer (Depot).
• Do not pull or carry by cord, use cord as a handle, close door on cord or pull cord around
sharp edges or corners. Do not run appliance over cord. Keep cord away from heated surfaces.
• Use vacuum cleaner only for its intended use as described in the instructions. Use only
attachments recommended by Hoover; others may cause hazards.
WARNING:
• This product contains chemicals known to the State of California to cause cancer and
reproductive toxicity. Wash hands after handling.
• Do not operate cleaner in bare feet or when wearing open toe shoes or sandals.
• Avoid picking up hard, sharp objects with the cleaner. They may damage the cleaner.
Save these instructions!
4
A
C
B
F
G
H
I
E
D
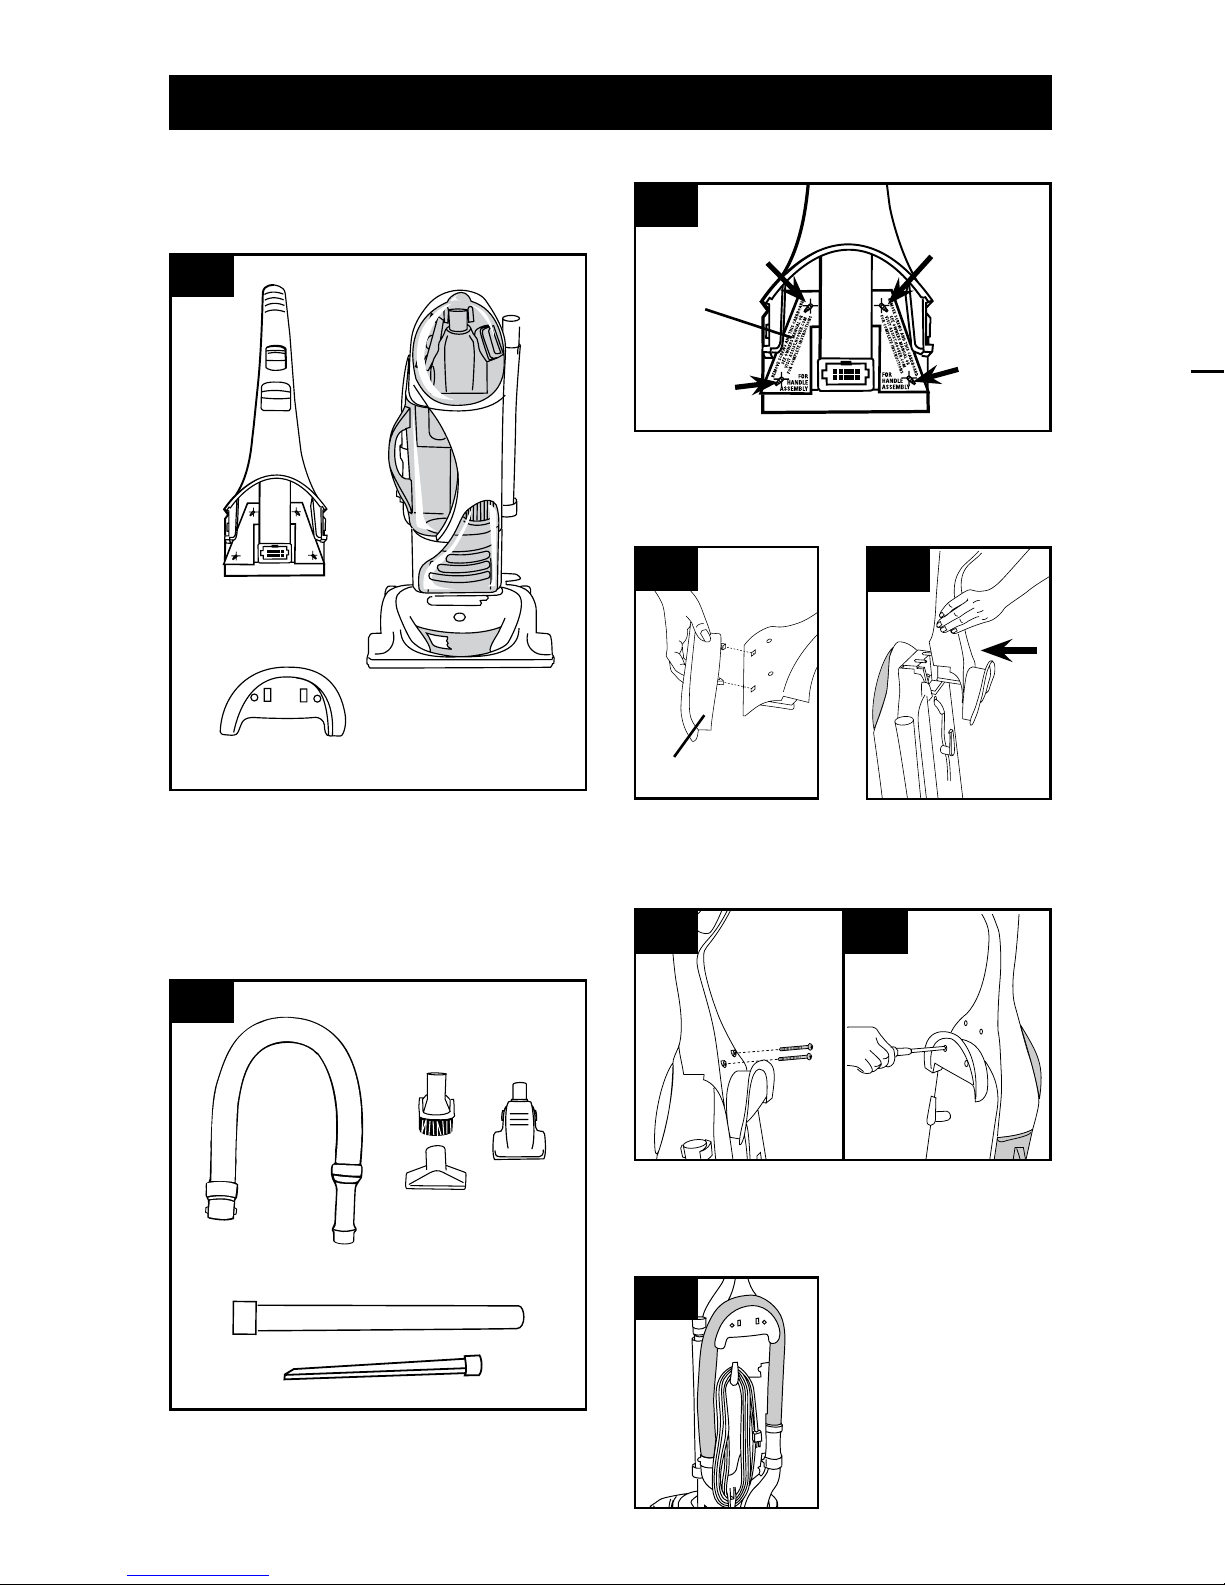
Carton contents
Empty carton. Find the parts shown below
before disposing of packing materials.
D. Hose
E. Dusting brush
F. Furniture nozzle
G. Powered hand tool
Accessory packs
The accessories are packed on the cleaner.
1.1
1.2
A. Handle section
B. Cleaner body
C. Hose holder
H. Extension wand
I. Crevice wand
Cleaner assembly
Disconnect cleaner from electrical outlet.
Remove cardboard (A) and four screws from
handle section. Discard cardboard, but keep
screws for assembly (Figs. 1-6 and 1-7).
A
1.3
B
Snap tabs on hose
holder (B) into
holes on handle
section.
1.4
Slide handle section
onto back of
handle.
1.5
1.6
1.7
Push screws into holes on back of handle
(Fig. 1-6) and hose holder (Fig. 1-7).
Tighten screws securely with a Phillips
screwdriver.
Place hose on
holder.
1.8
1. ASSEMBLING CLEANER
B. If a blockage
occurs during tool
use:
Turn cleaner OFF
and disconnect
from electrical
outlet.
1. Look into hose
end and remove
any blockage.
Service
To obtain approved Hoover® service and genuine Hoover® parts, locate the nearest
Authorized Hoover® Warrant y Service Dealer (Depot) by:
• Checking the Yellow Pages under “Vacuum Cleaners” or “Household”.
• Visit our website at hoover.com (U.S. Customers) or hoover.ca (Canadian customers).
Follow the service center link to find the service outlet nearest you.
• For an automated referral of authorized service outlet locations call 1-800-944-9200.
Do not send your vacuum to Hoover®, Inc., Company in Glenwillow for service. This will only
result in delay.
If you need further assistance:
To speak with a customer ser vice representative call 1-800-944-9200; Mon-Fri 8am-
7pm EST. Always identify your vacuum by the complete model number when requesting
information or ordering parts. (The model number appears on the bottom of the vacuum.)
PLEASE DO NOT RETURN THIS PRODUCT TO THE STORE.
Actual model may vary from images shown. Actual model may vary from images shown.
5
2.1
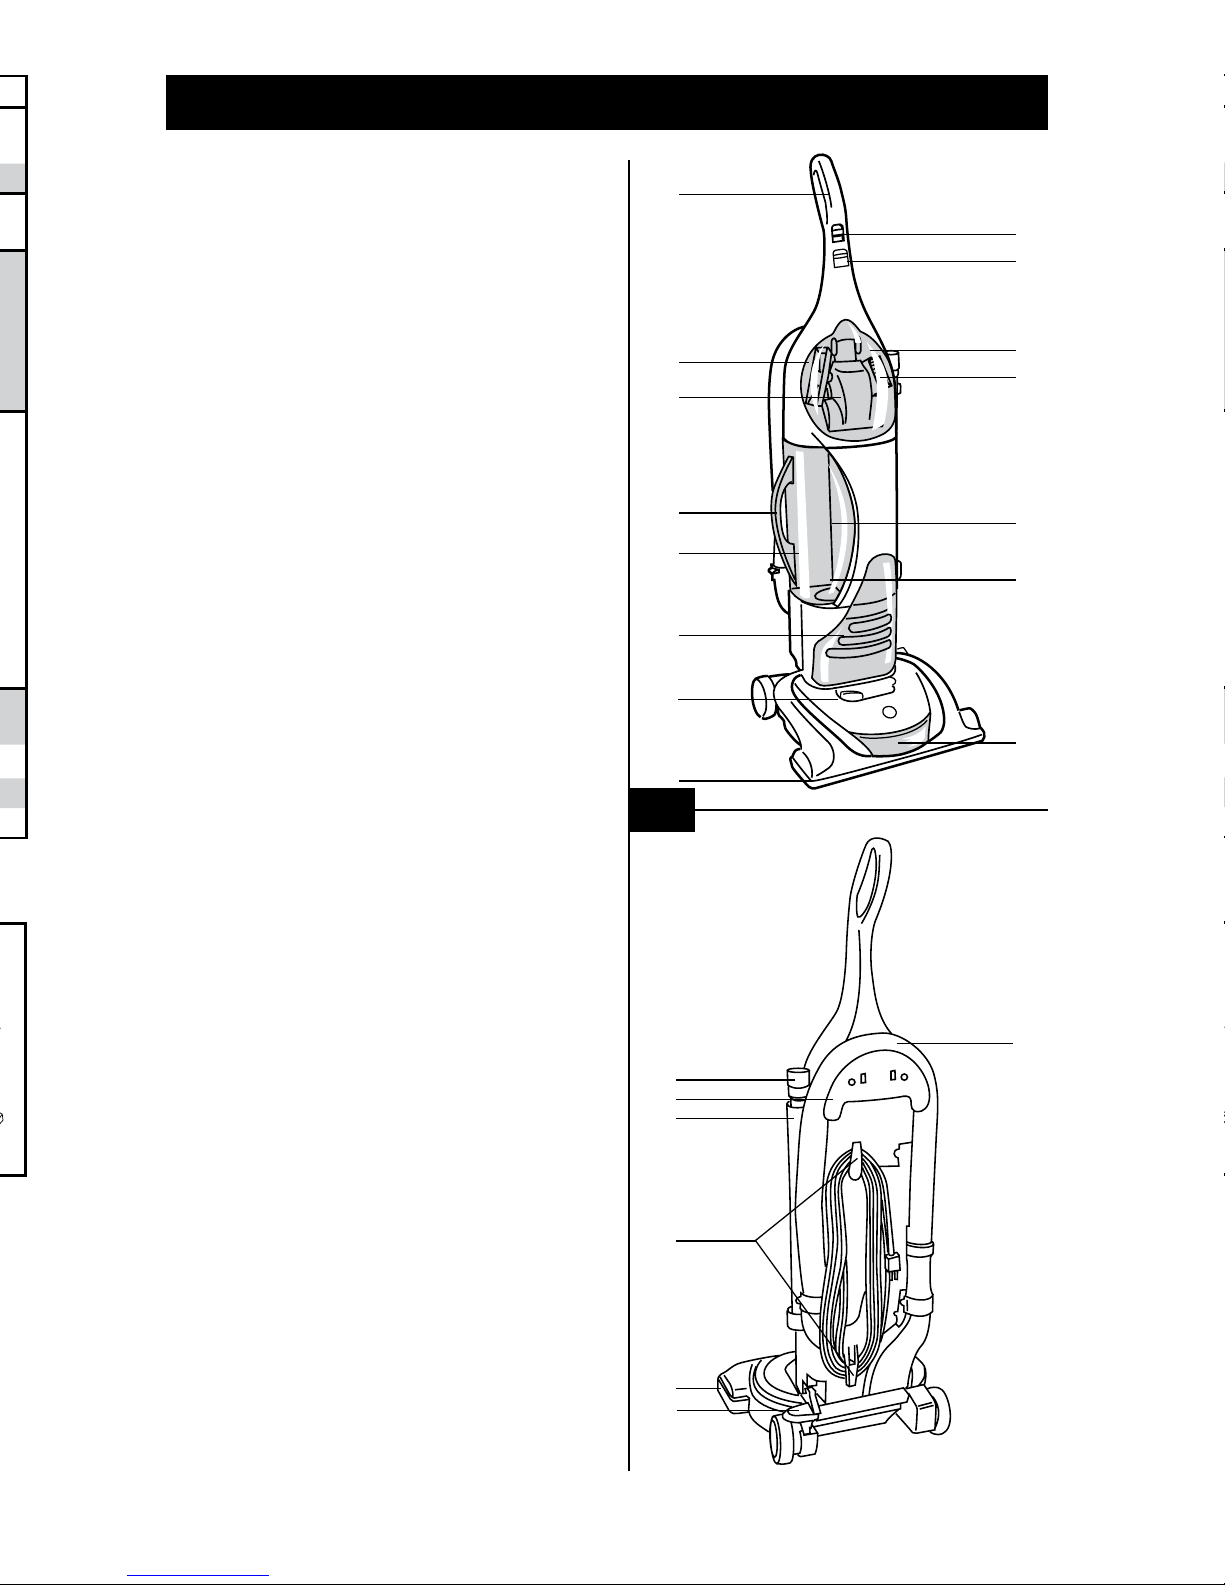
Cleaner description
Operate cleaner only at voltage specified on
data plate on bottom of cleaner.
The assembled cleaner will look like the
drawing.
1. Handle
2. Custom Control™ powerswitch
3. Custom Control™ indicator
4. Tool cover
5. Dusting brush
6. Powered hand tool
7. Furniture nozzle
8. Dirt cup
9. Dirt cup handle
10. HEPA cartridge filter
11. Pre-filter
12. Final filter
13. Three position handle release pedal: step
on lever to lower handle to operating or
low positions.
14. Nozzle control knob: rotate knob to
correct setting for height of carpet
being cleaned.
15. Furniture guard
16. Headlight
17. Ho se
18. Hose holder
19. Cord hooks: wrap cord around hooks for
storage. The top hook rotates right or
left for easy cord release.
20. Extension wand
21. Crevice wand: stores in wand.
*some models only.
This cleaner is intended for household use.
Not intended for commercial use in any
household or for any other commercial
purpose.
1
2
3
4
5
11
10
16
15
14
12
6
7
8
9
17
21
20
19
13
17
18
Polarized plug
To reduce the risk of electric shock, this appliance has a polarized plug (one blade is wider
than the other). This plug will fit in a polarized outlet only one way. If the plug does not
fit fully in the outlet, reverse the plug. If it
still does not fit, contact a qualified electrician
to install the proper outlet. Do not change the
plug in any way.
2. HOW TO USE
Actual model may vary from images shown.Actual model may vary from images shown.
6
Plug cord into electrical outlet.
CARPET setting - turns brushroll on, for cleaning carpets and rugs.
(Brushroll will automatically stop turning when handle is raised to
upright position.) BARE FLOOR setting - turns brushroll OFF for cleaning
hard surfact floors.
Brushroll automatic shut-off
If something gets caught in the brushroll, the cleaner will automatically
turn off. Slide the Custom Control™ switch to OFF. Unplug the cleaner.
Remove obstruction from brushroll and continue cleaning.
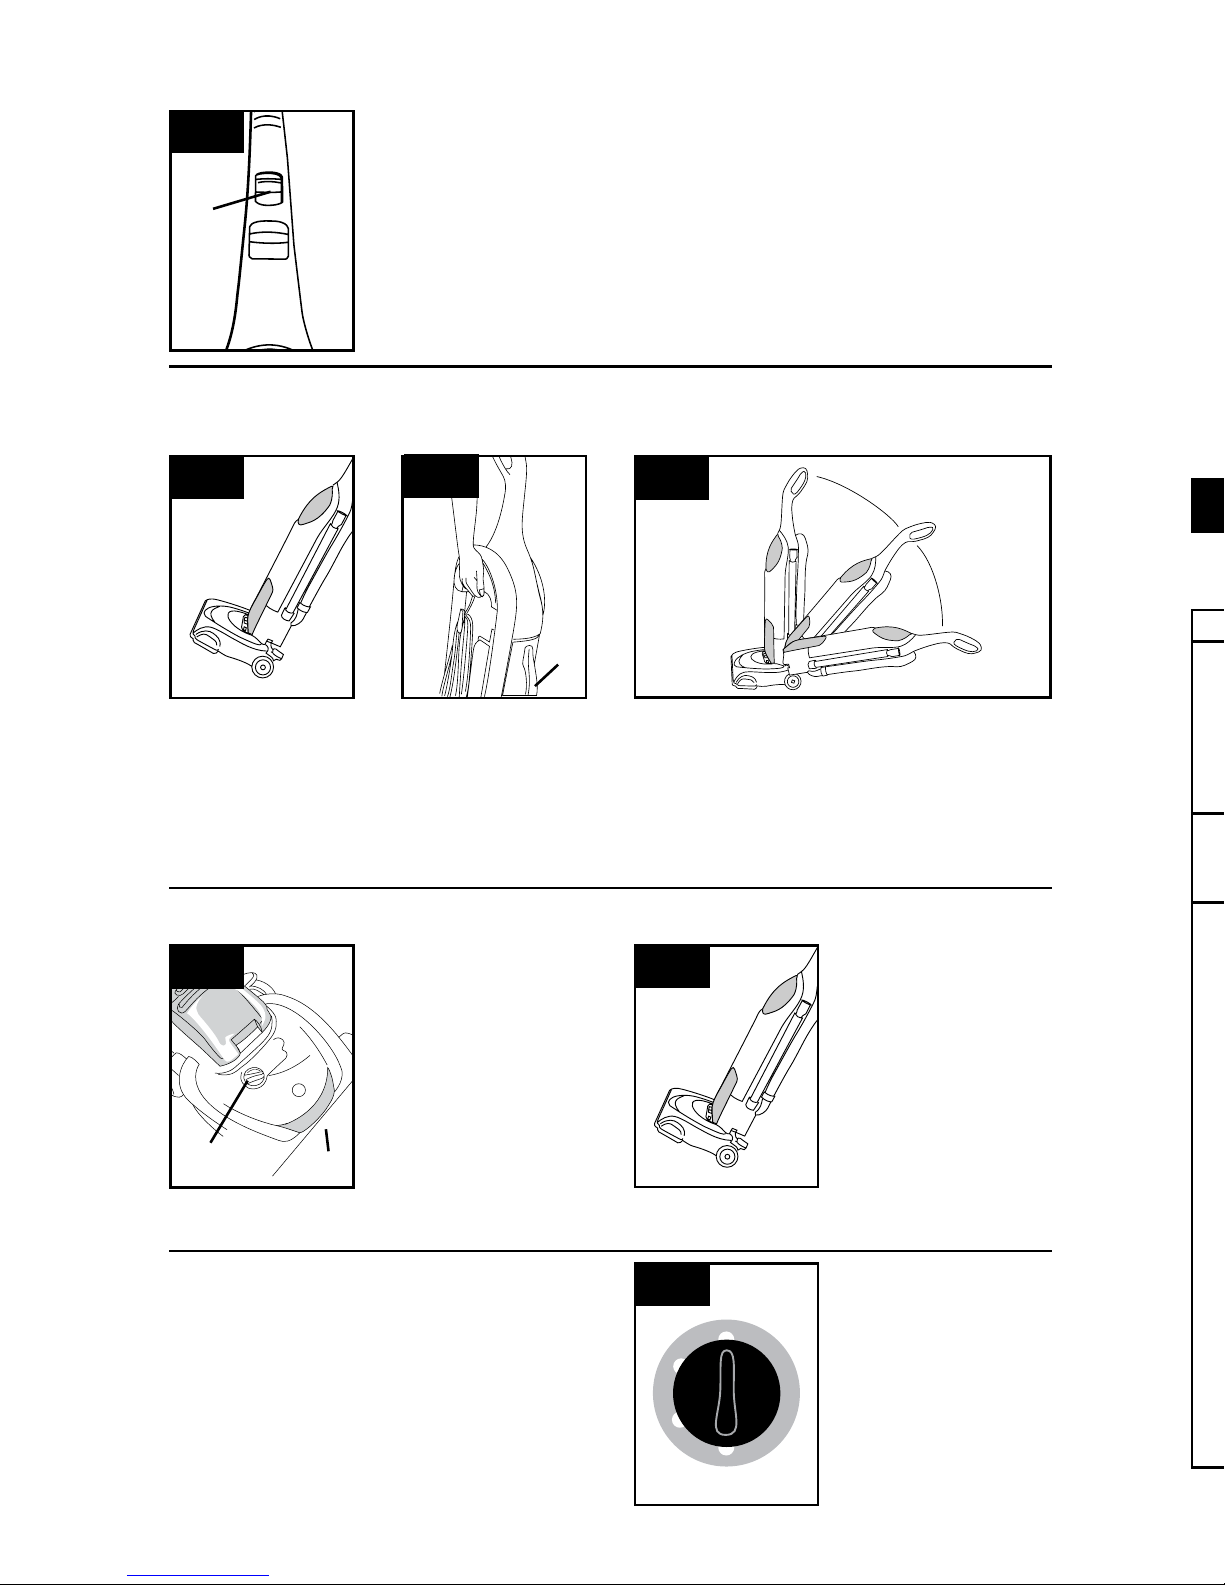
A
Custom Control™ switch
2.2
2.3
Put handle in
upright position.
Tilt cleaner back on
rear wheels. Push
forward.
Transporting
cleaner
A
2.4
Carrying
cleaner
Use the carr ying
handle to lift the
cleaner.
Do not lift cleaner
using dirt cup
handle (A).
Handle positions
The handle of your cleaner has three
positions; upright for storage and when
using cleaning tools; operating position for
general operation on carpet and f loors; low
for reaching under low furniture. Step on
handle release lever to lower handle.
2.5
The cleaning of
carpet and rugs
takes place at the
nozzle (C).
When it is
necessar y to raise
and lower the
nozzle for various
carpet pile heights,
turn the nozzle
control knob (D) to
the desired setting.
C
D
Carpet height adjustment
2.6
2.7
Handle position
For ease in sliding
knob, place handle
in the upright
position and tilt
cleaner backward.
For maximum cleaning performance, the
following carpet height settings are
recommended.
Low/Hard Surface: for bare floors and all
types of carpet
Note: If the cleaner is difficult to push, turn
knob to the next higher setting.
Settings
High Pile: for very
deep pile carpet
where easier
pushing effort is
desired, while
maintaining good
cleaning
performance.
H
E
I
G
H
T
A
D
J
U
S
T
M
E
N
T
2.8
PROBLEM POSSIBLE CAUSE POSSIBLE SOLUTION
Cleaner won’t
turn on
Not firmly plugged in
No voltage in wall plug
Blown fuse or tripped
breaker
Thermal protector activated
Agitator brushes
aren’t turning
Custom Control™ switch set
on bare f loor position.
Agitator is obstructed.
Cleaner won’t
pick up
Thermal protector
An internal thermal protector has been
designed into your cleaner to protect it from
overheating.
When the thermal protector activates, the
suction motor will stop running, however the
agitator will continue to run. If this happens,
proceed as follows:
1. Turn the cleaner OFF and disconnect it
from the electrical outlet.
2. Check dirt cup pre-filter, HEPA
cartridge filter and final filter for dirt
accumulation.
If a minor problem occurs, it usually can be solved quite easily when the cause is found by
using the check list below.
Actual model may vary from images shown.
 Loading...