

Hoover U8341, U8341950, UH40060CA Owner's Manual

TM
W
U
U
U
®
www.hoover.com
Owner’s Manual
English ➜ pages 3-20
ESPAÑOL ➜ pág 20-31
Thank You for
choosing
HOOVER
®
!

02
HOOVER SALES & SERVICE CENTERS
ALABAMA
Pinebrook Shpg. Ctr.
3980B Airport Blvd.
Mobile, AL 36608
(251) 341-0304
(251) 341-0395 fax
ARIZONA
3434 West Bell Rd.
Phoeniz, AZ 85053
(602) 439-2751
(602) 564-0938 fax
4881 E. Speedway Blvd.
Tucson, AZ 85712
(520) 795-5612
(520) 322-6016 fax
Mesa Shores Shpg Ctr.
2136 East Baseline Rd.
Suite B-1
Mesa, AZ 85204
(480) 633-0622
(480) 633-0626 fax
CALIFORNIA
Sycamore Plaza
1047 N. State College Blvd.
Anaheim, CA 92806
(714) 635-5710
(714) 635-8432 fax
Burlingame Plaza Shpg.Ctr.
1803A El Camino Real
Burlingame, CA 94010
(650) 652-7810
(650) 652-7811 fax
1660 Contra Costa Blvd.
Suite C
Pleasant Hill, CA 94523
(925) 674-1206
(925) 674-1304 fax
West Gate Shpg. Ctr.
17498 Hawthorne Blvd.
Torrance, CA 90504
(310) 921-6523
(310) 921-6533 fax
1834 Fulton Ave.
Sacramento, CA 95825
(916) 481-4860
(916) 481-1528 fax
3628 Geary Blvd.
San Franciso, CA 94118
(415) 668-5101
(415) 668-5976 fax
Greenhouse Market Place
699 Lewelling Blvd, Ste182
San Leandro, CA 94579
(510) 346-2400
(510) 346-2402 fax
6487 N. Blackstone Ave.
Fresno, CA 93710
(559) 449-8258
(559) 449-0302 fax
230 S. Lake Ave., #2
Pasadena, CA 91101
(626) 229-0636
(626) 229-0638 fax
19030 Ventura Blvd.
Tarzana, CA 91356
(818) 345-7637/7827
(818) 609-1246 fax
1287 Morena Blvd.
San Diego, CA 92110
(619) 276-9560
(619) 276-4359 fax
COLORADO
Academy Pl. Shpg. Ctr.
5142 N. Academy Blvd.
Colorado Springs, CO 80918
(719) 260-9988
(719) 260-8353 fax
Monaco Village Shpg. Ctr.
2200 S. Monaco Pkwy.
Denver, CO 80222
(303) 757-4904
(303) 757-2723 fax
FLORIDA
303 E. Altamonte Dr, Ste 1100
Altamonte Springs, FL 32701
(407) 831-1444
(407) 831-5444 fax
102 S. Flamingo Rd.
Pembroke Pines, FL 33027
(954) 432-0031
(954) 432-6350 fax
GEORGIA
3655 Roswell Rd. NE, Ste 126
Buckhead, GA 30342
(404) 814-1574
(404) 814-1035 fax
1064 Old Peachtree Rd.
Ste 102
Lawrenceville, GA 30043
(678) 442-9907
(678) 442-9947 fax
2960 Shallowford Rd. #200
Marietta, GA 30066
(678) 560-0066
(678) 560-0068 fax
10779 Alpharetta Hwy.
Suite 170
Roswell, GA 30076
(770) 649-0425
(770) 649-0704 fax
IDAHO
520 S. Meridan Rd, Ste. 150
Meridian, ID 83642
(208) 855-4775
(208) 855-4776 fax
ILLINOIS
Winston Plaza Shpg. Ctr.
1372 Winston Plaza
Melrose Park, IL 60160
(708) 344-3800
(708) 344-3853 fax
Yorkshire Plaza
4328 East New York Street
Aurora, IL 60504
(630) 499-5728
(630) 499-5816 fax
IOWA
3001-100th St.
Urbandale, IA 50322
(515) 331-0550
(515) 331-0545 fax
KENTUCKY
4131 Shelbyville Rd.
Louisville, KY 40207
(502) 895-4775
(502) 895-9874 fax
MARYLAND
Belair Beltway Plaza
7632 Belair Rd.
Baltimore, MD 21236
(410) 668-8100
(410) 668-9228 fax
The Festival at
Muddy Branch
305 Muddy Branch Rd.
Gaithersburg, MD 20878
(301) 948-0864
(301) 948-0866 fax
MICHIGAN
Evergreen Plaza Shpg. Ctr.
19799 West 12 Mile Rd.
Southfield, MI 48076
(248) 552-6253
(248) 552-6256 fax
MINNESOTA
Knollwood Village Shpg. Ctr.
8922 Highway 7
St. Louis Park, MN 55426
(952) 935-0091
(952) 935-0462 fax
Falcon Crossing Shpg. Ctr.
1539 W. Larpenteur Ave.
St. Paul, MN 55113
(651) 644-8684
(651) 644-6621 fax
MISSOURI
201 East Gregory
Kansas City, MO 64114
(816) 333-7440
(816) 333-3184 fax
18931 Valley View Pkwy.
Ste F
Independence, MO 64055
(816) 795-5303
(816) 795-5759 fax
NEBRASKA
Plaza II Shpg. Ctr.
2449 S. 120thStreet
Omaha, NE 68144
(402) 330-2290
(402) 330-7675 fax
NEVADA
Eastern Beltway Shpg. Ctr.
2050 East Serence Ave.
Suite 620-3
Las Vegas, NV 89123
(702) 614-0777
(702) 614-0787 fax
7920 W. Tropical Parkway
Suite 110
Las Vegas, NV 89149
(702) 645-4320
(702) 645-7518 fax
NEW MEXICO
Fiesta Crossings
4770 Montgomery VC NE
Suite A-103
Albuquerque, NM 87109
(505) 883-0800
(505) 883-4970 fax
NEW YORK
Sheridan Centre
3312 Sheridan Drive
Amherst, NY 14226
(716) 831-0153
(716) 833-2423 fax
Kohl’s Shopping Plaza
3523A Hempstead Turnpike
Levittown, NY 11756
(516) 520-1233
(516) 520-1293 fax
1577 Ridge Rd. West
Rochester, NY 14615
(585) 865-7190
(585) 865-7214 fax
Northern Lights Shpg. Ctr.
320 Northern Lights Plaza
No. Syracuse, NY 13212
(315) 454-4682
(315) 454-4782 fax
NORTH CAROLINA
Four Seasons Plaza
6449 Albemarle Rd.
Charlotte, NC 28212
(704) 568-0371
(704) 568-4283 fax
OHIO
4032 Belden Village St.
Canton, OH 44718
(330) 491-0086
(330) 491-0140 fax
Cross Pointe Shpg. Ctr. 109
101 E. Alex-Bell Rd
Centerville, OH 45459
(937) 291-3560
(937) 291-0076 fax
Civic Center Plaza
2256 Waycross Rd.
Forest Park, OH 45240
(513) 522-7575
(513) 522-7580 fax
Shoppes of Kenwood II
7714 B Montgomery Rd.
Cincinnati, OH 45236
(513) 791-7930
(513) 791-7934 fax
5160 Great Northern Plaza
North Olmsted, OH 44070
(440) 734-2755
(440) 734-2799 fax
Cranston Center
5831 Sawmill Rd.
Columbus, OH 43017
(614) 760-9399
(614) 760-9331 fax
104 Boardman-Poland Rd.
Youngstown, OH 44512
(330) 758-1828
(330) 758-1332 fax
3109 West Market Street
Fairlawn, OH 44333
(330) 864-6700
(330) 864-6702 fax
OKLAHOMA
3710 NW 50thSt.
Oklahoma City, OK 73112
(405) 947-4436
(405) 947-0886 fax
OREGON
4130 SW Lombard Ave.
Ste 110
Beaverton, OR 97005
(503) 574-2696
(503) 574-2762 fax
PENNSYLVANIA
Great Southern Shpg. Ctr.
1155 Washington Pike
Bridgeville, PA 15017
(412) 221-4568
(412) 221-0145 fax
Lincoln Court Shpg. Ctr.
245 Lancaster Pike
Frazer, PA 19355
(610) 651-0570
(610) 651-0572 fax
TENNESSEE
2200 N. Germantown Pky.
Ste. 7
Cordova, TN 38016
(901) 266-0333
(901) 266-0811 fax
Market Place Shpg. Ctr.
9309A Kingston Pike
Knoxville, TN 37922
(865) 690-0785
(865) 694-9985 fax
The Maples Shpg. Ctr.
1010 Murfreesboro Rd.
Suite 126
Franklin, TN 37064
(615) 599-2949
(615) 599-9663 fax
TEXAS
13536 Preston Rd, Ste 100
Dallas, TX 75240
(972) 503-9494
(972) 503-9496 fax
S. Frisco Village Shpg Ctr
2930 Preston Rd.
Frisco, TX 75034
(469) 633-0555
(469) 633-0745 fax
Westhill Village Shpg. Ctr.
7613 Westheimer
Houston, TX 77063
(713) 334-0199
(713) 334-1341 fax
N. Towne Plaza Shpg. Ctr.
6900 San Pedro, Suite 137
San Antonio, TX 78216
(210) 829-1906
(210) 805-0612 fax
19507 I-45, Suite #900
Cypresswood Ct.
Spring, TX 77388
(281) 288-5803
(281) 288-5876 fax
1823 West Bay Area Blvd.
Webster, TX 77598
(281) 338-2830
(281) 338-2835 fax
1491 Lee Trevino, Ste D
El Paso, TX 79936
(915) 598-8633
(915) 598-8610
UTAH
6935 Park Centre Drive
Salt Lake City, UT 84121
(801) 304-0516
(801) 304-0546 fax
VIRGINIA
Tuckernuck Sq. Shpg. Ctr.
9018 W. Broad Street
Richmond, VA 23294
(804) 747-8249
(804) 747-3395 fax
WASHINGTON
837 NE Northgate Way
Seattle, WA 98125
(206) 367-4425
(206) 367-0632 fax
North 2911 Monroe
Spokane, WA 99205
(509) 328-9514
(509) 328-9562 fax
WEST VIRGINIA
35 Riverwalk Plaza
S. Charleston, WV 25303
(304) 744-4748
(304) 744-4779 fax
WISCONSIN
Stein Mart Plaza
2791 South Oneida St.
Ashwaubenon, WI 54304
(920) 494-9441
(920) 494-5059 fax
Midvale Plaza
505 S. Midvale Blvd.
Madison, WI 53711
(608) 238-3470
(608) 238-0120 fax
10244 W. National Ave.
West Allis, WI 53227
(414) 327-7430
(414) 327-9875 fax
Lakeside Marketplace
11211 120thAve.
Suite D-067
Pleasant Prairie, WI
53142
(262) 857-3176
(262) 857-6815 fax
CANADA
Hoover Canada
9012 L’Acadie Blvd.
Montreal, Quebec
H4N 2Y8
(514) 384-8030
(514) 384-5940 fax
Hoover Canada
4151 North Service Rd.
Burlington, Ontario
L7R 4A8
(905) 335-3311
(905) 335-3320 fax
1/06

03
When using an electrical appliance, always follow basic precautions,
including the following:
READ ALL INSTRUCTIONS BEFORE USING APPLIANCE.
WARNING:
To reduce the risk of fire,
electric shock, or injury:
• Do not use outdoors or on wet
surfaces.
• Close supervision is necessary
when any appliance is used by or
near children. Do not allow vacuum cleaner to be used as a toy or
to run unattended at any time.
• Keep hair, loose clothing, fingers, feet and all parts of body
away from openings, rotating agitators and other moving parts. Do
not operate cleaner in bare feet or
when wearing open toe shoes or
sandals.
• Do not pick up anything that is
burning or smoking, such as cigarettes, matches, or hot ashes.
• Do not use to pick up flammable or combustible liquids such as
gasoline or fine wood sandings or
use in areas where they may be
present.
• Avoid picking up hard, sharp
objects with the cleaner. They may
damage the cleaner.
• Always turn off this appliance
before connecting or disconnecting hose.
• Unplug cleaner before connecting the powered pet hair cleaning
tool.
• Do not use without dirt cup or
filters in place. Empty cup frequently when picking up very fine
materials such as powder.
• Use extra care when cleaning on
stairs.
• Do not put any object into
openings. Do not use with any
opening blocked; keep free of dust,
lint, hair, and anything that may
reduce air flow.
• Do not pull or carry by cord,
use cord as a handle, close door
on cord or pull cord around sharp
edges or corners. Do not run
appliance over cord. Keep cord
away from heated surfaces.
• Always disconnect cord from electrical outlet before servicing the
cleaner.
• Turn cleaner off and unplug
when not in use.
• Do not unplug by pulling on
cord. To unplug, grasp the plug,
not the cord. Never handle plug or
appliance with wet hands.
• The use of an extension cord is
not recommended.
• Do not use with damaged cord
or plug. If appliance is not working
as it should, has been dropped,
damaged, left outdoors, or
dropped into water, take it to a
Hoover Sales and Service Center
or Authorized Hoover Warranty
Service Dealer.
• Use vacuum cleaner only for its
intended use as described in the
instructions.
• Use only attachments recommended by Hoover; others may
cause hazards.
Important safeguards . . . . . . . . 3
Unpacking . . . . . . . . . . . . . . . . 4
Carton contents . . . . . . . . . . . . 4
Cleaner description. . . . . . . . . . 6
Using the cleaner . . . . . . . . . . . 7
Transporting. . . . . . . . . . . . . 7
Embedded DirtFinder™
feature (some models) . . . . . . 8
Cleaning rugs . . . . . . . . . . . . 8
Using tools . . . . . . . . . . . 9-10
Powered pet hair cleaning
tool. . . . . . . . . . . . . . . 14-16
Cleaning stairs . . . . . . . . . 10
Maintenance. . . . . . . . . . . . . . 10
Emptying dirt cup . . . . . . 10-11
Filters . . . . . . . . . . . . . . . . . 11
Replacing headlight . . . . . . . 12
Lubrication . . . . . . . . . . . . . 17
Clearing blockages . . . . . . . . 16
Agitator brush roll. . . . . . 12-13
Agitator brush roll belt . . . . . 13
Replacing powered pet hair
cleaning tool brush roll . 14-15
Replacing powered pet hair
cleaning tool belt . . . . . . . . 15
Thermal protector . . . . . . . . 15
Service. . . . . . . . . . . . . . . . . 17
Troubleshooting . . . . . . . . . . . 18
Warranty . . . . . . . . . . . . . . . . 19
Parts & accessories mail
reorder form . . . . . . . . . . . . 29
©2006 The Hoover Company
www.hoover .com
Important Safeguards
Save these instructions
Contents
Owner’s Manual
English ➜ pages 3-20
ESPAÑOL ➜ pág 22-34
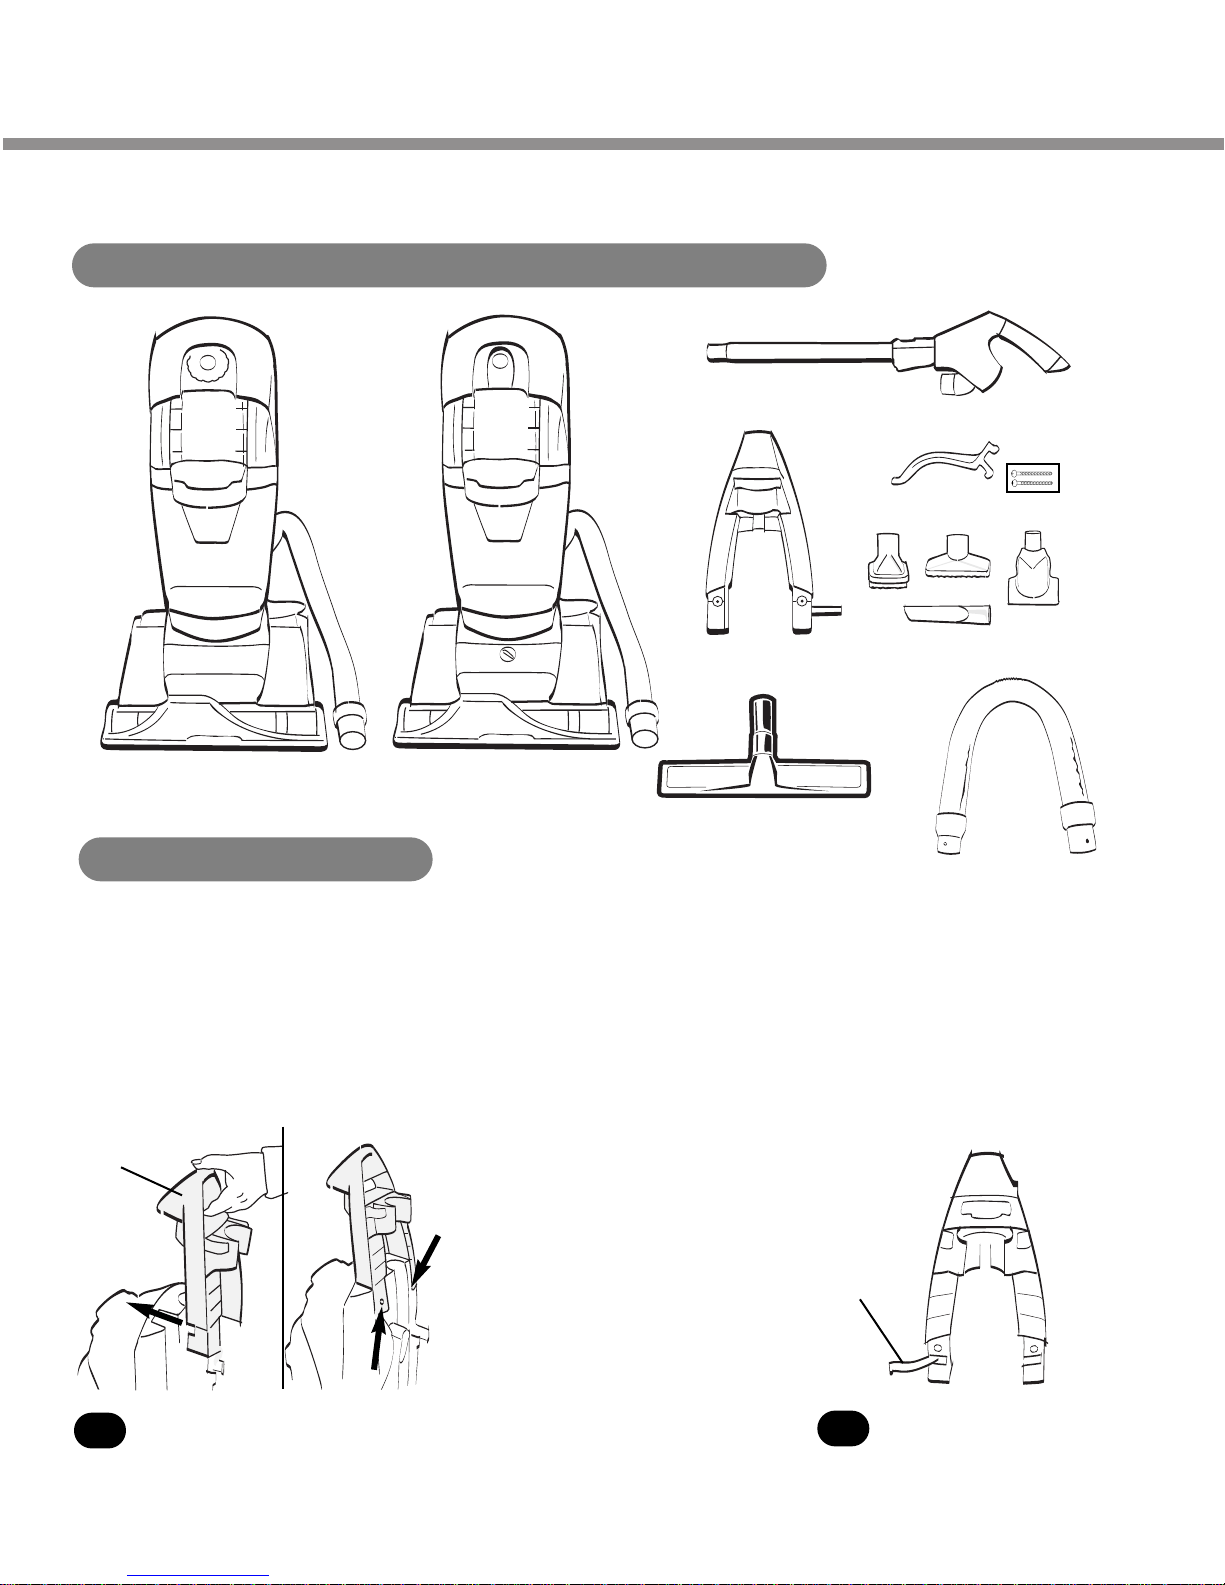
A. or B. Cleaner body and Hose
C. Telescoping handle/wand
D. Tag Along™ grip
E. Hose clip and (2) Tag
Along™ handle screws
A or B
C
D
F
G
Attach Tag Along™ grip
Attach hose clip
A
B
Slide the Tag Along™ grip (A)
onto the back of the cleaner.
Push screws into holes on
back of handle.
1
Carton contents
Unpacking your cleaner
With back of upper handle facing you, insert hose clip (B) into
slot on left.
2
E
H
F. Tools
G. Floor brush*
H. Extra Reach™ hose*
*Available on some models.
Using a Phillips screwdriver,
tighten screws securely.
04
®®
Remove telescoping
handle/wand
Position handle
Position tools
The telescoping handle/wand
(C) needs to be positioned and
secured in place. Align the telescoping handle/wand with the recesses on
the upper handle. Push the wand all
the way down into the cup (D) until
the handle/wand release latches (E)
snap into position.
To remove the telescoping
handle/wand for tool use,
push down either release latch (E)
and pull upwards to remove.
4
3
05
(Cont’d) →
Stretch hose and guide into hose
clip. Align button on hose end (F)
with hole on hose connector (G). Slide
hose end over connector until the button “pops up” into place. To remove
hose from hose connector, press button
and pull hose end to release.
The hose connector swivels 360° for
convenience.
The powered pet hair cleaning
tool (H) is stored on the front of
the cleaner. Place bottom of tool into
recessed area first, pivot tool up and
snap in place.
5
6
E
E
F
H
G
C
D
E
E
K
I
J
Snap crevice tool (I), dusting brush
(J) and furniture nozzle (K) into
storage areas on back of cleaner.
7
Attach hose
Use the following to identify the
parts and features of your cleaner.
Your model will resemble one of the two
illustrations shown below.
1. Soft grip handle/wand assembly
2. Tag Along™ grip
3. Powered pet hair cleaning tool
4. POWER button
5. Carry handle
6. Lifetime HEPA filter
7. Dirt cup
8. Headlight
9. Edge groomers
10. Furniture guard
Features
13
5
14
7
11
20
21
18
19
6
4
12
22
8
23
9
9
9
3
10
1
15
17
2
Cleaner description
16
8
06
Operate cleaner only at voltage specified on data plate on the back of the cleaner.
This cleaner is intended for household use.
Polarized plug
To reduce the risk of electric shock, this appliance has a polarized plug (one blade is wider than the other). This plug will fit in a
polarized outlet only one way.
If the plug does not fit fully in the outlet, reverse the plug. If it still does not fit, contact a qualified electrician to install the proper
outlet. Do not change the plug in any way.
11. Embedded DirtFinder™ (some
models)
12. Surface Command™ control dial
(some models)
13. Surface Selector (some models)
14. Hose connector
15. Hose
16. Telescoping handle/wand
17. Hose clip
18. Dusting brush
19. Furniture nozzle
20. Crevice tool
21. Cord hooks
22. Handle release pedal
23. Soft wheels
Automatic agitator
brush roll shut-off
®®
DO NOT USE CLEANER OUTDOORS
OR ON DAMP OR WET SURFACES.
POWER button
The POWER button (A) is located
at the top of the cleaner body.
Plug cord into electrical outlet.
To turn cleaner ON, press button once.
To turn cleaner OFF, press button again.
9
A
B
B
A
Using the cleaner
The Surface Command™ control
dial (some models) is an automatic height adjustment that allows you to
choose a cleaning mode for carpet
height or hard surface floors.
For maximum cleaning performance,
the following carpet height settings are
recommended:
Lowest setting: for all types of carpet,
Note: If the cleaner is difficult to push,
turn dial to the next higher setting.
Higher settings: for very deep pile car-
pet where easier pushing effort is
desired, while maintaining good cleaning performance.
HARD FLOOR The agitator is OFF; the
nozzle is set at LOW.
Surface Command™
control dial (some models)
Surface Selector (some
models)
Agitator brush roll control
10
The agitator brush roll will turn off
when the handle is in the upright,
storage position.
12
Rotate control dial to “Carpet”
settings (A) to turn agitator brush
roll ON for cleaning carpet or rugs.
Rotate control dial to “Hard Floor” (B) to
turn agitator brush roll OFF when cleaning hard floors.
13
To move your cleaner from room
to room, put handle in upright
position, tilt cleaner back on rear wheels
and push forward.
14
(Cont’d)
→
The Surface Selector (some
models) has three carpet height
settings and a hard floor setting. The
Surface Selector turns to allow you to
choose a cleaning mode for carpet
height or hard surface floors.
For maximum cleaning performance, the
following carpet height settings are recommended:
Lowest setting: for all types of carpet,
Note: If the cleaner is difficult to push,
turn dial to the next higher setting.
Higher settings: for very deep pile car-
pet where easier pushing effort is
desired, while maintaining good cleaning performance.
HARD FLOOR MODE (with agitator
brush roll shut off) the nozzle is set at
LOW.
11
07
Transporting cleaner
A
A
OR
NOTE: THE CLEANER IS SHIPPED
WITH THE CONTROL DIAL IN HARD
FLOOR POSITION. BEFORE YOU
BEGIN TO CLEAN CARPETS, ROTATE
THE CONTROL DIAL FROM HARD
FLOOR TO A CARPET SETTING.

Stand on one end of rug and move
cleaner toward other end. Before
reaching edge, push down on handle.
This will lift up the nozzle and will prevent the rug from clinging to the cleaner.
Continue to lift up nozzle so that when
you have reached the edge, it is completely off the rug. Move cleaner back to
start again, lower nozzle, and use only
forward strokes.
Handle positions
The handle of your cleaner has
three positions: upright for storage
and for when using cleaning tools; oper-
ating position for general operation on
carpets and floors; low for reaching
under low furniture. Step on handle
release pedal (E), then pull handle back
to lower handle.
16
18
Embedded DirtFINDER™
feature (some models)
Cleaning lightweight
flexible rugs
Edge cleaning
Special edge groomers are provid-
ed on both sides of the front of the
cleaner to remove dirt in carpet near
baseboards and furniture.
Guide either side parallel to the edge of
carpet or furniture.
19
Carrying cleaner
The cleaner can be carried by
placing hand under the carrying
handle and lifting.
15
08
With red and green lights, the
DirtFINDER™ system alerts the
user to areas of carpet that may need
more cleaning attention. It is able to
sense when embedded dirt is removed.
The clean light (green) will remain on
throughout cleaning except when the
detector senses that a larger amount of
dirt is being picked up; then the dirty
light (red) will come on.
When the dirty light is on, you should
take additional cleaning strokes in the
area until it changes to clean.
17
®®
09
(Cont’d) →
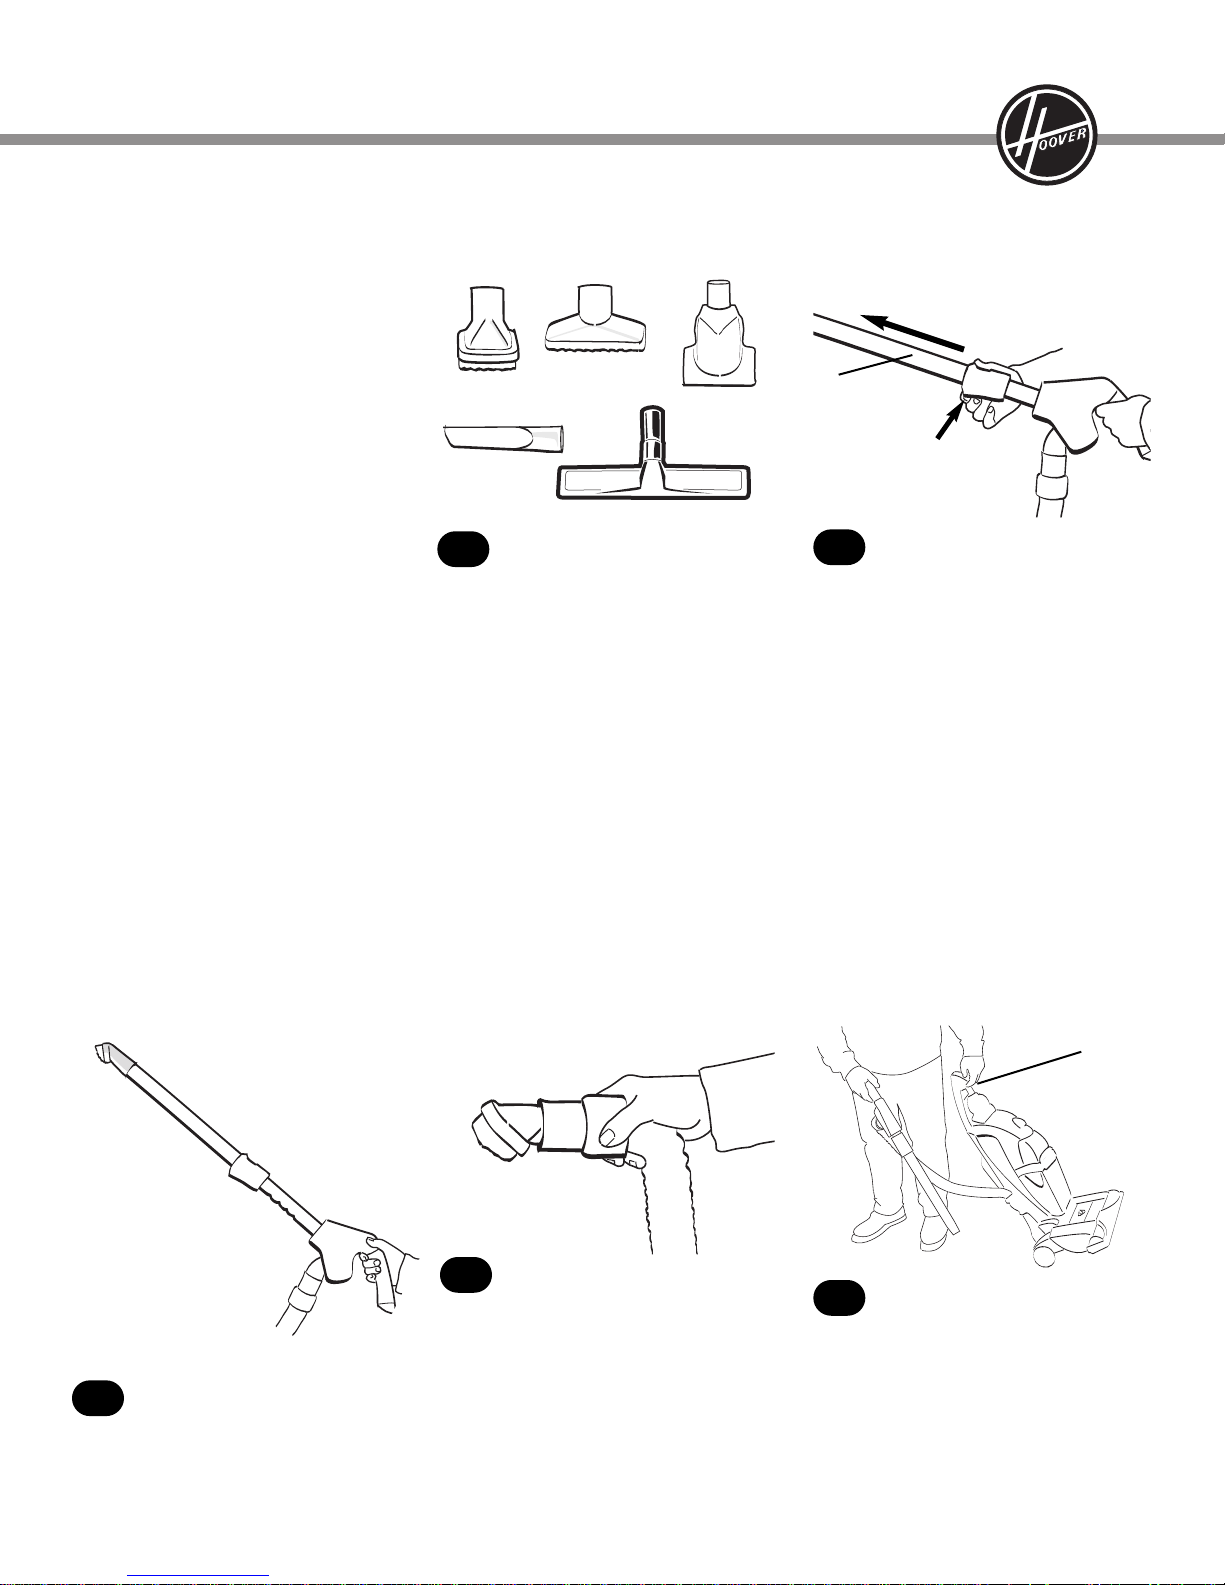
Using the tools Select proper tool
Attach tools
TagAlong™ grip
Tools allow for cleaning surfaces above
the floor and for reaching hard to clean
areas. The cleaner is ready for tool use
when the handle is in the upright position.
Note: When handle is in upright position, agitator brush roll is automatically
OFF.
Select the proper tool for the
cleaning task.
A. Dusting brush use for carved furniture, table tops, books, lamps, lighting
fixtures, venetian blinds, baseboards,
shutters, and registers.
B. Furniture nozzle use for upholstered
furniture, draperies, mattresses, clothing,
automobile interiors, and carpeted stairs.
C. Powered pet hair cleaning tool use
for upholstered furniture, carpeted stairs
and hard to reach places.
D. Crevice tool use in tight spaces, corners and along edges in such places as
dresser drawers, upholstered furniture,
stairs, and baseboards.
E. Soft Touch™ floor brush (some
models) use on hard surface floors.
20
F. Telescoping handle/wand can
be extended by depressing the
button (G) and pulling wand outward.
Release button to lock into position.
Shorten the telescoping handle/wand by
depressing the button and pulling wand
back.
21
All tools attach in the same
manner.
Tools may be attached to the telescoping handle/wand or directly to the
hose (see Fig. 23).
22
Attach tool to wand or hose by
pushing it firmly onto the end of
the wand or hose. Twist tool slightly
to tighten or loosen the connection.
For optimum performance of the pow-
ered pet hair cleaning tool, attach it
directly to the hose.
The hose can be removed from the
handle grip by depressing the button
and pulling away from the wand. (Fig.
5)
23
D
C
B
A
E
F
G
A
When using cleaning tools, the
cleaner can go with you. Place
hand under the Tag Along™ grip (A),
tilt cleaner back on rear wheels and
pull.
24
Some models include an Extra
Reach™ hose to provide you with a
20 foot reach (when connected to the
regular hose), to allow easier cleaning
of stairs and hard to reach high
places.
Press POWER button to turn cleaner
OFF. Remove regular hose from
handle/wand. (Fig. 5)
To attach Extra Reach™ hose to
regular hose, align button (A) on
Extra Reach™ hose end with hole (B)
on regular hose end. The button will
“pop up” when the hose ends are
secured in place.
Hard surface flooring may be
cleaned using the Soft Touch™
floor brush. Attach the floor brush to the
end of the telescoping handle/wand.
Extend the telescoping wand to reach
the floor.
Soft Touch™ floor brush
(some models)
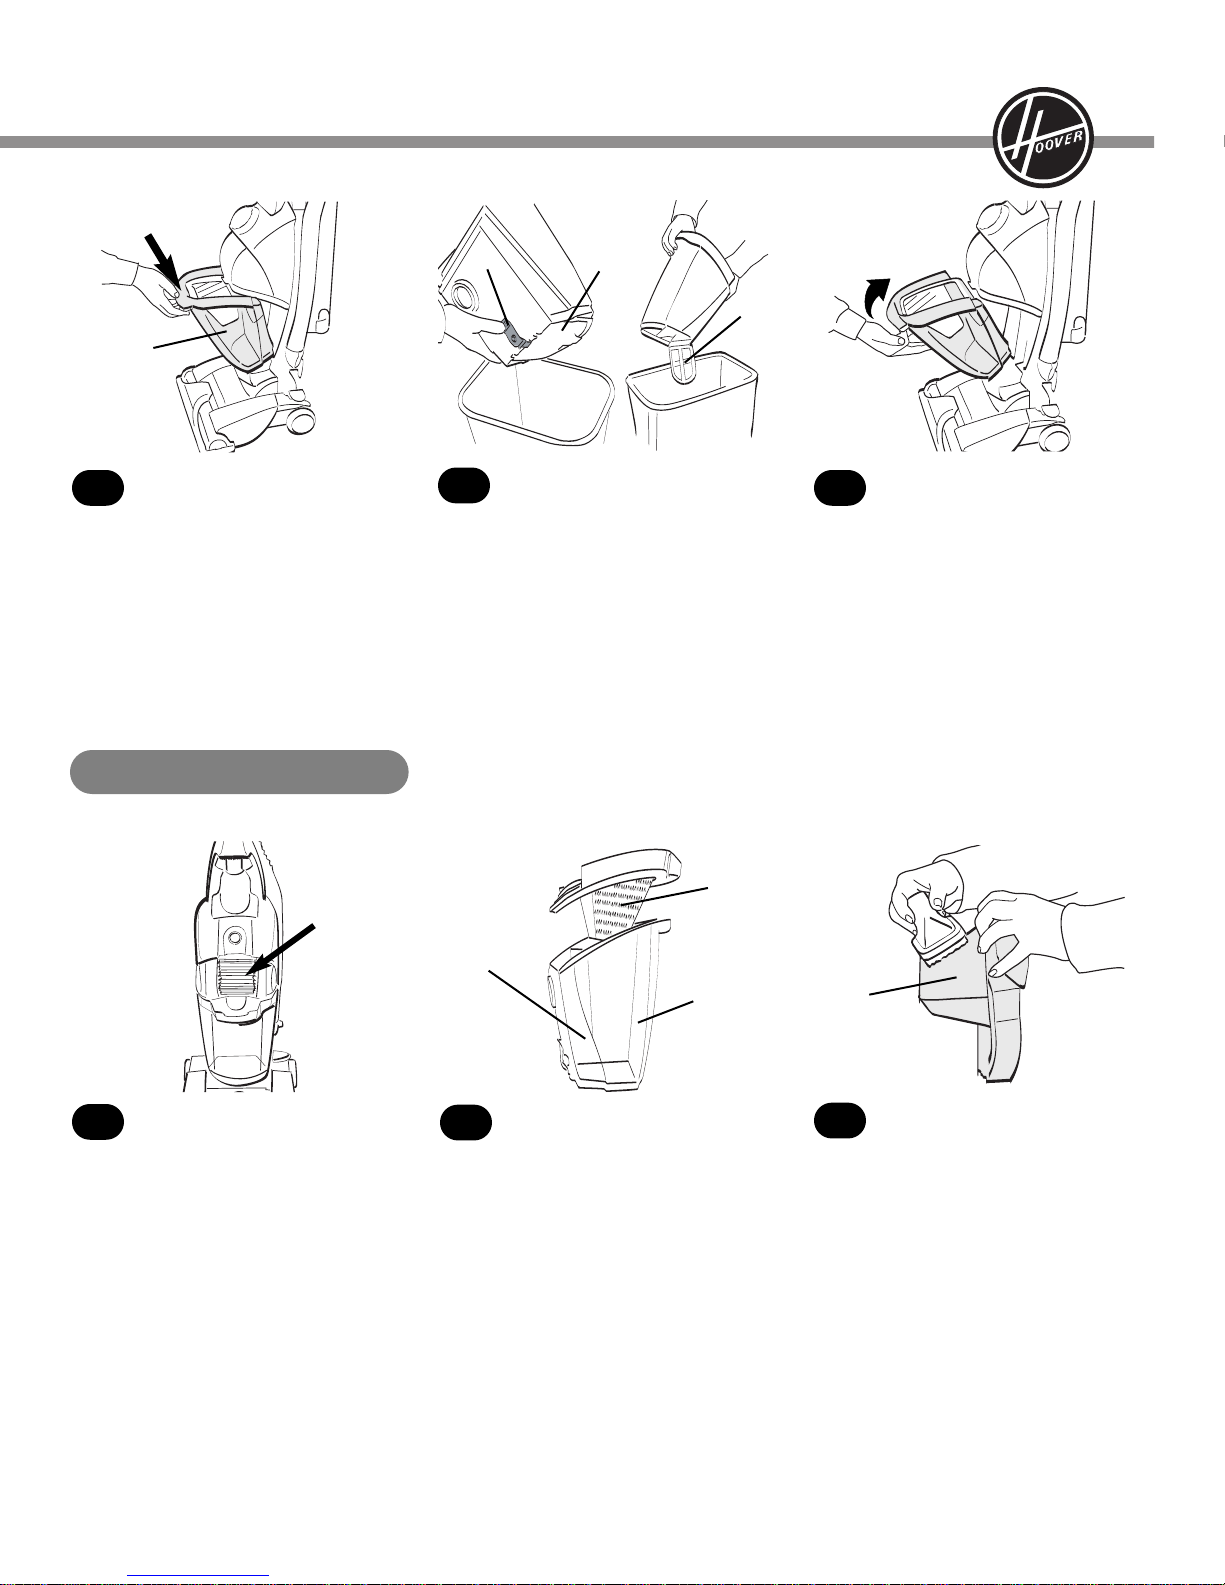
Dirt cup
Stair cleaning
27
Use the hose and the powered
pet hair cleaning tool for stair
cleaning.
Always place the cleaner at the bottom
of the stairs. Clean from bottom to top.
CAUTION: To avoid personal injury, and
to prevent the cleaner from falling, use
extra care if the cleaner is placed on
stairs.
NOTE: Maximum performance of the
powered hand tool will be achieved if
the powered pet hair cleaning tool is
used on the end of the hose without the
telescoping wand.
28
Maintenance
When to empty
It is recommended that the dirt cup be
emptied after every use or before the dirt
reaches the top of the dirt cup.
How to empty
Disconnect cleaner from electrical outlet. Do not use cleaner without dirt cup
or filters in place.
Place the cleaner in the upright position
before removing dirt cup.
Extra Reach™ hose
(some models)
25
Next, attach opposite end of
extra reach hose to hose connector on handle/wand. Align the button (C) on hose connector with hole
(D) on end of Extra Reach™ hose.
Slide the Extra Reach™ hose end onto
the hose connector until the button
“pops up” in place.
To remove hose from hose connector,
press button on hose connector and
pull hose end to release.
The hose connector swivels 360° for
convenience.
26
10
B
A
D
C
Familiarize yourself with these home
maintenance tasks as proper use and
care of your cleaner will ensure continued cleaning effectiveness.
How to clean tools
To clean the hose and the powered
hand tool, wipe off dirt with a cloth
dampened in a mild detergent. Rinse
with a damp cloth. Do not submerge
powered pet hair cleaning tool in
water.
Cleaning tools may be washed in
warm water with a detergent. Rinse
and air dry before using.
®®
11
To replace dirt cup, place bottom
of dirt cup in first. Pivot cup into
cleaner body.
31
(Cont’d)
→
To remove cup (A), press latch (B)
to release. Pivot cup outward.
29
Depress button (C) on back of dirt
cup to release door (D). Empty
dirt cup into trash receptacle. Close door
firmly to latch.
The dirt cup may also be emptied by
lifting off the lid and emptying into a
trash receptacle. Replace lid before
returning dirt cup to position.
30
Your cleaner is equipped with a
self-cleaning HEPA filter.
This filter is NOT removable.
If you notice that the filter is rotating
slower than normal or not rotating, refer
to the Troubleshooting section. If you
feel that this filter needs replacement,
take your cleaner to an Authorized
Hoover Sales and Service Center.
HEPA filter
Pre-filter screen
Cleaning the filters
32
While the cleaner is in operation,
the pre-filter screen (A) will stop
larger debris from entering the HEPA filter chamber. This larger debris will be
seen collecting in the larger chamber of
the dirt cup (B). The HEPA filter will collect fine particles that have passed
through the pre-filter screen. The HEPA
filter cleans itself while rotating, depositing fine debris in the smaller chamber of
the dirt cup (C).
The cleaner will continue to perform at
maximum cleaning levels if the pre-filter
screen is cleaned each time the dirt cup
is emptied (see Fig. 34).
33
Disconnect cleaner from electrical
outlet. Do not use cleaner without
dirt cup or filters in place.
The pre-filter screen (A), located inside
the dirt cup lid, is removable and can
be cleaned using the cleaner’s dusting
brush or washed in cold water and a
mild detergent. Rinse and let filter air
dry completely before repositioning.
To remove this filter, remove the dirt
cup and the dirt cup lid. Brush or
wash, air dry and replace the dirt cup
lid.
34
B
A
C D
D
A
A
B
C
 Loading...