

Hoover UH20060 Owner's Manual
®
®
Owner’s Manual
ENGLISH ➜ pp. 1-13
ESPAÑOL ➜ pág 14-19
Vacuum Cleaner
Contents
Important safeguards ......... 3
Cleaner assembly
Carton contents . . . . . . . . . . . . 4
Attach hose ................ 4
Attach handle . . . . . . . . . . . . . . 4
Storage - Position tools ...... 5
How to use .................5-7
Cleaner description . . . . . . . . . 5
Transporting . . . . . . . . . . . . . . . 6
Cleaning rugs .............. 7
Using tools . . . . . . . . . . . . . . . . 7
Cleaning stairs ............. 7
Maintenance ...............8-10
Emptying dirt cup ........... 8
Filters ..................... 9
Lubrication . . . . . . . . . . . . . . . .11
Clearing blockages . . . . . . 12-13
Agitator brushroll ...........11
Agitator brushroll belt . . . . . 9-10
Service ................... 12
If you have a problem ........ 12
Warranty ................... 13
FRANÇAIS ➜ p. 20-25
Review this manual
before operating
the cleaner.
Thank You
for choosing
®
HOOVER !
IMPORTANT: READ CAREFULLY
BEFORE ASSEMBLY AND USE.
Questions or concerns? For assistance, please call
Customer Service at 1-800-944-9200
Mon-Fri 8am-7pm EST. PLEASE DO NOT RETURN
THIS PRODUCT TO THE STORE.
THIS PRODUCT IS INTENDED FOR
HOUSEHOLD USE ONLY.
IF USED COMMERCIALLY WARRANTY
IS VOID.
©2010 Techtronic Floor Care Technology Limited. All
rights reserved. #961138001 ID101480-R1

MMYYXXXXXXXX
SAMPLESAMPLE
19881
74
15677
SAMPLESAMPLE
®
HOOVER
NEWTON, IOWA 50208
Made in China
Hecho en China/Fabriqué en Chin
e
XXXX
U
L
®
C
US
LISTED
®
HOUSEHOLD TYPE/TYPE MENAGER/TIPO DOMESTICO
SERIAL NO./NUMERO SER./NÚMERO DE SERIE
MODEL/MODÈLE/MODELO
U5180-900
120 V. 60 Hz. 12.0 A.
BELT/COURROIE/CORREA 38528040
FILTERS/FILTROS/FILTRES 93001633
www.hoover.com
SERIES/SÉRIE/SERIE ZC12.0
CLEANER/ASPIRATEUR/ASPIRADORA
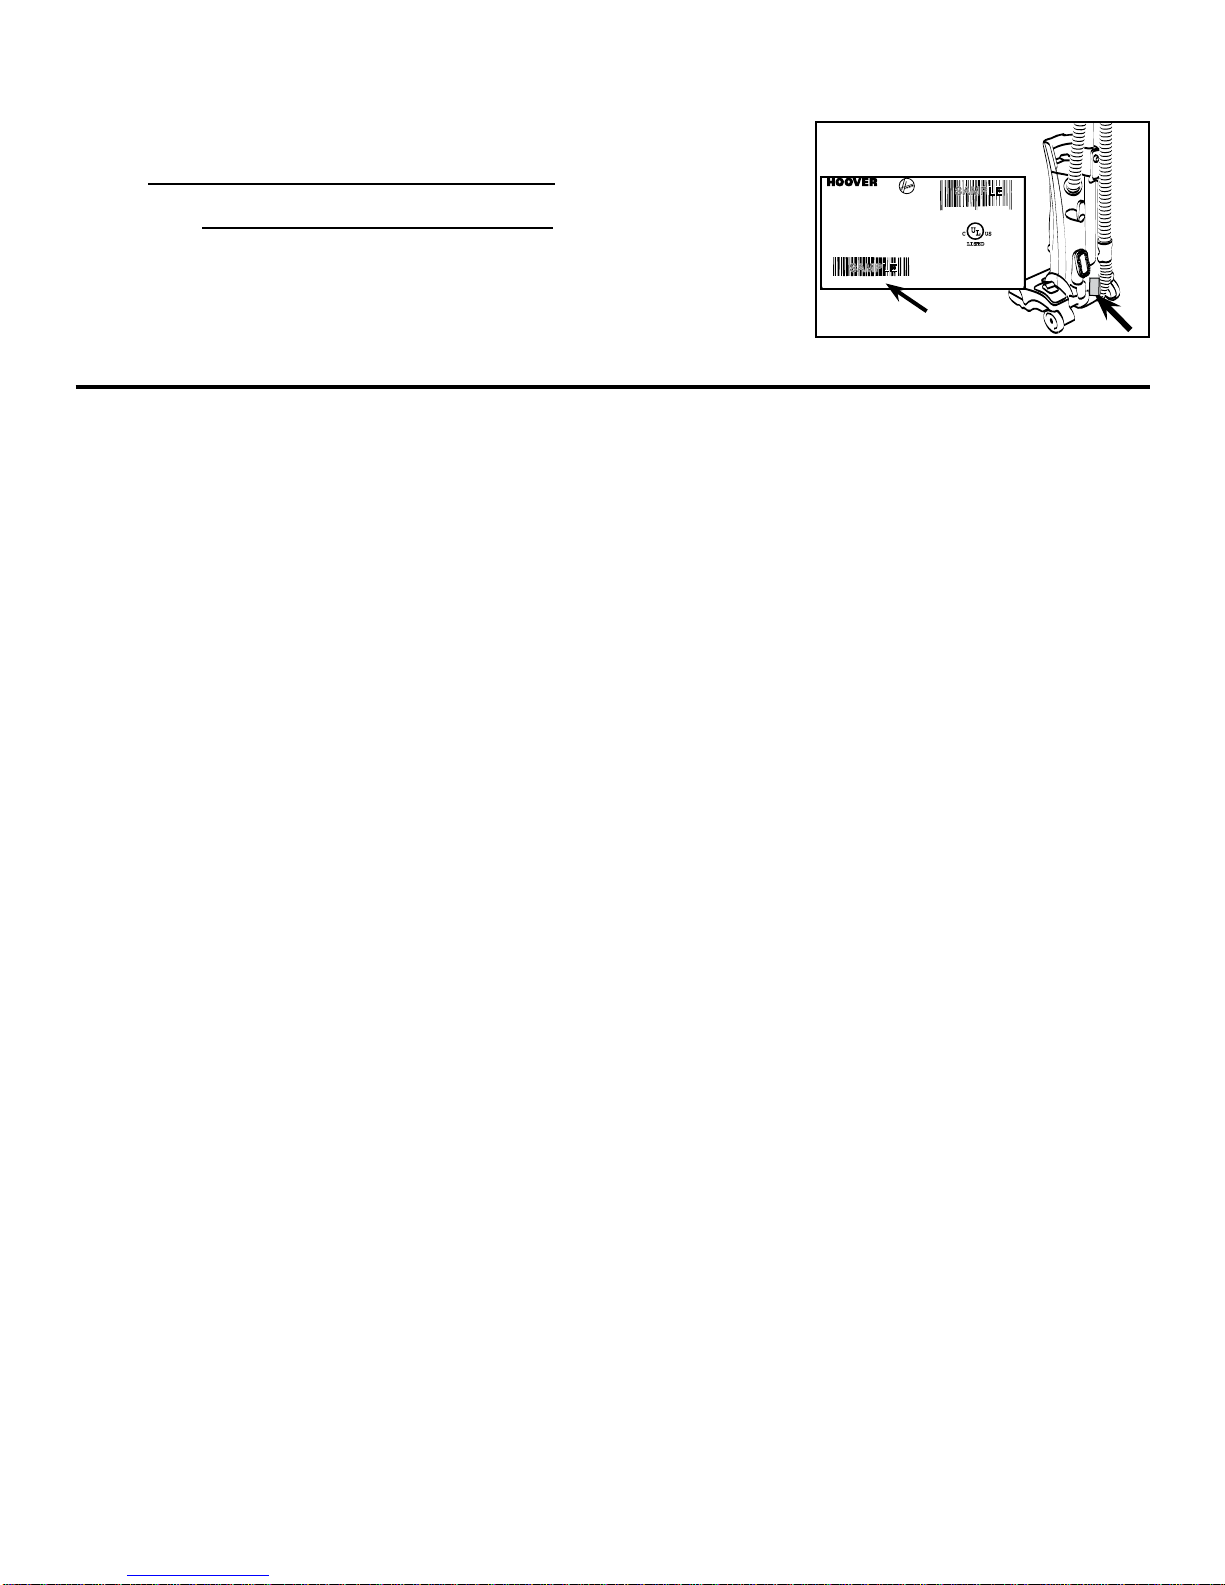
Thank you for choosing a HOOVER® product.
Please enter the complete model and Manufacturing Code in the
spaces provided.
Model
MFG. CODE
Hint: Attach your sales receipt to this owner’s manual. Verification of date of
purchase may be required for warranty service of your HOOVER® product.
Be sure to register your product online at Hoover.com or call 1-800-944-9200
SERIAL
NUMBER
to register by phone.
IMPORTANT SAFEGUARDS!
When using an electrical appliance, always follow basic precautions, including the following:
READ ALL INSTRUCTIONS BEFORE USING THIS APPLIANCE
WARNING: To reduce the risk of fire, electric shock, or injury:
• Do not use outdoors or on wet surfaces.
• Close supervision is necessary when any appliance is used by or near children. Do not allow vacuum cleaner to
be used as a toy or to run unattended at any time.
• Keep hair, loose clothing, fingers, feet and all parts of body away from openings, rotating agitator and other
moving parts.
• Do not pick up anything that is burning or smoking, such as cigarettes, matches, or hot ashes.
• Do not use to pick up flammable or combustible materials such as gasoline or fine wood sandings or use in
areas where they may be present.
• Always turn off this appliance before connecting or disconnecting hose.
• Do not use without dirt cup or filters in place. Empty cup and clean filter frequently when picking up very fine
materials such as powder.
• Use extra care when cleaning on stairs.
• Do not put any object into openings. Do not use with any opening blocked; keep free of dust, lint, hair, or any
thing that may reduce air flow.
• Always disconnect cord from electrical outlet before servicing the cleaner.
• Unplug cleaner when not in use. Turn off all controls before unplugging.
• Do not unplug by pulling on cord. To unplug, grasp the plug, not the cord. Never handle plug or appliance with
wet hands.
• The use of an extension cord is not recommended.
• Do not use with damaged cord or plug. If appliance is not working as it should, has been dropped, damaged, left
outdoors, or dropped into water, take it to a Hoover Sales and Service Center or Authorized Hoover Warranty
Service Dealer (Depot).
• Do not pull or carry by cord, use cord as a handle, close door on cord or pull cord around sharp edges or
corners. Do not run appliance over cord. Keep cord away from heated surfaces.
• Use vacuum cleaner only for its intended use as described in the instructions. Use only attachments recommend
ed by Hoover; others may cause hazards.
• Do not leave appliance when plugged in.
WARNING:
• This product contains chemicals known to the State of California to cause cancer and reproductive toxicity. Wash hands after
handling.
• Do not operate cleaner in bare feet or when wearing open toe shoes or sandals.
• Avoid picking up hard, sharp objects with the cleaner. They may damage the cleaner.
SAVE THESE INSTRUCTIONS!
3
If you need assistance:
Visit our website at hoover.com. Follow the authorized dealer locator link to find the Hoover® authorized dealer nearest you
or call 1-800-944-9200 for an automated referral of Hoover® authorized dealer locations (U.S. only) or to speak with a
customer service representative; Mon- Fri 8am - 7pm EST.
Please do not return this product to the store.
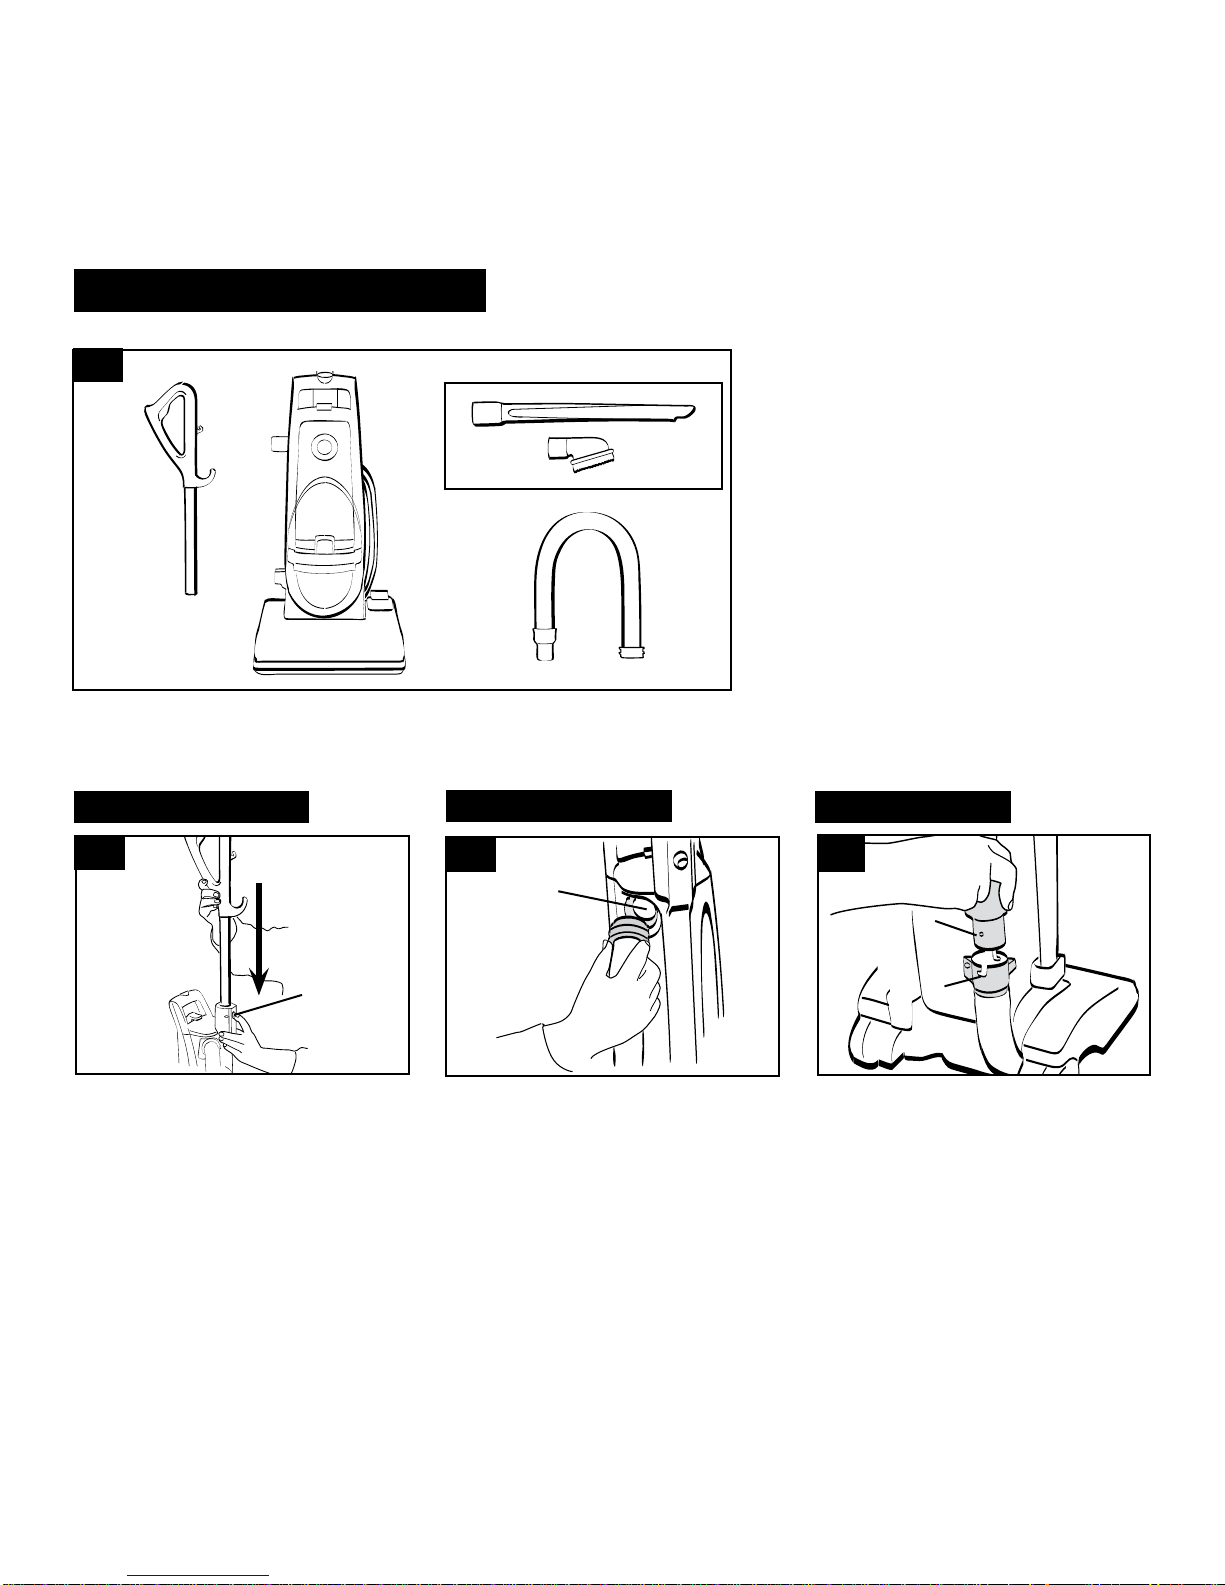
1. Cleaner assembly
Carton contents
1-1
A
Attach handle
1-2
A. Handle section
B. Cleaner
C. Crevice wand & dusting brush
C
D
B
Position hose
1-3
B
D. Hose
Remove all parts from carton and
identify each item shown.
Make sure all parts are located before
disposing of packing materials.
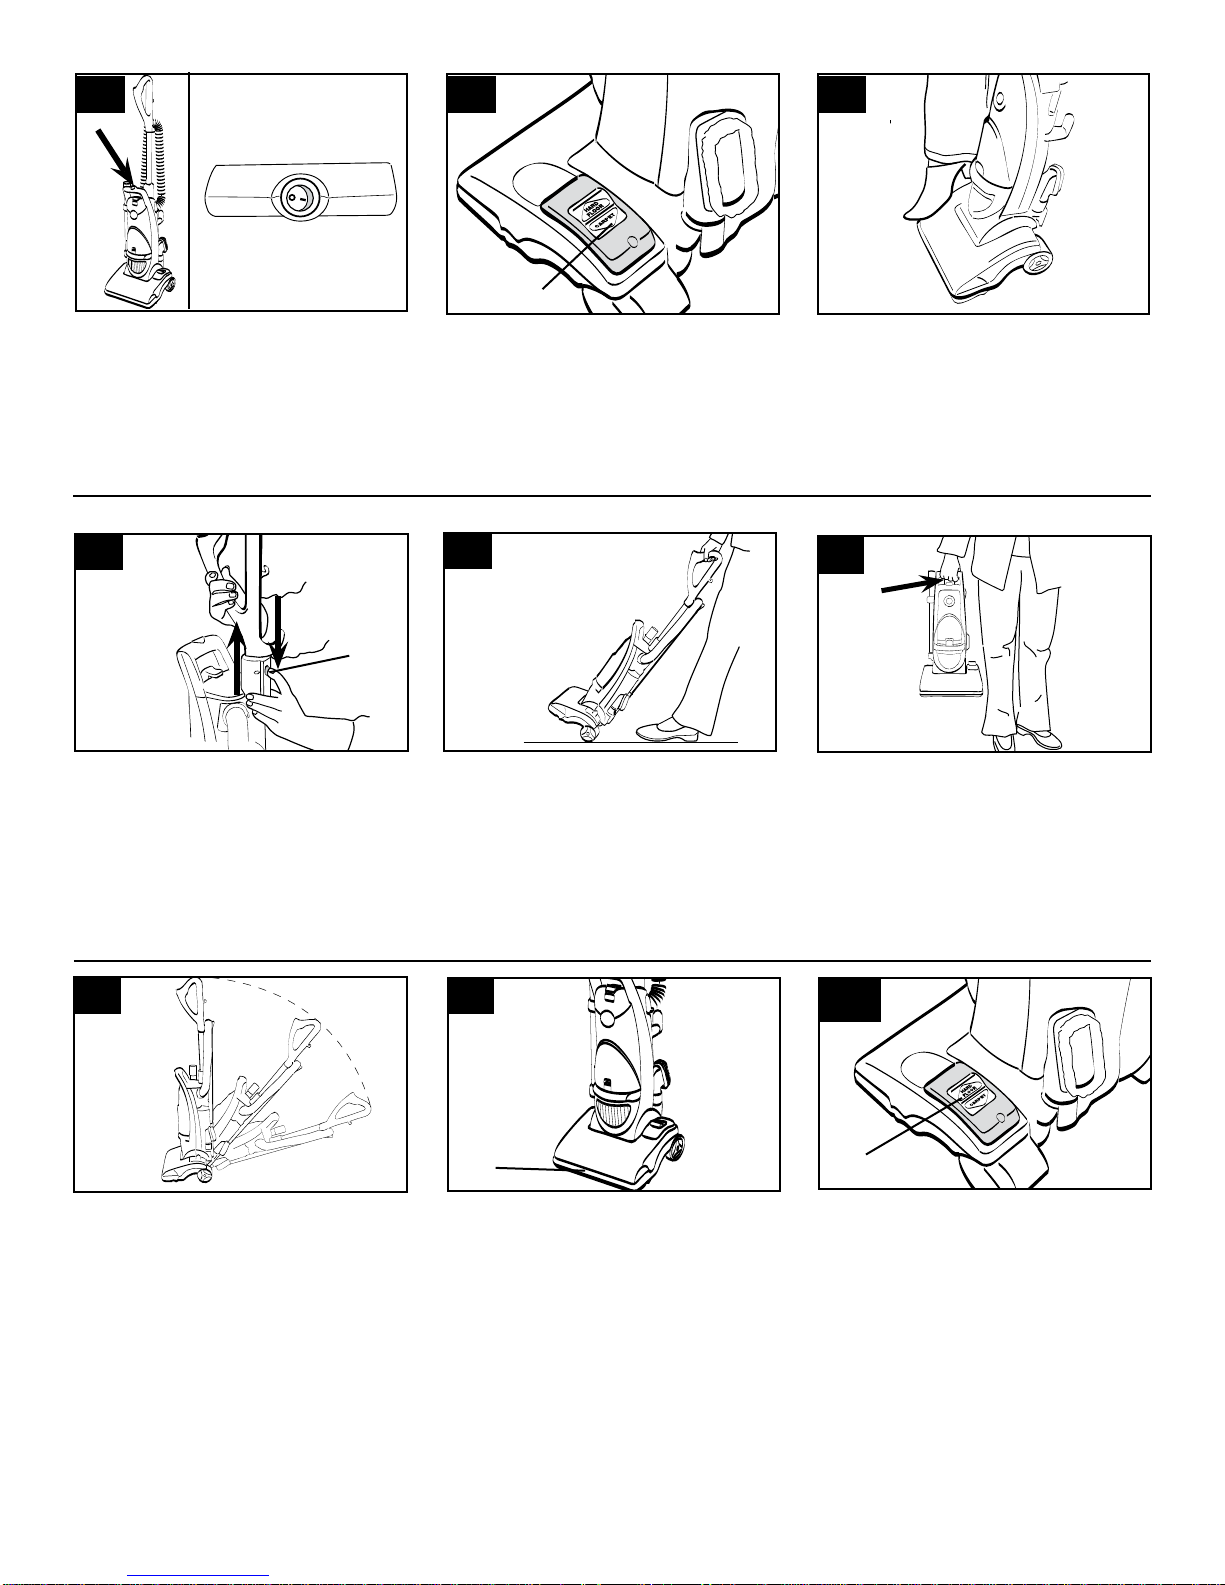
Attach hose
1-4
C
A
Press button (A) on back of handle
base and push handle down until
metal button on handle snaps out.
Press button (A) to raise and lower the
handle.
4
The hose is packed in a plastic bag
for shipping. Remove hose from bag
before assembly. Position hose over
rack and into hose tube (B).
NOTE: Hose must be connected at
the hose tube (B) and at the dirt
duct (D) on the back of the cleaner
for carpet or floor cleaning. For
tool use, refer to Fig. 2-11 and 2-13.
D
Align end of hose with projections (C)
over slots on dirt duct (D).
Slide hose into slots and twist hose to
lock it into place (To detach hose,
reverse procedure).
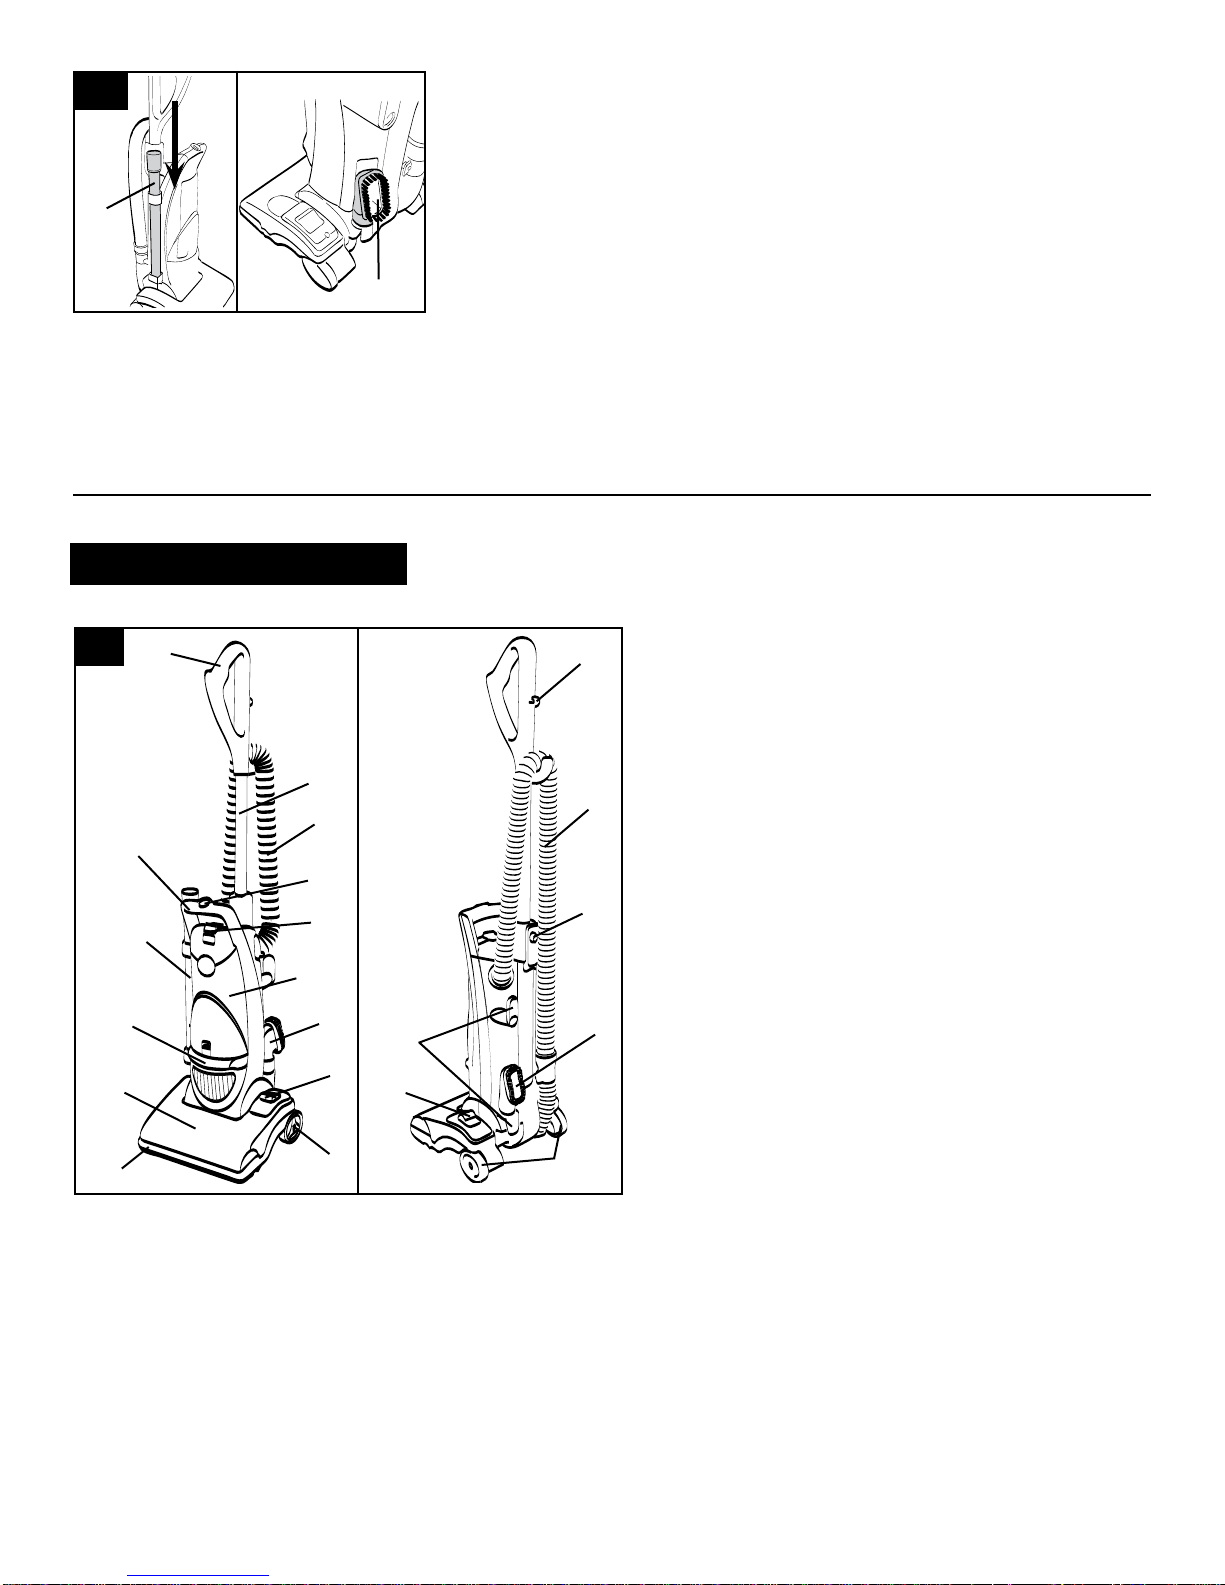
1-5
E
F
Storage - Position tools
Slide the crevice wand (E) down for
storage as shown.
Dusting brush (F) stores on back of
cleaner as shown.
2. How to use
Cleaner description
14
13
1
2
3
4
5
6
2-1
NOTE: The cleaner is shipped with the
agitator brushroll in the “BARE FLOOR”
position. Before carpet cleaning, step on
the pedal (Fig. 2-1, #8) to turn the agitator
brushroll to “CARPET”.
1. Handle grip
15
2. Retractable handle
3. Hose
4. ON/OFF switch
5. Dirt cup release button
6. Dirt cup assembly
7. Dusting brush
8. Agitator brushroll on-off pedal
9. Wheels
3
10. Furniture guard: helps prevent cleaner from marking
furniture
11. Hood
12. Stair cleaning handle
13. Crevice wand
16
14. Carrying handle
15. Cord clip
16. Handle release button
17. Cord hooks: top hook rotates for quick cord release
12
11
10
Operate cleaner only at voltage specified on data plate on back of cleaner.
This cleaner is intended for household use.
7
17
8
9
8
Polarized plug
To reduce the risk of electric shock, this appliance has a polarized plug (one
blade is wider than the other). This plug will fit in a polarized outlet only one way.
If the plug does not fit fully in the outlet, reverse the plug. If it still does not fit,
contact a qualified electrician to install the proper outlet. Do not change the plug
in any way.
7
9
Continued ➜
5
2-2 2-3 2-4
A
ON-OFF switch
Plug cord into electrical outlet.
To turn cleaner ON (I), push ON/OFF
switch once.
To turn cleaner OFF (O), push switch
again.
2-5
B
Retractable handle
The handle is designed to retract into
the body of the cleaner for convenience in storing or carrying. To lower
handle: depress button (B) at handle
base and push handle down. To raise
handle: depress button (B) and pull
handle up until it locks into desired
position.
The cleaner is shipped with the agitator brushroll in the BARE FLOOR
position. To turn the agitator brushroll
on for CARPET, step on the pedal (A).
2-6
Transporting cleaner
To move your cleaner from room to
room, put handle in upright position,
tilt cleaner back on rear wheels and
push forward.
Handle positions
The handle has two positions: upright
and operating.
To lower handle to operating position,
place your foot firmly on the cleaner
hood and pull handle back.
2-7
Carrying cleaner
The cleaner can also be moved by
using the carrying handle.
2-8
Handle positions
The handle of your cleaner has three
positions; upright for storage and
when using cleaning tools; operating
position for general operation on
carpet and floors; low for reaching
under low furniture. Step on hood to
lower handle.
6
2-9
C
Floating nozzle
carpet height
adjustment
The cleaning of carpet and rugs takes
place at the nozzle (C).
The nozzle “floats” for adjustment to
various carpet heights and hard
surface floors.
2-10
A
Agitator brushroll
on-off
To shut the agitator brushroll off for
cleaning hard floors, step on the
pedal (A). To turn the agitator brushroll
on for carpet cleaning, step on the
pedal again.
Cleaning lightweight
flexible rugs
Stand on one end of rug and move
cleaner toward other end or edge.
Before reaching edge, push down on
handle. This will lift up the nozzle
(front of cleaner) and will prevent rug
from clinging to cleaner. Continue to
lift up nozzle so that when you have
reached the edge, it is completely off
the rug. Move cleaner back to start
again, lower nozzle, and use only forward strokes.
Cleaning tools
Tools allow for cleaning surfaces
above the floor and for reaching hard
to clean areas.
The cleaner is ready for tool use
when handle is in upright position.
2-11
A
B
Removing hose
When using cleaning tools, place
cleaner handle in the upright position. Turn cleaner OFF before disconnecting and connecting hose
to hose tube (A).
Twist hose end (B) to remove hose.
When you are finished cleaning with
the tools, reposition hose end into
tube and twist to secure in place.
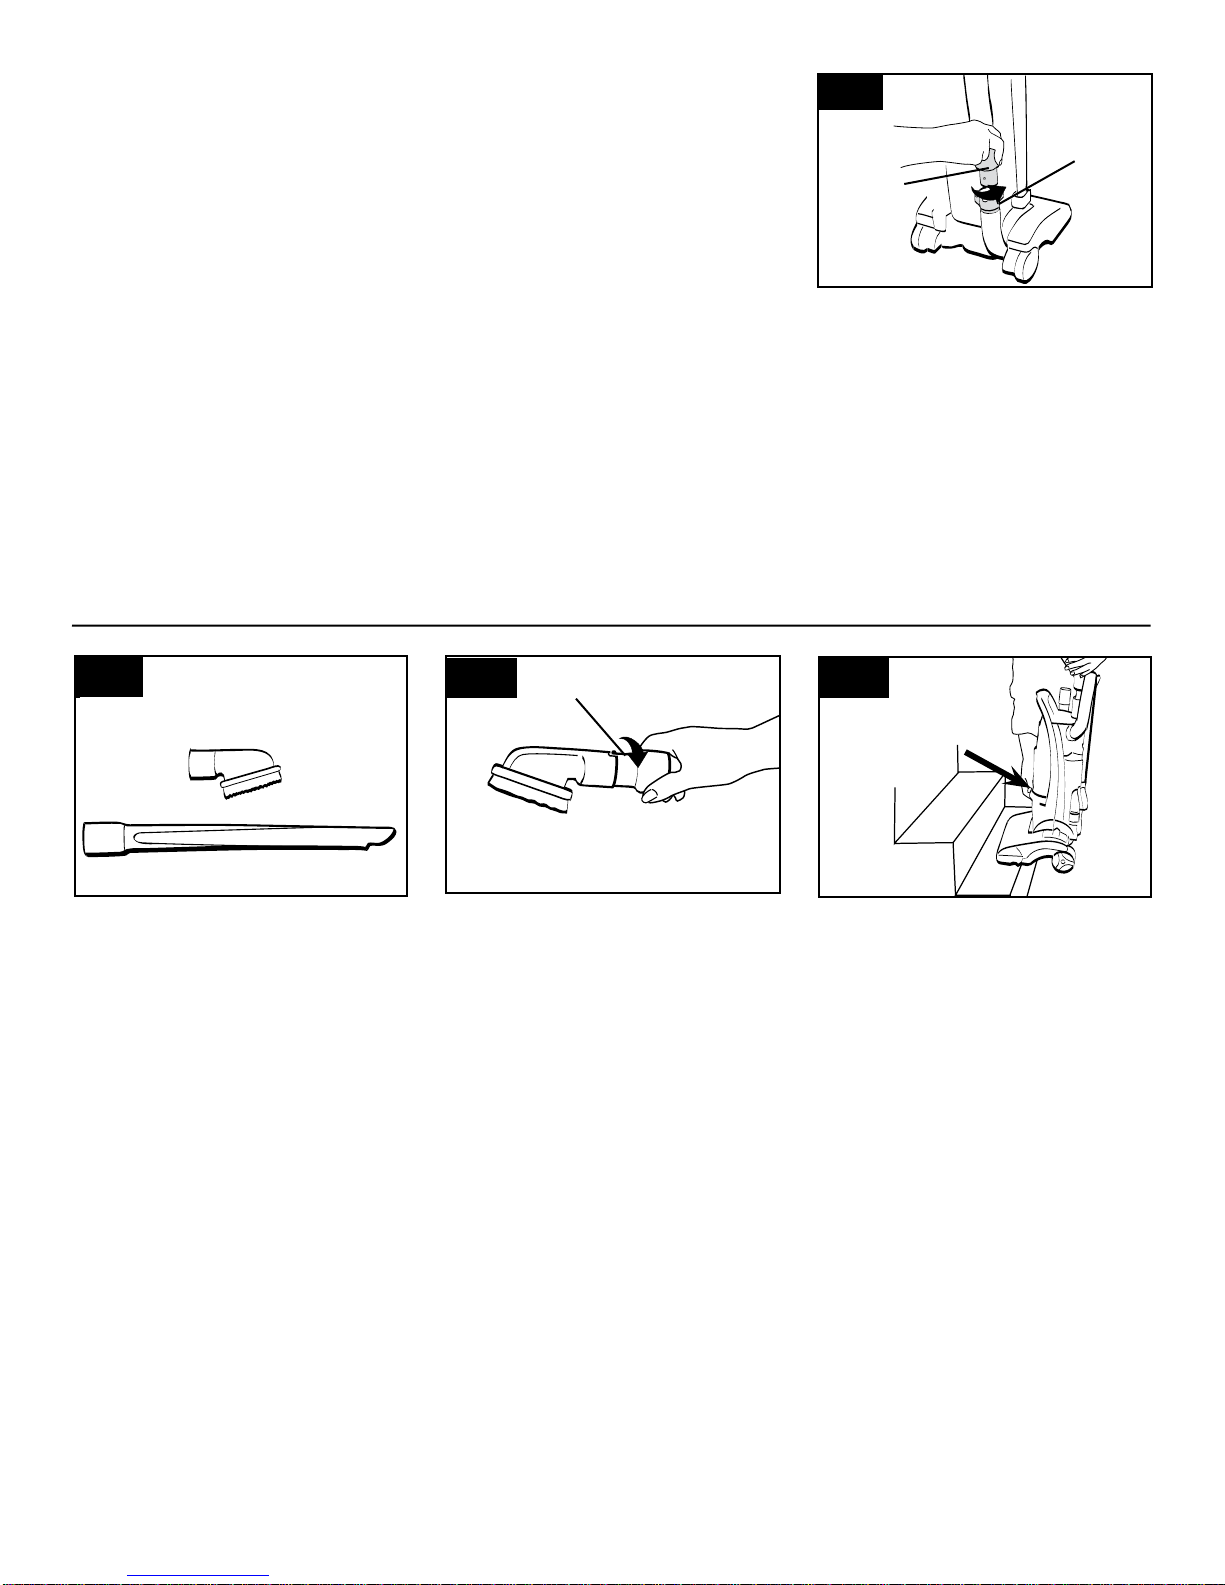
2-12
C
D
Select proper tool
C. Dusting brush use for carved furniture, table tops, books, lamps, lighting fixtures, venetian blinds, baseboards, shutters, and registers.
D. Crevice wand may be used in
tight spaces, corners and along
edges in such places as dresser
drawers, upholstered furniture, stairs
and baseboards.
Attach the dusting brush to the end
of the crevice wand for extra reach.
NOTE: For extended above-floor
tool use, it is recommended to
turn the agitator brushroll OFF.
Step on the agitator brushroll
pedal to turn the agitator to
“BARE FLOOR” setting.
2-13
E
Attach wand and tools
Attach tool or crevice wand to the
hose by aligning the the tab on the
hose (E) with the slot on the tool and
twisting to secure in place.
To remove tool or wand, twist to
unlock.
How to clean tools
To clean the hose, wipe off dirt with a
cloth dampened in a mild detergent.
Rinse with a damp cloth.
Cleaning tools may be washed in
warm water with a detergent. Rinse
and air dry before using.
2-14
Stair cleaning handle
Grasp cleaner by the stair cleaning
handle. Clean stairs from bottom to
top.
CAUTION: To avoid personal injury or unnecessary wear to carpet,
and to prevent the cleaner from
falling, always place it at bottom
of stairs.
Continued ➜
7

3. Maintenance
3-2
B
3-3
Familiarize yourself with these home
maintenance tasks as proper use and
care of your cleaner will ensure continued cleaning effectiveness.
3-1
A
Dirt cup
When to empty
It is recommended that the dirt cup
be emptied before the dirt reaches
the dirt duct opening (A), or after
every use if preferred. Place the
cleaner in the upright position before
removing the dirt cup.
Disconnect cleaner from electrical
outlet. Do not use cleaner without
dirt cup or filters in place.
CAUTION: Very fine materials,
such as face powder or cornstarch, may seal the filter and
cause a reduction in performance.
When using the cleaner for this
type of dust, empty the cup and
clean the filters often.
How to empty
Press dirt cup release button (B) and
pivot cup out.
C
D
Hold dirt cup over trash receptacle.
Press dirt cup door release button (C)
to open dirt cup door (D). Larger
debris collected in the dirt cup will fall
out.
Cleaning filters
3-4
Allergen (pleated) filter
Disconnect cleaner from electrical
outlet. Do not use cleaner without
dirt cup or filters in place.
Press tab (A) located on back of dirt
cup to remove filter frame assembly
(B).
8
A
B
3-5
Pull up on tab (C) on the filter screen
to remove. Brush the screen with the
dusting brush to clean.
Fit hooks on filter screen over ridge at
bottom of frame assembly and press
screen until tab (C) snaps in place.
C
 Loading...