

Page 1
hoover.com
OWNER’S MANUAL
Operating and Servicing Instructions
©2010 Techtronic Floor Care Technology Limited. All rights reserved. #960009657 ID101237-R0
IMPORTANT: READ CAREFULLY BEFORE ASSEMBLY AND USE.
Questions or concerns? For assistance, please call Customer Service at 1-800-944-9200
Mon-Fri 8am-7pm EST. PLEASE DO NOT RETURN THIS PRODUCT TO THE STORE.
THIS PRODUCT IS INTENDED FOR HOUSEHOLD USE ONLY.
IF USED COMMERCIALLY WARRANTY IS VOID.
Español - página E1
Remanufactured
Part # 59881333
Page 2

Important Safeguards ..............................................................................................3
Cleaner Asembly ...................................................................................................... 5
Carton Contents .................................................................................................. 5
How To Use ...............................................................................................................6
Cleaner Descriptions ...........................................................................................6
Cord Release ......................................................................................................6
On/Off Pedal .......................................................................................................6
Handle Release ...................................................................................................7
Floor/Carpet Cleaning .........................................................................................7
Suction Only Mode ..............................................................................................7
Carry Handle ...................................................................................................... 7
Cleaning Tools .....................................................................................................8
Maintenance .............................................................................................................. 9
Dirt Cup ............................................................................................................... 9
Filters ..................................................................................................................10
Umbrella Tube ..................................................................................................... 10
Belt And Brushroll ................................................................................................11
Troubleshooting ....................................................................................................... 12
Service.......................................................................................................................13
2
CONTENTS
Thank you for choosing a HOOVER® product.
Please enter the complete model and Manufacturing
Code in the spaces provided.
MODEL
MFG. CODE
Hint: Attach your sales receipt to this owner’s manual.
Verification of date of purchase may be required for
warranty service of your HOOVER
®
product.
Be sure to register your product online at Hoover.com or
call 1-800-944-9200 to register by phone.
If you need assistance:
Visit our website at hoover.com. Follow the authorized dealer locator link to find the Hoover® authorized
dealer nearest you or call 1-800-944-9200 for an automated referral of Hoover® authorized dealer
locations (U.S. only) or to speak with a customer service representative; Mon- Fri 8am- 7pm EST.
PLEASE DO NOT RETURN THIS PRODUCT TO THE STORE.
1-800-944-9200
Made in China
Page 3

IMPORTANT SAFETY INSTRUCTIONS
SAVE THESE INSTRUCTIONS
When using an electrical appliance, basic precautions should always be
followed, including the following:
READ ALL INSTRUCTIONS BEFORE USING THIS APPLIANCE.
WARNING: TO REDUCE THE RISK OF FIRE,
ELECTRIC SHOCK OR INJURY:
• Fully assemble before operating.
• Operate vacuum only at voltage specified on data label on bottom of cleaner.
• Do not leave appliance when plugged in. Unplug from outlet when not in use and
before cleaning or servicing.
• Do not use outdoors or on wet surfaces.
• Do not allow to be used as a toy. Not intended for use by children age 12 and under.
Close supervision is necessary when used near children. To avoid injury or damage,
keep children away from product, and do not allow children to place fingers or other
objects into any openings.
•
Use only as described in this manual. Use only manufacturer’s recommended
attachments and products.
• Do not use with damaged cord or plug. If appliance is not working as it should, has
been dropped, damaged, left outdoors, or dropped into water, take it to a service
center prior to continuing use.
• Do not pull or carry by cord, use cord as a handle, close a door on cord, or pull cord
around sharp edges or corners. Do not place product on cord. Do not run appliance
over cord. Keep cord away from heated surfaces.
• Do not unplug by pulling on cord. To unplug, grasp the plug, not the cord.
• Do not handle plug or appliance with wet hands.
• Do not put any object into openings. Do not use with any opening blocked; keep free
of dust, lint, hair, and anything that may reduce air flow.
• Keep hair, loose clothing, fingers, and all parts of body away from openings and
moving parts.
• Turn off all controls before unplugging.
• Use extra care when cleaning on stairs. To avoid personal injury or damage, and to
prevent the cleaner from falling, always place cleaner at bottom of stairs on floor.
Do not place cleaner on stairs or furniture, as it may result in injury or damage.
• Do not use to pick up flammable or combustible liquids, such as gasoline, or fine
wood sandings, or use in areas where they may be present.
• Do not pick up anything that is burning or smoking, such as cigarettes, matches, or
hot ashes.
• Do not use without filters and/or dirt cup in place.
• WARNING: This product contains chemicals known to the State of California to
cause cancer, birth defects or reproductive harm.
3
Page 4

4
CAUTION:
TO REDUCE THE RISK OF DAMAGE:
• Avoid picking up hard, sharp objects with this product, as they may cause damage.
• Store in a dry place. Do not expose machine to freezing temperatures.
• Do not use sharp objects to clean out hose as they can cause damage.
WARNING:
• To reduce the risk of electric shock, this appliance has a polarized plug (one blade
is wider than the other). This plug will fit in a polarized outlet only one way. If the
plug does not fit fully in the outlet, reverse the plug. If it still does not fit, contact a
qualified electrican to install the proper outlet. Do not change the plug in any way.
Page 5
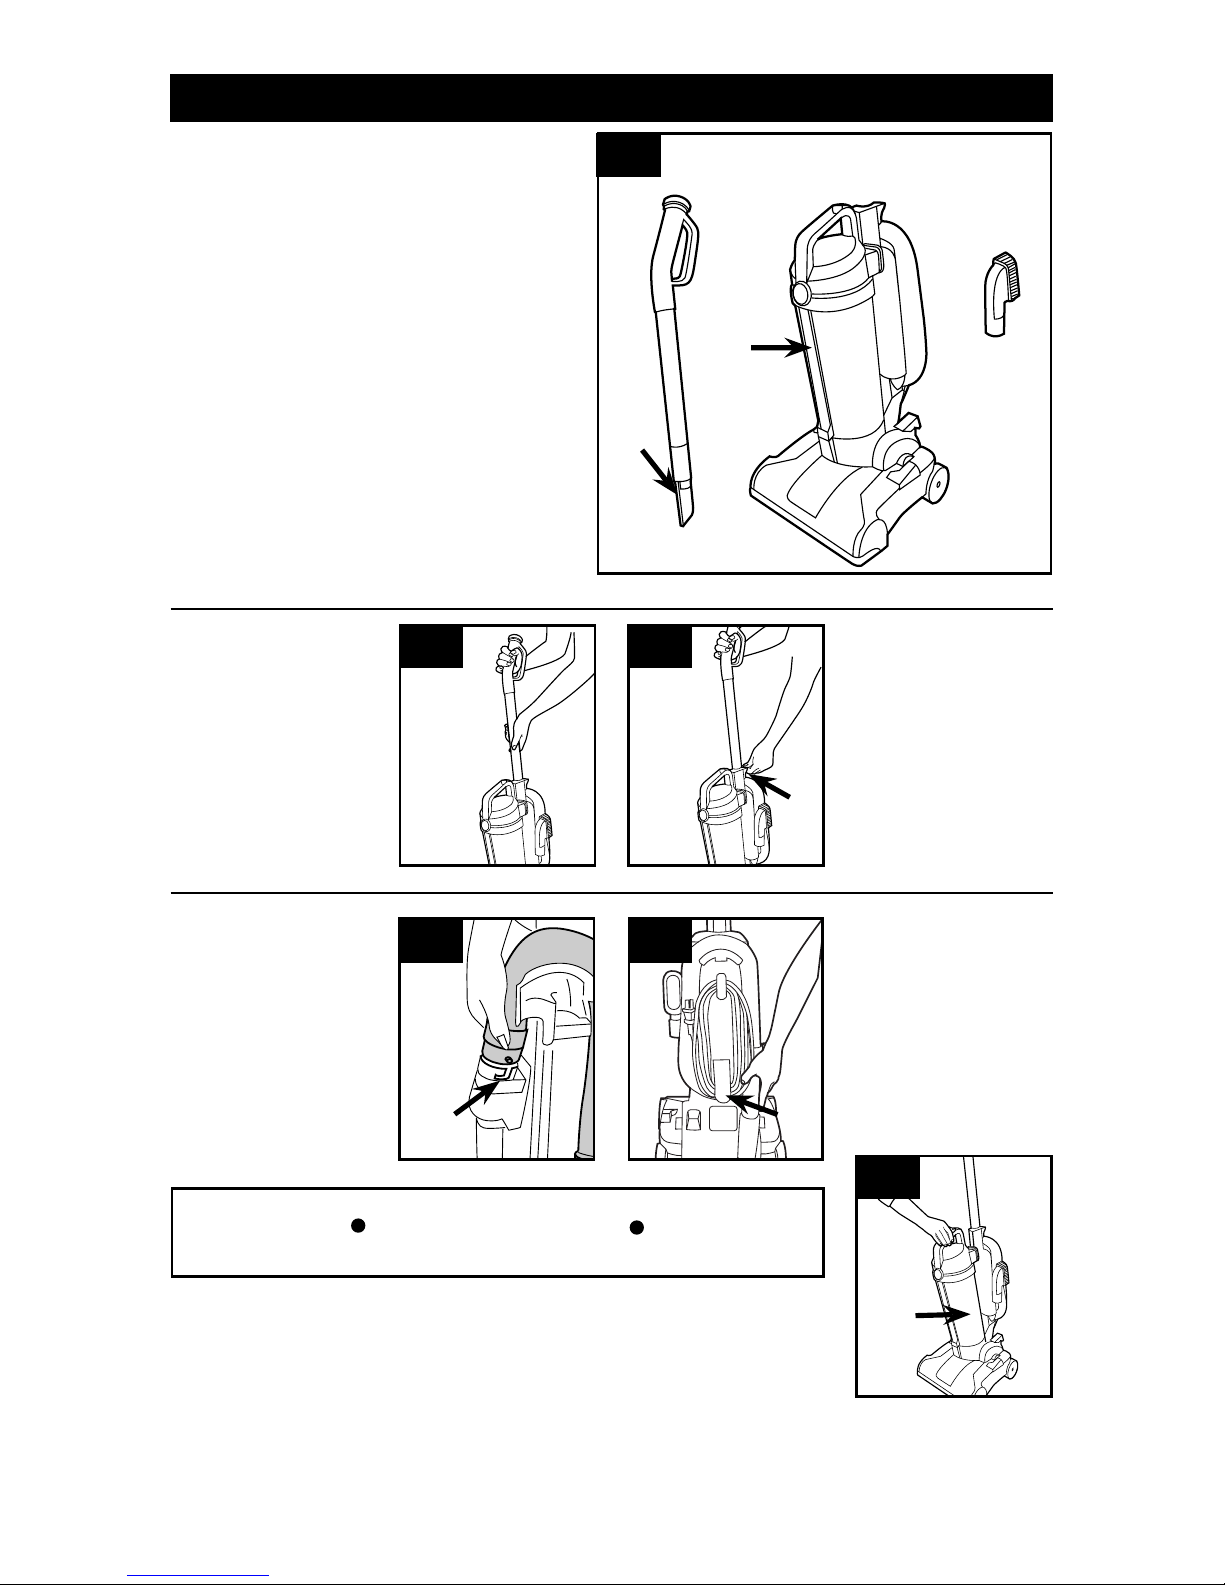
ATTACH HOSE
B
1.4
1.4 Align end of hose
with projection in dirt
duct on back of handle.
Slide hose into (B) and
twist hose to lock it into
place.
1.5 Position hose over
rack and into hose
tube (C).
C
1.5
IMPORTANT
Hose must be connected as shown for all operations.
5
Actual model may vary from images shown.
1.1 Remove all parts from carton and identify
each item shown. Make sure all parts are
located before disposing of packing.
A. Handle/Wand
B. Crevice T ool (Attached to wand)
C. Cleaner Body
D. Dirt Cup
E. Dusting Brush
A
C
1.1
B
D
1.2 Insert handle into
body of cleaner. Push
down until handle locks
into place.
1.3 Press handle
release button (A) to
remove.
1.2
ATTACH HANDLE
1. CLEANER ASSEMBLY
CARTON CONTENTS
1.3
A
1.6 Place bottom of
dirt cup into vacuum
body first.
Pivot cup into vacuum.
Dirt cup is secure when
you hear a click.
ATTACH DIRT
CUP
1.6
E
Page 6
1
2
3
5
4
11
10
9
8
7
6
2. HOW TO USE
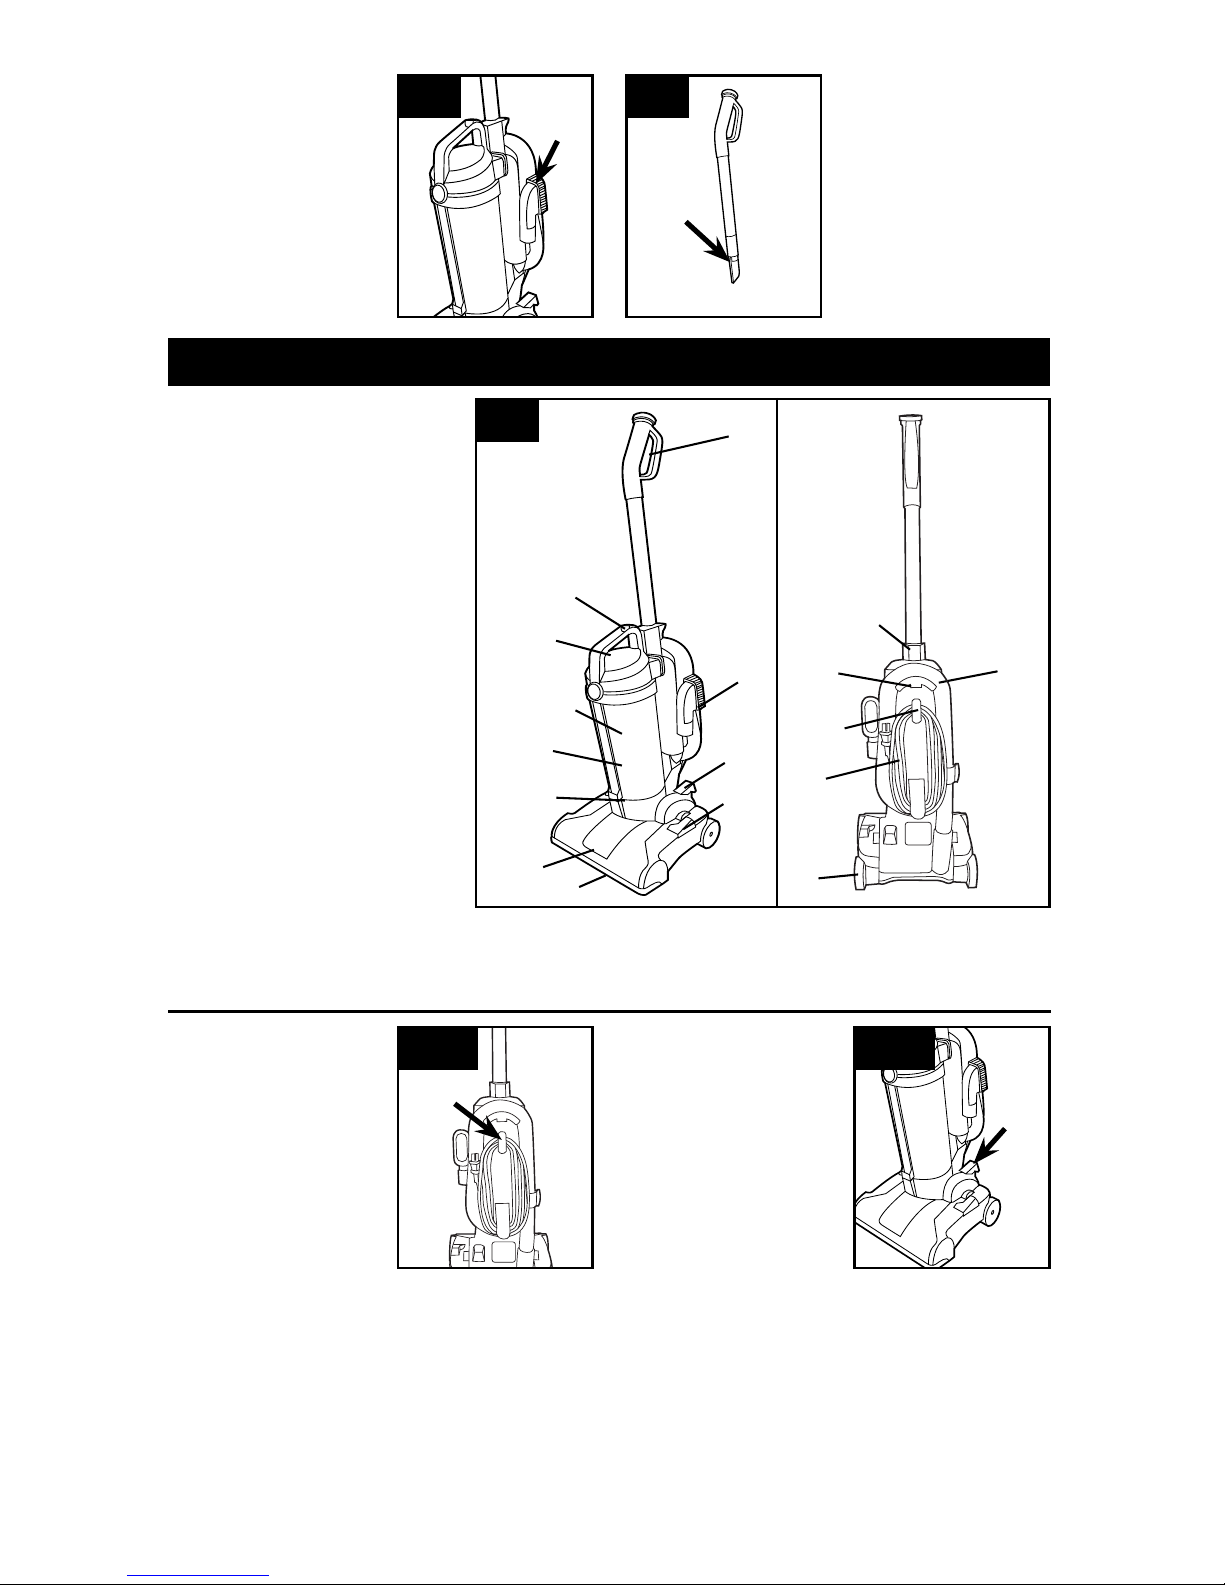
CLEANER DESCRIPTION
2.1
*Accessories not included with your model may be purchased
separately by visiting www.hoover.com, or your local HOOVER®
service center.
2.2
2.2 Turn the Quick Cord
Release for easy cord
removal. Store cord
in cord guide to keep
out of the way while
vacuuming.
For convienient
storage, wrap cord
around cord hooks.
Attach the plug end
to cord.
CORD
RELEASE/
STORAGE
6
Actual model may vary from images shown.
STORE TOOLS
1.6
E
D
1.7
1.6 Snap dusting brush
(D) into storage area on
side of cleaner.
1.7 Crevice tool is
permanently attached to
end of handle/wand and
inserted into cleaner
body for storage.
2.3
2.3 Plug cord into
electrical outlet. Turn
cleaner on by
depressing foot pedal
located on the back left
side of the cleaner.
ON/OFF PEDAL
12
13
14
15
16
17
1. Handle Grip
2. Stretch Hose
3. Dusting Brush
4. Dirt Cup Release Button
5. Umbrella Tube (inside Dirt Cup)
6. Dirt Cup
7. Filters
8. Nozzle
9. Bumper
10. Performance Indicator
1 1. Crevice Tool (Attached to
handle and stored in cleaner)
12. Hose Clip
13. Quick Release Cord Hook
14. Power Cord
15. Wheels
16. On/Off Pedal
17. Suction Control Pedal
2
Page 7
7
Actual model may vary from images shown.
2.4 Pull back handle to
tilt back. Press on the
front of nozzle if
needed.
HANDLE RELEASE
2.4
2.5 Move the handle
and adjust it to the
desired position for
operating the cleaner,
and lowering handle to
clean under furniture.
FLOOR/CARPET
CLEANING
2.5
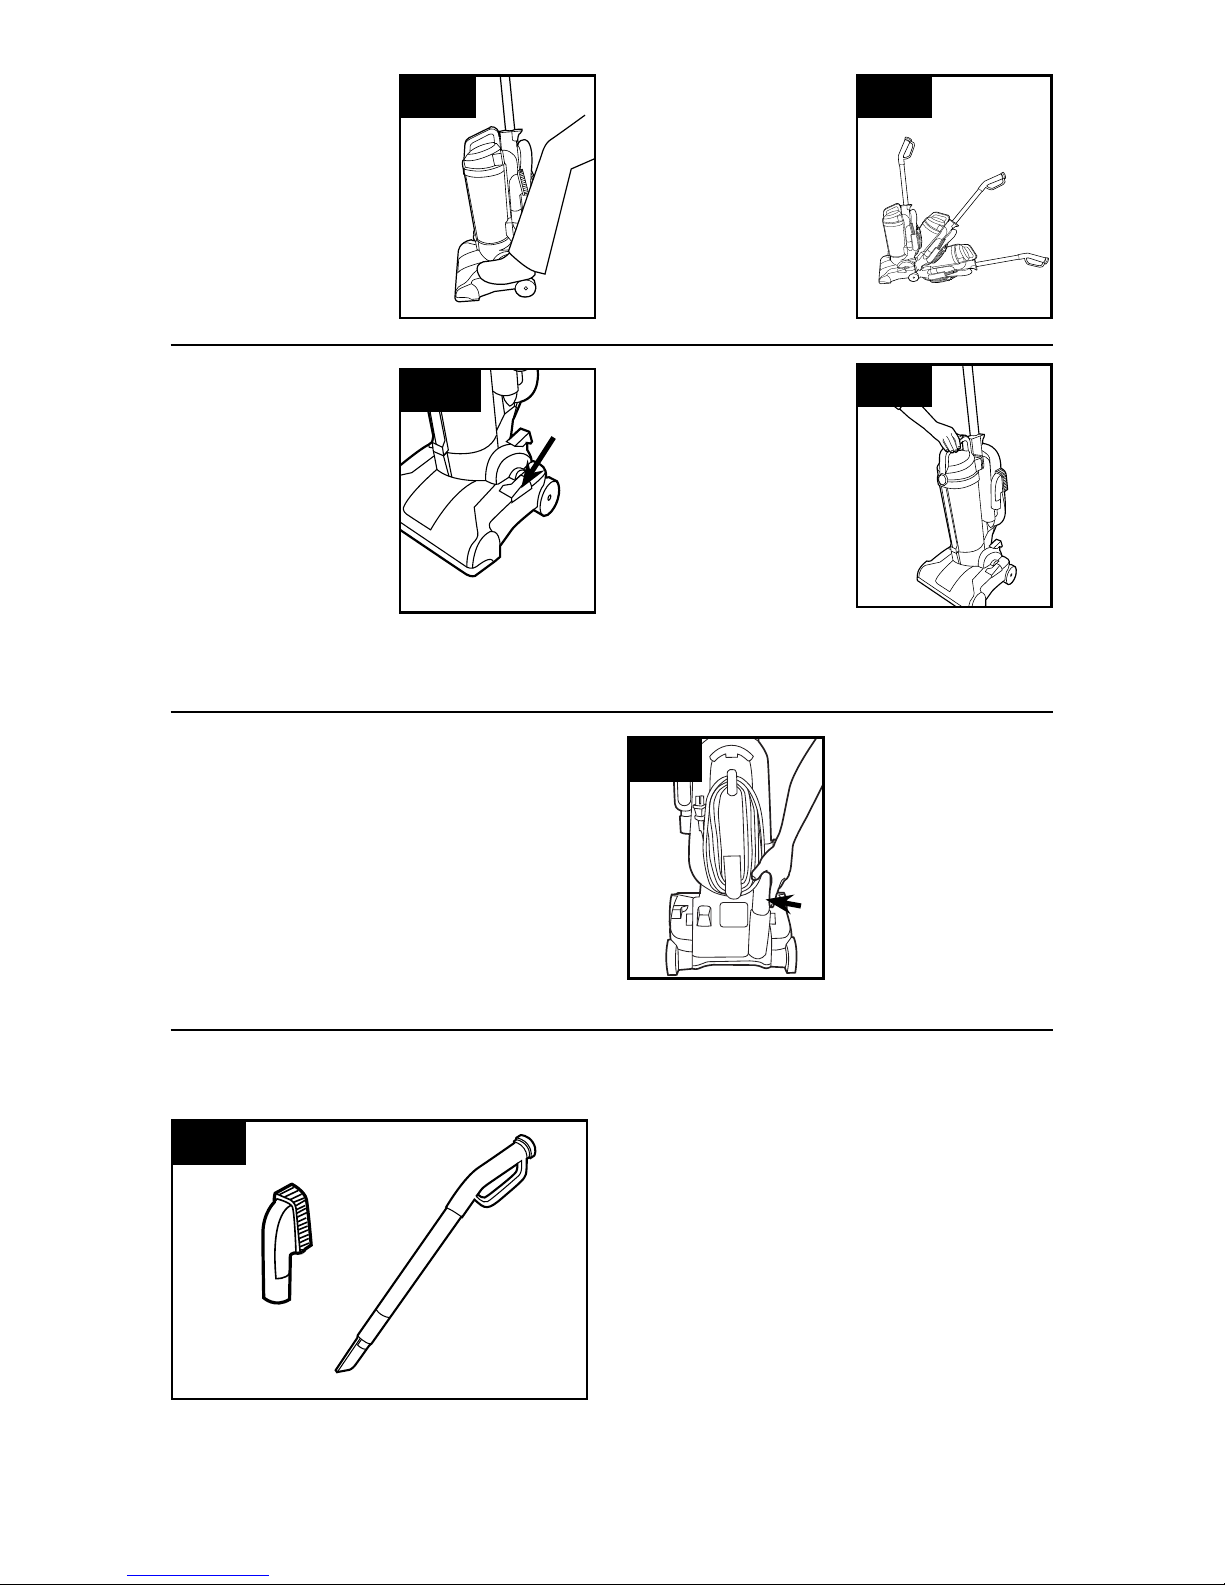
2.7 Use the carry handle
to move the cleaner
from room to room.
CARRY HANDLE
2.7
2.6 For optimal cleaning
performance on bare
floors, brushroll should
be turned off.
The vacuum is shipped
with the brushroll in the
ON position. To turn
brushroll OFF for
Suction Only Mode,
step on pedal (A).
2.6
SUCTION ONLY
MODE
A
A
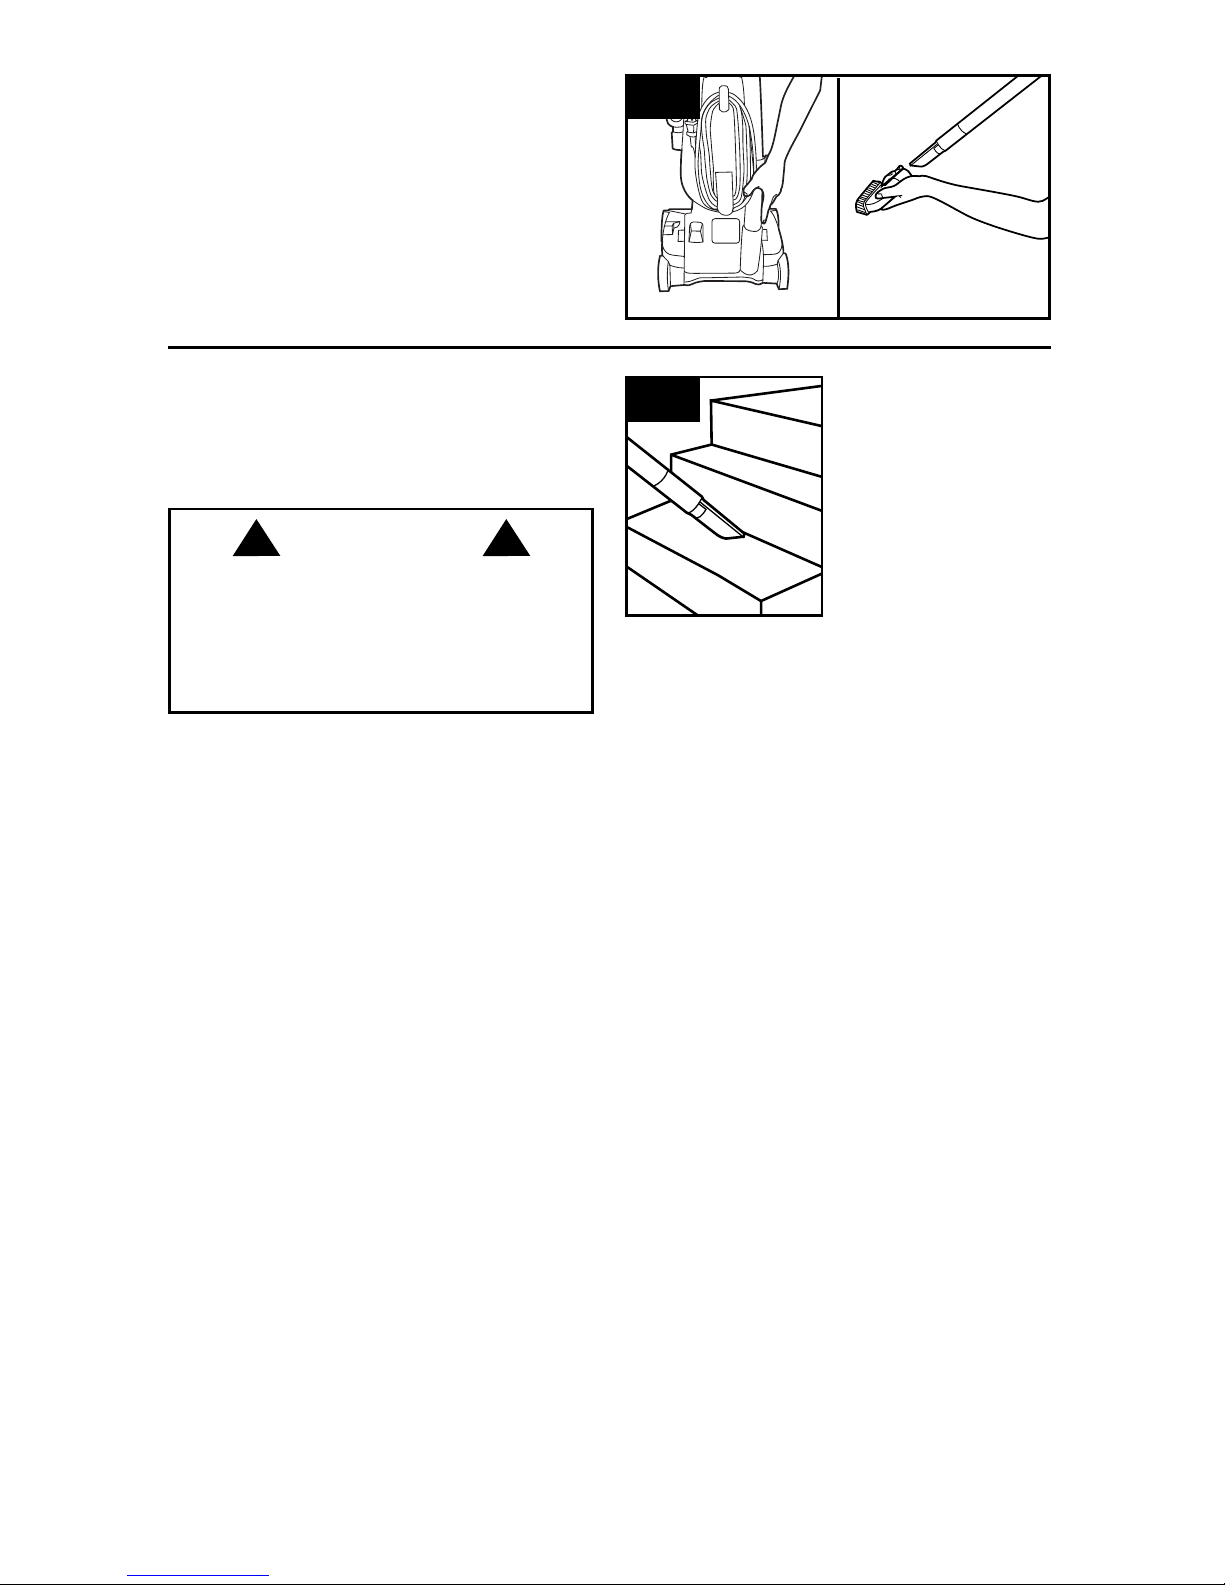
2.8 When using cleaning tools, cleaner handle
should be in the upright position to activate the
automatic “brushroll OFF” and for convenience in
moving the cleaner from one area to another.
Turn cleaner OFF before disconnecting and
connecting hose to hose tube (A).
To use hose, lift hose end as shown.
2.8
CLEANING TOOLS
A. Dusting brush may be used for carved furniture,
table tops, books, lamps, lighting fixtures, venetian
blinds, baseboards, shutters, and registers.
B. Crevice tool (located on bottom of handle/wand)
may be used in tight spaces, corners and along
edges in such places as dresser drawers,
upholstered furniture, stairs and baseboards.
C. Handle/Wand is used to give extra length to your
hose. Can also be used with dusting brush.
B
C
A
2.9
SELECT PROPER TOOL
(T ools may vary per model)
Page 8
8
Actual model may vary from images shown.
ATTACH WAND AND TOOLS
2.10 Remove the hose from hose caddy.
Connect tools to end of hose or use hose alone.
To use handle wand, first remove handle from
cleaner body pressing the handle release button
(see Fig. 1.3). Attach hose to top of handle.
Use crevice tool attached or place Upholstery tool
over crevice tool to clean.
2.10
STAIR CLEANING
CAUTION
! !
Use extra care when cleaning on stairs. To
avoid personal injury or damage, and to prevent
the cleaner from falling, always place cleaner
at bottom of stairs or on floor. Do not place
cleaner on stairs or furniture, as it may result in
injury or damage.
2.1 1 Use the hose or crevice tool for stair cleaning.
With handle in upright position, clean from bottom
to top.
2.11
Page 9

9
Actual model may vary from images shown.
3. MAINTENANCE
Familiarize yourself with these home maintenance tasks as proper use and care
of your cleaner will ensure continued cleaning effectiveness.
The System Check Indicator located at (A), alerts you to possible system
performance issues. Please refer to the Troubleshooting section on page 12 for
possible causes and solutions.
Any other servicing should be done by an authorized service representative.
DIRT CUP
How to Empty
3.2 Push dirt cup release button on top of dirt cup to
remove dirt cup.
3.3 Hold dirt cup over garbage can and press clean
release dirt cup button to empty. Make sure cup
bottom center opening is clear of debris. Snap
dirt cup bottom back into place after emptying.
3.2
CAUTION
! !
To reduce the risk of injury from moving parts,
unplug vacuum before servicing.
Do not operate cleaner without either the dirt
cup or filters in place.
An internal thermal protector has been designed into your cleaner to protect it from overheating. When
the thermal protector activates the cleaner witll stop running.
If this happens proceed as follows:
1. Turn cleaner OFF and disconnect it from the electrical outlet.
2. Empty dirt cup.
3. Inspect the nozzle/brushroll, filters, umbrella tube and hose for any obstructions. Clear obstructions
if present.
4. When cleaner is unplugged and motor cools for 30 minutes, the thermal protector will deactivate
and cleaning may continue.
If the thermal protector continues to activate after following the above steps, your cleaner needs
servicing.
NOTICE
! !
3.1
A
3.3
Page 10

10
Actual model may vary from images shown.
FILTERS
Secondary Foam Filter:
How to Clean
3.8 Click the button on the base of the cleaner
toward the outside edges to unlock the filter
cartridge.
3.9 Remove the foam filter.
3.10 Hold foam filter under running water to
wash. Wring excess water out of filter. Allow
filter to dry for at least 24 hours before replacing.
3.8 3.9
3.10
3.4
CAUTION
! !
To reduce the risk of personal injury, unplug
vacuum before servicing.
Do not operate cleaner without either the dirt
cup or filters in place.
3.11
Umbrella Tube:
How to clean
Remove dirt cup as described in Fig. 3.2.
3.11 Hold dirt cup by carry handle and press release
button (A) to empty dirt cup.
3.12 Twist umbrella tube counter clockwise and pull
out of dirt cup. Hold over trash can and shake free
of dirt and debris.
T o replace umbrella tube, insert back into dirt cup, align
slots and twist clockwise until tube locks in place.
3.12
Primary HEPA and Foam Filter:
How to Clean
Remove dirt cup as described in Figure 3.2.
3.4 Twist dirt cup lid counter clockwise and lift
up to remove.
3.5 Remove filter cartridge from dirt cup.
3.6 Separate foam filter from filter cartridge (A).
Hold foam filter under running water to wash.
Wring excess water out of filter (B). Allow filter
to dry for at least 24 hours before replacing in filter
cartridge.
3.7 Hold filter cartridge over trash can and tap off
dirt and debris. Hepa filter can also be cleaned by
running under water to wash (Fig. 3.6, B).
3.5
3.6
A
b
3.7
CAUTION
! !
To reduce the risk of personal injury, unplug
vacuum before servicing.
Do not operate cleaner without either the dirt
cup or filters in place.
A
Page 11

11
3.13
BELT AND BRUSHROLL
How to Replace
3.13 Lay the cleaner flat and flip it to expose the
nozzle base. The base should lay flat and face up.
Remove the five (5) screws.
2.14 Pull and lift the nozzle guard off.
3.15 Lift and remove the brushroll. Dispose of the
old belt.
3.16 Slide belt onto motorshaft.
3.17 Place new belt in area of brushroll without
bristles.
3.18 With new belt in place, pull and slide brushroll
into nozzle making sure that the brushroll end caps
are in the correct orientation. Rotate brushroll
manually to make sure belt is properly aligned.
3.19 Reattach nozzle guard.
3.20 Secure by aligning the three tabs in the
base slots.
3.21 Replace all five screws to secure nozzle guard.
3.14
3.15
3.16
3.17
3.18
SLOTS
TABS
3.19
SLOTS
TABS
3.20
3.21
CAUTION
! !
To reduce the risk of injury from moving parts,
unplug vacuum before servicing.
Page 12

4. TROUBLESHOOTING
If a minor problem occurs, it usually can be solved quite easily when the cause is found by using the
checklist below.
Any other servicing should be done by an authorized service representative.
WARNING
! !
PROBLEM POSSIBLE CAUSE POSSIBLE SOLUTION
Cleaner won’t run
Power cord not firmly plugged
into outlet.
Plug unit in firmly.
Blown fuse or tripped breaker.
Check fuse or breaker in home. Replace fuse/
reset breaker in home.
Needs service.
Take to service center. To find nearest location,
visit our website at www.hoover.com or call
1-800-944-9200.
Thermal protector activated.
Allow cleaner to cool for 30 minutes (this will
reset the thermal protector).
The Performance
Indicator is red or
the cleaner won’t
pick up or low
suction
Dirt cup not installed
correctly .
Review dirt cup removal & replacement.
Dirt cup full. Empty dirt cup.
Brushroll worn. Replace brushroll.
Broken or worn belt. Replace belt.
Clogged filter. Remove filter and clean
Nozzle/brushroll clogged. Check nozzle/brushroll; remove obstruction/clog.
Hose clogged. Remove hose; remove clog.
Dust escaping
from cleaner
Dirt cup full. Empty dirt cup.
Dirt cup not installed
correctly .
Review dirt cup removal & replacement.
Hose not installed correctly. Review hose installation.
Filter not installed completely. Review filter removal and replacement.
To reduce risk of personal injury - unplug cleaner before servicing.
12
La fiche du cordon
d’alimentation n’est pas bien
insérée dans la prise de cou-
rant.
Un fusible est grillé ou le dis-
joncteurest déclenché.
L’appareil doit être entretenu.
Protecteur thermique activé.
Page 13

13
To obtain approved Hoover® service and genuine Hoover® parts, locate the nearest Authorized Hoover
®
Warranty Service Dealer (Depot) by:
•CheckingtheYellowPagesunder“VacuumCleaners”or“Household”.
•Visitourwebsiteathoover.com(U.S.Customers)orhoover.ca(Canadiancustomers).
Follow the service center link to find the service outlet nearest you.
•Foranautomatedreferralofauthorizedserviceoutletlocationscall1-800-944-9200.
Do not send your vacuum to Hoover
®
, Inc., Company in Glenwillow for service. This will only result in delay.
If you need further assistance:
To speak with a customer service representative call 1-800-944-9200; Mon-Fri 8am-7pm EST. In Canada,
contact Hoover® Canada, Toronto: 755 Progress Ave., Scarborough, ON M1H 2W7 OR Hoover® Canada,
Edmonton: 18129-111 Ave., Edmonton, AB T5W 2P2, Phone: 1-800-944-9200, Mon-Fri 8am-7pm EST .
Always identify your vacuum by the complete model number when requesting information or ordering parts.
(The model number appears on the bottom of the vacuum.)
PLEASE DO NOT RETURN THIS PRODUCT TO THE STORE.
5. SERVICE
Page 14

©2010 Techtronic Floor Care Technology Limited. Todos los derechos reservados. #960009657 ID101237-R0
IMPORTANTE: LEA ATENTAMENTE ANTES DE ENSAMBLAR Y USAR.
¿Tiene alguna pregunta o inquietud? Para obtener asistencia, llame al Servicio de atención al
cliente al 1-800 944 9200, de lunes a viernes, de 8 a.m. a 7 p.m., hora del ESTE.
POR FAVOR, NO DEVUELVA ESTE PRODUCTO A LA TIENDA.
www.hoover.com
MANUAL DEL PROPIETARIO
Instrucciones de Funcionamiento y Servicio
ESTA ASPIRADORA PARA ALFOMBRAS ESTÁ DISEÑADA
PARA USO DOMÉSTICO.
EL USO COMERCIAL DE ESTE PRODUCTO ANULA LA GARANTÍA.
E1
Remanufacturado
Part # 59881333
Page 15

Instrucciones de seguridad importantes ..............................................................
E3
E2
Gracias por haber elegido un producto HOOVER®.
Anote los números completos de Código de fabricación
en los espacios provistos.
MODELO
CÓDIGO DE FAbRICACIÓN
Consejo: Adjunte su recibo de compra a este Manual del
propietario. Para obtener el servicio de garantía de su
producto HOOVER® puede requerirse la verificación de la
fecha de compra.
Inscriba su producto en línea en Hoover.com, o llame al
1-800-944-9200 si prefiere hacerlo por teléfono.
Si necesita ayuda:
Visite nuestro sitio web en www.hoover.com. Haga clic en el enlace que permite localizar los vendedores
autorizados hoover para encontrar el vendedor más cercano, o marque el 1-800-944-9200 para
escuchar un mensaje indicando la dirección de los vendedores autorizados Hoover® (sólo en ee. Uu.)
O para hablar con un representante de atención al cliente (de 8 am a 7 pm, hora estándar del este, de
lunes a viernes).
POR FAVOR, NO DEVUELVA ESTE PRODUCTO A LA TIENDA.
ÍNDICE
Ensamblado de la aspiradora .................................................................................E5
Contenido de la caja ...........................................................................................E5
Funcionamiento ........................................................................................................ E6
Descripción de la aspiradora ...............................................................................E6
Desenganche/ almacenaje del cable ..................................................................E6
Pedal de encendido/ apagado ...........................................................................E6
Pedal para soltar el mango ................................................................................. E7
Limpieza de pisos/ alfombras ..............................................................................E7
Modo de Solo Succion
..........................................................................................E7
Mango de transporte ..........................................................................................E7
Accesorios ........................................................................................................... E8
Mantenimiento .......................................................................................................... E9
Depósito para polvo ............................................................................................E9
Filtros ..................................................................................................................E10
Tubo paraguas .................................................................................................... E10
Banda y cepilo..................................................................................................... E11
Solución de problemas ............................................................................................ E12
Servicio .....................................................................................................................E13
Page 16

SEGURIDAD IMPORTANTES
INSTRUCCIONES DE
Al usar un aparato eléctrico, observe siempre las precauciones básicas,
incluyendo las siguientes:
LEA TODAS LAS INSTRUCCIONES ANTES DE USAR ESTE APARATO
ADVERTENCIA: PARA REDUCIR EL RIESGO
DE INCENDIOS, CHOqUES ELÉCTRICOS O
LESIONES:
• Ensamble Completamente El Producto Antes De Hacerlo Funcionar.
• Haga Funcionar La Aspiradora Sólo Al Voltaje Especificado En La Placa De Etiqueta Ubicada
Debajo De La Limpiadora.
• No Deje El Aparato Sin Supervisión Cuando Esté Enchufado. Desenchúfelo De La Toma De
Corriente Cuando No Lo Esté Usando Y Antes De Limpiarlo O Darle Mantenimiento.
• No La Use En Superficies Húmedas. No La Exponga A La Lluvia. Guarde En Interiores.
• No Permita Que Esta Máquina Se Use Como Un Juguete. No Está Diseñada ParA Que Lo
Utilicen Niños De 12 Años Y Menos. Se Debe Prestar Especial Atención Cuando Este Producto
Es Usado Cerca De Los Niños. Para Evitar Lesiones O Daños, Mantenga A Los Niños Lejos
Del Producto Y No Permita Que Los Niños Coloquen Los Dedos U Otros Objetos En Ninguna
Abertura.
• Use El Producto Sólo Como Se Describe En Este Manual. Use Sólo Los Accesorios Y Productos
Recomendados Por El Fabricante.
• No Use Este Aparato Con Un Cordón O Enchufe Dañado. Si El Aparato No Está Funcionando
Adecuadamente, Se Dejó Caer, Se Dañó, Se Dejó A La Intemperie, O Se Dejó Caer Dentro Del
Agua, Llévelo A Un Centro De Servicio.
• No Tire Del Cordón Ni Traslade El Aparato Jalando Del Cordón, Ni Tampoco Lo Use Como
Manija; No Cierre La Puerta Cuando El Cordón Está Atravesado Ni Tire De Este Alrededor De
Bordes O Esquinas Filosos.
• No Lo Desenchufe Tirando Del Cordón. Para Desenchufarlo, Sujete El Enchufe, No El Cordón.
• Nunca Manipule El Enchufe Ni El Aparato Con Las Manos Húmedas.
• No Coloque Ningún Objeto En Las AberturAs. No Use Este Aparato Con Ninguna Abertura
Obstruida; Manténgalo Libre De Suciedad, Pelusa, Cabello O Cualquier Objeto Que Pueda
Reducir El Flujo De Aire.
• Apague Todos Los Controles Antes De Desenchufar El Aparato.
• Tenga Especial Cuidado Al Limpiar Escaleras. Para Evitar Lesiones Personales O Daños, Y
Evitar Que La Aspiradora Se Caiga, Siempre Colóquela Al Pie De La Escalera, En El Suelo.
No Coloque La Aspiradora Sobre Escaleras Ni Muebles, Ya Que Puede Ocasionar Lesiones O
Daños.
• No Use Este Aparato Para Aspirar Liquidos Inflamables O Combustibles, Como Gasolina, Ni Lo
Use En Áreas Donde Dichos Líquidos Puedan Estar Presentes.
• No Aspire Ningún Objeto Que Se Esté Quemando O Que Libere Humo, Como Cigarrillos,
Fósforos O Cenizas Calientes.
• No Use Sin Filtro Y/O Depósito Para Polvo En Su Lugar
• ADVERTENCIA: Este Producto Contiene Sustancias Químicas Reconocidas Por El Estado De
California Como Causantes De Cáncer, Anomalías Congénitas O Daños Reproductivos.
E3E14
Page 17

E4 E13
Para obtener un servicio aprobado de Hoover
autorizado de servicio de garantía de Hoover
•ConsultandolasPáginasamarillasenlasección“Aspiradoras–uso”doméstico.
•Visitenuestrositiowebenhoover.com(clientes
estadounidenses) o hoover.ca (clientes canadienses). Siga el enlace del centro de servicio para
encontrar el centro de servicio más cercano.
•Paraqueleinformendemaneraautomáticalaubicacióndeloscentrosautorizadosdeservicio,llame
al 1-800-944-9200. No envíe su aspiradora a Hoover
servicio. Esto sólo provocará demoras.
Si necesita recibir más ayuda:
Para hablar con un representante de atención al cliente, llame al 1-800-944-9200; de lunes a viernes, de
8 a.m. a 7 p.m., hora del Este. En Canadá, comuníquese con Hoover
Scarborough, ON M1H 2W7 O Hoover
Teléfono: 1-800-944-9200, de lunes a viernes, de 8 a.m. a 7 p.m., hora del Este. Siempre identifique su
aspiradora por el número de modelo completo al solicitar información o realizar pedidos de piezas.
(El número de modelo se encuentra en la parte inferior del mango de la limpiadora).
NO DEVUELVA ESTE PRODUCTO A LA TIENDA.
ADVERTENCIA:
PARA REDUCIR EL RIESGO DE DAÑOS:
• Evite aspirar objetos duros y filosos con este producto, ya que pueden causar daños.
• Guarde la máquina en un lugar seco. No la exponga a temperaturas de congelamiento.
• No use objetos filosos para limpiar la manguera, ya que pueden causar daños.
ADVERTENCIA:
• Para disminuir el riesgo de choque eléctrico, este aparato tiene un enchufe polarizado (una
patilla es más ancha que la otra). Este enchufe puede usarse en una toma de corriente polarizada, de una sola manera. Si el enchufe no encaja completamente en la toma de corriente,
colóquelo al revés. Si aun así no encaja, comuníquese con un electricista calificado para que
instale la toma de corriente apropiada. No haga ningún tipo de modificación al enchufe.
Page 18

El modelo real puede no coincidir con
las imágenes que se muestran
ATE LA MANGUERA
B
1.4
1.4 Alinee el extremo
de la manguera con la
proyección del conducto de polvo en la parte
posterior del mango.
Deslice la manguera
dentro de (B) y hágala
girar para trabarla en su
lugar.
1.5 Coloque la manguera
sobre el soporte y dentro
del tubo de la manguera
(C).
C
1.5
1.1 Retire todas las piezas de la caja e
identifique cada artículo que se muestra.
Asegúrese de contar con todas las piezas
antes de desechar el embalaje.
A. Mango/La Varilla
B. Accesorio para Hendiduras de polvo
(CONECTADOS A LA V ARILLA)
C. Cuerpo de la aspiradora
D. Depósito para polvo
E. Accesorio para polvo
A
C
1.1
B
D
1.2 Inserte el mango en el cuerpo de la aspiradora.
Empuje hacia abajo hasta que el mango se trabe en
su lugar.
1.3 Oprima el botón de desenganche del mango (A)
para extraerlo.
1.2
COLOCACIÓN DEL MANGO
1.3
A
1.6 En primer lugar,
coloque la parte inferior
del contenedor para
polvo dentro del cuerpo
de la aspiradora. Gire el
contenedor dentro de la
aspiradora.
El contenedor para
polvo está asegurado
cuando escucha un clic.
FIJE EL
DEPÓSITO DE
POLVO
1.6
E
1. ENSAMBLAJE DE LA ASPIRADORA
CONTENIDO DE LA CAJA
IMPORTANTE
La manguera debe estar conectada como se muestra para todas las
operaciones.
Page 19

El modelo real puede no coincidir con
las imágenes que se muestran
E6
1
2
3
5
4
11
10
9
8
7
6
2.1
*Los accesorios no incluidos con su modelo pueden comprarse por
separado, visitando www.hoover.com.
2.2
2.2 Gire el gancho de
liberación rápida del
cordón eléctrico para
retirarlo más fácilmente.
Guarde el cordón en la
guía para mantenerlo
fuera del paso mientras
aspira.
Para un guardado
cómodo, enrolle el
cable alrededor de
los ganchos para
cable. Conecte el
extremo del enchufe
al cable.
DESENGANCHE/
ALMACENAJE
DEL CABLE
ALMACENAMIENTO DE LOS
ACCESORIOS
1.6
E
D
1.7
1.6 Inserte el cepillo para desempolvar (D) dentro
del área de almacenaje en el costado de la
aspiradora.
1.7 El accesorio para hendiduras (E) está conectado
en forma permanente al extremo del mango/varilla
y se inserta dentro del cuerpo de la aspiradora para
su almacenaje.
2.3
2.3 Conecte el cordón
eléctrico en la toma de
corriente. Encienda la
aspiradora pisando el
pedal localizado en la
parte posterior izquierda
de la aspiradora.
PEDAL DE
ENCENDIDO/
APAGADO
12
13
14
15
16
17
1. Empuñadura del asa
2. Manguera
3. Cepillo para Polvo
4. Botón de liberación de la cubeta
colectora
5. Umbrella Tube (dentro del
depósito de polvo)
6. Depósito para polvo
7. Filtros
8. Boquilla
9. Tope
10. Indicadores de rendimiento
11. Accesorio para Hendiduras de
polvo (Conectado al mango y
guardado dentro de la
aspiradora)
12. Abrazadera de la manguera
13. Enganche del cable de
liberación rápida
14. Cable de alimentación
15. Ruedas
16.
Pedal encendido/apagado
17. Suction Control Pedal
2. FUNCIONAMIENTO
DESCRIPCIÓN DE LA
ASPIRADORA
BANDA Y CEPILLO:
Quitar y reemplazar
3.13 Acueste la aspiradora y voltéela para ver la
base de la boquilla. La base debe quedar plana
y mirando hacia arriba. Utilice un destornillador
Phillips para retirar los cinco (5) tornillos y así
quitar la protección de la boquilla. Las flechas
indican la posición de los tornillos.
2.14 Tire y levante la protección de la boquilla.
3.15 Levante y retire el cepillo giratorio. Deseche la
banda usada.
3.16 Deslice la banda en el eje del motor.
3.17 Coloque la banda nueva en el área sin cerdas
del cepillo giratorio.
3.18 Una vez que la banda nueva está puesta
en su lugar, tire del cepillo giratorio y deslícelo
dentro de la boquilla asegurándose que las
tapas finales estén en la orientación correcta
(inserción 6a). Gire el cepillo giratorio de forma
manual para asegurarse que la banda esté alin-
eada apropiadamente.
3.19 Vuelva a colocar la protección de la boquilla.
3.20 Fíjela alineando las tres (3) lengüetas en
las ranuras de la base.
3.21 Coloque nuevamente los cinco (5) tornillos
para asegurar la protección de la boquilla.
SLOTS
TABS
SLOTS
TABS
Para reducir el riesgo de lesiones personales,
desenchufe la aspiradora antes de realizar el
servicio.
PRECAUCIÓN
! !
Page 20

DE SOLO SUCCION
E7
El modelo real puede no coincidir con
las imágenes que se muestran
2.4 Pise el pedal para
bajar el asa a la posición
de funcionamiento. El
asa no queda trabada en
una posición sola, sino
que oscila para permitir
un funcionamiento
adecuado.
PEDAL PARA
SOLTAR EL
MANGO
2.4
2.5 Mueva el asa y
ajústela en la posición
deseada para operar la
aspiradora y bajar el asa
para limpiar debajo de
los muebles.
LIMPIEZA DE
PISOS/
ALFOMBRAS
2.5
2.7 Es posible mover la
aspiradora utilizando el
mango de transporte.
MANGO DE
TRANSPORTE
2.7
Para obtener un óptimo
rendimiento de limpieza
en suelos sin moquetas,
debe apagarse el rodillo
de cepillos.
La aspiradora se envía
con el rodillo de cepillos
en la posición ON. A fin
de apagar el rodillo de
cepillos para el Modo
Suction Only (Sólo su
ción), pise el pedal (A).
2.6
MODO
A
A
2.8 Al utilizar accesorios de limpieza, el mango de la
aspiradora debe estar en posición vertical. Además,
apague la aspiradora antes de desconectar y
conectar la manguera al tubo de la manguera (A).
Para usar la manguera, levante el extremo de la
manguera, como se muestra.
2.8
ACESORIOS
A. El accesorio para polvo/tapizados se usa en las
superficies de las mesas, libros, accesorios de
iluminación y persianas.
B. El accesorio para hendiduras (ubicado en la
parte inferior del mango/la varilla) puede usarse en
lugares estrechos, esquinas y bordes.
C. El mango/la varilla se utiliza para proporcionar
longitud adicional a su manguera. También se
puede utilizar con el cepillo para desempolvar.
B
C
A
2.9
SELECCIÓN DE LOS
A
CCESORIOS APROPIADOS
(Disponible sólo en algunos modelos)
Page 21

E8
El modelo real puede no coincidir con
las imágenes que se muestran
CONEXIÓN DEL TUBO Y DE LOS
ACCESORIOS
2.10 Retire la manguera del portamangueras.
Conecte los accesorios al extremo de la manguera
o utilice la manguera sola.
Para utilizar la varilla del mango, retire primero el
mango del cuerpo de la aspiradora oprimiendo el
botón de desenganche del mango (vea Fig. 1.3).
Conecte la manguera a la parte superior del
mango.
Utilice el accesorio para hendiduras que está
conectado, o coloque el accesorio para tapizados
sobre el accesorio para hendiduras para limpiar.
2.10
LIMPIEZA DE ESCALERAS
2.11 Utilice la manguera o el accesorio para
hendiduras para limpiar escaleras.
Limpie los escalones de abajo hacia arriba.
2.11
PRECAUCIÓN
! !
Tenga especial cuidado al limpiar escaleras.
Para evitar lesiones personales o daños, y evitar que la aspiradora se caiga, siempre colóquela al pie de la escalera o sobre el suelo. No
coloque la aspiradora sobre escaleras ni muebles, ya que puede ocasionar lesiones o
daños.
DEPÓSITO PARA POLVO
Cómo limpiarlo
3.2 Presione el botón de liberación del contenedor
para polvo y gire el contenedor hacia afuera.
3.3 Sujetando el contenedor para polvo sobre el
recipiente de basura, presione el botón de liberación
de la puerta del contenedor para polvo para abrir la
puerta del contenedor para polvo.
Su aspiradora tiene incorporado un protector térmico interno para impedir el sobrecalentamiento.
Cuando se activa el protector térmico, la aspiradora deja de funcionar.
Si esto sucede, proceda de la siguiente manera:
1. Apague la aspiradora y desconéctela de la toma de corriente eléctrica.
2. Vacíe el depósito de polvo.
3. Inspeccione los filtros del cepillo giratorio/la boquilla, el tubo paraguas y la manguera para ver
si hay obstrucciones. Despeje las obstrucciones si las hay.
4. Cuando la aspiradora se desenchufa y el motor se enfría durante 30 minutos, el protector tér-
mico se desactiva y la limpieza puede continuar.
Si el protector térmico continúa activándose luego de seguir los pasos indicados arriba, su aspiradora
necesita un servicio.
Familiarícese con estas tareas de mantenimiento en el hogar, ya que el uso
y cuidado apropiados de su aspiradora asegurarán una limpieza continua-
mente eficaz.
El indicador de verificación del sistema, que se encuentra en la parte (A), lo
alerta sobre posibles problemas de rendimiento del sistema. Consulte la sec-
ción Solución de problemas en la página 12 para obtener información sobrepo-
sibles causas y soluciones.
Cualquier otra tarea de mantenimiento debe ser realizada por un representante de
mantenimiento autorizado.
Para reducir el riesgo de lesiones person-
ales, desenchufe la aspiradora antes de
realizar el servicio.
No use la aspiradora sin el contenedor para
polvo, o los filtros colocados en su lugar.
PRECAUCIÓN
! !
Page 22

El modelo real puede no coincidir con
las imágenes que se muestran
E9
DEPÓSITO PARA POLVO
Cómo limpiarlo
3.2 Presione el botón de liberación del contenedor
para polvo y gire el contenedor hacia afuera.
3.3 Sujetando el contenedor para polvo sobre el
recipiente de basura, presione el botón de liberación
de la puerta del contenedor para polvo para abrir la
puerta del contenedor para polvo.
3.2
Su aspiradora tiene incorporado un protector térmico interno para impedir el sobrecalentamiento.
Cuando se activa el protector térmico, la aspiradora deja de funcionar.
Si esto sucede, proceda de la siguiente manera:
1. Apague la aspiradora y desconéctela de la toma de corriente eléctrica.
2. Vacíe el depósito de polvo.
3. Inspeccione los filtros del cepillo giratorio/la boquilla, el tubo paraguas y la manguera para ver
si hay obstrucciones. Despeje las obstrucciones si las hay.
4. Cuando la aspiradora se desenchufa y el motor se enfría durante 30 minutos, el protector térmico se desactiva y la limpieza puede continuar.
Si el protector térmico continúa activándose luego de seguir los pasos indicados arriba, su aspiradora
necesita un servicio.
AVISO
! !
3.1
A
3.3
3. MANTENIMIENTO
Familiarícese con estas tareas de mantenimiento en el hogar, ya que el uso
y cuidado apropiados de su aspiradora asegurarán una limpieza continuamente eficaz.
El indicador de verificación del sistema, que se encuentra en la parte (A), lo
alerta sobre posibles problemas de rendimiento del sistema. Consulte la sección Solución de problemas en la página 12 para obtener información sobreposibles causas y soluciones.
Cualquier otra tarea de mantenimiento debe ser realizada por un representante de
mantenimiento autorizado.
Para reducir el riesgo de lesiones personales, desenchufe la aspiradora antes de
realizar el servicio.
No use la aspiradora sin el contenedor para
polvo, o los filtros colocados en su lugar.
PRECAUCIÓN
! !
Page 23

E10
El modelo real puede no coincidir con
las imágenes que se muestran
2.4 Pise el pedal para
bajar el asa a la posición
de funcionamiento. El
asa no queda trabada en
una posición sola, sino
que oscila para permitir
un funcionamiento
adecuado.
PEDAL PARA
SOLTAR EL
MANGO
Para obtener un óptimo
rendimiento de limpieza
en suelos sin moquetas,
debe apagarse el rodillo
de cepillos.
La aspiradora se envía
con el rodillo de cepillos
en la posición ON. A fin
de apagar el rodillo de
cepillos para el Modo
Suction Only (Sólo su
ción), pise el pedal (A).
MODO SUCTION ONLY
2.8 Al utilizar accesorios de limpieza, el mango de la
aspiradora debe estar en posición vertical. Además,
apague la aspiradora antes de desconectar y
conectar la manguera al tubo de la manguera (A).
Para usar la manguera, levante el extremo de la
manguera, como se muestra.
ACESORIOS
A
2.9
SELECCIÓN DE LOS
A
CCESORIOS APROPIADOS
(Disponible sólo en algunos modelos)
FILTROS
Filtro secundario de la espuma:
Cómo limpiar
3.8 3.9
3.10
3.4
3.11
Tubo paraguas: Cómo limpiar
Retire el contenedor para polvo, como se
describe en la Fig. 3.2.
3.11 Sostenga el depósito de polvo por la
empuñadura y oprima el botón de desenganche (A)
para vaciar el depósito de polvo.
3.12 Haga girar el tubo paraguas en sentido
antihorario y retírelo del depósito de polvo tirando
de él. Sosténgalo sobre el bote de basura y
sacúdalo para quitar polvo y residuos.
Para volver a colocar el tubo paraguas, insértelo
nuevamente dentro del depósito de polvo, alinee las
3.12
Filtro hecho con medios filtrantes
HEPA : Cómo limpiar
3.5
3.6
A
b
3.7
A
Para reducir el riesgo de lesiones personales,
desenchufe la aspiradora antes de realizar el
servicio.
No use la aspiradora sin el contenedor para
polvo, o los filtros colocados en su lugar.
PRECAUCIÓN
! !
Retire el contenedor para polvo, como se
describe en la Fig. 3.2.
3.4 Haga girar la tapa del depósito de polvo en
sentido antihorario y levántela para retirarla.
3.5 Retire el cartucho del filtro del depósito de
polvo.
3.6 Separe el filtro de espuma del cartucho del
filtro (A). Sostenga el filtro de espuma bajo agua
corriente para lavarlo. Escurra el exceso de agua
del filtro (B). Deje secar el filtro durante al
menos 24 horas antes de volver a colocarlo en
el cartucho del filtro.
3.7 Sostenga el cartucho del filtro sobre un bote
de basura y sacuda el polvo y los residuos. El
filtro HEPA también se puede limpiar pasándolo
bajo el agua para lavarlo (Fig. 3.6, B).
Para reducir el riesgo de lesiones personales,
desenchufe la aspiradora antes de realizar el
servicio.
No use la aspiradora sin el contenedor para
polvo, o los filtros colocados en su lugar.
PRECAUCIÓN
! !
3.8 Oprima el botón en la base de la aspiradora hacia los bordes
exteriores para destrabar el cartucho del filtro.
3.9 Retire el filtro de espuma.
3.10 Sostenga el filtro de espuma bajo el chorro de agua para lavarlo.
Escurra el exceso de agua del filtro. Deje secar el filtro al menos 24
horas antes de reemplazar elcartucho del filtro.
ranuras y hágalo girar en sentido horario hasta que el
tubo se trabe en su lugar.
Page 24

E11
El modelo real puede no coincidir con
las imágenes que se muestran
3.13
BANDA Y CEPILLO:
Quitar y reemplazar
3.13 Acueste la aspiradora y voltéela para ver la
base de la boquilla. La base debe quedar plana
y mirando hacia arriba. Utilice un destornillador
Phillips para retirar los cinco (5) tornillos y así
quitar la protección de la boquilla. Las flechas
indican la posición de los tornillos.
2.14 Tire y levante la protección de la boquilla.
3.15 Levante y retire el cepillo giratorio. Deseche la
banda usada.
3.16 Deslice la banda en el eje del motor.
3.17 Coloque la banda nueva en el área sin cerdas
del cepillo giratorio.
3.18 Una vez que la banda nueva está puesta
en su lugar, tire del cepillo giratorio y deslícelo
dentro de la boquilla asegurándose que las
tapas finales estén en la orientación correcta
(inserción 6a). Gire el cepillo giratorio de forma
manual para asegurarse que la banda esté alineada apropiadamente.
3.19 Vuelva a colocar la protección de la boquilla.
3.20 Fíjela alineando las tres (3) lengüetas en
las ranuras de la base.
3.21 Coloque nuevamente los cinco (5) tornillos
para asegurar la protección de la boquilla.
3.14
3.15
3.16
3.17
3.18
SLOTS
TABS
3.19
SLOTS
TABS
3.20
3.21
Para reducir el riesgo de lesiones personales,
desenchufe la aspiradora antes de realizar el
servicio.
PRECAUCIÓN
! !
Page 25

E12 E5
El modelo real puede no coincidir con
las imágenes que se muestran
ATE LA MANGUERA
1.4 Alinee el extremo
de la manguera con la
proyección del conduc-
to de polvo en la parte
posterior del mango.
Deslice la manguera
dentro de (B) y hágala
girar para trabarla en su
lugar.
1.5 Coloque la manguera
sobre el soporte y dentro
del tubo de la manguera
(C).
1.1 Retire todas las piezas de la caja e
identifique cada artículo que se muestra.
Asegúrese de contar con todas las piezas
antes de desechar el embalaje.
A. Mango/La Varilla
B. Accesorio para Hendiduras de polvo
(CONECTADOS A LA V ARILLA)
C. Cuerpo de la aspiradora
D. Depósito para polvo
E. Accesorio para polvo
1.2 Inserte el mango en el cuerpo de la aspiradora.
Empuje hacia abajo hasta que el mango se trabe en
su lugar.
1.3 Oprima el botón de desenganche del mango (A)
para extraerlo.
COLOCACIÓN DEL MANGO
CONTENIDO DE LA CAJA
La manguera debe estar conectada como se muestra para todas las
operaciones.
PROBLEMA CAUSA POSIBLE CAUSA POSIBLE
La aspiradora no
funciona
El cordón eléctrico no está
bien conectado en la toma de
corriente.
Conecte el enchufe firmemente.
Fusible quemado o interruptor
desconectado.
Revise el fusible o el interruptor en casa.
Reemplace el fusible / reajuste el interruptor.
Necesita servicio.
Llévela a un centro de servicio. Para encontrar
el lugar más cercano a su domicilio, visite nuestro sitio Web en www.dirtdevil.com o llame al
1-800-944-9200.
Protector térmico activado.
Desconecte la aspiradora. Deje que se enfríe.
El indicador de
rendimiento está
en rojo o la aspiradora no aspirará o succionará
con baja potencia
El recipiente de polvo no está
instalado correctamente.
Revise la forma de retiro y reemplazo del
recipiente de polvo
El recipiente de polvo está
lleno.
Vacíe el recipiente de polvo
Cepillo giratorio desgastada. Reemplace el cepillo giratorio
Banda rota o desgastada. Reemplace la banda
Filtro tapada. Retire y limpie el filtro
Boquilla/cepillo giratorio
tapado.
Inspeccione la boquilla/el cepillo giratorio.
Retire la obstrucción/el atasco
Manguera tapada. Retire la manguera; retire la obstrucción.
Polvo escapando
de la aspiradora
El recipiente de polvo está
lleno
Vacíe el recipiente de polvo
El recipiente de polvo no está
instalado correctamente.
Revise la forma de retiro y reemplazo del
recipiente de polvo
La manguera no está instalada correctamente
Revise la instalación de la manguera
El filtro no está instalado
completamente.
Revise el retiro y reemplazo del filtro
4. SOLUCIÓN DE PROBLEMAS
Si ocurre un problema menor, generalmente puede resolverse con bastante facilidad cuando se halla la
causa, usando esta lista de verificación.
Cualquier otra tarea de mantenimiento debe ser realizada por un representante de mantenimiento
autorizado.
Para reducir el riesgo de lesiones ocasionadas por piezas en movimiento, desenchufe la aspiradora
antes de realizar el mantenimiento.
ADVERTENCIA
! !
Page 26

5. SERVICIO
Para obtener un servicio aprobado de Hoover® y piezas genuinas de Hoover®, encuentre el Concesionario
autorizado de servicio de garantía de Hoover® (depositario) más cercano:
•ConsultandolasPáginasamarillasenlasección“Aspiradoras–uso”doméstico.
•Visitenuestrositiowebenhoover.com(clientes
estadounidenses) o hoover.ca (clientes canadienses). Siga el enlace del centro de servicio para
encontrar el centro de servicio más cercano.
•Paraqueleinformendemaneraautomáticalaubicacióndeloscentrosautorizadosdeservicio,llame
al 1-800-944-9200. No envíe su aspiradora a Hoover®, Inc., Company en Glenwillow para realizar el
servicio. Esto sólo provocará demoras.
Si necesita recibir más ayuda:
Para hablar con un representante de atención al cliente, llame al 1-800-944-9200; de lunes a viernes, de
8 a.m. a 7 p.m., hora del Este. En Canadá, comuníquese con Hoover® Canada, Toronto: 755 Progress Ave.,
Scarborough, ON M1H 2W7 O Hoover® Canada, Edmonton: 18129-111 Ave., Edmonton, AB T5W 2P2,
Teléfono: 1-800-944-9200, de lunes a viernes, de 8 a.m. a 7 p.m., hora del Este. Siempre identifique su
aspiradora por el número de modelo completo al solicitar información o realizar pedidos de piezas.
(El número de modelo se encuentra en la parte inferior del mango de la limpiadora).
NO DEVUELVA ESTE PRODUCTO A LA TIENDA.
 Loading...