

Page 1

TM
®
Page 2

02
ALABAMA
Pinebrook Shpg. Ctr.
3980B Airport Blvd.
Mobile, AL 36608
(251) 341-0304
(251) 341-0395 fax
ARIZONA
3434 West Bell Rd.
Phoeniz, AZ 85053
(602) 439-2751
(602) 564-0938 fax
4881 E. Speedway Blvd.
Tucson, AZ 85712
(520) 795-5612
(520) 322-6016 fax
Mesa Shores Shopping Ctr.
2136 East Baseline Rd.
Suite B-1
Mesa, AZ 85204
(480) 633-0622
(480) 633-0626 fax
CALIFORNIA
Sycamore Plaza
1047 N. State College Blvd.
Anaheim, CA 92806
(714) 635-5710
(714) 635-8432 fax
Burlingame Plaza Shpg.Ctr.
1803A El Camino Real
Burlingame, CA 94010
(650) 652-7810
(650) 652-7811 fax
1660 Contra Costa Blvd.
Suite C
Pleasant Hill, CA 94523
(925) 674-1206
(925) 674-1304 fax
West Gate Shpg. Ctr.
17498 Hawthorne Blvd.
Torrance, CA 90504
(310) 921-6523
(310) 921-6533 fax
1834 Fulton Ave.
Sacramento, CA 95825
(916) 481-4860
(916) 481-1528 fax
1287 Morena Blvd.
San Diego, CA 92110
(619) 276-9560
(619) 276-4359 fax
3628 Geary Blvd.
San Franciso, CA 94118
(415) 668-5101
(415) 668-5976 fax
Greenhouse Market Place
699 Lewelling Blvd.
San Leandro, CA 94579
(510) 346-2400
(510) 346-2402 fax
6487 N. Blackstone Ave.
Fresno, CA 93710
(559) 449-8258
(559) 449-0302 fax
230 S. Lake Ave. #2
Pasadena, CA 91101
(626) 229-0636
(626) 229-0638 fax
19030 Ventura Blvd. #B
Tarzana, CA 91356
(818) 345-7637/7827
(818) 609-1246 fax
COLORADO
Academy Pl. Shpg. Ctr.
5142 N. Academy Blvd.
Colorado Springs, CO 80918
(719) 260-9988
(719) 260-8353 fax
Monaco Village Shpg. Ctr.
2200 S. Monaco Pkwy.
Denver, CO 80222
(303) 757-4904
(303) 757-2723 fax
FLORIDA
303 E. Altamonte Dr, Ste 1100
Altamonte Springs, FL 32701
(407) 831-1444
(407) 831-5444 fax
102 Flamingo Rd.
Pembroke Pines, FL 33027
(954) 432-0031
(954) 432-6350 fax
GEORGIA
3655 Roswell Rd. NE, Ste 126
Buckhead, GA 30342
(404) 814-1574
(404) 814-1035 fax
1064 Old Peachtree Rd.
Ste 102
Lawrenceville, GA 30043
(678) 442-9907
(678) 442-9947 fax
2960 Shallowford Rd. #200
Marietta, GA 30066
(678) 560-0066
(678) 560-0068 fax
10779 Alpharetta Hwy.
Suite 170
Roswell, GA 30076
(770) 649-0425
(770) 649-0704 fax
IDAHO
520 S. Meridan Rd, Ste. 150
Meridian, ID 83642
(208) 855-4775
(208) 855-4776 fax
ILLINOIS
Winston Plaza Shpg. Ctr.
1372 Winston Plaza
Melrose Park, IL 60160
(708) 344-3800
(708) 344-3853 fax
Yorkshire Plaza
4328 East New York Street
Aurora, IL 60504
(630) 499-5728
(630) 499-5816 fax
IOWA
3001-100th St.
Urbandale, IA 50322
(515) 331-0550
(515) 331-0545 fax
KENTUCKY
4131 Shelbyville Rd.
Louisville, KY 40207
(502) 895-4775
(502) 895-9874 fax
LOUISIANA
4027 Veterans Memorial Blvd.
Metairie, LA 70002
(504) 888-1851
(504) 888-0752 fax
MARYLAND
Belair Beltway Plaza
7632 Belair Rd.
Baltimore, MD 21236
(410) 668-8100
(410) 668-9228 fax
The Festival at
Muddy Branch
305 Muddy Branch Rd.
Gaithersburg, MD 20878
(301) 948-0864
(301) 948-0866 fax
MICHIGAN
Evergreen Plaza Shpg. Ctr.
19799 West 12 Mile Rd.
Southfield, MI 48076
(248) 552-6253
(248) 552-6256 fax
MINNESOTA
Knollwood Village Shpg. Ctr.
8922 Highway 7
St. Louis Park, MN 55426
(952) 935-0091
(952) 935-0462 fax
Falcon Crossing Shpg. Ctr.
1539 W. Larpenteur Ave.
St. Paul, MN 55113
(651) 644-8684
(651) 644-6621 fax
MISSOURI
201 East Gregory
Kansas City, MO 64114
(816) 333-7440
(816) 333-3184 fax
18931 Valley View Pkwy.
Ste F
Independence, MO 64055
(816) 795-5303
(816) 795-5759
NEBRASKA
Plaza II Shpg. Ctr.
2449 S. 120thStreet
Omaha, NE 68144
(402) 330-2290
(402) 330-7675 fax
NEVADA
Eastern Beltway Shpg. Ctr.
2050 East Serence Ave.
Suite 620-3
Las Vegas, NV 89123
(702) 614-0777
(702) 614-0787 fax
7920 W. Tropical Parkway
Suite 110
Las Vegas, NV 89149
(702) 645-4320
(702) 645-7518 fax
NEW MEXICO
Fiesta Crossings
4770 Montgomery VC NE
Suite A-103
Albuquerque, NM 87109
(505) 883-0800
(505) 883-4970 fax
NEW YORK
Sheridan Centre
3312 Sheridan Drive
Amherst, NY 14226
(716) 831-0153
(716) 833-2423 fax
Kohl’s Shopping Plaza
3523A Hempstead Turnpike
Levittown, NY 11756
(516) 520-1233
(516) 520-1293 fax
1577 Ridge Rd. West
Rochester, NY 14615
(585) 865-7190
(585) 865-7214 fax
Northern Lights Shpg. Ctr.
320 Northern Lights Plaza
No. Syracuse, NY 13212
(315) 454-4682
(315) 454-4782 fax
NORTH CAROLINA
Four Seasons Plaza
6449 Albemarle Rd.
Charlotte, NC 28212
(704) 568-0371
(704) 568-4283 fax
OHIO
4032 Belden Village St.
Canton, OH 44718
(330) 491-0086
(330) 491-0140 fax
Cross Pointe Shpg. Ctr. 109
101 E. Alex-Bell Rd.
Centerville, OH 45459
(937) 291-3560
(937) 291-0076 fax
Civic Center Plaza
2256 Waycross Rd.
Forest Park, OH 45240
(513) 522-7575
(513) 522-7580 fax
Shoppes of Kenwood II
7714 B Montgomery Rd.
Cincinnati, OH 45236
(513) 791-7930
(513) 791-7934 fax
5160 Great Northern Plaza
North Olmsted, OH 44070
(440) 734-2755
(440) 734-2799 fax
Cranston Center
5831 Sawmill Rd.
Columbus, OH 43017
(614) 760-9399
(614) 760-9331 fax
104 Boardman-Poland Rd.
Boardman, OH 44512
(330) 758-1828
(330) 758-1332 fax
3109 West Market Street
Fairlawn, OH 44333
(330) 864-6700
(330) 864-6702 fax
OKLAHOMA
3710 NW 50thSt.
Oklahoma City, OK 73112
(405) 947-4436
(405) 947-0886 fax
PENNSYLVANIA
Great Southern Shpg. Ctr.
1155 Washington Pike
Bridgeville, PA 15017
(412) 221-4568
(412) 221-0145 fax
Lincoln Court Shpg. Ctr.
245 Lancaster Pike
Frazer, PA 19355
(610) 651-0570
(610) 651-0572 fax
TENNESSEE
2200 N. Germantown Pkwy
Suite 7
Cordova, TN 38016
(901) 266-0333
(901) 266-0811 fax
Market Place Shpg. Ctr.
9309A Kingston Pike
Knoxville, TN 37922
(865) 690-0785
(865) 694-9985 fax
The Maples Shpg. Ctr.
1010 Murfreesboro Rd.
Suite 126
Franklin, TN 37064
(615) 599-2949
(615) 599-9663 fax
TEXAS
13563 Preston Rd.
Suite 100
Dallas, TX 75240
(972) 503-9494
(972) 503-9496 fax
S. Frisco Village Shpg Ctr
2930 Preston Rd.
Frisco, TX 75034
(469) 633-0555
(469) 633-0745 fax
Westhill Village Shpg. Ctr.
7613 Westheimer
Houston, TX 77063
(713) 334-0199
(713) 334-1341 fax
N. Towne Plaza Shpg. Ctr.
6900 San Pedro, Suite 137
San Antonio, TX 78216
(210) 829-1906
(210) 805-0612 fax
19507 I-45, Suite #900
Cypresswood Ct.
Spring, TX 77388
(281) 288-5803
(281) 288-5876 fax
1823 West Bay Area Blvd.
Webster, TX 77598
(281) 338-2830
(281) 338-2835 fax
1491 LeeTrevino Dr, Ste D
El Paso, TX 79936
(915) 598-8633
(915) 598-8610 fax
UTAH
6935 Park Centre Drive
Salt Lake City, UT 84121
(801) 304-0516
(801) 304-0546 fax
VIRGINIA
Tuckernuck Sq. Shpg. Ctr.
9018 W. Broad Street
Richmond, VA 23294
(804) 747-8249
(804) 747-3395 fax
WASHINGTON
837 NE Northgate Way
Seattle, WA 98125
(206) 367-4425
(206) 367-0632 fax
North 2911 Monroe
Spokane, WA 99205
(509) 328-9514
(509) 328-9562 fax
WEST VIRGINIA
35 Riverwalk Plaza
S. Charleston, WV 25303
(304) 744-4748
(304) 744-4779 fax
WISCONSIN
Stein Mart Plaza
2791 South Oneida St.
Ashwaubenon, WI 54304
(920) 494-9441
(920) 494-5059 fax
Midvale Plaza
505 S. Midvale Blvd.
Madison, WI 53711
(608) 238-3470
(608) 238-0120 fax
10244 W. National Ave.
W. Allis, WI 53227
(414) 327-7430
(414) 327-9875 fax
Lakeside Marketplace
11211 120thAve.
Suite D-067
Pleasant Prairie, WI 53142
(262) 857-3176
(262) 857-6815 fax
CANADA
Hoover Canada
9012 L’Acadie Blvd.
Montreal, Quebec H4N 2Y8
(514) 384-8030
(514) 384-5940 fax
Hoover Canada
4151 North Service Rd.
Burlington, Ontario
L7R 4A8
(905) 335-3311
(905) 335-3320 fax
9/05
HOOVER SALES & SERVICE CENTERS
Page 3

03
When using an electrical appliance, always follow basic precautions,
including the following:
READ ALL INSTRUCTIONS BEFORE USING APPLIANCE.
WARNING:
To reduce the risk of fire,
electric shock, or injury:
• Do not use outdoors or on wet
surfaces.
• Close supervision is necessary
when any appliance is used by or
near children. Do not allow vacuum cleaner to be used as a toy or
to run unattended at any time.
• Keep hair, loose clothing, fingers, feet and all parts of body
away from openings, rotating agitators and other moving parts. Do
not operate cleaner in bare feet or
when wearing open toe shoes or
sandals.
• Do not pick up anything that is
burning or smoking, such as cigarettes, matches, or hot ashes.
• Do not use to pick up flammable or combustible liquids such as
gasoline or fine wood sandings or
use in areas where they may be
present.
• Avoid picking up hard, sharp
objects with the cleaner. They may
damage the cleaner.
• Always turn off this appliance
before connecting or disconnecting hose.
• Do not use without dirt cup or
filters in place. Empty cup frequently when picking up very fine
materials such as powder.
• Use extra care when cleaning on
stairs.
• Do not put any object into
openings. Do not use with any
opening blocked; keep free of dust,
lint, hair, and anything that may
reduce air flow.
• Do not pull or carry by cord,
use cord as a handle, close door
on cord or pull cord around sharp
edges or corners. Do not run
appliance over cord. Keep cord
away from heated surfaces.
• Always disconnect cord from electrical outlet before servicing the cleaner.
• Turn cleaner off and unplug
when not in use.
• Do not unplug by pulling on
cord. To unplug, grasp the plug,
not the cord. Never handle plug or
appliance with wet hands.
• The use of an extension cord is
not recommended.
• Do not use with damaged cord
or plug. If appliance is not working
as it should, has been dropped,
damaged, left outdoors, or
dropped into water, take it to a
Hoover Sales and Service Center
or Authorized Hoover Warranty
Service Dealer.
• Use vacuum cleaner only for its
intended use as described in the
instructions.
• Use only attachments recommended by Hoover; others may
cause hazards.
Important safeguards . . . . . . . . 3
Carton contents . . . . . . . . . . . . 4
Unpacking . . . . . . . . . . . . . . . . 4
Cleaner description. . . . . . . . . . 5
How to use. . . . . . . . . . . . . . . . 6
Using as an upright . . . . . . . . 6
Electrical cord . . . . . . . . . . . 6
Control panel. . . . . . . . . . . . 6
Auto agitator shut-off . . . . . . 6
Transporting. . . . . . . . . . . . . 7
Cleaning rugs . . . . . . . . . . . . 7
Using tools . . . . . . . . . . . . 8,9
Using as a canister . . . . . . . . 10
Carrying. . . . . . . . . . . . . . . 10
Cleaning stairs . . . . . . . . . 10
Emptying dirt cup . . . . . . . . . . 11
Maintenance. . . . . . . . . . . . . . 12
Filters . . . . . . . . . . . . . . . . . 12
Lubrication . . . . . . . . . . . . . 15
Clearing blockages. . . . . . 12,13
Agitator brush roll . . . . . . . . 14
Agitator belt. . . . . . . . . . . . . 14
Service. . . . . . . . . . . . . . . . . 17
Storage . . . . . . . . . . . . . . . 14,15
Troubleshooting . . . . . . . . . 16,17
Warranty . . . . . . . . . . . . . . . . 18
©2005 The Hoover Company
www.hoover .com
Important Safeguards
Save these instructions
Contents
Owner’s Manual
English ➜ pages 3-18
ESPAÑOL ➜ pág 19-30
FRANÇAIS ➜ 31-42
Page 4
04
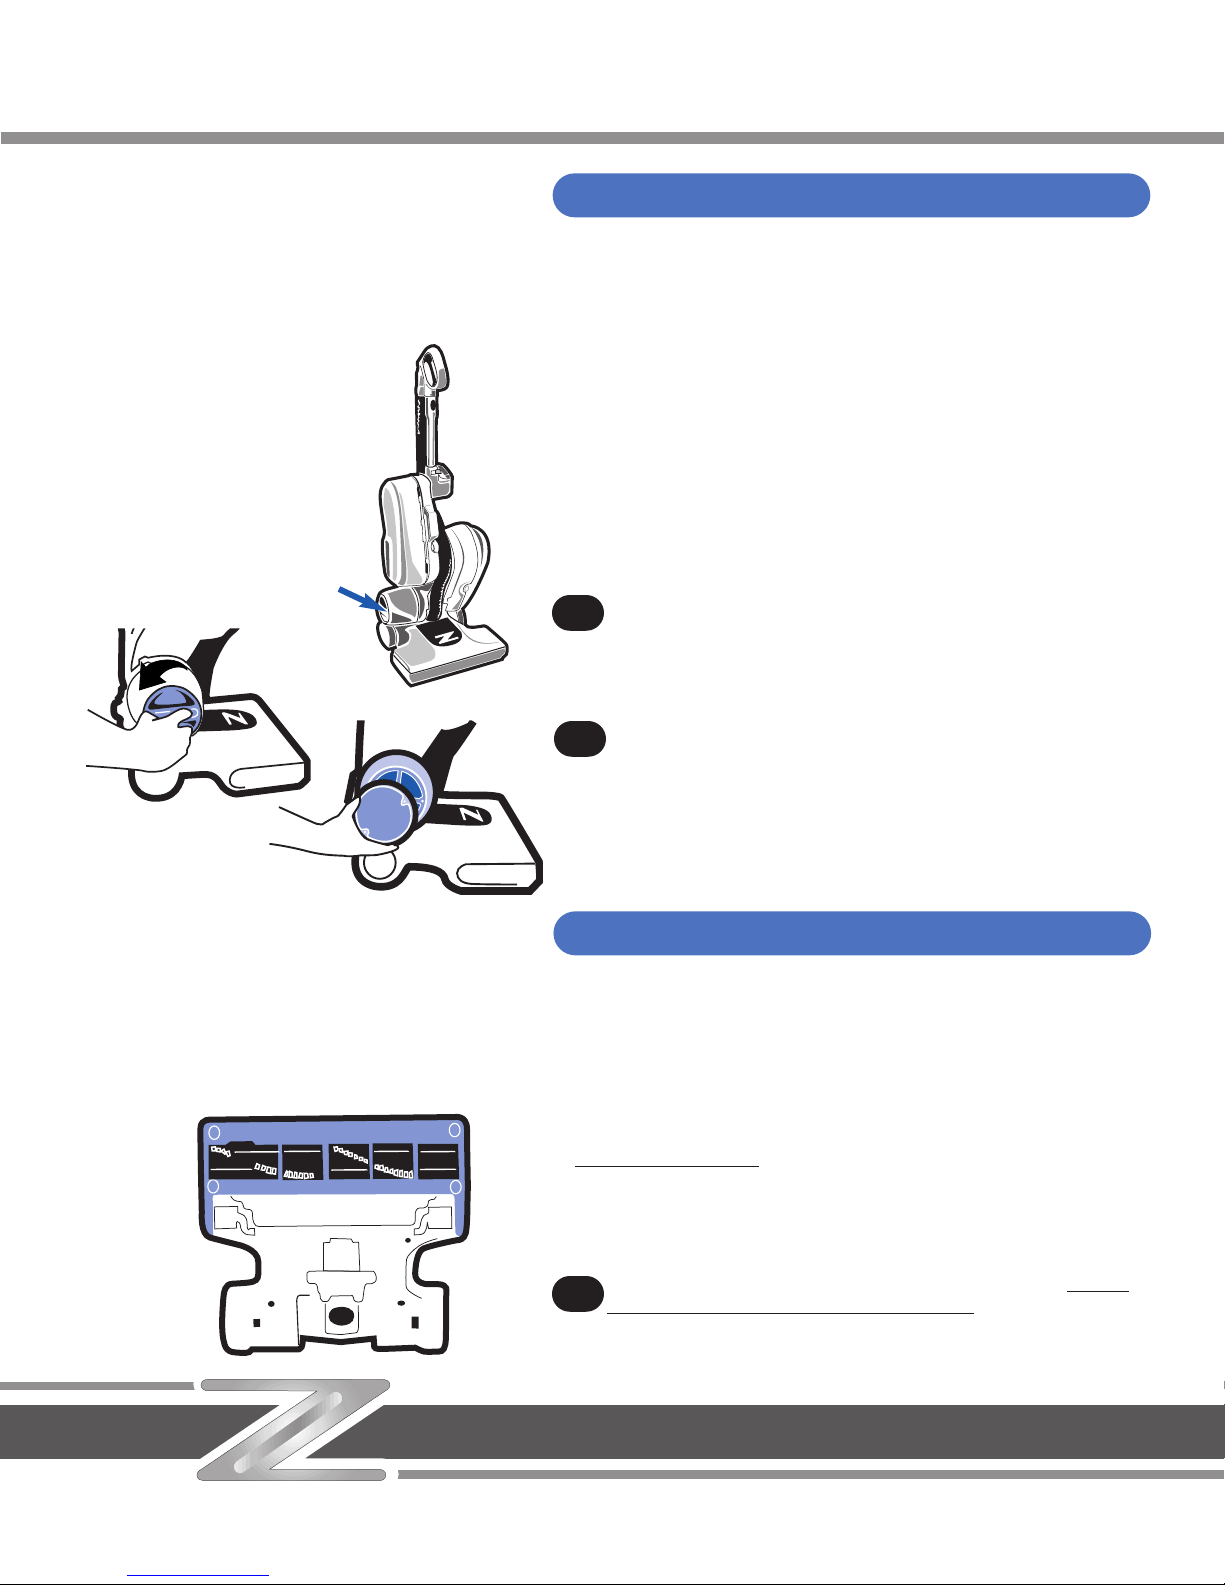
A. Cleaner
A
Lock handle in place
Position handle
Unfold cleaner
B
C
D
A
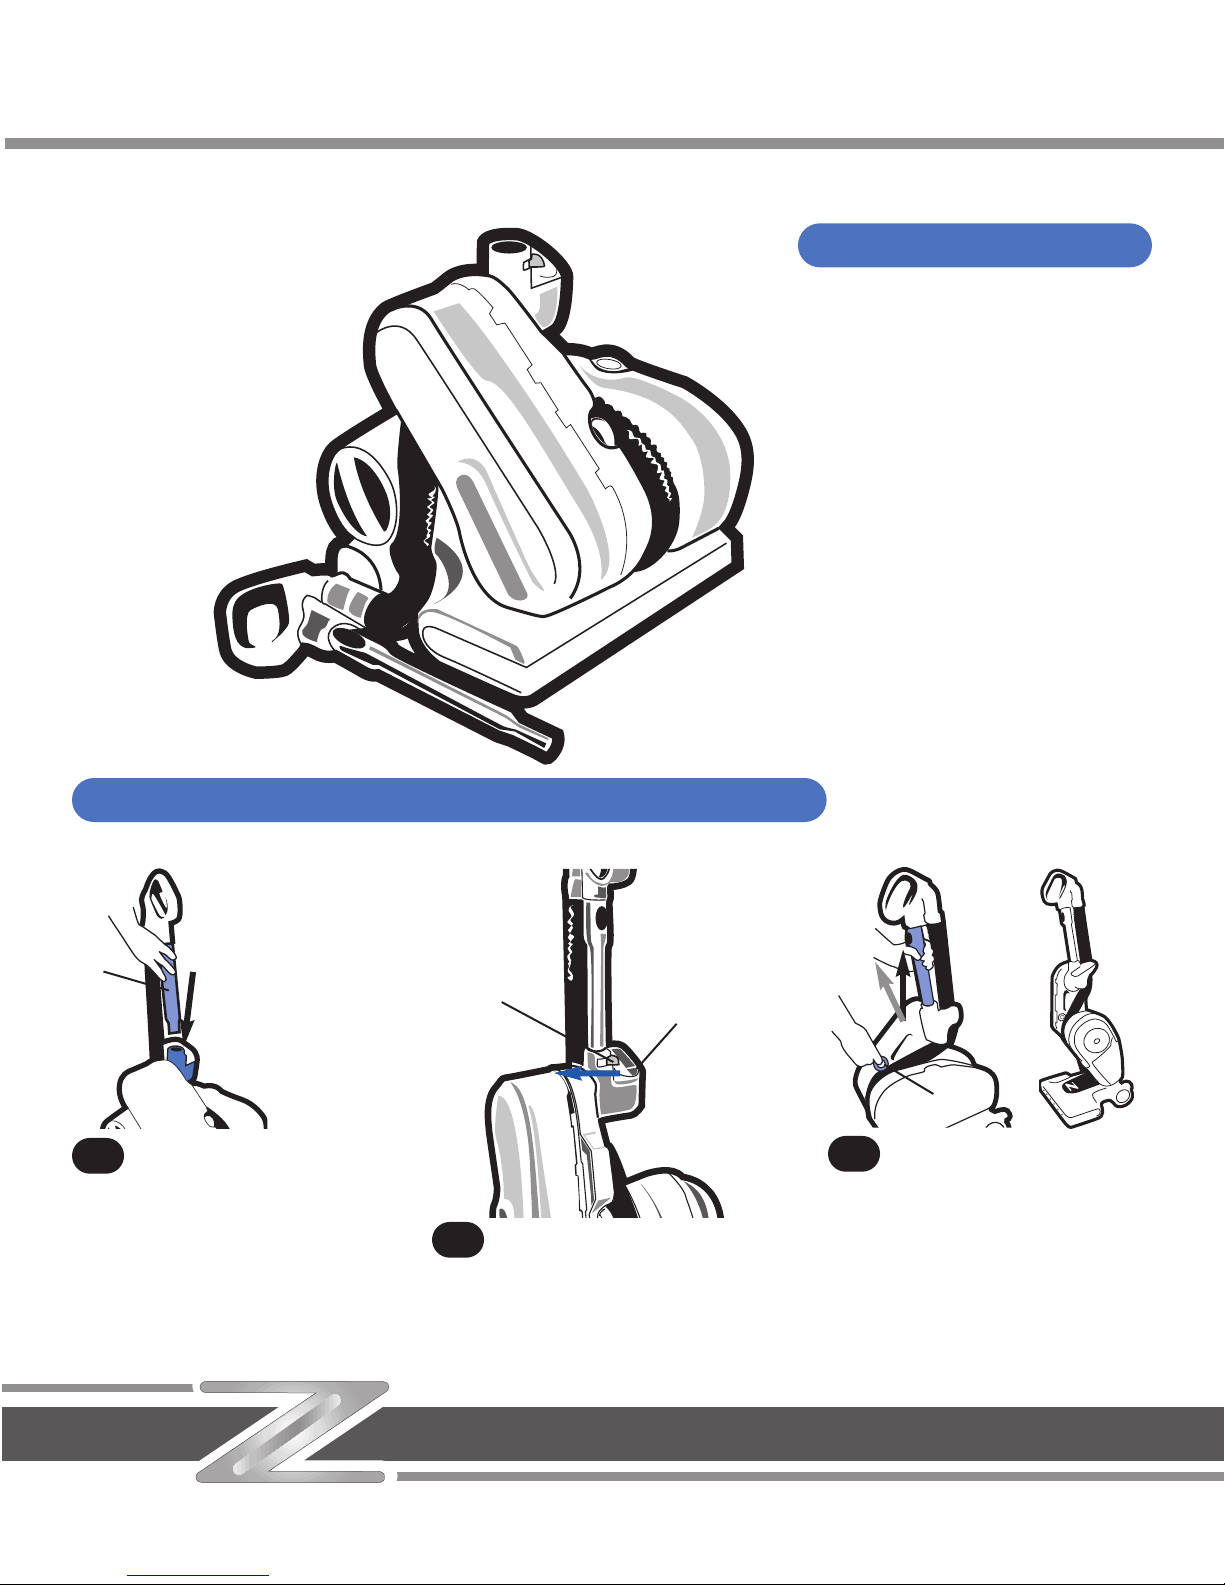
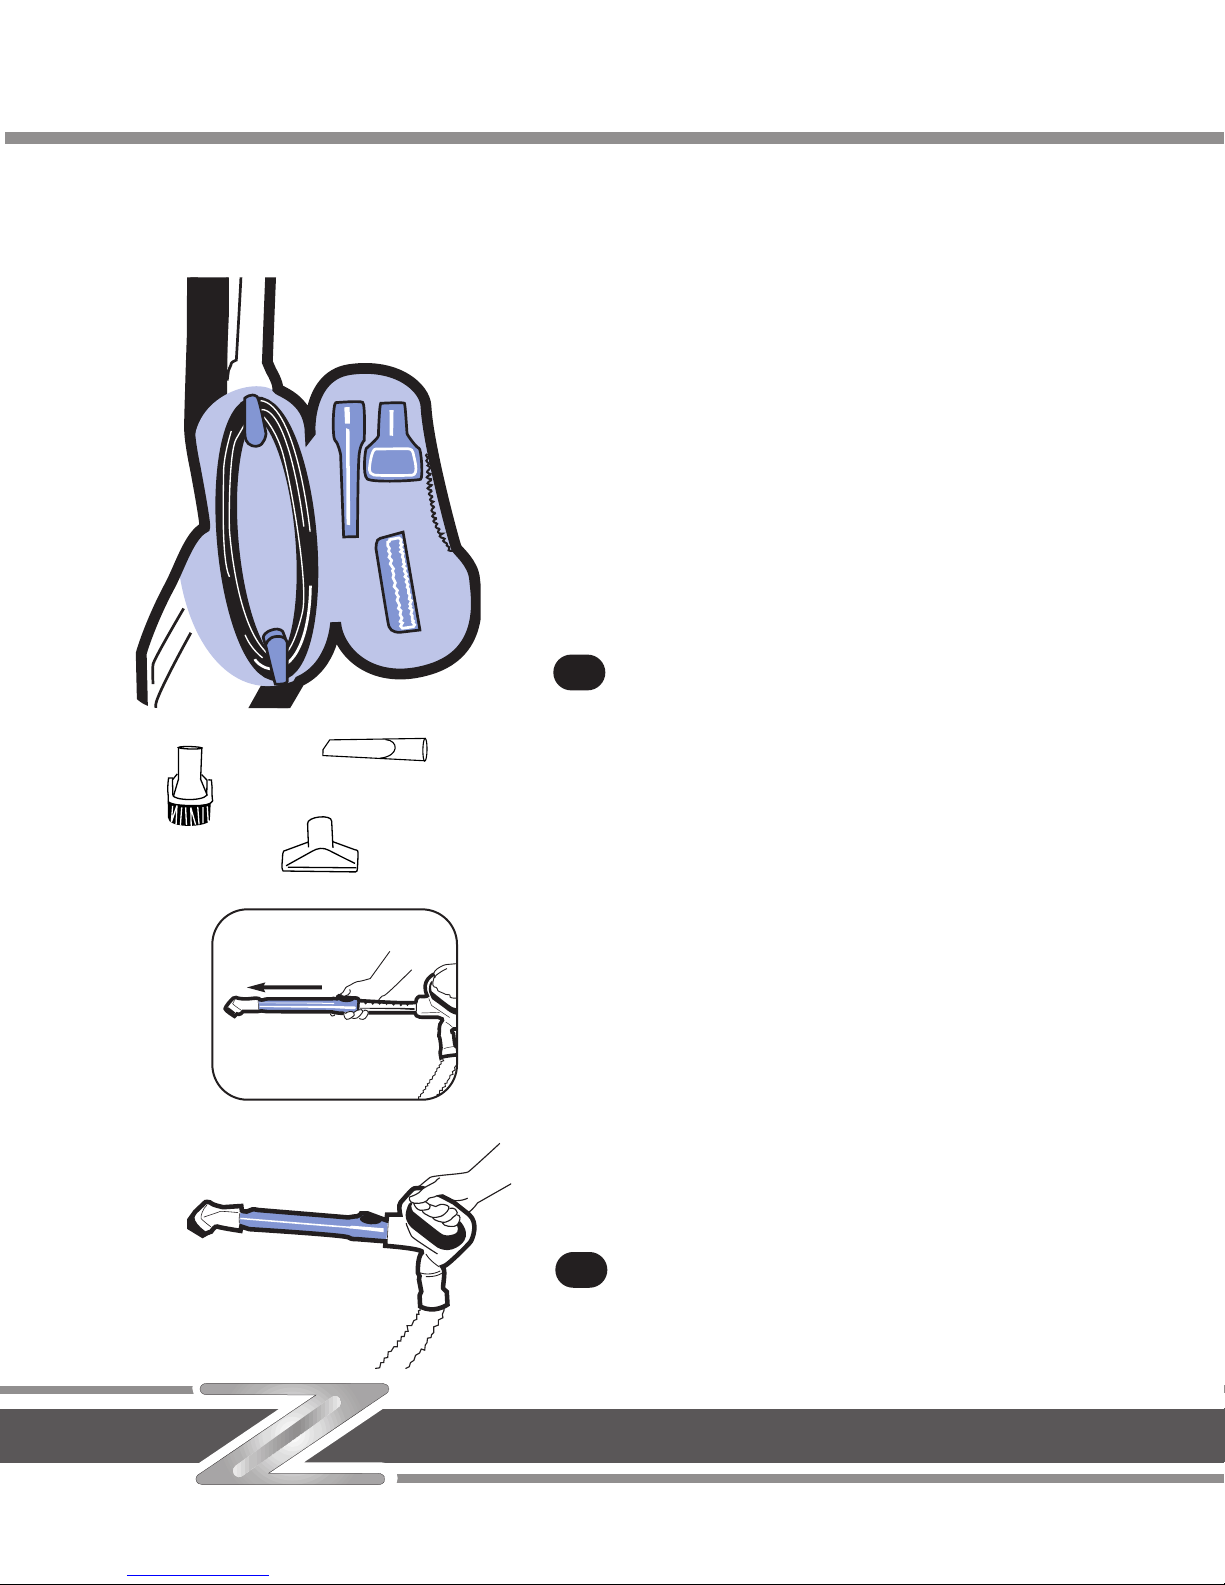
The telescoping handle/
wand (A) with attached
flexible hose needs to be positioned and locked in place.
Slide the locking latch (B)
toward the control panel to
allow the wand to be inserted
into the opening. Push the
wand all the way down into
the opening, aligning the button projection on the wand
with the slot.
Slide the locking latch (B)
away from the control panel
(C) to secure the telescoping handle/
wand.
To remove the wand for tool use,
slide the locking latch toward the
control panel and remove the wand.
To unfold the Z™ cleaner for
use in the upright position,
grasp and hold the pull ring (D) as
you are pulling up and slightly forward on either the carry handle or
telescoping handle/wand. It will
click when locked in place.
2
3
1
Carton contents
Unpacking your cleaner
Page 5
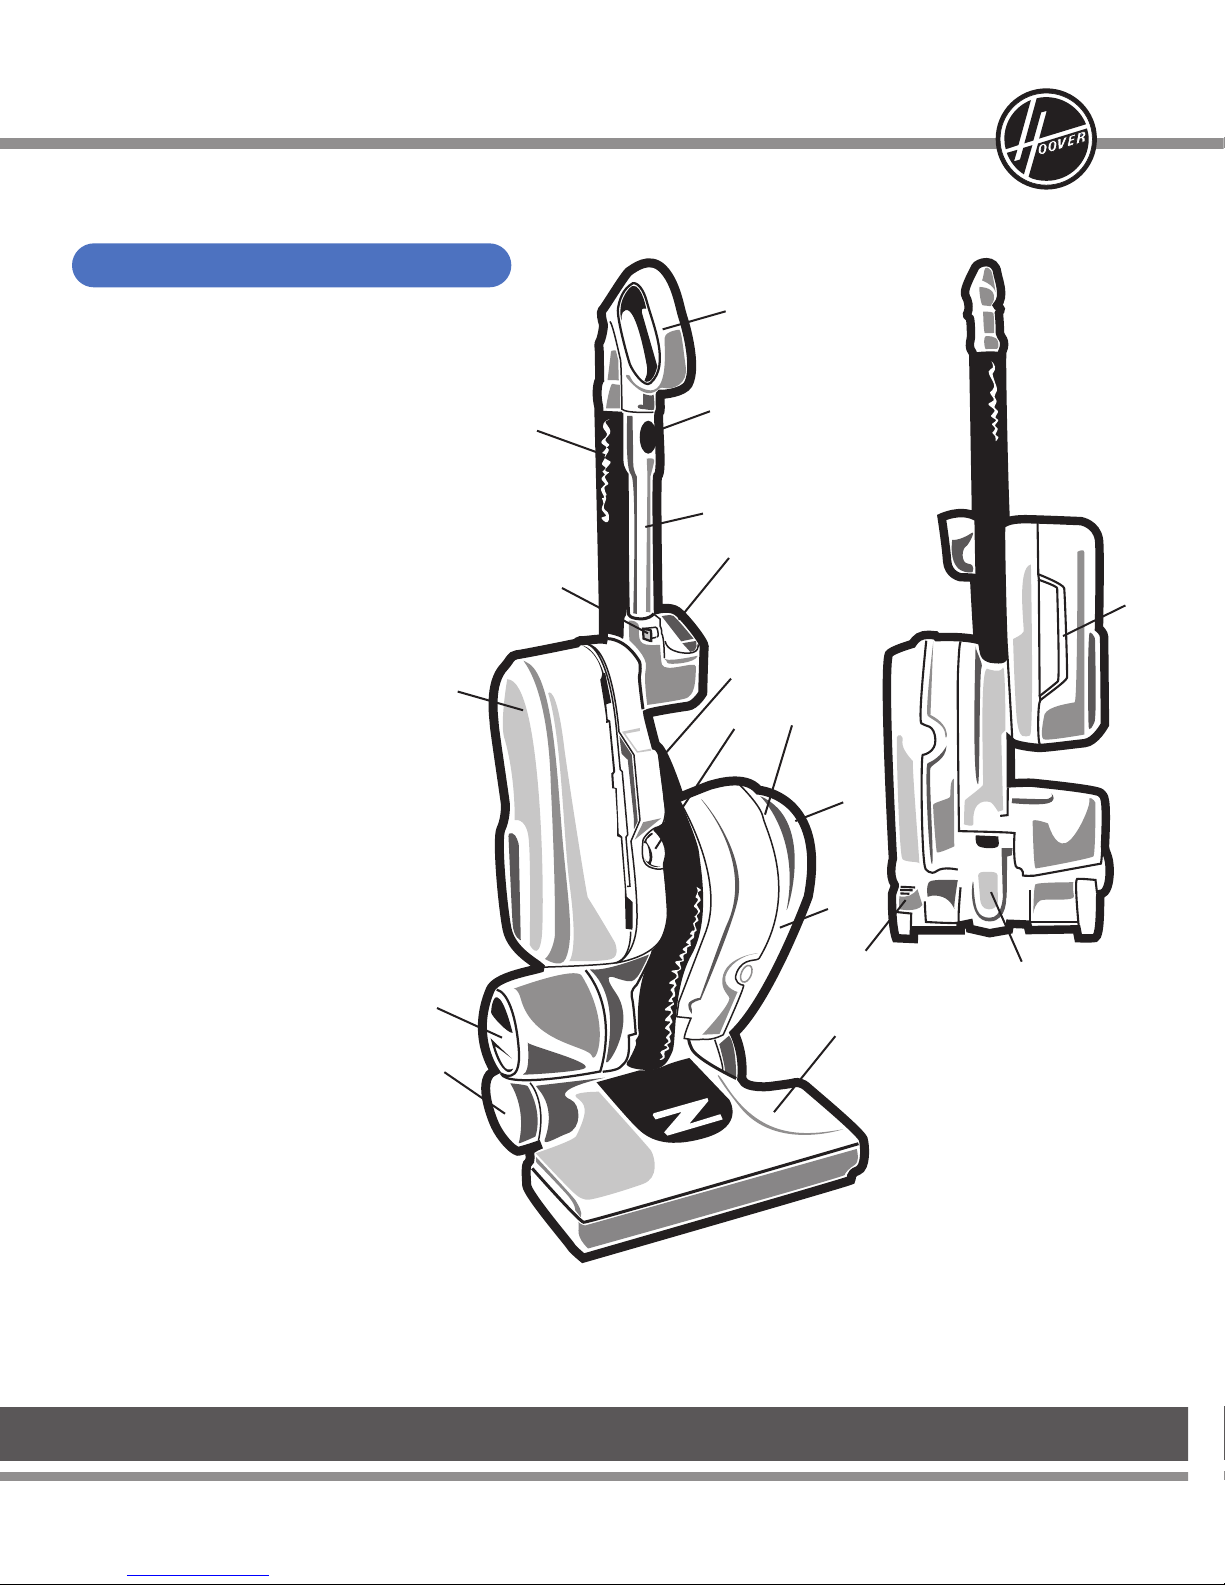
Use the following to identify the parts and
features of the Z™ cleaner:
1. Handle grip
2. Telescoping handle release
button
3. Hose
4. Telescoping handle/wand
5. ON/OFF control panel (base of handle)
6. Wand locking latch
7. Carry handle
8. Pull ring (to unfold or collapse)
9. Tool/cord storage compartment
10. Dirt cup handle
11. Self-cleaning HEPA filter (located in upper
cavity above dirt cup)
12. Dirt cup
13. Final filter
14. Nozzle
15. Soft wheels
16. Access door
17. Handle release pedal
Operate cleaner only at voltage specified on
data plate on underside of the main body
of the cleaner.
This cleaner is intended for household use.
Polarized plug
To reduce the risk of electric shock, this appliance
has a polarized plug (one blade is wider than the
other). This plug will fit in a polarized outlet only one
way.
If the plug does not fit fully in the outlet, reverse the
plug. If it still does not fit, contact a qualified electrician
to install the proper outlet. Do not change the plug in
any way.
®®
05
Features
11
14
10
16
13
15
12
17
8
4
7
6
1
9
9
2
5
Cleaner description
(Cont’d) →
3
Page 6
06
DO NOT USE CLEANER OUTDOORS OR ON DAMP OR WET
SURFACES.
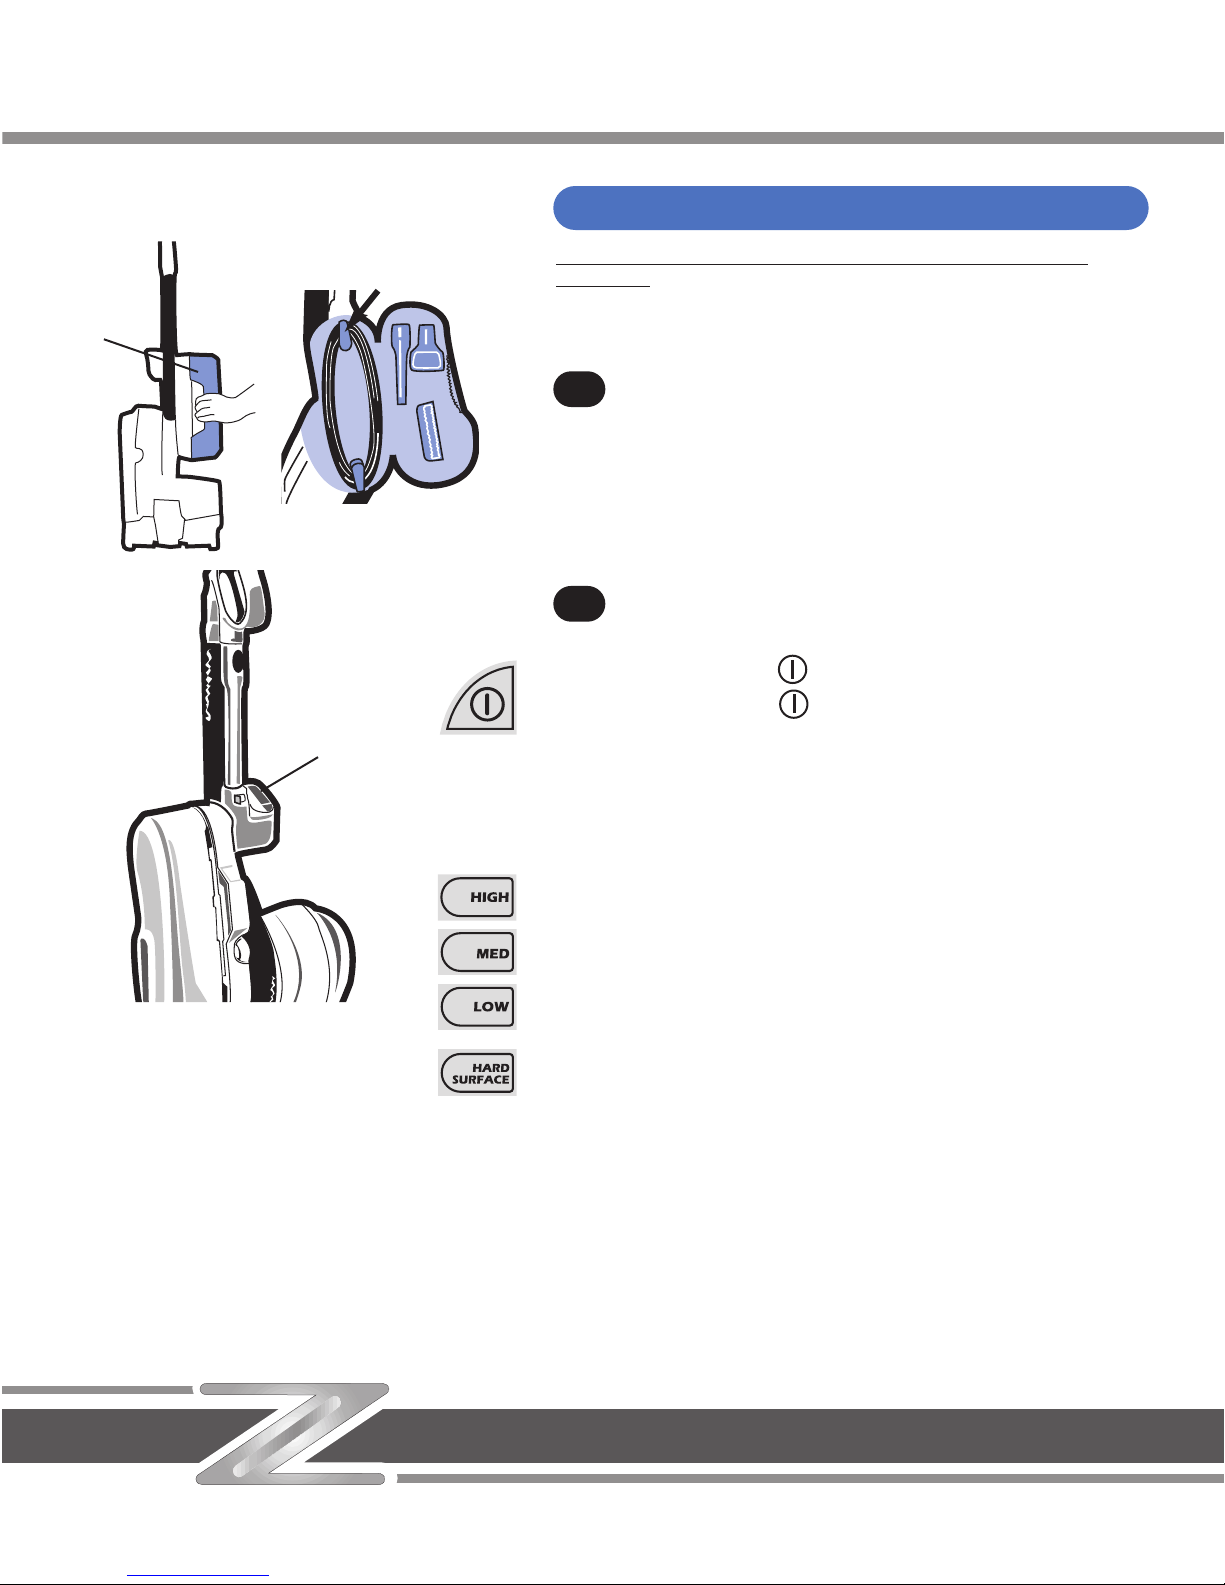
Electrical cord
Open the tool/cord storage compartment (A), located on the side
of the cleaner and remove the cord. The top cord hook swivels for
quick cord release.
ON/OFF and control panel
The DigiTouch™ control panel (B) is located at the handle base.
Open tool/cord storage compartment to remove cord and plug
cord into electrical outlet. Close storage door.
To turn cleaner ON, press once.
To turn cleaner OFF, press again.
The control panel allows you to choose a cleaning mode for carpet
height or hard surface floors.
For best cleaning results, select the LOW setting. If the cleaner is difficult
to push, select a higher setting.
Select the type of carpet to be cleaned:
HIGH for deep pile carpet,
MED for medium pile,
LOW for low pile, level loop, kitchen type, and other similar types,
HARD SURFACE for bare floors. The agitator is OFF; the nozzle is set at
LOW.
Automatic agitator shutoff
The agitator will turn off when the handle is in the upright, storage position in either the upright cleaner or canister cleaner (folded) positions.
4
5
A
B
Using the Z™ cleaner as an upright
Page 7
®®
07
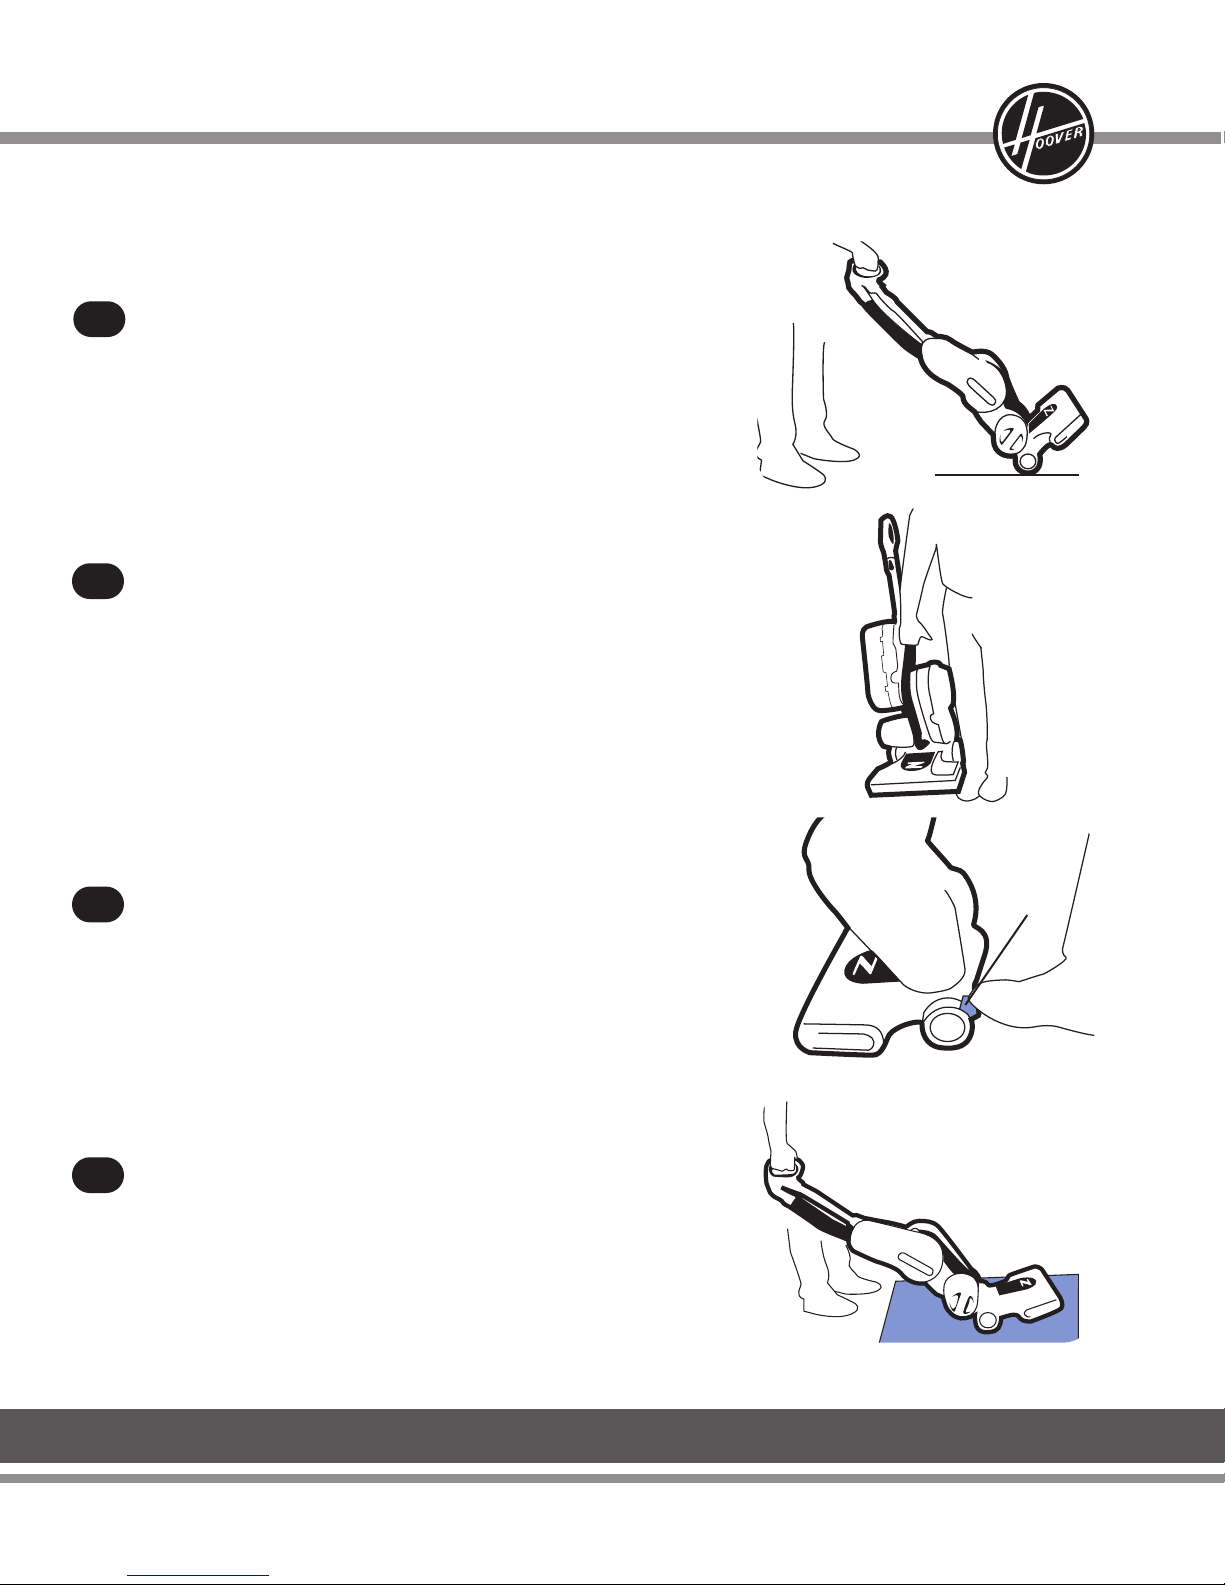
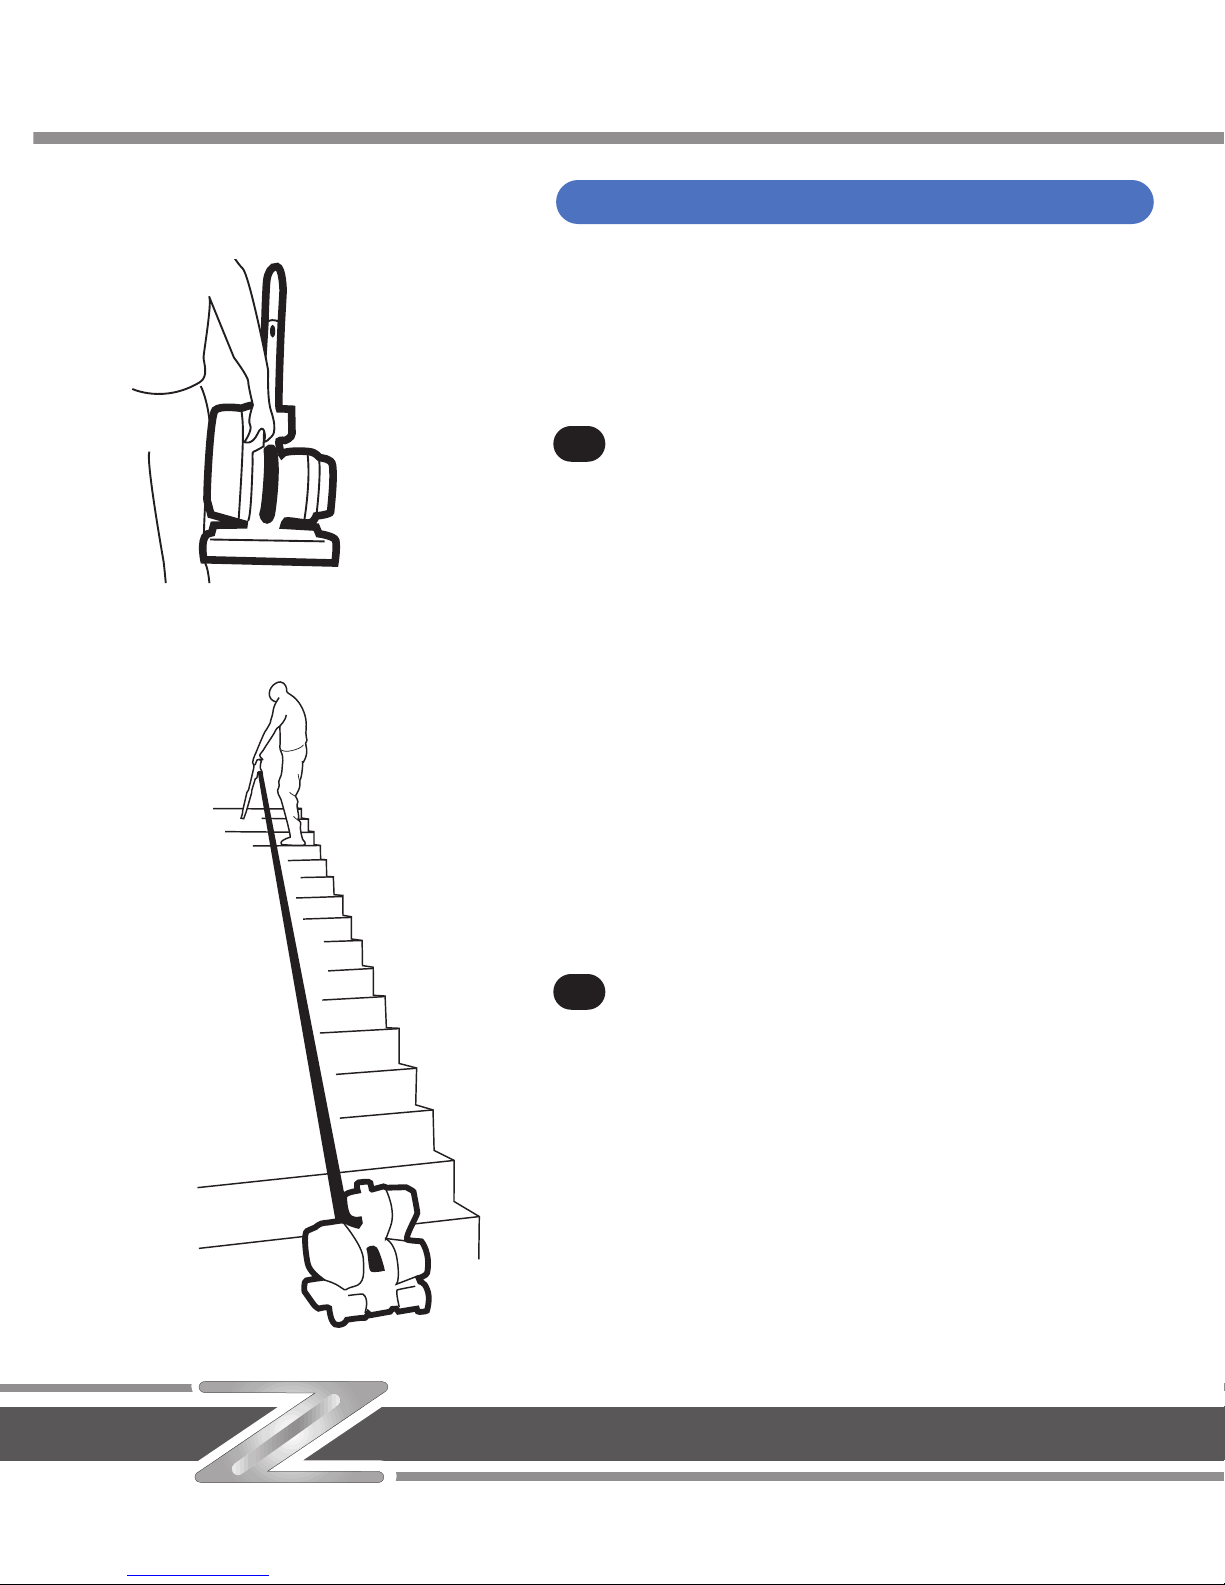
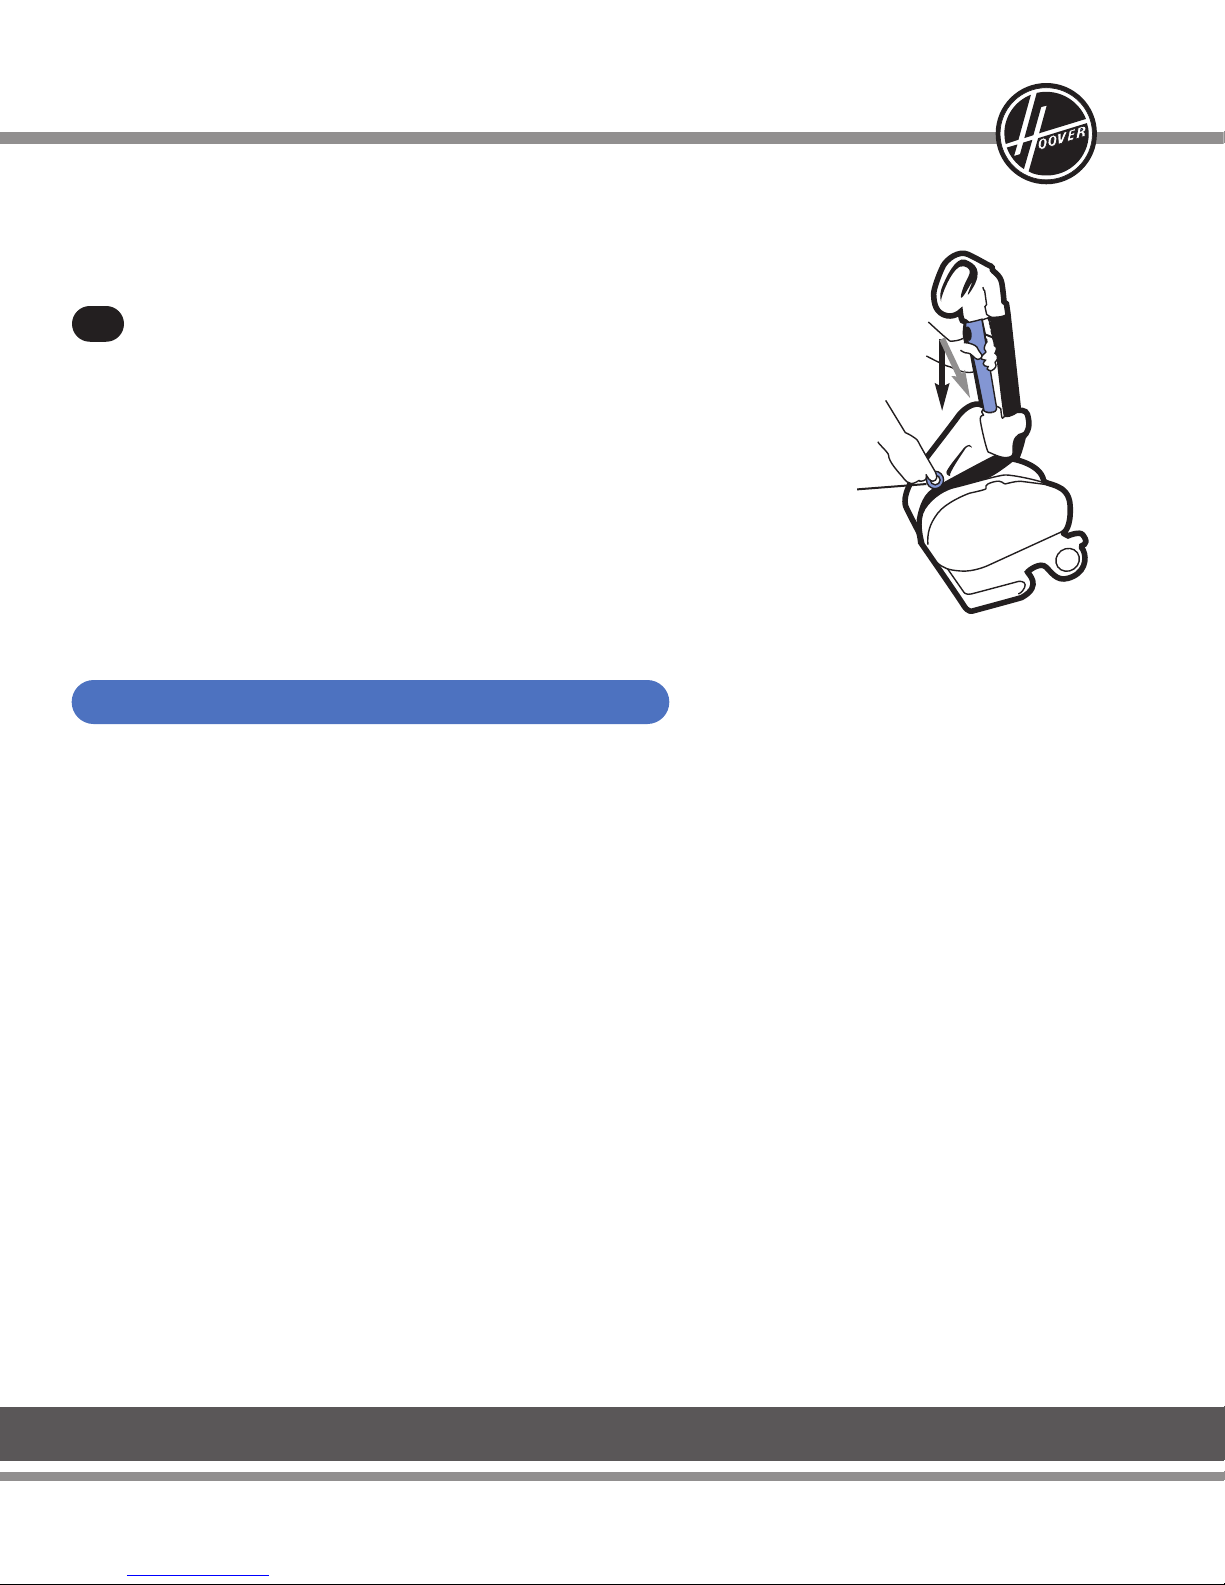
Transporting upright cleaner
Put handle in upright position. Tilt cleaner back on rear wheels and
push forward.
Carrying cleaner
The cleaner can be carried by placing hand under the control panel
and lifting.
Handle positions
The handle of your cleaner has three positions: upright for storage
and for when using cleaning tools; operating position for general
operation on carpets and floors; low for reaching under low furniture.
Step on handle release pedal (A), then pull handle back to lower handle.
Cleaning lightweight flexible rugs
Set control panel to either HIGH or MED carpet height.
Stand on one end of rug and move cleaner toward other end. Before
reaching edge, push down on handle. This will lift up the nozzle and will
prevent the rug from clinging to the cleaner. Continue to lift up nozzle so
that when you have reached the edge, it is completely off the rug. Move
cleaner back to start again, lower nozzle, and use only forward strokes.
6
7
9
8
A
(Cont’d) →
Page 8
Using the tools
The tools may be used with the Z™ cleaner either in the upright position,
or folded into the storage, or canister position.
The agitator will automatically turn off: (1) when the handle is in the
upright, storage position or (2) when the cleaner is in the canister position
(folded).
Tool storage compartment
The tools are located behind the tool/cord storage compartment.
Select the proper tool for the cleaning task.
B. Dusting brush use for carved furniture, table tops, books, lamps, lighting fixtures, venetian blinds, baseboards, shutters, and registers.
C. Crevice tool use in tight spaces, corners and along edges in such
places as dresser drawers, upholstered furniture, stairs, and baseboards.
D. Upholstery tool use for upholstered furniture, draperies, mattresses,
clothing, automobile interiors and carpeted stairs.
E. Telescoping handle/wand (attached to the hose) can be extended by
pushing forward on button and pulling wand outward. Shorten the telescoping handle/wand by pushing forward on the button and pulling back.
It can be used with any of the above tools.
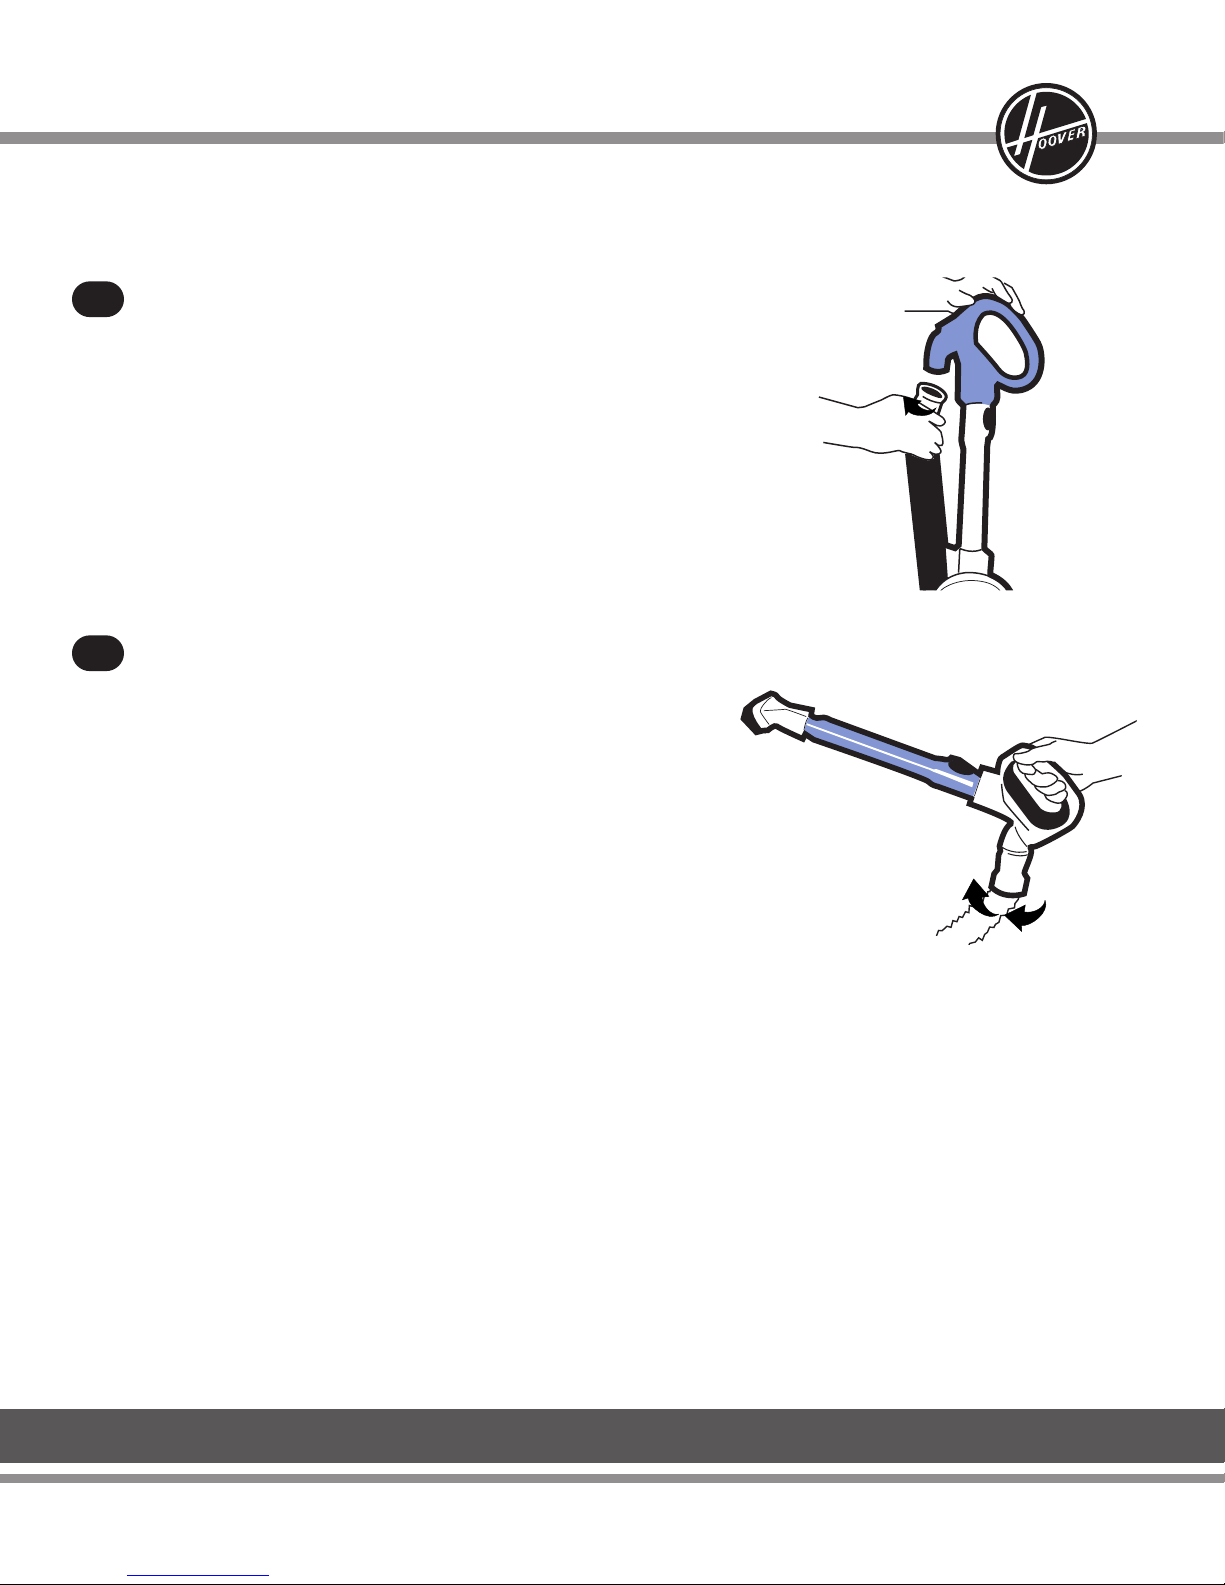
Attach wand and tools
All tools attach in the same manner.
Tools may be attached to the telescoping handle/wand or
directly to the hose.
08
C
B
E
D
10
11
Page 9
®®
09
The hose can be removed from the wand by twisting the hose
end in a clockwise direction and pulling away from the wand.
Twist wand or tool slightly to tighten or loosen the connection.
For convenience, the hose, when attached to the wand, swivels 360°.
How to clean tools
To clean the hose, wipe off dirt with a cloth dampened in a mild
detergent. Rinse with a damp cloth.
Cleaning tools may be washed in warm water with a detergent. Rinse
and air dry before using.
12
13
(Cont’d)
→
Page 10
10
To fold the Z™ cleaner for canister use, grasp and hold the pull ring
as you are pushing down and slightly backward on either the telescoping handle/wand or handle grip. It will click when locked in
place.
Carrying canister cleaner
The cleaner can be carried in the canister position as shown.
Refer to “Using the tools” under the Upright Cleaner section for selecting, attaching and using cleaning tools.
Stair cleaning
The hose on the Z™ cleaner extends a full 20’ and will reach all the
way to the top of a flight of stairs when the cleaner is placed at the bottom.
Use the hose and the upholstery tool for stair cleaning.
Always place the cleaner at the bottom of the stairs. Clean from
bottom to top.
CAUTION: To avoid personal injury, and to prevent the cleaner from
falling, use extra care if the cleaner is placed on stairs.
14
15
Using the Z™ cleaner as a canister
Page 11
®®
11
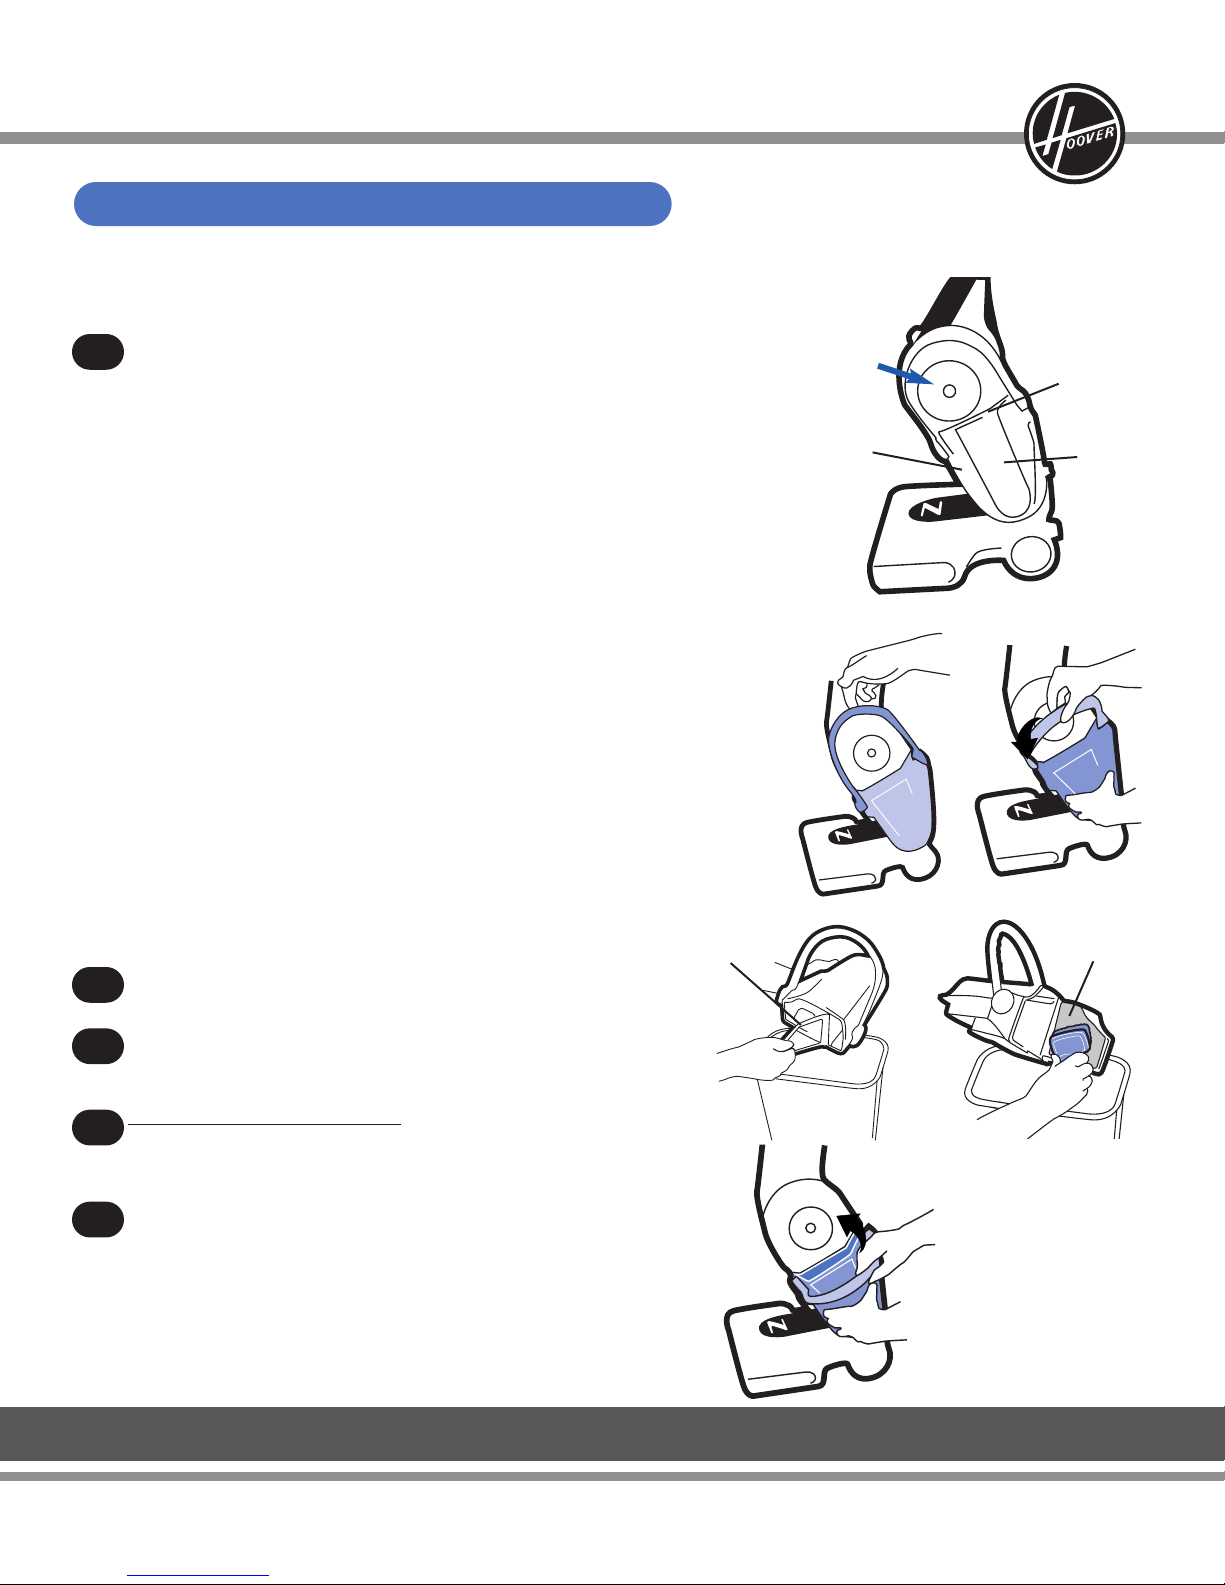
Dirt cup
Your cleaner is equipped with a self-cleaning HEPA filter.
This filter is NOT removable.
While the cleaner is in operation, the pre-filter screen (A) will stop larger
debris from entering the HEPA filter chamber. This larger debris will be
seen collecting in the larger side of the dirt cup (B). The HEPA filter will
collect fine particles that have passed through the pre-filter screen. The
HEPA filter cleans itself while rotating, depositing fine debris in the smaller
side of the dirt cup (C).
The ‘Z’ cleaner will continue to perform at maximum cleaning levels if the
pre-filter screen is cleaned when the dirt cup is emptied (see Fig. 19).
If you notice that the filter is rotating slower than normal, not rotating, or
the filter light comes on, refer to the Troubleshooting section.
When to empty
It is recommended that the dirt cup be emptied before the dirt reaches the
top of the dirt cup or after every use if you prefer.
How to empty
Disconnect cleaner from electrical outlet. Do not use cleaner without dirt
cup or filters in place.
Unfold the cleaner to the upright position before removing dirt cup.
To remove cup, pull handle to unlatch cup. Pull cup straight out.
Turn the dirt cup upside down over a trash container. Pull tab to
release door (D). Empty dirt cup.
CLEAN THE PRE-FILTER SCREEN (E) using the dusting brush tool.
Push the cup straight into the dirt cup cavity, push up slightly and
pivot the handle back to lock the dirt cup in place.
16
17
18
19
20
D
E
C
B
A
Emptying the dirt cup
(Cont’d) →
Page 12
12
Proper use and care of your cleaner will ensure continued cleaning
effectiveness.
HEPA filter
The HEPA filter equipped with your cleaner is self-cleaning, and
under normal cleaning conditions, should not need to be replaced.
If you feel that this filter needs replacement, take your cleaner to an
Authorized Hoover Sales and Service Center.
Final filter
Disconnect cleaner from electrical outlet. Do not use cleaner without
dirt cup or filters in place.
The final filter, located on the opposite side of the cleaner
from the dirt cup, is removable and can be washed in cold
water and a mild detergent. Rinse and let filter air dry completely
before repositioning.
To remove this filter, rotate filter cover counterclockwise.
Remove the filter, wash, air dry and return to the filter cavity.
Replace the filter cover by aligning the tabs and rotating clockwise
back into position.
Should you want to replace this filter, ask for HOOVER part No.
38762013.
Disconnect cleaner from electrical outlet.
Low suction or pick up may be due to a blockage in the system. Refer to
the following steps to check for blockages continuing with each step
until the blockage is found:
Turn cleaner OFF and disconnect from electrical outlet.
1. Check fullness of dirt cup container. Empty cup if full.
(See Figs. 17 & 18)
2. Clean pre-filter screen using dusting brush tool (see Fig. 19).
Check agitator brush roll
3. Turn cleaner OFF and disconnect from electrical outlet.
4. Turn cleaner over and clear blockage from brush roll. Do not
attempt to remove the agitator brush roll.
Return cleaner to operating position. Plug in, turn cleaner back ON and
continue cleaning.
21
22
23
Clearing blockages
Maintaining your cleaner
Page 13

®®
13
A
Check behind access door
5. Turn cleaner OFF and disconnect from electrical outlet. Remove
access door (A); check for blockage. Replace access door.
Check airflow path
6. Remove hose from wand.
7. Plug cleaner in and turn ON. Check for suction at end of hose. If
there is suction, continue with step 9. If there is no suction, check for
blockage in hose. Clear blockage.
8. Turn cleaner OFF and disconnect from electrical outlet.
9. Lower handle to floor. Remove 2 screws, one on each side of the
hose. Check for blockage in hose. Clear blockage.
Check wand
10. Turn cleaner OFF and disconnect from electrical outlet.
11. Remove wand from cleaner. Check for blockage. Clear blockage.
24
26
25
27
(Cont’d)
→
Page 14
14
The agitator brush roll is designed to last the lifetime of the cleaner. It
typically should not need replacement. If you feel the agitator brush roll
needs to be checked or replaced, take your cleaner to an Authorized
Hoover Sales and Service Center. Do not attempt to r
emove the
agitator brush roll.
The agitator cavity underneath the cleaner can be checked for
debris such as hair, strings, etc.
Disconnect cleaner from electrical outlet. Turn cleaner over and
remove any debris that has accumulated on the agitator brush roll. Do
not attempt to remove the agitator brush roll.
Return the cleaner to upright position.
The agitator belt is designed to last the lifetime of the cleaner. It typically
should not need replacement. If you feel the agitator belt needs to be
checked or replaced, take your cleaner to an Authorized Hoover
Sales and Service Center. Do not attempt to remove the agitator
belt.
Disconnect cleaner from electrical outlet.
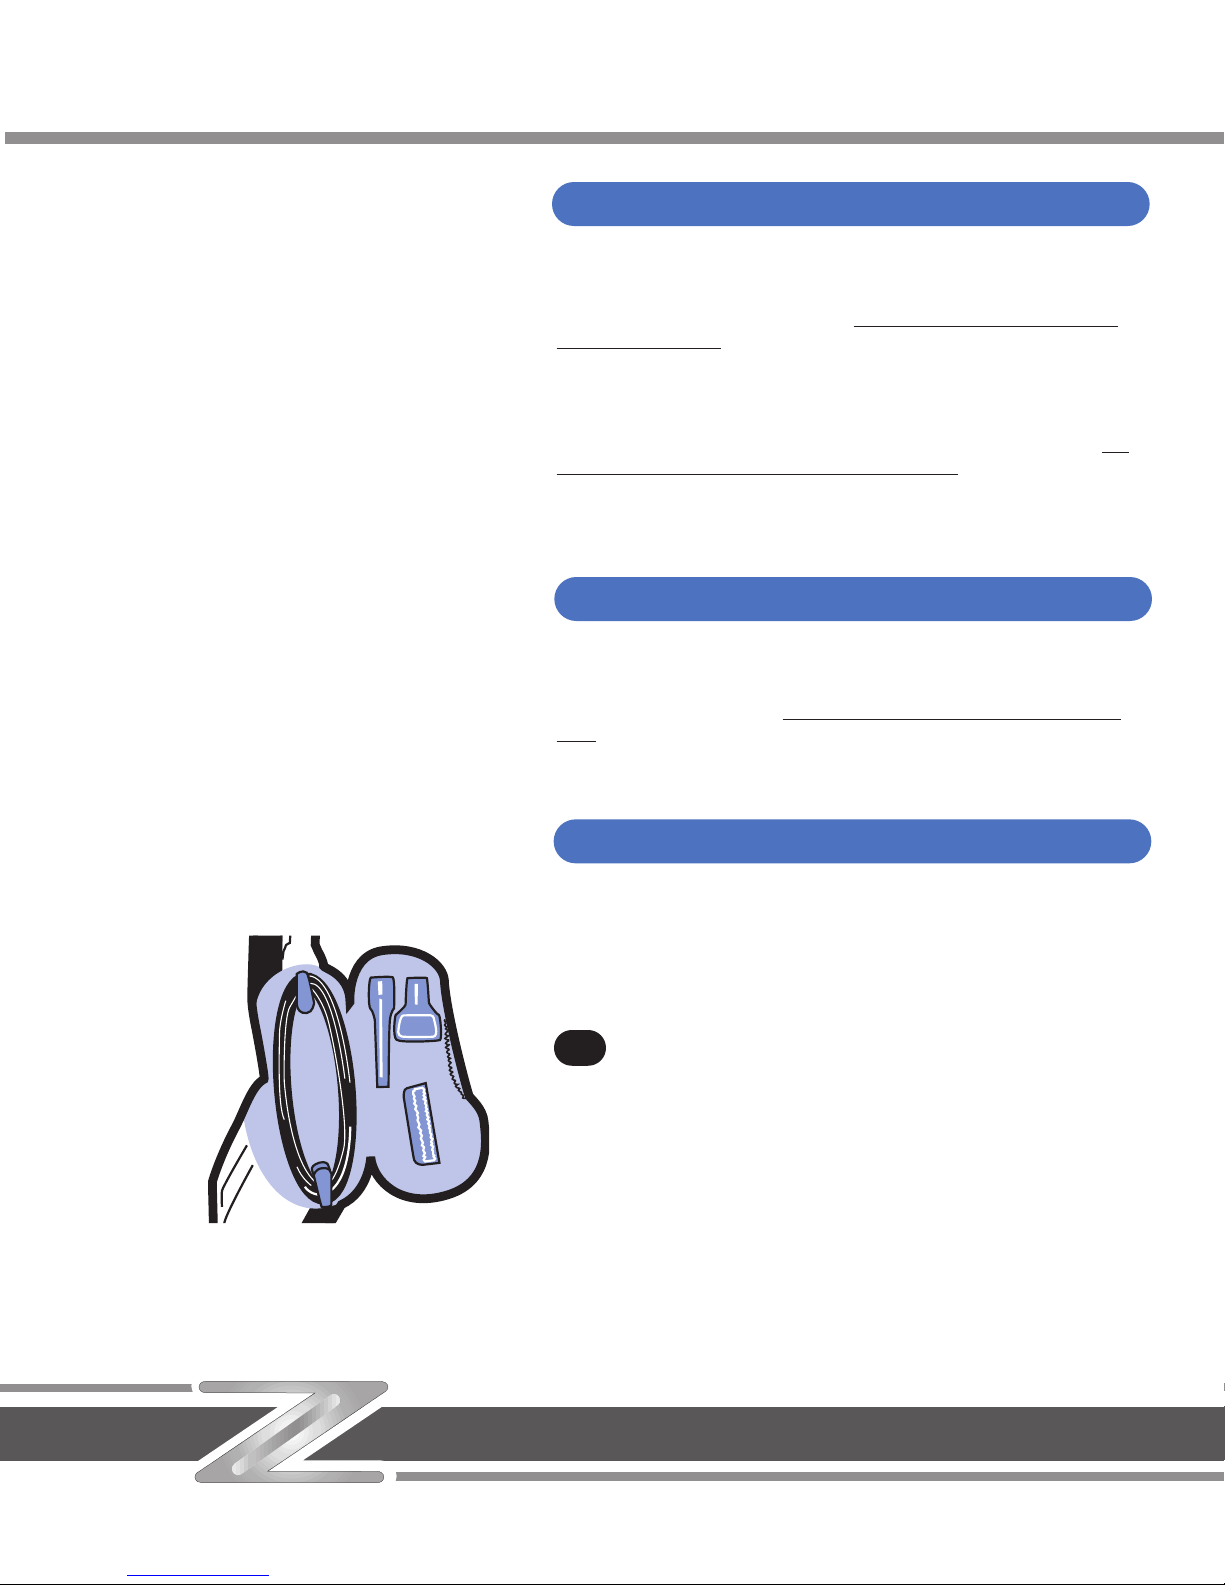
Cord storage
Open the tool/cord storage compartment. Wrap the cord in a
clockwise direction around the two cord hooks, ending with the
plug end at the center of the storage cavity. The plug should not be
against the tool so it interferes with closing the door.
28
Agitator brush roll
Agitator belt
Storing your cleaner
Page 15
®®
15
Fold cleaner to storage position
The cleaner can be folded to the storage, or canister position for more
compact storage. To fold the Z™ cleaner for storage, grasp and hold
the pull ring (A) as you are pushing down and slightly backward on either
the telescoping handle/wand or handle grip. It will click when it is locked in
place.
The cleaner is equipped with bearings that contain sufficient lubrication for the
life of the cleaner. The addition of lubricant could cause damage. Therefore, do
not add lubricant to any bearings.
29
(Cont’d)
→
A
Lubrication
Page 16

16
A
B
C
D
Troubleshooting
Use the chart below as a guide to the indicator lights on the control panel.
Agitator stall light (C) ON; See Manual light (A) ON; Obstruction in agitator.
Power light
blinking
. Cleaner will not run.
✓
Turn the cleaner OFF and unplug. Turn cleaner over. Check for obstruction and remove.
Suction motor light (D) ON; See Manual light (A) ON; Suction motor has overheated.
Power light
blinking
. Cleaner will not run.
✓
Check dirt cup. Empty if full.
✓
Check final filter. Clean if dirty.
✓
Refer to “Clearing blockages” on pages
✓
Turn the cleaner OFF and unplug.
12 and 13. Clear any blockages. Wait 15 minutes; plug cleaner back in
and turn ON.
Height adjustment light (LOW, MED or HIGH) Nozzle is unable to move to
continuously blinking
. selected setting. (NOTE: Light
will
blink
, then stop as it transi-
tions between carpet heights.)
✓
The cleaner can still be used.
✓
Turn cleaner OFF, then ON. If light continues to blink, take cleaner to a HOOVER Sales
& Service Center for service.
Filter light (B) ON; See Manual light (A) ON. HEPA Filter not rotating; jam in filter
filter not turning or turning slower than normal. drive.
✓
Place cleaner in the upright position with hose end connected to the wand. Turn cleaner
OFF, empty dirt cup and clean pre-filter screen. Turn back ON. If filter now turns, allow it
to run for one minute. After one minute, turn cleaner OFF and empty dirt cup. Continue
cleaning.
✓
If the filter is still not turning, take to a HOOVER Sales & Service Center for service.
Power light
blinking
; See Manual light (A)ON. Internal system problem.
Cleaner will not run.
✓
Turn the cleaner OFF, then back ON. If the lights remain the same, service is needed.
Take to a HOOVER Sales & Service Center.
Power light
blinking
; See Manual light (A)
blinking
. Internal system problem.
Cleaner will not run.
✓
Turn the cleaner OFF, then back ON. If the lights remain the same, service is needed.
Take to a HOOVER Sales & Service Center.
What to do
What’s the problem? What does it mean?
What to do
What’s the problem? What does it mean?
What to do
What’s the problem? What does it mean?
What to do
What’s the problem? What does it mean?
What to do
What’s the problem? What does it mean?
What to do
What’s the problem? What does it mean?
Page 17

®®
17
(Cont’d) →
To obtain approved HOOVER service and genuine HOOVER parts, locate the nearest Hoover Sales and Service Center or
Authorized Hoover Warranty Service Dealer (Depot) by:
✓ Checking the Service Section of Hoover on-line at www.hoover.com OR
✓ Checking the list of Sales and Service Centers provided with this cleaner OR
✓ Checking the Yellow Pages under “Vacuum Cleaners - Household” OR
✓ Calling 1-800-944-9200 for an automated referral of authorized service outlet locations
(U.S. only)
Do not send your cleaner to Hoover in Newton, Iowa for service; this will only result in delay.
If further assistance is needed, contact the Hoover Consumer Response Center, Phone: 330-499-9499.
In Canada, contact Hoover Canada, Burlington, Ontario L7R 4A8, Phone: 1-800-263-6376.
Always identify your cleaner by the complete model number when requesting information or ordering parts. (The model
number appears on the underside of the main body of the cleaner.)
Servicing your cleaner
Troubleshooting, cont’d.
Not firmly plugged in. Plug unit in firmly.
No voltage in wall plug. Replace fuse or reset circuit.
Agitator is obstructed. Disconnect cleaner from electrical outlet. Turn cleaner over and
remove any debris that has accumulated on the agitator brush
roll. Do not attempt to remove the agitator brush roll.
Dirt cup full. Disconnect cleaner from electrical outlet. Empty dirt cup.
Pre-filter screen dirty. Disconnect cleaner from electrical outlet. Clean the pre-filter
screen using the dusting brush tool.
Incorrect carpet height setting. Select another carpet height setting on the control panel.
Blockage in system. Clear blockage (see “Clearing blockages” section).
Incorrect carpet height setting. Select a higher carpet height setting on the control panel.
Dirt cup full. Disconnect cleaner from electrical outlet. Empty dirt cup.
Pre-filter screen dirty. Disconnect cleaner from electrical outlet. Clean the pre-filter
screen using the dusting brush tool.
Gentle brush mode selected. De-select gentle brush mode on the control panel.
Blockage in system. Clear blockage (see “Clearing blockages” section).
What’s the problem? Cleaner won’t turn on.
What’s the problem? Agitator brushes aren’t turning.
What’s the cause? What’s the solution?
What’s the cause? What’s the solution?
What’s the problem? Cleaner won’t pick up.
What’s the cause? What’s the solution?
What’s the problem? Cleaner hard to push.
What’s the cause? What’s the solution?
What’s the problem? Cleaning tools won’t pick up.
What’s the cause? What’s the solution?
If a minor problem occurs, it usually can be solved quite easily when the cause is found by using the check list below.
Page 18

Your HOOVER® appliance is warranted in normal household use, in accordance with the Owner’s Manual against original
defects in material and workmanship for a period of two full years from date of purchase. This warranty provides, at no cost
to you, all labor and parts to place this appliance in correct operating condition during the warranted period. This warranty
applies when the appliance is purchased in the United States including its territories and possessions, or in Canada or from a
U. S. Military Exchange. Appliances purchased elsewhere are covered by a limited one year warranty which covers the cost
of parts only. This warranty does not apply if the appliance is used in a commercial or rental application.
This warranty only applies when the product is in use in the country or territory in which it is purchased.
Warranty service can only be obtained by presenting the appliance to one of the following authorized warranty service out-
lets. Proof of purchase will be required before service is rendered.
1. Hoover Sales and Service Centers
2. Hoover Authorized Warranty Service Dealers (Depots)
For an automated referral of authorized service outlets in the U.S.A., phone 1-800-944-9200
OR visit Hoover on-line at www.hoover.com
This warranty does not cover pick up, delivery, or house calls; however, if you mail your appliance to a Hoover Sales and
Service Center for warranty service, transportation will be paid one way.
While this warranty gives you specific legal rights, you may also have other rights which vary from state to state.
If further assistance is needed, or if there are questions concerning this warranty or the availability of warranty service out-
lets, phone the Hoover Consumer Response Center, Phone 1-330-499-9499.
In Canada, contact Hoover Canada, Burlington, Ontario L7R 4A8, 1-800-263-6376.
18
(Domestic Use)
For your records, enter the model number and serial numbers in the spaces provided. These
numbers are located on the data label on the underside of the main body of the cleaner.
Model No. ____________________________
Serial No. _____________________________
Save your sales receipt and attach it to this manual. Proof of date of purchase may be required
for warranty service of your cleaner.
Full Two Year Warranty
Fill in and Save
If you need any assistance or need to contact us:
• www.hoov
er.com
• 1-800-944-9200 - automated service dealer locator
• 1-330-499-9499 - our Consumer Response Center (8 AM to 5 PM Monday - Friday)
Please do not return this product to the store.
Page 19

®
19
Al usar un aparato eléctrico, observe siempre las precauciones básicas,
incluyendo las siguientes:
LEA TODAS LAS INSTRUCCIONES ANTES DE USAR ESTE APARATO.
ADVERTENCIA:
Para reducir el riesgo de incendios,
choques eléctricos o lesiones:
• No use este aparato en el exterior
o en superficies mojadas
• Es necesaria una supervisión estricta
cuando cualquier aparato es utilizado
por o cerca de los niños. No permita
que la aspiradora sea usada como un
juguete ni que funcione sin atención
en ningún momento.
• Mantenga el cabello, la ropa
holgada, los dedos de las manos y pies
y todas las partes del cuerpo alejados
de las aberturas, del agitador rotatorio
y otras piezas en movimiento. No haga
funcionar la aspiradora descalzo
ni cuando calce sandalias o zapatos
que dejen los dedos de los pies
al descubierto.
• No aspire nada que se esté
quemando o echando humo, como
cigarrillos, cerillos o cenizas calientes.
• No use este aparato para aspirar
líquidos inflamables o combustibles
como gasolina o restos de madera
lijada, ni en áreas donde pudieran
encontrarse presentes.
• Evite recoger objetos duros o
afilados con la aspiradora. Éstos
pueden dañar la aspiradora.
• Apague siempre este aparato
antes de conectar o desconectar
la manguera.
• No use la aspiradora sin tener el
depósito para polvo o los filtros en su
lugar. Vacíe el depósito con frecuencia
cuando aspire materiales muy finos
como talco.
• Tenga especial cuidado al
limpiar escaleras.
• No coloque ningún objeto en las
aberturas. No la use con ninguna
abertura obstruida; manténgala libre
de polvo, pelusa, cabello o cualquier
cosa que pueda reducir el flujo
de aire.
• No tire de ésta ni la transporte por
el cordón, ni tampoco use el cordón
como mango, no cierre la puerta sobre
el cordón ni tire del mismo alrededor
de los bordes agudos ni esquinas.
No pase el aparato sobre el cordón.
Mantenga el cordón alejado de las
superficies calientes.
• Desconecte siempre el cordón de la
toma de corriente eléctrica antes de
prestarle servicio a la aspiradora.
• Desconecte el cordón cuando la
aspiradora no esté en uso.
• No la desenchufe tirando del
cordón. Para desenchufarla, sujete
el enchufe y no el cordón. Nunca
toque el enchufe ni el aparato con
las manos mojadas.
• No se recomienda el uso de
cordones de extensión.
• No use el aparato si el cordón o el
enchufe está dañado. Si el aparato no
está funcionando apropiadamente, se
ha dejado caer, ha sido dañado, se ha
dejado a la intemperie o se ha dejado
caer en agua, llévelo a un Centro de
ventas y servicio de Hoover o a un
Concesionario autorizado de servicio
de garantía de Hoover.
• Use la aspiradora solamente
para lo que ha sido diseñada según
se describe en las instrucciones.
• Use solamente los accesorios
recomendados por Hoover; el uso de
otros accesorios podría ser peligroso.
Salvaguardias importantes . . . 19
Contenido de la caja . . . . . . . 20
Desempaque. . . . . . . . . . . . . . 20
Descripción de la aspiradora. . 20
Cómo usar la aspiradora
Uso como aspiradora vertical 21
Cordón eléctrico . . . . . . . . 21
Panel de control . . . . . . . . 21
Apagado automático
del agitador . . . . . . . . . . . 21
Transporte. . . . . . . . . . . 21-22
Limpieza de alfombras . . . 22
Uso de accesorios . . . . 22–23
Uso como aspiradora
tipo receptáculo. . . . . . . . . 24
Cómo transportarla . . . . . . 24
Limpieza de escaleras. . . . . 24
Vaciado del depósito
para polvo . . . . . . . . . . . . . . 24
Mantenimiento . . . . . . . . . . . . 25
Filtros . . . . . . . . . . . . . . . . . 25
Lubricación . . . . . . . . . . . . . 27
Eliminación de
obstrucciones. . . . . . . . . . . . 26
Rodillo de escobillas
del agitador . . . . . . . . . . . . . 27
Correa del agitador . . . . . . . 27
Servicio . . . . . . . . . . . . . . . . 30
Almacenamiento. . . . . . . . . . . 27
Identificación y solución
de problemas . . . . . . . . . . . 28,29
Garantía. . . . . . . . . . . . . . . . . 30
© 2005 The Hoover Company
www.hoover .com
Salvaguardias importantes
Guarde estas instrucciones
Contenido
Manual del
proprietario
ESPAÑOL ➜ pág 19-30
Page 20

A. Aspiradora
Trabe el mango en su lugar
Coloque el mango
Desdoble la aspiradora
Debe colocar y asegurar en su
lugar el mango/tubo de
extensión telescópio (A) con la
manguera flexible conectada.
Deslice la traba de cierre (B) hacia
el panel de control para permitir que
el tubo de extensión se introduzca
en la abertura. Empuje el tubo de
extensión por completo dentro de la
abertura, alineando el botón saliente
del tubo de extensión con el orificio.
Deslice la traba de cierre (B)
alejándola del panel de control (C)
para fijar el mango/tubo de extensión
telescópio. Para sacar el tubo de
extensión para usar los accesorios, deslice
la traba de cierre hacia el panel de control
y saque el tubo de extensión.
Para desdoblar la aspiradora
Z™ y usarla en posición
vertical, sujete y sostenga el anillo
de jalar (D) al mismo tiempo que tira
hacia arriba y ligeramente hacia
delante, ya sea del mango de
transporte o del mango/tubo de
extensión telescópio. Hará un
chasquido cuando quede asegurada
en su lugar.
2
3
1
Contenido de la caja
Desempaque la aspiradora
Use la siguiente lista para identificar las piezas y las
características de la aspiradora Z™
1. Asidero del mango
2. Botón para soltar el mango telescópico
3. Manguera
4. Mango/tubo de extensión telescópico
5. Encendido y apagado y panel de control (en la
base del mango)
6. Traba de cierre del tubo de extensión
7. Mango de transporte
8. Anillo de jalar (para desdoblar o plegar)
9. Compartimiento de almacenamiento
para los accesorios/el cordón
10. Mango del depósito para polvo
11. Filtro HEPA autolimpiable (ubicado en
la cavidad superior encima del depósito para
polvo)
12. Depósito para polvo
13. Filtro final
14. Boquilla
15. Ruedas blandas
16. Puerta de acceso
17. Pedal para soltar el mango
Haga funcionar la aspiradora solamente con el
voltaje especificado en la placa de datos en la parte
de abajo del cuerpo principal de la aspiradora.
Esta aspiradora ha sido diseñada para uso
doméstico.
Características
Descripción de la aspiradora
Enchufe polarizado
Para disminuir el riesgo de choque eléctrico, este aparato tiene un
enchufe polarizado (una patilla es más ancha que la otra). Este
enchufe podrá usarse en una toma de corriente polarizada, sólo de
una manera.
Si el enchufe no encaja completamente en la toma de corriente,
inviértalo. Si aun así no encaja, comuníquese con un electricista
calificado para que le instale la toma de corriente adecuada. No
modifique el enchufe de manera alguna.
20
Page 21

®®
NO USE LA ASPIRADORA EN EL EXTERIOR O EN SUPERFICIES HÚMEDAS O MOJADAS.
Cordón eléctrico
Abra el compartimiento de almacenamiento para los accesorios/el cordón (A), ubicado en el lado de la aspiradora y saque el
cordón. El gancho superior para el cordón gira para soltar el cordón con rapidez.
Encendido y apagado y panel de control
El panel de control DigiTouch™ (B) está ubicado en la base del mango.
Abra el compartimiento de almacenamiento para los accesorios/el cordón, saque el cordón y enchúfelo en la toma de
corriente eléctrica. Cierre la puerta del compartimiento de almacenamiento.
Para ENCENDER la aspiradora, oprima una vez.
Para APAGAR la aspiradora, oprima de nuevo.
El panel de control le permitirá seleccionar un modo de limpieza adecuado para el espesor de la alfombra o para pisos de superficie
dura.
Para obtener los mejores resultados de limpieza, seleccione la posición LOW (BAJA). Si le cuesta mucho empujar la
aspiradora, seleccione una posición más alta.
Seleccione el tipo de alfombra a limpiar.
HIGH para alfombras de espesor alto
MED para alfombras de espesor mediano
LOW para alfombras de bajo espesor, tipo bucle, de cocina y otros tipos similares de alfombras
HARD SURFACE para pisos expuestos. El agitador está apagado; la boquilla se ajusta en la posición LOW.
Apagado automático del agitador
El agitador se apagará cuando el mango esté en la posición vertical de almacenamiento, ya sea en la posición de aspiradora
vertical o la posición de aspiradora tipo receptáculo (doblada).
Transporte de la aspiradora vertical
Ponga el mango en posición vertical. Incline la aspiradora hacia atrás sobre las ruedas posteriores y empuje hacia delante.
4
5
Uso del modelo Z™ como aspiradora vertical
6
Continuación
→
21
Page 22

Transporte de la aspiradora
Se podrá transportar la aspiradora poniendo la mano debajo del panel de control y levantándola.
Posiciones del mango
El mango de su aspiradora tiene tres posiciones: vertical, para guardarla y usar los accesorios de limpieza; de
funcionamiento, para uso general sobre alfombras y pisos; y baja, para aspirar debajo de muebles de poca altura. Para bajar
el mango, pise el pedal para soltar el mango (A) y tire del mango hacia atrás.
Limpieza de alfombras livianas y flexibles
Coloque el espesor de la alfombra ya sea en alto o mediano en el panel de control (HIGH o MED).
Párese en un extremo de la alfombra y pase la aspiradora hacia el otro extremo. Antes de llegar al borde, empuje el mango
hacia abajo. Esto levantará la boquilla y evitará que la alfombra se adhiera a la aspiradora. Continúe levantando la boquilla de
modo que cuando llegue al borde esté completamente separada de la alfombra. Retroceda la aspiradora para comenzar otra vez,
baje la boquilla y pásela solamente hacia delante.
Uso de los accesorios
Se podrán usar los accesorios con la aspiradora Z™ ya sea en la posición vertical o cuando la aspiradora está doblada para
guardarla; también se podrán usar en la posición de aspiradora tipo receptáculo (horizontal).
El agitador se apagará automáticamente: (1) cuando el mango esté en la posición vertical de almacenamiento o (2) cuando la
aspiradora esté en la posición de aspiradora tipo receptáculo (doblada).
7
9
8
22
Page 23

®®
Compartimiento de almacenamiento para los accesorios
Los accesorios se encuentran detrás del compartimiento de almacenamiento para los accesorios/el cordón. Seleccione el
accesorio adecuado para la tarea de limpieza.
B. El cepillo para desempolvar se usa para muebles tallados, superficies de las mesas, libros, lámparas, accesorios de iluminación,
persianas venecianas, zócalos, póstigos de ventanas y rejillas de ventilación.
C. El accesorio para hendiduras se puede usar en lugares estrechos, esquinas y en los bordes de sitios como cajones de cómodas,
muebles tapizados, escaleras y zócalos.
D. El accesorio para tapicería se usa para muebles tapizados, cortinas, colchones, prendas de vestir, interiores de automóviles y
escaleras alfombradas.
E. El tubo de extensión telescópico (conectado a la manguera) puede extenderse empujando el botón hacia delante y tirando del
tubo de extensión hacia fuera. Acorte el mango/tubo de extensión telescópico empujando el botón hacia delante y tirando del tubo
de extensión hacia atrás. Se puede usar con cualquiera de los accesorios antes mencionados.
Colocación del tubo de extensión y de
los accesorios
Todos los accesorios se colocan del mismo modo.
Los accesorios se pueden conectar al mango/tubo de extensión o directamente a la manguera (vea la figura 13).
Se puede sacar la manguera del tubo de extensión, girando el extremo de la manguera en sentido de las agujas del
reloj y tirando de ésta para alejarla del tubo de extensión.
Gire el tubo de extensión o el accesorio ligeramente para apretar o aflojar la conexión.
Para su conveniencia, la manguera gira a 360° cuando está conectada al tubo de extensión.
Cómo limpiar los accesorios
Para limpiar la manguera, limpie el polvo con un paño humedecido en detergente suave. Enjuague con un paño húmedo.
Los accesorios de limpieza se pueden lavar en agua tibia con un detergente. Enjuáguelos y deje que se sequen al aire libre
antes de usarlos.
10
11
12
13
23
Continuación →
Page 24

Para doblar el modelo Z™ y usarlo como aspiradora tipo receptáculo, sujete y sostenga el anillo de jalar al mismo tiempo
que empuja hacia abajo y ligeramente hacia atrás, ya sea el mango/tubo de extensión telescópico o el asidero del mango.
Hará un chasquido cuando quede asegurada en su lugar.
Transporte de la aspiradora tipo receptáculo
Se podrá transportar la aspiradora en posición de aspiradora tipo receptáculo (horizontal) como se muestra.
Consulte “Uso de accesorios”, bajo la sección de aspiradora vertical, para seleccionar, colocar y usar los accesorios de limpieza.
Limpieza de escaleras
Cuando se coloca la aspiradora al pie de un tramo de escaleras, la manguera del modelo Z™ se extiende hasta 6 m (20 pies) para
alcanzar la parte superior de éstas.
Use la manguera y el accesorio para tapicería para limpiar las escaleras.
Ponga siempre la aspiradora al pie de las escaleras. Limpie de abajo hacia arriba.
PRECAUCIÓN: Para evitar lesiones personales y para impedir que la aspiradora se caiga, tenga especial cuidado si coloca
la aspiradora en los peldaños de las escaleras.
Depósito para polvo
Su aspiradora está equipada con un filtro autolimpiable HEPA.
NO se podrá sacar este filtro.
Cuando la aspiradora esté funcionando, la malla del antefiltro (A) evitará que los residuos de mayor tamaño entren a la
cámara del
filtro HEPA. Se podrá ver cómo estos residuos de mayor tamaño se depositan en el lado más grande del depósito para
polvo (B). El filtro HEPA recogerá las partículas finas que hayan pasado a través de la malla del antefiltro. El filtro HEPA se
autolimpiará al girar, depositando los residuos finos en el lado más pequeño del depósito para polvo (C).
La aspiradora ‘Z’ continuará funcionando con el máximo rendimiento de limpieza si la malla del antefiltro se limpia
cuando se vacía el depósito para polvo (vea la figura 19).
Si observa que el filtro gira más despacio de lo normal, no gira, o la luz del filtro se enciende, consulte la sección de
Identificación y solución de problemas.
14
15
16
Vaciado del depósito para polvo
Uso del modelo Z™ como aspiradora tipo receptáculo
24
Page 25

®®
Cuándo vaciarlo
Se recomienda que el depósito para polvo se vacíe antes de que el polvo llegue a la parte superior del depósito para polvo o, si se
prefiere, después de cada uso.
Cómo vaciarlo
Desconecte la aspiradora de la toma de corriente eléctrica. No use la aspiradora sin tener el depósito para polvo o los filtros en
su lugar.
Desdoble la aspiradora para colocarla en posición vertical antes de sacar el depósito para polvo.
Para sacar el depósito, tire del mango para destrabar el depósito. Saque el depósito tirando de él directamente hacia fuera.
Voltee el depósito para polvo boca abajo sobre un basurero. Tire de la pestaña para abrir la puerta (D). Vacíe el depósito
para polvo.
LIMPIE LA MALLA DEL ANTEFILTRO (E) usando la escobilla para desempolvar.
Empuje el depósito directamente dentro de la cavidad del depósito para polvo, empujando hacia arriba ligeramente y
haciendo girar el mango hacia atrás para trabar el depósito para polvo en su lugar.
El uso y cuidado adecuados de su aspiradora asegurarán la eficacia en la limpieza por largo tiempo.
Filtro HEPA
El filtro HEPA con el que viene equipada la aspiradora es autolimpiable, y no deberá ser necesario reemplazarlo bajo
condiciones de limpieza normales. Si piensa que hay que reemplazar dicho filtro, lleve su aspiradora a un Centro
autorizado de ventas y servicio de Hoover.
Filtro final
Desconecte la aspiradora de la toma de corriente eléctrica. No use la aspiradora sin tener el depósito para polvo o los filtros en
su lugar.
El filtro final, ubicado en el lado opuesto del depósito para polvo en la aspiradora, se puede sacar y se puede lavar
en agua fría y detergente suave. Enjuáguelo y deje que el filtro se seque al aire por completo antes de volver a
colocarlo.
Para sacar el filtro, gire la cubierta del mismo en sentido contrario a las agujas del reloj. Saque el filtro, lávelo,
déjelo secar al aire e instálelo de nuevo en la cavidad del filtro.
Vuelva a colocar la cubierta del filtro, alineando las pestañas y girándola en sentido de las agujas del reloj para ubicarla
nuevamente en su posición.
Si desea reemplazar este filtro, pida la pieza No. 38762013 de HOOVER.
17
18
19
20
25
21
22
Mantenimiento de su aspiradora
Continuación →
Page 26

Desconecte la aspiradora de la toma de corriente eléctrica.
La succión o aspiración baja se puede deber a una obstrucción en el sistema. Consulte los siguientes pasos a fin de revisar si hay
obstrucciones, siguiendo cada paso hasta que encuentre la obstrucción:
Apague la aspiradora y desconéctela de la toma de corriente eléctrica.
1. Revise si el depósito para polvo está lleno. Vacíe el depósito si estuviera lleno. (Vea las figuras 17 y 18)
2. Limpie la malla del antefiltro usando la escobilla para desempolvar (vea la figura 19).
Revise el rodillo de escobillas del agitador
3. Apague la aspiradora y desconéctela de la toma de corriente eléctrica.
4. Voltee la aspiradora y elimine la obstrucción del rodillo de escobillas. No trate de sacar el rodillo de escobillas
del agitador.
Vuelva a colocar la aspiradora en la posición de funcionamiento. Enchufe la aspiradora, enciéndala y continúe la limpieza.
Revise detrás de la puerta de acceso
5. Saque la puerta de acceso (A); revise para ver si hay alguna obstrucción. Vuelva a colocar la puerta de acceso.
Revise el flujo de aire
6. Saque la manguera del tubo de extensión.
7. Enchufe la aspiradora y enciéndala. Verifique si hay succión en el extremo de la manguera. Si hay succión, continúe con
el paso 9. Si no hay succión, revise si hay alguna obstrucción en la manguera. Elimine la obstrucción.
8. Apague la aspiradora y desconéctela de la toma de corriente eléctrica.
9. Baje el mango al piso. Saque los 2 tornillos, uno en cada lado de la manguera. Revise para ver si hay alguna obstrucción
en la manguera. Elimine la obstrucción.
Revise el tubo de extensión
10. Apague la aspiradora y desconéctela de la toma de corriente eléctrica.
11. Saque el tubo de extensión de la aspiradora. Revise para ver si hay alguna obstrucción. Elimine la obstrucción.
23
25
24
26
27
Eliminación de obstrucciones
26
Page 27

®®
El rodillo de escobillas del agitador está diseñado para durar por el período de vida útil de la aspiradora. Normalmente no
necesitará ser reemplazado. Si piensa que es necesario revisar o reemplazar el rodillo de escobillas del agitador, lleve su aspiradora
a un Centro autorizado de ventas y servicio de Hoover. No trate de sacar el rodillo de escobillas del agitador.
Se podrá revisar la cavidad del agitador debajo de la aspiradora para ver si tiene residuos como cabello, hilos, etc.
Desconecte la aspiradora de la toma de corriente eléctrica. Voltee la aspiradora y saque los residuos acumulados en el rodillo de
escobillas del agitador. No trate de sacar el rodillo de escobillas del agitador.
Vuelva a colocar la aspiradora en posición vertical.
La correa del agitador está diseñada para durar por el período de vida útil de la aspiradora. Normalmente no necesitará ser
reemplazada. Si piensa que es necesario revisar o reemplazar la correa del agitador, lleve su aspiradora a un Centro autorizado de
ventas y servicio de Hoover. No trate de sacar la correa del agitador.
Desconecte la aspiradora de la toma de corriente eléctrica.
Almacenamiento del cordón
Abra el compartimiento de almacenamiento para los accesorios/el cordón. Enrolle el cordón en el sentido de las agujas del
reloj, alrededor de los dos ganchos para el cordón, acabando con el enchufe en el centro de la cavidad de
almacenamiento. El enchufe no deberá tocar el accesorio de manera que interfiera con el cierre de la puerta.
27
Rodillo de escobillas del agitador
Correa del agitador
Doble la aspiradora para colocarla en su posición de almacenamiento
Se podrá doblar la aspiradora para guardarla, o se podrá colocar en posición de aspiradora tipo receptáculo (horizontal)
para lograr un almacenamiento más compacto. Para doblar la aspiradora Z™ y guardarla, sujete y sostenga el anillo de
jalar (A) al mismo tiempo que empuja hacia abajo y ligeramente hacia atrás, ya sea el mango/tubo de extensión telescópico o el
asidero del mango. Hará un chasquido cuando quede asegurada en su lugar.
La aspiradora tiene cojinetes que cuentan con suficiente lubricación para la vida útil de la misma. La adición de lubricantes podría
causar daños. Por lo tanto, no añada lubricante a los cojinetes.
Almacenamiento de la aspiradora
28
29
Lubricación
Continuación →
Page 28

A
B
C
D
Lo que debe hacer
¿Cuál es el problema? ¿Qué significa?
Lo que debe hacer
¿Cuál es el problema? ¿Qué significa?
Lo que debe hacer
¿Cuál es el problema? ¿Qué significa?
Lo que debe hacer
¿Cuál es el problema? ¿Qué significa?
Lo que debe hacer
¿Cuál es el problema? ¿Qué significa?
Lo que debe hacer
¿Cuál es el problema? ¿Qué significa?
✓
Apague la aspiradora y desenchúfela. Voltee la aspiradora. Revise si hay obstrucciones y elimínelas.
Use la tabla siguiente como guía para las luces indicadoras en el panel de control.
La luz de atascamiento del agitador (C) está
encendida
; la luz See Manual
(Consulte manual) (A) está
encendida
; la luz de encendido
parpadea
.
La aspiradora no funciona.
La luz del motor de succión (D) está
encendida
; la luz See Manual (Consulte
manual) (A) está
encendida
; la luz de encendido
parpadea
. La aspiradora
no funciona.
✓
Revise el depósito para polvo. Vacíe el depósito si
estuviera lleno.
✓
Consulte “Eliminación de obstrucciones” en las
páginas 31 y 32. Elimine las obstrucciones.
La luz de ajuste del espesor de alfombras
(LOW, MED o HIGH)
parpadea continuamente.
La boquilla no puede colocarse en la posición seleccionada. (NOTA: la luz
parpadeará
y luego deja de par-
padear cuando cambie según el espesor de la alfombra).
✓
Revise el filtro final. Límpielo si estuviera sucio.
✓
Apague la aspiradora y desenchúfela. Espere
15 minutos; enchufe la aspiradora de nuevo
y enciéndala.
✓
Aún se puede usar la aspiradora.
✓
Apague y luego encienda la aspiradora. Si la luz continúa parpadeando, lleve la aspiradora a un Centro de
ventas y servicio de HOOVER para obtener servicio.
La luz del filtro (B) está
encendida
; la luz See Manual
(Consulte manual) (A) está
encendida
; El filtro HEPA no
gira o gira más despacio de lo normal.
El filtro no gira; el propulsor del filtro
está atascado.
✓ Coloque la aspiradora en posición vertical con el extremo de la manguera conectado al tubo de extensión.
Apague la aspiradora, vacíe el depósito para polvo y limpie la malla del antefiltro. Vuelva a encenderla. Si el
filtro gira ahora, permita que funcione durante un minuto. Después de un minuto, apague la aspiradora y vacíe el
depósito para polvo. Continúe limpiando.
✓ Si el filtro sigue sin girar, lleve la aspiradora a un Centro de ventas y servicio de HOOVER para obtener servicio.
La luz de encendido
parpadea
; la luz See Manual (Consulte manual) (A) está
encendida
. La aspiradora no funciona.
Problema del sistema interno.
✓
Apague y luego encienda la aspiradora. Si la luz continúa igual, es necesario prestarle servicio a la aspiradora.
Lleve la aspiradora a un Centro de ventas y servicio de HOOVER.
La luz de encendido
parpadea
; la luz See Manual (Consulte manual) (A)
parpadea
. La aspiradora no funciona.
Problema del sistema interno.
✓
Apague y luego encienda la aspiradora. Si la luces continúan iguales, ese necesario prestarle servicio.
Lleve la aspiradora a un Centro de ventas y servicio de HOOVER.
El agitador está obstruido.
El motor de succión se ha
sobrecalentado.
Identificación y solución de problemas
28
Page 29

®®
29
Continuación →
Identificación y solución de problemas, cont.
No está bien enchufada. Enchúfela bien.
No hay voltaje en la toma de corriente de la pared. Reemplace el fusible o reajuste el disyuntor.
El modo para superficies duras ha sido Seleccione un ajuste adecuado de modo para alfombra.
seleccionado en el panel de control.
El agitador está obstruido. Desconecte la aspiradora de la toma de corriente eléctrica. Voltee la aspiradora y saque cualquier residuo acumulado
en el rodillo de escobillas del agitador. No trate de sacar el rodillo de escobillas del agitador
.
El depósito para polvo está lleno. Desconecte la aspiradora de la toma de corriente eléctrica. Vacíe el
depósito para polvo.
La malla del antefiltro está sucia. Desconecte la aspiradora de la toma de corriente eléctrica. Limpie la
malla del antefiltro usando la escobilla para desempolvar.
La posición de altura para alfombras es incorrecta Seleccione otra posición de altura para alfombras en el panel de control.
El sistema está obstruido Despeje la obstrucción (vea la sección “Eliminación de obstrucciones”).
La posición de la altura para alfombras es incorrecta Seleccione una posición más alta de la altura para alfombras en el panel de control.
El depósito para polvo está lleno. Desconecte la aspiradora de la toma de corriente eléctrica. Vacíe el depósito para
polvo.
La malla del antefiltro está sucia. Desconecte la aspiradora de la toma de corriente eléctrica. Limpie la malla del
antefiltro usando la escobilla para desempolvar.
El modo de cepillado suave ha sido seleccionado. Desactive el modo de cepillado suave en el panel de control.
El sistema está obstruido. Despeje la obstrucción (vea la sección “Eliminación de obstrucciones”).
¿Cuál es el problema? La aspiradora no enciende.
¿Cuál es el problema? Las escobillas del agitador no giran.
¿Cuál es la causa? ¿Cuál es la solución?
¿Cuál es la causa? ¿Cuál es la solución?
¿Cuál es el problema? La limpiadora no recoge.
¿Cuál es la causa? ¿Cuál es la solución?
¿Cuál es el problema? Es difícil empujar la aspiradora.
¿Cuál es la causa? ¿Cuál es la solución?
¿Cuál es el problema? Los accesorios de limpieza no aspiran.
¿Cuál es la causa? ¿Cuál es la solución?
Si ocurre un problema menor, generalmente puede resolverse con bastante facilidad cuando se halla la causa, usando la siguiente
lista de verificación.
Si necesita ayuda o si necesita comunicarse con nosotros:
• www.hoover.com
• 1 800 944-9200 – localizador automatizado de concesionarios de servicio
• 1 330 499-9499 – nuestro Centro de respuesta al cliente (lunes a viernes de 8 de la mañana a 5 de la tarde)
Por favor no devuelva este producto a la tienda.
Page 30

Su aparato HOOVER®está garantizado para uso doméstico normal, según el Manual del Propietario, contra defectos
originales en el material y la fabricación por un período de dos años completos a partir de la fecha de compra. La presente
garantía cubre gratuitamente toda la mano de obra y las piezas necesarias para dejar este aparato en buen estado de
funcionamiento durante el período de garantía. Esta garantía es válida si el aparato fue comprado en los Estados Unidos, en
sus territorios y posesiones, en Canadá o en una tienda situada en una base militar de los EE.UU. Los aparatos comprados en
otros lugares están cubiertos por una garantía limitada de un año que cubre solamente el costo de las piezas. Esta garantía
no es válida si el aparato es utilizado para uso comercial o de alquiler.
Esta garantía solamente es válida cuando el producto se usa en el país o territorio en el cual fue comprado.
El servicio bajo garantía se puede obtener solamente al presentar el aparato en uno de los centros autorizados de servicio de
garantía indicados a continuación. Se requerirá la presentación de un comprobante de compra antes de prestarle servicio.
1. Centros de ventas y servicio de Hoover
2. Concesionarios autorizados de servicio de garantía de Hoover (Depósitos)
Para obtener una referencia automatizada de los centros autorizados de servicio en los Estados Unidos, llame al
1-800-944-9200, O visite el sitio Hoover en línea en www.hoover.com
Esta garantía no cubre la recogida, la entrega, ni las visitas a domicilio; sin embargo, si envía su aparato por correo a un
Centro de ventas y servicio de Hoover para obtener un servicio bajo garantía, se pagará el transporte de ida.
Esta garantía le otorga derechos legales específicos; usted puede tener además otros derechos que varían de estado
a estado.
Si necesita asistencia adicional, o si tiene preguntas sobre esta garantía o la disponibilidad de centros de servicio de
garantía, llame al Centro de respuesta al cliente de Hoover, al 1-330-499-9499.
En Canadá, comuníquese con Hoover Canada, Burlington, Ontario L7R 4A8, 1-800-263-6376.
Para sus archivos, anote los números de modelo y serie en los espacios provistos. Estos números se encuentran en la
etiqueta de datos que está en la parte de abajo del cuerpo principal de la aspiradora.
Número de modelo ____________________________
Número de serie ______________________________
Guarde su recibo de compra y adjúntelo a este manual. Para obtener el servicio de garantía de su aspiradora puede
requerirse un comprobante de la fecha de compra.
Anote y guarde
Garantía completa de dos años
30
Para obtener el servicio aprobado HOOVER y piezas genuinas HOOVER, localice el Centro de ventas y servicio de Hoover
o el Concesionario autorizado de servicio de garantía de Hoover (Depósito) más cercano, ya sea:
✓ Consultando la sección “Service” (Servicio) de The Hoover Company en Internet, www.hoover.com; O
✓ Consultando la lista de Centros de ventas y servicio proporcionada con esta aspiradora; O
✓ Consultando la sección amarilla bajo “Vacuum Cleaners - Household” (Aspiradoras para el hogar); O
✓ Llamando al 1-800-944-9200 para obtener una referencia automatizada de las ubicaciones de los centros de servicio
autorizados (solamente en EE.UU.).
No envíe su aspiradora a The Hoover Company en Newton, Iowa para obtener servicio; esto sólo resultará en demoras.
Si necesita asistencia adicional, comuníquese con el Centro de respuesta al cliente de Hoover, al teléfono 1-330-499-9499.
En Canadá, comuníquese con Hoover Canada, Burlington, Ontario L7R 4A8, teléfono: 1-800-263-6376.
Al solicitar información u ordenar piezas, siempre identifique su aspiradora por el número completo del modelo. (El
número de modelo se encuentra en la parte de abajo del cuerpo principal de la aspiradora).
Servicio para su aspiradora
Page 31

®
31
Durant l’utilisation d’un appareil électrique, toujours respecter les
précautions élémentaires, y compris les suivantes :
LIRE TOUTES LES INSTRUCTIONS AVANT D’UTILISER CET APPAREIL.
AVERTISSEMENT :
Afin de réduire au minimum les
risques d’incendie, de choc
électrique ou de blessures :
• Ne pas utiliser l’appareil à
l’extérieur ou sur une surface
mouillée.
• Faire preuve d’une grande prudence
lorsque l’appareil est utilisé par des
enfants ou près de ceux-ci. Ne pas
utiliser l’appareil comme jouet ni le
laisser sans surveillance.
• Garder cheveux, vêtements, doigts,
pieds ou toute autre partie du corps à
bonne distance des ouvertures, des
agitateurs et des autres pièces mobiles
de l’appareil. Ne pas utiliser l’appareil
pieds nus ni avec des sandales ou
des souliers qui laissent les orteils
à découvert.
• Ne pas utiliser l’aspirateur pour
ramasser toute matière qui dégage de
la fumée ou qui brûle, comme des
cigarettes, des allumettes ou des
cendres encore chaudes.
• Ne pas ramasser de liquides inflammables ou combustibles comme de
l’essence ou de la sciure de bois, et ne
pas utiliser l’appareil dans des endroits
où de tels composés sont présents.
• Éviter d’aspirer des objets durs et
acérés. Ils pourraient endommager
l’aspirateur.
• Toujours éteindre l’aspirateur avant
d’enlever ou de poser le tuyau.
• Ne pas utiliser l’appareil si le videpoussière ou les filtres ne sont pas en
place. Si des matériaux très fins sont
aspirés (par ex. de la poudre), vider le
vide-poussière fréquemment.
• Faire preuve d’une grande prudence
pendant l’utilisation dans des escaliers.
• Ne pas introduire d’objets dans les
ouvertures. S’assurer qu’aucune
ouverture n’est obstruée; garder
celles-ci exemptes de poussière, de
peluches, de cheveux et de toute
autre matière qui pourrait réduire le
débit d’air.
• Ne pas tirer l’appareil par le cordon
d’alimentation, utiliser le cordon pour
transporter ou soulever l’appareil,
coincer, écraser ou tirer le cordon
autour de coins ou d’arêtes vives.
Ne pas faire passer l’appareil sur le
cordon. Garder le cordon loin de
toute surface chauffée.
• Toujours débrancher l’appareil
avant d’en effectuer l’entretien.
• Éteindre et débrancher l’appareil s’il
n’est pas utilisé.
• Ne pas tirer sur le cordon
d’alimentation pour débrancher
l’appareil. Saisir la fiche et non le
cordon. Ne jamais manipuler la fiche
ou l’appareil avec les mains mouillées.
• L’utilisation d’une rallonge électrique n’est pas recommandée.
• Ne pas utiliser l’appareil si la fiche
ou le cordon est endommagé. Si
l’appareil fonctionne mal, s’il est
tombé par terre ou dans l’eau, s’il est
endommagé ou a été laissé à
l’extérieur, il doit être apporté à un
Centre de vente et de service Hoover
ou chez un détaillant de service
garanti autorisé Hoover.
• N’utiliser cet aspirateur que
conformément à son usage prévu, tel
que décrit dans le présent guide.
• N’utiliser que les accessoires
recommandés par Hoover; d’autres
accessoires pourraient s’avérer
dangereux.
Consignes de sécurité
importantes . . . . . . . . . . . . . . 31
Contenu de l’emballage . . . . . 32
Déballage . . . . . . . . . . . . . . . . 32
Description de l’aspirateur . . . 32
Utilisation
Utilisation de l’aspirateur
en position verticale. . . . . . . 33
Cordon électrique . . . . . . . 33
Panneau de commande . . . 33
Arrêt automatique
de l’agitateur . . . . . . . . . . . 33
Transport . . . . . . . . . . . 33-34
Nettoyage des tapis . . . . . . 34
Utilisation des
accessoires . . . . . . . . . . 34-35
Utilisation comme
aspirateur à traîneau . . . . . . 36
Transport de l’appareil . . . . 36
Nettoyage des escaliers . . . 36
Vidage du vide-poussière . . . 36
Entretien. . . . . . . . . . . . . . . . . 37
Filtres . . . . . . . . . . . . . . . . . 37
Lubrification . . . . . . . . . . . . 39
Déblocage des obstructions . 38
Rouleau-brosse agitateur . . . 39
Courroie de l’agitateur . . . . 39
Service . . . . . . . . . . . . . . . . 42s
Rangement . . . . . . . . . . . . . . . 39
Dépannage . . . . . . . . . . . . 40,41
Garantie. . . . . . . . . . . . . . . . . 42
© 2005 The Hoover Company
www.hoover .com
Consignes de sécurité importantes
Ranger et conserver ces instructions
Contenu
Guide de
l’utilisateur
FRANÇAIS ➜ 31-42
(Suite) →
Page 32

Position du manche
La manche/rallonge téle-
scopique (A) avec le tuyau
flexible doit être placée correctement et verrouillée. Faire glisser le
verrou (B) vers le panneau de commande afin de pouvoir insérer la ral-
longe dans l’ouverture. Pousser la
rallonge au fond de l’ouverture, en
s’assurant que le bouton saillant de
la rallonge est aligné avec l’encoche.
Faire glisser le verrou (B) en
l’éloignant du panneau de commande (C) pour verrouiller le manche/
rallonge télescopique. Pour enlever la
rallonge et utiliser un accessoire, faire
glisser le verrou vers le panneau de commande et enlever la rallonge.
Pour déplier l’aspirateur
ZMCet le faire fonctionner
en position verticale, saisir l’anneau à tirer (D) en tirant la
poignée de transport ou le
manche/rallonge télescopique
vers le haut et légèrement vers
l’avant. Un déclic indique
lorsqu’il est verrouillé.
2 3
1
Déballage de l’aspirateur
Verrouiller le manche en place
Déplier l’aspirateur
Utiliser les indications suivantes pour
identifier les pièces et les caractéristiques de
l’aspirateur ZMC:
1. Poignée
2. Bouton de dégagement du manche
télescopique
3. Tuyau
4. Manche/rallonge télescopique
5. Panneau de commande Arrêt/Marche
(à la base de la poignée)
6. Verrou de la rallonge
7. Poignée de transport
8. Anneau à tirer (pour déplier ou refermer
l’appareil)
9. Compartiment de rangement pour accessoires/cordon
10. Poignée du vide-poussière
11. Filtre HEPA autonettoyant (situé dans
la cavité supérieure, au-dessus du
vide-poussière)
12. Vide-poussière
13. Filtre terminal
14. Buse
15. Roulettes caoutchoutées
16. Porte d’accès
17. Pédale de déblocage du manche
N’utiliser l’aspirateur qu’à la tension spécifiée
sur la plaque signalétique située sous
le corps de l’appareil.
Cet aspirateur est destiné à une
utilisation domestique seulement.
Caractéristiques
Description de l’aspirateur
Fiche polarisée
Afin que les risques d’électrocution soient
minimes, cet appareil a été pourvu d’une fiche
polarisée (une lame est plus large que l’autre). Elle
ne pourra entrer dans une prise d’alimentation que dans
un sens.
Si la fiche n’entre pas, la retourner et essayer de
nouveau. Si elle ne peut être branchée, s’adresser à un
électricien qualifié, qui installera une prise
d’alimentation conforme. Ne modifier la fiche sous
aucun prétexte.
Contenu de l’emballage
A. Aspirateur
32
Page 33

®®
NE PAS UTILISER L’ASPIRATEUR À L’EXTÉRIEUR OU SUR DES SURFACES HUMIDES OU MOUILLÉES.
Cordon électrique
Ouvrir le compartiment de rangement pour accessoires/cordon (A), situé sur le côté de l’aspirateur et enlever le cordon. Le
crochet de rangement du cordon pivote pour faciliter le dégagement.
Interrupteur Marche/Arrêt et Panneau de
commande
Le panneau de commande DigiTouchMC(B) est situé à la base du manche.
Ouvrir le compartiment de rangement pour accessoires/cordon et brancher le cordon dans la prise de courant. Refermer la
porte.
Pour allumer l’aspirateur (ON), appuyer une fois sur .
Pour éteindre l’aspirateur (OFF), appuyer de nouveau sur .
Le panneau de commande vous permet de choisir le mode de nettoyage : tapis ou plancher dur.
Pour obtenir de meilleurs résultats, sélectionner le réglage bas (LOW). S’il est difficile de déplacer l’appareil pendant le nettoyage,
sélectionner un réglage supérieur.
Sélectionner le type de tapis devant être nettoyé :
HIGH pour les tapis épais,
MED pour les tapis moyens,
LOW pour les tapis à poils courts, bouclés, de cuisine ou autres tapis de ce genre,
HARD SURFACE pour les planchers durs. L’agitateur est éteint (OFF); la buse est réglée à la position basse (LOW).
Arrêt automatique de l’agitateur
L’agitateur se désactive automatiquement lorsque le manche est en position de rangement verticale, que l’aspirateur soit utilisé
comme aspirateur vertical ou aspirateur à traîneau (replié).
Transport de l’aspirateur en position verticale
Placer le manche à la position verticale. Incliner l’appareil pour qu’il repose sur ses roues arrière et pousser vers l’avant.
4
5
6
Utilisation de l’aspirateur ZMCcomme un aspirateur vertical
33
(Suite) →
Page 34

Transport de l’aspirateur
L’aspirateur peut être transporté en plaçant une main sous le panneau de commande pour soulever l’appareil.
Positions du manche
Le manche de l’aspirateur comporte trois positions : position verticale, pour l’utilisation d’accessoires et pour ranger l’appareil; position de fonctionnement, pour l’utilisation normale sur les planchers et tapis; et position basse pour nettoyer sous
les meubles. Appuyer sur le levier de dégagement (A) et tirer le manche vers l’arrière pour l’abaisser.
Nettoyage des tapis légers et flexibles
Régler la hauteur du tapis sur le panneau de commande à HIGH
ou MED.
Se placer à une extrémité du tapis et diriger l’aspirateur vers l’extrémité opposée. Avant d’atteindre le rebord, abaisser le manche.
Ainsi, la buse se soulèvera et le tapis ne restera pas coincé dans l’aspirateur. Continuer de lever la buse de l’aspirateur, de façon à ce
qu’elle ne touche plus du tout au tapis une fois le rebord atteint. Ramener l’appareil vers soi, rabaisser le devant de l’aspirateur, puis
répéter l’opération en s’assurant que l’appareil n’aspire que lorsqu’il se déplace vers l’avant.
Utilisation des accessoires
Les accessoires peuvent être utilisés avec l’aspirateur ZMCen position verticale, ou lorsqu’il est replié en aspirateur à traîneau.
L’agitateur se désactive automatiquement : (1) lorsque le manche est en position de rangement verticale ou (2) lorsque l’aspirateur
est en position repliée, comme aspirateur à traîneau.
7
8
9
34
Page 35

®®
Compartiment de rangement des accessoires
Les accessoires sont placés derrière le compartiment de rangement pour accessoires/cordon. Sélectionner l’accessoire le
mieux adapté à la tâche de nettoyage.
B. La brosse à épousseter est utilisée pour les boiseries sculptées, dessus de tables, livres, lampes, luminaires, stores vénitiens,
plinthes, volets et grilles à registre.
C. Le bec suceur est utilisé dans les espaces restreints, les coins et les rebords d’endroits tel que tiroirs, meubles capitonnés,
escaliers et plinthes.
D. L’accessoire pour meubles capitonnés convient pour les meubles capitonnés, draperies, tapisseries, matelas, vêtements,
intérieurs d’auto et escaliers avec tapis.
E. Le manche/rallonge télescopique (fixée au tuyau) peut être allongée en poussant le bouton vers l’avant et en tirant. Pour raccourcir le manche/rallonge télescopique, pousser le bouton vers l’avant et rentrer le manche/rallonge. Elle peut être uti-lisée avec n’importe quel accessoire indiqué plus haut.
Installation de la rallonge et des accessoires de nettoyage
Tous les accessoires se fixent à l’embout de la même manière.
Les accessoires peuvent être fixés manche/rallonge télescopique ou directement au tuyau (voir la figure 13).
On peut enlever le tuyau de la rallonge en tournant l’extrémité du tuyau dans le sens horaire et en le tirant hors de la
rallonge.
Tourner légèrement la rallonge ou l’accessoire pour serrer ou desserrer la connexion.
Pour plus de commodité, le tuyau pivote à 360° lorsqu’il est fixé à la rallonge.
Nettoyage des accessoires
Pour nettoyer le tuyau, essuyer la saleté avec un chiffon trempé dans un détergent liquide. Rincer avec un chiffon humide.
Les accessoires peuvent être lavés à l’eau tiède avec un détergent. Rincer puis laisser sécher à l’air libre avant de les réu-
tiliser.
10
11
12
13
35
(Suite) →
Page 36

Pour replier l’aspirateur ZMCet le faire fonctionner comme aspirateur à traîneau, saisir l’anneau à tirer et tirer la
manche/rallonge télescopique ou la poignée vers l’arrière et légèrement vers le bas. Un déclic indique lorsqu’il est
verrouillé.
Transport de l’aspirateur à traîneau
L’aspirateur peut être transporté en position à traîneau, comme il est illustré.
Consulter la section « Utilisation des accessoires » sous la rubrique Aspirateur vertical, pour fixer et utiliser les accessoires de
nettoyage.
Nettoyage des escaliers
Le tuyau de l’aspirateur ZMCmesure 6 m (20 pi) et permet d’atteindre le haut d’un escalier lorsque l’aspirateur est placé au
bas de celui-ci.
Pour nettoyer les escaliers, utiliser le tuyau et l’accessoire pour meubles capitonnés.
Toujours placer l’aspirateur au bas de l’escalier. Commencer par le bas de l’escalier.
MISE EN GARDE : Pour éviter les blessures et éviter de renverser l’aspirateur, faire preuve d’une grande prudence
lorsque l’aspirateur est placé dans les escaliers.
Vide-poussière
Votre aspirateur est équipé d’un filtre HEPA autonettoyant.
Le filtre n’est PAS amovible.
Lorsque l’aspirateur est en marche, le préfiltre (A) empêche les débris plus volumineux d’entrer dans la chambre du
filtre HEPA. Ces débris s’accumuleront dans la partie la plus large du vide-poussière (B). Le filtre HEPA filtrera les
fines particules qui auront traversé le préfiltre. Le filtre HEPA se nettoie automatiquement lorsqu’il tourne, déposant
les débris fins dans la partie la plus petite du vide-poussière (C).
L’aspirateur ‹‹ Z ›› continuera à offrir une efficacité de nettoyage maximale si la grille du préfilre est nettoyée chaque fois
que le vide-poussière est vidé (voir la figure 19).
Si le filtre ne tourne pas, s’il tourne plus lentement que d’habitude ou si le voyant du filtre est allumé, consulter la section «
Dépannage ».
Utilisation de l’aspirateur ZMCcomme un aspirateur à traîneau
14
15
16
Vidage du vide-poussière
36
Page 37

®®
Quand le vider?
Il est recommandé de vider le vide-poussière avant que la poussière n’atteigne le haut du vide-poussière ou après chaque usage si
désiré.
Vidage
Débrancher l’appareil de la prise de courant. Ne pas utiliser l’aspirateur si le vide-poussière ou les filtres ne sont pas en place.
Déplier l’aspirateur à sa position verticale avant d’enlever le vide-poussière.
Pour enlever le vide-poussière, le tirer par sa poignée. Tirer le vide-poussière directement vers l’avant.
Vider le vide-poussière dans une poubelle. Tirer la languette pour ouvrir la porte (D). Vider le vide-poussière.
NETTOYER LA GRILLE DU PRÉFILTRE (E) à l’aide de la brosse à épousseter.
Insérer le vide-poussière directement dans la cavité, pousser légèrement vers le haut et tourner la poignée pour verrouiller le
vide-poussière en place.
Une utilisation et un entretien corrects de l’appareil assureront son bon fonctionnement.
Filtre HEPA
Le filtre HEPA est autonettoyant et, dans des conditions d’utilisation normale, ne devrait pas être changé. Si vous pensez
que ce filtre doit être changé, apporter l’aspirateur à un Centre de vente et de service Hoover.
Filtre terminal
Débrancher l’appareil de la prise de courant. Ne pas utiliser l’aspirateur si le vide-poussière ou les filtres ne sont pas en place.
Le filtre terminal, situé du côté opposé au vide-poussière, peut être enlevé et lavé à l’eau froide avec un détergent
doux. Rincer le filtre et le laisser sécher complètement à l’air avant de le remettre dans l’aspirateur.
Pour enlever ce filtre, le faire tourner dans le sens antihoraire. Enlever le filtre, le laver, le laisser sécher à l’air et le
remettre en place dans la cavité du filtre.
Remettre le couvercle du filtre en place en alignant les languettes et en le faisant tourner dans le sens horaire.
Si le remplacement du filtre s’avérait nécessaire, commander la pièce HOOVER no38762013.
37
17
18
19
20
21
22
Entretien de l’aspirateur
(Suite) →
Page 38

Déblocage des obstructions
Débrancher l’appareil de la prise de courant.
Une succion ou une efficacité faibles peuvent être causées par une obstruction à l’intérieur du système. Suivre dans l’ordre les
étapes
sui-vantes jusqu’à ce que la source de l’obstruction soit identifiée :
Couper l’alimentation électrique de l’appareil (position OFF) et le débrancher.
1. Vérifier si le vide-poussière est plein. Le vider s’il est plein. (Voir les figures 17 et 18)
2. Nettoyer la grille du préfiltre à l’aide de la brosse à épousseter (voir la figure 19).
Vérifier le rouleau-brosse agitateur
3. Couper l’alimentation électrique de l’appareil (position OFF) et le débrancher.
4. Retourner l’aspirateur à l’envers et enlever l’obstruction du rouleau-brosse. Ne pas tenter d’enlever le rouleau-brosse
agitateur.
Remettre l’aspirateur en position de fonctionnement. Brancher l’appareil, le rallumer et continuer le nettoyage.
Vérifier derrière la porte d’accès
5. Enlever la porte d’accès (A); vérifier s’il y a obstruction. Remettre la porte d’accès en place.
Vérifier le débit d’air
6. Enlever le tuyau de la rallonge.
7. Brancher l’aspirateur et l’allumer (position ON). Vérifier la succion au bout du tuyau. S’il y a succion, continuer à l’étape
8. S’il n’y a pas de succion, vérifier si le tuyau est obstrué. Dégager les obstructions.
8. Couper l’alimentation électrique de l’appareil (position OFF) et le débrancher.
9. Abaisser le manche au niveau du plancher. Enlever les deux (2) vis, une de chaque côté du tuyau. Vérifier si les tuyaux
sont bloqués. Dégager les obstructions.
Vérification de la rallonge
10. Couper l’alimentation électrique de l’appareil (position OFF) et le débrancher.
11. Enlever la rallonge de l’aspirateur. Vérifier s’il y a des blocages. Dégager les obstructions.
23
24
25
26
27
38
Page 39

®®
Le rouleau-brosse agitateur est conçu pour durer aussi longtemps que l’aspirateur. Normalement, il n’exige aucun remplacement. Si
vous pensez que le rouleau-brosse agitateur doit être inspecté ou changé, apporter l’aspirateur à un Centre de vente et de service
Hoover. Ne pas tenter d’enlever le rouleau-brosse agitateur
.
La cavité de l’agitateur, située sous l’aspirateur, peut être inspectée pour y déloger les débris comme des cheveux, des fils, etc.
Débrancher l’appareil de la prise de courant. Retourner l’appareil à l’envers et enlever les débris accumulés dans le rouleau-brosse
agitateur. Ne pas tenter d’enlever le rouleau-brosse agitateur.
Remettre l’aspirateur en position verticale.
La courroie de l’agitateur est conçue pour durer aussi longtemps que l’aspirateur. Normalement, elle n’exige aucun remplacement.
Si vous pensez que la courroie de l’agitateur doit être inspectée ou changée, apporter l’aspirateur à un Centre de vente et de service Hoover. Ne pas tenter d’enlever la courroie de l’agitateur.
Débrancher l’appareil de la prise de courant.
Rangement du cordon
Ouvrir le compartiment de rangement pour accessoire/cordon. Enrouler le cordon dans le sens horaire autour des deux crochets du cordon; la fiche doit se trouver au centre de la cavité de rangement. La fiche ne doit pas reposer contre l’accessoire
afin de ne pas nuire à la fermeture de porte.
Pliage de l’aspirateur en position de rangement
L’aspirateur peut être replié pour le rangement ou se transformer en aspirateur à traîneau pour un rangement plus compact.
Pour replier l’aspirateur ZMCpour le rangement, saisir l’anneau à tirer (A) et tirer le manche/rallonge télescopique ou la
poignée vers l’arrière et légèrement vers le bas. Un déclic indique lorsque l’appareil est verrouillé.
L’aspirateur est pourvu de deux paliers suffisamment lubrifiés pour toute la durée de vie de l’aspirateur. Toute lubrification supplémentaire pourrait causer des dommages. Par conséquent, ne pas ajouter de lubrifiant aux paliers du moteur.
39
28
29
Rouleau-brosse agitateur
Courroie de l’agitateur
Rangement de l’aspirateur
Lubrification
(Suite) →
Page 40

A
B
C
D
Dépannage
Que faire?
Quel est le problème? Signification
Que faire?
Quel est le problème? Signification
Que faire?
Quel est le problème? Signification
Que faire?
Quel est le problème? Signification
Que faire?
Quel est le problème? Signification
Que faire?
Quel est le problème? Signification
✓
Éteindre (position OFF) puis débrancher l’aspirateur. Placer l’aspirateur à l’envers. Vérifier s’il y a des
obstructions et les enlever.
Utiliser le tableau ci-dessous pour comprendre le fonctionnement des voyants indicateurs
du panneau de commande.
Voyant Calage moteur (C) allumé; Voyant See Manual (Voir manuel) (A)
allumé; Voyant Alimentation clignote. L’aspirateur ne fonctionne pas.
Voyant Moteur de succion (D) allumé; Voyant See Manual (Voir manuel) (A)
allumé; Voyant Alimentation clignote. L’aspirateur ne fonctionne pas.
✓
Vérifier le vide-poussière. Le vider s’il est plein.
✓
Consulter la section « Déblocage des obstructions »
aux pages 12 et 13.
Dégager les obstructions.
Le voyant de réglage de la hauteur (LOW, MED
ou HIGH) clignote continuellement.
La buse est incapable de se placer au réglage
sélectionné. (REMARQUE : Le voyant
clignote
, puis
cesse de clignoter lors du changement de hauteur.)
✓
Vérifier le filtre terminal. Le nettoyer s’il est sale.
✓
Éteindre (position OFF) puis débrancher l’aspirateur.
Attendre 15 minutes; brancher l’aspirateur et
l’allumer.
✓
L’aspirateur peut fonctionner.
✓
Éteindre l’aspirateur, puis l’allumer de nouveau. Si le voyant continue à clignoter, apporter l’aspirateur à un
Centre de vente et de service HOOVER pour réparation.
Voyant Filtre (B) allumé; Voyant See Manual (Voir manuel)
(A) allumé; Le filtre HEPA ne tourne pas ou tourne plus
lentement que d’habitude.
Le filtre ne tourne pas; obstruction dans le rail
du filtre
✓
Placer l’aspirateur en position verticale avec l’extrémité du tuyau raccordée à la rallonge. Éteindre l’aspirateur,
vider le vide-poussière et nettoyer la grille du préfiltre. Mettre l’appareil en marche. Si le filtre tourne, le laisser
tourner pendant une minute. Après une minute, éteindre l’aspirateur et vider le vide-poussière. Continuer le nettoyage.
✓
Si le filtre ne tourne pas, apporter l’aspirateur à un Centre de vente et de service HOOVER pour réparation.
Voyant Alimentation clignote; Voyant See Manual (Voir manuel) (A) allumé.
L’aspirateur ne fonctionne pas.
Problème au niveau du système
interne
✓
Éteindre l’aspirateur, puis l’allumer de nouveau. Si rien ne change, l’appareil doit être réparé.
Apporter l’aspirateur à un Centre de vente et de service HOOVER.
Voyant Alimentation clignote; Voyant See Manual (Voir manuel) (A) clignote.
L’aspirateur ne fonctionne pas.
Problème au niveau du système
interne
✓
Éteindre l’aspirateur, puis l’allumer de nouveau. Si rien ne change, l’appareil doit être réparé.
Apporter l’aspirateur à un Centre de vente et de service HOOVER.
Obstruction au niveau
de l’agitateur.
Le moteur de succion a
surchauffé.
40
Page 41

®®
41
Si vous avez besoin d’aide, vous pouvez nous contacter au :
• www.hoover.com
• 1 800 944-9200 – service automatisé de localisation des Centres de service
• 1 330 499-9499 – Centre d’aide à la clientèle (de 8:00 à 17:00 du lundi au vendredi)
Ne pas retourner ce produit au détaillant.
(Suite) →
Dépannage, suite
L’appareil est mal branché. Bien enfoncer la prise mâle dans la prise d’alimentation.
La prise de courant ne fournit aucune tension. Remplacer le fusible ou réarmer le disjoncteur.
Le mode surface dure (Hard Surface) est sélectionné Sélectionner un mode de réglage approprié pour les tapis.
sur le panneau de commande.
L’agitateur est obstrué. Débrancher l’appareil de la prise de courant. Retourner l’appareil à l’envers et
enlever les débris accumulés dans le rouleau-brosse agitateur. Ne pas tenter d’enlever le rouleau-brosse agitateur.
Le vide-poussière est plein. Débrancher l’appareil de la prise de courant. Vider le vide-
poussière.
La grille du préfiltre est sale. Débrancher l’appareil de la prise de courant. Nettoyer la grille
du préfiltre à l’aide de la brosse à épousseter.
Mauvais réglage de la hauteur de tapis. Sélectionner un autre réglage de hauteur de tapis sur le panneau de commande.
Le système est obstrué. Dégager l’obstruction (voir la section « Déblocage des obstructions »).
Mauvais réglage de la hauteur de tapis. Sélectionner un réglage plus élevé de hauteur de tapis sur le
panneau de commande.
Le vide-poussière est plein. Débrancher l’appareil de la prise de courant. Vider le vide-
poussière.
La grille du préfiltre est sale. Débrancher l’appareil de la prise de courant. Nettoyer la grille
du préfiltre à l’aide de la brosse à épousseter.
Le mode « Gentle brush » est sélectionné. Désactiver le mode « Gentle brush » sur le panneau de commande.
Le système est obstrué. Dégager l’obstruction (voir la section « Déblocage des obstructions »).
Quel est le problème? L’aspirateur ne s’allume pas.
Quel est le problème? Les rouleaux-brosses ne tournent pas.
Quelle est la cause? Quelle est la solution?
Quelle est la cause? Quelle est la solution?
Quel est le problème? L'appareil n'aspire pas.
Quelle est la cause? Quelle est la solution?
Quel est le problème? L’appareil est difficile à pousser.
Quelle est la cause? Quelle est la solution?
Quel est le problème? Les accessoires n'aspirent pas la saleté.
Quelle est la cause? Quelle est la solution?
Si un problème d’ordre mineur survient, il peut habituellement être résolu très facilement. Il suffit de consulter la liste ci-dessous
pour en trouver la cause.
Page 42

Votre appareil HOOVERMDest garanti pour des conditions d’usage domestique, tel que stipulé dans le guide de l’utilisateur,
contre les défauts de matériaux et de fabrication pour une période de deux (2) ans après la date d’achat original. Cette
garantie vous offre, sans frais supplémentaires, les pièces et la main-d’œuvre nécessaires à la remise en bon état de
fonctionnement de l’appareil au cours de la période de garantie. La présente garantie s’applique si l’appareil a été acheté aux
États-Unis, ce qui comprend ses territoires et possessions, au Canada ou par l’intermédiaire du programme d’échanges
militaires américain. Les appareils achetés ailleurs sont couverts par une garantie limitée de un an qui couvre le coût des
pièces seulement. La présente garantie ne s’applique pas si l’appareil est utilisé à des fins commerciales ou de location.
Cette garantie ne s’applique que si l’appareil est utilisé dans le pays ou le territoire où il a été acheté.
Le service couvert par la garantie ne peut être obtenu qu’en envoyant l’appareil à l’un des points de service autorisés
ci-dessous. Une preuve d’achat est exigée avant toute réparation couverte par la garantie.
1. Centres de vente et de service Hoover
2. Ateliers de service garanti autorisé Hoover (dépôts)
Pour accéder à un service d’aide automatique qui vous donnera la liste des centres de service autorisés Hoover aux
États-Unis, composer le 1 800 944-9200 OU visiter Hoover en ligne au www.hoover.com
Cette garantie ne couvre ni l’enlèvement de l’appareil, ni sa livraison, ni les réparations à domicile. Toutefois, si vous
envoyez votre appareil par la poste à un Centre de vente et de service pour une réparation sous la garantie, son renvoi
sera payé.
Cette garantie vous confère des droits légaux spécifiques. Il se peut que vous bénéficiiez d’autres droits qui varient selon
la juridiction.
Pour de plus amples informations ou pour toute question sur la présente garantie ou sur l’emplacement des différents
Centre d’aide à la clientèle Hoover, téléphoner au 330 499-9499.
Au Canada, s’adresser à Hoover Canada, Burlington, Ontario L7R 4A8, 1 800 463-3923 (Montréal).
Veuillez inscrire les numéros de modèle et de série dans les espaces fournis à cet effet. Ces numéros sont inscrits sur
l’étiquette apposée sous le corps de l’appareil.
Modèle n° ____________________________
Node série _____________________________
Veuillez conserver votre reçu de caisse et le fixer à ce manuel, car une vérification de la date d’achat peut être effectuée avant toute réparation couverte par la garantie de votre appareil.
Garantie complète de deux ans
Remplir et conserver
42
Pour obtenir le service autorisé HOOVER ou des pièces d’origine HOOVER, il vous faut l’adresse du Centre de vente et de
service Hoover ou de l’atelier de service garanti autorisé (dépôt) le plus près de chez vous. Pour l’obtenir, vous pouvez :
✓ Consulter la section Service de Hoover en ligne au www.hoover.com OU
✓ Vérifier la liste des Centres de vente et de service fournie avec cet appareil OU
✓ Consulter les Pages Jaunes sous la rubrique « Aspirateurs domestiques - Vente & Service » OU
✓ Appeler au 1 800 944-9200 pour accéder à un service d’aide automatique qui vous indiquera les
adresses des Centres de service autorisés (É.-U. seulement)
Prière de ne pas envoyer votre appareil Hoover à l’adresse de Newton, en Iowa pour qu’il soit réparé. Il n’en résulterait que
des délais supplémentaires.
Si d’autres renseignements sont requis, communiquer avec le Centre d’aide à la clientèle Hoover,
Téléphone : 330-499-9499.
Au Canada, s’adresser à Hoover Canada, Burlington, Ontario L7R 4A8, téléphone : 1 800 463-3923 (Montréal).
Au moment de demander des renseignements ou de commander des pièces, toujours identifier l’appareil par son numéro
de modèle complet. (Le numéro de modèle est inscrit sous le corps de l’aspirateur.)
Réparation de l’aspirateur
Page 43

13. Occupation:
(check all that apply)
You Spouse
Professional/Technical................................................................l1.
l
Upper Management/Executive...................................................l2.
l
Middle Management ..................................................................l3.
l
Sales/Marketing..........................................................................l4.
l
Clerical/Service Worker..............................................................l5.
l
Tradesman/Machine Operator/Laborer......................................l6.
l
14. Are you or your spouse: You Spouse
A Homemaker?
...........................................................................
l
1.
l
Retired?
......................................................................................
l
2.
l
A Student?
..................................................................................
l
3.
l
Self Employed/Business Owner?
...............................................
l
4.
l
Working from a Home Office?
....................................................
l
5.
l
In the Military?
............................................................................
l
6.
l
A Veteran?
..................................................................................
l
7.
l
15. Which group describes your annual family income?
01.lUnder $15,000 08.l$75,000-$99,999
02.
l
$15,000-$19,999 09.l$100,000-$124,999
03.
l
$20,000-$29,999 10.l$125,000-$149,999
04.
l
$30,000-$39,999 11.l$150,000-$174,999
05.
l
$40,000-$49,999 12.l$175,000-$199,999
06.
l
$50,000-$59,999 13.l$200,000-$249,999
07.
l
$60,000-$74,999 14.l$250,000 & over
16. Level of education:
(check highest level completed)
1.lCompleted High School
2.
l
Completed College
3.
l
Completed Graduate School
17. Which credit cards do you use regularly?
1.lAmerican Express, Diners Club
2.lMastercard, Visa, Discover
3.lDepartment Store, Oil Company, etc.
4.lDo not use credit cards
18. For your primary residence, do you: 1.
l
Own? 2. lRent?
19. How recently did you move into your current residence?
1.lWithin 30 days 4.l7 to 12 months ago
2.
l
Within 1 - 3 months 5.lHave not moved in
3.
l
Within 4 - 6 months the last 12 months
20. Which of the following do you plan to do within the next 6 or 12 months?
1-6 7-12
Months Months
Buy/Lease a New Vehicle..........................................................l1.
l
Buy/Lease a Used Vehicle ........................................................l2.
l
21. Please check all that apply to your household.
01.lShop by Catalog/Mail
02.
l
Shop via the Internet
03.
l
Member of a Frequent Flyer Program
04.
l
Donate to Charitable Causes
05.
l
Own a Compact Disc Player
06.
l
Have a Dog
07.
l
Have a Cat
08.
l
Own a Wireless/Cellular Phone
09.
l
Subscribe to an Online/Internet Service
10.
l
Speak Spanish
11.
l
Own an Apple/Macintosh Computer
12.
l
Own a CD-ROM Drive
3. Your date of birth: /
Month/Mois/Mes Year/Année/Año
4. Marital status:
1. l Married 2. l Single
5. Date of purchase: / /
Month/Mois/Mes Day/Jour/Dia Year/Année/Año
6. Model number/Numéro de modèle/
Número de modelo:
7. Serial number (Ser. No.)/
Numéro de serie/Número de serie:
(on label on the back or bottom of your product)
(sur l’étiquette au dos du produit ou sous le produit)
(En una etigueta la parte de etrás o debajo de su producto)
8. Price paid
(please do not include sales tax)
/
Prix payé
(à l’exclusion des taxes)
/ Precio pagado:
9. For the following statement, please indicate whether you agree or
disagree that the statement describes your approach to shopping for home
cleaning appliances.
A)
I am willing to give up some quality for a lower price.
1.
l
Agree 2.lDisagree
10. For each of the following pairs, please check the one statement that most
closely describes you and your approach to cleaning your home.
(check only one)
1. lI have begun to take house cleaning a little less seriously in recent years, OR
2.
l
I keep up with maintaining a clean and organized home no matter what.
(check only one)
3. lI have a cleaning schedule that I insist on sticking to, OR
4.
l
I do not have any specific routine for cleaning my house.
(check only one)
5. lI like the sense of satisfaction I get when my home is clean and organized, OR
6.
l
I don’t really give much thought to how clean and organized my home looks.
11. Which of these statements best describes the way you think and feel about
cleaning your home?
(check only one)
1.lKeeping a clean home is important to me and I am proud of the result. I tend
to buy moderate and higher priced products and believe quality is more
important than price when buying cleaning tools for my home.
2.
l
I tend to have a systematic approach to cleaning my home. I give significant
consideration to price when buying cleaning tools for my home.
3.
l
I tend to be a bit ambivalent about cleaning my house as I neither like nor hate
cleaning. I prefer stylish, easy-to-use cleaning tools for my home and am willing
to pay a little more to get these features.
12.
Not including yourself
,
what is the GENDER and AGE (in years)
of children and other adults living in your household?
1. lNo one else in household 2. lChild under 1 yr.
Male Female Age Male Female Age
1. l2.
l
yrs. 1. l2.
l
yrs.
1.
l
2.
l
yrs. 1. l2.
l
yrs
HOOVER PRODUCT REGISTRATION CARD
PLEASE FILL OUT AND RETURN WITHIN THE NEXT 10 DAYS - or - REGISTER ON OUR WEBSITE AT: http://www.prodregister.com/hoover
Proper registration will serve as proof of purchase in the event your original receipt is misplaced or lost and may expedite the processing of your warranty claims. It also will serve as proof of purchase in the event of theft or loss. The additional questions will help us to develop products to meet your cleaning needs
in years to come. Thank you for choosing Hoover!
L’enregistrement sert de preuve d’achat au cas où la facture originale serait égarée ou perdue; i’enregistrement peut également accélérer le traitement d’une réclamation dans le cadre de la garantie. Il sert aussi de preuve d’achat en cas de vol ou de perte. Les questions additionnelles nous aideront à mettre au point, dans le futur,
de nouveaux produits pour vos besoins en nettoyage. Nous vous remercions d’avoir choisi Hoover!
En caso de pérdida del recibo original, su registo completo servirá como prueba de compra, y puede agilizar el processo de reclamo de su garantia. También servirá como prueba de compra en el caso de robo o pérdida. Las preguntas adicionales nos ayudarán a desarrollar productos para satisfacer su necesidades de limpiza
en el futuro. Gracias por seleccionar Hoover!
Y3R01-01
®
XXXXXX XXXXXX
XXXXXXXXXXXX
(PLEASE CONTINUE ON BACK) ➤ ➤ ➤
1. 1. l Mr. 2. l Mrs. 3. l Ms. 4. l Miss
First Name/Prénom/Nombre Initial Last Name/Nom de famille/Apellido
Street/Rue/Calle Apt. No./App./No. de apto
City/Ville/Ciudad State/Province/Estado ZIP/Postal code/Code postal/Codigo postal
2. E-mail Address:
LES QUESTIONS SUIVANTES SONT FACULTATIVES
LAS SIGUENTES PREGUNTAS SON OPCIONALES
$
.00
Page 44

Fold here. Seal with tape (do not staple). Pliez ici. Veuillez cacheter (Ne pas agrafer). Doble aquí. Favor de sellar con cinta adhesiva. No usar grapas.
If you have any comments or suggestions about our product, please write to:
Consumer Response Center, The Hoover Company 101 East Maple Street • North Canton, OH 44720
Call (330) 499-9499 or visit us online at: www.hoover.com
RETURN THIS CARD NOW FOR:
•
Warranty Confirmation
With the information you provide we can confirm the date of
purchase of your product. This confirmation is of benefit to
you, especially if your original proof of purchase is lost.
•
Proof of Ownership
Your model number, serial number, and other information will
be kept in our files for up to ten years.
•
$100,000 Give Away V
We’ll automatically enter you for a chance to win $5,000,
$25,000, or even $50,000!
P O BOX 173245
DENVER CO 80217-3245
Please send other
correspondence to:
Consumer Response Center
The Hoover Company
101 East Maple Street
North Canton, OH 44720
Y3R01-01
!802173245459!
22.
To help us understand our customers’lifestyles, please
indicate the interests and activities in which
you
or
your
spouse
enjoy participating on a regular basis:
First-Class
Postage
Required
Post Office will
not deliver
without proper
postage.
®
Copyright © 2003 All rights reserved
PRODUCT REGISTRATION
OFFICIAL SWEEPSTAKES RULES: NO PURCHASE NECESSARY TO WIN. Sweepstakes is sponsored by a
number of different companies, will be offered in a number of different presentations, and will award the following
prizes: one 1st Prize of $50,000; one 2nd Prize of $25,000; and five 3rd Prizes of $5,000. Sweepstakes begins May 19,
2003, and ends December 31, 2005. Enter by completing this product registration or a 3" x 5" card with your name,
address, city, state, ZIP Code, and the words “$100,000 Give Away V” and mail to P.O. Box 173245, Dept. Y3R, Denver,
CO 80217-3245. Entries must be received no later than December 31, 2005, and are limited to one per household.
Mechanically reproduced entries not acceptable. Not responsible for late, lost or illegible entries. A random drawing
held in January 2006, will select the winners from all entries collectively received by the sponsoring companies. Odds
of winning depend on the number of eligible entries received from all sponsors’ presentations. Open to U.S. residents
at least 18 years old, except employees and their families of the sweepstakes judge, all of the sponsoring companies,
and their respective subsidiaries. Each winner must submit a signed and notarized affidavit of eligibility within a specified time after being notified of their prospective winner status, and if a satisfactory affidavit is not received within the
stated time, a new winner will be selected. By submitting an entry, winner agrees to the use of their name, address, and
photograph for advertising/publicity purposes without compensation. All entries become the property of the sweepstakes judge. No transfer or substitution of prize is allowed. Winner is solely responsible for all taxes. All federal, state
and local laws apply. Offer void in Florida and where prohibited by law. For notice of sweepstakes winners, send a selfaddressed, stamped envelope to: “$100,000 Give Away V”, P.O. Box 173133, Denver, CO 80217-3133.
18. l Buy Prerecorded Videos
19. l Automotive Work
20. l Electronics
21. l Home Workshop/Do-It-
Yourself
22. l Recreation Vehicles (RV’s)
23. l Listen to
Records/Tapes/CDs
24. l Avid Book Reading
25. l Bible/Devotional Reading
26. l Health/Natural Foods
27. l Photography
28. l Cultural/Arts Events
29. l Fashion Clothing
30. l Art/Antique Collecting
31. l Foreign Travel
32. l Cruise Ship Vacations
33. l Travel in USA
34. l Gourmet Cooking/Fine Foods
35. l Wines
36. l Stamp/Coin Collecting
37. l Collectibles
38. l Our Nation’s Heritage
39. l Real Estate Investments
40. l Stocks/Bond Investments
41. l Contests/Sweepstakes
42. l Casino Gambling
43. l Science Fiction
44. l Wildlife/Environmental Issues
45. l Dieting/Weight Control
46. l Science/New Technology
47. l Self-Improvement
48. l Walking for Health
49. l Watching Sports on TV
50. l Home Video Recording
51. l Moneymaking Opportunities
01. l Bicycling
02. l Golf
03. l Physical
Fitness/Exercise
04. l Running/Jogging
05. l Snow Skiing
06. l Tennis
07. l Camping/Hiking
08. l Fishing
09. l Hunting/Shooting
10. l Powerboating
11. l Sailing
12. l Grandchildren
13. l Needlework/Knitting
14. l Sewing
15. l Flower Gardening
16. l Vegetable Gardening
17. l Crafts
23. Using the numbers in the above list, please
indicate your 3 most important activities:
Thanks for taking the time to fill out this questionnaire. Your answers will be used for market research studies and reports. They
will also allow you to receive important mailings and special offers from a number of fine companies whose products and services relate directly to the specific interests, hobbies, and other information indicated above. Through this selective program, you
will be able to obtain more information about activities in which you are involved and less about those in which you are not.
Please check here if, for some reason, you would prefer not to participate in this opportunity.
l
Failure to return this card will not diminish your warranty rights.
Page 45

45
Page 46

46
Page 47

47
Page 48

HOOVER et sont des marques déposées
®
HOOVER y son marcas registradas
HOOVER and are registered trademarks
R1 10-05 U9125900/950 Printed in Mexico 56511C42
®
®
 Loading...