

Page 1

®
®
Review this manual before
operating the cleaner.
This product was designed for
easy assembly (see page 3)
hoover.com
Owner’s Manual
ENGLISH ➜ pp. 1-12
ESPAÑOL ➜ pág 13-20
FRANÇAIS ➜ p. 21-27
Cyclonic Upright
Vacuum Cleaner
Page 2

Thank you for choosing a HOOVER®product
Please enter the COMPLETE model and serial numbers in the spaces provided.
Model___________________________________
Serial number___________________________________
Hint: Attach your sales receipt to this owner’s manual.
Verification of date of purchase may be required for warranty service of your
HOOVER product.
Be sure to fill out and return the product registration card included with your
cleaner (see back cover).
Review this manual before
operating cleaner
2
e
Contents
Assembling Cleaner ............................3
Carton Contents ....................................3
Cleaner Descriptions............................4
How To Use ........................................4-6
Cleaning Tools ..................................6
If You Have a Problem ........................11
Important Safeguards ..........................2
Lubrication ............................................9
Maintenance ....................................6-11
Authorized Service..........................11
Cleaning Filters..............................7-8
Clearing Blockages ........................12
Emptying Dirt Cup..........................6-7
Replacing Agitator Brush Roll ........9
Replacing Belt................................8-9
Replacing Powered Hand Tool
Agitator Brush Roll ......................10
Replacing Power Hand Tool Belt ..10
Replacing Headlight ..........................8
Thermal Protector ..............................11
Warranty ..............................................12
Parts & accessories mail order form29
SERIAL
NUMBER
Important Safeguards!
When using an electrical appliance, always follow basic precautions, including the following:
READ ALL INSTRUCTIONS BEFORE USING THIS APPLIANCE
WARNING:To reduce the risk of fire, electric shock, or injury:
• Do not use outdoors or on wet surfaces.
• Close supervision is necessary when any appliance is used by or near children.
Do not allow vacuum cleaner to be used as a toy or to run unattended at any
time.
• Keep hair, loose clothing, fingers, feet and all parts of body away from openings,
rotating agitator and other moving parts. Do not operate cleaner in bare feet or
when wearing open toe shoes or sandals.
• Do not pick up anything that is burning or smoking, such as cigarettes, matches,
or hot ashes.
• Do not use to pick up flammable or combustible materials such as gasoline or
fine wood sandings or use in areas where they may be present.
• Avoid picking up hard, sharp objects with the cleaner. They may damage the
cleaner.
• Always turn off this appliance before connecting or disconnecting hose.
• Unplug cleaner before connecting the powered hand tool.
• Do not use without dirt cup or filters in place. Empty cup and clean filter frequently when picking up very fine materials such as powder.
• Use extra care when cleaning on stairs.
• Do not put any object into openings. Do not use with any opening blocked; keep
free of dust, lint, hair, or anything that may reduce air flow.
• Do not pull or carry by cord, use cord as a handle, close door on cord or pull
cord around sharp edges or corners. Do not run appliance over cord. Keep cord
away from heated surfaces.
• Always disconnect cord from electrical outlet before servicing the cleaner.
• Unplug cleaner when not in use. Turn off all controls before unplugging.
• Do not unplug by pulling on cord. To unplug, grasp the plug, not the cord. Never
handle plug or appliance with wet hands.
• The use of an extension cord is not recommended.
• Do not use with damaged cord or plug. If appliance is not working as it should,
has been dropped, damaged, left outdoors, or dropped into water, take it to a
Hoover Sales and Service Center or Authorized Hoover Warranty Service Dealer
(Depot).
• Use vacuum cleaner only for its intended use as described in the instructions.
Use only attachments recommended by Hoover; others may cause hazards.
WARNING:This product contains chemicals known to the State of
California to cause cancer.
Wash hands after handling.
Save these instructions!
hooerco
CEANER/AIRATER/AIRAORA
MOE/MOE/MOEO
ERIE/RIE/ERIE C20
20 V 0 H 20 A
ET/CORROIE/CORREA
FITER/FITRO/FITRE
HOEHO TE/TE MENAER/TIO OMETICO
ERIA NO/NMERO ER/NMERO E ERIE
SAMPLESAMPLESAMPLESAMPLE
MMYYXXXXXXXX
SAMPLESAMPLESAMPLESAMPLE
UU
UU
XXXX
HOOVER
NEWTON, IOWA 50208
Made in China
Hecho en China/Fabriqué en Chin
© 2008 Healthy Gain Investments, LTD.
hoover.com
Page 3

PUSH
FIRMLY UNTIL
YOU HEAR A
SNAP OR
CLICK!
3
Attach handle
Carton contents
Remove all parts from carton and
identify each item shown.
Make sure all parts are located before
disposing of packing materials.
A
B
E
D
F
C
B
A
A
B
C
If you need any assistance:
Visit our website at hoover.com. Click on the “Service” button to find the service outlet nearest you
OR
Call 1-800-944-9200 for an automated referral of authorized service outlet locations (U.S. only) OR
Call 1-330-499-9499 to speak with a representative in our Consumer Response Center.
Please do not return this product to the store.
Continued
➜
1. Cleaner assembly
Hold plug (B) with one hand; upper
handle (C) with other hand.
Push plug into upper handle, aligning with opposite end of plug and
push firmly UNTIL YOU HEAR A
SNAP OR A CLICK.
After ends are connected, pull on
plug to make sure it is securely
attached.
1-2
Align the groove (D) on the back of
the upper handle with the small projection (E) on the back of the handle
housing.
Push upper handle down until you
hear a click.
1-3
1-4
1-5
1-1
A. Handle section
B. Cleaner body
C. Cleaning tools and wands
*NOTE: Three (3) wands and the floor
brush available on some models
only.
Grasp orange tie wrap (A) and pull
until the black plug (B) comes out of
the handle cavity.
DO NOT remove orange tie wrap
until step 1-3 is complete.
Note: The plug will only fit together
one way. If plug is not fitting together, check alignment of ends.
After the plug ends are fully connected, the orange tie wrap (A)
must be removed.
Use caution so as NOT TO CUT
the black power cord. Discard the
orange tie wrap.
Press button (F) at handle base and
push handle all the way down.
*
*
Page 4

1-6
2. How to use
Cleaner description
18. Wands
19. Crevice tool
20. Cord hooks: wrap cord
around hooks for storage. Top
hook can be rotated right or
left for easy cord release.
21. Handle release pedal:
step on lever to lower handle
to operating or low positions.
Operate cleaner only at
voltage specified on data
plate on back of cleaner.
This cleaner is intended for
household use.
1. Handle grip
2. ON/OFF switch
3. Telescoping handle
4. Handle release button
5. Carrying handle
6. Dirt cup release button
7. Dirt cup assembly
8. Dirt cup door hinge
9. Stair cleaning handle:
located below lower edge
of dirt cup.
10. Headlight
11. Nozzle control knob:
turn knob to correct setting
for height of carpet being
cleaned.
12. Furniture guard: helps
prevent cleaner from marking furniture.
13. Hose handle
14.Combination tool
15. Powered hand tool
16. Hose
17. Hose/tool holder
ON-OFF switch
Plug cord into electrical outlet.
To turn cleaner ON, push ON/OFF
switch once.
To turn cleaner OFF, push switch
again.
1
18
13
17
15
12
A
20
20
19
8
16
A
B
D
C
3
2
15
6
7
10
9
4
5
11
14
14
21
4
Polarized plug
To reduce the risk of electric shock,
this appliance has a polarized plug
(one blade is wider than the other).
This plug will fit in a polarized outlet
only one way. If the plug does not fit
fully in the outlet, reverse the plug. If
it still does not fit, contact a qualified
electrician to install the proper outlet. Do not change the plug in any
way.
2-1
Transporting cleaner
To move your cleaner from room to
room, put handle in upright position,
tilt cleaner back on rear wheels and
push forward.
2-3
2-2
T elescoping handle
For convenience in storing or carrying your cleaner, the handle is
designed to retract into the body of
the cleaner. Lower the handle by
depressing the button (A) located at
the handle base and pushing the
handle down. Raise the handle by
depressing the button and pulling
the handle upward, locking it into
the desired position.
Position tools
Place smaller diameter end of wand
(A) into bottom of rack. Snap wand
into clip at top. Repeat with other
wand.
Crevice tool (B) fits into one of the
extension wands.
Snap combination tool (C) and powered hand tool (D) into storage
areas on back of cleaner as shown.
Page 5

5
Handle positions
The handle of your cleaner has
three positions; upright for storage
and when using cleaning tools;
operating position for general
operation on carpet and floors; low
for reaching under low furniture.
Step on handle release lever to
lower handle.
Carrying cleaner
The cleaner can also be moved by
using the carrying handle.
2-4
2-5
2-8
2-6
Carpet height
adjustment
The cleaning of carpet and rugs
takes place at the nozzle (A).
When it is necessary to raise and
lower the nozzle for various carpet
pile heights, place handle in upright
position and turn the nozzle control
knob (B) to the desired setting.
The nozzle will not move into the
adjusted position until the cleaner
handle is lowered to the operating
position.
A
A
B
2-7
Settings
For maximum cleaning performance, the following carpet height
settings are recommended:
• Lowest setting: for all types of
carpet.
Note: If the cleaner is difficult to
push, turn knob to the next higher
setting.
• Higher settings: for very deep
pile carpet, where easier pushing
effort is desired, while maintaining
good cleaning performance.
Cleaning lightweight
flexible rugs
Stand on one end of rug and move
cleaner toward other end or edge.
Before reaching edge, push down
on handle. This will lift up the nozzle
(front of cleaner) as shown and will
prevent rug from clinging to cleaner.
Continue to lift up nozzle so that
when you have reached the edge, it
is completely off the rug. Move
cleaner back to start again, lower
nozzle, and use only forward
strokes.
Continued
➜
Stair cleaning
A stair cleaning handle has been
designed for ease in using your
cleaner on stairs. With handle in
operating position, place fingers
under edge of stair cleaning handle
(A) and guide cleaner with other
hand on upper handle.
As an alternative, you may use the
hose and power hand tool for stair
cleaning. Clean from bottom to top.
When using cleaning tools, the
agitator will continue to rotate.
CAUTION: To avoid personal
injury or unnecessary wear to
carpet, and to prevent the cleaner
from falling, always place it at
bottom of stairs.
2-9
Page 6

6
Select proper tool
D. Combination tool use with brush
for carved furniture, table tops,
books, lamps, lighting fixtures,
venetian blinds, baseboards, shutters, and registers.
Remove brush to clean upholstered
furniture, draperies, mattresses,
clothing, and carpeted stairs.
E. Powered hand tool may be used
for upholstered furniture, draperies,
mattresses, clothing, automobile
interiors, and carpeted stairs.
F. Crevice tool may be used in tight
spaces, corners and along edges in
such places as dresser drawers,
upholstered furniture, stairs and
baseboards.
2-12
I
B
A
J
C
2-11
F
H
G
E
D
K
2-13
2-14
Attach wand and tools
Attach tool or wand to the hose (I).
Attach tool to wand (J) by pushing it
firmly onto the wand.
Twist wand or tool slightly to tighten
or loosen the connection.
2-10
Removing hose
When using cleaning tools, cleaner
handle should be in the upright
position. Also, turn cleaner OFF
before disconnecting and connecting hose to hose tube (A).
To use hose, lift hose end (B) as
shown. Check to be sure the hose
tube cover (C) is closed over the
hose tube.
When you are finished cleaning with
the tools, lift cover from hose tube
and reposition hose end into tube.
Combination tool
Slide brush to remove.
To replace brushes, align bottom of
brush with grooves (K) on tool. Slide
brush into place.
Cleaning tools
Tools allow for cleaning surfaces
above the floor and for reaching
hard to clean areas.
The cleaner is ready for tool use
when handle is in upright
position.
CAUTION: The agitator continues
to rotate while cleaner handle is
in upright position. Avoid tipping
cleaner or setting it on furniture,
fringed area rugs or carpeted
stairs during tool use.
How to clean tools
To clean the hose, wipe off dirt with
a cloth dampened in a mild detergent. Rinse with a damp cloth.
Cleaning tools may be washed in
warm water with a detergent. Rinse
and air dry before using.
G. Wands are used to give extra
length to your hose. Use them with
any of the above tools.
Note: Some models include three (3)
wands.
H. Floor brush (available on some
models only) use on hard surface
floors.
Page 7

Remove dirt cup as described in
Fig. 3-2.
Pull down on latch (A) located at the
top of the dirt cup cavity to remove
gray filter frame (B). Remove white
fabric filter and black foam filter from
frame. Hand wash filters in cold
water with a mild detergent.
Allow filter frame and both filters to
air dry for 24 hours before replacing
filters into filter frame.
Reposition filter frame by inserting
tabs (C) into slots (D) on back of dirt
cup cavity. Rotate filter frame up
toward top of dirt cup cavity and
snap closed.
When to empty
Empty the dirt cup before the dirt
reaches the fill line (A).
CAUTION: Very fine materials,
such as face powder or cornstarch, may seal the filter and
cause a reduction in performance.
When using the cleaner for this
type of dust, empty the cup and
clean the filters often.
7
Continued
➜
B
C
D
Holding dirt cup over trash receptacle, press dirt cup door release button (C) to open dirt cup door (D).
Press dirt cup door release button to
latch dirt cup door closed.
3-6
3-8
3-7
A
C
D
B
A
Dirt and debris can be cleaned from
the filter assembly by brushing with
the cleaner’s combination tool.
Place the filter assembly on the dirt
cup, aligning tabs (A) on either side
of filter with slots on dirt cup (B) and
twist it clockwise to secure into position. Press dirt cup door release button (C) to latch dirt cup door closed.
Replace dirt cup as described in
Figs. 3-4 & 3-5.
Cyclonic filter
assembly
How to clean
Disconnect cleaner from electrical
outlet. Do not use cleaner without
dirt cup or filters in place.
3-3
3-5
3-2
How to empty
Disconnect cleaner from electrical
outlet. Do not use the cleaner
without dirt cup or filters in place.
Press dirt cup release button (B)
and pivot cup out.
3-4
Press on dirt cup release button
while firmly pressing on dirt cup.
Release button in order for it to
return to proper position and lock
the dirt cup into place.
Remove dirt cup as described in
Fig. 3-2.
Twist filter assembly (A) counterclockwise. Remove assembly from
dirt cup.
Secondary filter
How to clean
Disconnect cleaner from electrical
outlet. Do not operate cleaner
without dirt cup or filters in place.
Cleaning filters
Place bottom of dirt cup in first.
Pivot cup into cleaner body.
A
3-1
3. Maintenance
Familiarize yourself with these home
maintenance tasks as proper use
and care of your cleaner will ensure
continued cleaning effectiveness.
Dirt cup
B
C
A
Page 8

Remove dirt cup as described in
Fig. 3-2.
Pull filter frame (A) straight out from
bottom of dirt cup cavity. Do not
attempt to remove filter (B) from
frame.
Hand wash in cold water with a mild
detergent.
Allow to air dry for 24 hours before
replacing frame into bottom of dirt
cup cavity.
What to buy
When purchasing new filters, ask
for:
Secondary filter-white fabric filter,
HOOVER part No. 93002520.
Final filter assemby, HOOVER part
No. 93002521.
Belt replacement
The belt on your Hoover cleaner
causes the agitator to rotate and is
important for the effective operation
of the cleaner. The belt is located
under the hood of the cleaner and
should be checked from time to time
to be sure it is in good condition.
When to replace
Disconnect cleaner from electrical
outlet.
To check belt, remove hood as
shown in Fig. 3-13. Replace belt if it
is stretched, cut or broken.
What to buy
To assure effective operation, use
only genuine HOOVER belts with
your cleaner. When purchasing a
new belt, ask for HOOVER part No.
38528040 (belt package part No.
40201190).
How to replace
Disconnect cleaner from electrical
outlet.
Removing hood
Press handle release pedal and
place handle in low position.
Using a coin, turn the two slots (A)
on either side of the hood as shown.
3-13
8
3-11
3-12
Replacing lens
Reposition lens and secure with the
screw.
Installing bulb
Pull old bulb straight out of socket.
Push new bulb straight into socket
until locked in place.
Excessive force is not required.
3-9
B
A
Final filter
How to clean
Disconnect cleaner from electrical
outlet. Do not operate cleaner
without dirt cup or filters in place.
3-10
Headlight replacement
What to buy
This cleaner uses a 13 volt, T-3 114
wedge base bulb, Hoover part No.
27313107.
Removing lens
Disconnect cleaner from electrical
outlet.
Press handle release pedal and
place handle in low position.
Using a Phillips screwdriver, remove
the the screw as shown and lift off
lens.
A
A
Page 9
9
3-17
3-18
3-19
Continued
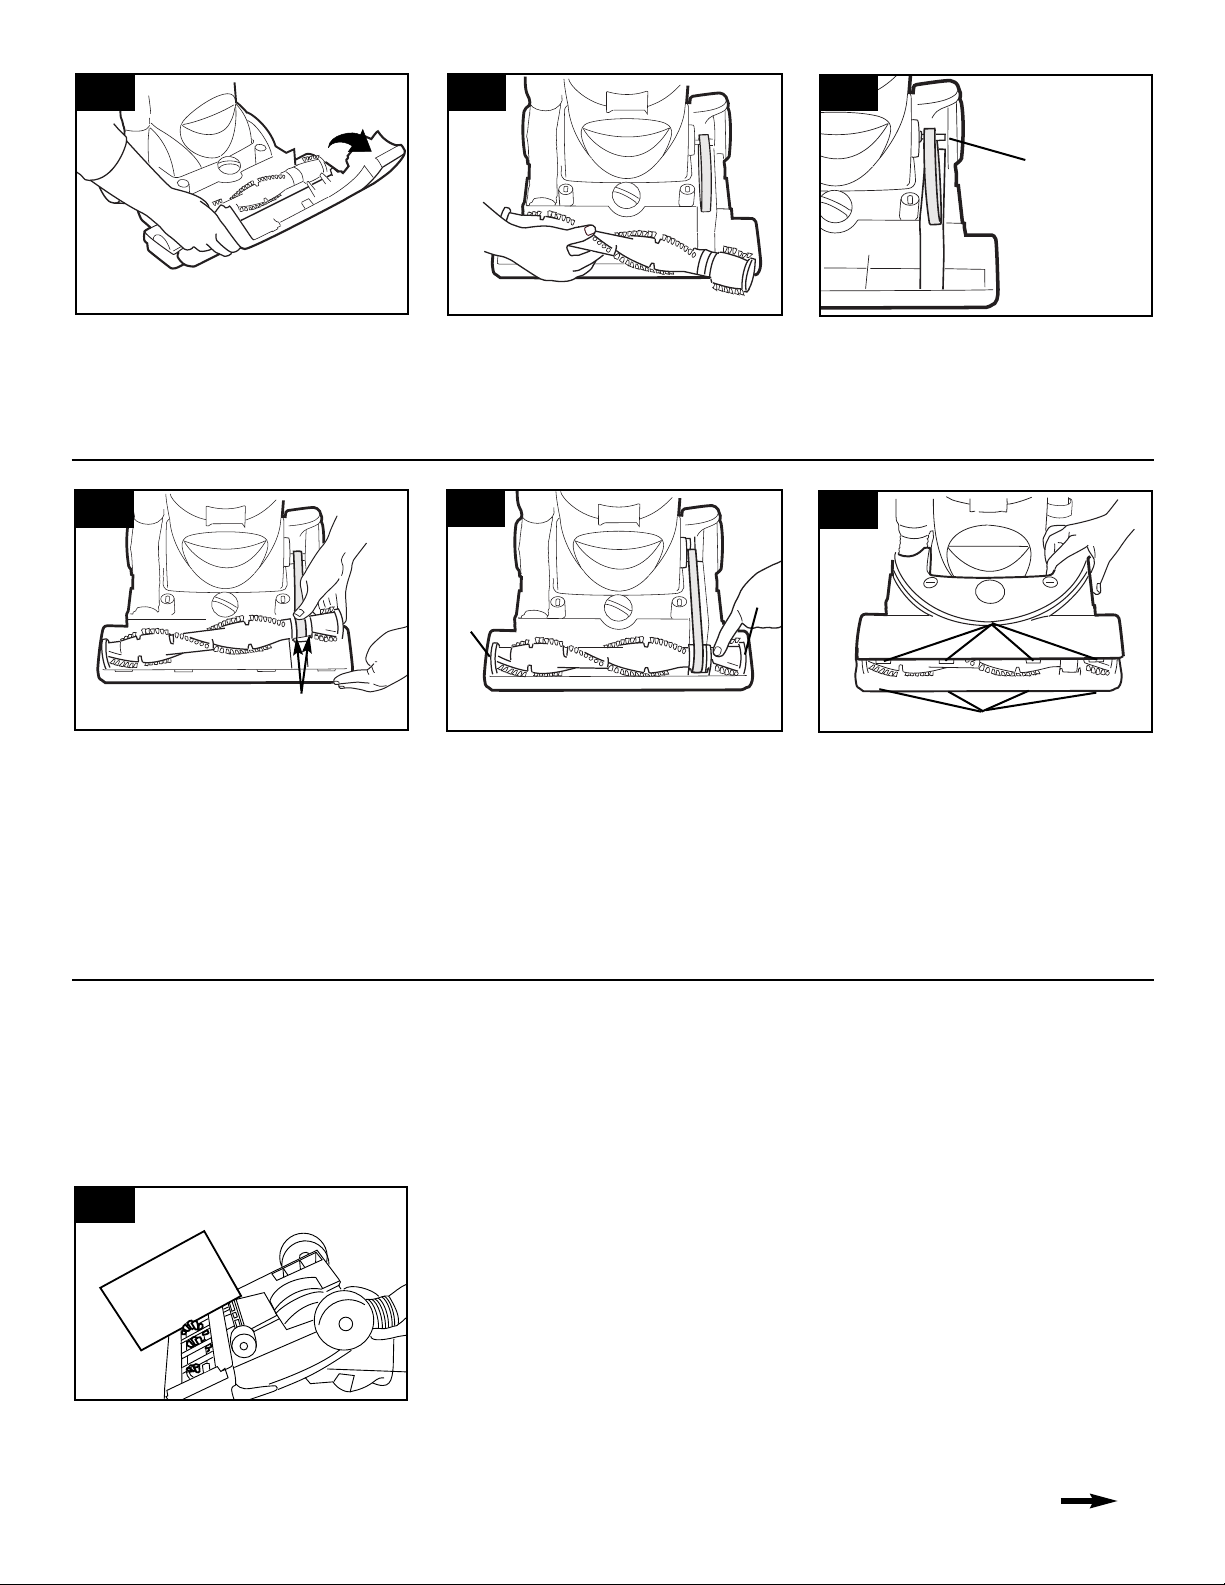
The agitator brush roll
When to replace
When agitator brushes are worn, the
agitator should be replaced.
To check condition of brushes, dis-
connect cleaner from electrical
outlet.
3-20
Move edge of a card across bottom
plate while turning agitator. To maintain cleaning effectiveness, replace
agitator if brushes do not touch
card.
Replacing agitator brush roll
Insert agitator through belt and place
belt in belt guide (C) on agitator.
Securing agitator
Grasp agitator firmly and fit it into
position by first sliding end opposite
the belt into the rectangular slot (D)
on side of cleaner.
Pull other side of agitator (E) into
place.
Turn agitator making sure belt turns
freely and is not pinched between
agitator and bottom of cleaner.
Replacing hood
Align tabs (F) on hood with slots (G)
on base of cleaner. Pivot hood into
position.
Secure hood into position by turning
the coin slots (Fig. 3-13).
What to buy
When purchasing a new agitator,
ask for HOOVER part No.
48414115.
How to replace
Disconnect cleaner from electrical
outlet.
Remove hood, belt and agitator following directions in “The belt” section beginning with Fig. 3-13.
Discard old agitator.
Continue following the directions in
“The belt” section to reposition belt,
new agitator and hood.
Lubrication
The motor is equipped with bearings that contain sufficient lubrication for the life of the motor. The
addition of lubricant could cause
damage. Therefore, do not add
lubricant to motor bearings.
Removing agitator brush roll
Remove agitator brush roll and used
belt.
Discard used belt.
3-15
3-16
Installing new belt
With lettering on outside of belt,
slide new belt over motor pulley (B).
3-14
C
B
D
E
G
F
Rotate hood toward front of cleaner
and remove the hood.
Page 10

Remove tool from hose. The belt
can be seen through the top of the
nozzle or by removing the bottom
plate and belt guard (Figs. 3-21 and
3-22).
10
3-21
A
Powered hand tool
Agitator brush roll
replacement
When agitator brushes are worn, the
brush roll should be replaced. Ask
for HOOVER part No. 48414088.
How to replace
1. Remove tool from hose and turn
it so bottom faces up. Press the
latches on both sides of tool and
remove bottom plate (A).
3-23
3. Remove agitator including end
plates (C) and discard.
4. Inspect belt to ensure that it is in
good condition. If belt is cracked,
gouged or broken, replace it (see
following section).
5. Insert brush roll through belt and
position belt over gear teeth (D) on
brush roll.
C
D
3-22
2. Unscrew the two Phillips screws
and remove belt guard (B).
B
3-24
3-26
3-25
E
6. With curved ends down, slide end
plates (C) of brush roll into slots (E)
on tool.
7. Replace belt guard (B) making
sure not to pinch brush bristles in
guard. Turn agitator, to make sure it
rotates freely.
Replace and tighten screws.
8. To replace bottom plate (A), insert
the four tabs on edge of bottom
plate into slots on front of tool.
Pivot bottom plate down and snap
closed.
A
B
C
Powered hand tool
Belt replacement
Inspect the belt
The powered hand tool belt is
designed to last a long time and is
not normally replaced. However, if
the belt is cracked, gouged or bro-
ken, it should be replaced.
Replace belt
When replacing belt, ask for
HOOVER part No. 38528037.
1. Remove tool from hose. Remove
bottom plate, belt guard and brush
roll as described in Figs. 3-21
through 3-23.
3-29
3-27
3-28
F
E
2. Grasp turbine (E) and pull firmly
to remove.
3. Remove belt from turbine pulley
(F). Replace with new belt.
4. With flat sides of turbine retainers
(G) pointing down, slide retainers
into grooves (H) in tool housing and
snap into place.
5. Replace brush roll, belt guard,
and bottom plate as described in
Figs. 3-23 through 3-26.
G
H
Page 11

11
Thermal protector
An internal thermal protector has
been designed into your cleaner to
protect it from overheating.
When the thermal protector acti-
vates, the cleaner will stop run-
ning. If this happens, proceed as
follows:
1. Turn the cleaner OFF and disconnect it from the electrical outlet.
2. Check secondary and final filters for dirt accumulation.
3. Refer to “Clearing blockages”
section.
4. When cleaner is unplugged
and the motor cools for 30 minutes, the thermal protector automati-
cally resets and cleaning may continue.
If the thermal protector continues to
activate after following the above
steps, your cleaner may need servicing (see “Service” section).
Service
To obtain approved HOOVER service
and genuine HOOVER parts, locate
the nearest Hoover Sales and
Service Center or Authorized
Hoover Warranty Service Dealer
(Depot) by:
• checking the Yellow Pages
under “Vacuum Cleaners Household” OR -
• checking the list of Sales and
Service Centers provided with this
cleaner OR -
• checking the Service section of
Hoover on-line at hoover.com
OR -
• calling 1-800-944-9200 for an
automated referral of authorized
service outlet locations (U.S.
only).
Do not send your cleaner to Hoover
in North Canton, Ohio for service,
this will only result in delay.
If further assistance is needed, contact the Hoover Consumer Response
Center, Phone: 1-330-499-9499.
In Canada, contact Hoover Canada,
Burlington, Ontario L7R 4A8,
Phone: 1-800-263-6376.
Always identify your cleaner by the
complete model number when
requesting information or ordering
parts. (The model number appears
on the back of the cleaner.)
Possible Cause
Possible Solution
• Incorrect carpet height setting
•
Move carpet height control to a
higher setting
Possible Cause
Possible Solution
• Belt broken or stretched
•
Replace agitator brush roll belt
as described in Figs. 3-13
through 3-19 in the Maintenance
section
Problem: Cleaner hard to push
Problem: Smoky/burning smell
detected
4. If you have a
problem
Problem: Smoky
Possible Cause
Possible Solution
• Broken or worn belt
•
Replace belt
• Agitator brush roll worn
•
Replace brush roll
• Dirt cup full
•
Empty dirt cup
• Incorrect carpet height setting
•
Move nozzle control knob to
lower setting
• Blockage in air flow passages
•
Clear blockage
Possible Cause
Possible Solution
• Not firmly plugged in
•
Plug unit in firmly
• No voltage in wall receptacle
•
Check fuse or breaker
• Blown fuse or tripped breaker
•
Replace fuse or reset breaker
• Thermal protector activated
•
Unplug cleaner and allow cleaner
to cool for 30 minutes (this will
reset the thermal protector)
If a minor problem occurs, it usually
can be solved quite easily when the
cause is found by using the checklist below.
Problem: Cleaner won’t run
Problem: Cleaner/tools won’t pick up
Problem: Powered hand tool brush
roll won’t turn
Possible cause
Possible solution
•
Too much pressure being
applied to tool
•
Continue using tool applying
light
pressure.
•
Blockage in turbine channel
•
Remove blockage.
• Broken or worn belt
•
Replace belt
• Low cleaner suction
•
Check items under “Cleaner won’t
pick up”.
Continued
Page 12

Clearing blockages
Disconnect cleaner from electrical
outlet.
Low suction or pick up may be due
to a blockage in the system. Refer
to the following steps to check for
blockages continuing with each
step until the blockage is found:
1. Check fullness of dirt cup; empty
if needed.
4-1
Checking under hood
8. Turn cleaner OFF and unplug.
9. Remove hood, belt and agitator
(Figs. 3-13 through 3-15).
Look into opening (C) for blockages
and remove.
10. Replace belt, agitator and hood.
Checking airflow path
2. Plug cleaner in and turn ON.
Check for suction at end of hose (A).
If there is suction, continue with step
3.
3. Turn cleaner OFF and unplug.
Check connection at hose tube (B);
remove any blockage.
A
C
C
4-3
4-2
B
Checking airflow path through
hose inlet tube on back of
cleaner
4. Turn cleaner OFF and unplug.
5. If blockage can be seen in tube
(C), remove 5 screws using a Phillips
screwdriver.
6. Pull tube from cleaner, remove
blockage.
7. Reposition tube on back of cleaner,
replace 5 screws.
12
4-4
A
If a blockage occurs during
powered hand tool use:
11. Disconnect powered hand tool
from hose. Remove bottom plate,
belt guard and turbine as described
in Figs. 3-21, 3-22 and 3-29.
Remove any blockage from turbine
channel (A).
Replace belt turbine, brush roll, belt
guard and bottom plate.
Full One Year
Warranty
(Domestic Use)
Your HOOVER® appliance is warranted
in normal household use, in accordance
with the Owner’s Manual against original
defects in material and workmanship for
a period of one full year from date of
purchase. This warranty provides, at no
cost to you, all labor and parts to place
this appliance in correct operating condition during the warranted period. This
warranty applies when the appliance is
purchased in the United States including
its territories and possessions, or in
Canada or from a U. S. Military
Exchange. Appliances purchased elsewhere are covered by a limited one year
warranty which covers the cost of parts
only. This warranty does not apply if the
appliance is used in a commercial or
rental application.
This warranty only applies when the
product is in use in the country or territory in which it is purchased.
Warranty service can only be obtained
by presenting the appliance to one of
the following authorized warranty service
outlets. Proof of purchase will be
required before service is rendered.
1. Hoover Sales and Service Centers.
2. Hoover Authorized Warranty
Service Dealers (Depots).
For an automated referral of authorized service outlets in the U.S.A.,
phone 1-800-944-9200 OR
visit Hoover on-line at hoover.com
This warranty does not cover pick up,
delivery, or house calls; however, if you
mail your appliance to a Hoover Sales
and Service Center for warranty service,
transportation will be paid one way.
While this warranty gives you specific
legal rights, you may also have other
rights which vary from state to state.
If further assistance is needed, or if
there are questions concerning this warranty or the availability of warranty service outlets, phone the Hoover
Consumer Response Center,
1-330-499-9499.
In Canada, contact Hoover Canada,
Burlington, Ontario L7R 4A8,
1-800-263-6376.
Page 13

HOOVER
®
Aspiradora
vertical ciclónica
Manual del
Gracias por haber elegido un producto HOOVER
Anote los números COMPLETOS de modelo y serie en los espacios provistos.
Modelo________________________________________________________________
Número de serie ______________________________________________________
Consejo: Adjunte su recibo de compra a este Manual del propietario.
Para obtener el servicio de garantía de su producto HOOVER puede requerirse la
verificación de la fecha de compra.
Asegúrese de llenar y devolver la tarjeta adjunta de registro del producto incluida
con su aspiradora (vea la contraportada).
®
propietario
ESPAÑOL ➜ 13-20
Índice
Ensamblado de la aspiradora ....................14
Contenido de la caja....................................14
Descripción de la aspiradora ......................14
Cómo usar la aspiradora........................14-16
Accesorios de limpieza..........................15
Si tiene un problema....................................18
Salvaguardias importantes ........................13
Lubricación ..................................................17
Mantenimiento ........................................16-18
Servicio autorizado ................................18
Limpieza de los filtros ............................16
Eliminación de obstrucciones ..............19
Vaciado del depósito para polvo ..........16
Reemplazo del rodillo de
escobillas del agitador ..........................17
Reemplazo de la correa ........................17
Reemplazo del accesorio de
mano turboaccionado rodillo de
escobillas del agitador ........................17
Reemplazo de la correa del
accesorio de mano
turboaccionado ....................................18
Reemplazo de la luz delantera..............17
Protector térmico ........................................18
Garantía.........................................................20
Formulario de pedido de piezas y
accesorios por correo ..............................30
Este producto ha sido diseñado
para ser ensamblado con
facilidad (vea la página 14)
Lea este manual
antes de hacer
funcionar la
aspiradora.
¡Salvaguardias importantes!
Al usar un aparato eléctrico, observe siempre las precauciones
básicas, incluyendo las siguientes:
LEA TODAS LAS INSTRUCCIONES ANTES DE USAR ESTE APARATO
ADVERTENCIA:
• No use este aparato en el exterior o en superficies mojadas.
• Es necesaria una supervisión estricta cuando cualquier aparato es utilizado por o cerca de
los niños. No permita que la aspiradora sea usada como un juguete ni que funcione sin
atención en ningún momento.
• Mantenga el cabello, la ropa holgada, los dedos de las manos y pies y todas las partes del
cuerpo alejados de las aberturas, del agitador rotatorio y otras piezas en movimiento. No
haga funcionar la aspiradora descalzo ni cuando calce sandalias o zapatos que dejen los
dedos de los pies al descubierto.
• No aspire nada que se esté quemando o echando humo, como cigarrillos, cerillos o
cenizas calientes.
• No use este aparato para aspirar materiales inflamables o combustibles como gasolina o
restos de madera lijada, ni en áreas donde pudieran encontrarse presentes.
• Evite recoger objetos duros o afilados con la aspiradora. Éstos pueden dañar la aspiradora.
• Apague siempre este aparato antes de conectar o desconectar la manguera.
• Desenchufe antes de conectar el accesorio de mano turboaccionado.
• No use la aspiradora sin tener el depósito para polvo o los filtros en su lugar. Vacíe el
depósito y limpie con frecuencia cuando aspire materiales muy finos como talco.
• Tenga especial cuidado al limpiar escaleras.
• No coloque ningún objeto en las aberturas. No la use con ninguna abertura obstruida;
manténgala libre de polvo, pelusa, cabello o cualquier cosa que pueda reducir el
flujo de aire.
• No tire de ésta ni la transporte por el cordón, ni tampoco use el cordón como mango, no
cierre la puerta sobre el cordón ni tire del mismo alrededor de los bordes agudos ni
esquinas. No pase el aparato sobre el cordón. Mantenga el cordón alejado de las
superficies calientes.
• Desconecte siempre el cordón de la toma de corriente eléctrica antes de prestar servicio
a la aspiradora.
• Desconecte el cordón cuando la aspiradora no esté en uso. Antes de desenchufarla, apague
todos los controles.
• No la desconecte tirando del cordón. Para desenchufarla, sujete el enchufe y no el cordón.
Nunca toque el enchufe ni el aparato con las manos mojadas.
• No se recomienda el uso de cordones de extensión.
• No use el aparato si el cordón o el enchufe está dañado. Si el aparato no está funcionando
apropiadamente, se ha dejado caer, ha sido dañado, se ha dejado a la intemperie o se ha
dejado caer en agua, llévelo a un Centro de ventas y servicio de Hoover o a un
Concesionario autorizado de servicio de garantía de Hoover (Depósito).
• Use la aspiradora solamente para lo que ha sido diseñada según se describe en las
instrucciones. Use solamente los accesorios recomendados por Hoover; el uso de otros
accesorios puede ser peligroso.
choques eléctricos o lesiones:
Para reducir el riesgo de incendios,
ADVERTENCIA Este producto contiene substancias químicas
conocidas en el estado de California por ser causantes de cáncer.
de manipularlo.
Lávese las manos después
© 2008 Healthy Gain Investments, LTD.
hoover.com
¡Guarde estas instrucciones!
13
Page 14

Si necesita asistencia:
Visite nuestra página en Internet
hoover.com. Haga clic en el botón
“Service” para encontrar el centro de
servicio más cercano a usted O
Llame al 1-800-944-9200 para obtener
una referencia automatizada de las
ubicaciones de los centros de servicio
autorizados (solamente en EE.UU.) O
Llame al 1-330-499-9499 para hablar
con un representante en nuestro
Centro de respuesta al cliente.
Por favor no devuelva este producto a
la tienda.
USE ESTAS INSTRUCCIONES EN
ESPAÑOL JUNTO CON LAS FIGURAS
PASO-A-PASO PROVISTAS EN EL
MANUAL DE INGLÉS.
1. Ensamblado
de la aspiradora
Contenido de
la caja
1-1
Accesorios incorporados en
la aspiradora
A. Sección del mango
B. Cuerpo de la aspiradora
C. Accesorios de limpieza y tubos
de extensión
* NOTA: Los tres (3) tubos de
extensión y la escobilla para pisos
están disponibles en algunos
modelos solamente.
Saque todos los componentes de
la caja e identifique cada pieza que
se muestra.
Asegúrese de encontrar todas las
piezas antes de desechar el material
de embalaje.
Coloque el mango
1-2
Sujete la banda de sujectión anaranjada
(A) y tire hasta que el enchufe negro (B)
salga de la cavidad para el mango.
NO saque la banda de sujeción
anaranjada hasta que haya completado
el paso 1-3.
1-3
Sujete el enchufe (B) con una mano y el
mango superior (C) con la otra mano.
Empuje el enchufe dentro del mango
superior, alineándolo con el extremo
14
opuesto del enchufe y empújelo
firmemente HASTA ESCUCHAR QUE
ENCAJA O HACE UN CHASQUIDO.
Cuando los extremos estén conectados,
tire del enchufe para asegurarse de que
está bien conectado.
Nota: El enchufe solamente se
conectará de una manera. Si el enchufe
no se conecta bien, revise el
alineamiento de los extremos.
Una vez que los extremos del enchufe
estén completamente conectados,
deberá sacar la banda de sujeción
anaranjada (A). Tenga cuidado de NO
CORTAR el cordón eléctrico negro.
Deseche la banda de sujeción
anaranjada.
1-4
Alinee la acanaladura (D) en la parte
posterior del mango superior con la
proyección pequeña (E) en la parte
posterior del compartimiento del mango.
Empuje el mango superior hacia abajo
hasta que escuche un chasquido.
1-5
Oprima el botón (F) en la base del
mango y empuje el mango
completamente hacia abajo.
1-6
Coloque los
accesorios
Coloque el extremo de diámetro más
pequeño del tubo de extensión (A) en la
parte inferior del soporte. Encaje el tubo
en el clip en la parte superior. Repita el
procedimiento con el otro tubo.
El accesorio para hendiduras (B) cabe
dentro de uno de los tubos de
extensión.
Encaje el accesorio combinado (C) y el
accesorio de mano turboaccionado (D)
en las áreas de almacenamiento en la
parte posterior de la aspiradora como
se muestra.
2. Cómo usar
la aspiradora
Descripción de
la aspiradora
2-1
1. Asidero del mango
2. Interruptor de encender y apagar
3. Mango telescópico
4. Botón para soltar el mango
5. Asa para transportar
6. Botón para soltar el depósito
para polvo
7. Conjunto del depósito para polvo
8. Bisagra de la puerta del depósito
para polvo
9. Mango para limpiar escaleras:
ubicado debajo del borde inferior
del depósito para polvo.
10. Luz delantera
11. Perilla de control de la boquilla:
gire la perilla a la posición correcta
para la altura de la alfombra que
está aspirando.
12. Protector para muebles: ayuda a
evitar que la aspiradora haga
marcas en los muebles.
13. Asa de la manguera
14. Accesorio combinado
15. Accesorio de mano
turboaccionado
16. Manguera
17. Sujetador para la
manguera/accesorios
18. Tubos de extensión
19. Accesorio corto para hendiduras
20. Ganchos para el cordón: envuelva
el cordón alrededor de los ganchos
para guardarlo. El gancho superior
se puede girar hacia la derecha
o izquierda para soltar el cordón
con facilidad.
21. Pedal para soltar el mango: pise
la palanca para bajar el mango a
las posiciones de funcionamiento
o posiciones bajas.
Haga funcionar la aspiradora
solamente con el voltaje especificado
en la placa de datos que se encuentra
en su parte posterior.
Esta aspiradora ha sido diseñada para
uso doméstico.
Enchufe polarizado
Para disminuir el riesgo de choque
eléctrico, este aparato tiene un enchufe
polarizado (una patilla es más ancha
que la otra). Este enchufe podrá usarse
en una toma de corriente polarizada,
sólo de una manera. Si el enchufe no
encaja completamente en la toma de
corriente, inviértalo. Si aun así no
encaja, comuníquese con un electricista
calificado para que le instale la toma de
corriente adecuada. No modifique el
enchufe de manera alguna.
Interruptor de
encender/apagar
(ON/OFF)
Enchufe el cordón en una toma de
corriente eléctrica. Para encender la
Page 15

15
La boquilla no se moverá a la
posición de ajuste hasta después de
bajar el mango de la aspiradora a la
posición de funcionamiento.
2-7
Posiciones
Para obtener el máximo rendimiento
de limpieza, se recomiendan las
siguientes posiciones según la altura
de la alfombra:
• Posición baja: para todo tipo de
alfombras.
Nota: Si le cuesta mucho empujar la
aspiradora, gire la perilla a la siguiente
posición más alta.
• Posiciones más altas: para alfombra
de pelo muy denso cuando se desea
disminuir el esfuerzo de empuje en
tanto que se mantiene una buena
eficiencia de limpieza.
2-8
Limpieza de
alfombras livianas
y flexibles
Párese en un extremo de la alfombra y
pase la aspiradora hacia el otro extremo
o borde. Antes de llegar al borde,
empuje el mango hacia abajo. Esto
levantará la boquilla (parte delantera de
la aspiradora) como se muestra y
evitará que la alfombra se adhiera a la
aspiradora. Continúe levantando la
boquilla de modo que, cuando llegue al
borde, esté completamente separada de
la alfombra. Retroceda la aspiradora
para comenzar otra vez, baje la boquilla
y pásela solamente hacia delante.
2-9
Limpieza
de escaleras
Se ha diseñado un mango para limpiar
las escaleras a fin de facilitar el uso de
su aspiradora en escaleras. Con el
mango en posición de funcionamiento,
coloque los dedos debajo del borde del
mango para limpiar escaleras (A) y pase
la aspiradora con la otra mano puesta
en el mango superior.
Como alternativa, puede usar la
manguera y el accesorio de mano
turboaccionado para limpiar las
escaleras. Limpie de abajo hacia arriba.
Durante el uso de los accesorios de
limpieza, el agitador continúa girando.
PRECAUCIÓN: Para evitar lesiones
personales o el desgaste innecesario
de la alfombra, y para impedir que
se caiga la aspiradora, colóquela
aspiradora (ON), empuje el interruptor
de encender y apagar una vez.
Para apagar la aspiradora (OFF),
empuje el interruptor de nuevo.
2-2
Mango telescópico
Para almacenar o transportar la
aspiradora con comodidad, el mango
está diseñado para retraerse en el
cuerpo de la aspiradora. Baje el mango
oprimiendo el botón (A) ubicado en la
base del mango y empujando el mango
hacia abajo. Levante el mango
oprimiendo el botón y tirando del
mango hacia arriba, trabándolo en la
posición deseada.
2-3
Traslado de
la aspiradora
Para mover la aspiradora de una
habitación a otra, coloque el mango en
la posición vertical, incline la aspiradora
hacia atrás sobre las ruedas traseras y
empújela hacia delante.
2-4
Para transportar
la aspiradora
La aspiradora también se puede mover
usando el asa para transportar.
2-5
Posiciones
del mango
El mango de su aspiradora tiene tres
posiciones: vertical, para guardarla y
usar los accesorios de limpieza;
posición de funcionamiento, para uso
general sobre alfombras de pared a
pared y pisos; y baja, para aspirar
debajo de muebles de poca altura. Pise
la palanca para bajar el mango.
2-6
Ajuste de la altura
para alfombras
La limpieza de las alfombras de pared
a pared y de área tiene lugar en la
boquilla (A).
Cuando sea necesario elevar y bajar
la boquilla para limpiar alfombras de
distintos espesores, coloque el mango
en posición vertical y gire la perilla de
control de la boquilla (B) a la posición
deseada.
siempre en la parte inferior de
las escaleras.
Accesorios
de limpieza
Los accesorios le permiten limpiar
superficies que están a mayor altura
que el piso y llegar a áreas difíciles
de limpiar.
La aspiradora está lista para usarse con
los accesorios cuando el mango está
en posición vertical.
PRECAUCIÓN: El agitador continúa
girando mientras el mango de la
aspiradora está en posición vertical.
Al usar los accesorios, evite inclinar
la aspiradora o colocarla sobre
muebles, alfombras con flecos o
escaleras alfombradas.
Cómo limpiar
los accesorios
Para limpiar la manguera, quite el polvo
con un paño humedecido en detergente
suave. Enjuague con un paño húmedo.
Los accesorios de limpieza se pueden
lavar en agua tibia con un detergente.
Enjuáguelos y deje que se sequen al
aire libre antes de usarlos.
2-10
Para sacar
la manguera
Cuando use los accesorios de limpieza,
el mango de la aspiradora deberá
estar en posición vertical. Asimismo,
apague la aspiradora antes de
desconectar y conectar la manguera
al tubo de la manguera (A).
Para usar la manguera, levante el
extremo de la manguera (B) como se
muestra. Verifique para asegurarse de
que la cubierta del tubo de la
manguera (C) esté cerrada sobre el
tubo de la manguera.
Cuando haya terminado de limpiar con
los accesorios, levante la cubierta del
tubo de la manguera y vuelva a colocar
el extremo de la manguera dentro
del tubo.
2-11
Selección del
accesorio apropiado
D. Uso del accesorio combinado con
escobilla para muebles tallados,
superficies de las mesas, libros,
lámparas, accesorios de iluminación,
persianas venecianas, zócalos, postigos
de ventanas y rejillas de ventilación.
Saque la escobilla para limpiar muebles
tapizados, cortinajes, colchones,
Page 16

16
3-7
La suciedad y los residuos se pueden
limpiar del conjunto del filtro
cepillándolo con el accesorio
combinado de la aspiradora.
Coloque el conjunto del filtro en el
depósito para polvo, alineando las
lengüetas (A) en cada lado del filtro con
las ranuras del depósito para polvo (B) y
gírelo en sentido de las agujas del reloj
para fijarlo en su posición. Oprima el
botón para soltar la puerta del depósito
para polvo (C) para cerrar la puerta del
depósito para polvo.
Vuelva a colocar el depósito para polvo
como se describe en las figuras 3-4 y 3-5.
Filtro secundario
Cómo limpiar
Desconecte la aspiradora de la toma
de corriente eléctrica. No utilice la
aspiradora sin tener el depósito para
polvo o los filtros en su lugar.
3-8
Saque el depósito para polvo como se
describe en la figura 3-2.
Presione la traba (A) ubicada en la parte
superior de la cavidad del depósito para
polvo sacar el marco gris del filtro (B).
Saque el filtro de tela blanca y el filtro de
espuma de goma negra del marco. Lave
los filtros a mano en agua fría con un
detergente suave.
Permite que el marco del filtro y ambos
filtros se sequen al aire durante 24 horas
antes de volver a colocar los filtros en el
marco.
Vuelva a colocar el marco del filtro
insertando las lengüetas (C) en las
ranuras (D) en la parte posterior de la
cavidad del depósito para polvo. Gire el
marco del filtro hacia la parte superior
de la cavidad del depósito para polvo y
encájelo para cerrarlo.
Filtro final
Cómo limpiar
Desconecte la aspiradora de la toma
de corriente eléctrica. No utilice la
aspiradora sin tener el depósito para
polvo o los filtros en su lugar.
3-9
Saque el depósito para polvo como se
describe en la figura 3-2.
Tire del marco del filtro (A) directamente
hacia fuera para sacarlo del fondo de la
cavidad del depósito para polvo. No
trate de sacar el filtro (B) del marco.
Lávelo a mano en agua fría con un
detergente suave.
Deje que el filtro se seque al aire libre y
PRECAUCIÓN: Los materiales muy
finos, tales como el talco facial o la
maicena, podrían sellar el filtro y
hacer que disminuya el rendimiento.
Cuando use la aspiradora para retirar
material de esta índole, vacíe
el depósito y cambie los filtros
a menudo.
3-2
Cómo vaciarlo
Desconecte la aspiradora de la toma
de corriente eléctrica. No use la
aspiradora sin tener el depósito para
polvo o los filtros en su lugar.
Presione el botón para soltar el
depósito para polvo (B) y gire para
sacar el depósito.
3-3
Sujetando el depósito para polvo sobre
el recipiente de basura, oprima el botón
para soltar la puerta del depósito para
polvo (C) para abrir la puerta del
depósito para polvo (D).
Oprima el botón para soltar la puerta
del depósito para polvo para cerrar la
puerta del depósito para polvo.
3-4
Coloque primero la parte inferior del
depósito para polvo. Gire el depósito
para insertarlo en el cuerpo de
la aspiradora.
3-5
Presione el botón para soltar el depósito
para polvo mientras presiona firmemente
el depósito para polvo. Suelte el botón
para que regrese a la posición correcta
y trabe el depósito para polvo en su
lugar.
Limpieza de
los filtros
Conjunto del
filtro ciclónico
Cómo limpiar
Desconecte la aspiradora de la toma
de corriente eléctrica. No use la
aspiradora sin tener el depósito para
polvo o los filtros en su lugar.
3-6
Saque el depósito para polvo como se
describe en la figura 3-2.
Gire el conjunto del filtro (A) en el
sentido contrario a las agujas del reloj.
Saque el conjunto del depósito para
polvo.
prendas de vestir y escaleras
alfombradas.
E. El accesorio de mano
turboaccionado se puede usar para
muebles tapizados, cortinas, colchones,
prendas de vestir, interiores de
automóviles y escaleras alfombradas.
F. El accesorio para hendiduras se
puede usar en lugares estrechos,
esquinas y en los bordes de sitios como
cajones de cómodas, muebles
tapizados, escaleras y zócalos.
G. Los tubos de extensión se usan para
hacer más larga la manguera. Úselos
con cualquiera de los accesorios antes
mencionados.
Nota: Algunos modelos incluyen tres (3)
tubos de extensión.
H. Use la escobilla para pisos
(algunos modelos) en pisos de
superficie dura.
2-12
Colocación del tubo
de extensión y de los
accesorios
Coloque el accesorio o tubo de
extensión en la manguera (I).
Coloque el accesorio en el tubo de
extensión (J), empujándolo firmemente
en el tubo de extensión.
Gire el tubo de extensión o el
accesorio ligeramente para apretar
o aflojar la conexión.
2-13
Accesorio combinado
Deslice la escobilla para sacarla.
2-14
Para volver a colocar las escobillas,
alinee la parte inferior de la escobilla con
las acanaladuras (K) del accesorio.
Deslice la escobilla en su lugar.
3. Mantenimiento
Familiarícese con estas tareas de
mantenimiento en el hogar, ya que el uso
y cuidado adecuados de su aspiradora
asegurarán la eficacia en la limpieza por
largo tiempo.
3-1
Depósito para polvo
Cuándo vaciarlo
Vacíe el depósito para polvo antes de
que la suciedad llegue a la línea de
llenado (A).
Page 17

17
3-19
Para volver a colocar la cubierta
Alinee las lengüetas (F) de la cubierta
con las ranuras (G) de base de la
aspiradora. Gire la cubierta para
colocarla en su posición.
Asegure la cubierta en su lugar girando
las ranuras para las monedas
(figura 3-13).
El rodillo de escobillas
del agitador
Cuándo reemplazarlo
El agitador se debe reemplazar
cuando las escobillas del agitador
estén gastadas.
Para revisar la condición de las
escobillas, desconecte la aspiradora
de la toma de corriente eléctrica.
3-20
Pase el borde de una tarjeta a lo ancho
de la placa inferior, mientras hace girar
el agitador. Para mantener una limpieza
eficaz, reemplace el agitador si las
escobillas no tocan la tarjeta.
Qué comprar
Cuando compre un agitador nuevo, pida
la pieza No. 48414-115 de HOOVER.
Cómo reemplazarlo
Desconecte la aspiradora de la toma
de corriente eléctrica.
Saque la cubierta, la correa y el agitador
siguiendo las instrucciones de la
sección “La correa”, comenzando con la
figura 3-13.
Deseche el agitador usado.
Continúe siguiendo las instrucciones de
la sección “La correa” para volver a
colocar la correa, el agitador nuevo y la
cubierta en su lugar.
Lubricación
El motor tiene cojinetes que cuentan
con suficiente lubricación para la vida
útil del motor. La adición de lubricantes
podría causar daños. Por lo tanto,
no añada lubricante a los cojinetes
del motor.
Accesorio de mano
turboaccionado
Reemplazo del rodillo de
escobillas del agitador
El rodillo de escobillas se debe
reemplazar cuando las escobillas del
agitador estén gastadas. Pida la pieza
No. 48414-088 de HOOVER.
Qué comprar
Para asegurar un funcionamiento eficaz,
use solamente correas genuinas
HOOVER con su aspiradora. Cuando
compre una correa nueva, pida la pieza
No. 38528-040 de HOOVER (paquete
de correa con número de pieza
40201190).
3-13
Cómo reemplazarla
Desconecte la aspiradora de la toma
de corriente eléctrica.
Para separar la cubierta
Presione el pedal para soltar el mango y
coloque el mango en la posición baja.
Usando una moneda, gire las dos
ranuras (A) en ambos lados de la
cubierta como se muestra.
3-14
Gire la cubierta hacia la parte delantera
de la aspiradora y saque la cubierta.
3-15
Para sacar el rodillo de
escobillas del agitador
Saque el rodillo de escobillas del
agitador y la correa usada.
Deseche la correa usada.
3-16
Para instalar la correa nueva
Con las letras en la parte de afuera de
la correa, deslice la nueva correa sobre
la polea del motor (B).
3-17
Reemplazo del rodillo
de escobillas del agitador
Introduzca el agitador a través de la
correa y coloque la correa en la guía
para la correa (C) del agitador.
3-18
Para sujetar de manera
segura el agitador
Sujete firmemente el agitador y
colóquelo en posición, deslizando
primero el extremo opuesto de la correa
en la ranura rectangular (D) en el lado
de la aspiradora.
Tire del otro lado del agitador (E) para
colocarlo en su lugar.
Gire el agitador, asegurándose que la
correa gire libremente y no quede
presionada entre el agitador y la parte
inferior de la aspiradora.
vuelva a colocarlo en el marco del filtro.
Permita que se seque al aire durante 24
horas antes de volver a colocar el marco
en el fondo de la cavidad del depósito
para polvo.
Qué comprar
Cuando compre filtros nuevos, pida:
Filtro secondario-filtro de tela blanca, No.
de pieza 93002520 de HOOVER
Conjunto del filtro final, No. de pieza
93002521 de HOOVER.
Reemplazo de
la luz delantera
Qué comprar
Esta aspiradora usa un bombillo de
13 voltios de base en cuña, tipo T-3 114,
pieza No. 27313-107 de Hoover.
3-10
Para sacar la lente
Desconecte la aspiradora de la toma
de corriente eléctrica.
Presione el pedal para soltar el mango y
coloque el mango en la posición baja.
Con un destornillador Phillips, saque
el tornillo como se muestra y levante
la lente.
3-11
Para instalar el bombillo
Saque el bombillo usado, directamente
de su receptáculo. Inserte uno nuevo
y empújelo hasta que quede fijo en
su lugar.
No se requiere usar fuerza excesiva.
3-12
Para reemplazar la lente
Vuelva a colocar la lente y asegúrela con
el tornillo.
Reemplazo de
la correa
La correa de su aspiradora Hoover hace
posible que el agitador gire y es
importante para el funcionamiento eficaz
de la aspiradora. La correa está ubicada
debajo de la cubierta de la aspiradora y
se debe revisar periódicamente para
asegurarse de que esté en buenas
condiciones.
Cuándo reemplazarla
Desconecte la aspiradora de la toma
de corriente eléctrica.
Para revisar la correa, saque la cubierta
como se muestra en la figura 3-13.
Reemplace la correa si está estirada,
rota o cortada.
Page 18

18
La correa del accesorio de mano
turboaccionado ha sido diseñada para
que dure mucho tiempo y normalmente
no necesita ser reemplazada. Sin
embargo, la correa deberá ser
reemplazada si está agrietada, rota o
cortada.
3-27
Saque el accesorio de la manguera.
La correa puede verse a través de la
parte superior de la boquilla o bien
sacando la placa inferior y el protector
de la correa (Figuras 3-21 y 3-22).
Reemplace la correa
Cuando reemplace la correa, pida la
pieza No. 38528-037 de HOOVER.
1. Saque el accesorio de la manguera.
Saque la placa inferior, el protector de la
correa y el rodillo de escobillas como se
describe en las Figuras 3-21 a 3-23.
3-28
2. Sostenga la turbina (E) y tire con
firmeza para sacarla.
3. Saque la correa de la polea de la
turbina (F). Reemplácela por una nueva
correa.
3-29
4. Con los lados planos de los
retenedores de la turbina (G) orientados
hacia abajo, deslice los retenedores
dentro de las ranuras (H) del
compartimiento para accesorios y
encájelos en su sitio.
5. Vuelva a colocar el rodillo de
escobillas, el protector de la correa y la
placa inferior como se describe en las
Figuras 3-23 a 3-26.
Protector térmico
Su aspiradora tiene incorporado un
protector térmico para impedir el
sobrecalentamiento. Cuando el
protector térmico se activa, la
aspiradora deja de funcionar.
Si esto sucede, proceda de la
siguiente manera:
1. Apague la aspiradora y
desconéctela de la toma de
corriente eléctrica.
2. Revise si se ha acumulado suciedad
en los filtros secundario y final.
3. Consulte la sección “Eliminación de
obstrucciones”.
4. Una vez que la aspiradora esté
desconectada de la toma de
corriente eléctrica y el motor se
3-21
Cómo reemplazarlo
1. Saque el accesorio de la manguera
y voltéelo de manera que la parte
inferior esté hacia arriba. Presione las
trabas en ambos lados del accesorio y
saque la placa inferior (A).
3-22
2. Quite los dos tornillos Phillips y saque
el protector de la correa (B).
3-23
3. Saque el agitador incluyendo las
placas del extremo (C) y deséchelo.
4. Inspeccione la correa para ver si está
en buenas condiciones. Reemplace la
correa si está agrietada, rota o cortada
(ver la siguiente sección).
5. Introduzca el rodillo de escobillas a
través de la correa y coloque la correa
sobre los dientes del engranaje (D) del
rodillo de escobillas.
3-24
6. Con los extremos curvados hacia
abajo, deslice las placas del extremo
(C) del rodillo de escobillas dentro de
las ranuras (E) del accesorio.
3-25
7. Vuelva a colocar el protector de la
correa (B) asegurándose de no pinchar
las cerdas de las escobillas en el
protector. Gire el agitador para
asegurarse de que se mueva
libremente.
Vuelva a colocar los tornillos y
apriételos.
3-26
8. Para volver a colocar la placa inferior
(A), introduzca las cuatro lengüetas en
el borde de la placa inferior en las
ranuras de la parte delantera del
accesorio.
Gire la placa inferior hacia abajo y
encájela para cerrarla.
Accesorio de mano
turboaccionado
Reemplazo de la correa
Inspeccione la correa
haya enfriado durante 30 minutos,
el protector térmico se repone
automáticamente y se puede seguir
pasando la aspiradora.
Si el protector térmico sigue
activándose después de efectuar los
pasos anteriores, es probable que su
aspiradora necesite servicio (vea la
sección “Servicio”).
Servicio
Para obtener el servicio aprobado
HOOVER y piezas genuinas HOOVER,
localice el Centro de ventas y servicio
de Hoover o el Concesionario
autorizado de servicio de garantía de
Hoover (Depósito) más cercano:
• consultando las páginas amarillas de
la guía de teléfonos, bajo “Vacuum
Cleaners-Household” (“Aspiradoras Artículos del hogar”) O -
• consultando la lista de Centros de
servicio de fábrica provista con esta
aspiradora, O -
• consultando la sección “Service”
(Servicio) de Hoover en línea en
hoover.com O -
• llamando al 1-800-944-9200 para
obtener una referencia automatizada
de las ubicaciones de los centros de
servicio autorizados (solamente en
EE.UU.).
No envíe su aspiradora a Hoover en
North Canton, Ohio para obtener
servicio; esto sólo le causará demoras.
Si necesita asistencia adicional,
comuníquese con Hoover Centro de
respuesta al cliente, teléfono
1-330-499-9499.
En Canadá, comuníquese con Hoover
Canada, Burlington, Ontario L7R 4A8,
teléfono: 1-800-263-6376.
Al solicitar información u ordenar piezas,
siempre identifique su aspiradora por el
número completo de modelo. (El
número de modelo figura en la parte
posterior de la aspiradora.)
4. Si tiene
un problema
Si ocurre un problema menor,
generalmente puede resolverse con
bastante facilidad cuando se halla la
causa, usando la siguiente lista de
verificación.
Problema: La aspiradora no funciona
Causa posible
Solución posible
• No está bien enchufada
•
Enchúfela bien
• No hay voltaje en la toma de
corriente de la pared
•
Revise el fusible o el disyuntor
Page 19

• Fusible quemado o se disparó
el disyuntor
•
Reemplace el fusible o reajuste
el disyuntor
• Protector térmico activado
•
Desenchufe la aspiradora y permita
que se enfríe durante 30 minutos
(esto reajustará el protector térmico)
Problema: La aspiradora/los
accesorios de la aspiradora
no aspiran
Causa posible
Solución posible
• La correa está rota o desgastada
•
Reemplace la correa
• El rodillo de escobillas del
agitador está desgastado
•
Reemplace el rodillo de escobillas
• El depósito para polvo está lleno
•
Vacíe el depósito para polvo
• Ajuste incorrecto de la altura
para alfombras
•
Mueva la perilla de control de la
boquilla a una posición más baja
• Obstrucción en los pasos del
flujo de aire
•
Elimine la obstrucción
Problema: Dificultad para empujar
la aspiradora
Causa posible
Solución posible
• Ajuste incorrecto de la altura
para alfombras
•
Coloque el control de la altura para
alfombras en una posición más alta
Problema: Se detecta un olor a
humo/quemado
Causa posible
Solución posible
• Correa rota o estirada
•
Reemplace la correa del rodillo de
escobillas del agitador como se
describe en las figuras 3-13 a 3-19
en la sección de Mantenimiento
Problema: El rodillo de escobillas
del accesorio de mano
turboaccionado no gira
Causa posible
Solución posible
• Se está aplicando demasiada
presión al accesorio
•
Continúe usando el accesorio
aplicando una presión ligera.
• Obstrucción en el canal de la
turbina
•
Elimine la obstrucción.
19
• La correa está rota o desgastada
•
Reemplace la correa
• Baja succión de la aspiradora:
•
Verifique en la sección “La
aspiradora no aspira”.
Eliminación de
obstrucciones
Desconecte la aspiradora de la toma
de corriente eléctrica.
La succión o aspiración baja se puede
deber a una obstrucción en el sistema.
Consulte los siguientes pasos a fin
de revisar si hay obstrucciones,
siguiendo los pasos uno a uno hasta
que encuentre la obstrucción:
1. Revise el nivel de llenado del
depósito para polvo; vacíelo si
es necesario.
4-1
Revisión del paso del flujo de aire
2. Enchufe la aspiradora y enciéndala.
Revise si hay succión en el extremo
de la manguera (A). Si hay succión,
continúe con el paso 3.
3. Apague la aspiradora
y desconéctela.
Revise la conexión en el tubo
de la manguera (B); elimine
cualquier obstrucción.
4-2
Revisión del paso del flujo de aire
a través del tubo de entrada de la
manguera en la parte posterior de
la aspiradora
4. Apague la aspiradora
y desconéctela.
5. Si puede verse la obstrucción en el
tubo (C), saque 5 tornillos usando un
destornillador Phillips.
6. Tire del tubo para sacarlo de la
aspiradora, elimine la obstrucción.
7. Vuelva a colocar el tubo en la parte
posterior de la aspiradora y vuelva a
colocar los 5 tornillos.
4-3
Revisión debajo de la cubierta
8. Apague la aspiradora
y desconéctela.
9. Saque la cubierta, la correa y el
agitador (figuras 3-13 y 3-15).
Mire dentro de la abertura (C) para
ver si hay obstrucciones y elimínelas.
10.Vuelva a colocar la correa, el
agitador y la cubierta.
Si ocurre una obstrucción
mientras se usa el accesorio de
mano turboaccionado:
4-4
11. Desconecte el accesorio de mano
turboaccionado de la manguera.
Saque la placa inferior, el protector de la
correa y la turbina como se describe en
las Figuras 3-21, 3-22 y 3-29.
Saque cualquier obstrucción del canal
de la turbina (A).
Vuelva a colocar la turbina de la correa,
el rodillo de escobillas, el protector de la
correa y la placa inferior.
Page 20

20
En Canadá, comuníquese con Hoover
Canada, Burlington, Ontario L7R 4A8,
1-800-263-6376.
Garantía de un año
completo
(Uso doméstico)
Su aparato HOOVER®está garantizado
para uso doméstico normal, según el
Manual del propietario, contra defectos
originales en el material y la fabricación
por el período de un año completo a
partir de la fecha de compra. La
presente garantía cubre gratuitamente
toda la mano de obra y las piezas
necesarias para dejar este aparato en
buen estado de funcionamiento durante
el período de garantía. Esta garantía es
válida si el aparato fue comprado en los
Estados Unidos, en sus territorios y
posesiones, en Canadá o en una tienda
situada en una base militar de los
EE.UU. Los aparatos comprados en
otros lugares están cubiertos por una
garantía limitada de un año que cubre
solamente el costo de las piezas. Esta
garantía no es válida si el aparato
es utilizado para uso comercial o
de alquiler.
Esta garantía solamente es válida
cuando el producto se usa en el país
o territorio en el cual fue comprado.
El servicio bajo garantía se puede
obtener solamente al presentar el
aparato en uno de los centros
autorizados de servicio de garantía
indicados a continuación. Puede
requerirse la presentación de un
comprobante de compra antes de
efectuar el servicio.
1. Centros de ventas y servicio de
Hoover
2. Concesionarios autorizados de
servicio de garantía de Hoover
(Depósitos).
Para obtener una referencia
automatizada de las ubicaciones de
los centros autorizados de servicio
en los Estados Unidos, llame al
1-800-944-9200 O
visite Hoover en línea en hoover.com
Esta garantía no cubre la recogida, la
entrega, ni las visitas a domicilio; sin
embargo, si envía su aparato a un
Centro de ventas y servicio de Hoover
para un servicio de garantía, el
transporte se pagará en una sola
dirección.
Esta garantía le otorga derechos legales
específicos, usted puede tener además
otros derechos que varían de estado
a estado.
Si necesita asistencia adicional, o si
tiene preguntas sobre esta garantía o la
disponibilidad de centros de servicio de
garantía, llame al Centro de respuesta al
cliente de Hoover al 1-330-499-9499.
Page 21

HOOVER
Aspirateur
vertical
cyclonique
Guide de
Merci d’avoir choisi un produit HOOVER
MD
Veuillez inscrire les numéros de modèle et de série COMPLETS dans les espaces
fournis à cet effet.
Modèle :__________________________________________________
Numéro de série :__________________________________________
Conseil : Il est recommandé de joindre votre reçu de caisse au guide de
l’utilisateur, car une vérification de la date d’achat peut être effectuée avant
toute réparation couverte par la garantie de votre produit HOOVER.
Assurez-vous de remplir et de retourner la carte d’enregistrement incluse avec
votre aspirateur (voir à l’endos).
MD
l’utilisateur
FRANÇAIS ➜ 21-27
Contenu
Assemblage de l’aspirateur ......................22
Contenu de l’emballage ..............................22
Description de l’aspirateur ........................22
Utilisation .....................................................22
Accessoires de nettoyage ....................23
Dépannage....................................................26
Consignes de sécurité importantes ..........21
Lubrification ................................................25
Entretien ......................................................24
Service autorisé ....................................26
Nettoyage des filtres..............................24
Déblocage des obstructions ................27
Vidage du vide-poussière ......................24
Remplacement du rouleau-brosse
de l’agitateur ..........................................25
Remplacement de la courroie ..............25
Remplacement du rouleau-brosse
agitateur de l’accessoire portatif à
turbine ..................................................25
Remplacement de la courroie de
l’accessoire portatif à turbine ............26
Remplacement de l’ampoule ................24
Protecteur thermique ..................................26
Garantie ........................................................27
Formulaire de commande postale de
pieces et accessoires................................29
Ce produit a été conçu pour un
assemblage facile (voir page 22)
Lire attentivement
ces instructions
avant d’utiliser
l’appareil.
Consignes de
sécurité importantes !
Durant l’utilisation d’un appareil électrique, toujours respecter les
précautions élémentaires, y compris les suivantes :
LIRE TOUTES LES INSTRUCTIONS AVANT D’UTILISER CET APPAREIL
Avertissement :
• Ne pas utiliser l’appareil à l’extérieur ou sur une surface mouillée.
• Faire preuve d’une grande prudence lorsque l’appareil est utilisé par des enfants ou près de
ceux-ci. Ne pas utiliser l’appareil comme jouet ni le laisser sans surveillance.
• Garder cheveux, vêtements, doigts, pieds ou toute autre partie du corps à bonne distance
des ouvertures, de l’agitateur et des autres pièces mobiles de l’appareil. Ne pas utiliser
l’appareil pieds nus ni avec des sandales ou des souliers qui laissent les orteils à découvert.
• Ne pas utiliser l’aspirateur pour ramasser toute matière qui dégage de la fumée ou qui brûle,
comme des cigarettes, des allumettes ou des cendres encore chaudes.
• Ne pas ramasser de liquides inflammables ou combustibles comme de l’essence ou de la
sciure de bois, et ne pas utiliser l’appareil dans des endroits où de tels composés sont
présents.
• Éviter d’aspirer des objets durs et acérés. Ils pourraient endommager l’aspirateur.
• Toujours éteindre l’aspirateur avant d’enlever ou de poser le tuyau.
• Débrancher l’appareil avant de raccorder l’accessoire portatif à turbine.
• Ne pas utiliser l’appareil si le vide-poussière ou les filtres ne sont pas en place. Si des
matériaux très fins sont aspirés (par ex. de la poudre), vider le vide-poussière et nettoyer le
filtre fréquemment.
• Faire preuve d’une grande prudence pendant l’utilisation dans des escaliers.
• Ne pas introduire d’objets dans les ouvertures. S’assurer qu’aucune ouverture n’est
obstruée ; garder celles-ci exemptes de poussière, de mousse, de cheveux ou de toute autre
matière qui pourrait réduire le débit d’air.
• Ne pas tirer l’appareil par le cordon d’alimentation, utiliser le cordon pour transporter ou
soulever l’appareil, coincer, écraser ou tirer le cordon autour de coins ou d’arêtes vives. Ne
pas faire passer l’appareil sur le cordon. Garder le cordon loin de toute surface chauffée.
• Toujours débrancher l’appareil avant d’en effectuer l’entretien.
• Débrancher l’appareil s’il n’est pas utilisé. Éteindre toutes les commandes avant de
débrancher l’appareil.
• Ne pas tirer sur le cordon d’alimentation pour débrancher l’appareil. Saisir la fiche et non le
cordon. Ne jamais manipuler la fiche ou l’appareil avec les mains mouillées.
• L’utilisation d’une rallonge électrique n’est pas recommandée.
• Ne pas utiliser l’appareil si la fiche ou le cordon est endommagé. Si l’appareil fonctionne
mal, s’il est tombé par terre ou dans l’eau, s’il est endommagé ou a été laissé à l’extérieur, il
doit être apporté à un Centre de vente et de service Hoover ou chez un détaillant de service
garanti autorisé Hoover (dépôt).
• N’utiliser cet aspirateur que conformément à son usage prévu, tel que décrit dans le présent
guide. N’utiliser que les accessoires recommandés par Hoover ; d’autres accessoires
pourraient s’avérer dangereux.
d’incendie, de choc électrique ou de
blessures :
Afin de réduire au minimum les risques
© 2008 Healthy Gain Investments, LTD.
hoover.ca
AVERTISSEMENT : Cet appareil contient des produits
chimiques reconnus dans l’état de Californie pour causer le cancer.
l’avoir manipulé.
Ranger et conserver
ces instructions !
Se laver les mains après
21
Page 22

Si vous avez besoin d’aide :
Visitez notre site Web au hoover.ca.
Cliquez sur le bouton « Service » pour
connaître l’adresse du Centre de
service le plus près de chez vous OU
Composez le 1 800 944-9200 pour
écouter un message vous indiquant
les adresses des Centres de service
autorisés (É.-U. seulement) OU
Composez le 330 499-9499 pour
parler à un représentant du Centre
d’aide à la clientèle.
Ne pas retourner ce produit au
détaillant
UTILISER LES INSTRUCTIONS
NUMÉROTÉES DE CETTE SECTION
FRANÇAISE AVEC LES
ILLUSTRATIONS NUMÉROTÉES
CORRESPONDANTES DE LA SECTION
ANGLAISE DE CE GUIDE.
1. Assemblage
de l’aspirateur
Contenu de
l’emballage
1-1
Accessoires emballés sur l’appareil
A. Manche
B. Corps de l’appareil
C. Accessoires de nettoyage
et rallonges
* REMARQUE: Les trois (3) rallonges
et la brosse à plancher ne sont
disponibles qu’avec certains
modèles.
Retirer toutes les pièces de la boîte
et les identifier à l’aide des croquis
ci-contre.
Avant de disposer de l’emballage en
carton, s’assurer qu’aucune pièce
ne manque.
Pour fixer le manche
1-2
Saisir l’attache orange (A) et la tirer
jusqu’à ce que la fiche noire (B) sorte de
la cavité du manche.
NE PAS enlever l’attache orange avant
que les étapes 1-3 aient été complétées.
1-3
Tenir la fiche (B) d’une main et la partie
supérieure du manche (C) de l’autre
22
main. Insérez la fiche dans la section
supérieure du manche, en l’alignant à la
partie opposée de la fiche, puis
enfoncez FERMEMENT JUSQU’À CE
QUE VOUS ENTENDIEZ UN DÉCLIC.
Lorsqu’elle est branchée, tirer sur la
fiche pour s’assurer qu’elle est
solidement fixée.
Remarque : La fiche mâle ne peut
s’insérer dans la fiche femelle que dans
un sens. Si fiche ne peut être insérée,
vérifier l’alignement de la fiche mâle et
de la fiche femelle.
Lorsque les extrémités des fiches
auront été connectées à fond, l’attache
orange (A) peut être enlevée. Faire
attention de ne PAS SECTIONNER le
cordon d’alimentation noir. Jeter
l’attache orange.
1-4
Aligner la rainure (D) à l’arrière de la
partie supérieure du manche avec le
petit bouton saillant (E) sitúe à l’arrière
du boîtier du manche.
Pousser la partie supérieure du
manche vers le bas jusqu’à ce qu’il y
ait un déclic.
1-5
Appuyer sur le bouton (F) situé à la
base du manche et enfoncer le
manche jusqu’au fond.
1-6
Rangement des
accessoires
Placez la plus petite extrémité du
raccord (A) dans le bas du porteaccessoires. Emboîtez le raccord dans la
pince en haut. Répétez la procédure
avec l’autre raccord.
Le bec suceur (B) s’adapte dans l’une
des rallonges.
Enclencher l’accessoire combiné (C) et
l’accessoire portatif à turbine (D) dans
les sections de rangement au dos de
l’appareil comme illustré.
2. Utilisation
Description de
l’aspirateur
2-1
1. Poignée
2. Interrupteur Marche/Arrêt
3. Manche télescopique
4. Bouton de dégagement du manche
5. Poignée de transport
6. Bouton de dégagement du
vide-poussière
7. Ensemble du vide-poussière
8. Charnière de la porte du
vide-poussière
9. Poignée pour nettoyage
d’escaliers : située sous la base du
vide-poussière.
10. Ampoule
11. Bouton de réglage de la hauteur :
tourner ce bouton au réglage désiré
en fonction de la longueur des poils
du tapis à nettoyer.
12. Protège-meubles : empêche
l’aspirateur de marquer les meubles.
13. Manche du tuyau
14. Accessoire combiné
15. Accessoire portatif à turbine
16. Tuyau
17. Support à tuyau et accessoires
18. Rallonges
19. Petit bec suceur
20. Crochets de rangement du cordon :
enrouler le cordon autour des
crochets pour le ranger. Le crochet
supérieur pivote vers la gauche ou la
droite, ce qui facilite le dégagement
du cordon.
21. Pédale de déblocage du manche :
appuyer sur cette pédale pour
abaisser le manche à sa position de
fonctionnement ou à la position
basse.
N’utiliser l’aspirateur qu’à la tension
spécifiée sur la plaque signalétique
située à l’arrière de l’appareil.
Cet aspirateur est destiné à une
utilisation domestique seulement.
Fiche polarisée
Afin que les risques d’électrocution
soient minimes, cet appareil a été
pourvu d’une fiche polarisée (une lame
est plus large que l’autre). Elle ne pourra
entrer dans une prise d’alimentation que
dans un sens. Si la fiche n’entre pas, la
retourner et essayer de nouveau. Si elle
ne peut être branchée, s’adresser à un
électricien qualifié, qui installera une
prise d’alimentation conforme. Ne
modifier la fiche sous aucun prétexte.
Interrupteur Marche/
Arrêt (ON/OFF)
Brancher le cordon dans une prise
d’alimentation. Pour allumer l’appareil,
appuyer sur l’interrupteur Marche/Arrêt.
Pour éteindre l’appareil, appuyer de
nouveau sur l’interrupteur.
2-2
Manche télescopique
Le manche est conçu pour rentrer dans
Page 23

23
Remarque : S’il est difficile de déplacer
l’appareil pendant le nettoyage, tourner
le bouton à un réglage supérieur.
• Réglages plus hauts : pour faciliter
le nettoyage des moquettes très
épaisses tout en assurant une bonne
performance d’aspiration.
2-8
Nettoyage des tapis
légers et flexibles
Se placer sur une extrémité du tapis et
diriger l’aspirateur vers l’extrémité
opposée. Avant d’atteindre le rebord,
abaisser le manche. Ainsi, la buse (à
l’avant de l’aspirateur) se soulèvera et le
tapis ne restera pas coincé dans
l’aspirateur. Continuer de lever la buse
de l’aspirateur, de façon à ce qu’elle ne
touche plus du tout au tapis une fois le
rebord atteint. Ramener l’appareil vers
soi, rabaisser le devant de l’aspirateur,
puis répéter l’opération en s’assurant
que l’appareil n’aspire que lorsqu’il se
déplace vers l’avant.
2-9
Nettoyage des escaliers
La poignée pour nettoyage d’escaliers a
été conçue pour faciliter l’utilisation de
l’aspirateur dans les escaliers. Avec le
manche en position de fonctionnement,
placer les doigts sous le rebord de la
poignée (A) pour nettoyer les escaliers
et saisir le manche de l’autre main pour
guider l’aspirateur.
Une autre possibilité est de nettoyer les
escaliers avec le tuyau et l’accessoire
portatif à turbine. Commencer par le bas
de l’escalier.
Lors de l’utilisation des accessoires
de nettoyage, l’agitateur continue
de tourner.
MISE EN GARDE : Afin d’éviter les
blessures ou l’usure prématurée du
tapis et d’empêcher l’appareil de
tomber, toujours placer l’appareil au
bas de l’escalier.
Accessoires
de nettoyage
Les accessoires permettent de nettoyer
les surfaces plus élevées et les endroits
difficiles à atteindre.
Pour utiliser les accessoires, placer le
manche à la position verticale.
MISE EN GARDE : L’agitateur
continue de tourner lorsque le
manche est en position verticale. Lors
de l’utilisation des accessoires, éviter
de faire basculer l’aspirateur ou de le
placer sur des meubles, des franges
de tapis ou des escaliers recouverts
le corps de l’appareil afin d’en faciliter le
rangement et le transport. Pour rentrer le
manche, appuyer sur le bouton (A) situé
à la base du manche tout en l’enfonçant.
Pour sortir le manche, appuyer sur le
bouton et tirer le manche vers le haut en
le bloquant à la position désirée.
2-3
Transpor t de
l’aspirateur
Pour déplacer l’appareil d’une pièce à
l’autre, placer le manche à la position
verticale, incliner l’appareil sur ses
roulettes arrière et pousser.
2-4
Transpor t de
l’aspirateur
L’aspirateur peut également être
déplacé à l’aide de la poignée
de transport.
2-5
Positions du manche
Le manche de l’aspirateur comporte trois
positions : position verticale, pour le
rangement et l’utilisation des accessoires ;
position de fonctionnement
, pour
l’utilisation normale sur les planchers et
tapis ; et position basse pour nettoyer
sous les meubles. Appuyer avec le pied
sur le levier de dégagement du manche
pour abaisser celui-ci.
2-6
Réglage selon la
hauteur du tapis
Le nettoyage des tapis et moquettes se
produit au niveau de la buse (A).
Lorsqu’il est nécessaire de monter ou
d’abaisser la buse en fonction des
différentes longueurs de poils de tapis,
placer le manche en position verticale et
régler le bouton de contrôle (B) de la
façon appropriée.
L’embout ne se déplacera pas si le
manche n’est pas abaissé en position
de fonctionnement.
2-7
Réglages
Pour une performance maximale, les
réglages de hauteur suivants sont
recommandés :
• Réglage le plus bas : pour tous les
types de moquette.
de tapis.
Nettoyage
des accessoires
Pour nettoyer le tuyau, essuyer la
saleté avec un chiffon trempé dans
un détergent doux. Rincer avec un
chiffon humide.
Les accessoires peuvent être lavés à
l’eau tiède avec un détergent. Rincer
puis laisser sécher à l’air libre avant de
les réutiliser.
2-10
Pour enlever le tuyau
Lors de l’utilisation des accessoires, le
manche de l’aspirateur doit être en
position verticale. Éteindre l’aspirateur
(OFF) avant de poser ou de retirer le
tuyau du tube pour tuyau (A).
Pour utiliser le tuyau, soulever son
extrémité (B), tel qu’il est illustré.
S’assurer que le clapet du tube pour
tuyau (C) recouvre le tube
hermétiquement.
Lorsque les accessoires ne sont plus
utilisés, soulever le clapet du tube pour
tuyau et y insérer le tuyau.
2-11
Choix de l’accessoire
approprié
D. L’accessoire combiné peut être
utilisé avec la brosse à épousseter pour
nettoyer les boiseries sculptées, dessus
de tables, livres, lampes, luminaires,
stores vénitiens, plinthes, volets et grilles
à registre.
Enlever la brosse pour nettoyer les
meubles capitonnés, tapisseries,
matelas, vêtements et escaliers
avec tapis.
E. L’accessoire portatif à turbine
convient pour les meubles capitonnés,
tapisseries, matelas, vêtements,
intérieurs d’auto et escaliers avec tapis.
F. Le bec suceur peut s’employer dans
les espaces restreints, les coins et les
rebords d’endroits tels que les tiroirs,
meubles capitonnés, escaliers et
plinthes.
G. Les rallonges prolongent votre
tuyau. Elles peuvent être utilisées avec
n’importe quel accessoire indiqué
plus haut.
Remarque : Certains modèles
comportent trois (3) rallonges.
H. La brosse à plancher (disponible
qu’avec certains modèles) est utilisée
pour nettoyer les surfaces dures.
Page 24

2-12
Installation de
la rallonge et
des accessoires
de nettoyage
Fixer l’accessoire ou la rallonge au
tuyau (I).
Fixer l’accessoire (J) en l’enfonçant bien
en place dans la rallonge.
Tourner légèrement la rallonge ou
l’accessoire pour serrer ou desserrer
la connexion.
2-13
Accessoire combiné
Faire glisser la brosse pour l’enlever.
2-14
Pour replacer la brosse, aligner sa base
avec les rainures (K) de l’accessoire.
Faire glisser la brosse en place.
3. Entretien
Il est recommandé de vous familiariser
avec les opérations d’entretien ; une
utilisation et un entretien corrects de
l’appareil assureront son bon
fonctionnement.
3-1
Vide-poussière
Quand le vider ?
Vider le vide-poussière avant que la
poussière n’atteigne la ligne (A).
MISE EN GARDE : Des matières très
fines, comme de la poudre pour le
visage ou la fécule de maïs, peuvent
sceller le filtre et réduire la
performance de l’appareil. Lorsque
l’appareil est utilisé pour aspirer de
tels produits, vider le
vide-poussière et nettoyer les filtres
plus souvent.
3-2
Vidage
Débrancher l’appareil de la prise de
courant. Ne pas utiliser l’aspirateur si
le vide-poussière ou les filtres ne sont
pas en place.
Appuyer sur le bouton de dégagement
du vide-poussière (B) et faire pivoter le
vide-poussière.
24
le vide-poussière ou les filtres ne sont
pas en place.
3-8
Enlever le vide-poussière, tel que décrit
à la figure 3-2.
Appuyer sur le verrou (A) situé sur le
dessus de la cavité du vide-poussière
pour enlever le cadre gris du filtre (B).
Enlever le filtre blanc en tissu et le filtre
noir en mousse du cadre. Laver le filtre à
la main avec de l’eau froide et un
détergent doux.
Laisser sécher le cadre des filtres et les
deux filtres pendant 24 heures avant de
les remettre en place dans le cadre.
Remettre en place le cadre du filtre en
insérant les languettes (C) dans les
fentes (D) situées au fond de la cavité du
vide-poussière. Faire tourner le cadre du
filtre vers le haut de la cavité du videpoussière et enclencher en place.
Filtre terminal
Nettoyage
Débrancher l’appareil de la prise de
courant. Ne pas utiliser l’aspirateur si
le vide-poussière ou les filtres ne sont
pas en place.
3-9
Enlever le vide-poussière, tel que décrit
à la figure 3-2.
Tirer le cadre du filtre (A) tout droit pour
l’enlever de la base de la cavité du videpoussière. Ne pas tenter d’enlever le
filtre (B) du cadre.
Laver le filtre à la main avec de l’eau
froide et un détergent doux.
Laisser sécher le cadre pendant 24
heures avant de le remettre en place à la
base de la cavité du vide-poussière.
Quoi acheter ?
À l’achat de nouveaux filtres, demander :
Filtre secondaire-filtre blanc en tissu, la
pièce HOOVER n° 93002520
Filtre terminal, la pièce HOOVER n°
93002521.
Remplacement
de l’ampoule
Quoi acheter ?
Cet appareil utilise une ampoule
13 volts, T-3 114 à culot poussoir, pièce
Hoover n
o
27313-107.
3-10
Enlèvement
de la lentille
Débrancher l’appareil de la prise
3-3
Tenir le vide-poussière au-dessus d’une
poubelle et appuyer sur le bouton de
dégagement de la porte du videpoussière (C) pour ouvrir la porte (D).
Appuyer sur le bouton de dégagement
de la porte du vide-poussière pour
enclencher la porte et la fermer.
3-4
Placer la base du vide-poussière en
premier. Faire pivoter le vide-poussière
dans l’aspirateur.
3-5
Enfoncer le bouton de dégagement du
vide-poussière tout en appuyant sur le
vide-poussière.
Relâcher le bouton pour qu’il reprenne
sa position et verrouiller le videpoussière en place.
Nettoyage des filtres
Ensemble du filtre
cyclonique
Nettoyage
Débrancher l’appareil de la prise de
courant. Ne pas utiliser l’aspirateur si
le vide-poussière ou les filtres ne sont
pas en place.
3-6
Enlever le vide-poussière, tel que décrit
à la figure 3-2.
Faire tourner l’ensemble du filtre (A)
dans le sens antihoraire. Enlever
l’ensemble du filtre du vide-poussière.
3-7
La poussière et les débris peuvent être
enlevés de l’ensemble du filtre en le
brossant avec l’accessoire combiné de
l’aspirateur.
Placer l’ensemble du filtre sur le videpoussière, aligner les languettes (A)
d’un côté du filtre avec les fentes du
vide-poussière (B) et faire tourner dans
le sens horaire pour fixer en place.
Appuyer sur le bouton de dégagement
de la porte du vide-poussière (C) pour
enclencher la porte et la fermer.
Remettre en place le vide-poussière,
tel qu’il est décrit aux figures 3-4 et 3-5.
Filtre secondaire
Nettoyage
Débrancher l’appareil de la prise de
courant. Ne pas utiliser l’aspirateur si
Page 25

25
3-20
Placer l’extrémité d’un morceau de
carton en travers de la plaque inférieure
tout en faisant tourner l’agitateur. Afin de
maintenir l’efficacité de l’appareil,
remplacer l’agitateur si les brosses ne
touchent pas au carton.
Quoi acheter ?
À l’achat d’un nouvel agitateur,
demander la pièce HOOVER
n° 48414-115.
Comment le remplacer ?
Débrancher l’appareil de la prise
de courant.
Retirer le couvercle, la courroie et
l’agitateur en suivant les directives de la
section « Courroie » commençant avec
la figure 3-13.
Jeter le vieil agitateur au rebut.
Continuer à suivre les directives de la
section sur la courroie pour remettre en
place la courroie, le nouvel agitateur et
le couvercle.
Lubrification
Le moteur est pourvu de deux paliers
suffisamment lubrifiés pour toute la
durée de vie du moteur. Toute
lubrification supplémentaire pourrait
causer des dommages. Par
conséquent, ne pas ajouter de
lubrifiant aux paliers du moteur.
Accessoire portatif à
turbine
Remplacement du rouleaubrosse agitateur
Lorsque les brosses de l’agitateur sont
usées, le rouleau-brosse doit être
remplacé . Demander la pièce
HOOVER n° 48414-088.
3-21
Comment le remplacer?
1. Retirer l’embout du tuyau puis le
retourner. Enfoncer les loquets des deux
côtés de l’accessoire puis retirer la
plaque inférieure (A).
3-22
2. Enlever les deux vis Phillips puis
retirer le protège-courroie (B).
3-14
Faire tourner le manche vers l’avant de
l’aspirateur et l’enlever.
3-15
Pour enlever le rouleau-brosse
de l’agitateur
Enlever le rouleau-brosse de l’agitateur
et la courroie usée.
Jeter la courroie usée.
3-16
Pour installer une nouvelle
courroie
Avec le lettrage à l’extérieur, faire
glisser la nouvelle courroie sur la poulie
du moteur (B).
3-17
Remise en place du
rouleau-brosse de l’agitateur
Insérer l’agitateur dans la courroie et
placer cette dernière dans le guidecourroie (C) de l’agitateur.
3-18
Pour fixer l’agitateur
Saisir fermement l’agitateur puis l’insérer
en position, d’abord en faisant glisser
son extrémité opposée à la courroie
dans la rainure rectangulaire (D) sur le
côté de l’appareil.
Tirer l’autre côté de l’agitateur (E) pour le
mettre en place.
Faire tourner l’agitateur pour s’assurer
qu’il tourne librement et que la courroie
n’est pas coincée entre l’agitateur et la
base de l’aspirateur.
3-19
Pour replacer le couvercle
Aligner les languettes (F) du couvercle
avec les fentes (G) sur la base de
l’aspirateur. Faire pivoter le couvercle
en position.
Fixer le couvercle en position en
tournant les fentes avec la pièce de
monnaie (figure 3-13).
Le rouleau-brosse
de l’agitateur
Quand le remplacer ?
L’agitateur doit être remplacé lorsque
ses brosses sont usées.
Pour vérifier l’état des brosses,
couper l’alimentation électrique
de l’appareil.
de courant.
Appuyer sur la pédale de déblocage
du manche et placer le manche à sa
position basse.
À l’aide d’un tournevis cruciforme, retirer
la vis, comme il est illustré, puis soulever
la lentille.
3-11
Pose de l’ampoule
Tirer sur l’ampoule pour l’enlever de la
douille. Enfoncer directement la nouvelle
ampoule jusqu’à ce qu’elle se bloque
en place.
Éviter d’utiliser une force excessive.
3-12
Remise en place
de la lentille
Remettre la lentille puis fixer en place
avec la vis.
Remplacement de
la courroie
La courroie de votre aspirateur Hoover
fait tourner l’agitateur et est essentielle
au bon fonctionnement de l’appareil.
S’assurer régulièrement du bon état de
la courroie située sous le couvercle
de l’aspirateur.
Quand la remplacer ?
Débrancher l’appareil de la prise
de courant.
Pour vérifier la courroie, retirer le
couvercle tel qu’illustré à la Figure 3-13.
Remplacer la courroie si elle est étirée,
coupée ou sectionnée.
Quoi acheter?
Afin de s’assurer de son fonctionnement
optimal, n’utiliser que des courroies
originales HOOVER avec votre
aspirateur. À l’achat d’une nouvelle
courroie, demander la pièce HOOVER
n° 38528-040 (numéro de pièce de
l’ensemble de la courroie 40201-190).
3-13
Comment la remplacer ?
Débrancher l’appareil de la prise
de courant.
Pour enlever le couvercle
Appuyer sur la pédale de déblocage du
manche et placer le manche à sa
position basse.
À l’aide d’une pièce de monnaie, tourner
les deux fentes (A) des deux côtés
du couvercle, tel qu’il est illustré.
Page 26

26
Remplacement de la courroie
À l’achat d’une nouvelle courroie,
demander la pièce HOOVER n° 38528-
037.
1. Retirer l’embout du tuyau. Retirer la
plaque inférieure, le protége-courroie et
le rouleau-brosse tel que décrit aux Fig.
3-21 à 3-23.
3-28
2. Saisir la turbine (E) et tirer fermement
dessus pour l’enlever.
3. Retirer la courroie de la poulie de la
turbine (F). Remplacer par la nouvelle
courroie.
3-29
4. Vérifier que les pattes de fixation (G)
de la turbine pointent vers le bas, puis
faire glisser les pattes dans les rainures
(H) de chaque côté du boîtier de
l’embout jusqu’à ce qu’il y ait un déclic.
5. Replacer le rouleau-brosse, le
protège-courroie et la plaque inférieure
tel que décrit aux Fig. 3-23 à 3-26.
Protecteur thermique
L’aspirateur est doté d’une protection
thermique interne pour le protéger
contre les surchauffes. Lorsque la
protection thermique est activée,
l’aspirateur cesse de fonctionner.
Dans un tel cas, procéder de la
façon suivante :
1. Éteindre l’aspirateur (OFF) et le
débrancher de la prise de courant.
2. Vérifier l’accumulation de poussière
sur le filtre secondaire et le
filtre terminal.
3. Débloquer le tuyau (voir la section
« Déblocage des obstructions »).
4. Lorsque l’aspirateur est débranché
et le moteur laissé au repos
pendant 30 minutes, la protection
thermique se réinitialise
automatiquement, et le nettoyage
peut reprendre.
Si la protection thermique continue de
s’activer après avoir suivi les étapes cidessus, l’aspirateur peut avoir besoin
d’être réparé (voir la section
« Service »).
Service
Pour obtenir le service autorisé HOOVER
ou des pièces d’origine HOOVER, il
vous faut l’adresse du Centre de vente
et de service Hoover ou de l’atelier de
service garanti autorisé (dépôt) le
plus près de chez vous. Pour l’obtenir,
3-23
3. Retirer l’agitateur, y compris les
plaques d’extrémité (C), puis le jeter.
4. Inspecter la courroie pour s’assurer
qu’elle est en bonne condition. La
courroie doit être remplacée si elle est
fendillée, coupée ou sectionnée (voir la
section suivante).
5. Insérer le rouleau-brosse dans la
courroie et placer celle-ci sur les dents
de l’engrenage (D) du rouleau-brosse.
3-24
6. Vérifier que les extrémités recourbées
sont face vers le bas, puis glisser les
plaques d’extrémité (C) du rouleaubrosse dans les rainures (E) de
l’embout.
3-25
7. Replacer le protège-courroie (B) en
s’assurant de ne pas y coincer les
brosses. Tourner l’agitateur pour vous
assurer qu’il ne coince pas.
Replacer la plaque inférieure et les vis.
3-26
8. Pour replacer la plaque inférieure (A),
insérer les quatre languettes dans les
rainures de l’embout.
Rabaisser la plaque inférieure puis
l’enfoncer pour la fixer en place.
Accessoire portatif à
turbine
Remplacement de la
courroie
Inspection de la courroie
La courroie de l’accessoire portatif à
turbine est conçue pour durer
longtemps et n’a normalement pas à
être remplacée. Toutefois, si elle est
étirée, coupée ou sectionnée, elle doit
être remplacée.
3-27
Retirer l’embout du tuyau. La courroie
est visible par le hublot situé sur dessus
de l’embout ou en enlevant la plaque
inférieure et le protège-courroie (Fig.
3-21 et 3-22).
vous pouvez :
• consulter les Pages Jaunes sous la
rubrique « Aspirateurs domestiques »
OU -
• vérifier la liste des Centres de vente et
service en usine fournie avec cet
appareil OU -
• consulter la section Service de
Hoover sur Internet au hoover.com
OU -
• composer le 1 800 944-9200 pour
accéder à un service d’aide
automatique qui vous indiquera les
adresses des Centres de service
autorisés (É.-U. seulement).
Prière de ne pas envoyer votre appareil
à l’adresse de North Canton, Ohio pour
qu’il soit réparé. Il n’en résulterait que
des délais supplémentaires.
Si d’autres renseignements sont requis,
communiquer avec le Centre d’aide à la
clientèle Hoover, Téléphone :
1 330 499-9499.
Au Canada, s’adresser à Hoover
Canada, Burlington, Ontario L7R 4A8,
téléphone : 1 800 463-3923 (Montréal).
Au moment de demander des
renseignements ou de commander des
pièces, toujours identifier l’appareil par
son numéro de modèle complet. (Le
numéro de modèle se trouve à l’arrière
de l’appareil.)
4. Dépannage
Si un problème d’ordre mineur survient,
il peut habituellement être résolu très
facilement. Il suffit de consulter la liste
ci-dessous pour en trouver la cause.
Problème : L’aspirateur
ne fonctionne pas
Cause possible
Solution possible
• L’appareil est mal branché
•
Bien enfoncer la fiche mâle dans
la prise de courant
• La prise de courant ne fournit
aucune tension
•
Vérifier le fusible ou le disjoncteur
• Fusible grillé/disjoncteur
déclenché
•
Remplacer le fusible/réenclencher
le disjoncteur
• Protecteur thermique activé
•
Laisser refroidir l’aspirateur pendant
30 minutes (le protecteur thermique
se réinitialisera)
Problème : L’aspirateur/les
accessoires n’aspirent pas la saleté
Cause possible
Solution possible
• Courroie cassée ou usée
•
Remplacer la courroie
Page 27

• Rouleau-brosse de l’agitateur usé
•
Remplacer le rouleau-brosse
• Vide-poussière plein
•
Vider le vide-poussière
• Mauvais réglage de la hauteur
de tapis
•
Régler le bouton de contrôle à une
position inférieure
• Obstruction du passage de l’air
•
Dégager l’obstruction
Problème : L’appareil
est difficile à pousser
Cause possible
Solution possible
• Mauvais réglage de la hauteur
de tapis
•
Régler la commande de hauteur
à un niveau supérieur
Problème : Odeur de
fumée/de brûlé détectée
Cause possible
Solution possible
• Courroie sectionnée ou étirée
•
Remplacer la courroie du rouleaubrosse de l’agitateur tel qu’il est
décrit aux figures 3-13 à 3-19 de la
section « Entretien »
Problème : Le rouleau-brosse de
l’accessoire portatif à turbine refuse
de tourner
Cause possible
Solution possible
• Pression excessive appliquée sur
l’embout
•
Poursuivre l’utilisation en réduisant la
pression
• Obstruction dans le conduit de la
turbine
•
Dégager l’obstruction
• Courroie cassée ou usée
•
Remplacer la courroie
• L’appareil aspire mal
•
Vérifier les items sous « L’appareil
refuse d’aspirer »
Déblocage des
obstructions
Débrancher l’appareil de la prise
de courant.
Une succion ou une efficacité faibles
peuvent être causées par une
obstruction à l’intérieur du système.
Suivre dans l’ordre les étapes suivantes
jusqu’à ce que la source de
l’obstruction soit identifiée :
1. Vérifier si le vide-poussière est plein;
le vider au besoin.
27
4-1
Vérifier le débit d’air
2. Brancher l’aspirateur et l’allumer
(position ON). Vérifier la succion au
bout du tuyau (A). S’il y a succion,
continuer à l’étape 3.
3. Éteindre (position OFF) puis
débrancher l’aspirateur. Vérifier le
branchement au niveau du tube pour
tuyau (B) ; enlever toute obstruction.
4-2
Vérifier le débit d’air passant
dans le tube d’alimentation du
tuyau à l’arrière de l’aspirateur
4. Éteindre (position OFF) puis
débrancher l’aspirateur.
5. Si l’obstruction peut être vue dans le
tube (C), enlever les cinq (5) vis à
l’aide d’un tournevis cruciforme.
6. Enlever le tube de l’aspirateur et
enlever l’obstruction.
7. Remettre en place le tube dans
l’aspirateur, de même que les
cinq (5) vis.
4-3
Vérifier sous le couvercle
8. Éteindre (position OFF) puis
débrancher l’aspirateur.
9. Enlever le couvercle, la courroie et
l’agitateur (figures 3-13 et 3-15).
Regarder dans l’ouverture (C) et
enlever toute obstruction.
10.Replacer la courroie, l’agitateur
et le couvercle.
Si l’appareil se bloque pendant
l’utilisation de l’accessoire portatif
à turbine :
4-4
11. Débrancher l’accessoire portatif à
turbine du tuyau. Enlever la plaque
inférieure, le protège-courroie et
l’accessoire portatif à turbine tel que
décrit aux Fig. 3-21, 3-22 et 3-29.
Enlever toute obstruction du conduit de
la turbine (A).
Replacer la turbine de la courroie, le
rouleau-brosse, le protège-courroie et la
plaque inférieure.
Garantie complète
de un an
(Usage domestique)
Votre appareil HOOVERMDest garanti
pour des conditions d’usage
domestique, comme il est stipulé dans
le guide de l’utilisateur, contre les
défauts de matériaux et de fabrication
pour une période de un (1) an après la
date d’achat. Cette garantie vous offre,
sans frais supplémentaires, les pièces et
la main-d’œuvre nécessaires à la remise
en bon état de fonctionnement de
l’appareil au cours de la période de
garantie. La présente garantie
s’applique si l’appareil a été acheté aux
États-Unis, ce qui comprend ses
territoires et possessions, au Canada ou
par l’intermédiaire du programme
d’échanges militaires américain. Les
appareils achetés ailleurs sont couverts
par une garantie limitée de un an qui
couvre le coût des pièces seulement. La
présente garantie ne s’applique pas si
l’appareil est utilisé à des fins
commerciales ou de location.
Cette garantie ne s’applique que si
l’appareil est utilisé dans le pays ou le
territoire où il a été acheté.
Le service couvert par la garantie ne
peut être obtenu qu’en envoyant
l’appareil à l’un des points de service
autorisés ci-dessous. Une preuve
d’achat est exigée avant toute réparation
couverte par la garantie.
1. Centres de vente et de service
Hoover.
2. Ateliers de service garanti autorisé
Hoover (dépôt).
Pour accéder à un service d’aide
automatique qui vous donnera la
liste des centres de service autorisés
Hoover aux États-Unis, composer
le 1 800 944-9200 OU
visiter Hoover sur Internet au
hoover.ca
Cette garantie ne couvre ni l’enlèvement
de l’appareil, ni sa livraison, ni les
réparations à domicile. Toutefois, si vous
envoyez l’appareil à un Centre de vente
et de service Hoover pour une demande
de service couvert par la garantie, son
renvoi sera payé.
Cette garantie vous confère des droits
légaux spécifiques. Il se peut que vous
bénéficiiez d’autres droits qui varient
selon la juridiction.
Pour de plus amples informations ou
pour toute question sur la présente
garantie ou sur l’emplacement des
différents Centre d’aide à la clientèle
Hoover, téléphoner au 1 330 499-9499.
Au Canada, s’adresser à Hoover
Canada, Burlington, Ontario L7R 4A8,
1 800 463-3923 (Montréal).
Page 28

HOOVER et sont des marques déposées
®
HOOVER y son marcas registradas
HOOVER and are registered trademarks
®
R7 8-08 U5180-900/-910/-950/-955, U5182-900,
U5183-900/-910, U5185-900/-910 Printed in China 93001634
®
 Loading...