

Hoover U5018 Owner's Manual

Upright Vacuum Cleaner
®
®
Congratulations
on your purchase!
This vacuum cleaner takes
HOOVER® Type “Z” Allergen
Filtration filter bags
Review this manual before
operating the cleaner.
This product was designed for
easy assembly (see page 3)
www.hoover.com
Owner’s Manual
ENGLISH ➜ pp. 1-13
ESPAÑOL ➜ pág 15-22
FRANÇAIS ➜ p. 23-30

Thank you for choosing a HOOVER®product
Please enter the COMPLETE model and serial numbers in the spaces provided.
Model___________________________________
Serial number___________________________________
Hint: Attach your sales receipt to this owner’s manual.
Verification of date of purchase may be required for warranty service of your
HOOVER product.
Be sure to fill out and return the product registration card included with your
cleaner (see back cover).
Owner’s Manual
ENGLISH ➜ pp.1-13
ESPAÑOL ➜ pág. 15-22
FRANÇAIS ➜ p. 23-30
Review this manual before
operating cleaner
Important Safeguards!
When using an electrical appliance, always follow basic precautions, including the following:
READ ALL INSTRUCTIONS BEFORE USING THIS APPLIANCE
WARNING:To reduce the risk of fire, electric shock, or injury:
• Do not use outdoors or on wet surfaces.
• Close supervision is necessary when any appliance is used by or near children.
Do not allow vacuum cleaner to be used as a toy or to run unattended at any
time.
• Keep hair, loose clothing, fingers, feet and all parts of body away from openings,
rotating agitator and other moving parts. Do not operate cleaner in bare feet or
when wearing open toe shoes or sandals.
• Do not pick up anything that is burning or smoking, such as cigarettes, matches,
or hot ashes.
• Do not use to pick up flammable or combustible materials such as gasoline or fine
wood sandings or use in areas where they may be present.
• Avoid picking up hard, sharp objects with the cleaner. They may damage the
cleaner and the bag.
• Always turn off this appliance before connecting or disconnecting hose.
• Do not use without dust bag or filters in place. Change bag frequently when
picking up very fine materials such as powder.
• Use extra care when cleaning on stairs.
• Do not put any object into openings. Do not use with any opening blocked; keep
free of dust, lint, hair, or anything that may reduce air flow.
• Do not pull or carry by cord, use cord as a handle, close door on cord or pull
cord around sharp edges or corners. Do not run appliance over cord. Keep cord
away from heated surfaces.
• Always disconnect cord from electrical outlet before servicing the cleaner.
• Unplug cleaner when not in use. Turn off all controls before unplugging.
• Do not unplug by pulling on cord. To unplug, grasp the plug, not the cord. Never
handle plug or appliance with wet hands.
• The use of an extension cord is not recommended.
• Do not use with damaged cord or plug. If appliance is not working as it should,
has been dropped, damaged, left outdoors, or dropped into water, take it to a
Hoover Factory Service Center or Authorized Hoover Warranty Service Dealer
(Depot).
• Use vacuum cleaner only for its intended use as described in the instructions.
Use only attachments recommended by The Hoover Company; others may cause
hazards.
Save these instructions!
© 2004 The Hoover Company
www.hoover.com
2
Contents
Assembling Cleaner..........................3-5
Carton Contents ....................................3
Cleaner Descriptions............................5
How To Use ........................................5-7
Cleaning Tools................................7-8
If You Have a Problem........................12
Important Safeguards ..........................2
Lubrication ..........................................11
Maintenance ....................................8-11
Authorized Service ..........................12
Cleaning Filters ................................9
Clearing Blockages ........................12
Replacing Agitator Brush Roll ......11
Replacing Belt ................................10
Replacing Edge Groomers ............11
Replacing Headlight ........................10
Replacing Filter Bag ......................8-9
Thermal Protector ..............................11
Warranty ..............................................13
SERIAL
NUMBER

3
Attach handle
Carton contents
Remove all parts from carton and identify each item shown.
Make sure all parts are located before disposing of packing materials.
A
A
B
D
C
If you need any assistance:
Visit our website at www.hoover.com. Click on the “Service” button
to find the service outlet nearest you OR
Call 1-800-944-9200 for an automated referral of authorized service
outlet locations (U.S. only) OR
Call 1-330-499-9499 to speak with a representative in our Consumer
Response Center.
Please do not return this product to the store.
Continued
➜
1. Cleaner assemblyNot
Slide handle section onto back of
cleaner body.
1-2
Push screw into hole on back of
handle. Tighten screw securely with
a Phillips screwdriver.
Screw must be inserted and tightened before operating cleaner.
1-3
1-1
A. Handle section
B. Cleaner body
C. Handle screw packet
(taped to handle)
D. Hose, cleaning tools and wands
(packed on cleaner)
Accessories packed
on cleaner
2. How to use
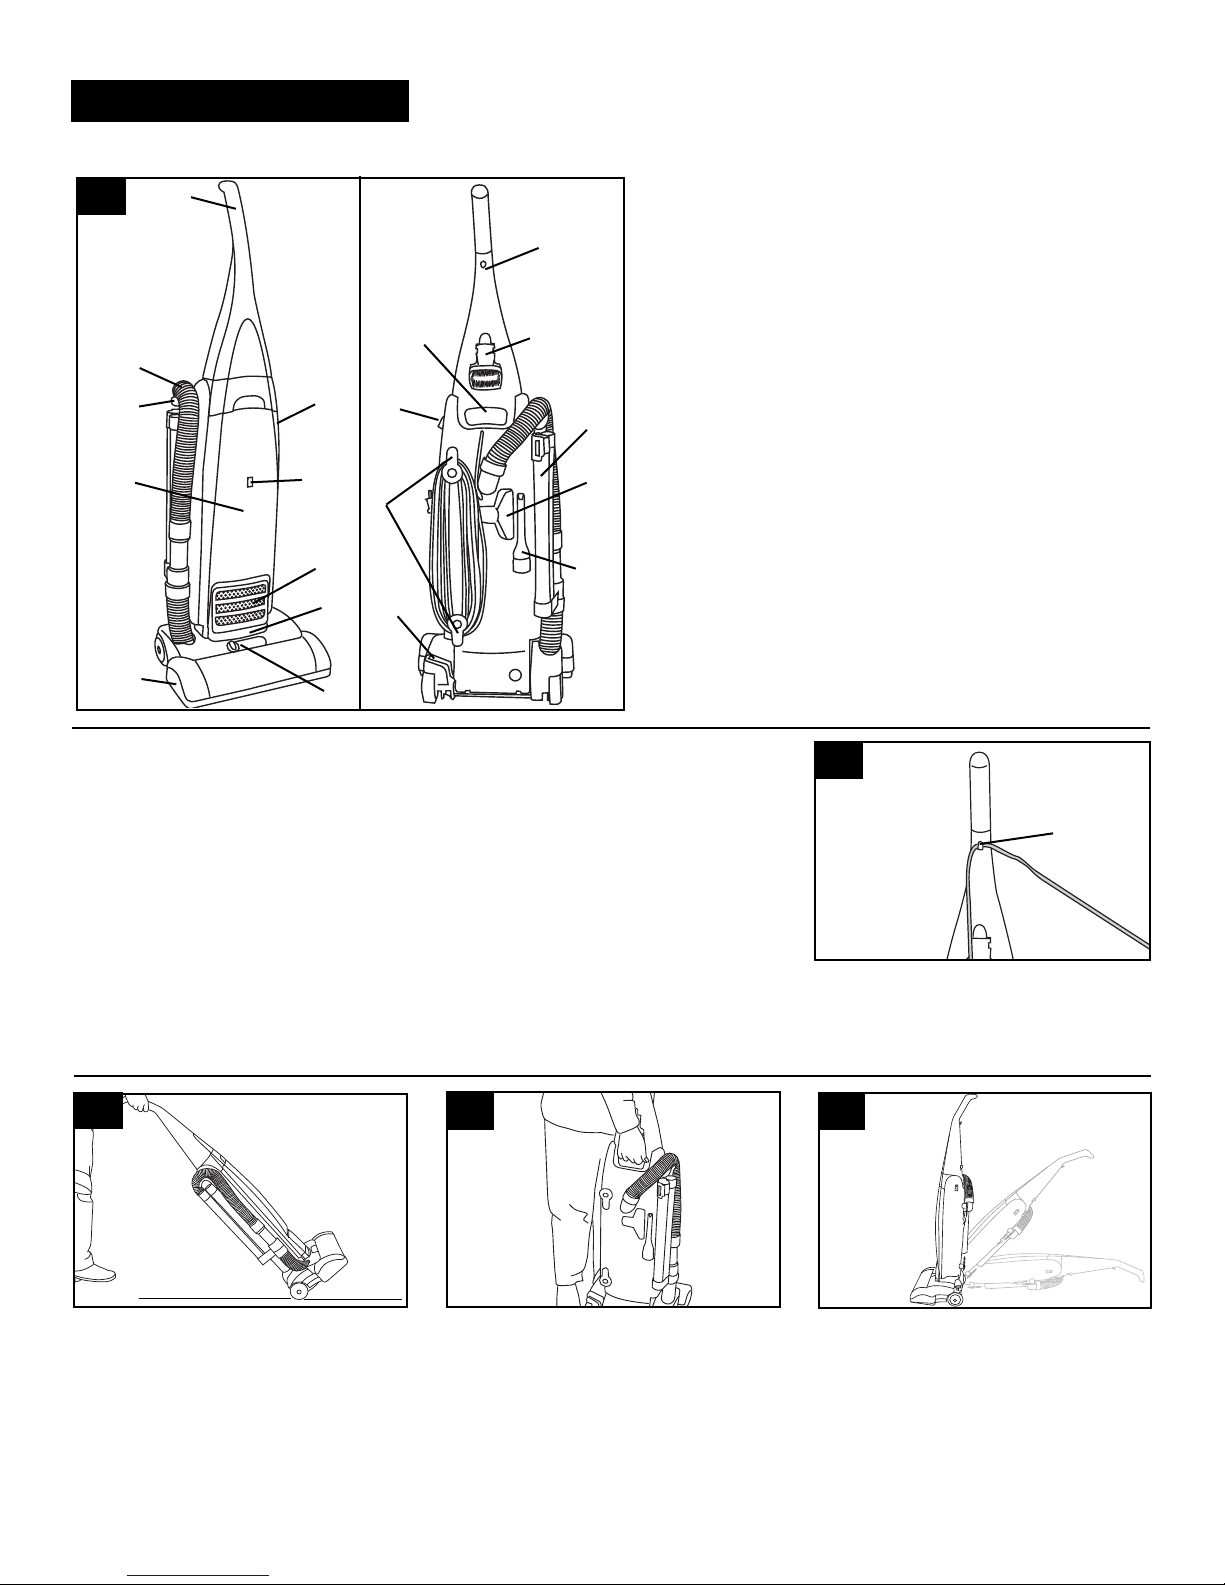
Cleaner description
13.Nozzle control knob:
slide knob to correct setting for height of carpet
being cleaned
14. Headlight
15. Check bag indicator
16. Bag door
17. Cord clip
18. Hose holder
Operate cleaner only at
voltage specified on data
plate on back of cleaner.
This cleaner is intended for
household use.
1. Handle
2. ON/OFF switch
3. Cord hooks: wrap cord
around hooks for storage.
Top hook can be rotated
right or left for easy cord
release.
4. Hose
5. Dusting brush
6. Furniture nozzle
7. Crevice tool
8. Carrying handle
9. Wands
10.Final filter
11.Handle release lever:
step on lever to lower
handle to operating or
low positions
12.Furniture guard: helps
prevent cleaner from
marking furniture.
2-2
ON-OFF switch
Plug cord into electrical outlet.
To turn cleaner ON, push switch up.
To turn cleaner OFF, push switch
down.
1
17
2
9
3
18
4
8
14
11
2
7
10
13
12
15
16
5
6
4
Polarized plug
To reduce the risk of electric shock,
this appliance has a polarized plug
(one blade is wider than the other).
This plug will fit in a polarized outlet
only one way. If the plug does not
fit fully in the outlet, reverse the
plug. If it still does not fit, contact a
qualified electrician to install the
proper outlet. Do not change the
plug in any way.
Cord clip
To help keep the cord out of the way
while vacuuming, position cord in
cord clip (A) located on the handle.
A
2-1
Transporting cleaner
To move your cleaner from room to
room, put handle in upright position,
tilt cleaner back on rear wheels and
push forward.
Handle positions
The handle of your cleaner has
three positions; upright for storage
and when using cleaning tools;
operating position for general
operation on carpet and floors; low
for reaching under low furniture.
Step on handle release lever to
lower handle.
Carrying cleaner
The cleaner can also be moved by
using the carrying handle.
2-3
2-4
2-5
 Loading...