

Page 1
H o o v e r
®
TM
TurboPOWER
TM
WindTunnel Canister
Cleaner with
Powered Hand Tool
Owner’s Manual
English ➜ pp. 1-14
Español ➜ pàg.15-22
Français ➜ p. 23-30
www.hoover.com
Review this manual before
operating cleaner.
Page 2

Fill in and retain
The model and serial number are located on the bottom of the cleaner.
For your personal records, please enter the COMPLETE model and serial number in
the spaces provided and retain this information.
Your cleaner is model________________________________________________________
and has serial number ______________________________________________________
It is suggested that you attach your sales receipt to this owner’s manual. Verification of
date of purchase may be required for warranty service of your Hoover product.
Index
Assembling Cleaner............................3-4
Cleaner Description................................4
How To Use
Canister Cleaner..............................5-6
Check Bag Indicator ..........................5
Cleaning Tools ................................6-7
Powered Nozzle ..............................5-6
To Clean Stairs....................................7
If You Have a Problem..........................13
Clearing Blockages ..........................13
Important Safeguards ............................2
Maintenance
Cleaning Filters................................8-9
Lubrication........................................12
Replacing Powered Hand Tool
Agitator Brush Roll..........................11
Replacing Powered Hand Tool Belt..12
Replacing Agitator Brush Roll ........10
Replacing Bag....................................8
Replacing Power Nozzle Belt ............9
Replacing Headlight ........................10
Replacing Edge Groomers ..............11
Service..................................................12
Storage ..................................................7
Warranty................................................14
I m p o rtant Safeguard s !
When using an electrical appliance, always follow
basic precautions, including the following:
READ ALL INSTRUCTIONS BEFORE USING THIS APPLIANCE
Wa rn i n g :
• Do not use outdoors or on wet surfaces.
• Close supervision is necessary when any appliance is used by or near children.
Do not allow vacuum cleaner to be used as a toy or to run unattended at any
time.
• Keep hair, loose clothing, fingers, feet and all parts of body away from openings,
rotating agitator and other moving parts. Do not operate cleaner in bare feet or
when wearing open toe shoes or sandals.
• Do not pick up anything that is burning or smoking, such as cigarettes, matches,
or hot ashes.
• Do not use to pick up flammable or combustible liquids such as gasoline or fine
wood sandings or use in areas where they may be present.
• The hose contains electrical wires. Do not use if damaged, cut or punctured.
• Avoid picking up hard, sharp objects with the cleaner.They may damage the
cleaner and the bag.
• Always turn off this appliance before connecting or disconnecting hose,
motorized nozzle or powered hand tool.
• Do not use without dust bag or filters in place. Change bag frequently when picking up very fine materials such as powder.
• Use extra care when cleaning on stairs.
• Do not put any object into openings. Do not use with any opening blocked; keep
free of dust, lint, hair,or anything that may reduce air flow.
• Do not pull or carry by cord, use cord as a handle, close door on cord or pull
cord around sharp edges or corners. Do not run appliance over cord. Keep cord
away from heated surfaces.
• Always disconnect cord from electrical outlet before servicing the cleaner.
• Unplug cleaner when not in use.Turn off all controls before unplugging.
• Do not unplug by pulling on cord. To unplug, grasp the plug, not the cord.
Never handle plug or appliance with wet hands.
• If cleaner has a cord reel, hold on to the plug while cord is being rewound to prevent cord from whipping.
• The use of an extension cord is not recommended.
• Do not use with damaged cord or plug. If appliance is not working as it should,
has been dropped,damaged, left outdoors, or dropped into water, take it to a
Hoover Factory Service Center or Authorized Hoover Warranty Service Dealer
(Depot).
• Use vacuum cleaner only for its intended use as described in the instructions.
Use only attachments recommended byThe Hoover Company; others may cause
hazards.
To reduce the risk of fire,electric shock or injury:
Save these instru c t i o n s !
2
© 2000 The Hoover Company, www.hoover.com
Page 3
1. Assembling cleaner
during assembly or operation, call
1-800-944-9200 for an automated referral of authorized service
outlet locations (U.S. only) OR
1-330-499-9499 to speak with a representative in the Hoover
Consumer Response Center. OR
Visit us online at www.hoover.com to find the service
outlet nearest you (click on the “Service” button).
Connect hose
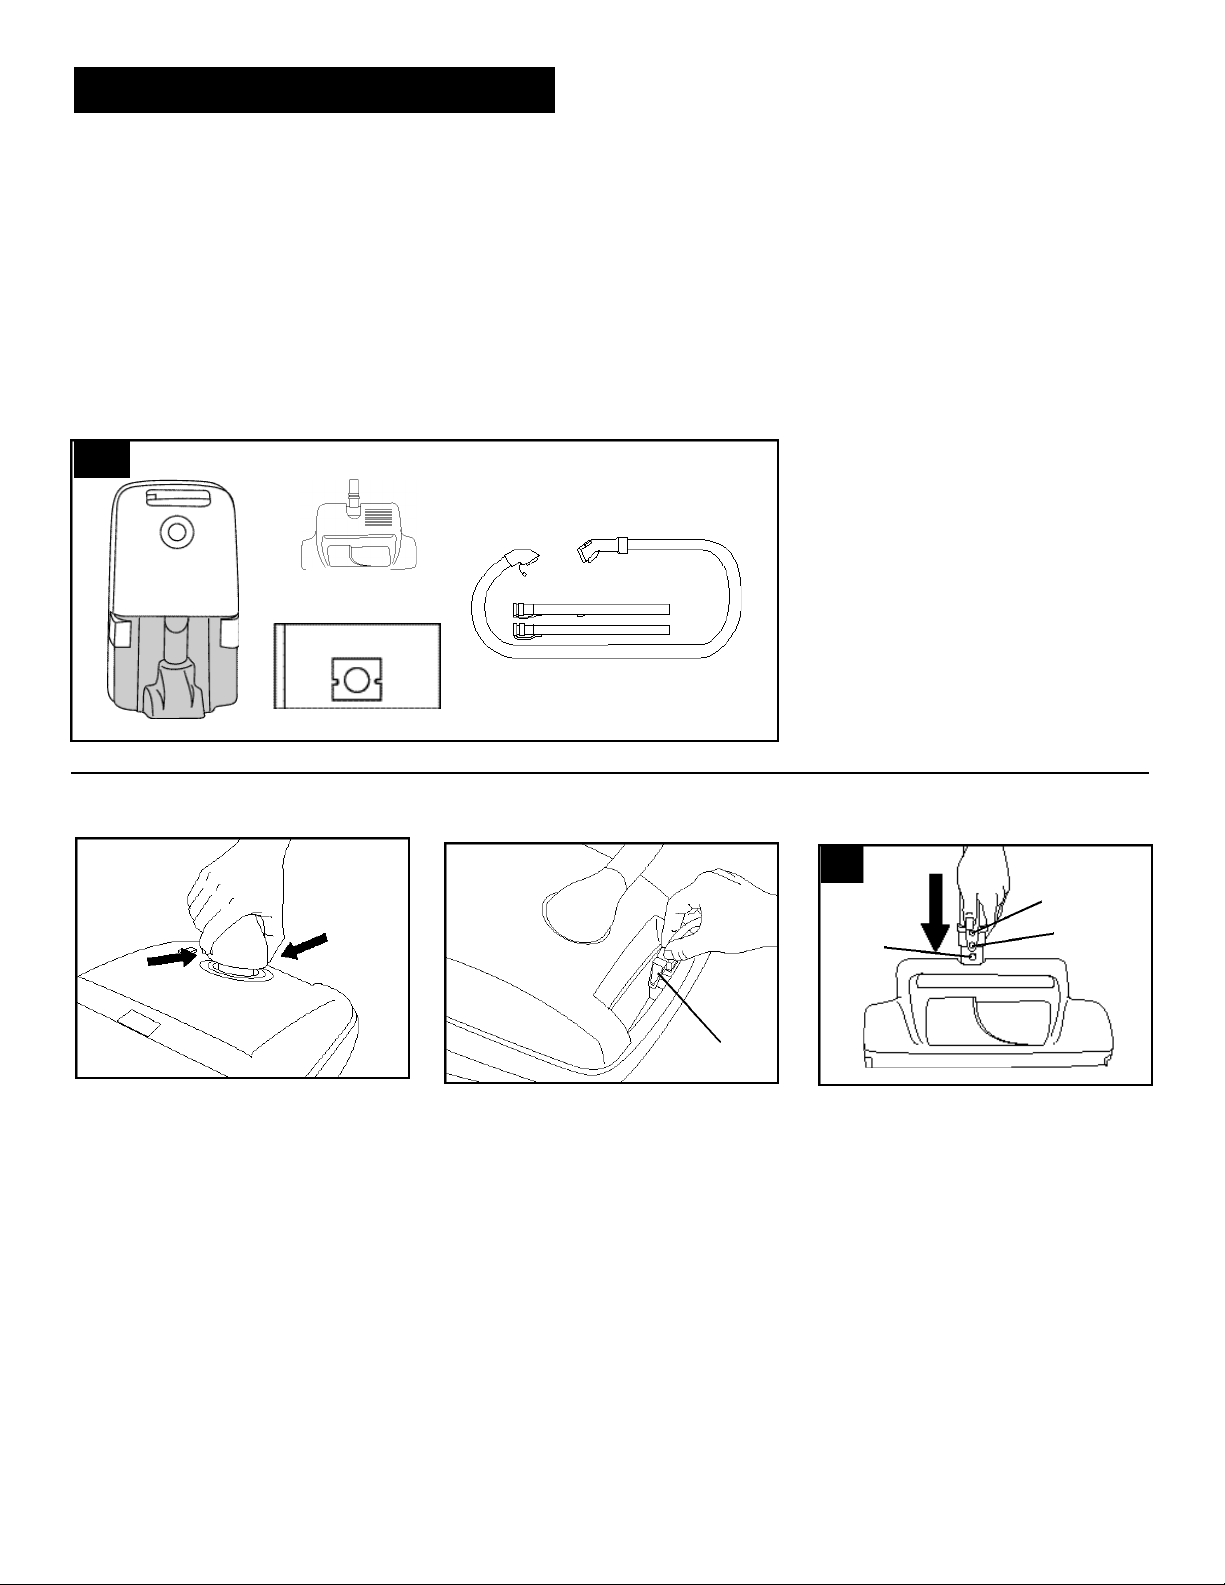
Carton contents
1-1
A
B
D
C
Connect hose, wands and nozzle
1-2
1-3
Unpack cleaner from carton and identify the parts shown. Remove and
dispose of cardboard packing.
A. Canister cleaner
B.WindTunnel™ powered nozzle
C. Extra paper bag (one bag is
installed in cleaner) (your model may
include additional bags)
D. Extension wands and hose
1-4
D
B
C
With hose toward front of cleaner, push
hose connector into opening in bag lid.
When hose is attached properly, hose
cord plug will reach to receptacle on
cleaner.
A
Insert plug as deeply into the receptacle as possible. Latch (A) will automatically fasten. Cleaner will not operate
unless plug is inserted into receptacle.
To disconnect hose, first remove hose
cord plug from receptacle while pulling
out on latch. Then, depress buttons
(shown in Fig.1-2 by arrows) on hose
connector and pull up.
Note: The flexible hose contains electrical wires for connection to the
power nozzle and should not be used
if damaged. The wires should not be
seen through the outer skin.
Attach nozzle and wands
The wand with the storage clip connects
to the power nozzle.
Attach it to power nozzle by fitting button projection (B) on nozzle connector
(C) into opening near end of wand. Be
sure nozzle is locked in place.
To release, press down on center of
latch (D) and remove nozzle.
Continued ➟
3
Page 4
1-5
1-6
G
F
E
H
1-7
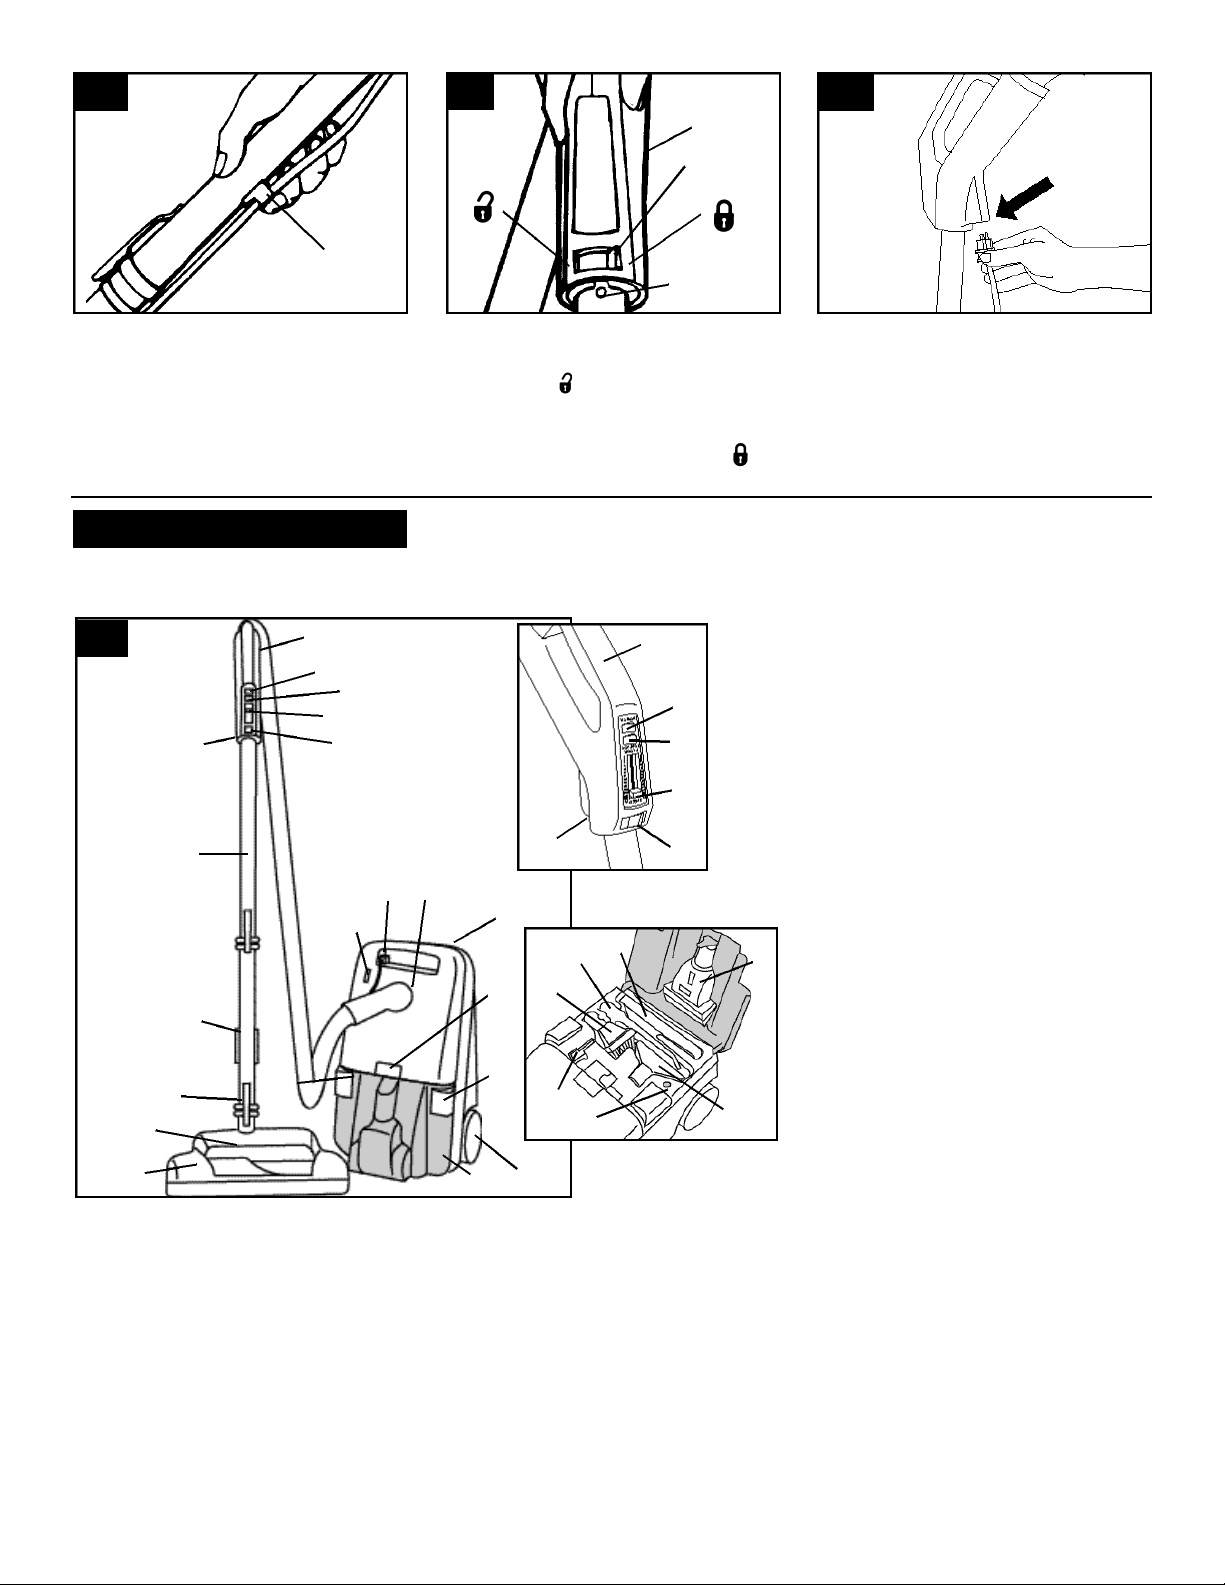
Attach second wand to the first. Position
cord into cord clips (E) on wands, placing excess cord between nozzle and
bottom cord clip.
Note: For some models, bottom cord
clip is on wand storage clip.
To attach the hose to the extension
wands, push latch (F) on the hand grip
to the unlock symbol.
Push the hand grip (G) down onto wand
so that the button projection (H) fits into
the slot. Push the latch to the lock
symbol to secure wand.
2. How to use
Cleaner description
23
8
9
7
10
6
25
26
24
21
5. Extension wands: used with rug
6. Wand/tool latch: used to lock hand
7. Floor surface selector button:
cleaning or “BARE” for hard surface
floor cleaning.
8. Hand grip
2-1
11
5
4
3
2
1
The assembled cleaner will look like the drawing.
1. WindTunnel™ carpet and floor
power nozzle: automatically
adjusts to different carpet pile
heights.
2. Headlight
3. Spring latch: locks extension
wands together or locks wand to
nozzle or tool.
4. Wand storage clip: place cleaner
on its end and hook clip onto bottom of cleaner.
4
8
9
7
10
11
6
27
22
14
13
12
16
20
18
17
15
19
and floor nozzle. One or both
wands may be used with cleaning
tools.
grip to extension wands or cleaning
tools.
push button toward “RUG” for carpet
Push plug on power nozzle cord completely into receptacle underneath
hand grip.
Always disconnect cleaner from electrical outlet before attaching or
removing power nozzle plug.
9. Remote ON/OFF switch: located
on the hand grip for convenient
cleaner operation.
10.Remote variable speed control:
allows user to manually select
cleaner speed at the hand grip.
11. Receptacle: connect power nozzle
cord underneath hand grip.
12. Dusting brush
13. Crevice tool
14. Hard floor tool
15. Furniture nozzle
16. Powered hand tool: stores in tool
lid
17. Power ON light: glows when
cleaner can be controlled at the
hand grip.
1 8 .Micro filter: aids in filtration of dirt
particles.
1 9 .L a rge wheels: p rovide easy towing
when cleaner is pulled over carpet,
a rea rugs and door sills.
20. Cord rewind pedal: step on pedal
to rewind cord for storage. Hold
plug until cord is rewound.
21.Tool lid: pull up on edge of lid in
recessed area.
22. Bag lid latch: lift to open bag lid.
23. ON/OFF pedal: conveniently
located on top of cleaner.
24. Check bag indicator: shows red
when paper bag should be
checked for fullness.
25. Hose connector
2 6 . R e c e p t a cl e : connect power nozzle
c o rd to canister cleaner.
27. Carrying handle
This cleaner is intended for household use.
This cleaner was inspected and
packaged carefully before being
shipped from the factory. If you
should happen to need assistance
Operate cleaner only at voltage specified on data plate on bottom of cleaner.
Page 5
To reduce the risk of electric shock, this
appliance has a polarized plug (one
blade is wider than the other). This
plug will fit in a polarized outlet only one
way. If the plug does not fit fully in the
outlet, reverse the plug. If it still does
not fit, contact a qualified electrician to
install the proper outlet. Do not change
the plug in any way.
2-2
B
2 - 3Polarized plug
C
A
ON-OFF switches
After assembling cleaner, plug cord into
electrical outlet. Turn cleaner on by
depressing ON-OFF pedal (A). To turn
cleaner off, depress pedal again.
Note: Pedal opposite ON-OFF pedal is
Cord Rewind Pedal (B).
2 - 4 2 - 5
On some models two switches are
used to turn the cleaner on for opera-
tion.
P ress remote control switch (C) on hand
grip to the “OFF” position before plugging
c o rd into electrical outlet.
Plug cord into an electrical outlet and
step on ON-OFF pedal. The POWER
ON light will glow, indicating that the
cleaner can then be controlled at the
hand grip. Press hand grip switch to
the ON position.
2 - 6
D
Check bag indicator
The indicator will begin to show red as
bag fills with dirt. There are three conditions that will cause the indicator to
become completely red:
1. The bag is full; change the bag.
2. Ve ry fine materials (such as powder)
have been picked up, clogging the bag
p o res; change the bag, even if it is not full.
3. There is a blockage in the nozzle, hose,
tools, or at the bag opening; remove the
b l o c k a g e .
Deluxe power
nozzle
Handle positions
The handle has two positions when used
with the power nozzle: upright and
operating.
To lower handle to operating position,
place your foot firmly on the power nozzle and pull handle back.
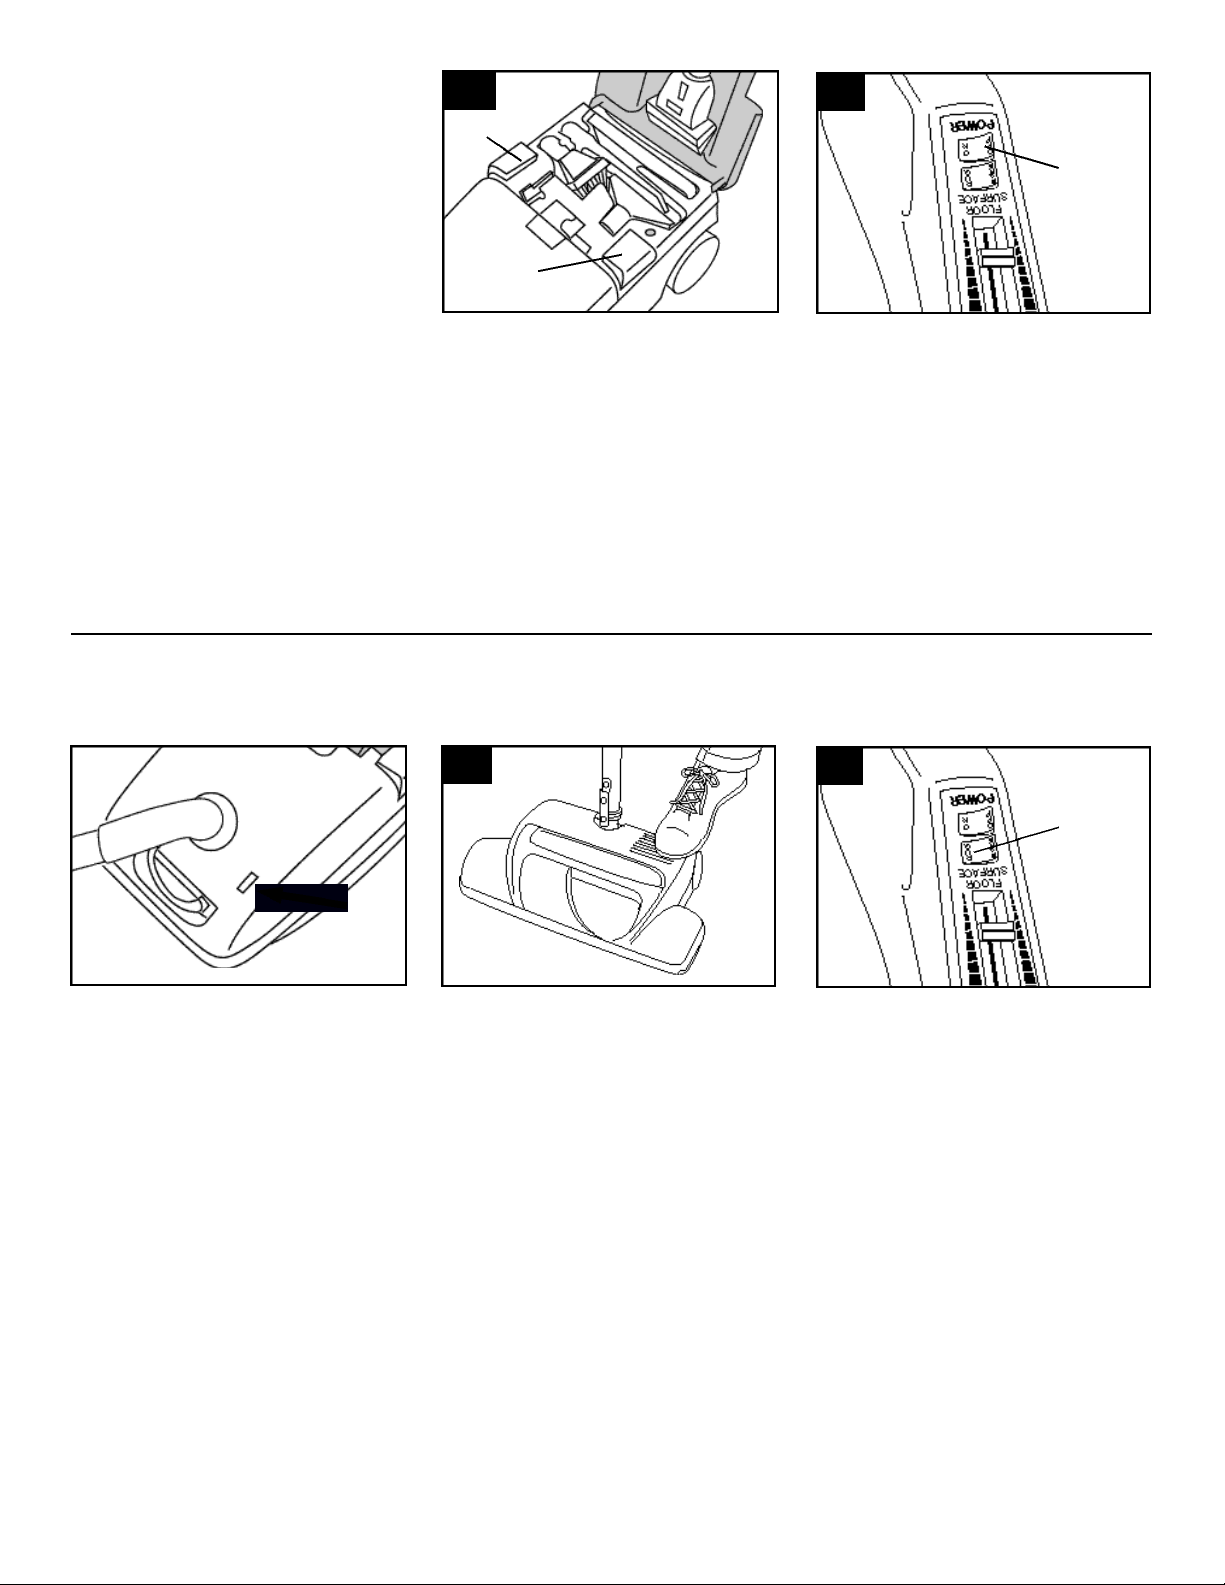
Floor surface selector
Carpet or rug cleaning
When using the power nozzle for carpet
and rug cleaning, push the floor surface
selector button toward “RUG” (D). This
setting provides the suction and agitator
action necessary to deep clean carpets.
The nozzle adjusts automatically to various carpet pile heights.
5
Page 6

2 - 7
2 - 8
2 - 9
E
Hard surface floor cleaning
The power nozzle can be used for
cleaning hard surface floors such as
wood, linoleum, vinyl, asphalt and rubber tile, sealed cork, concrete and terrazzo, as well as carpet.
To set the power nozzle for hard surface
floor cleaning, push the floor surface
selector button toward “BARE” (E). This
setting provides suction and no agitator
action. If you prefer, you may use the
hard floor tool to clean bare floors.
You will find it particularly convenient
when cleaning lightweight area rugs to
set the floor surface selector button on
“BARE” and continue cleaning the sur-
rounding floor surfaces.
Note: The headlight will be ON in both
the “RUG” and “BARE” floor surface
modes.
Edge cleaning
Special edge groomers are provided on
both sides of the nozzle to remove dirt in
carpet near baseboards and furn i t u re .
Guide side of nozzle parallel to edge of
carpet or furn i t u re as shown.
F
Variable speed control
The variable speed control (F) is located
on the hand grip.
Slide the control back to reduce energ y
consumption and to clean lightly soiled
a reas or delicate fabrics. Slide control forw a rd for maximum cleaning power in
heavily soiled areas. If the power nozzle is
d i fficult to push, slide the control toward
back to reduce the pow e r. This will help
p r event damage to the belt.
Cleaning tools
The cleaning tools are conveniently
stored in the cleaner underneath the tool
lid. Pull up on edge of lid in recessed
area to open.
The lid is also designed with a “breakaway” feature which allows it to snap off
if it is pushed open too far. To re-attach,
align small knobs on hinge area of lid
with slots at rear of cleaner; press lid
back into place.
The cleaning tools have many uses.
Select the tool best suited for the cleaning task from the following descriptions.
2 - 1 0
K
H
L
I
J
Select the proper tool
H. Crevice tool may be used in tight
spaces, corners, and along edges in
such places as dresser drawers, upholstered furniture, stairs and baseboards.
I. Furniture nozzle may be used for
upholstered furniture, draperies, tapestries, mattresses and clothing.
J. Dusting brush may be used for
carved furniture, table tops, books,
lamps, lighting fixtures, venetian blinds,
baseboards, shutters and registers.
K. Hard floor tool may be used for
walls and very irregular hard surface
floors such as brick and slate.
L. Powered hand tool may be used for
upholstered furniture, carpeted stairs,
and hard to reach places.
2 - 1 1
How to connect
To use the cleaner with tools, disconnect
the power nozzle from the hand grip.
Tools may be attached directly to the
hand grip. With the latch in the unlock
position, insert tool (or wand if extra
length is needed), then push latch to the
lock position to secure.
To remove the tool (or wand), push the
latch to the unlock position.
To connect tools to metal wands, insert
end of tool into wand and snap into
position. To disconnect, press down on
the center of spring latch and remove
tool.
6
Page 7

2 - 1 2
2 - 1 3
M
2 - 1 4
To connect tools to metal wands, insert
end of tool into wand and snap into posi-
tion. To disconnect, press down on the
center of spring latch and remove tool.
2 - 1 5
Wand storage clip
To save storage space, stand the cleaner on end and hook wand storage clip
on bottom of cleaner. The nozzle must
be positioned down as shown.
Lift up on wand to remove storage clip
from cleaner.
How to store cleaner
The cleaning tools are conveniently
stored in the cleaner, as shown. To
replace the wall/floor brush, be sure to
turn the connector toward the cord
rewind pedal (M) before pushing the
brush in place.
Powered hand tool
storage
The powered hand tool stores in the tool
lid.
To remove tool, grasp end of tool and
pivot forward.
2 - 1 6
How to clean stairs
Clean stairs by placing cleaner on end.
Clean stairs from bottom to top.
2 - 1 7
The powered hand tool is ideal for
cleaning carpeted stairs.
Use light pressure when cleaning with
the powered hand tool as excessive
pressure may cause the brushes to stall.
7
Page 8

3. Maintenance
Familiarize yourself with these home
maintenance tasks as proper use and
care of your cleaner will ensure continued cleaning effectiveness.
Filter bag
When to replace
Check the bag when the “CHECK BAG”
indicator shows red. When bag is filled
with dirt, the cleaner will not operate efficiently. Discard used bag.
CAUTION: Very fine materials, such
as face powder, cornstarch, fireplace
ashes or fireplace soot, may seal the
paper bag and may cause it to burst
even though it is only partially full of
dirt. When the cleaner is used to
remove material of this nature,
change the bag often.
Where to buy
Filter bags may be purchased from
Authorized Hoover Dealers (Depots),
Leading Retailers, Hoover Factory
Service Centers, or through The Hoover
Company online at
www.hoover.com
What to buy
In order to maintain the original cleaning
effectiveness and superior filtration qualities of your cleaner, use only Genuine
HOOVER® Allergen Filtration Type S
disposable filter bags.
Regular HOOVER® Type S disposable
bags also fit your cleaner and will give
satisfactory performance.
To assure that your HOOVER cleaner
operates at peak performance, it is
imperative that you use only genuine
HOOVER filter bags made by The
Hoover Company. HOOVER bags can
be identified by these trademarks—
®
3 - 1
How to replace
Disconnect cleaner from electrical
outlet.
Rotate hose to the side, lift bag lid latch
and open bag lid.
3 - 4
A
3 - 2
Carefully pull out used bag.
3 - 5
3 - 3
Form new bag into a box-like shape.
Slide bag collar firmly into holder.
3 - 6
Clear bag opening (A) by pushing the
pierced paper through opening toward
bag interior.
Close bag lid.
8
How to attach bag lid
The bag lid and hinges are designed
with a “break- away” feature. If the lid is
pushed open too far, it will come off. It
can be easily re-attached by aligning the
hinges with the appropriate slots in the
cleaner, as shown.
Filterssecondary and micro
How to clean
Disconnect cleaner from electrical
outlet.
The secondary filter, located behind
the grill in the bag compartment, protects the motor from dirt particles. If filter becomes dirty, pull off grill and lift out
filter. Wash filter in warm water or
replace it with a new one. A dry filter
must be put back into cleaner.
Do not operate cleaner without secondary filter in place.
Page 9

3 - 7
The micro filter aids in the filtration
process to return clean air to the room.
To remove this filter, open tool lid,
remove dusting brush and pull up red fil-
ter cassette.
3 - 8
If filter is dirty, open grid on cassette
and remove filter. Wash filter in warm
water or replace it with a new one. A
dry filter must be put back into cleaner.
Power Nozzle belt
replacement
The belt in your power nozzle drives the
a g i t a t o r. It has been designed specifically for use in this cleaner and is important for effective operation.
What to buy
T h e re are other belts manufactured that
a re similar in shape and size, but are not
designed for the HOOVER power nozzle.
Such belts do not operate the agitator
c o rrectly and may create stress which
could damage your power nozzle. Use
only a genuine HOOVER Belt p a rt n o .
4 0 2 0 1 1 8 0 when a belt replacement is
n e c e s s a ry.
When to replace
The belt should be checked from time to
time to be sure it is in good condition. To
check, remove the hood (see following
section). Replace the belt if it is stre t c h e d ,
cut, or broken.
3 - 1 1
3 - 9
How to replace
Disconnect cleaner from electrical
outlet and disconnect power nozzle
from extension wands.
To remove hood, turn nozzle over and
unscrew the 4 recessed Phillips head
screws.
Note: Do not remove the 3 screws in
the triangle formation as these hold
the motor in place.
3 - 1 2
3 - 1 0
Return nozzle to original position and lift
off hood.
3 - 1 3
C
Remove brush roll cover (C) by removing the 3 Phillips head screws.
C
Lift off brush roll cover (C).
D
If belt is not broken but is stretched or
cut, pull it off the motor pulley (D).
Continued ➟
9
Page 10

3 - 1 4 3 - 1 5
E
F
3 - 1 6
C
Lift up end of agitator brush roll. Remove
old belt from agitator pulley (E) and
replace with new belt. Lettering on belt
must be visible.
3 - 1 7
Position hood on top of nozzle base.
Tu rn nozzle over. Replace 2 short scre w s
at the back of nozzle and 2 long scre w s
at the fro n t .
Stretch belt back and attach to motor
pulley.
Hold opposite end of agitator brush ro l l
in place. Push belt end forw a rd, ro t a t i n g
end plate (F) until it slides into place.
Tu rn agitator, making sure it rotates fre e l y.
3 - 1 8
Agitator brush roll
replacement
When to replace
Disconnect cleaner from electrical
outlet.
When agitator brush roll brushes are
w o rn, the brush roll should be re p l a c e d .
To check condition of brushes, move
edge of a card across bottom plate while
t u rning brush roll. To maintain cleaning
e ffectiveness, replace brush roll if bru s hes do not touch card .
Replace brush roll cover (C) over agitator
b rush roll. Replace 3 short scre w s .
What to buy
When purchasing a new agitator bru s h
roll, ask for HOOVER p a rt n o .4 8 4 1 4 -
0 7 1 .
How to replace
Disconnect cleaner from electrical
outlet.
1. Remove hood, duct cover, belt and
b rush roll as shown in Figs. 3-9 to
3 - 1 4 .
2. Discard old brush ro l l .
3. Replace new brush roll and belt as
shown in Figs. 3-15 to 3-17.
Headlight re p l a c em e n t
The headlight, located on top of the
power nozzle, operates when the cleaner is turned on. Use only HOOVER
part no. 27317307, which is a fused
bulb, when replacing the headlight.
How to replace
Disconnect cleaner from electrical
outlet and disconnect power nozzle
from extension wands.
1. Remove the hood as shown in Figs.
3-9 and 3-10.
10
3 - 1 9
2. Push old bulb into socket and twist to
remove. Push new bulb into socket and
twist into place.
3. Replace hood.
Thermal protector
An internal thermal protector has been
used in your cleaner to prevent overheating if a large item or clog gets
caught in the nozzle or at the opening of
the bag.
When the blockage is not removed,
the thermal protector will trip and
cleaner will stop running.
If this happens, turn cleaner OFF and
disconnect cleaner from electrical
outlet. Then disconnect nozzle and
remove obstruction. Within 15 minutes
the thermal protector will cool and automatically reset and cleaning may
resume.
If cleaner does not operate, allow additional time for thermal protector to reset.
Page 11

Edge groomer
replacement
When to replace
The edge groomers, located on both
sides of the nozzle, should be re p l a c e d
when they no longer extend past the surface of the bottom plate.
What to buy
When purchasing edge groomers, ask for
Hoover p a rt n o . 3 9 5 1 1 0 0 4 .
How to replace
Disconnect cleaner from electrical
outlet.
1. Remove hood and b rush ro l l cover as
shown in Figs. 3-9 to 3-12.
3 - 2 0
H
G
2. Pull off both old edge groomers (G).
3.Push each new groomer onto the 3
tabs (H), starting with one of the end
tabs. Then push the groomer onto the
middle and remaining end tab.
4. Replace brush roll cover and hood as
shown in Figs. 3-16 and 3-17.
Powered hand tool
Agitator brush roll
replacement
When agitator brush roll brushes are
worn, the brush roll should be replaced.
Ask for HOOVER part no. 48414088.
3 - 2 1
How to replace
Disconnect cleaner from electrical
outlet.
1. Remove tool from hose and turn it so
bottom faces up. Press the latches on
either side of tool and remove bottom
plate (A).
A
B
2. Unscrew the two Philips screws and
remove belt guard (B).
3 - 2 5
B
3 - 2 33 - 2 2
D
C
3. Remove agitator including end plates
(C) and discard.
4. Inspect belt to ensure that it is in
good condition. If belt is cracked,
gouged or broken, replace it (see following section).
5. Insert brush roll through belt and
position belt over gear teeth (D) on
brush roll.
3 - 2 6
A
3 - 2 4
C
6. With curved ends down, slide end
plates (C) of brush roll into slots (E) on
tool.
E
7. Replace belt guard (B) making sure
not to pinch brush bristles in guard.
Turn agitator, making sure it rotates
freely.
Replace and tighten screws.
8. To replace bottom plate (A), insert the
four tabs on edge of bottom plate into
slots on front of tool.
Pivot bottom plate down and snap
closed.
11
Page 12

Powered hand tool
Belt replacement
Inspecting the belt
The powered hand tool belt is designed
to last a long time and is not normally
replaced. However, if the belt is
cracked, gouged or broken, it should be
replaced.
3 - 2 8
3 - 2 9
F
E
H
G
3 - 2 7
The belt can be seen through the top of
the nozzle or by removing the bottom
plate and belt guard (Figs. 3-21 and 3-
22).
Lubrication
The motor is equipped with two bear-
ings that contain sufficient lubrication for
the life of the motor. The addition of
lubricant could cause damage.
Therefore, do not add lubricant to
either motor bearing.
The agitator brush roll is equipped with
two ball bearings that should be lubri-
cated periodically by a Hoover Factory
Service Center or an authorized Hoover
Warranty Service Dealer (Depot).
Replacing belt
When replacing belt, ask for HOOVER
part no. 38528037.
1. Remove bottom plate, belt guard and
brush roll as described in Figs. 3-21
through 3-23.
2. Grasp turbine (E) and pull firmly to
remove.
3. Remove belt from turbine pulley (F).
Replace with new belt.
Service
To obtain approved HOOVER service and
genuine HOOVER parts, locate the nearest Hoover Factory Service Center or
Authorized Hoover Warranty Service
Dealer (Depot) by:
• checking the Yellow Pages
under “Vacuum Cleaners Household” OR -
• checking the list of Factory
S e rvice Centers provided
with this cleaner OR -
• calling 1 - 8 0 0 - 9 4 4 - 9 2 0 0 for an
automated re f e rral of authorized
s e rvice outlet locations (U.S. only)
O R -
• checking the Service section of The
Hoover Company online at
w w w. h o ov e r. c o m
Please do not send your cleaner to The
Hoover Company in North Canton for service, this will only result in delay.
If further assistance is needed, contact
The Hoover Company Consumer
Response Center, North Canton, Ohio
44720, Phone: 330-499-9499.
In Canada, contact Hoover Canada,
Burlington, Ontario L7R 4A8, Phone:
1-800-263-6376.
Always identify your cleaner by the com-
plete model number when requesting
information or ordering parts. (The model
number appears on the bottom of the
cleaner.)
4. With flat sides of turbine retainers (G)
pointing down, slide retainers into
grooves (H) on both sides of tool housing and snap into place.
5. Replace brush roll, belt guard, and
bottom plate as described in Figs. 3-23
through 3-26.
12
Page 13

4. If you have a
problem
If a minor problem occurs, it usually can
be solved quite easily when the cause is
found by using the check list below.
Problem: Cleaner won’t run
Possible cause
Possible solution
• Not “ON”at cleaner.
• Turn “ON” at cleaner.
• Not “ON”at hand grip.
• Turn “ON at hand grip.
• Not firmly plugged in.
• Plug unit in firmly.
• No voltage in wall plug.
• Check fuse or breaker.
• Blown fuse or tripped breaker.
• Replace fuse/reset breaker.
Problem: Cleaner suction low
Possible cause
Possible solution
• Bag full.
• Replace paper bag.
• Blockage in nozzle connector,
hose or wands.
• Remove blockage.
• Secondary filter dirty.
• Clean filter.
• Bag not opening.
• Open bag by pulling folds.
• Power set too low.
• Increase power setting.
• Hose not properly connected to
cleaner.
• Ensure hose is properly connected.
Problem: Powered hand tool
brush roll won’t turn
Possible cause
Possible solution
• Too much pressure being applied to
tool.
• Continue using tool applying light
pressure.
• Blockage in turbine channel.
• Remove blockage
• Broken or worn belt.
• Replace belt.
• Low cleaner suction.
• Check items under “Cleaner suction
low”.
Problem: Nozzle won’t pick up
Possible cause
Possible solution
• Low cleaner suction.
• See section “Cleaner suction low”.
• Blockage in nozzle connector.
• Remove blockage
• Agitator brush roll not running.
• See section “Agitator brush roll won’t
run”
• Agitator brush roll brushes worn.
• Replace brushes.
Clearing blockages
Low suction or pick up may be due to a
blockage in the system. Refer to the
following steps to check for blockages,
continuing with each step until the
blockage is found:
1. Turn cleaner off and disconnect
from electrical outlet; then disconnect power nozzle plug and wands
from hand grip.
4 - 2
4. Make sure power nozzle plug is disconnected from hand grip. Then
check for blockage in nozzle connector
( A ) .
4 - 3
5. Disconnect powered hand tool from
hose. Remove bottom plate, belt guard
and turbine as described in Figs. 3-21,
3-22 and 3-29.
Remove any blockage from turbine
channel (B).
Replace belt, turbine, brush roll, belt
guard and bottom plate.
A
B
Problem: Power nozzle agitator
brush roll won’t run
Possible cause
Possible solution
• Hose power cord not firmly
plugged in.
• Plug firmly into receptacle on
cleaner base.
• Broken or worn belt.
• Replace belt.
• Floor surface set to “BARE”.
• Set floor surface to “RUG”.
4 - 1
2. Plug cleaner in, turn on, and check
hose end for suction. Remove any
obstructions.
3. Remove power nozzle from wands
and attach wands to hose. Check for
suction and remove any blockages.
13
Page 14

Full Two Year
Warranty
(Domestic Use)
Your HOOVER® appliance is warr a n t e d
in normal household use, in accord a n c e
with the Owner’s Manual against original
defects in material and workmanship for
a period of two full years from date of
p u rchase. This warranty provides, at no
cost to you, all labor and parts to place
this appliance in correct operating condition during the warranted period. This
w a rranty applies when the appliance is
p u rchased in the United States including its territories and possessions, or in
Canada or from a U. S. Military
Exchange. Appliances purchased elsew h e re are covered by a limited two year
w a rranty which covers the cost of part s
o n l y. This warranty does not apply if the
appliance is used in a commercial or
rental application.
Warranty service can only be obtained
by presenting the appliance to one of
the following authorized warranty service outlets. Proof of purchase will be
required before service is rendered.
1. Hoover Factory Service
Centers.
2. Hoover Authorized Warranty
Service Dealers (Depots).
For an automated referral of authorized service outlets in the U.S.A.,
phone 1-800-944-9200 OR
visit The Hoover Company online at
www.hoover.com
This warranty does not cover pick up
delivery, or house calls; however, if you
mail your appliance to a Hoover Factory
Service Center for warranty service,
transportation will be paid one way.
While this warranty gives you specific
legal rights, you may also have other
rights which vary from state to state.
If further assistance is needed, or if
there are questions concerning this warranty or the availability of warranty service outlets, write or phone the
Consumer Response Center, The
Hoover Company, 101 East Maple St.,
North Canton, Ohio 44720. Phone 1330-499-9499.
In Canada, contact Hoover Canada,
Burlington, Ontario L7R 4A8,
1-800-263-6376.
14
 Loading...